1
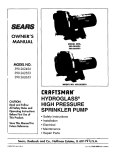
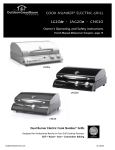
Fuses: If your electrical components are not working properly,
a fuse may have blown. For more information, please see your
Owner’s Guide.
Owner’s Guide carefully as
you begin learning about
your new vehicle and refer
to the appropriate sections
when questions arise.
FORD MOTOR COMPANY
All information contained
Customer Relationship Center
in this Quick Reference
P.O. Box 6248
Guide was accurate at the
Dearborn, MI 48121
time of duplication. We
1-800-392-3673 (FORD)
(TDD for the hearing impaired: 1-800-232-5952)
www.customersaskford.com
reserve the right to change
features, operation and/or
functionality of any vehicle
specification at any time.
Your Mercury dealer is the
Mercury Mariner
Quick Reference Guide
best source for the most
First Printing
current information.
November 2006
For detailed operating and
*8E6J19G217AA*
8E6J-19G217-AA
safety information, please
see your Owner’s Guide.
Auto-dimming rearview
mirror (if equipped)
The Auto-Dimming Rearview
Mirror is equipped with a
AdvanceTrac® with Roll
Stability Control™ (RSC)
The AdvanceTrac® with RSC
system provides stability
enhancement features for
certain driving conditions.
The AdvanceTrac® button,
located on the center stack of
the instrument panel, allows
the driver to control certain
features of the system. For
more information, please see
your Owner’s Guide.
MOON ROOF (if equipped)
The moon roof is equipped
with an automatic, one-touch,
express opening feature. Press
and release the rear portion
of the control located in the
overhead console. To stop
motion at any time during
the one-touch opening, press
the control a second time. To
close, press and hold the front
portion of the control until the
glass stops moving . To open
the moon roof vent position,
Tire Pressure Monitoring System: Using radio-frequency pressure sensors, this system monitors
tire pressure on all road tires and provides the driver with a yellow warning light when air needs
to be added. Message center equipped vehicles provide additional warning messages. The TPMS
warning light will reset itself (turn off) after the tires are set to specification and the vehicle is
driven above 20 mph (32 km/h) for at least 2 minutes. Note: Outside temperature affects tire
pressure. For more information, please see your Owner’s Guide.
Fuel Tank Capacity: Vehicles equipped with 2.3L four-cylinder engines and 3.0L six-cylinder engines
have a 16.5 gallon (62.5L) fuel tank.
Rear Window Buffeting: When one or both of your rear windows are open, the vehicle may demonstrate
a wind throb or buffeting noise. This noise is common among a wide range of vehicles and can be
eliminated by simply lowering a front window two to three inches.
Roadside Assistance: During your Mercury Mariner limited warranty period, the assurance and support of a
24-hour emergency roadside assistance program is included. Roadside assistance includes such services as
fuel delivery, tire changes, jump starts, winch outs, help when you’re locked out of your vehicle, and towing. To
receive roadside assistance in the United States, call (800) 241-3673. In Canada (800) 665-2006.
NER
16
7
6
17
8
7
SATELLITE COMPATIBLE
SIX-DISC/MP3 RADIO
(if equipped)
1. LOAD
Press to load a CD with
the CD6 system.
2. DIRECT
Press to access a desired
radio station, track or
MP3 folder.
3. SCAN
Press for a brief
sampling of radio
stations or
CD/MP3 tracks.
4. SHUFFLE
Press to play CD/MP3
tracks in random order
when active (on).
5. ON/OFF/VOL
Press to turn ON or
OFF. Turn to increase or
decrease the volume.
6. CAT/FOLD
In category mode, use
to select from various
music categories. In MP3
mode, use to access the
previous/next folder. In
satellite radio mode, use
to select from various
satellite radio categories.
7. CD
Press to enter CD/MP3
mode. If a disc is already
loaded into the system,
CD/MP3 play will begin
where it ended last.
8. AM/FM
Press to select AM, FM1
or FM2 frequency band.
9. EJECT
Press to eject a CD.
Select the desired CD
slot by pressing the
corresponding
memory preset.
10. CLOCK
Press to set the time.
The display will read SET
TIME. Use the memory
preset numbers to enter
in the desired time,
hours and minutes.es
11. SOUND
Press repeatedly to cycle
through sound options.
Press SEEK/TRACK
to adjust levels.
12. SEEK/TRACK
Press to access
the next listenable
station or track.
13. MENU
Press repeatedly to
access the following
features: AUTO PRESET
ON/OFF, RDS ON/OFF
and COMPRESSION
(only available in CD/
MP3 mode).
14. TUNE
In radio mode,
turn to go up or
down the
frequency band.
15. TEXT
In MP3 mode, press
repeatedly to scroll
through display
options. In satellite radio
mode, press and release
to display the artist and
song title.
16. SAT (if equipped)
Press to access satellite
radio mode. Press
repeatedly to cycle
through SAT1, SAT2 and
SAT3 modes.
17. AUX
Press to access LINE
(auxiliary audio mode).
qui
ppe
d)
N
Changing the Tires: If you get a flat tire while driving, do not apply the brake heavily.
Instead, gradually decrease your speed. Hold the steering wheel firmly and slowly move
to a safe place on the side of the road. Your vehicle is equipped with a temporary spare
tire, which is smaller than a regular tire, and is designed for emergency use only.
4
5
URY
MA
RI
Please read your entire
CENTER CONSOLE STORAGE
Your vehicle is equipped with a
configurable console containing
a tray and an inside bin that can
be removed to open up space
to fit a laptop computer, MP3
players, CDs or handbags. To
remove, open the console lid
and pull the bin straight up and
out from the console housing.
The sliding tray and inside bin
can be hooked on the side or
rear of the console for
extra storage.
5
6
8
Pre
ss a
9
butt AM/FM nd hol
1. M
da
on t
1
r
a
0
emory
d
p
o pl
ay t io stat reset
b
he d
i
P
11
isc i on. In C utton t reset
n th
o
e co D mod save a s
8
e
r
.
n
resp
,
Pre
DE
s
ond press a
Pre ST
ing
thro s to acc
ss to
slot
ess
ugh
a
n
acc
.
d
th
the
entr to show ess the
med e med
y
ia m ia m
t
e
2. M
chn additio destina
en
enu
ique
t
nal
tabs u and EDIA
des ion ent
s.
con to ste
tina
9. N
sist
vari
p
Pre
tion ry men
A
i
n
o
V
ss to
g
us s
u
Pre
our of
acce
s
s
ces.
step to ac
ss th
cess
t
e
h
rou
thro soun
gh t the na
d
ugh
he n
v
the menu a 3. SOU
avig igation
s
N
1
n
o
Pre
D
0. R
d
atio
und
ss to
EPE
n m menu a
men to step
P
res
AT
enu
acce
n
u ta
tabs d to
ss th
bs.
repe s while
.
e sy
at t
nav
g
h
s
i
u
g
t
idan e las
atio
thro em m
t
n
ce p
ugh
4
e
rom spoken guidan
syst nu and . MENU
p
Pre
nav
c
e
t
t
.
m
ss to
igat e is ac
men o step
1
1. T
tive
ion
see
u ta
UNE
to
k to
bs.
P
ress
the
t
o
nex
f
r
man
equ
t/p
ua
revi
fold ency
5. S
o
er in band lly adv
anc
stat us avai EEK
MP3
or
Pre
labl
ion
ss to
mod to the e up or
e
or t
load
nex
e
rack
.
For
t/p down t
a
load
.
m
revi
h
disc single C
Nav ore in
ous e
s in
i
D
fo
gati
all e . Pres
on S rmati
s an 6. LOA
mpt
o
upp
n
D
y slo d ho
lem , pleas
t loc ld to
ent.
e se
Smu
Pre
atio
e yo
d
g
ss to
ns.
e
nav
ur
igat s, fing
acce
erpr
the
ion
Pre
s
s
the
nav
d
i
s
n
i
s
s
t
c
w
s
stor
igat
n
acti
s co
or
ve hile th aviga 7. MA
in u ed in th ion sys uld aff scratch
the to re-c e map tion ma P
ect
se.
tem
e pr
ente
curr
disp
per es on t
p.
.
o
K
tect
ent
r
ive eep dis forma he
veh the m lay is
jack
n
c
a
icle
ets s clean ce of
pos p on
whe
ition
n no and
.
t
200
MER
C
you and your occupants.
4
3
TEM
reduce the risk of injury to
11
12
13
14
15
3
(if e
warnings designed to help
2
10
2
IGA
TION
SYS
well as important safety
Tire Pressure: Safe operation of your Mariner requires your tires to be
properly inflated. The recommended inflation pressure is found on the Safety
Compliance Certification Label or Tire Label which is located on the B-Pillar or
the edge of the driver’s door. At least once a month and before long trips, inspect
each tire and check the air pressure with a tire gauge. Don’t forget the spare. Air
pressure should be checked when the tires are cold. WARNING: Improperly
inflated tires can affect vehicle handling and can fail suddenly, resulting in a possible
loss of vehicle control.
1
9
1
features of your vehicle, as
RM
ATI
O
information concerning the
Fuel Pump Shut-off Switch: This device stops the electric fuel
pump from sending fuel to the engine when your vehicle has had
a substantial jolt. After an accident, if you find that the engine
cranks, but does not start, this switch may have been activated. The
fuel pump shut-off switch is located in the front passenger’s footwell,
behind a flip-up cover, by the kick panel access cover.
Location of Spare Tire and Tools: The spare tire is located under the
vehicle, just forward of the rear bumper. The jack and tools are located in
the load floor or cargo management system (if equipped).
NFO
contains more detailed
Gearshift / Overdrive
control
Overdrive is the normal drive
position for the best fuel
economy. Only turn Overdrive
OFF when driving with a
heavy load, towing a trailer up
or down steep hills, or when
additional engine braking is
needed. To deactivate, press the
switch located on the side of
the gearshift lever.
IALI
your Owner’s Guide which
Keyless entry pad
You can use the Keyless Entry
Keypad to lock or unlock the
doors and release the liftgate
glass without a key. The
keypad can be operated with
the factory set five-digit entry
code or you can create your
own. This code is on the owner’s
wallet card in the glove box.
Enter this code and within five
seconds press the 1•2 button on
the keypad. Enter your personal
five-digit code. The doors
will again lock then unlock,
to confirm that your personal
keycode has been programmed
to the module.
press and hold the front portion
of the control. To close, press
and hold the rear portion of the
control until the glass
stops moving.
ENT
is not intended to replace
feature that will reduce glare
in the rearview mirror when
bright lights are detected.
It automatically returns to
normal/clear when the vehicle
is placed in R (Reverse).
ESS
This Quick Reference Guide
Integrated Keyhead
Transmitter (IKT) and
Remote Entry System Your
Your vehicle comes equipped
with two specially programmed
Integrated Keyhead
Transmitters (IKTs). IKTs are
both a programmed ignition
key and a remote keyless entry
transmitter. Handle the IKT
carefully when starting the car
to avoid accidentally pressing
any of the remote entry
buttons. Press once to unlock
the driver’s door. The interior
lamps will illuminate if the
lamp is in the DOOR position.
Press twice to unlock all the
doors. Press once to lock
all the doors. Press twice
to confirm all the doors and
liftgate are closed. On the first
press of , the parklamps
will flash. On the second press
within three seconds, the
horn will chirp and the turn
signal lamps will flash once if
all the doors and the liftgate
are closed. Press
and hold
for 1.5 seconds to activate the
panic alarm. Press
again
or turn the key in the ignition
to deactivate the panic alarm.
Press twice within 3 seconds
to activate the car finder
feature; your horn will chirp
and your turn signal lamps will
flash. It is recommended that
this method be used to locate
your vehicle, rather than using
the panic alarm. Press
twice
within 3 seconds to open the
liftgate glass. Ensure that you
keep the IKT adhesive security
label in a safe place for future
reference. Replacements are
only available through an
authorized dealer.
NAV
ADDITIONALINFORMATION
8
QUI
CK R
EFE
REN
CE G
UID
E
6
3
9
15
2
4
8
5
7
13
11
10
12
14
3. Panel dimmer
control
Use the dimmer control
to adjust the brightness
of the instrument
panel and all applicable
switches in the vehicle
when the headlamps
and parking lamps are
on. Move the control to
the full upright position,
past the detent, to turn
on the interior lamps.
4. Speed control
For your speed control
to work, it must be
in the ON position.
Pressing and releasing
the ON button will
engage it. Pressing and
releasing the OFF button
disengages it. To set a
desired speed, press
6. Hazard Flasher
Push the flasher control,
located on the steering
column, and all front
and rear direction
signals will flash. Use
it when your vehicle is
disabled or is creating a
safety hazard for other
motorists. The hazard
flashers will operate
when the ignition is in
any position or if the key
is not in the ignition.
7. Check engine LIGHT
The Check Engine
indicator light
illuminates when the
8. Tire Pressure
Monitoring System
(TPMS)
Using radiofrequency pressure
sensors, this system
monitors all road tires
and illuminates a low
tire pressure light
when one or more of
your tires is significantly
under-inflated. Message
center equipped vehicles
provide additional
warning messages. The
TPMS warning light will
reset (turn off) after
the tires are reset to
specification and the
vehicle is driven above
20 mph (30 km/h) for
two minutes.
A malfunction indicator
is also combined with
the low tire pressure
light. When the
system detects a
malfunction, the
light will flash for
approximately one
minute and then
remain continuously
illuminated. Please note:
Outside temperature
affects tire pressure.
9. Message Center
The message center,
located on your
instrument cluster,
displays important
information through
constant monitoring
of vehicle systems.
You may select display
features
on the
message
center
for a
display of status
preceded by a brief
indicator chime. The
system will also notify
you of potential vehicle
problems with a display
of system warnings
followed by a long
indicator chime.
10. ABS Warning
LIGHT
The ABS warning
light will momentarily
illuminate when the
ignition is turned on.
If the light does not
illuminate, stays on
or flashes, have your
vehicle serviced. In
an emergency, apply
continuous force to the
brake pedal. Do not
pump the brakes. Any
pulsation or mechanical
noise you may feel or
hear is normal.
11. Compass
The compass heading (N,
NE, E, SE, S, SW, W or
NW) is displayed in the
center stack display.
The compass reading
may be affected when
you drive near large
buildings, bridges,
power lines and powerful
broadcast antennas. For
more information, please
see your Owner’s Guide.
12. AUXILIARY POWER
POINT (12V)
The 12V power point
outlets, located on the
instrument panel and
the rear of the center
console, are designed
for accessory plugs only.
Do not insert any other
object; damage may
occur and blow the fuse.
13. Passenger
Airbag Off
The passenger airbag
off indicator light will
illuminate when the
passenger’s frontal
airbag is off. For
additional information,
please see your
Owner’s Guide.
14. Reverse sensing
system (if equipped)
This system sounds a
tone to
warn the
driver of
obstacles
near
the rear bumper when
R (Reverse) is selected
and the vehicle is
moving at speeds less
than 3 mph (5 km/h).
As you move closer to
the obstacle, the rate
of the tone increases.
When an obstacle is less
than 10 inches (25 cm)
away, the tone sounds
continuously. The
system is not effective at
speeds above 3 mph (5
km/h) and may not
detect certain angular
or moving objects. With
the ignition on, press
the RSS control, located
below the climate
control system, to turn
the RSS off. An indicator
light will illuminate
when the system is off.
15. Auxiliary input
jack
The auxiliary input
jack provides a way to
connect your portable
music player to the
in-vehicle audio system.
This allows the audio
from a portable music
player to be played
through the vehicle
speakers. For more
information, please see
your Owner’s Guide.
Four-wheel drive
(4WD) system
(if equipped)
Your vehicle has an
intelligent 4WD system
that continuously
monitors vehicle
conditions and
automatically adjusts
the power distribution
between the front and
rear wheels. It combines
transparent all-surface
operation with a highly
capable four-wheel
drive system. The 4WD
system is always active
and requires no driver
input. It is capable
of handling all
road conditions,
including street and
highway driving as
well as off-road and
winter driving.
Power side view
mirrors
Rotate the control
clockwise to adjust
the right mirror, and
counterclockwise to
adjust
the left
mirror.
Then
move the
control in the direction
you wish to tilt the
mirror. Return to the
center position to lock
the mirror in place.
1
2
3
L IM
ATE
CON
TRO
L
CUR
YM
A
MER
1
2. Multifunction
lever
The multifunction lever
controls the front and
rear wipers and washers,
high beam headlamps
and turn signals. Rotate
the end of the control
away from you to
increase the windshield wiper speed
or toward
you to
decrease
the
5. Tilt steering
wheel lever
To adjust the steering
wheel, push the
adjustment lever down
to unlock the steering
column. While the lever
is in the down position,
tilt the steering wheel
to your desired position.
Then,
while
holding
the
steering
column in place, pull the
lever up to its original
position to lock the
steering column.
ignition is first turned
to the RUN position
to check the bulb. If
the light turns solid
or blinks after the
engine is started, the
On-Board Diagnostics
System has detected a
malfunction. Drive in a
moderate fashion (avoid
heavy acceleration or
deceleration) and have
your vehicle serviced
immediately. Always
secure your fuel cap by
turning it clockwise until
it clicks at least once to
avoid a warning caused
by a loose cap.
4
5
6
7
P
co ress
10
dec ntrol s to activ
ys
11
re
at
dispase the tem. Tu e or de 1. Power
12
rn t acti
the laye fan
o
v
fan center d in thespeed; manu ate theand fan
ope
a
t
h
p
s
c
l
rati anel a hared e fan ly inc limat
7. A
re
on
e
s
r
syst , press ea. To rdisplay etting wase or
Pre /C
em
e
a
ss
Dist
is of AUTO. turn to t the t ill be
U
se w to act
r
f, ou Whe
auto op of
i
p
ven ibutes
e
t
n
side
m
rfor ith rec vate/d
t
ts, d air
ea
man ircu
air i he clim atic
emi thro
ce a lated ctivat
s sh
a
ster ugh 2. Floor
t
8
e
e
.P
ut o
nd e
a
ven the
ut.
ffici ir to imair con
Cha anel,
ts, f win and
enc
nge Panel
loor dsh
prov ditio
defro
p
y
Pre
s
i
a
.
e
e co ning
v
n
t
l
ents d de
el, t he a
ss to
olin .
3. A
o pa ir fl and floor
fros st
a
n
e
g
d
t
n
U
ow
nel
rear ter
9
the o incr gage TO/D
.
d
and
Pas
i
floo
r
,
s
driv ease full
e
F
river
e
ctio
LOO
a
f
s
P
l
r
t
o
r
T
a
sett er s
v
e
o
o
n
u
emp
ents
R
r
r, or
f
side ss to e
at t ing w ide of decreatomati temperature
.
to fl rom in
he
co
ill
t
s
oor stru
dec temp ngage/
also top of be dis he vehi e the t perati
o
e
r
d
n
e
r
ly. ment
side ase t atur isen
adju the playe cle. T emp on. T
e
u
d
sts cent
sett of the he teme contr gage se
the
er p in the he tem rature rn
o
at t ing wi vehic perat l. Tur parate
whe passe anel a share peratu on
d
n PA nger rea.
re
PASShe top ll be di le. The ure on n to inc passe
Dist
SS T side The display
ribu
TEM of the splaye passe the pa rease nger
EMP tem cont
d
te
P is cent d in nger ssen /
10.
use efroste s outs
is d pera rol
ger
eng er p the
R
d to
isen ture
r ve ide a
s tem
ecirculated
age
a
P
r
g
clea nts
d. nel arehared peratu
ess
age
r th and ir throu
disp re
to a
d.
i
a
n
,
i
t
ew
4
d
f
c
the lay
inds emist gh the . Defro
the he veh tivate
air
hiel er ve win
Pre
inte amounicle. Re /deact
d of
nts. dshiest
ss to
r
c
i
t
v
i
i
f
o
og a It ca ld
und
r of of tim rcula ate a
nd t
n
thi clear
5
the esired the ve e nee ted air ir reci
hin be
rc
veh
h
d
o
auton ice. T the rea . Rear
i
c
e
i
.
r
he
cle. dors fr icle an ed to c may re ulation
m
defro
w
dm
duc
ool
om
amo aticall rear d indow
1
1
e
d
a
.
r
s
eac
y
turn unt of y after efrost of fog ter
Pre Passenger
hing also hown th
e
s
the elp r e
hea s to ac
pos ed to th time o a pred r turns and
inte edu
ition e L r if
off ated sea tivate heated
rior ce
the etermi off
OC
.T
of
fter t. Th or d
seat
the his but K or AC ignitio ned
e
e
1
a
0m
syst ctiv
outs ton
n
C
(
i
E
1
i
f
s
i
a
2. M
nute em
equ
6. D
also SSOR
t
i
e
d
e
t
auto he p ipp
river
s.
hea
Dist AX A
mat asse ed)
t cont Y
inst ribute /C
Pre heated
ical
(if eed mirr rols
ss to
rum s re
ly shnger
quip ors
T
c
his
uts
ped
driv activ seat
re-cent pan irculat
e
)
er h ate
.
c
(
e
o
o
e
d
auto eate or de if equip
the nomica oling o l vents air th
d
a
p
mat
c
retu MAX A l and f the in to coo rough
ical seat. Th tivate ed)
ly sh
th
e
nor rn the /C butefficien terior l the vethe
uts syste e
mal
t
a
s
t
ope ystem on aga . Depre ir is m hicle.
10 moff aftem
rati
in w
ssin ore
inut r
on. to
i
g
l
l
es.
TOM
ATIC
C
8
1. Headlamp and
foglamp control
Rotate the headlamp
control to the first
position to turn on
the parking lamps.
Rotate to the second
position to turn
on the headlamps.
To use the autolamp
(if equipped) light
sensitive on-off control
for the headlamps, turn
the headlamp control to
the position. To turn
the autolamps off, turn
the control back to the
O (Off) position.
For rear wiper operation,
rotate the rear wiper
control to the desired
position. Rotate the
control to either
position to activate the
rear washer. To activate
the high beams, push
the lever toward the
instrument panel. Pull
the lever toward you to
deactivate. To use the
“Flash to Pass” feature,
pull the lever towards
you slightly to activate
and release to deactivate.
For more information,
please see your Owner’s
Guide.
SET+. You can increase
speed using the speed
control by pressing
and holding SET+. You
can decrease speed by
pressing and holding the
CST- button. Pressing
the RESUME button will
automatically return the
vehicle to the previously
set speed. To disengage
the speed control, press
the OFF button or press
the brake pedal.
L AU
200
ER
NEW
RIN
THE
You
r
to tu new M
e
exp rn your rcury
e
M
driv rience everyd ariner
i
a
i
to lo ng adv nto an y drivi is abou
e
e
t
n
and ve the w nture. veryda g
Y
y
wha sophist ay this ou’re g
i
o
t
you ever ro cated S smart, ing
.
s
UV
des This Qu ad life
han tylish
la
ig
d
to k ned to ick Ref ys out les
e
n
b
new ow the help yo rence G efore
u
info Marine many f quick uide w
l
as
e
r
r
Own mation . For m atures y get
o
o
,
er’s
Guid please re deta f your
see
i
e.
you led
r
speed. Press the end
of the stalk to activate
the washer. One extra
wipe will happen a few
seconds after washing
the front window to
clear any water that is
dripping down from the
top of the windshield
caused by the washing.
DUA
INSTRUMENTPANELFEATURES
The foglamps can be
turned on when the
headlamp control is
in the parking lamp,
headlamp or autolamp
position and the high
beams are not on. Pull
the headlamp control
toward you to turn
on the foglamps. The
foglamp indicator
light will illuminate.
Push the control in to
deactivate. Remember,
the foglamps will not
operate when the
high beams are on.
The foglamps are also
deactivated when the
ignition is turned to the
LOCK position.
8
9