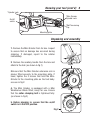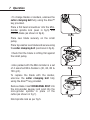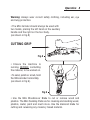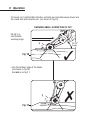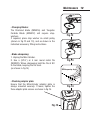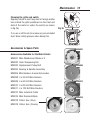
1
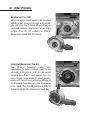
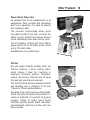
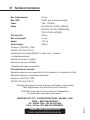
TM
MINI-GRINDER
OWNER’S INSTRUCTION MANUAL
Thankyou for purchasing an Arbortech Product.
Your Arbortech Mini Grinder has been designed & manufactured to
provide you with the highest satisfaction in performance, durability
and safe operation.
Double
Insulated
READ THIS MANUAL
TO SAVE TIME AND MONEY
Please read this manual carefully to ensure correct operation and care of
the machine. If you are using the Mini Grinder correctly, it will provide
you with years of reliable service and save you time and money.
TABLE OF CONTENTS
2.
5.
6.
7.
10.
12.
13.
15.
Rules for safe operation of electrical equipment
Knowing your tool
Unpacking and Assembly
Operation
Maintenance
Accessories & Spare Parts
Other Products
Technical Information
Please read these instructions before
you use your Mini-Grinder.
Rules for safe operation of electrical equipment 2
The Arbortech Mini Grinder is designed and built to meet and exceed
Australian and International Safety Standards.
Use only Arbortech approved or other qualified service centres for the
servicing and/or repair of this tool. For further assistance contact Arbortech.
The Arbortech Mini Grinder is double insulated to provide the highest
possible operator protection from electric shock. Please observe all
necessary safety precautions to avoid electric shock. Do not operate this tool
until you have read and understood all safety instructions and rules of
operation. Failure to comply with these instructions can result in serious
accidents including fire, electric shock or serious personal injury.
Read all instructions
Keep this manual for further reference.
1. Know you power tool: read the owner’s manual carefully. Know its applications and
limitations to avoid potential hazards.
2. Warning: Do not remove any parts as specified on page 5 (Knowing your tool).
3. Wear approved safety glasses: when operating a power tool.
4. Wear hearing protection: when operating a power tool.
5. Wear lung protection: during dusty operations.
6. Wear correct safety clothing: wear close fitting clothes and not loose clothes. Do not
wear jewellery. Tie back or conceal long hair.
7. Take care around grounded surfaces: pipes, radiators, ranges or refrigerators can
lead to electrical shock if touched while using electrical power tools.
8. Avoid dangerous environments: do not use electrical tools in wet or damp
conditions or in rain. Ensure a well lit work area.
9. Keep work area clean: an untidy work area can be obstructive and lead to injury.
3 Rules for safe operation
10. Secure the workpiece: to avoid serious personal injury.
11. Do not remove guards or shields: these are designed to increase operator safety.
12. Store idle tools in dry, out of reach places: When not in use the tool should be
stored in a dry, frost free location not within the reach of children.
13. Use the right tool: use the correct sized tool for the job. For example, do not try to
use the Mini Grinder to cut thick boards, bricks or pipes.
14. Keep away from children and visitors: bystanders must wear all correct safety
equipment. Do not let people touch a running tool.
15. Do not force the tool: the Mini Grinder is designed to operate at a specific speed
and the correct blade will enhance its performance in different materials. Force will not
increase the operating speed.
16. Maintain your tool carefully: Keep blades sharp. Keep the ventilation slots of the
power tool clean at all times and prevent any foreign matter from entering. Follow the
cleaning and maintenance instructions.
17. Avoid accidental starting: always ensure the tool is switched off before pluging in.
Do not carry with fingers on the switch.
18. Do not use tool if on/off switch is faulty: contact your authorised service centre.
19. Disconnect tools: when not using, changing blades, or servicing, always unplug the
tool from the power source.
20. Inspect the tool cord periodically: if damaged have it repaired by an authorised
service centre. Keep cord well away from the cutting blade.
21. Keep handles dry and clean: always use a clean cloth to clean the Mini Grinder. Do
not use solvents or petroleum based products.
22. Do not abuse cords: Do not carry by the cord. Do not pull plugs from the socket by
the cord. Do not coil the cord. The power cord of the tool and any extension cord used
should be checked frequently for damage. If damage has occurred, have the cord
replaced by an authorised service facility and replace the extension cord.
23. Check for damaged parts: before every use, inspect components for damage.
Check belt alignment and condition periodically. Check the extension arm is securely
fitted to the tool body. Check all bindings, mountings and moving parts for wear.
Rules for safe operation 4
24.Stay alert: Make sure you are well balanced when using the tool and you have
secure footing. Don’t use the tool when you are tired. Use common sense and care
during operation.
25. Cleaning: If the outer case of the motor needs cleaning do not use solvents but a
moist soft cloth only.
26. Lubricating: The grease in the gearbox will require replacement/replenishment after
extensive use of the grinder. Please see your appropriate service agent to provide this
service.
27. Do not use this tool when under the influence of drugs, alcohol or medication.
28. Keep hands away from the cutting area: always keep hands well away from the
blade. Do not reach underneath the workpiece during operation. Do not move or
remove the workpiece while operating this tool.
29. Guard against kickback: kickback occurs when the tool is stalled rapidly. Avoid
kickback by not twisting the blade in the workpiece and using only the bottom edge of
the blade to cut. Switch off immediately if the tool stalls.
Approach the workpiece slowly when lowering the blade into the cut.
30. Outdoor extension cords: when using the Mini Grinder outdoors, use only approved
extension cords.
31. Use only correct blades: use only Arbortech replacement blades with this tool. Only
use correct sized and intact washers. Use blades which are suitable for the purpose.
32. Never: touch the blades during use!
33. Never: start the machine with any part of the blade touching the workpiece.
34. Never: set down the tool before the blades have come to a complete stop.
35. Save these instructions for future reference and to save money.
5 Knowing your tool
Note: text, diagrams and data are correct at time of printing. In the interests
of continuous improvement of our products, technical specifications are
subject to alteration without prior notice.
*WARNING: DO NOT REMOVE THE MINI-GRINDER
EXTENSION ARM FROM THE MOTOR.
See Warranty Card For Conditions
*Mini-Grinder
Extension arm
*Auxiliary handle
*Cord
4g x 1/2”
screws x4
*Large pulley
*M10x1.5 Nut
*Spindle
Belt
Top Cover
Blade
6g x 3/8” Cover screws x3
Cutter Clamping
Bolt/Washer
*WARNING DO NOT REMOVE
*Housing
Knowing your tool (cont’d) 6
*Spindle Lock
*Mini-Grinder
Spindle Lock
On/off
switch
*Belt Tensioning
Cap
Mounting plate
Unpacking and assembly
1. Remove the Mini Grinder from its box. Inspect
to ensure that no damage has occurred during
shipping. If damaged, report to the retailer
immediately.
2. Remove the auxiliary handle from the box and
attach to the tool. (as shown in fig.1)
Fig.1
3.Ensure that the Mini Grinder extension arm is
always fitted securely to the mounting plate. If
loose, tighten the 3 screws that hold the MiniGrinder to the mounting plate on the tool body.
as seen in fig.2.
4. The Mini Grinder is packaged with a Mini
Woodcarver Blade fitted, ready for use. Ensure
that the cutter clamping bolt is tightened fully.
(as shown in fig.3)
5. Before plugging in, ensure that the on/off
switch is in the OFF position.
Fig.3
Fig.2
7 Operation
• To change blades or sanders, unscrew the
cutter clamping bolt fully using the Allen™
key provided.
Place a flat head screwdriver into the MiniGrinder spindle lock (seen in fig.5) and
remove blade (as shown in fig.6).
Fig.5
Place new blade securely on the small
pulley.
Place top washer over blade and secure using
the cutter clamping bolt (as shown in fig.6).
Check that the blade is sitting flat against
the small pulley.
• Also packed with the Mini-Grinder is a set
of 4 assorted Mini-Sanders (40, 60, 80 &
120 grit).
Fig.6
To replace the blade with the sander,
unscrew the cutter clamping bolt fully
using the Allen™ key provided.
Remove blade. Insert HEXAGONAL BOLT into
the mini-sander keyway and wind into the
mini-grinder spindle in place of the
cutter.(as shown in fig.7).
Hold spindle lock as per fig.5.
Fig.7
Operation 8
Warning: Always wear correct safety clothing, including ear, eye
and lung protection.
• The Mini Grinder should always be used with
two hands, placing the left hand on the auxiliary
handle and the right on the tool body.
(as shown in fig.8)
CUTTING GRIP
Fig.8
• Ensure the machine is
running BEFORE contacting
the material, to be worked on.
• To sand, polish or scrub, hold
the Mini-Grinder horizontally.
(as shown in fig.9).
Fig.9
• Use the Mini Woodcarver Blade to cut or remove wood and
plastics. The Mini Sanding Pads are for cleaning and sanding wood,
plastics, metal, paint and much more. Use the diamond blade for
cutting and recessing any masonry based material.
9 Operation
To trench cut, hold the Mini-Grinder vertically and simultaneously lower into
the wood and pull towards you. (as shown in fig.10)
SHOWING ANGLE & DIRECTION OF CUT
25-30 is a
comfortable
working angle.
0
25-300
Angle
Fig.10
✓
• Use the bottom edge of the blade
(as shown in fig.10)
And not as in fig.11.
✗
Fig.11
Maintenance 10
• Changing Blades:
The Diamond blade (MIN016) and Tungsten
Carbide Blade (MIN012) will require stepwashers.
If required, place step washer on small pulley
(shown in fig.12 and 13), and as shown in the
individual accessory fitting instructions.
Fig.12
• Blade sharpening:
1. Unplug the Mini Grinder.
2. Use a (3/16´´) or 4 mm round metal file
(MIN003). When sharpening hold the file at 90
to the blade, keeping the file level.
(as shown in fig.14)
Fig.13
0
• Checking adaptor plate
Ensure that the Mini-Grinder adaptor plate is
always mounted securely. If loose, tighten the
three adaptor plate screws as shown in fig.15.
Fig.15
o
90 Sharpening Angle
Fig.14
11 Maintenance
Tensioning or replacing the belt
Unplug the Mini-grinder
Remove the 4 belt tensioning cap screws (shown in fig. 17).
• Then remove the 3 top cover screws (see knowing your tool page 5)
• Remove all visible slack from the belt by turning the tensioning cap. (shown correctly
in fig.18). Rotate the belt tensioning cap in the direction in which the blade moves
away from the guard (see fig.17). The blade can be seen moving slightly when
rotating the Belt tensioning cap.
• When tensioned secure with top cover screws.
•
•
DO NOT OVER TENSION THE BELT
If replacing the belt ensure that the “V” shape sides of the belt are on the inside (as shown
in fig.19). Replacement belts (MIN003) are available through Arbortech Pty Ltd
(see address on back).
Note: clean with a soft cloth or small brush.
“V” Belt
Guard
Fig.19
Belt
Tensioning Cap
Small
Pulley
Slack removed and tensioned
Fig.17
Fig.18
Not tensioned
✓
✗
Maintenance 12
Cleaning the grills and switch
Regulary check to see if any dust or foreign matter
has entered the grills positioned on the front and
back of the motor or under the switch (as shown
in fig.16).
Fig.16
If so use a soft brush to remove any accumulated
dust. Wear safety glasses when doing this.
Accessories & Spare Parts
MIN001
Accessories Available for the Mini-Grinder
MIN001 Mini-Woodcarver Blades x 2
MIN002 4mm Sharpening File
MIN003 Replacement Pulley Belt
MIN006
MIN004 Bearing & Spindle Assembly
MIN006 Mini-Sanders 4x assorted sanders
MIN008 4 x 40 Grit Mini-Sanders
MIN009 4 x 60 Grit Mini-Sanders
MIN012
MIN010 4 x 80 Grit Mini-Sanders
MIN011 4 x 120 Grit Mini-Sanders
MIN012 Mini Industrial Cutter
MIN016 Mini Diamond Blade
MIN018 R-Burr disc (Fine)
MIN019 R-Burr disc (Coarse)
MIN016
13 Other Products
Woodcarver Pro-4 Kit
Wherever waste wood needs to be removed
rapidly or cut, shaped, trimmed or trenched,
you will find the 100mm Woodcarver an
ideal and versatile attachment for an angle
grinder. This Pro-Kit contains a 100mm
Woodcarver blade and Pro-Guard.
Industrial Woodcarver Pro-Kit
The 100mm Industrial Cutter with
replaceable Tungsten Carbide teeth is the
ultimate professional tool for all wood
shaping in soft and hard woods. You can
now remove large areas of wood quickly,
easily with control and precision, cutting in
all directions regardless of grain to produce
a fine finish. This Pro-Kit contains a 100mm
Industrial Cutter, Pro-Guard and fixing key.
Other Products 14
Power Chisel Power Tool
An excellent tool for all woodworkers in all
applications. Safe, versatile and completely
dust free in operation, it is ideal for experts
and beginners alike.
The constant reciprocating action gives
incredible control to the user, and also the
ability to carve difficult and uneven timbers
which traditionally have been hard to carve.
This kit contains a 20mm flat chisel, 20mm
gouge chisel, 25 ml oil bottle, power chisel
unit & 700 watt motor.
Avaliable also as an attachment.
Tuff-Cut
Set with tough Tungsten Carbide teeth, the
Tuff-Cut features a 4mm cutting width,
which makes it ideal for trenching in
melamine, laminate, plastics, fibreglass,
various non-ferrous materials and all types
of wood and wood based materials.
The Tuff-Cut blade features excellent control
and handling and is designed to fit onto
115mm & 125mm angle grinders.
Designed to be multi purpose cutting blade,
which will work with power and control in a
variety of materials. It is perfect for general
purpose cutting of wood, wood based
materials, plastics, plaster board, laminates,
sheet materials, aluminium & other soft, non
ferous metals.
15 Technical Information
Max. Blade diameter:
50 mm
Max. RPM:
18,000 rpm @ extension spindle
Power:
5.8A ~ 700 Watt
Rating:
230-240V, AC, 50-60Hz (MIN300)
230-240V, AC, 50Hz (MIN350/360)
120V, AC, 60Hz (MIN400)
Disc Bore Size:
9.5mm
Max. cutting depth:
10 mm
Weight:
1.83 Kg
Overall Length:
350mm
Tested acc.: EN 50144-1:1995
DIN VDE 0740 Part 21/01.94
According to the standard EN50144-1 under “load” - condition:
• A-weighted equivalent
Sound pressure level: 107db(A)
Sound pressure level: 120db(A)
• Weighted root mean square 8.6m/s
2
CE-Declaration of Conformity:
We declare under our sole responsibility that this product is in conformity with the
following standards or standardised documents:
Tested acc.: EN 50144-1:1995
DIN VDE 0740 Part 21/01.94
*Manufacturer reserves the right to change specifications without notice.
*Note: Specifications may differ from country to country.
NOTE: Motor may differ from that shown on box depending
on specifications required for your country.
Website: www.arbortech.com.au
Email: [email protected]
BOOK/004
ARBORTECH PTY LTD • 67 WESTCHESTER ROAD • MALAGA • 6090
PERTH • WESTERN AUSTRALIA
TEL: 08 9249 1944 • FAX: 08 9249 2936
U.S.A. -Tollfree: (877) 966 3368 (WOODENU)