1
1038B30a.book Page 1 Friday, October 26, 2001 11:24 AM
User's Guide
PARTNER
Personal Interactive Communicator
Model P900
FLEX™ Technology
1038B30a.book Page 2 Friday, October 26, 2001 11:24 AM
1038B30a.book Page 1 Friday, October 26, 2001 11:24 AM
Congratulations on your purchase of the Partner P900
Personal Interactive Communicator. Whether receiving or
sending messages, the Partner P900 Personal Interactive
Communicator can become a vital part of your business and
personal life and change the way you communicate with
family, friends, and business associates.
This guide explains how to use your new communicator and
provides helpful suggestions for first-time, as well as
experienced users.
A detachable quick-reference card is included for your
convenience.
Introduction
Introduction
1
Introduction
1038B30a.book Page 2 Friday, October 26, 2001 11:24 AM
2
Effective Use of Your Communicator
With this communicator, you can send wireless messages to
internet e-mail addresses and other communicator devices,
yet it is small enough to comfortably wear on your belt or fit in
a pocket. By supplying business associates, family members,
and friends with your wireless address information, you can
be contacted whenever needed.
Verizon Wireless Messaging Services,
1004 Avenue N, suite 100, Plano, Texas 75074
© 2003, Unication, Inc. All rights reserved. Printed in Taiwan
ITC00-003
1038B30a.book Page 3 Friday, October 26, 2001 11:24 AM
Contents
Introduction ................................... 1
Effective Use of Your
Communicator ........................ 2
Safety and General Information... 5
Getting Started............................ 14
Battery Information ................... 14
Installing/Replacing the
Battery.................................. 15
Control Buttons ..................... 16
ALT-mode Functions ................. 19
Turning On
Your Communicator.............. 20
Turning Off
Your Communicator.............. 21
Setting Transmitter Mode.......... 21
Messaging Service Instructions 22
Sending a Test Message to
Yourself................................. 22
Backlight ................................... 23
Setting Up
Your Communicator.............. 23
Using the Main Menu................ 23
Setting the Key Click................. 25
Creating a Signature................. 25
Setting the Font Size. ............... 26
Time and Date ............................. 27
Setting the Time and Date........ 27
Alerts............................................ 28
Setting the MailBox and
the News/Info Alert .............. 28
Setting the Alert Volume .......... 29
Reminder Alert ......................... 29
Private Time................................. 30
Setting Private Time ................ 31
Quiet Mode .................................. 31
Setting the Quiet Mode ............ 32
Addresses.................................... 33
Creating an Address Book
Entry .................................... 33
Searching the Address Book .... 34
Deleting Addresses .................. 34
Editing Addresses ................... 35
Messages..................................... 36
Selecting the Address(es) ........ 36
1038B30a.book Page 4 Friday, October 26, 2001 11:24 AM
Composing a Message .......... 38
Sending a Message .................. 38
MailBox ..................................... 39
Previewing and Reading
Messages ............................. 40
Previewing Messages .............. 42
Reading Messages ............... 43
Working with the
Message Options Menu........ 44
Replying to Messages .............. 46
Resending Messages ............... 48
Forwarding Messages............... 48
Deleting Messages ................... 49
Animated Icons ......................... 52
Advanced Messaging ................. 53
Using Info-On-Demand ............. 53
Setting News AutoPreview........ 54
Turning On News
AutoPreview ....................... 54
Alarms .......................................... 55
Setting the Alarm ................... 55
Folders ......................................... 56
Accessing the
MailBox Folders .................... 56
Using Your Personal Folder ...... 58
Using Your News/Info Folder..... 59
InBoxes ........................................ 60
Using Your MailBox InBox......... 60
Using Your News/Info InBox...... 60
Vital Signs.................................... 64
Use and Care ...............................66
FCC Compliance .........................67
Export Law and Patents .............69
Notes ............................................71
Personal Numbers.......................73
1038B30a.book Page 5 Friday, October 26, 2001 11:24 AM
IMPORTANT INFORMATION ON SAFE AND EFFICIENT
OPERATION.
READ THIS INFORMATION BEFORE USING YOUR
PERSONAL INTERACTIVE COMMUNICATOR.
The information provided in this document supersedes the
general safety information contained in user guides published
prior to July 2000. For information regarding radio use in a
hazardous atmosphere please refer to the Factory Mutual (FM)
Approval Manual Supplement or Instruction Card, which is
included with radio models that offer this capability.
RF Operational Characteristics
Your Personal Interactive Communicator contains a transmitter
and a receiver. When it is ON, it receives and transmits radio
frequency (RF) energy. The Personal Interactive Communicator
operates in the frequency range of 896 MHz to 941 MHz and
employs digital modulation techniques.
When you communicate with your Personal Interactive
Communicator, the output power level is 1.0 watt.
Safety and General Information
Safety and General Information
5
1038B30a.book Page 6 Friday, October 26, 2001 11:24 AM
Safety and General Information
Exposure to Radio Frequency Energy
6
Your Unication Personal Interactive Communicator is designed to
comply with the following national and international standards
and guidelines regarding exposure of human beings to radio
frequency electromagnetic energy:
• United States Federal Communications Commission,
Code of Federal Regulations; 47 CFR part 2 sub-part J.
• American National Standards Institute (ANSI) / Institute of
Electrical and Electronic Engineers (IEEE) C95. 1-1992.
• Institute of Electrical and Electronic Engineers (IEEE)
C95.1-1999 Edition.
• National Council on Radiation Protection and
Measurements (NCRP) of the United States, Report 86,
1986.
• International Commission on Non-Ionizing Radiation
Protection (ICNIRP) 1998.
• Ministry of Health (Canada) Safety Code 6. Limits of
Human Exposure to Radiofrequency Electromagnetic
Fields in the Frequency Range from 3 kHz to 300 GHz,
1999.
• Australian Communications Authority
Radiocommunications (Electromagnetic Radiation Human Exposure) Standard 1999 (applicable to wireless
phones only).
To assure optimal Personal Interactive Communicator
performance and make sure human exposure to radio frequency
electromagnetic energy is within the guidelines set forth in the
above standards, always adhere to the following procedures:
Portable Personal Interactive Communicator
Operation and EME Exposure
Body-worn Operation
To maintain compliance with FCC/Health Canada RF
exposure guidelines, if you wear a Personal Interactive
Communicator on your body when transmitting, always place the
Personal Interactive Communicator in a Unication supplied or
approved clip, holder, holster, case, or body harness. Use of
non-Unication-approved accessories may exceed FCC/Health
Canada RF exposure guidelines. If you do not use a body-
Safety and General Information
1038B30a.book Page 7 Friday, October 26, 2001 11:24 AM
7
Safety and General Information
1038B30a.book Page 8 Friday, October 26, 2001 11:24 AM
8
worn accessory, ensure the device is at least one inch
(2.5 cm) from your body when transmitting.
Approved Accessories
For a list of approved Unication accessories call
+886-2-22999678 or visit our website at www.uni.com.tw
Electromagnetic Interference/Compatibility
NOTE: Nearly every electronic device is susceptible to
electromagnetic interference (EMI) if inadequately shielded,
designed or otherwise configured for electromagnetic
compatibility.
• FACILITIES
To avoid electromagnetic interference and/or compatibility
conflicts, turn off your Personal Interactive Communicator in
any facility where posted notices instruct you to do so.
Hospitals or health care facilities may be using equipment
that is sensitive to external RF energy.
• AIRCRAFT
When instructed to do so, turn off your Personal Interactive
Communicator when on board an aircraft. Any use of a
•
Personal Interactive Communicator must be in accordance
with applicable regulations per airline crew instructions.
MEDICAL DEVICES
Pacemakers
The Advanced Medical Technology Association
recommends that a minimum separation of 6 inches
(15 centimeters) be maintained between a handheld
wireless Personal Interactive Communicator and a
pacemaker. These recommendations are consistent with the
independent research by, and recommendations of, the
United States Food and Drug Administration.
Persons with pacemakers should:
• ALWAYS keep the Personal Interactive Communicator
more than six inches (15 centimeters) from their
pacemaker when the Personal Interactive Communicator
is turned ON.
• not carry the Personal Interactive Communicator in the
breast pocket.
• use the ear opposite the pacemaker to minimize the
potential for interference.
Safety and General Information
1038B30a.book Page 9 Friday, October 26, 2001 11:24 AM
9
Safety and General Information
1038B30a.book Page 10 Friday, October 26, 2001 11:24 AM
10
• turn the Personal Interactive Communicator OFF
immediately if you have any reason to suspect that
interference is taking place.
Hearing Aids
Some digital wireless Personal Interactive Communicators
may interfere with some hearing aids. In the event of such
interference, you may want to consult your hearing aid
manufacturer to discuss alternatives.
Other Medical Devices
If you use any other personal medical device, consult the
manufacturer of your device to determine if it is adequately
shielded from RF energy. Your physician may be able to
assist you in obtaining this information.
1038B30a.book Page 11 Friday, October 26, 2001 11:24 AM
• USE WHILE DRIVING
Check the laws and regulations on the use of a Personal
Interactive Communicator in the area where you drive. Always
obey them.
When using your Personal Interactive Communicator while
driving, please:
• give full attention to driving and to the road.
• use hands-free operation, if available.
• pull off the road and park before making or answering a
call if driving conditions so require.
Operational Warnings
•
FOR VEHICLES WITH AN AIR BAG
Do not place a portable Personal Interactive Communicator
in the area over an air bag or in the air bag deployment area.
Air bags inflate with great force. If a portable Personal
Interactive Communicator is placed in the air bag
deployment area and the air bag inflates, the Personal
Interactive Communicator may be propelled with great force
and cause serious injury to occupants of the vehicle.
Safety and General Information
Safety and General
11
1038B30a.book Page 12 Friday, October 26, 2001 11:24 AM
Safety and General Information
•
12
POTENTIALLY EXPLOSIVE ATMOSPHERES
Turn off your Personal Interactive Communicator prior to
entering any area with a potentially explosive atmosphere,
unless it is a Personal Interactive Communicator type
especially qualified for use in such areas as
"Intrinsically Safe". Do not remove, install, or charge
batteries in such areas. Sparks in a potentially explosive
atmosphere can cause an explosion or fire resulting in bodily
injury or even death.
NOTE: The areas with potentially explosive atmospheres
referred to above include fueling areas such as below decks
on boats, fuel or chemical transfer or storage facilities, areas
where the air contains chemicals or particles, such as grain,
dust or metal powders, and any other area where you would
normally be advised to turn off your vehicle engine. Areas
with potentially explosive atmospheres are often but not
always posted.
•
BLASTING CAPS AND AREAS
To avoid possible interference with blasting operations, turn
off your Personal Interactive Communicator when you are
near electrical blasting caps, in a blasting area, or in areas
posted: “Turn off two-way radio”. Obey all signs and
instructions.
Operational Cautions
•
BATTERIES
All batteries can cause property damage and/or bodily injury
such as burns if a conductive material such as jewelry, keys,
or beaded chains touch exposed terminals. The conductive
material may complete an electrical circuit (short circuit) and
become quite hot. Exercise care in handling any charged
battery, particularly when placing it inside a pocket, purse, or
other container with metal objects.
ITC01-065
Safety and General Information
1038B30a.book Page 13 Friday, October 26, 2001 11:24 AM
13
1038B30a.book Page 14 Friday, October 26, 2001 11:24 AM
Getting Started
Getting Started
14
Battery Information
Your communicator uses one AA-size alkaline battery (do not
use carbon-zinc batteries), which also recharges the internal
transmit power source.
Two AA-size batteries are included with your communicator. One
is installed. Check the battery gauge in the Vital Signs menu and
replace the installed battery as needed.
If : is displayed on the Status screen, the AA-battery is low.
If : begins flashing, your communicator is about to shut down
due to low battery power. While : is flashing, you cannot
receive or transmit messages, but you can still read unread
messages and your address book entries.
Note: This product contains a Nickel-Cadmium (NiCd)
rechargeable battery that must be recycled or disposed of
properly. Recycling facilities may not be available in all areas.
1038B30a.book Page 15 Friday, October 26, 2001 11:24 AM
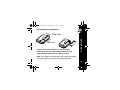
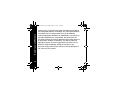
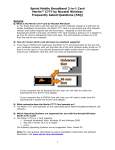
Installing/Replacing the Battery
Slide Door
Caution! You must match the (+) and (-) polarity
markings. If you insert the battery backwards, your
pager settings (time, date, etc.) will be erased.
000092-O
Getting Started
Slide Latch
Note: If you replaced a dead battery, wait a few hours before
using your communicator to ensure proper operation.
000139-O
15
1038B30a.book Page 16 Friday, October 26, 2001 11:24 AM
Getting Started
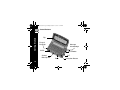
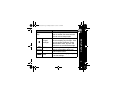
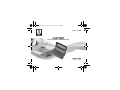
Control Buttons
Flip
Escape/
Backlight
Message
Acknowledge
CAPS
Clear/Delete
Symbol
Menu/Space
ALT
Enter
16
Navigation Buttons
1038B30a.book Page 17 Friday, October 26, 2001 11:24 AM
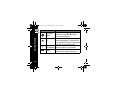
Flip
H
}
Escape/
Backlight
CAPS
Description
Houses and protects the LCD screen.
Open to awaken the communicator;
close to activate sleep mode.
Press to return to preceding screen
without accepting any changes. Also,
press to access the Status screen
from the Main menu, or press and
hold to turn on and off the backlight.
Press to capitalize next typed letters.
Press to access Main menu or to
U Menu/Space insert a space in text.
{ Enter
Getting Started
Control Button
Press to select the highlighted option
or to save settings.
17
1038B30a.book Page 18 Friday, October 26, 2001 11:24 AM
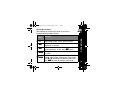
Control Button
Press y or z to scroll through menu
selections. Press w or x to page
through menu options.
Activates the Alt-mode control keys
(color-coded yellow). The status icon
ALT
) is displayed. The next key pressed
activates an Alt-mode function.
Message
Used to acknowledge message alerts
Acknowledge when the pager is in the holster.
When pressed, it deletes the
Delete
character to the left of the cursor.
Getting Started
Navigation
buttons
18
~
|
Description
1038B30a.book Page 19 Friday, October 26, 2001 11:24 AM
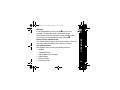
ALT-Lock — Activates the Alt-mode control keys
(color-coded yellow). To exit, press ~ again.
Cancel — Clears the entire message screen when
~ | composing a message.
~ } CAPS Lock — Activates the CAPS Lock mode
(uppercase letters). To exit, press } again.
Carriage Return — Inserts a carriage return after
~ { the cursor.
Symbols — Activates Symbols. Seventeen (17)
~U symbols are available at the bottom of the screen.
Press w or x to highlight the desired symbol and
press { to insert the symbol at the cursor.
~~
Getting Started
ALT-mode Functions
The following key sequences provide access to the
corresponding ALT-mode functions.
Control
Description
Buttons
19
1038B30a.book Page 20 Friday, October 26, 2001 11:24 AM
Turning On Your Communicator
Ensure that a fresh battery is properly installed as
described in “Installing/Replacing the Battery” on page 15.
Open the flip and press any key to turn your communicator on.
The communicator emits a 4-second power-up alert, and
displays the Status screen.
Press U, {, w , x , y , or z to display the Main
menu.
• If you do not select a menu item, the communicator goes
into standby mode.
• If you have one or more unread messages, 1 flashes on
the Standby screen.
Getting Started
20
1038B30a.book Page 21 Friday, October 26, 2001 11:24 AM
Press
To Display
Then Press
y or z
/ Power Off
{
y or z
? Yes
{
Setting Transmitter Mode
When the transmitter is turned off, the communicator cannot
send messages or replies, but it can receive messages.
Press
To Display
Then Press
y or z
t Preferences
{
y or z
a Transmitter Off
{
y or z
? Yes
or ?
No
Getting Started
Turning Off Your Communicator
You should turn off your communicator to save battery power.
The communicator receives any stored messages, once the unit
is turned back on in the coverage area.
{
21
1038B30a.book Page 22 Friday, October 26, 2001 11:24 AM
Getting Started
Messaging Service Instructions
To begin messaging service, contact your service provider for
instructions. The phone number of the messaging service can be
found in the literature provided by the service provider.
22
Sending a Test Message to Yourself
After you activate your service, you should test your
communicator and service by sending a message to yourself.
Use the telephone number, web site, or e-mail address (and a
wireless address) provided by your service provider. If you are
using a phone to send a word message, an operator will help;
otherwise, enter a numeric message or type one and send it.
While waiting for the message to reach your communicator, refer
to “Reading Messages” on page 43. If your communicator does
not receive the message within a few minutes, contact your
service provider.
After you have tested the communicator, read the rest of this
guide to learn about other features.
1038B30a.book Page 23 Friday, October 26, 2001 11:24 AM
Setting Up Your Communicator
This section explains how to set the time and date, alarm time,
alert mode, News/Info InBox alerts, and other features.
Using the Main Menu
Use the Main menu to access the following features:
• MailBox
• i News/Info InBox
• Info-On-Demand (if available)
• Address Book
• Personal Folder
• News/Info Folder
Getting Started
Backlight
In low-light conditions, press and hold H to turn on the
backlight. The backlight remains illuminated until the
communicator times out and returns to the Standby screen.
To manually turn the backlight off, press and hold H.
23
1038B30a.book Page 24 Friday, October 26, 2001 11:24 AM
Getting Started
• Delete Messages
• Preferences
• Vital Signs
• Power Off the Communicator
Accessing the Communicator Features from the Main Menu
From the Standby screen, press any key (the Status screen
displays momentarily). Or press U, {, w, x, y, or z to go
directly to the Main Menu.
Press
To ...
Then Press
U,
Display the Main menu from the
{, w, x, Status screen
y or z
y or z
24
Highlight desired menu item
{ to
select.
Setting the Key Click
When this feature is turned on and the communicator is in
audible mode, a "click" is emitted whenever a button is pressed.
Press
To Display
Then Press
y or z
t Preferences
{
< Key Click
y or z
{
y or z
? On
{ to
save.
Creating a Signature
You can create a signature for your messages that is
automatically appended to each message you initiate.
Press
To Display
Then Press
y or z
t Preferences
{
y or z
6 Signature
{
Keyboard To create desired signature
{ to
save.
Getting Started
1038B30a.book Page 25 Friday, October 26, 2001 11:24 AM
25
1038B30a.book Page 26 Friday, October 26, 2001 11:24 AM
Getting Started
Setting the Font Size.
26
Press
To Display
Then Press
y or z
t Preferences
{
y or z
Aa Font Size
{
y or z
aa Normal
or AA
Large
{ to
select.
{ again
to save.
1038B30a.book Page 27 Friday, October 26, 2001 11:24 AM
Time and Date
Press
To Display
Then Press
y or z
t Preferences
{
y or z
M Set Time & Date
{
Desired hour
(1 to 12, or 1 to
w or x for
minutes
y or z
24)
y or z
Desired minutes:
w or x for
Set first digit (0 to 5 ).
date
Repeat for second digit (0 to 9),
and again to set AM, PM, or R.
Press w or x to move left or right.
y or z
Desired month.
{ to
Repeat for day and year.
save.
Press w or x to move left or right.
Time and Date
Setting the Time and Date
27
1038B30a.book Page 28 Friday, October 26, 2001 11:24 AM
Alerts
Alerts
Alert icons are displayed on the Status screen.
• If an audible alert is selected, l is displayed.
• If k Vibrate is selected, k is displayed.
• If @ Silent is selected, no alert icon is displayed.
• Alert durations are shortened when the battery is low.
Setting the MailBox and the News/Info Alert
Press
To Display
Then Press
y or z
t Preferences
{
y or z
L MailBox Alert
or
L News/Info Alert
y or z
and
w or x
28
Desired Alert tone
Press U to sample the
tones.
{for list
of available
tones.
{ to
select.
{ again
to save.
1038B30a.book Page 29 Friday, October 26, 2001 11:24 AM
Then Press
{
{
{ to
save.
Reminder Alert
When active, generates alerts when there are unread personal
messages.
Press
To Display
Then Press
y or z
t Preferences
{
y or z
< Reminder Alert
{
y or z
? On or @ Off
{ to
save.
Alerts
Setting the Alert Volume
Press
To Display
y or z
t Preferences
< Alert Volume
y or z
z or w
This moves the cursor to the
and
left (-) or to the right (+) to
y or x
decrease or increase the
volume. Press U to sample.
29
1038B30a.book Page 30 Friday, October 26, 2001 11:24 AM
Private Time
Reminder Alert Types
• Audible - a chirp.
• Vibrate - a short vibration.
• Chirp and vibrate - a chirp followed by a 1-second vibration.
• Vibrate and beep - a 2-second vibration followed by a beep.
30
Private Time
Private Time mode lets you specify a time period during which
the communicator operates without an audible or vibrate alert.
1038B30a.book Page 31 Friday, October 26, 2001 11:24 AM
Then Press
{
{
x
{ to
save.
Quiet Mode
Setting Private Time
Press
To Display
t Preferences
y or z
y or z
h Set Private Time
y or z
h (Private Time activated)
i((Private Time deactivated)
y, z,
To set On time (when it starts)
w or x
and Off time (when it ends).
See “Setting the Time and Date” on
page 27 for more information on
setting times.
Quiet Mode
When turned on, Quiet Mode temporarily changes all audible
alerts to vibrator alerts. Turn the mode off to reinstate the audible
alerts.
31
1038B30a.book Page 32 Friday, October 26, 2001 11:24 AM
Quiet Mode
Setting the Quiet Mode
32
Press
To Display
Then Press
y or z
t Preferences
{
y or z
k Quiet Mode
{
y or z
? On
{ to
select.
{ again
to save.
Note: When you turn on the Quiet Mode, a e flashes on the
Status screen to remind you.
1038B30a.book Page 33 Friday, October 26, 2001 11:24 AM
Addresses
Creating an Address Book Entry
Press
To Display
y or z
# Address Book
y or z
6 New Entry
Keyboard Name
y or z
Desired field
Keyboard Address/number
Repeat
All desired fields
y or z
# Save Entry
Then Press
{
{
{
{
{
{
{
Note: Text in an address book field remains even if the screen
times out, so you can return and complete the entry.
Addresses
Your Address Book can store data for up to 250 people. Each
entry can include a name; wireless and e-mail addresses; home,
work, pager, mobile phone, and fax/other numbers; and notes.
33
Addresses
1038B30a.book Page 34 Friday, October 26, 2001 11:24 AM
34
Searching the Address Book
You can use search instead of scrolling through the entries.
Press
To Display
Then Press
# Address Book
y or z
{
y or z
{
! Search
Keyboard First few characters until desired
{
entry is highlighted.
Deleting Addresses
Press
To Display
# Address Book
y or z
y or z
Desired entry
U
Entry Options menu
J Delete Entry
y or z
y or z
? Yes
Then Press
{
{
{
{
1038B30a.book Page 35 Friday, October 26, 2001 11:24 AM
Then Press
{
{
{
{
{
{
Addresses
Editing Addresses
Press
To Display
# Address Book
y or z
y or z
Desired entry
U
Entry Options menu
6 Edit Entry
y or z
y or z
Desired field to edit
Keyboard Desired changes
Repeat for all fields.
# Save Entry
y or z
35
1038B30a.book Page 36 Friday, October 26, 2001 11:24 AM
Messages
Messages
This section describes how to select the addressee, compose
a message, and send messages.
36
Selecting the Address(es)
You can send a message to one or more addressees and to
multiple addresses for the same addressee.
Press
To Display
Then Press
y or z
T Send Message
{
y or z
E Select Address
{
y or z
# Address Book
{
y or z
Desired entry
{
y or z
Desired address
{
Repeat
Desired addressee/addresses
{
y or z
Done Addressing
{
1038B30a.book Page 37 Friday, October 26, 2001 11:24 AM
Entering an Address Not in Your Address Book
You can send messages to addresses that are not permanently
added to your Address Book.
To send the message, perform the following:
Press
To Display
Then Press
y or z
T Send Message
{
E Select Address
{
or
y or z
y or z
Keyboard
E\Add Addresses
Desired address type
Desired address
Messages
Note: The Communicator returns to the Send Message
menu, and E\Add Addresses replaces E Select Address.
Note: The Send Message selection is unavailable until you
compose the message and select an address.
{
{
37
1038B30a.book Page 38 Friday, October 26, 2001 11:24 AM
Messages
Composing a Message
Press
To Display
Then Press
y or z
T Send Message
{
y or z
6 Write Message
{
Keyboard
Your message
{
Note: The communicator returns to the Send Message menu,
and displays a checkmark in the Write Message selection.
Sending a Message
To send a message you need a selected address, and a
composed message. Which one is performed first, doesn’t
matter. Once you have both, do the following:
Press
To Display
Then Press
y or z
T Send Message
{
MESSAGE TRANSMITTING
38
1038B30a.book Page 39 Friday, October 26, 2001 11:24 AM
Q Sending in Progress (Flashing)
\ Sent Successfully
Send Message Failed
x
Send Message Failed Due to NiCd
Ç
Charging
Messages
MailBox
The MailBox receives incoming messages transmitted to your
communicator. The MailBox allows you to read, save, respond,
forward, and delete messages. It provides a transmission status
log for messages sent and acts as a holding area for unsent
messages, which are categorized into the following types:
39
Messages
1038B30a.book Page 40 Friday, October 26, 2001 11:24 AM
40
Previewing and Reading Messages
• When you receive a personal or information service
message, the Status screen is displayed and an alert is given
according to your settings. A flashing E (MailBox) or
j (News/Info) indicates which type of message has been
received.
• To stop an alert, press the side button or open the flip. The d
on the Standby screen and E or j on the Main menu flash
until you have read all received MailBox or News/Info service
messages.
Note: If reminder alerts is active, the communicator
periodically generates the selected alert to remind you of
any unread MailBox messages.
• When the main message memory is full, MEMORY FULL is
displayed on the Status screen. When memory is full, the
oldest messages (read first, then unread) are automatically
deleted to make room for new messages.
•
•
•
If turned on, the third line of the Status screen displays text
messages that indicate carrier-specific service modes.
Refer to your service provider literature.
If programmed ] displays whenever you are out of your
coverage area. Upon returning to your coverage area, ]] no
longer displays on the Status screen.
If your communicator is configured to save messages
received with errors, UPDATED is displayed at the beginning of
a message, which indicates the message has been
retransmitted to correct previously received errors.
Messages
1038B30a.book Page 41 Friday, October 26, 2001 11:24 AM
41
1038B30a.book Page 42 Friday, October 26, 2001 11:24 AM
Previewing Messages
Press
To Display
y or z
E MailBox
or
Then Press
{
j News/Info InBox
Messages
y or z
42
E InBox, T OutBox,
D Drafts Folder
or
Desired Info InBox (shown in
groups of four)
{to
display list of
messages.
The following icons can be displayed to the left of each message
in the preview list.
9 Indicates previously viewed and read messages.
\ Indicates a successful reply.
x Indicates an unsuccessful reply.
^ Indicates the unread MailBox message has custom reply
choices attached.
1038B30a.book Page 43 Friday, October 26, 2001 11:24 AM
Then Press
{
If there is additional text, É and Ñ
display to the left of the screen.
Note: If preset, the time and date the message was received
displays at the end of each message. To set the time and date,
see “Time and Date” on page 27.
Note: After you read your message, the last line of the screen is
a link to the Message Options menu. For specific information
about this menu, please see “Working with the Message Options
Menu” on page 44.
Messages
Reading Messages
Press
To Display
y or z
Desired message
y or z
Message text line-by-line
or
or
{
Message text page-by-page.
43
Messages
1038B30a.book Page 44 Friday, October 26, 2001 11:24 AM
44
Scrolling Between Messages
While reading a message, you can quickly display another
one.
Press
To Display
Then Press
The
previous
message
y, z or
w
or
{ to
or
The
next
message
read text.
x
Working with the Message Options Menu
You can access the Message Options Menu from any of the
InBoxes available in the MailBox.
1038B30a.book Page 45 Friday, October 26, 2001 11:24 AM
Press
y or z
y or z
To Display
Then Press
{
{
E MailBox
E InBox, T OutBox
or
y or z
U
Desired message
y or z
{
Desired option from the Message
Options Menu
See the following sections for more information on each of the
message options in the menu: 7 Next Message,
b Reply to Message, b Resend
0 Forward Message, D Move to
J Delete Message.
Messages
D Drafts Folder
Message,
Folder,
or
Note: The Message Options Menu is also accessible from the
message itself. See “Reading Messages” on page 43.
45
1038B30a.book Page 46 Friday, October 26, 2001 11:24 AM
Replying to Messages
You can compose your own custom reply to a message or use
one of the pre-programmed replies from the list.
Messages
Sending a Custom Reply
Press
To Display
U
Message Options menu
y or z
b Reply to Message
{
y or z
6 Custom Reply
{
Keyboard
Type in your reply message.
{
y or z
T Send Message
{
MESSAGE TRANSMITTING
46
Then Press
1038B30a.book Page 47 Friday, October 26, 2001 11:24 AM
Sending a Pre-programmed Reply
To Display
U
Message Options menu
y or z
b Reply to Message
y or z
Desired reply from list of
pre-programmed replies.
Then Press
{
{
MESSAGE TRANSMITTING
Note: Q flashes to the left of the message to indicate the reply is
in progress. If the reply is successful, \ displays to the left of the
message on the Message Preview screen. If the message reply
is unsuccessful, x or Ç displays instead. Please see “MailBox”
on page 39 for more information.
Messages
Press
47
1038B30a.book Page 48 Friday, October 26, 2001 11:24 AM
Messages
Resending Messages
This option is available only for messages in your OutBox that
were not successfully transmitted. If the message doesn’t show
x or Ç to the left, its option menu will not display this option.
Press
To Display
U
Message Options menu
y or z
b Resend Message
Then Press
{
MESSAGE TRANSMITTING
Forwarding Messages
You can append text to, and then forward any message.
48
1038B30a.book Page 49 Friday, October 26, 2001 11:24 AM
To Display
Then Press
U
Message Options menu
y or z
0 Forward Message
{
y or z
6 Write Message
{
Keyboard
Appended text
{
y or z
E Select Address
{
y or z
Desired address(es)
{
Messages
Press
MESSAGE TRANSMITTING
Deleting Messages
Press | to immediately delete a read message, whether it is
only highlighted in a list or open while you are reading it.
49
1038B30a.book Page 50 Friday, October 26, 2001 11:24 AM
Messages
If you try to delete an unread message from a list, a
confirmation message displays. You can select ? Yes and
continue or select @ No and cancel the deletion.
You can also delete messages as follows:
• Using the Message Options Menu
• Deleting All Read Messages
• Deleting Messages from an InBox
Using the Message Options Menu
The delete option deletes the current or highlighted message.
Press
To Display
U
Message Options menu
y or z
J Delete Message
Then Press
{
See “Working with the Message Options Menu” on page 44 for
more information.
50
1038B30a.book Page 51 Friday, October 26, 2001 11:24 AM
Press
To Display
Then Press
y or z
J Delete Messages
{
y or z
? Yes
{
Messages
Deleting All Read Messages
Perform this option from the Main Menu. See “Using the Main
Menu” on page 23. Messages in your Personal Folder and
News/Info Folder are not affected by this function.
Deleting Messages from an InBox
Caution: If you select J Delete All
and Unread messages are deleted.
Messages,
both Read
51
Messages
1038B30a.book Page 52 Friday, October 26, 2001 11:24 AM
52
Press
To Display
Then Press
y or z
Highlight the InBox
|
y or z
J Delete Read Messages
{
or
J Delete All Messages
y or z
? Yes
{
Messaging Emoticons
Your communicator provides 25 messaging emoticons you can
add to all your messages. To insert a smiley face, for example,
type :-) and the pager will display
instead. Please refer to the
Quick Reference Card at the end of this manual for a list of all
the available emoticons and their corresponding triads.
1038B30a.book Page 53 Friday, October 26, 2001 11:24 AM
Using Info-On-Demand
With Info-On-Demand, you can request information such as
News, Sports, and Stocks. This information is sent to your
communicator as a MailBox message.
Press
y or z
y or z
To Display
wait 2-3
minutes
when
complete
topic icon flashing
t
Info-On-Demand
Desired topic
Then Press
{
{
REQUEST TRANSMITTING
a message is received
or
read
message
Advanced Messaging
Advanced Messaging
REQUEST FAILED
53
1038B30a.book Page 54 Friday, October 26, 2001 11:24 AM
Advanced Messaging
Note: This is a network and subscription-dependent feature.
Not available in all areas. ITC01-057
54
Setting News AutoPreview
When this feature is turned on and you receive an information
service message, pressing any key takes you directly to the
News/Info InBox.
Turning On News AutoPreview
Press
To Display
Then Press
y or z
t Preferences
{
y or z
r News AutoPreview
{
y or z
? Yes
{
1038B30a.book Page 55 Friday, October 26, 2001 11:24 AM
Alarms
Setting the Alarm
Press
To Display
t Preferences
y or z
K Set Alarm
y or z
y or z
W
y or z
Desired fields and settings See
“Setting the Time and Date” on
page 27 for more information on
setting time and date.
Then Press
{
{
w or x
to set time
and date
fields
{ to
save.
Alarms
The alarm can be set for a specific time and date, or it can be
used as a daily alarm. When an alarm is set, K is displayed on
the Status screen. Press any key to silence an alarm.
55
1038B30a.book Page 56 Friday, October 26, 2001 11:24 AM
Note: To set a Daily Alarm, increment the month field past 12
(or day field past 31) to automatically display --/--/--.
Folders
Folders
The MailBox contains your InBox, OutBox and Drafts Folder. In
all of these folders you can preview, read, delete, and send these
messages. See “Messages” on page 36 for more information.
Accessing the MailBox Folders
Press
To Display
y or z
E MailBox
y or z
E InBox
or
T OutBox
or
D Drafts Folder
56
Then Press
{
{
1038B30a.book Page 57 Friday, October 26, 2001 11:24 AM
Your InBox
All incoming personal messages are saved into the MailBox
InBox.
Your Drafts Folder
All outgoing personal messages that have not been sent are
automatically saved into the MailBox Drafts Folder.
Folders
Your OutBox
All outgoing personal messages are saved into the MailBox
OutBox.
57
Folders
1038B30a.book Page 58 Friday, October 26, 2001 11:24 AM
Using Your Personal Folder
Access your Personal Folder from the Main Menu. Use it to
save personal messages and protect them from the J
Delete Messages option and from automatic deletion when
memory is full. In this folder you can preview, read, delete, and
send messages. See “Messages” on page 36 for more
information.
Moving a Message to Your Personal Folder
Press
To Display
y or z
Highlight the message in its original U
Folder/InBox
y or z
58
D Move to Folder
Then Press
{
Using Your News/Info Folder
Use your News/Info Folder to save News/Info messages and
protect them from the J Delete Messages option and from
automatic deletion when memory is full. In this folder you can
preview, read, delete, and forward messages. See “Messages”
on page 36 for more information.
Moving a Message to Your News/Info Folder
Press
To Display
Then Press
y or z
S News/Info InBox
{
y or z
Highlight the message
U
y or z
D Move to Folder
{
Folders
1038B30a.book Page 59 Friday, October 26, 2001 11:24 AM
59
1038B30a.book Page 60 Friday, October 26, 2001 11:24 AM
InBoxes
InBoxes
There are two inboxes for your communicator: the MailBox
and the News/Info InBox.
60
Using Your MailBox InBox
Please see “Messages” on page 36 for detailed information on
how to use the MailBox.
Using Your News/Info InBox
When your communicator receives information service
messages, they go to the News/Info InBox. To read the
messages in this inbox, refer to “Previewing and Reading
Messages” from pages 40 through 44. You can also create
Sub-InBoxes to organize your messages by topic. You can set
the history for each Sub-InBox, move them within the list, and
delete them.
1038B30a.book Page 61 Friday, October 26, 2001 11:24 AM
Press
To Display
Then Press
y or z
j News/Info InBox
{
y or z
Highlight the message with the
same name as the InBox you
wish to create
U
y or z
n Create InBox
{
InBoxes
Creating a Sub-InBox
Within the News/Info InBox, you can create up to 16
Sub-InBoxes to organize the incoming messages. A message
under 04: * Sports Update* , for example, creates the
Sub-InBox, n * Sports Update *. Once created, the new
InBox will receive all the messages that arrive under that topic.
61
InBoxes
1038B30a.book Page 62 Friday, October 26, 2001 11:24 AM
62
Setting the InBox History
After creating a new Sub-InBox, you can specify how many
messages it will store for you. This is the InBox History. You can
specify up to eight history messages to be stored. If you only
wish to see the latest message, set it to "No History." When the
Sub-InBox has no history, every new message overwrites the
previous one.
Press
y or z
y or z
y or z
y or z
To Display
j News/Info InBox
Highlight the desired Sub-InBox
8 Set InBox History
Highlight the desired number
Then Press
{
U
{
{
1038B30a.book Page 63 Friday, October 26, 2001 11:24 AM
Moving a Sub-InBox
Press
To Display
Then Press
y or z
j News/Info InBox
{
y or z
Highlight the desired
Sub-InBox
o Move InBox Up
U
{
or
p Move InBox Down
Deleting a Sub-InBox
Press
To Display
y or z
j News/Info InBox
y or z
Highlight the Sub-InBox to
delete
y or z
J Delete InBox
? Yes
y or z
InBoxes
y or z
Then Press
{
U
{
{
63
1038B30a.book Page 64 Friday, October 26, 2001 11:24 AM
Note: Deleting a Sub-InBox deletes all messages in it.
Vital Signs
Vital Signs
Vital Signs include the battery status, message memory usage,
and information about your communicator.
64
Checking Battery Status
Press
To Display
y or z
; Vital Signs
: Battery
y or z
nn% Eåååååå
Then Press
{
{
F
Checking Message Memory Usage
Press
To Display
Then Press
y or z
; Vital Signs
{
y or z
= Message Memory
{
Percentage of usage for
Mail/Pers Box and
News/Info Box
Displaying Communicator Information
Press
To Display
y or z
; Vital Signs
^ About
y or z
Then Press
{
{
Vital Signs
1038B30a.book Page 65 Friday, October 26, 2001 11:24 AM
65
1038B30a.book Page 68 Friday, October 26, 2001 11:24 AM
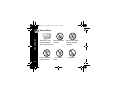
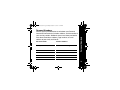
Use and Care
glub
glub
Use and Care
XX
66
X
Clean with a soft
Do not immerse
cloth dampened
in water.
with soap and water.
Do not use alcohol
or other cleaning
solutions.
Do not expose to
excessive heat...
... or moisture.
... or extreme
shock...
1038B30a.book Page 69 Friday, October 26, 2001 11:24 AM
This device complies with part 15 of the FCC Rules. Operation is
subject to the following two conditions: (1) This device may not
cause harmful interference, and (2) this device must accept any
interference received, including interference that may cause
undesired operation.
This equipment has been tested and found to comply with the
limits for a Class B digital device, pursuant to part 15 of the FCC
Rules. These limits are designed to provide reasonable
protection against harmful interference in a residential
installation. This equipment generates, uses and can radiate
radio frequency energy and, if not installed and used in
FCC Compliance
FCC Compliance
67
FCC Compliance
1038B30a.book Page 70 Friday, October 26, 2001 11:24 AM
68
accordance with the instructions, may cause harmful
interference to radio communications. However, there is no
guarantee that interference will not occur in a particular
installation.
If this equipment does cause harmful interference to radio or
television reception, which can be determined by turning the
equipment off and on, the user is encouraged to try to correct the
interference by one or more of the following measures:
• Reorient or relocate the receiving antenna.
• Increase the separation between the equipment and receiver.
• Connect the equipment into an outlet on a circuit different
from that which the receiver is connected.
• Consult the dealer or an experienced radio/TV technician for
help.
1038B30a.book Page 84 Friday, October 26, 2001 11:24 AM
Export Law Assurances
This product is controlled under the export regulations of the
United States of America and Canada.The Governments of the
United States of America and Canada may restrict the
exportation or re-exportation of this product to certain
destinations. For further information contact the U.S. Department
of Commerce or the Canadian Department of Foreign Affairs
and International Trade.
ITC00-007
Software Copyright Notice
The Unication products described in this manual may include
copyrighted Unication and third party software stored in
semiconductor memories or other media. Laws in the United
States and other countries preserve for Unication and third party
software providers certain exclusive rights for copyrighted
Export Law and Patents
Export Law and Patents
69
ITC00-007
70
software, such as the exclusive rights to distribute or reproduce
the copyrighted software. Accordingly, any copyrighted software
contained in the Unication products may not be modified,
reverse-engineered, distributed, or reproduced in any manner to
the extent allowed by law. Furthermore, the purchase of the
Unication products shall not be deemed to grant either directly or
by implication, estoppel, or otherwise, any license under the
copyrights, patents, or patent applications of Unication or any
third party software provider, except for the normal, nonexclusive, royalty-free license to use that arises by operation of
law in the sale of a product.
ITC00-007
ITC01-044
Export Law and Patents
Export Law and Patents
1038B30a.book Page 85 Friday, October 26, 2001 11:24 AM
85
Notes
1038B30a.book Page 87 Friday, October 26, 2001 11:24 AM
71
1038B30a.book Page 86 Friday, October 26, 2001 11:24 AM
Notes
Notes
72
1038B30a.book Page 88 Friday, October 26, 2001 11:24 AM
Use the spaces provided below to write down your Personal
Interactive Communicator’s wireless address, and the number of
your service provider. Additional spaces have been provided to
write down the wireless address, pager number, or e-mail
address of your family and friends.
Service Provider
Wireless Address
Family and Friends
Wireless Address/Pager Number
Personal Numbers
Personal Numbers
73
UNICATON GROUP / Taipei Taiwan
Unication Co., Ltd.
5 F ., NO.6, Wu-Kung 5 Rd.,
Hsinchuang City, Taipei, Taiwan, R.O.C.
6881038B30-A
US English
6881035b90c.fm Page 78 Tuesday, March 27, 2001 4:35 PM
1038B30a.book Page 91 Friday, October 26, 2001 11:24 AM
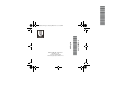
P900 Quick Reference Card
d
E
j
T
S
#
D
D
t
;
/
i
b
Q
L
K
M
<
a
+
O
N
o
p
:
=
Power On
MailBox
News/Info InBox
Send Message
Info-On-Demand
Address Book
Personal Folder/Move
Message to Folder
News/Info Folder
Preferences
Vital Signs
Power Off
Message Has Been Read
Message Reply
Reply in Progress
J
\
x
^
MailBox Alert, News/Info
Alert
Alarm/Set Alarm
Set Time & Date
Alert Volume/Key Click,
Reminder Alert
Transmitter Off
Next/Higher Value
Preceding/Lower Value
Previous Item
Next Item
Move InBox Up
Move InBox Down
Battery Gauge
Message Memory
^
f
?
@
r
Delete Message/InBox
Successful Reply/Send
Unsuccessful Reply/Send
Message Contains
Custom Reply Choices
n InBox
in InBox - Messages Read
j
News/Info InBox
m InBox Alert Selected
]] Out of Range
_ Low Battery
l Audible Alert/Alarm
k Vibrate Alert/Quiet Mode
h Private Time
6 Signature
About Screen
Back/Escape
Yes/On
No/Off
News AutoPreview
8 Set InBox History
7 Next Message
A CAPS (not locked)
ƒ CAPS Lock On
) Alt (not locked)
* Alt Lock On
Note: A flashing icon
denotes unread messages
or a function in process.
1038B30a.book Page 92 Friday, October 26, 2001 11:24 AM
Messaging Emoticons
Picture Triad
Description
Picture Triad
Description
:-)
Smiley
8<)
Teddy
;-)
Wink
=:I
Magic
B-)
Cool
(O)
Love
:-P
Pfrrt...
Yo!
Yo!
:-(
Sad
==b
Well Done!
:-/
Grrr...
o<I
Party!
iii
Hooray!
(l)
Ball
@>-
Flowers
>*<
Boom!
cII
Drink
%-I
Deadly
(II
Lunch
:<*
Meow!
;:;
Cloudy
:>#
Woof!
>o<
Sunny
(X)
Broken
-Y-
Holidays
Note: See “ALT-mode Functions”
on page 19 when using special
symbols, like the semi-colon.