1
Installation Guide
RMS Enterprise
Resource Management Suite®
Enterprise Applications
L a s t R e v is e d : 2 / 2 7 / 2 0 1 3
AMX Software License and Warranty Agreement
•
LICENSE GRANT. AMX grants to Licensee the non-exclusive right to use the AMX Software in the manner described in this
License. The AMX Software is licensed, not sold. This license does not grant Licensee the right to create derivative works of the
AMX Software. The AMX Software consists of generally available programming and development software, product documentation, sample applications, tools and utilities, and miscellaneous technical information. Please refer to the README.TXT file on
the compact disc or download for further information regarding the components of the AMX Software. The AMX Software is subject to restrictions on distribution described in this License Agreement. AMX Dealer, Distributor, VIP or other AMX authorized
entity shall not, and shall not permit any other person to, disclose, display, loan, publish, transfer (whether by sale, assignment,
exchange, gift, operation of law or otherwise), license, sublicense, copy, or otherwise disseminate the AMX Software. Licensee
may not reverse engineer, decompile, or disassemble the AMX Software.
•
ACKNOWLEDGEMENT. You hereby acknowledge that you are an authorized AMX dealer, distributor, VIP or other AMX authorized entity in good standing and have the right to enter into and be bound by the terms of this Agreement.
•
INTELLECTUAL PROPERTY. The AMX Software is owned by AMX and is protected by United States copyright laws, patent
laws, international treaty provisions, and/or state of Texas trade secret laws. Licensee may make copies of the AMX Software
solely for backup or archival purposes. Licensee may not copy the written materials accompanying the AMX Software.
•
TERMINATION. AMX RESERVES THE RIGHT, IN ITS SOLE DISCRETION, TO TERMINATE THIS LICENSE FOR ANY REASON UPON WRITTEN NOTICE TO LICENSEE. In the event that AMX terminates this License, the Licensee shall return or
destroy all originals and copies of the AMX Software to AMX and certify in writing that all originals and copies have been
returned or destroyed.
•
PRE-RELEASE CODE. Portions of the AMX Software may, from time to time, as identified in the AMX Software, include PRERELEASE CODE and such code may not be at the level of performance, compatibility and functionality of the GA code. The
PRE-RELEASE CODE may not operate correctly and may be substantially modified prior to final release or certain features may
not be generally released. AMX is not obligated to make or support any PRE-RELEASE CODE. ALL PRE-RELEASE CODE IS
PROVIDED "AS IS" WITH NO WARRANTIES.
•
LIMITED WARRANTY. AMX warrants that the AMX Software (other than pre-release code) will perform substantially in accordance with the accompanying written materials for a period of ninety (90) days from the date of receipt. AMX DISCLAIMS ALL
OTHER WARRANTIES, EITHER EXPRESS OR IMPLIED, INCLUDING, BUT NOT LIMITED TO IMPLIED WARRANTIES OF
MERCHANTABILITY AND FITNESS FOR A PARTICULAR PURPOSE, WITH REGARD TO THE AMX SOFTWARE. THIS LIMITED WARRANTY GIVES LICENSEE SPECIFIC LEGAL RIGHTS. Any supplements or updates to the AMX SOFTWARE,
including without limitation, any (if any) service packs or hot fixes provided to Licensee after the expiration of the ninety (90) day
Limited Warranty period are not covered by any warranty or condition, express, implied or statutory.
•
LICENSEE REMEDIES. AMX's entire liability and Licensee's exclusive remedy shall be repair or replacement of the AMX Software that does not meet AMX's Limited Warranty and which is returned to AMX in accordance with AMX's current return policy.
This Limited Warranty is void if failure of the AMX Software has resulted from accident, abuse, or misapplication. Any replacement AMX Software will be warranted for the remainder of the original warranty period or thirty (30) days, whichever is longer.
Outside the United States, these remedies may not available. NO LIABILITY FOR CONSEQUENTIAL DAMAGES. IN NO
EVENT SHALL AMX BE LIABLE FOR ANY DAMAGES WHATSOEVER (INCLUDING, WITHOUT LIMITATION, DAMAGES
FOR LOSS OF BUSINESS PROFITS, BUSINESS INTERRUPTION, LOSS OF BUSINESS INFORMATION, OR ANY OTHER
PECUNIARY LOSS) ARISING OUT OF THE USE OF OR INABILITY TO USE THIS AMX SOFTWARE, EVEN IF AMX HAS
BEEN ADVISED OF THE POSSIBILITY OF SUCH DAMAGES. BECAUSE SOME STATES/COUNTRIES DO NOT ALLOW
THE EXCLUSION OR LIMITATION OF LIABILITY FOR CONSEQUENTIAL OR INCIDENTAL DAMAGES, THE ABOVE LIMITATION MAY NOT APPLY TO LICENSEE.
•
U.S. GOVERNMENT RESTRICTED RIGHTS. The AMX Software is provided with RESTRICTED RIGHTS. Use, duplication, or
disclosure by the Government is subject to restrictions as set forth in subparagraph ©(1)(ii) of The Rights in Technical Data and
Computer Software clause at DFARS 252.227-7013 or subparagraphs ©(1) and (2) of the Commercial Computer Software
Restricted Rights at 48 CFR 52.227-19, as applicable.
•
SOFTWARE AND OTHER MATERIALS FROM AMX.COM MAY BE SUBJECT TO EXPORT CONTROL. The United States
Export Control laws prohibit the export of certain technical data and software to certain territories. No software from this Site may
be downloaded or exported (i) into (or to a national or resident of) Cuba, Iraq, Libya, North Korea, Iran, Syria, or any other country to which the United States has embargoed goods; or (ii) anyone on the United States Treasury Department's list of Specially
Designated Nationals or the U.S. Commerce Department's Table of Deny Orders. AMX does not authorize the downloading or
exporting of any software or technical data from this site to any jurisdiction prohibited by the United States Export Laws.
This Agreement replaces and supersedes all previous AMX Software License Agreements and is governed by the laws of
the State of Texas, and all disputes will be resolved in the courts in Collin County, Texas, USA. For any questions concerning this Agreement, or to contact AMX for any reason, please write: AMX License and Warranty Department, 3000 Research
Drive, Richardson, TX 75082.
Table of Contents
Table of Contents
RMS Enterprise Installation Overview ................................................................1
Overview .................................................................................................................. 1
The RMS Enterprise Installation Process ................................................................... 1
Upgrading From RMS v3.3 to RMS Enterprise.......................................................... 2
Accessing the RMS Enterprise Web UI ..................................................................... 2
Definitions of Terms.................................................................................................. 3
AMX License Server ........................................................................................................ 3
Licenses and Entitlements ............................................................................................... 3
Server License .............................................................................................................................
Entitlement ID .............................................................................................................................
Asset License...............................................................................................................................
Asset ID .......................................................................................................................................
3
3
3
4
Additional RMS Enterprise Documentation .............................................................. 4
RMS Enterprise Installation Checklist .................................................................5
Overview .................................................................................................................. 5
Understanding Minimum System Requirements ....................................................... 5
Minimum Server Hardware Requirements ................................................................ 6
Supported Virtual Servers ............................................................................................... 6
Supported Server Operating Systems ...................................................................... 7
Additional Server Software Dependencies ............................................................... 7
Supported Server Operating Systems Languages .......................................................... 8
Supported Web Browsers ............................................................................................... 8
Supported Database Platforms................................................................................. 8
Database Access ....................................................................................................... 9
Active Directory Services ........................................................................................ 10
Legacy TCP/IP Communications.............................................................................. 11
Pre-Authentication Settings.................................................................................... 11
Control System Requirements ................................................................................ 12
RMS SDK Support ......................................................................................................... 12
Supported Central Controllers ..................................................................................... 12
64MB Controllers - Duet Memory Allocation ................................................................ 12
GET DUET MEMORY ..............................................................................................................13
SET DUET MEMORY ...............................................................................................................13
Setting the Duet Memory Allocation Value............................................................................... 13
Licensing Information (Entitlement ID).................................................................... 14
RMS Enterprise Scheduling Interface...................................................................... 14
Scheduling Server Requirements .................................................................................. 14
RMS Enterprise - Installation Guide
i
Table of Contents
Installing Prerequisite Software ........................................................................15
Overview ................................................................................................................ 15
Installing Java SE6 .................................................................................................. 15
Disabling Auto-Update For Java ................................................................................... 16
Installing Apache Tomcat v6.0.x ............................................................................. 17
Configuring Apache Tomcat.......................................................................................... 20
Upgrading RMS v3.x to RMS Enterprise ...........................................................23
Overview ................................................................................................................ 23
1) Verify System Requirements for RMS Enterprise ................................................ 23
2) Stop RMS v3.3 Services ...................................................................................... 23
3) Disable RMS v3.3 Services .................................................................................. 24
Using a RMS v3.3 Database with RMS Enterprise ......................................................... 24
AMX RMS Server Installer ................................................................................25
Overview ................................................................................................................ 25
RMS Server Configuration ................................................................................29
Overview ................................................................................................................ 29
Migrating a Legacy RMS Database To RMS Enterprise........................................... 38
AMX License Manager ......................................................................................43
Overview ................................................................................................................ 43
Licensing in Multi-Server Installations ..................................................................... 43
Installing the AMX License Server........................................................................... 44
Install the AMX License Server on this machine ............................................................ 45
Use the local license server installed and running on this machine ........................................... 46
Search the network for available license servers........................................................... 47
Manually enter the license server hostname or IP address ........................................... 48
Additional License Server Options ................................................................................ 49
Use a previously configured license server ............................................................................... 49
Select a different license server ................................................................................................ 50
Selecting a Licensing Option .................................................................................. 50
Request a trial/evaluation license.................................................................................. 50
Register a new software license (Requires an Entitlement ID)....................................... 51
See all licensing options (Continue to main menu) ........................................................ 51
Licensing Options Menu dialog............................................................................... 51
Register License By: Entitlement ID .............................................................................. 52
Register License by Asset ID ......................................................................................... 52
View Existing Licenses................................................................................................... 52
Request a Trial License .................................................................................................. 52
Requesting a Trial/Evaluation License ..............................................................53
Overview ................................................................................................................ 53
Upgrading From a Trial License To a Registered License........................................ 58
ii
RMS Enterprise - Installation Guide
Table of Contents
Accessing the RMS Enterprise Web UI .......................................................................... 62
Registering a Purchased License ......................................................................63
Overview ................................................................................................................ 63
Manually Activating the Product License ................................................................ 67
Accessing the RMS Enterprise Web UI .......................................................................... 69
Adding Asset IDs (Locations) ............................................................................71
Overview ................................................................................................................ 71
Manually Adding Assets.......................................................................................... 78
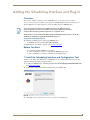
Adding the Scheduling Interface and Plug-In ...................................................83
Overview ................................................................................................................ 83
Supported Scheduling Plug-Ins ..................................................................................... 83
Before You Start ..................................................................................................... 83
1) Install the Scheduling Interface and Configuration Tool ..................................... 83
2) Install and Configure the Scheduling Plug-In ...................................................... 86
Mapping Locations to Resource Profiles for Scheduling ............................................... 90
Viewing Existing Licenses .................................................................................93
Overview ................................................................................................................ 93
Opening AMX License Manager.................................................................................... 93
Appendix A: Installing SQL Server 2008 Express Edition .................................97
Overview ................................................................................................................ 97
Installing SQL Server Express ................................................................................. 97
Configuring SQL Express via the SQL Server Configuration Manager.................. 101
Appendix B: Tomcat Configuration ................................................................105
Overview .............................................................................................................. 105
Testing for Acceptable Java Memory Settings ..................................................... 105
Appendix C: Clustered Deployment ...............................................................109
Overview .............................................................................................................. 109
Sticky Sessions ............................................................................................................ 109
Shared file storage ...................................................................................................... 109
In the event of node failure......................................................................................... 109
Recommended procedure to restore a failed node .................................................... 109
If a node loses connectivity to the database ............................................................... 109
Network infrastructure requirements.......................................................................... 110
Bandwidth costs .......................................................................................................... 110
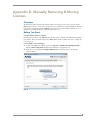
Appendix D: Manually Removing & Moving Licenses .....................................111
Overview .............................................................................................................. 111
Before You Start ................................................................................................... 111
Contact AMX Customer Support ................................................................................ 111
RMS Enterprise - Installation Guide
iii
Table of Contents
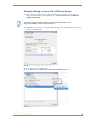
Launch AMX License Manager..................................................................................... 111
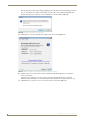
Manually Removing (Revoking) a License.............................................................. 112
Manually Moving a License (To a Different Server) ............................................... 115
Appendix E: Windows Pre-Authentication Configuration ...............................119
Overview .............................................................................................................. 119
Purpose ....................................................................................................................... 119
How It Works............................................................................................................... 119
Security Implications ................................................................................................... 119
Client Gateway Authentication.................................................................................... 119
Browser Support................................................................................................... 120
Internet Explorer ......................................................................................................... 120
Chrome........................................................................................................................ 120
Firefox ......................................................................................................................... 120
Configuration of RMS Enterprise .......................................................................... 120
Enable Window Pre-Authentication............................................................................. 120
Configuration of Tomcat ....................................................................................... 120
Executor Thread Pool .................................................................................................. 120
HTTP Connector .......................................................................................................... 120
AJP Connector ............................................................................................................ 121
Configuration of ISAPI Redirect ............................................................................ 121
Tomcat Connectors Download .................................................................................... 121
Tomcat Connectors Documentation ............................................................................ 121
Directory Structure...................................................................................................... 121
Unzip the Connector ................................................................................................... 121
Properties File for RMS API......................................................................................... 122
Properties File for RMS UI ........................................................................................... 122
URI Worker Map Properties for RMS API .................................................................... 122
URI Worker Map Properties for RMS UI ...................................................................... 122
Workers Properties for RMS API ................................................................................. 123
Workers Properties for RMS UI ................................................................................... 123
Configuration of IIS............................................................................................... 124
ISAPI and CGI Restrictions........................................................................................... 124
ISAPI Filters ................................................................................................................. 125
Virtual Directories ....................................................................................................... 126
RMS API ................................................................................................................................. 126
RMS UI ................................................................................................................................... 126
Authentication Settings............................................................................................... 127
Handler Mappings on Virtual Directories .................................................................... 128
Restart IIS .................................................................................................................... 128
Final Remarks........................................................................................................ 128
iv
RMS Enterprise - Installation Guide
RMS Enterprise Installation Overview
RMS Enterprise Installation Overview
Overview
RMS (Resource Management Suite®) Enterprise is an innovative meeting room management and equipment
monitoring software package that provides centralized remote management of networked AV equipment and
building systems. Use RMS Enterprise to:
Simplify operation, support and security with enterprise scalable software
Improve Help Desk performance to meet Service Level Agreements through proactive maintenance
Reduce energy consumption and extend useful life of devices with enhanced reporting features
RMS Enterprise is a client/server application where the NetLinx system acts as the client and the RMS
Enterprise application server listens for connections from NetLinx systems. NetLinx and the RMS Enterprise
application server communicate using TCP/IP sockets.
In order to establish communication, each NetLinx system must be able to resolve and connect to the RMS
Enterprise application server. This can be accomplished with a variety of Network configurations including
local area networks (LAN), wide area networks (WAN), and the Internet.
This document describes the process of installing RMS Enterprise on a server machine.
It is highly recommended that you read this document in its entirety before
commencing an installation of RMS Enterprise. If, after reading this document you
have specific questions about the requirements of your RMS system, please contact
AMX Technical Support for assistance.
The RMS Enterprise Installation Process
The installation process for RMS Enterprise consists of several steps, as described in this document:
1. Review the RMS Enterprise Installation Checklist. The RMS Enterprise Installation Checklist section
on page 5 is provided to ensure all the necessary prerequisites are met and all the necessary configuration
options are identified prior to the installation of the RMS server.
2. Install Prerequisite Software (as necessary). The Installing Prerequisite Software section on page 15
provides instructions for installing the two server software applications required by RMS Enterprise:
Java SE6 (JRE)
Tomcat (v6.x))
3. Complete the RMS Server Installer. The AMX RMS Server Installer section on page 25 provides
instructions for installing the AMX RMS Enterprise Installer application.
4. Complete the RMS Server Configuration. The RMS Server Configuration section on page 29 provides
instructions on running the RMS Server Configuration tool to register and enable your server, as well as
configure your database connection.
5. Complete the AMX License Manager. The AMX License Manager section on page 43 provides
instructions on installing the AMX License Manager application, which is required to install and manage
software licenses for RMS Enterprise (as well as other AMX software applications).
Once you have installed a registered version of RMS Enterprise (see the Registering
a Purchased License section on page 63 for details), you can upgrade your RMS
Entitlement with a Scheduling License. The Scheduling License enables support for
various scheduling plug-ins for RMS Enterprise. See the Adding the Scheduling
Interface and Plug-In section on page 83 for details.
RMS Enterprise - Installation Guide
1
RMS Enterprise Installation Overview
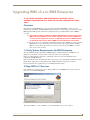
Upgrading From RMS v3.3 to RMS Enterprise
RMS Enterprise (SDK4) supports SDK3 legacy client connections without question and without making any
changes to the code. In fact, many features will be available without any code changes (such as multi-stage and
time delayed notifications and power use based on device type).
However, several advanced SDK features (including monitored power through PDU, Duet device native
support, system modes, and web configured RMS clients) utilize SDK4 changes that will require registration
of the room as new, with a corresponding loss of all history.
If you migrate from RMS v3.3 to RMS Enterprise and change the code from 3.3 SDK to 4.0 SDK,
you will have all locations with 3.x client gateways assigned but now OFFLINE and a completely
new set of unassigned 4.0 client gateways.
If you intend to upgrade your system (Server and SDK) completely from RMS 3.3 to RMS
Enterprise, it is necessary to delete the 3.x Client Gateway from the location and assign the
corresponding 4.x client gateway.
Once the 3.x client gateway has been deleted, there will be a loss of all of the history associated
with the 3.x masters and assets.
If you intend to install RMS Enterprise on a server that is currently running RMS v3.x, there are a few
important steps to follow to ensure that RMS Enterprise will operate correctly, as well as to preserve the preexisting RMS v3.x application. This provides a method of reverting back to the previous RMS v3.x, if
necessary.
See the Upgrading RMS v3.x to RMS Enterprise section on page 23 for details.
If you intend to use an existing Legacy (v3.x) RMS Database with RMS Enterprise, the data must be migrated.
See the Migrating a Legacy RMS Database To RMS Enterprise section on page 38 for details.
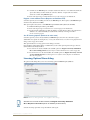
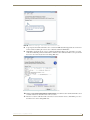
Accessing the RMS Enterprise Web UI
Once the installation is complete, the RMS Enterprise Web UI (FIG. 1) is accessed via web browser (see
Supported Web Browsers on page 8). To open the main RMS Enterprise Web UI, enter the following URL in
your browser’s address bar:
http://servername:8080/rms
FIG. 1 Example RMS Enterprise Web UI
2
RMS Enterprise - Installation Guide
RMS Enterprise Installation Overview
Port 8080 is the default port for Tomcat (see Installing Apache Tomcat v6.0.x on
page 17). However, when installing of Tomcat, this port can be assigned to another
value if desired. The value assigned to Tomcat is the value that is used in the URL.
Refer to the RMS Enterprise System Administrator’s Guide for details on using the RMS Enterprise Web UI.
Definitions of Terms
Before you start, it is important to understand the terminology used in the installation of RMS Enterprise:
AMX License Server
The AMX License Server is an application that allows you to centrally manage all AMX Licenses for your
installation. AMX License Server must be installed on the server before RMS Enterprise can be configured or
licensed.
AMX License Server is not exclusive to RMS Enterprise - other AMX server software licenses
(such as ISXPress) are managed via this application as well.
See the AMX RMS Server Installer section on page 25 for installation instructions.
Licenses and Entitlements
RMS Enterprise uses two types of licenses, one Server License and one or more Asset Licenses (see below).
An Entitlement represents the top-level "wrapper" for the various licenses that are included in an initial
purchase and installation of RMS Enterprise.
You must have a valid Entitlement ID (provided by AMX at the point of purchase) in order to install
a Server License or any Asset Licenses.
See the Register a new software license (Requires an Entitlement ID) section on page 51 for details.
Server License
RMS Enterprise requires that a single Server License be installed on the server that will run the RMS
application. One Server License is included with the Entitlement ID that is provided with the Software
Maintenance Agreement (RMS-ENT-SMA, FG3004-K).
Since the RMS Server License is included in the Entitlement, it is installed automatically. You will
not be asked to provide a RMS Server License number, only the Entitlement ID number (see
Entitlement ID below).
To increase the number of supported Locations in your RMS Enterprise system, you can purchase
additional Asset Licenses (see below), but only one RMS Server License is allowed on a given
server.
Entitlement ID
After purchasing software from AMX, you will receive a Entitlement ID. The Entitlement ID is required to
acquire and activate the initial license, and will also be required when requesting support services from AMX.
Some software packages may also allow for additional features and plug-ins to be licensed separately (such as
additional Locations in an RMS system). If applicable, each feature will be identified uniquely using an Asset
ID. Similar to the Entitlement ID, the Asset ID will be required when activating the license for the new feature.
Entitlement IDs begin with the prefix "ENT-".
See the Register a new software license (Requires an Entitlement ID) section on page 51 for details
on using an Entitlement ID.
Asset License
In RMS Enterprise, Asset Licenses represent Locations in your RMS system. One Asset License is required for
each Location in the system, and Asset Licenses are available to purchase in bundles of various sizes. For
example, Asset Licenses can be purchased to provide 25, 100 or 300 additional Locations to your existing
RMS Server. As your system grows, simply purchase additional Asset Licenses from AMX to accommodate
the number of Locations that you intend to add to your RMS system.
1,000 Asset Licenses are included with a Trial License.
See the Register License by Asset ID section on page 52 for installation instructions.
RMS Enterprise - Installation Guide
3
RMS Enterprise Installation Overview
Asset ID
In RMS Enterprise, Asset Licenses (see below) represent Locations in your RMS system. One Asset License is
required for each Location in the system. Asset IDs are used to activate additional Asset Licenses, in order to
add Locations to your RMS System. Asset IDs are purchased from AMX, and are entered in the AMX License
Manager to activate the associated Asset Licences.
Asset IDs begin with the prefix "AMX-".
See the Register License by Asset ID section on page 52 for details on using an Asset ID.
Additional RMS Enterprise Documentation
Refer to the following supplemental RMS Enterprise documents (available to view/download from
www.amx.com):
RMS Enterprise NetLinx Programmers Guide - Provides detailed NetLinx programming
information for RMS systems.
RMS Enterprise System Administrator’s Guide - Describes the RMS user interface.
4
RMS Enterprise - Installation Guide
RMS Enterprise Installation Checklist
RMS Enterprise Installation Checklist
Overview
RMS Enterprise is a true enterprise-level application, and has specific minimum system requirements that
must be met to ensure a successful deployment.
This section is provided to ensure that all the necessary prerequisites are met, and that the necessary
configuration options are identified prior to the installation of the RMS Enterprise server and RMS Database
server.
The system requirements provided in this section represent the results of AMX testing. Follow
these guidelines to ensure that RMS Enterprise will perform successfully.
It is highly recommended that you read this document in its entirety before commencing an
installation of RMS Enterprise. If, after reading this document you have specific questions about
the requirements of your RMS system, please contact AMX Technical Support for assistance.
Understanding Minimum System Requirements
Note that the overall performance of RMS Enterprise is a result of the server hardware and operating system
used, as well as it’s configuration. Other factors include the number of Locations, Assets and Users in the
system, as well as how the system is used.
For example, as stated under Supported Database Platforms (see page 8), the "Express Editions" of Microsoft
SQL Server are appropriate to use for RMS Enterprise systems with less than 50 locations. While this is true in
most cases, it is important to note that an installation with a small number of rooms could be configured in
such a way that it will generate a large amount of traffic to and from the server. As an example, a system with
50 locations, each of which contains a large number of devices with many control and monitoring functions
running constantly, would certainly require at least the Standard version (possibly the Enterprise version) of
Microsoft SQL Server in order to perform adequately, due to the large amount of traffic that would be
generated.
When considering the server hardware to use with RMS Enterprise, it is important to understand not only the
current requirements of the installation, but to also account for any potential upwards scaling of the system in
the future. For example, an installation initially configured to manage less than 50 locations can use an
"Express Edition" of Microsoft SQL Server. However, the "Express Editions" will no longer be appropriate, if
and when more locations are added.
It is crucial that RMS Enterprise is deployed on systems that meet or exceed all of the
requirements outlined in this section. Installing RMS Enterprise on systems that do
not meet these minimum requirements may result in poor performance or loss of
functionality. Note that AMX Technical Support must assume that these requirements
have been met in order to provide effective assistance.
RMS Enterprise - Installation Checklist
5
RMS Enterprise Installation Checklist
Minimum Server Hardware Requirements
Verify that your server hardware meets or exceeds the following minimum requirements for RMS Enterprise
(check the appropriate boxes below):
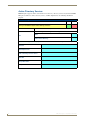
Server Hardware Requirements
Does your server meet the following Minimum Server Hardware Requirements?
Yes
No
• Processor Dual core Intel Xeon processor @ 2.67GHz (or equivalent)
• Memory
4 GB
• Display
1280 x 1024 resolution
• Hard Disk
1 GB available space for RMS Enterprise application files.
Note: Database size varies depending on the installation.
Yes to all
Please continue to the next step.
No to any
You must obtain a server that meets these minimum requirements to install RMS Enterprise.
RMS Enterprise performs best when installed on a server that is exclusively dedicated to running the RMS
Enterprise application.
For optimal performance, it is strongly recommended that a dedicated RMS server is used to run the
RMS Enterprise application - regardless of the size of the installation.
For systems with more than 50 rooms, it is a system requirement that the server running the
RMS Enterprise application be dedicated exclusively to RMS. In this case, it is crucial that no
other applications are allowed to run on the RMS server.
Supported Virtual Servers
RMS Enterprise can also be hosted on a virtual server with either of the following virtualization systems:
VMware ESXi (4.x or greater)
Hyper-V
If RMS Enterprise is to be installed on a virtual server, verify that it has sufficient
hardware resources to support these virtual hosts. The created virtual servers must
meet the Minimum Server Hardware Requirements indicated above.
6
RMS Enterprise - Installation Checklist
RMS Enterprise Installation Checklist
Supported Server Operating Systems
Verify that your server’s operating system (OS) meets the minimum requirements for RMS Enterprise:
Server Operating System (OS)
Do you have a compatible server OS installed?
Yes
No
Yes
No
Supported Microsoft Server Operating Systems:
Microsoft Windows Server 2012
• Standard Edition
Microsoft Windows Server 2008 R2 (x64):
• Web Edition / Standard Edition / Enterprise Edition
Microsoft Windows Server 2008 SP2 (x86 and x64):
• Web Edition / Standard Edition / Enterprise Edition
Yes
Please continue to the next step.
No
You must obtain a compatible server OS to install RMS.
Do you have an administrative account to the server where RMS will be installed?
Note: RMS is a system level application and requires administrative access to install and
configure RMS.
Yes
Please continue to the next step.
No
You must obtain an administrative logon account, or logon to the server with a user account that
has administrative access to the server.
Additional Server Software Dependencies
The software versions mentioned below have been tested successfully by AMX. No
assumptions should be made relative to other versions (earlier or later) in terms of
their compatibility with RMS Enterprise.
Verify that your server has all required software installed (check the appropriate boxes below):
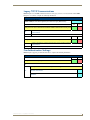
Additional Software Dependencies
Does your server have all required software installed?
Yes
No
• Java 6 Runtime Environment (SUN JRE 6.0)
• Tomcat - version 6
Note: The following applications are not required on the server, but would be needed in order to view the RMS
UI and help files directly on the server.
• Web Browser (see Supported Web Browsers below)
• Adobe Flash v10
• Adobe Acrobat Reader
Yes to all
Please continue to the next step.
No to any
Install any required software that is not present on the Server.
Because RMS Enterprise requires a specific version of Java, it is important that
Java’s auto-update feature is disabled, to avoid compatibility issues in the future. See
the Disabling Auto-Update For Java section on page 16 for details.
RMS Enterprise - Installation Checklist
7
RMS Enterprise Installation Checklist
Supported Server Operating Systems Languages
Supported Server OS Languages
Chinese (Simplified, PRC)
German
Portuguese (Portugal)
Chinese (Classic, HK)
Greek
Russian
English
Italian
Spanish
Flemish (Dutch)
Japanese
Turkish
French
Supported Web Browsers
The RMS UI is supported on the following web browsers:
Supported Web Browsers
Windows
Macintosh/Apple
Internet Explorer v8
Safari v4
Mozilla Firefox v3
Mozilla Firefox v3
Google Chrome v9
Google Chrome v9
Supported Database Platforms
Verify that you have a compatible 32-bit or 64-bit database platform for the RMS Enterprise database.
Supported Database Platforms
• Microsoft SQL Server 2012 Enterprise Edition
• Microsoft SQL Server 2012 Standard Edition
• Microsoft SQL Server 2012 Express Edition
• Microsoft SQL Server 2008 Enterprise Edition
• Microsoft SQL Server 2008 R2 Enterprise Edition
• Microsoft SQL Server 2008 Standard Edition
• Microsoft SQL Server 2008 R2 Standard Edition
• Microsoft SQL Server 2008 Express Edition
• Microsoft SQL Server 2008 R2 Express Edition
To ensure optimal performance, it is important to follow these guidelines:
The "Express Editions" of SQL Server (free download available from Microsoft) are only
appropriate for systems with less than 50 locations. See Appendix A: Installing SQL Server 2008
Express Edition on page 97 for installation and configuration instructions.
The RMS database must be installed on an external database server (not on the same server machine
as the RMS Enterprise application). This includes database servers using SQL Server Express.
Check the appropriate box below:
Database Platform
Yes
No
Do you have a supported Database platform?
8
Yes
Please continue to the next step.
No
Install or obtain access to a compatible database platform for the RMS Enterprise database.
RMS Enterprise - Installation Checklist
RMS Enterprise Installation Checklist
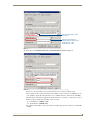
Database Access
If you will be using SQL database authentication instead of Windows Authentication to access the database
server, check the appropriate box below, and fill in the remaining information.
If you are not using Windows Authentication, then enter the Username and Password that will allow access the
database server.
Database Access
Yes
No
Using Windows Authentication?
Yes
If you are using Windows Authentication to access the database server, then no username or
password is needed.
Note: If you are using Windows Authentication for RMS database access, refer to the “Windows
Authentication” section in the RMS Enterprise Database Administrator's Guide for additional
configuration requirements.
Username:
No
Password:
SQL Server IP address or Host name
SQL Server Port
SQL Server Instance (optional)
SQL Server Catalog (Database Name)
In order for the RMS installer to create a new database catalog instance, the
database user account will require the "CREATE DATABASE" permissions.
Alternatively if a new empty RMS database catalog is created outside of the RMS
installer, then this database user account will only require "DB_OWNER" permissions
to the newly created, empty RMS catalog.
RMS Enterprise - Installation Checklist
9
RMS Enterprise Installation Checklist
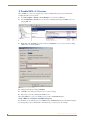
Active Directory Services
RMS Enterprise supports "LDAP" and "Window Active Directory" directory services. If you intend for RMS
Enterprise to utilize one of these directory services, it will be helpful to have the following information
prepared:
Active Directory
Yes
No
Does your installation require active directory services?
No
Please continue to the next step.
Which directory service will you will be using with RMS?
Yes
LDAP
Window Active Directory
Fill in the following information (required for initial connection to the Directory Services Server):
Bind DN
Bind DN password
URL of Directory Services Server
Base DN
Group Base Name
Group Attribute Name
10
RMS Enterprise - Installation Checklist
RMS Enterprise Installation Checklist
Legacy TCP/IP Communications
RMS Enterprise uses TCP/IP communications between Legacy (version 3.x or lower) clients and the RMS
Enterprise server. Please complete the following information:
TCP/IP Communications
TCP/IP Server Port Number
Default = 3839 (this is an IANA registered port number for Legacy RMS servers)
Yes
No
Does your server have a firewall that will block TCP/IP communication for this port?
Yes
Create an exception for TCP/IP communications on the specified TCP/IP port for RMS
communications.
No
Please continue to the next step.
Yes
No
Does your network router restrict or block traffic on this TCP/IP port?
Yes
Create an exception for TCP/IP communications on the specified TCP/IP port for RMS
communications.
No
Please continue to the next step.
Pre-Authentication Settings
RMS Enterprise supports pre-authentication. Please complete the following information:
Pre-Authentication Settings
Yes
No
Does your installation require pre-authentication?
No
Which pre-authentication method will you will be using with RMS?
Yes
Windows authentication
SiteMinder
RMS Enterprise - Installation Checklist
11
RMS Enterprise Installation Checklist
Control System Requirements
RMS SDK Support
Touch panel files for G4 panels
NetLinx modules (RFID is supported only on Duet-enabled NetLinx hardware)
Each RMS Server supports up to 3000 Locations with SDK4, or up to 1000 SDK3 Locations
Systems with more than 50 locations require Microsoft SQL Server 2008 Standard or
Enterprise Editions. Microsoft SQL Server "Express Editions" are not appropriate for
system with more than 50 locations. See Supported Database Platforms on page 8.
Supported Central Controllers
Supported Central Controllers
RMS SDK v4.0 / v3.0
Note: RMS Enterprise supports the following NI Central
Controllers and Enova DVX/DGX Switchers with at least
64 MB RAM:
• NI-3101-SIG
• NI-2100 / NI-3100 / NI-4100
• NI-700 / NI-900
• Enova DVX-2150HD / DVX-2155HD
• Enova DVX-3150HD / DVX-3155HD
• Enova DVX-2100HD
• Enova DGX16 / 32
RMS SDK v3.0 only
• NI-2000 / 3000 / 4000
• NI-700 and 900 (32 MB)
• NXC-ME260
• NXC-MPE
Note: Support for RMS SDK v3.0 only Controllers
is provided via the RMS Enterprise Backwards
Compatibility service using the RMS 3.x SDK.
These systems will continue to operate using the
feature set of RMS 3.x. New features included in
RMS Enterprise may not be available to these
systems.
Note: Version 4 Firmware is required for SDK v4.
RMS SDK v4 requires NetLinx Master version 4 firmware; connection instability and
Master lockups may result if using version 3 NetLinx Firmware with SDK v4.
64MB Controllers - Duet Memory Allocation
By default, Duet memory is set to the lowest possible amount to keep all available memory open for running
NetLinx code. This assures that if the Controller is loaded with a very large NetLinx program but doesn’t have
any Duet modules, then the NetLinx code will run efficiently.
However, when Duet modules are added to the program, they use some of the (SDRAM) memory required by
the Controller’s web interface to load.
In some cases, when a NI Controller or Enova DVX-2100HD All-In-One Presentation Switcher is connected
to an RMS Server, the Controller (or Switcher) can eventually reach a point where the amount of available
Duet memory gets too low to adequately support the Controller’s web interface. If this occurs, the web
interface will fail to load, and Telnet will report an out-of-memory error.
This issue can potentially affect any Controller with 64MB of SDRAM memory. Most NetLinx Integrated
Controllers, as well as the Enova DVX-2100HD All-In-One Presentation Switcher feature 64 MB of SDRAM
memory, with a default Duet memory allocation setting of 12MB.
12
RMS Enterprise - Installation Checklist
RMS Enterprise Installation Checklist
NI Central Controllers and Enova All-In-One Presentation Switchers that come equipped with 64MB of RAM
(and therefore could potentially experience this error) are listed in the following table:
NI Central Controllers and Enova All-In-One Presentation Switchers With 64MB of RAM
NetLinx Integrated Controllers
Enova DVX All-In-One Presentation Switchers
DVX-2100HD FG1905-04, FG1905-05, FG1905-01, FG1905-02
NI-700
FG2105-70
NI-900
FG2105-90
NI-2100
FG2105-04, FG2105-14
NI-3100*
FG2105-05, FG2105-15
NI-3101-SIG FG2105-08
NI-4100*
FG2105-06
* The NI-3100 and NI-4100 are available with 256MB of SDRAM installed. Check the online catalog at
www.amx.com for details.
Enova DVX-2150HD/2155HD and DVX-3150HD/3155HD All-In-One Presentation
Switchers come equipped with 256MB of RAM. NI Controllers and Enova DVX
Switchers with 256MB of RAM should not experience this issue, since their default
Duet memory allocation setting is 36 MB.
To avoid this error, it may be necessary to increase the Duet memory allocation on the NI Controller or
DVX-2100HD switcher. The Duet memory allocation setting can be viewed and adjusted via the telnet
terminal commands described below:
DUET MEMORY Telnet Commands
GET DUET MEMORY Display the amount of memory allocated for Duet Java pool.
This is the current Java memory heap size as measured in Megabytes.
An example is a value of 12 = 12MB.
SET DUET MEMORY Set the amount of memory allocated for Duet Java pool. This is the current Java
memory heap size as measured in Megabytes. This feature is used so that if a NetLinx
program requires a certain size of memory be allotted for its currently used Duet
Modules, it can be reserved on the Central Controller.
The default Duet memory allocation value for NI Central Controllers with 64MB of
SDRAM (as well as the DVX-2100HD) is 12MB
Note: This setting does not take effect until the next reboot.
There are some considerations when doing this:
The higher you increase the Duet memory, up to a maximum of 64Mb, the less memory there is for
the NetLinx code to run. To find out how much Duet memory you need to run your program is by
trial and error.
We recommend increasing it by 2Mb, then trying to run your program. Repeat this process until
your code runs as expected.
It is important to keep the amount of memory allocated to Duet as low as possible so there is
maximum memory to run the NetLinx code.
Setting the Duet Memory Allocation Value
Terminal commands can be sent directly to the NI Controller or DVX-2100HD via
either a Program Port or a Telnet terminal session. In your terminal program, type
"Help" or a question mark ("?") and <Enter> to access the Help Menu, and display the
supported Program port commands.
Refer to the "NetLinx Integrated Controllers WebConsole and Programming Guide"
for a full listing of supported telnet terminal commands.
1. Telnet into the Controller (refer to the relevant Operation/Reference Guide for details).
2. Type SET DUET MEMORY. You will be presented with how much the memory is currently set to and a
prompt for the new setting.
3. Enter the new setting (such as 14 to set the Duet memory allocation to 14MB), then press ENTER.
RMS Enterprise - Installation Checklist
13
RMS Enterprise Installation Checklist
4. Reboot the master and test your code.
5. Repeat if necessary.
Licensing Information (Entitlement ID)
If you have purchased RMS Enterprise, you will need the Entitlement ID obtained from AMX in order to
install the software (see the AMX License Manager section on page 43 for details).
RMS Enterprise Scheduling Interface
Scheduling Server Requirements
Once you have installed a registered version of RMS Enterprise (see the Registering a Purchased
License section on page 63 for details), you can upgrade your RMS Entitlement with a Scheduling License.
The Scheduling License enables support for various scheduling plug-ins for RMS Enterprise. See the Adding
the Scheduling Interface and Plug-In section on page 83 for instructions on installing the RMS Enterprise
Scheduling Interface and Scheduling Configuration Tool.
Verify that each server that will run the RMS Enterprise Scheduling Interface meets or exceeds the following
minimum requirements (check the appropriate boxes below):
Scheduling Server Hardware Requirements
Does your Scheduling server meet the following Minimum Hardware Requirements?
Yes
No
• Processor Dual core Intel Xeon processor @ 2.67GHz (or equivalent)
• Memory
4 GB
• Display
1280 x 1024 resolution
• Hard Disk
1 GB available space for RMS Enterprise Scheduling application files.
Yes to all
Please continue to the next step.
No to any
You must obtain a server that meets these minimum requirements to install RMS Enterprise.
For installations with more than 50 locations that use the Scheduling Interface, a separate server from the RMS
Application is required.
Scheduling Interface Operating System (OS)
Do you have a compatible server OS installed?
Yes
No
Yes
No
Supported Microsoft Server Operating Systems:
Microsoft Windows Server 2012
• Standard Edition
Microsoft Windows Server 2008 R2 (x64):
• Web Edition / Standard Edition / Enterprise Edition
Microsoft Windows Server 2008 SP2 (x86 and x64):
• Web Edition / Standard Edition / Enterprise Edition
Yes
Please continue to the next step.
No
You must obtain a compatible server OS to install RMS.
Do you have an administrative account to the server where RMS will be installed?
Note: RMS is a system level application and requires administrative access to install and
configure RMS, including the Scheduling Interface and Scheduling Configuration Tool .
14
Yes
Please continue to the next step.
No
You must obtain an administrative logon account, or logon to the server with a user account that
has administrative access to the server.
RMS Enterprise - Installation Checklist
Installing Prerequisite Software
Installing Prerequisite Software
Overview
As indicated in the RMS Enterprise Installation Checklist, RMS Enterprise requires two server software
applications to be on the server before RMS is installed:
Java SE6 (JRE)
Tomcat (v6.x required - version 7 is not supported)
If both of these applications are not already loaded on the server, download and install both before launching
the RMS enterprise Installation executable file.
If Tomcat 6 is already installed on the server, please refer to the Configuring Apache
Tomcat section on page 20 before installing RMS Enterprise.
Installing Java SE6
Java SE6 (Standard Edition version 6) installation files are available to download from www.oracle.com.
The minimum requirement for Java SE6 is the JRE (Java Runtime Environment).
RMS Enterprise will also work with the JDK (Java Development Kit), since it includes
the JRE.
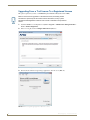
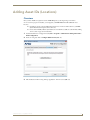
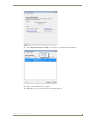
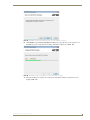
1. Download and launch the Java SE6 JRE installer. FIG. 2 shows the Java 6 JRE installer Welcome Screen.
FIG. 2 Java 6 JRE installer - Welcome screen
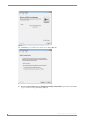
2. Click Install, and follow the instructions provided on-screen. In most cases, you should accept the
defaults. When complete, close the Java SE6 JRE installer (FIG. 3).
RMS Enterprise - Installation Guide
15
Installing Prerequisite Software
FIG. 3 Java SE6 JRE installer - Complete
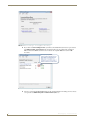
Disabling Auto-Update For Java
Because RMS Enterprise requires a specific version of Java, it is important that Java’s auto-update feature is
disabled, to avoid compatibility issues in the future:
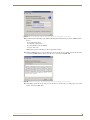
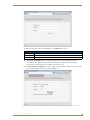
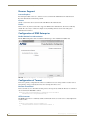
1. On the main Control Panel Page, select Java. This opens the Java Control Panel (FIG. 4):
FIG. 4 Java Control Panel
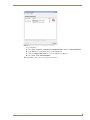
2. Un-check the Check for Updates Automatically option.
3. Java will prompt you to verify this action - click Never Check to proceed.
4. Click OK to close this dialog.
16
RMS Enterprise - Installation Guide
Installing Prerequisite Software
Installing Apache Tomcat v6.0.x
Apache Tomcat 6 installation files are available to download from tomcat.apache.org.
If Tomcat 6 is already installed on the server, please refer to the Configuring Apache
Tomcat section on page 20 before installing RMS Enterprise.
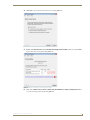
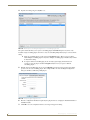
1. Download and launch the Apache Tomcat 6 Windows Service. FIG. 5 shows the Welcome Screen for the
Apache Tomcat 6 Setup Wizard:
FIG. 5 Apache Tomcat 6 Setup Wizard - Welcome Screen
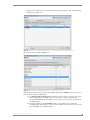
2. Click Next to review the License Agreement. Click I Agree to proceed with the installation.
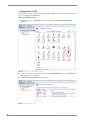
3. In the Choose Components screen, review the default component selections and read the on-screen
instructions (FIG. 6):
FIG. 6 Apache Tomcat 6 Setup Wizard - Choose Components
RMS Enterprise - Installation Guide
17
Installing Prerequisite Software
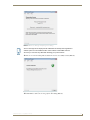
4. Click Next to accept the default settings and continue to the Configuration screen (FIG. 7):
FIG. 7 Apache Tomcat 6 Setup Wizard - Configuration
5. Fill in this information as required. Using the default settings, Tomcat will serve the web page content on
port 8080. If you wish for RMS to be hosted on the standard HTTP port 80 and you are not using IIS for
Windows Authentication purposes then you may enter port 80 in this field before proceeding.
Click Next to proceed to the Java Virtual Machine screen (FIG. 8):
FIG. 8 Apache Tomcat 6 Setup Wizard - Java Virtual Machine
It may be necessary to create a firewall rule to allow access to the port defined here (if other than
80).
If you are installing Tomcat to run on port 80, then you must make sure that no other web servers
are currently running (on port 80) on this server. It is not uncommon for Microsoft IIS server to
already be installed on the server, you may need to disable the IIS server in order to run Tomcat on
port 80. Tomcat will fail to start if another process is already listening on port 80.
The Tomcat HTTP port can be changed at a later time after install, but it will require the manual
editing of Tomcat configuration files. Please see the RMS IT Administrator's Guide for more
information.
6. Again, in most cases you should accept the default setting, and click Next to proceed to the Choose
Install Location screen (FIG. 9):
18
RMS Enterprise - Installation Guide
Installing Prerequisite Software
FIG. 9 Apache Tomcat 6 Setup Wizard - Choose Install Location
7. Again, in most cases you should accept the default setting,
8. Click Install to begin the installation.
9. When complete, click Finish to close the Apache Tomcat 6 Setup Wizard (FIG. 10).
FIG. 10 Apache Tomcat 6 Setup Wizard - Complete
10. Continue to the Configuring Apache Tomcat section.
RMS Enterprise - Installation Guide
19
Installing Prerequisite Software
Configuring Apache Tomcat
In order for Tomcat to function properly with RMS Enterprise, the following configuration changes must be
made via the Apache Tomcat 6 Properties dialog:
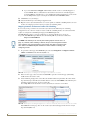
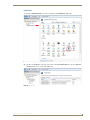
1. With Tomcat running, right-click on the Tomcat icon in the Windows task bar, and select Configure from
the context menu (FIG. 11). This opens the Apache Tomcat 6 Properties dialog
Tomcat context menu
Tomcat icon (Windows Task Bar)
FIG. 11 Apache Tomcat 6 context menu - select Configure
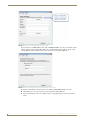
2. In the General tab, change the Startup Type from Manual to Automatic (select Automatic from the dropdown menu (FIG. 12):
FIG. 12 Apache Tomcat 6 Properties dialog - General tab
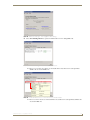
3. In the Java tab, click inside the Java Options text box (FIG. 13), and scroll down to the last line.
After the last line of code, enter the following line of code:
-XX:MaxPermSize=150M
20
RMS Enterprise - Installation Guide
Installing Prerequisite Software
150M
Recommended setting - 150M
(see Step 3)
Recommended settings for
Initial & Maximum Memory Pool:
32-Bit Windows - 1536
64-Bit Windows - 2048
FIG. 13 Apache Tomcat 6 Properties dialog - Java tab (editing Java Options)
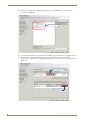
4. Enter values in the Initial Memory Pool and Maximum Memory Pool fields (FIG. 14).
150M
2048
2048
FIG. 14 Apache Tomcat 6 Properties dialog - Java tab (editing Memory allocation settings)
In most cases, the Initial Memory Pool and Maximum Memory Pool values should be equal.
The ideal values for these settings will depend on the number of clients connected to your RMS server. As
a rule of thumb, consider allocating half of the server’s available memory to Tomcat for use with RMS.
The following recommendations apply for the Maximum Memory Pool value, according to the version of
Windows (32-bit or 64-bit) that is installed on your server PC:
32-bit Windows - 1500MB (1.5GB)
64-bit Windows - 2048MB (2GB)
The example shown in FIG. 14 represents values that would be appropriate for a 64-bit server with 4GB
of RAM.
RMS Enterprise - Installation Guide
21
Installing Prerequisite Software
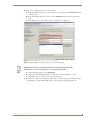
5. Click OK to save your changes.
6. At this point, stop the Tomcat service before proceeding (select Stop Service from the Tomcat context
menu).
Tomcat must be stopped before installing and configuring RMS Enterprise.
Once RMS Enterprise has been installed and configured, Tomcat must be restarted in order to run RMS
Enterprise.
If Tomcat fails to restart, please refer to the Appendix B: Tomcat
Configuration section on page 105 to troubleshoot the Java memory allocation
settings.
22
RMS Enterprise - Installation Guide
Upgrading RMS v3.x to RMS Enterprise
Upgrading RMS v3.x to RMS Enterprise
IF YOU INTEND TO INSTALL RMS ENTERPRISE ON A SERVER THAT IS
CURRENTLY RUNNING RMS V3.x, READ AND FOLLOW THESE INSTRUCTIONS
FIRST!
Overview
If you intend to install RMS Enterprise on a server that is currently running RMS v3.3, there are a few
important steps to follow to ensure that RMS Enterprise will operate correctly, and to preserve the pre-existing
RMS application. This provides a method of reverting back to the previously installed version of RMS, if
necessary.
Upgrading an existing installation of RMS to RMS Enterprise requires a base line of
RMS v3.3, with a database version of 3.0.9 or greater. Older versions of RMS (v3.2
or lower) must be migrated to v3.3 prior to upgrading the system to RMS Enterprise
as described in this section. Refer to RMS v3.x documentation for instructions.
It is not necessary or recommended to un-install an existing version of RMS v3.3 in order to install
RMS Enterprise on the same machine. These instructions describe stopping and then disabling
RMS v3.3 services. If for any reason it is necessary to revert to the previous RMS v3.3 system,
these services can be restarted.
1) Verify System Requirements for RMS Enterprise
Since the minimum system requirements for RMS Enterprise are different than those for RMS v3.3, it is
important to verify that the current system does in fact meet these newer requirements.
Before proceeding with these instructions, verify that the current server meets the minimum system
requirements for RMS Enterprise.
Refer to the RMS Enterprise Installation Checklist section on page 5 for a detailed listing of Hardware System
Requirements, supported Server Operating Systems, Additional Software Dependencies, and more.
If your system meets these requirements, proceed with the instructions below.
2) Stop RMS v3.3 Services
In the AMX Resource Manager Suite Service Manager (FIG. 15), stop all RMS Services (select each of the
four services, and click the Stop button):
FIG. 15 RMS Service Manager - Stop RMS Services
This stops the RMS v3.3 services, until they are restarted manually, or the server is restarted.
RMS Enterprise - Installation Guide
23
Upgrading RMS v3.x to RMS Enterprise
3) Disable RMS v3.3 Services
Once the RMS v3.3 services are stopped, it is necessary to disable them in order to prevent them from
restarting when the server is restarted.
1. Go to My Computer > Manage > Server Manager to access the Server Manager.
2. Select Configuration > Services to access the Services window. Note that the four RMS services are
stopped (FIG. 16):
FIG. 16 Server Manager window
3. Right-click on the first RMS service listed, and select Properties to access a Service Properties dialog
similar to the one shown in FIG. 17:
FIG. 17 Service Properties dialog
4. Change the Startup Type setting to Disabled.
5. Click OK to save changes and close the Service Properties dialog.
6. Repeat steps 3-5 for the remaining three RMS services.
Once all four RMS v3.3 services are disabled, you are ready to install RMS Enterprise.
Using a RMS v3.3 Database with RMS Enterprise
If you intend to use an existing Legacy (v3.3) RMS Database with RMS Enterprise, the data must be migrated.
See the Migrating a Legacy RMS Database To RMS Enterprise section on page 38 for details.
24
RMS Enterprise - Installation Guide
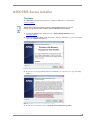
AMX RMS Server Installer
AMX RMS Server Installer
Overview
The AMX RMS Enterprise Installer application is available for AMX dealers to download from
www.amx.com/rms/.
Tomcat must be stopped during the process of installing RMS Enterprise. If Tomcat is
running, stop the service before continuing with the RMS Enterprise installation.
1. Download the RMS Enterprise installation file (i.e. ResourceManagementSuite.exe) from
www.amx.com/rms/.
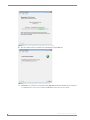
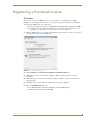
2. On the server that will run RMS, double-click the file to launch the AMX RMS Server Installer. The initial
dialog is the Welcome dialog (FIG. 18):
FIG. 18 AMX RMS Server Installer - Welcome dialog
3. Review the notes and copyright information, and click Next to proceed to the License Agreement dialog
(FIG. 19):
FIG. 19 AMX RMS Server Installer - License Agreement dialog
4. Read the license agreement, and select I accept the terms of this license agreement.
RMS Enterprise - Installation Guide
25
AMX RMS Server Installer
5. Click Next to proceed to the next dialog, where you can specify installation directories for both the RMS
and Tomcat installations (FIG. 20). Enter specific file path information for each if necessary (click the
Browse buttons to navigate to the desired directories in the Choose Your Directory dialog). However, in
most cases, the default directory settings can be used.
FIG. 20 AMX RMS Server Installer - Installation Directories
The Tomcat installation procedure is described in the previous section. At this point,
Tomcat should have already been installed.
The Tomcat Installation Directory path should only be changed if Tomcat was
installed to a directory other than the default, as described in the Installing Apache
Tomcat v6.0.x section on page 17.
6. Click Next to proceed. This action initiates the installation, as indicated in the Installation Progress
dialog (FIG. 21):
FIG. 21 AMX RMS Server Installer - Installation Progress
7. When the installation is complete, the Next button is enabled. Click Next to proceed to the Setup
Shortcuts dialog (FIG. 22). This dialog allows you to specify where to install RMS program shortcuts:
By default, the Create shortcuts in the Start-Menu option is selected. De-select this option to
prevent shortcuts from being added to the Start menu.
By default, shortcuts are created for all users that access this server (as indicated under create
shortcut for:). Select current user to limit shortcut creation to the current user’s UI only.
By default, shortcuts are created in the AMX Resource Management Suite/Server directory. To
change the target directory for shortcuts, enter a different file path in the text field provided. Click
the Default button to reset the path to the default.
26
RMS Enterprise - Installation Guide
AMX RMS Server Installer
FIG. 22 AMX RMS Server Installer - Setup Shortcuts
Click Next to proceed.
8. Once the Installation Progress dialog indicates Finished, click Next to proceed to the Installation
Complete dialog (FIG. 23):
FIG. 23 AMX RMS Server Installer - Installation Complete
As indicated in this dialog, RMS Server has been successfully installed at this point.
9. Click Next to launch the RMS Server Configuration tool (described in the next section - see page 29).
The Installation Complete dialog (FIG. 23) also provides the option to Quit, in which case the RMS Server
Installer will close. Note that at this point, the RMS Server has been installed, but not configured.
The RMS Configuration Wizard must be completed before RMS Enterprise can be used, therefore the
installation process is not yet complete.
It is highly recommended to click Next and continue to the RMS Configuration Wizard to complete
the installation process. However, if it is necessary for any reason to stop at this point, Tomcat can
be restarted if desired.
Remember that Tomcat must be stopped again before running the RMS Configuration Wizard.
RMS Enterprise - Installation Guide
27
AMX RMS Server Installer
28
RMS Enterprise - Installation Guide
RMS Server Configuration
RMS Server Configuration
Overview
After installing the RMS Server application (see the AMX RMS Server Installer section on page 25) you must
complete the RMS Server Configuration tool to register and enable your server.
The RMS Server Configuration tool also provides an opportunity to configure your database connection, and
whether to use an existing database catalog or create a new one.
There are a few pieces of information that you'll want to have available during this process. Specifically,
whether or not you will need support for:
Legacy Clients
Multi-Server
Directory Services
Pre-Authentication
1. Launch the RMS Server Configuration tool:
The RMS Server Configuration tool described in this section is how the Server Configuration
dialogs are presented when accessed via the Next button in the final dialog of the AMX RMS
Server Installer (see FIG. 23 on page 27).
You can also access the RMS Server Configuration options at any time to modify system settings or
diagnose system related problems.
To manually launch the RMS Server Configuration application, select:
C:\Program Files\ AMX\Resource Management Suite\Server\RMS Configuration
Note that when the application is launched manually, the options are presented as tabs rather than
the serial dialogs presented in the Wizard.
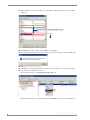
2. The first dialog in the wizard is the Log and Data Files Locations dialog. The options in this dialog allow
you to specify directories on the server for both Log Files and Data Files (FIG. 24).
FIG. 24 RMS Server Configuration tool - Log and Data Files Locations dialog
Note that these options are presented in the File Location tab (if the RMS Server Configuration
application was launched manually).
RMS Enterprise - Installation Guide
29
RMS Server Configuration
3. Enter specific file path information for each file type if necessary (click the Browse buttons to navigate to
the desired directories in the Choose Your Directory dialog). However, in most cases, the default directory
settings should be used.
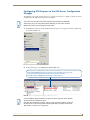
4. Click Next to proceed to the Legacy Configuration dialog (FIG. 25).
FIG. 25 RMS Server Configuration tool - Legacy Configuration dialog
Throughout the dialogs in the RMS Server Configuration tool, any required fields that
are not filled in are indicated with red shading.
Legacy Configuration refers to the process of configuring existing NetLinx Masters running RMS v3.x
(or earlier) code for use with RMS Enterprise servers.
Note that by default, Legacy Support is disabled (as indicated by the un-checked Enable Legacy Support
option in the upper-right corner of the dialog). The options in this dialog are only available if the Enable
Legacy Support option is selected (as shown above).
If you are not planning to use NetLinx Masters running RMS v3.x (or earlier) code with RMS Enterprise
servers, leave this option de-selected, and click Next to proceed.
If you are migrating to RMS Enterprise from a previous version of the RMS SDK, either fill in these
fields, or accept the default values:
Legacy Configuration Options
• Legacy IP
Address
This field identifies the IP address of the RMS Enterprise server.
• Legacy Port
This field identifies the IP port on which the Legacy (v3.x) RMS server accepts
connections from legacy NetLinx masters.
Note: This value should only be changed if there are multiple NIC cards in the RMS
Enterprise Server (as in a multi-server installation).
Default = 0.0.0.0
Default = 3839 (this is an IANA registered port for Legacy (v3.x) RMS
communications).
• Ping Delay
The Ping Delay setting is used to ensure that NetLinx clients are connected to the
RMS server. On this configured time interval, the RMS server broadcasts request
messages to the NetLinx clients.
If the NetLinx clients do not respond within a specified amount of time, the RMS server
assumes the connection has been lost and the NetLinx system is offline.
Default = 30 (seconds)
30
RMS Enterprise - Installation Guide
RMS Server Configuration
Legacy Configuration Options (Cont.)
• Ping Timeout
This value sets the maximum amount of time that the RMS server allows between
NetLinx client ping responses. If the NetLinx client does not return a ping response
within this amount of time, the RMS server assumes the connection has been lost and
the NetLinx system is offline.
• Core Pool Size
This value specifies the minimum number of threads allocated by the RMS
Enterprise Server to talk to Legacy (v3.x) RMS Servers.
• Maximum Pool
Size
This value specifies the maximum number of threads allocated by the RMS
Enterprise Server to talk to Legacy (v3.x) RMS Servers.
Default = 60 (seconds)
Default = 25
Default = 50
Note that these options are presented in the Legacy tab (if the RMS Server Configuration application was
launched manually).
5. Click Next to proceed to the Multi-Server Configuration dialog.
The options in this dialog allow you to configure RMS systems that use multiple servers (FIG. 26).
FIG. 26 RMS Server Configuration tool - Multi-Server Configuration dialog
For multi-server installations, each server must be configured individually via this
portion of the wizard.
Note that Multi-Server Support is disabled by default. The options in this dialog are only available
if the Enable Multi-Server option is selected. If you are not installing RMS in a multi-server
environment, leave this option de-selected, and click Next to proceed.
If you are installing RMS in a multi-server environment, either fill in these fields, or accept the
default values:
Multi-Server Configuration Options
Membership Configuration
• Worker Name
Enter the host name or IP Address of this server as it exists in the load balancing
server’s Worker List.
The Worker Name must be unique and must match the name that identifies this
server on the Load Balancing Server.
RMS Enterprise - Installation Guide
31
RMS Server Configuration
Multi-Server Configuration Options (Cont.)
• Search Cluster
Name
Enter the name of the Search Cluster to which this server will be added.
• Datagrid Cluster
Name
Enter the name of the Datagrid Cluster in which this server will participate.
The Search Cluster Name must be identical for all servers in the multi-server farm.
The Datagrid Cluster Name must be identical for all servers in the multi-server farm.
Note: Search Cluster Name and Datagrid Cluster Name only need to be changed from their default
values in cases where two distinct RMS multi-server farms are being installed.
• Membership
Address
Enter the multicast address on which the servers will broadcast their presence and
listen for other membership broadcasts.
Note: Verify that your network is enabled for multicast traffic.
The multicast address, in conjunction with the port is what creates a cluster group. To
divide up your farm into several different groups, change the port or the address.
Default = 228.0.0.4
• Membership
Port
Enter the multicast port address.
The multicast port, in conjunction with the address is what creates a cluster group. To
divide up your farm into several different groups, change the port or the address.
Default = 45564
• Membership
Drop-Time
The membership component will time out members and notify the Channel if a member fails to send a membership broadcast within the time-frame specified here. If a
membership broadcast is not received from a member in the specified time-frame,
the cluster will be notified.
Note: On a high latency network you may wish to increase this value, to protect
against false negatives (premature drops).
Default = 3000 (ms)
• Membership
Frequency
Enter the frequency in milliseconds in which membership broadcasts are sent out.
Changing this value simply changes the interval in between membership
broadcasts.
Default = 500 (ms)
Remote Log and Data Files
• Remote Log
Files Directory
Remote Log Files represent a compilation of log files for all servers in the RMS
installation.
Note: Log file names are prepended with the Worker Name to distinguish them from
each other.
Enter specific path information for the target directory to be used for Remote Log
Files (click the Browse buttons to navigate to the desired directory in the Choose
Your Directory dialog).
• The remote log file path should be a common shared network path that is
accessible by all RMS servers.
• This same directory path should be configured the same on each RMS server
participating in the RMS web server farm.
• Remote Data
Files Directory
All servers in the RMS installation utilize the same search index. Remote Data Files
represent a compilation of data files for all servers in the RMS installation.
Enter specific path information for the target directory to be used for Remote Data
Files (click the Browse buttons to navigate to the desired directory in the Choose
Your Directory dialog).
• The remote data file path should be a common shared network path that is
accessible by all RMS servers.
• This same directory path should be configured identically on each RMS server
participating in the RMS web server farm.
Note: If the search index is lost (due to hardware failure or file corruption), it can be
rebuilt via the Rebuild Search Index option in the RMS Enterprise UI.
Note that these options are presented in the Multi-Server tab (if the RMS Server Configuration application
was launched manually).
Refer to Appendix C: Clustered Deployment on page 109 for more information.
32
RMS Enterprise - Installation Guide
RMS Server Configuration
It is strongly recommended that the Windows firewall be disabled on all servers in a
multi-server installation, to avoid having communications required by RMS being
blocked.
6. Click Next to proceed to the Directory Services Configuration dialog. The options in this dialog allow
you to configure RMS to use directory services (LDAP or Windows Active Directory) for authentication
and user management (FIG. 27):
FIG. 27 RMS Server Configuration tool - Directory Services Configuration dialog
The Directory Services supported by RMS Enterprise are "LDAP" and "Windows
Active Directory".
Note that by default, Directory Services Support is disabled (as indicated by the un-checked Enable
Directory Services option in the upper-right corner of the dialog). The options in this dialog are only
available if the Enable Directory Services option is selected (as shown above).
If you are not installing RMS in a directory-enabled environment, leave this option de-selected, and
click Next to proceed.
If you are installing RMS in a directory-enabled environment, either fill in these fields, or accept
the default values:
Directory Services Configuration Options
Directory Connection
• Bind DN
Enter the Distinguished Name (DN) of the Active Directory user account that RMS will
use for connecting to the Active Directory server and searching for / reading directory
information.
• This field is required and cannot be left blank.
• Refer to the RMS Enterprise System Administrator's Guide (Appendix: Using
Directory Services) for more information.
• Bind DN
Password
Enter the password corresponding to the Bind DN in this field.
• URL
Enter the URL of the of the Directory Services server in this field.
RMS Enterprise - Installation Guide
After being input, it will be encrypted.
33
RMS Server Configuration
Directory Services Configuration Options (Cont.)
Directory Configuration
• Base
Enter the base DN used to search for users.
• Group Base
Enter the base DN used to search for groups.
• User Attribute
Name
Enter the name of the attribute on the Directory Services server that specifies the
names of group members for a group entry.
• Group Attribute Enter the name of the attribute on the Directory Services server that specifies the
Name
group name for a group entry.
Missing User Cleanup Thresholds
RMS provides an automatic User Cleanup process that periodically compares User records in the RMS
database to User records in the Directory Services server database. This is to avoid situations where a
User is removed from the Directory Services server database, but still exists in the RMS database.
Prior to any accounts being removed as a result of this comparison, a basic check is performed to ensure
the count of users to remove is below a fixed total and percentage of existing users. If the number of users
scheduled for removal exceeds either of these values, no accounts will be removed. This is simply to
prevent the accidental removal of RMS user account in specific cases.
Missing User Cleanup thresholds are controlled by these two entries:
• Max Number Users - If during account verification the total number of user accounts to be eliminated
exceeds this value, no accounts will be removed from RMS.
• Max Percent Users - The value assigned here is defined as a percentage of total RMS accounts. If the
number of accounts to be purged exceeds this percentage, no accounts will be removed from RMS.
Note: In most cases, these numbers can be set at high thresholds, which effectively disables this function.
Note that these options are presented in the Directory Services tab (if the RMS Server Configuration
application was launched manually).
Refer to the RMS Enterprise System Administrator’s Guide (Appendix: Using
Directory Services) for details on the RMS Enterprise support of service directories.
7. Click Next to proceed to the Pre-Authentication Configuration dialog. Pre-authentication allows Users
that have already successfully logged in to the network to access RMS without having to provide
additional login credentials specifically for RMS. The options in this dialog allow you to select between
Windows or SiteMinder as the Pre-Authentication Filter type (FIG. 28).
FIG. 28 RMS Server Configuration tool - Pre-Authentication Configuration dialog
34
RMS Enterprise - Installation Guide
RMS Server Configuration
Note that these options are presented in the Pre-Authentication tab (if the RMS Server Configuration
application was launched manually).
Note that Windows is selected by default.
The Pre-Authentication information entered here allows end-users to access the
RMS user-interface, and is separate from Database Authentication requirements
(defined in the Database Configuration dialog (see below).
8. Click Next to proceed to the Database Configuration dialog. Use the options in this dialog to configure
the RMS database or connect to an existing RMS database (FIG. 29):
FIG. 29 RMS Server Configuration tool - Database Configuration dialog
Database Configuration Options
Database Setup
Create New RMS
Database
Select this option to create a new RMS Enterprise database.
Note: This option should be used anytime you are installing a new RMS Enterprise
system. This option will create a new RMS database catalog, install the RMS database
schema, and populate the RMS default data records.
If a new empty database catalog was created externally, then the database installer will
skip the create catalog step and proceed with installing schema and data.
• An empty database catalog means that no tables, views, or stored procedures exist
in the catalog.
• RMS will not install schema or default data to an existing catalog that is not empty.
Note for Multi-Server Installations: The first server in a multi-server installation
should use the Create New Database option. The remaining servers should use the
Use Existing Database option, and utilize the same database as the first configured
server.
RMS Enterprise - Installation Guide
35
RMS Server Configuration
Database Configuration Options (Cont.)
Use Existing RMS
Database
Select this option to use an existing RMS database.
Note: This option should only be used when migrating data from an existing RMS 3.x
(Legacy) database or when upgrading the RMS Enterprise server and you want to
continue using an existing RMS Enterprise database.
• If you will be specifying an existing RMS 3.x ("Legacy") database, the database must
be migrated to become compatible with RMS Enterprise.
• See the Migrating a Legacy RMS Database To RMS Enterprise section on page 38
for details.
• See the Note above for multi-server installations.
Database Name
SQL Server Host
Enter the SQL Server Host name or IP address required to connect to the server.
Default = localhost
SQL Server Port
Enter the SQL Server port number required to connect to the server.
Default = 1433
SQL Server Instance
If applicable to your installation, enter the instance name of the SQL server used by
RMS.
SQL Server Catalog
Enter the name of the SQL Server Catalog (Database) used by RMS.
Database Authentication
Authentication Type
Select an Authentication Type:
• SQL Authentication - this option requires that you specify a username and
password in the text fields below.
• Windows Authentication
• Windows Authentication with provided username and password - this option
requires that you specify a username and password as well as a Windows Domain
name in the text fields below.
Note: In order for the RMS installer to create a new database catalog instance, the
database user account will require the "CREATE DATABASE" permissions.
Alternatively, if a new empty RMS database catalog is created by any means
outside of the RMS installer and configuration tools, then this database user account
will only require "DB_OWNER" permissions to the externally created, empty RMS
catalog.
Note that these options are presented in the Database tab (if the RMS Server Configuration application
was launched manually).
a. If Create New RMS Database is selected (under Database Setup), click Next to proceed to the RMS
Admin and User Passwords dialog. Use the options in this dialog to specify the password that will be
applied to the RMS administrator account after your RMS database has been created (FIG. 30).
FIG. 30 RMS Server Configuration tool - RMS Admin and User Passwords dialog
36
RMS Enterprise - Installation Guide
RMS Server Configuration
Enter the password in both text fields and click Next. This launches the database updates procedure, as
indicated in the Database Updates dialog (FIG. 31).
FIG. 31 RMS Server Configuration tool - Database Updates dialog
When this dialog indicates that the process is complete (as shown above), click Next to proceed:
b. If Use Existing RMS Database is selected (under Database Setup), and the existing database is an
RMS Enterprise database, then click Next to proceed to the License Configuration dialog, described
in Step #9 (below).
c. If Use Existing RMS Database is selected (under Database Setup), and the existing database is a
Legacy (RMS v3.x or earlier) database, then follow the instructions provided in the Migrating a
Legacy RMS Database To RMS Enterprise section on page 38.
9. The options in the License Configuration dialog allow you to configure RMS Enterprise licenses
(FIG. 32).
a. To complete the configuration, a valid RMS Enterprise license must be provided at this point.
b. Select Configure RMS Licenses to launch the AMX License Manager application. The AMX License
Manager steps you through the process of licensing RMS (described in the next section).
Note that these options are presented in the Licensing tab (if the RMS Server Configuration application
was launched manually).
RMS Enterprise - Installation Guide
37
RMS Server Configuration
FIG. 32 RMS Server Configuration tool - License Configuration dialog
Migrating a Legacy RMS Database To RMS Enterprise
If you will be using an existing Legacy (RMS 3.x) database (as specified in the Database Configuration dialog
in the RMS Server Configuration tool), the database must be migrated to become compatible with RMS
Enterprise, as described below:
1. Launch the RMS Server Configuration application by selecting:
C:\Program Files\ AMX\Resource Management Suite\Server\RMS Configuration
2. Select the Legacy tab (FIG. 33):
FIG. 33 RMS Server Configuration - Legacy tab
3. In the Database Configuration dialog, enter the IP Address or hostname of the Legacy Database Server in
the SQL Server Host field.
38
RMS Enterprise - Installation Guide
RMS Server Configuration
4. Enter the v3.x database name in the SQL Server Catalog field.
5. Enter Database Authentication information as required by the specified server.
6. Click Next to proceed. At this point the application will prompt you to verify the action of migrating the
data from the Legacy database (FIG. 34):
FIG. 34 Migrate Data? dialog
7. Click Yes to proceed to the Where would you like to create your new catalog? dialog (FIG. 35):
FIG. 35 RMS Server Configuration tool - Where would you like to create your new catalog? dialog
Note that by default, the new catalog is created on the same Server, with the same SQL Server Catalog
name, with "_MIGRATED" appended to it (for example "RMS3_3" becomes "RMS3_3_MIGRATED").
8. Review this information and make any necessary changes, then click Next to proceed to the RMS Admin
and User Passwords dialog (FIG. 36).
RMS Enterprise - Installation Guide
39
RMS Server Configuration
FIG. 36 RMS Server Configuration tool - RMS Admin and User Passwords dialog
a. Under RMS Administrator’s Password, enter an RMS Admin Password, and re-enter it in the next
field. This password will be applied to the RMS administrator account after your RMS database has
been created.
b. Under RMS User Password, enter an RMS Admin Password, and re-enter it in the next field. This
password will be applied to all regular RMS user accounts after your RMS database has been created.
For security reasons, after the user of each account has successfully logged in for the first time, he or
she will be requested to enter a new password.
9. Click Next to proceed to the Database Updates dialog, which indicates the progress of the migration
procedure (FIG. 37).
40
RMS Enterprise - Installation Guide
RMS Server Configuration
FIG. 37 RMS Server Configuration tool - Database Updates dialog
10. When the process is complete, click Next to proceed to the License Configuration dialog (see FIG. 32 on
page 38). The options in the License Configuration dialog allow you to configure RMS Enterprise
licenses.
11. Proceed to the next section - AMX License Manager on page 43.
RMS Enterprise - Installation Guide
41
RMS Server Configuration
42
RMS Enterprise - Installation Guide
AMX License Manager
AMX License Manager
Overview
The AMX License Manager is used to install and manage software licenses for RMS Enterprise (as well as
other AMX software applications). The AMX License Manager handles two distinct aspects of the RMS
Enterprise installation:
1. Installation of the AMX License Server application, which identifies existing licenses of AMX software
products (including RMS Enterprise) present on the server. See Installing the AMX License Server below
for details.
2. Entry of the RMS Entitlement information required to install and activate your RMS Enterprise Server
and Client Licenses. See the Licensing Options Menu dialog section on page 51 for details.
Licensing in Multi-Server Installations
Multi-server installations require a single instance of AMX License Server that can be accessed by the other
servers in the installation. Therefore, AMX License Server is only installed on the Primary RMS Enterprise
server (the first server configured), and shared among all of the subsequent servers.
Note that RMS Enterprise does not support clustering of the AMX License Server. The diagram in FIG. 38
indicates the basic relationship between the AMX License Server and the server nodes in a multi-server
installation:
Primary RMS Server
(The first server that had
RMS Enterprise installed)
Subsequent RMS Servers
R1
R2
R3
AMX
License
Server
RMS Server #2
RMS Server #3
Note that the AMX License Server
only resides on the Primary RMS Server.
FIG. 38 Licensing in Multi-Server Installations
As indicated in FIG. 38, if in the unlikely case that the Primary RMS Server were to fail, then subsequent
servers (R2 and R3) will not have access to the AMX License Server.
This situation will lead to a fault condition in which the RMS system will cease to function after a fault period
of 24 hours.
Note that this fault condition will not generate an error message from RMS
Enterprise; check the cluster to see if the Primary RMS Server has failed.
In order to avoid a loss of RMS functionality, the AMX License Server must be restored to an operational
state. All of the RMS Servers will expect the AMX License Server to be hosted at the same hostname / IP
address
RMS Enterprise - Installation Guide
43
AMX License Manager
Installing the AMX License Server
RMS Enterprise uses a network license server to store and manage the product licenses. This is the "AMX
License Server" application referred to in the AMX License Manager dialogs below.
1. Select Configure RMS Licenses in the License Configuration dialog (the last dialog in the RMS Server
Configuration tool - see FIG. 32 on page 38) to launch the AMX License Manager.
The initial view is the Welcome to AMX Licensing Manager dialog (FIG. 39).
FIG. 39 AMX License Manager Wizard - Welcome dialog
2. Click Next to proceed to the Select License Server dialog. Use the options in this dialog to install the
AMX License Server application on this machine, or select an existing network license server (FIG. 40).
FIG. 40 AMX License Manager Wizard - Select License Server
3. Choose one of the Select License Server options:
Install the AMX License Server on this machine - Use this (default) option if the AMX License
Server application is not currently installed on this machine. This option is also appropriate for
configuring the first server in a multi-server installation (see page 45).
44
RMS Enterprise - Installation Guide
AMX License Manager
Search the network for available license servers - Use this option if the AMX License Server
application is on the network. This option can be used to locate and select the AMX License Server
in multi-server installations (see page 47).
Manually enter the license server hostname or IP address - Use this option to manually enter
the hostname or IP address of the AMX License Server that you will connect to. This option can be
used to specify the AMX License Server in multi-server installations (see page 48).
Each of these options are described in the following sections.
Install the AMX License Server on this machine
If the AMX License Server application has not previously been installed on this server, then the first option
(selected by default) is to install the AMX License Server on this machine.
1. Select the Install the AMX License Server on this machine option in the Select License Server dialog
(see FIG. 40).
2. Click Next to install the AMX License Server application (FIG. 41):
FIG. 41 AMX License Manager Wizard - Select Licensing Option dialog
3. Once the installation is complete, the AMX License Manager searches for product licenses.
4. When no licenses are found on the server, the Select Licensing Option dialog is presented (FIG. 42):
RMS Enterprise - Installation Guide
45
AMX License Manager
FIG. 42 AMX License Manager Wizard - Select Licensing Option dialog
5. Select one of the licensing options listed and then click Next.
If Request a trial/evaluation license is selected, the next dialog presented is the Contact
Information dialog. Refer to the Requesting a Trial/Evaluation License section on page 53 for
instructions.
If Register a new software license (Requires an Entitlement ID) is selected, the next dialog
presented is the Contact Information dialog. Refer to the Registering a Purchased License section
on page 63 for instructions.
If See all licensing options (Continue to main menu) is selected, the next dialog presented is the
Licensing Options Menu dialog. Refer to the Selecting a Licensing Option section on page 50 for
instructions.
Use the local license server installed and running on this machine
Once the AMX License Server application has been installed locally (as described in the previous section), the
first option in the Select License Server dialog changes to “Use the previously configured license server”
(FIG. 43).
FIG. 43 Select License Server - Use the previously configured license server
46
RMS Enterprise - Installation Guide
AMX License Manager
1. With this option selected, click Next to proceed to the Licensing Status dialog (FIG. 44):
FIG. 44 AMX License Manager Wizard - Licensing Status dialog
2. Click Finished to close the AMX License Manager.
Click on the link Click here if you wish to continue and add additional or manage existing licenses to
jump to the Licensing Options Menu dialog (see the Selecting a Licensing Option section on page 50).
Search the network for available license servers
1. In the initial Select License Server dialog, select the Select a different license server option (FIG. 45):
FIG. 45 AMX License Manager - Select a Different License Server
2. Click Next to proceed to the next Select License Server dialog. This dialog provides a listing of all AMX
License Servers detected on the LAN (FIG. 46):
RMS Enterprise - Installation Guide
47
AMX License Manager
FIG. 46 AMX License Manager - Select License Server
3. Select the desired AMX License Server and click Next to proceed to the Select Licensing Option dialog
(see the Selecting a Licensing Option section on page 50).
If your server does not appear in the list, click Refresh.
If after refreshing the server list, you still do not see your server, click on My License server was
not listed, let me specify the license server path to open the Specify Network License Server
dialog - see FIG. 48 on page 49.
4. Click Next to proceed to the Licensing Options Menu dialog (see the Selecting a Licensing
Option section on page 50).
Manually enter the license server hostname or IP address
FIG. 47 Select License Server - Manually enter the license server hostname or IP address
1. With this option selected, click Next to proceed to the Specify Network License Server dialog (FIG. 48):
48
RMS Enterprise - Installation Guide
AMX License Manager
FIG. 48 AMX License Manager Wizard - Specify Network License Server
2. Enter either the hostname or IP address of the Network License Server that you will connect to in the
License Server field.
3. Click Next to attempt to connect to the specified server.
4. Once a connection is established with the Network License Server, click Next to proceed to the Select
Licensing Option dialog (see the Selecting a Licensing Option section on page 50).
Additional License Server Options
When the AMX License Manager application is launched on a machine that has previously been used to
connect to a license server, the first two options under Select License Server are updated to:
Use the previously configured license server
Select a different license server
The AMX License Manager application can be launched via the Configure RMS
Licenses option in the License Configuration dialog of the RMS Server Configuration
tool (see FIG. 32 on page 38).
Use a previously configured license server
The Use the previously configured license server option is followed by an indication of the currently
configured License Server. Select this option to use pre-defined settings based on the indicated server
(FIG. 49):
Currently configured License Server
FIG. 49 AMX License Manager Wizard - Use the previously configured license server
1. Select Use the previously configured license server.
2. Click Next to proceed:
If the RMS server is already licensed, the next dialog presented is the Licensing Status dialog (see
FIG. 44 on page 47).
Click Finish to close the AMX License Manager tool.
RMS Enterprise - Installation Guide
49
AMX License Manager
Click on the link Click here if you wish to continue and add additional or manage existing
licenses to jump to the Licensing Options Menu dialog (see the Selecting a Licensing
Option section on page 50).
If the RMS server is not currently licensed, the next dialog presented is the Select Licensing Option
dialog. See the Selecting a Licensing Option section on page 50 for instructions.
Select a different license server
Select this option to select a different license server from a listing of all AMX License Servers detected on the
LAN (FIG. 50):
FIG. 50 AMX License Manager Wizard - Select a different license server
1. Select the Select a different license server option.
2. Click Next to invoke a listing of all AMX License Servers detected on the LAN.
See the Search the network for available license servers section on page 47 for details.
3. Select the desired AMX License Server and click Next to proceed to the Select Licensing Option dialog
(see below).
Selecting a Licensing Option
Once you have connected to the AMX License Server, the Select Licensing Option dialog prompts you to
select a licensing option for RMS Enterprise (FIG. 51):
FIG. 51 AMX License Manager Wizard - Select Licensing Option dialog
Request a trial/evaluation license
Select this option if you want to request a free 90-day Trial License. Trial Licenses provide 1 RMS Server
License and 1000 RMS Enterprise Client Licenses.
This option requires that you have Internet access (in order to contact the AMX Licensing Server). Refer to the
Installing the AMX License Server section on page 44 for instructions on installing and running the Licensing
Server.
50
RMS Enterprise - Installation Guide
AMX License Manager
A trial license for RMS Enterprise can only be obtained one time for a server. When the trial license
expires after 90 days, another trial license cannot be obtained. A registered license must be
activated to continue using RMS Enterprise.
Refer to the Requesting a Trial/Evaluation License section on page 53 for instructions.
Register a new software license (Requires an Entitlement ID)
Select this option if you are installing a new license for RMS Enterprise. This requires a valid RMS Enterprise
Entitlement ID (obtained from AMX).
This option requires that you have a valid RMS Enterprise Entitlement ID (obtained from AMX).
Entitlement IDs begin with the prefix "ENT-".
Refer to the Registering a Purchased License section on page 63 for instructions.
If your network configuration precludes the ability to reach the Internet, then your product license
will have to be activated manually as described in the Manually Activating the Product
License section on page 67.
See all licensing options (Continue to main menu)
Select this option if you have already installed your RMS Enterprise Server License and want to register
additional licenses, update an existing license, or view your current licenses. See the Licensing Options Menu
dialog section on page 51 for details.
This option invokes the Licensing Options Menu dialog (see below).
Note that the Licensing Options that are available when you select this option depend on the type of license
(Trial or Purchased) already installed:
If a Trial License has been installed, the available options are Register License By: Entitlement
ID and View Existing Licenses. See the Request a trial/evaluation license section on page 50.
If a Purchased License has been installed, the available options are Register License By: Asset ID
and View Existing Licenses. See the Register a new software license (Requires an Entitlement
ID) section on page 51.
Licensing Options Menu dialog
The options in this dialog allow you to select a licensing option for RMS Enterprise (FIG. 52):
FIG. 52 AMX License Manager Wizard - Licensing Options Menu dialog
Note that once a License has been activated, the Register License By: Entitlement
ID and Request a Trial License options are disabled (as shown above).
Select the licensing option that corresponds with the desired goal:
RMS Enterprise - Installation Guide
51
AMX License Manager
Register License By: Entitlement ID
This option requires that you have a valid RMS Enterprise Entitlement ID (obtained from AMX). After
purchasing software from AMX, you will receive a Entitlement ID. The Entitlement ID is required to acquire
and activate the initial license, and will also be required when requesting support services from AMX.
This option is the same as the Register a new software license (Requires
Entitlement ID) option in the Select Licensing Option dialog (see FIG. 42 on
page 46).
Select this option if:
This server is not licensed at all.
This server already has a trial license that you want to upgrade to a permanent license. See the
Upgrading From a Trial License To a Registered License section on page 58.
See the Registering a Purchased License section on page 63 for instructions.
Register License by Asset ID
This option requires that you have already installed and activated a license for a purchased version of RMS
Enterprise, and you have obtained additional Asset Licenses from AMX.
Asset IDs are used to activate additional Asset Licenses, in order to add Locations to your RMS
System.
See the Adding Asset IDs (Locations) section on page 71 for instructions.
View Existing Licenses
This option allows you to view all existing RMS software licenses detected by the AMX License Manager.
See the Viewing Existing Licenses section on page 93 for details.
Request a Trial License
This option allows you to download and install a Trial/Evaluation license of RMS Enterprise.
This option is only available if a purchased license has not already been activated.
This option is identical to the Request a Trial/Evaluation License option presented in the Select
Licensing Option dialog (see FIG. 51 on page 50). The only difference is that the Licensing
Options Menu dialog can be accessed at any time via the Licensing tab of the RMS Server
Configuration application (Start > Programs > Resource Management Suite >Server >
RMS Configuration).
The process of installing a Trial License is identical, regardless of which method of access is used.
See the Request a trial/evaluation license section on page 50 for details.
52
RMS Enterprise - Installation Guide
Requesting a Trial/Evaluation License
Requesting a Trial/Evaluation License
Overview
Once you have access to the AMX License Server, you can request a Trial/Evaluation license of RMS
Enterprise.
See the Installing the AMX License Server section on page 44 for instructions on installing and
connecting to the AMX License Server application.
See the Upgrading From a Trial License To a Registered License section on page 58 for
instructions on upgrading a Trial License to a purchased License.
A trial license of RMS Enterprise can only be obtained one time for a server. When
the trial license expires after 90 days, another trial license cannot be obtained. A
registered license must be activated to continue using RMS Enterprise. See the
Upgrading From a Trial License To a Registered License section on page 58 for
details.
1. When the AMX License Server is launched, assuming that it detects no licenses on the server, the Select
Licensing Option dialog is presented (FIG. 53):
FIG. 53 Select Licensing Option dialog
2. Click the Request a trial/evaluation license option.
3. Click Next to proceed to the Contact Information dialog (FIG. 54):
RMS Enterprise - Installation Guide
53
Requesting a Trial/Evaluation License
FIG. 54 AMX License Manager Wizard - Contact Information
If you already have an AMX.COM account, click on Lookup Account to provide your credentials (email
address and password) to automatically populate the contact information for this license based on your
existing AMX account information, in the Contact Information Lookup dialog (FIG. 55):
FIG. 55 AMX License Manager Wizard - Contact Information Lookup dialog
a. Enter the Email Address and Password associated with your www.amx.com User Account.
b. Click Next to proceed to the Requesting Contact Information dialog (FIG. 56):
c. Once the information has been successfully retrieved, it is populated into the Contact Information
dialog.
54
RMS Enterprise - Installation Guide
Requesting a Trial/Evaluation License
FIG. 56 AMX License Manager Wizard - Requesting Contact Information
4. Once the contact information has been entered, click Next to proceed to the Customer Information dialog.
The drop-down menu on this dialog allows you to select the market that most applies to your application
(FIG. 57).
FIG. 57 AMX License Manager Wizard - Customer Information
5. Select from the drop-down menu and click Next to contact the AMX Licensing Server to obtain a trial
license.
Progress is indicated in the Requesting Trial License dialog (FIG. 58), as the AMX License Server is
contacted and the trial license is requested.
RMS Enterprise - Installation Guide
55
Requesting a Trial/Evaluation License
FIG. 58 AMX License Manager Wizard - Requesting Trial License dialog
6. Once the trial license has been obtained, it is automatically activated (FIG. 59):
FIG. 59 AMX License Manager Wizard - Trial License Activated
7. Click Next to proceed to the Licensing Status dialog (FIG. 60). Note that the Trial Licenses are indicated
as: 1 RMS Enterprise Server License (Trial) and 1000 RMS Location Asset Licenses (Trial):
56
RMS Enterprise - Installation Guide
Requesting a Trial/Evaluation License
FIG. 60 AMX License Manager Wizard - Installed Product Licenses (showing Trial Licenses)
This dialog can also be accessed by selecting the View Existing Licenses option in
the Licensing Options Menu, or in the Tools menu at the top of the dialog.
See the Upgrading From a Trial License To a Registered License section on page 58 for information on
upgrading a Trial license to a purchased RMS Enterprise license.
RMS Enterprise - Installation Guide
57
Requesting a Trial/Evaluation License
Upgrading From a Trial License To a Registered License
This option requires that you have a valid RMS Enterprise Entitlement ID (obtained from AMX).
When a Trial License is upgraded to a Purchased License, the existing license
information is replaced by the Purchased License information, but any system
information entered/gathered under the Trial License is available to the purchased
license.
1. Launch the RMS Server Configuration tool (Start > Programs > AMX Resource Management Suite >
Server > RMS Configuration).
2. In the Licensing tab, click on Configure RMS Licenses (FIG. 61).
FIG. 61 RMS Server Configuration - Licensing tab
3. This invokes the AMX Licensing Manager application - Welcome screen (FIG. 62):
FIG. 62 AMX Licensing Manager application (Welcome screen)
58
RMS Enterprise - Installation Guide
Requesting a Trial/Evaluation License
4. Click Next to proceed to the Select License Server dialog (FIG. 63):
FIG. 63 AMX License Manager - Select License Server
5. With the Use the local license server installed and running on this machine option selected, click Next
to proceed to the Licensing Status dialog (FIG. 64):
FIG. 64 AMX License Manager - Licensing Status dialog
6. Click on the Click here if you wish to continue and add additional or manage existing licenses link to
access the Licensing Options Menu dialog (FIG. 65):
RMS Enterprise - Installation Guide
59
Requesting a Trial/Evaluation License
FIG. 65 AMX License Manager - Licensing Options Menu dialog
7. Select the Register License by Entitlement ID option.
8. This selection invokes the Contact Information dialog (see FIG. 54 on page 54). Enter your contact
information.
9. Click Next to proceed to the Customer Information dialog (see FIG. 57 on page 55). Select from the
drop-down menu.
10. Click Next to proceed to the Install New AMX Product License dialog. (FIG. 66):
FIG. 66 AMX License Manager Wizard - Install New AMX Product License
11. Enter your Entitlement ID in this field.
Entitlement IDs begin with the prefix "ENT-".
The Entitlement ID is obtained from AMX after purchasing RMS Enterprise.
12. Click Next to prompt the License Manager to contact the AMX Licensing Server and activate the license
associated with the provided Entitlement ID, in the Requesting License dialog (FIG. 67):
60
RMS Enterprise - Installation Guide
Requesting a Trial/Evaluation License
FIG. 67 AMX License Manager - Requesting License dialog
An error message will be displayed if the entitlement has already been registered to
another system or if the entitlement ID is invalid. Please contact AMX customer
service if you encounter any difficulties obtaining your product license.
13. The License Activated dialog indicates that the license was successfully activated (FIG. 68):
FIG. 68 AMX License Manager - License Activated dialog
14. Click Next to return to the Licensing Options Menu dialog (FIG. 69):
RMS Enterprise - Installation Guide
61
Requesting a Trial/Evaluation License
FIG. 69 AMX License Manager - Licensing Options Menu dialog
After upgrading to a registered license, the only available options are Register
License By: Asset ID and View Existing Licenses.
Accessing the RMS Enterprise Web UI
Once the installation is complete, the RMS Enterprise Web UI is accessed via web browser (see Supported
Web Browsers on page 8).
To open the main RMS Enterprise Web UI, enter the following URL in your browser’s address bar:
http://servername:8080/rms
Port 8080 is the default port for Tomcat (see Installing Apache Tomcat v6.0.x on
page 17). However, when installing of Tomcat, this port can be assigned to another
value if desired. The value assigned to Tomcat is the value that is used here in the
URL.
Refer to the RMS Enterprise System Administrator’s Guide for details on using the RMS Enterprise Web UI.
62
RMS Enterprise - Installation Guide
Registering a Purchased License
Registering a Purchased License
Overview
Once you have access to the AMX License Server, you can register a new software license for RMS
Enterprise. See the Installing the AMX License Server section on page 44 for instructions on installing and
connecting to the AMX License Server application.
This option requires that you have a valid RMS Enterprise Entitlement ID (obtained from AMX).
For instructions on upgrading from a Trial License to a Registered (purchased) License, see the
Upgrading From a Trial License To a Registered License section on page 58.
1. When the AMX License Server is launched, assuming that it detects no licenses on the server, the Select
Licensing Option dialog is presented (FIG. 70):
FIG. 70 Select Licensing Option dialog
2. Click the Register a new software license (Requires an Entitlement ID) option.
3. Click Next to open the Contact Information dialog (see FIG. 54 on page 54). Enter your contact
information.
4. Click Next to proceed to the Customer Information dialog (see FIG. 57 on page 55). Select from the
drop-down menu.
5. Click Next to proceed to the Install New AMX Product License dialog. (FIG. 71):
6. Enter your Entitlement ID in this field.
The Entitlement ID is obtained from AMX after purchasing RMS Enterprise.
Entitlement IDs begin with the prefix "ENT-".
RMS Enterprise - Installation Guide
63
Registering a Purchased License
FIG. 71 AMX License Manager Wizard - Install New AMX Product License
7. Click Next to contact the AMX Licensing Server and activate the licenses associated with the provided
Entitlement ID.
To request a license, this system must be connected to the network and have Internet access. If the
machine is unable to access the Internet, a manual option will be provided.
See the Manually Activating the Product License section on page 67 for details.
8. Progress is indicated in the Requesting License dialog (FIG. 72):
FIG. 72 AMX License Manager Wizard - Requesting License
An error message will be displayed if the entitlement has already been registered to
another system or if the entitlement ID is invalid. Please contact AMX customer
service if you encounter any difficulties obtaining your product license.
9. The License Activated dialog indicates that the license was successfully activated (FIG. 73):
64
RMS Enterprise - Installation Guide
Registering a Purchased License
FIG. 73 AMX License Manager Wizard - License Activated
10. Click Next to proceed to the Licensing Status dialog (FIG. 74):
FIG. 74 AMX License Manager Wizard - Licensing Status dialog
If this server has previously had a Trial License registered by Entitlement ID, the trial
license will no longer be listed in the Installed Product Licenses dialog. Once a
license is registered, only valid registered licenses are displayed. See the Viewing
Existing Licenses section on page 93 for details.
11. Click Finished to exit the AMX License Manager, and return to the License Configuration tab of the
RMS Server Configuration tool (FIG. 75):
RMS Enterprise - Installation Guide
65
Registering a Purchased License
FIG. 75 RMS Server Configuration tool - License Configuration
12. Click Next to proceed to the final RMS Server Configuration dialog - the Configuration Summary dialog
(FIG. 76):
FIG. 76 RMS Server Configuration tool - Configuration Summary
13. Click Finish to exit the RMS Server Configuration tool.
66
RMS Enterprise - Installation Guide
Registering a Purchased License
Manually Activating the Product License
To register a new RMS Enterprise License, you must have a valid RMS Enterprise Entitlement ID (obtained
from AMX). Typically, this process also requires Internet access (in order to contact the AMX Licensing
Server). However, if your network configuration precludes the ability to reach the Internet, then your product
license will have to be activated manually as described below.
1. In the Licensing Options Menu dialog (see FIG. 53 on page 44), select Register License by Entitlement
ID (FIG. 77):
FIG. 77 AMX License Manager - Licensing Options Menu dialog
2. This selection invokes the Contact Information dialog (see FIG. 54 on page 54). Enter your contact
information.
3. Click Next to proceed to the Customer Information dialog (see FIG. 57 on page 55). Select from the
drop-down menu.
4. Click Next to proceed to the Install New AMX Product License dialog (see FIG. 71 on page 64).
5. Enter your Entitlement ID in the text field provided.
The Entitlement ID is obtained from AMX after purchasing RMS Enterprise.
Entitlement IDs begin with the prefix "ENT-".
6. Click Next to prompt the License Manager to contact the AMX Licensing Server and activate the license
associated with the provided Entitlement ID.
In this case, the AMX Licensing Server will not be reached, and the Unable To Contact AMX Licensing
Services dialog is invoked (FIG. 78):
RMS Enterprise - Installation Guide
67
Registering a Purchased License
FIG. 78 AMX License Manager - Unable To Contact AMX Licensing Services dialog
7. Select Contact AMX and obtain licenses via the telephone. This selection invokes the Manually
Activate Product License dialog (FIG. 79):
Click to copy the license information
to the clipboard (if you intend to email
this information to AMX)
FIG. 79 AMX License Manager - Manually Activate Product License dialog
Note that the Entitlement ID, Primary Lock and Secondary Lock identifiers are automatically
populated.
Click the link: Copy License Information To Clipboard if you intend to e-mail the information to
your AMX Customer Support Representative.
8. Call your AMX Customer Representative on the phone and relay the information from this dialog to your
AMX Customer Support Representative. You will be provided with a License Activation Code (in the
form of an email).
9. Click Next to proceed.
10. Copy the License Activation Code from the email into the License Activation Code field (FIG. 80):
68
RMS Enterprise - Installation Guide
Registering a Purchased License
Example License Activation Code
pasted from email into the text field
FIG. 80 AMX License Manager - Manually Activate Product License dialog
11. Click Next to activate the specified Entitlement ID and proceed to the License Activated dialog (FIG. 81):
FIG. 81 AMX License Manager Wizard - License Activated dialog
12. Click Next to return to the Licensing Options Menu dialog (FIG. 77 on page 67).
Accessing the RMS Enterprise Web UI
Once the installation is complete, the RMS Enterprise Web UI is accessed via web browser (see Supported
Web Browsers on page 8).
To open the main RMS Enterprise Web UI, enter the following URL in your browser’s address bar:
http://servername:8080/rms
Port 8080 is the default port for Tomcat (see Installing Apache Tomcat v6.0.x on
page 17). However, when installing of Tomcat, this port can be assigned to another
value if desired. The value assigned to Tomcat is the value that is used here in the
URL.
Refer to the RMS Enterprise System Administrator’s Guide for details on using the RMS Enterprise Web UI.
RMS Enterprise - Installation Guide
69
Registering a Purchased License
70
RMS Enterprise - Installation Guide
Adding Asset IDs (Locations)
Adding Asset IDs (Locations)
Overview
Once you have installed a registered version of RMS Enterprise (see the Registering a Purchased
License section on page 63 for details), you can upgrade your RMS Entitlement with additional Asset
Licenses.
Asset IDs are used to activate additional Asset Licenses, in order to add Locations to your RMS
System. Each Location requires an Asset License.
Assets can be manually added to Systems that are not network-accessible. See the Manually Adding
Assets section on page 78 for instructions.
1. Launch the RMS Server Configuration tool (Start > Programs > AMX Resource Management Suite >
RMS Configuration.
2. In the Licensing tab, click on Configure RMS Licenses (FIG. 82).
FIG. 82 RMS Server Configuration - Licensing tab
3. This invokes the AMX Licensing Manager application - Welcome screen (FIG. 83):
RMS Enterprise - Installation Guide
71
Adding Asset IDs (Locations)
FIG. 83 AMX Licensing Manager application (Welcome screen)
4. Click Next to proceed to the Select License Server dialog (FIG. 84):
FIG. 84 AMX License Manager - Select License Server
5. With the Use the local license server installed and running on this machine option selected, click Next
to proceed to the Licensing Status dialog (FIG. 85):
72
RMS Enterprise - Installation Guide
Adding Asset IDs (Locations)
FIG. 85 AMX License Manager - Licensing Status dialog
6. Click on the Click here if you wish to continue and add additional or manage existing licenses link to
access the Licensing Options Menu dialog (FIG. 86):
FIG. 86 AMX License Manager - Licensing Options Menu dialog
7. Click on Register License By: Asset ID to proceed to the Select Entitlement dialog (FIG. 87):
RMS Enterprise - Installation Guide
73
Adding Asset IDs (Locations)
FIG. 87 AMX License Manager - Select Entitlement dialog
8. Click to select the Entitlement to be updated.
9. Click Next to proceed to the Entitlement Asset ID dialog (FIG. 88):
FIG. 88 AMX License Manager - Entitlement Asset ID dialog
10. Enter the Asset ID obtained from AMX.
11. Click Next to proceed to the Requesting License Entitlement Update dialog (FIG. 89):
74
RMS Enterprise - Installation Guide
Adding Asset IDs (Locations)
FIG. 89 AMX License Manager - Requesting License Entitlement Update dialog
12. The system will then request to update the existing license. A successful activation results in the
presentation of the License Activated dialog (FIG. 90):
FIG. 90 AMX License Manager - License Activated dialog
13. Click Next to return to the Licensing Options Menu dialog. At this point, the only available options are
Register License By: Asset ID and View Existing Licenses (FIG. 91):
RMS Enterprise - Installation Guide
75
Adding Asset IDs (Locations)
FIG. 91 AMX License Manager - Licensing Options Menu dialog.
If you click on View Existing Licenses, you will see the additional Asset Licenses represented as
new RMS Location Asset Licenses in the Installed Product Licenses dialog. The example in
FIG. 92 shows that 500 Locations have been added to the original 1000, for a total of 1500
Locations:
FIG. 92 AMX License Manager - Installed Product Licenses dialog.
Also, if you view the Installed Entitlements (via the Installed Entitlements dialog), the new Assets
are represented as RMS Enterprise Location Licenses (FIG. 93):
76
RMS Enterprise - Installation Guide
Adding Asset IDs (Locations)
FIG. 93 AMX License Manager - Installed Entitlements dialog
To open this dialog:
a. Select Start > Programs > AMX Resource Management Suite > Server > RMS Configuration.
b. In the RMS Server Configuration dialog, open the Licenses tab.
c. Click on Configure RMS Licenses to access the AMX License Manager.
d. Select Tools > View AMX Entitlements.
14. Click Next to return to the Licensing Options Menu dialog.
RMS Enterprise - Installation Guide
77
Adding Asset IDs (Locations)
Manually Adding Assets
To add an Asset License, you must have a valid Asset ID (obtained from AMX). Typically, this process also
requires Internet access (in order to contact the AMX Licensing Server). However, if your network
configuration precludes the ability to reach the Internet, then your Asset license will have to be activated
manually as described below.
1. Launch the RMS Server Configuration tool (Start > Programs > AMX Resource Management Suite >
RMS Configuration.
2. In the Licensing tab, click on Configure RMS Licenses.
3. This invokes the AMX Licensing Manager - Welcome screen.
4. Click Next to proceed to the Select License Server dialog.
5. With the Use the local license server installed and running on this machine option selected, click Next
to proceed to the Licensing Status dialog (FIG. 94):
FIG. 94 AMX License Manager - Licensing Status dialog
6. Click on the Click here if you wish to continue and add additional or manage existing licenses link to
access the Licensing Options Menu dialog (FIG. 95):
78
RMS Enterprise - Installation Guide
Adding Asset IDs (Locations)
FIG. 95 AMX License Manager - Licensing Options Menu dialog
7. Click on Register License By: Asset ID to proceed to the Select Entitlement dialog (FIG. 96):
FIG. 96 AMX License Manager - Select Entitlement dialog
8. Click to select the Entitlement to be updated.
9. Click Next to proceed to the Entitlement Asset ID dialog (FIG. 97):
RMS Enterprise - Installation Guide
79
Adding Asset IDs (Locations)
FIG. 97 AMX License Manager - Entitlement Asset ID dialog
10. Enter the Asset ID obtained from AMX. and click Next to proceed.
11. The system will attempt to contact AMX Licensing Services to update the license and activate the new
Assets. In this case (without network access) it will fail, as indicated in the Unable to contact AMX
Licensing Services dialog (FIG. 98):
FIG. 98 AMX License Manager - Unable to contact AMX Licensing Services dialog
12. Click on the Contact AMX and obtain licenses via the telephone link to open the Manually Activate
Product License dialog (FIG. 99):
80
RMS Enterprise - Installation Guide
Adding Asset IDs (Locations)
FIG. 99 AMX License Manager - Manually Activate Product License dialog (License Information)
13. The information in this dialog along with the following information must be provided to AMX Customer
Service:
Product being added
Quantity of this product
Order Number or Dealer Number
Date of the order
AMX Customer Service will then provide the updated license key.
14. Click the Next button to proceed to the Manually Activate Product License dialog, and enter the key from
received from AMX Customer Service into the License Activation field (FIG. 100).
FIG. 100 AMX License Manager - Manually Activate Product License dialog (License Activation)
15. Click Next, to update the license and proceed to the License Activation Success dialog upon a successful
update of the license (FIG. 101):
RMS Enterprise - Installation Guide
81
Adding Asset IDs (Locations)
FIG. 101 AMX License Manager - License Activation Success dialog
16. Click Next to proceed to the Licensing Options Menu dialog.
17. Click on View Existing Licenses to view the updated licenses in the Installed Product Licenses dialog
(FIG. 102):
FIG. 102 AMX License Manager - Installed Product Licenses dialog
18. Click Next to view the updated entitlement in the Installed Entitlements dialog (FIG. 103):
FIG. 103 AMX License Manager - Installed Entitlements dialog
19. Click Next to return to the Licensing Options Menu dialog (FIG. 86 on page 73).
82
RMS Enterprise - Installation Guide
Adding the Scheduling Interface and Plug-In
Adding the Scheduling Interface and Plug-In
Overview
Once you have installed a registered version of RMS Enterprise (see the Registering a Purchased
License section on page 63 for details), you can upgrade your RMS Entitlement with a Scheduling License.
The Scheduling License enables support for various scheduling plug-ins for RMS Enterprise.
To ensure optimal performance of the RMS Enterprise UI, the RMS Scheduling
Interface application should not be installed on the Primary RMS Enterprise Server.
Install the RMS Scheduling Interface application on a separate server.
Verify that the server that will run the RMS Enterprise Scheduling Interface meets or exceeds the
minimum OS and hardware requirements indicated on page 14.
Supported Scheduling Plug-Ins
The following scheduling plug-in is supported by RMS Enterprise:
RMS Interface for Exchange EWS (RMS-SCH-EWS)
Scheduling plug-ins are available to purchase from www.amx.com/rms/.
Before You Start
Verify that the Primary RMS Server is running.
Have the IP Address and login credentials for the RMS Enterprise Server.
Have the IP Address and login credentials for the scheduling interface.
1) Install the Scheduling Interface and Configuration Tool
The first step in adding a Scheduling License to RMS Enterprise is to install the RMS Scheduling Interface
application and RMS Scheduling Configuration Tool:
1. Download the RMS Enterprise Scheduling installation file (ResourceManagementSuiteScheduler.msi)
from www.amx.com/rms/.
2. Double-click to launch the AMX RMS Scheduling Setup Wizard (FIG. 104):
FIG. 104 AMX RMS Scheduling Setup Wizard (Welcome screen)
3. Click Next to proceed to the End-User License Agreement screen (FIG. 105):
RMS Enterprise - Installation Guide
83
Adding the Scheduling Interface and Plug-In
FIG. 105 AMX RMS Scheduling Setup Wizard - End User License Agreement
4. Click I accept the terms in the License Agreement to enable the Next button, then click Next to proceed to
the Destination Folder screen (FIG. 106):
FIG. 106 AMX RMS Scheduling Setup Wizard - Destination Folder
The default target directory for the Interface installation is indicated in the text field on this screen:
32-bit OS: C:\Program Files\AMX\Resource Management Suite\Scheduler\
64-bit OS: C:\Program Files (x86)\AMX\Resource Management Suite\Scheduler\
In most cases you should use this default setting. However, if your installation requires a different folder,
click Change and select the desired folder in the Change Destination Folder screen.
5. Click Next to proceed to the Ready To Install AMX RMS Scheduling screen (FIG. 107):
84
RMS Enterprise - Installation Guide
Adding the Scheduling Interface and Plug-In
FIG. 107 AMX RMS Scheduling Setup Wizard - Ready To Install AMX RMS Scheduling
6. Click Install to begin installing AMX RMS Scheduling to the target directory on the specified server.
Installation progress is indicated in the Installing AMX RMS Scheduling screen (FIG. 108):
FIG. 108 AMX RMS Scheduling Setup Wizard - Installing AMX RMS Scheduling
7. When the installation is complete, the Completed the AMX RMS Scheduling Setup Wizard screen is
displayed (FIG. 109):
RMS Enterprise - Installation Guide
85
Adding the Scheduling Interface and Plug-In
FIG. 109 AMX RMS Scheduling Setup Wizard - Completed the AMX RMS Scheduling Setup Wizard
8. Click Finish to close the AMX RMS Scheduling Setup Wizard.
At this point, the Scheduling Interface and Scheduling Configuration Tool are both installed. The next step is
to install the appropriate RMS scheduling plug-in. This process will invoke the RMS Enterprise Scheduling
Configuration tool as described below.
2) Install and Configure the Scheduling Plug-In
Install the scheduling plug-in that will be used with RMS Enterprise.
Scheduling plug-ins are available to download from www.amx.com/rms/.
Refer to each plug-in’s Installation Guide for installation details.
Supported scheduling plug-ins are listed on page 83.
FIG. 110 shows the Installation Completed dialog for the Microsoft Exchange 2010 plug-in, as an example:
Click Next to launch the
RMS Enterprise Scheduling
Configuration tool
FIG. 110 RMS Exchange 2010 Plug-In - Installation Completed
1. At the end of the installation routine for the scheduling plug-in, click Next to launch the RMS Enterprise
Scheduling Configuration tool.
The RMS Enterprise Scheduling Configuration tool allows you to configure the Interface to communicate
with RMS Enterprise.
The initial view is of the RMS Server tab (FIG. 111):
86
RMS Enterprise - Installation Guide
Adding the Scheduling Interface and Plug-In
FIG. 111 RMS Enterprise Scheduling Configuration tool - RMS Server tab
1. Enter the appropriate connection information for your RMS Enterprise server:
RMS Enterprise Scheduling Configuration - RMS Server Configuration options
RMS Server URL: Enter the URL or IP address of the RMS Server that will use this scheduling plug-in.
User Name:
Enter the user name as required by the server (default = "scheduler")
Password:
Enter the password as required by the server (default = "password")
2. Click the Test Connection button to verify this information. The program will indicate that the
connection was successful or not. If the connection attempt fails, re-enter the server information.
You cannot proceed until you have successfully connected to the server.
3. Click Save RMS Server Setting to save these settings, register the Interface with the server, and enable
the Scheduling Plugins and Resource Profiles tabs (FIG. 112):
FIG. 112 RMS Enterprise Scheduling Configuration tool - Scheduling Plugins and Resource Profiles tabs enabled
RMS Enterprise - Installation Guide
87
Adding the Scheduling Interface and Plug-In
4. Open the Scheduling Plug-Ins tab (FIG. 113):
FIG. 113 RMS Enterprise Scheduling Configuration tool - Scheduling Plug-Ins tab
The options in this tab allow you to register a scheduling plug-in with RMS Enterprise. If you have only
installed a single scheduling plug-in, then there is only one Scheduling Plugin listed (and pre-selected) in this
dialog.
Only one scheduling plug-in can be registered with RMS Enterprise. However, it is possible to
install multiple scheduling plug-ins. If you have multiple scheduling plug-in installed, they will all
be listed in this dialog.
To register a different scheduling plug-in, the currently registered plug-in must first be unregistered: select the plug-in and click Unregister. Only then can you register a different
scheduling plug-in.
5. With the desired scheduling plug-in selected, click Register to invoke the Plugin Configuration dialog
specific to the selected scheduling plug-in. The example in FIG. 114 shows the Plugin Configuration
dialog for the Microsoft Exchange 2010 plug-in:
FIG. 114 Example Plugin Configuration tool
6. Enter the configuration information required by the plug-in. Refer to each plug-in’s Installation Guide for
installation details.
7. Click OK to save the configuration and close the Plugin Configuration dialog.
88
RMS Enterprise - Installation Guide
Adding the Scheduling Interface and Plug-In
The plug-in is now indicated as Registered in the Scheduling Plugins tab of the AMX - RMS Scheduling
Configuration tool (FIG. 115):
FIG. 115 RMS Enterprise Scheduling Configuration tool - Scheduling Plug-Ins tab (Plug-in Registered)
8. Open the Resource Profiles tab (FIG. 116):
FIG. 116 RMS Enterprise Scheduling Configuration tool - Resource Profiles tab
This tab displays all Resources (Locations) defined in RMS. Check the Use In RMS option for each resource
that you want to use this scheduling plug-in.
The Resource Name (Exchange Server) column provides the names of each resource (as it exists
in the scheduling interface). Double-click on a resource name to edit the name that will be
presented in the RMS UI. Note that editing a resource name here does not change the name in the
scheduling interface.
Select the checkboxes in the Use In RMS column to specify which resources will use this
scheduling plug-in. By default, no resources are selected. Only resources that have been selected in
this column will use the scheduling interface.
RMS Enterprise - Installation Guide
89
Adding the Scheduling Interface and Plug-In
A green checkmark in the Mapped column indicates that the resource is currently mapped to a
location in RMS. This is to call attention to the fact that resources that are currently mapped to
locations in RMS are currently in use, so care should be taken when removing these resources from
the scheduling interface (by de-selecting the checkmark in the Use In RMS column).
9. Click Save to save your changes.
10. Close the RMS Enterprise Scheduling Configuration tool.
11. Map the resources (Locations) listed here to a resource profile, to enable the scheduling interface for each
location. See Mapping Locations to Resource Profiles for Scheduling below.
Mapping Locations to Resource Profiles for Scheduling
It is necessary to map each of the selected resources (Locations) in the RMS Enterprise Scheduling
Configuration tool to a Resource Profile, in order to enable the scheduling interface for each location. This
requires accessing the Location Management page in the RMS Enterprise UI:
The RMS Enterprise UI is accessed via web browser (see Supported Web Browsers on page 8).
To open the main RMS Enterprise Web UI, enter the following URL in your browser’s address bar:
http://servername:8080/rms
Port 8080 is the default port for Tomcat (see Installing Apache Tomcat v6.0.x on
page 17). However, when installing of Tomcat, this port can be assigned to another
value if desired. The value assigned to Tomcat is the value that is used here in the
URL. Refer to the RMS Enterprise Installation Guide for details on installing and
configuring Tomcat.
1. To open the Locations page in the RMS Enterprise UI, select Management > Configure Locations/
Clients > Locations from the main menu (FIG. 117):
FIG. 117 RMS Enterprise UI - Management > Configure Locations/Clients > Locations
2. In the Locations page, select a Location and click Edit to open the Location Edit page (alternatively,
double-click on a Location to edit).
3. Under Scheduling Configuration, select a Resource Profile from the drop-down list. The entries in this
drop-down list represent the Resource Profiles that were selected to Use In RMS, in the RMS Enterprise
Scheduling Configuration tool - Resource Profiles tab.
For example FIG. 118 shows that five resources (Locations) are selected to Use In RMS:
FIG. 118 RMS Enterprise Scheduling Configuration tool - Resource Profiles tab, with resources selected to Use In RMS
In the RMS UI Locations page, these are the resources (Locations) that appear in the Resource Profile
drop-down list (FIG. 119):
90
RMS Enterprise - Installation Guide
Adding the Scheduling Interface and Plug-In
FIG. 119 RMS Enterprise UI (Locations page) - Resource Profile drop-down list
Note that if any of the resource names were edited in the RMS Enterprise Scheduling Configuration tool,
the edited names are displayed here.
4. Click Apply (at the bottom of this page) to save the selected Resource Profile as the scheduling
configuration for the currently selected Location.
5. Repeat this process for all other Locations that require scheduling.
Note that each resource profile can only be applied to a single Location. As resource profiles are applied
to Locations, they are removed from the Resource Profiles list.
RMS Enterprise - Installation Guide
91
Adding the Scheduling Interface and Plug-In
92
RMS Enterprise - Installation Guide
Viewing Existing Licenses
Viewing Existing Licenses
Overview
The View Existing Licenses option in the Licensing Options Menu dialog (FIG. 120) allows you to view all
existing RMS software licenses detected by the AMX License Manager.
FIG. 120 AMX License Manager - Licensing Options Menu dialog
Opening AMX License Manager
1. To open the AMX License Manager, click Configure RMS Licenses in the Licensing tab of the RMS
Server Configuration tool (FIG. 121). See the RMS Server Configuration section on page 29 for details.
Click to launch the
AMX License Manager
application
FIG. 121 RMS Server Configuration tool - Licensing tab
If you accessed the RMS Server Configuration tool via the Next button in the final dialog of the AMX
RMS Server Installer (see FIG. 23 on page 27), then click Next until you get to the License Configuration
page. Click Configure RMS Licenses to launch AMX License Manager.
Either way, the first dialog presented is the Welcome To AMX License Manager dialog (FIG. 122):
RMS Enterprise - Installation Guide
93
Viewing Existing Licenses
FIG. 122 AMX License Manager - Licensing Options Menu dialog
2. Click Next to proceed to the Select License Server dialog (FIG. 123).
FIG. 123 AMX License Manager - Select License Server dialog
3. Select a License Server option (see Selecting a Licensing Option on page 50), and click Next to proceed
to the Licensing Status dialog (FIG. 124):
FIG. 124 AMX License Manager - Licensing Status dialog
This dialog lists all licenses currently installed, with their current Status.
4. Click on the link: Click here if you wish to continue and add additional or manage existing licenses
to access the Licensing Options Menu dialog (FIG. 125):
94
RMS Enterprise - Installation Guide
Viewing Existing Licenses
FIG. 125 AMX License Manager - Licensing Options Menu dialog
5. Select View Existing Licenses to open the Installed Product Licenses dialog (FIG. 126):
FIG. 126 AMX License Manager Wizard - Installed Product Licenses
Hover over a Location Asset license to view details in the selected license in a tool-tip window
similar to the one shown in FIG. 127:
FIG. 127 Installed Product Licenses - Location Asset License Details window
Hover over a Server license to view details in the selected license in a tool-tip window similar to the
one shown in FIG. 127:
RMS Enterprise - Installation Guide
95
Viewing Existing Licenses
FIG. 128 Installed Product Licenses - Server License Details window
Click the View all other product licenses installed on this license server option to expand the list
to show all AMX product licenses (including non-RMS licenses).
6. Click Next to return to the Licensing Options Menu dialog (see the Licensing Options Menu
dialog section on page 51).
96
RMS Enterprise - Installation Guide
Appendix A: Installing SQL Server 2008 Express Edition
Appendix A: Installing SQL Server 2008
Express Edition
Overview
The instructions in this Appendix are intended to assist in installing and configuring SQL Server 2008 Express
Edition for use with RMS Enterprise.
While RMS does support Microsoft SQL Express 2008 databases, the RMS services and website
must connect using a TCP/IP connection or named pipes.
Connecting to SQL Express 2008 via shared memory is not supported.
The Network Administrator should perform this type of configuration.
SQL "Express" is only appropriate for systems with less than 50 locations. See the
Supported Database Platforms section on page 8 for details.
Installing SQL Server Express
The steps below describe installing SQL Server Express for RMS Enterprise via the SQL Server 2008 Setup
installation routine.
The following section (Configuring SQL Express via the SQL Server Configuration Manager on page 101)
describes configuring SQL Server Express for use with RMS Enterprise.
You can use the SQL Server Configuration Manager utility to configure (or change
the current configuration of) the SQL Server after it has been installed.
1. Download the SQL Server 2008 Express Edition (SP1 or higher) installation file from Microsoft.
2. Run the downloaded file to launch the SQL Server Installation Center.
3. Click on Installation in the menu pane to open the page shown in FIG. 129:
FIG. 129 SQL Server Installation Center
4. Click on New SQL Server stand-alone installation or add features to an existing installation to
proceed to the Product Key page.
5. Since SQL Express does not require a Product Key, click Next to proceed to the Setup Support Rules
page.
RMS Enterprise - Installation Guide
97
Appendix A: Installing SQL Server 2008 Express Edition
6. No changes are required in the Setup Support Rules page, so click Next to proceed to the Feature
Selection page (FIG. 130).
Select all Features
FIG. 130 SQL Server 2008 Setup - Feature Selection page
7. Select all options in the Features window, and click Next to proceed to the Instance Configuration page.
8. No changes are required on the following two pages (Instance Configuration and Disc Space
Requirements), so click Next to accept the default settings and proceed to the Server Configuration page
(FIG. 131):
Select an Account Name
Select Automatic
FIG. 131 SQL Server 2008 Setup - Server Configuration page
98
RMS Enterprise - Installation Guide
Appendix A: Installing SQL Server 2008 Express Edition
9. In the Server Configuration page (Server Accounts tab):
a. In the upper window (SQL Server Database Engine, select the appropriate Account Name from the
options provided.
b. In the lower window (SQL Server Browser), select Automatic from the Startup Type drop-down
menu.
c. Click Next to proceed to the Database Engine Configuration page (FIG. 132):
FIG. 132 SQL Server 2008 Setup - Database Engine Configuration page
10. In the Database Engine Configuration page (Account Provisioning tab):
RMS Enterprise supports both Windows Authentication and SQL Authentication. SQL
Authentication is recommended simply due to the simplicity of installation.
a. Under Authentication Mode, select Mixed Mode.
b. Enter and confirm a Password to apply to the SQL Server System Administrator account.
c. Click Next to proceed to the Error and Usage Reporting page.
11. No changes are required on the following two pages (Error and Usage Reporting and Installation Rules),
so click Next to accept the default settings and proceed to the Ready To Install page (FIG. 133):
RMS Enterprise - Installation Guide
99
Appendix A: Installing SQL Server 2008 Express Edition
FIG. 133 SQL Server 2008 Setup - Ready To Install page
12. Click Install to begin the installation. Progress is indicated in the Installation Progress page.
13. Once this page indicates Setup Process Complete, click Next to proceed to the Complete page (FIG. 134):
FIG. 134 SQL Server 2008 Setup - Complete page
14. Click Close to close the SQL Server 2008 Setup program.
100
RMS Enterprise - Installation Guide
Appendix A: Installing SQL Server 2008 Express Edition
Configuring SQL Express via the SQL Server Configuration
Manager
The following steps describe using the SQL Server Configuration Manager to configure (or change the current
configuration of) the SQL Server after it has been installed.
The screen caps included n this section represent the SQL Express 2008 User
Interface (UI). If you are using SQL Express 2008 R2, you may notice cosmetic
differences in the UI, but the principles are the same.
1. With SQL Server Express already installed, launch the SQL Server Configuration Manager utility from
the Start menu (FIG. 135):
FIG. 135 SQL Server Configuration Manager
2. In the left menu pane, select SQL Server Services (FIG. 136):
If the steps in the "Installing SQL Express" section were followed, then the SQL Server Browser service
should indicate Running at this point. If this is the case, then Steps 3-6 can be ignored.
verify that the SQL Server Browser service is Running before proceeding.
If the SQL Browser is Stopped (as indicated here), follow Steps 3-6.
FIG. 136 SQL Server Configuration Manager - SQL Server Services
If you followed the steps described in the previous section, the SQL Server Browser
service should be running at this point.
If the SQL Server Browser is running, Steps 3-6 can be ignored. However, verify that
the SQL Server is still running before continuing with Step 7 (selecting Protocols for
SQL Express - see FIG. 141 on page 103).
RMS Enterprise - Installation Guide
101
Appendix A: Installing SQL Server 2008 Express Edition
3. Right-click on SQL Server Browser and select Properties from the context-menu (FIG. 137). This
selection invokes the Properties dialog.
FIG. 137 SQL Server Configuration Manager - SQL Server Services context menu
4. In the Services tab, change the Start Mode setting to Automatic (FIG. 138):
FIG. 138 SQL Server Browser Properties dialog (Services tab)
5. Click Apply to save this change, and click OK to close this dialog.
6. Right-click on SQL Server Browser and select Start from the context-menu (FIG. 139):
FIG. 139 SQL Server Configuration Manager - SQL Server Services context menu
102
RMS Enterprise - Installation Guide
Appendix A: Installing SQL Server 2008 Express Edition
Note that the State column for the SQL Server Browser now indicates Running (FIG. 140):
FIG. 140 SQL Server Configuration Manager - SQL Server Browser Running
7. In the left menu pane, select Protocols for SQLEXPRESS (FIG. 141):
FIG. 141 SQL Server Configuration Manager - SQL Server Services
8. Right-click on TCP/IP and select Properties from the context menu. This selection invokes the
TCP/IP Properties dialog.
9. In the Protocol tab, change the Enabled setting to Yes (FIG. 142):
FIG. 142 TCP/IP Properties dialog (Protocol tab)
10. Click Apply to save these changes.
RMS Enterprise - Installation Guide
103
Appendix A: Installing SQL Server 2008 Express Edition
11. In the IP Addresses tab, change the TCP Port setting under each IP listed (IP1, IP2, IP3, etc) to 1433
(FIG. 143):
Change the TCP Port setting to 1433 for all IPs
Scroll down
FIG. 143 TCP/IP Properties dialog (IP Addresses tab)
12. Click Apply to save these changes, and click OK to close this dialog.
13. The program will prompt you to stop and restart the service for these changes to take effect (FIG. 144):
FIG. 144 TCP/IP Properties - Warning dialog
14. Click OK to close this dialog and return to the main screen of the SQL Server Configuration Manager.
15. Stop and Restart the SQL Server Services:
a. In the left menu pane, select SQL Server Services (FIG. 145):
A
B
FIG. 145 SQL Server Configuration Manager - SQL Server Services
b. Right-click on SQL Server (SQLEXPRESS) and select Restart from the context menu (FIG. 145).
104
RMS Enterprise - Installation Guide
Appendix B: Tomcat Configuration
Appendix B: Tomcat Configuration
Overview
In configuring RMS Enterprise, there are system variables involved that include:
The size of the RMS system (for example, the number of rooms in the system as well as the number
of devices in each room).
The characteristics of the network on which RMS is installed.
The manner in which the RMS system is designed, programmed and used.
The hardware and software configuration of the RMS server and RMS database server.
All of these variables can affect the overall performance of the RMS system.
In particular, the MaxPermSize, Initial Memory Pool and Maximum Memory Pool settings for Tomcat may
need to be adjusted from the suggested default values that are provided in the Configuring Apache
Tomcat section on page 20.
As indicated in the Installing Apache Tomcat v6.0.x section, Tomcat must be restarted after the final step in the
configuration procedure. Testing has indicated that in some cases, Tomcat will not restart if the recommended
memory settings are incompatible with a specific PC (usually due to the hardware configuration of the server).
Specifically, the Tomcat Start/Start options in the task bar are disabled, and the system manager indicates that
Tomcat is in "Starting" mode.
The recommended method of troubleshooting this issue is to perform a test that will establish valid values for
MaxPermSize, Initial Memory Pool and Maximum Memory Pool, for the server that will run the RMS
Enterprise application.
Testing for Acceptable Java Memory Settings
1. Open a command prompt on the server that will run the RMS Enterprise application.
2. Enter the following command at the Command prompt:
java -Xms<MB> -Xmx<MB> -XX:MaxPermSize=<MB>
3.
where:
Xms - Minimum heap size
Xmx - Maximum heap size
Enter values (in MB) for the minimum and maximum heap size as well as for MaxPermSize.
a. If the values entered are acceptable for this server, then the allocations are made and no error message
is invoked (FIG. 146):
FIG. 146 Java memory settings - no errors
RMS Enterprise - Installation Guide
105
Appendix B: Tomcat Configuration
b. However, if the values entered are not acceptable for this server, the following error messages are
returned (FIG. 147):
FIG. 147 Java memory settings - Java memory allocation errors
c. In this case, adjust the enter a different set of values. It may be necessary to repeat this process until
4.
the acceptable values are found. Use this method until you are able to establish memory allocation
values that do not generate these errors.
Once you have determined these values. change these settings in the Java tab of the Apache Tomcat 6
Properties dialog (FIG. 148).
FIG. 148 Apache Tomcat 6 Properties dialog - Java tab
Since it is recommended that the "Initial memory pool" and "Maximum memory pool"
values match each other, enter the value that was established in this test for
Maximum heap size in both the Initial memory pool and Maximum memory pool
fields in this dialog.
5. Delete the logs in the Tomcat 6.0 directory so they can re-initialize (FIG. 149):
106
RMS Enterprise - Installation Guide
Appendix B: Tomcat Configuration
FIG. 149 Apache Tomcat 6 Logs (delete all)
6. In Task Manager, select End Process on Tomcat6.exe (FIG. 150):
FIG. 150 End Process - Tomcat6.exe
At this point you should be able to restart Tomcat.
Since proper memory allocation settings are dependent on the hardware and
software configuration of the RMS server and RMS database server, if any changes
are made to either the software or hardware on the server, these steps may need to
be repeated.
RMS Enterprise - Installation Guide
107
Appendix B: Tomcat Configuration
108
RMS Enterprise - Installation Guide
Appendix C: Clustered Deployment
Appendix C: Clustered Deployment
Overview
The following points address common question relative to installing RMS in a clustered deployment.
Sticky Sessions
The term "sticky session" refers to the feature of many commercial load balancing solutions for web-farms to
route the requests for a particular session to the same physical machine that serviced the first request for that
session.
In a sticky session, the user is always sent to the same physical server as they page through the Web site. This
is usually done at the router or switch layer, and it keeps the session variables of the user available.
For users coming through the Flex interface, sticky sessions are a requirement. In the event of a failover to another node, the user's session will not exist on the new node and they'll be forced back to
the login screen.
For programmatic clients coming through the REST interface, sticky sessions aren't a requirement,
but still desirable for performance reasons.
Shared file storage
Shared file storage serves two purposes:
Server log files are written to a shared log directory. This provides the application a single place to
download log files via the Flex UI.
If access to the shared log directory is lost, the individual servers will continue to also write their
log files to a local directory on their own hard drive.
Shared file storage houses the search index. All nodes in the cluster need to be able to read this
index data. Searches against this data only happen from the Flex UI (e.g. the Asset Management UI
uses searches against this index exclusively).
If access to this search index is lost, searches will fail.
Tomcat's Session Replication feature is not used by RMS.
In the event of node failure
When a node fails, the transactions in-work on that server will not be committed to the database.
Human users will be forced to login again and start their workflow over.
Programmatic clients (or NetLinx controllers) will have their current request fail and subsequent
requests will be routed to another server. They use Digest authentication and will simply reauthenticate transparently.
Recommended procedure to restore a failed node
This will depend on the kind of failure:
If the JVM or Tomcat crashed, just restart Tomcat.
If the hard drive crashed, then a new drive and a reinstall is required.
If the hard drive crashed on the server that hosts the Sentinel Licensing service, then restoring that
node will likely also involve resetting the licenses with AMX so they can be reactivated on a new
hard drive.
If a node loses connectivity to the database
If a node loses database connectivity it does not remove itself from the cluster. It will just issue errors to both
the Flex and REST clients. The underlying database connection pool will begin working to restore database
connectivity. Without the database, the application simply will not function.
From a UI perspective, RMS may show an error retrieving the Hotlist, but if database connectivity is restored
the UI will recover and begin working again.
RMS Enterprise - Installation Guide
109
Appendix C: Clustered Deployment
Network infrastructure requirements
In a clustered deployment, the nodes must find each other using multicast UDP communication and need to all
be on the same subnet.
By default, RMS uses the following multicast ports for a clustered deployment: 45564, 45588, and 46655
Communication between the nodes provides a variety of functions:
1. Configuration changes made via the Flex UI.
2.
3.
4.
5.
For example, when a configuration change within the Flex UI is made (e.g. SMTP Server), that change is
persisted to the database and propagated to the other servers.
Search index write operations: when locations are created and client gateways and their assets are
registered with the server, this information must be indexed on the shared file storage.
Only one server can write to the index at a time, so RMS employs a dynamic master-slave approach:
The first server to start in a cluster becomes the master, and subsequent servers become slaves.
The slaves send their index updates to the master who will perform the index writes for them.
If the master node goes down, the second server that was started becomes the new master and
performs the index writes.
Search index read operations (via SMB network file storage).
A distributed data grid (between the nodes) stores the last time each REST-based client gateway
communicated with the server. This allows RMS to determine when a client has gone off-line.
Licensing checks. Each server must communicate with the Sentinel license service approximately every
10 minutes.
If the Sentinel license service goes down, RMS will continue to operate for a 24 hour grace period.
Bandwidth costs
Many factors influence the bandwidth costs, including the number of servers in the cluster as well as the
number of locations, client gateways, and assets.
110
RMS Enterprise - Installation Guide
Appendix D: Manually Removing & Moving Licenses
Appendix D: Manually Removing & Moving
Licenses
Overview
The instructions in this section describe using the AMX License Manager tool to remove (revoke) existing
RMS Enterprise Licenses, as well as move revoked licenses to a different server. This information is intended
to be used in scenarios where purchased RMS Enterprise Licenses need to be transferred from the server on
which they were initially installed, to a different replacement server.
Before You Start
Contact AMX Customer Support
Revoking and/or moving an active RMS Enterprise License requires contacting your AMX Customer Support
representative. Your representative will provide a RMA number, which you will need in order to complete the
revocation process.
Launch AMX License Manager
1. To launch the AMX License Manager tool, select Programs > AMX Resource Management Suite >
2.
Server > RMS Configuration. This launches the RMS Server Configuration tool.
Open the Licensing tab and click Configure RMS Licenses to launch the AMX License Manager
(Welcome dialog).
FIG. 151 AMX License Manager - Active License Selected For Removal
RMS Enterprise - Installation Guide
111
Appendix D: Manually Removing & Moving Licenses
Manually Removing (Revoking) a License
1. In the AMX License Manager (Welcome dialog), click Next to proceed to the Select License Server
dialog. You should be able to use the default selection - Use the local license server installed and
running on this machine.
If the license server was installed elsewhere, select the appropriate option in this
dialog and click Next to connect to the license server.
2. Click Next to proceed to the Licensing Status dialog, which provides a listing of all licenses detected on
the license server (FIG. 152):
FIG. 152 AMX License Manager - Licensing Status dialog
3. Select the License that you want to remove.
4. In the Tools menu, select Return License For Refund > Disconnected to Internet (FIG. 153):
FIG. 153 AMX License Manager - Active License Selected For Removal
112
RMS Enterprise - Installation Guide
Appendix D: Manually Removing & Moving Licenses
This selection invokes the Manually Return AMX Product License dialog (FIG. 154):
FIG. 154 AMX License Manager - Manually Return AMX Product License
5. In the RMA Number field, enter the 6-digit RMA number provided by AMX Customer Support.
6. Click the Copy License Information To Clipboard link and email the information to your Customer
7.
Service representative.
Customer service will create a Revoke Permission Ticket based on this information, and send the
Permission Ticket information to you. This Permission Ticket information is required in the next step:
Click Next to proceed to the License Revocation Permissions Ticket dialog (FIG. 155):
FIG. 155 AMX License Manager - License Revocation Permissions Ticket
8. Copy and paste the Permissions Ticket code received from AMX Customer Support into the Permissions
Ticket text field. Assuming the entered code is valid, this enables the Next button.
9. Click Next to prompt the license server to validate the Permissions Ticket code, and return a revocation
verification ticket if the permission ticket matches. The Revocation Verification Ticket code is provided in
the License Revocation Verification Ticket dialog (FIG. 156):
RMS Enterprise - Installation Guide
113
Appendix D: Manually Removing & Moving Licenses
FIG. 156 AMX License Manager - License Revocation Permissions Ticket
10. Click the Copy License Information to Clipboard link, paste the Revocation Verification Ticket code in
an email, and send it to Customer Service for revocation.
11. After the revocation verification ticket code has been sent to Customer Service, click Next to proceed to
the AMX License Revoke dialog (FIG. 157):
FIG. 157 AMX License Manager - AMX License Revoke
12. Click Next to close this dialog, completing the process in the AMX Licensing Manager.
Your Customer Service representative will complete the revocation process, and inform you of the final status,
114
RMS Enterprise - Installation Guide
Appendix D: Manually Removing & Moving Licenses
Manually Moving a License (To a Different Server)
1. In the AMX License Manager (Welcome dialog), click Next to proceed to the Select License Server
dialog. You should be able to use the default selection - Use the local license server installed and
running on this machine.
If the license server was installed elsewhere, select the appropriate option in this
dialog and click Next to connect to the license server.
2. Click Next to proceed to the Licensing Status dialog, which provides a listing of all licenses detected on
the license server (FIG. 158):
FIG. 158 AMX License Manager - Licensing Status dialog
3. Select the License that you want to move.
4. In the Tools menu, select Move License > Disconnected to Internet (FIG. 159):
FIG. 159 AMX License Manager - Active License Selected To Move
RMS Enterprise - Installation Guide
115
Appendix D: Manually Removing & Moving Licenses
This action invokes an Information dialog prompting you to verify this action, and reminding you that the
process of moving licenses entails removing all licenses from the selected entitlement installed n this
machine, allowing you to activate the selected entitlement on another machine (FIG. 160):
FIG. 160 Information dialog (click Yes to proceed)
5. Click Yes to proceed to the Manually Move AMX Product License dialog (FIG. 161).
FIG. 161 AMX License Manager - Manually Move AMX Product License dialog
6. Click the Copy License Information To Clipboard link and email the information to your Customer
7.
116
Service representative.
Customer service will create a Revoke Permission Ticket based on this information, and send the
Permission Ticket information to you. This Permission Ticket information is required in the next step:
Click Next to proceed to the License Revocation Permissions Ticket dialog (FIG. 162):
RMS Enterprise - Installation Guide
Appendix D: Manually Removing & Moving Licenses
FIG. 162 AMX License Manager - License Revocation Permissions Ticket
8. Copy and paste the Permissions Ticket code received from AMX Customer Support into the Permissions
Ticket text field. Assuming the entered code is valid, this enables the Next button.
9. Click Next to prompt the license server to validate the Permissions Ticket code, and return a revocation
verification ticket if the permission ticket matches. The Revocation Verification Ticket code is provided in
the License Revocation Verification Ticket dialog (FIG. 163):
FIG. 163 AMX License Manager - License Revocation Permissions Ticket
10. Click the Copy License Information to Clipboard link, paste the Revocation Verification Ticket code in
an email, and send it to Customer Service for revocation.
11. After the revocation verification ticket code has been sent to Customer Service, click Next to proceed to
the AMX License Return dialog (FIG. 164):
RMS Enterprise - Installation Guide
117
Appendix D: Manually Removing & Moving Licenses
FIG. 164 AMX License Manager - AMX License Return
12. Click Next to close this dialog, completing the process in the AMX Licensing Manager.
Your Customer Service representative will complete the return process, inform you of the final status, and
prompt you to re-activate it on another machine. Refer to the Registering a Purchased License section on
page 63 for instructions.
118
RMS Enterprise - Installation Guide
Appendix E: Windows Pre-Authentication Configuration
Appendix E: Windows Pre-Authentication
Configuration
Overview
Purpose
The purpose of configuring Windows-based pre-authentication in RMS Enterprise is to provide users with a
single sign-on (SSO) solution. Users who have already logged into their Windows computers can immediately
access RMS Enterprise via their browser and not be challenged with a login prompt by RMS.
How It Works
Microsoft's Internet Information Services (IIS) must be installed and sit in front of the Tomcat Server that
hosts RMS Enterprise. IIS can be hosted on the same physical server as Tomcat or can be on a different server
altogether. Users access RMS through IIS rather than browsing to the Tomcat Server directly. IIS receives the
Windows user name from the browser and then packages that user name into a request header before
forwarding the request on to the Tomcat Server. The RMS application, when configured for pre-authentication,
retrieves the user name from the request header and trusts IIS that the user's identity has already been
authenticated.
All users that want to leverage SSO must already have an RMS User account in the RMS database.
Another possibility would be if RMS is configured for LDAP / Active Directory User management,
the user account must already exist in that repository for SSO to work.
Security Implications
Because the RMS Enterprise Windows Pre-Authentication mechanism depends on a trust between IIS and
Tomcat, it is strongly advised that the HTTP/1.1 Connector in Tomcat be disabled (see Appendix B: Tomcat
Configuration on page 105 for more details).
All web traffic to RMS Enterprise should come through IIS, and no users should be able to access Tomcat
directly.
If the Tomcat HTTP/1.1 Connector is left enabled, it is trivial to spoof any RMS user
by simply putting the appropriate header into the HTTP request.
Client Gateway Authentication
Client gateways built upon the RMS 4 SDK do not participate in SSO, but they do communicate to RMS
through IIS when the system is configured for Windows Pre-Authentication. In this case, a client gateway's
requests simply pass through IIS anonymously and the RMS application challenges the client gateway to
authenticate with Digest Authentication.
Client gateways built with the RMS 3 Legacy SDK still communicate directly to the
RMS Server through port 3839. They have no authentication.
RMS Enterprise - Installation Guide
119
Appendix E: Windows Pre-Authentication Configuration
Browser Support
Internet Explorer
Internet Explorer (IE) versions 6, 7, and 8 have been tested and works with Windows Pre-Authentication.
IE 9 and 10 should also work with no problem.
Chrome
Chrome version 24 has been tested and works with Windows Pre-Authentication.
Firefox
Firefox version 14 (and newer) has native support for Windows Pre-Authentication, but it is not enabled by
default. The easiest way to enable and configure it is by installing a Firefox add-on such as Integrated
Authentication for Firefox.
Configuration of RMS Enterprise
Enable Window Pre-Authentication
Run the RMS Configuration Tool and enable the Windows type of Pre-Authentication (FIG. 165):
FIG. 165 RMS Server Configuration - Pre-Authentication Configuration
Configuration of Tomcat
Tomcat has a primary configuration file named server.xml that needs to be changed with a text editor such as
Notepad. These changes will only take effect after restarting the Tomcat service.
Executor Thread Pool
Tomcat can make use of a shared Executor that provides a thread pool. By default, the Executor is commented
out. Uncomment the <Executor> element.
<Executor name="tomcatThreadPool" namePrefix="catalina-exec-"
maxThreads="150" minSpareThreads="4"/>
HTTP Connector
The HTTP/1.1 Connector is enabled by default. Comment this Connector out due to the security implications
described earlier.
<!-<Connector port="8080" protocol="HTTP/1.1"
connectionTimeout="20000" redirectPort="8443" />
-->
120
RMS Enterprise - Installation Guide
Appendix E: Windows Pre-Authentication Configuration
AJP Connector
Change the AJP/1.3 Connector by adding a reference to the Executor and turning Tomcat authentication off.
The tomcatAuthentication key must be added, since it is not part of the basic Tomcat
installation.
<Connector port="8009" protocol="AJP/1.3" redirectPort="8443"
Executor="tomcatThreadPool" tomcatAuthentication="false"/>
Configuration of ISAPI Redirect
The Apache Tomcat site has Tomcat Connectors available for download. One of those connectors is for IIS and
is named ISAPI-redirect. It is a DLL that can be installed into IIS, but before the IIS configuration, the
ISAPI-redirect DLL must itself be configured.
Two instances of the ISAPI-redirect are required to make RMS Enterprise Windows Pre-Authentication work.
One of them is from the RMS UI and the other is for the RMS REST API used by the client gateways.
Tomcat Connectors Download
http://tomcat.apache.org/download-connectors.cgi
From this web site, browse to the "Binary Releases" and then choose the "windows" subdirectory. There are
numerous zip files that can be downloaded, but either the i386 or the x86_64 version for IIS is what is
required.
tomcat-connectors-1.2.37-windows-i386-iis.zip
tomcat-connectors-1.2.37-windows-x86_64-iis.zip
Tomcat Connectors Documentation
http://tomcat.apache.org/connectors-doc/
This link is for the Tomcat Connectors documentation. The "Reference Guide" section has very useful
information that describes all of the individual settings. The following sections are important for Windows
Pre-Authentication:
workers.properties
uriworkermap.properties
IIS
Directory Structure
The following directories need to be created. The exact names and paths can be changed, but the paths are
important and referenced in some of the configuration files.
C:\isapi-redirect-rms-api
C:\isapi-redirect-rms-api\conf
C:\isapi-redirect-rms-api\logs
C:\isapi-redirect-rms-ui
C:\isapi-redirect-rms-ui\conf
C:\isapi-redirect-rms-ui\logs
Unzip the Connector
There is no installer for the Tomcat Connector. It needs to be unzipped twice into two these directories:
C:\isapi-redirect-rms-api
C:\isapi-redirect-rms-ui
RMS Enterprise - Installation Guide
121
Appendix E: Windows Pre-Authentication Configuration
Properties File for RMS API
In the C:\isapi-redirect-rms-api directory, create a file named isapi_redirect.properties, and put the
following contents into the file with a text editor:
# Configuration file for the Jakarta ISAPI Redirector
# The path to the ISAPI Redirector Extension, relative to the website
# This must be in a virtual directory with execute privileges
extension_uri=/rms-api/isapi_redirect.dll
# Full path to the log file for the ISAPI Redirector
log_file=c:\isapi-redirect-rms-api\logs\isapi_redirect.log
# Log level (debug, info, warn, error or trace)
log_level=warn
# Full path to the workers.properties file
worker_file=c:\isapi-redirect-rms-api\conf\workers.properties
# Full path to the uriworkermap.properties file
worker_mount_file=c:\isapi-redirect-rms-api\conf\uriworkermap.properties
auth_complete=0
Properties File for RMS UI
In the C:\isapi-redirect-rms-ui directory, create a file named isapi_redirect.properties, and put the
following contents into the file with a text editor:
# Configuration file for the Jakarta ISAPI Redirector
# The path to the ISAPI Redirector Extension, relative to the website
# This must be in a virtual directory with execute privileges
extension_uri=/rms-ui/isapi_redirect.dll
# Full path to the log file for the ISAPI Redirector
log_file=c:\isapi-redirect-rms-ui\logs\isapi_redirect.log
# Log level (debug, info, warn, error or trace)
log_level=warn
# Full path to the workers.properties file
worker_file=c:\isapi-redirect-rms-ui\conf\workers.properties
# Full path to the uriworkermap.properties file
worker_mount_file=c:\isapi-redirect-rms-ui\conf\uriworkermap.properties
URI Worker Map Properties for RMS API
In the C:\isapi-redirect-rms-api\conf directory, create a file named uriworkermap.properties, and put the
following contents into the file with a text editor:
/rms|/api/*=worker1
/jkmanager=jkstatus
URI Worker Map Properties for RMS UI
In the C:\isapi-redirect-rms-ui\conf directory, create a file named uriworkermap.properties, and put the
following contents into the file with a text editor:
/rms|/*=worker1
/jkmanager=jkstatus
122
RMS Enterprise - Installation Guide
Appendix E: Windows Pre-Authentication Configuration
Workers Properties for RMS API
In the C:\isapi-redirect-rms-api\conf directory, create a file named workers.properties, and put the
following contents into the file with a text editor:
worker.list=worker1, jkstatus
worker.worker1.type=ajp13
worker.worker1.host=localhost
worker.worker1.port=8009
worker.balancer.type=lb
worker.balancer.balance_workers=worker1
worker.balancer.sticky_session=true
worker.jkstatus.type=status
worker.jkstatus.mount=/jkmanager
If IIS is hosted on a different machine than Tomcat, then the property
worker.worker1.host needs to be set to an actual DNS host name or IP address of the
Tomcat server rather than localhost.
Workers Properties for RMS UI
In the C:\isapi-redirect-rms-ui\conf directory create a file named "workers.properties" and put the
following contents into the file with a text editor:
worker.list=worker1, jkstatus
worker.worker1.type=ajp13
worker.worker1.host=localhost
worker.worker1.port=8009
worker.worker1.lbfactor=1
worker.balancer.type=lb
worker.balancer.balance_workers=worker1
worker.balancer.sticky_session=true
worker.jkstatus.type=status
worker.jkstatus.mount=/jkmanager
worker.jkstatus.read_only=True
If IIS is hosted on a different machine than Tomcat, then the property worker.worker1.host needs to be set to an
actual DNS host name or IP address of the Tomcat server rather than localhost.
RMS Enterprise - Installation Guide
123
Appendix E: Windows Pre-Authentication Configuration
Configuration of IIS
Internet Information Services (IIS) can be configured with the IIS Manager found in Computer Management >
Services and Applications > IIS Manager.
ISAPI and CGI Restrictions
1. With the root node (see AHARRISA1135) selected, double-click ISAPI and CGI Restrictions
(FIG. 166):
FIG. 166 IIS Manager - ISAPI and CGI Restrictions
2. Add two new restrictions and point each of them to the isapi_redirect.dll in the respective RMS API and
RMS UI directories created earlier.
3. Click "Allow extension path to execute" (FIG. 167):
FIG. 167 ISAPI and CGI Restrictions
124
RMS Enterprise - Installation Guide
Appendix E: Windows Pre-Authentication Configuration
ISAPI Filters
1. With the "Default Web Site" node selected, double-click "ISAPI Filters" (FIG. 168):
FIG. 168 IIS Manager - ISAPI Filters
2. Add two new ISAPI Filters and point each of them to the isapi_redirect.dll in the respective RMS API
and RMS UI directories created earlier (FIG. 169):
FIG. 169 ISAPI Filters
RMS Enterprise - Installation Guide
125
Appendix E: Windows Pre-Authentication Configuration
Virtual Directories
Two new virtual directories need to be added; one for RMS API and another for RMS UI. Right-click on the
"Default Web Site" node, and select "Add Virtual Directory…"
RMS API
FIG. 170 Add Virtual Directory - RMS API
RMS UI
FIG. 171 Add Virtual Directory - RMS UI
It is imperative that the aliases given match what is in the extension_uri property in the
isapi-redirect.properties files from earlier.
126
RMS Enterprise - Installation Guide
Appendix E: Windows Pre-Authentication Configuration
Authentication Settings
1. On each of the new virtual directories just added, visit the Authentication page (FIG. 172):
FIG. 172 rms-ui Home page - Authentication option
2. For the rms-api virtual directory, confirm that Anonymous Authentication is enabled, and all other forms
are disabled.
The RMS Enterprise application will be responsible for enforcing digest authentication for client
gateways, not IIS (FIG. 173):
FIG. 173 rms-api - Authentication page
3. For the rms-ui virtual directory, disable Anonymous Authentication and enable Windows Authentication.
All other forms of authentication should be disabled (FIG. 174):
RMS Enterprise - Installation Guide
127
Appendix E: Windows Pre-Authentication Configuration
FIG. 174 rms-ui - Authentication page
Handler Mappings on Virtual Directories
1. Select the rms-api virtual directory, and then double-click Handler Mappings.
It will look similar to FIG. 175, with ISAPI-dll in a disabled state:
FIG. 175 rms-api - Handler Mappings page
2. Right-click on ISAPI-dll, and click Edit Feature Permissions… , and click Execute.
3. Repeat this process for rms-ui virtual directory.
Restart IIS
Finally, restart the IIS service. Now browsing to the RMS application through the IIS server should result in
the user bypassing the login page and going straight into the application.
Final Remarks
Since the RMS application will be accessed through IIS, remember to not include port 8080 in the
URL to the application (e.g. http://myserver.com/rms).
Any clients that were previously configured to connect on port 8080 will need to be reconfigured to
connect using port 80.
The administrator needs to take software and network firewalls into consideration and make any
necessary changes for this new deployment. IIS needs to talk to Tomcat over port 8009. If IIS and
Tomcat are hosted on different machines or VMs, this port must be open.
128
RMS Enterprise - Installation Guide
Appendix: Installing SQL Server 2008 Express Edition
RMS Enterprise - System Administrator’s Guide
129
2/13 ©2013 AMX. All rights reserved. AMX and the AMX logo are registered trademarks of AMX. AMX reserves the right to alter specifications without notice at any time.
Increase Your Revenue
through education + knowledge
In the ever-changing AV industry, continual education is key to success. AMX University is
dedicated to ensuring that you have the opportunity to gather the information and
experience you need to deliver strong AMX solutions. Plus, AMX courses also help you
earn CEDIA, NSCA, InfoComm, and AMX continuing education units (CEUs).
Visit AMX University online for 24/7/365 access to:
- Schedules and registration for any AMX University course
- Travel and hotel information
- Your individual certification requirements and progress
3000 RESEARCH DRIVE, RICHARDSON, TX 75082 USA • 800.222.0193 • 469.624.8000 • 469-624-7153 fax • 800.932.6993 technical support • www.amx.com
93-3004-02
REV L