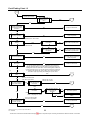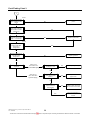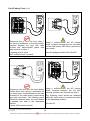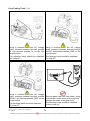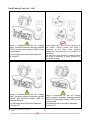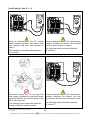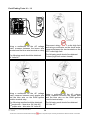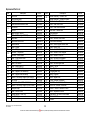
1
SERVICE INSTRUCTIONS
Raypak 131 Pool Heater
TM020
Revision: A
Published: April 09
Spartan
P0131
This document is stored and maintained electronically by
Service. All printed copies not bearing this statement in RED are deemed “uncontrolled”
Contents
Introduction .......................................................................................................................... 3
Safety Warning .................................................................................................................... 3
Pool Heater Model Identification .......................................................................................... 3
Specifications....................................................................................................................... 4
Preventative Maintenance ................................................................................................... 5
Water Treatment (Pool Balance) ......................................................................................... 5
Product Changes ................................................................................................................. 6
Plumbing & Installation Diagram .......................................................................................... 7
Lighting Instructions ............................................................................................................. 8
Wiring Diagrams .................................................................................................................. 9
131 Wiring Diagram – Grey Control Board ........................................................................ 9
131 Wiring Diagram – Black Control Board (prior to 14/4/09) ......................................... 10
131 Wiring Diagram – Black Control Board (14/4/09 onwards) ....................................... 11
Sequence of Operation ...................................................................................................... 12
Components and Their Function ........................................................................................ 16
Fault Indication .................................................................................................................. 18
Fault Finding ...................................................................................................................... 19
General Fault Finding Chart ............................................................................................ 20
Fault Finding Chart 1 ....................................................................................................... 21
Fault Finding Chart 1.1 .................................................................................................... 22
Fault Finding Chart 1.2 .................................................................................................... 22
Fault Finding Chart 1.3 .................................................................................................... 23
Fault Finding Chart 1.4 .................................................................................................... 24
Fault Finding Chart 1.5 .................................................................................................... 25
Fault Finding Chart 1.6 & 1.7 .......................................................................................... 26
Fault Finding Chart 1.8 .................................................................................................... 27
Fault Finding Chart 2 ....................................................................................................... 28
Fault Finding Chart 3 ....................................................................................................... 29
Fault Finding Chart 4 ....................................................................................................... 30
Fault Finding Chart 5 ....................................................................................................... 31
Fault Finding Chart 6 ....................................................................................................... 32
Fault Finding Chart 7 ....................................................................................................... 32
Fault Finding Chart 8 ....................................................................................................... 33
Fault Finding Chart 9 ....................................................................................................... 34
Test Procedures .............................................................................................................. 34
Component Adjustment Procedures .................................................................................. 41
Component Replacement Procedures ............................................................................... 43
Exploded View ................................................................................................................... 57
Replacement Parts List ................................................................................................... 58
Gas Type Conversion Procedure ....................................................................................... 59
Raypak Pool and Spa Heater Warranty (Australia Only) ................................................... 60
Document Revision History................................................................................................ 61
TM018 Raypak 131 Type A Pool & Spa Heaters REV: A
D.O.I: 8/04/2009
This document is stored and maintained electronically by
2
Service. All printed copies not bearing this statement in RED are deemed “uncontrolled”
Introduction
The information provided in these service instructions is based on the pool or spa heater
being installed in accordance with AS 5601 and the Installation Instructions provided with
each pool or spa heater.
Should you require further technical advice on a Raypak Pool or Spa Heater, contact your
nearest Rheem Service Department where genuine replacement parts are also available.
Safety Warning
The purpose of this service manual is to provide sufficient information to allow a person
with the skills as required by the Regulatory Authorities to carry out effective repairs to a
Raypak Pool Heater in the minimum of time.
Safety precautions or areas where extra care should be observed when conducting tests
outlined in this service manual are indicated by print in bold italics and/or a warning
symbol (see below). Take care to observe the recommended procedure.
“Live” testing to be conducted. Personal Protective Clothing (PPE) shall
be worn and an RCD shall be installed between the power point and 3-pin
cord of the pool heater to reduce the risk of electric shock.
Isolate power before conducting the indicated test
Hot surface or liquid. Personal Protective Clothing (PPE) shall be worn to
reduce the risk of scalding.
General warning symbol. Observe the instructions accompanying the
symbol.
If the supply cord is damaged, it must be replaced by the manufacturer or
its service agent or a similarly qualified person in order to avoid a hazard.
When conducting repairs to a gas appliance the gas train including
injector sizes must not be altered or modified in any way.
Pool Heater Model Identification
All identification numbers are designed to convey detailed information about the pool
heater to which it is attached.
P
013
1
N
C
O
P – Domestic Pool/Spa Heater
Approx. thermal input x 10
Series
N – Natural Gas
P – Propane Gas
C – Copper Heat Exchanger
O – On/Off Operation
Note: Model number, serial number and date of manufacture must be quoted in all correspondence.
TM018 Raypak 131 Type A Pool & Spa Heaters REV: A
D.O.I: 8/04/2009
This document is stored and maintained electronically by
3
Service. All printed copies not bearing this statement in RED are deemed “uncontrolled”
Specifications
Injector size (mm)
Burner Pressure (kPa)
Minimum Gas Pressure (kPa)
Maximum Gas Pressure (kPa)
Input (MJ)
Number of burners
Gas inlet connection
Header connection
Pre 2007
Gas valve
Post 2007
Ignition module
Control board
45ºC inlet high limit
55ºC outlet high limit
Transformer
Pressure switch¹
Flow switch¹
40ºC temperature probe
Control circuit fuse
Relay 1²
Relay 2²
Reset illuminated push button
Minimum
Flow Rate (l/s)
Maximum
Power Supply
P0131NCO
1.36
0.85
1.13
P0131PCO
0.77
2.64
2.75
3.5
120
15
RP¾/20
40mm
White Rogers 36E06-301
White Rogers 36G22-216
RAM-H4M7-01
Millennium grey or black board (24VAC 50Hz)
Campini TY60, opens 45ºC closes 35ºC (+/- 3ºC)
36TXVG11, opens 55 ºC closes 45 (+/- 3ºC)
Primary winding 240 Volts AC 50Hz 62.2 ohms
Secondary winding 24 Volts AC 50Hz 1.3 ohms
Barksdale MSPS-EE05-Q71 or Tecmark MSPS-EE05
Adjustable: 3.5 – 34.5kPa, max pressure 55kPa
Adjustable: max pressure 1000kPa
Refer to table on page 40
3A
Omron LY2N, DPDT, 24VAC, coil resist 186 ohms
Omron LY2N, DPDT, 24VAC, coil resist 186 ohms
24VAC LED, 1 X N/O momentary contact
1.3
6.9
240VAC 50Hertz
¹ The installation will have either a pressure switch or a flow switch depending upon the application (refer to
'Water Pressure Switch‟ on page 17 for more information).
² Models manufactured from the 14/4/09 feature an integrated PCB with power outage auto reset
incorporating the relays.
Auxiliary Component Specifications
Component
Electrical Interface Board (E.I.B)
Millennium 56659201 240VAC (30A max @ 240V)
Note: Auxiliary components are optional and may not be installed.
TM018 Raypak 131 Type A Pool & Spa Heaters REV: A
D.O.I: 8/04/2009
This document is stored and maintained electronically by
4
Service. All printed copies not bearing this statement in RED are deemed “uncontrolled”
Preventative Maintenance
It is suggested for peak performance that the pool/spa heater be serviced annually.
1. Clean the cabinet louvres of any dust, lint and debris.
2. Ensure plants or shrubs etc are not obstructing the cabinet louvres.
3. Check for signs of leaking at pipe fittings and headers.
4. Clean the burner bars.
5. Check for signs of sooting, the presence of soot accumulation indicates an abnormal
operating condition.
6. Check the main burner pressure and compare to that indicated on the rating label,
adjust if required. Remember to replace the pressure test point screw.
7. Check main burner flame to ensure all parts ignite readily and that the flame is blue
with little or no yellowing of the tips.
8. Check operation of the flame failure sensor. The burner should extinguish immediately
the flame sensor is disconnected.
9. Check for signs of excessive corrosion on the cabinet and inside the combustion
chamber.
10.With the burner operating disconnect one wire from the 45°C high limit (located on the
inlet header), the burner should extinguish. Reconnect the wire; the reset button lamp
should illuminate however the burner must not light. Press the reset button, the lamp
should extinguish and the burner should light.
11.With the burner operating disconnect one wire from the 55°C high limit (located on the
outlet header), the burner should extinguish. Reconnect the wire; the reset button lamp
should NOT illuminate and the burner should reignite.
12.Warn customer of the danger of storing pool chemicals and/or using flammable
materials or aerosol spray packs near the pool/spa heater. Aerosols and harsh
chemicals can cause premature failure of pool/spa heater components.
Water Treatment (Pool Balance)
Maintenance level
Water temp (ºC)
PH
Total Alkalinity (ppm)
Calcium Hardness (ppm)
Salt (ppm)
Free Chlorine (ppm)*
Fibreglass Pools
20 – 31
7.3 – 7.4
120 – 150
200 – 300
Fibreglass Spas
32 – 40
7.3 – 7.4
120 – 150
150 – 200
6000 MAXIMUM
2–3
2–3
Other Pool/Spa types
20 – 40
7.6 – 7.8
150 – 200
80 – 100
2–3
* Free Chlorine must not exceed 5ppm, however occasional chemical shock dosing of the
pool or spa water should not damage the heater providing that the water is balanced to the
above conditions.
Automatic chemical dosing devices and salt chlorinators are usually more efficient in
heated water. Unless controlled, they can lead to excessive chlorine levels that can
damage the pool/spa heater.
TM018 Raypak 131 Type A Pool & Spa Heaters REV: A
D.O.I: 8/04/2009
This document is stored and maintained electronically by
5
Service. All printed copies not bearing this statement in RED are deemed “uncontrolled”
Product Changes
Gas Valve Change
131 Model pool heaters manufactured before the 27/3/07 utilise a White Rogers 36E06301 gas valve, models manufactured after the 27/3/07 utilise a White Rogers 36G22-216
gas valve. The 36E06-301 gas valve is no longer available however the 36G22-216 gas
valve is a direct replacement. For more information refer to „Gas Valve‟ on page 52.
Change to Black Control Board
Raypak pool and spa heaters manufactured from July 2005 to the 31/10/2006 were fitted
with a controller which has a grey decal on the control panel. Models manufactured from
November 2006 onwards are fitted with a revised control board which incorporates
additional software functions, fault codes and a revised wiring arrangement. The revised
control board can be identified by a control panel with a black decal.
This Service Manual including fault finding charts covers both types of control panels.
Both control boards operate and are programmed in a similar fashion however black
control boards have additional fault codes and features. It should be noted that the wiring
arrangement also differs depending upon whether a black or grey board is fitted. Refer to
page 9 for grey board wiring diagram and pages 10 & 11 for black board wiring diagrams.
Black control board
Grey control board
Addition of Reset Button Safety Lock Out Circuit & Weather Shielding.
All Raypak pool and spa heaters manufactured after 14/04/2008 have been fitted with an
additional safety feature and weather shielding. The additional safety feature incorporates
a red reset button located on the front control panel and two relays located in the control
box (relay 1 and relay 2).
The safety lock out circuit prevents the heater from operating if the 45ºC inlet high limit
trips (open circuits) due to an over temperature condition.
If the 45ºC inlet high limit trips (open circuits), relays 1 and 2 open and „lock out‟ the pool
heater control circuit preventing operation until the 45ºC inlet high limit closes and the pool
heater is manually reset by pressing and releasing the red reset button. For more
information refer to „Sequence of Operation‟ on page 12 and wiring diagrams on pages 911.
Pool and spa heaters manufactured prior to the 14/04/2008 did not have the safety lock
out circuit or additional weather shielding fitted. A recall campaign to rework all Raypak
pool and spa heaters in the field was commenced in March 2008.
Any Raypak pool or spa heater that does not have a red reset button located
on the control or side panel does not have a safety lock out circuit or
additional weather shielding and MUST be reworked. Contact Rheem Service
for more information.
TM018 Raypak 131 Type A Pool & Spa Heaters REV: A
D.O.I: 8/04/2009
This document is stored and maintained electronically by
6
Service. All printed copies not bearing this statement in RED are deemed “uncontrolled”
Addition of Auto Reset PCB (Incorporating Safety Lock out circuit)
All Raypak pool and spa heaters manufactured from the 14/4/09
have an additional auto reset PCB fitted. This control automatically
resets the safety lockout circuit when power is applied for the first
time or from a power outage overcoming nuisance lock outs.
The auto reset PCB also incorporates the safety circuit functionality
noted above including relays (relay 1 and relay 2).
A manual reset (by pressing the red reset button) is still required should the 45°C inlet over
temperature cut out open circuit.
Plumbing & Installation Diagram
TM018 Raypak 131 Type A Pool & Spa Heaters REV: A
D.O.I: 8/04/2009
This document is stored and maintained electronically by
7
Service. All printed copies not bearing this statement in RED are deemed “uncontrolled”
Lighting Instructions
Main Burner
1. STOP read all of the safety information in the installation and operating instructions.
2. Press the pool heater Power button until the display is off.
3. Turn OFF all electrical power to the pool heater.
4. The pool/spa heater is equipped with an automatic ignition system, which lights the
burner.
5. Wait five (5) minutes to clear out any unburnt gas. STOP if you smell gas and follow
the safety instructions in the installation and operating instructions. If you do not smell
any gas go to the next step.
6. Turn the gas isolation valve to the ON position.
7. Turn on electrical power to the pool/spa heater.
8. Press and release the red reset button, the reset light should go out. NOTE: For
models manufactured from 14/04/09 onwards the reset button should NOT illuminate
and does not need to be pressed.
9. Press and release the Power button on the control panel and set the thermostat to the
desired setting.
10. The burner should light.
If the pool heater is not equipped with a red reset button, contact Rheem
Service.
To turn off the pool heater
1. Press the Power button on the control panel and wait for the display to extinguish
(„OFF‟ position).
TM018 Raypak 131 Type A Pool & Spa Heaters REV: A
D.O.I: 8/04/2009
This document is stored and maintained electronically by
8
Service. All printed copies not bearing this statement in RED are deemed “uncontrolled”
Wiring Diagrams
131 Wiring Diagram – Grey Control Board
TM018 Raypak 131 Type A Pool & Spa Heaters REV: A
D.O.I: 8/04/2009
This document is stored and maintained electronically by
9
Service. All printed copies not bearing this statement in RED are deemed “uncontrolled”
131 Wiring Diagram – Black Control Board (prior to 14/4/09)
TM018 Raypak 131 Type A Pool & Spa Heaters REV: A
D.O.I: 8/04/2009
This document is stored and maintained electronically by
10
Service. All printed copies not bearing this statement in RED are deemed “uncontrolled”
131 Wiring Diagram – Black Control Board (14/4/09 onwards)
TM018 Raypak 131 Type A Pool & Spa Heaters REV: A
D.O.I: 8/04/2009
This document is stored and maintained electronically by
11
Service. All printed copies not bearing this statement in RED are deemed “uncontrolled”
Sequence of Operation
1. MODELS MANUFACTURED PRIOR TO 14/4/09: When power is supplied to the
heater for the first time or power is removed and restored, the red reset button will
illuminate indicating that the heater requires resetting. The red reset button is required
to be pushed and released to reset the heater which will then be ready for operation.
Actuation of the red reset button energises relay 1 which causes the reset indicator
lamp to extinguish. Sequence of operation beyond this point assumes that the heater
has been successfully reset.
2. Manual operation of the controller power button turns the controller on to the last mode
of operation. Actuation of the pool/spa pump causes water to flow through the heater.
The resulting water pressure causes the pressure switch contacts to close enabling
operation of the control board gas valve output which at this stage is de-energised.
3. If the water temperature detected by the water temperature probe is 1ºC or less than
the control board set point temperature, the control board will initiate a call for heat and
supply power to relay 2 which will energise and supply power to the RAM ignition
module via the normally open contacts of relay 2 (which closed when the control board
called for heat), relay 1 (which closed in step 1 when the reset button was operated),
and the normally closed contacts of the 55ºC outlet high limit (for grey boards also via
the water pressure switch contacts).
4. When power is supplied to the RAM ignition module, the ignition module will perform
an internal check to ensure that it is functioning correctly. If the internal check fails the
ignition module will „lock out‟ and require resetting by turning the controller off for 5
seconds and then turning the controller back on again. If the ignition module is reset in
this manner operation will recommence from step 4.
5. If the ignition module internal check is successful, the ignition module will check the
flame sensor to ensure a flame is not present. If a flame is present a DC current (µA)
will be generated by the flame sensor and will be detected by the ignition module
which will „lock out‟ and require resetting by turning the controller off for 5 seconds and
then turning the controller back on again. If the ignition module is reset in this manner
operation will recommence from step 4.
6. If a flame is not detected in step 5, the ignition module will energise the igniter (which
will glow red hot) and then perform a second flame sensor check to ensure a flame is
not present. If a flame is present a DC current (µA) will be generated by the flame
sensor and will be detected by the ignition module which will „lock out‟ and require
resetting by turning the controller off for 5 seconds and then turning the controller back
on again. If the ignition module is reset in this manner operation will recommence from
step 4.
7. If a flame is not detected in step 6, and when the ignition module detects an igniter
current draw of > 1.4 amps, the ignition module will energise the gas valve which will
open supplying gas to the burner which is ignited by the hot surface igniter. This type
of ignition is termed HSI (hot surface ignition).
TM018 Raypak 131 Type A Pool & Spa Heaters REV: A
D.O.I: 8/04/2009
This document is stored and maintained electronically by
12
Service. All printed copies not bearing this statement in RED are deemed “uncontrolled”
8. Upon successful ignition of the burner, the resulting flame impinges on the flame
sensor which generates a DC micro amp (µA) current which is detected by the ignition
module. If a flame is not detected within 15 seconds from igniter power up, the ignition
module will de-energise the gas valve, „lock out‟ and require resetting by turning the
controller off for 5 seconds and then turning the controller back on again. If the ignition
module is reset in this manner operation will recommence from step 4.
9. If a flame was detected in step 8, the burner is now operating and will remain lit until
one of the following occurs at which time the gas valve will be de-energised (close):
I.
II.
III.
IV.
V.
VI.
VII.
The call for heat ends (water temperature detected by the water temperature
probe is 0.5ºC above the control board set point temperature).
The pressure switch contacts open (no water flow).
The 45ºC inlet high limit switch contacts open (over temperature condition). Refer
to notes b, c and d below.
The 55ºC outlet high limit switch contacts open (over temperature condition).
An external switch or time clock contact opens (if fitted).
Flame failure occurs (ignition module flame sensor does not detect a DC current).
The control board is turned off.
Notes:
a) If the 45ºC inlet high limit contacts are open at the start of a call for heat (step 3),
relay 1 will be de-energised and no further operation will take place until the 45ºC
inlet high limit contacts close (cool below 35ºC) at which time the reset indicator
lamp will illuminate. The heater will then require resetting by pressing the red reset
button. Also refer to point d below.
b) If the 45ºC inlet high limit contacts open during a call for heat and whilst the burner
is operating (step 9),, relay 1 and the gas valve will be de-energised and no further
operation will take place until the 45ºC inlet high limit contacts close (cool below
35ºC) at which time the reset indicator lamp will illuminate. The heater will then
require resetting by pressing the red reset button. Also refer to point d below.
c) If a call for heat is not in progress and the 45ºC inlet high limit contacts are open,
operation of the reset button will reset the heater, however, if the 45 ºC inlet high
limit contacts are still open when a call for heat is initiated no further operation will
take place until the 45ºC inlet high limit contacts close (cool below 35ºC) at which
time the reset indicator lamp will illuminate. The heater will then require resetting as
in step 1.
d) NOTE: The reset button cannot reset the heater whilst a call for heat is in progress
and the 45°C Hi Limit contacts are open.
Pump Operation
Pump operation is not controlled by the heater however the pump must be operating for
the burner to ignite. Actuation of the pool/spa pump causes water to flow through the
heater and the resulting water pressure causes the pressure switch contacts to close
enabling operation of the burner control circuit.
TM018 Raypak 131 Type A Pool & Spa Heaters REV: A
D.O.I: 8/04/2009
This document is stored and maintained electronically by
13
Service. All printed copies not bearing this statement in RED are deemed “uncontrolled”
Operational Flow Chart 1
HEATER OPERATION
Power supplied to
heater
Heater fitted with
auto reset PCB?
Reset lamp
illuminates
NO
C
NO
D
YES
NO
Reset button
pushed &
released?
Reset button
pushed &
released?
YES
YES
Relay 1 energised
Auto reset safety
circuit board resets
Reset lamp
extinguished
NO
3
(1)
(1) Control board is turned on by pressing
& releasing the „power‟ button.
Control board
turned on?
YES
Control board set
to „Manual‟?
Control board set to
„AUTO‟
NO
NO
YES
YES
4
NO
Water temp < set
temp - 1ºC?
Is time within auto
set time period?
YES
45º high limit
contacts close
when temp < 35º
YES
Control board initiates
call for heat
Reset lamp
illuminates
Gas valve de-energised
if on (pilot & main valve
close)
Relay 1 de-energised
Relay 2 energised
Heater fitted
with auto
reset PCB?
NO
45º high limit
contacts closed?
Heater Fitted with
auto reset PCB?
NO
YES
Auto reset safety circuit
board open circuits gas
valve circuit
YES
NO
5
NO
YES
C
D
E.I.B. OPERATION
External switch or
time switch
closed? (if fitted)
Start
YES
Control board set
to „Manual‟?
NO
NO
NO
Is time within
auto set time
period?
Control board set to
„AUTO‟
YES
YES
Water pressure
switch closed?
Aux 1
enabled?
YES
NO
55º high limit
contacts closed?
Aux 2
enabled?
Aux 3
enabled?
Aux 4
enabled?
Aux 5
enabled?
Aux 6
enabled?
YES
NO
YES
NO
YES
NO
YES
NO
YES
NO
YES
NO
A
B
A
B
A
B
A
B
A
B
A
B
A
Dotted line denotes optional
electronic interface box (E.I.B.)
B
YES
Enabled Aux relay(s)
energised
Disabled Aux relay(s)
de- energised
2
TM018 Raypak 131 Type A Pool & Spa Heaters REV: A
D.O.I: 8/04/2009
This document is stored and maintained electronically by
14
Service. All printed copies not bearing this statement in RED are deemed “uncontrolled”
Operational Flow Chart 2
2
Ignition module
energised
D
Internal check
ok?
System
check
(3 sec)
Ignition module
4 flash indication
NO
Turn controller on
5 sec
delay
YES
Flame signal >
0.2µA detected?
YES
Turn controller off
NO
E
Approx
5 sec
Ignition
& flame
proving
(15 sec
max)
Igniter on
Flame signal >
0.2µA detected?
NO
Ignition module
3 flash indication
Igniter off
LOCKOUT
YES
False Flame
Ignitor current
draw > 1.4A?
E
Has 15 sec‟s
expired since
igniter on?
NO
NO
Gas valve closes
YES
Gas valve deenergised
Gas valve energised
YES
Gas valve opens
Flame signal >
0.2µA detected?
NO
Flame Failure
YES
Burner
operation
Ignition module 3
flash indication
Igniter off
Igniter off
Gas valve closes
Flame signal
lost? (< 0.2µA)
YES
D
3
Gas valve
de-energised
NO
Water temp = Set
temp + 0.5ºC?
YES
Control board ends
call for heat
NO
External switch or
time switch
contacts open?
Relay 2
de-energised
Ignition module
de-energised
NO
45º high limit
contacts open?
NO
Water pressure
switch contacts
open?
NO
55º high limit
contacts
open?
YES
YES
Ignition module
de-energised
Gas valve
de-energised
Gas valve closes
5
Ignition module
de-energised
Gas valve
de-energised
Gas valve closes
4
YES
YES
Relay 1 de-energised
NO
TM018 Raypak 131 Type A Pool & Spa Heaters REV: A
D.O.I: 8/04/2009
This document is stored and maintained electronically by
15
Service. All printed copies not bearing this statement in RED are deemed “uncontrolled”
Components and Their Function
Gas Valve - An electromagnetic valve designed to control gas
flow to the burner. 131 models manufactured before 27/3/07
utilise a White Rogers 36E06-301 gas valve, models
manufactured after the 27/3/07 utilise a White Rogers 36G22-216
gas valve.
36E06-301 and 36G22-216 gas valves are equipped with a
redundant and main solenoid valve, a pressure regulator, the
36G22-216 is also fitted with an on/off switch. Both gas valves
are available in Natural Gas only and can be converted to LP
Gas; refer to page 59 for gas type conversion procedure. Note:
36E06-301 gas valves are no longer available however the
36G22-216 gas valve is a direct replacement.
36G22-216
The gas valve gas type can be determined by the colour of the regulator spring (bare
metal coloured spring for NG and grey/white powder coated spring for Propane).
The inlet gas pressure range is 1.1 – 3.5 kPa for Natural Gas and 2.75 – 3.5 kPa for
Propane Gas.
Hot Surface Igniter - When energised, the hot surface igniter glows red hot and ignites
gas flowing from the burner.
Flame Sensor - A probe utilised to detect if a flame is present. The probe projects across
the flame area of the burner and when in contact with the flame produces a DC current
(µA) which is detected by the ignition module.
Burner Manifold - A pipe fitted with a series of injectors which deliver gas from the gas
valve to the burner.
Burner - A series of bars connected to the burner manifold and held in place by a sheet
metal surround. Each bar contains a series of holes from which air/gas mixture flows. The
burner is ignited by the hot surface igniter.
Injector - A jet with an orifice used to deliver gas for combustion. The burner injectors are
located on the burner manifold. Injectors have a specific orifice size which is determined
by required thermal input, burner pressure and gas type.
Transformer - An electromagnetic device that transforms the incoming power supply from
240 volts AC to 24 volts AC. The secondary voltage (24 volts AC) is utilised for operation
of the control circuit components and gas valve.
45ºC Inlet High Limit - A normally closed temperature sensitive switch mounted on the
inlet header connection which will cut power to the gas valve if an over temperature
condition occurs. If the inlet water temperature reaches 45ºC or more, the 45ºC inlet high
limit contacts will open circuit shutting down the gas valve and burner and illuminating the
red reset button. The 45ºC inlet high limit contacts will automatically close when the
detected water temperature drops to 35ºC however heater operation cannot continue until
the heater is manually reset. Refer to sequence of operation on page 12 for more
information.
TM018 Raypak 131 Type A Pool & Spa Heaters REV: A
D.O.I: 8/04/2009
This document is stored and maintained electronically by
16
Service. All printed copies not bearing this statement in RED are deemed “uncontrolled”
55ºC Outlet High Limit - A normally closed temperature sensitive switch mounted on the
outlet header connection which will open circuit power to the gas valve if an over
temperature condition occurs. If the outlet water temperature reaches 55ºC or more, the
55ºC outlet high limit contacts will open circuit shutting down the gas valve and burner.
The 55ºC outlet high limit contacts will automatically close when the detected water
temperature drops below 45ºC at which time heater operation will automatically continue.
Water Pressure Switch - A normally open adjustable pressure sensitive switch utilised to
detect the presence of water flow (pressure) in installations where the inlet/outlet pipe work
is less than 1500 mm above or below the water level of the pool. For installations which
exceed this range an external flow switch must be installed (refer to „Water Flow Switch‟
on page 17 for more information).If the correct water flow (pressure) is present, the
pressure switch contacts will close enabling operation of the gas valve/ignition system
(refer to page 42 for pressure switch adjustment procedure).
Water Flow Switch - A normally open adjustable flow sensitive switch utilised to detect
the presence of water flow in installations where the Inlet/Outlet pipe work is greater than
1500 mm above or below the water level of the pool. For installations where the
Inlet/Outlet pipe work is less than 1500 mm above or below the water level of the pool a
pressure switch must be installed (refer to „Water Pressure Switch‟ on page 17 for more
information). If correct water flow is present the flow switch contacts will close enabling
operation of the gas valve/ignition system (refer to page 42 for flow switch adjustment
procedure).
Water Temperature Probe - A thermistor located on the inlet header manifold which is
utilised to detect the water temperature entering the heater (pool/spa water temperature).
The temperature probes resistance value will change according to the detected
temperature. The control board detects the changing resistance value and utilises this
input to display the water temperature and to determine if a call for heat is required. Refer
to page 40 for water temperature probe test procedure and temperature/resistance chart.
Solar Collector Water Temperature Probe (optional) - A thermistor located on the solar
collector (if fitted) which is utilised to detect the water temperature at the solar collector(s).
The solar collector temperature probes resistance value will change according to the
detected temperature.
The control board will monitor the water temperature at the solar collector and if the water
temperature at the solar collector (as detected by a solar collector water temperature
probe) is above the inlet water temperature (as detected by the pool heaters water
temperature probe), the control board will activate a solar diverter valve (if fitted) that
allows the water from the solar collector to be used as inlet water to the pool heater. Refer
to page 40 for water temperature probe test procedure and temperature/resistance chart.
Control Board (Controller) - An electronic PCB which monitors the inlet water
temperature and controls the water temperature by energising and de-energising the
ignition module. The control board has an LCD display with push buttons which allows for
user interface. The control board can also communicate via an electric interface board
(EIB) to provide additional switching of remote components i.e. pool lighting, garden
lighting and/or water fountains.
A remote controller is also available as an option.
TM018 Raypak 131 Type A Pool & Spa Heaters REV: A
D.O.I: 8/04/2009
This document is stored and maintained electronically by
17
Service. All printed copies not bearing this statement in RED are deemed “uncontrolled”
Fault Indication
The control board constantly monitors the status of the water temperature probe and solar
temperature probe if fitted (black boards only). If a malfunction has been detected, the
control board will display the following error codes to indicate the fault condition:
Fault
Heater rework required *
Water temperature probe open circuit
Water temperature probe short circuit
Solar thermistor probe short circuit
Water pressure switch contacts open
No mains power
Black Board
F1
F2
F3
F4
o
PO
Grey Board
N/A
OC
SC
SS
N/A
N/A
* F1 fault previously indicated an over temperature condition. This fault condition is no
longer applicable due to wiring changes. If a F1 fault occurs contact Rheem Service.
Water Pressure Switch Indication (black boards only): If the
water pressure is low or there is no flow through the heater, the
water pressure switch contacts will open. If an open circuit
pressure switch condition is detected power will be removed from
the gas valve and the pilot and burner will shut down (if on).
If the controller is set to „On‟ or „AUTO‟ and the water pressure switch contacts are open, a
small „o‟ will be shown to the left of the temperature display.
No Mains Power Indication & Power Backup (black boards only): The controller (and
remote controller if fitted) has a super capacitor power backup to keep the time of day
clock operating, maintain any programmed time periods and remember the last operating
mode if mains power is lost (or power supply to control board is lost).
Whenever mains power (or control board power) is lost, the
controller will disable all control relays and backlight and enter a
power saving mode which will maintain the time of day and any
programmed time periods for between 1.5 to 2 hours. During a
period of „no power‟ the LCD will display „PO‟.
If power is restored before the expiration of the power backup time, the controller will
resume its last operating mode.
Pool/Spa Heater Run Time: The controller records and stores the
number of hours the heater has been operating up to a total of
19990 hours. Run time information can be displayed on the LCD by
pressing and holding down the AUX button for 10 seconds whilst
the controller is in „OFF‟ mode.
The displayed hours must be multiplied by 10 to calculate the actual number of hours the
heater has been operating. In the example shown above the heater has been operating for
a period of 88 X 10 = 880 hours (880 – 889 hours). Note: If „0‟ is displayed the heater has
been operating for 0 – 9 hours.
TM018 Raypak 131 Type A Pool & Spa Heaters REV: A
D.O.I: 8/04/2009
This document is stored and maintained electronically by
18
Service. All printed copies not bearing this statement in RED are deemed “uncontrolled”
Fault Finding
Test Equipment
A list of test equipment which will assist in conducting diagnostic procedures is provided
below. This equipment is available from Rheem Service Spare Parts Department.
Fine probe adapter kit
Probe to alligator clip kit
WH0020082
WH0020084
Fault
Fault finding chart
1
1.1
1.2
1.3
1.4
1.5
1.6, 1.7
1.8
2
3
4
5
6
7
8
9
Heater not operating
Water not hot enough
Water too hot
High Limits Tripping
No or low water flow
Auxiliary switching not working
Remote controller not working
Leaking
Noisy
TM018 Raypak 131 Type A Pool & Spa Heaters REV: A
D.O.I: 8/04/2009
This document is stored and maintained electronically by
Page
21
22
22
23
24
25
26
27
28
29
30
31
32
32
33
34
19
Service. All printed copies not bearing this statement in RED are deemed “uncontrolled”
General Fault Finding Chart
General Fault Finding
Is the complaint for
heater not operating?
1
YES
NO
Is the complaint for
water not hot enough?
2
YES
NO
Is the complaint for
water too hot?
YES
Is the 45º and/or 55º
high limit tripping?
NO
3
NO
YES
Is the complaint for 45º
and/or 55º high limits
tripping?
4
YES
NO
Is the complaint for no
or low water flow?
YES
5
NO
Is the complaint for
auxiliary switching not
working?
YES
6
NO
Is the complaint for
remote controller not
working?
YES
7
NO
Is the complaint for
leaking?
YES
Noisy water heater
TM018 Raypak 131 Type A Pool & Spa Heaters REV: A
D.O.I: 8/04/2009
This document is stored and maintained electronically by
8
9
20
Service. All printed copies not bearing this statement in RED are deemed “uncontrolled”
Fault Finding Chart 1
1
Test 1
Is 240 volts present at the
heater power supply
GPO?
Is the fuse blown at
the switchboard?
NO
Household wiring or power
point faulty. Advise customer
to call an electrician.
NO
YES
Did the fuse blow
again?
Replace Fuse
YES
NO
Turn off heater power
supply & restore power
after 5 seconds.
(1)
1.2
Test 2
NO
Does the heater have
an auto reset PCB?
NO
Are relay 2 contacts 5 &
1 closed?
YES
YES
1.3
Are relay 1 contacts 5 &
1 closed?
YES
YES
NO
Replace relay 2.
NO
Replace relay 1.
YES
Replace reset button.
Test 3
Test 4
Is 24 volts present at
reset button LED
block?
NO
Does the heater have an
auto reset PCB?
(1)
Faulty fuse replaced, check
appliance operation.
Household wiring or power
point faulty. Advise customer
to call an electrician.
NO
YES
Is the red
reset button illuminated?
YES
NO
Does the controller
display „OFF‟?
1.1
Test 1
Is 240 volts present at
the heater power
supply GPO?
(1) If the heater does not have
a reset button contact Rheem
Service
YES
O/C wiring.
Replace auto reset safety
circuit board.
YES
NO
Press and release
the reset button.
(1)
Test 5
Does the red
reset light extinguish?
NO
Is the reset button
contact block ok?
NO
Replace reset button.
Test 6
Is 24 volts present at
relay 1 coil when reset
button is pressed &
held down?
YES
NO
This document is stored and maintained electronically by
Replace relay 1.
O/C wiring.
1.3
YES
TM018 Raypak 131 Type A Pool & Spa Heaters REV: A
D.O.I: 8/04/2009
YES
21
Service. All printed copies not bearing this statement in RED are deemed “uncontrolled”
Fault Finding Chart 1.1
1.1
Unplug heater power supply cord
set from GPO.
Did fuse blow
again?
Replace fuse.
YES
Household wiring, power point or
another connected appliance is
faulty. Advise customer to call an
electrician.
NO
Disconnect heater power supply
cord set from line terminal block and
megger between cord set active and
earth pins then cord set neutral and
earth pins.
Is reading less than 1
mega-ohm for either
reading
YES
Replace heater power supply cord
set.
Is reading less than 1
mega-ohm for either
reading
YES
Replace transformer.
NO
Disconnect transformer at line terminal
block and measure between each
transformer wire and earth.
Look for damaged or pinched wiring
touching the heater chassis.
NO
Fault Finding Chart 1.2
1.2
Test 7
Is 240 volts present
at line terminal block?
YES
Replace heater power supply cord
set.
YES
Replace control board.
NO
Replace transformer.
Test 8A for black boards
Test 8B for grey boards
Is 24 volts present at
control board
terminal marked
„24VAC‟
NO
NO
Test 9
Has the control circuit
fuse blown?
YES
Replace control
circuit fuse.
Test 9
Did control circuit
fuse blow again?
NO
YES
TM018 Raypak 131 Type A Pool & Spa Heaters REV: A
D.O.I: 8/04/2009
This document is stored and maintained electronically by
Faulty fuse replaced, check
appliance operation.
Resistance values for each control
circuit component will need to be
checked against resistance values in
specification table to locate the faulty
component or faulty wiring.
22
Service. All printed copies not bearing this statement in RED are deemed “uncontrolled”
Fault Finding Chart 1.3
1.3
Press and release the
controller power button.
Does the controller
display an error
code?
YES
1.4
NO
Does controller display
change to show water
temp and last mode of
operation?
NO
Replace control board.
NO
Pump must be operating for
burner to operate.
YES
Is pump operating?
YES
Controller set to „AUTO‟ mode
Does controller display
„AUTO‟?
Is controller clock set to
correct time?
YES
Controller set to manual mode
NO
Controller clock must be set for
auto mode to operate burner.
NO
Controller clock time must be
within programmed time period for
auto mode to operate burner.
YES
Is controller clock
time within programmed
time period?
NO
YES
Is set point temp 1º more
than water temperature?
NO
Set point temperature must be 1º
more than water temperature for
burner to operate.
NO
Replace control board.
YES
Does controller show
flame icon?
(1) The hot surface igniter must be checked within 18 seconds from
controller displaying flame icon and the ignition module receiving power.
If pilot ignition is not successful after 18 seconds the ignition module will
lock out and must be reset. To reset the ignition module turn controller off
by pressing and releasing the „power‟ button, wait 5 seconds then turn
controller on again by pressing and releasing the „power‟ button.
YES
(1)
Does hot surface igniter
glow?
NO
Test 10A for black boards.
Test 10B for grey boards.
Is the water pressure or
flow switch closed?
1.7
YES
NO
Min flow rate 1.3 l/sec
Max flow rate 6.9 l/sec
Is there sufficient
water flow through
the heater?
5
NO
YES
YES
Can the water pressure
or flow switch be
adjusted?
Adjust water pressure or
flow switch.
Refer to section on adjusting pressure
switch or adjusting flow switch
NO
Is 24 volts present at
control board terminal
marked „VALVE‟?
YES
Fault rectified. Water pressure or
flow switch adjusted.
Replace water pressure or flow
switch.
Test 11A for black boards.
Test 11B for grey boards.
NO
1.5
YES
TM018 Raypak 131 Type A Pool & Spa Heaters REV: A
D.O.I: 8/04/2009
This document is stored and maintained electronically by
Replace control board.
23
Service. All printed copies not bearing this statement in RED are deemed “uncontrolled”
Fault Finding Chart 1.4
1.4
Water temperature
probe open circuit
Is Error code
„OC‟ or „F2‟ displayed?
YES
Water temperature
probe short circuit
NO
Is Error code
„SC‟ or „F3‟ displayed?
YES
Is water temperature
probe plug firmly plugged
into control board socket?
YES
NO
Firmly plug water temperature
probe into control board
socket?
NO
Replace water temperature
probe.
Test 21
Is water temperature
probe resistance value
correct?
YES
NO
Replace control board.
No power at
control board
Is Error code
„PO‟ displayed?
1.2
YES
Pressure switch open
during call for heat
(Black boards only)
NO
Is Error code
„o‟ displayed?
YES
Is the pump operating?
YES
Pump must be operating for
burner to operate.
NO
Test 10A for black boards.
Is the water pressure or
flow switch closed?
YES
Replace control board.
NO
Min flow rate 1.3 l/sec
Max flow rate 6.9 l/sec
Is there sufficient water
flow through the heater?
NO
5
NO
YES
Refer to section on adjusting
pressure switch or adjusting
flow switch
Can the water pressure
or flow switch be
adjusted?
YES
Replace water pressure or
flow switch.
NO
Solar water temperature
probe open circuit
Is error code
„SS‟ or „F4‟ displayed?
YES
Adjust water pressure or flow
switch.
Test 21
Is solar water
temperature probe
resistance value correct?
NO
Replace solar water
temperature probe.
NO
Repair solar water
temperature probe wiring.
YES
Is solar water temp probe
wiring ok?
NO
YES
Replace control board.
Heater rework required
Error code
„F1‟ is displayed.
TM018 Raypak 131 Type A Pool & Spa Heaters REV: A
D.O.I: 8/04/2009
This document is stored and maintained electronically by
YES
Rework required. Contact
Rheem Service.
24
Service. All printed copies not bearing this statement in RED are deemed “uncontrolled”
Fault Finding Chart 1.5
1.5
Is an external time clock
or switch fitted?
Is external switch or time
clock on?
YES
External switch or time clock
must be on for burner to
operate.
NO
NO
YES
Test 12
Is 24 volts present at
relay 2 coil?
NO
YES
Repair O/C wiring.
Test 22
Does the heater have an
auto reset PCB?
YES
Is 24 volts present at auto
reset safety PCB inputs?
Test 23
Is 24 volts present at auto
reset safety PCB output?
YES
NO
Replace auto reset safety
PCB.
YES
A
NO
NO
Test 13
Are relay 2 contacts 6 & 4
closed?
YES
Repair O/C wiring.
NO
Replace relay 2.
NO
Repair O/C wiring.
Test 15
Is there 24 volts at relay 1
coil?
Test 16
Are relay 1 contacts 6 & 4
closed?
YES
NO
Replace relay 1.
A
YES
Test 14
45ºC inlet high limit has tripped
Are 45ºC inlet high limit
contacts closed?
YES
4
NO
Test 17
55ºC outlet high limit has tripped
Are 55ºC outlet high limit
contacts closed?
YES
4
NO
Test 18
Is 24 volts present at the
ignition module?
NO
Repair O/C wiring.
Is the ignition module
giving 4 flash indication?
YES
YES
Refer to section on ignition
module
NO
TM018 Raypak 131 Type A Pool & Spa Heaters REV: A
D.O.I: 8/04/2009
This document is stored and maintained electronically by
Replace ignition module.
1.6
25
Service. All printed copies not bearing this statement in RED are deemed “uncontrolled”
Fault Finding Chart 1.6 & 1.7
1.6
(1)
Test 19
Is 24 volts present at the
ignition module igniter
terminals?
NO
Is a false flame present?
Replace gas valve.
NO
Plug in flame sensor wiring
connector.
YES
Adjust flame rod so as it is not
touching any metal
component.
NO
Clean flame sensor or replace
flame sensor/HSI assembly.
NO
B
Is flame sensor wiring
connector plugged in?
YES
YES
YES
(1) These tests must be performed within 18
seconds from flame icon being displayed and
the ignition module receiving power. If ignition
is not successful after 18 seconds the ignition
module will lock out and must be reset.
To reset the ignition module turn controller off
by pressing and releasing the „power‟ button,
wait 5 seconds then turn controller on again by
pressing and releasing the „power‟ button.
Is flame sensor touching
any metal component?
NO
Is flame sensor clean?
YES
Replace ignition module.
(1)
Does hot surface igniter
glow?
Are HSI wiring
connectors plugged in?
NO
NO
1.7
YES
Faulty hot surface igniter.
Replace flame sensor/HSI
assembly.
YES
Does burner ignite?
Plug in hot surface igniter
wiring connectors.
1.8
YES
NO
Is gas valve on/off switch
set to „on‟?
(1)
YES
NO
Turn gas valve on/off switch
„on‟.
NO
Replace ignition module.
NO
Turn gas isolation valve on.
Test 20
Is there 24 volts at gas
valve?
YES
Is gas isolation valve
turned on?
YES
Is gas available?
YES
NO
Refer to specification table.
Is inlet gas pressure
within specification?
(1)
YES
NO
Advise customer.
NO
Replace gas valve.
Refer to gas valve section
Is gas available at gas
valve burner test point?
Are burner injectors
blocked?
YES
YES
NO
TM018 Raypak 131 Type A Pool & Spa Heaters REV: A
D.O.I: 8/04/2009
This document is stored and maintained electronically by
Clean or replace burner
injectors.
B
26
Service. All printed copies not bearing this statement in RED are deemed “uncontrolled”
Fault Finding Chart 1.8
1.8
Refer to specification table.
Is inlet gas pressure
within specification?
NO
Advise customer.
YES
Is burner flame
satisfactory?
YES
Is flame wind affected?
Burner flame should be blue with little or
no yellowing of the tips. Burner flame
should not be a harsh noisy blue flame.
Create wind break or
reposition heater.
YES
NO
Heater operating. Check
heater operation to ensure
heater high limits do not trip
due to excessive temperature.
NO
Does 45º inlet or 55º
outlet high limit trip?
4.1
YES
NO
4
Heater operating correctly.
Refer to specification table.
Is burner gas pressure
within specification?
NO
Can burner gas pressure
be adjusted?
Adjust burner gas pressure.
YES
YES
Burner gas pressure adjusted.
Check appliance operation.
Refer to section on adjusting
burner gas pressure.
NO
Are burner injectors
correct size and gas
type?
Replace gas valve.
NO
Replace burner injectors with
injectors of correct size and
gas type.
YES
Clean or replace burner
injectors
YES
Are burner injectors
partially blocked?
NO
TM018 Raypak 131 Type A Pool & Spa Heaters REV: A
D.O.I: 8/04/2009
This document is stored and maintained electronically by
Possible bad gas supply.
27
Service. All printed copies not bearing this statement in RED are deemed “uncontrolled”
Fault Finding Chart 2
2
Is heater plumbed
correctly?
NO
Remake plumbing to comply
with installation instructions.
NO
Ensure plumbing valves are
open or in correct postion.
NO
Replace water temperature
probe.
YES
Are plumbing valves open
or in correct position?
YES
Refer to section „testing water
temperature thermistors‟
Is water temperature
probe resistance value
correct?
YES
Is burner flame
satisfactory?
Is in/out header bypass
valve stuck open?
YES
Burner flame should be blue with little
or no yellowing of the tips. Burner
flame should not be a harsh noisy blue
flame.
YES
Free or replace bypass valve.
NO
Replace bypass valve spring
with one of the correct colour.
NO
Does in/out header
bypass valve have
correct spring?
NO
Pool heater operating
correctly. Pool may be loosing
temperature due to low
ambient air temperature or
adverse weather conditions.
Advise customer to fit a pool
cover.
YES
Is inlet gas pressure
within specification?
YES
NO
Advise customer.
NO
Replace burner injectors with
injectors of correct size and
gas type.
YES
Burner gas pressure correctly
adjusted.
Refer to specification table.
Are burner injectors
correct size and gas
type?
YES
Check & adjust burner gas
pressure.
NO
Refer to „Gas Valve‟ section.
Can burner gas pressure
be correctly adjusted?
NO
What type of heater is
installed?
Is gas of a suitable
quality?
Propane
NO
Advise customer that supply
gas is of a bad quality and is
unsuitable for heater
operation.
YES
Natural gas
TM018 Raypak 131 Type A Pool & Spa Heaters REV: A
D.O.I: 8/04/2009
This document is stored and maintained electronically by
Replace gas valve.
28
Service. All printed copies not bearing this statement in RED are deemed “uncontrolled”
Fault Finding Chart 3
3
Test 21
Is the water temperature
probe resistance value
correct?
Replace water temperature
probe.
NO
YES
Does water temperature
probe temp measured
above match controller
water temp?
NO
YES
Does flame icon
extinguish when set point
temp + 1º is reached?
YES
Replace control board.
NO
Test 18
Is 24 volts present at the
ignition module after
flame icon is
extinguished?
YES
NO
Does burner extinguish
after flame icon
extinguishes?
NO
Replace gas valve.
YES
What was original
complaint?
Water too hot
(45ºC and/or 55ºC
high limits NOT tripping)
Is temp rise across heat
exchanger > 12ºC
NO
Heater operating normally.
YES
Free or replace in/out header
bypass valve.
NO
Replace bypass valve spring
with one of the correct colour.
YES
Water too hot
(45ºC and/or 55ºC
high limits tripping)
Is in/out header bypass
valve stuck in closed
position?
NO
Does in/out header
bypass valve have
correct spring?
YES
TM018 Raypak 131 Type A Pool & Spa Heaters REV: A
D.O.I: 8/04/2009
This document is stored and maintained electronically by
Clean internal blockage in
tube bundle or replace tube
bundle.
29
Service. All printed copies not bearing this statement in RED are deemed “uncontrolled”
Fault Finding Chart 4
4
Which high limit has
tripped?
45ºC inlet
high limit
When 45ºC inlet high limit
trips is water temp > 42ºC
NO
YES
55ºC outlet
high limit
Wait until 45ºC inlet high limit
cools to below 32ºC
45ºC inlet high limit faulty.
Replace 45ºC inlet high limit.
Test 14
When 55ºC outlet high
limit trips is the inlet water
temp > 42ºC?
Does 45ºC inlet high limit
contact close?
NO
YES
NO
YES
45ºC inlet high limit faulty.
Replace 45ºC inlet high limit &
continue with fault finding to
determine why over temp
condition exists.
When 55ºC outlet
high limit trips is
water temp > 55ºC?
55ºC outlet high limit faulty.
Replace 55ºC outlet high limit.
NO
YES
Test 17
Wait until 55ºC outlet high
limit cools to below 45ºC.
C
C
Do 55ºC outlet high limit
contact close?
NO
YES
Flow too low
Is water flow through
heater > 1.3 l/sec?
NO
Is water pressure or
flow switch closed
when pump is
running?
Test 10A for black boards.
Test 10B for grey boards.
Two faults may exist.
Continue with fault finding
to determine why water
flow is too low then check
heater operation to
determine if high limit(s)
trip.
NO
YES
Can water pressure
or flow switch be
adjusted?
NO
YES
Refer to section on adjusting
pressure switch or section on
adjusting flow switch
Are heat exchanger
fins blocked?
YES
Water pressure or flow switch
adjusted. Continue with fault
finding to determine why water
flow is too low.
YES
Are heat exchanger
fins blocked with
soot?
Replace water pressure or
flow switch & continue with
fault finding to determine why
water flow is too low.
YES
Is burner flame
satisfactory?
5
YES
Clean or replace tube bundle.
NO
Advise customer.
4.1
Chart 4.1 is part of and
located within chart 1.8
NO
NO
Clean or replace tube bundle.
Continue with fault finding to
determine what is causing
sooting.
NO
Is inlet gas pressure
within specification?
3
Clean or replace tube
bundle.
TM018 Raypak 131 Type A Pool & Spa Heaters REV: A
D.O.I: 8/04/2009
This document is stored and maintained electronically by
YES
30
Service. All printed copies not bearing this statement in RED are deemed “uncontrolled”
Fault Finding Chart 5
5
Is heater plumbed
correctly?
NO
Remake plumbing to comply
with installation instructions.
NO
Ensure plumbing valves are
open or in correct postion.
YES
Unblock skimmer box.
YES
Advise customer to backwash
filter.
YES
Unblock, free or replace
seized pump.
YES
Are plumbing valves open
or in correct position?
YES
Is skimmer box blocked?
NO
Is pool/spa filter blocked?
NO
Is pump blocked or
seized?
Blockage in pipe work.
NO
TM018 Raypak 131 Type A Pool & Spa Heaters REV: A
D.O.I: 8/04/2009
This document is stored and maintained electronically by
31
Service. All printed copies not bearing this statement in RED are deemed “uncontrolled”
Fault Finding Chart 6
6
Does controller display
„AUTO‟?
YES
(Auto mode)
Is controller clock set to
correct time?
NO
Set controller clock to correct
time.
NO
Correctly program auto mode
time periods.
NO
Auxiliary(s) must be
programmed to turn on during
auto mode time periods.
YES
NO
(Manual mode)
Are auto mode time
periods programmed
correctly?
For information on programming
auxiliary operation in auto mode
refer to „TM055 Raypak Pool Heater
Controller Guide‟.
Is auxiliary(s) turned on?
YES
For information on selecting
auxiliary‟s whilst in manual mode;
refer to „TM055 Raypak Pool Heater
Controller Guide‟.
Are auxiliary's
programmed to turn on
during auto mode time
periods?
YES
YES
Is EIB cable plugged into
correct socket on main
controller?
Correct socket is marked „E.I.B.‟
NO
Plug EIB cable into correct
socket on main controller.
NO
Replace EIB cable.
YES
Is EIB cable continuous
and unbroken?
Temporarily connect
a new EIB.
YES
Does auxiliary(s) operate
using new EIB?
YES
Replace EIB.
Recover temporarily
connected new EIB and
replace main controller.
NO
Fault Finding Chart 7
7
Does heater function
using main controller?
1
NO
Correct socket is marked „Remote‟
YES
Is remote controller cable
plugged into correct socket
on main controller?
YES
Plug remote controller cable
into correct socket on main
controller.
NO
Is remote controller cable
continuous and unbroken?
NO
Replace remote controller
cable.
Does heater operate using
new remote controller?
YES
Replace remote controller.
YES
Temporarily connect
a new remote controller.
NO
TM018 Raypak 131 Type A Pool & Spa Heaters REV: A
D.O.I: 8/04/2009
This document is stored and maintained electronically by
Recover temporarily
connected new remote
controller and replace main
controller.
32
Service. All printed copies not bearing this statement in RED are deemed “uncontrolled”
Fault Finding Chart 8
8
Is leak from external
plumbing?
YES
NO
Is leak from rain or
splashed water pooling at
heater?
YES
Advise customer
YES
Normal operation. Condensate
may form when heater is first
started but should evaporate
as heater reaches operating
temperature. Advise customer.
YES
Tighten inlet or outlet
connection unions. Replace
o‟ring(s) if necessary. Use
silicone grease on o‟ring(s).
YES
Seal/replace adapter.
Remake using thread tape.
YES
Replace high limit adaptor
(use thread tape on adaptor).
YES
Ensure temperature probe clip
is properly retaining probe and
that o-ring is present. Replace
o-ring if required. Use silicone
grease on o-ring.
YES
Tighten or replace water
pressure switch. Use silicone
grease on switch thread.
YES
Replace header.
YES
Tighten in/out header to heat
exchanger unions(s) or
replace Sealing washer(s).
YES
Tighten or replace in/out
header bypass valve cap or
cap o-ring.
NO
Is leak Due to
condensate forming?
NO
Is leak at inlet or outlet
water connections?
NO
Is leak at water temp
probe/45º high limit
adaptor?
NO
Is leak at 45º high limit?
NO
Is leak at water
temperature probe?
NO
Is leak at water pressure
switch?
NO
Is leak at in/out header?
NO
Is leak at in/out header to
heat exchanger union(s)?
NO
Is leak at in/out header
bypass valve cap?
Replace leaking heat
exchanger.
NO
TM018 Raypak 131 Type A Pool & Spa Heaters REV: A
D.O.I: 8/04/2009
This document is stored and maintained electronically by
33
Service. All printed copies not bearing this statement in RED are deemed “uncontrolled”
Fault Finding Chart 9
9
Screaming or whining noises are
associated with low water flow.
Is noise a screaming or
whining sound?
5
YES
NO
Is noise a creaking or
cracking sound?
Expansion and contraction
noise associated with heating.
Normal operation.
YES
NO
Is noise from burner i.e
harsh flame?
YES
Is inlet gas pressure
within specification?
4.1
YES
Flow Chart 4.1 is
part of flow chart 1.8
NO
NO
Is noise from nearby
equipment i.e pool pump?
YES
Advise customer.
Look for loose component or
screws.
NO
Test Procedures
Fault Finding Tests 1 – 2
Test 1
Test 2
Ensure power point is switched on and
using a multimeter on the AC voltage
scale, measure between the 3 pin sockets
on the power point.
Normal reading should be:
Disconnect the grey wire from relay 2 and
using a multimeter on the ohms scale,
measure between the orange wire relay
terminal and the disconnected grey wire
relay terminal on relay 2.
Active to Neutral – 240 Volts AC.
Active to Earth – 240 Volts AC.
Neutral to Earth – 0 Volts.
Normal reading should be 0 ohms
(N/C contacts 5 and 1 closed).
TM018 Raypak 131 Type A Pool & Spa Heaters REV: A
D.O.I: 8/04/2009
This document is stored and maintained electronically by
34
Service. All printed copies not bearing this statement in RED are deemed “uncontrolled”
Fault Finding Tests 3 – 6
Test 3
Test 4
Disconnect the yellow wire from relay 1
and using a multimeter on the ohms scale,
measure between the grey wire relay
terminal and disconnected yellow wire
relay terminal on relay 1.
Using a multimeter on the AC voltage
scale, measure between the two terminals
on the reset button LED block (yellow and
blue wires).
Normal reading should be 24 Volts AC.
A reading of be 0 ohms
(N/C contacts 5 and 1 closed).
Test 5
Test 6
Disconnect red wire from the reset button
contact block and using a multimeter on
the ohms scale, measure between the two
terminals on the reset button contact block
(grey and red wires). The following result
should be obtained while the reset button
is pushed and held in the depressed
position:
Using a multimeter on the AC voltage
scale, measure between the red wire
terminal and blue wire terminal on relay 1.
The following result should be obtained
while the reset button is pushed and held
in the depressed position:
24 volts AC.
0 ohms (N/O contact closed).
TM018 Raypak 131 Type A Pool & Spa Heaters REV: A
D.O.I: 8/04/2009
This document is stored and maintained electronically by
35
Service. All printed copies not bearing this statement in RED are deemed “uncontrolled”
Fault Finding Tests 7 – 9
Test 7
Test 8A
Using a multimeter on the AC voltage
scale, measure between terminal marked
„A‟ and terminal marked „N‟ on the line
terminal block.
Using a multimeter on the AC voltage
scale, measure between terminal marked
„24VAC‟ and terminal marked „GND‟ on the
control board.
The following result should be obtained: The following result should be obtained:
240 Volts AC.
24 Volts AC.
Test 8B
Test 9
Using a multimeter on the AC voltage
scale, measure between terminal marked Remove glass fuse from fuse holder. Using
„24VAC‟ and terminal marked „GND‟ on the a multimeter on the ohms scale, measure
between the ends of the glass fuse.
control board.
The following result should be obtained:
The following result should be obtained:
0 ohms (fuse ok).
24 Volts AC.
TM018 Raypak 131 Type A Pool & Spa Heaters REV: A
D.O.I: 8/04/2009
This document is stored and maintained electronically by
36
Service. All printed copies not bearing this statement in RED are deemed “uncontrolled”
Fault Finding Tests 10A – 11B
Test 10A
Test 10B
Using a multimeter on the AC voltage
scale, measure between terminal marked
„P-SW‟ and terminal marked „GND‟ on the
control board.
Isolate power, disconnect wiring at pressure or
flow switch. Restore power and using a
multimeter on the ohms scale, measure
between the two terminals on the pressure or
flow switch.
The following result should be obtained whilst
the pump is operating: 0 ohms (pressure or
flow switch closed).
The following result should be obtained:
24 Volts AC.
Test 11A
Test 11B
Using a multimeter on the AC voltage
scale, measure between terminal marked
„VALVE‟ and terminal marked „GND‟ on
the control board.
Using a multimeter on the AC voltage
scale, measure between terminal marked
„VALVE‟ and terminal marked „GND‟ on the
control board.
The following result should be obtained:
24 Volts AC.
The following result should be obtained:
24 Volts AC.
TM018 Raypak 131 Type A Pool & Spa Heaters REV: A
D.O.I: 8/04/2009
This document is stored and maintained electronically by
37
Service. All printed copies not bearing this statement in RED are deemed “uncontrolled”
Fault Finding Tests 12 – 15
Test 12
Test 13
Using a multimeter on the AC voltage Using a multimeter on the AC voltage scale,
scale, measure between the double violet measure between the brown wire terminal
wire terminal and blue wire terminal on and blue wire terminal on relay 2.
relay 2.
The following result should be obtained:
The following result should be obtained:
24 Volts AC.
24 Volts AC.
Test 14
Test 15
Disconnect wiring at 45ºC inlet high limit
and using a multimeter on the ohms scale,
measure between the two terminals on the
45ºC inlet high limit.
Using a multimeter on the AC voltage scale,
measure between the bottom red wire
terminal and the blue wire terminal on relay
1.
The following result should be obtained:
24 Volts AC.
The following result should be obtained:
0 ohms (high limit contact closed).
TM018 Raypak 131 Type A Pool & Spa Heaters REV: A
D.O.I: 8/04/2009
This document is stored and maintained electronically by
38
Service. All printed copies not bearing this statement in RED are deemed “uncontrolled”
Fault Finding Tests 16 – 19
Test 16
Test 17
Using a multimeter on the AC voltage
scale, measure between the brown wire
terminal and the blue wire terminal on relay
1.
Disconnect wiring at 55ºC outlet high limit
and using a multimeter on the ohms scale,
measure between the two terminals on the
55ºC outlet high limit.
The following result should be obtained:
24 Volts AC.
The following result should be obtained:
0 ohms (high limit contact closed).
Test 18
Test 19
Using a multimeter on the AC voltage
scale, measure between each purple wire
and the blue wire on the RAM ignition
module terminal strip.
Using a multimeter on the AC voltage
scale, measure between the brown wire
and the blue wire on the RAM ignition
module terminal strip.
The following results should be obtained:
1st purple wire – blue wire: 24 Volts AC.
2nd purple wire – blue wire: 24 Volts AC.
The following result should be obtained:
24 Volts AC.
TM018 Raypak 131 Type A Pool & Spa Heaters REV: A
D.O.I: 8/04/2009
This document is stored and maintained electronically by
39
Service. All printed copies not bearing this statement in RED are deemed “uncontrolled”
Fault Finding Tests 20 – 21
Test 20
Using a multimeter on the AC voltage
scale, measure between the two terminals
on the gas valve.
The following result should be obtained:
24 Volts AC.
Fault Finding Test 21 – Water Temperature Probes
This test procedure and the temperature/resistance chart
below are the same for the water temperature probe and
solar collector water temperature probe (if fitted).
1. Remove the water temperature probe from the in/out
header (or solar collector) and hang in free air away
from any components.
2. Place thermometer probe tip next to tip of water
temperature probe so both probes measure the ambient
air temperature at the same location.
3. Disconnect the water temperature probe from the control
board, connect a multimeter to the probe plug and select
the ohms scale on the multimeter.
4. Compare the ohms reading to the thermometer
temperature and check against the water table shown
below allowing for a tolerance of + or - 3ºC.
Water Temperature Probe Temperature/Resistance Chart
All temperatures shown in ºC
Temp
50
49
48
47
46
45
44
43
42
41
kΩ
3.53
3.64
3.76
3.86
3.97
4.15
4.30
4.45
4.58
4.79
Temp
40
39
38
37
36
35
34
33
32
31
kΩ
4.94
5.09
5.29
5.43
5.68
5.88
6.11
6.31
6.52
6.77
TM018 Raypak 131 Type A Pool & Spa Heaters REV: A
D.O.I: 8/04/2009
This document is stored and maintained electronically by
Temp
30
29
28
27
26
25
24
23
22
21
kΩ
7.04
7.34
7.59
7.84
8.90
8.45
8.79
9.28
9.55
9.89
Temp
20
19
18
17
16
15
14
13
12
11
kΩ
10.17
10.55
11.11
11.85
12.34
12.81
13.16
14.06
14.44
15.03
Temp
10
9
8
7
6
5
4
3
2
1
kΩ
15.58
16.40
17.01
17.51
18.88
18.06
18.77
21.13
21.68
23.04
40
Service. All printed copies not bearing this statement in RED are deemed “uncontrolled”
Fault Finding Tests 22 – 23
Test 22
Test 23
Using a multimeter on the AC voltage
scale, measure between the orange and
blue wire and then the violet and blue wire
on the auto reset safety PCB six pin plug.
Using a multimeter on the AC voltage
scale, measure between the brown and
blue wire on the auto reset safety PCB six
pin plug.
The following results should be obtained:
Orange – blue wire: 24 Volts AC.
Violet – blue wire: 24 Volts AC.
The following result should be obtained:
24 Volts AC.
Component Adjustment Procedures
Burner Pressure Adjustment:
Check the inlet gas pressure at the gas valve inlet test point before adjusting
the gas valve burner pressure regulator.
Adjust the burner gas pressure to match the appliance rating plate as follows:
1. Remove the Lower In/Out Header Panel, Gas
Valve Cover and Gas Valve Enclosure.
2. Remove the Gas Valve burner pressure
adjustment screw cap by unscrewing in an
anticlockwise direction.
3. Using a screwdriver, turn the inner adjustment
screw clockwise to increase or counterclockwise to reduce gas pressure to the burner.
4. Replace the burner pressure adjustment screw cap and tighten firmly to prevent gas
leakage.
5. Replace the Gas Valve Enclosure, Gas Valve Cover and Lower In/Out Header Panel.
If the desired burner pressure cannot be achieved by adjusting the burner pressure
regulator, check the gas supply pressure to the pool heater using a manometer at the inlet
test point on the gas valve. If the inlet pressure is not within the prescribed limits, take the
necessary steps to provide the correct gas pressure to the heater. If the inlet pressure is
within the prescribed limits replace the gas valve.
TM018 Raypak 131 Type A Pool & Spa Heaters REV: A
D.O.I: 8/04/2009
This document is stored and maintained electronically by
41
Service. All printed copies not bearing this statement in RED are deemed “uncontrolled”
Pressure Switch Adjustment
1. Remove the In/Out Header Access Cover. Refer to „In/Out Header Access Cover‟
procedure on page 44.
2. Check that all valves are correctly positioned to allow water flow through the heater.
3. Start system pump and ensure that the correct water flow rate is flowing through the
heater (minimum 1.3 l/sec maximum 6.9 l/sec).
4. Turn power on at the heater.
5. Adjust set point of the heater to 40ºC. If the heater lights proceed to step 6. If the
burner does not light proceed to step 7.
6. Turn the pressure switch knurled adjustment wheel slowly anti-clockwise until the
burner extinguishes then proceed to step 7.
7. Turn the pressure switch knurled adjustment wheel slowly
clockwise until the heater lights then turn the adjustment wheel
an additional ¼ turn.
8. Turn off the pump; the burner should now go out. If the burner
does not extinguish there is a fault with the pressure switch or
pool heater and fault finding will need to be performed to
locate the fault.
9. If the heater did go out in step 8; the pump should be cycled
Pressure switch knurled
on and off several times to ensure that the adjustment is
adjustment wheel
correct.
Flow Switch Adjustment
1. Check that all valves are correctly positioned to allow water flow through the heater.
2. Start system pump and ensure that the correct water flow rate is flowing through the
heater (minimum 1.3 l/sec maximum 6.9 l/sec).
3. Turn power on at the heater.
4. Adjust set point of the heater to 40ºC. If the burner lights proceed to step 6. If the
burner does not light proceed to step 7.
Flow switch
5. Turn the flow switch adjustment screw slowly anti-clockwise
adjustment
screw
until the burner extinguishes then proceed to step 7.
6. Turn the flow switch adjustment screw slowly clockwise until
the burner lights then turn the adjustment wheel an additional
¼ turn.
7. Turn off the pump; the burner should extinguish. If the burner
does not extinguish there is a fault with the flow switch or pool
heater and fault finding will need to be performed to locate the
fault.
8. If the burner did extinguish in step 8; the pump should be cycled on and off several
times to ensure that the adjustment is correct.
TM018 Raypak 131 Type A Pool & Spa Heaters REV: A
D.O.I: 8/04/2009
This document is stored and maintained electronically by
42
Service. All printed copies not bearing this statement in RED are deemed “uncontrolled”
Component Replacement Procedures
Prior to performing any component replacement procedures detailed in this manual
ensure the safety warnings on page 3 are read and observed, failure to do so may
result in serious injury.
After performing any component replacement procedure where the power
supply was removed and then restored; the red reset button must be
pushed and released to reset the heater on models manufactured prior to
the 14/4/09. The reset light will then extinguish indicating that the heater
has been reset.
Front Access Panel
1.
2.
3.
4.
5.
Turn Controller off.
Isolate power supply to the pool heater.
Remove four screws retaining the Front Access Panel.
Remove the Front Access Panel.
Reassemble in reverse order of above.
Display Panel Removal
1. Remove the Front Access Panel. Refer to „Front Access Panel‟ procedure above.
2. Cut cable tie retaining the water temperature probe cable to wiring loom.
3. Remove four screws retaining the Display Panel and place on ground. Note: Support
the Display Panel whilst removing screws otherwise the Display Panel will fall when
the last screw is removed.
4. Remove the PCB Cover Panel by pressing down on the top side and pulling away from
the Display Panel. NOTE: The PCB Cover Panel is a tight fit, considerable pressure
will need to be applied to disengage the PCB Cover Panel from the Display Panel.
5. Mark and disconnect the wiring from the control board.
6. Mark and disconnect the wiring from the reset button.
7. Withdraw wiring disconnected in steps 5 and 6 through the cable entry in the PCB
Cover Panel
8. Reassemble in reverse order of above. Note: replace cable tie cut in step 2.
Electrical Control Box Cover
1. Remove the Front Access Panel. Refer to „Front Access Panel‟ procedure above.
2. Remove single screw retaining Electrical Control Box Cover.
3. Remove the Electrical Control Box Cover away from the Electrical Control Box and
slide sideways past the Display Panel wiring loom to remove.
4. Reassemble in reverse order of above.
TM018 Raypak 131 Type A Pool & Spa Heaters REV: A
D.O.I: 8/04/2009
This document is stored and maintained electronically by
43
Service. All printed copies not bearing this statement in RED are deemed “uncontrolled”
Top Panel
1.
2.
3.
4.
Turn Controller off.
Isolate power supply to the pool heater and pool pump.
Remove ten screws retaining the Top Panel and remove the Top Panel.
Reassemble in reverse order of above.
Front / Rear Upper Grille
1. Remove the Top Panel. Refer to „Top Panel‟ procedure on above.
2. Remove the screws (3 in each panel) retaining the Diverter Draft Intake Panel and
Flue Diverter Assembly to the left or right hand side panel.
3. Remove the screws (2 in each panel) from the „Front Access Panel‟, „Display Panel‟,
„Upper In/Out Header Panel‟ and the „Lower In/Out Header Panel‟ from the same side
panel as those removed in step 4.
4. Remove the 4 screws retaining the Upper Grille.
5. Gently pull the Side Panel away from the Upper Grille to disengage the locating tab.
6. Gently slide the Upper Grille locating tab out of the opposite side panel and remove.
7. Reassemble in reverse order of above.
Upper In/Out Header Panel
1.
2.
3.
4.
5.
Turn Controller off.
Isolate power supply to the pool heater and pool pump.
Remove four screws retaining the Upper In/Out Header Panel.
Remove the Upper In/Out Header Panel.
Reassemble in reverse order of above.
Lower In/Out Header Panel
1.
2.
3.
4.
Turn Controller off.
Isolate power supply to the pool heater and pool pump.
Remove four screws retaining the lower in/out header panel.
Pull the bottom of the Lower In/Out Header Panel away from the heater then pull down
to remove.
5. Reassemble in reverse order of above.
In/Out Header Access Cover
1. Remove the Upper In/Out Header Panel. Refer to „Upper In/Out Header Panel‟
procedure above.
2. Remove single hex head screw retaining the In/Out Header Access Cover.
3. Pull the In/Out Header Access Cover down and lift out to remove.
4. Reassemble in reverse order of above.
TM018 Raypak 131 Type A Pool & Spa Heaters REV: A
D.O.I: 8/04/2009
This document is stored and maintained electronically by
44
Service. All printed copies not bearing this statement in RED are deemed “uncontrolled”
Flue Diverter Assembly
Remove the Top Panel. Refer to „Top Panel‟ procedure on page 44.
Remove the 10 screws retaining the Flue Diverter Assembly.
Remove the upper 2 screws from the front and rear Upper Grille.
Gently pull one of the Upper Grille panels out at the top to create a gap between the
Upper Grille and the Flue Collector and lift clear.
5. Reassemble in reverse order of above.
1.
2.
3.
4.
Draft Intake Diverter
1. Remove the Flue Diverter Assembly. Refer to „Flue Diverter Assembly‟ procedure on
page 45.
2. Remove the 6 screws retaining the Draft Intake Diverter and lift clear.
3. Reassemble in reverse order of above.
Flue Collector
1. Remove the Top Panel. Refer to „Top Panel‟ procedure on page 44.
2. Remove the Flue Diverter Assembly. Follow steps 2 & 3 of the „Flue Diverter
Assembly‟ procedure on page 45.
3. Remove the Draft Intake Diverter. Follow step 2 of the „Draft Intake Diverter‟ procedure
above.
4. Remove four hex head screws retaining the Flue Collector to the front and rear
Refractory Supports and lift out the Flue Collector.
Jacket Assembly Complete
1.
2.
3.
4.
5.
Turn controller off.
Isolate the power supply to the pool heater and pool pump.
Isolate the pool water from the pool heater.
Disconnect the pool plumbing from the pool header at the In/Out Header unions.
Isolate the gas supply to the pool heater and disconnect the pool heater inlet gas
connection by unscrewing union in an anticlockwise direction.
6. If required, move the complete pool heater to a serviceable location.
7. Remove the Display Panel. Follow steps 2 & 3 of the „Display Panel‟ procedure on
page 43.
8. Disconnect the Cord Set at the Electrical Control Box. Follow steps 1-3 of the „Cord
Set‟ procedure on page 55.
9. Remove the Upper In/Out Header Panel. Follow steps 3 & 4 of the „Upper In/Out
Header Panel‟ procedure on page 44.
10. Remove the Lower In/Out Header Panel. Follow steps 3 & 4 of the „Lower In/Out
Header Panel‟ procedure on page 44.
11. Remove the 10 Philips head around the bottom edge of the Jacket Assembly.
12. Carefully flex the right hand side panel over the inlet gas connection pipe and lift the
entire Jacket Assembly clear of the pool heater.
13. Reassemble in reverse order of above.
14. Test for gas leaks using soapy water solution.
TM018 Raypak 131 Type A Pool & Spa Heaters REV: A
D.O.I: 8/04/2009
This document is stored and maintained electronically by
45
Service. All printed copies not bearing this statement in RED are deemed “uncontrolled”
Right Hand Side Panel
1. Remove the Cord Set. Refer to „Cord Set‟ procedure on page 55.
2. Remove the Display Panel. Follow steps 1-3 of the „Display Panel Removal‟ procedure
on page 43.
3. Remove the Top Panel. Follow steps 3 & 4 of the „Top Panel‟ procedure on page 44.
4. Remove the Upper In/Out Header Panel. Follow steps 3 & 4 of the „Upper In/Out
Header Panel‟ procedure on page 44.
5. Remove the Lower In/Out Header Panel. Follow steps 3 & 4 of the „Lower In/Out
Header Panel‟ procedure on page 44.
6. Remove the 2 screws retaining the front & rear Upper Grille panels to the right hand
side panel.
7. Remove the screws retaining the Diverter Draft Intake Panel and Flue Diverter
Assembly (3 in each panel) to the right hand side panel.
8. Isolate the gas supply and disconnect the pool heater inlet gas connection by
unscrewing union in an anticlockwise direction.
9. Remove the screw from the front and rear edge of the right hand side panel.
10. Remove the 3 screws along the bottom edge of the right hand side panel.
11. Remove the side Panel. NOTE: Each Upper Grille has a tab which slots into the side
panel. To disengage the tab, slide the panel off the tabs while keeping the panel
upright.
12. Reassemble in reverse order of above.
13. Test for gas leaks using soapy water solution.
Left Hand Side Panel
1. Remove the Display Panel. Follow steps 1-3 of the „Display Panel Removal‟ procedure
on page 43.
2. Remove the Top Panel. Follow steps 3 & 4 of the „Top Panel‟ procedure on page 44.
3. Remove the Upper In/Out Header Panel. Follow steps 3 & 4 of the „Upper In/Out
Header Panel‟ procedure on page 44.
4. Remove the Lower In/Out Header Panel. Follow steps 3 & 4 of the „Lower In/Out
Header Panel‟ procedure on page 44.
5. Remove the 2 screws retaining the front & rear Upper Grille panels to the left hand
side panel.
6. Remove the screws retaining the Diverter Draft Intake Panel and Flue Diverter
Assembly (3 in each panel) to the left hand side panel.
7. Remove the screw on the front and rear edge of the left hand side panel.
8. Remove the 3 screws along the bottom edge of the left hand side panel.
9. Remove the side panel. NOTE: Each Upper Grille has a tab which slots into the side
panel. To disengage the tab, slide the panel off the tabs while keeping the panel
upright.
TM018 Raypak 131 Type A Pool & Spa Heaters REV: A
D.O.I: 8/04/2009
This document is stored and maintained electronically by
46
Service. All printed copies not bearing this statement in RED are deemed “uncontrolled”
Base Assembly
1. Remove the Jacket Assembly. Refer to „Jacket Assembly Complete‟ procedure on
page 45.
2. Remove the 2 hex head screws retaining the Gas Valve Cover and remove.
3. Remove the 2 hex head screws retaining the Gas Valve Enclosure and remove.
4. Remove the hex head screws (2 on each support) retaining the front and rear
Refractory Supports to the Base Panel and lift the assembly clear of the Base Panel.
5. Reassemble in reverse order above.
6. Test for gas leaks using soapy water solution.
7. Check In/Out Header unions for water leaks.
45ºC Inlet High Limit
1. Remove the In/Out Header Access Cover. Refer to „In/Out Header Access Cover‟
procedure on page 44.
2. Disconnect the wiring from the 45ºC Inlet High Limit.
3. Unscrew the 45ºC Inlet High Limit from the Adaptor in an anticlockwise direction.
4. Reassemble in reverse order of above.
Water Temperature Probe
1. Isolate the pool water from the pool heater.
2. Remove the In/Out Header Access Cover. Refer to „In/Out Header Access Cover‟
procedure on page 44.
3. Remove the clip retaining the Water Temperature Probe and withdraw the Water
Temperature Probe from the Adaptor. NOTE: Ensure the o-ring is also removed from
the Adapter.
4. Remove the Display Panel. Follow steps 1–4 of the „Display Panel Removal‟ procedure
on page 43.
5. Unplug the Water Temperature Probe from the PCB socket marked „40/C Sensor‟
6. Withdraw the Water Temperature Probe and wiring from the pool heater.
7. Reassemble in reverse order of above and cable tie the water temperature probe cable
to wiring loom.
Adaptor - Water Temperature Probe & 45ºC Inlet High Limit
1. Remove the Water Temperature Probe. Follow steps 1-3 of the „Water Temperature
Probe‟ procedure above.
2. Remove the 45ºC Inlet High Limit. Follow steps 2 & 3 of the „45°C Inlet High Limit‟
procedure above.
3. Unscrew the Adaptor from the In/Out header in an anti-clockwise direction.
4. Fit the replacement Adapter using thread tape on the Adaptor thread.
5. Refit the Water Temperature Probe and secure using the spring clip.
6. Restore the pool water supply, start the pool pump and check for water leaks.
7. Complete reassembly in reverse order of above.
TM018 Raypak 131 Type A Pool & Spa Heaters REV: A
D.O.I: 8/04/2009
This document is stored and maintained electronically by
47
Service. All printed copies not bearing this statement in RED are deemed “uncontrolled”
Pressure Switch
1. Isolate the pool water from the pool heater.
2. Remove the In/Out Header Access Cover. Refer to „In/Out Header Access Cover‟
procedure on page 44.
3. Disconnect the wiring from the Pressure Switch.
4. Unscrew the Pressure Switch in an anticlockwise direction by gripping the metal
section of the Pressure Switch with a pair of multigrips.
5. Fit the replacement Pressure Switch using thread tape. Note: Do not apply excessive
thread tape or over tighten as a breakage could result.
6. Restore the pool water supply, start the pool pump and check for water leaks.
7. Check the Pressure Switch adjustment. Refer to „Pressure Switch Adjustment‟
procedure on page 42.
8. Complete reassembly in reverse order of above.
55ºC Outlet High Limit
NOTE: Some P0131 models are fitted with two 55°C Outlet High Limits, one on the In/Out
Header and one on the Heat Exchanger Outlet.
A number of changes have been made to the weather shielding covers fitted to the In/Out
Header; this procedure details the method for current assembly methods.
For P0131 models fitted with the rework kit it will be necessary to remove the Top Panel,
Flue Diverter Assembly, Draft Intake Diverter and then remove the In/Out Header weather
shield to access the 55°C Outlet High Limit(s).
During re-assemble the In/Out Header weather shield must be sealed to the Flue Collector
using high temperature silicone.
1. Remove the Flue Diverter Assembly. Refer to „Flue Diverter Assembly‟ procedure on
page 45.
2. Remove the Draft Intake Diverter. Follow step 2 of the „Draft Intake Diverter‟ procedure
on page 45.
3. Remove the hex screw retaining the 55ºC High Limit Cover.
4. Disconnect the wiring from the 55ºC Outlet High Limit.
5. Remove the 2 screws retaining the 55ºC Outlet High Limit and remove.
6. Reassemble in reverse order of above using a small amount of heat transfer paste on
the face of the 55ºC Outlet High Limit if required.
TM018 Raypak 131 Type A Pool & Spa Heaters REV: A
D.O.I: 8/04/2009
This document is stored and maintained electronically by
48
Service. All printed copies not bearing this statement in RED are deemed “uncontrolled”
In/Out Header
1. Isolate the pool water from the pool heater.
2. Remove the Lower In/Out Header Panel. Refer to „Lower In/Out Header Panel‟
procedure on page 44.
3. Remove the In/Out Header Access Cover. Refer to „In/Out Header Panel‟ procedure
on page 44.
4. Remove the Water Temperature Probe. Follow step 3 of the „Water Temperature
Probe‟ procedure on page 47.
5. Mark and disconnect the wiring from the 45°C Inlet High Limit, Pressure Switch and
55°C Outlet High Limit (if fitted on the In/Out Header).
6. Remove the Flue Diverter Assembly. Refer to „Flue Diverter Assembly‟ procedure on
page 45.
7. Remove the Draft Intake Diverter. Follow step 2 of the „Draft Intake Diverter‟ procedure
on page 45.
8. Remove the hex screw retaining the 55ºC High Limit Cover. Note: For models fitted
with the rework kit this part is not fitted.
9. Disconnect the wiring to the 55ºC High Limit mounted on the Heat Exchanger outlet
and draw the wiring back through the snap bush (where required).
10. Remove the hex screws retaining the In/Out Header weather shield(s) to the
Refractory Support and remove the weather shield. Note: On pool heaters that have
the rework kit fitted the silicone seal between the weather shield and the Flue Collector
will need to be broken.
11. Disconnect the pool pipe work from the pool heater at the In/Out Header Unions.
12. Disconnect the In/Out Header from the Heat Exchanger at the unions and remove the
In/Out Header. Note: Ensure the sealing washers are removed from the Heat
Exchanger.
13. Remove the 45°C Inlet High Limit and Water Temperature Probe Adapter (noting the
orientation of the 45°C Inlet High Limit), the Pressure Switch and the 55°C Outlet High
Limit (if fitted) from the In/Out Header and fit to the replacement In/Out Header.
14. Reassemble in reverse order of above. Do not fit the In/Out Header Access Cover or
the Upper and Lower In/Out Header Panels at this stage. Note: Ensure the Heat
Exchanger unions and water connection union o-rings are clean before reassembly
and use silicone grease on o-rings if required. Use thread tape when refitting the
Adapter and Pressure Switch. Do not apply excessive thread tape or over tighten as a
breakage could result.
15. Restore the pool water supply, start the pool pump and check for water leaks.
16. Check the Pressure Switch adjustment. Refer to „Pressure Switch Adjustment‟
procedure on page 42.
17. Complete reassembly.
TM018 Raypak 131 Type A Pool & Spa Heaters REV: A
D.O.I: 8/04/2009
This document is stored and maintained electronically by
49
Service. All printed copies not bearing this statement in RED are deemed “uncontrolled”
Bypass Valve
1. Isolate the pool water from the pool heater.
2. Remove the Upper In/Out Header Panel. Refer to „Upper In/Out Header Panel‟
procedure on page 44.
3. Remove the Lower In/Out Header Panel. Follow steps 3 & 4 of the „Lower In/Out
Header Panel‟ procedure on page 44.
4. Disconnect the pool pipe work at the In/Out Header outlet union.
5. Unscrew the Bypass Valve Cap, located on the right hand side of the In/Out Header, in
an anticlockwise direction and remove the Bypass Valve Cap followed by the Bypass
Valve Spring.
6. Using a pair of long nose pliers withdraw the Bypass Valve Disc through the In/Out
header outlet connection.
7. Install the replacement Bypass Valve components ensuring the Bypass Valve Disc is
correctly located onto the Bypass Valve Spring and Bypass Valve Cap spindle.
8. Restore the pool water supply, start the pool pump and check for water leaks
9. Complete reassembly in reverse order of above.
Heat Exchanger
1. Remove the In/Out Header. Follow steps 1-12 of the „In/Out Header‟ procedure on
page 49.
2. Remove the 2 screws retaining the 55ºC Outlet High Limit to the Heat Exchanger and
remove.
3. Remove the remaining screws securing the Flue Collector to the Refractory Supports
and remove the Flue Collector.
4. Lift out the Heat Exchanger.
5. Reassemble in reverse order of above. Do not fit the In/Out Header Access Cover or
the Upper and Lower In/Out Header Panels at this stage. Note: Ensure the Heat
Exchanger ends are aligned with the edges of the left and right hand Refractories
when reinstalling. Ensure the Heat Exchanger unions and water connection union orings are clean before reassembly and use silicone grease on o-rings if required. Use
heat transfer paste on 55ºC outlet high limit if required.
6. Restore the pool water supply, start the pool pump and check for water leaks.
7. Check the Pressure Switch adjustment. Refer to „Pressure Switch Adjustment‟
procedure on page 42.
8. Complete reassembly.
TM018 Raypak 131 Type A Pool & Spa Heaters REV: A
D.O.I: 8/04/2009
This document is stored and maintained electronically by
50
Service. All printed copies not bearing this statement in RED are deemed “uncontrolled”
Burner Assembly
1. Remove the Front Access Panel. Refer to „Front Access Panel‟ procedure on page 43.
2. Remove the Lower In/Out Header Panel. Follow steps 3 & 4 of the „Lower In/Out
Header Panel‟ procedure on page 44.
3. Isolate the gas supply to the pool heater.
4. Disconnect burner feed pipe at burner by unscrewing union in an anticlockwise
direction.
5. Remove the Philips head screws (2 in each end of the Burner Assembly) retaining the
Burner Assembly to the Burner Support Brackets. Lower the Burner Assembly and
remove through the rear of the pool heater. Note: Support the Burner Assembly when
removing the screws or the Burner Assembly will fall.
6. Reassemble in reverse order of above. Do not fit the Lower In/Out Header Panel at
this stage.
7. Restore the gas and power supplies and operate the pool heater and adjust the burner
pressure to that indicated on the rating label (refer to „Burner Pressure Adjustment‟
procedure on page 41).
8. Test for gas leaks using soapy water solution.
9. Complete reassembly.
Burner Manifold & Injectors
1. Remove the Burner Assembly. Refer to „Burner Assembly‟ procedure above.
2. Remove the 4 Philips head screws retaining the Burner Manifold to the Burner
Assembly and remove the Burner Manifold.
3. Remove the Injector(s) by unscrewing in an anticlockwise direction.
4. Reassemble in reverse order of above. Do not fit the Lower In/Out Header Panel at
this stage Note: When fitting the replacement Injectors ensure the sealing washer is
re-fitted.
5. Restore the gas and power supplies and operate the pool heater and adjust the burner
pressure to that indicated on the rating label (refer to „Burner Pressure Adjustment‟
procedure on page 41)
6. Test for gas leaks using soapy water solution.
7. Complete reassembly.
TM018 Raypak 131 Type A Pool & Spa Heaters REV: A
D.O.I: 8/04/2009
This document is stored and maintained electronically by
51
Service. All printed copies not bearing this statement in RED are deemed “uncontrolled”
Gas Valve
1. Remove the Lower In/Out Header Panel. Refer to „Lower In/Out Header Panel‟
procedure on page 44.
2. Isolate the gas supply to the pool heater.
3. Disconnect the gas service at the gas connection to the pool heater and remove any
unions on the pool heater side.
4. Disconnect the burner feed pipe at the gas control outlet by unscrewing union in an
anticlockwise direction.
5. Undo 2 screws retaining the Gas Valve Cover and remove. Screws are located on the
upper front and rear of the Gas Valve Cover.
6. Undo the screws retaining the Gas Valve Enclosure and remove. 2 screws are located
at the back of the Gas Valve Enclosure (securing the enclosure to the base) and 1
screw is located on left hand side (securing the enclosure to the Refractory Support).
7. Mark and disconnect the wiring to the Gas Valve. Note: There may be 2 or 3 wires
connected to the Gas Valve depending on the model of the Gas Valve fitted.
8. Remove the Gas Valve and unscrew the pipe extension and nipple from the inlet and
outlet of the Gas Valve.
9. Fit the pipe extension and nipple to the replacement gas valve using gas thread tap or
sealant.
10. Reassemble in reverse order of above. Note: Do not refit the Gas Valve Enclosure,
Gas Valve Cover or Lower In/Out Header Panel as this stage.
11. Restore the gas supply.
12. Operate the pool heater, test for gas leaks using soapy water solution and adjust the
burner pressure to that indicated on the rating label (refer to „Burner Pressure
Adjustment‟ procedure on page 41).
13. Complete reassembly.
Refractories & Top Refractory Retainers
Risk of skin and respiratory irritation. Gloves, face mask and overalls must
be worn when handling the refractories. Spent refractories should be sealed
in a plastic bag for disposal.
1.
2.
3.
4.
Isolate the gas supply to the pool heater.
Follow steps 1-11 of the „In/Out Header‟ procedure on page 49.
Follow steps 3 & 4 of the „Heat Exchanger‟ procedure on page 50.
Remove the Igniter & Flame Rod Assembly. Refer to „Igniter & Flame Rod Assembly‟
on page 54.
5. Lift out the front and rear top refractory retainers.
6. Lift out the left refractory. Note: Refractories are tight fitting and need to be worked out
gradually. Pay attention to how the Refractories are assembled as the front and side
Refractories are not interchangeable.
7. Lift out right Refractory.
8. Lift out front and rear Refractories.
9. Reassemble in reverse order of above. Note: Ensure the Heat Exchanger ends are
aligned with the edges of the left and right hand Refractories when reinstalling. Ensure
the water connection union o-rings are clean before reassembly and use silicone
grease on o-rings if required.
10. Restore the pool water supply, start the pool pump and check for water leaks.
TM018 Raypak 131 Type A Pool & Spa Heaters REV: A
D.O.I: 8/04/2009
This document is stored and maintained electronically by
52
Service. All printed copies not bearing this statement in RED are deemed “uncontrolled”
Lower Refractory Retainers and Refractory Supports
1. Remove the Refractories. Refer to „Refractory & Top Refractory Retainers‟ procedure
on page 52.
2. Remove the front and rear Lower Refractory Retainers.
3. Remove the screws retaining the left and right Lower Refractory Retainers and remove
the left and right Lower Refractory Retainers.
Rear Refractory Support
4. Remove the Burner Assembly. Follow steps 4 & 5 of the „Burner Assembly‟ procedure
on page 51.
5. Remove the Gas Valve Cover and Gas Valve Enclosure. Refer to steps 5 & 6 of the
„Gas Valve‟ procedure on page 52.
6. Mark and disconnect the wiring from the Gas Valve and draw the wiring back through
the cable entry in the rear Refractory Support.
7. Remove the hex head screws retaining the Rear Refractory Support to the Base Panel
and remove the Rear Refractory Support.
8. Remove the Burner Assembly Support Bracket from the Rear Refractory Support.
Front Refractory Support
9. Remove the Display Panel. Follow steps 2 & 3 of the „Display Panel‟ procedure on
page 43.
10. Remove the Burner Assembly (if not already removed in step 4 above. Follow steps 4
& 5 of the „Burner Assembly‟ procedure on page 51.
11. Remove the Electrical Control Box from the Front Refractory Support. Note: On some
models this will require the removal of all the components within the Electrical Control
Box. Refer to the various replacement procedures for each component.
12. Remove the hex head screws retaining the Front Refractory Support to the Base Panel
and remove the Front Refractory Support.
13. Remove the Burner Assembly Support Bracket from the Front Refractory Support.
14. Reassemble in reverse order of above. Do not refit the Lower In/Out Header Panel at
this stage. Note: Ensure the Heat Exchanger ends are aligned with the edges of the
left and right hand Refractories when reinstalling. Ensure the Heat Exchanger unions
and water connection union o-rings are clean before reassembly and use silicone
grease on o-rings if required. Cable tie the Water Temperature Probe wiring to the
main wiring loom.
15. Restore the pool water supply, start the pool pump and check for water leaks.
16. Restore the gas supply.
17. Operate the pool heater, test for gas leaks using soapy water solution and adjust the
burner pressure to that indicated on the rating label (refer to „Burner Pressure
Adjustment‟ procedure on page 41).
18. Complete reassembly.
TM018 Raypak 131 Type A Pool & Spa Heaters REV: A
D.O.I: 8/04/2009
This document is stored and maintained electronically by
53
Service. All printed copies not bearing this statement in RED are deemed “uncontrolled”
Igniter & Flame Rod Assembly
1. Remove the Front Access Panel. Refer to „Front Access Panel‟ procedure on page 43.
2. Remove the 2 hex head screws retaining the Igniter & Flame Rod assembly weather
shield and remove weather shield.
3. Disconnect the wiring at the flame rod spade terminal.
4. Disconnect the wiring at igniter electrode spade terminals.
5. Note the orientation of the Igniter & Flame Rod Assembly and remove the 2 screws
retaining the Igniter & Flame Rod Assembly and withdraw the Igniter and Flame Rod
Assembly from the combustion chamber.
6. Reassemble in reverse order of above ensuring the replacement Igniter and Flame
Rod Assembly is installed in the same orientation as the one removed.
Reset Button
1. Remove the Display Panel. Follow steps 1-4 and 6 of the „Display Panel‟ procedure on
page 43.
2. Separate the switch and LED assembly from the push button. NOTE: 2 types of Reset
Button have been used since inception.
Type 1. Using a small flat bladed screw driver lever the locking tab in to release the
switch and LED assembly from the push button and pull to separate.
Type 2. Pivot the locking tab across the switch and LED assembly to release the
switch and LED assembly from the push button and pull to separate.
3. Undo the lock nut to remove the push button from the Display Panel. Note the
orientation of the push button to ensure the switch and LED assembly will be reinstalled in the same orientation.
4. Mark and disconnect the wiring at the switch and LED blocks.
5. Reassemble in reverse order of above. To reinstall the switch and LED assembly push
the switch and LED assembly onto the push button until it clicks in place. Cable tie the
Water Temperature Probe wiring to the main wiring loom.
Control Board
1. Remove the Display Panel. Follow steps 1-5 of the „Display Panel‟ procedure on page
43.
2. Remove the screws and washers retaining the Control Board to the Display Panel.
3. Depress the Control Board locking tabs located on the left and right hand sides of the
Control Board and push the Control Board through the Display Panel.
4. Reassemble in reverse order of above and cable tie the Water Temperature Probe
wiring to the main wiring loom.
5. Re-program the Control Board if required.
Terminal Block
1. Remove the Electrical Control Box Cover. Refer to „Electrical Control Box Cover‟
procedure on page 43.
2. Mark and disconnect the Cord Set wiring and Transformer wiring from the Terminal
Block.
3. Remove the 2 screws retaining the Terminal Block and remove.
4. Reassemble in reverse order of above.
TM018 Raypak 131 Type A Pool & Spa Heaters REV: A
D.O.I: 8/04/2009
This document is stored and maintained electronically by
54
Service. All printed copies not bearing this statement in RED are deemed “uncontrolled”
RAM Ignition Module
1. Remove the Electrical Control Box Cover. Refer to „Electrical Control Box Cover‟
procedure on page 43.
2. Remove the multi-pin wiring plug from the RAM ignition module.
3. Remove the screw(s) retaining the RAM ignition module and remove.
4. Reassemble in reverse order of above.
Cord Set
1. Remove the Electrical Control Box Cover. Refer to „Electrical Control Box Cover‟
procedure on page 43.
2. Undo the top nut retaining the Cord Set earth wire to the earth stud and remove the
earth wire from the stud.
3. Disconnect the Cord Set active and neutral wires from the terminal block and withdraw
the Cord Set through the cable entry in the Electrical Control Box.
4. Unscrew the Cord Set cable gland compression nut in an anticlockwise direction and
remove the Cord Set by withdrawing through the compression gland.
5. Reassemble in reverse order of above.
Relay 1 / Relay 2
1. Remove the Electrical Control Box Cover. Refer to „Electrical Control Box Cover‟
procedure on page 43.
2. Pull the relevant Relay out of the Relay Base.
3. Reassemble in reverse order of above.
Relay Base
1. Remove the Electrical Control Box Cover. Refer to „Electrical Control Box Cover‟
procedure on page 43.
2. Pull the relevant Relay out of the Relay Base.
3. Mark and disconnect the wiring from the Relay Base requiring replacement.
4. Gently lever the yellow locking clip (located on the bottom of the Relay Base) down
with a flat bladed screwdriver and simultaneously lift the bottom of the Relay Base off
the din rail then lift the Relay Base up and out to remove.
5. Reassemble in reverse order of above. Note: To install the Relay Base onto the din
rail locate the top edge underneath the Relay Base onto the din rail and push the
Relay Base down until the yellow locking clip clicks into position.
TM018 Raypak 131 Type A Pool & Spa Heaters REV: A
D.O.I: 8/04/2009
This document is stored and maintained electronically by
55
Service. All printed copies not bearing this statement in RED are deemed “uncontrolled”
Transformer
1. Remove the Electrical Control Box Cover. Refer to „Electrical Control Box Cover‟
procedure on page 43.
2. Disconnect the Transformer primary active and neutral wires from the Terminal Block.
3. Disconnect the Transformer secondary neutral wire from the ground nest.
4. Disconnect the Transformer secondary active wire at the fuse holder by pressing the
two halves of the fuse holder together and twisting. Do not let internal fuse fall out.
5. Remove the 2 screws retaining the Transformer and remove the Transformer.
6. Reassemble in reverse order of above.
Wiring Loom
1. Remove the Electrical Control Box Cover. Refer to „Electrical Control Box Cover‟
procedure on page 43.
2. Remove the Display Panel. Refer to „Display Panel‟ procedure on page 43.
3. Remove the multi-pin wiring plug from the RAM ignition module.
4. Disconnect the wiring from the earth nest.
5. Disconnect the Transformer secondary winding active at the quick connect to the main
wiring loom.
6. Pull the Relays 1 & 2 out of the Relay Bases.
7. Remove the Relay Bases from the din rail. Follow step 4 of the „Relay Base‟ procedure
on page 55.
8. Disconnect the wiring at the flame rod spade terminal.
9. Disconnect the wiring at igniter electrode spade terminals.
10. Remove the In/Out Header Access Cover. Refer to „In/Out Header Access Cover‟
procedure on page 44.
11. Disconnect the wiring from the 45°C Inlet High Limit and the Pressure Switch.
12. Disconnect the wiring to the 55°C Outlet High Limit(s). Refer to 55°C Outlet High Limit‟
procedure on page 48.
13. Disconnect the wiring to the Gas Valve. Follow steps 1 & 5-7 of the „Gas Valve‟
procedure on page 52.
14. Cut all cable ties securing the Water Temperature Probe wiring to the main wiring
loom.
15. Withdraw all wiring disconnected in steps 11 - 13 to the front of the pool heater.
16. Carefully draw all the wiring back through the cable entry in the Electrical Control Box.
17. Reassemble in reverse order of above. Note: To install the Relay Base onto the din rail
locate the top edge underneath the Relay Base onto the din rail and push the Relay
Base down until the yellow locking clip clicks into position. Cable tie the Water
Temperature Probe wiring to the main wiring loom.
TM018 Raypak 131 Type A Pool & Spa Heaters REV: A
D.O.I: 8/04/2009
This document is stored and maintained electronically by
56
Service. All printed copies not bearing this statement in RED are deemed “uncontrolled”
Exploded View
TM018 Raypak 131 Type A Pool & Spa Heaters REV: A
D.O.I: 8/04/2009
This document is stored and maintained electronically by
57
Service. All printed copies not bearing this statement in RED are deemed “uncontrolled”
Replacement Parts List
Item
1
2
3
4
5
6
7
8
9
10
11
12
13
14
15
16
17
18
19
20
21
22
23
24
25
26
27
Description
Base Panel
Electrical Enclosure
Front Access Panel
Panel Electrical Enclosure Cover
Fuse Holder
Fuse 3A
Relay 24V (pre 14/4/09)
PCB - Auto Reset (post 14/4/09)
Relay Base
Transformer 240/24VAC
Ignition Module
Switch – Reset
Panel – Display
Controller – Grey Board
Controller – Black Board
Panel – PCB Control Cover
Cover – Igniter
Igniter – HSI Norton
Panel – Jacket Side LH
Panel – Jacket Side RH
Panel – Support Front Refractory
Panel – Support Rear Refractory
Channel – Refractory Support (Left & Right)
Fire Tile Kit
Thermostat – Hi Limit 55° Auto Reset
Channel – Refractory Support (Front & Rear)
Fibreglass Tape
Panel – Hi Limit Cover
Bracket Support – Gas Tray
Heat Exchanger
Part Nº
56320474
56144829
56320412
56144830
56659145
56659146
56659014
56PE5006
56659011
56650931N
56601004
56659098
56320410
56659197
56PE5001
56144826
56144825
56659144
56320400
56320408
56320433
56320403
56320416
56700466
56601547
56320415
56700702
56144839
56320428
56320499
TM018 Raypak 131 Type A Pool & Spa Heaters REV: A
D.O.I: 8/04/2009
This document is stored and maintained electronically by
Item
28
29
30
31
32
33
34
35
36
37
38
39
40
41
42
43
44
45
46
47
48
49
50
51
52
53
54
55
56
57
Description
Burner Assembly – Polidoro NG
Burner Assembly – Polidoro Propane
Gas Connector – Dormont
Panel – Gas Valve Cover
Panel – Gas Valve Enclosure
Gas Valve – Natural Gas
Pipe Extension
Flue Collector
Panel – Diverter Draft Intake
Flue Diverter Assembly
Panel – Jacket Upper Front & Rear
Panel – Jacket Top
Panel – Heat Shield Header Cover
Panel – Header Cover Wrapper
Panel – Header Cover Lid
Panel – Access In/Out Header
Panel – Access Lower Rear
Panel – Access Upper Rear
Header – In/Out
Cap – Bypass
O-ring Bypass Cap
Spring – Bypass
Valve – Bypass Disc
O-ring – Header Connection
Union Nut – Header Connection
Union Tail – Header Connection
Locator - Sensor Probe and Hi Limit
Water Temperature Sensor
Thermostat – Hi Limit 45° Auto Reset
Pressure Switch
Cordset
58
Service. All printed copies not bearing this statement in RED are deemed “uncontrolled”
Part Nº
56320497
56320496
56320476
56144828
56144827
56320218
56509196
56320473
56320406
56320472
56320402
56320405
56144824
56144814
56144813
56144832
56320420
56320432
56320495
56320486
56320481
56320482
56800369
56320479
56320477
56320478
56659206
56659202
56600188
56651284
56659143
Replacement Parts
Item
Not Shown on exploded
view
Description
Propane Gas
Injector – Main Burner
Natural Gas
Gas Valve Spring – Propane Conversion
Wiring Loom
Remote Controller – Grey Board
Remote Controller – Black Board
10 Metre
Remote Controller Cable 20 Metre
50 Metre
Part Nº
890688
890689
56600872
56009131
56659198
56PE5005
56CAB10
56CAB20
56CAB50
Gas Type Conversion Procedure
A serious scald hazard exists. Ensure components have sufficiently cooled
before performing this procedure.
1. Remove the Burner Assembly. Refer to „Burner Assembly‟ procedure on page 51.
2. Replace the Injectors with ones suitable for the new gas type. Refer to table below and
follow steps 2 & 3 of the „Burner Manifold and Injector‟ procedure on page 51. Note:
Ensure the sealing washer is removed from the existing injector and fitted to the
replacement injector.
3. Re-assemble and fit the Burner Assembly to the pool heater.
4. Remove the Gas Valve Cover and Gas Valve Enclosure. Refer to steps 5 & 6 of the
„Gas Valve‟ procedure on page 52.
5. Natural Gas – Propane Gas Conversion: Remove the
regulator cover screw, plastic adjustment screw and gas type
spring from the gas valve and replace with the grey/white
powder coated spring suitable for propane (refer to diagram
opposite and table below). Screw the adjustment screw half
way in (approx 5 full turns).
Propane Gas – Natural Gas Conversion: Replace the Gas
Control (refer to the table below). Follow steps 3 & 7-10 of
the „Gas Valve‟ procedure on page 52.
6. Restore power and gas supplies, start pump and operate the
pool heater.
7. Check for leaks using soapy water solution.
8. Adjust the burner pressure to that indicated in the „Specifications‟ table on page 4 for
the gas type. Refer to „Burner Pressure Adjustment‟ procedure on page 41.
9. Mark the rating label with the new injector size details and burner pressure using an
indelible ink and complete reassembly.
Gas Conversion Components
Part Nº
56600872
890688
Natural Gas – Propane Gas
Description
Spring - Propane
Injector (0.77mm)
TM018 Raypak 131 Type A Pool & Spa Heaters REV: A
D.O.I: 8/04/2009
This document is stored and maintained electronically by
Qty
1
15
Part Nº
56320218
890689
Propane Gas – Natural Gas
Description
Gas Valve
Injector (1.36mm)
Qty
1
15
59
Service. All printed copies not bearing this statement in RED are deemed “uncontrolled”
Raypak Pool and Spa Heater Warranty (Australia Only)
Rheem Australia will repair or if necessary replace any Raypak pool or spa heater; or any component of the pool or spa
heater which fails within the Warranty Periods specified hereafter, in accordance with and subject to the conditions and
exclusions mentioned herein.
Warranty conditions
1. This warranty is applicable only to pool and spa heaters manufactured from August 1st, 2005.
2. The pool or spa heater must be installed in accordance with the Raypak installation instructions included with the
heater and in accordance with all statutory, local and State requirements.
3. Where a failed component or heater is replaced under warranty the balance of the original warranty period only will
remain effective. The replaced part or heater does not carry a new warranty.
4. Where the heater is installed outside the boundaries of a metropolitan area as defined by Rheem, or further than
25km from a regional Rheem branch office or an accredited Rheem service Agent, the cost of transport, insurance
and travelling costs between the nearest Rheem branch or Rheem Agents premises and the installed site shall be the
owner‟s responsibility.
5. The warranty only applies to the Raypak supplied heater and genuine (Rheem or Raypak sourced) component
replacement parts and therefore does not cover any plumbing or electrical parts supplied by the installer and not an
integral part of the Raypak supplied heater, e.g. pressure limiting valves, isolation valves, non-return valves, electrical
switches, pumps, fuses, etc.
6. The heater must have been correctly sized for the pool/spa hot water demand in accordance with Raypak pool and
spa heater literature available from Raypak on request.
Warranty Exclusions
Repair and replacement work will be carried out as described in the Warranty Period, however the following exclusions
may cause the warranty to become void and may incur a service charge and/or the cost of any parts used.
1. Accidental damage to the heater or any component, including:
a. Acts of God;
b. Failure due to misuse;
c. Incorrect installation;
d. Attempts to repair carried out by other than Rheem or an accredited Agent;
2. Where it is found that there is nothing wrong with the heater.
3. Where the complaint is related to excessive discharge from the pressure relief valve (if fitted) due to excessive water
pressure.
4. Where there is no flow of water due to faulty plumbing;
5. Where water leaks are related to plumbing including connections to the heater.
6. Where there is a failure of gas or electricity supply or they do not comply with relevant codes or acts .
7. Where the heater or its components have failed directly or indirectly as a result of:
a. Excessive water pressure;
b. Excessive temperature and/or thermal input;
c. Corrosive atmosphere;
d. Incorrect flow rate through the heat exchanger.
8. Where the heater is located in a position that does not comply with the Raypak installation instructions or relevant
statutory requirements causing the need for major dismantling or removal of any structure, or the requirement of
special equipment to bring the heater to a serviceable position.
9. Repairs of any nature due to corrosion or scale formation of any of the heater components in contact with the pool or
spa water.
Subject to any Statutory provisions to the contrary, this warranty excludes all claims for damage to furniture, carpets,
walls, foundations or any other consequential loss either directly or indirectly due to leakage from the pool heater or its
fittings caused by any mode of failure.
Notes:
1. Rheem Australia is responsible for all service activities relating to Raypak Australia product.
2. Rheem Australia reserves the right to transfer fully functional components from a defective heater to a replacement
heater if required.
3. In addition to this warranty, the Trade Practices Act 1974 and similar laws in each State and Territory, provide the
owner with certain minimum statutory rights in relation to your heater. This warranty must be read subject to all
relevant legislation and nothing in this warranty has the effect of excluding, restricting or modifying those rights.
4. Every care has been taken to ensure accuracy in preparation of this publication. No liability can be accepted for any
consequences which may arise as a result of its application.
Rheem Australia Pty Ltd
TM018 Raypak 131 Type A Pool & Spa Heaters REV: A
D.O.I: 8/04/2009
This document is stored and maintained electronically by
ABN 21 098 823 511
60
Service. All printed copies not bearing this statement in RED are deemed “uncontrolled”
Document Revision History
Title: Raypak 131Pool Heater Service Instructions
Revision
A
Document Nº:
Details of change
Type A Raypak pool & spa heater service instructions issued
TM018 Raypak 131 Type A Pool & Spa Heaters REV: A
D.O.I: 8/04/2009
This document is stored and maintained electronically by
TM020
D.O.I.
4/09
61
Service. All printed copies not bearing this statement in RED are deemed “uncontrolled”