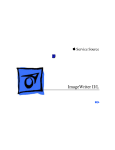
1
Chapter 1: Meet the ImageWriter II
ImageWriter II Features
The Apple ImageWriter II is the ideal addition to your Apple computer. The versatile ImageWriter II
combines ease of operation with a host of high-performance features to produce professional-quality
graphics and text printouts.
You can expand the ImageWriter II’s capabilities by choosing among three optional accessories—the
ImageWriter II SheetFeeder, ImageWriter II 32K Memory Option, and ImageWriter II AppleTalk Option.
Features for Everyone
Do you want presentation quality text for an important report? Do you need to print hundreds of mailing
labels? Could you show sales increases more dramatically with a bar chart in your report? Is it time to get
that novel off to your publisher? The flexible ImageWriter II easily does all this and more. Consider these
features for your day-to-day work.
Print Quality and Speed
You can select from among three levels of print quality at the press of a button:
Near Letter Quality (NLQ) for formal communications and presentations
Standard Quality for everyday work
Draft Quality when you want a quick printout for review or editing
The ImageWriter II can print high-resolution graphics, ideal for use with the Macintosh and with graphics
programs written for the Apple II computers.
The ImageWriter II’s high-speed print mechanism can turn out text at speeds up to 250 characters per
second.
Letters, Labels, and Forms
The ImageWriter II can handle a variety of printing tasks: reports, letters, envelopes, mailing labels, even
multi-part forms like invoices.
Easy Paper Loading and Ribbon Changes
With the automatic paper loading feature, you can load single-sheet paper with the push of a button.
Thanks to the built-in forms tractor, the ImageWriter II makes loading computer paper easier than ever
before.
Likewise, ribbon changes are a snap. Ribbon cartridges click in and out quickly and neatly. Whether you
print in black or color, you get high-quality images and long life from these continuous-loop, fabric
ribbons.
Seven-Color Printing
To print color graphics, click in an ImageWriter II color ribbon. With color software, you can print
documents in six colors plus black. You can even mix black text with color graphics.
Programmable Features
To make more sophisticated demands on the ImageWriter II, consider these programmable features.
Text Formatting and Character Sets
Using software, you can cause the ImageWriter II to print
Boldface type
Underlining
Subscripts and superscripts
Half-height characters
Various type sizes (from 4.5 to 17 characters per inch)
Several character sets (American plus seven European sets)
Custom characters
Special Formatting Features
The ImageWriter II provides special formatting features:
Horizontal tab settings
Spacing—proportional or standard
Lines per inch
Lines per page
ImageWriter II Accessories
You can further enhance your printer’s performance with ImageWriter II accessories—the ImageWriter II
SheetFeeder, the ImageWriter II 32K Memory Option, and the ImageWriter II AppleTalk Option.
The ImageWriter II SheetFeeder
You’ll find the ImageWriter II SheetFeeder perfect for large printing jobs on individual sheets of
letterhead and other standard paper. You no longer have to feed pages in one at a time. Load the
SheetFeeder with up to 100 individual pages. It feeds each sheet as the printer demands, and stacks
each printout.
The ImageWriter II 32K Memory Option
Designed for the Apple II computers, the Memory Option is an excellent way to expand the printer’s
memory and increase your own productivity. With the ImageWriter II 32K Memory Option, you can send a
document of up to 32,000 characters (16 to 20 pages) to the printer and continue working at the
computer, while the ImageWriter II does the printing.
The ImageWriter II AppleTalk Option
The AppleTalk Option promotes shared resources in offices and schools. With the card installed, one
ImageWriter II can serve as many as 31 computers on an AppleTalk network.
Note: The ImageWriter II will take either the AppleTalk Option or the Memory Option, but not both.
Chapter 2: Basic ImageWriter II Setup
This chapter shows you how to
unpack your ImageWriter II
plug in the power cord
install the ribbon
load paper
run the ImageWriter II’s self-test.
Once you have set up your ImageWriter II, you’re ready to connect it to your Apple computer. (If you
have an ImageWriter II SheetFeeder, you might want to connect it, too.)
Unpacking the ImageWriter II
If you haven’t already done so, remove the ImageWriter II from its carton. Reach under the printer with
both hands and lift upward. For the moment, put the printer in a work area where you can easily get to its
back side. Then follow these steps.
Remove all packing materials from the printer and return them to the carton. Save your shipping carton
and packing materials, in case you need to store or ship your printer.
Place the printer ribbon and power cord beside the printer.
Black Ribbon and Power Cord
Remove all pieces of tape from the printer.
Take off the front cover by grasping its sides (at the arrow icons) and lifting upward.
Removing the Front Cover
Slip the two retainer tubes from the carrier rod. The retainer keeps the print head from sliding around
during shipping. Save them with your other packing materials.
Removing the Print Head Retainer Tube
Looking for Power Sources:
When considering where to put your Apple system, keep in mind that the ImageWriter II requires its own
power source. Depending on which Apple system you have, you may need three or more electrical
outlets nearby—one each for the computer, monitor, and printer. Many people prefer to plug their
computer equipment into a special power strip, equipped with protection against surges in electrical
current. See your authorized Apple dealer for information about power strips.
Electrical equipment may be hazardous if misused. Operation of this product, or similar products, must
always be supervised by an adult. Do not allow children access to the interior of any electrical product and
do not permit them to handle any cables.
Installing the Ribbon Cartridge
The black ribbon (provided with your ImageWriter II) and the color ribbon (purchased separately) are both
continuous-loop, fabric ribbons. They will not run out, only wear out after a lot of use. Change the ribbon
when characters look faded.
Installing the ribbon cartridge is simple. Here’s how to do it.
Locate the ribbon knob on the ribbon cartridge and turn the knob clockwise to tighten the ribbon.
Tightening the Ribbon
If the ribbon cartridge deck is off to the side, gently slide it toward the center to give yourself some
working room.
Ribbon Cartridge Deck
Lower the ribbon cartridge onto the deck. Make sure that the ribbon slips between the plastic ribbon
guide and the clear paper guide.
Positioning the Ribbon
When the ribbon is in position, gently press the cartridge between the two cartridge support tabs, so that
the ribbon snaps into place. Make sure the ribbon is still positioned between the ribbon and paper
guides.
Properly Seated Ribbon
Take any slack out of the ribbon by turning the ribbon knob clockwise.
Return the front cover to the printer by slipping the cover tabs into the receiving slots and pressing down
on the cover.
Removing the Ribbon Cartridge
To remove a ribbon for replacement, gently spread the support tabs and lift the cartridge out.
Important!
The printer will not function if the front cover is off or incorrectly mounted. However, you can run the
printer when the front cover window is tilted open or removed.
Starting the ImageWriter II
Starting the printer takes two steps—plugging in the power cord and turning on the power.
Plug the power cord into the ImageWriter II’s power socket and plug the three-pronged end into the
power outlet.
This equipment is intended to be electrically grounded. Your ImageWriter II is equipped with a three-wire
grounding plug—a plug having a third (grounding) pin. This plug will fit only a grounding-type AC outlet.
This is a safety feature. If you are unable to insert the plug into the outlet, contact a licensed electrician to
replace the outlet with a properly grounded outlet.
Do not defeat the purpose of the grounding plug!
ImageWriter II Power Socket
Press the On/Off button. The green Power light and red Error light should light up. (The Error light is on
because the printer is out of paper.) The print head moves to the left margin and then to the center. The
ImageWriter II moves the print head to the center when no paper is present.
The On/Off Button and Related Lights
If nothing happens, check the following.
Is the front cover in place?
Press the On/Off button again. Is the printer on now?
Check the power cord connections. Is everything firmly plugged in?
Has anything interrupted power to the wall socket or power strip?
Does your power strip have an on-off switch?
If you’re still having problems, see Chapter 5, “General Troubleshooting.”
Loading Paper
This section shows you how to load either pin-feed paper or single sheets of paper. The vertical sides of
pin-feed paper have holes punched through them and perforations between sheets. For the printer test,
select the type of paper that you intend to use most often.
If you plan to use the ImageWriter II SheetFeeder, or multipart forms, envelopes, or labels most of the
time, use a few sheets of typing paper for now. Chapter 4 covers loading and printing on multipart forms,
envelopes, and labels.
If you’re working with single sheets of paper, see the section titled “Loading Single Sheets of Paper.”
Loading Pin-Feed Paper
Loading pin-feed paper for the first time takes three steps: adjusting the tractors to accommodate your
paper width, setting the printer to pin feed instead of friction feed, and rolling the paper in.
Get out your pin-feed paper. If the lead sheet is torn, wrinkled, or otherwise flawed, tear it off at the next
perforation to present a clean edge to the printer.
Lift up and remove the back cover to get to the forms tractor, the device that pulls paper into the printer.
Set the cover aside.
Removing the Back Cover
Flip open both paper clamps by lifting them in an outward direction. The clamps should spring into an
upright position.
Opening a Paper Clamp
Flip the tractor release levers into the up position by pushing them toward the front of the printer. This
frees the tractors, the pinned belts that move the paper, so you can adjust them to the width of your
paper.
Releasing a Tractor
Lay down the lead sheet of paper so that the first three pins of the left-margin tractor poke through the
first three pin holes. Don’t worry about the other side of the paper for the moment.
Loading Pin-Feed Paper
Close the left-margin paper clamp over the paper.
Find the pin-feed alignment icon on the back panel of the printer and the alignment notch directly above
it. Slide the tractor until the paper edge matches the icon’s vertical line and the notch.
The Pin-Feed Alignment Icon
With the tractor and paper properly aligned, lock the left-margin tractor in place by pressing its lever into
the down position.
Slide the other (right-margin) tractor so that its top three pins come up through the paper’s first three
holes.
Close the paper clamp and gently slide the tractor as far as necessary to take the slack out of the paper.
Press the right-margin tractor release lever into the down position. Figure 2-15 shows a properly aligned
sheet of pin-feed paper.
Pin-Feed Paper on the Forms Tractor
By the Way: Adjust the tractors only when you change to a paper with a different width. Starting a fresh
stack of pin-feed paper involves only opening the paper clamps, dropping the paper onto the pins, and
closing the clamps.
Set the paper release lever (located next to the platen knob) to the up position for pin feed.
Paper Release Lever
To load the paper into the printer, turn the platen knob clockwise until the leading edge of the paper
comes up under the paper bail.
Important!
With the top edge of the paper under the paper bail, printing will begin approximately one inch from the
top of the paper. You may want to compensate for this in your printing software, which sets a top margin
of its own. Chapter 4 gives some tips on resetting software top margins.
Paper Loaded Under the Paper Bail
Put the back cover on.
When the paper is satisfactorily loaded, jump ahead to the section “Running the ImageWriter II Printer
Self-Test” toward the end of this chapter.
Loading Single Sheets of Paper
When loading single sheets of paper, you can take advantage of the ImageWriter II’s automatic paper
loading feature. Slip in a piece of paper, press a button, and the printer automatically positions the paper
for printing to begin on the first line.
Important!
The ImageWriter II works best with 16- to 24-pound bond. If you need to work with lighter papers (like
onionskin), be sure to insert one or more backup sheets to provide enough thickness for the friction-feed
mechanism.
Do not use paper with staples or paper clips in your ImageWriter II.
To load your test sheet of paper, follow these steps.
Set the paper release lever (located next to the platen knob) to the down position for friction feed.
Choosing friction feed turns off the pin-feed mechanism.
Paper Release Lever Set for Friction Feed
Slip the sheet of paper between the back cover and platen.
Find the single-sheet icon located near the left side of the back cover and place the paper so that it aligns
with the line of the icon.
Aligning a Single Sheet of Paper
Make sure that the paper is straight (just as you do when putting paper in a typewriter) and in deep
enough for the platen to grip the paper.
Press the Form Feed button to load the page automatically. The ImageWriter II rolls the paper and
positions it for printing on the first line of the page (indicated by the print line on the plastic paper guide).
If the paper doesn’t load, check the Select light. It should be off. If the Select light is on, press the Select
button and then the Form Feed button.
By the Way: Although most people prefer automatic paper loading, you can crank the paper in by hand
with the platen knob.
Running the ImageWriter II Self-Test
Now that you have correctly loaded paper into your ImageWriter II, you’re ready to run its self-test—a
repeated printing of the ImageWriter II character set. When your ImageWriter II passes the test, you will
know that any problems that might arise have developed in the software, the computer, or in the
connection between the computer and printer.
Color Testing:
If you have installed the color ribbon, this test will print all the colors the ImageWriter II can generate.
Turn the ImageWriter II off by pressing the On/Off button.
To start the self-test, press the Form Feed button and hold it down while you press the On/Off button.
Release both buttons when the print head moves. (The printing test won’t begin until you release the
buttons.)
To stop the self-test, press the On/Off button to turn the printer off.
If you loaded a single sheet of paper, roll the test page out by turning the platen knob.
If you have loaded pin-feed paper, roll the paper forward to position the perforation under the paper bail.
This ensures that when you turn the printer back on, printing will begin an inch from the top. Tear off the
test sheet.
Examine the printout carefully
Are all characters complete?
Are all characters well aligned?
Is the spacing between characters and lines even?
Are all the lines equally dark from beginning to end?
If you notice any problems, check this troubleshooting list to see if the ribbon is properly installed and the
paper correctly loaded.
Is the ribbon cartridge firmly seated in its carrier?
Does the printing area of the ribbon lie between the ribbon guide and the paper guide?
Is the ribbon loose?
Is the paper straight?
Correct any problems and try the test again. If there’s still a problem, see Chapter 5, “General
Troubleshooting.” If Chapter 5 doesn’t help, contact your authorized Apple dealer.
What’s Next
If your printer passed the test, you’re ready to connect it to your Apple computer. If you have a Macintosh
Plus, a Macintosh, Apple IIc, Apple IIe, Apple II Plus, or Apple II, see Chapter 3. If you have a Macintosh
XL, Lisa Office System, or Apple III, see Appendix D.
Once you have connected your printer to your computer, if you have an ImageWriter II SheetFeeder, or
intend to connect your ImageWriter II to an AppleTalk network, see the manuals for these products.
Chapter 3: Connecting to Your Apple Computer
This chapter shows you how to connect the ImageWriter II to a Macintosh Plus, Macintosh, Apple IIc,
Apple IIe, Apple II Plus, or Apple II computer and how to test the connection. Appendix D shows you how
to connect the ImageWriter II to the Macintosh XL, the Lisa Office System, and the Apple III.
The test verifies that the computer can send data to the printer and that the printer can print the data. This
means that if a problem arises, you can trace the trouble to two probable areas: a loose connection or an
improperly configured program (a word processor or spreadsheet, for example).
Before You Begin
This chapter assumes that you have installed the printer ribbon and loaded paper into the printer. You
should also have successfully self-tested the ImageWriter II.
By the Way: The computer or printer can develop problems, but such hardware failures are uncommon.
If a problem arises, check the connections and software first. See Chapter 5, “General Troubleshooting.”
If the problem persists, try to narrow the problem to either the printer or the computer, and then see an
authorized Apple dealer.
Before continuing, check the part number on your Apple serial interface cable to make sure you have the
correct cable for your computer.
Apple System/Peripheral-8 Cable (for Macintosh Plus): Part No. M0187
Macintosh Peripheral-8 Cable: Part No. M0185
Apple IIc Peripheral-8 Cable: Part No. A2C4312
Apple IIe Printer-8 Cable: Part No. A9C0313
Note: The Apple II and Apple II Plus take the same cable as the Apple IIe.
If your serial interface cable does not have the proper connectors, don’t try to make it fit; see your
authorized Apple dealer before continuing.
Apple Serial Interface Cables
Important!
Your Apple computer and its peripheral devices were FCC-certified under test conditions that include use
of shielded cables and connectors between system components. It is important that you use shielded
cables and connectors to reduce the possibility of causing interference to radio, television, and other
electronic devices.
Always make sure you have turned off both the computer and a peripheral device, such as a printer,
before connecting or disconnecting them. Changing cables when the power is on can damage your
equipment.
Connecting the Printer Cable to the ImageWriter II
Locate the 8-pin, mini-circular connector on your printer cable. The top side of the connector bears an
Apple or a printer icon (for the Apple II, II Plus, and IIe).
The 8-Pin, Mini-Circular Connector
Plug the connector into the ImageWriter II’s serial interface socket. Make sure you get a firm fit. Loose
connections can cause interference with radios and televisions, scramble data, or stop the printing
process.
Plugging the Printer Cable Into the Printer
Find the section of this chapter that pertains to your computer. Installation instructions follow in this order:
Macintosh and Macintosh Plus
Apple IIc
Apple II, II Plus, and IIe
If you’re connecting the ImageWriter II to an AppleTalk network, see the documentation that comes with
the ImageWriter II AppleTalk Option.
Connecting to the Macintosh Plus and Macintosh
To connect the ImageWriter II to the Macintosh Plus or Macintosh, follow these six steps. Macintosh
Plus users should have performed the steps in the section “Using the Installer” in Macintosh Plus, The
Owner’s Guide before connecting to the ImageWriter II.
Insert the free end of the data cable into the printer port. If you have a Macintosh 128K or Macintosh
512K, tighten the connector’s thumbscrews for a secure connection.
Connecting the Printer Cable to the Macintosh Printer Port
If another connector (such as AppleTalk) occupies the printer port, connect to another port, for instance
the modem port.
Make sure you have a startup disk in the drive, and turn on the computer.
Turn the printer on and make sure the Select light is on.
Pull down the menu. If you see the Choose Printer accessory, connect or disconnect AppleTalk as
appropriate. Then select the device and/or port icon that matches your system.
If you see the Chooser accessory, first open the Control Panel to connect or disconnect AppleTalk. Then
select the Chooser to set the appropriate device and/or port icon. If you need help with these
procedures, see your owner’s guide for details.
By the Way: After making printer software choices, you may want to look at the Page Setup in the File
menu to check the printer’s name and other settings.
To test the ImageWriter II connection, press CAPS-LOCK into its down position. Then hold down
COMMAND and Shift while you press 4. Your ImageWriter II should start printing the contents of the
current screen.
If it does not, see the next section, “Solving Printer Software Problems,” and, if necessary, Chapter 5,
“General Troubleshooting.”
Solving Printer Software Problems
If you have a problem with your printer, check all your connections and make sure the printer is on and
selected. If these things are okay, you probably have a software problem. Read the section below that
pertains to your computer.
Macintosh Plus Software
Open the Control panel in the menu. Is AppleTalk connected or disconnected? Then select the
Chooser from the same menu. Have you selected the correct printer and port icons?
If you see the Choose Printer instead of the Chooser accessory on the menu, you haven’t installed the
right software on the current startup disk. To fix the problem, follow the instructions in the section “Using
the Installer” in Macintosh Plus, The Owner’s Guide.
Important!
Do not drag icons or use the Font D/A Mover to install printer software or the Chooser; run the Installer
program.
Macintosh 128K and Macintosh 512K Software
Go back to step 5 to make sure you’ve selected the correct status for AppleTalk (Connected or
Disconnected), and the appropriate printer and port icons.
Second, make sure you have a recent ImageWriter II printer resource; open the System Folder. If the
ImageWriter II icon looks like either of the ones shown in the margin, you’re ready to print. If you have a
different ImageWriter II icon or no ImageWriter II icon at all, see your authorized Apple dealer for a
software update.
Connecting to the Apple IIc
This is a very straightforward operation; just plug in and test.
Plug the connector firmly into the Apple IIc printer port.
Plugging the Printer Cable Into the Apple IIc
Now test the connection. Remove any disks from the disk drives.
Turn on the monitor.
Turn on the printer and make sure that the Select light is on.
Turn on the computer; ignore the “Check Disk Drive” message.
Press CONTROL-RESET. The Applesoft prompt appears:
To send keyboard output to the printer, typePR#1 and press Return.
Type any characters you want;This is a test will do. Note: These characters will not appear on the
screen. Press Return to send this message to the printer.
The ImageWriter II should respond by printing the characters you typed and the words “SYNTAX
ERROR.” Don’t worry about the error message. If the message printed, the connection passed the test.
If nothing happened, see Chapter 5, “General Troubleshooting.”
To return output to the screen, press CONTROL-RESET.
Connecting to the Apple II, II Plus, or IIe
Connecting the ImageWriter II to an Apple II, II Plus, or IIe requires configuring and installing a serial
interface card. The following section tells you how to configure the Apple Super Serial Card™. See
Appendix E for information on configuring other serial cards. Once the card is properly configured, you
can connect the ImageWriter II to your computer and test the connection. Follow these steps.
Turn off your computer, but do not unplug it.
Never open your computer, handle its circuitry, or install an interface card, unless you have turned off the
computer’s power switch. This is important; you could damage your computer and interface cards by
working inside the computer while the power is on.
Grasp the back edge of the lid and lift up. Set the lid aside.
Discharge any static electricity you may have collected by touching the power supply (the big box in the
rear left corner of the computer).
If the serial interface card is in your Apple, remove it.
You are now ready to configure your serial interface card. If you have a serial card other than the Apple
Super Serial Card, see Appendix E for configuration information.
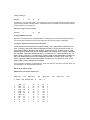
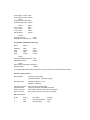
Configuring the Apple Super Serial Card
Configuring the Super Serial Card takes two steps: setting the jumper block and setting the DIP switches.
See the Apple II Super Serial Card User’s Manual.
The Apple Super Serial Card
Make sure that the triangle-shaped mark on the jumper block points to TERMINAL. If it does not, gently
unplug the block from the card (using a flat-bladed screwdriver or a chip puller), rotate it accordingly, and
plug it back into the card.
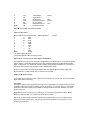
Super Serial Card Switch Settings
Note: On some Super Serial Cards, Open is the same as Off; Closed is On.
Switch 1
1
2
3
4
5
6
7
Open
Open
Open
Closed
Open
Closed
Closed
Function
9600 Baud
9600 Baud
9600 Baud
9600 Baud
Printer Mode
Printer Mode
Normal CTS
Switch 2
Function
1
2
3
4
5
6
7
8 Data, 1 Stop Bit
No Delay
Line Width 80/ Video off
Closed
Open
Open
Closed
Closed
Open
Open
Lf after CR
Interrupts off
Normal CTS
Installing and Connecting the Serial Interface Card
With your card properly configured, follow the instructions in this section to install the card, connect the
serial interface cable, and test the connection.
Important!
Before working with internal parts, turn off the computer’s power switch, remove the computer’s cover,
and touch the power supply case to discharge any static electricity that has accumulated on your clothes
or body.
Follow these steps:
Slide the nut plate onto the ribbon cable. Make sure the nuts on the nut plate face away from the 25-pin
connector.
Sliding the Nut Plate Onto the Ribbon Cable
Hold the connector and nut plate up to one of the large openings in the back panel. It’s best to choose
one of the openings near slot 1.
Positioning the Connector and the Nut Plate
Attach the 25-pin connector to the back panel using the screws and wrench that came with the Super
Serial Card. Don’t overtighten the screws or you could bend the connector.
Attaching the Connector to the Back Panel
Apple II, Apple II Plus:
If you are connecting your Super Serial Card to an Apple II or an Apple II Plus, you’ll need a special clamp
to attach the cable to the back panel. Ask your dealer for service parts 805-0084 and 805-0085.
Connect the ribbon cable to the Super Serial Card.
Connecting the Ribbon Cable to the Card
Put the card in slot 1. Install the card by rocking from back to front. Don’t rock it from side to side, and
don’t touch the gold “fingers” along the bottom edge of the card.
Installing the Super Serial Card in Slot 1
Connect the cable from your printer to the connector attached to the back panel of your computer.
Replace the cover.
Testing the Connection
Follow these steps to test the connection:
Make sure that drive 1 is empty.
Turn on the monitor.
Turn on the printer and make sure that its Select light is on.
Turn on the computer.
If your Apple automatically starts the disk drive, press CONTROL-RESET to stop the disk drive and put a
BASIC language prompt on the screen—a] for Applesoft or a> for Integer BASIC.
If you have an Apple II without an Auto-Start ROM, press RESET CONTROL-/kr/ Return to bring the
Integer BASIC prompt to the screen.
To send the keyboard output to the printer, typePR#1. (If you put the printer card in a slot other than slot
1, type that slot number instead. For example,PR#2 if you put the card in slot 2.) Press Return.
Type any characters you want;This is a test will do. Press Return to send this message to the printer.
Because you are sending characters to the printer, your typing will not appear on the screen.
The ImageWriter II should respond by printing the characters you typed and the words “SYNTAX
ERROR.” Don’t worry about the error message. If your message printed, the connection passed the test.
If it didn’t, see Chapter 5, “General Troubleshooting.”
To return output to the screen, press CONTROL-RESET.
Chapter 4: Working With the ImageWriter II
This chapter describes how to
create an efficient working environment for the ImageWriter II
use the control panel
find and set top of form
get the last page out of the ImageWriter II
print color graphics
load multipart forms, envelopes, and address labels
You’ll also find tips on using ImageWriter II Accessories.
Creating an Efficient Working Environment
Here are some points to keep in mind when creating an efficient working environment.
Keep your ImageWriter II out of direct sunlight.
Place it away from chemical fumes and containers filled with liquids—such as coffee cups, flower vases,
and so on.
The work surface should be sturdy, stable (no card tables, please), and free from vibration. Desks, file
cabinets, and printer stands work well.
Operate the ImageWriter II in temperatures from 50 to 104 Fahrenheit (10 to 40 Celcius). You should
not attempt to operate it outside this range.
Avoid operating your ImageWriter II when the relative, noncondensing humidity goes beyond the 20% to
95% range or store it where relative, noncondensing humidity exceeds the 10% to 95% range.
If you use pin-feed paper, consider where to store it. If you use small amounts of paper, slide the stack of
paper under the ImageWriter II. The area under the printer can accommodate up to 200 pages of 16pound bond. Position larger quantities so that they flow easily to the printer.
Do not push the paper too far under the printer or try to store too much paper under it. Either practice can
cause jamming.
Place the printer so that printed pages fall away from the printer. Piled-up pages can cause printer jams or
unevenly printed lines.
Control Panel Details
This section shows you how to work with the various buttons and lights on the ImageWriter II control
panel.
The ImageWriter II Control Panel
The Power Light
Turn the ImageWriter II on and off by pressing the On/Off button. When the printer is on, the green
Power light is on.
The Error Light
The Error light can light in three ways: continuously on, blinking, or irregular blinking. Each state indicates
a different problem area.
When the Error light is on continuously, the ImageWriter II has run out of paper. Load the appropriate
paper and press the Select button to continue printing.
When the Error light blinks on and off, look for either of two causes. The front cover may be loose or off.
Correctly seat it and press the Select button to continue. If the front cover is not the cause, check for
paper or print mechanism jams.
When the Error light blinks irregularly, check DIP switch SW2-4, located toward the front-left corner of the
printer. (You may have to slide the ribbon cartridge to the right to see the DIP switches.) If you don’t have
an accessory card (either the ImageWriter II 32K Memory Option or AppleTalk Option), the switch should
be set to Open. If you have either of these options installed, the switch should be Closed. See
Appendix A for details on DIP switch settings.
The Select Button and Light
When you press the Select button, the Select light turns on or off. When the Select light is on, it means
the printer is selected. That is, the printer can receive and print data sent from the computer.
Only the On/Off button works when the Select light is on. To do things like select Print Quality or issue a
Form Feed, you must press the Select button to turn off the Select light.
When you start the ImageWriter II with paper loaded, the Select light comes on automatically. When you
run out of paper, the Error light comes on and the Select light goes out. The computer then stops
sending data and the printer stops printing. After you add more paper, you can resume printing without
losing any text. To resume printing, press the Select button to reselect the printer.
By the Way: When the Select light goes out because you’ve run out of paper, you can press the Select
button without loading more paper. Each time you press the Select button, one line will print. You can
squeeze several more lines onto a page, but be careful of printing on a bare platen.
Selecting Print Quality
The ImageWriter II has three levels of print quality:
Draft: high speed (250 characters per second) for printing the least dense characters. Choose draft
quality when you want a printout quickly for reviewing or editing.
Standard: medium speed (180 characters per second) and character density. Standard quality is good for
everyday work.
Near Letter Quality (NLQ): (45 characters per second) high density characters for presentations and
formal communications.
Make sure the Select light is off before selecting a print quality. (If the light is on, press the Select button.)
By pressing the Print Quality button repeatedly, you can “walk” through the three settings.
Print Quality Selection Lights
When only the left light is on, you get draft quality. When the right light is on, quality is standard. Both
lights on means near letter quality.
Important for Macintosh Plus and Macintosh Owners:
Choosing either Standard or High quality in the Print command dialog box overrides any quality setting on
the printer. However, if you choose Draft quality in the dialog box, the quality will be that currently
selected at the printer—either draft, standard, or NLQ.
The Line Feed Button
Pressing the Line Feed button once and immediately releasing it advances the paper by one line. If you
press and hold down the Line Feed button, the printer will perform repeated line feeds up to four times.
After the fourth line feed, the printer automatically performs a form feed. When the Select light is on,
pressing the Line Feed button has no effect.
The Form Feed/Paper Load/Eject Button
The Form Feed button has three names to remind you of its three related functions:
Form Feed. When using pin-feed paper, pressing the Form Feed button advances the paper to the next
top-of-form position. That is, it feeds in a new “form,” or page, and positions it so that printing can begin
on the first line of the page.
Paper Load. When loading a single sheet of paper, pressing the Form Feed button causes the printer to
load the sheet with its top of form set 1/6 inch below the top edge of the paper. In this position, printing
begins on the first line of the page.
Eject. When a print job finishes in mid-page, pressing the Form Feed button ejects or pushes out the
current page. If you’re using pin-feed paper, the printer advances the paper to the next top-of-form
position.
When the Select light is on, pressing the Form Feed button has no effect.
Single Sheets in a Pin-Feed World:
If you’re using pin-feed paper and find you have to use a single sheet of paper, don’t despair. Back the
pin-feed paper out from under the platen, but leave it clamped in the forms tractor. Switch the paper
release lever to friction feed, and then load your single sheet of paper.
Pin-Feed Paper and Top of Form
The term top of form describes where the printer will print its first line on a page. With the ImageWriter II,
the top of form is the position of the print line relative to the top edge of the paper when you turn on the
printer. Thus, if the print line rests 1/6 inch below the top edge of the paper, that is the top of form.
When you print through an application program like MacWrite® or AppleWorks, the program keeps track
of the number of lines it has printed on the current page. When the count reaches the maxium number of
lines, the software issues a form feed and the paper advances to the top of the next page. The printer
itself can also keep track of the number of lines printed or line feeds issued.
You can throw off the line count by advancing or loading paper independently of the software. For
example, if you cause printing to pause and then advance the paper (either manually or by pressing the
Line Feed button), the software won’t register that you’ve set a new paper position. The result is that the
next page break will occur somewhere in the middle of the page instead of at the end of a page.
Because the printer sets the top of form when you turn the printer on, you can easily set a desired top of
form. Follow these steps.
Press the On/Off button to turn off the printer.
Turn the platen knob to advance the paper to the desired top-of-form position.
Press the On/Off button again to restart the printer and establish the new top-of-form position.
By the Way:When you’re unsure if you’re looking at a true top of form, turn off the printer, pause, and
turn it back on. The current position of the print line is the true top of form.
Removing the Last Pin-Feed Page
If you’re working with pin-feed paper, notice that when a print job ends, some of the last page remains
inside the printer. Choose any of three ways to make it easier to tear off the last page.
Preset top of form so that the top of the page lies just above the paper bail.
Eject the page with a form feed.
Leave the last page of the document in the printer.
Don’t print within 1/2 inch of any of the four corners of a sheet of paper. Printing too close to a corner can
tear the corner or even jam the printer.
Preset Top of Form
This method requires some experimenting with the program that prints your documents. You must
change the program’s top margin setting. The top margin is the distance from the top edge of the paper
to the first line of text on the page. To set top of form for easy paper removal, follow these steps
Set your top of form so that the top edge of page lies just above the paper bail.
Set the top margin one inch less than it is currently set. For example, if it’s set to one inch (or six lines),
change it to zero. If it’s set to 1.5 inches, set it to .5. If you don’t reduce your setting, the cost will be an
extra inch at the top of every page.
To compensate for the changed top margin, set the bottom margin one inch more than its current setting.
Print a brief document from your program to test the setting. If all goes well, the perforation following the
last page will stop just past the bail, making it easy to tear off the last page.
If the printout shows a smaller or larger top margin than you like, change the top and bottom margin
settings and try again.
Tearing Off a Page
Eject the Last Page
To eject the last page, follow these steps.
Make sure the Select light is out.
Press the Form Feed button once to eject the current page.
Tear off the last page at the perforation.
By the Way: You may want to save blank, ejected sheets of pin-feed paper to use as scratch paper.
Leave the Last Page in the Printer
This works pretty well, particularly if you make multiple copies of your work. Just remove the last page after
you’ve printed another document. When you need that last page, eject it.
Printing in Color
To print in color, you need a program that can send color commands to an ImageWriter II. The default
color for the ImageWriter II is black, and only color software can make it print differently. See Appendix A
for information on programming in color.
To print in color, install a color ribbon cartridge, just as you do a black ribbon. With the color ribbon
installed, the ImageWriter II can print up to six colors plus black. With black as one of the ribbon’s colors,
you can mix your color graphics with black text. However, if you intend to print a text-only document, it’s a
good idea to switch to a black ribbon. This preserves the black band on the color ribbon.
Although the ImageWriter II is factory set to print colors in a properly aligned manner, occasionally a
ribbon will need a slight adjustment. For example, you might see an underline character printing in a
different color from the text above it or see the tops of characters in a different color from the rest of the
characters. If you encounter problems like these, see the section “Color Ribbon Problems” in Chapter 5,
“General Troubleshooting.”
Loading Forms, Labels, and Envelopes
To print on multipart forms and envelopes, you need to adjust the printer for thicker paper.
Adjusting for Paper Thickness
To adjust for thicker paper, you need to set the paper thickness lever. In its standard (up) position, the
lever sets a thickness for one sheet of paper (16- to 24-pound bond). The lever clicks through four
positions. You can change to the second position by pushing the lever downward. The second position
is for a two-sheet thickness. The next position is for three sheets and the last for four.
Never use a form, label, or envelope that is thicker than four sheets of 16-pound bond. Too much paper
may cause lines to register incorrectly or may jam the printer.
Follow these steps to set the lever.
To get at the lever, remove the front cover. The lever is at the right end of the carrier rod.
The Paper Thickness Lever
Before setting the lever, count the sheets in an individual form. For envelopes, try a two-sheet thickness,
and for mailing labels, a three-sheet thickness.
Click the lever to the appropriate setting.
After adjusting the paper thickness lever, replace the front cover. If the cover is off or not properly seated,
the ImageWriter II will not print.
Finding the Correct Forms Tractor Setting
When working with pin-feed forms or labels, you may have to adjust the tractors. See Chapter 2 for an
explanation of how to adjust the tractors.
Before you adjust the tractors, a little experimentation is in order; follow these steps.
Make a test run on ordinary, pin-feed paper. Print your form or a few labels to determine where the
program sets the left margin. Use the pin-feed icon to help you align the form or label sheet.
Set the left tractor so that the point where you want to begin printing on your form or label corresponds
with the left margin actually delivered by the program.
By the Way: If the Error light comes on, signifying paper out, you may have set the left tractor too far to
the right. Readjust the tractor and try again.
Important!
Don’t try to set the margins beyond the red rings on the paper bail. These rings represent the print head’s
absolute boundaries.
With the left tractor set, use your form or label sheet to set the appropriate position for the right tractor.
When using labels, do not turn the platen knob counter-clockwise. This could cause a label to come off in
the printer, possibly causing damage.
When you have finished your form or label printing, you may want to make a note on your sample printout
page of the settings you used, for future reference. Be sure to reset paper thickness before reloading
regular paper.
Loading Envelopes
Follow these steps to load and print envelopes.
Remove the front cover and set the paper thickness lever to the appropriate thickness.
Replace the front cover.
Set the feed lever to friction feed.
Remove or tip back the front cover window.
Lift up the paper bail until it locks into place. This elevated position ensures that your envelopes won’t jam
in the bail during the printing process. Leave the bail in this position until you’ve finished printing your
envelopes.
Setting the Paper Bail for Envelopes
Align the envelope with the single-sheet icon on the back cover.
Turn the platen knob to draw the envelope into the desired position for printing.
Issue your software’s print command.
If necessary, turn the platen knob to eject the envelope from the printer when printing stops.
When you are finished with envelopes, press gently on both sides of the paper bail to return it to its
normal position.
Be sure to reset the paper thickness lever and, if necessary, the paper release lever before returning to
normal printing.
ImageWriter II Accessories
This section gives tips on using three ImageWriter II accessories:
ImageWriter II SheetFeeder
ImageWriter II 32K Memory Option
ImageWriter II AppleTalk Option
These are tips. For complete details on an accessory’s operation, see the accessory’s manual.
The ImageWriter II SheetFeeder
Before working with the ImageWriter II SheetFeeder, make sure that the paper release lever is in the
friction-feed (down) position. Before loading a stack of paper, flip through the stack to loosen any pages
that might be stuck together. Never load more than 100 sheets of paper at a time. See the ImageWriter II
SheetFeeder Installation Manual for more information.
Note:You cannot use pin-feed paper when the ImageWriter II SheetFeeder is in place.
The ImageWriter II 32K Memory Option
The Memory Option has a 32,000-character memory, enough to handle documents from 16 to 20 pages
long. With this option installed, issue your program’s print command. The option takes care of the
printing, while you and your computer tackle other projects.
Note for Macintosh Plus and Macintosh Users:
In most cases, the Memory Option has no effect when working with a Macintosh Plus or Macintosh,
because of the way these computers send data to the printer.
The ImageWriter II continues to print until it has processed all the characters in the option’s memory. To
pause while printing, press the Select button. Press it again to resume printing. If you need to cancel
printing, turn off the printer, pause a few seconds, and turn it on again.
If the Memory Option doesn’t seem to work, check DIP Switch SW2-4. It should be in the Closed position.
See Appendix A for details on DIP switches.
The ImageWriter II AppleTalk Option
With the ImageWriter II AppleTalk Option installed, as many as 31 computers can share the same
ImageWriter II. To enable the option, set DIP switch SW2-4 to Closed. To disable the AppleTalk Option,
first unplug the AppleTalk cable from the printer. Then set SW2-4 to Open.
Do not install an ImageWriter II to an AppleTalk network without an AppleTalk card installed or without the
card enabled. If you do, you will disable your entire AppleTalk network.
When disabling the AppleTalk Option, you must unplug from the AppleTalk network before resetting the
DIP switch. Failure to unplug can stop the whole network from functioning.
You must configure your software to work on the AppleTalk network with the ImageWriter II. See your
AppleTalk network and software documentation for more information. See Appendix A for details on DIP
switches.
Chapter 5: General Troubleshooting
This chapter lists common problems and suggests solutions. Many problems are easy to solve—such as
an unplugged power cord or having the Select button in the wrong position.
If there seems to be a more complex problem, run the printer’s self-test. See the section “The
ImageWriter II Self-Test” at the end of this chapter. If the self-test is successful, you’ll know that the
problem is not with the printer. The problem could be
a poor connection or flaw in the serial interface cable and its connectors
improperly configured software
improperly set DIP switches in the printer
a hardware failure, an improperly set jumper block, or DIP switches in the interface card (if the serial
interface cable connects to one)
a hardware failure in the computer.
Important!
Proper environment and maintenance can prevent many problems.
The following sections describe problems you might encounter and provide diagnostic instructions and
possible solutions.
You Turn the Printer On and Nothing Happens
Check these potential problem sources:
Is the power cord plugged in? Check the power cord connection to the printer and to its power outlet.
If you’re using a power strip, is it plugged in? Is it turned on?
Is power available to the power outlet? You may want to try plugging something else into it, like a radio or
lamp. If the appliance doesn’t work, the problem probably lies somewhere in your electrical system. Is the
outlet controlled by a wall switch? Is the problem a blown fuse or tripped circuit breaker?
If you determine that the printer is properly plugged in and turned on and that power is available to its
outlet (the test appliance works), the problem may be a blown fuse in the printer. Take the printer to your
authorized Apple dealer for fuse replacement. (The fuse is internal and should be replaced only by an
authorized Apple dealer.)
The Printer Is On, But Nothing Happens
Several things can cause this problem.
Is the ImageWriter II Select light on? You must select the printer, or it cannot receive data from the
computer.
Is the ribbon properly installed? Is it jammed?
Are you using the correct serial interface cable?
Is your serial interface card jumper block set to TERMINAL?
Are the data transmission rates between the printer and the software or between the printer and interface
card correctly matched? (See the section “Mismatched Data Transmission Rates,” later in this chapter.)
Is the printer correctly connected to the AppleTalk network?
Is the interface cable plugged into the correct socket? The cable will fit into a modem socket.
Never adjust or change a cable or an interface card when the computer is on.
If you are using a Macintosh Plus, Macintosh, or Macintosh XL computer, check the Chooser or Choose
Printer accessories (whichever appears on your menu). Make sure you’ve selected the correct printer
and port. If you have the Chooser, also check the Control Panel to see whether AppleTalk is connected
or disconnected.
Important!
If you have a Macintosh Plus, you should have the Chooser and not Choose Printer. If you do not have
the Chooser, you need to install software on your startup disk. See the section “Using the Installer” in
Macintosh Plus, The Owner’s Guide.
Error Light Problems
The red Error light’s three states indicate three problem areas:
The Error Light is On.
You are out of paper. Load a fresh supply of paper and press the Select button to print.
The Error Light is Blinking.
There are two causes for the blinking Error light. The front cover may be loose or not on. Correctly seat
the front cover and press the Select button to continue. If the front cover is not the cause, check to see if
anything has jammed the print mechanism.
The Error Light is Blinking Irregularly.
When the Error light blinks irregularly, take a look at DIP switch SW2-4, located toward the front-left corner
of the printer. (You might have to slide the ribbon deck to the right to see the DIP switches.) If you don’t
have an accessory card (the ImageWriter II 32K Memory Option or AppleTalk Option), the switch should
be set to Open. If you have either of these options installed, the switch should be Closed. See
Appendix A for details on DIP switch settings.
You Get a Printout, But Nothing Like You Expected
Unexpected output, like odd spacing or garbled characters, is usually a result of mismatched settings
between the printer and the software or between the printer and interface card settings. These
mismatches can stem from
incorrect configuring of an application program’s settings
incorrect DIP switch settings on the interface card
incorrect DIP switch settings on the ImageWriter II
When diagnosing a problem, check for software problems before checking the DIP switches. Chances
are the problem doesn’t lie with the printer’s switches, unless someone has reset them. The switches are
factory-set to standard specifications. See Appendix A for details on standard DIP switch settings and
how to change them.
Software problems happen when a program’s settings are not the same as the printer’s. The process of
changing software settings is called configuring.
If you suspect a configuration problem, read the material on configuration in your application program
manual and check it against the standard settings for the ImageWriter II in Appendixes A and C. If you
find a discrepancy, reconfigure the program to match the printer’s specifications.
You might also try printing something from a different program—one you know works. If it works and the
problem program doesn’t, you probably need to reconfigure the problem software.
Mismatched DIP switch settings can cause the same problems as misconfigured software. The switch
settings program the printer or interface card to do certain things, like send data at a given data
transmission rate, for example 9600 baud.
The ImageWriter II has two DIP switch blocks. Serial interface cards have their own DIP switch blocks. If
you’re using a Macintosh Plus, Macintosh, or Apple IIc, you need only concern yourself with the
ImageWriter II’s DIP switches.
Missing, Jumbled, or Random Characters
These problems are caused by mismatched baud rates or mismatched data byte information (including
data byte length, parity, stop bit, and start bit settings).
Mismatched Data Transmission Rates
When the data transmission rate settings between devices are different, the printer can produce a
garbled printout. The ImageWriter II is set to 9600 baud at the factory.
Switches SW2-1 and SW2-2 should be in the closed, or down, position. If you own a Macintosh Plus,
Macintosh, or Apple IIc and are having a baud rate problem, check these switches.
If you have an Apple II, II Plus, or IIe, make sure your serial card is set to 9600 baud, unless you’re using
an Apple Serial Communications Card or other card set to 300 baud. If this is the case, you must reset the
ImageWriter II to 300 baud to receive the signal. Switches SW2-1 and SW2-2 should both be open for
300 baud. Check your interface card manual for baud rate details.
Never adjust switches or work with an interface card when the computer is on. You could harm the
computer and the interface card.
Mismatched Data Bytes
Data byte mismatches can occur through improper software and serial interface card settings. Data byte
mismatches include mismatches for the
data byte length
start bit
stop bit
parity setting
The ImageWriter II is permanently set for an eight-bit data byte with one start bit, one stop bit, and no
parity. Check your software settings for these categories. If you have an interface card, check its settings.
Intermittently Dropped or Random Characters
Mismatched communications protocols or a hardware failure (like a flawed connector or cable) can cause
intermittent problems.
Communications protocols tell a computer when to send data and when to pause in sending. A protocol
mismatch can cause intermittent loss of characters or intermittent garbage. The ImageWriter II is factory
set for the hardware handshake (also known as Data Terminal Ready or DTR) protocol. DIP switch SW2-3
should be set to Open. Closing this switch results in the XON/XOFF protocol.
Check the protocol settings for your software and for your interface card (if you have one).
Spacing Problems
Did the printout show the entire document printing on one line? Did the printer double- or triple-space
when you wanted single spacing? The problem is line feed. A line-feed character causes the printer to
advance the paper one line every time your software sends a carriage return (meaning the end of a line).
If the whole document printed on one line, it means that no line-feed character was sent to advance the
paper. Any of three entities can issue line feeds: the printer, the software, and the interface card (if you
have one). If you want single-spaced documents as your standard, you must set one and only one of
these entities to add a line feed after a carriage return.
The ImageWriter II’s factory DIP switch setting suppresses the adding of a line feed after a carriage return.
Switch SW1-8 should be set to Open. If your system uses an interface card, set the interface card to add
the line feeds. If your system does not print through an interface card (Macintosh Plus, Macintosh, or
Apple IIc), or if you don’t want to reset the card, set your software to send the line feed. Some software
cannot do this, in which case you will have to reset switch SW1-8 to the Closed position to send a line
feed after a carriage return.
If you have unwanted double spacing, then the printer is receiving two line feeds for each carriage return.
Suppress one line feed as appropriate to your system. If you have triple spacing, suppress line feeds at
two points (preferably at the printer and the software).
Paper and Print Quality Problems
If characters don’t print clearly or start to look lighter with each line, check the following:
Is your ribbon cartridge correctly mounted?
Have you correctly threaded the ribbon between the ribbon guard and print head
Is the paper thickness lever set to the appropriate position? An incorrect setting can cause a poor
impression (including missing dots).
Is the ribbon worn out?
Did printing take place across the ribbon seam? When the printer types across the ribbon seam,
characters will print lighter for a line or so.
If the paper is feeding incorrectly, make sure that you’ve set the paper release lever to friction feed (the
down position). Also, make sure that you are not inserting pages at an angle. If you are using the
SheetFeeder with the ImageWriter II and have paper problems, see the ImageWriter II SheetFeeder
Installation Manual. 36. Page 61** Change: Text From: Current To: add new header, text, and art just
before the ImageWriter II Self-Test section.
Color Ribbon Problems
On occasion, an unwanted color may show up in a printout. Typically, this can be something like an
underscore character appearing in a different color than the text directly above it. Three things can cause
this problem:
The ribbon cartridge is not firmly in position on the ribbon cartridge deck. Press down on the cartridge to
make sure it is secure. If you hear the cartridge click into position, you may have solved the problem.
The color ribbon is old. Older ribbons tend to “bleed” colors across color boundaries. Replace the ribbon
with a new one.
The ribbon cartridge itself is not quite properly aligned to the print head. This peculiarity of individual
ribbons happens occasionally. To correct this problem, follow these five steps:
Remove the cover from the ImageWriter II and locate the ribbon adjustment assembly to the right of the
ribbon cartridge. Notice the two position markers. Their position is factory set for optimum performance
on most ribbons. You can turn the ring 180 degrees clockwise or counterclockwise to adjust the vertical
position of the ribbon relative to the print head. Turning the ring 180 degrees changes the ribbon’s
position by .014 inches.
Ribbon Adjustment Assembly
Push the ring downward to free it. If color overlap appears at the bottom portion of characters, turn the
ring clockwise as far as you deem necessary. Likewise, if color overlap appears toward the top of
characters, turn the ring counterclockwise. Do not try to exceed 180 degrees in either direction; you
could break the mechanism.
Release the ring when you have turned it to the desired position. The ring will pop up and lock into the
new position.
Replace the ImageWriter II’s cover.
Run the ImageWriter II self-test and study the areas you were having problem with. Another adjustment
may be necessary.
The ImageWriter II Self-Test
The self-test only tests the printer, not its communications, cables, connectors, or the computer. Here’s
how to run the test.
Turn off the printer and wait for a few seconds.
Press the Form Feed button and hold it down while pressing the On/Off button. Release both buttons.
Let the ImageWriter II print a half a page or so.
Turn off the printer to stop the test.
Study the printout. All characters should print clearly. If the problem you saw when printing from the
computer appears in the test, the problem probably lies with the printer. Contact your authorized Apple
dealer for assistance.
Chapter 6-ImageWriter II Care and Maintenance
A good environment plus occasional cleaning will keep your ImageWriter II printer in top working
condition for years to come.
Operating Environment
Apple designed the ImageWriter II to work well in any reasonably clean, indoor location. The ImageWriter
II operates reliably in temperatures from 50 to104 Fahrenheit (10 to 40 Celsius). You should not attempt
to operate it outside of this range. The safe, non-condensing humidity range is from 20% to 95%. You
can safely store the ImageWriter II in more extreme temperatures—from -40 to 116 Fahrenheit (-40 to 47
Celsius). The safe storage range for non-condensing humidity is 10% to 95%.
Avoid using the ImageWriter II in a dusty environment or exposing the printer to chemical or solvent
fumes (including steam from a coffee maker). Do not set containers filled with liquids—such as cups of
coffee—on or near the printer. Do not leave the printer in direct sunlight for long periods of time.
Cleaning the Case
Wipe the case with a soft, damp (not wet) cloth. To remove stains or dirt, add a drop of liquid detergent to
a damp cloth before wiping.
Important!
Don’t clean the case with household cleansers, ammonia, powders, abrasives, or solvents (such as
cleaning fluid). Any of these can mar the ImageWriter II’s finish.
Cleaning the Inside of Your ImageWriter II,Service
It’s a good idea to clean the inside of your ImageWriter II once a month, mainly to remove paper dust and
bits of paper. The ImageWriter II does not need lubrication thanks to special materials in the print
mechanism.
To clean the inside of your ImageWriter II, you should have either a soft, clean brush or small can of
compressed air. You could also use a clean, lint-free cloth. Here’s how to do it:
Turn off the printer and remove the front cover.
Remove the ribbon cartridge by gently bending aside either of the support tabs and popping out the
cartridge.
Brush or blow away any dust that may have accumulated.
If the carrier rod is dirty, wipe it with a clean, soft, lint-free cloth. Clean up any other dirt you might find.
Replace the ribbon cartridge and front cover.
You’re ready to print again.
Service
To help you get the best performance from your system, Apple has established a worldwide network of
full-support authorized Apple dealers. If you need answers to technical questions or information about
product updates, your authorized Apple dealer can help you. Apple’s Technical Support organization
backs each dealership to ensure prompt, reliable assistance.
If service is required on your ImageWriter II, or on any Apple product, take it to your local authorized Apple
dealer. If you have moved, take it to the nearest authorized Apple Service Center. There are more than
2100 authorized Apple dealers and Service Centers throughout the world.
Technical Support
If you have questions that your dealer is unable to answer, ask to be referred to Apple Technical Support.
Apple Technical Support provides your dealer with Technical Notes (which answer commonly asked
questions) and with access to technical support specialists.
Your dealer has the latest information on new hardware and software products and will keep you informed
about any product updates. If you want to upgrade your system, your dealer can help you select
compatible components.
AppleCare
Apple also offers the AppleCare® Service Agreement, which keeps your warranty in force for an
additional year. AppleCare is one of the lowest-priced service packages in the industry, and your
AppleCare agreement will be honored at all participating authorized Apple Service Centers within the
country of purchase—an added benefit if you relocate. Local service means time saved in getting your
Apple system back to work.
You may purchase AppleCare at any time, but for uninterrupted protection, it’s a good idea to buy the
service along with your system. In addition to providing you with complete coverage, purchasing
AppleCare along with your system avoids an owner-paid dealer inspection of your system if your warranty
has expired.
AppleCare is available through your authorized Apple dealer.
Appendix A: Controlling Printer Output
If you need to change printer output or do some troubleshooting, there are several ways to change
ImageWriter II default settings. But you may not have to bother with changing the printer output by
changing settings. Many people are satisfied with the printouts created using the standard settings. In
addition, if you use a powerful application program such as AppleWorks, the software options cover most
changes you might want to make. And, if you own a Macintosh Plus or a Macintosh, you can change a
document’s appearance on the screen through ruler settings and menu selections.
By the Way: Software changes override switch settings.
Here are ways of changing default settings.
Many application programs let you type in a setup string—a group of characters beginning with ESCAPE
or CONTROL that change printer settings.
You can write your own program in languages like BASIC or Pascal. Such a program becomes necessary
when an application does not allow direct control through software or a setup string.
You can reset ImageWriter II DIP switch settings. Once you flip a switch, the setting stays in effect when
you turn the power off, unlike software-generated settings. For example, you might prefer to print in pica
(10 characters per inch) most of the time, instead of elite (12 characters per inch). If you can’t change this
setting from your word processing software, you can reset the relevant switches.
If you use AppleWorks, you can create your own printer modifications and save them as a “custom printer”
setup.
Before you consider what changes you might make, it’s a good idea to become familiar with the standard
settings.
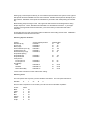
Standard Settings for the ImageWriter II
Here is a partial list of standard settings for the ImageWriter II. These are the settings most often changed
by average users. For a complete list, see Appendix C.
Maximum Line Width
Left Margin
Character Set
Characters per Inch
Lines per Inch
Lines per Page
Line Feed after Carriage Return
Baud Rate
Protocol
Horizontal Tabs
8 inches
0
American
12
6
66
None
9600 baud
Hardware Handshake
Cleared
The rest of this appendix shows you how to change these settings. Note: This appendix does not show
all the possible options. All options are listed on the reference card at the back of this book. For a
thorough discussion of your printer and its output options, see the ImageWriter II Technical Reference
Manual.
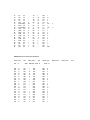
Changing Settings With DIP Switches
The ImageWriter II has two DIP (dual inline package) switch blocks, designated SW1 and SW2. Both are
located toward the lower left corner of the printer. (You may have to slide the ribbon deck to the right in
order to see them.)
Location of DIP Switches
SW1 has eight switches and SW2 six switches (two of which shouldn’t be touched: SW2-5 and SW2-6).
Tables A-1 and A-2 show the default settings for each block and describe the functions of the switches.
Do not touch switches SW2-5 and SW2-6. These are reserved for authorized Apple technicians to adjust
hammer-fire timing.
Default Settings for SW1
Note: Some DIP switches use Off for Open and On for Closed.
Switch
Setting
Concern
Default
1
2
3
4
5
6
7
8
Open
Open
Open
Open
Open
Closed
Open
Open
Character set
Character set
Character set
Page length
Skip perforation
Chars per inch
Chars per inch
LF after CR
American
American
American
66 lines
No
Elite (12 cpi)
Elite (12 cpi)
None
Default Settings for SW2
Note:SW2-5 and SW2-6 are factory set. Do not change their settings.
Switch Setting Concern
Default
1
2
3
4
Baud rate 9600
Baud rate 9600
Comm protocol
Option card
Closed
Closed
Open
Open
DTR (handshake)
No card
Important!
If you have the 32K Memory Option or AppleTalk card, SW2-4 should be Closed. If you have installed an
Apple Communications Card or other interface card that transmits at 300 baud, switches SW2-1 and SW22 should both be Open.
To explore the other available DIP switch options, see Appendix C.
Using Control Characters and Escape Sequences
You can change various settings on the ImageWriter II by sending the printer either a control character or
an escape sequence. Essentially, both of these send instructions to the printer; for example, change to
bold type, issue a form feed, and return to normal type, are all instructions to the printer. A control
character is just a single character, whereas an escape sequence always begins with an escape character
and is followed by one or more characters.
With members of the Apple II family, you can communicate these instructions to the printer by pressing
certain keys (after a PR#1 or as a setup string) or by writing commands into a program. For example,
typing CONTROL-L as a setup string sends a single character instruction telling the printer to perform a
form feed.
Note:Beyond their command menus, the Macintosh Plus, Macintosh, Macintosh XL, and the Lisa Office
System can command the printer through programs, but not through typing a direct command.
If you wanted to write a program to send a form feed instruction to the printer, you would write a line using
the control character’s ASCII code. (The form feed character’s ASCII code is 12.) For example, an
Applesoft program might have the line
/v/40 PRINT CHR$(12)
bASCII Codes
ASCII stands for the American Standard Code for Information Interchange. This code is a standard
character set used by many computers and peripheral devices to process and communicate data.
Appendix B has a complete list of all ASCII codes.
You can also type escape sequence characters directly to the printer (in an application program or after a
PR#1 instruction). For example, to have the ImageWriter II print in boldface type, you would press
Escape !
In a program, you would need to supply the ASCII codes for ESCAPE (27) and for ! (33). As an
alternative, you could enclose the exclamation point in double quotation marks—“!”. Thus, your program
line would look like this
/v/50 PRINT CHR$(27); CHR$(33)
or this
/v/50 PRINT CHR$(27); ”!”
Commonly Used Printer Instructions
This section gives the most commonly used control codes and escape sequences. For other codes, see
the reference card at the back of this manual and the ImageWriter II Technical Reference Manual. A
sample configuration program follows these instructions.
By the Way: If you have an application program that you need to configure for printing, pay close
attention to the following codes. Configuration programs often prompt you for information such as the
code for boldface type, for underlining, and so on.
When typing control sequences directly, do not include the spaces between the symbols or the hyphens
that separate the word CONTROL from the control character. ESCAPE means press the Escape key and
then release it. CONTROL means press the CONTROL key and hold it down while pressing the character
key.
Before starting, keep two things in mind. First, uppercase and lowercase are meaningful when writing
Escape sequences. That is, ESCAPE-N and ESCAPE-n are two different instructions. If your Apple
computer cannot generate lowercase characters, you’ll need to write your instructions with ASCII
characters.
On the other hand, the case of characters makes no difference when writing Control codes. CONTROL-n
and CONTROL-N send the same intruction.
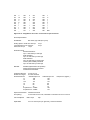
Selecting Special Features
Feature
Extended (9 cpi)
Pica (10 cpi)
Elite (12 cpi)
Semicondensed (13.4 cpi)
Condensed (15 cpi)
Ultracondensed (17 cpi)
Proportional Spacing
Proportional Pica
Proportional Elite
Lines per Inch
6 Lines per Inch
8 Lines per Inch
Print Quality*
Draft
Standard
Near Letter Quality
Access ASCII Equivalent
ESCAPE n
ESCAPE N
ESCAPE E
ESCAPE e
ESCAPE q
ESCAPE Q
Character Size
27
110
27
78
27
69
27
101
27
113
27
81
ESCAPE p
ESCAPE P
27
27
112
80
ESCAPE A
ESCAPE B
27
27
65
66
ESCAPE a 1
ESCAPE a 0
ESCAPE a 2
27
27
27
97 49
97 48
97 50
*These codes override the control cluster button setting.
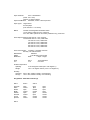
Selecting Color
The color options work only when you have installed a color ribbon. The color option instruction is
ESCAPE
K
n
27
75
d
Here, the letter n represents a color number you must enter and d is the ASCII equivalent:
Access
Black:
Yellow:
Red:
Blue:
Orange:
Green:
Purple:
ASCII
0
1
2
3
4
5
6
48
49
50
51
52
53
54
Setting Left Margin
ESCAPE
L
nnn
27
76
nnn stands for any three-digit number. For example, if you were to type EscapeL035, the printer would
begin printing in the 36th character position, calculated from the zero position (not first position) marked
by the left red ring on the paper bail.
Pushing a Page to Top of Form
ESCAPE
v
27
118
A Sample BASIC Program
Figure A-2 is a program written in Applesoft BASIC. The program gives a brief demonstration of how to
turn various printer commands off and on and ends with a form feed to eject the printed page.
Listing for Applesoft Printer Control Program
10 REM DEMO PRINTER CONTROLS 20 PRINT CHR$(4); ”PR#1”: REM SEND TO PRINTER 30 LET
ESC$ = CHR$(27): REM SAVE SOME KEYSTROKES 40 PRINT ”THIS IS THE DEFAULT FONT” 50
PRINT ESC$; CHR$(33): REM BOLD ON 60 PRINT ”THIS IS BOLDFACE” 70 PRINT ESC$; ”X”: REM
UNDERLINE ON 80 PRINT ”AND THIS IS UNDERLINED BOLD” 90 PRINT ESC$; CHR$(34): REM BOLD
OFF 100 PRINT ”AND THIS IS UNDERLINE ONLY” 110 PRINT ESC$; ”Y”: REM UNDERLINE OFF 120
PRINT ”BACK TO DEFAULT” 130 PRINT ESC$; CHR$(81): REM ULTRACONDENSED 140 PRINT ”NO
BOLD, NO UNDERLINE FOR AN ULTRACONDENSED FINISHED” 150 PRINT ”OKAY, PUSH THE
PAPER” 160 PRINT CHR$(12): REM FORM FEED 170 PRINT ESC$; ”E”: REM ELITE TYPE ON 180
PRINT CHR$(4); ”PR#0”: REM BACK TO SCREEN
For more details on settings, see Appendixes C and E, the reference card at the end of the book, and
the ImageWriter II Technical Reference Manual.
Appendix B: ASCII Codes
ASCII Codes for Normal Characters
ASCII code
0
1
2
3
4
5
6
7
8
9
10
11
char
ASCII code
&NULL &32 &SPACE &64
SOH
STX
ETX
EOT
ENQ
ACK
BELL
BS
HT
LF
VT
33
34
35
36
37
38
39
40
41
42
43
!
”
#
$
%
&
’
(
)
*
+
65
66
67
68
69
70
71
72
73
74
75
char
&
&96
A
B
C
D
E
F
G
H
I
J
K
ASCII code
&`
97
98
99
100
101
102
103
104
105
106
107
a
b
c
d
e
f
g
h
i
j
k
char
ASCII code
char
12
13
14
15
16
17
18
19
20
21
22
23
24
25
26
27
28
29
30
31
FF
44
CR
45
SO
46
SI
47
DLE
48
DC1 (XON)
DC2
50
DC3 (XOFF)
DC4
52
NAK
53
SYN
54
ETB
55
CAN
56
EM
57
SUB
58
ESC
59
FS
60
GS
61
RS
62
US
63
,
.
/
0
49
2
51
4
5
6
7
8
9
:
;
<
=
>
?
76
77
78
79
80
1
82
3
84
85
86
87
88
89
90
91
92
93
94
95
L
M
N
O
P
81
R
83
T
U
V
W
X
Y
Z
[
\
]
^
_
108
109
110
111
112
Q
114
S
116
117
118
119
120
121
122
123
124
125
126
127
l
m
n
o
p
113
r
115
t
u
v
w
x
y
z
{
|
}
~
DEL
q
s
ASCII Codes for Inverse Characters
ASCII code
128
129
130
131
132
133
134
135
136
137
138
139
140
141
142
143
144
145
146
147
148
149
&
A
B
C
D
E
F
G
H
I
J
K
L
M
N
O
P
Q
R
S
T
U
char
ASCII code
char
&160 &SPACE &192 &
161
162
163
164
165
166
167
168
169
170
171
172
173
174
175
176
177
178
179
180
181
!
”
#
$
%
&
’
(
)
*
+
,
.
/
0
1
2
3
4
5
193
194
195
196
197
198
199
200
201
202
203
204
205
206
207
208
209
210
211
212
213
ASCII code
&224 &`
225
226
227
228
229
230
231
232
233
234
235
236
237
238
239
240
241
242
243
244
245
a
b
c
d
e
f
g
h
i
j
k
l
m
n
o
p
q
r
s
t
u
Mouse Text
ASCII code
char
150
151
152
153
154
155
156
157
158
159
V
W
X
Y
Z
[
\
]
^
_
182
183
184
185
186
187
188
189
190
191
6
7
8
9
:
;
<
=
>
?
214
215
216
217
218
219
220
221
222
223
246
247
248
249
250
251
252
253
254
255
v
w
x
y
z
{
|
}
~
Blot
Appendix C: ImageWriter II Printer and Interface Specifications
Printer Specifications
Print Method:
Dot matrix, logic seek (line by line)
Printing Speed: ?Draft max ?250 cps
?Correspondence max ?180 cps
?NLQ max ?45 cps
10 cpi
10 cpi
10 cpi
Character Format:
Standard characters
Up to 7 dots wide by 8 dots high
Draft characters
Up to 12 dots wide by 8 dots high
NLQ characters
Up to 16 dots wide by 16 dots high
Custom (down loaded) characters
Up to 16 dots wide by 8 dots high
Standard:
96 ASCII (alphanumeric and symbols)
28 European language characters
32 MouseText characters
Vertical Dot Spacing:
1/72 of an inch
Printed Line Length:
8 inches maximum
Horizontal Pitches:
Charactersper Inch
17
136
15
120
13.4
107
12
96
10
80
9
72
Proportional-1 variable
Proportional-2 variable
Charactersper Line
136
120
107
96
80
72
160
144
Dotsper Inch (Approx.)
Paper Feed Direction: Forward and reverse
Line Spacing:
1/144 to 99/144 of an inch, selectable in increments of 1/144 of an inch
Line Feed Speed:
Paper Width:
?Max. 24 lps
6 lpi
3.5 to 9.5 inches pin to pin (pin feed), 10 inches maximum
Paper Thickness:
0.05 - 0.28 millimeter
(0.002 - 0.011 inch)
Original + 3 copies maximum
Paper Feed Method:
Selectable, friction or friction/pin-feed
Paper Types:
Single sheets
Pin-feed paper
(hole centers 4.0 - 9.5 inches)
Ribbon:
Cassette containing black inked fabric ribbon
13 mm wide by 13000 mm long, continuous
Four color ribbon optional 21 mm wide by 18000 mm long, continuous
Power Options:American120 volts AC ± 10%, 60 hertz
Universal100 volts AC ± 10%, 50/60 hertz
120 volts AC ± 10%, 50/60 hertz
140 volts AC ± 10%, 50/60 hertz
200 volts AC ± 10%, 50/60 hertz
220 volts AC ± 10%, 50/60 hertz
240 volts AC ± 10%, 50/60 hertz
Power Consumption: Operating: 180 watts maximum
Standby: 20 watts maximum
Data Interface:
8-bit serial
Weight:
11.36 kilograms (25 pounds)
Dimensions:
Width
Depth Height
431.8
17.0
304.8
12.0
127.0 millimeters
5.0 inches
Ambient Temperature:
Operating
10 to 40 degrees Celsius (50 to 104 degrees F.)
Storage
-40 to +47 degrees Celsius (-40 to +116 degrees F.)
Humidity:
Operating
Storage
20% to 95% relative humidity, noncondensing
10% to 95% relative humidity, noncondensing
ImageWriter II DIP Switch Settings
SW1-1
SW1-2
SW1-3
American
Italian
Danish
British
German
Swedish
French
Spanish
Open
Closed
Open
Closed
Open
Closed
Open
Closed
Open
Open
Closed
Closed
Open
Open
Closed
Closed
SW1-4
Open
Open
Open
Open
Closed
Closed
Closed
Closed
Form length 11 inches Open
Form length 12 inches Closed
SW1-5
Perforation skip inactiveOpen
Perforation skip active Closed
SW1-6
10 cpi Open
12 cpi Closed
17 cpi Open
160 dpi Closed
SW1-7
Open
Open
Closed
Closed
SW1-8
Carriage return only
Carriage return plus line feed
Open
Closed
ImageWriter II DIP Switch Settings
SW2-1
SW2-2
300 Baud
1200
2400
9600
Open
Closed
Open
Closed
Open
Open
Closed
Closed
SW2-3
Hardware Handshake Protocol Open
XON/XOFF Protocol
Closed
SW2-4
Option disabled (No option card) Open
Option Enabled
Closed
Do not adjust DIP switches SW2-5 and SW2-6. They are factory-set to control hammer-fire timing.
Interface Specifications
Data Input Form:
8-bit asynchronous serial:
1 start bit, 8 data bits, 1 stop bit (no parity)
Data Input Codes:
Characters: ASCII, 8- or 7-bit
Graphics: 8-bit binary
Transmission Speed:
Input Buffer Size:
Printer Connector:
Cable Connector:
300, 1200, 2400, or 9600 baud
2K bytes, 32K bytes w/ 32K Memory Option
Mini-circular connector, 8-pin socket or equivalent
Mini-circular connector, 8-pin plug or equivalent
Pin Connection
Pin No.
1
2
Symbol
DTR
DSR
Description
Data Terminal Ready
Data Set Ready
Direction
Output
Input
3
4
5
6
7
8
Shield
TxDSG
RxDTxD+
NC
RxD+
PG
Transmit Data Signal Ground
Receive Data Balanced Transmit +
No Connection
Balanced Receive +
Protective Ground
Output
Input
Output
Input
8-Pin Mini-Circular Connector Pinouts
Cable Connections
Mini-Circular Connector (RS 422/423) DB25-P (RS232-C)
1
6*
DSR
1
8*
DCD
2
20
DTR
3
3
RXD
4**
7
GND
5
2
TXD
6
—
NC
7
—
NC
8**
—
GND
Shield
Shield
*Jumpered together at DB25
**Jumpered together at Mini-Circular Connector
Symbol
Appendix D: Connecting to Other Apple Computers
This appendix shows you how to connect the ImageWriter II to the Macintosh XL, the Lisa Office System,
and the Apple III. Appendix D assumes that you have installed the ribbon and loaded the appropriate
paper into the printer. You should also have successfully self-tested the ImageWriter II. If you have not
completed these activities, see Chapter 2, “Basic ImageWriter II Setup.”
All three computers take the same serial interface cable, the Apple IIe Modem-8 Cable, Apple Part
Number A2C0311. Check to make sure you have the correct cable.
Apple IIe Modem-8 Cable
If your cable does not have the proper connectors at its ends, don’t try to make it fit; see your authorized
Apple dealer before continuing.
Important!
Your Apple computer and its peripheral devices are FCC-certified under test conditions that include use
of shielded cables and connectors between system components. It is important that you use shielded
cables and connectors to reduce the possibility of causing interference to radio, television, and other
electronic devices.
Regardless of which computer you’re connecting to, you can follow a few preliminary steps. Before
beginning, make sure that your computer and printer are turned off.
Make sure you have turned off both the computer and a peripheral device, such as a printer, before
connecting or disconnecting them. Connecting or disconnecting cables when the power is on can
damage your equipment.
Connecting the Printer Cable to the ImageWriter II
Begin by plugging the cable into the ImageWriter II. Locate the 8-pin, mini-circular connector on your
printer cable. Notice the little apple in the top of the connector. The apple side is the top side of the
connector.
The 8-Pin Mini-Circular Connector
Plug the connector into the ImageWriter II’s serial interface socket. Make sure you get a firm fit. Loose
connections can cause interference with radios and televisions, scramble data, or stop the printing
process.
Plugging the Printer Cable Into the Printer
Now you can connect the cable to your computer.
Connecting to the Macintosh XL
To connect the ImageWriter II to your Macintosh XL, follow these steps
Plug the cable connector into the Macintosh XL Serial B printer port, unless this port is already in use. If
you have another cable plugged into the Serial B port (such as AppleTalk), connect to the Serial A
modem port. Tighten the thumbscrews to seat the connector firmly in its socket.
Plugging the Printer Cable Into the Serial B Port
Start your Macintosh XL with MacWorks™. (You must be in MacWorks to install the printer.)
Turn the printer on and make sure that its Select light is on.
Pull down the menu. If you see the Choose Printer accessory, connect or disconect AppleTalk as
appropriate. Then select the device and/or port icon that matches your system.
If you see the Chooser accessory, first open the Control Panel to connect or disconnect AppleTalk. Then
select the Chooser to set the appropriate device and/or port icon. If you need help with these
procedures, see your owner’s guide for details.
By the Way: After making printer software choices, you may want to look at the Page Setup in the File
menu to check the printer’s name and other settings.
To test the ImageWriter connection, press the CAPS-LOCK key into its down position. Then hold down
and Shift while you press 4 from the main keyboard (not the numeric keypad). Your ImageWriter II
should begin printing the contents of the current Macintosh XL screen.
If it does not, see the next section, “Solving Printer Software Problems” and, if necessary, Chapter 5,
“General Troubleshooting.”
Important!
The test may split your screen between two pages. This is OK. The important thing is that the printer
prints an accurate representation of the current screen. If you do not get a screen image, see Chapter 5,
“General Troubleshooting.”
Solving Printer Software Problems
If all your connections are correct and the printer is on and selected, but the test doesn’t print, you
probably have a software problem. Check these two areas for problems:
First, Pull down the menu. If you see the Choose Printer accessory, make sure you have selected the
correct AppleTalk status (Connected or Disconnected), device, and port.
If you see the Chooser accessory, first open the Control Panel to see if AppleTalk is Connected or
Disconnected. Then select the Chooser and make sure you have selected the correct device and port
icons.
Second, see if you have a recent ImageWriter II printer resource; open the System Folder. If the
ImageWriter II icon looks like either of the ones shown in the margin, you’re ready to print. If you have a
different ImageWriter II icon or no ImageWriter II icon at all, see your authorized Apple dealer for a
software update.
Important
If you still can’t get the test to work and have the Chooser accessory in your menu, you should run the
Installer program again. Never try to install Chooser and the software that goes with it by dragging icons or
running Font D/A Mover.
By the Way: You may also want to check the Control Panel and make sure the settings are the way you
want them.
Connecting to the Lisa Office System
Connecting the Lisa takes two steps: plugging in the cable and setting a Preference.
Plug the remaining end of the cable into Lisa’s printer Port B. Tighten the thumbscrews on the connector
for a firm fit.
Connecting to Serial B Port
Important!
The Lisa reserves the Serial A port for modem communications and the Serial B port for printers. Be
sure you have connected the ImageWriter II to the correct port.
Turn the Lisa on and open thePreferences icon.
CheckConnect Devices.
SelectSerial B Connector.
CheckImageWriter II (or justImagewriter) on the list of available devices.
Finally, chooseSet Aside Preferences from the File/Print menu.
With the connection made, you’re ready to test your work.
Testing the Connection
Follow these steps to test your connection and configuration.
Turn the ImageWriter II on and make sure the Select light is on
Hold down OPTION and press the right Shift-4 (from the keypad) to print the current Lisa screen.
If the ImageWriter II produces an unacceptable printout, see Chapter 5, “General Troubleshooting.”
Connecting to the Apple III
Plug the connector into the Apple III’s Port C. The Apple III doesn’t have screw holes around Port C, so
make sure the connector’s thumbscrews don’t interfere with a firm connection.
Connecting to Port C
Configuring the Apple III
To configure the Apple III, you’ll need the disk System Utilities and your application startup disk. Your
Apple III Standard Device Drivers Manual describes this program. To configure your software, follow these
steps.
Start your Apple III with System Utilities.
Put the application disk in drive 2.
From System Utilities, read in the SOS.DRIVER file and look for a driver named .SERPRINTER,
.PRINTER, or .QUME. If you can’t find a suitable driver on your startup disk, check your System Utilities
disk for a file named SERPRINTER.DRIVER or PRINTER.DRIVER.
With the Edit Driver Configuration option, make sure that you’ve chosen a character driver working
through the built-in serial interface port. (It will have the notationn/a following the labelSlot No. on the Edit
Driver Parameters screen.)
Edit the configuration block according to Table D-1 (based on SERPRINTER.DRIVER).
Printer Driver Configuration Block Settings
Byte
1
2
3
4
Value
$00
$00
$00
$00
Parameter
Format
CR Delay
LF Delay
FF Delay
Setting 0
$0E
8 bits, no parity
None
None
None
Speed
9600 baud
Important!
Be sure to set baud rate to 9600, format to 8 bits, no parity, and set all delays to 0.
Generate a new system on each of your application startup disks.
To test your connection and configuration, start up the application you’ve changed and print something.
If it works, you have a successful connection. If there is a problem with the printout, see Chapter 5,
“General Troubleshooting.”
Appendix E: Configuring Serial Interface Cards
This appendix shows you how to configure the Apple Serial Interface Card and Apple Serial
Communications Card for use with the ImageWriter II. It also gives tips on installing cards not
manufactured by Apple Computer, Inc. This appendix assumes you have followed the instructions for
opening your computer and removing your serial card given in Chapter 3.
Never open your computer, handle its circuitry, or install an interface card, unless you have turned off the
computer’s power switch. This is important; you could damage your computer and interface cards by
working inside the computer while the power is on.
When you have configured your serial card, see “Installing and Connecting the Serial Interface Card” in
Chapter 3.
Configuring the Apple Serial Communications Card
Configuring the communications card takes two steps: setting the jumper block and setting a DIP switch
on the ImageWriter II. You may want to consult your Communicatons Interface Card Installation and
Operating Manual for help.
Make sure that the triangle-shaped mark on the jumper block points to TERMINAL. If it does not, gently
unplug the block from the card, rotate it accordingly, and plug it back into the card.
Because the communications card transmits data at 300 baud, you must reset two DIP switches in the
ImageWriter II. Switches SW2-1 and SW2-2 should both be in the Open position. See Appendix A for
details.
Configuring Other Serial Cards
Here is a list of ImageWriter II settings. Check your serial card manual for the appropriate switch settings.
Baud rate: 9600
Data format: 8 data bits, 1 stop bit, 1 start bit
Parity: None
Line feed after carriage return: O
Interrupts: Off
Delays: None
Operation mode: TERMINAL (not MODEM)
Baud Rate
If you have a card that cannot transmit data at 9600 baud, you must reset a switch in the printer itself to
change the printer’s baud rate. See Appendix A for details.
Apple II Serial Card Notes
If you have an Apple II Serial Card, note that the ImageWriter II requires no delays set for
Carriage returns
Line feeds
Form feeds
Note: For the Apple II Serial Card, Open is Off, Closed is On.
If your Apple II Serial Card has a ROM labeled P8A, you can send data at 9600 baud. However, if you have
a P8 ROM, you must send data at 300 baud. Do not connect a modem eliminator cable to the Apple II
Serial Card.
Appendix F: Configuring AppleWorks for Half-Height Subscripts and Superscripts
AppleWorks versions through 1.2 print full-height subscripts and superscripts. However, the ImageWriter
II can print these text elements half-height. This appendix shows you how to create an AppleWorks
printer driver that takes advantage of these half-height characters. Note that by configuring a custom
printer to take advantage of half-height characters, you are giving up other capabilities, such as
proportional spacing.
Important!
The new printer driver is an AppleWorks Custom Printer. You can have only one such custom printer on
your AppleWorks program disk at a time. If you want to keep more than one custom printer, you must
make a copy of the program disk to hold each custom printer. Further, you can have only three printer
drivers on a single disk.
Follow these steps.
With the AppleWorks Main Menu on your screen, choose option 5, Other Activities Menu.
Choose option 7,Specify information about your printer(s)
From the Printer Information menu, choose option 2,Add a printer.
Add a Printer Display
Disk: Drive 1
ADD A PRINTER
Escape: Printer Information
_____________________________________________________________________________
_ ___________________________ |
Main Menu
|_____________________________________ | _________________________
| | |
Other Activities
|___________________________________|__ | | __________________________
| | | |
Printer Information
|___________________________________|__ | | | __________________________
| | | | |
Add a Printer
|___________________________________|__ | | | |
Identify your printer, or a
compatible series
| | | | |
| | | | |
1. Apple Dot Matrix
9. Qume
Sprint 5
| | | | |
2. Apple Imagewriter
10. Qume Sprint 11
| | | | |
3. Apple Daisy Wheel
11. Apple Scribe
|
| | | |
4. Apple Silentype
12. Custom printer
|
| |
| |
|
| | | |
5. Epson MX series
|
|__| | |
6. Epson MX/Graftrax+
|
| | |
7.
Epson RX series
|
|__| |
8.
Epson FX series
|
|__|_________________________________________________________________|
_____________________________________________________________________________
_ Type number, or use arrows, then press Return
30K Avail.
Too Many Printers?
If you have three printers on your program disk, select the Remove command and remove one printer (not
the ImageWriter II) and then add your new printer.
From the Add a Printer menu, choose option 12,Custom printer. ^
Respond to the request for a name by typingSuperSub (or whatever name you prefer) and press Return.
Unless you have your printer interface card in a slot other than slot 1, choosePort 1 for access.
Follow the prompts at the bottom of the screen to answer the questions on the Add a Printer menu:
No to Line feed.
Yes to top-of-page.
No to stop at the end of each page, unless you’re using single sheets.
Yes to an eight-inch platen width.
Highlight thePrinter codes option and press Return. This brings up the Printer codes menu.
Choose option 3,Boldface, Subscript and Superscript and the Enhancements menu appears.
Correcting Typing Mistakes:
If you find yourself entering a code incorrectly, press ^ to return to the Enhancements menu and retype
the escape sequence.
The Printer Codes Menu
Disk: Drive 1
PRINTER CODES
Escape: Add a Printer
_____________________________________________________________________________
__
__________________________ |
Main Menu
|______________________________________ | __________________________
| | |
Other Activities
|___________________________________|__ | | __________________________
| | | |
Printer Information
|___________________________________|__ | | | __________________________
| | | | |
Printer codes
|___________________________________|__ | | | |
| | | | |
1. Characters per inch
| | | | |
| | | | |
2. Lines per inch
| | | | |
| | | | |
3. Boldface, Subscript and Superscript
|
| | | |
|
|
| | |
4. Underlining
|
|__| | |
|
| | |
5. Serial Interface settings
|
|__| |
|
|__|_________________________________________________________________|
_____________________________________________________________________________
_ Type number, or use arrows, then press Return
30K Avail.
From the Enhancements menu, choose option 3,Subscript Begin.
The Enhancements Menu
Disk: Drive 1
ENHANCEMENTS
Escape: Printer codes
_____________________________________________________________________________
__
__________________________ |
Main Menu
|______________________________________ | __________________________
| | |
Other Activities
|___________________________________|__ | | __________________________
| | | |
Printer Information
|___________________________________|__ | | | __________________________
| | | | |
Enhancements
|___________________________________|__ | | | |
| | | | |
1. Boldface Begin
| | | | |
2. Boldface End
| | | | |
3. Subscript Begin
| | | | |
4. Subscript End
|
|
|
|
|
|
| | | |
|
6.
5. Superscript Begin
Superscript End
|
|
|
|
|__| |
|
|__|
| | |
|
|
|
|
|
|__|_________________________________________________________________|
_____________________________________________________________________________
_ Type number, or use arrows, then press Return
30K Avail.
Important!
All escape characters in the next step are lowercase—x, y, and z.
Press Escape y to enter the code and ^ to return to the Enhancements menu.
The Subscript Begin Menu
Disk: Drive 1
UNDERLINING
_____________________________________________________________________________
__
__________________________ |
Main Menu
|______________________________________ | __________________________
| | |
Other Activities
|___________________________________|__ | | __________________________
| | | |
Printer Information
|___________________________________|__ | | | __________________________
| | | | |
Subscript Begin
|___________________________________|__ | | | |
| | | | |
Current control characters are
| | | | |
|
| | | |
Escape y
| | | | |
| | | | |
| | | | |
|
| | | |
|
|__| | |
|
|
| |
|
|__| |
|
|__|_________________________________________________________________|
_____________________________________________________________________________
_ Type the exact control character required (^ = End):
30K Avail.
Choose option 4,Subscript End.
Type Escape z to enter the code and ^ to return to the Enhancements menu.
Choose option 5,Superscript Begin.
Type Escape x to enter the code and ^ to return to the Enhancements menu.
Choose option 6,Superscript End.
Type Escape z to enter the code and ^ to return to the Enhancements menu.
You should also customize for boldface and characters per inch. Follow the instructions in each menu.
To return to the AppleWorks Main Menu, press Escape five times.
To use your new “printer,” choose it from the menu of printers after issuing the AppleWorks Print
command.
Copyright
©Copyright 1985, Apple Computer, Inc. for all nontextual material, graphics, figures, photographs, and all
computer program listings or code in any form, including object and source code. All rights reserved.
For some products, a multi-use license may be purchased to allow the software to be used on more than
one computer owned by the purchaser, including a shared-disk system. (Contact your authorized Apple
dealer for information on multi-use licenses.)
Apple, the Apple logo, AppleWorks, ImageWrite II, Lisa, MacWorks, and Super Serial Card are trademarks
of Apple Computer, Inc.
AppleCare is a registered service mark of Apple Computer, Inc.
Macintosh is a trademark of McIntosh Laboratory, Inc. and is being used with express permission of its
owner.
Printed in Japan.
Limited Warranty on Media and Replacement
If you discover physical defects in the manuals distributed with an Apple product or in the media on which
a software product is distributed, Apple will replace the media or manuals at no charge to you, provided
you return the item to be replaced with proof of purchase to Apple or an authorized Apple dealer during
the 90-day period after you purchased the software. In addition, Apple will replace damaged software
media and manuals for as long as the software product is included in Apple’s Media Exchange Program.
While not an upgrade or update method, this program offers additional protection for up to two years or
more from the date of your original purchase. See your authorized Apple dealer for program coverage
and details. In some countries the replacement period may be different; check with your authorized
Apple dealer.
ALL IMPLIED WARRANTIES ON THE MEDIA AND MANUALS, INCLUDING IMPLIED WARRANTIES OF
MERCHANTABILITY AND FITNESS FOR A PARTICULAR PURPOSE, ARE LIMITED IN DURATION TO
NINETY (90) DAYS FROM THE DATE OF THE ORIGINAL RETAIL PURCHASE OF THIS PRODUCT.
Even though Apple has tested the software and reviewed the documentation, APPLE MAKES NO
WARRANTY OR REPRESENTATION, EITHER EXPRESS OR IMPLIED, WITH RESPECT TO
SOFTWARE, ITS QUALITY, PERFORMANCE, MERCHANTABILITY, OR FITNESS FOR A PARTICULAR
PURPOSE. AS A RESULT, THIS SOFTWARE IS SOLD “AS IS,” AND YOU THE PURCHASER ARE
ASSUMING THE ENTIRE RISK AS TO ITS QUALITY AND PERFORMANCE.
IN NO EVENT WILL APPLE BE LIABLE FOR DIRECT, INDIRECT, SPECIAL, INCIDENTAL, OR
CONSEQUENTIAL DAMAGES RESULTING FROM ANY DEFECT IN THE SOFTWARE OR ITS
DOCUMENTATION, even if advised of the possibility of such damages. In particular, Apple shall have no
liability for any programs or data stored in or used with Apple products, including the costs of recovering
such programs or data.
THE WARRANTY AND REMEDIES SET FORTH ABOVE ARE EXCLUSIVE AND IN LIEU OF ALL
OTHERS, ORAL OR WRITTEN, EXPRESS OR IMPLIED. No Apple dealer, agent, or employee is
authorized to make any modification, extension, or addition to this warranty.
Some states do not allow the exclusion or limitation of implied warranties or liability for incidental or
consequential damages, so the above limitation or exclusion may not apply to you. This warranty gives
you specific legal rights, and you may also have other rights which vary from state to state.
Warning
This equipment has been certified to comply with the limits for a Class B computing device, pursuant to
Subpart J of Part 15 of FCC Rules. See instructions if interference to radio or television reception is
suspected.
Radio and Television Interference
The equipment described in this manual generates and uses radio-frequency energy. If it is not installed
and used properly—that is, in strict accordance with our instructions—it may cause interference with radio
and television reception.
This equipment has been tested and complies with the limits for a Class B computing device in
accordance with the specifications in Subpart J, Part 15, of FCC rules. These rules are designed to
provide reasonable protection against such interference in a residential installation. However, there is no
guarantee that the interference will not occur in a particular installation, especially if a “rabbit ear” television
antenna is used. (A “rabbit ear” antenna is the telescoping-rod type usually contained on television
receivers.)
You can determine whether your computer is causing interference by turning it off. If the interference
stops, it was probably caused by the computer or its peripherals. To further isolate the problem,
disconnect the peripheral devices and their input/output cables one at a time. If the interference stops, it
was caused by either the peripheral device or the I/O cable. These devices usually require shielded I/O
cables. For Apple peripherals, you can obtain the proper shielded cable from your dealer. For non-Apple
peripheral devices, contact the manufacturer or dealer for assistance.
If your computer does cause interference to radio or television reception, you can try to correct the
interference by using one or more of the following measures:
Turn the television or radio antenna until the interference stops.
Move the computer to one side or the other of the television or radio.
Move the computer farther away from the television or radio.
Plug the computer into an outlet that is on a different circuit than the television or radio. (That is, make
certain the computer and the radio or television set are on circuits controlled by different circuit breakers
or fuses.)
Consider installing a rooftop television antenna with coaxial cable lead-in between the antenna and
television.
If necessary, you should consult your Apple-authorized dealer or an experienced radio/television
technician for additional suggestions.