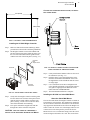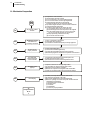
1
Weight Controller
HI-3030
INSTALLATION AND SERVICE MANUAL
Local Field Service
Hardy has over 200 field technicians in the U.S., and more positioned throughout the world to assist you in your support needs. We also have factory engineers who will travel to your facility anywhere in the world to help you solve
challenging applications. We're ready to support you with:
•
•
•
•
Installation and start-up
Routine maintenance and certification
Plant audits and performance measurement
Emergency troubleshooting and repair
To request Emergency Service and Troubleshooting, Start-up, Installation, Calibration, Verification or to discuss a
Maintenance Agreement please call 800-821-5831 Ext. 1757 or Emergency Service after hours (Standard Hours 6:00
AM to 6:00 PM Pacific Standard Time) and weekends Ext. 1111.
Outside the U.S
Hardy Process Solutions has built a network of support throughout the globe. For specific field service options available in your area please contact your local sales agent or our U.S. factory at +1 858-292-2710, Ext. 1757.
i
Table of Contents
Table of Contents
Table of Contents
- - - - - - - - - - - - - - - - - - - - - - - - - - - - - - - - - - - -i
Table of Illustrations
- - - - - - - - - - - - - - - - - - - - - - - - - - - - - - - - - - - -I
Chapter 1
Overview - - - - - - - - - - - - - - - - - - - - - - - - - - General Introduction to the Hardy HI 3030 Service Manual - - Description - - - - - - - - - - - - - - - - - - - - - - - - - Typical Applications - - - - - - - - - - - - - - - - - - - - - Hardy Web Tech - - - - - - - - - - - - - - - - - - - - - - Connectivity - - - - - - - - - - - - - - - - - - - - - - - - - Mapped I/O - - - - - - - - - - - - - - - - - - - - - - - - - WAVERSAVER® - - - - - - - - - - - - - - - - - - - - - - C2® Calibration - - - - - - - - - - - - - - - - - - - - - - - INTEGRATED TECHNICIAN™ (IT®) - - - - - - - - - - - - - Secure Memory Module (SMM) - - - - - - - - - - - - - - - Serial Port - - - - - - - - - - - - - - - - - - - - - - - - - - NIST/NTEP Option (-NTEP) - - - - - - - - - - - - - - - - - CWM - - - - - - - - - - - - - - - - - - - - - - - - - - - - Mounting Options - - - - - - - - - - - - - - - - - - - - - - Power Supply Options - - - - - - - - - - - - - - - - - - - - Sensor Input Options - - - - - - - - - - - - - - - - - - - - Rate of Change Option - - - - - - - - - - - - - - - - - - - Peripherals/System Components - - - - - - - - - - - - - - C2 Cable - - - - - - - - - - - - - - - - - - - - - - - - ADVANTAGE® Load Points - - - - - - - - - - - - - - - Platform and Floor Scale Bases - - - - - - - - - - - - - HI 215JB Series Junction Boxes - - - - - - - - - - - - - HI 215IT Series Junction Boxes - - - - - - - - - - - - - ACCESSORIES - - - - - - - - - - - - - - - - - - - - - - - HI 3000-RC (NEMA 4/4X Rear Cap) - - - - - - - - - - - HI 3000-MB - - - - - - - - - - - - - - - - - - - - - - - HI 3000-GF - - - - - - - - - - - - - - - - - - - - - - - HI 3000-TM - - - - - - - - - - - - - - - - - - - - - - - HI 3000-OM - - - - - - - - - - - - - - - - - - - - - - - Communication Options - - - - - - - - - - - - - - - - - - - DeviceNet - - - - - - - - - - - - - - - - - - - - - - EtherNet/IP™ - - - - - - - - - - - - - - - - - - - - Analog Output (-4AN) - - - - - - - - - - - - - - - - MOD-Bus/TPC/IP - - - - - - - - - - - - - - - - - - OPC - - - - - - - - - - - - - - - - - - - - - - - - Remote I/O (RIO) Interface to the Allen Bradley Network
Profibus - - - - - - - - - - - - - - - - - - - - - - - Analog Output (2AN) - - - - - - - - - - - - - - - - -
-
-
-
-1
-1
-1
-2
-3
-3
-3
-3
-3
-4
-4
-4
-4
-4
-4
-4
-4
-4
-4
-4
-4
-5
-5
-5
-5
-5
-5
-5
-5
-5
-5
-5
-5
-5
-5
-5
-6
-6
-6
Chapter 2
Specifications - - - - - - - - - - - About Chapter 2 - - - - - - - - - - - Specifications for a Standard Instrument
Number of Channels: - - - - - - Update Rate: - - - - - - - - - - Resolution - - - - - - - - - - - - Excitation Voltage: - - - - - - - - Averages: - - - - - - - - - - - - Input: - - - - - - - - - - - - - - Display: - - - - - - - - - - - - - Display Increments (Graduations): -
-
-
-
-
-
-
-
-
-
-
-
-
-
-
-
-
7
7
7
7
7
7
7
7
7
7
7
HI 3030 Weight Controller
Service Manual
Standard Opto 22 Electronic AC Relays:
Standard Opto 22 Electronic DC Relays:
Non-Linearity: - - - - - - - - - - - - WAVERSAVER®: - - - - - - - - - - Calibration Techniques: - - - - - - - Standard Interfaces: - - - - - - - - - Power and Utility Requirements: - - - Total Power: - - - - - - - - - - - - - Watts available for DeviceNet Power: Common Mode Voltage Range - - - Common Mode Rejection: - - - - - - Environmental Requirements: - - - - - - Operating Temperature Range: - - - Storage Temperature Range: - - - - Temperature Coefficient: - - - - - - - Humidity Range: - - - - - - - - - - - Approvals: - - - - - - - - - - - - - - Instrument Local I/O: - - - - - - - - Physical Characteristics: - - - - - - - - - Panel Mount (Model # HI 3030-PM) - Wall Mount (HI 3030-MB) - - - - - - Specifications for I/O Option Boards - - - Profibus Option Board - - - - - - - - ControlNet Option Board - - - - - - - EtherNet/IP™ Option Card - - - - - - Rate of Change Option - - - - - - - - - -
-
-
-
-
-
-
-7
-7
-7
-7
-7
-7
-8
-8
-8
-8
-8
-8
-8
-8
-8
-8
-8
-8
-8
-8
-8
-9
-9
-9
-9
-9
Chapter 3
Installation - - - - - - - - - - - - - - - - - - - - - - - About Chapter 3 - - - - - - - - - - - - - - - - - - - - - Unpacking - - - - - - - - - - - - - - - - - - - - - - - - Mechanical Installation - - - - - - - - - - - - - - - - - - Installing the HI 3030 Weight Controller in a Panel - - Panel Cutout Specifications - - - - - - - - - - - Installing the HI 3030 Weight Controller - - - - - Installing the HI 3030 in a Swivel/Wall Mount - - - - - About the Swivel/Wall Mount - - - - - - - - - - - Installing Printed Circuit Boards - - - - - - - - - - - Network Option Card Installation - - - - - - - - - - - - - Removing Printed Circuit Boards - - - - - - - - - - - Electrical Installation - - - - - - - - - - - - - - - - - - - Cabling and Interconnecting - - - - - - - - - - - - - Recommended Installation Procedures - - - - - - -AC Power Wiring - - - - - - - - - - - - - - - - - - -DC Power Wiring - - - - - - - - - - - - - - - - - - Load Point Connections - - - - - - - - - - - - - - - - - C2® Load Point Connection - - - - - - - - - - - - - Non-C2 Load Point Connection - - - - - - - - - - - LVDT and Half Bridge Load Cells/Sensors - - - - - - Junction Box Wiring - - - - - - - - - - - - - - - - - - - Installation of Secure Memory Module (SMM) (See Fig. 3-18)
Transferring a Secure Memory Module - - - - - - - - NTEP Option Installation - - - - - - - - - - - - - - - - - -
-
-
-
-
-
- 11
- 11
- 11
- 11
- 11
- 11
- 12
- 12
- 12
- 14
- 15
- 15
- 16
- 16
- 16
- 16
- 16
- 17
- 17
- 17
- 17
- 17
- 18
- 18
- 18
Chapter 4
Configuration About Chapter 4
Getting Started
Help - - - - - -
-
-
-
-
-
- 21
- 21
- 21
- 21
-
-
-
-
-
-
-
-
-
-
-
-
-
-
-
-
-
-
-
-
-
-
-
-
-
-
-
-
-
ii
iii
Table of Contents
About Help - - - - - - - - - - - - - - - - - - Description of the Front Panel - - - - - - - - - - - Front Panel Display - - - - - - - - - - - - - - Button Functions - - - - - - - - - - - - - - - Tare Button - - - - - - - - - - - - - - - - Zero Button - - - - - - - - - - - - - - - - Help Button - - - - - - - - - - - - - - - - Display Button - - - - - - - - - - - - - - - Print Button - - - - - - - - - - - - - - - - Up/Down - Left/Right Buttons - - - - - - - Enter Button - - - - - - - - - - - - - - - - Exit Button - - - - - - - - - - - - - - - - Clear Button - - - - - - - - - - - - - - - - 1 Button - - - - - - - - - - - - - - - - - - 2/ABC Button - - - - - - - - - - - - - - - Setup/3/DEF Button - - - - - - - - - - - - Amount/4/GHI - - - - - - - - - - - - - - - Units/5/JKL Button - - - - - - - - - - - - - 6/MNO Button - - - - - - - - - - - - - - - Tare Val/7/PQRS Button - - - - - - - - - - 8/TUV Button - - - - - - - - - - - - - - - Test/9/WXYZ Button - - - - - - - - - - - - User/./_/@ Button - - - - - - - - - - - - - 0/Char. Button - - - - - - - - - - - - - - - Starting Up for the First Time - - - - - - - - - - - Weight Controller Configuration From the Front Panel
Unit of Measure Parameters - - - - - - - - - - About Unit of Measure - - - - - - - - - - - Decimal Point Parameter - - - - - - - - - - - About the Decimal Point Parameter - - - - Motion Tolerance Parameter - - - - - - - - - - About Motion Tolerance - - - - - - - - - - Graduation Size Parameter - - - - - - - - - - About the Graduation Size Parameter - - - Zero Tolerance Parameter - - - - - - - - - - - Auto ZeroZero Tolerance Parameter - - - - - - Zero Reminder Parameter - - - - - - - - - - - About Zero Reminder - - - - - - - - - - - Tare Reminder Parameter - - - - - - - - - - - About the Tare Reminder Parameter - - - - Averages Parameter - - - - - - - - - - - - - - About the Averages Parameter - - - - - - Scale Capacity Parameter - - - - - - - - - - - About the Scale Capacity Parameter - - - - The WAVERSAVER® Parameter - - - - - - - About the WAVERSAVER Parameter - - - Operator ID - - - - - - - - - - - - - - - - - - About Operator ID - - - - - - - - - - - - - Instrument ID - - - - - - - - - - - - - - - - - About Instrument ID - - - - - - - - - - - - Serial Port Parameters - - - - - - - - - - - - - About the Serial Port Setup Parameters - - Tare Limit Parameter - - - - - - - - - - - - - About the Tare Limit Parameter - - - - - - Set Clock Parameter - - - - - - - - - - - - - - About Setting the Clock - - - - - - - - - - About Timezones (Greenwich Mean Time) - -
-
-
-
-
-
-
-
-
-
21
21
21
21
21
21
21
22
22
22
22
22
22
22
22
23
23
23
23
23
23
23
23
23
23
24
25
25
25
25
26
26
26
26
26
26
26
26
28
28
28
28
28
28
29
29
29
29
29
29
30
30
31
31
31
31
32
HI 3030 Weight Controller
Service Manual
Set LCD Contrast Parameter - - - - - - - - - - - - - - - About the Set LCD Contrast Parameter - - - - - - - Ethernet Parameters - - - - - - - - - - - - - - - - - - - About the Ethernet Parameters - - - - - - - - - - - About IP Addresses - - - - - - - - - - - - - - - - - Option Cards Configuration - - - - - - - - - - - - - - - - - Analog Option Card Configuration - - - - - - - - - - - - Configuring the Analog Option Card from the Web Page
Weight Controller Configuration From the Web Page - - - - - Set Date/Clock Parameters - - - - - - - - - - - - - The Instrument Configuration is complete - - - - - - Options Configuration - - - - - - - - - - - - - - - - - - - - Option Cards Configuration - - - - - - - - - - - - - - - Rate of Change (-ROC) Option Configuration - - - - - - ROC Configuration from the Front Panel - - - - - - - ROC Configuration from the Browser - - - - - - - - - DeviceNet Parameters - - - - - - - - - - - - - - - - - - About the DeviceNet Parameters - - - - - - - - - - -
-
-
-
- 34
- 34
- 34
- 34
- 34
- 35
- 35
- 35
- 39
- 44
- 44
- 44
- 44
- 44
- 44
- 45
- 46
- 46
Chapter 5
Calibration - - - - - - - - - - - - - - - - - About Chapter 5 - - - - - - - - - - - - - - - Getting Started - - - - - - - - - - - - - - - Binding - - - - - - - - - - - - - - - - - Electrical Check Procedures - - - - - - - C2 Calibration From the Front Panel - - - - - About The Gravitation Correction Factor
C2 Calibration From the Web Page - - - - - Traditional Calibration From the Front Panel - About Traditional Calibration - - - - - - - Traditional Calibration From the Web Page - - -
-
-
-
-
-
-
- 49
- 49
- 49
- 49
- 49
- 49
- 50
- 52
- 53
- 53
- 54
Chapter 6
Mapping - - - - - - - - - - - - - - - - - - - - - - - - About Mapping - - - - - - - - - - - - - - - - - - - - - Mapping to an HI 3030 with a pre-2.3 Firmware Version
Mapping to an Output Relay - - - - - - - - - - - - - Example #2 Mapping an Input - - - - - - - - - - - - Mapping Multiple Sources - - - - - - - - - - - - - - Simple Network Mapping - - - - - - - - - - - - - - Mapping to a Network Output - - - - - - - - - - Mapping a Network Input to a Local Output - - - - More Advanced Mapping - - - - - - - - - - - - - - - - Glossary of Mapping Terms - - - - - - - - - - - - - Rules for Hardy Control Link Mapping - - - - - - - - Local Input - - - - - - - - - - - - - - - - - - - - - - - Local Output - - - - - - - - - - - - - - - - - - - - - - - Volatile and Non-Volatile Memory - - - - - - - - - - - - A Definition of Mapping - - - - - - - - - - - - - - - - - Local Mapping Example - - - - - - - - - - - - - - - - - Local Mapping Output - - - - - - - - - - - - - - - - Network Input - - - - - - - - - - - - - - - - - - - - - - Network Output - - - - - - - - - - - - - - - - - - - - - Hardy Control Link Network Mapping - - - - - - - - - Boolean Mapping - - - - - - - - - - - - - - - - Analog Mapping - - - - - - - - - - - - - - - - - Mixed Mapping - - - - - - - - - - - - - - - - - Special (Command) Mapping) - - - - - - - - - - Command Interface - - - - - - - - - - - - - - - - - - - -
-
-
-
-
-
- 57
- 57
- 57
- 57
- 60
- 61
- 62
- 62
- 63
- 64
- 64
- 64
- 65
- 65
- 65
- 65
- 66
- 66
- 66
- 67
- 67
- 68
- 68
- 69
- 69
- 70
-
-
-
-
-
iv
v
Table of Contents
Parameter Numbers, Code Explanations, Valid Ranges and
Default Settings - - - - - - - - - - - - - - - - - - - - - Getting the Parameter Information on the Web Browser - - Mapping from the Front Panel - - - - - - - - - - - - - - - Unmapping Procedures - - - - - - - - - - - - - - - - - - Mapping a Hardy Control-Link Network to a ControlNet/DeviceNet/
Profibus Network - - - - - - - - - - - - - - - - - - - - - - Chapter 7
-
-
-
70
72
73
75
- - - 75
Troubleshooting - - - - - - - - - - - - - - - - - - - - - - - - - About Chapter 7 - - - - - - - - - - - - - - - - - - - - - - - - - - Disassembly and Reassembly Notes and Cautions - - - - - - - - - Error Messages - - - - - - - - - - - - - - - - - - - - - - - - - - General Troubleshooting Flow Chart Index - - - - - - - - - - - - - A - Stability Test - - - - - - - - - - - - - - - - - - - - - - - - - - B - Guidelines for Instabilities on Formerly Operating Systems - - - B1 - Guidelines for Instabilities on Formerly Operating
Systems (Cont’d) - - - - - - - - - - - - - - - - - - - - - - - - B2 - Guidelines for Instabilities on Formerly Operating Systems:
Mechanical Stability and Configuration Settings - - - - - - - - - C - Guidelines for Instabilities on Formerly Operating Systems - - - C1 - Guidelines for Instabilities on formerly Operating systems with
the Integrated Technician Summing Junction Box diagnostics - - E - Return to Zero Test - - - - - - - - - - - - - - - - - - - - - - F - Verify Individual Load Cell Milli-Volt Readings - - - - - - - - - - F(a) - Verify Individual Load Cell Readings Using INTEGRATED
TECHNICIAN™ - - - - - - - - - - - - - - - - - - - - - - - - - G - A/D Failure Error - - - - - - - - - - - - - - - - - - - - - - - - H - Mechanical Inspection - - - - - - - - - - - - - - - - - - - - - J - Electrical Inspection - - - - - - - - - - - - - - - - - - - - - - K - Load Sharing and Load Sensor Checkout - - - - - - - - - - - - M - Weight Reading Stops Incrementing - - - - - - - - - - - - - - N - Blank Screen - - - - - - - - - - - - - - - - - - - - - - - - - O - Display Stuck on a Screen - - - - - - - - - - - - - - - - - - - R - View Input States - - - - - - - - - - - - - - - - - - - - - - - S - Forcing Outputs - - - - - - - - - - - - - - - - - - - - - - - - System Integrity Check and Fault Determination From the Front Panel
Diagnostics - - - - - - - - - - - - - - - - - - - - - - - - - - About Diagnostics - - - - - - - - - - - - - - - - - - - - - Checking the Device Data List - - - - - - - - - - - - - - - Diagnostics - - - - - - - - - - - - - - - - - - - - - - - - - - INTEGRATED TECHNICIAN™ (IT®) - - - - - - - - - - - - Using IT From the Front Panel - - - - - - - - - - - - - - - Stability Test - - - - - - - - - - - - - - - - - - - - - - - Factory Defaults - - - - - - - - - - - - - - - - - - - - - - Return to Zero Test - - - - - - - - - - - - - - - - - - - - View Input States - - - - - - - - - - - - - - - - - - - - - Force Outputs - - - - - - - - - - - - - - - - - - - - - - - System Integrity Check and Fault Determination From the Web
Browser - - - - - - - - - - - - - - - - - - - - - - - - - - - - - Diagnostics - - - - - - - - - - - - - - - - - - - - - - - - - - Using IT From the Web Browser - - - - - - - - - - - - - - Setting the Factory Defaults from the Web Browser - - - - Overview of Typical Load Cell System - - - - - - - - - - - - - - - Troubleshooting The Network Connections and Configuration with
the "Ping" Tool - - - - - - - - - - - - - - - - - - - - - - - - - Selecting the module by number for Testing - - - - - - - - - - Exiting the Root Directory - - - - - - - - - - - - - - - - - - - -
-
77
77
77
77
78
79
80
- 81
- 82
- 83
- 84
- 85
- 86
-
87
88
89
90
91
92
93
94
95
96
97
97
97
97
102
102
102
105
106
106
107
107
-
108
108
108
110
111
- 112
- 112
- 112
HI 3030 Weight Controller
Service Manual
About Solid State Relays With Light Loads SCR SWITCHING LOAD CIRCUIT - - General Policies and Information - - - - - FOR FURTHER INFORMATION CONTACT:
Ordering Replacement Parts - - - - - - - System Support - - - - - - - - - - - Warranty - - - - - - - - - - - - - - - - Dictionary of Mapping
Symbols
Index
-
-
-
-
-
-
-
-
-
-
-
-
-
- 112
- 112
- 113
- 113
- 113
- 113
- 113
vi
I
Table of Illustrations
Table of Illustrations
Chapter 1
Chapter 3
Chapter 4
Overview - - - - - - - - - - - - - - - - - - - - - - - - - - - FIG. 1-1 FILLING A VESSEL USING A FEEDER - - - - - - - FIG. 1-2 SEQUENTIAL BATCH CONTROL - - - - - - - - - FIG. 1-3 LEVEL MONITORING - - - - - - - - - - - - - - - FIG. 1-4 DISPENSING (LOSS-IN-WEIGHT) FROM A VESSEL
TO ANOTHER VESSEL - - - - - - - - - - - - - - - - - - - - -
-
-
-
- - -3
Installation - - - - - - - - - - - - - - - - - - - - - - - - - - - - - FIG. 3-1 REAR PANEL CLEARANCE REQUIREMENT- - - - - - - FIG. 3-2 PANEL CUTOUT DIMENSIONS - - - - - - - - - - - - - FIG. 3-3 PANEL MOUNT INSTALLATION - - - - - - - - - - - - - FIG. 3-4 NEMA 4 GASKET FLUSH AGAINST THE FRONT
PANEL OF THE ENCLOSURE - - - - - - - - - - - - - - - - - - - - FIG. 3-5 INSTALLING THE SWIVEL MOUNT TO A HORIZONTAL
SURFACE - - - - - - - - - - - - - - - - - - - - - - - - - - - - - - FIG. 3-6 WEIGHT CONTROLLER INSTALLING IN A SWIVEL
MOUNT - - - - - - - - - - - - - - - - - - - - - - - - - - - - - - - FIG. 3-7 WEIGHT CONTROLLER INSTALLED IN A SWIVEL
MOUNT - - - - - - - - - - - - - - - - - - - - - - - - - - - - - - - FIG. 3-8 INSTALLING THE SWIVEL MOUNT TO A VERTICAL
SURFACE - - - - - - - - - - - - - - - - - - - - - - - - - - - - - - FIG. 3-9 WEIGHT CONTROLLER INSTALLING IN A SWIVEL
WALL MOUNT - - - - - - - - - - - - - - - - - - - - - - - - - - - - FIG. 3-10 WEIGHT CONTROLLER INSTALLED IN A SWIVEL/
WALL MOUNT - - - - - - - - - - - - - - - - - - - - - - - - - - - - FIG. 3-11 MAIN CONTROLLER BOARD INSTALLATION/LINING UP
BOARDS WITH THE SLOTS - - - - - - - - - - - - - - - - - - - - - FIG. 3-12 MAIN CONTROLLER BOARD INSTALLATION/SLIDING
THE BOARD INTO THE INSTRUMENT - - - - - - - - - - - - - - - FIG. 3-13 MAIN CONTROLLER BOARD INSTALLED WITH
REAR PLATE - - - - - - - - - - - - - - - - - - - - - - - - - - - - FIG. 3-14 POWER WIRING DIAGRAM - - - - - - - - - - - - - - - FIG. 3-15 DC POWER SUPPLY CONNECTION - - - - - - - - - - - FIG. 3-16 REAR PANEL/LOAD POINT CONNECTIONS - - - - - - - FIG. 3-17 JUNCTION BOX CONNECTIONS- - - - - - - - - - - - - FIG. 3-18 SECURE MEMORY MODULE (SMM) - - - - - - - - - - - FIG. 3-19 INSTALLING THE SECURE MEMORY MODULE - - - - - FIG. 3-20 TEST AND DATA MENU/SELECTING DEVICE DATA LIST FIG. 3-21 TEST DATA/VIEWING VERSION NUMBER- - - - - - - - FIG. 3-22 HI 3030 WEB PAGE/SELECTING OPERATION - - - - - - FIG. 3-23 OPERATION PAGE/SELECTING DIAGNOSTICS - - - - - FIG. 3-24 OPERATION - DIAGNOSTICS/FIRMWARE REVISION
NUMBER 2.7.00.28 - - - - - - - - - - - - - - - - - - - - - - - - - Configuration - - - - - - - - - - - - - - - - - - - - - FIG. 4-1 FRONT PANEL - - - - - - - - - - - - - - - FIG. 4-2 DIRECTIONAL BUTTONS - - - - - - - - - FIG. 4-3 LIST SELECTION/ENTER BUTTON - - - - FIG. 4-4 SUMMARY DISPLAY/1 CHANNEL - - - - - FIG. 4-5 SUMMARY DISPLAY/2 CHANNEL - - - - - FIG. 4-6 SUMMARY DISPLAY/4 CHANNELS - - - - FIG. 4-7 SINGLE CHANNEL SELECTION DISPLAY - FIG. 4-8 TARE MENU - - - - - - - - - - - - - - - - FIG. 4-9 TARE MENU/ENTRY ACCEPTED - - - - - FIG. 4-10 SUMMARY DISPLAY/SELECTING CHANNEL
-
-
-
-
1
2
2
2
-
-
11
11
12
12
12
13
13
13
14
14
14
14
15
15
16
16
17
17
18
18
18
18
19
19
19
- 21
- 21
- 22
- 22
- 23
- 23
- 23
- 23
- 24
- 24
- 24
HI 3030 Weight Controller
Service Manual
FIG. 4-11 CONFIGURATION MENU/SELECTING SETUP - - - - - FIG. 4-12 SETUP MENU/SELECTING CHANNEL NAME - - - - - FIG. 4-13 CHANNEL NAME/ENTERING CHANNEL NAME - - - - FIG. 4-14 SETUP MENU/TURNING ON A CHANNEL - - - - - - - FIG. 4-15 SETUP MENU/UNIT OF MEASURE- - - - - - - - - - - FIG. 4-16 SETUP MENU/DECIMAL POINT - - - - - - - - - - - - FIG. 4-17 SETUP MENU/MOTION TOLERANCE - - - - - - - - - FIG. 4-18 SETUP MENU/GRADUATION SIZE- - - - - - - - - - - FIG. 4-19 SETUP MENU/SELECTING ZERO TOLERANCE - - - - FIG. 4-20 ZERO TOLERANCE MENU/ZERO TOLERANCE - - - - FIG. 4-21 ZERO TOLERANCE MENU/USE AUTO ZERO - - - - - FIG. 4-22 ZERO TOLERANCE MENU/AUTO ZERO TOLERANCE- FIG. 4-23 ZERO TOLERANCE MENU/ZERO REMINDER - - - - - FIG. 4-24 ZERO REMINDER MESSAGE - - - - - - - - - - - - - FIG. 4-25 TARE REMINDER MESSAGE - - - - - - - - - - - - - FIG. 4-26 SETUP MENU/AVERAGES - - - - - - - - - - - - - - - FIG. 4-27 SETUP MENU/SCALE CAPACITY - - - - - - - - - - - FIG. 4-28 SETUP MENU/WAVERSAVER - - - - - - - - - - - - - FIG. 4-29 SETUP MENU/OPERATOR ID - - - - - - - - - - - - - FIG. 4-30 INSTRUMENT ID PARAMETER - - - - - - - - - - - - FIG. 4-31 INSTRUMENT ID MENU/CHEM 3 FILLER - - - - - - - FIG. 4-32 SETUP MENU/SERIAL PORT - - - - - - - - - - - - - FIG. 4-33 SERIAL PORT MENU/SCOREBOARD SETUP - - - - - FIG. 4-34 SERIAL PORT MENU/PRINTER SETUP - - - - - - - - FIG. 4-35 PORT SETUP MENU/BAUD RATE - - - - - - - - - - - FIG. 4-36 PRINTER PORT MENU/PARITY - - - - - - - - - - - - FIG. 4-37 PRINTER PORT MENU/DATA BITS - - - - - - - - - - FIG. 4-38 SETUP MENU/TARE LIMIT - - - - - - - - - - - - - - - FIG. 4-39 SETUP MENU/SET CLOCK- - - - - - - - - - - - - - - FIG. 4-40 CLOCK SETUP MENU/SET HOURS - - - - - - - - - - FIG. 4-41 CLOCK SETUP MENU/SET MONTH - - - - - - - - - - FIG. 4-42 CLOCK SETUP MENU/SET GMT - - - - - - - - - - - - FIG. 4-43 SETUP MENU/ETHERNET - - - - - - - - - - - - - - - FIG. 4-44 ETHERNET MENU/IP ADDRESS WITH DEFAULT
IP ADDRESS - - - - - - - - - - - - - - - - - - - - - - - - - - - FIG. 4-45 HARDY-LINK PARAMETER/SELECTING 11/SEC
OUTPUT - - - - - - - - - - - - - - - - - - - - - - - - - - - - - - FIG. 4-46 HARDY-LINK/SAVING PACKET OUTPUT - - - - - - - FIG. 4-47 WEIGHT CONTROLLER HOME PAGE/SELECTING
CONFIGURATION - - - - - - - - - - - - - - - - - - - - - - - - - FIG. 4-48 CONFIGURATION PAGE/SELECTING OPTIONS - - - - FIG. 4-49 CONFIGURATION/OPTIONS/SELECTING ANALOG
CHANNEL CONFIGURATION - - - - - - - - - - - - - - - - - - - FIG. 4-50 ANALOG CHANNEL CONFIGURATION PAGE - - - - - FIG. 4-51 CHAN 0 MODE/SELECTING 4-20 MILLIAMPS - - - - - FIG. 4-52 ANALOG CHANNEL CONFIGURATION (SLOT 0)/SAVING
SETTINGS - - - - - - - - - - - - - - - - - - - - - - - - - - - - - FIG. 4-53 CONFIGURATION-OPTIONS/SELECTING ANALOG
CHANNEL CONFIGURATION (SLOT 1) - - - - - - - - - - - - - - FIG. 4-54 ANALOG CHANNEL CONFIGURATION (SLOT 1)- - - - FIG. 4-55 CONFIGURATION PAGE/SELECTING MAPPING SETUP
FIG. 4-56 CONFIGURATION/MAPPING SETUP 1/SELECTING
DESTINATION/ANALOG OUT SLOT 0 - - - - - - - - - - - - - - - FIG. 4-57 MAPPING SETUP 1/SELECTING ANALOG OUTPUT
CHANNEL - - - - - - - - - - - - - - - - - - - - - - - - - - - - - FIG. 4-58 CURRENT MAPPINGS/PRESSING JUMP TO SOURCE
PAGE - - - - - - - - - - - - - - - - - - - - - - - - - - - - - - - -
- 24
- 24
- 25
- 25
- 25
- 25
- 26
- 26
- 27
- 27
- 27
- 27
- 27
- 27
- 28
- 28
- 29
- 29
- 29
- 30
- 30
- 30
- 30
- 30
- 31
- 31
- 31
- 31
- 32
- 32
- 32
- 32
- 34
- 34
- 35
- 35
- 35
- 35
- 36
- 36
- 36
- 36
- 37
- 37
- 37
- 37
- 38
- 38
II
III
Table of Illustrations
FIG. 4-59 MAPPING SETUP 1/OPENING LIST OF MAPPING
SYMBOLS - - - - - - - - - - - - - - - - - - - - - - - - - - - - - - FIG. 4-60 DICTIONARY OF MAPPING SYMBOLS - - - - - - - - - FIG. 4-61 CONFIGURATION/MAPPING SETUP 2 PAGE - - - - - - FIG. 4-62 MAPPING/SELECTING SOURCE/GROSS WT - - - - - - FIG. 4-63 PROCESS DATA/GROSS WT/CHANNEL 1 - - - - - - - - FIG. 4-64 DESTINATION AND SOURCE COMPLETE - - - - - - - - FIG. 4-65 GROSS WT MAPPED TO THE ANALOG OUTPUT
TABLE SLOT 0 - - - - - - - - - - - - - - - - - - - - - - - - - - - FIG. 4-66 WEIGHT CONTROLLER HOME PAGE/SELECTING
CONFIGURATION - - - - - - - - - - - - - - - - - - - - - - - - - - FIG. 4-67 CONFIGURATION PAGE/SELECTING INSTRUMENT
SETUP - - - - - - - - - - - - - - - - - - - - - - - - - - - - - - - FIG. 4-68 CONFIGURATION - INSTRUMENT SETUP WEIGHT
CONTROLLER PAGE - - - - - - - - - - - - - - - - - - - - - - - - FIG. 4-69 CONFIGURATION - INSTRUMENT SETUP WEIGHT
CONTROLLER PAGE/SELECTING CHANNEL - - - - - - - - - - - - FIG. 4-70 CONFIGURATION - INSTRUMENT SETUP WEIGHT
CONTROLLER PAGE/SETTING PARAMETERS - - - - - - - - - - - FIG. 4-71 CONFIGURATION - INSTRUMENT SETUP WEIGHT
CONTROLLER PAGE/SELECTING UNIT OF MEASURE - - - - - - - FIG. 4-72 CONFIGURATION - INSTRUMENT SETUP WEIGHT
CONTROLLER PAGE/SELECTING GRAD SIZE - - - - - - - - - - - FIG. 4-73 CONFIGURATION - INSTRUMENT SETUP WEIGHT
CONTROLLER PAGE/SELECTING DECIMAL POINT - - - - - - - - FIG. 4-74 SETTING THE TARE WEIGHT - - - - - - - - - - - - - - FIG. 4-75 HARDY-LINK PARAMETER/SELECTING 11/SEC OUTPUTFIG. 4-76 HARDY-LINK/SAVING PACKET OUTPUT - - - - - - - - FIG. 4-77 CONTROL-LINK PORT/SETTING PORT 1024 - - - - - - FIG. 4-78 SELECTING CERTIFICATION - - - - - - - - - - - - - - FIG. 4-79 CERTIFICATION MODE/SELECTING ON- - - - - - - - - FIG. 4-80 SERIAL PORT CONFIGURATION - - - - - - - - - - - - FIG. 4-81 CONFIGURING SERIAL PORT/PRINTER - SCOREBOARDFIG. 4-82 CONFIGURING SERIAL PORT/BAUD RATE - - - - - - - FIG. 4-83 CONFIGURING SERIAL PORT/PARITY - - - - - - - - - FIG. 4-84 CONFIGURING SERIAL PORT/SELECTING 7 OR 8 - - - FIG. 4-85 INSTRUMENT SETUP/SET DATE/SET CLOCK/SET
TIMEZONE - - - - - - - - - - - - - - - - - - - - - - - - - - - - - FIG. 4-86 SELECTING CHANNEL - - - - - - - - - - - - - - - - - FIG. 4-87 SELECTING OPTIONS - - - - - - - - - - - - - - - - - - FIG. 4-88 SELECTING RATE OF CHANGE - - - - - - - - - - - - - FIG. 4-89 RATE OF CHANGE, CH1/SETTING TIME MEASURE- - - FIG. 4-90 HI 3030 HOME PAGE/SELECTING CONFIGURATION - - FIG. 4-91 CONFIGURATION MENU/SELECTING OPTIONS - - - - FIG. 4-92 CONFIGURATION - OPTIONS/SELECTING
RATE-OF-CHANGE - - - - - - - - - - - - - - - - - - - - - - - - - FIG. 4-93 RATE OF CHANGE PAGE - - - - - - - - - - - - - - - - FIG. 4-94 RATE OF CHANGE/SELECTING TIME MEASURE - - - - FIG. 4-95 RATE OF CHANGE/ENTERING THE TIMEBASE VALUE - FIG. 4-96 OPTIONS MENU/DEVICENET - - - - - - - - - - - - - - FIG. 4-97 DEVICENET MENU/BAUD RATE - - - - - - - - - - - - - FIG. 4-98 DEVICENET MENU/NODE ADDRESS - - - - - - - - - - -
Chapter 5
38
38
38
39
39
39
39
39
40
40
40
40
41
41
41
42
42
42
42
42
43
43
43
43
43
44
44
44
45
45
45
45
45
46
46
46
46
47
47
47
Calibration - - - - - - - - - - - - - - - - - - - - - - - - - - - - - - 49
FIG. 5-1 PROPERLY INSTALLED LOAD CELL WITH NO BINDING - 49
FIG. 5-2 CONFIGURATION MENU/SELECTING SETUP - - - - - - - 50
HI 3030 Weight Controller
Service Manual
FIG. 5-3
FIG. 5-4
FIG. 5-5
FIG. 5-6
FIG. 5-7
FIG. 5-8
FIG. 5-9
FIG. 5-10
FIG. 5-11
FIG. 5-12
FIG. 5-13
FIG. 5-14
FIG. 5-15
FIG. 5-16
FIG. 5-17
FIG. 5-18
FIG. 5-19
FIG. 5-20
FIG. 5-21
FIG. 5-22
FIG. 5-23
FIG. 5-24
FIG. 5-25
FIG. 5-26
FIG. 5-27
FIG. 5-28
Chapter 6
CALIBRATION MENU/C2 CAL - - - - - - - - - CALIBRATION/SENSOR TYPE - - - - - - - - - C2 CALIBRATION SUB-MENU - - - - - - - - - ENTERING THE REFERENCE POINT - - - - - GRAVITY CORRECTION FACTOR - - - - - - - GRAVITY/CLEARING ENTRY - - - - - - - - - GRAVITY CORRECTION FACTOR/MEXICO CITY
C2 CALIBRATION - - - - - - - - - - - - - - - CONFIGURATION MENU/SELECTING SETUP - CONFIGURATION PAGE - - - - - - - - - - - - C2 CALIBRATION SUB-MENU - - - - - - - - - CALIBRATION/SELECTING SENSOR TYPE - - CALIBRATION/ENTERING REFERENCE WEIGHT
CAL COMPLETED OK - - - - - - - - - - - - - CONFIGURATION MENU/CALIBRATION - - - - CALIBRATION MENU - - - - - - - - - - - - - CALIBRATION/TRADITIONAL - - - - - - - - - TRADITIONAL CALIBRATION/ZERO VALUE - - DO TRADITIONAL CALIBRATION/ZERO - - - - TRADITIONAL CALIBRATION/SPAN VALUE - - TRADITIONAL CALIBRATION/SPAN - - - - - - CONFIGURATION MENU/SELECTING SETUP - CONFIGURATION PAGE - - - - - - - - - - - - CALIBRATION SUB-MENU - - - - - - - - - - - CAL LOW COMPLETED OK - - - - - - - - - - CAL HIGH COMPLETED OK - - - - - - - - - - -
-
-
-
-
- 50
- 50
- 50
- 50
- 51
- 51
- 51
- 51
- 52
- 52
- 52
- 52
- 53
- 53
- 53
- 53
- 54
- 54
- 54
- 54
- 54
- 55
- 55
- 55
- 55
- 56
Mapping - - - - - - - - - - - - - - - - - - - - - - - - - - - - - - FIG. 6-1 SELECTING CONFIGURATION ON HOME PAGE - - - FIG. 6-2 SELECTING MAPPING SETUP - - - - - - - - - - - - - FIG. 6-3 CONFIGURATION MAPPING SETUP 1/SELECTING A
DESTINATION - - - - - - - - - - - - - - - - - - - - - - - - - - - FIG. 6-4 LOCAL OUTPUT/SELECTING OUTPUT RELAY #1 - - - FIG. 6-5 OUTPUT RELAY #1 ADDRESS HO0.0 - - - - - - - - - FIG. 6-6 CONFIGURATION - MAPPING SETUP 2 - - - - - - - - FIG. 6-7 CONTROL PULL DOWN MENU/SELECTING SETPOINT
OUTPUT #1 - - - - - - - - - - - - - - - - - - - - - - - - - - - - FIG. 6-8 CONTROL MENU/ENTERING SETPOINT OUTPUT - - FIG. 6-9 MAPPED SETPOINT OUTPUT #1 TO OUTPUT RELAY #1
FIG. 6-10 DESTINATION/TARE - - - - - - - - - - - - - - - - - - FIG. 6-11 TARE (HO1.1) SELECTED AS A DESTINATION - - - - FIG. 6-12 CONFIGURATION - MAPPING SETUP #2 PAGE/
SELECTING LOCAL 3PUT #4 AS THE SOURCE - - - - - - - - - - FIG. 6-13 COMPLETED ASSIGNMENT STATEMENT - - - - - - - FIG. 6-14 INPUT CONTACT #4 MAPPED TO TARE - - - - - - - - FIG. 6-15 MAPPING SETUP #1 PAGE/SELECTING OUTPUT
RELAY #3 - - - - - - - - - - - - - - - - - - - - - - - - - - - - - FIG. 6-16 OUTPUT RELAY #3 (HO0.2) ENTERED IN THE
ASSIGNMENT STATEMENT AS A DESTINATION - - - - - - - - - FIG. 6-17 ALARMS/SELECTING OVERFILL ALARM - - - - - - - FIG. 6-18 SETPOINT #1 (HFO.9) ENTERED IN THE MAPPING
ASSIGNMENT STATEMENT - - - - - - - - - - - - - - - - - - - - FIG. 6-19 SETPOINTS/SELECTING SETPOINT WT SOURCE # - FIG. 6-20 SETPOINT WT SOURCE #1 (HFO10) ADDED AS
THE SECOND SOURCE TO THE ASSIGNMENT
STATEMENT - - - - - - - - - - - - - - - - - - - - - - - - - - - FIG. 6-21 MULTIPLE SOURCE MAP - - - - - - - - - - - - - - - -
- 57
- 57
- 57
- 57
- 58
- 58
- 59
- 69
- 60
- 60
- 60
- 60
- 60
- 60
- 61
- 61
- 61
- 61
- 61
- 262
- 62
- 62
IV
V
Table of Illustrations
FIG. 6-22 NETWORK/SELECTING DEVICENET BOOLEAN OUT - FIG. 6-23 DEVICENET BOOLEAN OUT (DO2.3) SET AS
DESTINATION - - - - - - - - - - - - - - - - - - - - - - - - - - - FIG. 6-24 PROCESS DATA/SELECTING GROSS WEIGHT
CHANNEL 1 - - - - - - - - - - - - - - - - - - - - - - - - - - - - FIG. 6-25 ASSIGNMENT STATEMENT MAPPING GROSS
WEIGHT, CHANNEL #1 (HF14) TO DEVICENET
INT OUT (DO2.3) - - - - - - - - - - - - - - - - - - - - - - - - - FIG. 6-26 SIMPLE NETWORK MAP/GROSS WEIGHT TO
DEVICENET BOOLEAN OUT - - - - - - - - - - - - - - - - - - - FIG. 6-27 LOCAL OUTPUT/SELECTING OUTPUT RELAY #2 - - - FIG. 6-28 OUTPUT RELAY #2 (HO0.1) SET AS DESTINATION - - FIG. 6-29 NETWORK/SELECTING DEVICENET BOOLEAN IN - - FIG. 6-30 ASSIGNMENT STATEMENT MAPPING DEVICENET
INT IN (DIO2) TO OUTPUT RELAY #2 (HO0.1)- - - - - - - - - - - FIG. 6-31 DEVICENET BOOLEAN IN CONNECTED TO OUTPUT
RELAY #2 OUT - - - - - - - - - - - - - - - - - - - - - - - - - - FIG. 6-32 INPUT FUNCTION - - - - - - - - - - - - - - - - - - - FIG. 6-33 OUTPUT FUNCTION - - - - - - - - - - - - - - - - - - FIG. 6-34 MAPPING SETPOINT 2 OUTPUT TO OUTPUT RELAY #1
FIG. 6-35 DEVICENET OUTPUT - - - - - - - - - - - - - - - - - FIG. 6-36 DEVICENET OUTPUT - - - - - - - - - - - - - - - - - FIG. 6-37 HARDY CONTROL LINK NETWORK MAPPING - - - - FIG. 6-38 WEIGHT CONTROLLER HOME PAGE/SELECTING
OPERATION- - - - - - - - - - - - - - - - - - - - - - - - - - - - FIG. 6-39 OPERATION PAGE/SELECTION DIAGNOSTICS - - - - FIG. 6-40 DIAGNOSTICS PAGE/SELECTING PARAMETERS- - - FIG. 6-41 LIST OF PARAMETER SETTINGS - - - - - - - - - - - FIG. 6-42 CONFIGURATION MENU/I/O MAPPING - - - - - - - - FIG. 6-43 BASIC I/O MAPPING/TARE SCALE 2- - - - - - - - - - FIG. 6-44 TARE SCALE 2/NOT MAPPED - - - - - - - - - - - - - FIG. 6-45 ITEM SELECTION MENU- - - - - - - - - - - - - - - - FIG. 6-46 ITEM SELECTION/INPUT 1- - - - - - - - - - - - - - - FIG. 6-47 TARE SCALE 2/SOURCE MAPPED - - - - - - - - - - FIG. 6-48 TARE SCALE 2 MAP INDICATION - - - - - - - - - - - FIG. 6-49 TARE SCALE 2/INPUT 1 - - - - - - - - - - - - - - - - FIG. 6-50 ITEM SELECTION/SELECTING NOT MAPPED - - - - - FIG. 6-51 OK TO FILL MENU/ITEM UNMAPPED - - - - - - - - - FIG. 6-52 BASIC I/O MAPPING/TARE SCALE 2 UNMAPPED - - - FIG. 6-53 HARDY CONTROL-LINK NETWORK CONNECTED
TO A CONTROLNET/DEVICENET/PROFIBUS NETWORK - - - - - Chapter 7
- 62
- 62
- 62
- 62
-
63
63
63
63
- 63
-
63
65
65
66
67
67
68
-
72
73
73
73
73
73
74
74
74
74
75
75
75
75
75
- 75
Troubleshooting - - - - - - - - - - - - - - - - - - - - - - - - - - FIG. 7-1 TEST AND DATA MENU/SELECTING DEVICE DATA LIST FIG. 7-2 TEST DATA DISPLAY/INSTRUMENT ID - MODEL
NUMBER - S/N - - - - - - - - - - - - - - - - - - - - - - - - - - - FIG. 7-3 TEST DATA DISPLAY/PROGRAM VERSION/PRINTER
BAUD RATE - - - - - - - - - - - - - - - - - - - - - - - - - - - - - FIG. 7-4 TEST DISPLAY/PRINTER PARITY - PRINTER
DATA BITS - IP ADDRESS- - - - - - - - - - - - - - - - - - - - - - FIG. 7-5 TEST DATA/DEVICENET ADDRESS - CHOOSE
SETPOINT - AMOUNT REQUIRED - - - - - - - - - - - - - - - - - FIG. 7-6 TEST DATA SETPT: 1/PREACT - DEAD BAND - LAST
CAL TYPE - - - - - - - - - - - - - - - - - - - - - - - - - - - - - - FIG. 7-7 TEST DATA/LAST CALIBRATION TIME - - - - - - - - - FIG. 7-8 TEST DATA/LAST CALIBRATION DAY/MONTH/YEAR - - FIG. 7-9 TEST DISPLAY/CALIBRATOR - UNITS - WAVERSAVER® -
77
97
97
97
98
98
98
99
99
99
HI 3030 Weight Controller
Service Manual
FIG. 7-10 TEST DATA DISPLAY/GRADUATION SIZE - ZERO
VALUE - SPAN VALUE- - - - - - - - - - - - - - - - - - - - - - - - - 99
FIG. 7-11 TEST DATA DISPLAY/ZERO COUNT - SPAN
COUNT - C2 SENSITIVITY - - - - - - - - - - - - - - - - - - - - - - - 100
FIG. 7-12 TEST DATA DISPLAY/SCALE CAPACITY - ZERO
TOLERANCE - AUTO ZERO TOLERANCE - - - - - - - - - - - - - - - 100
FIG. 7-13 TEST DATA DISPLAY/MOTION TOLERANCE AVERAGES - NUMBER OF SENSORS- - - - - - - - - - - - - - - - - 101
FIG. 7-14 TEST DATA/AVERAGES - NUMBER OF SENSORS LOAD SENSOR - - - - - - - - - - - - - - - - - - - - - - - - - - - - 101
FIG. 7-15 LOAD SENSOR DISPLAY/SERIAL NUMBER CAPACITY - SENSITIVITY (MV/V) - - - - - - - - - - - - - - - - - - - 101
FIG. 7-16 SENSITIVITY - INPUT RESISTANCE - OUTPUT
RESISTANCE - - - - - - - - - - - - - - - - - - - - - - - - - - - - - 102
FIG. 7-17 TEST AND DATA MENU - - - - - - - - - - - - - - - - - - 102
FIG. 7-18 SUMMARY DISPLAY/SELECTING SCALE NUMBER 1 - - - 102
FIG. 7-19 TEST AND DATA MENU/SELECTING DIAGNOSTICS - - - 102
FIG. 7-20 DIAGNOSTICS DISPLAY/SELECTING VOLTAGE &
WEIGHT - - - - - - - - - - - - - - - - - - - - - - - - - - - - - - - - 102
FIG. 7-21 DIAGNOSTICS DISPLAY/VOLTAGE & WEIGHT
TESTING DISPLAY - - - - - - - - - - - - - - - - - - - - - - - - - - 102
FIG. 7-22 SCALE #1 WITH TOTALS DISPLAYED - - - - - - - - - - - 103
FIG. 7-23 SCALE #1 WITH TOTALS DISPLAYED AND HI 215IT
JUNCTION BOX CONNECTED - - - - - - - - - - - - - - - - - - - - 103
FIG. 7-24 SCALE 1/INDIVIDUAL MILLIVOLT DISPLAY 1 - - - - - - - 103
FIG. 7-25 SCALE 1/INDIVIDUAL MILLIVOLT DISPLAY 2 - - - - - - - 103
FIG. 7-26 SCALE #1 WITH TOTALS/MILLIVOLT/VOLT SELECTED - - 104
FIG. 7-27 SCALE 1/INDIVIDUAL MILLIVOLT/VOLT DISPLAY 1 - - - - 104
FIG. 7-28 SCALE 1/INDIVIDUAL MILLIVOLT/VOLT DISPLAY 2 - - - - 104
FIG. 7-29 SCALE #1 WITH TOTALS/WEIGHT (LB) SELECTED - - - - 104
FIG. 7-30 SCALE 1/INDIVIDUAL WEIGHT DISPLAY 1- - - - - - - - - 105
FIG. 7-31 SCALE 1/INDIVIDUAL WEIGHT DISPLAY 1- - - - - - - - - 105
FIG. 7-32 DIAGNOSTICS DISPLAY/SELECTING STABILITY TEST - - 105
FIG. 7-33 STABILITY TEST DISPLAY - - - - - - - - - - - - - - - - - 105
FIG. 7-34 SYSTEM STABILITY TEST DISPLAY/PASS - - - - - - - - 105
FIG. 7-35 DIAGNOSTICS DISPLAY/FACTORY DEFAULTS - - - - - - 106
FIG. 7-36 FACTORY DEFAULTS DISPLAY - - - - - - - - - - - - - - 106
FIG. 7-37 PLEASE WAIT DISPLAY - - - - - - - - - - - - - - - - - - 106
FIG. 7-38 SUMMARY DISPLAY - - - - - - - - - - - - - - - - - - - - 106
FIG. 7-39 DIAGNOSTICS DISPLAY/SELECTING RETURN TO
ZERO TEST - - - - - - - - - - - - - - - - - - - - - - - - - - - - - - 107
FIG. 7-40 RETURN TO ZERO TEST DISPLAY - - - - - - - - - - - - 107
FIG. 7-41 RETURN TO ZERO TEST/PASS - - - - - - - - - - - - - - 107
FIG. 7-42 RETURN TO ZERO/FAIL - - - - - - - - - - - - - - - - - - 107
FIG. 7-43 DIAGNOSTICS/VIEW INPUT STATES - - - - - - - - - - - 107
FIG. 7-44 INPUT STATES DISPLAY/INPUT 2 AND 4 ACTIVE - - - - - 107
FIG. 7-45 DIAGNOSTICS DISPLAY/FORCE OUTPUTS - - - - - - - - 108
FIG. 7-46 OUTPUT RELAY DISPLAY/SELECTING OUTPUT
RELAY #1 - - - - - - - - - - - - - - - - - - - - - - - - - - - - - - - 108
FIG. 7-47 OUTPUT RELAY DISPLAY/SELECTING OUTPUT
RELAY #2 - - - - - - - - - - - - - - - - - - - - - - - - - - - - - - - 108
FIG. 7-48 OUTPUT RELAY #1 FORCED CLOSED DISPLAY - - - - - 108
FIG. 7-49 HOME PAGE/SELECTING OPERATION - - - - - - - - - - 109
FIG. 7-50 OPERATION - CHOOSE ONE/SELECTING DIAGNOSTICS- 109
FIG. 7-51 OPERATION - DIAGNOSTICS - - - - - - - - - - - - - - - 109
FIG. 7-52 OPERATION - DIAGNOSTICS/SELECTING WEIGHT
AND VOLTAGE - - - - - - - - - - - - - - - - - - - - - - - - - - - - 109
VI
VII
Table of Illustrations
FIG. 7-53
PAGE - FIG. 7-54
FIG. 7-55
FIG. 7-56
FIG. 7-58
OPERATION/DIAGNOSTICS - WEIGHT & VOLTAGE
- - - - - - - - - - - - - - - - - - - - - - - - - - - - - IT J-BOX DIAGNOSTICS WEIGHT AND VOLTAGE PAGE
SET FACTORY DEFAULTS - - - - - - - - - - - - - - TYPICAL LOAD CELL SYSTEM - - - - - - - - - - - - SCR SWITCHING LOAD CIRCUIT - - - - - - - - - - - -
-
110
110
110
111
112
HI 3030 Weight Controller
Service Manual
VIII
1
CHAPTER 1
Overview
CHAPTER 1: OVERVIEW
General Introduction to the Hardy HI 3030
Service Manual
This Service Manual provides the Technician with a complete description of installation, setup and troubleshooting
procedures for the HI 3030 Weight Controller. To get the
maximum service life from this product, technicians should
use this instrument in accordance with recommended practices either implied or expressed in this manual. Before using
the Weight Controller all service personnel should read and
understand all cautions, warnings, and safety procedures,
referenced or explicitly stated in this manual, to insure the
safe operation and repair of this instrument. Hardy sincerely
appreciates your business. We encourage input about the performance and operation of our products from our customers.
Should you not understand any information in this manual or
experience any problems with this product, please contact
our Technical Support Department at:
monitoring instruments. The Weight Controller instrument is
available as an HI 3030, a stand alone controller with a display (4 lines; 20 characters) and key pad or an HI 3030R,
blind remote stand-alone controller, swivel mounted with no
display.
The HI 3030 Weight Controller is a flexible, world-class
weight controller that can monitor and control up to four
scales simultaneously. In addition to the control functions,
the HI 3030 can function as a front end to a PLC, PC or DCS
system for applications such as leveling, batching, filling,
dispensing, check weighing or as a stand alone weigh controller or weight monitor. The HI 3030 Weight Controller
contains Hardy Instrument’s core features:
•
•
Phone: (858) 278-2900
FAX: (858) 278-6700
E-Mail:
•
•
[email protected]
[email protected]
Or visit our web site at:
http://www.hardyinst.com
Our web site is full of useful information about our products,
process weighing and vibration analysis applications. You
can also update the Weight Controller Manual. The latest
revised manuals are available FREE in the Support Section
of our Web Site. While you’re on the site feel free to visit the
other web pages which can provide answers to your questions about, load points, process weighing, or other Hardy
instruments. Be sure to sign up for the Hardy Newsletter to
get the latest information on all Hardy products and services.
For answers to technical issues and service problems check
the Hardy Web Tech on our Hardy Web Site. Most problems
can be resolved by the Hardy Web Tech, 365 days a year, 24
hours a day 7 days a week. You can still contact a technician
by phone during our operating hours if necessary.
There are several processes that are the same for each of the
HI 3000 Series instruments. If you do not find the process
you are looking for in this manual it is located in the HI 3000
User’s Guide. Please check there for Communication, Network, installation and setup procedures.
Description
The Hardy Weight Controller controller is part of a complete
line of application specific process weighing and condition
•
WAVERSAVER® - Eliminates the effects
of vibration on the scale.
C2® Electronic Calibration - Calibration
without test weights.
SMM (Secure Memory Module) - Memory for manual transfer of configuration
data to another HI 3030 instrument(s).
All of Hardy’s 3000 Series instrumentation is loaded with
standard features like a selectable 10/100 BaseT Ethernet
port and an embedded web server to link performance diagnostics and setup data to and from your local Intranet,
Extranet, VPN or via the Internet (World Wide Web). An
optional Devicenet interface allows multiple applications to
be viewed and controlled from one display and allows 3rd
party I/O to be easily added to the system. Mapped I/O saves
you wiring costs by distributing the I/O where you need it at
the process or in the control room. The controllers act as
“Masters” over optional Devicenet communications and
interfaces for Allen-Bradley Remote I/O, Profibus, ControlNet and Analog provide communications to PLC® and DCS
systems.
NOTE:
PLC® is a registered trademark of the AllenBradley Corporation.
The HI 3030’s INTEGRATED TECHNICIAN™, in conjunction with an IT Junction Box, provides built-in system diagnostics that allow you to troubleshoot and diagnose your
weighing system right from the front panel or from your
Web Site. INTEGRATED TECHNICIAN enables you to
read individual load sensor voltages and weights, make comparisons, and isolate individual system components for quick
and easy troubleshooting.
NOTE:
INTEGRATED TECHNICIAN® is a registered
trademark of Hardy Instruments.
HI-3030 Weight Controller
Service Manual
Typical Applications
•
•
•
•
•
•
Filling a Vessel Using a Feeder - Filling is
the adding (gain-in-weight) of a material
into a container on a scale. (See Fig. 1-1)
Sequential Batch Control - A gain-inweight application where multiple ingredients are added one at a time into a single
weight hopper. (See Fig. 1-2)
Level Monitoring - Maintaining material
levels in various vessels. (See Fig. 1-3)
Dispensing A Vessel - Dispensing is the
adding of a material by (loss-in-weight)
from a vessel on a scale to a container
which is off the scale. (See Fig. 1-4)
Check Weighing - Comparing a weight
against limits to determine if the weight is
within preset limits.
Weight Control or weight monitoring.
Liquid
Dry
Powder
Granular
Feeder
Elevator
Auger
Bulk
Load
Cells
Weighing
Instrument
D is ch a r g e
R e lay
Mixer
Discharge
Gate
FIG. 1-2 SEQUENTIAL BATCH CONTROL
Refill
Gate
High Level (Prox)
Feeder
(Fast & Slow Speed)
Low Level (Prox)
Scale
Load Points
FIG. 1-1 FILLING A VESSEL USING A FEEDER
Weight
Controller
FIG. 1-3 LEVEL MONITORING
2
3
CHAPTER 1
Overview
are important and will help us shape the future direction of
our products.
Load Point
Load Point
Dispense Gate
Target Weight
Connectivity
All HI 3000 Series products enable the user to use the selectable 10/100 base T Ethernet port or use its embedded web
server to link (Hardy Control-Link Network) performance,
diagnostics and setup data to and from your intranet,
extranet, VPN or the internet. Receive alarms via e-mail or
over WAP enabled devices including cellular phones and
PDAs. A DeviceNet interface allows multiple applications
to be viewed and controlled from a display and additional
3rd party I/O to be easily added to the weigh process control
system. The controller has a single RS-232 serial port configured as a printer port.
Mapped I/O
Discharge Gate
FIG. 1-4 DISPENSING (LOSS-IN-WEIGHT) FROM A
VESSEL TO ANOTHER VESSEL
Hardy Web Tech
Mapped I/O saves wiring costs by distributing the I/O where
you need it, at the process or in the control room. The controller is a DeviceNet Scanner and the DeviceNet Scan table
is configured using RS NetWorx®. Optional interfaces for
Allen-Bradley Remote I/O, Profibus and Analog provide
communications to PLC and DCS systems. For Installation
and Configuration instructions for Ethernet, Remote I/O,
DeviceNet and ControlNet, please refer to the HI 3000 Operation and Installation Manual, Communications/Cabling/
Network Chapters.
WAVERSAVER®
We have implemented Hardy Web Tech, our Online Tech
Support Knowledge Base, to serve your tech support needs
better than ever before. Hardy Web Tech helps you immediately find answers to your technical questions. Just type in
your question and see if your answer exists in our knowledgebase, which is populated by interactions with customers
like you.
You can also create your personalized support page, and
your own support section that you can access 24/7. You can
even view and update your entire call history, as well as
maintain your profile containing your product and system
information, so we can more effectively meet your needs.
Last, but not least, we invite all user feedback. Click on the
"Provide Feedback" link to let us know how we're doing!
What do you like about the product? What's missing? How
do you like our new support site? Anything! Your comments
Typically, mechanical noise (from other machinery in a plant
environment) is present in forces larger than the weight
forces trying to be detected. The HI 3030 is fitted with
WAVERSAVER® technology which eliminates the effects of
vibratory forces present in all industrial weight control and
measurement applications. By eliminating the factor of
vibratory forces the controller is capable of identifying the
actual weight data. WAVERSAVER® can be configured
from the front panel to ignore noise with frequencies as low
as 0.25 Hz. One of four higher additional cut off frequencies
may be selected to provide a faster instrument response time.
The default factory configuration is 0.50 Hz vibration frequency immunity.
C2® Calibration
C2® Second Generation Calibration enables a scale system
to be calibrated electronically without using certified test
weights which equals the systems load capacity. A C2
weighing system consists of up to eight load sensors, a junction box, interconnect cable and an instrument with C2 capabilities, such as the Weight Controller. All Hardy
Instruments C2 certified load sensors contain digital information detailing its unique performance characteristics. The
Hardy Weight Controller reads the performance characteristics of each individual load sensor and detects the quantity of
HI-3030 Weight Controller
Service Manual
load sensors in the system. Calibration is performed by simply adding a reference point from the front panelor via the
Web Server. The reference can be zero (no weight on the
scale) or alternatively, a known weight on the scale. The
instrument is capable of performing traditional calibration
such as with the use of certified test weights.
option is required when products are to be directly sold
based on weight readings of the scale. It is not available on
the blind remote version.
Mounting Options
•
NOTE:
WAVERSAVER®
C2®
IT®
,
, and
are registered
trademarks of Hardy Instruments Inc.
•
•
INTEGRATED TECHNICIAN™ (IT®)
The HI 3030 has a built in diagnostics utility which enables
the operator to rapidly troubleshoot a weighing system from
the front panel of the controller or via the Web Browser.
Simply press the Test/9 button and scroll through several
tests that will furnish the current state of each of the parameters that concern your application and the weigh system.
Help is just a click away in the event you should not understand the information on the display or need a description of
the parameter.
•
•
•
•
•
•
NIST/NTEP Option (-NTEP)
The HI 3030 is approved for National Institute of Standards
and Technology (NIST) applications formally called the
National Bureau of Standards (NBS), and certified under the
National Type Evaluation Program (NTEP) for up to 10,000
counts when the NIST mode is activated. This option is
required when products are to be directly sold based on
weight readings of the scale. For price, availability and
installation instructions, please contact your local Hardy
Representative or the Hardy Instruments Service Center.
NOTE:
The NTEP Option requires HI 3030 Firmware
version 2.8.00.00 or above.
•
•
•
•
-LC Single Scale Single Load Cell or
Summed Load Cell Input
-2S Dual Scale Input
-4S Four Scale Input
-JB Four Load Cell Input (Single Scale)
- Enables the instrument to sum four load
sensor inputs to act as a built-in summing
box.
Rate of Change Option
The ROC option measures and displays the rate at which a
material enters or is dispensed from the scale over a period
of time. To develop ROC data, a register is used that is 21
entries in length. New weight values are written to the register at the rate of 1/20th of the time base. The first register is
subtracted from the 21st Register. The 21st register is one
time base older than the 1st register. The time frame can be
set to units per second, minute or hour. A time base of discrete values is selectable from 1 to 1800.
Peripherals/System Components
C2 Cable
•
-CWM
The HI 3030 is approved for Measurement Canada, Canada
Weights and Measures Class III / III HD (3000 d). This
-AC 120/240 VAC with NO Output
relays
-AA 120/240 VAC with AC Output
Relays
-AD 120/240 VAC with DC Output
Relays
-DA 12-24 VDC with AC Output Relays
-DD 12-24 VDC with DC Output Relays
-DC 12-24 VDC with DC NO Output
Relays
Sensor Input Options
Serial Port
One standard RS 232 serial port which can be configured to
transmit weight data to a serial printer. Baud rates are user
selectable at 600, 1200, 2400, 4800, 9600 or 19,200.
-PM Panel Mount includes mounting
frame and Gasket.
-SA Stand alone which includes keyboard and 4x20 LCD display.
-MB Swivel mounted which includes
bracket and hardware.
Power Supply Options
Secure Memory Module (SMM)
The Secure Memory Module stores critical configuration (up
to 12 material configurations), calibration and setup data of
the HI 3030 Weight Controller, thereby protecting this information from corruption. During system operation when a
new parameter is entered, the SMM automatically updates
the value in its memory. Data stored in one HI 3030 can be
restored in another HI 3030 by physically transferring the
SMM to the new instrument. The SMM is conveniently
accessible from the instruments rear panel.
4
C2 Certified Load Cell Cable
5
CHAPTER 1
Overview
ADVANTAGE® Load Points
•
Refer to the Hardy Instruments Load Point
Selection Guide.
Platform and Floor Scale Bases
•
Refer to the Hardy Instruments Load Point
Selection Guide.
HI 215JB Series Junction Boxes
•
Refer to the Hardy Instruments Load Point
Selection Guide.
HI 215IT Series Junction Boxes
•
Refer to the Hardy Instruments Load Point
Selection Guide.
ACCESSORIES
HI 3000-RC (NEMA 4/4X Rear Cap)
Rear cap for the HI 3000 Series controllers. Upgrades the
entire assembly to a NEMA 4/4X rating by enclosing all the
rear panel connectors. Includes 2 cable grips.
HI 3000-MB
Swivel mount, includes bracket and hardware.
HI 3000-GF
Front gasket for the panel mount.
HI 3000-CD
EtherNet/IP™
EtherNet/IP, short for Ethernet Industrial Protocol, is an
open industrial networking standard that takes advantage of
commercial, off-the-shelf Ethernet communication chips and
media. Ethernet technology, enables the user to access
device-level data from the Internet.The Ethernet/IP networking standard supports both implicit messaging (real-time I/O
messaging) and explicit messaging (message exchange).
EtherNet/IP is an open network that takes advantage of commercial technology that already exists.
TCP/IP is the transport and network layer protocol of the
Internet and is commonly linked with all Ethernet installations and the business world. TCP/IP provides a set of services that any two devices can use to share data. Because
Ethernet technology and standard protocol suites such as
TCP/IP have been published for public use, standardized
software tools and physical media have been mass-produced
and are readily available, offering you the benefits of known
technology and accessibility. The UDP/IP (User Datagram
Protocol) is also used in conjunction with the Ethernet network. UDP/IP provides fast, efficient data transport required
for real-time data exchange.
Analog Output (-4AN)
The Analog Output Option enables the transmission of
Gross, Net, or Total weight as 0-5 VDC, 0-10 VDC, 0-20
mA or 4-20 mA (or the reverse of these), and makes it possible to span these ranges over a portion of the weight data.
Two analog option boards can be installed in each instrument. both voltage and current data are available simultaneously.
MOD-Bus/TPC/IP
Replacement or Additional CD’s.
HI 3000-TM
Technical Manual (printed).
HI 3000-OM
Operators Manual (printed).
Communication Options
NOTE:
devices such as sensors, push buttons, motor starters, simple
operator interfaces, drives and other weigh modules.
For Installation, Configuration and Setup please
refer to the HI 3000 Operation and Installation
Manual, Cabling and Networks Sections.
DeviceNet
The DeviceNet Network is an open, global industry-standard
communication network designed to provide an interface
through a single cable from a programmable controller or PC
directly to all HI 3000 Series instruments as well as smart
TCP/IP is the common transport protocol of the Internet and
is actually a set of layered protocols, providing a reliable
data transport mechanism between machines. Ethernet has
become the de facto standard of corporate enterprise systems
and it has also become the de facto standard for factory networking. Ethernet has matured to the point that the cost of
implementing this network solution has been dropping to
where its cost is commensurate with those of today's fieldbuses. Using Ethernet TCP/IP in the factory allows true integration with the corporate Intranet and MES systems that
support your factory.
OPC
OLE for Process Control (OPC) enables an HI 3000 module
to communicate with any device that supports OLE/COM.
The architecture is designed to utilize the Microsoft distributed OLE technology (DCOM) to facilitate clients interfacing to remote servers.
HI-3030 Weight Controller
Service Manual
Remote I/O (RIO) Interface to the Allen Bradley Network
The RIO port allows bi-directional communications with
Allen-Bradley Programmable Logic Controllers (PLC) and
Small Logic Controllers (SLC). The HI 3010 represents a
selectable 1/4, 1/2, 3/4 or full rack of discrete I/O (32 bits in
the Logic Controllers output and input image files) to the
PLC Controller and supports both discrete and block transfers of data. It can support up to 230.4 Kbaud transfer rates.
ControlNet Option
ControlNet is an open network protocol used in industrial automation applications for linking an HI 4050 to
any ControlNet-capable device (such as PLCs)Profibus
Allows bi-directional communications to Profibus (Process
Fieldbus) products including those made by Siemens, GE
Fanuc and Texas Instruments. This interface supports PROFIBUS-DP (Decentralized Periphery) and processes both
Selectable Predetermined and Block transfer commands. It
supports up to 12 Mbaud transfer rates.
Analog Output (2AN)
The–2AN option provides two independent Analog Outputs
per option card which can be configured from the front panel
or the embedded web server. This option allows the transmission of Gross, Net, Optional ROC or “mapped” Total
weight as 0-5V, 0-10V and 0-20mA or 4-20mA (or the
reverse of these) simultaneous, and makes it possible to span
these ranges over a portion of the weight data. All parameters can be mapped to these Analog outputs. All the outputs
can be assigned (mapped) to one channel or spread over multiple channels all independent of each other.
You can install up to two –2AN options in one controller.
When you install two –2AN options, the only other available
communication option is DeviceNet, which does not use an
option slot. A single –2AN option can be combined with
any of the other available network interface which takes up
an option slot.
NOTE:
When you install the RIO or ControlNet communication options, you must install the Analog 2AN
option card in the lower Option Slot.
6
7
CHAPTER 2
Specifications
CHAPTER 2: SPECIFICATIONS
About Chapter 2
Chapter 2 lists the specifications for the HI 3030 Weight
Controller. Specifications are listed for the standard instrument and for instruments fitted with optional equipment. The
specifications listed are designed to assist in the installation,
operation and troubleshooting of the instrument. Service personnel should be familiar with this section before attempting
an installation or repair of the instrument.
Non-Linearity:
•
0.0015% of Full Scale
•
•
4 line x 20 character backlit LCD
5 x 7 dot matrix
Display:
Display Increments (Graduations):
Specifications for a Standard Instrument
Number of Channels:
•
•
•
4 Channels
Update Rate:
•
55 updates per second
Resolution:
•
•
Displayed: 1:985,000 (3 mV/V load cells)
Internal 1:1,048,5761
Excitation Voltage:
•
•
5 VDC
Drives up to 16 350 ohm load cells
•
1 to 250 - Sliding, User Selectable in Single Unit Increments
•
Up to sixteen (16) 350 ohm Full Wheatstone Bridge, Strain Gauge Load Sensors/
Cells (5 volt excitation) on one vessel.
1,2,5,10,20,50,100,200,500, 1000 user
selectable
Corresponding weight is dependent on the
decimal point location.
Standard Opto 22 Electronic AC Relays:
• Switch Voltage: 24-240 VAC
• Wire Size: 12 AWG Maximum
•
Maximum Switch Current: .5 Amps
•
Single Cycle Surge: 85 Amps (Peak)
Standard Opto 22 Electronic DC Relays:
• Switch Voltage: 5-60 VDC
• Wire Size: 12 AWG Maximum
• Maximum Switch Current: .5 Amps
• 1 second surge: 5 Amps
WAVERSAVER®:
Averages:
Input:
•
Signal Voltage Range 0-120 mV/V (± 600
millivolts.
•
Up to 4 LVDT Load Sensors, (1 load sensor per channel)
WARNING: BECAUSE THE LVDT LOAD SENSORS ARE A
1 LOAD SENSOR PER CHANNEL. NOT TO DO SO MAY CAUSE PROPERTY DAMAGE AND/
OR PERSONAL INJURY.
VOLTAGE SOURCE, ONLY USE
CAUTION: LVDT LOAD SENSORS ARE NOT RATED FOR
WASHDOWN APPLICATIONS. THE LOAD SENSORS ARE NOT
HERMETICALLY SEALED AND WILL LEAK CAUSING INCOR-
•
•
•
•
•
•
OFF
7.5 Hz
3.5 Hz
1.0 Hz
0.5 Hz
0.25 Hz
Calibration Techniques:
•
•
C2® - Second Generation: Electronic
Traditional - Calibration with test weights
Standard Interfaces:
•
•
•
•
•
Ethernet - 10/100 Base T; embedded
server
DeviceNet - Master Scanner
ControlNet - Master Scanner
Profibus - Master Scanner
Serial RS 232 - simplex to Printer.
Power and Utility Requirements:
RECT WEIGHT READINGS AND INTERNAL CORROSION OF
THE COILS.
Voltage - Universal Power Supply (50/60 Hz)
HI 3030 Weight Controller
Service Manual
•
•
120-240 VAC ± 10%
12 - 24 VDC
8
Physical Characteristics:
Panel Mount (Model # HI 3030-PM)
Frequency
Depth
•
47-63 Hz
•
Total Power:
•
25 Watts maximum with options
Case Dimensions
Watts available for DeviceNet Power:
•
•
Front Panel Dimensions
•
± 2.5 VDC
Common Mode Rejection:
•
100dB @ 50-60Hz
Environmental Requirements:
Operating Temperature Range:
7.686" H x 9.40" W x 0.625" D
(195.22mm H x 247.39mm W x
15.87mmD)
Panel Cutout Dimensions
•
•
6.125"H x 8.56"W x 6.03"D (155.57mmH
x 217.42mmW x 1.53.16mmD)
15 Watts
Common Mode Voltage Range
•
8.03" (203.96mm) Back of the Bezel to
rear cable clearance.
6.75" H x 8.94" W (1775mm H x 227mm
W)
Case Material
-10º to 50º C (14º to 122º F)
•
GE Cycolac Type KJW - Flame Retardant
ABS (Acrylanitrile Butadiene Styrene)
•
4.6 pounds (2.1 Kilograms)
•
Front Panel NEMA 4 Seal
Storage Temperature Range:
Weight
•
-20º to70º C (-4º to 158º F)
Temperature Coefficient:
Rating
•
Less than 0.005% of full scale per degree
C for zero and span.
Humidity Range:
•
0-90% (non-condensing)
Approvals:
Wall Mount (HI 3030-MB)
Base Dimensions
•
•
•
•
•
•
CE
UL
CUL
NTEP
CWM
Instrument Local I/O:
•
•
•
5 mappable inputs optically isolated
4 mappable outputs 48-240 VAC Opto 22
3rd party mappable over DeviceNet, ControlNet, Profibus
9.3” L x 4.0” W (236.22mm L x
101.60mm W)
Overall Height with HI 3030 installed, as measured
from the base to the top of the front plate.
•
11.77” High (298.96mm H)
Swivel Material
•
304 Stainless Steel
9
CHAPTER 2
Specifications
Specifications for I/O Option Boards
EtherNet/IP™ Option Card
Profibus Option Board
Power Supply:
Power Supply:
•
•
+5V max - 350mA
+5V max 450mA
Operating Temperature:
Operating Temperature:
•
0 - 70° C (32° - 158° F)
•
10/100 Mbit/s
•
2048 bytes
•
2048 bytes
Baud Rate:
•
0 - 70° C (32 - 158° F)
Profibus Services:
I/O Input:
•
DP Services
ID Number and GSD Support:
I/O Output:
•
1003H with Standard GSD File (May
change if required)
Input Size:
Application Interface:
•
0-122 Words
Output Size:
•
•
Parallel
Specification Rel. 2:
0-122 Words
•
EtherNet/IP level 2 I/O Server CIP (ControlNet & DeviceNet)
Combined Input and Output Size:
Functionality:
•
Not exceed 208 Words
ControlNet Option Board
Power Supply:
•
+5V max - 350mA
0 - 70° C (32° - 158°F)
ControlNet Baud Rate:
•
5 Mbit/second
Max I/O Data Capacity:
•
•
Input - 250 bytes
Output - 250 bytes
ControlNet Supported Features:
•
•
10/100Mbit MB/TCP +EtherNet/IP + IT
functions
Rate of Change Option
Operating Temperature:
•
•
Redundant Media
Cyclic Messaging
•
•
Selectable discrete value - 1 to 1800 seconds
Time Frame Units - second, minute, hour
HI 3030 Weight Controller
Service Manual
10
11
CHAPTER 3
Installation
CHAPTER 3: INSTALLATION
About Chapter 3
Mechanical Installation
All information contained in Chapter 3 pertains to unpacking, cabling, interconnecting and installing the HI 3030
Weight Controller. Alternatives to any specifications contained or implied in this section are not recommended. It is
very important that the user and service personnel be familiar with the procedures contained in this chapter, before
installing or operating the HI 3030 Weight Controller.
Installing the HI 3030 Weight Controller in a Panel
NOTE:
Ethernet and DeviceNet installation and setup
instructions are located in the HI 3000 Series
Operation and Installation Manual in the
Cabling Section. There are also installation
instructions in the Quick Installation Guide.
Panel Cutout Specifications
Enclosure Size Requirements:
•
•
Overall depth of the enclosure must be a
minimum of 8.5" to allow for the 2" clearance between the rear panel of the HI 3030
Weight Controller and the inside surface of
the rear panel of the enclosure. (See Fig. 3-1)
There must be a 1" clearance completely
around the bezel and other installed units.
Unpacking
Step 1. Before signing the packing slip, inspect the packing
for damage of any kind.
Step 2. Report any damage to the carrier company immediately.
Step 3. Check to see that everything in the package
matches the bill of lading. You should normally
have:
HI 3030 Panel Mount
•
•
•
(1) HI 3030 Weight Controller with mating
connectors and ordered options installed.
(1) Mounting Kit with a mounting bracket,
gasket and (4) RAF 8-32 captive screws.
CD containing User Guide and Service Manuals
Step 4. If any items are missing, damaged, or there are any
questions, please contact Customer Support at:
Hardy Process Solutions
9440 Carroll Park Drive
San Diego, CA 92121
Phone: (858) 278-2900
FAX: (858) 278-6700
Web Site: http//www.hardysolutions.com
E-Mail: [email protected]
Step 5. Record the model number and serial number of the
Weight Controller. Store in a convenient, secure
location for reference when contacting Hardy Customer Service Department or to buy parts or firmware upgrades.
FIG. 3-1 REAR PANEL CLEARANCE REQUIREMENT
Dimensions of the panel cutout. (See Fig. 3-2)
•
•
8.94” ±.06 (227.076mm ± 1.52mm) Wide
6.625” ±.06 (168.26mm ± 1.52mm) High
HI-3030 Weight Controller
Service Manual
12
CONTROLLER IS REMOVED FROM THE PANEL, RE INSTALL
WITH A NEW GASKET.
8.94" (227.076)
6.625" (168.26)
FIG. 3-2 PANEL CUTOUT DIMENSIONS
Installing the HI 3030 Weight Controller
Step 1. Make sure that all Electrostatic Discharge (ESD)
precautions are taken before and during installation.
Step 2. The Weight Controller comes with a NEMA 4 &
4X rated compression gasket. Slide the gasket over
the rear of the instrument until the gasket is flush
with the back side of the front panel. (See Fig. 3-3)
Panel Mount
Collar
W/Captive Screws
FIG. 3-4 NEMA 4 GASKET FLUSH AGAINST THE
FRONT PANEL OF THE ENCLOSURE
Panel Gasket
Enclosure
Front Panel
FIG. 3-3 PANEL MOUNT INSTALLATION
Step 5. Gently slide the Panel Mount Collar over the rear of
the instrument. (See Fig. 3-3)
Step 6. Push the captive screws through the holes in the
Enclosure Front Panel and install the screws into
the tapped holes on the instrument until the screws
are finger tight.
Step 7. Use a slotted head screwdriver and tighten each
screw until the instrument is snug and the compression gasket is tight against the Enclosure Front
Panel. DO NOT OVERTIGHTEN!
Step 8. The Panel Mount installation is complete.
Installing the HI 3030 in a Swivel/Wall Mount
Step 3. Gently slide the Weight Controller with the gasket
into the cutout in the enclosure front panel or door
until the gasket is flush with the enclosure front
panel. (See Fig. 3-4) Be sure to secure the instrument with both hands when installing.
Step 4. Line up the instrument’s tapped holes with the
through holes in the enclosure front panel.
CAUTION: ONCE THE GASKET IS COMPRESSED IT
SHOULD NOT BE USED AGAIN. WHENEVER THE WEIGHT
About the Swivel/Wall Mount
The swivel mounts allows the Weight Controller to mount on
a horizontal or vertical surface. The instrument is mounted in
the swivel which is fastened to a hard surface. The mount not
only supports the instrument but also allows the Weight Controller to rotate for a better view of the display and more convenient access to the front panel key board. The Swivel
Mount also serves as a wall mount. Simply rotate the swivel
mount 90 degrees and attach it to a wall. The swivel allows
13
CHAPTER 3
Installation
the instrument to rotate several degrees, even with cables
and rear cover attached.
Step 1. Use four (4) 1/4 x 20 hex head bolts to fasten the
swivel mount to a horizontal surface. (See Fig. 3-5)
Step 3. Screw the two (2) fastener knobs into the threaded
holes on each side of the Weight Controller until the
brackets are snug against the instrument. (See Figs.
3-6 & 3-7)
CAUTION: DO NOT OVERTIGHTEN.
Step 4. To rotate the instrument in the swivel mount, loosen
the two fastener knobs.
Step 5. Rotate the instrument to the position you want.
Step 6. Re-tighten the fastener knobs.
FIG. 3-5 INSTALLING THE SWIVEL MOUNT TO A
HORIZONTAL SURFACE
Step 2. Place the Weight Controller between the Swivel
Mount brackets so that the threaded holes in the
instrument are aligned with the slots in the Swivel
bracket. (See Fig. 3-6)
FIG. 3-7 WEIGHT CONTROLLER INSTALLED IN A
SWIVEL MOUNT
Step 7. Use four (4) 1/4 x 20 fasteners to fasten the swivel
mount to a vertical surface. (See Fig. 3-8)
FIG. 3-6 WEIGHT CONTROLLER INSTALLING IN A
SWIVEL MOUNT
HI-3030 Weight Controller
Service Manual
14
FIG. 3-8 INSTALLING THE SWIVEL MOUNT TO A
VERTICAL SURFACE
Step 8. Place the Weight Controller between the Swivel
Mount brackets so that the threaded holes in the
instrument are aligned with the slots in the Swivel
bracket. (See Fig. 3-9)
FIG. 3-10 WEIGHT CONTROLLER INSTALLED IN A
SWIVEL/WALL MOUNT
Installing Printed Circuit Boards
Step 1. From the back of the instrument, align the PCB
board with the housing slots in the instrument so
that the backplane connector is facing the instrument. (See Fig. 3-11)
FIG. 3-9 WEIGHT CONTROLLER INSTALLING IN A
SWIVEL WALL MOUNT
Step 9. Screw the two fastener knobs into the threaded
holes on each side of the Weight Controller until the
brackets are snug against the instrument. (See Figs.
3-9 & 3-10)
FIG. 3-11 MAIN CONTROLLER BOARD INSTALLATION/LINING UP BOARDS WITH THE SLOTS
Step 2. Gently slide the circuit board into the slots making
sure that the each side of the PC board is in the
proper slot. (See Fig. 3-12)
15
CHAPTER 3
Installation
FIG. 3-12 MAIN CONTROLLER BOARD INSTALLATION/SLIDING THE BOARD INTO THE INSTRUMENT
Step 3. Gently push the PC board all the way into the
instrument until the backplane connector is connected to the backplane.
Step 4. Install the Main Board rear plate. (See Fig. 3-13)
•
•
•
•
Place the Main Board rear plate so that the
threaded holes on each side of the instrument
chassis are aligned.
Screw a panhead screw (#4-40) into the
threaded hole on the instrument chassis. Do
not tighten.
Screw the panhead screws that attach the
rear plate to the Main Board until they are
finger tight.
Use a Phillips head screw driver and tighten
all the installed screws until snug.
CAUTION: DO NOT OVERTIGHTEN.
FIG. 3-13 MAIN CONTROLLER BOARD
INSTALLED WITH REAR PLATE
Step 5. Installation of all the PC Boards used in any HI
3000 Series Instrument requires the same procedures.
Network Option Card Installation
All Network Option Card installation instructions can be
found in the HI 3000 Manual which is located on the
Resource CD you received with your HI 3000 Series instrument. If you do not currently have the Resource CD or an HI
3000 manual go to the Hardy Instruments Web Site and
download a free copy.
Removing Printed Circuit Boards
Step 1. Unplug all the cables that are connected to the
instrument.
Step 2. Use a Phillips head screw driver and remove the
two (2) pan head screws that fasten the rear plate to
the instrument. You do not need to remove any of
the screws that fasten the rear panel to the PC
Board.
Step 3. Use your fingers to grasp the two (2) (knurled
knobs) that are mounted on the rear panels.
Step 4. Gently pull the knobs away from the instrument
until the PC Board is clear of the instrument slots.
Step 5. Store the circuit board in a secure and dry location,
free of any ESD.
HI-3030 Weight Controller
Service Manual
Electrical Installation
Cabling and Interconnecting
Recommended Installation Procedures
•
Carefully plan the cable runs and wiring connections before routing, cutting and trimming cables and wires.
CAUTION: INSTRUMENT POWER AND RELAY
WIRES SHOULD BE ROUTED AWAY FROM ALL
OTHER SIGNAL CABLES TO AVOID ELECTRICAL
INTERFERENCE.
16
Step 1. The HI 3000 Series instruments are configured with
a universal power supply rated from 120 to 240
VAC. The instruments can be powered by a 120 or
240 VAC power source and requires no switching
or jumper settings.
Step 2. Install a 3-wire, minimum 14 AWG power line to
the 3-pin terminal block connector. (See Fig. 3-14)
Step 3. The power and relay circuit card, filters and conditions AC power. However, for noisy power lines,
external conditioning may be required. For more
information, consult the HI 3000 Series Installation
and Service Manual or contact Hardy Instruments
Technical Support.
-DC Power Wiring
•
•
•
•
•
All cabling should be neatly bundled, tied,
and dressed.
Use a 6 inch service bend to relieve stress on
the connectors and to ease servicing the unit.
Make sure that all plugs are firmly in place.
Be sure to secure the power cord with the
two (2) captive screw-on clips.
All connections are made at the rear panel of
the Weight Controller.
WARNING: DO NOT OPERATE WITH INCORRECT LINE
VOLTAGE. TO DO SO WILL RESULT IN PROPERTY DAMAGE
AND/OR PERSONAL INJURY. MAKE SURE THAT THE POWER
SOURCE DOES NOT EXCEED 24 VDC.
•
The DC power should be supplied by a “clean” primary
line, directly from the DC power source. (See Fig. 3-15)
-AC Power Wiring
WARNING: DO NOT OPERATE WITH INCORRECT LINE
VOLTAGE. TO DO SO WILL RESULT IN PROPERTY DAMAGE
AND/OR PERSONAL INJURY.
SOURCE DOES NOT EXCEED
MAKE SURE THAT THE POWER
240 VAC.
WARNING: IF A LITHIUM BATTERY IS REPLACED WITH AN
INCORRECT TYPE IT MAY CAUSE AN EXPLOSION WHICH
WILL CAUSE PROPERTY DAMAGE OR PERSONAL INJURY.
•
The AC power should be supplied by a “clean” primary
line, directly from the power panel. This line should not
supply any other equipment, including the feeding unit,
and should be supplied with a minimum 10 amp breaker.
(See Fig. 3-14)
FIG. 3-14 POWER WIRING DIAGRAM
•
Power Input J1
J1-1 Neu (Low)
J1-2 Line (HI)
J1-3 Ground
FIG. 3-15 DC POWER SUPPLY CONNECTION
Step 1. Connect your positive and negative DC voltage
lines to the Phoenix connector that plugs into the
DeviceNet Connector. (See Fig. 3-15)
Step 2. Plug the connector into the DeviceNet Connector at
the rear panel.
NOTE:
Use DC power source when you have the -DC
option and do not have the DeviceNet Option.
The DeviceNet option has its own DC power
source.
17
CHAPTER 3
Installation
Load Point Connections
•
•
•
•
•
•
NOTE:
FIG. 3-16 REAR PANEL/LOAD POINT CONNECTIONS
C2® Load Point Connection
WARNING: LOAD CELL CABLE LENGTH HAS BEEN CALCULATED INTO C2 CALIBRATION DATA. HARDY PROCESS
SOLUTIONS RECOMMENDS THAT YOU DO NOT CUT YOUR
ADVANTAGE OR ADVANTAGE LITE LOAD SENSOR CABLE,
AS YOUR C2 ACCURACY WILL BE AFFECTED AND THE
WARRANTY WILL BE VOIDED.
Cable color Code for C2 Load Points (left to right facing the
rear panel):
•
•
•
•
•
•
•
•
•
Shield
C2C2+
EXCSENSIGSIG+
SEN+
EXC+
Ground Wire
Violet
Grey
Black
Brown
White
Green
BLUE
RED
Step 1. Remove the factory installed jumper from the terminal block if you are connecting an 8 wire cable
from the junction box.
Step 2. Connect the cable (Recommended load cell cable:
Hardy Instruments Prt. # 6020-0001) wires to the J9
terminal block according to the cable color chart.
(See Fig. 3-16)
NOTE:
To purchase Hardy Load Cell cable, contact your
local Hardy Representative or Distributor.
Step 3. Plug the terminal block into the Channel 1 connector on the rear panel.
Non-C2 Load Point Connection
Cable color Code for Non-C2 Load Points:
•
•
•
Shield
C2C2+
Ground Wire
Not Used*
Not Used*
EXCSENSIGSIG+
SEN+
EXC+
Black
Brown
White
Green
Blue
Red
*If you are using an IT Summing Box you need to
connect the IT Summing Box Communication to
C2- and C2+.
Step 1. Remove the factory installed jumper from the terminal block if you have 6 wire load cell cable that
includes sense wires from the load cell or junction
box.
Step 2. Connect the cable (Recommended load cell cable:
Hardy Instruments Prt. # 6020-0001) wires to the J9
terminal block according to the Non-C2 cable color
chart.
Step 3. Plug the terminal block into the Channel 1 (J9) connector on the rear panel.
LVDT and Half Bridge Load Cells/Sensors
Please contact Hardy Technical Support for installation
instructions.
Junction Box Wiring
FIG. 3-17 JUNCTION BOX CONNECTIONS
Step 4. Connect the cable wires directly to the terminal
blocks according to the C2 or Non-C2 cable color
charts.
Step 5. Plug the terminal blocks into Channels 1 thru 4 connectors on the rear panel. Write down which load
cell is connected to Channel 1, Channel 2, Channel
3, Channel 4 for future reference.
NOTE:
If you have one load point you must plug it into
Channel 1. If you have more than one load point
you must make sure that you plug one of the load
points into Channel 1.
Step 6. If you only have 3 load cells, do not use Channel 4.
HI-3030 Weight Controller
Service Manual
Installation of Secure Memory Module
(SMM) (See Fig. 3-18)
18
Step 1. Disconnect the power cable from the Instrument.
Step 2. Remove the Secure Memory Module from the
instrument.
Step 3. Install the Secure Memory Module into the new
instrument.
Step 4. Power up the new instrument.
NTEP Option Installation
FIG. 3-18 SECURE MEMORY MODULE (SMM)
Step 7. Slide the module with the notch up into the module
housing at the rear panel. (See Figs. 3-19 & 20)
NOTE:
After installing the NTEP option you can no longer enter negative Tare values.
NOTE:
The NTEP Option pertains to the Gross Weight
displayed on the Front Panel of the Instrument
ONLY.
NOTE:
The NTEP Option requires HI 3030 Firmware
version 2.8.00.00 or above.
Step 1. Check to see which firmware version is currently
installed on your instrument by doing the following:
•
From the front panel press the Text/9 button.
The Test and Data Menu appears with the
cursor in front of the “Device Data List”.
(See Fig. 3-20)
TEST AND DATA MENU
> Dev i ce Dat a Li s t
Di agnos t i cs
-->
-->
FIG. 3-19 INSTALLING THE SECURE MEMORY
MODULE
Step 8. Press the module in until it stops. Do not force the
module, it should slide in easily.
Step 9. To remove the module pull the module straight out
of the housing. (See Fig. 3-19)
Transferring a Secure Memory Module
NOTE:
Make sure that when you move an SMM to
another instrument that you know what type of
instrument that will receive the SMM. For example if you accidently place a Dispenser into a previously configured Filler, the Filler changes into
a Dispenser and vice versa. Make sure that you
know the type of instrument the SMM was taken
from.
CAUTION: DO NOT REMOVE AN SMM WITH THE POWER
ALWAYS DISCONNECT THE POWER CABLE FROM THE
ON.
INSTRUMENT BEFORE REMOVING OR INSTALLING THE
SECURE MEMORY MODULE.
FIG. 3-20 TEST AND DATA MENU/SELECTING
DEVICE DATA LIST
•
•
Press the Enter button. The Test Data List
appears.
Press the down arrow button until the cursor
is in front of “Version:” The current Firmware version is listed here. (See Fig. 3-21)
TEST DATA
PP# :
> Ver s i on:
IP:
0 6 5 0 - 0 119 - 0 1
2 .7.0 0 .2 8
117.14 6 .12 5 .4 2
FIG. 3-21 TEST DATA/VIEWING VERSION NUMBER
19
CHAPTER 3
Installation
•
From the HI 3030 Web Page click on “Operation”. (See Fig. 3-22) The Operation page
appears. (See Fig. 3-23)
option requires that the instrument be returned to
the factory.
WARNING: ONCE THE NTEP SEAL AND LABEL ARE
PLACED ON THE HI 3030 THEY CANNOT BE BROKEN.
BREAKING THE NTEP SEAL VOIDS THE NTEP CERTIFICATION.
FIG. 3-22 HI 3030 WEB PAGE/SELECTING OPERATION
FIG. 3-23 OPERATION PAGE/SELECTING DIAGNOSTICS
•
Click on “Diagnostics”. The OperationDiagnostics page appears. (See Fig. 3-24)
FIG. 3-24 OPERATION - DIAGNOSTICS/FIRMWARE
REVISION NUMBER 2.7.00.28
Step 2. Contact your local Hardy Representative or Hardy
Instruments Service Center to arrange for the installation of the NTEP option. Installation of the NTEP
HI-3030 Weight Controller
Service Manual
20
21
CHAPTER 4
Configuration
CHAPTER 4: CONFIGURATION
About Chapter 4
Description of the Front Panel
Chapter 4 contains step-by-step instructions for configuring
the Hardy Instruments, HI 3030 Weight Controller. The procedures include complete instructions for configuring the
Weight Controller from the Front Panel, Remote I/O
(optional) ControlNet (optional), DeviceNet (Optional) and
Web Browser. We highly recommend reading the procedures
before configuring the Weight Controller. Being familiar
with the configuration procedures insures that the Controller
will provide trouble free service.
Getting Started
Before operating the Hardy HI 3030 Weight Controller,
check to make sure the following procedures have been performed:
•
•
•
Power and Load Point cables properly
installed.
Communication cables properly installed.
Calibration Performed.
FIG. 4-1 FRONT PANEL
Front Panel Display
All the features of the Weight Controller operate the same no
matter what the interface. First let’s get familiar with configuring the HI 3030 from the front panel of the instrument.
(See Fig. 4-1)
The Front Panel Display is a 4 line x 20 Alphanumeric character LCD. The screen displays all the menus for Configuring, Calibrating and Operating the HI 3030 Weight
Controller.
Help
Button Functions
About Help
Tare Button
As you move through the setup/configuration menus you
may on occasion need assistance. If you need help, do the
following:
Step 1. Use the up and down arrows to move the cursor in
front of the Menu Item you want help on.
Step 2. Click the Help button either on the front Panel and a
Help Dialog appears. The help dialog tells you what
the Menu Item is used for or other descriptive information to help you enter the right parameters for the
current menu item.
Step 3. Push the Exit button to return to the current menu.
Tares the selected scale. The Tare button sets the Tare
Weight equal to the Gross Weight and makes the Net Weight
equal to 0. When you are in Net Mode (i.e. a channel displays NET in the Summary display, you will see the weight
change to 0.00. If you are in Gross mode you will not see
anything happen, but the Net weight is changed to 0.00.
Press the right or left arrow buttons to verify that the Net
weight is 0.00.
Zero Button
Used in Gross mode to zero the selected scale to within the
tolerance level.
•
This function can be used as many times
as desired as long as the total does not
exceed the value entered as the zero tolerance.
Help Button
The Help button displays a Help message for the current
Menu item (the Menu item in front of the cursor) that is dis-
HI-3030 Weight Controller
Service Manual
22
played. In Standby the Help button does not display a Help
message.
SETUP MENU
This channel is
> Unit of Measur e
Decimal Point
Display Button
The Display Button displays the Net, Gross and Tare weights
for the scale that is connected to the Channel selected in the
Main Menu. There 4 channels total.
Print Button
The Print Button when pressed prints the Gross, Net and
Tare weights to an attached printer. If the Rate of Change
option is activated the print button prints the ROC as well. If
the Scoreboard is activated the Print Button does not function.
Up/Down - Left/Right Buttons
CHANNEL 1
ON
kg
2
FIG. 4-3 LIST SELECTION/ENTER BUTTON
For example, when selecting units from a pick list, use the
left and right arrows to move the cursor in front of the unit
you want and press the Enter button.
Exit Button
Takes you back to the previous menu.
Clear Button
The Clear button clears the total Alphanumeric Entry and
repositions the cursor for the first entry.
1 Button
Enters the integer 1 in a display.
2/ABC Button
Enters the integer 2 in the display. Also enters the characters
A, B, C. Pushing the button once enters the integer 2.
FIG. 4-2 DIRECTIONAL BUTTONS
The Up/Down arrow buttons move the cursor vertically
allowing the user to scroll through each item of a menu. The
Left/Right arrow buttons move the cursor horizontally left
and right. The Left arrow button has an added backspace
function. For example if there are Alpha/Numeric characters
that appear in the display, as you press the left button it
erases the characters. The Right arrow button moves the cursor to the right in the display and does not erase a alphanumeric entry. The Left/Right arrow buttons also move the
cursor through a pick list. (See Fig. 4-2)
Enter Button
The Enter button enters the Alpha/Numeric value entered for
a menu item in the display. The Enter button also enters the
selections from a pick list. (See Fig. 4-3)
NOTE:
For numeric entries only: Push the button and
the number on the button is entered.
NOTE:
For Alphanumeric entries only: Pushing the button once, the first letter on the button is entered in
uppercase, A, D, G, and so on. Push the button a
second time, the second letter is entered in uppercase, B, E, H, K and so on. Push the button a
third time, the third letter is entered in uppercase,
C, F, I, L, and so on. Push the button a fourth
time, the fourth letter is entered in uppercase, S,
Z. Push the button a fifth time the first letter is
entered in lowercase, a, d, g, and so on. After you
go through the lowercase letters, you can push
the button again for the number. You need to push
the buttons rapidly. If you delay too long the
instrument will accept the alphanumeric character and move the cursor to the left preparing for
the next alphanumeric entry. This is true for all
the Alphanumeric buttons. If this occurs use the
left arrow button to erase the current entry and
enter another.
23
CHAPTER 4
Configuration
Setup/3/DEF Button
This enables you to access the configuration and setup
menus. Also enters the number 3 and the letters D, E, F.
Amount/4/GHI
Enables you to make quick set point changes. Also enters the
number 4 and the letters C, H, I.
correct number of channels for the installed Channel card in
your instrument.
Step 1. The First display is the Summary Display with
either one, two or four channels (depending on the
installed option card) displaying the weight in
Gross mode. (See Fig. 4-4, 4-5, 4-6)
Step 2. To change from Gross to Net mode press either the
right or left arrow buttons until NET appears.
Units/5/JKL Button
Enables you to change the units of measure (Lbs/Kg/oz/g)
while in the standby mode of operation. Also enters the integer 5 and the letters J, K, L.
6/MNO Button
Enters the integer 6 and the letters M, N, O.
FIG. 4-4 SUMMARY DISPLAY/1 CHANNEL
Tare Val/7/PQRS Button
Enables you to set the Tare Value. Also enters the integer 7
and letters P, Q, R, S.
NOTE:
From Firmware Version 2.8.00.00 and above you
can no longer enter negative tare values.
8/TUV Button
FIG. 4-5 SUMMARY DISPLAY/2 CHANNEL
Enters the integer 8 and the letters T, U, V.
Test/9/WXYZ Button
Enables you to enter the Self-Test and IT modes. Also enters
the inter 9 and letters W, X, Y, Z.
User/./_/@ Button
Enables you to enter or change the 3 digit user code while in
the standby mode. Also enters the period (.), underscore (_)
and @ symbols.
0/Char. Button
Enters the integer 0 in the display. When you push the button
the second time a set of characters appears in the display.
FIG. 4-6 SUMMARY DISPLAY/4 CHANNELS
Step 3. To select a channel, press the up or down buttons to
move the cursor in front of the channel you want.
(See Fig. 4-7)
Step 4. Press either the Display or the Enter button. The
Single Channel display appears for the selected
channel.
Step 1. Using the up and down arrow buttons move the cursor in front of the character you want to display.
Step 2. Press the Enter Button to select the character.
Step 3. Press the Exit Button to return to the display. The
character should now appear next to the cursor.
Starting Up for the First Time
When the HI 3030 Weight Controller powers up after delivery from the factory, a Summary display appears with the
FIG. 4-7 SINGLE CHANNEL SELECTION DISPLAY
HI-3030 Weight Controller
Service Manual
Step 5. You will notice an arrow at the end of the TARE
line. (See Fig. 4-7)
NOTE:
Tare weight must be > 0 and < scale capacity.
From Firmware Version 2.8.00.00 and above you
can no longer enter negative tare values.
Step 6. To change the Tare Weight, press the Enter button.
The Tare menu appears. (See Fig. 4-8)
24
Step 1. Press the up or down arrows until the cursor is in
front of the Channel you want to configure. (See
Fig. 4-10)
>
1
2
3
4
0000.00 l b
0000.00 kg
0000.00 oz
0000.00 g
net
gr oss
gr oss
net
FIG. 4-10 SUMMARY DISPLAY/SELECTING
CHANNEL
Step 2. Press the Setup/3 button. The Configuration Menu
appears. (See Fig. 4-11)
FIG. 4-8 TARE MENU
Step 7. To change the Tare weight:
•
•
•
•
Press the Clear button.
Use the Alpha Numeric pad to enter the
new Tare weight.
Press the Enter button to set the entry.
A brief “Entry Accepted” displays. (See
Fig. 4-9)
CONFIGURATIONMENU
ADJ USTSETPOINTS
> SETUP
CALIBRATION
->
->
->
FIG. 4-11 CONFIGURATION MENU/SELECTING
SETUP
Step 3. Press the Enter button. The Setup Menu Appears.
(See Fig. 4-12)
SETUP MENU
>Channel Name
FIG. 4-9 TARE MENU/ENTRY ACCEPTED
This Channel is
Unit of Measur e
->
ON
lb
Step 8. Press the Exit button to return to the Single Channel
Display.
Step 9. Press the Exit button again to return to the Summary Display.
FIG. 4-12 SETUP MENU/SELECTING CHANNEL
NAME
Weight Controller Configuration From the
Front Panel
Step 4. Press the Enter button. The Channel Name # menu
appears. Use the alphanumeric buttons to enter a
descriptive name for the channel you selected. (See
Fig. 4-13)
The Weight Controller Configuration process sets up the
instrument to operate as a scale. This includes setting
WAVERSAVER®, Scale Capacity, Units of Measure,
Motion tolerance and other instrument parameters required
for your process. Here is where the permanent parameters
are entered. All the parameters configured except the communications parameters, (IP Address etc.) are stored in the
Secure Memory Module (SMM).
PARAMETER:CHANNEL NAME
RANGE: NONE
DEFAULT: CHANNEL #1
25
CHAPTER 4
Configuration
RANGE: LB, KG. OZ, G
DEFAULT: LB
CHANNEL NAME
2
> Weigh Scal e3
FIG. 4-13 CHANNEL NAME/ENTERING CHANNEL
NAME
Step 5. Press the Enter button to save the setting.
Step 6. Press Enter to return to the Setup Menu.
Step 7. Press the down arrow until the cursor is in front of
“This Channel is”. (See Fig. 4-14)
PARAMETER:THIS CHANNEL IS
RANGE: ON/OFF
DEFAULT: ON
Step 1. Press the down arrow button until the cursor is in
front of Unit of Measure. (See Fig. 4-15)
SETUP MENU
This Channel is
>Unit of Measur e
Decimal Point
ON
lb
2
FIG. 4-15 SETUP MENU/UNIT OF MEASURE
Step 2. Press the right or left arrow buttons to make your
selection.
Step 3. Press the Enter button to save the setting.
Decimal Point Parameter
About the Decimal Point Parameter
SETUP MENU
Channel Name
>This Channel is
Unit of Measur e
->
ON
lb
The Decimal Point Parameter is set to determine the resolution you want for a fill/dispense. Here you set the location of
the decimal point for the weight resolution. The higher the
number the farther to the left the decimal point moves and
the higher the resolution of the scale. It is important to note
that setting the resolution does effect the overall accuracy of
the instrument. Increasing the number of decimal points
increases the overall accuracy of the instrument.
FIG. 4-14 SETUP MENU/TURNING ON A CHANNEL
Step 8. Press the right or left arrow to toggle between ON
and OFF.
Step 9. Press the Enter button to save the setting.
Step 10. Press the down arrow until the cursor is in front of
Unit of Measure
PARAMETER:DECIMAL POINT
RANGE: 0-6
DEFAULT: 2
Step 1. Press the down arrow button until the cursor is in
front of Decimal Point. (See Fig. 4-16)
Unit of Measure Parameters
About Unit of Measure
The Unit of Measure Parameter sets the scale to either English or Metric units. The Selections are:
•
•
•
•
NOTE:
Pounds (lb)
Ounces (oz)
Kilograms (kg)
Grams (g)
Changing the units of measure converts all
parameter settings to the selected units except the
Setpoint Values.
PARAMETER:UNIT OF MEASURE
SETUP MENU
Decimal Point
>Motion Tol
Gr ad Size
2
10.00
1
FIG. 4-16 SETUP MENU/DECIMAL POINT
Step 2. Press the right or left arrow buttons to make your
selection.
Step 3. Press the Enter button to set the entry.
HI-3030 Weight Controller
Service Manual
Motion Tolerance Parameter
About Motion Tolerance
26
DEFAULT: 1
Step 1. Press the down arrow button until the cursor is in
front of Grad Size. (See Fig. 4-18)
Motion is the amount of allowable deviation between consecutive readings before a weighment is accepted as being
complete. Setting Motion Tolerance establishes the amount
of deviation you can allow in your particular fill/dispense
process. The base motion number can be calculated by using
the following formula:
Base Motion Number = (Total Load Cell Capacity/10,000) x
3
FIG. 4-18 SETUP MENU/GRADUATION SIZE
NOTE:
Motion Tolerance must be greater than or equal
to the Graduation Sizes. Our recommendation is
three (3) graduation sizes.
Step 2. Press the right or left arrow buttons to make your
selection.
Step 3. Press the Enter button to set the entry.
PARAMETER:MOTION TOLERANCE
RANGE: .000001 - 999999
DEFAULT: 10
Zero Tolerance Parameter
Step 1. Press the down arrow button until the cursor is in
front of Motion Tol (Tolerance). (See Fig. 4-17)
The Zero Tolerance parameter sets the weight units from
zero that will be accepted as zero by the instrument. You can
also turn on Auto Zero tolerance and set the Auto Zero Tolerance parameter and time. The Auto Zero Tolerance time
setting sets the time it should take to Auto Zero the scale.
SETUP MENU
Decimal Point
>Motion Tol
Gr ad Size
2
10.00
1
FIG. 4-17 SETUP MENU/MOTION TOLERANCE
Step 2. Press the Clear button to clear the current entry.
Step 3. Use the alphanumeric key pad to enter the new tolerance value.
Step 4. Press the Enter button to set the entry.
Auto Zero Tolerance Parameter
If ON, Auto Zero automatically zeros the empty scale to
gross zero. However, it does not always automatically zero
the scale. Auto zero tracking allows for small changes to be
zero’d off, but not larger changes, even when they are within
the auto zero tolerance.
PARAMETER:ZERO TOLERANCE
RANGE: .000001-999999
DEFAULT: 10.0
NOTE:
CWM mode range is 0-4% of scale capacity.
Graduation Size Parameter
About the Graduation Size Parameter
The Graduation Size is the Minimum increment displayed by
the instrument. The Base Graduation Number can be calculated by dividing the Total Load Cell Capacity by 10,000.
For example:
•
With two (2) decimal points selected, the
graduation size 10 will display increments
of .10 engineering units. With two (2) decimal points selected, the graduation size 50
will display increments of .50 engineering
units.
PARAMETER:GRAD SIZE
RANGE: 1, 2, 5, 10, 20, 50, 100, 200, 500, 1000
PARAMETER: AUTO ZERO TOLERANCE
RANGE: OFF/ON
DEFAULT: OFF
Zero Reminder Parameter
The Zero Reminder when turned ON, when you zero the
instrument asks you if you are sure you want to zero the
instrument.
PARAMETER:ZERO REMINDER
RANGE: ON/OFF
DEFAULT: OFF
Step 1. Press the down button until the cursor is in front of
Zero Tolerance. (See Fig. 4-19)
27
CHAPTER 4
Configuration
SETUP MENU
Gr ad Size
>Zer o Tol er ance
Tar eReminder
ZEROTOLERANCEMENU
UseAuto Zer o
OFF
>Azer o Tol
10.00
Zer o Reminder
OFF
1
->
OFF
FIG. 4-19 SETUP MENU/SELECTING ZERO
TOLERANCE
Step 2. Press the Enter button. The Zero Tolerance Menu
appears with the cursor in front of Zero Tolerance.
(See Fig. 4-20)
FIG. 4-22 ZERO TOLERANCE MENU/AUTO ZERO
TOLERANCE
Step 10. Press the Clear button to clear the current value.
Step 11. Use the alphanumeric key pad to enter the new
Auto Zero Tolerance value.
NOTE:
CWM mode: If tolerance is set greater than 4%
of scale capacity, the value will be truncated.
Step 12. Press the Enter button to set the entry.
Step 13. Press the down arrow button until the cursor is in
front of Zero Reminder. (See Fig. 4-23)
FIG. 4-20 ZERO TOLERANCE MENU/ZERO
TOLERANCE
Step 3. Press the Clear button to clear the current value.
Step 4. Use the alphanumeric key pad to enter the new Zero
Tolerance value.
NOTE:
CWM mode: If tolerance is set greater than 4%
of scale capacity, the value will be truncated.
Step 5. Press the Enter button to set the entry.
Step 6. Press the down arrow button until the cursor is in
front of Use Auto Zero. (See Fig. 4-21)
ZEROTOLERANCEMENU
UseAuto Zer o
OFF
Azer o Tol
10.00
OFF
>Zer o Reminder
FIG. 4-23 ZERO TOLERANCE MENU/ZERO
REMINDER
Step 14. Press right or left button to toggle between ON and
OFF.
Step 15. Press the Enter button to set the entry.
•
FIG. 4-21 ZERO TOLERANCE MENU/USE AUTO
ZERO
Step 7. Press the right or left arrow buttons to toggle
between OFF or ON.
Step 8. Press the Enter button to set the entry.
Step 9. Press the down arrow button until the cursor is in
front of AZERO Tol. (See Fig. 4-22)
When you press the Zero button a message
appears asking you if you want to zero the
instrument. (See Fig. 4-24) Follow the
instructions listed in the message.
Ar eyou sur eyou
want to ZEROScal e1
Yes pr ess Enter Key
NOpr ess Cl ear Key
FIG. 4-24 ZERO REMINDER MESSAGE
Step 16. Press the Exit button to return to the SETUP
MENU.
Step 17. Press the Down Arrow button until the cursor is in
front of “Tare Reminder”.
HI-3030 Weight Controller
Service Manual
28
Tare Reminder Parameter
About the Tare Reminder Parameter
The Tare Reminder when turned ON and you press the Tare
button, a message appears asking if you are sure that you
want to Tare the instrument.
PARAMETER:TARE REMINDER
RANGE: ON/OFF
DEFAULT: OFF
Step 1. Press the right or left arrow buttons to toggle
between ON and OFF.
•
When you press the Tare button a message
appears asking if you are sure you want to
Tare the instrument. (See Fig. 4-25) Follow the instruction in the message.
20ms
20ms
20ms
20ms
20ms
0
0
0
0
5
0
0
0
5
5
0
0
5
5
5
0
5
5
5
5
5
5
5
5
5
1
2
3
4
5 = 5 EU in 100ms
TABLE 4-1: 5 AVERAGES READING 5 EU
PARAMETER:AVERAGES
RANGE: 1-250
DEFAULT: 10
Step 1. Press the Down arrow until the cursor is in front of
Averages. (See Fig. 4-26)
Ar eyou sur eyou
want to TAREScal e 1
Yes pr ess Enter Key
NOpr ess Cl ear Key
FIG. 4-25 TARE REMINDER MESSAGE
Step 2. Press the Enter button to set the entry.
Step 3. Press the Exit button to return to the Setup Menu.
Step 4. Press the down arrow until the cursor is in front of
“Averages”.
Averages Parameter
About the Averages Parameter
This setting is to aid in ignoring the effects of material
impact. If material is not entering or exiting the scale evenly,
weight fluctuations can be seen. Applications requiring very
quick weight readings should reduce this setting to it’s minimum. If the weight is unstable due to material impacting,
increase the averages. This sets the number of weight readings that will be used to compute the displayed weight. The
average is a sliding average so that a new average is available for display at every reading.
The Weight Controller does 55 updates per second which
translates to an update approximately every 20 milliseconds.
If you average enough weight readings the weight loss or
gain remains smooth. If you average the weight too much
you can cause over filling. Here is an example of 5 averages
reading 5 Engineering Units (EU):
SETUP MENU
Tar eReminder
>Aver ages
Scal eCap
CHAN1
OFF
10
125.00
FIG. 4-26 SETUP MENU/AVERAGES
Step 2. Press the right or left arrow buttons to increase or
decrease the number of averages.
Step 3. Press the Enter button to set the entry.
Step 4. Press the down arrow button until the cursor is in
front of “Scale Cap”.
Scale Capacity Parameter
About the Scale Capacity Parameter
If this value is exceeded by 5% an HI indication appears on
the front display. Communications to and from optional
devices are not effected. This value is the nominal operating
capacity of the scale. (It is recommended that you use the
default parameter)
PARAMETER:SCALE CAP
RANGE: .000001-999999
DEFAULT: 999999
Step 1. Press the Down arrow button until the cursor is in
front of Scale Cap. (See Fig. 4-27)
29
CHAPTER 4
Configuration
SETUP MENU
Aver ages
>Scal eCap
WAVERSAVER
CHAN1
10
125.00
1.00 Hz
Step 2. Press the right or left arrow buttons to select the setting or turn WAVERSAVER off.
Step 3. Press the Enter button to set the entry.
Step 4. Press the Down arrow button until the cursor is in
front of “Operator ID”. (See Fig. 4-29)
Operator ID
About Operator ID
FIG. 4-27 SETUP MENU/SCALE CAPACITY
Step 2. Press the Clear button to clear the current entry.
Step 3. Use the alphanumeric key pad to enter the new
Scale Capacity value.
Step 4. Press the Enter button to set the entry.
The Operator ID is the ID of the user who is going to operate
the Weight Controller or service the instrument. Select three
letters or numbers or any combination of the two that adequately identifies the user. We have provided some examples
below for your assistance. The Operator ID is used in connection with the security level of the user.
The WAVERSAVER® Parameter
About the WAVERSAVER Parameter
Typically, mechanical noise (from other machinery in a plant
environment) is present in forces larger than the weight
forces trying to be detected. The Weight Controller is fitted
with WAVERSAVER® technology which eliminates the
effects of vibratory forces present in all industrial weight
control and measurement applications. By eliminating the
factor of vibratory forces the Weight Controller is capable of
identifying the actual weight data. WAVERSAVER® enables
the Weight Controller to distinguish between actual weight
data and mechanical noise, both of which are typically transferred to the Weight Controller by the load cell signal.
WAVERSAVER® can be configured to ignore noise with frequencies as low as 0.25 Hz. One of four higher additional cut
off frequencies may be selected to provide a faster instrument response time. The function is user selectable and can
be turned off.
PARAMETER:WAVERSAVER®
RANGE: .25 HZ, .50 HZ, 1.0 HZ, 3.50 HZ, 7.50 HZ,
OFF
DEFAULT: 1.00 HZ
Step 1. Press the Down arrow button until the cursor is in
front of WAVERSAVER®. (See Fig. 4-28)
SETUP MENU
WAVERSAVER
>Oper ator ID:
Instr ument ID
CHAN1
1.00 Hz
->
FIG. 4-29 SETUP MENU/OPERATOR ID
Step 1. Use the alphanumeric key pad to enter your Operator ID or press the Clear button to clear the previous
entry and use the alphanumeric key pad to enter you
Operator ID.
Step 2. A Operator ID is three (3) characters long and can
consist of alphanumeric characters.
Some examples of Operator IDs:
•
•
•
•
Joe
312
J15
JD7
Step 3. Press the Enter button to set the entry.
Step 4. Press the Down arrow button until the cursor is in
front of Instrument ID.
Instrument ID
About Instrument ID
SETUP MENU
Scal eCap
>WAVERSAVER
Oper ator ID:
CHAN1
125.00
1.00 Hz
FIG. 4-28 SETUP MENU/WAVERSAVER
The Instrument ID parameter is used to provide specific
identification for a Weight Controller. This is extremely
important when using several Weight Controllers in a process. A unique Instrument ID allows you to identify one
instrument from another.
PARAMETER:INSTRUMENT ID
RANGE: 19 CHARACTERS
DEFAULT: HARDY 3030
HI-3030 Weight Controller
Service Manual
Step 1. Press the down arrow until the cursor is in front of
Instrument ID. (See Fig. 4-30)
SETUP MENU
Oper ator ID:
>Instr ument ID
Ser ial Por t
CHAN1
->
->
30
PARAMETER:PARITY
RANGE: NONE, ODD, EVEN
DEFAULT: NONE
PARAMETER:DATA BITS
RANGE: 7 OR 8
DEFAULT: 8
PARAMETER:AUTO PRINT
RANGE: ON/OFF
DEFAULT: OFF
FIG. 4-30 INSTRUMENT ID PARAMETER
Step 2. Press the Enter button. The Instrument ID Menu
appears. (See Fig. 4-31)
INSTRUMENTIDMENU
>
ChemScal e2
Step 1. Press the down arrow until the cursor is in front of
Serial Port. (See Fig. 4-32)
SETUP MENU
Instr ument ID
>Ser ial Por t
IRPor t
CHAN1
->
->
ON
FIG. 4-32 SETUP MENU/SERIAL PORT
FIG. 4-31 INSTRUMENT ID MENU/CHEM 3 FILLER
Step 3. Press the Clear button to clear the current entry.
Step 4. Use the alphanumeric buttons to enter a new Instrument ID. It is important to be as descriptive as you
can in 19 characters. In our example we identified
the instrument as the Chemical 2 scale. That is the
2nd Chemical scale in a process.
Step 5. Press the Enter button to set the entry.
Step 6. Press the Exit button to return to the SETUP
MENU.
Step 7. Press the down arrow until the cursor is in front of
Serial Port. (See Fig. 4-32)
Serial Port Parameters
Step 2. Press the Enter button. The Serial Port Menu
appears with the cursor in front of Serial Scoreboard or Serial Printer. (See Figs. 4-33 and 34)
SETUP MENU
I/ R Por t
> Ser i al Scor eboar d
Set Cl ock
0n
-->
-->
FIG. 4-33 SERIAL PORT MENU/SCOREBOARD
SETUP
About the Serial Port Setup Parameters
The Serial Port Parameters are set to operate the Printer or
Scoreboard which can print out or display on a Scoreboard
the Gross, Net and Tare with a Rate of Change Option.
NOTE:
SETUP MENU
I/ R Por t
> Ser i al Pr i nt er
Set Cl ock
0n
-->
-->
If Scoreboard is configured the Print button does
not function.
FIG. 4-34 SERIAL PORT MENU/PRINTER SETUP
PARAMETER:SERIAL PORT
RANGE: PRINTER - SCOREBOARD
DEFAULT: PRINTER
PARAMETER:BAUD RATE
RANGE: 300, 1200, 2400, 4800, 9600, 19200
DEFAULT: 9600
Step 3. Press the right or left arrow to toggle between
Printer and Scoreboard.
Step 4. Press the Enter button. The Port Setup Menu
appears. (See Fig. 4-35)
31
CHAPTER 4
Configuration
Step 10. Press the right or left arrow buttons to select the
Data Bits you want. The Selections are:
PORT SETUP MENU
> Baud Rat e
Par i t y
Dat a Bi t s
9600
None
8
FIG. 4-35 PORT SETUP MENU/BAUD RATE
Step 5. Press the right or left arrow buttons to select the
Baud Rate. The Selections are:
•
•
•
•
•
•
8
7
Step 11. Press the enter button to set the entry.
Step 12. Press the Exit button two (2) times to return to the
SETUP MENU.
Tare Limit Parameter
About the Tare Limit Parameter
The Tare Limit Parameter limits the amount of automatic
tare. Tare is the artificial zeroing of the weight hopper so that
a new weight can be displayed. Also, the action of adjusting
out the known weight of the container from the total indicated weight, so that the indicator reads net weight directly.
300
1200
2400
4800
9600
19200
Step 6. Press the Enter button to set the entry.
Step 7. Press the down arrow button until the cursor is in
front of Parity. (See Fig. 4-36)
PORT SETUP MENU
Baud Rat e
> Par i t y
Dat a Bi t s
•
•
PARAMETER:TARE LIMIT
RANGE: .000001-999999
DEFAULT: 999999
Step 1. Press the down arrow until the cursor is in front of
Tare Limit. (See Fig. 4-38)
9600
None
8
FIG. 4-36 PRINTER PORT MENU/PARITY
FIG. 4-38 SETUP MENU/TARE LIMIT
Step 8. Press the right or left arrow buttons to select Parity.
The Selections are:
•
•
•
NONE
ODD
EVEN
Step 9. Press the down arrow until the cursor is in front of
Data Bits. (See Fig. 4-37)
Step 2. Press the Clear button to clear the current entry.
Step 3. Use the alphanumeric key pad to enter the new Tare
Limit value.
Step 4. Press the Enter button to set the entry.
Step 5. Press the Down arrow button until the cursor is in
front of “IR Port”.
Set Clock Parameter
About Setting the Clock
PORT SETUP MENU
Baud Rat e
Par i t y
> Dat a Bi t s
9600
None
8
FIG. 4-37 PRINTER PORT MENU/DATA BITS
You set the Hour, Minutes, Month, Day and Year parameters
here. These settings are the time stamps for the alarms.
PARAMETER:HOURS
RANGE: hh (01-24)
DEFAULT: NONE
PARAMETER:MINUTES
RANGE: mm (01-60)
DEFAULT: NONE
HI-3030 Weight Controller
Service Manual
32
PARAMETER:MONTH
RANGE: Jan. thru Dec.
DEFAULT: NONE
PARAMETER:DAY
RANGE: dd (01-31)
DEFAULT: NONE
PARAMETER:YEAR
RANGE: yyyy (2001, 2002, 2003)
DEFAULT: NONE
PARAMETER:TIMEZONE
RANGE: -12 TO +12
DEFAULT: -8
Step 1. Press the Down arrow button until the cursor is in
front of Set Clock. (See Fig. 4-39)
SETUP MENU
CHAN1
IRPor t
ON
>Set Cl ock
->
Set LCDContr ast
FIG. 4-39 SETUP MENU/SET CLOCK
Step 2. Press the Enter button. The Clock Setup Menu
appears with the cursor in front of Set Hours. (See
Fig. 4-40)
FIG. 4-41 CLOCK SETUP MENU/SET MONTH
Step 9. Press the right or left arrow buttons to change the
Month setting.
Step 10. Press the Enter button to set the entry.
Step 11. Press the Down arrow button until the cursor is in
front of Set Day.
Step 12. Press the right or left arrow buttons to change the
Day setting.
Step 13. Press the Enter button to set the entry.
Step 14. Press the Down arrow button until the cursor is in
front of Set Year.
Step 15. Press the right or left arrow buttons to change the
Year setting.
Step 16. Press the Down arrow button until the cursor is in
front of Timezone. (See Fig.4-42)
CLOCK SETUP MENU
Set Day
02
Set Year
2003
> Timezone
-8
FIG. 4-42 CLOCK SETUP MENU/SET GMT
About Timezones (Greenwich Mean Time)
FIG. 4-40 CLOCK SETUP MENU/SET HOURS
Step 3. Press the right or left arrow buttons to change the
Hours setting.
Step 4. Press the Enter button to set the entry.
Step 5. Press the Down arrow button until the cursor is in
front of Set Minutes.
Step 6. Press the right or left arrow buttons to change the
Minutes setting.
Step 7. Press the Enter button to set the entry.
Step 8. Press the Down arrow button until the cursor is in
front of Set Month. (See Fig. 4-41)
There are 25 integer World Time Zones from -12 through 0
(GMT) to +12. Each one is 15° of longitude as measured
East and West from the Prime Meridian of the World which
is at Greenwich, England. Some countries have adopted nonstandard time zones, usually a 30 minute offset.
Each Time Zone is measured relative to Greenwich, England. Civilian designations are typically three letter abbreviations (e.g. EST) for most time zones. Below is a list of the
abbreviated time zones with the GMT time adjustment. You
will see the time zone ranges in the e-mail header.
33
CHAPTER 4
Configuration
GMT
GMT
GMT
Civilian Time Zones
GMT: Greenwich Mean
UT: Universal
UTC: Universal Co-ordinated
WET: Western Europe
Cities
London, England
Dublin, Ireland
Edinburgh, Scotland
Reykjavik, Iceland
Casablanca, Morocco
+12
Civilian Time Zones
IDLE: International Date Line
East
NZST: New Zealand Standard
Cities
Wellington, NZ
Fiji
Marshall Islands
+13
Rawaki Island
+14
Line Islands
WEST OF GREENWICH
EAST OF GREENWICH
+1
+2
+3
CET: Central Europe
EET: Eastern Europe
BT: Baghdad
+3:30
Paris, France
Berlin, Germany
Amsterdam, Holland
Brussels, Belgium
Vienna, Austria
Madrid, Spain
Rome, Italy
Bern, Switzerland
Oslo, Norway
-1
WAT: West Africa
-2
AT: Azores
-3
+4:30
-3:30
+5:30
AST: Atlantic Standard
Caracas, Venezuela
La Paz
-5
EST: Eastern Standard
Bogota, Colombia
Lima, Peru
New York, NY, USA
-6
CST: Central Standard
Chicago, Illinois, USA
Mexico City, Mexico
Saskatchewan, Canada
-7
MST: Mountain Standard
Phoenix, Arizona
Denver, Colorado
Abu Dhabi, UAE
Muscat
Tblisi
Volgograd
Kabul
-8
Pacific Standard
Seattle, Washington
Portland, Oregon
San Francisco, CA
-9
YST: Yukon Standard
Afghanistan
-10
AHST: Alaska-Hawaii Standard
CAT: Central Alaska
HST: Hawaii Standard
Anchorage, Alaska
Honolulu, Hawaii
India
-11
NT: Nome
Nome, Alaska
-12
IDLW: International Date Line
West
Kuwait
Nairobi, Kenya
Riyadh, Saudi Arabia
Moscow. Russia
+6
+6:30
Cocos Islands
TABLE 4-2: GREENWICH TIME ZONES (GMT)
+7
+8
CCT: China Coast
Shanghai, China
Hong Kong, China
Beijing, China
+9
JST: Japan Standard
Tokyo, Japan
Osaka, Japan
Taipei, Taiwan
Australian Central Standard
Darwin, Australia
Adelaide, Australia
+10
+10:30
GST: Guam Standard
Step 17. Check Table 4-2 for the time zone you are in.
Step 18. Press the right or left arrow until the correct time
zone appears. For example Pacific Standard Time is
-8.
Step 19. Press the Enter button to set the entry.
Step 20. Press the Exit button to return to the SETUP
MENU.
Step 21. Press the Down arrow until the cursor is in front of
Set LCD Contrast.
Lord Howe Island
Set LCD Contrast Parameter
Norfolk Island
About the Set LCD Contrast Parameter
The Set LCD Contrast Parameter is used to increase or
decrease the contrast on the display. Press the right arrow
+11
+11:30
Newfoundland
-4
Athens, Greece
Helsinki, Finland
Istanbul, Turkey
Jerusalem, Israel
Harare, Zimbabwe
+5
+9:30
Brasilia, Brazil
Buenos Aires, Agentina
Georgetown, Guyana
Tehran, Iran
+4
Azores
Cape Verde Islands
TABLE 4-2: GREENWICH TIME ZONES (GMT)
HI-3030 Weight Controller
Service Manual
button to increase the contrast. Press the left arrow to
decrease the contrast.
PARAMETER:SET LCD CONTRAST
RANGE: NONE
DEFAULT: NONE
34
PARAMETER:ETHERNET
RANGE: 0.0.0.0 - 255.255.255.255
DEFAULT: 192.168.110.1
Step 1. Press the Down arrow button until the cursor is in
front of Ethernet. (See Fig. 4-43)
Step 1. Press the left or right arrow button to increase or
decrease the contrast.
Step 2. Press the Down arrow button until the cursor is in
front of Devicenet.
Ethernet Parameters
About the Ethernet Parameters
FIG. 4-43 SETUP MENU/ETHERNET
All Weight Controllers are designed with a selectable 10/100
base T Ethernet connection which links your PC to an
embedded server in the instrument. You can connect to an
instrument via the Internet, Intranet, Extranet, or VPN (Virtual Private Network). Your computer must have an ethernet
card and cable with an RJ45 connector to connect to the
instrument. Once connected you can, monitor, map and configure any of the instruments from your web browser from
any location in your plant or enterprise. Help Dialogs are
also available to assist when performing setup or troubleshooting of an instrument. In addition the browser connects
you to the Hardy Web Site which connects the user to a full
range of customer service and support. File downloads from
your control room are a snap. No more hauling devices to
download files to an instrument. Should you want to download a file or monitor the instrument from your laptop at the
site, simply connect a short cable from the lap top to the
Ethernet connect at the rear panel of the instrument to transfer files, monitor or configure the instrument. No matter
where you are, if you are connected to our instrument you
can configure and troubleshoot the HI 3030 Weight Controller. Furthermore if the packet output is too high simply set
the packet output to a lower setting.
About IP Addresses
An IP address consists of 32 bits. It is composed of two
parts:
•
•
The Network Number
The Host Number
By convention, the address is expressed as four decimal
numbers separated by periods, such as “200.1.2.3” representing the decimal value of each of the four bytes. Valid
addresses thus range from 0.0.0.0 to 255.255.255.255, a total
of about 4.3 billion addresses.
It is recommended that you leave the Mask, Gate and DNS
settings alone. Contact your Network Administrator if you
need to set these parameters.
Step 2. Press the Enter button. The Ethernet Menu appears
with the cursor in front of the IP Address. (See Fig.
4-44)
FIG. 4-44 ETHERNET MENU/IP ADDRESS WITH
DEFAULT IP ADDRESS
Step 3. Press the Clear button to clear the address.
NOTE:
Figure 4-44 has the Default IP address. You must
change this address when starting the instrument
for the first time.
Step 4. Use the alphanumeric key pad to enter the new
address. Remember there must be a period between
each port of the address. (e.g. 186.245.263.12)
Step 5. This is the only parameter you need to change. If
you need to change the other parameters, contact
your Network Administrator for assistance.
Step 6. Press the Enter button to set the entry.
Step 7. Press the Exit button to return to the SETUP
MENU.
PARAMETER:HARDYLINK
RANGE: 1/SEC, 11/SEC, 55/SEC
DEFAULT: 55/SEC
The Hardy Link Parameter enables you to set the UDP
packet output from the HI 3030 so that the controller does
not overburden your network with data packets. If you find
that the packet output is slowing your Ethernet Network,
35
CHAPTER 4
Configuration
simply set the output to 1/sec or 11/sec whichever meets
your needs.
Configuring the Analog Option Card from the Web
Page
Step 1. From the Ethernet Sub-menu press on the down
arrow until the cursor is in front of Hardy-Link.
(See Fig. 4-45)
Step 1. From Weight Controller Home Page click on Configuration. (See Fig. 4-47) The Configuration page
appears. (See Fig. 4-48)
ETHERNET
Tal k
>Har dyLnk
NO0
1
55/ sec
0.0.0.0
FIG. 4-45 HARDY-LINK PARAMETER/SELECTING
11/SEC OUTPUT
Step 2. Press on the left or right arrow button until the output you want appears. In our example we selected
11/sec. (See Fig. 4-46)
FIG. 4-47 WEIGHT CONTROLLER HOME PAGE/
SELECTING CONFIGURATION
ETHERNET
Tal k
>Har dyLnk
NO0
1
11/ sec
0.0.0.0
FIG. 4-48 CONFIGURATION PAGE/SELECTING
OPTIONS
Step 2. Click on Options. The Options page appears. (See
Fig. 4-49)
FIG. 4-46 HARDY-LINK/SAVING PACKET OUTPUT
Step 3. Click on the Enter button to save the selection.
Step 4. Press the Exit button to return to the Standby Display.
Option Cards Configuration
Option Card Configuration Procedures can be found in the
HI 3000 Series User’s Guide. Configuration Procedures for
the Option Cards are common for all HI 3000 Series Products. However, the Analog Option Output Card configuration is contained in this chapter.
Analog Option Card Configuration
NOTE:
You cannot configure the Analog Option Card
from the front the panel.
PARAMETER:ANALOG CHANNEL
CONFIGURATION
RANGE: 0-5 V, 0-10 V, 4-20 MILLIMAPS, 0-20
MILLIAMPS
DEFAULT: 0-10 V, LO - 0, HI - 100
FIG. 4-49 CONFIGURATION/OPTIONS/SELECTING
ANALOG CHANNEL CONFIGURATION
Step 3. Click Analog Channel Configuration to display the
Analog Channel Configuration page. (See Fig. 450)
HI-3030 Weight Controller
Service Manual
36
Configuring the Analog Option Card from the Front
Panel
Step 1. From the Configuration Options screen , select
Analog I/O Slot # ON and press the Enter button.
(See Fig. 4-52)
FIG. 4-52 SELECTING ANALOG I/O SLOT #
FIG. 4-50 ANALOG CHANNEL CONFIGURATION
PAGE
Step 4. Click on the Chan #
Mode pull down list
and select either volts
(V) and milliamps
(mA).
Step 2. On the Analog I/O Slot # screen, select the Slot #
Channel # option to configureand press Enter. (See
Fig. 4-53 left side)
NOTE: Don’t be confused about the Channels. On this page
you are configuring analog for the Analog board
channels not the instrument channel (channels 1-4).
FIG. 4-53 CHOOSING SLOT, CHANNEL, AND MODE
Step 5. In the Input and Output high and low text fields you
want to change, (See Fig. 4-51) type in the values to
use for your application.
Step 3. The cursor will appear in front of Mode. Use the
right and left arrows to toggle between volts (V)
and milliamps (mA), then press Enter to select your
choice. (See Fig. 4-53 right side)
Step 6. Click Save Settings to save the configuration.
Step 7. Use the same procedure to configure other Channels.
Step 4. Use the up and down arrows to position the cursor
in front of the Input or Output high or low value
you want to change. (See Fig. 4-54 left and right)
Step 5. To change the selected value, use the number and
decimal point keys to enter a new value, then press
Enter to save the new value.
FIG. 4-54 SETTING THE HIGH AND LOW VALUES
FIG. 4-51 ANALOG CHANNEL CONFIGURATION
(SLOT 1) SAVING SETTINGS
Step 8. Should you have two analog cards installed in the
Option Slots 0 and 1, to configure the other Analog
card, repeat the above process starting from the
Options page.
Step 6. Should you have two analog cards installed in the
Option Slots 0 and 1, to configure the other Analog
card, repeat the above process starting from the
Options page.
Mapping the Output
Currently, mapping for the analog card can only be done
from the WEB interface.
37
CHAPTER 4
Configuration
Step 1. Outputs (e.g. Gross,
Net, Rate-of-Change)
must be mapped to the
Analog Output table.
From the Weight Controller Home Page click
Configuration to open
the Configuration
menu. (See Fig. 4-55)
Select the instrument channel you want on the Mapping Setup Page 2 (Sources).
Step 4. Click on the Select button to select the analog output channel # destination. The destination appears
to the left of the equals sign in the Current Mappings text field. In this case the destination symbol
is HFO85. (See Fig. 4-58)
FIG. 4-55 CONFIGURATION MENU
Step 2. Click Mapping Setup to open the Mapping Setup 1/
page. (See Fig. 4-56)
FIG. 4-58 CURRENT MAPPINGS/PRESSING JUMP
TO SOURCE PAGE
Step 5. For more information about mapping symbols,
click the mapping symbols link at the top of the
page (See Fig. 4-59) to view the Mapping Symbols
Dictionary. (See Fig. 4-60)
FIG. 4-59 MAPPING SETUP 1/OPENING LIST OF
MAPPING SYMBOLS
FIG. 4-56 CONFIGURATION/MAPPING SETUP 1/
SELECTING DESTINATION/ANALOG OUT SLOT 0
Step 3. Click Analog Out Slot 0 as the destination to open
the screen below. (See Fig. 4-57)
FIG. 4-57 MAPPING SETUP 1/SELECTING ANALOG
OUTPUT CHANNEL
FIG. 4-60 DICTIONARY OF MAPPING SYMBOLS
NOTE: Do not confuse the Analog Output Slot 0 or Slot 1
Channels 0 and 1 with the Instrument channels 1-4.
The channel selection for the preceding step is for
the Analog Output Slot, not the instrument channel.
Step 6. Scroll the list until you find the HF0 - Hardy Float
Output Table/Analog Output Card Slot 0
(HFO085).
HI-3030 Weight Controller
Service Manual
Step 7. After selecting the destination, you need to select a
source. Click the Jump to Sources Page button (See
Fig. 4-58) to display the Mapping Setup 2 (Sources)
page. (See Fig. 4-61)
38
Step 10. When you click Select, the source symbol (Gross
Wt = HF14) is displayed in the Mappings field to
the right of the equals symbol. (See Fig. 4-64)
FIG. 4-64 DESTINATION AND SOURCE COMPLETE
Step 11. Click Map to complete the mapping process. The
map appears in the Current Mappings list. (See Fig.
4-65) The Gross Weight is assigned to the Analog
Output table for analog slot 0, channel 1.
FIG. 4-61
CONFIGURATION/MAPPING SETUP 2
PAGE
Step 8. You can select almost any source from this page.
Select Gross Wt. from the Process Data pull down
list. (See Fig. 4-62)
FIG. 4-65 GROSS WT MAPPED TO THE ANALOG
OUTPUT TABLE SLOT 0
Step 12. To map to the other Analog Output tables repeat the
steps above for each channel.
FIG. 4-62 MAPPING/SELECTING SOURCE/GROSS
WT
Step 9.
The Channel selection text field appears to the
right. Enter the instrument channel (1-4) you want
for the source. (See Fig. 4-63) Our example uses
channel 1.
FIG. 4-63 PROCESS DATA/GROSS WT/CHANNEL 1
NOTE:
This channel selection is for the instrument channel not the analog output slot channel.
39
CHAPTER 4
Configuration
Weight Controller Configuration From the
Web Page
Step 1. From the Weight Controller Home Page, click on
Configuration. (See Fig. 4-66) The Configuration
Page appears. (See fig. 4-67)
FIG. 4-65 CONFIGURATION - INSTRUMENT SETUP
WEIGHT CONTROLLER PAGE/SELECTING
CHANNEL
Step 4. Click on the channel you want to configure. Our
example shows channel 4.
Step 5. To create or change a Channel ID, double click in
the text field next to Channel ID. (See Fig. 4-70)
FIG. 4-62 WEIGHT CONTROLLER HOME PAGE/
SELECTING CONFIGURATION
FIG. 4-63 CONFIGURATION PAGE/SELECTING
INSTRUMENT SETUP
Step 2. Click on Instrument Setup. The ConfigurationInstrument Setup Page appears. (See Fig. 4-68)
Step 6. Type in the Channel ID you want for this channel.
In our example we used “Packer 1”.
Step 7. To create or change an Instrument ID, double click
in the text field next to Instrument ID.
Step 8. Type in the Instrument ID you want for this instrument. In our example we used “Chem Scale 3”.
FIG. 4-66 CONFIGURATION - INSTRUMENT SETUP
WEIGHT CONTROLLER PAGE/SETTING
PARAMETERS
Step 9. To create or change an Operator ID, double click in
the text field next to Operator.
Step 10. Type in the User ID. Remember you only have
three characters so be brief. We used “JD” (John
Doe).
Step 11. To select the Unit of measure, click on the Unit of
Measure pull down menu. (See Fig. 4-71)
FIG. 4-64 CONFIGURATION - INSTRUMENT SETUP
WEIGHT CONTROLLER PAGE
Step 3. To select a channel, click on the Channel pull down
menu. (See Fig. 4-69)
HI-3030 Weight Controller
Service Manual
40
Step 17. To set the Decimal point, click on the Decimal
Point pull down menu. (See Fig. 4-73)
FIG. 4-67 CONFIGURATION - INSTRUMENT SETUP
WEIGHT CONTROLLER PAGE/SELECTING UNIT
OF MEASURE
Step 12. Click on the Unit of measure you want for this
channel.
Step 13. To Set the Scale Capacity, double click in the text
field next to Scale Capacity.
Step 14. Type in the Scale Capacity of the device attached to
this channel.
NOTE:
Make sure you set the scale capacity correctly.
Setting it too low might lead to the material on
the scale exceeding this Channel’s Scale Capacity value. When the Scale Capacity value is
exceeded, there will be no weight visible on the
display (namely a series of ********). Setting it
too high might create problems in your weigh
process.
Step 15. To set the Grad (Graduation) Size, click on the Grad
Size pull down menu. (See Fig. 4-72)
FIG. 4-69 CONFIGURATION - INSTRUMENT SETUP
WEIGHT CONTROLLER PAGE/SELECTING
DECIMAL POINT
Step 18. To set the Number of Averages, double click in the
text field next to Number of Averages.
Step 19. Type in the number of averages for the device connected to this channel.
Step 20. To set the Motion Tolerance, double click in the text
field next to Motion Tolerance.
Step 21. Type in the Motion tolerance for the scale that is
connected to this channel.
Step 22. To set the Tare Weight, double click in the text field
next to Tare Weight. (See Fig. 74)
FIG. 4-70 SETTING THE TARE WEIGHT
Step 23. Type in the Tare weight for the scale that is connected to this channel.
Step 24. To set the Hardy-Link packet output click on the
Hardy-Link pull down list. (See Fig. 4-75)
FIG. 4-68 CONFIGURATION - INSTRUMENT SETUP
WEIGHT CONTROLLER PAGE/SELECTING GRAD
SIZE
Step 16. Click on the Grad Size you want for the device connected to this channel.
FIG. 4-71 HARDY-LINK PARAMETER/SELECTING
1/SEC OUTPUT
41
CHAPTER 4
Configuration
Step 25. Click on the output you want. In our example we
selected 1/sec. (See Fig. 4-76)
FIG. 4-72 HARDY-LINK/SAVING PACKET OUTPUT
PARAMETER:CONTROL-LINK PORT
RANGE: 1024-1055
DEFAULT: 1024
FIG. 4-74 SELECTING CERTIFICATION
Step 29. Click on the mode you want. In our case we
selected 10000 D (US NTEP). (See Fig. 79)
This parameter sets the Control-Link Port that packets are
sent and by the HI 3030. The instruments listens and transmits from this port. It is important to remember that after setting the Control-Link Port parameter you will have to cycle
power to make the change from one port setting to another.
Step 26. To set the Control-Link Port, double click in the
Control-Link Port text field. (See Fig. 77)
FIG. 4-75 NTEP MODE/SELECTING ON
Step 30. Click on the Save Parameters button to save the settings.
Step 31. To Configure the Serial Port, Click twice on the
right arrow. The Serial Port Configuration page
appears. (See Fig. 80)
FIG. 4-73 CONTROL-LINK PORT/SETTING PORT
1024
Step 27. Type in the port you want for the scale that is connected to this channel.
NOTE:
After configuring the Control-Link Port you have
to cycle power to make the change.
PARAMETER:CERTIFICATION
RANGE: NONE, 10000 D (US NTEP), AND 3000 D
(CANADA)
DEFAULT: NONE
The Certification pull-down selection list allows you to
select the Certification to apply. If you select US NTEP or
Canada, you can no longer tare a negative gross weight. Also
selecting either of these parameters sets the instrument to
meet the certification standard, but it does not generate certification. To get an NTEP or Canada certification, you will
need to request for the approproiate agency to come and certify the instrument.
Step 28. Select the certification type from the pull-down list
pull down list. (See Fig. 4-78)
FIG. 4-76 SERIAL PORT CONFIGURATION
Step 32. Click on the Serial Port pull down menu. Click on
either Printer or Scoreboard, depending on what the
serial port is connected to. Keep in mind when you
select Scoreboard the Printer does not function.
(See Fig. 4-81)
NOTE:
For cable installation and pin out for the Serial
Connection please see the HI 3000 Installation
and Service manual, Cabling Section/Serial Port.
HI-3030 Weight Controller
Service Manual
42
FIG. 4-80 CONFIGURING SERIAL PORT/
SELECTING 7 OR 8
Step 39. Click on the Save Parameters button to save the settings.
NOTE:
You can click on the Save Parameters button anytime during this process. If you only change one
parameter, click on the Save Parameters button.
You must click on the Save Parameters button in
order for the changes to occur.
NOTE:
If you have changed the Control-Link Port Settings you need to cycle the power now.
FIG. 4-77 CONFIGURING SERIAL PORT/PRINTER SCOREBOARD
Step 33. Click on the Baud Rate pull down menu.
Step 34. Click on the Baud Rate your printer or scoreboard
requires. (See Fig. 4-82)
FIG. 4-78 CONFIGURING SERIAL PORT/BAUD
RATE
Step 35. Click on the Parity pull down menu.
Step 36. Click on the Parity your printer or scoreboard
requires. (See Fig. 4-83)
FIG. 4-81 INSTRUMENT SETUP/SET DATE/SET
CLOCK/SET TIMEZONE
Set Date/Clock Parameters
Step 1. Double click in the Minute-mm field. Enter the current minutes. (See Fig. 4-85)
Step 2. Double click in the Hour-hh field. Enter the current
minutes.
FIG. 4-79 CONFIGURING SERIAL PORT/PARITY
Step 3. Double click in the Day-dd field. Enter the current
day.
Step 37. Click on the Data Bits pull down menu.
Step 4. Double click in the Month-mm field. Enter the current month.
Step 38. Click on 7 or 8 bits whichever you system requires.
(See Fig. 4-84)
Step 5. Double click in the Year-yyyy field. Enter the Current year.
Step 6. Double click in the Timezone field. Check Table 42 Civilian Time Zones, GMT on page 40 for the
time zone you are in. Enter the correct Greenwich
Mean Time value. Don’t forget to enter the positive
(+) or negative (-) sign. For our example we used
43
CHAPTER 4
Configuration
the default time zone which is -8 or PST (Pacific
Standard Time).
Step 7. Click on the Save Parameters button to save the setting.
Step 4. Press the up or down arrow buttons to move the
cursor in front of Options.
Step 5. Press the Enter button. The Options Menu appears.
(See Fig. 4-88)
The Instrument Configuration is complete
OPTIONS
Cont r ol Net I/ O
Pr of i bus I/ O
> Rat e of Change
Options Configuration
Option Cards Configuration
Option Card Configuration Procedures can be found in the
HI 3000 Series Operation and Installation Manual. Configuration Procedures for the Option Cards are common for all
HI 3000 Series Products.
Rate of Change (-ROC) Option Configuration
ROC Configuration from the Front Panel
PARAMETER:TIMEMEASURE
RANGE: SEC, MIN, HRS
DEFAULT: SEC
1
2
3
4
0000.00 l b
0000.00 kg
0000.00 oz
0000.00 g
Step 6. Press the up or down arrow buttons until the cursor
is in front of Rate of Change. (See Fig. 4-88)
Step 7. Press the Enter button. The Rate of Change, Channel 1 Menu appears with the cursor in front of
TimeMeasure. (See Fig. 4-89)
RATE OF CHANGE
CH1
Ti mebas e
Step 1. From the Summary Display, press the up or down
arrow buttons until the cursor is in front of the
channel you want to configure for Rate of Change
(ROC). (See Fig. 4-86)
>
FIG. 4-84 SELECTING RATE OF CHANGE
> Ti me Meas ur e
PARAMETER:TIMEBASE
RANGE: 1-1800 SECONDS
DEFAULT: 1 SECOND
OFF
OFF
->
net
gr oss
gr oss
net
s ec
1s
FIG. 4-85 RATE OF CHANGE, CH1/SETTING TIME
MEASURE
Step 8. To set the TimeMeasure, press the left or right
arrow buttons to select either seconds, minutes or
hours. In our example we selected seconds. (See
Fig. 4-89)
Step 9. Press the Enter button to set the entry.
Step 10. Press the down arrow button until the cursor is in
front of Timebase.
FIG. 4-82 SELECTING CHANNEL
Step 2. Press the Setup/3 button.
Step 3. The Configuration Menu appears. (See Fig. 4-87)
Step 11. To set the Timebase, press the left or right arrow
buttons to select the Timebase value. In our example we selected 1 second. (See Fig. 4-89)
Step 12. Press the Enter button to set the entry.
CONFIGURATION MENU
Cal i br at i on
> Opt i ons
I/ O Mappi ng
Step 13. Press the Exit button to return to the configuration
Menu.
Step 14. To operate the Rate of Change please see the HI
3030 User Guide/Rate of Change for instructions.
Step 15. Tap on Enter to set the entry.
Step 16. Tap on Exit to return to the Configuration Menu.
FIG. 4-83 SELECTING OPTIONS
HI-3030 Weight Controller
Service Manual
44
ROC Configuration from the Browser
Step 1. From the HI 3030 Home Page, click on “Configuration”. (See Fig. 4-90) The Configuration page
appears. (See Fig. 4-91)
FIG. 4-89 RATE OF CHANGE PAGE
Step 4. Click on the Channel pull down menu to select the
channel Rate of Change you want to view. (See Fig.
93)
FIG. 4-86 HI 3030 HOME PAGE/SELECTING
CONFIGURATION
FIG. 4-87 CONFIGURATION MENU/SELECTING
OPTIONS
Step 5. Click on the channel number.
Step 6. To set the Time Measure click on the Time Measure
pull down menu. (See Fig. 94)
Step 7. Click on the time measure you want.
Step 2. Click on Options. The Configuration - Options
page appears. (See Fig. 4-92)
Step 3. Click on “Rate-of-Change Configuration”. (See
Fig. 4-92) The Rate of Change page appears. (See
Fig. 93)
FIG. 4-90 RATE OF CHANGE/SELECTING TIME
MEASURE
Step 8. To set the Timebase, double click in the Timebase
text field. Type in the number you want the time it
takes to run a Rate of Change evaluation. (See Fig.
4-95)
FIG. 4-88 CONFIGURATION - OPTIONS/
SELECTING RATE-OF-CHANGE
FIG. 4-91 RATE OF CHANGE/ENTERING THE
TIMEBASE VALUE
Step 9. Click on the Set Parameter button to set the entry.
(See Fig. 4-95)
Step 10. Click on the back arrow to return to the HI 3030
Home Page.
45
CHAPTER 4
Configuration
DeviceNet Parameters
FIG. 4-93 DEVICENET MENU/BAUD RATE
About the DeviceNet Parameters
DeviceNet is a low-level network designed to connect the
Weight Controller to higher-level controllers such as PCs,
PLCs or embedded controllers.The DeviceNet Network is an
open, global industry-standard communication network
designed to provide an interface through a single cable from
a programmable controller or PC directly to all HI 3000
Series products as well as smart devices such as sensors,
push buttons, motor starters, simple operator interfaces,
drives and other weight modules. With DeviceNet the user
can monitor or control multiple applications from one display and allows 3rd party I/O to be easily added to any system. You no longer have to hard-wire each device to an I/O
module or I/O block. The network also provides access to
the intelligence present in the instruments for superior diagnostics and troubleshooting to help increase system up time.
The DeviceNet network lets you monitor your plant-floor
devices from a central location and reconfigure them as your
needs change or service them as required. You can, for
example, configure the Weight Controller modules for different applications.
PARAMETER:DEVICENET BAUD RATE
RANGE: 125K, 250K, 500K
DEFAULT: 125K
PARAMETER:DEVICENET NODE ADDRESS
RANGE: 0-64
DEFAULT: 0
Step 1. From the Options Menu press the Down arrow until
the cursor is in front of DeviceNet. (See Fig. 4-96)
OPTIONS
Remot eI/ O
> Devicenet I/ O
Cont r ol net I/ O
OFF
ON - >
ON - >
FIG. 4-92 OPTIONS MENU/DEVICENET
Step 2. Press the Enter button. The DeviceNet Menu
appears with cursor in front of Baud Rate. (See Fig.
4-97)
Step 3. Press the right or left arrow buttons to select the
Baud Rate you want.
NOTE:
Check with your Network Administrator for the
Baud Rate if you don’t know the correct Baud
Rate.
Step 4. Press the Enter button to set the entry.
Step 5. Press the Down arrow until the cursor is in front of
Node Address. (See Fig. 4-98)
FIG. 4-94 DEVICENET MENU/NODE ADDRESS
Step 6. Press the right or left arrow buttons to select the
Node Address.
Step 7. Press the Enter button to set the entry.
Step 8. Press the Exit button to return to the OPTIONS
MENU.
Step 9. Press the Exit button to return to the Summary Display.
HI-3030 Weight Controller
Service Manual
46
47
CHAPTER 5
Calibration
CHAPTER 5: CALIBRATION
About Chapter 5
Chapter 5 pertains to the calibration procedures for the
HI 3030 Weight Controller. Alternatives to any procedures
implied or explicitly contained in this chapter are not recommended. In order for the Weight Controller to work properly,
it must be calibrated prior to operation. Be sure to follow all
the procedures completely to insure that the weights read by
the Weight Controller are accurate. It is very important that
the user and service personnel be familiar with the procedures contained in this chapter, before installing or operating
the HI 3030 Weight Controller.
Getting Started
The HI 3030 Weight Controller can be calibrated two ways.
The first is the Hardy C2® Second Generation calibration
which requires no test weights. Hardy C2® Calibration is
one of the Core Technologies. We will describe the C2 Calibration process in this chapter. The second calibration technique is called the traditional calibration which requires
certified test weights. It is important to note that the procedures contained in this section either explicitly stated or
implied should be followed to guarantee the performance of
the instrument. Alternatives to the procedures listed here are
not recommended.
Before you can calibrate the instrument you first need to
check to see if the system is ready to be calibrated.
FIG. 5-1 PROPERLY INSTALLED LOAD CELL
WITH NO BINDING
Electrical Check Procedures
Step 1.
Check to see that there is power to the controller.
a.
Binding
Step 1.
Due a visual check to see if the load cells have
been installed so that nothing is binding the load
cell or other parts of the weighing system. Make
sure that nothing is draped over the scale or vessel such as a hose, electrical cord, tubes or other
objects.
Step 2.
C2 Calibration From the Front Panel
CAUTION: BINDING ON A SCALE/VESSEL OR LOAD CELL
DOES NOT ALLOW THE LOAD CELL FREE VERTICAL MOVE-
Step 1.
MENT AND MAY PREVENT THE INSTRUMENT FROM RETURN-
Step 2.
ING TO THE ORIGINAL ZERO REFERENCE POINT.
Step 3.
Step 2.
If there is power to the controller The front
panel display should be lit.
b. If the display appears with a value the unit is
ready for calibration.
Check to see that all communication and power
cables are securely fastened to the connectors on
the rear panel.
Check to see that the load cell is mounted so that
100% of the load (Vessel with Contents) vertically passes through the load cell. (See Fig. 5-1)
NOTE:
Press the Setup/3 button. The Configuration
Menu appears. (See Fig. 5-2)
Press the down arrow until the cursor is in front
of CALIBRATION. (See Fig. 5-3)
Press the Enter button. The CALIBRATION
Menu appears with the cursor in front of CAL
TYPE C2. (See Fig. 5-3)
If the cursor is in front of CAL TYPE TRAD,
press the left or right arrow buttons until CAL
TYPE C2 appears.
HI-3030 Weight Controller
Service Manual
C2 CAL
> Load Sensor s
Ref Point
Gr avit y
FIG. 5-2 CONFIGURATION MENU/SELECTING
SETUP
CALIBRATION
Sensor Type
CHAN 1
C2 - - >
0- 3mV/ V
Step 8.
The Load Sensor number is a read only field. It
tells you how many C2 load sensors are connected to the instrument. In our example there are
4 C2 load sensors connected to the instrument.
Press the down arrow button to move the cursor
in front of the Ref Point. (See Fig. 5-5)
a.
FIG. 5-3 CALIBRATION MENU/C2 CAL
CAUTION: FOR HARDY ADVANTAGE AND ADVANTAGE
LITE C2 LOAD CELLS YOU MUST SELECT 0-3MV/V ONLY.
SELECTING OTHER SENSOR TYPES WILL CREATE INCORRECT WEIGHT READINGS.
CHAN 1
4
0.00
1.00
FIG. 5-5 C2 CALIBRATION SUB-MENU
Step 7.
> Cal Type
48
b.
NOTE:
The Reference Point is the total live load that
is currently on the scale.
If you have nothing on the scale the Ref
Point is 0. If you have 5 lbs live load on the
scale the Ref Point is 5.
Normally the scale system is clean and ready to
receive product. This step establishes the gross
zero reference.
There are four (4) Sensor Type choices:
•
•
•
•
Step 4.
0-3mV/V - C2 Load Sensors Only
± 3mV/V - Non C2 Load Sensors
0-120mV/V - LVDT Type Load Sensors
± 120mV/V - LVDT Type Load Sensors
C2 CAL
Load Sensor s
> Ref Point
Gr avit y
Press the down arrow until the cursor is in front
of Sensor Type.
CHAN 1
4
0.00
1.00
FIG. 5-6 ENTERING THE REFERENCE POINT
CALIBRATION
Cal Type
> Sensor Type
CHAN 1
C2 - - >
0- 3mV/ V
Step 9.
Step 10.
Step 11.
Press the Clr (Clear) button to clear the entry.
Use the alphanumeric key pad to enter the weight
that is currently on the scale, typically zero
(0.00).
Press the down arrow button to move the cursor
in front of Gravity. (See Fig. 5-7)
FIG. 5-4 CALIBRATION/SENSOR TYPE
Step 5.
Step 6.
If the Sensor Type reads anything other than 03mV/V, use the left or right arrow to select 03mV/V.
Press the Enter button. C2 CAL Sub-menu
appears. (See Fig. 5-4)
About The Gravitation Correction Factor
Objects weigh less (about 0.5%) at the equator then they weigh
at each pole because the force of gravity is less at the equator
then at the North or South Pole. This is due in part to the effect
of the earth’s rotation and the shape of the earth at the equator.
Therefore objects at the equator are 21 Km further from the
Earth’s center than objects at the poles. For example if you
weigh 100 pounds at the North Pole on a spring scale you weigh
99.65 pounds at the equator. Depending on the latitude of your
location you would weigh somewhere in between. For those
who need the gravity correction factor you can set it here. The
49
CHAPTER 5
Calibration
table below shows the gravitation correction factor. In various
cities around the world. Mexico City (1.002102) is the lowest
and Oslo (0.998726) and Helsinki (1.001405) are the highest.
>
Table 1: Gravity Correction Factors
GRAV.
ACCEL
CITY
GRAV.
ACCEL
Amsterdam
0.999369
Los Angeles
1.001028
Athens
1.000684
Madrid
1.000461
Auckland
NZ
1.000782
Manila
1.000461
Bangkok
1.002392
Mexico City
1.002102
Brussels
0.999503
New York
1.000433
Buenos
Aires
1.001004
Oslo
0.998726
Calcutta
1.00191
Ottawa
1.000007
Cape Town
1.00104
Paris
0.999048
Chicago
0.99922
Rio de Janeiro
1.001884
Copenhagen
0.999075
Rome
1.000326
Nicosia
1.00093
San Francisco
1.000702
Jakarta
1.002631
Singapore
0.99877
Frankfurt
0.999579
Sydney
1.00104
Istanbul
1.000406
Taipei
1.001741
Havana
1.001872
Tokyo
1.000886
Helsinki
1.001405
Vancouver BC
0.999653
Kuwait
1.001405
Washington DC
1.000601
Lisbon
1.000615
Wellington NZ
0.999399
London
0.999445
Zurich
0.999821
CITY
NOTE:
NOTE:
You must perform a C2 Calibration after setting
the Gravity Correction factor or the correction
factor won’t work.
If you do not want to set the Gravity Correction
Factor go to Step 16.
0.00
1.00
FIG. 5-7 GRAVITY CORRECTION FACTOR
Step 12.
In general if your location is between the 45th parallel and
the equator the gravity correction is greater than 1.0.
Because the gravity is less at these attitudes you are adding,
for example 1.006 for an error that is .06%. For locations
between the 45th parallel and the North or South Pole your
correction factor is less than 1.0, for example .9994 for an
error that is -.06%.
C2 CAL
Ref Point
Gr avit y
Do C2 Cal ibr at ion
Press the Clear button to clear the entry. (See Fig.
5-8)
C2 CAL
CHAN 1
Ref Point
0.00
> Gr avit y
Do C2 Cal ibr at ion
FIG. 5-8 GRAVITY/CLEARING ENTRY
Step 13.
Step 14.
From the Gravity Correction Factors table select
the city correction factor closest to your location.
Use the keypad to enter the selected value. In our
example we entered 1.002102 which is the correction factor for Mexico City. (See Fig. 5-9)
C2 CAL
CHAN 1
Ref Point
0.00
1.002102
> Gr avit y
Do C2 Cal ibr at ion
FIG. 5-9 GRAVITY CORRECTION FACTOR/
MEXICO CITY
Step 15.
Step 16.
Step 17.
Step 18.
Press the Enter button to save the setting.
Press the down arrow button to move the cursor
in front of Do C2 Calibration. (See Fig. 5-10)
Wait 15 seconds for the scale to settle.
Press the Enter button to complete the Calibration.
C2 CAL
CHAN 1
Ref Point
0.00
Gr avit y
1.002102
> Do C2 Cal ibr at ion
FIG. 5-10 C2 CALIBRATION
HI-3030 Weight Controller
Service Manual
Step 19.
A “function OK” momentarily appears on the
screen indicating the calibration was successful
•
•
Step 20.
Step 21.
A message that says “function Error” means
that the calibration was not successful.
Check Chapter 7 - Troubleshooting of this
manual for corrective action.
Another message may occur which is: Security Violation. This means that the User does
not have the security level required to do a
calibration.
Step 2.
50
Click on Calibration. The Calibration Sub-menu
appears. (See Fig. 5-9)
Click on the Channels pull down menu.
Click on the Channel connected to the scale you
want to calibrate.
Step 3.
Step 4.
Press the Exit button until you return to the
Standby display.
C2 calibration is complete.
C2 Calibration From the Web Page
Step 1.
On the Weight Controller Home Page Click on
Configuration. (See Fig. 5-11) The Configuration page appears. (See Fig. 5-12)
FIG. 5-13 C2 CALIBRATION SUB-MENU
Step 5.
Click on the Sensor Type pull down list. (See Fig.
5-14)
FIG. 5-11 CONFIGURATION MENU/SELECTING
SETUP
FIG. 5-14 CALIBRATION/SELECTING SENSOR
TYPE
Step 6.
Step 7.
Step 8.
FIG. 5-12 CONFIGURATION PAGE
NOTE:
Click on 0-3mV/V for C2 (Hardy Advantage and
Advantage Lite) load sensors.
The Load Sensor number is a read only field. It
tells you how many C2 load sensors are connected to the instrument. If this number does not
coincide with the actual number of load sensors
go to Chapter 7 - Troubleshooting.
To enter the Reference Weight click in the Reference Weight field. (See Fig. 5-9)
The Reference Weight 0.000 is for demonstration
purposes only. The recommended Reference
Point should be 0.000.
51
CHAPTER 5
Calibration
a.
The Reference Point is the total weight that
is currently on the scale.
If you have nothing on the scale the Ref
Point is 0. If you have 5 lbs on the scale the
Ref Point is 5.
b.
Step 9.
Step 10.
Double click in the Reference weight text field.
Use you keyboard to type in the new value. In our
example we entered 0.00. (See Fig. 5-9)
Step 17.
Step 18.
Step 19.
FIG. 5-16 CAL COMPLETED OK
Click on “Back” to return to the Calibration page.
Click on “Home” to return to the Weight Controller Home page.
C2 calibration is complete.
Traditional Calibration From the Front
Panel
About Traditional Calibration
Traditional Calibration is the method of calibration that uses
test weights. We recommend that the test weights total 80 to
100% of the scale live load capacity.
Step 1.
FIG. 5-15 CALIBRATION/ENTERING REFERENCE
WEIGHT
Step 11. If you do not want to enter a gravity correction
factor go to Step 15.
Step 12. If there is a gravity correction factor entered and
you do not want to use a correction factor do the
following:
Step 2.
Go to the Gravity Correction Factors table on
page 51. Select the correction factor of the city
closest to your location.
Type the correction factor in the Gravity Correction Factor text field. In our example we entered
1.002102 which is the correction factor for Mexico City. (See Fig. 5-15)
Click on the Do C2 Calibration button.
A page telling you that the C2 Calibration completed OK. (See Fig. 5-16)
NOTE:
•
•
Step 13.
Step 14.
Step 15.
Step 16.
FIG. 5-17 CONFIGURATION MENU/CALIBRATION
Double click in the Gravity Correction
Factor text field.
Enter 1.0, the value used for no correction
factor.
Go to Step 15.
•
Press the Setup/3 button. The Configuration
Menu appears. (See Fig. 5-17)
Step 3.
Press the down arrow until the cursor is in front
of CALIBRATION. (See Fig. 5-17)
Press the Enter button. The CALIBRATION
Menu appears with the C2 Cal Type. (See Fig. 518)
If the CALIBRATION MENU appears with Cal
Type, TRAD go to Step 5.
CALIBRATION
Cal Type
> Sensor Type
CHAN 1
C2 - - >
0- 3mV/ V
FIG. 5-18 CALIBRATION MENU
HI-3030 Weight Controller
Service Manual
Step 4.
Press the Right or Left arrow buttons to select
Traditional Calibration. (See Fig. 5-19)
CALIBRATION
Cal Type
> Sensor Type
CHAN 1
TRAD - - >
0- 3mV/ V
Step 8.
Step 9.
52
Press the Enter button to do the Zero Calibration.
If “Function OK” appears the Zero Calibration is
complete If an ERR number appears go to Chapter 7, Troubleshooting for more information.
Press the Down arrow button until the cursor is in
front of Span Value. (See Fig. 5-22) To Set the
Span Value:
FIG. 5-19 CALIBRATION/TRADITIONAL
Step 5.
Press the Enter Button. The Traditional Cal Menu
appears with the cursor in front of Zero Value.
(See Fig. 5-20)
FIG. 5-22 TRADITIONAL CALIBRATION/SPAN
VALUE
•
•
NOTE:
FIG. 5-20 TRADITIONAL CALIBRATION/ZERO
VALUE
Step 6.
Traditional Calibration requires a zero point and
the physical placement of test weights on the
scale. To Set the Zero Value:
•
Step 10.
Place a certified test weight on the scale.
Use the alphanumeric key pad to enter the
value of the test weight. (If a 10 lb.weight
is used, enter 10).
Ideally the test weight used for the span should be
the highest weight that will be measured in the
application.
• Wait 12 seconds or more.
Press the Down arrow button until the cursor is in
front of the Do Trad Cal. (See Fig. 5-23)
Remove all weight "live load" from the
scale. The Zero Value should be 0.00.
CAUTION: THE SCALE MUST BE EMPTY.
•
NOTE:
Wait 12 seconds or more.
Zero Ct. is read only and is used to Troubleshoot
the instrument. The Zero Ct. is always smaller
than the Span Ct.
FIG. 5-23 TRADITIONAL CALIBRATION/SPAN
Step 11.
Step 7.
Press the Down arrow button until the cursor is in
front of the Do Trad Cal. (See Fig. 5-21)
Step 12.
Press the Enter button to do the Span Calibration.
If “Function OK” appears the Span Calibration is
complete If an ERR number appears go to Chapter 7, Troubleshooting for more information.
End of Calibration
Traditional Calibration From the Web Page
Step 1.
FIG. 5-21 DO TRADITIONAL CALIBRATION/ZERO
On the Weight Controller Home Page Click on
Configuration. (See Fig. 5-24) The Configuration page appears. (See Fig. 5-25)
53
CHAPTER 5
Calibration
Step 4.
If the Traditional Calibration - Low Step Reference is any value other than 0.0000 go to Step 4
otherwise go to Step 10.
To clear the entry, move the cursor over the current Reference Weight which highlights the
weight value.
Use your keyboard to type in the new 0.0000
(See Fig. 5-26)
Wait 12 seconds or more.
Click on the Do Cal Low button.
A page telling you that the Do Cal Low Calibration completed OK. (See Fig. 5-27)
Step 5.
Step 6.
Step 7.
Step 8.
Step 9.
FIG. 5-24 CONFIGURATION MENU/SELECTING
SETUP
FIG. 5-27 CAL LOW COMPLETED OK
Step 10.
Step 11.
Step 12.
Step 13.
Step 14.
FIG. 5-25 CONFIGURATION PAGE
Step 2.
Step 3.
Click on Calibration. The Calibration Sub-menu
appears. (See Fig. 5-26)
If necessary select the Sensor Type for this application.
Step 15.
Step 16.
Step 17.
Click on “Back” to return to the Calibration page.
Place a certified test weight on the scale.
To enter the Span Weight click in the Span
Weight field. (See Fig. 5-26)
To clear the entry, move the cursor over the current Span Weight which highlights the weight
value.
Use you keyboard to type in the new value. In our
example we entered 10.00. (See Fig. 5-26)
Wait 12 seconds or more.
Click on the Do Cal High button.
A page telling you that the Do Cal High Calibration completed OK. (See Fig. 5-28)
FIG. 5-28 CAL HIGH COMPLETED OK
Step 18.
Step 19.
FIG. 5-26 CALIBRATION SUB-MENU
Click on “Home” to return to the Weight Controller Home page.
Traditional calibration is complete.
HI-3030 Weight Controller
Service Manual
54
55
CHAPTER 6
Mapping
CHAPTER 6: MAPPING
About Mapping
Mapping is a simple process where you connect input (called
a “Source”) to an output (called a “Destination”). The HI
3030 has four (4) output Relays and 5 Input Contacts. In
addition you can map any of the parameters to the outputs
and Inputs. The benefit of Mapping is that it requires no programming whatsoever. Simply select a Destination and a
Source and your in business.
Step 1. From the Filler/Dispenser Home Page click on
Configuration. The Configuration Page appears.
(See Figs. 6-1 and 6-2)
It is important to remember that the HI 3030 has four separate channels. You will have to set up your mapping for each
channel. If you wanted all channels to Tare for example, you
would have to select each channel and map Tare to an output
relay.
Mapping to an HI 3030 with a pre-2.3 Firmware Version
The HI 3030’s with versions of firmware prior to 2.3 have
UDP packets that are sent out regularly which have data at
fixed locations. Some of these words correspond to words
contained in the 2.3+ version, Hardy Control-Link Table as
shown below:
2.3 Word
FIG. 6-1 SELECTING CONFIGURATION ON
HOME PAGE
FIG. 6-2 SELECTING MAPPING SETUP
Step 2. Click Mapping Setup to display the Configuration
Mapping Setup Page. The pull-down menus list all
Destinations for the HI 3030. (See Fig. 6-3)
Pre 2.3 Contents
0
setpoints & motion word
1&2
Net Wt 1, floating point
3&4
Net Wt 2, Floating Point
5&6
Net Wt 3, Floating Point
7&8
Net Wt 4, Floating Point
9
Packet Sequence Number
TABLE 6-1: HI 3030
Therefore a version 2.3+ HI 3030 can pick up Net Wt channel 2 from a pre-2.3 HI 3030 node, let’s say Node 2 from
2FI1. Net Weight 2 at 2FI3. Net Wt 3 at 2FI5, Net Weight 4
at 2FI7.
Mapping to an Output Relay
In English we might say: “Connect the Setpoint Output to
Relay Output #1.
•
•
Relay Output #1 is the Destination.
Setpoint Output is the Source.
In Assignment Statement form this mapping would look like
this:
•
•
Destination = Source or
Output Relay #1 = Setpoint Output
FIG. 6-3 CONFIGURATION MAPPING SETUP 1/
SELECTING A DESTINATION
Step 3. Let’s take a moment to take a look at this page.
•
Local Outputs include the 4 Output Relays
and a Software LED.
HI-3030 Weight Controller
Service Manual
•
•
Control includes parameters that control
the instrument which includes the following which is only a partial list:
NOTE:
1.
2.
3.
4.
NOTE:
C2® is a registered trademark of Hardy Instruments Inc.
•
Instrument Setup include parameters for
setting up the instrument itself and
includes the following which is only a partial list:
1.
2.
3.
4.
NOTE:
Tare
Zero
C2® Calibrate
Traditional Calibrate Low
WAVERSAVER®
Grad Size
Zero Tolerance
Motion Tolerance
56
Scratchpad which are empty registers you
can do whatever you want with.
The lists above do not include all the parameters.
For a list of all the parameters and their
addresses please see Appendix A.
Step 4. Back to our example. We want to select Output
Relay #1 as our destination. Click on the Local Outputs pull down menu. (See Fig. 6-4)
Step 5. Click on Output Relay. After you click on Output
Relay it is selected and a Number and a Select button appear to the right of the Local Outputs pull
down menu. (See Fig. 6-4)
Step 6. To select Output Relays from 1 - 4, double click in
the text box and type in the Output Relay number
you want. In our example we selected Output Relay
#1. (See Fig. 6-4)
WAVERSAVER® is a registered trademark of
Hardy Instruments Inc.
•
Setpoints includes setpoints for process
control and includes the following which
is only a partial list:
1.
2.
3.
4.
•
Hardy Control-Link Out
Hardy Control-Link Int Out
DeviceNet Text Out
DeviceNet Int Out
E-Mail includes E-Mail Outputs such as:
1.
2.
•
Step 7. Click on the Select button to the right of the Relay
#1 text box. An address appears in the Current
Mappings text box below. You will have to scroll
down to see it. In our example we selected Output
Relay #1 which has an address of: HO0.0. An equal
“=” sign also appears.
Network includes the network outputs for
Hardy Control Link, ControlNet, DeviceNet, Profibus etc. which is only a partial
list.
1.
2.
3.
4.
•
Amount Required.
Preact
Dead Band
Setpoint Weight Source
FIG. 6-4 LOCAL OUTPUT/SELECTING OUTPUT
RELAY #1
Send E-Mail
Custom Text
Calibration includes calibration parameters:
1.
2.
3.
4.
Do C2
Span Weight
Zero Weight
Zero Counts
FIG. 6-5 OUTPUT RELAY #1 ADDRESS HO0.0
Step 8. You have now selected the Destination.
Step 9. Click on the Jump to Sources Page button to select
the Source you want for this destination. (See Fig.
6-5) The Configuration, Mapping Setup 2 page
appears. (See Fig. 6-6)
57
CHAPTER 6
Mapping
1.
2.
3.
4.
•
Calibration includes calibration parameters:
1.
2.
3.
•
Gross Weight
Net Weight
Peak Weight
Tare Weight
Zero Weight
Span Weight
Calibration Type
Network includes the network outputs and
inputs for Hardy Control Link, ControlNet, DeviceNet, Profibus etc. which is
only a partial list.
1.
2.
3.
4.
Hardy Control-Link Short Int In
Hardy Control-Link Int Out
DeviceNet Text Out
DeviceNet Int In
FIG. 6-6 CONFIGURATION - MAPPING SETUP 2
•
Step 10. Lets take a moment to look at this page.
•
•
Local Inputs include the 5 input contact
closures provided by the HI 3030.
Control includes the following which is
only a partial list:
1.
2.
3.
4.
•
Step 11. Back to our example. We want to select Setpoint
Output which is a control parameter. Click on the
Control pull down menu. (See Fig. 6-7)
Zero Tolerance
Decimal Point
Setup Menu Security
Firmware Revision
Setpoints include the following which is
only a partial list:
1.
2.
3.
4.
•
The lists above do not include all the parameters.
For a list of all the parameters and their
addresses please see Appendix A.
Instrument Setup includes parameters for
setting up the instrument itself and
includes the following which is only a partial list:
1.
2.
3.
4.
•
Setpoint Output
Scale in Motion
ADC Error
Discharge
NOTE:
Scratchpad which are empty registers you
can do whatever you want with.
Amount Required
Preact
Deadband
Setpoint Weight Source
Process Data includes all the process
parameters and includes the following
which is only a partial list:
FIG. 6-7 CONTROL PULL DOWN MENU/
SELECTING SETPOINT OUTPUT
Step 12. Click on “Setpoint Output.” A Select button
appears to the right of the Control pulldown menu.
(See Fig. 6-8)
HI-3030 Weight Controller
Service Manual
Step 13. Double Click in the Setpoints text field and type in
the Setpoint number you want. The range is 1-12. In
our example we selected Setpoint #1.
58
Step 2. Click on Tare. A Select button appears. (See Fig. 610)
Step 3. Click on the Select button. (See Fig. 6-10) The Destination address appears. (See Fig. 6-11)
FIG. 6-8 CONTROL PULL-DOWN MENU/ENTERING
SETPOINT OUTPUT
Step 14. Click on the Select button to select Setpoint Output
#1 as the Source.
Step 15. The Assignment Statement is complete. You will
now see in the Current Mappings text box:
HO0.0=HI2.0
Step 16. Click on the Map button. You have now mapped
Setpoint Output #1 to Output Relay #1. Notice that
the new mapping is included in the list of current
mappings. (See Fig. 6-9)
FIG. 6-11 TARE (HO1.1) SELECTED AS A
DESTINATION
Step 4. Click on the “Jump to Sources Page” button. The
Configuration - Mapping Setup 2 page appears.
(See Fig. 6-12)
FIG. 6-12 CONFIGURATION - MAPPING SETUP #2
PAGE/SELECTING LOCAL INPUT #4 AS THE
SOURCE
FIG. 6-9 MAPPED SETPOINT OUTPUT #1 TO
OUTPUT RELAY #1
Example #2 Mapping an Input
There are 5 contact closure inputs designed into the HI 3030.
You want to map Input Contact #4 to Tare. Our Assignment
Statement is:
•
•
Step 5. Click on the Local Inputs pull down menu. Click on
Local Inputs. An Input# text box appears with a
Select button to the right. (See Fig. 6-12)
Step 6. Double Click in the Input# text box and type in the
number 4.
Step 7. Click on the Select button.
Step 8. The Mapping Assignment Statement is complete.
(See Fig. 6-13) Tare (HO1.0) = Input contact #4
(HI0.3)
Destination = Source
Tare (HO1.0) = Input #4 (HI0.3)
Step 1. On the Configuration - Mapping Setup 1 Page click
on the Control pull down menu. (See Fig. 6-10)
FIG. 6-13 COMPLETED ASSIGNMENT STATEMENT
Step 9. Click on the Map button. The Input Contact #4 is
now mapped to Tare. (See Fig. 6-14)
FIG. 6-10 DESTINATION/TARE
59
CHAPTER 6
Mapping
FIG. 6-14 INPUT CONTACT #4 MAPPED TO TARE
Mapping Multiple Sources
Now that you know how to map a single source to a destination we can move onto multiple sources mapping. Lets say
you want to energize or de-energize Output Relay #3 if you
have two scales. Whenever Scale #1 finishes weighing you
want to energize a visual signal such as a light indicating to
the operator that Scale #1 is finished, remove the weight.
The same for Scale #2. You want one Output Relay to energize or de-energize if either one of two conditions exist. Lets
map the multiple sources to Output Relay #3.
FIG. 6-16 OUTPUT RELAY #3 (HO0.2) ENTERED IN
THE ASSIGNMENT STATEMENT AS A
DESTINATION
Step 4. Click on the “Jump to Sources Page” button. (See
Fig. 6-16) The Mapping Setup #2 Page appears.
(See Fig. 6-17)
FIG. 6-17 ALARMS/SELECTING OVERFILL ALARM
Our Assignment Statement looks like this:
Destination = Source 1 + Source 2
Output Relay #3 = Scale #1 + Scale #2
In this Assignment Statement we use a boolean operator. “+”
which in boolean Assignment Statements mean “or”. This
means that if either of the scales is finished weighing, Relay
#3 will be energized or de-energized, depending on what you
want the relay to do. Here’s the process:
Step 5. Click on the Setpoints pull down menu. Select Setpoints Wt Source. (See Fig. 6-17)
Step 6. Double Click in the Setpoint# field and enter the
number of the Setpoint Weight Source you want.
The range is from 1 - 12. In our example we
selected #1 for Scale #1.
Step 7. Click on the Select button to the right of the Alarms
pull down menu. (See Fig. 6-17) The Setpoint #1
address appears in the Assignment Statement to the
right of the equals sign which means it is a Source.
(See Fig. 6-18)
Step 1. From the Configuration - Mapping Setup #1 page,
click on the Local Output pull down menu and
select Output Relay. (See Fig. 6-15)
Step 2. In the Relay# text field type number 3.
FIG. 6-15 MAPPING SETUP #1 PAGE/SELECTING
OUTPUT RELAY #3
Step 3. Click on the Select button to select the Destination Output Relay #3.
FIG. 6-18 SETPOINT #1 (HFO.9) ENTERED IN THE
MAPPING ASSIGNMENT STATEMENT
Step 8. To add another Source to the Assignment Statement
and make it a Boolean “or” Statement, click on the
“Or” button below the Assignment Statement. A
“+” plus sign appears to the right of the Setpoint #1
Address. (See Fig. 6-18)
Step 9. Click on the Setpoints pull down menu. (See Fig. 619)
Step 10. Select Setpoint Wt Source #2.
HI-3030 Weight Controller
Service Manual
FIG. 6-19 SETPOINTS/SELECTING SETPOINT WT
SOURCE #2
60
Step 2. Double click in the Word text box and type in the
number 2.
Step 3. Double click in the Bit text box and type in the
number 3.
Step 4. Click on the Select button to set the Destination.
The “DeviceNet Boolean Out” address appears on
the left side of the Assignment Statement. (See Fig.
6-23)
Step 11. Click on the Select button to the right of the Setpoints# field to add the “Setpoint Wt Source #2” to
the Assignment Statement. (See Fig. 6-20)
FIG. 6-23 DEVICENET BOOLEAN OUT (DO2.3) SET
AS DESTINATION
NOTE:
FIG. 6-20 SETPOINT WT SOURCE #1 (HFO10)
ADDED AS THE SECOND SOURCE TO THE
ASSIGNMENT STATEMENT
The DeviceNet Boolean Out address DO2.3
means the following. DO = DeviceNet Out. 2.3 =
Word 2, Bit 3.
Step 5. Click on the “Jump to Sources Page” button. The
Configuration - Mapping #2 page appears.
Step 12. Click on the Map button to save the mapping. The
multiple source map appears in the Current Mappings listing. (See Fig. 6-21)
FIG. 6-24 PROCESS DATA/SELECTING GROSS
WEIGHT CHANNEL 1
FIG. 6-21 MULTIPLE SOURCE MAP
Step 13. You have now mapped multiple sources to a single
destination.
Simple Network Mapping
Mapping to a Network Output
Step 6. Click on the Process Data pull down menu. (See
Fig. 6-24)
Step 7. Click on Gross Wt. (See Fig. 6-24)
Step 8. Click in the text field next Chan and enter the channel you want. In our example we selected Channel
#1.
Step 9. Click on the Select button to enter Gross Wt, Channel #1 as the source of the Assignment Statement.
Step 10. The Gross Wt address appears on the right side of
the Assignment Statement. (See Fig. 6-25)
If you want to send data to a PLC from the HI 3030 you need
to map the data to a network output. Here is the process:
Step 1. From the Configuration - Mapping Setup #1 page,
click on the Network pull down menu and select
DeviceNet Boolean Out. (See Fig. 6-22)
FIG. 6-25 ASSIGNMENT STATEMENT MAPPING
GROSS WEIGHT, CHANNEL #1 (HF14) TO
DEVICENET INT OUT (DO2.3)
FIG. 6-22 NETWORK/SELECTING DEVICENET
BOOLEAN OUT
Step 11. The Gross Weight is now available to the PLC via
the DeviceNet Scanner. (See Fig. 6-26)
61
CHAPTER 6
Mapping
FIG. 6-26 SIMPLE NETWORK MAP/GROSS
WEIGHT TO DEVICENET BOOLEAN OUT
Mapping a Network Input to a Local Output
If you want a PLC to send instructions to an HI 3030 you
will have to map the local Output to a network input. Here is
the process:
NOTE:
FIG. 6-29 NETWORK/SELECTING DEVICENET
BOOLEAN IN
Step 6. Click on “DeviceNet Boolean In” to select it as the
Source for the Assignment Statement. (See Fig. 629)
Step 7. Click in the Word text box and type in the number
“2”.
Step 8. Click in the Bit text box and type in the number “2”
Step 9. Click on the Select button to save the source.
Keep in mind that the network input on the HI
3030 will now be the source for the PLC output.
This enables the PLC to send instructions to the
network input on the HI 3030 and in turn to the
HI 3030 output.
Step 1. From the Configuration - Mapping Setup #1 page,
click on the Local Outputs pull down menu and
select Output Relay. (See Fig. 6-27)
FIG. 6-30 ASSIGNMENT STATEMENT MAPPING
DEVICENET INT IN (DIO2) TO OUTPUT RELAY #2
(HO0.1)
Step 10. Now whatever is sent to Devicenet Boolean In from
the Network will be sent to Output Relay #2.
FIG. 6-27 LOCAL OUTPUT/SELECTING OUTPUT
RELAY #2
Step 2. Double click in the Relay# field and type the number 2.
Step 3. Click on the Select button to select Output Relay #2
as the Destination for the left side of the Assignment Statement. (See Fig. 6-28)
FIG. 6-28 OUTPUT RELAY #2 (HO0.1) SET AS
DESTINATION
Step 4. Click on the “Jump to Sources Page” button. The
Configuration - Mapping #2 page appears.
Step 5. Click on the Networks pull down menu. (See Fig.
6-29)
FIG. 6-31 DEVICENET BOOLEAN IN CONNECTED
TO OUTPUT RELAY #2 OUT
HI-3030 Weight Controller
Service Manual
More Advanced Mapping
This section is for those who have some or a lot of experience Addressing I/O (mapping) or for those who want more
information as to how the mapping works locally and on the
network. We go into much more detail as to how the mapping works and include instructions for Boolean, Analog,
Mixed and Special Command mapping procedures.
tions of parameter values or device states to locations in the
local Input Image Table or Output Image Table.
Network Mapping - This is mapping between the master
and slave devices in the case of a DeviceNet, ControlNet,
RIO or Profibus network. Hardy Control Link network mapping is mapping between nodes on the network.
NOTE:
Mapping is similar to Addressing I/O’s in a PLC except there
are no predefined mappings in the HI 3000 Series Instruments and you are not mapping the physical location of an I/
O module terminal to a bit location in the processor, you are
actually mapping values or states in memory to another
memory location. This difference is important to understand
and will be explained later in this chapter. In order to understand Mapping we first need to define some of the terms and
understand the structure of an Assignment Statement.
In short mapping is nothing more than assigning data from
an address (Source) to another address (Destination) to be
used by the controller in ways that meet your process
requirements. Since the HI 3030 does not have any predefined Addressed I/O you are free to Address I/O in any
fashion that meets your needs.
Glossary of Mapping Terms
Assignment Statement - The assignment statement is an
order to the computer to change the value stored in the variable (Memory Address) on the left-hand side of the assignment operator (i.e. the = sign). For example: i = a + b, means
get the value stored in “a” and add it to the value stored in
“b” and store the sum value at memory address “i”. The left
hand side of the operator sign (=) is the address where you
want the values on the right hand side of the operator sign
(=) to be stored.
Destination - This is the destination memory address to
which data will be moved. Left Hand Side
I/O Interface - The section of the instrument that communicates with the “outside world”.
Input Contact - Inputs interface selector switches, push buttons, limit switches and other sensors to the HI 3030. Each
input has an address associated with it which describes the
physical location that the input device is connected to.
Input Image Table - A data table containing addressed
memory where the states of the input devices and parameter
values are stored. The state of each input device is transferred to the input image table from the input point during
the I/O scan.
Local Mapping - This is mapping within an HI 3030 Filler/
Dispenser module, primarily mapping internal memory loca-
62
It is important to understand that you cannot perform mapping functions on one HI 3000 Series
Instrument from another HI 3000 Series instrument. You must map the memory locations in
each instrument separately. More will said about
this later.
Node Number - This is the physical address of a device in a
network.
Output Relay - Outputs interface indicators, motor starters,
solenoids, and other actuators from the HI 3030. Each output
has an address associated with it. The address describes the
physical location that the output device is connected to.
Output Image Table - The data table containing addressed
memory where the desired state of the output devices and
parameter values are stored. The desired state or parameter
value of each output is transferred from the output image file
to the output point during the I/O scan.
Source - This is the memory address of the data you want to
move to the destination. Right Hand Side
Rules for Hardy Control Link Mapping
Some rules for Hardy Link Basic Mapping:
•
•
Input Contacts (5 total) can only be a
Source.
Output Relays can be a Source and a Destination.
Local Input
Inputs interface with selector switches, push buttons, limit
switches and other sensors connected to the HI 3030. When
the firmware is initiated it assigns the physical input contact
to a memory address (Remember Inputs can only be a
Source when mapping. (See Source definition in the Glossary of Mapping Terms)
63
CHAPTER 6
Mapping
•
Data Table
Input
7
0
5
4
3
2
1
0
1
Output Image
Input Image
•
2
1
Input Device
6
0
3
4
2
•
5
3
4
Address
1/3
•
FIG. 6-32 INPUT FUNCTION
•
Each input has an address associated with
it.
The address describes the physical location that the input device is connected to.
The address also describes the Input Image
Table location where the STATE of the
input device is stored.
The state of each input is transferred to the
Input Image File from the input point during the I/O scan every 1/55th of a second.
(See Fig. 6-1)
When you are mapping an Input to some
other Destination you are assigning the
value in the Input Image Table (for that
Input) to an Address in the Output Image
Table.
For example: OK TO FILL = Contact
closure input #5 means assign the state
(Open (0) or Closed (1)) of Contact #5,
contained in the Contact Closure input #5
memory address, in the Input Image Table
and move it to the OK TO FILL address in
the Output Image Table. (See Fig. #6-1)
•
•
•
•
•
Local Output
Outputs interface with indicators, motor starters, solenoids,
and other actuators connected to the HI 3030. Remember
Outputs can be a Destination and a Source. (See Destination
definition in the Glossary of Mapping Terms)
Data Table
7
6
5
4
3
2
1
Output
0
0
Output Image
1
Input Image
2
0
1
3
4
2
5
Output Device
This address describes the physical location that the output device is connected to.
This address also describes the data table
location where the desired state of the output device is stored.
The desired state of each output is transferred from the output image table to the
output point during the I/O Scan every 1/
55th of a second. (See Fig. 6-2)
For Example: Relay out #3 = FAST FILL
means assign the desired state (Open (0) or
Closed (1)) located at the Fast Fill Address
in the input image table and move it to the
Relay out #3 address in the Output Image
Table. (See Fig. 6-33)
Volatile and Non-Volatile Memory
It is important to understand that the data stored in the Output and Input Image Tables is stored in volatile memory.
This means, when you power off you lose the data. The
Addressing I/O (Mapping) is saved in non-volatile memory
and is not lost when you power off.
A Definition of Mapping
Mapping (Addressing I/O) is the same as using an Assignment Statement. The Destination is located on the left hand
side of the equals (=) sign and is a memory address (variable). The Source is the data located on the right hand side of
the equals (=) sign at a memory address. So when you refer
to the right hand side of the Assignment Statement you are
referring to the data only and not the address even though the
address is listed.
•
Memory Address (Variable) = Data (Values, states)
The equals (=) sign assigns the data on the right side of the
Assignment Statement to the Memory Address on the left
side of the Assignment Statement.
This is exactly what you are doing when you map a source to
a destination.
The things that can be mapped are organized into Input
Image Tables and Output Image Tables, which are arrays of
variables (i.e. memory locations of a certain size based on
the type assigned to the variable) with addresses where data
is stored.
3
Address
0/3
FIG. 6-33 OUTPUT FUNCTION
•
Each output has an address associated with
it.
A table is called an “output” image table if the items in the
table are permitted to be on the left hand side of an Assignment Statement. The Output variables are also further identified by the first two letters of the variable:
•
•
HO - Hardy Output Image Table
DO - DeviceNet Output Image Table
HI-3030 Weight Controller
Service Manual
•
•
NOTE:
RO - RIO Output Image Table
CO - ControlNet Output Image Table or
Profibus Output Image Table.
You won’t use ControlNet and Profibus at the
same time so they can both use the same tables.
If the items in the table are only permitted on the right hand
side of an Assignment Statement, we call it an “input” image
table:
HI 3030
To Actuator
Output Ima ge
Table
Output
0
1
1
2
2
3
3
4
Input
0
1
•
•
•
•
HI - Hardy Input Image Table
DI - DeviceNet Input Image Table
RI - RIO Input Image Table
CI - ControlNet Input Image Table or Profibus Output Image Table.
For example, the digital inputs on the Filler/Dispenser are
found in an input image table, as are the items in the DeviceNet input image table.
The HI 3030 scans through the I/O image tables 55 times a
second and reads any values that are contained in the tables.
If there is nothing stored in the tables the controller does
nothing with it. If there are state values or other values stored
in the tables, the firmware processes the data and outputs it
to an output device or the screen.
Local Mapping Example
Local Mapping Output
You hardwired a Valve Actuator to Output Relay #1. When
the Filling process gets an OK to Fill the Filler changes the
Fast Fill value (which is stored in the Input Image Table)
from 0 to 1 which means, close the output relay to begin a
fast fill. You need to map the Fast Fill to Output Relay #1.
The Destination is Output Relay #1 a State value that is
located in the Output Image Table at Address HO0.0.
The source is the Fast Fill value that is stored in the Fast Fill
memory address (HI2.1) in the Input Image Table. Do not
confuse the value with the address.
So now you have a Destination Address to which you can
assign the Source value.
64
2
Output Relay #1
Desired State (1)
Input Image
Table
Setpoint 2 Output
(HI2.1)
3
4
HO0.0 = HI2.1
Local Mapping - HI 3030
FIG. 6-34 MAPPING SETPOINT 2 OUTPUT TO
OUTPUT RELAY #1
As the instrument scans the Input Image Table it sees the
new state value (close = 1) for Setpoint 2 Output which was
set by the instrument’s firmware. It takes the new state value
(1) and sends it to the Output Relay #1 address on the Output
Image Table and sets the desired state for the relay to 1
which simultaneously closes the relay that opens the actuator
for a valve to begin a Setpoint 2 Output.
Network Input
PLC’s also have Input Image Tables and Output Image
Tables. The HI 3030 is a node in a total network and you
assign the HI 3030 Filler/Dispenser a node address so the
Network scanner can identify the instrument.
WARNING: YOU CANNOT ASSIGN THE SAME ADDRESS TO
TWO DIFFERENT NODES. THE PLC CANNOT DETERMINE
WHICH NODE IT IS COMMUNICATING WITH. THIS CAN
RESULT IN PROPERTY DAMAGE OR PERSONAL INJURY.
The Network scanner, scans each node’s Output Image Table
to read the values that are located there. If there are values in
the nodes’ Output Image Table it reads the values to the
PLC’s Input Image Table which makes the data available to
the PLC for processing.
My Assignment Statement is:
HO0.0 = HI2.1
Output Relay = Fast Fill
Here again you can assign the data in the node’s output
image table to an address in the PLC input image Table. So if
you want the net weight to be displayed in the PLC’s output
(screen) you have already assigned the Net Weight value
located in the Input Image Table to the Output Image Table.
The PLC Scanner reads the Net Weight value in the nodes’s
Output Image Table and moves the value to a word location
65
CHAPTER 6
Mapping
in the Input Image Table on the PLC. The Input Image Table
Net Weight value is then output let’s say to the PLC screen.
Network Output
Table and writes the values to another nodes’ Input Image
Table. Once the value is in the node’s Input Image Table it
becomes a source and can be mapped to any destination in
the HI 3030. (See Fig. 6-35)
When the Network Scanner writes values to the nodes it does
this by taking the data located in the PLC Output Image
HI 3030/DeviceNet
Node #1
Output
PLC
Input Image
Table
Input Image
Table
Boolean Word 11
0
1
2
Output Image
Table
Output Image
Table
3
OK To Fill
Mapping to OK to Fill on HI 3030
FIG. 6-35 DEVICENET OUTPUT
HI 3030/DeviceNet
Node #1
Input Image
Table
TOL Alarm
Output
0
1
2
Output Image
Table
3
Boolean Word 3
Mapping to the DeviceNet Light Bar
FIG. 6-36 DEVICENET OUTPUT
Hardy Control Link Network Mapping
If an HI 3030 Node #1 does not have any Output Relays
available, you can select another node’s Output Relay. HI
3030, Node #2 has an output relay available. This requires
that you first map Node #1 and Node #2 separately so that
the input contact in Node #1 can be mapped directly to the
Output Relay in Node #2. (See Fig. 6-37)
Step 11. You need to set up communication between Node
#1 and Node #2. You can do this by going to the HI
3030 Web Page, select Configuration, select Hardy
Control-Link. For complete instructions to setup
communications between instruments go to the HI
3000 Installation and Operation manual, Hardy
Control-Link Ethernet Network, Setting Node
Addresses for HI 3000 Series Instruments from the
Browser.
Step 12. At node #2 you need to map the Output Relay #3
state value, in the Output Image Table to the Hardy
Boolean In address in the Input Image Table. (See
Fig. 6-6 Green Arrows)
HI-3030 Weight Controller
Service Manual
ing with Node #2 you can map the Input Contact at
Node #1 directly to the Output Relay at Node #2.
(See Fig. 6-37 Black Arrow)
Step 13. At node #1 you need map Input Contact #1 in the
Input Image Table to Hardy Boolean Out in the
Output Image Table. (See Fig. 6-37 Red Arrows)
Step 14. Now that you have set up the local mapping for
Node #1 and Node #2 and Node #1 is communicat-
HI 3030
Node #1
HI 3030
Input Image
Table
Input Image
Table
Hardy Boolean In
Input Contact #1
Input
Node #2
Output
0
From Sensor
66
0
1
1
2
2
3
Output Image
Table
Output Image
Table
4
Hardy Boolean Out
Output Relay #3
Too Actuator
3
Mapping an Input to an Output Relay on Another HI 3030
FIG. 6-37 HARDY CONTROL LINK NETWORK MAPPING
Boolean Mapping
A Boolean variable is a variable that can have the value 0
(FALSE) or 1 (TRUE). In the HI 3030 Filler/Dispenser there
are 3 boolean operations supported:
•
•
•
AND - The symbol for “AND” in a Boolean Assignment Statement is “*”.
OR - The symbol for “OR” in a Boolean
Assignment Statement is “+”.
NOT - the symbol for “NOT” in a Boolean
Assignment Statement is “~”.
NOTE:
Make sure you use RS NetWorx for DeviceNet
and RS NetWorx for ControlNet. They are two
different applications.
A Boolean variable is addressed with the syntax below:
[tablename][word offset].[bit offset]
Example:
DI0.3 is bit #3 in the DeviceNet input table, word #0.
Analog Mapping
The Boolean image tables are arrays of short (2 byte) integers. An individual Boolean variable in the image table is
located by its word offset and its bit offset. Boolean image
tables are given 2 letter names as follows:
•
•
•
•
•
•
DI
DO
table.
HI
HO
RI
RO
is the DeviceNet input image table.
is the DeviceNet output image
is the Hardy input image table.
is the Hardy output image table.
is RIO input image table.
is RIO output image table.
The RIO input and output images tables are mapped to physical external devices using RSLogix. DeviceNet and ControlNet input and output image tables are mapped to physical
external devices using Rockwell Software’s RS NetWorx.
The Hardy input and output image tables have pre-defined
meanings for certain bits within the tables.
An analog variable is one that can have many different values. The HI 3030 Weight Controller supports float, 16 bit
integer, and 32 bit integer analog variable types.
There are three (3) analog operations supported. The symbols are the same as the Boolean operations, but with different meanings.
•
•
•
Multiply - The symbol for “Multiply” is
“*”.
Add - The symbol for “Add” is “+”.
Negate - the symbol for “Negate” is “~”.
Analog tables are given 3 letter names as follows:
DFI, DFO, DSI, DSO, DII, DIO all refer to DeviceNet
tables, where the item is a float, a short integer, or a 32 bit
integer depending on the first letter in the table name. HFI is
a table of Hardy defined floating point numbers.
67
CHAPTER 6
Mapping
An analog variable is address with the syntax below:
4 bytes: PARAMETER VALUE: what to set the parameter
to.
[tablename][offset]
Data returned by the HI 3030: 8 bytes, echoing the WRITEINTEGER command.
Example:
•
•
DFO2=HFI0
Explanation - DeviceNet Float Output
Word 2 = Gross Weight
The offset is an offset in words in the case of the DeviceNet
tables. The offsets in Hardy tables have various predefined
meanings.
•
•
•
HFI0 - is Gross Weight
HFI1 - is Net Weight
. . . . other offsets to be determined.
When an analog equation is evaluated, all terms get converted to float. The final result is then converted to the type
of the LHS (Left Hand Side).
Mixed Mapping
It is permissible to have analog variables appear in Boolean
equations and to have Boolean variables in analog equations.
(We call a mixed equation “Boolean” if its LHS is a Boolean
term, and “Analog” if its LHS is an analog term) The interpretation is the following:
A Boolean variable in an analog equation is converted to 1.0
or 0.0.
An Analog variable in a Boolean equation is TRUE if it is
greater than zero (0) and FALSE if it is less than or equal
zero (0).
Example:
•
•
DO1.0=HF10
Explanation - DeviceNet Output Word 1,
Bit 0 = Gross Weight
Special (Command) Mapping)
WRITEFLOAT, command number 0x1001
The WRITEFLOAT command is used to set the value of
float valued parameters.
Command data:
2 bytes: PARAMETER NUMBER: the number (PARAMID)
of the parameter to write.
4 bytes: PARAMETER VALUE: what to set the parameter
to.
Data returned by the HI 3030: 8 bytes, echoing the WRITEFLOAT command.
WRITESTRING, command number0x1002
The WRITESTRING command can be used to set the value
of any parameter.
Command data:
2 bytes: PARAMETER NUMBER: the number (PARAMID)
of the parameter to write.
Variable number of bytes: a zero terminated ASCII string,
giving the value to set the parameter to.
Data returned by the HI 3030: 8 bytes, echoing the first 8
bytes of the WRITESTRING command.
READINTEGER 0x2000
READFLOAT 0x2001
These commands are used to read the value of integer or
float parameters.
Command data:
2 bytes: PARAMETER NUMBER: the number (PARAMID)
of the parameter to read.
Data returned by the HI 3030: 8 bytes. The first 4 bytes echo
the command, and the next 4 contain the value of the parameter.
Command Interface consists of:
•
•
•
•
16 bit words
Word 0
Command #
Word 1
Parameter ID
Words 2&3 Data.
The commands defined are the following:
WRITEINTEGER, command number 0x1000
The WRITEINTEGER command is used to set the value of
integer valued parameters.
Command data:
2 bytes: PARAMETER NUMBER: the number (PARAMID)
of the parameter to write.
Setting up the command interface in mapping:
Use an equation of the form
CMD0 = (in_table)*(out_table)
In_table is an input table, defining where the command is
written.
Out_table defines where the reply data is written.
Example:
CMD0 = DSI0*DOO0
HI-3030 Weight Controller
Service Manual
This equation says the command will be written to the DeviceNet input table, at word offset 0, and the reply data is written to the DeviceNet output table, at word offset zero.
It is legal to omit the Out_table.
Example:
Parameter
Number
(Hexadecimal)
Code Explanation
68
Valid Range
0001
Operator ID
Max. 3 characters
0002
Instrument ID
Max. 19 characters
0004 = Chan 1
0404 = Chan 2
0804 = Chan 3
0C04 = Chan 4
WAVERSAVER®
0 = None
1 = 7.50 Hz
2 = 3.50 Hz
3 = 1.0 Hz (Def)
4 = .50 Hz
5 = .25 Hz
0005 = Chan 1
0405 = Chan 2
0805 = Chan 3
0C05 = Chan 4
Number of Averages
1-250
DEF = 10
0006 = Chan 1
0406 = Chan 2
0806 = Chan 3
0C06 = Chan 4
Zero Tolerance
0.000001-999999
DEF = 10
0007 = Chan 1
0407 = Chan 2
0807 = Chan 3
0C07 = Chan 4
Units of Measure
0 = lb, 1 = Kg, 2 = g
3 = oz
DEF = 0
0008 = Chan 1
0408 = Chan 2
0808 = Chan3
0C08 = Chan 4
Decimal Point
0-5
DEF = 2
000A = Chan 1
040A = Chan 2
080A = Chan 3
0C0A = Chan 4
Grad Size
0=1 (DEF), 1=2,
2=5, 3=10, 4=20,
5=50, 6=100, 7=200,
8=500, 9=1000
000D = Chan 1
040D = Chan 2
080D = Chan 3
0C0D = Chan 4
Motion Tolerance
0.000001-999999
DEF=10.00
000E = Chan 1
040E = Chan 2
080E = Chan 3
0C0E = Chan 4
Auto-Zero Tolerance
0.000001-999999
DEF=10.00
000F = Chan 1
040F = Chan 2
080F = Chan 3
0C0F = Chan 4
Capacity
0.000001-999999
DEF=999999.0
0010
Infrared Enable
1 = ON (DEF), 0 =
OFF
002A
Printer Baud Rate
0 = 300
1 = 1200
2 = 2400
3 = 4800
4 = 9600 (DEF)
5 = 19200
CMD0=DSI3
This equation says that the command will be written to the
DeviceNet input table, at word offset 3, but no reply data
will be written.
Command (CMD) Interface can be used different tables, or
multiple locations in one table. Example:
CMD0=DSI0*DSO0+RSI0*RSO0+RSI8*RSO8
Which says a command can show up in DeviceNet input
table word 0; Return in DeviceNet Out Table Word 0 or RIO
input table word 0; Return in RIO out table word 0 or RIO
input table word 8; return RIO out table word 8.
Input and output do not need to start at the same word:
Example: CMO0=DSI0*DSO4
Command in DeviceNet input word 0; return DeviceNet out word 4
Command Interface
Parameter Numbers, Code Explanations, Valid
Ranges and Default Settings
CAUTION: THESE VALUES AND EXPLANATIONS CAN
CHANGE. ALWAYS CHECK ON THE HARDY WEB SITE FOR
THE NEWEST COMMAND INTERFACE LIST BEFORE USING
THE COMMAND INTERFACE.
NOTE:
NOTE:
Data is handled based on the method used writing data to the unit. If data is written using the
Command Interface (See Below) the data is interpreted based on the displayed units. However, if
data is directly mapped into the unit, the unit
assumes lbs (pounds) and converts the entered
data to the displayed units.
The default parameter values are marked by
DEF and bold type.
TABLE 6-2: PARAMETER NUMBER, CODE
EXPLANATION, VALID RANGES AND DEFAULTS
69
CHAPTER 6
Mapping
Parameter
Number
(Hexadecimal)
002B
002C
Code Explanation
Printer Parity
Printer Data Bits
Valid Range
Code Explanation
Valid Range
0 = None (DEF)
1 = Odd
2 = Even
0047
Mail User ID
“user” (DEF)
0048
Mail From Address
“HI3000” (DEF)
0 = 7 bits
1 = 8 bits (DEF)
0049
Mail To Address
{
Setpoint Menu Security
(Write Only)
0 (DEF)
002E
Setup Menu Security
(Write Only)
0 (DEF)
002F
Calibration Menu
Security
0 (DEF)
0030
Options Menu Security
0 (DEF)
0031
Mapping Menu Security
0 (DEF)
0033
Local Clear Security
0 (DEF)
0034
Medium Level Password
0035
0036
002D
Parameter
Number
(Hexadecimal)
{““, 0},
{““, 0},
{““, 0}
}
(DEF)
004B
Mail To Config
004C
Channel Name
Max. 19 characters
DEF=Channel 1
044C
Channel Name
Max. 19 characters
DEF=Channel 2
084C
Channel Name
Max. 19 characters
DEF=Channel 3
0C4C
Channel Name
Max. 19 characters
DEF=Channel 4
0 (DEF)
0105
(Write Only)
Parameter Instance
High Level Password
0 (DEF)
0200 = Chan 1
Reference Weight
Cal LO or C2
0.000001-999999
DEF=0
DeviceNet Baud Rate
0 = 125kbps (DEF)
1 = 250kbps
2 = 500kbps
0600 = Chan 2
Reference Weight
Cal LO or C2
0.000001-999999
DEF=0
0037
DeviceNet Node
Address
0-63
DEF=0
0A00 = Chan 3
Reference Weight
Cal LO or C2
0.000001-999999
DEF=0
003F
RIO Baud Rate
0 = 57kbps (DEF)
1 = 115kbps
2 = 230kbps
0E00 = Chan 4
Reference Weight
Cal LO or C2
0.000001-999999
DEF=0
0201 = Chan 1
Span Weight
0040
RIO Rack Address
0-59
DEF=2
0.000001-999999
DEF=1000.0000
RIO Rack Size
0 = 1/4 (DEF)
1 = 1/2
2 = 3/4
3 = 4/4
02F0
(Write Only)
Parameter Map
0041
02F2
Mapped Float
0601 = Chan 2
Span Weight
0.000001-999999
DEF=1000.0000
0A01 = Chan 3
Span Weight
0.000001-999999
DEF=1000.0000
0E01 = Chan 4
Span Weight
0.000001-999999
DEF=1000.0000
0204 = Chan 1
(Read Only)
Cal Type
Not Cal’d (DEF)
1 = C2
0 = Traditional Hard
Calibration
0042
RIO Quarter #
0 = 1st (DEF)
1 = 2nd
2 = 3rd
3 = 4th
0043
RIO Last Quarter
1 = YES
0 = NO (DEF)
0044
ControlNet Address
1-99
DEF=1
0045
Main Active
1=ON
0=OFF
0046
Mail Server
“mailserver” (DEF)
TABLE 6-2: PARAMETER NUMBER, CODE
EXPLANATION, VALID RANGES AND DEFAULTS
TABLE 6-2: PARAMETER NUMBER, CODE
EXPLANATION, VALID RANGES AND DEFAULTS
HI-3030 Weight Controller
Service Manual
Parameter
Number
(Hexadecimal)
Code Explanation
Valid Range
0604 = Chan 2
(Read Only)
Cal Type
Not Cal’d (DEF)
1 = C2
0 = Traditional Hard
Calibration
0A04 = Chan 3
(Read Only)
Cal Type
Not Cal’d (DEF)
1 = C2
0 = Traditional Hard
Calibration
0E04 = Chan 4
(Read Only)
Cal Type
Not Cal’d (DEF)
1 = C2
0 = Traditional Hard
Calibration
0280
(Read Only)
Serial Number
53
0281
(Read Only)
Model Number
HI 3030 (DEF)
0282
(Read Only)
Program Part Number
0650-0xxx-01
0283
(Read Only)
Firmware Revision
X.X.XX
0320 = Setpt 1
0720 = Setpt 2
0B20 = Setpt 3
0F20 = Setpt 4
1320 = Setpt 5
1720 = Setpt 6
1B20 = Setpt 7
1F20 = Setpt 8
2320 = Setpt 9
2720 = Setpt 10
2B20 = Setpt 11
2F20 = Setpt 12
Setpoint Amount
Req’d
.000001 - 999999
Positive or Negative
values
DEF=0.000000
0321 = Setpt 1
0721 = Setpt 2
0B21 = Setpt 3
0F21 = Setpt 4
1321 = Setpt 5
1721 = Setpt 6
1B21 = Setpt 7
1F21 = Setpt 8
2321 = Setpt 9
2721 = Setpt 10
2B21 = Setpt 11
2F21 = Setpt 12
Preact
.000001 - 999999
Positive or Negative
values
DEF=1.000000
TABLE 6-2: PARAMETER NUMBER, CODE
EXPLANATION, VALID RANGES AND DEFAULTS
Parameter
Number
(Hexadecimal)
0322 = Setpt 1
0722 = Setpt 2
0B22 = Setpt 3
0F22 = Setpt 4
1322 = Setpt 5
1722 = Setpt 6
1B22 = Setpt 7
1F22 = Setpt 8
2322 = Setpt 9
2722 = Setpt 10
2B22 = Setpt 11
2F22 = Setpt 12
Code Explanation
Deadband
70
Valid Range
.000001 - 999999
Positive or Negative
values
DEF=1.000000
TABLE 6-2: PARAMETER NUMBER, CODE
EXPLANATION, VALID RANGES AND DEFAULTS
Getting the Parameter Information on the Web
Browser
Step 1. From the Weight Controller Home Page, click
Operation to display tThe Operation Page (See Fig.
6-38).
FIG. 6-38 WEIGHT CONTROLLER HOME PAGE/
SELECTING OPERATION
FIG. 6-39 OPERATION PAGE / SELECTING DIAGNOSTICS
Step 2. Click on Diagnostics. (See Fig. 6-38) The Diagnostics Page appears. (See Fig. 6-39)
Step 3. Click on Parameters to display a complete list of the
Parameters with settings. (See Fig. 6-40)
71
CHAPTER 6
Mapping
Mapping from the Front Panel
NOTE:
Mapping from the Front Panel is for the instrument only. To do network mapping you will need
to go to the Mapping Setup page on the HI 3030
web site.
Step 1. Press the Setup/3/DEF button once. The Configuration Menu appears with the cursor in front of
“ADJUST SETPOINTS” (Default).
Step 2. Press the down or up arrow buttons to move the
cursor in front of I/O Mapping. (See Fig. 6-41)
FIG. 6-40 DIAGNOSTICS PAGE/SELECTING
PARAMETERS
FIG. 6-42 CONFIGURATION MENU/I/O MAPPING
Step 3. Press the Enter button. The Basic I/O Mapping
Menu appears. (See Fig. 6-43) The List you see is a
list of Destinations. You need to map the Source to
the Destination (Tare Scale 2)
Step 4. Press the down arrow button until the cursor is in
front of “Tare Scale 2” appears. (See Fig. 6-42)
Step 5. Press the Enter button to map the Source.
BASICI/ OMAPPING
Tar eScal e1
->
>Tar eScal e2
->
Tar eScal e3
->
FIG. 6-43 BASIC I/O MAPPING/TARE SCALE 2
FIG. 6-41 LIST OF PARAMETER SETTINGS
Step 4. To print a hard copy, click on the printer icon in
your browser or highlight all the parameters and cut
and paste to your word processor, then print and
save the list.
HI-3030 Weight Controller
Service Manual
72
Step 6. You see that the “Tare Scale 2” is Not Mapped. (See
Fig. 6-43)
“Tar e Scal e 2”
>Map:
“Tar e Scal e 2”
>Map:
Input 1- >
Not Mapped- >
FIG. 6-47 TARE SCALE 2/SOURCE MAPPED
FIG. 6-44 TARE SCALE 2/NOT MAPPED
Step 7. Press the Enter button. (See Fig. 6-44) The ITEM
SELECTION Menu appears. (See Fig. 6-44)
Step 12. Press Exit to get back to the Basic I/O Mapping
Menu. Notice that an asterisk has been added to the
right arrow indicating that Tare Scale 2 is mapped
to something. (See Fig. 6-47)
Step 13. To Map other items repeat steps 1-13 for those
items you want to map.
ITEMSELECTION
>Not Mapped
Set pt 1 Out
Set pt 2 Out
BASICI/ OMAPPING
Tar eScal e1
->
>Tar eScal e2
*->
Tar eScal e3
->
FIG. 6-45 ITEM SELECTION MENU
Step 8. Press the down arrow button to move the cursor in
front of the Item you want to map to Tare Scale 2.
In our example we want to map Input 1 to Tare
Scale 2.
Step 9. Press the up or down arrow buttons to select the
Input you want to map to. In our example we want
to map Input 1 to Tare Scale 2. We move the cursor
in front of Input 1. (See Fig. 6-45)
Step 10. Press the Enter button to set the entry.
Step 11. Press the Exit button to return to the Tare Scale 2
menu. You see Input 1 has replaced Not Mapped.
(See Fig. 6-46)
ITEMSELECTION
Set pt 12 Out
>Input 1
Input 2
FIG. 6-46 ITEM SELECTION/INPUT 1
FIG. 6-48 TARE SCALE 2 MAP INDICATION
Step 14. To check what Items are mapped to which Input or
What Outputs are mapped to which Item, just go to
the Basic I/O Mapping Menu, select the Destination
you want to see and press Enter. The mapped data is
readily available.
73
CHAPTER 6
Mapping
Unmapping Procedures
Step 1. To Unmap Items go to the Basic I/O Mapping
Menu.
Step 2. Press the up or down arrow buttons until the cursor
is in front of the Item you want to unmap. In our
example we used Tare Scale 2.
Step 3. Press the Enter button. The Item “Tare Scale 2”
Menu appears. (See fig. 6-48)
Step 4. Press the down arrow until the cursor is in front of
Item.
Step 5. Press the Enter button.
BASICI/ OMAPPING
Tar eScal e1
->
>Tar eScal e2
->
Tar eScal e3
->
FIG. 6-52 BASIC I/O MAPPING/TARE SCALE 2
UNMAPPED
Mapping a Hardy Control-Link Network to
a ControlNet/DeviceNet/Profibus Network
“Tar e Scal e 2”
>Map:
Input 1- >
FIG. 6-49 TARE SCALE 2/INPUT 1
Step 6. Press the up or down arrow buttons until the cursor
is in front of Not Mapped. (See Fig. 6-49)
FIG. 6-53 HARDY CONTROL-LINK NETWORK
CONNECTED TO A CONTROLNET/DEVICENET/
PROFIBUS NETWORK
FIG. 6-50 ITEM SELECTION/SELECTING NOT
MAPPED
Step 7. Press the enter button to set the entry.
Step 8. Press the Exit button to return to the Tare Scale 2
Menu. (See Fig. 6-50)
“Tar e Scal e 2”
>Map:
Not Mapped- >
FIG. 6-51 OK TO FILL MENU/ITEM UNMAPPED
Step 9. Press on the Exit button to return to the Basic I/O
Mapping Menu appears. (See fig. 6-51) Notice that
the asterisk no longer appears. This tells you that
the item is unmapped. To unmap more items, repeat
steps 1-8
The Hardy HI 3000 Series of controllers are designed to save
you money. To connect a Hardy Control-Link Network to a
ControlNet/DeviceNet/Profibus Network simply purchase
one of the Hardy HI 3000 Series Network Interface Option
Cards and install it in the instrument that you want to directly
connect to the other network. You can map to this instrument
from all the other instruments on the Hardy Control-Link
Network, rather than buy a separate network card for each
instrument. (See Fig. 6-53)
Step 1. Determine into which Instrument you want to
install the Network option card.
Step 2. Install the network card. See the HI 3000 Installation and Operation manual, Cabling and Installation
Section.
Step 3. Connect the network cables from the designated HI
3000 Series Instrument and begin mapping to that
instrument from either the Hardy Control-Link Network or the ControlNet/DeviceNet/Profibus Network.
HI-3030 Weight Controller
Service Manual
74
75
CHAPTER 7
Troubleshooting
CHAPTER 7: TROUBLESHOOTING
About Chapter 7
Chapter 7 consists of all the procedures for troubleshooting
the electrical, mechanical and firmware elements of the HI
3030 Weight Controller in the event of a malfunction.
Included in Chapter 7 is a comprehensive flow chart to provide a road map for troubleshooting an entire Weight Controller system, including load cells and cabling.
Disassembly and Reassembly Notes and
Cautions
•
Always disconnect the power cord before
disassembling.
WARNING: FAILURE TO DISCONNECT THE POWER CORD
BEFORE DISASSEMBLING MAY CAUSE PERSONAL INJURY
AND/OR PROPERTY DAMAGE.
•
•
•
•
•
•
•
•
•
Make sure that any disassembly is done in
a clean, well ventilated, properly controlled static environment.
Always make sure that the assemblies and
sub-assemblies are well supported and
insulated when doing any repairs on the
Weight Controller.
Place small fasteners, connectors and electrical parts in closed containers so as not to
lose parts during reassembly.
Read all the disassembly instructions
before any disassembly begins. Be sure
that you are familiar with the procedures.
If any of the instructions for disassembly
are unclear, contact Hardy Instruments,
Technical Support Department for additional information and assistance.
Do not disconnect any electrical plug, connector or terminal unless an identification
tag is present or one is attached. Always
note where the connector or plug was
attached to the electrical component or
wiring harness.
Always install complete hardware groups
(Screws, Washers, Lock Washers, Spacers,
Etc.) back to the original point of removal.
Always replace broken or damaged modules or hardware immediately!
Always check to be sure that no loose
parts are sitting on printed circuit boards
or electrical connectors or wires when disassembling or reassembling.
Always protect printed circuit boards from
electrostatic discharge (ESD). Always use
approved ESD wrist straps and anti-static
pads.
•
•
Always perform a final inspection after
completing any reassembly to be sure that
all fasteners are tight, all connectors are
secure and there are no loose parts on any
of the printed circuit boards in the Weight
Controller.
Always follow proper safety procedures
when working on or around the Weight
Controller.
Error Messages
!A/D Failure Error! - Internal Electronics Error, Retry.
!A/D Convert Error! - Load Cells input out of range.
!Motion Error! - Check Settings and Retry
!Trad Cal Error! - Error occurred during calibration,
re-calibrate.
!C2 Cal Error! - Error occurred during calibration,
re-calibrate.
!Too Lo Error! - Verify that the load cell signal level is0-15
mV. Verify that there is enough weight on the
scale. Perform Span than go back and Zero.
!Too Hi Error! - Verify that the load cell signal level is 015mV. Verify that there is enough weight on
the scale. Perform Span than go back and
Zero.
!No C2 Sensor! - Instrument did not detect a C2 Load Sensor
!CAL Failed! - Too few counts between Zero and Span.
!C2 Caps Unequal! - Different load cell capacities (For
example 50 lbs capacity load cell and 100
lbs capacity load cell on one system. Make
the load cells even be removing the
uneven load cell and replacing it with a
load cell that is equal to the others capacity.
!HI/LO Too Close! - Zero and Span are not more than 1,000
counts from each other or there is no
change or negative change. Reset either so
the counts are more than 1,000 counts of
each other.
!Function Error! - Pressed a function button and the Function
did not work. Try again. Cycle power.
!Not Allowed! - Value entered is outside the range allowed.
Try another value.
!Security Violation! - User signed in with a password that
does not allow performance of a certain
function or entry to certain menus. Security level of the user identified in the User
ID, too low for the menu or function.
HI-3030 Weight Controller
Service Manual
General Troubleshooting Flow Chart Index
Drifting or unstable weight readings
A
Electrical, Mechanical and Configuration
reviews
B
Instabilities on Formerly Operating
System Without IT
C
Weight indication will not return to zero
E
Verify individual load sensor operation
F
Trad. Cal - A/D Failure Error
G
Mechanical Inspection
H
Electrical Inspection
J
Load Sensor Installation
K
Weight Display Stops Incrementing
M
Blank Display
N
Display Stuck on a Screen
O
View Input States
R
Forcing Outputs
S
76
77
CHAPTER 7
Troubleshooting
A - Stability Test
A - STABILITY TEST
A
Confirms the Health of the
internal A/D converter
circuits.
Enter
Diagnostics
STABILITY
TEST
Activate the
test and
review the
results.
PASS
No
There isn’t a port
defined or enabled
The internal A/D
converter has a
hardware problem
Yes
Continue
checking for
mechanical
problems.
B
H
Check
Configuration
settings under
options
B
Cycle power and re-run
the test. If the second
test fails contact:
Hardy Instruments
Technical Support
HI-3030 Weight Controller
Service Manual
B - Guidelines for Instabilities on Formerly Operating Systems
B
Check for
Electrical Stability
OK?
No
B1
No
B2
No
B3
Check for
Mechanical Stability
OK?
Check Configuration
settings for
stability
OK?
Yes
GO TO
K
78
79
CHAPTER 7
Troubleshooting
B1 - Guidelines for Instabilities on Formerly Operating Systems (Cont’d)
B1
B1.1
B1.2
Electrical
Physical Grounding All common equipment share a common ground point.
Keep the ground cable length to earth ground as short as possible.
Install a new ground rod if the cable length is excessive
Cable Cuts or breaks in the loadcell cable insulation allow moisture to wick into the cable
and loadpoints. This can setup stray capacitance charges and allow ground
currents to exist. This could create a highly intermittent situation.
B1.3
Vessel, Fill and discharge piping Ground all to a common point to eliminate electrical differences in
potential and static build-up.
B1.4
Loadcells Ground straps must be installed to provide a direct discharge path
to ground around the loadpoints.
B1.5
B1.6
B1.7
Cable Routing Separate high voltage sources and cables from low voltage signal cables.
Stay a minimum of 14 inches from magnetic fields and SCR controls.
Avoid parallel high voltage and signal cable runs.
Cable Shielding Ground low voltage cable shields only at the controller end.
Grounding both cable ends will produce ground currents.
Verify, with an ohm meter, the shield is only grounded at the weight controller.
Disconnect the shield at the controller and check for an pen circuit between
ground and shield. Reconnect the shield to ground and confirm a proper ground
path from the Junction Box to the controller.
Verify the shield is not connected to ground at the Junction Box.
Loadcell cable shields only pass through the Junction Boxes and are not connected
to ground at any point.
Weight Controller - Common AC ground and Chassis grounds.
GO TO
B
HI-3030 Weight Controller
Service Manual
B2 - Guidelines for Instabilities on Formerly Operating Systems: Mechanical Stability and Configuration Settings
80
81
CHAPTER 7
Troubleshooting
C - Guidelines for Instabilities on Formerly Operating Systems
C
Check individual load sensors output by
physically lifting the signal wires and
making a reading of that sensors output.
Use a Multi meter and
Record load sensor
data for comparison and
stability.
A load sensor output can be considered stable if
the readings only vary +- 0.01mV. Applying
weight and releasing the weight should show a
very rapid Millivolt change. A slow Millivolt
change can indicate a damaged strain guage.
Lift the signal wires, read and
record the Millivolt reading.
Repeat for each sensor.
Stable?
Inspect the summing junction box for
contamination or damage, and replace if necessary
No
Yes
Yes
Stable?
TEST
COMPLETE
No
Remove and replace any load
sensor determined to be unstable
No
Yes
Stable?
No
If you are unable to isolate the
problem, contact Hardy Technical
Support: 800-821-5831
Insure the problem is not
mechanical. (Review Section B)
HI-3030 Weight Controller
Service Manual
82
C1 - Guidelines for Instabilities on formerly Operating systems with the Integrated Technician Summing Junction Box diagnostics
C1
Check individual load sensors output by
using the INTEGRATED TECHNICIAN
diagnostics and IT summing junction box
Record load sensor for
comparison and stability
A load sensor output can be considered stable if
the readings only vary +- 0.01mV. Applying
weight and releasing the weight should show a
very rapid Millivolt change. A slow Millivolt
change can indicate a damaged strain guage.
Repeat for each sensor.
Inspect the summing junction box for
contamination or damage, and replace if necessary
Stable?
No
Insure the C2 wires are correctly terminated
even if you do not have C2 load sensors.
The IT communications and testing is
conducted over the C2 lines.
Yes
Yes
Stable?
TEST
COMPLETE
No
Insure the problem is not
mechanical. (Review Section B)
No
Yes
Stable?
No
If you are unable to isolate the
problem, contact Hardy Technical
Support: 800-821-5831
Remove and replace any load
sensor determined to be unstable
83
CHAPTER 7
Troubleshooting
E - Return to Zero Test
E
The Return to Zero Test is used to determine
whether the instrument can still zero a scale
based on preset parameters. If you pass the
Return to Zero Test you are within the sum of the
preset Motion and Zero Tolerance settings. If you
fail you are outside the sum of the preset Motion
and Zero Tolerance settings. If you fail the test
there may be too much build up on the scale and
you need to clean the scale or you have scale
problems. You should do this test whenever you
cannot zero the scale.
Enter
Diagnostics
Return
to ZERO
Activate the
test and
review the
results.
PASS
No
Clean any material
from the scale
The zero tolerance
level set in
configuration has
been exceeded
Yes
Verify the
individual
load cell
signal outputs
H
Check
mechanical
connections
are correct.
B3
Do not just
recalibrate or
increase the zero
tolerance levels.
Troubleshoot the
scale to why the
zero point has
shifted.
HI-3030 Weight Controller
Service Manual
F - Verify Individual Load Cell Milli-Volt
Readings
Using the load cell certificate, verify the milli volt per volt rating
Example: 3 mV/V load cells will produce approximately 15 mV at full load.
That is 5 volts excitation x 3 mV/V. A scale capacity of 1,000 lbs with 100 lbs
of dead load at empty the load point mV reading should equal 1.5 mV
F
Using a Multimeter
MV
readings
acceptable?
Physically lift the
signal leads to read
each load cell’s
output.
Check individual
load sensor
output mV
readings.
MV
readings
acceptable?
1) No dead load.
Apply load and re-test.
2) Wiring error.
Verify color code using the
load cell certificate.
3) Open bridge circuit.
Disconnect power and verify
load point bridge resistance
reading with an Ohmmeter.
1) Stressed load cell, remove
all load and re-test.
2) Excessive loading.
For additional
testing go to:
H
NO
Check load sensor
NEXT
MV
readings
acceptable?
K
MV
readings
acceptable?
A
Record load
sensor mV
output level for
comparison.
Repeat for all load
sensors
Defective load cell?
Replace and repeat
Test F
MV
readings
acceptable?
YES
TEST COMPLETE
If you were unable to determine the
Milli-volt readings. Go to
K load sharing
or
Contact Technical Support
84
85
CHAPTER 7
Troubleshooting
F(a) - Verify Individual Load Cell Readings
Using INTEGRATED TECHNICIAN™
F(a)
INTEGRATED TECHNICIAN is a built-in system
diagnostics utility that enables the operator to rapidly
troubleshoot a weighing system from the front panel,
PDA or Web Browser of the HI 3030. Used with an HI
215IT Junction Box you can read each individual
load cell in mV, mV/V and weight to determine if a load
sensor is malfunctioning or not connected.
Enter
Diagnostics
Voltage &
Weight
Read and record
each load cell’s
Signal output
Activate the
test and
review the
results.
Yes
PASS
No
All signal
levels fall
within the +0
to +15mV
range
The Millivolt range is
outside the
+0 to +15 mV range
Millivolt reading is
slow or 0.0 mV. It
may be a negative
reading. Use a multimeter to confirm
Check
Wiring
Apply weight
and insure all
signal voltages
increased the
same amount
No
Replace the load
cell if the unit signal
readings are out of
tolerance.
B
Check for
mechanical
reasons, or replace
load cell
PASS
HI-3030 Weight Controller
Service Manual
G - A/D Failure Error
86
87
CHAPTER 7
Troubleshooting
H - Mechanical Inspection
H
1)
2)
3)
4)
5)
Keep flexures on the horizontal
Vertical flexures should be avoided
Do not use flexures to correct for misaligning piping
Do not use hose flexures to make right angle bends
Non-flexed piping should have an unsupported
horizontal run using a ratio of 36 times its diameter.
6) Pipe flexure lengths should be a ratio of 6 times it’s diameter
7) Feed and discharge piping flexed
8) Are the flex joints on the correct side of the valve?
(a) You weigh the output valve, not the input valve
(b) Does the weigh scale see all the product to be weighed?
(C) If the product applies a force to a valve or pipe so that
pipe or valve must be included in the weigh vessel.
(d) Proper positioning of the flexures are key.
(E) Your vessel must seem to float.
H1
All pipes and conduits
flexible?
H2
Mechanically Isolated
from ladders and
connecting structures?
H3
Are the load cells
properly mounted?
1)
2)
3)
4)
H4
Are Check Rods
installed to dampen
vessel movement?
1) Protects the load cells from overload and impact forces
2) Limits the movement of the vessel.
3) Rods must be loose and not interacting with the vessel.
H5
Are cables routed
properly?
H6
Housekeeping
To
Verify Electrical
Go to
J
1) Floors or structures do not interact.
2) Local traffic does not interact.
3) Protected from forklifts and adjacent processing equipment
Level, solid mounting base
The load cell is mounted right side up.
All load cell bolts installed using anti-seize compounds.
Mechanically aligned to compensate for expansion and contraction.
1)
2)
3)
4)
5)
Separate conduit for low and high voltage cables.
Do not bundle low voltage with high voltage cables.
Maintain at least 3 inches of separation.
Maintain 14” separation from magnetic fields and 440 VAC.
Cables are in conduit or tied up and protected from damage.
1)
2)
3)
4)
Product, tools and production aids are off the vessel.
No workers are physically on the scale.
Must protect equipment from environmental damage
Make sure openings are sealed to keep water and environmental
contaminates from damaging:
(a) Instrument Cabinet or Enclosure
(b) Summing Card
(c) Load Cells
(d) Conduit Runs
(e) Covers are properly installed
HI-3030 Weight Controller
Service Manual
J - Electrical Inspection
DO NOT POWER UP THE CONTROLLER UNTIL
INPUT VOLTAGES CAN BE VERIFIED!
J
J1
Verify the proper
voltage level has been
supplied.
J2
Apply power to the
controller only if supply
voltage is correct.
J3
Does the scale reflect
a weight change?
J4
Cabling
1) Check the specification label attached to the weight controller
chassis. (110 VAC/220 VAC or 24 VDC)
2) Use a meter to verify neutral, ground and Hot are proper.
3) Computer grade power
4) Use active filters for motor noises and spikes.
5) Use isolation transformers to combat surges and sags.
6) Isolated from SCR and motor control circuits
7) Use a common earth ground.
a) Keep ground cable runs as short as possible
b) Excessive ground cable runs can act as an antenna
for AC noise.
c) Install grounding straps around load cells to direct
static away from the load cell and directly to ground.
d) Install ground straps on the input and discharge
piping, and the vessel to a common earth ground
1) Verify the front display illuminates.
2) Completes the Initialization process.
3) Displays a weight reading. This weight value will not be
correct if a calibration procedures were not performed.
Apply weight to the vessel
a) Does the weight increase and decrease in the
correct direction with the weight?
B) Is the weight reading repeatable?
C) The weight value will not be correct until a proper
calibration is completed.
1) Verify color code, input is excitation, Output is signal.
2) Shielding
a) Grounded only at the controller
b) Continuous shield connection from the load cell cable
to the instrument. Single point EMI/RFI drain.
c) Terminated but not grounded, at the summing box.
3) Sense lines Installed?
A) Jumpers or sense lines in the J1 connector?
B) Sense lines must be installed for C2 calibration.
4) Using a multimeter verify readings.
88
89
CHAPTER 7
Troubleshooting
K - Load Sharing and Load Sensor Checkout
K
K1
Verify the proper
voltage level has been
supplied.
K2
Apply power to the
controller only if supply
voltage is correct.
1) Does the mV signal increase in a positive direction?
2) If you receive a negative result, check if load cell is
mounted correctly.
a) The arrow goes with the direction of the force.
b) If there isn’t an arrow, you must manually verify the
correct direction. A negative reading indicates the
load cell is upside down.
c) Load cells in tension will not reflect a negative
reading if installed upside down. If upside down, only
the force applied by the cable would be included in
the weight readings.
d) If you are still receiving a negative signal, verify
load cell wire color code.
1) Verify a positive reading from each load cell, using a
multimeter.
2) Record the mV reading and compare each corner for
proper load sharing.
a) Proper load sharing should see only a difference of
+/- .5 mV.
b) Larger differences due to motors and piping,
should not exceed +/- 2 mV.
c) If there isn’t any motors, valves or piping to
explain the mV difference, adjust the corners and
balance the mV readings.
d) Use shims or if equipped adjusting bolts on the
load cell mounting hardware.
e) Drawing a load cell map will help determine the
correct leg to adjust and in which direction.
Three load Cells Balance Like a Three Legged Chair
1) Using a spirit level, verify the vessel is vertically and
horizontally correct.
2) Verify if any height change will effect the attitude of adjacent
vessels or piping.
3) Adjust each leg to dynamically match mV outputs.
4) Verify the mV readings and physical level when complete.
Four Load Cells or More Present a Challenge
1) Use a multimeter:
Determine the sum of the load cell signals
and your target mV setting for each load cell.
2) Read the output of individual load cells.
3) Adjust the load cell with the lowest reading to dynamically
match the target mV readings obtained in step 1.
4) Read the mV readings from each load cell to verify a proper
correction.
5) Repeat steps 3 and 4 to achieve a proper load sharing vessel.
6) Verify the mV readings and vessel level when complete.
HI-3030 Weight Controller
Service Manual
M - Weight Reading Stops Incrementing
Weight Reading is Frozen at Zero or a High Weight Reading
M
The load sensor output signal has exceeded the millivolt limits set
in Configuration and/or the internal factory setting.
1) Verify the signal wires are properly connected.
a) Verify load cell cable color code
(1) Load Cell Certificate.
(2) Installation Manual
(3) Cable marking strips
b) Broken signal wires act as antenna for EMI/RFI.
c) Load cell cable shields must be grounded only at the
controller to dampen EMI/RFI signals.
2) The load cell output signal voltage has exceeded 15 mV DC
a) Use a multimeter to verify mV levels.
B) Verify individual load cell milli-volt signals.
(1) An individual load cell may be over-ranged
and exhibit high milli-volt readings.
(2) Possible physical damage to the load cell
(3) Internal strain gauge bond broke.
(4) Moisture in the load cell cable or body.
3) Weight in the hopper exceeds the configuration Scale Capacity setting.
A) Under configuration verify the Scale Capacity setting.
B) 105% of the scale capacity setting will cause a HI indication.
C) This is used only as a warning and does not effect calibration.
D) Optional communication signals are unaffected by this indication.
4) Weight in the hopper exceeds the load cell capacity
a) Mechanical forces or product acting on the scale overloads the
load cells.
B) Use a multimeter to verify the milli-volt levels.
5) Review Mechanical and Electrical Flow charts for additional tips. B1
Error ?
Yes
No
Contact
Technical Support
Proceed with
Calibration
90
91
CHAPTER 7
Troubleshooting
N - Blank Screen
N
Measure AC Power
at J6
OK?
Measure the excitation
voltage at J1
5 VDC?
No
No
1) Check for proper power at the
source connection.
2) Check the circuit breaker at the
source.
Check the power fuse located inside
the case
OK?
Yes
Contact
Hardy Instrument
Technical Service
800-821-5831
No
Disconnect all the
connectors from the
back panel except
power.
Measure the
Excitation voltage
at J1
5 VDC?
Replace the 2.5
amp slo-blow fuse
and supply power.
Does the fuse blow
out again?
Yes
1) Reconnect the jacks one
at a time checking the 5 VDC
excitation.
2) If reconnecting any jack
effects the 5 VDC, check for
wiring errors.
No
Yes
Display OK
Monitor system for proper
operation
Check out complete
No
Contact Technical
Service
HI-3030 Weight Controller
Service Manual
O - Display Stuck on a Screen
O
Power Down then Power Up
Able to
change Screen?
Yes
No
Remove all connectors
Other than the power connector
Able to
change Screen?
Yes
No
Disconnect the power cable.
Remove the back plate with
printed circuit boards. Push
the EPROM down into its
socket until it is securely seated.
Able to
change Screen?
Yes
No
Contact Technical Service
1-800-821-5831
Monitor system for proper
operation
Check out complete
92
93
CHAPTER 7
Troubleshooting
R - View Input States
R - VIEW INPUT STATES
R
The Input States display shows
whether or not the instrument
has any inputs activated. This
provides a way of testing the
inputs before actually starting
the process.
Enter
Diagnostics
STABILITY
TEST
Activate the
test and
review the
results.
PASS
No
These are dry contact
closures. Allowing
110 VAC in the input
will damage the unit.
Verify contact is
being made between
the connector
common to the input
desired.
Contact Hardy
Technical
Support for
repair.
Use a jumper to
physically make the
connection and verify
operation.
Yes
HI-3030 Weight Controller
Service Manual
94
S - Forcing Outputs
S
Enter
Diagnostics
STABILITY
TEST
The Force Output function individually
activates each of the 4 Output relays in the
instrument. Useful in pre-startup to determine
that all the relays are connected to the correct
auxiliary devices
Activate the
test and
review the
results.
WARNING: Forcing the output relay may cause
damage or personal injury. Make absolutely sure
you know what the relay is connected to before
activating. If you are unsure, do a physical check
to determine what the selected relay is connected
to BEFORE activating
The relay will
activate. Therefore
activating any
machinery attached.
These are Opto
isolated solid-state
relays, switching 110240 VAC. They will
not work as a dry
contact closure
Verify voltage is
being provided. The
controller will not
supply the switching
voltage
Repeat for
each output
Contact Hardy
Technical
Support
Use an AC meter to
physically verify
operation
PASS
Yes
No
95
CHAPTER 7
Troubleshooting
System Integrity Check and Fault Determination From the Front Panel
TESTDATA
To determine if an instrument or cabling problem exists, verify the basic operation of the system by performing the following system checks.
> ID
HARDY 3030
Model :
HI 3030
Ser ial Num:
1136
Diagnostics
About Diagnostics
The Diagnostics menus enable the technician to get a more
complete view of how the Weight Controller and scale are
working. For example you can check to see the last Calibration, the type of calibration and when the last Calibration
was performed. You can view the Data List Display for the
Serial Number assigned to the instrument or Program Part
Number. You can also check the last graduation size, Units
selected, Operator ID, Analog Options and more information
about the configuration of the instrument you are checking.
You can get information about the Load Sensors such as Output Sensitivity, Hysteresis, Sensitivity of each individual
Load Sensor. Many of the Menu Items will allow you to
change them. If a Menu Item has an asterisk (*) in front of it
then you can change this item. The Diagnostic Menus allow
you to perform a Self Test which provides the total scale
input to the instrument such as mV and Weight, mV/V and
Weight and mV/V for the units selected (i.e. lbs, kg, oz, g).
INTEGRATED TECHNICIAN© enables you to totally diagnose a weighing system to determine the source of a problem
should one occur.
Checking the Device Data List
The Device Data List is a list of all the parameters that were
set for the ingredient you are currently using and the instrument parameters that have been set for this instrument. Any
parameters that have an asterisk (*) in front of it can be
changed from the Test Data Menu.
Step 1. From the Standby Display press the Test/9 button.
The Test and Data Menu appears with the cursor in
front of Device Data List. (See Fig. 7-1)
FIG. 7-2 TEST DATA DISPLAY/INSTRUMENT ID MODEL NUMBER - S/N
Step 3. Here you can view the Instrument ID, Model Number and Instrument Serial Number of the instrument. This is a read only display. To change any of
the parameters you will have to go to the Setup
Menu/Instrument ID.
Step 4. Press the down arrow button until the next three
parameters appears. (See Fig. 7-3)
TESTDATA
PP# :
0650- 0119- 01
Pr
og
Ver
:
1.2.03
>
Pr t Baud Rat e
9600
FIG. 7-3 TEST DATA DISPLAY/PROGRAM
VERSION/PRINTER BAUD RATE
Step 5. These are read only displays. The information is
important:
•
•
•
FIG. 7-1 TEST AND DATA MENU/SELECTING
DEVICE DATA LIST
Step 2. Press the Enter button. The Device Data List Display appears with the cursor in front of Instrument
ID. (See Fig. 7-2)
PP# = Program Part Number. This is the
part number of the firmware. To order
additional copies of the firmware you will
need this number. This is also additional
information available to a service technician for troubleshooting.
Often a technician needs to know the program version to determine if the correct
version is being used. A Hardy Technical
Support Technician will ask what version
of software you are currently using to
determine the source of a problem. You
can find the version here.
Prt Baud Rate (Printer Baud Rate) - Indicates the Baud Rate for the printer.
Step 6. Press the down arrow button until the next three
menu items are displayed. (See Fig. 7-4)
HI-3030 Weight Controller
Service Manual
96
Step 8. Press the down arrow to move to the next 3 parameters. (See Fig. 7-6)
TESTDATA
Pr t Par it y
NONE
8
> Pr t Dat a Bit s
IP:
192.168.110.99
TESTDATA
SETPT:
1
*Pr eact
0.00
0.00
> *Dead Bd
Last Cal Type:
C2
FIG. 7-4 TEST DISPLAY/PRINTER PARITY PRINTER DATA BITS - IP ADDRESS
•
•
•
Printer Parity - Indicates the parity setting
for the printer (Odd, Even, None).
Printer Data Bits - Indicates the Data Bit
setting for the printer.
IP - Lists the IP address for this instrument. The address listed in Fig. 7-4 is the
default IP address of an instrument right
from the factory.
FIG. 7-6 TEST DATA SETPT: 1/PREACT - DEAD
BAND - LAST CAL TYPE
•
Step 7. Press the down arrow button until the next three
menu items are displayed. (See Fig. 7-5)
TESTDATA
DeviceNet Adr :
> *ChooseSet point
*Amt Req
Preact - The number of units above or
below the set point value where you want
the relay to trip. Use as an “in flight” compensation value. Enter a negative number
for Gain in Weight Applications and a positive number for Loss in Weight Applications.
1.
2.
0
1
0.00
3.
4.
FIG. 7-5 TEST DATA/DEVICENET ADDRESS CHOOSE SETPOINT - AMOUNT REQUIRED
•
•
Devicenet Address - Lists the Node
Address of the instrument you are checking.
Choose Setpoint - Note this parameter has
an asterisk (*) in front of it. This means
that the value for this parameter or any
parameter with an asterisk can be changed
1.
2.
•
Press the right or left arrow buttons
you can select a setpoint (range is 112).
Press the Enter button to set the entry.
Amt Req (Amount Required) - The
Amount Required is the weight required
for your process.
1.
2.
3.
To change the Amount Required press
the Clr (Clear) button.
Use the alphanumeric key pad and
enter the new Amount Required.
Press the Enter button to set the entry.
•
Dead Bd (Dead Band) - Is a value used to
prevent relay chatter once the setpoint is
reached. The Dead Band must be larger
than the Preact,
1.
2.
•
Press the Clear button.
For Gain in Weight Preact settings,
press the User/./-/_/@ button two (2)
times. Use the alphanumeric keypad
to enter the negative value.
For Loss in Weight Preact settings,
use the alphanumeric keypad to enter
the positive value.
Press the Enter button to set the entry.
Press the Clear button.
Now use the alphanumeric keypad to
enter the new Dead Band value.
Last Cal Type - Lists the type of calibration last performed (C2, Trad or None).
This is a read only parameter and cannot
be changed from this menu.
Step 9. Press the down arrow button until the next three
menu items are displayed. (See Fig. 7-7 & Fig. 7-8)
97
CHAPTER 7
Troubleshooting
3.
•
FIG. 7-7 TEST DATA/LAST CALIBRATION TIME
Press the down arrow to move to the
next parameter you want to view or
change.
Press the up or down arrow until the cursor
is in front of *WAVERSAVER. This display shows the last WAVERSAVER selection.
1.
2.
3.
Press the left or right arrow buttons to
select the WAVERSAVER selection
you want.
Press the Enter button to set the entry.
Press the down arrow to move to the
next parameter.
Step 11. Press the down arrow button until the next three
menu items are displayed. (See Fig. 7-10)
FIG. 7-8 TEST DATA/LAST CALIBRATION DAY/
MONTH/YEAR
•
The Calibration time and date lists the
time and date the instrument was last calibrated. This is menu is read only and cannot be changed from this menu. The Cal
time is important to determine if the
instrument needs calibration to correct a
problem with the scale. If a calibration has
not been done for a long time it is time to
re-calibrate the instrument.
TESTDATA
*Gr ad Size
> Zer o Val ue:
Span Val ue:
FIG. 7-10 TEST DATA DISPLAY/GRADUATION
SIZE - ZERO VALUE - SPAN VALUE
•
The Zero Value and Span Value are read
only. The Graduation Size, Zero Value and
Span Value are for the last traditional calibration only. The *Grad Size (Graduations) can be changed.
•
Grad Size - Minimum increment displayed
by the instrument.
Step 10. Press the down arrow button until the next three
menu items are displayed. (See Fig. 7-9)
TESTDATA
Cal ibr at or
> *Unit s
WAVERSAVER:
JD
lb
1.00 Hz
1.
FIG. 7-9 TEST DISPLAY/CALIBRATOR - UNITS WAVERSAVER®
•
The Calibrator is read only and lists the
person who last calibrated the instrument.
•
Press the up or down arrow until the cursor
is in front of *Units.
2.
3.
•
1.
2.
This display shows the last selected
Unit. Press the left or right arrow
buttons to select the Units you want.
The selections are lbs, kg, oz, g.
Press the Enter button to set the entry.
1
0.00
10000.0
•
This display shows the last selected
Graduation size. Press the left or
right arrow buttons to select the Units
you want. The selections are 1, 2, 5,
10, 20, 50, 100, 200, 500, 1000.
Press the Enter button to set the entry.
Press the down arrow to move to Zero
Value
Zero Value - This is the value used when
zeroing the scale with no material in the
vessel or on the scale when performing a
traditional calibration.
Span Value - This is the value used when
putting between 80% - 100% of the scale
capacity when performing a traditional
calibration.
HI-3030 Weight Controller
Service Manual
Step 12. Press the down arrow button until the next three
menu items are displayed. (See Fig. 7-11)
CAUTION: CHANGING THE ZERO COUNT CAN NULLIFY
YOUR CALIBRATION. ONLY SERVICE PERSONNEL SHOULD
MAKE ANY CHANGES THE ZERO COUNT, SPAN COUNT OR
C2 SENSITIVITY.
CAUTION: SPAN COUNTS MUST BE LARGER THAN THE
ZERO COUNTS.
•
The C2 Sensitivity is the full scale output
sensitivity of C2 load sensor measured at
the factory.
1.
TESTDATA
*Zer o Ct :
> *Span Ct :
*C2 Sens.
2.
2229714
2147483647
1.84mV/ V
3.
4.
FIG. 7-11 TEST DATA DISPLAY/ZERO COUNT SPAN COUNT - C2 SENSITIVITY
•
•
*Span Count, *C2 Sensitivity, *Scale
Capacity can all be changed.
The Zero Count is the stored A/D counts
on the last calibration zero.
1.
2.
To clear the Zero Count press the Clr
(Clear) button.
Use the alphanumeric key pad to enter
the new Zero Count value
CAUTION: ZERO COUNTS MUST BE LESS THAN SPAN
COUNTS.
3. Press the Enter button to set the entry.
4. Press the down arrow to move to the
next parameter you want to view or
change.
5. If you get an error during calibration,
change Zero Count to 50,000 to clear
the calibration error, then recalibrate.
•
TESTDATA
*Scal eCap
> *Zer o Tol er
*Azer o Tol
•
•
*Scale Capacity,*Zero Tolerance and
*Auto Zero Tolerance can all be changed
from this menu.
5.
Scale Capacity - The maximum weight the
scale is rated for.
1.
2.
3.
1.
2.
3.
200.00
10.00
10.00
FIG. 7-12 TEST DATA DISPLAY/SCALE CAPACITY
- ZERO TOLERANCE - AUTO ZERO TOLERANCE
Press the up or down arrow until the cursor
is in front of *Span Count.
The Span Count are the A/D counts on the
last C2 (full scale) or Traditional (Span)
calibration.
To change the sensitivity press the Clr
(Clear) button.
Use the alphanumeric key pad and
enter the sensitivity specifications that
comes with new load sensors and
enter the full scale output sensitivity
of the C2 load sensors.
Press the Enter button to set the entry.
Press the down arrow to move to the
next parameter you want to view or
change.
Step 13. Press the down arrow button until the next three
menu items are displayed. (See Fig. 7-12)
CAUTION: CHANGING THE SPAN COUNT CAN NULLIFY
YOUR CALIBRATION.
•
98
To change the Scale Capacity click on
clear.
Use the alphanumeric key pad and
enter the new scale capacity.
Press the Enter button to set the entry.
•
Zero Tolerance - The number of graduations from zero that will be accepted as
zero by the instrument.
1. To clear the Zero Tolerance press the
Clr (Clear) button.
2. Use the alphanumeric key pad and
enter the new Zero Tolerance.
3. Press the Enter button to set the entry.
•
Auto Zero Tolerance - When Auto Zero is
enabled, automatically zeros the gross
To clear the Span Count press the Clr
(Clear) button.
Press the Enter button to set the entry.
Change the Span Count to a large
number (1,000,000.00) to clear calibration errors, then re-calibrate.
99
CHAPTER 7
Troubleshooting
weight as long as the weight is within the
zero tolerance for your process.
1.
2.
3.
4.
To change the Auto Zero Tolerance
press the Clr (Clear) button.
Use the alphanumeric key pad and
enter the new Auto Zero Tolerance.
Press the Enter button to set the entry.
Press the down arrow to move to the
next parameter you want to view or
change.
Step 14. Press the down arrow button until the next three
menu items are displayed. (See Fig. 7-13)
Step 16. Press the down arrow button until the cursor is in
front of Load Sensor. (See Fig. 7-14)
TESTDATA
*Aver ages
> Numof Sensor s
Load Sensor
FIG. 7-14 TEST DATA/AVERAGES - NUMBER OF
SENSORS - LOAD SENSOR
•
TESTDATA
*Mot ion Tol
> *Aver ages
Numof Sensor s
10.00
10
4
FIG. 7-13 TEST DATA DISPLAY/MOTION
TOLERANCE - AVERAGES - NUMBER OF SENSORS
Step 15. *Motion Tolerance, *Averages can be changed
from this menu. Number of Sensors is read only
and cannot be changed.
•
Motion Tolerance - The allowable deviation between consecutive weight readings.
1.
2.
3.
4.
•
Averages - The Number of weight readings used to compute displayed weight.
1.
2.
3.
•
To change the Motion Tolerance press
the Clr (Clear) button.
Use the alphanumeric key pad and
enter the new Motion Tolerance.
Press the Enter button to set the entry.
Press the down arrow to move to the
next parameter you want to view or
change.
To change the Averages press the Clr
(Clear) button.
Use the alphanumeric key pad and
enter the new Averages.
Press the Enter button to set the entry.
Number of Sensors - Lists the number of
C2 load sensors that are connected to the
the channel and instrument you are checking.
10
4
1- >
Load Sensor 1 - The instrument will read
C2 load sensors certification information
only.
1. The instrument displays sensor number 1 as a default.
2. If you want to look at the certified
specifications for other load sensors
press the up or down arrows to move
the list of sensors. The instrument can
detect a maximum of 32 sensors per
scale.
3. To view the certified sensor information which is read from the C2 chip,
do the following:
a. Press the Enter button. The Load
Sensor Display appears. (See Fig.
7-15)
LOADSENSOR
Ser ial # :
> Capacit y
Sens.
1
45236
1000.00
0.00mV/ V
FIG. 7-15 LOAD SENSOR DISPLAY/SERIAL
NUMBER - CAPACITY - SENSITIVITY (MV/V)
b.
c.
d.
e.
Serial Number - This is the serial
number of the selected load sensor for this channel. In our example we selected channel 1.
Capacity - the maximum weighing capacity of the load sensor.
Sensitivity - Sensitivity specification of the load sensor set at the
factory.
Press the down arrow until the
remainder of the load sensor
specifications appear. (See Fig. 716)
HI-3030 Weight Controller
Service Manual
>
FIG. 7-16 SENSITIVITY - INPUT RESISTANCE OUTPUT RESISTANCE
f.
g.
Input Resistance - This is the
Certified Input Resistance from
the certification done by the factory.
This is the Certified Output
Resistance from the certification
1
2
3
4
0000.00 l b
0000.00 kg
0000.00 oz
0000.00 g
100
net
gr oss
gr oss
net
FIG. 7-18 SUMMARY DISPLAY/SELECTING SCALE
NUMBER 1
Step 2. Press the Test/9 button. The Test and Data Menu
appears. (See Fig. 7-19)
Step 17. Press the Exit button to return to the Test Data Display.
Step 18. Press the Exit button to return to the Test and Data
Menu. (See Fig.7-17)
FIG. 7-19 TEST AND DATA MENU/SELECTING
DIAGNOSTICS
Step 3. Press the down arrow until the cursor is in front of
Diagnostics. (See Fig. 7-19)
Step 4. Press the Enter button. The Diagnostics Display
appears with the cursor in front of Voltage &
Weight. (See Fig. 7-20)
FIG. 7-17 TEST AND DATA MENU
Diagnostics
INTEGRATED TECHNICIAN™ (IT®)
INTEGRATED TECHNICIAN™ is a built-in system diagnostics utility that enables the operator to rapidly troubleshoot a weighing system from the front panel or Web Page of
the HI 3030. Used with an HI 215IT Junction Box you can
read each individual load cell in mV, mV/V, and weight to
determine if a load sensor is malfunctioning or not connected.
FIG. 7-20 DIAGNOSTICS DISPLAY/SELECTING
VOLTAGE & WEIGHT
Step 5. To test the Voltage and Weight Press the enter button. Voltage & Weight briefly turn to !! TESTING!!
while the test is performed. (See Fig. 7-21)
Using IT From the Front Panel
Step 1. From the Summary Display, press the up or down
arrow buttons until the cursor is in front of the scale
you want to diagnose. In our example we selected
Scale 1. (See Fig. 7-18)
DIAGNOSTICS
> !! TESTING!!
Stabil ity Test
Factor y Def aults
->
->
FIG. 7-21 DIAGNOSTICS DISPLAY/VOLTAGE &
WEIGHT TESTING DISPLAY
101
CHAPTER 7
Troubleshooting
Step 6. The Scale # Screen appears with the total MilliVolt
(mV), Milli-Volt/Volt (mV/V) and Weight (lb kg,
gr., oz) readings from the load sensors that are connected to the selected Scale. In our example it is
Scale #1. (See fig. 7-22)
>ALL
ALL
ALL
SCALE 1
3.2720 mV
0.457 mV/ V
0.00 l b
ing between 0-15 mV the reading is normal.
Step 10. To select the Millivolt readings for all the load sensors that are connected to the scale, press the up or
down arrow buttons until the cursor is in front of
the All Millivolt (mV).
Step 11. Press the Enter button. The Scale Millivolt per individual Scale Load Sensor display appears providing
the readings for all the load cells that are connected
to Scale 1. (See Fig. 7-24)
•
FIG. 7-22 SCALE #1 WITH TOTALS DISPLAYED
Step 7. If you connected the load sensors directly to the HI
3030 without using the HI 215IT Junction Box, Fig.
7-22 is displayed.
Step 8. If you are using IT and connected the load sensors
to an HI 215IT Junction Box the Scale #1 display
appears with arrows to the right of each category.
(See Fig. 7-23)
NOTE:
The values listed here are for illustration purposes only. Your readings will be different.
>ALL
ALL
ALL
SCALE 1
3.2720 mV ->
0.457 mV/ V ->
0.00 l b ->
FIG. 7-23 SCALE #1 WITH TOTALS DISPLAYED
AND HI 215IT JUNCTION BOX CONNECTED
Step 9. The IT Junction box enables you to read each individual load sensor’s Millivolt, Millivolt/Volt or
Weight Reading.
•
•
The mV reading is a coarser reading than
the mV/V or Weight. The mV reading is
sufficient to balance the corners of your
scale or vessel.
These readings allow you to determine if
the problem is in the instrument (internal)
or in a load sensor(s) (external). The specification range for the Weight Controller is
0-15 mV. If you are getting a reading outside this range (15.5 mV, 3.1 mV/V Maximum or any negative values) the problem
is exterior to the Instrument (most likely
improper wiring). If you are getting a read-
>LS1
LS2
LS3
To see the reading for Load Sensor #4
press the down arrow button. The Scale
Millivolt display appears with LS4 displayed. (See Fig. 7-24 & 25)
SCALE 1
0.817 mV
0.817 mV
0.817 mV
FIG. 7-24 SCALE 1/INDIVIDUAL MILLIVOLT
DISPLAY 1
>LS2
LS3
LS4
SCALE 1
0.817 mV
0.817 mV
0.817 Mv
FIG. 7-25 SCALE 1/INDIVIDUAL MILLIVOLT
DISPLAY 2
•
•
If all the load sensor readings are 0.00 mV
there is something wrong between the HI
3030 and the HI 215IT Junction Box or
with the Junction Box itself. The cable is
disconnected or something is wrong with
the Junction Box such that it is not transmitting the Millivolt readings to the HI
3030 Weight Controller.
If you do not get a reading for one or possibly two or more load sensors (LS3 for
example reads 0.00 mV or the millivolt
reading is either larger or smaller than it
should be) and you know that the Load
Sensors are connected to the Junction Box,
the individual load sensor cable is disconnected from the junction box or the load
sensor is malfunctioning.
HI-3030 Weight Controller
Service Manual
With this information you can quickly
determine what the problem is and where
it is located either from the Front Panel or
Web Browser.
If the Millivolt readings are not fine
enough to determine the problem select
the Millivolt/Volt readings.
•
Step 12. Press the Exit button to return to the Totals Display.
(See Fig. 7-26)
Step 13. To read the Millivolt/Volt reading for finer troubleshooting, press the down arrow until the cursor is in
front of the Millivolt/Volt (mV/V) reading for the
selected scale. In our example we selected Scale #1.
(See Fig. 7-26)
•
•
•
ALL
>ALL
ALL
SCALE 1
3.2720 mV ->
0.457 mV/ V ->
0.00 l b ->
FIG. 7-26 SCALE #1 WITH TOTALS/MILLIVOLT/
VOLT SELECTED
Step 14. Press the Enter button. The Scale Millivolt/Volt for
individual Scale Load Sensor display appears. (See
Fig. 7-27)
>LS1
LS2
LS3
SCALE 1
0.114 mV/ V
0.114 mV/ V
0.114 Mv/ V
•
•
102
If all the load sensor readings are 0.00 mV/
V there is something wrong between the
HI 3030 and the HI 215IT Junction Box or
with the Junction Box itself. The cable is
disconnected or something is wrong with
the Junction Box such that it is not transmitting the Millivolt/Volt readings to the
HI 3030 Weight Controller.
If you do not get a reading for one or possibly two or more load sensors (LS3 for
example reads 0.00 mV/V or the millivolt/
Volt reading is either larger or smaller than
it should be) and you know that the Load
Sensors are connected to the Junction Box,
the individual load sensor cable is disconnected from the junction box or the load
sensor is malfunctioning.
With this information you can quickly
determine what the problem is and where
it is located either from the Front Panel or
Web Browser.
If the Millivolt/Volt readings are not fine
enough to determine the problem select
the Weight readings.
Step 15. Press the Exit button to return to the Totals Display.
(See Fig. 7-29)
Step 16. To read the Weight reading for finer troubleshooting, press the down arrow until the cursor is in front
of the Weight (lb, kg, gr, oz) reading for the selected
scale. In our example we selected Scale #1. (See
Fig. 7-29)
ALL
ALL
>ALL
SCALE 1
3.2720 mV ->
0.457 mV/ V ->
0.00 l b ->
FIG. 7-27 SCALE 1/INDIVIDUAL MILLIVOLT/VOLT
DISPLAY 1
•
>LS2
LS3
Ls4
To see the reading for Load Sensor #4
press the down arrow button. The Scale
Millivolt/Volt display appears with LS4
displayed. (See Fig. 7-28)
SCALE 1
0.114 mV/ V
0.114 mV/ V
0.114 Mv/ V
FIG. 7-28 SCALE 1/INDIVIDUAL MILLIVOLT/VOLT
DISPLAY 2
FIG. 7-29 SCALE #1 WITH TOTALS/WEIGHT (LB)
SELECTED
Step 17. Press the Enter button. The Scale Weight for the
individual Scale Load Sensor display appears. (See
Fig. 7-30)
103
CHAPTER 7
Troubleshooting
>LS1
LS2
LS3
SCALE 1
0.00 l b
0.00 l b
0.00 l b
FIG. 7-30 SCALE 1/INDIVIDUAL WEIGHT DISPLAY
1
•
>LS2
LS3
LS4
To see the reading for Load Sensor #4
press the down arrow button. The Scale
Millivolt/Volt display appears with LS4
displayed. (See Fig. 7-31)
SCALE 1
0.00 l b
0.00 l b
0.00 l b
FIG. 7-32 DIAGNOSTICS DISPLAY/SELECTING
STABILITY TEST
Step 2. Press the Enter button. The Information display
appears “SYS. STABILITY TEST, PRESS ENTER
TO START”. (See Fig. 7-33)
STABILITY TEST
Pr ess ENTERt o t est
FIG. 7-33 STABILITY TEST DISPLAY
FIG. 7-31 SCALE 1/INDIVIDUAL WEIGHT DISPLAY
1
•
•
•
If you do not get a reading from one of the
load sensors, either the cable to the load
sensor is disconnected or the load sensor is
malfunctioning.
If one of the load sensors is reading higher
or lower than the other load sensors in
your system and you know that you calibrated the instrument and cornered the
scale, there is something wrong with the
load sensor.
If one of the load sensors is reading higher
or lower than the other load sensors and
you do not know if the scale has recently
been calibrated, re-calibrate the scale then
perform the Voltage and Weight test again.
Stability Test
The Stability Test switches a fixed signal into the analog to
digital convertor, and calculates the mean squared variation
from the average reading, using 100 samples.
The test passes if the mean squared variation is less than 5.0,
and the average reading is between 30237 and 36955.
Step 1. Press the up or down arrow buttons until the cursor
is in front of Stability Test. (See Fig.7-32)
Step 3. Press the ENTER button to perform the stability
test.
•
Each channel that passes the Stability Test
are displayed as PASS. (See Fig. 7-34)
This means that the Mean Squared Variation is less than 5.0 and the average reading is between 30237 and 36955. In short
the instrument is working fine.
STABILITY TEST
Test Resul t s
PASS
Mean Sq. Var
2.31
Mean ADCCount
33K
FIG. 7-34 SYSTEM STABILITY TEST DISPLAY/
PASS
•
If the channel does not pass the Stability
Test the FAIL display appears. This means
that the Mean Squared Variation is greater
than 5.0 and/or the average reading is not
between 30237 and 36955. This test examines the internal electronics and not the
load cells input signal.
HI-3030 Weight Controller
Service Manual
1.
Disconnect the power cord and reconnect the power cord to restart the
instrument.
Repeat the Stability test.
If a channel Fails the Stability Test
again, contact Hardy Instruments Inc.,
Technical Support for assistance.
2.
3.
Step 4. Press the Exit button to return to the Diagnostics
display.
Factory Defaults
CAUTION: IF YOU CHOOSE FACTORY DEFAULTS ALL
MAKE ABSOLUTELY SURE THAT THIS
DATA WILL BE LOST!
104
Step 3. Press the Exit button if you do not want to set the
Factory Defaults. The Diagnostics display reappears.
Step 4. Press the Enter button if you want to set the Factory
Defaults.
Step 5. If the password is not set for HI security a Security
Violation appears. You will have to change your
security level for your password to HI or find someone who has a HI security clearance to set the Factory Defaults. (See HI 3000 manual, Security
Section for more instructions)
Step 6. A display appears telling you to Please Wait. (See
Fig. 7-37)
Step 7. The Summary Display appears listing all the Channels. (See Fig. 7-38)
IS WHAT YOU WANT TO DO BEFORE CHOOSING THIS
OPTION. DO NOT USE THIS FUNCTION IN AN EFFORT TO
CORRECT ANY MALFUNCTIONS IN THE OPERATION OF THE
INSTRUMENT.
PLEASEWAIT
Step 1. Press the up or down arrow buttons until the cursor
is in front of Factory Defaults. (See Fig. 7-35)
DIAGNOSTICS
St abil it y Test
> Fact or y Def aul t s
Ret ur n t o Zer o
FIG. 7-37 PLEASE WAIT DISPLAY
->
->
->
FIG. 7-35 DIAGNOSTICS DISPLAY/FACTORY
DEFAULTS
•
•
Resetting the Default Parameters is used
when you want reset the instrument to all
defaults when changing a scale or application to be sure that all parameters are set to
a known working condition. Also used
when the scale seems not to respond to any
corrective action.
It is required that the security access to this
menu is High (HI).
Step 2. Press the Enter button. The Factory Defaults display appears. (See Fig. 7-36)
FIG. 7-38 SUMMARY DISPLAY
Step 8. You will have to go back into the Diagnostics section again to continue.
Return to Zero Test
The Return to Zero Test is used to determine whether the
instrument can still zero a scale based on preset parameters.
If you pass the Return to Zero Test you are within the sum of
the preset Motion and Zero Tolerance settings. If you fail
you are outside the sum of the preset Motion and Zero Tolerance settings. If you Fail the test there may be too much
build up on the scale and you need to clean the scale or you
have scale problems. You should do this test whenever you
cannot zero the scale.
Step 1. Press the up or down arrow buttons until the cursor
is in front of Return to Zero. (See Fig. 7-39)
FIG. 7-36 FACTORY DEFAULTS DISPLAY
105
CHAPTER 7
Troubleshooting
FIG. 7-39 DIAGNOSTICS DISPLAY/SELECTING
RETURN TO ZERO TEST
Step 2. Press the Enter button. The Return to Zero Test display appears. (See Fig. 7-40)
FIG. 7-42 RETURN TO ZERO/FAIL
Step 4. Press the Exit button to return to the Diagnostics
display.
View Input States
The Input States display shows whether or not the instruments has any inputs activated. A 1 means the input is active
and a 0 means it is not.
Step 1. Press the up or down arrow buttons until the cursor
is in front of View Input States. (See Fig. 7-43)
FIG. 7-40 RETURN TO ZERO TEST DISPLAY
Step 3. To perform the test press the Enter button. In a few
seconds a display appears telling you if the instrument has passed or failed.
•
If you Pass the Test the Pass display
appears. (See Fig. 7-41)
DIAGNOSTICS
Ret ur n t o Zer o
> ViewInput St at es
For ceOut put s
->
->
->
FIG. 7-43 DIAGNOSTICS/VIEW INPUT STATES
Step 2. Press the Enter button. The Input States display
appears. (See Fig. 7-44)
FIG. 7-41 RETURN TO ZERO TEST/PASS
•
If instrument Fails the test the Fail display
appears. (See Fig. 7-42) You may need to
do the following:
1.
2.
Check the scale for excess material.
Check your Motion and Zero Tolerance settings. They might be set too
low for your process.
FIG. 7-44 INPUT STATES DISPLAY/INPUT 2 AND 4
ACTIVE
Step 3. Press the Exit button to return to the Diagnostics
display.
Force Outputs
WARNING: FORCING THE OUTPUT RELAY MAY CAUSE
DAMAGE OR PERSONAL INJURY. MAKE ABSOLUTELY SURE
THAT YOU KNOW WHAT THE RELAY IS CONNECTED TO
BEFORE ACTIVATING. IF INSECTARY DO A PHYSICAL CHECK
HI-3030 Weight Controller
Service Manual
TO DETERMINE WHAT THE SELECTED RELAY IS CON-
•
NECTED TO BEFORE ACTIVATING.
106
All the output relays on the instrument are
Normally Open so activation will close the
relay.
The Force Outputs function individually activates each of
the 4 Output relays in the instrument. Useful in pre-startup to
determine that all the relays are connected to the correct auxiliary devices.
Step 1. Press the up or down arrow buttons until the cursor
is in front of Force Outputs. (See Fig. 7-45)
DIAGNOSTICS
ViewInput St at es
> For ceOut put s
Demo Mode
->
->
OFF
FIG. 7-48 OUTPUT RELAY #1 FORCED CLOSED
DISPLAY
Step 6. Press the Exit button to return to the Output Relay
Display.
•
FIG. 7-45 DIAGNOSTICS DISPLAY/FORCE
OUTPUTS
Step 2. Press the Enter button.
Step 3. The Output Relay display appears with the cursor in
front of Output Relay #1. (See Fig. 7-46)
•
If you want to select another Output Relay
do so now.
If you do not want to select another Output
Relay, press the Exit button to return to the
Diagnostics display.
Step 7. Press the Exit button again to return to the Diagnostics display.
Step 8. Press the Exit button until you return to the Summary Display.
System Integrity Check and Fault
Determination From the Web Browser
FIG. 7-46 OUTPUT RELAY DISPLAY/SELECTING
OUTPUT RELAY #1
Step 4. To select another Output Relay, press the up or
down arrow buttons until the cursor is in front of
the Output Relay you want to force. (See Fig. 7-47)
Diagnostics
Diagnostics is used to troubleshoot the Weight Controller. A
complete Troubleshooting Guide is available in this Service
Manual. What is important for Operational purposes is to be
able to see the information about this instrument. Setting
Default Settings is also useful to operators.
Using IT From the Web Browser
Step 1. From the Home Page click on Operation. (See Fig.
7-49) The Operation Choose One page appears.
(See Fig. 7-50)
FIG. 7-47 OUTPUT RELAY DISPLAY/SELECTING
OUTPUT RELAY #2
Step 5. Press the Enter button to activate the output relay
you have chosen. The Output Relay Forced Closed
display appears. (See Fig. 7-48)
107
CHAPTER 7
Troubleshooting
Step 3. Click on Weight and Voltage. (See Fig. 7-52) The
Operation/Diagnostics - Weight & Voltage page
appears with all four (4) channels listed. (See Fig.
7-52)
FIG. 7-49 HOME PAGE/SELECTING OPERATION
Step 2. Click on Diagnostics. (See Fig. 7-50) The Operation-Diagnostics Page appears with the four (4)
scales listed. (See Fig. 7-51)
FIG. 7-52 OPERATION - DIAGNOSTICS/
SELECTING WEIGHT AND VOLTAGE
FIG. 7-50 OPERATION - CHOOSE ONE/SELECTING
DIAGNOSTICS
FIG. 7-53 OPERATION/DIAGNOSTICS - WEIGHT &
VOLTAGE PAGE
Step 4. You will notice that the First Channel has a Test
Channel #1 button. This means that this channel is
connected to an HI 215IT Junction Box. The other
three (3) channels have the load sensors connected
directly to the HI 3030 and are not set for IT.
NOTE:
Whichever channel is connected to an HI 215IT
Junction Box will have a test button.
Step 5. Click on the Test button of the channel you want to
test. In out example we selected the Test Channel
#1 button. (See Fig. 7-54) The IT J-Box Diagnostics Weight and Voltage results appear.
FIG. 7-51 OPERATION - DIAGNOSTICS
HI-3030 Weight Controller
Service Manual
NOTE:
108
and you know that the Load Sensors are
connected to the Junction Box, the individual load sensor cable is disconnected from
the junction box or the load sensor is malfunctioning.
The values expressed here are for illustration
purposes only. Your values will be different.
Step 7. With this information you can quickly determine
what the problem is and where it is located either
from the Front Panel or Web Browser.
Setting the Factory Defaults from the Web Browser
Step 1. Click on “Set Factory Defaults”. The Set Factory
Defaults page appears. (See Fig. 7-55)
FIG. 7-54 IT J-BOX DIAGNOSTICS WEIGHT AND
VOLTAGE PAGE
NOTE:
The IT Web page shows all the Weight and Voltage values at once. So if you want to save time
use the Web Browser IT page for troubleshooting.
•
•
The mV reading is a coarser reading than
the mV/V or Weight readings. The mV
reading is sufficient to balance the corners
of your scale or vessel.
These readings allow you to determine if
the problem is in the instrument (internal)
or in a load sensor(s) (external). The specification range for the Weight Controller is
0-15 mV. If you are getting a reading outside this range (15.5 mV, 3.1 mV/V Maximum or any negative values) the problem
is exterior to the Instrument (most likely
improper wiring). If you are getting a reading between 0-15 mV the reading is normal.
Step 6. Check the results:
•
•
If all the load sensor readings are 0.00
there is something wrong between the HI
3030 and the HI 215IT Junction Box or
with the Junction Box itself. The cable is
disconnected or something is wrong with
the Junction Box such that it is not transmitting the readings to the HI 3030 Weight
Controller.
If you do not get a reading for one or possibly two or more load sensors (Sensor 3
for example reads 0.00 or the reading is
either larger or smaller than it should be)
FIG. 7-55 SET FACTORY DEFAULTS
WARNING: ANY AND ALL DATA WILL BE LOST IF FACTORY DEFAULTS ARE INSTALLED. THIS, INCLUDES EVERY
PARAMETER THAT WAS CHANGED FOR INGREDIENTS, IP
ADDRESS, EVERYTHING. THE INSTRUMENT IS RETURNED
TO THE CONDITION IT WAS RIGHT FROM THE FACTORY.
Step 2.
Step 3.
Step 4.
Step 5.
Enter the High Security Code Number.
Click on the Return to Factory Defaults button.
The Confirmation Page appears.
The page informs you that all Factory defaults have
been set.
Step 6. Click on “Back” to return to the previous page. The
previous page appears.
Step 7. Click on the left arrow to return to the Operation
Diagnostics page.
Step 8. Click on Home to return to the Weight Controller
Home Page.
Overview of Typical Load Cell System
1.
The typical system consists of one or
more load cells/points, a summing
junction box, and an HI 3030 Weight
Controller. (See Figure 7-56).
109
CHAPTER 7
Troubleshooting
FIG. 7-56 TYPICAL LOAD CELL SYSTEM
2.
3.
Load Cell/Sensor/Point - is a strain
gauge based force transducer, which
generates an electrical signal proportional to the load applied to the scale.
Load cells/points can be used any
place a person needs to measure pressure, load, or torque. This can be
accomplished by either Tension or
Compression type load cells/points.
The load cell/point takes as an input
the 5 volts DC Excitation Voltage
generated by the HI 3030, and
depending upon how much weight is
applied to the scale, generates a millivolt output (proportional to the
weight, 0-10mv DC for 2mv/V load
cells/points or 0-15mv DC for 3mv/V
load cells/points).
Weight Controller - is part of the HI
3010 instrument which, among other
functions, is used to power the load
cell(s)/point(s), take the millivolt signal output from the load cell(s)/
point(s), and digitize, interpret, communicate and display the results as a
weight indication.
Troubleshooting The Network Connections and Configuration with the "Ping"
Tool
Step 1. The Ping Tool is used from the root directory of the
PC. Get to the Root directory. The Root Directory is
the “C:/” Prompt.
Step 2. If you do not know how to get to the Root Directory, check you Operating System User Guide or
Manual for information on how to get to the root
directory.
Selecting the module by number for Testing
NOTE:
You can only ping from the PC you cannot ping
from an instrument.
Step 1. Type PING <space>IP address of the instrument
you want to test. For Example:
C:/PING 192.168.110.99
•
In our example we used the default
address for all HI 3000 Series Instruments.
The IP address you are testing will be different.
HI-3030 Weight Controller
Service Manual
Step 2. Press the Enter key on the PC.
Step 3. The PING utility starts sending out 56 signals and
64 signals should return if the unit is functioning
correctly.
•
2.
3.
•
NOTE:
HOT
Check the Network cables and connectors to be sure they are tightly fastened and the correct cables for this
application.
Check the configuration to be sure
that the instrument is configured correctly. (See Configuration IP Address
in Chapter 6)
Check the Ethernet card to be sure
that is securely seated and that it is
functioning correctly.
If the unit is configured correctly and the
Ethernet card is functioning correctly and
the cables are the correct ones for this
application and are securely fastened, 64
signals should be returned and the print
out will reflect this fact.
NOTE: The Ping utility continues to send out signals (pings) until you exit the Ping Tool.
•
state relay across the line, you must look at the rated dropout current of the load, and if it is less than 4mA it may not
turn off. The solution is to put a loading resistor in parallel
with the light load, to be sure leakage current is sufficiently
shunted away from the coil.
If the instrument or network are configured incorrectly and cables are loose or not
connected correctly, nothing prints out
after the first line. Do the following:
1.
Simultaneously press the <Ctrl> key and
the letter <C> key to stop the signals.
Exiting the Root Directory
Step 1. Type exit at the root directory prompt.
C:/exit
Step 2. Press the Enter key.
About Solid State Relays With Light Loads
There have been installations where solid state relays have
been used and failed to shut off a solenoid or relay when deenergized. The actual problem comes from the internal snubbing network in parallel with the Silicon Controlled Rectifier
(SCR) which does the actual switching. This network presents an impedance of 30K ohms, which means with 120
volts across, it will pass 4mA of AC current.
SCR SWITCHING LOAD CIRCUIT
The SCR itself presents no leakage current. Some solid state
relay manufactures specify 20mA minimum load. This is
based on the presumption a relay or solenoid will drop out
with only 4mA through it, which is not always true. That
may not be true. When switching a light load with a solid
110
SOLID
STATE
RELAY
15000 ohm
RELAY
COIL
NEEDED
SHUNT
NEUTRAL
FIG. 7-57 SCR SWITCHING LOAD CIRCUIT
Assume a load like a relay with a coil of 15,000 ohms and of
5% of nominal drop-out. When the solid state relay is off,
there will still be 1/3 of the line voltages across the relay, so
it will not drop out. For the relay to have 5% of the line
across it, it and a parallel shunt resistor must be 20 times less
resistance than the 30K snubbing network, or 1.5K ohms.
Use less than a 1.67K ohm parallel resistor and now total
load is below 1.5K ohm or 80mA.
General Policies and Information
With over 70 years of industrial weighing experience and
products in the field, Hardy Instruments continues to design,
manufacture, install and support Hardy products worldwide.
The following paragraphs describe Hardy's customer support
services and equipment warranty.
NOTE:
Before returning any product to Hardy Instruments, call the Technical Service Department
listed below for a Return Authorization Number.
Have your company name, address, telephone,
equipment model number, S/N, and a brief
description of the problem ready to give to him.
In addition, please have Appendix A completed
and ready to FAX to us before calling.
FOR FURTHER INFORMATION CONTACT:
Technical Service Manager
Hardy Process Solutions, Inc.
9440 Carroll Park Drive San Diego, CA 92121
Telephone: (858) 278-2900
FAX: (858) 278-6700
Web Site: http://www.hardysolutions.com
111
CHAPTER 7
Troubleshooting
E-Mail: [email protected]
Ordering Replacement Parts
Contact the Hardy Instruments Sales Department to order
replacement parts and option boards. Have your equipment
model number and serial number ready.
System Support
Technical Service is provided as follows:
•
New system start-up: Ensure that the
installation is checked and correct; instruments are calibrated, and operators
trained.
1.
2.
Service: Engineers are trained and
qualified to provide on-site installation, calibration, and maintenance.
On-site training: A Hardy Support
Representative can be scheduled to
train your operations and maintenance
personnel. This can be as simple as
basic load cell theory or as complete
as troubleshooting techniques which
allow you to service your equipment.
Warranty
A warranty problem may be handled by returning the product to the factory for repair or replacement under warranty.
•
The Last Cal Type will tell you what Calibration was done on the instrument. This is
important when you are not getting the
readings you configured for the instrument.
HI-3030 Weight Controller
Service Manual
112
113
Appendix A - HI 3030 Complete Mapping Symbols
DICTIONARY OF MAPPING SYMBOLS
Map Dictionary:
CMD0 - Specifies input and output locations for the command interface
DI - DeviceNet Input Table, as bits. DeviceNet tables are
125 words (16 bit) long.
DO - DeviceNet Output Table, as bits
DFI - DeviceNet Input, regarded as floats
DFO - DeviceNet Output, regarded as floats
DSI - DeviceNet Input, regarded as 16 bit integers
DSO - DeviceNet Output, regarded as 16 bit integers
DII - DeviceNet Input, regarded as 32 bit integers
DIO - DeviceNet Output, regarded as 32 bit integers
DTO - DeviceNet Output, regarded as text
DTI - DeviceNet Input, regarded as text
HI - Hardy Input Table
- HI0.0 - HI0.4 = digital inputs
- HI1.X = status bits
HI1.0 = A/D error
HI1.1 = A/D failure
HI1.5 = Real time clock failure
HI1.6 = Motion
HI1.8 = NVR Failure
HI1.9 = Infrared Failure
HI2.0 = Setpoint 1 output
HI2.1 = Setpoint 2 output
HI2.2 = Setpoint 3 output
HI2.3 = Setpoint 4 output
HI2.4 = Setpoint 5 output
HI2.5 = Setpoint 6 output
HI2.6 = Setpoint 7 output
HI2.7 = Setpoint 8 output
HI2.8 = Setpoint 9 output
HI2.9 = Setpoint 10 output
HI2.10 = Setpoint 11 output
HI2.11 = Setpoint 12 output
HI2.12 = Scale 1 in Motion
HI2.13 = Scale 2 in Motion
HI2.14 = Scale 3 in Motion
HI2.15 = Scale 4 in Motion
HSI - Hardy Input Table (Word)
HSI1 = Instrument Status Word
HSI2 = Setpoint Output Word
HSI3 = Command Status Word, Chan 1. This 16-bit word
holds the result status of mapped commands.
HSI3.15 = Command Status Data Valid. This bit is set when
the rest of the status bits are valid.
HSI4 = Command Status Word, Chan 2. This 16-bit word
holds the result status of mapped commands.
HSI4.15 = Command Status Data Valid. This bit is set when
the rest of the status bits are valid.
HSI5 = Command Status Word, Chan 3. This 16-bit word
holds the result status of mapped commands.
HSI5.15 = Command Status Data Valid. This bit is set when
the rest of the status bits are valid.
HSI6 = Command Status Word, Chan 4. This 16-bit word
holds the result status of mapped commands.
HSI6.15 = Command Status Data Valid. This bit is set when
the rest of the status bits are valid.
HSI7 = Watchdog Word. Each bit represents the corresponding node(bit0=Node0 etc.) sending data. Five seconds after
the last data packet arrives form any node, its bit is set to
zero.
HSI8,HSI9,HSI10,HSI11 - Status word for A/D channels 1-4
HSIX.0 = A/D error
HSIX.1 = A/D failure
HSIX.6 = Motion
HO - Hardy Output Table
HO0.0-HO0.3 = Output Relay 1-4
HO0.7 = Software LED (on back of unit)
HO1.0-HO1.3 = Tare Channel 1-4
HO1.4-HO1.7 = Zero Channel 1-4
HO1.12-HO1.15 = Print Channel 1-4
HO2.0-HO2.3 = C2 Calibrate Chan 1-4
HO2.4-HO2.7 = Trad Cal Low Ch 1-4
HO2.8-HO2.11 = Trad Cal High Ch 1-4
HO3.0-HO3.9 = Send Custom Email 0-9
HFI - Hardy Float Input Table
HFI4-7 = gross weight on chan 1-4
HFI8-11 = net weight on chan 1-4
HFI12-15 = peak weight on chan 1-4
HFI16-19 = Rate of Change on channels 1-4
HFO - Hardy Float Output Table
HFO[ 0- 7] - 8 user defined floating point scratchpad variables, saved in non-volatile RAM
HFO9-20 - Setpoint 1-12 input
HFO21-24 - Tare Wt ch 1-4
HFO25-28 - Motion Tolerance ch 1-4
HFO29-32 - Zero Tolerance ch 1-4
HFO33-36 - AutoZero Tolerance ch 1-4
HFO37-40 - Capacity ch 1-4
HFO41-44 - Cal Low Wt ch 1-4
HFO45-48 - Span Wt ch 1-4
HI-3030 Weight Controller
Service Manual
HFO49-60 - Setpoint 1-12 Target Wt
HFO61-72 - Setpoint 1-12 Preact Wt
HFO73-84 - Setpoint 1-12 Deadband Wt
HFO85-HFO88 - Analog Output Card, Slot 0
HFO89-HFO92 - Analog Output Card, Slot 1
HSO - Hardy Short Output table. A table of
16 bit integers.
HSO0 Setpoint and Motion Word
HSO1-4 Unit of Measure Ch 1-4
HSO5-8 Decimal Point Ch 1-4
HSO9-12 Grad Size Ch 1-4
HSO13-16 WaverSaver Ch 1-4
HSO17-20 Averages Ch 1-4
HSO21-24 Use Auto Zero Ch 1-4
HSO25-28 Zero Reminder Ch 1-4
HSO29-32 Tare Reminder Ch 1-4
HSO33-36 Channel 1-4 On
HSO37 AutoPrint On
HSO38 IR Enabled
HSO39 Printer Baud
HSO40 Printer Parity
HSO41 Printer Data Bits
HSO42 DeviceNet Baud
HSO43 DeviceNet Node
HSO44 RIO Baud
HSO45 RIO Address
HSO46 RIO Rack Size
HSO47 RIO Quarter
HSO48 RIO Last Quarter
HSO49 ControlNet Address
HSO50 Profibus Node Number
HSO51 Profibus Out Size
HSO52 Profibus In Size
HSO53 Setup Menu Security
HSO54 Calibration Menu Security
HSO55 Options Menu Security
HSO56 Mapping Menu Security
HSO57 Medium Level Password
HSO58 High Level Password
HSO59-62 Calibration Type Ch 1-4
HSO67-70 Calibration Month Ch 1-4
HSO71-74 Calibration Day Ch 1-4
HSO75-78 Calibration Hour Ch 1-4
HSO79-82 Calibration Minute Ch 1-4
HSO83-86 Calibration Second Ch 1-4
HTO - Hardy Text Output table.
HTO0 Operator ID
HTO1 Instrument ID
HTO2-HTO5 Channel 1-4 Name
114
HTO6-HTO15 Custom Text 0-9
HTI - Hardy Text Input table.
HTI0-HTI3 Calibrator ID Ch 1-4
HTI4 Model Number
HTI5 Program Part Number
HTI6 Firmware Revision
HII - Hardy Integer Input table.
HII0 IP Address
HII1 IP Mask Address
HII2 IP Gateway Address
HII3 IP DNS Address
HII4 Serial Number
EO, EFO, ESO, EIO, ETO- Hardy Control
Link Output tables
EO = Hardy Control Link output, addressed as bits
EFO = Hardy Control Link output, addressed as floats
ESO = Hardy Control Link output, addressed as 16 bit integers
EIO = Hardy Control Link output, addressed as 32 bit integers
ETO = Hardy Control Link output, addressed as text
0I, 0FI, 0SI, 0SO, 0II, 0IO, 0TI, 0TO- Hardy
Control Link Input tables, from Node 0
0I = Hardy Control Link input from Node 0, addressed as
bits
0FI = Hardy Control Link input from Node 0, addressed as
floats
0SI = Hardy Control Link input from Node 0, addressed as
16 bit integers
0II = Hardy Control Link input from Node 0, addressed as
32 bit integers
0TI = Hardy Control Link input from Node 0, addressed as
text
1I, 1FI, 1SI, 1SO, 1II, 1IO, 1TI, 1TO- Hardy Control Link
Input tables, from Node 1
2I, 2FI, 2SI, 2SO, 2II, 2IO, 2TI, 2TO- Hardy Control Link
Input tables, from Node 2
...
9I, 9FI, 9SI, 9SO, 9II, 9IO, 9TI, 9TO- Hardy Control Link
Input tables, from Node 9
UI, UFI, USI, USO, UII, UIO, UTI, UTO- Hardy Control
Link Input tables, from Node 10
VI, VFI, VSI, VSO, VII, VIO, VTI, VTO- Hardy Control
Link Input tables, from Node 11
...
ZI, ZFI, ZSI, ZSO, ZII, ZIO, ZTI, ZTO- Hardy Control Link
Input tables, from Node 15
115
Appendix A - HI 3030 Complete Mapping Symbols
RI, RO, RFI, RFO, RSI, RSO, RII, RIO, RTI,
RTO - RIO tables (used if you have an RIO
option card)
RI, RO = RIO input/output, addressed as bits
RFI, RFO = RIO input/output, addressed as floats
RSI, RSO = RIO input/output, addressed as 16 bit integers
RII, RIO = RIO input/output, addressed as 32 bit integers
RTI, RTO = RIO input/output, addressed as text
CI, CO, CFI, CFO, CSI, CSO, CII, CIO, CTI,
CTO - Communications Network tables
(used if you have a ControlNet, EtherNet/IP
or Profibus option card)
CI, CO = Communication Network input/output, addressed
as bits
CFI, CFO = Communication Network input/output,
addressed as floats
CSI, CSO = Communication Network input/output,
addressed as 16 bit integers
CII, CIO = Communication Network input/output, addressed
as 32 bit integers
CTI, CTO = Communication Network input/output,
addressed as text
MI, MO, MFI, MFO, MSI, MSO, MII, MIO, MTI,
MTO - Modbus tables (used if you have
Modbus)
MI, MO = Modbus input/output, addressed as bits
MFI, MFO = Modbus input/output, addressed as floats
MSI, MSO = Modbus input/output, addressed as 16 bit integers
MII, MIO = Modbus input/output, addressed as 32 bit integers
MTI, MTO = Modbus input/output, addressed as text
HVO The members in this table are displayed in the configured units (lb, kg, oz,
g)
HVO0-3 = Zero Tolerance, channels 1-4
HVO4-7 = Motion Tolerance, channels 1-4
HVO8-11 = Auto Zero Tolerance, channels 1-4
HVO12-15 = Scale Capacity, channels 1-4
HVO16-19 = Calibration reference weight, channels 1-4
HVO20-23 = calibration span weight, channels 1-4
HVO24-27 = peak weight, channels 1-4
HVO28-31 = tare weight, channels 1-4
HI-3030 Weight Controller
Service Manual
116
Index
Index
Symbols
!C2 Caps Unequal! 75
!Function Error! 75
!Not Allowed! 75
!Security Violation! 75
“clean” primary line 16
Numerics
0/Char. Button 23
10/100 base T Ethernet connection 34
10/100 BaseT Ethernet 1
14 AWG power line 16
2/ABC Button 22
32 bit integer 66
32 bit integer analog variable types 66
3rd party I/O 3
55 updates per second 28
6/MNO Button 23
8/TUV Button 23
9 terminal block 17
A
A - Guidelines for Instabilities on Formerly Operating
Systems 77
A/D Convert Error 75
A/D counts 98
A/D Failure Error 75
About Basic Mapping 55
About Chapter 2 7
About Diagnostics 95
About Help 21
About Instrument ID 29
About IP Addresses 34
About Motion Tolerance 26
About Operator ID 29
About Setting the Clock 31
About Solid State Relays With Light Loads 110
About the Averages Parameter 28
About the Decimal Point Parameter 25
About the DeviceNet Parameters 46
About the Ethernet Parameters 34
About the Graduation Size Parameter 26
About The Gravitation Correction Factor 48
About the Scale Capacity Parameter 28
About the Serial Port Setup Parameters 30
About the Set LCD Contrast Parameter 34
About the Swivel/Wall Mount 12
About the Tare Limit Parameter 31
About the Tare Reminder Parameter 28
About the WAVERSAVER Parameter 29
About Timezones 32
About Traditional Calibration 51
About Unit of Measure 25
About Zero Reminder 26
AC power 16
ACCESSORIES 5
Add 66
ADJUST INGREDIENT 71
Allen-Bradley Remote I/O 1, 3
Alpha/Numeric value 22
Alphanumeric character LCD 21
alphanumeric entry 22
amount of deviation 26
Amount/4/GHI 23
Analog 1
analog equation 67
Analog Mapping 66
Analog Output 5
Analog Output (-4AN) 5
Analog Output Option 5
Analog tables 66
analog variables 67
AND 66
application specific process weighing instruments
Approvals 8
arrays of numeric entities 63
artificial zeroing 31
ASCII string 67
asterisk 73
auto print 30
Auto Zero Tolerance 98
auxiliary devices 106
average reading 103
Averages 7, 99
Averages Parameter 28
1
B
B - Guidelines for Instabilities on Formerly Operating
Systems (Cont’d) 78
B1 - Guidelines for Instabilities on Former Operating
Systems (Cont’d) 79
B2 - Guidelines for Instabilities on Formerly Operating
Systems
Mechanical Stability and Configuration Settings. 80
Back 53
backspace function 22
Base Dimensions 8
Basic I/O Mapping Menu 71, 72
basic load cell theory 111
Basic Mapping Using Hardy Link 55
baud rate 30
Baud rates 4
bi-directional communications 6
Binding 47
binding 47
Block transfer commands 6
Boolean equations 67
Boolean Mapping 66
HI 3030 Weight Controller
Service Manual
Boolean operations 66
boolean operations 66
Boolean tables 66
Boolean variables 67
Built-in Smart Diagnostics (Knowledgebase)
Button Functions 21
1
Core Technologies 47
corrective action 50
cut off frequencies 29
cycle power 41
Cycle/7/PQRS Button 23
D
C
C - Guidelines for Instabilities on Formerly Operating
Systems 81
C2 7
C2 Cable 4
C2 Cal Error 75
C2 Cal Type 47, 51
C2 Calibration From the Front Panel 47
C2 Calibration From the Web Page 50
C2 Load Points 17
C2 load sensor 98
C2 Sensitivity 98
C2 weighing system 3
C2® Calibration 3
C2® Electronic Calibration 1
C2® Load Point Connection 17
C2® Second Generation Calibration 3
Cable color Code 17
Cable color Code for Non-C2 Load Points 17
Cabling and Interconnecting 16
CAL Failed 75
Calibration completed OK 51
CALIBRATION Menu 47, 51
Calibration page 53
calibration procedures 47
Calibration Sub-menu 50, 53
Calibration Techniques 7
Calibrator 97
Capacity 99
captive screws 12
certified test weight 52, 53
Channels 17
Checking the Device Data List 95
Choose Display 102
Clear Button 22
closed containers 75
Code Explanations 68
Command Interface 68
Common Mode Rejection 8
Common Mode Voltage Range 8
Communication cables 21
compression gasket 12
Configuration Menu 51
Configuration page 52
Confirmation Page 108
Connectivity 3
connector 75
controlled static environment 75
Control-Link Port 41
Control-Link Port text field 41
data bits 30
Data Menu 100
data packets 35
Day-dd field 44
DCS 1
Decimal Point Parameter 25
Default Settings 68
Defaults display 104
Device Data List 95
DeviceNet 5, 7, 21
DeviceNet input and output tables 66
DeviceNet input table 64, 68
DeviceNet interface 3
DeviceNet network 46
DeviceNet output table 68
DeviceNet Parameters 34
DeviceNet tables 66
Diagnostic Menus 95
Diagnostics 100, 106
Diagnostics Display 100
Diagnostics menus 95
Diagnostics Page 70
Dimensions of the panel cutout 11
disassembly 75
Disassembly and Reassembly Notes and Cautions
Dispensing A Vessel Using a Feeder 2
Display 7
Display Increments (Graduations) 7
Do C2 Calibration 49
Do C2 Calibration button 51
Do Cal High button 53
Do Cal Low button 53
Do Cal Low Calibration 53
Do Trad Cal 52
dressed 16
drives 46
E
E - Non-Return to Zero 83
Electrical Installation 16
electrical parts 75
electrical plug 75
Electrostatic Discharge 12
electrostatic discharge 75
embedded controllers 46
embedded web server 3
Enclosure Front Panel 12
Enclosure Size Requirements 11
Environmental Requirements 8
75
Index
ESD 12, 15, 75
EST 32
Ethernet - 10/100 Base T 7
Ethernet and DeviceNet installation
Ethernet IP por 3
Ethernet Network 35
Ethernet Parameters 34
EVEN 31
Excitation Voltage 7
Exit Button 22
Extranet 1, 34
H
11
F
F - Verify Individual Load Cell Milli-Volt Readings 84
Factory Defaults 104
Fail display 103
FALSE 67
Fanuc 6
fastener knobs 13
Filler/Dispenser Home Page 52, 108
Filler/Dispenser system 75
Filler/Dispenser/IBC 1
Filling a Vessel Using a Feeder 2
float 66
flow chart 75
follow proper safety procedures 75
FOR FURTHER INFORMATION CONTACT 110
Force Outputs 105, 106
Force Outputs function 106
Frequency 8
Front Panel 21
Front Panel NEMA 4 Seal 8
full scale output sensitivity 98
function Error 50
function OK 50
G
G - A/D Failure Error 86
GE 6
General Policies and Information 110
General Troubleshooting Flow Chart Index 76
Getting Started 21, 47
Getting the Parameter Information on the Web Browser
70
global industry-standard communication network
GMT 32
GMT time adjustment 32
Grad 97
Graduation Size 97
gravity 48
gravity correction factor 48
Gravity Corrector Factors table 49
Greenwich Mean Time 32
Greenwich, England 32
46
H - Mechanical Inspection 87
Hardy C2® Second Generation 47
Hardy input and output tables 66
Hardy Instruments C2 certified load sensors
Hardy Link Basic Mapping 62
Hardy Link Parameter 35
Hardy Technical Support Technician 95
Hardy Web Site 1
Hardy Web Tech 1, 3
Hardy-Link 35
Hardy-Link packet output 41
Hardy-Link pull down list 41
Help 21
Help Button 21
Help button 21
Help Dialog 21
HFI0 67
HFI1 67
HI 215IT Junction Box 100, 101
HI 215IT Series Junction Boxes 5
HI 215JB Series Junction Boxes 5
HI 3000 User’s Guide 1
HI 3000-CD 5
HI 3000-GF 5
HI 3000-MB 5
HI 3000-OM 5
HI 3000-RC 5
HI 3000-TM 5
HI 3030 Panel Mount 11
HI 3030’s INTEGRATED TECHNICIAN™ 1
High Security Code Number. 108
higher-level controllers 46
Hour-hh field 44
http //www.hardysolutions.com 1
Humidity Range 8
Hysteresis 95
3
I
I/O Mapping 71
individual Boolean variable 66
Infrared (IR) 7
Ingr./1 Button 22
Input 7
Input Resistance 100
Input States display 105
input table 67
Installation of Secure Memory Module 18
Installing Printed Circuit Boards 14
Installing the HI 3030 in a Swivel/Wall Mount 12
Installing the HI 3030 Weight Controller 12
Installing the HI 3030 Weight Controller in a Panel
Instrument ID 29
Instrument Local I/O 8
INTEGRATED TECHNICIAN 1
INTEGRATED TECHNICIAN™ 4, 95, 100
11
HI 3030 Weight Controller
Service Manual
INTEGRATED TECHNICIAN™ (IT)
interface 5
Internet 34
Internet (World Wide Web) 1
Intranet 1, 34
IT Web page 108
100
Month-mm field 44
Motion Error 75
Motion Tolerance 99
motor starters 46
Mounting Kit 11
Mounting Options 4
Multiply 66
J
N
J - Electrical Inspection 88
J9 terminal block 17
-JB 4
Junction Box 101
Junction Box Wiring 17
N - Blank Screen 91
National Bureau of Standards (NBS) 4
National Institute of Standards and Technology (NIST)
4
K
K - Load Sharing and Load Sensor Checkout
key pad 1
knurled knobs 15
89
L
Last Cal time 97
Last Cal Type 111
lattitude 48
leakage current 110
Left arrow button 22
Level Monitoring 2
LHS 67
LHS (Left Hand Side) 67
List of Alarms 75
list of Destinations 71
listens and transmitts 41
live load 52
load cells 47
Load Point cables 21
Load Sensor number 48, 50
Lock Washers 75
LVDT and Half Bridge Load Cells/Sensors 17
LVDT Tension Sensor - MB Series Connection
M
M - Weight Reading Stops Incrementing 90
Main Board 15
Main Board rear plate 15
Manual Button 22
map the Source 71
mapped data 72
Mapped I/O 1, 3
mean squared variation 103
Mechanical Installation 11
mechanical noise 3, 29
MilliVolt (mV) 101
Millivolt per individual Scale Load Sensor 101
Millivolt readings 101
Milli-Volt/Volt (mV/V) 101
Minute-mm field 44
Mixed Mapping 67
National Type Evaluation Program (NTEP) 4
neatly bundled 16
Negate 66
NEMA 4 & 4X 12
NEMA 4X 5
NIST/NTEP Option (-NTEP) 4
No C2 Sensor 75
nominal drop-out 110
Non-C2 Load Point Connection 17
NONE 31
Non-Linearity 7
Normally Open 106
NOT 66
Not Mapped 73
-NTEP 4
NTEP certification 42
NTEP Mode parameter 42
NTEP Option Installation 18
NTEP Seal and label 19
number of graduations 26
O
18
O - Display Stuck on a Screen 92
ODD 31
offset 67
OK to Fill Input Parameter 34
OLE technology (DCOM) 5
Online Tech Support Knowledge Base 3
Operating Temperature Range 8
Operation/Diagnostics - Weight & Voltage page 107
Operator ID 29
Option Cards Configuration 35, 44
OR 66
Ordering Replacement Parts 111
original point of remova 75
Output Relay #1 106
Output Relay Forced Closed 106
output table 63
Outputs 72
Overall depth 11
Overview of Typical Load Cell System 108
Index
Removing Printed Circuit Boards 15
repairs 75
Replacement or Additional CD’s 5
Resolution 7
Return to Factory Defaults button 108
Return to Zero Test 104
Right arrow button 22
Root directory 109
RS 232 4
RS NetWorx® 3
RS-232 serial port 3
P
Pacific Standard Time 33
packet output 35
Panel Cutout Specifications 11
Panel Mount (Model # HI 3010-PM 8
Panel Mount Collar 12
panhead screw 15
parallel shunt resistor 110
PARAMETER NUMBER 67
Parameter Numbers 68
PARAMETER VALUE 67
parameters 95
PARAMID 67
parity 30
Pass display 103
PC Boards 15
performance diagnostics 1
Peripherals/System Components 4
Personal Digital Assistant (PDA). 21
Phillips head screw driver 15
Physical Characteristics 8
Ping Tool 109
PING utility 110
Platform and Floor Scale Bases 5
PLC® 1
Power 8
power and relay circuit card 16
Power and Utility Requirements 8
Power Input J1 16
PP# = Program Part Number 95
pre-startup 106
Prime Meridian 32
Print Button 22
printed circuit boards 75
printer port 3
process weighing 1
Profibus 1, 6
Profibus (Process Fieldbus) 6
program version 95
Programmable Logic Controllers (PLC)
Provide Feedback link 3
push buttons 46
R
rated drop-out current 110
read only 97
READINTEGER 67
rear cover 13
reassembly 75
re-calibrate 97
Recommended load cell cabl 17
Ref Point 48
Reference Point 48
Reference Weight 50
Reference Weight field 50
Remote I/O 6
S
6
Scale # Screen 101
Scale Capacity 98
Scale Capacity Parameter 28
Scale Millivolt/Volt display 103
SCR SWITCHING LOAD CIRCUIT 110
Screws 75
Secure Memory Module 18
Secure Memory Module (SMM) 4
Security Violation 50
Selectable Predetermined 6
sensitivity specifications 98
Sensor Input Options 4
Sensor Type 48
Sensor Type choices 48
sensors 46
Sequential Batch Control 2
Serial Number 99
Serial Port 4
Serial Port Parameters 30, 34
Serial RS 232 8
Service Manuals 11
Set Clock Parameter 31
Set Date/Clock Parameters 44
Set LCD Contrast Parameter 34
Set the Span Value 52
Setup/3/DEF Button 23
short integer 66
Siemens 6
Silicon Controlled Rectifier (SCR) 110
simple operator interfaces 46
sliding average 28
slotted head screwdriver 12
small fasteners 75
Small Logic Controllers (SLC 6
smart devices 5
SMM 4, 18
SMM (Secure Memory Module) 1
solenoid 110
solid state relays 110
Spacers 75
Span Value 52, 97
Span Weigh 53
Span Weight field 53
Special (Command) Mapping) 67
HI 3030 Weight Controller
Service Manual
Specifications 7
Specifications for a Standard Instrument 7
Specifications for Peripherals/Systems Components 9
Stability Test 103
Standard Interfaces 7
Standard SPST (Form A) Setpoint Relays 7
Standby Display 95
Start Button 21
Starting Up for the First Time 23
Stop Button 21
Storage Temperature Range 8
sum 4
Summary Display 100
Support Section 1
Swivel bracket 13
Swivel Material 9
Swivel Mount 12
Swivel Mount (HI 3010-MB) 8
Swivel Mount brackets 13
swivel mounted 1
syntax 67
system diagnostics utility 100
System Integrity Check and Fault Determination From
the Front Panel 95
System Integrity Check and Fault Determination From
the PDA 106
System Support 111
T
Tare Limit Parameter 31
Tare Reminder Parameter 28
Tare Weight 41
Technical Support Department 1
Temperature Coefficient 8
Tension or Compression type load cells 109
terminal blocks 17
Test and Data Menu 95, 100
Test button 107
Test Channel #1 button 107
Test Data Display 100
Test Data List 18
test weight 52
Test/9 button 4, 100
Test/9/WXYZ Button 23
Texas Instruments 6
The Secure Memory Module 4
The WAVERSAVER® Parameter 29
tied 16
Timezone field 44
Too Hi Error 75
Too Lo Error 75
Trad Cal Error 75
Traditional 7
Traditional Cal Menu 52
Traditional Calibration 52
traditional calibration 4, 47
Traditional Calibration From the Front Panel 51
Traditional Calibration From the Web Page 52
troubleshooting 75
troubleshooting techniques 111
Troubleshooting The Network Connections and Configuration with the "Ping" Tool 109
TRUE 67
U
UDP packet output 35
Unit of Measure Parameters 25
Units/5/JKL Button 23
Universal Power Supply 8
universal power supply 16
Unmap 73
Unpacking 11
Up/Down - Left/Right Buttons 22
Update Rate 7
User Guide 11
User/./_/@ Button 23
Using IT From the Front Panel 100
V
Valid Ranges 68
vibratory forces 29
View Input States 105
Voltage & Weight 100
Voltage & Weight Displays 100
Voltage and Weight 100
VPN 1
VPN (Virtual Private Network) 34
W
wall mount 12
WAP enabled devices 3
Warranty 111
Washers 75
Watts available for DeviceNet Power 8
WAVERSAVER 3, 7
WAVERSAVER® 1, 3, 24
WAVERSAVER® technology 3
Web Browser 21, 102
Weight (lb kg, gr., oz) 101
Weight Controller Configuration From the PDA 39
Weight Controller Configuration From the Web Page 39
weight hopper 31
wiring harness 75
WRITEFLOAT 67
WRITEINTEGER 67
WRITESTRING 67
Y
Year-yyyy field
Z
Zero Count 97
44
Index
Zero counts 97
Zero Ct 52
zero point 52
Zero Reminder Parameter
Zero Tolerance 98
Zero Value 52
26
HI 3030 Weight Controller
Service Manual
9440 Carroll Park Drive, San Diego, CA 92121
Telephone: 1-800-821-5831
FAX: (858) 278-6700
Web Address: http://www.hardysolutions.com
Hardy Process Solutions Document Number: 0596-0266-01 REV R
Copyright 2011, Hardy Process Solutions, All Rights Reserved. Printed in the U.S.A.