1
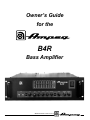
B4R Bass Amplifier
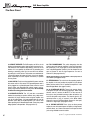
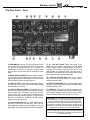
The Front Panel Controls and Their Use
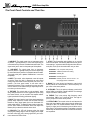
1. 0dB INPUT: The signal output from an instrument (active
or passive – typically passive) or a line level signal may be
connected here by means of a shielded instrument cable. The
signal at this jack is sent into the preamp at full amplitude.
2. -15dB INPUT: The signal output from an instrument
(active or passive – typically active) or a line level signal may
be connected here by means of a shielded instrument cable.
The signal at this jack is padded 15dB before it is sent into
the preamp.
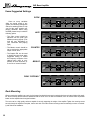
POSITION 1: Fully “scooped” mids (mid cut)
3. MUTE: This switch, when depressed, mutes all outputs
except the Tuner Out (#41). A footswitch can also control
muting if the Mute switch on the front panel is left in the “out”
position. (The front panel switch is still active with a
footswitch connected.) This is excellent for tuning your bass
with an electronic tuner without having to adjust any levels or
turn down your house volume.
POSITION 5: Basically flat with low end roll off – for
loud playing without “muddiness”
4. TEXTURE: This switch adds a “tube emulation” stage
which changes the tone for a more aggressive sound. Using
the Texture switch, you can overdrive the amplifier without
typical (and harsh-sounding) solid state clipping.
5. GAIN: This control sets the level of the signal entering the
preamp stage. Adjust this control until the Peak LED (#6)
flashes on strong signal peaks (but is not illuminated constantly while playing). To obtain the best signal to noise ratio,
set the Gain control as described above and adjust the
Master (#14) to obtain the desired volume level.
4
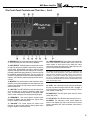
7. STYLE: This five-position switch allows you to vary the
tone of the amplifier. The following table lists each of the different settings – experiment with the Style and other EQ controls (#8,9,10,18,19) for the results which suit you best.
6. PEAK LED: This LED will illuminate when the signal
entering the preamp stage is near the clipping level. Adjust
the Gain control (#5) until a strong signal from your instrument causes this LED to flicker.
POSITION 2: Traditional passive tone setting
POSITION 3: Basically flat
POSITION 4: Boosted high end
8. BASS: This is the primary low frequency control which
allows 12dB of cut or boost at 50Hz. The low frequency output is flat at the center position.
9. ULTRA MID: This is the primary midrange control which
allows 7dB of cut at 400Hz or boost at 800Hz. The midrange
output is flat at the center position.
10. TREBLE: This is the primary high frequency control
which allows 18dB of cut or boost at 5kHz. The high frequency output is flat at the center position.
11. EFFECTS MIX: This control varies the mix between the
direct (dry) signal and the effects (wet) when the effects loop
(#39,40) is used. Full counterclockwise results in all direct
signal (no effect) and full clockwise gives all effect and no
direct signal. The clockwise position is equivalent to a series
effects loop and should be used with such devices as limiters
and equalizers.