1
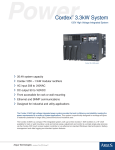
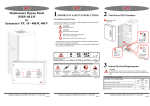
Smart-UPS® VT 10-40kVA 400V Site Preparation and Installation Manual Smart-UPS® VT 10-40kVA 400V Site Preparation & Installation Manual ! Output Pwr Zone Probe 10/100Ba Reset se-T AP9619 10/100 Network Managem ent Card EM IMPORTANT! THIS DOCUMENT CONTAINS IMPORTANT SAFETY INSTRUCTIONS – PLEASE SAVE THESE INSTRUCTIONS! Smart-UPS® VT and XR Battery Enclosure 10-40kVA, 400V Operation Manual – 990-1985 1 Contents Safety ..................................................................... 1 General Safety Instructions . . . . . . . . . . . . . . . . . . . . . . . . . . . . 1 Symbols used in this guide . . . . . . . . . . . . . . . . . . . . . . . . . . . . . 1 Environmental symbols . . . . . . . . . . . . . . . . . . . . . . . . . . . . . . . 1 General safety . . . . . . . . . . . . . . . . . . . . . . . . . . . . . . . . . . . . . . 2 Introduction............................................................ 3 UPS Family Range and Components . . . . . . . . . . . . . . . . . . . . . 4 352mm Enclosures –10-20kVA . . . . . . . . . . . . . . . . . . . . . . . . . . 4 523mm Enclosures – 30-40kVA . . . . . . . . . . . . . . . . . . . . . . . . . 4 Serial number. . . . . . . . . . . . . . . . . . . . . . . . . . . . . . . . . . . . . . . 5 Type label . . . . . . . . . . . . . . . . . . . . . . . . . . . . . . . . . . . . . . . . . 5 UPS sizes and weights . . . . . . . . . . . . . . . . . . . . . . . . . . . . . . . . 5 Foot print . . . . . . . . . . . . . . . . . . . . . . . . . . . . . . . . . . . . . . . . . 6 User interface . . . . . . . . . . . . . . . . . . . . . . . . . . . . . . . . . . . . . . 7 Connection interface (rear). . . . . . . . . . . . . . . . . . . . . . . . . . . . . 8 APC Network Management Card AP9619 (installed in UPS) and APC Humidity Sensor (Optional) . . . . . . . . . . . . . . . . . . . . . 8 APC Smart-UPS VT Battery Temperature Sensor (Optional) 1 delivered with UPS . . . . . . . . . . . . . . . . . . . . . . . . . . . . . . . . . 9 Floor anchoring (Optional) . . . . . . . . . . . . . . . . . . . . . . . . . . . . 9 Options . . . . . . . . . . . . . . . . . . . . . . . . . . . . . . . . . . . . . . . . . 11 Maintenance Bypass Panels . . . . . . . . . . . . . . . . . . . . . . . . . . . 11 APC Smart-UPS VT 10-40kVA Battery Breaker Box . . . . . . . . . . 12 Customized Battery solutions . . . . . . . . . . . . . . . . . . . . . . . . . 12 Smart-UPS® VT Extended Run Battery Enclosure (XR Enclosure) and Battery Module . . . . . . . . . . . . . . . . . . . . . 12 Site Preparation .....................................................13 Installation Space Requirements . . . . . . . . . . . . . . . . . . . . . . . 13 Clearance . . . . . . . . . . . . . . . . . . . . . . . . . . . . . . . . . . . . . . . . 13 Smart-UPS® VT 10-40kVA 400V Site Preparation and Installation Manual i Floor Anchoring Preparation . . . . . . . . . . . . . . . . . . . . . . . . . . 14 Drill holes for floor anchoring . . . . . . . . . . . . . . . . . . . . . . . . . 14 Hole positions for floor anchors . . . . . . . . . . . . . . . . . . . . . . . . 14 Operating Environment . . . . . . . . . . . . . . . . . . . . . . . . . . . . . 15 Operating conditions . . . . . . . . . . . . . . . . . . . . . . . . . . . . . . . . 15 Heat dissipation . . . . . . . . . . . . . . . . . . . . . . . . . . . . . . . . . . . 15 Audible noise . . . . . . . . . . . . . . . . . . . . . . . . . . . . . . . . . . . . . 15 Recommended source connections . . . . . . . . . . . . . . . . . . . . . 16 Recommended current protection . . . . . . . . . . . . . . . . . . . . . . 17 Minimum breaker settings for 10kVA UPS . . . . . . . . . . . . . . . . 18 Minimum breaker settings for 15kVA UPS . . . . . . . . . . . . . . . . 18 Minimum breaker setting for 20kVA UPS . . . . . . . . . . . . . . . . . 19 Minimum breaker setting for 30kVA UPS . . . . . . . . . . . . . . . . . 19 Minimum breaker setting for 40kVA UPS . . . . . . . . . . . . . . . . . 20 Recommended phase-conductor sizes for a 30°C temperature environment . . . . . . . . . . . . . . . . . . . . . . . . . . . . 20 EPO switch wiring . . . . . . . . . . . . . . . . . . . . . . . . . . . . . . . . . . 21 Basic Wiring Overview . . . . . . . . . . . . . . . . . . . . . . . . . . . . . . 22 Wiring Diagram with Maintenance Bypass Panel . . . . . . . . . . . 23 Wiring Diagram without Maintenance Bypass Panel . . . . . . . . 23 Site Preparation Checklist . . . . . . . . . . . . . . . . . . . . . . . . . . . . 24 Electrical Installation ............................................ 25 Preparing for Installation . . . . . . . . . . . . . . . . . . . . . . . . . . . . 25 Front Panel removal . . . . . . . . . . . . . . . . . . . . . . . . . . . . . . . . 25 Total-Power-Off Procedure . . . . . . . . . . . . . . . . . . . . . . . . . . . 26 System-Electrical Information . . . . . . . . . . . . . . . . . . . . . . . . . 27 Source connections . . . . . . . . . . . . . . . . . . . . . . . . . . . . . . . . . 30 Wiring . . . . . . . . . . . . . . . . . . . . . . . . . . . . . . . . . . . . . . . . . . 31 Input/Output Wiring – Single Mains (default) . . . . . . . . . . . . . . 32 Input/Output Wiring – Dual Mains . . . . . . . . . . . . . . . . . . . . . . 34 DC wiring . . . . . . . . . . . . . . . . . . . . . . . . . . . . . . . . . . . . . . . . 36 Communication Wiring to EPO and Optional Equipment . . . . 37 Pin connections J106 and J108 (EPO) . . . . . . . . . . . . . . . . . . . 37 Pin connections J106 for Battery Temperature Sensor, APC Maintenance Bypass Panel, ii Smart-UPS® VT 10-40kVA 400V Site Preparation and Installation Manual and Generator Control wiring . . . . . . . . . . . . . . . . . . . . . . . . . 38 Pin connections J108 (for EPO wiring options) . . . . . . . . . . . . 39 Connection of APC Humidity Sensor . . . . . . . . . . . . . . . . . . . . 40 Connecting the APC Battery Temperature Sensor . . . . . . . . . . . 42 Reinstall rear cover . . . . . . . . . . . . . . . . . . . . . . . . . . . . . . . . . 43 Levelling Feet . . . . . . . . . . . . . . . . . . . . . . . . . . . . . . . . . . . . . 44 Setting the levelling feet . . . . . . . . . . . . . . . . . . . . . . . . . . . . . 44 Front Panel Installation . . . . . . . . . . . . . . . . . . . . . . . . . . . . . 45 Front Panel installation . . . . . . . . . . . . . . . . . . . . . . . . . . . . . . 45 Floor Anchoring (Option) . . . . . . . . . . . . . . . . . . . . . . . . . . . . 46 Wiring Verification Procedure . . . . . . . . . . . . . . . . . . . . . . . . . 47 Installation Site Checklist . . . . . . . . . . . . . . . . . . . . . . . . . . . . 48 Warranty ..............................................................49 LIMITED FACTORY WARRANTY . . . . . . . . . . . . . . . . . . . . . . . . 49 APC product covered . . . . . . . . . . . . . . . . . . . . . . . . . . . . . . . . 49 Terms of warranty . . . . . . . . . . . . . . . . . . . . . . . . . . . . . . . . . . 49 Non-transferable warranty extends to first purchaser for use . . 49 Assignment of warranties . . . . . . . . . . . . . . . . . . . . . . . . . . . . 50 Drawings, descriptions . . . . . . . . . . . . . . . . . . . . . . . . . . . . . . 50 Warranty claims procedure . . . . . . . . . . . . . . . . . . . . . . . . . . . 50 Exclusions . . . . . . . . . . . . . . . . . . . . . . . . . . . . . . . . . . . . . . . . 50 Life Support Policy . . . . . . . . . . . . . . . . . . . . . . . . . . . . . . . . . 51 Smart-UPS® VT 10-40kVA 400V Site Preparation and Installation Manual iii Safety General Safety Instructions Symbols used in this guide WARNING! Risk of electric shock. CAUTION! Read this information to avoid equipment damage. Indicates important information. Note Indicates that more information is available on this subject in a different section of this manual. Indicates that more information is available on the same subject in a different manual. Environmental symbols Temperature 990-2283 Ventilation requirements Humidity Dust/Fumes Smart-UPS® VT 10-40kVA 400V Site Preparation and Installation Manual Altitude 1 Safety – General Safety Instructions General safety WARNING! All electrical power and control wiring must be installed by a qualified electrician and comply with local and national codes. WARNING! When connected, the UPS contains energy from both AC and DC sources. If the UPS has dual mains supply, be aware of the two AC supply sources. Hazardous voltage from batteries may be present even when the unit is disconnected from the utility power source(s). Follow the “Total-Power-Off Procedure” on page 26 procedure in this manual to completely de-energize the system. Disconnect charging source prior to connecting or disconnecting battery terminals. WARNING! Only trained personnel familiar with the construction and operation of the equipment, and the electrical and mechanical hazards involved, may install and remove system components. For configurations including customer-supplied external batteries, refer to manufacturer’s battery installation and maintenance instructions. 2 Smart-UPS® VT 10-40kVA 400V Site Preparation and Installation Manual 990-2283 Introduction Welcome to the Site Preparation and Installation Manual for the Smart-UPS® VT. This manual contains information on how to prepare your site for the installation of the UPS and optional APC equipment (also available at www.apc.com) and instructions on how to carry out the electrical/ mechanical installation. Separate manuals are available on: • Receiving and Unpacking – part no. 990-2284 • Operation and Maintenance – part no. 990-2282 ! Output Pwr Zone Probe 10/100Ba Reset se-T AP9619 10/100 Network Managem ent Card EM Don’t stand on, sit on or place any objects on UPS. Note For more information on APC products and services, visit us at www.apc.com Note Note 990-2283 Most illustrations show 523mm Enclosures but apply to both Enclosure sizes (352mm and 523mm). Any differences between the two Enclosure sizes will be addressed in the manual. Smart-UPS® VT 10-40kVA 400V Site Preparation and Installation Manual 3 UPS Family Range and Components 352mm Enclosures –10-20kVA ! Output Pwr Zone Probe 10/100BaseT Reset AP9619 10/100 Network Managemen t Card Rear Front EM Front view without front panel Type label 523mm Enclosures – 30-40kVA ! Output Pwr Zone Probe ! Output 10/100Ba Reset Pwr se-T Zone Probe AP9619 10/100Ba Reset 10/100 Network Managem se-T ent Card EM AP9619 10/100 Network Managem ent Card Front 4 Type label Rear EM Front view without front panel Smart-UPS® VT 10-40kVA 400V Site Preparation and Installation Manual 990-2283 Introduction – UPS Family Range and Components Serial number The serial number is available on the type label on the rear side of the UPS. Type label Hotline in US/Canada/LAM: +1 800 800 4APC ¥ Hotline in EMEA: +353 91 70 2000 ¥ Worldwide Support numbers: www.apcc.com/support/contact/ Mark acc. to SKU No. APC SKU SUVT10KH SUVT15KH SUVT20KH SUVT30KH SUVT40KH APC SKU w.startup SUVT10KHS SUVT15KHS SUVT20KHS SUVT30KHS SUVT40KHS Model APC Smart-UPS VT 10kVA 400V APC Smart-UPS VT 15kVA 400V APC Smart-UPS VT 20kVA 400V APC Smart-UPS VT 30kVA 400V APC Smart-UPS VT 40kVA 400V Apparent/Active Power 10kVA/8kW 15kVA/12kW 20kVA/16kW 30kVA/24kW 40kVA/32kW Voltage & Connection Types Unit serial number AC Input 380Y/220V 4W+GND 50/60Hz 400Y/230V 4W+GND 50/60Hz 415Y/240V 4W+GND 50/60Hz AC Output 380Y/220V 4W+GND 50/60Hz 400Y/230V 4W+GND 50/60Hz 415Y/240V 4W+GND 50/60Hz DC Input +/- 192V Rated Input Current 14.4/13.6/13.1A, 380/400/415V 21.5/20.5/19.7A, 380/400/415V 28.7/27.2/26.3A, 380/400/415V 43.1/40.9/39.4A, 380/400/415V 57.4/54.6/52.6A, 380/400/415V Rated Output Current 15.2/14.4/13.9A, 380/400/415V 22.8/21.7/20.9A, 380/400/415V 30.4/28.9/27.8A,380/400/415V 45.6/43.3/41.7A, 380/400/415V 60.8/57.7/55.6A, 380/400/415V SEE INSTALLATION INSTRUCTIONS BEFORE CONNECTING TO THE SUPPLY Battery Current 27.5A 41.2A 55.0A 82.5A 109.9A THIS REAR COVER MUST BE PLACED ON UPS 885-2532_rev01 UPS sizes and weights Height (identical for all Enclosure sizes) 823mm Depth – including Front Panel (identical for all Enclosure sizes) 906mm System Size/ Enclosure width APC Part No. Installed weight 10kVA 352mm SUVT10KHS 134kg 15kVA 352mm SUVT15KHS 134kg 20kVA 352mm SUVT20KHS 134kg 30kVA 523mm SUVT30KHS 182.5kg 40kVA 523mm SUVT40KHS 182.5kg 990-2283 Smart-UPS® VT 10-40kVA 400V Site Preparation and Installation Manual 5 Introduction – UPS Family Range and Components Foot print Rear Rear 1 906 mm 523 mm 352 mm Cable Entry. Levelling feet. Castors. Communication cable inlets. 6 Smart-UPS® VT 10-40kVA 400V Site Preparation and Installation Manual 990-2283 Introduction – UPS Family Range and Components User interface ! Output Pwr Zone Probe 10/100Base-T Reset 10/100 AP9619 Network Management Card EM Display: user-control interface used to configure the functionality, monitor the system, set alarm thresholds, and provide audible and visual alarms. Network Management Card with Environmental Monitor (AP9619): used for remote system control and monitoring, e-mail notifications, etc. Computer-interface port for the connection of computers with APC Powerchute® software. Mechanical Bypass Lever: used to bypass the upstream mains power around the UPS to support the load directly = internal mechanical bypass operation. Service port (for APC maintenance personnel only). Display port for the connection of display communication cable. Documentation storage. Inlet for communication cables. 990-2283 Smart-UPS® VT 10-40kVA 400V Site Preparation and Installation Manual 7 Introduction – UPS Family Range and Components Connection interface (rear) Power connection. Communication wiring connection (EPO signalling, Battery Temperature Sensor). Power cable entry. Protective earth. Ferrite cores for DC connection (do not remove). APC Network Management Card AP9619 (installed in UPS) and APC Humidity Sensor (Optional) Humidity Sensor ! Output Pwr Zone Probe 10/100Base-T Reset 10/100 AP9619 Network Management Card EM For installing Humidity Sensor see “Connection of APC Humidity Sensor” on page 40. 8 Smart-UPS® VT 10-40kVA 400V Site Preparation and Installation Manual 990-2283 Introduction – UPS Family Range and Components APC Smart-UPS VT Battery Temperature Sensor (Optional) 1 delivered with UPS APC SmartUPS VT Battery Temperature Sensor for External Battery Cabinet SUVTOPT007 For installation procedures concerning the APC Smart UPS VT Battery Temperature Sensor see “Connecting the APC Battery Temperature Sensor” on page 42. Note Floor anchoring (Optional) ! Output Pwr Zone Probe 10/100Base-T Reset 10/100 AP9619 Network Management Card EM Reuse transport brackets as Floor Anchoring Brackets 990-2283 Smart-UPS® VT 10-40kVA 400V Site Preparation and Installation Manual 9 Introduction – UPS Family Range and Components Floor-anchoring bolts are not provided with the UPS. Use floor anchoring bolts suitable for your floor material. Note For floor anchoring installation procedures see “Floor Anchoring Preparation” on page 14, and “Floor Anchoring (Option)” on page 46. Note 10 Smart-UPS® VT 10-40kVA 400V Site Preparation and Installation Manual 990-2283 Options Maintenance Bypass Panels Further details on APC Maintenance Bypass Panel (MBP) are available at www.apc.com. Note MBP for SUVT 10-20kVA MBP for SUVT 30-40kVA 305mm 450mm 305mm 126mm 400mm 126mm Part no. APC MBP for SUVT 10-20kVA SBPSU10K20HC1M1-WP Part no. APC MBP for SUVT 30-40kVA SBPSU30K40HC1M1-WP The Maintenance Bypass Panel provides overcurrent protection to the entire UPS system. It is also used to bypass the mains power around the UPS instead of through the system, e.g. when UPS maintenance is carried out. 990-2283 Smart-UPS® VT 10-40kVA 400V Site Preparation and Installation Manual 11 Introduction – Options APC Smart-UPS VT 10-40kVA Battery Breaker Box Front panel 360mm 270mm 183mm including front panel Part no. APC Smart-UPS VT 10-40kVA 400V Battery Breaker Box SUVTBB10K40H Customized Battery solutions Customized battery solutions are available from our Custom Engineering Group. Contact CEG through APC's Customer Support (contact numbers available on rear cover). Smart-UPS® VT Extended Run Battery Enclosure (XR Enclosure) and Battery Module XR Enclosure with Front Panel Battery Module 1500mm Serial: Model: BATTER Y UNIT Serial: Model: BATTER Y UNIT Serial: Model: BATTER Y UNIT Serial: Model: BATTER Y UNIT 523mm 925mm For more details on optional APC equipment for the APC Smart-UPS® VT, contact APC Customer Support. Refer to the rear cover for contact numbers. Note 12 Smart-UPS® VT 10-40kVA 400V Site Preparation and Installation Manual 990-2283 Site Preparation Installation Space Requirements Allow for enough working space behind the Enclosure for electrical work to be carried out (e.g. if you want to connect other equipment at a later stage). Note Clearance (A) (A) (B) (B) (C) (D) (D) (C) (G) (G) (E) (E) 523 mm Enclosure 352 mm Enclosure Space requirements 523mm Enclosure 352mm Enclosure Minimum clearance above Enclosure (A) 500 500 Enclosure depth (B) 906 906 Enclosure width (C) 523 352 Minimum free rear space for airflow* (D) 100 100 Minimum front clearance (E) 1000 1000 No side clearance required (add width of Enclosure Stabilizing Brackets (2x80mm) for floor anchoring protection if applicable)* 0 0 Total installation depth, inclusive of Front Panel, and minimum front and rear clearances (G) 2006 2006 *) All physical installations must comply with local standards. 990-2283 Smart-UPS® VT 10-40kVA 400V Site Preparation and Installation Manual 13 Floor Anchoring Preparation Floor Anchoring Preparation If floor anchoring is required in your area, read this section. If not, proceed to “Operating Environment” . Note Drill holes for floor anchoring Anchoring your UPS to the floor requires re-use of the brackets previously used to secure the Enclosure to its pallet. Refer to the drawings below for proper hole positions. Note Hole positions for floor anchors Rear Rear 147mm 130mm Floor anchor holes: Ø 10mm 130mm Floor anchor holes: Ø 10mm 130mm Top view of bottom plate of 523mm Enclosure 130mm 650mm Top view of bottom plate of 352mm Enclosure 130mm 23.5mm 575mm 404mm Refer to this drawing for floor anchor positions for 523mm Enclosure. Refer to this drawing for 352mm Enclosure. The Floor Anchoring procedure is described in section “Floor Anchoring (Option)” on page 46. 14 Smart-UPS® VT 10-40kVA 400V Site Preparation and Installation Manual 990-2283 Operating Environment Operating conditions Install the UPS in an indoor, temperature-controlled area, that is free of conductive contaminants. Note Temperature Range: 0° to 40°C Keep Ventilated Front-to-Rear Airflow (see space considerations) Relative Humidity: <95% Non-condensing No Conductive Dust or Corrosive Fumes Altitude derating table: 1000m: 100% load 1500m: 95% load 2000m: 91% load 2500m: 86% load 3000m: 82% load Heat dissipation UPS size kW at fully charged batteries BTU 10kVA 0.5 1,501 15kVA 0.75 1,761 20kVA 1.0 2,566 30kVA 1.5 2,866 40kVA 2.0 4,367 Audible noise 10-20kVA 30-40kVA Audible noise at 100% load: (1m from the UPS) 64dBA 67dBA Audible noise at <70% load (1 m from the UPS) 56dBA 59dBA 990-2283 Smart-UPS® VT 10-40kVA 400V Site Preparation and Installation Manual 15 Site Preparation – Operating Environment Recommended source connections The UPS must be supplied from a: 380Y/220V 4W + GND 50/60Hz or 400Y/230V 4W + GND 50/60Hz or 415Y/240V 4W + GND 50/60Hz source. CAUTION! Verify clockwise phase-rotation (L1, L2, L3) and make sure a neutral connection is present. See “Recommended phase-conductor sizes for a 30°C temperature environment” on page 20. 16 Smart-UPS® VT 10-40kVA 400V Site Preparation and Installation Manual 990-2283 Site Preparation – Operating Environment Recommended current protection AC output over-current protection and AC output disconnect must be provided by the customer. Note Dual/single mains configuration Connection 10kVA 15kVA 20kVA 30kVA 40kVA Notes Dual Mains input 20A breaker (30kA) 35A breaker (30kA) 50A breaker (30kA) 63A breaker (30kA) 80A breaker (30kA) 1+2 Dual Bypass input 20A breaker (30kAIC) 35A breaker (30kA) 50A breaker (30kA) 63A breaker (30kA) 80A breaker (30kA) 1+2 Single Mains/Bypass input 20A breaker (30kA) 35A breaker (30kA) 50A breaker (30kA) 63A breaker (30kA) 80A breaker (30kA) 1+2 Any Output 20A Class gL (gG) fuse 35A Class gL (gG) fuse 50A Class gL (gG) fuse 63A Class gL (gG) fuse 80A Class gL (gG) fuse 3 DC Max. batt. Voltage ±192V 22A 33A 44A 66A 88A 4 DC Low. batt. Voltage ±154V 27.5A 41.2A 55A 82.5A 109.9A 4 Note 1: If the available fault current of the installation is below 30kA, a lower Icu-rated breaker can be used. Note 2: For breaker settings, refer to below tables listing available overload currents. Note 3: Maximum rating of a single fuse configuration if the internal bypass must be protected during a load short circuit. Selectivity is not ensured by the configuration. Note 4: Maximum DC currents in Smart-UPS VT. Size cable for maximum DC currents as in table above. Use 150° cable for installation. 990-2283 Smart-UPS® VT 10-40kVA 400V Site Preparation and Installation Manual 17 Site Preparation – Operating Environment Minimum breaker settings for 10kVA UPS Overload Event Mains input Bypass input Output Duration Notes Internal fault 2kA 1.7kA 9kA <10ms 1 800% overload bypass operation – 121.5A 121.5A 500ms 150% overload normal/battery operation – – 22.8A 30s 125% overload normal/battery operation – – 19A 60s Continuously (380V) 16.4A 16.7A 16.7A ∞ Note 1: For the output value, the short-circuit-level is indicated. Minimum breaker settings for 15kVA UPS Overload Event Mains input Bypass input Output Duration Notes Internal fault 2.1kA 1.8kA 9kA <10ms 1 800% overload bypass operation – 182A 182A 500ms 150% overload normal/battery operation – – 34.2A 30s 125% overload normal/battery operation – – 25.4A 60s Continuously (380V) 24.6A 25.1A 25.1A ∞ Note 1: For the output value, the short-circuit-level is indicated. 18 Smart-UPS® VT 10-40kVA 400V Site Preparation and Installation Manual 990-2283 Site Preparation – Operating Environment Minimum breaker setting for 20kVA UPS Overload Event Mains input Bypass input Output Duration Notes Internal fault 2.5kA 2.3kA 9kA <10ms 1 800% overload bypass operation – 244A 244A 500ms 150% overload normal/battery operation – – 45.6A 30s 125% overload normal/battery operation – – 38A 60s Continuously (380V) 32.5A 33.4A 33.4A ∞ Note 1: For the output value, the short-circuit-level is indicated. Minimum breaker setting for 30kVA UPS Overload Event Mains input Bypass input Output Duration Notes Internal fault 3 kA 2.3kA 14 kA <10 ms 1 800% overload bypass operation – 365A 365A 500ms 150% overload normal/battery operation – – 68.4A 30s 125% overload normal/battery operation – – 57A 60s Continuously (380V) 49.2A 50.1A 50.1A ∞ Note 1: For the output value, the short-circuit level is indicated. 990-2283 Smart-UPS® VT 10-40kVA 400V Site Preparation and Installation Manual 19 Site Preparation – Operating Environment Minimum breaker setting for 40kVA UPS Overload Event Mains input Bypass input Output Duration Notes Internal fault 3 kA 2.3kA 14 kA <10 ms 1 800% overload bypass operation – 487A 487A 500ms 150% overload normal/battery operation – – 91.2A 30s 125% overload normal/battery operation – – 76A 60s Continuously (380V) 65.6A 66.9A 66.9A ∞ Note 1: For the output value, the short-circuit level is indicated. Recommended phase-conductor sizes for a 30°C temperature environment DC input for non APC Battery Breakers see “Recommended current protection” on page 17. [mm2] sizes UPS Mains input [mm2] AC output [mm2] DC input [mm2] 70°C Wire* 10kVA 2.5 2.5 50 15kVA 6 6 50 20kVA 10 10 50 30kVA 16 16 50 40kVA 25 25 50 * Data only applicable for APC Smart-UPS VT 10-40kVA Battery Breaker Box! Use Molex lug type or equivalent, and crimp to manufacturer’s specifications. Note ) 20 Smart-UPS® VT 10-40kVA 400V Site Preparation and Installation Manual 990-2283 Site Preparation – Operating Environment WARNING! At 100% non-linear load (EN50091-3 standard), the neutral shall be rated for 200% phase current. EPO switch wiring The UPS must be connected to either a dry contact or a 24VDC Emergency Power Off (EPO) switch or according to national rules. See “Communication Wiring to EPO and Optional Equipment” on page 37 in this manual. 990-2283 Smart-UPS® VT 10-40kVA 400V Site Preparation and Installation Manual 21 Basic Wiring Overview AC input power DC power Communication Interface EPO AC power (output) Battery Maintenance Breaker Box Bypass (optional) Panel (optional) Mains Breaker UPS ON OFF Battery Bank 22 Smart-UPS® VT 10-40kVA 400V Site Preparation and Installation Manual 990-2283 Site Preparation – Basic Wiring Overview Wiring Diagram with Maintenance Bypass Panel Mains Mains Breaker Maintenance Bypass Panel Input To load Output EPO UPS Battery Breaker Box Battery Bank Wiring Diagram without Maintenance Bypass Panel Mains bypass Bypass Breaker Mains Mains Breaker Bypass input To load Mains input EPO Output UPS Battery Breaker Box Battery Bank 990-2283 Smart-UPS® VT 10-40kVA 400V Site Preparation and Installation Manual 23 Site Preparation Checklist System components. Have you – considered Service Program or Extended Warranty plan? Site Preparation. Have you – verified that input voltage and current are available? considered correct operating space, floor strength (see “Installation Space Requirements” on page 13), cooling, and environment (see “Operating Environment” on page 15). reviewed all electrical work to determine wiring requirements? Arrival Preparation. Have you – 24 verified that space and handling equipment are available to receive the UPS? (Including unloading the UPS from the delivery truck). scheduled an authorized electrician to install the UPS? Smart-UPS® VT 10-40kVA 400V Site Preparation and Installation Manual 990-2283 Electrical Installation Preparing for Installation Front Panel removal ! Output Pwr Zone Probe 10/100Base-T Reset 10/100 AP9619 Network Management Card EM To remove a Front Panel, turn screw clockwise to unlocked position. Pull top of Front Panel free of UPS. Lift the Front Panel free of the two slots at the bottom of the UPS. 990-2283 Smart-UPS® VT 10-40kVA 400V Site Preparation and Installation Manual 25 Total-Power-Off Procedure WARNING! Risk of electric shock - parts inside the UPS are energized from the battery supply even when the AC power is disconnected. Before electrical installation begins, follow the Total-Power-Off procedure to completely de-energize the system. ON OFF Mains breaker Battery Breaker Box UPS ! Output Pwr Zone Probe 10/100Base-T Reset 10/100 AP9619 Network Management Card EM Battery Bank Set the Battery Breaker to the OFF position following the specifications provided by the manufacturer. Set the mains breaker to the OFF or LOCKED-OUT position. If the UPS has dual mains supply, set both supplies to the OFF or LOCKED-OUT position. WARNING! Correct lock-out procedures at mains breaker must be followed. If necessary, install a padlock. 26 Smart-UPS® VT 10-40kVA 400V Site Preparation and Installation Manual 990-2283 System-Electrical Information WARNING! All electrical power and power control wiring must be installed by a qualified electrician, and must comply with local and national regulations for maximum power rating. 10kVA 8kW 15kVA 12kW 20kVA 16kW 30kVA 24 kW 40kVA 32kW Input voltage (V)/per phase 3x380/ 220V 3x380/ 220V 3x380/ 220V 3x380/ 220V 3x380/ 220V Input current (nominal) (A) 13.0 19.4 26.0 38.6 51.7 Maximum input current (continuous, at minimum mains voltage)/per phase 14.3 21.5 28.6 42.5 56.8 Input current protection for mains source or single mains supply (external to UPS, not supplied) (A) 3x20 3x35 3x50 3x63 3x80 Input current protection for bypass source in dual 20 mains configuration (external to UPS, not supplied) (A) 35 50 63 80 Input frequency (Hz) range 40-70 40-70 40-70 40-70 40-70 Output voltage (on line). (V) Minimum and maximum values (+/- 1%) 3x380/ 220V 3x380/ 220V 3x380/ 220V 3x380/ 220V 3x380/ 220V Output current (nominal) (A) 15.2 22.8 30.4 45.6 60.8 Maximum output current (in bypass only at 110% overload per phase) 16.7 25.1 35.4 50.1 66.9 Bypass input current (A) (in bypass only at 110% overload, per phase) 16.7 25.1 35.4 50.1 66.9 Neutral output current (with 100% switch mode load) (A) 25.0 37.5 50.0 75.0 100.0 Output current protection (external to UPS, not supplied) (A) 20 35 35 63 80 Output frequency range (Hz) 50/60 50/60 50/60 50/60 50/60 DC overcurrent protection and disconnect switch for external safety: (A) DC voltage rating of the battery supply Maximum available battery short-circuit current. 22 33 44 66 88 +/- 192 10kA +/- 192 10kA +/- 192 10kA +/- 192 10kA +/- 192 10kA UPS ratings (380V) 990-2283 Smart-UPS® VT 10-40kVA 400V Site Preparation and Installation Manual 27 Electrical Installation – System-Electrical Information 10kVA 8kW 15kVA 12kW 20kVA 16kW 30kVA 24 kW 40kVA 32kW Input voltage (V)/per phase 3x400/ 230V 3x400/ 230V 3x400/ 230V 3x400/ 230V 3x400/ 230V Input current (nominal) (A) 12.4 18.6 24.8 37.2 49.6 Maximum input current (continuous, at minimum mains voltage)/per phase 13.6 20.5 27.3 40.9 54.6 Input current protection for mains source or single mains supply (external to UPS, not supplied) (A) 3x20 3x35 3x50 3x63 3x80 Input current protection for bypass source in dual mains configuration (external to UPS, not supplied) (A) 20 35 50 63 80 Input frequency (Hz) range 40-70 40-70 40-70 40-70 40-70 Output voltage (on line). (V) Minimum and maximum values (+/- 1%) 3x400/ 230V 3x400/ 230V 3x400/ 230V 3x400/ 230V 3x400/ 230V Output current (nominal) (A) 14.4 21.7 28.9 43.3 57.7 Maximum output current (in bypass only at 110% overload per phase) 15.9 23.8 31.8 47.6 63.5 Bypass input current (A) (in bypass only at 110% overload, per phase) 15.9 23.8 31.8 47.6 63.5 Neutral output current (with 100% switch mode load) (A) 25.0 37.5 50.0 75.0 100.0 Output current protection (external to UPS, not supplied) (A) 20 35 35 63 80 Output frequency range (Hz) 50/60 50/60 50/60 50/60 50/60 DC overcurrent protection and disconnect switch for external safety: (A) DC voltage rating of the battery supply Maximum available battery short-circuit current. 22 33 44 66 88 +/- 192 10kA +/- 192 10kA +/- 192 10kA +/- 192 10kA +/- 192 10kA UPS ratings (400V) 28 Smart-UPS® VT 10-40kVA 400V Site Preparation and Installation Manual 990-2283 Electrical Installation – System-Electrical Information 10kVA 8kW 15kVA 12kW 20kVA 16kW 30kVA 24 kW 40kVA 32kW Input voltage (V)/per phase 3x415/ 240V 3x415/ 240V 3x415/ 240V 3x415/ 240V 3x415/ 240V Input current (nominal) (A) 11.9 17.8 23.8 35.3 47.3 Maximum input current (continuous, at minimum mains voltage)/per phase 13.1 19.6 26.2 38.9 52.1 Input current protection for mains source or single mains supply (external to UPS, not supplied) (A) 3x20 3x35 3x50 3x63 3x80 Input current protection for bypass source in dual mains configuration (external to UPS, not supplied) (A) 20 35 50 63 80 Input frequency (Hz) range 40-70 40-70 40-70 40-70 40-70 Output voltage (on line). (V) Minimum and maximum values (+/- 1%) 3x415/ 240V 3x415/ 240V 3x415/ 240V 3x415/ 240V 3x415/ 240V Output current (nominal) (A) 13.9 20.9 27.8 41.7 55.6 Maximum output current (in bypass only at 110% overload per phase) 15.3 23.0 30.6 45.9 61.2 Bypass input current (A) (in bypass only at 110% overload, per phase) 15.3 23.0 30.6 45.9 61.2 Neutral output current (with 100% switch mode load) (A) 25.0 37.5 50.0 75.0 100.0 Output current protection (external to UPS, not supplied) (A) 20 35 35 63 80 Output frequency range (Hz) 50/60 50/60 50/60 50/60 50/60 DC overcurrent protection and disconnect switch for external safety: (A) DC voltage rating of the battery supply Maximum available battery short-circuit current. 22 33 44 66 88 +/- 192 10kA +/- 192 10kA +/- 192 10kA +/- 192 10kA +/- 192 10kA UPS ratings (415V) 990-2283 Smart-UPS® VT 10-40kVA 400V Site Preparation and Installation Manual 29 Electrical Installation – System-Electrical Information Source connections The UPS must be supplied from a: 380Y/220V 4W + GND 50/60Hz or 400Y/230V 4W + GND 50/60Hz or 415Y/240V 4W + GND 50/60Hz source. CAUTION! Verify clockwise phase-rotation (L1, L2, L3) and make sure a neutral connection is present. CAUTION! The installation must comply with all local and national codes. 30 Smart-UPS® VT 10-40kVA 400V Site Preparation and Installation Manual 990-2283 Wiring Make sure the UPS is in its final installation location before wiring. Note CAUTION! Verify clockwise phase-rotation (L1, L2, L3) and make sure a neutral connection is present. Power terminal lug diameter: min. 6mm, max. 8mm. Torque value: 7Nm. Note If floor anchoring is required, attach the Floor Anchoring Brackets to the UPS now. Follow instructions under Floor Anchoring. Note Leave a copy of your wiring diagram with the customer to facilitate maintenance and troubleshooting. Note 990-2283 Smart-UPS® VT 10-40kVA 400V Site Preparation and Installation Manual 31 Electrical Installation – Wiring Input/Output Wiring – Single Mains (default) The UPS is designed for both single (default) and dual mains installations. Carry out the “TotalPower-Off Procedure” on page 26, and follow the below steps to install the UPS in a single-mains installation. The illustrations show a 523mm Enclosure, but installation procedures are identical for 352mm Enclosures. Note Loosen the 14 (13 in 352mm enclosure) M4 screws with torque screwdriver from the rear cover, and remove. Cut a cross in the blanking plugs. Route the cables through the blanking plugs and into the cable land area. 32 Smart-UPS® VT 10-40kVA 400V Site Preparation and Installation Manual 990-2283 Electrical Installation – Wiring Mains input cables Neutral L1 L2 L3 N N Output cables L1 L2 L3 PE cables PE cables Attach input cable lugs on L1, L2 and L3 input busbars (left side in the UPS), using the provided M6 torque screws. Attach output cable lugs on L1, L2 and L3 output busbars, using the provided M6 torque screws. Attach N where shown, using the provided torque screws. Attach PE (Protective Earth) where shown, using the provided torque screws. Fasten cables with cable ties. 990-2283 Smart-UPS® VT 10-40kVA 400V Site Preparation and Installation Manual 33 Electrical Installation – Wiring Input/Output Wiring – Dual Mains The UPS is designed for single mains installation as default. Carry out the “Total-Power-Off Procedure” on page 26, and follow the below instructions to install the UPS in a dual-mains installation. The illustrations show 523mm Enclosures, but the installation procedures are identical for 352mm Enclosures. Note C B A Loosen the 14 (13 in 352mm enclosure) M4 with torque screwdriver from the cover for the cable termination area and remove. Cut a cross in the blanking plugs. Route the cables through the blanking plugs and into the cable land area. Remove the 2 torque screws from brackets A, B, and C and remove all 3 brackets. 34 Smart-UPS® VT 10-40kVA 400V Site Preparation and Installation Manual 990-2283 Electrical Installation – Wiring Remove the (2) M6x12 screws from Brackets A, B, and C and remove all 3 brackets. Mains input cables Neutral Bypass input cables L1 L2 L3 Neutral N L1 L2 N L3 Output cables L1 PE cable L2 L3 N Neutral PE cables Attach the mains input cable lugs to input busbars L1, L2, L3, using the provided torque screws. Attach the bypass input cable lugs to L1, L2, L3 bypass busbars, using the provided torque screws. Attach the output cable lugs to the L1, L2, L3 output busbars and attach, using the provided torque screws. Attach N where shown, using the provided torque screws. Attach PE (Protective Earth) where shown. Fasten all cables with cable ties. 990-2283 Smart-UPS® VT 10-40kVA 400V Site Preparation and Installation Manual 35 Electrical Installation – Wiring DC wiring L1 L2 L3 N L1 L2 N L3 L1 L2 Bat+ L3 N N Bat- Cut a cross in the blanking plug. Guide DC cables through cable entry and ferrite cores. Install cables on busbars. Fasten cables with cable ties. Do not remove the ferrite cores. Note 36 Smart-UPS® VT 10-40kVA 400V Site Preparation and Installation Manual 990-2283 Communication Wiring to EPO and Optional Equipment EPO switch and wiring must be suited for use in a SELV circuit. Note Pin connections J106 and J108 (EPO) L1 L2 L3 N L1 L2 N L3 L1 L2 L3 N J106 Pin Connections: 8 Ext. charging control return 7 External control of charging 6 Q3 active return 5 Q3 active J108 Pin Connections: 4 Battery measurement supply* 1 Normally open EPO 3 Battery unit quantity* 2 Normally open EPO return 2 Max. battery temperature* 3 Normally closed EPO 1 Battery measurement return* 4 Normally closed EPO return 5 +24V SELV supply 6 SELV ground * Can be used with External Battery Temperature Sensor, and APC Battery Breaker Box. 990-2283 Smart-UPS® VT 10-40kVA 400V Site Preparation and Installation Manual 37 Electrical Installation – Communication Wiring to EPO and Optional Equipment Pin connections J106 for Battery Temperature Sensor, APC Maintenance Bypass Panel, and Generator Control wiring Pins 1 through 4 are for battery measurement (only through external temperature sensor). See “Connecting the APC Battery Temperature Sensor” on page 42. Pins 5 & 6 are for external maintenance bypass Q3. When Q3 is closed, signals are fed back to the UPS controller. Pins 7 & 8 are for external charge control. When 7 & 8 are closed, the UPS charges batteries with a pre-defined percentage (0-100%) of the maximum charging power. To be used in generator applications, or if special codes require control of charging. J106 8 Charging control switch 7 6 Q3 switch 5 4 4 3 3 2 2 1 1 J1 (Temperature Sensor) When connecting the Q3 auxiliary signal, use gold-plated N/C auxiliary switch on Q3. Note 38 Smart-UPS® VT 10-40kVA 400V Site Preparation and Installation Manual 990-2283 Electrical Installation – Communication Wiring to EPO and Optional Pin connections J108 (for EPO wiring options) Connect the EPO cable, using one of the following 4 wiring configurations. 1: Dry Contracts Normally Open J108 1 2 EPO circuit EPO is activated when pin 1 is connected to pins 3, and 5. 3 4 5 6 2: +24V Normally Open J108 1 2 EPO circuit 3 4 5 EPO is activated when an isolated SELV 24VDC voltage is supplied on pin 1 with reference to pin 2. 6 3: Dry Contacts Normally Closed J108 1 2 3 4 EPO circuit 5 EPO is activated when a connection from pin 3 to pin 5 is opened. 6 4: +24V Normally Closed J108 1 2 3 4 5 6 990-2283 EPO circuit EPO is activated when a SELV 24VDC voltage is removed from pin 3 with reference to pin 4. Smart-UPS® VT 10-40kVA 400V Site Preparation and Installation Manual 39 Electrical Installation – Communication Wiring to EPO and Optional Equipment Connection of APC Humidity Sensor The Humidity Sensor and Temperature Sensor are provided in a plastic bag attached to the front of the UPS. Note Humidity Sensor ! Output Pwr Zone Probe 10/100Base-T Reset 10/100 AP9619 Network Management Card EM Temperature Sensor 40 Smart-UPS® VT 10-40kVA 400V Site Preparation and Installation Manual 990-2283 Electrical Installation – Communication Wiring to EPO and Optional ! Output Pwr Zone Probe 10/100Base-T Reset 10/100 AP9619 Network Management Card EM Remove the 2 screws from the cable inlet at the front – and remove cable-inlet plate. Guide the cable through the hole in the bottom plate and up through the cable inlet. See “Foot print” on page 6 for locating the bottom cable inlet. Guide the cable up alongside the side panel and insert the Humidity Sensor plug into the socket marked “Probe”. Fasten the cable to the side panel with the enclosed cable ties Remount the cable-inlet plate. Place the Humidity Sensor where applicable. 990-2283 Smart-UPS® VT 10-40kVA 400V Site Preparation and Installation Manual 41 Electrical Installation – Communication Wiring to EPO and Optional Equipment Connecting the APC Battery Temperature Sensor Cable to be used for temperature sensor: Double-insulated cable 0.75mm2 – maximum cable length 100m. Note Connect cable 0.75 mm2 to Battery Temperature Sensor housing Loosen two screws and open housing. Guide double-insulated cable through grommet. Fill in cables and fasten screws (see schematics on next page). Close housing. Connect APC Battery Temperature Sensor to UPS L 3 N L1 L2 N L3 L1 L2 Bat+ L3 N N Bat- Guide cable through cable entry. Connect cable to J106. 42 Smart-UPS® VT 10-40kVA 400V Site Preparation and Installation Manual 990-2283 Electrical Installation – Communication Wiring to EPO and Optional Connect cable to J1 as illustrated: J106 (UPS) 8 7 Temp. sensor J1 VCC Temp Gnd 6 5 4 3 2 1 Battery Temperature Sensor must be placed between batteries. Note Reinstall rear cover 990-2283 Smart-UPS® VT 10-40kVA 400V Site Preparation and Installation Manual 43 Levelling Feet Verify that the installation has been electrically wired before setting the levelling feet. Note After the Levelling Feet have been lowered, remember to reinstall the Front Panel. If Floor Anchoring is required, carry out these procedures first. (See “Floor Anchoring Preparation” on page 14 and “Floor Anchoring (Option)” on page 46). Setting the levelling feet Set the levelling feet to stabilize the UPS in its final installation position. Use a 13/14-mm wrench (shipped with UPS) to adjust all 4 levelling feet from front to back, and left to right, until the pads make solid contact with the floor. Use a level tube to check the Enclosure is horizontal. 13/14-mm wrench CAUTION! To avoid equipment damage, do not push or pull the UPS after the levelling feet have been lowered. 44 Smart-UPS® VT 10-40kVA 400V Site Preparation and Installation Manual 990-2283 Front Panel Installation Front Panel installation ! Output Pwr Zone Probe 10/100Base-T Reset 10/100 AP9619 Network Management Card EM To install a Front Panel, insert the two guide taps at the bottom of the Front Panel into the two slots at the bottom of the UPS. Push the Front Panel into place. To secure the Front Panel, turn the screw counterclockwise to locked position. 990-2283 Smart-UPS® VT 10-40kVA 400V Site Preparation and Installation Manual 45 Floor Anchoring (Option) Floor anchoring is an option. If your installation does not require this option, proceed to “Front Panel Installation” on page 45. Note Use the two transport brackets that secured the UPS to the pallet during transport for floor anchoring. ! Output Pwr Zone Probe 10/100Base-T Reset 10/100 AP9619 Network Management Card EM Floor Anchoring Bracket (re-use of transport bracket) Align the 4 holes in the bottom angle of the Floor Anchoring Bracket on either side of the UPS to the pre-drilled holes in the floor. Floor anchoring procedures are identical for both 352mm and 523mm UPS Enclosures. Note See “Floor Anchoring Preparation” on page 14 and install a minimum of 4 anchors on each Enclosure (minimum size: M8) where shown, following the specifications provided by the manufacturer. Front Panel Front Panel 46 Smart-UPS® VT 10-40kVA 400V Site Preparation and Installation Manual 990-2283 Wiring Verification Procedure Use following procedure to verify that the UPS has been wired properly: 1. Make sure the DC breaker is in the OFF position. 2. Ensure all power wiring is torqued to 7Nm. 3. Switch the DC breaker in the ON position. If a problem occurs, call APC Customer Support. Refer to rear cover for contact numbers. Note 4. Reinstall all rear cover and Front Panels to the UPS. If you have installed any optional equipment, refer to product-specific manuals. Note 990-2283 Smart-UPS® VT 10-40kVA 400V Site Preparation and Installation Manual 47 Installation Site Checklist This checklist should be completed by the electrician after the wiring has been completed: Installed at (company name, date, contact)__________________________________________ Name and telephone number of electrician: ___________________________________________ UPS serial number: ______________________________________________________________ Input Circuit Breaker size and type: _________________________________________________ Output fuse size and type: ________________________________________________________ Location of protection devices (room):______________________________________________ Breaker ID: ___________________________________________________________________ EPO type: ____________________________________________________________________ Wire size and type: _____________________________________________________________ PE connection method and location: ________________________________________ 48 Smart-UPS® VT 10-40kVA 400V Site Preparation and Installation Manual 990-2283 Warranty LIMITED FACTORY WARRANTY The limited warranty provided by American Power Conversion Corporation (“APC”) in this Statement of Limited Factory Warranty applies only to Products you purchase for your commercial or industrial use in the ordinary course of your business. APC product covered Smart-UPS® VT. Terms of warranty APC warrants that the Product shall be free from defects in materials and workmanship for a period of one (1) year from the date of start-up when APC authorized service personnel performed the startup of the Product, or a maximum of 18 months from the date of Product shipment from APC, when APC authorized service personnel have not performed the start-up of the Product (“Warranty Period”). In the event that the Product fails to meet the foregoing warranty, APC shall repair or replace any defective parts, such repair or replacement to be without charge for on-site labor and travel if APC authorized personnel have conducted start-up of the Product. An APC Start-Up Service must be performed/completed by APC authorized service personnel or replacement of defective parts only will be covered. APC shall have no liability and no obligation to repair the installed Product if non-authorized personnel performed the start-up and such start-up caused the Product to be defective. Any parts furnished under this warranty may be new or factory-remanufactured. Repair or replacement of a defective product or part thereof does not extend the original warranty period. Non-transferable warranty extends to first purchaser for use This Warranty is extended to the first person, firm, association or corporation (herein referred to by “You” or “Your”) for whom the APC Product specified herein has been purchased. This Warranty is not transferable or assignable without the prior written permission of APC. 990-2283 Smart-UPS® VT 10-40kVA 400V Site Preparation and Installation Manual 49 Warranty – LIMITED FACTORY WARRANTY Assignment of warranties APC will assign to you any warranties which are made by manufacturers and suppliers of components of the APC Product and which are assignable. Any such warranties are assigned “AS IS” and APC makes no representations as to the effectiveness or extent of such warranties, assumes NO RESPONSIBILITY for any matters which may be warranted by such manufacturers or suppliers and extends no coverage under this Warranty to such components. Drawings, descriptions APC warrants for the Warranty Period and on the terms of the Warranty set forth herein that the APC Product will substantially conform to the descriptions contained in the APC Official Published Specifications or any of the drawings certified and agreed to by an authorized APC representative, if applicable thereto (“Specifications”). It is understood that the Specifications are not warranties of performance and not warranties of fitness for a particular purpose. Warranty claims procedure To obtain service under Warranty, contact APC Customer Support (see rear cover).You will need the model number of the Product, the serial number, and the date purchased. A technician will ask you to describe the problem. If it is determined that the Product will need to be returned to APC you must obtain a returned material authorization (RMA) number from APC Customer Support. Products that must be returned must have the RMA number marked on the outside of the package, and be returned with transportation charges prepaid. If it is determined by APC Customer Support that on-site repair of the Product is allowed, APC will arrange to have APC authorized service personnel dispatched to the Product location to repair or replace the Product at the discretion of APC. Exclusions APC shall not be liable under the Warranty if its testing and examination discloses that the alleged defect in the product does not exist or was caused by your or any third person’s misuse, negligence, improper installation or testing, unauthorized attempts to repair or modify, or any other cause beyond the range of the intended use, or by accident, fire, lightning or other hazard. THERE ARE NO WARRANTIES, EXPRESSED OR IMPLIED, BY OPERATION OF LAW OR OTHERWISE, OF PRODUCTS SOLD, SERVICED OR FURNISHED UNDER THIS AGREEMENT OR IN CONNECTION HEREWITH. APC DISCLAIMS ALL IMPLIED WARRANTIES OF MERCHANTABILITY, SATISFACTION AND FITNESS FOR A PARTICULAR PURPOSE. THE APC EXPRESS WARRANTIES WILL NOT BE ENLARGED, DIMINISHED, OR AFFECTED BY AND NO OBLIGATION OR LIABILITY WILL ARISE OUT OF APC RENDERING TECHNICAL OR OTHER ADVICE OR 50 Smart-UPS® VT 10-40kVA 400V Site Preparation and Installation Manual 990-2283 Warranty – LIMITED FACTORY WARRANTY SERVICE IN CONNECTION WITH THE PRODUCTS. THE FOREGOING WARRANTIES AND REMEDIES ARE EXCLUSIVE AND IN LIEU OF ALL OTHER WARRANTIES AND REMEDIES. THE WARRANTIES SET FORTH ABOVE, CONSTITUTE SOLE LIABILITY OF APC AND YOUR EXCLUSIVE REMEDY FOR ANY BREACH OF SUCH WARRANTIES. THE WARRANTIES EXTEND ONLY TO YOU AND ARE NOT EXTENDED TO ANY THIRD PARTIES. IN NO EVENT SHALL APC, ITS OFFICERS, DIRECTORS, AFFILIATES OR EMPLOYEES BE LIABLE FOR ANY FORM OF INDIRECT, SPECIAL, CONSEQUENTIAL OR PUNITIVE DAMAGES ARISING OUT OF THE USE, SERVICE OR INSTALLATION OF THE PRODUCTS, WHETHER SUCH DAMAGES ARISE IN CONTRACT OR TORT, IRRESPECTIVE OF FAULT, NEGLIGENCE OR STRICT LIABILITY OR WHETHER APC HAS BEEN ADVISED IN ADVANCE OF THE POSSIBILITY OF SUCH DAMAGE. Life Support Policy As a general policy, American Power Conversion Corporation and its affiliates and subsidiaries worldwide (APC) do not recommend the use of any of its products in life support applications where failure or malfunction of the APC product can be reasonably expected to cause failure of the life support device or to significantly affect its safety or effectiveness. APC does not recommend the use of any of its products in direct patient care. APC will not knowingly sell its products for use in such applications. Examples of devices considered to be life support devices are neonatal oxygen analysers, nerve stimulators (whether used for anesthesia, pain relief, or other purposes), autotransfusion devices, blood pumps, defibrillators, arrhythmia detectors and alarms, pacemakers, hemodialysis systems, peritoneal dialysis systems, neonatal ventilator incubators, ventilators for both adults and infants, anesthesia ventilators, infusion pumps, and any other device designated as “critical” by the U.S.F.D.A. 990-2283 Smart-UPS® VT 10-40kVA 400V Site Preparation and Installation Manual 51 APC Worldwide Customer Support Customer support for this or any other APC product is available at no charge in any of the following ways: • Visit the APC Web site to access documents in the APC Knowledge Base and to submit customer support requests. – www.apc.com (Corporate Headquarters) Connect to localized APC Web sites for specific countries, each of which provides customer support information. – www.apc.com/support/ Global support searching APC Knowledge Base and using e-support. • Contact an APC Customer Support center by telephone or e-mail. – Regional centers: Direct InfraStruXure Customer Support Line (1)(877)537-0607 (toll free) APC headquarters U.S., Canada (1)(800)800-4272 (toll free) Latin America (1)(401)789-5735 (USA) Europe, Middle East, Africa (353)(91)702000 (Ireland) Japan (0) 35434-2021 Australia, New Zealand, South Pacific area (61) (2) 9955 9366 (Australia) – Local, country-specific centers: go to www.apc.com/support/contact for contact information. Contact the APC representative or other distributor from whom you purchased your APC product for information on how to obtain local customer support. Entire contents © 2005 by American Power Conversion. All rights reserved. Reproduction in whole or in part without permission is prohibited. APC, the APC logo, the APC Powerchute, and the APC Smart-UPS VT are registered trademarks of American Power Conversion Corporation. All other trademarks are the property of their respective owners. 990-2283 *990-2283* 02/2005