1
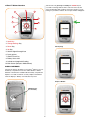
Step 2. Choose a Waypoint Icon
Page, toggle through and select the saved waypoint number, then
look at the direction of the arrow and the displayed distance.
Once you are satisfied with the number, press and hold your
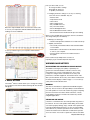
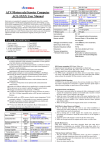
CHANGE SETTING key for 3 seconds to pull up your Select Icon
screen (A). Using your SCROLL and your CHANGE SETTINGS
keys, toggle through the different icons until you find the one you
like (B). Press the SET key once to record the change then press
again to return to the main screen (C).
From the Waypoint screen, press the SCROLL key to get to the
next screen. If you have a POI open, the next page will be the
Trail Monitor page. If you don’t have a POI selected, the next
page with be the Temperature and Altitude screen.
III. NAVIGATING
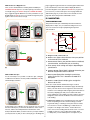
Trail Monitor Page
This powerful extra layer of detailed positional information is
displayed in a simple, easy to read format and gives the user
a host of visual tools to help in pinpointing their position
and orientation.
A
12:20
3D
E
B
(A)
(B)
C
D
F
12m
12.8yd
G
A.Waypoint / POI or Trail Head Icon
B.Distance Line: Shows direct distance from your position
to the marked POI or trailhead
C.Position Arrow: Shows your position relative to trailhead,
your orientation, and direction you are traveling
D.Scale Setting: Scale setting auto adjusts depending on
your distance
(C)
E.Compass Needle: Points North, helping to determine your
direction and position relative to the POI
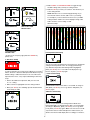
Step 3. Mark the Spot
F.Data Log Trail: Dotted line showing the path taken You are now ready to set your POI or “mark” the spot, saving the
coordinates in the device’s memory. Press and hold the SET key
until the display reads 0.0
relative to the POI. This is based on recorded GPS
data points
G.Distance to POI: Numeric display gives straight line distance to the POI
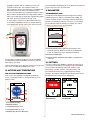
There are 2 modes that the Trail Monitor Page is used for.
1. POI or Waypoint Mode: The Trail Monitor page automatically
tracks your ‘trail” when a POI or waypoint is selected. In this
mode it is not recording the trail, but giving extra information to
the user by displaying the trail you have taken with all the
curves and bends. It also displays the mini compass arrow, the
straight line trail to the POI, the distance from the POI and a
scale reading.
2. Trail Data Recording: This is the hidden power of the reTrace™ Deluxe. Depending on the time interval settings (see Data
Log Period setting – in Settings section) the reTrace™ Deluxe
can save from 14 hours to 50,000 hours of data! That’s not
a misprint. The design of the reTrace™ Deluxe allows the
user to choose the recording interval, which is from 1 second
to 3600 seconds (or 1 hour), making this possible. What
is a data point, you ask? A data point is a snapshot of your
It’s that simple. The coordinates are now saved. As you move away
from the marked spot, you will notice the distance on the screen
increase, and the arrow will point back in the direction of the
freshly marked POI. When you want to retrace your steps and find
your way back to any POI you have saved, just go to the Waypoint
4