1
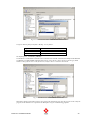
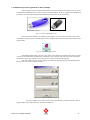
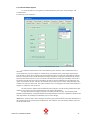
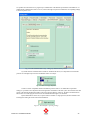
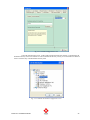
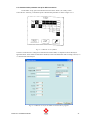
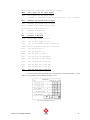
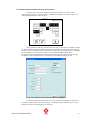
Piano Evo-4
Installation Manual
Version 1.0 rev. A
TOSOH BIOSCIENCE
PIANO Evo 4 Installation Manual
Dedicated to earn your trust
1
Revision
A
Date
08/05/2008
Improvements
Initial release Piano Evo-4 - New manual
Author
Jan Lambrechts
Transportstraat 4, 3980 Tessenderlo, Belgium
Tel.:+32(0)13 668830 Fax: +32(0)13 664749
E-mail: [email protected]
Member of the TOSOH Group
PIANO Evo 4 Installation Manual
2
Operator Manual Contentslist
LEGAL NOTICE ..................................................................................................................................................................... 5
PRECAUTIONS AND WARNINGS ...................................................................................................................................... 6
BIOHAZARDS ........................................................................................................................................................................... 6
CHAPTER 1 : PRE INSTALLATION ENQUERIES .......................................................................................................... 7
IMPORTANT NOTE .................................................................................................................................................................... 7
PRE-INSTALLATION CHECKLIST ............................................................................................................................................... 9
CHAPTER 2 : PIANO EVO-4 INSTALLATION ............................................................................................................... 11
IMPORTANT NOTE BEFORE INSTALLATION ............................................................................................................................. 11
2.1 MINIMUM PC CONFIGURATION ........................................................................................................................................ 12
2.2 INSTALLATION OF PIANO PROGRAM ................................................................................................................................ 12
2.3 HARDWARE SET-UP OF PROGRAM .................................................................................................................................... 21
2.4 SOFTWARE CONFIGURATION OF THE PIANO PROGRAM ..................................................................................................... 24
2.5 HOTLINE ASSISTANCE ...................................................................................................................................................... 50
2.6 CABLE CONFIGURATIONS ................................................................................................................................................. 50
2.7 COMMUNICATION LOG FILES ........................................................................................................................................... 54
2.8 HELPDIRECTORY SETUP ................................................................................................................................................... 54
2.9 FLAG DEFINITION IN CHROMATOGRAM PREVIEW ............................................................................................................. 55
2.10 AUTO REFRESH FUNCTION IN THE WORKLIST VIEW ....................................................................................................... 57
2.11 UIN REGISTRATION FOR THE PIANO PROGRAM .............................................................................................................. 57
2.12 USER INTERFACE LOG FILE ............................................................................................................................................ 57
CUSTOMER INQUERY FORM: .................................................................................................................................................. 60
PIANO Evo 4 Installation Manual
3
NOTES
PIANO Evo 4 Installation Manual
4
Legal Notice
By accessing the TOSOH BIOSCIENCE Piano program you agree to the following terms. If you do not
agree to the following terms, please notice that you are not allowed to use or access this program.
The contents of the Piano program are copyright TOSOH BIOSCIENCE.
Any rights not expressly granted herein are reserved. Reproduction, transfer, distribution or storage of part or all of
the program files in any form without the prior written permission of TOSOH BIOSCIENCE is prohibited except in
accordance with the following terms. TOSOH BIOSCIENCE consents to you browsing the Piano program on your
computer or printing of extracts from these pages for your personal use only and not for redistribution unless
consented to in writing by TOSOH BIOSCIENCE. Individual documents of our Piano program may be subject to
additional terms indicated in those documents.
The use of this program and the content therein, is permitted to private, non-commercial use. The use of
press releases and other documents classified as public is permitted in public communications if the source for the
information has been stated.
This program and the contents herein are provided as a convenience to you. The contents of TOSOH
BIOSCIENCE Piano program are provided on "as is" and "as available" basis. TOSOH BIOSCIENCE does not
warrant that its PIANO program will be uninterrupted or error-free. TOSOH BIOSCIENCE reserves the right to
revise the program or withdraw access to them at any time.
NO WARRANTY OF ANY KIND, EITHER EXPRESS OR IMPLIED, INCLUDING BUT NOT
LIMITED TO WARRANTIES OF TITLE OR NON-INFRINGEMENT OR IMPLIED WARRANTIES OF
MERCHANTABILITY OR FITNESS FOR A PARTICULAR PURPOSE, IS MADE IN RELATION TO THE
AVAILABILITY, ACCURACY, RELIABILITY OR CONTENT OF THESE PAGES. TOSOH BIOSCIENCE
SHALL NOT BE LIABLE FOR ANY DIRECT, INDIRECT, INCIDENTAL, SPECIAL OR CONSEQUENTIAL
DAMAGES, LOST PROFITS OR FOR BUSINESS INTERRUPTION ARISING OUT OF THE USE OF OR
INABILITY TO USE THIS SERVICE, EVEN IF TOSOH BIOSCIENCE HAS BEEN ADVISED OF THE
POSSIBILITY OF SUCH DAMAGES. SOME JURISDICTIONS DO NOT ALLOW EXCLUSION OF CERTAIN
WARRANTIES OR LIMITATIONS OF LIABILITY, SO THE ABOVE LIMITATIONS OR EXCLUSIONS
MAY NOT APPLY TO YOU. THE LIABILITY OF TOSOH BIOSCIENCE WOULD IN SUCH CASE BE
LIMITED TO THE GREATEST EXTENT PERMITTED BY LAW.
For your easy accessibility TOSOH BIOSCIENCE may include links to sites on the Internet that are
owned or operated by third parties. By linking to such third-party site, you shall review and agree to that site's rules
of use before using such site. You also agree that TOSOH BIOSCIENCE has no control over the content of that site
and cannot assume any responsibility for material created or published by such third-party sites. In addition, a link
to a non-TOSOH BIOSCIENCE site does not imply that TOSOH BIOSCIENCE endorses the site or the products
or services referenced in such third party site.
By submitting material to any of our servers, for example, by e-mail or via the TOSOH BIOSCIENCE Web pages,
you agree that: (a) the material will not contain any item that is unlawful or otherwise unfit for publication; (b) you
will use reasonable efforts to scan and remove any viruses or other contaminating or destructive features before
submitting any material; and (c) you own the material or have the unlimited right to provide it to us and TOSOH
BIOSCIENCE may publish the material free of charge and/or incorporate it or any concepts described in it in our
products without accountability or liability (d) you agree not to take action against us in relation to material that you
submit and you agree to indemnify us if any third party takes action against us in relation to the material you
submit.
TOSOH BIOSCIENCE does not and cannot review the content posted by users on its program and is not
responsible for such content. TOSOH BIOSCIENCE may at any time at its discretion remove any content posted by
users.
TOSOH BIOSCIENCE is a registered trademark of the TOSOH Corporation. TOSOH BIOSCIENCE's product
names are either trademarks or registered trademarks of TOSOH BIOSCIENCE. Other product and company
names mentioned herein may be trademarks or trade names of their respective owners. Your access to this program
should not be construed as granting, by implication, estoppel or otherwise, any license or right to use any marks
appearing on the program without the prior written consent of TOSOH BIOSCIENCE or the third party owner
thereof.
Copyright © TOSOH BIOSCIENCE n.v./s.a. 2007. All rights reserved.
PIANO Evo 4 Installation Manual
5
Precautions and Warnings
Microprocessors and motors, operating at high current, high voltages and high frequencies, control the
AIA-360, AIA-600II, AIA-21, AIA-1800, PIANO Evo-4 PC, GHbV, G7 and G8’s electromechanical functions.
Do not remove or open the side or back panels unless authorized by a TOSOH Bioscience representative or a
TOSOH Bioscience qualified person.
Do not place foreign objects inside the analyzer while it is operating. Mechanisms may be inactivated or
obstructed. Inactivation or obstruction may result in damage to the analyzer or personal injury to the operator.
Biohazards
Human sera used in the preparation of the Tosoh Bioscience reagent series have been tested by standard,
approved methods and found to be negative for the presence of HBsAg and the antibody to HTLV III. Because no
testing method can offer complete assurance that products derived from human sera will not transmit infectious
agents, it is recommended that all components of the Tosoh Bioscience reagent series be handled with the same
precautions used for patient specimens.
The following are general warnings and suggestions for the safe use of medical electrical equipment:
1.
Only properly trained operators should use the equipment.
2.
Reduce the risk of personal injury and damage to equipment by observing the following:
3.
Install the equipment in an area free of standing water.
4.
Install the equipment in an area free from the adverse effects of pressure, temperature, humidity, poor
ventilation, direct sunlight, dust, salt, and toxic gases.
Install the equipment on a sturdy, level floor, free from vibration.Do not install or operate the
equipment where chemicals are stored or toxic gases may be generated.
5.
Do not attempt to operate the equipment at a power frequency, voltage, or current other than those
specified by the manufacturer.Be certain that the equipment is properly grounded. Check the power and
grounding at regular intervals.
6.
Before using any equipment, make certain that it has been installed and properly inspected by a
manufacturer’s representative or properly trained persons.
7.
While using the equipment, follow the manufacturer’s recommended procedures. Perform all preventive
maintenance as scheduled. Monitor the equipment for malfunction on a routine basis. If a malfunction is
discovered, take appropriate measures to ensure personal safety and to protect the equipment from
damage. Qualified, properly trained persons should repair equipment.
8.
After using the equipment, follow the manufacturer’s recommended procedures for powering down.
9.
If the equipment is not to be used for an extended period of time, remove all liquid reagents from the lines
and reservoirs. Clean and dry all lines, reservoirs, and equipment surfaces. Carefully remove all power
cords and cables. Store the equipment in a clean, dry, well-ventilated area free from adverse
environmental effects.
10.
Do not attempt to modify the equipment in any way.
11.
Before attempting to operate equipment that has been stored for an extended period of time, the equipment
should be inspected by a manufacturer’s representative to ensure safe and proper functioning.
PIANO Evo 4 Installation Manual
6
Chapter 1 : Pré installation enqueries
Important note
The reason for the addition to the manual of a pré installation checklist is two fold. The first reason is to know
exactly the impact of the Piano program and the implementation into the working environment. The second reason is to find
out which involvement of third part companies are to be expected. In most cases the Lab information system supplier need
to be involved in order to build the communication to the Piano program. In other cases, it could require additional support
from the Tosoh Bioscience technical service department in order to install the communication hardware.
In order to facilitate the installation to be as efficient as possible, the need of an implementation checklist has been
requested from different sales entities in order to provide the right solution at the right place at the right time. Every single
installation does differ from a previous one by the way the program is used and the main purpose of the program for the user
himself. In a lot of cases, the program is used to facilitate the ease of connection and the embedded conversion of the Tosoh
communication protocols to a harmonised standard protocol or simply as a simulation of an existing instrument. The Piano
program does offer a lot more to the end-user as just a communication translator. And it is exactly in the acceptance of the
user that the dynamic of the Piano program can be provided. Therefore, a number of questions will emphase the expectance
of the user and the actual ways of working in the routine of diagnostics within the interrogated environment.
An important given is the profoundness of the involvement of Tosoh in the implementation. What are the
deliverables? Does the customer have special policies in place which could jeopardise the implementation? For these
reasons, it is important to know who is responsible for which deliverables at what time.
Deliverables are: PC system (PC system, screen, printer)
Operating system and the corresponding license(s)
Modem connection
Hardware requirements like serial port, network connection
The Piano program itself
The Piano program Hardware protection key
Connection wires
Any third party software, to support backup or remote diagnostics
During the pré-installation, it is important to know what the deliverables are and to what extend the deliverables
need to be supplied from any third party company.
PIANO Evo 4 Installation Manual
7
PIANO Evo 4 Installation Manual
8
Pré-installation checklist
No
Unknown
Yes
1
Hardware
Is an instrument in place for the known parameters to be run on the Tosoh instrument?
Is this instrument connected to the Lab Information system?
Can the communication be simulated on the actual method?
Does there exist a log trace of the actual communication?
What is the maximum distance to bridge to connect to the analyser(s)? (in m)
What is the maximum distance to bridge to connect to the Lab Information system? (in m)
2
PC
Is the PC provide by the customer?
If yes, is the PC delivered with a CD-rom device?
If yes, are there sufficient serial ports on the presented PC?
If “no” on previous question, are the additional serial ports organised locally?
If yes, is the PC part of the network?
If yes, does the PC have USB port(s)?
If yes, can the graphics card be set to a 1024 by 768 pixels resolution?
If yes, is a modem for Fax or telephone connection required?
If yes, are all operating system and driver software discs available?
If the PC is provided by Tosoh Bioscience, how many instrument are to be connected?
What is the language of the operating system ? (default English US)
3
Software implementation
Is the PC available, part of an IT network?
Is there an IT policy in place? (if yes, can a copy be provided)
Can the PC use a shared drive on the network for Data storage and/or backup?
Is a CD burner and burning software installed?
Does the customer require to have a “remote diagnostics” in place?
Is a telephone line available for “remote diagnostics”?
4
Applikation
Will the piano program be connected to the Lab information system?
Is there an existing protocol which might be used to connect?
Can a log file be obtained of the actual communication?
Are the RS-232 settings known of the actual communication?
Will the Piano program be used for sending results by fax?
Is the decimal point in the regional setting set to a comma?
Is the short date format in the regional setting set to Year Month Date?
5
General
Is the use of the Piano program linked to
PIANO Evo 4 Installation Manual
□ AIA only
□ HbA1c only
□ AIA and HbA1C
□ Others
9
DATE: ….. / ….. / ……….
Customer name: ____________________________________________________
Contactperson: ____________________________________________________ Tel.: ____________________________
Address : __________________________________________________________
___________________________________________________________
___________________________________________________________
Lab Information System company: ______________________________________
Contactperson: ____________________________________________________ Tel.: ____________________________
PIANO Evo 4 Installation Manual
10
Chapter 2 : Piano Evo-4 installation
Important note before installation
Before installing the Piano Evo-4 program, assure yourself that you have the following items in your immediate
access prior to start the installation:
•
•
•
•
•
The Piano Evo-4 operator manual
The installation CD
The USB Sentinel Rainbow key
The user manual of the PC
On an eventual need, the installation disks for the Windows operating program might be requested upon installation
of the program.
All the needed files to do a proper installation for Windows 95, Windows 98, Windows NT, Windows XP and
Vista have been added to the installation wizard. Drivers that are required for the proper operation of the display and
communication ports need to be installed prior to install the Piano Evo-4 program.
Drivers that are needed for the control of the communication ports, soundcard, modem and display need to be
installed correctly. Verify by means of a simple application that your communication ports are working. To do so you
might use the Windows standard accessory called Hyperterminal to verify the proper functioning. By means of the cable
describted in the chapter 1.6 Cable configuration, you’re able to simulate comport 1 p.e. and comport 2 with another
start of the Hyperterminal program. As you attach the cable in between comport 1 and comport 2, all characters entered
in the Hyperteminal screen will appear in the non-active Hyperterminal window.
Verify the proper installation of the modem by sending a fax with the modem and fax wizard. To check the
soundcard, you can browse throught the Windows subdirectory to look for a wave file. Doubleclick on the wave file to
hear the sound produced on your speakers.
If one of these items would not be working correctly, verify the proper installation of the hardware and/or
download the most recent drivers to update your PC.
PIANO Evo 4 Installation Manual
11
2.1 Minimum PC configuration
The minimum configuration of the PC for the Piano program is like follows:
- Processor: Pentium
- Minimum clockfrequentie: at least 100 MHz
- Minimum memory: 512 Mb RAM
- Minimum harddisk capacity: 30 Gb
- Minimum screen resolution: 1024 x 768 pixels with at least a 256 bit colordepth
- At least 1 USB port ver. 1.0 or ver. 2.0
- Supported operating systems: Windows 98, Windows 2000, Windows NT, Windows XP, Vista
- Preferable operating system: Windows XP professional with SP2 or later versions
- At least the number of comports equal to the number of instruments to connect plus one for the LIS
communication.
2.2 Installation of Piano Program
To install the program, place the CD-Rom into the CD drive. The Autorun program will start the install shield wizard for the
Piano Evo-4 program.
A. Upon inserting the Piano Evo-4 program CD, a guidance screen will be displayed as shown in fig.2.2.1
Fig.2.2.1. Piano Evo-4 installation program screen
The following order of installation should be followed to complete the installation:
1. Install “Adobe Acrobat reader”
2. Install the Piano program
3. Install the “Sentinel USB protection key driver”
4. Verify the result storage path and the backup directory
5. Unwrap the Helpfiles and customize the path
6. Perform the hardware connection of the instruments
PIANO Evo 4 Installation Manual
12
B. Select the applicable language for the installation guideline
In order to start the installation, select the proper hyperlink as shown in fig. 1.2.2.
Fig.2.2.2 Activation of the installation program
By pressing the “Operator manual data manager” button, you’re able to call up the operator manual.
Important note: The operator manual is available in a PDF format and need to have Adobe Acrobat installed on
your PC prior to open the manual.
C. To install the Adobe Acrobat reader program, select the option
Fig.2.2.3 Adobe Acrobat reader installation program
In order to install the Adobe Acrobat reader program, you can either use the installation wizard on the CD or
consult the internet on page http://www.adobe.com in order to retrieve the latest version in your proper language.
PIANO Evo 4 Installation Manual
13
D. The hyperlink wil start a script to install the program and the helpfiles. The script contains a check procedure to
identify the presence of the Sentinel Rainbow protection key driver, the Borland Database Engine administrator and
the virification of the link to the proper helpfiles in corespondance to the selected installation language.
Fig.2.2.4 Installation language selection screen
E.
As the Piano Evo-4 installation is activated in the proper language, the piano program installshield is starting, the
installwizard will unwrap the installationprogram and display the following screen.
Fig.2.2.5 First installation screen: confirmation to install
On this page confirm the installation by pressing the “Next” key.
PIANO Evo 4 Installation Manual
14
The next pop-up screen will ask you to accept the licence agreements of the Software.
Fig. 2.2.6 First setup screen
On this page confirm the installation by pressing the “Next” key. The next pop-up screen will ask you to
accept the licence agreements of the Software.
This screen looks as follows:
Fig. 2.2.7 License agreement
Read this license agreement very carefully and press “Yes” to confirm the agreement.
On the next screen, the user can see the progress to install the program onto the harddisk. The
default location is “c:\pianoEvo_4”.
PIANO Evo 4 Installation Manual
15
Fig. 2.2.8 Software copy progress
There are three selections possible that do correspond to the following selections:
Typical: This is the default selection and does enable a complete installation of all files required
to run the program.
Compact: The compact selection will only install (update) the main program without the database
structure and aliases. This option is the software update script that would install a newer version
of the program in the existing directory
Custom: With the custom setup, the user will be able to select which parts of the installation to be
installed of the program files.
Fig. 2.2.9 Custom selections
PIANO Evo 4 Installation Manual
16
A display will show the status of the installation process. As soon as the installation is finished, the install
shield wizard will ask you to reboot the PC.
Fig. 2.2.6 Screen 4 of setup: Confirmation of the installation directory
Press the “next” key to continue the installation.
Fig.2.2.7 Program installation progress with billboard presentations
PIANO Evo 4 Installation Manual
17
F. End of installation
Fig 2.2.8 End of installation, end of batch process
Important:
It is needed to restart the PC to enable the database engine to work with the Piano Evo-4 Program.
NOTE:
Before starting the program by pressing the program icon, verify by means of the “start”, “settings”, “control panel” and
“Display” the resolution of the screen.
The default screen size should be set to 1024 by 768 pixels.(See Figure 2.2.6)
Fig. 2.2.9 Display properties
PIANO Evo 4 Installation Manual
18
IMPORTANT NOTE:
1. After the installation of the software it is needed to restart the Windows.
2. Verify the proper set-up of the database paths. To do so open in “START” the “Settings” and go into the” control
panel”.
Open the “BDE Administrator” program.(Icon as shown below)
As you opened the BDE Administrator, select the ” Databases” Tag and select the ” Results” folder.
Fig. 2.2.10 BDE Database editor
Verify that the settings are as follows and correct if needed:
Type
DEFAULT DRIVER
ENABLE BCD
PATH
STANDARD
PARADOX
FALSE
{see text}
The default path for the Database is : C:\PianoEvo_4\Results
It is important that this path is correctly setup.
If the path is not correct, select the line “Path” and press onto the gray doted button to call up a file browser
PIANO Evo 4 Installation Manual
19
Fig 2.2.11 Path selection window within the BDE administrator
Verify next that the path for the folder “Backup” is set as follows:
Type
DEFAULT DRIVER
ENABLE BCD
PATH
STANDARD
PARADOX
FALSE
{see text}
The default path is: C:\PianoEvo_4\Backup
In case the PC is connected on a network over a TCP/IP or LAN network connection, the backup can be allocated
to a directory on a shared folder of the network. To do so, select the line “Path” and press onto the gray doted
button to call up a file browser. In the file browser, look for “Drives” and select the network.
Fig 2.2.12 Path browser within the BDE administrator
Important is that the network drive must be accessable at the moment that you close the program. At the end of the
program, all the databases are copied into the Backup directory for troubleshooting purposes.
PIANO Evo 4 Installation Manual
20
2.3 Hardware set-up of program
2.3.1 USB driver installation
Upon inserting the Hardware key, the windows plug&play device configurator will launch automatically.
Windows will automatically find the presence of the USB hardware key as USB Token and will try to locate a suitable
driver.
Fig.2.3.1.1USB Hardware key found
NOTE:
The actual installation program will install the driver for the USB hardware key automatically. It is recommended to run the
installation program prior to plug in the USB hardware key. You can use the Sentinel Protection Installer 7.4.0.exe file
either in the root directory of the Piano Evo-4 installation CD or in the program folder of the Piano program after installation
in case of a problem you would encounter in the proper key recognition.
2.3.2. Hardware key installation
Old version usb key
New version usb key
Fig.2.3.2.1Piano USB Hardware key
The USB protection key is supported by the USB port version 1.0 and 2.0.
To enable the Piano Evo-4 program as a full licensed version to run on your PC, you need to install the
Piano USB hardware key. To do so, locate an available USB port on the PC and place the USB Hardware key into
the slot. The windows platform will automatically load the driver for the hardware key.
PIANO Evo 4 Installation Manual
21
1.3.3 Hardware key license registration for demo packages
A demo program can be converted to a full licensed version as describted in this chapter. First, you need to
install the Piano USB hardware key. To do so, locate an available USB port on the PC and place the USB Hardware
key into the slot. The windows platform will automatically load the driver for the hardware key.
Old version usb key
New version usb key
Fig.2.3.3.1Piano USB Hardware key
In the case that the USB key is not validated by the program, you need to enter the license code by mains
of the Field Activator program. To load the Field Activator Program, run the Field Exchange Utility from the Piano
program folder.
Fig. 2.3.3.2 Field Exchange Utility
In the Field Exchange Utility, press the “Get Locking Code” button first. Send the locking code by e-Mail
or fax to the Tosoh Bioscience Technical Service departmet. Upon reception of the code, the License code will be
forwarded to you in reply e-Mail or by return fax. The license will be invoiced to the requester.
Next, enter the license code into the Update License field code printed on you personal registration form
that you received by return e-Mail or return fax.
Fig. 2.3.3.3 License code access screen
Press the “Update License” button. Upon positive registration, the program will recall a “Succes”
pop-up window and your hardware key is unlocked for further use.
PIANO Evo 4 Installation Manual
22
The hardware set-up of the Piano program exists out of a first connection from the PC com 2 port to the
first analyser , from PC com 3 port, for instance, by means of the cable 952003 to the AIA-600II analyser and so
on. The connection to the Lab information system routes from the communication port COM1.
The Piano program is capable of connecting up to 7 analysers to one PC.
2.3.4 Hardware key license serial number verification
In order to verify the USB key serial number, you can start a utility program that is located in the Start,
Program files, Piano Evo-4 and Serial number verification. In case the program does detect a proper hardware key,
it will display a 3 digit serial number.
Fig. 2.3.4.1 Serial number verification screen
If the USB key can not be found the error message “Error:SproFindFirstUnit” will appear.
Fig. 2.3.4.2 USB Key not found error screen
PIANO Evo 4 Installation Manual
23
2.4 Software configuration of the Piano program
program icon.
For the software configuration start the program by pressing the
To be able to configure the program, enter only the password “SUPERUSER”. The password registration is
character size independant .
Fig. 2.4.1 Password entry screen
And confirm the entrance of the password by selecting the OK button.
Next select in the Utility bar, the configuration button by pressing the
icon.
IMPORTANT NOTE: The piano program has been set-up as a configuration within our CRM program and can support the
Unique Identification number for traceability of the program on the Hotline, Service support or customer support calls. The
use of this UIN can be enabled by entering this information in the initial logon screen.
PIANO Evo 4 Installation Manual
24
2.4.1 Lab Information System
To connect the Piano Evo-4 program to the Lab Information System (LIS), call up the ledger “LIS
Communication”.
The following screen will appear:
Fig. 2.4.2 LIS Communication setup
To enable the communication to the Lab information System, select the “Host communication active”
check box.
Verify furthermore, the proper settings for Communication port, Baudrate, Parity, Data length, Stop bit length.
Enter the analyser name, that is required in the Lab Information System to recognise the communication from the
Piano Evo-4 Program. In the case that this field is left empty, the Piano Evo-4 program will transmit the Analyser
name as defined in the analyser set-up screen. Like this the information concerning the traceability of the result is
forwarded to the LIS where the result can be linked to the analyser used to establish this result. Furthermore, the
option “send comments to Host” will allow the comments received from the AIA-1800 or entered manually in the
worklist to be send to the LIS as well. This option will allow users to accompagnion the results with information to
interprete or validate the result on the LIS.
The LIS Timeout in milliseconds will enable the Piano program to close the existing communication after
30000 ms (30 seconds) to reset the communication port for further communication.
The drop down button for High Level Protocol is explained on the next page. The information Field
Delimiter, Repeat Delimiter, Component Delimiter and Escape Delimiter are listed as an additional reminder for the
used components in the ASTM protocol definition and can not be changed.
NOTE: If the “Analyzer Name” field is left empty, the Piano program will transmit the instrument identification of
the instrument where the result has been established onto. This will allow also a instrument traceability in the LIS
for the individual results.
PIANO Evo 4 Installation Manual
25
It is possible to set the Piano Evo-4 program up to communicate in the RS-232 specifications of the GHbV or G7
unidirectional communication mode. To do so, select in the high level protocol combox the corresponding settings
as shown in picture 2.4.3.
Fig. 2.4.3 LIS Communication setup – Change of communication protocol
If you did select the communication to enable an unidirectional device, it is important to know that this
protocol can and might only be used in combination with a G7 analyser.
Fig. 2.4.4 Barcode length definition
In order to remain compatible with the transmittion protocol of the G7 or GHbV RS-232 parameter
settings, it is possible to also adjust the barcode length in the transmittion to the LIS system. This function does add
spaces to the barcode identification field in order to increase the field size. However, the Piano communication in
between the G7 and the program need to be set at a default Barcode length of 13 characters.
By the added features to the G8, to report results in a double- or single precision, the Host simulation can
be changed according the needs of the actual installation.
Fig.2.4.5. Decimal place reporting settings
PIANO Evo 4 Installation Manual
26
The selection “5” or “6” do implement the possibility to send either in a Single precision “__0.0” or
double precision “__0.00”.
Please note that the HOST communication can be upgraded to a double precision communication, even for
a G7, which only report results in a single precision. This will imply that the results of a G7 will be enhanced by
applying an additional “0” at the end of the result.
On the other hand, if the user wants to use the double precision feature on the G8 but does not want to
interfere with the LIS communication format, the result transmission can be reduced to a single precision in order
to keep the existing communication. The result will be round up to a single precision by the Piano program itself.
Fig. 2.4.5 LIS Communication setup –GHbV simulation
Important:
If the Piano Evo-4 program has been set-up to simulate a GHbV or G7 communication protocol, the connected G7
instruments need to be set-up to communicate in between the instrument and the Piano Evo-4 program in RAW
data format. The reason why is that the mode of the analyzer is determined by the RAW data information. As this
information is collected from the analyzer communication, the string that is send in the communication to the LIS is
converted to the syntax in correspondence to the RS-232 specifications of the GHbV or G7.
PIANO Evo 4 Installation Manual
27
2.4.1.1 Files communication to LIS over TCP/IP
To connect the Piano Evo-4 program to the Lab Information System (LIS), call up the ledger “LIS
Communication”.
The following screen will appear:
Fig. 2.4.1.1 LIS Communication screen
Upon selecting the LIS Protocol, you may have a selection of different emulators. For the TCP/IP
transmission, you should select the “LIS File Transfer”.
Fig. 2.4.1.1.2 LIS Protocol selector
This will call up the following screen for defining the location of the remote drive. This drive may be a
standard location at the proper harddisk of the computer or either a remote location on the network. Be aware that
in order to enable the selection of the remote drive, the network should be logged in and the remote drive should
have remote access for full accommodations.
PIANO Evo 4 Installation Manual
28
Fig. 2.4.1.3 TCP/IP Configuration screen
In the LIS communication screen , as the LIS file transfer mode has been selected, you should select the
destination directory of the LIS result files. In order to facilitate the directory search, you can use the Browse button in
order to create the entry in the Destination directory field.
Fig. 2.4.1.4 LIS File Destination Configuration screen
PIANO Evo 4 Installation Manual
29
The syntax of the transmitted (or remote copied file) is as follows:
The name of the text file is as follows: “Patient Barcode”.txt
(p.e. 1234567.txt)
The path is configurable either by means of a path configuration in the PianoEvo.ini file or by a field in
the configuration screen under LIS.(See previous page)
The contents of the file is build as follows:
Instrument
[instrument name] (as defined in the piano configuration screen)
HbA1a
[value A1a]
HbA1b
[value A1b]
lA1c
[Value lA1c]
HbA1c
[Value sA1c]
HbF
[Value HbF]
HbA
[Value total A1]
HbA2
[Value A2]
HbX
[Value HVar0]
HbY
[Value HVar1]
HbZ
[Value HVar2]
For n=0 to n
Blanc
[Value P00]
Next n
G7Flag
[Value flag]
(00 if no flag is reported, for other flags consult the G7 operator manual)
The label and value are separated by a Tabulation and a Carriage return after every value.
In the case that there are P00 peeks detected, the values of the P00 peeks should be added at the end of the
data block.
Fig. 2.4.1.5 TCP/IP Configuration screen
PIANO Evo 4 Installation Manual
30
In the General Settings, the user can either enter a fixed name for the identifier of the analyzer name or
leave the field blank in order to add the corresponding analyzer ID into the transmitted file.
Examples of a transferred file for a STD and VAR mode application
Instrument
A1A
0.6
A1B
1.4
F
0.6
LA1C+ 2.0
SA1C 8.2
A0
87.8
G7Flag 00
G7
Example of a file transmission for a STD mode data set
Instrument
A1A
0.7
A1B
0.7
F
0.7
LA1C+ 3.0
SA1C 8.0
A0
88.1
G7Flag 00
G7
Example of a file transmission for a VAR mode data set
PIANO Evo 4 Installation Manual
31
2.4.1.2 Interface to the “Gentiane” tumormarker program.
One of the main assets of the Piano Evo-4 program has been the connectability of the program to a
program from the French company “Gentiane”. This company has made in collaboration with a number of French
leading Biologist and pathologists a program where the progress of a tumormarker and the treathement of a tumor
patient is calculated according to algorithms that have been established upon the evaluation in number of French
hospitals.
Information about the composition and collaboration to the company Gentiane can be consulted at
www.gentiane.fr and select “Cinetic system”. Unfortunately, this information is only available in French for the
time being.
Fig.2.4.1.2.1 Tumor progress program algorithm
In order to use this program, the Piano database structure has been enhanced to carry a patient unique
identifier.
This PUI (patient unique identifier) can be retrieved from the standard ASTM file patient line where this
number can be forwarded by the lab information system. The PUI is supposed to be a unique number like the
personal national registration number or the national health security number. This is very important as this number
will be the leading part in the tumor marker prognostic program.
In order to communicate with this program, an realtime export of the patient results can be set-up in the
Piano program to send the data in real time to a cental located common interchange file. In the PianoEvo.ini file,
your able to mark the path to this common location. In the case the file is opened by the Gentiane program in an
exclusive acces, a blockerfile will be made to add the results that are about to be reported to the common file are
intermittendly saved. The Gentiane program will look these blockerfiles up and add the content to the main
interchange file.
[TumorMarker]
PathName=C:\
BlockerFileName=ExportBlocked
AutoExport=0
In order to customize this interface the following settings are required. A. the assays that shold be exported
need to be set in the parameter settings of the configuration menu and B. the filename and directory for the data
allocation need to be set.
In order to use the option to export dedicated assay results, first select the configuration button in the
Piano program and go to the Parameter tab. In the individual lines of the parameter screen, you’re able to enable or
PIANO Evo 4 Installation Manual
32
disable the Export label. This export label is set by default to No but can be altered by clicking the left mouse click
and call up the edit option. In order to validate the entry, use the tab key to direct back to the next line. As soon the
cursor has been moved to the last column, the entry will be archived in the configuration screen.
Fig.2.4.1.2.2 Parameter screen to enable export function
As the export of particular assays has been enabled, the filename and directory need to be set-up for the
file interface to the Gentiane program. To do so, select the Tumormarker tag in the configuration screen and enter
in the Path and filename for tumormarker export the correct path and name for the location of the result file. You’re
able to use the find key to trace down the correct path over a network connection.
Fig.2.4.1.2.3 Tumor progress program algorithm
The use of the Export blocker file is to prevent a write access at the moment the file would be opened by
the Gentiane program for consulting results. As there would be a conflict possible in between 2 programs, the
PIANO Evo 4 Installation Manual
33
access blocker file will rescue the results in a separate file. The name of this file is set as ExportBlocked, but should
be set according the definition in the Gentiane program
Upon marking the “On validate export”, the results will only be send when the results are validated in the
worklist. If this option is not marked, the results will be exported upon reception of the analyser.
The information that is entered in this tag is also saved in the PianoEvo.ini file and can be either adjusted
in the main program configuration or the PianoEvo.ini by means of the Notepad editor. The entry of the
information is found at the bottom of the ini file.
2.4.1.3 About Gentiane
The company Gentiane is located in France and has been founded by a former employee of the company
Roche Diagnostics. With the collaboration of a number of companies and scientists, the program has been approved and
implemented by a concistant growing number of users and supported by a number of very important companies in France.
17, Chemin Prébois
38660 St Hilaire du Touvet
France.
Tel : +33(0)4 76 08 37 06
Fax : +33(0)4 76 08 37 06
Referenced support companies :
- Abbott Diagnostics,
- Brahms,
- Dade-Behring,
- DiagDirect,
- Ortho-Clinical Diagnostics,
- PGP,
- Roche Diagnostics,
- More than 220 laboratories for medical analyses, private as well as public.
PIANO Evo 4 Installation Manual
34
2.4.2 Analyser selection screen
To be able to select and configure the connection from the Piano Evo-4 program, you need to select the Analyser
tag.
Fig.2.4.2.1
To add an new connection, press the right mouse click to open the following window:
Fig. 2.4.2.2
To add the analyser press the “Add new analyser” key to access the setup screen.
PIANO Evo 4 Installation Manual
35
Fig. 2.4.2.3
To select the kind of interface you want to set up, use the drop down menu on the “Analyser type”.
The instrument name assigned in this screen must be identical to the name set in the analyser.
For the AIA-21, the name given in the name field need to match the name that is listed in the system specification,
RS-232 specifications and Analyser name definition of the analyser. This is needed if two or more analysers are
connected to define the parameter profiles per analyser. This will allow a worklist dispatching into the available
analytes per instrument.
For the AIA-600II, GHbV and G7, the name field is not used to specify the analyser profile but the selected
communication port will make this assignment. The name used for these analysers is only as an indication on the
worklist. By means of the Filter option, the user will be able to list the worklist, journal and patient report for the
selected analyser.
The analyser name will be archived with the result in order to trace the used analyser for producing the
result.(Analyser traceability).
It is important that the software version is entered and the syntax is respected as X.XX for all versions. The UIN
and serial number of the instrument shoudl be added to the configuration for traceability enhancement.On the printout of the chromatogram for the G7 and G8 instruments this information will be printed. This will allow customer
support to have a clear indication on the history of the instrument in our CRP platform.
PIANO Evo 4 Installation Manual
36
2.4.3 Communication parameter set-up for AIA-21
The settings for the AIA-21 instrument should be set up as shown in figure 2.4.3.1
Fig. 2.4.3.1 PIANO Evo-4 PC settings
NOTE: Very important is the name given to the analyser. This name should match exactly the name that has been
set into the AIA-21 RS-232 specification screen. If you’re about to connect 2 or more AIA-21 analysers, be aware
that every instrument needs to be named differently.
As soon as the Communication port has been assigned, the name has been entered and the communication
parameters have been set-up, press the continue button to proceed. This will call up a confirmation window. Press
ENTER or OK to confirm the port set-up.
Fig. 2.4.3.2 Communication set-up confirmation.
In the case that the indicated port has already been assigned, the program will show the following error.
Fig. 2.4.3.3 Error message
PIANO Evo 4 Installation Manual
37
Upon pressing the OK button, the analyser will be placed into the list as shown in figure 2.4.3.4. To call up an edit
function to correct the improper settings, select the
properties.
icon and press the right mouse click to call up the
Fig. 2.4.3.4 Faulty set-up on communication parameters
Upon selection of a valid communication port, an analyte selection screen will be called up as shown in the figure
2.4.3.5.
PIANO Evo 4 Installation Manual
38
Fig. 2.4.3.5 Analyte selection screen
To move the analyte from left to right, just select the first one and go down with the arrow down button while
holding the shift key. As analytes are copied from left to right, the parameters will be enabled for the corresponding
analyser. In the case that more immunology analysers are connected, the workload dispatching is set like this. If an
analyte has been enabled for more than one system, the first analyser that would identify the sample will get the
order.
PIANO Evo 4 Installation Manual
39
2.4.4 Communication parameter set-up for AIA-600II
To define the parameters in the AIA-600II, boot the main program and after initialisation select the System
utility menu, RS232 menu and set the parameters in the communication parameters as shown on the screen.
Fig. 2.4.4.1 AIA-600II configuration data
The configuration in the AIA-600II is called up by selecting the SPECIAL MENU on the analyser. In the special
menu select the option “RS-232 specifications”. In this screen set the parameters for the Data length, Parity, stop bit
length and Baudrate according the settings in the Piano Evo-4 program. Set by default the communication Protocol
to “Handshake”. This is needed to ensure a proper data transfers in between analyser and PC.
Fig. 2.4.4.2 RS-232 communication screen on the AIA-600II
PIANO Evo 4 Installation Manual
40
2.4.5 Communication parameter set-up for AIA-1800
The settings for the AIA-1800 instrument should be set up as shown in figure
Fig. 2.4.5 Configuration screen for AIA-1800 setup
PIANO Evo 4 Installation Manual
41
2.4.6 Communication parameter set-up for AIA-360
Important note: The AIA-360 instrument does work in a uni-directional mode. This means that the
analyzer is not capable of receiving worklist from the Piano Evo-4 program but returns only the results measured
on the instrument. The instrument does have a barcode identification system and does send the patient identification
in the data transmittion.
The settings for the AIA-360 instrument should be set up as shown in figure 1.4.6.1.
Fig. 2.4.6.1 AIA-360 configuration screen
PIANO Evo 4 Installation Manual
42
2.4.7 Communication parameter set-up for GHbV connection
For the GHbV set-up, power the instrument and select in the “Menu”, the “Utility” button.
In the “RS-232” selection, you should set-up the communication parameters as shown in figure 2.4.7.1.
Fig. 2.4.7.1 RS232C screen of GHbV
In order to set the Piano Evo-4 Program to communicate with the GHbV, it is important to know the analyser
application mode. These modes are identified as Standard, Variant and Thalassemia mode according to the 2.2, 3.0
or 7 minute mode of the analyser.
Fig. 2.4.7.2 RS232C screen for the GHbV on the Piano Evo-4 program
PIANO Evo 4 Installation Manual
43
2.4.8 Communication parameter set-up for G7 connection
For the G7 set-up, power the instrument and select in the “Menu”, the “Utility” button.
In the “RS-232” selection, you should set-up the communication parameters as shown in figure 2.4.8.1
with the highlighted options on the next page.
Fig. 2.4.8.1 RS232C screen of G7
Set the parameters in the G7 as indicated on the next page. As the analyser is capable of working
in a Query communication mode, enable the Query function by selection of the Query button in the G7
RS-232 screen. To void that the analyser would indicate continuous which samples that are to be skipped,
go into the MENU, UTILITY and BCR Utility screen and enable the ERROR SKIP button.
To enable the storage of chromatograms, set the communication parameters as listed on the next page.
The selection in the configuration screen of the Piano Evo-4 should be set to RAW as well.
Fig. 2.4.8.2 RS232C screen for G7on the Piano Evo-4 program
PIANO Evo 4 Installation Manual
44
To enable the used printer on the Piano Evo-4 PC to print the chromatograms in real time, you
may select the option “RAW with realtime printout”. To disable the printer of the G7, enter a 0 in the
parameter line COPY of the parameter screen on the G7.
The analyzer specific Unique Identification Number, Serial number of the instrument and the
software version can be registered here. It is in the interest of the customer and operator to register these
details as they will be printed on the chromatogram print-out. In case that chromatograms are send to
customer support or product management at Tosoh Bioscience, the software version and serial number can
be traced.
Export RAW file to PDF: This option does enable the real time export of chromatograms to a
drive, specified in the PianoEvo.ini entry line [JournalExport] and ChromaPDFPath. This drive can be any
dos physical drive that can be accessed either within the PC or over the network on a shared location.
PIANO Evo 4 Installation Manual
45
SMP3:
Handles the sample number with the last 3 digits
SMP5:
Uses 5 digits for the sample number
SMP8:
Uses 8 digits for the sample number
(ID number is added to the front of the number for a total of 8 digits)
BC13:
Transmits the barcode using 13 digits
BC18:
Transmits the barcode using 18 digits
BC20:
Transmits the barcode using 20 digits
BC NO:
Does not send barcode ID.
BM:
Transmits in BASIC mode
HM:
Transmits in HI-LEVEL mode
RAW:
Transmits in RAW mode
8BIT:
Sets the data length to 8 bits
7BIT:
Sets the data length to 7 bits
X-ON:
Sets the X parameter on (flow control on)
X-OFF:
Sets the X parameter off (flow control off)
STP1:
Sets the stop bit to 1
STP2:
Sets the stop bit to 2
NONE:
Sets the parity to none
ODD:
Sets the parity to odd numbers
EVEN:
Sets the parity to even numbers
1200:
Sets the baud rate to 1200 bps
2400:
Sets the baud rate to 2400 bps
4800:
Sets the baud rate to 4800 bps
9600:
Sets the baud rate to 9600 bps
To activate the real time result transmission, set the parameter AUTO TRANS from 0 to 1 in the
“MENU” and “parameter” screen as displayed in figure 1.4.8.3.
Fig. 1.4.8.3 Parameter screen 3
PIANO Evo 4 Installation Manual
46
2.4.9 Communication parameter set-up for G8 connection
For the G8 set-up, power the instrument and select in the “Menu”, the “Utility” button.
In the “RS-232” selection, you should set-up the communication parameters as shown in figure 2.4.9.1
with the highlighted options on the next page.
Fig. 2.4.9.1 RS-232 set-up screen G8
Set the parameters in the G8 as indicated on the next page. As the analyser is capable of working
in a Query communication mode, enable the Query function by selection of the Query button in the G8
RS-232 screen. To void that the analyser would indicate continuous which samples that are to be skipped,
go into the MENU, UTILITY and BCR Utility screen and enable the ERROR SKIP button.
To enable the storage of chromatograms, set the communication parameters as listed on the next page.
The selection in the configuration screen of the Piano Evo-4 should be set to RAW as well.
Fig. 2.4.9.2 RS232C screen for G8on the Piano Evo-4 program
To enable the used printer on the Piano Evo-4 PC to print the chromatograms in real time, you
may select the option “RAW with realtime printout”. To disable the printer of the G8, enter a 0 in the
parameter line COPY of the parameter screen on the G8.
PIANO Evo 4 Installation Manual
47
SMP 3: Handles the sample number with the last 3 digits
SMP 5: Uses 5 digits for the sample number
SMP 8: Uses 8 digits for the sample number
(ID number is added to the front of the number for a total of 8
digits)
BC 13: Transmits the bar code using 13 digits
BC 18: Transmits the bar code using 18 digits
BC 20: Transmits the bar code using 20 digits
BC NO: Does not send the bar code ID
BM:
Transmits in BASIC mode
HM:
Transmits in HI-LEVEL mode
RAW:
Transmits in RAW mode
8 BIT: Sets the data length to 8 bits
7 BIT: Sets the data length to 7 bits
X-ON: Sets the X parameter on (flow control on)
X-OFF: Sets the X parameter off (flow control off)
STP 1: Sets the stop bit to 1
STP 2: Sets the stop bit to 2
NONE: Sets the parity to none
ODD:
Sets the parity to odd numbers
EVEN: Sets the parity to even numbers
1200: Sets the baud rate to 1200 bps
2400: Sets the baud rate to 2400 bps
4800: Sets the baud rate to 4800 bps
9600: Sets the baud rate to 9600 bps
:
:
When this key is highlighted, an ID query is executed and only designated samples are
processed.
When highlighted, results are automatically transmitted
:
Return to the previous screen
IMPORTANT NOTE:
The G8 is capable of sending results in a single or double decimal point quotation. In order to set the decimal precision in
the G8 instrument, go into the parameter screen and press the top left corner twice in order to enter the extended parameter
list. As you would scroll down the parameter pages up to page 5, a parameter called PERCENT DECIMAL (first line on
page 5) will allow you to set the number of decimal places in between 1 or 2.
According to the settings in this parameter line, the piano program will enable an automatic interpretation of the decimal
place selection in the G8 instrument. No settings are required in the Piano program.
PIANO Evo 4 Installation Manual
48
2.4.10 Communication parameter set-up for Vidas connection
In order to use the Piano Program in combination with the Vidas instrument, it is important that the
parameter definition is done before to attach the instrument. (Refer to chapter 14.6 Parameters).
Fig. 2.4.10.1 RS232C screen for Biomerieux Vidas on the Piano Evo-4 program
PIANO Evo 4 Installation Manual
49
2.5 Hotline assistance
For hotline assistance on installation of the piano program you can reach the hotline call centre by means of:
Phone:
Fax:
e-Mail:
+32 13 618586
+32 13 664749
[email protected]
2.6 Cable configurations
2.6.1 Cable in between AIA-21 and Piano Evo-4 PC
For the connection of the AIA-21 to the Piano Evo-4 PC, the Piano Evo-4 program can be installed on the
same PC. Therefore, the communication in between the AIA-21 and the Lab information system need to rerouted
from COM2 to COM4. In between COM2 and COM3 a small RS-232 cable need to be installed to make the data
transfer from the AIA-21 program to the Piano Tubro Program. This cable is available as 952002 Piano Interlink
cable. Both programs need to be running to assure a proper operation.
Cable configuration
AIA-21
9 Pin Female Sub-D
Wiring
Piano Evo-4 PC
9 Pin Female Sub-D
Pin
Assignement
Pin
1
DCD
1
2
RX
2
3
TX
3
4
DTR
4
5
GND
5
6
DSR
6
7
RTS
7
8
CTS
8
9
RI
9
Important: Pins 1 and 4 on both ends are bridged on the connector.
Assignment
DCD
RX
TX
DTR
GND
DSR
RTS
CTS
RI
2.6.2 Cable in between AIA1800 and Piano Evo-4 PC
To connect an AIA-1800 to a Piano Evo-4 PC, the following cable configuration should be obtained. A
ready to use cable with a length of 2m can be ordered as 952003 RS232 cable.
Cable configuration
AIA-600II
9 Pin Female Sub-D
Piano Evo-4 PC
9 Pin Female Sub-D
Pin
Assignement
Pin
Assignment
2
RX
3
TX
3
TX
2
RX
5
GND
5
GND
7
RTS
8
CTS
8
CTS
7
RTS
Important: Pins 1 and 4 on both ends are bridged on the connector.
PIANO Evo 4 Installation Manual
50
2.6.3 Cable in between AIA600II and Piano Evo-4 PC
To connect an AIA-600II to a Piano Evo-4 PC, the following cable configuration should be obtained. A
ready to use cable with a length of 2m can be ordered as 952003 RS232 cable.
Cable configuration
AIA-600II
9 Pin Female Sub-D
Piano Evo-4 PC
9 Pin Female Sub-D
Pin
Assignement
Pin
Assignment
2
RX
3
TX
3
TX
2
RX
5
GND
5
GND
7
RTS
8
CTS
8
CTS
7
RTS
Important: Pins 1 and 4 on both ends are bridged on the connector.
2.6.4 Cable in between AIA360 and Piano Evo-4 PC
To connect an AIA-360 to a Piano Evo-4 PC, the following cable configuration should be obtained. A
ready to use cable with a length of 2m can be ordered as 952003 RS232 cable.
Cable configuration
AIA-600II
9 Pin Female Sub-D
Piano Evo-4 PC
9 Pin Female Sub-D
Pin
Assignement
Pin
Assignment
2
RX
3
TX
3
TX
2
RX
5
GND
5
GND
7
RTS
8
CTS
8
CTS
7
RTS
Important: Pins 1 and 4 on both ends are bridged on the connector.
2.6.5 Cable in between GHbV and Piano Evo-4 PC
To connect a GHbV to a Piano Evo-4 PC, the cable has on one end a 25 pin male sub D connector and on
the other end a 9 pin female sub-D connector. In most cases, this cable need to be made at the installation with a
length appropriate to the installation of the different analysers versus the interface PC.
Cable configuration
GHbV
25 Pin Male Sub-D
Pin
2
3
4
5
6
7
20
PIANO Evo 4 Installation Manual
Assignement
TX
RX
RTS
CTS
DSR
GND
DTR
Piano Evo-4 PC
9 Pin Female Sub-D
Pin
2
3
8
7
4
5
6
Assignment
RX
TX
CTS
RTS
DTR
GND
DSR
51
2.6.6 Cable in between G7 and Piano Evo-4 PC
To install a G7 onto a Piano Evo-4 PC, the cable need to be configurated as shown on the table below. It is
nessecary to bridge pins 1, 4 and 6 on both ends of the cable on the connector itself. (for sure on the side of the
G7). A cable as made for the AIA-600II can be used (order number 952003) but need to be modified on the G7
end.
Cable configuration
G7
9 Pin Female Sub-D
Piano Evo-4 PC
9 Pin Female Sub-D
Pin
Assignement
Pin
Assignment
2
RX
3
TX
3
TX
2
RX
5
GND
5
GND
7
RTS
8
CTS
8
CTS
7
RTS
Important: Pins 1,4 and 6 on both ends are bridged on the connector.
2.6.7 Cable in between G8 and Piano Evo-4 PC
To install a G8 onto a Piano Evo-4 PC, the cable need to be configurated as shown on the table below. It is
nessecary to bridge pins 1, 4 and 6 on both ends of the cable on the connector itself. (for sure on the side of the
G8). A cable as made for the AIA-600II can be used (order number 952003) but need to be modified on the G8
end.
Cable configuration
G8
9 Pin Female Sub-D
Piano Evo-4 PC
9 Pin Female Sub-D
Pin
Assignement
Pin
Assignment
2
RX
3
TX
3
TX
2
RX
5
GND
5
GND
7
RTS
8
CTS
8
CTS
7
RTS
Important: Pins 1,4 and 6 on both ends are bridged on the connector.
2.6.8 Cable in between Vidas and Piano Evo-4 PC
For the communication between the Biomerieux Vidas instrument and the Piano Evo-4 PC, the following
communication set-up need to be respected:
Cable configuration
Vidas
9 Pin Female Sub-D
Piano Evo-4 PC
9 Pin Female Sub-D
Pin
Assignement
Pin
Assignment
2
RX
3
TX
3
TX
2
RX
5
GND
5
GND
7
RTS
8
CTS
8
CTS
7
RTS
Important: Pins 1,4 and 6 on both ends are bridged on the connector.
PIANO Evo 4 Installation Manual
52
2.6.9 Cable in between Piano Evo-4 PC and LIS
For the communication in between the Piano Evo-4 PC and the LIS, most of the configurations do run as a
communication inbetween PC’s. For this purpose, the cable configuration listed below can be used. Verify always
with the Lab Information System provider the proper connection as it might differ from provider to provider.
Cable configuration
LIS
9 Pin Female Sub-D
Piano Evo-4 PC
9 Pin Female Sub-D
Pin
Assignement
Pin
Assignment
2
RX
3
TX
3
TX
2
RX
5
GND
5
GND
7
RTS
8
CTS
8
CTS
7
RTS
Important: Pins 1 and 4 on both ends are bridged on the connector.
PIANO Evo 4 Installation Manual
53
2.7 Communication Log files
For all the communication channels, that are defined in the configuration screen by adding analysers, a
communication Log file will be generated. The file name will be identical to the Analyser name p.e. AIA-21.log.
In the Log file all the ASTM low level frames are shown, as well as all error messages with date and time. The Log
files will reach a size of approximately 2 Mb. If the filesize is reach, the new data will be archived in a First In First
Out algorithm. The last communication activity can be traced by means of this file. This wil allow a bugfree
troubleshooting on the communication channels.
The Log files are archived in the c:\program files\TOSOH BIOSCIENCE\PianoEvo_4 subdirectory.
03/10/2002 11:54:23
03/10/2002 11:54:23
03/10/2002 11:54:23
03/10/2002 11:54:23
03/10/2002 11:54:23
03/10/2002 11:54:23
03/10/2002 11:55:20
03/10/2002 14:02:18
0.6
03/10/2002 14:02:18
03/10/2002 14:02:18
03/10/2002 14:02:18
03/10/2002 14:02:18
03/10/2002 14:02:18
03/10/2002 14:02:18
03/10/2002 14:02:18
03/10/2002 14:02:18
03/10/2002 14:02:18
03/10/2002 14:02:19
03/10/2002 14:02:19
03/10/2002 14:03:12
03/10/2002 14:03:12
03/10/2002 14:03:12
(R)
(S)
(S)
(R)
(R)
(S)
(R)
(R)
<STX>G,00020904697
<ETX>
ACK
<STX>A,00020904697
,0000 ,00
,
<ETX>U
EOT
ACK
EOT
EOT
<STX>1200002 0.6 1.0 0.8 1.4 4.9 92.8 0.0 0.0 0.0 6.40000020904596 <ETX><STX>1200002
(S)
(R)
(S)
(R)
(S)
(R)
(S)
(R)
(S)
(R)
(S)
(R)
(S)
(R)
NAK
1.0 0.8 1.4 4.9 92.8 0.0 0.0 0.0 6.4000002090459 <ETX> <STX>1200002
NAK
0.6 1.0 0.8 1.4 4.9 92.8 0.0 0.0 0.0 6.4000002090459 <ETX> <STX>120
NAK
0002 0.6 1.0 0.8 1.4 4.9 92.8 0.0 0.0 0.0 6.4000002090459 <ETX> <STX>1200002 0.6
NAK
1.0 0.8 1.4 4.9 92.8 0.0 0.0 0.0 6.4000002090459 <ETX> <STX>1200002
NAK
0.6 1.0 0.8 1.4 4.9 92.8 0.0 0.0 0.0 6.4000002090459 <ETX> <EOT>
NAK
<STX>1200002 0.6 1.0 0.8 1.4 4.9 92.8 0.0 0.0 0.0 6.4000002090459 <ETX>
ACK
EOT
Fig. 2.7 Example of a communication Log (from a G7)
2.8 Helpdirectory setup
In order to be allow the user to reduce the space on the harddisk required by the Helpfiles, the Helpfiles
can be consulted on the installation CD by means of a configurable path indication. Upon updates this option will
allow Tosoh Bioscience to present to you the latest information directly from CD.
In order to change the path of the Helpfile directory, you can open the “PianoEvo.ini” file in the directory
C:\PianoEvo_4\ and by means of the windows notepad and change the contents.
[HelpFiles]
Path=C:\Program Files\TOSOH BIOSCIENCE\PianoEvo_4\Pianohelp\
As Helpfiles are provide on CD, the path can be changed as :
[HelpFiles]
D:\Pianohelp\
Whereby the D: stands for the drive containing the Piano Evo-4 instalation CD.
PIANO Evo 4 Installation Manual
54
2.9 Flag definition in chromatogram preview
In the chromatogram preview, the flags transmitted by the GHbV or G7 can be documented with a text in
the length of maximum 13 characters. The default contents of the PianoEvo.ini file looks like this:
[HelpFiles]
Path=C:\PianoEvo_4\PianoHelp\PianoEvo_4\Pianohelp English\
[HbG5_Flags]
0=.
1=Total Area
2=sA1C%
3=F%
4=Total A1
5=Column count
6=Filter count
7=Theor. plate
8=Unk.LA1C/sA1C
9=Numb of peaks
10=Sample number
[HbG7_Flags]
0=.
1=Total Aerea
2=sA1C%
3=F%
4=Total A1
5=Column count
6=Filter count
7=Theor. plate
8=Unk.LA1C/sA1C
9=Number/peaks
10=Sample number
11=Total Area
12=sA1c% cal.
13=F% cal.
14=Total A1 cal.
15=Column count
16=Filter count
17=Theor. plate
18=Unk.LA1C/sA1C
19=Unk.sA1C/LA1C
20=Numb of peaks
21=HbF% (B-Thal)
22=RT A0 (B-Thal)
23=A2% (B-Thal)
24=P00 detected
25=TEST counter
26=LIFE counter
27=Missing peak
28=.
29=.
PIANO Evo 4 Installation Manual
55
30=RT[pk1] out
31=RT[pk2] out
32=RT[pk3] out
33=RT[pk4] out
34=RT[pk5] out
35=RT[pk6] out
36=RT[pk7] out
37=RT[pk8] out
38=RT[pk9] out
39=RT[pk10] out
40=Variant
IMPORTANT: The flag listed do correspond to the possible flags that could be transmitted by the GHbV, G7 and./or G8.
However to enable the flag transmittion, it is important that the flags are programmed in the instrument Flag menu. Refer to
the instrument manual in order to program these flags.
On the G8 instrument, you’re able to program flags in the range from 30 to 39 to deal with the retention time (RT) according
to the peak names as they have been set in the instruments IDT file. Please do review the IDT file on the instrument in order
to correct the flags according to the instrument parameter names.
P.e. for the variant mode on the G8, the following changes should be set in the PianoEvo.ini file:
30=RT FP out
31=RT A1A out
32=RT A1B out
33=RT HbF out
34=RT lA1c out
35=RT sA1c out
36=RT A0 out
37=RT H-V0 out
38=RT H-V1 out
39=RT H-V2 out
PIANO Evo 4 Installation Manual
56
2.10 Auto refresh function in the Worklist view
As a user is looking at the Worklist, the screen will change as soon as a result is send from an analyser to the
program. The last received result will be displayed instantly. In the case that the user is looking at a chromatogram, the
function “next” will display immediately the graph of the last received result. In order to avoid this effect, the user is able to
turn off this so called automatic refresh of the worklist view. In order to do so, open the Windows explorer and go into the
program directory (default: c:\PianoEvo_4) and edit the PianoEvo.ini file.
In this file, make a change to the statement “AutoUpDate=1” to AutoUpDate=0” to disable the auto refresh of the worklist.
2.11 UIN registration for the Piano program
Upon the first start of the Piano program, the user will be able to register a Unique Identification Number –
abbreviated as UIN- in order to receive the correct support upon contacting the company Tosoh Bioscience hotline.
This UIN field will remain on the login screen up till the moment something is entered. The entered number will be saved in
the PianoEvo.ini file in the entry [Customer] and can be corrected in this file at any time.
Example:
[Customer]
UIN=10024
2.12 User interface Log file
For the user registration, the Piano Evo-4 program does keep track on the number of applications of the Program by
means of a PianoEvo.log file. This file does register the Login date, time and user with the authority level. Everytime the
program is opened or closed, an entry is added to this log file. Furthermore, the Piano Evo-4 program has an automatic
closure sequence, whereby the program terminates at midnight. This closure is registered as Date Change in the
PianoEvo.log file. As a scheduled task would be programmed to restart the program after midnight plus one minute, the
program will restart with the last user with the corresponding login and password. In the log file this is stated as
“Autostartup !”. Be aware that the first two characters in the log file may not be deleted. These characters are the end of data
pointer of the log file. Erasing these two characters will make the log file invalid.
#% 29/07/2004 5:18:34 PM (Login) Login canceled, Level=0
29/07/2004 5:18:35 PM (Logout)
29/07/2004 5:20:26 PM (Login) Operator=JAL, Level=3
29/07/2004 5:31:36 PM (Logout) JAL
29/07/2004 5:32:20 PM (Login) Operator=JAL, Level=3
29/07/2004 5:34:19 PM (Logout) JAL
29/07/2004 5:37:14 PM (Login) Operator=JAL, Level=3
30/07/2004 (Backup) Date change
30/07/2004 12:00:01 AM (Logout) JAL
30/07/2004 8:25:44 AM (Login) Operator=JAL, Level=3, Autostartup !
30/07/2004 8:33:04 AM (Logout) JAL
30/07/2004 8:35:57 AM (Login) Operator=JAL, Level=3
30/07/2004 8:53:11 AM (Logout) JAL
30/07/2004 8:57:13 AM (Login) Operator=JAL, Level=3
30/07/2004 9:15:41 AM (Logout) JAL
PIANO Evo 4 Installation Manual
57
NOTES
PIANO Evo 4 Installation Manual
58
Name: ____________________________________
Adres : ____________________________________
____________________________________
____________________________________
Please place this form in an envelope and return this
Form to Tosoh Bioscience
Product Support Department
User registration
Transportstraat 4
3980 Tessenderlo
BELGIUM
USER REGISTRATION FORM
PRODUCT I.D. : PIANO EVO-4 EDITION
VERSION: 1.0 Rev. __
HARDWARE KEY S/N _____________________
___________________________________________________
Name : ____________________________________________________________________
Function : __________________________________________________________________
Company/Hospital : __________________________________________________________
Street : _________________________________________________Number : ___________
P.O. Box number : ________________________________________
ZIP : __________________________ Place : _____________________________________
Country : ___________________________________________________________________
e-Mail : ____________________________________________________________________
Phone : ____________________________________________________________________
Fax : ______________________________________________________________________
I allow TOSOH BIOSCIENCE to send me general product information.
I allow TOSOH BIOSCIENCE to send me update information on my e-Mail account
I allow TOSOH BIOSCIENCE to send me update information by mail
PIANO Evo 4 Installation Manual
59
Does this program forefill your requirements?
4.
Are there things you disliked on the program?
5.
Are there improvements that you would look for in this product?
PIANO Evo 4 Installation Manual
Unvaluable
3.
Unvaluable
Our primary asset for this program was:
• To connect a Tosoh instrument on an existing communication line
• To combine several Tosoh instruments to one platform
• To archive results in an electronical format
• To validate the results on the workbench before transfer
• To archive the data in different exortable formats
• To retrieve online support on the connected instruments
Usefull
2.
Usefull
How would you rate this product?
• this program does forefill our needs for the communication set-up
• this program does fit in our quality requirements
• the archieved data storage is essential
• the statistics presented do forefill our needs
• the data export function allows easy result transfer
important
1.
important
Customer inquery form:
60