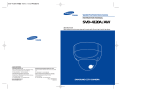
1
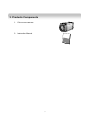
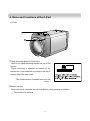
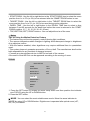
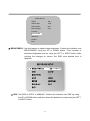
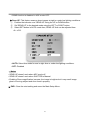
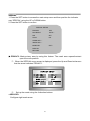
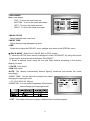
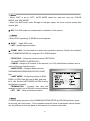
AUTO FOCUS, DAY&NIGHT ZOOM COLOR CAMERA USER MANUAL 사용 설명서 27X / 33X / 37X 용 서 Contents 1. 2. 3. 4. 5. 6. 7. 8. Precautions Features Products Components Name and Functions of Each Parts 1) Front 2) Back Connection 3 4 5 6 9 1) Connecting to Monitor 2) Connecting to Connection Operating Your Camera 1) Menu Configuration 2) Menu Setup Trouble Shooting Specifications 11 35 36 2 1. Precautions Cautions This information is provided to ensure your safety and to prevent any loss, financial, Please read it carefully and use the products accordingly. - Warning Installation of this product by unqualified personnel is strictly prohibited, Please consult an experienced installer or authorized retailer for proper installation to avoid possible fire or electric shock. If the camera overheats or smoke is noticed, turn off immediately. It may cause fire Do not install the product in an area of high humidity or near flammable materials (e.g oil or gas) Install the product in an incorrect environment may cause fire, electric shock damage to the product Do not install correct installation place, to prevent possible fall to product. Do not handle power plug with wet hand, it might cause electric shock. Do not insert foreign objects into the product or disassemble the products. It may cause ire or damage the product. - Cautions Use only under temperature condition (+50°C~-10°C). Severe light changes or flickering may hinder normal camera operation. Fall or strong shock, it may cause malfunction. Do not exposure direct sunshine or strong light the camera. Avoid touching the camera lens with finger. 3 2. Features High Magnification Zoom Lens High 432 x zoom function. (x27 Optical zoom, x16 Digital zoom) High 528 x zoom function. (x33 Optical zoom, x16 Digital zoom) High 592 x zoom function. (x37 Optical zoom, x16 Digital zoom) High resolution 600TVL Color : more than 600TVL, B/W : more than 700 TVL. SSNR3 Function Low illumination noise has been significantly reduced and resulting in a clear and sharp image display in the dark. Low illumination, Day Night The camera automatically determines whether it is night time or day time, selecting operating mode automatically. Change B/W mode (0.02Lux) building in ICR DAY & NIGHT in the dark. DIS Function Compensate for vibration of camera under the shaking condition. Motion detection Once motion is detected, the camera sends an alert signal to the processing unit without separate sensor (Output MD of External signal) Miscellaneous Functions Preset, Privacy Zone Masking, Digital zoom. Image Pause, Mirror Effect, Up Down reversion etc. Control via OSD menu and RS-485 The OSD menu and RS-485 pins allow for remote control for the camera, the user can control the lens using external control connection. Multi Protocol Various Protocols available by using Multi Protocol function. 4 3. Products 구성물 Components 1. Color zoom camera 2. Instruction Manual 5 4. Name and Functions of Each Part 1) Front ①Tripod Mounting Bracket Screw Hole Used to fix tripod mounting bracket on top of the camera. Tripod mounting is attached on bottom of the camera but it can install the mounting in the top of camera when the user need. * The measurement of suitable screw for the holes→ ②Remote receive Zoom and focus functions can be controlled by using external controllers ☞ This function is optional 6 2) BACK ① Key Buttons ▪ UP (TELE button): To move the arrow indicator to up - To close in on a far object. (ZOOM IN) ▪ DOWN (WIDE button): To move the arrow indicator to down - To widen the view. (ZOOM OUT) ▪ SET: To access the main setup menu. ▪ LEFT (F-NEAR button): To move the arrow indicator to left - To see a near object clearly ▪ RIGHT (F-FAR button): To move the arrow indicator to right - To see a far object clearly ▪ AF button: To activate auto focus just once ② Power Input Terminal - Power supply terminal (DC12V±10%). 7 ☞ Notes • If the Adaptor Power Line is extended improperly, it may cause malfunctions since the camera is affected by unstable voltage condition. • Ensure Power Supply Source: DC 12V ± 10%, 500㎃ • The wire is polarized. Match “+” and “-“terminals properly ③ Video Output Jack - Used to connect an external video monitor in jack. ④ External Control Connector - Zoom and focus functions can be controlled by using external signal, RS-485 communication. ⑤ Power LED - Illuminates when power is supplied. ⑥ Tripod Mount Pole - Used to install the camera on an optional Tripod or Bracket. 8 5. Connection 1) Connecting to Monitor Connect Video Out Jack to the monitor's Video In jack as shown below. • Connect cables with the unit powered down. 2) Connecting to connection ▪ External Control Connector 9 Focus and Zoom functions can be controlled by using external signals. * It can be broken by using Overvoltage. * MD (Motion Detection) Output Signal Level (less than 10mA) ▪ Communication Control Connector 10 6. Operating Your Camera 1) Menu Configuration MAIN SETUP MENU SSNR ▪ OFF ▪ ON WHITE BALANCE ▪ ATW ▪ OUTDOOR ▪ MANUAL ▪ INDOOR ▪ AWC → SET BACKLIGHT ▪ OFF ▪ BLC ▪ HLC MOTION DET ▪ OFF ▪ ON FOCUS ▪ MODE ▪ ZOOM TRK ▪ ZOOM SPEED ▪ D-ZOOM ▪ ZOOM POS INIT ▪ USER PRESET ▪ LENS INIT ▪ RET EXPOSURE ▪ BRIGHTNESS ▪ SSNR3 SPECIAL ▪ PRIVACY ▪ DAY / NIGHT ▪ DIS ▪ SYNC ▪ COMM ADJ ▪ IMAGE ADJ ▪ MONITOR ▪ DISPLAY ▪ RET ▪ IRIS ▪ SENS-UP RESET EXIT 2) Menu Setup Use the six buttons on back of the camera. 11 ▪ SHUTTER ▪ END ▪ AGC 1. Press the SET button for 2 seconds to access the main setup mode. • Main setup menu is displayed on the monitor screen. MAIN SETUP SSDR ON ↙ WHITE BAL ATW BACKLIGHT OFF MOTION DET OFF FOCUS ↙ EXPOSURE ↙ SPECIAL ↙ RESET EXIT 2. Select the desired feature by using the UP or DOWN button. MAIN SETUP Select feature by using The UP button. or DOWN SSDR ON ↙ WHITE BAL ATW BACKLIGHT OFF MOTION DET OFF Change the status by using the LEFT or RIGHT button. FOCUS ↙ EXPOSURE ↙ SPECIAL ↙ RESET EXIT 3. Change the status of the selected feature by using the LEFT or RIGHT button. 4. When completed, move the arrow indicator to 'EXIT' and press the SET button. ☞ Notes • Features marked with a „↙‟ have an accessible submenu. • Some features marked with a „---„ are not available according to the status of setting option. 12 SSDR(Super Dynamic Range) SSDR illuminates darker spots of an image while retaining the same light level for brighter spots to even out the overall brightness of images with high contrast between bright and dark spots. 1. When the SETUP menu screen is displayed, select „SSDR‟ by using the button so that the arrow indicates „SSDR‟. 2. Use the button to change the SSDR level according to the contrast between bright and dark areas. MAIN SETUP SSDR ON ↙ WHITE BAL ATW BACKLIGHT OFF MOTION DET OFF FOCUS ↙ EXPOSURE ↙ SPECIAL ↙ RESET EXIT WHITE BAL Your camera provides three 'WHITE BAL' control modes for your choosing in adjusting the white balance. 1. Press the SET button to access the main setup menu and move the indicator to 'WHITE BAL' using the UP or DOWN button. 2. Set 'WHITE BAL' using the LEFT or RIGHT button. MAIN SETUP SSDR ON ↙ WHITE BAL ATW BACKLIGHT OFF MOTION DET OFF FOCUS ↙ EXPOSURE ↙ SPECIAL ↙ RESET EXIT 13 ※ The five white balance control modes are as follows. ▶ ATW (Auto Tracking White Balance): Select This when the color temperature is between 1800°K and 10500°K ▶ AWC→SET (Auto White balance Control): To find the optimal setting for the current luminance environment in this mode, set the point the camera towards a sheet of white paper and press the SET button. If the environment changes, readjust it. ▶ OUTDOOR: Select this when the color temperature is between 1800°K and 10500°K. (sodium light inclusion) ▶ INDOOR: Select this when the color temperature is between 4500°K and 8500°K. ▶ Manual: To fine adjust, select the Manual mode. You can increase or decrease the red or blue factor while monitoring the difference on the screen. Set to 'MANUAL'mode and press the SET button. Increase or decrease the value for red(R-Gain) and blue(B-Gain), watching the color of the picture, and press the SET button when you obtain the best color. WHITE BAL MANUAL SETUP ▶ RED BLUE END 117 ||||||||||||||| 93 ||||||||||||||| Press SET to return ☞ Notes • Proper White Balance may not be obtained under the following conditions. ① When the scene contains mostly high color temperature object, such as a blue sky or sunset. ② When the scene is dim. ③ If your camera directly faces a fluorescent lamp or is used in an environment of varying lighting conditions. 14 BACKLIGHT When there is a strong backlight behind the object, clear images of the Background as well as the object can still be obtained by using the BACKLIGHT function. MAIN SETUP SSDR ON ↙ WHITE BAL ATW BACKLIGHT OFF MOTION DET OFF FOCUS ↙ EXPOSURE ↙ SPECIAL ↙ RESET EXIT 1. Please position the arrow to point to 'BACKLIGHT' on the SETUP menu by using the UP and DOWN buttons. 2. Please select the mode you wish to operate by pressing the LEFT or RIGHT button. ▶ BLC: Enables a user to directly select a desired area from a picture, and to view the area more clearly. ▶ HLC (High Light Compensation) : If the scene contains extremely bright light areas such as, from car headlight, the light can mask out much of the on-screen detail. ▶ OFF: Deactivates the BACKLIGHT function. 3. Select a desired mode using the Left and Right button and press the SET button. Select „BLC‟ to adjust the area to be enhanced and 15 Enhancement level. Select „HLC‟ to adjust the HLC MASK TONE and LEVEL. ☞ Notes Since the following symptoms may occur according to the ambient illumination when BLC is selected, set it to OFF. 1 Color or screen changes unnaturally. ○ 2 Noise appears in the bright part of the screen. ○ Since the performance of the BLC function may be affected by the area of the bright part of the screen, optimize the installation angle for the best BLC performance. If you increase LIMIT, the screen display may be distorted. For high performance of BLC function, We recommend that you set IRIS to AUTO in the EXPOSURE setup. Activating BLC may cause the camera to repeat the Auto Focus operation depending on lighting conditions. It is recommended that you use Focus Setup menu in One-Push or manual mode. Smart Zoom and BLC cannot be used in conjunction with each other. Setting up BLC and then Smart Zoom automatically cancels BLC. Setting up Smart Zoom and then BLC automatically cancels Smart Zoom. MOTION DET. This product has a feature that allows you to observe movements of objects in 8 different areas on the screen, and the words „MOTION DETECTED‟ appear on the screen when movement is detected; hence a single individual can conduct supervision efficiently. The camera detects an object‟s movement by sensing disparity of outline, and level of brightness and color. The camera receives detection signal from MD output terminal. 1. Please position the arrow to point to „MOTION DET‟ on the SETUP menu. Using the UP and DOWN buttons. 16 2. Please select the mode you wish to operate by pressing the LEFT or RIGHT button. MAIN SETUP SSDR ON ↙ WHITE BAL ATW BACKLIGHT OFF MOTION DET OFF FOCUS ↙ EXPOSURE ↙ SPECIAL ↙ RESET EXIT ① Please press the SETUP button. - OFF : MOTION DETECTION mode is cancelled. - ON : Any motion in the selected areas is observed. ▶ AREA SEL : Select the area user wants to observe in the 8 areas ▶ AREA MODE : Select to appear the word “ MOTION DETECTED” on the screen. ▶ SENSITIVITY: You can select up to 8 MD areas. When SENSITIVITY number is high, motion detection sensitivity is increased to recognize even small movement. ▶ SMART ZOOM : Smart Zoom is operated in connection with MOTION DETECTION. When the SMART ZOOM function is „ON‟ while the MOTION DETECTION mode is „ON‟, the zoom goes to the TARGET ZOOM position once motion is detected. Once the zoom action is finished and „DWELL TIME‟ has passed the zoom to the „START ZOOM‟ position. 17 • START ZOOM : Use the left or right button in the „START ZOOM‟ item to select the zoom position from 1x to 27x (or 33x) to be returned after the „SMART ZOOM‟ action is over. • TARGET ZOOM : Use the left or right button in the ‟TARGET ZOOM‟ item to select the zoom position from 1x to 27x (or 33x) to be used during motion detection. • DWELL TIME : Use the left or right button in the „DWELL TIME‟ item to select a time between 5 and 60 seconds for the dwell time before the zoom is returned to the „START ZOOM‟ position. (5, 7, 10, 15, 20, 30, 40, 60 sec) • TOP, BOTTOM, LEFT, RIGHT buttons : You can adjust the size of the area. ☞ Notes Tips on Using the Motion Detection Feature • The feature may not function properly under flickering light conditions. • The camera interprets sudden changes in lighting and subsequent change in brightness of an object as motion. • With the feature enabled, other algorithms may require additional time to operatethan usual. • This system does not guarantee prevention of fire or theft. The manufacturer shall not be held responsible for any accident or damage incurred. • Connect an external alarm device to MD Out on back of the camera. • Be careful of that MD Out can be appeared according to the moving of zoom. FOCUS MAIN SETUP SSDR ON ↙ WHITE BAL ATW BACKLIGHT OFF MOTION DET OFF FOCUS ↙ EXPOSURE ↙ SPECIAL ↙ RESET EXIT 1. Press the SET button to access the main setup manu and then position the indicator over FOCUS using the UP or DOWN button. 2. Press the SET button. ▶ MODE : You can select the most suitable zoom mode. Move the arrow indicator to „MODE‟ by using UP or DOWN button. Digital zoom is operated after optical zoom (x27, x33, x37) is finished. 18 • ONE PUSH : Focus is automatically adjusted just once, after zoom position is changed. Select 'ONE PUSH' and press the SET button to confirm. Increase or decrease optical zoom (ZOOM) or digital zoom (D-ZOOM) positions by using the directional buttons while verifying the changes on screen. Press the SET button once desired image quality is obtained. • AUTO : Select AUTO and press the SET button to confirm. Increase or decrease optical zoom (ZOOM) or digital zoom (D-ZOOM) positions by using the UP or DOWN button while verifying the changes on screen. Enabling D-ZOOM (ON) means that digital zoom will activate once optical zoom ends. Focus is automatically adjusted with moving zoom. • MANUAL : Select 'MANUAL' and press the SET button to confirm. Increase or decrease optical zoom (ZOOM) or digital zoom (D-ZOOM) positions by using the directional buttons while verifying the changes on screen. Press the SET button once desired image quality is obtained. Focus can be manually adjusted, independent of moving zoom. ▶ ZOOM TRACK: Select „ON‟ for the „SMART ZOOM‟ item in the motion detection menu and press SET button to change the settings for the „SMART ZOOM‟ funtion. Use the left or right button in the „ZOOM‟ item to select „AUTOTRACK‟ or „TRACK‟ and press SET button to activate the zoom action focus function. 19 • AUTOTRACK: Zooming in while deciding or adjusting the status of the focus. • TRACK: Zooming in with no relevance to the focus. • OFF: Only the zoom lens moves. ▶ ZOOM SPEED : Configure zoom tracing speed by using this feature. Position the indicator over 'ZOOM SPEED' by using the UP or DOWN button and then set todesired mode by using the LEFT or RIGHT button. FAST : To move zoom fast. MEDIUM : To move zoom at medium speed. SLOW : To move zoom slowly. ☞ Notes The „ZOOM SPEED‟ mode cannot be used if „MODE‟ is set to „AUTO‟ and „ZOOM TRAKck‟ is „ON‟. ▶ D-ZOOM : Configure magnification limit from x2~x16 using this feature. Position the indicator over 'D-ZOOM' by using the UP or DOWN button. Set 'DZOOM' to'ON' and press the SET button to confirm. Set „ZOOM LIMIT‟ to the desired level Using the LEFT or RIGHT button. 20 ☞ Notes When the DIS is enabled, you cannot use the D-ZOOM. ▶ ZOOM POS INIT : Moves to the controlled ZOOM position when the power truned on and is a function of the initial ZOOM position control. AUTO : If you turn the power off and on, the zoom magnification level is set to the previous level that was set before the power went off. MANUAL : The zoom magnification level can be set from 1x to 27x (or 33x, 37x). ☞ Notes When the DIS is enabled, you cannot use the D-ZOOM and the zoom position is saved after 5 seconds when you set zoom function. ▶ USER PRESET: Preset user-designated configurations using this feature. Position the indicator over „USER PRESET‟ using the UP or DOWN button and then set to „ON‟ using the LEFT or RIGHT button. Press the SET button to confirm. 21 ● ● ● ● PRESET NO : Up to 128 preset configurations are supported. PRESET SAVE : Save configured preset. PRESET CLEAR : Clear configured preset. END : Revert to the FOCUS SETUP menu. ▶ LENS INIT : Use the left or right button in the „Lens initialization‟ item to select „Automatic‟ or „Manual‟ and press the SET button to set up the initialization of the lens. • AUTO : The lens is initialized by setting the date. reset time can be set from 1 day to 7 days and the lens resets every 24 hours from the set time. • Manual : The Lens will reset when you press the SET button. ▶ END : To revert to the main setup menu. EXPOSURE 1. Press the SET button to access the main setup menu and then position the indicator over 'EXPOSURE' by using the UP or DOWN button. 2. Press the SET button to confirm. 22 MAIN SETUP SSDR ON ↙ WHITE BAL ATW BACKLIGHT OFF MOTION DET OFF FOCUS ↙ EXPOSURE ↙ SPECIAL ↙ RESET EXIT ▶ BRIGHTNESS : Use this feature to adjust image brightness. Position the indicator over 'BRIGHTNESS' using the UP or DOWN button. Then increase or decrease brightness level by using the LEFT or RIGHT button while verifying the changes on screen. Set END once desired level is obtained. ▶ IRIS : Set 'IRIS' to 'AUTO' or 'MANUAL'. Position the indicator over 'IRIS' by using the UP or DOWN button and then select the desired iris mode using the LEFT or RIGHT button. 23 • AUTO: The iris is automatically activated upon illumination. • MANUAL: Manual iris configuration. Set 'IRIS' to 'MANUAL' by using the LEFT or RIGHT button and then press the SET button. Increase or decrease iris level by using the LEFT or RIGHT button while verifying the changes on screen. ▶ SHUTTER : Control image brightness by adjusting shutter speed. ① Position the indicator over 'SHUTTER' by using the UP or DOWN button. Then select the desired shutter mode (A.FLK, ESC, MANUAL) using the LEFT or RIGHT button. 24 • A.FLK (NTSC: 1/100, PAL: 1/120): Flicker-free mode. • ESC : Automatic shutter speed setting (optimal). Auto operation is possible only when the IRIS is set to MANUAL. • MANUAL : Manual shutter speed setting. If you choose „MANUAL‟, select the optimal shutter speed. · In MANUAL mode, the optimal shutter speed needs to be designated. Select from 1/60 to 1/120,000 (NTSC) or from 1/50 to 1/120,000 (PAL). ② * 'Sens-Up' mode can be configured manually (2x to 512x). · Verify changes made to the shutter speed by referencing to changes in on screen brightness. ③ Press the SET button to complete. ☞ Notes • Image may become unstable if the camera is set to 'ESC' mode and faces a strong fluorescent light. • Under 'ESC' mode, the brightness can be adjusted using the LEFT or RIGHT button. • Sens-up is disabled under 'MANUAL' or 'A.FLK' mode. ▶ AGC (Auto Gain Control) : For brighter images. ① ② Position the indicator over 'AGC' by using the UP or DOWN button. Set 'AGC' to the desired mode by using the LEFT or RIGHT button. • HIGH : Wide range gain value adjustment 25 • MEDIUM • LOW • MANUAL • OFF : MEDIUM range gain value adjustment : Narrow range gain value adjustment : Selecting gain value range.(5dB~41dB) : Disabled ▶ SSNR3 : On screen noise reduction. ① ② Position the indicator over 'SSNR' by using the UP or DOWN button. Set 'SSNR' to the desired mode by using the LEFT or RIGHT button • OFF : Disabled. • LOW : Low noise reduction. • MEDIUM : MEDIUM noise reduction. • HIGH : High noise reduction. ☞ Notes • Changing 'AGC' setting from LOW to HIGH results in greater sensitivity, as well as on screen noise. 26 • SSNR function is disabled in AGC mode „OFF‟. ▶ Sens-UP: This feature ensures clear images at night or under low lighting conditions. ① ② ③ Position the indicator over 'SENS-UP' using the UP or DOWN button. Set 'SENS-UP' to the desired mode using the LEFT or RIGHT button. Select SET button is AUTO mode then, SENS-UP limit can be adjusted from x2~ x512. • AUTO: Select this mode for use in night time or under low lighting conditions. • OFF: Disabled ☞ Notes • SENS-UP doesn‟t work when AGC mode off. • SENS-UP doesn‟t work when SHUTTER is Manual • Enabling Zoom magnification increase, the image is brighter but it may result image ghost of moving subject and Auto focus b properly. ▶ END : Save the exist setting and move the Main Setup Menu. 27 SPECIAL 1. Press the SET button to access the main setup menu and then position the indicator over 'SPECIAL' using the UP or DOWN button. 2. Press the SET button to confirm. SPECIAL SETUP PRIVACY OFF DAY/NIGHT AUTO↙ DIS OFF SYNC INT COMM ADJ ↙ IMAGE ADJ ↙ MONITOR CRT↙ DISPLAY RETURN ▶ PRIVACY: Mask privacy area by using this feature. The mask area expand/contract upon the zoom position. ① When the SPECIAL menu screen is displayed, press the Up and Down buttons so that the arrow indicates „PRIVACY‟. ② Set up the mode using the 4 direction buttons. • AREA SEL Configure eight mask areas. 28 • AREA MODE Mask area display. - TOP : To move the mask area up. - BOTTOM : To move the mask area down. - LEFT : To move the mask area left. - RIGHT : To move the mask area right. • MASK COLOR Adjust desired mask color level. • MASK TONE Adjust desired mask transparency level. • END Select this to save the PRIVACY menu settings and return to the SPECIAL menu. ▶ DAY & NIGHT : Select from COLOR, BW or AUTO modes. ① When the SETUP menu screen is displayed, select „DAY/NIGHT‟ by using the Up and Down buttons so that the arrow indicates „DAY/NIGHT‟. ② Select a desired mode using the Left and Right buttons according to the picture display you want. • COLOR: Color mode. • B/W: BW mode. •AUTO: The camera automatically detects lighting conditions and selects the mode accordingly. •DWELL TIME : You can select the duration time about changing the day/night mode. → 5,7,10,15,20,30,40, 60(sec) •DURATION : You can select brightness of illumination about changing the day/night mode. • EXT : This mode allows you to apply a desired filter to external signals. 29 ☞ Notes • When “AGC” is set to “OFF”, AUTO MODE cannot be used but, only use “COLOR MODE” and “B/W MODE”. • When Use B/W mode under Sunlight or Halogen Lamp, the focus may be smear than normal light. ▶ DIS : The DIS mode can compensate for vibration of the camera. ☞ Notes • When DIS is operating, D-ZOOM does not operate. ▶ SYNC : Apply INIT mode. • INIT : Internal synchronization ▶ COMM ADJ : Use this feature to select communication protocol. Position the indicator over 'COMMUNICATION' by using the UP or DOWN button. • PROTOCOL : Select the communication PROTOCOL. (D-max/STW/PELCO-D/PELCO-P) • CAM ID : Assign an ID number to the camera (1 to 255). Identification number zero is used for Remote controller setup. • BAUD RATE : Configure baud rate from 2400/4800/9600/19200/38400/57600/115200 bps. • UART MODE : Configure parity bit to NON, EVEN, or ODD. Data bit is set to 8bit, and stop bit to 1bit. Set the UART MODE to EVEN if using the Remote Controller. •TERMINATION : Function that sets the resistance at the end of RS-485 communications. • PET PKT : Used to transfer a packet. ☞ Notes • It can be setup any item in the COMMUNICATION SETUP by RS-485 interface except for moving, exit of the menu. To be complete setup the items or parameter values, please use key buttons on the rear panel of this camera or a remocon controller. 30 ▶ IMAGE ADJ : Includes image quality or special function factors. 1 When the SETUP menu screen is displayed, select „IMAGE ADJ‟ by using the Up and ○ Down buttons so that the arrow indicates „IMAGE ADJ‟. 2 Selected a desired mode using the Up and Down buttons. ○ • H-REV : Use this feature to horizontally inverse the screen. • V-REV : Use this feature to vertically inverse the screen. • SHARPNESS : Increasing this value sharpens object edges. Too high of a setting, however, produces noise and may obscure the image. • COLOR : Adjusting this value affects the chroma level only; the burst level is unaffected. • END : Return to the USER PRESET menu. ▶ MONITOR Please change the settings value of video appropriate to your monitor. LCD : Please select this menu item when using an LCD monitor - CRT : Please select this menu item when using a CRT MONITOR - USER : Please use this menu item when using a monitor other than standard ones. You can change the gamma, PED level, and color gain in the sub menus. 31 ▶ DISPLAY: Includes image quality or special function factors. • CAM TITLE : Use this feature to designate a name for the camera, which will display on the monitor screen. ①Press the SET button to display the main setup menu and move the arrow indicator to 'CAM TITLE' by using the UP or DOWN button. ②Set 'CAM TITLE' to 'ON' by using the LEFT or RIGHT button. ☞ Notes • If the CAM TITLE feature is set to 'OFF', the name will not displayed in the monitor. ③Press SET button. ④You can enter up to 20 characters. a. Move the cursor to the character entry field by using the LEFT or RIGHT button. b. Use UP, DOWN, LEFT, and RIGHT buttons to select a desired character. c. Press the SET button to confirm selection of the blinking character. The character is then saved, and the cursor in the entry field moves to thenext position. d. Repeat steps „a‟ through until the desired name has been entered. ☞ Notes • Correcting Mistakes - Move the cursor to 'CLR' and press the SET button to clear the entire entry. To modify one character, use ‘←’ or ‘→’to position the cursor above the characterto be modified and click the SET button after selecting the character to enter. 32 ⑤Select on screen position of the CAM TITLE. a. Move the cursor to 'POS' and press SET button. b. The CAM TITLE is displayed on the top-left of the monitor screen. (Default position) c. Select the position by using the 4-directional buttons, then press the SET button to confirm the position. ⑥When completed, move the cursor to 'END' and press SET button. • CAM ID : Displays camera ID on top left corner of the screen. • CAM INFO : Displays camera information on screen. • MOTION ALARM : You can toggle the use of the camera alarm. • ZOOM MAG : Use th is feature to display the current zoom magnification level on screen. Position the indicator over „ZOOM MAG‟ using the UP or Down button. Then set to ON using the LEFT or RIGHT button. 33 • LANGUAGE : You ca n select the menu language according to your requirements (ENGLISH, Chinese, DEUTSCH, ITALIANO, FRANCAIS, ESPANOL, Korean, Japanese, PORTUGUESE ) • END : Select this to save the DISPLAY menu settings and return to the SPECIAL menu. RESET To reset your camera to factory default condition. ☞ Notes • Some in „COMM ADJ‟ mode can not be reverted even if it is RESET. EXIT To finish setup menu. 34 7. Troubleshooting Problem Solution No display • Check the power cable and the wiring between the camera and the monitor. • Ensure proper video cable connection (Video Out Jack). Dim display • The lens could be dirty. Clean with a soft, clean piece of cloth. • Adjust monitor settings. • Adjust camera position if exposed to a strong light source. Dark display • Adjust the monitor's contrast level. • Set the intermediate device, if in use, to 75Ω/ Hi-z The camera is not functioning properly • Check the power source for compliance with specifications and its surface is hot. Auto mode of DAY/NIGHT is not selected or not active. • Ensure DAY/NIGHT mode, the mode set to “AUTO” • Ensure AGC mode is set to “ ON” Motion Detection feature is not active. • Ensure that the feature is set to ON Improper color • Check the “WHITE BAL” mode, the setting is properly. Uneven colors Flickering • Adjust and configure WHITE BAL • The camera may be facing the sun or a fluorescent light. Adjust the position of the camera. SENS-UP feature is not active. • Ensure AGC menu is set to ON. • Ensure SHUTTER MENU is set to MANUAL. 35 8. Specifications Signal system Image Sensor Total Pixels Effective Pixels Resolution Scanning Frequency Scanning System Shutter Speed Min. Illumination Zoom Rate Digital Zoom DIS Min. Focus Distance Angle Field of view Back Light SSDR Day & Night Privacy Zone AGC Camera ID White Balance SSNR OSD Flip / Mirror Communication S/N Ratio Video Output Sync. System Operating Humidity Operating Temp. Dimension Weight Power Consumption Power Supply NTSC PAL 1/4” Sony super HAD CCD 811(H)X508(V) 795(H)X596(V) 768(H)X494(V) 752(H)X582(V) Color : 600TV Lines(Min), B/W : 700TV Lines(Min) 15.734KHz(H), 60(V) 15.625KHz(H), 50(V) 2:1 Interlace 2:1 Interlace 525 Lines/60Fields/30Frames 625 Lines/50Fields/25Frames 1/60~1/120,000 sec 1/50~1/120,000 sec 0.4Lux @F1.6 (Normal Color Mode) 0.02Lux @F1.6 (B/W Mode) 0.00004Lux @F1.6 (Sens-up Mode) 27X, f3.5~94.5mm (F1.6~3.9) 33X, f3.5~111.5mm (F1.6~3.9) 37X, f3.5~129.5mm (F1.6~3.9) 16x ON / OFF 1.5m 27X, H: 55.5°(Wide)~2.24°(Tele), V:42.5°(Wide)~1.79°(Tele) 33X, H: 55.5°(Wide)~1.77°(Tele), V:42.5°(Wide)~1.33°(Tele) 37X, H: 55.5°(Wide)~1.59°(Tele), V:42.5°(Wide)~1.19°(Tele) BLC / HLC / OFF ON / OFF AUTO / COLOR / B/W On / Off (8 Areas) LOW / MEDIUM / HIGH / MANUAL / OFF On ( 255 ID Selectable ) / Off ATW / Manual / AWC→SET / OUTDOOR/ INDOOR LOW / MEDIUM / HIGH / OFF Built-in On / Off RS 485, Multi Protocol (D-max, STW, Pelco) 52dB (AGC Off) Composite video output 75 ohm terminated Internal 30 % ~ 90 % RH - 10°C to 50°C 60(W) X 64(H) X 119.8(D)mm About 378g Max 5.1W DC 12V (±10%) 500㎃ 36 37