1
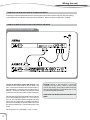
Hera
User Manual
w w w. a p e x - a u d i o . e u
APEX NV
Schoebroekstraat 62
3583 Beringen (Paal)
BELGIUM
Tel: + 32 (0)11 28 61 91
Fax: + 32 (0)11 25 56 38
e-mail: [email protected]
website: www.apex-audio.eu
Trademarks
The APEX trademark is owned by APEX N.V. All other brand, product and company names and any other registered names or trade marks
mentioned in this manual belong to their respective owners.
Disclaimer
APEX N.V. has taken all possible steps to ensure that the information given here is both correct and complete. In no event can APEX accept any
liability or responsibility for any loss or damage to the owner of the equipment, any third party, or any equipment which may result from use of
this manual or the equipment which it describes.
The information provided in this document may be modified at any time without prior warning. Specifications and appearance may differ from
those listed and illustrated. Any complaint against APEX N.V. shall be governed by the laws of Belgium.
Hera
Sound level Controller
July 2011
Serial number of this product:
© 2000-2011 APEX N.V. All rights reserved.
This manual may not be reproduced or transmitted, either in part
or as a whole, by any means, be they mechanical or electronic,
without the express written permission of APEX N.V.
Important safety instructions
Important safety instructions
CAUTION: to reduce the risk of electric shock, do not
remove cover (or back). No user-serviceable parts
inside. Refer servicing to qualified service personnel.
The lightning flash with arrowhead symbol,
within equilateral triangle, is intended to
alert the user to the presence of uninsulated
“dangerous voltage” within the product’s enclosure that
may be of sufficient magnitude to constitute a risk of
electric shock to persons.
The exclamation point within an equilateral
triangle is intended to alert the user to
the presence of important operating and
maintenance (servicing) instructions in the literature
accompanying the appliance.
Instructions
Before installing or operating the equipment, read all
safety instructions, warnings and operating instructions.
Heed all warnings. Follow all instructions. Keep all
safety, installing and operating instructions for future
reference.
Installing and operating location
Do not use this apparatus near water. Do not expose
this apparatus to drips or splashes. Do not place
any objects filled with liquids, such as vases, on the
apparatus.
Do not install near any heat sources such as radiators,
heat registers, stoves, or other apparatus (including
amplifiers) that produce heat. No naked flames, such
as lighted candles, should be placed on the apparatus.
The apparatus should be located close enough to the
AC outlet so that you can easily grasp the power cord
plug at any time.
The mains plug, the appliance coupler or the mains
switch is used as the disconnect device. Either device
shall remain readily operable when the apparatus is
installed or used.
Power source and grounding
This product should be operated only from the power
source indicated on the apparatus or in the operating
instructions. If you are not sure of the type of power
supply to your home, consult your product dealer or
local power company.
Do not defeat the safety purpose of the polarised or
grounding-type plug. A polarised plug has two blades
with one wider than the other. A grounding type plug
has two blades and a third grounding prong. The wide
blade or the third prong is provided for your safety. If
the provided plug does not fit into your outlet, consult an
electrician for replacement of the obsolete outlet.
Connect Class I construction apparatus to an AC outlet
with a protective grounding connection.
Do not overload wall outlets, extension cords or integral
convenience receptacles, as this can result in a risk of
fire or electric shock.
Protect the power cord from being walked on or pinched,
particularly at plugs, convenience receptacles and the
point where they exit form the apparatus.
Do not install the apparatus in a confined space such as
a book case or similar unit. Do not block any ventilation
openings.
Unplug this apparatus during lightning storms or when
unused for long periods of time.
Ensure that foreign objects and liquids cannot get into
the equipment.
Batteries (battery pack or batteries installed) should not
be exposed to excessive heat such as sunshine, fire or
the like. Never dispose of batteries in a fire as they may
explode and cause injury.
Install in accordance with the manufacturer’s instructions.
Only use attachments/accessories specified by the
manufacturer.
Use only with the cart, stand, tripod, bracket or
table specified by the manufacturer, or sold with the
apparatus.
4
When a cart is used, use caution when
moving the cart/apparatus combination to
avoid injury from tip over.
CAUTION: Danger of explosion if battery is incorrectly
replaced. Replace only with the same or equivalent
type.
Cleaning, maintenance and servicing
Unplug the apparatus from the wall outlet before
cleaning. Do not use liquid cleaners or aerosol cleaners.
Use a damp cloth for cleaning.
Do not attempt to service this product yourself, as
opening or removing covers may expose you to
dangerous voltage or other hazards. Refer all servicing
to qualified service personal.
Customer participation is important to minimize the
potential affects on the environment and human health
that can result from hazardous substances that may be
contained in this product.
Please, dispose of this product and its
packaging in accordance with local and
national disposal regulations including those
governing the recovery and recycling of waste electrical
and electronic equipment. Contact your local waste
administration, waste collection company or dealer.
Servicing is required when the apparatus has been
damaged in any way, such as power-supply cord or plug
damaged, liquid has been spilled or objects have fallen
into the apparatus, the apparatus has been exposed to
rain or moisture, does not operate normally or has been
dropped.
Intended use
The equipment may only be used for the purpose
described in the operation instructions. Never carry out
any work on the equipment other than as specified in
the operating manual.
Never push objects of any kind into this product through
openings, as they may touch dangerous voltage points
or short-cut parts, which could result in a fire or electric
shock.
Children should never use the apparatus without close
adult supervision.
WARNING: excessive sound pressure levels can cause
hearing loss.
Environmental precaution
Electrical and electronic equipment may contain hazardous substances for humans and their environment.
The “crossed out wheelie bin” symbol present
on the device and represented above is there
to remind one of the obligation of selective
collection of waste. This label is applied to
various products to indicate that the product is not to
be thrown away as unsorted municipal waste. At the
end of life, dispose of this product by returning it to the
point of sale or to your local municipal collection point
for recycling of electric and electronic devices.
5
Table of contents
Table of contents
6
Registration
7
Introduction
Product highlights
Foreword
8
Before you get started
9
9
9
9
9
9
About this manual
Inspection and unpacking
Operating environment
Power requirements
Installation
8
8
Front and rear panel description
Front panel
Rear panel
10
Wiring the unit
12
Connecting the Hera when used as a stand-alone device
Connection when the Hera is used together with the Argos
Connecting relays tot the Hera
Connection with a PC
Connection with the Apex Leto
12
12
13
14
14
Principles of operation
15
Turning on
Standard operations
Threshold schedulling
Logic outputs
Additional functions when used with the Argos
Microphone distance compensation
15
15
17
17
18
18
Installer menu
19
Installer menu
Menu structure
Basic set-up
Operation set-up
Logging set-up
Preferences
To exit
19
19
21
22
23
24
24
Memory readout
25
Technical specifications
26
Limited warranty
27
10
11
Registration
Register your product
Please take the time to register your product on-line by typing the following URL in your browser:
http://productregistration.apex-audio.eu/
As well as registering the product on-line, please take the trouble to record the serial number of the unit in the
space provided on page 3 of the manual, and keep the manual in a safe place.
7
Introduction
Dear customer,
Thank you for buying the Apex Hera.
Hera is a microprocessor based sound level controller. Hera can be used either as a standalone unit or combined
with the Apex Argos. Applications include noise level control in bar, theatre, concert venue,… as well as compliance
with Directive 2003/10/EC “Noise at work”.
Product highlights
• Factory calibrated for accurate measurement
• All settings may be made from the front panel and are
pin-code protected
• Two separated logic outputs for controlling external
devices and mains power cut relays, all set/reset times
are adjustable
• Average and peak RMS sound level logging over an
user adjustable time frame
• System tamper detection and logging
• 14-days sound level log (when measurements are
logged at 15 minute intervals)
• Ability to schedule multiple threshold parameters
covering any time or day of the week
• Easy computer log read-out through standard serial
port
• Optional remote large level display
Hera also offers two logic outputs that may be used to control
external devices or mains cut-off if a certain threshold is being
exceeded. This threshold value may be scheduled to allow for
different sound levels at set times.
All settings are pin code protected and can easily be set from
the devices’ front panel.
Apex Hera is delivered with a measurement microphone and
this is factory calibrated for perfect accuracy.
Hera also offers an automatic calibration function for remote
microphone distance compensation. This is imperative in most
venues, since the measurement microphones should be placed
out of reach.
Optionally you can connect the Apex Leto large deported
display to the Hera so that the audience, band or DJ may have
visual sight on the sound pressure levels at any time.
The Hera may be used together with the Apex Argos. The
Argos will then be slaved onto the Hera’s measurement and
threshold.
Foreword
Hera offers sound level monitoring and logging of events. As a
standalone unit it can be used as a cut-off device, as is required
by some authorities. Combined with the Argos the combined
units will act as a sound level controller with measurement and
logging function.
Hera, will not only log the average and peak RMS sound level
pressure over a time period, but Hera will also detect and log
the attempts of system tampering (for example disconnection
of the microphone). The logs can be easily consulted by any
user directly from the front panel or retrieved on a computer
and printed out.
8
Use the Hera together with the Apex Argos, they will be
your neighbours dream team !
Before you get started
About this manual
Installation
Carefully read all instructions and warnings before operating
this appliance. Keep this manual in a safe place so that it can
be referred to when required.
If the unit is brought into a warm room from a cold environment,
internal condensation may occur. Ensure that the unit has been
allowed to reach ambient temperature before switching it on.
This manual describes Hera internal software version v2.2.
Although this unit is intended for installation in a standard
19-inch rack it can nevertheless be used freestanding. If the
unit is installed in a flight-case or in an equipment rack, fix
the unit with all four screws through the front panel holes. For
normal use no extra support is needed, but in more extreme
conditions, such as on the road, we recommend the unit is
supported at the rear.
Latest manual revision can be downloaded from:
http://www.apex-audio.be/manufacturing/support/downloads/
Inspection and unpacking
Box content:
•
Hera unit
•
factory calibrated microphone
•
IEC AC power cable with mains plug
•
multi-conductor D-sub 15 data cable
for use with Argos
•
Terminal block 4-way for logic outputs
•
Allow at least 10 cm (4 inches) at each side of the unit for sufficient ventilation.
this manual
Operating environment
This appliance is designed to operate in most normal climates,
at a temperature between 0 °C and 50 °C (32 - 122 °F), with
relative humidity between 10% and 60%.
Power requirements
BEFORE you connect any unit to the mains, please make sure
that the voltage of your local AC supply is within the acceptable
range of the unit.
The Hera is designed to work from an AC supply between
90V and 240 V, at a frequency between 50 and 60 Hz. No AC
voltage selector is provided as the device automatically adjusts
to the incoming AC voltage.
Precautions should be taken so that the appliance is properly
grounded at all times. This unit must be earthed.
9
Front and rear panel description
Front panel
8
1
Front panel
10
1
LED display
RMS, LEQ, MAX,… sound level display
2
LCD display
This display is used in conjunction with the rotary encoder
and the pushbuttons. It shows settings, adjustments and
provides a readout of control-data.
3
Rotary Encoder
Used to change settings and to navigate through menus
and lists.
4
dB Mode/enter push button
5
Clock/undo push button
6
Measure/next push button
7
Errors/exit push button
8
Error red LED indicates any system tampering or failure.
Consult the error log to know the origin of the error.
9
Link green LED indicates a proper connection with the
Apex Argos.
10
Warning yellow LED indicates the warning relay output is
activated.
11
Alarm red LED indicates the alarm relay output is activated.
2
3
4
10
9
11
5
7
6
Rear panel
1
2
3
4
5
6
7
Rear panel
1
AC connector and fuse
2
Relays output
WARNING: under no circumstances should mains AC
voltage be plugged into these outputs.
The connections are (seen from left to right): ground, power
cut relay, warning relay, + 12 Vdc.
For an example of how to connect the relay outputs, see
“Wiring the unit” in the next pages.
3
To Argos
This connector must ONLY be used for connection with the
Apex Argos.
4
Serial port
Enables connection with an external computer in order to
read the Hera’s memory.
5
To remote display
This connector allows on or more Leto deported display to
be connected. Leto will mimic the information shown on the
front-panel LED display (1).
6
To Argos Mic input
This connector must ONLY used for connection with the
Argos.
7
Microphone input
Connect here the microphone SUPPLIED WITH THE Hera.
11
Wiring the unit
CONNECTING THE HERA WHEN USED AS A STAND-ALONE DEVICE
Connect the microphone supplied with the Hera to the microphone input located on the rear panel (see rear panel drawing).
In the installer menu, the operation mode must be set in ‘standalone’. Refer to the section “installer menu” for details.
CONNECTION WHEN THE HERA IS USED TOGETHER WITH THE ARGOS
Connecting the Hera to the Argos
Connect the microphone supplied with the Hera to the
microphone input socket located on the rear panel of the
Hera. Connect an XLR cable from the connector marked ‘To
Argos MIC INPUT’ on the Hera to the microphone input on
the Argos. Connect the data cable to the ‘TO Argos’ socket
on the Hera to the connector marked ‘TO Hera’ on the Argos.
The data cable is type DB15 male to DB15 female cable pin
to pin in direct numbering sequence (1 to 1, 2 to 2, and so on
up to 15). The XLR cable should be connected in the same
manner. Be very careful NOT TO CONNECT the earth to
the chassis and definitely be especially careful not to make
any solder links between pin 1 and the metal chassis of the
socket.
The wiring protocol is 1 = GROUND, 2 = HOT, 3 = COLD.
12
CAUTION: Because of wide tolerances in microphone
manufacture and the need to obtain an exact sound
pressure level reading, the microphone delivered with the
Hera and the Hera itself are a complementary pair, i.e. they
are calibrated together at the factory.
ALWAYS USE THE MICROPHONE SUPPLIED WITH THE
HERA !
The Hera must be set in ‘Argos attached’ operation mode.
Refer to the section “installer menu” for details.
The Argos must be set up as follows:
• ‘Source’ switch in ‘micro’ position;
• the setting of the THRESHOLD potentiometer is not important because the threshold is fully controlled by the Hera;
• ‘Speed’ switch on ‘slow’;
• ‘Noise’ switch on ‘OFF’.
• For the ‘Hold’ switch, choose the setting most appropriate
for your application (see the Argos manual for more
information).
Relays can be connected using the connector labelled ‘RELAY
OUTPUTS’. Only use 12V DC relays. No external power
supply is required, so do not connect any form of power to the
Hera’s relay outputs.
The different signals available at the connector are :
Pin 1 Pin 2
Pin 3
Pin 4
Ground POWER CUT relay WARNING relay +12 V dc
This numbering is arranged looking at the rear panel, from left
to right.
CONNECTING RELAYS TO THE HERA
Hera has two open-collector logic outputs. The first is for
signalling (warning output) that the sound level threshold
has been exceeded and the second usually to shuts off the
electrical power (alarm/cut-off output) if the sound level has not
been reduced after the warning.
As these outputs are open-collector outputs, they can be used
to provide control over two external relays or also be used to
drive logic systems such as Programmable Logic Controller
(PLC) in industrial environments.
Connecting relays to the Hera
13
WARNINGS:
1. Hera relay outputs are current limited to 60mA. Some
electromechanical relays or contactors may require larger
pull-in current to be activated. In such situation, a smaller
relay, requiring less pull-in current shall be wired between
the Hera and the contactor. We recommend the use of
solid-state relays which require very small pull-in and
holding currents.
2. Under no circumstances should mains AC voltage be
plugged into these outputs !
CONNECTION WITH A PC
Connection to a PC allows data stored in the Hera’s memory to
be recovered. The connection is made using a RS-232 serial
port on the PC.
Depending on the hardware revision of your Hera, you will be
able to use a standard straight serial cable or you will need to
make one by yourself.
Hera’s manufactured from March 2008 have a female 9-pin
D-Sub connector for serial connection. With those Hera,
you can use a standard pin-to-pin serial male / female
cable.
Older devices have a male 9-pin D-Sub connector and
require a costume made cable. It requires a 3 conductor
cable with a female 9-pin D-Sub connector on both end, wired
as follow:
Hera side PC side
Sub-D 9 female
Sub-D 9 female
pin 1
ground pin 5
pin 3 data pin 3
pin 4 data pin 2
COMMENTS:
1.This cable is specially for the Apex Hera and therefore
cannot be found in any computer shop.
2.This cable is not reversible. One side is for the Hera and
the other for the PC. Connect the Hera side into the Hera
serial port (see rear panel diagram) and the PC side into
an unused RS-232 port on the PC.
14
Most of today’s PC and laptop don’t have a serial port.
Nevertheless inexpensive USB to RS-232 converters are
available in any computer shop.
It is also possible to interconnect the Hera with a PC using
Ethernet network. A whitepaper detailing this topic is available
on the Apex website.
CONNECTION WITH THE APEX LETO
The Leto large display provides a copy of the LED sound level
display of the Hera for use at a remote location.
The optional Leto display is connected to Hera using a supplied
RJ-12 cable. This cable length is limited to just a few meters (see
the Leto user manual for more information).If longer distances
between Leto and Hera are required, then the optional Leto
Extender kit can be purchased.
Using the Extender kit enables cable lengths up to 200 m to
be used. The kit consists of one transmitter and one receiver
unit and standard RJ-45 FTP network cable should be used to
connect the two together (cable not supplied). Be aware that
this signal does not conform in any way to Ethernet standards !
A maximum of two Leto displays may be slaved to the Hera by
daisy-chaining two receiver units together.
Connecting Leto and Extenders
Principles of operation
The 4 LEDs located just above the push buttons have the
following functions:
TURNING ON
Hera does not have an on/off switch. It lights up when the AC
power is connected. At boot-up, the LCD screen will briefly
display the unit’s firmware version. Contact an Apex-approved
dealer for any software updates which may become available.
STANDARD OPERATIONS
The LED indicator on the left side of the front panel displays
the sound pressure level in dBspl. This can be pre-selected to
show present, average or maximum value as follow.
RMS:
LEQf (fast):
LEQn (normal):
LEQu (user):
MAX:
present level
average value over 10 seconds
average value over 1 minute
average value installer adjustable period
the peak value
The LED display mode is changed by pressing the ‘dB mode’
button. The selection is shown on the LCD dis¬play when in
‘clock’ mode.
• Red LED error: lights in the event of any fault.
This could, for example, come from the seal of the
Argos. If this happens, the message will be stored
in the list of errors (cf. ‘error’ mode). The LED will
go out a few seconds after the problem disappears.
• Green LED link: when the Hera is properly
connected to an Argos, this LED shows that the
connection is good. It should be lit up at all times
when the Argos is in use.
• Yellow LED warning: lights when the ‘alert’ relay
is triggered. This LED only functions when the Hera
is used in stand-alone mode.
• Red LED alarm: lights when the ‘cut’ relay is
triggered. This LED only functions when the Hera is
used in stand-alone mode.
LCD IN CLOCK MODE
This is the normal operation mode. In this case, the
displays will look something like this :
In case the Leto deported display is used, it will mimic the LED
display.
COMMENT: if the sound pressure level falls below the
minimum measurable (55 dB) then the display will show
4 horizontal bars ‘- - - -‘.
The LCD screen in the middle of the front panel has three
different display modes:
• ‘clock’ mode
• ‘measure’ mode
• ‘error’ mode
These three modes are selected by pressing one of the three
switches labelled ‘clock’ ‘measure’ and ‘error.’ See below for
details about each mode.
In the left upper corner you find the actual time displayed
in the following format: HH:MM:SS. In the right upper
corner, the date will be displayed in the following format:
DD/MM. The second line indicates the LED display
MODE (RMS, LEQf, MAX, …), followed by the actual
threshold indicated in dBspl. Above this threshold level,
the Argos will begin to reduce the signal. In case the logic
outputs are enabled and if the equivalent continuous
sound level (LEQ) over adjustable period of time exceeds
the threshold, the logic outputs will be triggered. The
threshold can be adjusted from the installer menu.
In this mode the Data Encoder knob allows the LCD
back-lighting to be adjusted.
Messages on this display can be in English, French, Dutch or
German. Language selection is made from the installer menu.
15
LCD IN MEASUREMENT LIST MODE
LCD IN ERROR LIST MODE
Hera stores a record of the equivalent continuous level
(LEQ) and maximum sound pressure level over a user
adjustable period of time into its memory. The memory can
contains up to 1440 items. When the memory is filled, the
newest measurement will replace the oldest. The time interval
between each item of this list is adjustable in the installer
menu. Interval can be from 1 minute to 8 hours. By default,
the interval between each record is of 15 minutes, giving a total
memory of 15 days.
Hera can also detect if anyone has disconnected any cables
from it, or even if anyone has opened the lid which prevents
access to the Argos adjustment. Should any of these events
take place it is automatically stored in the list of errors and
events. This list, as the record of sound pressure levels, can be
inspected at any time by the user and can even be transferred
to a computer. It is thus extremely easy to see if anyone has
tried to cheat !
When the LCD display is in ‘measurement list mode’, you
can inspect all records stored in the memory. Turn the ‘Data
Encoder’ knob to view the different measurements.
Turning the rotary encoder allows the operator to scroll through
any errors and events taking place in the system, showing the
date and time at which they occurred.
If the system generates an error, the ‘error ‘ LED (see the front
panel) illuminates. This error is instantly recorded in the error
list. The LED extinguishes when the problem disappears.
The list of messages, and their meaning, can be found here:
16
Message
Meaning
Log Started
Commencement of recording of errors and events.
Power Switch ON
Hera started up.
Power Switch OFF
Hera shut down.
Micro Disconnect
Microphone disconnected from Hera.
Micro Connected
Microphone connected to Hera.
Argos SealRemove
The lid giving access to the Argos calibration facilities has been opened.
Argos Seal OK
The lid giving access to the Argos calibration is in its proper place.
Argos Disconnect
Data cable between the Argos and the Hera disconnected.
Argos Connected
The Argos is connected to the Hera.
Argos Mic. Discon
The XLR cable between the Argos and the Hera has been disconnected.
Argos Mic. Conn.
The XLR cable is connected.
Clip Detection
Argos VCA (level reducing device) overloaded.
Installer setting
The Hera adjustment has been modified by the installer.
Warning Relay ON
The ‘Alert’ output relay has been activated.
Alarm Relay ON
The ‘Cut’ output relay has been activated.
Warn. Relay OFF
The ‘Warning’ relay output have been deactivated.
Alarm Relay OFF
The ‘Alarm’ relay output have been deactivated.
Warn. Relay Disc
The ‘Warning’ relay has been disconnected.
Alarm Relay Disc
The ‘Alarm’ relay has been disconnected.
In Stand alone
Hera has been configured to work in stand-alone mode, but will detect if an Argos has been connected.
Transmis. Start
Data transmission to the PC has begun.
Transmis. End
Data transmission to the PC has been completed.
THRESHOLD SCHEDULLING
The threshold can be constant or be scheduled over 4 periods
per week days. Threshold scheduling allows for automatic
adjustment of the sound level over the time. For example, it
is possible to automatically set a different threshold during the
working hours, the evening and nights. Or even during week’s
nights and weekend’s nights.
Threshold setup is done through the installer menu.
LOGIC OUTPUTS
The first logic output, called warning output, is usually used for
signalling that the sound level threshold has been exceeded
and the second, called alarm or cut-off output, usually to shuts
off the electrical power if the sound level has not been reduced
after the warning.
NOTE: the logic outputs must be enabled from the
installer menu.
Logic outputs are triggered if the equivalent continuous sound
level (LEQ) over a user adjustable period of time exceeds the
threshold. In the installer menu, installers have the ability to
setup three time periods as follow:
• Warning time period: if the LEQ value over this
period exceeds the actual threshold, the first logic
output is triggered.
• Cut-off time period: if despite the warning the LEQ
value over this period exceeds the actual threshold, the
second logic output is triggered.
• Recover-after time period: if the LEQ value over
this period is under the actual threshold, both warning
and cut-off outputs are resettled. The recovering time
can also be set in ‘manual’ so that only an operator
knowing the installer menu’s pin code can reset the
logic outputs.
NOTE: If the microphone is disconnected the warning
relay will operate. If the microphone is not reconnected
within 10 seconds the alarm relay will activate.
The graph bellow illustrates the principle of operations of the
logic outputs. In this example, the threshold has been set to
110 dB, the warning time period to 30 seconds and the cut-off
time period to 1 minute.
At the second 70, the music has exceeded the threshold and
the warning time period has start counting. The LEQ has been
computed over the following 30 seconds but the result was
below the threshold. So nothing happened.
17
At the second 126, the DJ exceeds the threshold once again,
so the averaging before the warning has started. 30 seconds
later, the Warning lamp has been switched on because the
LEQ value was over the threshold. At that time, the cut-off time
period starts counting.
The DJ has seen the warning and has directly reduced the level,
but unfortunately a few seconds later, he pushed the volume up
again. As the result that 1 minute after, the LEQ value was
still higher than the threshold and the cut-off relay has been
activated, cutting-out the electricity on the power amplifier.
ADDITIONAL FUNCTIONS WHEN USED WITH THE ARGOS
When connected to the Argos limiter, the Hera measures the
microphone signal and sends the appropriate commands to
the Argos, which can then reduce the sound pressure level if
necessary.
The Hera can also control the pink noise generator in the
Argos. Pink noise is used as a reference for calibrating the
Hera should it be necessary to take into account differences
in sound pressure level between the actual position of the
microphone and the position at which the authorities measure.
MICROPHONE DISTANCE COMPENSATION
The measurement microphone is often located where it cannot
be interfered with. Consequently there is a good chance that
the sound pressure level at the microphone will be different
from that on the dance floor, which is where the authorities take
their level measurements. To get round this problem the Hera
can calculate the difference and factor it into its measurements.
The calibration procedure is fully described in the “installer
menu” section.
18
Installer menu
INSTALLER MENU
The installer menu allows the Hera to be set up and adjusted
for optimum performance. To access the installer menu simply
press and then release the ‘enter’ and ‘next’ buttons on the front
panel at the same time. The Hera then asks you to enter your
secret code (PIN number). The default code is 1234.
You can change the number under the cursor using the rotary
encoder. To go to the next number, press ‘enter’. To go back
to the preceding number, press ‘undo’. When the four numbers
have been entered press ‘enter’ again to go into the menu.
NOTE: We strongly recommend that you change the PIN
number immediately to a code number of your choice
(option 11 in the menu). Do not write this code down and
do not leave it where the end user can find it !
MENU STRUCTURE
The following diagram shows the complete menu structure.
To move down the page, use the rotary encoder.
To move across the page, press ‘enter’ to go to the right and
‘undo’ to go to the left.
The following chapters describe each of the menu options in
detail.
19
HERA installer menu overview
20
BASIC SET-UP
OPTION 1: Choice of language
This option allows you to choose the language in which
messages will be displayed. All types of messages are
affected, including both error/event list and measurement list.
The available languages are English, Dutch, German and
French.
Positional compensation allows level differences between the
actual position of the microphone and the place where sound
pressure level is tested (by the authorities) to be taken into
account.
OPTION 4.1: Viewing compensation setting
This option simply shows the actual compensation in decibel
on the LED display.
Press ‘enter’, select the desired language using the rotary
encoder and then push ‘enter’ again to store your choice.
OPTION 4.2: Erasing the compensation setting
OPTION 2: Choice of operational mode
This option allows you to choose between operating the Hera
as a stand-alone device or in connection with the Apex Argos
limiter. This option is vital for the proper functioning of
the Hera. If this option is not set up correctly, the Hera will
definitely generate error messages.
Press ‘enter’, turn the encoder to select either ‘Hera only’ or
‘with Argos’ and press ‘enter’ again to confirm your selection.
OPTION 3: Frequency weighting filter
With this option, you can choose which frequency weighting
filter is applied to the measurement. Choices are A-filter or
C-filter. The default is A-filter as it is the most commonly used
filter curve.
IMPORTANT NOTICE: If the Hera is used together with
an Argos, you need to change the weighting filter of the
Argos as well. This can be done by changing the position
of a jumper inside the Argos. Argos is by default always
set on A-filter. Please refer to the Argos user manual for
detailed information.
This option is used to erase the compensation setting and
to return to direct measurement of sound at the microphone
position. Press ‘enter’ to confirm and ‘undo’ to cancel.
OPTION 4.3: Measuring the difference
The calibration of positional compensation requires a pinknoise or sinus generator. In case Hera is used together with
Argos, no external generator is required. Indeed, the Apex
Argos has a built-in pink-noise generator. The Argos’ generator
will be remotely controlled by the Hera.
If you use a tone generator, we recommend you to use a sinus
of a 1 kHz frequency.
COMMENT: Hera and its microphone are calibrated
together at the factory and are a pair. If you install a Hera
and an Argos together, ONLY USE THE MICROPHONE
SUPPLIED WITH THE HERA.
OPTION 4: Microphone position compensation
The measuring microphone is normally installed somewhere
where it cannot easily be reached, to prevent it from being
covered. However there is likely to be a difference in sound
pressure level between the microphone point and – for
example - the dance floor. This procedure allows you to
calculate this difference so that the Hera can compensate for it
in its measurements.
21
To calibrate the Hera proceed as follows:
• Turn the amplifiers down to their lowest setting.
• Press ‘enter’. Hera will ask you to place the measuring
microphone at the point where the sound is normally
tested (Microphone level at ear), for example in the
middle of the dance floor or wherever the authorities
normally make their level tests.
• Press ‘enter’. If Hera is used together with Argos, it will
now supply a pink- noise. If not, the Hera will ask you
to supply one. Press ‘enter’ again when you are ready.
• Slowly raise the amplifier gain to give a level of around
80dB. When the level is stable press ‘enter’.
• Do not touch the amplifier gain until calibration
procedure is over !
• If no Argos is connected. Turn the pink-noise off and
press ‘enter’.
• Hera then asks you to place the microphone where it will
be normally used (definitive microphone placement), for
example on the ceiling. When ready press ‘enter’.
• The Argos will once again generate pink-noise.Or
you will be asked to turn on your external pink-noise
generator. Press ‘enter’ when you are ready.
This option is used to manually enter the compensation. The
actual compensation in decibel is shown on the LED display.
Turn the rotary encoder to adjust it. Press ‘enter’ to confirm
and ‘undo’ to cancel.
Adjustment range goes from -20 to +20 dB per tenth of dB step.
OPERATION SET-UP
OPTION 5: Adjust threshold
OPTION 5.1: Selecting threshold mode
The limit threshold can be either constant or can vary following
a weekly list.
You can choose between ‘Always xxx dB’ or ‘follow list’. Select
by turning the encoder and then pressing ‘enter’.
OPTION 5.2: Threshold by default
This option enables you to set the threshold when you have
chosen the option ‘Always xxx dB’. Select by turning the
encoder to the desired value and then press ‘enter’.
Adjustment range is from 70 to 110 dB.
• Hera will display the level measured, which is likely to
be different from the level on the dance floor. When the
level has stabilised press ‘enter’.
OPTION 5.3: Editing the weekly list
• If no Argos is connected. Turn the pink-noise off and
press ‘enter’.
The weekly list allows the 7-day week to be sliced into 4 daily
time periods, making a total of 28. The threshold can be
different for each of these periods. The beginning of one period
marks the end of another.
• The Hera will display the level difference between the
two positions and will ask you to accept by pressing
‘enter’ or to reject by pressing ‘undo’
COMMENTS: pressing the ‘undo’ switch allows you to
return at any time to the previous setting or to cancel the
operation.
If you use Hera together with Argos and you don’t hear
any noise, please make sure to set the correct operation
mode in option 2.
If you use an external tone or pink-noise generator, be
sure to not modify its output level during the calibration
procedure.
22
OPTION 4.4: Manual compensation setting
Press ‘enter’ and the Hera will display the following message:
This shows the first period, which begins Monday at 3 a.m. and
ends at 8 a.m. Using the rotary encoder you can adjust the
threshold for this period. This will be shown on the LED display
at the left of the Hera front panel.
Only the time shown on the first line can be changed on this
screen. It can be changed using the ‘next’ and ‘exit’ buttons,
‘exit’ to increase the time in hourly intervals and ‘next’ to
decrease it by the same amount. The end time, shown on the
second line, indicates the start time of the next period. The one
period’s end time cannot overlap the next period’s start time.
To go to the next time period, press ‘enter’, change the start
time using the ‘next’ and ‘exit’ buttons and change the threshold
using the rotary encoder.
To go back to the preceding period press ‘undo’.
When the start times for all periods have been set, Hera
requires a few moments to store the new list.
OPTION 6: Warning and cut logic outputs
Relay outputs are triggered on time-averaged sound level
value. Time-averaged sound level is also called equivalent
continuous sound level (Leq). It is nothing more than an
averaging of each RMS sample values measured over a
certain period of time (each sample being taken every 125 mS).
This Leq value is then compared with the actual threshold and
relays are switched on or off as explained bellow.
OPTION 6.1: Enable or disable the logic outputs
This option allows you to enable or to disable the relay outputs.
OPTION 6.2: Reconnecting the AC mains supply
This option resets both relays and thus re-establishes the AC
electric supply and switches off the warning lamp.
This is the only way to reconnect the AC supply if option 6.5 has
been set to ‘Manual’.
OPTION 6.3: Warning time-averaged period
This function allows you to set up the time-averaged period
before the ‘alert relay’ signalisation is set. As soon as the
actual threshold is exceeded once, this period starts counting
and the average sound level is computed. If this average is
then higher than the threshold, the ‘alert relay’ will be switched
on and the ‘cut’ time-averaging begins. If the average is below
the threshold, nothing happens.
Adjustment range is from 10 sec to 60 sec by 10 sec steps.
OPTION 6.5: Recover after period
This option is used to configure the averaging period before the
AC supply can be recovered. If the equivalent sound level over
this period is below the threshold, both ‘alert’ and ‘cut’ relay will
be resettled. If not, this period starts running again.
By choosing the ‘Manual’ option you can opt for manual reset.
In this case the PIN number must be known to enable access
to the installer menu. Option 6.2 should then be used to bring
the AC supply back on line.
Adjustment range is from 1 min to 60 min or manual recover.
LOGGING SET-UP
OPTION 7: Client’s name
This function allows you to store the client’s name in the Hera’s
memory.
Press ‘enter’, turn the encoder to select a character and press
‘enter’ again to go to the next character.
The name must be 16 characters long; all character positions
must be filled, either using a letter, number or a space.
OPTION 8: Measurement log time
As explained in the user manual, Hera logs the equivalent level
(Leq) and peak level over regular time interval. It is also the
time interval between each updating of the level indicated on
the Hera’s LED display if the LEQu display mode has been
chosen by the user.
This option allows this time interval to be adjusted. By default,
the value is 15 minutes. Adjustment range is from 1 min to 59
min by 1 min steps and from 1 hour to 8 hours by 1 hour steps.
Hera’s memory is large enough to store up 1440 log items. If
the values are stored every 15 minutes, the memory will allow
a roll-back of the 15 last days. When the memory is full, the
oldest record is replaced by the newest one. That’s what we
call a ring memory.
OPTION 6.4: Cut-off time-averaged period
Enables adjustment of the averaging period before the ‘cut
relay’ operates. If the average sound level over this period is
higher than the threshold, the ‘cut relay’ is activated and the AC
supply is cut off. If it is lower than the threshold, both ‘alert’ and
‘cut’ relays are deactivated.
OPTION 9: Erase logging lists
Enables the error and events list, as well as the measurement
list, to be erased. Hera will then ask you to confirm by pressing
‘enter’ again, or ‘undo’ to cancel.
Adjustment range is from 1 min to 20 min by 1 min steps.
23
PREFERENCES
OPTION 10: Argos serial number
If the Argos is connected to the Hera then its serial number
MUST be entered here. This enables the Hera and the Argos
to work together correctly.
OPTION 11: Pin number
Enables the secret code which gives access to the installer
menu to be changed. WE ADVISE YOU TO CHANGE IT
IMMEDIATELY ! Do NOT give the end user the PIN code.
OPTION 12: Date and Time
OPTION 12.1: Changing the time
Press ‘enter’. The Hera will display the time in the format
HH:MM:SS. This can be adjusted using the rotary encoder
and the ‘enter’ switch, which enables you to go from Hours to
Minutes and then Minutes to Seconds. To store, press ‘enter’.
OPTION 12.2: Changing the date
Press ‘enter’. The Hera will display the date in the format DD/
MM/YYYY. This can be adjusted using the rotary encoder and
the ‘enter’ switch, which enables you to go from Day to Month
and then Month to Year. To store, press ‘enter’.
OPTION 12.3: Day of the week
Press ‘enter’, turn the rotary encoder to select the weekday and
then confirm by pressing ‘enter’ or cancel by pressing ‘undo’.
OPTION 13: Adjusting the LCD display
OPTION 13.1: Adjusting the contrast
Allows the contrast on the LCD screen to be adjusted. Press
‘enter’, turn the rotary encoder to select the required value and
then store by pressing ‘enter’.
OPTION 13.2: adjusting the back lighting
Allows adjustment of the back-lighting for the LCD screen.
Press ‘enter’, turn the rotary encoder to select the required
value and then store by pressing ‘enter’.
24
TO EXIT
To exit the menu at any time, press ‘exit’.
NOTE: We strongly advise you not to cut off
the AC supply when in the installer menu.
When the installer menu is entered the Hera
stops writing into the error and measurement
lists until such time as you exit the menu. This
explains the appearance of the message ‘List
error OFF’ in the error list. When the AC supply
is restored the list will not be re-activated and
data will not be written into it !
If this happens for any reason, go back to the
installer menu when the AC power is restored
and use the ‘exit’ button to go back to normal
operating mode.
Memory Readout
MEMORY READOUT
A Hera read-out PC software is available free of charge.
It allows for data stored in the Hera’s memory to be recovered
and eventually imported into any document. It is possible to
retrieve the LEQ and MAX measurements list, the events list
and other information such as firmware version. These data
can be saved to a file or directly be copied and pasted into a
spreadsheet or a database.
Connection with a PC can be made using a serial port or USB
and even network using the appropriate adapter. Check the
section Connection with a PC earlier in this manual for details.
The latest version of the Hera read-out PC application can
be downloaded from the Apex website. This software doesn’t
require any installation.
25
Technical specifications
Electrical specifications
Mains requirements
Voltage
Power consumption
Auto-detect 90-240 V - 50/60 Hz
40 VA
Relay outputs
Connections
Impedance
Maximum current
ground, output 1, output 2, +12 V
open collector
60mA maximum for each output
Measurements
Range
A-Filter accuracy
55 dBA - 120 dBA
27 Hz - 20 kHz + 1.2dB
Mechanical specifications
Weight
Dimensions
Unit
Width
Height
Depth
482 mm (19-inch)
44 mm (1U)
225 mm
Unit (Nett)
Unit + Package (Shipping)
2,9 kg
4,5 kg
In the interest of product development, Apex reserve the right to modify or improve specifications of this product at any time,
without prior notice and without any obligation to change or update equipment already delivered.
26
Limited warranty
Limited warranty
Apex N.V. (“Apex”) warrants you, the original purchaser, or any party that purchases the device from you,
that its products are free from defects in material and workmanship under normal use for a period of two
(2) years from the date of original purchase. The date of purchase is the date which appears on the first
invoice or any other proof of purchase provided by an Apex approved dealer.
Subject to the conditions and limitations set forth below, Apex will, at its discretion, either repair or replace
any part of its products that prove to be defective, provided that the product is returned with proof of
purchase, shipping prepaid, to an authorised Apex approved service facility.
Warranty cover of any repairs will only extend to the end of the original warranty period.
We will be happy to provide you with a list of authorised dealers to whom you can return the defective unit
or who will give you a returns note to enable you to send the unit to the factory.
Service turn-around time will be as fast as reasonably possible. If you are not satisfied with the repair,
contact Apex.
Exclusions and limitations
This limited warranty covers only repair or replacement for defective products manufactured by Apex.
Apex is not liable for, and does not cover under warranty, any loss of data or any costs associated with
determining the source of system problems or removing, servicing or installing Apex products. This
warranty excludes 3rd party software, connected equipment or stored data. Apex does not warrant
that the operation of the product will be uninterrupted or error-free. In the event of a claim, Apex’s sole
obligation shall be replacement of the hardware.
This limited warranty does not cover:
(1) any damage to this product that results from improper installation, accident, abuse,
misuse, natural disaster, insufficient or excessive electrical supply, abnormal mechanical or
environmental conditions or other external causes;
(2) any damage caused by operating the product outside the permitted or intended uses described
by Apex;
(3) any damage caused by any unauthorized disassembly, repair, or modification;
(4) consumable parts, such as batteries;
(5) any cosmetic damage.
Apex is not liable for consequential damages.
This limited warranty also does not apply to any product on which the original identification information
(including serial number) has been altered, obliterated or removed or any product that has not been
handled or packaged correctly.
Warranty services will be furnished only if the product is accompanied by a copy of the original retail
dealer’s invoice.
Warranty claims other than those indicated above are expressly excluded.
27
www.apex-audio.eu
[email protected]
Copyright
© 2000-2011 APEX N.V.
All rights reserved. This manual may not be reproduced or transmitted, either in part or as a whole, by any
means, be they mechanical or electronic, without the express written permission of APEX N.V.
Please recycle