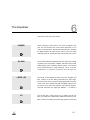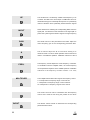
1
APEX PE Series
Paragraphic Equalisers
PE 133 MKII
USER MANUAL
APEX nv
Schoebroekstraat, 62
3583 Beringen - Belgium
Tel. +32 89 28 61 91
Contents
Section 1 : Contents
3
Section 2 : Introduction
5
2.1 The PE MKII series
5
Section 3 : Performance Highlights
9
Section 4 : Installation
11
4.1 Unpakking the unit
11
4.2 Checking the mains voltage
12
4.3 Setting the mains voltage
12
4.4 Replacing the mains fuse
5.5 The rear pannel
12
13
5.6 Rack mounting
15
Section 5 : Signal connections
1
17
5.1 Input
17
5.2 Output
18
5.3 Grounding
19
Section 6 : The Equaliser
21
Section 7 : General operating instructions
25
7.1 Introduction
25
7.2 Level control, O/load and power
25
7.3 HP and LP filters
7.4 Parametric
26
26
7.5 Graphic equaliser
28
7.6 Specific applications
29
Section 8 : Specifications
31
Section 9 : Maintenance and service information
33
Section 10 : Warranty
35
3
2
Introduction
The PE MKII serie
The APEX PE MKII series combines a graphic equaliser section
with a parametric filter section. Wide-range Butterworth low and/or
high pass filters precede the equalisers for added versatility and
shaping of the response curve near the edges.
The heart of each graphic equaliser section is a bank of 30
bandpass filters at distinct ISO centre frequencies or one filter for
each 1/3 octave frequency.
Perfectly flat amplitude and phase response is obtained by using
our DLT thick film hybrid circuits which surpasses the results and
quality of discrete components.
DLT stands for Dynamic Laser Trimming: at the factory, each filter
of the graphic equaliser is adjusted for optimum 1/3 octave filter
centre frequency and bandwidth by means of a special developed
trimming algorithm. Adjusting the centre frequency and the
Incorporating all filter components on the hybrid circuits has the
advantage that the number of soldered connections is largely
reduced, boosting the reliability to an extent only exceeded by
5
The controls of the graphic equaliser provides up to 12 dB of
reciprocal cut and boost at the distinct ISO centre frequencies. The
filters of the PE series preserve optimal filter bandwidth whatever
the settings of the controls are.
Because of this `constant Q’ circuitry, filter response does not
broaden at low cut or boost settings. In this way filter interaction is
minimised and the `graphic’ qualities of the equaliser preserved.
The individual filters of the graphic equaliser combine smoothly
together and result in a continuous response curve, free from
The strength of the parametric filters is the possibility to control Q,
frequency and bandwidth. A -45 to 15dB of non-reciprocal constant
Q is achieved by adding (boosting) or subtracting (cutting) the
output of a variable-state bandpass filter from the filter’s input. This
technique results in a broader boost than cut curves and makes it
possible to create very narrow notches, almost inaudible and
therefore without the sound-colouration often found with reciprocal
filters. One of the possible applications of those notch filters is
6
All filter and equaliser functions of the PE133MKII are switchable
IN and OUT of the signal paths. The complete unit can be
bypassed by switching it off. The fail safe relays will react as if
there were a mains failure and will link the input of each channel to
its corresponding output.
The PE133MKII has electronically balanced inputs and balanced,
floating output stages. Each output circuit actually simulate a
transformer with a 10KOhm impedance to ground for each leg.
Both the input and output circuits are factory adjusted for optimum
balance at low and high frequencies. This results in increased
interference immunity of the unit.
The overall gain of each channel of the PE133MKII is variable
from
-• to +6 dB with the front panel level control. All potential
overload points of each channel are continuously monitored by an
extremely fast “peak” overload detector, followed by a “peakstretching” circuit for clear indication of overload conditions. The
detector thresholds are chosen for approximately 2 dB headroom
when the overload led illuminates, giving the user the ability to
7
Performance Highlights
3
PE133MKII
• 30 band constant Q precision DLT graphic equaliser.
• 3 band constant Q parametric equaliser/notch filter.
• Variable LP and HP filters.
• Graphic equaliser in-out switchable.
• Switchable scale 6/12 dB on graphic equalisers.
• 6 dB of gain available.
• Extremely low distortion and noise.
• True differential input circuitry.
• Effective HF interference cancelation on in- and outputs through
perfectly HF balanced stages.
• XLR in- and outputs.
• Accurate “peak-stretching” overload indicators.
• Fail safe bypass.
• Earth-lift switch.
• Power transformer with low flux windings and magnetic
screening, reducing magnetic stray field to other units.
• Wide mains-voltage range.
• Professional parts and construction
9
4
Installation
In addition to these operating instructions and the PE MKII
equaliser, the packaging also contains :
• A power cord (see note for U.K.).
• A set of spare fuses.
NOTE
This apparatus must be earthed.
The wires of the mains lead are coloured in accordance with the
following code :
Green and yellow : Earth
Blue : Neutral
Brown : Live
As the colours of the wires in the mains lead may not
correspond with the coloured marking in your plug proceed as
follows ;
Unpacking the unit
The equaliser comes in a cardboard safety box, specially
designed for protection of the unit against damage during
transport. Save all the packing materials for future use if you
ever need to ship the unit again.
Please inspect the unit carefully for any signs of damage
occurred during transport. Your PE133MKII has undergone
stringent quality control inspection and tests at the factory. It left in
perfect condition. If damage is found, notify the transport
company immediately.
Only you, the consignee, may institute a claim against the carrier
for damage during shipment. Make sure to retain the damaged
11
Checking
the mains voltage
Setting
the mains voltage
Replacing
the mains fuse
• Check if the voltage selector on the rear of the equaliser
indicates the correct supply voltage before connecting the
recorder to the mains.
• Remove the plug from the wall socket and check if the mains
fuse is of the correct rating.
• Withdraw the fuse holder from the equaliser by turning the
locking screw a half revolution counter clockwise and pull out
the fuse holder of the socket
• Remove the old fuse and replace with fuse of the correct rating
• T630 mA (slow blow fuse) Littlefuse 213.630 for 100/120 V
• T315 mA (slow blow fuse) Littlefuse 213.315 for 220/240 V
NOTE
Delivery position is 220 V / T315mA Wickemann 19195 in all
cases
12
The rear panel
1 MAINS FUSE
Holds the mains fuse.
2 MAINS SOCKET
• Insert the plug of the mains lead into the mains socket. The
mains connector is a standard 3 pin IEC connector. The centre
terminal of the connector is directly connected to the chassis of
the equaliser.
• Connect the other end to your mains supply via a wall socket
that has a connection to earth!. Mains frequency is 50/60Hz.
• For units set at 100 V/120 V: use a UL listed cord set consisting of a minimum 18 AWG, type SVT or SJT three conductor
cord, a maximum of 15-feet in length and a parallel blade,
grounding type attachment plug, rated 15 A, 125 V.
IMPORTANT
*
• For units set at 230 V(domestic USA): use a UL listed cord
set consisting of a minimum 18 AWG, type SVT or SJT three
conductor cord, a maximum of 15-feet in length and a tandem
blade, grounding type attachment plug, rated 15 A, 250 V.
• For units set at 220V/230 V - 240 V (Europe except U.K): use
a cord set consisting of a minimum 18 AWG cord and grounding type attachment plug, rated 15 A, 250 V.
The cord set should have the appropriate safety approvals for
the country in which the equipment will be installed and marked
HAR.
3 MAINS VOLTAGE SELECTOR
The equaliser is designed to be operated with nominal mains
voltages of 115V and 230V. The circuits can tolerate a deviation of
±15% on the mains, covering the range 98V to132V and 195V to
264V.
13
4 SERIAL NUMBER
This number is the fingerprint of the unit and should be quoted in
any correspondence concerning the unit.
5 SIGNAL GROUND LIFT
This switch disconnects the signal ground from the mains and
chassis earth. The switch should be used if hum due to ground
loops is experienced and will generally solve the problem.
6 Balanced IN
Connects the equaliser to balanced outputs. The connector is a
female Neutric XLR NC3FD. For wiring details see section 'Signal
connections'.
7 Balanced OUT
Connects the equaliser to balanced inputs.The connector is a male
14
Rack mounting
The PE133MKII is designed for standard 19” rack mounting as well
as free standing outside a rack cabinet. The unit requires two
standard rack units.
Mounting the unit directly over large heat-producing devices may
shorten component life and therefore, is not recommended.
Ambient temperature should not exceed 50 degrees Celsius when
the equipment is powered.
Because of the chassis’ mechanical construction, the PE133MKII
has no need for support at the rear when mounted in a rack
cabinet. This feature facilitates manipulation of the unit while
ensuring perfect mechanical stability.
Make sure there is enough room for air circulation between
different pieces of equipment and through the heatsink at the back
15
16
5
Signal connections
For maximum performance, the use of two-conductor shielded
cable is recommend. Because the shield does not carry signal,
interference between signal current and shield current is minimised
in this way. Ordinarily the shield is connected to ground at one end
Input
The inputs of the equaliser are electronically balanced. The input
impedances of the “+” and “-” legs are made equal so that common
mode rejection (CMR) is practically independent from the
impedance of the driving source. HF and LF trims are provided to
optimise the CMR and null-out circuit tolerances.
These electronically balanced inputs are compatible with most
professional and semi-professional balanced or unbalanced
sound equipment.
A low pass filter precedes the input stages of the equaliser. When
driving the equaliser from a high impedance source, overall
frequency response can be compromised because of the low pass
filter capacitors.
When the source impedance is higher than 2Kž unbalanced or 4Kž
balanced, it is advisable to change the cutoff frequency of the input
filters. In this case, contact your dealer to make the modifications.
Generally, the output impedance of modern audio equipment is
17
Some general rules for input connections :
• Although not necessary, because of input circuit symmetry, it is
best to always use the “+” and “-” input terminals when wiring
the equaliser. In this way, hum pick-up from the open terminal is
avoided.
• When the PE133MKII is driven from a balanced source, ground
the shield at the source-end only and leave terminal 1 (SG) on
the PE133MKII disconnected. Wiring of the other input terminals
is straightforward. Check carefully for correct phase (relative to
output connections). (See figure A and B p20).
• When the equaliser is driven from an unbalanced source,
connect the shield to the circuit ground of the source and to
terminal 1 (signal ground) of the input XLR connector.
Depending on whether the circuit ground of the driving
equipment is connected to earth or not, it may be advantageous
to lift circuit ground from chassis ground on the equaliser using
the ground-lift switch. You can experiment with this and leave
the switch in the position that gives minimum hum or buzz.
Output
The output electronics of the equaliser simulate true transformer
operation. The impedance to ground from each output terminal is
approximately 10 Kž.
Output connections are via a standard 3 pin XLR male socket.
Because the output is made electronically floating, you may
ground eihter terminal 2 (+) or 3 (-) without fear of short-circuiting
an op-amp output to ground. Moreover, you loose 6dB of signal
Some general rules for output connections :
• Always ground the shield at the equaliser side only, by
connecting it to terminal 1 (SG) of the XLR socket.
• When driving an unbalanced load, connect terminal 2 (+) to the
signal input and terminal 3 (-) to the circuit ground of the driven
equipment. (See figure B and D p20).
• When driving a balanced input, connections are straightforward.
Check carefully for correct phase (relative to input connections).
18
Grounding
Because it is not always possible to determine whether the
equipment connected to the equaliser have their circuit ground
connected to earth and because the mains earth is not always of
good quality, it is hardly possible to give general rules for
• One and only one ground path should exist between each
piece of equipment.
• The circuit ground of the equaliser should not be left floating.
A ground loop generally causes a steady hum. If you encounter a
ground loop, you can often break it using the ground-lift switch on
the rear panel. When using the ground lift switch, the circuit
ground of the equaliser is disconnected from the chassis ground.
Chassis ground is always connected to earth for safety reasons.
Signal ground remains connected to terminal 1 of the XLR
sockets.
The input/output/supply board of the equaliser is provided with
place for adding a resistor and a capacitor (R107,C107) for those
who do not wish to completely disconnect the chassis and circuit
grounds. Providing a small ceramic capacitor between the two
grounds can be helpful for solving HF buzz problems, often
encountered when using mains ground.
The figures below shows some grounding schemes for the
equaliser. If you follow these figures while setting up your system
and hum or noise appears, don’t be afraid to experiment. Just
keep safety earth connected to the chassis of the equaliser. A
ground loop consists of two connections to ground, so there is
always another solution than to disconnect the chassis of the
19
Figure A
Figure B
Figure C
Figure D
20
6
The Equaliser
See fold out at the end of the manual
POWER
When pressing the power button, AC mains is applied to the
unit. The red led below the power switch illuminates as you
switch on the apparatus. The fail safe relays will open, switching
the filters between the input and the output of the unit. When
1
switching power off, the fail safe relays will link the input of each
O/LOAD
The O/LOAD indicator illuminates when the peak signal voltage
anywhere in the unit exceeds +18dBm. This level is about 2 dB
below clipping of the equaliser’s internal circuits. The overload
led is commanded by a “peak-stretching” circuit, for better
2
visualisation of overload conditions and will light for
LEVEL dB
The LEVEL control adjusts the input level to the equaliser and
filter sections of the unit. Being preceded by the input stage,
the level control does not permit to adjust signal level in this part
of the circuit. The equaliser has 6dB of available gain and can
3
LP
be used as a low noise and distortion gain make-up amplifier.
The level control lets you adjust gain between -• to +6dB in a
The LP filter has a tuning range of 2 to 40KHz. Like the HP
filter, the LP filter has a butterworth 12dB/octave response. This
filter is useful for rejecting unwanted high frequency noise and
4
21
HP
The HP filter has a continuously variable cutoff frequency of 15
to 300Hz. The filter has a roll-off slope of 12dB/octave and is of
5
the Butterworth type for maximally flat response. It is particularly
useful in situations where potentially harmful subsonic signals
IN/OUT
These switches are switching the corresponding filters in/out the
signal path. It is advised to leave the filters in the signal path to
6
protect the system against subsonic signals ore high frequency
GAIN
The GAIN controls of the parametric/notch filters adjust the
7
centre frequency gain of the corresponding parametric filter.
Q
The Q controls adjust the Q of each band. Setting Q to
maximum result in a narrow band operation while a minimum Q
8
result in a broadband operation. Calibration tolerance of the Q
FREQ.
The frequency control adjusts the centre frequency of the filter.
In combination with the multiplier switch, the centre frequency
can be positioned anywhere in the audible spectrum. Calibration
9
tolerance of the frequency controls is about ± 10...20%,
MULTIPLIER
The multiplier switch selects the range of the frequency control :
0.1 corresponds to a frequency range of 18 to 200 Hz
1 corresponds to a frequency range of 180 to 2000 Hz
10
10 corresponds to a frequency range of 1k8 to 20 kHz
The vernier control is used in combination with the frequency
11
The IN/OUT switch activate or deactivate the corresponding
IN/OUT
12
22
control and is used for fine tuning the position of the centre
parametric filter function.
SLIDERS
13
IN/OUT
14
SCALE
15
NOTE
The sliders of the graphic equaliser allow centre gain
adjustment for each of the indicated centre frequencies.
The IN/OUT switch activate or deactivate the corresponding
graphic equaliser section.
The SCALE switch switches the range of the corresponding
graphic equaliser section to 6dB or 12dB full scale.
Note :The rotary controls of the PM133MKII are high quality
conductive plastic potentiometers.
However, calibration accuracy of these controls is only modest.
Indications on the front panel therefore are principally intended
23
General operating instructions
Introduction
7
If you are not familiar with equalisers, the best thing to do before
first turn-on is to put all controls in their central position. When the
unit is not powered or the power supply fails, the fail-safe relay of
the equaliser links input and output. By putting the controls in their
central position, you make sure that the overall gain of your system
is not changed when the fail-safe relay activates. This is a good
starting point for the exploration of the equaliser’s functions.
Once all mains and input and output connections are made
correctly, switch the unit on by pressing the “power” switch. After
app 0,2 seconds the fail-safe relay will activate and thereby link the
unit in the signal path.
The graphics on the equaliser’s front panel illustrate the different
functions of the unit and make it ergonomically pleasant to work
Level control,
The level control is preceding the filter section of the equaliser and
O/load and power
levels the input signals of the filter section. The input stage of the
equaliser is located before the level control. The level control has
thus no effect on the levels in the input stage. In case the overload
led illuminates and decreasing the level with this control has no
effect, it probably means that the input stage is in overload. The
only solution to this problem is lowering the signal level at the input
of the unit by lowering the output of the driving equipment or by
adding an external loss pad to the input wiring.
Of course the power switch is for turning the unit on and off, but if
the system is set up well (LEVEL at 0dB...), it can be used as a
bypass for the complete equaliser, making use of the fail-safe
25
HP and LP filters
The HP filter has a continuously variable turnover frequency from
15 to 300Hz. The filter has a roll-off slope of 12dB/octave and is of
the Butterworth type for maximally flat response. It is particularly
useful in situations where potentially harmful subsonic signals are
likely to cause speaker or amplifier overload. Phono cartridges and
wind in microphones are examples of sources that can produce
excessive subsonic outputs. It is advised to leave the HP filter in
the signal path whenever possible. Adjusted for a 25Hz roloff, it will
not have a dramatic effect on sound while providing serious
protection against overload. The LP filter has a tuning range of
2kHz to 40kHz. Like the HP filter, the LP filter has a butterworth
12dB/octave response. This filter is useful for rejecting unwanted
high frequency noise and out of band signals that might cause
tweeter damage. As with the HP filter, it is advised to leave the LP
filter in the signal path. Setting the control for a 23KHz roloff will
protect your system while preserving musical integrity.
Deliberately narrowing the bandpass by adjusting the HP filter for a
300Hz roloff and the LP filter for a 2...3KHz roloff, will produce a
telephone-channel-like sound.
Parametric
If you have never used a parametric equaliser before, the best
thing to do is to experiment with actual program material. It is
hardly possible to describe the physical perception of certain
equaliser settings. It is therefore better you hear it for yourself. For
this reason, we will limit ourselves in this section to some general
guidelines for using these filters.
The bandwidth of the parametric filters is adjusted with the central
“Q” controls. “Q” calibration of these controls was chosen for
simplicity : The relationship between -3dB bandwidth (BW), Q and
centre frequency Fc is given by following simple formula :
Fc
BW = ——
Q
26
Boost a filter and discover the contrast between the subtle
shelving effects available from broadband operation ( Q minimum )
and the ringing, coloured sound you get from narrowband peaking
( Q maximum ). Be careful when boosting frequencies outside the
hearing range. High Q boosting at high frequencies is almost
inaudible and can cause tweeter damage. Woofers, specially if
they are mounted in horns or bass-reflex enclosures, should not
be driven with frequencies below the cabinet cutoff frequency, to
avoid destruction.
When you cut a section, you will find out that narrowband dips are
essentially inaudible. You can experiment with this using the IN
OUT switch for comparing processed and unprocessed sound.
Infinite notches are very useful for removing unwanted frequency
components like hum, without degrading sound integrity.
Adjusting a filter for infinite notching at maximum Q is not a simple
job and even with the slow-motion controls, frequency adjustment
can be a problem. This is caused by the fact that filter edges get
steeper, the more you attenuate. Also reliability of the notch
settings can pose a problem. This can become problematic in
permanent installations. In such cases it is better to use a
somewhat lower Q setting when infinite notching. You will find out
27
that even at lower Q these non reciprocal filters remain essentially
inaudible.
In the overlapping regions, between two filter sections, you can
adjust two adjacent sections to the same frequency. Because of
the perfect combining response of the filters, responses are added.
This is another way for building a deep, less sensitive notch. You
can adjust two -15dB filters to get a 30dB notch and because of
Graphic equaliser
The centre frequencies of the graphic equaliser are chosen for
perfect filter interpolation. For some frequencies this means a
slight deviation from the ISO proposed centre frequencies. The
maximum deviation is about 2% so there should be no problem
when using the equaliser in combination with commercial real time
analysers that, generally, use the ISO centre frequencies.
The 30 controls of the graphic section provide you with a lot of
possibilities for shaping sound. In doing so, it is best to regard
following principles :
• It is generally better to attenuate peaks, rather than to boost the
surrounding frequencies to the same level.
Noise will be lower and the sound will be more natural in this
way.
• Do not attempt to correct narrow peaks or dips with the graphic
section. Use the parametric filters for this purpose. These are
designed for narrowband operation and are much more versatile
.
• Do not use the graphic equaliser as a gain fix-up device. It is far
better to use the 6dB of available gain from the LEVEL control
than to put a lot of equaliser controls in the boost position.
28
Specific
applications
This part of the manual describes very specific suggestions on
how to use the PE133 in different applications. We recommend
that you read these. The information contained in each may
inspire you for setting-up your system. The proposed equaliser
settings are only indicative and are no guarantee for successful
implementation in your system.
Room equalisation
The PE133 is very well equipped for sound system equalisation
and adaptation of the system response to suit environmental
needs. The parametric filters can be used to suppress the major
ring modes of a room. This is most easily and safely done if the
system is provided with a limiter or compressor in the main signal
path to control the gain of the system once feedback occurs.
Put the bandwidth controls of the parametric filters in their centre
position. This will make it easier to find the exact frequency at
which feedback occurs. Afterwards, while fine-tuning, the
bandwidth of the filters can be reduced (higher Q setting) to
minimise the loss of audio information. Increase the gain of the
system until it feeds back at a single frequency. This is the major
ring mode. Make sure that from the moment feedback occurs, the
compressor or limiter is active. Feedback is a regenerative
process and it will become stronger and stronger until the system
goes into nonlinearity. By that time speaker failure could have
occurred. Make a rough estimation of the frequency at which
feedback occurs and notch-out the ring mode by adjusting the gain
and frequency controls of the appropriate filter section. Normally it
is not necessary to use the infinite notching capability. Remember
that the filter gets broader when the attenuation increases. It is
therefore better to adjust the gain control for a headroom of app. 5
to 10 dB below the feedback point. This procedure can be
repeated for the suppression of other ring modes, if they appear.
Normally after a few ring frequencies are eliminated, the “point of
diminishing returns” is reached and further effort is not very
rewarding.
The graphic equaliser section can now be used to further tailor the
29
system response and to compensate for deficiencies in the room
acoustics.
Conference equalisation
Low frequencies are attenuated for decreasing the effect of
windhowl in the microphone, using the high pass filter with a 30 Hz
cutoff. Hum is easily suppressed with a parametric filter in the
notch mode. For example : Adjust the LF parametric filter to
produce a notch at 50Hz with a Q of 3. Create, with the graphic
section, a slight boost in the vocal range for increased presence of
30
8
Specifications
INPUT:
• Electronically balanced
•
Absolute overload point : +22dBu
•
Impedance: 10 Kž (each leg)
•
equal impedance for “+” and “-” legs
CMRR better than 65dB (20Hz-20KHz)
•
XLR-3 type connector
connections : 1 signal ground; 2 hot (+); 3 cold (-)
OUTPUT:
•
Electronically balanced and floating, simulating transformer
output with app. 10 Kž to ground impedance for each leg
•
•
Max level: >+21dBm into 600 ž
Impedance: 51 ž (each leg)
•
Output symmetry balance better than 65dB (20Hz-20KHz IEC)
•
XLR-3 type connector
connections : 1 signal ground; 2 hot (+); 3 cold (-)
PERFORMANCE:
•
Frequency response: +0 -0.5dB, 20Hz-20KHz (graphic eq IN) PE133MKII
•
THD: <.01% (20Hz-20KHz)
•
Noise: <-92dBm (typ. -94dBm), graphic and parametric equalisers in circuit (0dB
settings)
measurements : 22Hz-22KHz RMS unweighted
•
Level control: -• to +6dB
•
•
Level control ‘0dB’ cal. accuracy: +-0.2dB (overall gain input to output)
Overload indicator: lights for approximately 200ms if the instaneous peak voltage at
31
any point in the equaliser comes within 2dB of clipping
FILTERS:
Graphic equaliser:
•
30 ISO centre frequencies: 25Hz-20KHz 1/3 octave
•
Centre frequency tolerance: ±1% (typically better than ±0.5%)
•
•
Q tolerance: ±1%
Max boost/cut: 6 or 12dB ±0.5dB reciprocal
•
Switchable
Parametric filters
• Tuning ranges: 18-200Hz,180Hz-2KHz,1800Hz-20KHz
•
On each band vernier control: ±10% of main frequency control.
•
Range of Q adjustment: 0.5 to 8
•
Range of level adjustment: -• to +15dB (typ -45 to +15.5 dB) non reciprocal.
Smaller cut than boost curves through addition and substraction of parametric
bandpass filter output to filter input
•
Each filter individually switchable
High pass filter:
•
Frequency range: 15-300Hz (-3dB frequencies)
•
Type: maximally flat 12dB/octave
•
In/out switchable
Low pass filter:
•
Frequency range: 2-40KHz (-3dB frequencies)
•
Type: maximally flat 12dB/oct
•
In/out switchable
POWER REQUIREMENTS:
•
Voltage: 110/120/220/240V 50/60Hz
•
•
Consumption: 20VA equaliser
IEC type connector
SIZE:
•
482mm(19 inch) wide x 89mm(3.5 inch) high x 255mm(10 inch) deep equaliser
WEIGHT:
•
32
app. 5 Kg
Maintenance and service information
Preventive
maintenance
9
Preventive maintenance consists of cleaning and visual inspecting
the unit. When accomplished regularly, preventive maintenance
may prevent malfunction and lengthen the apparatus life. The
severity of the environment in which the equaliser is used
determines the required frequency of preventive maintenance.
Regular cleaning prevents accumulated dust from penetrating
potentiometers.
The front panel can be cleaned with a soft cloth or a small softbristle brush. The brush is particularly useful for dislodging dirt on
and around the controls and inside the slider slots. Dirt that
remains can be removed with a soft cloth dampened in a mild
detergent-and-water solution. Do not use strong solvents as they
may damage the paint, the screened lettering or the plastic control
knobs. Be careful not to let detergent leak into the potentiometer
slots as it may damage the carbon resistance tracks.
The rear panel can be cleaned in the same way as the front panel.
The top cover minimises accumulation of dust inside the unit and
should normally be in place when using the equaliser. Dirt on
components acts as an insulating blanket, preventing efficient heat
dissipation. It also provides an electrical conduction path that
Corrective
Corrective maintenance consists of component replacement and
maintenance
repair of the unit.
Unless you are a highly skilled technician, do not try to repair this
unit. Moreover, specialised components are used in this
apparatus and for several of them it is very doubtful if you could
find a correct replacement. Therefore, contact your dealer in the
event of failure. He (or she) has notice of the Apex authorised
service centres and can advice you about what to do. Copy the
service request form on the next page, fill it out and ship it with the
defective unit. It will help the service technician to localise the
problem.
It is often more expedient to call your dealer or our factory
33
SERVICE REQUEST FORM
Please copy and complete this form as completely as possible and return it to Apex or
an authorised Apex service centre together with the defective unit.
Name/Company:...........................................................................................................................................
Adress:.............................................................................................................................
..............................................................................................................................
Telephone:........................................ Country:................................................................
Model No:......................................... Serial No:..............................................................
Purchased from:............................... Date:......................................................................
• Describe symptoms of malfunction:
• Under what conditions does the malfunction occur?
A. All the time
B. After a while
C. At high signal levels
D. At high temperatures
E. Other (please explain)
• How often did the problem occur?
• What did you do to isolate the problem to this unit?
• Further comments
34
WARRANTY
Summary
We, APEX nv Bosdel 52 3600 Genk Belgium warrant to you, the
original purchaser and any subsequent owner of this Apex
product, for a period of one year from the date of purchase by the
original purchaser that the product is free of defects in
components and factory workmanship under normal use and
service. The date of purchase is the date appearing on the first
end-user’s bill of sale or other proof of original purchase from an
Items excluded
We are not responsible for product failure caused by misuse,
from warranty
accident or neglect. This warranty shall not be applicable to any
product on which the serial number has been defaced, altered or
removed. It does not cover damage to other components,
connected to the Apex product, resulting from Apex product
failure. This warranty shall be considered void if this product is
subjected to repair work or alteration by persons other than
authorised by Apex in such a manner as to injure, in the sole
judgement of Apex, the performance, stability, reliability or safety
Our commitment
During the warranty period, when failing to perform as specified,
Apex will undertake to repair or at its option, replace this product
at no charge to its owner, provided the unit is returned, shipping
pre-paid, to the factory or authorised service facility. You must
notify us of your need for warranty service, preferably by filling in
the service request form and returning it to us. We will give you
notice of the authorised service centres to whom you may deliver
the product or we will give you an authorization to return it to the
factory. All components must be shipped in a factory pack,
shipping prepaid. If needed replacement packing can be obtained
35
from us.
Corrective action will be taken within a reasonable time of the date
of receipt of the defective product by us or the service centre. If the
repairs made by Apex or the authorised service centre are not
satisfactory, notify Apex or the service centre immediately. Repairs
Product changes
We reserve the right to change the design on any product without
prior notice and with no obligation to make corresponding changes
in products previously manufactured.
36