1
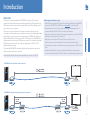
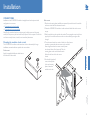
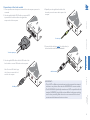
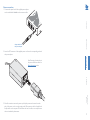
4 Optionally connect a set of stereo speakers
to the module.
CONTENTS
1 Place the remote module adjacent to the user location.
2 Connect a dual link DVI-D cable from the video monitor to
the DVI output socket of the remote module.
Note: If dual link screen resolutions are required,
the DVI-D cables used at both the local and
remote modules must be dual link types.
To speakers
To video monitor
5 Connect the link cable (see page 2 for cable advice) to
the remote module socket labeled TO LOCAL.
INSTALLATION
3 Connect the leads from the keyboard and mouse
to the two USB sockets on the remote module.
INTRODUCTION
Connections at the remote module
Note: The total current that may be drawn from the USB ports is 1.2A, which should be
sufficient for a keyboard, mouse (no more than 100mA each) and any two other devices
(500mA maximum each). If more power for USB devices is required, please use a powered
USB hub.
FURTHER
INFORMATION
To keyboard, mouse
and other USB
peripherals
IMPORTANT:
• This is NOT an Ethernet port and must not be connected to network
switches or any device other than the X-DVIPRO-DL local module.
• The X-DVIPRO-DL (dual link) extenders are NOT compatible with the
standard X-DVIPRO (single link) versions. Where both types are being
used in close proximity, take care not to cross connect the local and
remote modules between the two versions.
OPERATION
CATx link cable
8