1
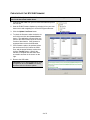
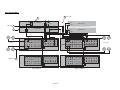
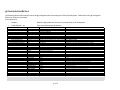
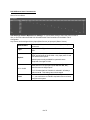
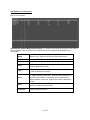
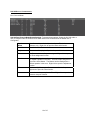
Integration Note
Manufacturer:
ELAN
Model Number(s):
System S1616A (Multi-Zone Control)
Core Module Version:
g! version 5.4, requires S1616A Firmware 2.0.2.2
Document Revision Date:
10/24/2012
OVERVIEW AND SUPPORTED FEATURES
THE FOLLOWING FEATURES ARE SUPPORTED:
Traditional Whole-House Audio: The ELAN S1616A is a multizone - multisource audio switcher that
can be controlled by the g! software using its VIA!Net port. The g! Viewer interface can be used to select
sources by zone, and control volume in each zone.
Multiple S1616A units: Up to 16 ELAN S1616A units can be controlled using the VIA!Net port on the g!
controller. Other ELAN System products, such as the ELAN V883 or V85 Video Switch, can be daisy
chained on a single RS-232 com port from the g! controller.
Independent Zone Settings: Volume, Bass, Treble, Loudness EQ, Do Not Disturb (DND) and Whole
House Music (WHM) settings can be selected independently for each zone.
Audio Sense Inputs: g! can receive feedback from the audio inputs on the rear of the S1616A chassis
for use with Event Maps.
ELAN S1616A Programming (Version 5.4 and above): In Version 5.4 or above, the g! software
supports programming ELAN S1616A features from Configurator.
Note: The S1616A is not configurable using VIA!Tools.
THE FOLLOWING FEATURES ARE NOT SUPPORTED:
Control from HomeBrick/MultiBrick: Control of an S1616A is only available from the HC Series
controller’s VIA!Net connection. The S1616A cannot be controlled from legacy HomeBrick/MultiBrick
controllers.
Any feature not specifically noted as supported should be assumed to be unsupported.
ELAN Home Systems ● 1690 Corporate Circle ● Petaluma, CA 94954 USA
tech support: 800.622.3526 • main: 760.710.0990 • sales: 877.289.3526 • email: [email protected]
©2013 ELAN Home Systems. All rights reserved. ELAN and g! are trademarks of ELAN Home Systems. All other trademarks are the property of their respective owners.
ELAN S1616A Configurations:
1. Single Chassis Mode: Single Chassis Mode supports source audio inputs in any combination of
stereo or mono to a maximum of 16 total inputs. It supports integration of the C2 Communication
Controller. Single Chassis Mode supports a maximum of 64 audio zones with up to 256 audio
outputs (16 chassis required) in any combination or stereo or mono.
Number of Stereo Sources
Number of Mono Sources
8
0
7
2 max
6
4 max
5
6 max
4
8 max
3
10 max
2
12 max
1
14 max
0
16 max
The C2 Communication Controller requires the use of 1 Mono
2. Dual Chassis Mode: Dual Chassis Mode supports stereo source audio inputs only, to a
maximum of 16 total sources. It supports integration of the C2 Communication Controller. When
a C2 Communications Controller is used there is a maximum of 15 stereo source inputs
available. Dual Chassis Mode supports a maximum of 64 audio zones with up to 128 stereo
pairs of audio output (8 chassis pairs required.)
In Dual Chassis Mode each S1616A is dedicated to the Left or the Right channel audio outputs.
A minimum of 1 chassis pair is required for a Dual Chassis Mode system.
INSTALLATION OVERVIEW
1. During the rough-in phase, install speaker wire for the speakers and Cat5 cable for keypads, in each
zone.
2. Also during the rough-in phase, run a Cat5 wire from the location of the ELAN S1616A to the HCxx
controller for VIA!Net communications. Refer to the HCxx Installation Manual for the VIA!Net wiring
code.
3. Mount the speakers and keypads in each zone, and install the ELAN S1616As and the sources. Set
the VIA!Net Unit IDs for the S1616As. Refer to the S1616A Installation Manual for VIA!Net Unit ID
programming.
4. Connect the g! system to the ELAN S1616A system electrically. See the wiring diagrams for more
information.
5. Configure the g! system for the ELAN S1616A and confirm communication between the ELAN
S1616A and the Controller.
6. Test the system by changing sources in a zone to confirm the correct source plays and volume is
controlled. Test source control for any sources that are to be controlled from the g! interface.
2 of 15
CHECK/UPDATE THE S1616A FIRMWARE
IMPORTANT! Verify that the S1616A firmware on all chassis is one of the supported versions
listed in the document header above.
1. Connect a USB cable from your PC to the rear USB mini port on
the S1616A.
2. Start the ELAN Firmware Updater by selecting it from your start
button menu and navigating to it via the All Programs browser.
3. Click the Update Com Ports button.
4. To check the firmware: select the device as
an S1616A and click the Current Version
button. The application will search the com
ports for the S1616A then report the current
version of that chassis. If the firmware is
supported then remove the USB cable.
5. If the firmware needs to be updated: select
the device as an S1616, select the COM
Port, and the proper firmware version then
click the Transfer button. Wait for the
transfer to complete and state that it was
successful as shown in the screen on the
right.
6. Remove the USB cable.
Important: Prior to downloading the S1616A
configuration all S1616s MUST be Factory
Defaulted after the firmware update.
3 of 15
CONNECTION DIAGRAMS
SINGLE CHASSIS MODE
1
ViaNet
HC Controller
Audio Source
Cat5 Cable 2
3
ViaNet
C2 Controller
4 RCA Cable
Speakers
Audio Outputs
Source Inputs / Loop Outputs
ViaNet
Audio Outputs
Speaker Wire 5
Source Inputs / Loop Outputs
ViaNet
BILL OF MATERIALS
#
Device
1
Controller
ELAN
Various EX.HC6
VIA!Net
RJ45 Female
2
Cat5 Cable
Installer
N/A
VIA!Net
RJ45 Male x RJ45 Male
Use ELAN VIA!Net Color Code
3
Communications Controller
ELAN
C2
VIA!Net
RJ45 Female
Optional
4
RCA Cable
N/A
N/A
Analog
RCA x RCA
5
Speaker Wire
N/A
N/A
N/A
Various
Manufacturer
Part Number
Protocol
4 of 15
Connector Type
Notes
DUAL CHASSIS MODE
4 RCA Cable
1
Left
HC Controller
ViaNet
Left
Right
Cat5 Cable 2
3
Left Speakers
C2 Controller
ViaNet
Audio Source
Right
Loop Out
Left
Right
Audio Outputs
Audio Source
Right Speakers
Audio Outputs
Source Inputs / Loop Outputs
Source Inputs / Loop Outputs
ViaNet
ViaNet
Speaker Wire 5
Audio Outputs
Audio Outputs
Source Inputs / Loop Outputs
Source Inputs / Loop Outputs
ViaNet
ViaNet
Right Chassis
Left Chassis
5 of 15
g! CONFIGURATION DETAILS
The following table provides settings used in the g! Configurator when connecting to an ELAN S1616A system. Please refer to the g! Configurator
Reference Guide for more details.
In the table below:
o
“<Select>”
Select the appropriate item from the list (or drop-down) in the Configurator.
o
“<User Defined>”, etc.
Type in the desired name for the item.
Devices
Communication Devices
<RS-232 Sources>
<IR Controlled Sources>
Other Audio Devices / Interfaces
Audio Zone Controllers
Sources
Zones
Tab Layout
Variable Name
Name
Type
Location
Setting
Comments
ViaNet (Added by Default)
Serial Port / ViaNet HCxx
<User Defined> (Not Required)
Add any RS-232 controlled sources. Refer to the Integration Note for each specific source device.
Add IR devices on the Input/Output tab for other IR controlled sources. Refer to the Configurator Reference Guide .
Name
Template
Default Device
<User Defined>
<Select>
<Select>
Add Interfaces for any source that does not have a built-in interface
Name
Device Type
Location
Comm Device
<User Defined> (Default: ELAN S1616A )
ELAN S1616A (Single or Dual Chassis Mode)
<User Defined> (Not Required)
VIANET
Name
Source Device
Source Volume
Source Icon
Display Name
Level
<User Defined>
<Select>
<Select>
<Select>
<User Defined>
<Select>
Name
Universal Receiver
Show Source
Settings Interface
Display 1 / 2
Slave Zone 1/2
<User Defined>
<Select>
<Select>
<Select>
<Select>
<Select>
Interface Tabs
<Select>
Select the RS-232 or IR controlled source for this interface
Sources must be previously configured in order to allow selection.
See note 1
This icon appears on the source button in the Viewer Interface
This text appears on the source button in the Viewer Interface
Sets Source Input Gain Level for System Volume Balancing
Zone IR Receiver assignment.
Set to No for any inputs that are not used in that Zone
Drop-down field used to select the Settings interface for the zone.
Drop-down field used to select which television display is assigned to the zone.
Drop-down field used to assign a slave zone to this zone.
Move any unused zones to the left into Available Zones to remove from the viewer
Notes:
1. For systems with devices that have controllable volume (such as an AudioTron), select the desired volume (normally 100%).
6 of 15
S1616A PROGRAMMING
g! software version 5.4 and higher is required to program the S1616A.
Note: This document shows one method for programming, however other options are available. Please
refer to the Programming section of the S1616A Installation Manual for detailed programming information.
S1616A Settings: To access these settings. Click on the ELAN S1616A under Audio Zone Controllers on
the Media Tab of Configurator.
Name
System Name (Editable).
Device Type
ELAN S1616A – Single or Dual Chassis Mode determined
when the S1616A is added.
Communication
Device
VIA!Net (Default Setting) .
Number of Units
The number of S1616As in the system. 1-16 Single Mode
chassis are configurable; 1-8 Dual Mode chassis pairs are
configurable.
Number of
Zones
The number of Zones in the system. The Number of Units
affects the Number of Zones available.
Number of
Sources
The number of Sources in the system.
C2 Controller
Set to Yes if a C2 Controller is being integrated in the system,
otherwise leave at the default setting of No.
C2 Page Mode
Default setting is Whole House Page. Set to Group Page if
Page Groups will be used.
7 of 15
S1616A SOURCE INPUT CONFIGURATION
SINGLE CHASSIS MODE
S1616A Single Chassis Mode Source Settings: To access these settings, Select the S1616A node or
click on Sources under the ELAN S1616A within Audio Zone Controllers on the Media Tab of
Configurator.
Any Source can be assigned to any Input (Mono Source) or Input pair (Stereo Source).
Source Name
The names of the sources. Sources are assigned using the
Source tree.
Type
Right click in the Type column to set Sources as Stereo or
Mono.
Optical
Right click in the Optical column to set the Source input to the
SPDIF optical inputs of the S1616A. Only Input pairs 1/2 and
9/10 can be set to Optical.
Optical inputs are only available for systems that are
comprised of a single S1616A.
In 1 – In 16
Right click in the In columns to assign inputs to Sources.
Stereo Sources use input pairs (In1 / In2, In3 / In4, etc.),
Mono Sources use single inputs.
If a C2 Communications Controller is selected it will always
default to In 16. This setting cannot be changed.
Level
The source volume level (gain). Use these adjustments
(+ / –) on each source to maintain equivalent source volumes
throughout the system.
8 of 15
DUAL CHASSIS MODE
S1616A Dual Chassis Mode Source Settings: To access these settings, Select the S1616A node or
click on Sources under the ELAN S1616A within Audio Zone Controllers on the Media Tab of
Configurator.
Sources have dedicated Inputs. Source 1 uses Input 1; Source 2 uses Input 2, etc.
Source Name
The names of the sources. Sources are assigned using the
Source tree.
Level
The source volume level (gain). Use these adjustments
(+ / –) on each source to maintain equivalent source volumes
throughout the system.
Note: Dual Chassis Mode, if a C2 Communications Controller is selected it will
always default to Source 16. This setting cannot be changed.
9 of 15
S1616A ZONE CONFIGURATION
S1616A Zone Settings: To access these settings click on Zones under the ELAN S1616A within Audio
Zone Controllers on the Media tab of Configurator.
Zone Name
Custom Name for Zone. Select the individual Zone Node in the
tree to access the Name field.
SubZone Of
Right click to assign the Zone as a SubZone of another Zone.
SubZones track to the same Source as their “master” Zone.
WHM
Determines if the Zone participates in WHM. Default is Yes.
Right click to change.
Right click to select a Group. Zones are assignable to any 1 of 8
Groups. Zones that are grouped track to the same Source.
Group
Note: Volume, EQ, DND and Loudness Control are always on a
zone by zone basis and will not be affected by Grouping.
Max Vol
The Maximum volume allowed for a zone. Use this setting to
prevent unpleasant volume levels or speaker damage in a zone.
Right click to change.
On Max
The maximum volume level for a zone when it is turned on. If the
zone is turned off with the volume above this point, it will return to
this level when reactivated. Right click to change.
On Min
The minimum volume level for a zone when it is turned on. If the
zone is turned off with the volume below this point, it will return to
this level when reactivated. Right click to change.
On Bass
The bass level for a zone when it is turned on. If the zone is
turned off with the level different, it will return to this level when
reactivated. Right click to change.
On Treble
The treble level for a zone when it is turned on. If the zone is
turned off with the level different, it will return to this level when
reactivated. Right click to change.
On Loudness
The Loudness setting for a zone when it is turned on. If the zone
is turned off with the setting different, it will return to this setting
when reactivated. Right click to change.
On DND
The DND setting for a zone when it is turned on. If the zone is
turned off with the setting different, it will return to this setting
when reactivated. Right click to change.
10 of 15
S1616A OUTPUT CONFIGURATION
SINGLE CHASSIS MODE
S1616A Single Chassis Mode Output Settings: To access these settings, Select the S1616A node or
click on Outputs under the ELAN S1616A within Audio Zone Controllers on the Media Tab of
Configurator.
Speaker
Name
Enter Custom Name for the Speaker Output. This is for
reference only. Right click to open the Name edit function.
Unit ID
The VIA!Net Unit ID of the chassis.
Output
The number of the physical Speaker Output of the chassis.
Zone
The Zone to which the Output is assigned. Right click to open
the Zone assignment function.
Type
Assigns the speaker as a Left, Right or Mono output. Right click
to open the assignment function.
Level
Allows the Output volume of a speaker to be adjusted relative to
the “Master” speaker in the zone. This first Output assigned to a
given Zone is the Master. The Master can be reassigned to a
different speaker in the zone. Right click to open the adjustment
function.
Filter
Enables a High Pass or Low Pass crossover for the Output.
Right click to open the Filter function.
Crossover
Determines the frequency for the Filter. Right click to open the
crossover set point function.
11 of 15
S1616A OUTPUT CONFIGURATION
DUAL CHASSIS MODE
S1616A Dual Chassis Mode Output Settings: To access these settings, Select the S1616A node or
click on Outputs under the ELAN S1616A within Audio Zone Controllers on the Media Tab of
Configurator.
Speaker
Name
Enter Custom Name for the Speaker Output. This is for
reference only. Right click to open the Name edit function.
Unit ID
The VIA!Net Unit ID of the chassis.
Output
The number of the physical Speaker Output of the chassis.
Zone
The Zone to which the Output is assigned. Right click to open
the Zone assignment function.
Level
Allows the Output volume of a speaker to be adjusted relative to
the “Master” speaker in the zone. This first Output assigned to a
given Zone is the Master. The Master can be reassigned to a
different speaker in the zone. Right click to open the adjustment
function.
Filter
Enables a High Pass or Low Pass crossover for the Output.
Right click to open the Filter function.
Crossover
Determines the frequency for the Filter. Right click to open the
crossover set point function.
12 of 15
S1616A C2 CONFIGURATION
WHOLE HOUSE MODE
S1616A C2 WHM Paging Settings: To access these settings click on Zones under the ELAN S1616A
within Audio Zone Controllers on the Media Tab of Configurator.
Zone Name
Custom Name for Zone. Select the individual Zone Node in the
tree to access the Name field.
WH Page
Determines if the Zone participates in Whole House Paging.
Default is Yes. Right click to change.
Page Vol
The Page volume for a zone. Right click to change.
Door Bell
Determines if the Zone participates in Door Bell audio. Default is
Yes. Right click to change.
DB Vol
The Door Bell volume for a zone. Right click to change.
13 of 15
GROUP PAGING MODE
S1616A C2 Group Paging Settings: To access these settings click on Zones under the ELAN S1616A
within Audio Zone Controllers on the Media Tab of Configurator.
Zone Name
Custom Name for Zone. Select the individual Zone Node in
the tree to access the Name field.
Pg Group 1 - 8
Determines if the Zone participates in Group Paging for that
Page Group. Default is No. Right click to change.
Whole House 9
Determines if the Zone participates in Whole House Paging.
Default is No. Right click to change.
Door Bell
Determines if the Zone participates in Door Bell audio. Default
is Yes. Right click to change.
Page Vol
The Page volume for a zone. Right click to change.
DB Vol
The Door Bell volume for a zone. Right click to change.
Note:
Zones may participate in more than 1 Group.
14 of 15
S1616A PROGRAMMING FUNCTIONS
1. Import Settings from S1616A: Use this function to read chassis programming into Configurator.
This will populate all Input and Output fields.
This function does not populate Source, Zone or Speaker Names as that information is not
contained in the S1616A.
This function does not retrieve C2 Communication Controller data.
Note: You MUST select the proper system Type (Single or Dual Chassis) when adding the
system to Configurator and set the Number of Units field correctly before importing data into
Configurator!
2. Write Configuration to S1616A: Use this function to transfer chassis programming to the
S1616A.
Note: If Source Audio Inputs are changed from Analog to Optical Digital or the reverse it is
required to physically power cycle the S1616A after writing the Configuration for the change to be
enabled.
3. Print Configuration: Use this function to create a printout of Source and Zone audio
connections to assist in wiring.
Note: Transferring chassis data to and from S1616As is done over the VIA!Net connection between the
S1616As and the HCxx Controller. All chassis should be connected to the VIA!Net bus when importing or
writing data.
COMMON MISTAKES
1. Multiple Chassis configuration: When using multiple S1616A chassis, it is important to set the
VIA!Net Unit ID on each chassis to reflect the correct chassis number. Refer to the ELAN
documentation to set these Unit IDs properly.
2. Incompatible Firmware: Confirm the firmware running on the S1616A is the same on all chassis
in the system and is one of the compatible versions. See the header of this document for
compatible versions.
3. Incorrect System Type: When adding the system in Configurator it is important to select the
correct system Type, (Single Chassis Mode / Dual Chassis Mode) when the system is first
added.
4. SubZone / Slave Zone Conflict: Do not assign a Zone as a Slave Zone to one Zone and as a
SubZone to a different Zone. Unexpected/undesired operation may occur.
5. No System Audio: After the initial configuration transfer, if audio is not present in an otherwise
functioning system, perform a factory default of the S1616A(s) and reload the configuration.
6. Failure to Factory Default after a firmware update: For the S1616As to operate properly they
MUST be factory defaulted prior to downloading their configuration.
15 of 15