1
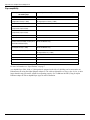
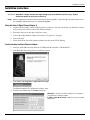
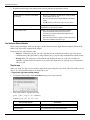
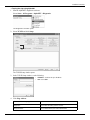
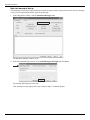
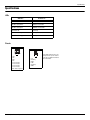
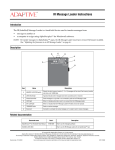
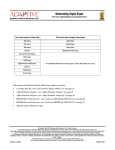
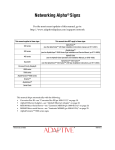
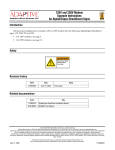
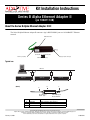
Kit Installation Instructions
Series B Alpha Ethernet Adapter II
(pn 10881114B)
About the Series B Alpha Ethernet Adapter II Kit
The Series B Alpha Ethernet Adapter II connects a sign’s RS232/RS485 port to a 10/100BASE-T Ethernet
network.
MAC address label
Left LED (D1)
Ethernet port (RJ45)
Right LED (D2)
Sign port (RJ11 serial port)
RJ45 Ethernet port (front)
Typical use
Ethernet
B
C
Alpha sign
Alpha sign
Alpha sign
A
(Detail)
A
B
RJ11 Serial port,
labeled “Sign”.
Item
A
B
C
Part #
1088-8621
1088-1114
—
C
RJ45 Ethernet port,
labeled “Ethernet”.
Description
3-foot serial cable, RJ11-to-RJ11
Alpha Ethernet Adapter Kit
TCP/IP cable (10/100BASE-T)
© Copyright 2003-2007 Adaptive Micro Systems LLC. All rights reserved.
Adaptive Micro Systems • 7840 North 86th Street • Milwaukee, WI 53224 USA • 414-357-2020 • 414-357-2029 (fax) • http://www.adaptivedisplays.com
Adaptive is a registered trademark of Adaptive Micro Systems. AlphaNet is a trademark of Adaptive Micro Systems.
All other brand and product names are trademarks or registered trademarks of their respective companies.
February 14, 2007
97088101C
About the Series B Alpha Ethernet Adapter II Kit
Sign compatibility
The Alpha Ethernet Adapter II works with
the following signs
The Alpha Ethernet Adapter II does not work with the following signs
215C, 215R
210C
220C
(shipped after February 1, 2000)
220C
(all shipped prior to February 1, 2000)
300C series
420
4000C, 4000R series
(using RS232 jumper and jack)
790i
7000C series
(using RS232 jumper and jack)
Solar
Alpha Big Dot
AlphaPremiere 9000 series
AlphaVision FS
AlphaVision CM, FM, 1.4”, 2.1”
BetaBrite one-line displays
(P1026, P1036 and P1040), including 213C
and BetaBrite Window Display
AlphaVision InfoTracker (IT)
(works with MSS485 only)
BetaBrite Director
(all shipped after July 1, 2000)
AlphaTicker
(works with MSS485 only)
Personal Priority Display (PPD)
BetaBrite Director
(all shipped before July 1, 2000)
Alpha Serial Clock
AlphaEclipse 3600 series
*AlphaEclipse 2500/2600/3500 series
Signs with NEMA enclosures
Alpha Director
Alpha Window
For more information see “Specifications” on page 7.
*An AlphaEclipse 2500, 2600, or 3500 sign that is mounted on the side of a building can be connected to an
Ethernet network using the Alpha Ethernet Adapter II. The cable used should be no longer than 10 feet. A cable
longer than this may prevent the AEAII from operating properly. See TechMemo 04-0003 (Using an Alpha
Ethernet Adapter II with an AlphaEclipse sign) for more information.
2 of 8
Series B Alpha Ethernet Adapter II Kit Installation Instructions
Installation instructions
Installation instructions
WARNING! Hazardous voltage. Contact with high voltage may cause death or serious injury. Always
disconnect power to unit prior to servicing.
NOTE: Observe appropriate precautions to prevent electrostatic discharge (ESD) or “static” damage to the replacement part. For
safe handling of ESD-sensitive parts, see TechMemo #00-0005.
Setup the Series B Alpha Ethernet Adapter II
1. Log the Ethernet Adapter’s MAC address and keep it with you. You will need it when you install the software
and you may not be at the location of the Ethernet Adapter.
2. Disconnect all power to the sign at the power source.
3. Connect the Alpha Ethernet Adapter II as shown in “Typical use” on page 1.
4. Turn on the sign.
5. Check the Network side of the adapter and make sure the green LED is flashing.
Install and setup the Alpha Ethernet software
1. Insert the Alpha Ethernet Setup Software CD-ROM into the computer’s CD-ROM drive.
2. Click Next and follow the prompts to install the software.
3. Click Start > All Programs > Alpha Ethernet Setup.
The Ethernet Adapter IP Configuration window opens.
4. Fill in the information and click Setup when done:
Series B Alpha Ethernet Adapter II Kit Installation Instructions
•
MAC Address—Located on the Ethernet Adapter. This is the address
you logged before installing the adapter.
•
IP Address, Subnet Mask, Gateway—Obtain these from your network
administrator.
3 of 8
Installation instructions
5. Read the status message at the bottom of the window and take the appropriate action:
If this message appears...
Setup IP address is successful, reboot adaptor
to take effect.
Then do this...
•
When the Test IP Address window appears, unplug the Alpha
Ethernet Adapter from the sign.
•
Wait a few seconds and then plug the Alpha Ethernet Adapter
back in.
•
Click No, because you will test the sign in the next section.
IP address already exists.
This indicates that the address you entered was already
programmed in the Alpha Ethernet Adapter.
Setup IP Address failed.
An address was not assigned to the Alpha Ethernet Adapter.
•
Check the information entered in the previous step.
•
Shut down your computer and unplug the Alpha Ethernet
Adapter from the sign.
•
Wait a full minute and then restart your computer and plug the
Alpha Ethernet Adapter back into the sign.
Test the Alpha Ethernet Adapter
Before testing the adapter, make sure the sign is on and connected to the Alpha Ethernet Adapter and that an IP
address was successfully assigned to the adapter.
In this section you will perform to tests:
•
•
Ping test—During the ping test you will verify that you can communicate with the sign. You can test
communication to the sign either by using AlphaNet or by using the ping command from a DOS prompt.
Message test—The second test verifies that the sign displays the data you send. You can either use
AlphaNet (explained in this document) or you can use the application you typically use to communicate
with your sign.
Ping the sign
When you “ping” the sign, you are sending a signal to the sign asking for a reply back. This tests whether you are
able to “see” the sign and whether it can reply back to you.
➩ To ping the sign from the DOS prompt
1. To open the DOS prompt, select Start>Run and type cmd in the text field.
2. In the DOS window, type the following:
ping [your sign’s IP address]
example: ping 207.46.232.182
If this message appears...
4 of 8
Then do this...
Reply from...
The test was successful, go to the next test.
Request Timeout...
The test failed. Contact your network administrator.
Series B Alpha Ethernet Adapter II Kit Installation Instructions
Installation instructions
➩ To ping the sign using AlphaNet
1. Start the AlphaNET diagnostics software.
Select Start > All Programs > AlphaNET > Diagnostics.
The Diagnostics window opens.
2. Select TCP/IP and click Setup.
The TCP/IP Setup window opens.
3. In the TCP/IP Setup window, set the following:
•
IP Address—Set this to the sign’s IP address.
•
Port—Set to 3001.
4. Click Ping Address:
If this message appears...
Then do this...
Reply from...
The test was successful, go to the next test.
Request Timeout...
The test failed. Contact your network administrator.
Series B Alpha Ethernet Adapter II Kit Installation Instructions
5 of 8
Installation instructions
Send a test message to the sign
This diagnostic test message simply broadcasts a simple message to all the signs on the network. Once the message
is sent, you will physically check the signs for the message.
1. In the Diagnostics window, click the Broadcast Message button.
The Broadcast Message window opens.
2. In the Broadcast Message window, select Send Message to All Signs and click Send.
The message should appear on the sign.
If the message does not appear on the sign, contact Adaptive Technical Support.
6 of 8
Series B Alpha Ethernet Adapter II Kit Installation Instructions
Specifications
Specifications
LEDs
When the...
then there is...
left LED is off
no connection.
left LED is solid amber
10BASE-T connection.
left LED is solid green
100BASE-T connection.
right LED is off
no activity.
right LED is blinking amber
one-way communication.
right LED is blinking green
two-way communication.
Pinouts
RJ45 Ethernet port
RJ11 Serial port
8
1
1 = TX+
2 = TX3 = RX+
4 = RX5 = not connected
6 = not connected
7 = not connected
8 = not connected
Shield = Chassis ground
1
6
1 = 5V
2 = RS485 (-)
3 = RXD
4 = TXD
5 = RS485 (+)
6 = GND
Series B Alpha Ethernet Adapter II Kit Installation Instructions
Some Alpha products have 5 volt
jumpers for RJ11 power. Refer to
your sign’s installation manual for
more information.
7 of 8
Series B Alpha Ethernet Adapter II Kit Installation Instructions
THIS PAGE INTENTIONALLY BLANK
8 of 8
Series B Alpha Ethernet Adapter II Kit Installation Instructions