1
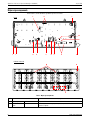
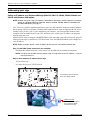
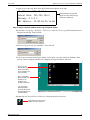
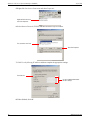
AlphaVision™ PC Series III Sign User Manual
http://www.adaptivedisplays.com
7
AlphaVision ™ PC Seri es III
Sign model
Sign display size (pixels)
AVPC320128T3
320 x 128
AVPC320112T3
320 x 112
AVPC320096T3
320 x 96
AVPC320080T3
320 x 80
AVPC320064T3
320 x 64
AVPC320032T3
320 x 32
AVPC192016T3
192 x 16
© Copyright 2004-2006 Adaptive Micro Systems LLC. All rights reserved.
Adaptive Micro Systems • 7840 North 86th Street • Milwaukee, WI 53224 USA • 414-357-2020 • 414-357-2029 (fax) • http://www.adaptivedisplays.com
Trademarked names appear throughout this document. Rather than list the names and entities that own the trademarks or insert a trademark symbol with each mention of the
trademarked name, the publisher states that it is using names for editorial purposes and to the benefit of the trademark owner with no intention of improperly using the trademark.
The following are trademarks of Adaptive Micro Systems: Adaptive, Alpha, AlphaLert, AlphaNET, AlphaNet plus, AlphaEclipse, AlphaEclipse RoadStar, AlphaPremiere, AlphaTicker,
AlphaVision, AlphaVision InfoTracker, Automode, BetaBrite, BetaBrite Director, BetaBrite Messaging Software, Big Dot, Director, EZ KEY II, EZ95, PagerNET, PPD, PrintPak, Serial Clock,
Smart Alec, Solar, TimeNet.
The distinctive trade dress of this product is a trademark claimed by Adaptive Micro Systems LLC.
Due to continuing product innovation, specifications in this manual are subject to change without notice.
July 26, 2006
1234600401
AlphaVision™ PC Series III Sign User Manual (pn 1234600401)
July 26, 2006
Contents
Safety information . . . . . . . . . . . . . . . . . . . . . . . . . . . . . . . . . . . . . . . . . . . . . . . . . . . . . . . . . . . . . . . . 3
Warnings and cautions . . . . . . . . . . . . . . . . . . . . . . . . . . . . . . . . . . . . . . . . . . . . . . . . . . . . . . . . . . . . . . . . . . . . . . . . . .3
Controlling electrostatic discharge (ESD) . . . . . . . . . . . . . . . . . . . . . . . . . . . . . . . . . . . . . . . . . . . . . . . . . . . . . . . . . . . .3
Introduction . . . . . . . . . . . . . . . . . . . . . . . . . . . . . . . . . . . . . . . . . . . . . . . . . . . . . . . . . . . . . . . . . . . . . 4
Purpose . . . . . . . . . . . . . . . . . . . . . . . . . . . . . . . . . . . . . . . . . . . . . . . . . . . . . . . . . . . . . . . . . . . . . . . . . . . . . . . . . . . . .4
Revision history . . . . . . . . . . . . . . . . . . . . . . . . . . . . . . . . . . . . . . . . . . . . . . . . . . . . . . . . . . . . . . . . . . . . . . . . . . . . . . .4
Related documentation . . . . . . . . . . . . . . . . . . . . . . . . . . . . . . . . . . . . . . . . . . . . . . . . . . . . . . . . . . . . . . . . . . . . . . . . . .4
Sign identification . . . . . . . . . . . . . . . . . . . . . . . . . . . . . . . . . . . . . . . . . . . . . . . . . . . . . . . . . . . . . . . . . . . . . . . . . . . . . .5
Major sign components . . . . . . . . . . . . . . . . . . . . . . . . . . . . . . . . . . . . . . . . . . . . . . . . . . . . . . . . . . . . 6
Addressing your sign . . . . . . . . . . . . . . . . . . . . . . . . . . . . . . . . . . . . . . . . . . . . . . . . . . . . . . . . . . . . . . 8
Setting an IP address on a Windows 2000 sign (320x128, 320x112, 320x96, 320x80, 320x64, and 320x32 with
Windows 2000 option) . . . . . . . . . . . . . . . . . . . . . . . . . . . . . . . . . . . . . . . . . . . . . . . . . . . . . . . . . . . . . . . . . . . . . . . . . . . . . . . . .8
Step 1: Install VNC Viewer software on your computer . . . . . . . . . . . . . . . . . . . . . . . . . . . . . . . . . . . . . . . . . . . . .8
Step 2: Get a temporary IP address for the sign . . . . . . . . . . . . . . . . . . . . . . . . . . . . . . . . . . . . . . . . . . . . . . . . . . .8
Step 3: Assign a static IP address to the sign using VNC Viewer . . . . . . . . . . . . . . . . . . . . . . . . . . . . . . . . . . . . . .9
Setting an IP address on a Windows CE sign (320x32 and 192x16) . . . . . . . . . . . . . . . . . . . . . . . . . . . . . . . . . . . . . . .11
Step 1: Get a temporary IP address for the sign . . . . . . . . . . . . . . . . . . . . . . . . . . . . . . . . . . . . . . . . . . . . . . . . . .11
Step 2: Assign a static IP address to the sign using Network Setup . . . . . . . . . . . . . . . . . . . . . . . . . . . . . . . . . . .11
Software . . . . . . . . . . . . . . . . . . . . . . . . . . . . . . . . . . . . . . . . . . . . . . . . . . . . . . . . . . . . . . . . . . . . . . . 13
Installing software on a Windows 2000 sign’s hard drive (320x128, 320x112, 320x96, 320x80, and 320x64) . . . . . .13
Step 1: Share the CD-ROM drive . . . . . . . . . . . . . . . . . . . . . . . . . . . . . . . . . . . . . . . . . . . . . . . . . . . . . . . . . . . . .13
Step 2: Install software . . . . . . . . . . . . . . . . . . . . . . . . . . . . . . . . . . . . . . . . . . . . . . . . . . . . . . . . . . . . . . . . . . . . .14
Configuring a Windows 2000 sign (320x128, 320x112, 320x96, 320x80, and 320x64) . . . . . . . . . . . . . . . . . . . . . . . .14
Using peripherals and options . . . . . . . . . . . . . . . . . . . . . . . . . . . . . . . . . . . . . . . . . . . . . . . . . . . . . . 17
Attaching a monitor, keyboard, and mouse directly to a Windows 2000 sign (320x128, 320x112, 320x96, 320x80,
320x64, and 320x32 with Windows 2000 option) . . . . . . . . . . . . . . . . . . . . . . . . . . . . . . . . . . . . . . . . . . . . . . . . . . . . . . . . . . . .17
Dimming a Windows 2000 sign (320x128, 320x112, 320x96, 320x80, and 320x64) . . . . . . . . . . . . . . . . . . . . . . . . . .17
Installing a second TuneBlaster sound card . . . . . . . . . . . . . . . . . . . . . . . . . . . . . . . . . . . . . . . . . . . . . . . . . . . . . . . . .18
Stacklight option . . . . . . . . . . . . . . . . . . . . . . . . . . . . . . . . . . . . . . . . . . . . . . . . . . . . . . . . . . . . . . . . . . . . . . . . . . . . . .20
Troubleshooting . . . . . . . . . . . . . . . . . . . . . . . . . . . . . . . . . . . . . . . . . . . . . . . . . . . . . . . . . . . . . . . . . 21
Appendix . . . . . . . . . . . . . . . . . . . . . . . . . . . . . . . . . . . . . . . . . . . . . . . . . . . . . . . . . . . . . . . . . . . . . . . 24
2
July 26, 2006
AlphaVision™ PC Series III Sign User Manual(pn 1234600401)
Safety information
Warnings and cautions
Be aware of the following warnings when installing or servicing signs.
WARNING
WARNING
AVERTISSEMENT
Hazardous voltage.
Contact with high voltage
may cause death or serious
injury.
Always disconnect power to
unit prior to servicing. SM1000A
COURANT DE
FUITE ELEVE.
HIGH LEAKAGE
CURRENT.
Earth connection
essential before
connecting
supply.
Raccordement
a la terre
indispensable
avant le
raccordement
au reseau.
SM1009A
WARNING
Possible crush hazard.
Unpack sign as directed.
Otherwise sign could tip over
which could result in
serious injury or death.
SM1018
Controlling electrostatic discharge (ESD)
ATTENTION
OBSERVE PRECAUTIONS
ELECTROSTATIC
SENSITIVE DEVICE
This equipment contains components that may be damaged by “static electricity”, or electrostatic
discharge. To prevent this from happening, be sure to follow the guidelines in Adaptive Tech Memo 000005, “Preventing Electrostatic Discharge (ESD) Damage,” available on our Web site at http://
www.adaptivedisplays.com.
Safety information
3
AlphaVision™ PC Series III Sign User Manual (pn 1234600401)
July 26, 2006
Introduction
Purpose
This manual is intended as a guide for installation and setup of the sign, as well as for routine maintenance.
Revision history
Part number
Date
1234600401
July 26, 2006
Notes
First release.
Related documentation
Sign size
Part number
320 x 128
and
320 x 112
1234601101
AlphaVision PC Series III 320x128 and
320x112 Sign Electrical Installation Guide
1234601501
AlphaVision PC Series III 320x128 and
320x112 Sign Mechanical Installation Guide
320 x 96 and
320 x 80
1234600301
AlphaVision PC Series III 320x96 and 320x80
Sign Electrical Installation Guide
1234601601
AlphaVision PC Series III 320x96 and 320x80
Sign Mechanical Installation Guide
1234601401
AlphaVision PC Series III 320x64 Sign
Electrical Installation Guide
1234601901
AlphaVision PC Series III 320x64 Sign
Mechanical Installation Guide
1234601201
AlphaVision PC Series III 320x32 Sign
Electrical Installation Guide
1234601701
AlphaVision PC Series III 320x32 Sign
Mechanical Installation Guide
1234601301
AlphaVision PC Series III 192x16 Sign
Electrical Installation Guide
1234601801
AlphaVision PC Series III 192x16 Sign
Mechanical Installation Guide
320 x 64
320 x 32
192 x 16
All types
4
Title
Description
Describes the electro-mechanical installation of
t320x128 and 320x112 signs.
Describes the electro-mechanical installation of
320x96 and 320x80 signs.
Describes the electro-mechanical installation of
the 320x64 sign.
Describes the electro-mechanical installation of
the 320x32 sign.
Describes the electro-mechanical installation of
the 192x16sign.
TechMemo
00-0005
Preventing Electrostatic Discharge (ESD)
Damage
Provides grounding procedures, lists work area
guidelines, and explains ESD.
1132600801
Service Bulletin 06-0004 Alphavision PC
support latch upgrade kit instructions
These instructions are for the AlphaVision PC
Support Latch Upgrade Kit (pn 1132201101).
The support latch and handle provide extra
support for the LED display panels to help
prevent them from closing and to make them
safer to open and close during servicing. These
instructions explain how to install the support
latch and handle and where to place the labels.
1132600601
TechMemo 05-009 AlphaVision PC manual
support latch upgrade kit instructions
These instructions are for the AlphaVision PC
Manual Support Latch Upgrade Kit (pn
1132600501). The support latch provides
additional support for the LED display panels
while they are open. These instructions explain
how to install the support latch.
Introduction
July 26, 2006
AlphaVision™ PC Series III Sign User Manual(pn 1234600401)
Sign identification
A
B
C
D
Table 1: Sign identification
Item
Name
A
Model number
Model number description
AVPC320096T3-DS-W2K-A4
Music channels:
A1 = 1 music channel (up to 2 speakers)
A4 = 4 music channels (up to 8 speakers)
A8 = 8 music channels (up to 16 speakers)
Sign operating system:
W2K = Windows 2000
Sign type:
DS = double-sided
WCE = Windows CE
SS = single-sided
T3 = Series III sign
Sign display width and height (in pixels)
First three digits are width, last three are height.
Sign model:
AVPC = AlphaVision PC
B
Electrical information Input voltage, frequency, and amperage.
C
Date of manufacture Month, day, and year the sign was made.
E
Introduction
Serial number
Consecutive, unique identification number.
5
AlphaVision™ PC Series III Sign User Manual (pn 1234600401)
July 26, 2006
Major sign components
Shown below is a 320 x 96 Master sign. Other sign sizes are similar.
K
F
Inside
L
M
O
J
I
H
G
E
D
C
B
A
LED door underside
M
P33
P36
DB5
DB4
P33
P36
P33
N
P36
DB3
P33
P33
P33
DB10
DB15
DB2 0
P36
DB9
P36
P33
DB8
P36
P33
DB7
P36
P33
DB6
P36
P36
P33
DB14
P36
P33
DB13
P36
P33
DB12
P36
P33
DB11
P36
P36
P33
P36
P33
DB18
P36
P33
DB17
P36
P33
DB16
P36
P36
P33
P36
P33
DB23
P36
P33
DB22
P36
P33
P36
P33
P36
P33
DB28
P36
P33
DB27
P36
P33
DB1 9
INPUT
DB30
DB1
P33
INPUT
P33
DB25
P33
P36
LB7
LB8
P33
P36
INPUT
INPUT
P33
DB2
LB5
LB6
DB24
DB29
PDB2
PDB1
PDB3
DB21
DB26
P36
P36
PDB5
PDB4
O
Table 2: Major sign components
Item
6
Name
Description
A
Speaker (option)
Plays sounds from TuneBlaster sound board.
B
TuneBlaster sound
board
Used to play sounds through up to 4 speakers per board. The TuneBlaster sound
board is an option.
Major sign components
July 26, 2006
AlphaVision™ PC Series III Sign User Manual(pn 1234600401)
Table 2: Major sign components (Continued)
Item
Name
Description
C
Modular network
adapter
Connects Ethernet adapter on the sign controller board to an external Ethernet
network. A 110 punch-down tool is required to wire an external Ethernet
connection to this adapter.
D
Controller board with
turbo adapter board
(on top)
The turbo adapter board is an interface between the controller board and the LED
driver boards. The turbo adapter board is an Advantech PCM-9579 embedded PC
board with Celeron 650MHz processor.
E
Hard disk drive (not
installed on Windows
CE units)
Used to store operating system and programs.
F
Light
Philips 371237 18W compact fluorescent bulb. Powered through fuses (item I).
G
Power supply
Supplies either 5V (Meanwell PSP-1000) or 12V (Meanwell SP-200-12) power to
sign components.
H
EMI filter
Removes electromagnetic interference from incoming and outgoing AC power.
I
Fuses
Two, 1/4 x 1 1/4-inch, fast acting, 10A, 250V fuses.
J
Breaker box
AC power switchbox.
K
Thermostats
Control the following sign functions:
• TS1 — At 120F, turns fans on.
• TS2 — At 130F, dims the sign’s LEDs.
P5
Loopback board
Boosts signal strength.
P3
L
P4
• TS3 — At 160F, turns sign off.
M
TB5 DC terminal block
P1
P2
INPUT
A
B
5V and 12V wiring terminal.
1
2
3
N
LED driver board
O
Power distribution
board
Major sign components
Supplies 5V to LED driver boards.
7
AlphaVision™ PC Series III Sign User Manual (pn 1234600401)
July 26, 2006
Addressing your sign
Setting an IP address on a Windows 2000 sign (320x128, 320x112, 320x96, 320x80, 320x64, and
320x32 with Windows 2000 option)
NOTE: Another way to set a sign’s IP address is described in “Attaching a monitor, keyboard, and mouse
directly to a Windows 2000 sign (320x128, 320x112, 320x96, 320x80, 320x64, and 320x32 with
Windows 2000 option)” on page 17.
VNC Viewer is a software application that allows you to see and control the desktop of another computer
that is running VNC Server software. Windows 2000 AlphaVision PC signs are shipped with VNC Server
installed. Once you have VNC Viewer installed on your computer, you can control the Windows 2000
computer inside an AlphaVision PC sign. This will allow you to set the sign’s IP address, run programs
from the sign, and so on.
AlphaVision PC signs are shipped with DHCP enabled. This means that a sign will automatically get an IP
address once the sign is connected to a TCP/IP network. Later, this DHCP IP address can be changed to a
static IP address.
NOTE: Before you begin, obtain a static IP address for the sign from your network administrator.
Step 1: Install VNC Viewer software on your computer
Download the software from http://www.realvnc.com and follow their installation instructions.
NOTE: In order to use the VNC Viewer to control a sign, the sign must have an IP address — and you
must know what it is.
Step 2: Get a temporary IP address for the sign
1. Turn off the sign.
2. Connect the sign to a TCP/IP network.
Your computer must be connected
to this same TCP/IP network.
E
E
TCP/IP connection:
Use this punchdown block to
wire a permanent TCP/IP
connection to the sign.
8
Addressing your sign
July 26, 2006
AlphaVision™ PC Series III Sign User Manual(pn 1234600401)
3. Apply power to the sign. Write down the IP address that appears on the sign.
IP Address: 207.12.27.1
Subnet Mask: 255.255.255.0
Gateway: 0.0.0.0
Example IP address message that
appears when first starting the sign
(shown for a 320x96 sign).
MAC Address: 00-80-66-05-1e-86
Step 3: Assign a static IP address to the sign using VNC Viewer
1. Select Start > Programs > RealVNC > VNC Viewer. After VNC Server, type the IP address that was
displayed on the sign. Then click OK:
2. After Session password, type “dbadmin”. Then click OK.
3. You are now connected to the sign’s desktop. At this point, you can perform any Windows 2000
activity, such as setting the window area, changing the sign’s IP address, and so on.
This is the sign’s
desktop. When you
work in this window,
you are working on the
sign’s hard drive.
This is your desktop.
When you work in this
window, you are
working on your
computer’s hard drive.
You can go switch
between desktops —
just keep track of which
desktop window you are
currently working.
4. Right-click My Network Places on the sign’s desktop and select Properties.
Right-click this icon on the sign’s
desktop and select Properties.
Addressing your sign
9
AlphaVision™ PC Series III Sign User Manual (pn 1234600401)
July 26, 2006
5. Right-click Local Area Connection and select Properties.
Right-click this menu item
and select Properties.
6. Select Internet Protocol (TCP/IP) and then click the Properties button.
First select this menu item.
Then click Properties.
7. Click Use the following IP address and then complete the appropriate settings.
First click here.
See your network administrator
for these settings.
8. When finished, click OK.
10
Addressing your sign
July 26, 2006
AlphaVision™ PC Series III Sign User Manual(pn 1234600401)
Setting an IP address on a Windows CE sign (320x32 and 192x16)
NOTE: Another way to set a sign’s IP address is described in “Attaching a monitor, keyboard, and mouse
directly to a Windows 2000 sign (320x128, 320x112, 320x96, 320x80, 320x64, and 320x32 with
Windows 2000 option)” on page 17.
The Network Setup software allows you to change the IP address of a sign and is available from Adaptive
Micro Systems.
AlphaVision PC signs are shipped with DHCP enabled. This means that a sign will automatically get an IP
address once it is connected to a TCP/IP network. Later, you can change this DHCP IP address to a static
IP address.
Step 1: Get a temporary IP address for the sign
1. Turn off the sign.
2. Connect the sign to a TCP/IP network.
Your computer must be
connected to this same
TCP/IP network.
TCP/IP connection:
Use this punchdown
block to wire a
permanent TCP/IP
connection to the sign.
3. Apply power to the sign. Write down the IP address that appears on the sign. An example from a
320x32 sign is shown below:
IP Address: 169.254.107.136
Gateway: 0.0.0.0
Example IP address message that
appears when first starting the sign
(shown for a 320x32 sign).
Subnet Mask: 255.255.0.0
MAC Address: 00-80-66-05-22-84
Step 2: Assign a static IP address to the sign using Network Setup
1. Download and save the setup file from http://www.ams-i.com/avpc/setip.exe.
2. Run the setip.exe file.
Addressing your sign
11
AlphaVision™ PC Series III Sign User Manual (pn 1234600401)
July 26, 2006
3. After Current IP address, type the IP address that was displayed on the sign. Then enter the new IP
address:
Device Name is the name the sign will
be seen as on the network. To leave the
name the same, leave this box empty.
Click Use the following IP address
See your network
administrator for
these settings.
4. After you have entered the appropriate information, click Set.
12
Addressing your sign
July 26, 2006
AlphaVision™ PC Series III Sign User Manual(pn 1234600401)
Software
Installing software on a Windows 2000 sign’s hard drive (320x128, 320x112, 320x96, 320x80, and
320x32)
Step 1: Share the CD-ROM drive
1. If you have not already done so, install and start VNC Viewer software on your computer. See “Step
3: Assign a static IP address to the sign using VNC Viewer” on page 9.
2. Open My Computer on your desktop.
Double-click My Computer to open it.
3. Right-click on the CD-ROM drive to be shared and select Sharing...
4. Click Share this folder. Then type a Share name. Click the Permissions button.
First click here.
Then type in a name for the
shared folder.
Finally, click Permissions.
5. Select Everyone. Then complete the Permissions as appropriate. When finished, click OK.
Select Everyone.
Then select Allow or Deny for
each Permission.
Click OK.
Software
13
AlphaVision™ PC Series III Sign User Manual (pn 1234600401)
July 26, 2006
6. On the sign’s desktop, right-click the Start button and select Explore. The sign’s hard drive
directory appears:
7. Select My Network Places in the left panel and then double-click Entire Network in the right panel.
8. Double-click the following in the right panel, in the order given:
•
•
•
•
Microsoft Windows Network
the network on which your computer resides
your computer (look for your name)
your computer’s CD-ROM drive (look for the name you gave the shared file in step 3)
Step 2: Install software
1. Insert the CD into the CD-ROM drive.
2. Follow the installation prompts.
Configuring a Windows 2000 sign (320x128, 320x112, 320x96, 320x80, and 320x64)
You can view and modify your sign’s current settings, as well as see some of the changes before they are
actually performed.
NOTE: You will need to restart your computer after making any changes.
1. If you have not already done so, install and start VNC Viewer software on your computer. See “Step
1: Install VNC Viewer software on your computer” on page 8 and “Step 2: Get a temporary IP
address for the sign” on page 8.
14
Software
July 26, 2006
AlphaVision™ PC Series III Sign User Manual(pn 1234600401)
2. Right-click the sign’s desktop and select Properties. The Display Properties window appears:
3. Click the Settings tab and then click the Advanced button. When the advanced properties window
appears, click the Startup parameters tab and make the appropriate changes:
These are the properties
of your sign with which
you will be working.
You can specify turbo card
information, set the type and size
of your sign, and indicate whether
back-to-back mounting is used.
NOTE: These items are factory-set
and changing them may adversely
affect sign operation.
Software
15
AlphaVision™ PC Series III Sign User Manual (pn 1234600401)
July 26, 2006
4. Click the Capture Windows tab and make the appropriate changes:
To resize the window,
position the mouse
over a corner and,
when it turns into a
double arrow, click
and drag the window
inward or outward.
Note that the
dimension
information below
changes accordingly.
Click here to see a preview of your capture
window. You can also click and drag this
preview window inward and outward to change
its width and height.
Capture window preview.
You can click the gray tab
and drag the window to a
different area of your screen.
Capture window
dimension
information
The Insert and Delete
buttons allow you to
add and delete
capture windows.
You can have up to
99 capture windows.
5. Click the Color Conversions tab and make the appropriate changes:
This setting defines how the colors of the
16-color Windows standard palette
(System color) are converted into the
eight LED colors (LED Sign color). For
each of the 16 colors, you can specify the
color to appear on the sign in its place.
Returns the settings to
their original values.
6. When changes are complete, click OK, then follow any prompts for restarting your system.
16
Software
July 26, 2006
AlphaVision™ PC Series III Sign User Manual(pn 1234600401)
Using peripherals and options
Attaching a monitor, keyboard, and mouse directly to a Windows 2000 sign (320x128, 320x112,
320x96, 320x80, 320x64, and 320x32 with Windows 2000 option)
1. Remove power from the sign.
2. Open the sign.
NOTE: For a double-sided sign, just open the Master side.
3. Connect a VGA CRT monitor, computer keyboard and mouse to a sign’s controller board as shown:
VGA CRT monitor
Ethernet connection
Jumpers (J1 through J10):
Keyboard and mouse connection
4. Apply power to the sign.
Dimming a Windows 2000 sign (320x128, 320x112, 320x96, 320x80, and 320x64)
To dim the sign by 50%, turn off the sign and attach a jumper to J8 on the sign’s controller board (see
above).
Using peripherals and options
17
AlphaVision™ PC Series III Sign User Manual (pn 1234600401)
July 26, 2006
Installing a second TuneBlaster sound card
TuneBlaster sound card
Speaker connections
This option is not available for all signs
1. Remove power from the sign.
WARNING
Hazardous voltage.
Contact with high voltage
may cause death or serious
injury.
Always disconnect power to
unit prior to servicing. SM1000A
2. Open both sides of the sign.
WARNING
Crush hazard.
Keep hands
clear.
SM1023
3. Locate the factory-installed TuneBlaster card and the four (4) mounting holes to the right or above
the factory-installed TuneBlaster sound card.:
The mounting holes for the
second TuneBlaster sound
card are located to the right
or above the installed
TuneBlaster card.
Existing TuneBlaster card (factory installed)
4. Fasten the second TuneBlaster sound card to the sign using the four (4) mounting holes:
Four screws (two on each side)
are used to attach a TuneBlaster
board to the sign.
18
Using peripherals and options
July 26, 2006
AlphaVision™ PC Series III Sign User Manual(pn 1234600401)
TuneBlaster 2
P6
+12VDC
GND
+12VDC
NOTE: On older signs, TuneBlaster boards were
installed so that the speaker connections faced up,
not down as shown here.
SW1
This diagram applies to 320 x128, 320x112,
320 x 96, and 320 x 64 signs.
Speaker
Connections
1 2 3 4 5
5. Connect the second TuneBlaster sound card as shown:
OFF
ON
TuneBlaster 2
SW1 settings:
1 = ON
2 = OFF
3 = OFF
4 = OFF
5 = OFF
P4
P3
Speaker
Connections
SOUND
COMM
COMM
U1
P2
Orange
Black
12 VDC
GND
This terminal block
should be connected
to a SP-200-12
power supply.
TuneBlaster 1
SW1
Speaker
Connections
1 2 3 4 5
Set SW1 on each
TuneBlaster board as shown.
CN5
SOUND
CN19
CN4
P6
+12VDC
OFF
ON
TuneBlaster 1
SW1 settings:
1 = OFF
2 = OFF
3 = OFF
4 = OFF
5 = OFF
Speaker
Connections
COMM
SOUND
P4
P3
P2
U1
COMM
SOUND
GND
Using peripherals and options
19
AlphaVision™ PC Series III Sign User Manual (pn 1234600401)
July 26, 2006
Stacklight option
The 50 mm stacklight mount (item A below) can be attached to either the left or the right side of the sign:
D
B
B
A
A
C
Table 3: Stacklight options
Item
Name
A
Stacklight mount
(only on one side)
Description
Up to 5 lights can be
stacked on a 50 mm
stacklight mount.
B
C
Stacklight wiring path
(only on one side)
Relay controller
7
Relay control
6
5
4
3
2
1
0
A B A B A B A B A B A B A B A B
Port : A
V+
(12V power supply)
To USB port
on embedded PC
Wire routing path
Sign case
Stacklight base
3
4
5
Stacklight base
0
1
2
V(12V power supply)
Sign case
D
20
Embedded PC
Using peripherals and options
July 26, 2006
AlphaVision™ PC Series III Sign User Manual(pn 1234600401)
Troubleshooting
Table 4: Problem/Solution chart
#
Problem
1
On one side of the sign, half of the
display (3 rows of LED driver boards)
is a solid color, displaying garbage,
or blank
Recommended solution
1.
Swap the cables on the Turbo board.
•
If the problem is on the sign’s Master side, swap P1 and P2.
•
If the problem is on the sign’s Slave side, swap P5 and P6.
If the problem goes to the other half of the display, then the Turbo board is bad.
2.
Swap the cables P1 and P2 on the lower Loopback board located on the bad side of
the display.
If the problem goes to the other half of the display, then the cable between the Turbo
board and the Loopback board is bad.
3.
Swap the cables P4 and P5 on the lower Loopback board located on the bad side of
the display.
If the problem goes to the other half of the display, then the Loopback board is bad.
4.
Swap the cables P1 and P2 on the uper Loopback board located on the bad side of the
display.
If the problem goes to the other half of the display, then the cable between the
Loopback boards is bad.
5.
Swap the cables P4 and P5 on the upper Loopback board located on the bad side of
the display.
If the problem goes to the other half of the display, then the upper Loopback board is
bad.
6.
Swap the cables going from the Loopback board to the LED driver board at the LED
driver board located on the bad side of the display.
If the problem goes to the other half of the display, then the cable between the
Loopback board and the LED driver board is bad.
2
3
On one side of the sign, half of the
display (3 rows of LED driver boards)
is blank.
On one side of the sign, part of the
display is displaying garbage.
Troubleshooting
1.
Check the cable connections on the Turbo board.
•
The Master side must be plugged into P1 and P2.
•
The Slave side must be plugged into P5 and P6.
2.
Check the power going to the first LED driver board in the chain to make sure it is
getting 5v.
3.
Run through the steps for problem #1 above.
1.
Run through the steps from problem #1 above.
2.
If the problem does not move, then check the turbo cables for loose connections.
21
AlphaVision™ PC Series III Sign User Manual (pn 1234600401)
July 26, 2006
Table 4: Problem/Solution chart (Continued)
#
4
Problem
One side of the sign is blank.
Recommended solution
1.
2.
Check the cable connections on the Turbo board.
•
The Master side must be plugged into P1 and P2.
•
The Slave side must be plugged into P5 and P6.
On the Turbo Card, swap P1 and P2 with P5 and P6.
If the problem moves to the other side of the display, then the Turbo board is bad.
5
The entire sign is blank.
3.
Check the 12v power supply and all of the 5v power supplies to make sure they are
outputting the correct voltage.
4.
Check the power going to the first LED driver board in the chain to make sure it is
getting 5v.
1.
Is it powered on?
2.
Check the cable connections on the Turbo board.
3.
•
The Master side must be plugged into P1 and P2.
•
The Slave side must be plugged into P5 and P6.
On the Turbo board, check the status LEDs:
•
D1 – Power
•
D3 – FPGA is loaded
If D1 is on, but D3 is not, then there could be a fault with the controller board, Turbo
board, or the hard drive.
4.
Is the Controller’s PWR LED on?
5.
Do they still have communication to the display?
Call Adaptive Tech Support
6
7
22
On one side of the sign, the top half
of the display is showing the data for
the bottom half of the display, and
the bottom half of the display is
showing the data for the top half of
the display.
The cables on the Turbo board are swapped. Swap the cables on the Turbo board:
• P1 and P2 if the problem is on the Master side.
A diagonal test pattern in a red,
green, and amber sequence is
running.
Hard drive is not functioning properly:
• P5 and P6 if the problem is on the Slave side.
1.
Check to make sure the hard drive IDE cable is connected to the controller board.
2.
Check to make sure the voltage at the hard drive is 5 volts.
8
Display is cycling between diagonal
lines, solid vertical columns, and the
Ethernet information.
The Test Mode DIP Switch on the TuneBlaster board is set to ON.
Switch DIP Switch #5 on the TuneBlaster board to OFF
9
A single LED, a row of LEDs, or a
column of LEDs on one LED driver
board is out.
Replace the entire LED driver board.
10
There is a ghosting column of LEDs
(a column of LEDs that is dimly on
when it is supposed to be off).
Replace the entire LED driver board.
Troubleshooting
July 26, 2006
AlphaVision™ PC Series III Sign User Manual(pn 1234600401)
Table 4: Problem/Solution chart (Continued)
#
Problem
11
There is a shorted column of LEDs (a
column of LEDs that is on in addition
to the column that is supposed to be
on).
Replace the entire LED driver board.
12
There is a shorted row of LEDs (a
row of LEDs that is on in addition to
the row that is supposed to be on).
Replace the entire LED driver board.
13
An entire LED driver board is blank,
but there is data on the drivers on
both sides of the blank board.
Check the power going to the LED driver board. It may not be getting the 5 volts it needs.
However, if the power is good, then replace the LED driver board.
14
An entire LED driver board is blank
and there is no data on the rest of the
LED driver boards after it in the
chain.
1.
Verify the LED driver board is receiving 5v and the input cable is securely attached.
2.
Use a long data cable to bypass the first blank LED driver board. If the data comes
back on, then the bypassed LED driver board has a bad input. Replace the bypassed
LED driver board.
3.
If #1 doesn’t fix the problem, then use a long data cable to bypass the LED driver
board to the right of the first blank LED driver board. If the data comes back on, then
the bypassed LED driver board has a bad output. Replace the bypassed LED driver
board.
1.
Check cable connections between the controller board and the TuneBlaster board(s).
2.
Check the speaker wiring to the TuneBlaster board(s).
3.
Are the TuneBlaster board(s) getting the required 12 volts?
4.
Cycle power on the display. Does the sound card play its power-up tune?
5.
If there is still no sound, replace the sound card.
15
No sound from sound card
(TuneBlaster sound boards).
Troubleshooting
Recommended solution
23
AlphaVision™ PC Series III Sign User Manual (pn 1234600401)
July 26, 2006
Appendix
Table 5: Technical specifications
Current1,2
Model number
(see “Sign identification” on page 5)
Sign
Display size
operating
(pixels)
system
Total
(A)
Max
(A)
Fuse
(A)
Slave sign
Max
(A)
Fuse
(A)
9.64
9.64
15
—
—
10.44
10.44
15
—
—
11.54
11.54
15
—
—
AVPC320128T3-DS-W2K-A1
18.68
9.64
15
9.04
15
AVPC320128T3-DS-W2K-A4
19.48
10.44
15
9.04
15
AVPC320128T3-DS-W2K-A8
20.58
11.54
15
9.04
15
7.44
7.44
20
—
—
8.24
8.24
20
—
—
AVPC320128T3-SS-W2K-A1
AVPC320128T3-SS-W2K-A4
AVPC320128T3-SS-W2K-A8
AVPC320096T3-SS-W2K-A1
AVPC320096T3-SS-W2K-A4
AVPC320096T3-SS-W2K-A8
320 x 128
and
320 x 1124
320 x 96
and
320 x 804
Windows
2000
Master sign
Windows
2000
9.34
9.34
20
—
—
AVPC320096T3-DS-W2K-A1
14.28
7.44
20
6.84
—
AVPC320096T3-DS-W2K-A4
15.08
8.24
20
6.84
—
AVPC320096T3-DS-W2K-A8
16.18
9.34
20
6.84
—
AVPC300032T3-SS-WCE-A1
300 x 32
Windows
CE
or
optional
Windows
2000
2.92
2.92
10
—
—
3.72
3.72
10
—
—
4.82
4.82
10
—
—
5.24
2.92
10
2.32
—
6.04
3.72
10
2.32
—
7.14
4.82
10
2.32
—
1.47
1.47
10
—
—
2.27
2.27
10
—
—
AVPC192016T3-SS-WCE-A8
3.37
3.37
10
—
—
AVPC192016T3-SS-WCE-A1
2.34
1.47
10
0.87
—
AVPC192016T3-DS-WCE-A4
3.14
2.27
10
0.87
—
AVPC192016T3-DS-WCE-A8
4.24
3.37
10
0.87
—
AVPC300032T3-SS-WCE-A4
AVPC300032T3-SS-WCE-A8
AVPC300032T3-DS-WCE-A1
AVPC300032T3-DS-WCE-A4
AVPC300032T3-DS-WCE-A8
AVPC192016T3-SS-WCE-A1
192x16
AVPC192016T3-SS-WCE-A4
AVPC320064T3-SS-W2K-A1
5.36
5.36
15
—
—
6.16
6.16
15
—
—
7.26
7.26
15
—
—
AVPC320064T3-DS-W2K-A1
10.14
5.36
15
4.77
—
AVPC320064T3-DS-W2K-A4
10.94
6.16
15
4.77
—
AVPC320064T3-DS-W2K-A8
12.04
7.26
15
4.77
—
AVPC320064T3-SS-W2K-A4
AVPC320064T3-SS-W2K-A8
320 x 64
and
320 x 484
Windows
CE
Windows
2000
Weight
(approx
pounds)
Dimensions3
(L x H x W)
(inches)
900
125.59 x 53.2 x 23.64
1000
125.59 x 53.2 x 25.37
650
125.8 x 43.7 x 23.2
870
125.83 x 43.7 x 24.93
180
106.85 x 16.71 x 8.40
350
106.85 x 16.71 x 16.85
80
78.5 x 11.6 x 8.5
160
78.5 x 11.6 x 17
550
125.83 x 34.1 x 21.5
650
125.83 x 34.1 x 22.2
NOTES:
1 Measurement conditions: amber match mode, lights on (if applicable), all speakers on, all fans on.
2
If an electrical outlet option is included (for sizes 320x128, 320x112, 320x96, 320x80, or 320x64 only), the total current needs to be
increased by 10 amps.
3All sign lengths include the added length of a speaker (approximately 12 inches). The 320x32 signs ship with speakers attached.
Speakers are optional on all other signs.
4 The maximum current is 1 amp less per side (fuse values remain the same). For example the total amperage for a double-sided sign
would be 2 amps less than listed.
24
Appendix