1
IBM Intellistation M-Pro (6889) System Integration and Reference Guide
Rev 15
Symphony and Xpress NT
SYSTEM INTEGRATION AND REFERENCE GUIDE
IBM INTELLISTATION M-PRO (MODEL 6889)
Post Production Products
MediaComposer for Windows NT
Symphony
Xpress NT Deluxe
Xpress NT Elite
Avid Technology Systems Engineering
Avid Part Number: 0130-04268-01
Rev 15
June 3, 1999
IBM Intellistation M-Pro (6889) System Integration and Reference Guide
Rev 15
Symphony and Xpress NT
Table of Contents
1.
General Information........................................................................................................................ 6
1.1
How To Use This Document ..................................................................................................... 6
1.2
Updates to this Document ......................................................................................................... 7
1.3
Where to Obtain More Information ............................................................................................ 7
1.4
Revision History......................................................................................................................... 8
2. System Integration Checklist ...................................................................................................... 11
3. IBM Intellistation M-Pro System Description............................................................................. 25
3.1
System Board Overview.......................................................................................................... 25
3.2
Configured Peripherals............................................................................................................ 27
3.3
Chassis.................................................................................................................................... 27
3.4
Keyboard ................................................................................................................................. 28
3.5
Mouse...................................................................................................................................... 28
3.6
Graphics Cards and Monitors.................................................................................................. 28
3.7
IBM Intellistation Models and Options ..................................................................................... 29
4. BIOS ............................................................................................................................................... 31
4.1
BIOS Revisions ....................................................................................................................... 31
4.2
BIOS Groups ........................................................................................................................... 32
4.3
System Summary .................................................................................................................... 33
4.4
Product Data............................................................................................................................ 33
4.5
Devices and I/O Ports ............................................................................................................. 34
4.6
Start Options............................................................................................................................ 35
4.7
Date and Time ......................................................................................................................... 35
4.8
System Security....................................................................................................................... 36
4.9
Advanced Setup ...................................................................................................................... 36
4.10 ISA Legacy Resources............................................................................................................ 37
4.11 Power Management ................................................................................................................ 37
4.12 Updating the System BIOS ..................................................................................................... 38
5. Hardware Configuration............................................................................................................... 41
5.1
System Board Graphic ............................................................................................................ 41
5.2
Switches and Jumpers ............................................................................................................ 43
5.3
I/O Panel Connections ............................................................................................................ 44
5.4
Central Processor.................................................................................................................... 45
5.5
Memory.................................................................................................................................... 45
5.5.1
Identification of PC100 Compliant SDRAM DIMM ........................................................... 46
5.5.2
Memory Requirements for Avid NT Products .................................................................. 46
5.6
System Board Integrated Devices........................................................................................... 46
5.6.1
Adaptec AIC-7895 SCSI Host Adapter Configuration...................................................... 46
5.6.1.1 Adaptec Option ROM Configuration............................................................................. 47
5.6.1.2 Adaptec Option ROM Menus........................................................................................ 47
5.6.2
Intel EtherExpress Pro100 Network Interface.................................................................. 49
5.6.3
Crystal Semiconductor 4235 Audio Chip ......................................................................... 49
5.7
AGP Graphics.......................................................................................................................... 50
5.8
PCI Board Configuration ......................................................................................................... 50
5.8.1
Avid MediaComposer or Symphony Board Configuration Chart ..................................... 51
5.8.2
Avid Xpress NT Board Configuration Chart ..................................................................... 52
5.9
Adaptec/JNI AHA-F940 Fibre Channel Controller................................................................... 53
5.10 Adaptec AHA-3940 SCSI Host Adapter .................................................................................. 54
5.10.1 Adaptec Option ROM Configuration ................................................................................ 55
5.10.2 Adaptec Option ROM Menus ........................................................................................... 55
5.11 Avid Meridien Digital Media Board .......................................................................................... 57
5.12 Avid Meridien Display Controller (EDC) .................................................................................. 58
5.13 Meridien 3D Effects Combination............................................................................................ 59
5.14 Connecting the Meridien I/O Box ............................................................................................ 60
6. Windows NT Configuration ......................................................................................................... 61
IBM Intellistation M-Pro (6889) System Integration and Reference Guide
Rev 15
Symphony and Xpress NT
6.1
Windows NT Workstation 4.0 .................................................................................................. 61
6.2
Windows NT Server................................................................................................................. 61
6.3
Windows NT Workstation Installation...................................................................................... 61
6.4
Windows NT Service Packs .................................................................................................... 63
6.5
Post-Service Pack Fixes ......................................................................................................... 64
6.6
Service Pack 4 Installation Procedure..................................................................................... 64
6.6.1
Preparing to Install Service Pack 4 .................................................................................. 64
6.6.2
Installing Service Pack 4 from CD-ROM.......................................................................... 65
6.6.3
Installing Service Pack 4 from a Download...................................................................... 66
6.6.4
Resolving Year 2000 Issues ............................................................................................ 67
6.6.5
Reapplying a Service Pack .............................................................................................. 68
6.6.6
Uninstalling a Service Pack.............................................................................................. 68
6.6.7
Copying SP4 to Disk ........................................................................................................ 69
6.6.8
Re-installing Service Pack 3 ............................................................................................ 69
6.7
General Windows NT Setup.................................................................................................... 70
6.7.1
Explorer View ................................................................................................................... 70
6.7.2
Screen Savers.................................................................................................................. 70
6.7.3
Fonts ................................................................................................................................ 70
6.7.4
Environment Variables ..................................................................................................... 71
6.7.5
Applications Partition........................................................................................................ 71
6.7.6
User Account Guidelines.................................................................................................. 72
6.7.7
Windows NT Registry Modifications................................................................................. 73
6.7.7.1 KeyboardDataQueueSize............................................................................................. 73
6.7.7.2 MouseDataQueueSize ................................................................................................. 73
6.7.7.3 CD Autorun ................................................................................................................... 74
6.7.8
Serial Ports....................................................................................................................... 74
6.7.9
Parallel Port...................................................................................................................... 75
6.7.10 Dual Monitor Support ....................................................................................................... 75
6.8
Windows NT Error Handling.................................................................................................... 76
6.8.1
DRWATSN32.LOG .......................................................................................................... 76
6.8.2
NT Event Viewer Configuration........................................................................................ 76
6.8.3
NT Crash Dump Recovery Configuration ........................................................................ 77
6.9
Pagefile Configuration ............................................................................................................. 77
6.10 Windows NT HAL Replacement.............................................................................................. 78
6.10.1 Determining the HAL Version........................................................................................... 79
6.10.2 Replacing the HAL ........................................................................................................... 80
6.11 Hardware Profiles .................................................................................................................... 80
6.12 Changing the Registered Owner ............................................................................................. 82
7. Windows NT Device Drivers ........................................................................................................ 83
7.1
NT Device Drivers and Revisions Chart.................................................................................. 83
7.2
MGACtrl Service..................................................................................................................... 84
7.3
Adaptec SCSI Host Adapter.................................................................................................... 84
7.3.1
Adaptec SCSI Driver Revision Verification ...................................................................... 85
7.3.2
Installing or Updating the Adaptec SCSI Device Driver ................................................... 85
7.4
Adaptec Fibre Channel Adapter .............................................................................................. 86
7.4.1
Adaptec Fibre Channel Driver Revision Verification ........................................................ 86
7.4.2
Updating or Installing the Adaptec Fibre Channel Driver................................................. 86
7.5
Avid Meridien Digital Media Board Driver ............................................................................... 87
7.6
Avid Edit Display Controller..................................................................................................... 88
7.6.1
Number Nine Display Device Driver ................................................................................ 88
7.6.2
Avid Edit DMA Device Driver ........................................................................................... 89
7.7
Crystal CS4235 Audio Driver .................................................................................................. 90
7.7.1
Crystal CS4235 Audio Sound Driver Revision Verification.............................................. 90
7.7.2
Installing or Updating the Crystal Audio Driver ................................................................ 90
7.7.3
Installing the MIDI Driver.................................................................................................. 91
7.8
Intel PIIX IDE Bus Master Drivers ........................................................................................... 93
7.8.1
IDE Bus Master Driver Revision Verification.................................................................... 93
IBM Intellistation M-Pro (6889) System Integration and Reference Guide
Rev 15
Symphony and Xpress NT
7.8.2
Updating or Installing the IDE Bus Master Device Driver ................................................ 93
7.9
Intel EtherExpress Pro100 Network Interface ......................................................................... 94
7.9.1
Network Interface Driver Revision Verification................................................................. 95
7.9.2
Updating or Installing the Network Interface Device Driver ............................................. 95
7.10 Pinnacle 3D DVE Genie Driver ............................................................................................... 95
7.11 Sentinel Driver ......................................................................................................................... 96
7.11.1 Sentinel Driver Revision Verification ................................................................................ 96
7.12 VTR Serial Driver..................................................................................................................... 97
8. Windows NT Networking ............................................................................................................. 99
8.1
Networking DHCP ................................................................................................................... 99
8.2
Networking and Final Integration............................................................................................. 99
8.3
Computer Browser Service ................................................................................................... 100
9. Windows NT Maintenance and Recovery ................................................................................ 101
9.1
Windows NT Repair Disk ...................................................................................................... 101
9.2
Using the Emergency Repair Disk ........................................................................................ 102
9.3
Windows NT Boot Diskette.................................................................................................... 103
9.4
Registry Backup .................................................................................................................... 104
9.5
Saving the Disk Configuration ............................................................................................... 104
9.6
Removing Stripe Sets............................................................................................................ 105
10.
Peripheral Configuration ........................................................................................................ 107
10.1 Disk Configuration Guidelines ............................................................................................... 107
10.2 Supported File Systems ........................................................................................................ 108
10.3 Disk Striping .......................................................................................................................... 109
10.4 Partitioning Disk Drives ......................................................................................................... 110
10.5 Formatting Disk Drives .......................................................................................................... 111
10.6 Non Avid Storage .................................................................................................................. 112
10.7 Network Drives ...................................................................................................................... 112
10.8 Removable Drives ................................................................................................................. 113
10.9 Disk Fragmentation ............................................................................................................... 113
10.10
Resolution Matrix ............................................................................................................... 114
10.11
Keyboard and Mouse Extensions ...................................................................................... 115
11.
Diagnostics and Utilities ........................................................................................................ 117
11.1 Vendor Utilities and Diagnostics............................................................................................ 117
11.2 Avid Diagnostics .................................................................................................................... 118
11.3 Avid Utilities ........................................................................................................................... 118
11.4 Third Party Utilities ................................................................................................................ 119
12.
Troubleshooting...................................................................................................................... 121
12.1 Media Board Driver Failure ................................................................................................... 121
12.2 Display Monitor Colors or Resolution Incorrect..................................................................... 121
12.3 Second Display Monitor Not Enabled.................................................................................... 122
12.4 Edit DMA Ext Clock Error ...................................................................................................... 122
12.5 MIDI Resource Failure .......................................................................................................... 123
12.6 Application Key (Dongle) Does Not Function........................................................................ 124
13.
Reference Section................................................................................................................... 125
13.1 IBM Intellistation M-Pro Parts View ....................................................................................... 125
13.2 Environmental Specifications ................................................................................................ 127
13.3 Packaging.............................................................................................................................. 128
IBM Intellistation M-Pro (6889) System Integration and Reference Guide
Rev 15
Symphony and Xpress NT
IBM Intellistation M-Pro (6889) System Integration and Reference Guide
Rev 15
MediaComposer, Symphony and Xpress NT
1.
1.1
General Information
How To Use This Document
This document describes the recommended configuration and integration guidelines or
restrictions for Avid NT products on an IBM Intellistation M-Pro (Model 6889). This guide also
serves as a reference for common Windows NT procedures but is not intended as a
replacement for any platform vendor published documentation, peripheral documentation, or
Avid product specific documentation. The document describes the procedures necessary to
produce a functional system. It is designed as a reference to answer the “How do I do that”
questions that come with any step involved in configuring or maintaining a system.
While much of the information described in this document is procedural in nature, it is NOT
necessarily in order of implementation. Please use the System Integration Checklist for the
exact order of integration and reference the specific section headers for detail about the
integration steps.
This document uses modular sections designed to accommodate maintenance. Each section
covers a specific set of content, and the content of each section is not intended to be in any
specific order. This allows support for multiple products and for different configuration
techniques to be added or subtracted as needed.
Sections and Content
1. General Information – Provides an overview of the guide’s purpose and revision history.
2. System Integration Checklist – Step-by-step system integration process.
3. System Description – Describes the features and components that comprise the vendor
platform.
4. BIOS Configuration – Recommended system BIOS configuration.
5. Hardware System Configuration – Describes information relevant to hardware
configuration only.
6. Windows NT Configuration – Describes all Windows NT setup requirements for
maintenance and operation.
7. Windows NT Device Drivers - Describes Windows NT device driver requirements for all
hardware.
8. Windows NT Networking – Describes common networking configuration requirements.
9. Windows NT Maintenance and Recovery – Describes common Windows NT maintenance
tools and techniques.
10. Peripheral Configuration – Describes common peripheral setup, including storage
requirements.
Avid Technology Systems Engineering
General Information
Page - 6
IBM Intellistation M-Pro (6889) System Integration and Reference Guide
Rev 15
MediaComposer, Symphony and Xpress NT
11. Diagnostics and Utilities – All utilities used to assist troubleshooting.
12. Troubleshooting – Common system configuration troubleshooting procedures.
13. Reference – Dumping ground for all miscellaneous information.
Do not use this document to integrate another vendor platform. While much of the content will
be applicable to another platform there are specific steps which are not relevant to another
system.
NT Directory Naming
Many directories are described in this document as <systemroot>. This is another way of
describing the name of the directory where Windows NT is installed. This is necessary
because there are no naming standards for the directory and it may differ among installations.
Many vendors commonly standardize installations with directory names like winnt or winnt40
but this is not guaranteed.
1.2
Updates to this Document
This document will be updated as new information becomes available. New revisions will
render the previous document obsolete.
1.3
Where to Obtain More Information
•
For more information on the IBM Intellistation M-Pro platform refer to:
IBM Corporation:
•
Updated device drivers, technical information, or other related information is posted to
Avid web sites:
Avid Technology:
•
www.pc.ibm.com
www.avid.com
Web addresses for vendors mentioned in this document:
Adaptec:
Crystal Semicoductor:
Diamond Multimedia
Executive Software:
Intel Corporation:
Iomega Corporation:
Microsoft Corporation:
Miramar Systems:
Quantum Corporation:
Avid Technology Systems Engineering
www.adaptec.com
www.crystal.com
www.diamondmm.com
www.execsoft.com
www.intel.com
www.iomega.com
www.microsoft.com
www.miramarsys.com
www.quantum.com
General Information
Page - 7
IBM Intellistation M-Pro (6889) System Integration and Reference Guide
Rev 15
MediaComposer, Symphony and Xpress NT
Raxco Software:
Seagate Corporation:
Turtle Beach
1.4
www.raxco.com
www.seagate.com
www.tbeach.com
Revision History
Revision
15
1.5
Date
03-Jun-1999
30-Apr-1999
1.4
12-Apr-1999
1.3
16-Feb-1999
1.2
1.1
12-Jan-1999
19-Oct-1998
1.0
2-Sep-1998
002aBeta
002-Beta
1-Jul-1998
Comments
- Revision for Avid Release
- ESD warnings added to board installation
- Rewrote Meridien 3D effects description
- MGACtrl service disable procedure.
- More explanation in integration steps
- Integration steps divided between Avid and
Reseller
- Sections moved around for better continuity
- Platform vendor Windows NT installation
procedure added
- Additional detail on several procedures.
- Automatic reboot removed from crash
control.
- Stripe set removal added
- Service Pack 4 and Y2K installation
procedures added.
- Service Pack 3 and hotfixes removed.
- Edits based on comments from
Manufacturing and Avid/Singapore Training
- Minor re-ordering of integration steps.
Integrator may delay some reboots.
- Addition of supported driver matrix.
- Driver verification procedures reference
driver matrix for revision information.
- Edits to reflect BIOS changes
- Minor edits based on feedback from
Symphony System Support training.
- (Fibre driver rev, SCSI BIOS, Hal
clarification)
- First Customer Ship revision.
- Removed beta requirements updated driver
and BIOS areas.
Removed MediaComposer NT references
16-Jun-1998
-
001-Beta
26-May-1998
-
Avid Technology Systems Engineering
Corrections and revisions based on reviewer
comments
Initial Release for beta integration
Author
Dan Powell
Dan Powell
Dan Powell
Dan Powell
Dan Powell
Dan Powell
Dan Powell
Dan Powell
Dan Powell
Dan Powell
General Information
Page - 8
IBM Intellistation M-Pro (6889) System Integration and Reference Guide
Rev 15
MediaComposer, Symphony and Xpress NT
Symphony, and Xpress are trademarks of Avid Technology, Inc. All other trademarks contained
herein are the property of their respective owners.
Avid Technology Systems Engineering
General Information
Page - 9
IBM Intellistation M-Pro (6889) System Integration and Reference Guide
Rev 15
MediaComposer, Symphony and Xpress NT
Avid Technology Systems Engineering
General Information
Page - 10
IBM Intellistation M-Pro (6889) System Integration and Reference Guide
Rev 15
MediaComposer, Symphony and Xpress NT
System Integration Checklist
2.
Applicable Avid NT Products:
Symphony, Xpress NT, MediaComposer
This checklist should be followed exactly as detailed to successfully integrate Avid NT products on the
IBM Intellistation. Before starting system integration you will need:
•
•
•
•
•
•
Blank 2.0MB High Density Double Side diskettes
Tools such as a regular flat-blade screwdriver, 3/16 Nut driver, and anti-static protection.
MIDI Cable
Category 5 network Cable and port
IBM Ready to Configure CD-ROM
Windows NT Workstation Product License Identification
Note: For this document, revision (1.4) integration steps and responsibility are divided between Avid
manufacturing and external reseller actions. Avid has defined where each integration action begins
and ends to facilitate proper system configuration.
Integration Step
Read General
Information Section
Avid Manufacturing Action Required
Read the General Information section to familiarize yourself with this document’s
purpose, conventions, and design.
Reference section 1
Read System
Description Section
Read the System Description section to familiarize yourself with the system platform.
Reference sections 3.1 through 3.7
Inventory System
Inventory the system to insure all parts are present.
Remove system unit
side panel
Remove left side panel from system unit by grasping and pulling the thumb hold, then
sliding cover towards the front of the system unit.
Check connections
and switches
Check all system board connections to insure shipment has not damaged or loosened
cables. Check that the processor is secure and a terminator is present if required.
Check system board switches for correct values.
Reference sections 5.1 through 5.4
Avid Technology Systems Engineering
System Integration Checklist
Page - 11
IBM Intellistation M-Pro (6889) System Integration and Reference Guide
Rev 15
MediaComposer, Symphony and Xpress NT
Integration Step
Connect Keyboard
and Mouse
Avid Manufacturing Action Required
Connect the keyboard to the keyboard port on the rear I/O connector panel.
Connect the IBM PS2 mouse to the PS2 mouse port on the rear I/O connector panel.
Reference section 5.3 for connector location.
Connect Monitor to
VGA connector
Check and add
memory if needed.
Connect a single monitor to the AGP graphics card.
Reference section 5.3
Verify memory is secure and add additional DIMMs if required. Symphony and Xpress
ship with different amounts of memory as standard configuration.
Reference sections 5.5 through 5.5.2 for full instructions.
Add MIDI Cable to
system
A MIDI/Game/Joystick cable may be installed to the port header on the system board
to allow the use of automated MIDI fader peripherals. Refer to the System Board
Graphic diagram in the Hardware Configuration section of this document for the
header location.
Reference section 5.6.3 for full instructions.
Connect Power Cord
Connect power cord to the system unit. System will power up for a brief interval and
then shutdown.
Power up system
Power up the system and check that the IBM logo is visible on the display. If no screen
information (blank monitor), correct the problem.
Perform and verify all required BIOS changes. Press F1 to enter BIOS. The BIOS
screens will appear after the system has completed a scan of the Adaptec 7895
device.
Configure BIOS
Parameters.
Check the version of the BIOS matches one of the valid versions on the chart in
section 4.1. DO NOT UPDATE THE BIOS. If the BIOS revision is not reflected on the
chart in section 4.1, contact Avid Systems Engineering immediately.
We recommend you DO NOT set BIOS parameters from a restoration diskette.
Key parameters to configure are PCI Parity, Bus Mastering, Startup Sequence, Power
Management
Reference sections 4 through 4.11 for full instructions.
Avid Technology Systems Engineering
System Integration Checklist
Page - 12
IBM Intellistation M-Pro (6889) System Integration and Reference Guide
Rev 15
MediaComposer, Symphony and Xpress NT
Integration Step
Avid Manufacturing Action Required
Configure the on-board Adaptec 7895 controller. Press “Ctrl A” to enter the Adaptec
BIOS when displayed on the monitor.
Configure Adaptec
7895 SCSI
Parameters.
Key parameters to configure are Bus Bandwidth setting to 20MB/s for all devices on
channels A and B.
Reference sections 5.6.1 through 5.6.1.2 for full instructions.
Check Network
Interface hardware
configuration
Verify that system board SW1-6 switch is OFF. Verify that Ethernet Support is enabled
in the BIOS Devices and I/O Ports and the Network device is enabled for bus
mastering in the BIOS Advanced Setup.
Reference sections 4.5, 4.9, 5.2 and 5.6.2 for full instructions.
This procedure assumes Windows NT Workstation is pre-installed on the system drive
by the platform vendor and will require build completion. Completing the platform
vendor installation is the most reliable method of achieving a successful Windows NT
configuration on the system unit. Completing the platform vendor installation will
automatically update the system to Windows NT Service Pack 4. Time to complete a
pre-installed automated procedure is approximately fifteen minutes.
Other acceptable methods to install Windows NT Workstation are:
Boot pre-installed
version of Windows
NT and complete
installation.
1.
Manually, using the Windows NT Setup diskettes and Windows NT Distribution
Media CD-ROM.
2.
Rapid Deployment
Regardless of the method used to create the system disk, the following information is
required by Avid Systems Engineering to complete the installation.
•
Company Name and Organization:
Name: Avid Technlogy
Organization: Avid Technology
•
End User License product registration ID.
•
Computer Name: AvidTechnology
•
Administrator account password: No password assigned
•
Site network requirements are understood. Minimum network requirements
defined by Avid Systems Engineering are:
1.
2.
3.
Network adapter search for 82557
TCP/IP protocol only applied
DHCP configured
Reference section 6.3 for detailed instructions.
Avid Technology Systems Engineering
System Integration Checklist
Page - 13
IBM Intellistation M-Pro (6889) System Integration and Reference Guide
Rev 15
MediaComposer, Symphony and Xpress NT
Integration Step
Avid Manufacturing Action Required
Verify or Install
Windows NT Service
Pack 4
Verify that Windows NT Service Pack 4 is installed. If not, installation of the service
pack will be necessary.
Detailed instructions and references are in sections 6 through 6.6.4
Install Y2K compliant
components
Execute Y2Ksetup from the service pack 4 I386\Update directory and install Internet
Explorer 4.01 and MDAC components.
Reference section 6.6.2 through 6.6.4 for detailed instructions.
Copy SP4 contents to
System Disk
If the system was originally supplied with Service Pack 3 on the system disk, delete
the service pack 3 directory. If you installed Service Pack 4 from a CD-ROM, copy the
\I386 directory from the Service Pack 4 CD-ROM to C:\SP4. Also copy the CD
directories \Msie401 (for Microsoft Internet Explorer 4.01 Service Pack 1) and \Mdac
(for Microsoft Data Access Components 2.0 Service Pack 1) to C:\SP4.
If Service Pack 4 was applied via downloads, move the downloaded compressed
images to C:\SP4.
Reference section 6.6.7 for more instructions.
Configure Windows
NT Explorer View
To assist installation and configuration procedures, set the Windows NT Explorer view
to display all files, including hidden files. Use the Explorer View menu and tab to make
the changes.
Full instructions and references are in section 6.7.1
Disable Screen
Savers
Screen savers must be disabled to avoid interference during processor intensive
operations such as exports or long rendering sessions. Access the Display Control
Panel Settings tab to make changes.
Full instructions and references are in section 6.7.2
Check the Temp
directory and variable
Most installations of Windows NT configure the system TEMP variable properly.
However, this should be verified to avoid installation or application problems. Verify
the TEMP directory is present on the system disk (C:) and the TEMP variable is
present in the System section of the System Control Panel Environment page.
Full instructions and references are in section 6.7.4
Avid Technology Systems Engineering
System Integration Checklist
Page - 14
IBM Intellistation M-Pro (6889) System Integration and Reference Guide
Rev 15
MediaComposer, Symphony and Xpress NT
Integration Step
Format remaining
system disk space
and create an
applications partition.
Avid Manufacturing Action Required
If the system disk drive has unformatted space you must use the disk administrator to
allocate this unused space as an additional primary partition. Quick format the new
partition choosing NTFS for the file system
When formatting is complete you must insure this partition is assigned drive letter D:.
To do this you may need to move the CD-ROM to an unused letter other than D and
assign drive letter D to the partition.
Full instructions and references are in section 6.7.5
Create a “Users”
Directory and Add
the user account
AvidTechnology
Since the administration of individual user accounts is site specific, Avid and its
resellers will configure the system with two NT administrative privileged accounts for
consistency, demonstration, and troubleshooting. Create a “Users” directory on drive
D. Use the NT User Manager
Account Name
Administrator
AvidTechnology
Password
No password assigned
No password assigned
Privileges
Administrator
Administrator
Full instructions and references are in section 6.7.6
Use Regedt32 or Regedit to make modifications to the NT Registry.
HKLM\SYSTEM\CurrentControlSet\Services\Cdrom\Parameters
\AutoRun to 0
Perform NT Registry
Modifications
HKLM\SYSTEM\CurrentControlSet\Services\Kybd\Parameters
\KeyboardDataQueueSize to 128H
HKLM\SYSTEM\CurrentControlSet\Services\Mousclass\Parameters
\MouseDataQueueSize to 128H
Full instructions and references are in sections 6.7.7 through 6.7.7.3
Configure serial ports COM1 and COM2 using the Ports Control Panel. Settings for
each ports are:
Configure Serial
Ports
Baud Rate :
Data Bits :
Stop Bits :
Parity :
Flow Control :
38400
8
1
None
None
Full instructions and references are in section 6.7.8
Configure Windows
NT Event Viewer
Set the NT event logs System, Application, and Security to preserve entries instead of
overwriting.
Full instructions and references are in section 6.14.2
Avid Technology Systems Engineering
System Integration Checklist
Page - 15
IBM Intellistation M-Pro (6889) System Integration and Reference Guide
Rev 15
MediaComposer, Symphony and Xpress NT
Integration Step
Configure Windows
NT Crash Dump
Recovery
Avid Manufacturing Action Required
Configure the System Control Panel Startup/Shutdown Recovery options to preserve a
crash dump file. Do not restart when asked. Changes to the file are effective after the
next system restart.
Full instructions and references are in section 6.14.3
Configure the
Pagefile
Configure a 300MB pagefile on the system partition (C:). Set the minimum and
maximum size to 300MB using the System Control Panel Performance tab. Do not
restart when asked. Changes to the page file are effective after the next system
restart.
Full instructions and references are in section 6.15
Replace the NT HAL
To facilitate MIDI operations with the Crystal CS4235 audio chip and service pack 4,
the NT APIC HAL must be replaced.
Reference sections 6.16 through 6.16.2 for more instructions.
Verify or install
Adaptec SCSI device
driver
The Adaptec SCSI device driver is installed and started as part of the NT pre-load
build by IBM. Verify the driver AIC78XX.SYS is at the recommended revision level
reflected on the driver chart in section 7.1.
Full instructions and references are in section 7.3 through 7.3.2
Verify or install
network interface
device driver
The EtherExpress Pro100B is based on the Intel 82558 chip. This interface is a
replacement for the Intel 82557. It is not the same as the Intel 82557-based 10/100
Ethernet PCI interface available as an option during Windows NT 4.0 network software
installation. If the interface is improperly specified during default Windows NT
installation it will NOT function although the drivers will display no indication of error
during installation of networking.
Verify the device driver E100BNT.SYS reflects the recommended revision level
reflected on the driver chart in section 7.1.
Verify or install
Crystal Audio device
driver
Install MIDI Drivers
The Crystal Audio CS4235 device driver must be enabled on shipping systems. Use
the Multimedia Control Panel to check the properties of the Audio Device.
Full instructions and references are in section 7.7.1
Configure the MIDI device driver resources. Remember the MIDI driver resources
require IRQ 9 to function successfully. Restart system as part of the installation
procedure.
Reference section 7.7.3 for full instructions.
Disable Computer
Browser service
Use the Services Control Panel to disable the Computer Browser Service.
Full instructions and references are in section 8.3
Avid Technology Systems Engineering
System Integration Checklist
Page - 16
IBM Intellistation M-Pro (6889) System Integration and Reference Guide
Rev 15
MediaComposer, Symphony and Xpress NT
Integration Step
Avid Manufacturing Action Required
Install Adaptec EZSCSI kit.
Install EZ SCSI kit from IBM Ready to Configure kit. Do not restart the system.
Create Windows NT
Factory Default
Emergency Repair
Disk.
Create Windows NT Factory Default Emergency Repair Disk. Open a command
prompt and type rdisk /s to create the repair disk.
Reference section 9.1 for instructions.
Power Down System
and prepare system
for shipment
Avid Technology Systems Engineering
- END AVID MANUFACTURING -
System Integration Checklist
Page - 17
IBM Intellistation M-Pro (6889) System Integration and Reference Guide
Rev 15
MediaComposer, Symphony and Xpress NT
Integration Step
Read General
Information Section
Reseller Action Required
Read the General Information section to familiarize yourself with this document’s
purpose, conventions, and design.
Reference section 1
Read System
Description Section
Read the System Description section to familiarize yourself with the system platform.
Reference sections 3.1 through 3.7
Before completing integration and installing the system at a customer location you
should discuss the customer networking environment and requirements. Site
requirements may necessitate changes to the Windows NT configuration as shipped.
Determine what additional protocols the customer will require. Additional protocols will
access to the Windows NT Distribution CD-ROM and re-application of Service Pack 4
on the system. Changes will also require replacement of the NT HAL.
Determine Customer
Network
Requirements
Determine what the customer computer name and IP parameters will be in advance.
Systems are shipped from Avid with the following networking parameters:
•
Company Name and Organization:
Name: Avid Technology
Organization: Avid Technology
•
Computer Name: AvidTechnology
•
TCP/IP protocol applied with DHCP configured.
Inventory System
Inventory the system to insure all parts are present.
Remove system unit
side panel
Remove left side panel from system unit by grasping and pulling the thumb hold, then
sliding cover towards the front of the system unit.
Connect Keyboard
and Mouse
Connect the keyboard to the keyboard port on the rear I/O connector panel.
Connect the IBM PS2 mouse to the PS2 mouse port on the rear I/O connector panel.
Reference section 5.3 for connector location.
Connect Monitor to
AGP VGA connector.
Connect Power Cord
and Power up system
Connect a single monitor to the AGP graphics card.
Reference section 5.3 for connector location.
Connect power cord to the system unit. System will power up for a brief interval and
then shutdown. Apply power to the system and check that the IBM logo is visible on
the display. If no screen information (blank monitor), correct the problem.
Avid Technology Systems Engineering
System Integration Checklist
Page - 18
IBM Intellistation M-Pro (6889) System Integration and Reference Guide
Rev 15
MediaComposer, Symphony and Xpress NT
Integration Step
Reseller Action Required
This system was pre-built to a certain point. Before commencing with Avid Symphony
or Xpress board and software installation, you should perform a quick review of the
system as shipped by Avid. If any areas checked do not match this integration guide
you must correct the discrepancies and report them to Avid.
Verify the following areas:
1.
Power on system and enter the system BIOS by pressing F1
2.
Spot check the following BIOS areas:
Devices and I/O Ports
USB Support = Disabled
Ethernet Setup/ Ethernet Support = Enabled
Network Boot = Disabled
Advanced Setup
PCI Parity = Disabled
Network Adapters = Enabled
Power Management
ACPI BIOS Mode = Disabled
APM = Disabled
Verify system
integrity from Avid
manufacturing
3.
Exit the system BIOS and restart the system.
4.
Enter the Adaptec 7895 BIOS by pressing Ctrl A when displayed on-screen.
5.
Spot check the following Adaptec 7895 ROM settings:
Sync Transfer Rate is set to 20MB/s for all SCSI ID on channel A
Sync Transfer Rate is set to 20MB/s for all SCSI ID on channel B.
6.
Boot Windows NT and log on to the system.
User Name: Administrator (No password required. Press “Enter”)
7.
Verify Windows NT Service Pack 4 is installed on the system. Refer to section 6.4
for instructions.
8.
Check that the minimum and maximum pagefile size is set to 300MB. Use the
System Control Panel Performance tab to review the pagefile size.
9.
Check that the system has only one Hardware profile assigned. This should be
“Original Configuration”. Use the System Control Panel Hardware Profiles tab to
review.
10. Verify that MIDI device drivers were installed properly on the system. Launch
Windows NT Diagnostics from the Administrative Tools program group. Open the
resource tab and insure that the MPU-401 device is at IRQ 9.
11. Verify the Windows NT HAL.DLL file size is 52,384 bytes.
12. Check that the Organization is equal to the Avid Technology. Select My
Computer, right mouse click and choose Properties. The second line under
“Registered to:” is the organization. This will require modification further in the
integration process.
Avid Technology Systems Engineering
System Integration Checklist
Page - 19
IBM Intellistation M-Pro (6889) System Integration and Reference Guide
Rev 15
MediaComposer, Symphony and Xpress NT
Integration Step
Read the PCI Board
Configuration
Sections
Remove AGP
Graphics Card
Install Adaptec F940
Fibre Channel
Install Adaptec 3940
SCSI Adapter
Install Meridien
Digital Media Board
and 3D DVE board.
Reseller Action Required
Read the PCI Board Configuration section and charts to understand the proper slot
utilization and requirements for Avid hardware.
Reference sections 5.8 through 5.8.2 for more information.
The AGP graphics card supplied with the IBM Intellistation system must be removed
before installing the Avid Meridien Display Controller (EDC) board.
The board must be shipped with the system for troubleshooting purposes.
If present, install the Adaptec F940 Fibre Channel board in the system.
Reference section 5.9 for more information.
If present, install the Adaptec 3940 SCSI board in the system.
Reference section 5.10 for more information.
If you are configuring a system with the 3D DVE board set, connect the cables from
the board set to the Avid Meridien Digital Media Board.
Install Avid Meridien Digital Media Board and 3D DVE module in the system.
Reference sections 5.11 and 5.13 for detailed instructions.
Install the Avid Edit
Display Controller
Connect Display
Monitors
Install the Avid Edit Display Controller in the system.
Reference section 5.12 for detailed instructions.
Connect the primary and secondary display monitor (if present) to the EDC Boot and
Edit connectors.
Reference section 5.12 for detailed instructions.
Attach Dongle to
Parallel Port
Connect Meridien I/O
Breakout Box (BOB)
Attach the application key (dongle) to the parallel port.
Reference section 5.3 for connector location.
Connect the cable between the Meridien Digital Media Board connector labeled “M”
and the Meridien I/O Breakout Box (BOB).
Full instructions and references are in section 5.14
Avid Technology Systems Engineering
System Integration Checklist
Page - 20
IBM Intellistation M-Pro (6889) System Integration and Reference Guide
Rev 15
MediaComposer, Symphony and Xpress NT
Integration Step
Reseller Action Required
Connect disk drives to the appropriate disk controller, either SCSI or Fibre Channel.
What drive types and how they are configured is dependent on the end-user
requirements and where the system is built or tested.
Connect Disk Drives
Channel Configuration - If you are testing the configuration before delivery, configure
either the customer disk drives or use a set of drives from your test-bed.
End-User Configuration – Configure drives based on operational requirements.
Power up system.
Verify yellow LED on EDC board is flashing in a steady state, approximately once per
second.
Verify disk drives are
identified on SCSI
adapters.
If any disk drives are connected to SCSI adapters on the system, verify the SCSI
adapter BIOS scan identifies each disk drive. If not, power down the system and check
cables and termination.
If present in the system, configure the Adaptec 3940 controller BIOS parameters.
Press “Ctrl A” to enter the Adaptec BIOS when displayed on the monitor.
Configure Adaptec
3940 SCSI
Parameters
Key parameters to configure are Bus Bandwidth setting to 20MB/s for all devices on
channels A and B.
Reference sections 5.10.1 through 5.10.2 for full instructions.
Select VGA Mode
from Windows NT
boot menu
Allow operating system to boot in basevideo VGA mode by choosing the VGA option
in the Windows NT boot menu.
Disable the MGACtrl
service
If the system has a Matrox Millenium or G200, disable the MGACtrl Service. Refer to
section 7.2 for more information.
Install Adaptec Fibre
Channel device driver
If the board is present in the system, install the Adaptec Fibre Channel device driver.
Avid supplies this driver on diskette with each F940 option.
Refer to section 7.4 through 7.4.2 for detailed instructions.
Install the Avid
application software
Install EDC Number
Nine display driver
Insert the Avid Symphony or Xpress CD-ROM in the driver and open the Windows NT
Explorer. Choose and double-click Setup.EXE. Install Avid Symphony or Xpress on
drive D:. Do not restart when asked.
Install the Avid Edit Display Controller (EDC) Number Nine display driver and reboot
the system.
Reference sections 7.6 through 7.6.1 for more information.
Avid Technology Systems Engineering
System Integration Checklist
Page - 21
IBM Intellistation M-Pro (6889) System Integration and Reference Guide
Rev 15
MediaComposer, Symphony and Xpress NT
Integration Step
Complete Number
Nine Display Driver
setup
Verify the Media
board driver starts
Reseller Action Required
Choose resolution 1024 x 768 for single monitor systems or 2048 x 768 for multiple
monitor systems. Test the resolution and apply the change.
Reference sections 7.6.1 for more information.
Examine the Devices Control Panel and verify the Meridien Digital Media board device
driver started.
Reference section 7.5 for more information.
Verify the EditDMA
driver starts
Verify the 3D DVE
board driver starts.
Examine the Devices Control Panel and verify the EditDMA device driver started.
Reference section 7.6.2 for more information.
Examine the Devices Control Panel and verify the 3D DVE board device driver started.
Reference section 7.10 for more information.
Verify the Sentinel
driver starts.
Perform hardware
confidence tests with
Avid System Test
Create Hardware
Profiles
Examine the Devices Control Panel and verify the Sentinel device driver started.
Reference section 7.11 through 7.11.1 for more information.
Perform functional confidence tests using Avid System Test. For more information
about Avid System Test refer to the Avid Symphony or Xpress Setup Guide.
Create Hardware Profiles
Refer to section 6.11 for more information.
Use Regedit or Regedt32 to change the Windows NT registration information so it
reflects the end-user customer and organization.
Change System
Ownership Fields in
NT Registry
HKLM\SOFTWARE\Microsoft\Windows NT\CurrentVersion\RegisteredOrganization to
End User Organization
HKLM\SOFTWARE\Microsoft\Windows NT\CurrentVersion\RegisteredOwner to End
User Owner
Refer to section 6.12 for more information.
Avid Technology Systems Engineering
System Integration Checklist
Page - 22
IBM Intellistation M-Pro (6889) System Integration and Reference Guide
Rev 15
MediaComposer, Symphony and Xpress NT
Integration Step
Reseller Action Required
Since you are this far in the process, all Avid recommended hardware, drivers, and
applications are successfully installed and tested and the system is as close to
SHIPPING configuration as possible.
Create Windows NT
Repair Disk
(Avid Operational
ERD)
Label a diskette “Avid Operational ERD”. Open a command prompt and type rdisk /s to
create the repair disk.
If you will be testing the customer disk drives and configuration as part of your
integration process, re-create the Operational ERD when ready to sign the system
over to the customer.
Full instructions and references are in section 9.1
Create a Windows NT Boot disk by copying the following files to a diskette:
Create a Windows NT
Boot Disk
BOOT.INI
NTDETECT.COM
BOOTSECT.DOS (If it exists)
NTLDR
Full instructions and references are in section 9.3
Channel Configuration - If you are testing the configuration before delivery, configure
either the customer disk drives or use a set of drives from your test-bed.
Software Configure
Disk Drives
End-User Configuration – Configure drives based on operational requirements.
Configure the drives in an NTFS stripe set based on the resolution matrix in section
10.10. Launch the Disk Administrator in the Administrative Tools program group to
create the stripe set.
Perform Application
Test
Delete DISK Key
Launch Avid application to verify the application and hardware can communicate
properly. Use your own confidence routines, but try to exercise key areas within the
applications. Suggested areas to cover include a quick digitize operation, simple
sequence construction, and titles. If you have a 3D DVE board installed you should
test a couple real time effects.
If the drives you used to test the system will not be installed at the customer site you
must remove the DISK key from the NT registry to avoid nuisance event entries about
missing FT members. If you configured the customer drives, do not delete the disk
key.
Reference section 9.6 for more information.
Shutdown Windows
NT and prepare the
system for delivery
Integration process is complete.
Avid Technology Systems Engineering
System Integration Checklist
Page - 23
IBM Intellistation M-Pro (6889) System Integration and Reference Guide
Rev 15
MediaComposer, Symphony and Xpress NT
Avid Technology Systems Engineering
System Integration Checklist
Page - 24
IBM Intellistation M-Pro (6889) System Integration and Reference Guide
Rev 15
MediaComposer, Symphony and Xpress NT
3.
IBM Intellistation M-Pro System Description
This section describes the features and components of the IBM Intellistation M-Pro Model 6889
workstation.
3.1
System Board Overview
The IBM Intellistation M-Pro workstation is based on an IBM designed extended ATX system
board using the Intel 440BX AGPset as its foundation.
Processor
The system board accepts up to two Intel Pentium II or Pentium III processors. Because the
system board is capable of dual processors there is an Intel APIC present to provide interrupt
control and mapping. Direct user control of the mapping parameters is not possible, nor is
control of the APIC. Current processor specifications supported on this system:
Processor(s):
Processor clock speed:
SECC Format:
Math co-processor:
L1 internal cache:
L2 external cache std/max:
L2 external cache type:
L2 cache organization:
Up to two Intel Pentium II or two Pentium III
Pentium II 350,400,450MHz
Pentium III 450, 500MHz
Slot 1
Built-in
32KB
512KB / 512KB
ECC Write-back synchronous pipeline burst
4 way set associative non-blocking
Chipset
The system board is designed around the Intel 440BX AGPset core logic which implements a
100MHz front side system bus. The 440BX AGPset also provides a memory controller,
multifunction logic for peripheral interfacing, as well as data paths and control for the AGP and
PCI buses.
AGP Interface
The system board implements one accelerated graphics port (AGP) slot. Designed to accept
a video graphics device, AGP is a 64-bit high performance interface intended to off load video
data from the PCI bus.
PCI Bus
The system board has five PCI slots arranged as a single non-bridged bus. PCI slot 1 (closest
to the processor) has a extension slot for an Adaptec ARO1130 RAIDport board. PCI slot 5 is
considered shared with the ISA slot. The bus width is 32-bits and clock speed is fixed at
Avid Technology Systems Engineering
System Description
Page - 25
IBM Intellistation M-Pro (6889) System Integration and Reference Guide
Rev 15
MediaComposer, Symphony and Xpress NT
33MHz. Each slot is capable of bus mastering, is compliant with the PCI 2.1 specification, and
accepts 5 volt or 3.3 volt full length interface cards.
ISA Bus
The system board has one ISA slot that is shared with the last PCI slot. The bus width is 16bits and speed is fixed at 8.3MHz. The slot accepts 5-volt interface cards only.
Additional devices are configured to the ISA bus through the Intel PIIX4 Multi-Function I/O
logic.
IDE Bus Master Interface
The system board has a PCI Bus Master IDE interface implemented by the Intel PIIX4 logic.
Two IDE busses, primary and secondary, are provided via two 40-pin connectors on the
system board. Up to four IDE devices can be attached to the system board connectors using
ribbon cables. On each bus, one IDE device is designated as the primary (master) device,
while the other is designated the secondary (slave) device. These designations are
determined by switch or jumper settings on each IDE device. If a single device is connected to
a bus, it must be designated as a primary device.
IBM designates IDE 1 for the primary IDE bus, and IDE 2 for the secondary bus. These
designations may change in the system BIOS if one bus is disabled.
Adaptec 7895 Ultra-Wide SCSI
The system board includes an integrated Adaptec 7895 dual channel Ultra-Wide SCSI
controller. One 16-bit channel is routed internally to provide support for a SCSI system drive
and/or expansion bay peripherals. The second channel is routed to the rear of the system
providing a connection for external 16-bit SCSI peripherals. The system board also includes a
connector to route an 8-bit SCSI chain with appropriate cables. Use of the 8-bit connector
forfeits configuration of one 16-bit channel.
Intel EtherExpress Pro100B Network Interface
An integrated Intel EtherExpress PRO100B 82558 network interface provides 10/100 BaseT
ethernet connectivity capability.
Crystal Audio Sound
A Crystal Audio 4235 audio sound chip provides 16-bit audio capability and support for MPU401 MIDI emulation in single processor systems with a special Windows NT installation
procedure.
Memory
Four 128-pin DIMM slots are present on the system board providing support for up to 1GB of
physical host memory at current densities. See the Hardware Configuration section for more
information about the memory requirements.
Avid Technology Systems Engineering
System Description
Page - 26
IBM Intellistation M-Pro (6889) System Integration and Reference Guide
Rev 15
MediaComposer, Symphony and Xpress NT
Ports
Serial Ports - There are two external 9 pin DB9M serial ports implemented on the system
board. Each port employs a 16550 UART with 16 byte buffers.
Parallel Ports - One external 25 pin DB25F parallel port with EPP/ECP capabilities is provided.
Sound/MIDI- Accepts audio line in, line out, and microphone through jacks on the rear of the
system box. MIDI/Joystick connection is accomplished through an optional cable routed from
the system board to the rear of the system.
USB - Two USB headers are provided.
3.2
3.3
Configured Peripherals
•
System Disk - Varies size may vary by system model but must be a SCSI bus type device.
•
CD-ROM - All CD-ROM drives are IDE bus designs. The drive manufacturer and model
varies by system model.
•
Diskette Drive - All diskette drives are 3.5 inch 1.44 MB units. The drive manufacturer and
model varies by system model.
Chassis
The system components are housed in a mini-tower chassis. Layout is straightforward and
clean with no obvious areas that would create maintenance difficulties. Airflow is applied to the
card area by one fan and system drive has a dedicated fan. A single fan with a shroud
attachment redirects airflow directly to the processors. The power supply has one fan.
Expansion Bays
1. Can accommodate an additional one 3.5-inch half-height disk drive internally.
2. Can accommodate one additional 5.25-inch externally accessible peripheral.
3. The number of bulkhead card panel slots is limited to the number of add-in card slots.
Power Control
1. The system has a delayed acting power switch. To power down the system the switch
must be depressed for approximately five seconds.
2. The system will briefly cycle power if the power line cord is attached. This is a normal
condition. Always wait a few seconds before installing or removing any devices from
the system.
3. The AC line voltage is automatically configured via an auto-sensing 330W power
supply.
Avid Technology Systems Engineering
System Description
Page - 27
IBM Intellistation M-Pro (6889) System Integration and Reference Guide
Rev 15
MediaComposer, Symphony and Xpress NT
3.4
Keyboard
IBM supplies a Windows 95 104 key standard PS/2 style keyboard with each system. Avid
replaces this keyboard with a customized keyboard featuring labeled keycaps for the
Symphony and Xpress NT products.
3.5
Mouse
Depending on the model, a three button Windows mouse or Microsoft two button mouse is
standard. The mouse port accepts only PS/2 style male connectors.
3.6
Graphics Cards and Monitors
IBM offers three graphics card choices with the Intellistation. Some Avid products such as
Symphony require removal of the standard AGP graphics card in favor of an Avid
designed Edit Display Controller (EDC). For more information, consult the Hardware
Configuration and Windows NT Device Drivers sections of this document.
Standard Graphics Cards and Resolution
Matrox Millenium II or G200 AGP-based with 8MB (16MB max) of on-board memory. Provides
resolutions up to 1600 x 1200 @65K colors. This is the recommended choice for standard
business 2D graphics.
PERMEDIA 2 enhanced AGP-based with 8MB of on-board memory. Provides resolutions up
to 1600 x 1200 @65K colors. This is the recommended choice for entry level 3D graphics.
Intergraph Intense 3D Pro 3400, PCI-based 16MB std./max frame buffer (SDRAM) and 16MB
(SGRAM) of texture memory. Provides 32-bit (true color) 16M colors at 1280 x 1024. An
optional Intergraph Intense 3D Pro 3400GA Geometry and Lighting Accelerator is available.
This is the recommended choice for advanced 3D graphics.
Monitors
Systems may be purchased with or without monitors. Depending on the Avid product intended
for use with the Intellistation two display monitors may be required. For more information on
display monitors, consult the Hardware Configuration section of this document.
Avid Technology Systems Engineering
System Description
Page - 28
IBM Intellistation M-Pro (6889) System Integration and Reference Guide
Rev 15
MediaComposer, Symphony and Xpress NT
3.7
IBM Intellistation Models and Options
IBM Model
688924U
688964U
688952U
Processor
400 MHz
400 MHz
P3-500 MHz
Disk
4.2GB SCSI
4.2GB SCSI
9.1GB SCSI
Std Memory
128MB
128MB
128MB
Graphics Card
Matrox Millenium II AGP
Matrox G200 AGP
Matrox G200 AGP
Models shipped by Avid since Symphony and Xpress NT introduction.
Avid Technology Systems Engineering
System Description
Page - 29
IBM Intellistation M-Pro (6889) System Integration and Reference Guide
Rev 15
MediaComposer, Symphony and Xpress NT
Avid Technology Systems Engineering
System Description
Page - 30
IBM Intellistation M-Pro (6889) System Integration and Reference Guide
Rev 15
MediaComposer, Symphony and Xpress NT
4.
BIOS
Modifications to certain system BIOS parameters must be made for proper operation. Press
F1 to enter the BIOS during a cold power up of the system. Use the arrow keys on the
keyboard to navigate the BIOS menus. Reset all BIOS parameters to the default values by
selecting “Load Default Settings” from the BIOS menu and reference the following charts for
BIOS information and required changes.
Verify and adjust all parameters to reflect the chart. There may be slight variations between
the parameter values listed here and the specific system model being configured.
When changes are completed select “Save Settings” then “Exit Setup”.
4.1
BIOS Revisions
Vendors commonly release BIOS updates to add new features or correct problems. Always
consult with Avid Systems Engineering before applying a BIOS update as changes may have
an integration impact. Never downgrade the BIOS revision in the system unless Avid Systems
Engineering or the platform vendor issue explicit instructions to do so. It is also not advisable
to update the BIOS to a more recent revision as long as the revision in the system is at
the accepted minimum for the processor type configured.
Should a BIOS update be necessary, the procedure is included in this section.
Current Revision Matrix
Revision
NUKT35AUS
NUKT34AUS
NUKT33AUS
NUKT32AUS
NUKT31AUS
NUKT30AUS
NUKT29AUS
NUKT28AUS
NUKT27AUS
Status
BIOS Date 3/25/99
BIOS Date 2/12/99
Not Released
BIOS Date
12/08/98
Not Released
BIOS date
10/19/98
BIOS date 8/7/98
Not Released
BIOS date 7/8/98.
Avid Technology Systems Engineering
Key Feature
Graphics PROM init code
Pentium III support
Expansion Chassis Support
Minimum revision for MIDI port
functionality.
BIOS Configuration
Page - 31
IBM Intellistation M-Pro (6889) System Integration and Reference Guide
Rev 15
MediaComposer, Symphony and Xpress NT
4.2
BIOS Groups
The chart represents the Intellistation BIOS group categories. Each category may be selected
by navigating with the keyboard arrow direction keys and pressing the enter key.
System Summary
Product Data
Devices and I/O
Ports
Start Options
Date and Time
System Security
Advanced Setup
ISA Legacy
Resources
Power Management
Save Settings
Restore Settings
Load Default Settings
Exit Setup
Basic information about the processor and other integrated system
devices
Machine type, BIOS revision and date.
Integrated device information and setup.
Boot options, miscellaneous configuration.
System date and time.
Remote administration, hardware password protection.
ROM shadowing, PCI configuration
Memory, I/O, and interrupt resource assignments.
ACPI and APM configuration.
Commits parameter changes
Restores previous values
Firmware default values
Avid Technology Systems Engineering
BIOS Configuration
Page - 32
IBM Intellistation M-Pro (6889) System Integration and Reference Guide
Rev 15
MediaComposer, Symphony and Xpress NT
4.3
System Summary
Verify the information displayed in this category accurately reflects the system configuration.
These values are not user modifiable. Any errors in the configuration must be
corrected through other BIOS sections.
Category
Processor
Processor Speed
Dual Processor
Installed
L2 Cache Size
Cache State
System Memory
Memory Type
Video Controller
Default Value Comments
CPU Type
Verify processor type matches the type in your system.
CPU Speed Verify processor speed matches.
Not Installed
512KB
Enabled
128MB
Verify memory size is correct for installed amount
Memory Type Should reflect ECC unless types are intentionally mixed.
Indicates the Vendor AGP based video device. Normally
Matrox
Ethernet Support Enabled
Audio Support
Enabled
SCSI Support
Enabled
The SCSI controller must be enabled in the Devices and I/O
Ports screen.
Diskette Drives
Drive Type
Verify one diskette drive is detected.
IDE Hard Drives Drive Type
Should reflect any configured devices.
CD-ROM Drives Drive Type
Should reflect any configured devices.
4.4
Product Data
The values in the Product Data Group are not user modifiable.
Category
Machine/Model Type
Default Value Comments
6889xxx
Machine 6889 Model Type xxx
(Where xxx identifies the model).
Flash EEPROM
NUKTxxAUS
Revision Level
Boot Block Rev Level Unique
identifier
System Board
Unique
Identifier
identifier
System Serial Number Unique
identifier
System UUID
Unique
identifier
BIOS Date
Varies
Avid Technology Systems Engineering
1. 512K ROM (All systems use this size flash ROM)
2. Revision Will Vary
Unique identifier
Unique identifier
Unique identifier
Unique identifier
BIOS Configuration
Page - 33
IBM Intellistation M-Pro (6889) System Integration and Reference Guide
Rev 15
MediaComposer, Symphony and Xpress NT
4.5
Devices and I/O Ports
Change the parameter values to reflect the chart values. Default values may differ between
systems.
Category
SubCategory
Mouse
Recommended Value
Installed
Diskette Drive A
1.44 MB 3.5"
Diskette Drive B
Not installed
Serial Port Setup Serial Port A Address
Serial Port A IRQ
Serial Port B Address
Serial Port A IRQ
USB Setup
USB Support
USB Kybd/MouseSupport
Parallel Port
Setup
Parallel Port
Parallel Port Mode
Video Setup
3
Disabled
Autodetect
378h
Extended
Parallel Port Extended Mode
DMA
No DMA
Parallel Port IRQ
7
Video Controller
Video Memory
Will reflect AGP card type installed.
8192 MB
PCI or AGP Depends on card type
installed.
(This field appears beginning with Rev 32)
Unimportant
Palette Snooping
Disabled
Video Interrupt
Enabled
IDE Drives Setup IDE Hard Disk 0-3
IDE CD-ROM 0-3
SCSI Setup
2F8h
Bi-directional
Video Aperture
Ethernet Setup
4
Parallel Port Extended Mode
Primary Display
Audio Setup
3F8h
Configuration Dependent
High Performance
Audio Support
Enabled
Game / MIDI Port
Enabled
Ethernet Support
Enabled
Network Boot
Disabled
MAC Address
Hardcoded
SCSI Support
Enabled
Avid Technology Systems Engineering
BIOS Configuration
Page - 34
IBM Intellistation M-Pro (6889) System Integration and Reference Guide
Rev 15
MediaComposer, Symphony and Xpress NT
4.6
Start Options
Change the BIOS parameter values to reflect the chart values.
Category
Startup Sequence
Sub Category
Primary Startup
Sequence
Item
First Startup
Device
Second
Startup Device
Third Startup
Device
Fourth Startup
Device
Automatic Power On
Startup Sequence
Diskette Drive 0
CD-ROM
Hard Disk 0
Disabled
Disabled
First Startup
Device
Second
Startup Device
Third Startup
Device
Fourth Startup
Device
Error Startup Sequence
Unimportant
Unimportant
Unimportant
Unimportant
Primary
Keyboard NumLock State
On
Keyboard Speed
Fast
Disketteless Operation
Disabled
Keyboardless Operation
Mode
Disabled
Power On Self Test
4.7
Recommended Value
Quick
Power On Logos
Enabled
Power On F1/Esc Options
Enabled
Power On Status
Disabled
Virus Detection
Disabled
Date and Time
Change to reflect current date and time.
Category
Time
Date DD/MM/YYYY
Avid Technology Systems Engineering
Recommended Value
Current Time
Current Date
BIOS Configuration
Page - 35
IBM Intellistation M-Pro (6889) System Integration and Reference Guide
Rev 15
MediaComposer, Symphony and Xpress NT
4.8
System Security
Changes to the system security area should be conducted by end users only.
Category
Default
Values
Disabled
Enhanced Security
Secure IDE Devices and Diskette Drives
Remote Administration
Adapter ROM Security
AssetCare
Asset ID
4.9
Comments
Can only be changed when
flashing the system BIOS. See
IBM user documentation for more
information.
Enabled
No
Disabled
Disabled
Advanced Setup
Change the BIOS parameter values to reflect the chart values. Default values may differ
between systems.
Category
Sub Category
Cache Control
Cache State
Recommended Value
Enabled with ECC
L2 Cache Size
512KB
ROM Shadowing
PCI Control
System Dependent
PCI Adapter Reset
Enabled
PCI Parity
Disabled
PCI Bus Master
Network Adapters
Enabled
Mass Storage Adapters
Enabled
Display Adapters
Enabled
Multimedia Devices
Enabled
Communication Adapters
Enabled
Serial Adapters
Enabled
Plug and Play Control Set Device Node
Address Decode
Plug and Play Operating System
Processor Control
Processor 0 ID
Processor Updating
Avid Technology Systems Engineering
Disabled
16-Bit
No
System Dependent
Enabled
BIOS Configuration
Page - 36
IBM Intellistation M-Pro (6889) System Integration and Reference Guide
Rev 15
MediaComposer, Symphony and Xpress NT
4.10
ISA Legacy Resources
Change the BIOS parameter values to reflect the chart values. Default values may differ
between systems.
Category
Memory
Resources
I/O Port
Resources
DMA Resources
Interrupt
Resources
4.11
Description
Recommended Value
No Changes Required
No Changes Required
0
NMI
1
2
3
4
5
6
7
8
9
Keyboard
Cascade
Serial Port 1
Serial Port 2
Available
Diskette Drive
Parallel Port
Real Time Clock
ACPI
10
11
12
13
14
15
Available
Available
Mouse
Coprocessor
IDE Drives
IDE Drives
No Changes Required
Not modifiable
Not modifiable
Not modifiable
Serial Port 1
Serial Port 2
Available
Not modifiable
Parallel Port
Not modifiable
This will be reported as available after disabling
ACPI
Available
Available
Not modifiable
Not modifiable
Available
Secondary IDE (CD-ROM)
Power Management
This area of the BIOS contains extensive options relative to remote PC administration and
power management. Some of these items are not fully supported by Windows NT 4.0.
Specific power management changes should be conducted by end users only.
Category
ACPI BIOS Mode
Sub Category
APM
Disabled
Activity Monitor
Automatic Power On
Recommended Value
Disabled
Unimportant
Wake on LAN
Avid Technology Systems Engineering
Disabled
BIOS Configuration
Page - 37
IBM Intellistation M-Pro (6889) System Integration and Reference Guide
Rev 15
MediaComposer, Symphony and Xpress NT
4.12
Updating the System BIOS
Vendors commonly release BIOS updates to add new features or correct problems. It is not
advisable to update the BIOS to a more recent simply because a more recent version exists. If
a BIOS change is required, Avid Systems Engineering will release information relevant to the
update and how to obtain. DO NOT ARBITRARILY UPGRADE THE SYSTEM BIOS.
The following procedure should be used if a BIOS update is necessary. To create a flash
diskette you will need a formatted 2.0MB HD DS diskette. Open the Windows NT Explorer,
select the BIOS update file, and double click the BIOS update file to launch. Follow the
instructions on the display to create the diskette.
1. Before updating the system BIOS you should record any settings you made to the BIOS
configuration. Cycle power on the system and press F1 to enter BIOS configuration/setup.
2. Using the charts in this document as a guide, record all parameter values currently set in
the system BIOS. Some parameter settings may have to be re-entered after updating the
BIOS.
3. Power down the system and insert the Flash Diskette in the diskette drive.
4. Press ENTER to start the process.
5. Choose your country when prompted and press ENTER.
6. The system serial number is displayed and you are asked if you would like to update the
serial number.
•
If you choose "y" then you are prompted to enter the serial number. Choose N to
leave the existing serial number intact.
7. The machine model/type is displayed and you are asked if you would like to update the
model/type.
•
If you choose "Y" then you are prompted to enter the machine/model type. Choose N
to leave the existing model intact.
8. The application will inform you that your system can be enabled to use enhanced security
features. Choose N to bypass these features.
9. The application will ask you if you want to change the logos displayed during startup.
Choose N to leave the logo unchanged.
10. The current BIOS level on the system is compared to that on the flash update diskette.
•
If the BIOS levels are the same, a message is displayed stating
"The post/BIOS code in the system is the same version as that on the diskette. Press
ENTER to continue. Press ESC to cancel."
Your system does not require a BIOS update and you should cancel the
procedure by pressing the ESC key.
Avid Technology Systems Engineering
BIOS Configuration
Page - 38
IBM Intellistation M-Pro (6889) System Integration and Reference Guide
Rev 15
MediaComposer, Symphony and Xpress NT
•
If the BIOS level on the flash diskette is newer than the system ROM, you will receive
the message:
“The system post/BIOS is being updated. This may take up to 2 minutes. Do not
power off or restart the system during this procedure.”
•
If the BIOS level on the flash diskette is older than the system ROM, you will receive
the message:
“The post/BIOS code in the system is a newer version than that on the diskette if you
continue, the older version will replace the newer version in the system.”
If you press ENTER, you will receive the message:
“The system post/BIOS is being updated. This may take up to 2 minutes. Do not
power off or restart the system during this procedure.”
11. The update is complete and you should remove the diskette and press ENTER to reboot
the system.
12. Press F1 to enter the BIOS configuration/setup screens and verify/change all parameters
to the values you recorded in step 2.
13. Procedure is complete.
Avid Technology Systems Engineering
BIOS Configuration
Page - 39
IBM Intellistation M-Pro (6889) System Integration and Reference Guide
Rev 15
MediaComposer, Symphony and Xpress NT
Avid Technology Systems Engineering
BIOS Configuration
Page - 40
IBM Intellistation M-Pro (6889) System Integration and Reference Guide
Rev 15
MediaComposer, Symphony and Xpress NT
5.
Hardware Configuration
This section describes the specifics for reliable hardware configuration of Avid product on the IBM
Intellistation M-Pro. Follow all procedures and recommendations as detailed.
5.1
System Board Graphic
MIDI
Header
IBM 6889 System Board
Avid Technology Systems Engineering
Hardware Configuration
Page - 41
IBM Intellistation M-Pro (6889) System Integration and Reference Guide
Rev 15
MediaComposer, Symphony and Xpress NT
Item
1
2
3
4
5
6
7
8
9
10
11
12
13
14
15
16
17
18
19
20
21
22
23
24
25
26
27
28
29
30
31
32
33
34
35
36
37
38
Location
U25
U24
J5M1
J4
J2M1
J3
J10D1
J9B1
J11B1
J8F2
J8F1
J15
J10E1
J8F1
J12B3
J7E1
J5
J6
J12B1
SW1
J6D1
J13
J10F1
J4D1
J2E3
J1F1
J4F1
J7
Description
Secondary CPU or Terminator
Primary CPU
Power Connector
Secondary CPU Fansink Connector
Power Connector
Secondary CPU Fansink Connector
DIMM Slots 0 - 3
SCSI Channel B (16-bit)
Power Switch and LED Connector
Hard Disk LED Connector
Diskette Drive Connector
Primary IDE Connector
RFID Antenna Connector
SCSI Channel B (8-bit)
Secondary IDE Connector
Battery
Internal Speaker Connector
Clear CMOS Jumper
Front Panel Fan Connector
Front Panel Fan Connector
Tamper Detect Switch
Switch Pack
Wake on LAN Connector
Wake on Modem Connector
SCSI Channel A Connector
RAIDport Extension
Shared PCI/ISA Slot
PCI Slots
AGP Slot
CD Audio Connector
Microphone Connector
Audio Line In/Out Connector
RJ-45 Ethernet Connector
JTAG
Rear Fan Connector
Parallel, Serial 1 and 2 Ports
USB Headers 1 and 2
Keyboard / Mouse Ports
System Board Key
Avid Technology Systems Engineering
Hardware Configuration
Page - 42
IBM Intellistation M-Pro (6889) System Integration and Reference Guide
Rev 15
MediaComposer, Symphony and Xpress NT
5.2
Switches and Jumpers
Verify the switch settings and jumper positions are correct for this system model. The switch
pack is located on the system board, refer to item #22 on the layout. The example below
shows the switch settings for a 400MHz Pentium II system. DO NOT CHANGE THE
PROCESSOR SPEED UNLESS IT IS SET IMPROPERLY.
8
OFF
7
OFF
Pentium II Processor
Speed Setting
6
OFF
5
OFF
Speed
350MHz
400MHz
450MHz
4
ON
SW1-1
OFF
ON
OFF
3
OFF
SW1-2
OFF
ON
ON
2
ON
SW1-3
ON
OFF
OFF
1
ON
SW1-4
ON
ON
ON
Processor speed settings are not required with Pentium III processors. Pentium III processors
ignore switch positions 1-4.
ROM Operation
Normal
Recovery
Switch
SW1-5
SW1-5
Setting
Off (D)
On
Ethernet Operation
Normal
Disabled
SW1-6
SW1-6
Off (D)
On
Administrator/BIOS Password
Locked
Unlocked
SW1-7
SW1-7
Off (D)
On
Diskette Operation
Normal
Read Only
SW1-8
SW1-8
Off (D)
On
Clear CMOS and Password
Normal Setting
Erase Password and Clear CMOS
Jumper
J7E1
Pins
2-1
3-2
For more information about the switch pack functions and procedures, reference the IBM
system documentation.
Avid Technology Systems Engineering
Hardware Configuration
Page - 43
IBM Intellistation M-Pro (6889) System Integration and Reference Guide
Rev 15
MediaComposer, Symphony and Xpress NT
5.3
I/O Panel Connections
The figure represents the 6889 rear I/O panel and connectors.
Midi Port
Slot 1
Slot 2
Slot 3
Slot 4
Slot 5
Avid Technology Systems Engineering
Hardware Configuration
Page - 44
IBM Intellistation M-Pro (6889) System Integration and Reference Guide
Rev 15
MediaComposer, Symphony and Xpress NT
5.4
Central Processor
The system board can support up to two SECC Slot 1 type Pentium II or Pentium III
processors. As of this writing available Pentium II processor speeds are 450MHz, 400MHz,
and 350MHz. Available Pentium III speeds are 450MHz and 500MHz. Pentium II and Pentium
III processors may not be mixed in the same system.
Customers may elect to upgrade processor speed at any time provided Avid has evaluated
the processor speed.
Not all Avid NT products are currently supported in multiprocessor configurations. Refer to the
chart to determine the appropriate number of processors by product.
Avid NT Product
MediaComposer
Symphony
Xpress NT Deluxe
Xpress NT Elite
Supported
Processors
1
1
1
1
Supported Processor Speeds
Pentium II 400, 450, Pentium III 450, 500
Pentium II 400, 450, Pentium III 450, 500
Pentium II 400, 450, Pentium III 450, 500
Pentium II 400, 450, Pentium III 450, 500
Important: The absence of a second processor requires a terminator card in the unused
processor slot.
5.5
Memory
Four 128-pin DIMM slots are present on the system board providing support for up to 1GB of
physical host memory. There are no specific DIMM configuration rules, but each DIMM must
meet the following specifications:
•
Memory may be purchased from any vendor qualified by IBM.
•
Must be certified PC100 compliant SDRAM.
•
DIMMs from 66MHz systems CANNOT be used in this system.
•
Must be 64-bit wide or 72-bit wide error correcting code (ECC) synchronous DRAMs
(SDRAMs). If 64-bit and 72-bit DIMMs are mixed, the system will default to a 64-bit data
path.
•
Mixing ECC and non-ECC type DIMMS will cause the system to default to non-ECC.
•
Each SDRAM DIMM must be 32, 64, 128, or 256 MB in size.
•
Each SDRAM DIMM must be a 168-pin, unbuffered, +3 VDC, serial PD type.
•
Each SDRAM DIMM must use gold-lead connector pads.
•
256MB DIMMS must be registered type.
Avid Technology Systems Engineering
Hardware Configuration
Page - 45
IBM Intellistation M-Pro (6889) System Integration and Reference Guide
Rev 15
MediaComposer, Symphony and Xpress NT
5.5.1
Identification of PC100 Compliant SDRAM DIMM
To identify 100MHz bus compatible SDRAM DIMM look at the label on the DIMM. All
compliant DIMMS have the format PC100-aaa-bbb where the underlined letters represent
timing parameters of the module and the revision number of the latest serial presence detect
specification. Additionally, the design revision of the SDRAM DIMM specification must be silk
screened on the DIMM printed circuit board.
66 MHz SDRAM DIMM do not require these identifications, as the specifications are not as
stringent.
5.5.2
Memory Requirements for Avid NT Products
The chart represents the recommended memory requirements for Avid products. Customers
may elect to install additional memory if desired. Optimal page file parameters are outlined in
the Windows NT Configuration section of this document.
5.6
Avid NT Product
MediaComposer
Minimum Memory
128MB
Standard Configuration
256MB
Maximum Memory
1GB
Symphony
128MB
256MB
1GB
Xpress NT Deluxe
128MB
192MB
1GB
Xpress NT Elite
128MB
192MB
1GB
System Board Integrated Devices
This section describes the physical hardware configuration specifics for all system board
integrated devices.
5.6.1
Adaptec AIC-7895 SCSI Host Adapter Configuration
The IBM Intellistation M-Pro includes an Adaptec AIC-7895 dual channel Ultra-wide SCSI
adapter on the system board. Channel A is routed within the system enclosure, while Channel
B is available for use with external peripherals. This procedure describes the recommended
BIOS configuration of the controller.
Instructions to load or check device driver revisions are located in the Windows NT Device
Drivers section of this document.
Avid Technology Systems Engineering
Hardware Configuration
Page - 46
IBM Intellistation M-Pro (6889) System Integration and Reference Guide
Rev 15
MediaComposer, Symphony and Xpress NT
5.6.1.1
Adaptec Option ROM Configuration
Use this procedure to make modifications to the SCSI bus parameters for all peripherals
you intend to connect. Important: Before starting this procedure verify SCSI support is
enabled in the Devices and I/O Ports section of the system BIOS.
1. Power up the system.
2. Enter the Adaptec 7895 option ROM by holding the Ctrl plus the “A” key immediately
after the Adaptec 7895 SCSI Host Adapter message appears on the monitor.
3. The Adaptec option ROM screens are not mouse driven and must be navigated using
the arrow keys. Use the arrow keys to move to the appropriate parameter and the
Enter key to change values.
4. Two channels 0A, and 0B will be displayed on the upper right hand section of the
display, Choose the 0A channel first and review the parameter settings for each of the
sections.
5. When all parameter changes are verified press Esc and choose Yes to return to the
main screen.
6. Choose the 0B channel and review the parameter settings for each of the sections.
7. When all parameter changes are verified for channel press Esc and choose Yes to
return to the main screen.
8. Press Esc and choose Yes to save the changes.
9. Restart the system when changes are complete.
5.6.1.2
Adaptec Option ROM Menus
All parameters should reflect the “Recommended” values in the charts below. Insure the
correct parameters are configured for all devices on both SCSI channels.
NOTE: All systems configured by Avid manufacturing will ship with the Maximum Sync
Transfer Rate set to 20 MBytes/sec for each SCSI ID.
SCSI Bus Interface Definitions
Host Adapter SCSI ID
Recommended
7
SCSI Parity Checking
Enabled
Host Adapter SCSI Termination
Enabled
Avid Technology Systems Engineering
Hardware Configuration
Page - 47
IBM Intellistation M-Pro (6889) System Integration and Reference Guide
Rev 15
MediaComposer, Symphony and Xpress NT
Boot Device Settings
Recommended
Boot Channel
A First
Boot SCSI ID
0
Boot LUN Number(**)
0
SCSI Device Configuration
Recommended
Initiate Sync Negotiation
Yes (Enabled)
Maximum Sync Transfer Rate
20 MBytes/sec
Enable Disconnection
Yes (Enabled)
Initiate Wide Negotiation
Yes (Enabled)
Send Start Unit Command
Yes (Enabled)
BIOS Multiple Lun Support
No (Disabled)
Include in BIOS Scan
Yes (Enabled)
Notes:
1. Insure the correct parameters are configured for all devices on both SCSI channels.
2. Leave SCSI disconnects enabled unless there is a specific device that does not
support disconnects.
3. The adapter must be configured to use the appropriate negotiation method for the all
disks. Never set the adapter to use wide negotiation on narrow disks for example.
4. For each Avid IS9 Pro, or IS18 Pro, the synchronous transfer rate must be set to
20MB/s and the maximum number of drives allowed on each external SCSI chain is
eight. This requirement is imposed due to performance instability when too many
spindles are chained.
5. For LVD only configurations the Maximum Sync Transfer Rate may be changed to
40MB/sec. Refer to the Peripheral Configuration section of this guide for more
information.
Advanced Configuration Options
Recommended
Reset SCSI Bus at IC Initialization
Enabled
Extended BIOS Translation for DOS Drives > 1 GB
Enabled
Host Adapter BIOS (Configuration Utility Reserves BIOS Space)
Enabled
Support Removable Disks under BIOS as Fixed Disks
Boot Only
Display <Ctrl-A> Message During BIOS Initialization
Enabled
BIOS Support for Bootable CD-ROM
Enabled
BIOS Support for Int 13h Extensions
Enabled
Avid Technology Systems Engineering
Hardware Configuration
Page - 48
IBM Intellistation M-Pro (6889) System Integration and Reference Guide
Rev 15
MediaComposer, Symphony and Xpress NT
5.6.2
Intel EtherExpress Pro100 Network Interface
There are no specific physical hardware setup requirements for the network interface other
than to verify the system board SW1-6 switch is OFF. Verify that Ethernet Support is enabled
in the BIOS (section 4.5), and the Network device is enabled for bus mastering (Section 4.9).
The LED on the system board will be illuminated when a network cable is connected to the
port even when power is removed from the system unit. This is normal behavior.
The rear I/O connector panel and the front panel also have LED indicators. When a category 5
cable is connected between the 6889 network interface and a building network, these LEDs
indicate network-polling activity. The LEDs do not mean the system is configured properly for
network operation.
Instructions to load or check device driver revisions are located in the Windows NT Device
Drivers section of this document.
5.6.3
Crystal Semiconductor 4235 Audio Chip
The Crystal Semiconductor 4235 component provides business-class audio support. There
are no specific physical hardware setup requirements for the audio portion of the CS4235
component. Connectors are available on the rear of the system I/O panel for microphone
input, analog audio input, and analog audio output.
A MIDI/Game/Joystick cable may be installed to the port header on the system board to allow
the use of automated MIDI fader peripherals. Refer to the System Board Graphic diagram for
the header location. To install the MIDI port cable:
1. On the rear of the chassis below the external SCSI port are two knockout blanks. Use a
flat blade screwdriver to twist off the larger of the two knockouts.
2. Insert the keyed cable into the MIDI header on the system board and route the D-Shell
connector through the knockout opening. Care should be taken to route the cable away
from any module slots.
3. Secure the D-Shell connectors.
4. Cable part number is 0070-00501-01
Instructions to load or check device driver revisions are located in the Windows NT Device
Drivers section of this document.
Avid Technology Systems Engineering
Hardware Configuration
Page - 49
IBM Intellistation M-Pro (6889) System Integration and Reference Guide
Rev 15
MediaComposer, Symphony and Xpress NT
5.7
AGP Graphics
The AGP graphics card supplied with the IBM Intellistation system must be removed before
installing the Avid Meridien Display Controller board. The board must be shipped with the system
for troubleshooting purposes.
5.8
PCI Board Configuration
Slot configuration guidelines are mandatory due to the interconnection requirements of the
Avid Edit Display Controller, Meridien Digital Media Board, and the 3D effects combination
cards. PCI cards must be installed into the system using one of the two configurations shown
below.
Observe these points for successful installation:
•
PCI slots on the IBM Intellistation are numbered 1-5 with PCI slot 1 closest to the
processor.
•
Care must be exercised when installing boards into PCI slot 1 as to not damage the
internal SCSI cabling in the vicinity.
•
Route internal cables away from the PCI modules as to not impede airflow or board
maintenance.
•
Never attempt to force the board in a slot.
•
Insure each board is seated properly in the PCI slot.
•
Secure each board to the expansion bulkhead after installation.
Important: PCI boards are assigned certain resources based on BIOS and device driver
negotiation. Due to a specific driver address requirements it is vital the Avid Meridien Digital
Media I/O and EDC boards are installed in the system simultaneously.
Avid Technology Systems Engineering
Hardware Configuration
Page - 50
IBM Intellistation M-Pro (6889) System Integration and Reference Guide
Rev 15
MediaComposer, Symphony and Xpress NT
5.8.1
Avid MediaComposer or Symphony Board Configuration Chart
AGP Slot
1
PCI Slots
Device
Comments
AGP Graphics Board
Remove when Avid boards are installed
Device
Comments
Customer Option Slot:
1
Available Slot
2
Avid Meridien Digital
Media Board
3
Avid 3D DVE Board
Genie/Viper combination
4
Primary Disk
Controller
Adaptec F940 Fibre Channel Controller
5
Avid Edit Display
Controller
Avid approved disk controller such as Adaptec
3940AUW or customer option board (Not sold through
Avid) (See Note 1)
SCSI controller A channel is used for the System Disk
Onboard
2 Channel UW SCSI
Disk Controller
Onboard
Intel 82558 Network
Interface
Intel Pro100 10/100 BaseT
Onboard
CS4235 Audio
Use of onboard audio for MIDI functions will limit
system to a single processor.
SCSI controller B channel can support external drives
for audio or graphics storage only. (See Note 2)
1. PCI slot 1 can be used for customer installable options such as an additional Avid
approved disk controller, a third party effects processor, or other customer option.
Customer options are not supported by Avid.
2. Onboard SCSI support – Symphony configurations use separate SCSI storage for audio
files. The Adaptec 7895 controller may be used to support these disks.
Avid Technology Systems Engineering
Hardware Configuration
Page - 51
IBM Intellistation M-Pro (6889) System Integration and Reference Guide
Rev 15
MediaComposer, Symphony and Xpress NT
5.8.2
Avid Xpress NT Board Configuration Chart
AGP Slot
1
PCI Slots
Device
Comments
AGP Graphics Board
Remove when Avid boards are installed
Device
Comments
Customer Option Slot:
1
Available Slot
2
Avid Meridien Digital
Media Board
3
Optional
Avid 3D DVE Board
Choose One:
- Optional 3D DVE effects board
- Non-bus master device option (See Note 2)
4
Primary Disk
Controller
Adaptec AHA-3940AUW
5
Avid Edit Display
Controller
Avid approved disk controller such as Adaptec
3940AUW or customer option board (Not sold through
Avid) (See Note 1)
SCSI controller A channel is used for the System Disk
Onboard
2 Channel UW SCSI
Disk Controller
Onboard
Intel 82558 Network
Interface
10/100 BaseT
Onboard
CS4235 Audio
Use of onboard audio for MIDI functions will limit
system to a single processor.
SCSI controller B channel can support external drives
for limited resolution media storage only. (See Note 2)
1.
PCI slot 1 can be used for customer installable options such as an additional Avid approved disk
controller, a third party effects processor, or other customer option. Customer options are not
supported by Avid.
2.
If this slot is not used for a DVE option, the slot must be limited to a non-bus master device due to
bus constraints. Disk controllers can not be configured in this slot.
3.
SCSI Support
Onboard Adaptec 7895 can support single stream 2:1 resolution when configured with Avid ISx pro
series drives. SCSI only configurations require an Avid approved disk controller for use as the
primary disk controller. See Peripheral Configuration section of this document for more
information.
Avid Technology Systems Engineering
Hardware Configuration
Page - 52
IBM Intellistation M-Pro (6889) System Integration and Reference Guide
Rev 15
MediaComposer, Symphony and Xpress NT
5.9
Adaptec/JNI AHA-F940 Fibre Channel Controller
If the system requires an Adaptec AHA-F940 Fibre Channel controller, install the board in the
recommended PCI slot reflected in the board configuration charts. There are no further
internal hardware configuration requirements.
Instructions to load or check device driver revisions are located in the Windows NT Device
Drivers section of this document.
F940 Fibre Channel Controller
Avid Technology Systems Engineering
Peripheral Configuration
Page - 53
IBM Intellistation M-Pro (6889) System Integration and Reference Guide
Rev 15
MediaComposer, Symphony and Xpress NT
5.10
Adaptec AHA-3940 SCSI Host Adapter
Optional Adaptec AHA-3940UW or Adaptec AHA-3940AUW dual channel ultra-wide SCSI
adapters may be installed in the system. The AHA-3940UW is identified by one external SCSI
port and the AHA-3940-AUW has two mini external SCSI connector ports. Install the board in
the recommended PCI slot reflected in the board configuration charts. This procedure
describes the recommended physical configuration of the controller.
Since the IBM 6889 includes an onboard Adaptec 7895 SCSI controller, the Adaptec
3940AUW uses the same Windows NT device driver. For instructions about loading or
checking device driver revisions refer to the Windows NT Device Drivers section of this
document.
Adaptec AHA-3940AUW SCSI Adapter
Avid Technology Systems Engineering
Peripheral Configuration
Page - 54
IBM Intellistation M-Pro (6889) System Integration and Reference Guide
Rev 15
MediaComposer, Symphony and Xpress NT
5.10.1
Adaptec Option ROM Configuration
1. Power up the system.
2. Enter the Adaptec AHA-3940xxx adapter option ROM by holding the Ctrl plus the “A” key
after it identifies itself on the display. This will occur after the internal Adaptec 7895 has
scanned and reported drives on it’s own channels.
3. The Adaptec option ROM screens are not mouse driven and must be navigated using the
arrow keys.
4. Two channels 0A, and 0B will be displayed on the upper right hand section of the display,
Choose the 0A channel first and review the parameter settings for each of the sections.
5. When all parameter changes are verified press Esc and choose Yes to return to the main
screen.
6. Choose the 0B channel and review the parameter settings for each of the sections.
7. When all parameter changes are verified for channel press Esc and choose Yes to return
to the main screen.
8.
5.10.2
Press Esc and choose Yes to save the changes. Restart the system to complete the
procedure.
Adaptec Option ROM Menus
All parameters should reflect the “Recommended” values in the charts below.
NOTE: All systems configured by Avid manufacturing will ship with the Maximum Sync
Transfer Rate set to 20 MBytes/sec for each SCSI ID.
SCSI Bus Interface Definitions
Host Adapter SCSI ID
Recommended
7
SCSI Parity Checking
Enabled
Host Adapter SCSI Termination
Enabled
Boot Device Settings
Recommended
Boot Channel
A First
Boot SCSI ID
0
Boot LUN Number(**)
0
Avid Technology Systems Engineering
Peripheral Configuration
Page - 55
IBM Intellistation M-Pro (6889) System Integration and Reference Guide
Rev 15
MediaComposer, Symphony and Xpress NT
SCSI Device Configuration
Initiate Sync Negotiation
Recommended
Yes (Enabled)
Maximum Sync Transfer Rate
20 MBytes/sec
Enable Disconnection
Yes (Enabled)
Initiate Wide Negotiation
Yes (Enabled)
Send Start Unit Command
Yes (Enabled)
BIOS Multiple Lun Support
No (Disabled)
Include in BIOS Scan
Yes (Enabled)
Advanced Configuration Options
Recommended
Plug and Play SCAM Support
Disable
Reset SCSI Bus at IC Initialization
Enabled
Extended BIOS Translation for DOS Drives > 1 GB
Enabled
Host Adapter BIOS (Configuration Utility Reserves BIOS Space)
Enabled
Support Removable Disks under BIOS as Fixed Disks
Boot Only
Display <Ctrl-A> Message During BIOS Initialization
Enabled
BIOS Support for Bootable CD-ROM
Enabled
BIOS Support for Int 13h Extensions
Enabled
Notes:
1. Insure the correct parameters are configured for all devices on both SCSI channels.
2. Leave SCSI disconnects enabled unless there is a specific device that does not support
disconnects.
3. The adapter must be configured to use the appropriate negotiation method for the all
disks. Never set the adapter to use wide negotiation on narrow disks for example.
4. For each Avid IS9 Pro, or IS18 Pro, the synchronous transfer rate must be set to 20MB/s
and the maximum number of drives allowed on each external SCSI chain is eight. This
requirement is imposed due to performance instability when too many spindles are
chained.
Avid Technology Systems Engineering
Peripheral Configuration
Page - 56
IBM Intellistation M-Pro (6889) System Integration and Reference Guide
Rev 15
MediaComposer, Symphony and Xpress NT
5.11
Avid Meridien Digital Media Board
The Avid Meridien Digital Media board is the video engine hardware required for Symphony
and Xpress. Before installing the module insure the appropriate cables are available:
•
Display Controller interconnect cable
(Qty 1) Avid Part # 0070-00491-01
•
3D effects board interconnect cables
(Qty 2) Avid Part # 0070-00435-01
If not installing a 3D effects board in the system the media board may be installed into the
recommended PCI slot reflected in the board configuration charts.
If installing a 3D effects combination there are interconnection dependencies with the media
board which require consideration. Before installing the media board in the system you should
build the 3D combination and complete the cabling between the board set. Reference and
complete the instructions in section 5.13 before installing the media module in the system.
Instructions to load or check device driver revisions are located in the Windows NT Device
Drivers section of this document.
3D Effects Board
Cable Connectors
Edit Display
Controller
Cable Connector
A
B
Meridien I/O Box Connector
Avid Meridien Digital Media Board
Avid Technology Systems Engineering
Peripheral Configuration
Page - 57
IBM Intellistation M-Pro (6889) System Integration and Reference Guide
Rev 15
MediaComposer, Symphony and Xpress NT
5.12
Avid Meridien Display Controller (EDC)
The Avid Meridien Display controller board is often referred to as the Edit Display controller.
The board is a standard dual-head graphics adapter built around two Number Nine
Corporation Revolution 3D graphics controllers, and a special DMA pixel engine required for
Avid applications. Install the display controller into the PCI slot recommended in the board
configuration charts.
Attach one end of the cable to the display controller cable header and the other end to the
Meridien Digital Media board. Each end of the cable is keyed to facilitate proper installation.
Be careful to properly align the cable in the connectors, and do not force the connections.
The edit display controller supports two display monitors that should be the same size and
vendor brand to minimize configuration difficulties. As of this writing the recommended monitor
size is 17 or 21 inches and should be auto or multi-synchronous.
Monitor connections to the edit display controller are designated Boot for the primary VGA
display, and Edit for the secondary display. Arrange your monitors so the Boot monitor is on
the left.
Important: Remove the AGP Card from the system before installing the display controller
board.
Cable to Meridien
Media Board
nd
2 Monitor
(Edit Monitor)
VGA (Boot Monitor)
Avid Meridien Display Controller
Avid Technology Systems Engineering
Peripheral Configuration
Page - 58
IBM Intellistation M-Pro (6889) System Integration and Reference Guide
Rev 15
MediaComposer, Symphony and Xpress NT
5.13
Meridien 3D Effects Combination
The Meridien 3D effects board combination consists of Pinnacle Genie 3D DVE module with
an Avid designed daughter card. The two boards are physically mated using plastic standoffs
attached to the Avid daughter card and are shipped from the manufacturer as completed
assembly to facilitate faster installation.
Two “over the top” connector boards nicknamed “Croc” and “Odile” ensure proper stability to
the constructed board set as well as provide power and signal interfacing between the Genie
and Avid daughter card. The “Croc” and “Odile” boards should be seated firmly onto each of
the two boards in the effects board assembly. If they are loose, line up the connector boards
and be very careful not to force them into their effects board connectors.
View from top of combined board set:
Pinnacle Genie
“Odile” Board
Avid Daughter Card
“Croc” Board
A cable
B cable
Route the two interconnect cables Avid Part # 0070-00435-01 from the Avid daughter board
cable connectors to the Meridien digital media board. This is somewhat easier to do before the
media board is installed in the system but is not required. Line up the cables and be very
careful not to force the cables into their connectors.
3D Effects Assembly
Avid Technology Systems Engineering
Peripheral Configuration
Page - 59
IBM Intellistation M-Pro (6889) System Integration and Reference Guide
Rev 15
MediaComposer, Symphony and Xpress NT
5.14
Connecting the Meridien I/O Box
Connect one end of the data cable to the “M” connector on the Meridien Digital Media board.
Connect the other end of the cable to the breakout box connector designated “System”.
Note: Refer to the Avid Symphony or Xpress product documentation for more information.
To Meridien Media
Board “M” connector
Avid Technology Systems Engineering
Peripheral Configuration
Page - 60
IBM Intellistation M-Pro (6889) System Integration and Reference Guide
Rev 15
MediaComposer, Symphony and Xpress NT
6.
Windows NT Configuration
This section describes the Windows NT installation and configuration specifics for Avid NT
products. Configuration instructions for device drivers are not included in this section. Refer
to the Windows NT Device Drivers section of this guide.
All recommendations and procedures should be completed for best results.
6.1
Windows NT Workstation 4.0
Avid NT applications are currently compatible with Windows NT Workstation 4.0 only.
IBM pre-installs Windows NT Workstation 4.0 and Service Pack 4 on the system disk root
partition. A CD-ROM distribution of Windows NT Workstation 4.0 is included with the system
along with documentation and license information.
Recovery procedures are detailed later in this guide.
6.2
Windows NT Server
Windows NT Server 4.0 is not supported for use with Avid products.
6.3
Windows NT Workstation Installation
The following procedure is used to install Windows NT Workstation on your computer.
Pre-Installed Automated Procedure:
Pre-installed operating systems require the user to complete installation. Service packs and
appropriate platform specific special files are already included on the system and will be
installed as part of the procedure. You will not require additional files or media. Follow this
procedure to supply the appropriate responses to the prompts. Time to complete this
procedure is roughly fifteen minutes.
Manual Installation: If you are installing the operating system manually after replacing a hard
disk or adding a parallel NT installation you will need the Windows NT Setup Diskettes 1-3
and a diskette containing the Adaptec 7800 Family Manager device drivers. This diskette can
be created from another system using the IBM Ready to Configure CD-ROM. You will also
require the Windows NT Workstation distribution CD-ROM and access to the appropriate
Windows NT service pack media. Follow this procedure to supply the appropriate responses
to the prompts.
Avid Technology Systems Engineering
Windows NT Configuration
Page - 61
IBM Intellistation M-Pro (6889) System Integration and Reference Guide
Rev 15
MediaComposer, Symphony and Xpress NT
1. If you are installing the operating system manually, insert Windows NT Setup Disk #1 in
the diskette drive and the Windows NT distribution CD in the CD-ROM drive. Power on the
system.
2. Windows NT setup will begin processing and you will receive the message “Setup is
inspecting your computer.”
3. Windows NT setup will examine your disk drives and start file copy operations. If you are
installing the operating system using the Windows NT Setup diskettes, you will be asked
to insert diskettes two and three during the process. When prompted to search for
additional mass storage devices and controllers, choose “S” to specify additional devices.
Highlight “Other” in the dialog box and choose “Enter”. Insert the Adaptec 7800 Family
Manager Set diskette in the A:\ drive and press Enter. This will load the correct SCSI
device driver for your system.
4. The Windows NT setup program initializes and the End User License Agreement (EULA)
is displayed. Choose “I Agree” to the EULA dialog.
5. The installation begins to copy files and will display the Windows NT Setup Wizard Dialog.
Choose “Next” to continue.
6. Enter the following information for the Company Name and Organization:
Name: Avid Technology
Organization: Avid Technology
7. The product registration ID is requested. Enter the Product ID as found on outside of
the Windows NT distribution media CD-ROM and documentation.
8. The installation will prompt for a Computer Name. Enter “AvidTechnology”
9. The installation will prompt for an Administrator account password. Click Next.
10. The dialog “Windows NT setup ready to guide you through NT Networking” will appear.
Click Next.
11. Choose “This computer will participate on a network” and check the box “Wired to a
Network”.
12. To have the setup program search for a network adapter, click the “Start Search” button.
13. The system will identify the Intel Pro100 82557 network interface.
14. For network protocols choose TCP/IP, then click NEXT twice.
15. The properties of the Intel Pro100 are determined and displayed. Click OK to the 82557
properties.
16. The following dialog appears: “If there is a DHCP server on your network, TCP can be
configured to dynamically provide an IP address. If you are not sure ask your system
administrator. Do you wish to use DHCP?” Click YES to accept DHCP.
17. Click NEXT to start the network.
18. Do not change the Workgroup and Domain selections when asked. Click Next to
continue.
Avid Technology Systems Engineering
Windows NT Configuration
Page - 62
IBM Intellistation M-Pro (6889) System Integration and Reference Guide
Rev 15
MediaComposer, Symphony and Xpress NT
19. Setup continues and will detect a 16 color VGA display. Click OK to accept this display.
20. Setup will continue to install and restart the system.
21. The manufacturer pre-installed automated installation procedure will continue with Service
Pack 3 or 4 (depending on the age of the system) and Microsoft Internet Explorer. If you
are installing Windows NT manually, continue after the restart and apply Service Pack 4 to
the system. After the service pack application, you should follow the instructions in this
section to install the Y2K compliant features.
6.4
Windows NT Service Packs
Microsoft periodically releases operating system patches and other fixes in the form of a
Service Pack. In addition to problem corrections, these releases often contain new
functionality or features that warrant testing by Avid for compatibility. Avid Systems
Engineering maintains release information about the recommended service packs. It is
recommended only those service packs and appropriate fix kits certified by Avid be used with
our products.
Current compatibility and requirements:
Windows NT 4.0 Service Pack 4
Service packs may be downloaded directly from Microsoft’s web site (www.microsoft.com).
The releases tend to be very large and are difficult to download reliably with standard
modems. Microsoft also sells the service packs on CD-ROM for a nominal charge.
IBM Intellistation systems have service pack 4 pre-installed. A copy of the service pack 4 files
is included on the system disk \SP4 directory, but no CD-ROM media is included. Customers
are advised to create a backup of these files in the event the service pack needs to be
reapplied. To check the service pack version on the system:
Open My Computer.
Choose Help and select About Windows NT
View the contents of the window for the following information:
Microsoft (R) Windows NT (R)
Version 4.0 (Build 1381, Service Pack 4)
Avid Technology Systems Engineering
Windows NT Configuration
Page - 63
IBM Intellistation M-Pro (6889) System Integration and Reference Guide
Rev 15
MediaComposer, Symphony and Xpress NT
6.5
Post-Service Pack Fixes
Occasionally Microsoft releases post-service pack fixes to address problems in specific areas
of Windows NT. These releases also warrant certification by Avid before use with our
products. These post-service pack releases sometimes have dependencies on other kits that
may create confusion or improperly configured systems if exact installation instructions are not
followed.
Avid Systems Engineering recommends installing post service pack fixes only to address sitespecific problems or widespread critical problems.
Post service pack fixes may be downloaded from Microsoft’s web site at www.microsoft.com.
6.6
Service Pack 4 Installation Procedure
This section describes the procedures necessary to update your system to service pack 4.
IBM provides the service pack pre-installed in the directory C:\SP4. To re-install the service
pack from this directory, follow the directions described in "Installing Service Pack 4 from CDROM" in this section.
6.6.1
Preparing to Install Service Pack 4
1.
Inventory the non-Avid applications on your system. Determine if the applications require
a maintenance update before installing the new service pack.
2.
If Miramar PC-MacLAN is installed on your system, you must obtain a patch from Miramar
before installing service pack 4.
3.
Perform a full system backup of all files using your favorite backup application. Be sure to
backup the NT registry!
4.
Create an Emergency Repair Disk using rdisk /s.
5.
Rename your current $NtServicePackUninstall$ directory in <systemroot>\system32 to
reflect the version of the files contained within the directory. For example, if you currently
have service pack 3 installed rename the $NtServicePackUninstall$ directory to SP3
Original Uninstall. You can delete the files and directory after you are certain your system
is operational following the new service pack installation.
6.
Disable all non-essential third-party drivers, services, or startup applications. This includes
utilities like anti-virus or disk defragmentation software.
7.
Insure you have adequate space on your system disk (C:\) to permit installation of the new
service pack. You will require 80MB free disk space to install the new service pack and
allow for a service pack uninstall directory.
Avid Technology Systems Engineering
Windows NT Configuration
Page - 64
IBM Intellistation M-Pro (6889) System Integration and Reference Guide
Rev 15
MediaComposer, Symphony and Xpress NT
8.
6.6.2
Use the Windows NT Explorer to copy the AIC78XX.SYS SCSI driver and E100BNT.SYS
network driver from the <%systemroot%\system32\drivers > directory to the desktop.
This driver may be necessary to complete the SP4 installation.
Installing Service Pack 4 from CD-ROM
1.
Insert the Service Pack CD into your CD-ROM drive.
2.
Avid ships systems with CD Autorun disabled so the Service Pack CD will not automatically
start.
3.
From My Computer or the Windows NT Explorer select the CD ROM drive.
4.
Right-mouse click and choose Open from the menu.
5.
Select Spsetup.bat and double-click to launch.
6.
Check the box labeled "Backup files necessary to uninstall this Service Pack at a later
time". To use the uninstall feature of this Service Pack, you must create an uninstall
directory during the initial installation. Always do this!
7.
Click the "Read Me" button to read the SP4 readme.txt file if desired.
8.
Check the box labeled "Accept license agreement" and click the Install button to initiate
installation.
9.
Allow the service pack installation to progress. You are permitted to cancel the service
pack installation only during the "Backup" phase of the operation.
10. The service pack installation program may detect an OEM driver version and may ask you
if you want to replace the driver. This occurs when special device drivers are installed on a
system that does not match the service pack setup list. ALWAYS CLICK NO to preserve
the OEM driver.
11. When the installation is complete, you will receive a dialog box stating "Installation
Complete. You must restart the system." DO NOT restart the computer.
12. On the IBM 6889 you must follow this procedure prior to restarting your computer. Use the
Windows NT Explorer to copy the AIC78XX.SYS SCSI driver and E100BNT.SYS network
driver from the desktop back to the <%systemroot%\system32\drivers > directory.
13. Restart the system.
14. After restarting the system, you will receive a dialog box that states:
To resolve known Windows NT 4.0 Year 2000 issues you must install the following
versions (or greater) of the programs listed below:
Microsoft Data Access Components 2.0 Service Pack 1
Microsoft Internet Explorer 4.01 Service Pack 1
Avid Technology Systems Engineering
Windows NT Configuration
Page - 65
IBM Intellistation M-Pro (6889) System Integration and Reference Guide
Rev 15
MediaComposer, Symphony and Xpress NT
Would you like to view the Y2K.txt file to get more information about the locations of these
products?
15. Choose NO.
16. If offered the choice to perform the installation now, start the installation of these
components. If not offered the choice to perform the installation of the components,
reference the Resolving Year 2000 Issues section of this document.
6.6.3
Installing Service Pack 4 from a Download
If you choose to download service pack 4 from Microsoft you will end up with a compressed
executable file on your disk drive. To extract this file and begin the installation:
1.
Open a command prompt window and type SP4I386.EXE or double-click the file from the
Windows NT Explorer. Using a command prompt only you can also extract the file into the
current directory without launching the installation program typing SP4I386 /x.
2.
Execute UPDATE.EXE from the service pack \I386\Update directory.
3.
Check the box labeled "Backup files necessary to uninstall this Service Pack at a later
time". To use the uninstall feature of this Service Pack, you must create an uninstall
directory during the initial installation.
4.
Click the "Read Me" button to read the SP4 readme.txt file if desired.
5.
Check the box labeled "Accept license agreement" and click the Install button to initiate
installation.
6.
Allow the service pack installation to progress. You are permitted to cancel the service
pack installation only during the "Backup" phase of the operation.
7.
The service pack installation program may detect an OEM driver version and may ask you
if you want to replace the driver. This occurs when special device drivers are installed on a
system that does not match the service pack setup list. ALWAYS CLICK NO to preserve
the OEM driver.
8.
When the installation is complete, you will receive a dialog box stating "Installation
Complete. You must restart the system." DO NOT restart the computer.
9.
On the IBM 6889 you must follow this procedure prior to restarting your computer. Use the
Windows NT Explorer to copy the AIC78XX.SYS SCSI driver and E100BNT.SYS network
driver from the desktop back to the <%systemroot%\system32\drivers > directory.
10. Restart the system.
11. After restarting the system, you will receive a dialog box that states:
To resolve known Windows NT 4.0 Year 2000 issues you must install the following
versions (or greater) of the programs listed below:
Microsoft Data Access Components 2.0 Service Pack 1
Avid Technology Systems Engineering
Windows NT Configuration
Page - 66
IBM Intellistation M-Pro (6889) System Integration and Reference Guide
Rev 15
MediaComposer, Symphony and Xpress NT
Microsoft Internet Explorer 4.01 Service Pack 1
Would you like to view the Y2K.txt file to get more information about the locations of these
products?
12. Choose NO.
13. If offered the choice to perform the installation now, start the installation of these
components.
14. If not offered the choice to perform the installation of the components, reference the
Resolving Year 2000 Issues section of this document.
6.6.4
Resolving Year 2000 Issues
Microsoft addressed seven known Y2K issues with the release of Service Pack 4. Applying
Service Pack 4 will bring the Windows NT Workstation 4.0 operating system into Y2K
compliance. However, the service pack fixes address the operating system only, and do not
address compliance problems present in ancillary applications.
1.
Upgrade these products individually from the following folders on the Service Pack 4 CDROM:
\Msie401 (for Microsoft Internet Explorer 4.01 Service Pack 1)
\Mdac (for Microsoft Data Access Components 2.0 Service Pack 1)
2.
Run the Y2KSETUP.EXE program located in the \I386\Update directory on the service
pack 4 CD-ROM or SP4 directory on your computer. This application automatically updates
operating system components to resolve known Year 2000 issues. An uninstaller option is
not available for Y2KSETUP.EXE.
Alternatively, download these products from:
http://support.microsoft.com/support/downloads/
Download the Year 2000 Service Pack (y2ksp4i.exe or y2ksp4a.exe) from one of the
locations below to your computer:
ftp://ftp.microsoft.com/bussys/winnt/winnt-public/fixes/
http://support.microsoft.com/support/ntserver/content/servicepacks/
http://support.microsoft.com/support/downloads/
Run the self-extracting executable to expand the package.
Avid Technology Systems Engineering
Windows NT Configuration
Page - 67
IBM Intellistation M-Pro (6889) System Integration and Reference Guide
Rev 15
MediaComposer, Symphony and Xpress NT
6.6.5
Reapplying a Service Pack
Any time you install hardware or software on your computer that requires you to use files from
the original Windows NT 4.0 CD-ROM distribution, you must re-apply the current service pack.
The files included on the original Windows NT 4.0 distribution may not be the same revision as
the files on the service pack.
If you re-install SP4 after installing new software or hardware, you must create a new service
pack uninstall directory. To retain your ability to back out to a bootable configuration, copy the
current Uninstall folder to a safe location before running the SP4 installation program.
6.6.6
Uninstalling a Service Pack
Under normal circumstances, you will not need to uninstall a service pack from your computer.
However, in case this is required because of a problem, use the following procedure:
Note 1:
Any changes you made to the system registry after installation of the new service pack will be
lost after uninstalling. Any software applications installed after the new service pack was
applied will require re-installation after restoring the previous version service pack.
Note 2:
This procedure assumes you saved a service pack Uninstall directory when you applied the
new service pack. If you do not have a service pack uninstall directory you cannot successfully
remove the service pack on your system using this procedure. You must reinstall the previous
service pack over the current version and force replacement of all files.
1. Log on to system using the Administrator account.
2. Using Windows NT Explorer verify you have the Service Pack Uninstall directory:
\%systemroot%\$NtServicePackUninstall$\spuninst\.
3. Open the Control Panels and run the Add/Remove Programs control panel.
4. Select Windows NT 4.0 Service Pack 4, and click the Remove button.
5. If Windows NT 4.0 Service Pack 4 is not available in the list of applications to remove, use
the Windows NT Explorer to locate and double-click SPUNINST.EXE from the
\%systemroot%\$NtServicePackUninstall$\spuninst\ directory.
6. The current service pack will be removed and the previous version will be restored. Refer
to Re-installing Service Pack 3 for restrictions and notes.
7. For an added measure of reliability, restore your system using the Emergency Repair Disk
you created before installing the new service pack.
Avid Technology Systems Engineering
Windows NT Configuration
Page - 68
IBM Intellistation M-Pro (6889) System Integration and Reference Guide
Rev 15
MediaComposer, Symphony and Xpress NT
6.6.7
Copying SP4 to Disk
To facilitate faster access to service pack files when reapplication is needed, IBM supplies the
latest Windows NT service pack distribution on the system disk. Normally IBM puts these files
in C:\SP3.
After a successful update to service pack 4, you can remove the service pack 3 distribution
files from your system. Create a backup of the directory C:\SP3 for safekeeping. Delete the
SP3 directory when your backup is complete.
If you installed Service Pack 4 from a CD-ROM, copy the \I386 directory from the Service
Pack 4 CD-ROM to C:\SP4. Also copy the CD directories \Msie401 (for Microsoft Internet
Explorer 4.01 Service Pack 1) and \Mdac (for Microsoft Data Access Components 2.0 Service
Pack 1) to C:\SP4.
If Service Pack 4 was applied via downloads, move the downloaded compressed images to
C:\SP4.
6.6.8
Re-installing Service Pack 3
If you need to re-install Service Pack 3 after uninstalling Service Pack 4 follow this procedure:
SP4 modifies the Security Account Manager (SAM) and Security databases in the NT registry.
Older versions of the files that reference or control these databases no longer recognize the
database structure. When you uninstall SP4 the files that control the database are NOT
removed. When you re-install SP3 you MUST answer NO when if the dialog "Confirm File
Replace" is presented for any of the following files:
Lsasrv.dll
Msv1_0.dll
Samlib.dll
Samsrv.dll
Services.exe
Winlogon.exe
If you overwrite the newer files with the older versions on SP3, you will be unable to log on to
the system.
If you uninstall SP4 on a system that previously had SP3 without Internet Explorer 4.0
installed, cryptography code will not work correctly after the SP4 uninstall completes. To
correct the problem, reinstall SP3 after you have uninstalled SP4.
Avid Technology Systems Engineering
Windows NT Configuration
Page - 69
IBM Intellistation M-Pro (6889) System Integration and Reference Guide
Rev 15
MediaComposer, Symphony and Xpress NT
6.7
General Windows NT Setup
This section describes recommended general Windows NT Workstation configuration
information.
6.7.1
Explorer View
To assist installation and configuration procedures, set the Windows NT Explorer view to
display all files. To do this:
6.7.2
1.
Choose the View menu from the NT Explorer
2.
Select Options.
3.
Click the View resource tab, and set the Show all Files button.
4.
Clear the “Hide file extensions for known file types” box.
5.
Click OK to complete the changes.
Screen Savers
Screen savers must be disabled to avoid interference during processor intensive operations
such as exports or long rendering sessions. To do this:
6.7.3
1.
Right mouse click on the desktop and select Properties. The Display Control Panel will
appear.
2.
Select the Screen Saver tab from the Display Control Panel.
3.
Choose None under the Screen Saver box.
4.
Click Apply and OK to commit the change.
Fonts
Use small screen fonts with the primary display driver to avoid missing characters in
application dialog boxes or menus. Small fonts are the default with most display drivers and
may be checked in the Settings tab in the Display Control Panel.
Avid Technology Systems Engineering
Windows NT Configuration
Page - 70
IBM Intellistation M-Pro (6889) System Integration and Reference Guide
Rev 15
MediaComposer, Symphony and Xpress NT
6.7.4
Environment Variables
The system must have a TEMP system environment variable set to allow for scratch pad
activities by applications.
1. Open Control Panels and double click the System control panel.
2. Select the Environment tab.
3. Scroll through the System Variables section and check for a TEMP variable.
4. If a TEMP variable does not exist, create one in the Variables box, set the path to
%SystemDrive%, and select Set to commit the change.
5. Insure a TEMP directory is present on the root drive C:
To create a temp directory:
1. Launch Windows NT Explorer.
2. Select File from the menu bar and choose New Folder
3. While the folder is highlighted type Temp and press Enter.
6.7.5
Applications Partition
A worthwhile practice is to install all applications and utilities on a partition other than the root
system partition. This practice allows enough space on the system partition for application
scratch files, temporary file growth, crash dumps, error logs, etc.
On the Intellistation the primary system root partition is defined as a 2GB NTFS or FAT
partition. The disk has plenty of free space to create a second partition. You must use the
Windows NT Disk Administrator to create and format a partition using the remaining space on
the disk.
1. From the Start Menu go to Programs and Administrative Tools (Common).
2. Choose and launch the Disk Administrator
3. Locate the free space immediately following the root drive C:
4. Highlight the free space by single clicking.
5. Right mouse click and choose Create. Click OK and assign the logical drive partition size
using the remaining space.
6. Assign the drive letter D: This may require reassigning the CDROM drive to letter E
beforehand.
Avid Technology Systems Engineering
Windows NT Configuration
Page - 71
IBM Intellistation M-Pro (6889) System Integration and Reference Guide
Rev 15
MediaComposer, Symphony and Xpress NT
7. Commit the change.
8. Highlight the new partition, right mouse click and choose Format.
9. Check the “Quick Format option” and choose NTFS for the File System.
10. Leave the Allocation Unit Size at “Default allocation unit” and click Start.
11. Choose OK to begin formatting and acknowledge when complete.
12. Exit the Disk Administrator.
6.7.6
User Account Guidelines
Avid applications will work with non-privileged user accounts or privileged user accounts.
Creating non-privileged user accounts allows the system administrator to control driver or
application installations, system hardware configurations, and system security.
Since the administration of individual user accounts is site specific, Avid and its resellers will
configure the system with two NT administrative privileged accounts for consistency,
demonstration, and troubleshooting.
Account Name
Administrator
AvidTechnology
Password
No password assigned
No password assigned
Privileges
Administrator
Administrator
Each user account must have a home directory assigned to a local path directory on a
partition other than the system partition. This reduces the user chances of accidentally filling
the system partition with application data such as project files or bins.
1. If a Users directory does not exist, create a Users directory on the D: drive partition with
the Windows NT Explorer or the command prompt MKDIR command.
2. Open Administrative Tools and choose User Manager.
3. Create a new user, for example, AvidTechnology by choosing the User menu and
selecting New User. Fill in the fields for the new user account and click OK.
4. Double click the user account and select the Profile button.
5. Select the Local Path button under the Home Directory section and type in a path for the
target directory. NT will create the directory if one does not exist. Examples:
d:\users\administrator
d:\users\avidtechnology
6. Click OK to complete the profile changes.
7. Click the Groups button to open the Groups Membership dialog.
Avid Technology Systems Engineering
Windows NT Configuration
Page - 72
IBM Intellistation M-Pro (6889) System Integration and Reference Guide
Rev 15
MediaComposer, Symphony and Xpress NT
8. Insure Administrators is selected from the “Not member of” column, and click the Add
button to grant this group membership to the user account.
9. Click OK twice and select Exit from the User menu to complete the procedure.
6.7.7
Windows NT Registry Modifications
This section describes the recommended changes to the Windows NT registry
Important: Improper changes to the Windows NT Registry can render a system unusable so
use caution when editing. If you are performing multiple changes to the registry it is not
necessary to exit the editor after each change. Perform all the required changes and exit when
complete. Changes to the Windows NT Registry become effective after a system restart.
6.7.7.1
KeyboardDataQueueSize
This parameter determines the size of the keyboard ring buffer. Some systems experience
a buffer overflow condition during periods of peak activity or when the keyboard is extended
by an un-buffered extension cable.
1. Invoke the Registry Editor (Regedt32.exe)
2. Locate and open HKEY_LOCAL_MACHINE\SYSTEM\CurrentControlSet\Services
subtree.
3. Locate and open the Kbdclass key.
4. Select the Parameters key.
5. Select the KeyboardDataQueueSize value entry.
6. Change the value from 64 Hex to 128 Hex.
7. Choose “Close” to save the value.
6.7.7.2
MouseDataQueueSize
This parameter determines the size of the mouse ring buffer. Some systems experience a
buffer overflow condition during periods of peak activity or when an un-buffered extension
cable extends the keyboard.
1. Invoke the Registry Editor (Regedt32.exe)
2. Locate and open HKEY_LOCAL_MACHINE\SYSTEM\CurrentControlSet\Services
subtree.
Avid Technology Systems Engineering
Windows NT Configuration
Page - 73
IBM Intellistation M-Pro (6889) System Integration and Reference Guide
Rev 15
MediaComposer, Symphony and Xpress NT
3. Locate and open the Mouclass key.
4. Select the Parameters key.
5. Select the MouseDataQueueSize value entry.
6. Change the value from 64 Hex to 128 Hex.
7. Choose “Close” to save the value.
6.7.7.3
CD Autorun
This parameter determines whether AUTORUN.EXE is automatically started when media is
inserted into a CD-ROM drive. Autorun CD-ROMs cause applications to lose focus and should
be disabled for normal operation.
1.
Invoke the Registry Editor (Regedt32.exe)
2. Locate and open HKEY_LOCAL_MACHINE\SYSTEM\CurrentControlSet\Services
subtree.
3. Locate and open the Cdrom key.
4. Select the Autorun value entry.
5. Change the value from 1 to 0.
6. Choose “Close” to save the value.
6.7.8
Serial Ports
To permit proper machine control operation in the Symphony and Xpress applications use the
Ports Control Panel Settings button to set serial ports COM1 and COM2 to the following
specifications:
Baud Rate :
Data Bits :
Stop Bits :
Parity :
Flow Control :
38400
8
1
None
None
Avid Technology Systems Engineering
Windows NT Configuration
Page - 74
IBM Intellistation M-Pro (6889) System Integration and Reference Guide
Rev 15
MediaComposer, Symphony and Xpress NT
6.7.9
Parallel Port
The parallel port must be enabled to allow the functionality of application key driver
Sentinel.sys. Check the Sentinel for I386 device in the Multimedia Control Panel to verify
the parallel port is functional.
1. Open the Multimedia Control Panel, then open the Devices tab.
2. Open the Other Multimedia Devices and look for the Sentinel for I386 Systems service.
3. Click on the Settings button. You should see information similar to the following:
Parallel Ports
Physical
Address
378
Port
Type
IBM AT
Bus #
Bus Type
0
ISA
Addr
Space
I/O
DOS
Addr
----
Use?
Yes
Created
By
System
If the information does not appear correctly open the Devices Control Panel.
Scroll down the list of devices for the Parport and Parallel devices. Both should have a
Status equal to Started and a Startup value of Automatic.
6.7.10
Dual Monitor Support
The Avid Edit Display Controller (EDC) supports a dual desktop display configuration.
However, you must be aware of the following limitations:
•
Windows NT dual monitor support is provided by a limited number of graphics board
vendors. It is the device driver supplied by these vendors, in the EDC it’s a Number Nine
Corporation driver, and not the principle application that drives the display functionality.
•
You must double the size of the horizontal display resolution using the control panels
provided by the board manufacturer. For example, the suggested display resolution of
1024 x 768 must be doubled to 2048 x 768.
•
Because the display driver treats both displays as one larger display, all Avid NT
applications will exhibit the following behavior:
1.
The Windows NT log on dialog box will be centered across both monitors.
2.
Windows NT pop-up dialog boxes, error messages, and tool pop-ups will be
centered between the two displays. You must drag these boxes onto one of the
displays to view them properly.
Avid Technology Systems Engineering
Windows NT Configuration
Page - 75
IBM Intellistation M-Pro (6889) System Integration and Reference Guide
Rev 15
MediaComposer, Symphony and Xpress NT
6.8
Windows NT Error Handling
This section describes the recommended configuration of the Windows NT error handling and
reporting facilities.
6.8.1
DRWATSN32.LOG
Windows NT maintains a separate log file for application errors called drwatsn32.log. By
default this log file is created in the <systemroot>directory and may be used by software
developers to determine the cause of application errors such as abnormal exits or access
violations. The user or installer should not modify this log file.
6.8.2
NT Event Viewer Configuration
NT keeps three logs for System, Security, and Application events. These events may
indicate error conditions, warnings, or simple informational status about the system. Events
are viewed using the Event Viewer accessible through the Administrative Tools program
group, or by running eventvwr.exe.
The EventLog service must be set to Automatic startup in the Services Control Panel.
For normal operation, Avid Systems Engineering recommends the following changes to the
event log configuration:
1. Start Event Viewer
2. Select Log menu and choose Log Settings
3. Verify Change Settings for System Log is selected
4. Verify Maximum Log Size is set to 512KB
5. Click button for Do Not Overwrite Events (Clear Log Manually)
6. Select Change Settings for Application Log
7. Verify Maximum Log Size is set to 512KB
8. Click button for Do Not Overwrite Events (Clear Log Manually)
Avid Technology Systems Engineering
Windows NT Configuration
Page - 76
IBM Intellistation M-Pro (6889) System Integration and Reference Guide
Rev 15
MediaComposer, Symphony and Xpress NT
6.8.3
NT Crash Dump Recovery Configuration
The system must be configured to allow a complete memory dump store in the event of a
Windows NT system crash.
1.
Open the System control panel.
2.
Select the Startup/Shutdown tab.
3.
Under the Recovery section check the following boxes:
Write an event to the System log.
Write debugging information to %SystemRoot%\MEMORY.DMP
4.
6.9
To make the changes effective you must restart the system. If you are performing other
configuration work you can opt to dismiss the restart prompt.
Pagefile Configuration
When a process needs to use more memory than is available to it’s working set, some
memory blocks currently in use by the process must be out-placed to make room for the new
data. This process is called paging and is handled by the memory management code within
Windows NT. Memory blocks that cannot be paged to free memory pool areas must be paged
out to a file on the disk called the pagefile.
The initial size of a pagefile is determined by the operating system and often proves to be
improperly sized for normal operation. Windows NT will dynamically grow the pagefile when it
requires more room to operate, but this dynamic expansion slows performance.
Windows NT paging performs best when multiple pagefiles are spread over multiple disk
drives rather than a single drive. It is also better to move the pagefile off of the disk where the
operating system files reside to reduce disk contention. However, since the end-user
customer disk configuration is not known at the time the system is integrated, it is not possible
to configure an external pagefile.
Systems are configured with a 300MB pagefile on the system disk. This will permit the capture
of a Windows NT operating system crash and provide for sufficient expansion of the pagefile
under most circumstances. If an additional pagefile is required for operation, it should be
configured on the first striped set of disk drives.
Configuring the Pagefile
1.
In Control Panel, double-click System.
2.
Select the Performance tab.
Avid Technology Systems Engineering
Windows NT Configuration
Page - 77
IBM Intellistation M-Pro (6889) System Integration and Reference Guide
Rev 15
MediaComposer, Symphony and Xpress NT
6.10
3.
Under the Virtual Memory section press the Change button.
4.
The Virtual Memory dialog will display the number of drives attached to the system
5.
Select drive C:
6.
Select initial size to 300MB.
7.
Select maximum size to 300MB.
8.
When changes are complete, press the Set button.
9.
To make the changes effective you must restart the system. If you are performing other
configuration work you can opt to dismiss the restart prompt.
Windows NT HAL Replacement
When Windows NT 4.0 is installed on the IBM Intellistation it detects the APIC component on
the system board and installs a corresponding Hardware Abstraction Layer (HAL) system file.
Due to a problem with this file the Avid Meridien Digital Media Board device driver will not start
successfully when service pack 3 is installed and a replacement HAL file must be installed
manually.
Service pack 4 corrects the HAL problem with the Meridien Digital Media board. However, the
APIC HAL normally installed with service pack 4 renders MIDI inoperable. Therefore, HAL
replacement must be conducted to allow MIDI operations.
The HAL version must be examined when the following conditions are TRUE:
Avid media board hardware will be installed on the IBM Intellistation AND
⇒ On any IBM Intellistation with a pre-installed Windows NT operating system.
⇒ Any time the Windows NT operating system is re-installed.
⇒ Any time the Windows NT operating system is repaired.
⇒ After any installation of Windows NT Service Pack 3.
⇒ After installation of Windows NT Service Pack 4 if MIDI operation with the Crystal
Audio CS4235 chip is required.
Avid Technology Systems Engineering
Windows NT Configuration
Page - 78
IBM Intellistation M-Pro (6889) System Integration and Reference Guide
Rev 15
MediaComposer, Symphony and Xpress NT
6.10.1
Determining the HAL Version
Use this procedure to determine the HAL on your computer system. You may use this
procedure or may perform the rename/replacement using the Windows NT Explorer. However,
if you use Explorer you will not see accurate file size information. You are encouraged to use
the command window to avoid making errors.
1. Open an MS-DOS command window from the Start menu.
2. C:\> cd %systemroot%\system32
3. C:\> dir hal.dll
Examine the table and match the file date and size. Proceed with the instructions referenced
in the required action column.
Date
8/9/96
Size
51,424
65,664
Name
HAL.DLL
4/30/97
51,488
65,664
66,240
Required Action
These HAL files must be replaced. Indicates there is
no service pack on this system or the service pack
revision is incorrect. Install service pack 3 before
proceeding. See section on Service Pack installation.
12/14/96
HAL.DLL
11/24/97
66,400
HAL.DLL
4/30/97
51,744
HAL.DLL
10/15/98
66,880
HAL.DLL
10/15/98
52,384
HAL.DLL
This HAL must be replaced. The system has service
pack 3 installed and is at the minimum acceptable
operating level, but the incorrect HAL is installed.
Proceed with HAL replacement.
This HAL must be replaced. The system has service
pack 3 and the pent-fix hotfix applied, and the incorrect
HAL is installed. Proceed with HAL replacement.
This is the correct HAL for service pack 3. The
system should be updated to service pack 4 as soon
as possible.
This HAL must be replaced. The system has service
pack 4 installed along with the default APIC HAL.
This is the correct HAL. The system has service pack
4 installed and is at the minimum acceptable operating
level. No further action is required.
Another way to determine if the Hal must be replaced is:
1. Launch Windows NT Diagnostics from the Administrative Tools Group and select the
Resources Tab.
2. Check the box labeled “Include HAL resources”
The device column should include entries with the description:
PC Compatible EISA/ISA HAL
Avid Technology Systems Engineering
Windows NT Configuration
Page - 79
IBM Intellistation M-Pro (6889) System Integration and Reference Guide
Rev 15
MediaComposer, Symphony and Xpress NT
You must replace the HAL if the device column includes entries with the description:
UP MPS 1.4 - APIC platform
6.10.2
Replacing the HAL
This procedure assumes the system has NT service pack 4 installed as per instructions in
previous section. You may use this procedure or may perform the rename/replacement
using the Windows NT Explorer. However, if you use Explorer you will not see accurate
file size information. Since some HAL files have similar file sizes, you are encouraged to use
the command prompt procedure.
1. Open an MS-DOS command window from the Start menu.
2. C:\> cd %systemroot%\system32
3. C:\> dir hal.dll
4. C:\> ren HAL.DLL HALAPIC.DLL
5. Insert Service Pack 4 in the CD-ROM drive, or reference another location for the service
pack files. On the IBM Intellistation these files are located on the system disk (C:) in the
directory \SP4.
6. C:\> copy [drive letter]\I386\HAL.DLL %systemroot%\system32\HAL.DLL
7. C:\> dir hal.dll
Expected results:
4/30/97
10/15/98
51,744 HAL.DLL
52,384 HAL.DLL
(This is the Service Pack 3 single processor HAL)
(This is the Service Pack 4 single processor HAL)
8. Changes become effective after the next system restart.
Important: If Service Packs 3 or 4 are re-installed for any reason the HAL replacement must
be done again.
6.11
Hardware Profiles
Windows NT supports multiple hardware profiles as a means to selectively disable device
drivers or services. Avid Systems Engineering recommends configuration of three hardware
profiles for performance and troubleshooting procedures.
Avid Technology Systems Engineering
Windows NT Configuration
Page - 80
IBM Intellistation M-Pro (6889) System Integration and Reference Guide
Rev 15
MediaComposer, Symphony and Xpress NT
Original Configuration
This profile omits only Avid hardware devices (Meridien Digital Media and EditDMA) from
operation. All other device drivers remain operable and enabled.
Avid Configuration (Network Enabled)
This is the normally used hardware profile and should include all Avid hardware devices and
networking enabled.
Avid Configuration (Network Disabled)
This profile disables the network device driver only for configurations for digitize or print to
tape operations.
Important: This procedure should not be implemented until all hardware, operating system,
and applications configuration requirements are satisfied and verified functional.
1.
Open the System Control Panel and select the Hardware Profiles tab.
2.
Select the Copy button and rename Original Configuration to Avid Configuration
(Network Enabled) and click OK.
3.
Select the Copy button and rename Original Configuration to Avid Configuration
(Network Disabled) and click OK.
4.
Highlight Avid Configuration (Network Enabled) and press the up arrow to make it the
default profile.
5.
Highlight Avid Configuration (Network Disabled) profile and click the Properties button.
Select the Network tab and check the box marked Network-disabled hardware profile.
6.
Click OK to close, and Apply and Close to commit the changes.
7.
Open the Devices Control Panel.
8.
Scroll down the driver list until you get to APMEditDMA..
9.
Select the HW Profiles button and highlight the Original Configuration hardware profile.
10. Press the Disable button, verify the change for the Original Configuration profile and
click OK.
11. Scroll down the driver list until you get to APMPhxNTDriver device driver.
12. Select the HW Profiles button and highlight the Original Configuration hardware profile.
13. Press the Disable button, verify the change for the Original Configuration profile and
click OK.
14. Procedure is complete.
Avid Technology Systems Engineering
Windows NT Configuration
Page - 81
IBM Intellistation M-Pro (6889) System Integration and Reference Guide
Rev 15
MediaComposer, Symphony and Xpress NT
6.12
Changing the Registered Owner
Before releasing the system to the end-user you must change the registered ownership
information in the Windows NT Registry. This facilitates accurate ownership information within
the system and is especially important for products whose installers hardcode against the
fields in the NT Registry.
Use Regedit or Regedt32 to change the Windows NT registration information so it reflects the
end-user customer and organization.
1. Invoke the Registry Editor (Regedt32.exe)
2
Locate and open:
HKEY_LOCAL_MACHINE\SOFTWARE\Microsoft\Windows NT\CurrentVersion
3. Double click on the RegisteredOrganization field.
4. Modify the field to reflect the end-user organization name and click OK.
5. Double click on the RegisteredOwner field.
6. Modify the field to reflect the end-user owner name and click OK.
7. Choose “Close” to save the value.
Avid Technology Systems Engineering
Windows NT Configuration
Page - 82
IBM Intellistation M-Pro (6889) System Integration and Reference Guide
Rev 15
MediaComposer, Symphony and Xpress NT
7.
Windows NT Device Drivers
This section describes the procedures necessary to check revisions, install, or update all
Windows NT device drivers required by Avid NT products.
Avid Systems Engineering maintains support, revision, and performance information about all
Windows NT device drivers. As updated drivers become available, we perform several tests to
assess the impact on our products. For reliable performance, we recommend checking with us
before installing new drivers from a vendor, even if the drivers were supplied with the product.
Before updating or installing device drivers it is a good idea to inventory the devices you will
be configuring and collect the appropriate device drivers. IBM supplies drivers on their Ready
to Configure CD-ROM that provides a convenient method of installing or creating driver
diskettes. However, since driver revisions change routinely always check with Systems
Engineering for the most appropriate revisions.
7.1
NT Device Drivers and Revisions Chart
Component
Driver Name
Adaptec 7800 Family Manager
AIC78XX.SYS
Adaptec AIC-1160 Family PCI
Fibre Channel
Avid Edit Display Controller
AIC116X.SYS
Device
Controlled
7895
3940
F940
AvidEDC.SYS
Miniport Driver
Avid Display
Controller EDC
4.113.30.10
Avid EditDMA
APMEDITDMA.SYS
Avid Display
Controller EDC
Application
Specific
Avid Meridien Digital Media
APMPHXNTDRIVER.SYS
Avid Meridien
Digital Media
Application
Specific
Crystal Audio CS4235 Audio
Intel PIIX Bus Master
Intel Pro100B 82558 Network
CWBAUDIO.SYS
PIIXIDE.SYS
E100BNT.SYS
Low Level MIDI Support
MMDRV.DLL
Sound Chip
IDE Interface
82558 Network
Interface
MIDI
MPU-401 MIDI Driver
MPU401.SYS
MIDI
Sentinel Driver
SENTINEL.SYS
Dongle
4.01.1900
2.03
3.00.07,
3.19.00, 3.29.00
4.00 Size =
16,656
4.00 Size =
11,280
PD5.30
Windows NT PIC HAL
HAL.DLL
NT Kernel
Windows NT Service Pack 4
Required Hotfixes = None
NT Kernel
Avid Technology Systems Engineering
Valid Versions
Notes
2.11, 2.2, 2.21
1.2
JNI owns
card/driver
On
product
CD
On
product
CD
On
product
CD
Legacy
HAL only
Legacy
HAL only
On
product
CD
4/30/97 Size =
51,744 (SP3)
10/15/98 Size =
52,384 (SP4)
Windows NT Device Drivers
Page - 83
IBM Intellistation M-Pro (6889) System Integration and Reference Guide
Rev 15
MediaComposer, Symphony and Xpress NT
7.2
MGACtrl Service
Systems normally ship with a Matrox AGP graphics card (Millenium II, G200). As Avid
replaces the graphics card with the Meridien display controller, the Matrox MGACtrl service
must be disabled after the Matrox card is removed.
7.3
1.
Open the Services control panel.
2.
Scroll down the list of services and single click to select the MGACtrl service.
3.
Click the Startup button.
4.
Under the Startup Type section set the radio button marked Disabled.
5.
Click OK.
6.
If the MGACtrl service is still started, click the Stop button.
7.
Click Close to exit the control panel.
8.
Changes will be effective after the next system reboot.
Adaptec SCSI Host Adapter
The Adaptec 7800 Family Manager Driver includes support for the following SCSI Host
Adapters:
•
•
AIC-7895 integrated dual channel
AHA-2940UW, AHA-3940UW or AHA-3940AUW
DriverName: AIC78XX.SYS
IBM Intellistation M-Pro systems include an Adaptec 7895 dual channel SCSI controller chip
on the system board. The 7895 is NOT supported by the Adaptec AIC78XX device driver
included with the Windows NT Workstation 4.0 distribution or Windows NT Service Packs 3.
With Windows NT Service Pack 4 the device driver is the wrong revision and must be
replaced. An updated driver kit is necessary:
•
To complete a new Windows NT installation when the target system drive is SCSI based.
•
To enable support for this device with pre-installed NT systems where the adapter was not
previously enabled.
•
To enable this device after service pack re-installation or maintenance.
You can create the Adaptec Family Manager driver set by running the “Diskette Factory” on
the IBM Ready to Configure CD-ROM.
Avid Technology Systems Engineering
Windows NT Device Drivers
Page - 84
IBM Intellistation M-Pro (6889) System Integration and Reference Guide
Rev 15
MediaComposer, Symphony and Xpress NT
7.3.1
Adaptec SCSI Driver Revision Verification
If the system has Windows NT pre-installed and an AIC78XX driver was installed, verify the
Adaptec device driver is the proper revision:
1. Using Windows NT Explorer, open the <systemroot>\system32\drivers directory and
locate aic78xx.sys. Insure the NT Explorer options are set to display all files as noted
in the Windows NT Configuration General Setup instructions in this document.
2. If the driver is not present it must be installed.
3. Right mouse click the file and select Properties from the menu.
4. Choose the Version tab and verify the File Version reflects a version in the driver
revision chart.
5. If the version is not correct, the driver must be updated.
7.3.2
Installing or Updating the Adaptec SCSI Device Driver
If the ADAPTEC SCSI device driver is not the correct revision or is missing from the system,
this procedure should be followed to update the driver.
1. Open the Control Panels and double-click on SCSI Adapters.
2. Select the Drivers tab, and check for an existing Adaptec AHA-294X/AHA-394X or AIC78XX PCI SCSI driver.
3. If the driver is not present skip to step 5. Otherwise, select the driver and click the
Remove button.
4. Choose Yes to the “Are you sure you want to remove this driver” dialog.
5. Choose the Add button.
6. In the Install Driver window, click the Have Disk button.
7. Insert the Adaptec 7800 Family Manager Driver diskette or point to the appropriate path
where the drivers are located.
8. At the Copy manufacturer’s files from box, type a:\winnt\4_0 for diskette or point to the
appropriate path and click OK.
9. At the Install Driver window click OK.
10. Respond to "Do you want to use the currently installed driver(s) or install new
one(s)", by selecting the New button.
11. Type a:\winnt\4_0 or point to the appropriate path and click continue.
Avid Technology Systems Engineering
Windows NT Device Drivers
Page - 85
IBM Intellistation M-Pro (6889) System Integration and Reference Guide
Rev 15
MediaComposer, Symphony and Xpress NT
12. The driver installation is complete and the system must be restarted to take effect. Click
Yes to restart the system.
7.4
Adaptec Fibre Channel Adapter
The Adaptec AIC-1160 Family PCI Fibre Channel Device Driver kit includes support for the
following Fibre Channel Adapters:
•
AHA-F940 and AHA-F950
DriverName: AIC116X.SYS
Fibre channel drivers are not included with the Windows NT Workstation 4.0 distribution or
Windows NT Service Packs and must be installed separately.
7.4.1
Adaptec Fibre Channel Driver Revision Verification
If the system has a previously installed version of the AIC-1160 driver verify the revision:
1. Using Windows NT Explorer, open the <systemroot>\system32\drivers directory and
locate aic116x.sys. Insure the NT Explorer options are set to display all files as noted in
the Windows NT Configuration General Setup instructions in this document.
2. If the driver is not present it must be installed.
3. Right mouse click the file and select Properties from the menu.
4. Choose the Version tab and verify the File Version reflects a version in the driver
revision chart.
5. If the version is not correct the driver must be updated.
7.4.2
Updating or Installing the Adaptec Fibre Channel Driver
If the Adaptec Fibre Channel device driver is not the correct revision or is missing from the
system this procedure should be followed to update the driver.
1. Open the Control Panels and double-click on SCSI Adapters.
2. Select the Drivers tab, and check for an existing Adaptec AIC-1160 Family PCI Fibre
Channel Adapters (SCSI) driver.
3. If the driver is not present skip to step 5. Otherwise, select the driver and click the
Remove button.
Avid Technology Systems Engineering
Windows NT Device Drivers
Page - 86
IBM Intellistation M-Pro (6889) System Integration and Reference Guide
Rev 15
MediaComposer, Symphony and Xpress NT
4. Choose Yes to the “Are you sure you want to remove this driver” dialog.
5. Choose the Add button.
6. In the Install Driver window, click the Have Disk button.
7. Insert the Adaptec AIC-1160 Family Driver diskette or use the browse button to locate the
path containing the necessary files.
8. At the Copy manufacturer’s files from box, type the path containing the necessary files.
9. Click OK.
10. At the Install Driver window click OK.
11. Respond to "Do you want to use the currently installed driver(s) or install new
one(s)", by selecting the New button.
12. Type the path containing the necessary files and click continue.
13. The driver installation is complete and the system must be restarted to take effect. Click
Yes to restart the system.
7.5
Avid Meridien Digital Media Board Driver
The Avid Meridien Digital Media board device driver is an integral part of the Symphony, and
XpressNT applications and is installed during setup. The device driver is registered in the
System startup group.
Driver Name: APMPHXNTDRIVER.SYS
APMPHXNTDRIVER.SYS will be copied to the <systemroot>\system32\drivers directory.
Supporting files will be copied to the <systemroot> \system32\drivers\Avid directory.
Refer to this procedure to check the status of the driver:
1. Open the Devices control panel.
2. Single click to select the APMPHXDriver.
3. Check the Status column for a device status of Started. This indicates that driver loaded
and initialized properly. Check the Troubleshooting section of this document for
suggestions to correct any problems.
4. Click the Startup button.
5. Under the Startup Type section insure that the radio button marked System is checked.
6. Click the Cancel button.
7. Click Close to exit the control panel.
Avid Technology Systems Engineering
Windows NT Device Drivers
Page - 87
IBM Intellistation M-Pro (6889) System Integration and Reference Guide
Rev 15
MediaComposer, Symphony and Xpress NT
Important: The executable needs to be matched with the correct version of the driver. If you
have a version mismatch you will see an error message when you launch the application or
board diagnostics.
7.6
Avid Edit Display Controller
The Avid Edit Display Controller (EDC) is built around two Number Nine 3D Revolution
graphics chips which provide support for two display monitors, and a digital encoder/decoder
device for on screen motion video. Two Windows NT drivers are required to support these
features.
AvidEDC Number Nine Display Driver
AVIDEDCD.DLL
Driver Name: AVIDEDC.SYS,
Avid EditDMA driver
Driver Name: AVIDEDITDMA.SYS
The Symphony or Xpress NT installer programs install the Avid EditDMA device driver.
The Avid Edit Display controller driver files are copied to disk by the Symphony or Xpress NT
installer programs but the driver is not installed. Use the Number Nine Display Driver
installation procedure to install the device driver.
7.6.1
Number Nine Display Device Driver
Use this procedure to install and activate the Avid Edit Display Controller (EDC).
AvidEDC Number Nine Display Driver
AVIDEDCD.DLL
Driver Name: AVIDEDC.SYS,
1. Boot the system in VGA mode by choosing the Windows NT Workstation Version 4.00
[VGA Mode] selection from the NT boot menu. The system will boot into 16-color mode at
640 x 480 resolution.
2. Right mouse click on the desktop, and select Properties. This will bring up the Display
Properties dialog.
3. Click the Settings resource tab.
4. Type the letter ’T’ on the keyboard or click the Display Type button to bring up the
Display Type dialog.
5. Type the letter ’C’ on the keyboard or click the Change button to bring up the Change
Display Dialog.
Avid Technology Systems Engineering
Windows NT Device Drivers
Page - 88
IBM Intellistation M-Pro (6889) System Integration and Reference Guide
Rev 15
MediaComposer, Symphony and Xpress NT
6. Type the letter ’H’ on the keyboard or click the Have Disk button to bring up the Install
From Disk dialog.
7. Type in the path to the Number Nine display driver files. For example, D:\Avid\EDCInstall
and click OK.
8. Click OK for the next dialog box to bring up the Third-party Drivers dialog.
9. The Avid EDC Display Controller will appear as a third party choice.
10. Click Yes button to accept the Avid EDC selection.
11. Click the Cancel button to close the Display Type dialog.
12. Click the OK button to close the Display Properties box. This will bring up a dialog
instructing you to restart the system. Choose Yes to initiate a system shutdown.
13. Allow the system to restart normally.
14. Upon log in Windows NT will open the Display Control Panel automatically.
15. For single monitor systems only open the Avid EDC Display Control Center control
panel. Click the Desktop tab and select the Normal Mode button.
16. Click the Settings tab and select True Color on the Color Pallette menu.
17. Set the refresh rate is set to 75 Hz or above.
18. Set the Desktop Area slider to 2048 x 768 for two monitor systems and 1024 x 768 for
single monitor systems. Other resolutions are available but should be left to the end user.
19. Click the Test button and the system will display the resolution chosen. Click Close to
apply.
7.6.2
Avid Edit DMA Device Driver
The Avid EditDMA device driver is an integral part of the Symphony and XpressNT
applications and is installed during the setup of these applications. The device driver is
registered in the Automatic startup group.
Driver Name: APMEDITDMA.SYS
APMEDITDMA.SYS is copied to the <systemroot>\system32\drivers directory.
Refer to this procedure to check the status of the driver:
1. Open the Devices control panel.
2. Single click to select the APMEDITDMA driver.
Avid Technology Systems Engineering
Windows NT Device Drivers
Page - 89
IBM Intellistation M-Pro (6889) System Integration and Reference Guide
Rev 15
MediaComposer, Symphony and Xpress NT
3. Check the Status column for a device status of Started. This indicates that driver loaded
and initialized properly. Check the Troubleshooting section of this document for
suggestions to correct any problems.
4. Click the Startup button.
5. Under the Startup Type section insure that the radio button marked Automatic is
checked.
6. Click the Cancel button.
7. Click Close to exit the control panel.
Important: The Edit DMA device driver requires a clock from the Meridien Digital Media
board. The cable between the Meridien Digital Media board and the Meridien Display
Controller must be attached.
7.7
Crystal CS4235 Audio Driver
The Crystal Audio CS4235 sound chip permits business audio support with the IBM. The MIDI
port drivers must be configured to permit the use of fader accessories for MIDI automation
gain recording. You can create the Crystal Audio driver set by running the “Diskette Factory”
on the IBM Ready to Configure CD-ROM.
DriverName: CWBAUDIO.SYS
Use the following procedures when working with the Crystal Audio sound chip.
7.7.1
Crystal CS4235 Audio Sound Driver Revision Verification
1. Open the Multimedia Control Panel and select the Devices tab.
2. Click the “+ “ box to the left of Audio Devices to expand the display. Audio for
CrystalWare Audio Driver should appear. If it does not appear, the driver is either not
present or started.
3. Select the Audio for CrystalWare Audio Driver and press the Properties button.
Choose Settings and look for the Copyright information. The version number next to
CWBAUDIO should reflect one of the versions on the device driver revision chart.
7.7.2
Installing or Updating the Crystal Audio Driver
1.
Open the Multimedia Control Panel.
Avid Technology Systems Engineering
Windows NT Device Drivers
Page - 90
IBM Intellistation M-Pro (6889) System Integration and Reference Guide
Rev 15
MediaComposer, Symphony and Xpress NT
2.
Click on the Devices resource tab and the Multimedia Properties windows will open.
Select the Add button.
3.
Select Unlisted or Updated Drivers and press OK. A dialog box will appear requesting
the source path of the drivers to be installed. Either type a specific path or use the browse
button to locate the appropriate location of the drivers. For example if you are using the
IBM RTC CD-ROM the path would be [cd drive]\winnt\crywntus.
4.
Press OK to select the CrystalWare Audio Driver. Windows NT may report one or more
drivers already present in the system. Select the New button to ensure a complete
installation.
5.
The CrystalWare Configuration Panel will be displayed during the installation. This panel
will display the resources allocated to the device. These resources are not modifiable.
Default Resources:
Device
WSS
IRQ
5
DMA Channels
1 (Play), 3 (Capture)
6. After completing the driver installation, the system will require a restart.
7.7.3
Installing the MIDI Driver
The current implementation of MIDI support on the IBM 6889 requires that the MPU-401
compatible driver be installed at IRQ 9. The MPU-401 driver will not function at any other
IRQ. Also, because the audio chip on the system board is an ISA device, the interrupt
resource is not shareable with other devices in the system.
Along with the MPU-401 driver is another driver called “Low Level Wave, MIDI and AUX
Support”. Both of these drivers are required for MIDI support.
Note 1: The system BIOS level needs to be at level 27 or higher.
Important: Because of the specific resource requirement, the MIDI drivers must be installed
BEFORE any other device drivers or hardware. If MIDI installation is attempted after other
hardware has been installed or after a board swap or upgrade, the IRQ 9 resource may be
lost. Refer to the Troubleshooting section of this document for recommendations if you
cannot free IRQ 9.
Procedure:
1. Insure you have access to the Windows NT service pack 3 (SP3) distribution disk. On
most IBM systems there is an \I386 directory on the C drive that contains the service pack
distribution.
Avid Technology Systems Engineering
Windows NT Device Drivers
Page - 91
IBM Intellistation M-Pro (6889) System Integration and Reference Guide
Rev 15
MediaComposer, Symphony and Xpress NT
2. Launch Windows NT Diagnostics from the Administrative Tools program group and
select the resource tab.
3. Inspect the resource map and look for any device already using IRQ 9. If a device has
claimed IRQ 9 you must refer to the Troubleshooting section of this document.
4. Open the Multimedia Control Panel and select the Devices tab.
5. Click the “+ “ box to the left of MIDI Devices and Instruments to expand the display.
6. Select the Add button at the bottom of the window.
7. Scroll down the list, select the MPU-401 Compatible Driver and click OK.
8. A dialog box will appear asking for the location of the driver. Type in the path where the
driver is located. This can be the C:\I386 directory or from an SP3 distribution disk.
9. On occasion a dialog may come up informing that the driver is on the system and allows
selection or either Current or New. Always select New.
10. Once the driver attempts to load another dialog will appear asking you to select an IRQ
and base address. When this is shown select IRQ 2/9 and a Base I/O of 330. The base
address can be something else but this should work. Do not use any other IRQ setting, as
MIDI will only function at IRQ 9!
11. After this driver is installed, the system will prompt you to restart, select “Don’t Restart
Now”
12. Repeat step 6 but when the list appears again select the Low Level Wave, MIDI and
AUX Support driver.
13. Again you will be prompted for a location and possible dialog of Current / New. Select
New.
14. Once the driver is installed you will be asked to restart. At this time restart the machine.
15. After the system restarts, log on to NT and launch Windows NT Diagnostics again.
16. Open the resources tab and insure that the MPU-401 driver is at IRQ 9. If this is the case
you can shut down the machine and continue with system integration. The IRQ resource
should be locked down at this point.
Avid Technology Systems Engineering
Windows NT Device Drivers
Page - 92
IBM Intellistation M-Pro (6889) System Integration and Reference Guide
Rev 15
MediaComposer, Symphony and Xpress NT
7.8
Intel PIIX IDE Bus Master Drivers
Most Avid systems use a SCSI system disk over IDE disk drives. However, if the system uses
an IDE system disk drive, the standard Windows NT device ATAPI driver must be replaced in
favor of a Bus Mastering device driver. The driver provides more efficient controller
functionality. If you are not certain of the system disk type, check the System Summary
section of the system BIOS to verify the drive type.
IDE Bus Mastering drivers are dependent on the PIIX component of the system chip set and
the system board vendor. Never use a generic driver unless explicitly instructed to do so.
DriverName: PIIXIDE.SYS
7.8.1
IDE Bus Master Driver Revision Verification
If Windows NT was pre-installed and a PIIXIDE.SYS driver was installed, verify the device
driver is the proper revision:
1. Using Windows NT Explorer, open the <systemroot>\system32\drivers directory and
locate piixide.sys. Insure the Explorer options are set to display all files as noted in the
Windows NT Configuration General Setup instructions in this document.
2. If the driver is not present it must be installed.
3. Right mouse click the file and select Properties from the menu.
4. Choose the Version tab and verify the File Version reflects a version in the driver
revision chart.
5. If the version is not correct, the drivers must be updated.
7.8.2
Updating or Installing the IDE Bus Master Device Driver
If the Intel PIIX PCI Bus Master IDE controller device driver is not the correct revision or is
missing from the system this procedure should be followed to update the driver.
1. Open the Control Panels and double-click on SCSI Adapters.
2. Select the Drivers tab, and check for an existing Intel PIIX PCI Bus Master IDE
Controller driver or the default IDE driver, IDE CD-ROM (Atapi 1.2) / Dual-Channel PCI
IDE Controller.
3. If either driver is present select the driver and click the Remove button. Be sure to remove
BOTH drivers if present.
Avid Technology Systems Engineering
Windows NT Device Drivers
Page - 93
IBM Intellistation M-Pro (6889) System Integration and Reference Guide
Rev 15
MediaComposer, Symphony and Xpress NT
4. Choose Yes to the “Are you sure you want to remove this driver” dialog.
5. Choose the Add button.
6. In the Install Driver window, click the Have Disk button.
7. Provide the appropriate path to the PIIXIDE driver directory. (This will either be a diskette
or disk directory).
8. At the Copy manufacturer’s files from box, type the correct path or browse for the
correct directory and click OK.
9. At the Install Driver window click OK.
10. Respond to "Do you want to use the currently installed driver(s) or install new
one(s)", by selecting the New button.
11. Type the correct path and click continue.
12. The driver installation is complete and the system must be restarted to take effect. Click
Yes to restart the system.
13. When the system has restarted verify the driver loaded and started successfully by
entering SCSI Adapters Control Panel. The Intel PIIX PCI Bus Master IDE Controller
should be listed. The default driver IDE CD-ROM (Atapi 1.2) / Dual-Channel PCI IDE
Controller should not be listed.
7.9
Intel EtherExpress Pro100 Network Interface
The system uses an Intel Pro/100B embedded network interface. This interface requires a
driver that is not present on the Windows NT 4.0 distribution CD-ROM or Service Pack 3. The
correct drivers are available on the IBM Ready to Configure (RTC) CD-ROM supplied with the
system or from Avid Systems Engineering. Use the menu driven interface on the RTC CDROM to create a diskette of the driver installation kit.
DriverName: E100BNT.SYS
Important: The EtherExpress Pro100B is based on the Intel 82558 chip. This interface is a
replacement for the Intel 82557. It is not the same as the Intel 82557-based 10/100 Ethernet
PCI interface available as an option during Windows NT 4.0 network software installation. If
the interface is improperly specified during default Windows NT installation it will NOT function
although the drivers will display no indication of error during installation of networking.
Follow the instructions in this guide for updating or installing the network interface driver to
avoid problems.
Avid Technology Systems Engineering
Windows NT Device Drivers
Page - 94
IBM Intellistation M-Pro (6889) System Integration and Reference Guide
Rev 15
MediaComposer, Symphony and Xpress NT
7.9.1
Network Interface Driver Revision Verification
If the system has a previously installed version of the EtherExpress Pro100B driver verify the
revision:
1. Using Windows NT Explorer, open the <systemroot>\system32\drivers directory and
locate E100BNT.SYS. Insure the explorer options are set to display all files as noted in
the Windows NT Configuration General Setup instructions in this document.
2. If the driver is not present it must be installed.
3. Right mouse click the file and select Properties from the menu.
4. Choose the Version tab and verify the File Version reflects one of the versions in the
driver chart.
5. If the version is not correct, the driver must be updated.
7.9.2
7.10
Updating or Installing the Network Interface Device Driver
1.
Open the Network Control Panel and choose the Adapters tab.
2.
If updating the driver from a previous revision press the Update button and skip to step 4.
3.
Select the Add button. The Select Network Adapter dialog box will appear along with a list
of adapters. Do not use the adapters from this list. Instead, select the Have Disk button.
4.
A dialog box will appear requesting the source path of the drivers to be installed. Either
type a specific path or use the browse button to locate the appropriate location of the
drivers.
5.
A dialog box will appear with the Intel EtherExpress Pro Adapter. Press OK to initiate
the installation.
6.
Choose the Close button to finalize the installation.
7.
Restart the system.
Pinnacle 3D DVE Genie Driver
The Pinnacle Genie device driver is an integral part of the Symphony application and Xpress
NT when this 3D DVE effects option is purchased. The driver is installed during setup of these
applications.
Driver Name:
Supporting File:
PGenie.sys
VIPR0201.abf
Avid Technology Systems Engineering
Windows NT Device Drivers
Page - 95
IBM Intellistation M-Pro (6889) System Integration and Reference Guide
Rev 15
MediaComposer, Symphony and Xpress NT
Installed driver location: \winnt\system32\drivers and \winnt\system32\drivers\avid
•
PGenie.sys will be copied to the <systemroot>\system32\drivers directory.
•
VIPR0201.abf will be copied to the <systemroot> \system32\drivers\Avid directory.
Refer to this procedure to check the status of the driver:
1. Open the Devices control panel.
2. Single click to select the PGenie driver.
3. Check the Status column for a device status of Started. This indicates that driver loaded
and initialized properly. Check the Troubleshooting section of this document for
suggestions to correct any problems.
4. Click the Startup button.
5. Under the Startup Type section insure that the radio button marked Automatic is
checked.
6. Click the Cancel button.
7. Click Close to exit the control panel.
Tip: When the Genie device driver initializes during system startup you will hear the tune “Do
Re Me”.
7.11
Sentinel Driver
The Sentinel driver is necessary to support the application key on the parallel port. The
appropriate version of the Sentinel device driver software is included with the Symphony and
Xpress product CD-ROMS and is installed by the application installer
DriverName: SENTINEL.SYS
7.11.1
Sentinel Driver Revision Verification
To verify the Sentinel device driver is the proper revision:
1. Using Windows NT Explorer, open the <systemroot>\system32\drivers directory and
locate sentinel.sys. Insure the Explorer options are set to display all files as noted in the
Windows NT Configuration General Setup instructions in this document.
2. If the driver is not present it must be installed.
Avid Technology Systems Engineering
Windows NT Device Drivers
Page - 96
IBM Intellistation M-Pro (6889) System Integration and Reference Guide
Rev 15
MediaComposer, Symphony and Xpress NT
3. Right mouse click the file and select Properties from the menu.
4. Choose the Version tab and verify the File Version is reflected on the driver chart.
5. If the version is not correct, the drivers must be updated.
6. If the driver does not appear reference the Troubleshooting section of this document.
7.12
VTR Serial Driver
To control Avid products from a Sony VTR a specialized serial device driver is required. The
driver is not routinely installed with the NewsCutter product. To install the driver, manually
copy Serial.sys from the Avid Applications\Drivers\SerialDriver directory into the
<systemroot>\system32\drivers directory and reboot the system to activate.
The version information remains the same as the default Windows NT driver (4.0).
Avid Technology Systems Engineering
Windows NT Device Drivers
Page - 97
IBM Intellistation M-Pro (6889) System Integration and Reference Guide
Rev 15
MediaComposer, Symphony and Xpress NT
Avid Technology Systems Engineering
Windows NT Device Drivers
Page - 98
IBM Intellistation M-Pro (6889) System Integration and Reference Guide
Rev 15
MediaComposer, Symphony and Xpress NT
8.
8.1
Windows NT Networking
Networking DHCP
Avid systems are configured to support networking. Since network protocol and configuration
requirements are site-specific, it is not possible to configure a system that will match the
needs of every end-user. Thus, out of box protocol integration will be limited to TCP/IP
configured to support Dynamic Host Control Protocol (DHCP).
•
End-users are advised to review their networking requirements before system
installation.
•
End-users must change the system identification and networking configuration to
reflect site requirements.
During out of box Windows NT installation the system requires the installer to decide if the
computer will participate on a network. A series of questions prompt the installer for the type of
network interface, and what default protocols are required.
Default selections chosen by Avid during system integration:
8.2
1.
Computer Name – Set the system name to reflect “AvidTechnology”
2.
Network Adapter - Choose the Search function and it will identify the Intel Pro100 82557
3.
Protocols - Choose only TCP/IP
4.
TCP/IP Configuration - Choose and configure for DHCP only. Do not change the
Workgroup and Domain selections.
Networking and Final Integration
Before completing integration and installing the system at a customer location, you should
discuss the customer networking environment and requirements. Site requirements may
necessitate changes to the Windows NT configuration as shipped.
Determine what additional protocols the customer will require. Additional protocols will access
to the Windows NT Distribution CD-ROM and re-application of Service Pack 4 on the system.
Determine what the customer computer name and IP parameters will be in advance.
The networking adapter device driver may require updating after the appropriate service pack
is installed. You must have access to the device driver diskette or have the IBM Ready to
Configure disk available to create a driver diskette.
Avid Technology Systems Engineering
Windows NT Networking
Page - 99
IBM Intellistation M-Pro (6889) System Integration and Reference Guide
Rev 15
MediaComposer, Symphony and Xpress NT
8.3
Computer Browser Service
The Browser Service must be disabled for in-house and shipping systems.
9.
Open the Services control panel.
10. Single click to select the Computer Browser service.
11. Click the Startup button.
12. Under the Startup Type section set the radio button marked Disabled.
13. Click OK.
14. If the Computer Browser service is still started, click the Stop button.
15. Click Close to exit the control panel.
16. Changes will be effective after the next system reboot.
Avid Technology Systems Engineering
Windows NT Networking
Page - 100
IBM Intellistation M-Pro (6889) System Integration and Reference Guide
Rev 15
MediaComposer, Symphony and Xpress NT
9.
Windows NT Maintenance and Recovery
This section describes routine maintenance and restoration procedures for Windows NT
installations.
9.1
Windows NT Repair Disk
The Windows NT Repair disk is vital to successful restoration of a user system in the event of
a damaged operating system component. The Emergency Repair Disk (ERD) as it sometimes
called should be updated any time a change to the operating system has occurred. This can
happen whenever hardware is added or applications have been installed. The ERD is also
used to replace damaged system files, restore damaged or incorrect registry information, or
rebuild the system startup environment.
The repair disk does not restore applications or device drivers. Instead it holds copies of the
user environment, software associations, passwords, and information about the system
configuration. The ERD is not a replacement for regular backups. It provides enough recovery
to restore a system to a bootable state only.
Creating or maintaining repair information is accomplished by the RDISK application included
with Windows NT Workstation. RDISK may be used to update the repair information stored in
the Winnt\Repair folder or to copy the information to an Emergency Repair Disk.
To create an Emergency Repair Disk:
1.
Open MS-DOS command window or select the Run command from the Start menu.
2.
Type rdisk /s.
Note: If you use the Windows NT Explorer to execute rdisk you will not update the
Default, Sam, and Security configuration files.
3.
The application will report progress as it saves the system configuration.
4.
You will be asked to create an Emergency Repair Disk. Click the Yes button.
5.
You will be instructed to put a high-density diskette (2.0MB HD DS) in the diskette drive.
The application will format the disk for you. Click OK to start the process.
6.
Appropriate configuration files will be saved to the disk and finally a notice about the
sensitivity of the data will be presented. Click the OK button to complete the procedure.
7.
Close the command window if open.
Important: Your system is shipped with two Emergency Repair Disks.
Avid Technology Systems Engineering
Windows NT Maintenance
Page - 101
IBM Intellistation M-Pro (6889) System Integration and Reference Guide
Rev 15
MediaComposer, Symphony and Xpress NT
Factory Default ERD - This disk should be created and stored as means to bring the system
back to a baseline default configuration in the event of a complete Windows NT rebuild.
Create this disk after all of the following conditions have been satisfied:
•
Windows NT is successfully installed along with the appropriate service packs and post
service pack fixes.
•
All platform vendor default hardware components and device drivers have been installed
and successfully configured. This includes the networking and MIDI resource drivers but
does not include optional disk controllers such as Fibre Channel.
AVID Operational ERD - is created after all Avid recommended hardware, drivers, and
applications were successfully installed and tested and the system is as close to SHIPPING
configuration as possible. Use this disk as the normal and customary end-user ERD.
9.2
Using the Emergency Repair Disk
The repair disk saves the following files:
Autoexec.nt
Config.nt
Copy of %systemroot%\System32\Autoexec.nt, used to initialize the MSDOS environment.
Copy of %systemroot%\System32\Config.nt, used to initialize the MSDOS environment.
Default._
Registry key HKEY_USERS\DEFAULT, compressed.
Ntuser.da_
Compressed version of %systemroot%\Profiles\Default user\Ntuser.dat.
The repair process uses Ntuser.da_ if this one needs to be repaired.
Sam._
Security._
Compressed Registry key HKEY_LOCAL_MACHINE\SECURITY
Software._
Compressed Registry key HKEY_LOCAL_MACHINE\SOFTWARE
System._
Compressed Registry key HKEY_LOCAL_MACHINE\SYSTEM
Setup.log
Log of which files were installed during a repair disk creation along with a
cyclic redundancy check (CRC) information for use during the repair
process.
The repair disk restores ONLY registry data in case of accidental user file deletion, operating
system corruption or other configuration problems. It does not restore your applications or
other vital files. If the system disk is reformatted and a new copy of NT is installed your
applications will require re-installation.
To use the repair disk you must initiate a Windows NT Setup by booting the Setup Diskette #1
or booting the Windows NT Distribution CD-ROM. You will be given an option to perform a
repair operation during this process.
Avid Technology Systems Engineering
Windows NT Maintenance
Page - 102
IBM Intellistation M-Pro (6889) System Integration and Reference Guide
Rev 15
MediaComposer, Symphony and Xpress NT
9.3
Windows NT Boot Diskette
Should a problem arise with the system disk master boot record or from accidental deletion of
the files in the root directory (C:\), it may be possible to access the disk to correct the problem
without having to restore from the Windows NT distribution media. Creating a Windows NT
boot diskette may permit access to the system disk in the event Windows NT will not start.
Note this is not a replacement for a proper backup of the disk.
Creating a Boot Diskette
Creating a boot diskette must be performed from a functional Windows NT system.
1. Insert a high-density diskette into Drive A.
2. Right-click on the diskette drive icon and choose Format.
3. Format the disk using Full Format.
4. Open the Windows NT Explorer and click on the root folder (usually C:\).
5. Check the Options setting under the View menu.
6. Select the button labeled Show All Files.
7. Select the file properties for each of the following files and clear the System and/or Hidden
attribute. Then copy the files to the diskette
BOOT.INI
NTDETECT.COM
BOOTSECT.DOS (Only on systems with MS-DOS or Windows 9x dual start installations)
NTLDR
NTBOOTDD.SYS (Some SCSI boot drives only) (If this file is in the root folder, copy it to
the diskette. If the file does not exist it is not required by the system)
Using the Boot Diskette
Make certain the startup sequence is set to boot from the diskette drive first. Refer to the BIOS
configuration guidelines in this document for more information.
1. Insert the diskette into drive A (diskette drive).
2. Boot the system and allow the diskette drive to read.
3. If Windows NT does not start normally another method will be needed to restore the system.
4. If the problem is caused by root directory or MBR corruption Windows NT should start normally.
5. Check for missing files in the root directory or repair the master boot record.
Avid Technology Systems Engineering
Windows NT Maintenance
Page - 103
IBM Intellistation M-Pro (6889) System Integration and Reference Guide
Rev 15
MediaComposer, Symphony and Xpress NT
9.4
Registry Backup
The Windows NT registry contains all of the internal configuration information about the
operating system, applications, and hardware on the system. It is vital that backups of this
information are available. To save all or parts of the registry use one of the following methods:
9.5
•
Create a new backup of the registry any time a configuration change has occurred on the
system. A configuration change is any installation of new hardware or applications.
•
Use RDISK.EXE to create a current Emergency Repair Disk that saves the registry to
diskette. Remember to use /S to save the full registry hives, else passwords and other
vital information will not be saved to disk.
•
The registry can be saved as part of normal backups. Some applications require the user
to explicitly save the registry, as is the case with NTBACKUP.
•
Use the Windows NT registry editor, Regedt32.exe, to save and restore registry keys.
•
Use the Configuration Save option in the Windows NT Disk Administrator to save the
SYSTEM registry hive.
Saving the Disk Configuration
Whenever changes are made to the disk configuration on a system, such as creating stripe
sets, or changing drive letter assignments, the disk configuration should be saved to a
diskette. This will permit a successful restoration of the disk configuration in case of a
hardware failure or other problems.
Creating a Disk Configuration Diskette
1. Launch the Windows NT Disk Administrator.
2. From the Partition menu, select Configuration, then Save.
3. Insert a formatted high-density diskette in the diskette drive and click OK.
4. This will copy the disk configuration information to the diskette.
5. Label this diskette and keep in a safe place.
Restoring the Disk Configuration
1. Launch the Windows NT Disk Administrator.
2. From the Partition menu, select Configuration, then Restore.
Avid Technology Systems Engineering
Windows NT Maintenance
Page - 104
IBM Intellistation M-Pro (6889) System Integration and Reference Guide
Rev 15
MediaComposer, Symphony and Xpress NT
3. Insert the saved disk configuration diskette and click Yes.
4. This will copy the disk configuration information into the registry.
9.6
Removing Stripe Sets
If you remove stripe sets from a system and do not inform Windows NT properly, the system
will record event entries about the missing FT members after each system restart. To correct
this situation you need to remove the stripe set entries from the system registry. There are two
common methods for removing stripe sets.
Removing all Stripe Set Devices by deleting the DISK key
Important: This procedure will remove all stripe sets and drive letter information from the NT
registry. This should only be done if you are certain you want to remove every drive from the
system.
1. Invoke the Registry Editor (Regedt32.exe).
2. Locate and open HKEY_LOCAL_MACHINE\SYSTEM\ subtree.
3. Locate and select the DISK key.
4. Press “Delete” to remove the DISK key.
5. Choose “Close” to save the value.
Removing all Stripe Set Devices by deleting the partitions
1. Launch the Windows NT Disk Administrator from the Administrative Tools program group.
2. Select the stripe set partition you want to remove by single clicking the partition with the
mouse.
3. Right mouse click and select “Delete”.
4. Acknowledge the dialog box stating all data will be lost.
5. Choose “Exit” from the Partition menu to complete the changes.
5. Insert the saved disk configuration diskette and click Yes.
Remember to update your Emergency Repair Disk when all changes are complete.
Avid Technology Systems Engineering
Windows NT Maintenance
Page - 105
IBM Intellistation M-Pro (6889) System Integration and Reference Guide
Rev 15
MediaComposer, Symphony and Xpress NT
Avid Technology Systems Engineering
Peripheral Configuration
Page - 106
IBM Intellistation M-Pro (6889) System Integration and Reference Guide
Rev 15
MediaComposer, Symphony and Xpress NT
10.
Peripheral Configuration
This section describes disk storage configuration options, file systems, and general peripheral
requirements.
10.1
Disk Configuration Guidelines
Enabling Write Cache
Most SCSI disk drives (including Avid drives) ship with write cache disabled. Enabling write
cache on a drive is perhaps the most important configuration change you can make to
improve disk performance. However, this does not occur when a drive is placed in service and
requires a special utility.
Avid provides a utility called Avid Startup which automatically enables write caching on Avid
drives after a system restart. For more information, refer to the product documentation.
Installing EZ-SCSI
Every Adaptec controller is shipped with a utility called SCSI Explorer on their EZ-SCSI tool-kit
that allows a user to examine mode pages and specifically toggle drive cache settings.
Systems using multiple high performance non-Avid storage devices may require a method of
setting write cache so it is important an application like SCSI Explorer is installed on the
system.
Important: For convenience and troubleshooting the EZ-SCSI tools must be installed on
every system. This application is located on the IBM Ready to Configure CD-ROM and is
named “SCSI Full Utilities”.
IBM Ready to Configure CD-ROM versions less than 4.0 contain EZ-SCSI v4.0L. If you install
this version on a system with Windows NT 4.0 and service pack 4, the EZ-SCSI installation
process will warn you of possible incompatibilities with “NT 3.51 service pack 4”. This is a
nuisance dialog and may be ignored. IBM Ready to Configure CD-ROM versions 4.0 and
higher contain EZ-SCSI v5.0 and install normally.
To enable or disable a write cache on a drive with SCSI Explorer:
1. Start SCSI Explorer and choose the Disk Cache tab.
2. Click a disk device icon on the SCSI device list.
3. Click the Write Cache tab, and select the Enable Write Cache button.
4. Click Apply to commit the change.
5. Repeat for remaining disks on the system.
Avid Technology Systems Engineering
Peripheral Configuration
Page - 107
IBM Intellistation M-Pro (6889) System Integration and Reference Guide
Rev 15
MediaComposer, Symphony and Xpress NT
General Storage Configuration:
The configuration of the SCSI host adapter should be verified to ensure the correct
parameters are in effect for all disk drives on the system.
1. Leave SCSI disconnects enabled unless there is a specific device that does not support
disconnects.
2. If possible keep non-media storage devices such as tape or removable drives on a
separate controller channel.
3. If you intend to combine wide and narrow drives on the same chain, place the wide drives
first. Use only wide to narrow conversion cables that have termination on the open pins.
4. Insure the adapter is configured to use the appropriate bus burst negotiation method for
the all disks. Remember, Avid drives IS9 Pro and IS18 Pro require 20MB/s .
5. SCSI cabling and termination is often overlooked when configuring a system. Always use
high quality cables for every drive connected to the system and secure them properly.
Keep the cables as short as possible. Always use an active terminator on the last drive of
a chain.
6. Low voltage differential drive (LVD) drives are less sensitive to chain length problems
experienced with Ultra-Wide devices. If you configure a SCSI chain using LVD drives
exclusively, you should set the Adaptec 7895 or 3940AUW Synchronous Transfer Rate to
40MB/s for each SCSI ID. This will insure maximum performance from these drives.
10.2
Supported File Systems
Since the file system is an integral part of the operating system and not the application, Avid
NT applications are supported with either the NTFS or the FAT file systems.
NTFS
NTFS is the NT native file system, offering robust security features, compression, and better
block management than FAT. It allows partition sizes up to 2 terabytes depending on block
size and disk drive configurations and is the most appropriate choice for RAID configurations.
Avid recommends using the default allocation unit size for all partitions.
For standard editing configurations Avid Systems Engineering suggests the NTFS file
system over FAT for all volumes intended as media disks.
FAT16
The FAT file system is needed only if compatibility is required with 16-bit operating systems
such as MS-DOS, Windows 9x, or Windows 3.x. The FAT file system implemented in
Windows NT permits partitions and extended partitions larger than 2GB, to a maximum of
4GB. For backward compatibility with 16-bit operating systems confine the partition size to no
more than 2GB.
Avid Technology Systems Engineering
Peripheral Configuration
Page - 108
IBM Intellistation M-Pro (6889) System Integration and Reference Guide
Rev 15
MediaComposer, Symphony and Xpress NT
FAT32
Windows NT 4.0 through service pack 4 does not support the FAT32 file system supported
with Windows 95 OSR2 or Windows 98.
10.3
Disk Striping
Disk striping (RAID 0) allows data transfers to split over multiple drives simultaneously. With
striping the overall performance of an I/O system is greatly enhanced and is a must for
increased image quality or real time support.
Advantages of Disk Striping
•
Better read and write performance.
•
Striping is cumulative. Unlike disk mirroring (RAID1), you sum the total partition size of
each drive.
•
Striped drives may be any size, and you may mix any combination of drives.
•
When striping across multiple controllers or channels you may have an uneven amount of
drives on each controller.
•
Drive combinations may consist of narrow and wide variations although this will negatively
impact overall disk performance.
•
Striping requires no special third party drivers as operating code is built into Windows NT.
Simply create the stripe set through the Windows NT Disk Administrator once, format
the drives, and each time you boot NT the stripe driver (FTDISK.SYS) is loaded. For more
information refer to the Windows NT documentation of the Disk Administrator online help.
Disadvantages
•
If one member of a stripe set becomes defective, the entire stripe set is lost.
•
Stripe sets are not easily moved to other systems. This is a consideration for users
planning to share drives between systems. Avid has provided a utility (DiskMounter)
which may assist stripe set movement between systems. For more information, see the
Utilities section of this document.
Creating a Stripe Set
1. Launch the Windows NT Disk Administrator from the Administrative Tools program group.
2. Press and hold the Ctrl key and single click an area of free disk space on each disk drive
you want to be a member of a stripe set. Up to 32 drives can be selected.
Avid Technology Systems Engineering
Peripheral Configuration
Page - 109
IBM Intellistation M-Pro (6889) System Integration and Reference Guide
Rev 15
MediaComposer, Symphony and Xpress NT
3. Right mouse click and choose “Create Stripe Set”. A dialog box will be displayed that
allows you to choose the size of the stripe set.
4. Enter the targeted size of the stripe set and then click OK.
5. Choose “Commit Changes Now” and reboot the system if you do not have existing stripe
sets.
6. Once the system has restarted you will need to launch the Disk Administrator again and
format the newly created stripe set.
Important: Whenever a stripe set is created you should save your disk configuration to a
diskette. This provides a method of recovery in the event of a hardware or software failure.
Refer to the NT Maintenance and Recovery section of this document.
10.4
Partitioning Disk Drives
Partitioning disk drives is a method of disk organization only and has no functional
performance value. Avid NT applications do not require specific partition sizes. Avid Systems
Engineering recommends partition sizes and planning are left to the customer according to the
customer workflow. For detailed information about partitioning, consult the Windows NT
documentation or Disk Administrator on-line help.
Partition Guidelines
•
NT allows up to 4 primary partitions per drive. Each partition is assigned a drive letter and
can not be further subdivided.
•
NT allows 1 extended partition per drive. An extended partition may be subdivided into
any number of logical drives, each with it’s own drive letter.
•
NT allows unformatted space on multiple drives to be configured as a volume set, again
assigned only one drive letter.
•
In general, FAT file systems should be limited to a 2GB-partition size to maintain
backward compatibility.
•
The NTFS file system is recommended for any partition greater than 2GB.
•
Drives employing NTFS may be partitioned any size.
Avid Technology Systems Engineering
Peripheral Configuration
Page - 110
IBM Intellistation M-Pro (6889) System Integration and Reference Guide
Rev 15
MediaComposer, Symphony and Xpress NT
10.5
Formatting Disk Drives
Every disk drive on the system must be formatted before it can be placed in service. There are
three types of disk formatting available:
•
•
•
Low-level Format
Full Format
Quick Format
Important: All format operations destroy data on the disk.
Low-Level Format
Low-level formatting writes error correction and sector identification information for each
sector onto the disk. It also configures the disk drive geometry based on the host adapter
parameters and is necessary whenever a drive has been formatted using a different brand
controller. Avid drives in particular may need to be low-level formatted if they were previously
in service on a Macintosh computer.
Low-level formatting is performed through the SCSI host adapter. Follow the procedure
described here for low level formatting using an Adaptec controller:
1. Power up the system.
2. Enter the Adaptec option ROM by holding the Ctrl plus the A key immediately after the
Adaptec SCSI Host Adapter message appears on the monitor.
3. The Adaptec option ROM screens are not mouse driven and must be navigated using the
arrow keys.
4. Two channels 0A, and 0B will be displayed on the upper right hand section of the display,
Choose the channel supporting the disk drive(s) needing formatting.
5. Choose SCSI Disk Utilities and select Perform Low Level Format.
Important: Never interrupt a low-level format. Always allow the process to complete.
6. When formatting operations are complete press Esc and choose Yes to return to the main
screen.
7. Press Esc and choose Yes to save the changes, then restart the system.
Important: Low-level format is not a replacement for the operating system disk format
Full Format
After partition information has been determined, the drive must be formatted. Full formatting is
accomplished through the Windows NT Disk Administrator and configures a disk volume for
the type of file system chosen. Formatting also scans the partition for bad sectors.
Avid Technology Systems Engineering
Peripheral Configuration
Page - 111
IBM Intellistation M-Pro (6889) System Integration and Reference Guide
Rev 15
MediaComposer, Symphony and Xpress NT
A format operation may be interrupted, but if the volume was previously formatted, the data is
lost.
Quick Format
Quick format simply initializes the volume with the appropriate file system and performs no
bad sector scanning. Use this option only if the volume was previously formatted under
Windows NT.
10.6
Non Avid Storage
Some configurations may require non-Avid storage devices from IBM, Seagate, or others.
Avid provides video resolution performance guarantees only on Avid storage combinations
specifically tested in-house. Avid does not provide the same performance assurances when
non-Avid storage devices are employed. However, the use of such devices is not specifically
prohibited. Avid Systems Engineering recognizes this and suggests the following guidelines
when non-Avid storage devices are used for media drives.
•
Disable Drive Filtering if the Avid NT application implements it. On Avid Symphony and
Xpress NT this is accomplished by opening the General Settings list and clearing the
Drive Filtering check box.
•
Enable write caching on all disk drives.
•
Disable recovered error reporting by the disk drive if possible.
•
Use only high quality cables and active termination.
•
Follow the SCSI specification for cable length, keeping the overall length within published
guidelines.
•
Avoid mixing drives with different bus speeds.
For configurations requiring backup devices such as DLT, DAT, or 8mm helical scan, Avid
Systems Engineering suggests these devices are configured to a SCSI bus separate from the
primary media drives SCSI chain. This will lessen the interconnection problems common with
narrow and wide SCSI bus devices, prevent termination mismatches, and make it easier to
troubleshoot.
Avid does not provide support for Iomega Jaz, Zip or other removable devices used as media
storage devices.
10.7
Network Drives
Avid does not support digitize or playback operations to or from a Windows NT server or
workgroup media sharing environment. However, media may be archived to networked
volumes.
Avid Technology Systems Engineering
Peripheral Configuration
Page - 112
IBM Intellistation M-Pro (6889) System Integration and Reference Guide
Rev 15
MediaComposer, Symphony and Xpress NT
10.8
Removable Drives
Avid does not provide support for Iomega Jaz, Zip or similar removable devices used as
media storage devices. These devices can however be employed as media archival devices.
Parallel port or IDE based Jaz drives are best avoided as they may conflict with system
devices.
Avid does support MediaDock configurations for use as media drives.
For configurations requiring backup devices such as DLT, DAT, or 8mm helical scan, Avid
Systems Engineering suggests these devices are configured to a SCSI bus separate from the
primary media drives SCSI chain. This will lessen the interconnection problems common with
narrow and wide SCSI bus devices, prevent termination mismatches, and make it easier to
troubleshoot.
10.9
Disk Fragmentation
As data is written, deleted, and re-written to a disk drive, the drive is writing the data in the
form of blocks as defined by the file system allocation size. File systems keep track of the
location and number of blocks used by a particular file. When files are written to a disk the file
system attempts to write the blocks contiguously on the platters. If there is not enough
contiguous space on the disk to accommodate the file, the file system breaks up the file into
pieces, writing as many contiguous blocks as it can in one spot then jumping to another
location on the disk to complete the write. Whenever this occurs the file system has to keep
reference pointers to all the pieces of the file. These pointers are sometimes called retrieval
pointers and the file is considered fragmented.
As more data is added and deleted from the disk, less contiguous space becomes available
and the files become more fragmented. This fragmentation increases the amount of overhead
the file system and drive must perform to locate and retrieve the data whenever a read or write
operation is required. As a disk becomes severely fragmented, performance becomes
impacted.
You cannot avoid fragmentation on a disk. The trick is to minimize the impact it will have on
your system. Unfortunately there isn’t a reliable number to reference for too much
fragmentation. For example, a system with thousands of small files may perform acceptably
with 70% fragmentation, but this would be intolerable for a video application with media files
averaging in the hundred of thousands of blocks.
Commercial defragmentation utilities such as Executive Software’s Diskeeper or Raxco
Software’s PerfectDisk NT are available for both FAT and NTFS file systems. These utilities
can lessen the amount of fragmentation on disk but do not completely eliminate it. The only
way to completely defragment a disk drive is to perform a full backup followed by a restore.
This reconstructs the file system bitmap and places the files in a contiguous layout, eliminating
all fragmentation.
Important: If a commercial defragmentation utility is to be used by the customer, it must be
disabled while using Avid applications.
Avid Technology Systems Engineering
Peripheral Configuration
Page - 113
IBM Intellistation M-Pro (6889) System Integration and Reference Guide
Rev 15
MediaComposer, Symphony and Xpress NT
10.10
Resolution Matrix
The following charts represent Avid tested configurations designed to support targeted
application resolutions.
SCSI Matrix
# of Drives
1 x IS9 Pro or
1 x IS18 Pro
Stripe
Config
Non
Stripe
# of SCSI
Channels
1
2 x IS9 Pro or
2 x IS18 Pro
2 Way
Stripe
1
2 x IS9 Pro or
2 x IS18 Pro
2 Way
Stripe
2
4 x IS9 Pro or
4 x IS18 Pro
4 Way
2
Single
One Stream
Resolutions
Supported
15:1s
4:1s
2:1s
15:1s
4:1s
2:1s
15:1s
4:1s
2:1s
15:1s
4:1s
2:1s
Field
Two Stream
Resolutions
Supported
15:1s
4:1s
2:1s
15:1s
4:1s
2:1s
15:1s
4:1s
2:1s
15:1s
4:1s
2:1s
Two
One Stream
Resolutions
Supported
20:1
3:1
Fields
Two Stream
Resolutions
Supported
20:1
20:1
3:1
2:1
20:1
3:1
2:1
20:1
3:1
2:1
20:1
20:1
3:1
20:1
3:1
2:1
Fibre Channel Matrix
# of
Drives
10 x FC
7200 RPM
# of
Drives
10 x FC
7200RPM
# of
Drives
6 x FC
10K RPM
Stripe
Config
10 Way Stripe
Stripe
Config
10 Way Stripe
Stripe
Config
6 Way Stripe
Avid Technology Systems Engineering
Single Field
One Stream
Two Stream
Resolutions
Resolutions
Supported
Supported
15:1s
15:1s
4:1s
4:1s
2:1s
2:1s
Two Fields
One Stream Two Stream
Resolutions Resolutions
Supported
Supported
20:1
20:1
3:1
3:1
2:1
2:1
Single Field
One Stream
Two Stream
Resolutions
Resolutions
Supported
Supported
Two Fields
One Stream Two Stream
Resolutions Resolutions
Supported
Supported
1:1
Single Field
One Stream
Two Stream
Resolutions
Resolutions
Supported
Supported
Two Fields
One Stream Two Stream
Resolutions Resolutions
Supported
Supported
1:1
Peripheral Configuration
Page - 114
IBM Intellistation M-Pro (6889) System Integration and Reference Guide
Rev 15
MediaComposer, Symphony and Xpress NT
10.11
Keyboard and Mouse Extensions
Keyboard/Mouse/VGA extension kits fall into three categories:
Console and Expanders Switchers - buffered, active switchers used to control multiple
systems from a central location. Cable lengths using UTP Cat 5 wire to 700 feet are possible
with some of these solutions.
Major Vendors: Rose Electronics, Raritan, Cybex Computer Products
Price Range: $300+
Switch Boxes – un-buffered, passive units designed to switch between two systems. Design
accommodates 6 to 20 foot extension cables including monitor cables. Sometimes these
boxes require the display resolution dropped to 800 x 600 for best results.
Major Vendors: Dalco Electronics, BlackBox Corp.
Price Range: $30+
Passive cable extensions - Most cable-only solutions vendors limit their product lines to 6,
12, or 25-foot extensions. Extensions longer than 25 feet require a booster since long
extensions are prone to signal degradation. Use of these cables can negatively impact the
performance and reliability of the monitor and mouse. Prices range to about $20 per cable.
There is no published specification for maximum peripheral cable length. With the average PC
mouse/keyboard length at 6 to 10' and VGA 6 feet what's the best solution to extend these
peripherals? For deskside systems, a 6' extension should be more than adequate, with
minimal signal degradation. For rack-mountable systems, use no more than 12' before adding
a line booster. Beyond that you start getting into buffer overflow problems, systems that fail to
recognize one or more of the peripherals and screen refresh rates or resolutions that must be
dropped below the minimum spec of 1024 x 768 75Hz.
Avid Technology Systems Engineering
Peripheral Configuration
Page - 115
IBM Intellistation M-Pro (6889) System Integration and Reference Guide
Rev 15
MediaComposer, Symphony and Xpress NT
.
Avid Technology Systems Engineering
Peripheral Configuration
Page - 116
IBM Intellistation M-Pro (6889) System Integration and Reference Guide
Rev 15
MediaComposer, Symphony and Xpress NT
11.
Diagnostics and Utilities
Diagnostic and utility applications are considered optional in nature if they are not required for
successful operation of Avid applications. The end-user should assess the impact to their
individual workflow requirements before installing or using any software.
11.1
Vendor Utilities and Diagnostics
IBM Enhanced Diagnostics CD-ROM
This CD-ROM contains functional tests for the various graphics adapters available with the
IBM M-Pro systems. These tests are native to MS-DOS only, and an installation batch file is
profile to create the necessary testing diskettes.
IBM Ready-To-Configure Utility Program CD-ROM
This CD-ROM contains device drivers, diskette creation procedures, utilities, and selected
documentation for the system. Navigation is internationalized through a menu driven interface.
The following is a list of Windows NT Applications and Device Drivers supplied on the CD.
Applications:
•
•
•
•
•
•
•
•
•
•
•
•
•
•
•
Adaptec SCSI Full Utilities
ConfigSafe
CoSession Remote 32
IBM AntiVirus
IBM ClientCare Setup
IBM IDE Hard Disk Monitor
IBM NetFinity
IBM Product Registration
IBM Utilities
Install Online Books
LANDesk(R) Client Manager 3.0
Multiprocessor Upgrade for Windows NT
PC-Doctor for Windows NT
Tivoli Lightweight Client Framework
VoiceType Simply Speaking GOLD
Device Drivers:
•
•
•
•
•
Adaptec 7800 Family Manager Set
Bus Mastering IDE/SMART
Crystal Audio
GLyder MAX-2 2D/3D Graphics Accelerator
Intel(R) Ethernet Driver
Avid Technology Systems Engineering
Diagnostics and Utilities
Page - 117
IBM Intellistation M-Pro (6889) System Integration and Reference Guide
Rev 15
MediaComposer, Symphony and Xpress NT
•
•
•
•
11.2
Intergraph 3D Graphics for Windows NT 3.51
Intergraph 3D Graphics for Windows NT 4.0
Number Nine 9FX Reality 334 Video for Windows NT 3.51
Number Nine 9FX Reality 334 Video for Windows NT 4.0
Avid Diagnostics
Avid System Test Pro
Avid System Test Pro is a diagnostic program designed to test the Avid specific components
of the system. Avid System Test Pro requires that all relevant Avid supplied device drivers are
loaded and started before tests can be run. Refer to the on-line help file in the Avid\Utilities
directory for more information.
StorEX
Avid StorEx is a general-purpose hard-drive exerciser program. It verifies the operation of
hard drives connected to a SCSI host adapter or Fibre Channel adapter and may be useful
when troubleshooting storage problems. For more information refer to the NewCutter product
documentation.
Avid Video I/O
The Avid Video I/O Utility program allows field updates of the firmware inside the Avid
Meridien I/O box without returning the unit to Avid. This utility should used only when advised
by Avid Customer Support. The updated firmware code is bundled in the utility and Customer
Support will provide access to updated files if the need arises.
Avid does not recommend automatically updating your firmware if you are not experiencing
problems. It is possible that the new firmware might perform task differently that the previous
revision. Refer to the on-line help file in the Avid\Utilities directory for more information.
11.3
Avid Utilities
Avid Startup
Avid Startup is a Windows NT service that executes automatically at system startup. The
service enables write caching on Avid storage devices and will update firmware on the devices
if necessary.
Avid Startup does not need to execute each time the system is started if the drive
configuration has not changed. If your system has many drives configured this utility can take
considerable time to complete its task. If you need to disable the startup utility:
1.
Open the Services control panel.
Avid Technology Systems Engineering
Diagnostics and Utilities
Page - 118
IBM Intellistation M-Pro (6889) System Integration and Reference Guide
Rev 15
MediaComposer, Symphony and Xpress NT
2.
Single click to select the Avid Startup service.
3.
Click the Startup button.
4.
Under the StartupType section set the radio button marked Disabled.
5.
Click OK.
6.
Click Close to exit the control panel.
7.
Changes will be effective after the next system reboot.
Note: If you disable Avid Startup, always re-enable the service any time you change
your drive configuration or rev the application.
Disk Mounter
Avid Disk Mounter is a utility that permits moving stripe sets between Windows NT systems.
The utility must reside on the source and target system and must be executed on both
systems to allow stripe set movement.
Disk Mounter is limited to Avid storage devices and simple stripe set configurations only. It
does not support drives configured with extended partitions. For more information on Disk
Mounter refer to the on-line Disk Mounter help file in the Avid\Utilities directory.
11.4
Third Party Utilities
Avid Systems Engineering maintains a list of utilities and applications that have been tested
on Windows NT systems. The evaluations are done to insure the applications do not interfere
with the operation of Avid applications or the Windows NT operating system environment.
Avid Systems Engineering makes no claims of total compatibility or interoperability.
The list will be available through Avid Customer Support channels.
Avid Technology Systems Engineering
Diagnostics and Utilities
Page - 119
IBM Intellistation M-Pro (6889) System Integration and Reference Guide
Rev 15
MediaComposer, Symphony and Xpress NT
.
Avid Technology Systems Engineering
Diagnostics and Utilities
Page - 120
IBM Intellistation M-Pro (6889) System Integration and Reference Guide
Rev 15
MediaComposer, Symphony and Xpress NT
12.
Troubleshooting
This section describes common integration related difficulties with the IBM 6889 platform.
12.1
Media Board Driver Failure
If the media board device driver fails to start properly the Avid Symphony and Xpress
applications will not function. Check for the following common causes of this problem:
•
Insure the driver is registered as a SYSTEM startup device in the Devices Control Panel.
•
Examine the System Event Log for the entries similar to these:
8/20/98 2:11:59 PM
APMPhxNTDriver
Error None 2
N/A
APMPhxNTDriver Driver Entry Message: Driver Entry Error = Failed to call to
PhoenixProbePCIBus
IBM1
8/20/98 2:11:59 PM
APMPhxNTDriver
Error None 2
N/A
APMPhxNTDriver Driver Entry Message: Driver Entry Error = Failed call to
HalAssignSlotResources
IBM1
There are two common reasons for these entries:
1. Your system has service packs 1, 2, or 3 installed and the wrong HAL is installed on the
system. Service Pack 4 does not require the HAL replacement procedure to allow the
Meridien Digital Media board driver to function. Service Pack 4 does however require a
HAL replacement for MIDI operation using the Crystal Audio C4235 audio chip. Refer to
the HAL replacement procedure in this document.
2. The cables between the 3D effects board and the media board are improperly seated or
defective. Try removing the 3D effect board as a test.
12.2
Display Monitor Colors or Resolution Incorrect
Symptom:
Text and graphics appear in 640 x 480 resolution with 16 colors only.
Solution:
Windows NT has booted in basevideo mode, either by user selection, or because no display
driver is loaded. This is common when the Number Nine display driver has not been loaded
and started. Refer to the Windows NT Device Drivers section of this document.
Avid Technology Systems Engineering
Troubleshooting
Page - 121
IBM Intellistation M-Pro (6889) System Integration and Reference Guide
Rev 15
MediaComposer, Symphony and Xpress NT
12.3
Second Display Monitor Not Enabled
If after booting Windows NT only the primary display monitor is enabled check the following
areas:
•
Insure the second monitor has power applied.
•
Insure the cabling between the monitor and the display controller is secure and there are
no bent pins. Try swapping cables between the primary and secondary monitors to see if
the problem follows the cable.
•
Open the Avid EDC Control Panel and insure the Multi button is checked.
•
If the Multi button is grayed out, open the Event Viewer in the Administrative Tools
program group. Look for any revolution3d entries in the System event log. If there are
revolution3d entries compare them to the following examples:
revolution3d
Error None 39
N/A
A
The device could not allocate one or more required resources due to conflicts with other
devices The device memory setting of ‘F6800000’ could not be satisfied due to a conflict
with Driver ‘revolution3d\Device\Video0’.
revolution3d
Error None 39
N/A
A
The device could not allocate one or more required resources due to conflicts with other
devices The device memory setting of ‘F7000000’ could not be satisfied due to a conflict
with Driver ‘revolution3d\Device\Video0’.
revolution3d
Error None 39
N/A
A
The device could not allocate one or more required resources due to conflicts with other
devices The device memory setting of ‘F7800000’ could not be satisfied due to a conflict
with Driver ‘revolution3d\Device\Video0’.
If there are entries that look similar to these examples, examine the slot configuration of
the boards in the system. Make certain the display controller is in the proper slot.
12.4
Edit DMA Ext Clock Error
If the media board device driver does not load properly the Edit DMA device driver may report
the following error in the System Event Log.
8/20/98 2:01:47 PM
APMEditDMA
not loaded, ext clock error
Error
None
4
N/A
IBM1 APMEditDMA
This error can also occur if the cable between the display controller board and the media
board is not properly seated.
Avid Technology Systems Engineering
Troubleshooting
Page - 122
IBM Intellistation M-Pro (6889) System Integration and Reference Guide
Rev 15
MediaComposer, Symphony and Xpress NT
12.5
MIDI Resource Failure
The current implementation of MIDI support on the IBM 6889 requires that the MPU-401
compatible driver be installed at IRQ 9. The MPU-401 driver will not function at any other
IRQ. Also, because the audio chip on the system board is an ISA device, the interrupt
resource is not shareable with other devices in the system. If MIDI installation is attempted
after other hardware has been installed or after a board swap or upgrade, the IRQ 9 resource
may be lost and the drivers will not load properly.
1. Launch Windows NT Diagnostics from the Administrative Tools program group and
select the resource tab.
2. Inspect the resource map and look for any device already using IRQ 9.
3.
If a device has claimed IRQ 9 you will need to remove the complete board set and
install the AGP graphics card. Removing just the board that has claimed the IRQ 9
resource or locking the availability of the resource in the BIOS will not be sufficient since
the system may assign the resource to another device.
4. Open the Multimedia Control Panel and select the Devices tab.
5. Click the “+ “ box to the left of MIDI Devices and Instruments to expand the display.
6. Select the Add button at the bottom of the window.
7. Scroll down the list, select the MPU-401 Compatible Driver and click OK.
8. A dialog box will appear asking for the location of the driver. Type in the path where the
driver is located. This can be the C:\I386 directory or from the SP3 distribution disk.
9. On occasion a dialog may come up informing that the driver is on the system and allows
selection or either Current or New. Always select New.
10. Once the driver attempts to load another dialog will appear asking you to select an IRQ
and base address. When this is shown select IRQ 2/9 and a Base I/O of 330. The base
address can be something else but this should work. Do not use any other IRQ setting as
MIDI will only function at IRQ 9!
11. After this driver is installed, the system will prompt you to restart, select “Don’t Restart
Now”
12. Repeat step 6 but when the list appears again select the Low Level Wave, MIDI and
AUX Support driver.
13. Again you will be prompted for a location and possible dialog of Current / New. Select
New.
14. Once the driver is installed you will be asked to restart. At this time restart the machine.
15. After the system restarts, log on to NT and launch Windows NT Diagnostics again.
Avid Technology Systems Engineering
Troubleshooting
Page - 123
IBM Intellistation M-Pro (6889) System Integration and Reference Guide
Rev 15
MediaComposer, Symphony and Xpress NT
16. Open the resource tab and insure that the MPU-401 driver is at IRQ 9. If this is the case
you can shut down the machine and reinstall the boards removed in step 3. The IRQ
resource should be locked down at this point.
12.6
Application Key (Dongle) Does Not Function
Symptom:
Symphony or Xpress fail to detect the dongle attached to the system.
Solution:
The best way to troubleshoot an application key failure is from the top down.
Since the application key has a few dependency services, a failure in any one of these
services will render the application key inoperable.
The application key requires a service called Sentinel for I386 Systems:
1. Open the Multimedia Control Panel, then open the Devices tab.
2. Open the Other Multimedia Devices and look for the Sentinel for I386 Systems service.
3. Click on the Settings button. You should see information similar to the following:
Parallel Ports
Physical
Address
378
Port
Type
IBM AT
Bus #
Bus Type
0
ISA
Addr
Space
I/O
DOS
Addr
----
Use?
Yes
Created
By
System
If the information does not appear correctly, open the Devices Control Panel.
Scroll down the list of devices for the Parport and Parallel devices. Both should have a
Status equal to Started and a Startup value of Automatic.
Try starting both devices if not started. If this fails, the parallel port setting in the system
BIOS is the likely cause of he problem.
Shut down the system and enter the system BIOS by pressing F2.
Look at the submenu Devices and IO Ports/ Parallel Port Setup.
Change parallel port parameters to reflect recommendations listed in the BIOS
Configuration section of this document.
Restart the system and re-check the Sentinel service.
Avid Technology Systems Engineering
Troubleshooting
Page - 124
IBM Intellistation M-Pro (6889) System Integration and Reference Guide
Rev 15
MediaComposer, Symphony and Xpress NT
13.
13.1
Reference Section
IBM Intellistation M-Pro Parts View
Avid Technology Systems Engineering
Reference
Page - 125
IBM Intellistation M-Pro (6889) System Integration and Reference Guide
Rev 15
MediaComposer, Symphony and Xpress NT
Item
1
2
3
4
5
6
7
8
9
10
11
12
13
14
15
16
17
18
19
20
System (Type 6889)
Handle/Cap Assembly
Power switch/LED Cable
Assembly
Top/Side Cover Assembly
CD-ROM Drive 32X Max
6.4 GB IDE Hard Disk Drive,
7200 RPM
9.1 GB IDE Hard Disk Drive,
7200 RPM
9.1 GB SCSI Hard Disk Drive,
7200 RPM
3.5-In. 1.44 MB Diskette Drive
3.5-In 1.44 MB Diskette Drive
- Japan
Blank Louver Bezels (3.5-In.
and 5.25-In.)
Miscellaneous Optional Bezels
3.5-In. Bezel Assembly
Model Plate
RFID Antenna
Front Bezel
System Board-without
processor or memory
Fan Assembly 92 mm
Card Guide
C2 Switch Assembly
EMC Kit
3.5/5.25-In. Hard Disk Bracket
Access Cover Assembly
Video Adapter - Matrox
Millenium
Video Adapter - 3D PRO
3400/GA
Video Adapter - 3D PRO
3400/T
Air Baffle
Avid Technology Systems Engineering
IBM FRU
12J5547
12J4510
Item
21
22
01K1637
23
System (Type 6889)
3.5-In. Hard Disk Bracket
64 MB ECC DIMM Memory
128 MB ECC DIMM Memory
350 MHz Pentium II
microprocessor
400 MHz Pentium II
microprocessor
Terminator Card, Processor
IBM FRU
12J4516
01K4353
01K4354
01K4333
01K4334
01K7349
02K2903
02K1119
10L6078
10L6079
10L6085
24
25
Processor Retainer Support
Bracket Assembly
Power Supply 330 W.
Keylock Assembly
75H9550
75H9552
26
Chassis Assembly
12J4515
01K1888
12J5551
Cable - Audio CD-ROM
75H9219
12J5549
12J5552
03K9769
12J5548
93H9345
Cable - CD-ROM IDE
Cable - Diskette Drive
Cable - Hard Disk IDE
Cable - Intergraph
Cable - SCSI 2 Drop
01K1483
01K1541
01K1553
01K2035
01K1485
02K2861
10L5607
01K1495
12J4508
12J4501
12J5546
01K4340
01K4337
01K4336
Cable - SCSI 4 Drop
Foot (Qty 4)
Microphone
Miscellaneous Hardware Kit
Miscellaneous Screw Kit
Speaker
System Board EMC Shield
01K1481
12J4506
01K4910
12J4503
93F0041
06H9417
01K1855
opt
01K9866
12J5102
02K2864
Reference
Page - 126
IBM Intellistation M-Pro (6889) System Integration and Reference Guide
Rev 15
MediaComposer, Symphony and Xpress NT
13.2
Environmental Specifications
Feature
Depth
Height
Width
Weight
Air Temperature
Humidity
Maximum altitude
Heat Output
Low range input voltage
High range input voltage
Input kVA (approximately)
Airflow
Average sound pressure levels
Declared (upper limit) sound power levels
Description
445 mm (17.5 inches)
492 mm (19.4 inches)
200 mm (7.9 inches)
17.3 kg (38 pounds)
System on: 10° to 35°C (50° to 95°F)
System off: 10° to 43°C (50° to 110°F)
System on: 8% to 80%
System off: 8% to 80%
2134 m (7000 ft)
Maximum (as shipped): 306 BTU (90 watts)
Sine-wave input (50 to 60 Hz) required.
Minimum: 90 V AC
Maximum: 137 V AC
Sine-wave input (50 to 60 Hz) required
Minimum: 180 V ac
Maximum: 265 V ac
Maximum (as shipped): 0.70 kVA
Approximately 0.92 cubic meters/minute (32.5
CFM)
At operator position:
42 dB operating
37 dB idle
At bystander position (1 meter):
36 dB operating
34 dB idle
5.2 bels operating
5.0 bels idle
•
Maximum configuration weight depends on options installed.
•
Figures above are a system fully populated with options.
•
Maximum power and heat specifications are based on the maximum capacity of the system
power supply.
•
For additional information, see the ISO Supplier's Declaration available from IBM.
Avid Technology Systems Engineering
Reference
Page - 127
IBM Intellistation M-Pro (6889) System Integration and Reference Guide
Rev 15
MediaComposer, Symphony and Xpress NT
13.3
Packaging
PLATFORM PACKOUT DIAGRAM
0170-03020-01 (foam)
0170-03020-01 (foam)
0170-03019-01
0170-03018-01
0170-03023-01
Mouse
0170-03023-01
0170-03022-01
0170-03021-01
Pwr Cord & Headset
Docs with NT License
on Top
0170-03002-01 (top)
0170-03016-01
CDs & Floppies
Platform
Foam (2) & Board
0170-03002-01 (bot)
0170-03017-01
(velcro-4 places)
0170-03001-01
FIGURE 1
Avid Technology Systems Engineering
Reference
Page - 128


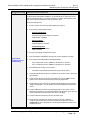
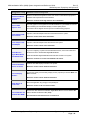
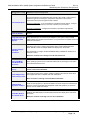
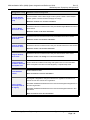


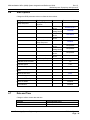
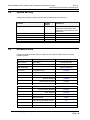


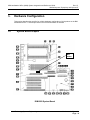
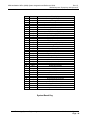
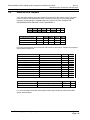
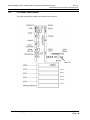

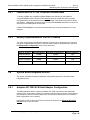
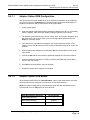


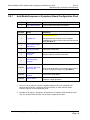
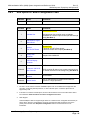
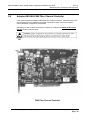
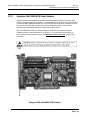

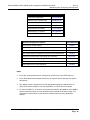


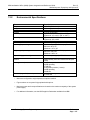
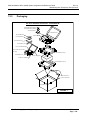


![User Manual [PDF 779 kB]](http://vs1.manualzilla.com/store/data/005781460_1-49b4dd0a8e6377162bdb6a1daefcc9f3-150x150.png)