1
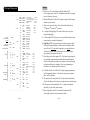
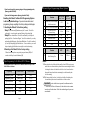
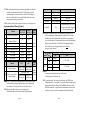
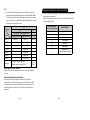
INSTALLATION GUIDE
NuAS Module
[ CM 3000 ]
INSTALLATION GUIDE
CM3000
www.NUSTART.ca
TABLE OF CONTENTS
Page 2
-
Wiring Diagram
Page 4
-
Switch and Jumper Settings
Page 6
-
Installation of AM,FM or SS Antennas
Page 7
-
Option Programming for Four Button Remotes
Page 7
-
Option Programming for Six Button Remotes
Page 8
-
Remote - Pager Programming Menu Options
Page 9
-
Diagnosing Problems with Auto-Start
Page 13
Page 3
Notes
Wiring Diagram
CN1
OFF / ON
Alt/Tach
15(25) / 25(45)
Gasoline(Diesel)
SW
CN12
[
4
3
2
1
(-)
(+)
CN11
Tx
Rx
[
3
2
1
(-)
Temp CN10
(+)
[
4
3
2
1
Led
(+)
Knock CN9
(-)
[
2
1
2nd
1st
Tach Learning Switch
Antenna
Temp Sensor
Remote Paging
System
Optional Sensor
CN8
6 Yellow
8 Black
2 : Pk ing Light
4 : Accessor y
6 : Starter
8 : Ground
2 . Starter Kill/Anti-Grind-Violet at CN1 supplies a negative 250mA output
when the system is armed.
(-)Light Output
(-)Status Output
(-) Ignition Output
(-)AccessoryOutput
(- )Starter Outp ut
1
2
3
4
5
6
7
8
9
Lt.Blue
Gray/Bk
Lt.Blue/Wh
Violet/Bk
Red/Wh
Red
Brown/Bk
Brown/Wh
Yellow/Bk
(-)E-Brake Sensing
(-)Ho od Sensin g
(+)Brak e Sensing
(-)TrunkSen sing
(- )Door Sensing
(+)Doo r Sensing
(-) Glo w Plug
(+) Glow Plug
Engine Sensing
CN4
1
2
3
4
5
6
None
Violet/Wh
Orange/Bk
Blue
Blue/Bk
None
(-)Tru nkUnlock
(-)2nd Pulse Unlock
(-)Unlock
(-)Lock
250 mA
250 mA
250mA
250 mA
CN5
1
2
3
4
5
6
7
8
Orange
Orange/Wh
Violet
Brown
White
Yellow
Yellow/Wh
None
(-)Rearm
(-)Disarm
(-) Dome L ight Sup ervision
(+) Siren
(- )Horn
(-)Aux1
(-)Aux2
Futu re Use
250 mA
250 mA
250 mA
250 mA
250 mA
2 50 mA
250 mA
CN6
1
2
Bk
Bk/Wh
LED (-)
LED (+)
CN7
1
2
3
4
Bk
White
Red
Yellow
(-)
2nd Shock
(+)
1st Shock
CN3
DIP
5 Violet
7 Gr/Red
1 : (+) 12V Con stant
3 : (+) 12 V Constant, Prewir ed
R elay fo r 2nd Ig, Acc or Star ter
5 : Starter Kill/Anti-Grind
7 : Ignition
Gr/Wh
Bk
Gr
Wh/Bk
Red/Bk
Jumper
DIP1
DIP2
2 Gr/Wh
4 White
1
2
3
4
5
CN2
Cut -> Auto
Normal -> Manual
1 Red
3 Red/Wh
1. There are two 12V Constant Wires in the Main Harness(CN1).
One is to supply power to the CPU and Ignition and the other is to supply
power to Starter and Accessory.
2 50 mA
250 mA
250 mA
250 mA
250 mA
3 . There are two pre-wired relays. One for Starter-kill and the other for
2nd Ignition, 2 nd Starter or 2nd Accessory.
4 . (-) Output for Parking light(CN2): Some vehicles, such as Jeep, have
negative Parking lights.
5 . (-) Status Output(CN2): This comes in one second before Ignition on and
continues until one second after Ignition off.
6 . Light Blue of CN3: You need to tie this wire into the emergency brake
for Manual Transmission Mode or Turbo mode. Most emergency brake
wires will show 12V at rest when the ignition is on or ground when you
set the brake. In either Manual Transmission or Turbo Mode, Engine
stays running for two minutes after key off.
7 . Glow Plug wires for diesel engines(CN3) : If the negative glow plug wire
sees ground, the remote starting is delayed until this ground disappears.
Likewise, if the positive glow plug wire sees positive, the remote starting
is delayed until this positive disappear. There is no programming for
diesel mode. It is automatic once this wire is used.
8 . (-)2nd Pulse Unlock wire (Or/Bk of NC4) requires option programming
under Programming Menu #1, 1-4 before the wire generates a ground
pulse. See Note on Page 9.
9 . The sequence for the rearm pulse(CN5): (1) pulse when armed (locked),
(2) pulse after Starter, and (3) pulse one second after remote start shut down.
10 . The sequence for the disarm pulse(CN5): (1) pulse when disarmed
(unlocked), (2) pulse before remote starting.
11 . Dome Light Supervision(CN5): Automatic Transmission Only.
Dome light is turned on for one minute after unlock.
Page 4
Page 5
If you program Dome Light Rearm option, The Violet wire of CN5
supplies a ground pulse before Lock and a pulse after remote start.
The Dome Light Rearm Option is to simulate Opening the door and
pressing the factory lock button for factory arming.
12 . Learning Tach/Injector Wire: Start the vehicle with the manual key and
let the engine idle down. The next step is to press the black tachometer
button. The car siren will chirp once to confirm the tach was learned.
If the siren chirps 3 times, you have the wrong tach wire.
13 . Alternator Sensing: Locate the small gauge wire from the alternator.
When tested with your meter, it should show you less than 5V when
the key is on and the vehicle is not started.
When the vehicle is started, the wire should read between 9V to 14V.
14 . Diagnosing Tach Learning Error
If the car siren chirps 3 times, there is a problem with the tachometer
learning . Wait for 2 seconds and the cause for the error will be
indicated by the numbe r of times parking lights flash.
Installation of AM, FM or SS Antennas
and RPS. The antennas have been
calibrated for horizontal installation
at the left-top corner of the windshield.
Different installation may
adversely affect the
transmitting distance.
Option Programming for Four Button Remotes
Step1 : For Programming menu 1: Press Buttons (I+II) for 2 seconds.
Error Number
(# of times parking lights flash)
Tach Learning Error Dignosis
1
2
Dip Switch #1 is on alternator sensing.
Manual Car Key is in the off position.
3
No signal or the signal is not fast enough.
Find a different wire.
Switch and Jumper Settings
Dip
Jumper Wire
#1
#2
Switch
On Uncut: Manual Transmission
Tach Sensing 25 min run time (45 min diesel)
Cut: Automatic Transmission Alternator Sensing 15 min run time (25 min diesel)
Off
Important!
Installation of AM, FM or SS Antennas
Once you cut the Jumper Wire, you are not allowed to reconnect
the wire. The reconnection will completely void warranty.
Page 6
For Programming menu 2: Press Buttons (I+IV) for 2 seconds.
The car will chirp once indicating that you are in programming mode.
Step2 : Wit hin a 2 seconds after pressing (I+II) or (I+IV), press Button IV
the number of times to go to the option number you want to change.
You have to hear a chirp and see the parking light flash
each time when you press Button IV.
Step3 : Wait a few seconds. You will hear a number of chirps and see a
number of parking light flashes corresponding to the option number
you want to change. If the number of chirps or flashes is not what
you want, go back to Step 1.
Step4 : Press Button I for the default factory settings and your car will
respond by one chirp and one flash. Press Button II for the optional
setting and your car will respond by two chirps and two parking flashes.
Page 7
-
-
If you hear a long chirp, you are going out of programming mode,
please go back to Step1.
Remote-Pager Programming Menu Options
Programming Menu #1 (Auto-Start and Door Lock Options)
If you want to change more options, go back to Step1.
Resetting all of Menu #1 or Menu #2 of Programming Options
to the factory default settings - if you are not sure about current
programming, change everything to the factory settings and start again.
1. Resetting all of Menu #1 to the factory setting
Step 1: Press buttons (I+II) simultaneously for 2 seconds. This will be
Feature
parking light flash. Press button III again. You will be confirmed by a car chirp
and parking light flash again. Press button III third time. You will be confirmed
by a car chirp and parking light flash third time. A few second later, your car will
chirp and parking light flash three times rapidly to confirm the resetting.
Unlock Before, Lock After Starting,
Lock after remote start
OFF
ON
1-2
Door Lock / Unlock Pulse Duration
0.8 sec
2.5 sec
1-3
Min. Crank Time for the
Alternator Sensing
0.8 sec
1.0 sec
1-4
1-5
1-6
1-7
Driver’s Priority Unlock
Double Pulse Unlock
OFF
OFF
ON
ON
Turbo
OFF
ON
Feature
OFF
ON
Programming
Method
Diesel Preheating Time
20 sec
3~99 sec
Option
Programmer
(CM3 -Series)
2. Resetting all of Menu #2 to the factory setting.
Follow the same steps above except that you press buttons (I+IV) for 2
seconds at the Step 1 instead of buttons (I+II).
Programming
Method
1-1
confirmed by a siren chirp and a one-time flashing of the parking light.
Step2 : Press button III once. This will be confirmed by a car chirp and
Optional
Factory Default
Setting - Button I Setting - Button II
1-8
Remote
controller
Option Programming for Six Button(ONE WAY) Remotes
Note :
The procedures will be same as the 4 button remotes except the use
of the different buttons.
1-1 Some vehicles such as Mercedes-Benz and the Lexus ES300 require you to
unlock the car to disarm the factory alarm before remote starting the vehicle.
Activating this feature will unlock the vehicle for a brief second in order to
disarm the factory alarm before auto-starting the vehicle remotely then
lock after starting.
1-4 This feature unlocks the driver’s side door lock with the first unlock pulse.
A second unlock pulse is need to unlock the rest of the car doors.
Programming
6 Button Remote
4 Button Remote
Programming Menu 1
(Trunk+Start)-
(I+II)-
Programming Menu 2
(Trunk+Stop)-
(I+IV)-
Option Selection
(Stop)-
(IV)
Factory Setting
Lock
(I)
Option Selection
Unlock
( II )
Default Setting Selection
(Start)-
( III )
Page 8
Important! In order for this feature to operate, the i nstaller must use the
2nd Unlock Wire (Or/Bk wire of Connector 4). Isolate the driver’s door actuator
fromthe r est of the other doors. Call us for the technical suppor t if you are not
sure about this.
Page 9
1-7 Turbo mode requires the connection of the emergency brake wire for either
automatic or manual transmission vehicles. With this mode, engine will
continue running for two minutes after key is turned off if the emergency
brake was set before the key was turned off and the foot brake was not
being pressed when the key was turned off.
1-8 This feautre is needed for diesel engine when you don’t use glow plug wires.
Programming Menu #2 (Security Options)
Ignition Kill
Optional
Factory Default
Programming
Setting - Button I Setting - Button II
Method
Feature
2-1
Cold Start with Temp Sensor
OFF
ON
2-2
Timer Start or Minimum Interval
between Cold Starts
Passive Arming
Anti-jacking
Ignition Controlled Door Lock
Aux 1 Output
Aux 2 Output
Siren Duration
3 Hr
1.5 Hr
2-3
2-4
2-5
2-6
2-7
2-8
Feature
2-9
2-10
Channel Expander
Passive Arming with the
Channnel Expander
Passive Locking, too No Passve Locking Remote
controller
OFF
ON
OFF
ON
0.5 Sec
Latch
0.5 Sec
Latch
30 Sec
60 Sec
OFF
ON
Note : 2-1 Cold start mode requires installation of the temperature sensor.
In the default factory setting, Cold Sensor input works as Remote Start
Activation Input. A Ground pulse to this wire will start the vehicle
2-4 With this option, Panic mode becomes Anti-Jacking mode.
The differences between Panic mode and Anti-Jacking mode are:
Anti-Jacking Mode
IV for 2 seconds
1.5 minutes
Ignition-Kill
N/A
Activated immediately if key is not on.
If key is on, activated in 30 seconds
after pressing the Button IV
N/A
2-5 Automatic Transmission Vehicle: This programmable option enables your
vehicle to automatically lock the doors upon starting the vehicle with a key.
In addition, the vehicle will automatically unlock the doors upon pulling the
key out from the ignition. This option must be chosen at the time of installation.
Manual Transmission Vehicle or Turbo Mode: This Programmable option
will locks the doors after starting the vehicle with a key and the
emergency brake is released.
2-9
Setting
Contents
2-6
Programming
Method
Non using of Channel Using of Channel
Expander module Expander module Option
Programmer
When Option 2-9 is on
Non using of Passive Using of Passive (CM3 -Series)
Mode with remote Mode with remote
Page 10
Panic Mode
Button
IV for 2 seconds
Siren
1.5 minutes
Installation required
Starter-Kill
Starter Kill
Activated immediately
2-7
off
Off
Pluse
on
off
Latch
on
Latch
On
1-99, Latch
Pluse
1-99, Latch
2-6 & 2-7
You can program the duration between 1 to 99 seconds.
You can program the “Latch Mode” also.
2-9 If you need more than 2 Aux outputs, you can interface the CM3000 with
Channel Expander for 7 Aux outputs. If you take this Channel Expander option
and you turn on the Passive setting of the Nu4000R, the four buttons of the
Nu4000R operate these 7 outputs instead of normal button functions such as
arm/disarm or start/stop. Refer to the manual of the Channel Expander.
Page 11
2-10
If you take the Channel Expander option of 2-9, the Passive setting of the
remote will change the button functions to operate of the Channel Expander.
The Passive setting of the remote will no longer work as the Passive Arming
function. Therefore, if you need both Channel Expander and Passive Arming
function, you need to choose this option.
Setting
AUX No.
off
AUX 1
Button II
Button I
Button II
AUX 2
AUX 3
Button III
Button II
Button III
Button III
AUX 4
AUX 5
Button IV
AUX 6
AUX 7
Button III-
Output
If there is a problem in auto-starting your car, you will hear three chirps when
you attempt to auto-start the car.
Wait for 2 seconds and the cause for the error will be indicated by the number
of times parking lights flash
Error Number
2-9
On
Access to passive mode through a remote
Non setting of passive mode Setting of passive mode
Diagnosing Problems with Auto-Start
(# of times parking lights flash)
1
2
3
4
5
6
7
Button II-
Error Reason
Engine On
Key On
Door Open
Trunk Open
Brake On
Hood Open
Reservation Off
(Manual Transmission Only)
Button IVAll outputs are connecting with
Channel Expander through AUX1.
AUX1,
AUX2
Adjusting the Car Siren Volume:
In order to decrease the chirping volume of the siren, cut the loop located on
the siren.
Adjusting the Shock Sensor Sensitivity:
In order to the shock sensor sensitivity, turn the screw located on the
sensor clockwise. In order to decrease the sensitivity, turn the screw located
on the sensor counter-clockwise. Turning the screw just a small amount can
make a big difference so make sure you recheck the sensitivity after each
adjustment.
Page 12
Page 13
Page 14
Page 15