1
If you program Dome Light Rearm option, The Violet wire of CN5
supplies a ground pulse before Lock and a pulse after remote start.
The Dome Light Rearm Option is to simulate Opening the door and
pressing the factory lock button for factory arming.
12 . Learning Tach/Injector Wire: Start the vehicle with the manual key and
let the engine idle down. The next step is to press the black tachometer
button. The car siren will chirp once to confirm the tach was learned.
If the siren chirps 3 times, you have the wrong tach wire.
13 . Alternator Sensing: Locate the small gauge wire from the alternator.
When tested with your meter, it should show you less than 5V when
the key is on and the vehicle is not started.
When the vehicle is started, the wire should read between 9V to 14V.
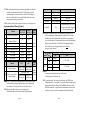
14 . Diagnosing Tach Learning Error
If the car siren chirps 3 times, there is a problem with the tachometer
learning . Wait for 2 seconds and the cause for the error will be
indicated by the numbe r of times parking lights flash.
Installation of AM, FM or SS Antennas
and RPS. The antennas have been
calibrated for horizontal installation
at the left-top corner of the windshield.
Different installation may
adversely affect the
transmitting distance.
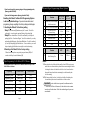
Option Programming for Four Button Remotes
Step1 : For Programming menu 1: Press Buttons (I+II) for 2 seconds.
Error Number
(# of times parking lights flash)
Tach Learning Error Dignosis
1
2
Dip Switch #1 is on alternator sensing.
Manual Car Key is in the off position.
3
No signal or the signal is not fast enough.
Find a different wire.
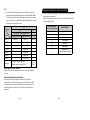
Switch and Jumper Settings
Dip
Jumper Wire
#1
#2
Switch
On Uncut: Manual Transmission
Tach Sensing 25 min run time (45 min diesel)
Cut: Automatic Transmission Alternator Sensing 15 min run time (25 min diesel)
Off
Important!
Installation of AM, FM or SS Antennas
Once you cut the Jumper Wire, you are not allowed to reconnect
the wire. The reconnection will completely void warranty.
Page 6
For Programming menu 2: Press Buttons (I+IV) for 2 seconds.
The car will chirp once indicating that you are in programming mode.
Step2 : Wit hin a 2 seconds after pressing (I+II) or (I+IV), press Button IV
the number of times to go to the option number you want to change.
You have to hear a chirp and see the parking light flash
each time when you press Button IV.
Step3 : Wait a few seconds. You will hear a number of chirps and see a
number of parking light flashes corresponding to the option number
you want to change. If the number of chirps or flashes is not what
you want, go back to Step 1.
Step4 : Press Button I for the default factory settings and your car will
respond by one chirp and one flash. Press Button II for the optional
setting and your car will respond by two chirps and two parking flashes.
Page 7