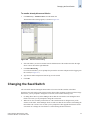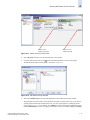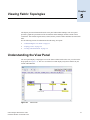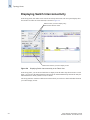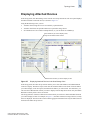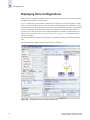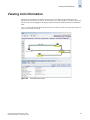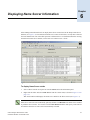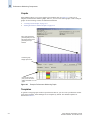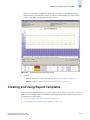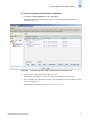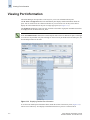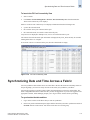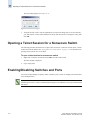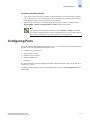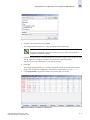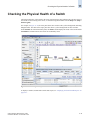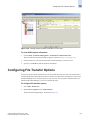
1
Fabric Manager
Administrator’s Guide
Supporting Fabric Manager 5.2.0
Supporting Fabric OS v5.2.0
Publication Number: 53-1000196-01-HP
Publication Date: 10/31/06
Copyright © 2006 Brocade Communications Systems, Inc. All Rights Reserved.
Brocade, the Brocade B weave logo, Fabric OS, File Lifecycle Manager, MyView, Secure Fabric OS, SilkWorm, and
StorageX are registered trademarks and Tapestry is a trademark of Brocade Communications Systems, Inc., in the
United States and/or in other countries. FICON is a registered trademarks of IBM Corporation in the U.S. and other
countries. All other brands, products, or service names are or may be trademarks or service marks of, and are used to
identify, products or services of their respective owners.
Notice: This document is for informational purposes only and does not set forth any warranty, expressed or implied,
concerning any equipment, equipment feature, or service offered or to be offered by Brocade. Brocade reserves the right
to make changes to this document at any time, without notice, and assumes no responsibility for its use. This
informational document describes features that may not be currently available. Contact a Brocade sales office for
information on feature and product availability. Export of technical data contained in this document may require an
export license from the United States government.
The authors and Brocade Communications Systems, Inc. shall have no liability or responsibility to any person or entity
with respect to any loss, cost, liability, or damages arising from the information contained in this book or the computer
programs that accompany it.
The product described by this document may contain “open source” software covered by the GNU General Public
License or other open source license agreements. To find-out which open source software is included in Brocade
products, view the licensing terms applicable to the open source software, and obtain a copy of the programming source
code, please visit http://www.brocade.com/support/oscd.
Brocade Communications Systems, Incorporated
Corporate Headquarters
Brocade Communications Systems, Inc.
1745 Technology Drive
San Jose, CA 95110
Tel: 1-408-333-8000
Fax: 1-408-333-8101
Email: [email protected]
European and Latin American Headquarters
Brocade Communications Switzerland Sàrl
Centre Swissair
Tour A - 2ème étage
29, Route de l'Aéroport
Case Postale 105
CH-1215 Genève 15
Switzerland
Tel: +41 22 799 56 40
Fax: +41 22 799 56 41
Email: [email protected]
Asia-Pacific Headquarters
Brocade Communications Singapore Pte. Ltd.
9 Raffles Place
#59-02 Republic Plaza 1
Singapore 048619
Tel: +65-6538-4700
Fax: +65-6538-0302
Email: [email protected]
Document History
The following table lists all versions of the Fabric Manager Administrator’s Guide.
Title
Publication Number Summary of Changes
Date
Brocade Fabric Manager User’s
Guide, v3.0
53-0000204-01
N/A
October 2001
Brocade Fabric Manager User’s
Guide, v4.0
53-0000823-02
N/A
April 2003
Brocade Fabric Manager User’s
Guide, v4.1.0
53-0000823-04
N/A
September 2003
Brocade Fabric Manager User’s
Guide, v4.1.1
53-0000823-05
Editorial & structural changes,
aligned information with online
help information, updated Call
Home feature information, updated
link icons, additional
troubleshooting information.
December 2003
Fabric Manager User’s Guide
53-0000823-06
Updated to include switch specific
information.
March 2004
Fabric Manager User’s Guide
53-0000823-07
Editorial & structural changes,
included new feature support since
Fabric Manager 4.1.1, updated
graphics, updated troubleshooting
information.
May 2004
Fabric Manager User’s Guide
53-0000823-08
Editorial & structural changes,
device node and device port name
support, and minor adjustment for
database change.
July 2004
Fabric Manager User’s Guide
53-0000823-09
Editorial & structural changes,
added support for SilkWorm 4100,
4 Gbit/sec support, and end-to-end
performance monitoring; also
revised installation, firmware
download, fabric merge, admin
password on multiple switches, and
enable security sections.
October 2004
Fabric Manager Administrator’s
Guide
53-0000823-10
Editorial & structural changes,
including new feature support; also
revised installation and overview
sections and book title.
April 2005
Fabric Manager Administrator’s
Guide
53-1000042-01
Added support for SilkWorm 4900,
7500, and FR4-18i port blade;
added support for Fabric OS v5.1.0
features, such as FCIP Tunneling
and FC-FC Routing Service.
February 2006
Fabric Manager Administrator’s
Guide
53-1000196-01
Added support for FR4-16IP port
blade; added support for Fabric OS
v5.2.0 features, such as Admin
Domains and iSCSI; added offline
zoning. Revised Fabric Manager
client information throughout.
October 2006
Contents
About This Document
How This Document Is Organized . . . . . . . . . . . . . . . . . . . . . . . . . . . . . . . . .
xix
Supported Hardware and Software . . . . . . . . . . . . . . . . . . . . . . . . . . . . . . . . .
xxi
What’s New in This Document. . . . . . . . . . . . . . . . . . . . . . . . . . . . . . . . . . . .
xxi
Document Conventions. . . . . . . . . . . . . . . . . . . . . . . . . . . . . . . . . . . . . . . . . .
xxii
Additional Information . . . . . . . . . . . . . . . . . . . . . . . . . . . . . . . . . . . . . . . . . . xxiii
Getting Technical Help . . . . . . . . . . . . . . . . . . . . . . . . . . . . . . . . . . . . . . . . . . xxvi
Document Feedback . . . . . . . . . . . . . . . . . . . . . . . . . . . . . . . . . . . . . . . . . . . . xxvii
Chapter 1
Chapter 2
Introducing Fabric Manager
Overview of Fabric Manager . . . . . . . . . . . . . . . . . . . . . . . . . . . . . . . . . . . . .
1-1
Browser and Platform Requirements . . . . . . . . . . . . . . . . . . . . . . . . . . . . . . .
1-2
System Requirements . . . . . . . . . . . . . . . . . . . . . . . . . . . . . . . . . . . . . . . . . . .
1-4
Fabric and Switch Access . . . . . . . . . . . . . . . . . . . . . . . . . . . . . . . . . . . . . . . .
1-5
Administrative Domains . . . . . . . . . . . . . . . . . . . . . . . . . . . . . . . . . . . . . .
1-6
Role-Based Access Control . . . . . . . . . . . . . . . . . . . . . . . . . . . . . . . . . . .
1-7
Installation
Planning for the Installation . . . . . . . . . . . . . . . . . . . . . . . . . . . . . . . . . . . . . .
2-1
Installation and Troubleshooting Information . . . . . . . . . . . . . . . . . . . . .
2-1
Upgrading Fabric Manager . . . . . . . . . . . . . . . . . . . . . . . . . . . . . . . . . . . . . . .
2-4
Licence Keys. . . . . . . . . . . . . . . . . . . . . . . . . . . . . . . . . . . . . . . . . . . . . . .
2-5
Upgrading from the Evaluation Version . . . . . . . . . . . . . . . . . . . . . . . . . .
2-5
Installing the Fabric Manager Server . . . . . . . . . . . . . . . . . . . . . . . . . . . . . . .
2-6
Installing Fabric Manager Server on Windows . . . . . . . . . . . . . . . . . . . .
2-6
Installing Fabric Manager Server on Solaris . . . . . . . . . . . . . . . . . . . . . . 2-14
Installing Fabric Manager Server on Linux . . . . . . . . . . . . . . . . . . . . . . . 2-17
Fabric Manager Administrator’s Guide
Publication Number: 53-1000196-01-HP
v
Copying an Installation from Server to Server . . . . . . . . . . . . . . . . . . . . . . . . 2-20
Uninstalling the Fabric Manager Server . . . . . . . . . . . . . . . . . . . . . . . . . . . . . 2-22
Chapter 3
Fabric Manager Client
Launching Fabric Manager . . . . . . . . . . . . . . . . . . . . . . . . . . . . . . . . . . . . . . .
3-1
Uninstalling the Fabric Manager Client . . . . . . . . . . . . . . . . . . . . . . . . . . . . .
3-4
Understanding the Fabric Manager Layout . . . . . . . . . . . . . . . . . . . . . . . . . .
3-6
Scope Panel. . . . . . . . . . . . . . . . . . . . . . . . . . . . . . . . . . . . . . . . . . . . . . . .
3-7
View Panel . . . . . . . . . . . . . . . . . . . . . . . . . . . . . . . . . . . . . . . . . . . . . . . .
3-9
Task Panel . . . . . . . . . . . . . . . . . . . . . . . . . . . . . . . . . . . . . . . . . . . . . . . . . 3-12
Information Panel . . . . . . . . . . . . . . . . . . . . . . . . . . . . . . . . . . . . . . . . . . . 3-12
Menu Bar . . . . . . . . . . . . . . . . . . . . . . . . . . . . . . . . . . . . . . . . . . . . . . . . . 3-14
Status Indicators . . . . . . . . . . . . . . . . . . . . . . . . . . . . . . . . . . . . . . . . . . . . 3-14
Refreshing the Window . . . . . . . . . . . . . . . . . . . . . . . . . . . . . . . . . . . . . . 3-16
Selecting Elements and Accessing Modules . . . . . . . . . . . . . . . . . . . . . . 3-17
Customizing Fabric Manager . . . . . . . . . . . . . . . . . . . . . . . . . . . . . . . . . . . . . 3-18
Displaying Fabrics by IP Address, Domain ID, WWN, and Name . . . . . 3-18
Customizing Tables. . . . . . . . . . . . . . . . . . . . . . . . . . . . . . . . . . . . . . . . . . 3-18
Filtering Elements in a Table . . . . . . . . . . . . . . . . . . . . . . . . . . . . . . . . . . 3-20
Customizing Tool Tips . . . . . . . . . . . . . . . . . . . . . . . . . . . . . . . . . . . . . . . 3-21
Resizing Panels . . . . . . . . . . . . . . . . . . . . . . . . . . . . . . . . . . . . . . . . . . . . . 3-22
Chapter 4
vi
Discovering and Customizing Fabrics
Discovering a Fabric . . . . . . . . . . . . . . . . . . . . . . . . . . . . . . . . . . . . . . . . . . . .
4-1
Discovering a Single Fabric . . . . . . . . . . . . . . . . . . . . . . . . . . . . . . . . . . .
4-2
Discovering Multiple Fabrics (Subnet Scan) . . . . . . . . . . . . . . . . . . . . . .
4-3
Logging In to Multiple Switches Simultaneously . . . . . . . . . . . . . . . . . . . . .
4-4
Monitoring Fabrics . . . . . . . . . . . . . . . . . . . . . . . . . . . . . . . . . . . . . . . . . . . . .
4-6
Changing the Seed Switch . . . . . . . . . . . . . . . . . . . . . . . . . . . . . . . . . . . . . . .
4-7
Deleting a Fabric from Fabric Manager . . . . . . . . . . . . . . . . . . . . . . . . . . . . .
4-9
Fabric Manager Administrator’s Guide
Publication Number: 53-1000196-01-HP
Renaming Fabric Components . . . . . . . . . . . . . . . . . . . . . . . . . . . . . . . . . . . . 4-10
Renaming a Fabric . . . . . . . . . . . . . . . . . . . . . . . . . . . . . . . . . . . . . . . . . . 4-10
Renaming a Switch . . . . . . . . . . . . . . . . . . . . . . . . . . . . . . . . . . . . . . . . . . 4-10
Renaming a Port . . . . . . . . . . . . . . . . . . . . . . . . . . . . . . . . . . . . . . . . . . . . 4-11
Renaming a Device . . . . . . . . . . . . . . . . . . . . . . . . . . . . . . . . . . . . . . . . . . 4-11
Importing Device Names . . . . . . . . . . . . . . . . . . . . . . . . . . . . . . . . . . . . . 4-12
Working With Switch and Port Groups . . . . . . . . . . . . . . . . . . . . . . . . . . . . . 4-14
Understanding the Groups View. . . . . . . . . . . . . . . . . . . . . . . . . . . . . . . . 4-15
Creating and Populating Switch Groups. . . . . . . . . . . . . . . . . . . . . . . . . . 4-16
Editing a Switch Group. . . . . . . . . . . . . . . . . . . . . . . . . . . . . . . . . . . . . . . 4-18
Creating Port Groups . . . . . . . . . . . . . . . . . . . . . . . . . . . . . . . . . . . . . . . . 4-19
Editing a Port Group . . . . . . . . . . . . . . . . . . . . . . . . . . . . . . . . . . . . . . . . . 4-20
Deleting a Switch or Port Group. . . . . . . . . . . . . . . . . . . . . . . . . . . . . . . . 4-20
Chapter 5
Chapter 6
Viewing Fabric Topologies
Understanding the View Panel . . . . . . . . . . . . . . . . . . . . . . . . . . . . . . . . . . . .
5-1
View Panel Toolbar Items. . . . . . . . . . . . . . . . . . . . . . . . . . . . . . . . . . . . .
5-2
Viewing Tool Tips. . . . . . . . . . . . . . . . . . . . . . . . . . . . . . . . . . . . . . . . . . .
5-3
Selecting Items in the Topology . . . . . . . . . . . . . . . . . . . . . . . . . . . . . . . .
5-4
Changing the Layout. . . . . . . . . . . . . . . . . . . . . . . . . . . . . . . . . . . . . . . . .
5-4
Saving View Preferences . . . . . . . . . . . . . . . . . . . . . . . . . . . . . . . . . . . . .
5-4
Topology Views . . . . . . . . . . . . . . . . . . . . . . . . . . . . . . . . . . . . . . . . . . . . . . .
5-5
Displaying Monitored Fabrics . . . . . . . . . . . . . . . . . . . . . . . . . . . . . . . . .
5-5
Displaying Switch Interconnectivity . . . . . . . . . . . . . . . . . . . . . . . . . . . .
5-6
Displaying Attached Devices . . . . . . . . . . . . . . . . . . . . . . . . . . . . . . . . . .
5-7
Displaying Zone Configurations. . . . . . . . . . . . . . . . . . . . . . . . . . . . . . . .
5-8
Viewing Link Information . . . . . . . . . . . . . . . . . . . . . . . . . . . . . . . . . . . . . . .
5-9
Displaying Name Server Information
Fabric Manager Administrator’s Guide
Publication Number: 53-1000196-01-HP
vii
Chapter 7
Monitoring Alerts and Events
Monitoring Alerts . . . . . . . . . . . . . . . . . . . . . . . . . . . . . . . . . . . . . . . . . . . . . .
7-1
Viewing Alerts . . . . . . . . . . . . . . . . . . . . . . . . . . . . . . . . . . . . . . . . . . . . .
7-1
Identifying Alerts . . . . . . . . . . . . . . . . . . . . . . . . . . . . . . . . . . . . . . . . . . .
7-2
Filtering Alerts . . . . . . . . . . . . . . . . . . . . . . . . . . . . . . . . . . . . . . . . . . . . .
7-7
Acknowledging Alerts . . . . . . . . . . . . . . . . . . . . . . . . . . . . . . . . . . . . . . .
7-8
Resolving Alerts . . . . . . . . . . . . . . . . . . . . . . . . . . . . . . . . . . . . . . . . . . . .
7-8
Deleting Alerts . . . . . . . . . . . . . . . . . . . . . . . . . . . . . . . . . . . . . . . . . . . . .
7-8
Configuring Alert Display Options. . . . . . . . . . . . . . . . . . . . . . . . . . . . . . 7-10
Monitoring Fabric Events . . . . . . . . . . . . . . . . . . . . . . . . . . . . . . . . . . . . . . . . 7-11
Viewing Fabric Events . . . . . . . . . . . . . . . . . . . . . . . . . . . . . . . . . . . . . . . 7-11
Filtering Fabric Events . . . . . . . . . . . . . . . . . . . . . . . . . . . . . . . . . . . . . . . 7-12
Configuring Notification Parameters . . . . . . . . . . . . . . . . . . . . . . . . . . . . . . . 7-13
Chapter 8
Using Performance Monitoring
Performance Monitoring Components . . . . . . . . . . . . . . . . . . . . . . . . . . . . . .
8-2
Enabling Performance Monitoring . . . . . . . . . . . . . . . . . . . . . . . . . . . . . . . . .
8-5
Disabling Performance Monitoring . . . . . . . . . . . . . . . . . . . . . . . . . . . . . . . .
8-7
Generating Custom Reports and Graphs . . . . . . . . . . . . . . . . . . . . . . . . . . . .
8-7
Creating Custom Reports . . . . . . . . . . . . . . . . . . . . . . . . . . . . . . . . . . . . .
8-8
Creating Custom Graphs. . . . . . . . . . . . . . . . . . . . . . . . . . . . . . . . . . . . . . 8-11
Creating and Using Report Templates . . . . . . . . . . . . . . . . . . . . . . . . . . . . . . 8-13
Creating Templates for Reports and Graphs. . . . . . . . . . . . . . . . . . . . . . . 8-14
Generating Reports and Graphs from Templates . . . . . . . . . . . . . . . . . . . 8-16
Saving Performance Monitor Reports or Graphs . . . . . . . . . . . . . . . . . . . . . . 8-17
Printing Performance Monitor Reports. . . . . . . . . . . . . . . . . . . . . . . . . . . . . . 8-17
Exporting Reports . . . . . . . . . . . . . . . . . . . . . . . . . . . . . . . . . . . . . . . . . . . . . . 8-18
Displaying Saved Reports and Graphs . . . . . . . . . . . . . . . . . . . . . . . . . . . . . . 8-18
Deleting Reports and Graphs . . . . . . . . . . . . . . . . . . . . . . . . . . . . . . . . . . . . . 8-19
Editing Performance Monitor Graphs. . . . . . . . . . . . . . . . . . . . . . . . . . . . . . . 8-19
Displaying Performance Monitor Reports in External Applications . . . . . . . 8-20
viii
Fabric Manager Administrator’s Guide
Publication Number: 53-1000196-01-HP
Chapter 9
Change Management
Using Change Management Profiles . . . . . . . . . . . . . . . . . . . . . . . . . . . . . . .
9-1
Creating a Profile . . . . . . . . . . . . . . . . . . . . . . . . . . . . . . . . . . . . . . . . . . .
9-4
Cloning a Profile . . . . . . . . . . . . . . . . . . . . . . . . . . . . . . . . . . . . . . . . . . . .
9-5
Editing a Profile . . . . . . . . . . . . . . . . . . . . . . . . . . . . . . . . . . . . . . . . . . . .
9-5
Deleting a Profile . . . . . . . . . . . . . . . . . . . . . . . . . . . . . . . . . . . . . . . . . . .
9-6
Using Snapshots and Change Reports . . . . . . . . . . . . . . . . . . . . . . . . . . . . . .
9-6
Displaying a Change Report . . . . . . . . . . . . . . . . . . . . . . . . . . . . . . . . . . .
9-6
Creating Snapshots on Demand . . . . . . . . . . . . . . . . . . . . . . . . . . . . . . . .
9-8
Comparing Snapshots . . . . . . . . . . . . . . . . . . . . . . . . . . . . . . . . . . . . . . . .
9-9
Exporting Snapshot and Change Reports . . . . . . . . . . . . . . . . . . . . . . . . .
9-9
Exporting Switch Configuration Information. . . . . . . . . . . . . . . . . . . . . . 9-10
Displaying Change Reports in External Applications . . . . . . . . . . . . . . . 9-10
Printing Snapshot and Change Reports . . . . . . . . . . . . . . . . . . . . . . . . . . 9-11
Changing Baseline Snapshot . . . . . . . . . . . . . . . . . . . . . . . . . . . . . . . . . . 9-11
Chapter 10
Call Home Support
About Call Home . . . . . . . . . . . . . . . . . . . . . . . . . . . . . . . . . . . . . . . . . . . . . . 10-1
Call Home Email Messages . . . . . . . . . . . . . . . . . . . . . . . . . . . . . . . . . . . 10-2
Call Home External Executable . . . . . . . . . . . . . . . . . . . . . . . . . . . . . . . . 10-2
Configuring Call Home . . . . . . . . . . . . . . . . . . . . . . . . . . . . . . . . . . . . . . . . . 10-3
Editing Configurations . . . . . . . . . . . . . . . . . . . . . . . . . . . . . . . . . . . . . . . . . . 10-4
Enabling or Disabling Call Home Globally . . . . . . . . . . . . . . . . . . . . . . . . . . 10-5
Monitoring Call Home . . . . . . . . . . . . . . . . . . . . . . . . . . . . . . . . . . . . . . . . . . 10-6
Chapter 11
Switch Configuration and Management
Viewing Switch Information. . . . . . . . . . . . . . . . . . . . . . . . . . . . . . . . . . . . . . 11-1
Viewing Port Information . . . . . . . . . . . . . . . . . . . . . . . . . . . . . . . . . . . . . . . . 11-4
Synchronizing Date and Time Across a Fabric . . . . . . . . . . . . . . . . . . . . . . . 11-5
Opening a Telnet Session for a Nonsecure Switch . . . . . . . . . . . . . . . . . . . . . 11-6
Enabling/Disabling Switches and Ports . . . . . . . . . . . . . . . . . . . . . . . . . . . . . 11-6
Fabric Manager Administrator’s Guide
Publication Number: 53-1000196-01-HP
ix
Configuring Ports . . . . . . . . . . . . . . . . . . . . . . . . . . . . . . . . . . . . . . . . . . . . . . 11-7
Swapping Ports . . . . . . . . . . . . . . . . . . . . . . . . . . . . . . . . . . . . . . . . . . . . . . . . 11-8
Administering ISL Trunking. . . . . . . . . . . . . . . . . . . . . . . . . . . . . . . . . . . . . . 11-9
Administering License Keys. . . . . . . . . . . . . . . . . . . . . . . . . . . . . . . . . . . . . . 11-10
Exporting License Keys . . . . . . . . . . . . . . . . . . . . . . . . . . . . . . . . . . . . . . 11-10
Importing and Restoring License Keys . . . . . . . . . . . . . . . . . . . . . . . . . . 11-12
Removing License Keys . . . . . . . . . . . . . . . . . . . . . . . . . . . . . . . . . . . . . . 11-13
Using Baseline Configurations for Configuration Management . . . . . . . . . . 11-13
Saving a Baseline Configuration to a File . . . . . . . . . . . . . . . . . . . . . . . . 11-14
Comparing Switches to a Baseline File . . . . . . . . . . . . . . . . . . . . . . . . . . 11-16
Comparing Switches to a Baseline Switch . . . . . . . . . . . . . . . . . . . . . . . . 11-18
Downloading a Configuration . . . . . . . . . . . . . . . . . . . . . . . . . . . . . . . . . 11-19
Customizing Baseline Configurations . . . . . . . . . . . . . . . . . . . . . . . . . . . 11-21
Saving Switch Configuration Files . . . . . . . . . . . . . . . . . . . . . . . . . . . . . . . . . 11-23
Checking the Physical Health of a Switch . . . . . . . . . . . . . . . . . . . . . . . . . . . 11-25
Replacing a Switch in the Fabric . . . . . . . . . . . . . . . . . . . . . . . . . . . . . . . . . . 11-26
Chapter 12
Configuring Standard Security Features
Managing Passwords . . . . . . . . . . . . . . . . . . . . . . . . . . . . . . . . . . . . . . . . . . . 12-1
Enabling and Disabling Switch Passwords. . . . . . . . . . . . . . . . . . . . . . . . 12-1
Changing Admin Password on Multiple Switches . . . . . . . . . . . . . . . . . . 12-2
Enabling Secure Communication Over HTTPS . . . . . . . . . . . . . . . . . . . . . . . 12-3
Managing the Truststore . . . . . . . . . . . . . . . . . . . . . . . . . . . . . . . . . . . . . . . . . 12-3
Managing Administrative Domains . . . . . . . . . . . . . . . . . . . . . . . . . . . . . . . . 12-4
Requirements for Admin Domains . . . . . . . . . . . . . . . . . . . . . . . . . . . . . . 12-4
Launching the Admin Domain Module . . . . . . . . . . . . . . . . . . . . . . . . . . 12-5
Managing Access Control Lists . . . . . . . . . . . . . . . . . . . . . . . . . . . . . . . . . . . 12-6
Propagating RADIUS Configuration Across Switches . . . . . . . . . . . . . . . . . 12-7
Chapter 13
Managing the iSCSI Target Gateway
About the iSCSI Target Gateway . . . . . . . . . . . . . . . . . . . . . . . . . . . . . . . . . . 13-1
x
Fabric Manager Administrator’s Guide
Publication Number: 53-1000196-01-HP
Viewing iSCSI Information . . . . . . . . . . . . . . . . . . . . . . . . . . . . . . . . . . . . . . 13-2
iSCSI Summary . . . . . . . . . . . . . . . . . . . . . . . . . . . . . . . . . . . . . . . . . . . . 13-3
iSCSI Ports . . . . . . . . . . . . . . . . . . . . . . . . . . . . . . . . . . . . . . . . . . . . . . . 13-3
iSCSI Initiators . . . . . . . . . . . . . . . . . . . . . . . . . . . . . . . . . . . . . . . . . . . . . 13-4
iSCSI Targets . . . . . . . . . . . . . . . . . . . . . . . . . . . . . . . . . . . . . . . . . . . . . . 13-5
Virtual Initiators . . . . . . . . . . . . . . . . . . . . . . . . . . . . . . . . . . . . . . . . . . . . 13-5
Exported FC Targets . . . . . . . . . . . . . . . . . . . . . . . . . . . . . . . . . . . . . . . . . 13-6
iSCSI Sessions . . . . . . . . . . . . . . . . . . . . . . . . . . . . . . . . . . . . . . . . . . . . . 13-7
Setting Up iSCSI Target Gateway Services . . . . . . . . . . . . . . . . . . . . . . . . . . 13-7
Chapter 14
Firmware Management
Determining Availability of Firmware-Specific Features. . . . . . . . . . . . . . . . 14-1
Using Built-in FTP Server and Firmware Repository . . . . . . . . . . . . . . . . . . 14-3
Viewing the Firmware Repository . . . . . . . . . . . . . . . . . . . . . . . . . . . . . . 14-3
Importing and Removing Firmware . . . . . . . . . . . . . . . . . . . . . . . . . . . . . 14-4
Defining a Fabric Profile . . . . . . . . . . . . . . . . . . . . . . . . . . . . . . . . . . . . . 14-6
Viewing SAN Firmware Versions. . . . . . . . . . . . . . . . . . . . . . . . . . . . . . . 14-8
Configuring File Transfer Options . . . . . . . . . . . . . . . . . . . . . . . . . . . . . . . . . 14-9
Downloading Firmware to Multiple Switches . . . . . . . . . . . . . . . . . . . . . . . . 14-11
Downloading Firmware with Firmware Repository Support . . . . . . . . . . 14-12
Downloading Firmware Using an External FTP Server . . . . . . . . . . . . . . 14-13
Controlling Firmware Download Reboots . . . . . . . . . . . . . . . . . . . . . . . . . . . 14-15
Downloading Firmware to HBAs . . . . . . . . . . . . . . . . . . . . . . . . . . . . . . . . . . 14-15
Downloading Firmware to XPath OS Switches . . . . . . . . . . . . . . . . . . . . . . . 14-18
Accessing Firmware When Changing the FTP Server . . . . . . . . . . . . . . . . . . 14-18
Collecting FDMI Device Information . . . . . . . . . . . . . . . . . . . . . . . . . . . . . . 14-19
Rebooting Switches . . . . . . . . . . . . . . . . . . . . . . . . . . . . . . . . . . . . . . . . . . . . 14-19
Creating a Reboot Group with Multiple Switches . . . . . . . . . . . . . . . . . . 14-20
Creating Single-Switch Reboot Groups . . . . . . . . . . . . . . . . . . . . . . . . . . 14-21
Assigning Switches to a Reboot Group . . . . . . . . . . . . . . . . . . . . . . . . . . 14-22
Performing a Sequenced Reboot. . . . . . . . . . . . . . . . . . . . . . . . . . . . . . . . 14-23
Fabric Manager Administrator’s Guide
Publication Number: 53-1000196-01-HP
xi
Chapter 15
Managing Zones
Introduction to Zoning . . . . . . . . . . . . . . . . . . . . . . . . . . . . . . . . . . . . . . . . . . 15-1
Managing Zoning Offline . . . . . . . . . . . . . . . . . . . . . . . . . . . . . . . . . . . . . . . . 15-2
Use Cases for Offline Zoning . . . . . . . . . . . . . . . . . . . . . . . . . . . . . . . . . . 15-3
Requirements for Offline Zoning . . . . . . . . . . . . . . . . . . . . . . . . . . . . . . . 15-3
Offline Zone Editing . . . . . . . . . . . . . . . . . . . . . . . . . . . . . . . . . . . . . . . . . 15-4
Managing Zoning with Web Tools . . . . . . . . . . . . . . . . . . . . . . . . . . . . . . . . . 15-16
Chapter 16
Fabric Watch
Launching Fabric Watch . . . . . . . . . . . . . . . . . . . . . . . . . . . . . . . . . . . . . . . . . 16-1
Using Fabric Watch with Web Tools . . . . . . . . . . . . . . . . . . . . . . . . . . . . . . . 16-2
Chapter 17
Managing Secure Fabrics
Enabling Secure Mode . . . . . . . . . . . . . . . . . . . . . . . . . . . . . . . . . . . . . . . . . . 17-1
Using the Policy Editor. . . . . . . . . . . . . . . . . . . . . . . . . . . . . . . . . . . . . . . . . . 17-3
Configuring FCS Policy Options . . . . . . . . . . . . . . . . . . . . . . . . . . . . . . . 17-4
Configuring SCC Policy Options . . . . . . . . . . . . . . . . . . . . . . . . . . . . . . . 17-6
Configuring Telnet, RSNMP, WSNMP, HTTP, and API Policy Options . 17-7
Configuring DCC Policy Options. . . . . . . . . . . . . . . . . . . . . . . . . . . . . . . 17-9
Configuring SES and MS Policy Options. . . . . . . . . . . . . . . . . . . . . . . . . 17-11
Configuring Serial and Front Panel Policy Options . . . . . . . . . . . . . . . . . 17-13
Changing the Admin Security Password . . . . . . . . . . . . . . . . . . . . . . . . . 17-15
Configuring No-Node WWN Zoning . . . . . . . . . . . . . . . . . . . . . . . . . . . . 17-17
Adding a Switch to a Secure Fabric . . . . . . . . . . . . . . . . . . . . . . . . . . . . . . . . 17-17
Merging Secure Fabrics . . . . . . . . . . . . . . . . . . . . . . . . . . . . . . . . . . . . . . . . . 17-18
Using Telnet on a Secure Fabric . . . . . . . . . . . . . . . . . . . . . . . . . . . . . . . . . . . 17-19
Chapter 18
FICON and CUP
Identifying Switches with FMS Mode Enabled . . . . . . . . . . . . . . . . . . . . . . . 18-1
Editing the Current Port Connectivity Configuration. . . . . . . . . . . . . . . . . . . 18-2
Editing a Stored Port Connectivity Configuration . . . . . . . . . . . . . . . . . . . . . 18-4
Identifying Port Zone Conflicts . . . . . . . . . . . . . . . . . . . . . . . . . . . . . . . . . . . 18-6
xii
Fabric Manager Administrator’s Guide
Publication Number: 53-1000196-01-HP
Configuring Insistent Domain ID Mode . . . . . . . . . . . . . . . . . . . . . . . . . . . . . 18-6
Identifying Ports That Completed the RNID Exchange . . . . . . . . . . . . . . . . . 18-8
Monitoring Link Incidents . . . . . . . . . . . . . . . . . . . . . . . . . . . . . . . . . . . . . . . 18-9
Cascaded FICON Setup . . . . . . . . . . . . . . . . . . . . . . . . . . . . . . . . . . . . . . . . . 18-9
Configure a Fabric for Cascaded FICON . . . . . . . . . . . . . . . . . . . . . . . . . 18-9
Merge Two Fabrics for Cascaded FICON . . . . . . . . . . . . . . . . . . . . . . . . 18-11
Chapter 19
Managing the FC-FC Routing Service
Requirements for Fibre Channel Routing . . . . . . . . . . . . . . . . . . . . . . . . . . . . 19-1
About Fibre Channel Routing. . . . . . . . . . . . . . . . . . . . . . . . . . . . . . . . . . . . . 19-2
Setting Up FC-FC Routing . . . . . . . . . . . . . . . . . . . . . . . . . . . . . . . . . . . . . . . 19-3
Connecting Edge Fabrics . . . . . . . . . . . . . . . . . . . . . . . . . . . . . . . . . . . . . . . . 19-4
Diagnosing Fabric Device Sharing . . . . . . . . . . . . . . . . . . . . . . . . . . . . . . . . . 19-5
Sharing Devices Between Fabrics . . . . . . . . . . . . . . . . . . . . . . . . . . . . . . . . . 19-6
Displaying Logical SANs . . . . . . . . . . . . . . . . . . . . . . . . . . . . . . . . . . . . . . . . 19-8
Displaying FC Router Information . . . . . . . . . . . . . . . . . . . . . . . . . . . . . . . . . 19-9
Translate Domains and Virtual Device Status . . . . . . . . . . . . . . . . . . . . . . . . 19-11
FC-FC Routing and Secure Fabrics . . . . . . . . . . . . . . . . . . . . . . . . . . . . . . . . 19-12
FC-FC Routing and AD-Enabled Fabrics. . . . . . . . . . . . . . . . . . . . . . . . . . . . 19-12
Chapter 20
Using the FCIP Tunneling Service
About FCIP Tunneling . . . . . . . . . . . . . . . . . . . . . . . . . . . . . . . . . . . . . . . . . . 20-1
Viewing FCIP Information . . . . . . . . . . . . . . . . . . . . . . . . . . . . . . . . . . . . . . . 20-2
Configuring an FCIP Tunnel . . . . . . . . . . . . . . . . . . . . . . . . . . . . . . . . . . . . . 20-3
Chapter 21
Third-Party and Foreign Device Management
Accessing Third-Party Management Applications . . . . . . . . . . . . . . . . . . . . . 21-1
Adding Third-Party Management Applications . . . . . . . . . . . . . . . . . . . . 21-2
Editing Third-Party Management Applications . . . . . . . . . . . . . . . . . . . . 21-4
Running Third-Party Management Applications . . . . . . . . . . . . . . . . . . . 21-4
Examples of Launching Applications. . . . . . . . . . . . . . . . . . . . . . . . . . . . 21-4
Importing Device WWNs . . . . . . . . . . . . . . . . . . . . . . . . . . . . . . . . . . . . . . . . 21-7
Fabric Manager Administrator’s Guide
Publication Number: 53-1000196-01-HP
xiii
Chapter 22
Creating Reports
Displaying the Switch Health Report . . . . . . . . . . . . . . . . . . . . . . . . . . . . . . . 22-1
Chapter 23
Storing Data and Performing Backups
Data Persistence . . . . . . . . . . . . . . . . . . . . . . . . . . . . . . . . . . . . . . . . . . . . . . . 23-1
Performing Backups . . . . . . . . . . . . . . . . . . . . . . . . . . . . . . . . . . . . . . . . . . . . 23-1
Full Backup. . . . . . . . . . . . . . . . . . . . . . . . . . . . . . . . . . . . . . . . . . . . . . . . 23-2
Incremental Backup . . . . . . . . . . . . . . . . . . . . . . . . . . . . . . . . . . . . . . . . . 23-3
Chapter 24
Server Management Console
Introduction to Server Management Console . . . . . . . . . . . . . . . . . . . . . . . . . 24-1
Launching the Server Management Console . . . . . . . . . . . . . . . . . . . . . . . . . 24-2
Managing Fabric Manager Services . . . . . . . . . . . . . . . . . . . . . . . . . . . . . . . . 24-2
Changing Authentication Information . . . . . . . . . . . . . . . . . . . . . . . . . . . . . . 24-3
Backing Up and Restoring the Database . . . . . . . . . . . . . . . . . . . . . . . . . . . . 24-5
Capturing Technical Support Information . . . . . . . . . . . . . . . . . . . . . . . . . . . 24-6
Creating a Login Banner. . . . . . . . . . . . . . . . . . . . . . . . . . . . . . . . . . . . . . . . . 24-7
Changing Secure Communication Settings (HTTP or HTTPS) . . . . . . . . . . . 24-8
Changing the Web Server Port Number . . . . . . . . . . . . . . . . . . . . . . . . . . . . . 24-10
Chapter 25
Fabric Troubleshooting Tools
General Device Diagnostics . . . . . . . . . . . . . . . . . . . . . . . . . . . . . . . . . . . . . . 25-1
Fabric Merge Check . . . . . . . . . . . . . . . . . . . . . . . . . . . . . . . . . . . . . . . . . . . . 25-2
Event Message Severity Level . . . . . . . . . . . . . . . . . . . . . . . . . . . . . . . . . . . . 25-4
Trace Route . . . . . . . . . . . . . . . . . . . . . . . . . . . . . . . . . . . . . . . . . . . . . . . . . . . 25-5
Chapter 26
Troubleshooting
Capturing Fabric Manager Support Information . . . . . . . . . . . . . . . . . . . . . . 26-1
xiv
Fabric Manager Administrator’s Guide
Publication Number: 53-1000196-01-HP
Checking the Client Side . . . . . . . . . . . . . . . . . . . . . . . . . . . . . . . . . . . . . . . . 26-3
Authentication Issues (Unable to Login) . . . . . . . . . . . . . . . . . . . . . . . . . 26-3
Client Access to Switches. . . . . . . . . . . . . . . . . . . . . . . . . . . . . . . . . . . . . 26-5
Client-Side CPU Usage . . . . . . . . . . . . . . . . . . . . . . . . . . . . . . . . . . . . . . 26-5
Capturing/Reporting Client-Side Issues . . . . . . . . . . . . . . . . . . . . . . . . . . 26-5
Checking Client/Server Interaction . . . . . . . . . . . . . . . . . . . . . . . . . . . . . . . . 26-5
No Client/Server Interaction . . . . . . . . . . . . . . . . . . . . . . . . . . . . . . . . . . . 26-6
Client/Server Version Mismatch . . . . . . . . . . . . . . . . . . . . . . . . . . . . . . . . 26-6
Determine Whether Client or Server Problem . . . . . . . . . . . . . . . . . . . . . 26-6
Checking the Server Side . . . . . . . . . . . . . . . . . . . . . . . . . . . . . . . . . . . . . . . . 26-7
Server Cannot Access Switches . . . . . . . . . . . . . . . . . . . . . . . . . . . . . . . . 26-7
Server-Side CPU Usage . . . . . . . . . . . . . . . . . . . . . . . . . . . . . . . . . . . . . . 26-7
Statistics Not Collected. . . . . . . . . . . . . . . . . . . . . . . . . . . . . . . . . . . . . . . 26-7
Capturing/Reporting Server-Side Issues. . . . . . . . . . . . . . . . . . . . . . . . . . 26-7
Checking Fabric Discovery Problems . . . . . . . . . . . . . . . . . . . . . . . . . . . . . . 26-8
Capturing supportShow and supportSave Output. . . . . . . . . . . . . . . . . . . . . . 26-8
Topology . . . . . . . . . . . . . . . . . . . . . . . . . . . . . . . . . . . . . . . . . . . . . . . . . . . . . 26-10
Nodes Swapped With Another Switch Node . . . . . . . . . . . . . . . . . . . . . . 26-10
Lettering in Legend Unreadable When Printed . . . . . . . . . . . . . . . . . . . . 26-10
Links Do Not Reconfigure After Disruptive Failover . . . . . . . . . . . . . . . 26-11
Nodes Overlap . . . . . . . . . . . . . . . . . . . . . . . . . . . . . . . . . . . . . . . . . . . . . 26-11
Fabric Manager Administrator’s Guide
Publication Number: 53-1000196-01-HP
xv
Pinpointing Additional Problem Areas. . . . . . . . . . . . . . . . . . . . . . . . . . . . . . 26-11
Locating Fabric Manager License Key and Serial Number . . . . . . . . . . . 26-11
Switches and Hosts Do Not Recognize HBA After Firmware Download to
HBA . . . . . . . . . . . . . . . . . . . . . . . . . . . . . . . . . . . . . . . . . . . . . . . . . . . . . 26-12
503 Service Unavailable/Overloaded Error . . . . . . . . . . . . . . . . . . . . . . . 26-12
Installation Wizard . . . . . . . . . . . . . . . . . . . . . . . . . . . . . . . . . . . . . . . . . . 26-12
Fabric Manager Client Does Not Start . . . . . . . . . . . . . . . . . . . . . . . . . . . 26-12
Web Tools Pages Do Not Launch . . . . . . . . . . . . . . . . . . . . . . . . . . . . . . . 26-13
Wizard Hangs . . . . . . . . . . . . . . . . . . . . . . . . . . . . . . . . . . . . . . . . . . . . . . 26-14
Performance Monitoring. . . . . . . . . . . . . . . . . . . . . . . . . . . . . . . . . . . . . . 26-14
Fabric Manager Database File Is Too Large. . . . . . . . . . . . . . . . . . . . . . . 26-14
Sequenced Reboot Does Not Show Correct Status. . . . . . . . . . . . . . . . . . 26-14
Stopping Fabric Manager Server on Solaris and Linux . . . . . . . . . . . . . . 26-15
Changing Printers in Fabric Manager . . . . . . . . . . . . . . . . . . . . . . . . . . . . 26-15
Changing the Time in Fabric Manager . . . . . . . . . . . . . . . . . . . . . . . . . . . 26-15
ODBC Driver Installer Error . . . . . . . . . . . . . . . . . . . . . . . . . . . . . . . . . . 26-15
fmsupportshow Output File is Empty . . . . . . . . . . . . . . . . . . . . . . . . . . . . 26-16
Appendix A Repository
SAN . . . . . . . . . . . . . . . . . . . . . . . . . . . . . . . . . . . . . . . . . . . . . . . . . . . . . . . .
A-2
Fabric . . . . . . . . . . . . . . . . . . . . . . . . . . . . . . . . . . . . . . . . . . . . . . . . . . . . . . .
A-2
Switch . . . . . . . . . . . . . . . . . . . . . . . . . . . . . . . . . . . . . . . . . . . . . . . . . . . . . . .
A-2
Device . . . . . . . . . . . . . . . . . . . . . . . . . . . . . . . . . . . . . . . . . . . . . . . . . . . . . . .
A-3
Switch Port . . . . . . . . . . . . . . . . . . . . . . . . . . . . . . . . . . . . . . . . . . . . . . . . . . .
A-4
Device Port . . . . . . . . . . . . . . . . . . . . . . . . . . . . . . . . . . . . . . . . . . . . . . . . . . .
A-7
Zone_config . . . . . . . . . . . . . . . . . . . . . . . . . . . . . . . . . . . . . . . . . . . . . . . . . .
A-7
Zone . . . . . . . . . . . . . . . . . . . . . . . . . . . . . . . . . . . . . . . . . . . . . . . . . . . . . . . .
A-8
Zone Membership . . . . . . . . . . . . . . . . . . . . . . . . . . . . . . . . . . . . . . . . . . . . . .
A-8
Zone Alias. . . . . . . . . . . . . . . . . . . . . . . . . . . . . . . . . . . . . . . . . . . . . . . . . . . .
A-9
Appendix B Licenses for Third-Party Products
ABA Licence . . . . . . . . . . . . . . . . . . . . . . . . . . . . . . . . . . . . . . . . . . . . . . . . .
xvi
B-1
Fabric Manager Administrator’s Guide
Publication Number: 53-1000196-01-HP
Apache License. . . . . . . . . . . . . . . . . . . . . . . . . . . . . . . . . . . . . . . . . . . . . . . .
B-3
AXL License. . . . . . . . . . . . . . . . . . . . . . . . . . . . . . . . . . . . . . . . . . . . . . . . . .
B-6
Jason Hunter & Brett McLaughlin License . . . . . . . . . . . . . . . . . . . . . . . . . .
B-7
LGPL License 2.0 . . . . . . . . . . . . . . . . . . . . . . . . . . . . . . . . . . . . . . . . . . . . . .
B-8
LGPL License 2.1 . . . . . . . . . . . . . . . . . . . . . . . . . . . . . . . . . . . . . . . . . . . . . . B-13
MIT License . . . . . . . . . . . . . . . . . . . . . . . . . . . . . . . . . . . . . . . . . . . . . . . . . . B-20
ONC RPC License . . . . . . . . . . . . . . . . . . . . . . . . . . . . . . . . . . . . . . . . . . . . . B-20
Open SSL License . . . . . . . . . . . . . . . . . . . . . . . . . . . . . . . . . . . . . . . . . . . . . B-21
Public Domain . . . . . . . . . . . . . . . . . . . . . . . . . . . . . . . . . . . . . . . . . . . . . . . . B-25
Reusable Objects/NetComponents License . . . . . . . . . . . . . . . . . . . . . . . . . . B-25
Sun Java License. . . . . . . . . . . . . . . . . . . . . . . . . . . . . . . . . . . . . . . . . . . . . . . B-26
Wolf Paulus License . . . . . . . . . . . . . . . . . . . . . . . . . . . . . . . . . . . . . . . . . . . . B-29
Index
Fabric Manager Administrator’s Guide
Publication Number: 53-1000196-01-HP
xvii
xviii
Fabric Manager Administrator’s Guide
Publication Number: 53-1000196-01-HP
About This Document
The Fabric Manager Administrator’s Guide is written to help you, the storage area network (SAN)
administrator, to monitor, configure, and manage your SAN. This document is specific to Fabric
Manager version 5.2.0 and all switches running Brocade Fabric OS version 5.2.0 and XPath version
7.1.2c or later. For a detailed list of the firmware and hardware versions that are supported with specific
versions of Fabric Manager, refer to the Fabric Manager release notes.
In those instances in which procedures or parts of procedures documented here apply to some switches
but not to others, this guide identifies exactly which switches are supported and which are not.
“About This Document” contains the following sections:
•
•
•
•
•
•
•
“How This Document Is Organized,” next
“Supported Hardware and Software” on page xxi
“What’s New in This Document” on page xxi
“Document Conventions” on page xxii
“Additional Information” on page xxiii
“Getting Technical Help” on page xxvi
“Document Feedback” on page xxvii
How This Document Is Organized
This document is organized to help you find the particular information that you want as quickly and
easily as possible.
The document contains the following components:
•
Chapter 1, “Introducing Fabric Manager,” provides an overview of Fabric Manager and lists the
supported operating systems.
•
Chapter 2, “Installation,” provides information and instructions on installing the Fabric Manager
server on supported operating systems.
•
•
Chapter 3, “Fabric Manager Client,” introduces you to the graphical user interface.
•
•
•
Chapter 5, “Viewing Fabric Topologies,” describes Fabric Manager’s Topology View.
Chapter 4, “Discovering and Customizing Fabrics,” includes common tasks that fabric
administrators perform.
Chapter 6, “Displaying Name Server Information,” includes information in the Name Server table.
Chapter 7, “Monitoring Alerts and Events,” provides information about different types of Fabric
Manager alerts and switch events, and how to manage and monitor them using Fabric Manager.
Fabric Manager Administrator’s Guide
Publication Number: 53-1000196-01-HP
xix
xx
•
Chapter 8, “Using Performance Monitoring,” provides information about the Performance
Monitoring feature of Fabric Manager.
•
Chapter 9, “Change Management,” describes how the Change Management feature works and can
be set up to create reports and alerts based on defined changes.
•
Chapter 10, “Call Home Support,” provides information on how to enable, configure, and disable
the Fabric Manager Call Home feature.
•
Chapter 11, “Switch Configuration and Management,” provides information saving baselines and
comparing switches against them. It also includes information on creating custom templates.
•
Chapter 12, “Configuring Standard Security Features,” provides information about standard
security features, such as enabling secure communication, managing Admin Domains, and
managing ACLS.
•
Chapter 13, “Managing the iSCSI Target Gateway,” provides information about iSCSI management
in Fabric Manager.
•
Chapter 14, “Firmware Management,” provides information on downloading firmware to single
and multiple switches simultaneously. It also provides information about performing an FDMIcapable HBA firmware download.
•
Chapter 15, “Managing Zones,” provides information on how to create and manage zones, aliases,
and configurations in Fabric Manager.
•
Chapter 16, “Fabric Watch,” provides information on how Fabric Watch works and how to
configure alarms and thresholds.
•
Chapter 17, “Managing Secure Fabrics,” provides information on using the Security feature on
switches and fabrics, including configuring policies, managing secure fabrics, and changing secure
passwords.
•
Chapter 18, “FICON and CUP,” provides information on how to manage FICON and FICON CUP
using Fabric Manager.
•
Chapter 19, “Managing the FC-FC Routing Service,” provides information on how to use Fabric
Manager to work with Fibre Channel routers.
•
Chapter 20, “Using the FCIP Tunneling Service,” provides information on how to configure an
FCIP tunnel.
•
Chapter 21, “Third-Party and Foreign Device Management,” provides information on launching
third-party applications and importing foreign devices.
•
•
Chapter 22, “Creating Reports,” provides information on creating Excel reports.
•
Chapter 24, “Server Management Console,” provides information on using the Server Management
Console to stop and start Fabric Manager services, backup the Fabric Manager database, and
capture technical support information.
•
Chapter 25, “Fabric Troubleshooting Tools,” provides information on the Device Diagnostics
wizard.
•
•
Chapter 26, “Troubleshooting,” provides information on troubleshooting client and server issues.
•
Appendix B, “Licenses for Third-Party Products,” lists the licenses for the third-party products that
are included as part of Fabric Manager.
•
The index points you to the exact pages on which specific information is located.
Chapter 23, “Storing Data and Performing Backups,” provides information on storing user settings
and performing backups.
Appendix A, “Repository,” provides information on the database views of elements within Fabric
Manager so that they can be accessed by a CIM model.
Fabric Manager Administrator’s Guide
Publication Number: 53-1000196-01-HP
Supported Hardware and Software
This document supports the following platforms:
•
•
•
•
•
•
•
•
•
•
Brocade SilkWorm 200E switch
Brocade SilkWorm 3250 switch
Brocade SilkWorm 3850 switch
Brocade SilkWorm 3900 switch
Brocade SilkWorm 4100 switch
Brocade SilkWorm 4900 switch
Brocade SilkWorm 7500 switch
Brocade SilkWorm 24000 director
Brocade SilkWorm 48000 director
Brocade SilkWorm Multiprotocol Router Model AP7420
Although many different software and hardware configurations are tested and supported by Brocade
Communications Systems, Inc. for the Brocade Fabric Manager 5.2.0 release, documenting all possible
configurations and scenarios is beyond the scope of this document; however, this document does
specify when procedures or steps of procedures apply only to specific switches.
Some Fabric Manager tasks launch Brocade Web Tools. This document provides procedures based on
Web Tools v5.2.0 for procedures during which Fabric Manager launches Web Tools. If your switch is
running a firmware version other than v5.2.0, refer to the version of Web Tools documentation for that
firmware version.
This document does not support all Fabric Manager versions. This document is specific to Fabric
Manager 5.2.0 and Brocade Fabric OS v5.2.0. To obtain information about an OS version other than
v5.2.0, refer to the documentation specific to your OS version.
What’s New in This Document
The following changes have been made since this document was last released:
•
Information that was added:
-
Support for the FC4-16IP and FC4-48 port blades
ACL support
Offline zoning
Administrative Domains
Role-Based Access Control
iSCSI management
Call home XML file format options and supportSave capture
Trace Route
Cascaded FICON
Secure communication: HTTPS and truststore management
SMTP server authentication
Fabric Manager Administrator’s Guide
Publication Number: 53-1000196-01-HP
xxi
•
Information that was changed:
-
Fabric Manager client interface
Installation instructions
Server Management Console
For further information, refer to the Fabric Manager release notes.
Document Conventions
This section describes text formatting conventions, important notices formats, and special term use.
Text Formatting
The narrative-text formatting conventions that are used in this document are as follows:
bold text
Identifies command names
Identifies the names of user-manipulated GUI elements
Identifies keywords and operands
Identifies text to enter at the GUI or CLI
italic text
Provides emphasis
Identifies variables
Identifies paths and Internet addresses
Identifies document titles
code text
Identifies CLI output
Identifies syntax examples
For readability, command names in the narrative portions of this guide are presented in mixed
lettercase: for example, switchShow. In actual examples, command lettercase is often all lowercase.
Otherwise, this manual specifically notes those cases in which a command is case sensitive.
Notes, Cautions, and Warnings
The following notices appear in this document.
Note
A note provides a tip, emphasizes important information, or provides a reference to related information.
Caution
A caution alerts you to potential damage to hardware, firmware, software, or data.
Warning
A warning alerts you to potential danger to personnel.
xxii
Fabric Manager Administrator’s Guide
Publication Number: 53-1000196-01-HP
Key Terms
For definitions specific to Brocade and Fibre Channel, see the Brocade Glossary.
For definitions of SAN-specific terms, visit the Storage Networking Industry Association online
dictionary at http://www.snia.org/education/dictionary.
Additional Information
This section lists additional Brocade and industry-specific documentation that you might find helpful.
Brocade Resources
The following related documentation is provided on the Brocade Documentation CD-ROM and on the
Brocade Web site, through Brocade Connect.
Note
Go to http://www.brocade.com and click Brocade Connect to register at no cost for a user ID and
password.
Fabric OS
•
•
•
•
•
Fabric OS Administrator’s Guide
Fabric OS Command Reference
Fabric OS MIB Reference
Fabric OS Message Reference
Brocade Glossary
XPath OS
•
•
•
•
•
XPath OS Administrator’s Guide
XPath OS Command Reference
XPath OS MIB Reference
XPath OS System Error Message Reference
Web Tools—AP Edition Administrator’s Guide
Optional Applications
•
•
•
•
Web Tools Administrator’s Guide
Fabric Watch Administrator’s Guide
Secure Fabric OS Administrator’s Guide
EZSwitchSetup Administrator’s Guide
SilkWorm 48000
•
SilkWorm 48000 Hardware Reference Manual
Fabric Manager Administrator’s Guide
Publication Number: 53-1000196-01-HP
xxiii
•
•
•
SilkWorm 48000 QuickStart Guide
FR4-18i Hardware Reference Manual
FR4-16IP Hardware Reference Manual
SilkWorm 24000
•
•
SilkWorm 24000 Hardware Reference Manual
SilkWorm 24000 QuickStart Guide
SilkWorm 24000/48000
•
•
•
•
•
•
•
•
•
Port Blade and Filler Panel Replacement Procedure
Control Processor Blade Replacement Procedure
Blower Assembly Replacement Procedure
Cable Management Tray and Guide Replacement Procedure
Chassis Door Replacement Procedure
WWN Bezel and Card Replacement Procedure
Power Supply and Filler Panel Replacement Procedure
14U Rack Mount Kit Installation Procedure
Mid-Mount Rack Kit Installation Procedure
SilkWorm 7500
•
•
•
•
SilkWorm 7500 Hardware Reference Manual
SilkWorm 7500 QuickStart Guide
SilkWorm 7500 Fan Assembly Replacement Procedure
SilkWorm Mid Sized Power Supply Replacement Procedure
SilkWorm 4900
•
•
•
•
SilkWorm 4900 Hardware Reference Manual
SilkWorm 4900 QuickStart Guide
SilkWorm 4900 Fan Assembly Replacement Procedure
SilkWorm Mid Sized Power Supply Replacement Procedure
SilkWorm 4100
•
•
SilkWorm 4100 Hardware Reference Manual
SilkWorm 4100 QuickStart Guide
SilkWorm 3900
•
•
•
•
•
xxiv
SilkWorm 3900 Hardware Reference Manual (for v4.x software)
SilkWorm 3900 QuickStart Guide (for v4.x software)
SilkWorm 3900 Fan Assembly Replacement Procedure
SilkWorm 3900 Motherboard Assembly Replacement Procedure
SilkWorm 3900 Power Supply Replacement Procedure
Fabric Manager Administrator’s Guide
Publication Number: 53-1000196-01-HP
SilkWorm 3250/3850
•
•
SilkWorm 3250/3850 Hardware Reference Manual (for v4.x software)
SilkWorm 3250/3850 QuickStart Guide (for v4.x software)
SilkWorm 200E
•
SilkWorm 200E Hardware Reference Manual (for v5.x software)
SilkWorm Multiprotocol Router Model AP7420
•
•
•
•
SilkWorm Multiprotocol Router Model AP7420 Hardware Reference Manual
SilkWorm Multiprotocol Router Model AP7420 QuickStart Guide
SilkWorm Multiprotocol Router Model AP7420 Power Supply Replacement Procedure
SilkWorm Multiprotocol Router Model AP7420 Fan Assembly Replacement Procedure
For practical discussions about SAN design, implementation, and maintenance, you can obtain Building
SANs with Brocade Fabric Switches through:
http://www.amazon.com
For additional Brocade documentation, visit the Brocade SAN Info Center and click the Resource
Library location:
http://www.brocade.com
Release notes are available on the Brocade Connect Web site and are also bundled with the Fabric OS
firmware.
Other Industry Resources
For additional resource information, visit the Technical Committee T11 Web site. This Web site
provides interface standards for high-performance and mass storage applications for Fibre Channel,
storage management, and other applications:
http://www.t11.org
For information about the Fibre Channel industry, visit the Fibre Channel Industry Association Web
site:
http://www.fibrechannel.org
Fabric Manager Administrator’s Guide
Publication Number: 53-1000196-01-HP
xxv
Getting Technical Help
Contact your switch support supplier for hardware, firmware, and software support, including product
repairs and part ordering. To expedite your call, have the following information available:
1.
General Information
•
•
•
•
•
•
•
•
•
2.
Technical Support contract number, if applicable
Switch model
Switch operating system version
Error numbers and messages received
supportSave command output
Detailed description of the problem and specific questions
Description of any troubleshooting steps already performed and results
Serial console and telnet session logs
syslog message logs
Switch Serial Number
The switch serial number and corresponding bar code are provided on the serial number label, as
shown here:
:
*FT00X0054E9
FT00X0054E9
The serial number label is located as follows:
3.
xxvi
•
•
•
•
•
SilkWorm 3014—On the top of the chassis, under the insertion arm
•
•
SilkWorm 12000, 24000, and 48000—Inside the chassis next to the power supply bays
SilkWorm 3016 and 4012—On the bottom of the switch module
SilkWorm 200E, 3200, 3250 and 3850—On the bottom of the chassis
SilkWorm 3800 and 3900— Nonport side of the chassis
SilkWorm 4100, 4900, and 7500—On the switch ID pull-out tab located inside the chassis on
the port side on the left
SilkWorm Multiprotocol Router Model AP7420—On the bottom of the chassis and on the back
of the chassis.
World Wide Name (WWN)
•
SilkWorm 200E, 3014, 3016, 3250, 3800, 3850, 3900, 4012, 4100, 4900, 7500 switches and
SilkWorm 24000, and 48000 directors: Provide the license ID. Use the licenseIdShow
command to display the license ID.
•
SilkWorm Multiprotocol Router Model AP7420: Provide the switch WWN. Use the
switchShow command to display the switch WWN.
•
All other SilkWorm switches: Provide the switch WWN. Use the wwn command to display the
switch WWN.
Fabric Manager Administrator’s Guide
Publication Number: 53-1000196-01-HP
Document Feedback
Because quality is our first concern at Brocade, we have made every effort to ensure the accuracy and
completeness of this document. However, if you find an error or an omission, or you think that a topic
needs further development, we want to hear from you. Forward your feedback to:
[email protected]
Provide the title and version number and as much detail as possible about your comment, including the
topic heading and page number and your suggestions for improvement.
Fabric Manager Administrator’s Guide
Publication Number: 53-1000196-01-HP
xxvii
xxviii
Fabric Manager Administrator’s Guide
Publication Number: 53-1000196-01-HP
Chapter
Introducing Fabric Manager
1
This chapter describes the system requirements and supported operating systems, and includes the
following sections:
•
•
•
•
“Overview of Fabric Manager” on page 1-1
“Browser and Platform Requirements” on page 1-2
“System Requirements” on page 1-4
“Fabric and Switch Access” on page 1-5
Overview of Fabric Manager
Fabric Manager is a fabric monitor and management application that provides a central point of control
for multiple switches and fabrics. You can use Fabric Manager to configure multiple switches
simultaneously from one location, view the status of multiple devices in one window, and perform
SAN-level maintenance without having to access each switch in your fabric or SAN. Fabric Manager is
tightly integrated with additional SAN management products (including Web Tools and Fabric Watch)
and can be used in conjunction with other SAN and storage resource management applications as the
tool to drill down into single or multiple Brocade fabrics.
Fabric Manager:
•
•
Enables global integration and execution of processes across multiple switches and fabrics
•
•
Reduces the overall cost of SAN management by simplifying management tasks
Assists SAN administrators by centralizing the configuration, monitoring, and management tasks of
SANs
Provides access to critical SAN information across Brocade SilkWorm-based SANs
Figure 1-1 on page 1-2 shows an example Fabric Manager display.
The remainder of this chapter lists the requirements and supported browsers and operating systems for
Fabric Manager.
Chapter 2, “Installation” describes how to install Fabric Manager.
Chapter 3, “Fabric Manager Client” describes the components of Fabric Manager, including how you
can customize the layout.
The remaining chapters describe how to use Fabric Manager to perform various management tasks.
Fabric Manager Administrator’s Guide
Publication Number: 53-1000196-01-HP
1-1
1
Browser and Platform Requirements
Figure 1-1
Fabric Manager Client
Browser and Platform Requirements
Fabric Manager requires any browser that conforms to HTML version 4.0, JavaScript version 1.0, and
Java Plug-in 1.5.0_06 or higher.
Brocade has certified and tested Fabric Manager on the platforms shown in Table 1-1.
Table 1-1
Certified and Tested Platforms
Operating System
Browser
Java Plug-In
Solaris 10 (Sparc only)
Firefox 1.5.
1.5.0_06
Linux Red Hat AS 4.0
Firefox 1.5
1.5.0_06
Windows 2003 Server SP1
Internet Explorer 6.0
Firefox 1.5
1.5.0_06
Windows XP SP2
Internet Explorer 6.0
Firefox 1.5
1.5.0_06
The following platforms are supported, but have not been fully tested:
•
•
1-2
Solaris 8 (Sparc only)
Solaris 9 (Sparc only)
Fabric Manager Administrator’s Guide
Publication Number: 53-1000196-01-HP
Browser and Platform Requirements
•
•
1
Linux Red Hat AS 3.0
Windows 2000 Server SP4
Operating systems that are running on top of any virtualization software (such as VMWare or Microsoft
Virtual Server) are not supported.
Note
Some browsers must be configured to work with Fabric Manager. For information about how to do this,
see “Configuring Internet Explorer,” next.
Configuring Internet Explorer
Correct operation of Fabric Manager with Internet Explorer requires specifying the appropriate settings
for browser refresh frequency and process model. Browser pages should be refreshed frequently to
ensure the correct operation of Fabric Manager.
See the Web Tools Administrator’s Guide for additional information on installing Java on your
workstation.
To set the refresh frequency
1.
Click Tools > Internet Options in the Internet Explorer browser.
2.
Click the General tab and click Settings (under “Temporary Internet Files”).
3.
Click Every visit to the page under “Check for newer versions of stored pages,” as shown in
Figure 1-2.
Figure 1-2
Fabric Manager Administrator’s Guide
Publication Number: 53-1000196-01-HP
Configuring Internet Explorer
1-3
1
System Requirements
System Requirements
The system requirements for the Fabric Manager client and server software depend on the size of the
fabric and whether you are using one or more machines for the client and server software.
Note
It is recommended that you have a dedicated system for the Fabric Manager server.
For a large SAN with 1281 to 2560 ports or 51 to 80 switches, you should run the Fabric Manager client
and server software on separate machines. Adhere to the system requirements for each, as listed in
Table 1-2 on page 1-4.
Each Fabric Manager server can support up to five Fabric Manager clients (not running on the same
machine).
The Fabric Manager client accesses any managed switches through an Ethernet connection.
Note
If your client and server are on different systems, you must ensure that both have access to the switches,
good network connection, and good bandwidth. A firewall between the client, server, and SAN is not
recommended.
Table 1-2
System Requirements for Client and Server Machines
Operating Machine
System
Type
Windows
and Linux
Requirements
Small SAN
1-512 Ports
(1-20 Switches)
Medium SAN
513-1280 Ports
(21-50 Switches)
Large SAN
1281-2560 Ports
(51-80 Switches)
Client
800 MHz CPU
256 MB RAM
512 MB virtual
memory
1.5 GHz CPU
512 MB RAM
512 MB virtual
memory
1.5 GHz CPU
512 MB RAM
512 MB virtual
memory
Server
1.8 GHz P4 CPU
1 GB RAM
512 MB virtual
memory
2.0 GHz P4 CPU
1.5 GB RAM
512 MB virtual
memory
2 x 3 GHz P4 CPU
2.5 GB RAM
1 GB virtual memory
2 x 3 GHz P4 CPU
2 GB RAM
1 GB virtual memory
Not recommended
Combined1 2 GHz P4 CPU
1.5 GB RAM
1 GB virtual memory
1-4
Fabric Manager Administrator’s Guide
Publication Number: 53-1000196-01-HP
Fabric and Switch Access
Table 1-2
System Requirements for Client and Server Machines (Continued)
Operating Machine
System
Type
Solaris
1
Requirements
Small SAN
1-512 Ports
(1-20 Switches)
Medium SAN
513-1280 Ports
(21-50 Switches)
Large SAN
1281-2560 Ports
(51-80 Switches)
Client
Sun Ultra 25 or
equivalent
UltraSPARC CPU 1 @
750 MHz
512 MB RAM
1 GB of virtual memory
Sun Ultra 25 or
equivalent
UltraSPARC CPU 1 @
750 MHz
1 GB RAM
1 GB of virtual memory
Sun Ultra 45 or
equivalent
UltraSPARC CPU 1
@ 1 GHz
2 GB RAM
2 GB of virtual
memory
Server
Sun Ultra 25 or
equivalent
UltraSPARC CPU 1 @
750 MHz
1 GB RAM
1 GB of virtual memory
Sun Ultra 45 or
equivalent
UltraSPARC CPU 2 @
1 GHz
2 GB RAM
2 GB of virtual memory
Sun Ultra 45 or
equivalent
UltraSPARC CPU 2
@ 1 GHz
4 GB RAM
2 GB of virtual
memory
Combined1 Sun Ultra 25 or
equivalent
UltraSPARC CPU 1 @
750 MHz
2 GB RAM
2 GB of virtual memory
Not recommended
Sun Ultra 45 or
equivalent
UltraSPARC CPU 2 @
1 GHz
4 GB RAM
2 GB of virtual memory
1. Requirements for a combined installation assume one client and server. Separate machines are suggested for
running additional clients.
Minimum hard disk space required for installation is 400 MB (Windows) and 500 MB (Solaris and
Linux). After installation, the recommended minimum free disk space is 2 GB for small and medium
SAN sizes and 10 GB for large SAN sizes.
Fabric and Switch Access
Fabric Manager behavior is dependent on your Administrative Domain access privileges and your user
account role. The Administrative Domain defines what switches, ports, and devices you can monitor.
The account role determines the actions you can perform on those switches, ports, and devices.
The following sections briefly describe how Administrative Domains and account roles affect Fabric
Manager users:
•
•
“Administrative Domains” on page 1-6
“Role-Based Access Control” on page 1-7
See the Fabric OS Administrator’s Guide and the Web Tools Administrator’s Guide for detailed
information about these topics.
Fabric Manager Administrator’s Guide
Publication Number: 53-1000196-01-HP
1-5
1
Fabric and Switch Access
Administrative Domains
An Administrative Domain (Admin Domain) is a logical grouping of fabric elements that defines what
switches, ports, and devices you can view and modify. An Admin Domain is a filtered administrative
view of the fabric. The logical view presented within an Admin Domain does not hide fabrics, chassis,
switches, and slots; however, the attributes of switch ports and end devices are filtered based on Admin
Domain membership.
Note
Do not confuse an Admin Domain with the domain ID of a switch. They are two different identifiers.
Admin Domains are numbered from 0 through 255. This document refers to specific Admin Domains
using the format “ADn” where n is a number between 0 and 255.
This document uses the following Admin Domain concepts:
AD0
A special Admin Domain that contains all switches, ports, and
devices that have not been put into other Admin Domains.
AD255
A special Admin Domain that is an unfiltered view of the entire
physical fabric. AD255 is also referred to as the physical fabric.
Admin Domain-capable fabric
A fabric that runs Fabric OS v5.2.0 or higher and has a valid
Advanced Zoning license, but has no Admin Domains other than
AD0 and AD255 (physical fabric).
Admin Domain-unaware fabric A fabric that:
•
•
runs Fabric OS v5.1.x or lower.
runs Fabric OS v5.2.0 or higher but does not have an
Advanced Zoning license.
Admin Domain-aware fabric
A fabric with at least one user-defined Admin Domain activated.
User-defined Admin Domains include AD0, if you have explicitly
added members to it.
Physical fabric administrator
A user with the Admin role and access to all Admin Domains
(AD0 through AD255).
All Fabric Manager users must have access to AD0 and the physical fabric to monitor Admin Domainaware fabrics. If you do not have access to these Admin Domains, then you cannot log in to the switch
via Fabric Manager. If, after you log in, you lose access to the physical fabric, you can no longer access
the port configuration, Admin Domain administration, and Fabric Watch functionality.
Fabric Manager displays each Admin Domain as a virtual fabric (see “Topology Views” on page 5-5).
Fabric Manager shows only Admin Domain members that have been discovered. For example, if the
Admin Domain membership list has a device WWN that is not yet connected to the fabric (and so was
never discovered by Fabric Manager), this device is not displayed in the user interface.
Fabric Manager collects Admin Domain membership information from the seed switch once a day and
on fabric discovery and refresh. All switches in the fabric are expected to have the same Admin Domain
membership configuration, although Fabric Manager does not validate this.
Fabric Manager displays a filtered view only in the Fabric Manager client window. All legacy (pre5.2.0) views, dialogs, and functionality continue to work in Admin Domain-unaware mode and display
an unfiltered view, at the physical fabric level.
1-6
Fabric Manager Administrator’s Guide
Publication Number: 53-1000196-01-HP
Fabric and Switch Access
1
Role-Based Access Control
Role-Based Access Control (RBAC) defines the capabilities that a user account has based on the role
the account has been assigned. For each role, there is a set of pre-defined permissions on the jobs and
tasks that can be performed on a fabric and its associated fabric elements.
When you log in to a switch, your user account is associated with a pre-defined role. The role that your
account is associated with determines the level of access you have on that switch and in the fabric.
Following is a description of each of the roles:
Admin
Administrative use.
FabricAdmin
Administrative use excluding user management and Admin Domain
management.
SwitchAdmin
Administrative use excluding security, user management, and zoning.
ZoneAdmin
Zone management only.
BasicSwichAdmin
Administrative use with a subset of Admin level access.
Operator
A subset of administrative tasks performed off-hours.
User
Nonadministrative use, such as monitoring system activity.
For information about changing user account roles, see the Web Tools Administrator’s Guide.
You can log in to Fabric Manager with any role, as long as you have the correct credentials and access to
AD0 and the physical fabric.
All Fabric Manager users have full access (create, edit, delete) to all Fabric Manager resources, such as:
•
•
•
•
•
Firmware repository
Call home configurations
Preferences
Change Management profiles and reports
Third-party application launch configurations
When you log in to a switch, the role of the user account with which you log in to the switch determines
your permissions on that switch. If you try to perform an operation for which your role does not give
permission, Fabric Manager displays an informative message.
All fabric-level actions use the user role that you provide for the seed switch.
Fabric Manager Administrator’s Guide
Publication Number: 53-1000196-01-HP
1-7
1
1-8
Fabric and Switch Access
Fabric Manager Administrator’s Guide
Publication Number: 53-1000196-01-HP
Chapter
Installation
2
This chapter describes how to install, upgrade, or uninstall the Fabric Manager server software. You do
not need to explicitly install the Fabric Manager client at this time; the Fabric Manager client
automatically installs the first time you launch it.
This chapter has the following sections:
•
•
•
•
•
“Planning for the Installation” on page 2-1
“Upgrading Fabric Manager” on page 2-4
“Installing the Fabric Manager Server” on page 2-6
“Copying an Installation from Server to Server” on page 2-20
“Uninstalling the Fabric Manager Server” on page 2-22
Planning for the Installation
You should have the following information available prior to starting the install.
•
•
Fabric Manager serial number and license key (if you are installing the full version)
•
Type of authentication to use:
Whether to use the built-in FTP server or an external FTP server for operations such as firmware or
configuration download.
•
•
Windows authentication. You need to know the Windows Domain or Workgroup name.
•
•
Switch-based authentication. You need to know the switch IP addresses.
RADIUS server authentication. For each RADIUS server, you need to know the IP or
DNS name, authentication port and type (PAP or CHAP), and shared secret.
Solaris and Linux only: NIS authentication. You need to know the host name or IP address
of your NIS server and NIS domain name.
Installation and Troubleshooting Information
Before installing Fabric Manager, refer to the following sections for installation notes and
troubleshooting information (including information specific to the Windows, Solaris, and Linux
environments).
Fabric Manager Administrator’s Guide
Publication Number: 53-1000196-01-HP
2-1
2
Planning for the Installation
Uninstalling or Upgrading Fabric Manager
Fabric Manager stores user-specific information, such as username and server port number, for each
user in a FabricManager.Properties file. This file is not removed when you uninstall Fabric Manager.
You must manually delete it. FabricManager.Properties is located in your home directory on the file
system. For example:
C:\Documents and Settings\userA\Fabric Manager\<Server_IP>\client\FabricManager.Properties
Single Server Monitoring a Fabric
You should have only one Fabric Manager server configured to monitor a fabric. If multiple Fabric
Manager servers monitor the same fabric, switches in that fabric are subject to duplicate requests, which
might result in performance degradation.
Java Runtime Environment (JRE)
The JRE used by Fabric Manager is embedded in the Fabric Manager install image (a separate Java
installation is not required). During the Fabric Manager installation, the JRE included in the Fabric
Manager install image is installed in the directory where Fabric Manager is installed. This JRE is
available only for Fabric Manager. The Fabric Manager JRE installation does not modify any Javarelated environment variables. This JRE does not replace or conflict with any other JRE installed on the
system (for example, this JRE is not used by Web Tools). You can install or run any other application
(such as Web Tools) using a different JRE and the two JREs will not conflict with each other. See the
Fabric Manager release notes to determine the JRE version included in Fabric Manager.
Video Drivers
Ensure that your system has the latest video drivers installed prior to installing Fabric Manager. As an
added precaution, you should also upgrade to the latest Microsoft DirectX drivers. This should fix any
interaction problems among the JRE, the DirectX drivers, and the video drivers.
Install Wizard
If the install wizard does not appear during the installation, run the DOS command dxdiag and ensure
that the graphics tests run without error. If any Microsoft DirectX files are missing or any diagnostics
fail, go to the Microsoft Web site and upgrade to the latest version of DirectX.
Web Tools Java Plug-in and Web Browser
Fabric Manager launches Web Tools to process some requests. Web Tools requires a Java Plug-in and a
compatible Web browser. See the Web Tools Administrator’s Guide to determine the Java Plug-in and
Web browser requirements.
Fabric Manager Server
If you try to install the Fabric Manager server immediately after closing a Fabric Manager client, the
install wizard indicates that the port is in currently in use. You need to wait approximately five minutes
after closing all clients before you can install the Fabric Manager server. This allows the Fabric
Manager server enough time to free the connection port.
2-2
Fabric Manager Administrator’s Guide
Publication Number: 53-1000196-01-HP
Planning for the Installation
2
IP Connection to Switches
The Fabric Manager client and server software poll different fabric information directly, necessitating
access to each switch via an IP connection. Ensure that the network environment does not have a proxy
server or firewall between the switches and the server and clients. If a proxy server or firewall exists,
ensure that proper rules are set up to allow access.
Blocked Port Numbers
For some Fabric Manager functions to function correctly the following TCP/UDP port numbers must
not be blocked by a proxy server or network firewall:
•
•
•
•
•
•
•
•
20, 21 (FTP)
23 (telnet/sectelnet)
111 (RPC mapping)
897 and 898 (API)
600 through 1023 (API)
1024+ (API)
HTTP and HTTPS port numbers. By default these are ports 80 and 443, respectively.
RADIUS port numbers. By default, these are ports 1812 and 1813.
If you want to use the built-in FTP server, port 2002 must not be blocked.
If a firewall exists between the Fabric Manager server and client, the following port numbers must be
open:
•
•
•
Web Server port number on the Fabric Manager server (default Web Server port number is 80).
Nine consecutive port numbers chosen during installation (default starting port number is 24600).
Port 2638 for Sybase.
HTTP
HTTP must be enabled on each switch in the SAN that you want to discover, monitor, and configure
with Fabric Manager. Each supported switch has HTTP enabled automatically. See the Fabric OS
Command Reference for information about enabling HTTP with the command line interface (CLI), if
necessary, or see Chapter 17, “Managing Secure Fabrics” for information about secure Fabric OS
policies for HTTP.
Solaris Installation Considerations
When you install Fabric Manager over an existing version on a UNIX system, the install wizard
prompts you to select the location where the existing version of Fabric Manager is installed. The install
wizard then finds the existing serial number and license key and attempts to validate them. If the serial
number and license key are valid, the install wizard skips the Get User Input window and goes directly
to the License Agreement window. The serial number and license key are saved. If the serial number
and license key are not valid, you must re-enter the serial number and license key to install the Full
version of Fabric Manager.
Fabric Manager Administrator’s Guide
Publication Number: 53-1000196-01-HP
2-3
2
Upgrading Fabric Manager
Ensure that the recommended J2SE patches for Solaris Java applications are installed. Use the
appropriate patch for your version of Solaris. These patches can be found at:
http://sunsolve.sun.com/pub-cgi/show.pl?target=patches/patch-access
Note
You might encounter issues when using XWindows emulators from Windows to access the SUN host.
Windows Installation Considerations
When you install Fabric Manager over an existing version, the install wizard automatically finds the
existing serial number and license key and attempts to validate them. If the serial number and license
key are valid, the install wizard does not prompt you to re-enter them. The serial number and license
key are saved. If the serial number and license key are not valid, you must re-enter the serial number
and license key to install the full version of Fabric Manager.
If you launch the Fabric Manager install wizard on a Windows XP or 2003 machine and an After
Installation window appears, click Cancel to exit. The After Installation window provides access to a
Windows program that exists only on a few Windows XP or 2003 machines (depending on your
Windows image). If you do not cancel this program, your Fabric Manager shortcut is moved to the All
Users folder after the installation is complete. Also, if you subsequently uninstall Fabric Manager, the
uninstall wizard is unable to remove the Fabric Manager menu item from the Start > Programs menu.
To find the name of the Windows authentication domain that must be specified during installation, open
a DOS window and type set. The alias USERDOMAIN indicates the active domain. If the client and
server reside on different Microsoft domains, both domains must have trusts established between them
or Fabric Manager will not be able to authenticate the client.
Note
The domain name required is not the internet domain (such as corp.mycompany.com); it is the Domain
name Microsoft uses for authentication.
Upgrading Fabric Manager
You can upgrade to Fabric Manager 5.2.0 from versions 4.4.x, 5.0.x, or 5.1.x. All configuration data is
migrated to 5.2.0.
If you have earlier versions of Fabric Manager, you must first upgrade them to 4.4.x and then upgrade to
5.2.0.
The following information cannot be migrated to Fabric Manager 5.2.0:
•
•
•
Topology settings
View customization
At-A-Glance window customization
Note
After you upgrade to Fabric Manager 5.2.0, you cannot discover a fabric with a seed switch running
Fabric OS v2.x or lower. If, prior to the upgrade, you had discovered a fabric with the seed switch
running Fabric OS v2.x, this fabric is available for monitoring after the Fabric Manager upgrade.
2-4
Fabric Manager Administrator’s Guide
Publication Number: 53-1000196-01-HP
Upgrading Fabric Manager
2
Licence Keys
If you are upgrading to Fabric Manager 5.2.0 from a version earlier than 5.0.0, you need a new license
key. License keys for versions prior to 5.0.0 can no longer be used. Upgrading from Fabric Manager
5.0.0 or 5.1.0 does not require a new Fabric Manager license.
Fabric Manager has the following license types:
•
•
•
•
•
•
•
4 Domain Limit
•
10 Domain Limit Upgrade (Fabric Manager 4.x with 10 domains to Fabric Manager 5.x with 10
domains)
10 Domain Limit
Unlimited Upgrade (4 domain to unlimited)
Unlimited Upgrade (10 domain to unlimited)
Unlimited Upgrade (Fabric Manager 4.x unlimited to Fabric Manager 5.x unlimited)
10 Domain Limit Upgrade Version (4 to 10 domain)
4 Domain Limit Upgrade (Fabric Manager 4.x with 4 domains to Fabric Manager 5.x with 4
domains)
Note
Licensing for Fabric Manager is per server, not one copy per site.
Upgrading from the Evaluation Version
During installation, you can choose to install either the full version of Fabric Manager or an evaluation
version. The evaluation version can be used for up to 60 days. You do not need to provide a serial
number or license key to use the evaluation version; however, you must accept the license agreement
displayed during the installation.
Each time you launch the evaluation version of Fabric Manager, a warning message notifies you when
the evaluation version will expire and gives you the option to register Fabric Manager or to continue
with the evaluation version. To register Fabric Manager, click Enter Now in the warning message and
enter a valid serial number and license key.
You can also register Fabric Manager at any time from within Fabric Manager.
To register Fabric Manager
1.
Select Help > Register.
2.
Type a valid serial number and license key in the Fabric Manager Registration window.
3.
Click Enter.
Fabric Manager Administrator’s Guide
Publication Number: 53-1000196-01-HP
2-5
2
Installing the Fabric Manager Server
Installing the Fabric Manager Server
This section describes how to install the Fabric Manager server using the installation wizard.
•
•
•
“Installing Fabric Manager Server on Windows” on page 2-6
“Installing Fabric Manager Server on Solaris” on page 2-14
“Installing Fabric Manager Server on Linux” on page 2-17
Installing Fabric Manager Server on Windows
Use the following procedure to install the Fabric Manager server on a Windows platform.
To install the Fabric Manager server on Windows
1.
Double-click the Windows folder from the Fabric Manager Installation for Windows and Solaris
CD-ROM (disk 1).
2.
Double-click the Install icon.
The Fabric Manager installation wizard launches and asks whether you want to install the full
version or the evaluation version of Fabric manager, as shown in Figure 2-1.
A valid serial number and license key are required to install the full version of Fabric Manager.
Figure 2-1
2-6
Fabric Manager Installation Wizard
3.
Select the version you want to install (Full or Evaluation); then click Next.
4.
Either enter a serial number and license key, or accept the license agreement, depending on whether
the full or evaluation version is selected.
Fabric Manager Administrator’s Guide
Publication Number: 53-1000196-01-HP
Installing the Fabric Manager Server
•
2
Full version only: Type a valid serial number and license key.
The serial number and license key are verified at this time. If the serial number or license key
is invalid, an error message displays and you must re-enter them. You cannot continue
installing the full version without a valid serial number and license key.
•
5.
Evaluation version only: Accept the license agreement.
Click Next.
If you already have Fabric Manager 4.2 or later installed, the install wizard provides you the
choice of migrating your existing database automatically, or removing it:
a.
Click Yes if you want to update to the new database and automatically save your existing
data, or click No to remove your current data and create the new database.
b.
Click Next.
The Introduction window appears.
6.
Read the introduction; then click Next.
The Select Destination Folder window appears.
Figure 2-2
7.
Select Destination Folder
Use the default location (C:\FabricManager), or click Choose to select a new folder.
You can also type a new destination folder. The path must not contain spaces. Alpha-numeric
characters, dash, and underscore are the only characters allowed.
Note
This document uses <installdir> to indicate the folder where Fabric Manager is installed.
8.
Click Next.
The Select FTP Server window appears.
Fabric Manager Administrator’s Guide
Publication Number: 53-1000196-01-HP
2-7
2
Installing the Fabric Manager Server
Figure 2-3
9.
Select FTP Server
Select whether to use the built-in FTP server or your own external FTP server.
The FTP server is used primarily for firmware download. To use the Fabric Manager firmware
repository, you must either select the built-in FTP server or, if you select the external FTP server,
ensure that your FTP server resides on the same system as the Fabric Manager server.
The built-in FTP server is always installed, regardless of which option you select. If you select the
external FTP server, the built-in FTP server is disabled.
After installation, you can change which FTP server to use at any time, as described in
“Configuring File Transfer Options” on page 14-9.
10. Click Install.
Fabric Manager is installed on your machine.
The Specify Port Number window appears.
2-8
Fabric Manager Administrator’s Guide
Publication Number: 53-1000196-01-HP
Installing the Fabric Manager Server
Figure 2-4
2
Specify Port Number
11. Enter the Web server port number. The default is 80.
If you type a new Web server port number, make note of it: you must use the same port number
when you launch the Fabric Manager client. Do not use port 2638, as it is used internally by the
Fabric Manager server.
12. Enter the starting port number. The default is 24600.
If the default starting port number is not a free port number, the server cannot start up correctly. If
you enter a new port number, you must ensure that it and the next eight port numbers represent free
ports.
Note
If you are upgrading or migrating from a previous version of Fabric Manager, you might
receive a message indicating that the ports are unavailable. This can occur when the ports
have yet to be released by the previous uninstall. You should wait a few minutes and try
again.
13. Click Next.
The Select Authentication Method window appears.
Fabric Manager Administrator’s Guide
Publication Number: 53-1000196-01-HP
2-9
2
Installing the Fabric Manager Server
Figure 2-5
Select Authentication Method
14. Select your authentication method and click Next.
This is the method that will be used to authenticate users when users try to log in to the Fabric
Manager server.
15. Provide additional information depending on the type of authentication method selected.
Figure 2-6
Windows Domain or Workgroup Authentication
For Windows domain or work group authentication:
Type the Windows Domain or Workgroup name.
2-10
Fabric Manager Administrator’s Guide
Publication Number: 53-1000196-01-HP
Installing the Fabric Manager Server
2
Note
If your machine is running Windows XP and it belongs to a local workgroup, but you want to
authenticate the users locally (instead of using a Windows domain controller), you must
perform the following Windows XP registry configuration:
1. Set HKEY_LOCAL_MACHINE\SYSTEM\CurrentControlSet\Control\Lsa\ForceGuest
to 0.
2. Disable the guest account.
3. Create a local user and use it to log in within Fabric Manager.
Figure 2-7
RADIUS Authentication Parameters
For RADIUS authentication:
You should configure at least two RADIUS servers so that if one fails, the other assumes
service. You can configure up to three RADIUS servers.
a.
Enter values for the following:
-
RADIUS server IP address or DNS name.
-
Shared secret and confirm shared secret. The shared secret is a password for the
RADIUS client and server. It is used in an encryption process to obscure details in
RADIUS messages like user passwords.
RADIUS authentication port number.
Authentication type. The authentication type should match the setting on your
RADIUS server.
It is recommended that the shared secret be at least 22 characters containing mixedcase letters with numeric and symbol or punctuation characters.
b.
Fabric Manager Administrator’s Guide
Publication Number: 53-1000196-01-HP
Timeout. The number of seconds the client waits for the RADIUS server to reply.
Retry. The number of attempts to connect to the RADIUS server before giving up.
Click Add.
2-11
2
Installing the Fabric Manager Server
c.
Figure 2-8
Optional: You can add multiple RADIUS servers by entering their configuration
information and clicking Add. To edit information you have already entered, select a
server from the table at the bottom of the window, make your changes, and click Update.
Switch-Based Authentication
For switch-based authentication:
Enter the IP addresses of the switches, separating each IP address with a semicolon.
When using switch-based authentication, you should enter multiple switch IP addresses. If you
enter only a single switch IP address, you cannot access Fabric Manager if that switch is down.
16. Click Next.
The SAN size selection window appears.
2-12
Fabric Manager Administrator’s Guide
Publication Number: 53-1000196-01-HP
Installing the Fabric Manager Server
Figure 2-9
2
Select SAN Size
17. Select the size of the SAN that Fabric Manager will be managing (Table 2-1 lists the polling rates
for each SAN size).
Table 2-1
Polling Rates per SAN Size
Total Ports Managed
Small SAN (up to 512 ports, 1-20 domains)
Polling Rates
Performance
Monitoring
Fabric Manager Updates
5 minutes
1 minute
Medium SAN (513-1280 ports, 21-50 domains) 5 minutes
5 minutes1
Large SAN (1281-2560 ports, 51-80 domains)
30 minutes1
5 minutes
1. Medium SANs can take between 5 and 10 minutes to update for some actions. Large SANs can take
between 30 to 60 minutes to update for some actions. You should issue a refresh manually for immediate
updates. Using Refresh Status Information to refresh a switch typically provides quicker updates than refreshing
an entire fabric.
18. Click Next.
The Important Information window appears.
19. Ensure that the Services window is closed (as described in the Information window); then click
Next.
When the Fabric Manager installation finishes, the Install Complete window appears.
Fabric Manager Administrator’s Guide
Publication Number: 53-1000196-01-HP
2-13
2
Installing the Fabric Manager Server
Figure 2-10 Installation Complete
20. Optional: Click the View ReadMe checkbox to open the ReadMe file after exiting the installation
wizard.
21. Click Done to exit the install wizard.
The Fabric Manager server starts. If you selected to use the built-in FTP server, and if no other FTP
server is installed on the Fabric Manager server, then the built-in FTP server starts.
Installing Fabric Manager Server on Solaris
This section describes how to install the Fabric Manager server on a Solaris platform.
You must have root access to install the Fabric Manager server on a Solaris system. You do not need
root access to install and run the Fabric Manager client.
Note
Before installing, ensure that all NFS mount points are up. Fabric Manager uses the df -k command to
check disk space. If the NFS mount points are down, the df command can take a long time to respond
and the Fabric Manager installation might stop responding.
To install Fabric Manager server on Solaris
1.
Click install.bin from the File Manager window that displays when you insert the Fabric Manager
Installation for Windows and Solaris CD-ROM (disk 1).
2.
Double-click the Install icon.
The Get User Input window displays.
3.
2-14
Click Yes if you have a previous version of Fabric Manager installed; otherwise, click No and then
click Next.
Fabric Manager Administrator’s Guide
Publication Number: 53-1000196-01-HP
Installing the Fabric Manager Server
2
If you selected Yes:
a.
Select whether you have client, server, or both installed and click Next.
b.
Identify the location where the previous Fabric Manager client is installed and click Next.
c.
Identify the location where the previous Fabric Manager server is installed and click Next.
The install wizard provides you the choice of migrating your existing database automatically,
or removing it.
d.
Click Yes if you want to update to the new database and automatically save your existing data,
or click No to remove your current data and create the new database.
e.
Click Next.
4.
Select the version you want to install (Full or Evaluation); then click Next.
5.
Either enter a serial number and license key, or accept the license agreement, depending on whether
the full or evaluation version is selected.
•
Full version only: Type a valid serial number and license key.
The serial number and license key are verified at this time. If the serial number or license key
is invalid, an error message displays and you must re-enter them. You cannot continue
installing the full version without a valid serial number and license key.
•
6.
Evaluation version only: Accept the license agreement.
Click Next.
The Introduction window appears.
7.
Read the introduction; then click Next.
The Select Destination Folder window appears.
8.
Use the default location, or click Choose to select a new folder.
You can also type a new destination folder. The path must not contain spaces. Alpha-numeric
characters, dash, and underscore are the only characters allowed.
Note
This document uses <installdir> to indicate the folder where Fabric Manager is installed.
9.
Click Next.
The Select FTP Server window appears.
10. Select whether to use the built-in FTP server or your own external FTP server.
The FTP server is used primarily for firmware download. To use the Fabric Manager firmware
repository, you must either select the built-in FTP server or, if you select the external FTP server,
ensure that your FTP server resides on the same system as the Fabric Manager server.
The built-in FTP server is always installed, regardless of which option you select. If you select the
external FTP server, the built-in FTP server is disabled.
After installation, you can change which FTP server to use at any time, as described in
“Configuring File Transfer Options” on page 14-9.
11. Click Install.
Fabric Manager is installed on your machine.
Fabric Manager Administrator’s Guide
Publication Number: 53-1000196-01-HP
2-15
2
Installing the Fabric Manager Server
The Specify Port Number window appears.
12. Enter the Web server port number. The default is 80.
If you type a new Web server port number, make note of it: you must use the same port number
when you launch the Fabric Manager client. Do not use port 2638, as it is used internally by the
Fabric Manager server.
13. Enter the starting port number. The default is 24600.
If the default starting port number is not a free port number, the server cannot start up correctly. If
you enter a new port number, you must ensure that it and the next eight port numbers represent free
ports.
Note
If you are upgrading or migrating from a previous version of Fabric Manager, you might
receive a message indicating that the ports are unavailable. This can occur when the ports
have yet to be released by the previous uninstall. You should wait a few minutes and try
again.
14. Click Next.
The Select Authentication Method window appears.
15. Select your authentication method and click Next.
This is the method that is used to authenticate users when users try to log in to the Fabric Manager
server.
16. Provide additional information depending on the type of authentication method selected.
For NIS authentication:
Enter your NIS host name or IP address and NIS domain name. You can omit the NIS host
name to force the Fabric Manager server to use broadcast to locate a valid NIS server or NIS
slave.
For switch-based authentication:
Enter the IP addresses of the switches, separating each IP address with a semicolon.
When using switch-based authentication, you should enter multiple switch IP addresses. If you
enter only a single switch IP address, you cannot access Fabric Manager if that switch is down.
For RADIUS server authentication:
You should configure at least two RADIUS servers so that if one fails, the other assumes
service. You can configure up to three RADIUS servers.
2-16
Fabric Manager Administrator’s Guide
Publication Number: 53-1000196-01-HP
Installing the Fabric Manager Server
a.
2
Enter values for the following:
-
RADIUS server IP address or DNS name.
-
Shared secret and confirm shared secret. The shared secret is a password for the
RADIUS client and server. It is used in an encryption process to obscure details in
RADIUS messages like user passwords.
-
It is recommended that the shared secret should be at least 22 characters containing
mixed case letters with numeric and symbol or punctuation characters.
-
Timeout. The number of seconds the client waits for the RADIUS server to reply.
RADIUS authentication port number.
Authentication type. The authentication type should match the setting on your
RADIUS server.
Retry. The number of attempts to connect to the RADIUS server before giving up.
b.
Click Add.
c.
Optional: You can add multiple RADIUS servers by entering their configuration
information and clicking Add. To edit the information you have already entered, select it
from the list, make your changes, and then click Update.
For password file authentication:
No additional information is required.
17. Click Next.
The SAN size selection window appears.
18. Select the size of the SAN that Fabric Manager will be managing (Table 2-1 lists the polling rates
for each SAN size).
19. Click Next.
When the Fabric Manager installation finishes, the Install Complete window appears.
20. Click Done to exit the install wizard.
Installing Fabric Manager Server on Linux
This section describes how to install the Fabric Manager server on a Linux platform.
You must have root access to install Fabric Manager server on a Linux system. You do not need root
access to install and run the Fabric Manager client.
Note
Before installing, ensure that all NFS mount points are up. Fabric Manager uses the df -k command to
check disk space. If the NFS mount points are down, the df command can take a long time to respond
and the Fabric Manager installation might stop responding.
To install Fabric Manager server on Linux
1.
Click install.bin from the File Manager window that displays when you insert the Fabric Manager
Installation for Linux CD-ROM (disk 2).
2.
Double-click the Install icon.
Fabric Manager Administrator’s Guide
Publication Number: 53-1000196-01-HP
2-17
2
Installing the Fabric Manager Server
The Get User Input window displays.
3.
Click Yes if you have a previous version of Fabric Manager installed; otherwise, click No and then
click Next.
If you selected Yes:
a.
Select whether you have client, server, or both installed and click Next.
b.
Identify the location where the previous Fabric Manager client is installed and click Next.
c.
Identify the location where the previous Fabric Manager server is installed and click Next.
The install wizard provides you the choice of migrating your existing database automatically,
or removing it.
d.
Click Yes if you want to update to the new database and automatically save your existing data,
or click No to remove your current data and create the new database.
e.
Click Next.
4.
Select the version you want to install (Full or Evaluation); then click Next.
5.
Either enter a serial number and license key, or accept the license agreement, depending on whether
the full or evaluation version is selected.
•
Full version only: Type a valid serial number and license key.
The serial number and license key are verified at this time. If the serial number or license key
is invalid, an error message displays and you must re-enter them. You cannot continue
installing the full version without a valid serial number and license key.
•
6.
Evaluation version only: Accept the license agreement.
Click Next.
The Introduction window appears.
7.
Read the introduction; then click Next.
The Select Destination Folder window appears.
8.
Use the default location, or click Choose to select a new folder.
You can also type a new destination folder. The path must not contain spaces.
Note
This document uses <installdir> to indicate the folder where Fabric Manager is installed.
9.
Click Next.
The Select FTP Server window appears.
10. Select whether to use the built-in FTP server or your own external FTP server.
The FTP server is used primarily for firmware download. To use the Fabric Manager firmware
repository, you must either select the built-in FTP server or, if you select the external FTP server,
ensure that your FTP server resides on the same system as the Fabric Manager server.
The built-in FTP server is always installed, regardless of which option you select. If you select the
external FTP server, the built-in FTP server is disabled.
After installation, you can change which FTP server to use at any time, as described in
“Configuring File Transfer Options” on page 14-9.
2-18
Fabric Manager Administrator’s Guide
Publication Number: 53-1000196-01-HP
Installing the Fabric Manager Server
2
11. Click Install.
Fabric Manager is installed on your machine.
The Specify Port Number window appears.
12. Enter the Web server port number. The default is 80.
If you type a new Web server port number, make note of it: you must use the same port number
when you launch the Fabric Manager client. Do not use port 2638, as it is used internally by the
Fabric Manager server.
13. Enter the starting port number. The default is 24600.
If the default starting port number is not a free port number, the server cannot start up correctly. If
you enter a new port number, you must ensure that it and the next eight port numbers represent free
ports.
Note
If you are upgrading or migrating from a previous version of Fabric Manager, you might
receive a message indicating that the ports are unavailable. This can occur when the ports
have yet to be released by the previous uninstall. You should wait a few minutes and try
again.
14. Click Next.
The Select Authentication Method window appears.
15. Select your authentication method and click Next.
This is the method that is used to authenticate users when users try to log in to the Fabric Manager
server.
16. Provide additional information depending on the type of authentication method selected.
For NIS authentication:
Enter your NIS host name or IP address and NIS domain name. You can omit the NIS domain
name to force the Fabric Manager server to use broadcast to locate a valid NIS server or NIS
slave.
For switch-based authentication:
Enter the IP addresses of the switches, separating each IP address with a semicolon.
When using switch-based authentication, you should enter multiple switch IP addresses. If you
enter only a single switch IP address, you cannot access Fabric Manager if that switch is down.
For RADIUS server authentication:
You should configure at least two RADIUS servers so that if one fails, the other assumes
service. You can configure up to three RADIUS servers.
Fabric Manager Administrator’s Guide
Publication Number: 53-1000196-01-HP
2-19
2
Copying an Installation from Server to Server
a.
Enter values for the following:
-
RADIUS server IP address or DNS name.
-
Shared secret and confirm shared secret. The shared secret is a password for the
RADIUS client and server. It is used in an encryption process to obscure details in
RADIUS messages like user passwords.
-
It is recommended that the shared secret should be at least 22 characters containing
mixed case letters with numeric and symbol or punctuation characters.
-
Timeout. The number of seconds the client waits for the RADIUS server to reply.
RADIUS authentication port number.
Authentication type. The authentication type should match the setting on your
RADIUS server.
Retry. The number of attempts to connect to the RADIUS server before giving up.
b.
Click Add.
c.
Optional: You can add multiple RADIUS servers by entering their configuration
information and clicking Add. To edit the information you have already entered, select it
from the list, make your changes, and then click Update.
For password file authentication:
No additional information is required.
17. Click Next.
The SAN size selection window appears.
18. Select the size of the SAN that Fabric Manager will be managing (Table 2-1 lists the polling rates
for each SAN size).
19. Click Next.
When the Fabric Manager installation finishes, the Install Complete window appears.
20. Click Done to exit the install wizard.
Copying an Installation from Server to Server
This section provides information on how to copy a Fabric Manager server installation from one server
to another (keeping the same version).
If you are using an external FTP (located on the Fabric Manager server), you must copy the firmware
files. For more information, see “Accessing Firmware When Changing the FTP Server” on page 14-18.
Before you start the copy, ensure that the following conditions exist:
2-20
•
•
•
•
Host1 and Host2 are running the same type of operating system.
•
If an external executable is used in a call home configuration on Host1, then it will be located on
the same drive and directory on Host2.
Host2 will be running the same version of Fabric Manager that was running on Host1.
Host2 will have same Fabric Manager license as on Host1.
Fabric Manager installation on Host2 will be in the same drive and directory as Host1 (for example,
C:\FabricManager).
Fabric Manager Administrator’s Guide
Publication Number: 53-1000196-01-HP
Copying an Installation from Server to Server
•
2
Fabric Manager server will use the same ports on Host2 that are used on Host1.
If the Web server port number on Host1 is already in use on Host2, use the Server Management
Console on Host2 to change the Web Server port number after installation, as described in
“Changing the Web Server Port Number” on page 24-10.
•
The user will enter the Host2 name/IP address when connecting from the Fabric Manager client.
To copy a Fabric Manager server installation
1.
Perform a fresh install of Fabric Manager server on Host2 in the same drive and directory as on
Host1 and with the same license level. See “Installing the Fabric Manager Server” on page 2-6 for
installation information.
You can specify XX for the authentication method, switch/domain name, Web server port number,
and starting port number, because these are all overwritten by the remainder of this procedure.
2.
Stop the Fabric Manager client on Host1.
3.
Stop the Fabric Manager services on Host1.
You can stop the services using the Server Management Console, as described in “Managing Fabric
Manager Services” on page 24-2.
4.
Stop the Fabric Manager services on Host2.
You can stop the services using the Server Management Console, as described in “Managing Fabric
Manager Services” on page 24-2.
5.
Delete the fmserver folder on Host2.
The default from the Fabric Manager server installation on Host2 is:
<installdir>\server\server\fmserver
6.
Delete the databases folder on Host2.
The default from the Fabric Manager server installation on Host2 is:
<installdir>\server\db\SYBSsa9\databases
7.
Copy the fmserver folder from the Fabric Manager server installation on Host1 to the same location
on Host2.
The default location is <installdir>\server\server\fmserver.
8.
Copy the databases folder from the Fabric Manager server installation on Host1 to the same
location on Host2
The default location is <installdir>\server\db\SYBSsa9\databases.
9.
Delete all files displayed under the log folder within the fmserver folder.
The default location is <installdir>\server\server\fmserver\log\*
10. Optional (only if you still want to access the old Fabric Manager server): Start the Fabric Manager
services on Host1 using the Server Management Console.
11. Start the Fabric Manager services on Host2 using the Server Management Console.
Fabric Manager Administrator’s Guide
Publication Number: 53-1000196-01-HP
2-21
2
Uninstalling the Fabric Manager Server
Note
After copying the Fabric Manager server installation from Host1 to Host2 and confirming that it is
working as expected on Host2, you might want to uninstall the Fabric Manager server installation from
Host1 so that your switches are polled by only one Fabric Manager server.
To upgrade the Fabric Manager server installation on Host2
1.
Follow the steps in “To copy a Fabric Manager server installation” on page 2-21 to keep the same
version of Fabric Manager server on Host2.
2.
Upgrade the Fabric Manager server version on Host2 as directed in “Installing the Fabric Manager
Server” on page 2-6.
Note
Do not install a newer version of Fabric Manager on Host2 and then overwrite those files
by copying old files from Host1.
Uninstalling the Fabric Manager Server
This section describes how to uninstall Fabric Manager from either a Windows, Solaris, or Linux
platform.
You must stop the Fabric Manager server, if it is running, before you uninstall it. Chapter 24, “Server
Management Console” describes how to stop the Fabric Manager server using the Server Management
Console.
You must restart your system after you uninstall Fabric Manager.
To uninstall the Fabric Manager server from Windows
1.
Stop the Fabric Manager server, if it is running. See “Managing Fabric Manager Services” on
page 24-2 for instructions.
2.
From the Start menu, click Programs > Fabric Manager > Uninstall Fabric Manager to launch
the uninstall wizard.
The Uninstall Fabric Manager wizard appears, as shown in Figure 2-11.
2-22
Fabric Manager Administrator’s Guide
Publication Number: 53-1000196-01-HP
Uninstalling the Fabric Manager Server
2
Figure 2-11 Fabric Manager Uninstall Wizard
3.
Click Next.
You must restart your system when uninstallation is complete. You are prompted whether you want
the wizard to restart your system immediately, or whether you want to restart your system yourself.
4.
Select Yes to automatically restart your system immediately, or No to restart your system yourself.
If you select No, be sure to restart your system before performing any other operations.
5.
Click Done.
User-specific information, such as login name and server port number, is stored in a separate file and is
not removed when you uninstall Fabric Manager. You must manually delete this file. For more
information, see “Uninstalling or Upgrading Fabric Manager” on page 2-2.
To uninstall the Fabric Manager server from Solaris
1.
Stop the Fabric Manager server, if it is running. See “Managing Fabric Manager Services” on
page 24-2 for instructions.
2.
Navigate to the location where you installed Fabric Manager.
3.
From the Fabric Manager/ UninstallerData directory, run Uninstall_FabricManager.
4.
Click Next.
You must restart your system when uninstallation is complete. You are prompted whether you want
the wizard to restart your system immediately, or whether you want to restart your system yourself.
5.
Select Yes to automatically restart your system immediately, or No to restart your system yourself.
If you select No, be sure to restart your system before performing any other operations.
6.
Click Done.
Fabric Manager Administrator’s Guide
Publication Number: 53-1000196-01-HP
2-23
2
Uninstalling the Fabric Manager Server
To uninstall the Fabric Manager server from Linux
1.
Stop the Fabric Manager server, if it is running. See “Managing Fabric Manager Services” on
page 24-2 for instructions.
2.
Navigate to the location where you installed Fabric Manager.
3.
From the Fabric Manager/ UninstallerData directory, run Uninstall_FabricManager.
4.
Click Next.
You must restart your system when uninstallation is complete. You are prompted whether you want
the wizard to restart your system immediately, or whether you want to restart your system yourself.
5.
Select Yes to automatically restart your system immediately, or No to restart your system yourself.
If you select No, be sure to restart your system before performing any other operations.
6.
2-24
Click Done.
Fabric Manager Administrator’s Guide
Publication Number: 53-1000196-01-HP
Chapter
Fabric Manager Client
3
This chapter includes the following topics:
•
•
•
•
“Launching Fabric Manager” on page 3-1
“Uninstalling the Fabric Manager Client” on page 3-4
“Understanding the Fabric Manager Layout” on page 3-6
“Customizing Fabric Manager” on page 3-18
Launching Fabric Manager
This section describes how to launch the Fabric Manager client. Before launching the client, you must
have already installed the Fabric Manager server, as described in Chapter 2, “Installation”.
The Fabric Manager client is automatically installed the first time you launch it. Note that the Fabric
Manager client is not a web-based client—but it supports a web-based client installation.
On Windows platforms, during client installation you can optionally choose to create desktop and Start
menu shortcut items for the Fabric Manager client. The Start Menu shortcut is:
Start > Programs > FabricManager serverIP
The user name and password that you use to start Fabric Manager are not used for authenticating with
the switch and these are typically not the same accounts.
Whenever the Fabric Manager server version is upgraded or downgraded, the version change is autodetected before the client is launched and the new version of the client is automatically downloaded and
installed.
If you launch the Fabric Manager client for multiple servers running the same or different versions, then
multiple copies of the Fabric Manager client are installed on the client machine. For Windows and
Linux users, one desktop icon is optionally created for each associated Fabric Manager server per user.
To launch Fabric Manager
1.
Open a browser window and type the Fabric Manager server hostname or IP address in the Address
field; for example:
http://FMserverhost1.companyname.com/
http://192.168.10.11/
If, when the Fabric Manager server was installed, a Fabric Manager web server port number was
specified (instead of the default 80), you must specify the port number after the hostname or IP
address. In the following examples, 8080 is the web server port number:
http://FMserverhost1.companyname.com:8080/
http://192.168.10.11:8080/
Fabric Manager Administrator’s Guide
Publication Number: 53-1000196-01-HP
3-1
3
Launching Fabric Manager
The Fabric Manager introduction window displays, as shown in Figure 3-1 on page 3-2.
Figure 3-1
2.
Fabric Manager Introductory Window
Click the Launch Fabric Manager link.
If the browser is not configured with the correct JRE version (JRE version 1.5), then Fabric
Manager redirects you to a window from which you can download the correct version.
If this is the first time that the Fabric Manager client is launched from the server, then the client is
automatically installed on the client machine, in the Java Control Panel user cache.
A security warning displays, asking whether you want to trust the digitally signed Fabric Manager
client application.
3.
Click Yes to trust the application.
Windows and Linux only: If this is the first time that the Fabric Manager client is launched from the
server, a create shortcut dialog displays, asking whether you want to create shortcuts for the Fabric
Manager client.
•
•
•
3-2
Click Yes to create the desktop and Start menu shortcuts.
Click No to continue without creating the shortcuts.
Click Configure to customize shortcut creation using the Java Control Panel, shown in
Figure 3-2. Then click OK to close the Java Control Panel.
Fabric Manager Administrator’s Guide
Publication Number: 53-1000196-01-HP
Launching Fabric Manager
Figure 3-2
4.
3
Customizing Shortcut Creation
Type your user name and password in the login dialog, shown in Figure 3-3. This is the user name
and password that you use to log in to the server, and not the ones used to log in to the switches.
Figure 3-3
Fabric Manager Login
Note
Fabric Manager stores your user name and populates the User name field automatically
whenever you subsequently launch the software.
The login banner displays, if one is configured. See “Creating a Login Banner” on page 24-7 for
information on configuring a login banner.
5.
Click Agree in the login banner.
The Fabric Manager client launches.
Fabric Manager Administrator’s Guide
Publication Number: 53-1000196-01-HP
3-3
3
Uninstalling the Fabric Manager Client
Figure 3-4 shows the Fabric Manager window the first time you launch it. Note that it does not show
any fabrics. You must discover fabrics before you can manage them with Fabric Manager. See
“Discovering a Fabric” on page 4-1 for information about adding devices from a SAN for Fabric
Manager to begin monitoring.
Note
The screenshots in the remainder of this chapter show Fabric Manager windows in which fabrics are
already discovered.
Figure 3-4
Fabric Manager Initial Launch Default Window
If this is not the first time the Fabric Manager client is launched from the server, Fabric Manager checks
whether any fabrics were previously discovered and whether your user credentials are valid. All of the
fabrics that have valid user credentials are loaded in the client. If any fabrics were discovered by the
Fabric manager server but do not have your valid user credentials, then you receive a message dialog
that one or more fabrics are available for monitoring. If you receive this message, you can click Close to
ignore it, or click Monitor Fabrics to begin monitoring these fabrics. See “Monitoring Fabrics” on
page 4-6 for instructions.
Uninstalling the Fabric Manager Client
To remove the installed Fabric Manager client, you must clear the Java Control Panel cache, as
described in the following procedure.
3-4
Fabric Manager Administrator’s Guide
Publication Number: 53-1000196-01-HP
Uninstalling the Fabric Manager Client
3
To uninstall the Fabric Manager client
1.
Launch the Java Control Panel.
Windows: From the Start menu, click Settings > Control Panel > Java.
Solaris and Linux: Launch the ControlPanel executable file. In the Java 2 SDK, this file is in the
following location:
<SDK installation directory>/jre/bin/ControlPanel
In a Java 2 Runtime Environment installation, this file is in the following location:
<JRE installation directory>/bin/ControlPanel
Figure 3-5
Java Control Panel
2.
Click the General tab.
3.
Click Settings in the Temporary Internet Files section.
4.
Click View Applications.
Fabric Manager Administrator’s Guide
Publication Number: 53-1000196-01-HP
3-5
3
Understanding the Fabric Manager Layout
Figure 3-6
Java Application Cache Viewer
5.
Select Fabric Manager and click Remove Selected Application.
6.
Click OK to close the Java windows.
Understanding the Fabric Manager Layout
The Fabric Manager client consists of four basic panels, illustrated in Figure 3-7 on page 3-7 and
described in the following sections:
•
•
•
•
“Scope Panel” on page 3-7
“View Panel” on page 3-9
“Task Panel” on page 3-12
“Information Panel” on page 3-12
The remainder of this section describes the general layout of the Fabric Manager client. In addition to
the panel descriptions, this section contains the following information:
•
•
•
“Menu Bar” on page 3-14
“Status Indicators” on page 3-14
“Refreshing the Window” on page 3-16
Additional details are described in Chapter 5, “Viewing Fabric Topologies”.
3-6
Fabric Manager Administrator’s Guide
Publication Number: 53-1000196-01-HP
3
Understanding the Fabric Manager Layout
Menu bar
Scope
Panel
View
Panel
Task
Panel
Information
Panel
Figure 3-7
Fabric Manager Client Window
Scope Panel
The Scope panel is where you select the information to be displayed in the other panels of the Fabric
Manager client. The selections you make in the Scope panel affect what is displayed in the other panels.
From the View drop-down menu, you can select one of the following views to be displayed in the View
panel:
•
SAN View
If you select SAN View, the View panel displays all of the monitored fabrics in the database. The
SAN View is the default view when you launch the Fabric Manager client.
•
Fabric View
If you select Fabric View, the View panel displays the switches and their interconnectivity for a
single fabric.
•
Host-Storage View
If you select Host-Storage View, the View panel displays the end-to-end connectivity of all of the
monitored fabrics.
Fabric Manager Administrator’s Guide
Publication Number: 53-1000196-01-HP
3-7
3
Understanding the Fabric Manager Layout
In Figure 3-9, the Fabric View is selected in the Scope panel, and the View panel displays the switches
that are in the selected fabric.
The view that is selected in the Scope panel determines
the topology that is displayed in the View panel.
Figure 3-8
View Panel, Fabric Selection
The Display By drop-down menu provides four different identifiers you can use to view SAN elements
(name, IP address, domain ID, or WWN). Select the identifier that you want Fabric Manager to use as it
displays each element.
The contents of the Scope panel changes depending on what view is selected (see the different Scope
panels in Figure 3-7 and Figure 3-9). The View and Display By options are always available. When
Fabric View or Host-Storage View is selected, the Scope panel displays additional options, which are
described in detail in Chapter 5, “Viewing Fabric Topologies”.
3-8
Fabric Manager Administrator’s Guide
Publication Number: 53-1000196-01-HP
Understanding the Fabric Manager Layout
3
View Panel
The View panel displays the topology of the selection in the Scope panel.
In Figure 3-9, the Host-Storage View is selected in the Scope panel, and the View panel displays the
monitored fabrics and attached devices. See Figure 3-7 and Figure 3-8 for examples of the View panel
when the SAN View and the Fabric View are selected.
The View panel displays the topology for the view that is selected
in the Scope panel, in this case, the Host-Storage View.
Figure 3-9
View Panel, Host-Storage Selection
You can right-click an element in the View panel to display a context menu of tasks for that element.
Different SAN elements provide different menu options. Figure 3-10 shows the context menu that
appears when you right-click a fabric element.
Fabric Manager Administrator’s Guide
Publication Number: 53-1000196-01-HP
3-9
3
Understanding the Fabric Manager Layout
Figure 3-10 Context Menu for the Fabric Element
The View Panel has the following additional components, as shown in Figure 3-11:
•
View bread crumbs
The navigation path that resulted in the currently displayed view. Each step in the path is a clickable
link; you can click a link to quickly navigate to a previous view.
•
Server date and time
The date and time (including the time zone) of the Fabric Manager server.
•
Alert count
Summary of unacknowledged and unresolved alerts. Each alert type is a clickable link; if you click
a link, the View panel displays the SAN view and the Information panel displays the Alerts tab for
the SAN.
•
Application toolbar
Buttons that allow you to move backward and forward in your session history, refresh your data,
export the view to an SVG file, and print the view. Table 3-1 provides a description of these
buttons. You can also hover the mouse over any of the buttons to get a short description.
3-10
Fabric Manager Administrator’s Guide
Publication Number: 53-1000196-01-HP
Understanding the Fabric Manager Layout
•
3
View toolbar
Buttons that allow you to perform operations on the topology displayed in the View panel. These
buttons are described in detail in Chapter 5, “Viewing Fabric Topologies”. You can also hover the
mouse over any of the buttons to get a short description.
View bread crumbs
Server date and time
Alert count
Application
toolbar
View toolbar
Figure 3-11 View Panel Components
Table 3-1
Application Toolbar Buttons
Icon Name
Description
SVG Export
Saves the contents of the View panel to an SVG file.
Print View
Prints the contents of the View panel.
Refresh View Refreshes the displayed information.
Go Back
Navigation icon: Returns to the previous view in the navigation history (if
applicable). If you click the small downward arrow next to the Back button, a
menu showing the previous 10 views displays.
Go Home
Navigation icon: Returns to the view that appeared when you opened Fabric
Manager.
Go Forward
Navigation icon: Moves forward to the next view in the navigation history (if
applicable). If you click the small downward arrow next to the Forward button,
a menu showing the next 10 views displays.
Fabric Manager Administrator’s Guide
Publication Number: 53-1000196-01-HP
3-11
3
Understanding the Fabric Manager Layout
Task Panel
The Task panel provides quick access to commonly performed tasks for the selected SAN element in the
View panel. This is not a comprehensive list of tasks, but just the tasks that are used most often on the
type of selected element.
The task list changes depending on the type of element that is selected. For example, Figure 3-7 shows
the Task panel when the entire SAN is selected (by clicking on the background of the View panel). The
list of tasks is different than the list for a single fabric is selected, or when a device is selected (as shown
in Figure 3-8 and Figure 3-9, respectively).
To select a task from the Task panel, click on one of the task groups, and then select the task you want
from the pop-up menu that displays, as shown in Figure 3-12.
Figure 3-12 Selecting a Task from the Task Panel
Information Panel
The Information panel displays detailed information about the elements in the View panel. The
Information panel consists of a series of tabs, each containing a table of information (as shown in
Figure 3-13).
Number of items in the table,
and number of items selected
Time of the last refresh
Filter options
Figure 3-13 Information Panel
Some of the tabs have a filter that allows you to selectively display information for that tab. All tabs,
other than the Overview tab, display the total number of items in the table, and the number of items you
have selected.
3-12
Fabric Manager Administrator’s Guide
Publication Number: 53-1000196-01-HP
Understanding the Fabric Manager Layout
3
The Information panel has Export, Copy, and Search options at the top of the tables. These options are
not available if the table does not have any content.
•
•
•
Click Export to save the contents of the table to a tab-delimited file.
Click Copy to copy the contents of the table in tab-delimited text format to a file.
Click Search to search for a specific text string in the table.
Type your text string in the box that displays on the table, as shown in Figure 3-14, and press
Enter. The first row that contains the text string is highlighted. If the text is not found in the table,
the text turns red.
Figure 3-14 Searching for Text String in a Table
The contents in the Information panel changes depending on the element that is selected in the View
panel. For example, the Information panel shown in Figure 3-7 (SAN View) shows a different set of
tabs than the Information panel shown in Figure 3-8 (Fabric View).
For some of the tables in the Information panel, you can right-click an element in the table to display a
context menu of tasks for that element. Different elements provide different menu options. Figure 3-10
shows the context menu that appears when you right-click a port element.
Figure 3-15 Context Menu for the Port Element
Fabric Manager Administrator’s Guide
Publication Number: 53-1000196-01-HP
3-13
3
Understanding the Fabric Manager Layout
Menu Bar
The menu bar contains drop-down menus with commands for executing specific Fabric Manager tasks.
Commands are dependent upon the element selected within the View panel. Not all commands apply to
all elements. Unavailable commands appear grayed out in the menu bar.
Status Indicators
The colors that appear as background headers provide a quick, visual status. These colors correspond to
the Status Legend available from the Help menu (Help > Status Legend).
Figure 3-16 Status Legend
For example, Figure 3-17 shows the status of various switches, indicated by colored backgrounds in the
View panel, the Scope panel, and the Information panel. In the Information panel, the Status column
also indicates the status.
3-14
Fabric Manager Administrator’s Guide
Publication Number: 53-1000196-01-HP
Understanding the Fabric Manager Layout
3
Figure 3-17 Background Colors Indicating Status
By default, persistently disabled ports are no color (transparent). For switches running Fabric OS v5.0.x
or later, you can change this color using the following procedure.
To change the default color of persistently disabled ports
1.
Click Edit > Preferences in the Menu bar.
The Preferences dialog box displays.
2.
Expand User Specific and select General (see Figure 3-22 on page 3-20).
3.
Select the color you want to indicate persistently disabled ports.
Fabric Manager Administrator’s Guide
Publication Number: 53-1000196-01-HP
3-15
3
Understanding the Fabric Manager Layout
Refreshing the Window
Fabric Manager views are updated periodically, depending on your SAN size, as shown in Table 3-2.
Table 3-2
Polling Rates per SAN Size
Total Ports Managed
Polling Rates
PM and APM
Fabric Manager Updates
Small SAN (up to 512 ports, 1-20 domains)
5 minutes
1 minute
Medium SAN (513-1280 ports, 21-50 domains)
5 minutes
5 minutes1
Large SAN (1281-2560 ports, 51-80 domains)
5 minutes
30 minutes1
1. Medium SANs can take between 5 and 10 minutes to update for some actions. Large SANs can take between
30 to 60 minutes to update for some actions. You should issue a refresh manually for immediate updates.
The Fabric Manager window is automatically updated whenever you switch views, such as switching
from the SAN View to the Fabric View. The tables in the Information Panel are automatically updated
whenever you click a different tab.
You can manually refresh the status at any time using one of the following methods:
•
Right-click a switch or fabric element and select Refresh Status Information from the context
menu. Using Refresh Status Information to refresh a switch typically provides quicker updates
than refreshing an entire fabric.
•
•
Click the Refresh button in the View panel to refresh the view.
•
Select Discovery > Refresh from the Menu bar.
Click the Refresh link in the Information panel. This method refreshes only the information in the
visible table. The header of the Information panel indicates the last time the panel was refreshed.
Figure 3-18 illustrates the various ways you can manually refresh the Fabric Manager views.
3-16
Fabric Manager Administrator’s Guide
Publication Number: 53-1000196-01-HP
Understanding the Fabric Manager Layout
Select Refresh from the Discovery menu
3
Right-click a fabric or switch and select
Refresh Status Information from the
context menu.
Click Refresh button in the View panel
The header in the Information panel
displays the time of the last refresh.
Click Refresh in the Information panel to
refresh the visible table.
Figure 3-18 Manually Refreshing the Fabric Manager Window
Selecting Elements and Accessing Modules
Some of the procedures in this document require you to select SAN elements, such as fabrics, devices,
or switches. When you select SAN elements, you can select them from different places in the Fabric
Manager client:
•
•
•
View panel
Information panel table
Scope panel
This document does not list all of the ways you can select an element. When procedures in this
document indicate you must select a SAN element, note that there are several ways you can select it.
Fabric Manager Administrator’s Guide
Publication Number: 53-1000196-01-HP
3-17
3
Customizing Fabric Manager
Fabric Manager provides several methods for you to access modules and execute tasks:
•
•
•
From the Menu bar
From the Task panel
From the right-click context menu
When describing how you can access a module or task, this document describes one way you can do it;
however, note that there might be other ways to access the same module or task.
Customizing Fabric Manager
This section describes several ways to change the look and feel of Fabric Manager.
•
•
•
•
•
“Displaying Fabrics by IP Address, Domain ID, WWN, and Name,” next
“Customizing Tables” on page 3-18
“Filtering Elements in a Table” on page 3-20
“Customizing Tool Tips” on page 3-21
“Resizing Panels” on page 3-22
Displaying Fabrics by IP Address, Domain ID,
WWN, and Name
You can display the SAN elements by the identifier that you find most useful.
To select the identifier, click (Name, WWN, IP, or Domain ID) from the Display By drop-down menu
in the Scope panel, as shown in Figure 3-19.
Figure 3-19 Selecting How To Identify SAN Elements
Customizing Tables
You can customize the tables in the Information panel to display only the information you want to see,
in the order you want to see it. You can also sort the order of the columns and the order of the
information displayed in the columns.
3-18
Fabric Manager Administrator’s Guide
Publication Number: 53-1000196-01-HP
Customizing Fabric Manager
3
To customize the contents displayed in a table
1.
Right-click anywhere in the table header in the Information panel.
A pop-up menu displays the available columns for the table, as shown in Figure 3-20. A check next
to a column name indicates that the column is displayed in the table.
2.
Check or uncheck a column name in the pop-up menu to display or hide it in the table.
Figure 3-20 Hiding/Showing Table Columns
To reorder the columns in a table
1.
Click and hold on the header of the table column you want to move.
2.
Drag the column to the left or right until you get it in the position you want; then release the mouse
button.
To sort the information displayed within a column (ascending or descending)
1.
Click the header of the column you want to reorder. Each time you click the column heading, the
order toggles between ascending and descending.
An up or down arrow to the right of the column name indicates the column that is sorted and
whether it is in ascending (up arrow) or descending (down arrow) order.
To sort the information displayed within multiple columns from different table
views simultaneously (ascending or descending)
1.
Click the header of the first column to be sorted.
2.
Ctrl-click each additional column that you want to be sorted. To sort a column in descending order,
ctrl-click twice on the column header.
An up or down arrow to the right of the column name indicates the column that is sorted and
whether it is in ascending (up arrow) or descending (down arrow) order. Numbers next to the
arrows indicate the sort order.
In Figure 3-21, the table is sorted first by status (in descending order), and then by switch name (in
ascending order). The numbers next to the arrows in the column headers indicate the sort order.
Fabric Manager Administrator’s Guide
Publication Number: 53-1000196-01-HP
3-19
3
Customizing Fabric Manager
Figure 3-21 Editing the Sort Order for Multiple Columns
To customize the table font setting
1.
Click Edit > Preferences in the Menu bar.
The Preferences dialog displays.
2.
Expand User Specific and click General (see Figure 3-22).
Figure 3-22 General Preferences
3.
Select the table font from the Font Name drop-down menu. The default font is “Courier New.”
4.
Select the font size from the Font Size drop-down menu. The default size is 11.
5.
Click OK.
The table font changes accordingly. This setting is persisted in the Fabric Manager database.
Filtering Elements in a Table
When a table can potentially display a large amount of data rows, a set of filters is provided at the top of
the table so you can narrow the display to the data in which you are most interested.
3-20
Fabric Manager Administrator’s Guide
Publication Number: 53-1000196-01-HP
Customizing Fabric Manager
3
The filters can consist text fields and drop-down menus. In Figure 3-23, the Name is a text field, and the
Type, State, and Status are drop-down menus.
Figure 3-23 Filtering Elements in a Table
For example, if you name all of the switches for your Accounting team “acctx”, where x is a number,
you can view only the accounting switches by typing acct in the Name text field, and clicking Filter.
Only the switches that have acct in their name are then displayed in the table.
To filter elements in a table
1.
In the filter text fields, type text (letters, numbers, or symbols such as a period) that are included in
the elements that you want to view.
For example, to view all the elements that include “switch” in their name, type switch in the text
field of the Name filter.
2.
From the filter drop-down menus, select a value that you want included in the elements that you
want to view.
3.
Click the Filter tab.
Each element that matches all of the criteria you specified in the filters is displayed in the table.
Customizing Tool Tips
Fabric Manager tables with multiple columns of information are difficult to view due to narrow
columns and/or having to use the side-to-side scroll bars. Information within an individual cell of a
column or information within an entire row in a table can be viewed much easier using tool tips. You
can customize whether the tool tips display the entire text of a cell or all of the information for a single
row when you mouse over the cell. The default is to display the entire row.
To customize table tool tips
1.
Click Edit > Preferences in the Menu bar.
The Preferences dialog box displays.
2.
Expand User Specific and select General (see Figure 3-22 on page 3-20).
Fabric Manager Administrator’s Guide
Publication Number: 53-1000196-01-HP
3-21
3
Customizing Fabric Manager
3.
Check the Show “Detailed” table tooltips checkbox to display tool tips for the entire row in a
table. Uncheck this box to display tool tips for only a single cell in the table.
4.
Click OK.
Resizing Panels
You can adjust the size of the Fabric Manager panels (Scope panel, View panel, Tasks panel, and
Information panel) by dragging the borders between the panels.
You can hide or show panels by clicking the arrow in the panel header. For example, if you want to
make the Information panel as large as possible so you can view more of the table, you can click the
arrow in the View panel header to hide that panel, as shown in Figure 3-24. To display the View panel
again, click the arrow in the View panel header.
Click the arrows in the panel headers
to hide or show the panel.
Figure 3-24 Hiding the View Panel
3-22
Fabric Manager Administrator’s Guide
Publication Number: 53-1000196-01-HP
Chapter
Discovering and Customizing Fabrics
4
This chapter provides information about discovering fabrics with Fabric Manager (including running
subnet scans), renaming and deleting fabrics, customizing and using the information provided in the
Fabric Manager views, and synchronizing the data and time across an entire fabric. See the following
sections for the steps required to accomplish the specific Fabric Management tasks:
•
•
•
•
•
•
“Discovering a Fabric,” next
“Logging In to Multiple Switches Simultaneously” on page 4-4
“Monitoring Fabrics” on page 4-6
“Deleting a Fabric from Fabric Manager” on page 4-9
“Renaming Fabric Components” on page 4-10
“Working With Switch and Port Groups” on page 4-14
Discovering a Fabric
You must discover a fabric before you can administer it with Fabric Manager. You can discover fabric in
two ways:
Discover fabric
Use this option if you want to discover a single fabric and you know the IP
address or DNS name of the seed switch.
Subnet Scan
Use this option if you want to discover multiple fabrics in the same subnet, or if
you do not know the exact IP address of the seed switch.
When you discover a fabric, Fabric Manager checks if the seed switch is running the latest Fabric OS
version in the fabric, and if it is not, Fabric Manager prompts you to select a new seed switch.
After fabric discovery successfully completes, the Fabric Manager client that initiated the discovery is
updated to display the newly discovered fabric. Other Fabric Manager clients receive a message dialog
that one or more fabrics are available for monitoring. If you receive this message, you can click Close to
ignore it, or click Monitor Fabrics to begin monitoring the newly discovered fabrics. See “Monitoring
Fabrics” on page 4-6 for instructions.
Note
On an Admin Domain-aware fabric, you must be a physical fabric administrator to discover the fabric.
Fabric Manager Administrator’s Guide
Publication Number: 53-1000196-01-HP
4-1
4
Discovering a Fabric
Discovering a Single Fabric
Use the following procedure to discover a single fabric. You need to provide the IP address of the seed
switch for the fabric. If you do not know the exact IP address, see “Discovering Multiple Fabrics
(Subnet Scan)” on page 4-3.
To discover a fabric
1.
Click Discovery > Discover Fabric in the Menu bar.
The Fabric Discovery Login dialog box appears, as shown in Figure 4-1.
Figure 4-1
2.
Fabric Discovery Login
Type the IP address or the DNS name of the seed switch in the fabric that you want to discover.
To discover a fabric using a DNS name, you must have an entry in the hosts.txt file in
C:\WINDOWS\system2\driver\etc or in /etc on Unix-based machines. The entry should be on a new
line with the format switchIP switchName. For example 10.144.8.42 mySwitch. The switch is
discovered in Fabric Manager using the DNS name switchName as specified in the hosts.txt file
(mySwitch in the above example).
You do not need to include http:// before the IP address to discover a fabric. If you do not know the
exact address of a switch, you can run a subnet scan to discover fabrics. See “Discovering Multiple
Fabrics (Subnet Scan),” next, for additional information.
3.
Type the user name and password used to log in to the switch.
4.
Click OK.
The fabric is discovered only if the authentication succeeds. Otherwise, you are prompted again for
a user name and password. Authentication fails if the user name or password is invalid for the
switch, if the password has expired, or if the account is locked out after too many invalid login
attempts. If the password has expired, you are prompted to either change the password or provide
different login credentials.
After the fabric is discovered, all the switches in the fabric are tested against the user name and
password. If any of the switches fails to authenticate, you are prompted to log in to the switches that
failed. If you choose not to log in, the Fabric Device Management Interface (FDMI) and some data
for the Fabric Inventory reports might not be available.
If you choose to not log in to the switches that failed, you can log in later by choosing Discovery >
Switch Login. If the seed switch is not running the latest Fabric OS version in the fabric, you are
prompted to change the seed switch.
4-2
Fabric Manager Administrator’s Guide
Publication Number: 53-1000196-01-HP
Discovering a Fabric
4
Discovering Multiple Fabrics (Subnet Scan)
You can use Fabric Manager to scan a subnet and discover fabrics. A subnet scan eliminates the need to
know the exact address of a switch to discover a fabric. Fabric Manager lists the switches and fabrics
that it finds during the subnet scan. You can then select which fabrics to discover.
Note
Switches might appear in your subnet scan even after you unplug the Ethernet cables of those switches.
To run a subnet scan
1.
Click Discovery > Subnet scan from the Menu bar.
The Subnet scan dialog displays (see Figure 4-2).
Figure 4-2
Subnet Scan
2.
Type the first three sets of digits of an IP address in the first three sections of the IP Address Range
field.
3.
Type a wildcard in the last section of the IP Address Range field to represent the range of the scan.
For example:
•
192.168.168.*
Discovers any fabric in the address range of 192.168.168.0 through 192.168.168.255.
•
192.168.168.1**
Discovers any fabric in the address range of 192.168.168.100 through 192.168.168.199.
•
192.168.168.11*
Discovers any fabric in the address range of 192.168.168.110 through 192.168.168.119.
•
192.168.168.25*
Discovers any fabric in the address range of 192.168.168.250 through 192.168.168.255.
Note
The number before the “*” can be any number as long as the resulting range is
greater than 0 and less than 255. You cannot enter 192.168.168.3** or
192.168.168.26*, for example.
4.
Click Scan.
The result of the scan is a list of available fabrics (see Figure 4-3) that match the IP address range.
The IP addresses are of seed switches that are running the latest firmware in the fabrics and are
HTTP-reachable from Fabric Manager. If multiple switches in the fabric are running the latest
firmware version, then the seed switch is randomly chosen from those switches.
Fabric Manager Administrator’s Guide
Publication Number: 53-1000196-01-HP
4-3
4
Logging In to Multiple Switches Simultaneously
5.
Click the checkboxes next to the fabrics you want to discover. Click Select All to select all of the
fabrics in the list.
6.
Click Discover Selected Fabrics.
You are prompted to log in to the seed switch of each fabric you discover.
7.
Click Close to close the Subnet Scan dialog.
Figure 4-3
Subnet Scan Results
Logging In to Multiple Switches Simultaneously
You can use Fabric Manager to log in to multiple switches at the same time. With multiple login, you do
not need to log in to each switch individually to administer your fabric. After you log in to a switch,
Fabric Manager stores your login information and automatically logs you in to the switches. By default,
Fabric Manager stores switch passwords on the server. You can disable switch passwords from being
saved on the server. See “Enabling and Disabling Switch Passwords” on page 12-1 for additional
information.
You must log in to a switch to perform most of the Fabric Manager administrative tasks.
For switches running Fabric OS v5.2.0 or higher in admin domain-unaware mode, you can provide
credentials for any role on the switch. For Admin Domain-aware switches, you must have access to at
least AD0 and the physical fabric.
For switches running firmware versions earlier than Fabric OS v5.2.0, you must provide admin-level
credentials.
If the Persist switch passwords option is set (from the Edit > Preferences menu), then all credentials
are persisted immediately, after successful authentication.
4-4
Fabric Manager Administrator’s Guide
Publication Number: 53-1000196-01-HP
Logging In to Multiple Switches Simultaneously
4
Note
You cannot log in to Fabric OS v4.0 through v4.2 switches with the factory user account in Fabric
Manager (although you can from the CLI or Web Tools). You must use an account with administrative
privileges (such as admin) to gain access.
To log in to multiple switches
1.
Click Discovery > Switch Login from the Menu bar.
The Switch Login window displays (see Figure 4-4).
Figure 4-4
2.
Switch Login
Select the switches or fabrics you want from the SAN Elements tab and click the right arrow to
move them to the Selected Switches panel.
You can also drag fabric or switch names from the SAN Elements tab directly into the Selected
Switches panel.
3.
Type your user name in the User ID field.
4.
Type your password in the Password field.
5.
Optional: Click the Overwrite discovery credentials checkbox if you want only admin-level (for
Fabric OS versions earlier than 5.2.x) or physical fabric admin-level (for Fabric OS versions 5.2.x
or higher) credentials to be authenticated. Any other user-level credentials will fail with the
message “Invalid Role.”
6.
Click Apply.
Fabric Manager Administrator’s Guide
Publication Number: 53-1000196-01-HP
4-5
4
Monitoring Fabrics
The success or failure of the login displays in the Status column of the Selected Switches table. The
Messages column provides additional information if the login fails.
The background of the status field changes colors to display its status:
•
Green indicates a successful login.
The user ID and password are saved for performing administrative operations until the session
is terminated. When the session is terminated, this user ID and corresponding password are
persisted to the database. The saved information is used for successive Fabric Manager
sessions when administrative operations are initiated from Fabric Manager.
•
•
Red indicates that the login failed.
Yellow indicates one of the following conditions:
-
The switch login is being applied; the “Status” column text changes to “Testing”.
The switch is unreachable in Fabric Manager. When you add this unreachable switch to
the Selected Switches list, the “Status” column text changes to “Unreachable”.
Note
If you did not log in to all of the switches successfully, remove the successful switches from the Selected
Switches panel and retry with a new user ID and password.
A key icon
displays next to each switch and fabric that completes a successful login. The key
icon is displayed next to the fabric only if authentication is successful for all the switches in the
fabric.
Monitoring Fabrics
In the SAN View, the Overview tab of the Information panel displays the number of discovered fabrics
and the number of fabrics you are monitoring, as shown in Figure 4-5. The number of discovered
fabrics might be higher than the number of fabrics you are monitoring if other Fabric Manager clients
have discovered fabrics.
Figure 4-5
Information Panel Showing Discovered and Monitored Fabrics
You can monitor these fabrics using the following procedure.
4-6
Fabric Manager Administrator’s Guide
Publication Number: 53-1000196-01-HP
Changing the Seed Switch
4
To monitor already discovered fabrics
1.
Click Discovery > Monitor Fabrics from the Menu bar.
The Monitor Fabrics dialog appears, as shown in Figure 4-6.
Figure 4-6
Monitor Fabrics Dialog
2.
Select the fabrics you want to monitor from the left-hand side of the window and click the right
arrow to move them to the right-hand side.
3.
Click Start Monitoring.
For each selected fabric, you are prompted to provide the user name and password for logging in to
the switch (see Figure 4-1).
4.
Type the user name and password used to log in to the switch.
5.
Click OK.
Changing the Seed Switch
The seed switch must be running the latest Fabric OS version of all the switches in the fabric.
Sometimes, the seed switch is auto-selected, such as when a fabric segments or when two fabrics merge.
Other times, you are prompted to change the seed switch, such as in the following cases:
•
If, during fabric discovery, Fabric Manager detects that the seed switch is not running the latest
Fabric OS version, you are prompted to change the seed switch.
•
When one or more switches join the fabric or if the switch firmware is changed on any of the
switches in the fabric, Fabric Manager checks to make sure that the seed switch is still running the
latest Fabric OS version. If it is not, then you are prompted to either upgrade the firmware on the
seed switch or to change the seed switch to a switch running the latest firmware.
Fabric Manager Administrator’s Guide
Publication Number: 53-1000196-01-HP
4-7
4
Changing the Seed Switch
Note that if a fabric of switches running only Fabric OS v2.x or older is created due to segmentation,
Fabric Manager continues to monitor that fabric, but if any switch with a higher Fabric OS version joins
the fabric, you do not receive any prompts to change the seed switch.
You can change the seed switch as long as the following conditions are met:
•
•
•
The new seed switch is HTTP-reachable from Fabric Manager.
The new seed switch is running the latest Fabric OS version in the fabric.
You have physical fabric administrator level access to the new seed switch for Admin Domainaware fabrics.
This operation preserves historical and configuration data, such as performance monitoring, change
management, and user-customized data for the selected fabric.
Caution
If the seed switch firmware is downgraded from Fabric OS v5.2.x to a lower version, then all RBACrelated data is discarded from Fabric Manager.
If, during the seed switch change, the fabric is deleted, but the rediscovery operation fails (for example,
if the new seed switch becomes unreachable via HTTP), then you must rediscover the fabric again. If
you rediscover the fabric using a switch that was present in the fabric before the change seed switch
operation was performed, then all of the historical and configuration data is restored to the rediscovered
fabric. If you rediscover the fabric using a switch that was added to the fabric after the fabric was
deleted, then the historical and configuration data is lost.
If multiple users try to change the seed switch of the same fabric simultaneously, only the first change
seed switch request is executed; subsequent requests that are initiated before the first request completes
will fail.
If another user changes the seed switch of a fabric you are monitoring, and if you have provided login
credentials for only that seed switch in the fabric, then you lose connection to the seed switch.
To change the seed switch
1.
Select the fabric for which you want to change the seed switch and click Tasks > Fabric
Management > Change seed Switch from the menu bar.
Alternatively, you can right-click the fabric in the View panel or Information panel and select
Change seed Switch from the context menu.
If the fabric contains other switches that are running the latest Fabric OS version and are also
HTTP-reachable from Fabric Manager, the Change Seed Switch dialog appears, as shown in
Figure 4-7. Otherwise, a message displays that you cannot change the seed switch.
4-8
Fabric Manager Administrator’s Guide
Publication Number: 53-1000196-01-HP
Deleting a Fabric from Fabric Manager
Figure 4-7
2.
4
Change Seed Switch Dialog
Select a switch to be the new seed switch from the Change Seed Switch dialog.
You can select only one switch. Only switches that are running the latest Fabric OS version in the
fabric are displayed. The current seed switch is not displayed in this list.
3.
Click Ok.
If you are not already logged in to the seed switch, the Fabric Login Dialog displays (as shown in
Figure 4-1).
If you are successfully authenticated, the fabric is deleted from Fabric Manager without purging
historical data, and the same fabric is rediscovered with the new seed switch.
Deleting a Fabric from Fabric Manager
If you decide you no longer want Fabric Manager to monitor a specific fabric, you can delete it.
Deleting a fabric also deletes any Change Management profiles and snapshots; removes Performance
Monitoring data (including historical statistics for its switches and any reports or graphs that have been
generated and saved in the database); and, any switches and ports from the fabric are removed from
their switch or port groups.
To delete a fabric from Fabric Manager
•
Right-click the fabric from View panel or Information panel that you want to remove and select
Delete from the context menu.
Fabric Manager prompts you to ensure that you want to delete the fabric.
Fabric Manager Administrator’s Guide
Publication Number: 53-1000196-01-HP
4-9
4
Renaming Fabric Components
Renaming Fabric Components
You can rename the following SAN elements in Fabric Manager:
•
•
•
•
•
•
Fabric
Switch
Port
Switch Group
Port Group
Device
Renaming a Fabric
When you discover a fabric, Fabric Manager assigns a name to that fabric that matches the name of the
switch that you used to discover the fabric. For example, to monitor a fabric that includes Switch_01,
enter the IP address of Switch_01 in the Fabric Discovery Login dialog box to discover the fabric.
Fabric Manager then names that fabric Switch_01.
Note
Fabric names and device names are concepts used only by Fabric Manager. Removing or renaming
fabric names and device names apply only to the Fabric Manager server.
After you discover the fabric, you can assign a more meaningful name (for example, mktng_SAN or
HQ).
Fabric information is global and any changes you make to the fabric, including renaming the fabric, are
displayed to all users connected to the Fabric Manager server. No information is copied or changed on
any switches.
To rename a fabric
1.
Right-click the fabric that you want to rename and select Rename from the context menu.
2.
Type a new name for the fabric and click OK.
Renaming a Switch
Switch information is global and any changes you make to the switch, including renaming the switch,
are displayed to all users connected to the server.
Note
Renaming a switch changes the switch configuration and affects all Fabric Manager servers accessing
the switch.
Switches can be identified by IP address, domain ID, World Wide Name (WWN), or customized switch
names that are unique and meaningful.
4-10
Fabric Manager Administrator’s Guide
Publication Number: 53-1000196-01-HP
Renaming Fabric Components
4
Switch names can be a maximum of 15 characters long. They must begin with an alpha character, but
otherwise can consist of any combination of alphanumeric and underscore characters.
To rename a switch
1.
Right-click the switch you want to rename and select Rename from the context menu.
You must be logged in to the switch to rename it. If you are not logged in to the switch, Fabric
Manager prompts you to log in before proceeding.
2.
Type a new name for the switch and press Enter.
Renaming a Port
If you rename a port on a switch that runs Fabric OS versions 3.1.0 (and higher) or 4.1.0 (and higher),
Fabric Manager propagates that name to the port and changes the port name on the switch, provided the
fabric login information has been set up successfully.
Note
If you want to rename a port on a switch that runs firmware versions prior to 3.1.0 or 4.1.0, the port
name is local to the Fabric Manager server.
Port information is global and any changes you make to the port, including renaming the port, are
displayed to all users accessing the server. Neither Fabric Manager nor the Fabric OS enforce names to
be unique. You should use port names that are easy to distinguish.
To rename a port
1.
In the Information panel, right-click the port you want to rename and select Rename from the
context menu.
2.
Type a new name for the port and press Enter.
Renaming a Device
Devices are identified using WWN and SCSI inquiry or custom names that are unique and meaningful.
Use the following procedure to rename a single device name.
You can also rename devices by importing the names from import device names using the Device Name
Import Wizard and rename several devices at once.
To rename a device
1.
Select a fabric from View panel.
2.
Click the FC Devices tab in the Information panel to display the list of devices for that fabric.
3.
Right-click the device you want to rename and select Rename from the context menu (see
Figure 4-8).
Fabric Manager Administrator’s Guide
Publication Number: 53-1000196-01-HP
4-11
4
Renaming Fabric Components
Figure 4-8
Renaming a Device Port
Importing Device Names
The Device Name Import wizard allows you to easily rename device names by importing them.
You can rename devices by:
•
•
•
Using Zone Aliases
Importing Names from a .csv File
Importing FDMI Host Names
To import device names
1.
Select Tasks > Device Sharing and Troubleshooting > Import Device Node/Port Names from
the Menu bar.
The Device Name Import wizard displays (see Figure 4-9 on page 4-13).
2.
4-12
Follow the wizard instructions to complete the import process.
Fabric Manager Administrator’s Guide
Publication Number: 53-1000196-01-HP
Renaming Fabric Components
Figure 4-9
4
Device Name Import Wizard
Using Zone Aliases
You can name devices using zone aliases by placing a WWN in a zone alias and then defining the name
as you want. Subsequently, the device is identified using the name of the alias in which it was placed,
using the zone alias as the name of the device.
Before you rename a device using a zone alias, note the following:
•
If an alias contains more than one member and one or more of those members is not a WWN, then
the alias is ignored.
•
If an alias contains more than one member and all members are WWNs, an “_x” string is appended
to the alias where x is an incrementing number.
•
•
•
If a WWN is contained in multiple aliases, one of the aliases is selected at random.
•
The Name value is stored in a different table from the device information. This allows the device to
exit the fabric and return without losing the user configured name.
•
The name defaults to www-symbolicName-role or www-SCSIInquiryName-role where role is:
initiator, target, both, or unknown.
An import operation overrides current names for devices.
The names are global to the Fabric Manager server and they apply to the devices for all fabrics on
that Fabric Manager server.
Importing Names from a .csv File
When importing from a comma-separated value (.csv) file, Fabric Manager first parses the file for
errors. If any invalid data is found, an alert box asks you whether to skip the invalid lines and continue
the import process.
Fabric Manager Administrator’s Guide
Publication Number: 53-1000196-01-HP
4-13
4
Working With Switch and Port Groups
The format for the .csv file is:
WWN, name, comment
For example:
10:00:00:00:00:00:00:00, test_node, device node for testing purposes only
The parser ignores anything after the second comma to the end of the line.
Importing FDMI Host Names
You can import FDMI host names as device port names. All FDMI host names and their WWNs that are
currently in the device port database table for the selected fabric are imported. Device port names that
match the WWN are renamed to the corresponding host name.
Working With Switch and Port Groups
This section describes how to use Fabric Manager to create groups of SAN elements (switch groups or
port groups) that you can monitor and manage as a group.
Groups are global across Fabric Manager and are available only at the physical fabric level. Only users
that have physical fabric access to all of the managed fabrics can view the switch and port groups. Users
that are using the same Fabric Manager server see the same groups and can make changes to these
groups.
Creating groups allows you to organize switches or ports by function, type, firmware version, or any
other criteria that you select. You can also create functional hierarchies of groups. Using switch or port
groups simplifies your management tasks. For example, you can log in to all switches in a group or
activate licenses on all group members simultaneously. Additional reasons for creating groups include
the following:
•
•
•
Create groups of switch model types or firmware versions to expedite firmware downloads.
•
•
•
Group switches by physical location to monitor fabrics in disparate locations.
•
Nest fabrics to drill down to the source of a problem; for instance, if you create a switch group for a
campus and then nest within that switch groups for departments, you can move down the hierarchy
to determine the source of any status change.
•
•
•
Create separate groups for monitoring and management to reduce unnecessary levels of nesting.
Activate licenses on all group members simultaneously.
Group switches by function to monitor switches that belong to different departments or that serve
as a backbone to the SAN.
Group switches by SAN island to monitor or update individual islands.
Group switches by redundancy so you can maintain one half of a fabric while the other half
continues to carry traffic.
Group ports by certain devices and hosts to more easily monitor those elements.
Use groups to simplify the monitoring view of a large or complex fabric.
See the following sections for information about working with switch and port groups:
•
•
4-14
“Understanding the Groups View” on page 4-15
“Creating and Populating Switch Groups” on page 4-16
Fabric Manager Administrator’s Guide
Publication Number: 53-1000196-01-HP
Working With Switch and Port Groups
•
•
•
•
4
“Editing a Switch Group” on page 4-18
“Creating Port Groups” on page 4-19
“Editing a Port Group” on page 4-20
“Deleting a Switch or Port Group” on page 4-20
Understanding the Groups View
The right-hand panel displays details about the selected element in the left-hand panel. The information
is displayed in an At-A-Glance view. Figure 4-10 shows two group At-A-Glance views in the right-hand
panel of the Groups View.
The At-A-Glance views might contain links that you can click to display additional information. For
example, in Figure 4-10 the Groups Information and Member Switches are expanded in the BldgA
group display.
Click links to display
additional information
Switch and port icons indicate the
types of switch and ports included in
the SAN element. Mouse over the icon
for a brief description.
Click icons to perform specific
tasks. Mouse-over the icon for
a brief description.
Figure 4-10 Groups View Example
Fabric Manager Administrator’s Guide
Publication Number: 53-1000196-01-HP
4-15
4
Working With Switch and Port Groups
At the bottom left of each At-A-Glance view are icons that display the types of switches and ports
included in that view. You can mouse-over these icons to get a brief summary of the switch or port type.
The At-A-Glance Views contain clickable icons that perform specific tasks, ranging from changing
views to opening a telnet session. Table 4-1 shows the complete list of icons. Not all icons are available
for all elements.
Table 4-1
At-A-Glance Icons
Icon Name
Expand List
Description
Expands the list within the At-A-Glance window to reveal additional
information. Located in the header of the At-A-Glance window.
Edit View Options Launches the Edit View Options dialog so you can customize the
information displayed in the view.
Update
Updates the information in the displayed view.
Telnet
Opens a telnet session to the switch. See “Opening a Telnet Session for a
Nonsecure Switch” on page 11-6 for additional information.
Admin View
Launches the Switch Admin module of Web Tools.
Switch Events
Opens the Events view for the switch in a new Fabric Manager window.
Group Events
Opens the Events view in a new Fabric Manager window for the
appropriate group.
Fabric Watch
Launches the Fabric Watch module of Web Tools.
Health Report
Displays the Switch Health Report in a separate window.
Group Creation
Opens the Edit Switch Group window.
Creating and Populating Switch Groups
Use the following procedure to create and populate switch groups. A switch can be in multiple switch
groups at the same time.
If a switch is removed from a fabric and it was a member of a group, it is also automatically removed
from the group.
Note
When you create port groups, it is better to create more port groups with fewer ports in each group than
to create fewer port groups with a lot of ports in each group. The Fabric Manager client memory usage
increases with the number of ports you have in a port group when you view that port group.
To create a group of switches or ports
1.
Click Tasks > Groups > Manage Switch/Port Groups from the Menu bar.
The Groups View displays (see Figure 4-11).
4-16
Fabric Manager Administrator’s Guide
Publication Number: 53-1000196-01-HP
Working With Switch and Port Groups
Click this icon to
create switch groups
4
Click this icon to
create port groups
Figure 4-11 Switch and Port Groups View
2.
Select My SAN from the tree in the left-hand side of the window.
3.
Click the switch group creation icon
in the SwitchGroups panel to create switch groups.
The Edit Switch Groups window appears, as shown in Figure 4-12.
Figure 4-12 Edit Switch Groups Window
4.
Select the SwitchGroups icon in the right-hand panel of the Edit Switch Groups window.
The group that you create will be nested within the item that you click in this step. If you click an
existing group instead of the SwitchGroups icon, your new group appears as a subgroup of that
group. Using Figure 4-12 as an example, select BldgA to create a new subgroup within that group;
select SwitchGroups to create a new group at the same level in the hierarchy as BldgA and BldgB.
Fabric Manager Administrator’s Guide
Publication Number: 53-1000196-01-HP
4-17
4
Working With Switch and Port Groups
After you create a group, you can drag it to a new location in the hierarchy.
5.
Click Create.
The Create Group dialog box displays.
6.
Type a name for your group in the Name field and click OK.
The new switch group appears in the right-hand side of the Edit Switch Groups window.
7.
Select the switch group that you created in the right-hand side of the Edit Switch Groups window.
8.
Select the switches that you want to add to your group from the SAN Elements tab on the left-hand
side of the Edit Switch Groups window; then click the right-arrow to add the switch to the group.
To add multiple switches at once, you can either press and hold the Ctrl key as you click additional
switches or drag any node in the tree to add the switches from that node. Drag switches directly
from the SAN Elements tab to the switch group to populate the group quickly.
To delete switches from the group, select the switches in the right-hand side of the window and
click Delete.
To rename the group, select the group and click Edit.
9.
Click OK in the Edit Switch Groups window when you are finished adding switches to your group.
The new switch group displays in the SAN Elements tab on the left-hand side of the Groups View.
You can click the switch group to view its members.
Editing a Switch Group
Use the following procedure to edit a switch group. You can add and delete group members and rename
the group.
To edit a switch group
1.
Click Tasks > Groups > Manage Switch/Port Groups from the Menu bar.
The Groups View displays (see Figure 4-11).
2.
Right-click SwitchGroups in the SAN Elements tab on the right-hand side of the window, and
select Edit Switch Groups from the context menu.
Alternatively, you can click the switch group creation icon in the SwitchGroups panel.
The Edit Switch Groups window appears, as shown in Figure 4-12.
3.
Select the switch group that you want to edit from the right-hand side of the window.
4.
Add any members from one group to another by dragging the members to another group.
Delete a member from a group by selecting it and clicking Delete.
Rename the group by selecting it and clicking Edit.
5.
4-18
Click OK to save the changes and close the Edit Switch Groups window.
Fabric Manager Administrator’s Guide
Publication Number: 53-1000196-01-HP
Working With Switch and Port Groups
4
Creating Port Groups
When you create port groups, it is better to create more port groups with fewer ports in each group than
to create fewer port groups with a lot of ports in each group. The Fabric Manager client memory usage
increases with the number of ports you have in a port group when you view that port group.
To create a group of ports
1.
Click Tasks > Groups > Manage Switch/Port Groups from the Menu bar.
The Groups View displays (see Figure 4-11).
2.
Select My SAN from the tree in the left-hand side of the window.
3.
Click the port group creation icon
in the PortGroups panel to create port groups.
The Edit Port Groups window appears, as shown in Figure 4-13.
Figure 4-13 Edit Port Groups Window
4.
Select the PortGroups icon in the right-hand panel of the Edit Port Groups window.
The group that you create will be nested within the item that you click in this step. If you click an
existing group instead of the PortGroups icon, your new group appears as a subgroup of that group.
Using Figure 4-13 as an example, select FastPorts to create a new subgroup within that group;
select PortGroups to create a new group at the same level in the hierarchy as FastPorts and
SlowPorts.
After you create a group, you can drag it to a new location in the hierarchy.
5.
Click Create.
The Create Group dialog box displays.
6.
Type a name for your group in the Name field and click OK.
The new port group appears in the right-hand side of the Edit Port Groups window.
7.
Select the port group that you created in the right-hand side of the Edit Port Groups window.
8.
Select the ports that you want to add to your group from the SAN Elements tab on the left-hand side
of the Edit Ports Groups window; then click the right-arrow to add the port to the group.
Fabric Manager Administrator’s Guide
Publication Number: 53-1000196-01-HP
4-19
4
Working With Switch and Port Groups
To add multiple ports at once, you can either press and hold the Ctrl key as you click additional
ports or drag any node in the tree from the SAN Elements tab to the port group to populate the
group quickly.
To delete ports from the group, select the ports in the right-hand side of the window and click
Delete.
To rename the group, select the group and click Edit.
9.
Click OK in the Edit Port Groups window when you are finished adding ports to your group.
The new port group displays in the SAN Elements tab on the left-hand side of the Groups View.
You can click the port group to view its members.
Editing a Port Group
Use the following procedure to edit a port group. You can add and delete group members and rename
the group.
To edit a port group
1.
Click Tasks > Groups > Manage Switch/Port Groups from the Menu bar.
The Groups View displays (see Figure 4-11).
2.
Right-click PortGroups in the SAN Elements tab on the right-hand side of the window, and select
Edit Port Groups from the context menu.
Alternatively, you can click the port group creation icon in the PortGroups panel.
The Edit Port Groups window appears, as shown in Figure 4-13.
3.
Select the port group that you want to edit from the right-hand side of the window.
4.
Add any members from one group to another by dragging the members to another group.
Delete a member from a group by selecting it and clicking Delete.
Rename the group by selecting it and clicking Edit.
5.
Click OK to save the changes and close the Edit Switch Groups window.
Deleting a Switch or Port Group
Use the following procedure to delete a switch or port group.
To delete a switch or port group
1.
Click Tasks > Groups > Manage Switch/Port Groups from the Menu bar.
The Groups View displays (see Figure 4-11).
2.
Right-click a group in the SAN Elements tab on the right-hand side of the window and click Delete
from the context menu:
You can also delete a group directly from the SAN Elements tab by selecting the group and then
pressing Delete on your keyboard.
3.
4-20
Click Yes in the confirmation window.
Fabric Manager Administrator’s Guide
Publication Number: 53-1000196-01-HP
Chapter
Viewing Fabric Topologies
5
The chapter provides information about the View panel within Fabric Manager. The View panel
provides a graphical representation of the elements that Fabric Manager monitors and all of their
connections. This includes logical SANs (LSANs) and any virtual switches and links associated with
them.
See the following sections for information about the using View panel:
•
•
•
“Understanding the View Panel” on page 5-1
“Topology Views” on page 5-5
“Viewing Link Information” on page 5-9
Understanding the View Panel
The View panel displays a topological view of the SAN or fabric based on the view you select in the
Scope panel (see Figure 5-1). This view is a filtered view that displays only those elements in your
current Admin Domain.
Figure 5-1
Fabric Manager Administrator’s Guide
Publication Number: 53-1000196-01-HP
View Panel
5-1
5
Understanding the View Panel
You can choose to identify the switches by name, IP address, WWN, or domain ID (see “Scope Panel”
on page 3-7). In Figure 5-1 the switches are identified by IP address.
The colors that appear as background headers provide a quick, visual status. See “Status Indicators” on
page 3-14 for information.
View Panel Toolbar Items
The View panel includes application toolbar buttons (see Table 3-1 on page 3-11) as well as its own set
of toolbar buttons, described in Table 5-1.
Table 5-1
Icon
View Panel Toolbar Items
Name
Description
Pan
Drag the contents of the View panel in any direction to see different portions
of the fabric topology.
Select
Select any graphical object (fabric, switch, or device) or line connection in
the View panel. You can move the graphical objects with this tool.
Zoom in
rectangle
Click and drag to zoom in on a particular rectangular region of the topology.
Zoom in
Click to zoom in.
Zoom out
Click to zoom out.
Fit to view
Click to fit the entire topology in your Fabric Manager window.
Overview
Click to open a window that displays the entire topology in miniature. The
View panel displays what is in the rectangular area in the miniature overview.
See “Changing the Layout” on page 5-4 for more information.
Legend
Click to open (or close) a window that displays the legend for status, link, and
event information. Each type of information is displayed in a separate tab in
the Legend window. Figure 5-2 shows the three tabs of the Fabric Legend
window. In the SAN View, only the Status and Event tabs are available.
Orthogonal/ Click to toggle the style of the links between straight style, so they connect in
straight links a straight line from one element to another, or orthogonal style, in horizontal
and vertical lines, with right angles, to connect elements. Figure 5-4 shows an
example of orthogonal links.
5-2
Relayout the
nodes
Click to automatically rearrange the graphical objects in the View panel in an
orderly arrangement. This is useful if you have moved the elements around a
lot.
Lock the
focus
Click to prevent the view from recentering on the selected object if the
selected object is offscreen. This button toggles between locking and
unlocking the focus.
Fabric Manager Administrator’s Guide
Publication Number: 53-1000196-01-HP
Understanding the View Panel
Figure 5-2
5
Fabric Legend, Three Tabs
Viewing Tool Tips
In the View panel, tool tips display when you move the mouse over an element or a link. The tool tip
provides additional information about that element or link. Figure 5-3 shows the tool tip for a switch.
Figure 5-3
Fabric Manager Administrator’s Guide
Publication Number: 53-1000196-01-HP
Tool Tip for a Switch
5-3
5
Understanding the View Panel
Selecting Items in the Topology
You can use the select tool to click an item in the View panel. When you select an item, the item
becomes highlighted and the Information panel displays detailed information about the item. For
example, in Figure 5-1 switch 10.32.151.161 is selected.
You can use Shift-Click to select multiple items in the View panel. If you select multiple items, the
Information panel displays data only for the first item selected. You can also click and drag the select
tool to select a group of items. You cannot select links using the click-and-drag method.
Changing the Layout
Click the Overview icon
in the View toolbar if it is difficult to view an entire fabric in the View
panel. A small window displays the entire fabric in a miniature (or zoomed out) format (see Figure 5-4).
This tool includes a gray box that you can drag over the portions of the fabric you want to have
displayed in the larger View panel. This tool helps you pinpoint the portion of a large fabric that you
want to view.
To move nodes, click the Select icon
in the toolbar and then drag a node. Fabric Manager stores the
changes that you make to the locations of the nodes.
Figure 5-4
Miniature Topology Overview Window
Saving View Preferences
When you exit the Fabric Manager client, the following topology view settings are automatically saved
and are restored the next time you launch the client:
•
•
•
5-4
Connection option (orthogonal or straight links)
Legend (default is to not display the legend)
Mini-map (default is to not display the mini-map)
Fabric Manager Administrator’s Guide
Publication Number: 53-1000196-01-HP
Topology Views
5
Topology Views
Fabric Manager displays three types of topography views:
SAN View
Displays all of the monitored fabrics in the database.
Fabric View
Displays the topology of a single fabric; its focus is on the switches and their
interconnectivity.
Host-Storage View
Displays all of the monitored fabrics and their attached devices; its focus is on
end-to-end connectivity.
The Fabric View and Host-Storage View also allow you to display zone configurations.
Displaying Monitored Fabrics
In the Scope panel, click SAN View from the View drop-down menu. The View panel displays all of the
monitored fabrics in the database, as shown in Figure 5-5.
Figure 5-5
Displaying Monitored Fabrics in the SAN View
The background color of the fabric label indicates the status of the fabric, which is determined by the
most severe status of all of the switches in the fabric. The status hierarchy, from most severe to least is:
Down, Marginal, Unknown, and Healthy.
For example, in Figure 5-5 all of the switches in the fabric FM_200E_90 are healthy; in fabric
sw4100_wt161, at least one switch has Marginal status, and none are in Down status.
Fabric Manager Administrator’s Guide
Publication Number: 53-1000196-01-HP
5-5
5
Topology Views
Displaying Switch Interconnectivity
In the Scope panel, click Fabric View from the View drop-down menu. The View panel displays how
the switches in a fabric are interconnected, as shown in Figure 5-6.
Select the fabric you want to display, along
with the Admin Domain context.
Select which elements you want to display or hide.
Figure 5-6
Displaying Switch Interconnectivity in the Fabric View
In the Scope panel, you can select which fabric to display from the Fabric drop-down menu. For each
fabric, you can select the Admin Domain context from the Admin Domain drop-down menu. Only the
Admin Domains to which you have access are shown.
The Scope panel also contains a tabbed section from which you can choose which individual elements
you want to display or hide.
5-6
Fabric Manager Administrator’s Guide
Publication Number: 53-1000196-01-HP
Topology Views
5
Displaying Attached Devices
In the Scope panel, click Host-Storage View from the View drop-down menu. The View panel displays
the fabrics and their connected devices, as shown in Figure 5-7.
Using the Host-Storage View you can:
•
•
•
Visualize which storage devices are accessible by a particular host.
Visualize which hosts are possible initiators to a particular storage device.
See whether devices are routed to multiple fabrics (so you can check for redundancy).
Select the fabrics you want to display or hide,
along with the Admin Domain context.
Select which elements you want to display or hide.
Figure 5-7
Displaying Attached Devices in the Host-Storage View
In the Scope panel, the Fabric Scope section enables you to select which fabrics and Admin Domain
contexts to display. The Fabric Scope section lists all monitored fabrics in the SAN. Check the fabrics
you want to display in the View panel, and uncheck the fabrics you want to hide. For each fabric, you
can select the Admin Domain context you want to display from the drop-down menu. Only the Admin
Domains to which you have access are shown.
The Scope panel also contains a tabbed section from which you can choose which individual elements
you want to display or hide. For example, in Figure 5-7, the fabric contains four target devices, but only
three are displayed. The tabs in this section contain aggregate information from only the fabrics that are
checked in the Fabric Scope section.
Fabric Manager Administrator’s Guide
Publication Number: 53-1000196-01-HP
5-7
5
Topology Views
Displaying Zone Configurations
In the Fabric View and the Host-Storage View, you can select the Zone tab in the Scope panel to display
a graphical representation of a selected zone.
Figure 5-8 shows how you can visualize zones in the Host-Storage View. In the Scope panel, a single
fabric is selected in the Fabric Scope section. The fabric is Admin Domain-aware, and AD0 is selected.
In the tabbed section of the Scope panel, the Zone tab is selected. Within the Zone tab, the zone database
and zone configuration are selected. The selected zone database is from the offline zone database
repository, so you can see what the effects of implementing this zone database would be before you
actually save it to the fabric. (See “Managing Zoning Offline” on page 15-2 for information about
editing zones offline.)
The View panel displays a graphical representation of the initiator and target accessibility within the
zone.
The Information panel displays information about the zone members.
Figure 5-8
5-8
Displaying Zones in the Host-Storage View
Fabric Manager Administrator’s Guide
Publication Number: 53-1000196-01-HP
Viewing Link Information
5
Viewing Link Information
The Fabric View displays interswitch links (ISLs) between switches and the Host-Storage View
displays links from switches to devices. You can mouse over a link to display a summary tool-tip. You
can also click a link to highlight it and display detailed information about that link in the Information
panel.
Figure 5-9 shows information about the ISL between two switches. In the View panel, the switches at
either end of the link are circled.
Figure 5-9
Fabric Manager Administrator’s Guide
Publication Number: 53-1000196-01-HP
Information About ISLs
5-9
5
5-10
Viewing Link Information
Fabric Manager Administrator’s Guide
Publication Number: 53-1000196-01-HP
Chapter
Displaying Name Server Information
6
Fabric Manager launches Web Tools to display Name Server entries listed in the Simple Name Server
database (see Figure 6-1). This includes all Name Server entries for the fabric, not only those related to
the local domain. Each row in the table represents a different device. For detailed instructions on using
the Web Tools Name Server module, see the Web Tools Administrator’s Guide.
Figure 6-1
Name Server View
To display Name Server entries
1.
Select a fabric from the View panel or from the Fabrics tab in the Information panel.
2.
Right-click the fabric and select Name Server from the context menu, as shown in Figure 3-10 on
page 3-10.
Web Tools launches and displays the Name Server Table for the fabric selected (see Figure 6-1).
Note
Name Server entries are not automatically polled by default. Click Refresh in the Name Server window
to poll Name Server entries. You can also click the Auto Refresh checkbox and specify a time interval
at which the Name Server entries will be automatically refreshed.
Fabric Manager Administrator’s Guide
Publication Number: 53-1000196-01-HP
6-1
6
6-2
Displaying Name Server Information
Fabric Manager Administrator’s Guide
Publication Number: 53-1000196-01-HP
Chapter
Monitoring Alerts and Events
7
This chapter provides information about the alerts and events generated in Fabric Manager. The Alerts
tab within Fabric Manager provides a unified list of all of the alerts for any element you are monitoring.
The Events tab provides a list of events for the selected element. Fabric events are displayed at the
fabric, switch, and switch group levels.
See the following sections for information about working with alerts and events:
•
•
•
“Monitoring Alerts” on page 7-1
“Monitoring Fabric Events” on page 7-11
“Configuring Notification Parameters” on page 7-13
Monitoring Alerts
Alerts are Fabric Manager-specific events that are stored in the Fabric Manager database. For example,
if a switch is rebooting while data collection is being performed, an alert is generated indicating that the
switch is unreachable. When that same switch has finished booting and data collection occurs again, the
previous switch unreachable alert is changed to indicate that it is resolved.
Viewing Alerts
Alerts are displayed in the information panel, in the Alerts tab.
To view all alerts for all monitored fabrics
1.
Select the SAN in the View panel (click anywhere in the panel other than a fabric cloud).
2.
Click the Alerts tab in the Information Panel.
To view all alerts for a specific fabric
1.
Select the fabric in the View panel.
2.
Click the Alerts tab in the Information Panel.
To view all alerts for a specific switch
1.
Select the switch in the View panel (Fabric View only).
2.
Click the Alerts tab in the Information Panel.
Fabric Manager Administrator’s Guide
Publication Number: 53-1000196-01-HP
7-1
7
Monitoring Alerts
To view alerts for switch groups
1.
Click Tasks > Groups > Manage Switch/Port Groups.
The Groups view displays (see Figure 4-10 on page 4-15).
2.
3.
Select one of the following from the tree on the left side of the window, depending on the alerts you
want to display:
•
•
To view all alerts for all switch groups, select the SwitchGroups node.
•
To view all alerts for a specific switch in a switch group, expand the SwitchGroups node,
expand the user-created switch group, and select the switch.
To view all alerts for a specific switch group, expand the SwitchGroups node and select the
user-created switch group.
Click Alerts in the view selection panel on the right side of the window.
Figure 7-1 shows an example of the Alerts tab.
Unacknowledged and unresolved alert information is displayed in bold text by default in the Alerts tab.
You can configure the alert display options to change what types of alerts are displayed in bold text.
All alerts, regardless of status, remain in the Alerts tab until you delete them.
When a fabric is deleted from Fabric Manager, any alerts generated by the fabric or its member switches
are deleted from the Fabric Manager database as well.
Figure 7-1
Alerts Tab
Identifying Alerts
Any switches and fabrics with unacknowledged or unresolved alerts of either Critical or Warning
severity level are easy to identify in the Fabric Manager interface. The upper right corner of the Fabric
Manager client displays a SAN-level summary of unacknowledged and unresolved alerts, as shown in
Figure 7-2. The alerts are organized by severity level (for example, “1 Critical, 3 Warning”), and each
category is a link. When you click one of these links, the SAN level topology is displayed in the View
Panel and the SAN details are displayed in the Information Panel with the Alerts tab selected. The filter
on the Alerts tab is set to display the severity level of the clicked link.
7-2
Fabric Manager Administrator’s Guide
Publication Number: 53-1000196-01-HP
Monitoring Alerts
7
You can right-click any of the alerts in the Alerts tab and then click Show on Topology to display and
highlight the item in the View Panel to which the alert applies (see Figure 7-2).
Alert count
Figure 7-2
Identifying Alerts
Table 7-1 lists the types of alerts in Fabric Manager.
Fabric Manager Administrator’s Guide
Publication Number: 53-1000196-01-HP
7-3
7
Monitoring Alerts
Table 7-1
Alert Types
Type of Alert
Description
Switch Status Change
Generated whenever a switch changes from Healthy to Marginal or from
Healthy to Down. Note the following characteristics:
•
If the reason a switch is Marginal or Down changes, but the Marginal or
Down status remains unchanged, a new alert is not generated. The
original alert remains in the Alerts view but the reason for the Marginal
or Down status is updated in the Description column.
•
If the switch status changes between Marginal and Down, a new alert is
not generated. The original alert remains in the Alerts view but the new
severity is updated in the Severity column and the reason for the status
change is also updated in the Description column.
•
If the switch status changes from Marginal or Down to Healthy, the
original alert remains in the Alerts view but its entry in the Resolved
column automatically changes from No to Yes.
The switch status corresponds to the switchStatusPolicyShow and
switchStatusPolicyChangeSet Fabric OS commands.
Switch Unreachable
Seed switch change
Generated whenever the Fabric Manager server is unable to reach a switch.
Note the following characteristics:
•
A new alert is not generated as long as the switch remains unreachable.
The original alert remains in the Alerts view but the Last Occurrence
column is continuously updated with latest unreachable times until the
alert is resolved.
•
The alert is resolved when the Fabric Manager server is able to reach the
switch, if the switch is deleted from either the fabric or Fabric Manager,
or if the fabric the switch belongs to is deleted from Fabric Manager.
Generated when you try to change the seed switch. A fabric-level alert is
displayed when the seed switch is successfully changed; a fabric-level
critical alert is displayed when the seed switch change fails.
A fabric-level alert is also generated when the seed switch is not running the
latest Fabric OS version in the fabric. This might happen if:
•
•
•
A switch running a newer version of Fabric OS joins the fabric.
Firmware is upgraded on one of the existing switches in the fabric.
Two fabrics are merged and the automatically selected seed switch is not
the switch running the latest Fabric OS version.
The alert is resolved when the seed switch firmware becomes the latest
firmware available in the fabric, either because you upgrade the firmware on
the seed switch or change the seed switch to a switch with the latest firmware
version. See “Changing the Seed Switch” on page 4-7 for more information.
Note: If a fabric running only Fabric OS 2.x or lower switches is created due
to fabric segmentation, that fabric continues to be managed from Fabric
Manager; however, if a switch with a higher Fabric OS version joins the
fabric, an alert requesting you to change the seed switch is not generated.
7-4
Fabric Manager Administrator’s Guide
Publication Number: 53-1000196-01-HP
Monitoring Alerts
Table 7-1
7
Alert Types (Continued)
Type of Alert
Description
Change Management
Generated only if you have elected to receive alerts through the Change
Management feature in Fabric Manager. Any alerts generated on switches or
fabrics as defined in your Change Management profile are also displayed in
the Alerts tab. Note the following characteristics:
•
If an alert is triggered by a Change Management profile, the alert status
is updated each time a scheduled Change Management check is run. If
there is no change in the alert status, the original alert is updated
continuously in the Last Occurrence column of the Alerts tab with the
latest unreachable time until the alert is resolved.
•
If you change the baseline Change Management profile that is
configured to trigger alerts, any alerts previously triggered by that
defined baseline profile remain in the Alerts tab but the status is changed
from No to Yes in the Resolved column. Also, the reason for the status
change is updated in the Description column to indicate that it is
resolved because of a baseline change.
See Chapter 9, “Change Management” for additional information about the
types of trigger alerts you can set using Change Management profiles.
supportSave and
supportShow capture
FDMI
Generated when Fabric Manager is trying to capture supportSave or
supportShow information.
•
If the operation succeeds, an info alert is displayed. The alert contains
the location of the log files on the FTP server.
•
If the operation fails, an error alert is displayed. The alert contains the
reason for the failure (for example, if the FTP server does not have
enough space to hold the logs).
Generated when the FDMI data can not be collected. If FDMI data is
collected successfully after failing the previous time, an alert is also
generated.
There must be at least one FDMI-capable switch (a switch running
Fabric OS v3.2.0 or higher) in the fabric for FDMI information to be
collected and for FDMI failure alerts to be generated.
iSCSI data collection
Fabric Manager Administrator’s Guide
Publication Number: 53-1000196-01-HP
Generated when iSCSI data collection fails because of invalid user
credentials. For successful iSCSI data collection, all iSCSI-capable switches
(switches with an FC4-16IP port blade) must have user credentials in the
Fabric Manager repository.
7-5
7
Monitoring Alerts
Table 7-1
Alert Types (Continued)
Type of Alert
Description
Password expiration or Generated when a password expires or is about to expire, or when a user
lockout
account is locked out due to too many unsuccessful login attempts.
Note the following characteristics:
User authentication
fails
•
If the password expiry warning period is reached, a switch-level
warning alert is displayed. The alert is resolved when either the
password expires or when the password is changed and the user
authenticates to that switch from Fabric Manager.
•
If the password expires, a switch-level critical alert is displayed. The
alert is resolved when the password is changed and the user
authenticates to that switch from Fabric Manager.
•
If the user account is locked out, then a switch-level critical alert is
displayed. The alert is resolved when the account is unlocked.
Generated when a change to the user role prevents the user from being
authenticated on the switch. The last occurrence time of the alert is updated
every time the condition is detected, such as when the user logs in to the
switch or manually refreshes the status information, or when Fabric Manager
automatically polls the switch.
The alert is resolved when the user credentials are changed and
authentication is successful.
Performance
Monitoring
Two types of alerts are generated via Performance Monitoring: data
collection (via the five-minute thread), and end-to-end monitor validation
(via the 24-hour thread).
The alerts are resolved (by the five-minute and one-hour threads,
respectively) when the error condition that raised the alert is rectified. The
alert is logged the first time the error is encountered and remains until the
data is recaptured successfully or you turn Performance Monitoring off.
The following scenarios generate an alert:
•
•
Resource limit exceeded
•
•
•
Combination of resource limit and license missing
•
Database exceptions
Advanced Performance Monitoring license removed or otherwise
unavailable on a switch where end-to-end monitors needs to be created
Authentication failure via API
API reports a fabric access exception, causing an alert to be logged with
the API error code and error message (if available)
These alerts are at the fabric level.
7-6
Fabric Manager Administrator’s Guide
Publication Number: 53-1000196-01-HP
Monitoring Alerts
7
Filtering Alerts
You can filter the alerts that are displayed in the Alerts tab according to the severity of the alert, whether
the alert was acknowledged or resolved, and the source ID of the alert.
To filter alerts
1.
Select a fabric, switch, or the entire SAN in the View Panel, as described in “Monitoring Alerts” on
page 7-1.
You cannot filter the switch group alerts.
2.
Click the Alerts tab in the Information Panel.
3.
Select the filters at the top of the table to narrow down the information that displays in the Alerts
tab.
•
•
•
•
Severity
Select Severity level to display only alerts of that severity.
Acked
Select Yes or No to display only alerts that are acknowledged or not.
Resolved
Select Yes or No to display only alerts that are resolved or not.
Source ID
Type the IP address of a switch to display alerts only for that switch. You can
use the “*” character as a wildcard character.
Selecting Any in the drop-down lists causes that attribute to be ignored. For example, to display all
unresolved, critical alerts, regardless of whether they have been acknowledged, set Severity to
Critical, set Resolved to No, and set Acked to Any.
4.
Click Filter.
The Alerts tab displays only the alerts match the filter you set up. To clear the filter and view the
entire list of alerts, click Show All.
Figure 7-3
Fabric Manager Administrator’s Guide
Publication Number: 53-1000196-01-HP
Filtering Alerts
7-7
7
Monitoring Alerts
Acknowledging Alerts
The Acked column in the Alerts tab indicates whether an alert is acknowledged.
When you acknowledge an alert, your user name is displayed in the Acked By column of the Alerts tab.
This lets other Fabric Manager users on the same server know that you have already acknowledged the
alert and are aware of the issue. Once an alert is acknowledged, it cannot be unacknowledged.
You can acknowledge alerts regardless of switch role.
To acknowledge alerts
1.
Display the alerts for the SAN, fabric, switch, or switch group, as described in “Monitoring Alerts”
on page 7-1.
2.
Select the alert you want to acknowledge.
3.
Click Ack.
The Acked column value changes from No to Yes, the Acked By column value displays your user
name, and the Acked Time column value displays the time that you acknowledged the alert.
Resolving Alerts
The Resolved column in the Alerts tab indicates whether an alert is resolved.
You cannot manually resolve Fabric Manager alerts. All alerts within Fabric Manager are automatically
resolved either when the issue no longer exists or the baseline has changed so that the alert is no longer
valid. See Table 7-1 on page 7-4 for information about alert resolution scenarios.
You can enable automatic deletion of resolved alerts after a period of time using the procedure
described in “Deleting Alerts,” next.
Deleting Alerts
You can delete Fabric Manager alerts manually from the Alerts tab or you can enable automatic alert
deletion. By default, automatic alert deletion is disabled.
Deleting Alerts Manually
You can delete only alerts that have been resolved. Any resolved alerts are identified with a Yes value in
the Resolved column of the Alerts tab.
To delete alerts manually
1.
Display the alerts for the SAN, fabric, switch, or switch group, as described in “Monitoring Alerts”
on page 7-1.
2.
Right-click the alert you want to delete and click Delete from the context menu.
Use Shift-click or Ctrl-click to select multiple alerts.
The alert is deleted and removed from the Alerts table.
7-8
Fabric Manager Administrator’s Guide
Publication Number: 53-1000196-01-HP
Monitoring Alerts
7
Deleting Alerts Automatically
You can configure Fabric Manager to automatically delete resolved alerts after a period of time.
When you enable automatic alert deletion, you specify the time period after which resolved alerts are
deleted. The options are 60, 90, or 120 days; the default is 90 days. For example, if you set the alert
history period to 60 days, a resolved alert is deleted 60 days after the date on which it was resolved.
Only resolved alerts are deleted (alerts with a Yes in the Resolved column of the Alerts tab).
Automatic alert deletion is triggered once every 24 hours; enabling automatic alert deletion does not
immediately trigger alert deletion.
To enable automatic deletion of resolved alerts
1.
Click Edit > Preferences.
The Options dialog displays.
2.
Expand Server specific and click Alerts History.
The Alerts History pane displays (see Figure 7-4 on page 7-10).
3.
Check the Purge checkbox to enable automatic alert deletion.
4.
Select the time period after which resolved alerts are to be deleted.
Clicking Restore to Defaults sets the alert history period to the default value (90 days).
5.
Click OK.
Resolved alerts are deleted after the alert history period is exceeded.
To disable automatic deletion of resolved alerts
1.
Click Edit > Preferences.
The Options dialog displays.
2.
Expand Server specific and click Alerts History.
The Alerts History pane displays (see Figure 7-4).
3.
Uncheck the Purge checkbox to disable automatic alert deletion.
4.
Click OK.
Resolved alerts are no longer automatically deleted.
Fabric Manager Administrator’s Guide
Publication Number: 53-1000196-01-HP
7-9
7
Monitoring Alerts
Figure 7-4
Alerts History
Configuring Alert Display Options
By default, unacknowledged and unresolved alert information is displayed in bold type in the Alerts tab,
and all other alerts are displayed in normal type. Using the following procedure, you can change which
type of alert information is displayed in bold type.
To configure alert display options
1.
Click Edit > Preferences.
The Options dialog displays.
2.
Expand Server specific and click Alert Display Options.
The Alert Display Options pane displays (see Figure 7-7).
7-10
3.
Select which type of alert is to be displayed in bold text in the table.
4.
Click OK.
Fabric Manager Administrator’s Guide
Publication Number: 53-1000196-01-HP
Monitoring Fabric Events
Figure 7-5
7
Alert Display Options
Monitoring Fabric Events
Fabric events are events generated by the Fabric OS. Fabric Manager displays these events in the
Information panel. These events are not stored in the Fabric Manager database.
Viewing Fabric Events
You can monitor fabric and switch events from the Events tab in the Information panel. The Events tab
allows you to filter events to include only the information you want, and export, copy, and print the
table.
You should view fabric events on a periodic basis to see if any action is required. How often you should
check depends on your company’s requirements.
Events have the following severities:
•
•
•
•
•
•
Panic
Critical
Error
Warning
Information
Debug
To view all events for a specific fabric
1.
Select the fabric in the View panel.
2.
Click the Events tab in the Information Panel.
Fabric Manager Administrator’s Guide
Publication Number: 53-1000196-01-HP
7-11
7
Monitoring Fabric Events
To view all events for a specific switch
1.
Select the switch in the View panel (Fabric View only).
2.
Click the Events tab in the Information Panel.
To view events for switch groups
1.
Click Tasks > Groups > Manage Switch/Port Groups.
The Groups view displays (see Figure 4-10 on page 4-15).
2.
3.
Select one of the following from the tree on the left side of the window, depending on the events
you want to display:
•
To view events for a specific switch group, expand the SwitchGroups node and select the usercreated switch group.
•
To view events for a specific switch in a switch group, expand the SwitchGroups node, expand
the user-created switch group, and select the switch.
Click Events in the view selection panel on the right side of the window.
The Events tab displays a list of all the events for the selected fabric or switch, as shown in Figure 7-6.
For switch groups, the list of events displays in the Groups view.
Figure 7-6
Events Tab for a Fabric
Filtering Fabric Events
You can filter the fabric events that are displayed in the Events tab according to the number of events
you want to view, the severity level of the events, and the time frame.
7-12
Fabric Manager Administrator’s Guide
Publication Number: 53-1000196-01-HP
Configuring Notification Parameters
7
To filter fabric events for switches and fabrics
1.
Select a fabric, switch, or the entire SAN in the View Panel, as described in “Monitoring Fabric
Events” on page 7-11.
2.
Click the Events tab in the Information panel.
3.
Select the filter options. You might need to resize the panel to display all of the filter options and
buttons.
4.
a.
Select the number of events to display from the Number of events drop-down list.
b.
Select the event severity from the Severity drop-down list.
c.
Select the time for which you want to display events. You can select either the most recent
events or select a specific time range.
Click Filter.
The Events tab displays only those events that match the selected criteria.
To filter fabric events for switch groups
1.
Access the switch groups event list, as described in “Monitoring Fabric Events” on page 7-11.
2.
Click Events in the view selection panel on the right side of the window.
3.
Click Filter in the Events view panel.
4.
Check the appropriate checkboxes to filter events by number, severity, and time, and select values
from the corresponding drop-down menus.
5.
Click OK.
The Events panel displays only those events that match the selected criteria.
Configuring Notification Parameters
You can configure notification parameters for Change Management and Call Home email notifications
on a global basis because each user on a server shares the same configuration values. The configuration
information is stored in the Fabric Manager database and persists across client and server reboots.
You must configure notification parameters before specifying that you get email notifications or reports
for Change Management or Call Home.
To configure notification parameters
1.
Click Edit > Preferences in the Menu bar.
The Preference dialog displays.
2.
Expand Server specific and click Notifications.
The Notification pane displays, as shown in Figure 7-7 on page 7-14.
3.
Fill out the fields in the Notification pane as follows:
Fabric Manager Administrator’s Guide
Publication Number: 53-1000196-01-HP
7-13
7
Configuring Notification Parameters
•
Mail Server Address
The IP address or DNS name of the mail server
•
Change Management From-Address
The email address that will appear in the email as the From: address
•
Call Home From-Address
The email address that will appear in the email as the From: address
4.
Select the format of the XML file for Call Home by clicking either the Format 1 (default) or
Format 2 radio button.
Fabric Manager provides two formats for the XML file. Click Show Selected Format to display
the format of the selected XML file.
5.
Optional: If you use an SMTP mail server that requires authentication, check the Server requires
authentication checkbox in the SMTP area and type the username and password to be used for
authentication in the Username and Password fields respectively.
6.
Optional: To send a test email, type an email address in the Send Test Email To field and click
Test. The Test button is disabled until you type a valid email address.
7.
Click OK.
Figure 7-7
7-14
Notification Configuration
Fabric Manager Administrator’s Guide
Publication Number: 53-1000196-01-HP
Chapter
Using Performance Monitoring
8
The performance monitoring feature in Fabric Manager provides insight into how much traffic a
particular port or device is generating on the fabric over a specific timeframe. It is also used to indicate
the devices that are creating the most traffic and to identify the ports that are the most congested.
Performance monitoring is enabled or disabled on an entire fabric, not on a switch or port basis. Before
you can enable performance monitoring and create reports, graphs, or report templates, you must first
log in to the seed switch of the fabric. The seed switch must have an activated Brocade Advanced
Performance Monitoring license if you want the end-to-end feature (it is not required for port statistics
monitoring). End-to-end monitors are not set on switches without the license.
The benefit of using performance monitoring is diminished if it is enabled or disabled on an as-needed
basis. Performance monitoring should be enabled constantly to receive the necessary historical data
required for a meaningful report.
You can use Fabric Manager or an external tool (such as Crystal Reports) to run reports and generate
graphs based on the information captured in Fabric Manager.
All the data collected in performance monitoring is stored in the database. If you are monitoring large
fabrics, ensure that you have ample database space to store all of the information.
If you delete a fabric, all performance monitoring data for that fabric is also deleted from the database.
Note
Fabric Manager does not support Advanced Performance Monitoring on iSCSI ports (GbE ports on the
FC4-16IP port blade).
See the following sections for information about working with performance monitoring:
•
•
•
•
•
•
•
•
•
•
•
•
“Performance Monitoring Components” on page 8-2
“Enabling Performance Monitoring” on page 8-5
“Disabling Performance Monitoring” on page 8-7
“Generating Custom Reports and Graphs” on page 8-7
“Creating and Using Report Templates” on page 8-13
“Saving Performance Monitor Reports or Graphs” on page 8-17
“Printing Performance Monitor Reports” on page 8-17
“Exporting Reports” on page 8-18
“Displaying Saved Reports and Graphs” on page 8-18
“Deleting Reports and Graphs” on page 8-19
“Editing Performance Monitor Graphs” on page 8-19
“Displaying Performance Monitor Reports in External Applications” on page 8-20
Fabric Manager Administrator’s Guide
Publication Number: 53-1000196-01-HP
8-1
8
Performance Monitoring Components
Performance Monitoring Components
Before you start using performance monitoring on your fabric, you need to be familiar with the
following components:
•
•
•
•
•
•
“Port Statistics” on page 8-2
“End-to-End Monitoring” on page 8-2
“Granularity” on page 8-3
“Reports” on page 8-3
“Graphs” on page 8-4
“Templates” on page 8-4
Port Statistics
The port statistics component within the performance monitoring feature in Fabric Manager allows you
to see how much traffic a particular port is generating on a fabric over a period of time. The receive
(RX) and transmit (TX) values for ports are retrieved over a specific timeframe and stored in a database.
Monitoring port statistics does not require an Advanced Performance Monitoring license.
End-to-End Monitoring
End-to-end monitoring sets all possible target and initiator pairs from the filtered list retrieved from the
API for the fabric. Fabric Manager stores the configuration of the monitors persistently and periodically
re-creates them on the fabric as necessary. Each time the Fabric Manager server retrieves the monitor
values, it checks for and re-creates any monitors (configured through Fabric Manager) that are no
longer present. If a resource limit is reached while trying to set all of the possible pairs, performance
monitoring does not attempt to determine the best set of monitors. Instead, monitors are set on a firstcome, first-serve basis (in the order presented to Fabric Manager from the API).
Configuration of data capture file information is not supported. The monitor values for the end-to-end
monitors are retrieved at a set interval (that is not configurable) and stored in the database from the
previous release. You can then request that reports be generated from the stored data (see “Generating
Custom Reports and Graphs” on page 8-7).
Fabric Manager attempts to set the monitors between the following types of devices only:
•
•
•
•
•
initiator-target
initiator-unknown
target-unknown
initiator and target-any device role
unknown-any device role
Monitors between initiator-initiator and target-target are not set. Monitors between all other device
types are valid.
Fabric Manager sets monitors in the fabric only if the total monitor count is 4000 or less. If the number
of monitors is greater than 4000, monitors are not set on any ports.
8-2
Fabric Manager Administrator’s Guide
Publication Number: 53-1000196-01-HP
Performance Monitoring Components
8
Granularity
Granularity is the timeframe for the sample values that are used to generate a report. Since Fabric
Manager stores a limited number of samples for each granularity, every level of granularity is not
available for all possible time ranges. For example, if you select a timeframe to be the past three days,
the five-minute granularity level is not available. The options for granularity (for both Port Statistics
and End-to-End Monitoring) are listed in Table 8-1.
Table 8-1
Stored Samples (per Fabric) for Granularity Options
Granularity Samples
Time Covered in Stored Samples
5 minutes
600
2 days and 2 hours
30 minutes
700
2 days and 2 hours, plus 12.5 days
2 hours
775
2 days and 2 hours, plus 12.5 days, plus 50 days
1 day
797
2 days and 2 hours, plus 12.5 days, plus 50 days, plus 732 days (rounded
to 797 days)
There might be gaps in the stored data. Events that can cause gaps in data include:
•
Authentication failures
Fabric Manager uses switch user names and passwords to store data. If the password is changed
(resulting in an authentication failure) on a switch where performance monitoring is enabled, data
collection fails (creating a gap in the stored data).
•
Switch not reachable
Data is not gathered if the seed switch is unreachable. If the seed switch is reachable, but additional
switches in the fabric are unreachable by Ethernet, the data is gathered.
•
Performance monitoring is not enabled
Data is not being gathered, causing a gap in the stored data.
Note
If data is not available for some of the granularity points when values are rolled up to the next time
period value, the missing data is ignored. For example, if five of six 5-minute values are 50, and the sixth
value is missing: N1= 50, N2= 50, N3=50, N4= 50, N5= 50, N6= NA. The rolled up value for 30-minute
entry=250 (because the N6 value is calculated as if it is a value of zero).
Reports
Fabric Manager allows you to present information in two forms: reports and graphs. In Fabric Manager,
you can create customized reports, or you can create reports from templates. You can also save, print,
and export reports created in Fabric Manager. See the following sections for more information:
•
•
•
•
•
“Creating Custom Reports” on page 8-8
“Creating and Using Report Templates” on page 8-13
“Saving Performance Monitor Reports or Graphs” on page 8-17
“Printing Performance Monitor Reports” on page 8-17
“Exporting Reports” on page 8-18
Fabric Manager Administrator’s Guide
Publication Number: 53-1000196-01-HP
8-3
8
Performance Monitoring Components
Graphs
Fabric Manager allows you to create graphs of performance data (see Figure 8-1). There are no
templates for Performance Monitor graphs; however, you can create custom graphs or edit existing for
graphs. See the following sections for additional information:
•
•
“Creating Custom Graphs” on page 8-11
“Editing Performance Monitor Graphs” on page 8-19
Each node represents a
granularity data point. The
intervals are based on the
granularity level you
selected.
Customize graph
display options here.
Uncheck the boxes for
ports you do not want to
display information on in the
graph.
Figure 8-1
Example Performance Monitoring Graph
Templates
To generate an ongoing report without a specified time interval, you can create a performance monitor
report from a template. Fabric Manager has six templates by default. The defaults templates are
described in Table 8-2.
8-4
Fabric Manager Administrator’s Guide
Publication Number: 53-1000196-01-HP
8
Enabling Performance Monitoring
Table 8-2
Default Performance Monitoring Report Templates for Port Statistics
Report Name
Format
Time
Granularity Filter
“Top N” of Ports (Aggregate Tx/Rx Traffic) over
time T
Display
(HTML)
Last 1 hour
5 minutes
None
“Top N” of Ports (Aggregate Tx/Rx Traffic) over
time T
Display
(HTML)
Last 30
minutes
5 minutes
None
“Top N” of Ports Receiving (Rx) traffic over time T Display
(HTML)
Last 1 hour
5 minutes
None
“Top N” of Ports Receiving (Rx) traffic over time T Display
(HTML)
Last 30
minutes
5 minutes
None
“Top N” of Ports Generating (Tx) traffic over time
Display
(HTML)
Last 1 hour
5 minutes
None
“Top N” of Ports Generating (Tx) traffic over time
Display
(HTML)
Last 30
minutes
5 minutes
None
You can create and save additional templates. For more information, see “Creating Templates for
Reports and Graphs” on page 8-14.
Enabling Performance Monitoring
Using the performance monitoring feature, you can collect information about the traffic generated
between ports (end-to-end) and/or the receive/transmit traffic on individual switch ports. The
performance monitor data is not stored on the Fabric Manager database during periods when the feature
is not enabled.
Note
Performance monitor is designed to be enabled at all times. Its benefits are diminished if the historical
data is not available to you when you need it.
Before you can enable performance monitoring, you must be logged in to the seed switch of the fabric
you want to monitor. For end-to-end performance monitoring, an active Brocade Advanced
Performance Monitoring license is required on switches that you want to monitor. Performance
monitoring of port statistics does not require any special licenses on the switches that you want to
monitor.
Note
The retrieval of port statistics and end-to-end monitoring of data can take longer than expected if you
issue any CPU-intensive commands (such as the portTest diagnostic command) while performance
monitoring is enabled.
Fabric Manager Administrator’s Guide
Publication Number: 53-1000196-01-HP
8-5
8
Enabling Performance Monitoring
To enable performance monitoring
1.
Select the fabric in the View Panel and select Tasks > Performance Monitoring > Configuration
from the Menu Bar.
The Performance Monitoring Configuration dialog displays, as shown in Figure 8-2.
Figure 8-2
Configuring Performance Monitoring
2.
To collect end-to-end statistics, click On in the End-to-End Monitors section.
To collect switch port transmit and receive data, click On in the Port Rx/Tx History section.
3.
Click Save.
4.
Optional: Select View Set Monitors to see the list of devices that are being monitored.
The End-to-End View Set Monitors dialog displays (see Figure 8-3). This table lists all the device
pairs (initiators and targets) that are being monitored. This list is useful if there is a resource
limitation or license issue and all possible conversations are not being monitored. The monitors that
could not be set are listed within the Not Set Monitors tab.
Figure 8-3
8-6
Viewing the End-to-End Monitors that are Set/Not Set
Fabric Manager Administrator’s Guide
Publication Number: 53-1000196-01-HP
Disabling Performance Monitoring
5.
Click Close to return to the Performance Monitoring Configuration dialog (see Figure 8-2).
6.
Optional: Select Refresh Monitors to reestablish the End-to-End monitor set at any time.
8
This option is useful when you do not want to wait for the monitor set to be updated (for example,
after zoning changes have been made).
Disabling Performance Monitoring
Using the performance monitoring feature, you can collect information about the traffic generated
between ports (end-to-end) or the receive and transmit traffic on individual switch ports. The
performance monitoring data is not stored on the Fabric Manager database during periods when the
feature is not enabled.
Note
Performance monitoring is designed to be enabled at all times. Its benefits are diminished if the
historical data is not available to you when you need it.
Before you can disable the performance monitoring feature, you must be logged in to the seed switch of
the fabric you want to monitor.
To disable performance monitoring
1.
Select the fabric in the View Panel and select Tasks > Performance Monitoring > Configuration
from the Menu Bar.
The Performance Monitoring Configuration dialog displays (see Figure 8-2 on page 8-6).
2.
To stop the collection of end-to-end statistics, click Off in the End-to-End Monitors section. Endto-end ports are removed from the fabric when you stop the end-to-end monitoring.
To stop the collection of individual switch port data, click Off in the Port Rx/Tx History section.
3.
Click Save.
Generating Custom Reports and Graphs
You can use performance monitoring to create a custom one-time user report or a report for a specific
timeframe. You can generate the custom performance monitor report in two formats: report or graph.
See the following sections for information on creating a custom report or graph:
•
•
“Creating Custom Reports” on page 8-8
“Creating Custom Graphs” on page 8-11
Fabric Manager Administrator’s Guide
Publication Number: 53-1000196-01-HP
8-7
8
Generating Custom Reports and Graphs
Creating Custom Reports
To generate custom performance monitor reports
1.
Select the fabric in the View Panel and select Tasks > Performance Monitoring > Generate
Custom Reports from the Menu Bar.
The Generate Report dialog displays (see Figure 8-4).
Figure 8-4
Generate Custom Report/Graph
2.
Click Report.
3.
Select one of the following report types from the Report Type drop-down list:
For End-to-End monitoring reports...
•
•
•
“Top N” Conversations by Generating (Tx) traffic over time T
“Top N” Conversations by Receiving (Rx) traffic over time T
“Top N” Conversations by Aggregate (Tx/Rx) traffic over time T
For Port Statistics reports...
•
•
•
8-8
“Top N” of ports Generating (Tx) traffic over time T
“Top N” of ports Receiving (Rx) traffic over time T
“Top N” of ports Aggregate (Tx/Rx) traffic over time T
Fabric Manager Administrator’s Guide
Publication Number: 53-1000196-01-HP
Generating Custom Reports and Graphs
4.
8
Select one of the following formats for the report from the Format Type drop-down list:
•
Display (HTML)
Displays the report in HTML format.
•
Export (XML)
Saves the report as an XML file. The XML format is useful if you want to export the data to
another application.
•
Export (HTML)
Saves the report as an HTML file.
5.
Type the number (1 through 100) of results you want for the report in the Top N field.
6.
Define the time range or interval using one of the following:
•
•
7.
Click Last, type a number, and then select the time increment (Minutes, Hours, or Days).
Click From Time, and then enter values in the From Time and To Time fields. This includes
the month (mm), day (dd), year (yyyy), hour (HH), minute (MM), and morning (AM) or night
(PM).
Select the granularity (the time interval between samples) from the Granularity drop-down list.
The available options are 5 minutes, 30 minutes, 2 hours, and 1 day. See “Granularity” on page 8-3
for information on how granularity is calculated.
8.
For Port Statistics reports only: Select the ports for which you want to generate the report:
•
Click All.
Includes all ports in the database with the specified granularity and time range.
•
Click Device Ports only.
Includes only device ports (F_Ports and L_Ports) in the database with the specified granularity
and time range.
•
Click ISL Ports only.
Includes only ISL ports (EX_Ports and E_Ports) in the database with the specified granularity
and time range.
•
Click Advanced Port Selection; then click Select Ports to select specific ports.
The Advance Port Selection dialog displays (see Figure 8-5 on page 8-10).
All of the switches that were available when the Generate Report dialog was launched are
listed. If another user has discovered or removed a fabric, switch, or port since then, it is not
reflected in this list.
Note
If the port type of a switch in a fabric changes, and performance monitoring is enabled,
multiple port WWNs with different port types are displayed in the performance monitor
table and graph reports.
Fabric Manager Administrator’s Guide
Publication Number: 53-1000196-01-HP
8-9
8
Generating Custom Reports and Graphs
Figure 8-5
9.
Selecting Ports for a Custom Report
Select the ports from the Available Switches list that you want to include in the report. Use the
right-arrow to move them over; then click OK.
The Generate Report dialog displays again (see Figure 8-4 on page 8-8).
10. Click Generate Report.
If you selected Display HTML as the format type for your report (in step 4), the report is displayed
(see Figure 8-6 on page 8-11).
8-10
Fabric Manager Administrator’s Guide
Publication Number: 53-1000196-01-HP
Generating Custom Reports and Graphs
Figure 8-6
8
Custom Report in HTML Format
If there is no information matching the report criteria you selected, a message displays “No
Performance statistics records were found matching the specified search criteria.” Click OK in the
information message to close it.
If you selected an export option (see step 4), a Save File dialog displays. Navigate to the location
you want to save the file to and click Save.
11. Optional:
•
•
•
Print the report. See “Printing Performance Monitor Reports” on page 8-17.
Save the report. See “Saving Performance Monitor Reports or Graphs” on page 8-17.
Export the report. See “Exporting Reports” on page 8-18.
Creating Custom Graphs
To generate a custom performance monitor report as a graph
1.
Select the fabric in the View Panel and select Tasks > Performance Monitoring > Generate
Custom Reports from the Menu Bar.
The Generate Report dialog displays (see Figure 8-4 on page 8-8).
2.
Click Graph.
Fabric Manager Administrator’s Guide
Publication Number: 53-1000196-01-HP
8-11
8
Generating Custom Reports and Graphs
3.
Select one of the following report types from the Report Type drop-down list:
For end-to-end monitoring reports...
•
•
•
“Top N” Conversations by Generating (Tx) traffic over time T
“Top N” Conversations by Receiving (Rx) traffic over time T
“Top N” Conversations by Aggregate (Tx/Rx) traffic over time T
For port statistics reports...
•
•
•
“Top N” of ports Generating (Tx) traffic over time T
“Top N” of ports Receiving (Rx) traffic over time T
“Top N” of ports Aggregate (Tx/Rx) traffic over time T
4.
Type the number (1 through 20) of results you want for the report in the Top N field.
5.
Define the time range or interval using one of the following:
•
•
6.
Click Last, type a number, and then select the time increment (Minutes, Hours, or Days).
Click From Time, and then enter values in the From Time and To Time fields. This includes
the month (mm), day (dd), year (yyyy), hour (HH), minute (MM), and morning (AM) or night
(PM).
Select the granularity (the time interval between samples) from the Granularity drop-down list.
The available options are 5 minutes, 30 minutes, 2 hours, and 1 day. See “Granularity” on page 8-3
for information on how granularity is calculated.
7.
For Port Statistics reports only: Select which ports you want displayed in your graph:
•
Click All.
Includes all ports in the database with the specified granularity and time range.
•
Click Device Ports Only.
Incudes only device ports (F_Ports and L_Ports) in the database with the specified granularity
and time range.
•
Click ISL Ports Only.
Includes only ISL ports (EX_Ports and E_Ports) in the database with the specified granularity
and time range.
•
Click Advanced Port Selection; then click Select Ports to select specific ports.
The Advance Port Selection dialog displays (see Figure 8-5 on page 8-10).
All of the switches that were available when the Generate Report dialog was launched are
listed. If another user has discovered or removed a fabric, switch, or port since then, it is not
reflected in this list.
Note
If the port type of a switch in a fabric changes, and Performance Monitor is enabled,
multiple port WWNs with different port types are displayed in the Performance Monitor
table and graph reports.
8.
Click OK.
Your custom Performance Monitor graph is displayed (see Figure 8-7 on page 8-13).
8-12
Fabric Manager Administrator’s Guide
Publication Number: 53-1000196-01-HP
Creating and Using Report Templates
8
If there is no information matching the report criteria you selected, an information message is
displayed stating “No Performance statistics records were found matching the specified search
criteria.” Click OK in the information message to close it.
Figure 8-7
9.
Custom Performance Monitor Graph
Optional:
•
•
Save the graph. See “Saving Performance Monitor Reports or Graphs” on page 8-17.
Edit the graph. See “Editing Performance Monitor Graphs” on page 8-19.
Creating and Using Report Templates
You can use Performance Monitor to create report templates that you can use to create future reports or
graphs. See the following sections for information on creating report templates and generating reports
or graphs from existing templates:
•
•
“Creating Templates for Reports and Graphs” on page 8-14
“Generating Reports and Graphs from Templates” on page 8-16
Fabric Manager Administrator’s Guide
Publication Number: 53-1000196-01-HP
8-13
8
Creating and Using Report Templates
Creating Templates for Reports and Graphs
To create a Performance Monitor report template
1.
Select the fabric in the View Panel and select Tasks > Performance Monitoring > Generate from
Template from the Menu Bar.
The Generate From Template dialog displays (see Figure 8-8).
Figure 8-8
2.
Create or Generate Report from a Template
Click Create New Template.
The Generate Template dialog displays (see Figure 8-9).
8-14
Fabric Manager Administrator’s Guide
Publication Number: 53-1000196-01-HP
Creating and Using Report Templates
Figure 8-9
8
Creating a Report or Graph Template
3.
Click Report or Graph.
4.
Select one of the following report or graph types from the Report Type drop-down list:
For end-to-end monitoring reports...
•
•
•
“Top N” Conversations by Generating (Tx) traffic over time T
“Top N” Conversations by Receiving (Rx) traffic over time T
“Top N” Conversations by Aggregate (Tx/Rx) traffic over time T
For port statistics reports...
•
•
•
5.
“Top N” of ports Generating (Tx) traffic over time T
“Top N” of ports Receiving (Rx) traffic over time T
“Top N” of ports Aggregate (Tx/Rx) traffic over time T
Select one of the following formats for the report (this option is not available for graphs):
•
Display (HTML)
Displays the report in HTML format.
•
Export (XML)
Saves the report as an XML file. The XML format is useful if you want to export the data to
another application.
•
Export (HTML)
Saves the report as an HTML file.
6.
Type the number of results you want for the report in the Top N field.
For reports, the range is 1 through 100. The range for graphs is 1 through 20.
Fabric Manager Administrator’s Guide
Publication Number: 53-1000196-01-HP
8-15
8
Creating and Using Report Templates
7.
Click Last, type a number, and then select the time increment (Minutes, Hours, or Days).
8.
Select the granularity (the time interval between samples) from the Granularity drop-down list.
The available options are 5 minutes, 30 minutes, 2 hours, and 1 day. See “Granularity” on page 8-3
for information on how granularity is calculated.
9.
For Port Statistics reports only (skip to step 10 for End-to-End monitoring reports). Select the ports
for which you want to generate the report:
•
Click All.
Includes all ports in the database with the specified granularity and time range.
•
Click Device Ports Only.
Incudes only device ports (F_Ports and L_Ports) in the database with the specified granularity
and time range.
•
Click ISL Ports Only.
Includes only ISL ports (EX_Ports and E_Ports) in the database with the specified granularity
and time range.
Note
If the port type of a switch in a fabric changes, and Performance Monitor is enabled,
multiple port WWNs with different port types are displayed in the Performance Monitor
table and graph reports.
10. Click Create Template.
The Save Template dialog appears (see Figure 8-10).
Figure 8-10 Save Template
11. Type a name for the report or graph template; then click OK.
Generating Reports and Graphs from Templates
The Performance Monitor feature has a set of six templates (by default) that are useful if you need to
generate an ongoing report without a specified time interval. Table 8-2 on page 8-5 lists the default
templates.
8-16
Fabric Manager Administrator’s Guide
Publication Number: 53-1000196-01-HP
Saving Performance Monitor Reports or Graphs
8
To generate a report or graph from a Performance Monitor template
1.
Select the fabric in the View Panel and select Tasks > Performance Monitoring > Generate
reports from Template from the Menu Bar.
The Generate from Template dialog displays (see Figure 8-8 on page 8-14).
2.
Select the template you want from the list; then click OK.
The report or graph is generated and displayed.
3.
Click Save in Database to save the report or graph.
The Save Report dialog displays.
4.
Type a name for the report or graph.
5.
Click OK.
Saving Performance Monitor Reports or Graphs
To save a Performance Monitor report or graph
1.
Create a custom report or graph, generate a report or graph from a template, or edit an existing
graph as described in the following sections:
•
•
•
•
“Creating Custom Reports” on page 8-8
“Creating Custom Graphs” on page 8-11
“Generating Reports and Graphs from Templates” on page 8-16
“Editing Performance Monitor Graphs” on page 8-19
The report or graph is displayed.
2.
Click Save in Database to save the report or graph.
The Save Report dialog displays.
3.
Type a name for the report or graph; then click OK to save it.
Printing Performance Monitor Reports
You can print only reports; you cannot print a graph.
To print a Performance Monitor report
1.
Create a custom report or generate a report from a template as described in the following sections:
•
•
“Creating Custom Reports” on page 8-8
“Generating Reports and Graphs from Templates” on page 8-16
The report is displayed.
2.
Click Print to print the report.
The Print Report dialog displays.
3.
Select a printer and click OK.
Fabric Manager Administrator’s Guide
Publication Number: 53-1000196-01-HP
8-17
8
Exporting Reports
Exporting Reports
You can export Performance Monitor reports (not graphs) as HTML or XML files and open them in
external applications.
To export Performance Monitor reports
1.
Create a custom report or generate a report from a template as described in the following sections:
•
•
“Creating Custom Reports” on page 8-8
“Generating Reports and Graphs from Templates” on page 8-16
The report is displayed.
2.
Click Export as XML or Export as HTML to export the report.
The Save dialog displays.
3.
Provide a filename for the report; then click OK.
Displaying Saved Reports and Graphs
To display a saved Performance Monitor report or graph
1.
Select the fabric in the View Panel and select Tasks > Performance Monitoring > Saved Reports
from the Menu Bar.
The Saved Reports dialog displays (see Figure 8-11).
Figure 8-11 Saved Reports and Graphs
8-18
Fabric Manager Administrator’s Guide
Publication Number: 53-1000196-01-HP
Deleting Reports and Graphs
2.
Select the report or graph that you want to display or do one of the following:
•
•
•
3.
8
Click All to display all saved end-to-end and port statistics reports.
Click Ports to display all saved port statistics reports.
Click E-E (End-to-End) to display all saved end-to-end reports.
Click View.
The report or graph is displayed.
Deleting Reports and Graphs
To delete a performance monitor report or graph
1.
Select the fabric in the View Panel and select Tasks > Performance Monitoring > Saved Reports
from the Menu Bar.
The Saved Reports dialog displays.
2.
Select the report or graph that you want to display.
3.
Click Delete.
The report or graph is deleted.
Editing Performance Monitor Graphs
Existing performance monitor graphs can be edited as follows:
•
•
•
Change the graph to a linear or logarithmic format.
Select different values for the y-axis: MB/sec or MB/granularity.
Filter ports.
To change the graph format
1.
Create a performance monitor graph. See “Creating Custom Graphs” on page 8-11.
2.
Display the graph (see Figure 8-7 on page 8-13).
3.
Click Linear to display the graph as a linear graph, or Logarithmic to display the graph as a
logarithmic graph.
To change the y-axis values
1.
Create a performance monitor graph. See “Creating Custom Graphs” on page 8-11.
2.
Display the graph (see Figure 8-7 on page 8-13).
3.
Click MB/Second to display MB/second values on the y-axis, or MB/Granularity to display MB/
granularity on the y-axis.
Fabric Manager Administrator’s Guide
Publication Number: 53-1000196-01-HP
8-19
8
Displaying Performance Monitor Reports in External Applications
To display information about selected ports only
1.
Create a performance monitor graph. See “Creating Custom Graphs” on page 8-11.
2.
Display the graph (see Figure 8-7 on page 8-13).
A list of the ports that correspond to the graph are listed in the graph report. To display only a
subset of the ports in the graph, you can filter them out.
3.
A selected checkbox indicates information from that port is displayed in the graph. Use the
checkboxes to deselect the ports you do not want displayed in the graph.
4.
Click Filter Ports.
Displaying Performance Monitor Reports in External
Applications
When you export performance monitor reports in XML format (see “Exporting Reports” on page 8-18),
an xslt file (style sheet) is also saved with the XML file. The xslt file can be used to translate the XML
file into an Excel spreadsheet or another software applications that allows you to open XML files. You
can edit performance monitor reports in the Excel spreadsheet or similar software application.
Note
You do not have to use an xslt file, but the translated information is not very useful without the style
sheet.
To open a performance monitor report (saved as an XML file) in Excel
1.
Launch Excel 2003/XP (or later).
2.
Click File > Open.
The Open dialog displays.
3.
Navigate to the XML file and click Open.
The Import XML dialog displays and asks if you want to open a stylesheet.
4.
Open the file using one of these methods:
•
Click Open the file with the following stylesheet applied
The xslt file created by Fabric Manager is the default selected file. You can either use that file
or navigate to another style sheet of your own. Click OK to display the information in an Excel
spreadsheet.
•
Click Open the file without applying a stylesheet (not recommended)
The information is displayed in an Excel spreadsheet without any formatting.
8-20
Fabric Manager Administrator’s Guide
Publication Number: 53-1000196-01-HP
Chapter
Change Management
9
The change management feature allows you to monitor changes in a fabric and generate Extensible
Markup Language (XML) reports listing the changes.
The change management feature is available to users with physical fabric access.
To use the change management feature, you must set up profiles defining which elements to monitor,
when to monitor them, and what to do when changes occur to those elements. The notification
configuration defines what to do when changes occur to the selected elements.
When you set up the profiles, you must select at least one element to monitor. You do not have to define
schedules or notification; however, if you do not define a schedule, there is no automated checking, and
if you do not define notifications, there are no alerts or email notifications.
The profiles are saved on the server database. After a profile is defined and saved, any user on the same
server can view, edit, clone, or delete it. You can apply a single profile to multiple fabrics, and one
fabric can have multiple profiles for different monitoring purposes simultaneously.
To use the change management feature, you should follow these basic steps:
1.
Configure notification parameters for all users on the server (see “Configuring Notification
Parameters” on page 7-13).
2.
Create a change management profile defining which elements to monitor for changes (see
“Creating a Profile” on page 9-4).
3.
Optional: Compare subsequent snapshots to the baseline snapshot to monitor changes to the
elements over defined time frames (see “Comparing Snapshots” on page 9-9).
4.
Optional: Create multiple profiles to monitor different sets of elements. Snapshots are associated
with a single profile however, and a snapshot based on Profile X cannot be compared to a snapshot
based on Profile Y.
See the following sections for information about setting up, creating, and working with change
management profiles, and also working with the subsequent change reports using snapshots:
•
•
“Using Change Management Profiles,”
“Using Snapshots and Change Reports” on page 9-6
Using Change Management Profiles
You create a change management profile so you can monitor changes to fabric elements and provide
email notification or alerts automatically when change occurs. Table 9-1 on page 9-2 lists the fabric
elements you can monitor, and Table 9-2 on page 9-3 describes known limitations working with the
change management feature.
Fabric Manager Administrator’s Guide
Publication Number: 53-1000196-01-HP
9-1
9
Using Change Management Profiles
You view and manage profiles using the Change Management dialog, shown in Figure 9-1.
Figure 9-1
Change Management, Manage Profiles Tab
Note that the Change Management dialog does not display all change management profiles, but only
those profiles of the monitored fabrics. If a displayed profile contains inaccessible fabrics, then those
fabrics are not displayed in the Fabrics column.
See the following sections for information on working with change management profiles:
•
•
•
•
“Creating a Profile” on page 9-4
“Cloning a Profile” on page 9-5
“Editing a Profile” on page 9-5
“Deleting a Profile” on page 9-6
Table 9-1
Change Management Profile Monitored Elements
Monitored Element
Description
Firmware
Any changes
ISL1
Switch Configuration File
Name server
Zoning1 2
9-2
Device links
Identifies the domain and port WWN to which the device is connected.
Licenses
Added/Removed
Fabric Manager Administrator’s Guide
Publication Number: 53-1000196-01-HP
Using Change Management Profiles
Table 9-1
9
Change Management Profile Monitored Elements (Continued)
Monitored Element
Description
Port Status
•
•
•
•
•
•
•
•
Configured/Disabled
•
SCC and DCC policies added/removed/changed (in SFWC mode
only)
•
•
•
CHAP user ID added/removed
Security1
Switches
ACL
iSCSI
Online/Offline
Note: Down status is not reported.
Enabled/Disabled
Policy changes
Added/Removed
Configuration changes1,3
Strict fabric-wide consistency policy (SFWC) added/removed/
changed
Virtual targets added/removed
Discovery Domains (DDs) and Discovery Domain Sets (DDsets)
added/removed/changed
1. If a fabric includes a SilkWorm AP7420 as a seed switch, information about these elements are not retrieved (not
supported by the SilkWorm AP7420).
2. For AD-aware or AD-enabled fabrics, zoning information is collected from AD0 and is used for the change
management snapshot and change reports; that is, change management for zoning is available for the ROOT zone
database only.
3. If a fabric includes a SilkWorm AP7420 as a member switch (not the seed switch), switch configuration changes
are not reported for the SilkWorm AP7420. Security policy change information for the entire fabric might not be
collected if the SilkWorm AP7420 is the first object Fabric Manager gets from API.
Table 9-2
Change Management Limitations
Change
Description
Time changes
If the current system time on the Fabric Manager server is changed to a time that
is after the end time of a scheduled change management check, the change report
will not run.
Adding switches
If a switch is added to a fabric after a change management profile is created, the
profile settings are not applied to the switch until you log in to it.
Segmented
fabrics
If a fabric segments into separate fabrics, the original fabric retains all of the
change management profiles and continues to run the scheduled profiles and
report any missing switches, devices, and so on. However, the new, smaller
fabrics that are created for the segmented switches do not have any change
management profiles or reports.
Merging fabrics
If two fabrics both have change management profiles associated with them, and
you merge the fabrics, the change management profile for the fabric that was
discovered first is applied to the merged fabric.
Logical switch
groups
Change management profiles cannot be applied to logical switch groups.
Fabric Manager Administrator’s Guide
Publication Number: 53-1000196-01-HP
9-3
9
Using Change Management Profiles
Creating a Profile
You can create change management profiles after you have configured the notification parameters (see
“Configuring Notification Parameters” on page 7-13).
To create a change management profile
1.
Click Tasks > Change Management > Manage CM profiles.
The Change Management dialog displays with the Manage Profile tab selected (see Figure 9-1).
Any existing profiles are displayed in the dialog.
2.
Click New Profile.
The change management wizard displays, as shown in Figure 9-2.
3.
Follow the instructions in the wizard to set up the profile.
The wizard is self-explanatory, so the individual steps are not described in this document.
Figure 9-2
Change Management Wizard
Fabric Manager saves the change management profile information to the database. The first snapshot
report created is saved as the baseline snapshot report. All subsequent snapshots are compared against
the baseline snapshot, and the comparison report (change report) is displayed in the subsequent
snapshots.
Each snapshot is also saved in the database. You can purge them at a specified time or delete them
manually. If a fabric is removed from Fabric Manager, all associated snapshots and reports are deleted.
The profile is not deleted.
9-4
Fabric Manager Administrator’s Guide
Publication Number: 53-1000196-01-HP
Using Change Management Profiles
9
Cloning a Profile
You can clone (duplicate) an existing change management profile if you need another similar profile
and do not want to repeat all of the steps required to create a new one. For example, if you have another
fabric that you want to run the same (or similar) checks on, you can clone an existing profile and make
minor adjustments as needed.
To clone a change management profile
1.
Click Tasks > Change Management > Manage CM profiles.
The Change Management dialog displays with the Manage Profile tab selected (see Figure 9-1 on
page 9-2). Any existing profiles are displayed in the dialog.
2.
Select the profile you want to clone, and click Clone Profile.
The change management wizard displays with existing values filled in.
3.
Follow the wizard instructions as in creating a profile, making any changes to the existing values.
Fabric Manager saves the cloned change management profile information to the database.
Note
Figure 9-1 displays a change management profile and its clone (“Zoning Profile”). Since the Profile
Name, Monitored Areas, Schedule, Fabrics, and Notification are identical, the only difference is the
Creation Time.
Editing a Profile
You can edit an existing change management profile to change the following information:
•
•
•
•
profile name
fabrics being monitored
snapshot schedule
notification method
Note
You cannot change the snapshot items that are being monitored. To monitor a different set of snapshot
items, you must create a new profile.
Use the following procedure to make changes to an existing change management profile.
To edit a change management profile
1.
Click Tasks > Change Management > Manage CM profiles.
The Change Management dialog displays with the Manage Profile tab selected (see Figure 9-1 on
page 9-2). Any existing profiles are displayed in the dialog.
2.
Select the profile you want to edit and click Edit Profile.
The change management wizard displays with existing values filled in.
3.
Follow the wizard instructions as in creating a profile, making any changes to the existing values.
Fabric Manager Administrator’s Guide
Publication Number: 53-1000196-01-HP
9-5
9
Using Snapshots and Change Reports
Deleting a Profile
When you delete a change management profile, all associated snapshots and change reports are also
deleted from the database.
To delete change management profiles
1.
Click Tasks > Change Management > Manage CM profiles.
The Change Management dialog displays with the Manage Profile tab selected (see Figure 9-1 on
page 9-2). Any existing profiles are displayed in the dialog.
2.
Select one or more change management profiles from the table and click Delete Profile.
A confirmation dialog displays.
3.
Click OK to delete the selected profiles, and all snapshots and change reports based on the selected
profiles, from the database.
Using Snapshots and Change Reports
After a change management profile is defined, a snapshot report of the information requested in the
profile is created and saved automatically on the Fabric Manager server. The initial snapshot report
serves as the baseline, and all subsequent snapshot reports are compared to the baseline. Each change
management profile can have multiple snapshots associated with it.
Note
Since each snapshot report is stored on the Fabric Manager server, you need to ensure adequate disk
space if you are running numerous checks on a large fabric (or on multiple fabrics).
See the following subsections for information on change reports and snapshots:
•
•
•
•
•
•
•
•
“Displaying a Change Report” on page 9-6
“Creating Snapshots on Demand” on page 9-8
“Comparing Snapshots” on page 9-9
“Exporting Snapshot and Change Reports” on page 9-9
“Exporting Switch Configuration Information” on page 9-10
“Displaying Change Reports in External Applications” on page 9-10
“Printing Snapshot and Change Reports” on page 9-11
“Changing Baseline Snapshot” on page 9-11
Displaying a Change Report
A change report is automatically created each time a snapshot (subsequent to the baseline snapshot) is
created. The change report lists any changes between the baseline snapshot and the subsequent
snapshot.
9-6
Fabric Manager Administrator’s Guide
Publication Number: 53-1000196-01-HP
Using Snapshots and Change Reports
9
To compare a snapshot to the baseline configuration
1.
Click Tasks > Change Management > View CM reports.
The Change Management dialog displays with the View Change Reports and Snapshots tab
selected (see Figure 9-3).
Figure 9-3
2.
Change Management, View Change Reports and Snapshots Tab
Select the fabric containing the change reports you want.
The Reports section displays a list of profiles and associated snapshots for that fabric.
3.
Select a snapshot report (other than the baseline), then click View (in the Change Reports section)
to access its change report.
The Change Report is displayed as shown in Figure 9-4 on page 9-8.
Fabric Manager Administrator’s Guide
Publication Number: 53-1000196-01-HP
9-7
9
Using Snapshots and Change Reports
Figure 9-4
Change Report
You can export the report as an XML file or as an HTML file, or print it using the buttons at the
bottom of the report window.
Note
Change reports created with Fabric Manager versions earlier than v5.1.0 display only the Difference
Summary; they do not display the Profile information in the header of the report.
Creating Snapshots on Demand
Use the following procedure to take a snapshot immediately.
To create a snapshot on demand
1.
Click Tasks > Change Management > View CM reports.
The Change Management dialog displays with the View Change Reports and Snapshots tab
selected (see Figure 9-3 on page 9-7).
9-8
Fabric Manager Administrator’s Guide
Publication Number: 53-1000196-01-HP
Using Snapshots and Change Reports
2.
9
Select the fabric containing the change reports you want.
The Reports section for that switch displays a list of profiles and associated snapshots for that
fabric.
3.
Select a snapshot report; then click Take Now (under the Snapshots area) to take a snapshot and
display its change report.
The Change Report is displayed as shown in Figure 9-4.
Comparing Snapshots
Use the following procedure to compare two snapshots. The snapshots must both be from the same
change management profile.
To compare two snapshots
1.
Click Tasks > Change Management > View CM reports.
The Change Management dialog displays with the View Change Reports and Snapshots tab
selected (see Figure 9-3 on page 9-7).
2.
Select the fabric containing the snapshots you want.
The Reports section for that switch shows a list of profiles and associated snapshots for the fabric.
3.
Select two snapshots from the table (associated with the same change management profile), and
click View in the Change Reports section.
The Change Report is displayed, as shown in Figure 9-4 on page 9-8.
Exporting Snapshot and Change Reports
Use the following procedure to export snapshots and change management reports as an XML file.
To export snapshots and change management reports
1.
Click Tasks > Change Management > View CM reports.
The Change Management dialog displays with the View Change Reports and Snapshots tab
selected (see Figure 9-3 on page 9-7).
2.
Select the fabric containing the snapshots you want.
The Reports section for that switch displays a list of profiles and associated snapshots for that
fabric.
3.
Select a snapshot in the Reports section.
4.
Click Export (in either the Snapshots or Change Reports area) to export the snapshot or change
report as an XML file.
The Save dialog displays.
5.
Type a name for the file and browse to the location where you want to save the file, then click Save.
Fabric Manager Administrator’s Guide
Publication Number: 53-1000196-01-HP
9-9
9
Using Snapshots and Change Reports
Exporting Switch Configuration Information
If the snapshot contains any switch configuration information, you can extract this information and
export it to a file using the Export Switch Config button in the View Change Reports and Snapshots
tab.
To export switch configuration information
1.
Click Tasks > Change Management > View CM reports.
The Change Management dialog displays with the View Change Reports and Snapshots tab
selected (see Figure 9-3 on page 9-7).
2.
Select the fabric containing the snapshots you want.
The Reports section for that switch displays a list of profiles and associated snapshots for that
fabric.
3.
Select a snapshot in the Reports section.
4.
Click Export Switch Config (in the Snapshots area) to extract switch configuration from the
snapshot and export it to a file.
The Save dialog displays. You get an error message if the snapshot does not contain any switch
configuration information.
5.
Type a name for the file and browse to the location where you want to save the file, then click Save.
Displaying Change Reports in External
Applications
When you export change management change reports in XML format (see “Exporting Snapshot and
Change Reports” on page 9-9), an xslt file (style sheet) is also saved with the XML file. The xslt file can
be used to translate the XML file into an Excel spreadsheet or another software applications that allows
you to open XML files. You can edit change management change reports in the Excel spreadsheet or
similar software application.
Note
You do not have to use an xslt file, but the translated information is not very useful without the style
sheet.
To open a change management change report (saved as an XML file) in Excel
1.
Launch Excel 2003/XP (or later).
2.
Click File > Open.
The Open dialog displays.
3.
Navigate to the XML file, and click Open.
The Import XML dialog displays and asks if you want to open a stylesheet.
9-10
Fabric Manager Administrator’s Guide
Publication Number: 53-1000196-01-HP
Using Snapshots and Change Reports
4.
9
Open the file using one of these methods:
•
Click Open the file with the following stylesheet applied
The xslt file created by Fabric Manager is the default selected file. You can either use that file,
or navigate to another style sheet of your own. Click OK to display the information in an Excel
spreadsheet.
•
Click Open the file without applying a stylesheet (not recommended)
The information is displayed in an Excel spreadsheet without any formatting.
Printing Snapshot and Change Reports
Use the following procedure to print a snapshot or change report.
To print a snapshot or change report
1.
Click Tasks > Change Management > View CM reports.
The Change Management dialog displays with the View Change Reports and Snapshots tab
selected (see Figure 9-3 on page 9-7).
2.
Select the fabric containing the snapshot or change report you want.
The Reports section for that switch displays a list of profiles and associated snapshots for that
fabric.
3.
Select a snapshot or change report, then click View (in the corresponding Snapshots or Change
Reports area).
The Change Report is displayed (see Figure 9-4 on page 9-8).
4.
Click Print to print the snapshot or change report.
Changing Baseline Snapshot
You can assign an existing snapshot to be the new baseline snapshot using the following procedure.
To change a baseline snapshot
1.
Click Tasks > Change Management > View CM reports.
The Change Management dialog displays with the View Change Reports and Snapshots tab
selected (see Figure 9-3 on page 9-7).
2.
Select the fabric containing the baseline snapshot you want.
The Reports section for that switch displays a list of profiles and associated snapshots for that
fabric.
3.
Select a snapshot (other than the baseline) that you want to select as the new baseline snapshot.
4.
Click Change Baseline.
A confirmation displays indicating that all previous change reports (compared to the previous
baseline) will be deleted.
Fabric Manager Administrator’s Guide
Publication Number: 53-1000196-01-HP
9-11
9
Using Snapshots and Change Reports
5.
Click Yes in the confirmation window to proceed.
A dialog displays asking if you want to regenerate all change reports based on the new baseline.
6.
Select one of the following:
•
•
Yes to generate new change reports, the click OK.
No if you do not want to generate new change reports, the click OK.
If you selected Yes or No, a confirmation displays indicating that the baseline has been change
successfully.
•
Cancel if you have decided not to change the baseline
If you select Cancel, the baseline is not changed.
9-12
Fabric Manager Administrator’s Guide
Publication Number: 53-1000196-01-HP
Chapter
Call Home Support
10
This chapter describes the call home feature of Fabric Manager and contains the following information:
•
•
•
•
•
“About Call Home” on page 10-1
“Configuring Call Home” on page 10-3
“Editing Configurations” on page 10-4
“Enabling or Disabling Call Home Globally” on page 10-5
“Monitoring Call Home” on page 10-6
About Call Home
When you enable the call home feature, Fabric Manager monitors the status of switches continuously
and generates call home alerts whenever a call home triggering event occurs.
Triggering events include the following:
•
•
•
•
Switch status changes to either marginal or down
Switch status remains marginal or down but the reason for the status changes
Switch reboots
Switch is unreachable (complete loss of IP connectivity)
All qualifying events trigger a call home action, and the status of each call home action is recorded in
the following file:
<installdir>/server/server/fmserver/log/callhomehistory.log
You can view the call home alerts in Fabric Manager. You can also configure call home to send an email
message to a user-defined email address and run an external executable whenever a call home triggering
event occurs.
You can configure call home to optionally capture support information (supportShow or supportSave)
when a triggering event occurs. Fabric Manager can capture supportSave information only for switches
running Fabric OS v5.2.0 or higher. The supportShow and supportSave information is collected in the
location of the built-in or external FTP server.
Each call home alert includes the reason for the alert, a brief description of the failure, and detailed
switch information (including the name, IP address, WWN, domain ID, switch type, factory and
supplier serial numbers, firmware version, switch status, and other information). The alert also includes
the 100 most-recent events from the event log and supportShow command output in a text file.
Fabric Manager Administrator’s Guide
Publication Number: 53-1000196-01-HP
10-1
10
About Call Home
Call Home Email Messages
You can configure call home to send an email message to a user-defined email address whenever a call
home event is triggered for an unhealthy switch. The email message contains the details of the FTP
server location where the supportShow or supportSave information is captured.
The supportShow and supportSave commands run in the background. When the operation completes,
another email message is sent with the zipped supportShow or supportSave output and XML file
attachments. This email has the original call home email subject line plus “with SupportShow” added at
the end. The body of this email is the same as the first email.
Fabric Manager also sends an XML file as an attachment in the call home email message. You can
select the format for the XML file from one of two options. See “Configuring Notification Parameters”
on page 7-13 for instructions.
If you want to be notified that the server is still running, you can configure call home to send a “server
is alive” email message periodically. The default (and minimum) value is one-hour intervals; the
maximum value is 32767. The “server is alive” messages include the list of switches in the
configuration and the server name and IP address. These messages serve as a notice that call home is
functioning properly.
Call Home External Executable
You can configure call home to run an external executable script whenever a call home event is
triggered for an unhealthy switch. You can configure call home to run this executable instead of or in
addition to sending an email message.
If you configure an external executable, Fabric Manager passes an XML file to the executable whenever
a call home event occurs. This XML file is also sent as an attachment in the call home email message.
The external executable runs as a background process, and the task manager monitors the process. All
other functionality is at your discretion. See “Configuring Notification Parameters” on page 7-13 for
instructions on selecting the format for the XML file.
Caution
Large executables can impair the performance of your server.
The external executable must have the following characteristics:
•
•
It must reside on the Fabric Manager server.
•
It must be able to receive a command-line argument from Fabric Manager. The argument is the
name of the XML file that call home generates when an event occurs.
It must be capable of being executed by the OS where the Fabric Manager server is installed and it
must be a valid binary for that OS (Windows, Solaris, or Linux).
For example, if you enter the executable C:\executable.exe in the External Executable on Server field
when prompted by the Call Home Configuration wizard, call home launches C:\executable.exe
filename.xml, where filename is the name of the file that is passed as an argument to the executable
when a call home event is triggered.
Note
There might be additional executable requirements, depending on your needs.
10-2
Fabric Manager Administrator’s Guide
Publication Number: 53-1000196-01-HP
Configuring Call Home
10
Configuring Call Home
Each call home configuration you create acts independently without impacting any other configuration.
If you set up a call home configuration to send an email message, you need to also set up the notification
parameters. See “Configuring Notification Parameters” on page 7-13 for instructions on setting the
notification parameters for call home and change management. If you have not already set up the
notification parameters, the Call Home Configuration wizard prompts you to do so.
If you set up a call home configuration to capture supportSave or supportShow information, you must
configure the FTP parameters before configuring call home. See “Configuring File Transfer Options”
on page 14-9 for instructions on configuring the FTP server.
To set up a call home configuration
1.
Click Tasks > Call Home > Create or Edit configuration.
The Call Home window displays, as shown in Figure 10-1.
Figure 10-1 Call Home Dialog
2.
Click Add.
The Call Home Configuration wizard is launched (see Figure 10-2 on page 10-4).
Fabric Manager Administrator’s Guide
Publication Number: 53-1000196-01-HP
10-3
10
Editing Configurations
Figure 10-2 Call Home Configuration Overview
3.
Follow the instructions in the wizard to set up the call home configuration.
The wizard is self-explanatory, so the individual steps are not described in this document.
If the call home configuration is successful, you get a confirmation email.
Editing Configurations
You can edit a call home configuration at any time. Any change that you make applies immediately
when you commit the change.
To edit an existing call home configuration
1.
Click Tasks > Call Home > Create new configuration.
The Call Home dialog displays (see Figure 10-1 on page 10-3).
2.
Select a configuration from the list.
3.
Click Edit to change the configuration settings.
The Call Home Configuration wizard launches. Use the wizard to make changes to the
configuration.
10-4
4.
Optional: In the Call Home dialog, you can click Rename to change the name of an existing
configuration, or click Delete to delete an existing configuration.
5.
Click OK to close the Call Home dialog.
Fabric Manager Administrator’s Guide
Publication Number: 53-1000196-01-HP
Enabling or Disabling Call Home Globally
10
To add switches to an existing call home configuration
1.
In the View panel, select the switches you want to add to a call home configuration.
2.
Click Tasks > Call Home > Add switches to existing configuration.
The Call Home dialog box displays, as shown in Figure 10-3.
3.
Select the call home configuration to which you want to add the selected switches.
4.
Click Add Switches.
Figure 10-3 Adding Switches to a Call Home Configuration
Enabling or Disabling Call Home Globally
When you set up a call home configuration, it does not take effect unless you enable call home. When
you enable call home, then all of the call home configurations that you set up are enabled. You cannot
enable or disable individual call home configurations.
To enable or disable call home globally
1.
Click Tasks > Call Home > Create new configuration.
The Call Home dialog displays (see Figure 10-1 on page 10-3).
2.
Click Enable or Disable.
3.
Click OK to commit the change and close the Call Home dialog.
Fabric Manager Administrator’s Guide
Publication Number: 53-1000196-01-HP
10-5
10
Monitoring Call Home
Monitoring Call Home
You can view the call home alerts using the Call Home Monitoring tool. To access this tool, select
Tasks > Call Home > Call Home Alert History to open the window shown in Figure 10-4.
Figure 10-4 Call Home Monitoring Window
The Call Home Monitoring window displays details of the call home alerts triggered by Fabric Manager
and also displays the status of call home email messages. The alerts are initially sorted by date, in
descending order. You can sort the alerts in any order by clicking the column heading.
You can view the Call Home Monitoring window even if call home is disabled. In this case, the window
displays any alerts that were triggered before call home was disabled.
You can delete an alert by selecting it in the table and clicking Delete. Use Ctrl-click to select multiple
alerts.
10-6
Fabric Manager Administrator’s Guide
Publication Number: 53-1000196-01-HP
Chapter
Switch Configuration and Management
11
This chapter contains the following sections:
•
•
•
•
•
•
•
•
•
•
•
•
•
“Viewing Switch Information” on page 11-1
“Viewing Port Information” on page 11-4
“Synchronizing Date and Time Across a Fabric” on page 11-5
“Opening a Telnet Session for a Nonsecure Switch” on page 11-6
“Enabling/Disabling Switches and Ports” on page 11-6
“Configuring Ports” on page 11-7
“Swapping Ports” on page 11-8
“Administering ISL Trunking” on page 11-9
“Administering License Keys” on page 11-10
“Using Baseline Configurations for Configuration Management” on page 11-13
“Saving Switch Configuration Files” on page 11-23
“Checking the Physical Health of a Switch” on page 11-25
“Replacing a Switch in the Fabric” on page 11-26
Viewing Switch Information
The Fabric Manager client provides several ways for you to view information about a switch.
You can mouse over a switch in the View panel to display the following basic switch information:
•
•
•
•
•
switch name
WWN
IP address
domain ID
switch type
When the Fabric View is selected, the Scope panel displays the switch name and switch type in the
Switches tab. You can mouse over the fields in the table to display the full description in a tool tip.
See Figure 11-1 for mouse over examples.
Fabric Manager Administrator’s Guide
Publication Number: 53-1000196-01-HP
11-1
11
Viewing Switch Information
Figure 11-1 Displaying Switch Information
The Switches tab in the Information panel displays detailed information about the switches.You can
scroll across the columns in the table or you can mouse over an entry in the table to display all of the
information for the switch in a single pop-up box (see Figure 11-2).
Note
The Switches tab in the Information panel displays information about all of the switches in a fabric, even
if you uncheck those switches in the Scope panel. The View panel displays only those switches that are
checked in the Scope panel.
Figure 11-2 Displaying Detailed Switch Information
11-2
Fabric Manager Administrator’s Guide
Publication Number: 53-1000196-01-HP
Viewing Switch Information
11
To see the most detailed information about a switch, select a switch in the View panel and then refer to
the various tabs in the Information panel.
Note
The Overview tab in the Information panel for a switch displays values for port-based routing, dynamic
load sharing, and in order delivery. These values are displayed as “N/A” for XPath OS switches and for
switches running Fabric OS versions earlier than v5.2.0.
The Brocade switch models are not displayed as part of the switch information. You can use the switch
type to determine the Brocade switch model. Table 11-1 shows the Brocade switch models and their
corresponding switch type, as displayed in Fabric Manager. Note that not all of these switch models are
supported in Fabric OS 5.2.0.
Table 11-1
Switch Models and Corresponding Switch Type Description
Switch Model
Fabric Manager Description
SilkWorm 200E
4 Gbit 16-port switch with switch limit
SilkWorm 2000
1 Gbit 8-port entry switch
SilkWorm 2200
1 Gbit 16-port entry switch
SilkWorm 2400
1 Gbit 8-port switch
SilkWorm 2800
1 Gbit 16-port switch
SilkWorm 3014
4 Gbit 14-port embedded fabric switch
SilkWorm 3016
2 Gbit 16-port embedded fabric switch
SilkWorm 3200
2 Gbit 8-port switch
SilkWorm 3250
2 Gbit 8-port switch with switch limit
SilkWorm 3800
2 Gbit 16-port switch
SilkWorm 3850
2 Gbit 16-port switch with switch limit
SilkWorm 3900
2 Gbit 32-port switch
SilkWorm 4012
4 Gbit 12-port embedded fabric switch
SilkWorm 4020
4 Gbit 20-port embedded fabric switch
SilkWorm 4100
4 Gbit 32-port switch
SilkWorm 4900
4 Gbit 64-port
SilkWorm 7500
4 Gbit 32-port switch and FC Router
SilkWorm 12000
2 Gbit core fabric switch
SilkWorm 24000
2 Gbit 128-port core fabric switch
SilkWorm 48000
4 Gbit 256-port core fabric switch
SilkWorm Multiprotocol
Router Model AP7420
2 Gbit FC + 1 GbE 16-port Fabric Application Platform
Fabric Manager Administrator’s Guide
Publication Number: 53-1000196-01-HP
11-3
11
Viewing Port Information
Viewing Port Information
The Fabric Manager client provides several ways for you to view information about ports.
The FC Ports and GigE Ports tabs in the Information panel display detailed information about the
ports. You can scroll across the columns in the table or you can mouse over an entry in the table to
display all of the information for the port in a single pop-up box (see Figure 11-3).
The GigE Ports tab displays GigE ports only on Fabric OS switches. GigE ports on XPath OS switches
are displayed in the FC Ports tab as VE_Ports.
Note
In the Area ID/Port Index column, the area ID and port index values are different for ports 32 through
47 on the FC4-48 port blade. For ports 0 through 31 on the FC4-48 port blade and for all other ports, the
area ID and port index are the same.
Figure 11-3 Displaying Detailed Port Information
To see the most detailed port information about, launch the FC Port Connectivity View (Figure 11-4).
The FC Port Connectivity View displays information about the FC ports on a selected switch.
11-4
Fabric Manager Administrator’s Guide
Publication Number: 53-1000196-01-HP
Synchronizing Date and Time Across a Fabric
11
To launch the FC Port Connectivity View
1.
Select a switch.
2.
Click Tasks > Switch Management > Show FC Port Connectivity View from the Menu bar.
The FC Port Connectivity View displays.
Each row in the FC Port Connectivity View displays information about the following items:
•
•
•
a port in the selected switch
the switch or device port connected to this port
the connected switch (if a switch is connected to the port)
Loop devices are displayed in multiple rows, one row for each related device port.
The connected switch and switch port information is displayed only for E_Ports and only for switches
running Fabric OS 5.0.x or higher.
If no switch or device is connected to the port, then the related fields are empty.
Figure 11-4 FC Port Connectivity View
Synchronizing Date and Time Across a Fabric
You can synchronize date and time across an entire fabric. Because the firmware timestamps entries in
the port log dump, you can more easily correlate events when you synchronize your fabric.
You must be logged in to switches within a fabric when attempting to set the time on that fabric. The
fabric configuration determines which switches you must be logged in to. If you are not logged in to the
appropriate switches, Fabric Manager prompts you to log in to those switches before proceeding.
To synchronize the date and time
1.
Log in to the switches in the fabric that you want to synchronize.
2.
In the View panel or Information panel, right-click the fabric that you want to synchronize and click
Set Time from the context menu. You cannot set the time for a switch group.
Fabric Manager Administrator’s Guide
Publication Number: 53-1000196-01-HP
11-5
11
Opening a Telnet Session for a Nonsecure Switch
The Time dialog displays (see Figure 11-5).
Figure 11-5 Time Dialog
3.
To adjust the time or date, click the applicable areas in the Time dialog (day-of-week, month, day,
year, hour, minute, second, AM or PM) and use the up and down arrows to change the values; then
click OK.
Opening a Telnet Session for a Nonsecure Switch
The following procedure describes how to open a telnet session for a nonsecure switch, that is, a switch
without secure mode enabled. See “Using Telnet on a Secure Fabric” on page 17-19 for instructions on
opening a telnet session for a secure fabric.
To open a telnet session for a nonsecure switch
1.
Right-click a nonsecure switch and select Telnet from the context menu.
The telnet prompt is displayed.
2.
Log in using telnet.
Enabling/Disabling Switches and Ports
You can use Fabric Manager to quickly enable or disable a port, a switch, or multiple ports and switches
across multiple fabrics.
Note
A disabled port on an FC router is both disabled and stopped. An enabled FC router port is both enabled
and started.
11-6
Fabric Manager Administrator’s Guide
Publication Number: 53-1000196-01-HP
Configuring Ports
11
To enable or disable elements
1.
Log in to the switches necessary to disable or enable the elements. You cannot enable or disable a
port or switch until you log in to that switch. If you are not logged in to the appropriate switches,
Fabric Manager prompts you to do so before you can continue.
2.
Right-click the switch, port, or switch/port group that you want to enable or disable and select
Disable/Enable > Disable or Disable/Enable > Enable from the context menu.
Note
The status of the switch determines if the menu item (Disable or Enable) is available.
For example, a disabled switch can only be enabled. However, if you are using telnet, the
enable/disable commands are executable regardless of the switch status.
Configuring Ports
You use the Web Tools Port Management module (Figure 11-6) to perform the basic port configuration
procedures. From the Port Management module, you can:
•
•
•
•
•
Configure port type and speed
Assign a name to a port
Disable a port over reboots
Enable or disable a port
Swap ports
For more information on the Port Management module and performing these tasks, see the Web Tools
Administrator’s Guide.
To configure ports, right-click a port in the Information panel and select Port Configuration from the
context menu.
Fabric Manager Administrator’s Guide
Publication Number: 53-1000196-01-HP
11-7
11
Swapping Ports
Figure 11-6 Web Tools Port Management Module
Swapping Ports
If a port malfunctions, or if you want to connect to different devices without having to re-wire your
infrastructure, you can move traffic from one port to another port (swap ports) without changing the I/O
Configuration Data Set (IOCDS) on the mainframe computer.
Fabric Manager launches the Web Tools Port Management module to swap the ports. Web Tools
automatically disables the ports prior to the swap and then reenables them afterwards.
Use the following procedure to swap the area IDs of a pair of ports. To undo a port swap, run the
following procedure again on the same two ports.
Fabric Manager identifies swapped ports with “[swapped]” in the Area ID/Port Index column in the FC
Ports tab and in other tables where the Area ID/Port Index is displayed.
11-8
Fabric Manager Administrator’s Guide
Publication Number: 53-1000196-01-HP
Administering ISL Trunking
11
To swap ports
1.
Right-click a port to be swapped in the Information panel FC Ports tab and click Port Swap from
the context menu.
Web Tools launches and displays the Port Swap dialog in the Port Management module, as shown
in Figure 11-7. See the Web Tools Administrator’s Guide for additional instructions.
Figure 11-7 Swapping Ports Using Web Tools
Administering ISL Trunking
Interswitch link (ISL) trunking optimizes network performance by forming trunking groups that can
distribute traffic across a shared bandwidth. You use the Trunking tab of the Web Tools Switch Admin
module (Figure 11-8) to view and manage trunks.
From the Trunking tab, you can:
•
•
Display trunk group information
Disable or reenable the trunk mode on a port
Fabric Manager Administrator’s Guide
Publication Number: 53-1000196-01-HP
11-9
11
Administering License Keys
For more information on the Trunking tab and performing these tasks, see the Web Tools
Administrator’s Guide.
To view and manage trunks, right-click a switch and choose Trunking Details from the context menu.
Figure 11-8 Web Tools Trunking Tab
Administering License Keys
This section describes how to use Fabric Manager to administer the license keys that are required to use
different Fabric OS features.
You can use Fabric Manager to display, store, load, and reload your license keys in the event of a switch
failure.
A Web Tools license must be installed on a switch before Fabric Manager can recognize the switch. All
other licenses can be installed using Fabric Manager.
Exporting License Keys
You can export the license keys of multiple switches to a single file. You can even export keys from
different switches in different fabrics to one file. The file matches the license keys to the WWN of the
appropriate switch so you can quickly and easily import the keys at any time. You should export license
keys from healthy switches to a file so you can restore the licenses if switches fail. If for any reason you
need to recover your license keys, import those keys from the file you created.
11-10
Fabric Manager Administrator’s Guide
Publication Number: 53-1000196-01-HP
Administering License Keys
11
To export license keys to a file
1.
Click Tasks > Switch Management > Load from Switch.
The License Admin -- Switch Selection window displays (see Figure 11-9).
Figure 11-9 License Administration (Switch Selection)
2.
Select the switches and fabrics from the SAN Elements tab that have license keys that you want to
export to a file.
3.
Click the right-arrow to move the selected elements to the right panel, then click OK.
The License Administration window displays with the Switch tab selected. Fabric Manager
prompts you to log in to the switches if you are not already.
Note
You can print license information about switches from the License Administration dialog
by clicking Print.
Figure 11-10 License Administration Window
4.
Click Export to File.
The Save dialog displays, as shown in Figure 11-11.
Fabric Manager Administrator’s Guide
Publication Number: 53-1000196-01-HP
11-11
11
Administering License Keys
Figure 11-11 Save Dialog
5.
Optional: Check the WWN, Switch Name, and IP Address checkboxes to save these switch
properties to the license file. These properties are informational only and have no effect on the file.
6.
Select a directory, type a name for the file, and click Export.
Caution
Do not open or manually edit this file.
Importing and Restoring License Keys
If you need to restore license keys to a switch, import them from the file where they were saved. See
“Exporting License Keys” on page 11-10 for additional information.
To import license keys from a file
1.
Click Tasks > Switch Management > Import from File.
The Import License -- Select license file window displays (see Figure 11-12).
Figure 11-12 Importing a License
11-12
Fabric Manager Administrator’s Guide
Publication Number: 53-1000196-01-HP
Using Baseline Configurations for Configuration Management
2.
11
Navigate to your license key file (not displayed in Figure 11-12), select it, and click Open.
The License Administration window displays with the File tab selected.
Note
You can print license information about switches from the License Administration
window by clicking Print.
3.
Select the licenses that you want to download and click Download to Switch.
Fabric Manager loads the licenses to the selected switches. Fabric Manager prompts you to log in
to the switches if you are not already.
Removing License Keys
Use the following procedure to remove a license key.
Note
When you remove a license key, you disable the functionality of the licensed feature.
To remove a license key and disable the functionality of a licensed feature
1.
Click Tasks > Switch Management > Load from Switch.
The License Admin -- Switch Selection window displays (see Figure 11-9).
2.
Select the switches and fabrics from the SAN Elements tab that have license keys you want to
remove.
3.
Click the right-arrow to move the selected elements to the right-hand window, then click OK.
The License Administration window displays with the Switch tab selected.
Note
You can print license information about switches from the License Administration
window by clicking Print.
4.
Select the licenses that you want to remove and click Remove from Switch.
Using Baseline Configurations for Configuration
Management
You can establish baseline configurations of switch configuration files and use them to validate and
ensure consistent switch settings in your fabric, propagate configuration settings to additional switches
in the fabric, and troubleshoot the switches.
The two sources that Fabric Manager uses as baselines are described in Table 11-2.
Fabric Manager Administrator’s Guide
Publication Number: 53-1000196-01-HP
11-13
11
Using Baseline Configurations for Configuration Management
Table 11-2
Baseline Sources
Source
Description
Switch
Compare multiple switches to one switch that you identify as a baseline.
File
•
•
•
Save the configuration file of a switch as a file on an FTP server.
Compare switches to the baseline configuration file.
Propagate the baseline configuration file to switches.
See Chapter 9, “Change Management” for information about automatic configuration file backups.
You can use the Save Baseline tool within Fabric Manager to:
•
•
•
Create a limitless number of baselines.
•
•
Propagate the baseline of one fabric throughout a second fabric before you merge the fabrics.
•
Create and store multiple baselines that serve different purposes so you can quickly adapt your
fabric as its function changes.
Recover fabric and switch settings.
Propagate a baseline configuration to each new switch that you add to a fabric to ensure that the
switch is compatible with the fabric.
Propagate a baseline configuration throughout a fabric to ensure consistent Fabric Watch and
SNMP settings.
See the following sections for information on using baseline configurations and templates:
•
•
•
•
•
“Saving a Baseline Configuration to a File” on page 11-14
“Comparing Switches to a Baseline File” on page 11-16
“Comparing Switches to a Baseline Switch” on page 11-18
“Downloading a Configuration” on page 11-19
“Customizing Baseline Configurations” on page 11-21
Saving a Baseline Configuration to a File
This section describes how to save a baseline configuration from a single switch in a fabric. You can
export the following categories of information from the configuration file to the baseline:
•
•
•
Settings that you can normally assign with the configure command
Settings for Fabric Watch and SNMP
Settings for the security banner and password policy
When you create your baseline in Fabric Manager, you can choose the settings you want to add or omit
from the baseline. For example, you can save Fabric Watch configuration settings to a baseline, then
propagate those settings to an entire fabric and not alter the switch name of any switch in the fabric.
11-14
Fabric Manager Administrator’s Guide
Publication Number: 53-1000196-01-HP
Using Baseline Configurations for Configuration Management
11
To save a baseline configuration to a file
1.
Ensure that file transfer properties between the switches and your host are configured. See
“Configuring File Transfer Options” on page 14-9 for additional information.
2.
Log in to the switch that has the configuration that you want to save as your baseline. See “Logging
In to Multiple Switches Simultaneously” on page 4-4 for additional information.
3.
Select Tasks > Configuration Management > Save Baseline.
The Save Baseline -- Configuration Template Selection dialog box opens (see Figure 11-13).
Figure 11-13 Save Baseline (Configuration Template Selection)
4.
Select Full Configuration, then click Next.
The Save Baseline -- Switch Selection window opens (see Figure 11-14).
Figure 11-14 Save Baseline (Switch Selection)
5.
From the SAN Elements tab, select the switch that has the configuration you want to save, then
click the right-arrow to add it to the right-hand window.
6.
Click OK.
The Save Baseline -- Parameter Selection window opens (see Figure 11-15).
Fabric Manager Administrator’s Guide
Publication Number: 53-1000196-01-HP
11-15
11
Using Baseline Configurations for Configuration Management
Figure 11-15 Save Baseline (Parameter Selection)
7.
Click the checkboxes for each setting or group of settings of the configuration file that you want to
save to the baseline. Expand and collapse the navigation tree to access your options.
Note
The Solaris environment does not display checkboxes clearly. If the checkbox displays
full, the value is selected. If the checkbox displays shallow, it is not selected.
8.
Click Save.
The Save base file dialog box opens.
9.
Provide a name for your baseline, choose a folder to keep it in, and then click Save.
Comparing Switches to a Baseline File
This section provides information about comparing switches to a baseline file. When you compare the
configuration of a switch to a baseline file, Fabric Manager identifies and lists each parameter that does
not match. You should compare the configuration of one or more switches to a baseline if you plan to
merge two fabrics, add a new switch to a fabric, verify that Fabric Watch and SNMP settings are
consistent across a fabric, or troubleshoot the problem if a fabric segments.
To compare switches to a baseline file
1.
Select Tasks > Configuration Management > Compare/Download from File.
The Compare/Download from File -- Select Baseline Configuration dialog opens (Figure 11-16).
11-16
Fabric Manager Administrator’s Guide
Publication Number: 53-1000196-01-HP
Using Baseline Configurations for Configuration Management
11
Figure 11-16 Compare/Download from File
2.
Navigate to the baseline file and click Open.
The Compare/Download from File -- Target Switch Selection window opens.
Note
In a Solaris environment, ensure that you select a directory and not the actual file to
compare the configuration against.
3.
From the SAN Elements tab, select the switches that you want to compare to the baseline file and
click the right-arrow or drag the switches to move them to the right-hand window.
You can use Ctrl-click or Shift-click to select multiple switches.
4.
Click OK.
The Compare/Download from File -- Switch Configuration comparison and Download window
displays and compares the configurations of the switches to the baseline (see Figure 11-17).
5.
Click Apply Baseline to apply this baseline to the switches that you selected.
Figure 11-17 Switch Configuration Comparison
Fabric Manager Administrator’s Guide
Publication Number: 53-1000196-01-HP
11-17
11
Using Baseline Configurations for Configuration Management
Comparing Switches to a Baseline Switch
This section provides information about comparing the configuration data of switches to a switch that
you select to be the baseline switch. When you compare the configuration of a switch to a baseline
switch, Fabric Manager identifies and lists each parameter that does not match. You should compare the
configuration of one or more switches to a baseline if you plan to merge two fabrics, add a new switch
to a fabric, verify that Fabric Watch and SNMP settings are consistent across a fabric, or troubleshoot
the problem if a fabric segments.
To compare switches to a baseline switch
1.
Select Tasks > Configuration Management > Compare/Download from Switch.
The Compare/Download from Switch -- Source Configuration Selection window opens (see
Figure 11-18).
Figure 11-18 Compare/Download from Switch
2.
Navigate to the switch that you want to use as a baseline and click the right-arrow to move that
switch to the right-hand side of the window.
3.
Click OK.
The Compare/Download from Switch -- Target Switch Selection window opens.
4.
From the SAN Elements tab, select the switches that you want to compare to the baseline file and
click the right-arrow or drag the switches to move them to the right-hand window.
You can use Ctrl-click or Shift-click to select multiple switches.
11-18
5.
Click OK.
6.
The Compare/Download from Switch -- Switch Configuration comparison and Download window
displays and compares the configurations of the switches to the baseline. (See Figure 11-17.)
7.
Click Apply Baseline to apply this baseline to the switches that you selected.
Fabric Manager Administrator’s Guide
Publication Number: 53-1000196-01-HP
Using Baseline Configurations for Configuration Management
11
Downloading a Configuration
You can download a configuration to a switch from a baseline file or from another switch. During the
download process, you can choose the settings that you want to download and the settings that you want
to omit. See “Saving a Baseline Configuration to a File” on page 11-14 for instructions on saving a
baseline configuration file.
The configuration download succeeds only if all of the configuration parameters are successfully
downloaded. If some of the configuration parameters are not accepted by the switch, then the entire
configuration download fails and Fabric Manager displays a message indicating which parameters
caused the failure.
•
•
“Downloading to Switches from a Baseline File” on page 11-19
“Downloading to Switches from a Baseline Switch” on page 11-20
Downloading to Switches from a Baseline File
The following procedure describes how to download a configuration from a baseline file to one or more
switches.
To download a baseline file to one or more switches
1.
Select Tasks > Configuration Management > Compare/Download from File.
The Compare/Download from File -- Select Baseline Configuration dialog opens (see Figure 11-16
on page 11-17).
2.
Navigate to the baseline file and click Open.
The Compare/Download from File -- Target Switch Selection window opens.
3.
From the SAN Elements tab, select the switches that you want to receive the baseline file from and
click the right-arrow or drag the switches to move them to the right-hand window.
You can use Ctrl-click or Shift-click to select multiple switches.
4.
Click OK.
The Compare/Download from File -- Switch Configuration comparison and Download window
displays and compares the configurations of the switches to the baseline. Fabric Manager displays a
warning that the selected switches will be disabled and rebooted.
5.
Click Apply Baseline to apply this baseline to the switches that you selected.
A series of prompts are displayed to ensure that you are not downloading a configuration
accidentally; then the Apply Baseline window displays, as shown in Figure 11-19.
Fabric Manager Administrator’s Guide
Publication Number: 53-1000196-01-HP
11-19
11
Using Baseline Configurations for Configuration Management
Figure 11-19 Apply Baseline Dialog
The root navigation tree divides the switches into the following two groups:
•
Non-Reboot Configuration Group
Any switches that do not need to reboot if the configuration file is downloaded.
•
Reboot Configuration Group
Any switches that need to reboot if the configuration file is downloaded.
Note
The delay timer at the bottom of the Apply Baseline dialog cannot be configured from
here. It is propagated from current settings in the sequenced reboot group and
represented by the combination of Fabric Stabilization timeout and Delay after Fabric
Stabilization parameters.
6.
Click Apply.
Fabric Manager issues an additional prompt to ensure that you want to proceed. The download
proceeds one group at a time. The status of each switch is displayed in the right-hand side of the
window.
Downloading to Switches from a Baseline Switch
The following procedure describes how to download a configuration from a baseline switch to one or
more switches.
To download a configuration from a baseline switch to one or more switches
1.
Select Tasks > Configuration Management > Compare/Download from Switch.
The Compare/Download from Switch -- Source Configuration Selection window opens
(see Figure 11-18 on page 11-18).
2.
Navigate to the switch that you want to use as a baseline and click the right arrow to move that
switch to the right window.
3.
Click OK.
The Compare/Download from Switch -- Target Switch Selection window opens.
11-20
Fabric Manager Administrator’s Guide
Publication Number: 53-1000196-01-HP
Using Baseline Configurations for Configuration Management
4.
11
From the SAN Elements tab, select the switches that you want to compare to the baseline file and
click the right-arrow or drag the switches to move them to the right-hand window.
You can use Ctrl-click or Shift-click to select multiple switches.
5.
Click OK.
6.
The Compare/Download from Switch -- Switch Configuration comparison and Download window
displays and compares the configurations of the switches to the baseline. Fabric Manager displays a
warning that the selected switches will be disabled and rebooted.
7.
Click Apply Baseline to apply this baseline to the switches that you selected.
A series of prompts are displayed to ensure that you are not downloading a configuration
accidentally; then the Apply Baseline window displays, as shown in Figure 11-19.
The root navigation tree divides the switches into the following two groups:
•
Non-Reboot Configuration Group
Any switches that do not need to reboot if the configuration file is downloaded.
•
Reboot Configuration Group
Any switches that need to reboot if the configuration file is downloaded.
Note
The delay timer at the bottom of the Apply Baseline dialog cannot be configured from
here. It is propagated from current settings in the sequenced reboot group and
represented by the combination of Fabric Stabilization timeout and Delay after Fabric
Stabilization parameters.
8.
Click Apply.
Fabric Manager issues an additional prompt to ensure that you want to proceed. The download
proceeds one group at a time. The status of each switch is displayed in the right-hand side of the
window.
Customizing Baseline Configurations
You must use a configuration template when you save a baseline configuration. Fabric Manager
provides the following templates (see Figure 11-13 on page 11-15):
•
•
•
Full Configuration
SNMP/Fabric Watch
Security Banner/Password Policy
You can create custom templates or edit one of the existing templates.
Access the configuration templates by selecting Tasks > Configuration Management > Save
Baseline. Any customized baseline templates you create are also accessible from this location. Select
one of the templates and click Next; then select a switch from the switch picker list. The Save Baseline
-- Parameter Selection dialog box is displayed.
The parameters that appear in this dialog box (see Figure 11-15) are determined by the configuration
template you have selected.
Fabric Manager Administrator’s Guide
Publication Number: 53-1000196-01-HP
11-21
11
Using Baseline Configurations for Configuration Management
To create a custom template, you must create an XML file and save it in the following directory on your
Fabric Manager client:
<User_Home>/Fabric Manager/<server_IP_address/client/baseline/templates
The standard configuration template files are also in this directory.
To create a custom baseline template, you must define custom XML tags
1.
Open fullBaseLineTemplate.xml in a text editor. This file is in the following location:
<User_Home>/Fabric Manager/<server_IP_address/client/baseline/templates
Note
If you are running Fabric Manager in a Windows environment, the Notepad application
does not work for this task. To edit the XML document, you must open the file in
WordPad or a similar application that recognizes carriage returns.
2.
Edit the Description tag in the .xml file by providing a template name for your new baseline
configuration between the <summary> and </summary> tags, as shown in the following example:
<Description>
<summary>My Template</summary>
<detail>This will show my custom parameters</detail>
</Description>
3.
Add or remove section tags to include or remove sections from the configuration file to the
template. Each section appears in the configuration file as text in square brackets ([ ]).
For example, to add the [Boot Parameters] section of the configuration file to the template, you can
use the Boot Parameters value attribute in a section tag. The Boot Parameter text attribute identifies
the checkbox in the Save Baseline -- Parameter Selection dialog box (see Figure 11-20). This
section tag includes a prefix tag to add parameters to the section.
<section value="Boot Parameters" text="boot parameters">
<prefix ID="boot" text="Boot"/>
</section>
Figure 11-20 Added Sections
11-22
Fabric Manager Administrator’s Guide
Publication Number: 53-1000196-01-HP
Saving Switch Configuration Files
4.
11
Add or remove prefix tags to section tags to include or remove parameters from the Save Baseline - Parameter Selection dialog box. In each section, only include prefixes that appear in the
analogous section in the configuration file.
The prefix tag adds parameters to the template. Every parameter in the configuration file includes a
prefix before the first dot (.). Set the ID attribute of the prefix tag to add all the configuration file
parameters that use that prefix to the template. For example, you can add all the parameters in the
configuration file that begin with boot. to the template. Set the text attribute to define the text that
accompanies the parameter in the Save Baseline -- Parameter Selection dialog box (see Figure 11-21
on page 11-23).
<prefix ID="boot" text="Boot"/>
Figure 11-21 Adding Prefixes
5.
Save the file in the same directory (with a different filename) to create a new configuration
template. If you save the file with these changes and do not change the filename, the existing
configuration is updated.
Saving Switch Configuration Files
Fabric Manager lets you back up the entire configuration file from one switch or from a set of switches.
Fabric Manager uploads the entire configuration file from the selected switches and stores them in
individual files. Files are named with the convention cfg_fabricName_switchName_domainID. For
example, cfg_msit_ref_ulys_FMUly_24_14.
You can restore these files to switches using CLI, Web Tools, or Fabric Manager.
Note
There are some limitations to restoring these files using Fabric Manager. Some data might not be
downloaded even though they exist in the configuration files. The limitation is dependent on the
Fabric OS being used. For more information, see the Fabric Manager Release Notes.
Fabric Manager Administrator’s Guide
Publication Number: 53-1000196-01-HP
11-23
11
Saving Switch Configuration Files
To save the switch configuration files
1.
Select Tasks > Configuration Management > Save Config files from Switches.
The Select a Folder window appears, as shown in Figure 11-22.
Figure 11-22 Selecting a Folder to Save Your Switch Configuration Files
2.
Browse to the folder where you want to save your switch configuration files and click OK.
The Switch Selection window appears, as shown in Figure 11-23.
Figure 11-23 Selecting the Switches
3.
From the SAN Elements tab, select the switches from which you want to save configuration files
and click the right arrow button.
Click Login if you need to log in to the switches.
4.
Click OK.
Configuration files from the selected switches are saved to the folder you selected.
11-24
Fabric Manager Administrator’s Guide
Publication Number: 53-1000196-01-HP
Checking the Physical Health of a Switch
11
Checking the Physical Health of a Switch
The background color of the switch in the View panel and Scope panel indicates the real-time status of
the switch. For the meaning of the colors, see the Status Legend available from the Help menu (Help >
Status Legend).
For example, in Figure 11-24, the View panel shows two switches with a yellow background, indicating
Marginal status. The table in the Scope panel also shows a yellow background for those switches.
In the Switches tab of the Information panel, the Status column displays the status of the switch and the
Contributors column indicates the reason for an unhealthy status.
Figure 11-24 Checking the Physical Health of a Switch
To display a detailed, customizable switch status report, see “Displaying the Switch Health Report” on
page 22-1.
Fabric Manager Administrator’s Guide
Publication Number: 53-1000196-01-HP
11-25
11
Replacing a Switch in the Fabric
Replacing a Switch in the Fabric
Use the following procedures if you want to replace a switch in the fabric. The procedure for replacing
the seed switch differs from that for replacing a non-seed switch.
Caution
If you replace the seed switch, all historical data in the database for the fabric containing the seed switch
is lost.
To replace a switch in the fabric (non-seed switch)
1.
Physically remove the existing switch from the fabric.
The switch status indicator turns orange and the switch status is set to Missing Switch in the
Information panel.
2.
Right-click the switch that you want to remove and select Delete from the context menu.
Fabric Manager prompts you to ensure that you want to delete the switch.
3.
Physically connect the new switch to the fabric and power it on. Wait until Fabric Manager
discovers the switch. (This might take a few minutes.)
To replace a switch in the fabric (seed switch)
1.
Change the seed switch to a different switch in the fabric (see “Changing the Seed Switch” on
page 4-7).
2.
Physically remove the existing switch from the fabric.
The switch status indicator turns orange and the switch status is set to Missing Switch in the
Information panel.
3.
Right-click the switch that you want to remove and select Delete from the context menu.
Fabric Manager prompts you to ensure that you want to delete the fabric.
11-26
4.
Physically connect the new switch to the fabric and power it on. Wait until Fabric Manager
discovers the switch. (This might take a few minutes.)
5.
Change the seed switch to be the new switch.
Fabric Manager Administrator’s Guide
Publication Number: 53-1000196-01-HP
Chapter
Configuring Standard Security Features
12
The chapter provides information about standard security features in Fabric Manager and contains the
following sections:
•
•
•
•
•
•
“Managing Passwords” on page 12-1
“Enabling Secure Communication Over HTTPS” on page 12-3
“Managing the Truststore” on page 12-3
“Managing Administrative Domains” on page 12-4
“Managing Access Control Lists” on page 12-6
“Propagating RADIUS Configuration Across Switches” on page 12-7
Managing Passwords
This section describes:
•
•
“Enabling and Disabling Switch Passwords,”
“Changing Admin Password on Multiple Switches” on page 12-2
Enabling and Disabling Switch Passwords
Fabric Manager stores switch passwords to the server automatically (by default). Use the following
procedure to enable switch passwords to be saved to the server or disable switch passwords from being
saved to the server.
Note
If you disable switch passwords from being saved to the server, then you need to monitor the fabrics
again when you restart the client. In this case, a message dialog displays on client startup about the
missing credentials; you must click the Provide credentials now button in that dialog and enter seed
switch credentials to start monitoring the fabrics. You can provide the credentials for the rest of the
switches in the fabric by clicking Discovery > Switch Login.
To enable or disable switch passwords
1.
Click Edit > Preferences in the Menu bar.
The Preferences dialog displays.
2.
Expand User specific and click General (see Figure 3-22 on page 3-20).
Fabric Manager Administrator’s Guide
Publication Number: 53-1000196-01-HP
12-1
12
Managing Passwords
3.
Enable switch passwords to be saved to the server by checking the Persist switch passwords
checkbox.
Disable switch passwords from being saved to the server by unchecking the box.
4.
Click OK.
Changing Admin Password on Multiple
Switches
This section describes how you can set the password for accounts with the role of admin, which
includes the default admin account as well as non-default user accounts that have the admin role. You
can change the password on a single switch or on multiple nonsecure switches simultaneously. Other
accounts with administrator-level privileges, such as “root” or “factory”, are excluded. You cannot use a
RADIUS server for authentication on a selected switch.
You cannot set the “admin” account password on any switches in secure mode. See “Changing the
Admin Security Password” on page 17-15 for information about using passwords in secure fabrics.
To set the “admin” account password on multiple switches
1.
Select Tasks > Switch Management > Set Admin Password from the Menu bar.
The Set “admin” Account Passwords dialog displays.
2.
From the SAN Elements tab, select the switches or fabrics for which you want to change the admin
password, and click the right arrow to move them to the Selected Switches panel.
You can also drag fabrics or switches from the SAN Elements tab directly into the Selected
Switches panel.
3.
12-2
Type the new admin password in the New Password field.
Fabric Manager Administrator’s Guide
Publication Number: 53-1000196-01-HP
Enabling Secure Communication Over HTTPS
12
Passwords must adhere to the following conditions:
•
•
•
They must be between 8 and 40 characters long.
The password is entered exactly as you want it.
Only printable ASCII characters are included, with the following exceptions: slash (“/”),
backslash (“\”), less than (“<”), greater than (“>”), ampersand (“&”), quotation mark, and
apostrophe.
In addition, passwords must adhere to any additional conditions that you set up through Web Tools
or the CLI.
4.
Retype the new password in the Confirm Password field.
5.
Click Apply.
If you have not logged in to the selected switches, the switch login dialog displays, allowing you to
enter current login information.
When all of the selected switches have the current login information, Fabric Manager begins to set
the new “admin” account password on each switch in the Selected Switches panel, starting with the
first switch listed and then proceeding down the rows in the table one switch at a time.
6.
Check the Status column in the Selected Switches table to determine the success or failure of the
password change operation.
The background of the status field changes color to display its status, as follows:
•
•
Yellow indicates that setting the new password is in progress.
•
Green indicates success for the new password.
Red indicates the password change failed. An error message displays in the adjacent Messages
column.
After a switch has a successful new password setting, your saved password for that switch in Fabric
Manager is updated with the new password.
Enabling Secure Communication Over HTTPS
By default, Fabric Manager connects to all switches using HTTP. You can change the security
configuration to enable switch connection using HTTP over SSL (HTTPS). The connection setting
applies to the entire Fabric Manager server and not to selected switches.
You change the security configuration using the Server Management Console. See “Changing Secure
Communication Settings (HTTP or HTTPS)” on page 24-8 for instructions.
Managing the Truststore
Fabric Manager provides a default trusted certificates repository (truststore) with well-known root
Certification Authority (CA) certificates. This truststore is in the following location:
Solaris and Linux:
<installdir>/server/server/fmserver/conf/cacerts.jks
Windows:
<installdir>\server\server\fmserver\conf\cacerts.jks
Fabric Manager Administrator’s Guide
Publication Number: 53-1000196-01-HP
12-3
12
Managing Administrative Domains
The default truststore password is “password”.
Fabric Manager provides a set of command line utilities to manage the truststore. You can use these
utilities to import, export, delete, and print trusted certificates. You can also change the default trusted
password.
importcert
Imports a certificate from a file and add it to the list of trusted certificates
(truststore).
exportcert
Exports a certificate from the truststore to another file.
listcert
Prints the contents of a truststore entry or the entire truststore file.
printcert
Prints the contents of a certificate stored in a file other than the truststore.
deletecert
Deletes a truststore entry.
storepasswd
Changes the default truststore password. The new password must be at least six
characters long.
Caution
Use care when typing the password, as it is echoed (displayed exactly as typed). This is a limitation of
the Java keytool.
Fabric Manager supports certificate validation and extended hostname verification (if they are enabled).
By default, both certificate validation and hostname verification are enabled.
If certificate validation is enabled, switch connection is not established unless the certificate is issued by
a trusted CA. If the switch certificate is not issued by a well-known CA (or one of the trusted CAs in the
trusted certificate repository), the root certificate must be added to the trusted certificate repository.
Managing Administrative Domains
Using Administrative Domains (Admin Domains), you can partition the fabric into logical groups and
allocate administration of these groups to different user accounts so that these accounts manage only the
Admin Domains assigned to them and do not make changes to the rest of the fabric.
You can create domains that are grouped together based on the type of members in the domain. For
example, you can create Admin Domains based on the type of switches in your fabric using the WWN
or domain ID (not to be confused with the Admin Domain number) or put all the devices in a particular
department in the same Admin Domain for ease of administering those devices.
You can have up to 256 Admin Domains in a fabric (254 user-defined and 2 system-defined), numbered
from 0 through 255. Admin Domains are designated by a name and a number. This document refers to
specific Admin Domains using the format “ADn” where n is a number between 0 and 255.
See the Web Tools Administrator’s Guide for additional information.
Requirements for Admin Domains
Admin Domains are supported on fabrics with switches running Fabric OS 5.2.0 and higher.
You must have a valid Advanced Zoning license to use Admin Domains.
12-4
Fabric Manager Administrator’s Guide
Publication Number: 53-1000196-01-HP
Managing Administrative Domains
12
A fabric running Fabric OS 5.2.0 or higher with a valid zoning license is called an Admin Domaincapable fabric.
To manage Admin Domains, you must be a physical fabric administrator. A physical fabric
administrator is a user with the Admin role and access to all Admin Domains (AD0 through AD255).
Launching the Admin Domain Module
You can manage Admin Domains using the Admin Domain module of the Web Tools interface. From
the Admin Domain module you can:
•
•
•
•
•
create Admin Domains
rename Admin Domains
add and remove Admin Domain members
delete Admin Domains
activate and deactivate Admin Domains
The following procedure describe how to launch the Admin Domain module from Fabric Manager.
To launch the Admin Domain module
1.
Right-click a fabric and select AD Admin from the context menu.
Web Tools launches and displays the Admin Domain module, as shown in Figure 12-1. See the
Web Tools Administrator’s Guide for instructions on using this module.
Figure 12-1 Web Tools Admin Domain Module
Fabric Manager Administrator’s Guide
Publication Number: 53-1000196-01-HP
12-5
12
Managing Access Control Lists
Managing Access Control Lists
For switches running Fabric OS v5.2.x and higher, you can create and activate Switch Connection
Control (SCC) and Device Connection Control (DCC) policies in the base Fabric OS that are
functionally equivalent to the SCC and DCC policies supported in Secure Fabric OS.
In Secure Fabric OS, these polices are fabric-wide. In the base Fabric OS (for Fabric OS v5.2.x and
higher), these polices are switch-based; however, you can distribute these policies to all switches in the
fabric.
To manage the ACL policies, the following requirements must be met:
•
•
•
•
You can select only one switch at a time.
The switch must be running Fabric OS v5.2.x or higher.
Security must not be enabled on the fabric.
Your user account must have either the Admin or Fabric Admin role for ACL management.
Fabric Manager launches Web Tools to manage the ACL policies. The following procedure describes
how to launch the Web Tools Switch Admin module from Fabric Manager. See the Web Tools
Administrator’s Guide for additional instructions on configuring the SCC and DCC policies.
To manage ACL policies
1.
Right-click a switch and select ACL Management from the context menu.
Alternatively, you can select a switch and then click Tasks > Switch Management > ACL
Management from the Menu bar.
The Switch Admin module of Web Tools launches, with the ACL tab selected, as shown in
Figure 12-2.
See the Web Tools Administrator’s Guide for instructions on using this interface.
12-6
Fabric Manager Administrator’s Guide
Publication Number: 53-1000196-01-HP
Propagating RADIUS Configuration Across Switches
12
Figure 12-2 Web Tools Switch Admin Module, ACL Management Tab
Propagating RADIUS Configuration Across Switches
Fabric OS supports RADIUS authentication, authorization, and accounting service (AAA). When
configured for RADIUS, the switch becomes a Network Access Server (NAS) that acts as a RADIUS
client. In this configuration, authentication records are stored in the RADIUS host server database.
Login and logout account name, assigned role, and time accounting records are also stored on the
RADIUS server.
You can replicate RADIUS AAA configuration across multiple switches for failover purposes.
If you are using Fabric OS v3.x, you can replicate AAA configuration only to switches with version 3.2
and later. If you are using Fabric OS v4.4, you can replicate AAA configuration only to switches with
version 4.4 and later.
To replicate RADIUS configuration
1.
Click Tasks > Fabric Management > Replicate AAA Configuration from the Menu bar.
The Replicate AAA Configuration wizard opens with an Overview that describes the steps you will
be performing.
Fabric Manager Administrator’s Guide
Publication Number: 53-1000196-01-HP
12-7
12
Propagating RADIUS Configuration Across Switches
2.
Follow the instructions in the wizard to set up the call home configuration.
The wizard is self-explanatory, so the individual steps are not described in this document. For
additional help, click Help on the left-hand side of the window.
12-8
Fabric Manager Administrator’s Guide
Publication Number: 53-1000196-01-HP
Chapter
Managing the iSCSI Target Gateway
13
The chapter provides information about iSCSI management in Fabric Manager and contains the
following sections:
•
•
•
“About the iSCSI Target Gateway” on page 13-1
“Viewing iSCSI Information” on page 13-2
“Setting Up iSCSI Target Gateway Services” on page 13-7
About the iSCSI Target Gateway
The Brocade iSCSI Target Gateway service provides the ability to leverage your shared Fibre Channel
SAN resources with IP-based servers by using iSCSI links between your IP and FC SANs. After you
configure the iSCSI Gateway, you can share resources such as data backup, data migration, security, and
storage asset utilization across both your IP and FC SANs.
As shown in Figure 13-1, the IP-based server can access the shared storage resource on the Fibre
Channel SAN using iSCSI links.
The iSCSI Target Gateway is supported only on the SilkWorm 48000 director with SilkWorm 48000 CP
blades running Fabric OS 5.2.0 or higher, and configured with an FC4-16IP blade. The FC4-16IP port
blade works as an iSCSI Target Gateway.
Although iSCSI service is fabric wide, you can manage the iSCSI Target Gateway through any iSCSIcapable switch in a fabric. Any applied iSCSI Target Gateway change is propagated and enforced to the
whole fabric.
For additional information about iSCSI Target Gateway, see the iSCSI Gateway Service Administrator’s
Guide.
Fabric Manager Administrator’s Guide
Publication Number: 53-1000196-01-HP
13-1
13
Viewing iSCSI Information
iSCSI Host
iSCSI Host
IP
Network
SilkWorm 48000
with FC4-16IP Blade
FC SAN
Fibre
Channel
Target
Fibre
Channel
Target
Figure 13-1 iSCSI Target Gateway Connecting iSCSI Servers to FC Storage
Viewing iSCSI Information
The iSCSI tab in the Information panel displays detailed iSCSI information (see Figure 13-2). The
iSCSI tab is available in the SAN, fabric, or switch context. If the selected switch is not iSCSI-capable,
or if there are no iSCSI-capable switches in the SAN or selected fabric, then the iSCSI tab is empty.
Figure 13-2 iSCSI Tab, Summary View
The iSCSI tab displays information in several subtabs, described in the following sections.
13-2
Fabric Manager Administrator’s Guide
Publication Number: 53-1000196-01-HP
Viewing iSCSI Information
13
iSCSI Summary
The iSCSI Summary tab, shown in Figure 13-2, displays a summary of iSCSI-specific parameters as
well as a table of information about iSCSI-capable switches.
The information shown is in the context of user selection. If you made no selection, the information is
SAN-wide; if you selected a fabric, the information is fabric-wide, and if you selected a switch, the
information is specific to that switch. Because virtual targets are fabric-wide entities, if you click this
tab in the switch context, the value for No. of iSCSI Targets is N/A.
To view additional iSCSI-specific details about a switch, right-click a switch in the table and click
iSCSI Configuration in the context menu. This launches the Web Tools iSCSI Target Gateway Admin
module, from which you can view and configure iSCSI parameters (see “Setting Up iSCSI Target
Gateway Services” on page 13-7).
To configure Discovery Domain and Discovery Domain Sets, right-click a switch in the table and click
Configure DD/DDSet in the context menu. This launches the Web Tools iSCSI Target Gateway Admin
module, from which you can configure and edit the DD and DDSet details (see “Setting Up iSCSI
Target Gateway Services” on page 13-7).
iSCSI Ports
The iSCSI Ports tab, shown in Figure 13-3, lists the iSCSI (GbE) ports in an iSCSI-capable SAN,
fabric, or switch. This tab shows only the GbE ports on FC4-16IP port blades. The portal IP is shown as
N/A for non-configured GbE ports. You can filter the list based on portal IP and switch IP addresses.
Figure 13-3 iSCSI Tab, iSCSI Ports View
To modify an existing port configuration, right-click a port in the table and click Configure iSCSI
Ports in the context menu. This launches the Web Tools iSCSI Target Gateway Admin module, from
which you can view and configure iSCSI ports (see “Setting Up iSCSI Target Gateway Services” on
page 13-7).
To view details about an existing iSCSI port configuration, right-click a port in the table and click
iSCSI Port Detail View in the context menu. The port details are displayed in a pop-up window, as
shown in Figure 13-4.
Fabric Manager Administrator’s Guide
Publication Number: 53-1000196-01-HP
13-3
13
Viewing iSCSI Information
Figure 13-4 iSCSI Port Detail View
iSCSI Initiators
The iSCSI Initiators tab, shown in Figure 13-5, lists all iSCSI initiators in the SAN, fabric, or switch.
You can filter the list based on initiator name (IQN) and initiator IP address.
To view additional details about an initiator, right-click the initiator in the table and click View iSCSI
Initiator Details in the context menu. This launches the Web Tools iSCSI Target Gateway Admin
module (see “Setting Up iSCSI Target Gateway Services” on page 13-7).
Figure 13-5 iSCSI Tab, iSCSI Initiators View
13-4
Fabric Manager Administrator’s Guide
Publication Number: 53-1000196-01-HP
Viewing iSCSI Information
13
iSCSI Targets
The iSCSI Targets tab, shown in Figure 13-6, lists all iSCSI targets (virtual targets) in the SAN, fabric,
or switch. You can filter the list based on iSCSI target name (IQN) and FC target name. This tab is
disabled in the switch context because virtual targets are fabric-wide entities.
Figure 13-6 iSCSI Tab, iSCSI Targets View
If an iSCSI target is created from LUNs of multiple FC devices, there are multiple entries for that iSCSI
target corresponding to each FC device. If an iSCSI target has multiple LUN configurations from a
single FC device, there is only one entry for that iSCSI target.
The state of the iSCSI target is offline if any of the FC devices that are part of the iSCSI target are
offline.
To edit an iSCSI target, right-click the target in the table and click Configure iSCSI Targets in the
context menu. This launches the Web Tools iSCSI Target Gateway Admin module, from which you can
view and configure iSCSI targets (see “Setting Up iSCSI Target Gateway Services” on page 13-7).
Virtual Initiators
The Virtual Initiators tab, shown in Figure 13-7, lists the virtual initiators available in the SAN, fabric,
or switch. You can filter the list based on virtual initiator name and switch name.
Fabric Manager Administrator’s Guide
Publication Number: 53-1000196-01-HP
13-5
13
Viewing iSCSI Information
Figure 13-7 iSCSI Tab, Virtual Initiators View
Exported FC Targets
The Exported FC Targets tab, shown in Figure 13-8, lists details of FC targets that are exported as
virtual targets. This tab is disabled when accessed in the switch context.
If the iSCSI target is created by specifying a LUN range from the same FC device, then the table
displays a single entry for the iSCSI target; otherwise, the table displays multiple entries for an iSCSI
target for each LUN shared from FC devices.
To edit the configuration for the exported FC targets, right-click a device in the table and click
Configure Virtual Targets in the context menu. This launches the Web Tools iSCSI Target Gateway
Admin module, from which you can view and configure virtual targets (see “Setting Up iSCSI Target
Gateway Services” on page 13-7).
Figure 13-8 iSCSI Tab, Exported FC Targets View
13-6
Fabric Manager Administrator’s Guide
Publication Number: 53-1000196-01-HP
Setting Up iSCSI Target Gateway Services
13
iSCSI Sessions
The iSCSI Sessions tab, shown in Figure 13-9, lists all active iSCSI sessions in the SAN, fabric, or
switch. You can filter the list based on initiator name and iSCSI target name.
Figure 13-9 iSCSI Tab, iSCSI Sessions View
Setting Up iSCSI Target Gateway Services
To set up the iSCSI Target Gateway service, you use the Web Tools iSCSI Target Gateway Admin
module. Using the iSCSI Target Gateway Admin module, you can do the following:
•
•
•
•
•
Activate and deactivate the iSCSI Target Gateway service.
Create and manage iSCSI virtual targets.
Configure iSCSI ports.
Manage iSCSI sessions and iSCSI authentications.
Edit Discovery Domain Sets that enforce iSCSI device access control.
To launch the Web Tools iSCSI Target Gateway Admin module, your user account must have either the
Admin or FabricAdmin role.
To configure the iSCSI Target Gateway
1.
Select the SAN or an iSCSI-capable switch or fabric.
2.
Click the iSCSI tab in the Information panel.
3.
Click the iSCSI Summary subtab.
4.
Right-click a switch in the table and select iSCSI Configuration from the context menu.
The Web Tools iSCSI Target Gateway Admin module launches, as shown in Figure 13-10.
5.
Follow the instructions in the Web Tools Administrator’s Guide for setting up the iSCSI Target
Gateway services.
Fabric Manager Administrator’s Guide
Publication Number: 53-1000196-01-HP
13-7
13
Setting Up iSCSI Target Gateway Services
Figure 13-10 iSCSI Configuration Using Web Tools
13-8
Fabric Manager Administrator’s Guide
Publication Number: 53-1000196-01-HP
Chapter
Firmware Management
14
This chapter provides information about using Fabric Manager to download firmware to multiple
switches and host bus adapters (HBAs).
Refer to the following sections for firmware download specifics:
•
•
•
•
•
•
•
•
•
•
“Determining Availability of Firmware-Specific Features” on page 14-1
“Using Built-in FTP Server and Firmware Repository” on page 14-3
“Configuring File Transfer Options” on page 14-9
“Downloading Firmware to Multiple Switches” on page 14-11
“Controlling Firmware Download Reboots” on page 14-15
“Downloading Firmware to HBAs” on page 14-15
“Downloading Firmware to XPath OS Switches” on page 14-18
“Accessing Firmware When Changing the FTP Server” on page 14-18
“Collecting FDMI Device Information” on page 14-19
“Rebooting Switches” on page 14-19
Determining Availability of Firmware-Specific
Features
Determining the firmware version to use depends upon the features you need to manage your fabric.
Table 14-1 lists the firmware-specific features and their supported firmware versions.
Table 14-1
Firmware-Specific Features
Feature
Fabric OS
XPath OS
5.2.x 5.1.x 5.0.x 4.4.x 4.2.x 4.1.x 4.0.x 3.1.x 3.0.x 2.6.x 7.3.x 7.1.x
Port name change on a switch
X
X
X
X
X
X
Port swapping
X
X
X
X
X
X
Topology/ISL monitoring
X
X
X
X
X
X
Security administration
X
X
X
X
X
X
X
Enabling secure mode
X
X
X
X
FDMI/HBA firmware
download
X
X
X
X
X
X
X
Fabric Manager Administrator’s Guide
Publication Number: 53-1000196-01-HP
X1
X
X
X
X2
X2
X
14-1
14
Determining Availability of Firmware-Specific Features
Table 14-1
Firmware-Specific Features (Continued)
Feature
Fabric OS
XPath OS
5.2.x 5.1.x 5.0.x 4.4.x 4.2.x 4.1.x 4.0.x 3.1.x 3.0.x 2.6.x 7.3.x 7.1.x
FTP server and firmware
repository
X
X
X
X
X
FICON
X
X
X
X
X
X
X
X
X
FICON-CUP
Cascaded FICON
3
X
X
X
X
X
Performance Monitoring (port
statistics)
X
X
X
X
X4
X
Performance Monitoring (endto-end)5
X
X
X
X
X4
X
X
X
X
QuickLoop6
Fibre Channel Router
X
X
FCIP
X
X
X
supportShow information in
Fabric Manager
X
supportSave information in
Fabric Manager
X
Replicate authentication,
authorization, and accounting
(AAA) configuration
X
Role-based access control
(RBAC)
X
Administrative Domains
X
8
X
iSCSI management
X
ACL management
X
Trace Route9
X
1.
X
X
X
Change Management
configuration checking7
Offline zone management
X
X
X
X
X
X
X
X
X
X
X
X
X
X
X
XPath OS v7.1.2c and higher is required for LSAN view support.
2.
Topology/ISL monitoring is supported on Fabric OS v2.6.0k or higher and Fabric OS v3.0.2k or higher.
3.
All switches in the fabric must be running Fabric OS v5.2.0 or higher
4. Performance Monitoring port statistics return incorrect values for Fabric OS v4.x to 4.2.0b. Firmware versions v4.2.0c or higher work
correctly.
5.
The seed switch must be running Fabric OS v3.x/4.x or higher for End-to-End Performance Monitoring to be enabled.
6. The QuickLoop feature can be implemented only on switches running Fabric OS v2.x/3.x; however, when using a seed switch running
Fabric OS v4.x, you can see the Fabric OS v2.x/3.x switches in QuickLoops.
14-2
Fabric Manager Administrator’s Guide
Publication Number: 53-1000196-01-HP
Using Built-in FTP Server and Firmware Repository
14
7. If a fabric has a switch running firmware versions 2.6.x or earlier, 3.0 or earlier, or XPath OS v7.1.0, Change Management switch
configuration checking is not supported. Fabric Manager uses one switch in the fabric to collect security policy information through the API.
Fabric Manager cannot collect security policy information for a fabric if the switch it selects is running firmware versions 2.6.x or earlier, 3.0 or
earlier, or XPath OS v7.1.0 because the API does not support those versions of firmware or that switch type.
8.
The seed switch must be running Fabric OS v4.4.0 or higher or Fabric OS v5.0.0 or higher.
9.
At least one switch in the trace route must be running Fabric OS v5.2.0 or higher.
Using Built-in FTP Server and Firmware Repository
Fabric Manager contains a built-in FTP server that can be used as a firmware repository. The firmware
repository has several advantages, such as:
•
•
Displaying firmware based on version
•
•
Helping you select the appropriate firmware for switches
Providing an interface from which SAN users can retrieve the latest firmware from Brocade or
other repositories
Reporting a SAN-wide inventory of firmware currently installed on fabric switches
These features are also available if you choose to use your own FTP server. Your own FTP server must
reside on the same system as the Fabric Manager server and the user name must have root access to the
FTP server.
You decide whether to use this built-in FTP server or your own FTP server during the installation
process. You can change which server to use at any time, as described in “Configuring File Transfer
Options” on page 14-9.
Note
Fabric Manager does not support firmware repository management or firmware download for switches
running XPath OS. See “Downloading Firmware to XPath OS Switches” on page 14-18 for information
on downloading firmware to these switches.
The remainder of this section discusses features available only if you are using the built-in FTP server
or if your FTP server resides on the same system as the Fabric Manager server.
Viewing the Firmware Repository
If you use the built-in FTP server, downloaded firmware versions reside in the Fabric Manager software
installation directory under <installdir>/server/server/fmserver/ftproot. A hierarchical structure is
created, with each firmware version in its own folder, as in the following example:
C:/FabricManager/Server/Server/fmserver/FTPRoot/Switches/4.x/4.3.x/4.3
If you use your own external FTP server, downloaded firmware versions reside in your FTP Root
directory. For example:
D:/FTPRoot/Switches/4.x/4.3.x/4.3
The directory structure is displayed in the Firmware Repository Management window, as shown in
Figure 14-1. To access this window, select Tasks > Firmware Management > Firmware Repository
Management.
Fabric Manager Administrator’s Guide
Publication Number: 53-1000196-01-HP
14-3
14
Using Built-in FTP Server and Firmware Repository
Click View to read the
firmware release notes.
Firmware
versions in
your repository
are displayed
here.
Click to import a new
firmware version into your
repository.
Switches supported by the
selected firmware version
are displayed here.
Figure 14-1 Firmware Repository Management
Select a firmware version in the Repository pane to display its information. Click View to read the
release notes associated with that particular firmware version. The Supported Switch Type Information
table displays the switches supported by the selected version. Fabric Manager determines which
switches are supported based on the switch type and also on the blade types in the switch. You can
display all supported switch types or just the switches within your SAN that are supported.
Importing and Removing Firmware
You can import firmware into the repository by specifying one of the following:
•
The URL to the firmware file or to the directory where the file is located. The URL should use
HTTP protocol and the address should end with Catalog.xml. FTP URLs are not supported.
•
The local directory on which the firmware file and its release notes are located.
Firmware files are assumed to be in a .gz or .zip format.
A comparison of file names and metadata (firmware version) is performed each time you import. If the
file or version you select is already in the repository, you are given the option to overwrite the existing
file.
14-4
Fabric Manager Administrator’s Guide
Publication Number: 53-1000196-01-HP
Using Built-in FTP Server and Firmware Repository
14
To import firmware into the repository
1.
Select Tasks > Firmware Management > Firmware Repository Management.
The Firmware Repository Management window appears. (See Figure 14-1 on page 14-4.)
2.
To import firmware from a URL location, click Import from URL. To import from a folder on
your local system, click Import from File.
The Import Firmware dialog box appears.
Figure 14-2 Importing From a URL or From a File
3.
Type the URL to the firmware directory or file, or click Browse to locate the firmware file and
release notes on your local system.
If release notes are available in the same file path specified in the URL, they are automatically
imported along with the firmware when importing from a URL. When importing from a file on
your local system, you must specify the release notes separately.
4.
Click Import.
If you connect to the Internet through a proxy server, a dialog box appears in which you type the
proxy port and proxy host information. Depending on your configuration, you might also need to
provide a user name and password for proxy authentication. Proxy information is saved only for
that particular Fabric Manager session. The URL is stored in the database. The next time you start a
Fabric Manager client and connect, you must perform a proxy authentication again.
If you entered a URL to a firmware directory, the Select Firmwares to Import window appears.
Fabric Manager Administrator’s Guide
Publication Number: 53-1000196-01-HP
14-5
14
Using Built-in FTP Server and Firmware Repository
Figure 14-3 Selecting Firmware Versions From a URL Location
a.
Select the firmware versions you want to import and click Import.
b.
Depending on where you are importing your firmware versions, you might be asked to enter
your company information and to accept the license agreement.
When the firmware has been successfully imported, it appears in the Firmware Versions tree in the
Repository pane.
You can also import firmware versions from the Download to Switches window. See “Downloading
Firmware to Multiple Switches” on page 14-11 for more information.
To remove firmware from the repository
1.
Select Tasks > Firmware Management > Firmware Repository Management.
2.
Select the firmware to delete from the Firmware Version tree in the Repository pane.
3.
Click Delete Firmware.
Defining a Fabric Profile
You can use the fabric profile manager to create a firmware “policy” that defines the firmware versions
to be applied to switches during a firmware download. For example, you can always download the most
recent firmware versions to all switches, or you can download firmware version a.b.c for all switches in
fabric XYZ. By default, the most recent firmware versions are applied to all switches.
The fabric profile manager is useful when downloading firmware to switches. You can download
according to the defined policy, or you can manually select which firmware to download to the
switches.
Select Tasks > Firmware Management > Manage Fabric Profile to launch the fabric profile manager
(shown in Figure 14-4 on page 14-7).
14-6
Fabric Manager Administrator’s Guide
Publication Number: 53-1000196-01-HP
Using Built-in FTP Server and Firmware Repository
14
This table displays the
switches, the firmware
version to be
downloaded, and their
current firmware
version.
Select a fabric to view only the
switches associated with that fabric.
Click to define your switch firmware
policy.
Figure 14-4 Fabric Profile Management Window
To create a fabric profile for downloading firmware
1.
Select Tasks > Firmware Management > Manage Fabric Profile.
The Fabric Profile Management window appears, as shown in Figure 14-4.
2.
Select a fabric in the SAN Elements window.
3.
Click Show switch types in selected fabric to display only switches in the selected fabric. Click
Show all switch types to display all supported switches, regardless of whether they exist in your
fabric.
4.
Click Edit Profile Information.
The Edit Fabric Profile window appears. If you selected Show switch types in selected fabric,
only the switches in your fabric are displayed; otherwise, all supported switches are displayed.
Fabric Manager Administrator’s Guide
Publication Number: 53-1000196-01-HP
14-7
14
Using Built-in FTP Server and Firmware Repository
Figure 14-5 Edit Fabric Profile Window
5.
For each switch, select the firmware version you want downloaded in the Desired Firmware
column. Click Set All To Latest to set all switches to the latest firmware version in the repository.
6.
Click OK.
7.
Click Close to exit the Fabric Profile Management window.
Viewing SAN Firmware Versions
Use the SAN Firmware Information window to view firmware versions in switches across your SAN
environment. The information in this window, illustrated in Figure 14-6, is for reporting purposes only.
To download firmware to switches, see “Downloading Firmware to Multiple Switches” on page 14-11.
14-8
Fabric Manager Administrator’s Guide
Publication Number: 53-1000196-01-HP
Configuring File Transfer Options
14
Figure 14-6 Viewing Switch Firmware Information in Your SAN
To view SAN firmware information
1.
Choose Tasks > Firmware Management > SAN Firmware Information View.
The SAN Firmware Information window appears, as shown in Figure 14-4 on page 14-7.
2.
From the fabric tree, select the element whose switch information you want to view.
3.
Optional: Click Print to print the firmware information.
Configuring File Transfer Options
You must set up file transfer options before you can transfer files from a host IP to the remote IP of a
switch using the File Transfer Protocol (FTP). The FTP server must allow read and write access from
the Fabric Manager server for these options to work correctly. You can choose either the FTP server
included with Fabric Manager or your own external FTP server.
To configure file transfer options
1.
Select Edit > Preferences.
2.
Expand Server specific and select File Transfer.
The File Transfer dialog displays, as shown in Figure 14-7.
Fabric Manager Administrator’s Guide
Publication Number: 53-1000196-01-HP
14-9
14
Configuring File Transfer Options
Figure 14-7 Options (File Transfer)
3.
Configure your FTP server.
If you are using the FTP server built-in with Fabric Manager:
a.
Click the Use built-in FTP Server radio button.
b.
If you do not want to use the default user name and password, click the Use my user name
and password radio button.
i.
Type your user name in the User Name field.
ii.
Type your password in the Password field and confirm it in the Confirm Password field.
If you are using an external FTP server:
a.
Click the Use External FTP Server radio button.
b.
Type the IP address of your FTP server in the Remote Host IP field.
c.
Type your login name in the Remote User Name field.
d.
Type a default FTP directory in the Remote Directory Path field. Do not enter a file name,
only a directory.
Note that if the external FTP server is running on the same system as the Fabric Manager
server:
14-10
•
The firmware repository is always created at the FTP root directory of the external FTP
server regardless of the directory specified in the Remote Directory Path field.
•
The FTP root directory must have write access.
e.
Choose File Transfer Protocol(ftp) from the Select Protocol drop-down menu.
f.
Type your password in the Password Required for FTP field.
Fabric Manager Administrator’s Guide
Publication Number: 53-1000196-01-HP
Downloading Firmware to Multiple Switches
4.
14
Click Test to ensure that you can access the FTP server specified. Fabric Manager reports success
or failure. The test must be successful in order for certain features to work (for example, firmware
download, configuration download, fabric merge check, and so on).
In addition to validating connectivity to the FTP server, clicking the Test button writes a temporary
file to the specified FTP directory. In order for the test to complete successfully:
•
•
5.
Write permissions must be set up properly on the specified directory of the FTP server.
Ports 20 and 21 must be open between the Fabric Manager client, the FTP server, and the
switch.
Click OK to save the settings.
Downloading Firmware to Multiple Switches
Downloading firmware to multiple switches is faster than downloading to one switch at a time and then
rebooting that switch.
Before you begin downloading firmware, verify that your task meets the following requirements:
•
All switches (including blades) that you choose to upgrade can run the firmware that you plan to
download.
•
•
All switches that you choose to simultaneously reboot reside on the same fabric.
TCP/UDP Ports 20 and 21 (FTP) must be accessible between the Fabric Manager server and each
switch.
Caution
If you are upgrading firmware from Fabric OS v3.0.0 to v3.1.0, or from Fabric OS v4.0.0 to v4.1.0, any
port name changes that you have made in Fabric Manager are lost; this ensures that multiple Fabric
Manager clients that are simultaneously active during the firmware upgrade do not overwrite each
other’s port names.
Note
If you have recently connected or rewired any switches in the fabric, then before starting the firmware
download from Fabric Manager, make sure that the View Panel displays the current fabric configuration.
You might have to wait for a few minutes for Fabric Manager to discover the new topology, or you can
force a refresh by clicking the refresh button (
) in the Application Toolbar. You can start the
firmware download when the View Panel displays the current fabric configuration. This ensures that
Fabric Manager accurately checks for any adjacent single-CP switches before initiating the firmware
download and warns users appropriately.
The Fabric Manager firmware download to multiple switches feature is not supported for switches
running XPath OS. If you attempt to download firmware to one of these switches using Fabric Manager,
the Web Tools-AP Edition is launched. See the Web Tools—AP Edition Administrator’s Guide for more
information.
Downloading firmware steps vary depending on where your FTP server is located:
•
If you are using the FTP server built in with Fabric Manager, see “Downloading Firmware with
Firmware Repository Support” on page 14-12.
Fabric Manager Administrator’s Guide
Publication Number: 53-1000196-01-HP
14-11
14
Downloading Firmware to Multiple Switches
•
If your external FTP server resides on the same system as the Fabric Manager server, see
“Downloading Firmware with Firmware Repository Support” on page 14-12.
•
If your external FTP server resides on the same system as the Fabric Manager server but the
external FTP server user does not have root access, see “Downloading Firmware Using an External
FTP Server” on page 14-13.
•
If your external FTP server is on a system different from where the Fabric Manager server is
installed, see “Downloading Firmware Using an External FTP Server” on page 14-13.
Downloading Firmware with Firmware
Repository Support
The Firmware Download to Switches window, illustrated in Figure 14-8 on page 14-12, provides
information on firmware versions and download status.
During download, status
messages from the switches
are displayed here.
Firmware versions in the repository that
support the switch type are displayed. You
can also import firmware from a file using
the “Import Firmware” option.
Reboot information (automatic or
manual) is displayed here.
Status indicates download
state: ready for download,
download in progress, or
download complete.
Figure 14-8 Firmware Download to Switches
14-12
Fabric Manager Administrator’s Guide
Publication Number: 53-1000196-01-HP
Downloading Firmware to Multiple Switches
14
You can select the firmware version to download for each switch. The fabric profile determines the
default setting in the drop-down menu. If you did not set up a fabric profile, the default setting is the
most recent firmware version. A warning message appears if you try to download firmware that does
not match a switch.
To download firmware to multiple switches concurrently
1.
Choose Tasks > Firmware Management > Firmware Download to switches.
The Firmware Download to Switches window opens.
2.
From the SAN Elements tab, select the switches that you want to upgrade and either drag the
switches to the Selected Switches panel or click the right arrow. Use Shift-click and Ctrl-click to
select multiple switches.
3.
Choose the firmware version to download from the Firmware to Download column.
If the firmware version you want to download does not appear in the Firmware to Download
column, select Import Firmware from the Firmware to Download drop-down menu. You can also
click Import Firmware from URL or Import Firmware from File to import the firmware files
into the repository.
4.
Check the Download firmware version even if same checkbox if it is okay to overwrite the
firmware in the switch with the same version.
5.
Optional: If you have set up a fabric profile and want to download firmware versions based on that
profile, click Update Firmware to Match Profile.
6.
Click Download.
Firmware download status is displayed in the Status column. All messages returned from the
switches are displayed in the Messages column.
When download is complete, a reboot message appears if you must manually reboot any switches.
Downloading Firmware Using an External FTP
Server
Use this procedure to download firmware if:
•
your external FTP server resides on the same system as the Fabric Manager server, but the external
FTP server does not have root access
•
you external FTP server is on a system different from where the Fabric Manager server is installed
To download firmware using an external FTP server
1.
Copy the .zip file containing the firmware to the local host on which the Fabric Manager client is
running.
2.
Unzip the file and extract its contents to the FTP home directory.
You need to know where the FTP home directory is located prior to unzipping the file.
3.
Select Tasks > Firmware Management > Firmware Download to switches.
Fabric Manager Administrator’s Guide
Publication Number: 53-1000196-01-HP
14-13
14
Downloading Firmware to Multiple Switches
The Firmware Download to Switches window opens, as shown in Figure 14-9. Note that this
window is different from the window that appears when you are downloading firmware with
firmware repository support.
Figure 14-9 Firmware Download Using External FTP Server
4.
In the Host IP Address field, type the local host IP address of the firmware file.
Note
The file transfer options are not committed until you click Download (in step 9). If you
close this window before clicking Download, the file transfer options do not apply.
5.
In the Remote User Name and Password Required for FTP fields, type your user ID and password
for the FTP server.
6.
To populate the Firmware File field, click Browse to browse the local host and select the firmware
file.
The full path of the file is placed in the Firmware File field. For example, if your FTP home
directory is c:\Inetpub\ftproot, then the Firmware File field might contain the following:
C:\Inetpub\ftproot\5.x\v5.2.0_rc1 (where v5.2.0_rc1 is the firmware filename)
You need to modify this field as follows:
a.
Delete the extra directory information (C:\Inetpub\ftproot) in the Firmware File field.
b.
If the path contains backslashes (\), convert these to forward slashes (/).
c.
For Fabric OS v4.x and v5.x switches only, add /release.plist to the end of the path.
For example, the Firmware File field should now contain only one of the following, depending on
the firmware version:
14-14
Fabric Manager Administrator’s Guide
Publication Number: 53-1000196-01-HP
Controlling Firmware Download Reboots
14
2.6.x/v2.6.2
3.x/v3.2.0_rc1
4.4.x/v4.4.0_rc1/release.plist
5.x/v5.2.x_rc1/release.plist
7.
Select FTP from the Select Protocol drop-down menu.
8.
From the SAN Elements tab, select the switches that you want to upgrade and either drag the
switches to the Selected Switches panel or click the right arrow. Use Shift-click and Ctrl-click to
select multiple switches.
You can also drag a fabric name from the SAN Elements tab into the Selected Switches panel to
add all of the switches from that fabric.
Note
If you want to download firmware to a dual-switch chassis, you need to select only one of
its logical switches. Both switches are upgraded. If you add both of the logical switches
from a dual-switch chassis to the Selected Switches panel, you receive a warning when
you click Download. In the Firmware Download to Switches window, when you select
one logical switch in a dual-switch chassis the other switch is grayed out.
9.
Click Download. For switches running firmware prior to Fabric OS v4.0, you must click Reboot to
open the Sequenced Reboot window when the download completes.
Note
If the switch loses network connectivity during the firmware download from Fabric Manager, the
firmware download action times out after approximately 25 minutes for switches running Fabric OS
v2.x or v3.x, and after approximately 80 minutes for switches running Fabric OS v4.x or v5.x. An error
message is not returned when the firmware download is interrupted.
Controlling Firmware Download Reboots
If you are downloading firmware with firmware repository support, then for switches running firmware
versions after Fabric OS v4.0, the Reboot Required column in the Firmware Download to Switches
window displays the following reboot information:
•
•
•
Automatic
reboot occurs automatically after firmware download
Manual
you must manually reboot the switch
Not Applicable
no firmware matching the selected switch type is available in the repository
Switches running a firmware version prior to Fabric OS v4.0 do not automatically reboot after a
firmware download. You can create a download sequence to control the order that the switches reboot.
See “Performing a Sequenced Reboot” on page 14-23 for additional information.
Downloading Firmware to HBAs
Fabric Manager supports up to 50 firmware downloads to multiple HBAs simultaneously. HBA
firmware downloads are supported only on switches with the following firmware versions:
Fabric Manager Administrator’s Guide
Publication Number: 53-1000196-01-HP
14-15
14
Downloading Firmware to HBAs
•
•
•
Fabric OS v3.1.1 or later
Fabric OS v4.1.0 or later
Fabric OS v5.0.0 or later
Fabric Manager supports only the Emulex HBA with the following drivers for the FDMI-based
firmware downloads:
•
•
•
•
Miniport Driver 5.20a8c-2g (Windows 2003 Server), Firmware 3.93A0
Miniport Driver 5-1.11A0 (Windows 2003 Server), Firmware 3.93A0
FCport Driver 5-2.40a2 (Windows 2003 Server), Firmware 1.91A1
Solaris driver for Sparc systems version 6.00g, Firmware 3.92A2
Note
lpfc.conf must have fdmi-on option set to 1 to turn on FDMI for the Solaris driver.
FDMI-capable HBAs must be connected to an FDMI-capable switch to get FDMI functionality.
FDMI is disabled by default on the Emulex HBA. You must enable FDMI by using either the elxcfg or
lputil tool.
Caution
If a host or switch connected to an HBA is rebooted during a firmware download to that HBA, the
firmware in the HBA flash can become corrupted. The HBA will be unable to log back into the switch or
respond to a query from the switch. Both Fabric Manager and the switch cannot see the HBA and it
drops out of the Name Server list. If this occurs, use HBAnyware on the attached host and reload the
firmware on the HBA.
You must place the HBA firmware in the following directory if you want to use the built-in FTP server
provided with Fabric Manager:
<installdir>/server/server/fmserver/ftproot/HBAs
To download firmware to one or more HBAs
1.
Log in to the switches with Fabric OS v3.1.0 (or later), Fabric OS v4.1.0 (or later), or Fabric OS
v5.0.0 (or later) already loaded and FDMI-capable HBAs connected to them. See “Logging In to
Multiple Switches Simultaneously” on page 4-4 for additional information.
2.
Select Tasks > Firmware Management > Firmware Download to HBAs.
The Firmware Download to HBAs window displays (see Figure 14-10 on page 14-17).
3.
In the Host IP address field, type the IP address of the FTP server on which the firmware file
resides.
The IP address displays automatically if you have already configured file transfer options. If you
have not configured file transfer options, click the Save settings to options checkbox to save your
FTP settings as your file transfer options. See “Configuring File Transfer Options” on page 14-9 for
additional information.
14-16
4.
In the User Name field, type your user ID for the FTP server.
5.
In the Firmware File field, type the path and name of the firmware file (in UNIX format) or click
Browse to navigate to the file.
Fabric Manager Administrator’s Guide
Publication Number: 53-1000196-01-HP
Downloading Firmware to HBAs
14
Clicking Browse overrides the current settings for host IP address, user name, and password. The
information defaults to the current host system from which the Fabric Manager application is
executed.
6.
In the Password field, type your password.
Figure 14-10 Firmware Download to HBAs
7.
From the SAN Elements tab, select the HBAs that you want to upgrade and either drag them to the
Selected HBAs panel or click the right arrow. Use Shift-click and Ctrl-click to select multiple
HBAs.
You can also drag a fabric name from the SAN Elements tab into the Selected HBAs panel to add
all of the HBAs from that fabric.
Caution
Simultaneous firmware download to one or more HBAs on the same host from multiple
Fabric Manager clients is not supported and will most likely permanently corrupt the
firmware on the HBAs, causing them to be unusable.
Non-FDMI capable HBAs appear with a grey background.
If multiple device ports are configured on a host to share the same device node WWN, Fabric
Manager randomly selects one of the device ports and performs the HBA firmware download only
to that device port.
If Fabric Manager detects that a device is no longer in the Name Server, the device is displayed
with a grey background in the Firmware Download to HBAs window until the device logs into the
Name Server again.
8.
Click the Download button to begin the firmware download. Fabric Manager prompts you with a
confirmation dialog.
Fabric Manager Administrator’s Guide
Publication Number: 53-1000196-01-HP
14-17
14
Downloading Firmware to XPath OS Switches
9.
Click OK to proceed or Cancel to abort. Fabric Manager provides a report of successful and
unsuccessful downloads.
Downloading Firmware to XPath OS Switches
Fabric Manager does not support firmware repository management or firmware download for switches
running XPath OS. For these switches, you can extract the firmware files (.zip, .tar, .gz) manually into
Fabric Manager’s built-in FTP server or external FTP server, and use the FTP server configuration to
perform firmware download through Web Tools—AP Edition or the command line interface.
If you use Fabric Manager’s built-in FTP server for this purpose, you must create a new user account in
the built-in FTP server using the following procedure.
To configure a user account for external purposes in the built-in FTP server
1.
Choose Edit > Preferences.
2.
Expand Server specific and select File Transfer.
The File Transfer dialog displays, as shown in Figure 14-7 on page 14-10.
3.
Configure your FTP server.
a.
Click the Use built-in FTP Server radio button.
b.
Click the Use my user name and password radio button.
i.
Type your user name in the User Name field.
ii.
Type your password in the Password field and confirm it in the Confirm Password field.
4.
Click Test to ensure that you can access the FTP server specified. Fabric Manager reports success
or failure.
5.
Click OK to save the settings.
Accessing Firmware When Changing the FTP Server
Fabric Manager does not copy firmware files when you change from the built-in FTP server to an
external FTP server, or change from one external FTP server to another located on the Fabric Manager
server.
To move the firmware files to the new FTP server
14-18
1.
Manually copy the contents of the firmware repository on the current FTP server to the new server.
Be sure to copy the folder structure exactly as it is on the current FTP server.
2.
Stop the current FTP server.
3.
Configure the new FTP server to use port 21.
4.
Start the new FTP server.
Fabric Manager Administrator’s Guide
Publication Number: 53-1000196-01-HP
Collecting FDMI Device Information
14
Collecting FDMI Device Information
FDMI device information is updated once a day as a server-side service, with a few exceptions:
•
Downloading firmware to HBAs starts FDMI data collection so that the data matches the
download.
•
FDMI data for a new fabric is collected when it is discovered. Because the devices and ports must
be in the database prior to storing FDMI data, data collection does not start until the device
discovery is complete.
You can, at any time, choose Discovery > Refresh to update the FDMI device information.
If FDMI data cannot be collected, an alert appears with a brief description of the problem. The alert
remains unresolved until the server can collect FDMI for that fabric.
Note
There must be at least one FDMI-capable switch in the fabric for FDMI information to be collected.
Rebooting Switches
This section provides information on creating reboot groups and performing sequenced reboots. A
reboot group contains one or more switches from a single fabric. You cannot group switches from
different fabrics, and each switch can belong only to one reboot group.
Create a reboot group containing multiple switches from the same fabric if you want the selected
switches to reboot simultaneously. You might want to create reboot groups containing switches that run
the same firmware, serve the same function, reside in the same physical location, or share any other
attribute. After creating reboot groups, you can then configure a sequential reboot of the reboot groups.
A sequenced reboot allows different areas of your SAN to reboot and stabilize before other switches in
the fabric begin to reboot. This reduces the load of interswitch traffic on the SAN. For example, you can
use the following reboot strategies:
•
•
•
•
•
Simultaneously reboot switches that run the same firmware.
Simultaneously reboot switches of the same model.
Reboot the core switches of a fabric, then the edge switches.
Reboot the backbone of a large SAN, then reboot other sections.
Reboot distant physical locations sequentially.
Refer to the following sections for information about creating reboot groups containing single or
multiple switches, adding switches to existing reboot groups, and configuring a sequenced reboot:
•
•
•
•
“Creating a Reboot Group with Multiple Switches” on page 14-20
“Creating Single-Switch Reboot Groups” on page 14-21
“Assigning Switches to a Reboot Group” on page 14-22
“Performing a Sequenced Reboot” on page 14-23
Fabric Manager Administrator’s Guide
Publication Number: 53-1000196-01-HP
14-19
14
Rebooting Switches
Creating a Reboot Group with Multiple Switches
Create a reboot group containing more than one switch if you want the switches to reboot
simultaneously.
To create a reboot group
1.
Click Tasks > Reboot > Create Reboot Sequence.
The “Create or Change Reboot Groups and Sequence” window displays (see Figure 14-11).
Figure 14-11 Create or Change Reboot Groups and Sequence
2.
Select a fabric from the Select Fabric drop-down list.
3.
Click Create.
The Create Reboot Group dialog opens, as shown in Figure 14-12.
Figure 14-12 Create Reboot Group
14-20
4.
In the Name of the Reboot Group field, type a name for the reboot group.
5.
In the Fabric Stabilization Timeout field, specify the amount of time allowed for the fabric to
stabilize before a timeout occurs.
Fabric Manager Administrator’s Guide
Publication Number: 53-1000196-01-HP
Rebooting Switches
6.
14
Optional: In the “What to do if timeout occurs?” field, click one of the following buttons:
•
•
•
Prompt: Provides a prompt whenever a timeout occurs that asks if you want to continue.
Continue: Continues the reboot sequence when a timeout occurs.
Abort: Terminates the reboot sequence when a timeout occurs.
The default selection is Prompt.
7.
In the Delay After Fabric Stabilization field, type the amount of time that must elapse before the
next reboot in the sequence begins.
Fabric Manager considers a fabric stable when all WWNs appear in the fabricShow command
output.
8.
Click OK.
Your reboot group is displayed automatically in the Reboot Groups tree.
The reboot groups listed in the Reboot Groups tree include bracketed text displayed next to the name of
the reboot group. The bracketed text represents the duration of the fabric stabilization timeout, the
timeout option (see step 6), and the duration of the delay after fabric stabilization time that you
configured.
Example
CoreSwitchRebootGroup [1m,P,2m]
In this example, 1m indicates a stabilization timeout of one minute, P identifies the timeout option
(Prompt), and 2m indicates that two minutes will elapse before the next reboot in the sequence begins.
Creating Single-Switch Reboot Groups
Create a single-switch reboot group for any switch in your fabric that is not assigned to a multiswitch
reboot group if you want to include it in a reboot sequence.
To create a single-switch reboot group
1.
Click Tasks > Reboot > Create Reboot Sequence.
The “Create or Change Reboot Groups and Sequence” window displays (see Figure 14-11 on
page 14-20).
2.
Select a fabric from the Select Fabric drop-down list.
3.
Select a switch from the list of Unassigned Switches. To create more than one single-switch reboot
group, select multiple switches. Each switch is made into its own single-switch reboot group.
4.
Click the Create Single Switch Groups button. The Create Single Switch Reboot Groups dialog
displays, as shown in Figure 14-13.
Fabric Manager Administrator’s Guide
Publication Number: 53-1000196-01-HP
14-21
14
Rebooting Switches
Figure 14-13 Create Single Switch Reboot Groups
5.
Optional: In the Reboot Group Name field, type a prefix for the reboot group name. If you do not
enter a prefix for the reboot group, a default name of “Reboot SwitchName”, where SwitchName is
the name of the switch. You must provide a prefix for each single-switch reboot group you create.
6.
In the Fabric Stabilization Timeout field, specify the amount of time allowed for the fabric to
stabilize before a timeout occurs.
7.
Optional: In the “What to do if timeout occurs?” field, click one of the following buttons:
•
•
•
Prompt: Provides a prompt whenever a timeout occurs that asks if you want to continue.
Continue: Continues the reboot sequence when a timeout occurs.
Abort: Terminates the reboot sequence when a timeout occurs.
The default selection is Prompt.
8.
In the Delay After Fabric Stabilization field, type the amount of time that must elapse before the
next reboot in the sequence begins.
Fabric Manager considers a fabric stable when all WWNs appear in the fabricShow command
output.
9.
Click OK.
Your reboot group is displayed automatically in the Reboot Groups tree.
The reboot groups listed in the Reboot Groups tree include bracketed text displayed next to the name of
the reboot group. The bracketed text represents the duration of the fabric stabilization timeout, the
timeout option (see step 6), and the duration of the delay after fabric stabilization time that you
configured.
Example
Reboot sw4900 [1m,C,2m]
In this example, 1m indicates a stabilization timeout of one minute, C identifies the timeout option
(Continue), and 2m indicates that two minutes will elapse before the next reboot in the sequence begins.
Assigning Switches to a Reboot Group
Use the following procedure to add switches to an existing reboot group.
14-22
Fabric Manager Administrator’s Guide
Publication Number: 53-1000196-01-HP
Rebooting Switches
14
To assign switches to an existing reboot group
1.
Click Tasks > Reboot > Create Reboot Sequence.
The Create or Change Reboot Groups and Sequence window displays (see Figure 14-11 on
page 14-20).
2.
Select a fabric from the Select Fabric drop-down list.
The switches in that fabric display in the Unassigned Switches list.
3.
Select the reboot group that you want to populate.
4.
Select a switch that you want to add to the reboot group and click the left arrow.
Use Shift-click and Ctrl-click to select multiple switches; then click the left arrow.
5.
Click OK to save the changes and close the window, or click Apply to save the changes without
closing the window.
Performing a Sequenced Reboot
Use the following procedure to create a list of switches to be rebooted and the order in which they are to
be rebooted.
To set up and run a sequenced reboot
1.
Log in to the switches that you want to reboot. See “Logging In to Multiple Switches
Simultaneously” on page 4-4 for additional information.
2.
Click Tasks > Reboot > Sequence Reboot.
The Sequence Reboot window displays, as shown in Figure 14-14.
Figure 14-14 Sequenced Reboot
Fabric Manager Administrator’s Guide
Publication Number: 53-1000196-01-HP
14-23
14
Rebooting Switches
3.
Select a fabric from the Select Fabric drop-down list.
4.
From within the Reboot Groups tab, click the reboot group that you want to reboot first; then click
the right arrow to add it to the Selected Switches list.
5.
Repeat step 4 to add additional groups in the sequence that you want to reboot.
6.
Optional: To rearrange the order of the reboot sequence, click Create/Change Sequence.
Select the reboot group you want to move; then, use the up or down arrows to place it in the
sequence you want.
7.
Click Fastboot or Reboot to begin the sequenced reboot. A fastboot is the same as a reboot except
that it bypasses the power-on self test (POST), reducing boot time significantly.
You are prompted several times by Fabric Manager to ensure that you want to continue. The
prompts advise you of any potential problems in your fabric.
A message displays at the end of the reboot sequence, listing successful and unsuccessful reboots.
14-24
Fabric Manager Administrator’s Guide
Publication Number: 53-1000196-01-HP
Chapter
Managing Zones
15
Fabric Manager allows you to manage the zone database of a fabric directly or by using an offline copy
of the live zone database. You can also use Web Tools to manage the live zone database but not the
offline zone database.
Note
If you plan to add a switch to a fabric that uses zoning, first discover that switch with Fabric Manager
and run a merge check between that switch and the fabric to which you plan to add it. This check
identifies any zoning and configuration mismatches before you physically connect the switch. See
Chapter 16, “Fabric Merge Check” for information about running a merge check on the fabric.
This chapter contains the following sections:
•
•
•
“Introduction to Zoning” on page 15-1
“Managing Zoning Offline” on page 15-2
“Managing Zoning with Web Tools” on page 15-16
Introduction to Zoning
Zoning enables you to partition your storage area network (SAN) into logical groups of devices that can
access each other. For example, you can partition your SAN into two zones, winzone and unixzone, so
that your Windows servers and storage do not interact with your UNIX servers and storage.
Zones can be configured dynamically. They can vary in size, depending on the number of fabric
connected devices, and devices can belong to more than one zone. Because zone members can access
only other members of the same zone, a device not included in a zone is not available to members of that
zone.
When using a mixed fabric–that is, a fabric containing v4.x, v3.x and v2.x switches–you should use the
most advanced switches to perform zoning tasks.
When zone or Fabric Assist (FA) zone members are specified by fabric location (domain, area) only, or
by device name (node name or port WWN) only, then zone boundaries can be enforced at the hardware
level, and the zone is referred to as a “hard zone.”
When zone elements are specified by fabric location (domain, area) and other elements of the same zone
are specified by device name (node name or port WWN), zone enforcement depends on name server
lookups and the zone is referred to as a “soft zone.”
For more specific information about zoning concepts, see the Fabric OS Administrator’s Guide.
Fabric Manager Administrator’s Guide
Publication Number: 53-1000196-01-HP
15-1
15
Managing Zoning Offline
Managing Zoning Offline
Every monitored fabric has a zone database associated with it. For fabrics with Admin Domains, every
Admin Domain has a zone database associated with it. This zone database contains zone aliases, zones,
and zone configurations. If no zone aliases, zones, or zone configurations are defined, the zone database
is empty.
A fabric or Admin Domain can have only one active zone database associated with it.
Fabric Manager has a zone database repository, in which it stores a copy of each active zone database.
Fabric Manager stores non-active zone databases in the zone database repository, as well.
You can view the zone database repository by clicking Tasks > Zone Management > Zone
Administration and launching the Zone Administration module, shown in Figure 15-1.
Figure 15-1 Zone Administration Module
The Zone Administration module displays the zone databases grouped by fabric and, within each fabric,
by Admin Domain.
The active zone databases do not have a name. They are denoted by Zone DB (not named) in the Zone
Database Name column. Active zone databases are displayed, even if they are empty.
The non-active zone databases have names so that you can identify them in the repository. These names
are user-defined and must be unique within the fabric or Admin Domain in which they are located.
Note that the Zone Administration module does not automatically refresh. To view updated information,
you must close and relaunch the module.
15-2
Fabric Manager Administrator’s Guide
Publication Number: 53-1000196-01-HP
Managing Zoning Offline
15
The Zone Administration module displays the location of each zone database: either fabric (for the
active zone database) or offline repository.
For offline zone database only, the Zone Administration module also displays the following:
•
•
•
•
timestamp when the zone database was created
timestamp when the zone database was last saved to the repository
timestamp when the zone database was last saved to the fabric
list of users who loaded a zone database for editing using the zone editor or the compare/merge tool
These values are not applicable to the active zone database.
From the Zone Administration module, you can launch the Zone Editor Tool, from which you can edit
the zone databases offline, without affecting the zone database on the fabric.
Use Cases for Offline Zoning
Following are some reasons you might want to create, edit, and modify zone databases offline:
•
•
You want to make changes to the zone database now, but apply them later, for example:
-
If you make incremental changes to zoning on an ongoing basis, but want to apply the changes
to the fabric during scheduled downtime.
-
If you are expecting new servers to be delivered later in the week, but want to make changes to
zoning now and apply the changes after the servers are delivered and ready to go online.
You want to keep multiple copies of the zone database and switch between them.
For example, if you want to allow specific servers access to tape drives for backup during specific
time windows, you can have multiple zone databases (one or more for backup and one for normal
operation) and switch between them easily.
•
You want to analyze the impact of changes to storage access before applying the changes.
For example, if you deploy a new server and want to ensure that the zoning changes result in only
the new server gaining access to specific storage devices and nothing else. See “Comparing Two
Zone Databases” on page 15-7.
•
You want to create a mirror fabric for redundancy
For example, if you want to mimic the fabric used in Production for redundancy purposes, you can
take a copy of the zone database from Production and apply it to a different mirror fabric. See
“Copying a Zone Database from One Fabric to Another” on page 15-7.
Requirements for Offline Zoning
Offline zone management is supported only on fabrics where the seed switch is running Fabric OS v5.x
or higher. Offline zone management is not supported on the SilkWorm AP7420.
Access Control
Only users with the following roles can update the zone databases:
•
Admin
Fabric Manager Administrator’s Guide
Publication Number: 53-1000196-01-HP
15-3
15
Managing Zoning Offline
•
•
Zone Admin
Fabric Admin
If you do not have one of these roles, you can launch the Zone Editor only in read-only mode.
Admin Domain Considerations
If an Admin Domain is removed from the fabric, Fabric Manager deletes all of the zone databases
associated with that Admin Domain. Offline zone databases are associated with an Admin Domain
number and not an Admin Domain name in the Fabric Manager zone database repository.
If an Admin Domain is renamed (but the ID remains the same), the offline zone databases are still
available.
Limitations
You can edit only one zone database at a time in the Zone Editor. If you want to manage LSAN zones on
multiple fabrics, you must edit the LSAN zones in each fabric’s zone database and then apply them at
the same time later, or edit the zone database in one fabric and save a copy of that zone database to all
other fabrics and apply them individually.
Offline Zone Editing
Offline editing refers to editing the zone database from the Fabric Manager repository. Online editing
refers to editing the live zone database on a fabric (currently what you can do using Web Tools). You
can do the following offline:
•
•
Export and import the entire zone database to and from local storage.
•
•
Compare two zone databases and visually analyze the differences.
Edit zone information locally, without affecting the fabric. Zone changes are applied to the local
copy and can be applied to the fabric at a later time.
Merge two zone databases.
Concurrent editing of the same zone database is permitted only from two different clients. When editing
the live zone database, the last save operation overwrites the previously saved zone database. When you
save a zone database to the Fabric Manager repository, the saved copy is added to the set of existing
zone databases.
This section contains the following procedures for managing zone databases offline:
•
•
•
•
•
•
•
•
15-4
“Editing a Zone Database Offline” on page 15-5
“Copying a Zone Database from One Fabric to Another” on page 15-7
“Comparing Two Zone Databases” on page 15-7
“Merging Two Zone Databases” on page 15-11
“Exporting and Importing a Zone Database” on page 15-13
“Rolling Back Changes to the Zone Database on the Fabric” on page 15-14
“Deleting a Zone Database from the Local Repository” on page 15-15
“Undoing the Automatic Checkout of a Zone Database” on page 15-15
Fabric Manager Administrator’s Guide
Publication Number: 53-1000196-01-HP
Managing Zoning Offline
15
Editing a Zone Database Offline
This section describes how you can edit a zone database offline and either save the changes to an offline
zone database or replace the zone database on the fabric.
To edit a zone database offline
1.
Click Tasks > Zone Management > Zone Administration from the menu bar.
The Zone Administration module launches, as shown in Figure 15-1.
2.
Select the zone database you want to edit from the table.
If you select a zone database that is on the fabric, the Zone Editor edits a copy of that zone database
and not the actual zone database on the fabric.
3.
Click View/Edit Zone DB.
The Zone Editor Tool launches, as shown in Figure 15-2.
The Zone Editor Tool has similar functionality as the Web Tools Zone Admin module. See the Web
Tools Administrator’s Guide for instructions on how to create, modify, and delete zones, zone
aliases, and zone configurations.
Figure 15-2 Zone Editor Tool
Fabric Manager Administrator’s Guide
Publication Number: 53-1000196-01-HP
15-5
15
Managing Zoning Offline
4.
To save the zone database to the fabric without changing the effective zone configuration, click
File > Save Zone Database > To the fabric without enabling and then click OK in the
confirmation window.
To save the zone database to the fabric and replace the effective zone configuration, click
File > Save Zone Database > To the fabric with enabling and then click OK in the confirmation
window.
To save the zone database offline, continue with step 5.
5.
Click File > Save Zone Database > To the Offline Repository to save the zone database offline.
The Save Zone Database to Offline Repository dialog box displays, populated with the current zone
database name, fabric, and Admin Domain.
The zone database that is on the fabric does not have a name, so if you were editing that zone
database, the database name displays as Name of Zone DB, as shown in Figure 15-3.
Figure 15-3 Save Zone Database to Offline Repository
6.
Fill out this dialog box as follows:
•
To modify the current zone database, click OK.
You can modify only offline (named) zone databases. You cannot replace the zone database
that is on the fabric.
If you have been editing a copy of the active zone database, then the name in the dialog box
displays as Name of Zone DB, as shown in Figure 15-3. Enter a new name for the zone
database; otherwise, if you click OK without entering a new name, a new offline zone database
is created with the name Name of Zone DB.
•
To create a new zone database or replace a zone database:
a.
Type the name of zone database.
b.
Select the fabric and Admin Domain from the drop-down lists.
c.
Click OK.
If the name you provide does not exist in the fabric and Admin Domain, then a new zone
database is created. If the name does exist, then a warning is displayed stating that a zone
database with that name already exists and you must provide a different name.
15-6
Fabric Manager Administrator’s Guide
Publication Number: 53-1000196-01-HP
Managing Zoning Offline
15
Copying a Zone Database from One Fabric to Another
This section describes how you can copy a zone database from one fabric to another fabric or to a
different Admin Domain in the same fabric.
To copy a zone database
1.
Click Tasks > Zone Management > Zone Administration from the menu bar.
The Zone Administration module launches, as shown in Figure 15-1.
2.
Select the zone database you want to copy.
3.
Click View/Edit Zone DB.
The Zone Editor Tool launches, as shown in Figure 15-2.
4.
Click File > Save Zone Database > To the Offline Repository.
The Save Zone Database to Offline Repository dialog box displays, populated with the current zone
database name, fabric, and Admin Domain.
5.
Fill out this dialog box as follows:
a.
Type the name of zone database.
b.
Select the fabric and Admin Domain from the drop-down lists.
c.
Click OK.
If the name you provide does not exist in the fabric and Admin Domain, then a new zone database
is created. If the name does exist, then a warning is displayed stating that a zone database with that
name already exists and you must provide a different name.
Comparing Two Zone Databases
This section describes how you can compare two zone databases, make minor modifications, and save
the modified zone database.
To compare two zone databases
1.
Click Tasks > Zone Management > Compare/Merge.
Alternatively, if you are in the Zone Editor Tool, you can click Zoning Actions > Compare/Merge
Zone Database. If you want to compare the zone database that you are currently editing in the
Zone Editor Tool, you must save the zone database first, before doing the comparison, because the
saved version is used in the comparison.
The Compare/Merge Zone Database module launches (see Figure 15-4 on page 15-8).
Fabric Manager Administrator’s Guide
Publication Number: 53-1000196-01-HP
15-7
15
Managing Zoning Offline
Figure 15-4 Compare/Merge Zone Database Module
2.
Click 1. Choose Reference Zone Database.
The Zone Administration dialog box opens.
3.
Select the zone database to use as the reference zone database and click OK. You cannot update
this zone database during the comparison.
4.
Click 2. Choose Editable Zone Database.
The Zone Administration dialog box opens.
5.
Select the zone database that you want to compare to the reference zone database and click OK.
You can make minor changes to this zone database during the comparison.
6.
Click 3. Compare.
The Reference zone database and Editable zone database sections are populated with the two zone
databases you selected.
Blue triangles in the tree structure indicate nodes that are different between the two zone databases.
Expand the nodes to see their contents and the differences. For example, Figure 15-4 shows that the
differences between BlueDB and GreenDB are that in GreenDB, switch port (161, 25) is deleted
from CRM_Zone1, alias CRM_Server1 is added, and configuration CRM_Cfg2 is added.
15-8
Fabric Manager Administrator’s Guide
Publication Number: 53-1000196-01-HP
Managing Zoning Offline
15
In the Comparison Options section, you can customize the display as follows:
•
You can click radio buttons to display the entire zone databases or only the differences between
the two.
•
From the Tree Level drop-down menu, you can fully expand the trees by selecting All Levels,
or expand the trees to the zone configuration or zone level by selecting Zone Configs or
Zones, respectively.
•
You can click the Previous and Next buttons to navigate through the zone database trees,
highlighting each difference.
•
From the Comparison View drop-down menu, click Host-to-Storage Connectivity or
Storage-to-Host Connectivity to display only the host and storage devices in the trees. From
these views you can easily understand the implications of making a change in zoning in terms
of connectivity changes, specifically, which servers lose or gain access to which storage
devices.
Figure 15-5 shows an example of the Host-to-Storage Connectivity view. As shown in the figure, in
RedZoneDB on the right, the host (Intraserver) gains access to one device (shown in green), but
loses access to two devices (shown in red).
Figure 15-5 Host-to-Storage Connectivity View
Figure 15-6 shows an example of the Storage-to-Host Connectivity view. As shown in the figure, in
BrownZoneDB on the right, two of the devices lose access to the host (Intraserver, shown in red).
In this example, the Show Only Changes radio button is selected so that only the differences
between the two databases are shown.
Fabric Manager Administrator’s Guide
Publication Number: 53-1000196-01-HP
15-9
15
Managing Zoning Offline
Figure 15-6 Storage-to-Host Connectivity View
7.
Optional: Add or remove zones, aliases, and configurations from the editable zone database using
the Add, Merge, and Remove buttons.
You must be in the Traditional comparison view to modify the editable zone database. You cannot
modify the zone database from the Host-to-Storage or Storage-to-Host Connectivity views.
For example, to add switch port (161, 25) to CRM_Zone1 in Figure 15-4, select the switch port on
the left side, select CRM_Zone1 on the right side, and click Add in the Zone Member box.
Elements can appear in more than one place in the zone database. For example, in Figure 15-4, the
zone CRM_Zone1 appears in the Configurations node and in the Zones node. Any changes you
make to an element in one place are changed in all other places as well.
Mouse over the buttons to display a tool tip that tells what elements you must select to perform the
operation (see Figure 15-7).
15-10
Fabric Manager Administrator’s Guide
Publication Number: 53-1000196-01-HP
Managing Zoning Offline
15
Figure 15-7 Compare/Merge Tool Tips
8.
Click Save to Offline to save the editable zone database in the offline repository.
To save the editable zone database under a different name or different fabric and Admin Domain,
click the arrow next to the Save to Offline button and then click Save as. Populate the fields in the
dialog box (shown in Figure 15-3) and click OK.
Merging Two Zone Databases
This section describes how you can merge two zone databases. You can merge only the zones and zone
configurations of those zone databases. You cannot merge zone aliases.
To merge two zone databases
1.
Click Tasks > Zone Management > Compare/Merge.
Alternatively, if you are in the Zone Editor Tool, you can click Zoning Actions > Compare/Merge
Zone Database. If you want to merge the zone database that you are currently editing in the Zone
Editor Tool, you must save the zone database first, before doing the merge, because the saved
version is used in the merge.
The Compare/Merge Zone Database module launches (see Figure 15-4 on page 15-8).
2.
Click 1. Choose Reference Zone Database.
The Zone Administration dialog box opens.
3.
Select the zone database to use as the reference zone database and click OK. You cannot update
this zone database during the merge.
4.
Click 2. Choose Editable Zone Database.
The Zone Administration dialog box opens.
5.
Select the zone database that you want to compare to the reference zone database and click OK.
You can make minor changes to this zone database during the merge.
6.
Click 3. Compare.
Fabric Manager Administrator’s Guide
Publication Number: 53-1000196-01-HP
15-11
15
Managing Zoning Offline
The Reference zone database and Editable zone database sections are populated with the two zone
databases you selected.
Blue triangles in the tree structure indicate nodes that are different between the two zone databases.
Expand the nodes to see their contents and the differences.
Figure 15-8 Merging Zones and Zone Configurations
7.
To merge zone configurations, select one or more zone configuration nodes on the left side, select
one zone configuration node on the right side, and click Merge in the Zone Config section.
To merge zones, select one or more zone nodes on the left side, select one zone node on the right
side, and click Merge in the Zone section.
For example, in Figure 15-8, you can merge CRM_Zone1 by selecting that zone in both the
reference and editable zone databases, and clicking Merge in the Zone section. After the merge,
CRM_Zone1 contains all of the switch port members that were in it initially, plus any additional
members that were in the reference zone database, (161, 25) in this case.
You cannot merge a zone or zone configuration to a non-existent element.
You cannot merge CRM_Zone2 or CRM_Zone3 with their counterparts because these zones do not
exist in the editable zone database (as indicated by the red X).
The elements to be merged can have different names. For example, in Figure 15-8 you can merge
CRM_Zone2 in the reference zone database with z2 in the editable zone database.
Mouse over the buttons to display a tool tip that tells what elements you must select to perform the
operation (see Figure 15-7).
8.
Click Save to Offline to save the editable zone database in the offline repository.
To save the editable zone database under a different name or different fabric and Admin Domain,
click the arrow next to the Save to Offline button and then click Save as. Populate the fields in the
dialog box (shown in Figure 15-3) and click OK.
15-12
Fabric Manager Administrator’s Guide
Publication Number: 53-1000196-01-HP
Managing Zoning Offline
15
Exporting and Importing a Zone Database
This section contains procedures for exporting the contents of a zone database from the Fabric Manager
repository to local storage and for importing the zone database from local storage to the Fabric Manager
repository.
Exporting the zone database saves a copy of that zone database for backup purposes. Following are
some examples of when you might want to export and import the zone databases:
•
For example, if you are restructuring your SAN and want to merge Fabric A with Fabric B, Fabric
A loses all of the zone databases associated with it. Prior to the merge, export the offline zone
databases associated with Fabric A so that you can later import them into the merged fabric.
•
If you downgrade the seed switch, you should first export all of the offline zone databases
associated with the fabric so that you do not lose the zone databases. If you upgrade the seed switch
later, you can then import the zone databases.
You can export and import only one zone database at a time.
To export a zone database to local storage
1.
Click Tasks > Zone Management > Zone Administration from the menu bar.
The Zone Administration module launches, as shown in Figure 15-1.
2.
Select the zone database you want to export.
3.
Right-click the zone database and select Export Zone DB from the context menu to export the
contents of the zone database to local storage.
The Export Zone Database dialog box (similar to a Save As dialog box) displays.
4.
Type the name of the file and browse to the location where you want to save it.
5.
Click Export.
The zone database contents are saved as a .zip file in the location specified.
To import a zone database from local storage
1.
Click Tasks > Zone Management > Zone Administration from the menu bar.
The Zone Administration module launches, as shown in Figure 15-1.
2.
Select a zone database.
3.
Right-click the zone database and select Import Zone DB from the context menu.
The Import Zone Database dialog box (similar to a Save As dialog box) displays.
4.
Browse to locate the .zip file to import.
5.
Click Import.
The Save Zone Database to Offline Repository dialog box displays, as shown in Figure 15-3.
6.
Fill in the values for the zone database name, fabric, and Admin Domain, and click OK.
If the name you provide does not exist in the fabric and Admin Domain, then a new zone database
is created. If the name does exist, then a warning is displayed stating that a zone database with that
name already exists and you must provide a different name.
Fabric Manager Administrator’s Guide
Publication Number: 53-1000196-01-HP
15-13
15
Managing Zoning Offline
Rolling Back Changes to the Zone Database on the Fabric
If you have made modifications to the zone database that is on the fabric, saved those changes to an
offline zone database, and then saved those changes to the fabric, you can later revert back to the
version of the zone database that was on the fabric before you applied the changes.
For example, assume the zone database on the fabric contains one configuration and two zones:
Zone DB (not named):
Config1, Zone1, Zone2
You modify the zone database to add a zone, save it offline as ZoneDB2, and also apply the changes to
the fabric:
Zone DB (not named):
ZoneDB2:
Config1, Zone1, Zone2, Zone3
Config1, Zone1, Zone2, Zone3
Another user modifies the zone database to add an alias, saves it offline as ZoneDB3, and applies the
changes to the fabric:
Zone DB (not named):
ZoneDB2:
ZoneDB3:
Config1, Zone1, Zone2, Zone3, Alias1
Config1, Zone1, Zone2, Zone3
Config1, Zone1, Zone2, Zone3, Alias1
If you select ZoneDB3 and roll back the changes, the zone database on the fabric reverts back to what it
was before ZoneDB3 was applied:
Zone DB (not named):
ZoneDB2:
ZoneDB3:
Config1, Zone1, Zone2, Zone3
Config1, Zone1, Zone2, Zone3
Config1, Zone1, Zone2, Zone3, Alias1
If you select ZoneDB2 and roll back the changes, the zone database on the fabric reverts back to what it
was before ZoneDB2 was applied:
Zone DB (not named):
ZoneDB2:
ZoneDB3:
Config1, Zone1, Zone2
Config1, Zone1, Zone2, Zone3
Config1, Zone1, Zone2, Zone3, Alias1
To revert to previous version of the zone database on the fabric
1.
Click Tasks > Zone Management > Zone Administration from the menu bar.
The Zone Administration module launches, as shown in Figure 15-1.
2.
Select the zone database you want to roll back.
You must select a zone database that has a value in the Last Saved to Fabric column. You cannot
roll back changes for zone databases that were never saved to the fabric.
3.
Right-click the zone database and select Rollback Zone DB from the context menu.
The zone database on the fabric reverts back to what it was before the selected zone database
changes were applied.
15-14
Fabric Manager Administrator’s Guide
Publication Number: 53-1000196-01-HP
Managing Zoning Offline
15
Deleting a Zone Database from the Local Repository
The following procedures describes how to delete a zone database from the local repository.
You cannot delete the zone database that is on the fabric. Every fabric has a zone database associated
with it, even if the zone database is empty.
To delete a zone database from the local repository
1.
Click Tasks > Zone Management > Zone Administration from the menu bar.
The Zone Administration module launches, as shown in Figure 15-1.
2.
Select one or more zone databases that are located in the repository. You cannot delete zone
databases that are currently in the fabric.
3.
Click Delete Zone DB.
4.
Click OK in the confirmation window.
Undoing the Automatic Checkout of a Zone Database
When you edit a zone database, either through the Zone Editor Tool or the Compare/Merge Zone
Database module, you are implicitly checking out the zone database. Fabric Manager displays the user
name of all users who have checked out a copy of the zone database in the Who has taken a copy?
column of the Zone Administration table.
If the authentication mechanism has changed (from RADIUS to Windows Domain, for example), the
user names displayed in the Who has taken a copy? column might not be accurate.
Caution
Before you edit a zone database, check this column to determine whether other users are modifying it at
the same time, so that your changes do not overlap.
If you have checked out a zone database but are not planning to update it, you can undo the checkout so
that other users can update it without worrying about their changes being overwritten.
When you undo the checkout, the user names of other users who are currently logged in to the client are
also removed. Ensure that those other users are not updating the zone database before you undo the
checkout.
To undo the checkout of a zone database
1.
Click Tasks > Zone Management > Zone Administration from the menu bar.
The Zone Administration module launches, as shown in Figure 15-1.
2.
Select a zone database that you have checked out (your user name is in the Who has taken a copy?
column).
3.
Right-click the zone database and select Undo Zone DB Checkout from the context menu.
4.
Click Yes in the confirmation window.
This removes the user names of users currently logged in to the client from the Who has taken a
copy? column for this zone database.
Fabric Manager Administrator’s Guide
Publication Number: 53-1000196-01-HP
15-15
15
Managing Zoning with Web Tools
Managing Zoning with Web Tools
You can monitor and manage zoning for a single fabric through the Web Tools Zone Admin module (see
Figure 15-9). The information in the Zone Admin module is collected from the selected switch. A
zoning license and administrative privileges are required to access the Zone Admin module within Web
Tools. When you use the Web Tools Zone Admin module to update the zone database, any changes you
make update the active zone database on the fabric.
Note
If secure mode is enabled, zoning can be administered only from the primary FCS switch. For specific
information regarding secure fabrics, see the Secure Fabric OS Administrator’s Guide.
To launch the Web Tools Zone Admin module
1.
Right-click a fabric in the View panel or Information panel of the Fabric Manager client.
2.
Select Zone Admin from the context menu.
The Zone Admin module displays (see Figure 15-9 on page 15-16).
Figure 15-9 Zone Admin Module
15-16
Fabric Manager Administrator’s Guide
Publication Number: 53-1000196-01-HP
Managing Zoning with Web Tools
15
In the Zone Admin module, you can right-click the name of a device in the Member Selection list to
launch the Device Detail view for that element.
You can click the enabled configuration button
(located in the top right corner of the Zone Admin
module) to view the effective zoning configuration (a separate window opens).
A live snapshot is taken of all the zoning configurations at the time you launch the Zone Admin module.
Information displayed in the Zone Admin module is not updated automatically by Web Tools.
If anyone changes the zone configurations after you launch the Zone Admin module, the refresh icon (in
the bottom right corner of the window) blinks. When you click the refresh icon, any changes you have
made in the Zone Admin session that are not saved are lost, and the latest Zone Configuration
information is displayed in the Zone Admin module.
With the Zone Admin module, you can perform several administration functions, such as:
•
•
•
Manage zone aliases
Manage zones
Manage zoning configurations
For detailed instructions on using the Web Tools Zone Admin module, see the Web Tools
Administrator’s Guide.
Fabric Manager Administrator’s Guide
Publication Number: 53-1000196-01-HP
15-17
15
15-18
Managing Zoning with Web Tools
Fabric Manager Administrator’s Guide
Publication Number: 53-1000196-01-HP
Chapter
Fabric Watch
16
Fabric Watch is an optional, licensed feature that monitors the performance and status of switches and
can automatically alert you when problems arise. Fabric Watch tracks a variety of SAN fabric elements,
events, and counters. For example, Fabric Watch monitors:
•
•
Fabric resources, including fabric reconfigurations, zoning changes, and new logins.
Switch environmental functions such as temperature, power supply, and fan status, along with
security violations.
•
Port state transitions, errors, and traffic information for multiple port classes as well as operational
values for supported models of Finisar “Smart” GBICs/SFPs.
•
Performance information for AL_PA, end-to-end, and SCSI command metrics.
Fabric Watch lets you define how often to measure each switch and fabric element and to specify
notification thresholds. Whenever fabric elements exceed these thresholds, Fabric Watch automatically
provides notification using several methods, including email messages, SNMP traps, and log entries.
Note
To use the Fabric Watch feature, you must have a Fabric Watch license installed on your switch.
This chapter provides information about using Fabric Watch. See the following sections:
•
•
“Launching Fabric Watch” on page 16-1
“Using Fabric Watch with Web Tools” on page 16-2
For more detailed information about Fabric Watch, see the Fabric Watch Administrator’s Guide.
Launching Fabric Watch
Fabric Manager launches Brocade Web Tools to configure Fabric Watch. You cannot access the Fabric
Watch module if the switch does not have a Fabric Watch license or if the switch is unreachable.
To access Fabric Watch
1.
Right-click a switch and select Fabric Watch from the context menu.
If the switch user name and password does not exist or is invalid, you are prompted to enter the
correct user name and password.
Web Tools launches and displays the Fabric Watch module, as shown in Figure 16-1 on page 16-2.
Fabric Manager Administrator’s Guide
Publication Number: 53-1000196-01-HP
16-1
16
Using Fabric Watch with Web Tools
Using Fabric Watch with Web Tools
Fabric Watch navigation tree, lists the
available classes for the switch
Summary of actions
The last time the Fabric Watch
module was updated
Figure 16-1 Fabric Watch Module (with Alarm Notification Tab Displayed)
You can administer Fabric Watch operations through the Fabric Watch module in Web Tools (see
Figure 16-1).
The Fabric Watch navigation tree, on the left side of the module, displays the available classes. The
classes are organized in a set of folders. Not all classes are available for all switches.
Use the Fabric Watch module if you want to:
•
•
Configure custom threshold values on particular elements.
•
•
Choose if and how Fabric Watch alerts you to errant values (configure alarms).
•
Configure email notifications of Fabric Watch events.
Place limits on the acceptable values of those elements and enable the custom limits (configure
threshold boundaries).
Choose if and how frequently Fabric Watch identifies unacceptable values (configure threshold
traits).
For detailed instructions on using the Web Tools Fabric Watch module, see the Web Tools
Administrator’s Guide.
16-2
Fabric Manager Administrator’s Guide
Publication Number: 53-1000196-01-HP
Chapter
Managing Secure Fabrics
17
This chapter provides information on enabling secure mode for a fabric, adding a switch to a secure
fabric, and checking secure fabrics prior to merging them. It also includes information about using the
policy editor to configure security policies, and provides instructions on how to configure no node
WWN zoning, how to change admin security passwords (for FCS or non-FCS switches/directors), and
how to use telnet on a secure fabric. See the following sections for specific secure fabric information:
•
•
•
•
•
“Enabling Secure Mode” on page 17-1
“Using the Policy Editor” on page 17-3
“Adding a Switch to a Secure Fabric” on page 17-17
“Merging Secure Fabrics” on page 17-18
“Using Telnet on a Secure Fabric” on page 17-19
Enabling Secure Mode
This section describes how to create a secure fabric using the Secure Fabric wizard.
To use the Secure Fabric wizard, your primary FCS switch must be running Fabric OS v5.0.0 or later,
Fabric OS v4.4.0 or later, or Fabric OS v3.2x or later. If your primary FCS switch is not running one of
these operating systems, you must enable or disable secure mode using the CLI. See the Secure Fabric
OS Administrator’s Guide for CLI information.
All switches in the fabric must be running Fabric OS v5.0.0 or later, Fabric OS v4.1x or later, Fabric OS
V3.1x or later, or Fabric OS v2.6.1x or later regardless of whether you are using CLI or the Secure
Fabric wizard.
If you enable secure mode on a fabric that contains any Fabric OS v5.2.x switches, any switch local
ACL policies (SCC, DCC, and Distributed Passwords) are discarded.
You cannot enable secure mode under the following conditions:
•
You cannot enable secure mode on a fabric unless all switches in the fabric have a Secure Fabric OS
license, a zoning license, and security certificates installed. For more information about security
certificates, see the Secure Fabric OS Administrator’s Guide.
•
You cannot enable secure mode for an edge fabric that is configured for Fibre Channel routing. See
“FC-FC Routing and Secure Fabrics” on page 19-12 for additional limitations when using the FCFC Routing Service and secure fabrics.
•
•
You cannot enable secure mode on Admin Domain-aware fabrics.
You cannot enable secure mode if a fabric-wide consistency policy is configured on the switch.
Fabric Manager Administrator’s Guide
Publication Number: 53-1000196-01-HP
17-1
17
Enabling Secure Mode
To launch the Secure Fabric wizard to create a secure fabric
1.
In the Information Panel, right-click the fabric for which you want to enable security and choose
Security > Enable Secure Mode from the context menu.
The Enable Secure Mode for Fabric wizard is launched (see Figure 17-1).
Figure 17-1 Enable Secure Mode for Fabric Wizard
2.
Follow the instructions in the wizard to enable secure mode for the fabric.
The wizard is self-explanatory, so the individual steps are not described in this document.
Caution
One of the steps in the wizard is to optionally create a set of policies (see Figure 17-2 on
page 17-3). If you create policies without Fabric Manager client/server IP addresses,
or...
If you create empty Serial, Telnet, HTTP, and API policies simultaneously,
then...
You will suddenly be unable to manage security and the switch.
17-2
Fabric Manager Administrator’s Guide
Publication Number: 53-1000196-01-HP
Using the Policy Editor
17
Figure 17-2 Select Security Policy Settings (Optional)
Using the Policy Editor
The Policy Editor allows you to view and configure your security policy settings.
When you launch the Policy Editor (shown in Figure 17-3 on page 17-4), the Summary tab displays by
default. The Summary tab displays the defined and active security policies in two panels.
•
The Defined Policy Set panel lists the currently defined policies (active and inactive) in the selected
fabric. You can define a policy and then save it with or without activating it.
•
The Active Policy Set panel lists the currently active policies. This panel is informational only.
To make changes to a policy, click the tab for that policy and make the changes. Then click the
Summary tab to view the changes in the Defined Policy Set panel. The changes are not saved until you
click Save. The changes are not activated unless you click Activate. If you click Activate, all policies
in the Defined Policy Set panel are activated.
You can use the Policy Editor for the following tasks:
•
•
•
•
•
•
•
•
“Configuring FCS Policy Options” on page 17-4
“Configuring SCC Policy Options” on page 17-6
“Configuring Telnet, RSNMP, WSNMP, HTTP, and API Policy Options” on page 17-7
“Configuring DCC Policy Options” on page 17-9
“Configuring SES and MS Policy Options” on page 17-11
“Configuring Serial and Front Panel Policy Options” on page 17-13
“Changing the Admin Security Password” on page 17-15
“Configuring No-Node WWN Zoning” on page 17-17
Fabric Manager Administrator’s Guide
Publication Number: 53-1000196-01-HP
17-3
17
Using the Policy Editor
Figure 17-3 Policy Editor (Summary Tab)
Configuring FCS Policy Options
Switches in your Fabric Configuration Server (FCS) policy serve as trusted switches. Use the following
procedure to display these switches and to add, remove, or reorder switches in the policy.
To configure/edit the FCS policy
1.
In the Information Panel, right-click the secure fabric for which you want to set policies and choose
Security > Security Policy Editor from the context menu.
The Policy Editor appears (see Figure 17-3 on page 17-4).
2.
Click the FCS tab (see Figure 17-4 on page 17-5).
All switches in the selected fabric are displayed in the Available Switch List, and the currently
selected FCS switches display in the FCS Switch List.
The first switch listed in the FCS Switch List serves as the primary FCS (from which you can
configure your fabric), and any subsequent switches serve as a backup FCS. The order in which
switches appear in the FCS Switch List represents a chain where each backup switch takes over as
the primary FCS if the preceding primary FCS fails.
17-4
Fabric Manager Administrator’s Guide
Publication Number: 53-1000196-01-HP
Using the Policy Editor
17
Figure 17-4 Configuring the FCS Policy
3.
Select a switch from the Available Switch List and click Add FCS to add the switch to the FCS
Switch List, or click Add All to add all of the switches in the current fabric simultaneously.
To add a switch that is not listed in the Available Switch List, click Add Others, and type the
WWN of the switch you want to add.
To remove a switch from the FCS policy, select the switch from the FCS Switch List, then click
Remove FCS.
You can arrange the order of the switches in the FCS Switch List using the up/down arrow keys.
The primary FCS switch is the first switch in the list and is also identified with a star icon next to it.
Note
Changing the primary FCS causes updates in the fabric that might take time to complete,
depending on the fabric size.
4.
Click the Summary tab.
5.
Click Save to save your changes but not apply them, or click Activate to save and apply your
changes.
The Security Policy Review dialog displays.
6.
After reviewing the Security Policy, click one of the following:
•
•
•
Continue (to continue applying your changes)
Cancel (to cancel your changes)
Copy to File (to copy the Security Policy to a file)
Fabric Manager Administrator’s Guide
Publication Number: 53-1000196-01-HP
17-5
17
Using the Policy Editor
Configuring SCC Policy Options
The SCC policy defines all switches in the secure fabric (FCS and non-FCS). You cannot add a new
switch to a secure fabric without adding the switch to the SCC policy. SCC policies are created
automatically in Fabric Manager when you enable secure mode on a fabric.
To configure/edit the SCC policy
1.
In the Information Panel, right-click the secure fabric for which you want to set policies and choose
Security > Security Policy Editor from the context menu.
The Policy Editor appears (see Figure 17-3 on page 17-4).
2.
Click the SCC tab (see Figure 17-5).
All current switches in the fabric display in the Available Switches list.
Figure 17-5 Configuring the SCC Policy
3.
Select a switch that you want to include in the SCC policy and click Add Switch, or click Add All
to add all switches from the fabric into the policy.
To add a switch that is not listed in the Available Switch list, click Other, and type the WWN of the
switch you want to add.
Note
All switches within a fabric must be included in the SCC policy or else the excluded
switches segment out into their own fabric.
To remove a switch from the SCC policy, select the switch from the Fabric Switches list, then click
Remove Switch.
To delete the policy, click Delete Policy.
17-6
Fabric Manager Administrator’s Guide
Publication Number: 53-1000196-01-HP
Using the Policy Editor
17
4.
Click the Summary tab.
5.
Click Save to save your changes but not apply them, or click Activate to save and apply your
changes.
The Security Policy Review dialog displays.
6.
After reviewing the Security Policy, click one of the following:
•
•
•
Continue (to continue applying your changes)
Cancel (to cancel your changes)
Copy to File (to copy the Security Policy to a file)
Configuring Telnet, RSNMP, WSNMP, HTTP, and
API Policy Options
The Telnet policy contains a list of IP addresses and subnets that can establish Telnet connections to any
switch in the fabric. Any Telnet attempts from an IP address or subnet that does not appear in the policy
will fail.
Caution
If you create an empty policy, you prevent all Telnet access to your fabric.
Configure the RSNMP policy (read-only SNMP policy) to limit SNMP access to specific, trusted
management stations in your environment. You cannot create an RSNMP policy without a WSNMP
policy already present.
Configure the WSNMP policy (read/write SNMP policy) to limit SNMP access to specific, trusted
management stations in your environment. When you add a member to the WSNMP policy, that
member automatically gains RSNMP access.
Configure the HTTP policy to grant access to IP addresses and subnets so they can establish HTTP
connections to the switches in the fabric.
Create an API policy to control the workstations that can use the API to access the fabric.
To configure/edit any of these policies
1.
In the Information Panel, right-click the secure fabric for which you want to set policies and choose
Security > Security Policy Editor from the context menu.
The Policy Editor appears (see Figure 17-3 on page 17-4).
2.
Click the tab that corresponds to the policy you want (Telnet, RSNMP, WSNMP, HTTP, or API).
The selected policy appears. The Telnet policy is used in this example (see Figure 17-6 on
page 17-8). The RSNMP, WSNMP, HTTP, and API policies are similar.
Fabric Manager Administrator’s Guide
Publication Number: 53-1000196-01-HP
17-7
17
Using the Policy Editor
Figure 17-6 Configuring the Telnet Policy
3.
Click Create Policy.
You have now created an empty policy, which denies the policy type (Telnet, RSNMP, WSNMP,
HTTP, or API) access from all hosts to all switches in the fabric.
Caution
If you create policies without Fabric Manager client/server IP addresses,
or...
If you create empty Serial, Telnet, HTTP, and API policies simultaneously,
then...
You will suddenly be unable to manage security and the switch.
If you use Fabric Manager to update the API policy to disable API access from the
current host (either by creating an empty policy, or by specifically excluding this host
from the API policy list), the security transaction is locked and can take up to two hours
before Fabric OS releases the security transaction. You cannot modify the policies until
the security transaction is released.
If you want to continue managing security and the switch, continue with the rest of
the procedure.
4.
Type the IP address of a host that you want to include in the policy in the Enter IP Address field.
Note
The IP address of your Fabric Manager client must appear in the Serial, Telnet, RSNMP,
WSNMP, HTTP, and API policies or you cannot access the fabric with Fabric Manager.
17-8
Fabric Manager Administrator’s Guide
Publication Number: 53-1000196-01-HP
Using the Policy Editor
17
5.
(Optional) Click Add FM Server IP to add the Fabric Manager server IP address, or click Add
this FM Client IP to add the Fabric Manager client IP address.
6.
Click Add IP. The IP address is placed in the Permitted Access Points list.
To remove a switch from the policy, select the IP address from the Permitted Access Points list,
then click Remove IP.
To delete the policy, click Delete Policy.
7.
Click the Summary tab.
8.
Click Save to save your changes but not apply them, or click Activate to save and apply your
changes.
The Security Policy Review dialog displays.
9.
After reviewing the Security Policy, click one of the following:
•
•
•
Continue (to continue applying your changes)
Cancel (to cancel your changes)
Copy to File (to copy the Security Policy to a file)
Configuring DCC Policy Options
You can configure DCC policies to bind device ports to specific switch ports. With Fabric Manager, you
can create and configure multiple DCC policies with unique names and populate DCC policies with
switch and device WWNs.
To create a DCC policy
1.
In the Information Panel, right-click the secure fabric for which you want to set policies and choose
Security > Security Policy Editor from the context menu.
The Policy Editor appears (see Figure 17-3 on page 17-4).
2.
Click the DCC tab (see Figure 17-7 on page 17-10).
Fabric Manager Administrator’s Guide
Publication Number: 53-1000196-01-HP
17-9
17
Using the Policy Editor
Figure 17-7 Configuring the DCC Policy
3.
Click Create Policy.
The Enter DCC Policy dialog box displays.
4.
Type a name for the new policy in the Enter Policy Name field and click Create in the Enter DCC
Policy dialog.
The new name is displayed in the Policy menu within the DCC tab.
5.
(Optional) Click Name, IP, or WWN to change how the switches and devices are displayed in the
Available Switches and Devices list.
6.
Select a switch or device WWN from the Switches and Devices tab to add to the policy, and then
click Add Member.
To add a WWN that is not displayed, click Add Device WWN and type the WWN you want to add.
7.
Click the Summary tab.
8.
Click Save to save your changes but not apply them, or click Activate to save and apply your
changes.
The Security Policy Review dialog displays.
9.
After reviewing the Security Policy, click one of the following:
•
•
•
17-10
Continue (to continue applying your changes)
Cancel (to cancel your changes)
Copy to File (to copy the Security Policy to a file)
Fabric Manager Administrator’s Guide
Publication Number: 53-1000196-01-HP
Using the Policy Editor
17
To make changes to existing DCC policies
1.
In the Information Panel, right-click the secure fabric for which you want to set policies and choose
Security > Security Policy Editor from the context menu.
The Policy Editor appears (see Figure 17-3 on page 17-4).
2.
Click the DCC tab (see Figure 17-7 on page 17-10).
3.
Perform any of the following actions for each DCC policy:
•
To remove a DCC policy, click Policy > Policy Name You want to delete and click Delete
Policy.
•
To rename a DCC policy, click Policy > Policy Name You want to rename and click Rename
Policy.
•
To change the contents of a DCC policy, click Policy > Policy Name you want to edit, then...
-
Select a switch or device WWN from the Switches and Devices tab to add to the policy,
and click Add Member.
-
To add a WWN that is not displayed, click Add Device WWN and type the WWN you
want to add.
4.
Click the Summary tab.
5.
Click Save to save your changes but not apply them, or click Activate to save and apply your
changes.
The Security Policy Review dialog displays.
6.
After reviewing the Security Policy, click one of the following:
•
•
•
Continue (to continue applying your changes)
Cancel (to cancel your changes)
Copy to File (to copy the Security Policy to a file)
Configuring SES and MS Policy Options
Create an SES policy to allow device ports to access switches using the SES protocol. With Fabric
Manager, you can create and configure multiple SES policies with unique names and populate SES
policies with switch and device WWNs.
Create an MS policy to allow trusted fabric-connected devices to access the Management Server. With
Fabric Manager, you can create and configure multiple MS policies with unique names and populate
MS policies with switch and device WWNs.
SES and MS policies are both device-based.
To create an SES or MS policy
1.
In the Information Panel, right-click the secure fabric for which you want to set policies and choose
Security > Security Policy Editor from the context menu.
The Policy Editor appears (see Figure 17-3 on page 17-4).
2.
Click the tab that corresponds to the policy you want (SES or MS).
Fabric Manager Administrator’s Guide
Publication Number: 53-1000196-01-HP
17-11
17
Using the Policy Editor
The selected policy appears (see Figure 17-8). The SES policy is used in this example; the MS
policy is similar.
Figure 17-8 Configuring the SES Policy
3.
Click Create Policy.
The WWN of a device that connects to the fabric displays in the Available Access Points list.
4.
Select a device from the Available Access Points list.
5.
Click Add Device.
6.
Click the Summary tab.
7.
Click Save to save your changes but not apply them, or click Activate to save and apply your
changes.
The Security Policy Review dialog displays.
8.
After reviewing the Security Policy, click one of the following:
•
•
•
Continue (to continue applying your changes)
Cancel (to cancel your changes)
Copy to File (to copy the Security Policy to a file)
To make changes to your SES or MS policy
1.
In the Information Panel, right-click the secure fabric for which you want to set policies and choose
Security > Security Policy Editor from the context menu.
The Policy Editor appears (see Figure 17-3 on page 17-4).
2.
Click the tab that corresponds to the policy you want (SES or MS).
The selected policy appears (see Figure 17-8 on page 17-12).
17-12
Fabric Manager Administrator’s Guide
Publication Number: 53-1000196-01-HP
Using the Policy Editor
3.
17
Perform any of the following:
•
To add a device to the policy, select the device in the Available Access Points field, then click
Add Device.
•
To remove a device from the policy, select the device in the Permitted Access Points field, then
click Remove Device.
4.
Click the Summary tab.
5.
Click Save to save your changes but not apply them, or click Activate to save and apply your
changes.
The Security Policy Review dialog displays.
6.
After reviewing the Security Policy, click one of the following:
•
•
•
Continue (to continue applying your changes)
Cancel (to cancel your changes)
Copy to File (to copy the Security Policy to a file)
Configuring Serial and Front Panel Policy
Options
Create a Serial or Front Panel policy to grant serial port or front panel access to specific switches.
Caution
If you create policies without Fabric Manager client/server IP addresses, or if you create empty Serial,
Telnet, HTTP, and API policies simultaneously, then you will suddenly be unable to manage security and
the switch.
To create a serial or front panel policy
1.
In the Information Panel, right-click the secure fabric for which you want to set policies and choose
Security > Security Policy Editor from the context menu.
The Policy Editor appears (see Figure 17-3 on page 17-4).
2.
Click the tab that corresponds to the policy you want (Serial or Front Panel).
The selected policy appears (see Figure 17-9 on page 17-14). The Serial policy is used in this
example; the Front Panel policy is similar.
Fabric Manager Administrator’s Guide
Publication Number: 53-1000196-01-HP
17-13
17
Using the Policy Editor
Figure 17-9 Configuring the Serial Policy
3.
Click Create Policy.
You have now created an empty policy, which denies Serial and Front Panel access from all hosts to
all switches in the fabric.
Caution
If you create policies without Fabric Manager client/server IP addresses,
or...
If you create empty Serial, Telnet, HTTP, and API policies simultaneously,
then...
You will suddenly be unable to manage security and the switch.
4.
(Optional) Click Name, IP, or WWN to change how the switches and devices are displayed in the
Available Access Points list.
5.
Select a switch in the Available Access Points list and click Add Switch to add it to your policy.
Repeat this step for each switch that you want to add.
6.
Click the Summary tab.
7.
Click Save to save your changes but not apply them, or click Activate to save and apply your
changes.
The Security Policy Review dialog displays.
8.
After reviewing the Security Policy, click one of the following:
•
•
•
17-14
Continue (to continue applying your changes)
Cancel (to cancel your changes)
Copy to File (to copy the Security Policy to a file)
Fabric Manager Administrator’s Guide
Publication Number: 53-1000196-01-HP
Using the Policy Editor
17
To make changes to the Serial or Front Panel policy
1.
In the Information Panel, right-click the secure fabric for which you want to set policies and choose
Security > Security Policy Editor from the context menu.
The Policy Editor appears (see Figure 17-3 on page 17-4).
2.
Click the tab that corresponds to the policy you want (Serial or Front Panel).
The selected policy appears (see Figure 17-9 on page 17-14). The Serial policy is used in this
example; the Front Panel policy is similar.
3.
Perform either of the following:
•
To add a switch to the policy, click the switch in the Available Access Points list and then click
Add Switch.
•
To remove a host from the policy, click the host in the Permitted Access Points field and then
click Remove Switch.
4.
Click the Summary tab.
5.
Click Save to save your changes but not apply them, or click Activate to save and apply your
changes.
The Security Policy Review dialog displays.
6.
After reviewing the Security Policy, click one of the following:
•
•
•
Continue (to continue applying your changes)
Cancel (to cancel your changes)
Copy to File (to copy the Security Policy to a file)
Changing the Admin Security Password
Use the following procedure to change the admin password for secure FCS and secure non-FCS
switches.
To change the password that implements security
1.
In the Information Panel, right-click the secure fabric for which you want to change passwords and
choose Security > Security Policy Editor from the context menu.
The Policy Editor appears (see Figure 17-3 on page 17-4).
2.
Click the Password tab (see Figure 17-10 on page 17-16).
Fabric Manager Administrator’s Guide
Publication Number: 53-1000196-01-HP
17-15
17
Using the Policy Editor
Figure 17-10 Configuring the FCS or Non-FCS Admin Security Password
3.
Type the current password in the FCS Administrator Password field.
4.
Type the new password in the New Password field.
Passwords must be from 8 through 40 characters long and must differ from the old password by at
least one character. In addition, passwords must adhere to any additional conditions that you set up
through Web Tools or the command line interface.
5.
Type the new password again in the Verify field.
6.
Click FCS Switches to change the admin password for secure FCS switches only, or click NonFCS Switches to change the admin password for secure non-FCS switches only.
7.
Click Change Password.
8.
Click the Summary tab.
9.
Click Save to save your changes but not apply them, or click Activate to save and apply your
changes.
The Security Policy Review dialog displays.
10. After reviewing the Security Policy, click one of the following:
•
•
•
17-16
Continue (to continue applying your changes)
Cancel (to cancel your changes)
Copy to File (to copy the Security Policy to a file)
Fabric Manager Administrator’s Guide
Publication Number: 53-1000196-01-HP
Adding a Switch to a Secure Fabric
17
Configuring No-Node WWN Zoning
Fabric Manager allows you to enable or disable No-Node WWN Zoning. When you enable this feature,
security becomes port-oriented. Devices have port and node WWNs. When you disable node zoning,
you ensure that devices with multiple ports cannot access secure fabrics with node WWNs. You must
add individual port WWNs to your policies for devices to access your secure fabric.
To configure No-Node WWN Zoning
1.
In the Information Panel, right-click the secure fabric for which you want to set policies and choose
Security > Security Policy Editor from the context menu.
The Policy Editor appears (see Figure 17-3 on page 17-4).
2.
Click the Options tab.
3.
To enable No Node WWN Zoning, check the No Node WWN Zoning checkbox; to disable,
uncheck the No Node WWN Zoning checkbox.
4.
Click the Summary tab.
5.
Click Save to save your changes but not apply them, or click Activate to save and apply your
changes.
The Security Policy Review dialog displays.
6.
After reviewing the Security Policy, click one of the following:
•
•
•
Continue (to continue applying your changes)
Cancel (to cancel your changes)
Copy to File (to copy the Security Policy to a file)
Adding a Switch to a Secure Fabric
If you attempt to add a new switch to a secure fabric the same way you would add it to a non-secure
fabric, the switch is rejected and segmented into its own fabric. For the switch to be added successfully,
secure mode must first be enabled on the switch and then two secure fabrics must be merged together.
For instructions on adding a switch to the SCC policy, see “Configuring SCC Policy Options” on
page 17-6.
To add a switch to a secure fabric
1.
Enable secure mode on a single switch in a nonsecure fabric (see “Enabling Secure Mode” on
page 17-1).
2.
Merge the two secure fabrics into one fabric using the secure fabric wizard (see “Merging Secure
Fabrics” on page 17-18).
Fabric Manager Administrator’s Guide
Publication Number: 53-1000196-01-HP
17-17
17
Merging Secure Fabrics
Merging Secure Fabrics
Fabric Manager provides a wizard to help you merge secure fabrics that are not physically connected.
This wizard performs a compatibility check that identifies noncompatible parameters and enables you to
create security policies for the merged fabric.
Before launching the wizard, you first select the secondary fabric that you want to merge into a primary
fabric. You select the primary fabric within the wizard.
If the fabric you selected as the secondary fabric has a Change Management configuration or is part of a
Performance Monitoring configuration, this configuration and data in the secondary fabric is lost after
the merge. The primary fabric, however, preserves all Change Management and Performance
Monitoring configurations.
After successfully completing the Merge Secure Fabrics wizard, you can connect the two fabrics
physically.
To merge secure fabrics
1.
In the Information Panel, select the secure fabric that you want to merge into a primary secure
fabric.
This fabric is the secondary fabric.
2.
Right-click on this fabric in the Information Panel and choose Security > Merge with Secure
Fabric from the context menu.
If Fabric Manager detects Change Management or Performance Monitoring configurations in the
secondary fabric, a confirmation message asks whether you want to continue with the merge.
The Merge Secure Fabrics wizard displays, as shown in Figure 17-11.
Figure 17-11 Merge Secure Fabric Wizard
17-18
Fabric Manager Administrator’s Guide
Publication Number: 53-1000196-01-HP
Using Telnet on a Secure Fabric
3.
17
Follow the instructions in the wizard to merge the secondary fabric with another (primary) secure
fabric.
The wizard is self-explanatory, so the individual steps are not described in this document.
Before performing the merge, the wizard performs a compatibility check for the two fabrics. If this
check fails, you must exit the Merge Secure Fabrics wizard and fix the incompatibility via the CLI.
After fixing the incompatibility, run the Merge Secure Fabrics wizard again. See the Fabric OS
Command Reference for additional information about CLI commands.
After successfully completing the Merge Secure Fabrics wizard, you can connect the two fabrics
physically.
Using Telnet on a Secure Fabric
The telnet-to-FCS option is accessible only for a secure fabric. For nonsecure fabrics, only the default
telnet option is accessible. SecTelnet is launched instead of the default telnet client for fabrics running
secure Fabric OS.
For Linux only: You cannot launch a telnet session for a secure fabric. If you need telnet access to a
secure switch under Linux, and if your switch supports ssh (that is, running Fabric OS 4.4 or higher),
you can do one of the following:
•
•
Launch an ssh client from outside of Fabric Manager to the switch.
Configure the third-party application for that switch to launch an ssh client.
If your secure switch does not support ssh, you can access telnet only if you launch a Fabric Manager
client from Windows or Solaris.
To open a telnet session for a secure fabric (Windows or Solaris)
1.
In the Information Panel, right-click a secure fabric and choose Telnet to FCS from the context
menu. (For switches in non-secure fabrics, only the Telnet option is available.)
The SecTelnet prompt displays.
2.
Log in using your login ID and password.
Note
If a secTelnet session is already active on a secure switch running firmware versions v2.6.x or 3.1.0 and
you attempt to launch a new session, you receive the message, “Sorry, this system is engaged.” You must
close the open telnet session and relaunch telnet for the secure switch.
Fabric Manager Administrator’s Guide
Publication Number: 53-1000196-01-HP
17-19
17
17-20
Using Telnet on a Secure Fabric
Fabric Manager Administrator’s Guide
Publication Number: 53-1000196-01-HP
Chapter
FICON and CUP
18
FICON is a protocol used between IBM (and compatible) mainframes and storage. FICON is supported
on switches running Fabric OS v4.1.2 and later.
FICON Control Unit Port (CUP) is a protocol for managing FICON directors. CUP is used by IBM
mainframe management applications to provide in-band management for ESCON and FICON. CUP is
an optional, license-based feature and is supported on switches running Fabric OS v4.4.0 or later.
Host-based management programs manage the switches using CUP protocol by sending commands to
the emulated Control Device implemented by Fabric OS. A Brocade switch or director that supports
CUP can be controlled by one or more host-based management programs or director consoles, such as
Brocade Web Tools or Brocade Fabric Manager. The director allows control to be shared between hostbased management programs and director consoles.
To monitor a FICON CUP environment in Fabric Manager, you must have the following (all can be
performed through Web Tools):
•
•
•
A CUP license installed on a FICON director
FICON Management Server (FMS) mode enabled on the FICON director
CUP attributes (FMS Parameters) configured for the FICON director
This chapter contains the following topics:
•
•
•
•
•
•
•
•
“Identifying Switches with FMS Mode Enabled” on page 18-1
“Editing the Current Port Connectivity Configuration” on page 18-2
“Editing a Stored Port Connectivity Configuration” on page 18-4
“Identifying Port Zone Conflicts” on page 18-6
“Configuring Insistent Domain ID Mode” on page 18-6
“Identifying Ports That Completed the RNID Exchange” on page 18-8
“Monitoring Link Incidents” on page 18-9
“Cascaded FICON Setup” on page 18-9
Identifying Switches with FMS Mode Enabled
To monitor a FICON CUP environment in Fabric Manager, FMS mode must be enabled on the FICON
director.
You can enable FMS mode using Web Tools or the command line interface (CLI). See the Web Tools
Administrator’s Guide for information on enabling FMS mode with Web Tools. See the Fabric OS
Command Reference for information about the ficoncupset command.
Fabric Manager Administrator’s Guide
Publication Number: 53-1000196-01-HP
18-1
18
Editing the Current Port Connectivity Configuration
The following procedure describes how to identify which switches have FMS mode enabled.
To identify switches with FMS mode enabled
1.
Select a switch from the View panel.
2.
Click the Overview tab in the Information panel.
3.
Scroll or use the Search function to locate “FMS Mode” in the Property column.
The FMS Mode property displays true if FMS mode is enabled, false if FMS mode is not enabled,
and Not supported for switches that do not support FMS mode.
Editing the Current Port Connectivity Configuration
This section describes how to view and edit the current port connectivity configuration. It also describes
how to make the current port connectivity configuration active immediately or to save it to be used later.
If you save the configuration for future use, see “Editing a Stored Port Connectivity Configuration” on
page 18-4 for the activation procedure.
Note
You can activate the current port connectivity configuration only for FMS-enabled switches running
Fabric OS v4.4.0 or later.
Users with roles of user or basicswitchadmin can only view the port connectivity configuration. Users
with the role of zoneadmin cannot access the port connectivity configuration. All other user roles can
view and modify the port connectivity configuration.
To view and edit the current port connectivity configuration
1.
In the View panel or Information panel, right-click a switch that has FMS mode enabled and select
Port Address Configuration > Active from the context menu.
The Edit FICON CUP Port Connectivity Configuration dialog displays (see Figure 18-1). Any
modified values are indicated with a blue background.
18-2
Fabric Manager Administrator’s Guide
Publication Number: 53-1000196-01-HP
Editing the Current Port Connectivity Configuration
18
Some cells for the SilkWorm 24000 and 48000 switches are disabled.
•
For SilkWorm 24000 switches, disabled cells are those with 7E in the Area ID column or 10/14
in the Port column.
•
For SilkWorm 48000 switches, disabled cells are those with FE or FF in the Area ID column or
10/30 in the Port column.
Figure 18-1 Editing the Port Connectivity Configuration
2.
You can use the Edit FICON CUP Port Connectivity Configuration dialog to:
•
Block a port
•
To block a port, click the checkbox in the Block column corresponding to that port.
To block all ports, click the Block All checkbox.
Prohibit a port
-
To prohibit all ports from communicating with one another, click the Prohibit All
checkbox.
-
To prohibit a port from communicating with all other ports, click the checkbox in the
Prohibit column corresponding to that port. All the affected ports then display the (
)
icon automatically in the matrix.
-
To allow a port to communicate with all other ports, uncheck the checkbox in the Prohibit
column corresponding to that port.
-
To allow or prohibit communication between specific ports, click the cells in the matrix. If
you click one of the (
) icons, the corresponding prohibit checkbox is unchecked
automatically.
Fabric Manager Administrator’s Guide
Publication Number: 53-1000196-01-HP
18-3
18
Editing a Stored Port Connectivity Configuration
•
Modify port names
•
To add or change the port name, click the Port Name field and type the name.
To clear all of the port names, click the Clear All Port Names checkbox.
Analyze zone conflicts
Click Analyze Zone Conflicts to see if there are any problems between the PDCM and the
currently enabled zone configuration. Any port connections that cannot communicate with
each other due to a zone conflict are displayed with a red background. For example, if in the
PDCM port n1 can talk to port n2 even though the ports are not in the same zone, a zone
conflict exists and the background cells are shaded red. The Analyze Zone Conflicts tool
analyzes only zones created by port zoning against the switch port zoning (not WWN).
•
Activate the current configuration
a.
Click Activate to activate the configuration that is currently displayed.
A confirmation dialog displays.
b.
Check the Active=Saved Mode checkbox if you want to save the FICON CUP port
connectivity configuration as an IPL file, in addition to activating the configuration. The
next time the switch reboots, it loads the configuration from this IPL file.
c.
Click Yes to activate the displayed configuration.
Click No to close the dialog without activating the configuration.
•
•
Click Refresh to receive up-to-date information
Click Save As to save the configuration as a file.
The configuration name must consist of only upper-case letters, digits, hyphen, and
underscore. If you use lower-case letters, they are converted to upper-case.
•
Click Cancel to close the dialog.
Editing a Stored Port Connectivity Configuration
This section describes how to view and edit stored port connectivity configurations. It also describes
how to activate a stored port connectivity configuration.
18-4
Fabric Manager Administrator’s Guide
Publication Number: 53-1000196-01-HP
Editing a Stored Port Connectivity Configuration
18
Note
You can activate a stored port connectivity configuration only for FMS-enabled switches running
Fabric OS v4.4.0 or later.
Users with roles of user or basicswitchadmin can only view the port connectivity configuration. Users
with the role of zoneadmin cannot access the port connectivity configuration. All other user roles can
view and modify the port connectivity configuration.
To view and edit a stored port connectivity configuration
1.
In the View panel or Information panel, right-click a switch that has FMS mode enabled and select
Port Address Configuration > Stored from the context menu.
The FICON CUP Port Connectivity Configurations dialog displays (see Figure 18-2).
Figure 18-2 Activating a Stored Port Connectivity Configuration
2.
Select a configuration from the CUP Port Connectivity Configurations dialog and do any of the
following:
•
•
Click Activate to activate the stored configuration.
•
Click Edit to edit the selected configuration. This launches the Edit CUP Port Connectivity
Configurations dialog (see Figure 18-1 on page 18-3).
•
Click Delete to delete the selected configuration.
Click New to create a new configuration. This launches the Edit FICON CUP Port
Connectivity Configurations dialog (see Figure 18-1 on page 18-3).
You cannot delete the initial IPL configuration; you can, however, delete all user-created
configurations.
•
•
Click Copy to copy the selected configuration and save it under a different name.
Click Close to exit the dialog.
Fabric Manager Administrator’s Guide
Publication Number: 53-1000196-01-HP
18-5
18
Identifying Port Zone Conflicts
Identifying Port Zone Conflicts
Fabric Manager identifies ports that cannot communicate with each other due to zone conflicts. Zone
conflicts are identified as:
•
Port zone configurations: If two ports are not defined in the same zone, they cannot communicate
with each other. Fabric Manager can analyze port communication conflicts based on only on zones
defined by port name (not WWN).
•
Blocked port communication: You can block ports from communicating with each other using the
block feature in the Edit FICON CUP Port Connectivity Configuration dialog. By clicking a
combination of ports in the graph, you can block the port connectivity.
To display an analysis of which ports cannot communication with each other because of zone conflicts,
click the Analyze Zone Conflicts button in the Edit FICON CUP Port Connectivity Configuration
dialog. Fabric Manager displays the zone conflicts highlighted in red.
Note
The Analyze Zone Conflicts feature supports only switches running Fabric OS v4.4.0 or later.
You cannot use the Analyze Zone Conflicts feature in an Admin Domain-aware fabric.
To analyze port zone conflicts
1.
Display the Edit FICON CUP Port Connectivity Configuration dialog for the active configuration,
as described in “Editing the Current Port Connectivity Configuration” on page 18-2, or for a stored
configuration, as described in “Editing a Stored Port Connectivity Configuration” on page 18-4.
2.
Optional: Click the checkboxes for a combination of ports that you want to block. You can block as
many ports as you want.
3.
Click Analyze Zone Conflict.
The Edit FICON CUP Port Connectivity Configuration dialog displays zone conflicts highlighted
in red.
Configuring Insistent Domain ID Mode
This section describes how to identify which switches have Insistent Domain ID (IDID) mode enabled
and how to enable or disable IDID mode on a switch.
When you configure IDID mode, Fabric Manager launches the Switch Admin module of Web Tools.
Web Tools automatically disables the switch. Afterwards, you must manually enable the switch.
To identify switches that have insistent domain ID (IDID) enabled
1.
Select a switch from the View panel.
2.
Click the Overview tab in the Information panel.
3.
Scroll or use the Search function to locate “IDID” in the Property column.
The IDID property identifies switches that are IDID-enabled with a value of true.
18-6
Fabric Manager Administrator’s Guide
Publication Number: 53-1000196-01-HP
Configuring Insistent Domain ID Mode
18
Figure 18-3 Information Panel Showing IDID Mode
To configure IDID mode on a switch
1.
Right-click a switch and select Insistent Domain ID(IDID) from the context menu. Note that this
menu item is available only for switches running Fabric OS 5.0.x or higher.
A confirmation dialog warns you that the switch will be disabled and asks if you want to continue.
2.
Click Yes in the confirmation dialog.
The switch is disabled, and Web Tools launches and displays the Configure tab of the Switch
Admin module (see Figure 18-4 on page 18-8). See the Web Tools Administrator’s Guide for
instructions on using Web Tools to set the IDID mode.
Afterwards, you must manually enable the switch using either Web Tools or Fabric Manager.
Fabric Manager Administrator’s Guide
Publication Number: 53-1000196-01-HP
18-7
18
Identifying Ports That Completed the RNID Exchange
Figure 18-4 Web Tools Switch Admin Module, Configure Tab
Identifying Ports That Completed the RNID Exchange
The following procedure describes how to identify ports that have completed the request node
identification (RNID) exchange.
To identify ports that have completed the RNID exchange
1.
Launch the FC Port Connectivity View, as described in “Viewing Port Information” on page 11-4,
or access the FC Devices tab in the Information panel.
2.
Scroll to the right in the FC Port Connectivity View or FC Devices tab to locate the Capability
column.
The Capability column identifies ports that have completed the RNID exchange with a value of
FICON.
18-8
Fabric Manager Administrator’s Guide
Publication Number: 53-1000196-01-HP
Monitoring Link Incidents
18
Monitoring Link Incidents
Problems that occur on links between a host and the switch, or between the storage CUP and the switch
are known as link incidents. Any FRU failures are referred to as implicit link incidents. Table 18-1
describes the types of link and implicit link incidents.
Table 18-1
Types of Link and Implicit Link Incidents
Link Incidents
•
•
•
Bit-error-rate threshold exceeded
•
•
Primitive sequence time-out
Loss of signal or synchronization
Non-operational primitive sequence
(NOS) recognized
Implicit Link Incidents (FRU Failures)
•
•
•
•
WWN card
Power supply
System hardware slot
Fan
Invalid primitive sequence for port state
To monitor link and implicit link incidents
1.
Select a switch from the View panel.
2.
Click the Events tab in the Information panel.
3.
Check the value in the Source column within the Events tab.
The Source column identifies the source of link incidents as FICON or MSFICON. The source of
implicit link incidents are identified as EM or FW.
Cascaded FICON Setup
This section describes how you can use Fabric Manager to configure a fabric for cascaded FICON and
to merge two fabrics for cascaded FICON.
You can configure a fabric for cascaded FICON only if all switches in the fabric are running
Fabric OS v5.2.0 or higher. You cannot configure a secure fabric for cascaded FICON with the Fabric
Manager FICON Configuration utility.
To merge two fabrics for cascaded FICON, both fabrics must have all switches running Fabric OS
v5.2.0 or higher.
Configure a Fabric for Cascaded FICON
Using Fabric Manager, you can easily configure a fabric for cascaded FICON. You launch the utility,
select a fabric to configure, indicate whether you want FMS mode set, and click OK. Fabric Manager
then performs the following operations on the selected fabric:
•
•
•
Turns on the insistent domain ID flag (IDID) on all switches.
Enables port-based routing on 4 Gbit/sec platform switches.
Disables Dynamic Load Sharing (DLS) on all switches.
Fabric Manager Administrator’s Guide
Publication Number: 53-1000196-01-HP
18-9
18
Cascaded FICON Setup
•
•
Enables In-Order Delivery (IOD) on all switches.
Sets High Integrity Fabric Configuration (HIFC) on the seed switch.
•
Fabric-wide consistency policy is configured to include SCC in strict mode.
SCC policy is created or modified to limit connectivity to only the switches in the selected
fabric.
(Optional) Turns on FICON Management Server (FMS) mode on all switches. If some switches
already have FMS mode enabled, it is reenabled.
Fabric Manager performs an RBAC check on all switches in the fabric for the above operations, except
for setting HIFC, for which Fabric Manager performs an RBAC check on the seed switch only. If the
RBAC check fails for any operation on any switch, an error message displays listing the errors for each
failed operation.
If you select FMS mode to be enabled on all switches and if some of the switches do not have a CUP
license, then after successful configuration, you can access the Port Connectivity (PDCM) matrix, but
the host system cannot communicate with the FICON Management Server unless you install a CUP
license. If a CUP license is later installed on these switches, then FMS mode must be reenabled on these
switches.
To configure a fabric for cascaded FICON
1.
Click Tasks > Cascaded FICON Setup > Configure a fabric for cascaded FICON setup.
If none of the discovered fabrics meet the requirements for cascaded FICON (all switches must be
running Fabric OS v5.2.0 or higher and fabric must not be a secure fabric), then an informational
message displays.
Otherwise, the FICON configuration utility shown in Figure 18-5 on page 18-10 displays.
Figure 18-5 Configure a Fabric for Cascaded FICON
2.
18-10
Select a fabric to configure for cascaded FICON.
Fabric Manager Administrator’s Guide
Publication Number: 53-1000196-01-HP
Cascaded FICON Setup
18
3.
(Optional) Check the Turn ON FMS Mode checkbox if you want FMS mode to be set on all of the
switches in the selected fabric.
4.
Click OK.
Fabric Manager starts configuring the fabric for cascaded FICON.
If Fabric Manager cannot add the SCC policy to the fabric-wide consistency policy (because the
accept distribution parameter for the SCC policy is set to No), a message displays, informing you
that HIFC cannot be set on the switches. In this case, you should set the accept distribution
parameter for SCC policy to Yes on the listed switches and retry.
If DCC policies are defined on the seed switch, they are activated when Security policies are
activated on the seed switch. A message displays, notifying you that the DCC policies will be
activated. If you do not want the DCC policies to be activated, click Cancel to exit the
configuration utility.
A message displays when configuration is successful.
Merge Two Fabrics for Cascaded FICON
Fabric Manager provides a wizard that merges two fabrics for cascaded FICON. You must be a physical
fabric administrator on both fabrics that you want to merge.
Fabric Manager performs the following operations on the selected fabrics:
•
•
•
Checks the fabrics for any merge issues.
Turns on the insistent domain ID (IDID) flag on all of the switches in both fabrics.
Clears Admin Domain, Access Control Lists (ACLs), and zone databases, if they exist, from one of
the fabrics (you select which fabric from within the wizard).
Note
Clearing the ACL database in a large fabric might take a long time; for example, in a 50switch fabric, this operation might take from 30 minutes to 1 hour.
•
Configures High Integrity Fabric Configuration (HIFC) on the seed switch of the other fabric.
•
•
•
•
•
Fabric-wide consistency policy is configured to include SCC in strict mode.
SCC policy is created or modified to limit connectivity to only the switches in both fabrics.
Enables port-based routing on 4 Gbit/sec platform switches.
Disables Dynamic Load Sharing (DLS) on all switches.
Enables In-Order Delivery (IOD) on all switches.
(Optional) Configures long distance settings on selected ports (requires Extended Fabric license).
(Optional) Turns on FICON Management Server (FMS) mode on all switches. If some switches
already have FMS mode enabled, it is reenabled.
If you select FMS mode to be enabled on all switches and if some of the switches do not have a CUP
license, then after successful configuration, you can access the Port Connectivity (PDCM) matrix, but
the host system cannot communicate with the FICON Management Server unless you install a CUP
license. If a CUP license is later installed on these switches, then FMS mode must be reenabled on these
switches.
Fabric Manager Administrator’s Guide
Publication Number: 53-1000196-01-HP
18-11
18
Cascaded FICON Setup
Note
It is recommended that you do a configuration backup on all switches before performing the fabric
merge. This helps you to revert back the switch configurations later.
To merge two fabrics for cascaded FICON
1.
Click Tasks > Cascaded FICON Setup > Merge two fabrics for cascaded FICON setup.
The Merge wizard shown in Figure 18-6 on page 18-12 displays.
At least two of the discovered fabrics must meet the requirement that all switches must be running
Fabric OS v5.2.0 or higher; otherwise, an informational dialog displays and the wizard does not
launch.
Figure 18-6 Merge Two Fabrics for Cascaded FICON
2.
Follow the instructions in the wizard to merge two fabrics for cascaded FICON.
The wizard is self-explanatory, so the individual steps are not described in this document.
If DCC policies are defined on the seed switch, they are activated when Security policies are
activated on the seed switch. A message displays, notifying you that the DCC policies will be
activated. If you do not want the DCC policies to be activated, click Cancel to exit the wizard.
The wizard displays a summary screen upon successful fabric merge.
3.
18-12
Read the summary screen, and click Cancel to close the wizard.
Fabric Manager Administrator’s Guide
Publication Number: 53-1000196-01-HP
Chapter
Managing the FC-FC Routing Service
19
The FC-FC Routing Service provides Fibre Channel routing between two or more fabrics without
merging those fabrics.
This chapter includes the following sections:
•
•
•
•
•
•
•
•
•
“Requirements for Fibre Channel Routing” on page 19-1
“About Fibre Channel Routing” on page 19-2
“Setting Up FC-FC Routing” on page 19-3
“Connecting Edge Fabrics” on page 19-4
“Diagnosing Fabric Device Sharing” on page 19-5
“Sharing Devices Between Fabrics” on page 19-6
“Displaying Logical SANs” on page 19-8
“Displaying FC Router Information” on page 19-9
“FC-FC Routing and Secure Fabrics” on page 19-12
Requirements for Fibre Channel Routing
The FC-FC Routing Service is supported only on the following switch models:
•
•
SilkWorm 7500 switch
•
SilkWorm AP7420 (see the XPath OS Administrator’s Guide for information about managing this
switch)
SilkWorm 48000 director, when configured with an FR4-18i blade (see the Fabric OS
Administrator’s Guide for more information)
Fabric Manager scans all switches discovered. Any of the supported switches listed above are
considered FC Router-capable. If an EX_Port or VEX_Port is configured for that switch, the switch is
FC-Router enabled.
The FC-FC Routing Service is not supported on AD-enabled edge fabrics.
Only users with Admin role can configure FC-FC routing.
Fabric Manager Administrator’s Guide
Publication Number: 53-1000196-01-HP
19-1
19
About Fibre Channel Routing
About Fibre Channel Routing
Fibre Channel routing provides connectivity to devices in different fabrics without merging the fabrics.
For example, using Fibre Channel routing you can share tape drives across multiple fabrics without the
administrative problems, such as change management, network management, scalability, reliability,
availability, and serviceability, that might result from merging the fabrics.
Fibre Channel routing allows you to create logical storage area networks (LSANs) that can span fabrics.
These LSANs allow Fibre Channel zones to cross physical SAN boundaries without merging the fabrics
and while maintaining the access controls of zones.
Fibre Channel routing requires some additional terminology:
FC Router
A switch running FC-FC Routing Service.
EX_Port
A type of port that functions somewhat like an E_Port, but does not propagate
fabric services or routing topology information from one fabric to another. A
VEX_Port is similar to an EX_Port, but is a virtual port that enables routing
functionality via an FCIP tunnel.
Interfabric link (IFL) The link between an E_Port and an EX_Port, or a VE_Port and a VEX_Port.
Edge fabric
A standard Fibre Channel fabric with targets and initiators connected through
an FC Router to another Fibre Channel fabric.
Backbone fabric
An FC Router can connect two edge fabrics; a backbone fabric connects FC
Routers. The backbone fabric is the fabric to which the FC Router switch
belongs. A backbone fabric consists of at least one FC Router and possibly a
number of Fabric OS-based Fibre Channel switches. Initiators and targets in
the edge fabric can communicate with devices in the backbone fabric through
the FC Router.
metaSAN
The collection of all SANs interconnected with FC Routers.
Note
Devices on edge fabrics that are connected to a SilkWorm AP7420 Multiprotocol Router cannot
communicate with devices in the backbone fabric.
Figure 19-1 on page 19-3 shows a metaSAN with a backbone consisting of one SilkWorm 7500
connecting hosts in Edge Fabric 1 and 3 with storage in Edge Fabric 2 and the backbone fabric through
the use of LSANs. A device is shared between:
•
•
•
19-2
The backbone fabric and Edge Fabric 1
Edge Fabric 1 and Edge Fabric 2
Edge Fabric 2 and Edge Fabric 3
Fabric Manager Administrator’s Guide
Publication Number: 53-1000196-01-HP
Setting Up FC-FC Routing
19
VE_Port
Edge Fabric 2
IP Cloud
Edge Fabric 1
Edge Fabric 3
E_Port
E_Port
IFL
IFL
IFL
VEX_Port
SilkWorm
7500
EX_Port (2)
= LSAN
Backbone Fabric
Figure 19-1 A metaSAN with Edge-to-Edge and Backbone Fabrics
For additional information about FC-FC routing, see the Fabric OS Administrator’s Guide.
Setting Up FC-FC Routing
The following procedure provides the basic steps for setting up FC-FC Routing using a Fibre Channel
router (FC Router).
1.
Ensure that the backbone fabric ID of the FC Router is the same as that of other FC Routers in the
backbone fabric.
2.
On the FC Router, ensure that the ports to be configured as EX_Ports are either not connected or
are disabled.
3.
Configure EX_Ports, as described in “Connecting Edge Fabrics” on page 19-4. As part of this
configuration, supply a fabric ID for the fabric to which the port will get connected. You can choose
any unique fabric ID as long as it is consistent for all EX_Ports that connect to the same edge
fabric.
4.
Connect the cables from the EX_Ports on the FC Router to the edge fabrics, if they are not already
connected.
5.
Configure LSAN zones on the fabrics that will share devices. See “Sharing Devices Between
Fabrics” on page 19-6.
6.
View the information in the LSAN View and the FCR Info View to make sure that your
configuration has succeeded.
Fabric Manager Administrator’s Guide
Publication Number: 53-1000196-01-HP
19-3
19
Connecting Edge Fabrics
Connecting Edge Fabrics
Fabric Manager allows you to connect edge fabrics without merging them using an FC Router. Using
the following procedure, you select a fabric to be the edge fabric, then launch the FC Router
Configuration wizard to configure an FC Router to which the edge fabric will be connected.
The wizard prompts you to select an FC Router to connect to the edge fabric, set the fabric ID, and then
select which ports on the FC Router are to be configured as EX_Ports.
•
If the FC Router is an XPath OS switch, EX_Port configuration is done via the Fabric Manager
wizard.
•
If the FC Router is a Fabric OS switch, the Fabric Manager wizard prompts you to launch Web
Tools to complete the EX_Port configuration. See the Web Tools Administrator’s Guide for
additional information.
Note
You cannot launch the FC Router Configuration wizard if the selected edge fabric is AD-enabled. When
displaying the list of FC Routers for you to select, the wizard does not display FC Routers from ADenabled fabrics.
To connect edge fabrics
1.
Select a fabric that you want to connect to an FC Router and click Tasks > Device Sharing and
Troubleshooting > FC Router configuration. This fabric will be an edge fabric.
The FC Router Configuration wizard launches (see Figure 19-2).
Figure 19-2 FC Router Configuration Wizard
2.
Follow the instructions in the wizard to configure the EX_Ports on the FC Router.
The wizard is self-explanatory, so the individual steps are not described in this document.
3.
19-4
When EX_Port configuration is complete, physically connect the selected edge fabric to the
EX_Ports on the FC Router.
Fabric Manager Administrator’s Guide
Publication Number: 53-1000196-01-HP
Diagnosing Fabric Device Sharing
19
Diagnosing Fabric Device Sharing
Before you set up device sharing, you can verify whether two fabrics are configured to share devices.
Using the Diagnose Fabric Device Sharing wizard, you select two or more fabrics and generate a report
on whether device sharing is possible for each pair of selected fabrics.
When the wizard lists the fabrics, it displays only discovered fabrics; it does not list foreign fabrics,
secure fabrics, AD-enabled fabrics, or fabrics with an XPath OS switch as the proxy.
Fabric Manager performs the following checks on the selected fabrics:
•
•
•
Are the selected fabrics configured with an FC Router?
Are the selected fabrics connected to the same backbone fabric?
Is sharing of devices between backbone and edge fabric supported?
To diagnose fabric device sharing
1.
Click Tasks > Device Sharing and Troubleshooting > Diagnose Fabric Device Sharing.
The Diagnose Fabric Device Sharing wizard launches, as shown in Figure 19-3.
Figure 19-3 Diagnose Fabric Device Sharing Wizard
2.
Follow the instructions in the wizard.
The wizard is self-explanatory, so the individual steps are not described in this document.
The Summary screen appears when the diagnosis is complete.
Fabric Manager Administrator’s Guide
Publication Number: 53-1000196-01-HP
19-5
19
Sharing Devices Between Fabrics
Figure 19-4 Summary Screen
3.
Optional: Click Print to print the summary.
4.
Click Finish to exit the wizard.
Sharing Devices Between Fabrics
You can share devices between fabrics without merging them using an FC Router (see Figure 19-1 on
page 19-3). Fabric Manager allows you to set up the shared devices easily with the Share Devices
wizard. Using the Share Devices wizard, you must first select the devices you want to share, then the
wizard creates a logical SAN (LSAN).
You cannot share devices between secure edge and backbone fabrics; the Share Devices wizard does not
display these devices.
To share devices between fabrics
1.
Click Tasks > Device Sharing and Troubleshooting > Share Devices.
The Share Devices wizard launches (see Figure 19-5 on page 19-7).
19-6
Fabric Manager Administrator’s Guide
Publication Number: 53-1000196-01-HP
Sharing Devices Between Fabrics
19
Figure 19-5 Share Devices Wizard
2.
Read the overview information, then click Next.
The Select Devices to Share screen displays (see Figure 19-6). Note that the wizard does not
display AD-enabled fabrics or iSCSI devices (Virtual Initiators and Virtual Targets).
Figure 19-6 Selecting Devices to Share
3.
Type a name for the logical SAN (LSAN). The name is automatically prefixed with LSAN_.
Fabric Manager Administrator’s Guide
Publication Number: 53-1000196-01-HP
19-7
19
Displaying Logical SANs
4.
Select the devices you want to share using any of the following methods. You must select at least
one device from the Available Devices list, and at least one device using any of the following
methods:
•
Click the name of a device you want to share in the Available Devices list, and click the right
arrow to move the device to the Selected Devices list.
•
Type the full path name of a valid .csv file in the Import Device Ports from file field and click
the Select Device Port(s) button. You can also use the Browse button to locate the .csv file.
Typically the .csv file contains name server entries of the switches that are not managed by
Fabric Manager but are connected to a fabric managed by Fabric Manager. This step is
required if you want to share devices among fabrics managed by Fabric Manager and those not
managed by Fabric Manager, but where all the fabrics are connected to an FC Router in the
backbone fabric.
•
5.
Type the device port WWN in the Device Port WWN field and click Add.
Click Next.
A summary displays the devices that will be shared in the new LSAN. The summary also displays
whether the FC Router is properly configured for the selected device sharing.
6.
Read the summary.
If something is incorrect, click Previous and then correct it. If you added devices from an
undiscovered fabric using the manual method (using a .csv file or typing the WWN in step 4), you
must manually create the LSAN on the undiscovered fabric, as Fabric Manager creates LSANs
only in discovered or managed fabrics.
7.
Click Finish to automatically create the LSAN and exit the wizard.
If the FC Router is not properly configured, the devices cannot communicate with each other, even
though an LSAN is created. See “Connecting Edge Fabrics” on page 19-4 for information on
configuring the FC Router.
Displaying Logical SANs
The LSAN View (see Figure 19-7 on page 19-9) displays information about the LSANs that span the
selected edge fabric. The LSAN View is not available for AD-enabled fabrics.
To display the LSAN View and modify LSANs
1.
Select an edge fabric and click Tasks > Device Sharing and Troubleshooting > Show LSAN
View.
The LSAN View displays.
2.
Click the + next to an LSAN name to display the devices in that LSAN.
3.
Optional: Select an LSAN and click Modify. This launches the Share Devices wizard, which
allows you to add or remove devices from the LSAN.
4.
Optional: Select an LSAN and click Delete to delete the LSAN from the selected fabric.
Note
The Modify and Delete buttons are enabled only for users with the Admin role.
19-8
Fabric Manager Administrator’s Guide
Publication Number: 53-1000196-01-HP
Displaying FC Router Information
19
Figure 19-7 LSAN View
Displaying FC Router Information
The FCR Info View (see Figure 19-8) displays information about FC Routers. This view is available
only for backbone fabrics containing FC Routers. This view is not available for AD-enabled fabrics.
Figure 19-8 FCR Info View, Physical Devices Tab
The FCR Info View displays information in three tabs:
Fabric Manager Administrator’s Guide
Publication Number: 53-1000196-01-HP
19-9
19
Displaying FC Router Information
•
Physical Devices
This tab displays all the devices shared from the edge fabrics connected to the selected FC Router
through EX_Ports. The devices displayed here are only those devices that are physical to the edge
fabrics connected to the FC Router. Using Figure 19-9 on page 19-10 as an example, the Physical
Devices tab would show Host 1 on Edge Fabric 1 for FC Router 1, and would show Target 2 on
Edge Fabric 2 for FC Router 2.
•
Virtual Devices
This tab displays all the devices shared from the edge fabrics connected to the selected FC Router
through EX_Ports and to which other edge fabrics these devices are virtual. Using Figure 19-9 as
an example, the Virtual Devices tab would show Proxy Host 1 on Edge Fabric 2 for FC Router 1,
and would show Proxy Target 2 on Edge Fabric 1 for FC Router 2.
•
LSAN Information
This tab displays LSAN zones from the edge fabric connected to the FC Router and the member
devices of LSAN zones that are attached to the edge fabrics connected to the selected FC Router.
Hos t 1
P roxy
Hos t 1
P roxy
T arget 2
T arget 2
E dge F abric 1
E dge F abric 2
E
E
EX
E
FC Router 1
B ac kbone F abric
E
EX
FC Router 2
Figure 19-9 Backbone Fabric with Multiple FC Routers
19-10
Fabric Manager Administrator’s Guide
Publication Number: 53-1000196-01-HP
Translate Domains and Virtual Device Status
19
Note
When you access the FCR Info View for a single FC Router, the information displayed in the Physical
and Virtual Devices tabs varies from what is displayed in the CLI commands. For example, the
fcrproxydevshow command provides information on the devices that are proxy to the edge fabrics
connected to the FC Router. The FCR Info View shows the devices connected to the edge fabric and
information on the other edge fabrics that are importing this device as a proxy device.
To view the complete information about all devices that are shared through a backbone fabric, either
access the FCR Info View at the fabric node level, or select the FCR Info View for each of the FC
Routers in the backbone fabric individually.
To display the FCR Info View
1.
Select a backbone fabric and click Tasks > Device Sharing and Troubleshooting > Show FCR
Info View.
The FCR Info view displays, as shown in Figure 19-8. The FCR Info view does not display if the
fabric does not have an FC Router.
Translate Domains and Virtual Device Status
When you select a device in the View panel, the Information panel displays detailed information about
that device. In the Overview tab, the Status field displays the status.
For virtual devices created by FC-FC Routing, the Information panel might show the status as Partially
Offline. This status indicates that the FC Router and LSAN configuration have changed after they were
set up.
Two scenarios that cause this are explained next.
Scenario 1
A backbone fabric consisting of Fabric OS FC Routers is connected to an edge fabric via EX_Ports.
When LSANs are created to share devices between these two fabrics, a translate domain is created in
each of these fabrics. If the E_Port on the edge fabric connecting to the EX_Port is disabled, the
translate domain is removed from the edge fabric. In this scenario, the translate domain in the backbone
fabric remains, although the virtual devices attached to that translate domain are removed. The
Information panel shows the status of these virtual devices as Partially Offline.
Scenario 2
The backbone fabric segments after the LSANs are created, moving all of the shared devices to the
newly formed fabric. The new fabric is connected to the original backbone through EX_Ports for an
edge-to-edge sharing. The translate domain originally created in the backbone fabric is not removed in
this case. The Information panel shows the status of the shared devices as Partially Offline.
Fabric Manager Administrator’s Guide
Publication Number: 53-1000196-01-HP
19-11
19
FC-FC Routing and Secure Fabrics
FC-FC Routing and Secure Fabrics
The following limitations apply to FC-FC routing and secure fabrics:
•
•
Fabric Manager does not support FC Router configuration for secure edge fabrics.
•
The Share Devices wizard and the Diagnose Fabric Device Sharing wizard do not list secure
fabrics.
•
•
•
The FCR Info View is not supported for secure backbone fabrics.
The FC Router Configuration wizard does not list FC Router switches in secure backbone fabrics
during FC Router configuration.
Security operations are not supported for fabrics containing an FC Router.
Fabric Manager does not support enabling security for edge fabrics that are configured for Fibre
Channel routing.
FC-FC Routing and AD-Enabled Fabrics
The following limitations apply to FC-FC routing and AD-enabled fabrics:
19-12
•
•
Fabric Manager does not support FC Router configuration for AD-enabled edge fabrics.
•
The Share Devices wizard and the Diagnose Fabric Device Sharing wizard do not list AD-enabled
fabrics.
•
•
The LSAN View is not supported for AD-enabled fabrics.
The FC Router Configuration wizard does not list FC Router switches in AD-enabled backbone
fabrics during FC Router configuration.
The FCR Info View is not supported for AD-enabled backbone fabrics.
Fabric Manager Administrator’s Guide
Publication Number: 53-1000196-01-HP
Chapter
Using the FCIP Tunneling Service
20
This chapter describes the Fibre Channel over IP (FCIP) Tunneling Service. It contains the following
topics:
•
•
•
“About FCIP Tunneling” on page 20-1
“Viewing FCIP Information” on page 20-2
“Configuring an FCIP Tunnel” on page 20-3
About FCIP Tunneling
The optional FCIP Tunneling Service enables you to use “tunnels” to connect Fibre Channel SANs over
IP-based networks. An FCIP tunnel transports data between a pair of Fibre Channel switches, and can
have more than one TCP connection between the pair of IP nodes. However, from the Fibre Channel
fabric point of view, the FCIP tunnel is just a connection between switches while the IP network and
protocols remain invisible.
Fabric OS supports FCIP tunnels between any of the following SilkWorm switches:
•
•
•
SilkWorm 7500
SilkWorm 48000 with an FR4-18i blade
SilkWorm Multiprotocol Router Model AP7420
Note
You must have an FCIP license installed on the switch to use the FCIP Tunneling Service.
GbE ports configured for FCIP are called virtual E_Ports (VE_Ports) or virtual EX_Ports (VEX_Ports).
An FCIP tunnel between two VE_Ports is an FCIP interswitch link (FCIP ISL), and merges the two
fabrics. An FCIP tunnel between a VE_Port and a VEX_Port is an FCIP interfabric link (FCIP IFL) and
does not merge the fabrics. FCIP tunnels between two VEX_Ports are not supported.
Fibre Channel frame encapsulation on one VE_Port and the reconstruction of Fibre Channel frames on
the other VE_Port is transparent to the initiator and target.
GbE ports support FCIP with link speeds up to 1-Gbit/sec. Each GbE port supports up to eight FCIP
tunnels.
See the Fabric OS Administrator’s Guide for additional information about FCIP.
Figure 20-1 on page 20-2 illustrates a portion of a Fibre Channel network using FCIP. The FCIP
interswitch link (VE_Ports connected through the IP network) joins two SANs (Data Center FC and
Office FC) into parts of a larger SAN.
Fabric Manager Administrator’s Guide
Publication Number: 53-1000196-01-HP
20-1
20
Viewing FCIP Information
Fibre
Channel
initiator
Fibre
Channel
initiator
Office
FC SAN
Data Center
FC SAN
IP WAN
Network
VE_Port
VE_Port
SilkWorm
7500
SilkWorm
7500
VE_Port
SilkWorm
48000
with FR4-18i
Blade
VE_Port
Office
FC SAN
Office
FC SAN
Fibre
Channel
Target
SilkWorm
48000
with FR4-18i
Blade
Fibre
Channel
Target
31.5
Figure 20-1 Network Using FCIP
Viewing FCIP Information
Fabric Manager displays information about the physical GbE ports as well as the virtual or logical ports
for the GbE ports. Fabric Manager always displays the logical ports (8 logical ports per GbE port)
regardless of FCIP tunnel configuration. The logical ports are numbered from 16 through 31.
The GigE Ports tab in the Information panel displays information about the physical GbE ports (see
Figure 20-2).
20-2
Fabric Manager Administrator’s Guide
Publication Number: 53-1000196-01-HP
Configuring an FCIP Tunnel
20
Figure 20-2 Information Panel for Physical Gbe Ports
The FC Ports tab in the Information panel displays information about all of the ports, including the
logical ports for the GbE ports (see Figure 20-3).
Logical ports for GbE ports are
designated here.
Figure 20-3 Information Panel for Logical GbE Ports
Configuring an FCIP Tunnel
To enable an FCIP interswitch link (ISL), you must configure both the local and remote switches using
the Web Tools Port Management module. The local switch is the switch that initiates the FCIP
connection request, and the remote switch is the switch that listens for FCIP connection requests.
Web Tools provides a wizard to assist you in configuring an FCIP ISL. With the GbE Port
Configuration wizard, you can configure GbE ports, add IP interfaces and IP routes, and configure FCIP
tunnels.
After FCIP tunnels are created, your configuration is saved in a persistent database. At this point, all
configured GbE ports now appear in the fabric as E_Ports. Note that fabrics connected through FCIP are
merged (unless they are connected as VEX_Ports).
If you want to configure an FCIP tunnel so that the fabric is isolated (and does not automatically merge
with another fabric), you need to configure a VEX_Port on one of the fabrics, so the FCIP tunnel is
created between the VEX_Port (backbone fabric) and a VE_Port (edge fabric).
Fabric Manager Administrator’s Guide
Publication Number: 53-1000196-01-HP
20-3
20
Configuring an FCIP Tunnel
See the Web Tools Administrator’s Guide for additional information about managing the FCIP
Tunneling Service.
To configure an FCIP tunnel
1.
Right-click a logical port on the local switch in the Information panel and select Port
Configuration from the context menu. Logical ports are numbered from 16 through 31 on the
SilkWorm 7500 and on the FR4-18i blade of the SilkWorm 48000.
The Web Tools Port Management module launches.
20-4
2.
Follow the instructions in the Web Tools Administrator’s Guide for configuring an FCIP
interswitch or interfabric link.
3.
Repeat steps 1–2 on the remote switch.
Fabric Manager Administrator’s Guide
Publication Number: 53-1000196-01-HP
Chapter
Third-Party and Foreign Device Management
21
The chapter provides information about managing third-party application and importing foreign devices
in Fabric Manager and contains the following sections:
•
•
“Accessing Third-Party Management Applications” on page 21-1
“Importing Device WWNs” on page 21-7
Accessing Third-Party Management Applications
Right-clicking a fabric or switch displays a Management Application option that lets you launch or
configure third-party management applications.
Figure 21-1 Accessing Third-Party Applications
If you select multiple fabrics or nodes, only the Configure submenu appears.
Fabric Manager Administrator’s Guide
Publication Number: 53-1000196-01-HP
21-1
21
Accessing Third-Party Management Applications
Adding Third-Party Management Applications
You can add up to three management applications to a fabric or switch. They can be either .exe files
located on the Fabric Manager client system, or URLs to the application.
To add third-party applications to the list
1.
In the Information Panel, right-click the fabric or switch to which you want the application
associated and choose Management Application > Configure from the context menu.
The Configure Application window appears.
Figure 21-2 Configure Application Window
2.
Click Add.
The Add Application window appears.
Figure 21-3 Add Application Window
3.
Type a name for the application.
The name is what appears in the Launch submenu and does not have to be the same as the
application name.
4.
If you are adding a program located on your local hard disk, do the following:
a.
Select the Executable radio button.
b.
Click Browse to locate the application and click Open.
Executables must reside on the Fabric Manager client system.
21-2
Fabric Manager Administrator’s Guide
Publication Number: 53-1000196-01-HP
Accessing Third-Party Management Applications
c.
21
Optional: Type the arguments to the application, separating each argument with a space, or
click Edit to select the arguments.
Figure 21-4 Selecting Application Arguments
Arguments vary, depending on whether you select a fabric or switch.
5.
If your application is located on the Internet, select the URL checkbox and then type the URL to
the application.
6.
Click OK.
7.
Click Apply to close the Configure Application window.
The applications are added to the Launch submenu.
Configuring Multiple Fabrics
Use the following procedure to add a third-party management application to several fabrics or switches
at one time.
To add a third-party management application to multiple fabrics or nodes
1.
In the Information Panel, select the fabrics or switches with which you want the application
associated.
2.
With the fabrics or switches still selected, right-click and choose Management Applications >
Configure from the context menu that appears.
3.
Follow the steps in “Adding Third-Party Management Applications” on page 21-2 to add the
application and its arguments.
4.
Click Apply to All Fabrics (or Apply to All Switches).
Previously configured applications for the selected fabrics and switches are deleted and replaced
with the new application.
Fabric Manager Administrator’s Guide
Publication Number: 53-1000196-01-HP
21-3
21
Accessing Third-Party Management Applications
Editing Third-Party Management Applications
After a third-party management application has been added, you can later edit it: for example, to change
its arguments, name, or location.
Note
If an application is associated with multiple fabrics or switches and you want to make a global change to
the application’s arguments, you must either edit each fabric or switch individually or follow the steps in
“Configuring Multiple Fabrics” and incorporate your changes when defining the application.
To edit a third-party management application
1.
In the Information Panel, right-click the fabric or switch containing the application you want to edit
and choose Management Application > Configure from the context menu.
The Configure Application window appears.
2.
Check the Select checkbox next to the application you want to change and click Edit.
3.
Make your edits; then click OK.
4.
Click Apply to close the Configure Application window.
Running Third-Party Management Applications
To launch a third-party management application, right-click the fabric or switch containing the
application you want to launch and choose Management Applications > Launch > application from
the context menu that appears.
Examples of Launching Applications
This section describes two examples of launching third-party applications from Fabric Manager:
•
•
“Launching an application on the Fabric Manager client system” on page 21-4
“Launching Web Tools Switch Explorer” on page 21-5
Launching an application on the Fabric Manager client system
This example describes how to launch an application the gping (graphical ping) application from the
Fabric Manager Management Application context menu. For this example, assume gping is an
application located on your local hard disk.
To launch gping
1.
In the Information Panel, right-click the switch from which you want to run gping and choose
Management Application > Configure.
The Configure Applications for Switch window appears (Figure 21-2 on page 21-2).
2.
Click Add.
The Add Application window appears (Figure 21-3 on page 21-2).
21-4
Fabric Manager Administrator’s Guide
Publication Number: 53-1000196-01-HP
Accessing Third-Party Management Applications
3.
In the Application Name edit box, type gping.
4.
Click the Executable radio button.
5.
Click Browse to locate the gping executable and click Open.
21
gping requires an IP address as an argument. This example uses the IP address of the switch.
6.
Click Edit, select %IP%, and click OK.
Your Add Application window should look similar to Figure 21-5.
Figure 21-5 Configure gping
7.
Click OK.
8.
In the Configure Applications for Switch window, click Apply.
9.
In the Information Panel, right-click the switch you just configured and choose Management
Application > Launch > gping.
The gping window for that switch appears, as illustrated in Figure 21-6.
Figure 21-6 gping
Launching Web Tools Switch Explorer
This example describes how to launch the Web Tools Switch Explorer from the Fabric Manager
Management Application context menu.
Fabric Manager Administrator’s Guide
Publication Number: 53-1000196-01-HP
21-5
21
Accessing Third-Party Management Applications
To launch Web Tools Switch Explorer
1.
In the Information Panel, right-click the switch from which you want to run Switch Explorer and
choose Management Application > Configure.
The Configure Applications for Switch window appears (Figure 21-2 on page 21-2).
2.
Click Add.
The Add Application window appears (Figure 21-3 on page 21-2).
3.
In the Application Name edit box, type WebTools SwitchExplorer.
4.
Click the URL radio button.
5.
In the URL edit box, type http://%IP%
6.
Click OK.
Switch Explorer requires the IP address of the switch to display. Your window should look similar
to Figure 21-7.
Figure 21-7 Configuring Switch Explorer
7.
Click Apply.
8.
In the Information Panel, right-click the switch you just configured and choose Management
Application > Launch > WebTools SwitchExplorer.
The Web Tools Switch Explorer window for that switch appears, as illustrated in Figure 21-8 on
page 21-7.
21-6
Fabric Manager Administrator’s Guide
Publication Number: 53-1000196-01-HP
Importing Device WWNs
21
Figure 21-8 Web Tools Switch Explorer
Importing Device WWNs
This section describes how you can share devices between foreign fabrics and a fabric managed by
Fabric Manager.
Foreign fabric definitions stored in a .csv file can be imported into Fabric Manager through the Share
Devices wizard. The Share Devices wizard creates the LSAN in the Brocade fabrics that are being
managed from Fabric Manager. The final (Summary) step in the Share Devices wizard shows you the
LSAN you need to create in the foreign fabric and the WWNs of the members that belong to that LSAN.
When an LSAN is modified in Fabric Manager, the changes are made to the Brocade fabrics. For
foreign fabrics, the final zone definition is displayed. For example, if, in foreign fabrics, you delete
device D1 and add device D2 to LSAN_Test1, the output is similar to:
"Modifying the existing LSAN_Test1.
The final members list should be: D2,wwn1, wwn3, ... "
Fabric Manager Administrator’s Guide
Publication Number: 53-1000196-01-HP
21-7
21
Importing Device WWNs
When an LSAN is removed from Fabric Manager, the output is similar to:
"Delete LSAN_Test1 from the active configuration."
To import foreign fabrics
1.
Create the .csv file containing the foreign fabric information. Use the following example as the .csv
format:
Type,Port Id,Port Name,Node Name,COS,FC4 Types,
FL,610FEF,21:00:00:20:37:C3:2C:76,20:00:00:20:37:C3:2C:76,3,2,
2.
Choose Tasks > Device Sharing and Troubleshooting > Share Devices.
3.
Read the overview instructions and click Next.
4.
Type a name for the logical SAN (LSAN). The name is automatically prefixed with LSAN_.
5.
Click Browse to locate your .csv file; then click Open. (See Figure 21-9.)
Figure 21-9 Share Devices Wizard, Step 2
6.
Click Select Device Ports.
A list of the devices defined in the .csv file displays, as shown in Figure 21-10.
21-8
Fabric Manager Administrator’s Guide
Publication Number: 53-1000196-01-HP
Importing Device WWNs
21
Figure 21-10 Select Device Ports
7.
Select the devices to import and click Add Selected Device Ports. The devices appear in the
Selected Devices list in the wizard.
8.
Click Close to close the Foreign Device Port(s) window.
9.
Click Next in the wizard.
10. Read the summary.
The summary displays which devices are being shared in the new LSAN.
The summary also displays the LSAN you must create in the foreign fabric and the WWNs of the
members that belong to that LSAN.
If something is incorrect, click Previous and then correct it. If everything is correct, click Finish.
11. Create an LSAN in the foreign fabric, as directed by the summary step in the wizard, and ensure
that the LSAN is part of the effective zone configuration.
Fabric Manager Administrator’s Guide
Publication Number: 53-1000196-01-HP
21-9
21
21-10
Importing Device WWNs
Fabric Manager Administrator’s Guide
Publication Number: 53-1000196-01-HP
Chapter
Creating Reports
22
Displaying the Switch Health Report
Fabric Manager creates a switch health report that is Web-based. The report displays the switch state
contributors, the status, and the IP address of the switch. Note that this is a static report and not a
dynamic view of the switch. See the Web Tools Administrator’s Guide for additional information.
The switch health report is available only for switches running the following firmware versions:
•
•
•
Fabric OS v3.2.x or higher
Fabric OS v4.4.x or higher
Fabric OS v5.0.0 or higher
For other switches, either the switch reports option is disabled or an error message is displayed.
To display the switch health report
1.
Select a switch and click Reports > Switch Health Reports from the Menu bar.
You can also right-click a switch and select Health Report from the context menu.
The Switch Health Report displays, as shown in Figure 22-1.
Fabric Manager Administrator’s Guide
Publication Number: 53-1000196-01-HP
22-1
22
Displaying the Switch Health Report
Figure 22-1 Switch Health Report
2.
Optional: Click the underlined links in the left panel to display detailed information about ports and
Switch Availability Monitoring (SAM).
3.
Optional: Mouse-over the Action field (see Figure 22-2) and click an action to:
•
•
•
•
•
22-2
refresh the information displayed in the report
customize the report
view the data in raw XML format
view the style sheet for the report
view the XML schema for the report
Fabric Manager Administrator’s Guide
Publication Number: 53-1000196-01-HP
Displaying the Switch Health Report
22
Figure 22-2 Switch Report Action Menu
Fabric Manager Administrator’s Guide
Publication Number: 53-1000196-01-HP
22-3
22
22-4
Displaying the Switch Health Report
Fabric Manager Administrator’s Guide
Publication Number: 53-1000196-01-HP
Chapter
Storing Data and Performing Backups
23
This chapter contains the following sections:
•
•
“Data Persistence” on page 23-1
“Performing Backups” on page 23-1
Data Persistence
Fabric Manager stores user settings when you exit, not while you run the software. When the client
attempts to log in to the server, the server authenticates the client login. After the server authenticates
the client, Fabric Manager launches and polls switches.
Fabric Manager stores the following user settings locally (on the client machine):
•
•
Fabric Manager user name
Dimensions of the Fabric Manager window
The following user settings are saved on the database in the server:
•
•
User interface settings (view customizations, topology locations, etc.)
Switch user names and passwords
Other settings are global to all clients running on the same Fabric Manager server.
Performing Backups
To perform database backups using a graphical user interface, use the Server Management Console. The
Server Management Console always performs a full backup. To automate either a full or incremental
backup, use the CLI steps described in this section.
To perform database backups, you can use the dbbackup utility. The dbbackup utility is called from a
script to back up the Fabric Manager database. You can perform either a Full Backup or an Incremental
Backup. The full database backup includes both the transaction log file and the database file. The
incremental backup is used to back up only the transaction log file.
Fabric Manager Administrator’s Guide
Publication Number: 53-1000196-01-HP
23-1
23
Performing Backups
Full Backup
To perform a full backup, enter the following command in the CLI (the entire command is on a single
line):
dbbackup -c
"uid=dba;pwd=sql;eng=fabman;CommLinks=tcpip{DOBROADCAST=DIRECT;HOST=localh
ost;ServerPort=2638}" -y -r -n <destdir>
where:
•
<destdir>
is the destination directory for the backup files.
•
-y
is an option that causes the dbbackup utility to overwrite files without any prompt.
Caution
Be careful with the -y option if you are always backing up the same directory. The
fabman.db database file is overwritten without a prompt by this option.
•
-r
is an option that renames and restarts the transaction log file after backing it up. You can use
this option to reduce the transaction log file size.
•
-n
is an option that causes the transaction log file to be named using the yymmddxx.log format,
where xx is AA, AB, AC, etc.
Note
A copy of the transaction log file is also placed in the databases directory. This copy can be safely
deleted after the backup is complete.
23-2
Fabric Manager Administrator’s Guide
Publication Number: 53-1000196-01-HP
Performing Backups
23
Incremental Backup
To perform an incremental backup, enter the following command in the CLI (the entire command is on
a single line):
dbbackup -c
"uid=dba;pwd=sql;eng=fabman;CommLinks=tcpip{DOBROADCAST=DIRECT;HOST=localh
ost;ServerPort=2638}" -y -r -n -t <destdir>
where:
•
<destdir>
is the destination directory for the backup files.
•
-y
is an option that causes the dbbackup utility to overwrite files without any prompt.
Caution
Be careful with the -y option if you are always backing up the same directory. The
fabman.db database file is overwritten without a prompt by this option.
•
-r
is an option that renames and restarts the transaction log file after backing it up. You can use
this option to reduce the transaction log file size.
•
-n
is an option that causes the transaction log file to be named using the yymmddxx.log format,
where xx is AA, AB, AC, etc.
•
-t
causes only the transaction log file to be backed up.
Note
A copy of the transaction log file is also placed in the databases directory. This copy can be safely
deleted after the backup is complete.
Fabric Manager Administrator’s Guide
Publication Number: 53-1000196-01-HP
23-3
23
23-4
Performing Backups
Fabric Manager Administrator’s Guide
Publication Number: 53-1000196-01-HP
Chapter
Server Management Console
24
This chapter contains the following topics:
•
•
•
•
•
•
•
•
•
“Introduction to Server Management Console” on page 24-1
“Launching the Server Management Console” on page 24-2
“Managing Fabric Manager Services” on page 24-2
“Changing Authentication Information” on page 24-3
“Backing Up and Restoring the Database” on page 24-5
“Capturing Technical Support Information” on page 24-6
“Creating a Login Banner” on page 24-7
“Changing Secure Communication Settings (HTTP or HTTPS)” on page 24-8
“Changing the Web Server Port Number” on page 24-10
Introduction to Server Management Console
Server Management Console is a stand-alone application for managing and monitoring Fabric Manager
Services. It provides an interface for viewing and changing the authentication options used by the Fabric
Manager Server. Figure 24-1 on page 24-2 shows the Server Management Console.
SMC is automatically installed with the Fabric Manager Server.
You can perform the following tasks using the Server Management Console:
•
•
•
•
•
•
•
Start, stop, and restart FM Services
View and edit authentication information.
Backup and restore Fabric Manager database
Collect supportShow information for the FM Server
Create, change, or delete the login banner
Change the security configuration setting from HTTP to HTTPS or vice versa.
Change the Web Server port number
Fabric Manager Administrator’s Guide
Publication Number: 53-1000196-01-HP
24-1
24
Launching the Server Management Console
Figure 24-1 Server Management Console, Services Tab
Launching the Server Management Console
The Server Management Console is available only to users who have root access on UNIX systems and
users who have write privilege to the Fabric Manager installation directory on Windows systems. It is
available only on hosts where the Fabric Manager Server is installed.
To launch the Server Management Console on Windows
•
Select Start > Programs > FabricManager > Server Management Console
To launch the Server Management Console on Linux and Solaris
1.
Go to the following directory:
<installdir>/server/util/smc/bin
2.
Type the following at the command line:
./smc.sh
Managing Fabric Manager Services
You must be logged in at the admin or root level to stop, start, and restart the Fabric Manager services.
24-2
Fabric Manager Administrator’s Guide
Publication Number: 53-1000196-01-HP
Changing Authentication Information
24
Stopping and restarting the Fabric Manager services causes clients connected to the server to lose
connection, and they must re-log in to the server.
The screen does not automatically refresh; you must click Refresh Status every time you want to
refresh the screen.
To monitor and manage Fabric Manager Services
1.
Launch the Server Management Console.
2.
Click the Services tab.
The pane displays information about all of the Fabric Manager services, as shown in Figure 24-1.
3.
Click Stop Services to stop all of the services.
Click Restart Services to stop and then restart the services.
Click Start Services to start the services. This button is activated only if the FM Services are
already stopped. If the Fabric Manager server is configured to use the external FTP server, the
Server Management Console does not attempt to start Fabric Manager’s built-in FTP service.
Click Refresh Status to update the table with the latest status of the services in case the services
were stopped or restarted outside of the Server Management Console.
Changing Authentication Information
The Authentication tab of the Server Management Console displays the current authentication
information. Figure 24-2 shows the Authentication tab for Windows domain or workgroup
authentication.
Figure 24-2 Server Management Console, Authentication Tab
Fabric Manager Administrator’s Guide
Publication Number: 53-1000196-01-HP
24-3
24
Changing Authentication Information
All responses by the Fabric Manager server for authentication requests coming from Fabric Manager
clients are logged to an audit trail log file. This file is automatically backed up on the first day of every
month.
Click Authentication Audit Trail to display the log file messages from the current month and the
previous month.
To change authentication information
1.
Launch the Server Management Console.
2.
Click the Authentication tab.
3.
Click Edit.
The Edit Authentication Information wizard appears, as shown in Figure 24-3. The wizard fields
are populated with the existing authentication configuration.
4.
Follow the instructions in the wizard to select an authentication method and configure the
appropriate parameters.
If you choose to edit the current authentication information, the fields are populated with the
existing settings. If you switch to a different authentication method, you must enter all of the
configuration parameters for that method.
Note
If you select NIS Authentication (for Solaris or Linux), you must provide both the NIS ServerName/IP
address and the NIS Domain Name to configure this authentication method.
Figure 24-3 Edit Authentication Information Wizard
24-4
Fabric Manager Administrator’s Guide
Publication Number: 53-1000196-01-HP
Backing Up and Restoring the Database
24
Backing Up and Restoring the Database
The Database tab of the Server Management Console allows you to backup and restore the Fabric
Manager database (fabmandb). The Database Server must be running when you backup the database,
and it must be stopped when you restore the database.
Note
You should periodically back up the database for disaster recovery and so that the database transaction
log does not get too large.
Figure 24-4 Server Management Console, Database Tab
To backup the database
1.
Launch the Server Management Console.
2.
Click the Database tab.
3.
Click Backup Database.
The Database Backup window displays.
4.
Click Browse to select the location where the database will be backed up.
5.
Click Backup.
Upon completion, a window displays the files that were backed up.
6.
Click OK to close the window.
Fabric Manager Administrator’s Guide
Publication Number: 53-1000196-01-HP
24-5
24
Capturing Technical Support Information
To restore the database
1.
Launch the Server Management Console.
2.
Click the Database tab.
3.
Click Restore Database.
The Database Restore window displays.
4.
Click Browse to select the path to the database.
5.
Click Restore.
Upon completion, a window displays the status of the restore operation.
6.
Click OK to close the window.
Capturing Technical Support Information
The SupportShow tab of the Server Management Console allows you to capture technical support
information. This information includes Fabric Manager server data for all Fabric Manager services and
HTTP pages information for all switches from all fabrics discovered by the Fabric Manager server. This
information is saved in a .zip file in a location that you specify.
Figure 24-5 shows the SupportShow tab.
Figure 24-5 Server Management Console, SupportShow Tab
24-6
Fabric Manager Administrator’s Guide
Publication Number: 53-1000196-01-HP
Creating a Login Banner
24
To capture supportShow information
1.
Launch the Server Management Console.
2.
Click the SupportShow tab.
3.
Click Browse to select the path where the supportShow data will be saved.
4.
Click Capture Technical Support Information.
The Server Management Console displays the following confirmation message when the capture is
complete:
Creating a Login Banner
You can configure a login banner that displays after you successfully log in to Fabric Manager (see
Figure 24-6). By default, no banner is set up.
If you configure a login banner, then after a user successfully logs in to Fabric Manager, the Fabric
Manager client displays the login banner dialog with two buttons. If the user clicks Agree and
continue, the client proceeds as usual; if the user clicks Disagree and exit, the client closes.
Figure 24-6 Login Banner
The BannerMessage tab of the Server Management Console allows you to create and edit this banner.
If the Database Server is not running, you cannot edit the banner.
Fabric Manager Administrator’s Guide
Publication Number: 53-1000196-01-HP
24-7
24
Changing Secure Communication Settings (HTTP or HTTPS)
Figure 24-7 Server Management Console, BannerMessage Tab
To create or edit the login banner
1.
Launch the Server Management Console.
2.
Click the BannerMessage tab.
3.
Type a new banner message or edit the existing message.
To disable the banner message, delete the existing message (set the message to a zero-length
string).
4.
Click Submit.
Changing Secure Communication Settings (HTTP or
HTTPS)
Using the Security tab of the Server Management Console, you can change the configuration settings to
connect to and communicate with switches using HTTP or using HTTP over SSL (HTTPS). The
configuration setting applies to the entire Fabric Manager server and not to selected switches. By
default, Fabric Manager connects to all switches using HTTP.
If you select HTTPS, then all southbound (server-to-switch) HTTP-based operations initiated by the
server is secured by connecting to switches using HTTPS. It is strongly recommended that you select
HTTPS only if your SAN meets the following requirements:
•
•
24-8
All switches in the SAN must be capable of supporting HTTPS.
All switches must have a valid SSL certificate.
Fabric Manager Administrator’s Guide
Publication Number: 53-1000196-01-HP
Changing Secure Communication Settings (HTTP or HTTPS)
24
If a fabric contains some switches running Fabric OS versions that do not support HTTPS, then
southbound operations to those switches will fail.
Note
If HTTP is turned off, all client-initiated HTTP operations stop working. These operations include
FICON/CUP features (including PDCM matrix) and switch and port control operations (such as enable,
disable, and reboot).
Figure 24-8 Server Management Console, Security Tab
In the Security tab, the current running configuration is displayed; however, because this tab does not
automatically refresh, the running configuration that is displayed might be out-of-date. Click Reset to
update the running configuration.
Clicking Reset also restores the values in the dialog box to the values specified by the last Apply
command or, if you have not activated Apply, to the values in effect when the dialog box was opened.
To change the connection settings
1.
Launch the Server Management Console.
2.
Click the Security tab.
3.
Select the connection method by clicking the appropriate radio button:
•
•
4.
Connect using HTTP (default)
Connect using HTTPS (HTTP over SSL) only
Replace the port number in the Port field if you need to use a different port number than the default.
Fabric Manager Administrator’s Guide
Publication Number: 53-1000196-01-HP
24-9
24
Changing the Web Server Port Number
5.
Optional: If you selected Connect using HTTPS, check or uncheck the following options. By
default, both options are checked.
•
Enable hostname verification
If enabled, hostname verification fails if the name on the security certificate on the switch is
invalid or does not match the name or IP address of the switch.
•
Enable certificate validation
If enabled, certificate validation fails if the security certificate was issued by a company you
have chosen not to trust or if the certificate date is invalid. To enable trust, you must install the
certificate in the Fabric Manager trusted root CAs store.
6.
Click Apply to save the changes.
You must restart the server for the changes to take effect.
Changing the Web Server Port Number
Using the Settings tab of the Server Management Console, you can change the Web Server port
number. The configuration setting applies to the entire Fabric Manager server and not to selected
switches. The default Web Server port number is 80.
Figure 24-9 Server Management Console, Security Tab
To change the Web Server port number
24-10
1.
Launch the Server Management Console.
2.
Click the Settings tab.
Fabric Manager Administrator’s Guide
Publication Number: 53-1000196-01-HP
Changing the Web Server Port Number
3.
24
Type a new port number in the Web Server port field.
Do not use port 2638, and do not use the nine consecutive port numbers that were reserved for
Fabric Manager during server installation. These ports are reserved for Fabric Manager to use
internally.
4.
Click Apply to save the changes.
You must restart the server for the change to take effect.
Fabric Manager Administrator’s Guide
Publication Number: 53-1000196-01-HP
24-11
24
24-12
Changing the Web Server Port Number
Fabric Manager Administrator’s Guide
Publication Number: 53-1000196-01-HP
Chapter
Fabric Troubleshooting Tools
25
This chapter describes the following troubleshooting tools that are provided with Fabric Manager:
•
•
•
•
“General Device Diagnostics” on page 25-1
“Fabric Merge Check” on page 25-2
“Event Message Severity Level” on page 25-4
“Trace Route” on page 25-5
General Device Diagnostics
A device diagnostic wizard is available to check communication problems that might arise between
devices in the same fabric, or devices shared through FC Routers. The wizard checks:
•
•
•
•
•
•
•
•
•
device status
switch port health status
zone configuration in the fabric
active DCC policy availability in secure fabric
active DCC policy availability in non-secure fabric
LSAN zone configurations in the edge fabrics
device moved to a new fabric
fabric segmentation
FC router physical connection status
The wizard displays a summary diagnostic report that you can print. The wizard also provides an option
to capture trace route information (pathinfo and fcping) for the selected device ports. See “Trace Route”
on page 25-5 for information about the trace route functionality.
Note
You can diagnose only two device ports at a time.
Note
This tool is not supported for Admin Domain-aware fabrics or for virtual targets and initiators in an
iSCSI Target Gateway.
Fabric Manager Administrator’s Guide
Publication Number: 53-1000196-01-HP
25-1
25
Fabric Merge Check
To use the device diagnostic wizard
1.
Select Tasks > Device Sharing and Troubleshooting > Device Connectivity Troubleshooting
(GDD).
The Device Connectivity Troubleshooting wizard appears, as shown in Figure 25-1.
2.
Follow the instructions in the wizard to set up the profile.
The wizard is self-explanatory, so the individual steps are not described in this document.
Figure 25-1 Device Connectivity Troubleshooting Wizard
Fabric Merge Check
This section describes how to perform a fabric merge check. The purpose of the fabric merge check is to
show inconsistencies between the two fabrics that might cause the new fabric to segment after it has
been physically connected. The fabric merge check also provides an option to resolve any zone merge
issues between the selected fabrics.
During the fabric merge check, Fabric Manager extracts copies of configuration elements from the two
fabrics, runs tests (see Table 25-1) and compares the results for any inconsistencies.
You cannot run the fabric merge check if Admin Domains are enabled on either of the fabrics.
Switch configurations are required for the fabric merge check operation. FTP settings are required to get
the switch configurations for legacy switches running Fabric OS v2.6.x or earlier and Fabric OS v3.2.x
or earlier.
25-2
Fabric Manager Administrator’s Guide
Publication Number: 53-1000196-01-HP
Fabric Merge Check
25
Note
If a test is not applicable to the fabric, the test is not executed and Fabric Manager displays the message,
“Test not applicable to subject fabrics.” For example, if one or more fabrics are secure, the management
server platform test and the zoning test are not executed and the message is displayed.
Table 25-1
Fabric Merge Check Tests
Component Tests
All Fabrics
•
•
•
•
•
•
•
Domain IDs
•
ACL
1.
TimeOutValues
Buffer-to-Buffer Credits
Disable Device Probe
Route Priority per Frame
VC Priority
Fabric Manager
Configuration and Data
•
•
•
•
•
•
•
Secure Fabrics Only
VC Encoding
•
•
•
•
•
PIDs
Non-Secure Fabric Only
Sequence Level
Switching
•
Suppress Class F
Long Distance Mode
InterOp Mode
Data Field Sizes
Security
FCS policies1
SCC policy1
Version stamp1
Management Server platform
Zoning
Results for these tests are not displayed in the Merge Check Results window.
To perform a fabric merge check
1.
Log in to the switches that you are considering merging. See “Logging In to Multiple Switches
Simultaneously” on page 4-4 for additional information.
2.
Select Tasks > Fabric Management > Fabric Merge Check.
The Fabric Merge Check dialog box opens, as shown in Figure 25-2.
Figure 25-2 Fabric Merge Check
3.
Select a fabric from each of the drop-down menus. The selected fabrics will be checked for merge
compatibility.
4.
Click Check...
The Merge Check Results window displays a list of any inconsistencies between the two fabrics
(see Figure 25-3).
Fabric Manager Administrator’s Guide
Publication Number: 53-1000196-01-HP
25-3
25
Event Message Severity Level
Note
If you run a fabric merge check between a secure fabric and a nonsecure fabric, the results of the
Security, FCS policies, version stamp, and Management Server platform tests display the message, “Not
applicable to subject fabrics.”
Figure 25-3 Merge Check Results
If the two zone databases on the fabrics will prevent the fabrics from merging, you are queried
about launching the Zone Merge Manager tool.
5.
Optional: Launch the Zone Merge Manager tool.
This tool highlights all of the zoning conflicts between the two fabrics in red. With this information,
you can resolve the conflicts and apply the results to either of the fabrics.
The Merge Check Results window displays again. At the zoning test stage, it reports, “Merge
Check Successful,” along with the results of the other tests.
If you decided not to use the Zone Merge Manager tool, then the zoning test reports that “Operator
cancelled zone merge - Merge Check Failed” for the zoning test, along with the results of all the
other tests in the Merge Check Results window.
Event Message Severity Level
Fabric Manager writes event messages to a log file, which can then be used to capture diagnostic
information. You can set the log parameters to capture diagnostic information only at the severity level
you want. Configuring the severity level determines which messages you want Fabric Manager to save
to the log file. Any changes you make to the log level are immediate (they do not require an application
restart).
To configure the severity level of event messages that are logged
1.
Click Edit > Preferences.
The Preferences window displays.
2.
25-4
Expand User Specific and click Log Parameters.
Fabric Manager Administrator’s Guide
Publication Number: 53-1000196-01-HP
Trace Route
25
The Log Parameters dialog displays (see Figure 25-4).
Figure 25-4 Setting the Log Parameters
3.
Select one of the following severity levels from the Log Level drop-down list.
The hierarchy, from most severe to least is: Fatal, Error, Warning, Info, and Debug. Fabric Manager
logs all events of the selected severity level and lower. Selecting Off disables the logger.
4.
Click OK.
Trace Route
The trace route feature of Fabric Manager combines the functionality of the pathinfo and fcping
commands.
Trace route displays detailed routing information from a source port or area on the local switch to a
destination port or area on another switch. This routing information describes the exact path that a user
data stream takes to go from the source port to the destination port, including all intermediate switches.
Note
Fabric Manager cannot capture the routing information if any of the switches in the path is running
Fabric OS v2.x or XPath OS.
The route information depends on the state of the intermediate switches and their ports. The path
obtained for two ports might not be the same at all times. Also, the reverse path might not be the same
as the forward path.
If one of the ports is inactive, the path shown is the path if the port was active.
Trace route performs a zoning check between the source and destination ports and displays whether the
selected device port WWNs are part of an active zone configuration. Note that if the selected device
port WWNs are part of a zone that is not active, then the trace route displays that the device ports are not
zoned.
Trace route also displays the maximum, minimum, and average round trip time for the data between the
device port WWNs and the domain controller.
Fabric Manager Administrator’s Guide
Publication Number: 53-1000196-01-HP
25-5
25
Trace Route
To capture the trace route information
1.
Select Tasks > Technical Support Information > Trace Route.
The Trace Route dialog displays, as shown in Figure 25-5.
Figure 25-5 Trace Route Dialog
2.
Select two devices from the Available Devices panel and move them to the Selected devices to
collect trace route panel using the arrow buttons. Alternatively, you can search for devices either
by device port WWN or device port name using the Search and Add panel.
The rules for selecting devices are:
25-6
•
•
•
•
Two and only two devices must be selected.
•
•
•
Devices cannot be connected to a switch running Fabric OS v2.x or XPath OS.
•
Devices must be connected to two different switches in the fabric.
Devices must be online.
Devices must not be iSCSI virtual devices. iSCSI virtual devices are filtered out.
Devices cannot both be initiators or both be targets; otherwise, any combination of target,
initiator, initiator+target, and unknown device is allowed.
At least one of the devices must be connected to a switch running Fabric OS v5.2.x or higher.
Devices must belong to the same fabric. Note that if the fabric fragments such that the devices
now belong to different fabrics, the trace route will not work.
Fabric Manager Administrator’s Guide
Publication Number: 53-1000196-01-HP
Trace Route
3.
25
Click Trace Route.
The trace route information displays in a summary window, shown in Figure 25-6. Click the tabs to
display the forward route, reverse route, and fcping information.
4.
Optional: Click Copy to clipboard to copy the information to the clipboard from which you can
then paste it into another application. The information from all three tabs is copied.
5.
Click Close to exit the summary window.
6.
Click Close to exit the Trace Route dialog.
Figure 25-6 Trace Route Summary
Fabric Manager Administrator’s Guide
Publication Number: 53-1000196-01-HP
25-7
25
25-8
Trace Route
Fabric Manager Administrator’s Guide
Publication Number: 53-1000196-01-HP
Chapter
Troubleshooting
26
This chapter describes problem scenarios that can occur while using Fabric Manager and provides
troubleshooting tips to help you resolve these problems. Refer to the following sections for
troubleshooting information specific to the suspected trouble area:
•
•
•
•
•
•
•
•
“Capturing Fabric Manager Support Information” on page 26-1
“Checking the Client Side” on page 26-3
“Checking Client/Server Interaction” on page 26-5
“Checking the Server Side” on page 26-7
“Checking Fabric Discovery Problems” on page 26-8
“Capturing supportShow and supportSave Output” on page 26-8
“Topology” on page 26-10
“Pinpointing Additional Problem Areas” on page 26-11
Capturing Fabric Manager Support Information
For all problems with Fabric Manager, use the Server Management Console to capture supportshow
information, as described in “Capturing Technical Support Information” on page 24-6.
If the Server Management Console is unavailable, or if you are capturing and reporting client-side
issues, follow these steps:
1.
To capture server-side information, perform the following, depending on your operating system:
Windows:
Generate fmsupportshow output by clicking
Start > Programs > Fabric Manager > Utilities > Capture FM Support Information
A command window opens (see Figure 26-1 on page 26-2) and runs the fmsupportshow.bat
file. Alternatively, you can run the following script to capture the problem:
<installdir>\bin\fmsupportshow.bat
Solaris and Linux:
Run the following script to capture the problem:
<installdir>/bin/fmsupportshow.sh
2.
To capture client-side information, run the following script to capture supportshow information on
the client side:
Fabric Manager Administrator’s Guide
Publication Number: 53-1000196-01-HP
26-1
26
Capturing Fabric Manager Support Information
Windows:
<UserHomeDirectory>\Fabric Manager\<IP of FM Server>\client\fmclientsupportshow.bat
For example:
C:\Documents and Settings\Admin\Fabric Manager\127.0.0.1\client\fmclientsupportshow.bat
Solaris and Linux:
<UserHomeDirectory>/Fabric Manager/<IP of FM Server>/client/fmclientsupportshow.sh
For example:
/user/admin/Fabric Manager/127.0.0.1/client/fmclientsupportshow.sh
See page 26-3 for an example of the fmsupportshow output for Solaris.
3.
Obtain a screenshot of the client (if reporting a GUI problem)
4.
Include any fabric or switch activities, such as firmware downloads, reboots, segmentation, and
merge.
5.
Include any actions executed from Fabric Manager.
6.
If the issue is related to Fabric OS, then:
7.
a.
Capture Fabric Manager supportShow information using the Server Management Console (see
“Capturing supportShow and supportSave Output” on page 26-8).
b.
Capture switch supportShow and supportSave information from the Fabric Manager client or
from the command line interface (see the Fabric OS Command Reference).
Report the problem to technical support (via .zip or tar file).
Figure 26-1 Capture Fabric Manager Support Information
The fmsupportshow utility provides the following information in the specified destination directory:
Windows:
•
•
..\FabricManager\support\<date and time directory>\client
..\FabricManager\support\<date and time directory>\server\db
fmsupportshow creates a directory using a combination of “date and time stamp” and copies all
these files into this directory.
26-2
Fabric Manager Administrator’s Guide
Publication Number: 53-1000196-01-HP
Checking the Client Side
26
Client-related information is copied to the client directory, and server-related information is copied
to the server directory.
For example, in Figure 26-1, the files are located at:
•
•
C:\FabricManager\support\Wed-10-11-2006-15-39-18\client
C:\FabricManager\support\Wed-10-11-2006-15-39-18\server\db
Solaris and Linux: Following is an example for fmSupportShow output in Solaris. The output for
Linux is similar.
Example
fmgr007006:/test/fm5.2/FabricManager/bin# ./fmsupportshow.sh
creating directory /test/fm5.2/FabricManager/support/2006-06-23-09-28-12
creating directory /test/fm5.2/FabricManager/support/2006-06-23-09-28-12/
server
Fabric Manager Server data captured successfully to /test/fm4.4/
FabricManager/support/2006-06-23-09-28-12/server
fmgr007006:/test/fm5.2/FabricManager/bin#
Checking the Client Side
If you suspect the problem is related to the client-side, check the following areas:
•
•
•
“Authentication Issues (Unable to Login)” on page 26-3
“Client Access to Switches” on page 26-5
“Client-Side CPU Usage” on page 26-5
If the problem persists or cannot be resolved, see “Capturing/Reporting Client-Side Issues” on
page 26-5.
Authentication Issues (Unable to Login)
If the user is unable to login to the Fabric Manager server, follow these steps:
1.
Check the user name and password.
2.
Check the Login Module and Domain settings in the server:
<installdir>/server/server/fmserver/deploy/fmauth-service.xml
Depending on the platform you have installed, there are several possible valid settings within the
fmauth-service.xml file:
•
Fabric Manager server running under Windows when using Windows domain authentication:
<attribute name="LoginModule">Win</attribute>
<attribute name="DomainName">your_domain</attribute>
•
Fabric Manager server running under Windows, Solaris, or Linux when using switch-based
authentication:
<attribute name="LoginModule">Switch</attribute>
<attribute name="Switches">"10.33.10.1,10.33.7.111"</attribute>
Fabric Manager Administrator’s Guide
Publication Number: 53-1000196-01-HP
26-3
26
Checking the Client Side
•
Fabric Manager server running under Solaris or Linux when using NIS authentication:
<attribute name="LoginModule">NIS</attribute>
<attribute name="DomainName">yourdomain.com</attribute>
<attribute name="NISServer">"your_NISServer"</attribute>
•
Fabric Manager server running under Solaris or Linux when using local password
authentication:
<attribute name="LoginModule">File</attribute>
•
Fabric Manager server running under Windows, Solaris, or Linux when using RADIUS
authentication:
<attribute name="LoginModule">RADIUS</attribute>
<attribute name="RADIUSServerIP">yourRADIUSserver</attribute>
<attribute name="RADIUSServerPort">RADIUSportnumbers</attribute>
<attribute name="AuthenticationType">CHAP;PAP;</attribute>
<attribute name="SharedSecret">your_sharedsecret</attribute>
Note
If you are using the local password authentication, the DomainName attribute is missing
from the XML file. Also, if you are using the NIS authentication, there is an extra
parameter in the XML file called NISServer.
3.
Check the Fabric Manager server log for any errors:
<installdir>/server/server/fmserver/log/server.log
Example
2006-05-27 17:11:19,256 INFO
[com.brocade.fabman.auth.server.FMAuthRemoteServer] Creating New Login
Session: user = [stsun], client host = [192.168.42.139], session id= [2]
2006-05-27 17:11:19,272 INFO
[com.brocade.fabman.auth.server.WinNTLoginModule] Authenticating user
[stsun] using [brocade] domain
2006-05-27 17:11:20,272 ERROR
[com.brocade.fabman.auth.server.WinNTLoginModule] Authentication failed
for [brocade/stsun]
Account Lockout
For switches running Fabric OS v5.1.x or later, if the Fabric Manager server is using switch-based
authentication while the password policies are enabled on the switch and the lockout threshold is set,
then unsuccessful Fabric Manager client login attempts might lock out the switch password. The error
message given is:
Login failed for <username>. Invalid userid/password.
No indication is given that the switch password is locked out.
Changing Authentication Method
If you change the authentication method from Windows domain to either RADIUS or switch-based
authentication, and then revert back to Windows domain authentication, subsequent Fabric Manager
client logins fail with “java.lang.UnsatisfiedLinkError” or “java.lang.NoClassDefFoundError.”
26-4
Fabric Manager Administrator’s Guide
Publication Number: 53-1000196-01-HP
Checking Client/Server Interaction
26
This happens only on Windows installations, when the Windows domain authentication method is the
authentication method when the server starts up. If the RADIUS, NIS, local password, switch-based, or
any other authentication method is in effect when the server starts up, there is no restriction on
switching the authentication type.
To fix this problem, restart the Fabric Manager services, which you can do through the Server
Management Console (see Chapter 24, “Server Management Console” for additional information) or by
clicking Start > Settings > Control Panel > Administrative Tools > Services, right-clicking Fabric
Manager, and selecting Restart.
Client Access to Switches
If the client cannot access some of the switches, you need to check the IP connectivity between the
client/server, the client/switch, and the server/switch; then, check the Web server on the switch by
launching Web Tools on that switch.
Note
Use sectelnet to access the switch if secure mode has been enabled.
Client-Side CPU Usage
If the client-side CPU usage is too heavy and has an unusually sluggish or slow response, you should
check the recommended configuration.
Capturing/Reporting Client-Side Issues
Run the fmsupportshow.bat file to generate supportshow output, as described in “Capturing Fabric
Manager Support Information” on page 26-1.
Checking Client/Server Interaction
If you suspect the problem is related to an interaction between the client and the server, check the
following areas:
•
•
•
“No Client/Server Interaction” on page 26-6
“Client/Server Version Mismatch” on page 26-6
“Determine Whether Client or Server Problem” on page 26-6
Fabric Manager Administrator’s Guide
Publication Number: 53-1000196-01-HP
26-5
26
Checking Client/Server Interaction
No Client/Server Interaction
If the client cannot talk to the server, follow these steps:
1.
Ensure that the server name is correct.
2.
Ensure that the port number is correct.
3.
Ensure there is IP connectivity (for example, using ping or trace route).
4.
Check for the presence of firewalls.
5.
If a firewall is present, ensure that the proper ports are opened.
Fabric Manager takes the first nine ports (numerically) starting with the port entered during the
installation. For example, if you entered 24600 as the port during the installation, then ports 24600
through 24608 are included.
Ensure that ports 20, 21, and 23 are open.
Also, for HTTP and API purposes, ports 80, 111, 443, 600 through 1023, and 1024+ must also be
open.
Client/Server Version Mismatch
If the client has an incompatible version, a warning is issued. To install a compatible client version,
follow these steps:
1.
Uninstall incompatible client, see “Uninstalling the Fabric Manager Client” on page 3-4.
2.
Automatically install a compatible version by opening a browser window and typing the Fabric
Manager server hostname or IP address in the Address field; for example:
http://FMserverhost1.companyname.com/
http://192.168.10.11/
Determine Whether Client or Server Problem
To determine if the problem is related to the client or the server, follow these steps:
1.
Run another client.
If the other client displays correct data, the problem is probably client-related. If it displays
incorrect data, then the problem is probably associated with the server.
2.
Check the server log for any errors.
If errors exist, it is probably a server problem if the client is operating incorrectly.
26-6
Fabric Manager Administrator’s Guide
Publication Number: 53-1000196-01-HP
Checking the Server Side
26
Checking the Server Side
If you suspect the problem is related to the server, check the following areas:
•
•
•
“Server Cannot Access Switches” on page 26-7
“Server-Side CPU Usage” on page 26-7
“Statistics Not Collected” on page 26-7
If the problem persists or cannot be resolved, see “Capturing/Reporting Server-Side Issues” on
page 26-7.
Server Cannot Access Switches
If the server cannot access any switches, follow these steps:
1.
Ensure that there is IP connectivity to the switches.
2.
If you are running secure Fabric OS, check http_policy.
3.
If the Fabric Manager server has secured HTTP (HTTPS) enabled, verify that the switch also has
secured HTTP enabled and that the certificates are installed on both the switch and the Fabric
Manager server.
4.
Ensure the version of the Fabric OS is supported.
Note
Fabric Manager displays inaccessible switches with a blue icon.
Server-Side CPU Usage
If the server-side CPU usage is too heavy and has an unusually sluggish or slow response, you should
check the recommended configuration.
Statistics Not Collected
If your end-to-end or performance monitoring statistics are not collected, verify that the Fabric Manager
PM Server is running. If it is stopped, restart the service using the Server Management Console. No
alerts or errors are generated if this service is not running.
Capturing/Reporting Server-Side Issues
Generate supportshow output, as described in “Capturing Fabric Manager Support Information” on
page 26-1.
Fabric Manager Administrator’s Guide
Publication Number: 53-1000196-01-HP
26-7
26
Checking Fabric Discovery Problems
Checking Fabric Discovery Problems
If you are having fabric discovery problems, identify the problem (see below) and try the recommended
solution:
•
Switch does not exist or there is no Ethernet path to the switch.
Attempt to ping the switch from both the client and the server.
•
IP address is not properly formed.
Fix the IP address and/or URL of the switch.
•
Seed switch name is unknown to the DNS.
Check the DNS configuration.
•
HTTP service on the switch is not running (or is running too slow).
Attempt to use Web Tools via the client.
•
Fabric was reconfiguring or unstable at the time of the attempted launch.
Use the fabricshow command to see if the fabric is stable.
•
Switch does not have Web Tools license.
Attempt to use Web Tools via the client host.
•
Switch cannot deliver Fabricinfo.html
It is not a Brocade switch.
•
Seed switch is already monitored in another fabric.
Check all of the loaded unmonitored fabrics on the client GUI.
•
Client has lost connection to the server (or server is down).
Launch the Server Management Console, click the Services tab, and then click the Restart Services
button to stop and restart the Fabric Manager server process. See Chapter 24, “Server Management
Console” for additional information.
•
Database is not running.
Launch the Server Management Console, click the Services tab, and then click the Restart Services
button to stop and restart the Fabric Manager server process. See Chapter 24, “Server Management
Console” for additional information.
Capturing supportShow and supportSave Output
If a switch is not operating as expected, you can capture diagnostic data for the switch using a Fabric
Manager wizard. The Capture Technical Support Information wizard captures the supportSave or
supportShow command output and saves it. You can either use the output files to do your own
troubleshooting, or you can send the files to your technical support contact for analysis.
The supportShow output is saved as a text file, which is then bundled into a .zip file. For multiple
switches, multiple text files bundled into .zip files are created, one for each switch. The supportSave
output is saved in individual files, one for each type of data.
26-8
Fabric Manager Administrator’s Guide
Publication Number: 53-1000196-01-HP
Capturing supportShow and supportSave Output
26
The output files are saved on the FTP server. The wizard displays the name and location of the file. If
you are using the built-in FTP server, the output files are saved in the following directory:
<installdir>\server\server\fmserver\ftproot\technicalsupport
The FTP server must be configured before you can capture the supportShow and supportSave
information. If the FTP server is not configured, the wizard prompts you to configure it.
Fabric Manager can capture supportSave information only for switches running Fabric OS v5.2.0 or
higher. If you try to capture supportSave information for a switch running a firmware version earlier
than Fabric OS v5.2.0, then Fabric Manager captures supportShow information instead.
For additional information about the supportSave and supportShow commands, see the Fabric OS
Command Reference.
Note
You can also generate fmSupportShow (in Windows) by clicking...
Start Menu > Programs > Fabric Manager > Utilities > Capture FM Support Information.
To capture the supportShow and supportSave command output
1.
Click Tasks > Technical Support Information > Capture SupportSave/SupportShow.
The Capture Technical Support Information wizard launches, as shown in Figure 26-2.
2.
Follow the instructions in the wizard to select the switches and capture the supportSave or
supportShow information.
The wizard is self-explanatory, so the individual steps are not described in this document.
Note that it might take up to 30 minutes to capture supportSave information for some switches.
When you select the switches, if you select a single switch from each monitored fabric, then the
operation executes in parallel on each switch. If you select more than one switch from the same
fabric, the operation executes serially on those switches.
Alerts inform you when the capture is complete.
Fabric Manager Administrator’s Guide
Publication Number: 53-1000196-01-HP
26-9
26
Topology
Figure 26-2 Capture Technical Support Information Wizard
Topology
This section describes a few problem scenarios related to topology.
•
•
•
•
“Nodes Swapped With Another Switch Node” on page 26-10
“Lettering in Legend Unreadable When Printed” on page 26-10
“Links Do Not Reconfigure After Disruptive Failover” on page 26-11
“Nodes Overlap” on page 26-11
Nodes Swapped With Another Switch Node
Nodes are repositioned after expanding/collapsing link bundles in any of the topology layouts.
Sometimes the nodes are not only repositioned but also swapped with another switch node.
Lettering in Legend Unreadable When Printed
When you print a topology layout in one page that does not originally fit the screen, the lettering in the
legend becomes too small to read.
To avoid this problem, zoom the Topology view so that it fits on the screen. Use the snapshot feature to
save the layout to a PNG graphics file. Then, using a graphics program or web browser, print out the
topology from one of these applications.
26-10
Fabric Manager Administrator’s Guide
Publication Number: 53-1000196-01-HP
Pinpointing Additional Problem Areas
26
Links Do Not Reconfigure After Disruptive
Failover
Links sometimes do not reconfigure correctly in the core-edge topology mode after a disruptive HA
failover, causing them to be out of proportion.
Whenever the ISL links that connect to the nodes end up out of proportion, select any of the ISL link
styles and the topology layout issue is then corrected.
Nodes Overlap
If you move nodes then redo the view in the tree layout, the nodes can sometimes overlap.
Pinpointing Additional Problem Areas
This section describes specific problems that you might experience with Fabric Manager. A solution to
the problem is included.
•
•
•
•
•
•
•
•
•
•
•
•
•
•
•
“Locating Fabric Manager License Key and Serial Number” on page 26-11
“Switches and Hosts Do Not Recognize HBA After Firmware Download to HBA” on page 26-12
“503 Service Unavailable/Overloaded Error” on page 26-12
“Installation Wizard” on page 26-12
“Fabric Manager Client Does Not Start” on page 26-12
“Web Tools Pages Do Not Launch” on page 26-13
“Wizard Hangs” on page 26-14
“Performance Monitoring” on page 26-14
“Fabric Manager Database File Is Too Large” on page 26-14
“Sequenced Reboot Does Not Show Correct Status” on page 26-14
“Stopping Fabric Manager Server on Solaris and Linux” on page 26-15
“Changing Printers in Fabric Manager” on page 26-15
“Changing the Time in Fabric Manager” on page 26-15
“ODBC Driver Installer Error” on page 26-15
“fmsupportshow Output File is Empty” on page 26-16
Locating Fabric Manager License Key and Serial
Number
Fabric Manager v5.2.0 and later stores the serial number and license key in a file each time a user
successfully registers Fabric Manager. The file name is fmlicense.txt and should be in the local Fabric
Manager user directory. The file contains the version of Fabric Manager installed, the serial number,
license key, license type, and licensing date.
Fabric Manager Administrator’s Guide
Publication Number: 53-1000196-01-HP
26-11
26
Pinpointing Additional Problem Areas
You can also click Help > Register to view the license key and serial number.
If you still cannot find your license key and serial number, contact Technical Support.
Switches and Hosts Do Not Recognize HBA
After Firmware Download to HBA
During the firmware download to HBA process, if the switch or host to which the HBA is attached is
rebooted, the firmware in the HBA flash memory can become corrupted and HBA will not be able to
log in to the switch or respond to the query from the switch. Thus, from both the Fabric Manager and
the switch point of view, this HBA does not appear and drops out of the name server list. To solve this
problem, use HBAnyware on the attached host and reload the firmware on the HBA.
503 Service Unavailable/Overloaded Error
The 503 error indicates that Fabric Manager has discovered a switch whose web server is unavailable or
overloaded. If you receive this error, try to poll the switch using only one Fabric Manager server.
When a switch displays this error after Fabric Manager has already discovered the switch, the error is
displayed only in the error log.
Although switches can appear as unreachable in Fabric Manager when they receive this error, the error
occurs more frequently on switches that run firmware versions 2.x and 3.x.
Installation Wizard
This section describes problems that might occur while you are running the installation wizard.
Installation Wizard Does Not Launch
Run the DOS command dxdiag and make sure that the graphics tests run without errors. If any version
of DirectX files or any diagnostic files are missing, go to Microsoft’s Web site and upgrade to the latest
version of DirectX.
Installation Wizard Locks Up
Press the Ctrl key until a DOS Java console displays. The console captures a log of the entire
installation process.
Fabric Manager Client Does Not Start
This section describes scenarios in which the Fabric Manager client fails to launch.
26-12
Fabric Manager Administrator’s Guide
Publication Number: 53-1000196-01-HP
Pinpointing Additional Problem Areas
26
Welcome Page Does Not Launch
If the Internet Explorer security settings are configured such that no Active X components or Java
Script can be executed, then the Fabric Manager welcome page does not launch. Use the following
procedure to configure the Internet Explorer security parameters to allow the Welcome page to launch.
To configure the Internet Explorer security parameters
1.
In the Internet Explorer, click Tools > Internet Options.
2.
Click the Security tab in the Internet Options dialog box.
3.
Click Custom Level.
4.
Under the Scripting category, enable the following:
•
•
•
Active scripting
Allow paste options via script
Scripting of Java applets
5.
Click OK to close the Security Settings window.
6.
In the Internet Options window, select Trusted sites and then click Sites.
7.
Type the url of the server that hosts the Fabric Manager server.
8.
Uncheck the Require server verification checkbox.
9.
Click Add.
10. Click OK to close the Internet Options window.
Illegal Argument Error (Windows)
On Windows, if you try to start the Fabric Manager client remotely (using a Fabric Manager server
running on a different host), you might get the following: “Java Web Start - Illegal Argument Error”.
The workaround for this is to delete the temporary internet files:
1.
In the Internet Explorer browser, click Tools > Internet Options.
2.
Click the General tab.
3.
In the Temporary Internet Files section, click Delete Files.
4.
Click OK to confirm deletion.
Failed to Load Resource
When launching the Fabric Manager client, if you get the error “Failed to load resource,” cancel the
operation and retry.
Web Tools Pages Do Not Launch
When launching the AD Admin, Fabric Watch, or Port Configuration modules, if you get the error
“Exception encountered during initialization,” this might mean that you lost access to the physical
fabric (AD255).
Fabric Manager Administrator’s Guide
Publication Number: 53-1000196-01-HP
26-13
26
Pinpointing Additional Problem Areas
You must have access to at least AD0 and the physical fabric on an Admin Domain-aware switch to
monitor and manage that switch.
Wizard Hangs
Occasionally the FC Router Configuration wizard and the Device Connectivity Troubleshooting wizard
(device diagnostic wizard) hang due to rendering issues with Java Swing. If this happens, close the
wizard by clicking the X button in the upper right-hand corner of the window, and then relaunch the
wizard.
Relaunch the FC Router Configuration wizard by right-clicking on the edge fabric and selecting FC
Router Configuration; relaunch the Device Connectivity Troubleshooting wizard by clicking
Tasks>Device Sharing and Troubleshooting>Device Connectivity Troubleshooting (GDD).
Performance Monitoring
The following problems might happen if you are using performance monitoring.
Incorrect Performance Monitoring Port Statistics
If you are running a 4.x version of Fabric OS on a switch that is v4.2.0b or lower, the Advanced
Performance Monitoring port statistics for the switch are returned incorrectly. You must upgrade the
firmware on the 4.x switch to Fabric OS v4.2.0c or higher.
Performance Monitoring Configuration Window Hangs
If you have manually stopped the Fabric Manager PM Server process and you then try to refresh Endto-End monitors while the Fabric Manager PM Server process is dead, the Performance Monitor
configuration window hangs. If this happens, you must manually restart the Fabric Manager PM Server
process.
Fabric Manager Database File Is Too Large
Make sure that you periodically back up the Fabric Manager database so that the file does not get too
large. You can back up the database using the Server Management Console. See Chapter 24, “Server
Management Console” for instructions.
Sequenced Reboot Does Not Show Correct
Status
If you perform a sequenced reboot on all of the switches in a large fabric at the same time, the Reboot
window might not show the status of some of the switches correctly. The Reboot window might show
the status of switches as still performing the reboot when the reboot is actually done and you can reach
the switches via telnet.
26-14
Fabric Manager Administrator’s Guide
Publication Number: 53-1000196-01-HP
Pinpointing Additional Problem Areas
26
You can use the uptime command to verify how long the switch has been running. Refer to the Fabric
OS Command Reference for information.
Stopping Fabric Manager Server on Solaris and
Linux
Included in the Fabric Manager installation are scripts for starting and stopping the Fabric Manager
server. Normally you do not need to use these scripts, because the server starts automatically. However,
for troubleshooting you might need to stop and restart the server. To do this, change directory to
<installdir>/server/bin and run ./fmsvcctl stop or ./fmsvcctl start.
Do not use the other scripts in this directory, such as stopFabricManagerServer.sh,
startFabricManagerServer.sh, and restartFabricManagerServer.sh, because they are intended for
internal use only.
Changing Printers in Fabric Manager
If you have multiple printers configured, selecting a non-default printer on the page setup dialog in
Fabric Manager might crash the Fabric Manager client when you click OK. This occurs rarely on some
Windows hosts. To prevent the Fabric Manager client from crashing, do not change the printer from the
page setup dialog. Either change the printer from the print dialog or change the default printer on
Windows and then close and relaunch the Fabric Manager client.
Changing the Time in Fabric Manager
When running Fabric Manager server and client on the same or different machines, if the host time is
changed by a minute the client and server stop communicating properly. They continue to communicate,
but not correctly.
If the Fabric Manager client is open when the time is changed on the host, then when the client is
closed, no data is persisted to the server and a dialog appears asking if you want to close the client
without saving. It appears the client and server are having a problem communicating. This can happen
for multiple reasons, one common reason being if the host time is being updated by an NTP server, then
the host time can change periodically.
When the system time is advanced on some Windows platforms, the Fabric Manager server restarts.
When this happens, all the Fabric Manager clients close connection to the Fabric Manager server and
must be restarted as well. This is a fast restart, so normally no damage occurs. However, if performance
monitoring is scheduled to run then, a round of data collection might be lost. Normally this only
happens twice a year when time has to be advanced or decreased for daylight savings.
ODBC Driver Installer Error
The Open DataBase Connectivity (ODBC) driver installer package does not come with JVM. Make
sure that the JRE is already installed on your system before you run the ODBC driver installer.
Otherwise, you get an error message saying that Java-VM is not installed.
Fabric Manager Administrator’s Guide
Publication Number: 53-1000196-01-HP
26-15
26
Pinpointing Additional Problem Areas
fmsupportshow Output File is Empty
On Windows, if the FM_HOME environment variable becomes corrupted, then when you run
fmsupportshow, an output file with the proper name and timestamp is created in the wrong directory and
is empty.
To fix this problem, edit the FM_HOME environment variable to have the correct path.
26-16
Fabric Manager Administrator’s Guide
Publication Number: 53-1000196-01-HP
Appendix
Repository
A
The Common Information Model (CIM) is an industry standard developed by the Distributed
Management Task Force (DMTF). CIM describes application data so that administrators can view data
from different platforms and vendors in the same way. CIM is not a database.
This appendix describes the database views of the following elements within Fabric Manager so that
they can be accessed by a CIM model:
•
•
•
•
•
•
•
•
•
•
“SAN” on page A-2
“Fabric” on page A-2
“Switch” on page A-2
“Device” on page A-3
“Switch Port” on page A-4
“Device Port” on page A-7
“Zone_config” on page A-7
“Zone” on page A-8
“Zone Membership” on page A-8
“Zone Alias” on page A-9
Each table in this appendix lists the following:
•
•
•
•
•
Column
View column name.
Type
Value type. For example, string, int, long, and so on.
Qualifier
A modifier that describes the class.
Description
Brief description of the column.
Database Equivalent
by one of the following:
•
•
•
•
How to access the element in the Fabric Manager database, represented
Database table and column. For example, “fabric.dbid”.
SQL query. For example, “select switches.wwn from switches, switch_detail, fabric where...”
Fixed value. For example, “WWN”.
Example
Fabric Manager Administrator’s Guide
Publication Number: 53-1000196-01-HP
An example return value.
A-1
A
SAN
SAN
A SAN is represented in CIM by AdminDomain. Fabrics in a SAN are represented in CIM by the
ContainedDomain relationship and are not modeled in Fabric Manager. Fabric Manager has only one
SAN and all fabrics are added to that SAN.
Fabric
A fabric is represented in CIM by AdminDomain. Use the CIM_AdminDomain view to access the
fabric table.
Table A-1
CIM_AdminDomain View
Column
Type
Qualifier Description
Dbid
Int
Key
fabric.dbid
Database key,
used for joins to
replace traversal
of associations.
Name
String
16
WWN of
principal
switch. Not
durable.
Select switches.wwn from
switches, switch_detail, fabric
where
switches.fabric_id=fabric.dbid
and switches.dbid=switch_
detail.switch_id and
switch_detail.switch_role=
'Principal
'1000006069
1078F2
3
Format. It is
always WWN.
None. Fixed string 'WWN
'WWN
NameFormat String
Database Equivalent
Example
1
Switch
A switch is represented in CIM by ComputerSystem. A switches table and switch_detail table exist in
the Fabric Manager database. To access this data, use the CIM_ComputerSystem view.
Note
The CIM_ComputerSystem view does not filter out phantom switches.
Table A-2
A-2
CIM_ComputerSystem View
Column
Type
Qualifier Description
Database
Equivalent
Example
Dbid
Int
Key
Switches.dbid
2
Database key, used
for joins to replace
traversal of
associations.
Fabric Manager Administrator’s Guide
Publication Number: 53-1000196-01-HP
A
Device
Table A-2
CIM_ComputerSystem View (Continued)
Column
Type
Qualifier Description
Database
Equivalent
Example
Fabric_id
Int
Foreign
Key
Database key for
fabric, used for joins
to go from fabric to
switches.
Fabric.dbid
1
Name
String 16
WWN of switch.
Switches.wwn
10000060
691078F2
Dedicated
Int
Fixed value of 5,
indicating a switch.
None. Fixed value of
5.
5
OtherIdentifyingInfo String 10
String value of
domain_id. This is a
string[ ] in MOF.
Switches.domain_id
20
IdentifyDescriptions
String 8
Fixed value of
None. Fixed value of
“DomainID”. This is 'DomainID
a string[ ] in CIM.
'DomainID
ElementName
String
Name of switch.
Switches.name
Meteor1
OperationalStatus
Int
Switch status.
Maps Switch_detail. 2
switch_status where
Switch_detail.
switch_id =
switches.dbid to the
CIM Operational
status. See Table A-3.
Small
Small
The following table shows the mapping of Switch_detail.switch_status (WT Switch status) to API
status and CIM Operational status.
Table A-3
Switch_detail.switch_status Mapping
API switch status
WT Switch Status
(Switch_detail.switch_status)
Operational Status (CIM)
Unknown
0
Unknown
0
Not Supported
4
UNMONITORED
12
OK
1
HEALTHY
2
Warning
2
MARGINAL
4
Faulty
3
DOWN
6
Device
In CIM, a device is a host or an array, both represented by ComputerSystem. Use the
CIM_LogicalPortGroup view to access the Device table in the Fabric Manager database.
Fabric Manager Administrator’s Guide
Publication Number: 53-1000196-01-HP
A-3
A
Switch Port
Table A-4
CIM_LogicalPortGroup View
Column
Type
Qualifier Description
Database
Equivalent
Example
Dbid
Int
Key
Database key used
for joins to replace
traversal of
associations.
device.dbid
1
Name
String 16
WWN of node.
Device.wwn
20000000c922aec0
NameFormat
String 3
Format. It is always
“WWN”.
None. Fixed string
'WWN
'WWN
User defined name.
Device.inqname
[34] “Emulex
LP850 FV3.20X4
DV5-5.01A0 “
ElementName String
Switch Port
CIM uses an FCPort class and a ProtocolEndPoint class for switch ports. Fabric Manager provides a
CIM_FCPort view for the FCPort class. This view also contains rows for device ports. The
CIM_FCPort view does not filter out virtual ports created for phantom switches. Virtual ports do not
automatically show up in the switch_port table; they are created when a device node is imported from
the phantom switches.
Fabric Manager does not have a view for the ProtocolEndPoint class.
Table A-5
CIM_FCPort View
Column
Type
Qualifier Description Database Equivalent
Fabric_Id
Int
Key
Switch_id
Int
Database
key, used for
joins with
fabrics.
For switch port: fabric.dbid
where switches.fabric_id=
fabric.dbid.
Database
key, used for
joins with
switches.
For switch port:
switch_port.switch_id.
Example
12
For device_port:
device_port.fabric_id
22
For device_port:
switch_port.switch_id
where device_port.switch_
port_wwn =
switch_port.port_wwn.
If join fails (for offline
devices), set to -1.
A-4
Fabric Manager Administrator’s Guide
Publication Number: 53-1000196-01-HP
Switch Port
Table A-5
A
CIM_FCPort View (Continued)
Column
Type
Qualifier Description Database Equivalent
SystemName
String
16
Switch or
device
WWN.
Example
10000060695
For switch port:
0056e
switches.wwn where
switches.dbid=switch_port.
switch_id.
For device_port:
device.wwn where
device.dbid=device_port.de
vice_id.
ElementName
String
Port
symbolic
name, if
available.
Switch ports
use port
name.
OperationalStatus Int
Small
Operational
status of
device or
switch port.
For switch port:
switch_port.port_name.
Bay1
For device port:
device.inqname where
device.dbid=device_port.
device_id
For switch_port:
switch_port. port_status.
2 means OK/
online
switch_port. port_status is
mapped to CIM operational
status. See “Port Status
Mapping” on page A-7.
For device_port, an online
device is 2 (online), an
offline device is 10
(stopped).
In SMI-S, this is an array.
DeviceID
String
key
Speed
Double Long
Opaque key. For switch_port:
switchPort.port_ww
Fabric
Manager uses
device_port:
WWN.
device_port.device_
port_wwn
201D00051E
317396
Bits per
second.
2125000000
(for 2 GBit/
sec)
For switch_port:
switch_port.port_speed
For device_port:
switch_port.port_speed
where device_port.switch_
port_wwn =
switch_port.port_wwn
If the join fails, it is set to 0.
Fabric Manager Administrator’s Guide
Publication Number: 53-1000196-01-HP
A-5
A
Switch Port
Table A-5
CIM_FCPort View (Continued)
Column
Type
Qualifier Description Database Equivalent
Example
PortNumber
Int
Short
20
PortNumber.
For switch_port:
switch_port.port_number.
For device_port:
switch_port. port_number
where device_port.switch_
port_wwn =
switch_port.port_wwn.
If it fails to join, it is set to
-1
PortType
Int
Short
FC Type.
For switch_port:
switch_port.port_type
suitably mapped.
For device_port,
device_port.port_type
suitably mapped.
OtherNetwork
PortType
String
LinkTechnology
String
OtherLink
Technology
String
Permanent
Address
String
Network
Addresses
String
10 (for N
ports), 15 (for
F ports), and
so on.
Other
network port
type.
Empty string.
(empty string)
Type of
technology.
Constant string 4
4
Other link
technology.
Empty string.
(empty string)
16
WWN of
port.
Same as DeviceID.
201D00051E
317396
6
PID of port.
For switch_port: switch
domain.
010D00
2
For device_port:
device_port.port_id.
This column is an array in
SMI-S.
ActiveCOS
String
16
Active COS.
For switch_port: blank.
2,3
For device_port,
device_port.cosNote.
ActiveFC4Types
A-6
String
16
Active FC4
types.
For switch_port: blank.
(blank)
For device_port:
device_port.fc4type.
Fabric Manager Administrator’s Guide
Publication Number: 53-1000196-01-HP
Device Port
A
Table A-6 shows how switch_port. port_status is mapped to API status and CIM operational status. This
mapping is not in sync with CIM values because CIM uses API status and Fabric Manager uses the Web
Tools Backend port status. These statuses have different values and logic.
Table A-6
Port Status Mapping
API port status
WT port status (switch_port. port_status) Operational status (CIM)
Unknown
Unknown,empty string, Mod_Inv, No_Module,
No_Light, In_Sync, No_Card, No_Port,
Laser_Flt, Port_Flt, Diag_Flt, Lock_Re
Not Supported
0
0
OK
Online
2
Unused
1
Warning
4
Faulty
No_Sync,
6
Disabled
Disabled, Disabled (FMS mode)
null
Device Port
CIM uses an FCPort class and a ProtocolEndPoint class for device ports. Fabric Manager provides a
CIM_FCPort view for the FCPort class. This view also contains rows for switch ports. See “Switch
Port” on page A-4 for information on the CIM_FCPort view.
Fabric Manager does not have a view for the ProtocolEndPoint class.
Zone_config
The zone configuration is represented in CIM by ZoneSet. zone_config in the Fabric Manager database
determines the following record types:
•
•
•
•
config
zone
alias
quickloop
Use CIM_ZoneSet to access the Fabric Manager information.
Table A-7
CIM_ZoneSet View
Column
Type Qualifier Description
Database
Equivalent
Example
Dbid
Int
Database key, used for
joins to replace traversal
of associations.
Zone_config.dbid
1
Fabric_id
Int
Key of fabric.
Zone_config.fabric_id
2
Fabric Manager Administrator’s Guide
Publication Number: 53-1000196-01-HP
Key
A-7
A
Zone
Table A-7
Column
CIM_ZoneSet View (Continued)
Type Qualifier Description
ElementName String
Active
Int
Small
Database
Equivalent
Example
Name of zone config.
Zone_config.name
where config_type=1
LSAN_cfg
Boolean, 1 for enabled
config.
Zone_confg.config_
state==1
1
Zone
A zone is represented in CIM by Zone. Fabric Manager contains a CIM_Zone view in its database and
is defined by the following table.
Table A-8
CIM_Zone
Column
Type Qualifier Description
Database Equivalent
Example
Dbid
Int
Database key,
used for joins to
replace traversal
of associations.
Zone_config.dbid
1
Fabric_id
Int
Key of fabric.
Zone_config.fabric_id
2
Name of zone.
Zone_config.name where
config_type=2
LSAN_zone1
1
If zone appears in
Zone_config, members of
some zone_config whose
Zone_confg.config_state=1
Key
ElementName String
Active
Int
Small
Boolean, 1 for
zones in enabled
config.
ZoneType
Int
Small
Type of zone, will Constant
always be constant
2 for default.
2 (for default)
ZoneSubType
String
Empty string.
(empty string)
Constant
Zone Membership
A zone member is represented in CIM by ZoneMembershipSettingData.
Table A-9
A-8
CIM_ZoneMembershipSettingData view
Column
Type Qualifier Description
Database
Equivalent
Example
Dbid
Int
Unique key.
None
100
Fabric_id
Int
Key of fabric.
Zone_config.fabric_id
2
Key
Fabric Manager Administrator’s Guide
Publication Number: 53-1000196-01-HP
Zone Alias
Table A-9
A
CIM_ZoneMembershipSettingData view (Continued)
Column
Type Qualifier Description
Database
Equivalent
Example
Zone_id
Int
Key of zone.
Zone_config.dbid
4
Connectivity
MemberType
Int
2–device_port
4–domain:port
5–device
4 or 2
Go through each
member in
Zone_config.members
Connectivity
MemberID
String 16
Connectivity
MemberID is
Domain:port if
Connectivity
MemberType is 4
(domain:port) and
WWN if Connectivity
MemberType is 2
(device port) or 5
(device).
Go through each
member in
zone_config.members
Small
1:4 or
210000008704
27BD
Zone Alias
Zone aliases are represented by CIM_NamedAddressCollection objects. Aliases exist only in the
defined configurations and not in active configurations because they are expanded to the real WWN or
Domain/Area during zone activation. There should be no instance of a CIM_NameAddressCollection
object belonging to an active zone set.
Table A-10
CIM_NamedAddressCollection
Column
Type Qualifier Description
Database
Equivalent
Example
Dbid
Int
Unique key.
None
100
Fabric_id
Int
Key of fabric.
Zone_config.fabric_id
2
Zone_id
Int
Key of zone.
Zone_config.dbid
4
Key
ElementName String 64
Name of the alias.
Connectivity
MemberType
2–device_port
4–domain:port
5–device
Fabric Manager Administrator’s Guide
Publication Number: 53-1000196-01-HP
Int
Small
My_device_1
Go through each
member in
Zone_config.members.
4 or 2
A-9
A
Zone Alias
Table A-10
A-10
CIM_NamedAddressCollection (Continued)
Column
Type Qualifier Description
Database
Equivalent
Example
Connectivity
MemberID
String 16
Go through each
member in
Zone_config.members
1:4 or
21000000870
427BD
Connectivity
MemberID is
Domain:port if
Connectivity
MemberType is 4
(domain:port) and
WWN if Connectivity
MemberType is 2
(device port) or 5
(device).
Fabric Manager Administrator’s Guide
Publication Number: 53-1000196-01-HP
Appendix
Licenses for Third-Party Products
B
The following third-party products are included as part of Fabric Manager:
•
•
•
•
•
•
•
•
•
•
•
•
•
•
•
•
•
•
•
•
•
Apache Xerces XML Parser - v1.7.0 (Apache License)
AXL RADIUS Client API 3.29 (AXL License)
FTP Client (Reusable Objects/NetComponents License)
FTP server by Rana Bhattacharyya (Apache License)
FTP tools, edtftpj-1.4.5.jar, (LGPL License 2.1)
HTTP Client 0.3-3 (LGPL License 2.1)
Java On line help 1.1.3 (Sun Java License)
Java Runtime Environment 1.5.0_06 (Sun Java License)
Java Service Wrapper 3.1.2 (MIT License)
Java Web Services 1.1 (Sun Java License)
Javatar 2.5 (Public Domain)
JBOSS 4.0.2 Application Server (LGPL License 2.1)
JDOM 1.0 (Jason Hunter & Brett McLaughlin License)
JfreeChart 0.9.20 (LGPL License 2.1)
Log4J package 1.2.8 (Apache License
ONC/RPC C Based RPC Library 4.0 (ONC RPC License)
Open JCE v1.1 (ABA Licence)
OpenSSL Encryption Library - v0.9.6 (Open SSL License)
Retroguard Obfuscator (LGPL License 2.0)
SOAP package v1.1 (Apache License)
SWIXML 1.5 (Wolf Paulus License)
ABA Licence
THE ABA PUBLIC LICENSE
0. Australian Business Access Pty Ltd (ACN 070 045 117) owns Software which it wishes to make
available to the general public without charge. This Licence, issued on October 1 1998, governs the
terms and conditions under which Software that ABA so designates may be used. No other licence is
granted or implied other than what is explicitly stated herein.
Fabric Manager Administrator’s Guide
Publication Number: 53-1000196-01-HP
B-1
B
ABA Licence
1. For the purposes of this Licence, the term "Software" refers to all files containing a copyright notice
referring to "The ABA Public Licence", and all derivative works. If this Licence is applied to a source
file, then it applies equally to all compiled, encoded, executable or encrypted formats. Likewise if this
Licence is applied to a file it applies to all subsequent modifications to the file.
2. For the purposes of this Licence, the term "Permitted Uses" refers to the compilation, linking,
execution, modification, copying and distribution of the Software.
3. For the purposes of this Licence, the term "Licensee" applies to any individual or organisation who
elects to agree to the full terms and conditions of the Licence, and hence who may put the Software to
the Permitted Uses.
4. If any law or regulation prevents an individual or organisation from being bound by each and every
term and condition of this Licence, then no licence whatsoever is granted and the party may not become
a Licensee.
5. GRANT OF LICENCE. Australian Business Access hereby grants Licence to the accompanying
Software for the Permitted Uses subject to all of the following conditions being met:
a) This Licence must remain intact and unaltered, and accompany each and every copy of the
Software.
b) The Licensee must not alter or remove any mark or notice of ownership, copyright, trademark or
any other property right that has been placed on the Software.
c) Modified files must contain a prominent notice stating the date, purpose, location and author of
each change.
d) All modifications must be promptly emailed to [email protected].
e) A copy of the Software must be supplied to recipient of a work, product or service which uses
the Software. This condition will be considered fulfilled if the recipient is notified in writing of the
Australian Business Access web site address "www.aba.net.au".
f) Any work, product or service using the Software must be supplied with a prominent notice
acknowledging Australian Business Access and the use of the Software.
g) No charge whatsoever may be made for copying or distributing the Software.
h) Notwithstanding condition (g), the Software may be incorporated into any commercial work,
product or service which has functionality in excess of that provided by the Software.
6. Australian Business Access hereby asserts total ownership of any derivative works created
consequential to the Permitted Uses of the Software. Notwithstanding this right of ownership,
Australian Business Access waives all ownership and interest in any work created by a Licensee which
simply utilises the Software as a module or library. Under no circumstances does this waiver apply to
the Software itself or any modification thereof.
7. If you have any copy of Software covered by this Licence and you are not a Licensee, you must
destroy each such copy as soon as possible.
8. The Licensee is hereby notified that:
a) The Software may contain cryptographic technology that is subject to the import or export
controls of certain countries.
b) The Software may contain technology patented in some countries and therefore require
additional licensing from the patent holders in those countries prior to use.
9. Australian Business Access makes no claim or representation that the use of the Software will not
infringe any third party's rights.
B-2
Fabric Manager Administrator’s Guide
Publication Number: 53-1000196-01-HP
Apache License
B
10. The Software is provided with NO WARRANTY explicit or implied. Australian Business Access
does not claim or represent any suitability of purpose or guarantee of correct operation. This is free
software. If it breaks you get to keep both pieces.
11. The Software is put to its Permitted Uses solely at the discretion and risk of the Licensee.
Furthermore, the Licensee agrees to indemnify Australian Business Access from any and all actions or
damages arising from, or consequential to, the Permitted Use of the Software.
12. This Licence, and the rights it grants, are solely governed by the Laws of the State of Victoria,
Australia.
13. Australian Business Access may be contacted in the following ways:
Phone:
+61 3 8341 2400
Fax:
+61 3 8341 2499
Email:
[email protected]
Address:
Level 2, 33 Lincoln Square South
Carlton, Victoria 3053, Australia
Apache License
Apache License
Version 2.0, January 2004
http://www.apache.org/licenses/
TERMS AND CONDITIONS FOR USE, REPRODUCTION, AND DISTRIBUTION
1.
Definitions.
"License" shall mean the terms and conditions for use, reproduction, and distribution as defined by
Sections 1 through 9 of this document.
"Licensor" shall mean the copyright owner or entity authorized by the copyright owner that is
granting the License.
"Legal Entity" shall mean the union of the acting entity and all other entities that control, are
controlled by, or are under common control with that entity. For the purposes of this definition,
"control" means (i) the power, direct or indirect, to cause the direction or management of such
entity, whether by contract or otherwise, or (ii) ownership of fifty percent (50%) or more of the
outstanding shares, or (iii) beneficial ownership of such entity.
"You" (or "Your") shall mean an individual or Legal Entity exercising permissions granted by this
License.
"Source" form shall mean the preferred form for making modifications, including but not limited to
software source code, documentation source, and configuration files.
"Object" form shall mean any form resulting from mechanical transformation or translation of a
Source form, including but not limited to compiled object code, generated documentation, and
conversions to other media types.
"Work" shall mean the work of authorship, whether in Source or Object form, made available under
the License, as indicated by a copyright notice that is included in or attached to the work (an
example is provided in the Appendix below).
Fabric Manager Administrator’s Guide
Publication Number: 53-1000196-01-HP
B-3
B
Apache License
"Derivative Works" shall mean any work, whether in Source or Object form, that is based on (or
derived from) the Work and for which the editorial revisions, annotations, elaborations, or other
modifications represent, as a whole, an original work of authorship. For the purposes of this
License, Derivative Works shall not include works that remain separable from, or merely link (or
bind by name) to the interfaces of, the Work and Derivative Works thereof.
"Contribution" shall mean any work of authorship, including the original version of the Work and
any modifications or additions to that Work or Derivative Works thereof, that is intentionally
submitted to Licensor for inclusion in the Work by the copyright owner or by an individual or Legal
Entity authorized to submit on behalf of the copyright owner. For the purposes of this definition,
"submitted" means any form of electronic, verbal, or written communication sent to the Licensor or
its representatives, including but not limited to communication on electronic mailing lists, source
code control systems, and issue tracking systems that are managed by, or on behalf of, the Licensor
for the purpose of discussing and improving the Work, but excluding communication that is
conspicuously marked or otherwise designated in writing by the copyright owner as "Not a
Contribution."
"Contributor" shall mean Licensor and any individual or Legal Entity on behalf of whom a
Contribution has been received by Licensor and subsequently incorporated within the Work.
2.
Grant of Copyright License. Subject to the terms and conditions of this License, each Contributor
hereby grants to You a perpetual, worldwide, non-exclusive, no-charge, royalty-free, irrevocable
copyright license to reproduce, prepare Derivative Works of, publicly display, publicly perform,
sublicense, and distribute the Work and such Derivative Works in Source or Object form.
3.
Grant of Patent License. Subject to the terms and conditions of this License, each Contributor
hereby grants to You a perpetual, worldwide, non-exclusive, no-charge, royalty-free, irrevocable
(except as stated in this section) patent license to make, have made, use, offer to sell, sell, import,
and otherwise transfer the Work, where such license applies only to those patent claims licensable
by such Contributor that are necessarily infringed by their Contribution(s) alone or by combination
of their Contribution(s) with the Work to which such Contribution(s) was submitted. If You
institute patent litigation against any entity (including a cross-claim or counterclaim in a lawsuit)
alleging that the Work or a Contribution incorporated within the Work constitutes direct or
contributory patent infringement, then any patent licenses granted to You under this License for
that Work shall terminate as of the date such litigation is filed.
4.
Redistribution. You may reproduce and distribute copies of the Work or Derivative Works thereof
in any medium, with or without modifications, and in Source or Object form, provided that You
meet the following conditions:
(a) You must give any other recipients of the Work or Derivative Works a copy of this License; and
(b) You must cause any modified files to carry prominent notices stating that You changed the files;
and
(c) You must retain, in the Source form of any Derivative Works that You distribute, all copyright,
patent, trademark, and attribution notices from the Source form of the Work, excluding those
notices that do not pertain to any part of the Derivative Works; and
(d) If the Work includes a "NOTICE" text file as part of its distribution, then any Derivative Works
that You distribute must include a readable copy of the attribution notices contained within such
NOTICE file, excluding those notices that do not pertain to any part of the Derivative Works, in at
least one of the following places: within a NOTICE text file distributed as part of the Derivative
Works; within the Source form or documentation, if provided along with the Derivative Works; or,
within a display generated by the Derivative Works, if and wherever such third-party notices
B-4
Fabric Manager Administrator’s Guide
Publication Number: 53-1000196-01-HP
Apache License
B
normally appear. The contents of the NOTICE file are for informational purposes only and do not
modify the License. You may add Your own attribution notices within Derivative Works that You
distribute, alongside or as an addendum to the NOTICE text from the Work, provided that such
additional attribution notices cannot be construed as modifying the License.
You may add Your own copyright statement to Your modifications and may provide additional or
different license terms and conditions for use, reproduction, or distribution of Your modifications,
or for any such Derivative Works as a whole, provided Your use, reproduction, and distribution of
the Work otherwise complies with the conditions stated in this License.
5.
Submission of Contributions. Unless You explicitly state otherwise, any Contribution intentionally
submitted for inclusion in the Work by You to the Licensor shall be under the terms and conditions
of this License, without any additional terms or conditions. Notwithstanding the above, nothing
herein shall supersede or modify the terms of any separate license agreement you may have
executed with Licensor regarding such Contributions.
6.
Trademarks. This License does not grant permission to use the trade names, trademarks, service
marks, or product names of the Licensor, except as required for reasonable and customary use in
describing the origin of the Work and reproducing the content of the NOTICE file.
7.
Disclaimer of Warranty. Unless required by applicable law or agreed to in writing, Licensor
provides the Work (and each Contributor provides its Contributions) on an "AS IS" BASIS,
WITHOUT WARRANTIES OR CONDITIONS OF ANY KIND, either express or implied,
including, without limitation, any warranties or conditions of TITLE, NON-INFRINGEMENT,
MERCHANTABILITY, or FITNESS FOR A PARTICULAR PURPOSE. You are solely
responsible for determining the appropriateness of using or redistributing the Work and assume any
risks associated with Your exercise of permissions under this License.
8.
Limitation of Liability. In no event and under no legal theory, whether in tort (including
negligence), contract, or otherwise, unless required by applicable law (such as deliberate and
grossly negligent acts) or agreed to in writing, shall any Contributor be liable to You for damages,
including any direct, indirect, special, incidental, or consequential damages of any character arising
as a result of this License or out of the use or inability to use the Work (including but not limited to
damages for loss of goodwill, work stoppage, computer failure or malfunction, or any and all other
commercial damages or losses), even if such Contributor has been advised of the possibility of such
damages.
9.
Accepting Warranty or Additional Liability. While redistributing the Work or Derivative Works
thereof, You may choose to offer, and charge a fee for, acceptance of support, warranty, indemnity,
or other liability obligations and/or rights consistent with this License. However, in accepting such
obligations, You may act only on Your own behalf and on Your sole responsibility, not on behalf of
any other Contributor, and only if You agree to indemnify, defend, and hold each Contributor
harmless for any liability incurred by, or claims asserted against, such Contributor by reason of
your accepting any such warranty or additional liability.
END OF TERMS AND CONDITIONS
APPENDIX: How to apply the Apache License to your work.
To apply the Apache License to your work, attach the following boilerplate notice, with the fields
enclosed by brackets "[ ]" replaced with your own identifying information. (Don't include the
brackets!) The text should be enclosed in the appropriate comment syntax for the file format. We
also recommend that a file or class name and description of purpose be included on the same
"printed page" as the copyright notice for easier identification within third-party archives.
Copyright [yyyy] [name of copyright owner]
Fabric Manager Administrator’s Guide
Publication Number: 53-1000196-01-HP
B-5
B
AXL License
Licensed under the Apache License, Version 2.0 (the "License"); you may not use this file except in
compliance with the License. You may obtain a copy of the License at
http://www.apache.org/licenses/LICENSE-2.0
Unless required by applicable law or agreed to in writing, software distributed under the License is
distributed on an "AS IS" BASIS, WITHOUT WARRANTIES OR CONDITIONS OF ANY KIND,
either express or implied. See the License for the specific language governing permissions and
limitations under the License.
AXL License
License Agreement between the purchaser and AXL Software
AXL Radius Client License
AXL Software, hereinafter referred to as AXL, grants you a worldwide non- exclusive, transferable
limited license to use the Software Components comprising the Radius Client class package. You may
not redistribute any of the Software Components except as follows:
1. You may reproduce and redistribute and sublicense the Software Components in object code form
only (Java class files) and only when incorporated into your software product which adds substantial
and primary functionality to the Software Components.
2 Some portions of the Software Components may be under different licenses. All such licenses permit
the use and redistribution their respective components. Currently this includes the BouncyCastle crypto
classes.
3. You may not permit further redistribution of the Software Components by your end users except as
part of a new software product you develop that meets the restrictions of item 1.
To clarify, you may use the Software Components only to build new software you develop, and you may
only distribute the Software Components as part of this new software with the exception of those
components from Section 2 that give you more rights.
4. The end consumer is licensed to use the class code in any way seen fit which meets the restrictions
herein.
5. Your license will automatically terminate upon any transfer of the Software Components not
permitted herein. Upon transfer (including pursuant to a merger, acquisition or sale of assets), you must
deliver the Software, including any copies and related documentation, to the transferee. The transferee
must accept these License Terms as a condition to the transfer.
6. This is a License Agreement. AXL Software warrants that it has all the intellectual property and
other rights necessary to enter into this Agreement and to grant to Customer the licenses identified.
7. AXL software agrees to hold harmless and indemnify the end consumer from and against all
damages liabilities and costs (including reasonable attorneys fees and expenses) in connection with any
breach of the representation made in Section 6.
AXL SOFTWARE MAKES NO REPRESENTATIONS OR WARRANTIES ABOUT THE
SUITABILITY OF THE SOFTWARE FOR A PARTICULAR PURPOSE, EITHER EXPRESS OR
IMPLIED, INCLUDING BUT NOT LIMITED TO THE IMPLIED WARRANTIES OF
MERCHANTABILITY, FITNESS FOR A PARTICULAR PURPOSE, OR NON- INFRINGEMENT.
EXCEPT AS PROVIDED HEREIN, AXL SHALL NOT BE LIABLE FOR ANY DAMAGES
B-6
Fabric Manager Administrator’s Guide
Publication Number: 53-1000196-01-HP
Jason Hunter & Brett McLaughlin License
B
SUFFERED BY LICENSEE AS A RESULT OF USING, MODIFYING OR DISTRIBUTING THIS
SOFTWARE OR ITS DERIVATIVES. THE SOFTWARE IS NOT DESIGNED FOR USE IN HIGH
RISK ACTIVITIES REQUIRING FAIL-SAFE PERFORMANCE. AXL DISCLAIMS ANY
EXPRESS OR IMPLIED WARRANTY OF FITNESS FOR HIGH RISK ACTIVITIES.
Restricted Rights Legend
This software and documentation is a "commercial item," as defined in 48 C.F.R. 2.101 (10/95),
consisting of "commercial computer software" and "commercial computer software documentation," as
defined in 48 C.F.R. 12.212 (9/95). Use, duplication, or disclosure by the U.S. Government is subject to
the restrictions of U.S. GOVERNMENT END USERS consistent with 48 C.F.R. 12.212 and 48 C.F.R
227.7202-1 through 227.7202-4 (6/95).
Jason Hunter & Brett McLaughlin License
$Id: LICENSE.txt,v 1.11 2004/02/06 09:32:57 jhunter Exp $
Copyright (C) 2000-2004 Jason Hunter & Brett McLaughlin.
All rights reserved.
Redistribution and use in source and binary forms, with or without modification, are permitted provided
that the following conditions are met:
1. Redistributions of source code must retain the above copyright notice, this list of conditions, and the
following disclaimer.
2. Redistributions in binary form must reproduce the above copyright notice, this list of conditions, and
the disclaimer that follows these conditions in the documentation and/or other materials provided with
the distribution.
3. The name "JDOM" must not be used to endorse or promote products derived from this software
without prior written permission. For written permission, please contact
<request_AT_jdom_DOT_org>.
4. Products derived from this software may not be called "JDOM", nor may "JDOM" appear in their
name, without prior written permission from the JDOM Project Management
<request_AT_jdom_DOT_org>.
In addition, we request (but do not require) that you include in the end-user documentation provided
with the redistribution and/or in the software itself an acknowledgement equivalent to the following:
"This product includes software developed by the JDOM Project (http://www.jdom.org/)."
Alternatively, the acknowledgment may be graphical using the logos available at http://www.jdom.org/
images/logos.
THIS SOFTWARE IS PROVIDED ``AS IS'' AND ANY EXPRESSED OR IMPLIED WARRANTIES,
INCLUDING, BUT NOT LIMITED TO, THE IMPLIED WARRANTIES OF MERCHANTABILITY
AND FITNESS FOR A PARTICULAR PURPOSE ARE DISCLAIMED. IN NO EVENT SHALL
THE JDOM AUTHORS OR THE PROJECT CONTRIBUTORS BE LIABLE FOR ANY DIRECT,
INDIRECT, INCIDENTAL, SPECIAL, EXEMPLARY, OR CONSEQUENTIAL DAMAGES
(INCLUDING, BUT NOT LIMITED TO, PROCUREMENT OF SUBSTITUTE GOODS OR
SERVICES; LOSS OF USE, DATA, OR PROFITS; OR BUSINESS INTERRUPTION) HOWEVER
Fabric Manager Administrator’s Guide
Publication Number: 53-1000196-01-HP
B-7
B
LGPL License 2.0
CAUSED AND ON ANY THEORY OF LIABILITY, WHETHER IN CONTRACT, STRICT
LIABILITY, OR TORT (INCLUDING NEGLIGENCE OR OTHERWISE) ARISING IN ANY WAY
OUT OF THE USE OF THIS SOFTWARE, EVEN IF ADVISED OF THE POSSIBILITY OF SUCH
DAMAGE.
This software consists of voluntary contributions made by many individuals on behalf of the JDOM
Project and was originally created by Jason Hunter <jhunter_AT_jdom_DOT_org> and Brett
McLaughlin <brett_AT_jdom_DOT_org>. For more information on the JDOM Project, please see
<http://www.jdom.org/>.
LGPL License 2.0
Licensing agreement for Retroguard Obfuscator ( http://www.retrologic.com/rg-gnu-gpl.html )
GNU GENERAL PUBLIC LICENSE
Version 2, June 1991
Copyright (C) 1989, 1991 Free Software Foundation, Inc.
59 Temple Place, Suite 330, Boston, MA 02111-1307 USA
Everyone is permitted to copy and distribute verbatim copies of this license document, but changing it is
not allowed.
Preamble
The licenses for most software are designed to take away your freedom to share and change it. By
contrast, the GNU General Public License is intended to guarantee your freedom to share and change
free software--to make sure the software is free for all its users. This General Public License applies to
most of the Free Software Foundation's software and to any other program whose authors commit to
using it. (Some other Free Software Foundation software is covered by the GNU Library General
Public License instead.) You can apply it to your programs, too.
When we speak of free software, we are referring to freedom, not price. Our General Public Licenses
are designed to make sure that you have the freedom to distribute copies of free software (and charge for
this service if you wish), that you receive source code or can get it if you want it, that you can change
the software or use pieces of it in new free programs; and that you know you can do these things.
To protect your rights, we need to make restrictions that forbid anyone to deny you these rights or to ask
you to surrender the rights. These restrictions translate to certain responsibilities for you if you
distribute copies of the software, or if you modify it.
For example, if you distribute copies of such a program, whether gratis or for a fee, you must give the
recipients all the rights that you have. You must make sure that they, too, receive or can get the source
code. And you must show them these terms so they know their rights.
We protect your rights with two steps: (1) copyright the software, and (2) offer you this license which
gives you legal permission to copy, distribute and/or modify the software.
Also, for each author's protection and ours, we want to make certain that everyone understands that
there is no warranty for this free software. If the software is modified by someone else and passed on,
we want its recipients to know that what they have is not the original, so that any problems introduced
by others will not reflect on the original authors' reputations.
B-8
Fabric Manager Administrator’s Guide
Publication Number: 53-1000196-01-HP
LGPL License 2.0
B
Finally, any free program is threatened constantly by software patents. We wish to avoid the danger that
redistributors of a free program will individually obtain patent licenses, in effect making the program
proprietary. To prevent this, we have made it clear that any patent must be licensed for everyone's free
use or not licensed at all.
The precise terms and conditions for copying, distribution and modification follow.
GNU GENERAL PUBLIC LICENSE
TERMS AND CONDITIONS FOR COPYING, DISTRIBUTION AND MODIFICATION
0. This License applies to any program or other work which contains a notice placed by the copyright
holder saying it may be distributed under the terms of this General Public License. The "Program",
below, refers to any such program or work, and a "work based on the Program" means either the
Program or any derivative work under copyright law: that is to say, a work containing the Program or a
portion of it, either verbatim or with modifications and/or translated into another language.
(Hereinafter, translation is included without limitation in the term "modification".) Each licensee is
addressed as "you".
Activities other than copying, distribution and modification are not covered by this License; they are
outside its scope. The act of running the Program is not restricted, and the output from the Program is
covered only if its contents constitute a work based on the Program (independent of having been made
by running the Program). Whether that is true depends on what the Program does.
1. You may copy and distribute verbatim copies of the Program's source code as you receive it, in any
medium, provided that you conspicuously and appropriately publish on each copy an appropriate
copyright notice and disclaimer of warranty; keep intact all the notices that refer to this License and to
the absence of any warranty; and give any other recipients of the Program a copy of this License along
with the Program.
You may charge a fee for the physical act of transferring a copy, and you may at your option offer
warranty protection in exchange for a fee.
2. You may modify your copy or copies of the Program or any portion of it, thus forming a work based
on the Program, and copy and distribute such modifications or work under the terms of Section 1 above,
provided that you also meet all of these conditions:
a) You must cause the modified files to carry prominent notices stating that you changed the files
and the date of any change.
b) You must cause any work that you distribute or publish, that in whole or in part contains or is
derived from the Program or any part thereof, to be licensed as a whole at no charge to all third
parties under the terms of this License.
c) If the modified program normally reads commands interactively when run, you must cause it,
when started running for such interactive use in the most ordinary way, to print or display an
announcement including an appropriate copyright notice and a notice that there is no warranty (or
else, saying that you provide a warranty) and that users may redistribute the program under these
conditions, and telling the user how to view a copy of this License. (Exception: if the Program
itself is interactive but does not normally print such an announcement, your work based on the
Program is not required to print an announcement.)
These requirements apply to the modified work as a whole. If identifiable sections of that work are not
derived from the Program, and can be reasonably considered independent and separate works in
themselves, then this License, and its terms, do not apply to those sections when you distribute them as
separate works. But when you distribute the same sections as part of a whole which is a work based on
the Program, the distribution of the whole must be on the terms of this License, whose permissions for
other licensees extend to the entire whole, and thus to each and every part regardless of who wrote it.
Fabric Manager Administrator’s Guide
Publication Number: 53-1000196-01-HP
B-9
B
LGPL License 2.0
Thus, it is not the intent of this section to claim rights or contest your rights to work written entirely by
you; rather, the intent is to exercise the right to control the distribution of derivative or collective works
based on the Program.
In addition, mere aggregation of another work not based on the Program with the Program (or with a
work based on the Program) on a volume of a storage or distribution medium does not bring the other
work under the scope of this License.
3. You may copy and distribute the Program (or a work based on it, under Section 2) in object code or
executable form under the terms of Sections 1 and 2 above provided that you also do one of the
following:
a) Accompany it with the complete corresponding machine-readable source code, which must be
distributed under the terms of Sections 1 and 2 above on a medium customarily used for software
interchange; or,
b) Accompany it with a written offer, valid for at least three years, to give any third party, for a
charge no more than your cost of physically performing source distribution, a complete machinereadable copy of the corresponding source code, to be distributed under the terms of Sections 1 and
2 above on a medium customarily used for software interchange; or,
c) Accompany it with the information you received as to the offer to distribute corresponding
source code. (This alternative is allowed only for noncommercial distribution and only if you
received the program in object code or executable form with such an offer, in accord with
Subsection b above.)
The source code for a work means the preferred form of the work for making modifications to it. For an
executable work, complete source code means all the source code for all modules it contains, plus any
associated interface definition files, plus the scripts used to control compilation and installation of the
executable. However, as a special exception, the source code distributed need not include anything that
is normally distributed (in either source or binary form) with the major components (compiler, kernel,
and so on) of the operating system on which the executable runs, unless that component itself
accompanies the executable.
If distribution of executable or object code is made by offering access to copy from a designated place,
then offering equivalent access to copy the source code from the same place counts as distribution of the
source code, even though third parties are not compelled to copy the source along with the object code.
4. You may not copy, modify, sublicense, or distribute the Program except as expressly provided under
this License. Any attempt otherwise to copy, modify, sublicense or distribute the Program is void, and
will automatically terminate your rights under this License. However, parties who have received copies,
or rights, from you under this License will not have their licenses terminated so long as such parties
remain in full compliance.
5. You are not required to accept this License, since you have not signed it. However, nothing else
grants you permission to modify or distribute the Program or its derivative works. These actions are
prohibited by law if you do not accept this License. Therefore, by modifying or distributing the
Program (or any work based on the Program), you indicate your acceptance of this License to do so, and
all its terms and conditions for copying, distributing or modifying the Program or works based on it.
6. Each time you redistribute the Program (or any work based on the Program), the recipient
automatically receives a license from the original licensor to copy, distribute or modify the Program
subject to these terms and conditions. You may not impose any further restrictions on the recipients'
exercise of the rights granted herein. You are not responsible for enforcing compliance by third parties
to this License.
B-10
Fabric Manager Administrator’s Guide
Publication Number: 53-1000196-01-HP
LGPL License 2.0
B
7. If, as a consequence of a court judgment or allegation of patent infringement or for any other reason
(not limited to patent issues), conditions are imposed on you (whether by court order, agreement or
otherwise) that contradict the conditions of this License, they do not excuse you from the conditions of
this License. If you cannot distribute so as to satisfy simultaneously your obligations under this License
and any other pertinent obligations, then as a consequence you may not distribute the Program at all.
For example, if a patent license would not permit royalty-free redistribution of the Program by all those
who receive copies directly or indirectly through you, then the only way you could satisfy both it and
this License would be to refrain entirely from distribution of the Program.
If any portion of this section is held invalid or unenforceable under any particular circumstance, the
balance of the section is intended to apply and the section as a whole is intended to apply in other
circumstances.
It is not the purpose of this section to induce you to infringe any patents or other property right claims or
to contest validity of any such claims; this section has the sole purpose of protecting the integrity of the
free software distribution system, which is implemented by public license practices. Many people have
made generous contributions to the wide range of software distributed through that system in reliance
on consistent application of that system; it is up to the author/donor to decide if he or she is willing to
distribute software through any other system and a licensee cannot impose that choice.
This section is intended to make thoroughly clear what is believed to be a consequence of the rest of this
License.
8. If the distribution and/or use of the Program is restricted in certain countries either by patents or by
copyrighted interfaces, the original copyright holder who places the Program under this License may
add an explicit geographical distribution limitation excluding those countries, so that distribution is
permitted only in or among countries not thus excluded. In such case, this License incorporates the
limitation as if written in the body of this License.
9. The Free Software Foundation may publish revised and/or new versions of the General Public
License from time to time. Such new versions will be similar in spirit to the present version, but may
differ in detail to address new problems or concerns.
Each version is given a distinguishing version number. If the Program specifies a version number of
this License which applies to it and "any later version", you have the option of following the terms and
conditions either of that version or of any later version published by the Free Software Foundation. If
the Program does not specify a version number of this License, you may choose any version ever
published by the Free Software Foundation.
10. If you wish to incorporate parts of the Program into other free programs whose distribution
conditions are different, write to the author to ask for permission. For software which is copyrighted by
the Free Software Foundation, write to the Free Software Foundation; we sometimes make exceptions
for this. Our decision will be guided by the two goals of preserving the free status of all derivatives of
our free software and of promoting the sharing and reuse of software generally.
NO WARRANTY
11. BECAUSE THE PROGRAM IS LICENSED FREE OF CHARGE, THERE IS NO WARRANTY
FOR THE PROGRAM, TO THE EXTENT PERMITTED BY APPLICABLE LAW. EXCEPT WHEN
OTHERWISE STATED IN WRITING THE COPYRIGHT HOLDERS AND/OR OTHER PARTIES
PROVIDE THE PROGRAM "AS IS" WITHOUT WARRANTY OF ANY KIND, EITHER
EXPRESSED OR IMPLIED, INCLUDING, BUT NOT LIMITED TO, THE IMPLIED WARRANTIES
OF MERCHANTABILITY AND FITNESS FOR A PARTICULAR PURPOSE. THE ENTIRE RISK
AS TO THE QUALITY AND PERFORMANCE OF THE PROGRAM IS WITH YOU. SHOULD
THE PROGRAM PROVE DEFECTIVE, YOU ASSUME THE COST OF ALL NECESSARY
SERVICING, REPAIR OR CORRECTION.
Fabric Manager Administrator’s Guide
Publication Number: 53-1000196-01-HP
B-11
B
LGPL License 2.0
12. IN NO EVENT UNLESS REQUIRED BY APPLICABLE LAW OR AGREED TO IN WRITING
WILL ANY COPYRIGHT HOLDER, OR ANY OTHER PARTY WHO MAY MODIFY AND/OR
REDISTRIBUTE THE PROGRAM AS PERMITTED ABOVE, BE LIABLE TO YOU FOR
DAMAGES, INCLUDING ANY GENERAL, SPECIAL, INCIDENTAL OR CONSEQUENTIAL
DAMAGES ARISING OUT OF THE USE OR INABILITY TO USE THE PROGRAM (INCLUDING
BUT NOT LIMITED TO LOSS OF DATA OR DATA BEING RENDERED INACCURATE OR
LOSSES SUSTAINED BY YOU OR THIRD PARTIES OR A FAILURE OF THE PROGRAM TO
OPERATE WITH ANY OTHER PROGRAMS), EVEN IF SUCH HOLDER OR OTHER PARTY HAS
BEEN ADVISED OF THE POSSIBILITY OF SUCH DAMAGES.
END OF TERMS AND CONDITIONS
How to Apply These Terms to Your New Programs
If you develop a new program, and you want it to be of the greatest possible use to the public, the best
way to achieve this is to make it free software which everyone can redistribute and change under these
terms.
To do so, attach the following notices to the program. It is safest to attach them to the start of each
source file to most effectively convey the exclusion of warranty; and each file should have at least the
"copyright" line and a pointer to where the full notice is found.
Copyright (C)
This program is free software; you can redistribute it and/or modify it under the terms of the GNU
General Public License as published by the Free Software Foundation; either version 2 of the License,
or (at your option) any later version.
This program is distributed in the hope that it will be useful, but WITHOUT ANY WARRANTY;
without even the implied warranty of MERCHANTABILITY or FITNESS FOR A PARTICULAR
PURPOSE. See the GNU General Public License for more details.
You should have received a copy of the GNU General Public License along with this program; if not,
write to the Free Software Foundation, Inc., 59 Temple Place, Suite 330, Boston, MA 02111-1307
USA
Also add information on how to contact you by electronic and paper mail.
If the program is interactive, make it output a short notice like this when it starts in an interactive mode:
Gnomovision version 69, Copyright (C) year name of author
Gnomovision comes with ABSOLUTELY NO WARRANTY; for details type `show w'.
This is free software, and you are welcome to redistribute it under certain conditions; type `show c'
for details.
The hypothetical commands `show w' and `show c' should show the appropriate parts of the General
Public License. Of course, the commands you use may be called something other than `show w' and
`show c'; they could even be mouse-clicks or menu items--whatever suits your program.
You should also get your employer (if you work as a programmer) or your school, if any, to sign a
"copyright disclaimer" for the program, if necessary. Here is a sample; alter the names:
Yoyodyne, Inc., hereby disclaims all copyright interest in the program
'Gnomovision' (which makes passes at compilers) written by James Hacker.
, 1 April 1989
B-12
Fabric Manager Administrator’s Guide
Publication Number: 53-1000196-01-HP
LGPL License 2.1
B
Ty Coon, President of Vice
LGPL License 2.1
Licensing agreement for JBOSS (http://www.opensource.org/licenses/lgpl-license.php)
Licensing agreement for JfreeChart from Object Refinery (http://www.object-refinery.com/lgpl.html)
Licensing agreement for HTTP Client package (Ronald Tschalär package)
GNU Lesser General Public License
Version 2.1, February 1999
Copyright (C) 1991, 1999 Free Software Foundation, Inc.59 Temple Place, Suite 330, Boston, MA
02111-1307 USA Everyone is permitted to copy and distribute verbatim copies of this license
document, but changing it is not allowed.
[This is the first released version of the Lesser GPL. It also counts as the successor of the GNU
Library Public License, version 2, hence the version number 2.1.]
Preamble
The licenses for most software are designed to take away your freedom to share and change it. By
contrast, the GNU General Public Licenses are intended to guarantee your freedom to share and change
free software--to make sure the software is free for all its users.
This license, the Lesser General Public License, applies to some specially designated software
packages--typically libraries--of the Free Software Foundation and other authors who decide to use it.
You can use it too, but we suggest you first think carefully about whether this license or the ordinary
General Public License is the better strategy to use in any particular case, based on the explanations
below.
When we speak of free software, we are referring to freedom of use, not price. Our General Public
Licenses are designed to make sure that you have the freedom to distribute copies of free software (and
charge for this service if you wish); that you receive source code or can get it if you want it; that you can
change the software and use pieces of it in new free programs; and that you are informed that you can
do these things.
To protect your rights, we need to make restrictions that forbid distributors to deny you these rights or to
ask you to surrender these rights. These restrictions translate to certain responsibilities for you if you
distribute copies of the library or if you modify it.
For example, if you distribute copies of the library, whether gratis or for a fee, you must give the
recipients all the rights that we gave you. You must make sure that they, too, receive or can get the
source code. If you link other code with the library, you must provide complete object files to the
recipients, so that they can relink them with the library after making changes to the library and
recompiling it. And you must show them these terms so they know their rights.
We protect your rights with a two-step method: (1) we copyright the library, and (2) we offer you this
license, which gives you legal permission to copy, distribute and/or modify the library.
To protect each distributor, we want to make it very clear that there is no warranty for the free library.
Also, if the library is modified by someone else and passed on, the recipients should know that what
they have is not the original version, so that the original author's reputation will not be affected by
problems that might be introduced by others.
Fabric Manager Administrator’s Guide
Publication Number: 53-1000196-01-HP
B-13
B
LGPL License 2.1
Finally, software patents pose a constant threat to the existence of any free program. We wish to make
sure that a company cannot effectively restrict the users of a free program by obtaining a restrictive
license from a patent holder. Therefore, we insist that any patent license obtained for a version of the
library must be consistent with the full freedom of use specified in this license.
Most GNU software, including some libraries, is covered by the ordinary GNU General Public License.
This license, the GNU Lesser General Public License, applies to certain designated libraries, and is
quite different from the ordinary General Public License. We use this license for certain libraries in
order to permit linking those libraries into non-free programs.
When a program is linked with a library, whether statically or using a shared library, the combination of
the two is legally speaking a combined work, a derivative of the original library. The ordinary General
Public License therefore permits such linking only if the entire combination fits its criteria of freedom.
The Lesser General Public License permits more lax criteria for linking other code with the library.
We call this license the "Lesser" General Public License because it does Less to protect the user's
freedom than the ordinary General Public License. It also provides other free software developers Less
of an advantage over competing non-free programs. These disadvantages are the reason we use the
ordinary General Public License for many libraries. However, the Lesser license provides advantages in
certain special circumstances.
For example, on rare occasions, there may be a special need to encourage the widest possible use of a
certain library, so that it becomes a de-facto standard. To achieve this, non-free programs must be
allowed to use the library. A more frequent case is that a free library does the same job as widely used
non-free libraries. In this case, there is little to gain by limiting the free library to free software only, so
we use the Lesser General Public License.
In other cases, permission to use a particular library in non-free programs enables a greater number of
people to use a large body of free software. For example, permission to use the GNU C Library in nonfree programs enables many more people to use the whole GNU operating system, as well as its variant,
the GNU/Linux operating system.
Although the Lesser General Public License is Less protective of the users' freedom, it does ensure that
the user of a program that is linked with the Library has the freedom and the wherewithal to run that
program using a modified version of the Library.
The precise terms and conditions for copying, distribution and modification follow. Pay close attention
to the difference between a "work based on the library" and a "work that uses the library". The former
contains code derived from the library, whereas the latter must be combined with the library in order to
run.
TERMS AND CONDITIONS FOR COPYING, DISTRIBUTION AND MODIFICATION
0. This License Agreement applies to any software library or other program which contains a notice
placed by the copyright holder or other authorized party saying it may be distributed under the terms of
this Lesser General Public License (also called "this License"). Each licensee is addressed as "you".A
"library" means a collection of software functions and/or data prepared so as to be conveniently linked
with application programs (which use some of those functions and data) to form executables. The
"Library", below, refers to any such software library or work which has been distributed under these
terms. A "work based on the Library" means either the Library or any derivative work under copyright
law: that is to say, a work containing the Library or a portion of it, either verbatim or with modifications
and/or translated straightforwardly into another language. (Hereinafter, translation is included without
limitation in the term "modification".)
B-14
Fabric Manager Administrator’s Guide
Publication Number: 53-1000196-01-HP
LGPL License 2.1
B
"Source code" for a work means the preferred form of the work for making modifications to it. For a
library, complete source code means all the source code for all modules it contains, plus any associated
interface definition files, plus the scripts used to control compilation and installation of the
library.Activities other than copying, distribution and modification are not covered by this License; they
are outside its scope. The act of running a program using the Library is not restricted, and output from
such a program is covered only if its contents constitute a work based on the Library (independent of the
use of the Library in a tool for writing it). Whether that is true depends on what the Library does and
what the program that uses the Library does.
1. You may copy and distribute verbatim copies of the Library's complete source code as you receive it,
in any medium, provided that you conspicuously and appropriately publish on each copy an appropriate
copyright notice and disclaimer of warranty; keep intact all the notices that refer to this License and to
the absence of any warranty; and distribute a copy of this License along with the Library.
You may charge a fee for the physical act of transferring a copy, and you may at your option offer
warranty protection in exchange for a fee.
2. You may modify your copy or copies of the Library or any portion of it, thus forming a work based on
the Library, and copy and distribute such modifications or work under the terms of Section 1 above,
provided that you also meet all of these conditions:
a) The modified work must itself be a software library.
b) You must cause the files modified to carry prominent notices stating that you changed the files
and the date of any change.
c) You must cause the whole of the work to be licensed at no charge to all third parties under the
terms of this License.
d) If a facility in the modified Library refers to a function or a table of data to be supplied by an
application program that uses the facility, other than as an argument passed when the facility is
invoked, then you must make a good faith effort to ensure that, in the event an application does not
supply such function or table, the facility still operates, and performs whatever part of its purpose
remains meaningful.
(For example, a function in a library to compute square roots has a purpose that is entirely welldefined independent of the application. Therefore, Subsection 2d requires that any applicationsupplied function or table used by this function must be optional: if the application does not supply
it, the square root function must still compute square roots.)
These requirements apply to the modified work as a whole. If identifiable sections of that work are
not derived from the Library, and can be reasonably considered independent and separate works in
themselves, then this License, and its terms, do not apply to those sections when you distribute
them as separate works. But when you distribute the same sections as part of a whole which is a
work based on the Library, the distribution of the whole must be on the terms of this License,
whose permissions for other licensees extend to the entire whole, and thus to each and every part
regardless of who wrote it.
Thus, it is not the intent of this section to claim rights or contest your rights to work written entirely
by you; rather, the intent is to exercise the right to control the distribution of derivative or collective
works based on the Library.
In addition, mere aggregation of another work not based on the Library with the Library (or with a
work based on the Library) on a volume of a storage or distribution medium does not bring the
other work under the scope of this License.
Fabric Manager Administrator’s Guide
Publication Number: 53-1000196-01-HP
B-15
B
LGPL License 2.1
3. You may opt to apply the terms of the ordinary GNU General Public License instead of this License
to a given copy of the Library. To do this, you must alter all the notices that refer to this License, so that
they refer to the ordinary GNU General Public License, version 2, instead of to this License. (If a newer
version than version 2 of the ordinary GNU General Public License has appeared, then you can specify
that version instead if you wish.) Do not make any other change in these notices.
Once this change is made in a given copy, it is irreversible for that copy, so the ordinary GNU General
Public License applies to all subsequent copies and derivative works made from that copy.
This option is useful when you wish to copy part of the code of the Library into a program that is not a
library.
4. You may copy and distribute the Library (or a portion or derivative of it, under Section 2) in object
code or executable form under the terms of Sections 1 and 2 above provided that you accompany it with
the complete corresponding machine-readable source code, which must be distributed under the terms
of Sections 1 and 2 above on a medium customarily used for software interchange.
If distribution of object code is made by offering access to copy from a designated place, then offering
equivalent access to copy the source code from the same place satisfies the requirement to distribute the
source code, even though third parties are not compelled to copy the source along with the object code.
5. A program that contains no derivative of any portion of the Library, but is designed to work with the
Library by being compiled or linked with it, is called a "work that uses the Library". Such a work, in
isolation, is not a derivative work of the Library, and therefore falls outside the scope of this License.
However, linking a "work that uses the Library" with the Library creates an executable that is a
derivative of the Library (because it contains portions of the Library), rather than a "work that uses the
library". The executable is therefore covered by this License. Section 6 states terms for distribution of
such executables.
When a "work that uses the Library" uses material from a header file that is part of the Library, the
object code for the work may be a derivative work of the Library even though the source code is not.
Whether this is true is especially significant if the work can be linked without the Library, or if the work
is itself a library. The threshold for this to be true is not precisely defined by law.
If such an object file uses only numerical parameters, data structure layouts and accessors, and small
macros and small inline functions (ten lines or less in length), then the use of the object file is
unrestricted, regardless of whether it is legally a derivative work. (Executables containing this object
code plus portions of the Library will still fall under Section 6.)
Otherwise, if the work is a derivative of the Library, you may distribute the object code for the work
under the terms of Section 6. Any executables containing that work also fall under Section 6, whether or
not they are linked directly with the Library itself.
6. As an exception to the Sections above, you may also combine or link a "work that uses the Library"
with the Library to produce a work containing portions of the Library, and distribute that work under
terms of your choice, provided that the terms permit modification of the work for the customer's own
use and reverse engineering for debugging such modifications.
You must give prominent notice with each copy of the work that the Library is used in it and that the
Library and its use are covered by this License. You must supply a copy of this License. If the work
during execution displays copyright notices, you must include the copyright notice for the Library
among them, as well as a reference directing the user to the copy of this License. Also, you must do one
of these things:
B-16
Fabric Manager Administrator’s Guide
Publication Number: 53-1000196-01-HP
LGPL License 2.1
B
a) Accompany the work with the complete corresponding machine-readable source code for the
Library including whatever changes were used in the work (which must be distributed under
Sections 1 and 2 above); and, if the work is an executable linked with the Library, with the
complete machine-readable "work that uses the Library", as object code and/or source code, so that
the user can modify the Library and then relink to produce a modified executable containing the
modified Library. (It is understood that the user who changes the contents of definitions files in the
Library will not necessarily be able to recompile the application to use the modified definitions.)
b) Use a suitable shared library mechanism for linking with the Library. A suitable mechanism is
one that (1) uses at run time a copy of the library already present on the user's computer system,
rather than copying library functions into the executable, and (2) will operate properly with a
modified version of the library, if the user installs one, as long as the modified version is interfacecompatible with the version that the work was made with.
c) Accompany the work with a written offer, valid for at least three years, to give the same user the
materials specified in Subsection 6a, above, for a charge no more than the cost of performing this
distribution.
d) If distribution of the work is made by offering access to copy from a designated place, offer
equivalent access to copy the above specified materials from the same place.
e) Verify that the user has already received a copy of these materials or that you have already sent
this user a copy.
For an executable, the required form of the "work that uses the Library" must include any data and
utility programs needed for reproducing the executable from it. However, as a special exception, the
materials to be distributed need not include anything that is normally distributed (in either source or
binary form) with the major components (compiler, kernel, and so on) of the operating system on which
the executable runs, unless that component itself accompanies the executable.
It may happen that this requirement contradicts the license restrictions of other proprietary libraries that
do not normally accompany the operating system. Such a contradiction means you cannot use both them
and the Library together in an executable that you distribute.
7. You may place library facilities that are a work based on the Library side-by-side in a single library
together with other library facilities not covered by this License, and distribute such a combined library,
provided that the separate distribution of the work based on the Library and of the other library facilities
is otherwise permitted, and provided that you do these two things:
a) Accompany the combined library with a copy of the same work based on the Library,
uncombined with any other library facilities. This must be distributed under the terms of the
Sections above.
b) Give prominent notice with the combined library of the fact that part of it is a work based on the
Library, and explaining where to find the accompanying uncombined form of the same work.
8. You may not copy, modify, sublicense, link with, or distribute the Library except as expressly
provided under this License. Any attempt otherwise to copy, modify, sublicense, link with, or distribute
the Library is void, and will automatically terminate your rights under this License. However, parties
who have received copies, or rights, from you under this License will not have their licenses terminated
so long as such parties remain in full compliance.
9. You are not required to accept this License, since you have not signed it. However, nothing else
grants you permission to modify or distribute the Library or its derivative works. These actions are
prohibited by law if you do not accept this License. Therefore, by modifying or distributing the Library
(or any work based on the Library), you indicate your acceptance of this License to do so, and all its
terms and conditions for copying, distributing or modifying the Library or works based on it.
Fabric Manager Administrator’s Guide
Publication Number: 53-1000196-01-HP
B-17
B
LGPL License 2.1
10. Each time you redistribute the Library (or any work based on the Library), the recipient
automatically receives a license from the original licensor to copy, distribute, link with or modify the
Library subject to these terms and conditions. You may not impose any further restrictions on the
recipients' exercise of the rights granted herein. You are not responsible for enforcing compliance by
third parties with this License.
11. If, as a consequence of a court judgment or allegation of patent infringement or for any other reason
(not limited to patent issues), conditions are imposed on you (whether by court order, agreement or
otherwise) that contradict the conditions of this License, they do not excuse you from the conditions of
this License. If you cannot distribute so as to satisfy simultaneously your obligations under this License
and any other pertinent obligations, then as a consequence you may not distribute the Library at all. For
example, if a patent license would not permit royalty-free redistribution of the Library by all those who
receive copies directly or indirectly through you, then the only way you could satisfy both it and this
License would be to refrain entirely from distribution of the Library.
If any portion of this section is held invalid or unenforceable under any particular circumstance, the
balance of the section is intended to apply, and the section as a whole is intended to apply in other
circumstances.
It is not the purpose of this section to induce you to infringe any patents or other property right claims or
to contest validity of any such claims; this section has the sole purpose of protecting the integrity of the
free software distribution system which is implemented by public license practices. Many people have
made generous contributions to the wide range of software distributed through that system in reliance
on consistent application of that system; it is up to the author/donor to decide if he or she is willing to
distribute software through any other system and a licensee cannot impose that choice. This section is
intended to make thoroughly clear what is believed to be a consequence of the rest of this License.
12. If the distribution and/or use of the Library is restricted in certain countries either by patents or by
copyrighted interfaces, the original copyright holder who places the Library under this License may add
an explicit geographical distribution limitation excluding those countries, so that distribution is
permitted only in or among countries not thus excluded. In such case, this License incorporates the
limitation as if written in the body of this License.
13. The Free Software Foundation may publish revised and/or new versions of the Lesser General
Public License from time to time. Such new versions will be similar in spirit to the present version, but
may differ in detail to address new problems or concerns.
Each version is given a distinguishing version number. If the Library specifies a version number of this
License which applies to it and "any later version", you have the option of following the terms and
conditions either of that version or of any later version published by the Free Software Foundation. If
the Library does not specify a license version number, you may choose any version ever published by
the Free Software Foundation.
14. If you wish to incorporate parts of the Library into other free programs whose distribution
conditions are incompatible with these, write to the author to ask for permission. For software which is
copyrighted by the Free Software Foundation, write to the Free Software Foundation; we sometimes
make exceptions for this. Our decision will be guided by the two goals of preserving the free status of
all derivatives of our free software and of promoting the sharing and reuse of software generally.
NO WARRANTY
15. BECAUSE THE LIBRARY IS LICENSED FREE OF CHARGE, THERE IS NO WARRANTY
FOR THE LIBRARY, TO THE EXTENT PERMITTED BY APPLICABLE LAW. EXCEPT WHEN
OTHERWISE STATED IN WRITING THE COPYRIGHT HOLDERS AND/OR OTHER PARTIES
PROVIDE THE LIBRARY "AS IS" WITHOUT WARRANTY OF ANY KIND, EITHER
EXPRESSED OR IMPLIED, INCLUDING, BUT NOT LIMITED TO, THE IMPLIED WARRANTIES
B-18
Fabric Manager Administrator’s Guide
Publication Number: 53-1000196-01-HP
LGPL License 2.1
B
OF MERCHANTABILITY AND FITNESS FOR A PARTICULAR PURPOSE. THE ENTIRE RISK
AS TO THE QUALITY AND PERFORMANCE OF THE LIBRARY IS WITH YOU. SHOULD THE
LIBRARY PROVE DEFECTIVE, YOU ASSUME THE COST OF ALL NECESSARY SERVICING,
REPAIR OR CORRECTION.
16. IN NO EVENT UNLESS REQUIRED BY APPLICABLE LAW OR AGREED TO IN WRITING
WILL ANY COPYRIGHT HOLDER, OR ANY OTHER PARTY WHO MAY MODIFY AND/OR
REDISTRIBUTE THE LIBRARY AS PERMITTED ABOVE, BE LIABLE TO YOU FOR
DAMAGES, INCLUDING ANY GENERAL, SPECIAL, INCIDENTAL OR CONSEQUENTIAL
DAMAGES ARISING OUT OF THE USE OR INABILITY TO USE THE LIBRARY (INCLUDING
BUT NOT LIMITED TO LOSS OF DATA OR DATA BEING RENDERED INACCURATE OR
LOSSES SUSTAINED BY YOU OR THIRD PARTIES OR A FAILURE OF THE LIBRARY TO
OPERATE WITH ANY OTHER SOFTWARE), EVEN IF SUCH HOLDER OR OTHER PARTY HAS
BEEN ADVISED OF THE POSSIBILITY OF SUCH DAMAGES.
END OF TERMS AND CONDITIONS
How to Apply These Terms to Your New Libraries
If you develop a new library, and you want it to be of the greatest possible use to the public, we
recommend making it free software that everyone can redistribute and change. You can do so by
permitting redistribution under these terms (or, alternatively, under the terms of the ordinary General
Public License).
To apply these terms, attach the following notices to the library. It is safest to attach them to the start of
each source file to most effectively convey the exclusion of warranty; and each file should have at least
the "copyright" line and a pointer to where the full notice is found.
one line to give the library's name and an idea of what it does.
Copyright (C) year name of author
This library is free software; you can redistribute it and/or modify it under the terms of the GNU
Lesser General Public License as published by the Free Software Foundation; either version 2.1 of
the License, or (at your option) any later version.
This library is distributed in the hope that it will be useful, but WITHOUT ANY WARRANTY;
without even the implied warranty of MERCHANTABILITY or FITNESS FOR A PARTICULAR
PURPOSE. See the GNU Lesser General Public License for more details.
You should have received a copy of the GNU Lesser General Public License along with this library;
if not, write to the Free Software Foundation, Inc., 59 Temple Place, Suite 330, Boston, MA 021111307 USA
Also add information on how to contact you by electronic and paper mail. You should also get your
employer (if you work as a programmer) or your school, if any, to sign a "copyright disclaimer" for the
library, if necessary. Here is a sample; alter the names:
Yoyodyne, Inc., hereby disclaims all copyright interest in the library `Frob' (a library for tweaking
knobs) written by James Random Hacker.
signature of Ty Coon, 1 April 1990
Ty Coon, President of Vice
That's all there is to it!
Copyright © 2003 by the Open Source Initiative
Fabric Manager Administrator’s Guide
Publication Number: 53-1000196-01-HP
B-19
B
MIT License
Technical questions about the website go to Steve M.: webmaster at opensource.org /
Policy questions about open source go to the Board of Directors.
The contents of this website are licensed under the Open Software License version 1.1.
MIT License
Copyright (c) 1999, 2003 TanukiSoftware.org
Permission is hereby granted, free of charge, to any person obtaining a copy of this software and
associated documentation files (the "Software"), to deal in the Software without restriction, including
without limitation the rights to use, copy, modify, merge, publish, distribute, sub-license , and/or sell
copies of the Software, and to permit persons to whom the Software is furnished to do so, subject to the
following conditions:
The above copyright notice and this permission notice shall be included in all copies or substantial
portions of the Software.
THE SOFTWARE IS PROVIDED "AS IS", WITHOUT WARRANTY OF ANY KIND, EXPRESS OR
IMPLIED, INCLUDING BUT NOT LIMITED TO THE WARRANTIES OF MERCHANTABILITY,
FITNESS FOR A PARTICULAR PURPOSE AND NON-INFRINGEMENT. IN NO EVENT SHALL
THE AUTHORS OR COPYRIGHT HOLDERS BE LIABLE FOR ANY CLAIM, DAMAGES OR
OTHER LIABILITY, WHETHER IN AN ACTION OF CONTRACT, TORT OR OTHERWISE,
ARISING FROM, OUT OF OR IN CONNECTION WITH THE SOFTWARE OR THE USE OR
OTHER DEALINGS IN THE SOFTWARE.
ONC RPC License
/*
* Sun RPC is a product of Sun Microsystems, Inc. and is provided for
* unrestricted use provided that this legend is included on all tape
* media and as a part of the software program in whole or part. Users
* may copy or modify Sun RPC without charge, but are not authorized
* to license or distribute it to anyone else except as part of a product or
* program developed by the user.
*
* SUN RPC IS PROVIDED AS IS WITH NO WARRANTIES OF ANY KIND INCLUDING THE
* WARRANTIES OF DESIGN, MERCHANTIBILITY AND FITNESS FOR A PARTICULAR
* PURPOSE, OR ARISING FROM A COURSE OF DEALING, USAGE OR TRADE PRACTICE.
*
* Sun RPC is provided with no support and without any obligation on the
* part of Sun Microsystems, Inc. to assist in its use, correction,
* modification or enhancement.
B-20
Fabric Manager Administrator’s Guide
Publication Number: 53-1000196-01-HP
Open SSL License
B
*
* SUN MICROSYSTEMS, INC. SHALL HAVE NO LIABILITY WITH RESPECT TO THE
* INFRINGEMENT OF COPYRIGHTS, TRADE SECRETS OR ANY PATENTS BY SUN RPC
* OR ANY PART THEREOF.
*
* In no event will Sun Microsystems, Inc. be liable for any lost revenue
* or profits or other special, indirect and consequential damages, even if
* Sun has been advised of the possibility of such damages.
*
* Sun Microsystems, Inc.
* 2550 Garcia Avenue
* Mountain View, California 94043
*/
Open SSL License
License Agreement:
LICENSE ISSUES
==============
The OpenSSL toolkit stays under a dual license, i.e. both the conditions of the OpenSSL License and
the original SSLeay license apply to the toolkit. See below for the actual license texts. Actually both
licenses are BSD-style Open Source licenses. In case of any license issues related to OpenSSL please
contact [email protected].
OpenSSL License
--------------/* ====================================================================
* Copyright (c) 1998-2000 The OpenSSL Project. All rights reserved.
*
* Redistribution and use in source and binary forms, with or without
* modification, are permitted provided that the following conditions
* are met:
*
* 1. Redistributions of source code must retain the above copyright
*
notice, this list of conditions and the following disclaimer.
*
Fabric Manager Administrator’s Guide
Publication Number: 53-1000196-01-HP
B-21
B
Open SSL License
* 2. Redistributions in binary form must reproduce the above copyright
*
notice, this list of conditions and the following disclaimer in
*
the documentation and/or other materials provided with the
*
distribution.
*
* 3. All advertising materials mentioning features or use of this
*
software must display the following acknowledgment:
*
"This product includes software developed by the OpenSSL Project
*
for use in the OpenSSL Toolkit. (http://www.openssl.org/)"
*
* 4. The names "OpenSSL Toolkit" and "OpenSSL Project" must not be used to
*
endorse or promote products derived from this software without
*
prior written permission. For written permission, please contact
*
[email protected].
*
* 5. Products derived from this software may not be called "OpenSSL"
*
nor may "OpenSSL" appear in their names without prior written
*
permission of the OpenSSL Project.
*
* 6. Redistributions of any form whatsoever must retain the following
*
acknowledgment:
*
"This product includes software developed by the OpenSSL Project
*
for use in the OpenSSL Toolkit (http://www.openssl.org/)"
*
* THIS SOFTWARE IS PROVIDED BY THE OpenSSL PROJECT ``AS IS'' AND ANY
* EXPRESSED OR IMPLIED WARRANTIES, INCLUDING, BUT NOT LIMITED TO, THE
* IMPLIED WARRANTIES OF MERCHANTABILITY AND FITNESS FOR A PARTICULAR
* PURPOSE ARE DISCLAIMED. IN NO EVENT SHALL THE OpenSSL PROJECT OR
* ITS CONTRIBUTORS BE LIABLE FOR ANY DIRECT, INDIRECT, INCIDENTAL,
* SPECIAL, EXEMPLARY, OR CONSEQUENTIAL DAMAGES (INCLUDING, BUT
* NOT LIMITED TO, PROCUREMENT OF SUBSTITUTE GOODS OR SERVICES;
* LOSS OF USE, DATA, OR PROFITS; OR BUSINESS INTERRUPTION)
* HOWEVER CAUSED AND ON ANY THEORY OF LIABILITY, WHETHER IN CONTRACT,
* STRICT LIABILITY, OR TORT (INCLUDING NEGLIGENCE OR OTHERWISE)
* ARISING IN ANY WAY OUT OF THE USE OF THIS SOFTWARE, EVEN IF ADVISED
B-22
Fabric Manager Administrator’s Guide
Publication Number: 53-1000196-01-HP
Open SSL License
B
* OF THE POSSIBILITY OF SUCH DAMAGE.
* ====================================================================
*
* This product includes cryptographic software written by Eric Young
* ([email protected]). This product includes software written by Tim
* Hudson ([email protected]).
*
*/
Original SSLeay License
----------------------/* Copyright (C) 1995-1998 Eric Young ([email protected])
* All rights reserved.
*
* This package is an SSL implementation written
* by Eric Young ([email protected]).
* The implementation was written so as to conform with Netscapes SSL.
*
* This library is free for commercial and non-commercial use as long as
* the following conditions are aheared to. The following conditions
* apply to all code found in this distribution, be it the RC4, RSA,
* lhash, DES, etc., code; not just the SSL code. The SSL documentation
* included with this distribution is covered by the same copyright terms
* except that the holder is Tim Hudson ([email protected]).
*
* Copyright remains Eric Young's, and as such any Copyright notices in
* the code are not to be removed.
* If this package is used in a product, Eric Young should be given attribution
* as the author of the parts of the library used.
* This can be in the form of a textual message at program startup or
* in documentation (online or textual) provided with the package.
*
* Redistribution and use in source and binary forms, with or without
* modification, are permitted provided that the following conditions
* are met:
Fabric Manager Administrator’s Guide
Publication Number: 53-1000196-01-HP
B-23
B
Open SSL License
* 1. Redistributions of source code must retain the copyright
*
notice, this list of conditions and the following disclaimer.
* 2. Redistributions in binary form must reproduce the above copyright
*
notice, this list of conditions and the following disclaimer in the
*
documentation and/or other materials provided with the distribution.
* 3. All advertising materials mentioning features or use of this software
*
must display the following acknowledgement:
*
"This product includes cryptographic software written by
*
Eric Young ([email protected])"
*
The word 'cryptographic' can be left out if the rouines from the library
*
being used are not cryptographic related :-).
* 4. If you include any Windows specific code (or a derivative thereof) from
*
the apps directory (application code) you must include an acknowledgement:
*
"This product includes software written by Tim Hudson ([email protected])"
*
* THIS SOFTWARE IS PROVIDED BY ERIC YOUNG ``AS IS'' AND
* ANY EXPRESS OR IMPLIED WARRANTIES, INCLUDING, BUT NOT LIMITED TO, THE
* IMPLIED WARRANTIES OF MERCHANTABILITY AND FITNESS FOR A PARTICULAR
PURPOSE
* ARE DISCLAIMED. IN NO EVENT SHALL THE AUTHOR OR CONTRIBUTORS BE LIABLE
* FOR ANY DIRECT, INDIRECT, INCIDENTAL, SPECIAL, EXEMPLARY, OR
CONSEQUENTIAL
* DAMAGES (INCLUDING, BUT NOT LIMITED TO, PROCUREMENT OF SUBSTITUTE
GOODS
* OR SERVICES; LOSS OF USE, DATA, OR PROFITS; OR BUSINESS INTERRUPTION)
* HOWEVER CAUSED AND ON ANY THEORY OF LIABILITY, WHETHER IN CONTRACT,
STRICT
* LIABILITY, OR TORT (INCLUDING NEGLIGENCE OR OTHERWISE) ARISING IN ANY WAY
* OUT OF THE USE OF THIS SOFTWARE, EVEN IF ADVISED OF THE POSSIBILITY OF
* SUCH DAMAGE.
*
* The licence and distribution terms for any publically available version or
* derivative of this code cannot be changed. i.e. this code cannot simply be
* copied and put under another distribution licence
* [including the GNU Public Licence.]
*/
B-24
Fabric Manager Administrator’s Guide
Publication Number: 53-1000196-01-HP
Public Domain
B
Public Domain
This work was autored by Timothy Gerard Endres, [email protected].
This work has been placed into the public domain.
You are free to use this work in any way you wish.
DISCLAIMER
THIS SOFTWARE IS PROVIDED AS-IS, WITH ABSOLUTELY NO WARRANTY. YOU ASSUME
ALL RESPONSIBILITY FOR ANY AND ALL CONSEQUENCES THAT MAY RESULT FROM
THE USE OF THIS SOFTWARE!
Reusable Objects/NetComponents License
Original Reusable Objects, Inc.
Copyright © 1996-1998 Original Reusable Objects, Inc.
Copyright in this document and the software accompanying this document is owned by Original
Reusable Objects, Inc. All rights reserved.
NetComponents License
Original Reusable Objects, Inc., hereinafter referred to as ORO, grants you a non-exclusive, nontransferable limited license to use the software components comprising the NetComponents Java class
package (“Licensed Software”). There is no fee for this license. You may not redistribute any of the
Licensed Software except as follows:
You may reproduce and redistribute the Licensed Software in object code form only (Java .class files)
and only when incorporated into your software product which adds substantial and primary
functionality to the Licensed Software.
You may not permit further redistribution of the Licensed Software by your end users except as part of a
new software product you develop that meets the restricions of item 1.
To clarify, you may use the Licensed Software only to build new software you develop, and you may
only distribute the Licensed Software as part of this new software. You may not include the Licensed
Software in a software development kit or other library or development tool that exposes the API's of
the Licensed Software without first negotiating a specific license for that purpose with ORO, Inc.
Except as permitted by applicable law and this License, you may not decompile, reverse engineer,
disassemble, modify, rent, lease, loan, distribute, create derivative works from the Licensed Software or
transmit the Licensed Software over a network.
You may not use or otherwise export or reexport the Licensed Software except as authorized by United
States law and the laws of the jurisdiction in which the Licensed Software was obtained. In particular,
but without limitation, the Licensed Software may not be used or otherwise exported or reexported (1)
into (or to a national or resident of) any United States embargoed country or (2) to anyone on the U.S.
Treasury Department’s list of Specially Designated Nationals or the U.S. Department of Commerce's
Table of Denial Orders. By using the Licensed Software, you represent and warrant that you are not
located in, under control of, or a national or resident of any such country or on any such list.
Fabric Manager Administrator’s Guide
Publication Number: 53-1000196-01-HP
B-25
B
Sun Java License
ORO MAKES NO REPRESENTATIONS OR WARRANTIES ABOUT THE SUITABILITY OF THE
LICENSED SOFTWARE, EITHER EXPRESS OR IMPLIED, INCLUDING BUT NOT LIMITED TO
THE IMPLIED WARRANTIES OF MERCHANTABILITY, FITNESS FOR A PARTICULAR
PURPOSE, OR NON-INFRINGEMENT. ORO SHALL NOT BE LIABLE FOR ANY DAMAGES
SUFFERED BY LICENSEE AS A RESULT OF USING, MODIFYING OR DISTRIBUTING THE
LICENSED SOFTWARE OR ITS DERIVATIVES. THE LICENSED SOFTWARE IS NOT
DESIGNED FOR USE IN HIGH RISK ACTIVITIES REQUIRING FAIL-SAFE PERFORMANCE.
ORO DISCLAIMS ANY EXPRESS OR IMPLIED WARRANTY OF FITNESS FOR HIGH RISK
ACTIVITIES.
Restricted Rights Legend
The Licensed Software and documentation is a “commercial item,” as defined in 48 C.F.R. 2.101 (10/
95), consisting of “commercial computer software” and “commercial computer software
documentation,” as defined in 48 C.F.R. 12.212 (9/95). Use, duplication, or disclosure by the U.S.
Government is subject to the restrictions of U.S. GOVERNMENT END USERS consistent with 48
C.F.R. 12.212 and 48 C.F.R. 227.7202-1 through 227.7202-4 (6/95).
Trademarks
ORO, the ORO logo, Original Reusable Objects, Component software for the Internet, and
NetComponents are trademarks or registered trademarks of Original Reusable Objects, Inc. in the
United States and other countries.
Java is trademark of Sun Microsystems, Inc. Netscape is a trademark of Netscape Communications
Corporation. All other product names mentioned are the trademarks of their respective owners.
Sun Java License
(http://java.sun.com/j2se/1.5.0/jre-1_5_0_03-license.txt )
Sun Microsystems, Inc. Binary Code License Agreement
for the JAVA 2 PLATFORM STANDARD EDITION RUNTIME ENVIRONMENT 5.0
SUN MICROSYSTEMS, INC. ("SUN") IS WILLING TO LICENSE THE SOFTWARE IDENTIFIED
BELOW TO YOU ONLY UPON THE CONDITION THAT YOU ACCEPT ALL OF THE TERMS
CONTAINED IN THIS BINARY CODE LICENSE AGREEMENT AND SUPPLEMENTAL
LICENSE TERMS (COLLECTIVELY "AGREEMENT"). PLEASE READ THE AGREEMENT
CAREFULLY. BY DOWNLOADING OR INSTALLING THIS SOFTWARE, YOU ACCEPT THE
TERMS OF THE AGREEMENT. INDICATE ACCEPTANCE BY SELECTING THE "ACCEPT"
BUTTON AT THE BOTTOM OF THE AGREEMENT. IF YOU ARE NOT WILLING TO BE
BOUND BY ALL THE TERMS, SELECT THE "DECLINE" BUTTON AT THE BOTTOM OF THE
AGREEMENT AND THE DOWNLOAD OR INSTALL PROCESS WILL NOT CONTINUE.
1. DEFINITIONS. "Software" means the identified above in binary form, any other machine readable
materials (including, but not limited to, libraries, source files, header files, and data files), any updates
or error corrections provided by Sun, and any user manuals, programming guides and other
documentation provided to you by Sun under this Agreement. "Programs" mean Java applets and
applications intended to run on the Java 2 Platform Standard Edition (J2SE platform) platform on Javaenabled general purpose desktop computers and servers.
B-26
Fabric Manager Administrator’s Guide
Publication Number: 53-1000196-01-HP
Sun Java License
B
2. LICENSE TO USE. Subject to the terms and conditions of this Agreement, including, but not limited
to the Java Technology Restrictions of the Supplemental License Terms, Sun grants you a nonexclusive, non-transferable, limited license without license fees to reproduce and use internally
Software complete and unmodified for the sole purpose of running Programs. Additional licenses for
developers and/or publishers are granted in the Supplemental License Terms.
3. RESTRICTIONS. Software is confidential and copyrighted. Title to Software and all associated
intellectual property rights is retained by Sun and/or its licensors. Unless enforcement is prohibited by
applicable law, you may not modify, decompile, or reverse engineer Software. You acknowledge that
Licensed Software is not designed or intended for use in the design, construction, operation or
maintenance of any nuclear facility. Sun Microsystems, Inc. disclaims any express or implied warranty
of fitness for such uses. No right, title or interest in or to any trademark, service mark, logo or trade
name of Sun or its licensors is granted under this Agreement. Additional restrictions for developers and/
or publishers licenses are set forth in the Supplemental License Terms.
4. LIMITED WARRANTY. Sun warrants to you that for a period of ninety (90) days from the date of
purchase, as evidenced by a copy of the receipt, the media on which Software is furnished (if any) will
be free of defects in materials and workmanship under normal use. Except for the foregoing, Software
is provided "AS IS". Your exclusive remedy and Sun's entire liability under this limited warranty will
be at Sun's option to replace Software media or refund the fee paid for Software. Any implied
warranties on the Software are limited to 90 days. Some states do not allow limitations on duration of an
implied warranty, so the above may not apply to you. This limited warranty gives you specific legal
rights. You may have others, which vary from state to state.
5. DISCLAIMER OF WARRANTY. UNLESS SPECIFIED IN THIS AGREEMENT, ALL EXPRESS
OR IMPLIED CONDITIONS, REPRESENTATIONS AND WARRANTIES, INCLUDING ANY
IMPLIED WARRANTY OF MERCHANTABILITY, FITNESS FOR A PARTICULAR PURPOSE OR
NON-INFRINGEMENT ARE DISCLAIMED, EXCEPT TO THE EXTENT THAT THESE
DISCLAIMERS ARE HELD TO BE LEGALLY INVALID.
6. LIMITATION OF LIABILITY. TO THE EXTENT NOT PROHIBITED BY LAW, IN NO EVENT
WILL SUN OR ITS LICENSORS BE LIABLE FOR ANY LOST REVENUE, PROFIT OR DATA, OR
FOR SPECIAL, INDIRECT, CONSEQUENTIAL, INCIDENTAL OR PUNITIVE DAMAGES,
HOWEVER CAUSED REGARDLESS OF THE THEORY OF LIABILITY, ARISING OUT OF OR
RELATED TO THE USE OF OR INABILITY TO USE SOFTWARE, EVEN IF SUN HAS BEEN
ADVISED OF THE POSSIBILITY OF SUCH DAMAGES. In no event will Sun's liability to you,
whether in contract, tort (including negligence), or otherwise, exceed the amount paid by you for
Software under this Agreement. The foregoing limitations will apply even if the above stated warranty
fails of its essential purpose. Some states do not allow the exclusion of incidental or consequential
damages, so some of the terms above may not be applicable to you.
7. TERMINATION. This Agreement is effective until terminated. You may terminate this Agreement
at any time by destroying all copies of Software. This Agreement will terminate immediately without
notice from Sun if you fail to comply with any provision of this Agreement. Either party may terminate
this Agreement immediately should any Software become, or in either party's opinion be likely to
become, the subject of a claim of infringement of any intellectual property right. Upon Termination, you
must destroy all copies of Software.
8. EXPORT REGULATIONS. All Software and technical data delivered under this Agreement are
subject to US export control laws and may be subject to export or import regulations in other countries.
You agree to comply strictly with all such laws and regulations and acknowledge that you have the
responsibility to obtain such licenses to export, re-export, or import as may be required after delivery to
you.
Fabric Manager Administrator’s Guide
Publication Number: 53-1000196-01-HP
B-27
B
Sun Java License
9. TRADEMARKS AND LOGOS. You acknowledge and agree as between you and Sun that Sun owns
the SUN, SOLARIS, JAVA, JINI, FORTE, and iPLANET trademarks and all SUN, SOLARIS, JAVA,
JINI, FORTE, and iPLANET-related trademarks, service marks, logos and other brand designations
("Sun Marks"), and you agree to comply with the Sun Trademark and Logo Usage Requirements
currently located at http://www.sun.com/policies/trademarks. Any use you make of the Sun Marks
inures to Sun's benefit.
10. U.S. GOVERNMENT RESTRICTED RIGHTS. If Software is being acquired by or on behalf of
the U.S. Government or by a U.S. Government prime contractor or subcontractor (at any tier), then the
Government's rights in Software and accompanying documentation will be only as set forth in this
Agreement; this is in accordance with 48 CFR 227.7201 through 227.7202-4 (for Department of
Defense (DOD) acquisitions) and with 48 CFR 2.101 and 12.212 (for non-DOD acquisitions).
11. GOVERNING LAW. Any action related to this Agreement will be governed by California law and
controlling U.S. federal law. No choice of law rules of any jurisdiction will apply.
12. SEVERABILITY. If any provision of this Agreement is held to be unenforceable, this Agreement
will remain in effect with the provision omitted, unless omission would frustrate the intent of the
parties, in which case this Agreement will immediately terminate.
13. INTEGRATION. This Agreement is the entire agreement between you and Sun relating to its
subject matter. It supersedes all prior or contemporaneous oral or written communications, proposals,
representations and warranties and prevails over any conflicting or additional terms of any quote, order,
acknowledgment, or other communication between the parties relating to its subject matter during the
term of this Agreement. No modification of this Agreement will be binding, unless in writing and
signed by an authorized representative of each party.
SUPPLEMENTAL LICENSE TERMS
These Supplemental License Terms add to or modify the terms of the Binary Code License Agreement.
Capitalized terms not defined in these Supplemental Terms shall have the same meanings ascribed to
them in the Binary Code License Agreement . These Supplemental Terms shall supersede any
inconsistent or conflicting terms in the Binary Code License Agreement, or in any license contained
within the Software.
A. Software Internal Use and Development License Grant. Subject to the terms and conditions of this
Agreement and restrictions and exceptions set forth in the Software "README" file, including, but not
limited to the Java Technology Restrictions of these Supplemental Terms, Sun grants you a nonexclusive, non-transferable, limited license without fees to reproduce internally and use internally the
Software complete and unmodified for the purpose of designing, developing, and testing your
Programs.
B. License to Distribute Software. Subject to the terms and conditions of this Agreement and
restrictions and exceptions set forth in the Software README file, including, but not limited to the
Java Technology Restrictions of these Supplemental Terms, Sun grants you a non-exclusive, nontransferable, limited license without fees to reproduce and distribute the Software, provided that (i) you
distribute the Software complete and unmodified and only bundled as part of, and for the sole purpose
of running, your Programs, (ii) the Programs add significant and primary functionality to the Software,
(iii) you do not distribute additional software intended to replace any component(s) of the Software, (iv)
you do not remove or alter any proprietary legends or notices contained in the Software, (v) you only
distribute the Software subject to a license agreement that protects Sun's interests consistent with the
terms contained in this Agreement, and (vi) you agree to defend and indemnify Sun and its licensors
from and against any damages, costs, liabilities, settlement amounts and/or expenses (including
attorneys' fees) incurred in connection with any claim, lawsuit or action by any third party that arises or
results from the use or distribution of any and all Programs and/or Software.
B-28
Fabric Manager Administrator’s Guide
Publication Number: 53-1000196-01-HP
Wolf Paulus License
B
C. Java Technology Restrictions. You may not create, modify, or change the behavior of, or authorize
your licensees to create, modify, or change the behavior of, classes, interfaces, or subpackages that are
in any way identified as "java", "javax", "sun" or similar convention as specified by Sun in any naming
convention designation.
D. Source Code. Software may contain source code that, unless expressly licensed for other purposes, is
provided solely for reference purposes pursuant to the terms of this Agreement. Source code may not be
redistributed unless expressly provided for in this Agreement.
E. Third Party Code. Additional copyright notices and license terms applicable to portions of the
Software are set forth in the THIRDPARTYLICENSEREADME.txt file. In addition to any terms and
conditions of any third party opensource/freeware license identified in the
THIRDPARTYLICENSEREADME.txt file, the disclaimer of warranty and limitation of liability
provisions in paragraphs 5 and 6 of the Binary Code License Agreement shall apply to all Software in
this distribution.
For inquiries please contact: Sun Microsystems, Inc., 4150
Network Circle, Santa Clara, California 95054, U.S.A.
(LFI#141623/Form ID#011801)
Wolf Paulus License
$Id: license.txt,v 1.2 2005/05/31 05:05:47 wolfpaulus Exp $
Copyright (C) 2003-2005 Wolf Paulus.
All rights reserved.
Redistribution and use in source and binary forms, with or without modification, are permitted provided
that the following conditions are met:
1. Redistributions of source code must retain the above copyright notice, this list of conditions, and the
following disclaimer.
2. Redistributions in binary form must reproduce the above copyright notice, this list of conditions, and
the disclaimer that follows these conditions in the documentation and/or other materials provided with
the distribution.
3. The end-user documentation included with the redistribution, if any, must include the following
acknowledgment:
"This product includes software developed by the SWIXML Project (http://www.swixml.org/)."
Alternately, this acknowledgment may appear in the software itself, if and wherever such third-party
acknowledgments normally appear.
4. The name "Swixml" must not be used to endorse or promote products derived from this software
without prior written permission. For written permission, please contact <info_AT_swixml_DOT_org>
5. Products derived from this software may not be called "Swixml", nor may "Swixml" appear in their
name, without prior written permission from the Swixml Project Management.
THIS SOFTWARE IS PROVIDED ``AS IS'' AND ANY EXPRESSED OR IMPLIED WARRANTIES,
INCLUDING, BUT NOT LIMITED TO, THE IMPLIED WARRANTIES OF MERCHANTABILITY
AND FITNESS FOR A PARTICULAR PURPOSE ARE DISCLAIMED. IN NO EVENT SHALL
THE SWIXML PROJECT OR ITS CONTRIBUTORS BE LIABLE FOR ANY DIRECT, INDIRECT,
Fabric Manager Administrator’s Guide
Publication Number: 53-1000196-01-HP
B-29
B
Wolf Paulus License
INCIDENTAL, SPECIAL, EXEMPLARY, OR CONSEQUENTIAL DAMAGES (INCLUDING, BUT
NOT LIMITED TO, PROCUREMENT OF SUBSTITUTE GOODS OR SERVICES; LOSS OF USE,
DATA, OR PROFITS; OR BUSINESS INTERRUPTION) HOWEVER CAUSED AND ON ANY
THEORY OF LIABILITY, WHETHER IN CONTRACT, STRICT LIABILITY, OR TORT
(INCLUDING NEGLIGENCE OR OTHERWISE) ARISING IN ANY WAY OUT OF THE USE OF
THIS SOFTWARE, EVEN IF ADVISED OF THE POSSIBILITY OF SUCH DAMAGE.
====================================================================
This software consists of voluntary contributions made by many individuals on behalf of the Swixml
Project and was originally created by Wolf Paulus <wolf_AT_swixml_DOT_org>. For more
information on the Swixml Project, please see <http://www.swixml.org/>.
SWIXML LOGO PERMISSION AGREEMENT
(1) You may only use the SWIXML logos as a link to the SWIXML page at http://www.swixml.org.
You may not use the logo images for any other purpose, including advertising, marketing collateral,
labels, packaging, letterhead or business cards.
(2) You may not give away the SWIXML logo or otherwise provide, in any way, access to the HTML
code for the link.
(3) You agree to abide by the SWIXML Trademark and Logo Usage Requirements located at http://
www.swixml.org/license.txt. You may not alter the logo in any way, including its size, proportions,
colors or elements, or otherwise change its appearance. The logo must appear by itself; it may not be
combined with any other graphic or textual elements and may not be used as an element of any other
logo or mark.
(4) Your use of the logo must be truthful and not misleading nor may it imply any relationship with, or
endorsement or sponsorship by SWIXML. You may not use the logo on any web site that is in violation
of any applicable laws or government regulations.
(5) Where feasible, please consider placing the following legend on a web page accessible from the
page where the Logo appears:
"SWIXML and the SWIXML Logo are trademarks or registered trademarks of Carlsbad Cubes in
the U.S. and other countries."
(6) Carlsbad Cubes reserves the right to modify these guidelines or the logo or create a new logo at any
time. You agree to either modify your use of the logo or stop all use of the logo thirty (30) days
following electronic notice from Carlsbad Cubes. Carlsbad Cubes reserves the right to terminate this
agreement at any time. You agree to stop all use of the logo within thirty (30) days of notice of
termination.
(7) You acknowledge that Carlsbad Cubes is the sole owner of the SWIXML logo, the SWIXML
trademark and all SWIXML-based trademarks for use in connection with computer related products, or
services, and the good will associated with these marks. Your use of the logo inures solely to
SWIXML's benefit. You will not do anything inconsistent with Carlsbad Cubes' interest in the
SWIXML logo, the SWIXML trademark or Carlsbad Cubes' SWIXML-based trademarks, and you
agree not to adopt, use, register or attempt to register anywhere in the world any name, trademark, logo,
or similar designation confusingly similar to the SWIXML logo, the SWIXML trademark, or Carlsbad
Cubes' SWIXML-based trademarks.
B-30
Fabric Manager Administrator’s Guide
Publication Number: 53-1000196-01-HP
Wolf Paulus License
B
(8) CALSBAD CUBES DISCLAIMS ANY WARRANTIES THAT MAY BE EXPRESS OR IMPLIED
BY LAW REGARDING THE LOGO, INCLUDING WARRANTIES AGAINST INFRINGEMENT
OF THIRD PARTY RIGHTS AND ANY OTHER WARRANTIES THAT MAY BE IMPLIED BY
APPLICABLE LAW. CARLSBAD CUBES DOES NOT GRANT ANY INDEMNITY AGAINST
INFRINGEMENT OR OTHER CLAIMS ARISING FROM YOUR USE OF THE LOGO. YOUR USE
OF THE LOGO IS AT YOUR OWN RISK. YOU AGREE TO INDEMNIFY CARLSBAD CUBES
AGAINST ANY CLAIMS OR LIABILITY THAT MAY ARISE FROM YOUR USE OF THE LOGO.
(9) This Application/Agreement shall be governed by California law and controlling U.S. federal law.
This Application/Agreement is the parties' entire agreement relating to its subject matter, and it may not
be modified unless in writing signed by an authorized representative of each party. Notwithstanding the
foregoing, if any use of the Logo is governed by existing agreements you have entered into with
Carlsbad Cubes this agreement does not supersede or alter the terms of such other agreements.
Fabric Manager Administrator’s Guide
Publication Number: 53-1000196-01-HP
B-31
B
B-32
Wolf Paulus License
Fabric Manager Administrator’s Guide
Publication Number: 53-1000196-01-HP
Index
Symbols
.csv file
Alerts view
configuring display options
API policy, configuring 17-7
4-13
7-10
2-4
26-3
authentication domain
authentication issues
Numerics
authentication options, changing
24-3
503 Service Unavailable/Overloaded error 26-12
B
A
backbone fabric
AAA configuration
12-7
26-4
7-8
acknowledging alerts
activating
current port connectivity configuration 18-2
stored port connectivity configuration 18-4
AD. See Admin Domains.
adding
switches to a secure fabric 17-17
third-party management applications
AD-enabled fabrics
limitations with FC Routing 19-12
Admin Domains
brief description 1-6
admin password, changing 12-2
admin security password, changing
3-14, 11-25
backing up database
full backup 23-2, 24-5
incremental backup 23-3
banner, creating 24-7
access control. See RBAC.
account lockout
19-2
background colors, meaning of
21-2
17-15
administering
Fabric Watch 16-2
ISL trunking 11-9
license keys 11-10
Administrative Domains. See Admin Domains
baseline configurations
about 11-13
comparing switches 11-16
customizing 11-21
downloading 11-19
saving 11-14
baseline snapshots, changing 9-11
baseline switch
comparing switches to 11-18
downloading configuration from
blocked port numbers 2-3
browser refresh frequency, setting
browsers, supported
11-20
1-3
1-2
built-in FTP server, as firmware repository
14-3
alerts
acknowledging 7-8
deleting 7-8
identifying 7-2
resolving 7-8
Fabric Manager Administrator’s Guide
Publication Number: 53-1000196-01-HP
Index-1
C
call home
configuring 10-3
configuring notification parameters 7-13
editing configurations 10-4
enabling and disabling 10-5
external executable 10-2
monitoring alerts 10-6
triggers 10-1
capturing supportShow and supportSave output
change management
configuring notification parameters 7-13
limitations 9-3
managing profiles 9-1
snapshots and change reports 9-6
taking snapshots 9-8
change reports
displaying 9-6
displaying in Excel 9-10
exporting 9-9
printing 9-11
changing
admin password 12-2
admin security password 17-15
baseline snapshots 9-11
default color 3-15
printers 26-15
Topology view layout 5-4
checking physical health of a switch 11-25
CIM model
device A-3
device port A-7
fabric A-2
SAN A-2
switch A-2
switch port A-4
zone A-8
zone alias A-9
zone configuration A-7
zone membership A-8
client requirements 1-2, 1-4
comparing
snapshots 9-9
switches to a baseline file 11-16
switches to a baseline switch 11-18
configuration download
from baseline file 11-19
from baseline switch 11-20
configuration files, saving 11-23
configuration, exporting 9-10
26-8
configuring
Alerts view options 7-10
API policy 17-7
call home 10-3
DCC policy 17-9
EX_Ports 19-4
FC Router 19-4
FCIP tunnels 20-3
FCS policy 17-4
file transfer options 14-9
Front Panel policy 17-13
HTTP policy 17-7
Internet Explorer 1-3
IP interfaces 20-3
IP routes 20-3
MS policy 17-11
notification parameters 7-13
ports 11-7
RSNMP policy 17-7
SCC policy 17-6
Serial policy 17-13
SES policy 17-11
Telnet policy 17-7
WSNMP policy 17-7
connecting edge fabrics 19-4
2-20
CPU requirements 1-4
copying installations
cloning change management profiles 9-5
colors
changing default 3-15
meaning of 3-14, 5-2,
Index-2
11-25
Fabric Manager Administrator’s Guide
Publication Number: 53-1000196-01-HP
creating
change management profiles 9-4
custom performance monitoring graphs 8-11
custom performance monitoring reports 8-8
firmware policy 14-6
login banner 24-7
LSANs 19-6
performance monitor report templates 8-14
port groups 4-19
reboot groups (multiple switches) 14-20
reboot groups (single switch) 14-21
reports 22-1
secure fabrics 17-1
snapshots 9-8
switch groups 4-16
user account in FTP server 14-18
CUP 18-1
customizing
baseline configurations
Fabric Manager 3-18
tables 3-18
11-21
D
database backups
full 23-2, 24-5
incremental 23-3
database views A-1
date and time, synchronizing
dbbackup utility
11-5
23-1
17-9
default color, changing 3-15
DCC policy, configuring
deleting
alerts 7-8
change management profiles 9-6
fabrics 4-9
LSANs 19-8
performance monitoring reports and graphs 8-19
switch and port groups 4-20
device diagnostic wizard, troubleshooting 26-14
25-1
4-11
device diagnostics
device names
A-7
device sharing, diagnosing 19-5
device WWNs, importing 21-7
device, CIM model A-3
device port, CIM model
Fabric Manager Administrator’s Guide
Publication Number: 53-1000196-01-HP
devices
displaying 5-7
sharing between fabrics 19-6
diagnosing fabric device sharing 19-5
DirectX drivers 2-2
disabling
call home 10-5
no-node WWN zoning 17-17
performance monitoring 8-7
ports 11-6
switch passwords 12-1
switches 11-6
tool tips 3-21
discovering a fabric 4-1, 4-3
disk space requirements
1-5
displaying
attached devices 5-7
change reports 9-6
change reports in Excel 9-10
FC Router information 19-9
logical SANs 19-8
Name Server information 6-1
performance monitoring reports and graphs
SAN elements 3-18
document conventions xxii
8-18
downloading configuration to switch
from baseline file 11-19
from baseline switch 11-20
downloading firmware
creating policy for 14-6
to HBAs 14-15
to multiple switches 14-11
to XPath OS switches 14-18
using external FTP server 14-13
with firmware repository support 14-12
E
edge fabrics
about 19-2
connecting 19-4
editing
call home configurations 10-4
change management profiles 9-5
performance monitoring graphs 8-19
port groups 4-20
switch groups 4-18
third-party management applications 21-4
Index-3
email notification parameters, configuring
7-13
Fabric Watch
about 16-1
administering 16-2
Fabric Watch module, launching
enabling
call home 10-5
no-node WWN zoning 17-17
performance monitoring 8-5
ports 11-6
secure mode 17-1
switch passwords 12-1
switches 11-6
tool tips 3-21
end-to-end monitoring 8-2
fabric, CIM model
A-2
FabricManager.Properties file
FC Router information, displaying
19-4
Excel, opening performance monitoring reports in
8-20
exporting
license keys 11-10
performance monitoring reports 8-18
snapshot and change reports 9-9
switch configuration information 9-10
external executable for call home 10-2
FCIP tunnels, configuring
FCR Info view
20-3
19-9
17-4
14-19
4-14
FDMI-based firmware downloads 14-16
Fibre Channel Association xxv
FICON CUP 18-1
file transfer options, configuring 14-9
FDMI host names, importing
fabric events
filtering 7-12
viewing 7-11
Fabric Manager
customizing 3-18
installing 2-6
installing on Linux 2-17
installing on Solaris 2-14
installing server 2-14, 2-17
launching 3-1
licensing 2-4
registering 2-5
uninstalling 2-22
upgrading 2-4
Fabric Manager license key and serial number 26-11
Fabric Manager services, managing
fabric merge check 25-2
4-10
fabric profile manager 14-6
fabric scan 4-3
fabric topologies
Index-4
19-9
FDMI device information, collecting
F
26-14
FC-FC routing
about 19-2
limitations with AD-enabled fabrics 19-12
limitations with secure fabrics 19-12
setting up 19-3
supported switches 19-1
FCIP Tunneling Service, about 20-1
FCS policy, configuring
fabric names
2-2
fabrics
connecting 19-4
deleting 4-9
discovering 4-1, 4-3
logging in 4-4
renaming 4-10
FC Router Configuration wizard, troubleshooting
evaluation version of Fabric Manager 2-5
events
filtering 7-12
viewing 7-11
EX_Ports, configuring
16-1
5-1
24-2
filtering
elements 3-20
fabric events 7-12
firewall requirement 1-4
firmware
downloading to multiple switches 14-11
importing into repository 14-4
moving to new FTP server 14-18
removing from repository 14-6
firmware download
controlling reboots 14-15
creating policy for 14-6
to HBAs 14-15
to XPath OS switches 14-18
firmware policy, creating 14-6
firmware repository
14-3
Fabric Manager Administrator’s Guide
Publication Number: 53-1000196-01-HP
14-8
14-1
HTTP requirement 2-3
firmware versions, viewing
firmware-specific features
FMS-enabled switches
activating port connectivity configuration 18-2
activating stored port connectivity configuration
identifying 18-1
foreign fabrics, importing 21-7
Front Panel policy, configuring
I
18-4
17-13
FTP
built-in server 2-1
FTP server
configuring 14-9
moving firmware to 14-18
FTP server (built-in)
as firmware repository 14-3
creating user account in 14-18
full database backup 23-2
icons
Topology view 5-2
identifying
alerts 7-2
port zone conflicts 18-6
IDID-enabled switches, identifying
18-6
importing
device WWNs 21-7
FDMI host names 4-14
firmware into repository 14-4
license keys 11-12
incremental database backup 23-3
18-6
installation requirements 2-1
insistent domain ID
G
installation wizard, troubleshooting 26-12
installations, copying from server to server
GbE ports
20-1
generating reports
22-1
generating reports and graphs from performance monitoring
templates 8-16
gping application, launching
21-4
granularity levels in performance monitoring
graphs, performance monitoring
about 8-4
creating 8-11
deleting 8-19
displaying 8-18
editing 8-19
saving 8-17
groups
about 4-14
creating 4-16, 4-19
deleting 4-20
editing 4-18, 4-20
8-3
2-20
installing
Fabric Manager server 2-6
installing Fabric Manager
server (Linux) 2-17
server (Solaris) 2-14
installing Fabric Manager on Windows 2-6
20-3
IP routes, configuring 20-3
IP interfaces, configuring
iSCSI Target Gateway
supported switches 13-1
ISL trunking, administering 11-9
J
J2SE patches
2-4
Java Plug-ins, supported
1-2
2-2
Java-VM not installed error 26-15
Java Runtime Environment (JRE)
H
hard disk space requirements
1-5
14-15
HTTP and HTTPS settings, changing 24-8
HTTP policy, configuring 17-7
HBAs, downloading firmware onto
Fabric Manager Administrator’s Guide
Publication Number: 53-1000196-01-HP
Index-5
19-2
L
metaSAN
launching
Fabric Manager 3-1
Fabric Watch module 16-1
gping application 21-4
policy editor 17-3
Server Management Console 24-2
third-party management applications
Web Tools Switch Explorer 21-5
license keys
administering 11-10
exporting 11-10
for Fabric Manager 26-11
importing and restoring 11-12
removing 11-13
license types 2-4
monitoring
call home alerts 10-6
link incidents 18-9
performance 8-1
MS policy, configuring 17-11
modifying change management profiles
link incidents, monitoring
18-9
links
customizing in Topology view 5-2
viewing 5-9
log level, setting 25-4
logging in to switches and fabrics
4-4
logical SANs. See LSANs.
login banner, creating
24-7
26-3
LSAN view 19-8
login issues
LSANs
creating 19-6
displaying 19-8
modifying 19-8
M
9-5
21-4
N
Name Server entries, displaying
6-1
naming
devices 4-11
fabrics 4-10
ports 4-11
switches 4-10
NIS authentication 2-16,
no-node WWN zoning
2-19
17-17
notification parameters, configuring
7-13
O
opening
performance monitoring reports in Excel 8-20
telnet session for nonsecure switch 11-6
operating systems supported 1-2
P
passwords
changing 12-2
enabling and disabling
12-1
mail server address, configuring 7-13
management applications
adding 21-2
editing 21-4
examples 21-4
launching 21-4
managing zoning 15-16
memory requirements 1-4
menu bar 3-14
merging
fabric merge check 25-2
secure fabrics 17-18
Index-6
Fabric Manager Administrator’s Guide
Publication Number: 53-1000196-01-HP
performance monitoring
about 8-1
creating custom graphs 8-11
creating custom reports 8-8
creating report templates 8-14
deleting reports and graphs 8-19
disabling 8-7
displaying reports and graphs 8-18
editing graphs 8-19
enabling 8-5
exporting reports 8-18
generating reports from templates 8-16
graphs 8-4
opening reports in Excel 8-20
printing reports 8-17
report templates 8-4
reports 8-3
saving reports and graphs 8-17
troubleshooting 26-14
physical fabric administrator 1-6
physical health of switches, checking
11-25
planning for the installation 2-1
platforms, supported
1-2
policies, configuring 17-4, 17-6, 17-7, 17-9, 17-11, 17-
13
profiles
cloning 9-5
creating 9-4
deleting 9-6
modifying 9-5
R
RADIUS configuration 12-7
RADIUS server authentication
RAM requirements
2-1, 2-11, 2-16, 2-19
1-4
RBAC
pre-defined roles 1-7
reboot groups
assigning switches to 14-22
creating with multiple switches 14-20
creating with single switch 14-21
reboot, sequenced 14-23
rebooting switches
14-19
reboots, controlling after firmware download 14-15
refresh frequency, setting
refresh rates
1-3
2-13, 3-16
17-3
polling rates 2-13, 3-16
refreshing
status information 3-16
registering Fabric Manager 2-5
port connectivity
activating current configuration 18-2
activating stored configuration 18-4
identifying port zone conflicts 18-6
port groups
about 4-14
creating 4-19
deleting 4-20
editing 4-20
port names 4-11
removing
firmware from repository 14-6
license keys 11-13
renaming
devices 4-11
fabrics 4-10
ports 4-11
switches 4-10
replacing switches 11-26
policy editor, launching
port statistics
8-2
port zone conflicts, identifying 18-6
ports
configuring 11-7
enabling and disabling
renaming 4-11
printers, changing 26-15
11-6
replicating RADIUS configuration 12-7
report templates
creating 8-14
for performance monitoring 8-4
reports
performance monitoring 8-3, 8-8
switch health 22-1
printing
performance monitoring reports 8-17
snapshot and change reports 9-11
Fabric Manager Administrator’s Guide
Publication Number: 53-1000196-01-HP
Index-7
11, 17-13
reports, performance monitoring
deleting 8-19
displaying 8-18
exporting 8-18
opening in Excel 8-20
printing 8-17
saving 8-17
request node identification 18-8
security, no-node WWN zoning 17-17
sequenced reboot
sequenced reboot, troubleshooting
server installation 2-6, 2-14, 2-17
18-8
Role-Based Access Control. See RBAC
17-7
Server Management Console
about 24-1
backing up database 24-5
capturing supportshow information 24-6
changing authentication options 24-3
changing secure communication settings 24-8
changing Web Server port number 24-10
creating login banner 24-7
launching 24-2
managing Fabric Manager services 24-2
restoring database 24-5
server requirements 1-2, 1-4
SES policy, configuring
21-4
S
3-18
SAN, CIM model A-2
SAN elements display
saving
baseline configurations 11-14
performance monitoring reports and graphs 8-17
supportShow and supportSave output 26-8
switch configuration files 11-23
SCC policy, configuring 17-6
sectelnet, launching 17-19
secure communication settings, changing 24-8
secure fabrics
adding switches to 17-17
limitations with FC Routing 19-12
merging 17-18
using telnet 17-19
secure mode
enabling 17-1
policy editor 17-3
requirements 17-1
security password, changing 17-15
security policies, configuring 17-4, 17-6, 17-7, 17-9, 17-
Index-8
26-11
Serial policy, configuring 17-13
restoring
database 24-5
license keys 11-12
RNID exchange, identifying ports that completed
RSNMP policy, configuring
26-14
serial number for Fabric Manager, locating
requirements
for client and server 1-4
for installation 2-1
for secure mode 17-1
resolving alerts 7-8
running
subnet scan (fabric scan) 4-3
third-party management applications
14-23
17-11
setting
admin account password 12-2
log level 25-4
refresh frequency 1-3
severity level, setting for log parameters
sharing devices between fabrics
25-4
19-6
snapshots
changing baseline 9-11
comparing 9-9
creating 9-8
exporting 9-9
printing 9-11
sorting table items 3-19
starting
Fabric Manager 3-1
Fabric Manager services
status indicators 3-14
status legend
24-2
3-14
stopping Fabric Manager services
subnet scan
24-2
4-3
supported
hardware and software
operating systems 1-2
switch models 11-3
supportSave
capturing output 26-8
xxi
Fabric Manager Administrator’s Guide
Publication Number: 53-1000196-01-HP
supportShow
capturing output 26-8
supportshow information
capturing 24-6, 26-1
printing 26-9
switch colors 5-2
third-party management applications
adding 21-2
editing 21-4
examples 21-4
launching 21-4
time and date, synchronizing 11-5
9-10
Switch Explorer, launching 21-5
tool tips
enabling and disabling
Topology view 5-3
topologies, viewing 5-1
switch configuration, exporting
switch groups
about 4-14
creating 4-16
deleting 4-20
editing 4-18
switch health report
22-1
switch models supported 11-3
switch names 4-10
switch passwords, enabling and disabling
12-1
A-4
switch, CIM model A-2
switch-based authentication 2-16, 2-19
switch port, CIM model
switches
adding to a secure fabric 17-17
assigning to reboot groups 14-22
checking status of 11-25
enabling and disabling 11-6
logging in 4-4
rebooting 14-19
renaming 4-10
replacing 11-26
synchronizing date and time fabric-wide
system requirements
11-5
1-4
3-21
Topology view
changing the layout 5-4
troubleshooting
authentication issues 26-3
capturing client-side issues 26-5
capturing server-side issues 26-7
client access to switches 26-5
client/server interaction 26-5
devices 25-1
fabric discovery problems 26-8
Fabric Manager server issues 26-7
firmware download to HBA 26-12
general 26-11
heavy CPU usage 26-5, 26-7
installation wizard 26-12
Java-VM error 26-15
performance monitoring 26-14
printing supportshow output 26-9
sequenced reboot 26-14
tips 26-1
topology issues 26-10
wizard hangs 26-14
trunking, ISL 11-9
trusted switches
17-4
20-3
tunnels, configuring
T
table items, sorting 3-19
U
tables
customizing 3-18
Telnet policy, configuring 17-7
uninstalling Fabric Manager
telnet session, opening for nonsecure switch
11-6
templates
for performance monitoring reports 8-4, 8-14
generating reports and graphs from 8-16
2-22
updating status information 3-16
upgrading Fabric Manager 2-4
user settings, stored 23-1
V
VE_Ports
Fabric Manager Administrator’s Guide
Publication Number: 53-1000196-01-HP
20-1
Index-9
version mismatch
26-6
VEX_Ports
about 19-2, 20-3
video drivers 2-2
View panel
example 5-1
viewing
fabric events 7-11
fabric topologies 5-1
firmware repository 14-3
links 5-9
SAN firmware versions 14-8
virtual memory requirements 1-4
W
Web Server port number, changing
Web Tools, launching
24-10
21-5
2-4
WSNMP policy, configuring 17-7
Windows authentication domain
Z
zone alias, CIM model A-9
zone configuration, CIM model A-7
zone conflicts, identifying 18-6
zone membership, CIM model
A-8
zone, CIM model A-8
zoning
about 15-1
managing 15-16
Index-10
Fabric Manager Administrator’s Guide
Publication Number: 53-1000196-01-HP