1
RASExpress
User Guide
RASExpress User Guide
P/N 82065605, Revision F
© 1999 by Multi-Tech Systems, Inc.
All rights reserved. This publication may not be reproduced, in whole or in part,
without prior expressed written permission from Multi-Tech Systems, Inc.
Multi-Tech Systems, Inc. makes no representation or warranties with respect to the
contents hereof and specifically disclaims any implied warranties of merchantability
or fitness for any particular purpose. Furthermore, Multi-Tech Systems, Inc. reserves
the right to revise this publication and to make changes from time to time in the content hereof without obligation of Multi-Tech Systems, Inc., to notify any person or organization of such revisions or changes.
Revision
Date
B
5/29/97
Description
Updated for RASExpress version 5.1. Added Quick Start, Telnet, and
Web browser chapters, and Update appendix.
C
9/22/97
Updated for RASExpress version 5.2.
D
10/21/98
Updated for RASExpress version 5.31. Deleted Windows remote
utilities chapter and warranty chapter.
E
3/17/99
Updated for RASExpress 5.40.
F
12/22/99
Updated for RASExpress 5.50. Added filter appendix; rearranged
appendixes; updated MCSI chapter.
Multi-Tech, CommPlete, RASExpress, MCSI, MultiModem, MultiModemManager,
and the Multi-Tech logo are trademarks of Multi-Tech Systems, Inc. MS-DOS and
Windows are registered trademarks of Microsoft in the U.S. and other countries.
Novell is a registered trademark and IPX is a trademark of Novell Inc. pcANYWHERE
is a registered trademark of Symantec Corporation. Other trademarks and trade
names mentioned in this publication belong to their respective owners.
Multi-Tech Systems, Inc.
2205 Woodale Drive
Mounds View, Minnesota 55112
(612) 785-3500 or (800) 328-9717
Fax (612) 785-9874
Fax Back (612) 717-5888
Technical Support (800) 972-2439
BBS (612) 785-3702 or (800) 392-2432
Internet Address: http://www.multitech.com
Software User License Agreement
RASExpress software is licensed by Multi-Tech Systems, Inc. to the original end-user purchaser of the product, hereafter referred to as “Licensee.” The License includes the distribution diskette, other accompanying programs, and the documentation. The RASExpress
software, hereafter referred to as “Software,” consists of the computer program files included on the original distribution diskettes.
Licensee agrees that by purchase and/or use of the Software, he hereby accepts and
agrees to the terms of this License Agreement.
In consideration of mutual covenants contained herein, and other good and valuable considerations, the receipt and sufficiency of which is acknowledged, Multi-Tech Systems,
Inc. does hereby grant to the Licensee a non-transferable and non-exclusive license to use
the Software and accompanying documentation on the following conditions and terms:
The software is furnished to the Licensee for execution and use on a single computer system only and may be copied (with the inclusion of the Multi-Tech Systems, Inc. copyright
notice) only for use on that computer system. The Licensee hereby agrees not to provide
or otherwise make available any portion of this software in any form to any third party
without the prior express written approval of Multi-Tech Systems, Inc.
Licensee is hereby informed that this Software contains confidential proprietary and
valuable trade secrets developed by or licensed to Multi-Tech Systems, Inc. and agrees
that sole ownership shall remain with Multi-Tech Systems, Inc.
The Software is copyrighted. Except as provided herein, the Software and documentation
supplied under this agreement may not be copied, reproduced, published, licensed, sublicensed, distributed, transferred, or made available in any form, in whole or in part, to
others, without expressed written permission of Multi-Tech Systems, Inc. Copies of the
Software may be made to replace worn or deteriorated copies for archival or backup
procedures.
Licensee agrees to implement sufficient security measures to protect Multi-Tech Systems,
Inc. proprietary interests and not to allow the use, copying or transfer by any means,
other than in accordance with this agreement. Licensee agrees that any breach of this
agreement will be damaging to Multi-Tech Systems, Inc.
Licensee agrees that all warranties, implied or otherwise, with regard to this Software,
including all warranties of merchantability and fitness for any particular purpose are expressly waived, and no liability shall extend to any damages, including consequential
damages, whether known to Multi-Tech Systems, Inc. It is hereby expressly agreed that
Licensee’s remedy is limited to replacement or refund of the license fee, at the option of
Multi-Tech Systems, Inc., for defective distribution media. There is no warranty for misused materials.
This package contains 3.5-inch disks. Neither this software nor the accompanying documentation may be modified or translated without the written permission of Multi-Tech
Systems, Inc.
This agreement shall be governed by the laws of the State of Minnesota. The terms and
conditions of this agreement shall prevail regardless of the terms of any other submitted
by the Licensee. This agreement supersedes any proposal or prior agreement. Licensee
further agrees that this License Agreement is the complete and exclusive statement of
Agreement, oral, written, or any other communications between Multi-Tech Systems, Inc.
and Licensee relating to the subject matter of this agreement. This agreement is not assignable without written permission of an authorized agent of Multi-Tech Systems, Inc.
CommPlete Communications Server
iii
iv
CommPlete Communications Server
Table of Contents
1 Introduction
Introduction............................................................................................................................. 2
Typographic Conventions ..................................................................................................... 3
How RASExpress Works with LANs and Data Communications................................... 4
Redirectors........................................................................................................................... 4
LAN Operation with RASExpress.................................................................................... 4
RASExpress Dial-Out and Dial-In Operation ................................................................. 5
Dial-Out Operation ......................................................................................................... 5
Remote Control Dial-In Operation................................................................................ 5
Remote Control Dial-In Security ................................................................................... 6
Using PPP and TCP/IP with the RASExpress Server........................................................ 7
IP Addressing...................................................................................................................... 7
IP Addresses........................................................................................................................ 7
Address Mask ..................................................................................................................... 7
Default Route Configuration............................................................................................. 8
Specifications........................................................................................................................... 9
2 Quick Start
RASExpress Quick Start....................................................................................................... 12
3 Terminal and Telnet Management
Introduction........................................................................................................................... 16
How to Access RASExpress ................................................................................................ 16
Using a Terminal............................................................................................................... 16
Using Telnet ...................................................................................................................... 16
Main Menu ............................................................................................................................ 17
Quick Configuration of Server............................................................................................ 17
Dial Out.................................................................................................................................. 20
Configuration of Server ....................................................................................................... 21
Server Setup ...................................................................................................................... 21
General Setup................................................................................................................. 21
IP Remote Access........................................................................................................... 23
IPX Remote Access ........................................................................................................ 25
Point-to-Point Protocol ................................................................................................. 26
Multilink PPP ................................................................................................................. 28
MAC Layer Bridging..................................................................................................... 29
Telnet............................................................................................................................... 30
SNTP Client.................................................................................................................... 30
SNMP Agent .................................................................................................................. 32
SMTP Client ................................................................................................................... 33
Virtual Port Information ............................................................................................... 34
Physical Port Information............................................................................................. 36
Applications ................................................................................................................... 36
Security ........................................................................................................................... 37
OSPF Configuration ...................................................................................................... 38
User Setup ......................................................................................................................... 41
CommPlete Communications Server
v
User Information ........................................................................................................... 41
Edit Permissions ............................................................................................................ 42
Communication Setup ......................................................................................................45
ISI Setup.......................................................................................................................... 45
Board Information......................................................................................................... 46
Edit Line Information ................................................................................................... 46
ISDN Primary Rate Interface ....................................................................................... 47
Modem Setup.....................................................................................................................48
Administrator Setup .........................................................................................................49
Management of Server..........................................................................................................51
Server Information ............................................................................................................51
General Information...................................................................................................... 51
Statistics Summary........................................................................................................ 52
Version............................................................................................................................ 52
Reboot Server................................................................................................................. 53
Current Log Status ........................................................................................................ 53
Set Server Time.............................................................................................................. 53
User Information ...............................................................................................................53
Line Information................................................................................................................54
Statistics ..............................................................................................................................56
Display General Statistics............................................................................................. 56
Display IP Statistics....................................................................................................... 57
Display IPX Statistics .................................................................................................... 59
Display PPP Statistics ................................................................................................... 60
Display Port Statistics ................................................................................................... 61
Display Dial In/Dial Out Statistics ............................................................................. 62
Display Line Usage Statistics ....................................................................................... 62
Display Modem Connect String Table ....................................................................... 63
Display Line Utilization Table..................................................................................... 63
Display Call History ..................................................................................................... 64
Reset SBC Processors ........................................................................................................65
4 Browser Management
Introduction ...........................................................................................................................68
Main Page...............................................................................................................................68
Configuration of Server Menu.............................................................................................70
Server Configuration.........................................................................................................71
User Configuration............................................................................................................73
User Information Form................................................................................................. 74
Edit Permissions ............................................................................................................ 75
Administrator Configuration...........................................................................................78
IP Remote Access...............................................................................................................80
IPX Remote Access ............................................................................................................83
Point to Point Protocol ......................................................................................................85
Multilink PPP.....................................................................................................................89
MAC Layer Bridging ........................................................................................................90
Virtual Port Setup..............................................................................................................91
Physical Port Setup............................................................................................................93
Telnet...................................................................................................................................94
SNTP Setup ........................................................................................................................95
SNMP Setup.......................................................................................................................97
SMTP Setup........................................................................................................................98
vi
CommPlete Communications Server
Applications .................................................................................................................... 100
Security ............................................................................................................................ 101
ISI Setup ........................................................................................................................... 103
ISI Card Setup .............................................................................................................. 103
Add a Card ................................................................................................................... 104
Delete a Card................................................................................................................ 104
Modify Card Settings .................................................................................................. 104
Edit Line Information.................................................................................................. 105
ISDN PRI Setup............................................................................................................... 106
Modem Setup .................................................................................................................. 107
OSPF Configuration ....................................................................................................... 109
OSPF Area Settings......................................................................................................... 110
OSPF Areas................................................................................................................... 110
OSPF Area Configuration........................................................................................... 111
OSPF Area Address Range Settings.......................................................................... 112
OSPF Interface Settings.................................................................................................. 113
Management of Server Menu............................................................................................ 115
Server Information.......................................................................................................... 116
User Information............................................................................................................. 117
Serial Line Control.......................................................................................................... 117
Reboot Server .................................................................................................................. 118
General Statistics............................................................................................................. 119
Router & PPP Statistics .................................................................................................. 120
Calls & Line Usage Statistics ......................................................................................... 121
Modem Connect String Table ....................................................................................... 122
Statistics Summary ......................................................................................................... 123
IPX Route Table .............................................................................................................. 123
IPX SAP Table ................................................................................................................. 124
ARP Statistics .................................................................................................................. 124
TCP/UDP Statistics ........................................................................................................ 125
IP Route Table ................................................................................................................. 125
Port Statistics ................................................................................................................... 126
Display EIA Signals........................................................................................................ 127
Display Port Addresses.................................................................................................. 128
Inbound Users................................................................................................................. 128
Reset SBC Processors...................................................................................................... 129
Line Utilization ............................................................................................................... 129
Call History ..................................................................................................................... 130
TCP Connection Table ................................................................................................... 131
5 Remote Node Client Software
Windows Dial-Up Networking ........................................................................................ 134
Windows 95/98................................................................................................................... 134
Windows NT 4.0 ................................................................................................................. 135
6 MCSIWSN and WinMCSI Redirectors
Introduction......................................................................................................................... 138
The MCSIWSN Redirector ................................................................................................ 138
MCSIWSN Installation................................................................................................... 138
Running the MCSIWSN Redirector ............................................................................. 139
MCSIWSN Command Line Operation ........................................................................ 139
Using MCSIWSN as an INT14 Redirector................................................................... 141
CommPlete Communications Server
vii
COMS14 Command Line Parameters...........................................................................142
COMS14 -L [Server Name]............................................................................................142
COMS14 -C COMn LineType SpecificName GeneralName ServerName ....................142
COMS14 -D COMn ......................................................................................................143
COMS14 -M...................................................................................................................143
The WinMCSI Redirector ...................................................................................................144
WinMCSI Installation .....................................................................................................144
Running the WinMCSI Redirector ................................................................................145
To log on to the communications server from a workstation.................................145
Checking Connectivity ...................................................................................................148
7 RASExpress Script Language
Introduction to the RASExpress Script Language...........................................................150
An Overview of the RASExpress Script Language.........................................................150
Commands .......................................................................................................................150
Arguments........................................................................................................................151
Variables ...........................................................................................................................151
Format String and Format Control Characters............................................................151
Script Language Execution Notes .................................................................................152
Operator Precedence.......................................................................................................152
Creating, Compiling, and Executing a Script File .......................................................152
Creating a Script File....................................................................................................152
Compiling a Script File ................................................................................................153
Script Error Handling ..................................................................................................153
Running a Script File....................................................................................................153
RASExpress Script Language Command Format .......................................................154
Script Command Summary................................................................................................155
Format Conversion..........................................................................................................155
Communication Parameter Settings .............................................................................155
Display ..............................................................................................................................156
Arithmetic Conversion ...................................................................................................156
File/Directory Manipulation .........................................................................................156
Connection Information and Control ...........................................................................158
String Manipulation ........................................................................................................159
Miscellaneous...................................................................................................................160
RASExpress Script Commands..........................................................................................161
Appendix A Reinstalling RASExpress
Introduction .........................................................................................................................184
Reinstalling RASExpress ....................................................................................................184
To reinstall RASExpress on a RASCard ....................................................................184
RASExpress Server Configuration Utility........................................................................187
Main Menu .......................................................................................................................187
Server Setup .....................................................................................................................188
General Setup................................................................................................................188
Administrator Setup ....................................................................................................190
IP Remote Access Configuration................................................................................190
IPX Remote Access Configuration .............................................................................192
PPP Configuration........................................................................................................193
Multilink PPP................................................................................................................196
MAC Layer Bridging ...................................................................................................197
Telnet .............................................................................................................................197
viii
CommPlete Communications Server
SNTP Client.................................................................................................................. 198
SNMP Agent ................................................................................................................ 200
Virtual Port Information ............................................................................................. 201
Physical Port Information........................................................................................... 203
SMTP Client ................................................................................................................. 204
Applications ................................................................................................................. 205
Security ......................................................................................................................... 206
OSPF Configuration .................................................................................................... 207
User Setup ....................................................................................................................... 210
User Information ......................................................................................................... 210
Access List .................................................................................................................... 212
Communication Setup ................................................................................................... 214
Intelligent Serial Interface (ISI) .................................................................................. 215
Line Information.......................................................................................................... 215
ISDN Primary Rate Interface ..................................................................................... 217
Modem Setup .................................................................................................................. 217
RASExpress Server ............................................................................................................. 219
Function Keys.................................................................................................................. 220
Options Menu ................................................................................................................. 220
Server Information ...................................................................................................... 220
User Information ......................................................................................................... 221
User Information Window ......................................................................................... 221
Access List .................................................................................................................... 222
Serial Line Control....................................................................................................... 225
Shutdown Server ......................................................................................................... 226
Display Statistics.......................................................................................................... 226
Display EIA Signals..................................................................................................... 228
Display Port Addresses .............................................................................................. 228
Inbound User List........................................................................................................ 228
Reset SBC Processors .................................................................................................. 229
RASExpress Server Color Utility...................................................................................... 230
General Setup .................................................................................................................. 230
Menu Color Setup........................................................................................................... 231
Form Color Setup............................................................................................................ 232
Directory Color Setup .................................................................................................... 233
Appendix B Upgrading RASExpress
Introduction......................................................................................................................... 234
Before You Start .................................................................................................................. 234
How to Upgrade RASExpress........................................................................................... 234
Initiating the New Port Names ......................................................................................... 235
Appendix C Telnet Commands
Introduction......................................................................................................................... 236
Telnet Configuration Commands..................................................................................... 236
General Commands........................................................................................................ 236
Application Commands................................................................................................. 237
IP Commands.................................................................................................................. 238
IPX Commands ............................................................................................................... 239
Multilink PPP Commands............................................................................................. 239
MAC Layer Commands................................................................................................. 240
CommPlete Communications Server
ix
Telnet Commands ...........................................................................................................240
SNTP Commands ............................................................................................................241
SNMP Commands...........................................................................................................242
Security Commands........................................................................................................242
PPP Commands ...............................................................................................................243
ISI Commands .................................................................................................................246
ISDN Commands ............................................................................................................247
Virtual Port Commands..................................................................................................248
Physical Port Commands ...............................................................................................249
SMTP Commands............................................................................................................249
Statistics Commands .......................................................................................................251
Server Commands ...........................................................................................................253
Line Commands ..............................................................................................................253
User Commands ..............................................................................................................254
Administrator Commands .............................................................................................255
Modem Commands.........................................................................................................255
OSPF Commands ............................................................................................................257
Miscellaneous Commands .............................................................................................259
Variable Definitions ........................................................................................................260
Appendix D Creating Filter Templates
Introduction .........................................................................................................................262
Patterns .................................................................................................................................262
Definitions ............................................................................................................................263
Examples ..............................................................................................................................264
Appendix E Error Messages
Server Error Messages ........................................................................................................265
RASCON Error Messages ..................................................................................................268
RASExpress Install Error Messages ..................................................................................269
Index .................................................................................................................................271
x
CommPlete Communications Server
1 Introduction
CommPlete Communications Server
1
RASExpress User Guide
Introduction
This manual describes how to configure and manage RASExpress on the CommPlete
Communications Server.
RASExpress is a set of software utilities for managing the CommPlete Communications
Server’s remote access servers. Pre-installed on each of the CommPlete system’s
RASCards are configuration and management utilities for terminal, Telnet and World
Wide Web access. These utilities are explained in Chapters 3 and 4. Also pre-installed
are three DOS programs: the RASExpress server program (RASEXP.EXE), a local
configuration utility (RASCON.EXE), and a color utility with which the administrator
can change RASExpress window and menu colors (SETCOLOR.EXE). These utilities
are explained in Appendix A.
RASExpress servers can also be configured and managed by the Windows
management utility MultiCommManager. For more information, refer to the
MultiCommManager documentation.
Remote users can link their client PCs to the LAN-based RASExpress server by running the Windows® 95 Dial-Up Networking remote node client and dialing into the
RASExpress server. With RASExpress, a modem and phone line creates an electronic
“extension cord” to the LAN.
Client computers can use the CommPlete to dial out by running a MCSI redirector
program. Redirector programs intercept data intended for a modem and redirect it to
the client computer’s network interface card, which sends the data to the RASExpress
server’s communications lines. MCSI redirector programs for both DOS and Windows
are included with RASExpress.
The client computer must have a minimum of 640 KB of RAM, and must run DOS
version 5.0 or above, Windows 3.1x, Windows 95, Windows 98, or Windows NT 4.0.
2
CommPlete Communications Server
1 Introduction
Typographic Conventions
Certain typographic conventions have been adopted throughout the text of this
manual to illustrate keyboard input, screen display dialogs, and special vocabulary.
• Text entered by you is shown in bold. Example: supervisor.
• Code examples and screen messages are shown in a monospace font.
• Italics are used for important new terms, for book and manual titles, and when
terminology is explained, introduced, or emphasized. Example: “The word bit is a
contraction of the words binary digit.”).
• Names of keyboard keys are shown in small caps. Example: SHIFT.
• Certain keys and key combinations may be abbreviated as follows:
<CR>
Means press the carriage return key, which can be represented on the
keyboard by a broken left-pointing arrow or the words Enter or Return.
The ENTER key, or carriage return, is used to activate most commands.
ALT+X
Means to hold down the ALT key while you press the key represented
by X.
CTRL+X
Means to hold down the CTRL (control) key while you press the key
represented by X.
• Please notice the difference between the capital letter O and the number 0.
CommPlete Communications Server
3
RASExpress User Guide
How RASExpress Works with LANs and Data
Communications
A RASExpress server allows you to share modem services on a LAN. Services are
shared by running a redirector program on the client PC that allows the user to
connect to and log onto the RASExpress server. The DOS version of this program is a
terminate-and-stay-resident (TSR) program, which runs in the background until it is
required.
The DOS redirector used with RASExpress is MCSIWSN.EXE. The Windows version
is WinMCSI. When run by a user at a client PC, MCSIWSN requests all active
communications servers to broadcast their presence on the LAN. After MCSIWSN
loads, the user logs onto the RASExpress server by typing logon, a user name, and an
optional password. The user can then run data communication software from the
DOS prompt.
To dial out through the RASExpress server, the user runs the redirector, enters the
user name and password, runs the communications software, and selects an available
modem. The modem operates just as if it were connected directly to the user’s PC.
To dial in for remote control, a remote caller dials one of the RASExpress server modems. The RASExpress server displays a List of Hosts screen from which the remote
caller can select a host. The remote caller then types a password, if one is required.
The remote caller then is connected through the RASExpress server to a client PC that
is running a remote control communications program.
To dial in for a remote node session, a remote caller goes through a similar procedure.
Redirectors
A redirector allows a communications program on a client PC to use the RASExpress
server’s communications lines as if they were local modems. A software redirector,
such as MCSIWSN for DOS (for IPX networks) or WinMCSI for Windows (for IPX or
TCP/IP networks), is installed in a client PC. MCSIWSN can be used with any LAN
data communications software that has a MCSI-compatible interface (INT6B ACS
API). WinMCSI is used with any data communications software that supports COM1
through COM8 .
LAN Operation with RASExpress
Using any of the RASExpress configuration utilities, the system administrator can
name the RASExpress server, assign user access privileges, and configure each port
for operation. User privileges are established by assigning user names and passwords
to users (limited only by the amount of RAM), and then specifying which users are to
have access to which modem ports.
For a client PC on the LAN to use the RASExpress server, it must run a redirector
program such as WinMCSI. The redirector program works with a communications
program to redirect asynchronous data to one of the RASExpress server’s communications lines. When the asynchronous data is redirected, it is converted into LAN
packets for routing to the RASExpress server (outbound operation), or it is received
as packets from the LAN and converted to asynchronous data for the communications program (inbound operation).
4
CommPlete Communications Server
1 Introduction
The client PC operates with the MCSIWSN redirector for DOS or the WinMCSI
director for Windows. To use the LAN version of a communications program, MCSI
must be installed to redirect data to the LAN instead of to the client PC’s serial port.
Any LAN communications program with the MCSI-compatible INT6B ACS API,
such as NASI™ or NCSI™, can operate with the RASExpress server.
A client PC can also dial out using an IP protocol such as Telnet. Before the client can
dial out, however, the user must load TCP/IP and have the TCP/IP protocol configured for the IP router address, which is the local IP address of the RASExpress server.
RASExpress Dial-Out and Dial-In Operation
Dial-in and dial-out asynchronous communications is the transmission of data over a
LAN to and from remote sites via asynchronous gateways. Most gateways perform
only dial-in or dial-out functions, but not both. In contrast, the RASExpress server
provides high speed dial-in and dial-out capabilities with the added benefits of economical modem pooling and shared phone lines.
Dial-Out Operation
To dial out, the user can use either Telnet or MCSI. To use Telnet, or to use MSCI on
some networks, the user must first load TCP/IP. To use MCSI, the user must log on
to the LAN and run MCSIWSN for DOS or WinMCSI for Windows from the client
PC. (To use WinMSCI on some networks, the user must first load IPX.) Then the user
must log on to the RASExpress server using the assigned user name and password.
Running a data communications program then allows the selection of an available
outbound modem. The outbound modem operates as if it were directly connected to
the client PC. Modem configurations can be changed, terminal emulation performed,
and files transferred. When data is sent from the client PC to the modem, the transfer
begins with the communications software, which sends asynchronous data to the
redirector, which then sends it to the client PC’s NIC. There it is converted to packets
and addressed to the RASExpress server. The data is received at the RASExpress
server’s network interface and sent to the RASExpress software. The software sends it
to the modem card, where it is converted back to asynchronous data and sent to the
selected modem.
Remote Control Dial-In Operation
Before a remote user can dial in, a client PC on the LAN must be set up for remote
computing. To do this from a DOS client PC, run the MCSI redirector by typing
MCSIWSN -I. From a Windows client using ComMap for Windows, select Port Type
for the port number and select Inbound. Then log on to the RASExpress server, using
the assigned user name and password, and run the host portion of the communication
®
software (such as pcANYWHERE ) that is installed on the client PC. The RASExpress
Connection Manager monitors all inbound lines for an incoming call, and connects the
remote user with the host PC that the user selects from the Connection Manager list.
The remote caller runs the remote portion of the communications software, dials in to
one of the assigned RASExpress server modems, and receives the List of Hosts
screen, which requests a valid user name and password. The caller is then connected
to the client PC and the remote communications session begins.
As part of the inbound operation, the inbound modem sends asynchronous data to
the server. The RASExpress then sends the data to the RASExpress server’s network
CommPlete Communications Server
5
RASExpress User Guide
interface, where the data is converted to LAN packets and addressed to the
destination client PC. At the client PC’s NIC, the data is sent to the redirector,
converted into an asynchronous data stream, and sent to the communications
software.
Remote Control Dial-In Security
You can increase the security of your LAN by using a dual-level security system. The
first level of security is the user name and password. When encrypted passwords are
selected, the user name and password are encrypted before being sent to the server.
The second level is the callback feature found in RASExpress. Callback security
works by configuring the RASExpress server to hang up when it receives a valid user
name and password, and then to call a predetermined number that is stored in the
user’s profile. For mobile users, RASExpress can be configured to request the user to
enter the number of the telephone that the user is calling from. RASExpress also
allows the use of RADIUS or TACACS+ security and accounting if there is a RADIUS
or TACACS+ server on the network.
6
CommPlete Communications Server
1 Introduction
Using PPP and TCP/IP with the RASExpress Server
IP Addressing
IP (Internet Protocol) addresses are 32-bit addresses used to uniquely identify devices
on a diversified network. An IP address is formatted as four groups of three digits
separated by periods, e.g., 204.220.153.001.
There are three classes of Internet addresses: A, B and C. Class A networks use the
first byte of the IP address for the network number, and the remaining three bytes for
the host number. The first byte must have a value from one through 127.
Class B networks use the first two bytes of the IP address for the network number,
and the last two bytes for the host number. The first byte must have a value from 128
through 191.
Class C networks use the first three bytes of the IP address for the network number,
and the last byte for the host number. This scheme provides for a very large number
of networks, each with up to 255 addressable devices. The first byte must have a
value from 192 through 223.
The part of the IP address that refers to the network is called the network address. A
network mask is a bit pattern that yields the network address in a Boolean AND operation with the IP address. For example, in Class C networks, network addresses
take the form X.X.X.0. The network mask for Class C networks is 255.255.255.0. In all
IP addresses on a given network, the network address is the same, while the host part
of the address is different for each host or workstation.
Table 1. Internet Address Classes
Class Range
Mask
No. of Hosts
Remarks
A
0–127
255.0.0.0
16,000,000
127 is reserved for loopback. None left.
B
128–191
255.255.0.0
65,384
16,384 possible networks
C
192–255
255.255.255.0
254
224–255 are reserved. 2,097,152
possible networks.
IP Addresses
If the RASExpress server is to be used on an existing IP network, make certain that
the network can allot an IP address for the RASExpress server and one IP address for
each line that will be configured for IP accessibility.
Within the port configuration there is an entry for IPCP that enables or disables the
ability to use IP and/or TCP/IP.
Address Mask
The mask configuration is typically set as the default mask for the class of the network. For example, 255.0.0.0 is the mask for Class A, 255.255.0.0 for Class B, and
255.255.255.0 for Class C.
CommPlete Communications Server
7
RASExpress User Guide
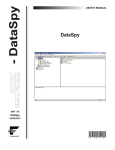
Default Route Configuration
If the RASExpress server is connected to a network with an Internet connection, you
should configure the IP default route address to the address of the router that interfaces the customer’s network. Mainly, this parameter is offered to accommodate nonRIP routers. All packets will be directed to this device for distribution.
Internet
T1-MUX
IP Address = 199.24.15.244
Router or T1
IP Address = 206.16.196.254
IP Address = 206.16.196.250
Novell File
Server
Unix Host
IP Address = 206.16.196.253
IP Address = 206.16.196.252
IP Address =
206.16.196.251
Mask =
255.255.255.0
Default Route = 206.16.196.254
(Address of router attaching Internet)
WinNT Web Server
Port 1
IP Address =
206.16.196.101
RASExpress
server
Port 2
IP Address =
206.16.196.102
PPP Client (Trumpet, Win95)
IP Address = 206.16.196.101
Remote Node with TCP/IP
IP Address = 206.16.196.102
Port 3
IP Address =
206.16.196.103
WLink w/ IP
IP Address =
206.16.196.103
Port 4
IP Address =
206.16.196.104
Win95 w/Netware Client and PPP
IP Address = 206.16.196.104
Figure 1. Typical network configuration.
8
CommPlete Communications Server
1 Introduction
Specifications
Software Features
• Dial-in: Supports dumb terminal; Telnet; remote-node, remote-control, or PPP
dial-in network access (including third-party PPP clients); Windows 95/98/NT
callback and dial-up networking; and login security based on the dial-in protocol
used (e.g., NetWare login, remote-control host security, PPP PAP and CHAP,
RADIUS, or TACACS+ ).
• Dial-out: Supports dial-out communications from IPX (MCSIWSN and WSN are
DOS redirectors) or TCP/IP clients (Telnet and WinMCSI are Windows
redirectors) via an encrypted user database file.
• Supports separate supervisor and RADIUS or TACACS+ shared secret passwords.
• Can function as a basic FTP server, allowing you to FTP upgrade and other files to
the RASExpress server.
• Supports the Simple Network Time Protocol (SNTP), allowing the RASExpress
server to synchronize its clock with a time server.
• Supports client-to-LAN or LAN-to-LAN access with full-featured routing.
• Routs IP and IPX packets; bridges other protocols.
• Supports simple scripting for login; IPX/SPX spoofing; data compression; and
dial-on-demand link establishment.
• Displays server, line, and user information.
• Tracks number, type, and duration of connections.
• Separately tracks users waiting for inbound remote-control sessions.
• Logs the number of packets sent and received over the LAN.
• Supports remote management and configuration via Telnet (IP), a Web browser, or
the MultiCommManager SNMP manager.
• Supports DHCP for dynamic IP address allocation for PPP clients.
Server Requirements
• 486DX-66 MHz or faster processor.
• 1 MB of RAM per port, 16 MB minimum
• One 3.5-inch floppy disk drive.
• DOS 6.22 or later.
• Dedicated operation.
• Novell® (IPX), TCP/IP, or Microsoft (NDIS) over Ethernet.
CommPlete Communications Server
9
RASExpress User Guide
Administration Computer Requirements
• 486DX-66 or faster processor.
• 16 MB of RAM minimum
• One 3.5-inch floppy disk drive.
• Windows 3.1, 3.11, 95, 98, or NT 4.0 to run MultiCommManager.
Client Requirements
• 486 or faster processor.
• One 3.5-inch floppy disk drive.
• MS-DOS or PC-DOS version 5.0 or later.
• 16550 UART or equivalent recommended.
• IPX or TCP/IP network client.
• Windows 3.1, 3.11, 95, or 98 to run remote node software; Windows 95 or NT
Workstation to run the Windows Dial-Up Networking remote node client.
10
CommPlete Communications Server
2 Quick Start
CommPlete Communications Server
11
RASExpress User Guide
RASExpress Quick Start
Each RAS96 RASCard comes with RASExpress pre-installed. However, RASExpress
cannot communicate with your LAN until it is set up with the correct IP address.
Required Equipment
• A CommPlete Communications Server with at least one RASCard installed.
• A dumb terminal or a PC that can communicate in terminal mode.
• A shielded RS-232C serial cable with a female DB-9 on one end and a connector to
match the terminal’s serial port on the other end. (A DB-9 to DB-9 serial cable is
provided with the CommPlete system.)
• An IP address for each RASCard and port that is to be configured.
Quick Start Procedure
1. Make sure that the CommPlete system’s MR9600 controller and the RASCard
segment’s T1 card or PRI card have been configured (refer to the System
Installation and Quick Start Guide.)
2. Turn off the RASCard.
3. Connect a terminal to the configuration port on the rear of the RASCard.
4. Turn on the RASCard.
Note: The RASCard takes a few moments to load the RASExpress software and
initialize the modems after it is turned on.
5. Turn on the terminal and press ENTER. The RASExpress server main menu
appears.
6. Type 1 and press ENTER to select Quick Configuration of Server.
7. Enable IP Remote Access (option 1), and type the IP address for the RASExpress
server (option 2). You will receive error messages that the remote addresses of
the WAN ports are not on the same subnet; this is normal for the initial setup.
Note: For detailed descriptions of menu options, see "Quick Configuration of
Server" on page 17.
8. Fill in the rest of the requested information. IP Default Route (option 4) is the
router address for the LAN’s file server.
9. If you set Remote Client IP Address (option 10) to Use DHCP, Use Address
Pool, or Use Radius, skip to step 10.
If you set Remote Client IP Address (option 10) to Configure Per Port, when you
are done with the quick configuration, from the main menu select Configuration
of server (option 3), then Communication Setup (option 3), and then ISI Setup
(option 1). Delete all ISI cards before saving and rebooting the server. This
corrects the initial subnet error the next time the server loads.
10. When you are done, press ESC and save the changes to disk. You will be asked to
reboot the server.
12
CommPlete Communications Server
2 Quick Start
11. Type Y and press ENTER. The connection closes while the RASExpress server
reboots. A new menu appears after the RASCard has rebooted.
12. To complete the configuration of the RASExpress server, select option 3,
Configuration of server, from the main menu. For detailed information about the
menu options, see Chapter 3.
Alternately, you can use the dumb terminal to do a quick configuration of your
other RASExpress servers and then use the Telnet interface (Chapter 3), the Web
interface (Chapter 4), or MultiCommManager to complete the configurations from
an off-site or a client computer.
CommPlete Communications Server
13
RASExpress User Guide
14
CommPlete Communications Server
3 Terminal and Telnet
Management
CommPlete Communications Server
15
RASExpress User Guide
Introduction
The CommPlete Communications Server RAS96 RASCard ships with RASExpress
pre-installed. (Throughout this user guide, the RASCard with RASExpress installed is
referred to as the RASExpress server.) All you need to do to get RASExpress up and
running is to configure it for your particular operation. Should the hard disk become
damaged or the software corrupted, you can reinstall and configure RASExpress following the instructions in Appendix A.
You can configure and manage the RASExpress server either locally, using a
terminal, or remotely, using Telnet, a World Wide Web browser, or the
MultiCommManager SNMP manager.
This chapter describes the menus for the terminal and the Telnet interfaces. For
remote management using Telnet commands, see Appendix C. For remote
management using a Web browser, see Chapter 4. For remote management using
MultiCommManager, see the MultiCommManager User Guide.
How to Access RASExpress
Using a Terminal
To enable remote configuration of the RASExpress server, you must first configure
the server’s IP settings, including the server’s IP address. To do this, you must
connect a terminal to the server’s serial port. Once IP is configured and working, you
can complete the server configuration either locally, through the terminal, or
remotely, through Telnet, a browser, or MultiCommManager.
1. Using the provided RS-232C serial cable, connect a terminal to the RASExpress
server’s configuration port.
2. Turn on the RASExpress server and the terminal, and then press ENTER. The
RASExpress main menu appears.
Using Telnet
Using Telnet for access requires a TCP/IP protocol stack to be loaded on the client.
Telnet access is possible both by dialing in through the RASExpress server and, more
commonly, through the LAN or Internet.
Dial-In Access
1. Dial in to the RASExpress server using a terminal program. A login prompt
appears.
2. Enter a valid user name and password. A menu appears.
3. Select Telnet Session from the menu.
4. Enter the IP address of the RASExpress server.
5. The RASExpress main menu appears.
TCP/IP Access
1. Run your Telnet software, and connect to the IP address of the RASExpress server.
2. The RASExpress main menu appears.
16
CommPlete Communications Server
3 Terminal and Telnet Management
Main Menu
When you access the RASExpress server using either a terminal or Telnet, the main
menu appears. The terminal and Telnet main menus are identical except for the first
item. To select an item from this or any other menu, type the item number and press
ENTER. To exit a menu, press ESC. The menus are described on the following pages.
Terminal main menu:
[ 1] Quick Configuration of server
[ 2] Management of server
[ 3] Configuration of server
[Esc] Close the session
Telnet main menu:
Services provided by the telnet server
[ 1] Dial out
[ 2] Management of server
[ 3] Configuration of server
[Esc] Close the telnet session
Quick Configuration of Server
This option is available only when you connect a dumb terminal to the RASExpress
server. Its purpose is to set up the RASExpress server to communicate with your
network. Once the RASExpress server is communicating with the network, you can
either continue to configure the RASExpress server with the terminal or you can do a
quick configuration of your other RASExpress servers and then use
MultiCommManager or another utility to complete the configuration from a client
computer.
When you select Quick Configuration of Server, you must enter a user name and
password following the prompts, after which the IP Remote Access menu appears.
The parameters that you can set in this menu apply to IP routing on all ports of the
RASExpress server.
[ 1] IP Remote Access
[ 2] IP Address
[ 3] IP Subnet Mask
[ 4] IP Default Route
[ 5] IP RIP
[ 6] IP Auto Learn Default Gateway
[ 7] Primary Name Server
[ 8] Secondary Name Server
[ 9] DNS Caching Server
[10] IP Frame Type
[11] Remote Client IP Address
[12] Configure IP Address Pool
[13] IP Static Route
[ESC] to go to prev menu
:enabled
:192.168.090.004
:255.255.255.000
:192.168.090.001
:enabled
:disabled
:000.000.000.000
:000.000.000.000
:disabled
:TYPE_II
:Use Address Pool
IP Remote Access
Shows the IP port status. When it is enabled, the RASExpress server provides remote
access on IP, allowing any remote PPP-compatible client to call in and access local
TCP/IP hosts.
CommPlete Communications Server
17
RASExpress User Guide
IP Address
Shows the IP network address for the RASExpress server’s Ethernet interface. It can
be edited only if IP Remote Access is enabled. The IP address must be assigned by
the system administrator, and it must be unique on the TCP/IP network.
IP Subnet Mask
Shows the IP subnet mask of the RASExpress server. This field can be edited only if
IP Remote Access is enabled. The mask shown in the example is the standard mask
for a Class C network (see page 7).
IP Default Route
Shows the IP address to which packets are sent that cannot be routed by the
RASExpress server. If there is no router on the network, the address should be filled
with zeroes. This field can be edited only if IP Remote Access is enabled.
IP RIP
Enables or disables the IP Routing Information Protocol (RIP-2). Enable IP RIP if you
want the RASExpress server to use RIP-2 for IP routing.
IP Auto Learn Default Gateway
Enables or disables RASExpress to learn the correct default gateway if you have
configured the default gateway incorrectly or if the configured gateway goes down
and a different router starts acting as a default router. This feature requires a RIP-2
router that supports default gateway broadcasting.
Primary Name Server
Shows the address of the primary name server that is used by the RASExpress server
to resolve names to IP addresses for Telnet and RLOGIN clients dialing in from a
dumb terminal. This field can be edited only if IP Remote Access is enabled.
Secondary Name Server
Shows the address of the secondary name server that is used by the RASExpress
server to resolve names to IP addresses for Telnet and RLOGIN clients dialing in
from a dumb terminal. The secondary name server is used when the primary name
server does not respond. This field can be edited only if IP Remote Access is enabled.
DNS Caching Server
Enable to have the RASExpress server act as a DNS server. When this option is
enabled, the RASExpress server gives out its IP address as the DNS server to dialing
PPP clients.
IP Frame Type
Shows the RASExpress server’s IP frame type. It can be edited only if IP Remote
Access is enabled. Two frame types are available: TYPE_II (the default) and SNAP.
Remote Client IP Address
Shows how the RASExpress server allocates IP addresses to remote client-to-LAN
users. Select Use DHCP if you have a DHCP server on your LAN. Select Use
Address Pool if the IP addresses you assign to the clients are mostly contiguous.
Select Configure Per Port (the default) if you want to assign a specific address to each
of the remote ports. For LAN-to-LAN ports you must configure all IP addresses
manually. Select Use Radius if you want to use your RADIUS server to assign IP
addresses.
18
CommPlete Communications Server
3 Terminal and Telnet Management
Configure IP Address Pool
Select this option to configure a range of IP addresses. In the address pool menu, type
the IP address range from which the IP address will be allocated. If the range includes
one or more addresses that you want to exclude from allocation, you can type their
address ranges in the second and third sets of menu options.
Static Routes
Select this optionto display or configure a list of permanent routes for use when
WAN ports are set up for LAN-to-LAN operation. A static route is a manually
configured route that specifies the transmission path a datagram must follow, based
on the datagram's destination address. Static routes are useful when selecting a
preferred route to a remote host. To add a static route to the list, type A and press
ENTER. The following menu appears:
[ 1] Address
:000.000.000.000
[ 2] Mask
:000.000.000.000
[ 3] Metric
:0
[ 4] Gateway
:000.000.000.000
[ESC]
to go to previous menu
Address. The destination of the static route. The destination must be an IP address
entered in dotted decimal notation. If the destination is a network, the node portion
of the IP address is 0. If the destination is a host, the mask must be 255.255.255.255.
Mask. The IP network mask. It indicates the network and subnet portion of the IP
address with non-zero numbers; the node portions are shown with zeros.
Metric. The number of hops to the destination IP address. The number of hops is the
number of routers that traffic must travel through to reach the destination.
Gateway. The IP address, in dotted decimal notation, of the next-hop router.
When you have finished configuring the static route, type F and press ENTER to add it
to the list.
CommPlete Communications Server
19
RASExpress User Guide
Dial Out
This item appears only on the Telnet main menu. Use it to dial out through the
RASExpress server:
1. Select Dial out from the Telnet main menu.
2. Enter your user name and password when requested. A list of lines appears:
SrNo
1
2
3
4
5
6
7
8
9
10
11
12
13
14
15
16
Server Name
General Name
Specific Name
Status
SERVER_1
SERVER_1
SERVER_1
SERVER_1
SERVER_1
SERVER_1
SERVER_1
SERVER_1
SERVER_1
SERVER_1
SERVER_1
SERVER_1
SERVER_1
SERVER_1
SERVER_1
SERVER_1
MODEM
MODEM
MODEM
MODEM
MODEM
MODEM
MODEM
MODEM
MODEM
MODEM
MODEM
MODEM
MODEM
MODEM
MODEM
MODEM
2A
2B
2C
2D
2E
2F
2G
2H
3A
3B
3C
3D
3E
3F
3G
3H
FREE
FREE
FREE
FREE
FREE
FREE
FREE
FREE
FREE
FREE
FREE
FREE
FREE
FREE
FREE
FREE
N: Next Page
A: Select Any Line
ESC: Prev Menu
Choose a line :
3. Type A and press ENTER to select any available line, or select a specific line by
typing the number of the line.
4. In the menu that appears, set the baud, stop bits, data bits, and parity for the call.
If you do not need to make any changes, type F and press ENTER.
5. A message similar to the following appears:
USER1 Connected to line MODEM:2C at 115200 8N1
6. You can now dial out by using the AT command ATDTxxxxxxx, where xxxxxxx
represents the telephone number.
20
CommPlete Communications Server
3 Terminal and Telnet Management
Configuration of Server
The Configuration of Server menu gives the system administrator complete control
over the RASExpress server. The administrator can use it to view the current status of
the RASExpress server, change network addresses, change a user’s connection
parameters, and open, close, or change the duration of the server log. Use the
Configuration of Server menu to make fundamental changes to the server’s
configuration.
Menu path: Main Menu ➔ Configuration of Server.
[ 1] Server Setup
[ 2] User Setup
[ 3] Communication Setup
[ 4] Modem Setup
[ 5] Administrator Setup
[ESC] to go to main menu
Server Setup
Menu path: Main Menu ➔ Configuration of Server ➔ Server Setup.
[ 1] General Setup
[ 2] IP Remote Access
[ 3] IPX Remote Access
[ 4] Point-to-Point Protocol
[ 5] Multilink PPP
[ 6] MAC Layer Bridging
[ 7] Telnet
[ 8] SNTP Client
[ 9] SNMP Agent
[10] SMTP Client
[11] Virtual Port Information
[12] Physical Port Information
[13] Applications
[14] Security
[15] OSPF Configuration
[ESC] to go to previous menu
Use the Server Setup menu to configure the basic operations of the RASExpress server.
General Setup
Menu path: Main Menu ➔ Configuration of Server ➔ Server Setup ➔ General
Setup.
[ 1] Server Name
[ 2] Supervisor Password
[ 3] Log Status
[ 4] Log Start Date(MM-DD-YYYY)
[ 5] Log Start Time(HH:MM:SC)
[ 6] Log Number of Days
[ 7] Write Error Messages into file
[ 8] Message File
[ 9] PPP Connection Log
[10] Screen Saver
[11] Connection manager menu
[12] Command to MultiModem Manager
[ESC] to go to previous menu
CommPlete Communications Server
:
:
:
:
:
:
:
:
:
:
:
:
SERVER_1
****************
enabled
2-1-1999
00:00:00
1
enabled
C:\RAS550\SERVER.MSG
enabled
disabled
disabled
disabled
21
RASExpress User Guide
Server Name
Use this field to assign a unique name to the RASExpress server. The server name is
broadcast on the Novell network. It is also used by MultiCommManager to monitor
RASExpress server statistics.
Supervisor Password
Use this field to assign a supervisor password. The password is case-sensitive. It locks
the local console and prevents regular users from running MultiCommManager and
making changes to the RASExpress server.
Log Status
Use this field to enable or disable the call log. The default is disabled. When enabled
is selected, RASExpress logs all calls for one hour in the file yyyymmdd.LOG, where
yyyymmdd is the year, month, and day the log was created. The 24 saved logs for each
date are given the extensions .L00–.L23. When disabled is selected, RASExpress does
not log calls.
Log Start Date
You can start the call log automatically, if it is disabled, by entering the start date in
the format month-day-year. When the date arrives, the log begins at the time specified
in the Log Start Time field.
Log Start Time
Enter the time at which you want the log to automatically start, in the format
hours:minutes:seconds.
Log Number of Days
Specify the number of days ,up to seven, that you want log files to remain on the
server’s hard disk. Log files older than the specified number of days are
automatically deleted. This option prevents old log files from filling the disk.
Write Error Messages into File
Select enabled to have RASExpress save all error and other messages it receives into
a message file. The default is disabled.
Message File
If you select enabled in the previous field, you can assign a name to the message file
in this field. The default file name is SERVER.MSG.
PPP Connection Log
Use this field to enable or disable the PPP connection log.
Screen Saver
RASExpress has a built-in screen saver. Select disabled if you do not want the screen
saver. Select enabled if you do want to use the screen saver. The screen saver appears
only on the monitor connected to the RASExpress server.
Connection Manager Menu
Select enabled to display the Connection Manager menu to a user calling into the
RASExpress server for remote control operation. Select disabled to display the Host
List to the user.
Command to MultiModemManager
This command does not apply to CommPlete Communications Servers.
22
CommPlete Communications Server
3 Terminal and Telnet Management
IP Remote Access
Menu path: Main Menu ➔ Configuration of Server ➔ Server Setup ➔ IP Remote
Access.
[ 1] IP Remote Access
[ 2] IP Address
[ 3] IP Subnet Mask
[ 4] IP Default Route
[ 5] IP RIP
[ 6] IP Auto Learn Default Gateway
[ 7] Primary Name Server
[ 8] Secondary Name Server
[ 9] DNS Caching Server
[10] IP Frame Type
[11] Remote Client IP Address
[12] Configure IP Address Pool
[13] IP Static Route
[ESC] to go to prev menu
:enabled
:192.168.090.004
:255.255.255.000
:192.168.090.001
:enabled
:disabled
:000.000.000.000
:000.000.000.000
:disabled
:TYPE_II
:Use Address Pool
Use the IP Remote Access menu to set up parameters that apply to IP routing on all
ports.
IP Remote Access
Shows the IP remote access status. When it is enabled, the RASExpress server provides remote access on IP. This allows any remote PPP-compatible client to call in and
access local TCP/IP hosts, such as WWW, FTP, Telnet, etc.
IP Address
Shows the IP network address for the RASExpress server’s Ethernet interface. It can
be edited only if IP Remote Access is enabled. The IP address must be assigned by
the system administrator, and it must be unique on the TCP/IP network.
IP Subnet Mask
Shows the IP subnet mask of the RASExpress server. This field can be edited only if
IP Remote Access is enabled.
IP Default Route
Shows the IP default route on the network on which the RASExpress server is
installed. Any IP packets that cannot be routed by the RASExpress server are sent to
this address. If there is no router on the network, the address should be filled with
zeroes. This field can be edited only if IP Remote Access is enabled.
IP RIP
Enables or disables the IP Routing Information Protocol (RIP-2). Enable IP RIP if you
want the RASExpress server to use RIP-2 for IP routing.
IP Auto Learn Default Gateway
Enable to have RASExpress learn the correct default gateway if you have configured
the default gateway incorrectly or if the configured gateway goes down and a
different router starts acting as a default router. This feature requires a RIP-2 router
that supports default gateway broadcasting.
Primary Name Server
Shows the address of the primary name server used by the RASExpress server to
resolve names to IP addresses for Telnet and RLOGIN clients dialing in from a dumb
terminal. This field can be edited only if IP Remote Access is enabled.
CommPlete Communications Server
23
RASExpress User Guide
Secondary Name Server
Shows the address of the secondary name server used by the RASExpress server. The
secondary name server is used when the primary name server does not respond. This
field can be edited only if IP Remote Access is enabled.
DNS Caching Server
Enable to have the RASExpress server act as a DNS server. When this option is
enabled, the RASExpress server gives out its IP address as the DNS server to dialing
PPP clients.
IP Frame Type
Shows the RASExpress server’s IP frame type. It can be edited only if IP Remote
Access is enabled. Two frame types are available: TYPE_II (default) and SNAP.
Remote Client IP Address
Shows how the RASExpress server allocates IP addresses to remote client-to-LAN
users. Select Use DHCP if you have a DHCP server on your LAN. Select Use
Address Pool if the IP addresses you assign to the clients are contiguous. Select
Configure Per Port (the default) if you want to assign a specific address to each of the
remote ports. Select Use Radius if you want to use your RADIUS server to assign IP
addresses. For LAN-to-LAN ports you must configure all IP addresses manually.
Configure IP Address Pool
Select to configure a range of IP addresses. In the address pool menu, type the IP
address range from which the IP address will be allocated. If the range includes one
or more addresses that you want to exclude from allocation, you can type their
address ranges in the second and third sets of menu options.
Static Routes
Select this optionto display or configure a list of permanent routes for use when
WAN ports are set up for LAN-to-LAN operation. A static route is a manually
configured route that specifies the transmission path a datagram must follow, based
on the datagram's destination address. Static routes are useful when selecting a
preferred route to a remote host. To add a static route to the list, type A and press
ENTER. The following menu appears:
[ 1] Address
:000.000.000.000
[ 2] Mask
:000.000.000.000
[ 3] Metric
:0
[ 4] Gateway
:000.000.000.000
[ESC]
to go to previous menu
Address. The destination of the static route. The destination must be an IP address
entered in dotted decimal notation. If the destination is a network, the node portion
of the IP address is 0. If the destination is a host, the mask must be 255.255.255.255.
Mask. The IP network mask. It indicates the network and subnet portion of the IP
address with non-zero numbers; the node portions are shown with zeros.
Metric. The number of hops to the destination IP address. The number of hops is the
number of routers that traffic must travel through to reach the destination.
Gateway. The IP address, in dotted decimal notation, of the next-hop router.
When you have finished configuring the static route, type F and press ENTER to add it
to the list.
24
CommPlete Communications Server
3 Terminal and Telnet Management
IPX Remote Access
Menu path: Main Menu ➔ Configuration of Server ➔ Server Setup ➔ IPX Remote
Access.
[ 1] IPX Routing
[ 2] Learning Network numbers
[ 3] Route Netbios Over IPX
[ 4] Internal Network Number
[ 5] 802.3 Routing
[ 6] 802.3 Network Number
[ 7] 802.2 Routing
[ 8] 802.2 Network Number
[ 9] TYPE_II Routing
[10] TYPE_II Network Number
[11] SNAP Routing
[12] SNAP Network Number
[ESC] to go to prev menu
:enabled
:enabled
:disabled
:00abcdef
:enabled
:12345000
:enabled
:12345001
:enabled
:12345002
:enabled
:12345003
From the IPX Remote Access menu, you can change the following parameters:
IPX Routing
Select enabled to allow the RASExpress server to use the IPX protocol for remote
access.
Learning Network Numbers
Select enabled to allow the RASExpress server to automatically detect and use the
network’s numbers.
Note: The server needs some time to learn the IPX address of the LAN segment it is
attached to. If it is unable to learn the address, it will use the default network address
as configured. If the RASExpress server comes up before the file server and uses the
default address, you will get a warning on your file server about conflicting network
numbers. If this happens, reboot the RASExpress server.
Route NetBIOS Over IPX
This option enables the routing of NetBIOS over IPX packets. Select enabled if you
are running applications on NetBIOS over IPX. Select disabled if you do not need this
option.
Internal Network Number
Type the IPX internal network number for the RASExpress server. This number
should be unique in the network.
802.3 Routing
Select enabled to enable routing of 802.3 IPX packets on the LAN.
802.3 Network Number
Type a network number for the 802.3 frame type.
802.2 Routing
Select enabled to enable routing of 802.2 IPX packets on the LAN. .
802.2 Network Number
Type a network number for the 802.2 frame type.
CommPlete Communications Server
25
RASExpress User Guide
Type_II Routing
Select enabled to enable routing of Ethernet_II IPX packets on the LAN.
Type_II Network Number
Type a network number for the Ethernet_II frame type.
SNAP Routing
Select enabled to enable routing of Ethernet SNAP IPX packets on the LAN.
SNAP Network Number
Type a network number for the Ethernet SNAP frame type.
Point-to-Point Protocol
Menu path: Main Menu ➔ Configuration of Server ➔ Server Setup ➔ Point-toPoint Protocol.
Select this option to edit the PPP parameters for a selected WAN port. The List of
Lines appears. Type the number of the line whose PPP parameters you want to edit,
and press ENTER. The following menu appears.
Port Name :
WAN3
1.SLIP
2.Port Type
3.Maximum Receive Unit
4.Async Control Map
5.Compression
6.Authentication Protocol
7.User Name
8.User Password
9.Dial On Demand
10.IPXCP
11. Network Number
12. Node Number
13. CIPX Compression
14. Netbios Over IPX
15.BCP
:
:
:
:
:
:
:
:
:
:
:
:
:
:
:
enabled
Client to LAN
1534
00000000
disabled
Password Authentication Protocol
***********************************************
disabled
enabled
1234500c
000012345070
disabled
disabled
disabled
16.IPCP
17. Local Address
18. Remote Address
19. Subnet Mask
20. VJ Compression
21. Forward Broadcast
:
:
:
:
:
:
enabled
192.168.090.004
From Address Pool
255.255.255.000
disabled
disabled
Port Name
Shows the name of the port you are configuring. Press ESC to select another port to
configure.
SLIP
This field shows the status of the SLIP protocol for the port. Enable SLIP if you have
SLIP clients dialing into the RASExpress server.
Port Type
Select the type of connection the port is to be used for. Select Client-to-LAN if the
PPP peer is a dial-up client. Select LAN-to-LAN if the PPP peer is a dial-up client or
another router. If you change the connection type, be sure to also change the IP
address .
Maximum Receive Unit
Type the PPP Maximum Receive Unit (MRU) for the port, in the range 0–1534. The
MRU is the maximum packet size in bits.
26
CommPlete Communications Server
3 Terminal and Telnet Management
Async Control Map (ACCM)
Type the PPP Asynchronous Control Character Map (ACCM) for the port, in the
range 0–FFFFFFFF.
Compression
Select enabled to enable PPP data compression for the port. Enable data compression
only if the data link is slower than 57,600 bps and the modem is not doing any data
compression. Disable it if the data link is 57,600 bps or faster or if the modem is doing
data compression.
Authentication Protocol
Select the PPP authentication protocol for the port. You can choose Password
Authentication Protocol (PAP), Challenge Handshake Authentication Protocol
(CHAP), or None.
User Name
Type a user name here for use in LAN-to-LAN security. For a client-to-LAN configuration, leave this field blank.
User Password
Type a password here for use in LAN-to-LAN security. The password is casesensitive, and must match the password at the other end of the PPP connection.. For a
client-to-LAN configuration, leave this field blank.
Dial on Demand
This field is used only for LAN-to-LAN operations. Enable it if you want to disconnect the line during idle times and connect only when you need to transfer data. If
this option is enabled, RASExpress spoofs all watchdog and serialization packets.
IPXCP
Select enabled to enable IPX for remote dial-in clients on the port. Select disabled to
disable IPX. IPXCP is a PPP network control protocol for IPX. It is responsible for
configuring, enabling, and disabling the IPX protocol modules on both ends of the
point-to-point link.
Network Number
This field shows the IPX network number of the port. There is a unique number for
each port that does not correlate with the existing network number. You can edit this
field only if IPXCP is enabled for the port.
Node Number
This field shows the IPX remote node number of the port. Each port must have a
unique node number. You can edit this field only if IPXCP is enabled for the port.
CIPX Compression
Select enabled to enable CIPX (Compressed Internetwork Packet Exchange) compression of IPX headers for the port. Select disabled if you do not want CIPX compression.
If you select enabled, CIPX compression must also be enabled on the server for your
choice to have an effect. You can edit this field only if IPXCP is enabled for the port.
NetBIOS over IPX
This field allows you to enable or disable routing of NetBIOS over IPX packets on the
port. Enable it if you are using applications that require NetBIOS over IPX support.
You can edit this field only if IPXCP is enabled for the port.
CommPlete Communications Server
27
RASExpress User Guide
BCP
This field shows the status of the Bridge Control Protocol (BCP) for the port. Enable
BCP if the other end of the PPP link supports BCP.
IPCP
This field enables IP for the port. Select disabled if TCP/IP or PPP is not to be used.
Local Address
This field shows the IP local network address of the port. This address can be edited
only for LAN-to-LAN ports, and only if IPCP is enabled. For all client-to-LAN
connections, the local address is the same as the IP address of the LAN port. For
LAN-to-LAN ports, make sure the IP address is on a different network or a subnet of
any of the existing networks.
Remote Address
This field shows the IP network address of the port. It is the address assigned to the
remote PPP client. It must be on the same network as the IP local address. This field
can be edited only if IPCP is enabled for the port. It cannot be edited for client-toLAN ports if DHCP is enabled.
Subnet Mask
This field contains the mask used to specify the subnetwork part of the IP address.
For all client-to-LAN connections it is the same as the LAN network. See “IP
Addressing” on page 7.
VJ Compression
Select enabled to enable Van Jacobson compression of TCP/IP headers on the PPP
link. VJ compression is used by many PPP clients. Select disabled to disable Van
Jacobson compression. If IPCP and VJ Compression are enabled, a dial-in PPP client
that uses this compression method may experience greater speed than with VJ
Compression disabled.
Forward Broadcast
This field allows you to enable or disable forwarding of UDP broadcast packets onto
the port. Enable it if your UDP applications depend on the broadcasts. When forwarding is enabled, the RASExpress server forwards to the selected port all UPD
broadcast packets that come from the LAN and from the client-to-LAN ports. Forwarding broadcasts on remote links increases the traffic on the links, so enable forwarding only if necessary.
Multilink PPP
Menu path: Main Menu ➔ Configuration of Server ➔ Server Setup ➔ Multilink
PPP.
[ 1] Multilink PPP
[ 2] GroupEPD
[ 3] Bundle Server IP Address
[ 4] Bundle Server UDP Port
[ESC] Previous Menu
:
:
:
:
enabled
c0a85a04
000.000.000.000
582
Use this menu to set up Multilink PPP on the RASExpress server. The Multilink PPP
protocol bonds two physical ports to one IP address for greater bandwidth.
RASExpress 5.40 introduced MultiChassis Multilink support, which enables the
bundling of multilink connections across different RASExpress servers, as would be
28
CommPlete Communications Server
3 Terminal and Telnet Management
the case in a typical ISP setup, where there might be one telephone number and
several RASExpress servers.
Note: All MultiChassis Multilink servers must have IP and PPTP turned on to enable
the servers to talk to each other. Also, all MultiChassis Multilink servers should point
to the same RADIUS or TACACS+ server.
Multilink PPP
Select enabled to enable Multilink PPP (MLPPP) support on the RASExpress server.
RASExpress supports Multilink PPP for both analog and ISDN channels.
Group EPD
Identifies the bundle group that the RASExpress server belongs to. The EPD (End
Point Descriminator) is an arbitrary four-byte hexadecimal value. By default
RASExpress initializes it to the IP address of its Ethernet interface. However, all
servers that belong to the same bundle group should have the same EPD.
Bundle Server IP Address
Type the IP address of the Bundle Server. The Bundle Server is the RASExpress 5.40
or later server chosen to manage the multichassis multilinks. Though it can be any
RASExpress 5.40 server on the network, ideally it is one that is equidistant from all
RASExpress servers in the bonding group. If the servers are on different networks,
then the hop count from the Bundle Server to all the other servers should be more or
less equal. Alternately, the one that is least busy can function as the Bundle Server.
Bundle Server UDP Port
Identifies the UDP port number that the RASExpress server uses to communicate
between itself and the Bundle Server.
MAC Layer Bridging
Menu path: Main Menu ➔ Configuration of Server ➔ Server Setup ➔ MAC Layer
Bridging .
[ 1] Bridging
[ 2] Spanning Tree
[ESC] to go to previous menu
: disabled
: disabled
Use this menu to configure MAC (Media Access Control) layer bridging for the
RASExpress server.
Bridging
Select enabled to enable the server to bridge all MAC layer packets. The default is
disabled. If you do not use networking protocols other than IP and IPX, you should
disable bridging, since it slows down the RASExpress server by requiring the router
to examine each and every packet on the connected LAN segment. However, you
need bridging to support networking protocols like NetBIOS. Note that if you enable
bridging for the RASExpress server but disable routing of IP or IPX on a specific port,
bridging of those protocol packets will not take place on that port. However, if you
disable IP or IPX entirely for the RASExpress server, then those packets will be bridged.
Spanning Tree
Spanning Tree bridging is used to detect looped back links. The default is disabled.
This option is unavailable when Bridging is disabled.
CommPlete Communications Server
29
RASExpress User Guide
Telnet
Menu path: Main Menu ➔ Configuration of Server ➔ Server Setup ➔ Telnet.
[ 1] Telnet Administration
[ 2] Telnet Client
[ 3] Telnet Dialout
[ 4] Telnet Auto Dialout
[ 5] Auto Dialout Port Number
[ 6] Interface Type
[ESC] to go to previous menu
:
:
:
:
:
:
enabled
enabled
enabled
disabled
8000
Menu
Telnet Administration
Select enabled if you want to be able to configure and manage the RASExpress server
from any Telnet client.
Telnet Client
Select enabled to allow a remote user who has dialed in to the RASExpress server to
Telnet to different hosts on the network.
Telnet Dialout
Select enabled to allow users to use any Telnet client to select a modem on the
RASExpress server and dial out to UNIX hosts and BBSs.
Telnet Auto Dialout
Select enabled to allow a Telnet client to connect to the TCP port number in Auto
Dialout Port Number and use any free modem on the RASExpress server
Auto Dialout Port Number
Type the TCP port number to be used for Telnet auto dialout.
Interface Type
Choose the Telnet interface type; the choices are Menu and Command. Menu mode
allows the RASExpress server to be configured using the menus in this chapter.
Command mode allows the RASExpress server to be configured by typing Telnet
commands (see Appendix C).
SNTP Client
Menu path: Main Menu ➔ Configuration of Server ➔ Server Setup ➔ SNTP Client.
[ 1] SNTP Client
[ 2] SNTP Server IP Address
[ 3] Time Zone Standard Name
[ 4] Offset from UTC
[ 5] Daylight Savings
[ 6] Offset During Daylight Savings
[ 7] Start of Daylight Savings Time
[ 8] End of Daylight Savings Time
[ESC] to go to previous menu
:
:
:
:
:
:
disabled
000.000.000.000
CST
-06:00
enabled
60
The Simple Network Time Protocol (SNTP) is used to synchronize computer clocks in
the Internet. RASExpress uses SNTP time signals to synchronize server clocks for accounting accuracy.
SNTP Client
Select enabled to enable the RASExpress server to use SNTP time signals.
30
CommPlete Communications Server
3 Terminal and Telnet Management
SNTP Server IP Address
Type the IP address of the SNTP server you want to use as a time source.
Time Zone Standard Name
Type a one- to three-letter abbreviation for the time zone of the RASExpress server
that you are configuring. It is used for display purposes only.
Offset from UTC
Type the time difference between the location of the RASExpress server and the prime
meridian at Greenwich, U.K. in the format hours:minutes. Sites west of Greenwich
have negative numbers, and those east of Greenwich have positive numbers.
U.S. time zone
Offset from UTC
Eastern Standard (EST)
-05:00
Central Standard (CST)
-06:00
Mountain Standard (MST)
-07:00
Pacific Standard (PST)
-08:00
Daylight Savings
Select enabled to make RASExpress automatically adjust the clock for daylightsaving time.
Offset During Daylight Savings
Type the number of minutes that the clock changes during the shifts to and from
daylight-saving time. In most parts of the world it is 60 minutes.
Start of Daylight Savings Time
Select to configure the time and day that daylight-saving time begins. A menu
appears in which you can change the following items:
Ordinal. Daylight-saving time usually starts at the same time on the same day of the
week in the same month every year. Each day of the week occurs four or five times a
month. Select on which occurrence daylight-saving time starts: the first, second, third,
fourth, or last of the month. In the U.S.A. daylight-saving time starts at 2:00 A.M. on
the first Sunday in April.
Day of Week. Select the day of the week on which daylight-saving time starts.
Month. Select the month in which daylight-saving time starts.
Time. Type the time of day that daylight-saving time starts.
End of Daylight Savings Time
Select to configure the time and day that daylight-saving time ends. A menu appears
in which you can change the following items:
Ordinal. Select on which occurrence of the selected day of the week that daylightsaving time ends: the first, second, third, fourth, or last of the month. In the U.S.A.
daylight-saving time ends at 2:00 A.M. on the last Sunday in October.
Day of Week. Select the day of the week on which daylight-saving time ends.
Month. Select the month in which daylight-saving time ends.
Time. Type the time of day that daylight-saving time ends.
CommPlete Communications Server
31
RASExpress User Guide
SNMP Agent
Menu path: Main Menu ➔ Configuration of Server ➔ Server Setup ➔ SNMP Agent.
[ 1] SNMP Agent
[ 2] Trap Manager Community Name
[ 3] Trap Manager IP Address
[ 4] Trap Manager Port Number
[ 5] SNMP Reboot Required Trap
[ 6] Get Community Name
[ 7] Get Community Permission
[ 8] Set Community Name
[ 9] Set Community Permission
[10] Authentication
[ESC] to go to previous menu
:enabled
:
:192.168.090.005
:162
:disabled
:public
:readonly
:supervisor
:readwrite
:Simple Community Name
The RASExpress server can be managed or configured by any standard Simple
Network Management Protocol (SNMP) manager.
SNMP Agent
Select enabled to enable SNMP management, disabled to disable it.
Trap Manager Community Name
Type the community name of the SNMP trap manager. Any SNMP traps that are
generated by the RASExpress server will be sent to this manager.
Trap Manager IP Address
Type the IP address of the SNMP trap manager.
Trap Manager Port Number
Type the port number of the SNMP trap manager. The default port number is 162.
SNMP Reboot Required Trap
Enable to send a trap to the manager whenever a configuration change is made that
requires a reboot of the server.
Get Community Name
The RASExpress server can be configured for Get and Set communities. Type the
name of the Get community here. The default is public.
Get Community Permission
Select the Get community permission. The choices are readonly and readwrite. The
default is readonly.
Set Community Name
Type the name of the Set community. The default is supervisor.
Set Community Permission
Select the Set community permission. The choices are readonly and readwrite. The
default is readwrite.
Authentication
Select whether SNMP authentication is simple or encrypted. Set authentication to
Simple Community Name if you are using MultiCommManager or a third party
manager. This uses plain text for the Get and Set community names. You may also
select Simple Community Name if you are using Multi-Tech MultiManager.
32
CommPlete Communications Server
3 Terminal and Telnet Management
Set authentication to Encrypted Community Name only if you are using Multi-Tech
MultiManager (not MultiCommManager) to manage your servers. When authentication is encrypted, the administrative user name and password and the PDU ID (a
field in the SNMP request to the agent) are used to prepare an encrypted sequence
for authentication of the SNMP request by the agent (RAS). It is a combination
understood only between the RAS and MultiManager.
SMTP Client
Menu path: Main Menu ➔ Configuration of Server ➔ Server Setup ➔ SMTP Client.
Use this window to configure SMTP (Simple Mail Transfer Protocol) service on the
RASExpress server.
[ 1] SMTP Client
[ 2] SMTP Server IP Address
[ 3] SMTP Sender Email Address
:disabled
:000.000.000.000
:
SMTP
[ 4]
[ 5]
[ 6]
[ 7]
[ 8]
:disabled
:disabled
:disabled
:disabled
:disabled
Events:
Send mail on message file full
Send mail on log file full
Send mail on debug log full
Send mail on server upgrade
Send ras alive mail
[ 9] SMTP Recipient List
[ESC] to go to previous menu
SMTP Client
Select enabled to enable SMTP service. Select disabled to disable SMTP service. This
option must be enabled to make the other options in the window accessible.
SMTP Server IP Address
Type the IP address of the SMTP server.
SMTP Sender Email Address
Type the e-mail address of the RASExpress server.
Send Mail on Message File Full
Select enabled if you want the RASExpress server to send an e-mail alert to the
addresses in the recipient list when the message file is full.
Send Mail on Log File Full
Select enabled if you want the RASExpress server to send an e-mail alert to the
addresses in the recipient list when the log file is full.
Send Mail on Debug Log Full
Select enabled if you want the RASExpress server to send an e-mail alert to the
addresses in the recipient list when the debug log is full.
Send Mail on Server Upgrade
Select enabled if you want the RASExpress server to send an e-mail alert to the
addresses in the recipient list when the server is upgraded.
CommPlete Communications Server
33
RASExpress User Guide
Send RAS Alive Mail
Select enabled if you want the RASExpress server to send an e-mail alert to the
addresses in the recipient list that the RASExpress server is running. The message is
sent once per hour.
SMTP Recipient List
Select this option to see the list of e-mail recipients. E-mail alert messages are sent to
these recipients if any of the four preceding options are enabled and the conditions
are met. To add a new recipient, type A, press ENTER, type the recipient’s e-mail
address, and press ENTER again. To select an address for editing, type E, press ENTER,
type the line number of the address, and press ENTER again. To delete an address
from the list, type D, press ENTER, select the line number of the address, and press
ENTER again; the address will be deleted without warning.
Virtual Port Information
Menu path: Main Menu ➔ Configuration of Server ➔ Server Setup ➔ Virtual Port
Information.
Use the Virtual Port Information option to configure an individual WAN port. When
you select the option, a list of WAN ports appears. Type the line number for the port
you want to edit, and press ENTER. The following menu appears.
1.
2.
3.
4.
5.
6.
7.
8.
9.
10.
11.
12.
13.
14.
Idle Timeout
(mins)
Session Timeout (mins)
PPP Detect
Auto Login Protocol
Auto Login Address
Filter Template Name
Tunneling Protocol
Tunnel Server IP Address
DialType
ConnectType
PhoneNumber
ScriptFile
Bundle with a LAN-to-LAN Port
Bundled Port
:
:
:
:
:
:
:
:
:
:
:
:
:
:
10
0
enabled
None
None
Analog
Answering
disabled
WAN1
Idle Timeout
Type the number of minutes of no activity that is allowed before RASExpress
disconnects the port. A value of 0 disables idle timeout.
Session Timeout
Type the number of minutes allowed per session. When this time is exceeded,
RASExpress automatically disconnects the port. A value of 0 disables session timeout.
PPP Detect
Select enabled to enable automatic PPP connections on the port. Select disabled to
disable automatic PPP connections. When disabled is selected, a PPP client is
presented with a menu on connection.
Auto Login Protocol
Select the protocol that is to be used for auto login on the port when PPP Detect is
enabled. The options are None, Telnet, and Rlogin. When None is selected, a menu
is presented to the caller after login.
34
CommPlete Communications Server
3 Terminal and Telnet Management
Auto Login Address
Type the Telnet or Rlogin host IP address to be used when PPP Detect is enabled.
This field can be edited only if Auto Login Protocol is set to Telnet or Rlogin.
Filter Template Name
Type the name of the filter template for the port. For more information about filter
templates, see Appendix D.
Tunneling Protocol
Select PPTP to enable tunneling on the port. Select None to disable tunneling.
Tunnel Server IP Address
Type the IP address of the server used for PPTP tunneling. This field is inactive if
tunneling is disabled.
Dial Type
Select whether the server will make an analog or an ISDN call. For a client-to-LAN
connection, this field is unavailable.
Connect Type
Select the type of LAN-to-LAN connection. The options are Answering and Dialing.
For a client-to-LAN connection, Answering is the only option.
Telephone Number
Type the number the server will dial for a LAN-to-LAN connection. For a client-toLAN connection, this field is unavailable.
Script File Name
Type the name of the login script file, which is processed only on a LAN-to-LAN
dialing port. The script must be compiled by the RASExpress script compiler before it
can be used, and the compiled file must be stored in the directory where RASExpress
is installed (typically C:\RAS550). It is not necessary to type the file name’s .COD
extension. For a client-to-LAN connection, this field is unavailable.
Bundle with a LAN-to-LAN Port
Select enabled to bundle the port with a PPP port configured as a LAN-to-LAN port.
Any call on such a reserved port is mapped to the bundled PPP port. You can do
multilink PPP on LAN-to-LAN connections by reserving multiple virtual ports for a
single PPP port.
Bundled Port
Select the PPP port to be bundled with the virtual port.
CommPlete Communications Server
35
RASExpress User Guide
Physical Port Information
Menu path: Main Menu ➔ Configuration of Server ➔ Server Setup ➔ Physical Port
Information.
Use the Physical Port Information menu to configure an individual physical port.
When you select the option, a list of ports appears. Type the line number for the port
you want to edit, and press ENTER. The following menu appears.
1. Auto Dial Out
2. TCP Port Number
3. Raw TCP Connection
: disabled
: 9001
: disabled
Auto Dialout
Select enabled to enable auto dialout for the port. Select disabled to disable auto
dialout.
TCP Port Number
Type the auto dialout TCP port number. This field is unavailable if Auto Dialout is
disabled.
Raw TCP Connection
Select disabled to disable all Telnet negotiations on the port, so that the connection is
treated as a “raw” TCP data stream.
When a standard Telnet connection is made, certain parameters are negotiated, such
as terminal type and screen size. However, some applications use Telnet for faxing or
credit card validation for which negotiation is neither required nor recommended. It
is for such applications that you should disable this option.
Applications
Menu path: Main Menu ➔ Configuration of Server ➔ Server Setup ➔ Applications.
[ 1] Web Server
: enabled
[ 2] FTP Server
: enabled
[ 3] TFTP Server
: enabled
[ 4] RLOGIN Client
: enabled
[ESC] to go to previous menu
Use this menu to enable or disable applications that are installed with RASExpress.
Web Server
Enable this option to allow the RASExpress server to be managed by a Web browser.
FTP Server
Enable this option to allow File Transfer Protocol (FTP) file transfers between the
RASExpress server and the management console. You can use FTP to send upgrade
files to the RASExpress server (see Appendix B). Unlike TFTP, FTP has password
protection.
TFTP Server
The Trivial File Transfer Protocol (TFTP) is used by host computers to exchange files.
It is used by RASExpress for its remote management programs. Leave this option
enabled if you want RASExpress server to be managed by these programs.
36
CommPlete Communications Server
3 Terminal and Telnet Management
RLOGIN Server
Enable this option to allow the RASExpress server to be used as an RLOGIN client
for connecting to an RLOGIN server.
Security
Menu path: Main Menu ➔ Configuration of Server ➔ Server Setup ➔ Security
[ 1] Security Protocol
[ 2] Accounting
[ 3] TACACS+ Encryption
[ 4] Shared Secret
[ 5] Allow call if security server down
[ 6] Primary Server Address
[ 7] Backup Server Address 1
[ 8] Backup Server Address 2
[ 9] Backup Server Address 3
[10] Call back delay attribute value
[11] Remote User Enter Number attribute value
[12] Protocol Permissions attribute value
[13] Inbound user service type value
[14] Shell user service type value
[ESC] to go to previous menu
:
:
:
:
:
:
:
:
:
:
:
:
:
:
Local
disabled
disabled
****************
disabled
000.000.000.000
000.000.000.000
000.000.000.000
000.000.000.000
224
225
226
10
11
Use this menu to configure the RASExpress server to work with your security server.
The RASExpress server supports the RADIUS (Remote Authentication Dial-In User
Service) and TACACS+ protocols for authentication.
Security Protocol
Select the security protocol you are using on your network. If you do not have a
security server on your network, select Local. The other two options are RADIUS
and TACACS+.
Accounting
This field enables or disables accounting support in the security server. Enable it if
you want your RADIUS or TACACS+ server to keep track of accounting information
such as number of bytes sent, number of bytes received, log in time, log out time, port
number, etc.
TACACS+ Encryption
Select enabled to enable encryption of TACACS+ packets between the RASExpress
server and the TACACS+ security server. Enable only if your TACACS+ server
supports encryption.
Shared Secret
Type the shared secret used for communication between the RASExpress server and
the security server. It must match the shared secret configured at the security server.
Allow Call If Security Server Down
Enable to provide access by any user if the primary and all backup security servers are
down. Disable to prevent any user from logging on if the security servers are all down.
Primary Server Address
Type the IP address of your primary security server.
Backup Server Address 1–3
Type the IP address of your backup security server. You can specify up to three
backup security servers.
CommPlete Communications Server
37
RASExpress User Guide
Call Back Delay Attribute Value
Type the value you have chosen for the Callback Delay attribute. You must set up the
same attribute in the dictionary file of your RADIUS server. Make sure that you select
a unique attribute value. The value must not clash with any of the standard RADIUS
attributes nor any other custom attributes. Consult your RADIUS server documentation before making any changes.
Remote User Enter Number Attribute Value
Enter the value you have chosen for the Remote User Enter Number attribute. You
must set up the same attribute in the dictionary file of your RADIUS server. Make
sure that you select a unique attribute value. The value must not clash with any of the
standard RADIUS attributes nor any other custom attributes. Consult your RADIUS
server documentation before making any changes.
Protocol Permissions Attribute Value
Enter the value you have chosen for the Protocol Permissions attribute. You must set
up the same attribute in the dictionary file of your RADIUS server. Make sure that
you select a unique attribute value. The value must not clash with any of the standard
RADIUS attributes nor any other custom attributes. Consult your RADIUS server
documentation before making any changes.
Inbound User Service Type Value
Enter the service type value you have chosen for Inbound User. You must set up the
same service type value in the dictionary file of your RADIUS server. Make sure that
you select a unique service type value. The value must not clash with any of the
standard RADIUS service types or any other custom service types. Consult your
RADIUS server documentation before making any changes.
Shell User Service Type Value
Enter the service type value that you have chosen for Shell User. You must set up the
same service type value in the dictionary file of your RADIUS server. Make sure that
you select a unique service type value. The value must not clash with any of the
standard RADIUS service types or any other custom service types. Consult your
RADIUS server documentation before making any changes.
OSPF Configuration
Menu path: Main Menu ➔ Configuration of Server ➔ Server Setup ➔ OSPF
Configuration
[ 1] OSPF
[ 2] Router ID
[ 3] Area Configuration
[ 4] Interface Configuration
[ESC] to go to previous menu
: disabled
: 192.168.090.004
Open Shortest Path First (OSPF) is an internal gateway protocol. Designed for IP
networks, OSPF supports variable length subnet masks (VLSM), which allows more
efficient allocation of IP addresses than RIP-1, and tagging of externally derived
routing information. OSPF also allows packet authentication and uses IP multicast
when sending or receiving packets.
Use the OSPF menus to create an OSPF (Open Shortest Path First) database for the
RASExpress server.
38
CommPlete Communications Server
3 Terminal and Telnet Management
OSPF Routing
Select enabled to enable OSPF routing on the server.
Router ID
Type the identifier for the OSPF router. It has the same format as an IP address, but
identifies the router independent of its IP Address.
Area Configuration
Use Area Configuration to review or configure OSPF areas. An OSPF area is made
up of internal routers linked to other areas within an autonomous system (AS) by
area border routers.
When you select Area Configuration, the List of Areas menu appears. To edit an
area in the List of Areas, type its serial number and press ENTER. To create a new
area, Type A and press ENTER. In both cases, the Area Configuration menu appears
with the following options:
[ 1] Area ID
: 000.000.000.000
[ 2] Stub Area
: disabled
[ 3] Inject Default Route : disabled
[ 4] Stub Metric
: 1
[ESC]
to go to previous menu
Area ID. The identification number assigned to the area. It has the same format as an
IP address, but has the function of defining a summarization point for Link State
Advertisements. The default value is 0.0.0.0, the same as the backbone.
Stub Area. Determines whether AS external advertisements will be flooded through
the area. Cannot be enabled for backbone areas.
Inject Default Route. Determines whether a default route is summarized into a stub
area if the OSPF router is connected to multiple areas.
Stub Metric. Shows the cost of the default route summarized into a stub area.
List of Address Ranges
The List of Address Ranges specifies the address ranges in an OSPF area. Although
an area can be loosely defined as a collection of networks, in actuality an area is
specified as a list of address ranges. Each address range is defined as an address and
mask pair. Many separate networks may be contained in a single address range, just
as a subnetted network is composed of many separate subnets.
To access the List of Address Ranges menu, select Area Configuration, type R for
“ranges,” and then press ENTER. To edit the address ranges in an area, type the area’s
serial number and press ENTER. Then type A to add a new address range or E to edit
an address range and press ENTER. In either case, the Address Range Configuration
menu opens with the following options.
[ 1] Address
: 000.000.000.000
[ 2] Mask
: 000.000.000.000
[ 3] Status
: Advertise
[ESC]
to go to previous menu
Address. Type the IP address part of the IP address and IP mask pair. The IP address
and IP network mask pair specify the IP addresses contained in the address range.
For example, the class B address range of X.X.X.X with a network mask of 255.255.0.0
includes all IP addresses from X.X.0.0 to X.X.255.255.
Mask. Type the IP mask part of the IP address and IP mask pair.
CommPlete Communications Server
39
RASExpress User Guide
Status. Select Advertise to have the networks contained in the address range
advertised in other areas. Select Do Not Advertise to have the networks contained in
the address range hidden from other areas.
Interface Configuration
Use Interface Configuration to review or configure an OSPF interface.
When you select Interface Configuration, a list of OSPF interfaces appears. To edit
an interface, type E and press ENTER, then type the interface’s line number and press
ENTER. The Interface Configuration menu then appears with the following options:
[ 1] Interface
[ 2] AreaID
[ 3] Metric
[ 4] RouterDeadInterval
[ 5] TransmitDelay
[ 6] Priority
[ 7] HelloInterval
[ 8] RetransmitInterval
[ 9] AuthenticationType
[10] PlainTextPassword
[ESC] to go to previous menu
:
:
:
:
:
:
:
:
:
:
disabled
000.000.000.000
1
60
1
1
15
15
None
********
Interface. Indicates whether OSPF routing is enabled on this interface. OSPF can be
enabled on LAN and WAN ports of type LAN-toLAN.
Area ID. The area to which this interface belongs.
Metric. Indicates the cost of sending a packet on the interface, expressed in the link
state metric.
Router Dead Interval. The number of seconds to wait before the neighbors should
declare the OSPF router down if they do not receive any Hello packets from it.
Transmit Delay. The estimated number of seconds it takes to transmit a Link State
Update packet over this interface.
Priority. Indicates the priority for the OSPF router to become the Designated Router
on the connected interface.
Hello Interval. The number of seconds between the Hello packets sent on the
interface by the OSPF router.
Retransmit Interval. The number of seconds between link state advertisement
transmissions.
Authentication Type. The authentication scheme used on the attached network. The
choices are Simple and None.
Plain Text Password. The simple password to be used for the attached network.
40
CommPlete Communications Server
3 Terminal and Telnet Management
User Setup
Menu path: Main Menu ➔ Configuration of Server ➔ User Setup.
If you have created a list of users, selecting User Setup causes the list to appear.
1.
2.
3.
4.
5.
6.
7.
8.
USER1
USER2
USER3
USER4
USER5
USER6
USER7
USER8
A: Add
D: Delete
ESC: Prev Menu
E: Edit
R: Edit Permissions
Enter your choice:
Use the following menus to set up user names, passwords, callback numbers, and
permissions. First select an action, then select a user by typing the user line number.
To add a user to the list, type A and press ENTER. To delete a user from the list, type
D, press ENTER, and follow the prompts. To edit a user, type E and press ENTER. To
edit permissions for a user, type R and press ENTER.
User Information
Menu path: Main Menu ➔ Configuration of Server ➔ User Setup ➔ Add or Edit.
When you type A to add or E to edit a user, the following menu appears.
1. User Name
:
2. Password
:
3. Remote User Enter Number (On/Off) :
4. Call Back Number
:
5. Call Back Delay (secs)
:
6. Concurrent Logins
:
7. Static IP Address
:
Select field to modify (S to Save, ESC
USER1
******************************
OFF
15
0
000.000.000.000
to Cancel):
User Name
Type the user name in this field. This is the name that a remote caller uses to log into
the RASExpress server. It may not duplicate any other user name.
Password
Type the password the user will use to log into the RASExpress server. The password
is case-sensitive. It should be unique and easy for the user to remember. To enter a
new password, type the new password and press ENTER, then type it again to verify
it. For security, the actual characters are replaced by asterisks.
Remote User Enter Number
Select ON to indicate that the user is mobile. When the user calls into the RASExpress
server, RASExpress prompts the user to type the user’s local telephone number. The
server then disconnects and calls back the user at that number after the delay
specified in the Call Back Delay field.
If the Remote User Enter Number field is set to OFF, you can enter a fixed callback
number in the Call Back Number field. If the Remote User Enter Number is set to ON,
then the Call Back Number field is unavailable because the remote number is variable.
CommPlete Communications Server
41
RASExpress User Guide
Call Back Number
To enable callback security, type the user’s callback security phone number in this
field. When a user calls in with a valid user name and password, the RASExpress
server hangs up. Then, after the delay specified in the Call Back Delay field, the
RASExpress server calls back the user at the callback number. This field is valid only
if the Remote User Enter Number field is disabled by selecting OFF.
Call Back Delay
This field sets the time in seconds that the RASExpress Server must wait before
calling back the user. The value entered in this field is valid only if the Remote User
Enter Number field is set to On, or if a phone number has been entered in the Call
Back Number field.
Concurrent Logins
The number of concurrent logins the user is permitted. A value of 0 indicates that
there is no limit on the number of concurrent logins.
Note: For multilink connections, the number of concurrent logins permitted should
be at least the number of links in the multilink bundle.
Static IP Address
The user’s static IP address. A value of 000.000.000.000 indicates no static address.
Edit Permissions
Menu path: Main Menu ➔ Configuration of Server ➔ User Setup ➔ Edit
Permissions
Use the Edit Permissions menu to control the user’s access to the RASExpress server.
To edit user permissions, type R in the User Setup menu and select the user name.
The following menu appears.
[ 1] Mode Permissions
[ 2] Line Permissions
[ 3] Protocol Permissions
[ 4] Time of day Logins
[ 5] Connection time limits
[ 6] Terminal Login
[ 7] Tunneling
F: To Save Modifications
[ESC] to go to previous menu
Type a number to select the user permissions you want to edit. When you have finished editing permissions for the user, type F to save your modifications. To exit the
menu without saving your modifications, press ESC.
Mode Permissions
Menu path: Main Menu ➔ Configuration of Server ➔ User Setup ➔ Edit
Permissions ➔ Mode Permissions.
1.
2.
3.
4.
5.
Dial Out
Dial In Remote Node
Dial In Remote Control
Telnet To Host
Rlogin To Host
D: Delete
42
Esc: Prev Menu
CommPlete Communications Server
3 Terminal and Telnet Management
The Mode Permissions menu lists the types of connections the user is permitted to
use. If there are less than five modes listed in the Modes Permitted list, you can add a
missing mode by typing A and pressing ENTER. The Add Permission menu appears
with a list of options that are not on the Modes Permitted menu. Type the number of
the mode you want and press ENTER to add it to the Mode Permissions list. Press ESC
to close the Add Permission menu. To delete a line from the Modes Permitted list, type
D, press ENTER, and select the line number; the line will be deleted with no additional
prompting .
Line Permissions
Menu path: Main Menu ➔ Configuration of Server ➔ User Setup ➔ Edit
Permissions ➔ Line Permissions.
Line
1.
2.
3.
4.
13.
14.
15.
16.
Name
WAN1
WAN2
WAN3
WAN4
.
.
WAN13
WAN14
WAN15
WAN16
D: Delete
Esc: Prev Menu
The Lines Permitted menu lists the WAN ports the user is permitted to use. If any
ports have been deleted, type A and press ENTER to add to the list of lines. The Add
Permission menu appears with a list of deleted ports. Type the number of a deleted
port and press ENTER to add it to the Lines Permitted list. Press ESC to close the Add
Permission menu. To delete a port from the Lines Permitted list, type D, press ENTER,
and select the port number; the port is deleted with no additional prompting. Press
ESC to quit the Lines Permitted list.
Protocol Permissions
Menu path: Main Menu ➔ Configuration of Server ➔ User Setup ➔ Edit
Permissions ➔ Protocol Permissions.
1. Internet Protocol - IP
2. Internetwork Packet Exchange - IPX
3. Spanning Tree Protocol
D: Delete
Esc: Prev Menu
The Protocols Permitted menu lists the network protocols the user is permitted to
use. If one or more of the three protocols have been deleted from the list, type A and
press ENTER to add a protocol. The Add Permission menu appears with a list of
deleted protocols. To add a deleted protocol to the Protocols Permitted list, type its
number and press ENTER. Press ESC to close the Add Permission menu. To delete a
line from the Protocols Permitted list, type D, press ENTER, and select the line number; the line is deleted with no additional prompting.
CommPlete Communications Server
43
RASExpress User Guide
Time of Day Logins
Menu path: Main Menu ➔ Configuration of Server ➔ User Setup ➔ Edit
Permissions ➔ Time of day Logins.
Time of Day Logins Setup
00:00
06:00
12:00
18:00
Sunday
----********************************************
Monday
--**********************************************
Tuesday
--**********************************************
Wednesday --**********************************************
Thursday --**********************************************
Friday
--**********************************************
Saturday --**********************************************
Press ESC to return to prev menu
The Time of Day Logins Setup display shows the times during which the user is
allowed to dial in or out. RASExpress divides the week into half-hour blocks, starting
at midnight. An asterisk (*) indicates that the user is allowed to call during the half
hour block. A hyphen (-) indicates that the user is not allowed to call during the half
hour block. By default, the user is allowed to call at any time.
Note: Time of day logins can be changed only through Telnet command mode
(Appendix C) or the RASCON utility for DOS (page 213).
Connection Time Limit
Menu path: Main Menu ➔ Configuration of Server ➔ User Setup ➔ Edit
Permissions ➔ Connection time limits.
Current connection time limit is 0 minutes
Enter new value for connection time limit for user in minutes:
Use Connection Time Limit to limit how long the user can remain connected. If the
user exceeds the time limit shown in this screen, the RASExpress server automatically
disconnects the user. A value of zero (the default) indicates no limit. To save your
changes, press ENTER. To return to the previous menu, press ESC.
Terminal Login
Menu path: Main Menu ➔ Configuration of Server ➔ User Setup ➔ Edit
Permissions ➔ Terminal Login.
[ 1] Auto Login Protocol : None
[ 2] Login Host Name
:
[ESC] to go to previous menu
Select Auto Login Protocol to choose the protocol that will be used to automatically
log on to a host computer. Choose Telnet, Rlogin, or None. None disables auto login
altogether. Select Login Host Name to type the IP address of the host computer.
44
CommPlete Communications Server
3 Terminal and Telnet Management
Tunneling
Menu Path: Main Menu ➔ Configuration of Server ➔ User Setup ➔ Edit
Permissions ➔ Tunneling
[ 1] Tunneling Protocol
: PPTP
[ 2] Tunnel Server IP Address :
Select Tunneling Protocol to choose a tunneling protocol for the user. You can select
PPTP (Point to Point Tunneling Protocol) or None, which disables tunneling altogether.
If you select PPTP, type the IP address of the PPTP server in the Tunnel Server IP
Address option.
Communication Setup
Menu path: Main Menu ➔ Configuration of Server ➔ Communication Setup.
Caution: This section is included for completeness only. Do not change the communication defaults that were set when RASExpress was installed on your RASCard.
[ 1] ISI Setup
[ 2] ISDN Primary Rate Interface
From the Communication Setup menu, select the type of communications card you
want to configure: ISI (analog modem) or ISDN Primary Rate Interface.
ISI Setup
Menu path: Main Menu ➔ Configuration of Server ➔ Communication Setup ➔ ISI
Setup.
ISI608 Card Setup
Card No
1
2
3
Base Address
210
220
230
A: Add a card D: Delete a card
E: Edit Line Information
ESC: Prev menu
Irq Level
10
11
12
Number Of Ports
8
8
8
M: Modify card settings
When you select ISI (intelligent serial interface) from the Communication Setup
menu, the ISI608 Card Setup menu appears. This menu shows the card number, base
address, IRQ level, and number of ports for each installed ISI card. To modify the
card settings, first select the action, then select the card you want to modify. To add a
card to the list, type A and press ENTER. To delete a card, type D, press ENTER and
follow the prompts. To modify a card setting, type M and press ENTER. To edit line
information, type E and press ENTER .
Note: The base address and IRQ values are assigned to the card slot, not to the card
itself, making it possible to swap out cards without needing to reconfigure RASExpress.
The maximum number of card slots in a CommPlete segment is three. If you assign a
base address and IRQ to a fourth card slot, it will create an error condition.
CommPlete Communications Server
45
RASExpress User Guide
Board Information
Menu path: Main Menu ➔ Configuration of Server ➔ Communication Setup ➔
Multitech ISI Setup ➔ Add or Modify.
1. Base Address
2. Irq
3. Number of Ports
: 210
: 10
: 08
Select the field to modify (ESC Prev Menu)
Use the Board Information menu to create or modify the port settings for a modem
card. The port settings consist of a base address, IRQ number, and the number of
ports on the card. To change any setting, select the option and type a new value.
Note: Setting the wrong base address and IRQ value can lead to unpredictable results.
Base Address
This is the base I/O address for the modem card in hexadecimal format. It provides
the RASExpress server with information about card activity, and allows the card to
use one interrupt for all ports on the card. There is a maximum number of three communication cards in a CommPlete segment. Each card must have a unique base I/O
address number.
IRQ Number
This is the interrupt number for the modem card. An IRQ requests the attention of
RASExpress and the server’s microprocessor. The IRQ number used for each communication card must be unique in the segment.
Number of Ports
This is the number of ports on the modem card.
Edit Line Information
Menu path: Main Menu ➔ Configuration of Server ➔ Communication Setup ➔ ISI
Setup ➔ Edit Line Information.
When you select Edit Line Information and select a card, the List of Lines menu appears. The List of Lines menu lists the phone lines on the selected card. Type the
number of the line you want to edit, and press ENTER. The Line Information menu
appears. The Line Information menu lists the parameters that can be configured for
the selected port. To edit a parameter, type its number, press ENTER, and type or
select the new value.
1.
2.
3.
4.
5.
6.
7.
8.
9.
10.
Line Status
General Name
Specific Name
Modem Name
Connection Started By
Baud Rate
Data Bits
Stop Bits
Parity
RTS/CTS Flow control
:
:
:
:
:
:
:
:
:
:
enabled
MODEM
2A
MT5634HD8
Data Carrier Detect
115200
8
1
NONE
enabled
Select the field to modify (ESC Prev Menu):
46
CommPlete Communications Server
3 Terminal and Telnet Management
Line Status
Shows whether the port is enabled or disabled.
General Name
Describes the general name for the port. The general name is used by the workstation
MCSI software to take the line.
Specific Name
Shows the specific name for the port. The specific name is used by the workstation
MCSI software to take the line.
Modem Name
Shows the model name of the modem used for the port. To change the modem name,
select Modem Name and press ENTER. When the List of Modems window appears,
select the new modem name and press ENTER.
Connection Started By
Selects how the RASExpress server detects a dial-in connection. When the Modem
Response option is selected, the server starts a dial-in connection when the modem
responds with a CONNECT string. When the Data Carrier Detect option is selected,
the server starts a dial-in connection when the DCD signal goes high.
Baud Rate
Selects the baud rate used by the port. You can select a rate up to 460800 bps.
Data Bits
Selects the number of data bits used by the port.
Stop Bits
Selects the number of stop bits used by the port.
Parity
Selects the type of parity used by the port.
RTS/CTS Flow Control
Selects hardware flow control on the port. The options are enabled and disabled.
ISDN Primary Rate Interface
Menu path: Main Menu ➔ Configuration of Server ➔ Communication Setup ➔
ISDN Primary Rate Interface.
[ 1] ISDN Primary Rate Interface
[ 2] I/O Address
[ 3] IRQ Number
[ 4] Memory Address
[ 5] No Of Ports
[ESC] to go to previous menu
: enabled
: 2f0
:
7
: d000
:
23
Use the ISDN Primary Rate Interface menu to modify settings for an ISDN PRI
communication card. To change a setting, select the field and type a new value.
ISDN Primary Rate Interface
Use this field to enable or disable ISDN PRI support by the RASExpress server.
Enable it only if an ISDN PRI card is installed in the server
CommPlete Communications Server
47
RASExpress User Guide
I/O Address
This is the base I/O address for the PRI card in hexadecimal format. It provides the
RASExpress server with information about card activity, and allows the card to use
one interrupt for all ports on the card. Only one PRI card can be used on a RASExpress server. The I/O address must be unique.
IRQ Number
This is the IRQ number for the PRI card. The IRQ number must be unique. The IRQ
requests the attention of RASExpress and the server’s microprocessor. The default
value is 7.
Memory Address
The PRI card shares memory with the RASExpress server for internal communication.
Type the shared memory address into this field in hexadecimal format. The default
value is D000.
Number of Ports Select the number of ports available to the ISDN PRI card. In North
America, 23 data channels are standard; in Europe 30 data channels are standard.
Modem Setup
Menu path: Main Menu ➔ Configuration of Server ➔ Modem Setup.
Caution: This section is included only for completeness. Do not change the modem
defaults that were set when RASExpress was installed on your RASCard.
When you select Modem Setup, the List of Modems menu appears. You can add a
modem to this list, delete it, or modify the default settings of the modem. If your modem type is not listed, type A and press ENTER. When the Modem Information menu
appears, insert the required information.
To edit the settings for a modem, type M and press ENTER. Next, select the modem
number. The Modem Information menu appears with the following options.
1.
2.
3.
4.
5.
6.
7.
8.
9.
10.
11.
12.
13.
14.
15.
16.
17.
Modem Name
Initialization string 1
Initialization string 2
Initialization string 3
Initialization string 4
Initialization string 5
Dial prefix string
Dial suffix string
Hangup string
NO CARRIER string
NO DIALTONE string
NO ANSWER string
Connect response string
OK string
ERROR string
RING string
BUSY string
:
:
:
:
:
:
:
:
:
:
:
:
:
:
:
:
:
MT5634HD8
AT&F&S1S0=1S91=16
ATDT
+++ATH0
NO CARRIER
NO DIALTONE
NO ANSWER
CONNECT
OK
ERROR
RING
BUSY
Select the field to modify (S to Save, ESC to Cancel):
Modem Name
Shows the model name of the modem. Enter a new modem name only if it is not
listed in the List of Modems menu.
48
CommPlete Communications Server
3 Terminal and Telnet Management
Initializing String 1–5
These fields display the initialization string or strings used to configure the modem
when power is applied or the modem is reset.
If you want to use a custom initialization string, create and name a new modem. Then
copy information from one of the listed modems and modify the string to the commands and values you want to use.
Caution: Changing the modem strings is not recommended unless you are adding a
new modem.
Dial Prefix
Displays the dial prefix, which is automatically sent to the modem before the phone
number. The default prefix is the tone dialing command ATDT.
Dial Suffix
Displays the dial suffix, which is automatically sent to the modem after the phone
number. This field is normally empty.
Hangup String
Displays the command string used to end a call.
NO CARRIER string, NO DIALTONE string, NO ANSWER string, Connect
Response string, OK string, ERROR string, RING string, BUSY string
These fields display the modem’s result codes, which are used by RASExpress for
monitoring calls. They should be spelled exactly the same as the modem sends them.
By default, these fields are set for verbose responses. If your modem is set for terse
responses, refer to your modem’s owner’s manual for information about the
responses.
Administrator Setup
Menu path: Main Menu ➔ Configuration of Server ➔ Administrator Setup.
Serial_No
1.
2.
A:Add
AdministratorName
ADMIN1
ADMIN2
D:Delete
E:Edit
Esc: Prev Menu
Select Administrator Setup to display or edit a list of administrators. Administrators
are users with administrative rights. To add an administrator to the list, type A and
press ENTER; to edit an entry, type E and press ENTER. Both actions open a menu in
which you can edit the administrator’s user name, password, and configuration and
management permissions.
[ 1] Name
: ADMIN1
[ 2] Password
: ****************
[ 3] Permissions
[ESC]
to go to previous menu
Name
The administrator’s user name.
CommPlete Communications Server
49
RASExpress User Guide
Password
The administrator’s password. You must type the password twice to confirm it
Permissions
Dislays the administrator’s permissions. Up to two permissions can be listed:
Configuration and Management. If Configuration is listed, the administrator can
configure the RASExpress server. If Management is listed, the administrator can
manage the RASExpress server and view statistics. If neither is listed, the
administrator can only view statistics. The default is neither. To add a permission to
the list, type A and press ENTER. To delete a permission from the list, type E and
press ENTER.
50
CommPlete Communications Server
3 Terminal and Telnet Management
Management of Server
Menu path: Main Menu ➔ Management of Server.
[ 1] Server Information
[ 2] User Information
[ 3] Line Information
[ 4] Statistics
[ 5] Display EIA Signals
[ 6] Display Port Addresses
[ 7] Inbound User List
[ 8] Reset SBC Processors
[ESC] to go to main menu
Select Management of Server to view current activity on the RASExpress server, to
view statistics for a given period, and to change selected settings. The following
topics describe submenus that can be selected from the Management of Server menu.
Server Information
Menu path: Main Menu ➔ Management of Server ➔ Server Information.
[ 1] General Information
[ 2] Statistics Summary
[ 3] Version
[ 4] Reboot Server
[ 5] Current LogStatus
[ 6] Set Server Time
[ESC] to go to main menu
General Information
Menu path: Main Menu ➔ Management of Server ➔ Server Information ➔ General
Information.
Supervisor Password
Log Status
Write Error Messages into file
Message File
Screen Saver
Connection manager menu
Command to MultiModem Manager
:
:
:
:
:
:
:
****************
enabled
enabled
C:\RAS550\SERVER.MSG
disabled
disabled
disabled
ESC : Prev Menu
This screen gives general information about the RASExpress server. None of the
parameters can be changed from this screen.
Supervisor Password
For security, this field displays only asterisks.
Log Status
Shows whether the call log is enabled or disabled. The default is disabled. When
enabled is selected, RASExpress logs all calls for one hour in the file yyyymmdd.LOG,
where yyyymmdd is the year, month, and date the log was created. Saved logs are
given the extensions .L00–.L23 for each date.
CommPlete Communications Server
51
RASExpress User Guide
Write Error Messages into File
When this field is enabled, RASExpress saves all messages into a message file. The
default is disabled.
Message File
This field shows the name and path of the message file. The default file name is
SERVER.MSG.
Screen Saver
This field shows the status of the RASExpress screen saver.
Connection Manager Menu
When this field is enabled, the Connection Manager menu is displayed to a user
calling into the RASExpress server for remote control operations. If it is disabled, the
Host List is displayed to the user.
Command to MultiModemManager
This command does not apply to CommPlete Communications Servers.
Statistics Summary
Menu path: Main Menu ➔ Management of Server ➔ Server Information ➔
Statistics Summary.
Server Name
Time Server Invoked
Current Time
ServerUp Time
Busy Lines
Total dial in calls
Total dial out calls
Users waiting for dial in
Total pkts sent to LAN
Total pkts recv from LAN
Total bytes sent to LAN
Total bytes recv from LAN
Total bytes sent to lines
Total bytes recv from lines
<ESC>:Prev Menu
:
:
:
:
:
:
:
:
:
:
:
:
:
:
<R>:Refresh
SERVER_1
Aug 1, 1999 Sun 14:29:51
Aug 8, 1999 Sun 13:35:54
6 Days, 23 Hours, 5 Minutes, 3 Seconds
0
0
0
0
110315
138497
14234006
15066870
0
0
<U>:Reset
Select Statistics Summary to display a statistical summary of server activity since the
server was last started. To refresh the display with current information, type R and
press ENTER. To reset the statistics to zero, type U and press ENTER.
Version
Menu path: Main Menu ➔ Management of Server ➔ Server Information ➔ Version.
ServerName
Version
Number Of Cards
Number Of Lines
Card Number
: 1
Card Number
: 2
Card Number
: 3
:
:
:
:
SERVER_1
5.50
3
24
Base Address
Base Address
Base Address
: 210
: 220
: 230
IRQ : 10
IRQ : 11
IRQ : 12
ESC: Prev Menu
The Version Information screen displays basic information about the RASExpress
server, including the version number of the RASExpress software loaded on the server.
52
CommPlete Communications Server
3 Terminal and Telnet Management
Reboot Server
Menu path: Main Menu ➔ Management of Server ➔ Server Information ➔ Reboot
Server.
To reboot the RASExpress server, select Reboot Server from the Server Information
menu and answer Y to the confirmation question.
Current Log Status
Menu path: Main Menu ➔ Management of Server ➔ Server Information ➔ Current
Log Status.
Log Status
Log start time
Log stop time
Current Time
Time Left
:
:
:
:
:
T: Toggle Log Status
Enter your choice:
OPEN
Aug 8, 1999
Aug 8, 1999
Aug 8, 1999
0 Hours, 24
Sun 14:00:01
Sun 15:00:00
Sun 14:35:11
Minutes, 49 Seconds
ESC: Prev Menu
Displays current log information. To start or stop a log, type T and press ENTER.
Set Server Time
Menu path: Main Menu ➔ Management of Server ➔ Server Information ➔ Set
Server Time.
[ 1] Server Time (HH:MM:SC)
[ESC] Previous Menu
:
14:35:11
Displays the server time. To set the time, press 1, then press ENTER, and type the new
time in the 24-hour format hours:minutes:seconds.
User Information
Menu path: Main Menu ➔ Management of Server ➔ User Information.
Select User Information to see a list of users, if you have created a user list:
1. USER1
2. USER2
3. USER3
4. USER4
5. USER5
6. USER6
7. USER7
8. USER8
ESC: Prev Menu
CommPlete Communications Server
53
RASExpress User Guide
Line Information
Menu path: Main Menu ➔ Management of Server ➔ Line Information.
Line
General Name
Specific Name
User Name
Status
1
MODEM
2A
WAITING FOR CALL
2
MODEM
2B
WAITING FOR CALL
3
MODEM
2C
WAITING FOR CALL
4
MODEM
2D
WAITING FOR CALL
5
MODEM
2E
WAITING FOR CALL
.
.
.
.
.
.
.
.
.
.
.
.
20
MODEM
4D
WAITING FOR CALL
21
MODEM
4E
WAITING FOR CALL
22
MODEM
4F
WAITING FOR CALL
23
MODEM
4G
WAITING FOR CALL
24
MODEM
4H
WAITING FOR CALL
D: Disconnect
R: Reset Line
O: Put Line Out of Service
E: Enable Line
V: View Line Statistics
F: Refresh
N: Next Page
Esc: Prev Menu
Enter the choice:
This menu displays information about the current status of each of the RASExpress
server’s phone lines. Through this menu you can disconnect, reset, enable, put out of
service, change the settings, or view the statistics of each line.
Line
Shows the index number of each line. After you type an action letter (such as R for
Reset), you must type the number of the line that you want the action to apply to.
General Name
Shows the type of communication device that is on the line.
Specific Name
Shows the specific name for the communication device. The specific name is unique
to the device. It contains the slot number and a letter that identifies a specific device
in the slot. For example, segment line 22 (4F) is line 6 of slot 4.
User Name
Shows which users are currently online with the RASExpress server.
Status
This column shows the line type, which can be RN, for idle; IN, for inbound; or OUT,
for outbound. It also shows the line status, which can be WAITING FOR CALL, ON
LINE, WAITING TO CALL, CALLING BACK, OUT OF SERVICE,
INITIALIZING, or TELNET ON LINE.
Next Page
To view more lines, type N and press ENTER.
Disconnect Line
To disconnect a line, type D and press ENTER. Type the number of the line you want
to disconnect, then press ENTER. The line immediately disconnects, and the message
WAITING TO CALL appears in the Status column.
Reset Line
To reset a line, type D and press ENTER. Type the number of the line you want to
reset, then press ENTER. The word INITIALIZING appears in the Status column as
the line device is reset to its initial state.
54
CommPlete Communications Server
3 Terminal and Telnet Management
Put Line Out of Service
To put a line out of service, type O and press ENTER. Type the number of the line you
want to put out of service, then press ENTER. The message OUT OF SERVICE appears in the Status column the next time you refresh the screen.
Enable Line
To enable a line that has been taken out of service, type E and press ENTER. Type the
number of the line you want to enable, then press ENTER. The word INITIALIZING
appears in the Status column as the line device is enabled.
Refresh
Press F to refresh the screen with current information.
View Line Statistics
To view the statistics of a single line, type V and press ENTER. Type the number of the
line you want to view, then press ENTER. A screen similar to the following one
appears. After you view it, press ESC to return to the previous menu.
Line Name
: MODEM : 2A
Status : WAITING FOR CALL
Current time
: Aug 8, 1999 Sun 14:45:51
Connect time
:
Line Parameters :
User Name
:
Calling Party ID :
Network Address : 00000000
Node Address
: 000000000000
Line tx throughput
:
0
Line rx throughput
:
Bytes tx to line
:
0
Bytes rx from line
:
Packets tx to user
:
0
Packets rx from user
:
Total bytes tx to line:
0
Total bytes rx from line:
Total dial in calls
:
0
Total dial out calls
:
<Esc>:Prev Menu
CommPlete Communications Server
<R>:Refresh
0
0
0
0
0
<U>:Reset
55
RASExpress User Guide
Statistics
Menu path: Main Menu ➔ Management of Server ➔ Statistics.
[ 1]
[ 2]
[ 3]
[ 4]
[ 5]
[ 6]
[ 7]
[ 8]
[ 9]
[10]
[11]
Display
Display
Display
Display
Display
Display
Display
Display
Display
Display
Display
General Statistics
IP Statistics
IPX Statistics
PPP Statistics
Port Statistics
DialIn/DialOut Statistics
Line Usage Statistics
Modem Connect String Table
Line Utilization Table
Call History
Multichassis Bonding Table
Use the Statistics menu to review RASExpress server activity.
Display General Statistics
Menu path: Main Menu ➔ Management of Server ➔ Statistics ➔ Display General
Statistics.
Port
Type
Port Throughput
Send
1
2
3
4
5
.
.
.
20
21
22
23
24
ANALOG
ANALOG
ANALOG
ANALOG
ANALOG
ANALOG
ANALOG
ANALOG
ANALOG
ANALOG
<ESC>:Prev Menu
Pending Bytes
0
0
0
0
0
.
.
.
0
0
0
0
0
Receive
Send
0
0
0
0
0
.
.
.
0
0
0
0
0
<R>:Refresh
Total Bytes (Line)
Receive
0
0
0
0
0
.
.
.
0
0
0
0
0
Send
0
0
0
0
0
.
.
.
0
0
0
0
0
Receive
0
0
0
0
0
.
.
.
0
0
0
0
0
0
0
0
0
0
.
.
.
0
0
0
0
0
<U>:Reset
The General Statistics screen displays current statistics for each line that is active. To
refresh the display type R and press ENTER. To reset the statistics to zero, type R and
press ENTER. The Port Throughput columns display throughput activity (in bytes per
second in near real-time) when sending and receiving data to and from the port. The
Pending Bytes columns display the number of bytes that are waiting to be processed.
The Total Bytes columns display the total number of bytes that have been sent to and
received from the port during the current connection. When the line is waiting for a
call or is idle, all values in these columns are zero.
56
CommPlete Communications Server
3 Terminal and Telnet Management
Display IP Statistics
Menu path: Main Menu ➔ Management of Server ➔ Statistics ➔ Display IP
Statistics.
[ 1] ARP Statistics
[ 2] Router Statistics
[ 3] UDP / TCP Statistics
[ 4] List Routing Table
[ 5] TCP Connection Table
[ESC] to go to previous menu
Use the Display IP Statistics menu to review IP statistics since the RASExpress
server was last started.
ARP Statistics
Menu path: Main Menu ➔ Management of Server ➔ Statistics ➔ Display IP
Statistics ➔ ARP Statistics.
<< ARP Statistics >>
Requests Received
Replies Sent
Packets with Bad Length Field
Packets with Unsupported Hardware Type
Packets with Unsupported Protocol Type Field
Packets with Bad Address
Requests Sent
<ESC>: Prev Menu
:
:
:
:
:
:
:
620
367
0
0
0
0
0
<R>: Refresh
The ARP Statistics screen displays ARP (Address Resolution Protocol) statistics since
the RASExpress server was last started. To refresh the display press R.
Router Statistics
Menu path: Main Menu ➔ Management of Server ➔ Statistics ➔ Display IP
Statistics ➔ Router Statistics.
Packets
Packets
Packets
Packets
Packets
<< IP General Statistics >>
Received
Forwarded
Transmitted
that could not be Forwarded
Received with Header Errors
:
:
:
:
:
26616
0
28570
0
0
<< ICMP Statistics >>
Echo Request Messages Received
Echo Response Messages Transmitted
Destination Unreachable Messages Received
Destination Unreachable Messages Transmitted
Redirect Messages Received
Redirect Messages Transmitted
Parameter Problem Messages Received
Parameter Problem Messages Transmit
:
:
:
:
:
:
:
:
0
0
0
0
0
0
0
0
<< RIP Statistics >>
Request Packets Received
Response Packets Transmitted
Request Packets Transmitted
Response Packets Received
:
:
:
:
1
21170
1
21166
<ESC>: Prev Menu
<R>: Refresh
The Router Statistics screen displays IP (Internet Protocol), ICMP (Internet Control
Message Protocol), and RIP (Routing Information Protocol) statistics since the
RASExpress server was last started.
CommPlete Communications Server
57
RASExpress User Guide
UDP / TCP Statistics
Menu path: Main Menu ➔ Management of Server ➔ Statistics ➔ Display IP
Statistics ➔ UDP / TCP Statistics.
<< UDP Statistics >>
Packets
Packets
Packets
Packets
Received
Sent
Received with Unreachable Destination
Received with Errors
:
:
:
:
21211
21220
0
0
:
:
:
:
:
:
:
239
0
5416
7338
30
0
0
<< TCP Statistics >>
Number of Successful Connections
Number of Connection Attempt Failures
Packets Received
Packets Transmitted
Number of Retransmissions
Packets Received with Errors
Packets Transmitted with RST
<ESC>: Prev Menu
<R>: Refresh
The UDP / TCP Statistics screen displays UDP (User Datagram Protocol) and TCP
(Transmission Control Protocol) statistics since the RASExpress server last started.
List Routing Table
Menu path: Main Menu ➔ Management of Server ➔ Statistics ➔ Display IP
Statistics ➔ List Routing Table.
Network
Next Hop
Mask
Metric
Port
127.000.000.001
192.168.090.004
192.168.090.000
Direct Delivery
Direct Delivery
Direct Delivery
255.255.255.255
255.255.255.255
255.255.255.000
0
0
1
50
50
1
<ESC>:Prev Menu
<R>:Refresh
The Routing Table shows IP routing information for the RASExpress server’s router,
including the network address, forwarding address, subnet mask, metric (hop count),
and the port number through which the IP address is reachable.
58
CommPlete Communications Server
3 Terminal and Telnet Management
List TCP Connection Table
Menu path: Main Menu ➔ Management of Server ➔ Statistics ➔ Display IP
Statistics ➔ List TCP Connection Table.
TCP Connection Table
Local Address
Local Port
Remote Address
Remote Port
Connect Time
Connection Up Time
Connection State
User Name
.
.
.
Local Address
Local Port
Remote Address
Remote Port
Connect Time
Connection Up Time
Connection State
User Name
<ESC>:Prev Menu
:
:
:
:
:
:
:
:
192.168.090.004
6000
000.000.000.000
0
:
:
:
:
:
:
:
:
192.168.090.004
23
192.168.090.005
1503
Aug 8, 1999 Sun 10:49:18
5 Hours, 33 Minutes, 35 Seconds
ESTAB
SUPERVISOR
LISTEN
<R>:Refresh
The TCP Connection Table shows TCP connection information for each of the
server’s local ports.
Display IPX Statistics
Menu path: Main Menu ➔ Management of Server ➔ Statistics ➔ Display IPX
Statistics.
[ 1] List Routing Table
[ 2] List SAP Table
[ESC] to go to previous menu
List Routing Table
Menu path: Main Menu ➔ Management of Server ➔ Statistics ➔ Display IPX
Statistics ➔ List Routing Table.
Network
00abcdef
00000003
12345001
00000024
12345002
12345003
<ESC>:Prev Menu
Hops
1
1
1
2
1
1
Ticks
1
1
1
2
1
1
<R>:Refresh
The Routing Table shows IPX (Internet Packet Exchange) routing information for the
RASExpress server’s router.
CommPlete Communications Server
59
RASExpress User Guide
List SAP Table
Menu path: Main Menu ➔ Management of Server ➔ Statistics ➔ Display IPX
Statistics ➔ List SAP Table.
Type
Network
Node
Socket
Hops
0026
0026
0335
0004
00abcdef
00abcdef
12345001
00000024
000000000001
000000000001
00080080024d
000000000001
8000
8000
828d
0451
1
1
1
2
<ESC>:Prev Menu
Server
SERVER_1
SERVER_2
SERVER_2
RENEE
<R>:Refresh
The SAP Table shows SAP (Service Access Point) information for the RASExpress
server.
Display PPP Statistics
Menu path: Main Menu ➔ Management of Server ➔ Statistics ➔ Display PPP
Statistics.
LCP Statistics (bytes)
Port
Send
1
2
3
4
5
.
.
.
20
21
22
23
24
<ESC>:Prev Menu
Receive
0
0
0
0
0
.
.
.
0
0
0
0
0
NCP Statistics (bytes)
Send
0
0
0
0
0
.
.
.
0
0
0
0
0
<R>:Refresh
Receive
0
0
0
0
0
.
.
.
0
0
0
0
0
Mapped to
Type
Port
0
0
0
0
0
.
.
.
0
0
0
0
0
<U>:Reset
The PPP Statistics screen displays the number of Link Control Protocol (LCP) and
Network Control Protocol (NCP) bytes sent or received for each active WAN port.
LCP packets are usually exchanged only during the establishment of the PPP connection. The NCP statistics include both IPX and IP packets. Information is displayed
only for remote node lines. For remote control connections, all values are zero.
60
CommPlete Communications Server
3 Terminal and Telnet Management
Display Port Statistics
Menu path: Main Menu ➔ Management of Server ➔ Statistics ➔ Display Port
Statistics.
Line
1
2
3
4
5
.
.
.
21
22
23
24
25
P: Prev Page
Enter the choice
Name
LAN
WAN1
WAN2
WAN3
WAN4
.
.
.
WAN20
WAN21
WAN22
WAN23
WAN24
Esc: Prev Menu
:
Type the number of the port you want to view, and press ENTER. Then select whether
you want to view IPX or IP port statistics. Screens similar to the following ones
appear. After you view each screen, press ESC to return to the previous menu.
Information is displayed only for remote node lines. For remote control connections,
all values are zero.
<< IP Port LAN Statistics >>
1.
2.
3.
4.
5.
6.
7.
8.
IP Packets Received
Packets Sent
IP Router Packets Forwarded
Packets Redirected
Received Packets Filtered
Transmit Packets Filtered
IP Router Packets Not Forwarded
Short Packets Received
<ESC>:Prev Menu
1.
2.
3.
4.
5.
6.
7.
8.
9.
10.
<R>:Refresh
:
:
:
:
:
:
:
:
13539
15683
0
0
0
0
13832
0
<U>:Reset
<< IPX Port LAN Statistics >>
802.3
Packets Received
:
11749
Packets Sent
:
5897
Packets Forwarded
:
5
Packets to Route
:
7
Receive Packets Filtered
:
0
Transmit Packets Filtered
:
0
Packets Hop Count too Large :
0
Path Not Found Packets
:
2
Transmit Packets Discarded :
0
Large Packets Received
:
0
<ESC>:Prev Menu
CommPlete Communications Server
<R>:Refresh
802.2
8680
5886
0
0
0
0
0
0
0
0
TYPE II
5876
5884
0
0
0
0
0
0
0
0
SNAP
5877
5885
0
0
0
0
0
0
0
0
<U>:Reset
61
RASExpress User Guide
Display Dial In/Dial Out Statistics
Menu path: Main Menu ➔ Management of Server ➔ Statistics ➔ Display
DialIn/DialOut Statistics.
Port
Type
Total Dial In Calls
1
2
3
4
5
.
.
.
20
21
22
23
24
ANALOG
ANALOG
ANALOG
ANALOG
ANALOG
0
0
0
0
0
.
.
.
0
0
0
0
0
ANALOG
ANALOG
ANALOG
ANALOG
ANALOG
<ESC>:Prev Menu
Total Dial Out Calls
0
0
0
0
0
.
.
.
0
0
0
0
0
<R>:Refresh
The Dial In/Dial Out Statistics screen displays the line type and total number of
incoming and outgoing calls for each line since the last reboot of the server.
Display Line Usage Statistics
Menu path: Main Menu ➔ Management of Server ➔ Statistics ➔ Display Line
Usage Statistics.
Port
Type
Time Used by Current User
DD:HH:MM:SS
1
2
3
4
5
.
.
.
20
21
22
23
24
ANALOG
ANALOG
ANALOG
ANALOG
ANALOG
.
.
.
ANALOG
ANALOG
ANALOG
ANALOG
ANALOG
00:00:38:12
<ESC>:Prev Menu
<R>:Refresh
00:01:09:42
00:00:11:34
00:01:02:13
00:00:29:40
Total Time Used
DD:HH:MM:SS
32:07:33:57
30:21:37:02
31:16:38:22
29:23:55:09
28:00:32:53
.
.
.
22:02:51:21
23:09:41:10
21:21:43:12
20:12:36:38
20:07:56:18
The Line Usage Statistics screen displays the type of connection for each line, how
long the current user has been online, and the total time the line has been in use since
the RASExpress server last started.
62
CommPlete Communications Server
3 Terminal and Telnet Management
Display Modem Connect String Table
Menu Path: Main Menu ➔ Management of Server ➔ Statistics ➔ Display Modem
Connect String Table.
Port
1
2
3
4
5
.
.
.
20
21
22
23
24
Connect String
Connect 33600 LAPM Compressed
Not Connected
Not Connected
Not Connected
Not Connected
Not
Not
Not
Not
Not
<ESC>:Prev Menu
Connected
Connected
Connected
Connected
Connected
<R>:Refresh
The Modem Connect String Table displays the connect string for each current
connection.
Display Line Utilization Table
Menu Path: Main Menu ➔ Management of Server ➔ Statistics ➔ Display Line
Utilization Table.
Line
General Name
Specific Name
1
MODEM
2A
2
MODEM
2A
3
MODEM
2B
4
MODEM
2C
5
MODEM
2D
.
.
.
.
.
.
.
.
.
20
MODEM
4D
21
MODEM
4E
22
MODEM
4F
23
MODEM
4G
24
MODEM
4H
P: Prev Page
Esc: Prev Menu
Enter the choice :
Type the number of the line whose utilization statistics you want to view, and then
press ENTER. A table appears that displays the total number of calls at each connect
speed.
CommPlete Communications Server
63
RASExpress User Guide
Display Call History
Menu Path: Main Menu ➔ Management of Server ➔ Statistics ➔ Display Call
History.
Line
General Name
Specific Name
1
MODEM
2A
2
MODEM
2A
3
MODEM
2B
4
MODEM
2C
5
MODEM
2D
.
.
.
.
.
.
.
.
.
20
MODEM
4D
21
MODEM
4E
22
MODEM
4F
23
MODEM
4G
24
MODEM
4H
P: Prev Page
Esc: Prev Menu
Enter the choice :
Type the number of the line whose call history you want to view, and press ENTER.
A screen appears that displays information about the line's last ten calls. The
information includes the connect string, the user name, the connect and disconnect
times, the duration of each completed call, and the daylight savings (if any) in
minutes.
Display EIA Signals
Menu path: Main Menu ➔ Management of Server ➔ Display EIA Signals.
Port
DTR
DSR
RTS
CTS
1
2
3
4
5
.
.
.
20
21
22
23
24
ON
ON
ON
ON
ON
.
.
.
ON
ON
ON
ON
ON
OFF
OFF
OFF
OFF
OFF
.
.
.
OFF
OFF
OFF
OFF
OFF
ON
ON
ON
ON
ON
.
.
.
ON
ON
ON
ON
ON
ON
ON
ON
ON
ON
.
.
.
ON
ON
ON
ON
ON
<ESC>:Prev Menu
CD
RI
OFF
OFF
OFF
OFF
OFF
.
.
.
OFF
OFF
OFF
OFF
OFF
OFF
OFF
OFF
OFF
OFF
.
.
.
OFF
OFF
OFF
OFF
OFF
<R>:Refresh
The EIA Signals screen displays the current status of the EIA RS-232 signals on each
line. DTR and RTS are sent by the port. CTS, DSR, DCD, and RI are received by the
port. The DSR signal is not used by the RASExpress server. The status for each signal
can be either ON or OFF.
64
CommPlete Communications Server
3 Terminal and Telnet Management
Display Port Addresses
Menu path: Main Menu ➔ Management of Server ➔ Display Port Addresses.
Port
IPX Addresses
Network Address
Local
1
2
3
4
5
.
.
.
20
21
22
23
24
1234500c
12345004
12345005
12345006
12345007
.
.
.
12345017
12345018
12345019
1234501a
1234501b
192.168.090.004
192.168.090.004
192.168.090.004
192.168.090.004
192.168.090.004
.
.
.
192.168.090.004
192.168.090.004
192.168.090.004
192.168.090.004
192.168.090.004
<ESC>:Prev Menu
IP Addresses
Remote
From
From
From
From
From
From
From
From
From
From
Address
Address
Address
Address
Address
.
.
.
Address
Address
Address
Address
Address
Pool
Pool
Pool
Pool
Pool
Pool
Pool
Pool
Pool
Pool
Subnet Mask
255.255.255.000
255.255.255.000
255.255.255.000
255.255.255.000
255.255.255.000
.
.
.
255.255.255.000
255.255.255.000
255.255.255.000
255.255.255.000
255.255.255.000
<R>:Refresh
The Port Addresses screen displays the IPX and IP addresses for each port on the
RASExpress server. The IPX Network Address is that of the remote node client connecting to the port. The IP Local Address is the IP address for the server side of the
connection. The IP Remote Address is the IP address of the client. Note that these
parameters are displayed only for remote node (PPP) connections.
Inbound User List
Menu path: Main Menu ➔ Management of Server ➔ Inbound User List.
Select Inbound User List to display a list of users waiting for a remote control session.
If there are users waiting for a dial-in remote control session on the RASExpress
server, then a list appears telling you who and how many users are waiting. If no
users are waiting, a message appears that says so.
This option applies only to remote control. The listed users are the logon names of
users waiting to be taken over. These names would also be displayed in the Host List
if you dialed in for a remote control session.
Reset SBC Processors
Menu path: Main Menu ➔ Management of Server ➔ Reset SBC Processors.
This option does not apply to a CommPlete Communications Server.
CommPlete Communications Server
65
RASExpress User Guide
66
CommPlete Communications Server
4 Browser Management
CommPlete Communications Server
67
RASExpress User Guide
Introduction
You can manage or configure the RASExpress server from anywhere in the world by
using a Web browser. To access the RASExpress server, simply type the IP address of
the server into the browser’s URL field and follow the prompts to log in. In the
RASExpress server’s Web pages, click the hypertext links to configure or manage the
server. To change the value of an option, click the option box and type or select a new
value. To save your changes, click the Submit button. To cancel your changes, click
the Reset button. To return to the home page and main menus, click Back to main
page.
Note: When you finish configuring a server, you must click Close Configuration at
the bottom of the main page. If you do not, the server locks out the ability to configure it for three minutes. Neither Telnet nor MultiCommManager can access the
server until the time expires. There is no way to adjust the three-minute period.
Main Page
The main page is the default page that appears when you connect to the RASExpress
server. It is also your control center for the RASExpress server. If your browser can
display frames, the main page appears in frame view, as shown in the following
illustration.
If your browser cannot display frames, or if you select Standard View from the
Display menu, RASExpress appears as shown in the following illustration. Scroll
down to see more lines and the main menus.
68
CommPlete Communications Server
4 Browser Management
Tip: If the page is too crowded, try reducing your browser’s font size.
Line Name
This column shows the names of all lines served by the RASExpress server.
Type
This column shows each line’s type assignment, which can be RN, for remote node;
IN, for inbound; or OUT, for outbound.
Line Status
This column shows the status of each line. Status messages are WAITING FOR
CALL, ON LINE, WAITING TO CALL, CALLING BACK, OUT OF SERVICE,
INITIALIZING, and TELNET ON LINE.
User Name
This column shows who is currently using each line.
Connect Time
This column shows the time at which the line connected for the current call.
Caller ID
If Caller ID is active, this column shows Caller ID information about the current call.
CommPlete Communications Server
69
RASExpress User Guide
Configuration of Server Menu
The Configuration of Server menu appears in the left frame in the framed view, and
near the bottom of the page in the standard view. To configure the RASExpress
server, click the hypertext links in the menu.
Configuration of Server:
·
·
·
·
·
·
·
·
·
·
·
·
·
·
·
·
·
·
·
·
70
Server Configuration
User Configuration
Administrator Configuration
IP Remote Access
IPX Remote Access
Point-to-Point Protocol
Multilink PPP
MAC Layer Bridging
Virtual Port Setup
Physical Port Setup
Telnet
SNTP Setup
SNMP Setup
SMTP Setup
Applications
Security
ISI Setup
ISDN PRI Setup
Modem Setup
OSPF Setup
· OSPF Area Settings
· OSPF Interface Settings
CommPlete Communications Server
4 Browser Management
Server Configuration
Use this page to review the basic operational setup of the RASExpress server, to turn
logs on and off, and to set the call log’s start date and time.
Server Name
Use this option to assign a unique name to the RASExpress server. The server name is
broadcast on the Novell network. It is also used by MultiCommManager to monitor
RASExpress server statistics.
Supervisor Password
Use this option to assign a supervisor password. This password is case-sensitive. It
locks the local console and prevents regular users from running MultiCommManager
and making changes to the RASExpress server.
Confirm Supervisor Password
Type the supervisor password again to confirm it.
Log Status
Use this option to turn the call log on or off. The default is OFF. When the call log is
on, RASExpress logs all calls for one hour in the file yyyymmdd.LOG, where yyyymmdd
is the year, month, and day the log was created. The 24 saved logs for each date are
given the extensions .L00–.L23.
Log Number of Days
Specify the number of days ,up to seven, that you want log files to remain on the
server’s hard disk. Log files older than the specified number of days are
automatically erased. This option prevents old log files from filling the disk.
CommPlete Communications Server
71
RASExpress User Guide
Log Start Date
You can start the call log automatically, if it is off, by entering the start date in the
format month-day-year. When the date arrives, the log begins at the time specified in
the Log Start Time field.
Log Start Time
Enter the time at which you want the call log to automatically open, in the format
hours:minutes:seconds.
Write Error Messages into File
When this option is on, RASExpress saves all error and other messages it receives into
a message file. The default is OFF.
Message File
Use this option to specify the name of the message file. The default file name is
SERVER.MSG.
PPP Connection Log
Use this option to enable or disable the PPP connection log.
Screen Saver
Use this option to turn the RASExpress screen saver on or off. The screen saver
appears only on the monitor connected to the RASExpress server.
Connection Manager Menu
Select ON to display the Connection Manager menu to a user calling into the
RASExpress server for remote control operation. Select OFF to display the Host List
to the user.
Command to MultiModemManager
This command does not apply to CommPlete Communications Servers.
72
CommPlete Communications Server
4 Browser Management
User Configuration
Select User Configuration to add users to the user database, to delete them from the
user database, to edit user passwords and phone numbers, and to edit mode, line,
protocol, time, and other permissions for each user.
The User Configuration page displays the list of users.
To configure a user, select the user name in the list of users, then select the operation
you want to perform in the Choose Operation box and click Submit. If you select
Delete User, the user name is deleted from the list. If you select any other option, the
User Information form or the Edit Permissions page appears. The Reset button has
no function on this page.
CommPlete Communications Server
73
RASExpress User Guide
User Information Form
Enter basic information about the user in the User Information form. When you are
done, click Submit to save the information and return to the User Configuration
page, or click Reset to cancel your changes.
User Name
Type the user name in this field. This is the name a remote caller uses to log into the
RASExpress server. It may not duplicate any other user name.
Password
Type the password the user will use to log into the RASExpress server. The password
is case-sensitive. It should be unique and easy for the use to remember. For security,
the password characters are shown as a string of asterisks.
Confirm Password
Retype the password to confirm it.
Remote User Enter Number
Select ON to indicate that the user is mobile. When the user calls into the RASExpress
server, RASExpress prompts the user to type his or her local telephone number. The
server then disconnects and calls back the user at that number after the delay
specified in the Callback Delay field.
Callback Number
To enable callback security, type the user’s callback security phone number in this
field. When a user calls in with a valid user name and password, the RASExpress
server hangs up. Then, after the delay specified in the Callback Delay field, the
RASExpress server calls back the user at the callback number. This field is valid only
if the Remote User Enter Number option is disabled by selecting OFF.
Callback Delay
This field sets the time in seconds that the RASExpress server must wait before
calling back the user. The value entered in this field is valid only if the Remote User
74
CommPlete Communications Server
4 Browser Management
Enter Number field is set to ON or if a phone number has been entered in the
Callback Number field.
Concurrent Logins
The number of concurrent logins the user is permitted. A value of 0 indicates that
there is no limit on the number of concurrent logins.
Note: For multilink connections, the number of concurrent logins permitted should
be at least the number of links in the multilink bundle.
Static IP Address
The user’s static IP address. A value of 000.000.000.000 indicates no static address.
Edit Permissions
Use the Edit Permissions page to control the user’s access to the RASExpress server.
The page is divided into the following sections, which can be found by scrolling:
•
•
•
•
•
•
•
Mode Permissions
Line Permissions
Protocol Permissions
Time of Day Logins
Connection Time Limit
Login Permissions
Tunneling Protocol
Mode Permissions
Mode Permissions lists the types of connections the user is permitted to use. By default, all modes are permitted. To change a mode permission, click the check box for
the mode.
CommPlete Communications Server
75
RASExpress User Guide
Line Permissions
The Line Permissions list shows which of the available WAN ports the user is
permitted to use. To add or delete a port, click Modify Line Permissions. In the Line
Numbers box, type the numbers of the lines you want the action to apply to, select
the action you want to perform (Add or Delete), and then click Update.
Protocol Permissions
Protocol Permissions the network protocols the user is permitted to use. By default,
all three protocols are permitted. To change a protocol permission, click the check box
for the protocol.
Time of Day Logins
Time of Day Logins shows the times that the user is allowed to access the RASExpress
server. RASExpress divides the week into half-hour blocks, starting at midnight. Y
indicates that the user is allowed to call during the half hour block. N indicates that
the user is not allowed to call during the half hour block. By default, the user is
allowed to call at any time.
Note: Time of day logins can be changed only through the RASCON utility for DOS
(page 213) or Telnet command mode (Appendix C).
76
CommPlete Communications Server
4 Browser Management
Connection Time Limit
Use Connection Time Limit to limit how long the user can remain connected. If the
user exceeds the time limit displayed in the box, the RASExpress server automatically
disconnects the user. A value of zero (the default value) indicates no time limit.
Login Permissions
Use Login Permissions to select the protocol the user will use to automatically log on
to a host computer. If you do not want the user to have auto login permission, select
None. If you select Telnet or RLogin, type the IP address of the host computer in the
Login Host Name box.
Tunneling Protocol
Use Tunneling Protocol to select a tunneling protocol for the user. You can select
PPTP (Point to Point Tunneling Protocol) or None, which disables tunneling
altogether. If you select PPTP, type the IP address of the PPTP server in the Tunnel
Server IP Address/DNS box.
When you finish configuring permissions for the user, click Submit to save your
changes. To exit without saving, click Reset.
CommPlete Communications Server
77
RASExpress User Guide
Administrator Configuration
Select Administrator Configuration to display or edit a list of administrators.
Administrators are users with administrative rights.
To configure an administrator, select the administrator name in the list of users, then
select the operation you want to perform in the Choose an Operation box and click
Submit. If you select Delete User, the administrator name is deleted from the list. If
you select any other option, an Administrator Configuration form appears, in which
you can edit the administrator’s user name, password, and configuration and
management permissions.
78
CommPlete Communications Server
4 Browser Management
User Name
Type the administrator’s user name.
Password
Type the administrator’s password.
Confirm Password
Type the password again to confirm it
Permissions
Select the administrator’s permissions. If Configuration is selected, the administrator
can configure the RASExpress server. If Management is selected, the administrator
can manage the RASExpress server and view statistics. If neither is selected, the
administrator can only view statistics.
When you are done, click Submit to save the information and return to the
Configuration of Server menu, or click Reset to cancel your changes
CommPlete Communications Server
79
RASExpress User Guide
IP Remote Access
Use the IP Remote Access page to set up IP parameters that apply to IP routing on all
ports. When you are done, click Submit to save the information and return to the
Configuration of Server menu, or click Reset to cancel your changes.
IP Remote Access
Select Enabled to provide remote access on IP. This allows any remote PPP-compatible
client to call in and access local TCP/IP hosts, such as WWW, FTP, Telnet, etc.
80
CommPlete Communications Server
4 Browser Management
IP Address
Type the IP network address for the RASExpress server’s Ethernet interface. You can
edit this field only if IP Remote Access is enabled. The IP address must be assigned
by the system administrator, and it must be unique on the TCP/IP network.
IP Subnet Mask
Type the IP subnet mask for the RASExpress server. You can edit this field only if IP
Remote Access is enabled.
IP Default Route
Type the default IP route on the network on which the RASExpress server is installed.
Any IP packets that cannot be routed by the RASExpress server are sent to this address.
If there is no router on the network, the address should be filled with zeroes. You can
edit this field only if IP Remote Access is enabled.
Primary Name Server
Type the address of the primary name server used by the RASExpress server to
resolve names to IP addresses for Telnet and RLOGIN clients dialing in from a dumb
terminal. You can edit this field only if IP Remote Access is enabled.
Secondary Name Server
Type the address of the secondary name server used by the RASExpress server. The
secondary name server is used when the primary name server does not respond. You
can edit this field only if IP Remote Access is enabled.
DNS Caching Server
Enable to have the RASExpress server act as a DNS server. When this option is
enabled, the RASExpress server gives out its IP address as the DNS server to dialing
PPP clients.
IP Frame Type
Selects the RASExpress server’s IP frame type. You can edit this field only if IP
Remote Access is enabled. Two frame types are available: TYPE_II (default) and
SNAP.
Remote Client IP Address
Selects how the RASExpress server allocates IP addresses to remote client-to-LAN
users. Select Use DHCP if you have a DHCP server on your LAN. Select Use
Address Pool if the IP addresses you assign to the clients are continuous. Select
Configure Per Port (the default) if you want to assign a specific address to each of the
remote ports. Select Use Radius if you want to use your RADIUS server to assign IP
addresses. For LAN-to-LAN ports you must configure all IP addresses manually.
IP RIP
Enables or disables the IP Routing Information Protocol (RIP-2). Enable IP RIP if you
want the RASExpress server to use RIP-2 for IP routing.
Auto Learn Default Gateway
Enable this option to have RASExpress learn the correct default gateway if you have
configured the default gateway incorrectly or if the configured gateway goes down
and a different router starts acting as a default router. This feature requires a RIP-2
router that supports default gateway broadcasting.
CommPlete Communications Server
81
RASExpress User Guide
Address Pool Assign From
If you select Use Address Pool in Remote Client Address, type the first IP address in
the pool in this field.
Address Pool Assign To
If you select Use Address Pool in Remote Client Address, type the last IP address in
the pool in this field.
Address Pool Exclude From/To
Use these fields to exclude IP addresses from the address pool. By excluding addresses within the pool, you can create a pool consisting of three address ranges.
List of Static Routes
Displays a list of static routes for use when WAN ports are set up for LAN-to-LAN
operation. A static route is a manually configured route that specifies the
transmission path a datagram must follow, based on the datagram's destination
address. Static routes are useful when selecting a preferred route to a remote host.
Static Route Setup
Select this optionto set up and edit a list of static routes. On the Static Route Setup
page, add a static route to the list by selecting Add a Static Route and clicking
Submit. In the page that appears, supply the required information.
IP Address. The destination of the static route. The destination must be an IP address
entered in dotted decimal notation. If the destination is a network, the node portion
of the IP address is 0. If the destination is a host, the mask must be 255.255.255.255.
Mask. The IP network mask. It indicates the network and subnet portion of the IP
address with non-zero numbers; the node portions are shown with zeros.
Gateway. The IP address, in dotted decimal notation, of the next-hop router.
Metric. The number of hops to the destination IP address. The number of hops is the
number of routers that traffic must travel through to reach the destination.
82
CommPlete Communications Server
4 Browser Management
IPX Remote Access
Use the IPX Remote Access page to set up IPX routing on all ports. When you are
done, click Submit to save the information and return to the Configuration of Server
menu, or Reset to cancel your changes.
IPX Routing
Select Enabled to allow the RASExpress server to use the IPX protocol for remote
access.
Learning Network Numbers
Select Enabled to allow the RASExpress server to automatically detect and use the
network’s numbers.
Note: The server needs some time to learn the IPX address of the LAN segment it is
attached to. If it is unable to learn the address, it will use the default network address
as configured. If the RASExpress server comes up before the file server and uses the
default address, you will get a warning on your file server about conflicting network
numbers. If this happens, reboot the RASExpress server.
Route NetBIOS Over IPX
This option enables the routing of NetBIOS over IPX packets. Select Yes if you are
running applications on NetBIOS over IPX. Select No if you do not need this option.
Internal Network Number
Type the IPX internal network number for the RASExpress server. This number
should be unique in the network.
CommPlete Communications Server
83
RASExpress User Guide
802.3 Routing
Select Yes to enable routing of 802.3 IPX packets on the LAN.
802.3 Network Number
Type a network number for the 802.3 frame type.
802.2 Routing
Select Yes to enable routing of 802.2 IPX packets on the LAN.
802.2 Network Number
Type a network number for the 802.2 frame type.
Type_II Routing
Select Yes to enable routing of Ethernet_II IPX packets on the LAN.
Type_II Network Number
Type a network number for the Ethernet_II frame type.
SNAP Routing
Select Yes to enable routing of Ethernet SNAP IPX packets on the LAN.
SNAP Network Number
Type a network number for the Ethernet SNAP frame type.
84
CommPlete Communications Server
4 Browser Management
Point-to-Point Protocol
Use the Point-to-Point Protocol (PPP) pages to set up PPP routing on your ports.
When you are done, click Submit to save the information and return to the
Configuration of Server menu, or Reset to cancel your changes.
PPP Ports
To edit PPP parameters for a WAN port, select the port and click Submit. The PPP
Setup page for the selected port appears:
CommPlete Communications Server
85
RASExpress User Guide
Port Name
Shows the name of the port you are configuring.
SLIP
Shows the status of the SLIP protocol for the port. Enable SLIP if you have SLIP
clients dialing into the RASExpress server.
Port Type
Select the type of connection the port is to be used for. Select Client-to-LAN if the
PPP peer is a dial-up client. Select LAN-to-LAN if the PPP peer is a dial-up client or
another router. If you change the connection type, be sure to also change the IP address.
86
CommPlete Communications Server
4 Browser Management
Maximum Receive Unit
Type the PPP maximum receive unit (MRU) for the port, in the range 0–1534. The
MRU is the packet size in bits.
Async Character Control Map
Type the PPP Asynchronous Control Character Map (ACCM) for the port, in the
range 0–FFFFFFFF.
Compression
Select Enabled to enable PPP data compression for the port. Enable data compression
only if the data link is slower than 57,600 bps and the modem is not doing any data
compression. Disable it if the data link is 57,600 bps or faster or if the modem is doing
data compression.
Authentication
Select the PPP authentication protocol for the port. You can choose PAP (Password
Authentication Protocol), CHAP (Challenge Handshake Authentication Protocol), or
None.
User Name
Type a user name for use in LAN-to-LAN security. For a client-to-LAN configuration,
leave this field blank.
User Password
Type a password for use in LAN-to-LAN security. The password is case-sensitive,
and it must match the password at the other end of the PPP connection. For a clientto-LAN configuration, leave this field blank.
Confirm User Password
Retype the user password to confirm that you typed it correctly.
Dial on Demand
This field is used only for LAN-to-LAN operations. Enable it if you want to disconnect the line during idle times and connect only when you have to transfer data. If
this option is enabled, RASExpress spoofs all watchdog and serialization packets.
IPXCP
Select Enabled to enable IPX for remote dial-in clients on the port. Select Disabled to
disable IPX. IPXCP is a PPP network control protocol for IPX. It is responsible for
configuring, enabling, and disabling the IPX protocol modules on both ends of the
point-to-point link.
Network Number
This field shows the IPX network number of the port. There is a unique number for
each port that does not correlate with the existing network number. You can edit this
number only if IPXCP is enabled for the port.
Node Number
This field shows the IPX remote node number of the port. Each port must have a
unique node number. You can edit this field only if IPXCP is enabled.
CIPX Compression
Select Enabled to enable CIPX (Compressed Internetwork Packet Exchange) compression of IPX headers for the port. Select Disabled if you do not want CIPX com-
CommPlete Communications Server
87
RASExpress User Guide
pression. If you select Enabled, CIPX compression must also be enabled on the server
for your choice to have an effect. You can edit this field only if IPXCP is enabled for
the port.
NetBIOS over IPX
This field allows you to enable or disable routing of NetBIOS over IPX packets on the
port. Enable it if you are using applications that require NetBIOS over IPX support.
You can edit this field only if IPXCP is enabled for the port.
BCP
This field shows the status of the Bridge Control Protocol (BCP) for the port. Enable
BCP if the other end of the PPP link supports BCP.
IPCP
Select Enabled to enable IP for the port. Select Disabled if TCP/IP or PPP is not to be
used.
Local Address
This field shows the IP local network address of the port. This address can be edited
only for LAN-to-LAN ports, and only if IPCP is enabled for the port. For all client-toLAN connections, the local address is the same as the IP address of the LAN port. For
LAN-to-LAN ports, make sure the IP address is on a different network or a subnet of
any of the existing networks.
Remote Address
This field shows the IP network address of the port. It is the address assigned to the
remote PPP client. It must be on the same network as the IP local address. This field
can be edited only if IPCP is enabled for the port. It cannot be edited for client-toLAN ports if DHCP is enabled.
Subnet Mask
This field contains the mask used to specify the subnetwork part of the IP address.
For all client-to-LAN connections it is the same as the LAN network. See “IP
Addressing” on page 7.
VJ Compression
Select Enabled to enable Van Jacobson compression of TCP/IP headers on the PPP
link. VJ compression is used by many PPP clients. Select Disabled to disable Van
Jacobson compression. If IPCP and VJ Compression are enabled, a dial-in PPP client
that uses this compression method may experience greater speed than with VJ
Compression disabled.
Forward Broadcast
This field allows you to enable or disable forwarding of UDP broadcast packets onto
the WAN port. Enable it if your UDP applications depend on the broadcasts. When
forwarding is enabled, the RASExpress server forwards to the selected port all UPD
broadcast packets that come from the LAN and from the client-to-LAN ports. Forwarding broadcasts on remote links increases the traffic on the links, so enable forwarding only if necessary.
88
CommPlete Communications Server
4 Browser Management
Multilink PPP
Use this page to set up Multilink PPP on the RASExpress server. The Multilink PPP
protocol bonds multiple ports to one IP address for greater bandwidth. When you are
done, click Submit to save the information and return to the Configuration of Server
menu, or click Reset to cancel your changes.
Note: RASExpress has MultiChassis Multilink support, which enables the bundling
of multilink connections across different RASExpress servers. All MultiChassis
Multilink servers must have IP and PPTP turned on to enable the servers to talk to
each other. Also, all MultiChassis Multilink servers should point to the same RADIUS
or TACACS+ server.
Multilink PPP
Select Enabled to enable Multilink PPP (MLPPP) support on the RASExpress server.
RASExpress supports Multilink PPP for both analog and ISDN channels.
Group EPD
Identifies the bundle group that the RASExpress server belongs to. The EPD (End
Point Descriminator) is an arbitrary four-byte hexadecimal value. By default
RASExpress initializes it to the IP address of its Ethernet interface. However, all
servers that belong to the same bundle group should have the same EPD.
Bundle Server IP Address
Type the IP address of the Bundle Server. The Bundle Server is the RASExpress 5.40
or later server chosen to manage the multichassis multilinks. It can be any RASExpress
5.40 or later server on the network, but the optimal server is the one that is equidistant from all RASExpress servers in the bonding group. If the servers are on different
networks, then the hop count from the Bundle Server to all the other servers should
be more or less equal. Alternately, the one that is least busy can function as the Bundle
Server.
CommPlete Communications Server
89
RASExpress User Guide
Bundle Server UDP Port Number
Identifies the UDP port number that the RASExpress server uses to communicate
between itself and the Bundle Server.
MAC Layer Bridging
Use this page to configure MAC (Media Access Control) layer bridging for the
RASExpress server. When you are done, click Submit to save the information and
return to the Configuration of Server menu, or click Reset to cancel your changes.
Bridging
Select Enabled to enable the server to bridge all MAC layer packets. The default is
Disabled. If you do not use networking protocols other than IP and IPX, you should
disable bridging, because it slows the RASExpress server by requiring the router to
examine each and every packet on the connected LAN segment. However, you need
bridging to support networking protocols like NetBIOS. Note that if you enable
bridging for the RASExpress server but disable routing of IP or IPX on a specific port,
bridging of those protocol packets will not take place on that port. However, if you
disable IP or IPX entirely for the RASExpress server, then those packets will be
bridged.
Spanning Tree
Spanning Tree bridging is used to detect looped back links. The default is Disabled.
This option is unavailable when Bridging is disabled.
90
CommPlete Communications Server
4 Browser Management
Virtual Port Setup
Use the Per Port Setup pages to configure an individual WAN port. When you click
Virtual Port Setup in the Configuration of Server menu, a list of WAN ports
appears. Select the port you want to configure, and click Submit. Then make your
changes in the Per Port Setup page. When you are done, click Submit to save the
information and return to the Configuration of Server menu, or click Reset to cancel
your changes.
Port Name
Shows the name of the port you are configuring.
Idle Timeout
Type the number of minutes of no activity allowed before RASExpress disconnects
the port. A value of 0 disables idle timeout.
Session Timeout
Type the number of minutes allowed per session. When this time is exceeded,
RASExpress automatically disconnects the port. A value of 0 disables session timeout.
CommPlete Communications Server
91
RASExpress User Guide
PPP Detect
Select ON to enable automatic PPP connections on the port. Select OFF to disable
automatic PPP connections. When OFF is selected, a PPP client is presented with a
menu on connection.
Auto Login Protocol
Select the protocol that is to be used for auto login on the port when PPP Detect is
enabled. The options are None, Telnet, and Rlogin. When None is selected, a menu
is presented to the caller after login.
Auto Login IP Address/DNS
Type the Telnet or Rlogin host IP address to be used when PPP Detect is enabled.
This field can be edited only if Auto Login Protocol is set to Telnet or Rlogin.
Filter Template Name
Type the name of the filter template for the port. For more information about filter
templates, see Appendix D.
Tunneling Protocol
Select PPTP to enable tunneling on the port. Select None to disable tunneling.
Tunnel Server IP Address/DNS
Type the IP address of the server used for PPTP tunneling. This field is inactive if
tunneling is disabled.
Connect Type
Select the type of LAN-to-LAN connection. The options are Answering and Dialing.
For a client-to-LAN connection, Answering is the only option.
Dial Type
Select whether the server will make an analog or an ISDN call. For a client-to-LAN
connection, this field is unavailable.
Telephone Number
Type the number the server will dial for a LAN-to-LAN connection. For a client-toLAN connection, this field is unavailable.
Script File Name
Type the name of the login script file, which is processed only on a LAN-to-LAN
dialing port. The script must be compiled by the RASExpress script compiler before it
can be used, and the compiled file must be stored in the directory where RASExpress
is installed (typically C:\RAS550). It is not necessary to type the file name’s .COD
extension. For a client-to-LAN connection, this field is unavailable.
Bundle with a LAN-to-LAN Port
Select ON to bundle the port with a PPP port configured as a LAN-to-LAN port. Any
call on such a reserved port is mapped to the bundled PPP port. You can do multilink
PPP on LAN-to-LAN connections by reserving multiple virtual ports for a single PPP
port.
Bundled Port
Select the PPP port to be bundled with the virtual port.
92
CommPlete Communications Server
4 Browser Management
Physical Port Setup
Use the Physical Port Settings pages to configure an individual physical port.
When you click Physical Port Setup in the Configuration of Server menu, a list of
physical ports appears. Select the port you want to configure, and click Submit. Then
make your changes in the Physical Port Settings page. When you are done, click
Submit to save the information and return to the Configuration of Server menu, or
click Reset to cancel your changes.
Port Name
Shows the name of the port you are configuring. Port names consist of two parts. The
numeric part of the name identifies the slot the port is installed in, while the
alphabetic part identifies a specific port in that slot. Thus, the port name 2C identifies
the third port in slot 2.
Auto Dialout
Select ON to enable auto dialout for the port. Select OFF to disable auto dialout.
Auto Dialout TCP Port Number
Type the auto dialout TCP port number. This field is inactive if Auto Dialout is off.
Raw TCP Connection
Select OFF to disable all Telnet negotiations on the port, so that the connection is
treated as a “raw” TCP data stream.
When a standard Telnet connection is made, certain parameters are negotiated, such
as terminal type and screen size. However, some applications use Telnet for faxing or
credit card validation for which negotiation is neither required nor recommended. It
is for such applications that you should disable this option.
CommPlete Communications Server
93
RASExpress User Guide
Telnet
Use this page to configure Telnet options for the RASExpress server. When you are
done, click Submit to save the information and return to the Configuration of Server
menu, or click Reset to cancel your changes.
Telnet Administration
Select Enabled if you want to be able to configure and manage the RASExpress
server from any Telnet client.
Telnet Client
Select Enabled to allow a remote user who has dialed in to the RASExpress server to
Telnet to different hosts on the network.
Telnet Dialout
Select Enabled to allow users to use any Telnet client to select a modem on the
RASExpress server and dial out to UNIX hosts and BBSes.
Telnet Auto Dialout
Select Enabled to allow a Telnet client to connect to the number in Auto Dialout TCP
Port Number and use any free modem on the RASExpress server
Auto Dialout TCP Port Number
Type the TCP port number that is to be used for Telnet auto dialout.
Telnet Interface Type
Select the interface type for the Telnet client; the choices are Menu and Command.
Menu mode allows the RASExpress server to be configured using menus, as in
Chapter 3. Command mode allows the RASExpress server to be configured by typing
Telnet commands (Appendix C).
94
CommPlete Communications Server
4 Browser Management
SNTP Setup
For accounting accuracy, the RASExpress server can adjust its time and date using
Simple Network Time Protocol (SNTP) signals from a time server. Use this page to
configure the SNTP parameters. When you are done, click Submit to save the
information and return to the Configuration of Server menu, or click Reset to cancel
your changes.
SNTP Client
Select Enabled to enable the RASExpress server to synchronize its clock using SNTP
signals.
SNTP Server IP Address
Type the IP address of the SNTP server you want to use as a time source.
Time Zone Standard Name
Type a one- to three-letter abbreviation for the time zone of the RASExpress server
that you are configuring. It is used for display purposes only.
CommPlete Communications Server
95
RASExpress User Guide
Offset from UTC
Set the time difference between the location of the RASExpress server and the prime
meridian at Greenwich, U.K., in the format hours:minutes. Sites west of Greenwich
have negative numbers, and those east of Greenwich have positive numbers.
U.S. time zone
Offset from UTC
Eastern Standard (EST)
-05:00
Central Standard (CST)
-06:00
Mountain Standard (MST)
-07:00
Pacific Standard (PST)
-08:00
Daylight Savings
Select Enabled to make RASExpress automatically adjust the clock for daylightsaving time.
Offset During Daylight Savings
Type the number of minutes that the clock changes during the shift to and from
daylight-saving time. Typically it is 60 minutes.
Start of Daylight Savings Time
Daylight-saving time usually starts at the same time on the same day of the week in
the same month every year. In the U.S.A. daylight-saving time starts at 2:00 A.M. on
the first Sunday in April. In Ordinal, select on which occurrence of the selected day
of the week that daylight-saving time starts: the first, second, third, fourth, or last of
the month. In Day of Week, select the day of the week that daylight-saving time
starts. In Month, select the month that daylight-saving time starts. In Time, type the
time of day that daylight-saving time starts, in the format hours:minutes.
End of Daylight Savings Time
Daylight-saving time usually ends at the same time on the same day of the week in
the same month every year. In the U.S.A. daylight-saving time ends at 2:00 A.M. on
the last Sunday in October. In Ordinal, select on which occurrence of the selected day
of the week that daylight-saving time ends: the first, second, third, fourth, or last of
the month. In Day of Week, select the day of the week that daylight-saving time
ends. In Month, select the month that daylight-saving time ends. In Time, type the
time of day that daylight-saving time ends, in the format hours:minutes.
96
CommPlete Communications Server
4 Browser Management
SNMP Setup
The RASExpress server can be managed or configured by any standard Simple
Network Management Protocol (SNMP) manager. Use this page to configure SNMP
parameters for the RASExpress server. When you are done, click Submit to save the
information and return to the Configuration of Server menu, or click Reset to cancel
your changes.
SNMP Agent
Select Enabled to enable SNMP agent support, Disabled to disable it.
Trap Manager Community Name
Type the community name of the SNMP trap manager. Any SNMP traps that are
generated by the RASExpress server will be sent to this manager.
Trap Manager IP Address
Type the IP address of the SNMP trap manager.
Trap Manager Port Number
Type the port number of the SNMP trap manager. The default port number is 162.
SNMP Reboot Required Trap
Enable to send a trap to the manager whenever a configuration change is made that
requires a reboot of the server.
Get Community Name
The RASExpress server can be configured for Get and Set communities. Type the
name of the Get community here. The default is public.
CommPlete Communications Server
97
RASExpress User Guide
Get Community Permission
Select the Get community permission. The choices are Read_Only and Read_Write.
The default is Read_Only.
Set Community Name
Type the name of the Set community. The default is supervisor.
Set Community Permission
Select the Set community permission. The choices are Read_Only and Read_Write.
The default is Read_Write.
Authentication
Select whether SNMP authentication is simple or encrypted. Set authentication to
Simple if you are using MultiCommManager or a third party manager. This uses plain
text for the Get and Set community names. You can also select Simple if you are
using Multi-Tech MultiManager.
Set authentication to Encrypted only if you are using Multi-Tech MultiManager (not
MultiCommManager) to manage your servers. When authentication is encrypted, the
administrative user name and password and the PDU ID (a field in the SNMP request
to the agent) are used to prepare an encrypted sequence for authentication of the
SNMP request by the agent (RAS). It is a combination understood only between the
RASExpress server and MultiManager.
SMTP Setup
Use this page to configure SMTP (Simple Mail Transfer Protocol) service on the
RASExpress server. When you are done, click Submit to save the information and
return to the Configuration of Server menu, or click Reset to cancel your changes.
98
CommPlete Communications Server
4 Browser Management
SMTP Client
Select Enabled to enable SMTP service. Select Disabled to disable SMTP service. This
option must be enabled to make the other options in the window accessible.
SMTP Server IP Address
Type the IP address of the SMTP server.
SMTP Sender Email Address
Type the e-mail address of the RASExpress server.
SMTP Recipients
This box displays the list of e-mail recipients. E-mail alert messages are sent to these
recipients if any of the following options are enabled and the conditions are met. To
add or delete a recipient, click Modify Recipient List. In the SMTP Recipients page,
to add a recipient to the list, type the recipient’s e-mail address in the Enter New
Recipient Name box and click Submit. To delete an entry from the list, select the
entry, then select Delete Recipient and click Submit.
Message File Full
Select Enabled if you want the RASExpress server to send an e-mail alert to the
addresses in the Recipient list when the message file is full.
Log File Full
Select Enabled if you want the RASExpress server to send an e-mail alert to the
addresses in the Recipient list when the log file is full.
Debug Log Full
Select Enabled if you want the RASExpress server to send an e-mail alert to the
addresses in the Recipient list when the debug log is full.
Server Upgrade
Select Enabled if you want the RASExpress server to send an e-mail alert to the
addresses in the Recipient list when the server is upgraded.
CommPlete Communications Server
99
RASExpress User Guide
Applications
Use this page to enable or disable several applications that are installed with
RASExpress. When you are done, click Submit to save the information and return to
the Configuration of Server menu, or click Reset to cancel your changes.
Web Server
Select Enabled to allow the RASExpress server to be managed by a Web browser.
FTP Server
Select Enabled to allow File Transfer Protocol (FTP) file transfers between the
RASExpress server and the management console. You can use FTP to send upgrade
files to the RASExpress server (see Appendix B). Unlike TFTP, FTP has password
protection.
TFTP Server
The Trivial File Transfer Protocol (TFTP) is used by host computers to exchange files.
It is used by RASExpress for its remote management programs. Leave this option
enabled if you want RASExpress server to be managed by these programs.
RLOGIN Client
Select Enabled to allow the RASExpress server to be used as a client for connecting
to an RLOGIN server.
100
CommPlete Communications Server
4 Browser Management
Security
Use this page to configure the RASExpress server to work with your security servers.
The RASExpress server supports the RADIUS (Remote Authentication Dial-In User
Service) and TACACS+ protocols for authentication. When you are done, click
Submit to save the information and return to the Configuration of Server menu, or
click Reset to cancel your changes.
Security Protocol
Select the security protocol you are using on your network. If you do not have a
security server on your network, select Local. The other two options are RADIUS
and TACACS+.
Accounting
This field enables or disables accounting support in the security server. Enable it if
you want your RADIUS or TACACS+ server to keep track of accounting information
such as number of bytes sent, number of bytes received, log in time, log out time, port
number, etc.
TACACS+ Encryption
Select Enabled to enable encryption of TACACS+ packets between the RASExpress
server and the TACACS+ security server. Enable only if your TACACS+ server supports encryption.
CommPlete Communications Server
101
RASExpress User Guide
Shared Secret
Type the shared secret used for communication between the RASExpress server and
the security server. It must match the shared secret configured at the security server.
Confirm Shared Secret
Type the shared secret again to confirm that you typed it correctly
Allow Call If Security Server Down
Enable to provide access by any user if the primary and all backup security servers are
down. Disable to prevent any user from logging on if the security servers are all down.
Primary Server Address
Type the IP address of your primary security server.
Backup Server Address
Type the IP address of your backup security server. You can specify up to three
backup security servers.
Call Back Delay Attribute Value
Enter the value you have chosen for the Callback Delay attribute. You must set up the
same attribute in the dictionary file of your RADIUS server. Make sure that you select
a unique attribute value. The value must not clash with any of the standard RADIUS
attributes or any other custom attributes. Consult your RADIUS server documentation before making any changes.
Remote User Enter Number Attribute Value
Enter the value you have chosen for the Remote User Enter Number attribute. You
must set up the same attribute in the dictionary file of your RADIUS server. Make
sure that you select a unique attribute value. The value must not clash with any of the
standard RADIUS attributes or any other custom attributes. Consult your RADIUS
server documentation before making any changes.
Protocol Permissions Attribute Value
Enter the value you have chosen for the Protocol Permissions attribute. You must set
up the same attribute in the dictionary file of your RADIUS server. Make sure that
you select a unique attribute value. The value must not clash with any of the standard
RADIUS attributes or any other custom attributes. Consult your RADIUS server documentation before making any changes.
Inbound User Service Type Value
Enter the service type value that you have chosen for Inbound User. You must set up
the same service type value in the dictionary file of your RADIUS server. Make sure
that you select a unique service type value. The value must not clash with any of the
standard RADIUS service types or any other custom service types. Consult your
RADIUS server documentation before making any changes.
Shell User Service Type Value
Enter the service type value that you have chosen for Shell User. You must set up the
same service type value in the dictionary file of your RADIUS server. Make sure that
you select a unique service type value. The value must not clash with any of the standard RADIUS service types or any other custom service types. Consult your RADIUS
server documentation before making any changes.
102
CommPlete Communications Server
4 Browser Management
ISI Setup
Use these pages to configure the ISI (Intelligent Serial Interface) circuits of a T1
RASExpress server. When you are done, click Submit to save the information and
return to the Configuration of Server menu or click Reset to cancel your changes.
ISI Card Setup
To configure an ISI, or modem, card, select the card from the Choose a Card list,
select the action you want to perform from the Choose Operation list, and click
Submit. The Choose a Card list identifies cards by number, base address, IRQ
number, and number of ports. Depending on the action you select, one of several
configuration pages appears.
CommPlete Communications Server
103
RASExpress User Guide
Add a Card
When you select Add a Card or Modify Card Settings, the Edit ISI Card Information
page appears. This page shows the base address, IRQ number, and number of ports
of the selected card. To change the base address or IRQ number, select the field and
type a new value. To change the number of ports, select the desired number from the
drop down list.
Note: Up to three modem cards can be used in a RASExpress server. Adding settings
for a nonexistent card can cause RASExpress to display phantom ports. Setting the
wrong base address and IRQ value can lead to unpredictable results.
Base Address
This is the card’s base I/O address in hexadecimal format. It provides the
RASExpress server with information about card activity and allows the use of one
interrupt for all ports on the card. Each card must have a unique base I/O address.
IRQ
This is the interrupt number for the modem card. The IRQ number used for each card
must be unique.
Number of Ports
This is the number of ports on the modem card.
Delete a Card
To remove an ISI, or modem, card from the ISI Card Setup page, select the card from
the Choose a Card list, select Delete a Card, and then click Submit. All information
about the card is deleted from the RASExpress server.
Modify Card Settings
See “Add a Card.”
104
CommPlete Communications Server
4 Browser Management
Edit Line Information
Select Edit Line Information to individually configure the physical ports on the card.
The ISI Card Edit Line Information page lists the ports. To configure a port, select
the port in the Choose a Line list and click Submit.
Modem Name
Shows the model name of the modem used on the line. To change the modem name,
click Change Modem, and then select the new name from the Choose a Modem list.
Line Status
Shows whether the line is enabled or disabled.
General Name
This field describes the general name for the line. The general name is used by the
workstation MCSI software to take the line.
Specific Name
Shows the specific name for the line. It identifies the line by slot and modem. The
specific name is used by the workstation MCSI software to take the line.
Connection Started By
Selects how the RASExpress server detects a dial-in connection. When the Modem
Response option is selected, the server starts a dial-in connection when the modem
responds with a CONNECT string. When the Data Carrier Detect option is selected,
the server starts a dial-in connection when the DCD signal goes high.
Baud Rate
Selects the baud rate used by the port. You can select a rate of up to 460800 bps.
CommPlete Communications Server
105
RASExpress User Guide
Data Bits
Select the number of data bits used by the port.
Stop Bits
Select the number of stop bits used by the port.
Parity
Select the type of parity used by the port.
RTS/CTS Flow Control
Selects hardware flow control on the port. The options are Enabled and Disabled.
ISDN PRI Setup
Use this page to configure an ISDN Primary Rate Interface (PRI) card. When you are
done, click Submit to save the information and return to the Configuration of Server
menu, or click Reset to cancel your changes.
ISDN Primary Rate Interface
Use this field to enable or disable ISDN PRI support by the RASExpress server.
Enable it only if an ISDN PRI card is installed in the server.
I/O Address
This is the base I/O address for the PRI card in hexadecimal format. It provides the
RASExpress server with information about card activity, and allows the use of one
interrupt for all ports on the card. Only one PRI card can be used in a RASExpress
server. The I/O address must be unique. The default value is 2F0.
IRQ Number
This is the IRQ number for the PRI card. The IRQ number must be unique. The
default value is 7.
106
CommPlete Communications Server
4 Browser Management
Memory Address
The PRI card shares memory with the RASExpress server for internal communication.
Type the shared memory address into this field in hexadecimal format. The default
value is D000.
Number of Ports
Select the number of ports available to the ISDN PRI card. In North America, 23 data
channels are standard; in Europe 30 data channels are standard.
Modem Setup
Use the Modem Configuration page to create and edit modem configurations. A
configuration is implemented when you select the modem name. When you are done,
click Submit to save the information and return to the Configuration of Server
menu, or click Reset to cancel your changes.
RASExpress includes a list of preconfigured Multi-Tech modems. To edit one of these
configurations, select the modem in the Choose a Modem list, select Edit Modem
Parameters, and then click Submit. In the Edit Modem Information page, make your
changes, and then click Submit to save them. To add a new modem, select Add a
Modem and type the requested information in the same form used for Edit Modem
Parameters. To delete a modem from the list, first select it, then select Delete a
Modem and click Submit.
Caution: This section is included only for completeness. Do not change the modem
defaults that were set when RASExpress was installed on your RASCard.
CommPlete Communications Server
107
RASExpress User Guide
Modem Name
The model name of the modem. Enter a new modem name only if it is not in the
Choose a Modem list.
Initializing String 1–5
These fields display the initialization string or strings used to configure the modem
when power is applied or the modem is reset.
Changing preconfigured modem strings is not recommended. If you want to use a
custom initialization string, create and name a new modem configuration. Then copy
information from one of the listed modems and modify the string as required.
Dial Prefix String
Displays the dial prefix, which is automatically sent to the modem before the phone
number. The default prefix is the tone dialing command ATDT.
Dial Suffix String
Displays the dial suffix, which is automatically sent to the modem after the phone
number. This field is normally empty.
Hangup String
Displays the command string used to end a call.
108
CommPlete Communications Server
4 Browser Management
NO CARRIER string, NO DIALTONE string, NO ANSWER string, Connect
Response string, OK string, ERROR string, RING string, BUSY string
These fields display the modem’s result codes, which are used by RASExpress to
monitor calls. They should be spelled exactly the same as the modem sends them. By
default, these boxes are set for verbose responses. If your modem is set for terse
responses, refer to the modem’s manual for the terse response codes.
OSPF Setup
OSPF (Open Shortest Path First) is an internal gateway protocol. Designed for IP
networks, OSPF supports variable length subnet masks (VLSM), which allows more
efficient allocation of IP addresses than RIP-1, and tagging of externally derived
routing information. OSPF also allows packet authentication and uses IP multicast
when sending or receiving packets.
Use the OSPF Configuration page to enable the OSPF protocol on the RASExpress
server. When you are done, click Submit to save the information and return to the
Configuration of Server menu, or click Reset to cancel your changes.
OSPF Routing
Select Enabled to enable OSPF routing on the server.
Router ID
Type the identifier for the OSPF router. It has the same format as an IP address, but
identifies the router independent of its IP Address.
CommPlete Communications Server
109
RASExpress User Guide
OSPF Area Settings
Use the OSPF Area pages to configure or review OSPF areas. An OSPF area is made
up of internal routers linked to other areas within an autonomous system (AS) by
area border routers.
OSPF Areas
When you select OSPF Area Settings, the OSPF Areas page appears. To configure an
area, select it in the Choose an Area list, select the action you want to perform from
the Choose an Operation list, and then click Submit. Depending on the action you
select, one of two area configuration pages appears. When you are done, click Submit
to save the information and return to the Configuration of Server menu, or click
Reset to cancel your changes.
110
CommPlete Communications Server
4 Browser Management
OSPF Area Configuration
Area ID
This is the identification number assigned to the area. It has the same format as an IP
address, but has the function of defining a summarization point for Link State
Advertisements. The default value is 0.0.0.0, the same as the backbone.
Stub Area
Enable to allow AS external advertisements to be flooded through the area. This
option cannot be enabled for backbone areas.
Inject Default Route
Enable to allow a default route to be summarized into a stub area if the OSPF router
is connected to multiple areas.
Stub Metric
Shows the cost of the default route summarized into a stub area.
CommPlete Communications Server
111
RASExpress User Guide
OSPF Area Address Range Settings
Though an area can be loosely defined as a collection of networks, in actuality an area
is specified as a list of address ranges. Each address range is defined as an address
and mask pair. Many separate networks may be contained in a single address range,
just as a subnetted network is composed of many separate subnets.
To configure the address ranges in an OSPF area, select the area on the OSPF Areas
page, and then select Address Range Settings. On the OSPF Area Address Range
Settings page, select the range in the Choose an Address Range list, select the action
you want to perform from the Choose an Operation list, and then click Submit.
When you select Add Address Range or Edit Address Range, the OSPF Area
Address Range Configuration page appears:
Address
Type the IP address part of the IP address and IP mask pair. The IP address and IP
network mask pair specify the IP addresses contained in the address range. For
example, the class B address range of X.X.X.X with a network mask of 255.255.0.0
includes all IP addresses from X.X.0.0 to X.X.255.255.
Mask
Type the IP mask part of the IP address and IP mask pair.
Status
Select Advertise to have the networks contained in the address range advertised in
other areas. Select Do Not Advertise to have the networks contained in the address
range hidden from other areas.
112
CommPlete Communications Server
4 Browser Management
OSPF Interface Settings
Use OSPF Interface Settings to configure an OSPF interface.
When you select OSPF Interface Settings, a list of OSPF interfaces appears. To
configure an interface, select it from the list and click Submit. The OSPF Interface
Configuration page then appears with the following options:
Interface Status
Indicates whether OSPF routing is enabled on the interface. OSPF can be enabled on
LAN and WAN ports of type LAN-toLAN.
Area ID
The area to which this interface belongs.
Metric
Indicates the cost of sending a packet on the interface, expressed in the link state
metric.
Router Dead Interval
The number of seconds to wait before the neighbors should declare the OSPF router
down if they do not receive any Hello packets from it.
Transmit Delay
The estimated number of seconds it takes to transmit a Link State Update packet over
this interface.
CommPlete Communications Server
113
RASExpress User Guide
Priority
Indicates the priority for the OSPF router to become the Designated Router on the
connected interface.
Hello Interval
The number of seconds between the Hello packets sent on the interface by the OSPF
router.
Retransmit Interval
The number of seconds between link state advertisement transmissions.
Authentication Type
The authentication scheme used on the attached network. The choices are Simple and
None.
Plain Text Password
The simple password to be used for the attached network.
Confirm Password
Type the password again to confirm that you typed it correctly.
114
CommPlete Communications Server
4 Browser Management
Management of Server Menu
The Management of Server menu appears in the left frame in the framed view, and
near the bottom of the page in the standard view. Click the hypertext links in the
menu to view or to manage various operations of the RASExpress server.
Management of Server:
·
·
·
·
·
·
·
·
·
·
·
·
·
·
·
·
·
·
·
·
·
·
·
Server Information
User Information
Serial Line Control
Reboot Server
General Statistics
Router/PPP Statistics
Calls/Line Usage Statistics
Modem Connect String Table
Statistics Summary
IPX Route Table
IPX SAP Table
ARP Statistics
TCP/UDP Statistics
IP Route Table
Port Statistics
Display EIA Signals
Display Port Addresses
Inbound Users
Reset SBC Processors
Line Utilization
Call History
TCP Connection Table
Multi-Chassis Bonding Table
CommPlete Communications Server
115
RASExpress User Guide
Server Information
Use this page to review the basic operational configuration of the RASExpress server,
to set the server’s clock, and to turn the log on or off.
Server Time
This option shows the server time in 24-hour format. To change it, type the new time
in the format hours:minutes:seconds.
Log Status
Use this option to turn the call log on or off. The default is OFF. When ON is selected,
RASExpress logs all calls for one hour in the file yyyymmdd.LOG, where yyyymmdd is
the year, month, and day the log was created. The 24 saved logs for each date are
given the extensions .L00–.L23.
Write Error Messages into File
When this option is on, RASExpress saves all messages it receives into a file. The
default is OFF.
Message File
This option displays the name and path of the message file. The default file name is
SERVER.MSG.
Screen Saver
This option shows whether the RASExpress built-in screen saver is on or off.
Connection Manager Menu
When this option is on, the Connection Manager menu is displayed to a user calling
into the RASExpress server for remote control operations. When it is off, the Host
List is displayed to the user.
Command to MultiModemManager
This command does not apply to CommPlete Communications Servers.
116
CommPlete Communications Server
4 Browser Management
User Information
Select User Information to display a list of user names. This page has no other
function.
Serial Line Control
Select Serial Line Control to change the status of a serial line. To change a line, click
it in the Choose a Line box, click the action you want to perform on it in the Choose
Operation box, and then click Submit. To see the results of your actions, click Back
to main page.
CommPlete Communications Server
117
RASExpress User Guide
Disconnect Line
Select this option to break the connection on the selected line. The line immediately
becomes ready for another call.
Reset Line
Select this option to reinitialize the modem on the selected line.
Put Line Out of Service
Select this option to take a line out of service. The words OUT OF SERVICE appear
in the Line Status column on the main page.
Enable Line
Select this option to put a line back into service that has been taken out of service.
Click Submit to save your changes. Click Reset to undo any changes that have not
been saved.
Reboot Server
To reboot the RASExpress server, select Reboot Server, then click Reboot the Server
to confirm.
118
CommPlete Communications Server
4 Browser Management
General Statistics
Select General Statistics to display current statistics for each active line.
The Port Throughput columns display throughput activity (in bytes per second in
near real-time) when sending and receiving data to and from the port. The Pending
Bytes columns display the number of bytes that are waiting to be processed. The
Total Bytes columns display the total number of bytes that have passed through the
port during the current connection. When the line is waiting for a call or is idle, all
values in these columns are zero.
To reset the statistics to zero, click the Reset General Statistics button.
CommPlete Communications Server
119
RASExpress User Guide
Router & PPP Statistics
Select Router/PPP Statistics to display router and PPP statistics for each port.
The Router Statistics columns display the number of IPX and IP packets sent or received for each active port. The PPP Statistics columns display the number of Network Control Protocol (NCP) and Link Control Protocol (LCP) bytes sent or received
for each active port. LCP packets are usually exchanged only during the establishment
120
CommPlete Communications Server
4 Browser Management
of the PPP connection. The NCP statistics include both IPX and IP packets. Information is displayed only for remote node ports. For remote control connections, all
values are zero.
To reset the router statistics to zero, click the Reset Router Statistics button. To reset
the PPP statistics to zero, click the Reset PPP Statistics button.
Calls & Line Usage Statistics
Select Calls/Line Usage Statistics to see the number of calls and the connection time
for each port.
The Dial-In Dial-Out Calls columns display the number of times each port has been
used since the RASExpress server last started.
The Line Usage Statistics columns display how long the current user has been
connected and the total time the port has been in use since the RASExpress server last
started.
CommPlete Communications Server
121
RASExpress User Guide
Modem Connect String Table
The Modem Connect String Table displays the current connect string for each port.
122
CommPlete Communications Server
4 Browser Management
Statistics Summary
Statistics Summary displays a statistical summary of call, LAN, and line activities
since RASExpress was last started.
To reset the statistics to zero, click the Reset Summary Statistics button.
IPX Route Table
The IPX Route Table displays IPX (Internet Packet Exchange) routing information for
the RASExpress server’s router.
CommPlete Communications Server
123
RASExpress User Guide
IPX SAP Table
The IPX SAP Table shows SAP (Service Access Point) information for the
RASExpress server.
ARP Statistics
The ARP Statistics page displays ARP (Address Resolution Protocol) statistics since
the RASExpress server was last started.
124
CommPlete Communications Server
4 Browser Management
TCP/UDP Statistics
The UDP / TCP Statistics page displays UDP (User Datagram Protocol) and TCP
(Transmission Control Protocol) statistics since the RASExpress server was last
started.
IP Route Table
The IP Route Table shows IP routing information for the RASExpress server’s router,
including the network address, forwarding address, subnet mask, metric (hop count),
and the port number through which the IP address can be reached.
CommPlete Communications Server
125
RASExpress User Guide
Port Statistics
When you select Port Statistics, the Port Statistics page appears. To see the statistics
for any port, click the port in the Choose a Line box, then click Submit. A page
similar to the following one appears.
Statistics are displayed only for remote node lines. For remote control connections, all
values are zero. After you view the information, use your browser's Back command
to return to the Port Statistics page to select another line, or click Back to main page
to return to the Management of Server menu.
To reset the IPX port statistics to zero, click the Reset IPX Port Statistics button. To
reset the IP port statistics to zero, click the Reset IP Port Statistics button.
126
CommPlete Communications Server
4 Browser Management
Display EIA Signals
The EIA Signals page displays the current status of the EIA RS-232 signals on each
serial line. DTR and RTS are sent by the port. CTS, DSR, DCD, and RI are received by
the port. The DSR signal is not used by the RASExpress server. The status for each
signal can be either ON or OFF.
CommPlete Communications Server
127
RASExpress User Guide
Display Port Addresses
The Port Addresses page displays the IPX and IP addresses for each of the
RASExpress server’s ports. The IPX Network Address is the address for the remote
node client that is connecting to the port. The IP Local Address is the IP address for
the server side of the connection. The IP Remote Address is the IP address of the
client. These parameters are displayed only for remote node (PPP) connections.
Inbound Users
Select Inbound Users to display a list of users waiting for a remote control session.
If there are users waiting for a dial-in remote control session on the RASExpress
server, then a list appears telling you who and how many users are waiting. If no
users are waiting, a message appears instead.
This option applies only to remote control. The listed users are the logon names of
users waiting to be taken over. These names would also be displayed in the Host List
if you dialed in for a remote control session.
128
CommPlete Communications Server
4 Browser Management
Reset SBC Processors
This option does not apply to a CommPlete Communications Server.
Line Utilization
Select Line Utilization to display the Line Utilization page. To review the connection
statistics for a line, click the line in the Choose a Line box, and then click Submit. A
page similar to the following one appears.
After you view the information, use your browser's Back command to return to the
Line Utilization page to select another line, or click Back to main page to return to
the Management of Server menu.
CommPlete Communications Server
129
RASExpress User Guide
Call History
Select Call History to display the Call History page. To see the call history of a line,
click the line in the Choose a Line box, and then click Submit. A page similar to the
following one appears.
The Call History page displays information about the line's last ten calls. After you
view the information, use your browser's Back command to return to the Call
History page to select another line, or click Back to main page to return to the
Management of Server menu.
130
CommPlete Communications Server
4 Browser Management
TCP Connection Table
The TCP Connection Table shows TCP connection information for each of the
server’s local ports.
CommPlete Communications Server
131
RASExpress User Guide
132
CommPlete Communications Server
5 Remote Node
Client Software
CommPlete Communications Server
133
RASExpress User Guide
Windows Dial-Up Networking
The Windows 95, 98, and NT operating systems include a remote-node client called
Dial-Up Networking. Dial-Up Networking’s defaults work with the RASExpress
server; however, you may want to make modifications for your location.
Windows 95/98
To install and run Dial-Up Networking
1. Install a NetWare client or Client for Microsoft Networks on the client computer.
Microsoft Client for Netware Networks, Microsoft Client for Microsoft Networks,
and two Novell Netware clients are included with Windows 95.
2. Insert the Windows compact disc into the CD-ROM drive.
3. In Windows, click the Start button, then select Settings, Control Panel, and
Add/Remove Programs.
4. Click the Windows Setup tab.
5. Check Communications in the Components list.
6. Click the Details button.
7. Check Dial-up Networking in the Components list.
8. Click OK. Dial-Up Networking is installed from the Windows compact disc.
9. When the installation is complete, reboot the computer.
To create a connection entry
1. Double-click the My Computer icon.
2. Double-click the Dial-Up Networking icon.
3. Double-click the Make New Connection icon, and follow the directions in the
wizard to create a connection entry.
4. The client computer should now be ready to dial up the RASExpress server.
For further information on Dial-Up Networking or Microsoft Client for NetWare
Networks, see Windows Help.
134
CommPlete Communications Server
5 Remote Node Client Software
Windows NT 4.0
To install Dial-Up Networking
1. Double-click the My Computer icon, and then double-click the Dial-Up
Networking icon. If Dial-Up Networking is not installed, you will see an Install
button in the Dial-Up Networking dialog box.
2. Insert the Windows NT 4.0 compact disc into the CD ROM drive.
3. Click Install in the Dial-Up Networking dialog box.
4. In the Add RAS Device dialog box, choose the modem to use with Dial-Up
Networking, and then click OK.
5. In the Remote Access Setup dialog box, click Configure.
6. In the Configure Port Usage dialog box, click Dial out only, and then click OK.
7. In the Remote Access Setup dialog box, click Network.
8. In the Network Configuration dialog box, make sure that only TCP/IP is
selected, and then click OK.
9. If there is a network interface card that does not have TCP/IP bound to it, the
Microsoft TCP/IP Properties window appears. Click Cancel to close the window.
10. Click Continue, then click Restart to finish the installation.
11. When the installation is complete, reboot the computer.
To create a connection entry
1. Double-click the My Computer icon, and then double-click the Dial-Up
Networking icon.
2. In the Dial-Up Networking dialog box, click the New button.
3. In the New Phonebook Entry wizard, follow the directions to create a connection
entry.
4. The client computer should now be ready to dial up the RASExpress server.
For further information on Dial-Up Networking, see Windows NT Help.
CommPlete Communications Server
135
RASExpress User Guide
136
CommPlete Communications Server
6 MCSIWSN and WinMCSI
Redirectors
CommPlete Communications Server
137
RASExpress User Guide
Introduction
Note: This chapter is for IP or IPX network users only.
This chapter describes how a client PC can use MCSI (pronounced miksee) software
redirectors to access the RASExpress server’s modems when using standard communications software.
MCSIWSN is a DOS application for use with IPX networks only. WinMCSI is a
Windows application for use with either IPX or IP networks. ComMap can be used
with either IPX or IP networks.
To install MCSIWSN, see “Installing the MCSIWSN Redirector” on this page. To
install WinMCSI, see “Installing and Configuring the WinMCSI Redirector” on page
144.
The MCSIWSN Redirector
Installation of the MCSIWSN redirector for DOS enables you to establish a connection
between a client PC and the RASExpress server, and run any DOS communication
software that has a MCSI/NASI/NCSI compatible interface.
MCSIWSN Installation
1. Turn on your client PC and log in to your LAN.
2. Insert the workstation diskette into your floppy disk drive. Change to your
floppy disk drive, e.g., A:\, and type install.
3. The Installation Options menu appears.
Make sure only Software Redirector for DOS (MCSI) is checked, then press ESC
to continue.
4. The Enter Pathname for MCSI files window appears. Press ENTER to accept the
default (C:\MCSI), or type a different path and press ENTER.
5. MCSI is installed in the designated directory. When the installation is complete,
the message AsyncGateway MCSI Installation Complete appears. Press
any key to continue. The message: Installation of client is
completed appears. Press any key to return to the DOS prompt.
138
CommPlete Communications Server
6 MCSIWSN and WinMCSI Redirectors
Running the MCSIWSN Redirector
1. Change to the subdirectory containing the MCSIWSN files, e.g., C:\MCSI.
2. Type mcsiwsn (the program name for the redirector software) and press ENTER.
The redirector software loads, and the following message appears:
Initializing, please wait...
MCSI Program is resident
3. Type logon and press ENTER. The following message appears:
Enter your user name:
You can use a preferred communications server name if more than one communications server is on the network, e.g., logon server_1/user1.
4. Type user1 (or your RASExpress user name) and press ENTER. If a password has
been assigned to the user name, the following message appears. (If a password
was not assigned, then the message in step 5 appears.)
Enter your password:
5. Type user1 (or your RASExpress password) and press ENTER. Note that the
password is case-sensitive. The following message appears:
Login Completed.
6. You are now connected to the RASExpress server and can run any MCSIcompatible communications software to use one of the server’s modems.
To unload MCSIWSN from memory, change to the directory where MCSIWSN is
located, type mcsiwsn -u, and press ENTER. MCSIWSN will unload from memory,
provided that other memory-resident programs have not been loaded after MCSIWSN
was loaded. If other memory-resident programs were loaded after MCSIWSN, then
you must unload them in reverse order before you can unload MCSIWSN.
MCSIWSN Command Line Operation
MCSIWSN command line parameters allow you to operate MCSIWSN as an INT14
software redirector, make MCSIWSN Novell NASI compatible, turn on the pop up
Inbound Outbound menu, select Inbound as default connection type, unload
MCSIWSN from memory, and enable the command interpreter option for
applications that make use of this option.
1. Log into your network. This automatically establishes a communications link
between your client PC and the RASExpress server.
2. Change to the subdirectory containing the MCSIWSN files.
3. Type mcsiwsn ? at the DOS prompt and press ENTER. The following help screen
appears:
CommPlete Communications Server
139
RASExpress User Guide
Usage is:
-U
For uninstalling this program.
-F
If you want to search for active modem servers.
-C
Turns on Command Interpreter option.
-I
Connection Manager will connect as inbound.
-P
Display Connection Manager popup.
-N<1 to 9> Number of multiple connections operational
at the same time up to 9 (default = 1).
-A
Load TSR as an INT14.
-X
Novell NASI compatible.
-M
Wait on specific line when it is inbound.
-C<1 to 9> Number of Servers to wait when it is inbound.
You can type MCSIWSN parameters in any order, but there must be a space
before each one (e.g., MCSIWSN -I -P -N5).
-U
Unloads MCSIWSN.
-F
Searches for active modem servers.
-C
Enables the command interpreter. An additional 5 KB of memory is used
by MCSIWSN when the command interpreter is enabled. It allows applications programs that provide a command interpreter interface to issue
the following commands:
CONNECT, DISCONNECT, HELP, LIST, RESUME, SET, SHOW,
SWITCH
-I
Connection Manager connects as inbound. When setting up for inboundonly connections, adding this parameter string to the command removes
the need for operator intervention to select INBOUND on the
Connection Manager screen.
-P
Adding this parameter to the command line turns on the Connection
Manager OUTBOUND/INBOUND screen.
-Nx
This option sets the maximum number of connections that can be operational at one time. X represents a number from 1 through 9 (default = 1).
Increasing the number of multiple connections expands the MCSIWSN
memory requirement by up to 10 KB.
-A
This parameter enables MCSIWSN to become an INT14-compatible
interface when the COMS14.EXE program is run. See “Using MCSIWSN
as an INT14 Redirector” on page 141.
-X
This parameter makes MCSIWSN compatible with Novell NASI-based
software
-M
This parameter allows you to wait on a specific line when it is in inbound
mode
-Sx
This option allows a user to wait on multiple servers on the same network when it is in inbound mode. X is the number of servers available, in
the range 1–9 (default = 1).
4. Select the command line options needed for the client PC on which MCSIWSN
will be run. Then type mcsiwsn followed by the selected parameter string.
5. When the MCSI is Resident message appears, type logon and press ENTER.
The following message appears:
Enter your user name:
140
CommPlete Communications Server
6 MCSIWSN and WinMCSI Redirectors
6. Type user1 or another valid user name and press ENTER. If a password is assigned to the user name, the following message appears. (If a password is not
assigned, go to step 8.)
Enter your password:
7. Type user1 or the valid password for the user name you entered, and press
ENTER. Note that the password is case-sensitive. The following message appears:
Login Completed.
8. You are now connected to the RASExpress server, and can use the RASExpress
server’s modems by running any MCSI-compatible software.
Using MCSIWSN as an INT14 Redirector
Running MCSIWSN on a workstation as an INT14 redirector enables the workstation
to use communications software that provides a network INT14 interface.
This section is for users whose LAN PCs will be running a LAN network version of
INT14-compatible communications software. Before you can begin:
• You must have your RASExpress user name and password, which was assigned
by the LAN system administrator when the RASExpress server was installed.
• The RASExpress server and the client PC must be properly connected to a LAN
with IPX capability, and you must have access to a network version copy of a dialin or dial-out communications program with a MCSI-compatible interface.
Note: The INT14 that is used in Windows is not the same as a network INT14, and
does not connect to the gateway.
1. Turn on your client PC and log into your LAN.
2. Change to the subdirectory containing the MCSIWSN files, i.e., C:\MCSI.
3. Type mcsiwsn -a and press ENTER. This loads MCSIWSN and allows it to operate
as an INT14 redirector. A message similar to the following appears:
Initializing, please wait...
INT14 Program is Resident.
4. Type logon and press ENTER. The following message appears:
Enter your user name.
Note: If you have more than one RASExpress server on your network and you
are not listed as a user on every RASExpress server, then you must type the
following command: logon ServerName\UserName.. E.g., logon server_1\user1.
5. Type user1 (or your valid RASExpress user name) and press ENTER. If a password has been assigned, the following message appears. (If a password was not
assigned, go to step 7.)
Enter your password.
6. Type user1 (or your valid RASExpress password) and press ENTER. Note that the
password is case-sensitive. The following message appears:
Login Completed.
CommPlete Communications Server
141
RASExpress User Guide
7. If the RASExpress server is the only remote access server on your LAN, then type
coms14 -c comn Inbound * * * (n is replaced by the number 1, 2, 3, or 4, which
selects one of the COMS14 COM ports) or coms14 -c comn> Outbound * * * and
press ENTER (Inbound or Outbound must be specified). This connects you to a
line on the RASExpress server.
Note: If you have more than one remote access server on your network, see
“COMS14 Command Line Parameters” on page 142.
8. You are now connected to the RASExpress server and can run any INT14-compatible software. Follow the software’s instructions to establish the software’s
INT14 connection to the RASExpress server’s modem.
COMS14 Command Line Parameters
To list the COMS14 command line parameters, type coms14 ?. The following information appears.
Usage : coms14 -l [Server Name]
(for listing services)
: coms14 -c COM<n> <LineType> <SpecificName> <GeneralName> <ServerName>
(for establishing a connection)
: coms14 -d COM<n>
(to disconnect)
: coms14 -m (to list mapping of local COM ports to Network ports)
COMS14 -L [Server Name]
Type coms14 -L for a list of available communications servers.
Type coms14 -L [Server Name], e.g., coms14 -L server_1, for a list of services at the
specific server, similar to that shown below:
List of services at the server SERVER_1
GENERAL NAME
SPECIFIC NAME STATUS
--------------- ------------------ -----MODEM
LINE1 FREE
COMS14 -C COMn LineType SpecificName GeneralName
ServerName
Type coms14 -c comn (n = 1, 2, 3, or 4), followed by its argument string, to connect to
one of the four COM ports (COM1, COM2, COM3, COM4) allowed by INT14
software.
142
LineType
Identifies whether the session will be inbound or outbound. The
LineType position must be filled by inbound, outbound, or an
asterisk. The latter indicates that the line type last selected by the
user is to be used.
SpecificName
Identifies the specific name assigned to the port on the RASExpress
server. This position must contain either the specific name assigned
to the RASExpress port (the default specific name for port one is
B1_LINE1) or it must contain an asterisk, which indicates that the
first available specific name is to be used. The specific name is used
when one specific modem is to be used on a communications server.
CommPlete Communications Server
6 MCSIWSN and WinMCSI Redirectors
GeneralName
Identifies the general name assigned to the port on the RASExpress
server. This position must contain either the general name assigned
to the RASExpress port (e.g., MODEM) or it must contain an asterisk, which indicates that the first available specific name is to be
used. The general name is used when more than one style of modem is used on a communications server, e.g., an MT5634HD8 and
an MT5634HD16.
ServerName
Identifies the server name assigned to the RASExpress server. This
position must contain either the server name (e.g., SERVER_1), or it
must contain an asterisk. The latter indicates that the first available
server is to be used. The server name is used when more than one
RASExpress server is on a network.
COMS14 -D COMn
Type coms14 -d comn (n = 1, 2, 3, or 4) to disconnect from the COM port to which
you were connected, i.e., COM1, COM2, COM3, or COM4. The following message
appears.
Port is disconnected.
COMS14 -M
Type coms14 -m to see which of the four COM ports are mapped to network ports by
INT14 software. A message similar to the following appears.
Mapping of logical COM ports to network ports
LOCAL PORT STATUS GENERAL NAME
SPECIFIC NAME SERVER NAME
----------- --------- -------------- ------------------ ----------COM1
BUSY
MODEM
LINE1 SERVER_1
COM2
FREE
COM3
FREE
COM4
FREE
CommPlete Communications Server
143
RASExpress User Guide
The WinMCSI Redirector
The WinMCSI modem-sharing program manages access to a modem for inbound and
outbound calls. It allows Windows communications software packages that do not
support INT6B or INT14 to connect to Multi-Tech gateways such as RASExpress. It
also detects other compatible communications servers on your network and displays
the resources they provide to eligible LAN users.
WinMCSI Installation
1. Turn on your client PC, start Windows, and log in to your LAN.
2. Exit all Windows programs except Windows Explorer.
3. Insert the Workstation Redirectors diskette for your operating system into your
floppy disk drive.
4. Choose one of the following operations.
· Windows 3.1x: In the WinMCSI directory, double-click Install.exe.
· Windows 95/98: In the W95MCSI folder, double-click Inst95.exe.
· Windows NT 4.0: In the root folder of Disk 2, double-click Setup.exe.
5. The WinMCSI Setup wizard appears. Follow the instructions in the Setup
wizard to install WinMCSI.
Note: In the Choose the Network Type dialog box, if you choose IP you must
have a TCP/IP protocol active with the default IP router matched with the local
IP address of the RASExpress server.
6. When installation is complete, the COM Port to MCSI Mapping dialog box
appears. You can use this opportunity to map your com ports, or you can close
the dialog box now and map your com ports later in the ComMap program.
144
CommPlete Communications Server
6 MCSIWSN and WinMCSI Redirectors
· Click Add Port to add the first available port to the MCSI Port list.
· To map a line to a port, select the port in the MCSI Port list, next select the
line to which you want to map the COM port, and then click Map. You can
also map a line to the selected port by double-clicking the line. If a port is
selected that is already mapped, the port status message Mapped to MCSI
appears, and the line information appears in the Server Name, Class Name,
and Port Name boxes.
Note: If a serial mouse is connected to COM1, you must select a different
local port.
· Click Unmap if you want to unmap a line.
· Click Search to search for lines on a server.
· Click Close when finished.
Running the WinMCSI Redirector
Before running data communications software, LAN users should use WinMCSI to
log on to the communications server.
To log on to the communications server from a workstation
1. Start ComMap by double-clicking the ComMap icon in the WinMCSI program
group (Windows 3.1x) or Start menu (Windows 95/98/NT).
Tip: To save space on your screen, resize the ComMap window to display only
the menu bar, tool bar, and status bar.
2. If you have not previously done so, select the Setup menu to configure ComMap.
Network Type. The Network Type dialog box shows your current network type
(IP or IPX). To change the network type, click the appropriate type for your network. You must restart Windows if you change this setting.
CommPlete Communications Server
145
RASExpress User Guide
Note: Do not change the network type unless the network has changed. Also,
make sure that your SYSTEM.INI file contains device drivers specific to the
selected network type.
Connect Timer. The MCSI Connect Timer dialog box shows the default value of
the connect timer in the Interval box. This value sets the time in seconds, in the
range 0 through 60, that the MCSI emulator waits for a MCSI device to become
available. To change the value of the connect timer, type a different value in the
box.
Baud Change. Select Enable Baud Change to allow an application to change the
baud rate or other parameters for the selected port. If Disable Baud Change is
selected, then an application cannot change the baud rate or other parameters.
Default Login. Use the Default Login dialog box to automatically log in to a specific server whenever Windows runs. Select a server from the Available Servers
box, then type a user name and optional password. Click OK when finished.
ComMap saves these login parameters in your COMMCSI.INI file.
Note: You can use a text editor to edit the COMMMCSI.INI file, however you
cannot change the password because the password field is encrypted. Editing the
password will corrupt the file.
If there are no servers listed in the Available Servers box, type a server name in
the Server Name box, then click the Search button to search for a match. You can
use * and ? as wild card characters.
Port Type. Use this command to designate your mapped ports as outbound
(available only for calling out) or inbound (available only for calling in). A port
cannot be both outbound and inbound. In Windows 3.1x, all mapped ports have
the same port type. In Windows 95/98/NT, however, you can designate one port
as outbound and another as inbound. To change the port type, click the appropriate
option button. Click OK when finished.
3. If you did not automatically log into the RASExpress server, do so now by
clicking Login in the File menu, or by clicking the Login button, shown at left.
The MCSI Login window appears.
146
CommPlete Communications Server
6 MCSIWSN and WinMCSI Redirectors
The Available Servers box lists the names of the available servers. Click the name
of the server you want to attach to, type a user name and password, then click
Login. A message that your login was successful appears. Click OK.
If there are no servers listed in the Available Servers box, type a server name in
the Server Name box, then click Search to search for a match. You can use * and ?
as wild card characters.
4. To view your log status, click Log Status in the File menu.
The MCSI Login Status window shows the name of the server you are logged
into and the name with which you logged in. Click Close to close the window.
5. To access a modem on the server, you must map the modem to one of the COM
ports in your computer. Click the Map button (shown at left) or, in the Map
menu, click Map. The COM Port to MCSI Mapping dialog box appears.
Note: DOS users do not have the Add Port and Remove Port buttons.
· To redirect a local COM port to a RASExpress server port.
1. If necessary, click Add Port to add the next available local port to the MCSI
Port list.
CommPlete Communications Server
147
RASExpress User Guide
2. Select a port in the MCSI Port list.
3. Select an available line in the list of server ports.
4. Click Map to redirect the selected local MCSI port to the selected server
port. Alternately, double-click the selected server port to map it to the local
port.
· To unmap a local port, wait until the port is free, then select the port and click
Unmap. Data addressed to the local port is no longer sent to the server port.
· To search for one or more available server ports, enter the search text in the
Select Server, Select Class, and Select Port boxes. You can use * and ? as wild
card characters. Click the Search button to search for a match.
· Click the Close button when you are finished mapping ports.
6. To view a list of mapped COM ports, select Map List from the Map menu.
7. To unmap a COM port, select Unmap from the Unmap menu, or click the Unmap
button, shown at left. Select the COM port you want to unmap, then click Unmap.
8. To log out from the RASExpress server, select Logout from the File menu, or
click the Logout button, shown at left.
9. To exit from WinMCSI, select Exit from the File menu, or click the Exit button,
shown at left. Alternately, you can minimize WinMCSI to an icon.
Checking Connectivity
After using ComMap for Windows to map your COM Ports, we recommend that you
check your connectivity and configure your ports by using Windows Terminal or
HyperTerminal.
148
CommPlete Communications Server
7 RASExpress Script Language
CommPlete Communications Server
149
RASExpress User Guide
Introduction to the RASExpress Script Language
The RASExpress script language is a set of commands that can be used to perform
LAN-to-LAN login operations. A script file can be useful for both simple and
complex operations, such as dialing a number, logging onto a server, downloading
files, and so on.
You can create a script file without programming experience if you have programming “intuition.” If you have had some exposure to C language or BASIC programming, so much the better. This chapter does not attempt to teach you how to
program; rather, it describes the commands you can use when creating a script file.
An Overview of the RASExpress Script Language
A RASExpress script file consists of commands, arguments, and variables. You should understand the differences between them before you attempt to create a script file.
Commands
A command is an executable function. RASExpress commands have the following
constraints:
• The first word on a command line is the command name.
• Each command must be on a separate line.
• Each command is terminated by a semicolon.
• /* in a command line indicates the start of a comment, and */ indicates the end of a
comment (all comment characters and the markers are ignored).
• Extra arguments in the command line are ignored.
Script files are created by putting together specific commands that produce specific
results. For example, if you want to prompt the user for information, you must include a command to display the prompt on the screen as well as a command to retrieve the response of the user. This chapter lists all commands recognized in the
RASExpress environment.
Note: Command elements that appear in bold must be typed exactly as they appear.
Elements that appear in italic are placeholders that must be replaced by actual
information. Brackets [ ] enclose optional items. Braces { } enclose a set of choices
from which you must choose only one. Choices are separated by a vertical bar |.
For additional information on formatting within a script file, see “Format String and
Format Control Characters” on page 151.
150
CommPlete Communications Server
7 RASExpress Script Language
Arguments
Arguments focus the execution of a command in some way. They can be passed from
one process to another by value or by address. If you have one or two values you
wish to pass, it is probably more efficient to pass the value. Following is an example
of a statement that passes the value of variable t to process test.
test (t);
To pass an argument by address, prefix the argument name in the formal parameter
list by the keyword VAR.
test (VAR t);
You might want to use this method if you have an array of values stored in sequential
addresses. Once you have passed the address of the first value, you can increment the
address to retrieve the other values.
Variables are the only arguments that can be passed by address. However, an expression like A + B, where A and B are integer variables, can be passed by value.
Variables
Three basic types of variables are supported: INTEGER, REAL, and STRING. Since
the ASCII null character is internally used to indicate the end of the sequence, it cannot be part of STRING. All other characters, including extended ASCII characters, can
be part of STRING.
Format String and Format Control Characters
The format string contains two types of objects: ordinary characters that are copied to
the output stream as is (with one exception as explained below), and format conversion specifications, each of which leads to the conversion of the corresponding argument and is copied to the output stream.
The character \ is given special treatment:
• If the following character is \, it is copied to the output stream.
• If the following character is n, a newline is copied to the output stream.
• If the following character is r, a carriage return is copied to the output stream.
• If the following character is x or X, the next two characters are taken and treated as
hexadecimal and copied to the output stream.
• Any other character forces the \ as well as the following character to be copied to
the output stream.
Conversion specification begins with the % character and is followed by the conversion character. The conversion characters and their meanings are:
d The argument is converted to a decimal notation.
x The argument is converted to a hexadecimal notation.
f The argument is converted to a floating point notation.
s The argument is a string; characters from the string are copied until a null is
encountered.
CommPlete Communications Server
151
RASExpress User Guide
c The argument is a character. If the corresponding argument is an integer the value
of the argument modulo 256 is taken and copied; if the argument is real it is
ignored and ‘0’ is copied; if the argument is a string the first character of the string
is copied.
% A % is copied to the output stream. If the character following % is not %, the % as
well as the following character are copied to the output stream.
Script Language Execution Notes
Execution starts at the PROC main. PROC main cannot have any arguments. All
variables must be declared before they are used. All procedures must be declared
before they are called. Recursion is allowed in procedures.
To define mutually recursive procedures, use the FORWARD directive to indicate
that the procedure body is defined later in the source file. Procedures defined with
the FORWARD directive should have all the parameters and return value (if any)
specified; the actual definition of the procedure body should not contain the formal
parameter list or the return value. Example of forward-defined procedures:
Example
proc a(integer x, y)
forward;
proc b(integer u, v)
forward;
proc a;
integer t;
/* Some more code
t = b(x, y);
/* Some more code
return(t);
endproc
proc b;
return(a(u, v));
endproc
: integer;
: integer;
here. */
here. */
Operator Precedence
Operators are listed in the order of precedence :
Unary Operators
Binary Operators
: - ! (unary minus, logical negation)
: * / + - < > <= >= == != && ||
All operators are left-associative. Expressions are evaluated completely, so care must
be taken when writing expressions. For example, an expression like
(a != 0 && b / a) would create a run-time error.
Creating, Compiling, and Executing a Script File
This section provides the basic information necessary to create, compile, and execute
(run) a script file for RASExpress.
Creating a Script File
A script file can be created using a text editor or a screen snapshot that contains
RASExpress script language commands. This file is the source code and should be
saved with a .SCR extension.
152
CommPlete Communications Server
7 RASExpress Script Language
Compiling a Script File
The process of compiling converts the source code into an executable file, which is
also to say that there are now two versions of your script file. One version (with the
.SCR extension) is the source code, which can be altered by you in any text editor.
The other version is the script file’s executable form (with a .COD extension), which
cannot be directly modified by you.
To compile a script file from the DOS prompt, copy the source file to the directory
where RASExpress is installed (typically C:\RAS550), and run the SCRIPT.EXE
utility. The syntax is SCRIPT file_name <CR>. The compiled file must remain in the
RASExpress directory.
Script Error Handling
When a script file is compiled, any errors that may occur are recorded in an error file
to assist you in debugging the source code. The name of the error file is
file_name.OUT. For example, if you compile MTS_HOST.SCR and RASExpress
encounters errors in your script, those errors are flagged in MTS_HOST.OUT.
Running a Script File
A RASExpress script file can be run only on a LAN-to-LAN dialing port. To run the
script file automatically, access the RASExpress configuration program using a terminal, Telnet, Web, or DOS interface, select Communication Setup from the main
menu, select Line Information, and type the name of the compiled script file in the
Script File Name field. In all cases, type the file name without the .COD extension.
CommPlete Communications Server
153
RASExpress User Guide
RASExpress Script Language Command Format
program
::= declarations proc_declarations
declarations
::= var_type identifier [ , identifier ] ;
var_type
::= INTEGER | REAL | STRING
statement_list
::= statement
statement
::= elementary_statement
elementary_statement
::= identifier = expression ; |
å identifier [ ( expression { , expression } ) ] ; |
å goto label ; |
å label :
expression>
::= expression OPERATOR expression | ( expression ) |
å ! expression | - expression | identifier
å [ (expression { , expression } ) ]
OPERATOR
::= < | <= | > | >= | == | != | && | || | + | - | * | / | !
proc_declaration
::= PROC identifier [ ( parameter_list ) ] [ : vartype ] ;
FORWARD ;
proc_declaration
::= PROC identifier [ ( parameter_list ) ] [ : vartype ] ;
declarations statement_list
ENDPROC
154
parameter_list
::= argument_list [ ; argument_list ]
argument_list
::= [ VAR ] var_type identifier [, identifier ]
CommPlete Communications Server
7 RASExpress Script Language
Script Command Summary
This section lists the RASExpress script commands by category.
Format Conversion
ATOF
atof(string number_string) : real;
Converts number_string into a floating point number.
ATOI
atoi(string number) : integer;
Converts a numeric string of decimal digits to an integer.
FTOA
ftoa(real float_no, var string buffer) : integer;
Converts float_no into a sequence of decimal digits and copies it to buffer.
ITOA
itoa(integer number, var string buffer [, integer radix]);
Converts number to a sequence of characters according to radix and copies it to
buffer.
Communication Parameter Settings
BAUDRATE
baudrate(integer baud_rate | string baud_rate) : integer;
Sets the baud rate to the specified value.
DATABITS
databits(integer no_of_bits) : integer;
Sets the number of data bits for the communication channel.
PARITY
parity(string option) : integer;
Sets the parity for the communication channel.
STOPBITS
stopbits(integer no_of_bits) : integer;
Sets the number of stop bits for the communication channel.
CommPlete Communications Server
155
RASExpress User Guide
Display
DISPLAY
display(integer int_value | real real_value | string str_value);
Displays the given argument at the current cursor position.
FDISPLAY
fdisplay(string format_str {, integer | real | string argument}) : integer;
Displays the format string with all the arguments at the current cursor position.
Arithmetic Conversion
CEIL
ceil(real float_no) : integer;
Returns the least integer greater than or equal to float_no.
DEC
dec(var integer integer_variable);
Decrements integer_variable by 1.
FLOOR
floor(real float_no) : integer;
Returns the greatest integer less than or equal to float_no.
INC
inc(var integer integer_variable);
Increments integer_variable by 1.
MOD
mod(integer number1, number2) : integer;
Divides number1 by number2 and returns the remainder.
File/Directory Manipulation
DELETE
delete(string file_name) : integer;
Deletes the specified file name.
DISKFREE
diskfree [(string drive_letter)] : integer;
Gets the free disk space of the specified drive in bytes.
FCLOSE
fclose(integer file_handle) : integer;
Closes the given file_handle.
156
CommPlete Communications Server
7 RASExpress Script Language
FCREATE
fcreate(string file_name) : integer;
Creates the file given in file_name.
FGETC
fgetc(integer file_handle, var string buffer) : integer;
Reads a character from the file given by file_handle into buffer.
FGETS
fgets(integer file_handle, var string buffer, integer max_len) : integer;
Reads a new line terminated string from the file given by file_handle into buffer.
FINDFIRST
findfirst(string file_pattern, integer attribute, var string file_name) : integer;
Looks for the first file of file_pattern with the given attribute.
FINDNEXT
findnext(var string file_name) : integer;
Looks for the next file of file_pattern with the given attribute.
FOPEN
fopen(string file_name [, string open_mode | integer open_mode]) : integer;
Opens file_name with the specified mode and returns a handle to the file.
FPUTC
fputc(integer file_handle, string buffer) : integer;
Writes a character from the buffer to the file.
FPUTS
fputs(integer file_handle, string buffer [, integer count]) : integer;
Writes from the buffer to file given file_handle.
FREAD
fread(integer file_handle, var string buffer, integer count) : integer;
Reads count bytes from the file specified by the file_handle into buffer.
FSEEK
fseek(integer file_handle, offset, origin) : integer;
Adjusts the file pointer for the given file.
FWRITE
fwrite(integer file_handle, string buffer, integer count) : integer;
Writes count bytes from the buffer to the file specified by the given file_handle.
GETFILEATTR
getfileattr(string file_name) : integer;
Gets the attribute of the file.
CommPlete Communications Server
157
RASExpress User Guide
GETFILEDATE
getfiledate(string file_name, var string buffer) : integer;
Gets the date on the specified file.
GETFILESIZE
getfilesize(string file_name) : integer;
Gets the size of the file in bytes.
GETFILETIME
getfiletime(string file_name, var string buffer) : integer;
Gets the time on the specified file.
ISFILE
isfile(string path_name) : integer;
Checks if the path_name is a directory or not.
MKDIR
mkdir(string path_name) : integer;
Creates the directory in the specified path.
RMDIR
rmdir(string path_name) : integer;
Removes the directory in the specified path.
SETFILEATTR
setfileattr(string file_name, integer attribute) : integer;
Sets the attribute for the specified file.
SETFILEDATE
setfiledate(string file_name, file_date) : integer;
Sets the date for the specified file.
SETFILETIME
setfiletime(string file_name, file_time) : integer;
Sets the time for the specified file.
Connection Information and Control
CONNECTED
connected : integer;
Indicates if a connection is initialized.
DROPCONNECTION
dropconnection;
Terminates the current connection.
158
CommPlete Communications Server
7 RASExpress Script Language
HANGUP
hangup;
Hangs up the modem.
RGETC
rgetc(var string buffer [, integer timeout]) : integer;
Gets a character from the remote machine.
TRANSMIT
transmit(string key_sequence) : integer;
Sends out the characters specified in the key_sequence.
String Manipulation
STRCAT
strcat(var string first_string, second_string) : integer;
Concatenates second_string to the first_string.
STRCMP
strcmp(string first_string, second_string) : integer;
Compares first_string and second_string.
STRCPY
strcpy(var string target_string, source_string);
Copies second_string to first_string.
STRFMT
strfmt(var string buffer, string format_string {, integer | real | string argument}) :
➥ integer;
Formats the arguments according to format_string and copies to buffer.
STRLEN
strlen(string buffer) : integer;
Returns the string length of buffer.
TOLOWER
tolower(var string buffer);
Converts the string variable to lower case.
TOUPPER
toupper(var string buffer);
Converts the string variable to upper case.
CommPlete Communications Server
159
RASExpress User Guide
Miscellaneous
EXIT
exit;
Terminates the execution of the script.
QUIT
quit;
Terminates the execution of the script and quits to DOS prompt.
WAIT
wait(integer delay);
Suspends the script execution for the specified delay (in seconds).
WAITFOR
waitfor(string pattern [, integer timeout]) : integer;
Waits for a pattern from the remote machine.
160
CommPlete Communications Server
7 RASExpress Script Language
RASExpress Script Commands
This section lists the RASExpress script commands in alphabetical order. Note that
these commands are a subset of the MultiExpress script language, from which the examples were taken. Therefore, some of the examples contain commands that are not
available in the RASExpress script command set, notably the conditional commands.
Nonetheless, we hope that the following examples will illustrate the use of the
RASExpress script commands.
ATOF
atof(string number_string) : real;
Converts number_string into a floating point number.
Example
/*This script illustrates the atof command.*/
proc main;
real x;
string s;
s = "12345.67";
x = atof(s);
fdisplay("Number string is ‘%s’, float value is : %f^J^M", s, x);
endproc
ATOI
atoi(string number) : integer;;
Converts a numeric string of digits to an integer. If a non-decimal character is encountered in the string, the return value is undefined.
Example
/*This script illustrates the atoi command.*/
proc main;
string str;
display("Example for atoi command^J^M");
display("Enter a numeric string to convert to integer : ");
getstr(str, 10);
fdisplay("^J^MDecimal value of ‘%s’ is : %d ", str, atoi(str));
endproc
CommPlete Communications Server
161
RASExpress User Guide
BAUDRATE baudrate(integer baud_rate | string baud_rate) : integer;;
Sets the baud rate to the specified value. If a connection is not initialized or an invalid
baud rate is specified, the command is ignored and 0 is returned; otherwise the baud
rate is initialized and 1 is returned.
Example
/*This script illustrates the baudrate command.*/
proc main;
display("Testing baud rate setting^J^M");
display("Baud rate will be set to 2400, press any key...");
getkey;
baudrate(2400);
display("^J^MBaud rate will be set to 19200, press any key...");
getkey;
baudrate(19200);
display("^J^MData bits will be set to 7, press any key...");
getkey;
databits(7);
display("^J^MData bits will be set to 8, press any key...");
getkey;
databits(8);
display("^J^MStop bits will be set to 1, press any key...");
getkey;
stopbits(1);
display("^J^MStop bits will be set to 2, press any key...");
getkey;
stopbits(2);
display("^J^MParity will be set to even, press any key...");
getkey;
parity("even");
display("^J^MParity will be set to none, press any key...");
getkey;
parity("none");
endproc
CEIL
ceil(real float_no) : integer;;
Rounds up float_no to the next greatest integer (if the value is already an integer, its
value is returned). For example, 1023.23 is returned as 1024; -1023.23 is returned as
-1023.
Example
/*This script illustrates the ceil command.*/
proc main;
real x;
x = 1023.23;
fdisplay("ceil(%f) is : %d^J^M", x, ceil(x));
x = -1023.23;
fdisplay("ceil(%f) is : %d^J^M", x, ceil(x));
endproc
162
CommPlete Communications Server
7 RASExpress Script Language
CONNECTED connected : integer;;
Indicates if a connection is initialized. If a connection is initialized, 1 is returned, else
0 is returned.
Example
/*This script illustrates the connected command.*/
proc main;
if connected then
display("Connection is on^J^M");
else
display("No connection made^J^M");
endif
endproc
DATABITS
databits(integer no_of_bits) : integer;;
Sets the number of data bits for the communication channel. The no_of_bits passed
should be in the range 5 through 8. If the connection is not initialized or no_of_bits is
not in the range 5 through 8, the command is ignored and 0 is returned; otherwise 1 is
returned.
Example
See baudrate command.
DEC
dec(var integer integer_variable);;
Decrements integer_variable by 1.
Example
/* This script illustrates arithmetic operators, inc, dec, and mod
commands. */
proc main;
integer x, y;
x = 10;
y = 20;
fdisplay("Value of x is :%d and y is :%d^J^M", x, y);
fdisplay("Sum of x and y is : %d^J^M", x + y);
fdisplay("Difference x - y is :%d^J^M", x - y);
fdisplay("Product of x and y is :%d^J^M", x * y);
fdisplay("Value of x / y is :%d^J^M", x / y);
fdisplay("Value of x mod y is :%d^J^M", mod(x, y));
fdisplay("Value of x before incrementing is :%d^J^M", x);
inc(x);
fdisplay("Value of x after incrementing is :%d^J^M", x);
fdisplay("Value of x before decrementing is :%d^J^M", x);
dec(x);
fdisplay("Value of x after decrementing is :%d^J^M", x);
endproc
CommPlete Communications Server
163
RASExpress User Guide
DELETE
delete(string file_name) : integer;;
Deletes the specified file name. If deletion is successful, 1 is returned; otherwise 0 is
returned.
Example
See fcreate command.
DISKFREE
diskfree [(string drive_letter)] : integer;;
If the drive specified by drive_letter is a valid drive, the free disk space in bytes is returned; otherwise -1 is returned. The drive letter is optional. The drive letter should
be between a and z, or A and Z. If the drive letter is omitted, the current drive is
assumed.
Example
/* This script illustrates the diskfree command. */
proc main;
fdisplay("Disk free space is : %d bytes^J^M", diskfree);
endproc
DISPLAY
display(integer int_value | real real_value | string str_value);;
Displays the given argument at the current cursor position.
Example
/* This script illustrates the display command. */
proc main;
integer x;
real y;
string s;
x = 100;
y = 10.4567;
s = "example string";
display(" integer x = "); /* Display
display(x); /* Display the value of
display("^J^M real y = ");
display(y); /* Display the value of
display("^J^M string s = ");
display(s); /* Display the value of
display("^J^M");
endproc
164
the string constant. */
x. */
y. */
s. */
CommPlete Communications Server
7 RASExpress Script Language
DROPCONNECTION
dropconnection;
Terminates the current connection. If this function is called, then the script is aborted.
Example
/* This script illustrates the dropconnection command. */
proc main;
if connected theÿ
display("Terminating connection, press any key...");
getkey;
dropconnection;
endif
endproc
ENDPROC
endproc
This command indicates the end of a procedure. It complements the proc command
in every script file.
EXIT
exit;
This command terminates the execution of the script.
Example
/* This script illustrates the exit command. */
proc main;
display("Press any key to exit the script...");
getkey;
display("^J^M");
exit;
endproc
FCLOSE
fclose(integer file_handle) : integer;
Closes the given file_handle. If file_handle is negative or invalid, 0 is returned; otherwise 1 is returned.
Example
See fcreate command.
CommPlete Communications Server
165
RASExpress User Guide
FCREATE
fcreate(string file_name) : integer;
Creates the file given in file_name. File_name can include the drive letter and path. If
the file is created, 1 is returned; otherwise 0 is returned. If the file is created, it is
closed and will have to be opened by an fopen call to access it.
Example
/* This script file illustrates fcreate, fopen, fread, */
/* fwrite, fputs, fputc, fgets, fgetc, and fclose commands. */
proc main;
string file_name;
string test_string;
string str;
integer len;
integer count;
integer file_handle;
integer position;
integer offset;
integer origin;
file_name = "tempfile";
if fcreate(file_name) then
fdisplay("%s created^J^M", file_name);
else
fdisplay("%s could not be created^J^M", file_name);
goto error_exit;
endif
/* open the file in read/write mode.*/
file_handle = fopen(file_name, "READWRITE");
if file_handle >= 0 then
fdisplay("%s opened^J^M", file_name);
else
fdisplay("%s could not be opened^J^M");
goto error_exit;
endif
test_string = "example string";
if fputs(file_handle, test_string) then
fdisplay("fputs done^J^M");
else
fdisplay("fputs failed^J^M");
goto error_exit;
endif
if fputc(file_handle, "a") then
fdisplay("fputc done^J^M");
else
fdisplay("fputc failed^J^M");
goto error_exit;
endif
len = 4;
if fwrite(file_handle, test_string, len) then
fdisplay("fwrite done^J^M");
else
fdisplay("fwrite failed^J^M");
goto error_exit;
endif
fclose(file_handle);
/* close the file. */
/* open the file in read/write mode. */
file_handle = fopen(file_name, "READWRITE");
if file_handle >= 0 then
fdisplay("%s opened^J^M", file_name);
else
fdisplay("%s could not be opened^J^M", file_name);
goto error_exit;
endif
/* read in characters into a string. */
if fgets(file_handle, str, 3) then
fdisplay("fgets done, string read is :%s^J^M", str);
else
166
CommPlete Communications Server
7 RASExpress Script Language
fdisplay("fgets failed^J^M");
goto error_exit;
endif
if fgetc(file_handle, str) then
fdisplay("fgetc done, char read is :%s^J^M", str);
else
fdisplay("fgetc failed^J^M");
goto error_exit;
endif
count = fread(file_handle, str, 5);
if count == 5 then
fdisplay("fread done^J^MBuffer read is :%s^J^M", str);
else
fdisplay("fread failed^J^M");
goto error_exit;
endif
origin = 1;
offset = 0;
position = fseek(file_handle, offset, origin);
if position != -1 then
fdisplay("current file offset is : %d^J^M", position);
endif
fclose(file_handle);
if isfile(file_name) then
fdisplay("%s exists^J^M", file_name);
else
fdisplay("%s does not exist^J^M", file_name);
endif
if delete(file_name) then
fdisplay("%s deleted^J^M", file_name);
else
fdisplay("%s could not be deleted^J^M");
endif
error_exit :
endproc
FDISPLAY
fdisplay(string format_str {, integer | real | string argument}) : integer;
Displays the format string with all the arguments at the current cursor position. There
should be a one-to-one correspondence between the format control characters in the
format string and the arguments provided. If an argument provided does not match
the corresponding format control character it is ignored in the conversion. The
number of arguments converted is returned. For a detailed description of the format
control characters, see “Format String and Format Control Characters” on page 151.
Example
/* This script illustrates the fdisplay command. */
proc main;
string date_str;
string time_str;
display("Example for fdisplay command^J^M");
date(date_str);
time(time_str);
fdisplay("Current date is : %s, time is : %s^J^M", date_str,
➥ time_str);
endproc
CommPlete Communications Server
167
RASExpress User Guide
FGETC
fgetc(integer file_handle, var string buffer) : integer;
Reads a character from the file given by file_handle into buffer. The buffer is null terminated. If an invalid file handle is passed, the command is ignored and 0 is returned; otherwise the number of bytes read is returned. If an error is encountered
while reading, a negative value is returned.
Example
See fcreate command.
FGETS
fgets(integer file_handle, var string buffer, integer max_len) : integer;
Reads a new line terminated string from the file given by file_handle into buffer. Buffer
is null terminated. The maximum number of characters to read can be specified by
max_len, but is limited to 132. Returns the number of bytes read (excluding the null).
If an invalid file handle is passed, the command is ignored and 0 is returned.. If the
end of file is reached, the predefined variable EOF is set. If there is any error in
reading, a negative value is returned.
Example
See fcreate command.
FINDFIRST
findfirst(string file_pattern, integer attribute, var string file_name) : integer;
The file_pattern is the pattern to seek in the directory. It can include the drive letter
and path. Attribute is the file attribute to seek. If a file/directory matching the given
pattern is found, file_name is updated; else file_name is not updated. The return value
is 1 if a matching file is found, else it is 0.
Example
/* This script illustrates the findfirst and findnext commands. */
proc main;
string dir_name;
string file_name;
integer len;
integer attribute;
len = 64;
attribute = 0;
display("Example for findfirst and findnext commands^J^M");
display("Enter file pattern : ");
if getstr(dir_name, len) then
fdisplay(" ^J^MFiles in %s are :^J^M", dir_name);
if findfirst(dir_name, attribute, file_name) then
fdisplay("%s^J^M", file_name);
while findnext(file_name) do
fdisplay("%s^J^M", file_name);
endwhile
endif
endif
endproc
168
CommPlete Communications Server
7 RASExpress Script Language
FINDNEXT
findnext(var string file_name) : integer;
If there is a matching next file/directory for the given pattern, file_name is updated;
otherwise it is not updated. If there is a next file/directory the return value is 1, else it
is 0.
Example
See findfirst command.
FLOOR
floor(real float_no) : integer;
Rounds down float_no to the next integer (if the value is already an integer, its value
is returned). For example, 1023.23 is returned as 1023; -1023.23 is returned as -1024.
Example
/* This script illustrates the floor command. */
proc main;
real x;
x = 1023.23;
fdisplay("floor(%f) is : %d^J^M", x, floor(x));
x = -1023.23;
fdisplay("floor(%f) is : %d^J^M", x, floor(x));
endproc
FOPEN
fopen(string file_name [, string open_mode | integer open_mode]) : integer;
Opens file_name. The mode in which the file should be opened is specified by
open_mode. If open_mode is not specified, it is assumed to be read/write mode. If a
string argument is given for open_mode, it should be either readonly or readwrite; any
other value will fail the command. If open_mode is an integer, it should match the values accepted in the DOS Int 21 Fn 3Dh. (I.e., the value should be a valid open mode as
understood by DOS. If the value is not a valid one, it could lead to unpredictable behavior). If the file is opened, the predefined variable EOF is set and the file handle is
returned; otherwise -1 is returned.
Example
See fcreate command.
FPUTC
fputc(integer file_handle, string buffer) : integer;
Writes the first character from the buffer to the file given by the file_handle. Returns the
number of bytes written to the file. If an invalid file handle is passed the command is
ignored and 0 is returned.
Example
See fcreate command.
CommPlete Communications Server
169
RASExpress User Guide
FPUTS
fputs(integer file_handle, string buffer [, integer count]) : integer;
Writes from buffer to the file specified by file_handle. The number of characters written
to the file is determined by count if specified; otherwise it is taken to be the string
length of buffer. Returns the number of bytes written to the file. If an invalid file handle is passed, the command is ignored and 0 is returned.
Example
See fcreate command.
FREAD
fread(integer file_handle, var string buffer, integer count) : integer;
Reads count bytes from the file specified by file_handle into buffer. If file_handle is
negative, the command is ignored and 0 is returned; otherwise the number of bytes
actually read is returned. If the end of the file is reached, the predefined variable EOF
is set. If an error is encountered while reading, a negative value is returned.
Example
See fcreate command.
FSEEK
fseek(integer file_handle, offset, origin) : integer;
File_handle should not be negative. If file_handle is negative or invalid, the command is
ignored and -1 is returned. Offset indicates the number of bytes to move from the
origin specified. Origin can be one of three values: 0 for beginning of file, 1 for current
position, and 2 for end of file. If there is an error, -1 is returned, else the current file
pointer position is returned.
Example
See fcreate command.
FTOA
ftoa(real float_no, var string buffer) : integer;
Converts float_no into a sequence of decimal digits and copies it to buffer. If the number is converted and copied to buffer, 1 is returned; otherwise 0 is returned.
Example
/* This script illustrates the ftoa command. */
proc main;
real x;
string str;
x = 1024.345;
ftoa(x, str);
fdisplay("Number converted is %f, converted string is
➥ ‘%s’^J^M", x, str);
endproc
170
CommPlete Communications Server
7 RASExpress Script Language
FWRITE
fwrite(integer file_handle, string buffer, integer count) : integer;
Writes count bytes from buffer to the file specified by file_handle. The number of bytes
written is returned as the value of the function.
Example
See fcreate command.
getfileattr(string file_name) : integer;
GETFILEATTR
Gets the attribute of the file specified by file_name if the file is present; otherwise -1 is
returned. The attribute value is as returned by the DOS Int 21 Fn 4300h call.
Example
See getfiledate command.
GETFILEDATE
getfiledate(string file_name, var string buffer) : integer;
Gets the date on the file specified by file_name if present, and copies it to buffer (in
mm:dd:yy format). If the file is present, 1 is returned, else 0 is returned.
Example
/* This script illustrates the getfiledate, getfiletime, */
/* getfileattr, setfiledate, setfiletime, and setfileattr */
/* commands. */
proc main;
string buffer;
string file_name;
string date;
string time;
integer attribute;
integer len;
integer size;
len = 45;
display("Example for getfiledate, getfiletime, getfileattr,^J^M");
display("setfiledate, setfiletime, and setfileattr commands^J^M");
display("Enter file name : ");
if getstr(file_name, len) then
if getfiledate(file_name, date) then
fdisplay("^J^MFile date is : %s^J^M", date);
else
display("^J^MError getting file date^J^M");
endif
if getfiletime(file_name, time) then
fdisplay("File time is : %s^J^M", time);
else
display("Error getting file time^J^M");
endif
size = getfilesize(file_name);
if size != -1 then
fdisplay("File size is : %d^J^M", size);
else
display("Error getting file size^J^M");
endif
attribute = getfileattr(file_name);
if attribute != -1 then
fdisplay("Attribute is : %d^J^M", attribute);
else
CommPlete Communications Server
171
RASExpress User Guide
display("Error getting file attribute^J^M");
endif
display("Enter date to set to : ");
if getstr(buffer, len) then
if setfiledate(file_name, buffer) then getfiledate
➥ (file_name, buffer);
fdisplay("^J^MFile date is set to : %s^J^M", buffer);
else
display("^J^MError setting file date^J^M");
endif
endif
display("Enter time to set to : ");
if getstr(buffer, len) then
if setfiletime(file_name, buffer) then getfiletime
➥ (file_name, buffer);
fdisplay("^J^MFile time is set to : %s^J^M", buffer);
else
display("^J^MError setting file time^J^M");
endif
endif
display("Enter attribute to set to : ");
attribute = getint;
if setfileattr(file_name, attribute) then
attribute = getfileattr(file_name);
if attribute != -1 then fdisplay("^J^MFile attribute
➥ set to : %d^J^M", attribute);
else
display("^J^MError setting file attribute^J^M");
endif
else
display("^J^MError setting file attribute^J^M");
endif
endif
display("Enter file name to delete : ");
if getstr(file_name, len) then
if delete(file_name) then
fdisplay("^J^M%s deleted^J^M", file_name);
else
fdisplay("^J^M%s could not be deleted^J^M", file_name);
endif
endif
endproc
GETFILESIZE getfilesize(string file_name) : integer;
Gets the size of the file specified by file_name in bytes if the file is present, else -1 is
returned.
Example
See getfiledate command.
172
CommPlete Communications Server
7 RASExpress Script Language
GETFILETIME getfiletime(string file_name, var string buffer) : integer;
Gets the time of the file specified by file_name if the file is present, and copies it to
buffer (in hh:mm:ss format). If the file is present 1 is returned, else 0 is returned.
Example
See getfiledate command.
HANGUP
hangup;
Hangs up the modem.
Example
/* This script illustrates the hangup command. */
proc main;
display("Example for hangup command^J^M");
if connected then
display("Will hang up the modem, press any key...");
getkey;
hangup;
display("^J^M");
else
display("Connection not made, command ignored^J^M");
endif
endproc
INC
inc(var integer integer_variable);
Increments integer_variable by 1.
Example
See dec command.
ISFILE
isfile(string path_name) : integer;
Verifies that path_name is a directory. If path_name is a directory, 0 is returned; otherwise 1 is returned.
Example
See fcreate command.
CommPlete Communications Server
173
RASExpress User Guide
ITOA
itoa(integer number, var string buffer [, integer radix]);
Converts number to a sequence of characters according to radix and copies it to buffer.
If radix is not given, 10 (decimal) is assumed. If number is converted and buffer is updated, 1 is returned; otherwise 0 is returned.
Example
/* This script illustrates the itoa command. */
proc main;
integer i;
string str;
display("Example for itoa command^J^M");
display("Enter an integer (in decimal) : ");
i = getint;
itoa(i, str);
fdisplay("^J^MValue in decimal is : %s^J^M", str);
itoa(i, str, 16);
fdisplay("Value in hex is : %s^J^M", str);
endproc
MKDIR
mkdir(string) : integer;
Creates the directory in the path specified by path_name. If creation of the directory is
successful, 1 is returned; else 0 is returned.
Example
/* This script illustrates the mkdir command. */
proc main;
string name;
integer len;
len = 45;
display("Example for mkdir command^J^M");
display("Enter directory name to create : ");
if getstr(name, len) then
if mkdir(name) then
fdisplay("^J^M%s created^J^M", name);
else
fdisplay("^J^M%s could not be created^J^M", name);
endif
endif
endproc
MOD
mod(integer number1, number2) : integer;
Divides number1 by number2 and returns the remainder. If number2 is zero, script execution is terminated.
Example
See dec command.
174
CommPlete Communications Server
7 RASExpress Script Language
PARITY
parity(string option) : integer;
Sets the parity for the communication channel. The option that is passed should be
one of the following : NONE, ODD, or EVEN. If connection is not initialized or an
invalid option is passed, the command is ignored and 0 is returned. If a valid option
is passed, the parity is set and 1 is returned.
Example
See baudrate command.
PROC
PROC <procedure_name> [ (<parameter_list>) ] [ : <var_type>] ;
This statement declares the beginning of a procedure, which will be executed until
ENDPROC is encountered. Execution of a script file starts at PROC MAIN, which
cannot have any arguments. All procedures must be declared before they are used.
Example
/*
This script illustrates the proc command.
*/
proc main;
display("This is a simple procedure.^M") ;
endproc
proc xplusy (integer x, y): integer;
integer sum;
sum = x + y'
return(sum) ;
endproc
QUIT
quit;
Terminates the execution of the script.
Example
/* This script illustrates the quit command. */
proc main;
display("Press any key to exit the program...");
getkey;
display("^J^M");
quit;
endproc
CommPlete Communications Server
175
RASExpress User Guide
RGETC
rgetc(var string buffer [, integer timeout]) : integer;
Gets a character from the remote machine. Timeout is optional and should be in seconds. If the connection is not initialized, the command is ignored and 0 is returned. If
the connection is initialized, the command waits for a character from the remote. If a
character is received, it is copied into buffer (which is terminated with a null) and 1 is
returned; otherwise 0 is returned. If timeout is specified and no characters are received within that period, 0 is returned. If timeout is not specified it waits until a
character is received, or until the connection is dropped.
Example
/* This script illustrates the rgetc command. */
proc main;
string s;
integer timeout;
timeout = 5;
fdisplay("Waiting for a character, timeout is : %d
➥ seconds...", timeout);
if rgetc(s, timeout) then
fdisplay("Character received is : %s^J^M", s);
else
display("No character received^J^M");
endif
endproc
RMDIR
rmdir(string path_name) : integer;
Removes the directory from the path specified by path_name. If the directory deletion
is successful, 1 is returned, else 0 is returned.
Example
/* This script illustrates the rmdir command. */
proc main;
string name;
integer len;
len = 45;
display("Example for rmdir command^J^M");
display("Enter directory name to remove : ");
if getstr(name, len) then
if rmdir(name) then
fdisplay("^J^M%s removed^J^M", name);
else
fdisplay("^J^M%s could not be removed^J^M", name);
endif
endif
endproc
176
CommPlete Communications Server
7 RASExpress Script Language
SETFILEATTR setfileattr(string file_name, integer attribute) : integer;
Sets the attribute for the file specified by file_name. If the attribute is set successfully, 1
is returned, else 0 is returned. The attribute should be according to DOS Int 21 Fn
4301h call.
Example
See getfiledate command.
SETFILEDATE setfiledate(string file_name, file_date) : integer;
Sets the date for the file specified by file_name. If the date is set successfully, 1 is returned, else 0 is returned. The date should be given in mm-dd-yy or mm/dd/yy
format. If there is any error in the date string, 0 is returned, and the command is
ignored.
Example
See getfiledate command.
SETFILETIME setfiletime(string file_name, file_time) : integer;
Sets the time for the file specified by file_name. If the time is set successfully, 1 is returned, else 0 is returned. The time should be given in hh:mm:ss format. If there is
any error in the time string, 0 is returned, and the command is ignored.
Example
See getfiledate command.
STOPBITS
stopbits(integer no_of_bits) : integer;
Sets the number of stop bits for the communication channel. The no_of_bits passed
should be 1 or 2. If the connection is not initialized or no_of_bits is not within this
range, the command is ignored and 0 is returned; otherwise 1 is returned.
Example
See baudrate command.
STRCAT
strcat(var string first_string, second_string) : integer;
Concatenates second_string to first_string. If there is any concatenation error, 0 is
returned; otherwise 1 is returned.
Example
See strlen command.
CommPlete Communications Server
177
RASExpress User Guide
STRCMP
strcmp(string first_string, second_string) : integer;
Compares first_string to second_string. If they are the same, 0 is returned. If first_string
is less than second_string (i.e., earlier in the alphabet or number line), a negative value
is returned; otherwise a positive value is returned.
Example
See strlen command.
STRCPY
strcpy(var string target_string, source_string);
Copies source_string to target_string. If there is any error in copying, 0 is returned;
otherwise 1 is returned.
Example
See strlen command.
STRFMT
strfmt(var string buffer, string format_string {, integer | real | string argument})
➥ : integer;
Formats the arguments according to format_string and copies to buffer. There should
be a one-to-one correspondence between the format control characters in the format
string and the provided arguments. If a provided argument does not match the corresponding format control character, it is ignored in the conversion. The number of
converted arguments is returned. For a detailed description of the format control
characters, see “Format String and Format Control Characters” on page 151.
Example
See strlen command.
STRLEN
strlen(string buffer) : integer;
Returns the string length of buffer.
Example
/* This script illustrates the strlen, strcat, strcmp, */
/* strcpy, and strfmt commands. */
proc main;
string str;
string tail;
string str1;
string str2;
str = "test string";
display("Example of strlen command^J^M");
fdisplay("str value is : %s^J^Mlength of the string is
➥ %d^J^M", str, strlen(str));
display("Example of strcat command^J^M");
fdisplay("str value is : %s^J^M", str);
tail = " for strcat";
fdisplay("str value after concatenating with ‘%s’ is
➥ : ^J^M", tail);
strcat(str, tail);
fdisplay("%s^J^M^J^M", str);
display("Example of strcmp command^J^M");
str1 = "string";
178
CommPlete Communications Server
7 RASExpress Script Language
str2 = "string";
fdisplay("str1 : %s^J^Mstr2 : %s^J^M", str1, str2);
if !strcmp(str1, str2) then
display("str1 and str2 are same^J^M^J^M");
else
display("str1 and str2 are different^J^M^J^M");
endif
str1 = "string1";
str2 = "string2";
fdisplay("str1 : %s^J^M", str1);
fdisplay("str2 : %s^J^M", str2);
if !strcmp(str1, str2) then
display("str1 and str2 are same^J^M");
else
display("str1 and str2 are different^J^M");
endif
display("Example of strcpy command^J^M");
str = "first string";
str1 = "second string";
fdisplay("str value before strcpy is : ‘%s’^J^M", str);
strcpy(str, str1);
fdisplay("str value after strcpy is : ‘%s’^J^M", str);
display("Example of strfmt command^J^M");
display("constants 120 & 150 will be");
display(" concatenated into a string and shown^J^M");
strfmt(str, "%d %d^J^M", 120, 150);
display(str);
display("^J^MEnd of script, press any key...");
getkey;
display("^J^M");
endproc
TOLOWER
tolower(var string buffer);
Converts the string variable to lower case.
Example
/* This script illustrates the tolower command. */
proc main;
string str;
integer len;
display("Example for tolower command^J^M");
display("Enter string to convert : ");
len = 20;
if getstr(str, len) then
fdisplay("^J^MString read is : %s^J^M", str);
tolower(str);
fdisplay("Converted string is : %s^J^M", str);
endif
endproc
CommPlete Communications Server
179
RASExpress User Guide
TOUPPER
toupper(var string buffer);
Converts the string variable to upper case.
Example
/* This script illustrates the toupper command. */
proc main;
string str;
integer len;
display("Example for toupper command^J^M");
display("Enter string to convert : ");
len = 20;
if getstr(str, len) then
fdisplay("^J^MString read is : %s^J^M", str);
toupper(str);
fdisplay("Converted string is : %s^J^M", str);
endif
endproc
TRANSMIT
transmit(string key_sequence) : integer;
Sends out the characters specified in key_sequence. Key_sequence should be null terminated. If connection is not initialized, the command is ignored and 0 is returned. If all
the keys given in key_sequence are sent out successfully, 1 is returned; otherwise 0 is
returned.
Example
/* This script illustrates the transmit command. */
proc main;
string s;
integer i;
s = " example string ";
for i = 0 to 100 do
if transmit(s) then
display("Transmit successful\x0d\x0a");
else
display("Transmit failed\x0d\x0a");
endif
endfor
endproc
WAIT
wait(integer delay);
Suspends the script execution for the time in seconds specified by delay. Characters
typed on the keyboard will be sent to the remote and the incoming characters will
also be shown on the terminal.
Example
/* This script illustrates the wait command. */
proc main;
integer duration;
display("Enter wait duration in seconds : ");
duration = getint;
fdisplay("^J^MWait starts (duration = %d seconds)^J^M", duration);
wait(duration);
display("Wait ends^J^M");
endproc
180
CommPlete Communications Server
7 RASExpress Script Language
WAITFOR
waitfor(string pattern [, integer timeout]) : integer;
Waits for a pattern from the remote machine. Timeout is optional. It waits for pattern
to be received from the remote machine or timeout to occur (if specified), whichever is
earlier. The pattern match is not case sensitive. If the connection is not initialized or
pattern is not received, 0 is returned; otherwise 1 is returned.
Example
/* This script illustrates the waitfor command. */
proc main;
string pat;
integer timeout;
pat = "abcdef";
timeout = 10;
fdisplay("wait for ‘%s’ starts (timeout = %d seconds)^J^M",
➥ pat, timeout);
if (waitfor(pat, timeout)) then
display("Pattern got, wait ends^J^M");
else
display("Pattern not got, wait failed^J^M");
endif
endproc
CommPlete Communications Server
181
RASExpress User Guide
182
CommPlete Communications Server
Appendixes
CommPlete Communications Server
183
RASExpress User Guide
Appendix A Reinstalling RASExpress
Introduction
The RASExpress software package includes programs for installation on the
CommPlete Communications Server, on client computers, and on remote computers.
RASExpress Server comes pre-installed on all CommPlete Communications Server
RAS96 RASCards. This appendix is a guide to reinstalling and configuring the
RASExpress software, should that become necessary. To configure and manage
RASExpress using Telnet or a browser, see the other chapters of this manual.
The RASExpress server software includes the server program, RASEXP.EXE, the local
configuration utility, RASCON.EXE, and the color utility, SETCOLOR.EXE, which the
system administrator can use to adjust the color of the server screens. All three are
DOS programs.
Reinstalling RASExpress
• The RASExpress Server software must be installed on a hard drive.
• A client calling into the RASExpress server is referred to as the client PC or as the
user.
• In many cases, you can use the INSERT key to toggle between insert mode and
overwrite mode when editing data in a field. Insert mode lets you insert characters
into a line of text. Overwrite mode lets you replace existing characters with new
characters.
• HIMEM.SYS must be loaded by the RASExpress server’s CONFIG.SYS file. Make
sure there are no network drivers loaded before you start the installation. We also
recommend removing any reference to SMARTDRV.EXE from the RASExpress
server’s AUTOEXEC.BAT file.
To reinstall RASExpress on a RASCard
1. Connect a monitor and keyboard to the RASCard.
2. Delete C:\CONFIG.SYS and C:\AUTOEXEC.BAT.
3. To ensure the correct environment for a reinstallation, at the C:\ prompt, type
the following commands:
copy config.000 config.sys
copy autoexec.000 autoexec.bat
4. Reboot the RASCard.
Note: You may alternately restore RASExpress to its factory settings by typing
restore at the C:\ prompt. However, this command will also lose all your custom
settings and user names. To retain your settings, follow the steps in this procedure.
5. Type CD RASEXP.DSK to change to the RASExpress installation directory.
184
CommPlete Communications Server
6. Type install.
7. The Install Options window appears.
In the Operating System field, select the operating system on which the installation is to be performed. Press ENTER to see the options, which are Novell and
Any Other. If you select Novell, you can install RASExpress Server to a network
drive or to a local drive. If you select Any Other, you can install only to a local
drive. On the CommPlete Communications Server, install RASExpress as Any
Other. Press ESC.
8. The Ethernet Card Information window appears.
Select the Card Type field and press ENTER to see the list of network interface
card (NIC) types for which RASExpress can be installed. To install RASExpress
for the CommPlete Ethernet interface, choose the COMMPLETE option, then
press ESC to continue.
9. In the Enter path name for Network drivers field, type the path to the directory
where you want the RASExpress files to be copied, then press ENTER. By default,
the drivers will be copied to C:\RAS550. To accept the path and continue with
the installation, press ESC.
10. A window appears that shows the progress of the files as they are copied from
the source directory to the destination directory.
11. The RASExpress Server Configuration utility starts. Use the utility to configure
the RASExpress server, as explained in “RASExpress Server Configuration” on
page 187.
12. Press ESC when you have finished configuring the RASExpress server. A message
about your AUTOEXEC.BAT and CONFIG.SYS files appears. Press any key after
you have read the message. The original files are saved as AUTOEXEC.000, .001,
.002, etc., and CONFIG.000, .001, .002, etc.
13. The Licensing Information window appears.
In the Name field, type the name of the person for whom you installed the
RASExpress server. It can be up to 17 characters long.
In the Organization field, type the name of the organization for which you installed the RASExpress server. It can be up to 50 characters long.
CommPlete Communications Server
185
RASExpress User Guide
Press ESC to continue.
14. The following message appears:
RASExpress Server Installation Completed.
15. Installation of the RASExpress server is complete. Press any key to continue.
16. A Restart Computer? message appears. We recommend that you select Yes
to have your configuration changes take effect immediately.
17. Your computer reboots. The RASExpress Server main window appears,
indicating that the RASExpress server is now operating. (See “RASExpress Server
Main Window” on page 219.)
186
CommPlete Communications Server
RASExpress Server Configuration Utility
The RASExpress Server Configuration utility (RASCON.EXE) is a DOS program for
configuring the RASExpress server. It starts automatically following installation of
the RASExpress Server software. You can also run it any time the server is off-line by
changing to the RASExpress directory (C:\RAS550) and typing rascon. You can also
configure the RASExpress server using terminal and Telnet menus (Chapter 3),
Telnet commands (Appendix C), a Web browser (Chapter 4), or MultiCommManager
(refer to the MultiCommManager User Guide).
Note: Because of the 640K memory limitation in DOS, the User Setup and Modem
Setup menus cannot be loaded while the network files are running. To unload the
network files, from the C:\ prompt, type mtslsl -u <CR>. Alternately, reboot the
server and bypass AUTOEXEC.BAT by pressing F5 when the message Starting
MS-DOS appears. Then change to the RASExpress directory and type rascon <CR> to
start RASCON.
Main Menu
When you run RASCON, the Main Menu appears. The Main Menu is the starting
point for configuring the RASExpress server. To select a submenu, highlight it using
the arrow keys, and press ENTER. To close a menu and most configuration windows,
press ESC.
CommPlete Communications Server
187
RASExpress User Guide
Server Setup
To open the Server Setup menu, select Server Setup from the Main Menu. From the
Server Setup menu, you can open several windows that configure the RASExpress
server’s network operations.
General Setup
To open the General Setup window, select General Setup from the Server Setup
menu.
In the General Setup window, you can change the following parameters:
Server Name
Use this field to assign a unique name to the RASExpress server. The server name is
broadcast on the Novell network. It is also used by MultiCommManager to monitor
RASExpress server statistics.
Supervisor Password
Use this field to assign a supervisor password. The password is case-sensitive. For
security, the actual characters are replaced by asterisks. This password locks the local
console and prevents regular users from running MultiCommManager and making
changes to the RASExpress server.
188
CommPlete Communications Server
Log Status
This field turns the call log on and off. When On is selected, RASExpress logs all calls
for one hour in the file yyyymmdd.LOG, where yyyymmdd is the year, month, and day
the log was created. The 24 saved logs for each date are given the extensions .L00–
.L23. When Off is selected, RASExpress does not log calls.
Log Start Date
You can start the call log automatically, if it is off, by entering the start date in the
format month-day-year. When the date arrives, the log begins at the time specified in
the Log Start Time field.
Log Start Time
Enter the time at which you want the log to automatically start, in the format
hours:minutes:seconds.
Write Error Messages into File
This field turns the message log on and off. Select On to have RASExpress save all
error and other messages it receives into a file. Select Off to disable the log. The
default is Off.
Message File
If On is selected in the previous field, you can use this field to assign a name to the
message file. The default file name is SERVER.MSG.
PPP Connection Log
This field turns the PPP connection log on and off.
Screen Saver
RASExpress Server has a built-in screen saver. Select Off if you do not want the
screen saver. Select On if you do want to use the screen saver.
Connection Manager Menu
Select On to display the Connection Manager menu to a user calling into the
RASExpress server for remote control operation. Select Off to display the Host List to
the user.
Command to MultiModemManager
This command does not apply to CommPlete Communications Servers.
Press ESC when finished.
CommPlete Communications Server
189
RASExpress User Guide
Administrator Setup
To open the List of Administrators window, select Administrator Setup from the
Server Setup menu.
The List of Administrators lists the users who have administrative rights. To add an
administrator to the list, press INSERT; to edit an entry, press ENTER. Both actions
open a dialog box in which you can edit the administrator’s user name, password,
and configuration and management permissions.
User Name
The administrator’s user name.
User Password
The administrator’s password. You must type the password twice to confirm it
Configuration Permissions
If enabled, permits the administrator to configure the RASExpress server.
Management Permissions
If enabled, permits the administrator to manage the RASExpress server.
IP Remote Access Configuration
To open the IP Remote Access Configuration window, select IP Remote Access from
the Server Setup menu.
190
CommPlete Communications Server
Use the IP Remote Access Configuration window to set up parameters that apply to
IP routing on all ports.
IP Remote Access
This field shows the IP remote access status. When it is enabled, the RASExpress
server provides remote access on IP. This allows any remote PPP compatible client to
call in and access local TCP/IP hosts, such as WWW, FTP, Telnet, etc.
IP Address
This field shows the IP network address for the RASExpress server’s Ethernet interface. It can be edited only if IP Remote Access is enabled. The IP address must be assigned by the system administrator, and it must be unique on the TCP/IP network.
IP Subnet Mask
This field shows the IP subnet mask of the RASExpress server. This field can be edited only if IP Remote Access is enabled. The mask shown in the example is the standard mask for a Class C network.
IP Default Route
This field shows the default IP route on the network on which the RASExpress server
is installed. Any IP packets that cannot be routed by the RASExpress server are sent
to this address. If there is no router on the network, the address should be filled with
zeroes. This field can be edited only if IP Remote Access is enabled.
IP RIP
Shows the IP Routing Information Protocol (RIP-2) status. Enable IP RIP if you want
the PRIme Access Server to use RIP-2 to do IP routing.
IP Learn Default Gateway
Enables or disables RASExpress to learn the correct default gateway if you have
configured the default gateway incorrectly or if the configured gateway goes down
and a different router starts acting as a default router. This feature requires a RIP-2
router that supports default gateway broadcasting.
Primary Name Server
This field shows the address of the primary name server that is used by the
RASExpress server to resolve names to IP addresses for Telnet and RLOGIN clients
dialing in from a dumb terminal. This field can be edited only if IP Remote Access is
enabled.
CommPlete Communications Server
191
RASExpress User Guide
Secondary Name Server
This field shows the address of the secondary name server that is used by the
RASExpress server to resolve names to IP addresses for Telnet and RLOGIN clients
dialing in from a dumb terminal. The secondary name server is used when the
primary name server does not respond. This field can be edited only if IP Remote
Access is enabled.
DNS Caching Server
Enable to have the RASExpress server act as a DNS server. When this option is
enabled, the RASExpress server gives out its IP address as the DNS server to dialing
PPP clients.
IP Frame Type
This field shows the RASExpress server’s IP frame type. It can be edited only if IP
Remote Access is enabled. Two frame types are available: TYPE_II (default) and
SNAP.
Remote Client IP Addresses
This field shows how the RASExpress server allocates IP addresses to remote clientto-LAN users. Select Use DHCP if you have a DHCP server on your LAN. Select Use
address pool if the IP addresses you assign to the clients are continuous. Select
Configure per port (the default) if you want to assign a specific address to each of the
remote ports. Select Use Radius if you want to use your RADIUS server to assign IP
addresses. For LAN-to-LAN ports you must configure all IP addresses manually.
Static Routes
Press ENTERto display a list of the static routes used when WAN ports are set up for
LAN-to-LAN operation. Because of DOS memory constraints, static routes cannot be
added, deleted, or modified in this interface.
Press ESC when finished.
IPX Remote Access Configuration
To open the IPX Remote Access Configuration window, select IPX Remote Access
from the Server Setup menu.
From the IPX Remote Access Configuration window, you can change the following
parameters:
IPX Remote Access
Select Enabled to allow the RASExpress server to use the IPX protocol for .remote
access.
192
CommPlete Communications Server
Learning Network Numbers
Select Enabled to allow the RASExpress server to automatically detect and use the
network’s numbers.
Note: The server needs some time to learn the IPX address of the LAN segment it is
attached to. If it is unable to learn the address, it will use the default network address
as configured. If the RASExpress server comes up before the file server and uses the
default address, you will get a warning on your file server about conflicting network
numbers. If this happens, reboot the RASExpress server.
Internal Network Number
Type the IPX internal network number for the RASExpress server. This number
should be unique on the network.
Route NetBIOS Over IPX Packets
This option enables the routing of NetBIOS over IPX packets. Select Yes if you are
running applications on NetBIOS over IPX. Select No if you do not need this option.
802.3
Select Yes to enable routing of 802.3 IPX packets on the LAN, then type a network
number for the 802.3 frame type.
802.2
Select Yes to enable routing of 802.2 IPX packets on the LAN, then type a network
number for the 802.2 frame type.
Type_II
Select Yes to enable routing of Ethernet_II IPX packets on the LAN, then type a network number for the Ethernet_II frame type.
SNAP
Select Yes to enable routing of Ethernet SNAP IPX packets on the LAN, then type a
network number for the Ethernet SNAP frame type.
Press ESC when finished.
PPP Configuration
To open the PPP Configuration window, select Point-to-Point Protocol Setup from
the Server Setup menu.
CommPlete Communications Server
193
RASExpress User Guide
From the PPP Configuration window, you can edit the following PPP parameters for
a selected WAN port. To choose a port to edit, select Port Name and press ENTER. A
List of Lines menu appears, from which you can select the desired port.
Port Name
Shows the name of the port you are configuring. Press ENTER to select another port to
configure.
Port Type
Select the type of connection the port is to be used for: Client-to-LAN or LAN-toLAN. Select Client-to-LAN if the PPP peer is a dial-up client. Select LAN-to-LAN if
the PPP peer is a dial-up client or another router. If you change the connection type,
be sure to change the IP address also.
SLIP
This field shows the status of the Serial Line Internet Protocol (SLIP) for the selected
port. Enable SLIP if you have SLIP clients dialing into the RASExpress server.
Data Compression
Select Enable to enable PPP data compression for the port. Enable data compression
only if the data link is slower than 57,600 bps and the modem is not doing any data
compression. Disable it if the data link is 57,600 bps or faster or if the modem is doing
data compression.
Maximum Receive Unit (MRU)
This field shows the PPP maximum receive unit (MRU) for the port, in the range 0–
1534. The MRU is the packet size in bits.
Async Control Map (ACCM)
This field shows the PPP asynchronous character control map for the port, in the
range 0–FFFFFFFF.
Dial on Demand
This field is used only for LAN-to-LAN operations. Enable it if you want to disconnect the line during idle times and connect only when you have to transfer data. If
this option is enabled, RASExpress spoofs all watchdog and serialization packets.
Authentication Protocol
This field shows the PPP authentication protocol for the port. You can choose PAP
(Password Authentication Protocol), CHAP (Challenge Handshake Authentication
Protocol), or None.
User Name
Type a user name here for use in LAN-to-LAN security. For a client-to-LAN configuration, leave this field blank.
Password
Type a password here for use in LAN-to-LAN security. The password is casesensitive, and must match the password at the other end of the PPP connection. For a
client-to-LAN configuration, leave this field blank.
IPXCP
Select Enabled to enable IPX for the selected port. Select Disabled to disable IPX, so
that it will be unavailable for remote dial-in clients. IPXCP is a PPP network control
194
CommPlete Communications Server
protocol for IPX. It is responsible for configuring, enabling, and disabling the IPX
protocol modules on both ends of the point-to-point link.
Network Number
This field shows the IPX network number of the port. There is a unique number for
each port that does not correlate with the existing network number. You can edit this
field only if IPXCP is enabled.
Node Number
This field shows the IPX remote node number of the port. Each port must have a
unique node number. You can edit this field only if IPXCP is enabled.
CIPX Compression
Select Enable to enable CIPX (Compressed Internetwork Packet Exchange) compression of IPX headers for the port. Select Disable if you do not want CIPX compression. If you select Enable, CIPX compression must also be enabled on the server
for your choice to have an effect. You can edit this field only if IPXCP is enabled.
NetBIOS over IPX
This field allows you to enable or disable routing of NetBIOS over IPX packets
through the port. Enable it if you are using applications that require NetBIOS over
IPX support. You can edit this field only if IPXCP is enabled.
BCP
This field shows the status of the Bridge Control Protocol (BCP) for the port. Enable
BCP if the other end of the PPP link supports BCP.
IPCP
This field enables IP for the port. Select Disabled if TCP/IP or PPP is not to be used.
Local Address
This field shows the IP local network address of the port. This field can be edited only
for LAN-to-LAN ports, and only if IPCP is enabled. For all client-to-LAN
connections, the local address is the same as the IP address of the LAN port. For
LAN-to-LAN ports, make sure the IP address is on a different network or a subnet of
any of the existing networks.
Remote Address
This field shows the IP network address of the port. It is the address assigned to the
remote PPP client. It must be on the same network as the IP local address. This field
can be edited only if IPCP is enabled. It cannot be edited for client-to-LAN ports if
DHCP is enabled.
Subnet Mask
This field contains the mask used to specify the subnetwork part of the IP address.
For all client-to-LAN connections it is the same as the LAN network. See “IP
Addressing” on page 7.
VJ Compression
Select Enabled to enable Van Jacobson compression of TCP/IP headers on the PPP
link. VJ compression is used by many PPP clients. Select Disabled to disable Van
Jacobson compression. If IPCP and VJ Compression are enabled, a dial-in PPP client
that uses this compression method may experience greater speed than with VJ
Compression disabled.
CommPlete Communications Server
195
RASExpress User Guide
Forward Broadcasts
This field allows you to enable or disable forwarding of UDP broadcast packets onto
the port. Enable it if your UDP applications depend on the broadcasts. When
forwarding is enabled, the RASExpress server forwards to the selected port all UPD
broadcast packets that come from the LAN and from the client-to-LAN ports. Forwarding broadcasts on remote links increases the traffic on the links, so enable forwarding only if necessary.
Multilink PPP
To open the Multilink PPP window, select Multilink PPP from the Server Setup
menu.
Use this window to set up Multilink PPP on the RASExpress server. The Multilink
PPP protocol bonds two physical ports to one IP address for greater bandwidth.
Note: RASExpress has MultiChassis Multilink support, which enables the bundling
of multilink connections across different RASExpress servers. All MultiChassis
Multilink servers must have IP and PPTP turned on to enable the servers to talk to
each other. Also, all MultiChassis Multilink servers should point to the same RADIUS
or TACACS+ server.
Multilink PPP Status
Select Enabled to enable Multilink PPP (MLPPP) support on the RASExpress server.
RASExpress supports Multilink PPP for both analog and ISDN channels.
Group EPD
Identifies the bundle group that the RASExpress server belongs to. The EPD (End
Point Descriminator) is an arbitrary four-byte hexadecimal value. By default
RASExpress initializes it to the IP address of its Ethernet interface. However, all
servers that belong to the same bundle group should have the same EPD.
Bundle Server IP Address
Type the IP address of the Bundle Server. The Bundle Server is the RASExpress 5.40
or later server chosen to manage the multichassis multilinks. It can be any RASExpress
5.40 or later server on the network, but the optimal server is the one that is equidistant from all RASExpress servers in the bonding group. If the servers are on different
networks, then the hop count from the Bundle Server to all the other servers should
be more or less equal. Alternately, the one that is least busy can function as the Bundle
Server.
Bundle Server UDP Port
Identifies the UDP port number that the RASExpress server uses to communicate
between itself and the Bundle Server.
196
CommPlete Communications Server
MAC Layer Bridging
Select MAC Layer Bridging from the Server Setup menu to open the MAC Layer
Bridging window. Use this window to configure MAC (Media Access Control) layer
bridging for the RASExpress server.
Bridging
Select Enabled to enable the server to bridge all MAC layer packets. The default is
Disabled. If you do not use networking protocols other than IP and IPX, you should
disable bridging, since it slows down the RASExpress server by requiring the router
to examine each and every packet on the connected LAN segment. However, you will
need bridging to support networking protocols like NetBIOS. Note that if you enable
bridging and disable routing of IP or IPX on a specific port, bridging of those protocol
packets will not take place on that port. However, if you disable IP or IPX entirely for
the RASExpress server, then those packets will be bridged.
Spanning Tree
Spanning Tree bridging is used to detect looped back links. The default is Disabled.
This option is unavailable when Bridging is disabled.
Telnet
Select Telnet from the Server Setup menu to open the Telnet Options window.
Telnet Administration
Select Enabled if you want to be able to configure and manage the RASExpress
server from any Telnet client.
Telnet Client
Select Enabled to allow a remote user who has dialed in to the RASExpress server to
Telnet to different hosts on the network.
Telnet Dialout
Select Enabled to allow users to use any Telnet client to select a modem on the
RASExpress server and dial out to UNIX hosts and BBSs.
Telnet Auto Dialout
Select Enabled to allow a Telnet client to connect to the TCP port number in Auto
Dialout Port Number and use any free modem on the RASExpress server.
CommPlete Communications Server
197
RASExpress User Guide
Auto Dialout Port Number
Type the TCP port number that is to be used for Telnet auto dialout.
Interface Type
Choose the Telnet interface type; the choices are Menu and Command. Menu mode
allows the RASExpress server to be configured using the menus in Chapter 3.
Command mode allows the RASExpress server to be configured using Telnet
commands (see Appendix C).
SNTP Client
Select SNTP Client from the Server Setup menu to open the SNTP Client
Configuration window.
The Simple Network Time Protocol (SNTP) is used to synchronize computer clocks in
the Internet. RASExpress uses SNTP time signals to synchronize server clocks for
accounting accuracy.
SNTP Client
Select Enable to enable the RASExpress server to synchronize its clock using SNTP
signals.
SNTP Server Address
Type the IP address of the SNTP server you want to use as a time source.
Time Zone
Type a one- to three-letter abbreviation for the time zone of the RASExpress server
that you are configuring. It is used for display purposes only.
Offset from UTC
Type the time difference between the location of the RASExpress server and the prime
meridian at Greenwich, U.K., in the format hours:minutes. Sites west of Greenwich
have negative numbers, and those east of Greenwich have positive numbers.
U.S. time zone
198
Offset from UTC
Eastern Standard (EST)
-05:00
Central Standard (CST)
-06:00
Mountain Standard (MST)
-07:00
Pacific Standard (PST)
-08:00
CommPlete Communications Server
Daylight Savings
Select Enable to make RASExpress automatically adjust the clock for daylight-saving
time.
Move Clock By
Type the number of minutes that the clock changes during the shift to and from
daylight-saving time. In most parts of the world it is 60 minutes.
Start Ordinal
Daylight-saving time usually starts at the same time on the same day of the week in
the same month every year. Each day of the week occurs four or five times a month.
Select on which occurrence daylight-saving time starts: the first, second, third, fourth,
or last of the month. In the U.S.A., daylight-saving time starts at 2:00 A.M. on the first
Sunday in April.
Start Day
Select the day of the week that daylight-saving time starts.
Start Month
Select the month that daylight-saving time starts.
Start Time
Type the time of day that daylight-saving time starts.
End Ordinal
Select on which occurrence of the selected day of the week that daylight-saving time
ends: the first, second, third, fourth, or last of the month. In the U.S.A., daylight-saving
time ends at 2:00 A.M. on the last Sunday in October.
End Day
Select the day of the week that daylight-saving time ends.
End Month
Select the month that daylight-saving time ends.
End Time
Type the time of day that daylight-saving time ends.
CommPlete Communications Server
199
RASExpress User Guide
SNMP Agent
Select SNMP Agent from the Server Setup menu to open the SNMP Agent
Configuration window.
The RASExpress server can be managed or configured by any standard Simple
Network Management Protocol (SNMP) manager.
SNMP Agent
Select Enabled to enable SNMP management, Disabled to disable it.
SNMP Trap Manager IP Address
Type the IP address of the SNMP trap manager.
SNMP Trap Manager Community Name
Type the community name of the SNMP trap manager. Any SNMP traps that are
generated by the RASExpress server will be sent to this manager.
SNMP Trap Manager Port Number
Type the port number of the SNMP trap manager. The default port number is 162.
SNMP Reboot Required Trap
Enable to send a trap to the manager whenever a configuration change is made that
requires a reboot of the server.
SNMP Authentication
Select whether SNMP authentication is simple or encrypted. Set authentication to
Simple if you are usingMultiCommManager or a third party manager. This uses
plain text for Get and Set community names. You may also set authentication to
Simple if you are using Multi-Tech MultiManager.
Set authentication to Encrypted only if you are using Multi-Tech MultiManager. (not
MultiCommManager) to manage your servers. When authentication is encrypted, the
administrative user name and password and the PDU ID (a field in the SNMP request
to the agent) are used to prepare an encrypted sequence for authentication of the
SNMP request by the agent (RAS). It is a combination understood only between the
RAS and MultiManager.
SNMP Get Community Name
The RASExpress server can be configured for Get and Set communities. Type the
name of the Get community here. The default is public.
200
CommPlete Communications Server
SNMP Get Community Permission
Select the Get community permission. The choices are readonly and readwrite. The
default is readonly.
SNMP Set Community Name
Type the name of the Set community. The default is supervisor.
SNMP Set Community Permission
Select the Set community permission. The choices are readonly and readwrite. The
default is readwrite.
Virtual Port Information
To open the Virtual Port Information window, select Virtual Port Information from
the Server Setup menu.
Use the Virtual Port Information window to configure an individual WAN port.
Port Name
Displays the name of the port for which the information is displayed. To select
another port, press ENTER. A List of Lines window appears from which you can
select the new port.
Idle Timeout
Type the number of minutes of no activity that is allowed before RASExpress
disconnects the port. A value of 0 disables idle timeout.
Session Timeout
Type the number of minutes allowed per session. When this time is exceeded,
RASExpress automatically disconnects the port. A value of 0 disables session timeout.
CommPlete Communications Server
201
RASExpress User Guide
PPP Detect
Select Enabled to enable automatic PPP connections on the port. Select Disabled to
disable automatic PPP connections. When Disabled is selected, a PPP client is
presented with a menu on connection.
Auto Login Protocol
Select the protocol that is to be used for auto login on the port when PPP Detect is
enabled. The options are None, Telnet, and Rlogin. When None is selected, a menu
appears to the caller after login.
Host IP Address
Type the Telnet or Rlogin host IP address to be used when PPP Detect is enabled. This
field can be edited only if the Auto Login Protocol field is set to Telnet or Rlogin.
Filter Template Name
Type the name of the filter template for the port. For more information about filter
templates, see Appendix D.
Tunnel Protocol
Select PPTP to enable tunneling on the port. Select None to disable tunneling.
Tunnel Server IP Address
Type the IP address of the server used for PPTP tunneling. This field is inactive if
tunneling is disabled.
Connect Type
Select the type of LAN-to-LAN connection. The options are Answering and Dialing.
For a client-to-LAN connection, Answering is the only option.
Dial Type
Select whether the server will make an analog or an ISDN call. For a client-to-LAN
connection, this field is unavailable.
Telephone Number
Type the number the server will dial for a LAN-to-LAN connection. For a client-toLAN connection, this field is unavailable.
Script File Name
Type the name of the login script file, which is processed only on a LAN-to-LAN
dialing port. The script must be compiled by the RASExpress script compiler before it
can be used, and the compiled file must be stored in the directory where RASExpress
is installed (typically C:\RAS550). It is not necessary to type the file name’s .COD
extension. For a client-to-LAN connection, this field is unavailable.
Bundling for LAN to LAN
Select Enabled to bundle the port with a PPP port configured for LAN-to-LAN
operation. Any call on such a reserved port is mapped to the bundled PPP port. You
can do multilink PPP on LAN-to-LAN connections by reserving multiple virtual
ports for a single PPP port.
Bundled Port for LAN to LAN
Select the PPP port to be bundled with the virtual port.
202
CommPlete Communications Server
Physical Port Information
To open the Physical Port Information window, select Physical Port Information
from the Server Setup menu.
Use the Physical Port Information window to configure an individual physical port.
Port Name
Displays the name of the selected port. To select another port, press ENTER. A List of
Lines window appears from which you can select the new port. The port name
consists of a general name (“MODEM”) and a specific name (“2A”), which identifies
the port by card and modem.
Auto Dialout
Select Enabled to enable auto dialout for the port. Select Disabled to disable auto
dialout.
Auto Dialout TCP Port Number
Displays the auto dialout TCP port number. To edit it, click in the box and type a new
TCP port number. This field is unavailable if Auto Dial Out is disabled.
Raw TCP Connection
Select Disabled to disable all Telnet negotiations on the port, so that the connection is
treated as a “raw” TCP data stream.
When a standard Telnet connection is made, certain parameters are negotiated, such
as terminal type and screen size. However, some applications use Telnet for faxing or
credit card validation for which negotiation is neither required nor recommended. It
is for such applications that you should disable this option.
CommPlete Communications Server
203
RASExpress User Guide
SMTP Client
To open the SMPT Client Configuration window, select SMPT Client from the
Server Setup menu. Use this window to configure SMTP (Simple Mail Transfer
Protocol) service on the RASExpress server.
SMTP Client
Select Enabled to enable SMTP service. Select Disabled to disable SMTP service. This
option must be enabled to make the other options in the window accessible.
SMTP Server IP Address
Type the IP address of the SMTP server.
SMTP Sender E-Mail Address
Type the e-mail address of the RASExpress server.
List of Recipients
Select this field and press ENTER to see the list of e-mail recipients. E-mail alert
messages are sent to these recipients if any of the four following options are enabled
and the conditions are met. To add a new recipient, press INSERT and type the
recipient’s e-mail address. Press ENTER to confirm the entry, then press ESC to close
the window. To delete an entry from the list, select the entry and press DELETE.
Send Mail on Message File Full
Select Enabled if you want the RASExpress server to send an e-mail alert to the
addresses in the Recipient list when the message file is full.
Send Mail on Log File Full
Select Enabled if you want the RASExpress server to send an e-mail alert to the
addresses in the Recipient list when the log file is full.
Send Mail on Debug Log Full
Select Enabled if you want the RASExpress server to send an e-mail alert to the
addresses in the List of Recipients when the debug log is full.
Send Mail After Server Upgrade
Select Enabled if you want the RASExpress server to send an e-mail alert to the
addresses in the Recipient list when the server is upgraded.
204
CommPlete Communications Server
Send RAS Alive Mail
Select Enabled if you want the RASExpress server to send an e-mail alert to the
addresses in the List of Recipients list that the RASExpress server is running. The
message is sent once per hour.
Applications
To open the Applications window, select Applications from the Server Setup menu.
Use this window to enable or disable several applications that are installed with
RASExpress Server.
Web Server
Enable this option to allow the RASExpress server to be managed by a Web browser.
FTP Server
Enable this option to allow File Transfer Protocol (FTP) file transfers between the
RASExpress server and the management console. You can use FTP to send the
upgrade files to the RASExpress server (see Appendix B). Unlike TFTP, FTP has
password protection.
TFTP Server
The Trivial File Transfer Protocol (TFTP) is used by host computers to exchange files.
It is used by RASExpress for its remote management programs. Leave this option
enabled if you want RASExpress server to be managed by these programs.
RLOGIN Client
Enable this option to allow the RASExpress server to be used as an RLOGIN client
for connecting to an RLOGIN server.
CommPlete Communications Server
205
RASExpress User Guide
Security
To open the Security window, select Security from the Server Setup menu. Use this
window to configure the RASExpress server to work with your security servers. The
RASExpress server supports the RADIUS (Remote Authentication Dial-In User
Service) and TACACS+ protocols for authentication.
Security Protocol
Use this field to select the security protocol you are using on your network. If you do
not have a security server on your network, select Local. The other two options are
RADIUS and TACACs+.
Accounting
This field enables or disables accounting support in the security server. Enable it if
you want your RADIUS or TACACS+ server to keep track of accounting information
such as number of bytes sent, number of bytes received, log in time, log out time, port
number, etc.
Shared Secret
Type the shared secret used for communication between the RASExpress server and
the security server. It must match the shared secret configured at the security server.
TACACS+ Encryption
Select Enabled to enable encryption of TACACS+ packets between the RASExpress
server and the TACACS+ security server. Enable only if your TACACS+ server
supports encryption.
Primary Server Address
Type the IP address of your primary security server.
Backup Server Address
Type the IP address of your backup security server. You can specify up to three
backup security servers.
Allow Call If Security Server Down
Enable to provide access by any user if the primary and all backup security servers
are down. Disable to prevent any user from logging on if the security servers are all
down.
206
CommPlete Communications Server
Call Back Delay Attribute Value
Enter the value you have chosen for the Callback Delay attribute. You must set up the
same attribute in the dictionary file of your RADIUS server. Make sure that you select
a unique attribute value. The value must not clash with any of the standard RADIUS
attributes or any other custom attributes. Consult your RADIUS server documentation before making any changes.
Remote User Enter Number Attribute Value
Enter the value you have chosen for the Remote User Enter Number attribute. You
must set up the same attribute in the dictionary file of your RADIUS server. Make
sure that you select a unique attribute value. The value must not clash with any of the
standard RADIUS attributes or any other custom attributes. Consult your RADIUS
server documentation before making any changes.
Protocol Permissions Attribute Value
Enter the value you have chosen for the Protocol Permissions attribute. You must set
up the same attribute in the dictionary file of your RADIUS server. Make sure that
you select a unique attribute value. The value must not clash with any of the standard
RADIUS attributes or any other custom attributes. Consult your RADIUS server documentation before making any changes.
Inbound User Service Type Value
Enter the service type value that you have chosen for Inbound User. You must set up
the same service type value in the dictionary file of your RADIUS server. Make sure
that you select a unique service type value. The value must not clash with any of the
standard RADIUS service types or any other custom service types. Consult your
RADIUS server documentation before making any changes.
Shell User Service Type Value
Enter the service type value that you have chosen for Shell User. You must set up the
same service type value in the dictionary file of your RADIUS server. Make sure that
you select a unique service type value. The value must not clash with any of the
standard RADIUS service types or any other custom service types. Consult your
RADIUS server documentation before making any changes.
OSPF Configuration
To open the OSPF Configuration window, select OSPF Configuration from the
Server Setup menu. Use this window to create an OSPF (Open Shortest Path First)
database for the RASExpress server.
Open Shortest Path First (OSPF) is an internal gateway protocol. Designed for IP
networks, OSPF supports variable length subnet masks (VLSM), which allows more
efficient allocation of IP addresses than RIP-1, and tagging of externally derived
routing information. OSPF also allows packet authentication and uses IP multicast
when sending or receiving packets.
CommPlete Communications Server
207
RASExpress User Guide
OSPF Routing
Select Enabled to enable OSPF routing on the server.
Router ID
Type the identifier for the OSPF router. It has the same format as an IP address, but
identifies the router independent of its IP Address.
Area Configuration
Use Area Configuration to review or configure OSPF areas. An OSPF area is made
up of internal routers linked to other areas within an autonomous system (AS) by
area border routers.
To review or configure OSPF areas, press ENTER to open the List of Areas. To edit an
area in the List of Areas, select it and press ENTER. To create a new area, press INSERT.
In both cases the Area Configuration window opens with the following options:
Area ID. The identification number assigned to the area. It has the same format as an
IP address, but has the function of defining a summarization point for Link State
Advertisements. The default value is 0.0.0.0, the same as the backbone.
Stub Area. Determines whether AS external advertisements will be flooded through
the area. Cannot be enabled for backbone areas.
Inject Default Route. Determines whether a default route is summarized into a stub
area if the OSPF router is connected to multiple areas.
Stub Metric. Shows the cost of the default route summarized into a stub area.
List of Address Ranges
The List of Address Ranges specifies the address ranges in an OSPF area. Although
an area can be loosely defined to be a collection of networks, in actuality an area is
specified to be a list of address ranges. Each address range is defined as an address
and mask pair. Many separate networks may be contained in a single address range,
just as a subnetted network is composed of many separate subnets.
To open the List of Address Ranges window, select an area in the List of Areas
window and press F2. To edit an address range, select it and press ENTER. To add a
new address range, press INSERT. In both cases the Address Range Configuration
window opens with the following options.
Address. Type the IP address part of the IP address and IP mask pair. The IP address
and IP network mask pair specify the IP addresses contained in the address range.
For example, the class B address range of X.X.X.X with a network mask of 255.255.0.0
includes all IP addresses from X.X.0.0 to X.X.255.255.
208
CommPlete Communications Server
Mask. Type the IP mask part of the IP address and IP mask pair.
Advertise. Indicates whether the networks contained in the address range will be
advertised or hidden from other areas.
Interface Configuration
Press ENTER to review or configure the OSPF interface.
Port Name. Displays the name of the port for which the information is displayed. To
select another port, press ENTER. A List of Lines window appears from which you
can select the new port.
Interface Enabled. Indicates whether OSPF routing is enabled on this interface. OSPF
can be enabled on LAN and WAN ports of type LAN-toLAN.
Area ID. The area to which this interface belongs.
Metric. Indicates the cost of sending a packet on the interface, expressed in the link
state metric.
Router Dead Interval. The number of seconds to wait before the neighbors should
declare the OSPF router down if they do not receive any hello packets from it.
Transmit Delay. The estimated number of seconds it takes to transmit a Link State
Update packet over this interface.
Priority. Indicates the priority for the OSPF router to become the Designated Router
on the connected interface.
Hello Interval. The number of seconds between the hello packets sent on the
interface by the OSPF router.
Retransmit Interval. The number of seconds between link state advertisement
transmissions.
Authentication Type. The authentication scheme used on the attached network. The
choices are Simple and None.
Plain Text Password. The simple password to be used for the attached network.
CommPlete Communications Server
209
RASExpress User Guide
User Setup
Select User Setup from the Main Menu to manage user profiles. A List of Users
window appears from which you can select individual user profiles for editing,
providing you have added users to the list. To edit a user profile, select a user name
and perform one of the following actions.
Note: Because of the 640K memory limitation in DOS, the User Setup menu cannot
be accessed while the network files are running. To unload the network files, from
the C:\ prompt, type mtslsl -u <CR>. Alternately, reboot the server. When the
message Starting MS-DOS appears, press F5 to bypass AUTOEXEC.BAT. Then
change to the RASExpress directory and type rascon <CR> to start RASCON.
• To remove a selected user name from the List Of Users window, press DELETE.
• To add a user name, press INSERT. The User Information window appears.
• To edit a user name, press ENTER. The User Information window appears.
• To edit user permissions, press F2. The Access List menu appears.
• To import user names from the network, press F3. The List of Servers appears.
User Information
The User Information window displays basic information about the user.
User Name
This field shows the name a remote user uses to log in to the RASExpress server. The
user name may not duplicate any other user name. To change the name, select User
Name and type a different name.
Password
This field shows the password the user uses to log into the RASExpress server. The
password is case-sensitive. It should be unique and easy for the user to remember. To
change the password, select Password, type a different password, and press ENTER.
You must then reenter the password correctly before it is accepted.
210
CommPlete Communications Server
Remote User Enter Number
Select On to indicate that the user is mobile. When the user calls into the RASExpress
server, RASExpress prompts the user to type the user’s local telephone number. The
server then disconnects and calls back the user at that number after the delay
specified in the Call Back Delay field.
If the Remote User Enter Number field is set to Off, you can enter a fixed callback
number in the Callback Number field. If the Remote User Enter Number is set to
On, then the Call Back Number field is unavailable because the remote number is
variable.
Call Back Number
To enable callback security, type the user’s callback security phone number in this
field. When the user calls in with a valid user name and password, the RASExpress
server hangs up. Then, after the delay specified in the Call Back Delay field, the
RASExpress server calls back the user at the callback number. This field is valid only
if the Remote User Enter Number field is disabled by selecting Off.
Call Back Delay
This field sets the time in seconds that must elapse before the RASExpress server calls
back the remote user. This field is active only if the Remote User Enter Number field
is set to On, or if a phone number has been entered in the Call Back Number field.
To change the time, select Call Back Delay and type a different time.
Static IP Address
The user’s static IP address. A value of 000.000.000.000 indicates no static address.
Number of Concurrent Logins
The number of concurrent logins the user is permitted. A value of 0 indicates that
there is no limit on the number of concurrent logins.
Note: For multilink connections, the number of concurrent logins permitted should
be at least the number of links in the multilink bundle.
Press ESC when finished.
CommPlete Communications Server
211
RASExpress User Guide
Access List
To edit user permissions, select the user name and press F2. The Access List appears.
Mode Permissions
Select Mode Permissions from the Access List. The Modes Permitted window
appears.
The Modes Permitted window lists the types of connections the user is permitted to
use. The options are Dial Out, Dial In Remote Node, Dial in Remote Control,
Telnet, and Rlogin. If there are no modes listed in the Modes Permitted list, or if you
want to add a mode that is not listed, press INSERT. The Add Permission window
appears with any options that are not already on the Modes Permitted list. Select any
mode in the list and press ENTER to add it to the Modes Permitted list. Press ESC to
close the Add Permission list. To delete a line from the Modes Permitted list, select
the line and press DELETE; the line will be deleted with no additional prompting.
Press ESC to quit the Modes Permitted list.
Line Permissions
Select Line Permissions from the Access List to open the Lines Permitted window.
The Lines Permitted window lists the WAN ports the user is permitted to use. Press
INSERT to add a port to the list. The Add Permission window appears. Select any port
listed in the window and press ENTER to add it to the Lines Permitted list. If there are
no more ports to add to the list, then the message All lines already allowed
appears at the bottom of your screen. To delete a selected port from the Lines
212
CommPlete Communications Server
Permitted list, press DELETE; the port will be deleted with no additional prompting.
Press ESC to quit the Lines Permitted list.
Protocol Permissions
Select Protocol Permissions from the Access List. The Protocols Permitted window
appears.
The Protocols Permitted window lists the network protocols the user is permitted to
use If you would like to add to the list of protocols, press INSERT. The Add Permission window appears. Select any protocol listed in the window and press ENTER to
add it to the Protocols Permitted list. If there are no more protocols to add to the list,
then the message All protocols already allowed appears at the bottom of
your screen. To delete a protocol from the Protocols Permitted list, select it and press
DELETE; the protocol will be deleted with no additional prompting. Press ESC to quit
the Protocols Permitted list.
Time of Day Logins
Select Time of Day Logins from the Access List. The Time of Day Logins Setup
Window appears.
The Time of Day Logins Setup Window shows the times that the user is allowed to
dial in or dial out. RASExpress divides the week into half-hour blocks, starting at
midnight. A block indicates that the user is allowed to call during that half hour. A
line indicates that the user is not allowed to call during that half hour. To change the
permission of a time block, select it with the arrow keys and press the space bar. To
save your changes, press ENTER. By default, the user is allowed to call at any time.
CommPlete Communications Server
213
RASExpress User Guide
Connection Time Limit
Select Connection Time Limits from the Access List. The Connection Time Limit
window appears.
Use the Connection Time Limit window to limit how long the user can remain connected. A value of zero (the default) indicates no time limit. If the user exceeds the
time limit shown in this window, the RASExpress server automatically disconnects the
user. To save your changes, press ENTER.
Terminal Login
Select Terminal Login from the Access List. The Auto Login Setup window appears.
Select Auto Login Protocol to choose which protocol will be used to automatically
log in to a host computer. You can choose Telnet, Rlogin, or None. None disables
auto login altogether. In Host IP Address, type the IP address of the host computer
you want the user to automatically log in to.
Tunneling
Select Tunneling from the Access List. The Tunneling window appears.
Select Tunnel Protocol to choose a tunneling protocol for the user. You can choose
PPTP (Point to Point Tunneling Protocol) or None, which disables tunneling
altogether. In Tunnel Server IP Address, type the IP address of the tunnel server
(this field is inactive if tunneling is disabled).
Communication Setup
Select Communication Setup from the Main Menu.
Caution: This section is included for completeness only. Do not change the communication defaults that were set when RASExpress was installed on your RASCard.
From the Communication Types menu, select the type of communications card you
want to configure: Intelligent Serial Interface (ISI) (analog modem) or ISDN
Primary Rate Interface.
214
CommPlete Communications Server
Intelligent Serial Interface (ISI)
When you select Intelligent Serial Interface (ISI) from the Communication Types
menu, the ISI Card Setup window appears. This window shows the base address,
IRQ level, and number of ports for each installed ISI card. To edit a card setup, select
the card and press ENTER.
The Board Information window appears. This window shows the base address, IRQ
number, and number of ports for the selected modem card. To change one of these
options, select the field and type a new value.
Note: Setting the wrong base address and IRQ value can lead to unpredictable results.
Base Address
This is the base I/O address for the modem card in hexadecimal format. It provides
the RASExpress server with information about card activity, and allows the card to
use one interrupt for all ports on the card. Up to three modem cards can be used in a
RASExpress server. Each card must have a unique base I/O address number.
IRQ Number
This is the IRQ number for the modem card. The IRQ number used for each modem
card must be unique to the card. The IRQ requests the attention of RASExpress and
the computer’s microprocessor.
Number of Ports
This is the number of ports on the modem card.
Press ESC to return to the ISI Card Setup window. To add a new card to this window, press INSERT and enter the base address, IRQ number, and number of ports in
the Board Information window.
To remove a modem card from the ISI Card Setup window, select the card and press
DELETE.
Line Information
To edit line information for an ISI card, select the card in the ISI Card Setup window
and press F2. The List of Lines window that appears lists the physical ports, or lines,
served by the RASExpress server. Select any line in the list and press F2 to test it, or
ENTER to configure it. The Line Information window that appears lists the parameters
that can be configured for the selected port. To edit a parameter, use the up and
down arrow keys to select the parameter, then press ENTER and type the new value.
CommPlete Communications Server
215
RASExpress User Guide
Line Status
This field shows whether the port is enabled or disabled.
General Name
This field describes the general name for the port. The general name is used by the
workstation MCSI software to take the line.
Specific Name
This field shows the specific name for the port. The specific name is used by the
workstation MCSI software to take the line.
Modem Name
This field shows the model name of the modem that is connected to the port. To
change the modem name, select Modem Name and press ENTER. When the List of
Modems window appears, select the new modem name and press ENTER.
Connection Started By
This field selects how the RASExpress server detects a dial-in connection. When the
Modem Response option is selected, the server starts a dial-in connection when the
modem responds with a CONNECT string. When the Data Carrier Detect option is
selected, the server starts a dial-in connection when the DCD signal goes high.
Baud Rate
This field selects the baud rate used by the port. You can select a rate up to 460800
bps.
Data Bits
This field selects the number of data bits used by the port.
Stop Bits
This field selects the number of stop bits used by the port.
Parity
This field selects the type of parity used by the port.
RTS/CTS Flow Control
This field allows you to enable RTS/CTS flow control on the port. The options are
Enabled and Disabled.
216
CommPlete Communications Server
ISDN Primary Rate Interface
When you select ISDN Primary Rate Interface from the Communication Types
menu, the ISDN Primary Rate Interface window appears.
Use the ISDN Primary Rate Interface window to modify settings for the RASExpress
server’s ISDN PRI communication card. To change a setting, select the field and type
a new value.
ISDN Primary Rate Interface
Use this field to enable or disable ISDN PRI support by the RASExpress server.
Enable it only if an ISDN PRI card is installed in the server
I/O Address
This is the base I/O address for the PRI card, in hexadecimal format. It provides the
RASExpress server with information about card activity, and allows the card to use
one interrupt for all 23 ports on the card. Only one PRI card can be used in a RASExpress server. The I/O address must be unique. The default value is 2F0.
IRQ Number
This is the interrupt number for the PRI card. The IRQ number must be unique to the
card. The IRQ requests the attention of RASExpress and the server’s microprocessor.
The default value is 7.
Memory Address
The PRI card shares memory with the RASExpress server for internal communication.
Type the shared memory address in hexadecimal format in this field. The default
value is D000.
Number of Ports
Select the number of ports available to the ISDN PRI card. In North America, 23 data
channels are standard; in Europe 30 data channels are standard.
Modem Setup
Note: Because of the 640K memory limitation in DOS, the Modem Setup menu
cannot be accessed while the network files are running. To unload the network files,
from the C:\ prompt, type mtslsl -u <CR>. Alternately, reboot the server. When the
message Starting MS-DOS appears, press F5 to bypass AUTOEXEC.BAT. Then
change to the RASExpress directory and type rascon <CR> to start RASCON.
Select Modem Setup from the Main Menu. The List of Modems window appears. If
your modem type is not listed, press INSERT and, when the Modem Information
window appears, type in your modem’s name.
CommPlete Communications Server
217
RASExpress User Guide
Select the modem that you want to configure and press ENTER. The Modem
Information window appears with the following options.
Caution: This section is included only for completeness. Do not change the modem
defaults that were set when RASExpress was installed on your RASCard.
Modem Name
This field shows the model name of the modem. Enter a new modem name only if it
is not listed in the List of Modems window.
Initializing String 1–5
These fields display the initialization string or strings used to configure the modem
when power is applied or the modem is reset.
Caution: Changing preconfigured modem strings is not recommended. If you want
to use a custom initialization string, create and name a new modem configuration.
Then copy information from one of the listed modems and modify the string as
required.
Dial Prefix
This field displays the dial prefix, which is automatically sent to the modem before
the phone number. The default prefix is the tone dialing command ATDT.
Dial Suffix
This field displays the dial suffix, which is automatically sent to the modem after the
phone number. This field is normally empty.
Hangup String
This field displays the string used to end a call.
NO CARRIER string, NO DIALTONE string, NO ANSWER string, Connect
Response string, OK string, ERROR string, RING string, BUSY string
These fields display the modem’s result codes, which are used by RASExpress to
monitor calls. They should be spelled exactly the same as the modem sends them. By
default, these fields are set for verbose responses. If your modem is set for terse
responses, refer to the modem’s owner’s manual for information about the responses.
218
CommPlete Communications Server
RASExpress Server
To start RASExpress Server, change to the directory in which you installed RASExpress, the default being C:\RAS550. Then type RASEXP. The RASExpress Server
main window that appears is your control center for the RASExpress server.
Line Name
This column shows the names of the lines.
Type
This column shows each line’s type, which can be RN, for idle; IN, for inbound; or
OUT, for outbound.
Status
This column shows the status of each line, which can be WAITING FOR CALL, ON
LINE, WAITING TO CALL, CALLING BACK, OUT OF SERVICE,
INITIALIZING, or TELNET ON LINE.
User Name
This column shows who is currently using the RASExpress server.
Connect Time
This column shows the time at which the line connected.
Last Messages
This box displays the most recent error messages and messages related to general
usage.
CommPlete Communications Server
219
RASExpress User Guide
Function Keys
There are two function keys that the system administrator can use while the
RASExpress server is running:
F1—Display online help.
F2—Display the Options menu.
Options Menu
You must enter a password to access the Options menu, if you selected one during
installation. However, the default is that no password is required. The following
topics describe submenus that can be selected from the Options menu.
Server Information
Supervisor Password
This field is disabled. To change the supervisor password, use General Setup in the
RASExpress Server Configuration Utility (RASCON.EXE). See page 188.
Log Status
Use this field to turn the call log on or off. The default is OFF. When ON is selected,
RASExpress logs all calls for one hour in the file yyyymmdd.LOG, where yyyymmdd is
the year, month, and day the log was created. The 24 saved logs for each date are
given the extensions .L00–.L23. This is the only field that can be changed in this menu.
Write Error Messages to File
When this field shows ON, RASExpress saves all messages it receives into a message
file. The default is OFF.
220
CommPlete Communications Server
Message File
This field shows the name and path of the message file. The default file name is
SERVER.MSG.
Screen Saver
This field shows the status of the RASExpress screen saver.
Connection Manager Menu
When this field is ON, the Connection Manager menu is displayed to a user calling
into the RASExpress server for remote control operations. When it is OFF, the Host
List is displayed to the user.
Command to MultiModemManager
This command does not apply to CommPlete Communications Servers.
User Information
Select a user name in the List of Users menu to make the User Information window
appear. To add a user to the list, press INSERT. To delete a user, select it and press
DELETE. By default the List of Users is empty.
User Information Window
User Name
This field shows the name that the user will use to log into the RASExpress Server.
The user name must be unique.
Password
This field shows the password the user will use to log into the RASExpress server.
The password is case-sensitive. It should be unique, and easy for the use to remember. To enter a new password, type the new password and press ENTER, then type it
again to verify it.
CommPlete Communications Server
221
RASExpress User Guide
Remote User Enter Number
Select On to indicate that the user is mobile. When the user calls into the RASExpress
server, RASExpress prompts the user to type the user’s local telephone number. The
RASExpress server then calls back the user within the time specified in the Call Back
Delay field.
Call Back Number
To enable callback security, type the user’s callback security phone number in this
field. When a user calls in with a valid user name and password, the RASExpress
server hangs up. Then, after the delay specified in the Call Back Delay field, the
RASExpress server calls back the user at the callback number. This field is valid only
if the Remote User Enter Number field is disabled by selecting Off.
Call Back Delay
This field determines the length of time the RASExpress Server waits before calling
back a user. The value entered in this field is only valid if a phone number has been
entered in the previous field.
Static IP Address
The user’s static IP address. A value of 000.000.000.000 indicates no static address.
Number of Concurrent Logins
The number of concurrent logins the user is permitted. A value of 0 indicates that
there is no limit on the number of concurrent logins.
Note: For multilink connections, the number of concurrent logins permitted should
be at least the number of links in the multilink bundle.
Access List
To edit user permissions, select the user name and press F2. The Access List appears.
Mode Permissions
Select Mode Permissions from the Access List. The Modes Permitted window
appears.
222
CommPlete Communications Server
The Modes Permitted window lists the types of connections the user is permitted to
use. The options are Dial Out, Dial In Remote Node, Dial in Remote Control,
Telnet, and Rlogin. If there are less than five modes listed in the Modes Permitted
list, you can add a missing mode by pressing INSERT. The Add Permission window
appears with a list of any options that are not already on the Modes Permitted list.
Select any mode in the list and press ENTER to add it to the Modes Permitted list.
Press ESC to close the Add Permission list. To delete a line from the Modes Permitted
list, select the line and press DELETE; the line will be deleted with no additional
prompting. Press ESC to quit the Modes Permitted list.
Line Permissions
Select Line Permissions from the Access List. The Lines Permitted window appears.
The Lines Permitted window lists the WAN ports the user is permitted to use. Press
INSERT to add to the list of lines. The Add Permission window appears. Select any
line listed in the window and press ENTER to add it to the Lines Permitted list. If
there are no more lines to add to the list, then the message All lines already
allowed appears at the bottom of your screen. To delete a selected line from the
Lines Permitted list, press DELETE; the line will be deleted with no additional
prompting. Press ESC to quit the Lines Permitted list.
Protocol Permissions
Select Protocol Permissions from the Access List. The Protocols Permitted window
appears.
The Protocols Permitted window lists the network protocols the user is permitted to
use. If you would like to add to the list of protocols, press INSERT. The Add Permission window appears. Select any protocol listed in the window and press ENTER to
add it to the Protocols Permitted list. If there are no more protocols to add to the list,
then the message All protocols already allowed appears at the bottom of
your screen. To delete a protocol from the Protocols Permitted list, select it and press
DELETE; the protocol will be deleted with no additional prompting. Press ESC to quit
the Protocols Permitted list.
CommPlete Communications Server
223
RASExpress User Guide
Time of Day Logins
Select Time of Day Logins from the Access List. The Time of Day Logins Setup
Window appears.
The Time of Day Logins Setup Window shows the times that the user is allowed to
dial in or dial out. RASExpress divides the week into half-hour blocks. A rectangle
indicates that the user is allowed to call during that half hour. A line indicates that the
user is not allowed to call during that half hour. To change the permission of a time
block, select it with the arrow keys and press the space bar. To save your changes,
press ENTER. By default, the user is allowed to call at any time.
Connection Time Limit
Select Connection Time Limits from the Access List. The Connection Time Limit
window appears.
Use the Connection Time Limit window to limit how long the user can remain connected. A value of zero indicates no time restriction. If the user exceeds the time limit
shown in this window, the RASExpress server automatically disconnects the user. To
save your changes, press ENTER. By default, the user has no time limit.
Terminal Login
Select Terminal Login from the Access List. The Auto Login Setup window appears.
Select Auto Login Protocol to choose which protocol will be used to automatically
log in to a host computer. You can choose Telnet, Rlogin, or None. None disables
auto login altogether. In Host Name, type the IP address of the host computer you
want the user to automatically log in to.
224
CommPlete Communications Server
Tunneling
Select Tunneling from the Access List. The Tunneling Setup window appears.
Select Tunnel Protocol to choose a tunneling protocol for the user. You can choose
PPTP (Point to Point Tunneling Protocol) or None, which disables tunneling
altogether. In Host Name, type the IP address of the tunnel server (this field is
inactive if tunneling is disabled).
Serial Line Control
Disconnect Line
Select this option to disconnect a line on the RASExpress server. When the Line Control menu disappears, select the line that you would like to disconnect by using the
up and down arrow keys or the PAGE UP and PAGE DOWN keys, then press ENTER to
disconnect it. Return to the Line Control menu by pressing ESC. If no line is connected, the Line Control menu remains on the screen.
Reset Line
Select this option to reset a line on the RASExpress server. When the Line Control
menu disappears, select the line that you would like to reset by using the up and
down arrow keys or the PAGE UP and PAGE DOWN keys, then press ENTER. Return to
the Line Control menu by pressing ESC.
Put Line Out of Service
Select this option to take a line on the RASExpress server out of service. When the
Line Control menu disappears, select the line that you would like to take out of
service by using the up and down arrow keys or the PAGE UP and PAGE DOWN keys,
then press ENTER. Return to the Line Control menu by pressing ESC.
Enable Line
Select this option to put a line back into service that has been taken out of service.
When the Line Control menu disappears, select the line that you would like to enable
by using the up and down arrow keys or the PAGE UP and PAGE DOWN keys, then
press ENTER. Return to the Line Control menu by pressing ESC.
Press ESC to return to the Options menu.
CommPlete Communications Server
225
RASExpress User Guide
Shutdown Server
To shut down the RASExpress server, select Shutdown Server and answer Yes to the
confirmation question.
Display Statistics
To view the RASExpress server’s statistics, select Display Statistics from the Options
menu. From the Statistics menu, select General Statistics, Router Statistics, or PPP
Statistics.
General Statistics
The General Statistics screen displays current statistics for each active line. The Port
Throughput columns display throughput activity (in bytes per second in near realtime) when sending and receiving data to and from the port. The Pending Bytes
columns display the number of bytes that are waiting to be processed. The Total
Bytes columns display the total number of bytes that have been sent to and received
from the port during the current connection. When the line is waiting for a call or is
idle, all values in these columns are zero. Press ESC to return to the Statistics menu.
226
CommPlete Communications Server
Router Statistics
The Router Statistics screen displays the number of IPX and IP packets sent or received for each active WAN port. Information is displayed only for remote node
lines. For remote control connections, all values are zero. Press ESC to return to the
Statistics menu.
PPP Statistics
The PPP Statistics screen displays the number of Link Control Protocol (LCP) and
Network Control Protocol (NCP) bytes sent or received for each active WAN port.
LCP packets are usually exchanged only during the establishment of the PPP connection. The NCP statistics include both IPX and IP packets. Information is displayed
only for remote node lines. For remote control connections, all values are zero. Press
ESC to return to the Statistics menu.
Press ESC to return to the Options menu.
CommPlete Communications Server
227
RASExpress User Guide
Display EIA Signals
The EIA Signals screen displays the current status of the EIA RS-232 signals on each
line. DTR and RTS are sent by the port. CTS, DSR, DCD, and RI are received by the
port. The DSR signal is not used by the RASExpress server. The status for each signal
can be either ON or OFF. Press ESC to return to the Options menu.
Display Port Addresses
The Port Addresses screen displays the IPX and IP addresses for each of the RASExpress server’s ports. The IPX Network Address is that of the remote node client connecting to the port. The IP Local Address is the IP address for the server side of the
connection. The IP Remote Address is the IP address of the client. Note that these parameters are displayed only for remote node (PPP) connections. Press ESC to return to
the Options menu.
Inbound User List
Select Inbound User List to display a list of users waiting for a remote control session. Press ESC to return to the Options menu.
If there are users waiting for a dial-in remote control session on the RASExpress
server, then a list appears telling you who and how many users are waiting. If no
users are waiting, a message appears that says so.
This option applies only to remote control. The listed users are the logon names of
users waiting to be taken over. These names would also be displayed in the Host List
if you dialed in for a remote control session.
228
CommPlete Communications Server
Reset SBC Processors
This option does not apply to a CommPlete Communications Server.
CommPlete Communications Server
229
RASExpress User Guide
RASExpress Server Color Utility
To run the RASExpress Color Utility, change to the RAS550 directory (e.g.,
C:\RAS550) on the RASExpress server, and type SETCOLOR.
General Setup
This option creates settings that apply to all RASExpress windows. When you select
General Setup, the following window appears, which displays the current settings.
Shade Windows
Determines whether the windows have a shadow.
Beep on Entering/Exiting Windows
Determines whether there should be a beep when a window is opened or closed.
Color for Active Window Border
Sets the color for the border of the active window.
Press ESC to return to the Main Menu.
230
CommPlete Communications Server
Menu Color Setup
The Menu Color setup window configures the colors for RASExpress Server menus.
Color for Window Border
Sets the border color of the menus in RASExpress.
Color for Window Background
Sets the background color of the menus in RASExpress.
Color for Fields in Menu
Sets the color of the fields in menus in RASExpress.
Color for Menu Bar
Sets the color of the menu bars in RASExpress.
Press ESC to return to the Main Menu.
CommPlete Communications Server
231
RASExpress User Guide
Form Color Setup
The Form Color setup window configures the colors for RASExpress forms.
Color for Window Border
Sets the border color of the forms in RASExpress.
Color for Window Background
Sets the background color of the forms in RASExpress.
Color for Labels in Form
Sets the color of the labels in forms in RASExpress.
Color for Bar Cursor
Sets the color of the bar cursors in forms in RASExpress.
Color for Fields in Form
Sets the color of the fields in forms in RASExpress.
Press ESC to return to the Main Menu.
232
CommPlete Communications Server
Directory Color Setup
The Directory Color setup window configures the colors for RASExpress directories.
Color for Window Border
Sets the border color of the directories in RASExpress.
Color for Window Background
Sets the background color of the directories in RASExpress.
Color for Fields in Directory
Sets the color of the fields in the directories in RASExpress.
Color for Bar Cursor
Sets the color of the bar cursors in directories in RASExpress.
Color for Headers in Directory
Sets the color of the headers in directories in RASExpress.
Press ESC to return to the Main Menu.
Press ESC to leave the Color Utility program. A window appears that asks if you want
to save changes to disk. Select No or Yes and press ENTER, or press Y or N.
CommPlete Communications Server
233
RASExpress User Guide
Appendix B Upgrading RASExpress
Introduction
As part of its continuing effort to improve its products and provide added value to its
customers, Multi-Tech Systems from time to time releases upgraded versions of
RASExpress. Because these upgrades can be installed through the Internet, you can
upgrade all your RASExpress servers, wherever they might be, from a single
workstation.
RASExpress upgrades can be downloaded from the Multi-Tech Web site at
http://www.multitech.com/Support/Networking.asp or the Multi-Tech BBS at
612-785-3702 (before 1 March 2000), 763-785-3702 (after 1 March 2000), or 800-3922432. Please check with Technical Support at 800-972-2439 for the upgrade file name
and passwords.
Before You Start
The entire installation can be accomplished from a workstation or personal computer
with access to the Internet. Typically, it would be the workstation on which
MultiCommManager is installed. Before you start, please make sure you have the
following:
• An FTP (File Transfer Protocol) or TFTP (Trivial File Transfer Protocol) file transfer
program. This must be supplied by you.
• FTP Server or TFTP Server in the Applications menu, as appropriate, is enabled
on all servers that are to be updated.
How to Upgrade RASExpress
1. Download the RASExpress upgrade .EXE file from the Multi-Tech Web site or
BBS. The file name includes the version number, e.g., RASU540.EXE.
2. Copy the upgrade file to the directory where the FTP or TFTP file transfer
program is installed.
3. Change the name of the upgrade file to UPGRADE.EXE.
4. If necessary, ping the RASExpress server that is to be upgraded to make sure you
have a good connection.
5. Using FTP or TFTP, transfer the compressed file to the server. In the following
example, the TFTP syntax is tftp -b SourceFileName ServerIPAddress=
DestinationFileName. The source file name is the name of the upgrade file. The
destination file name is upgrade.exe. Example: tftp -b upgrade.exe
200.2.9.1=upgrade.exe.
234
CommPlete Communications Server
B
Upgrading RASExpress
If you use TFTP, the compressed file is automatically placed in the RASExpress
directory on the server. If you use an FTP program, you must specify the current
RASExpress directory (e.g., C:\RAS550).
6. When the transfer is complete, use Telnet to access the server(see Chapter 3). The
Telnet main menu now includes a fourth option:
Services provided by the telnet server
[ 1] Dial out
[ 2] Management of RASExpress server
[ 3] Configuration of RASExpress server
[ 4] Upgrade Server
[Esc] Close the telnet session
Enter your choice[1 to 4] :
7. Type 4 and press ENTER to select the fourth option, Upgrade Server. The
following messages appear:
Enter your choice[1 to 4] : 4
[ESC] to go to previous menu
Enter your upgrade key :
8. Type anything you like for the key, and then press ENTER. The connection is
broken, and RASExpress is automatically upgraded.
When RASExpress is upgraded, the file UPGRADE.LOG is created on the server
in the RASExpress directory. This file contains details of the upgrade that can be
reviewed using any ASCII text viewer, such as Notepad.
9. The upgrade is complete. To upgrade another RASExpress server, repeat steps 4–9.
Initiating the New Port Names
A feature new in RASExpress 5.30 is that RASExpress identifies ports the same way
as MultiCommManager. Ports are now named 2A, 2B, 2C, etc., instead of B1_LINE1,
B1_LINE2, B1_LINE3, etc.
If you upgrade to RASExpress 5.50 from version 5.29 or earlier, the old names are
retained. To use the new names, you must delete the ISI cards from ISI Setup and
reboot the server. When the server reboots, it automatically detects the ISI cards,
reinstalls them, and uses the new names.
CommPlete Communications Server
235
RASExpress User Guide
Appendix C Telnet Commands
Introduction
You can select the Telnet interface for the RASExpress server to be either menu mode
or command mode. This appendix documents the syntax for configuration commands
used in Telnet command mode.
Telnet Configuration Commands
General Commands
ServerName
SET ServerName string
GET ServerName
The Set command requires a server reboot.
Password
SET Password
GET Password
LogStatus
SET LogStatus {ENABLED|DISABLED}
GETLogStatus
LogNumberOfDays
SET LogNumberOfDays integer
GET LogNumberOfDays
LogStartTime
SET LogStartTime time
GET LogStartTime
LogStartDate
SET LogStartDate date
GET LogStartDate
MsgStatus
SET MsgStatus {ENABLED|DISABLED}
GET MsgStatus
ScreenSaver
SET ScreenSaver {ENABLED|DISABLED}
GET ScreenSaver
236
CommPlete Communications Server
C Telnet Commands
CntMgrMenu
SET CntMgrMenu {ENABLED|DISABLED}
GET CntMgrMenu
ComMdmMgr
SET ComMdmMgr {ENABLED|DISABLED}
GET ComMdmMgr
MsgFilename
SET MsgFilename filename
GET MsgFilename
MsgFileSize
SET MsgFileSize filesize
GET MsgFileSize
ServerTime
SET ServerTime time
GET ServerTime
ConnectionLog
SET ConnectionLog {ENABLED|DISABLED}
GET ConnectionLog
Application Commands
All SET commands require a server reboot.
Application WEB
SET Application WEB {ENABLED|DISABLED}
GET Application WEB
Application FTP
SET Application FTP {ENABLED|DISABLED}
GET Application FTP
Application TFTP
SET Application TFTP {ENABLED|DISABLED}
GET Application TFTP
Application RLOGIN
SET Application RLOGIN {ENABLED|DISABLED}
GET Application RLOGIN
CommPlete Communications Server
237
RASExpress User Guide
IP Commands
All SET commands require a server reboot.
IP RemoteAccess
SET IP RemoteAccess {ENABLED|DISABLED}
GET IP RemoteAccess
IP Address
SET IP Address ipaddress
GET IP Address
IP SubnetMask
SET IP SubnetMask ipaddress
GET IP SubnetMask
IP RIP
SET IP RIP {ENABLED|DISABLED}
GET IP RIP
IP AutoLearnDefaultGateway
SET IP AutoLearnDefaultGateway {ENABLED|DISABLED}
GET IP AutoLearnDefaultGateway
IP DefaultRoute
SET IP DefaultRoute ipaddress
GET IP DefaultRoute
IP PrimaryDNS
SET IP PrimaryDNS ipaddress
GET IP PrimaryDNS
IP SecondaryDNS
SET IP SecondaryDNS ipaddress
GET IP SecondaryDNS
IP FrameType
SET IP FrameType {TYPE_II|SNAP}
GET IP FrameType
IP RemoteClientAddress
SET IP RemoteClientAddress {DHCP|AddressPool|ConfigurePerPort|Radius}
GET IP RemoteClientAddress
IP IncludeAddressPool
SET IP IncludeAddressPool ipaddress - ipaddress
GET IP IncludeAddressPool
IP ExcludeAddressPool
SET IP ExcludeAddressPool {1|2} ipaddress - ipaddress
GET IP ExcludeAddressPool {1|2}
238
CommPlete Communications Server
C Telnet Commands
IP DNSCachingServer
SET IP DNSCachingServer {ENABLED|DISABLED}
GET IP DNSCachingServer
IP StaticRoute Gateway
SET IP StaticRoute address mask Gateway ipaddress
GET IP StaticRoute address mask Gateway
IP StaticRoute Metric
SET IP StaticRoute address mask Metric integer
GET IP StaticRoute address mask Metric
IP StaticRoute
SET IP StaticRoute address mask gateway metric
GET IP StaticRoute address mask
IPX Commands
All SET commands require a server reboot.
IPX Remoteaccess
SET IPX Remoteaccess {ENABLED|DISABLED}
GET IPX Remoteaccess
IPX LearnNetworkNumbers
SET IPX LearnNetworkNumbers {ENABLED|DISABLED}
GET IPX LearnNetworkNumbers
IPX RouteNetbiosOverIPX
SET IPX RouteNetbiosOverIPX {ENABLED|DISABLED}
GET IPX RouteNetbiosOverIPX
IPX InternalNetworkNumber
SET IPX InternalNetworkNumber {hexdigit}
GET IPX InternalNetworkNumber
8
IPX NetworkNumber
SET IPX NetworkNumber frametype {hexdigit}
GET IPX NetworkNumber frametype
8
IPX Routing
SET IPX Routing frametype {ENABLED|DISABLED}
GET IPX Routing frametype
Multilink PPP Commands
The SET commands all require a server reboot.
MLPPP MultiLink
SET MLPPP MultiLink {ENABLED|DISABLED}
GET MLPPP MultiLink
CommPlete Communications Server
239
RASExpress User Guide
MLPPP GroupEPD
SET MLPPP GroupEPD integer
GET MLPPP GroupEPD
MLPPP BundleServerIPAddress
SET MLPPP BundleServerIPAddress ipaddress
GET MLPPP BundleServerIPAddress
MLPPP BundleServerUDPPort
SET MLPPP BundleServerUDPPort integer
GET MLPPP BundleServerUDPPort
MAC Layer Commands
The SET commands all require a server reboot.
MACLayer Bridging
SET MACLayer Bridging {ENABLED|DISABLED}
GET MACLayer Bridging
MACLayer SpanningTree
SET MACLayer SpanningTree {ENABLED|DISABLED}
GET MACLayer SpanningTree
Telnet Commands
Telnet Administrator
SET Telnet Administrator {ENABLED|DISABLED}
GET Telnet Administrator
Telnet Client
SET Telnet Client {ENABLED|DISABLED}
GET Telnet Client
Telnet DialOut
SET Telnet DialOut {ENABLED|DISABLED}
GET Telnet DialOut
Telnet AutoDialOut
SET Telnet AutoDialOut {ENABLED|DISABLED}
GET Telnet AutoDialOut
Telnet AutoDialOutPortNumber
SET Telnet AutoDialOutPortNumber integer
GET Telnet AutoDialOutPortNumber
The SET command requires a server reboot.
Telnet CommandLineTCPPortNumber
SET TELNET CommandLineTCPPortNumber integer
GET TELNET CommandLineTCPPortNumber
The SET command requires a server reboot.
240
CommPlete Communications Server
C Telnet Commands
Telnet DiagnosticTCPPortNumber
SET TELNET DiagnosticTCPPortNumber integer
GET TELNET DiagnosticTCPPortNumber
The SET command requires a server reboot.
Telnet Interfacetype
SET Telnet Interfacetype {MENU|COMMAND}
GET Telnet Interfacetype
SNTP Commands
SNTP Client
SET SNTP Client {ENABLED|DISABLED}
GET SNTP Client
The SET command requires a server reboot.
SNTP ServerAddress
SET SNTP ServerAddress ipaddress
GET SNTP ServerAddress
SNTP TimeZone
SET SNTP TimeZone string
GET SNTP TimeZone
SNTP UTCoffset
SET SNTP UTCoffset [+|-]hour:minute
GET SNTP UTCoffset
SNTP DaylightSavings
SET SNTP DaylightSavings {ENABLED|DISABLED}
GET SNTP DaylightSavings
SNTP DaylightOffset
SET SNTP DaylightOffset integer
GET SNTP DaylightOffset
SNTP Ordinal
SET SNTP {Start|End} Ordinal ordinal
GET SNTP {Start|End} Ordinal
SNTP WeekDay
SET SNTP {Start|End} WeekDay dayofweek
GET SNTP {Start|End} WeekDay
SNTP Month
SET SNTP {Start|End} Month monthofyear
GET SNTP {Start|End} Month
SNTP Time
SET SNTP {Start|End} Time time
GET SNTP {Start|End} Time
CommPlete Communications Server
241
RASExpress User Guide
SNMP Commands
SNMP Agent
SET SNMP Agent {ENABLED|DISABLED}
GET SNMP Agent
The SET command requires a server reboot.
SNMP TrapMgrCommunityName
SET SNMP TrapMgrCommunityName string
GET SNMP TrapMgrCommunityName
SNMP TrapMgrIPAddress
SET SNMP TrapMgrIPAddress ipaddress
GET SNMP TrapMgrIPAddress
SNMP TrapMgrPortNumber
SET SNMP TrapMgrPortNumber integer
GET SNMP TrapMgrPortNumber
SNMP CommunityName
SET SNMP CommunityName {1|2} string
GET SNMP CommunityName {1|2}
SNMP Permission
SET SNMP Permission {1|2} {READONLY|READWRITE}
GET SNMP Permission {1|2}
SNMP Authentication
SET SNMP Authentication {SimpleCommunityName|EncryptedNamePassword}
GET SNMP Authentication
Security Commands
Security Protocol
SET Security Protocol {LOCAL|RADIUS|TACACS}
GET Security Protocol
Security Accounting
SET Security Accounting {ENABLED|DISABLED}
GET Security Accounting
Security AllowOnServerFail
SET Security AllowOnServerFail {ENABLED|DISABLED}
GET Security AllowOnServerFail
Security TACACSEncryption
SET Security TACACSEncryption {ENABLED|DISABLED}
GET Security TACACSEncryption
242
CommPlete Communications Server
C Telnet Commands
Security SharedSecret
SET Security SharedSecret
GET Security SharedSecret
Security PrimaryServerAddress
SET Security PrimaryServerAddress ipaddress
GET Security PrimaryServerAddress
Security BackupServerAddress
SET Security BackupServerAddress {1|2|3} ipaddress
GET Security BackupServerAddress {1|2|3}
Security CallBackDelay
SET Security CallBackDelay integer
GET Security CallBackDelay
Security RemoteUserNumber
SET Security RemoteUserNumber integer
GET Security RemoteUserNumber
Security ProtocolPermission
SET Security ProtocolPermission integer
GET Security ProtocolPermission
Security ShellUserServiceType
SET Security ShellUserServiceType integer
GET Security ShellUserServiceType
Security InboundUserServiceType
SET Security InboundUserServiceType integer
GET Security InboundUserServiceType
Security RAR
SET Security RAR {ENABLED|DISABLED}
GET Security RAR
Enables or disables retransmissions of accounting records. The default is DISABLED.
This parameter is not saved in the configuration file, so every time the server reboots
the value returns to DISABLED.
PPP Commands
PPP Slip
SET PPP [wan_virtual_port_range] Slip {ENABLED|DISABLED}
GET PPP [wan_virtual_port_range] Slip
PPP DataCompression
SET PPP [wan_virtual_port_range] DataCompression {ENABLED|DISABLED}
GET PPP [wan_virtual_port_range] DataCompression
CommPlete Communications Server
243
RASExpress User Guide
PPP DialOnDemand
SET PPP [wan_virtual_port_range] DialOnDemand {ENABLED|DISABLED}
GET PPP [wan_virtual_port_range] DialOnDemand
The SET command requires a server reboot.
PPP IPXCP
SET PPP [wan_virtual_port_range] IPXCP {ENABLED|DISABLED}
GET PPP [wan_virtual_port_range] IPXCP
The SET command requires a server reboot.
PPP IPCP
SET PPP [wan_virtual_port_range] IPCP {ENABLED|DISABLED}
GET PPP [wan_virtual_port_range] IPCP
The SET command requires a server reboot.
PPP BCP
SET PPP [wan_virtual_port_range] BCP {ENABLED|DISABLED}
GET PPP [wan_virtual_port_range] BCP
The SET command requires a server reboot.
PPP CIPXCompression
SET PPP [wan_virtual_port_range] CIPXCompression {ENABLED|DISABLED}
GET PPP [wan_virtual_port_range] CIPXCompression
The SET command requires a server reboot.
PPP VJCompression
SET PPP [wan_virtual_port_range] VJCompression {ENABLED|DISABLED}
GET PPP [wan_virtual_port_range] VJCompression
The SET command requires a server reboot.
PPP ForwardBroadcast
SET PPP [wan_virtual_port_range] ForwardBroadcast {ENABLED|DISABLED}
GET PPP [wan_virtual_port_range] ForwardBroadcast
The SET command requires a server reboot.
PPP NetbiosOverIPX
SET PPP [wan_virtual_port_range] NetbiosOverIPX {ENABLED|DISABLED}
GET PPP [wan_virtual_port_range] NetbiosOverIPX
The SET command requires a server reboot.
PPP NetworkNumber
SET PPP wan_virtual_port NetworkNumber {hexdigit}
GET PPP wan_virtual_port NetworkNumber
8
The SET command requires a server reboot.
244
CommPlete Communications Server
C Telnet Commands
PPP NodeNumber
SET PPP wan_virtual_port NodeNumber {hexdigit}
GET PPP wan_virtual_port NodeNumber
12
The SET command requires a server reboot.
PPP LocalAddress
SET PPP [wan_virtual_port_range] LocalAddress ipaddress
GET PPP [wan_virtual_port_range] LocalAddress
The SET command requires a server reboot.
PPP RemoteAddress
SET PPP wan_virtual_port RemoteAddress ipaddress
GET PPP wan_virtual_port RemoteAddress
The SET command requires a server reboot.
PPP SubnetMask
SET PPP [wan_virtual_port_range] SubnetMask ipaddress
GET PPP [wan_virtual_port_range] SubnetMask
The SET command requires a server reboot.
PPP PortType
SET PPP [wan_virtual_port_range] PortType {Client_To_Lan|Lan_To_Lan}
GET PPP [wan_virtual_port_range] PortType
The SET command requires a server reboot.
PPP MRU
SET PPP [wan_virtual_port_range] MRU mrurange
GET PPP [wan_virtual_port_range] MRU
The SET command requires a server reboot.
PPP Username
SET PPP [wan_virtual_port_range] Username username
GET PPP [wan_virtual_port_range] Username
PPP UserPassword
SET PPP [wan_virtual_port_range] UserPassword
GET PPP [wan_virtual_port_range] UserPassword
PPP ACCM
SET PPP [wan_virtual_port_range] ACCM {hexdigit}
GET PPP [wan_virtual_port_range] ACCM
8
PPP AuthenticationProtocol
SET PPP [wan_virtual_port_range] AuthenticationProtocol {PAP|CHAP|NONE}
GET PPP [wan_virtual_port_range] AuthenticationProtocol
CommPlete Communications Server
245
RASExpress User Guide
ISI Commands
ADD ISI
ADD ISI baseaddress irqnumber {8|16}
Requires a server reboot.
DELETE ISI
DELETE ISI cardno
Requires a server reboot.
LIST ISI
LIST ISI
FLASH
FLASH ISI [Cardno_range [Lineno_range]] FileName [-b]
ISI LineStatus
SET ISI [Cardno_range [Lineno_range]] LineStatus {ENABLED|DISABLED}
GET ISI [Cardno_range [Lineno_range]] LineStatus
ISI GeneralName
SET ISI [Cardno_range [Lineno_range]] GeneralName string
GET ISI [Cardno_range [Lineno_range]] GeneralName
The SET command requires a server reboot.
ISI SpecificName
SET ISI [Cardno_range [Lineno_range]] SpecificName string
GET ISI [Cardno_range [Lineno_range]] SpecificName
The SET command requires a server reboot.
ISI ModemName
SET ISI [Cardno_range [Lineno_range]] ModemName modemname
GET ISI [Cardno_range [Lineno_range]] ModemName
ISI ConStartedby
SET ISI [Cardno_range [Lineno_range]] ConStartedby {ModemResponse|DCD}
GET ISI [Cardno_range [Lineno_range]] ConStartedby
ISI Baud
SET ISI [Cardno_range [Lineno_range]] Baud baudrate
GET ISI [Cardno_range [Lineno_range]] Baud
ISI Data
SET ISI [Cardno_range [Lineno_range]] Data {5|6|7|8}
GET ISI [Cardno_range [Lineno_range]] Data
ISI Stop
SET ISI [Cardno_range [Lineno_range]] Stop {1|2}
GET ISI [Cardno_range [Lineno_range]] Stop
246
CommPlete Communications Server
C Telnet Commands
ISI Parity
SET ISI [Cardno_range [Lineno_range]] Parity {NONE|ODD|EVEN}
GET ISI [Cardno_range [Lineno_range]] Parity
ISI FlowControl
SET ISI [Cardno_range [Lineno_range]] FlowControl {ENABLED|DISABLED}
GET ISI [Cardno_range [Lineno_range]] FlowControl
ISI BaseAddress
SET ISI Cardno BaseAddress baseaddress
GET ISI [Cardno_range] BaseAddress
The SET command requires a server reboot.
ISI IRQ
SET ISI Cardno IRQ irqnumber
GET ISI [Cardno_range] IRQ
The SET command requires a server reboot.
ISI NumberOfPorts
SET ISI Cardno NumberOfPorts {8|16}
GET ISI [Cardno_range] NumberOfPorts
The SET command requires a server reboot.
ISDN Commands
ISDN PRI
SET ISDN PRI {ENABLED|DISABLED}
GET ISDN PRI
The SET command requires a server reboot.
ISDN IOAddress
SET ISDN IOAddress {0x100—0x3FF}
GET ISDN IOAddress
The SET command requires a server reboot.
ISDN IRQNumber
SET ISDN IRQNumber irqnumber
GET ISDN IRQNumber
The SET command requires a server reboot.
ISDN MemoryAddress
SET ISDN MemoryAddress {hexdigit …}
GET ISDN MemoryAddress
The SET command requires a server reboot.
ISDN NoOfPorts
SET ISDN NoOfPorts {23|30}
GET ISDN NoOfPorts
The SET command requires a server reboot.
CommPlete Communications Server
247
RASExpress User Guide
Trace ISDN
trace isdn // Dumps the PRI 64k trace.
Virtual Port Commands
VirtualPort IdleTimeOut
SET VirtualPort [wan_virtual_port_range] IdleTimeOut integer
GET VirtualPort [wan_virtual_port_range] IdleTimeOut
VirtualPort SessionTimeOut
SET VirtualPort [wan_virtual_port_range] SessionTimeOut integer
GET VirtualPort [wan_virtual_port_range] SessionTimeOut
VirtualPort PPPDetect
SET VirtualPort [wan_virtual_port_range] PPPDetect {ENABLED|DISABLED}
GET VirtualPort [wan_virtual_port_range] PPPDetect
VirtualPort AutologinProtocol
SET VirtualPort [wan_virtual_port_range] AutologinProtocol
{NONE|RLOGIN|TELNET}
GET VirtualPort [wan_virtual_port_range] AutologinProtocol
VirtualPort AutoLoginAddress
SET VirtualPort [wan_virtual_port_range] AutoLoginAddress string
GET VirtualPort [wan_virtual_port_range] AutoLoginAddress
VirtualPort TunnelingProtocol
SET VirtualPort [wan_virtual_port_range] TunnelingProtocol {NONE|PPTP}
GET VirtualPort [wan_virtual_port_range] TunnelingProtocol
VirtualPort TunnelServerAddress
SET VirtualPort [wan_virtual_port_range] TunnelServerAddress string
GET VirtualPort [wan_virtual_port_range] TunnelServerAddress
VirtualPort FilterTemplateName
SET VirtualPort [wan_virtual_port_range] FilterTemplateName string
GET VirtualPort [wan_virtual_port_range] FilterTemplateName
The SET command requires a server reboot.
VirtualPort DialType
SET VirtualPort [wan_virtual_port_range] DialType {ANALOG|ISDN}
GET VirtualPort [wan_virtual_port_range] DialType
The SET command requires a server reboot.
VirtualPort ConnectType
SET VirtualPort [wan_virtual_port_range] ConnectType {ANSWERING|DIALING}
GET VirtualPort [wan_virtual_port_range] ConnectType
VirtualPort TelephoneNumber
SET VirtualPort [wan_virtual_port_range] TelephoneNumber integer
GET VirtualPort [wan_virtual_port_range] TelephoneNumber
248
CommPlete Communications Server
C Telnet Commands
VirtualPort ScriptFileName
SET VirtualPort [wan_virtual_port_range] ScriptFileName integer
GET VirtualPort [wan_virtual_port_range] ScriptFileName
VirtualPort BundledPort
SET VirtualPort [wan_virtual_port_range] BundledPort [wan_virtual_port]
GET VirtualPort [wan_virtual_port_range] BundledPort
VirtualPort BundlingEnabled
SET VirtualPort [wan_virtual_port_range] BundlingEnabled
{ENABLED|DISABLED}
GET VirtualPort [wan_virtual_port_range] BundlingEnabled
Physical Port Commands
PhysicalPort RawTCPConnection
SET PhysicalPort [analog_port_range] RawTCPConnection {ENABLED|DISABLED}
GET PhysicalPort [analog_port_range] RawTCPConnection
PhysicalPort AutoDialOut
SET PhysicalPort [analog_port_range] AutoDialOut {ENABLED|DISABLED}
GET PhysicalPort [analog_port_range] AutoDialOut
The SET command requires a server reboot.
PhysicalPORT TcpPortNumber
SET PhysicalPort [analog_port_range] TcpPortNumber integer
GET PhysicalPort [analog_port_range] TcpPortNumber
The SET command requires a server reboot.
PhysicalPort MonitorCD
SET PhysicalPort [analog_port_range] MonitorCD {ENABLED|DISABLED}
GET PhysicalPort [analog_port_range] MonitorCD
SMTP Commands
LIST SMTP
LIST SMTP
ADD SMTP
ADD SMTP string
DELETE SMTP
DELETE SMTP string
SMTP Client
SET SMTP Client {ENABLED|DISABLED}
GET SMTP Client
CommPlete Communications Server
249
RASExpress User Guide
SMTP ServerAddress
SET SMTP ServerAddress ipaddress
GET SMTP ServerAddress
SMTP SenderEmailId
SET SMTP SenderEmailId string
GET SMTP SenderEmailId
SMTP MessageFull
SET SMTP MessageFull {ENABLED|DISABLED}
GET SMTP MessageFull
SMTP LogFull
SET SMTP LogFull {ENABLED|DISABLED}
GET SMTP LogFull
SMTP DebugLogFull
SET SMTP DebugLogFull {ENABLED|DISABLED}
GET SMTP DebugLogFull
SMTP ServerUpgrade
SET SMTP ServerUpgrade {ENABLED|DISABLED}
GET SMTP ServerUpgrade
SMTP RasAlive
SET SMTP RasAlive {ENABLED|DISABLED}
GET SMTP RasAlive
SMTP ServerCrash
SET SMTP ServerCrash {ENABLED|DISABLED}
GET SMTP ServerCrash
Enables or disables sending of e-mail if the server crashes with a core dump. Sends
the e-mail to the internal recipient name.
SMTP ISIReload
SET SMTP ISIReload {ENABLED|DISABLED}
GET SMTP ISIReload
Enables or disables sending of e-mail if the server reloads firmware on an ISI card.
SMTP SecurityDead
SET SMTP SecurityDead {ENABLED|DISABLED}
GET SMTP SecurityDead
Enables or disables sending of e-mail if the server is unable to talk to the RADIUS
server.
SMTP IntRecipient
SET SMTP IntRecipient string
GET SMTP IntRecipient
Gets or sets the internal recipient e-mail address. Only this recipient receives the Core
file mail.
250
CommPlete Communications Server
C Telnet Commands
Statistics Commands
SHOW Summary
SHOW Summary
SHOW Version
SHOW Version
SHOW LogStartTime
SHOW LogStartTime
SHOW LogStopTime
SHOW LogStopTime
SHOW LogTimeLeft
SHOW LogTimeLeft
SHOW GenStatistics
SHOW GenStatistics
SHOW IP ARP
SHOW IP ARP
SHOW IP General
SHOW IP General
SHOW IP ICMP
SHOW IP ICMP
SHOW IP RIP
SHOW IP RIP
SHOW IP UDP
SHOW IP UDP
SHOW IP TCP
SHOW IP TCP
SHOW IP RoutingTable
SHOW IP RoutingTable
SHOW IPX RoutingTable
SHOW IPX RoutingTable
SHOW IPX SAPTable
SHOW IPX SAPTable
SHOW LineStatistics
SHOW LineStatistics [real_port_range]
SHOW PPP
SHOW PPP [wan_virtual_port_range]
CommPlete Communications Server
251
RASExpress User Guide
SHOW IPStat
SHOW IPStat [virtual_port_range]
SHOW IPXStat
SHOW IPXStat [virtual_port_range]
SHOW DialIn
SHOW DialIn
SHOW DialOut
SHOW DialOut
SHOW LineUsageStatistics
SHOW LineUsageStatistics
SHOW Address
SHOW Address
SHOW EIA
SHOW EIA
SHOW InboundList
SHOW InboundList
SHOW ConnectStringTable
SHOW ConnectStringTable
SHOW LineInformation
SHOW LineInformation
SHOW CallHistory
SHOW CallHistory [real_port_range]
SHOW LineUtilization
SHOW LineUtilization [analog_port_range]
SHOW IP TCPConnectionTable
SHOW IP TCPConnectionTable
SHOW IP BondingTable
SHOW IP BondingTable
252
CommPlete Communications Server
C Telnet Commands
Server Commands
RESET SBC
RESET SBC sbcnum
RESET GenStatistics
RESET GenStatistics [real_port_range]
RESET IPStat
RESET IPStat [virtual_port_range]
RESET IPXStat
RESET IPXStat [virtual_port_range]
RESET LineStatistics
RESET LineStatistics [real_port_range]
RESET PPP
RESET PPP [wan_virtual_port_range]
RESET Summary
RESET Summary
LOCK
LOCK
UNLOCK
UNLOCK
REBOOT
REBOOT
Line Commands
DISABLE
DISABLE [analog_port_range]
DISCONNECT
DISCONNECT [real_port_range]
ENABLE
ENABLE [analog_port_range]
RESET
RESET [analog_port_range]
UPGRADE
UPGRADE key
CommPlete Communications Server
253
RASExpress User Guide
User Commands
ADD USER
ADD USER username
DELETE USER
DELETE USER username
LIST USER
LIST USER [username]
USER Password
SET USER username Password
GET USER username Password
USER RemoteUserNumber
SET USER username RemoteUserNumber {ON|OFF}
GET USER username RemoteUserNumber
USER CallBackNumber
SET USER username CallBackNumber integer
GET USER username CallBackNumber
USER CallBackDelay
SET USER username CallBackDelay integer
GET USER username CallBackDelay
USER LinePermission
SET USER username LinePermission {+|-}Portno_range
GET USER username LinePermission
USER ModePermission
SET USER username ModePermission modepermission
GET USER username ModePermission
USER ProtocolPermission
SET USER username ProtocolPermission protocolpermission
GET USER username ProtocolPermission
USER ConTimelimit
SET USER username ConTimelimit integer
GET USER username ConTimelimit
USER TDL
SET USER username TDL {+|-}dayofweek_range slot_range
GET USER username TDL
USER AutoLoginProtocol
SET USER username AutoLoginProtocol {NONE|TELNET|RLOGIN}
GET USER username AutoLoginProtocol
254
CommPlete Communications Server
C Telnet Commands
USER LoginHostName
SET USER username LoginHostName ipaddress
GET USER username LoginHostName
USER TunnelingProtocol
SET USER username TunnelingProtocol {NONE|PPTP}
GET USER username TunnelingProtocol
USER TunnelServerAddress
SET USER username TunnelServerAddress string
GET USER username TunnelServerAddress
USER ConcurrentLogins
SET USER username ConcurrentLogins integer
GET USER username ConcurrentLogins
USER StaticIPAddress
SET USER username StaticIPAddress ipaddress
GET USER username StaticIPAddress
Administrator Commands
ADD RASADMIN
ADD RASADMIN username
DELETE RASADMIN
DELETE RASADMIN username
LIST RASADMIN
LIST RASADMIN [username]
RASADMIN Password
SET RASADMIN username Password
GET RASADMIN username Password
RASADMIN Permissions
SET RASADMIN username Permissions {+|-}admin_permissions
GET RASADMIN username Permissions
Modem Commands
ADD MODEM
ADD MODEM modemname
DELETE MODEM
DELETE MODEM modemname
LIST MODEM
LIST MODEM [modemname]
CommPlete Communications Server
255
RASExpress User Guide
MODEM InitStr
SET MODEM modemname InitStr {1|2|3|4|5} string
GET MODEM modemname InitStr {1|2|3|4|5}
MODEM DialPrefix
SET MODEM modemname DialPrefix string
GET MODEM modemname DialPrefix
MODEM DialSuffix
SET MODEM modemname DialSuffix string
GET MODEM modemname DialSuffix
MODEM HangupStr
SET MODEM modemname HangupStr string
GET MODEM modemname HangupStr
MODEM NoCarrierStr
SET MODEM modemname NoCarrierStr string
GET MODEM modemname NoCarrierStr
MODEM NoAnswwerStr
SET MODEM modemname NoAnswwerStr string
GET MODEM modemname NoAnswwerStr
MODEM ConnectResponseStr
SET MODEM modemname ConnectResponseStr string
GET MODEM modemname ConnectResponseStr
MODEM OkStr
SET MODEM modemname OkStr string
GET MODEM modemname OkStr
MODEM ErrStr
SET MODEM modemname ErrStr string
GET MODEM modemname ErrStr
MODEM RingStr
SET MODEM modemname RingStr string
GET MODEM modemname RingStr
MODEM BusyStr
SET MODEM modemname BusyStr string
GET MODEM modemname BusyStr
256
CommPlete Communications Server
C Telnet Commands
OSPF Commands
OSPF Routing
SET OSPF Routing {ENABLED|DISABLED}
GET OSPF Routing
OSPF RouterID
SET OSPF RouterID router_id
GET OSPF RouterID
The SET command requires a server reboot.
ADD OSPF AREA
ADD OSPF AREA area_id
Requires a server reboot.
DELETE OSPF AREA
DELETE OSPF AREA area_id
Requires a server reboot.
LIST OSPF AREA
LIST OSPF AREA
OSPF AREA StubArea
SET OSPF AREA area_id StubArea {ENABLED|DISABLED}
GET OSPF AREA area_id StubArea
The SET command requires a server reboot.
OSPF AREA InjectDefaultRoute
SET OSPF AREA area_id InjectDefaultRoute {ENABLED|DISABLED}
GET OSPF AREA area_id InjectDefaultRoute
The SET command requires a server reboot.
OSPF AREA StubMetric
SET OSPF AREA area_id StubMetric integer
GET OSPF AREA area_id StubMetric
The SET command requires a server reboot.
ADD OSPF RANGE
ADD OSPF RANGE area_id address mask
Requires a server reboot.
DELETE OSPF RANGE
DELETE OSPF RANGE area_id address mask
Requires a server reboot.
LIST OSPF RANGE
LIST OSPF RANGE area_id
CommPlete Communications Server
257
RASExpress User Guide
OSPF RANGE Status
SET OSPF RANGE area_id address mask Status {ADVERTISE|DONOTVERTISE}
GET OSPF RANGE area_id address mask Status
The SET command requires a server reboot.
OSPF PORT InterfaceEnabled
SET OSPF PORT virtual_port_range InterfaceEnabled {ENABLED|DISABLED}
GET OSPF PORT virtual_port_range InterfaceEnabled
The SET command requires a server reboot.
OSPF PORT AreaId
SET OSPF PORT virtual_port_range AreaId area_id
GET OSPF PORT virtual_port_range AreaId
The SET command requires a server reboot.
OSPF PORT Metric
SET OSPF PORT virtual_port_range Metric integer
GET OSPF PORT virtual_port_range Metric
The SET command requires a server reboot.
OSPF PORT RouterDeadInterval
SET OSPF PORT virtual_port_range RouterDeadInterval integer
GET OSPF PORT virtual_port_range RouterDeadInterval
OSPF PORT TransmitDelay
SET OSPF PORT virtual_port_range TransmitDelay integer
GET OSPF PORT virtual_port_range TransmitDelay
OSPF PORT HelloInterval
SET OSPF PORT virtual_port_range HelloInterval integer
GET OSPF PORT virtual_port_range HelloInterval
OSPF PORT Priority
SET OSPF PORT virtual_port_range Priority integer
GET OSPF PORT virtual_port_range Priority
OSPF PORT RetransmitInterval
SET OSPF PORT virtual_port_range RetransmitInterval integer
GET OSPF PORT virtual_port_range RetransmitInterval
OSPF PORT Authentication
SET OSPF PORT virtual_port_range Authentication {NONE|SIMPLE}
GET OSPF PORT virtual_port_range Authentication
OSPF PORT PlainTextPassword
SET OSPF PORT virtual_port_range PlainTextPassword
GET OSPF PORT virtual_port_range PlainTextPassword
258
CommPlete Communications Server
C Telnet Commands
Miscellaneous Commands
DebugLevel
SET DebugLevel {0—3}
GET DebugLevel
Changes the debug level.
MsgFileSize
SET MsgFileSize {1—1024}
GET MsgFileSize
Sets the size of the message file in units of 1 KB. The maximum debug file size is 1
MB (1024×1024). The default is 100 KB. This parameter is not saved in the
configuration file, so every time the server reboots the file size returns to 100K.
Memory
SET memory [selector]:offset count data
GET memory [selector]:offset count
Dumps the selected memory location.
PING
PING hostname [-c count] [-s size] [-t timeout]
AT
AT [date] time [repeat timer] command
LIST AT
LIST AT command_no
DELETE AT
DELETE AT
CommPlete Communications Server
259
RASExpress User Guide
Variable Definitions
baudrate = {150|300|600|1200|2400|4800|9600|19200|38400|57600|115200|
230400|460800}
frametype = {TYPE_II|SNAP|802.2|802.3}
mrurange = {0–1534}
hexdigit = {0–9|A–F|a–f}
baseaddress = hexdigit
3
irqnumber = {2–5|7|9–12|15}
char = {a–z|A–Z|0–9}
string = char…
filename = string
filesize = {1–1024} // The unit is 1024 bytes (1K)
username = string
modemname = string
integer = {0–9…}
sbcnum = {2–9}
Lineno = integer
Lineno_range = Lineno[,Lineno…|-Lineno] // The range of lines on an ISI card.
cardno = integer
Cardno_range = cardno[,cardno…|-cardno] // The range of ISI cards.
wan_virtual_port = integer
virtual_port = integer
analog_port = integer
real_port = integer
wan_virtual_port_range = wan_virtual_port [,wan_virtual_port…|- wan_virtual_port]
// The range of virtual WAN ports.
virtual_port_range = virtual_port [,virtual_port…|-virtual_port]
// The range of the virtual LAN port and the virtual WAN ports.
analog_port_range = analog_port [,analog_port…|-analog_port]
// The range of ISI ports.
real_port_range = real_port [,real_port…|-real_port]
// The range of ISI and ISDN ports.
dayofweek = {Sunday|Monday|Tuesday|Wednesday|Thursday|Friday|Saturday}
monthofyear = {January|February|March|April|May|June|July|August|
September|October|November|December}
ordinal = {First|Second|Third|Fourth|Last}
days = integer
day = {0–31}
260
CommPlete Communications Server
C Telnet Commands
month = {0–12}
year = {1980–2099}
hour = {0–23}
minutes = {0–59}
seconds = {0–59}
time = hour:minute:second
duration = days:hour:minutes:seconds
date = day-month-year
timeout = integer
size = integer
count = integer
timer = integer
command_no = integer
ipadd = {0–255}
ipaddress = ipadd.ipadd.ipadd.ipadd
router_id = ipaddress
area_id = ipaddress
address = ipaddress
mask = ipaddress
modepermission = mode…
mode = {+|-}{Dialout|DialinRemoteNode|DialinRemoteControl|Telnet|Rlogin}
protocolpermission = protocol…
protocol = {+|-}{IP|IPX|STP}
adminpermissions = {management|configuration}
dayofweek_range = dayofweek[,dayofweek…|-dayofweek]
slot_range = slot[,slot…|-slot]
slot = {1–48} // The day is divided into 48 slots of 30 minutes each, beginning at
midnight.
CommPlete Communications Server
261
RASExpress User Guide
Appendix D Creating Filter Templates
Introduction
A filter template (also simply called a filter) can be used to selectively forward or
filter inbound and/or outbound packets. It can be associated with either a user or a
port; however, a filter associated with a user overrides a filter associated with a port.
When a filter is associated with a user or port, all packets are compared with the filter
patterns in the filter; if there is a match, the specified action is taken. In the absence of a
user or port filter, all packets are forwarded.
Filter templates are stored in the FILTER.INI file on the RASExpress server. A filter
template is composed of ASCII text consisting of a filter name, a description, and a
pattern list. The filter name should uniquely identify the template. The description is
a text string that describes the purpose of the filter in plain language. The pattern list
consists of one or more patterns separated by semicolons. A colon is required at the
end of a template to separate it from the next template in the file.
You can use any text editor to write a filter template. You must then FTP the edited
FILTER.INI file to the RASExpress server.
Patterns
Patterns are applied in the order they are written. The first pattern decides the default
action. If the Action parameter of the first pattern is filter, then packets that match the
pattern are filtered and packets that do not match the pattern are forwarded. If the
Action parameter of the first pattern is forward, then packets that match the pattern
are forwarded and packets that do not match the pattern are filtered. If the Usage
parameter is set to none, the filter is not used. If it is set to input, the filter is applied
only to the input stream. If it is set to output, the filter is applied only to the output
stream. If it is set to input_output, the filter is applied to both the input and the
output streams.
There are three types of patterns: Generic, IP, and IPX, each of which has a different
definition. Each consists of a list of required parameters separated by commas, which
together define the match that is is being looked for and the type of packet in which
the match is being sought.
Generic Pattern: The Generic pattern applies the Mask parameter at the Offset parameter for Length parameter bytes to the raw data packet from the address header,
and checks to see if it matches the Result parameter. If it matches, it is successful, else
it is not successful. The Generic pattern is used only on bridging ports.
IP Pattern: The IP pattern applies the SrcAddrMask parameter to the source address
and the DstAddrMask parameter to the destination address, and compares them with
the SrcAddrResult and DstAddrResult parameters respectively. An equality check
with the Protocol, SrcPort, and DstPort parameters is also done. If any of these fields
is set to zero, it is not included in the check.
262
CommPlete Communications Server
D Creating Filter Templates
IPX Pattern: The IPX pattern applies a check similar to the IP pattern.
The Operation parameter uses logical operators to extend the check to more than one
pattern. If it is set to none, no further check is done for the following patterns in the
list. If it is set to invert, the result of the check is logically negated to decide the action
to be taken. If it is set to and or or, the result of the check is logically ANDed or ORed
with that of the next pattern. The evaluation is carried out in the order in which the
patterns are specified. This field is optional, and if it is not provided, a default value
of or is assumed.
For all the optional parameters a default value of 0 is assumed and hence is not
included in the comparison. Also, for the port addresses and the socket addresses,
one number or a range of numbers is allowed.
Definitions
The following list defines the grammar and syntax of the filter template, its patterns,
and its parameters. Filter elements that appear in bold must be typed exactly as they
appear. Elements that appear in italic are placeholders that must be replaced by
actual information. Brackets [ ] enclose optional items. Braces { } enclose a set of choices
from which you must choose only one; choices are separated by a vertical bar |. The
characters ::= mean “consists of,” and an ellipsis … indicates that an argument can be
repeated. A superscripted number indicates a required number of repetitions.
Template
::= Filter_Name,Description,Pattern_List:
Description
::= “An ASCII string of no more than 80 characters that describes the
template”
Pattern_List
::= Pattern[;Pattern…]
Pattern
::= {Generic_Pattern|IP_Pattern|IPX_Pattern}
Generic_Pattern ::= generic,Usage,Action[,Offset=integer],Length=integer,
Mask=hex_string,Value=hex_string,operation=Operation
IP_Pattern
::= IP,Usage,Action[,SrcAddrMask=ip_address][,SrcAddrResult=
ip_address][,DstAddrMask=ip_address][,DstAddrResult=
ip_address],Protocol=Protocol[,SrcPort=
integer[integer…]][,DstPort=integer[integer…]],operation=
Operation
IPX_Pattern
::= IPX,Usage,Action[,SrcNetMask=net_address][,SrcNetResult=
net_address][,SrcNodeMask=node_address][,SrcNodeResult=
node_address][,SrcSocket=integer[integer…]][,DstNetMask=
net_address][,DstNetResult=net_address][,DstNodeMask=
node_address][,DstNodeResult=node_address][,DstSocket=
integer[integer…]],operation=Operation
Usage
::= {none|input|output|input_output}
Action
::= {forward|filter}
Operation
::= {none|and|or|invert}
Protocol
::= {TCP|UDP|integer}
hex_string
::= hex_digit[hex_digit…]
CommPlete Communications Server
263
RASExpress User Guide
hex_digit
::= {0–9|a–f|A–F}
ip_address
::= dec_number.dec_number.dec_number.dec_number
dec_number
::= 0–9[0–9[0–9]]
integer
::= 0–9[0–9…]
net_address
::= {hex_digit}
4
node_address
::= {hex_digit}
6
Examples
Example 1: Filters all SNMP traffic between a manager and an agent. The manager
address is 200.200.150.120 and the agent address is 200.200.150.110. There are two
patterns used in the pattern list, the first one for the packets from the manager to the
agent, and the second one for the packets from the agent to the manager. The first
pattern has or as the operation, whereas it is set to none in the second pattern.
Filter_SNMP=“Filter SNMP packets”,IP,input,filter,
SrcAddrMask=255.255.255.255,SrcAddrResult=200.200.150.120,
DstAddrMask=255.255.255.255,DstAddrResult=200.200.150.110,
Protocol=UDP,SrcPort=0,DstPort=161,operation=or;
IP,input,filter,SrcAddrMask=255.255.255.255,
SrcAddrResult=200.200.150.110,DstAddrMask=255.255.255.255,
DstAddrResult=200.200.150.120,Protocol=UDP,SrcPort=161,DstPort=0,
operation=none:
Example 2: Filters all Web traffic between a browser and a Web server. The Web
server address is 200.200.150.120 and the browser address is 200.200.150.110. There
are two patterns used in the pattern list, the first one for the packets from the server
to the browser, and the second one for the packets from the browser to the server.
Filter_Web=“Filter Web packets”,IP,input,filter,
SrcAddrMask=255.255.255.255,SrcAddrResult=200.200.150.120,
DstAddrMask=255.255.255.255,DstAddrResult=200.200.150.110,
Protocol=TCP,SrcPort=80,DstPort=0,operation=or;
IP,input,filter,SrcAddrMask=255.255.255.255,
SrcAddrResult=200.200.150.110,DstAddrMask=255.255.255.255,
DstAddrResult=200.200.150.120, Protocol=TCP,SrcPort=0,DstPort=80,
operation=none:
Example 3: Forwards only Web traffic on the RAS. There are two patterns, one that
allows Web requests to pass through and the other to allow the responses.
Forward_only_Web=“Forward Web packets”,IP,input_output,forward,
Protocol=TCP,SrcPort=80, operation=or;
IP,input_output,forward,Protocol=TCP,DstPort=80:
Example 4: Filters Telnet packets on the network. Only one pattern is needed to block
all received packets that have a destination port number of 23.
Telnet_Filter=“Filter all Telnet packets”,IP,input,filter,
Protocol=TCP,DstPort=23:
264
CommPlete Communications Server
E
Error Messages
Appendix E Error Messages
Server Error Messages
“Attempt to connect with invalid password”
Explanation: The user tried to connect with an invalid password.
Action: Ask the user to set up the correct password and try again.
“Attempt to connect with invalid user name”
Explanation: The user tried to connect with an invalid user name.
Action: Ask the user to set up the correct user name and try again.
“Can not open file ISI2.BIN”
Explanation: The server has been set up for a two-port ISI card, and ISI2.BIN file
was not found in the RASExpress Server directory.
Action: Copy the file again.
“Can not open file ISI8.BIN”
Explanation: The server has been set up for an eight-port ISI card, and ISI8.BIN file
was not found in the RASExpress Server directory.
Action: Copy the file again.
“Carrier was lost”
Explanation: The carrier was lost.
Action: The user must call again.
“Client did not respond in time”
Explanation: There was no response from the client side in specified time.
Action: The client must call again.
“Connection was aborted by the user”
Explanation: Connect was aborted by the user.
“Dialtone was not found”
Explanation: There was no dialtone when the server tried to call.
Action: Make sure the telephone line is connected properly to the modem.
“Error creating error window”
Explanation: There has been an internal error in server.
Action: Restart server.
“Error creating log file”
Explanation: There was an error creating the log file.
Action: Make sure you have write permission in the log file directory. Try
changing the log filename if you still get the error.
CommPlete Communications Server
265
RASExpress User Guide
“Error creating root window”
Explanation: There has been an internal error in server.
Action: Restart server.
“Error detected while loading firmware”
Explanation: There was an error while loading the firmware.
Action: Recopy the .BIN file and try again.
“Error detected while verifying firmware”
Explanation: There was an error while verifying the firmware.
Action: Make sure your ISI card setup is correct.
“Error displaying EIA screen”
Explanation: There has been an internal error in server.
Action: Restart server.
“Error displaying main screen”
Explanation: There has been an internal error in server.
Action: Restart server.
“Error displaying statistics screen”
Explanation: There has been an internal error in server.
Action: Restart server.
“Error in reading configuration file SERVER.CFG”
Explanation: The configuration file SERVER.CFG is missing or corrupted.
Action: Delete the file if present and run RASCON again.
“Error initializing ISI card”
Explanation: The ISI card setup is incorrect.
Action: Make sure the base address, number of ports, and IRQ are correct.
“Error initializing Memory Manager”
Explanation: There has been an internal error in server.
Action: Contact Multi-Tech Technical Support.
“Error initializing packet driver”
Explanation: The packet driver being used is not compatible with RASExpress
Server.
Action: Use the driver shipped with RASExpress Server.
“Error initializing UART driver”
Explanation: There has been an internal error in server.
Action: Contact Multi-Tech Technical Support.
“Error initializing User Interface”
Explanation: There has been an internal error in server.
Action: Contact Multi-Tech Technical Support.
“Error opening modem setup file MODEMS.CNF”
Explanation: The configuration file MODEMS.CNF is missing.
Action: Copy it from the RASExpress Server diskette.
266
CommPlete Communications Server
E
Error Messages
“Error opening setup file SERVER.CFG”
Explanation: The configuration file SERVER.CFG is missing.
Action: Run RASCON again.
“Error reading modem setup file MODEMS.CNF”
Explanation: The configuration file MODEMS.CNF is missing or corrupted.
Action: Copy it from the RASExpress Server diskette.
“Error reading setup file SERVER.CFG”
Explanation: The configuration file SERVER.CFG is missing or corrupted.
Action: Run RASCON again.
“Flow control signal (CTS) did not go high”
Explanation: The port is set up for RTS/CTS flow control, but the CTS signal did not
go high.
Action: Make sure the modem is connected properly and the cable is good if it
is a direct connection.
“General error”
Explanation: An unknown error occurred at the port.
“Inactivity timer expired”
Explanation: The inactivity timer for the user has expired.
Action: The client must call again to continue using the server.
“Initialization string for modem is too long”
Explanation: The initialization string for the modem was too long.
Action: Break it up in smaller strings and try again.
“Initialization was aborted by the user”
Explanation: The user aborted the initialization process.
“Invalid log period, Press any key to continue”
Explanation: The log period entered either had invalid characters or was beyond the
allowed range. The log period must be less than 4 days.
Action: Retype the log period.
“IPX/SPX was not found”
Explanation: IPX/SPX was not loaded before running server.
Action: Load IPX/SPX before using the remote console.
“ISI card did not reset correctly”
Explanation: The ISI card setup is incorrect.
Action: Make sure the base address, number of ports, and IRQ are correct.
“Line dialed is busy”
Explanation: The number called by the server is currently busy.
Action: The client must call again later.
CommPlete Communications Server
267
RASExpress User Guide
“Modem did not respond in time”
Explanation: There was a modem initialization error.
Action: Make sure that the modem is connected to the port. If you do not want
a modem there, change the port setup for a direct connection.
“Modem returned error”
Explanation: Modem has returned an error.
Action: Make sure your modem setup is correct for the specified modem.
“Not enough memory”
Explanation: There has been an internal error in server.
Action: Contact Multi-Tech Technical Support.
“Other side did not answer the call”
Explanation: The client modem did not answer the call back.
Action: The client must call again after a while.
“Packet Driver not found”
Explanation: You must have a packet driver running before you load the server.
Action: Make sure you run a packet driver before you run the server.
“There is no port at specified base address”
Explanation: There was no port found at the address that was set up.
Action: Make sure you have set up the correct base address for the COM port
and try again.
“There was a critical communication error”
Explanation: There was a critical error while the server was trying to send or receive.
Action: The connection has been dropped. The other side should call again.
“There was no response for connect request”
Explanation: The other side did not respond for the connect request.
Action: Make sure the modem setup is correct.
“You need DOS version 3.20 or later for running SERVER”
Explanation: RASExpress Server will not run for DOS versions below 3.20.
Action: Upgrade your machine for DOS 3.20 or later.
RASCON Error Messages
“Cannot insert any more cards”
Explanation: You have reached the limit of four cards supported on the server.
Action: None.
“Duplicate User Name”
Explanation: The user name that was typed already exists.
Action: Type a new name that is unique.
“Error in reading configuration file”
Explanation: The configuration file SERVER.CFG does not exist or is corrupted.
268
CommPlete Communications Server
E
Error Messages
Action: Delete the CFG file and run RASCON again.
“Illegal user”
Explanation: The user name that was typed is not allowed.
Action: Type a new name that is allowed.
“Invalid entry”
Explanation: You have typed an invalid entry.
Action: Refer to your manual to get the valid range for the field.
“Modem information not found. Run Modem Setup”
Explanation: MODEMS.CNF was not found.
Action: Copy it from the original diskette or run Modem Setup for a fresh
modem setup.
Action: Type a valid filename and try again.
“No memory for saving the screen”
Explanation: There has been an internal error in SERLOG.
Action: Contact Multi-Tech Technical Support.
RASExpress Install Error Messages
“Bad path name”
Explanation: Invalid pathname was entered.
Action: Enter a valid DOS pathname.
“Destination File Open Error”
Explanation: Destination pathname may be incorrect or may not have write
permission.
Action: Make sure you give the correct destination pathname.
“Error Copying File. Hit ANY key to exit”
Explanation: There has been an error while copying the file.
Action: Abort the installation and run it fresh after cleaning up the destination
directory.
“Error creating error window”
Explanation: There has been an internal error in INSTALL.
Action: Contact Multi-Tech Technical Support.
“Error creating root window”
Explanation: There has been an internal error in INSTALL.
Action: Contact Multi-Tech Technical Support.
“Error displaying window”
Explanation: There has been an internal error in INSTALL.
Action: Contact Multi-Tech Technical Support.
“Error initializing Memory Manager”
Explanation: There has been an internal error in INSTALL.
CommPlete Communications Server
269
RASExpress User Guide
Action: Contact Multi-Tech Technical Support.
“Error initializing User Interface”
Explanation: There has been an internal error in INSTALL.
Action: Contact Multi-Tech Technical Support.
“Error opening file. Hit ANY key”
Explanation: There has been an error in opening the destination file. There may be a
problem in the directory you have chosen.
Action: Press a key to abort, choose a different directory, and try again.
“Error renaming file. Hit ANY key”
Explanation: There has been an error in renaming SYSTEM.INI file. There may be a
problem in the directory you have chosen.
Action: Press a key to abort, choose a different directory, and try again.
“Error writing to file. Hit ANY key”
Explanation: There has been an error in opening the destination file. There may be a
problem in the directory you have chosen.
Action: Press a key to abort, choose a different directory, and try again.
“Invalid installation disk”
Explanation: The installation disk does not have the required files.
Action: Make sure you have the correct diskette, and try again.
“Please enter full pathname”
Explanation: You did not enter the full pathname.
Action: Enter the full pathname with drive letter and back slashes.
Source File Open Error :
Explanation: There probably is a problem in the source disk.
Action: Try a different copy of the software.
270
CommPlete Communications Server
Index
CommPlete Communications Server
271
RASExpress User Guide
Symbols
802.2 frame type, enabling
browser, 84
DOS, 193
Telnet/terminal, 25
802.3 frame type, enabling
browser, 84
DOS, 193
Telnet/terminal, 25
A
ACCM (Asynchronous Control Character Map)
browser, 87
DOS, 194
Telnet/terminal, 27
address pool, configuring
browser, 81, 82
DOS, 192
Telnet/terminal, 19, 24
administrator setup
browser, 78
DOS, 190
Telnet/terminal, 49
applications configuration
browser, 100
DOS, 205
Telnet/terminal, 36
ARP statistics
browser, 124
Telnet/terminal, 57
authentication, configuring
browser, 87
DOS, 194
Telnet/terminal, 27
authentication, SNMP
browser, 98
DOS, 200
Telnet/terminal, 32
auto dialout
browser, 93
DOS, 203
Telnet/terminal, 36
auto login protocol
browser, 77, 92
DOS, 202, 214, 224
Telnet/terminal, 34, 44
AUTOEXEC.BAT, 185
B
base address, setting
browser, 103, 104, 106
DOS, 215, 217
Telnet/terminal, 45, 48
272
baud rate, setting
browser, 105
DOS, 216
Telnet/terminal, 47
BCP (Bridge Control Protocol), enabling
browser, 88
DOS, 195
Telnet/terminal, 28
bridge configuration
browser, 90
DOS, 197
Telnet/terminal, 29
browser management of RASExpress servers, 68–129
browser management, enabling
browser, 100
DOS, 205
Telnet/terminal, 36
Bundle Server
browser, 89
DOS, 196
Telnet/terminal, 29
bundling a port
browser, 92
DOS, 202
Telnet/terminal, 35
C
call history
browser, 130
Telnet/terminal, 64
call statistics per port
browser, 121
Telnet/terminal, 62
callback delay
browser, 75
DOS, 211, 222
Telnet/terminal, 42
callback security, 6
browser, 74
DOS, 211, 222
Telnet/terminal, 42
CHAP (Challenge Handshake Authentication
Protocol)
browser, 87
DOS, 194
Telnet/terminal, 27
CIPX compression
browser, 88
DOS, 195
Telnet/terminal, 27
Client for Microsoft Networks, 134
client-to-LAN operation
browser, 86
DOS, 194
Telnet/terminal, 26
CommPlete Communications Server
Index
clocks, synchronizing
browser, 95
DOS, 198
Telnet/terminal, 30
color utility, DOS, 230–33
ComMap for Windows, 145
communication setup
browser, 103
DOS, 214–17
Telnet/terminal, 45–47
compression, CIPX
browser, 88
DOS, 195
Telnet/terminal, 27
compression, data
browser, 87
DOS, 194
Telnet/terminal, 27
computer requirements, 10
COMS14 commands, 142
concurrent logins
browser, 75
DOS, 211, 222
Telnet/terminal, 42
CONFIG.SYS, 185
configuration, initial, 12, 17
connect string table
browser, 122
Telnet/terminal, 63
Connection Manager, 5
browser, 72, 116
DOS, 189, 221
Telnet/terminal, 22, 52
connection status
browser, 122
Telnet/terminal, 63
connection type
LAN-to-LAN
browser, 92
DOS, 202
Telnet/terminal, 35
mapped port, 146
setting
browser, 86
DOS, 194
Telnet/terminal, 26
current activity
browser, 119
DOS, 226
Telnet/terminal, 56
D
data bits, setting
browser, 106
DOS, 216
Telnet/terminal, 47
CommPlete Communications Server
data compression, enabling
browser, 87
DOS, 194
Telnet/terminal, 27
daylight-saving time, setting
browser, 96
DOS, 199
Telnet/terminal, 31
DCD signal, 47, 105, 216
dial on demand, enabling
browser, 87
DOS, 194
Telnet/terminal, 27
dial prefix, setting
browser, 108
DOS, 218
Telnet/terminal, 49
dial suffix, setting
browser, 108
DOS, 218
Telnet/terminal, 49
dial-in operation, 4, 5
dialing modes
browser, 75
DOS, 212, 223
Telnet/terminal, 43
dial-out operation, 4, 5, 20
Dial-Up Networking, 2, 134
disabling a line
browser, 118
DOS, 225
Telnet/terminal, 55
disconnecting a line
browser, 118
DOS, 225
Telnet/terminal, 54
DNS server, setting
browser, 81
DOS, 192
Telnet/terminal, 18, 24
DOS applications, 184–233
E
EIA signals
browser, 127
DOS, 228
Telnet/terminal, 64
enabling a line
browser, 118
DOS, 225
Telnet/terminal, 55
EPD (End Point Descriminator)
browser, 89
DOS, 196
Telnet/Terminal, 29
273
RASExpress User Guide
error messages, 265–70
browser, 72, 116
DOS, 189, 219, 220
Telnet/terminal, 22, 52
Ethernet configuration, 185
Ethernet interface
browser, 81
DOS, 191
Telnet/terminal, 18, 23
Ethernet_II frame type, enabling
browser, 84
DOS, 193
Telnet/terminal, 26
F
filter template, 262–64
browser, 92
DOS, 202
Telnet/terminal, 35
flow control, enabling
browser, 106
DOS, 216
Telnet/terminal, 47
frame type, setting
browser, 81
DOS, 192
Telnet/terminal, 18, 24
FTP
enabling
browser, 100
DOS, 205
Telnet/terminal, 36
requirement, 234
function keys, DOS, 220
G
general statistics
browser, 119
DOS, 226
Telnet/terminal, 56
H
hangup string, setting
browser, 108
DOS, 218
Telnet/terminal, 49
Host List, 4, 5, 65, 128, 228
displaying
browser, 72, 116
DOS, 189, 221
Telnet/terminal, 22, 52
274
I
idle timeout
browser, 91
DOS, 201
Telnet/terminal, 34
inbound users list
browser, 128
DOS, 228
Telnet/terminal, 65
initial configuration of RASExpress, 12, 17
initialization strings, setting
browser, 108
DOS, 218
Telnet/terminal, 49
Install Options window, 185
INT14, 139, 140
INT6B, 4
Internet, 2
IP protocol, 7, 190
access, enabling
browser, 80
DOS, 191
Telnet/terminal, 17, 23
address mask, setting, 7
browser, 81, 88
DOS, 191, 195
Telnet/terminal, 18, 23, 28
address overview, 7
addresses, allocating
browser, 81
DOS, 192
Telnet/terminal, 18, 24
default gateway
browser, 81
DOS, 191
Telnet/terminal, 18, 23
default route, setting
browser, 81
DOS, 191
Telnet/terminal, 18, 23
local address, setting
browser, 88
DOS, 195
Telnet/terminal, 28
network address, setting
browser, 81
DOS, 191
Telnet/terminal, 18, 23
port address display
browser, 128
DOS, 228
Telnet/terminal, 65
port statistics
browser, 126
DOS, 226
Telnet/terminal, 55, 61
CommPlete Communications Server
Index
remote address, setting
browser, 88
DOS, 195
Telnet/terminal, 28
RIP
browser, 81
DOS, 191
Telnet/terminal, 18, 23
routing configuration
browser, 80
DOS, 190
Telnet/terminal, 17, 23
routing information
browser, 125
Telnet/terminal, 58
IPCP protocol, enabling
browser, 88
DOS, 195
Telnet/terminal, 28
IPX protocol
enabling
browser, 83
DOS, 192
Telnet/terminal, 25
node number, setting
browser, 87
DOS, 195
Telnet/terminal, 27
port address display
browser, 128
DOS, 228
Telnet/terminal, 65
port statistics
browser, 126
Telnet/terminal, 55, 61
remote access, configuring
browser, 83
DOS, 192
Telnet/terminal, 25
routing statistics
browser, 123
Telnet/terminal, 59
SAP information
browser, 124
Telnet/terminal, 60
IPXCP protocol, enabling
browser, 87
DOS, 195
Telnet/terminal, 27
IRQ number, setting
browser, 103, 104, 106
DOS, 215, 217
Telnet/terminal, 45, 48
ISDN configuration
browser, 89, 106
DOS, 196, 217
Telnet/terminal, 28, 47
CommPlete Communications Server
ISI card configuration
browser, 103
DOS, 214
Telnet/terminal, 45
L
LAN operation, 4
LAN-to-LAN operation
browser, 86, 87, 92
DOS, 194, 202
Telnet/terminal, 26, 27, 35
LCP (Link Control Protocol) statistics
browser, 120
DOS, 227
Telnet/terminal, 60
line control
browser, 117–18
DOS, 225
Telnet/terminal, 54–55
line information, editing
browser, 105
DOS, 215
Telnet/terminal, 46–47
line permissions
browser, 76
DOS, 212, 223
Telnet/terminal, 43
line setup
browser, 105
DOS, 215
Telnet/terminal, 46–47
line statistics
browser, 126, 129, 130
Telnet/terminal, 55, 64
line usage statistics
browser, 121
Telnet/terminal, 62
line utilization
browser, 129
Telnet/terminal, 63
log status information, 53
logging server activity
browser, 71, 72, 116
DOS, 189, 220
Telnet/terminal, 22, 51
login permissions
browser, 77
DOS, 214, 224
Telnet/terminal, 42, 44
logins, concurrent
browser, 75
DOS, 211, 222
Telnet/terminal, 42
275
RASExpress User Guide
M
MAC layer bridging configuration
browser, 90
DOS, 197
Telnet/terminal, 29
managing a RASExpress server
browser, 115–29
DOS, 219–29
Telnet/terminal, 16–65, 51–65
mask, address
browser, 81
DOS, 191
Telnet/terminal, 18, 23
mask, address, setting
browser, 88
DOS, 195
Telnet/terminal, 28
MCSIWSN redirector, 4, 5, 138–43
as INT14 redirector, 141–43
basic operation, 139
command line operation, 139–41
COMS14 commands, 142
installation, 138
message file
browser, 72, 116
DOS, 189, 221
Telnet/terminal, 22, 52
modem configuration
browser, 107
DOS, 217–18
Telnet/terminal, 48–49
modes permissions
browser, 75
DOS, 212, 223
Telnet/terminal, 43
MRU (Maximum Receive Unit), setting
browser, 87
DOS, 194
Telnet/terminal, 26
MultiChassis Multilink setup
browser, 89
DOS, 196
Telnet/terminal, 29
Multilink PPP configuration
browser, 89
DOS, 196
Telnet/terminal, 28
N
NASI, 140
NCP (Network Control Protocol) statistics
browser, 120
DOS, 227
Telnet/terminal, 60
276
NetBIOS, 29, 90, 197
enabling
browser, 83, 88
DOS, 193, 195
Telnet/terminal, 25, 27
NetWare, 134
network interface, 185
network interface card (NIC), 6
network number
automatic detection
browser, 83
DOS, 193
Telnet/terminal, 25
setting
browser, 87
DOS, 195
Telnet/terminal, 27
NIC configuration, 185
Novell NetWare, 185
O
OSPF configuration
browser, 109–14
DOS, 207–9
Telnet/terminal, 38–40
out of service, setting line
browser, 118
DOS, 225
Telnet/terminal, 55
overview of RASExpress, 2, 4–6
P
PAP (Password Authentication Protocol)
browser, 87
DOS, 194
Telnet/terminal, 27
parity type
browser, 106
DOS, 216
Telnet/terminal, 47
password, assigning
browser, 71
DOS, 188
Telnet/terminal, 22
password, user
browser, 87
DOS, 194
Telnet/terminal, 27
permissions, user
browser, 75–77
DOS, 212–14, 222
Telnet/terminal, 42–45
physical port configuration
browser, 93
DOS, 203
Telnet/terminal, 36
CommPlete Communications Server
Index
port addresses display
browser, 128
DOS, 228
Telnet/terminal, 65
port configuration
browser, 91, 93, 105
DOS, 201, 203
Telnet/terminal, 34, 36, 46–47
port control
browser, 117–18
DOS, 225
Telnet/terminal, 54–55
port setup
DOS, 215
PPP protocol
configuration
browser, 85–88
DOS, 193–96
Telnet/terminal, 26–28
enabling detection of
browser, 92
DOS, 202
Telnet/terminal, 34
statistics
DOS, 227
Telnet/terminal, 60
PPTP (Point to Point Tunneling Protocol)
browser, 77, 92
DOS, 202, 214, 225
Telnet/terminal, 35, 45
PRI configuration
browser, 106
DOS, 217
Telnet/terminal, 47
primary name server, setting
browser, 81
DOS, 191
Telnet/terminal, 18, 23
protocol permissions
browser, 76
DOS, 213, 223
Telnet/terminal, 43
Q
quick configuration procedure, 12, 17
R
RADIUS security, 38, 102, 207. See also security
configuration
RASCON, 187–218
RASEXP, 219–29
RASExpress Server Configuration utility, 185, 187–218
RASExpress server defined, 16
RASExpress server operation
browser, 68–69
DOS, 219–29
CommPlete Communications Server
rebooting the server
browser, 118
Telnet/terminal, 53
redirection, 4, 5, 138–43, 139
reinstalling RASExpress, 184–86
remote control operation, 4
browser, 75
DOS, 212, 223
remote node operation, 4, 134
browser, 75
DOS, 212, 223
remote user number
browser, 74
DOS, 211, 222
Telnet/terminal, 41
requirements, computer, 10
Reset SBC Processors option
browser, 129
DOS, 229
Telnet/terminal, 65
resetting a line
browser, 118
DOS, 225
Telnet/terminal, 54
result codes, setting
browser, 109
DOS, 218
Telnet/terminal, 49
RIP (Routing Information Protocol)
browser, 81
DOS, 191
Telnet/terminal, 18, 23
RLOGIN protocol
browser, 75, 77, 92, 100
DOS, 37, 202, 205, 212, 214, 223, 224
Telnet/terminal, 34, 42, 44
router, 8, 23, 81, 191
information
browser, 125
Telnet/terminal, 58
statistics
browser, 120
DOS, 227
Telnet/terminal, 57
routing IPX packets
browser, 84
DOS, 193
Telnet/terminal, 25
RS-232 signals
browser, 127
DOS, 228
Telnet/terminal, 64
RTS/CTS flow control, enabling
browser, 106
DOS, 216
Telnet/terminal, 47
277
RASExpress User Guide
S
SAP information
browser, 124
Telnet/terminal, 60
screen saver
browser, 72, 116
DOS, 189, 221
Telnet/terminal, 22, 52
script file, selecting
browser, 92
DOS, 202
Telnet/terminal, 35
script language, 149–81
command format, 154
command summary, 155–60
commands
atof, 161
atoi, 161
baudrate, 162
ceil, 162
connected, 163
databits, 163
dec, 163
delete, 164
diskfree, 164
display, 164
dropconnection, 165
endproc, 165
exit, 165
fclose, 165
fcreate, 166
fdisplay, 167
fgetc, 168
fgets, 168
findfirst, 168
findnext, 169
floor, 169
fopen, 169
fputc, 169
fputs, 170
fread, 170
fseek, 170
ftoa, 170
fwrite, 171
getfileattr, 171
getfiledate, 171
getfilesize, 172
getfiletime, 173
hangup, 173
inc, 173
isfile, 173
itoa, 174
mkdir, 174
mod, 174
parity, 175
proc, 175
quit, 175
278
rgetc, 176
rmdir, 176
setfileattr, 177
setfiledate, 177
setfiletime, 177
stopbits, 177
strcat, 177
strcmp, 178
strcpy, 178
strfmt, 178
strlen, 178
tolower, 179
toupper, 180
transmit, 180
wait, 180
waitfor, 181
format characters, 151
overview, 150–53
secondary name server, setting
browser, 81
DOS, 192
Telnet/terminal, 18, 24
security, 6
browser, 74
DOS, 211, 222
Telnet/terminal, 42
security configuration
browser, 87, 101
DOS, 194, 206–7
Telnet/terminal, 27, 37–38
serial line control
browser, 117–18
DOS, 225
Telnet/terminal, 54–55
server configuration
browser, 71
DOS, 188–214, 220
Telnet/terminal, 21–49
server information
browser, 68, 116
DOS, 219, 220
Telnet/terminal, 51–53, 54–55
server name, assigning
browser, 71
DOS, 188
Telnet/terminal, 22
server statistics
browser, 119–21
DOS, 226–28
Telnet/terminal, 52
session timeout
browser, 91
DOS, 201
Telnet/terminal, 34
SETCOLOR command, 230
shared secret. See security configuration
shutting down the server
DOS, 226
CommPlete Communications Server
Index
SLIP (Serial Line Internet Protocol), enabling
browser, 86
DOS, 194
Telnet/terminal, 26
SMTP configuration
browser, 98
DOS, 204
Telnet/terminal, 33
SNAP frame type, enabling
browser, 84
DOS, 193
Telnet/terminal, 26
SNMP configuration
browser, 97
DOS, 200
Telnet/terminal, 32
SNTP configuration
browser, 95
DOS, 198
Telnet/terminal, 30
Spanning Tree bridging, enabling
browser, 90
DOS, 197
Telnet/terminal, 29
specifications, 9–10
static IP address
browser, 75
DOS, 211, 222
Telnet/terminal, 42
static routes
browser, 82
DOS, 192
Telnet/terminal, 19, 24
statistics
ARP
browser, 124
Telnet/terminal, 57
calls per port
browser, 121
Telnet/terminal, 62
DOS interface, 226–28
general
browser, 119
DOS, 226
Telnet/terminal, 56
IP port
browser, 126
Telnet/terminal, 55, 61
IPX port
browser, 126
Telnet/terminal, 55, 61
IPX routing
browser, 123
Telnet/terminal, 59
line usage
browser, 121
Telnet/terminal, 62
PPP
CommPlete Communications Server
DOS, 227
Telnet/terminal, 60
router
browser, 120
DOS, 227
Telnet/terminal, 57
summary
browser, 123
TCP
browser, 125, 131
Telnet/terminal, 58, 59
Telnet/terminal interface, 52, 56–61
UDP
browser, 125
Telnet/terminal, 58
stop bits
browser, 106
DOS, 216
Telnet/terminal, 47
string options, setting
browser, 109
DOS, 218
Telnet/terminal, 49
subnet mask, setting
browser, 81, 88
DOS, 191, 195
Telnet/terminal, 18, 23, 28
supervisor password, assigning
browser, 71
DOS, 188
Telnet/terminal, 22
synchronizing computer clocks
browser, 95
DOS, 198
Telnet/terminal, 30
T
TACACS+ security. See security configuration
TCP
raw connection
browser, 93
DOS, 203
Telnet/terminal, 36
statistics
browser, 125, 131
Telnet/terminal, 58, 59
TCP/IP protocol, 7
Telnet, 5
browser, 75, 77, 92
DOS, 202, 212, 214, 223, 224
management of RASExpress, 16–65
Telnet/terminal, 34, 42, 44
Telnet commands, 236–61
Telnet configuration
browser, 93, 94
DOS, 197, 203
Telnet/terminal, 30, 36
279
RASExpress User Guide
terminal management of RASExpress, 16–65
TFTP
enabling
browser, 100
DOS, 205
Telnet/terminal, 36
requirement, 234
throughput statistics
browser, 119
DOS, 226
Telnet/terminal, 56
time limit, setting
browser, 77
DOS, 214, 224
Telnet/terminal, 44
time limits, user
browser, 76
DOS, 213, 224
Telnet/terminal, 44
time of day logins
browser, 76
DOS, 213, 224
Telnet/terminal, 44
time, changing server
browser, 116
Telnet/terminal, 53
timeouts
browser, 91
DOS, 201
Telnet/terminal, 34
tunneling protocol
browser, 77, 92
DOS, 202, 214, 225
Telnet/terminal, 35, 45
Type_II frame type, enabling
browser, 84
DOS, 193
Telnet/terminal, 26
typographic conventions, 3
user configuration
browser, 73
DOS, 210–14
Telnet/terminal, 41–45
user information
browser, 74, 117
DOS, 210, 221–25
Telnet/terminal, 53
user name
displaying
browser, 69
specifying
browser, 74, 87
DOS, 194, 210
Telnet/terminal, 27, 41
user password, specifying
browser, 74
DOS, 210
Telnet/terminal, 41
user permissions
browser, 75–77
DOS, 212–14
Telnet/terminal, 42–45
users, inbound
browser, 128
DOS, 228
Telnet/terminal, 65
V
version information
Telnet/terminal, 52
virtual port configuration
browser, 91
DOS, 201
Telnet/terminal, 34
VJ compression, enabling
browser, 88
DOS, 195
Telnet/terminal, 28
U
UDP
broadcast packets, enabling
browser, 88
DOS, 196
Telnet/terminal, 28
statistics
browser, 125
Telnet/terminal, 58
UPGRADE.LOG file, 235
upgrading RASExpress, 234
280
W
Web browser management of RASExpress servers,
68–129
enabling
browser, 100
DOS, 205
Telnet/terminal, 36
WinMCSI redirector, 4, 5, 144–48
installation, 144–45
operation, 145–48
CommPlete Communications Server
This page left intentionally blank.
82065605