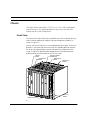
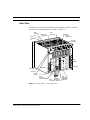
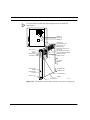
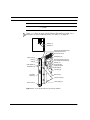
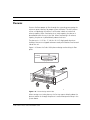
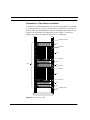
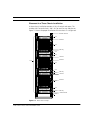
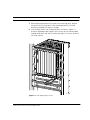
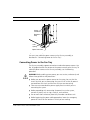
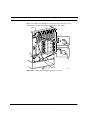
1
Cuda 12000 IP Access Switch
Installation Guide
Release 3.0
PART NO. 780-000002-02
PUBLISHED SEPTEMBER 2001
http://www.adc.com
ADC Telecommunications, Inc.
8 Technology Drive
Westborough, MA 01581
ADC Telecommunications, Inc. (herein referred to as “ADC”) may revise this manual at any time without notice.
All statements, technical information, and recommendations contained herein are believed to be accurate and
reliable at the time of publication but are presented without any warranty of any kind, express or implied,
(including the warranties of merchantability and fitness and against infringement or interferrence with your
enjoyment of the information) and you are solely responsible for your use of this manual with any equipment
or software described herein.
This manual (in whole or in part, including all files, data, documentation, and digital and printed copies made
therefrom) is protected by United States copyright laws, international treaties and all other applicable national
or international laws. With the exception of materials printed for use by a user who is authorized by separate
license from ADC, this manual may not, in whole or part, be modified, excerpted, copied, photocopied,
translated, or reduced to any electronic medium or machine readable form, without ADC’s written consent
obtained prior thereto.
The CUDA 12000 is listed to UL 1950 Third Edition and CAN/CSA-C22.2 No. 950-95 Third Edition compliance.
The following information is for compliance by Class A devices with FCC regulations: the equipment described
in this manual has been tested and found to comply with the limits for a Class A digital device, pursuant to part
15 of the FCC regulations. These limits are designed to provide reasonable protection against harmful
interference when the equipment is operated in a commercial environment. This equipment generates, uses,
and can radiate radio-frequency energy and, if not installed and used in accordance with the instruction
manual, may cause harmful interference to radio communications. Operation of this equipment in a residential
area is likely to cause harmful interference, in which case you will be required to correct the interference at your
own expense.
You can determine whether your equipment is causing interference by turning it off. If the interference stops, it
was probably caused by the equipment or one of its peripheral devices. If the equipment causes interference to
radio or television reception, try to correct the interference by using one or more of the following methods.
■
Turn television or radio antenna until the interference stops.
■
Move equipment to one side or the other of the television or radio.
■
Move equipment farther away from the television or radio.
■
Plug equipment into an outlet that is on a different circuit from the television or radio. (That is, make
certain the equipment and the television or radio are on circuits controlled by different circuit breakers or
fuses.)
Modifications to this equipment that are not authorized by ADC could void the FCC certification and UL
approval and negate your authority to operate the equipment.
This manual is provided by ADC on an ”AS IS, WITH ALL FAULTS” basis, without any representation or
warranty of any kind, either express or implied, including without limitation any representations or
endorsements regarding use of, the results of, or performance of the equipment or software, its
appropriateness, accuracy, reliability, or correctness. You assume the entire risk as to the use of this
manual . ADC does not assume liability for the use of this manual beyond its original purchase price.
In no event will ADC be liable for additional direct or indirect damages including any lost profits, lost
savings, lost revenue or other incidental or consequential damages arising from any defects, or the
use or inability to use this manual or the equipment or software described herein, even if ADC has
been advised of the possibility of such damages.
Cuda 12000, MeshFlow, CudaView, FastFlow Broadband Provisioning Manager and CableOnce are trademarks
of ADC Telecommunications, Inc. CableLabs® is a registered trademark of Cable Television Laboratories, Inc.
Java® is a registered trademark of Sun Microsystems, Inc. in the United States and other countries. All Martek
trademarks depicted or contained herein are the property of Martek Power, Inc.
The Cuda 12000 includes RSA BSAFE cryptographic or security protocol software from RSA security. The Cuda
12000 contains an integrated DOCSIS-compliant provisioning server. Use of this provisioning functionality is
restricted to licensed authorization. ADC will not support provisioning for for your use thereof if you are not
authorized by the appropriate software license to use such provisioning.
All other company and product names mentioned herein may be trademarks of their respective companies.
The equipment and software described herein may be covered by an ADC warranty statement. You may obtain a
copy of the applicable warranty by referring to www.adc.com/cable/support and selecting the technical assistance
link. What follows is a summary of the warranty statement. The summary is not binding on ADC and is provided to
you merely as a convenience.
The equipment warranty usually lasts twelve (12) months from point of shipment and the software warranty usually
lasts sixty (60) days from the point of shipment. The software warranty covers both functionality as well as the
media on which the software is delivered. Neither warranty entitles the customer to receive free and unlimited
access for technical assistance. A separate technical support agreement must be purchased for unlimited access to
technical support resources.
The equipment warranty only applies to the cost of a replacement component. It does not include the labor charge
for installation of the replacement component. During the warranty period, warranty claims will be processed on a
10-day return to factory basis. Once the defective component is returned to the factory, ADC’s sole liability under
the equipment warranty shall be either:
■
To repair or to replace, at ADC’s option, the defective equipment component with a new or refurbished
component; or
■
If after repeated efforts ADC is unable to resolve the defect by repair or replacement, to refund the purchase
price of the equipment or component upon return of the defective item.
A working component will be returned to the customer within 10 days after it is received by ADC.
The warranty period for repaired or replaced equipment components shall be the remainder of the original
warranty period for the repaired or replaced item or ninety (90) days, whichever is greater.
Equipment warranty claims can be processed on-line through a web interface or directly by a customer support
representative of ADC. As part of the standard process for issuing a Return Materials Authorization (RMA), the
Customer Support organization will verify all reported failures prior to authorizing a shipment of a replacement
part.
The equipment warranty does not cover any of the following events:
■
The equipment has been subject to abnormal use, abnormal conditions, improper storage, exposure to
moisture or dampness, unauthorized modifications, unauthorized connections, unauthorized repair, misuse,
neglect, abuse, accident, alteration, improper installation, or other events which are not the fault of ADC,
including damage caused by shipping;
■
ADC or an authorized ADC distributor or reseller was not notified by the customer of the equipment defect
during the applicable warranty period.
If the software media is unusable such that the software cannot be loaded onto the equipment, ADC will replace
the media within 1 business day after ADC is notified through Technical Assistance Center.
During the software warranty period, ADC will provide software updates and/or maintenance releases at no
additional charge to resolve any issues where the software does not function according to software specification.
In order to receive on-going software maintenance releases after the 60-day warranty period, the customer must
purchase the base level technical assistance agreement.
The software warranty does not cover any of the following events:
■
Unauthorized modifications to the software or firmware;
■
Unauthorized installation of non-ADC software on the Cuda 12000 platform;
■
ADC or an authorized ADC distributor or reseller was not notified by the customer of the software defect
during the applicable warranty period.
Non-ADC software may be warranted by its developer, owner or other authorized entity as expressly provided in
the documentation accompanying such software.
Failures caused by non-ADC software are not covered by ADC’s warranty and service activities to remedy such
failures will be billed to the customer.
Remote technical assistance will be provided free of charge during the 60-day software warranty period. The hours
for support during the warranty period are Monday through Friday from 8:00am to 5:00pm EST.
Additional hardware and software services are available by purchasing an extended service agreement. Contact
your account representative or call 1-877-227-9783 for further details.
© 2001 ADC Telecommunications, Inc. All Rights Reserved.
CONTENTS
ABOUT THIS GUIDE
Document Objective 9
Audience 9
Document Organization 10
Notations 11
Conventions Used in This Guide 11
Related Documentation 11
Contacting ADC Customer Support 12
1
HARDWARE OVERVIEW
Key Features 13
System Overview 15
The Chassis and Modules 15
Routing Support 16
Backplane Connections 17
The Cooling System 17
Chassis 18
Front View 18
Rear View 19
Interior View 21
Management Module 22
Application Modules 25
Application Module Features 26
Application Module Components 26
DOCSIS Modules 29
1x4 DOCSIS Module 29
1x4 DOCSIS SpectraFlow Module 31
1x6 DOCSIS SpectraFlow Module with Spectrum Management
EuroDOCSIS Modules 35
1x4 EuroDOCSIS Module 35
1x4 EuroDOCSIS SpectraFlow Module 37
33
1x4 EuroDOCSIS SpectraFlow Module with Spectrum
Management 39
Egress Modules 41
Octal 10/100 Ethernet SpectraFlow Modules 41
Gigabit Ethernet SpectraFlow Modules 43
Packet Over SONET (POS) SpectraFlow Modules 46
Fan Tray 49
Replacing the Fan Tray Filtering Screen 50
Plenums 51
Replacing the Plenum Filtering Screen 52
Ethernet Patch Panel 54
2
PREPARING FOR INSTALLATION
Installation Overview 57
Safety Guidelines 58
Safety When Lifting 58
Safety When Rack Mounting 58
Electrical Safety Guidelines and Precautions 59
Avoiding Electrostatic Discharge Damage 59
Site Requirements 60
Pre-Installation Considerations 60
Tools for Installation 61
3
RACK-MOUNTING THE SYSTEM
Rack-Mount Installation Components 63
System Placement in the Rack 64
Placement of a Single-Chassis Installation 65
Placement in a Two-Chassis Installation 66
Placement in a Three-Chassis Installation 67
Rack-Mount Order 68
Rack-Mounting the Intake Plenum 68
Rack-Mounting the Fan Tray 69
Rack-Mounting the Chassis 71
Rack-Mounting the Exhaust Plenum 74
4
INSTALLING MODULES
Determining Module Location 77
Replacing Filler Panels and Backplates
Filler Panels 80
Removing a Filler Panel 80
Replacing a Filler Panel 81
Backplates 83
Removing a Backplate 85
Replacing a Backplate 85
Installing System Modules 87
Removing Modules 90
5
79
CABLING THE SYSTEM
Cabling the Management Module 93
Cabling for Serial Access 94
Cabling COM 1 for Terminal Access 94
Cabling COM 1 for Modem Access 95
Cabling COM 2 for Terminal Access 96
Cabling COM 2 for Modem Access 97
Cabling for Network Access
98
Cabling DOCSIS and EuroDOCSIS Modules 100
Cabling Octal 10/100 Ethernet SpectraFlow Modules 103
Cabling Gigabit Ethernet SpectraFlow and POS SpectraFlow Modules
Connecting Power 109
Connecting Power to the Chassis 110
Connecting Power to the Fan Tray 115
Replacing Fan Tray Fuse Cartridges 119
Cabling for System Fault Reporting 120
6
POWERING ON AND POWERING OFF
Powering On the System 125
Observing LED Activity
126
Understanding the Initialization Process
131
Powering Off the System 131
Basic Troubleshooting 133
127
107
A
CONFIGURING NETWORK ACCESS
Network Access 135
Logging On 135
Configuring Network Access 136
Security Considerations 137
Default System Accounts 137
IPChains 138
B
SYSTEM SPECIFICATIONS AND COMPLIANCE
C
MARTEK POWER SUPPLY
Front Panel LEDs 141
Basic Troubleshooting 142
D
WIRING DIAGRAMS
Cabling for Serial Access 145
COM Terminal Cable Assembly 145
COM Modem Cable Assembly 146
Cabling for Fault Reporting 147
2-Way Cable for Cuda 12000 and Fan Tray 147
3-Way Cable for Cuda 12000, Fan Tray and Martek 4KW Power
Supply 148
E
GLOSSARY
INDEX
ABOUT THIS GUIDE
This chapter introduces you to the Cuda 12000 IP Access Switch Installation
Guide and contains:
■
Document Objective
■
Audience
■
Document Organization
■
Notations
■
Related Documentation
■
Contacting ADC Customer Support
Document Objective
This guide provides information on how to install and power on the Cuda
12000.
Audience
This guide is intended for a network administrator who is responsible for
installing the Cuda 12000 within a cable television head-end site. It assumes
a working knowledge of network operations, although it does not assume
prior knowledge of ADC’s network equipment.
10
CHAPTER : ABOUT THIS GUIDE
Document Organization
The Cuda 12000 IP Access Switch Installation Guide is organized as follows:
■
Chapter 1: Hardware Overview — Provides a physical and functional
overview of the Cuda 12000 and system components.
■
Chapter 2: Preparing for Installation — Describes site requirements,
safety information and other considerations that you should be aware of
before installing the system.
■
Chapter 3: Rack-Mounting the System — Provides step-by-step
procedures for rack-mounting the chassis and related system
components.
■
Chapter 4: Installing Modules — Provides information and procedures
on how to install and replace system modules.
■
Chapter 5: Cabling the System — Provides step-by-step procedures for
cabling system components and power sources.
■
Chapter 6: Powering On and Powering Off — Provides information
on system initialization processes and includes explanations of status
messages and LED activity upon boot up.
■
Appendix A: Configuring Network Access — Contains information
on getting started using the Cuda 12000.
■
Appendix B: System Specifications and Compliance — Contains
information on Cuda 12000 hardware specifications and compliance.
■
Appendix C: Martek Power Supply— Contains an explanation of the
front panel LEDs for the optional Martek Power Supply and some basic
troubleshooting techniques.
■
Appendix D: Wiring Diagrams — Contains pin-outs for serial access
cabling and fault reporting cabling.
■
Appendix E: Glossary — Provides a list of terms with definitions.
ADC Telecommunications, Inc.
Notations
11
Notations
This table lists the text notations that are used throughout the Cuda 12000
documentation set.
Icon
Notice Type
Description
Information Note
Important or useful information,
such as features or instructions
Caution
Information that alerts you to
potential damage to the system
Warning
Information that alerts you to
potential personal injury
Conventions Used in This Guide
■
Text formatted in italics indicates information that provides important tips
or warnings.
■
A description of each numbered callout in the module graphics,
excluding the Management module, can be found in Table 1-2 on page
26.
Related Documentation
For more information on the Cuda 12000, see these publications:
■
Cuda 12000 IP Access Switch CudaView Administration Guide — A
procedural guide containing all the information that you need to
configure the system using the graphical user interface (GUI).
■
Cuda 12000 IP Access Switch CLI-based Administration Guide — A
procedural guide containing all the information that you need to
configure the system using the command line interface (CLI).
■
Cuda 12000 IP Access Switch CLI Reference Guide — A reference
guide containing all the information about the commands used to
configure and manage the Cuda 12000 using the command line
interface (CLI).
Cuda 12000 IP Access Switch Installation Guide
12
CHAPTER : ABOUT THIS GUIDE
Contacting ADC Customer Support
To help you resolve any issues that you may encounter when installing,
maintaining, and operating the Cuda 12000, you can reach ADC Customer
Support as follows:
■
Phone: (877) 227-9783 (option 4)
■
E-mail: [email protected]
■
Customer Support Web Site — To access ADC Customer Support on the
Web, go to http://www.adc.com/cable/support then select the
Technical Assistance Center link. You can then report the problem online,
search the ADC Customer Support database for known problems and
solutions, and check Frequently Asked Questions.
When contacting ADC for technical assistance, be sure to have this
information ready:
■
List of system hardware and software components, including revision
levels and serial numbers.
■
Diagnostic error messages.
■
Details about recent system configuration changes, if applicable.
ADC Telecommunications, Inc.
1
HARDWARE OVERVIEW
This chapter contains an overview of the Cuda 12000 hardware. The physical
and functional descriptions of the Cuda 12000 hardware components and
related features are illustrated. The following sections are included:
■
Key Features
■
System Overview
■
Chassis
■
Management Module
■
Application Modules
■
Fan Tray
■
Plenums
■
Ethernet Patch Panel
Key Features
The Cuda 12000 provides the following hardware:
Feature
Description
Total System
Redundancy
The entire system is architected for full redundancy to
provide a highly fault-tolerant solution that includes:
■
Dual-Power Sources: The system can be connected to
two -48 VDC power sources to ensure uninterrupted
power availability.
■
MeshFlowTM Fabric: Every application module is
connected to every other application module via a
high-speed serial mesh. This mesh supports a peak
throughput capacity of 204.6 Gbps. (132 x 1.55 Gbps.)
14
CHAPTER 1: HARDWARE OVERVIEW
Feature
Description
■
Dual Management modules: The Cuda 12000 supports
up to two Management modules to ensure
uninterrupted system management.
■
Redundant Management Buses: The backplane consists
of a 100-Mbps management BUS with redundant
channels, over which the Management modules and
system application modules communicate.
Distributed
Application modules consist of a network processor with
Processing Power dedicated Synchronous Burst SRAM. Unlike other
systems that use a central system processor, processing
power and memory scale with every application module
that you install in the chassis.
CableOnceTM
Network
Connections
The system supports a CableOnce design that allows you
to cable directly to the appropriate connector fixed to
the rear of the chassis, or slot backplate. Cabling directly
to these stationary connectors, instead of to the
modules themselves, allows module replacement
without recabling. You remove a module and then insert
a new one while the cables remain attached to the
system. This blind-mate design also lets you pre-cable
chassis slots to prepare them in advance for module
installation at a later time.
Hot-swappable
Modules
All system modules can be replaced while the system is
running without interruption to other interconnected
networks. Both application modules and Management
modules are hot-swappable.
ADC Telecommunications, Inc.
System Overview
15
System Overview
The Cuda 12000 is intended for installation at your cable head-end site, or at
your distribution hub, where it switches and routes IP traffic between your
cable plant, IP backbone, and external networks.
The Cuda 12000 requires a -48 VDC power source for proper operation.
The Chassis and Modules
The Cuda 12000 offers a modular architecture that supports the following
modules:
■
Management Module
■
DOCSIS Modules
- 1x4 DOCSIS Module
- 1x4 DOCSIS SpectraFlow Module
- 1x6 DOCSIS SpectraFlow Module with Spectrum Management
■
EuroDOCSIS Modules
- 1x4 EuroDOCSIS Module
- 1x4 EuroDOCSIS SpectraFlow Module
- 1x4 EuroDOCSIS SpectraFlow Module with Spectrum Management
■
Egress Modules
- Octal 10/100 Ethernet SpectraFlow Module
- Gigabit Ethernet SpectraFlow Module
- Packet over SONET (POS) SpectraFlow Module
■
Cuda Protocol Analyzer (CPA) Module - refer to the Cuda Protocol
Analyzer User’s Guide for more information.
DOCSIS (Data Over Cable Service Interface Specification) is a CableLabs®
standard for inter operability with DOCSIS 1.0 and DOCSIS 1.1-based cable
modems. EuroDOCSIS (European Data Over Cable Service Interface
Specification) is a CableLabs® and tComLabs® standard.
DOCSIS and EuroDOCSIS modules serve as CMTS interface modules with
your HFC network using upstream and downstream ports. Upstream ports
Cuda 12000 IP Access Switch Installation Guide
16
CHAPTER 1: HARDWARE OVERVIEW
support both QPSK and 16 QAM modulation; the downstream port supports
64/256 QAM modulation. Each application module has an independent
network processor and Synchronous Burst RAM. As a result, processing
power and memory scale with every module that you install in the chassis.
DC-to-DC converters mounted on each module down-convert the -48 VDC
power distribution and restrict power failures to a module level.
Routing Support
The route server module functions in a dual role as both a forwarding device
and a route server. The configured route server is an egress (non-DOCSIS)
module, such as an Octal 10/100 Ethernet SpectraFlow Module, Gigabit
Ethernet SpectraFlow Module, or Packet over SONET (POS) SpectraFlow
Module.
While maintaining its original role as a forwarding module, the route server
maintains a central routing table. This module then distributes the routing
table to other application modules upon initialization, and incrementally
updates the forwarding tables as new routes are discovered. Distributed
forwarding tables on each application module provide an added level of fault
tolerance; should the Management module or another application module
fail, the existing operational modules forward traffic without interruption.
A minimum system configuration includes:
■
A single Management module.
■
A DOCSIS or EuroDOCSIS module.
■
An egress (non-DOCSIS) module, such as 10/100 Ethernet SpectraFlow,
Gigabit Ethernet SpectraFlow, or Packet over SONET (POS) SpectraFlow,
configured as a route server.
ADC Telecommunications, Inc.
System Overview
17
Backplane Connections
Each module slides into a chassis slot and connects directly to the backplane,
where each gains connection to a redundant 100 Mbps management BUS, a
high-speed serial mesh, redundant power BUSes, and various other
components. The management BUS consists of dual 100 Mbps management
channels over which the system Management modules and the application
modules communicate.
The Cooling System
The cooling system for the Cuda 12000 is comprised of a fan tray
augmented by plenums. The fan tray is comprised of three hot-swappable
fan modules. Each fan module within the assembly consists of two five-inch
fans. These six fans provide system cooling for a single chassis.
A fan tray is rack-mounted beneath each chassis in the rack and is designed
to utilize plenums to ensure adequate air flow through the system. A plenum
rack-mounted directly beneath each fan tray serves as the intake plenum to
ensure adequate airflow into the system. Another plenum mounted above
the chassis serves as the exhaust plenum to ensure proper airflow out of the
system.
Each fan module in the assembly includes an LED on the front panel to
indicate status. Green illumination indicates normal operation. If a fan
should stop rotating or begin rotating too slowly, the LED illuminates red to
indicate failure. In the event of a failure, the affected fan module can be
replaced without interruption to the remaining units. A temperature sensor
within the unit monitors the inlet airflow to ensure that the incoming air
stream is not too warm. If the temperature of the incoming air stream
exceeds acceptable limits, all three LEDs on the front of the fan tray
illuminate red.
Power redundancy provides for two -48 VDC power connectors on the rear
of the fan tray unit. Each fan module within the unit connects directly to a
backplane where it gains connection to two DC voltage distribution
channels.
Cuda 12000 IP Access Switch Installation Guide
18
CHAPTER 1: HARDWARE OVERVIEW
Chassis
The Cuda 12000 is encased in a 15.75”H x 17.1”W x 15.9”D high-grade
aluminum chassis. This section describes the front view, rear view, and
interior view of a Cuda 12000 chassis.
Front View
The front of the Cuda 12000 chassis provides access for installation of up to
twelve network application modules and two Management modules, as
shown in Figure 1-1.
Slots on the front of the chassis are numbered from left to right. Dual circuit
breakers in the lower-right corner of the chassis provide power-on controls
for up to two separate power sources and overcurrent protection of 30
Amps. A single ESD grounding jack located on the circuit breaker panel
provides convenient connection to an ESD wrist strap.
DOCSIS
Module
Packet Over SONET
(POS) Module
Gigabit Ethernet
Module
10/100 Ethernet
Module
Power
Fault
Power
Fault
Status Display
Status Display
Power
Fault
Power
Fault
Read Man
ual
before
actuatin
button g
Status Display
ACTIVE
FDX
Link
100 MB
Port
Keyboard
Keyboard
Mouse
Tx
Rx
LINK
SIG DET
ACTIVITY
BER
LOF
SIG DET
1
2
3
4
5
6
7
8
Power
Fault
Status Display
Read Man
ual
before
actuatin
button g
Power
Fault
Status Display
Status Display
Read Man
ual
before
actuatin
button g
Mouse
Com 1
Com 1
Com 2
Com 2
Video
10/100 Enet
OUT OF
MANAGEBAND
MENT
Active Link
10/100 Enet
Active Link
Rx 0dB
Tx -30d
Management
Modules
OUT OF
MANAGEBAND
MENT
Video
B
ON
1
0
OFF
ON
1
0
OFF
Dual Circuit
Breakers
ESD Grounding Jack
Figure 1-1 Cuda 12000 — Chassis Front View
ADC Telecommunications, Inc.
Chassis
19
Rear View
The rear of the Cuda 12000 provides access to power terminals, network
connectors, and slot backplates, as shown in Figure 1-2.
ESD
Grounding
Jack
BITS Clock
Connectors
(2)
Analog
Connectors
(2)
Cable
Clasps (11)
RJ-21
Ethernet
Ports (J1-J11)
Slot 1 RF
Connectors
J11
J10
J9
J8
J7
J6
J5
J4
J3
J2
J1
Active
Upstream
Downstream
Backplates
Alarms Out
Alarms In
Power
Studs (4)
Earth
Grounding
Studs (2)
Power
Cover
CMTS
Backplate
(Optional)
Figure 1-2 Cuda 12000 — Chassis Rear View
Cuda 12000 IP Access Switch Installation Guide
Fiber
Module
Backplate
(Optional)
BAC_02D
20
CHAPTER 1: HARDWARE OVERVIEW
You can access these components from the rear of the chassis:
Component
Description
Power Studs
Four 1/4” threaded power studs provide
connection to two power sources. A
source/return pair is offered for both power
sources—A and B.
RJ-21 Ethernet Ports
These Champ-style RJ-21 interfaces provide
network connectivity to the octal (8-port) 10/100
Ethernet modules for slots 1 through 11 through
an external cable and patch panel.
Cable Clasps
Eleven cable clasps provide for cable
management and organization on the rear panel.
Earth Grounding Terminals
Two threaded grounding studs support chassis
connections to earth ground using an
anti-rotational lug.
Backplates
Each rear chassis slot is covered with a blank
backplate, or a backplate appropriate to the
application module that resides in the slot.
ESD Grounding Jack
Provides a single ESD grounding jack for
connection to an ESD wrist strap.
Analog Connectors
Two DB-15 receptacles allow for analog
connections for status and alarm monitoring of
fan tray, power supplies, and system events. The
receptacle on the left is for input, the receptacle
on the right is for output.
Building Integrated Timing
Supply (BITS) Clock
Connectors
Optional Feature: Two BNC connectors allow
connection to an external BITS clock.
Slot 1 RF connectors
Slot 1 is shipped DOCSIS/EuroDOCSIS-ready with
a permanently fixed DOCSIS module backplate
containing six upstream ports and two
downstream ports.
Alarms In
This DB-15 receives fault signals from the
connected devices. Facing the rear of the chassis,
this is the serial connector on the right.
Alarms Out
Transmits fault signals to an external indication
device. Facing the rear of the chassis, this is the
serial connector on the left. To connect to an
external alarm indication device, see the
instructions for the device to which you are
cabling.
ADC Telecommunications, Inc.
Chassis
21
Interior View
The chassis interior provides connection to a number of backplane
components, as shown in Figure 1-3.
1
2
3
4
5
6
7
8
9 10 11 12 13 14
FRONT
Mesh
Connector
Management
Chassis I/O
Slot 1
F Connectors
ON
1
0
OFF
ON
1
0
OFF
Figure 1-3 Cuda 12000 -- Chassis Interior View
BAC 42
The chassis interior includes these components:
Component
Description
Mesh connectors
Connects each module to the high-speed serial mesh.
Management
Connects all modules to a 100 Mbps management BUS.
Chassis I/O
Connects each module to the RJ-21 port mounted on the rear
chassis panel for slots 1 through 11.
Slot 1 F Connectors
Provides a ready-to-cable connection to DOCSIS and
EuroDOCSIS modules.
■
■
Cuda 12000 IP Access Switch Installation Guide
The 1x6 DOCSIS SpectraFlow module with Spectrum
Management uses all six upstream F connectors and two
downstream F connectors.
The 1x4 EuroDOCSIS SpectraFlow module with Spectrum
Management uses the top four F connectors (upstream)
and both of the bottom F connectors (downstream).
22
CHAPTER 1: HARDWARE OVERVIEW
Component
Description
■
The 1x4 DOCSIS, 1x4 DOCSIS SpectraFlow, 1x4
EuroDOCSIS, and 1x4 EuroDOCSIS SpectraFlow modules
only use the top four F connectors (upstream) and the
single bottom F connector (downstream). These modules
do not utilize the remaining three F connectors.
Management Module
The Management module (Figure 1-4) controls the operations of the chassis.
It maintains and executes the Cuda 12000 management functionality,
including:
■
DHCP
■
TFTP
■
DNS/DDNS
■
Time of Day
■
Syslog
■
Configuration File Manager
■
LDAP
The Management module supports internal Stratum-3 clock functionality.
The Stratum-3 oscillator is an optional feature that provides a backup for the
external clock source. If the external source should fail, the Cuda 12000’s
internal clock will have the accuracy of a Stratum-3 clock, resulting in a
systematic packet loss of less than one packet per hour.
ADC Telecommunications, Inc.
Management Module
23
Figure 1-4 shows the Cuda 12000 Management module. Table 1-1 describes
the Management module components.
SDRAM (15)
Compact FLASH (13)
Timing and Alarms
Controller (TAC) (21)
Stratum-3
Oscillator (Optional) (22)
Power Supply (17)
Hard Drive (14)
Management
Connector (16)
Power Supply
Components (17)
Ejector Lever (11)
Power
Fault
Status Display
Keyboa
rd
Pentium Processor (12)
Mouse
CMOS Battery Backup (18)
Com 1
Com 2
10/100 Enet
Active Link
Power (1)
Fault (2)
Status Display (3)
Reset Button (4)
Keyboard Connector (5)
Mouse Connector (6)
COM 1(7)
COM 2 (8)
Craft Management
Interface (9)
Video Port (10)
Ejector Lever (11)
OUT OF
MANAGEBAND
MENT
CRMI (19)
Video
Video Adapter (20)
BAC_03B
Figure 1-4 Management Module
Cuda 12000 IP Access Switch Installation Guide
24
CHAPTER 1: HARDWARE OVERVIEW
Table 1-1
Management Module Components
Component
Description
Power (1)
Single green LED that indicates module is
receiving power and the initial startup circuitry is
working.
Fault (2)
Single red LED that indicates fault conditions
exist.
Status display (3)
8-character LED panel that displays module
status.
Reset button (4)
Resets the module.
Keyboard connector (5)
Mini-DIN, 6-pin connector used to attach
keyboard.
Mouse connector (6)
Mini-DIN, 6-pin connector used to attach mouse.
COM 1 (7)
Mini-DIN, 8-pin connector.
COM 2 (8)
Mini-DIN, 8-pin connector.
CRAFT Management
Interface (9)
RJ-45 port for connection to a 10/100 Ethernet
network. Used for out-of-band remote and
diagnostic management access.
Video port (10)
DB-15 Type II video port for connection to
monitor.
Ejector levers (11)
Used to seat or eject modules.
Pentium processor (12)
Module processing unit.
Compact FLASH (13)
Compact FLASH disk socket. Used by the
processor primarily for BIOS, diagnostics and the
latest configuration file. Reserved for future
functionality.
Hard drive (14)
Hard disk used by the Pentium in support of the
Cuda operating system.
SDRAM (15)
Two 128-megabyte DIMMs provide the pentium
with 256 megabytes of synchronous SDRAM for
processing of system management functions.
Management connector (16) Connects the module to a management BUS that
consists of two management channels.
Power supply components
(17)
Includes a DC-to-DC converter that converts the
incoming 48 volt power distribution to
appropriate voltages for individual module
components.
ADC Telecommunications, Inc.
Application Modules
Table 1-1
25
Management Module Components (continued)
Component
Description
CMOS battery backup (18)
Provides 3.3-volt battery backup for boot
parameters.
CRMI (19)
Centralized Resource Management Interface.
Provides miscellaneous board management
functions.
Video adapter (20)
Provides digital-to-analog conversion, video
memory, and video controller functions to
support connection and operation of an external
monitor.
Timing and Alarms
Controller (TAC) (21)
Provides alarm processing for detection of
externally connected fan tray and power
supplies.
Optional Feature: Stratum-3 Oscillator that
supports internal and external clock
synchronization.
Application Modules
The basic application modules meet the specifications outlined within
DOCSIS, and provide the features necessary to offer data over cable services.
This section describes the Cuda 12000 application modules, features of
these modules, and common components shared by the modules.
■
DOCSIS Modules - CMTS that support DOCSIS 1.0 and DOCSIS 1.1, and
provide two-way data communication over your HFC network.
■
EuroDOCSIS Modules - CMTS that support EuroDOCSIS specifications
and provide two-way data communication over your HFC network.
■
Egress Modules:
- Octal 10/100 Ethernet SpectraFlow Modules - Provide 8 autosensing
10/100 Mbps ports for connection to your Ethernet network.
- Gigabit Ethernet SpectraFlow Modules - Provide 1000 Mbps
connections to single mode or multi mode fiber-optic cable.
- Packet Over SONET (POS) SpectraFlow Modules - Support high-speed
transmission of IP data over OC-3 or OC-12 networks.
Cuda 12000 IP Access Switch Installation Guide
26
CHAPTER 1: HARDWARE OVERVIEW
Application Module Features
Some of the application modules support a SpectraFlow and/or Spectrum
Management feature. These two features are described below:
■
SpectraFlow Application Modules
SpectraFlow Modules enable the Cuda 12000 to provide advanced levels
of Quality of Service (QoS) beyond DOCSIS 1.1 throughout the Cuda
12000. Heightened transmission ordering, scheduling, and classification
facilitate SpectraFlow on every application module within the Cuda
12000, ensuring true QoS throughout the chassis.
■
SpectraFlow DOCSIS/EuroDOCSIS Modules with Spectrum
Management (SPM)
Some operators may experience upstream noise in their cable systems
due to external sources such as thunderstorms, electric motors, etc.
Adding SPM to a SpectraFlow DOCSIS/EuroDOCSIS module offers
advanced methods to intelligently avoid these types of noisy interferences
on the system, providing high service availability even in such unplanned
periods of interference. This ensures a transparent migration to a new
channel, offering superior signal quality for the subscriber.
Application Module Components
Each application module consists of a high-speed network processor with
dedicated Synchronous Burst RAM, and a number of other common
components as described in Table 1-2. A detailed illustration of each module
is shown in the sections that follow.
Table 1-2
Common Application Module Components
Component
Description
Power (1)
Single green LED that indicates module is receiving
power.
Fault (2)
Single red LED that indicates fault conditions exist.
Status Display (3)
8-character LED panel that displays module status.
ADC Telecommunications, Inc.
Application Modules
Table 1-2
27
Common Application Module Components (continued)
Component
Description
Reset button (4)
Resets the module.
10/100 Ethernet, Gigabit Ethernet, POS, and
Management modules reboot immediately after you
press the reset button.
For DOCSIS and EuroDOCSIS modules, you must
press the reset button for 5 seconds to initiate
reboot. Pressing the reset button less than 5 seconds
on the DOCSIS or EuroDOCSIS modules, causes the
display to cycle through the upstream frequencies,
ie. US1, US2...US6.
Ejector levers (5)
Used to seat or eject modules.
Pentium processor (6)
Processing unit utilized by these modules:
■
DOCSIS modules
■
EuroDOCSIS modules
■
Any egress (non-DOCSIS/EuroDOCSIS) module
configured for route server operation by ADC.
Compact FLASH (7)
Used by the processors, primarily for BIOS,
diagnostics and the latest configuration file. The
Compact FLASH is configured with two disk
partitions, one partition is used by the Pentium
processor, and the other partition is used by the IXP
1200 processor. Each partition stores configuration
information specific to the processor and board type.
IXP 1200 Network
Processor (8)
Provides line-speed processing of network data.
Synchronous Burst Static Up to 8 MB SIMM. Dedicated to the network
RAM (9)
processor for fast-path processing and storage of the
routing table. 2 Mb of Sync Burst RAM holds up to
32,000 routing entries.
SDRAM (10)
Bank 1 - Up to 256 MB of SDRAM contained in a
144-pin SO DIMM. Used by the network processor.
SDRAM (11)
Bank 2 - 64 MB of SDRAM contained in a 144-pin
SO DIMM. Used by the Pentium II processor
mounted on the reverse side of the board.
Mesh Communication
Chip (12)
(MCC) ASIC that connects the module to every other
module via a high-speed serial link. Connects the
network processor to the high-speed serial mesh.
Mesh Connector (13)
Connects the MCC to the high-speed serial mesh.
Cuda 12000 IP Access Switch Installation Guide
28
CHAPTER 1: HARDWARE OVERVIEW
Table 1-2
Common Application Module Components (continued)
Component
Description
Ethernet Connector (14) Connects the module to the Fast Ethernet BUS on
the backplane.
Management Connector Connects the module to a management BUS that
(15)
consists of two management channels.
Power Supply (16)
Includes a DC-to-DC converter that converts the
incoming 48 VDC power distribution to appropriate
voltages for individual module components.
MAC chip (17)
Responsible for Layer 2 (MAC-layer) functions.
PHY chip (18)
Responsible for OSI Layer 1 (physical layer)
transmit/receive functions.
Note that the Octal 10/100 Ethernet module uses
two chips consisting of four ports each.
Temperature sensor (19) Sends an Interrupt in the event that operating
temperature exceeds the acceptable limit of 70°C.
ADC Telecommunications, Inc.
Application Modules
29
DOCSIS Modules
DOCSIS (Data Over Cable Service Interface Specification) modules interface
with your cable network and support automated registration of
DOCSIS-compliant cable modems. These modules currently support DOCSIS
1.0 and DOCSIS 1.1.
1x4 DOCSIS Module
The 1x4 DOCSIS module offers four upstream RF ports and a single
downstream RF port. The 4 upstream ports each provide up to a 10 Mbps
connection to hybrid fiber coaxial (HFC) cable and support both QPSK and
16 QAM modulation schemes within a frequency range of 5 to 42 MHz.
The single downstream port provides up to a 40 Mbps connection to your
HFC network and supports both 64 and 256 QAM modulation schemes
within a 93 MHz to 855 MHz frequency range. The downstream port is
compliant with ITU J83 Annex B FEC for 6 MHz channelization.
The module is connected to the network by installing a DOCSIS module
backplate on the selected slot, then cabled to the RF connectors attached to
the backplate. Cabling to the backplate and not to the module itself allows
you to remove and replace the module without re-cabling; it also allows you
to cable slots in advance. For information about installing a DOCSIS module
backplate, see “Backplates”on page 83.
These modules are hot-swappable; this means you can remove and replace
the modules with the system powered on and running.
Figure 1-5 shows a 1x4 DOCSIS module. For a description of each numbered
callout, see Table 1-2 on page 26.
Cuda 12000 IP Access Switch Installation Guide
30
CHAPTER 1: HARDWARE OVERVIEW
The 1x4 DOCSIS module has been designed to the DOCSIS 1.0 and DOCISIS
1.1 specifications.
SDRAM (11)
Phy Chip (18)
SDRAM (10)
MAC Chip (17)
Temperature Sensor (19)
Ejector Lever (5)
Power
Fault
Status Display
Power (1)
Fault (2)
Status Display (3)
Reset Button (4)
Mesh Connector (13)
Management (15)
Mesh Communication Chip (12)
Ethernet (14)
IXP 1200 Network Processor (8)
Synchronous Burst Static RAM (9)
Shielded Connector
Upstream
Ports
Pentium II
Processor (6)
Receive Test Port
(Rx 0dB)
Transmit Test Port
(Tx -30dB)
FLASH
Memory (7)
Rx 0dB
Tx -30d
B
Downstream
Port
RF Board
Ejector Lever (5)
Power Supply (16)
BAC_04A
Figure 1-5 1x4 DOCSIS Module
ADC Telecommunications, Inc.
Application Modules
31
1x4 DOCSIS SpectraFlow Module
The 1x4 DOCSIS SpectraFlow module offers four upstream RF ports and a
single downstream RF port. The four upstream ports each provide up to a 10
Mbps connection to hybrid fiber coaxial (HFC) cable and support both QPSK
and 16 QAM modulation schemes within a frequency range of 5 to 42 MHz.
The single downstream port provides up to a 40 Mbps connection to your
HFC network and supports both 64 and 256 QAM modulation schemes
within a 93 MHz to 855 MHz frequency range. The downstream port is
compliant with ITU J83 Annex B FEC for 6 MHz channelization.
The module is connected to the network by installing a DOCSIS module
backplate on the selected slot, then cabled to the RF connectors attached to
the backplate. Cabling to the backplate and not to the module itself allows
you to remove and replace the module without re-cabling; it also allows you
to cable slots in advance. For information about installing a DOCSIS module
backplate, see “Backplates”on page 83.
These modules are SpectraFlow enabled. For information about SpectraFlow,
see “Application Module Features”on page 26.
These modules are hot-swappable; this means you can remove and replace
the modules with the system powered on and running.
Figure 1-6 shows a 1x4 DOCSIS SpectraFlow module. For a description of
each numbered callout, see Table 1-2 on page 26.
Cuda 12000 IP Access Switch Installation Guide
32
CHAPTER 1: HARDWARE OVERVIEW
The 1x4 DOCSIS SpectraFlow module has been designed to the DOCSIS 1.0
and DOCSIS 1.1 specifications.
SDRAM (11)
Phy Chip (18)
SDRAM (10)
MAC Chip (17)
Temperature Sensor (19)
Ejector Lever (5)
Power
Fault
Status Display
Power (1)
Fault (2)
Status Display (3)
Reset Button (4)
Mesh Connector (13)
Management (15)
Mesh Communication Chip (12)
Ethernet (14)
IXP 1200 Network Processor (8)
Synchronous Burst Static RAM (9)
Shielded Connector
Upstream
Ports
Pentium II
Processor (6)
Receive Test Port
(Rx 0dB)
Transmit Test Port
(Tx -30dB)
FLASH
Memory (7)
Rx 0dB
Tx -30d
B
Downstream
Port
RF Board
Ejector Lever (5)
Power Supply (16)
BAC_04A
Figure 1-6 1x4 DOCSIS SpectraFlow Module
ADC Telecommunications, Inc.
Application Modules
33
1x6 DOCSIS SpectraFlow Module with Spectrum
Management
The 1x6 DOCSIS SpectraFlow module with Spectrum Management offers six
upstream RF ports, which increases the system’s upstream port density, and
two downstream RF ports. The module contains the internal RF switching
capability for the upstream path.
The two downstream ports consist of an active port (F2), that is always
activated and contains the downstream carrier, and a failover port (F1), that
is only activated during failover. When configured for redundancy mode, the
maximum transmit output level is 57dBmV.
If the module is not configured for redundancy mode, then port F2 is
unused. Port F1 is then the transmit signal, which has a maximum output
level of 50-61dBmV.
The module is connected to the network by installing a DOCSIS module
backplate on the selected slot, then cabling to the RF connectors attached to
the backplate. Cabling to the backplate and not to the module itself allows
you to remove and replace the module without re-cabling. It also allows you
to cable slots in advance. For information about installing a DOCSIS module
backplate, see “Backplates”on page 83.
These modules are SpectraFlow enabled and support Spectrum
Management. For information about SpectraFlow or Spectrum
Management, see “Application Module Features”on page 26.
These modules are hot-swappable; this means you can remove and replace
the modules with the system powered on and running.
Cuda 12000 IP Access Switch Installation Guide
34
CHAPTER 1: HARDWARE OVERVIEW
Figure 1-7 shows a 1x6 DOCSIS SpectraFlow with Spectrum Management
module. For a description of each numbered callout, see Table 1-2 on
page 26.
SDRAM (11)
Phy Chip (18)
SDRAM (10)
MAC Chip (17)
Temperature Sensor (19)
Ejector Lever (5)
Power
Fault
Status Display
Power (1)
Fault (2)
Status Display (3)
Reset Button (4)
Mesh Connector (13)
Management (15)
Mesh Communication Chip (12)
Ethernet (14)
IXP 1200 Network Processor (8)
Synchronous Burst Static RAM (9)
Processor (6)
Upstream
Ports
Receive Test Port
(Rx 0dB)
Transmit Test Port
(Tx -30dB)
Downstream Port 2
Rx 0dB
Tx -30d
B
Downstream Port 1
FLASH
Memory (7)
Ejector Lever (5)
RF Board
Power Supply (16)
BAC_04B
Figure 1-7 1x6 DOCSIS SpectraFlow Module with Spectrum Management
ADC Telecommunications, Inc.
Application Modules
35
EuroDOCSIS Modules
EuroDOCSIS (European Data Over Cable Service Interface Specification)
modules interface with your cable network and support automated
registration of EuroDOCSIS 1.0-compliant cable modems.
1x4 EuroDOCSIS Module
The 1x4 EuroDOCSIS module offers four upstream RF ports and a single
downstream RF port. The four upstream ports each provide up to a 10 Mbps
connection to hybrid fiber coaxial (HFC) cable and support both QPSK and
16 QAM modulation schemes within a frequency range of 5 to 65 MHz.
The single downstream port provides up to a 40 Mbps connection to your
cable network and supports both 64 and 256 QAM modulation schemes
within a 91 MHz to 858 MHz frequency range. The downstream port is
compliant with ITU J83 Annex A FEC for 8 MHz channelization.
The module is connected to the network by installing a DOCSIS module
backplate on the selected slot, then cabled to the RF connectors attached to
the backplate. Cabling to the backplate and not to the module itself allows
you to remove and replace the module without re-cabling; it also allows you
to cable slots in advance. For information about installing a DOCSIS module
backplate, see “Backplates”on page 83.
These modules are hot-swappable; this means you can remove and replace
the modules with the system powered on and running.
Figure 1-9 shows a 1x4 EuroDOCSIS module. For a description of each
numbered callout, see Table 1-2 on page 26.
Cuda 12000 IP Access Switch Installation Guide
36
CHAPTER 1: HARDWARE OVERVIEW
The 1x4 EuroDOCSIS module has been designed to the EuroDOCSIS
specification.
SDRAM (11)
Phy Chip (18)
SDRAM (10)
MAC Chip (17)
Temperature Sensor (19)
Ejector Lever (5)
Power
Fault
Status Display
Power (1)
Fault (2)
Status Display (3)
Reset Button (4)
Mesh Connector (13)
Management (15)
Mesh Communication Chip (12)
Ethernet (14)
IXP 1200 Network Processor (8)
Synchronous Burst Static RAM (9)
Shielded Connector
Upstream
Ports
Pentium II
Processor (6)
Receive Test Port
(Rx 0dB)
Transmit Test Port
(Tx -30dB)
FLASH
Memory (7)
Rx 0dB
Tx -30d
B
Downstream
Port
RF Board
Ejector Lever (5)
Power Supply (16)
BAC_04A
Figure 1-8 1x4 EuroDOCSIS Module
ADC Telecommunications, Inc.
Application Modules
37
1x4 EuroDOCSIS SpectraFlow Module
The 1x4 EuroDOCSIS SpectraFlow module offers four upstream RF ports and
a single downstream RF port. Each of the four upstream ports provide up to
a 10 Mbps connection to HFC cable and support both QPSK and 16 QAM
modulation schemes within a frequency range of 5 to 65 MHz.
The single downstream port provides up to a 40 Mbps connection to your
cable network and supports both 64 and 256 QAM modulation schemes
within a 91 MHz to 858 MHz frequency range. The downstream port is
compliant with ITU J83 Annex A FEC for 8 MHz channelization.
The module is connected to the network by installing a DOCSIS module
backplate on the selected slot, then cabling to the RF connectors attached to
the backplate. Cabling to the backplate and not to the module itself allows
you to remove and replace the module without re-cabling. It also allows you
to cable slots in advance. For information about installing a DOCSIS module
backplate, see “Backplates” on page 83.
These modules are SpectraFlow enabled. For information about SpectraFlow,
see “Application Module Features”on page 26.
These modules are hot-swappable; this means you can remove and replace
the modules with the system powered on and running.
Figure 1-9 shows a 1x4 EuroDOCSIS SpectraFlow module. For a description
of each numbered callout, see Table 1-2 on page 26.
Cuda 12000 IP Access Switch Installation Guide
38
CHAPTER 1: HARDWARE OVERVIEW
The 1x4 EuroDOCSIS SpectraFlow module has been designed to the
EuroDOCSIS specification.
SDRAM (11)
Phy Chip (18)
SDRAM (10)
MAC Chip (17)
Temperature Sensor (19)
Ejector Lever (5)
Power
Fault
Status Display
Power (1)
Fault (2)
Status Display (3)
Reset Button (4)
Mesh Connector (13)
Management (15)
Mesh Communication Chip (12)
Ethernet (14)
IXP 1200 Network Processor (8)
Synchronous Burst Static RAM (9)
Shielded Connector
Upstream
Ports
Pentium II
Processor (6)
Receive Test Port
(Rx 0dB)
Transmit Test Port
(Tx -30dB)
FLASH
Memory (7)
Rx 0dB
Tx -30d
B
Downstream
Port
RF Board
Ejector Lever (5)
Power Supply (16)
BAC_04A
Figure 1-9 1x4 EuroDOCSIS SpectraFlow Module
ADC Telecommunications, Inc.
Application Modules
39
1x4 EuroDOCSIS SpectraFlow Module with Spectrum
Management
The 1x4 EuroDOCSIS SpectraFlow module with Spectrum Management
offers four upstream RF ports and two downstream RF ports. Each of the 4
upstream ports provide up to a 10 Mbps connection to HFC cable and
support both QPSK and 16 QAM modulation schemes within a frequency
range of 5 to 65 MHz.
The two downstream ports consist of an active port (F2), that is always
activated and contains the downstream carrier, and a failover port (F1), that
is only activated during failover. When configured for redundancy mode, the
maximum transmit output level is 57dBmV.
If the module is not configured for redundancy mode, then port F2 is
unused. Port F1 is then the transmit signal, which has a maximum output
level of 50-61dBmV.
The module is connected to the network by installing a DOCSIS module
backplate on the selected slot, then cabling to the RF connectors attached to
the backplate. Cabling to the backplate and not to the module itself allows
you to remove and replace the module without re-cabling. It also allows you
to cable slots in advance. For information about installing a DOCSIS module
backplate, see “Backplates” on page 83.
These modules are SpectraFlow enabled and support Spectrum
Management. For information about SpectraFlow or Spectrum
Management, see “Application Module Features”on page 26.
These modules are hot-swappable; this means you can remove and replace
the modules with the system powered on and running.
Figure 1-10 shows a 1x4 EuroDOCSIS SpectraFlow module with Spectrum
Management. For a description of each numbered callout, see Table 1-2 on
page 26.
Cuda 12000 IP Access Switch Installation Guide
40
CHAPTER 1: HARDWARE OVERVIEW
The EuroDOCSIS module has been designed to the EuroDOCSIS
specification.
SDRAM (11)
Phy Chip (18)
SDRAM (10)
MAC Chip (17)
Temperature Sensor (19)
Ejector Lever (5)
Power
Fault
Status Display
Power (1)
Fault (2)
Status Display (3)
Reset Button (4)
Mesh Connector (13)
Management (15)
Mesh Communication Chip (12)
Ethernet (14)
IXP 1200 Network Processor (8)
Synchronous Burst Static RAM (9)
Pentium Processor (6)
Shielded Connector
Upstream
Ports
Receive Test Port
(Rx 0dB)
Transmit Test Port
(Tx -30dB)
Downstream Port 2
Rx 0dB
Tx -30d
B
Downstream Port 1
Compact FLASH (7)
Ejector Lever (5)
RF Board
Power Supply (16)
BAC_04C
Figure 1-10 1x4 EuroDOCSIS SpectraFlow Module with Spectrum Management
ADC Telecommunications, Inc.
Application Modules
41
Egress Modules
Each Egress (non-DOCSIS) module has an independent network processor
and Synchronous Burst RAM sources. As a result, processing power and
memory scale with every module that you install in the chassis.
Octal 10/100 Ethernet SpectraFlow Modules
The Octal 10/100 Ethernet SpectraFlow module (Figure 1-11) contains eight
auto negotiating 10/100BASE-TX Fast Ethernet ports that support
connection to UTP Category 5 copper wire. The module auto senses 10/100
Mbps, full duplex, and half duplex connections and complies with all IEEE
802.3u specifications. The module is hot-swappable; this means you can
remove and replace the module with the system powered on and running.
Connection to this module is achieved though the RJ-21 Champ-style
connector mounted on the rear chassis for slots 1 through 11. Cabling to the
RJ-21 connector and not to the module itself allows you to remove and
replace the module without re-cabling. It also allows you to cable slots in
advance.
Chassis slot 12 does not have a RJ-21 connector associated with it and does
not support installation of 10/100 Ethernet SpectraFlow modules.
The module functions as a layer 3 switch and forwards packets at wire speed
on all ports simultaneously; it supports a transmission distance of up to 100
meters.
Table 1-3 Octal 10/100 Ethernet SpectraFlow Module Transmission Range
Wire Type
Transmission Distance
Line Ratio
UTP Cat 5
100 meters
10/100 Mbps
In addition to the common module components found on each application
module, the 10/100 Ethernet SpectraFlow module offers an LED port status
display consisting of eight rows of four LEDs—one row for each Ethernet
port. For each Ethernet interface, these LED status are shown:
LED
Description
ACTIVE
Illuminates when forwarding data.
FDX
Indicates full-duplex link.
LINK
Indicates a valid link to the network.
Cuda 12000 IP Access Switch Installation Guide
42
CHAPTER 1: HARDWARE OVERVIEW
LED
Description
100 MB
Illuminates when link speed is 100 Mbps; otherwise speed
is 10 Mbps.
Figure 1-11 shows an Octal 10/100 Ethernet SpectraFlow module. For a
description of each numbered callout, see Table 1-2 on page 26.
SDRAM (11)
SDRAM (10)
Reserved for Pentium Module (6)
Temperature Sensor (19)
Mesh Connector (13)
Management (15)
Ejector Lever (5)
Power (1)
Fault (2)
Status Display
Status Display (3)
Reset Button (4)
Power
Fault
Read Man
ual
before
actuatin
button g
ACTIVE
FDX
LINK
100 MB
PORT
1
2
3
4
5
6
7
8
Port Status
Display (21)
Mesh Communication Chip (12)
IXP 1200 Network Processor (8)
Ethernet (14)
Power Filter (20)
Synchronous Burst
Static RAM (9)
Phy Chips (18)
MAC Chip (17)
Compact FLASH (7)
Power Supply (16)
Ejector Lever (5)
BAC_20A
Figure 1-11 Octal 10/100 Ethernet SpectraFlow Module
ADC Telecommunications, Inc.
Application Modules
43
Gigabit Ethernet SpectraFlow Modules
The system supports connection to Gigabit Ethernet networks using these
modules:
Gigabit Ethernet
Module
Description
1000BASE-SX
Provides a 1000 Mbps Ethernet connection over 62.5 or
50 micron multi mode fiber-optic cable.
1000BASE-LX
Provides a 1000 Mbps Ethernet connection over 9 micron
single-mode fiber-optic cable and supports a transmission
distance of up to 10 kilometers or more.
These modules connect to the network using an ADC-provided fiber-optic
cable. This fiber optic cable consists of a duplex SC connector on one end
and an AMP MPX connector on the other end. Connect the module to the
network by installing a fiber module backplate on the selected slot, then
inserting the AMP MPX connector into the blind-mate fiber port located on
the backplate. Cabling to the backplate and not to the module itself allows
you to remove and replace the module without re-cabling. It also allows you
to cable slots in advance.
These single-port modules comply with IEEE 802.3z specifications. Table 1-4
shows the transmission ranges for the 1000BASE-SX modules.
Table 1-4 1000BASE-SX Transmission Ranges
Fiber Type
Diameter Wavelength Transmission Optical
(microns) (Nanometers) Distance
Output Power
Input
Sensitivity
Multi mode
50
Multi mode
62.5
850
850
500 meters
220 meters
■
Min: -9.5 dBm
■
Min: -17 dBm
■
Max: -4 dBm
■
Max: 0 dBm
■
Min: -9.5 dBm
■
Min: -17 dBm
■
Max: -4 dBm
■
Max: 0 dBm
Table 1-5 shows the transmission range for the 1000BASE-LX modules.
Cuda 12000 IP Access Switch Installation Guide
44
CHAPTER 1: HARDWARE OVERVIEW
Table 1-5 1000BASE-LX Transmission Ranges
Fiber Type
Diameter
(microns)
Single mode 9
Wavelength Transmission
(Nanometers) Distance
Optical
Output Power
1300
■
Min: -9.5 dBm
■
Min: -20 dBm
■
Max: -3 dBm
■
Max: -3 dBm
10 kilometers
Input
Sensitivity
In addition to the common module components found on each application
module, each Gigabit Ethernet SpectraFlow module includes an LED display
that provides these port status:
Status
Description
Tx
Indicates the module is transmitting a Gigabit Ethernet
packet from the module.
Rx
Indicates the module is receiving a Gigabit Ethernet
packet.
LINK
Indicates a valid connection to the network. Illuminates
when a MAC-layer link is detected.
SIG DET (Signal
Detect)
Indicates a valid signal is detected. Illuminates when
optical energy is detected.
Figure 1-12 shows a Gigabit Ethernet SpectraFlow module. For a description
of each numbered callout, see Table 1-2 on page 26.
ADC Telecommunications, Inc.
Application Modules
SDRAM (11)
SDRAM (10)
Reserved for Pentium Module (6)
Temperature Sensor (19)
Mesh Connector (13)
Management (15)
Ejector Lever (5)
Status Display (3)
Reset Button (4)
Power
Fault
Status Display
Power (1)
Fault (2)
Read Man
ual
before
actuatin
button g
Tx
Rx
LINK
SIG DET
Port Status
Display (21)
Mesh Communication Chip (12)
IXP 1200 Network Processor (8)
Telco Ethernet (14)
Power Filter (20)
Synchronous Burst
Static RAM (9)
Phy Chip (18)
MAC Chip (17)
Optical
Transceiver (22)
Compact FLASH (7)
Power Supply (16)
Ejector Lever (5)
BAC_57A
Figure 1-12 Gigabit Ethernet SpectraFlow Module
Cuda 12000 IP Access Switch Installation Guide
45
46
CHAPTER 1: HARDWARE OVERVIEW
Packet Over SONET (POS) SpectraFlow Modules
The system supports transmission of IP data directly over Synchronous
Optical Network (SONET) to more efficiently utilize bandwidth and leverage
the management, fault-tolerance, and high transmission speeds inherent in
SONET networks.
The system supports connection to SONET networks using these modules:
POS Module
Description
POS OC-3
Provides a 155 Mbps connection to SONET STS-3c or SDH
STM-1 networks.
POS OC-12
Provides a 622 Mbps connection to SONET STS-12c or
SDH STM-4 networks.
POS modules connect to the network using the provided fiber-optic cable.
This fiber optic cable consists of a duplex SC connector on one end and an
AMP MPX connector on the other end. The module is connected to the
network by installing a fiber module backplate on the selected slot, then
inserting the AMP MPX connector into the blind-mate fiber port located on
the backplate. Cabling to the backplate and not to the module itself allows
you to remove and replace the module without re-cabling. It also allows you
to cable slots in advance.
Both OC-3 and OC-12 POS modules are available in a number of
configurations. Table 1-6 shows the available configurations and associated
parameters of OC-3 modules.
Table 1-6 POS OC-3 Configurations
Fiber Type
Diameter
(microns)
Wavelength Transmission Optical
(nanometers) Distance
Output Power
Input
Sensitivity
Multi mode
62.5
1300
Single mode 9
Single mode 9
1300
1300
2 kilometers
15 kilometers
40 kilometers
■
Min: -20 dBm
■
Min: -31 dBm
■
Max: -14 dBm
■
Max: -14 dBm
■
Min: -15 dBm
■
Min: -31 dBm
■
Max: -8 dBm
■
Max: -8 dBm
■
Min: -5 dBm
■
Min: -34 dBm
■
Max: 0 dBm
■
Max: -8 dBm
ADC Telecommunications, Inc.
Application Modules
47
Table 1-7 shows the available configurations and associated parameters of
OC-12 modules.
Table 1-7 OC-12 Configurations
Fiber Type
Diameter
(microns)
Multi mode 62.5
Single
mode
9
Single
mode
9
Wavelength
Transmission
(Nanometers) Distance
Optical
Output Power
1300
■
Min: -20 dBm
■
Min: -26 dBm
■
Max: -14 dBm
■
Max: -14 dBm
■
Min: -15 dBm
■
Min: -28 dBm
■
Max: -8 dBm
■
Max: -7 dBm
■
Min: -5 dBm
■
Min: -34 dBm
■
Max: 0 dBm
■
Max: -8 dBm
1300
1300
500 meters
15 kilometers
40 kilometers
Input
Sensitivity
In addition to the common module components found on each application
module, each POS SpectraFlow module includes an LED display that provides
these port status:
Status
Description
ACTIVITY
Indicates a packet is transmitting from, or received to the
module.
BER (Bit Error Rate) Indicates the BER threshold has been exceeded.
LOF (Loss of Frame) Indicates a loss of frame condition has occurred.
SIG DET (Signal
Detect)
Indicates a valid signal. Illuminates when optical energy is
detected.
Figure 1-13 shows a POS SpectraFlow module. For a description of each
numbered callout, see Table 1-2 on page 26.
Cuda 12000 IP Access Switch Installation Guide
48
CHAPTER 1: HARDWARE OVERVIEW
SDRAM (11)
SDRAM (10)
Reserved for Pentium Module (6)
Temperature Sensor (19)
Mesh Connector (13)
Management (15)
Ejector Lever (5)
Status Display (3)
Reset Button (4)
Power
Fault
Status Display
Power (1)
Fault (2)
Read Man
ual
before
actuatin
button g
ACTIVITY
BER
LOF
SIG DET
Port Status
Display (21)
Mesh Communication Chip (12)
IXP 1200 Network Processor (8)
Telco Ethernet (14)
Power Filter (20)
Synchronous Burst
Static RAM (9)
Phy Chip (18)
MAC Chip (17)
Optical
Transceiver (22)
Compact FLASH (7)
Power Supply (16)
Ejector Lever (5)
BAC_56A
Figure 1-13 POS SpectraFlow Module
ADC Telecommunications, Inc.
Fan Tray
49
Fan Tray
The fan tray for the Cuda 12000, shown in Figure 1-14, contains three
hot-swappable fan modules encased within a 2U, 17.25”W x 3.5”H x
15.5”D aluminum chassis. Each fan module within the assembly contains
two 5-inch fans; these six fans provide cooling for a single chassis.
Three LEDs located on the front panel indicate the operational status of each
fan module within the assembly; green indicates the fan module is
operational; red indicates failure. In case of failure, the affected fan module
can be replaced without interruption to other fan modules within the unit.
LEDs (3)
Thumbscrews (8)
Status
Status
Status
Filtering Screen
(Located behind
Front Panel)
Figure 1-14 Fan Tray
The fan tray draws in cooling air and pushes it up into the above system.
Intake vents on the front panel provide additional air flow. A sensor within
the unit monitors the temperature of the inlet air stream. If the temperature
of the air drawn into the unit is higher than desirable, all three LEDs on the
front of the unit illuminate red to indicate a fault condition. The front panel
is secured in place with eight captive thumbscrews.
The top, bottom, front, and rear of the system must remain unobstructed to
ensure adequate airflow and prevent overheating.
The fan tray must be mounted directly below each Cuda 12000. For
information on the proper placement of the fan tray within the rack, see
“System Placement in the Rack” on page 64.
Cuda 12000 IP Access Switch Installation Guide
50
CHAPTER 1: HARDWARE OVERVIEW
Replacing the Fan Tray Filtering Screen
You should periodically check the filtering screen for an accumulation of dust
and other matter. The fan tray filter catches dust, which can reduce air flow
and over time impact the efficiency and effectiveness of the fans. If the filter
looks dirty, use the following procedure to replace the filtering screen:
1 Loosen the 8 captive screws which secure the front panel to the fan tray.
2 Pull the front panel from the fan tray unit, as shown in Figure 1-15.
3 Slide the filtering screen from the front panel, as shown in Figure 1-15.
4 Slide the replacement filter into the front panel.
5 Align the front panel so the three holes in the panel are aligned with the
LEDs on the fan tray unit. Place the panel against the front of the fan tray
and secure the panel in place by tightening the eight captive screws.
Filtering
Screen
LEDs (3)
Status
Status
Status
Front
Panel
Filtering Screen
Bracket
Captive
Thumbscrews (8)
BAC_46A
Figure 1-15 Removing the Fan Tray Filtering Screen
ADC Telecommunications, Inc.
Plenums
51
Plenums
Plenums facilitate proper air flow through the system by guaranteeing the
minimum space necessary for proper system ventilation. The ADC plenum
utilizes a single design that allows it to function in both an intake and
exhaust capacity. When functioning in an intake capacity, the plenum is
placed below each fan tray in the rack. When functioning in an exhaust
capacity, the plenum is placed directly above the chassis.
The plenum is a 3 1/2”H x 17 1/8 W x 16 1/4”D high-grade aluminum
chamber. Plenums are shipped rackmount-ready with brackets fixed to each
side of the unit.
Figure 1-16 shows the Cuda 12000 plenum design and resulting air flow
paths.
Incoming
Air Stream
Outgoing Air Stream
THIS SID
E UP
BAC_52
Figure 1-16 Plenum Design and Air Flow
When serving as an intake plenum, the fan tray mounts directly above the
plenum to draw air through the plenum’s vented front panel and up in the
system above.
Cuda 12000 IP Access Switch Installation Guide
52
CHAPTER 1: HARDWARE OVERVIEW
A filtering screen is placed immediately behind the vented front panel to
clean the incoming air stream prior to circulation up through the system.
Replacement filters are available through ADC.
When serving as an exhaust plenum, the fan trays mounted directly below
each chassis push air up through the rack-mounted systems and into the
exhaust plenum.
The first chassis installation requires two plenums; one directly above the
chassis, and one below the fan tray. See “System Placement in the Rack” on
page 64 for details regarding the proper component order.
Replacing the Plenum Filtering Screen
To replace this filtering screen, see Figure 1-17 and use this procedure:
1. Loosen the two captive thumbscrews that secure the front panel to the
plenum.
2. Pull the front panel from the plenum unit, as shown in Figure 1-17.
3. The filtering screen sits between the front panel and a slotted aluminum
grid. Remove the filtering screen from behind the front panel.
4. Place the replacement filtering screen onto the slotted grid located at the
front of the intake plenum. The filtering screen has two holes that allow
you to slip the filtering screen over the two screw cylinders attached to
the aluminum grid.
5. Align the front panel so that the two captive thumbscrews located on the
front panel align with the two screw cylinders on the aluminum grid.
Place the panel against the front of the plenum and secure the panel in
place by tightening the two captive screws.
ADC Telecommunications, Inc.
Plenums
THIS SID
E UP
Filtering
Screen
Front
Panel
Figure 1-17 Replacing the Plenum Filtering Screen
Cuda 12000 IP Access Switch Installation Guide
Thumbscrews (2)
53
54
CHAPTER 1: HARDWARE OVERVIEW
Ethernet Patch Panel
If you have an Octal 10/100 Ethernet SpectraFlow Module, a Category 5
Ethernet patch panel unit will need to be mounted in your chassis. The patch
panel contains 24 RJ-45 port locations on the front that connect to your
network. The rear of the patch panel has two RJ-21 ports that connect to the
Octal 10/100 Ethernet SpectraFlow modules.
Figure 1-18 shows a front view of the Ethernet patch panel and Figure 1-19
shows the rear view of the Ethernet patch panel.
Patch Panel
RJ45 Cable
Power
Fault
Power
Fault
Status Display
Status Display
To
Network
Power
Power
Fault
Fault
Status Display
Status Display
Read Man
ual
before
actuating
button
RJ45 Connectors (24)
Active
FDX
Link
100 MB
Port
Keyboard
1
2
3
4
5
6
7
8
Keyboard
Mouse
Mouse
Com 1
Com2
Com 1
Com 2
10/100 Enet
Video
Active Link
10/100 Enet
Active Link
OUT OF
BAND
MANAGEME
NT
OUT OF
BAND
MANAGEME
NT
Video
Rx 0dB
Tx -30dB
ON
1
0
OFF
ON
1
0
OFF
BAC 67
Figure 1-18 Front View of the Category 5 Ethernet Patch Panel
ADC Telecommunications, Inc.
Ethernet Patch Panel
55
RJ-21
Connector
Rear View of
Cat 5E
Ethernet
Patch Panel
Cat 5E
Patch Cable
J11
J10
J9
J8
J7
J6
J5
J4
J3
J2
J1
BAC_26C
Figure 1-19 Rear View of the Category 5 Ethernet Patch Panel
Cuda 12000 IP Access Switch Installation Guide
56
CHAPTER 1: HARDWARE OVERVIEW
ADC Telecommunications, Inc.
2
PREPARING FOR INSTALLATION
This chapter provides safety information, site requirements, and other
information for installing Cuda 12000 components. This chapter contains:
■
Installation Overview
■
Safety Guidelines
■
Site Requirements
■
Pre-Installation Considerations
■
Tools for Installation
Installation Overview
The installation process for the Cuda 12000 is described in these steps.
Please refer to the detailed instructions for each step before attempting to
install the system or any of the components.
1. Review safety guidelines, contained in “Safety Guidelines,” next.
2. Prepare the site, as described in “Site Requirements” on page 60.
3. Unpack the system and components.
4. Rack mount the system, as described in Chapter 3, “Rack-Mounting the
System.”
5. Install system modules, as described in Chapter 4, “Installing Modules.”
6. Cable the System, as described in Chapter 5, “Cabling the System.”
7. Connect the Power, as described in “Connecting Power” on page 109.
8. Power On the system, as described in Chapter 6, “Powering On and
Powering Off.”
58
CHAPTER 2: PREPARING FOR INSTALLATION
Safety Guidelines
This section provides safety information and other guidelines to help ensure
your protection and prevent damage to the system. Observe these guidelines
whenever working with the Cuda 12000.
This section does not cover every potentially hazardous condition, so please
use proper caution when working with the system.
Safety When Lifting
To help prevent bodily injury when lifting or moving the chassis or other
system components, follow these guidelines:
■
Don’t attempt to lift the chassis by yourself. Always use an appropriate
number of personnel to lift and move the chassis.
■
When lifting the chassis, ensure that your footing is solid.
■
Never move suddenly or twist your body when lifting the chassis.
■
If you must bend when lifting the chassis, bend at the knees and not your
waist.
■
Always disconnect all external cables before moving the chassis.
■
Before moving the chassis, ensure that you have an unobstructed path to
the rack.
Safety When Rack Mounting
To prevent bodily injury and ensure that the system remains physically stable
when mounting or working with the unit, follow these guidelines:
■
If this unit is the only device in the rack, mount the unit at the bottom of
the rack.
■
If the rack is partially filled, you should load the rack from the bottom to
the top mounting the heaviest unit at the bottom of the rack.
■
If stabilizers are provided with the rack, ensure that they are installed
before mounting or working with the rack-mount unit.
ADC Telecommunications, Inc.
Safety Guidelines
59
Electrical Safety Guidelines and Precautions
WARNING: Review all guidelines and recommendations in this section
before connecting power to the system.
Before cabling the system power, you must review, understand, and follow
these guidelines and precautions:
■
Before you connect the power sources to the system, be sure that the
circuit to which you are connecting the system is off so that all power is
removed from the circuit and the wires that you are connecting.
■
Take care not to overload the power supply circuit to which you are
connecting the system.
■
Before proceeding with connecting the power lines to the system,
remove all jewelry such as rings, watches, and necklaces.
■
Do not work alone whenever potentially hazardous conditions exist.
■
Before beginning the power cabling procedure, locate the emergency
power-off switch for the location in which you are working.
■
Before proceeding with connecting the power lines to the system, check
your work area for possible hazards such as ungrounded power extension
cables and moist floors.
Avoiding Electrostatic Discharge Damage
Electrostatic Discharge (ESD) can damage module components, causing
complete or intermittent failures in operation. ESD can occur when a module
is improperly handled. To prevent ESD damage to a system module, follow
these guidelines:
■
Always wear an ESD grounding device, such as an ESD wrist strap, when
handing the chassis component. Connection points are available on the
front and rear of the chassis.
■
Store the module in its antistatic bag until you are ready to install it.
■
Handle the module by its edges to avoid touching any pins, leads, or
solder connections on the circuit board.
Cuda 12000 IP Access Switch Installation Guide
60
CHAPTER 2: PREPARING FOR INSTALLATION
Site Requirements
You must observe these environmental site requirements to ensure safe
operations and proper system performance.
■
Location — Install this system in a Restricted Access Location.
■
Electrical — System electrical range: -42V to -68V.
■
Electrostatic — Always use ESD grounding devices when handling
system components.
■
Humidity — Operating and storage humidity must remain within these
ranges:
■
■
■
Operating: 10% – 90% (noncondensing)
Temperature — Operating and storage temperatures must remain
within these ranges:
■
Operating: 0° to 40°c
■
Storage: -40° to 75°c
Flooring — Site flooring must be a non-flammable material.
Pre-Installation Considerations
When planning the installation, please keep these considerations in mind:
■
Ensure that the cables are the appropriate length for your installation.
■
Ensure that the power cable you are using is long enough to reach the
power source.
■
ADC provides cables to connect the Fiber modules. The ADC-provided
cable consists of an AMP MPX connector on one end, and a duplex SC
connector on the other. If the connection to your network does not utilize
SC connectors, you will need to provide the appropriate
SC-to-<connector type> adapter.
■
Ensure that you have calculated the attenuation requirements
appropriate to your cable plant when cabling DOCSIS and EuroDOCSIS
modules.
ADC Telecommunications, Inc.
Tools for Installation
61
Tools for Installation
You need these tools and equipment for proper installation of the Cuda
12000:
■
#1 Phillips screwdriver
■
#2 Phillips screwdriver
■
7/16” socket or wrench
■
Antistatic mat if you plan to remove system modules
■
ESD grounding strap to prevent Electrostatic Discharge Damage
■
Tape measure, especially if you plan to rack-mount the chassis in a
partially filled rack
Cuda 12000 IP Access Switch Installation Guide
62
CHAPTER 2: PREPARING FOR INSTALLATION
ADC Telecommunications, Inc.
3
RACK-MOUNTING THE SYSTEM
This chapter describes the preparations for rack-mounting the Cuda 12000
and instructions on how to rack-mount a Cuda 12000 chassis and
components. This chapter includes:
■
Rack-Mount Installation Components
■
System Placement in the Rack
■
Rack-Mount Order
■
Rack-Mounting the Intake Plenum
■
Rack-Mounting the Fan Tray
■
Rack-Mounting the Chassis
■
Rack-Mounting the Exhaust Plenum
CAUTION: Before proceeding with the procedures in this chapter, read
Chapter 2, “Preparing for Installation.”
Rack-Mount Installation Components
The Cuda 12000 is designed for mounting in a TIA/EIA-compliant 19”-wide,
Telco-style rack. You can rack-mount up to three systems in a single 7’ rack.
A proper rack-mount system installation is comprised of these components:
Chassis
Cuda 12000. For information on how to rack-mount the
chassis, see “Rack-Mounting the Chassis” on page 71.
Fan tray
The fan tray consists of six fans for optimal air flow and
cooling of a single chassis. A fan tray is required for each
rack-mounted chassis. For example, a three-chassis
installation requires 3 fan trays.
64
CHAPTER 3: RACK-MOUNTING THE SYSTEM
Plenums
A proper rack-mount setup of the Cuda 12000 utilizes
plenums to facilitate air flow and system cooling. The ADC
plenum utilizes a single design to facilitate air flow into the
system and out of the system. When used to facilitate the
intake of air, it is referred to as an intake plenum; each
rack-mounted chassis requires an intake plenum. When
used to facilitate exhaust of air, it’s referred to as an
exhaust plenum.
Note: The first chassis in the rack requires two plenums.
CAUTION: If for any reason you are not using plenums,
be sure to leave 2 U’s of vertical rack space where they
would normally be mounted.
You must also insure that there is adequate airflow in or
off of the system.
Two 48 VDC
Power Sources
The system supports connection to up to two 48 Volt
DC power sources for optimal power availability. Power
redundancy ensures that power to the chassis continues
uninterrupted should one of the power sources fail.
You will need rack-mount screws to perform the installation procedures in
this chapter. Note that ADC does not supply rack-mount screws with the
system.
System Placement in the Rack
The number of systems that you want to install influences the placement of
the units in the rack. You can mount up to three chassis in a standard 19”
Telco rack, assuming a rack height of 7 feet (48 U’s). These sections detail
the proper installation of up to three chassis in a single rack.
In these sections, vertical rack space is measured in Units (U’s). Remember
that 1 U is equal to 1.75 inches.
When installing multiple systems in a single rack, only one plenum is
required between systems. Refer to Figures 3-2 and 3-3 for the proper
installation of multiple chassis in a single rack.
ADC Telecommunications, Inc.
System Placement in the Rack
65
Placement of a Single-Chassis Installation
A single chassis installation occupies a minimum of 15 U’s of vertical rack
space. This includes 9 U’s for the chassis, and 2 U’s for the fan tray and each
plenum. If this unit is the only device in the rack, it should be mounted
towards the bottom of the rack. Figure 3-1 shows the proper rack-mount
installation of a single chassis.
Exhaust
Plenum
2 Us
2 Us
Power
Fault
Power
Fault
Power
Fault
Status Display
Status Display
Status Display
Status Display
Status Display
Fan Tray
Power
Fault
Power
Fault
Read Manual
before actuating
button
Keyboard
Keyboard
Mouse
Mouse
Com 1
Com 1
Com 2
Com 2
Active
FDX
Link
100 MB
Port
15 Us
Active Link
Active Link
1
2
3
4
5
6
7
8
10/100 Enet
10/100 Enet
Chassis
9 Us
ON
1
0
OFF
ON
1
0
OFF
2 Us
3 Us
Intake
Plenum
BAC_05C
Figure 3-1 Single-Chassis Setup
Cuda 12000 IP Access Switch Installation Guide
66
CHAPTER 3: RACK-MOUNTING THE SYSTEM
Placement in a Two-Chassis Installation
A two-chassis installation occupies 28 U’s of vertical rack space. This includes
9 U’s for each chassis, and 2 U’s for each plenum and fan tray. If the rack is
partially filled, you should load the rack from the bottom to the top with the
heaviest unit mounted at the bottom of the rack. Figure 3-2 shows the
proper rack-mount installation of two chassis in a single rack.
Exhaust Plenum
2 Us
Power
Fault
Power
Fault
Power
Fault
Power
Fault
Chassis
Power
Fault
Status Display
Status Display
Status Display
Status Display
Status Display
Read Manual
before actuating
button
Keyboard
Keyboard
Mouse
Mouse
Active
FDX
Link
100 MB
Port
Com 1
Com 1
Com 2
Com 2
Active Link
Active Link
1
2
3
4
5
6
7
8
10/100 Enet
10/100 Enet
9 Us
ON
1
0
OFF
Fan Tray
ON
1
0
OFF
2 Us
28 Us
2 Us
Plenum
Power
Fault
Power
Fault
Power
Fault
Power
Fault
Power
Fault
Status Display
Status Display
Status Display
Status Display
Status Display
Chassis
Read Manual
before actuating
button
Keyboard
Keyboard
Mouse
Mouse
Com 1
Active
FDX
Link
100 MB
Port
Com 1
Com 2
Com 2
Active Link
Active Link
1
2
3
4
5
6
7
8
10/100 Enet
10/100 Enet
9 Us
ON
1
0
OFF
Fan Tray
ON
1
0
OFF
2 Us
2 Us
Intake Plenum
3 Us
BAC_06B
Figure 3-2 Two Chassis Setup
ADC Telecommunications, Inc.
System Placement in the Rack
67
Placement in a Three-Chassis Installation
A three-chassis installation occupies 41 U’s of vertical rack space. This
includes 9 U’s for each chassis, and 2 U’s for each fan tray and plenum.
Figure 3-3 shows the proper installation of three chassis in a single rack.
Exhaust Plenum
2 Us
Power
Fault
Power
Fault
Power
Fault
Power
Fault
Chassis
Power
Fault
Status Display
Status Display
Status Display
Status Display
Status Display
Read Manual
before actuating
button
Keyboard
Keyboard
Mouse
Mouse
Active
FDX
Link
100 MB
Port
Com 1
Com 1
Com 2
Com 2
Active Link
Active Link
1
2
3
4
5
6
7
8
10/100 Enet
10/100 Enet
9 Us
ON
1
0
OFF
Fan Tray
ON
1
0
OFF
2 Us
2 Us
Plenum
Power
Fault
Power
Fault
Power
Fault
Power
Fault
Power
Fault
Status Display
Status Display
Status Display
Status Display
Status Display
Chassis
Read Manual
before actuating
button
Keyboard
Keyboard
Mouse
Mouse
Com 1
Com 1
Com 2
Com 2
Active
FDX
Link
100 MB
Port
41 Us
Active Link
Active Link
1
2
3
4
5
6
7
8
10/100 Enet
10/100 Enet
9 Us
ON
1
0
OFF
ON
1
0
OFF
2 Us
2 Us
Fan Tray
Plenum
Power
Fault
Power
Fault
Power
Fault
Power
Fault
Power
Fault
Status Display
Status Display
Status Display
Status Display
Status Display
Read Manual
before actuating
button
Keyboard
Keyboard
Mouse
Mouse
Com 1
Active
FDX
Link
100 MB
Port
Com 1
Com 2
Com 2
Active Link
Active Link
1
2
3
4
5
6
7
8
10/100 Enet
10/100 Enet
9 Us
Chassis
ON
1
0
OFF
ON
1
0
OFF
2 Us
2 Us
Fan Tray
Intake Plenum
3 Us
Figure 3-3 Three-Chassis Setup
Cuda 12000 IP Access Switch Installation Guide
68
CHAPTER 3: RACK-MOUNTING THE SYSTEM
Rack-Mount Order
The Cuda 12000 components should be rack-mounted in this order:
The rack should be filled from the bottom up.
1. Install the plenum that will facilitate the inflow of air, as described in
“Rack-Mounting the Intake Plenum” on page 68.
2. Install the fan tray directly above the intake plenum, as described in
“Rack-Mounting the Fan Tray” on page 69.
3. Install the chassis, as described in “Rack-Mounting the Chassis” on
page 71.
4. If you are installing a second chassis, repeat steps 1 through 3.
5. If you are installing a third chassis, repeat steps 1 through 3 again.
6. Install the exhaust plenum, as described in “Rack-Mounting the Exhaust
Plenum” on page 74.
Rack-Mounting the Intake Plenum
You must rack-mount a plenum directly beneath each fan tray to guarantee
the minimum necessary air space of 2 U’s (3 1/2 inches) and ensure that
adequate air flows into the system. A plenum functioning in this capacity is
referred to as an intake plenum.
You must mount the intake plenum directly below each fan tray in the rack.
For more information on the proper placement of system components in a
rack, see “System Placement in the Rack” on page 64.
CAUTION: If for any reason you are not using plenums, be sure to leave 2
U’s (3.5 inches) of vertical rack space where they would normally be
mounted.
Use this procedure to rack-mount the intake plenum:
1. Determine the placement of the plenum in the rack as described in
“System Placement in the Rack” on page 64.
2. Position the plenum so that the front end that contains the filtering
screen is facing towards you.
ADC Telecommunications, Inc.
Rack-Mounting the Fan Tray
69
3. Ensure that the side stamped “THIS SIDE UP” is facing up and insert the
plenum into the rack until the front brackets on each side of the plenum
meet the mounting posts, as shown in Figure 3-4. Ensure that the open
top is facing up.
4. While keeping the plenum flush against the mounting posts, position the
plenum so that the 4 holes in the mounting brackets are aligned with
those in the post.
5. Insert all 4 screws (2 on each side) into the bracket holes as shown in
Figure 3-4. Using the appropriate tool, tighten all the screws so that each
one goes through the bracket and into the rack-mount post.
THIS SI
DE UP
Plenum
Screws (4)
Mounting
Bracket
BAC_37B
Figure 3-4 Rack-Mounting the Intake Plenum
Rack-Mounting the Fan Tray
The fan tray is comprised of six 12-volt fans that provide cooling for a single
chassis. You must mount the fan tray directly below each chassis in the rack.
For more information on the proper placement of system components in a
rack, see “System Placement in the Rack” on page 64.
Cuda 12000 IP Access Switch Installation Guide
70
CHAPTER 3: RACK-MOUNTING THE SYSTEM
Use this procedure to rack-mount the fan tray:
1. Determine the placement of the fan tray in the rack as described in
“System Placement in the Rack” on page 64.
2. Position the fan tray so that the front end that contains the filtering
screen is facing towards you.
3. Position the fan tray above the intake plenum, then insert the fan tray
into the rack. Ensure that the front brackets on each side of the fan tray
unit meet the mounting posts on each side of the rack, as shown in
Figure 3-5.
4. Rest the fan tray unit on top of the plenum to ensure an adequate seal
between the bottom of the fan tray and the top of the plenum.
5. While keeping the brackets flush against the mounting posts, position
the fan tray so that the 4 holes in the mounting brackets are aligned with
those in the post.
6. Insert all four screws (2 on each side) into the bracket holes as shown in
Figure 3-5. Using the appropriate tool, tighten all the screws so that each
one goes through the bracket and into the rack-mount post.
Fan Tray Assembly
(Front End)
Screws (4)
Status
Status
Status
Mounting Bracket
BAC_09C
Figure 3-5 Rack-Mounting the Fan Tray
ADC Telecommunications, Inc.
Rack-Mounting the Chassis
71
Rack-Mounting the Chassis
The following section describes the procedure for rack-mounting the chassis.
There are a number of warnings that should be followed to insure safety.
WARNING: To avoid bodily injury when lifting or moving the chassis, follow
these guidelines:
■
A fully-loaded chassis can weigh up to 100 pounds. Don’t attempt to
lift the chassis by yourself. Always use an appropriate number of
personnel to lift and move the chassis.
■
When lifting the chassis, ensure that your footing is solid.
■
Never move suddenly or twist your body when lifting the chassis.
■
If you must bend when lifting the chassis, bend at the knees and not
your waist.
■
Always disconnect all external cables when moving the chassis.
■
Ensure that you have an unobstructed path to the rack.
WARNING: To prevent bodily injury and ensure that the system remains
physically stable when mounting or working with the unit, follow these
guidelines:
■
■
■
If this unit is the only device in the rack, it should be mounted at the
bottom of the rack.
If the rack is partially filled, you should load the rack from the bottom
to the top with the heaviest unit mounted at the bottom of the rack.
If stabilizers are provided with the rack, ensure that they are installed
before mounting or working with the rack-mount unit.
The chassis is shipped rack-mount ready with mounting brackets secured to
each side. Use this procedure to rack-mount the chassis:
1. Determine the placement of the chassis in the rack as described in
“System Placement in the Rack” on page 64.
2. Ensure that any system modules that are installed in the unit are firmly
locked in place. All captive screws should also be secured in place.
3. Ensure that you have an unobstructed path to the rack. Also ensure that
the rack is stabilized.
Cuda 12000 IP Access Switch Installation Guide
72
CHAPTER 3: RACK-MOUNTING THE SYSTEM
Before proceeding, ensure that you have properly installed and secured the
intake plenum, as described in “Rack-Mounting the Intake Plenum” on
page 68.
4. Using an appropriate number of personnel, move the chassis to the rack.
5. With the front of the chassis facing you, use an appropriate number of
personnel to slide the chassis into the rack, pushing it into the rack until
the front mounting brackets on the chassis meet the mounting posts, as
shown in Figure 3-6.
Mounting
Rails
Power
Fault
Front
Mounting
Brackets
Power
Fault
Status Display
Status Display
Power
Fault
Power
Fault
Status Display
Status Display
Read
before Manual
actuati
button ng
Active
FDX
Link
100 MB
Port
Keyboa
1
2
3
4
5
6
7
8
rd
Keyboa
rd
Mouse
Mouse
Com 1
Com 2
Com 1
Com 2
Active Link
Active Link
10/100
Enet
10/100
Enet
ON
1
0
OFF
Status
Status
ON
1
0
OFF
Status
Screws (8)
BAC_38A
Figure 3-6 Inserting the Chassis in the Rack
6. Rest the chassis on top of the fan tray to ensure that a tight seal is made
between the bottom of the chassis and the top of the fan tray.
ADC Telecommunications, Inc.
Rack-Mounting the Chassis
73
7. While keeping the brackets flush against the mounting posts, position
the chassis so that the 8 holes in the mounting brackets (4 on each
bracket) are aligned with those in the post.
8. Insert all eight screws into the bracket holes, as shown in Figure 3-7.
Using the appropriate tool, tighten all the screws so that each one goes
through the bracket and into the rack-mount post. Ensure that all screws
are firmly in place.
Power
Fault
Power
Fault
Status Display
Status Display
Power
Fault
Power
Fault
Status Display
Status Display
Read Man
ual
before
actuatin
button g
Active
FDX
Link
100 MB
Port
Keyboa
rd
Keyboa
rd
1
2
3
4
5
6
7
8
Mouse
Mouse
Com 1
Com 1
Com 2
Com 2
Active Link
Active Link
10/100
Enet
10/100
Enet
Rx 0dB
Tx -30d
B
ON
1
0
OFF
ON
1
Status
0
OFF
Status
Status
BAC_40B
Figure 3-7 Rack-Mounting the Chassis
Cuda 12000 IP Access Switch Installation Guide
74
CHAPTER 3: RACK-MOUNTING THE SYSTEM
Rack-Mounting the Exhaust Plenum
You must mount a plenum directly above each chassis to guarantee the
minimum necessary air space of 2 U’s (3.5 inches) and ensure that adequate
air flows out of the system. A plenum functioning in this capacity is referred
to as an exhaust plenum.
For more information on the proper placement of system components in a
rack, see “System Placement in the Rack” on page 64.
CAUTION: If for any reason you are not using plenums, be sure to leave 2
U’s (3.5 inches) of vertical rack space where they would normally be
mounted.
Use this procedure to rack-mount the exhaust plenum:
1. Determine the placement of the plenum in the rack as described in
“System Placement in the Rack” on page 64.
2. Position the plenum so that the front panel is facing towards you and the
side stamped “THIS SIDE UP” is facing up.
3. Insert the plenum into the rack until the front brackets on each side of
the plenum meet the mounting posts, as shown in Figure 3-8.
4. Rest the plenum on top of the chassis to ensure an adequate seal
between the bottom of the plenum and the top of the chassis, as shown
in Figure 3-8.
5. While keeping the plenum flush against the mounting posts, position the
plenum so that the 4 holes in the mounting brackets are aligned with
those in the post.
6. Insert all 4 screws (2 on each side) into the bracket holes as shown in
Figure 3-8. Use the appropriate tool to tighten all the screws so that each
one goes through the bracket and into the rack-mount post.
ADC Telecommunications, Inc.
Rack-Mounting the Exhaust Plenum
Plenum
THIS SID
E UP
2 Us
(3.5 in.)
Power
Fault
Power
Fault
Status Display
Status Display
Screws (4)
Power
Power
Fault
Fault
Status Display
Status Display
Read
before Manual
actuati
button ng
Active
FDX
Link
100 MB
Port
Keyboar
d
1
2
3
4
5
6
7
8
Keyboar
d
Mouse
Mouse
Com 1
Com 2
Com 1
Com 2
10/100 Enet
Active Link
10/100 Enet
Active Link
OUT OF
MANAG BAND
EMENT
Rx 0dB
OUT OF
MANAG BAND
EMENT
Video
Video
Tx -30dB
ON
1
0
OFF
ON
1
0
OFF
BAC_39D
Figure 3-8 Rack-Mounting the Exhaust Plenum
Cuda 12000 IP Access Switch Installation Guide
75
76
CHAPTER 3: RACK-MOUNTING THE SYSTEM
ADC Telecommunications, Inc.
4
INSTALLING MODULES
This chapter describes how to install and replace system modules in the
Cuda 12000 chassis. Installing and replacing system modules involves the
following steps:
■
Determining Module Location
■
Replacing Filler Panels and Backplates
■
Installing System Modules
■
Removing Modules
CAUTION: Before proceeding with the procedures in this chapter, you
should read Chapter 2, “Preparing for Installation.”
Determining Module Location
The first step in module installation is to determine an appropriate slot in
which to install the module. Cuda 12000 modules are accessible from the
front of the chassis.
When installing modules, you must adhere to specific board orientation
restrictions based on chassis slot number. Chassis slots are numbered from 1
through 14, as shown in Figure 4-1.
78
CHAPTER 4: INSTALLING MODULES
Filler Panels
1 2 3 4 5 6 7 8 9 101112 13 14
FRONT
Power
Fault
Power
Fault
Power
Fault
Power
Power
Fault
Fault
Power
Power
Fault
Fault
Status
StatusDisplay
Display
StatusDisplay
Display
Status
Status Display
Status Display
Status Display
Read Manual
before actuating
button
Keyboard
Keyboard
Keyboard
Keyboard
Mouse
Mouse
Mouse
Mouse
om 1
Com 1
Com 1
Com 2
Active
FDX
Link
100 MB
Port
Com
12
Com
Com 2
Com 2
Active
Link
Active
Link
OUT OF BAND
10/100 Enet
Active Link
Active Link
10/100 Enet
1
2
3
4
5
6
7
8
OUT OF BAND
10/100
Enet
MANAGEMENT
10/100
Enet
MANAGEMENT
Video
Video
ON
1
0
OFF
ON
1
0
OFF
REAR
J11
J10
J9
J8
J7
J6
J5
J4
J3
J2
J1
Backplates
12 11 10 9 8 7 6 5 4 3 2 1
BAC_11D
Figure 4-1 Chassis Slot Numbering
ADC Telecommunications, Inc.
Replacing Filler Panels and Backplates
79
Table 4-1 identifies the module types supported by each chassis slot.
Table 4-1 Module Location Based on Slot
Slot
Modules Accepted
1
■
DOCSIS
■
EuroDOCSIS
■
10/100 Ethernet
■
Cuda Protocol Analyzer
■
DOCSIS
■
EuroDOCSIS
■
10/100 Ethernet
■
POS
■
Gigabit Ethernet
■
Cuda Protocol Analyzer
■
DOCSIS
■
EuroDOCSIS
■
Gigabit Ethernet
■
POS
■
Cuda Protocol Analyzer
■
Management Modules
2– 11
12
13, 14
CAUTION: Appropriate backplates must be in place prior to installing
modules.
Replacing Filler Panels and Backplates
This section provides the replacement procedures for these items:
■
Filler Panels: Blank aluminum faceplates that occupy unused chassis
slots to ensure proper air flow over vital components.
■
Backplates: Aluminum plates that cover the back of each chassis slot
and enable CableOnce (blind-mate) connectivity to network modules.
Ensure that all unused chassis slots contain a filler panel and are covered by a
backplate. Backplates keep dust and debris out of the chassis slot, helps
maintain the cooling integrity of the system, and is required to meet FCC
compliance.
Cuda 12000 IP Access Switch Installation Guide
80
CHAPTER 4: INSTALLING MODULES
Filler Panels
All unused slots must contain a filler panel. A filler panel unit consists of an
aluminum board mounted with a blank faceplate. You can remove and
replace these units with the power on. Filler panels are inserted into all
unused slots from the front of the chassis and serve three primary functions:
■
Maintain the cooling integrity of the system by occupying the space
where a module would normally be seated, thereby directing air flow to
where it is needed most. It is especially important to install filler panels in
all unused slots when stacking chassis.
■
Keep dust and other debris out of the chassis slot.
■
Ensure FCC compliance.
You will need a #1 Phillips screwdriver to complete the following procedures.
Be sure to save all filler panels for possible re-configuration of the system.
Removing a Filler Panel
To remove a filler panel:
1. Ensure that you are properly grounded by wearing an ESD protective
device.
2. Loosen the two captive screws (shown in Figure 4-2) that secure the unit
in the chassis.
3. Unseat the panel by moving the ejector levers to the outward position, as
shown in Figure 4-2.
4. Grasp both ejector levers and gently slide the unit straight out from the
chassis.
ADC Telecommunications, Inc.
Replacing Filler Panels and Backplates
Captive Screw
Power
Fault
81
Slot
Guide
Power
Fault
Status Display
Status Display
Power
Fault
Power
Fault
Active
FDX
Link
100 MB
Port
1
2
3
4
5
6
7
8
Status Display
Filler Panel
Status Display
Read Manu
al
before
actuating
button
Keyboard
Keyboard
Ejector
Lever
Mouse
Mouse
Com 1
Com 2
Com 1
Com 2
Active Link
Active Link
10/100
Enet
10/100
Enet
Rx 0dB
Tx -30dB
Ejector
Lever
ON
1
0
OFF
ON
1
0
OFF
Captive Screw
Slot
Guide
BAC_43B
Figure 4-2 Removing a Filler Panel
Replacing a Filler Panel
To replace a unit:
1. Ensure that you are properly grounded by wearing an ESD protective
device.
2. Standing in front of the chassis, align the filler panel with the selected
slot, then insert the top and bottom edges of the filler panel into the slot
guides, as shown in Figure 4-3.
Cuda 12000 IP Access Switch Installation Guide
82
CHAPTER 4: INSTALLING MODULES
Power
Fault
Captive
Screw
Power
Fault
Status Display
Status Display
Power
Fault
Power
Fault
Status Display
Status Display
Read Man
ual
before
actuating
button
Slot Guide
Port
Active
Active
FDX FDX
LINK Link
MB
100100
MEG
PORT
Keyboard
Keyboard
1
1
2
2
3
3
4
4
5
5
6
6
7
8
7
8
Mouse
Mouse
Com 1
Com 2
Filler Panel
Com 1
Com 2
Active Link
Active Link
10/100
Enet
10/100
Enet
Filler Panel
Rx 0dB
Tx -30dB
ON
1
0
OFF
ON
1
Slot Guide
0
OFF
Captive Screw
BAC_15
Figure 4-3 Inserting the Filler Panel
3. Slide the filler panel along the slot guides and into the chassis until the
faceplate meets the chassis.
4. Secure the filler panel in place with the two captive screws, as shown in
Figure 4-4.
CAUTION: Be sure not to over tighten the screws.
ADC Telecommunications, Inc.
Replacing Filler Panels and Backplates
83
Chassis
Edge
Grid
Power
Fault
Captive
Screw
Power
Fault
Status Display
Status Display
Power
Fault
Power
Fault
Status Display
Status Display
Read Man
ual
before
actuating
button
Ejector
Lever
Hook
Port
Active
Active
FDX FDX
LINK Link
MB
100100
MEG
PORT
Keyboard
Keyboard
1
1
2
2
3
3
4
4
5
5
6
6
7
8
7
8
Mouse
Mouse
Com 1
Com 1
Com 2
Com 2
Active Link
Active Link
Chassis
Edge
Grid
10/100
Rx 0dB
Tx -30dB
Enet
10/100
Enet
Ejector
Lever
Hook
ON
1
0
OFF
Captive
Screw
ON
1
0
OFF
BAC_13
Figure 4-4 Securing the Filler Panel
Backplates
Your system uses three types of slot backplates, accessible from the rear of
the chassis:
■
Blank Backplates: Used as follows:
■
■
To cover all unused chassis slots.
To cover slots in which 10/100 Ethernet modules reside. Covering
Ethernet slots is necessary because connection to a 10/100 Ethernet
module is achieved through the RJ-21 Champ connectors fixed on the
rear of the chassis for each slot, 1 through 11.
■
DOCSIS Module Backplates: Used to connect to all DOCSIS and
EuroDOCSIS modules that reside in chassis slots 2 through 12.
■
Fiber Module Backplates: Used to connect Gigabit Ethernet and POS
modules that reside in slots 2 through 12.
Slot 1 is shipped DOCSIS/EuroDOCSIS ready with a permanently fixed
DOCSIS module backplate attached to the back of the slot. Note that you
cannot install fiber modules in slot 1.
Cuda 12000 IP Access Switch Installation Guide
84
CHAPTER 4: INSTALLING MODULES
Figure 4-5 shows the three types of removable backplates that the Cuda
12000 uses.
R1
R2
R3
R4
R5
R6
F2
F1
Blank
Backplate
DOCSIS
Module
Backplate
Figure 4-5 Cuda 12000 Removable Backplates
Fiber
Module
Backplate
If you are installing a DOCSIS or EuroDOCSIS module in any slot, 2 through
12, you must first install a DOCSIS module backplate on the back of the
selected slot.
Slot 1 comes DOCSIS/EuroDOCSIS ready. Slot 1 has a permanently fixed DOCSIS
module backplate mounted with eight F-type connectors. Table 4-2 shows the
upstream and downstream ports used for each CMTS module.
Table 4-2 DOCSIS/EuroDOCSIS Module Ports
Upstream Downstream
Ports
Ports
CMTS Module
1x4 DOCSIS
1x4 DOCSIS SpectraFlow
1x6 DOCSIS SpectraFlow with Spectrum Management
1x4 EuroDOCSIS
1x4 EuroDOCSIS SpectraFlow
1x4 EuroDOCSIS SpectraFlow with Spectrum
Management
R1 - R4
R1 - R4
R1 - R6
R1 - R4
R1 - R4
R1 - R4
F1
F1
F1 & F2
F1
F1
F1 & F2
ADC Telecommunications, Inc.
Replacing Filler Panels and Backplates
85
Octal 10/100 Ethernet modules connect to the network through RJ-21 ports
mounted on the back of the chassis and do not use a removable backplate
for connection to the network.
You will need a #1 Phillips screwdriver to complete these procedures. Be sure
to save all backplates for possible re-configuration of the system.
You can use the following procedures to remove any backplate for slots 2
through 12. Note that chassis slots 13 and 14 are reserved for Management
modules and do not utilize removable backplates.
Removing a Backplate
To remove a backplate:
1. Remove the eight screws (four on each side) that secure the backplate to
the chassis.
2. Remove the backplate from the chassis, as shown in Figure 4-6.
Replacing a Backplate
To replace a backplate:
1. From the rear of the chassis, place the backplate over the open slot. Align
the four notches on either side of the backplate with the holes in the
chassis. If you are installing a DOCSIS module backplate, position the
backplate so that the downstream port, labelled F1, is at the bottom, as
shown in Figure 4-6.
2. While holding the backplate in position against the chassis, insert and
tighten the eight screws to secure the backplate in place. Figure 4-6
shows the installation of a DOCSIS module, fiber module, and blank
backplate.
Cuda 12000 IP Access Switch Installation Guide
86
CHAPTER 4: INSTALLING MODULES
REAR
J11
J10
J9
J8
J7
Blank
Backplate
DOCSIS
Module
Backplate
Fiber
Module
Backplate
12 11 10 9
8
Blank
Backplate
Open
Slot
J11
J10
J9
J8
J7
J6
J5
J4
J3
J2
7
J6
J5
J4
J3
J2
J1
R1
R1
R2
R2
R3
R3
R4
R4
R5
R5
R6
R6
F2
F2
F1
F1
6
Screws (8)
Notch
5
4
3
2
1
Fiber
Module
Backplate
DOCSIS
Module
Backplate
J1
F1
DOCSIS
Module
Backplate
Fiber
Module
Backplate
BAC_14F
Figure 4-6 Replacing Backplates
ADC Telecommunications, Inc.
Installing System Modules
87
Installing System Modules
This section describes how to install system modules in the Cuda 12000
chassis. All system modules have ejector levers and require the same
installation process. All modules are hot-swappable; you can remove and
replace modules while the system is operating without interruption to other
modules in the same system.
Before you begin this procedure, be sure to read Chapter 2, “Preparing for
Installation” and review these sections:
■
“Determining Module Location” on page 77
■
“Replacing Filler Panels and Backplates” on page 79
CAUTION: Electrostatic Discharge (ESD) can damage module components,
causing complete or intermittent failures in operation. ESD can occur when a
module is improperly handled.
To prevent ESD damage to a system module:
■
Always wear an ESD grounding device, such as an ESD wrist strap, when
handling the module. The chassis offers two jacks for this purpose: a
single ESD grounding jack on the front power switch panel, and a single
jack in the upper left corner of the rear chassis panel.
■
Do not remove the module from its antistatic bag until you are ready to
install it.
■
Handle the module by its edges to avoid touching any pins, leads, or
solder connections on the circuit board.
You need a #1 Phillips screwdriver to install a system module in the chassis.
To install a system module in the chassis:
1. Ensure that you are properly grounded by wearing an ESD protective
device.
2. Choose the slot in which you want to install the module. See Table 4-1 on
page 79 for instructions on determining the appropriate slot for each
module type.
3. If you are installing a Gigabit Ethernet module, POS module, or
DOCSIS/EuroDOCSIS module, ensure that you have installed the
appropriate backplate, as described in “Backplates”on page 83.
Cuda 12000 IP Access Switch Installation Guide
88
CHAPTER 4: INSTALLING MODULES
4. If you haven’t already done so, remove the filler panel from the selected
slot. For more information about removing filler panels, see “Filler Panels”
on page 80.
5. Remove the module from its shielded, antistatic bag. Standing in front of
the chassis, position the module vertically so that the faceplate (front) is
toward you and the LED message display is at the top. Align the module
with the selected slot as shown in Figure 4-7.
CAUTION: Always insert the module carefully, to ensure that the board
components on the module that you are installing do not scrape against the
adjacent faceplates.
6. Insert the module edges in the upper and lower slot guides and slide the
module midway into the slot. Move the levers to the outward position, as
shown in Figure 4-7.
1
Ejector
Lever
Slot
Guide
Power
Fault
Power
Fault
Status Display
Status Display
Power
Fault
Power
Fault
Status Display
Status Display
Read Manu
al
before
actuating
button
2
Status Display
Power
Fault
Led
Message
Display
Active
Active
FDX FDX
LINK Link
MB
100100
MEG
PORT
Port
Keyboard
Keyboard
1
1
2
2
3
3
4
4
5
5
6
6
7
8
7
8
Mouse
Mouse
Com 1
Com 1
Com 2
Com 2
Enet
Active Link
Active Link
10/100
2
10/100
Enet
Rx 0dB
Tx -30dB
ON
1
0
OFF
Rx 0dB
Tx -30dB
1
Ejector
Lever
ON
1
0
OFF
Slot
Guide
BAC_17
Figure 4-7 Inserting the Module
7. With the ejector levers still in the outward position, apply pressure to the
center of the module face plate, and gently slide the module along the
guides and into the slot until you feel it firmly meet the backplane.
ADC Telecommunications, Inc.
Installing System Modules
89
8. Move the ejector levers to the inward position (Figure 4-8) until you feel
them lock into place. The ejector lever hooks must catch the holes in the
chassis edge grid, as shown in Figure 4-8; this action locks the module in
place. As you move the ejectors to the inward position, you should feel
the module connectors engage the backplane connectors as the module
seats firmly in place.
9. With the module fully inserted, and the ejector levers locked in the
inward position, secure the module in place with the captive screws, as
shown in Figure 4-8.
CAUTION: Be sure not to over-tighten the screws.
Chassis
Edge
Grid
Captive
Screw
Power
Fault
Status Display
Power
Fault
Power
Fault
Status Display
Status Display
Power
Fault
Power
Fault
Status Display
Status Display
Read Man
ual
before
actuating
button
Ejector
Lever
Hook
1
Active
Active
FDX FDX
LINK Link
MB
100100
MEG
PORTPort
Keyboard
Keyboard
1
1
2
2
3
3
4
4
5
5
6
6
7
8
7
8
Mouse
Mouse
Com 1
Com 2
2
Com 1
Com 2
Active Link
Active Link
Chassis
Edge
Grid
10/100
Rx 0dB
Tx -30dB
Enet
10/100
Enet
Ejector
Lever
Hook
Rx 0dB
Tx -30dB
ON
1
0
OFF
Captive
Screw
ON
1
0
OFF
Figure 4-8 Seating and Securing the Module
BAC 18A
Repeat the above steps for any remaining system modules that you want to
install.
Cuda 12000 IP Access Switch Installation Guide
90
CHAPTER 4: INSTALLING MODULES
Removing Modules
This section describes how to remove system modules from the Cuda 12000
chassis. All system modules have ejector levers and require the same removal
process. You can use the procedure in this section to remove all Cuda 12000
Management modules. These modules are hot-swappable; you can remove
and replace modules with the power on.
CAUTION: To prevent damage to the system, be sure that you are properly
grounded with an ESD protection device before beginning this procedure. Be
sure to have a shielded antistatic bag available in which to store the module.
You need a #1 Phillips screwdriver to remove a system module from the
chassis.
To remove a system module from the chassis:
1. Ensure that you are properly grounded by wearing an ESD protective
device.
2. Loosen the two captive screws that secure the module in place, as shown
in Figure 4-9.
3. Release the module from the backplane by moving the levers to the
outward position, as shown in Figure 4-9. As you move the levers to the
outward position, you should feel the module connectors release from
the backplane connectors.
4. Grasp the ejector levers and pull the module out of the slot.
5. Do one of the following to ensure that the slot does not remain open
(empty):
■
■
Install another module in the slot, as described in “Installing System
Modules” on page 87.
If you are not installing another module in the slot, install a filler panel
into the empty slot, as described in “Filler Panels” on page 80.
CAUTION: Always remove the module carefully to ensure that the board
components on the module that you are installing do not scrape against the
adjacent faceplates.
ADC Telecommunications, Inc.
Removing Modules
91
After removing the module, be sure to store the module in an anti-static
bag.
Captive
Screw
1
Ejector
Lever
Power
Fault
2
Status Display
Power
Fault
Power
Fault
Status Display
Status Display
Power
Fault
Power
Fault
Status Display
Status Display
Read Man
ual
before
actuating
button
Active
FDX
Link
100 MB
Port
Keyboard
Keyboard
1
2
3
4
5
6
7
8
Mouse
Mouse
Com 1
Com 2
Enet
Active Link
Active Link
10/100
Com 1
Com 2
Ejector
Lever
10/100
Enet
Rx 0dB
2
Tx -30dB
Rx 0dB
Tx -30dB
ON
1
0
OFF
ON
1
0
OFF
1
Captive
Screw
BAC_19A
Figure 4-9 Releasing Module from Backplane
6. Repeat the above steps for any remaining system modules that you want
to remove.
Cuda 12000 IP Access Switch Installation Guide
92
CHAPTER 4: INSTALLING MODULES
ADC Telecommunications, Inc.
5
CABLING THE SYSTEM
Your cabling tasks depend on the physical configuration of your system. This
chapter describes how to cable the Cuda 12000 and includes:
■
Cabling the Management Module
■
Cabling DOCSIS and EuroDOCSIS Modules
■
Cabling Octal 10/100 Ethernet SpectraFlow Modules
■
Cabling Gigabit Ethernet SpectraFlow and POS SpectraFlow Modules
■
Connecting Power
■
Cabling for System Fault Reporting
CAUTION: Before proceeding with the procedures in this chapter, read
Chapter 2, “Preparing for Installation.”
Cabling the Management Module
The Cuda 12000 Management module supports these forms of access:
Serial Access
COM ports on the front of the management module
provide serial access to the system. Using an
ADC-provided serial cable, you can use COM 1 or COM 2
to access the system locally using a terminal emulation
program, such as HyperTerminal, or for remote modem
access. See “Cabling for Serial Access,” next for
instructions on how to cable the COM ports.
Network Access The 10/100 Ethernet Craft port located on the front of the
Management module provides both Telnet and Web access
to the system. See “Cabling for Network Access” on page 98
for instructions on how to cable the Craft port.
94
CHAPTER 5: CABLING THE SYSTEM
Cabling for Serial Access
Initial access to the Cuda 12000 is achieved through either of the COM ports
located on the front of the Management module. You must first access the
system through these COM ports to assign an IP address to the Craft port
and configure the system for network access.
Both COM port 1 and COM port 2 provide serial access to the system. The
advantage to this form of direct access is that you do not loose your
connection to the system upon reboot. Both COM port 1 and COM port 2
can be cabled for either terminal or modem access.
Connection to these COM ports are achieved through these ADC-provided
serial cables:
Terminal Access Cable This 10-foot serial cable consists of an 8-pin Mini
DIN connector on one end; a 9-pin female DSub on
the other.
Modem Access Cable
This 10-foot serial cable consists of an 8-pin Mini
DIN connector on one end; a 25-pin male DSub on
the other.
Refer to Appendix C for serial access cabling wiring diagrams.
Cabling COM 1 for Terminal Access
The Management module supports local (serial) access through the COM 1
port located on the front of the Management module. You can use the
ADC-provided serial cable to attach a COM server, terminal emulator, or a PC
running a terminal emulation program to this port to access the command
line interface.
To cable the Management module for local access, have the terminal access
serial cable at hand and use the following procedure:
1. Insert the 8-pin Mini-DIN connector on one end of the cable into the
COM 1 port located on the front of the Management module.
2. Attach the DB-9 connector on the other end of the cable to a COM
server, or a system running a terminal emulation program.
ADC Telecommunications, Inc.
Cabling the Management Module
95
Figure 5-1 shows the cabling of COM port 1 for terminal access:
Power
Fault
Status Display
Keyboard
Mouse
Com 1
Com 2
Active Link
To Computer or
COM Server
10/100 Enet
BAC_53
Figure 5-1 Cabling COM 1 for Terminal Access
Cabling COM 1 for Modem Access
The Management module also supports modem access through COM 1
located on the front of the Management module. Connection is achieved
using an ADC-provided modem access serial cable. This setup provides
dial-up access to the command line interface.
To cable the Management module for modem access, have the modem
access serial cable at hand and use the following procedure:
1. Insert the 8-pin Mini-DIN connector on one end of the cable into COM 1
located on the front of the Management module.
2. Attach the DB-25 connector on the other end of the cable to the serial
port on the modem.You can then dial into the modem to access the
Cuda 12000 management system.
Cuda 12000 IP Access Switch Installation Guide
96
CHAPTER 5: CABLING THE SYSTEM
Figure 5-2 shows the cabling of COM port 1 for modem access:
Power
Fault
Status Display
Keyboard
Mouse
Com 1
Com 2
Active Link
10/100 Enet
To Modem
BAC_54
Figure 5-2 Cabling COM 1 for Modem Access
Cabling COM 2 for Terminal Access
The Management module also supports local (serial) access through the
COM 2 port located on the front of the Management module. You can use
the ADC-provided serial cable to attach a COM server, terminal emulator, or
a PC running a terminal emulation program to this port to access the
command line interface.
To cable the Management module for local access, have the terminal access
serial cable at hand and use the following procedure:
1. Insert the 8-pin Mini-DIN connector on one end of the cable into the
COM 2 port located on the front of the Management module.
2. Attach the DB-9 connector on the other end of the cable to a COM
server, or a system running a terminal emulation program.
ADC Telecommunications, Inc.
Cabling the Management Module
97
Figure 5-3 shows the cabling of COM port 2 for terminal access:
Power
Fault
Status Display
Keyboard
Mouse
Com 1
Com 2
Active Link
To Computer or
COM Server
10/100 Enet
BAC_53com2
Figure 5-3 Cabling COM 2 for Terminal Access
Cabling COM 2 for Modem Access
The Management module also supports modem access through COM 2
located on the front of the Management module. Connection is achieved
using an ADC-provided modem access serial cable. This setup provides
dial-up access to the command line interface.
To cable the Management module for modem access, have the modem
access serial cable at hand and use the following procedure:
1. Insert the 8-pin Mini-DIN connector on one end of the cable into COM 2
located on the front of the Management module.
2. Attach the DB-25 connector on the other end of the cable to the serial
port on the modem.You can then dial into the modem to access the
Cuda 12000 management system.
Cuda 12000 IP Access Switch Installation Guide
98
CHAPTER 5: CABLING THE SYSTEM
Figure 5-4 shows the cabling of COM port 2 for modem access:
Power
Fault
Status Display
Keyboard
Mouse
Com 1
Com 2
Active Link
10/100 Enet
To Modem
BAC 54
Figure 5-4 Cabling COM 2 for Modem Access
Cabling for Network Access
The 10/100BASE–TX CRAFT management interface uses an RJ-45 connector
and provides a 10/100 Mbps Ethernet connection over UTP-Category 5
copper wire. To gain command line interface (CLI) management access to the
system, Telnet directly into the Management module through this port. If you
have installed CudaView (graphical user interface software), you can point
your Web browser to the address assigned to this port to gain Web-based
management access. Refer to the Cuda 12000 IP Access Switch CLI-based
ADC Telecommunications, Inc.
Cabling the Management Module
99
Administration Guide or the Cuda 12000 IP Access Switch CudaView
Administration Guide for more information on gaining access to the system.
To cable the CRAFT management interface.
1. Insert the RJ-45 connector on the 10/100BASE-TX cable into the CRAFT
management port until it clicks into place.
2. Connect the other end of the 10/100BASE-T cable to the MDI port on the
network device to which you want to connect.
Power
Fault
Status Display
Keyboard
Mouse
Com 2
Com 1
Active Link
10/100 Enet
To
MDI Port on
Network
Device
BAC_22
Figure 5-5 Cabling the CRAFT Management Interface
Cuda 12000 IP Access Switch Installation Guide
100
CHAPTER 5: CABLING THE SYSTEM
Cabling DOCSIS and EuroDOCSIS Modules
The system supports a CableOnce (blind-mate) setup for DOCSIS and
EuroDOCSIS modules. Instead of cabling directly to the module, attach the
cables to the F connectors on the CMTS backplate that covers the back of
the slot. This means that once you cable the RF downstream port(s) and the
RF upstream ports for a particular slot, you can remove and replace DOCSIS
and EuroDOCSIS modules within that slot without having to recable them;
the cables remain fixed to the backplate.
If you have a module(s) in the chassis that is powered on and active, make
sure that the module is configured.
Before cabling a DOCSIS/EuroDOCSIS module to your cable plant, you
should configure the downstream ports with a frequency and power output
appropriate to your cable plant. If you have not done so, ensure that the
downstream port status is set to down. For information on how to configure
DOCSIS/EuroDOCSIS modules, see the Cuda 12000 IP Access Switch
CLI-based Administration Guide and the Cuda 12000 IP Access Switch
CudaView Administration Guide.
The procedure in this section assumes:
■
You have already selected the slot in which to install the DOCSIS or
EuroDOCSIS module, as described in “Determining Module Location” on
page 77.
■
If necessary, you have already installed the CMTS backplate on the back
of the selected slot as described in “Backplates” on page 83.
Slot one consists of a permanently fixed CMTS backplate and is shipped
DOCSIS/EuroDOCSIS ready. If you are installing a DOCSIS or EuroDOCSIS
module in any other slot, you must first install a CMTS backplate onto the
back of the slot.
Do not tighten the backplate RF connectors up against the backplates
themselves. It is important that the chassis interface is permitted to float to
allow the module connectors to be inserted properly. The torque
specification for the nut that tightens the backplate RF connector to the
backplate is 8 in-lb.
ADC Telecommunications, Inc.
Cabling DOCSIS and EuroDOCSIS Modules
101
The ports on DOCSIS and EuroDOCSIS modules use high performance RF
connectors. Using a cable with a male connector of incorrect dimensions
may cause physical damage. The center conductor diameter must be less
than 34 mil (.85mm) and shorter than 125 mil (3.1mm) measuring from the
edge of the connector.
To cable a slot for DOCSIS/EuroDOCSIS module operation:
1. Attach the upstream coaxial cables to the upstream F connectors located
on the CMTS backplate, as shown in Figure 5-6. Upstream connectors are
labelled R1-R6 on the backplate. If you are cabling slot 1, the upstream
connectors are the first 6 ports counting down from the top of the
backplate. The torque specification for attaching a coaxial cable to the F
connector is 30 in-lb.
2. Ensure that the other end of the upstream cables that you have
connected are properly attached to the HFC network.
3. Attach the downstream coaxial cable to the downstream F connector(s)
on the CMTS backplate, as shown in Figure 5-6. The torque specification
for attaching a coaxial cable to the F connector is 30 in-lb.
4. Ensure that the other end of the downstream cable is properly attached
to the HFC network.
Cuda 12000 IP Access Switch Installation Guide
102
CHAPTER 5: CABLING THE SYSTEM
To HFC
Network
J11
J10
J9
J8
J7
J6
J5
J4
J3
J2
J1
Upstream
Coaxial
Connectors (R1-R6)
R1
R2
R3
R4
R5
R6
F2
F1
Downstream
Coaxial
Connectors (F1, F2)
To HFC
Network
BAC_24C
Figure 5-6 Cabling the DOCSIS/EuroDOCSIS Module
ADC Telecommunications, Inc.
Cabling Octal 10/100 Ethernet SpectraFlow Modules
103
Cabling Octal 10/100 Ethernet SpectraFlow Modules
The system supports a CableOnce (blind-mate) setup for Octal
10/100BASE-TX modules. Connection to the 10/100 Ethernet network is
achieved through RJ-21 Champ connectors fixed on the rear chassis panel
for slots 1 through 11. Because you cable the slot and not the module itself,
you can remove and replace a 10/100 Ethernet module in the selected slot
without having to recable it.
Slot 12 does not support 10/100 Ethernet modules.
To cable a 10/100 Ethernet module slot to a Cat 5 Ethernet patch panel.
follow this procedure:
1. Locate the slot that you have installed, or want to install, the 10/100
Ethernet module. Then locate the RJ-21 port for the selected slot on the
back of the chassis. The RJ-21 ports located on the back of the chassis are
numbered right-to-left, from J1–J11, as shown in Figure 5-7.
2. If you haven’t already done so, unscrew and remove the RJ-21 metal dust
cover, as shown in Figure 5-7.
3. Insert the male RJ-21 connector on the Cat 5 patch cable into the RJ-21
port for the selected slot, as shown in Figure 5-7.
4. Tighten the retaining screws on the connector to secure the cable to the
chassis.
Cuda 12000 IP Access Switch Installation Guide
104
CHAPTER 5: CABLING THE SYSTEM
J11
J10
J8
J9
J6
J7
J5
J4
J3
J2
J1
To CAT 5E
Ethernet
Patch Panel
J11
J10
J9
J8
J7
J6
J5
J4
J3
J2
RJ-21
Metal
Dust
Cover
J1
RJ-21
Telco
Ethernet
Port (J1-J11)
To CAT 5E
Ethernet
Patch
Panel
CAT 5E Patch
Cable
Cable
Management
Bracket
BAC_25C
Figure 5-7 Cabling the 10/100 Ethernet Connection
5. Insert the RJ-21 connector on the other end of the cable into the
appropriate port on the Cat 5 10/100 Ethernet patch panel.
6. Tighten the retaining screws on the connector to secure the cable to the
panel.
7. Repeat steps 1 through 6 for another slot that you want to cable for
10/100 Ethernet operation.
ADC Telecommunications, Inc.
Cabling Octal 10/100 Ethernet SpectraFlow Modules
105
For example, Figure 5-8 shows the proper cabling of chassis slot 9 for a
10/100 Ethernet module.
RJ-21
Connector
Rear View of
Cat 5E
Ethernet
Patch Panel
Cat 5E
Patch Cable
J11
J10
J9
J8
J7
J6
J5
J4
J3
J2
J1
BAC_26C
Figure 5-8 Cabling a 10/100 Ethernet Slot
To cable a Cat 5 Ethernet patch panel to your network, follow this
procedure:
1. Locate the group of RJ-45 ports on the front of the patch panel that
correspond to the RJ-21 connector that you installed on the back of the
panel, as shown in Figure 5-8.
2. Insert the RJ-45 connector from an Ethernet patch cable into one of the
RJ-45 ports located in step 1.
3. Connect the other end of the Ethernet patch cable to your network.
4. Repeat steps 1 through 3 for all Ethernet ports that you want to connect
to your network.
Figure 5-9 shows the cabling of Ethernet patch panel port 5 to a network.
Cuda 12000 IP Access Switch Installation Guide
106
CHAPTER 5: CABLING THE SYSTEM
Patch Panel
RJ45 Cable
Power
Fault
Status Display
Status Display
To
Network
Power
Fault
Power
Power
Fault
Fault
Status Display
Status Display
Read Man
ual
before
actuatin
g
button
RJ45 Connectors (24)
Active
FDX
Link
100 MB
Port
Keyboard
1
2
3
4
5
6
7
8
Keyboard
Mouse
Mouse
Com 1
Com2
Com 1
Com 2
10/100 Enet
Video
Active Link
10/100 Enet
Active Link
OUT OF
MANAGEBAND
MENT
OUT OF
MANAGEBAND
MENT
Video
Rx 0dB
Tx -30dB
ON
1
0
OFF
ON
1
0
OFF
BAC_67
Figure 5-9 Cabling the Ethernet Ports to Network
ADC Telecommunications, Inc.
Cabling Gigabit Ethernet SpectraFlow and POS SpectraFlow Modules
107
Cabling Gigabit Ethernet SpectraFlow and POS
SpectraFlow Modules
The system supports a CableOnce setup for fiber modules, including the
Gigabit Ethernet module, and all POS modules. Instead of cabling directly to
the module, attach the cable to the fiber module backplate that contains a
single blind-mate fiber port. This allows you to remove and replace the
module without having to recable it.
The cabling procedure for both Gigabit Ethernet and POS modules are the
same. Both require installation of a fiber module backplate and use a cable
provided by ADC to connect to the network.
The procedure in this section assumes:
■
You have selected the slot in which to install the Gigabit Ethernet or POS
module, as described in “Determining Module Location” on page 77.
■
You have installed a fiber module backplate on the back of the selected
slot as described in “Backplates” on page 83.
Slot 1 does not accept Gigabit Ethernet or POS modules.
Use the following procedure to cable a slot for connection to a POS or
Gigabit Ethernet module:
1. Insert the AMP MPX connector on the fiber cable into the single port on
the fiber module backplate, as shown in Figure 5-10.
Cuda 12000 IP Access Switch Installation Guide
108
CHAPTER 5: CABLING THE SYSTEM
Fiber
Module
Backplate
J11
J10
J9
J8
J7
J6
J5
J4
J3
J2
J1
To
Network
Tie-Wrap
for
Fiber Cable
Male
Blind-mate
Fiber
Connector
BAC_27C
Figure 5-10 Cabling Fiber Modules
2. Attach the duplex SC connectors on the other end of the cable to the
network device to which you want to connect.
Repeat steps 1 and 2 for all slots that you want to cable for fiber module
operation.
Note that the ADC cable provided for fiber module connections utilizes
duplex SC connectors. If the network device to which you are connecting
does not use SC connectors, you must use an appropriate adapter to make
the fiber connection.
ADC Telecommunications, Inc.
Connecting Power
109
Connecting Power
This section provides safety information and procedures for connecting your
Cuda 12000 to power sources. You must wire power sources to both the
chassis and fan tray assembly independently. Both the chassis and fan tray
can support connections to two separate power sources. Redundant power
sources ensure that power to the system continues uninterrupted in the
event that one power source fails.
The system (full chassis and single fan tray) supports a maximum power
consumption of 1100W and supports connection to two DC -48V (-42 to
-68 VDC) power sources.
Consider the following when cabling power:
■
ADC recommends that you wire the chassis and fan tray to the same
power source. This is to reduce the risk of creating a condition in which
the chassis operates while the fan tray does not provide cooling.
■
Both the chassis and the fan tray support connection to two power
sources, referred to as power sources A and B. ADC recommends that
you utilize both A and B power sources for increased fault tolerance. In
this suggested setup, power source A connectors from both the fan tray
and chassis are connected to a single power source; power source B
connectors from both the fan tray and chassis are connected to another
power source.
Cuda 12000 IP Access Switch Installation Guide
110
CHAPTER 5: CABLING THE SYSTEM
Connecting Power to the Chassis
Your system supports connection to redundant power sources. Use 10 gauge
electrical wire to connect the power sources to the chassis. Use the
procedure below to connect the power sources to the system:
WARNING: Before cabling system power, you must review, understand, and
follow these guidelines and precautions:
■
Before you connect the power sources to the system, be sure that the
circuit to which you are connecting the system is off so that all power is
removed from the circuit and the wires that you are connecting.
■
Before proceeding with connecting the power, ensure that both power
switches on the chassis are in the off position.
■
Take care not to overload the power supply circuit to which you are
connecting the system.
■
Before proceeding with connecting the power lines to the system,
remove all jewelry such as rings, watches, and necklaces.
■
Do not work alone whenever potentially hazardous conditions exist.
■
Before beginning the power cabling procedure, locate the emergency
power-off switch for the location in which you are working.
■
Before proceeding with connecting the power lines to the system, check
your work area for possible hazards such as ungrounded power extension
cables and moist floors.
You need a 7/16” wrench or socket and a No. 1 phillips screwdriver to
connect power to the chas