1
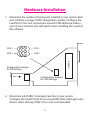
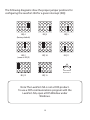
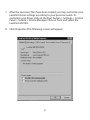
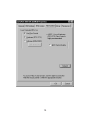
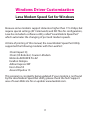
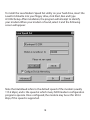
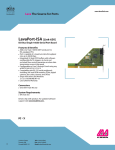
LavaPort-ISA
Installation Manual
LavaPort
ISA
LAVA COMPUTERS
MADE IN
Rev. B01
MOKO L16.4.4
CANADA
Contents
Before Beginning Installation
3
Hardware Installation
5
Software Installation
7
Windows Installation
• Setting LavaPort Data Rates
• Setting LavaPort FIFO Control
• Flow Control
• Com Addressing and IRQ’s
• Setting a 230.4 kbps Data Rate
• Lava Modem Speed Set
9
9
11
13
15
16
17
Windows NT Installation
19
Troubleshooting
23
2
Before Beginning
Installation
Determine what types of add-in boards are currently in your PC. Most
devices (ports, network cards, sound cards, controllers) use a particular
IRQ (numbering 2-15).The LavaPort-ISA requires an unused IRQ, so
determining which are in use is important. This can be done in
Windows by going to 'Device Manager' and double clicking 'Computer'.
Any number that is not listed is a free IRQ.
Note: Many diagnostic programs do not accurately report IRQ usage. DO
NOT rely on MSD (Win3.1) or Windows to report IRQ conflicts accurately.
The following listing of devices shows common IRQ allocation. Note that
this list is not universal – your PC setup may be different:
IRQ 2/9
3
4
5
10
11
12
15
Network or Sound Card
Com 2
Com 1
LPT 2 or Sound Card
Network Card
SCSI Controller
usually free
Secondary IDE channel
3
Note: A Com Port which is not connected to any external devices
continues to be seen as "in use" by the PC hardware. If you are disabling
an existing Com Port or other device, to make room for the LavaPort-ISA,
be sure to physically remove the port/device, or disable it with the
proper jumper. Disabling a Com Port through software, or merely
disconnecting its cable, will not necessarily disable the port, and may
cause a hidden conflict.
PCI Motherboard users take note:
Many PCI motherboards automatically allocate IRQ's 10-15 to the PCI
bus. If you wish to use one of these IRQ's for the LavaPort-ISA, you must
release one of them to the ISA bus through the PCI Bus Configuration
Menu in BIOS – accessed at boot-up.
If you are a Windows user, you may verify which IRQ’s
are in use in your PC by accessing Control Panel, System,
Device Manager. Double-click the icon “Computer”.
There you will find a listing of USED IRQ’s. Any numbers
that are not listed mean that that IRQ number is available.
4
Hardware Installation
COM 3
COM 1
COM 4
COM 2
16C650
1. Determine the number of serial ports installed in your system. Each
port will have a unique "COM" designation number. Configure the
LavaPort for the next consecutive unused COM address & make a
note of your selection.You will need it when installing the LavaPort
ISA software.
Configuration Jumpers
for IRQ Settings
Configuration Jumpers
for COM Settings
2. Determine which IRQ's (interrupts) are free in your system.
Configure the LavaPort-ISA for an unused IRQ. Note: although some
devices allow sharing of IRQ's, this is not recommended.
5
The following diagrams show the proper jumper positions for
configuring the LavaPort-ISA for a given interrupt (IRQ):
IRQ 4
(factory default)
IRQ 3
IRQ 5
IRQ 2
(same as IRQ 9)
IRQ 10
IRQ 11
LIFETIME
WARRANTY
IRQ 12
IRQ 15
Note: The LavaPort-ISA is not a DOS product.
To use a DOS communications program with the
LavaPort-ISA, open a DOS Window under
Windows.
6
Software Installation
Windows Driver Installation
1. After configuring the hardware jumpers, install the LavaPort-ISA into
any available ISA slot in your system and begin Windows.
2. From the My Computer icon, choose Control Panel and click Add
New Hardware.
3. Select the Auto-Detect option. Windows will detect the LavaPort-ISA
as a standard Com port residing at the address and IRQ which you
selected during hardware jumper configuration.
4. From Control Panel, Device Manager, select the Com port that
corresponds to your LavaPort-ISA.
5. When the Com Port Properties page appears select the Driver page
and choose the Change Driver/Have Disk option.
6. Insert the LavaPort-ISA driver installation diskette into your floppy
drive and double-click the INF file that appears.The LavaPort-ISA
driver will install automatically.
7
7. After the necessary files have been copied, you may customize your
LavaPort driver settings according to your personal needs.To
customize your driver, click on the Start button > Settings > Control
Panel > System > Device Manager. Click on Ports and select the
LavaPort 650 ISA.
8. Click Properties.The following screen will appear:
8
Windows Driver Customization
Setting LavaPort Data Rates
9
The data rate of the LavaPort may be set using the Bits per Second pull
down menu.
Please note that this menu will also appear when setting the “Port
Properties” in any communications application, and may have to be set
independently of your Control Panel settings. Control Panel settings
may not necessarily be linked to those of your Communications
Application.
For optimum performance, always verify that your LavaPort is set to the
maximum speed supported by your modem, and that both speed
settings are the same.
For Internet users: Port speeds in Dial-Up Networking must be set
independently of speed settings in Control Panel.
Many users may find it easier to use the Lava Modem Speed Set Utility
included in the Utils subdirectory of the LavaPort diskette. Please see
page 17 of this manual for more information.
10
Windows Driver Customization
Setting LavaPort FIFO Control
11
The LavaPort-ISA incorporates a 16650 UART chip with a 32-byte FIFO
(first-in-first-out) buffer.
The FIFO control tabs set the buffer “trigger” levels. When the buffer is
filled to its trigger level with the selected number of bytes, the CPU will
be interrupted and asked to either reload the buffer (for transmission),
or retrieve data from the buffer (for reception).
Most efficient data transmission occurs when the CPU is interrupted
infrequently. For each interrupt, the CPU can then service the buffer with
larger data blocks: during transmission, it can place a large burst of data
into the buffer, and during reception it can retrieve a large block from
the buffer and then continue multi-tasking.
Ideally therefore, Receive triggers should be set as high as possible and
Transmit triggers as low as possible.
However, if the Transmit trigger levels are set too low, or too Receive
triggers too high, and the CPU is busy when an interrupt is called by the
LavaPort, a short period of inactivity may occur between the port and
the modem.This will reduce effective transmission/reception speeds.
Optimum buffer settings are dependent on your modem speed, your
CPU speed, and the amount of multi-tasking that occurs while online.
For a fast modem and fast CPU performing few multi-tasking functions,
set transmit triggers low and receive triggers high. If multi-tasking while
online, set transmit triggers high and receive triggers low.
12
Windows Driver Customization
Setting LavaPort Flow Control
Flow Control refers to the type of signaling that is used between the
modem and the LavaPort.
If you are connecting the LavaPort to a modem or ISDN terminal
adapter, use the default setting of Hardware (RTS/CTS) flow control.
Software Flow Control (Xon/Xoff ) is used only for connecting the
LavaPort to a non-modem serial device (e.g. Using a null-modem cable
to connect to another Com Port).
13
14
Windows Driver Customization
Com Address & IRQ Resources
The Resources Tab must match the hardware configuration jumpers on
the LavaPort-ISA. If any of these settings are changed, the system must
be shut down and the LavaPort jumpers must be moved accordingly.
15
Windows Driver Customization
Setting a 230.4 kbps Data Rate
The LavaPort-ISA supports data rates up to 460.8 kbps, including 115.2
kbps and 230.4 kbps. However, not all modems support Com Port rates
above 115.2 kbps.
If your modem does not support higher data rates and you select a
higher data rate in the LavaPort Properties, Windows will automatically
default to the slowest supported rate in the chain.
Some modems do support higher data rates but require special settings
and INF files for configuration. Contact your modem manufacturer for
details, or try using the Lava Modem Speed Set Utility found in the “Utils”
subdirectory of your LavaPort diskette.
16
Windows Driver Customization
Lava Modem Speed Set for Windows
Because some modems support data rates higher than 115.2 kbps, but
require special settings (AT Commands) and INF files for configuration,
Lava has included a software utility called “Lava Modem Speed Set”
which automates the changing of port and modem speeds.
At time of printing of this manual, the Lava Modem Speed Set Utility
supported the following modems with the LavaPort:
3Com Impact IQ
3Com (US Robotics) Courier I-Modem
Motorola BitSURFR Pro EZ
Farallon Netopia
Adtran Express XRT
Eicon Diva TA
Ascend Pipeline 15
This program is constantly being updated. If your modem is not found
by the Lava Modem Speed Set utility, please check the Tech Support
area of Lava’s Web site for an update: www.lavalink.com.
17
To install the Lava Modem Speed Set utility on your hard drive, insert the
LavaPort diskette into your floppy drive, click Start, Run and type
A:\Utils\Setup. After installation, the program will attempt to identify
your modem. When your modem is found, select it and the following
screen will appear:
Note that AutoBaud refers to the default speed of the modem (usually
115.2 kbps), and is the speed at which many ISDN modem configuration
programs operate. Once configured, the modem may be set for 230.4
kbps, if this speed is supported.
18
Windows NT 4.0 Installation
Note: Make sure that you are installing the correct
LavaPort-ISA drivers for the appropriate operating system.
DO NOT install drivers for other Windows versions
under Windows NT
Windows NT Driver Installation
1. Before the LavaPort-ISA is installed in your PC, turn on your
computer and start NT, logging on as Administrator. Access
Start|Programs | Administrative Tools | Windows NT Diagnostics.
2. In the Resources Tab, you will find a listing of the IRQ’s and I/O
addresses that are currently in use by your system. Choose an
unused IRQ and I/O address and configure the LavaPort jumpers
accordingly.
3. Shut down your PC, and insert the LavaPort-ISA card into any
unused ISA slot.
4. When the PC boots, enter the BIOS setup and ensure that the PnP
OS setting is set to “NO“ or ”Disabled”.
19
5. Log onto NT4 as Administrator. Insert the LavaPort installation
diskette into your floppy drive and select Run from the Start Menu.
When prompted type: A:\NT4.0\Setup.
6. After the necessary files have been copied, select My Computer and
start Control Panel. A new icon will appear called “LavaPort”.This
applet should now be used to configure ALL Com Ports in your PC –
not just LavaPorts.
20
Troubleshooting
Windows (general)
System hangs after the LavaPort is accessed
==>Verify that there are no IRQ conflicts.
Everything works fine initially, but after rebooting the PC, Windows
functions in "Safe Mode" only.
==>Symptomatic of a hidden IRQ conflict. Reconfigure the LavaPort for
a different IRQ.
Baud Rate selection of 230.4 kbps or higher is reduced to 115.2 kbps as
soon as the modem is accessed.
==>Verify that the modem's .INF file supports 230.4 kbps
Windows 2000/XP
If the standard Windows install procedure does not work for Win2K/XP,
the only fix is to reinstall the operating system without ACPI and with a
Standard PC Hardware Abstraction Layer. Please consult
http://support.microsoft.com for details. Search for 'force HAL' and read
the first link.
21
Windows NT
The NT Event Viewer will display messages regarding the LavaPort driver
regardless of success or failure. If you are having trouble with the
LavaPort go to Start | Programs | Administrative Tools |Event Viewer.
Write down any messages reported by the following services:
DetectLava, SerialLava, Serial.
DOS or Windows 3.11
Visit www.lavalink.com for installation details.
Consult Lava's FAQs on our web site (www.lavalink.com) for relevant
solutions, or send e-mail to [email protected].
22
This page intentionally blank.
23
Lava
Technical Support
9:00 am to 5:30 pm Monday to Friday (Eastern Time)
Tel: +416 674-5942
Fax: + 416 674-8262
E-mail: [email protected]
Internet: www.lavalink.com
Lava Computer MFG Inc.
This device complies with part 15 of the FCC Rules. Operation is subject
to the following conditions: (1) This device may not cause harmful interference,
and (2) this device must accept any interference received, including interference
that may cause undesired operation.
Lava Computer MFG Inc. 908 Niagara Falls Blvd. #629. North Tonawanda NY 14120-2060