1
Connections and Wiring
Preparing Captive Wires
You will need a wire stripper and flat-blade screwdriver to prepare and connect the captive wires.
Never pre-tin wires for compression-type connections.
1. Strip 0.25 inch (6.35 mm) of insulation off all wires.
2. Insert each wire into the appropriate opening on the connector (according to the wiring diagrams
and connector types described in this section).
3. Tighten the screws to secure the wire in the connector. Do not tighten the screws excessively doing
so may strip the threads and damage the connector.
Wiring a Power Connection
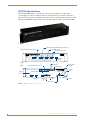
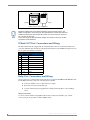
To use the 2-pin 3.5 mm mini-Phoenix connector with a 12 VDC-compliant power supply, the incoming
PWR and GND cables from the external source must be connected to their corresponding locations on
connector (FIG. 2).
1. Insert the PWR and GND wires on the terminal end of the 2-pin 3.5 mm mini-Phoenix cable. Match
the wiring locations of the +/- on both the power supply and the terminal connector.
2. Tighten the clamp to secure the two wires. Do not tighten the screws excessively; doing so may strip
the threads and damage the connector.
3. Verify the connection of the 2-pin 3.5 mm mini-Phoenix to the external 12 VDC-compliant power
supply.
PWR +
Power Supply
GND To the Integrated Controller
FIG. 2 2-pin mini-Phoenix connector wiring diagram (direct power)
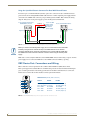
Using the 4-Pin Mini-Phoenix Connector For Data and Power
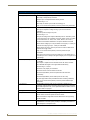
Connect the 4-pin 3.5 mm mini-Phoenix (female) captive-wire connector to an external NetLinx device
as shown in FIG. 3.
To the Integrated Controller’s
AXlink/PWR connector
To the external AXlink device
Top view
PWR +
AXM/RX
GND -
AXP/TX
PWR +
AXM/RX
GND -
AXP/TX
Top view
FIG. 3 Mini-Phoenix connector wiring diagram (direct data and power)
NI-2000, NI-3000, NI-4000 Hardware Reference Guide
25