1
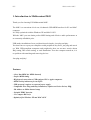
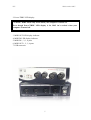
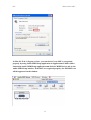
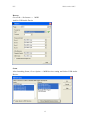
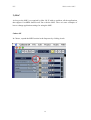
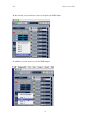
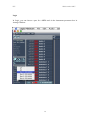
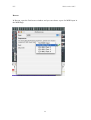
WARRANTY
Ego Systems Inc. warrants the return policy to its original purchaser as follows; All the EGO
SYSTEMS INC.’s products, under normal use, will be free from faulty as long as the purchaser
owns this product.
The terms of warranty is 15 months to EGO SYSTEMS INC. distributors considering a 3-month
temporary stock period ahead of being sold to the end user.
Therefore, the actual terms of warranty is 12 months to the end user.
EGO SYSTEMS INC. will, at its sole option, repair or replace a product, which is found to be defective.
This warranty shall be invalid if, in the sole opinion of EGO SYSTEMS INC., a product failure is the
result of misuse, abuse, modification, or misapplication. Except as expressly provided above, EGO
SYSTEMS INC. products are provided, 'as is' without any kind of warranty. No claim is made for
merchantability or fitness for any purpose. In no event will EGO SYSTEMS INC. be liable for any direct,
indirect, consequential, or incidental damages arising out of use of the product.
The purchaser must contact EGO SYSTEMS INC. or its regional representative to receive prior
approval before returning a faulty unit.
To obtain warranty service, the buyer or his authorized dealer must send the email to
[email protected] or [email protected] before returning the product. EGO SYSTEMS INC. will
then issue an authorization number.
All such returns must be shipped to EGO SYSTEMS INC.' headquarters in Seoul, Korea as being
packaged in the original or equivalent protective packaging material (Rack, PCI card, Power Cables,
connection cables), with freight prepaid and adequate insurance.
Any Shipments without freight prepaid will not be accepted.
If the returned product is deemed to be defective, the repaired or replacement product will be back
to you at no extra charge via the carrier chosen by EGO SYSTEMS INC.
TRADEMARKS
ESI, Miditerminal M4U, M4U are trademarks of EGO SYStems Inc. IBM is a registered trademark of
International Business Machines Corporation. Windows is a trademark of Microsoft Corporation. Other
product and brand names are trademarks or registered trademarks of their respective companies.
RADIO FREQUENCY INTERFERENCE AND COMPATIBILITY
NOTE: This equipment has been tested and found to comply with the limits for EN55022
ClassA:1998+A1:2001, EN55024:1998 of CE Test Specifications.
ESI
Miditerminal M4U
This equipment generates, uses, and can radiate radio frequency energy. If not installed and used in
accordance with the instruction, it may cause interference to radio communications. This device also
complies with part 15 class A of the FCC Rules Operation is subject to the following two conditions; This
device may not cause harmful interference, and must accept any interference received, including
interference that may cause undesired operation.
CORRESPONDENCE
For technical support inquiries, contact your nearest dealer or contact us directly. Direct all other
correspondence to:
EGO Systems Inc.
Suite 1003, Shinhan Bldg. 45-11 Yoido-dong
Youngdungpo-gu, Seoul, Korea
Web Site: www.egosys.net E-mail: [email protected]
Tel: 82-2-780-4451
Fax: 82-2-7804454
Technical support (Korean language only)
: 82-2-711-6655
Ego Systems Inc. US. Office
3003N. First St., Suite 303,
San Jose, CA 95134, USA
Website: www.esi-pro.com E-mail: [email protected]
Tel: 1-408-519-5774
Fax: 1-408-519-5786
Technical Support (English only)
[email protected]
2
ESI
Miditerminal M4U
INDEX
1. Introduction to Miditerminal M4U ______________________________________ 4
2. Description of Miditerminal M4U ______________________________________ 5
3. System Requirement _________________________________________________ 8
1) PC ______________________________________________________________ 8
2) MAC ____________________________________________________________ 8
4. Installation _________________________________________________________ 9
1) Hardware Installation _____________________________________________ 9
2) Driver Installation________________________________________________ 10
5. Setting in Applications_______________________________________________ 12
1) PC _____________________________________________________________
Cubase SX_______________________________________________________
Logic ___________________________________________________________
Giga Studio ______________________________________________________
Reason __________________________________________________________
Sonar ___________________________________________________________
12
12
13
14
15
15
2) MAC ___________________________________________________________
Cubase SX_______________________________________________________
Nuendo _________________________________________________________
Logic ___________________________________________________________
Reason __________________________________________________________
16
16
18
19
20
* The known Problems ________________________________________________ 21
All features and specifications subject to change without notice.
First Edition Oct. 2002
3
ESI
Miditerminal M4U
1. Introduction to Miditerminal M4U
Thank you for choosing ESI Miditerminal M4U.
The M4U is a convenient 4 in 4 out, 64 channels USB MIDI Interface for PC and MAC
computer.
It is fully optimized with the Windows XP and MAC OS X.
With the M4U you can obtain perfect MIDI timing and effective audio performance at
an extremely affordable price.
USB makes installation of new peripherals much simpler, just plug and play.
You don’t have to open your computer to add peripherals any more, just plug and turn it
on. With USB-compliant computers and peripherals, there are no more worries about
IRQ setting, DIP switch setting, or card installation. Even the computer turned on, it is
no problem with attaching and removing devices.
Just plug and play!
Features
- 4 In 4 Out MIDI (64 MIDI channel)
- Perfect MIDI timing
- High-speed connection to USB-equipped PC or Apple computers
- MIDI-activity indicators for each port
- USB-powered; requires no external power supply
- Compatible True Plug-and-Play installation; requires no Device Driver, IRQ,
I/O Address or DMA channel setup
- Variable THRU function
- 1/3 Compact Rack size
- Optimized for Windows XP and MAC OS X
4
ESI
Miditerminal M4U
2. Description of Miditerminal M4U
Front Panel
1
2
3
4
5
5
5
6
Rear Panel
6
6
6
5
7
1: USB/MIDI THRU switch
This is where you select USB mode or three kind of MIDI Thru mode.
1) USB mode: When you select this mode, M4U will be working as a basic MIDI
interface. It’s the Normal mode.
You can control MIDI in/ouput from your Sequencer application.
In addition, Power/THRU LED will become red color.
If you push the button again, you can go to the THRU mode.
5
ESI
Miditerminal M4U
If you want go back to the Normal mode, always push to pull out the button.
2) THRU Mode 1: Input and Output ports will be matched by 1:1.
For example, MIDI data from Input 2 directly goes to Output 2.
All LED display will be turned on. After 2~3 seconds, LED will be turned off again.
Power/THRU LED will become green color.
3) THRU Mode 2: The MIDI data from Input 4 goes to Output 1~4.
LED Display Input 4 and Output 1~4 would be turned on.
After 2~3 seconds, Output 1~4 will turned off. ( Input 4 is remains to be turned on)
Output LED will be lit by signal.
Power/THRU LED will become green color.
4) THRU Mode 3: The MIDI data from Input 1 goes to Output 1~4.
LED Display Input 1 and Output 1~4 would be turned on.
After 2~3 seconds, Output 1~4 will be turned off.( Input 1 is remain to be turned
on)
Output LED will be light by signal.
In addition, Power/THRU LED will become green color.
* Three kinds of THRU modes are changed in sequence whenever the button is
pushed in.
LED signal display
Normal
THRU 1
Function
Basic MIDI interface
I/O port matching (1:1)
THRU 2
In 4 -> All MIDI Outputs
THRU 3
In 1 -> All MIDI Outputs
In 4, Out 1~4 display will be turned on
After 2~3 seconds, Out 1~4 LED will be turn
off again (In 4 will be remains to be turned on)
Flickering according to the signal
In 1, Out 1~4 display will be turned on
After 2~3 seconds, Out 1~4 LED will be turn
off again (In 1 will be remains to be turned on)
Flickering according to the signal
All LED display will be turned on
After 2~3 seconds, LED will be turn off again
Flickering according to the signal
6
ESI
Miditerminal M4U
2. Power/THRU LED display
* Caution: THRU Mode only works when your computer is turned on.
Even though Power/THRU LED display is lit, M4U isn’t worked when your
computer is turned off.
3. MIDI OUT LED display indicator
4. MIDI IN LED display indicator
5: MIDI IN 1, 2, 3, 4 ports
6: MIDI OUT 1, 2, 3, 4 ports
7. USB connector
7
ESI
Miditerminal M4U
3. System Requirement
1) PC
Windows XP operating system only
Intel Pentium III CPU or equivalent AMD CPU
Motherboard with Intel series chipsets or VIA chipsets
UDMA66/100 7200rpm hard disk drive
More than 256MB of RAM
(Highly depends on the system requirements of your audio software)
2) MAC
MAC OS 10.1 or later only
Macintosh with G3 or better processor (except the original PowerBook G3)
One available USB port
More than 256MB of RAM
(Highly depends on the system requirements of your audio software)
* Caution
1. We don’t recommend using many USB devices with the M4U via USB hub at the
same time. It may cause Input data lose.
2. Some old mainboard that using OHCI (open host controller interface) may
cause problem.
3. Check our web site http://www.esi-pro.com occasionally for the most recent
update information or technical issues.
8
ESI
Miditerminal M4U
4. Installation
1) Hardware Installation
Before you begin, make sure you have read your computer’s manual on installing USB
devices. Your computer’s manual should describe the precautions you should take.
Shutting down computer wouldn’t need for installing an USB device to the computer.
However, we will take it from the start to make sure you can follow every detail of
installation.
1. Find the USB port on your computer. USB port is looked like below. You can find it
by the PS/2 or serial ports on the back of desktop computer system.
USB port on computer
2. Plug in appropriate plug of USB cable (called Series A plug) to the USB port of
computer. You will notice that USB ports on computer and M4U are different.
Series A plug
3. Connect the other end of the USB cable (Series B plug) to the USB port of M4U.
Series B plug
Turn on the computer. You will see the LED displays of M4U are lit. The M4U get the
power from the computer via USB cable so you don’t need to attach any external power
supplier.
9
ESI
Miditerminal M4U
Series A Plug is used for those devices on which the external cable is permanently
attached like Mouse, Keyboard and USB hub etc…
Series B Plug is for that requires detachable external cables and used for devices
like Printers, Scanners, Modems, Stand alone Hubs.
2) Driver Installation
After Hardware installation is done properly, your PC or MAC computer will
automatically detect the M4U and install default driver.
You don’t need install additional driver.
In XP, go to Device Manager and check ‘USB Audio Device’ under Sound, video
and game controllers. Double click this device and check ‘ESI-M4U’ under USB
audio device properties.
10
ESI
Miditerminal M4U
In Mac OS X 10.2 (Jaguar) or later, you can check if your M4U is recognized
properly by using Audio MIDI Setup application in Applications/Utilities folder.
Launch the Audio MIDI Setup application and click the MIDI Devices tab on the
Audio MIDI Setup window. If the M4U is recognized properly, the ESI-M4U icon
will be appeared on the window.
11
ESI
Miditerminal M4U
5. Setting in Applications
* This chapter only contains the basic setup for some of the software. For more
detailed info, please refer to the manual of the software.
1) PC
Cubase SX
In Cubase, set input and output as USB Audio Device.
See red circle of below picture.
12
ESI
Miditerminal M4U
Logic
In Logic, you can choose a port for a MIDI track in the instrument parameter box in
Arrange Window.
In addition, go to ‘Synchronisation’ -> ‘MIDI’ and uncheck ‘Transmit MIDI clock’ for
better performance.
13
ESI
Miditerminal M4U
Giga Studio
After launching GigaStudio, set input and output as USB Audio Device.
See red circle of below picture.
14
ESI
Miditerminal M4U
Reason
Go to Edit -> Preference -> MIDI
And Set USB Audio Device
Sonar
After launching Sonar, Go to Option -> MIDI devices setting and Select USB Audio
Device.
15
ESI
Miditerminal M4U
2) MAC
As long as the M4U is recognized by Mac OS X with no problem, all the applications
that support CoreMIDI should work fine with the M4U. Here are some examples of
how to change application settings for using the M4U.
Cubase SX
In Cubase, expand the MIDI section in the Inspector by clicking its tab.
16
ESI
Miditerminal M4U
In this section, you can choose a port (or all ports) for MIDI input.
In addition, you can choose a port for MIDI output.
17
ESI
Miditerminal M4U
Nuendo
In Nuendo, you can choose a port for a MIDI track in the Track List area.
18
ESI
Miditerminal M4U
Logic
In Logic, you can choose a port for a MIDI track in the instrument parameter box in
Arrange Window.
19
ESI
Miditerminal M4U
Reason
In Reason, open the Preferences window and you can choose a port for MIDI input in
the MIDI Page.
20
ESI
Miditerminal M4U
* The known Problems in Windows XP
-We doubt it is Windows default USBAudio driver’s MIDI problem. We’ll contact
the Microsoft to solve the problem together.
1. Even after the M4U is disconnected from computer, the driver in the Device Manger
will remain for 5 minute and disappeared.
To clear out the USB MIDI driver from the system, computer needs about 5 minutes
of processing time when you disconnect the M4U.
Thus, if you want to reconnect the M4U to the computer, give it 5 minutes at least.
2. System Exclusive data SEND/RECEIVE problems
1) Send: There is no problem for processing general or small sized data like a 1kB.
However, if you send the SYSEX data bigger than output buffer size of your
sequencer program mostly like dumping SYSEX data, you may fail to send the data.
2) Receive: According to the Data processing method of each application, you may
fail to receive the SYSEX data.
There is no problem with Cakewalk and MIDIOX.
Because these programs make buffering first and display Data later.
However, if your software is not one of those, you may have problem when the
driver and an application exchanging the SYSEX data.
- Solution: Use Cakewalk or MIDIOX(freeware) and make the buffer size bigger than
the System exclusive data you want to deal with.
1) MIDIOX (Freeware)
* You can download the evaluate version of MIDIOX at www.midiox.com
After launching MIDI OX, go to View -> Sysex -> Configure.
Set proper buffer size (bigger than the size of Send/Receive data) of Output
and Input like the following picture.
* Numbers of the below picture is only the example.
* You may not need to care about Input buffer size.
21
ESI
Miditerminal M4U
2) Cakewalk or Sonar
If your software is Cakewalk or Cakewalk Sonar, Go to programs’ directory
folder. (C-> Program files -> Cakewalk)
Find and open TSSEQ.INI file.
Type SyxSendPacketsize=n like a below picture and Save it.
‘2048’ in the below picture is only the example.
The size of ‘n’ has to be bigger than the size of SEND/RECEIVE data,
Restart Cakewalk or Sonar.
Please refer to Cakewalk or Sonar manual for detailed information about Sysx part.
* Parts of this manual are continually being updated. Please check our web site
http://www.egosys.net occasionally for the most recent update information.
22
ESI
Miditerminal M4U
23