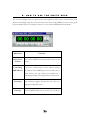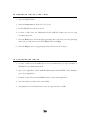
1
Miditerminal 4140 4 IN 4 OUT 64 CHANNEL MIDI/SMPTE INTERFACE User's Manual COPYRIGHT 2001, EGO SYSTEMS INC. All rights in this document are reserved. No part of this document may be copied, reproduced, or distributed in any form or by any means without the prior written permission of EGO SYStems Inc. WARRANTY EGO SYStems Inc. warrants to the original purchaser that this product, under normal use, will be free from defects in materials and workmanship for as long as the purchaser owns this product. EGO-SYS will, at its sole option, repair or replace a product, which is found to be defective. This warranty shall be null and void if, in the sole opinion of EGO-SYS, a product failure is the result of misuse, abuse, modification, or misapplication. Except as expressly provided above, this product is provided “as is” without warranty of any kind. No claim is made for merchantability or fitness for any purpose. In no event will EGO-SYS be liable for any direct, indirect, consequential, or incidental damages arising out of use of this product. You must contact EGO-SYS or our regional representative for prior approval before returning a failed product. All such returns must be shipped to EGO-SYS or our regional representative in original or equivalent protective packaging material, with freight prepaid and adequate insurance. If the product is deemed to be defective, the repaired or replacement product will be returned to you at no charge via carrier chosen by EGO-SYS. TRADEMARKS EGO-SYS, Miditerminal, and Miditerminal 4140 are trademarks of EGO SYStems Inc. IBM is a registered trademark of International Business Machines Corporation. Windows is a trademark of Microsoft Corporation. Other product and brand names are trademarks or registered trademarks of their respective companies. RADIO FREQUENCY INTERFERENCE NOTE: This equipment has been tested and found to comply with the limits for a Class A device, pursuant to Part 15 of the FCC Rules, and EN50 081-1/2:1992 of CE Test Specifications. This equipment generates, uses, and can radiate radio frequency energy. If not installed and used in accordance with the instructions, it may cause interference to radio communications. EGO SYStems Inc. 45-11 Yoido-dong, Shinhan Bldg. Suite 1003 Yoido-dong Youngdungpo-gu, Seoul, Korea Tel: +82 2 780-4451~3 Fax: +82 2 780-4454 Web Site: www.egosys.net Revised July, 2001 1 Contents About This Manual 3 Introduction 4 1. What's in the Box 5 2. Check Your IRQ's 6 3. Hardware Installation 7 4. Driver Installation 9 Windows 2000 15 Windows 98SE,ME 5. Let's See If It Works 21 21 MIDI check 6. SMPTE Desk 24 Software Installation 24 How to use the SMPTE Desk software 25 2 About This Manual What we expect you to know... • We assume that you have basic computer skills. If you are a computer novice, you should familiarize yourself with these basic skills before using the Miditerminal 4140 (or any other computer-related products). • We assume that you already have at least a MIDI sequencer or some other MIDI software and that you are familiar with its use. • If the Miditerminal 4140 is your first MIDI interface purchase, we hope you already have some kind of MIDI software. Read your MIDI software manual thoroughly and follow the installation instructions BEFORE you start installing the Miditerminal 4140. In most cases, it doesn't make any difference which you install first, but take the precaution of reading all installation manuals before preceding any further. 3 Introduction Thank you for purchasing the Miditerminal 4140, the professional choice MIDI/SMPTE interface for IBM PC and compatibles. This manual will guide you to follow a step-by-step installation of hardware and software for a variety of setup options according to your system. For best results, we suggest that you read this manual in its entirety before beginning any software or hardware installation. R E Q U I R E M E N T S To install and use the Miditerminal 4140 in your computer music system, you will need, at minimum, the following equipment and components: 1. IBM compatible computer with a parallel printer port, running Microsoft Windows 98SE, ME, or 2000 operating system. 2. MIDI instrument(s) – Synthesizers, Sound Modules… 3. Standard MIDI cables (at least 2) 4. MIDI software * If you want to use the Miditerminal 4140 with an older Windows operating system such as Windows 95 or 98, you should use the older Miditerminal 4140 driver instead of the EWDM driver. You can download it from our website: www.egosys.net 4 1. What's in the Box? Check to make sure that you have all that you've paid for. The Miditerminal 4140 box should contain the following: 1. Miditerminal 4140 2. Custom Miditerminal printer port cable with Y-cable keyboard adapter for either PS/2 or regular keyboard connectors 3. 3.5" Driver floppy diskette 4. This Manual !! IMPORTANT !! Y - C A B L E K E Y B O A R D A D A P T E R Do the Y-cables and printer cable look strange? That's because they are custom-made cables FOR USE ONLY WITH MIDITERMINAL 4140. Do not connect any other devices with this cable as it may severely damage them. Depending on the type of computer you have, you will need to use either a PS/2-type keyboard adapter or regular keyboard adapter - never both at the same time. However, don't discard the unused Y-cable adapter. You should keep the unused Y-cable adapter in a safe place in case you need to connect to a different computer. This Y-cable draws DC power from the computer's keyboard port and serves the same function as a DC power adapter. Because it carries an electrical current, you should keep the cable away from moisture at all times. 5 C U S T O M P R I N T E R P O R T C A B L E This cable connects your Miditerminal 4140 to your computer's printer port and it also connects the Y-cable keyboard adapter at one end. This also is a custom-made cable FOR USE ONLY WITH THE MIDITERMINAL 4140. Do not connect printers or any other devices with this cable at any time. Doing so may severely damage the printer or computer. 2. Check Your IRQ Settings Check your soundcard and other installed hardware devices' IRQ settings and make sure that they don't have the same IRQ settings as your printer port IRQ (the number that you’ve just checked above). If you do find a device that has the same IRQ as your printer port IRQ, change the IRQ of the device to a different IRQ. Consult the manuals of other hardware devices. If you have problems read "Printer Port Tech Stuff" before preceding any further. If you are using an ECP Printer Port, be sure to cross check the Direct Memory Access with other hardware devices as well. It should have a number different from any other devices. * Please choose ECP or EPP mode for the parallel (printer) port via the BIOS CMOS setup of your computer’s motherboard. * Now the IRQ of the Miditerminal 4140 is set automatically during the driver installation. 6 3. Hardware Installation It's very important that you follow the CHECK LIST instructions below to insure safe and optimal performance of the Miditerminal 4140 and your whole computer music system. Once you have read them thoroughly, proceed to make the connections as shown in the diagram. C H E C K L I S T 1. Turn off your computer and all hardware devices attached to your computer before making any connections. 2. If you have a notebook computer and/or PS/2 port, select the appropriate Ycable keyboard adapter and connect it to the supplied Miditerminal 4140 printer port cable. 3. If you have Zip drives, dongles or other SCSI controllers connected to your computer printer port, make sure that the Miditerminal 4140 is the LAST or only device in the chain. 7 IMPORTANT! The supplied printer cable carries an electrical current. Do not use this cable with any other devices. 8 4. Driver Installation A. WINDOWS 2000 DRIVER INSTALLATION BEFORE INSTALLATION: The printer driver for your system should be installed properly before installing the Miditerminal 4140 driver. Please confirm this as follows. Otherwise, please enable the Parallel Port from the CMOS setup and let Windows install it. 1. Open the Device Manager. 2. Open "Ports (Com & LPT).” 9 3. Open "(ECP or xxx) Printer Port (LPTx)." 4. Select "Port Settings" and set the following check boxes. Off: Try not to use an interrupt. Off: Never use an interrupt. On: Use any interrupt assigned to the port. 10 INSTALLATION: 1. Open "Start-> Settings-> Control Panel-> Add/Remove Hardware." 2. Select "Add a new device" from the "Devices" list box. 11 3. Select "No, I want to select the hardware from a list." 4. Select "Sound, video, and game controllers." 12 5. Press the "Have Disk" button. 6. Find the Miditerminal 4140 driver directory and install the driver. 13 7. REBOOT your computer. 14 B. WINDOWS 98SE/ME DRIVER INSTALLATION 1. Quit all applications before you start installing the driver. 2. Pull up the Start menu from your computer's desktop. 3. Select Control Panel (Start/Settings/Control Panel) 15 4. Double-click the Add New Hardware icon. 5. Follow the Installation Wizard until it asks if you want the computer to automatically search for the new hardware. Select NO, and then press NEXT to proceed. 16 17 6. Select SOUND, VIDEO and GAME CONTROLLERS by clicking it to highlight it, then press NEXT to proceed. 7. The next Wizard page will ask you for the manufacturer and model. Regardless of what manufacturer and model are chosen, click HAVE DISK and the Wizard will prompt you to insert the driver diskette. 18 8. The Install from Disk dialog appears. Insert the Miditerminal 4140 Driver and Software disk in your floppy disk drive and select the appropriate drive (usually A:\ or B:\ drive). Click OK to continue. 9. When the Select Device dialog appears, you will then see the Miditerminal 4140 listed. Select it by clicking once to highlight it and then click OK to continue. Your computer will start copying the appropriate files to your hard drive. 19 10. At the final stage of Wizard, click FINISH to complete the driver installation. 11. Your driver installation is now complete and you should RESTART your computer to begin using the Miditerminal 4140. 20 5. Let's See If It Works Congratulations! You have completed all software and hardware installations to use the Miditerminal 4140. Before you begin using the Miditerminal 4140, just check to make sure that you have correctly installed your MIDI and digital audio hardware and software. M I D I C H E C K If you have followed the instructions correctly and the rest of your computer music system is working properly, you should open your favorite MIDI sequencer and find the following in your sequencer's MIDI selection menu. < Example – Cakewalk Pro Audio/Sonar > Don’t check 'SMPTE-Miditerminal 4140 EWDM’ on ‘Output Ports’ because it’s a phantom port. 21 < Example – Cubase VST > These numbers refer to the Miditerminal 4140's MIDI Input and Output sockets. To check if your Miditerminal 4140 is working properly, you should enable all 4 inputs and 4 outputs and see if the MIDI signal is present on all sockets. 1. Open your favorite MIDI sequencer and send a signal on all 16 MIDI channels to the 4140-Out 1 thru the 4140-Out 4 MIDI Output ports. 2. Check the front panel LED's on the Miditerminal 4140 to see if they are blinking when a MIDI signal is present. If so, the Miditerminal 4140’s MIDI Outputs are working properly. 3. To check if the MIDI Inputs are working, connect your favorite keyboard controller to any one of the four MIDI Inputs of the Miditerminal 4140. 4. Set up your keyboard to send a MIDI signal on all 16 MIDI channels (OMNI mode) and start playing. If the Miditerminal 4140's front panel LED's are blinking with a press of the keyboard, the MIDI Inputs are working properly. 22 5. Record some music on your sequencer and play it back. If you find that your sequencer didn't record anything, yet you've observed that the MIDI Input LED's were blinking, you probably don't have the Miditerminal 4140 driver (IRQ's) set up properly or the Miditerminal 4140 isn't properly connected to your computer's printer port. If you still have problems, contact your nearest EGO SYS dealer or our Technical Support Department (www.egosys.net). 23 6. SMPTE Desk Software If you don't have the need to generate SMPTE, you don't have to install the The SMPTE Desk is software that allows you to read and generate longitudinal time code (SMPTE). This allows you to synchronize your MIDI sequencer and/or digital audio recording software with analog audio multitrack recorders or VTR's. SMPTE Desk Software. The Miditerminal 4140 can read SMPTE without the SMPTE Desk installed. A. SOFTWARE INSTALLATION To install this software, follow the 2 easy steps below: 1. Insert the Miditerminal 4140 Driver and Software diskette into your floppy drive. 2. Just copy the file named "SMPTEDSK.EXE" onto any place on your computer's hard disk drive. That's it! 24 B. HOW TO USE THE SMPTE DESK The on-screen display items are pretty much self-explanatory. This section only describes their function and simple usage. If you need to know more about using SMPTE, there are many good books available and you can always contact us or your nearest Miditerminal 4140 dealer. Menu item Function Reset Time To Zero Click on the SMPTE time with the left button of the mouse. Controlling If you have a wheel mouse, use the wheel to change SMPTE time the number of the SMPTE panel. If you don’t have a wheel mouse, you can increase the number by 1 increment per click of the right button of the mouse. Start-Stop Start and Stop toggles between the two once you begin generating time code. Frame(s) Sets the SMPTE frame rate to 24, 25, 29.97, 30D, 30 25 T O G E N E R A T E S M P T E T I M E C O D E 1. Open the SMPTE Desk. 2. Select the frame rate (30, 30D, 29.97, 25, or 24) 3. Set the SMPTE time with your mouse. 4. Connect a cable from the Miditerminal 4140's SMPTE Output jack into the tape recorder's input jack. 5. Press the Start button, and it will begin generating time code. Once you start generating time code, you will notice now that the Start button reads Stop. 6. Press the Stop button to stop generating time code if you want to stop it. T O S Y N C H R O N I Z E S M P T E 1. Connect a cable from the SMPTE Out of an external device (ex. tape recorder) to SMPTE In of the Miditerminal 4140. 2. Open your application. Check ‘SMPTE-Miditerminal 4140 EWDM’ of the MIDI In port of your application. 3. Properly set the offset time and SMPTE frame of your audio application. 4. Set your software to ‘Slave mode’ and standby. 5. Start playback of your Master Device (such as a tape recorder or VTR). 26 Miditerminal 4140 4 In 4 Out 64 Ch MIDI/SMPTE Interface User's Manual EGO SYStems Inc. 45-11 Yoido-dong, Shinhan Bldg. Suite 1003 Yoido-dong Youngdungpo-gu, Seoul, Korea Tel: +82 2 780-4451~3 Fax: +82 2 780-4454 Web Site: www.egosys.net 27