1
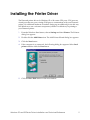
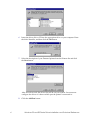
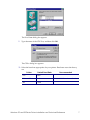
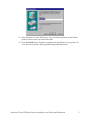
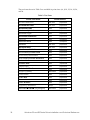
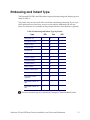
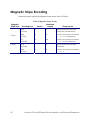
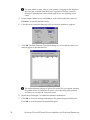
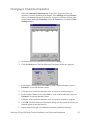
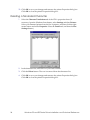
Printer Driver for the Datacard
150i, 28x, and 450 Series
Printers on Windows® 95 and 98
Installation and
Technical Reference Manual
November 2001
Part No. 526887-001, Rev B
Revision Log
Printer Driver for the Datacard Printers on Windows® 95 and 98
Installation and Technical Reference Manual
Revision
Date
Affected Pages
Description of Changes
A
May 1998
All
New Release
B
December 2001
All
Update for new company
information and Windows 98.
Liability Statement
This Datacard product has been built to the high standards of DataCard
Corporation. Please note and heed the WARNING and CAUTION labels that have
been placed on the equipment for your safety. Please do not attempt to operate or
repair this equipment without adequate training. Any use, operation or repair in
contravention of this document is at your own risk. By acceptance of this system you
hereby assume all liability consequent to your use or misuse of this equipment.
DataCard Corporation assumes no liability for incidental, special or consequential
damage of any kind. Equipment specifications, applications and options are subject
to change at the sole discretion of DataCard Corporation without notice.
Proprietary Notice
All drawings and information herein is the property of DataCard Corporation. All
unauthorized use and reproduction is prohibited.
Acknowledgments
Datacard is a registered trademark and QuikWorks is a trademark of DataCard
Corporation.
Microsoft and Windows are registered trademarks of Microsoft Corporation.
© 1998, 2001 DataCard Corporation.
All rights reserved. Printed in the United States of America.
Datacard Group
11111 Bren Road West
Minnetonka, MN 55343-9015
952.933.1223
Fax: 952.933.7971
www.datacard.com
ii
Table of Contents
Introduction _______________________________________________________________________ 1
What’s in this Manual___________________________________________________________________1
Related Documents ____________________________________________________________________2
System Requirements___________________________________________________________________3
Printer Driver Limitations ________________________________________________________________4
Embossing Limitations __________________________________________________________________4
Installing the Printer Driver__________________________________________________________ 5
Selecting Embossing and Indent Fonts _________________________________________________ 10
Setting 150i Printer Configuration Options ______________________________________________ 12
Setting 28x Printer Configuration Options ______________________________________________ 13
Setting Customer Engineer Configuration Options__________________________________ 13
Setting Supervisor Configuration Options __________________________________________ 14
Setting 450 Printer Configuration Options ______________________________________________ 15
Disabling Auto Remake __________________________________________________________ 15
Setting Communication Parameters ______________________________________________ 15
Printer Fonts ______________________________________________________________________ 17
Embossing and Indent Type___________________________________________________________ 19
Magnetic Stripe Encoding ____________________________________________________________ 20
Translating Characters _______________________________________________________________ 21
Changing a Character Translation ________________________________________________ 23
Deleting a Translated Character __________________________________________________ 24
Printing in a Windows Environment_________________________________________________ 25
Adding CPX Ports ____________________________________________________________________ 25
Restoring Default Spool Settings _______________________________________________________ 28
Troubleshooting __________________________________________________________________ 29
Why do I get an error using embossed fonts? __________________________________________ 29
Embossed fonts do not print as they appear on the screen. _____________________________ 29
Why don't embossed fonts appear in the font menu? __________________________________ 29
Why don't magnetic stripe fonts appear in the font menu? _____________________________ 30
Why do I get time-out errors? _________________________________________________________ 30
Initial setup problems printing Graphics, Embossing or Magnetic Stripe __________________ 31
How do I check the version of the printer driver? _______________________________________ 31
My Word 97 document doesn’t print. __________________________________________________ 31
Multiple copies of Word 6 documents don't print. ______________________________________ 31
Index ____________________________________________________________________________ 33
iii
List of Tables
Table 1: Supported Printer Capabilities................................................................................................ 1
Table 2: Text Fonts ................................................................................................................................. 18
Table 3: Embossing and Indent Type by Printer ............................................................................... 19
Table 4: Magnetic Stripe Tracks ........................................................................................................... 20
iv
Introduction
The Datacard Printer Drivers for Windows® 95 and 98 provide users with the ability
to print from those Microsoft® Windows operating systems to the Datacard 150i,
280, 285, and 450 Series card printers. The capabilities of these printers are listed in
Table 1.
Table 1: Supported Printer Capabilities
Printer
Capabilities
150i
Emboss
Indent
Encode magnetic stripes
Topping
280
Emboss
Indent
Encode magnetic stripes
Print graphics
Topping
285
Encode magnetic stripes
Print graphics
450
Emboss
Indent
Encode magnetic stripes
Topping
This driver allows for rotation of both barcodes and printed text but not for rotation
of embossed text.
What’s in this Manual
This manual contains the following information:
Introduction. This chapter provides information about system requirements and
limitations.
Installing the Printer Driver. This chapter provides installation information and
procedures for both the printer driver and the printer.
Printer Fonts. This chapter includes information about fonts that are available using
the printer driver for Windows 95 and 98.
Windows 95 and 98 Printer Driver Installation and Technical Reference
1
Printing in a Windows Environment. This chapter tells how to get information and
procedures for pausing, resuming, and deleting print jobs.
Troubleshooting. This chapter includes information and procedures for solving
printing problems.
Related Documents
If you need additional information about the printer your system uses, refer to one
of the documents listed below:
Manual
2
Manual Part
Number
CD-ROM Library
Part Number
Datacard 150i Card Personalization
System CPX Protocol/Setup Manual
526637-001
539170-001
Datacard 150i Card Personalization
System Administrator’s Guide
526638-001
280/285 Card Personalization System CRT
Operator’s Manual
539017-001
280/285 Card Personalization System
Keyboard Option Operator’s Manual
539018-001
280/285 Card Personalization System
Maintenance Manual
539019-001
Datacard CPX Communications Protocol
Manual
526473-001
28x Magnetic Stripe Option Installation
and Technical Reference Manual
526583-001
Datacard 450 Operator’s Guide
526141-001
539039-001
NA
Windows 95 and 98 Printer Driver Installation and Technical Reference
System Requirements
The minimum system requirements for installing and using the printer driver for
Windows 95 or 98 are:
·
Microsoft Windows 95 or 98
·
An computer that meets the Windows minimum requirements
·
One of the following:
·
A 150i printer with the following firmware:
Mainboard:
·
·
556228-501 Rev. A or above
A 2xx printer with the following firmware:
Mainboard:
596006-501 Rev. H or above
Graphics:
596199-50x Rev. A or above
A 450 printer with the following firmware:
Mainboard:
590752-501 Rev. D or above
Refer to the operator’s manual for procedures to determine the printer’s firmware
level.
Windows 95 and 98 Printer Driver Installation and Technical Reference
3
Printer Driver Limitations
The Datacard printer driver for Windows 95 or 98 does not support:
·
Two-sided badge printing using the Datacard QuikWorks software
·
Encapsulated postscript (.eps) files
·
Microsoft Windows 3.1 and NT (see separate driver for Windows NT and 2000)
·
NTT (or J) encoding
·
Smart card personalization
·
Barcode generation: your Windows application must generate the barcode and
pass it to the driver for printing
·
“Indent” fonts do not display in WYSIWYG (what-you-see-is-what-you-get)
·
Encryption capability as required by Visa
·
The 150i password for the production of major brands of financial cards (Visa,
MasterCard, etc.)
·
Any magnetic stripe encoding schemes other than IATA, ABA, or TTS
·
Network printing: because of the complex nature of networking, Datacard does
not provide Help Desk technical support for the printer driver in networked
applications
Embossing Limitations
Cards pass through the embosser in landscape orientation and the embossing
wheels print characters horizontally. Therefore, embossing must be limited to
landscape orientation.
4
Windows 95 and 98 Printer Driver Installation and Technical Reference
Installing the Printer Driver
The Datacard printer driver for Windows 95 or 98 creates CPX ports. CPX ports are
virtual ports that use your existing COM ports to communicate with your Datacard
printer. No additional hardware is needed. Setting up an additional port in this way
tells Windows to use a software component (called a Port Monitor) for printing to
your Datacard printer.
1.
From the Windows Start button, choose Settings and then Printers. The Printers
dialog box appears.
2.
Double-click the Add Printer icon. The Add Printer Wizard dialog box appears.
3.
Click the Next button.
4.
If the computer is on a network, the following dialog box appears. Select Local
printer and then click the Next button.
5.
Click the Have Disk button on the next window.
Windows 95 and 98 Printer Driver Installation and Technical Reference
5
6.
Insert the driver disk or CD into the appropriate drive on your computer. Enter
the drive identifier, and then click the OK button.
7.
Select the description of your Datacard printer from the Printers list and click
the Next button.
After several seconds, the driver files will be on your system. You must now
configure the driver so it knows which port the printer is connected to.
8.
6
Click the Add Port button.
Windows 95 and 98 Printer Driver Installation and Technical Reference
The Port Name dialog box appears.
9.
Type the name of the CPX Port, and then click OK.
The CPXx: dialog box appears.
10. Select the baud rate appropriate for your printer. Baud rates set at the factory
are:
Printer
Default Baud Rate
150i
9600
280 and 285
9600
450
19200
Recommended
57600; 19200 if less than a Pentium
Windows 95 and 98 Printer Driver Installation and Technical Reference
7
If you select Confirmation for each data block processed, the operator must
acknowledge the following message before the printer will continue to the next
record. Card-by-card confirmation will reduce throughput.
If you select Cache bitmaps in printer memory, the speed of printing can
increase significantly when you use Printer type fonts and print the same
bitmap (for example, a logo) on several consecutive cards.
Other settings are optional. Datacard recommends that only authorized
Datacard service representatives alter the remaining settings.
11. Click the OK button.
12. Click the Next button.
13. If you want, type a user friendly name for the printer. In most cases, the default
name is sufficient.
8
Windows 95 and 98 Printer Driver Installation and Technical Reference
14. Select whether you want Windows to use your Datacard printer as the default
printer. In most cases you should select No.
15. Click the Finish button. Windows completes the installation of your printer. Go
on to the next procedure, Selecting Embossing and Indent Fonts.
Windows 95 and 98 Printer Driver Installation and Technical Reference
9
Selecting Embossing and Indent Fonts
The information that follows explains how to identify to your Windows 95
application program which fonts are resident in your Datacard printer and how to
complete the software settings. For a complete explanation of printer fonts, see
Printer Fonts.
Use the following procedure to select the printer fonts and complete the software
settings
1.
In the Printers window, select your Datacard printer. Then from the File menu,
select Properties. The Properties dialog box for your printer appears.
2.
Click the Fonts tab. From the list of fonts available for your printer, select those
that are actually installed in your printer.
You may select up to five fonts.
3.
10
For all printers, select the Paper tab.
Windows 95 and 98 Printer Driver Installation and Technical Reference
4.
For the 280, 285, and 450 printers, in the Page size area select the card size you
are using. The printer driver refers to the card size as the paper size. Select a
logical page size to restrict the printing and embossing to legal areas. If your
Windows application does not use page sizes, you must manually position your
information in the allowable print area. Be sure to allow a margin of at least
0.200 inch to the centerline of text for normal text, and a top margin of 0.35 inch
for embossing fonts.
The printer drivers for Windows 95 and 98 support either CR50 or CR80.
Your printer is factory set to support one or the other. (The 150i supports
only CR80.)
5.
For all printers, in the Orientation area, select Landscape.
Both orientations allow graphics and embossing. However, cards pass
through the embosser in landscape orientation and the embossing wheels
print characters horizontally. Therefore, embossing should be limited to
landscape orientation.
6.
For all printers, select Normal feed as the Paper source. The “Pause feed” and
“Pre-Embossed Card” options, when present, require the user to respond to a
message displayed on the printer after each card is printed.
7.
For the 150i printer only, for the media choice, select the coercivity setting
appropriate for your card stock.
8.
For the 150i, 280, and 450 printers, click the More Options button. The Paper -More Options dialog box appears. Select Topper Enabled to apply topping to
embossed text. (Note: The 150i is designed to apply topping to the lower half of
a CR80 card only. The topper must be disabled to emboss on the upper areas of
the card.)
Windows 95 and 98 Printer Driver Installation and Technical Reference
11
9.
Click OK to close the dialog box.
10. Click OK on the Properties dialog box to save your settings. Go on to the printer
configuration options procedure for your printer.
Setting 150i Printer Configuration Options
The following procedure tells how to change the 150i printer configuration to work
with the printer driver. The instructions begin with the printer powered off.
1.
Power ON the 150i. When “150i/CPX” is displayed, immediately press the #
key.
The # key must be pressed before the machine enters the Ready mode to
access the Setup Menu.
The printer scrolls through the Setup Menu as you press the # key. Within
an option, press 0 to scroll through the choices available. When the
appropriate choice is displayed, press the # key to accept the choice and
move on to the next option.
2.
Make the following selections:
Baud = 9600
Parity = None
Bits = 8
Monitor = No
TestCard = (appropriate setting)
Save Changes = Yes
After Save Changes = Yes is accepted, the printer will reset. Allow it to go to
Ready mode.
12
Windows 95 and 98 Printer Driver Installation and Technical Reference
Setting 28x Printer Configuration Options
The following procedure tells how to change the 28x printer configuration to work
with the printer driver for Windows 95 or 98. The instructions begin at the main
menu of the printer’s display window.
Setting Customer Engineer Configuration Options
1.
At the Datacard 28x printer front panel, press Esc to go to the Main Menu.
2.
Press F3 to choose Set Up.
3.
Select F3 to choose Customer Engineer.
4.
When prompted for an access code, press F2 and then F1.
5.
Press F1 to choose the configuration menu.
6.
Verify and set the configuration options identified below. Use the function keys
(F1, F2, and F3) to scroll through menus, select a menu, select menu options,
and save options.
Configure Menu option
System Page Select
Value to select or enter
System Page Menu
Page = CPX Format
Use High Baud Rate = On
Baud Rate Menu
Baud = 57600
NAK Busy Used = On
Send Pause Status = On
Host Comm.
Data Bits and Parity Menu
Parity = 8 bit None
Ignore Transmit Error = On
Use Comm. Translation Table = Off
Check Card Limits Error
Card Limits Error = On
For 486-based workstations and below, in the System Page Select Menu,
choose Use High Baud Rate = OFF and in the Host Comm. Menu choose
Baud Rate = 19200.
7.
Press Esc twice to return to the Set Up Menu.
Windows 95 and 98 Printer Driver Installation and Technical Reference
13
Setting Supervisor Configuration Options
1.
Press F2 to choose Supervisor.
2.
When prompted for an access code, press F1 and F2.
3.
Verify and set the configuration options identified below. Use the function keys
(F1, F2, and F3) to scroll through menus, select a menu, select menu options,
and save options.
Setup Menu option
Value to select or enter
Power Up Online
Power Up Online = On
Options Control Table
Option = 1 (PRT-OFF, GFX-T0)
Select Match Trigger Used
Match = None
Magstripe Current Adjust
Cur = (appropriate status) (if applicable)
Magstripe Erase Rejects
Rej = Std No Erase (if applicable)
Set Topper = On (if applicable)
Printer = Off
Host = None (If applicable)
Convert to Graphics Table
Used = None
Allow Graphics Printing = Yes
Always Print Logo/Fixed Fields = No
Graphics Print Ignore Embossing = No
Graphics Template[0-3] = 0
Graphics Darkness Adjustments
Type = Std Default
4.
14
Press Esc twice to return to Online Ready.
Windows 95 and 98 Printer Driver Installation and Technical Reference
Setting 450 Printer Configuration Options
The information that follows explains how to change the 450 printer configuration to
work with the printer driver for Windows 95 or 98.
Disabling Auto Remake
1.
Press the READY button. The message, “Operator Setup Press Option Key”
appears.
2.
Press the OPTION button eight times. The current Auto Remake setting
appears.
3.
If necessary, press the ENTER button to set Auto Remake to Off.
4.
Press the READY button.
Setting Communication Parameters
1.
Press the READY button. The message, “Operator Setup Press Option Key”
appears.
2.
While pressing and holding the READY button, press the EXIT button two
times and the OPTION button two times, and then release the READY button.
The message Cust. Eng. Setup Press Option Key appears.
3.
Press the OPTION button two times.
4.
Press the ENTER button. The current Baud Rate setting appears.
5.
If necessary, press the ENTER button until 9600 is displayed.
The printer scrolls through the Customer Engineer Setup options as you
press the OPTION button. To back up to an earlier option, press and hold
the READY button, and then press the OPTION button.
6.
Press the OPTION button. The current Parity setting appears.
7.
If necessary, press the ENTER button until None is displayed.
8.
Press the OPTION button. The current Bits/Char setting appears.
9.
If necessary, press the ENTER button until 8 is displayed.
10. Press the OPTION button. The current Stop Bits setting appears.
11. If necessary, press the ENTER button until 1 is displayed.
12. Press the OPTION button. The current Parity Err Actn setting appears.
13. If necessary, press the ENTER button until Halt is displayed.
14. Press the OPTION button. The current Input End of Line setting appears.
Windows 95 and 98 Printer Driver Installation and Technical Reference
15
15. If necessary, press the ENTER button until CR is displayed.
16. Press the OPTION button. The current Buffered Mode setting appears.
17. If necessary, press the ENTER button until Off is displayed.
18. Press the OPTION button. The current Data Conversion setting appears.
19. If necessary, press the ENTER button until ## is displayed.
20. Press the OPTION button. The current Protocol setting appears.
21. If necessary, press the ENTER button until CPX Special is displayed.
If you cycle through the choices and CPX Special is not one of them, the
operating system EPROM must be upgraded.
22. Press the READY button.
23. Power off the printer, and then power it on.
16
Windows 95 and 98 Printer Driver Installation and Technical Reference
Printer Fonts
The printer driver for Windows 95 and 98 uses two types of fonts: text and pseudo.
Refer to the tables on the pages that follow for specific fonts that are available.
text fonts
Text fonts are the “flat” fonts printed on a card. They are available on the 280
with graphics and the 285. Text fonts come in two varieties: TrueType and
Printer.
·
The Windows operating system provides TrueType fonts, which are similar
to graphics. The 280 with graphics and the 285 printers can use all the
TrueType fonts. When you display a list of fonts in your Windows
application, a TT icon precedes all TrueType fonts.
·
The printers provide Printer fonts. The fonts are similar, and in some cases
nearly identical, to the TrueType fonts. The purpose of providing printerresident fonts is to improve printing speed, although systems with very fast
computers may be able to print cards using TrueType fonts as fast or faster
than cards using printer fonts. When you display a list of fonts in your
Windows application, a printer icon precedes all printer fonts. When using
printer fonts, the screen image may not match the printed output.
pseudo fonts
Pseudo fonts enable embossing, indent, and magnetic stripe encoding
capabilities. Most Windows applications do not have a built-in method for
embossing or encoding; however, font selection capabilities are usually
available. The printer drivers for Windows 95 and 98 use font selection as a
method for identifying an encoding format (track 1-IATA, track 2-ABA, track 3TTS) or an embossing style.
Font selections must match the printer settings and hardware configuration.
Windows 95 and 98 Printer Driver Installation and Technical Reference
17
The text fonts shown in Table 2 are available in point sizes 4, 6, 8, 10, 12, 14, 18, 24,
and 36.
Table 2: Text Fonts
Printer Font Name
18
Characteristics
AvantGarde-Book
San serif
proportional
AvantGarde-Demi
San serif
proportional
Bookman-Demi
Serif
proportional
Bookman-LightItalic
Serif
proportional
Bookman-Light
Serif
proportional
Bookman-DemiItalic
Serif
proportional
Courier
Serif
monospace
Courier-Bold
Serif
monospace
Helvetica
San serif
proportional
Helvetica-Bold
San serif
proportional
NewCenturySchlbk-Roman
Serif
proportional
NewCenturySchlbk-Bold
Serif
proportional
NewCenturySchlbk-Italic
Serif
proportional
NewCenturySchlbk-BoldItalic
Serif
proportional
Palatino-Roman
Serif
proportional
Palatino-Bold
Serif
proportional
Palatino-Italic
Serif
proportional
Palatino-BoldItalic
Serif
proportional
Symbol (Symbol)
Decorative
proportional
Times Roman
Serif
proportional
Times-Bold
Serif
proportional
Times-Italic
Serif
proportional
Times-BoldItalic
Serif
proportional
ZapfChancery-MediumItalic
Script
proportional
✺❁❐❆✤❉■❇❂❁▼▲ (ZapfDingbat)
Decorative
proportional
Windows 95 and 98 Printer Driver Installation and Technical Reference
Embossing and Indent Type
The Datacard 150i, 280, and 450 printers support the embossing and indent type sets
listed in Table 3.
The printer uses an area on all sides to hold the card during embossing. If you try to
place embossed text in this area, an error occurs and the embossed font will not
print. If a character isn’t available in the printer/embosser, that character is ignored.
Table 3: Embossing and Indent Type by Printer
Type
150i
2xx
450
Farrington 7B
X
X
X
Standard Gothic
X
X
X
Large Gothic
X
X
Hospital Elite
X
X
Hospital 7B
X
X
OCRA1 Indent
X
X
X
X
OCRB4 Emboss
X
X
OCRB4 Indent
X
X
6mm Gothic
X
X
X
OCRB1 Indent
X
MasterCard Indent
X
X
Electron Indent
X
X
Standard Gothic
(Cyrillic)
X
X
Standard Gothic CP
850
X
Standard Gothic CP
852
X
The most common type sets ordered are Farrington 7B and Standard Gothic.
Windows 95 and 98 Printer Driver Installation and Technical Reference
19
Magnetic Stripe Encoding
Datacard printers support the Magnetic Stripe tracks listed in Table 4.
Table 4: Magnetic Stripe Tracks
Magnetic
Stripe Style
3 Track
2 Track
20
Encoding Font
Track #
Maximum
Length
Character Set
IATA
(210 BPI)
1
76
alphanumeric ISO standard
characters (64 characters)
ABA
(75 BPI)
2
37
numeric and special characters
., :, ;, <, =, > (16 characters)
TTS
(210 BPI)
3
104
numeric and special characters
., :, ;, <, =, > (64 characters)
IATA
(210 BPI)
1
76
alphanumeric ISO standard
characters
ABA
(75 BPI)
2
37
numeric and special characters
., :, ;, <, =, >
Windows 95 and 98 Printer Driver Installation and Technical Reference
Translating Characters
If you use special characters (for example, accent marks for some languages, the Visa
V), you will need to translate the characters sent by your Windows application to the
corresponding positions on the embossing wheels.
1.
Select the Character Translations tab of the CPXx: properties sheet. (If
necessary, from the Windows 95 Start button, select Settings and then Printers.
Select your Datacard printer from the list of printers, and then click the right
mouse button and select Properties. Select the Details tab, and then the Port
Settings button.)
2.
Click the Add button. The Edit Character Translation dialog box appears.
3.
In the Input Character area, select Hex to work with hexadecimal values or
Decimal to work with decimal values.
4.
Click the arrows until the character value you want to translate appears.
Windows 95 and 98 Printer Driver Installation and Technical Reference
21
For exact values to enter, refer to your country’s code page in the Windows
Resource Kit, available from Microsoft Corporation. Decimal values 00
through 31 (hexadecimal values 00 through 1F) are non-printing control
codes.
5.
In the Output Character area, select Hex to work with hexadecimal values or
Decimal to work with decimal values.
6.
Click the arrows until the character value you want to translate to appears.
7.
Click OK. The Edit Character Translation dialog box closes and the values you
entered appear in the character list.
The output character displayed will not be correct for your system, because
the printer driver for Windows 95 has no way of knowing what punches
and dies you’ve loaded in your print wheel.
22
8.
Repeat steps 2 through 7 for additional character translations.
9.
Click OK to save your changes and return to the printer Properties dialog box.
Click OK to close the printer Properties dialog box.
Windows 95 and 98 Printer Driver Installation and Technical Reference
Changing a Character Translation
1.
Select the Character Translations tab of the CPXx: properties sheet. (If
necessary, from the Windows Start button, select Settings and then Printers.
Select your Datacard printer from the list of printers, and then click the right
mouse button and select Properties. Select the Details tab, and then the Port
Settings button.)
2.
In the characters list, select the row you want to change.
3.
Click the Edit button. The Edit Character Translation dialog box appears.
4.
In the Input Character area, select Hex to work with hexadecimal values or
Decimal to work with decimal values.
5.
Click the arrows until the character value you want to translate appears.
6.
In the Output Character area, select Hex to work with hexadecimal values or
Decimal to work with decimal values.
7.
Click the arrows until the character value you want to translate to appears.
8.
Click OK. The Edit Character Translation dialog box closes and the values you
entered appear in the character list.
9.
Repeat steps 2 through 8 for additional character translation changes.
Windows 95 and 98 Printer Driver Installation and Technical Reference
23
10. Click OK to save your changes and return to the printer Properties dialog box.
Click OK to close the printer Properties dialog box.
Deleting a Translated Character
24
1.
Select the Character Translations tab of the CPXx: properties sheet. (If
necessary, from the Windows Start button, select Settings and then Printers.
Select your Datacard printer from the list of printers, and then click the right
mouse button and select Properties. Select the Details tab, and then the Port
Settings button.)
2.
In the characters list, select the row you want to delete.
3.
Click the Delete button. The row is removed from the characters list.
4.
Click OK to save your changes and return to the printer Properties dialog box.
Click OK to close the printer Properties dialog box.
Windows 95 and 98 Printer Driver Installation and Technical Reference
Printing in a Windows Environment
You manage print jobs on your Datacard printer in exactly the same way you
manage other print jobs in Windows. See Windows help, available from the Start
button menu, for information on:
·
Pausing print jobs
·
Restarting print jobs
·
Deleting print jobs
Adding CPX Ports
If you need to change the CPX port that you use to communicate with your Datacard
printer, you may need to create another CPX port. The following procedure explains
how to install another CPX port after the printer has been installed.
1.
Open the Datacard printer’s Properties dialog box from the Printers window or
the menu in the printer’s job window.
2.
Select the Details tab.
3.
Click the Add Port button. The Add Port dialog box appears.
4.
Select Other and then select the CPX Protocol for the type of port you want to
add. Click the OK button.
Windows 95 and 98 Printer Driver Installation and Technical Reference
25
The Port Name dialog box appears.
5.
Type in the name of the CPX port, and then click the OK button.
The CPXx: dialog box appears.
6.
26
Verify that the baud rate is set appropriately for your printer. Other settings are
optional. Datacard recommends that only authorized Datacard service
representatives alter the remaining settings.
Windows 95 and 98 Printer Driver Installation and Technical Reference
7.
The new CPX port is created and assigned to your Datacard printer.
Windows 95 and 98 Printer Driver Installation and Technical Reference
27
Restoring Default Spool Settings
Normally, the spool settings need not be changed. If they were changed, you can
restore the default settings by clicking the Restore Defaults button on the Spool
Settings dialog box.
1.
Open the Datacard printer’s Properties dialog box from the Printers window or
the menu in the printer’s job window.
2.
Select the Details tab.
3.
Click the Spool Settings button. The Spool Settings dialog box appears.
4.
Click the Restore Defaults button.
If Disable bi-directional support for this printer was selected, the default
setting, Enable bi-directional support for this printer, will not be restored.
You must select the default setting before going on to the next step.
28
5.
Click OK to save the default settings and close the Spool Settings dialog box.
6.
Click OK to close the printer Properties dialog box.
Windows 95 and 98 Printer Driver Installation and Technical Reference
Troubleshooting
Why do I get an error using embossed fonts?
The most common error occurs when embossed fonts are not positioned correctly on
a card. Embossed fonts can be placed anywhere on a card, except for the margin
area, which varies by printer. If embossed text is placed in the margin area of the
card, an illegal font placement error will be detected by the printer and the card will
not print the embossed text. The error message will appear both on the printer and
on the computer screen.
The solution is to redesign the card, moving the embossed font into the legal
printable area of the card.
The 150i is designed to apply topping to the lower half of a CR80 card. The topper
must be disabled to emboss on the upper areas of the card.
Embossed fonts do not print as they appear on
the screen.
The problem likely is traced to the orientation you are using. Emboss fonts only
print horizontally on a card in landscape orientation. If the font has been rotated in
landscape orientation, the font will not print as displayed. Conversely, in portrait
orientation, the embossed font must be rotated to display vertically on the card.
Embossing should be limited to landscape orientation. The reason for this is the
mechanical design of the printer and the wheel set.
If you are using QuikWorks and need to use embossed fonts on a card designed
in portrait orientation, select the field to be embossed, select the rotate menu
command three times, and then move the field to the proper place on the card.
Why don't embossed fonts appear in the font
menu?
Embossed fonts are special printer fonts. For embossed fonts to appear in your
application's font list, the font cartridge must be selected from the cartridge list
found on the Fonts tab of the printer’s Properties dialog box (see page 10).
Determine which type sets have been installed in your printer and select them.
Windows 95 and 98 Printer Driver Installation and Technical Reference
29
Applications may need to be restarted to ensure that the new fonts are recognized
and updated in the menu.
Also, in the application, make sure the correct printer is selected and the Page Setup
is configured properly for card size, card orientation, and margins.
Why don't magnetic stripe fonts appear in the
font menu?
The magnetic stripe fonts are special printer fonts. For magnetic stripe fonts to
appear in your application’s font list, the Magnetic Stripe Encoder must be selected
from the cartridge list found on the Fonts tab of the printer’s Properties dialog box
(see page 10). Applications should be restarted to ensure that the new fonts are
recognized and updated in the menu.
Also, in the application, make sure the correct printer is selected and the Page Setup
is configured properly for card size, card orientation, and margins.
Why do I get time-out errors?
The computer and printer have a communication protocol. If they lose contact
during a print operation, a timing sequence begins and attempts are made to
reconnect. If the timing sequence reaches a "time-out" state, an error occurs. (Timeout values are set in the CPXx: dialog box, available by clicking the Port Settings
button on the Details tab of the printer Properties dialog box.) Depending on the
reason for the time-out error (for example, loose cable connection, file missing,
mismatched baud rates), the solution to fix the problem will vary. If the problems
persists after your attempts to resolve it or if you experience back-to-back time-out
error messages, take the following steps to resolve the problem, trying to print after
each step:
1.
Cancel the error message and start the print operation from the beginning.
2.
Purge all print jobs and restart the application issuing the card.
3.
Reboot the printer.
4.
Restart Windows.
When installing the driver, the most common problem is no communications rather
than lost communications. Verify the communications settings, including PC
COMM port; verify use of the correct connections and that baud rate settings match
between the printer and software, printer configuration, etc. Many times the
problem lies with an improperly configured PC. You may need to contact your PC
technical support representative to ensure that the PC’s IRQ, DMA, BIOS, and other
settings are correct.
30
Windows 95 and 98 Printer Driver Installation and Technical Reference
Initial setup problems printing Graphics,
Embossing or Magnetic Stripe
If you have followed the prescribed steps to select embossed fonts and/or magnetic
stripe fonts and still cannot print successfully, the problem may be an incorrect
setting in the printer itself. In other words, some parameter is turned off that should
be turned on (for example, Graphics off or Magnetic Stripe Track XX off). The
machine is set up correctly in the factory, but can be user configured and,
consequently, the potential exists for incompatibility. Check technical manuals and
follow prescribed steps to ensure that settings are correct.
How do I check the version of the printer driver?
From the Windows Start button, select Settings and then Printers. Select the
Datacard printer from the list of printers installed. Select File and then Properties.
The printer Properties dialog box appears. Select the Paper tab, and then click the
About button.
My Word 97 document doesn’t print.
There is an incompatibility between Microsoft Word 97 and the printer driver for
Windows 95. To print a card created in Word 97, save it in Word 6 format and then
send it to your Datacard printer.
Multiple copies of Word 6 documents don't print.
To print more than one copy of a card created in Microsoft Word Version 6, start a
print request for each copy you want to print.
Windows 95 and 98 Printer Driver Installation and Technical Reference
31
&
32
Windows 95 and 98 Printer Driver Installation and Technical Reference
Index
.eps ......................................................................... 8
150i printer configuration options ................... 16
28x
printer configuration options....................... 17
supervisor settings ........................................ 18
450
Auto Remake setting..................................... 19
communication parameters.......................... 19
printer configuration options....................... 19
baud rate ....................................................... 11, 17
Cache bitmaps in printer memory................... 12
character translation .......................................... 25
changing ......................................................... 27
deleting ........................................................... 28
communication settings .................................... 12
Confirmation for each data block processed.. 12
CPX communication settings ........................... 12
CPX ports .............................................................. 9
adding ............................................................. 29
embossing fonts.................................................. 23
error................................................................. 33
in font menu ................................................... 33
setup problems .............................................. 35
unexpected printing results ......................... 33
encapsulated postscript....................................... 8
encoding, magnetic stripe................................. 24
firmware................................................................ 7
fonts
embossing and indent............................. 14, 23
magnetic stripe encoding ............................. 24
printer ............................................................. 21
pseudo............................................................. 21
text ................................................................... 22
TrueType ........................................................ 21
graphics printing setup problems.................... 35
indent types ........................................................ 23
J encoding ............................................................. 8
limitations
printer ............................................................... 8
printer driver.................................................... 8
magnetic stripe encoding.................................. 24
magnetic stripe fonts ......................................... 24
in font menu ................................................... 34
setup problems .............................................. 35
NTT encoding....................................................... 8
port settings ........................................................ 12
printer capabilities ............................................... 5
printer configuration options
150i .................................................................. 16
28x.................................................................... 17
450.................................................................... 19
printer driver
checking version ............................................ 35
limitations......................................................... 8
printer fonts, selection....................................... 14
printer limitations ................................................ 8
printing in a Windows environment............... 29
problems
embossed fonts .............................................. 33
magnetic stripe fonts..................................... 34
printing setup................................................. 35
time-out errors ............................................... 34
Word 6 multiple copies................................. 35
Word 97 document printing......................... 35
pseudo fonts ....................................................... 21
software settings, completing........................... 14
spool settings ...................................................... 32
system requirements ........................................... 7
text fonts.............................................................. 22
time-out errors.................................................... 34
translating characters ........................................ 25
TrueType fonts ................................................... 21
two-sided printing ............................................... 8
Windows 3.1 ......................................................... 8
Windows NT ........................................................ 8
Word 6 printing problems ................................ 35
Word 97 printing problems .............................. 35
Windows 95 and 98 Printer Driver Installation and Technical Reference
33
&
36
Windows 95 and 98 Printer Driver Installation and Technical Reference