1
9600
ADVANCED FUNCTIONS
• Read this User’s Guide before you start using your P-touch.
• Keep this User’s Guide in a handy place for future reference.
QUICK REFERENCE
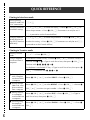
Printing in Interface mode
Entering/exiting
Interface mode (RS- d + 0
232C connection)
Changing interface
parameter settings
d + 2 → m or g to select the setting → rotate r (OR j or k) to
select the parameter → Press r (OR n) (Parameters can only be set if
e is pressed to set the P-touch offline.)
Changing interface
d + 1 → m or g to select the parameter → rotate r (OR j or k)
format function settings (ESC/P Interface to select the setting → Press r (OR n) (Parameters can only be set if e
mode only)
is pressed to set the P-touch offline.)
Printing in Transfer mode
Entering Transfer
mode
d + ( → Press r (OR n)
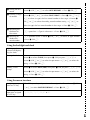
Using a template
transferred from a
computer
If a database is linked: PF key → Rotate r (OR m or g) to select a record →
Continue with 7 or 8 → Type in each line of text, then press r (OR n) →
Continue with 1, 2, 3, 4, 5 or 6
If a database is not linked: PF key → Type in each line of text, then press r
(OR n) → Continue with 1, 2, 3 or 4
1 Printing a label
with a template
transferred from
a computer
2 Printing multiple
labels with a template transferred
from a computer
3 Editing the text
in a template
transferred from
a computer
4 Finishing using
the template
transferred from
a computer
Rotate r (OR m or g) to select PRINT → Press r (OR n)
Rotate r (OR m or g) to select REPEAT → Press r (OR n) → Rotate r
(OR m or g) to select (or type) number → Press r (OR n)
Rotate r (OR m or g) to select EDIT → Press r (OR n) → Type in
each line of text, then press r (OR n)
Rotate r (OR m or g) to select FINISH → Press r (OR n) → Press r
(OR n)
5 Printing the next
record
Rotate r (OR m or g) to select NEXT RECORD → Press r (OR n)
6 Printing a range
of records
Rotate r (OR m or g) to select CONT. PRINT → Press r (OR n) → m
or g to select (or type) the first record number in the range → Rotate r
(OR j or k) to select the ending record number setting → m or g to
select (or type) the last record number in the range → Press r (OR n)
7 Searching the
database for
characters
8 Searching the
database for
record number
d + space bar → Type in characters → Press r (OR n)
d + space bar twice → Rotate r (OR m or g) to select (or type) number
→ Press r (OR n)
Using the backlight and clock
Lighting up the
screen and display- )
ing the clock
Setting the clock
Rotate r to select CLOCK, then press r (OR just press d + )) →
Rotate r (OR j or k) to select the parameter → m or g to select the
setting → Press r (OR n)
Adding a time
stamp
Rotate r to select DATE/TIME, then press r (OR just press d + t) →
Rotate r (OR j or k) to select the parameter → m or g to select the
setting → Press r (OR n)
Using the macro functions
Assigning an opera- ( → PF key → Keys of operation to be assigned → ( → Rotate r (OR
tion to a PF key
m or g) to select SAVE RECORDING → Press r (OR n)
Performing an
operation assigned
to a PF key
!, @, #, $, %, ^, & or *
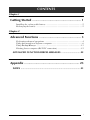
CONTENTS
Chapter 1
Getting Started ........................................................ 1
Installing the rechargeable battery .................................................................... 2
Recharging the battery ....................................................................................... 2
Chapter 2
Advanced Functions ................................................ 3
Performing advanced operations ....................................................................... 4
Using data transferred to/from a computer ........................................................ 6
Using Backup Manager .................................................................................... 13
Printing from a computer (RS-232C connection) ............................................. 15
ADVANCED FUNCTION ERROR MESSAGES ............................22
Appendix ............................................................... 23
INDEX ........................................................................................25
i
ii
Ch. 1
Chapter
1
Getting Started
Getting Started
1
Ch. 1 Getting Started
Installing the rechargeable battery
●
●
●
●
●
●
●
●
●
●
●
●
●
●
●
●
●
●
●
●
●
●
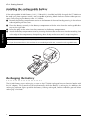
If the rechargeable Ni-MH battery (9.6 V, 1500 mAh) is installed and fully charged, the PT-9600 can
be used away from a power source, and is capable of printing labels from two 36mm wide tape cassettes. Fully charging the battery takes 2 1/2 hours.
1 Remove the battery compartment cover on the bottom of the machine by pressing in the release
tab and pulling off the cover.
2 Place the battery securely in the battery compartment with the wires from the rechargeable battery on the right side.
3 Insert the plug on the wires into the connector in the battery compartment.
Getting Started
4 Attach the battery compartment cover by inserting the three tabs on the cover into the matching slots
at the edge of the compartment, then pushing down firmly on the cover until it snaps into place.
NOTE
☞ Only use the rechargeable battery designed exclusively for this machine.
☞ If you do not intend to use this machine for an extended period of time, remove the rechargeable battery.
Recharging the battery
●
●
●
●
●
●
●
●
●
●
●
●
●
●
●
●
●
●
●
●
●
●
The Ni-MH battery starts recharging as soon as the PT-9600 is plugged into an electrical outlet with
the AC adapter. The P-touch can be used normally while the battery is recharging. In addition, the
recharging indicator lights up while the battery is being recharged, and the indicator goes off when
recharging is finished.
2
Ch. 2
Chapter
2
Advanced Functions
Advanced Functions
3
Ch. 2 Advanced Functions
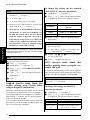
2 Press m or g until the desired setting is
displayed, or use the number keys to type in
the setting.
Performing advanced
operations
●
●
●
●
●
●
●
●
●
●
●
●
●
●
●
●
●
●
●
●
●
●
●
Screen backlight key/clock key())
The PT-9600 is equipped with a screen backlight that allows you to view the screen, even in
the dark. In addition, the clock allows you to
see the current time.
To light up the screen:
●
Advanced Functions
If the PT-9600 is plugged in using the AC adapter,
the screen backlight remains on until ) is pressed
again to turn it off. If the PT-9600 is running on the
rechargeable battery, the screen backlight automatically goes off if no key is pressed for 30 seconds.
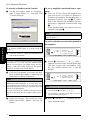
Hold down ). The clock appears.
Q
R1 2 3 4 5 6 7 8 9 A B C D E F K Q
Q
Q
RG
Q
Q
30/03/2002
Q
R
Q
Q
Q
RH NOL
Q
Q
RI M
RJ AUTO
0.4
HELSINKI
A
AUTO
16:30
Margin
tings, press e(OR hold down d and press )).
3 Press j or k to select the next parameter.
4 Repeat steps 2 and 3 until the date, time
and format are set as you wish.
The following settings for the date and time formats
are available:
y4/m2/d2 (2002/04/01), y2/m2/d2 (02/04/01),
m1/d1/y2 (4/1/02), m2/d2/y2 (04/01/02), m3 d1,
y4 (Apr. 1, 2002), m4 d2, y4 (April 01, 2002), d2
m4 ’y2 (01 April ’02), d2 m3 ’y2 (01 Apr. ’02),
h2:m2 n1 (08:53 PM), H2:m2 (20:53)
5 Press r (OR press n) to apply the settings.
To display the clock:
Length
To return to the text without changing the clock set-
NOTE
Press ). The screen is lit.
NOTE
●
NOTE
Font
Width
Size
Date/Time function (d + t)
The Date/Time function allows you to add a
time stamp to your label. In addition, you can
specify if the time stamp will be added to the
text or added to the label when it is printed and
whether a specified date and time or the current
date and time will be used.
Clock setting function (d + ))
To print a time stamp on the label:
The Clock setting function enables you to set the
clock so that the most accurate date and time
can be added to your label using the Date/Time
function.
1 Press j, k, m or g to position the cursor at the point in the text where you want
to add the time stamp.
To set the time:
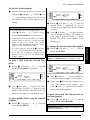
1 Rotate r until CLOCK is displayed, and
then press r (OR hold down d and
press )). The current clock settings are
shown with the day setting flashing.
Q
R1 2 3 4 5 6 7 8 9 A B C D E F K Q
Q
Q
RG 01/06
Q
Q
CURRENT
Q
RH
Q
Q
NO DD/MM/YYYY
Q
R
hh:mm
Q
Q
RI L
M 01/04/2002
00:00
R
J
4
AUTO
0.4
HELSINKI
A
AUTO
Length
Margin
Font
Width
Size
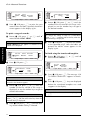
2 Rotate r until DATE/TIME is displayed,
and then press r (OR hold down d and
press t).
NOTE
To return to the text without adding a time stamp,
press e(OR hold down d and press t).
Q
R1 2 3 4 5 6 7 8 9 A B C D E F K Q
Q
Q
RG 01/08
Q
Q
Q
RH
Q
Q
NO AT PRINTING
R
Q
Q
L
Q
RI M OFF
R
J
AUTO
0.4
HELSINKI
A
AUTO
Length
Margin
Font
Width
Size
Ch. 2 Advanced Functions
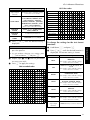
3 Press m or g to select either OFF (the
time stamp is added to the text immediately) or ON (the time stamp is added to the
label when it is printed).
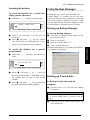
2 Press the PF key where you wish to assign
the operation.
Q
R1 2 3 4 5 6 7 8 9 A B C D E F K Q
Q
Q
RG
Q
Q
KEY ASSIGN
Q
RH NO
Q
Q
R
START RECORDING NOW
Q
L
Q
Q
RI M
MACRO KEY TO FINISH
R
NOTE
If ON is selected, the time stamp mark (
added to the text at the cursor’s position.
) is
J
AUTO
0.4
HELSINKI
A
AUTO
Length
Margin
Font
Width
Size
4 Press k to select the next parameter (FORWARD).
5 Press m or g to select either OFF (the current date and time is added) or ON (a specified date and time is added).
Q
R1 2 3 4 5 6 7 8 9 A B C D E F K Q
Q
Q
RG
Q
Q
Q
RH ON <<< P-touch >>>
Q
Q
R
Q
L
Q
RI M
Q
RJ 1:_
6 Press j or k to select the next parameter.
8 Repeat steps 6 and 7 until the date and
time for the FORWARD parameter are set
as you wish.
9 Press r (OR press n) to add the time
stamp to the text or label according to the
specified settings.
0.4
HELSINKI
A
AUTO
Margin
Font
Width
Size
3 Press the necessary keys to perform the operation that you wish to assign to the key. The
character size setting indicator bar flashes.
NOTE
If p or f is pressed, if d is held down and 9
is pressed or if the r is pressed or rotated, the END
OF RECORDING screen immediately appears.
4 Press ( (OR press the PF key).
Macro function (()
With the PT-9600, frequently performed operations can be assigned to one of the eight PF
keys, allowing you to execute the operation just
by pressing one key. The operation can contain
up to 64 steps, for example, for typing in text (in
Insert mode) or applying formatting.
NOTE
No operation is recorded if ) or any other key that
does not perform a function is pressed.
To assign an operation to a PF key:
1 Press (.
Q
R1 2 3 4 5 6 7 8 9 A B C D E F K Q
Q
Q
RG END OF RECORDING
Q
Q
Q
RH
Q
Q
NO !SAVE
Q
R
RECORDING
Q
M
I
Q
R
!
CANCEL
RECORDING
RJ
AUTO
0.4
HELSINKI
A
AUTO
Length
Margin
Font
Width
Size
5 Rotate r (OR press m or g) until !
moves beside SAVE RECORDING.
NOTE
If ! is moved beside CANCEL RECORDING, the
operation is not assigned to the key.
6 Press r (OR press n).
NOTE
To perform an operation assigned to a PF key:
To return to the text without assigning an operation
●
to a PF key, press e(OR press ().
Q
R1 2 3 4 5 6 7 8 9 A B C D E F K Q
Q
Q
RG
Q
Q
KEY ASSIGN
Q
RH NO
Q
Q
R
Q
SELECT
ONE
OF
THE
Q
L
Q
RI M
PF
KEYS
RJ
AUTO
0.4
HELSINKI
A
AUTO
Length
Margin
Font
Width
Size
Press the PF key where the operation that
you wish to perform is assigned.
Q
R1 2 3 4 5 6 7 8 9 A B C D E F K Q
Q
Q
RG OK TO OPERATE MACRO?
Q
Q
Q
RH NO
Q
Q
R
Q
Q
L
Q
RI M
RJ
Length
Margin
Font
Width
Size
5
Advanced Functions
7 Press m or g until the desired setting is
displayed.
AUTO
Length
Ch. 2 Advanced Functions
NOTE
☞ To stop the operation from being performed,
Using data transferred
to/from a computer
●
●
●
●
●
●
●
●
●
●
●
●
●
●
●
●
●
●
●
●
●
●
press o.
☞ To erase the operation assigned to a PF key,
start up P-touch Backup Manager, which was
installed with P-touch Editor 3.2, and then erase
the macro.
☞ While an operation assigned to a PF key is
being performed, the operation can be overwritten by pressing the keys of the new operation.
Transfer mode
With the Transfer mode, a template or a userdefined character image (character not available
on the PT-9600) can be transferred from the
computer and assigned to a PF key on the
PT-9600 or label data on the PT-9600 can be
backed up to a computer. A template created
with the P-touch Editor software on the computer can be downloaded to the PT-9600, where it
can be edited and printed. In addition, if text
data stored on the PT-9600 is backed up to a
computer, that data can be restored on the
PT-9600 in case the data is erased from the
P-touch’s memory.
Advanced Functions
NOTE
☞ Data transfer between the computer and
PT-9600 is through the USB connection.
☞ One CSV database can be saved if one is not
already transferred to a PF key.
To enter Transfer mode:
1 Hold down d and press (.
NOTE
To return to the text without entering Transfer
mode, press e.
Q
R1 2 3 4 5 6 7 8 9 A B C D E F K Q
Q
Q
RG TRANSFER MODE?
Q
Q
Q
R
Q
O
N
Q
RH L
Q
Q
Q
RI M
RJ AUTO
0.4
HELSINKI
A
AUTO
Length
Margin
Font
Width
Size
2 Press r (OR press n) to enter Transfer mode.
NOTE
To quit Transfer mode after it is entered, press o.
Q
R1 2 3 4 5 6 7 8 9 A B C D E F K Q
Q
Q
RG
Q
Q
TRANSFER MODE
Q
R
Q
Q
RH ONL
Q
READY
Q
Q
RI M
RJ AUTO
0.4
HELSINKI
A
AUTO
Length
6
Margin
Font
Width
Size
Ch. 2 Advanced Functions
While data is being sent from the computer to
the PT-9600, the following screen appears.
NOTE
Be sure not to turn off the PT-9600 while data is
being sent to it, otherwise the data will be lost.
Q
R1 2 3 4 5 6 7 8 9 A B C D E F K Q
Q
Q
RG
Q
Q
RECEIVING
Q
RH NO
Q
Q
R
DO NOT POWER OFF
Q
L
Q
RI M
Q
RJ AUTO
0.4
HELSINKI
A
AUTO
Length
Margin
Font
Width
Size
While data is being sent from the PT-9600 to the
computer, the following screen appears.
Before transferring data, make sure that the P-touch
is in Transfer Mode. Refer to Transfer mode on
page 6.
Q
R1 2 3 4 5 6 7 8 9 A B C D E F K Q
Q
Q
RG
Q
Q
SENDING
Q
RH NO
Q
Q
Q
R
Q
L
Q
RI M
RJ
2 From the File List, select the character
image that you wish to transfer.
AUTO
0.4
HELSINKI
A
AUTO
Length
Margin
Font
Width
Size
User-defined character image
If a user-defined character image (a bitmap
character not usually available on the PT-9600)
is assigned to a PF key, that character can be
added to any label that you create on the
PT-9600. The user-defined character image can
be edited like any other character and formatted
using almost all text format functions.
The user-defined character image will have the
size of the bitmap created on the computer. If
the size of the user-defined character image is
smaller than the specified text size setting, space
will be added above and below the character. If
the size of the user-defined character image is
larger than the specified text size setting, the
error message “IMAGE CHARACTER SIZE
ERROR!” will appear.
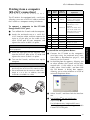
To transfer a character image to the Ptouch:
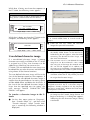
1 On the Start menu, point to “Programs”,
then “P-touch Editor 3.2”, and then click
“Transfer Manager”. When Transfer Manager is started up, the following window is
displayed.
NOTE
☞ If the desired character image is not listed, click
the Modify Folder button. In the Browse For
Folder dialog box that appears, select the folder
containing the desired character image, and
then click the OK button.
☞ The maximum size of a user-defined character
image that can be transferred is 380 × 2048
dots. Any part of the image that extends out of
this size will be clipped off. In addition, the
character image should be a monochrome bitmap, otherwise it will not be assigned correctly.
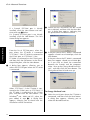
3 Click the Change PF Key Mapping button,
and then select the PF key where you wish
to assign the character image.
NOTE
Only one character image or template can be
assigned to each PF key. If a character image or
template is already assigned to a PF key, the previous data is erased when a different character image
or template is transferred.
4 Click the Start button to convert the character image to the P-touch image format and
begin transferring it. A dialog box appears,
indicating that the character image is being
transferred.
7
Advanced Functions
NOTE
Ch. 2 Advanced Functions
NOTE
NOTE
☞ Only the character image files that are selected
The PT-9600 can only contain one database. All
templates are linked to the single transferred database. The database can be replaced or updated.
will be transferred. To transfer more than one
character image at the same time, hold down
the keyboard’s Ctrl key, and then click the
names of the desired character images.
☞ To stop transferring the character image, click
the Cancel button in the dialog box that appears
during transfer.
5 When the message “The transfer was completed successfully.” appears, click the OK
button.
To add a user-defined character image to
the text:
●
Advanced Functions
Press the PF key where the user-defined
character image that you wish to use is
assigned. The character is added to the text
at the cursor’s position.
To transfer a template to the P-touch:
1 Create the layout file in P-touch Editor 3.2.
NOTE
To link a database to a layout file, merge fields from
a database into the layout.
2 With the layout file displayed, open the
[File] menu, and then click the [Transfer
Template] command. The layout file is converted to a P-touch template format and
Transfer Manager starts up.
Q
R1 2 3 4 5 6 7 8 9 A B C D E F K Q
Q
Q
RG
Q
Q
Q
RH NO <<< P-touch >>>
Q
Q
R
Q
L
Q
Q
RI 1:ABC
M
_
R
J
AUTO
0.4
HELSINKI
A
AUTO
Length
Margin
Font
Width
Size
Template data
A layout file (*.lbl) created with P-touch Editor
can be transferred to the P-touch, where it can
be used as a template for printing labels and
stamps.
NOTE
Since data saved with and transferred from P-touch
Editor may appear slightly different (font, detailed
layout, etc.) than if it was printed from P-touch Editor, try printing a test label first. For more details,
refer to Readme96.txt (in the main folder) on the
enclosed CD-ROM.
If a database (*.mdb file created with P-touch
Editor 3.2) was linked to the template, the database can also be transferred to the P-touch. Data
from selected records of the database can then
be added to and printed in the template. In
addition, the database data can be searched to
find specific records.
8
NOTE
Before transferring data, make sure that the P-touch
is in Transfer Mode. Refer to Transfer mode on
page 6.
3 From the File List, select the template file
that you wish to transfer.
NOTE
To select a different template that has already been
converted to the P-touch template format, click the
Modify Folder button. In the Browse For Folder dialog box that appears, select the folder containing
the desired template, and then click the OK button.
4 Click the Change PF Key Mapping button,
and then select the PF key where you wish
to assign the template.
●
Only the first 9999 lines of a database
linked to a template is read by the P-touch.
●
Only the first line of text typed into a database field is read by the P-touch.Therefore,
if you wish to print labels that seem to have
more than one line of text, create the template and database with separate fields for
each line of text.
●
Some characters available with P-touch Editor are not available with the P-touch.
●
Barcodes specified with settings not compatible with the P-touch barcodes settings
will not be printed correctly.
●
A template created with P-touch Editor
should have a fixed length with a maximum
of 1 m.
●
The template and database should be created so that no more than 1000 characters
per label will be printed.
●
Fields that extend out of the print area will
not be printed either partially or completely.
●
A numbering field specified with P-touch
Editor is not compatible with the Numbering function on the P-touch.
●
Backgrounds specified with P-touch Editor
are not compatible with the P-touch.
●
If text or a barcode are positioned overlapping other objects, the text or barcode will
normally be printed on top of the other
object.
●
The printed label may differ from the image
that appears in the Preview area of Transfer
Manager.
●
If the number or order of fields in a database are changed and only the database
(*.csv file) is transferred to update it, the
database may not link correctly with the
template. In addition, the first line of data in
the file must be recognized by the P-touch
as the field names, otherwise the database
cannot be used to print.
●
A layout using the split printing function
(enlarging the label and printing it on 2 or
more labels) cannot be transferred.
NOTE
Only one character image or template can be
assigned to each PF key. If a character image or
template is already assigned to a PF key, the previous data is erased when a different character image
or template is transferred.
5 Click the Start button to transfer the template. A dialog box appears, indicating that
the template is being transferred.
NOTE
☞ Only the template and database files that are
selected will be transferred. To transfer more
than one template and a database at the same
time, hold down the keyboard’s Ctrl key, and
then click the names of the desired files.
☞ To stop transferring the template and database,
click the Cancel button in the dialog box that
appears during transfer.
6 When the message “The transfer was completed successfully.” appears, click the OK
button.
Notes on creating templates
Since some P-touch Editor 3.2 functions are not
available with the P-touch, keep the following
points in mind when using P-touch Editor 3.2 to
create templates. In addition, after creating the
template, try using the P-touch to print a sample
of the label to check that the label is printed correctly.
●
Select only the “Landscape” (horizontal)
printing orientation.
●
Since some fonts available with P-touch
Editor may not be available on the P-touch,
the font used to print text may be different
from the font selected for the template. In
addition, since the size of all text on the
P-touch is set to “AUTO”, the text size may
automatically be reduced.
●
●
Although character styles can be applied to
individual characters with P-touch Editor,
the text line is the smallest string of characters that a style can be applied to with the
P-touch. In addition, some character styles
are not available with the P-touch.
The P-touch can only print an underline
with one line and a strikeout with two lines.
9
Advanced Functions
Ch. 2 Advanced Functions
Ch. 2 Advanced Functions
To transfer a database to the P-touch:
1 On the Start menu, point to “Programs”,
then “P-touch Editor 3.2”, and then click
“Transfer Manager”.
To use a template transferred from a computer:
1 Press the PF key where the template that
you wish to use is assigned. If a database is
linked to the template, the database data is
displayed (Continue with step 2). If a database is not linked to the template, the template data is displayed (Continue with step
4).
If the database does not contain any text,
continue with step 5.
NOTE
To return to the text without using the transferred
template, press e.
NOTE
To select a database record to be printed in
the template:
Advanced Functions
Before transferring data, make sure that the P-touch
is in Transfer Mode. Refer to Transfer mode on
page 6.
Q
R1 2 3 4 5 6 7 8 9 A B C D E F K Q
Q
Q
RG
Q
Q
[NO. ]:[TITLE
]
Q
R
Q
Q
H
NO
R
Q
1:Sales Manag
!
Q
Q
RI M
!
2:Product Man
R
2 From the File List, select the database that
you wish to transfer.
J
AUTO
0.4
HELSINKI
A
AUTO
Length
Margin
Font
Width
Size
NOTE
To select a different database that has already been
converted to a *.csv file, click the Modify Folder
button. In the Browse For Folder dialog box that
appears, select the folder containing the desired
template, and then click the OK button.
2 Rotate r (OR press m or g) until !
appears to the left of the record whose data
you want to print with the template. Only
the one record marked with ! will be
printed.
3 Click the Start button to transfer the database. A dialog box appears, indicating that
the database is being transferred.
Q
R1 2 3 4 5 6 7 8 9 A B C D E F K Q
Q
Q
RG
Q
Q
1:Sales Manag
Q
RH
Q
Q
NO
Q
R
2:Product Man
!
Q
L
I
Q
R
M
!
3:Merchandise
R
J
NOTE
Only the template and database files that are
selected will be transferred. To transfer more than
one template and a database at the same time, hold
down the keyboard's Ctrl key, and then click the
names of the desired files.
To stop transferring the database, click the Cancel
button in the dialog box that appears during transfer.
4 When the message “The transfer was completed successfully.” appears, click the OK
button.
10
AUTO
0.4
HELSINKI
A
AUTO
Length
Margin
Font
Width
Size
NOTE
☞ To view other fields in the currently selected
record, rotate r (OR press j or k).
☞ To search for a specific record, refer to Searching the database on page 13.
3 Press r (OR press n) to specify the currently selected record.
Ch. 2 Advanced Functions
To edit text in the template:
4 For each field, edit the text as you wish, and
Q
R1 2 3 4 5 6 7 8 9 A B C D E F K Q
Q
Q
RG 03/06
Q
Q
FINISH
Q
RH NO
Q
Q
R
Q
MENU
REPEAT
!
Q
Q
RI L
M
!EDIT
R
then press r (OR press n). When r (OR
n) is pressed after typing in the text for the
J
last field, the MENU screen appears in the
NOTE
☞ To quit editing text in a template, press e,
rotate r (OR press m or g) until ! moves
beside CANCEL EDITING?, and then press n.
☞ Accented characters (Refer to the User’s Guide),
symbols (Refer to the User’s Guide), barcodes
(Refer to the User’s Guide), time stamps
(page 4) and user-defined character images
(page 7) can be entered in the fields.
☞ To select a different field, rotate r (OR press
m or g) until the desired field is displayed.
☞ If a PF key with an operation assigned to it is
pressed, the message “OK TO FINISH TEMPLATE?” appears.
0.4
HELSINKI
A
AUTO
Margin
Font
Width
Size
8 Rotate r (OR press m or g) until the
desired setting is displayed, or use the
number keys to type in the desired number
of copies.
9 Press r (OR press n) to begin printing
the set number of copies. The number of
each copy is displayed while it is being
printed. The MENU screen appears in the
display again.
To change the text entered in the template:
0 Rotate r (OR press m or g) until !
moves beside EDIT.
NOTE
With templates that do not contain any text, only
PRINT and FINISH appear in the MENU screen.
To print a label using the selected template:
Q
R1 2 3 4 5 6 7 8 9 A B C D E F K Q
Q
Q
RG 04/06
Q
Q
REPEAT
Q
R
Q
O
N
Q
H
R
MENU
EDIT
!
Q
Q
Q
RI L
M
!
NEXT
RECORD
R
5 Rotate r (OR press m or g) until !
moves beside PRINT (or just press p).
J
Q
R1 2 3 4 5 6 7 8 9 A B C D E F K Q
Q
Q
RG 01/06
Q
Q
Q
RH NO
Q
Q
R
Q
MENU
PRINT
!
Q
Q
RI L
M
!
FINISH
R
J
AUTO
0.4
HELSINKI
A
AUTO
Length
Margin
Font
Width
Size
6 Press r (OR press n) to print the label.
The message “COPIES 1/ 1” appears in the
display while the label is being printed. The
MENU screen appears in the display again.
To print multiple labels using the selected
template:
7 Rotate r (OR press m or g) until !
moves beside REPEAT.
AUTO
0.4
HELSINKI
A
AUTO
Length
Margin
Font
Width
Size
A Press r (OR press n). The first field for the
transferred template appears in the display.
B Repeat step 4 until the text is edited as you
wish. The MENU screen appears again
when r (OR n) is pressed after editing
the last field in the template.
To print the record after the one that has
just been printed:
C Rotate r (OR press m or g) until !
moves beside NEXT RECORD.
NOTE
NEXT RECORD does not appear if a database is not
linked to the template.
11
Advanced Functions
display.
AUTO
Length
Ch. 2 Advanced Functions
Q
R1 2 3 4 5 6 7 8 9 A B C D E F K Q
Q
Q
RG 05/06
Q
Q
EDIT
Q
RH NO
Q
Q
R
Q
MENU
NEXT
RECORD
!
Q
Q
RI L
M
!CONT. PRINT
R
J
AUTO
0.4
HELSINKI
A
AUTO
Length
Margin
Font
Width
Size
D Press r (OR press n) to print the next
record. After the label is printed, the MENU
screen appears in the display again.
J
E Rotate r (OR press m or g) until !
moves beside CONT. PRINT.
NOTE
CONT. PRINT does not appear if a database is not
linked to the template.
Advanced Functions
Q
R1 2 3 4 5 6 7 8 9 A B C D E F K Q
Q
Q
RG 06/06
Q
Q
NEXT RECORD
Q
R
Q
O
N
Q
H
R
Q
MENU
CONT.
PRINT
!
Q
Q
RI L
!
R
HELSINKI
A
AUTO
Font
Width
Size
AUTO
0.4
HELSINKI
A
AUTO
Length
Margin
Font
Width
Size
To change the setting in steps of 5, hold down
either m or g, and then release the key when the
desired setting is displayed.
J Press r (OR press n) to print the records
in the specified range. After the labels are
printed, the MENU screen appears in the
display again.
To finish using the transferred template:
K Rotate r (OR press m or g) until !
moves beside FINISH.
Q
R1 2 3 4 5 6 7 8 9 A B C D E F K Q
Q
Q
RG 02/06
Q
Q
PRINT
Q
R
Q
Q
RH ONMENU
Q
FINISH
!
Q
L
Q
RI M
REPEAT
!
RJ AUTO
0.4
HELSINKI
A
AUTO
Q
R1 2 3 4 5 6 7 8 9 A B C D E F K Q
Q
Q
RG CONTINUOUS PRINT
Q
Q
Q
R
Q
Q
Q
RH NO
START
END
Q
L
Q
RI M
1
100
R
AUTO
0.4
HELSINKI
A
AUTO
Length
Margin
Font
Width
Size
NOTE
As a default, the numbers of the first and last
records in the database appear.
G Rotate r (OR press m or g) until the
number of the first record in the range is
displayed, or use the number keys to type in
the desired number.
NOTE
To change the setting in steps of 5, hold down
either m or g, and then release the key when the
desired setting is displayed.
H Press r (OR press j or k) until the ending record number setting is selected.
12
0.4
Margin
I Rotate r (OR press m or g) until the
number of the last record in the range is displayed, or use the number keys to type in
the desired number.
F Press r (OR press n).
J
AUTO
Length
NOTE
To print a range of records:
J
Q
R1 2 3 4 5 6 7 8 9 A B C D E F K Q
Q
Q
RG CONTINUOUS PRINT
Q
Q
Q
RH
Q
Q
NO
R
Q
START
END
Q
Q
RI L
M
1
100
R
Length
Margin
Font
Width
Size
L Press r (OR press n). The message “OK
TO FINISH TEMPLATE?” appears in the display.
M Press r (OR press n). Any text displayed
before the transferred template was used
reappears in the display.
NOTE
☞ To go back to the transferred template, press
e.
Ch. 2 Advanced Functions
Using Backup Manager
Searching the database
●
To search the database for a record containing specific characters:
1 Hold down d and press the space bar.
Q
R1 2 3 4 5 6 7 8 9 A B C D E F K Q
Q
Q
RG SEARCH CHARACTERS
Q
Q
Q
R
Q
O
N
Q
H
R
Q
L
Q
RI M
Q
[_
]
R
J
AUTO
0.4
HELSINKI
A
AUTO
Length
Margin
Font
Width
Size
●
●
●
●
●
●
●
●
●
●
●
●
●
●
●
●
●
●
●
●
●
●
Backup Manager, which was installed with
P-touch Editor 3.2, enables you to save data
from the P-touch onto the computer as a backup
in case the P-touch’s memory is erased. In addition, data backed up onto the computer can be
transferred back (restored) onto the P-touch.
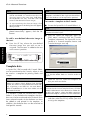
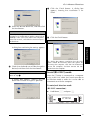
Starting up Backup Manager
To start up Backup Manager:
3 Press r (OR press n). The first record
after the current one (indicated by !) that
contains the entered characters appears.
To search the database for a specific
record number:
1 Click the Start button in the taskbar to display the Start menu.
2 Point to “Programs”.
3 Point to “P-touch Editor 3.2”.
4 Click “Backup Manager”.
When Backup Manager is started up, the following window is displayed.
1 Hold down d and press the space bar
twice.
Q
R1 2 3 4 5 6 7 8 9 A B C D E F K Q
Q
Q
RG JUMP RECORD NO.
Q
Q
Q
RH NO
Q
Q
R
Q
Q
Q
RI L
M
1
R
J
AUTO
0.4
HELSINKI
A
AUTO
Length
Margin
Font
Width
Size
2 Rotate r (OR press m or g) until the
desired record number is displayed, or use
the number keys to type in the desired
number.
Backing up P-touch data
3 Press r (OR press n). The record with
the specified record number appears.
To back up P-touch data onto the
computer:
1 On the Printer → PC tab, click the Update
List button.
NOTE
Before transferring data, make sure that the P-touch
is in Transfer Mode. Refer to Transfer mode on
page 6.
2 From the File List, select the data that you
wish to back up.
13
Advanced Functions
2 Type in the characters that you wish to
search for.
Ch. 2 Advanced Functions
NOTE
NOTE
☞ Only the selected data will be backed up. To
To stop transferring the data, click the Cancel button in the dialog box that appears during transfer.
select more than one file to back up, hold down
the keyboard’s Ctrl key, and then click the
names of the desired files.
☞ To select all data, click the Select All button.
3 Click the Start button to back up the data. A
dialog box appears, indicating that the data
is being transferred.
NOTE
To stop transferring the data, click the Cancel button in the dialog box that appears during transfer.
4 When the message “The transfer was completed
successfully.” appears, click the OK button.
Restoring backed up P-touch data
Advanced Functions
To restore P-touch data backed up on the
computer:
1 Click the PC → Printer tab.
NOTE
Before transferring data, make sure that the P-touch
is in Transfer Mode. Refer to Transfer mode on
page 6.
2 From the File List, select the data that you
wish to transfer back to the P-touch.
NOTE
☞ Only the selected data will be transferred to the
P-touch. To select more than one file to restore,
hold down the keyboard’s Ctrl key, and then
click the names of the desired files.
☞ To select all data, click the Select All button.
☞ To change the PF key where the data is
assigned, click the Change PF Key Mapping
button, and then select the PF key where you
wish to assign the data.
☞ Only one character image or template can be
assigned to each PF key. If a character image or
template is already assigned to a PF key, the
previous data is erased when a different character image or template is transferred.
3 Click the Start button to restore the data. A
dialog box appears, indicating that the data
is being transferred.
14
4 When the message “The transfer was completed successfully.” appears, click the OK
button.
Ch. 2 Advanced Functions
●
●
●
●
●
●
●
●
●
●
●
●
●
●
●
●
●
●
●
Pin
No.
●
●
●
Signal
Name
INPUT/
OUTPUT
1
Explanation
Not connected
The PT-9600 is also equipped with a serial port,
allowing you to use an RS-232C cable to connect
the P-touch to a computer running Windows®.
2
To connect a computer to the PT-9600
though the RS-232C port:
3
TD
OUTPUT
Send signal Xon/Xoff
when Busy is set to
Xon/Xoff
Only in the ESC/P interface mode: Sends X-off
when the printer is busy,
X-on when not busy
4
DTR
OUTPUT
Data Terminal Ready
5
SG
RD
INPUT
1 Turn off both the P-touch and the computer.
2 Attach the enclosed core to a serial (RS232C) interface cable, and then connect the
9-pin or 25-pin plug on the cable to the
serial (COM) port of your computer and
tighten the screws to lock it in place.
NOTE
The core reduces electromagnetic interference to
other equipment.
3 Insert the 9-pin plug on the interface cable
into the RS-232C port of the PT-9600 and
tighten the screws to lock it in place.
4 Turn on the P-touch, and then start up the
computer.
NOTE
☞ Consult your computer supplies dealer when
purchasing the serial (RS-232C) interface cable.
☞ We recommend that the interface cable have a
length of 3 m or less. In addition, the cable
should be a shielded cross cable.
Signal Ground
6
7
Receive Data
Receives data transmitted from the computer
Not connected
RTS
OUTPUT
Request To Send
8
Not connected
9
Not connected
To install the serial printer driver:
1 Connect the PT-9600 to the computer’s
serial port using the enclosed serial interface cable as described on page 15, and
then turn on the P-touch.
2 In the dialog box that appears, allowing you
to select whether the P-touch will be connected with a USB cable or an RS-232C
cable, select “Serial cable”, and then click
the OK button. A dialog box appears,
allowing you to select whether to install or
uninstall the printer driver.
3 Select “Install”, and then click the Next button.
®
4 For Windows 98 and 98 SE users:
Skip to step 5.
For Windows® Me, 2000 and XP users:
A dialog box appears, allowing you to add a
P-touch (PTCOM) port.
15
Advanced Functions
Printing from a computer
(RS-232C connection)
Ch. 2 Advanced Functions
If a P-touch (PTCOM) port is already
installed, click the Next button and continue with step 5 below.
If a P-touch (PTCOM) port is not already
installed, click the Add button. The Port
Name dialog box appears.
Advanced Functions
From the list of PTCOM ports, select the
port where the PT-9600 is connected
(“PTCOM1:” if the PT-9600 is connected to
the COM1 port, or “PTCOM2:” if the
PT-9600 is connected to the COM2 port),
and then click the OK button. In the Driver
Setup dialog box, click the Next button.
5 A dialog box appears, allowing you to
select the PTCOM port where the PT-9600
is connected.
Select “PTCOM1:” if the PT-9600 is connected to the COM1 port, or “PTCOM2:” if
the PT-9600 is connected to the COM2
port, and then click the Next button. (On
Windows® Me, 2000 and XP, select the
port added in step 4.) A dialog box
appears, allowing you to check how the
installation will be carried out.
16
6 Check that the installation will be carried
out as desired, and then click the Next button. A dialog box appears, indicating that
the printer driver has been installed.
7 If the port where the PT-9600 is connected
supports a baud rate of 9600 bps, click the
Next button.
If the port where the PT-9600 is connected
does not support a baud rate of 9600 bps,
or if you wish to check the connection
between the P-touch and the computer,
select “Start up the Change Baud Rate Wizard.”, and then click the Next button. The
Change Baud Rate Wizard starts up.
To change the baud rate:
8 Select the serial port where the PT-9600 is
connected, and then click the Next button.
A dialog box appears, allowing you to
select the desired baud rate.
Ch. 2 Advanced Functions
A Click the Finish button. A dialog box
appears, showing that installation is finished.
9 Select the desired baud rate, and then click
the Next button.
NOTE
Normally “9600 bps” is selected; however, your
computer may not be able to support a baud rate of
9600 bps. If this is the case, refer to the computer’s
instruction manual, and select the maximum possible baud rate.
B Click the Finish button.
NOTE
Advanced Functions
A dialog box confirming the settings appears.
0 Check that the baud rate will be changed as
desired, and then click the Next button.
NOTE
To change the settings, click the Back button, and
return to step 9.
A dialog box appears, showing that the
baud rate has been changed as specified.
If a dialog box appears, explaining that the computer should be restarted, select the option for
restarting the computer, click the Finish button to
restart the computer, and then remove the CDROM from the computer.
Serial (RS-232C) mode
After the PT-9600 is connected to a computer
using an RS-232C cable, the P-touch must be set
to Interface mode in order for it to be able to
communicate with the computer.
To enter/exit Interface mode
(RS-232C connection):
●
Hold down d and press 0.
Q
R1 2 3 4 5 6 7 8 9 A B C D E F K Q
Q
Q
RG
Q
Q
INTERFACE
Q
R
Q
Q
H
Q
R
RS ONLINE
Q
Q
RI
RJ
AUTO
0.4
HELSINKI
A
AUTO
Length
Margin
Font
Width
Size
17
Ch. 2 Advanced Functions
NOTE
To change the settings for the standard
serial (RS-232C) interface parameters:
☞ To exit Interface mode and return to the text,
1 Hold down d and press 2.
hold down d and press 0.
☞ To go offline, press e.
2 Press j or k until the desired parameter
is displayed. The current setting is shown.
☞ To go back online, press the space bar.
☞ Before using the USB connection, exit Interface
Parameter
Settings
BAUDRATE
19200, 9600 (default), 2400, 1200,
600, 300
BIT LENGTH
8 (default), 7
automatically. If a baud rate of 9600 bps can
PARITY
NONE (default), ODD, EVEN
be used, the P-touch can be left at its default
BUSY
DTR (default), XonXoff
mode (hold down d and press 0).
☞ The baud rate of the PT-9600 does not change
baud rate setting. If the baud rate of the Ptouch must be changed, refer to To change the
settings for the standard serial (RS-232C) interface parameters: on page 18, and then change
the baud rate setting of the P-touch.
Advanced Functions
With an RS-232C connection, there are two different print data formats for the Interface mode:
standard and ESC/P.
NOTE
Before using the Interface mode, select the print
data format (standard or ESC/P).
1 Press e to go offline.
2 Hold down d and press 2.
3 Press j or k until INTERFACE MODE is
displayed.
4 Press m or g until the desired setting is
displayed.
5 Press n.
Standard Interface mode (Mode that
enables printing from P-touch Editor
using an original P-touch driver)
With the standard Interface mode, the PT-9600
starts printing automatically when it receives a
print command from the computer. If no data is
received for 5 seconds, the PT-9600 automatically exits Interface mode.
In the standard Interface mode, various interface
parameters can be selected to specify how the
data is sent from the computer.
18
3 Press m or g until the desired setting is
displayed.
NOTE
☞ To return the parameter to its default setting,
press the space bar.
☞ To quit without changing any settings, press
e(OR hold down dand press 2).
4 Repeat steps 2 and 3 until all parameters
are set as you wish.
5 Press n to apply the settings.
ESC/P Interface mode (Mode that
enables printing from a program created by the user)
In the ESC/P Interface mode, various interface parameters and text formats can be selected to specify how
the data sent from the computer will be printed.
NOTE
Before changing any interface settings or text formats, press e to go offline.
To change the settings for the ESC/P
interface parameters:
1 Hold down d and press 2.
2 Press j or k until the desired parameter
is displayed. The current setting is shown.
Parameter
Settings
LINES OF TEXT
1 (default), 2, 3, 4, 5, 6, 7
A. CUT
(Auto cut function)
1 (default), 2, 7, 8
(For details on the available settings,
refer to the User’s Guide.)
Ch. 2 Advanced Functions
ASCII hex codes
Settings
T. MARGIN
(Tape margin
function)
(For details on the available settings,
refer to the User’s Guide.)
CODE TABLE
IBM EXTENDED (default), AMERICAN, FRENCH, GERMAN, ENGLISH, DANISH 1, SWEDISH,
ITALIAN, SPANISH 1, JAPANESE,
NORWEGIAN, DANISH 2, SPANISH 2, LATIN AMERICAN
(Refer to the code tables below.)
BARCODE
WIDTH
SMALL (default), EXTRA SMALL,
LARGE, MEDIUM
BARCODE
RATIO
3:1 (default), 2.5:1, 2:1
INTERFACE
MODE
STANDARD (default), ESC/P
23 24 40 5B 5C 5D 5E 60 7B 7C 7D 7E
USA
# $ @ [
\
]
'
{
France
# $
à
ç
§
'
é
ù
Germany
# $
§ Ä Ö Ü
'
ä
ö ü ß
UK
£ $ @ [
'
{
}
Denmark I
# $ @ Æ Ø Å
' æ ø
å
Sweden
#
Italy
# $ @ °
Spain I
3 Press m or g until the desired setting is
displayed.
NOTE
☞ To return the parameter to its default setting,
press the space bar.
☞ To quit without changing any settings, press
e(OR hold down dand press 2).
4 Repeat steps 2 and 3 until all parameters
are set as you wish.
0 1 2 3 4 5 6 7 8 9 A B C D E
'
p Ç É
á
α
!
1 A Q a
q ü æ
í
β ±
2
"
2 B R b
r
é Æ ó
3
# 3 C S
c
s
â
ô ú
4
$ 4 D T d
t
ä
ö ñ
0
SP 0 @ P
5
§ % 5
E U e
u
à
ò Ñ
6
.
F V
v
å
û
& 6
f
ª
7
'
7 G W g w ç
ù
º
8
(
8 H X h
x
ê
ÿ
¿
)
9
I
Y
i
y
ë Ö
*
:
J
Z
j
z
è Ü
Ω
{
δ
B
+
;
K
[
k
C
,
<
L
\
l
D
•
ï
¢ ½
î
£ ¼
– = M } m }
ì
¥
E
.
> N
n
Ä Pts «
F
/
? O
o
Å ƒ
¡
»
ø
2
\
é
ù
Pts $ @ ¡ Ñ ¿
'
¥
]
'
ä
ö
å
ü
à
ò
è
ì
ñ
}
#
É Æ Ø Å Ü é æ ø
å
ü
Denmark II
# $
É Æ Ø Å Ü é æ ø
å
ü
Spain II
# $
á
¡ Ñ ¿
é
'
í
ñ ó ú
Latin America # $
á
¡ Ñ ¿
é
ü
í
ñ ó ú
{
}
To change the settings for the text format
functions:
1 Hold down d and press 1.
2 Press j or k until the desired function is
displayed. The current setting is shown.
Function
Settings
FONT
HELSINKI (default), BRUSSELS,
BERMUDA
(For samples of the available settings,
refer to the User’s Guide.)
SIZE
AUTO (default), 72, 44, 38, 26, 19,
13, 10
(For samples of the available settings,
refer to the User’s Guide.)
WIDTH
NORMAL (default), NARROW,
NARROWEST, WIDE
(For samples of the available settings,
refer to the User’s Guide.)
STYLE1
NORMAL (default), BOLD,
OUTLINE, SHADOW, STRIPE
(For samples of the available settings,
refer to the User’s Guide.)
STYLE2
NORMAL (default), ITALIC,
VERTICAL
(For samples of the available settings,
refer to the User’s Guide.)
°
9
É Ä Ö Å Ü é
Norway
µ ÷
A
]
# $ @ [
F
1
\
}
è
Japan
5 Press n to apply the settings.
IBM extended codes
°
UNDERLINE
OFF (default), ON
FRAME
OFF (default), 1, 2
(For samples of the available settings,
refer to the User’s Guide.)
T. LENGTH
(Tape length
function)
AUTO (default), 5.0 cm to 23.0 cm
19
Advanced Functions
Parameter
Ch. 2 Advanced Functions
Function
Settings
H. ALIGN
(Text alignment
function)
LEFT (default), CENTRE, RIGHT,
JUSTIFY
(For samples of the available settings,
refer to the User’s Guide.)
SEC G
ROTATE
(Text rotation
function)
OFF (default), ON
(For details on the available settings,
refer to the User’s Guide.)
MIRROR
(Mirror printing
function)
OFF (default), ON
(For details on the available settings,
refer to the User’s Guide.)
3 Press m or g until the desired setting is
displayed.
NOTE
☞ To return the function to its default setting, press
Control code
Command
Bold on
SEC H
Bold off
SEC –
Underline on/off
SEC 4
Italic on
SEC 5
Italic off
ESC i
Bar Code
CAN
Clear all text
DEL
Backspace
NOTE
☞ Other ESCAPE sequences are ignored.
* Only applicable when bit image data exists.
the space bar.
☞ To quit without changing any settings, press
e(OR hold down dand press 1).
BIT IMAGE correspondences
BIT IMAGE
Advanced Functions
HORIZONTAL
VERTICAL
DPI
DPI
60
60
8DOTS Wdpi
120
60
8DOTS
Wdpi Wspeed
120
60
8DOTS 4times DPI
240
60
8DOTS
CRT GRAPHICS
80
60
8DOTS
CRT GRAPHICS II
90
60
4 Repeat steps 2 and 3 until all functions
are set as you wish.
8DOTS STD
5 Press n to apply the settings.
With the ESC/P Interface mode, various keyboard commands can be used to control the
operation of the PT-9600. All commands other
than those listed below are ignored.
Control code
Command
CR
LF
(CR + LF)
(LF + CR)
Interpreted as a “Return” or “Print
when data reaches the number of
lines of the LINES OF TEXT setting”
FF
Print start.
ESC 0
ESC 2
ESC 3
ESC A
Line spacing commands.*
24DOTS STD
60
180
24DOTS Wdpi
120
180
24DOTS
CRT GRAPHICS II
90
180
24DOTS 3times DPI
180
180
24DOTS 6times DPI
360
180
ESC $
Absolute location control*
ESC \
Relative location control*
ESC @
Printer initialization.
As for the Bar Code printing, P-touch 9600 has a
subset of BROTHER 4318 DOT MATRIX
PRINTER BARCODE CONTROL PROTOCOL.
ESC K
ESC L
ESC Y
ESC Z
ESC *
Bit Image data commands.
Please refer to “Bit Image Correspondences” below.
Please contact BROTHER LOCAL OFFICES FOR
MORE DETAILED INFORMATION.
SEC J
Perform n/180 inch Line Feed
ESC !
Master Select
Bold, Italic, underline only.
SEC E
Bold on
SEC F
Bold off
20
Ch. 2 Advanced Functions
Effective commands
ESC i [PARAMETERS] B [BAR-CODE DATA]
[TERMINATOR]
• i
SMALL LETTER i
• [PARAMTERS]
TYPE
t0
CODE 39 (DEFAULT)
t1
INTERLEAVED 2 OF 5
t5
EAN 8/13, UPC-A
t6
UPC-E
t9
CODABAR (NW-7)
s
STYLE
WILL BE IGNORED
p
NUMBER OF PASSES
r
CHARACTER
u
UNITS OF MEASUREMENT
x
HORIZONTAL POSITION
WILL BE IGNORED
Y
VERTICAL OFFSET
WILL BE IGNORED
h
HEIGHT OF BAR-CODE
• B OR b
WILL BE IGNORED
r0
OFF
r1
ON
WILL BE IGNORED
WILL BE IGNORED
Advanced Functions
t
HEAD CODE OF BAR-CODE DATA
• [BAR-CODE DATA]
SERIES OF DATA CORRESPONDING TO EACH TYPE
(STANDARD)
• ?
A check digit will be generated if a “?” is added at
the end of the data string.
• [TERMINATOR]
\
(FIXED)
NOTE
Interface Setting
Connect to an IBM PC (or compatible), with RS232C cable, and select EPSON LQ850 from the PC
software’s list of printers.
21
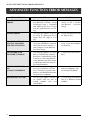
ADVANCED FUNCTIONS ERROR MESSAGES
ADVANCED FUNCTION ERROR MESSAGES
ERROR MESSAGE
CAUSE
SOLUTION
IMAGE CHARACTER SIZE
ERROR!
●
This message appears if the
user-defined character image
transferred from a computer
and added to the text is larger
than the specified text size setting.
●
Select a larger text size
setting or use a smaller
user-defined
character
image.
MACRO ERROR!
●
This message appears if you try
to assign an operation that is
longer than 64 steps to a PF
key.
●
Assign the operation with
64 steps or less.
NUMBERING ERROR!
NO TEXT AVAILABLE
FOR THIS FUNCTION.
●
This message appears if you try
to use the Numbering function
when the text only contains a
time stamp or a user-defined
character image.
●
Enter other text before
trying to use the Numbering function.
NO DATABASE OR
INCORRECT FORMAT!
●
This message appears if a database is linked to the template,
but there is no database on the
P-touch or if the record fields
in the database on the P-touch
are different from that used in
the linked database.
●
Transfer the correct database.
PF KEY ASSIGNED TO
PC!
CANNOT OVERWRITE
●
This message appears if you try
to assign a macro to a PF key
that is already assigned a template or user-defined character
image from a computer.
●
Overwrite the macro
from the computer, not
the P-touch keyboard.
RECORD NOT FOUND!
●
This message appears if there is
no record with the text or
record number that was
searched for.
●
Try searching for different
text or a different record
number.
22
Appendix
Appendix
23
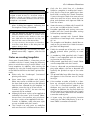
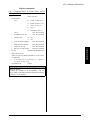
Appendix
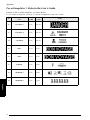
Pre-set templates ➩ Refer to the User’s Guide.
Samples of the available templates are shown below.
☞ For samples of templates 1 through 31, refer to the Appendix in the User’s Guide.
No.
Template
name
32
CAUTION1-1
36 mm
102 mm
33
CAUTION1-2
36 mm
102 mm
34
CAUTION2
24 mm
102 mm
35
PIPE-1
18 mm
AUTO
36
PIPE-2
24 mm
AUTO
37
BIN BOX
18 mm
70 mm
38
NETWORK-1
12 mm
70 mm
39
NETWORK-2
18 mm
38 mm
Appendix
24
Tape
width
Label
length
Sample
INDEX
A
A. CUT parameter 18
Advanced functions 3
Appendix 23
Assigning operations to PF keys 5
B
Backing up data 13
Backing up data from PT-9600 6
Backlight 4
Backup Manager
Starting 13
BARCODE RATIO parameter 19
BARCODE WIDTH parameter 19
Battery 2
BAUDRATE parameter 18
BIT LENGTH parameter 18
BUSY parameter 18
C
Changing
ESC/P Interface parameters 18
Format function settings 19
Text in transferred template 11
Character image transfer 7
Clock setting function 4
CODE TABLE parameter 19
D
Data backup 6
Data transfer 6
Database data 8
Database search 13
Date & time formats 4
Date/Time function 4
Downloading data to PT-9600 6
E
Editing
Text in template 11
Entering
Transfer mode 6
Error messages 22
Functions
Clock setting 4
Date/Time 4
Macro 5
I
Interface mode 17
INTERFACE MODE parameter 19
Interface parameters 18
L
Lighting up screen 4
LINES OF TEXT parameter 18
M
Macro function 5
Modes
Interface 17
Transfer 6
P
PARITY parameter 18
Performing assigned operations 5
PF keys 5
Printing
Database data 10
From computer 15
Label using template 11
Range of records 12
Time stamp 4
R
Rechargeable battery 2
Recharging 2
Record range printing 12
Record search 13
Restoring data 14
RS-232C port 15
S
Screen backlight key 4
Searching database 13
Setting clock 4
F
Frequently performed operations 5
25
T
T. MARGIN parameter 19
Template text
Editing 11
Printing 11
Time & date formats 4
Time stamp 4
Transfer mode 6
Transferring
Character image from computer 7
Data to/from computer 6
Templates from computer 8
U
User-defined character image 7
Using computer data 6
26
Printed in China
LA8786001