1
Tech
no
nter
Ce
Solution
gy
s
lo
Desk Top Editor
For
Production
Tech
no
nter
Ce
Solution
gy
s
lo
Desk Top Editor
For
Production
Readme.txt
*********************************************
Desk Top Editor For Production
(Version 1.0.0.0)
*********************************************
- Read Me First May 2003
This document contains important information that may be useful in using
Desk Top Editor For Production. Please read this carefully before you install it.
-------- System Requirements -------Computer:
PC-AT compatible machine
CPU:
Pentium‡V 600MHz or higher (2GHz or higher for multi-bit
images)
Main memory:
256 Mb or more (512 MB or more for multi-bit images)
Hard disk:
- Program:
50 MB or more
- Document storage: 200 MB or more
Monitor:
800x600 pixels or better, 64,000 colors or more
OS:
Windows 98
Windows 98 Second Edition
Windows Millennium Edition
Windows NT Workstation 4.0 (Service Pack 6a or later)
Windows NT Server 4.0 (Service Pack 6a or later)
Windows 2000 Professional
Windows 2000 Server (Service Pack 2 or later)
Windows XP Home Edition
Windows XP Professional
*
Both TCP/IP protocol and Client for Microsoft Networks protocol must be added to
your system if you wish to:
- Connect to ScanRouter V2 delivery server or Document Management Server from
Desk Top Editor For Production on your computer.
- Connect to ScanRouter V2 delivery server via Auto Document Link on your
computer.
------ Restrictions on installing and running Desk Top Editor For Production -----* If you are going to install and run Desk Top Editor For Production on a Windows
XP
computer, please refer to the later section, <For Windows XP users>.
*
To install Desk Top Editor For Production on Windows NT 4.0, Windows 2000, or
Windows XP, you must have administrator privileges.
Note: Administrator privileges allow the user to do many potentially
destructive things to the system. It is strongly recommended that only
trained system administrators have this privilege.
*
After you install Acrobat(R) Reader, please make sure that it works correctly.
*
When you restart your computer after installing Desk Top Editor For Production,
you must log in as the same user who installed it.
*
After restarting your computer following the installation, you may have to wait
a few minutes for the desktop to appear.
* If you install Desk Top Editor For Production on a computer from which
DeskTopBinder
V2 has been uninstalled, you can use the same location to store documents by
specifying the same folder path for the data storage location when you install
Desk Top Editor For Production. Please note, however, that if you have made any
changes to the folder manually (by using Windows Explorer or the like), you will
Page 1
Readme.txt
not be able to reuse the folder as the data storage location; for example, if
you have:
- Renamed the folder
- Deleted, moved, or renamed files stored in the folder
- Moved the folder to other location such as another folder or drive
*
If you are going to reuse the previous location for data storage, please be aware
that all the extended features settings will be lost. You will need to
reconfigure
any necessary functions in the Extended Features dialog box.
-------- Special Notes/ Limitations -------* Please be aware that the system may become unstable if sufficient free space is
not
available for the Windows swap file. Please note that Desk Top Editor For
Production
temporarily requires additional disk space when dealing with image files. If
there
is not enough space in the swap file to work with files, it will automatically
attempt to use space on the boot disk of your computer.
*
RICOH File Writer is a printer driver required when converting file format of
electronic documents such as those created with word processing software into an
image format such as TIFF.
This printer driver is designed to be automatically installed when you install
Desk Top Editor For Production. However, depending on your Windows configuration,
there are cases where you must install it manually. In this case, a message will
appear when system is rebooted after the installation of Desk Top Editor For
Production completed. Please follow the message to install RICOH File Writer.
You will be requested to open the ReadMe file in the RICOH File Writer folder,
then to install it using the Windows Add Print wizard.
* To convert electronic documents such as those created with word processing
software
into PDF file format, you must have installed on your computer Adobe(R)
Acrobat(R).
When installing Adobe(R) Acrobat(R), choose 'Custom" as the type of setup and
then
select "Acrobat PDF Writer files".
*
We do not provide any service/support regarding Acrobat(R) Reader or Adobe (R)
Acrobat(R).
* If you want to create and add a document but the application you want to use is
not
listed in the "Standard" list in the "Create from Application" dialog box, press
the
"Add" button, then select a file created with the application to add the file to
the
[User Template] list. You will be able to use it as a template.
*
There are two ways of viewing documents stored in a ScanRouterV2 delivery server,
with the following differences.
[Open in Application]: Documents can be deleted from other client machines.
[Open in Viewer]:
Documents cannot be deleted from other client machines.
*
The following are the recommended maximum number of items that each cabinet
Page 2
Readme.txt
("My Cabinet" and "Shared Cabinet" of "My Workroom" and "Editing Cabinet" and
"Shared Cabinet" of "Document Server Edit Tool") can hold:
Documents:
1000/cabinet
Sections:
1000/cabinet
Folders:
200/cabinet
Documents:
100/folder
Sections:
100/folder
Folders:
50/folder
Sections:
100/document
*
You can add up to 49 Shared Cabinets to My Workroom.
*
You can add Shared Cabinets and Document Server Cabinets to Document Server Edit
Tool as much as 49 in total.
*
If files created with Microsoft(R) Office or other application programs that you
want to add to Desk Top Editor For Production contain macros, select the Disable
Macros setting.
*
If files created with Microsoft(R) Office or other application programs that you
want to add to Desk Top Editor For Production contain macros, printing or
converting
those files may not work properly. To avoid this, follow the procedure below:
Printing files:
Launch the application associated with the file, then print it using the
Print command of the application.
Converting into image files:
Launch the application associated with the file, then convert the data
using Ricoh File Writer.
Converting into PDF files:
Launch the application associated with the file, then convert the data
using PDF Writer.
* Converting a Microsoft (R) Excel file containing multiple sheets into PDF file
may
not work properly and some sheets may be left unconverted.
*
If files created with Microsoft(R) Office or other application programs that you
want to add to Desk Top Editor For Production contain links, thumbnails may not
work correctly. Either avoid creating thumbnails or select the "No" button in the
dialogbox displayed when creating thumbnails so that the linked information won't
be updated.
* To convert electronic documents such as those created with word processing
software
into an image file format such as TIFF or PDF, Desk Top Editor For Production
opens
the document with the application associated with the document and prints the
document with RICOH File Writer or Adobe(R) Acrobat(R). The conversion is when
unavailable the relevant application software is not installed on the computer or
if printing with such printer drivers are not available.
* While electronic documents such as those created with word processing software
are
being converted into color or grayscale images, additional memory is temporarily
required. Converting a file into an image on a computer having a small amount of
memory, or creating a high-resolution image may take a long time.
* Desk Top Editor For Production cannot handle TIFF files with JPEG compression
saved
Page 3
Readme.txt
with the Imaging for Windows application or image files composed of 256 colors
(8 bits).
* Desk Top Editor For Production cannot handle TIFF files with LZW compression
saved
with Photoshop 5.5 and the like.
*
When you add a TIFF file to Desk Top Editor For Production, its comments will be
lost if the file has been edited with the Imaging for Windows application.
*
When you copy a document from Editing Cabinet to Document Server Cabinet, it may
fail if the document has been edited and saved with an imaging application other
than Desk Top Editor For Production Viewer, such as Imaging for Windows. If that
is the case, you will need to edit and save it again using Desk Top Editor For
Production Viewer.
*
If you have edited a document, stored in Document Server Edit Tool, with an
imaging application other than Desk Top Editor For Production Viewer such as
Imaging for Windows, do not terminate Desk Top Editor For Production before you
save the document. If you do this, Desk Top Editor For Production may not be
able to work with the document.
* Desk Top Editor For Production cannot handle BMP files composed of 2 colors,
except
those in Black & White.
* In order to print HTML files, it is required that a web browser that can print
HTML
files, such as Internet Explorer or Netscape Communicator, be installed on your
computer and that Windows Explorer be properly configured to print HTML files.
* When exporting HTML with converting multi-page TIFF into JPEG file, only the
first
page will be converted; the rest of the pages will be discarded.
* The recommended size of image data that Desk Top Editor For Production can handle
is
equivalent to those of A3, 600 dpi (color/grayscale) or A3, 1200 dpi (black &
white)
at maximum.
*
The following features are not available for batch printing or easy printing.
- Send to Document Server
- Sample Print
- Locked Print
*
When printing a document from a server directly or with batch printing, depending
on the application program with which the document is created, there are cases
when
it cannot be printed on the paper size. In this case, change the paper size in
your
printer's properties dialog box, then try again.
*
When you connect to a ScanRouter V2 delivery server via client software such as
Auto Document Link or Desk Top Editor For Production located on a different
subnet,
the connection will fail if either or both of the host names cannot be solved
with
a name resolution method such as WINS or DNS.
*
Reducing noise from an image that has been scanned in halftone may not succeed on
Page 4
Readme.txt
the first try. You may need to repeat this until the noise is completely removed.
*
While you are using Desk Top Editor For Production to print documents, to convert
documents into image data, or to send documents to Job Binding, do not attempt to
print files from another application because it may cause an error.
*
When you create/update content text search data of documents, you must save it in
textformat. If you save it in other format such as rich text format, content text
search will not work correctly.
*
When converting files, the file name specified when you select "Combine into a
multi-page TIFF file" or "Save as self-extracting" will be ignored if you select
"Add as document" in the "Select save as/add as" section.
*
If you modify your printer's default settings, printing results may be different
from what you specified with Desk Top Editor For Production.
*
When you work with a file whose format is not supported by Desk Top Editor For
Production, some operations such as creating thumbnails or printing may not work
properly.
* When you view 1000 different folders in total stored in My Cabinet and Shared
Cabinet
of My Workroom as well as in My Computer, the following message will be
displayed.
"Too many objects for processing. Quit and then restart the application."
When you see this message, just restart Desk Top Editor For Production.
* You may fail to print more than one document at a time if you use older version
of
SmartNetMonitor for Client. It is recommended that you use version 5.0.4.0 or
grater
of SmartNetMonitor for Client.
* When you use Easy Scanning, the standard settings for the TWAIN driver will be
valid
except those available in the Easy Scanning properties dialog box.
* The minimum size of image data that can be converted to Text (with OCR) or be
created
as Content Text Search Data is 128 x 128 pixels.
* When you convert an Excel 2002 file into image on a computer with one of the
Windows
9x series (including Windows Me) of operating systems, the file may not be
converted
properly. When you encounter this problem, deselect the option "Allow A4/Letter
paper
resizing" in the Options dialog box of Microsoft Excel 2002, and try again.
* The Send by E-mail function requires you to have installed a MAPI compliant
e-mail
program on your computer. The following software have been confirmed to work with
this function properly:
Page 5
Microsoft
Microsoft
Microsoft
Microsoft
Microsoft
Readme.txt
Outlook97
Outlook98
Outlook2000
Outlook2002 (but not with .exe file attachment)
Outlook Express
Depending on your computing environment, the Send by E-mail function may not work
properly even with the above software. If you are not sure about your
environment,
try the similar function of other program, such as the Send To menu of Microsoft
Word, to see if it works. When it works, then the Send by E-mail function must
work as well.
*
When Desk Top Editor For Production and Office 2000 are installed and used on the
same Windows XP computer, an application may not be terminated properly after it
is launched for creating a file, etc. When this happens and you created files on
ScanRouter DocumentServer, those files will be exclusive locked and you will not
be able to change the document type set for cabinet/folder that contains the
file.
Restart ScanRouter DocumentServer to fix the problem. It is recommended to use
Office XP rather than Office 2000 on Windows XP computer.
*
Unicode is not supported.
*
When LPR Port is selected for your printer port, server printing may take a long
time.
*
If you see an error message, "System load may be too large or the document(s) may
be in use" is displayed while connecting to a Document Server, please wait until
any operation of the device to which you are connecting is complete, and try
again.
*
Depending on the application or data being used, your printer driver may not be
able to determine automatically whether the original is a black & white document
or a color document. In this case, specify whether your document should be
printed
in color or black & white explicitly and try again.
*
Thumbnails created for a file will differ depending on whether or not the
application program associated with the file is installed on your computer.
*
The icons of shortcuts that are exported as HTML are different from the ones of
regular files.
*
Desk Top Editor For Production cannot handle TIFF files edited with the Paint
program included with Windows XP.
* If you have changed User name of a Document Server Cabinet via the Document
Server
Cabinet Properties dialog box, choose Refresh from the View menu to display the
new
name on the window.
*
When you paste drawing, text, stamp, or illustration over a color or grayscale
image section, each object color will automatically be converted to the
corresponding
color of the color palette of the target section. Consequently, the color of the
object on the target section may be different from the one you have specified in
the
Select Color dialog box or the one of the original image (when inserting stamp or
Page 6
Readme.txt
illustration).
*
When you copy documents from Editing Cabinet to Document Server Cabinet, the
document properties will be replaced with the property data managed with the
device.
Any information that is not managed with the device will be lost.
* If you copy a document from a Document Server Cabinet stored via the copier
function
of the corresponding device to Editing Cabinet or a shared cabinet of Document
Server
Edit Tool as a TIFF document, and then you copy it back to the Document Server
Cabinet, please note that an error may occur while printing the document if one
of
the following options is specified: Booklet, Magazine or Double Copies.
*
No more than 2500 documents can be copied to a Document Server Cabinet at a time.
* When you choose Thumbnail View to display the contents of a Document Server
Cabinet
while one or more documents in the cabinet are being deleted, thumbnails of the
deleting documents may be blank.
*
When you print a document containing more than one section and want to print each
section as a separate file, name of each print job will be the name of the
original
document.
* When you copy documents from Editing Cabinet to Document Server Cabinet, they
will
be appeared under the Edited Document tree.
* You can zoom images displayed in the Desk Top Editor For Production Viewer by
typing
any percentage from 10% to 500% in the magnification box appeared in the toolbar
of
the Viewer.
* You can combine documents of which Storage Method is the same. In addition, you
can
combine documents of which Storage Method is Copy and Printer. The storage method
of the new document will be the one of the first combined document.
*
Do not close the Easy Viewer window while a large image is displayed. An error
message, "This program is not responding" may be displayed.
*
Print Backup documents will be listed under the Print Backup Document tree of the
corresponding Document Server Cabinet as well as under the All Users tree and the
corresponding user's tree, if it exists.
*
Please note that when you change the size of image data with the Change Size menu
item, the margin value specified in the Change Size dialog box will be added to
the
actual size in addition to the size you specify.
* When copying, moving, or deleting more than one document at a time, you can
cancel
the operation on a document basis. Note that it is applicable to documents stored
Page 7
Readme.txt
in My Cabinet and shared cabinets of My Workroom, Editing Cabinet and shared
cabinets of Document Server Edit Tool, and Document Management Servers.
* You can delete up to 2499 documents at a time stored in Editing Cabinet or a
shared
cabinet of Document Server Edit Tool or in any cabinet of My Workroom.
<For Windows XP users>
* You cannot launch more than one Desk Top Editor For Production on a computer by
switching users.
*
You cannot use Desk Top Editor For Production via Remote Desktop of Windows XP.
*
If you install Windows XP on the PC where Desk Top Editor For Production is
installed, you need to reinstall Desk Top Editor For Production after you install
Windows XP. Please also note that the following extended features, if any, need
to
be reconfigured.
- Scan
- Easy Scanning
- Easy Print
- Send by Fax
- Preview and Print
- Job Binding (RPCS printer)
- Document Server Edit Tool
----- Device Models compatible with Desk Top Editor For Production -----Scanner
TWAIN compliant scanner:
RICOH Aficio 2090/2105
Savin 4090/40105
Nashuatec 9005/10515
RexRotary 9008/10518
Gestetner 9002/ 10512
Lanier LD 090/0105
infotec IS 2090/2105
* equipped with Printer/Scanner Unit Type2105
Document Server:
RICOH Aficio 2090/2105
Savin 4090/40105
Nashuatec 9005/10515
RexRotary 9008/10518
Gestetner 9002/ 10512
Lanier LD 090/0105
infotec IS 2090/2105
* equipped with File Format Converter Type B,
Optional interface and 256MB Memory
Printer
RICOH Aficio 2090/2105
Savin 4090/40105
Nashuatec 9005/10515
RexRotary 9008/10518
Gestetner 9002/ 10512
Lanier LD 090/0105
infotec IS 2090/2105
* equipped with Printer/Scanner Unit Type2105
RICOH Aficio 1085/1105
Savin 2585/25105
Nashuatec 8505/10505
RexRotary 8508/10508
Page 8
Readme.txt
Gestetner 8502/10502
Lanier 5685/5705
infotec 4850e MF/4105e MF
* equipped with EB105e
RICOH Aficio 850/1050
Savin 2085DP/2105DP
Nashuatec D485/D4105
RexRotary 2885/28105
Gestetner 3285/32105
Lanier 5485/5505
infotec 4850 MF/4105 MF
* equipped with EB105
-------- Uninstalling Desk Top Editor For Production -------* Despite being uninstalled, Desk Top Editor For Production files are not
completely
deleted in cases such as the following:
- If you have added files manually to the installation directory of Desk Top
Editor For Production.
- If you have copied the Desk Top Editor For Production program folder to your
computer's desktop.
- If you have added shortcuts manually to the Desk Top Editor For Production
program folder. (Only the files that were installed by the install program
will
be removed when uninstallation is taken place.)
*
Even after Desk Top Editor For Production is uninstalled, files added to Desk Top
Editor For Production remain in the location specified when installing Desk Top
Editor For Production .
*
Even after you uninstall Desk Top Editor For Production, the menu item may remain
in the Start menu. In this case, please remove it manually.
*
*
*
*
Pentium is a trademark of Intel Corporation.
Microsoft is a registered trademark and Windows and Windows NT are trademarks of
Microsoft Corporation in the U.S.A. and other countries.
UNLHA(32).DLL is freeware provided by Mr. Micco.
The names of companies and products mentioned herein may be either trademarks or
registered trademarks of their respective owners.
Copyright (C) 2003
Page 9
CompDevList_DTEFull.txt
*********************************************
DeskTopBinder V2 Professional
(Version 3.0.0.0)
*********************************************
- Compatible Device List Apr, 2003
This document provides you with important information on using this software.
Please read this carefully.
-------- Peripheral Device Models Confirmed with DeskTopBinder V2 Professional
-------This software is compatible with the devices listed below.
*
The following devices support Batch Printing, Easy Printing,
and Job Binding features:
Ricoh
Aficio
1022/1027/1032/1035/1045/1060/1075/2035/2045/2035G/2045G
1224C/1224CG/1232C/1232CG
Aficio
AP2600/AP2600N/AP2610/AP2610N/AP3800C/AP4510/CL3000/CL5000
LASER AP206/LASER AP2610/LASER AP2610N
Aficio AP3800C + Copier feature Expander Type3800C
Nashuatec
2205/2705/3205/3525/4525/6005/7505/3545/4545/DSc224/DSc232
C7006/C7010/C7116
DSc38
P7026/P7026n/P7126/P7126n/P7145
DSc38 + Copier feature Expander Type3800C
Rex Rotary
2238/2738/3238/3508/4508/6008/7508/3518/4518/DSc224/DSc232
C7006/C7010/C7116
DSc38
P7026/P7026N/P7126/P7126N/P7145
DSc38 + Copier feature Expander Type3800C
Gestetner
2212/2712/3212/3502/4502/6002/7502/3532/4532/4532
4235g/4245g/DSc224/DSc232
C7006/C7010/C7116
DSc38
P7026/P7026n/P7126/P7126n/P7145
DSc38 + Copier feature Expander Type3800C
SAVIN
2235/2245/2522/2527/2532/2535/2535p/2545/2545p/2560/2575
4035/4045/4135g/4145g/C2408/C3210
SLP6c/SLP38c/SLP26/SLP26n
MLP26/MLP26n/MLP45
CLP1036/CLP1620
SLP38c + Copier feature Expander Type3800C
Infotec
4353MF/4452MF
IP280/IS2022/IS2027/IS2032/IS2060/IS2075/IS2035/IS2045/ISC824/ISC1032
IP280 + Copier feature Expander Type3800C
Lanier
5635/5645/5622/5627/5632/LD060/LD075/LD035/LD045/
LD024c/LD032c
2138 + Copier feature Expander Type3800C
*
The following devices support Easy Scanning feature:
Page 1
CompDevList_DTEFull.txt
Ricoh
Aficio
1022/1027/1032/1035/1045/1060/1075/2035/2045/2035G/2045G/
1224C/1224CG/1232C/1232CG/220/270/350e/355e/450e/455e
IS330DC
Aficio AP3800C + Copier feature Expander Type3800C
Nashuatec
2205/2705/3205/3525/4525/6005/7505/3545/4545/DSc224/DSc232
D422/427
SC430DC
DSc38 + Copier feature Expander Type3800C
Rex Rotary
2238/2738/2822/2827/3238/3508/4508/6008/7508/3518/4518/DSc224/DSc232
SC430DC
DSc38 + Copier feature Expander Type3800C
Gestetner
2212/2712/3212/3222/3227/3235e/3245e/3502/4502/6002/7502/3532/4532/
4235g/4245g/DSc224/DSc232
SC430DC
DSc38 + Copier feature Expander Type3800C
SAVIN
2235/2245/2522/2527/2532/2535/2545/2560/2575/4035/4045/4135g/4145g/
C2408/C3210
9935DPE/2035DPE/9945DPE/2045DPE
9922DP/9927DP
SLP38c + Copier feature Expander Type3800C
Infotec
4220MF/4270MF/4353MF/4452MF
IS2022/IS2027/IS2032/IS2060/IS2075/IS2035/IS2045/ISC824/ISC1032
IP280 + Copier feature Expander Type3800C
Lanier
5622/5627/5622/5627/5632/5635/5645/LD060/LD075/LD035/LD045/LD024c/LD032c
2138 + Copier feature Expander Type3800C
*
The following devices support Sending by Fax feature:
Ricoh
Aficio 1022/1027/1032/1035/1045/2035/2045/2035G/2045G/1224C
/1224CG/1232C/1232CG/4410F/4410NF
2205/2705/3205/3525/4525/3545/4545/DSc224/DSc232/F104/F104L
2238/2738/3238/3508/4508/3518/4518/DSc224/DSc232/F104/F104L
Nashuatec
Rex Rotary
Gestetner
2212/2712/3212/3502/4502/3532/4532/4235g/4245g/DSc224/DSc232/F104/F104L
SAVIN
2235/2245/2522/2527/2532/2535/2545/4035/4045/4135g/4145g
/C2408/C3210/3750/3750nf
Infotec
4353MF/4452MF
IS2022/IS2027/IS2032/IS2035/IS2045/ISC824/ISC1032/IF2150/IF2200
Lanier
5622/5627/5632/5635/5645/LD035/LD045/LD024c/LD032c/LF410/LF415e
*
The following devices support the viewing and/or retrieving of documents
stored in
the document server:
[Supports viewing and retrieving]
Ricoh
Aficio
1022/1027/1032/1035/1045/1060/1075/2035/2045/2035G/2045G
/1224C/1224CG/1232C/1232CG
Nashuatec
2205/2705/3205/3525/4525/6005/7505/3545/4545/DSc224/DSc232/DSc38
Rex Rotary
2238/2738/3238/3508/4508/6008/7508/3518/4518/DSc224/DSc232/DSc38
Page 2
Gestetner
CompDevList_DTEFull.txt
2212/2712/3212/3502/4502/6002/7502/3532/4532/4235g/4245g
/DSc224/DSc232/DSc38
Savin
2235/2245/2522/2527/2532/2535/2535p/2545/2545p/2560/2575/4035/4045
/4135g/4145g/C2408/C3210/SLP38c
Infotec
4353 MF/4452
MF/IS2022/IS2027/IS2032/IS2060/IS2075/IS2035/IS2045
/ISC824/ISC1032/IP280
Lanier
5635/5645/5622/5627/5632/2138/LD060/LD075/LD035/LD045/LD024c/LD032c/
[Supports viewing only]
Ricoh
Nashuatec
Rex Rotary
Gestetner
Savin
Infotec
Lanier
Aficio AP3800C + Copier feature Expander Type3800C
DSc38 + Copier feature Expander Type3800C
DSc38 + Copier feature Expander Type3800C
DSc38 + Copier feature Expander Type3800C
SLP38c + Copier feature Expander Type3800C
IP280 + Copier feature Expander Type3800C
2138 + Copier feature Expander Type3800C
Copyright (C) 2001-2003
Page 3
aboutme.txt
This tool allows you to set the community name for SNMP communication.
For the overview and operating instructions of SNMP Setup Tool, please refer
to the online help of this tool. This setup tool is located in the \RDS folder
after installing the software. The executable file name is "PMComm.exe."
The community name set with this tool will be used commonly among
the following software:
SmartNetMonitor for Admin
SmartNetMonitor for Client
Ver 5.5.0.0 and later
Ver 5.5.0.0 and later
DeskTopBinder V2 Professional
Ver 1.0.7.0 / Ver 2.0.2.0 and later
DeskTopBinder V2 Lite
Ver 3.0.0.0 and later
ScanRouter Enterprise
Ver 1.0.2.0 and later
ScanRouter V2 Professional
Ver 1.0.7.0 / Ver 2.0.2.0 and later
ScanRouter V2 Lite
Ver 1.0.7.0 / Ver 2.0.2.0 and later
Page 1
REMPV1_EX_Readme.txt
*************************************************************************
Desk Top Editor For Production (V1.0.0.0) Install Check Utility
*************************************************************************
May, 2003
This tool is designed to check whether all the components supplied with
Desk Top Editor For Production are properly installed or not.
-------------------------------How to use this software
-------------------------------(1) Copy both the REMPV1_EX.exe and the REMPV1_EX.dat to your local disk
at which the check will be performed. Both files must be
in the same directory.
(2) Run the REMPV1_EX.exe and follow the instructions on the screen.
----------Notes
----------Please be noted that this tool cannot be executed from within the CD. You
must first copy it to one of the directories in which creating files is
allowed.
Page 1
README.TXT
Desk Top Editor For Production Converter Printer Driver (Windows /95/98/ME)
<Introduction>
RICOH File Writer is a printer driver for the Windows 95/98/ME environment. (It is
incompatible with Windows NT.) This printer driver allows you to convert the
format of electronic word-processed materials into an image file format such as
TIFF.
<Installation>
1.1 Installing Desk Top Editor For Production
RICOH File Writer is designed to automatically attempt to install when
Desk Top Editor For Production is being installed. However, there are cases where
the
installation fails due to insufficient OS configuration files, etc.
If a message informs you that the installation of RICOH File Writer was
unsuccessful, please install RICOH File Writer by following the instructions
below.
1.2 Installing the Printer Driver
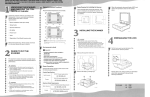
1.From the Start menu, select [Settings] and then open [Printers].
2.Double-click [Add Pinter] to start [Add Printer Wizard].
3.Click [Next].
4.Check the [Local printer] checkbox, and click [Next].
5.Click [Have Disk], and after selecting "RICOH File Writer", click [OK].
6.Select "RICOH File Writer", and click [Next].
7.Select "RICOHFileWriter" as the port.
8.Complete the installation in accordance with the wizard instructions.
After completing the installation, configure the following settings:
1.Select "RICOH File Writer" in [Printers], and then select [Properties] from
the File menu. [RICOH File Writer Properties] is displayed.
2.Click the [Details] tab, and click [Spool Settings].
3.Check the [Print directly to the printer] checkbox, and click [OK].
4.Close the [Properties] dialog box.
Page 1
Operating Instructions
Overview
Desk Top Editor For Production Displays
Desk Features
Viewer Features
Appendix
Preface
Desk Top Editor For Production can integrate and manage diverse data such as image data from scanners and existing image files created with applications. Also, Desk Top Editor For Production can edit
documents stored in network devices without losing their image qualities.
This book explains how to set up and operate Desk Top Editor For Production. For information about
using Desk Top Editor For Production, see Desk Top Editor For Production Help.
Trademarks
Microsoft, Windows, Windows NT, and PowerPoint are registered trademarks of Microsoft Corporation
in the United States and/or other countries.
Adobe, Acrobat, and PostScript are registered trademarks of Adobe Systems Incorporated. Adobe and
Acrobat are registered trademarks of Adobe Systems Incorporated.
Pentium is a registered trademark of Intel Corporation.
Other product names used herein are for identification purposes only and might be trademarks of their
respective companies. We disclaim any and all rights involved with those marks.
Outside In Viewer Technology (c) 1992-2000 Intranet Solutions Chicago, Inc. All rights reserved.
The product names of the Windows operating systems are as follows:
•
The product name of Windows® 95 is Microsoft® Windows® 95.
•
The product name of Windows® 98 is Microsoft® Windows® 98.
•
The product name of Windows® Me is Microsoft® Windows® Millennium Edition.
•
The product names of Windows NT® 4.0 are as follows:
Microsoft® Windows NT® Server 4.0
Microsoft® Windows NT® Workstation 4.0
•
The product names of Windows® 2000 are as follows:
Microsoft® Windows® 2000 Advanced Server
Microsoft® Windows® 2000 Server
Microsoft® Windows® 2000 Professional
•
The product names of Windows® XP are as follows:
Microsoft® Windows® XP Professional
Microsoft® Windows® XP Home Edition
TABLE OF CONTENTS
1. Overview
Desk Top Editor For Production........................................................................... 1
Document Server Edit Tool Capabilities .................................................................... 1
Starting and Quitting Desk Top Editor For Production...................................... 2
Starting.......................................................................................................................2
Quitting.......................................................................................................................2
Document Management ........................................................................................ 3
Cabinets and Folders ................................................................................................. 3
Documents and Sections ........................................................................................... 3
Document Properties ................................................................................................. 3
Adding Functions ....................................................................................................... 3
2. Desk Top Editor For Production Displays
Structure of Desk Top Editor For Production ..................................................... 5
3. Desk Features
Desk Display Layout..............................................................................................7
Document Views ........................................................................................................ 8
Displaying Document Content............................................................................12
Displaying a Document Using Easy Viewer .............................................................12
Managing Documents..........................................................................................14
Adding Documents...................................................................................................14
Transferring Documents or Files.............................................................................. 14
Searching for Documents.........................................................................................15
Arranging Documents .............................................................................................. 15
Printing/Outputting/Converting Documents..............................................................16
Using Document Server Edit Tool......................................................................17
Structure of Document Server Edit Tool .................................................................. 17
Adding Document Server Cabinets..........................................................................18
Editing Documents Stored in Document Server Cabinet ......................................... 18
Documents Displayed in Document Server Cabinet ................................................ 19
Maintenance .........................................................................................................20
Arranging Folders.....................................................................................................20
Adding Functions .....................................................................................................20
Backing Up Desk Top Editor For Production Cabinet ..............................................20
i
4. Viewer Features
Viewer Display Layout......................................................................................... 23
Editing Image Sections .......................................................................................25
Before You Start Editing........................................................................................... 25
Editing Multiple Sections at Once ............................................................................ 25
Editing Section by Section .......................................................................................28
Managing Sections ..............................................................................................30
Changing the Section Order..................................................................................... 30
Inserting/Replacing a Section .................................................................................. 30
Printing/Outputting/Converting a Section .................................................................30
Rotating a Section.................................................................................................... 31
5. Appendix
Operating Environment .......................................................................................33
System Requirements.............................................................................................. 33
File Types that Desk Top Editor For Production can Manage .................................35
Installing Desk Top Editor For Production........................................................37
Installing ...................................................................................................................37
Uninstalling...............................................................................................................38
Dial-up Related Devices ...................................................................................... 39
When a Dial-up Router Is Connected to the Network Environment Where
Desk Top Editor For Production Is Used ............................................................... 39
When Using a Dial-up Network Computer ............................................................... 39
Troubleshooting...................................................................................................40
INDEX......................................................................................................... 42
ii
1. Overview
Desk Top Editor For Production
Desk Top Editor For Production can integrate various kinds of data, such as files
created in different applications, scanned image data, and existing image files,
for total document management and printing.
Desk Top Editor For Production can manage My Workroom documents created
on a computer. When functions are added in Extended Features, Document Link
Desk Top Editor can be connected input and output network devices. Depending on the network devices, documents stored in Document Server can be copied
to Editing Cabinet of Document Server Edit Tool in Desk Top Editor For Production, retaining image quality close to that of when stored, and edited.
Also, using Desk Top Editor For Production, documents in ScanRouter V2 Professional and ScanRouter Enterprise in-trays, and documents stored in ScanRouter DocumentServer cabinet can be viewed and controlled.
To use Document Server Edit Tool, ScanRouter DocumentServer, ScanRouter V2
Professional, and ScanRouter Enterprise, they must be configured using Extended Features.
Document Server Edit Tool Capabilities
Document Server Edit Tool can copy documents from network device Document Servers to Editing Cabinet, retaining image quality close to that of when
stored, and edit them. After editing is complete, documents can be copied and
returned to its original Document Server.
It is possible to print edited documents from Editing Cabinet; however, if you
want to print high-quality image documents, it is recommended that edited documents are copied from Editing Cabinet to Document Server, and then printed.
Document Server Edit Tool can be configured from Extended Features.
1
Overview
Starting and Quitting Desk Top Editor For
Production
1
Starting
A Click [Start], and then point to [Programs].
B Point to [Desk Top Editor For Production], and then click [Desk Top Editor For Production].
Desk Top Editor For Production starts.
Quitting
A On the [File] menu, click [Exit].
Desk Top Editor For Production quits.
Note
❒ If the [Display list of expired documents on exit] check box in the [My Cabinet
Properties] dialog box is selected, documents are searched for and a list of
expired documents appears when you quit Desk Top Editor For Production. You can delete unnecessary documents in the list of expired documents.
❒ If the [Delete Job Binding documents 24 hours after they were created] check box
in the [Job Binding (RPCS Printer) Properties] dialog box is selected, when you
quit Desk Top Editor For Production a confirmation message about deleting the documents appears.
2
Document Management
Document Management
Cabinets and Folders
1
Added documents are stored in cabinets. In these cabinets, you can create folders and use them to sort documents.
This cabinet has a trash can. Files and documents are temporarily stored here
when they are deleted.
When Desk Top Editor For Production is installed, one My Cabinet and one Editing Cabinet can be created. However, you cannot add more cabinets.
Documents and Sections
You can add multiple files made with various applications as a single document.
When saving multiple files as a document, one file becomes one section, and one
document consists of multiple sections.
Document Properties
Document properties, including information such as creator, document status,
and expiration date, make document management easier.
Using Desk Top Editor For Production, you can configure document properties
for each document and check them using Properties. Items that can be checked
are: document name, size, location, date added/modified, creator, work status,
and expiration date.
Adding Functions
New functions can be added using Desk Top Editor For Production Extended
Features. Related devices or programs are displayed under the Desk Top Editor
For Production tree. In addition to managing documents in My Workroom, the
following document management programs become available:
• Document Server Edit Tool
• ScanRouter DocumentServer
• ScanRouter V2 delivery server
Add or delete network devices or programs as needed.
Note
❒ For more information about network devices and programs, see Desk Top
Editor For Production Help "[Extended Features] in [Overview]".
3
Overview
1
4
2. Desk Top Editor For
Production Displays
Structure of Desk Top Editor For Production
Desk Top Editor For Production has two displays: Desk, and Viewer.
❖ Desk display
Displays a document list. This appears when performing Desk Top Editor For
Production operations.
5
Desk Top Editor For Production Displays
❖ Viewer display
Displays document content. This is mainly used when editing a document.
2
6
3. Desk Features
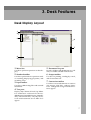
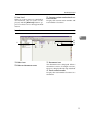
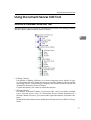
Desk Display Layout
1
2
3
6
7
4
5
1. Menu bar
5. Document list pane
Use this to perform operations on the display.
Displays folders and documents in a cabinet, or a folder selected from the tree.
2. Standard toolbar
6. Output toolbar
Use this to perform basic operations such
as searching, displaying properties, and
switching views.
Use this for printing, sending by e-mail,
and fax transmission.
3. Input toolbar
Use this to convert documents or sections
into images, PDF files, and text. Functions configured using Extended Features appear.
Use this to add existing files and scanned
documents.
4. Tree pane
7. Conversion toolbar
Displays My Cabinet of Desk Top Editor
For Production and network devices
added using Extended Features. Immediately after installation, only My Workroom and Document Server Edit Tool
appear.
7
Desk Features
Document Views
The following views are available:
Note
❒ Folder or document names can be edited by clicking on them.
❒ Type of views and display contents vary depending on the network devices.
Thumbnail view
3
1
2
3
4
7
8
5
9
6
1. Folder icon
2. Folder or document name
3. Clip
A clip appears if a document is composed
of multiple sections.
These buttons appear when a document
consists of multiple sections. Use these to
move through the sections of a document.
4. Section thumbnail
7. Note
Section thumbnails are displayed. If a
thumbnail is not created, a blank appears.
Click this to view marked sections. Double-click to open the [Note Contents] dialog box.
5. Section icon
Displays an icon of the application the
section was created with.
8
6. [Previous Section] [Next Section] buttons
Desk Display Layout
8. Note Leaf
When six or more notes are attached to
one document, only five notes are displayed, and the [Note Leaf] buttons appear. Use these to move through marked
sections.
9. Current section number/total section number
Displays the current section number and
total number of sections.
Icons view
3
2
1
1. Folder icon
2. Folder or document name
3
4
3. Document icon
The document icon is displayed. When a
document consists of multiple sections,
the icon is displayed with a clip attached.
4. Total section number
Displays the total number of sections in a
document.
9
Desk Features
Details view
1
3
1. Displayed items
Click each item to sort documents.
Calendar view
❖ Monthly view
1
10
Desk Display Layout
❖ Weekly view
1
3
2
4
3
5
1. [Monthly][Weekly] buttons
Click to switch between weekly and
monthly calendar.
2. [Specify Date] button
Displays the month or week of a specified date.
3. [Today] button
Displays the current month or week.
4. [Calendar Settings] button
Select Monday or Sunday as the first
day of the calendar week.
5. [Added][Modified] date
Select to display documents in order
of date added or modified.
11
Desk Features
Displaying Document Content
Document content can be displayed by the following methods:
❖ Using Easy Viewer
Click [Easy Viewer] on the [View] menu, or click the [Easy Viewer] button on the
toolbar, and then select a document in the document list pane.
❖ Using Viewer
Two methods are available:
• On the [Document] menu, click [Open in Viewer].
• In Desk Top Editor For Production Preferences, make the settings for documents to be displayed using Viewer when they are double-clicked, and
then double-click a document.
3
❖ Using an application
Three methods are available:
• In Desk Top Editor For Production Preferences, make the settings for documents to be displayed using an application when they are double-clicked,
and then double-click a document.
• In the Thumbnails view, select a section, and then click [Open in Application]
on the [Document] menu.
• In the Icon view, Details view, or Calendar view, select a document containing only one section, and then click [Open in Application] on the [Document] menu.
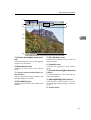
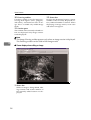
Displaying a Document Using Easy Viewer
You can easily display the contents of a document, section by section.
Click the icon, the [Easy Viewer] button, and then select a document in the document list pane.
You can change the size of the [Easy Viewer] window.
Note
❒ Only image sections can be displayed using Easy Viewer.
Reference
For more information about file formats that can be displayed using Easy
Viewer, See p.36 “Image File That Can Be Displayed”.
12
Displaying Document Content
1
2
7
3
8
4
3
5
6
1. [Previous Section][Next Section] buttons
Click these buttons to move through the
sections of a document.
2. [Open Viewer] button
Click this to start Viewer. Easy Viewer
closes.
3. Current section number/total section number
Displays the current section number and
the total number of sections.
4. [Fit to Width] button
Fits the current section to the width of the
window.
9
5. [Fit in Window] button
Fits the current section to the overall size
of the window.
6. [Launch] button
Launches an application. Easy Viewer
closes.
7. [Previous Document][Next Document]
buttons
Use these buttons to move from document to document.
8. [90°°Left][90°°Right] [180°°] buttons
Click these to rotate sections of a displayed image. Rotated images cannot be
saved.
9. Section name
13
Desk Features
Managing Documents
Reference
For details, see Help.
Adding Documents
To add a document, start from the [File] menu, or the Input toolbar.
The following methods are available:
• Create a new file using an application
A new file created with an application is added as a document.
• Add a file as a document
An existing file is added as a document. You can use a drag-and-drop operation.
• Add a document using a scanner
A scanned image is added as a document.
• Add a document using easy scanning
Configure scan-input settings in advance. The image scanned with an easy
scanning-compliant scanner is added as a document.
3
Note
❒ Scan or easy scanning settings must be configured using Extended Features.
Transferring Documents or Files
By monitoring delivery server in-trays on the network, specific Windows folders, and Fax Received Files of network devices using Auto Document Link, documents or files in monitored items can be transferred and added to Desk Top
Editor For Production or ScanRouter DocumentServer as documents, or saved
to Windows folders as files.
There are two methods of transfer: automatic, and manual.
Reference
For more information about Auto Document Link, see Auto Document Link
Guide.
14
• Transfer Settings
On the [Tools] menu, point to [Auto Document Link], and then click [Properties].
In the [Auto Document Link Properties] dialog box, select the item you want to
monitor, and then make the necessary settings.
• Automatic transfer
Documents or files in monitored items are automatically transferred to the
specified locations using the settings in the [Auto Document Link Properties] dialog box.
To transfer documents or files automatically, Auto Document Link must be
started.
Managing Documents
• Manual transfer
On the [Tools] menu, point to [Auto Document Link], and then click [Check New
Data]. Documents or files in monitored items are transferred to specified locations using the settings in the [Auto Document Link Properties] dialog box.
Note
❒ Auto Document Link can also be started from the [Start] menu of Windows.
❒ The Auto Document Link icon appears on the taskbar when you start Desk
Top Editor For Production. Right-click the icon. You can also make settings
and check new data from the menu.
3
Searching for Documents
To search for documents, start from the [File] menu, or General toolbar.
The following methods are available:
• Specific Search
Searches using detailed conditions. Keywords or Content Text Search data is
used to find documents.
• Broad Search
Searches only using words or date.
Arranging Documents
The following methods are available:
• Display properties
Check document properties and document type.
• Create thumbnails
When section thumbnails are created, you can find and view documents in
the Thumbnails view.
• Combine/separate documents
Combines multiple documents or separates Desk Top Editor For Production
documents that include multiple sections. When a Desk Top Editor For Production is separated, one section becomes one document, creating multiple
documents.
• Add/delete a note and change note contents
Adds or deletes notes on a section to make document arrangement easier.
You can change the color of a note, and enter a comment.
• Create Content Text Search data
Creates Content Text Search data.
15
Desk Features
Printing/Outputting/Converting Documents
To print, output, or convert documents, start from the [File] menu, or Output/Conversion toolbar.
The following methods are available to print or output documents:
❖ Printing/Outputting documents
• Print
• Preview and Print
• Print using Easy Print
• Export as files
• Send by E-mail
• Fax transmission (Send by Fax)
• Deliver from ScanRouter V2 delivery server
• Save in Job Binding
3
❖ Converting documents
• Convert to image of the specified file format
• Convert to PDF
• Convert to Text (with OCR)
Note
❒ Send by E-mail, Easy Print, Send by Fax, Deliver, Save in Job Binding, Convert to Image, Convert to PDF, and Convert to Text (with OCR) must be configured using Extended Features.
16
Using Document Server Edit Tool
Using Document Server Edit Tool
Structure of Document Server Edit Tool
There are three types of cabinet in Document Server Edit Tool: Editing Cabinet,
Shared Cabinet, and Document Server Cabinet.
3
• Editing Cabinet
Documents in Editing Cabinets (in a client computer) can be edited. A copy
of a Document Server Cabinet document is moved to Editing Cabinet and edited using Viewer. After editing is complete, the document can be copied and
returned to Document Server Cabinet.
Copied documents are sorted as edited documents.
• Shared Cabinet
Documents in Shared Cabinets (on the network) can be viewed by multiple
users. You can move a copy of a Document Server Cabinet document to a
Shared Cabinet; however, you cannot edit copied documents in Shared Cabinets.
Multiple Shared Cabinet can be added from Document Server Edit Tool Properties.
17
Desk Features
• Document Server Cabinet
Documents in Document Server Cabinets (which is in Document Server of a
device installed with options necessary for Document Server Edit Tool) can
be viewed and printed. You cannot edit documents in Document Server Cabinets.
Multiple Document Server Cabinets can be added using Document Server
Edit Tool Properties.
Adding Document Server Cabinets
Follow the procedure below to add a Document Server Cabinet.
3
A In the tree pane, select Document Server Edit Tool, and then click [Properties] on the [File] menu.
The [Document Server Edit Tool Properties] dialog box appears.
B Click [Add].
The [Select Cabinet] dialog box appears.
C Click [Document Server Cabinet], and then click [OK] .
The [Document Server Cabinet Properties] dialog box appears.
D Make the necessary properties settings, and then click [OK].
The cabinet is added.
Editing Documents Stored in Document Server Cabinet
Follow the procedure below to edit Document Server Cabinet documents in Editing Cabinet.
A In Document Server Cabinet, select a document you want to edit, and then
click [Copy] on the [Edit] menu.
The [Copy Document] dialog box appears.
B Select the copy location, and then click [OK].
Note
❒ If the storage method for the document is [Copy] or [Printer], the [Copy File
Format] dialog box appears. You can make settings for the copying method.
C In Editing Cabinet, select the copied document, and then click [Open in Viewer] on the [Document] menu.
Viewer starts and the document appears.
D Edit the document. After editing is complete, repeat steps 1-2 to copy, and
then return the edited document to Document Server Cabinet.
18
Using Document Server Edit Tool
Editing Cabinet Limitations
Editing Cabinet documents have the following limitations:
• When a document is copied from Editing Cabinet to a Document Server Cabinet, some document information, such as note and work status, will be lost.
• Only documents copied from the same device can be combined. However,
scanned documents cannot be combined with documents stored using methods other than scanning.
Documents Displayed in Document Server Cabinet
3
In addition to stored documents, the following documents are displayed in Document Server Cabinet:
• Edited documents
Only documents edited in Editing Cabinet and copied to Document Server
Cabinet are displayed.
• Print Backup
Only documents specified with [Print Backup Document] in network devices are
displayed.
19
Desk Features
Maintenance
Arranging Folders
You can create, delete, move, and change folder names.
Adding Functions
To add functions, click [Extended Features] on the [Tools] menu.
The following functions can be configured:
• Input functions
Scan, easy scanning
• Output functions
Print, Easy Print, Send by E-mail, Send by Fax, Deliver, Preview and Print,
Save in Job Binding
• Convert functions
Convert to Image, Convert to PDF, Convert to Text (with OCR)
• Network functions
Windows Document, Document Server Edit Tool, ScanRouter V2 delivery
server, ScanRouter DocumentServer, Document Server, Job Binding (RPCS
Printer)
• Tools functions
Import HTML, Export HTML, Export Document Properties Summary in CSV
format, Entry Assistant, Print Document Properties Summary by List
3
Backing Up Desk Top Editor For Production Cabinet
For backups, start from the [File] menu.
You can perform periodic backups and extract backup data.
Note
❒ Only My Cabinet and Document Server Edit Tool Editing Cabinet can be
backed up.
❖ Manual backup
Select the folder you want to back up. On the [File] menu, click [Back up]. In
the [Back Up] dialog box, select the objects you want to back up. In the [Save
As] dialog box, specify the name for the backup file and the location where
you want to save the file.
❖ Automatic backup
Click the [File] menu, click [Properties]. In the [My Cabinet Properties] dialog box,
click the [Backup] tab, and then make the necessary settings.
20
Maintenance
❖ Restoring backup data
Use Windows Explorer to uncompress the file.
In the [Extract To] dialog box, click [Browse Desk Top Editor For Production]. Specify the location for the file, and then uncompress it .
Note
❒ Documents in Document Server Cabinet cannot be backed up.
Note
❒ For more information about backups, see Help "[Backup] in [Operations for Desk
Top Editor For Production]".
3
21
Desk Features
3
22
4. Viewer Features
Viewer Display Layout
The menu and toolbars appear differently, depending on whether an image or
non-image section is displayed.
1
2
3
8
4
5
9
6
10
7
11
12
1. Menu bar
6. Section name
Use this to perform operations on the display.
Use this to change the section name.
2. Standard toolbar
The section thumbnail list in a document
appears
Use this to perform basic operations such
as switching sections and adding notes.
3. Input toolbar
Use this to add existing files and scanned
documents.
4. Image Viewing toolbar
Use this to zoom in or out an image.
5. Note
Use this to attach or delete a note, or to
change the note contents.
7. Section list pane
8. Output toolbar
Use this for printing, sending by e-mail,
and fax transmission.
9. Conversion toolbar
Use this to convert documents or sections
into images, PDF files, and text. Functions configured using Extended Features appear.
23
Viewer Features
10. Drawing toolbar
12. Status bar
Use this to specify an area for image processing, draw figures (lines, polygons,
and circles), and insert text onto an image. This is available only in Edit Image
mode.
Displays the document location, section
number of the currently displayed section, and total number of sections. When
displaying an image section, zoom ratio
and section size appear.
11. Section pane
The contents of the currently selected section are displayed. Only image sections
can be displayed.
Note
❒ The Image Viewing toolbar appears only when an image section is displayed.
The Drawing toolbar can be used in Edit Image mode.
4
❖ Viewer display when editing an image
1
1. Status bar
While an image is being edited, editing contents and section number of
the currently edited section are displayed.
24
Editing Image Sections
Editing Image Sections
Reference
For more information, see Help.
Before You Start Editing
Before you start editing an image, you must enter Edit Image mode. To enter
Edit Image mode, switch from the [Section] menu or the Image Viewing toolbar.
Important
❒ We recommend backing up documents before you start editing them. Documents immediately reflect the changes made using the following functions of
this software, and cannot be undone.
4
Editing Multiple Sections at Once
The following image processing functions can be performed for image sections
of a document. Image processing can be performed not only for an image section
displayed in the Section pane, but also for all sections in a document at once. Section range can also be specified to apply the image processing.
Note
❒ Multiple grayscale image sections and color image sections cannot be edited
at once.
To Process a Specified Image Section
The following editing functions can be performed for a specified area. Methods
for specifying the image processing area for multiple sections and specifying a
range for a single section are different. When a range is specified, an image processing area cannot be specified.
❖ Delete Area
Deletes inside a specified area of an image section.
❖ Fill Area
Fills inside or outside a specified area of an image section with white or black.
❖ Move Area
Moves a specified area of image section to a different position within the same
section.
25
Viewer Features
❖ Copy Area
Copies a specified area of an image section and pastes it to a different position
within the same section, or a different section. The copied area can be pasted
on the same section multiple times.
❖ Move to Anchor Point
Moves a specified area of an image section to the base anchor (a specific point
on the image). The specified area can be moved and positioned correctly using the base anchor.
❖ Invert Black and White
Inverts inside a specified area of an image section.
❖ Mirror
Mirror reverses inside a specified area of an image section.
4
❖ Rotate Image
Rotates a specified area of an image section clockwise or counter-clockwise by
90 or 180 degrees.
For Entire Image Area
The following editing functions can be performed for the entire area of an image
section.
❖ Change Size
Changes the image section size. Two methods are available: selecting a paper
size, and specifying the desired size.
❖ Erase Center
Erases the center of the section by filling it with white. This function can be
used for erasing the shadow scanned when scanning originals such as thick
books.
❖ Erase Border
Erases the surrounding area of the section by filling it with white. This function can be used for erasing the shadow scanned when scanning originals
such as thick books.
❖ Overlay Template
Combines an image section and a template. This function can be used to insert
a company logo.
❖ Skew Correction
Adjusts the skew of an image section. Skew can be corrected automatically or
manually.
26
Editing Image Sections
❖ Reduce Noise
Reduces noise in an image section to make it clearer. This function can be
used if dust or stains were scanned with the original.
❖ Enhance Image
Enhances the section to make the image clearer. This function can be used if
a less-gradated original was scanned.
❖ Insert Page Number
Inserts page numbers onto an image section. The page number format and
range can be specified.
❖ Insert Text
Inserts text into an image section. The insert position and character strings
can be changed.
4
Available Processing Methods
The following three methods are available to edit image sections:
❖ Process sections while confirming each display
Image sections in the specified range appear in Section pane when specifying
whether to show the processing or not by checking it section by section. On
the menu that appears when you right-click the Section pane, you can select
a processing method, such as going to the next section showing the processing to the current section, or suspending processing.
❖ Process the selected sections at one time
Image sections in the specified range are processed together.
❖ Batch process while confirming section overlay
Image sections in the specified range are processed with OR image combining
while specifying whether to perform batch processing or not by checking the
processing result. On the menu that appears when you right-click the Section
pane, you can select a processing method, such as execution of batch processing, or canceling processing.
This method can be used only for Delete Area, Erase Center, and Erase Border
functions of multiple sections.
27
Viewer Features
Editing Section by Section
Image editing such as drawing figures and image processing can be performed
section by section.
The following functions are available:
❖ Text
Enters a character string as text.
❖ Stamp
Pastes a ready-to-use stamp onto an image
❖ Insert Illustration
Pastes a ready-to-use illustration onto an image.
4
❖ Straight Lines
Draws a straight line onto an image. You can also draw a diagonal line
❖ Horizontal/Vertical Lines
Draws a horizontal, vertical, or 45 degree diagonal line onto an image section.
❖ Squares/Rectangles
Draws a square or rectangle onto an image section.
❖ Rounded Rectangles
Draws a round-cornered rectangle onto an image section.
❖ Ovals
Draws an oval onto an image section.
❖ Polygons
Draws a polygon onto an image section.
❖ Freehand
Draws a freehand figure or line onto an image section.
❖ Insert Text
Inserts text onto an image section. The insertion point and character string can
be specified.
❖ Show-Through Correction
Eliminates the show-through image (scanned in with a color scanner) and
makes the image clearer.
❖ Erase Selected Area
Erases inside or outside the range specified onto an image section.
❖ Move
Moves the range specified onto an image section.
28
Editing Image Sections
❖ Cut
Cuts the range specified onto an image section.
❖ Copy
Copies the range specified onto an image section.
❖ Paste
Pastes the copied or cut range onto an image section.
❖ Clear
Deletes inside the range specified onto an image section.
❖ Erase
Erases unwanted parts, as if you are using an eraser.
4
29
Viewer Features
Managing Sections
Reference
For more information, see Help.
Changing the Section Order
To change the section order, use the [Section] menu, or move a section thumbnail
in the thumbnail pane using a drag-and-drop operation.
Inserting/Replacing a Section
4
To insert or replace a section, start from the [File] menu or the Input toolbar.
The following types of data can be inserted or replaced:
• New images (blank image files)
• Data imported from a file
• Scanned image data
• Clipboard images
• Data captured from added documents
• Image data scanned using easy scanning
Note
❒ To use scan or easy scanning to insert or replace a section, you must first configure them using Extended Features.
Printing/Outputting/Converting a Section
To print, output, or convert a section, start from the [File] menu, Output toolbar,
or Conversion toolbar.
The following methods are available to print, output, or convert sections:
❖ Printing/Outputting sections
• Print
• Preview and Print
• Print using Easy Print
• Export as files
• Send by E-mail
• Fax transmission (Send by Fax)
• Save in Job Binding
30
Managing Sections
❖ Converting sections
• Convert to image of the specified file format
• Convert to PDF
• Convert to Text (with OCR)
Note
❒ Send by E-mail, Easy Print, Send by Fax, Save in Job Binding, Convert to Image, Convert to PDF, and Convert to Text (with OCR) must be configured using Extended Features.
Rotating a Section
A section can be rotated clockwise or counter-clockwise by 90 or 180 degrees.
When a range is specified, multiple sections can be rotated at once.
To rotate a section, start from the [Section] menu.
4
31
Viewer Features
4
32
5. Appendix
Operating Environment
System Requirements
Before installing Desk Top Editor For Production, make sure your computer
meets the following system requirements:
• Computer
PC/AT compatible computer
• Operating System
Microsoft Windows 98
Microsoft Windows 98 Second Edition
Microsoft Windows Millennium Edition
Microsoft WindowsNT Workstation 4.0 Service Pack 6a or later
Microsoft WindowsNT Server 4.0 Service Pack 6a or later
Microsoft Windows 2000 Professional Service Pack 2 or later
Microsoft Windows 2000 Server Service Pack 2 or later
Microsoft Windows XP Professional
Microsoft Windows XP Home Edition
• CPU
Pentium III 600 MHz or faster
• RAM
256 MB or more
• Hard Drive Space Available
50 MB or more
• Display
800 x 600 pixels 256 Colors or more (1024 x 768 pixels or more recommended),
800 x 600 pixels 64,000 Colors or more recommended
• Connecting System
ScanRouter V2 Professional V1.0.4.0 or later
ScanRouter Enterprise V1.0.0.0 or later
ScanRouter DocumentServer V1.0.0.0 or later
• Scanner
See the Readme file.
• Printer
See the Readme file.
33
Appendix
Note
❒ Do not install or use the following software on a computer where Desk Top
Editor For Production will be installed:
❒
❒
❒
5
❒
❒
• DeskTopBinder V2
• ScanRouter DocumentServer
• ScanRouter V2 Professional
• ScanRouter Enterprise
If you want the computer, which will be installed with Desk Top Editor For
Production, to be connected to the computer with Print Job Manager Professional installed, you must install PrintIntegrater Port.
To convert a file to PDF, Adobe Acrobat PDF Writer must be installed.
To use Document Server Edit Tool, options necessary for Document Server
Edit Tool must be installed on the devices that support Document Server. For
information about those devices, contact your local dealer or sales representative.
We recommend you increase memory and hard disk capacity if you use grayscale or black and white images with Desk Top Editor For Production.
When you use Desk Top Editor For Production on a dialup network computer, the computer may connect to the dial-up network while using Desk Top
Editor For Production.
Reference
p.39 “Dial-up Related Devices”
34
Operating Environment
File Types that Desk Top Editor For Production can Manage
Desk Top Editor For Production can manage the following file types:
Files Created Using Document Editing Applications
Desk Top Editor For Production can manage files with the extensions below.
When these files are used with Desk Top Editor For Production, the related applications must be installed.
❖ .txt
Notepad must be installed.
❖ .doc (a file created by using Microsoft® Word 97, Microsoft ®Word 98, Microsoft®
Word 2000, or Microsoft® Word version 2002)
Microsoft® Word 97, Microsoft® Word 98, Microsoft® Word 2000, or Microsoft® Word version 2002 must be installed.
❖
5
.rtf (a file created by using Microsoft® Word 97, Microsoft® Word 98, Microsoft® Word
2000, or Microsoft® Word version 2002)
Microsoft® Word 97, Microsoft® Word 98, Microsoft® Word 2000, or Microsoft® Word version 2002 must be installed.
❖ .ppt (a file created by using Microsoft® PowerPoint® 97, Microsoft® PowerPoint®
2000, or Microsoft® PowerPoint® version 2002)
Microsoft® PowerPoint® 97, Microsoft® PowerPoint® 2000, or Microsoft ®
PowerPoint® version 2002 must be installed.
❖ .xls (a file created by using Microsoft® Excel 97, Microsoft® Excel 2000, or Microsoft®
Excel version 2002)
Microsoft® Excel 97, Microsoft® Excel 2000, or Microsoft® Excel version 2002
must be installed.
❖ .pdf (a file created by using Acrobat 3.0/4.0/5.0)
Adobe® Acrobat 4.0 or later must be installed.
Note
❒ According to the configuration of Windows and the application's settings, the
thumbnail created might be different. For example, the thumbnail's background color will change according to the color scheme on the [Appearance]
tab in the [Display Properties] dialog box.
❒ For files whose format is not supported by Desk Top Editor For Production,
Desk Top Editor For Production operations may not work properly.
35
Appendix
Image File That Can Be Displayed
Scanned documents and the following image files are displayed with Viewer.
They are displayed as thumbnails in the document list pane and section list
pane.
Only the file types listed below are treated as image files.
Note
❒ Multi-page TIFF files cannot be edited using Viewer.
❖ BMP (Uncompressed)
Black & White (1 bit), 256 colors (8 bits), Grayscale (8 bits), Full Colors (24 bits)
❖ TIFF compliant to multi-pages (Uncompressed)
Black & White (1 bit), 256 colors (8 bits), Grayscale (8 bits), Full Colors (24 bits)
❖ TIFF compliant to multi-pages (ITU-T G3 FaxMH, ITU-T G3 FaxMR, ITU-T G4 FaxMMR,
Huffman (MH) )
Black & White (1 bit)
5
❖ TIFF compliant to multi-pages (JPEG (JFIF) -YCbCr)
Grayscale (8 bits), Full Colors (24 bits)
❖ TIFF Class F compliant to multi-pages (ITU-T G3 FaxMH, ITU-T G3 FaxMR, ITU-T G4
FaxMMR)
Black & White (1 bit)
❖ JPEG (Normal, Progressive)
Grayscale (8 bits), Full Colors (24 bits)
❖ PNG
Black & White (1 bit), 256 colors (8 bits), Grayscale (8 bits), Full Colors (24 bits)
❖ JPEG2000
Grayscale (8 bits)
Note
❒ Only JPEG2000 files copied from a Document Server network device can
be treated as image files. Also, operations for files copied to locations other
than Document Server Cabinet may not be performed properly.
36
Installing Desk Top Editor For Production
Installing Desk Top Editor For Production
Installing
Desk Top Editor For Production is registered as a Windows application program. Before starting installation, make sure no other applications are running.
Note
❒ If the operating system is Windows NT 4.0, Windows 2000, or Windows XP,
log on as an administrator.
❒ Desk Top Editor For Production cannot be installed on a computer where
DeskTopBinder V2 or RP Edit Service is already installed. Before installing
Desk Top Editor For Production, uninstall these applications.
A Insert the installation CD into the CD-ROM drive.
B Execute Setup.exe on the installation CD.
5
Installation starts.
C Click [Next] in the dialog box that appears.
D Check the license agreement, and then click [Yes].
E Enter the user information, and then click [Next].
Enter the user name, company name, and serial number.
F Check the entered information, and then click [Yes].
G Specify the installation location, and then click [OK].
H Specify the location of the documents that Desk Top Editor For Production
will manage, and then click [Next].
You can change the location of documents managed by Desk Top Editor For
Production, but it is generally better leave them as they are and use the RDCab folder, the stored location folder.
In the RDCab folder, the PL folder is created. The RDCab folder must be created in the built-in hard drive of client computers where Desk Top Editor For
Production is installed.
I Check the setup details of the installation location, and then click [Next].
J Click [Yes] to use Auto Document Link as a terminate-and-stay-resident
tool, or click [No] to start it from the application.
K Click [Finish].
37
Appendix
Uninstalling
Even if you uninstall Desk Top Editor For Production, the document location
folder (usually the PL folder within the RDCab folder) will not be deleted. The
document section files will remain in the document location folder.
A Start Windows.
B Click [Start], point to [Settings], and then Click [Control Panel].
C Double-click [Add/Remove Programs].
D Click [Desk Top Editor For Production].
E Click [Add/Remove] or [Change/Remove].
F Click [Remove] in the dialog box that appears, and then click [Next].
A confirmation dialog box appears.
5
G Click [OK].
38
Dial-up Related Devices
Dial-up Related Devices
When a Dial-up Router Is Connected to the Network Environment
Where Desk Top Editor For Production Is Used
Make sure the network delivery server, or other network devices using Desk
Top Editor For Production and Auto Document Link, is configured properly.
If the network environment is changed, reconfigure the network delivery server
and other network devices with Desk Top Editor For Production and Auto Document Link.
Important
❒ If the delivery server or other network devices are connected via a dialup
router, communication charges may accrue when you connect to the network
lines.
5
When Using a Dial-up Network Computer
When you use Desk Top Editor For Production or Auto Document Link on a
dial-up network computer, depending on configuration, the computer will connect to the dial-up network when scanning using a TWAIN scanner, or connecting to a delivery server or Document Server.
Important
❒ If a computer is configured to automatically connect to the Internet, it will
connect without a confirmation dialog box appearing, and communication
charges may accrue.
39
Appendix
Troubleshooting
❖ A document cannot be converted to an image.
Make sure that RICOH File Writer is installed. If it is, see the Readme file located in the RFWriter folder on the CD-ROM, and install it from [Add Printer].
❖ Some applications do not appear in the list displayed in [Standard] in the [Create
File from Application] dialog box.
Click [Add], and then add the new file created with the application in the [User
Template] list.
❖ I want to convert and output files.
Select the document you want to convert and output. On the [File] menu, click
[Convert]. Before converting and outputting, Convert must be configured
from Extended Features.
❖ Document thumbnails cannot be displayed in the Thumbnails view.
Select the document whose thumbnail was not appeared. On the [Document]
menu, click [Create Thumbnail].
5
❖ I want to reduce the time needed for adding documents.
If thumbnails are to be created when adding documents, more time is required. To reduce the time needed, clear the [Automatically create thumbnail
when saving document] check box in the [My Cabinet Properties] dialog box.
❖ I want to change the Easy Scan settings.
Change the settings in the [Easy Scanning Properties] dialog box from Extended
Features.
❖ I want to change the Easy Print settings.
Change the settings in the [Easy Print Properties] dialog box from Extended
Features.
❖ I want to use a different scanner.
On the [Tools] menu, click [Scanner Settings], and then select a different scanner in the [Select a scanner] box.
❖ I want to use a different ScanRouter V2 Professional and ScanRouter Enterprise delivery server.
First delete the existing ScanRouter V2 delivery server from Extended Features. Add the ScanRouter V2 delivery server again, and then connect it to another delivery server.
❖ Part of an image is not printed.
In the [Print] dialog box, select the [Fit image to page] check box. If you do not
want to change the image size, select a paper tray and load paper that is one
size larger than the image.
40
Troubleshooting
❖ I want to cancel notification of expired documents when quitting Desk Top Editor
For Production
Expired Desk Top Editor For Production documents are listed when quitting
Desk Top Editor For Production. Unnecessary documents can be deleted. To
cancel this function, clear the [Display list of expired documents on exit] check box
on the [General] tab in the [My Cabinet Properties] dialog box.
❖ Document conversion to text cannot be made well.
Characters in bold and italic, inverted image colors, cross lines, and shaded
characters cannot be converted to text.
❖ I want to access ScanRouter DocumentServer
ScanRouter DocumentServer can be accessed by configuring from Extended
Features.
❖ The print result is not satisfactory when printing documents other than images using Viewer or Easy Viewer.
Print from [Print] on the [File] menu on the Desk display, or open sections using its corresponding application, and then print.
5
❖ The display speed is slow when viewing a document other than an image using
Viewer or Easy Viewer.
Right-click the document. The menu appears. Point to [View], and then click
[Draft]. The display speed may become improve.
41
INDEX
A
Add, 14
Adding Functions, 3, 20
Application, 35
Arrange, 15
B
Back Up, 20
C
Cabinet, 3
Convert, 16, 30
D
Desk Display, 7
Desk display, 5
Desk Top Editor For Production, 1
Displaying Document, 12
Document, 3
Document Management, 3
Document Properties, 3
Document Server Cabinet, 17
Document Server Edit Tool, 1, 17
E
Editing Cabinet, 17
Editing Multiple Sections, 25
Editing Section by Section, 28
Editing Sections, 25
F
File Types, 35
Folder, 3
I
Image File, 36
Installing, 37
42
M
Maintenance, 20
Managing Documents, 14
Managing Sections, 30
O
Operating Environment, 33
Output, 16, 30
P
Print, 16, 30
Q
Quitting, 2
R
Rotate, 31
S
Search, 15
Section, 3
Shared Cabinet, 17
Starting, 2
T
Transfer, 14
Troubleshooting, 40
U
Uninstalling, 38
V
Viewer Display, 23
Viewer display, 6
UE
USA
B638-8511
Some illustrations or explanations in this guide may differ from your product due to improvements or
changes in the product.
Notes:
1. The contents of this documents are subject to change without notice.
2. No part of this document may be duplicated, reproduced in any form, modified or quoted without
prior consent of the supplier.
3. THE SUPPLIER SHALL NOT BE LIABLE FOR THE RESULT OF THE OPERATION OF THIS
SOFTWARE OR THE USE OF THIS DOCUMENT.
Important
❒ It is possible that any document or data stored in the personal computer will be damaged or
lost by user error during operation or software error. Be sure to back up all important data
beforehand.
❒ Do not remove or insert any disk while operating this software.
❒ THE SUPPLIER SHALL NOT BE LIABLE TO YOU FOR DAMAGES OR LOSS OF ANY
DOCUMENT OR DATA PRODUCED BY USING THIS SOFTWARE.
❒ THE SUPPLIER SHALL NOT BE LIABLE TO YOU FOR ANY CONSEQUENTIAL, INCIDENTAL OR INDIRECT DAMAGES (INCLUDING, BUT NOT LIMITED TO, DAMAGES
FOR LOSS OF PROFITS, BUSINESS INTERRUPTION OR LOSS OF BUSINESS INFORMATION, AND THE LIKE) CAUSED BY FAILURE OF THIS SOFTWARE OR LOSS OF DOCUMENTS OR DATA, NOR FOR ANY OTHER DAMAGES ARISING OUT OF THE USE OF
THIS SOFTWARE, IF THE SUPPLIER HAS BEEN ADVISED OF THE POSSIBILITY OF
SUCH DAMAGES.
Copyright © 2003
Operating Instructions
UE USA B638-8511
Auto Document Link Guide
Auto Document Link:Overview
Monitor Item Settings
Confirmation and Transfer
Appendix
Preface
Auto Document Link can monitor the delivery server in-tray (ScanRouter V2 Professional and ScanRouter Enterprise) in the network, local Windows folders, and network device Fax Received File, and
notify of documents or files on client computers. Also, Auto Document Link can automatically transfer
these documents or files to Desk Top Editor For Production folders, ScanRouter DocumentServer folders, or Windows folders.
This manual explains how to use Auto Document Link. For information about Fax Received File, see
the operating instructions that come with the network device. For information about how to use ScanRouter V2 Professional and ScanRouter Enterprise, see the ScanRouter V2 Professional and ScanRouter Enterprise Management Guide, or Help of respective products.
Network devices used in the illustrations of this guide are examples only. As such, they may differ from
actual network devices.
Trademark
Microsoft, Windows, Windows NT, PowerPoint, and Outlook are registered trademarks of Microsoft
Corporation in the United States and/or other countries.
Adobe and Acrobat are registered trademarks of Adobe Systems Incorporated.
Other company names and product names are trademarks or registered trademarks of their respective
companies. They are used for explanations in this manual and the rights of owners. Use of these marks
does not infringe on the rights of owners.
TABLE OF CONTENTS
1. Auto Document Link:Overview
Introduction ............................................................................................................ 1
Monitoring In-trays ..................................................................................................... 2
Monitoring Local Folders............................................................................................ 3
Monitoring Fax Received File..................................................................................... 4
Start and Quit .........................................................................................................5
Starting.......................................................................................................................5
Quitting.......................................................................................................................5
2. Monitor Item Settings
Adding/Changing/Removing Monitor Item ..........................................................7
In-tray ......................................................................................................................8
Local Folders........................................................................................................ 10
Fax Received File................................................................................................. 12
3. Confirmation and Transfer
Manual Confirmation and Transfer ....................................................................15
Save as Windows File.............................................................................................. 15
Add as Desk Top Editor For Production Document .................................................15
Notification Only ....................................................................................................... 16
Automatic Confirmation and Transfer ...............................................................17
Save as Windows File.............................................................................................. 17
Add as Desk Top Editor For Production Document .................................................17
Notification Only ....................................................................................................... 17
4. Appendix
Troubleshooting...................................................................................................19
File Formats.......................................................................................................... 20
File Names ............................................................................................................21
Save as Windows File.............................................................................................. 21
Add as Desk Top Editor For Production Document .................................................22
Dial-up-related Device ......................................................................................... 23
When a Dial-up Router Is Connected in the Network Environment Where Desk Top
Editor For Production Is Used................................................................................23
When Using a Dial-up Network Computer ............................................................... 23
INDEX......................................................................................................... 24
i
ii
1. Auto Document Link:Overview
Introduction
Auto Document Link monitors selected items and notifies you when there are
documents or files in the items. Also, Auto Document Link can transfer these
documents or files and add them to Desk Top Editor For Production or ScanRouter DocumentServer as documents, or save them in local Windows folders
as files. In-trays, local Windows folders, and Fax Received Files can be set as
monitored items.
Note
❒ ScanRouter V2 Link and Auto-addition Tool functions have been integrated
into Auto Document Link. Auto Document Link is installed at the same time
as Desk Top Editor For Production. Auto Document Link can neither be installed independently nor coexist with ScanRouter V2 Link or Auto-addition
Tool.
❒ Set up an environment correctly if ScanRouter V2 Administration Utility,
Desk Top Editor For Production, or Auto Document Link is used in the dialup connection computer. See p.23 “Dial-up-related Device”.
❒ Processing is delayed when "Grayscale" or "Color" is set as the read condition
in the network device, when 600 dpi is set as the resolution, or when large images are being read. If you are using these types of images frequently, we recommend that you increase your computer's CPU, memory, and hard disk
capacity.
1
Auto Document Link:Overview
Monitoring In-trays
1
FAX
3
1
SCN
2
FAX
4
SCN
SCN
FAX
5
GGFMXA0N
1. Delivery server
2. Client computer
3. Received in in-tray
4. Monitoring
5. Transferring/Notification
In-trays can be set as monitored items.
By setting an in-tray as a monitored item, Auto Document Link can notify you
of documents delivered from network devices and transfer them. Transferred
documents are added to Desk Top Editor For Production or ScanRouter DocumentServer as documents, or saved in a Windows folder as files.
Note
❒ Delivering fax documents received from the delivery server can be used for
ScanRouter V2 Professional and ScanRouter Enterprise only.
2
Introduction
Monitoring Local Folders
1
1
2
3
FILE
4
GGFMXA1N
1. Client computer
2. Local folder
3. Monitoring
4. Transferring/Notification
Specified Local Windows folders can be set as monitored items.
By setting a local folder as a monitored item, Auto Document Link can notify
you of files when they appear in those items and transfer them. Transferred files
are added to Desk Top Editor For Production or ScanRouter DocumentServer as
documents, or moved to another Windows folder as files.
Note
❒ Folders that contain files or the following cannot be set as monitored items:
• Network folders
• Folders where Windows is installed
• Hidden folders
• System folders
• Folders used as Desk Top Editor For Production cabinets
• Desktop folders
3
Auto Document Link:Overview
Monitoring Fax Received File
1
2
FAX
FAX
1
3
FAX
4
GGFMXA2N
1. Client computer
2. Document Server
3. Monitoring
4. Transferring/Notification
Fax Received File in the Document Server can be set as a monitored item.
By setting Fax Received File as a monitored item, Auto Document Link can notify you of documents received by fax and transfer them. Transferred documents
are added to Desk Top Editor For Production or ScanRouter DocumentServer as
documents, or saved in a Windows folder as files.
Note
❒ Fax Received File can be set as a monitored item only when the Document
Server is configured to store documents received by fax.
❒ Only a device that supports Fax Received File can be set as a monitored item.
For details about network devices, see the Readme file.
4
Start and Quit
Start and Quit
Starting
1
From the Start Menu
A Click the [Start] button, and then point to [Programs].
B Point to [Desk Top Editor For Production], and then click [Auto Document Link].
Auto Document Link starts, and the Auto Document Link icon
the taskbar.
appears on
Note
❒ When no settings are made in Properties, the [Auto Document Link Properties]
dialog box appears.
From Desk Top Editor For Production
A On the [Tools] menu of Desk Top Editor For Production, point to [Auto Doc-
ument Link], and then click [Launch].
A dialog box appears. Use this to select whether to place the tool as a terminate-and-stay-resident tool on the taskbar, or not.
B Click [OK].
Auto Document Link starts, and the Auto Document Link icon
the taskbar.
appears on
From Startup
If Auto Document Link has been registered for startup when installing Desk Top
Editor For Production, Auto Document Link starts when you log on to Windows, and the icon appears on the taskbar.
Quitting
A Right-click the Auto Document Link icon
on the taskbar, and then click
[Exit].
Auto Document Link exits.
5
Auto Document Link:Overview
1
6
2. Monitor Item Settings
Adding/Changing/Removing Monitor
Item
Make monitor item settings in the [Auto Document Link Properties] dialog box.
While the item is being monitored or data in the monitored item is being transferred, properties cannot be set or changed.
A On the menu that appears when you right-click the icon on the taskbar,
click [Properties], or on the [Tools] menu of Desk Top Editor For Production,
point to [Auto Document Link], and then click [Properties].
The [Auto Document Link Properties] dialog box appears.
B Add, change, or remove a monitored item.
• When adding an item
A Click [Add], and then select an item to be monitored in the [Select Server
Type] dialog box.
B Click [Next].
C Make the necessary settings.
Reference
For details about settings for the in-tray, local Windows folders, and Fax
Received File, see p.8 “In-tray”, p.10 “Local Folders”, p.12 “Fax Received File”.
• When changing settings of an item
A In the monitored items list, select the item whose settings you want to
change, and then click [Change].
B Make the necessary changes.
• When removing an item
A In the monitored items list, select the item you want to remove, and then
click [Remove].
The confirmation message about removing the item appears.
B Click [OK].
C Click [OK].
7
Monitor Item Settings
In-tray
Follow the procedure below to make settings for an in-tray to be monitored.
In-trays of multiple delivery servers can be set as monitored items.
Note
❒ Up to 20 in-trays of all the delivery servers included can be set as monitored
items.
2
A In the [Auto Document Link Properties] dialog box, click [Add].
The [Select Server Type] dialog box appears.
B Select [Delivery Server], and then click [Next].
The [Delivery Server - Select Server] dialog box appears.
C Click [Browse] to select a delivery server, or click [Specify] to enter the delivery server name or IP address.
D Click [Next].
The [Delivery Server - Monitor Tray Settings] dialog box appears.
E Make the necessary in-tray and monitor method settings.
A Click [Browse], and then select an in-tray to be monitored.
B Enter the password, if the in-tray requires one.
Note
❒ For the in-tray password, ask the delivery server administrator.
C Select the [Automatically check new data] check box to check the monitored
in-tray periodically, and then make the necessary settings for [Checking
interval] and [Notification method].
D Select the [Transfer new data after notification] check box if you want to transfer delivered documents.
Note
❒ The original document is deleted after a transfer is completed.
F Click [Next].
The [Delivery Server - Transfer Settings] dialog box appears.
Note
❒ When the [Transfer new data after notification] check box is not selected in the
[Delivery Server - Monitor Tray Settings] dialog box, the [Finish] button appears
instead of the [Next] button. Click [Finish] to finish the settings.
8
In-tray
G Make the necessary settings for the saving method and file format of image
files.
A Click [Add as Desk Top Editor For Production] or [Save as Windows file], and
then click [Browse] to select a folder where the data is to be added or
saved.
Note
❒ When you select [Add as Desk Top Editor For Production] and click [Browse],
the adding location can be selected from either [My Workroom] or [Document Management Server] in the [Select Save-in Location] dialog box.
2
B Select the file formats in the [Black & White image] and [Grayscale/Color image] lists.
Reference
For details about file formats, see p.20 “File Formats”.
H Click [Finish].
I If you want to add more in-trays for monitoring, repeat step A to H.
9
Monitor Item Settings
Local Folders
Follow the procedure below to make settings for a local Windows folder to be
monitored.
Note
❒ Up to 30 local folders can be set as monitored items.
2
A In the [Auto Document Link Properties] dialog box, click [Add].
The [Select Server Type] dialog box appears.
B Select [My Computer], and then click [Next].
The [My Computer - Monitor Folder Settings] dialog box appears.
C Select a folder to be monitored, and then make the necessary monitor method settings.
A Click [Browse], and then select the folder to be monitored.
B Select the [Automatically check new data] check box to check the monitored
folder periodically, and then make the necessary settings for [Checking interval] and [Notification method].
C Select the [Transfer new data after notification] check box if you want to transfer the files in the monitored folder.
Note
❒ The original file is deleted after a transfer is completed.
D Click [Next].
The [My Computer - Transfer Settings] dialog box appears.
Note
❒ When the [Transfer new data after notification] check box is not selected in the
[My Computer - Monitor Folder Settings] dialog box, the [Finish] button appears
instead of the [Next] button. Click [Finish] to finish the settings.
E Make the necessary settings for the saving method and file format of image
files.
A Click [Add as Desk Top Editor For Production] or [Save as Windows file], and
then click [Browse] to select a folder where the data is to be added or
saved.
Note
❒ When you select [Add as Desk Top Editor For Production] and click [Browse],
the adding location can be selected from either [My Workroom] or [Document Management Server] in the [Select Save-in Location] dialog box.
❒ When adding to Desk Top Editor For Production or ScanRouter DocumentServer as documents, one file is added as one document.
10
Local Folders
B Select the file formats in the [Black & White image] and [Grayscale/Color image] lists.
Reference
For details about file formats, see p.20 “File Formats”.
F Click [Finish].
G If you want to add more folders for monitoring, repeat step A to F.
2
11
Monitor Item Settings
Fax Received File
Follow the procedure below to make settings for Fax Received File to be monitored.
Fax Received Files of multiple network devices can be set as monitored items.
Note
❒ Up to 20 Fax Received Files can be set as monitored items.
2
A In the [Auto Document Link Properties] dialog box, click [Add].
The [Select Server Type] dialog box appears.
B Select [Fax Received File], and then click [Next].
The [Fax Received File - Select Server] dialog box appears.
C Click [Browse] to select a network device, or click [Specify] to enter the host
name or IP address.
D Click [Next].
The [Fax Received File - Monitor Item Settings] dialog box appears.
E Make the necessary monitor method settings.
A Enter the user code in the [User Code] and the time in the [Disconnect after
no response continues for] boxes.
Note
❒ Ask the administrator for the user code when Fax Received File has user
limitations.
B Select the [Automatically check new data] check box to check Fax Received
File periodically, and then make the necessary settings for [Checking interval] and [Notification method].
C Select the [Transfer new data after notification] check box if you want to transfer documents.
F Click [Next].
The [Fax Received File - Transfer Settings] dialog box appears.
Note
❒ An error message appears when the network device does not support Fax
Received File.
❒ When the [Transfer new data after notification] check box is not selected in the
[Fax Received File - Monitor Item Settings] dialog box, the [Finish] button appears instead of the [Next] button. Click [Finish] to finish the settings.
12
Fax Received File
G Make the necessary settings for the saving method and file format of image
files.
A Click [Add as Desk Top Editor For Production] or [Save as Windows file], and
then click [Browse] to select a folder where the data is to be added or
saved.
Note
❒ When you select [Add as Desk Top Editor For Production] and click [Browse],
the adding location can be selected from either [My Workroom] or [Document Management Server] in the [Select Save-in Location] dialog box.
2
B Select the file format on the pull-down menu.
Reference
For details about file formats, see p.20 “File Formats”.
C Select the [Delete new data from device after transferring] check box to delete
the original document after a transfer is completed.
Important
❒ When the original document is deleted after a transfer is completed, Fax
Received File cannot be checked by other users.
H Click [Finish].
I If you want to add more Fax Received Files for monitoring, repeat step A to
H.
13
Monitor Item Settings
2
14
3. Confirmation and Transfer
Manual Confirmation and Transfer
A Double-click the icon
for Auto Document Link on the taskbar.
Or, right-click the icon for Auto Document Link on the taskbar to select
[Check New Data]. If there are no documents or files in the monitored item, the
"XXX (the data when you double-clicked the icon for Auto Document Link)
No new data in all monitored items." message appears. When there are documents or files in the monitored item, the following are displayed depending
on the transfer settings made for each item.
Note
❒ New data can also be checked from the menu of Desk Top Editor For Production. On the [Tools] menu of Desk Top Editor For Production, point to
[Auto Document Link], and then click [Check New Data].
Save as Windows File
For in-tray documents and files in local Windows folders, the original documents or files are deleted and saved in the specified Widows folder as files. For
Fax Received File, deletion of original documents varies depending on the transfer settings for Fax Received File.
After the documents or files are saved in the specified location, the [New Data Notification] dialog box appears.
Add as Desk Top Editor For Production Document
For in-tray and files in local Windows folders, original documents or files are deleted and saved in the specified Desk Top Editor For Production or ScanRouter
DocumentServer folder as documents. For Fax Received File, deletion of original
documents varies depending on the transfer settings of Fax Received File.
After the documents or files are saved in the specified location, the [New Data Notification] dialog box appears.
15
Confirmation and Transfer
Notification Only
After the arrival of documents or files is confirmed, notification is given via the
selected method. No documents or files are deleted from monitored items.
Desk Top Editor For Production can be started by clicking [Launch Desk Top Editor
For Production] in the [New Data Notification] dialog box.
Note
❒ To check the arrival of documents or files in the monitored items, these items
must be configured using Desk Top Editor For Production Extended Features.
3
16
Automatic Confirmation and Transfer
Automatic Confirmation and Transfer
When you set to monitor in-tray, local Windows folders, and Fax Received File,
Auto Document Link automatically monitors the items at each set time. When
there are documents or files in the monitored items, the following are displayed
depending on the transfer settings made for each item.
Save as Windows File
For in-tray documents and files in local Windows folders, the original documents or files are deleted and saved in the specified Widows folder as files. For
Fax Received File, deletion of original documents varies depending on the transfer settings for Fax Received File.
When the arrival of documents or files is set to be notified using a pop-up window, the [New Data Notification] dialog box appears after the documents or files are
saved in the specified location.
3
Add as Desk Top Editor For Production Document
For in-tray documents and files in local Windows folders, original documents or
files are deleted and saved in the specified Desk Top Editor For Production or
ScanRouter DocumentServer folder as documents. For Fax Received File, deletion of original documents varies depending on the transfer settings of Fax Received File.
When the arrival of documents or files is set to be notified using a pop-up window, the [New Data Notification] dialog box appears after the documents or files are
added to the specified location.
Notification Only
After the arrival of documents or files is confirmed, notification is given via the
selected method. No documents or files are deleted from monitored items.
Desk Top Editor For Production can be started by clicking [Launch Desk Top Editor
For Production] in the [New Data Notification] dialog box.
Note
❒ To check the arrival of documents or files in the monitored items, these items
must be configured using Desk Top Editor For Production Extended Features.
17
Confirmation and Transfer
3
18
4. Appendix
Troubleshooting
Problem
Causes and solutions
Cannot receive documents in the intray.
Check if the service of the delivery server stops using
ScanRouter V2 Administration Utility. Also, check if the
same in-tray is monitored by multiple Auto Document
Links.
It takes time to receive data from a
network device.
Check the value of "Checking interval" in the setting dialog box of each monitored item in Auto Document
Link. Do not make the size of data large by reducing the
resolution of documents for scanning.
Note
❒ It may take time to receive data depending on the
processing capability of the computer (e.g., the
memory of computer is small).
If you connect from Auto Document
Link to the delivery server, the "Unable to connect to the delivery server." message appears.
The names of the delivery server and client computer
may not be correctly resolved.
• Check that the DNS settings and the contents of the
host file correspond.
• If the names are not correctly resolved, add the name
of the delivery server to the Hosts file.
Cannot monitor Fax Received File.
Check the same Fax Received File is monitored by multiple Auto Document Links. Also, check the network device is turned on.
Adding or saving location of the doc- Documents or files are added to or saved in the followuments or files does not exist.
ing locations:
• When adding to Desk Top Editor For Production,
documents or files are added to My Server Folder
under My Workroom.
• When saving in a Windows folder, the documents or
files are saved in the folder for extraction under the
program directory.
• When adding to ScanRouter DocumentServer, documents or files cannot be transferred if the adding
location does not exist.
Image conversion has failed when
An error message appears. Documents or files are saved
adding or saving documents or files. in the folder for extraction.
19
Appendix
File Formats
Documents are received by either of the file formats below depending on the setting.
Note
❒ An image that contains only two values, white (0) and black (1), is called a
"Black & White image". An image that contains gradation and requires many
values to represent that gradation is called a "Grayscale/Color image".
❒ In the case of multiple-page documents, one file is created for each page because Multi-page option is not available for Grayscale/Color images.
❖ TIFF/TIFF-F
File formats used to save bitmap images. These formats are used for Black &
White, Grayscale, and Color images.
One file is created for a single-page image in TIFF, and one file for multiplepage images in Multi-page TIFF and TIFF-F.
You can select the TIFF Compression Format as MH, MR, or MMR. In general,
the order is MH, MR, MMR from low to high compression ratios (depending
on the image).
4
❖ PDF
This file format can be opened with Adobe Acrobat Reader. Multi-page images can be saved in one file with this file format.
❖ JPEG
This method can compress image data with consistent quality.
20
File Names
File Names
Save as Windows File
When you select [Save as Windows file] as the saving method for documents or
files in the monitored items, the following file names are used when saving documents or files:
❖ In-tray document
Document name_nnn.xxx
• nnn
Page number for documents when they are received as a file in single-page
format. The page number is fixed to 001 when documents are received as
multiple-page format file.
• xxx
Extension of each file format
4
Note
❒ If the same documents are received in multiple-page format, the first name
in the page group is used.
❒ When ScanRouter V2 Professional or ScanRouter Enterprise is used, the
file name of documents delivered from a client computer (on which Desk
Top Editor For Production or Web Document Viewer is installed) is
section_nnn.xxx (nnn is the section number).
❖ Local folder file
File name_nnn.xxx
• nnn
Page number for files
• xxx
Extension of each file format
❖ Fax Received File
RcvFaxYYYYMMDDhhmmss-pppp_nnn.xxx
• RcvFaxYYYYMMDDhhmmss
The date and time when the documents are delivered by fax is displayed
in the form of "YYYYMMDDhhmmss". "RcvFax" is fixed at the beginning
of each name.
For example, "RcvFax20020912224530" is displayed when a document is
received on September 12, 2002 at 22:45 30 seconds.
• pppp
Page name for documents. The format varies depending on the devices.
21
Appendix
• nnn
Page number for documents
• xxx
Extension of each file format
Add as Desk Top Editor For Production Document
When you select [Add as Desk Top Editor For Production] as the saving method for
documents or files in the monitored items, the following document names are
used when saving documents or files:
❖ In-tray document
Document name
4
Note
❒ Section name of the document is Section name_nnn (nnn is the section
number).
❖ Local folder file
File name
❖ Fax Received File
RcvFaxYYYYMMDDhhmmss
• RcvFaxYYYYMMDDhhmmss
The date and time when the documents are delivered by fax is displayed
in the form of "YYYYMMDDhhmmss". "RcvFax" is fixed at the beginning
of each name.
For example, "RcvFax20020912224530" is displayed when a document is
received on September 12, 2002 at 22:45 30 seconds.
Note
❒ Section name of the document is RcvFaxYYYYMMDDhhmmss-pppp_nnn
(pppp is the page name, nnn is the section number).
22
Dial-up-related Device
Dial-up-related Device
When a Dial-up Router Is Connected in the Network Environment
Where Desk Top Editor For Production Is Used
Properly configure the network delivery server or other network devices with
Desk Top Editor For Production or Auto Document Link.
If the network environment is changed, reconfigure the network delivery server
and other network devices with Desk Top Editor For Production and Auto Document Link.
Important
❒ If the delivery server is connected when a connection to the delivery server
via the dial-up router is set, the line may be connected and telephone charges
may be accrued.
4
When Using a Dial-up Network Computer
If ScanRouter V2 Administration Utility, Desk Top Editor For Production, or
Auto Document Link is used in the dial-up connection computer, dial-up may
be made through the delivery server or the Document Server, depending on the
setting.
Important
❒ When you set your computer to automatically connect to the Internet, without displaying the dialog box for confirming the connection, the line is connected and telephone charges accrue. To avoid the unnecessary dial-up
connection, be sure to set to display connection confirmation during operation. Also, check if the unnecessary dial-up connection is made when these
software products are used.
23
INDEX
A
Adding, 7
Auto Document Link, 1
Auto Document Link Properties, 5
C
Changing, 7
Confirmation, 15
F
Fax Received File, 4, 12
File Formats, 20
File Names, 21
I
M
Monitor Item Settings, 7
P
PDF, 20
Q
Quitting, 5
R
Removing, 7
S
Starting, 5
In-tray, 2, 8
J
JPEG, 20
T
TIFF, 20
Transfer, 15
Troubleshooting, 19
L
Local Folders, 3, 10
24
UE
USA
B638-8561
Part of illustrations or explanations in this guide may differ from your product due to improvement or
change in the product.
Notes:
1. The contents of this documents are subject to change without notice.
2. No part of this document may be duplicated, replicated, reproduced in any form, modified or quoted
without prior consent of the supplier.
3. THE SUPPLIER SHALL NOT BE LIABLE FOR THE RESULT OF THE OPERATION OF THIS
SOFTWARE OR THE USE OF THIS DOCUMENT.
Important
❒ It is possible that any document or data stored in the PC will be damaged or lost by user
error during operation or software error. Be sure to back up of all important data beforehand.
❒ Do not remove or insert any disk while operating this software.
❒ THE SUPPLIER SHALL NOT BE LIABLE TO YOU FOR DAMAGES OR LOSS OF ANY
DOCUMENT OR DATA PRODUCED BY USING THIS SOFTWARE.
❒ THE SUPPLIER SHALL NOT BE LIABLE TO YOU FOR ANY CONSEQUENTIAL, INCIDENTAL OR INDIRECT DAMAGES (INCLUDING, BUT NOT LIMITED TO, DAMAGES
FOR LOSS OF PROFITS, BUSINESS INTERRUPTION OR LOSS OF BUSINESS INFORMATION, AND THE LIKE) CAUSED BY FAILURE OF THIS SOFTWARE OR LOSS OF DOCUMENTS OR DATA, NOR FOR ANY OTHER DAMAGES ARISING OUT OF THE USE OF
THIS SOFTWARE, IF THE SUPPLIER HAS BEEN ADVISED OF THE POSSIBILITY OF
SUCH DAMAGES.
Copyright © 2003
Auto Document Link Guide
UE USA B638-8561