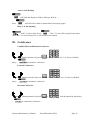
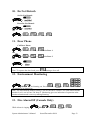
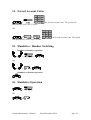
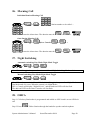
1
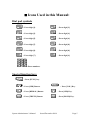
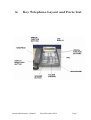
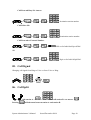
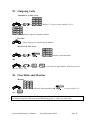
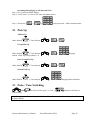
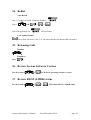
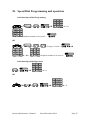
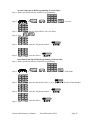
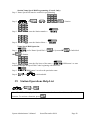
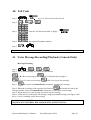
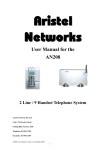
DV SERIES SYSTEM ADMINISTRATOR’S USER GUIDE Aristel networks System Administrator’s Manual Issued December 2004 Page 1 MANUAL INDEX Icons Used ....................................................................................................... 4,5 A Specifications ............................................................................................ 7 B Key Telephone – Station Operation ................................................... 8-31 01 Answering Calls ........................................................................................ 8 Automatic Answer ................................................................................. 8 External Call .......................................................................................... 8 Other Calls ............................................................................................. 8 02 Baby Listening .......................................................................................... 9 03 Background Music Listening .................................................................. 9 04 Call Forward Functions ........................................................................... 9 Call Forward All ................................................................................... 9 Call Forward Busy ............................................................................... 9 Call Forward No Answer ..................................................................... 9 Call Forward Busy/No Answer ......................................................... 10 Call Follow Me .................................................................................... 10 Call Forward To External Number .................................................. 10 05 Call Signal ............................................................................................... 10 06 Call Split .................................................................................................. 10 07 Call Transfer Functions ......................................................................... 11 Announced Transfer .......................................................................... 11 Unannounced Transfer ...................................................................... 11 Quick Transfer using DSS button .................................................... 11 Quick Transfer using Page button ................................................... 11 08 Call Waiting ............................................................................................. 11 Set up Call Waiting Signal ................................................................ 11 Answer Call Waiting........................................................................... 12 C.O. Queuing ....................................................................................... 12 09 Conference Functions ............................................................................. 12 Combined Internal/External Conference Call ................................ 12 External Conference Call ................................................................... 12 Internal Conference Call .................................................................... 12 Date and Time see section 19 10 Do Not Disturb ........................................................................................ 13 11 Door Phone Calls .................................................................................... 13 12 Environment Monitoring ....................................................................... 13 13 Fire Alarm Off (Console Only) ............................................................. 13 14 Forced Account Codes ........................................................................... 14 15 Handsfree / Handset Switching ............................................................. 14 Handset to Handsfree ........................................................................ 14 Handsfree to Handset ......................................................................... 14 16 Handsfree Operation .............................................................................. 14 System Administrator’s Manual Issued December 2004 Page 2 17 Headset Operation .................................................................................. Programming....................................................................................... Enable Headset Mode ........................................................................ Disable Headset Mode......................................................................... Answering a Call in Headset Mode .................................................. Disconnecting from a Call in Headset Mode ................................... 18 Hold Calls ................................................................................................ Normal Hold ....................................................................................... Exclusive Hold ..................................................................................... Retrieving External Call from Normal Hold.................................... Retrieving External Call from Exclusive Hold ................................ 19 Individual / Own station Alarms / Date & Time ................................. Date & Time Setting (Console Only)................................................. Individual Station Alarm (Console Only) ........................................ Own Station Alarm ............................................................................. 20 Internal Calls .......................................................................................... Operator Call ...................................................................................... Handsfree Call .................................................................................... Hot Call ............................................................................................... Manual Call ........................................................................................ Normal Call ......................................................................................... 21 Lock and Unlock Telephone .................................................................. Normal Lock/Unlock .......................................................................... Temporary Lock/Unlock ................................................................... 22 Lock and Unlock the RS232 (SMDR) Port .......................................... 23 Macro Key ............................................................................................... Programming a Macro Key ............................................................... Cancelling a Macro Key .................................................................... 24 Mute ......................................................................................................... 25 Message Text for Display ....................................................................... Selecting and Displaying a Message ................................................. Removing a Message .......................................................................... 26 Morning Call ........................................................................................... 27 Night Switching ...................................................................................... Auto Switching Mode ......................................................................... Manual Switching Mode .................................................................... 28 OHCA ...................................................................................................... 29 Outgoing Calls ........................................................................................ Automatic C.O. line access ................................................................ Hot Call ............................................................................................... Manual C.O. line access ..................................................................... 30 Over-Ride and Monitor ......................................................................... Monitor ................................................................................................ System Administrator’s Manual Issued December 2004 Page 3 15 15 15 15 15 15 15 15 15 15 16 16 16 16 17 17 17 17 17 17 17 18 18 18 18 18 18 18 19 19 19 19 20 20 20 20 20 21 21 21 21 21 21 31 32 33 34 35 36 37 38 39 40 41 42 43 Over-Ride ............................................................................................ Cancel Over-Ride or Monitor ........................................................... Paging ...................................................................................................... All Internal and External .................................................................. All External ......................................................................................... All Internal .......................................................................................... Answer Paging .................................................................................... External Zone ..................................................................................... Internal Zone ...................................................................................... Incoming DISA Paging ...................................................................... Pick Up .................................................................................................... All Pick Up .......................................................................................... Group Pick Up .................................................................................... Own Group Pick Up ........................................................................... Station Pick Up ................................................................................... Pulse / Tone Switching ........................................................................... Redial ....................................................................................................... Auto-Redial ......................................................................................... Last Number Redial ........................................................................... Releasing Calls ........................................................................................ Handset ................................................................................................ Handsfree ............................................................................................ Review System Software Version ......................................................... Review RS232 and SMDR status .......................................................... Speed Dial Programming and Operation ............................................ Individual Speed Dial Programming ................................................ Individual Speed Dial Operation ...................................................... System Speed Dial Programming (Console Only) .......................... System Speed Dial operation ............................................................. System Name Speed Dial Programming (Console Only) ............... Individual Name Speed Dial Programming .................................... Station Name Speed Dial Programming (Console Only) ............... Name Speed Dial Operation .............................................................. Station Operations Help List ................................................................. Toll Code ................................................................................................. Voice Message Recording/Playback ..................................................... Message Recording ............................................................................. Message Playback (All systems)........................................................ Volume Control ...................................................................................... Power Fail Warning Notice ................................................................... System Administrator’s Manual Issued December 2004 Page 4 22 22 22 22 22 22 22 22 22 23 23 23 23 23 23 23 24 24 24 24 24 24 24 24 25 25 25 26 26 27 27 28 28 28 29 29 30 30 30 31 Icons Used in this Manual: Dial pad symbols : Press digit [1]. : Press digit [2]. : Press digit [3]. : Press digit [4]. : Press digit [5]. : Press digit [6]. : Press digit [7]. : Press digit [8]. : Press digit [9]. : Press digit [0]. : Press digit [*]. : Press digit [#]. : Enter numbers. Special function keys : Press [FUNC] key. : Press [SPK] Button. : Press [VOL] Key. : Press [REDIAL] Button. : Press [SPD] Key. : Press [TRF/FL] Button. : Press [HOLD] Key. System Administrator’s Manual Issued December 2004 Page 5 DSS keys : Press [DSS Function] Key. : Press [DSS CO line] Key : Press [DSS Station] Key. :Microphone On/Off. :FAC Button : : Forward Button Press [SAVE] Key. :Calculator Start/Cancel : Press Page Key. : Press Be Paged Key toAnswer a Page Call : Press MW Key. : Press conf/dnd Key :Press door Key. Other symbols : Hang Up or On Hook. : Station (Key Phone or SLT) : Lift Handset or Off Hook. or during ringing. System Administrator’s Manual : During Conversation or on talking. Issued December 2004 Page 6 A: Key Telephone Layout and Parts List System Administrator’s Manual Issued December 2004 Page 7 B: Key Telephone Station Operation 01. Automatic Answer + to enable Automatic Answer. The LED will be on. + to disable Automatic Answer. The LED will be off. External Call press During incoming ringing, on the ringing Station.., or press the flashing DSS button assigned for the incoming line, or number. + + 01 ~ 08 for the line Other Calls or press on the ringing Station. 02. Baby Listening or on the Key Telephone that will be listened to. Press + Press or + on same Station on listening telephone. Station to be listened to. Cancel Baby Listening + + to cancel. Note: Once the Baby Listening has been enabled, the microphone on the listened to Station will be active all the time. System Administrator’s Manual Issued December 2004 Page 8 03. Background Music Listening + Cancel Background Music Listening or 04. Call Forward NOTE! + can be replaced by pressing in all Modes. To Cancel All Call Forward Modes + + + + own station number. + + + destination station number. + + destination station number. + + destination station number. Call Forward All + Call Forward Busy + + Call Forward No Answer + + System Administrator’s Manual Issued December 2004 Page 9 Call Forward Busy/No Answer + + + + destination station number + + + destination station number. DSS set for Individual Speed Dial Call Follow Me + Call Forward to External Number + + + + + + + + OR digit set for Individ Spd Dial. 05. Call Signal Changing call signal from Ring to Voice or from Voice to Ring. + = + 06. Call Split or Pressing with station A + + call station B + on answer will alternate between station A and station B. System Administrator’s Manual Issued December 2004 Page 10 07. Call Transfer Announced Transfer or + + required station number. Talk to station, announce call + Unannounced Transfer (Camp On) or + + required station number. + + Quick Transfer by DSS key or + + Quick Transfer by Page key or + make Page announcement and wait for answer. + Paged station answers page by then paging party 08. Call Waiting Step 1. + call a station which is busy or does not answer. Step 2. Note: If the called station was busy, it will recall to the station leaving the message and when this station answers the call, it will call the message left station. System Administrator’s Manual Issued December 2004 Page 11 Answer Call Waiting will flash and display will show Message Wait by ….. Press and call will be made to station that left message signal. Busy C.O. line queuing and C.O. line is busy. Press The C.O. line will be placed in the queue. When the C.O. line becomes free, it will recall to your station. 09. Conference Combined External/Internal Conference or party + During internal call, press + use C.O. line to call third + use C.O. line to call third + dial the station for third party to commence conference. External Conference or party + During external call, press to commence conference. Internal Conference or + During internal call, press to commence conference. System Administrator’s Manual Issued December 2004 Page 12 10. Do Not Disturb Set Do Not Disturb + Reset Do Not Disturb + OR + + + + 11. Door Phone Call Door Phone + + + for Door 1 + + + for Door 2 OR OR + during a door call. Note: To operate the door latch, press 12. Environment Monitoring OR on listening ext. Press + + + ext number to be listened to Note: The Environment Monitor ability is set in Zone506-ST-Item 07 for each station and the monitor level is set in Zone 506 Item 07. Monitoring gives no indication of operation at the monitored station and is one-way talking/listening. 13. Fire Alarm Off (Console Only) While Alarm is ringing, System Administrator’s Manual OR + + Issued December 2004 + Page 13 14. Forced Account Codes + + automatically seize a free C.O.line. the Forced Account Code. The system will OR + + + will automatically seize a free C.O. line. the Forced Account Code. The system 15. Handsfree / Handset Switching Handset to Handsfree operation or + or + + OR + Handsfree to Handset operation 16. Handsfree Operation + OR + System Administrator’s Manual Issued December 2004 Page 14 17. Headset Operation Programming An eight digit max. Password can be programmed into Zone 301 Set 08 Item 01. This is not necessary for operation. Enable Headset mode Step 1. Connect Headset to Key Telephone Step 2. + + + Step 3. Leave handset Disable Headset mode As above Answer a Call in Headset mode Press OR OR Disconnect from a Call in Headset mode Press 18. Hold Calls Normal Hold or press Exclusive Hold or press + Retrieve External Call from Normal Hold With a Call on hold, OR + + and the two digit number of the C.O. line (01, 02, 03, etc) System Administrator’s Manual Issued December 2004 Page 15 Retrieve External Call from Exclusive Hold At Holding Station: , OR + + and the two digit number of the C.O. line (01, 02, 03, etc) At any other Station: + OR + + and the two digit number of the C.O. line (01, 02, 03, etc) + 19. Individual / Own station Alarms / Date & Time Date & Time Setting (Console Only) + + + + enter the data as: DD MM YY W HH DD = Day of the Month MM = Month of the Year W = Day of the week. Monday = 1, Tuesday = 2, etc. YY = Year HH = Hour of Day MM = Minutes + MM + To save the new Date and Time on a 25 Button: To save the new Date and Time on a 15 Button: Individual Station Alarm (Console Only) + + enter the Station number enter the Alarm Time and Duration + System Administrator’s Manual Issued December 2004 Page 16 Own Station Alarm + + or if a Console + + enter alarm time and duration + 20. Internal Calls Call Operator + enter the number programmed for Operator (Usually 0 or 9) Handsfree Call + enter Station number OR + + enter Telephone number Hot Call connection will be made as programmed (Internal or SPD number) Manual Call or and call will be made to the Operator. Note: This must programmed to function prior to using. It is an individual station feature. Normal Call or then System Administrator’s Manual or or Dial digits as required. Issued December 2004 Page 17 21. Lock / Unlock Telephone. Normal Lock and Unlock + + + enter the password to lock/unlock then press Temporary (once off) Lock and Unlock + + + enter the password to lock/unlock 22. Lock / Unlock RS232 (SMDR) port. Lock and Unlock RS232 Port/SMDR (Console Only) or + + + each operation toggles the lock/unlock 23. Macro Key Assignment. Programming a Macro Key + + + (DSS 16-25) + Press the Keys in the sequence required + The DSS key selected to be the Macro key must not be already programmed as a function key. Cancelling the Programming of a Macro Key + + System Administrator’s Manual + (DSS 16-25) + Issued December 2004 Page 18 24. Mute During a Handset Call or + Press again to resume talking. OR or + Press again to resume talking. During a Handfree Call or + Press again to resume talking. 25. Message Text Selecting and displaying a message + + + press 1 ~ 6 to select the required message to be displayed + Removing the Message + + + Note: These are the six available messages 1. DO NOT DISTURB 2. BACK AT (ENTER TIME) 3. NOT IN OFFICE = : AS IN 2:00 4. RETURN ON (ENTER DATE OR TIME) 5. RING MY MOBILE 6. CALL (ENTER NUMBER. Max = 11 digits) System Administrator’s Manual = / AS IN 12/6 Issued December 2004 Page 19 26. Morning Call Individual Station Morning Call + + + Station number to be called. + enter the Alarm time. The duration must be + + Own Station Morning Call + + (for a Console + enter the Alarm time. The duration must be )+ + + 27. Night Switching Automatic switching: Day Mode/Night Mode Toggle + + + Note: This will toggle the system from Auto to Manual Night Switching Mode and visa versa Manual switching: Day Mode/Night Mode Toggle + + + Note: When the system is in Manual Mode, this will toggle the system from Night Mode to Day Mode and visa versa. When the system is in Night Mode:The 1st Console will display “Night Service” and the dnd/conf LED will fast flash. The dnd/conf LED on the other Consoles will fast flash. 28. OHCA Step 1. Call a busy Station that is programmed and cabled as OHCA and is on an Off-Hook call Step 2. Press Talk to Station through the handsfree speaker and microphone System Administrator’s Manual Issued December 2004 Page 20 29. Outgoing Calls Automatic C.O. line access or + dial the C.O. access code (usually 9 or 0) + dial the required Telephone number. Hot Call + Talk to Operator or outside Speed Number. Manual C.O. line access or + + dial the required number OR or line (01, 02, 03, etc) + + + enter the two digit number of the desired C.O. 30. Over-Ride and Monitor Monitor + dial busy Station number OR to select a busy C.O. line + Note: During Monitoring, the Monitoring party will hear the other parties’ conversation, but the Monitored parties will not hear the Monitoring party. ie: One way connection. System Administrator’s Manual Issued December 2004 Page 21 Over-Ride + dial busy Station number OR to select a busy C.O. line + Note: An Over-Ride tone will be heard by the parties and a conference call is set up with all parties connected. Cancel Monitor or Over-Ride 31. Paging All Internal and External + + All External + + All Internal + + Answer Paging + + External Zone + + + External Zone Number (1 ~ 8) + + Internal Zone Number (1 ~ 8) Internal Zone + System Administrator’s Manual Issued December 2004 Page 22 Incoming DISA Paging to All Internal Zone Step 1. Set a password DISA Paging Step 2. Call in on a C.O. line set for Auto-Attendant answer. Step 3. On answer, + + enter password + Make announcement 32. Pick Up All Pick Up Other Station + Your Station + + + + + + Group Pick Up + Your Station Other Station Station’s Pick Up Group number 1~8 Ringing Own Group Pick Up Other Station + Your Station Station Pick Up Other Station + Your Station + Ringing Station Number 33. Pulse / Tone Switching OR Tone dialing. to select a Pulse type C.O. line + button set for Pulse to Note: It is only possible to change from Pulse to Tone. It is not possible to change from Tone to Pulse dialing. System Administrator’s Manual Issued December 2004 Page 23 34. Redial Auto-Redial Step 1. Call Busy external Telephone Number + Step 2. OR + Note: During Redial, the + LED will flash. Last Number Redial The system will select a free C.O. line and redial the last number that was dialed. 35. Releasing Calls Handset Handsfree Press 36. Review System Software Version For all systems + LCD shows operating Software version 37. Review RS232 (SMDR) status For all systems + System Administrator’s Manual + LCD shows RS232 / SMDR status Issued December 2004 Page 24 38. Speed Dial Programming and operation Individual Speed Dial Programming + + + OR 0~9+ telephone number to be stored + OR + + + 0 ~ 99 + if using a Console + OR telephone number to be stored + Individual Speed Dial Operation + OR 0~9 OR OR + System Administrator’s Manual + OR Issued December 2004 0~9 Page 25 System Speed Dial Programming (Console Only) + Step 1. + + Step 2. enter the Speed Dial Code and the Item = + Step 3. enter the Telephone Number for this Speed Dial Code + System Speed Dial Operation + Step 1. OR Step 1. + OR Step 1. OR Step 1. + Step 2. enter the Speed Dial Code required. The System will select a free C.O. and dial the number. Note: When entering Names in Name Speed Dial, DSS button 3 moves the cursor to the left DSS button 4 moves the cursor to the right DSS button 10 clears all digits/letters previously stored System Administrator’s Manual Issued December 2004 Page 26 System Name Speed Dial Programming (Console Only) Step 1. Name Speed Dial must be enabled in programming. Step 2. + + + Step 3. enter the Speed Dial Code (100~Max) = System Step 4. Item = Step 5. enter the Telephone number + Step 6. enter the Name + Individual Name Speed Dial Programming (Console Only) Step 1. Name Speed Dial must be enabled in programming. Step 2. + + + Step 3. enter the Speed Dial Code (1~9) or Step 4. enter the Telephone number + Step 5. enter the Name + System Administrator’s Manual Issued December 2004 = Individual for Speed Dial Number Page 27 Station Name Speed Dial Programming (Console Only) Step 1. Name Speed Dial must be enabled in programming. + Step 2. + + Step 3. enter the Station number + Step 4. enter the Station Name + = Station Name Speed Dial Operation Step 1. OR set for Name Speed Dial + = System OR = Individual = Station Step 2. enter the first letter of the name + searching through the Speed Dial Codes beginning with that letter. DSS button 1 to start DSS button 2 to select the particular name. Step 3. Step 4. or to dial and talk. 39. Station Operations Help List + + Note: The LCD will display the function information for 3 seconds and then scroll to the next function. To activate a function, press System Administrator’s Manual Issued December 2004 Page 28 40. Toll Code + Step 1. Step 2. any C.O. line to be used for the call. + + Step 3. enter the Toll Password (Max. 8 digits) + Step 4. the required Telephone number Step 5. + Note: If zone 253 is enabled, the full Toll Code used will be printed in the SMDR output. 41. Voice Message Recording/Playback (Console Only) Message Recording Step 1. + + + Step 2. The LCD will display the following instructions:= R = Record message(s) = P = Playback the message(s) = N = Go to the next message Step 3. = B = Go to previous message the system will immediately commence recording the message. Step 4. When the recording of the message has finished, this marks the end of the message and the system will immediately commence recording the next message. Step 5. Repeat Step 4 for each message except for the last message. Step 6. At the end of recording the last message, hangup the handset using your fingers. (this gives a “clean” sounding end to the message) Note: The messages MUST be recorded in the sequence as programmed. IF THE SEQUENCE IS ALTERED, THE SYSTEM WILL MALFUNCTION. System Administrator’s Manual Issued December 2004 Page 29 Message Playback Step 1. + + + Step 2. system will play the first message Step 3. system will play the next message Step 4. when finished listening 42. Volume Control For the call in progress only (does not affect future calls) During a call change to speech volume as required During Ringing change the Ring volume as required For all future calls (sets the default levels) To set the Ring volume level: To set the Speaker volume level: + + + System Administrator’s Manual + + To set the Hand piece volume level: To set the Ring frequency (tone): + + + + + Issued December 2004 + + Page 30 POWER-FAIL EMERGENCY CALLS Please note that under Power-Fail (no 240V mains supply) conditions, the system is completely non-operational. Power-Fail conditions result in the system being incapable of receiving or making any calls. However, if you require full or partial system operation during Power-Fail conditions, there are three options available. 1. An emergency Power-Fail backup battery can be installed (at initial installation or at a later date). The Aristel battery backup set will allow the telephone system to operate with full capability and functions for approximately 4~8 hours. This time will vary depending on the system capacity, features installed and the amount of calls on the system during the Power-Fail period. The Aristel backup battery is constantly charged by the telephone system and (assuming that your battery is fully charged) there will be no service interruption during the change over from Mains supply to backup battery supply. 2. Power-Fail phones can be connected/installed to the system. In the event of a 240V power failure, these phones can be used to receive and make calls. In general, only certain lines will be available for answering incoming and making out going calls during the power-fail period. Depending which system you have and how many/which “power-fail phones” are connected, you may have one or several operating phones on selected lines during Power-Fail. 3. An “Uninterruptible Power Supply” (UPS) can be fitted to the system. This is a power source that is fed by the 240V mains and in turn feeds manufactured 240V power to the telephone system. It also stores power in a battery for use during Power-Fail periods. The battery is then used to supply the telephone system with 240V manufactured by the UPS itself. This will give full operation for a limited time only. A UPS can be also used to power computers, alarms, etc. during power-fail periods. The period of time that a UPS will operate for is dependant on the number of devices being fed with power. A UPS can supply power for periods from five minutes to several hours. See your Aristel dealer for further details on these options, or contact Aristel Networks on 03 8542 2300 during business hours. System Administrator’s Manual Issued December 2004 Page 31