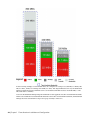
1
Installation and Configuration Guide for Linux Workstations ® Legal Notices Autodesk® Flame® 2014, Autodesk® Flame® Premium 2014, Autodesk® Flare™ 2014, Autodesk® Flint® 2014, Autodesk® Inferno® 2014, Autodesk® Lustre® 2014, Autodesk® Smoke® Advanced 2014, Autodesk® Smoke® HD 2014, Autodesk® Backdraft® Conform 2014 © 2013 Autodesk, Inc. All rights reserved. Except as otherwise permitted by Autodesk, Inc., this publication, or parts thereof, may not be reproduced in any form, by any method, for any purpose. Certain materials included in this publication are reprinted with the permission of the copyright holder. Portions related to MD5 Copyright © 1991-2, RSA Data Security, Inc. Created 1991. All rights reserved. License to copy and use this software is granted provided that it is identified as the “RSA Data Security, Inc. MD5 Message-Digest Algorithm” in all material mentioning or referencing this software or this function. License is also granted to make and use derivative works provided that such works are identified as “derived from the RSA Data Security, Inc. MD5 Message-Digest Algorithm” in all material mentioning or referencing the derived work. RSA Data Security, Inc. makes no representations concerning either the merchantability of this software or the suitability of this software for any particular purpose. It is provided “as is” without express or implied warranty of any kind. These notices must be retained in any copies of any part of this documentation and/or software. The following are registered trademarks or trademarks of Autodesk, Inc., and/or its subsidiaries and/or affiliates in the USA and other countries: 123D, 3ds Max, Algor, Alias, AliasStudio, ATC, AutoCAD LT, AutoCAD, Autodesk, the Autodesk logo, Autodesk 123D, Autodesk Homestyler, Autodesk Inventor, Autodesk MapGuide, Autodesk Streamline, AutoLISP, AutoSketch, AutoSnap, AutoTrack, Backburner, Backdraft, Beast, BIM 360, Burn, Buzzsaw, CADmep, CAiCE, CAMduct, CFdesign, Civil 3D, Cleaner, Combustion, Communication Specification, Constructware, Content Explorer, Creative Bridge, Dancing Baby (image), DesignCenter, DesignKids, DesignStudio, Discreet, DWF, DWG, DWG (design/logo), DWG Extreme, DWG TrueConvert, DWG TrueView, DWGX, DXF, Ecotect, ESTmep, Evolver, FABmep, Face Robot, FBX, Fempro, Fire, Flame, Flare, Flint, FMDesktop, ForceEffect, FormIt, Freewheel, Fusion 360, Glue, Green Building Studio, Heidi, Homestyler, HumanIK, i-drop, ImageModeler, Incinerator, Inferno, InfraWorks, Instructables, Instructables (stylized robot design/logo), Inventor LT, Inventor, Kynapse, Kynogon, LandXplorer, Lustre, MatchMover, Maya, Maya LT, Mechanical Desktop, MIMI, Mockup 360, Moldflow Plastics Advisers, Moldflow Plastics Insight, Moldflow, Moondust, MotionBuilder, Movimento, MPA (design/logo), MPA, MPI (design/logo), MPX (design/logo), MPX, Mudbox, Navisworks, ObjectARX, ObjectDBX, Opticore, Pipeplus, Pixlr, Pixlr-o-matic, Productstream, RasterDWG, RealDWG, ReCap, Remote, Revit LT, Revit, RiverCAD, Robot, Scaleform, Showcase, ShowMotion, Sim 360, SketchBook, Smoke, Socialcam, Softimage, Sparks, SteeringWheels, Stitcher, Stone, StormNET, TinkerBox, ToolClip, Topobase, Toxik, TrustedDWG, T-Splines, ViewCube, Visual LISP, Visual, VRED, Wire, Wiretap, WiretapCentral, XSI. ACE™, TAO™, CIAO™, and CoSMIC™ are copyrighted by Douglas C. Schmidt and his research group at Washington University, University of California, Irvine, and Vanderbilt University, Copyright (c) 1993-2009, all rights reserved. Adobe and Reader are either trademarks or registered trademarks of Adobe Systems Incorporated in the United States and/or countries. Automatic Duck and the duck logo are trademarks of Automatic Duck, Inc. FFmpeg is a trademark of Fabrice Bellard, originator of the FFmpeg project. Lucida is a registered trademark or trademark of Bigelow & Holmes in the U.S. and other countries. Python is a registered trademark of Python Software Foundation. All other brand names, product names or trademarks belong to their respective holders. Disclaimer THIS PUBLICATION AND THE INFORMATION CONTAINED HEREIN IS MADE AVAILABLE BY AUTODESK, INC. “AS IS.” AUTODESK, INC. DISCLAIMS ALL WARRANTIES, EITHER EXPRESS OR IMPLIED, INCLUDING BUT NOT LIMITED TO ANY IMPLIED WARRANTIES OF MERCHANTABILITY OR FITNESS FOR A PARTICULAR PURPOSE REGARDING THESE MATERIALS. Contents Chapter 1 Flame Premium Installation and Configuration . . . . . . . . . . . . . . . . . . . . . . . . . 1 Hardware setup . . . . . . . . . . . . . . . . . . . . . . . . . . . . . . . . . . . . . . . . . . . . . . . 2 Typical configuration overview for Creative Finishing applications . . . . . . . . . . . . . . . . . 3 Video . . . . . . . . . . . . . . . . . . . . . . . . . . . . . . . . . . . . . . . . . . . . . . . . . 6 Audio . . . . . . . . . . . . . . . . . . . . . . . . . . . . . . . . . . . . . . . . . . . . . . . . . 7 Media storage . . . . . . . . . . . . . . . . . . . . . . . . . . . . . . . . . . . . . . . . . . . . . 8 Configure BIOS . . . . . . . . . . . . . . . . . . . . . . . . . . . . . . . . . . . . . . . . . . . 17 Install Linux . . . . . . . . . . . . . . . . . . . . . . . . . . . . . . . . . . . . . . . . . . . . . . . . 20 Configure basic network settings . . . . . . . . . . . . . . . . . . . . . . . . . . . . . . . . . . 21 Configure an InfiniBand card . . . . . . . . . . . . . . . . . . . . . . . . . . . . . . . . . . . . 22 Install the DKU and the AJA OEM-2K firmware . . . . . . . . . . . . . . . . . . . . . . . . . . . 22 Configure storage . . . . . . . . . . . . . . . . . . . . . . . . . . . . . . . . . . . . . . . . . . 23 Manually configure media storage . . . . . . . . . . . . . . . . . . . . . . . . . . . . . . 26 Install Creative Finishing software . . . . . . . . . . . . . . . . . . . . . . . . . . . . . . . . . . . . 30 Prepare the installation media . . . . . . . . . . . . . . . . . . . . . . . . . . . . . . . . . . . . 31 Install Lustre stand-alone . . . . . . . . . . . . . . . . . . . . . . . . . . . . . . . . . . . . . . 31 Uninstall . . . . . . . . . . . . . . . . . . . . . . . . . . . . . . . . . . . . . . . . . . . . . . . 32 Software configuration . . . . . . . . . . . . . . . . . . . . . . . . . . . . . . . . . . . . . . . . . . . 32 Configure media storage . . . . . . . . . . . . . . . . . . . . . . . . . . . . . . . . . . . . . . . 33 Single workstation rendering . . . . . . . . . . . . . . . . . . . . . . . . . . . . . . . . . . . . 34 Configure Backburner services . . . . . . . . . . . . . . . . . . . . . . . . . . . . . . . . 36 Event triggers . . . . . . . . . . . . . . . . . . . . . . . . . . . . . . . . . . . . . . . . . . . . 37 Standard filesystem maintenance . . . . . . . . . . . . . . . . . . . . . . . . . . . . . . . . . . 39 Troubleshoot the filesystem . . . . . . . . . . . . . . . . . . . . . . . . . . . . . . . . . . 40 Control fragmentation . . . . . . . . . . . . . . . . . . . . . . . . . . . . . . . . . . . . 45 Limit concurrent usage . . . . . . . . . . . . . . . . . . . . . . . . . . . . . . . . . . . . 45 Configure bandwidth reservation . . . . . . . . . . . . . . . . . . . . . . . . . . . . . . . 45 Monitor partition fill rate . . . . . . . . . . . . . . . . . . . . . . . . . . . . . . . . . . . 51 Use multi-threaded direct input output . . . . . . . . . . . . . . . . . . . . . . . . . . . . 52 Enable media pre-allocation . . . . . . . . . . . . . . . . . . . . . . . . . . . . . . . . . . 52 Test filesystem performance . . . . . . . . . . . . . . . . . . . . . . . . . . . . . . . . . . 53 Start the software . . . . . . . . . . . . . . . . . . . . . . . . . . . . . . . . . . . . . . . . . . . . . 53 i Command line start-up options . . . . . . . . . . . . . . . . . . . . . . . Node-locked licensing . . . . . . . . . . . . . . . . . . . . . . . . . . . . Network licensing . . . . . . . . . . . . . . . . . . . . . . . . . . . . . . Install the license server software . . . . . . . . . . . . . . . . . . . Get the unique host ID of a license server . . . . . . . . . . . . . . Request license codes . . . . . . . . . . . . . . . . . . . . . . . . . License the workstation with a local or single remote license server . Create a license file for a remote license server . . . . . . . . . . . . Configure the workstation to use a set of redundant license servers . Change the default port used by the license server . . . . . . . . . . Start the license server . . . . . . . . . . . . . . . . . . . . . . . . . Killing an application . . . . . . . . . . . . . . . . . . . . . . . . . . . . Chapter 2 . . . . . . . . . . . . . . . . . . . . . . . . . . . . . . . . . . . . . . . . . . . . . . . . . . . . . . . . . . . . . . . . . . . . . . . . . . . . . . . . . . . . . . . . . . . . . . . . . . . . . . . . . . . . . . . . . . . . . . . . . 54 . 55 . 56 . 57 . 58 . 58 . 58 . 59 . 60 . 60 . 61 . 61 Install and configure a Flare workstation . . . . . . . . . . . . . . . . . . . . . . . . . . . 63 Installation workflows . . . . . . . . . . . . . . . . . . . . . . . . . . Install Linux for Flare . . . . . . . . . . . . . . . . . . . . . . . . . . Prepare the CentOS disc . . . . . . . . . . . . . . . . . . . . . . Configure Linux for Flare . . . . . . . . . . . . . . . . . . . . . Configure basic network settings . . . . . . . . . . . . . . Disable operating system updates . . . . . . . . . . . . . . Install device drivers . . . . . . . . . . . . . . . . . . . . . Install the Autodesk software . . . . . . . . . . . . . . . . . . . . . . Test your Linux environment . . . . . . . . . . . . . . . . . . . Prepare the installation media . . . . . . . . . . . . . . . . . . . Install Flare . . . . . . . . . . . . . . . . . . . . . . . . . . . . . Configure media storage . . . . . . . . . . . . . . . . . . . . . . Connecting Remotely to the Storage of a Flame or Inferno Uninstall . . . . . . . . . . . . . . . . . . . . . . . . . . . . . . License your software . . . . . . . . . . . . . . . . . . . . . . . . . . Install the license server software . . . . . . . . . . . . . . . . . Get license codes . . . . . . . . . . . . . . . . . . . . . . . . . . Create a license file for a remote license server . . . . . . . . . . Configure nodes or workstations to get a license . . . . . . . . . Change the default port used by the license server . . . . . . . . Start Flare . . . . . . . . . . . . . . . . . . . . . . . . . . . . . . . . Chapter 3 . . . . . . . . . . . . . . . . . . . . . . . . . . . . . . . . . . . . . . . . . . . . . . . . . . . . . . . . . . . . . . . . . . . . . . . . . . . . . . . . . . . . . . . . . . . . . . . . . . . . . . . . . . . . Workstation . . . . . . . . . . . . . . . . . . . . . . . . . . . . . . . . . . . . . . . . . . . . . . . . . . . . . . . . . . . . . . . . . . . . . . . . . . . . . . . . . . . . . . . . . . . . . . . . . . . . . . . . . . . . . . . . . . . . . . . . . . . . . . . . . . . . . . . . . . . . . . . . . . . . . . . . . . . . . . . . . . . . . . . . . . . . . . . . . . . . . . . . . . . . . . . . . . . . . . . . . . . . . . . . . . . . . . . . . . . . . . . . . . . . . . . . . . 63 . 64 . 64 . 65 . 65 . 66 . 67 . 67 . 68 . 68 . 69 . 69 . 70 . 76 . 76 . 77 . 77 . 77 . 78 . 78 . 79 Networked processing . . . . . . . . . . . . . . . . . . . . . . . . . . . . . . . . . . . . . 81 Deploying on networked hardware . . . . . . . . . . . . . . . . . . . . . . . . . . . . . . . . . . . . 81 Backburner . . . . . . . . . . . . . . . . . . . . . . . . . . . . . . . . . . . . . . . . . . . . . . . . . 81 Backburner command-job utility . . . . . . . . . . . . . . . . . . . . . . . . . . . . . . . . . . 84 Restart Backburner Manager and Backburner Server . . . . . . . . . . . . . . . . . . . . . . . . 86 Backburner Monitor . . . . . . . . . . . . . . . . . . . . . . . . . . . . . . . . . . . . . . . . . . . . 86 Web Monitor . . . . . . . . . . . . . . . . . . . . . . . . . . . . . . . . . . . . . . . . . . . . . 87 Windows Monitor . . . . . . . . . . . . . . . . . . . . . . . . . . . . . . . . . . . . . . . . . . 99 Backburner Manager . . . . . . . . . . . . . . . . . . . . . . . . . . . . . . . . . . . . . . . . . . . 107 Burn . . . . . . . . . . . . . . . . . . . . . . . . . . . . . . . . . . . . . . . . . . . . . . . . . . . . 112 Architectural overview . . . . . . . . . . . . . . . . . . . . . . . . . . . . . . . . . . . . . . . 112 Installation or upgrade workflow . . . . . . . . . . . . . . . . . . . . . . . . . . . . . . . . . 112 Install the Smoke for Mac distribution of Burn . . . . . . . . . . . . . . . . . . . . . . . 113 Install Linux for Burn . . . . . . . . . . . . . . . . . . . . . . . . . . . . . . . . . . . . . . . 113 Prepare the CentOS disc . . . . . . . . . . . . . . . . . . . . . . . . . . . . . . . . . . . 114 Configure Linux for Burn . . . . . . . . . . . . . . . . . . . . . . . . . . . . . . . . . . 114 Install and configure Burn . . . . . . . . . . . . . . . . . . . . . . . . . . . . . . . . . . . . . 116 Install the DKU . . . . . . . . . . . . . . . . . . . . . . . . . . . . . . . . . . . . . . . . 116 Prepare the installation media . . . . . . . . . . . . . . . . . . . . . . . . . . . . . . . . 117 Installing Backburner Manager . . . . . . . . . . . . . . . . . . . . . . . . . . . . . . . 117 Install Burn on render nodes . . . . . . . . . . . . . . . . . . . . . . . . . . . . . . . . . 117 Connect the node to Backburner Manager . . . . . . . . . . . . . . . . . . . . . . . . . 118 ii | Contents Configure workstations for Burn . . . . . . . . . . . . . . . . Configure multicasting . . . . . . . . . . . . . . . . . . . . . Install additional fonts . . . . . . . . . . . . . . . . . . . . . Disable local Stone and Wire IO on a node . . . . . . . . . . Run multiple versions of Burn on the same node . . . . . . . License your software . . . . . . . . . . . . . . . . . . . . . . . . Two licensing scenarios . . . . . . . . . . . . . . . . . . . . Get license codes . . . . . . . . . . . . . . . . . . . . . . . . Install the license server software . . . . . . . . . . . . . . . Create a license file for a remote license server . . . . . . . . Configure nodes or workstations to get a license . . . . . . . Change the default port used by the license server . . . . . . Run the software . . . . . . . . . . . . . . . . . . . . . . . . . . . Troubleshooting . . . . . . . . . . . . . . . . . . . . . . . . . . . Troubleshoot the background processing network . . . . . . Test network components . . . . . . . . . . . . . . . . . . . Assess compatibility between jobs and render nodes . . . . . WiretapCentral and Wiretap Gateway Installation . . . . . . . . . . . . WiretapCentral and Wiretap Gateway . . . . . . . . . . . . . . . . Install and license Wiretap Gateway on a dedicated system . Configure Wiretap Gateway . . . . . . . . . . . . . . . . . . Install WiretapCentral on a dedicated system . . . . . . . . . Configure WiretapCentral . . . . . . . . . . . . . . . . . . . Test the installation . . . . . . . . . . . . . . . . . . . . . . Wiretap path translation . . . . . . . . . . . . . . . . . . . . . . . Troubleshoot the Wire network . . . . . . . . . . . . . . . . . . . Supported ingest file formats . . . . . . . . . . . . . . . . . . . . . Installing and Configuring Lustre ShotReactor . . . . . . . . . . . . . . Lustre Background Rendering . . . . . . . . . . . . . . . . . . . . . . . Configure Lustre BrowseD . . . . . . . . . . . . . . . . . . . . . . Background rendering components . . . . . . . . . . . . . . . . . Share the storage for rw access from background render nodes . . . Set up render nodes . . . . . . . . . . . . . . . . . . . . . . . . . Configue Lustre to detect Backburner Manager . . . . . . . . . . . Specify the Background Rendering path in Lustre . . . . . . . . . . . . . . . . . . . . . . . . . . . . . . . . . . . . . . . . . . . . . . . . . . . . . . . . . . . . . . . . . . . . . . . . . . . . . . . . . . . . . . . . . . . . . . . . . . . . . . . . . . . . . . . . . . . . . . . . . . . . . . . . . . . . . . . . . . . . . . . . . . . . . . . . . . . . . . . . . . . . . . . . . . . . . . . . . . . . . . . . . . . . . . . . . . . . . . . . . . . . . . . . . . . . . . . . . . . . . . . . . . . . . . . . . . . . . . . . . . . . . . . . . . . . . . . . . . . . . . . . . . . . . . . . . . . . . . . . . . . . . . . . . . . . . . . . . . . . . . . . . . . . . . . . . . . . . . . . . . . . . . . . . . . . . . . . . . . . . . . . . . . . . . . . . . . . . . . . . . . . . . . . . . . . . . . . . . . . . . . . . . . . . . . . . . . . . . . . . . . . . . . . . . . . . . . . . . . . . . . . . . . . . . . . . . . . . . . . . . . . . . . . . . . . . . . . . . . . . . . . . . . . . . . . . . . . . . . . . . . . . . . . . . . . . . . . . . . . . 118 . 119 . 120 . 120 . 120 . 122 . 122 . 122 . 122 . 123 . 124 . 124 . 125 . 125 . 126 . 130 . 131 . 133 . 133 . 135 . 136 . 137 . 138 . 140 . 140 . 145 . 149 . 149 . 151 . 151 . 152 . 154 . 154 . 157 . 157 Index . . . . . . . . . . . . . . . . . . . . . . . . . . . . . . . . . . . . . . . . . . . . . 159 Contents | iii iv Flame Premium Installation and Configuration 1 Prerequisties for installation ■ Root access to your system. The default root account password on an Autodesk workstation is password. ■ If you need to change your system date or time, do it before installing the application. ■ Archiving existing media on the framestore is recommended. ■ Prepare the installation media (page 31) to access the install directory. Software upgrade only To upgrade the software without updating the hardware or OS: 1 Install the DKU and the AJA OEM-2K firmware (page 22). 2 Install Creative Finishing software (page 30). These instructions also apply for Flame, Flare, Smoke Advanced, Lustre, Inferno, Flint, and Backdraft Conform 3 License your software. If you are not on subscription use Node-locked licensing (page 55). On subscription you can use node-locked or Network licensing (page 56). Unnecessary if upgrading to a service pack of the same software version or to a service pack of the same extension. Install from scratch or upgrade Linux To reinstall or upgrade the operating system and/or change your hardware or storage setup: 1 If you are installing your hardware make the following connections: ■ Peripherals such as mouse, keyboard, pen tablet, graphics monitor, house network. ■ Autodesk Wire network. ■ VTR and a broadcast monitor. ■ Audio hardware for your workstation. ■ Storage arrays to the workstation, but do not power them on before having installed Linux, to prevent the Linux installer from attempting to format the arrays and use them as system drives. 2 Configure BIOS (page 17). 3 Install Linux (page 20). 4 Install the DKU and the AJA OEM-2K firmware (page 22) 5 If you are using a new Stone Direct storage array, Configure storage (page 23) 1 6 Install Creative Finishing software (page 30) 7 Configure media storage (page 33). 8 License your software. If you are not on subscription use Node-locked licensing (page 55). On subscription you can use node-locked or Network licensing (page 56). Unnecessary if upgrading to a service pack of the same software version or to a service pack of the same extension. Hardware setup If you are only upgrading an existing application, you do not need to reconfigure your hardware. This section contains wiring diagrams for HP Z800 workstation with the NVIDIA 6000 graphics card and the AJA KONA 3G. It does not contain information and diagrams for the older workstations supported in this version. If you have an HP Z800 with an NVIDIA 5800 graphics card, see the HP Z800 Workstation Hardware Setup Guide PDF. 2 | Chapter 1 Flame Premium Installation and Configuration Typical configuration overview for Creative Finishing applications Typical configuration Hardware setup | 3 The Z820 with the optional NVIDIA SDI2, AJA KONA 3G and 2-port GigE adapters. Optionally, your workstation can be set up with a second ATTO Fibre Channel adapter in slot 1. 4 | Chapter 1 Flame Premium Installation and Configuration The Z800 with a 2-port GigE adapter in slot 1 (top to bottom), and a Mellanox QDR InfiniBand / 10-GigE adapter in slot 7. Optionally, your workstation can be set up with a second ATTO Fibre Channel adapter in slot 1. Hardware setup | 5 Video HP Z820 Video I/O The only video hardware you must provide are a sync generator, VTR, HD/SDI-ready broadcast monitor and patch panel (if desired). Some of the following steps might not be necessary depending on your hardware configuration. Connection procedure: 1 Connect the output of the sync generator to the top Ref Loop port of the AJA K3G-Box. 2 Connect the Input port of the NVIDIA SDI card (the one next to the DVI port) to the bottom Ref Loop port of the AJA K3G-Box. 3 Connect the Fill (outer) port of the NVIDIA SDI card to the Input port of the AJA HD5DA distribution amplifier. 4 Connect one of the OUT ports of the distribution amplifier to an SDI IN port of the broadcast monitor. 5 For RTD or Stereo, connect another OUT port of the amplifier to the Link A input port of the VTR. 6 For Stereo or RTD, connect the Key (middle) SDI port of the NVIDIA SDI card to the Link B input port of the RTD VTR. 7 Connect the RS-422 port of the AJA K3G-Box to the VTR control port. 8 If not using RTD, connect SDI OUT A, SDI OUT B, SDI IN A and SDI IN B ports of the VTR to the SDI1, SDI2, SDI3 and SDI4 ports on the front of the AJA K3G-Box. 9 Connect the SDI IN 1/A, SDI IN 2/B, SDI OUT 1/A and SDI OUT 2/B plugs of the AJA cable to the SDI1, SDI2, SDI3 and SDI4 ports of the AJA Kona 3G card. 10 Connect the SDI IN 1/A, SDI IN 2/B, SDI OUT 1/A and SDI OUT 2/B plugs on the other end of the AJA cable to the SDI1, SDI2, SDI3 and SDI4 ports on the back of the AJA K3G-Box, as illustrated. 11 Connect the AJA control cable to the AJA Kona card and to the corresponding port on the back of the AJA K3G-Box. 6 | Chapter 1 Flame Premium Installation and Configuration The only video hardware you must provide are a sync generator, VTR, HD/SDI-ready broadcast monitor and patch panel (if desired). 1 Connect the output of the sync generator to the top Ref Loop port of the AJA K3G-Box. 2 Connect the Input port of the NVIDIA SDI card (the one next to the DVI port) to the bottom Ref Loop port of the AJA K3G-Box. 3 Connect the Fill (outer) port of the NVIDIA SDI card to the Input port of the AJA HD5DA distribution amplifier. 4 Connect one of the OUT ports of the distribution amplifier to an SDI IN port of the broadcast monitor. 5 For RTD or Stereo, connect another OUT port of the amplifier to the Link A input port of the VTR. 6 For Stereo or RTD, connect the Key (middle) SDI port of the NVIDIA SDI card to the Link B input port of the RTD VTR. 7 Connect the RS-422 port of the AJA K3G-Box to the VTR control port. 8 If not using RTD, connect SDI OUT A, SDI OUT B, SDI IN A and SDI IN B ports of the VTR to the SDI1, SDI2, SDI3 and SDI4 ports on the front of the AJA K3G-Box. 9 Connect the SDI IN 1/A, SDI IN 2/B, SDI OUT 1/A and SDI OUT 2/B plugs of the AJA cable to the SDI1, SDI2, SDI3 and SDI4 ports of the AJA Kona 3G card. 10 Connect the SDI IN 1/A, SDI IN 2/B, SDI OUT 1/A and SDI OUT 2/B plugs on the other end of the AJA cable to the SDI1, SDI2, SDI3 and SDI4 ports on the back of the AJA K3G-Box, as illustrated. 11 Connect the AJA control cable to the AJA Kona card and to the corresponding port on the back of the AJA K3G-Box. Audio Your application uses the Discreet Native Audio subsystem. Discreet Native Audio uses the following hardware components, shipped with your system. Lucid ADA 88192 Audio Converter Converts signals between the workstation and all digital or analog audio I/O devices. AJA K3G-Box Balanced Audio breakout box and AJA Kona 3G adapter card The Balanced Audio breakout box is the audio component of the AJA breakout box. It provides connections for audio I/O. This breakout box connects to the AJA Kona 3G adapter on your workstation. The Kona 3G adapter provides real-time input and output of uncompressed SD and HD video signals as well as audio data at 24-bit resolution. The Kona 3G adapter handles balanced AES/EBU audio signals from the Balanced Audio breakout box. Hardware setup | 7 Connect the Discreet Native Audio hardware components to the AJA breakout box Media storage It is not recommended to use the system disk for media storage. The following can be used: ■ A UNIX-compatible filesystem on a DAS (such as an Autodesk-recommended Dot Hill or XR-series disk array). ■ A UNIX-compatible filesystem on a Network Attached Storage (NAS) based on the Network File System (NFS) protocol. The fact that all I/O operations occur over the network makes it impossible to reliably predict steady performance for NAS filesystems. Also that the NFS protocol features built-in cache and time-out mechanisms, which may cause several workstations working on the same media source to appear de-synchronized. 8 | Chapter 1 Flame Premium Installation and Configuration ■ A SAN: infrastructure that allows multiple workstations to share simultaneous access to a central storage enclosure. When attached to a CXFS SAN declared as a standard filesystem partition to Stone and Wire, Creative Finishing workstations running the current release have shown optimal (real-time) performance with version 4.02 of the CXFS client, and the following mount options for the CXFS volume: rw,noatime,filestream,inode64. ■ USB 2.0 and FireWire (IEEE 1394) attached devices must be use one of the these filesystems: XFS, ext2, ext3, or HFS (Mac). NTFS is not supported. ■ SCSI tape drives can be connected to a fibre channel port via for example the Atto FibreBridge 2390D. The device’s driver must accept standard UNIX tape device calls. The device must be certified for use with the currently supported version of the workstation operating system and kernel. Configure a direct attached storage or SAN as media storage You can use your application with the following storage configurations (but not the system drive): ■ ■ Fibre channel adapter On HP Z800 workstations, connections to media storage are made using the ATTO Celerity FC84-EN fibre channel adapter, located in slot five (top to bottom). It has four ports, called loops. You can connect your storage enclosure to the fibre channel cards using either two or four loops. A two-loop device can be connected to either the inner pair of ports or the outer pair of ports. A 4-loop device requires both the inner pair and the outer pair. If you are not using all the ports of a fibre channel adapter, terminate the two unused ports with the FC loopback couplers that shipped with your system. Terminating these ports significantly decreases the time required to boot the system. Stone Direct See also Autodesk Stone Direct Services & Support. Dot Hill AssuredSAN 3003 The Dot Hill storage solution consists of one main disk enclosure, plus an optional expansion enclosure. The main disk enclosure contains two controllers: Controller A at the top, Controller B at the bottom. Connecting an expansion: if you are using an expansion enclosure, connect the SAS port of controller A to the SAS port of the top I/O module on the expansion, and the SAS port of controller B to the SAS port of the bottom I/O module of the expansion. Hardware setup | 9 Connecting the FC loops to the main enclosure controllers: each controller has 4 FC ports, numbered 0 to 3. The Autodesk recommended configuration uses only ports 0 and 2 of each controller. The storage can be connected to the workstation through either 2 FC loops or 4 loops. 2-loop configuration: On ATTOcards 2 micro chips handle fiber traffic to the four ports: chip A handles ports 1 and 2 and chip B handles ports 3 and 4. To get maximum storage performance in a 2 loop configuration, the fiber loops should be distributed across the two chips. Autodesk recommends the following connections: 1 ATTO Port 2 to Dot Hill port A0 2 ATTO Port 3 to Dot Hill port B0 You can also use the two outer ports on the FC adapter card, if they're not used to connect to a SAN or archiving device. 1 ATTOPort 1 to Dot Hill port A0 2 ATTOPort 4 to Dot Hill port B0 4-loop configuration: A 4-loop configuration uses all four ports available on theATTOfibrechannel adapter card. If you want to also connect your workstation to a SAN or an archiving device, you will need to install a second FC adapter card into your workstation. Connect the FC loops as follows: ■ ATTOPort 1 to Dot Hill port A2 ■ ATTOPort 2 to Dot Hill port A0 ■ ATTOPort 3 to Dot Hill port B0 10 | Chapter 1 Flame Premium Installation and Configuration ■ ATTOPort 4 to Dot Hill port B2 XR 6500 The following diagrams illustrate 2-loop and 4-loops connections for XR 6500 series storage assemblies. Cable your storage exactly as illustrated to ensure proper functionality. A XR 6500 RAID enclosure supports a maximum of seven XE expansion enclosures. Configurations with two XR RAID enclosures are not supported. Hardware setup | 11 12 | Chapter 1 Flame Premium Installation and Configuration Notes: ■ In a 4-loop configuration, you need a minimum of one XE expansion enclosure attached to the XR 6500 RAID enclosure. Hardware setup | 13 ■ The total number of enlcosures must be an even number. XR 6412 The following diagrams illustrate 2-loop and 4-loop connections for XR 6412 series storage assemblies. A XR 6412 RAID enclosure supports a maximum of seven XE expansion enclosures. Configurations with two XR RAID enclosures are not supported. 14 | Chapter 1 Flame Premium Installation and Configuration NOTE In a 4-loop configuration with a XR 6412 RAID enclosure, you need a minimum of one XE expansion enclosure attached to the XR RAID enclosure. XR 5402 and XR 5412 The following digrams illustrate 2-loop and 4-loop connections for XR 5402 and XR 5412 series storage assemblies. XR 5402 and XR 5412 series storage assemblies support 2-loop configurations with one XR RAID enclosure, and 4-loop configurations with two XR RAID enclosures. Hardware setup | 15 The XR 5402 and XR 5412 RAID enclosures support a maximum of four XE expansion enclosures. 16 | Chapter 1 Flame Premium Installation and Configuration In a configuration with two XR RAID enclosures, the number of XE extension enclosures per XR RAID enclosure must be the same. The total number of enclosures in the storage assembly must be an even number. Archiving to USB 2.0, FireWire (IEEE 1394) and fibre channel devices is supported. This includes filesystems, tape drives, and VTRs. For information on connecting a VTR, see Video (page 6). Configure BIOS Z820 If BIOS settings are not set up correctly before installing Linux, you will need to reinstall the OS. Before configuring the custom Autodesk BIOS settings, it is recommended to reset all BIOS settings to factory defaults. To enter the BIOS menu, press F10 while booting. Certified BIOS settings. Items not listed are left at their factory values. BIOS Menu Submenu Item Value Storage Storage Options SATA Emulation RAID+AHCI Boot Order EFI Boot sources Disable (press F5) Boot Order > Legacy Boot sources ATAPI CD/DVD Drive Hardware setup | 17 BIOS Menu Submenu Item Value USB Floppy / CD Power Advanced Hard Drive <hard drive model> Runtime Power Management Disable Idle Power Saving Normal Turbo Mode Disable Hardware Power Management SATA Power Management Disable Bus Options Numa Disable Device Options Internal Speaker Disable NIC Option ROM Download Disable NIC1 Option ROM Download Disable Hyper-threading Enable Slot 5 Option ROM Download Disable Slot 7 Option ROM Download Disable OS Power Management Slot Settings Z800 The BIOS of your workstation is correctly configured prior to shipping, so you normally do not need to perform the procedures in this section. This section contains information on the certified BIOS settings for the HP Z800 workstation, as well as instructions on updating your BIOS and restoring it to the default factory settings. For information on updating your BIOS version, or reverting the BIOS to factory defaults, consult the Hardware Setup Guide. WARNING If BIOS settings are not set up correctly before installing Linux, you will need to reinstall the OS. After wiring the workstation and before installing Linux, turn the workstation on and check the BIOS version and BIOS settings. The certified BIOS version for your workstation is 3.07. Ensure the BIOS version number that appears on screen while booting the workstation matches the certified version. If the versions do not match, update the BIOS to the certified version, after configuring BIOS settings. BIOS update instructions are at the end of this chapter. To adjust system BIOS settings, press F10 while booting the workstation. Autodesk certified BIOS settings. Unlisted items have factory default settings. 18 | Chapter 1 Flame Premium Installation and Configuration Storage Storage Options SATA Emulation Boot Order Optical Drive RAID+AHCI USB Device Hard Drive <hard drive model> Integrated SATA Power OS Power Management Runtime Power Management Disable Idle Power Saving Normal MWAIT Aware OS Disable ACPI S3 Hard Disk Reset Disable SATA Power Management Disable Intel Turbo Boost Technology Disable Processors Hyper-Threading Enable Chipset/Memory Memory Node Interleave Enable NUMA Split Mode Disable S5 Wake on LAN Disable Internal Speaker Disable NIC PXE Option ROM Download Disable Slot 1 PCIe2 x8(4) Option ROM Download Disable Slot 3 PCIe2 x8(4) Option ROM Download Disable Slot 4 PCIe2 x16(8) Option ROM Download Disable Slot 6 PCI32 Option ROM Download Disable Hardware Power Management Advanced Device Options Hardware setup | 19 Install Linux To prepare your system and perform a fresh install of Red Hat Enterprise Linux. 1 If reinstalling Linux on an existing system, back up all user settings, project settings, and media from the system disk to other media. The Linux installation formats the system disk, resulting in total data loss. In addition, back up the following directories: ■ /usr/discreet (for software setup and configuration files). ■ /etc (for Linux configuration files, networking, etc). ■ /usr/local/flexlm/licenses (for the license file). 2 Ensure your system is in the following state: ■ Power off all storage enclosures connected to the system. If left on, the Red Hat installer may reformat them as part of the installation process, resulting in loss of data on the device. Turn off the RAID controllers first, then the expansion enclosures. ■ Mouse, keyboard and graphics monitor are connected, and the graphics monitor is powered on. ■ Other peripherals, such as the tablet and video breakout box are connected and powered on. ■ If you are using a KVM switch, it is switched to the system on which you want to install Linux. ■ The storage array is powered off. ■ The DVI-Ramp (if any) is connected and powered on. 3 Insert the DVD of the custom Autodesk distribution of Red Hat Enterprise Linux in the DVD-ROM drive, and power off the system. If your system is equipped with internal media storage, after turning the system off, open the side panel and disconnect the main connector for the internal storage drives. Do not disconnect the system drive. 4 Check the BIOS settings 1 Reboot the system. 2 On startup press F10 to check the BIOS settings. If the keyboard is connected to the system through a KVM switch, you may have to press F10 repeatedly or continuously. 3 Ensure the BIOS settings are correct, save them if necessary, and reboot the system. 4 If the system does not boot from the Linux installation disc, review the primary boot device setting in the BIOS. 5 When the Red Hat installation screen appears: 1 For Red Hat 5, press F8 to display the Autodesk Red Hat Linux installation menu. At the boot prompt in the installation menu, enter the command ifffsbc (do not use the default options) to launch the installation. The system may spend several minutes loading drivers. The installer guides you through the rest of the process. 2 For Red Hat 6, select Flame Premium from the menu. 6 If prompted, initialize the system disk. The test of the installation is automatic. 7 When the installation has completed, eject the disc and reboot the system. After the system reboots, you may be prompted by the Kudzu hardware setup utility to set up new hardware detected for your system. You can ignore these prompts and allow the utility's count-down to expire since the hardware for the system is unchanged. 8 Boot into your new Linux installation and change the root password: Login as root, with the default password password. In a terminal use the passwd command to change the password. 9 By default the time zone is set to EST. To change it, login to the desktop as root, right click on the clock, and select Timezones. 20 | Chapter 1 Flame Premium Installation and Configuration 10 Configure basic network settings (page 21). 11 Configure an InfiniBand Card (page 22) 12 Install the DKU and the AJA OEM-2K firmware (page 22) 13 Configuring Storage (page 23) Configure basic network settings Login as root to edit the files described below in a text editor, and reboot the system for the new configuration to be used. You'll need the following from your network administrator: ■ A unique static IP address and host name for your system ■ The network gateway IP address. ■ The subnet mask of your network. ■ DNS server IP address(es). /etc/sysconfig/network Sample snippet from /etc/sysconfig/network. NETWORKING=yes HOSTNAME=workstation1 GATEWAY="10.1.0.25" The GATEWAY value is used if no GATEWAY is defined in a network port’s configuration file. /etc/resolv.conf Sample snippet from /etc/resolv.conf nameserver 192.9.201.1 /etc/hosts You may need to edit the loopback setting which may look like 127.0.0.1 vxfhost.localhost.localdomain localhost by default. Optionally add hostname / IP address pairs for other workstations on your network. Sample snippet from file: 127.0.0.1 localhost.localdomain localhost 192.168.0.100 workstation1 /etc/sysconfig/network-scripts/ifcfg-ethn Edit /etc/sysconfig/network-scripts/ifcfg-ethn, where n specifies the ethernet port number, usually 0 for the first on-board port. If your workstation has an add-on ethernet card installed, the Linux operating system may assign ports eth0 through eth3 to the add-on card. In such a case, the on-board Ethernet ports become eth4 and eth5. Optionally set the GATEWAY if not set in /etc/sysconfig/network. Sample snippet from file: DEVICE="eth0" BOOTPROTO="static" Install Linux | 21 IPADDR="192.168.1.100" NETMASK="255.255.0.0" ONBOOT="yes" GATEWAY=192.168.0.1 You'll need the following from your network administrator: ■ A unique static IP address and host name for your system ■ The network gateway IP address. ■ The subnet mask of your network. ■ DNS server IP address(es). Configure an InfiniBand card If the card was not present when you last ran the DKU installation, run it again to setup the drivers for the card. After changing the configuration, you must reboot for them to take effect. If your workstation is equipped witha Mellanox QDR InfiniBand / 10 GigE adapter card, or a QLogic 9000 DDR InfiniBand adapter card, perform the procedures in this section to configure the IP address of the Infini|Band port. Mellanox QDR InfiniBand / 10 GigE adapter card ■ Settings are stored in /etc/sysconfig/network-scripts/ifcfg-ib0 ■ You can update the file by running, as root, the script /usr/discreet/DKU/InfiniBand/ofed/install.pl ■ You may need to edit the IP address, netmask, broadcast address and base network address. QLogic DDR InfiniBand card ■ Settings are stored in /etc/sysconfig/network-scripts/ifcfg-ib1 ■ You can update the file by running, as root, the script /sbin/iba_config ■ You may need to edit the IP address. Install the DKU and the AJA OEM-2K firmware Check the DKU version In a terminal, as root, check the currently installed DKU version with the command head -n1 /etc/DKUversion. If the version does not meet the requirements for the new application version, install the DKU. Install the DKU WARNING Do not attempt to install the current version of the DKU on unsupported platforms, including older Creative Finishing systems. This will result in the installation script only installing a generic configuration which can render your operating system unusable. To install the DKU: 1 Prepare the installation media (page 31). 22 | Chapter 1 Flame Premium Installation and Configuration 2 Run the install script (for example from the USB device): /mnt/usbdisk/DKU-<version>/INSTALL_DKU. When the DKU installation script completes, a warning to update the AJA card or DVI-Ramp firmware may appear and you are returned to the command prompt. If your workstation is connected to a SAN, run the install script with the --multipath parameter to install the multipath version of the ATTO driver, e.g. /mnt/usbdisk/DKU-<version>/INSTALL_DKU —multipath. 3 If you installed from a disc, return to the root directory, and eject the disc with the command eject. 4 Before rebooting the system, ensure the Wacom tablet is connected. If storage devices (external disk arrays or internal storage) were previously disconnected or turned off as part of an operating system installation, reconnect and power them up. 5 Reboot the with the command reboot. After the workstation reboots and until you install the application, the Wacom tablet might not behave correctly. Installing the application, then logging out of the KDE desktop and logging back in should eliminate this problem. Check the AJA Firmware Before upgrading the AJA firmware, make sure you have upgraded the DKU, and that you have restarted the system. 1 In a terminal, as root, run /usr/discreet/DKU/current/Utils/AJA_firmwareUpdate/AJAfw_update. If you have an AJA OEM-2K card, you must start the firmware update by typing Y and then pressing Enter. If you have a AJA Kona 3G, the upgrade begins automatically. While the AJA firmware and drivers are being updated, your workstation appears to be frozen and your mouse and keyboard do not work. This is normal and indicates that the firmware is being updated. Once the firmware update is complete, you are returned to the terminal. 2 Shut down the system with shutdown -g0. If the system does not prompt you to power down, press the power button for 10 seconds to force a power down. 3 Disconnect the power cord, wait 10 seconds, reconnect the power cord, then restart the system. Configure storage Before you can use a new storage array, create logical units (LUNs) on it, and then create the XFS filesystem on the logical volume. Scripts are provided to configure your storage for Dot Hill (DH) storage or for XR storage /usr/discreet/DKU/current/Utils/Storage/*/*_config.pl. For help, run XR_config.pl --help or DH_Configurator --help Manually configure media storage (page 26) is also possible. The workstation must be running the custom Autodesk distribution of Red Hat Enterprise Linux, and the correct DKU. If you are configuring an XR storage array with two sets of enclosures, connect only one set of enclosures, and then perform the filesystem creation procedures in the next section. Then disconnect the storage, and repeat the entire process for the second set of enclosures. Workflow 1 Set up any Storage Area Network (SAN), before setting up a DAS. 2 When configuring a storage array, you can disconnect other storage devices (DAS or SAN) from the workstation so that you do not unintentionally format the wrong device. 3 If configuring arrays with two XR enclosures, ensure only one set of enclosures is connected to the workstation. Install Linux | 23 4 Create LUNs. If you have more than one XR enclosure, create all of the LUNs individually, then create the XFS file system on them all at once. 5 Create the XFS filesystem Configure Dot Hill storage 1 Ensure the storage enclosures are connected to the workstation as documented. Connect an Ethernet cable to the Ethernet port of the top storage controller (controller A) and to an available network port on the workstation. 2 Configure your workstation's eth port to the same subnet as the storage controller. The default IP address of storage controller A is 10.0.0.2. 3 In a terminal, as root, run DH_config.sh. 4 Enter the IP or hostname of the top controller of the storage enclosure. WARNING If your storage is connected to the network switch rather than directly to the workstation, make sure you are entering the correct IP address or hostname at this step. Entering the information of another storage enclosure will lead to loss of data on that storage. 5 The main menu is displayed. Select option 2 to partition the storage, create the XFS filesystem and mount it. Confirm whether you want to delete event logs from the storage. 6 Select the number of loops to configure: 2 or 4. 7 If the script detects a previous configuration on the storage, it will ask you whether you want to keep it. Answer No if you want to start with a fresh configuration. 8 The script partitions the storage, creates the XFS filesystem and the mount point and then mounts the storage. When the operation completes you are returned to the main menu. Type 6 to exit the configuration utility. After configuration, the storage spends a few hours initializing. During this time, performance is not optimal. You can monitor the status of the drives by logging into the RAIDar Storage Management utility. 1 In a web browser enter the IP address of the top storage controller, for example: http://10.0.0.2. 2 Log in. The default username is "manage" and the default password is "!manage" 3 Click on each of the Vdisks. The Current Job row in the table indicates the progress of the initialization operation. Configure XR storage Create LUNs 1 In a terminal, as root, run /usr/discreet/DKU/current/Utils/Storage/XR/XR_config.pl. The XR Configuration Utility exits without configuring your storage if any of the following is true: ■ The total number of disks is not a multiple of 12. ■ One of more of the enclosures does not have the correct firmware. ■ When using two sets of enclosures, the number of expansion chassis attached to each XR RAID enclosure is not the same. ■ An odd number of enclosures in a 4-loop configuration. Only even numbers of enclosures are supported. 2 The script displays information about the storage, and if a LUN configuration already exists on the storage, you are prompted for confirmation to overwrite that configuration. 24 | Chapter 1 Flame Premium Installation and Configuration WARNING LUN setup destroys data on the device. 3 The utility detects the number of enclosures and drives and presents you with a list of options. Choose 2 to create LUNs with a sector size of 512 bytes. This is the optimal sector size for XFS DAS (direct-attached) storage of Creative Finishing applications. 4 Choose 2-loop or 4-loop configuration. 4-loop configurations are only supported for XR 6412 and XR 6500 storage. The utility creates LUNs on your storage. This process might take a few minutes. 5 When the LUN creation process completes, you are prompted to create the XFS filesystem. ■ If configuring arrays with two XR enclosures, type N . If you answer Y (the default) by mistake, you get another chance to answer no after the system rescans the disks. Do not create the filesystem until you have create LUNs on all enclosures. ■ If you have only one XR enclosure choose Y to create the XFS filesystem, Create the XFS filesystem 1 After choosing Y, and type Yes to confirm the detected devices. The configuration utility partitions the storage array, groups the partitions into a logical volume, creates the XFS filesystem on the volume, and mounts the volume to /mnt/StorageMedia on an HP Z800, or /mnt/stoneMedia on older workstations. If the storage driver does not reinitialize quickly enough after LUN creation, the filesystem creation step may fail, and the XR Configuration Utility posts an error like: "Can't open /dev/sdb1 exclusively. Mounted filesystem?" The filesystem will appear mounted. Type pvdisplay -v in the terminal to verify that the physical volume, volume group and logical volume were created. 2 Exit the configuration script with x. 3 Even though your storage array is usable at this point, the drives are still initializing following the LUN creation. Your storage operates at reduced performance until the initialization process completes. This might take a few hours. To check the progress of the initialization run the command /usr/discreet/DKU/current/Utils/Storage/XR_config.pl --arrayStatus 4 Once the initialization process completes, create a back-up of the storage configuration with the command: /usr/discreet/DKU/current/Utils/Storage/XR_config.pl --saveConfig. Arrays with two enclosures 1 After creating the LUNs on the first set of enclosures, power off the workstation, disconnect the storage enclosures, and connect the second set of enclosures, then power the workstation back on. 2 Create the LUNs. 3 Power off the workstation again, connect both sets of enclosures to the workstation. 4 Power the workstation back on and Create the XFS filesystem. To perform only the filesystem creation operations: 1 In a terminal, as root, run /usr/discreet/DKU/current/Utils/Storage/current/XR_config.pl --createFS. The configuration utility partitions the storage array, groups the partitions into a logical volume, creates the XFS filesystem on the volume, and mounts the volume. This is the same as running the XR_config.pl with no parameter, and choosing option 4 from the main menu. 2 Type Yes to confirm. 3 Following LUN creation, drive initialization may take a few hours. The storage array is usable during this time but operates at reduced performance. To check the progress of the initialization, run /usr/discreet/DKU/current/Utils/Storage/XR_config.pl --arrayStatus 4 Once the initialization process completes, back up the storage configuration: /usr/discreet/DKU/current/Utils/Storage/XR_config.pl --saveConfig. Install Linux | 25 How to power storage on or off Power your system and storage up or down in the proper sequence. An incorrect power up sequence can mean your system does not recognize all drives. Power on a system: 1 Ensure your workstation is shut down. 2 Power up the XE expansion enclosures. 3 Power up the XR RAID controller enclosures. 4 Wait about 90 seconds for all the drives to spin up. Their lights are solid green when they are spun up. 5 Power on your workstation. Power off a system: 1 Shut down your workstation. 2 Shut down the XR RAID controller enclosures. 3 Shutdown the XE expansion enclosures. Manually configure media storage Overview This section provides advanced instructions for manually configuring a storage array. Normally, you do not need to perform any of these tasks, as they are all automatically performed by the XR Configuration Utility. This utility is installed with the DKU and automates the LUN creation process. NOTE Make sure you do not re-partition the system drive or any other disks that you want to preserve as they are. Partitioning destroys all data on the disks. Creating Hardware LUNs LUNs, also referred to as Logical Units or Logical Drives, are groups of disk drives that are striped together to provide optimal performance and RAID protection. Once configured, LUNs are seen by the Linux operating system as if they were single disk drives. For systems with two sets of enclosures, you have to configure one set at a time with the XR Configuration Utility. Connect the first set of enclosures, and use the utility to configure it. When done, disconnect the first set and connect the second set. When the second set of enclosures is configured, re-connect both sets. To configure LUNs on XR-series storage: 1 Open a terminal and log in as root and run /usr/discreet/DKU/current/Utils/Storage/current/XR_config.pl. The utility detects whether a LUN configuration exists on the storage attached to that workstation. 2 If a LUN configuration already exists on the storage, you are prompted for confirmation to overwrite that configuration. WARNING LUN configuration is destructive. Make sure you want to overwrite an existing configuration before you confirm. 3 After the script detects the number of enclosures and drives, it prompts you to indicate the filesystem your storage uses. Type 2. 26 | Chapter 1 Flame Premium Installation and Configuration 4 When asked if you have a 2-loop or a 4-loop configuration, select the option that applies to your storage. The XR Configuration Utility configures your storage. 5 Type x to exit the XR Configuration Utility. 6 Reboot your workstation, so that the newly-created LUNs are rescanned by the operating system. The XR Configuration Utility exits without configuring your storage if any of the following is detected: ■ An incorrect number of disks. The total number of disks must be a multiple of 12. ■ One or more of the enclosures do not have the correct firmware. ■ In a dual RAID enclosure environment, the number of expansion chassis on each RAID enclosure is not the same. ■ An odd number of enclosures in a 4-loop configuration. Only even numbers of enclosures are supported. Partitioning Disks or LUN devices as Primary Partitions To achieve optimal performance, each disk or LUN in the array should be partitioned as a single primary partition. On storage arrays with 450 GB drives, use the parted utility to create GPT (GUID Partition Table) type partitions. On arrays with smaller drives, use the fdisk utility to create Linux LVM type partitions. To partition disk or LUN devices with 450 GB drives or larger: 1 Reboot your system to reload the fibre channel adapter drivers. 2 Open a terminal, and log in as root and view a list of disks or LUN devices detected by the operating system, using the following command: fdisk -l | grep dev. Identify the disk or LUN devices that are part of the storage array to be configured with a standard filesystem. These devices will be re-partitioned. 3 Use the parted command to re-partition each disk device identified in the previous step: /sbin/parted -s -- <disk name> mklabel gpt mkpart primary 0 -1 where <disk name> is the name of a disk device identified in step 1, without a partition number, such as /dev/sdb. 4 Repeat for each disk. To partition disk or LUN devices with drives smaller than 450 GB: 1 Reboot your system to reload the fibre channel adapter drivers. 2 Open a terminal, and log in as root and view a list of disks or LUN devices detected by the operating system: fdisk -l | grep dev. Identify the disk or LUN devices that are part of the storage array to be configured with a standard filesystem. These devices will be re-partitioned. 3 If you plan to configure a standard filesystem on a former Stone FS storage array, delete the volume label and volume table on each LUN device that is part of the storage array. Type the following command for each LUN device: dd if=/dev/zero of=<LUN device> count=4096 Where <LUN device> is the device name of a LUN in your storage array, such as /dev/sdc. WARNING When using the dd command, be very careful to not delete your system drive (usually /dev/sda) or any other drive aside from the LUNs in your storage array. 4 Use fdisk to re-partition each disk device identified in the previous step: fdisk <disk name> where <disk name> is a disk device name without a partition number, such as /dev/sdf. The fdisk utility starts, checks the disk device, and then displays its prompt. NOTE When fdisk starts, a warning about the number of disk cylinders may appear. You can disregard this warning. Install Linux | 27 5 Type n to display the New partition creation menu. fdisk displays the type of partitions you can create (primary or extended). 6 Create a primary partition on the disk device by typing p at the prompt. 7 When prompted to enter a partition number, type 1 to make the primary partition the first one on the LUN. NOTE You may have to delete pre-existing partitions by entering d when prompted, and repeating step 3. 8 When prompted to set the starting cylinder number, press Enter twice to accept the defaults, which are the first and last cylinder on the device. The fdisk prompt reappears. 9 Type t to set the partition type. You are prompted to enter the hexadecimal code of the partition type to be created on the LUN. 10 Type 8e to set the partition type to Linux LVM. fdisk sets the partition as Linux LVM and the following output appears: Changed system type of partition 1 to 8e (Linux LVM) 11 Type w to save the new partition table. 12 Repeat steps 2 through 9 for each disk or LUN device identified in step 1. Assembling the Disk or LUN Devices into a Logical Volume After you have formatted each disk or LUN device as a partition, you must assemble the LUNs into a single logical volume on which you create the XFS filesystem. This procedure does not cover creating fault-tolerance and assumes that the LUNs are RAID-protected, as is the case with Stone Direct XR-series arrays. To assemble a logical volume: 1 Verify that the disk or LUN devices are detected by the operating system: fdisk -l | grep dev All devices appear in a list similar to the following example (your values may vary): /dev/sdb1 /dev/sdc1 /dev/sdd1 /dev/sde1 1 1 1 1 180482 180482 180482 180482 1449713663+ 1449713663+ 1449713663+ 1449713663+ ee ee ee ee EFI EFI EFI EFI GPT GPT GPT GPT Partitions created with the parted command for arrays with 450 GB disks are marked “EFI GPT”. Partitions created in fdisk for arrays with smaller capacity disks are marked “Linux LVM”. Other devices of different types may be listed before and after the GPT or LVM devices. 2 Create a physical volume on each of the devices: pvcreate <list of devices> where <list of devices> is a list of all the devices in the storage array. For example, if you have four devices, ranging from /dev/sdb1 to /dev/sde1, you would type: pvcreate /dev/sdb1 /dev/sdc1 /dev/sdd1 /dev/sde1. The physical volumes are created. TIP You can use the command pvremove to delete any erroneously entered devices. 3 Verify that the physical volumes were initialized correctly: pvscan -v. A list of all of the physical volumes you created appears. The following sample output is for the previous example of 4 physical volumes created on devices /dev/sdb1 through /dev/sde1: Walking through all physical PV /dev/sdb1 lvm2 [2.03 TB / PV /dev/sdc1 lvm2 [2.03 TB / PV /dev/sdd1 lvm2 [2.03 TB / PV /dev/sde1 lvm2 [2.03 TB / Total: 4 [8.10 TB] / in use: volumes 2.03 TB free] 2.03 TB free] 2.03 TB free] 2.03 TB free] 0 [0 ] / in no VG: 4 [8.10 TB] 28 | Chapter 1 Flame Premium Installation and Configuration 4 Create the volume group “vg00” from the physical volumes you created in the preceding step: vgcreate vg00 <list of volumes> where <list of volumes> is the list of physical volumes you created in the preceding step. TIP You can use the command vgremove to delete any erroneously entered volume. 5 Verify the volume was created and obtain the value of the “Free PE / Size” field: vgdisplay -v. In the output, find the line that contains the “Free PE / Size” field and write down the value of the “Free PE”. For example, in the following example output the “Free PE” value is 2124556. Free PE / Size 2124556 / 8.10 TB 6 Create a new logical volume on “vg00”: lvcreate -l <Free_PE_value> -i <#_of_physical_volumes> -I 32 -n lvol1 vg00 where <Free_PE_value> is the “Free PE” value you noted in the preceding step and <#_of_physical_volumes> is the number of physical volumes. If we continue with the example used in the previous steps, you would type: lvcreate -l 2124556 -i 4 -I 32 -n lvol1 vg00. The output confirms the creation of the logical volume: Logical volume “lvol1” created NOTE If the command outputs several lines about a file descriptor leaked on lvdisplay invocation, ignore them. 7 Check if the adsk_lvm startup script has been installed by the DKU to enable automatic logical volume reassembly upon reboot: chkconfig --list | grep adsk_lvm. If the script is properly configured, the command output is: adsk_lvm 0:off 1:off 2:on 3:on 4:on 5:on 6:off. If the command output is different, enable the script with: chkconfig --add adsk_lvm chkconfig adsk_lvm on Creating the XFS Filesystem on the Logical Volume After having created the logical volume, you are now ready to create and mount the XFS filesystem. To create and mount an XFS filesystem: 1 Identify the optimal agsize value for your array by running the mkfs.xfs command: mkfs.xfs -d agcount=128 -f /dev/vg00/lvol1. This command displays diagnostics information similar to the following (your values may differ): meta-data=/dev/vg00/lvol1 agcount=128, agsize=1066667 blks = sectsz=512 attr=0 data = bsize=4096 blocks=134400000, imaxpct=25 = sunit=16 swidth=64 blks, unwritten=1... 2 From the diagnostic information printed in the previous step, note: agsize on the first line, sunit and swidth on the fourth line. 3 Depending on the values of sunit and swidth, calculate a new agsize value using one of the following three methods: ■ If the values of sunit and swidth are both equal to 0, multiply the agsize value by 4096. For example (your values will differ): 1066667 * 4096 = 4369068032. Proceed using the value calculated above as the new agsize value. ■ If the command displays a warning message about the agsize being a multiple of the stripe width, multiply the agsize value by 4096, and subtract the sunit value multiplied by 4096. For example (your values will differ): 1066667 * 4096 = 4369068032 16 * 4096= 65536 4369068032 - 65536 = 4369002496 Install Linux | 29 Continue using the value calculated above as the new agsize value. ■ If the values of sunit and swidth are not equal to 0, and no warning message appears, proceed to step 4 using the agsize value displayed by the mkfs.xfs command in step 1. 4 Run mkfs.xfs again to create the XFS filesystem on the device /dev/vg00/lvol1 using the value calculated in one of the previous steps: mkfs.xfs -d agsize= <new agsize> -f /dev/vg00/lvol1. The filesystem is created on the storage array. NOTE If the command fails, redo your calculations starting from step 1. 5 Verify that the storage can be mounted by running one of the following commands: ■ For HP Z800 systems: mount /mnt/StorageMedia ■ For older systems: mount /mnt/stoneMedia The storage should mount, as the DKU installation script should have created the mount point directory for your storage (/mnt/StorageMedia on HP Z800 workstations, or /mnt/stoneMedia on older workstations), as well as the corresponding entry in the /etc/fstab file. If you receive an error message and the storage does not mount, follow the instructions in the next section to manually mount the storage. Manually Creating a Mount Point and Mounting the Storage If the mount point directory for your storage was not created automatically by the DKU, or if the storage does not mount, create the mount point and mount the storage manually: 1 Create the directory that will serve as the mount point for the filesystem, if it does not exist. For example: mkdir /mnt/StorageMedia WARNING Do not use the word “stonefs” as the name for your mount point directory. “Stonefs” is a reserved word, and can cause issues if used as the mount point directory name. 2 Mount the XFS filesystem from the logical volume /dev/vg00/lvol1 on the directory you created in the previous step. For example: mount -av -t xfs -o rw,noatime,inode64 /dev/vg00/lvol1 /mnt/StorageMedia . The filesystem is mounted as /mnt/StorageMedia. 3 Confirm that the storage is now mounted: df -h. The output should list /dev/mapper/vg00-lvol1 mounted on your mount point directory. 4 Append a line to /etc/fstab so the filesystem is mounted at startup, for example: /dev/vg00/lvol1 /mnt/ StorageMedia xfs rw,noatime,inode64 5 Optional: Confirm that the filesystem can mount automatically by rebooting the workstation and using the command df -h again. Install Creative Finishing software Install the software with a GUI: 1 Open a terminal as root. Go to the application installation directory and start the application installation script with the command ./INSTALL_SOFTWARE, where SOFTWARE is the name of the software to be installed, e.g. ./INSTALL_FLAME. If installing an educational version, add the switch --edu, e.g. ./INSTALL_FLAME --edu. The installation script verifies the installation packages and checks your system for previously-installed versions of the application. To use the command line installer, use the switch --noui. 2 The graphical installer launches. 3 Select a media storage device and folder. 30 | Chapter 1 Flame Premium Installation and Configuration 4 If your system has a customized xorg configuration, you are prompted to overwrite the file, or not. 5 Once the install has finished, logout of the root user, and login with the application user (e.g. Flame). The password null, there is no password set. 6 You can now further configure the application with the graphical Setup interface by clicking the link on the desktop. Prepare the installation media Check the release announcement to find out on what media the installers are available. Major releases are distributed on a USB device. To mount a USB device: ■ Attach the device. Log in to the terminal as root. On Red Hat 6, change directory to the USB mount point at /media/AUTODESK/. On Red Hat 5, continue with the following steps. ■ Use the dmesg command to output something like sdf: sdf1 to list a recent device connected. Or list the devices attached to your system with the command: fdisk -l | grep "/dev/sd". The device assigned to the USB device should look similar to /dev/sds or /dev/sde ■ On a fresh Red Hat 5 installation, automount is enabled , but execution from the device is disabled by default. So you must enable it: 1 unmount the USB drive with eject /<mountpoint> or eject /dev/<device id>. 2 Create a mount point directory for the disk with mkdir /mnt/usbdisk. 3 Mount the device mount -o shortname=winnt /dev/<device>1 /mnt/usbdisk. Or from the GUI browse to /dev, right-click the USB device, and choose Mount. Software is sometimes distributed as tar files. To extract from a tar file: 1 In a terminal, as root, use the md5sum command to verifty the checksum matches the md5sum listed in the checksum file. 2 Extract from the tar archive with tar -xvf filename.tar. Install Lustre stand-alone Lustre is included in the Install Creative Finishing software (page 30) process. The following is for a stand-alone Lustre installation. Prerequisites ■ Prepare the installation media (page 31) to access the install directory. ■ If you need to change your system date or time, do it before installing the application. To install Lustre: 1 In a terminal, as root, go the the install directory and run ./INSTALL_LUSTRE 2 If prompted with a message asking if you would like to automatically run Backburner Server on this machine, click Yes. The Lustre application, as well as supporting software (Backburner, Wiretap, Wiretap Gateway, the server) are installed. A new user account is created for the version of Lustre you just installed. 3 Configure Lustre. Install Creative Finishing software | 31 Uninstall 1 If you are logged in as the application user in KDE, log out and log back into KDE as root. 2 From the KDE menu, choose Autodesk > Remove Software. 3 Select the packages you want to uninstall in the RPM list on the left (click Select All to select all the packages), then click the arrow to move them to the RPM uninstall list on the right then click Next. 4 In the Choose folders window choose the application directories you want to remove from the /usr/discreet directory, and click Next. 5 In the confirmation dialog click Uninstall & Remove. The uninstallation starts and displays details on the process. 6 Optionally delete the log files associated with a given application version in /usr/discreet/log, or /var/log/ for Flame. Software configuration Application setup can be done via the graphical setup utility which can be accessed from an icon on the desktop. You can also configure the software by editing configuration files. General Video Device The video card used to connect to the VTR and broadcast monitor. Sets the video device keyword in /usr/discreet/[product_name]/cfg/init.cfg. Audio Device The device used for audio output. Sets the video device keyword in /usr/discreet/[product_name]/cfg/init.cfg. Reserved Application Memory The amount of memory allocated to frame buffers used by modules such as the Player, Action, Input/Output clip. Set to Automatic unless you are troubleshooting. Sets the video MemoryApplication keyword in /usr/discreet/[product_name]/cfg/init.cfg. Network Panel Display The behaviour of the Network Panel. Show Mounted (default) displays only the framestores known to be available. Show All displays all known framestores without checking their status. Sets the NetworkPanelDisplay keyword in /usr/discreet/[product_name]/cfg/init.cfg. Default Web Browser The browser used to browse the documentation and to view an archive's HTML tables of contents. Set to open to use the default system browser. Sets the DefaultWebBrowser keyword in /usr/discreet/[product_name]/cfg/init.cfg. Archive Sets the destination directory. Its default value is /usr/discreet/archive. You can make the target directory relative to the home directory of the application by prefixing the path with a tilde (e.g. ~/archive). To save table of contents in a directory relative to the project directory, refer to the ARCHIVELIBRARY keyword section of the project config file. The ArchiveLibrary keyword of the project config file, if set, has precedence over this one. Sets the ArchiveLibrary keyword in /usr/discreet/[product_name]/cfg/init.cfg. Audio Device The device used for audio output. Sets the video device keyword in /usr/discreet/[product_name]/cfg/init.cfg. Preview Video Preview Device keyword specifies the device used for the graphics-to-video display. Sets the VideoPreviewDevice keyword in /usr/discreet/[product_name]/cfg/init.cfg. Vtr Vtr Identifies video tape recorders that can be used for clip I/O. Any enabled VTR can be selected for a project, regardless of the project's video I/O timings. Sets the Vtr keyword in /usr/discreet/[product_name]/cfg/init.cfg. 32 | Chapter 1 Flame Premium Installation and Configuration Media Storage Media Storage Configures /usr/discreet/sw/cfg/stone+wire.cfg. Backburner Local Server Setting The network name of the workstation running the Backburner Manager. In a standalone setup, use localhost (the default). In a render-farm setup, enter the name of the dedicated Backburner Manager workstation. Xorg.conf Screen Selection Configures /etc/X11/xorg.conf. Configure media storage This is necessary for new installations. For an upgrade you might need to upgrade projects to the current version and transfer clip libraries. Configure your application to use the media storage filesystem 1 Ensure the disk array or SAN storage is connected to your workstation and powered up, and that a UNIX-compatible filesystem exists on the storage. 2 In a terminal, as root, stop Stone and Wire with the command: /etc/init.d/stone+wire stop 3 Create the Managed Media Cache directory or directories: ■ Create a point for your storage e.g. mkdir -p /mnt/StorageMedia. Do not use the reserved word “stonefs” in the directory name. For a DAS, the DKU installer should have already created a mount point for it at /mnt/StorageMedia (for HP Z800 workstations) or /mnt/stoneMedia (for older workstations). ■ Mount the filesystem e.g. mount -av -t xfs -o rw,noatime,inode64 /dev/vg00/lvol1 /mnt/StorageMedia. To automatically mount at boot, create an entry for it in the /etc/fstab. ■ On the mounted filesystem create the Managed Media Cache directory. The name should include the partition name and the hostname. Set permissions for the directory to be readable, writable, and searchable by the owner and its group, and readable and searchable by all: 1 mkdir -p /mnt/StorageMedia/smoke1/p7 2 chown -R root:users /mnt/StorageMedia/smoke1/p7 3 chmod -R 775 /mnt/StorageMedia/smoke1/p7 ■ Optionally create separate mount points and Managed Media Cache directories for each additional volume. The DKU only creates the mount point and /etc/fstab entry for the initial volume /dev/vg00/lvol1. 4 Configure Stone and Wire by editing the the following keywords in /usr/discreet/sw/cfg/stone+wire.cfg. Usage is documented in comments in the file. This file can also be edited with the graphical Setup utility. ■ Path ■ Name ■ Shared ■ [DefaultFileFormats] ■ SymlinkAcrossFilesystems Software configuration | 33 5 If this is the first filesystem you are configuring for this workstation: Get the FRAMESTORE ID, e.g. grep "FRAMESTORE" /usr/discreet/sw/cfg/sw_framestore_map and use the ID value to update /usr/discreet/sw/cfg/sw_storage.cfg e.g. [Framestore] ID=myworkstation 6 Optionally Configure bandwidth reservation (page 45). 7 Restart Stone and Wire with: /etc/init.d/stone+wire restart 8 Check the filesystem is mounted: /usr/discreet/sw/sw_df. Any project created in your application after this point has the new standard filesystem partition as its primary partition. Any pre-existing projects are unaffected by this setting and remain associated to their respective partitions. Single workstation rendering In a standalone deployment, all the Backburner and creative application components needed for background processing are installed on a single workstation. Lustre Lustre can work with streaming media-such as Red (.r3d) files-in two distinct ways. In the simplest configuration, Lustre reads material natively through the Wiretap Gateway. In this case, the Wiretap Gateway decodes the media on-the-fly, immediately returning proxy-quality images for use in Lustre. As shown in the following illustration, Backburner is not needed. As in the native workflow, Lustre browses storage devices via the Wiretap Gateway. Here, however, transcoding jobs are sent directly from the Lustre UI to the Backburner Manager. The Backburner Manager sends the job to the Backburner Server, which invokes the Autodesk MIO Adapter processing engine to carry out the transcoding. The MIO Adapter reads from storage directly and writes its results to the Wiretap Gateway. The Backburner Monitor can optionally be used to monitor job progress. Background I/O Background I/O is a media management tool for performing I/O with minimum impact on the performance of the creative workstation. The tool has both a command-line and an embedded interface, and can: ■ Transfer clips using Wire ■ Publish clips ■ Stonify soft-imported clips ■ Resize clips ■ Generate proxies for clips The embedded version of the tool makes use of Backburner for two operations only: to transfer clips using Wire and to generate proxies for clips. The other operations to not require Backburner. In contrast, the command-line version of the tool uses Backburner for all operations. Stone and Wire are automatically installed during installation of the Visual Effects and Finishing application. Not all Backburner components may have been installed during product installation. The Backburner Web Monitor and Backburner Web Server are optional, for the purposes of Background I/O. Requesting a “Background Wire” transfer from the Clip Library menu invokes Backburner. The Visual Effects and Finishing application submits the job to the locally-installed Backburner Manager which invokes the 34 | Chapter 1 Flame Premium Installation and Configuration Backburner Server, which calls the Wire daemon to carry out the task. Monitoring is embedded in the Visual Effects and Finishing application. It can also be done using the Backburner Web Monitor (optional). To set up background I/O in Visual Effects and Finishing, on a workstation with a Visual Effects and Finishing application and all Backburner components installed. 1 Check that the Backburner Manager and Backburner Server are installed and set to run as daemons by running chkconfig --list | grep -i Backburner. You should see output like: backburner_manager 0:off 1:off 2:on 3:on 4:on 5:on 6:offbackburner_server 0:off 1:off 2:on 3:on 4:on 5:on 6:off. Levels “3”, “4”, and “5” must be “on” for the daemons to start automatically. 2 Check /usr/discreet/backburner/cfg/manager.host contains the token localast, so that Backburner Server can locate the manager. If you made a change, reinitialise the Backburner Manager and Backburner Server: /etc/init.d/backburner restart 3 Check the BackburnerManagerHostname keyword in /usr/discreet/<product_home>/cfg/init.cfg is set to the IP address of a valid manager, in this case localhost. BackburnerManagerHostname is also used to indicate the manager for Burn and Cleaner XL. If either of these other systems has been set up for this seat of the creative application, you can indicate that manager instead. 4 Restart the Visual Effects and Finishing application so it picks up the new configuration file setting and begins communicating with Backburner. Check that background I/O is using Backburner by importing an image sequence from the filesystem into a clip library and generating proxies for it, in the background: 1 Create a new project for which proxy generation is always on or is conditional. To do this, edit the project's settings in the Preferences Menu, Project Management group. It is not recommended that you enable proxies or otherwise change proxy settings for an existing project, since it can result in the generation of proxies for all clips already in the project in the foreground, an operation that can take considerable time. The purpose of this procedure is to test proxy generation in the background. 2 In the library, click Import Image. 3 In the Clip Media group, enable Soft-Import Full Res. 4 In the Background Operations group, enable Generate/Import Proxies. The Proxy Generation button in this area of the software does not determine whether proxies are generated or not. It specifies how they are generated: in the background (with Backburner) or the foreground (Backburner not needed). 5 Use the file browser to select and import media files from your filesystem. 6 Verify the proxies are generated in the background, in a timely manner: ■ View progress of the background I/O in the Background Import/Export Queue. In the Library menu, click the Background Monitor button (Ctrl+0). ■ Review messages appearing in the message bar in the Message History window. In the Preferences menu, Miscellaneous group, click the Message History button (Ctrl+Alt+F7). ■ If the playable thumbnails indicate “Pending Render” for too long, this is a sign that the proxies are not being generated. Check background I/O using Backburner is operational by importing an image sequence from a remote clip library into a local clip library. This operation makes use of the background I/O Wire feature, as well as Backburner. In general, requesting a “Background Wire” transfer from the Clip Library menu invokes Backburner and the Wire transfer 1 Check that Autodesk Stone and Wire must be installed on a remote system. Stone and Wire are automatically installed during the installation of all Visual Effects and Finishing applications. 2 Create a new project or open an existing project. Software configuration | 35 3 Disable any settings that might cause proxies to be generated or the clip to be resized by editing the project's settings in the Preferences Menu, Project Management group. 4 Open the clip library and enable the following: ■ Dual Library View ■ Show All Libraries ■ Copy on Drag 5 In the Clip Library menu, click Network. The local system is listed at the top of the network library. Remote systems are listed below it, in alphabetical order. 6 Select a library on a remote system and exit the network library. Selected libraries are highlighted and marked with a “C” (connect) or “AC” (auto-connect). 7 Return to the clip library, navigate to the remote library in one view, and the local library in the other. 8 In the clip library Wire Options area, enable Background Wire. 9 Drag and drop a clip from the remote library to your local library. 10 Visually verify the selected clip is successfully copied. Additional verification is also possible: ■ View progress of the background I/O in the Background Import/Export Queue. In the Library menu, click the Background Monitor button (Ctrl+0). ■ Review messages appearing in the message bar in the Message History window. In the Preferences menu, Miscellaneous group, click the Message History button (Ctrl+Alt+F7). Configure Backburner services Backburner Server and Backburner Manager are installed with the Creative Finishing application, and are set to run automatically when the workstation starts. By default, the Backburner Server installed on the workstation communicates with the locally-installed Backburner Manager. To configure Backburner services: 1 Ensure Backburner Server is set to run automatically on your workstation: chkconfig –-list | grep -i backburner_server. If backburner_server is not set to “on” for run levels 3, 4, and 5, enable it: 1 chkconfig backburner_server on 2 /etc/init.d/backburner_server restart 2 Decide if you want to use the locally installed Backburner Manager, or a centralized Manager installed on another system in your network. See Deploying on networked hardware (page 81). 3 Make sure the following Backburner keywords in the /usr/discreet/<product_home>/cfg/init.cfg file are configured properly. Keyword Setting BackburnerManagerHostname <hostname> Set <hostname> to the hostname or IP address of the workstation running Backburner Manager. This hostname or IP address must match the one in the /usr/discreet/backburner/cfg/manager.host file. If it does not, background Wire transfers will fail. BackburnerManagerPriority <priority> Set <priority> to a value from 0 to 100. The default is 50. 36 | Chapter 1 Flame Premium Installation and Configuration Keyword Setting BackburnerManagerGroup <groupname> Set <groupname> to the name of a group of computers on a Burn® rendering network. For example, if the name of the group is “renderfarm1”, you would set this keyword to BackburnerManagerGroup renderfarm1. Event triggers Overview You can set up your Creative Finishing software to execute custom external commands when certain events take place inside the application, for example, when the project or the video preview timing is changed by the user. The /usr/discreet/<application_home>/python/hook.py Python script contains a number of predefined functions that are called by the Creative Finishing application when certain events occur. These functions are referred to as “hooks”. You can enter Python commands directly inside these functions, or use the functions to call an external script or executable. To be able to run shell commands or external script using the os.system Python statement, add the following line in the hook.py script, before the definition of the first hook: import os ■ Functions in hook.py receive certain predefined parameters from the application. These parameters contain specific details on the event that occurred in the application, for example, the name of the project loaded. Use these details to better customize the response action. ■ Functions in hook.py are executed in a separate thread from the application. Thus, the application does not wait for a hook function to complete. ■ When a function is called by the application, it executes with the privileges of the user account from which the application was launched. Make sure your custom code in the hook.py file does not call external scripts or executables that require more elevated user privileges. ■ Functions do not return any value to the application that called them. Thus, the application cannot provide any feedback on whether your custom code executed properly or not. ■ Actions defined in the hook.py file for one version of an application are not automatically used by other versions or applications. To carry your code over to another application or version, you must manually copy your customized hook.py file into the python subdirectory of that application’s home directory. Check the latest hook.py file after installing new versions of the software, to see any new functions that may have been added. void projectChanged(string projectName) This hook is called by the Creative Finishing application when the project is changed in the Project Management section of the Preferences menu. This hook is not triggered when a project is loaded at application start-up. This function receives the following parameter from the application. projectName A string that specifies the name of the loaded project. For example, My Project. Usage example: def projectChanged(projectName): print projectName Software configuration | 37 When the project is changed in the application, this example function outputs the name of the project in the application terminal. void previewWindowConfigChanged(string description, int width, int height, int bitDepth, string rateString, string synchString) This hook is called by the Creative Finishing application when the video preview timing is changed in the software. This function receives the following parameters from the application. The values of the parameters are extracted by the application from the VideoPreviewDevice keyword in the init.cfg software initialization configuration file. description A string that describes the video preview timing, as listed in the init.cfg file. For example, 1920x1080@5994i_free. width An integer that specifies the width of the preview timing. For example, 1920. height An integer that specifies the width of the preview timing. For example, 1080. bitDepth An integer that specifies the bit depth of the preview timing. For example, 12. rateString A string that specifies the refresh rate of the preview timing. For example, 6000i. syncString A string that specifies the sync source of the preview timing. For example, freesync. Usage example: def previewWindowConfigChanged(description,width,height,bitDepth,rateString,syncString): print os.system(“/usr/bin/mySyncChangeScript --sync=”+syncString) When the video preview timing is changed in the application, this example function calls a custom external script, mySyncChangeScript, and passes the sync value to it. That external script could use the sync value, for example, to trigger a sync change on the sync generator. The output of the external script is displayed in the application terminal. void archiveSegmentComplete(string segmentPath, string archiveName, string archivePath, int status, string statusMessage, bool archiveComplete) This hook called when Creative Finishing software completes writing an archive segment. segmentPath Path to the file segment that just completed, an empty string for non-file archives. archiveName Name of the archive that was entered when formatting the archive. archivePath Path to the archive that was entered when formatting the archive. status Zero if successful, non-zero if there was an error. statusMessage Description of the error. Empty string if status is 0. archiveComplete True if all segments of the archive are complete. void batchExportBegin(string nodeName, string exportPath, string namingPattern, string resolvedPattern, int firstFrame, int lastFrame ) This hook is called before an export begins. The export is blocked until this function returns. For stereo export this function is called twice (once for the left channel, and then once for the right channel). If the function returns a valid path, the exported files are exported to that path. nodeName Name of the export node. 38 | Chapter 1 Flame Premium Installation and Configuration exportPath Export path as entered in the application UI. namingPattern List of optional naming tokens as entered in the application UI. resolvedPattern Full path to the first frame that will be exported with all the tokens resolved. firstFrame Frame number of the first frame that will be exported lastFrame Frame number of the last frame that will be exported. return Value A new exportPath. Empty strings or non-string return values are ignored, while invalid paths cause the export to fail with a path error. void batchExportEnd( string nodeName, string exportPath, string resolvedPattern, int firstFrame, int lastFrame, string gatewayClipPath, int versionNum, bool aborted ) This hook is called when an export ends. This function is a complements the batchExportBegin function described above. For stereo export this function is called twice (once for the left channel, and then once for the right channel). If the function returns a valid path, the exported files are exported to that path. nodeName Name of the export node. exportPath Export path as entered in the application UI. resolvedPattern Full path to the first frame that will be exported with all the tokens resolved. firstFrame Frame number of the first frame that will be exported. lastFrame Frame number of the last frame that will be exported. gatewayClipPath Path to the gateway clip (empty if not created). versionNum Current version number of export (0 if unversioned). aborted True if the user aborted the export before it was complete. Standard filesystem maintenance Performance of a filesystem depends on a number of factors, including the following: ■ Hardware and operating system ■ Fragmentation. Fragmentation is a phenomenon that consists of a file being broken into several blocks, which are stored in non-contiguous sectors on the disk. This decreases filesystem performance, as it takes a lot of time to retrieve and reassemble the scattered pieces of the file before making it usable. ■ I/O sizes ■ Filesystem and tuning parameters. Standard filesystems tuned for a specific file format can under-perform for other file formats. For instance, a filesystem optimized and capable of delivering real-time performance for 2K 10-bit DPX files delivers lower real-time performance for SD media. ■ Free space available and fill rate ■ Locality of reference. This principle states that files used in the context of the same application or procedure (for example, consecutive frames in a timeline) should be as close to each other as possible on the disk, in order to minimize seek times between two successive I/O operations. Locality of reference is good in the case of frames written on an empty partition, and decreases as the filesystem fills up and becomes fragmented. ■ Concurrent I/O and metadata operations ■ Number of I/O threads and processes in use at a given time. Multi-threaded I/O is the use of multiple parallel I/O threads within a disk read process. This method allows the RAID array to optimize the fetching of multiple blocks of data. Software configuration | 39 Troubleshoot the filesystem This section describes some common filesystem problems and steps you can take to solve them. When troubleshooting storage or wire issues, start by verifying that Stone and Wire processes are running properly, and by checking the log files. Verifying that Stone and Wire Processes Are Running There are five processes that must be running for Stone and Wire to work: ■ sw_serverd ■ sw_probed ■ sw_dbd ■ sw_bwmgr ■ ifffsWiretapServer. This process is started by the sw_wiretapd script. To verify that Stone and Wire processes are running: 1 Run: ps -ef | grep sw_. This command should return several lines similar to the following: root 9447 1 0 Feb25 0:00:35 /usr/discreet/sw/sw_probed --daemonize root 9455 1 0 Feb25 0:00:35 /usr/discreet/sw/sw_dbd -d root 9463 1 0 Feb25 0:08:11 /usr/discreet/sw/sw_bwmgr -d root 9472 1 0 Feb25 0:08:11 /usr/discreet/sw/sw_serverd -d root 9513 1 0 Feb25 0:00:00 /bin/sh /usr/discreet/sw/sw_wiretapd 2 To verify that the ifffsWiretapServer process is running, type: ps -ef | grep Wire The command should return a line similar to the following: root 9522 9513 0 Feb25 00:03:29 /usr/discreet/wiretap/2010/ifffsWiretapServer -c /usr/discreet/wiretap/cfg/wiretapd.cfg 3 If Stone and Wire processes are not running, start them. Starting Stone and Wire Processes All Stone and Wire processes should start when you restart your system. If they are not running, check that they are configured to run and then restart Stone and Wire. To start Stone and Wire processes, you must modify a text file listing all processes. 1 Use a text editor to open the Stone and Wire configuration file /etc/sysconfig/stone+wire. The file should include the following: dl_stone=on dl_wire=on dl_wiretap=on dl_vic=on 2 If any of the processes you need are set to “off”, change them to “on”. Restart Stone and Wire. To restart Stone and Wire, type /usr/discreet/sw/sw_restart. If any Stone and Wire process is still not running, check the error logs. Checking Stone and Wire Error Logs Every Stone and Wire process has a log file. You can find these log files at /usr/discreet/sw/log. 40 | Chapter 1 Flame Premium Installation and Configuration The current log file is named <process>.log, where <process> is the name of the Stone and Wire process or daemon. The next time Stone and Wire creates a log file for the process, it renames the previous log file by adding a number to the file name. For example, the sw_served process log file is named sw_served.log. The next time the process is launched, the first log file is renamed to sw_served.log.1. Each time Stone and Wire creates a new log file, the old log file is renamed by incrementing the number that appears at the end of the filename. You can also use the terminal to list the most recent version of the log files. Type the following in a terminal: ls -altr Enabling Verbose Stone and Wire Driver Error Reporting Use the swr_set_debug utility to enable verbose reporting of Stone and Wire driver errors. When you turn on error reporting, Stone and Wire outputs error messages in the following locations: ■ /var/log/messages ■ Console window NOTE You must disable verbose error reporting after you have finished troubleshooting. The messages generated by this process can fill up the system drive. To enable verbose Stone and Wire driver error reporting: 1 Run: /usr/discreet/sw/tools/swr_set_debug <level> where <level> is the number representing the verbosity of the report. Choose from one of the following levels: ■ 1 - Turns on error reporting. This is the default level. ■ 2 - Provides more detailed reporting. All operations and errors are logged. ■ 0 - Disables error reporting. 2 Check the terminal and the log files for error information. Troubleshooting Missing Frames If the application cannot find some of the frames referenced by your clips, the following error message is displayed when the application starts: ■ In the terminal: WARNING: <nnnn> <volume_type> frames are missing on this volume; see the application installation guide for corrective measures. Where <nnnn> represents the number of missing frames, and <volume_type> can be stonefs or standardfs. ■ In the application start-up screen: VOLUMEMGT: WARNING: Some frames not found;see the application installation guide for corrective measures. By default, the message only appears in the terminal. To have it appear also in the start-up screen, open the ~/.cshrc file in a text editor and add the following on a new line: setenv DL_IC_NOTIFY_MISSING 1 . Then, log out of the KDE desktop, and log back in. The error message appears in one or both of the following situations: ■ Some clips in your libraries or desktops reference missing frames on a remote volume. ■ Some clips in your libraries or desktops reference local frames that no longer exist. To identify the type of issue: 1 Open a terminal and type: vic -v <volume_name> -s remote -s lost where <volume_name> is the name of the affected volume, for example, stonefs or standardfs. The output of this command should be similar to the following: Software configuration | 41 Checking libraries for remote and lost frames... /usr/discreet/clip/stonefs/My_Project1/editing.000.desk has none /usr/discreet/clip/stonefs/My_Project1/Default.000.clib references 30 missing frames. /usr/discreet/clip/stonefs/My_Project2/editing.000.desk has none /usr/discreet/clip/stonefs/My_Project2/from_caplan.000.clib references 70 remote frames 2 Depending on the result of the previous command, do one of the following: ■ For clips with frames listed as missing, contact your local Autodesk support representative for help on resolving this issue. ■ For clips with frames listed as remote, perform the following procedure. To recover remote frames: 1 Archive all clip libraries that are reported as containing remote frames. In the previous example, the fourth library (from_caplan) contains remote frames. 2 Rename the libraries you just archived, such as by adding the remote suffix to the library name. 3 Restore the clip libraries from the archive. All the frames referenced by the clips should now be stored locally. 4 Delete the original libraries. Verifying that the Disks are Available to the Operating System If your disks or logical drives are not visible in the output of the sw_df command, verify that they are visible to the operating system. 1 Run the command that will provide you with a list of all the controllers or disks on your system. cat /proc/scsi/scsi. A listing of all controllers and hard disks attached to your system appears. 2 If any controllers or hard disks in your configuration are not visible, check the connections and cabling to your storage device, and ensure that your storage hardware is running. If you must reconnect or tighten connections to your storage hardware, it is a good idea to rescan your hardware to ensure that the operating system is able to communicate with it. 1 Unload the Stone and Wire driver: /etc/init.d/stone+wire unload 2 Unload and reload the fibre channel drivers. Type one of the following sequence of commands, according to your fiber channel card model. ■ If you have a QLogic-based card, type: rmmod qla2300 rmmod qla2400 rmmod qla2xxx rmmod qla2xxx_conf modprobe qla2xxx modprobe qla2300 modprobe qla2400 ■ If you have an ATTO-based card, type one of the following sequences of commands: For HP Z800 workstations, type: rmmod celerity8fc modprobe celerity8fc For older HP workstations, type: 42 | Chapter 1 Flame Premium Installation and Configuration rmmod celerityfc modprobe celerityfc NOTE Depending on the storage you are running, your system might not use all of the drivers listed. If your system does not use a driver listed, the commands to unload or reload the drivers will fail. You can ignore these failures. They just indicate that the driver is not required by your system. 3 Reload the Stone and Wire driver: /etc/init.d/stone+wire reload. Your filesystem should now be mounted. Verifying Disk Usage You cannot write to storage partitions that are completely full. To see if the filesystem is full, run /usr/discreet/sw/sw_df. If your filesystem is full or almost full, consider deleting or archiving older material from clip libraries to free disk space. VTR archiving in Creative Finishing applications requires free space on the framestore to generate slates, test patterns, headers, and audio encoding. You can also clear the Undo Buffer to free up space. Clearing the Undo Buffer The Undo Buffer takes up space on your filesystem. Consider clearing it if your filesystem is full or almost full to free disk space. WARNING Clearing the Undo Buffer cancels any undoable operation. Consider what operations might be stored in the Undo Buffer before you clear it. To clear the Undo Buffer: 1 Open your Creative Finishing application, and go into the Preferences menu. 2 Click Clear Buffer in the Undo section. Solving a Framestore ID Mismatch The framestore ID must match the filesystem ID for the workstation to mount your filesystem. If the IDs do not match, you must change your framestore ID to ensure that all hosts on your Wire network have a unique ID. 1 Open a terminal as root, and run cat /usr/discreet/sw/cfg/sw_storage.cfg. The output of the command includes the [Framestore] section, which lists the framestore ID. 2 Open /usr/discreet/sw/cfg/sw_framestore_map in a text editor. The sw_framestore_map file includes a section similar to the following: [FRAMESTORES] FRAMESTORE=london HADDR=172.16.129.32 ID=32 The Framestore ID value in the sw_framestore_map file must match the Filesystem ID value listed in the sw_storage.cfg file. NOTE If the framestore ID in the sw_storage.cfg file is not the same as the one in the sw_framestore_map file, the ID listed in sw_storage.cfg has priority. 3 Change the Framestore ID value in the sw_framestore_map file to match the Filesystem ID listed in the sw_storage.cfg file. Software configuration | 43 NOTE The last sequence of numbers in the IP address defined by the HADDR keyword in the sw_framestore_map file does not have to match the Framestore ID. These values are often the same by default, but it is not a requirement for Stone and Wire operation. 4 Save and close the file. 5 Restart Stone and Wire: /usr/discreet/sw/sw_restart 6 If you continue to get error messages, contact Customer Support. Solving a Partition ID Conflict Each partition must have a different partition ID. If there are multiple partitions using the same ID, you will receive an error message. To solve a Partition ID conflict: 1 Note the ID listed in the error message. 2 Stop Stone and Wire: /etc/init.d/stone+wire stop 3 Open the /usr/discreet/sw/cfg/stone+wire.cfg file in a text editor. 4 Find the [PARTITION#] section, where # is the ID listed in the error message. Change the # for an unused ID. Partition identifiers go from 0 to 7, giving a total of 8 possible partitions. Stone filesystem and standard filesystem partitions share the same pool of identifiers, but only standard filesystem ones are listed in stone+wire.cfg. It is recommended to start numbering standard filesystem partitions at 7, decrementing with each additional standard filesystem partition. 5 Save and close the stone+wire.cfg file. 6 Start Stone and Wire. Type: /etc/init.d/stone+wire start. A message appears in the terminal indicating that Stone and Wire is restarted. 7 Start your Creative Finishing application to verify that the partition ID conflict is resolved. Removing Invalid Frame References from the Stone and Wire Database Stone and Wire has a database inconsistency detection mechanism. If you change the framestore ID of a Stone filesystem or standard filesystem partition in your system without reformatting the Stone and Wire database, the inconsistency check mechanism detects invalid frame references in the database, and prevents the Stone and Wire database server (sw_dbd) from starting. If you receive an error message that sw_dbd could not be started when you start a Creative Finishing application or Stone and Wire, perform the following steps to determine if the problem is related to invalid frame references, and to remove those references from the Stone and Wire database. To remove invalid frame references from the Stone and Wire database: 1 Open a terminal and log in as root. 2 Search the /usr/discreet/sw/log/sw_dbd.log file for the text “Bad framestore ID” e.g.: cat /usr/discreet/sw/log/sw_dbd.log | grep -i bad/ framestore/ id ■ ■ If the search returns one or more lines, the problem is related to invalid frame references. Perform the remaining steps in this procedure to clean up the Stone and Wire database. If the search returns no results, the problem is not related to invalid frame references. Read the /usr/discreet/sw/log/sw_dbd.log file to determine the cause of the problem. 3 Stop Stone and Wire: /etc/init.d/stone+wire stop 4 Clean up the Stone and Wire database by typing: /usr/discreet/sw/sw_dbd -C. A message is displayed in the terminal asking you to confirm the deletion of invalid entries from the database. 44 | Chapter 1 Flame Premium Installation and Configuration 5 Type Y to confirm the operation. Invalid entries are removed from the Stone and Wire database. 6 Restart Stone and Wire: /etc/init.d/stone+wire start Control fragmentation Filesystem fragmentation is directly related to the amount of mixing and interleaving of blocks of data of different sizes, and is aggravated by multiple I/O clients concurrently writing data to the partition. Although some standard filesystems (such as XFS) feature advanced space allocation techniques, which make them more resistant to fragmentation, this problem still occurs as the filesystem's free space decreases and frequent file deletion, creation, and resizing operations take place. Here are some steps you can take to counter filesystem fragmentation: ■ Avoid storing mixed resolution projects on a standard filesystem partition. Workflows where many different media formats are used simultaneously tend to become fragmented more rapidly than if a single resolution media format is used consistently. ■ Separate your media and metadata partitions. The worst contributors to fragmentation on a media storage device are the files used to store metadata. These include clip libraries, setup files, and databases. It is recommended to keep all metadata on a separate partition. NOTE You may keep the audio data on the same partition as the frames. This has no significant impact on performance or filesystem fragmentation. ■ Use the defragmentation tools provided by your filesystem vendor on a regular basis. NOTE Defragmentation tools are often unable to realign files based on their locality of reference. Therefore, it is advisable to reinitialise your partition periodically, by archiving your projects, formatting the partition, and restoring the archives. Limit concurrent usage A filesystem performs best when only one process is accessing it. In some workflows this is not always possible, which leads to a temporary decrease in performance. Furthermore, mixing read and write operations can have a detrimental effect on throughput. Autodesk strongly advises against allowing any third-party application to access the storage at the same time as your Creative Finishing applications. The I/O operations from such applications may drastically decrease the bandwidth available to your Creative Finishing application and also contribute to filesystem fragmentation. NOTE Unlike direct attached storage (DAS), a Storage Area Network (SAN) is typically designed to handle concurrent usage and will perform better under such situations. Configure bandwidth reservation This section provides guidelines for configuring the standard filesystem Bandwidth Manager on the Flame or Inferno workstation to have storage bandwidth adequately distributed between the local application and the remote Flare workstations. Stone and Wire provides a mechanism to reserve storage bandwidth for Creative Finishing applications and tools that use a local mount point to a standard filesystem (DAS or SAN) as their media storage. This ensures that the local application gets the bandwidth it requires and that real-time playback on the local system is Software configuration | 45 not jeopardized by requests from concurrent processes, including access from remote hosts such as Flare workstations. NOTE Bandwidth reservation policies apply only to I/O requests from Creative Finishing applications and tools. They cannot protect your storage bandwidth from I/O requests coming from third-party processes or user interactions. It is your responsibility to avoid using third-party tools with the frame storage. See Limit concurrent usage (page 45). Bandwidth requests are managed by the Stone and Wire Bandwidth Manager, based on the parameters in the /usr/discreet/sw/cfg/sw_bwmgr.cfg configuration file. When Stone and Wire starts up, the Bandwidth Manager automatically creates a [Device] section in the configuration file for each partition declared in /usr/discreet/sw/cfg/stone+wire.cfg. The Manager sets total theoretical read and write bandwidth values for each device, as well as the default reservation values. Adding a New Device to the Bandwidth Manager Use the instructions in this section if you want additional standard filesystem mount points (such as mount points to SAN volumes or to any other standard filesystem volume that is not present in the /usr/discreet/sw/cfg/stone+wire.cfg file) to be managed by the Bandwidth Manager. You may also use these instructions as guidelines for understanding and editing the settings in the predefined [Device] sections of the configuration file. Each partition managed by the Bandwidth Manager must have a [Device] section associated to it in the /usr/discreet/sw/cfg/sw_bwmgr.cfg file. To add a new device to the Bandwidth Manager: 1 Open the /usr/discreet/sw/cfg/sw_bwmgr.cfg file in a text editor. 2 Add a new [Device] section at the end of the file, using the following syntax: TIP You may also copy and paste an existing [Device] section, and change its parameters. [Device<device_number>] Path<path_number>=<device_mount_point> TotalAvailableReadBandwidth=<total_read_bandwidth> TotalAvailableWriteBandwidth=<total_write_bandwidth> DefaultReservation=<default_reservation> where: ■ <device_number> represents the number of the [Device] section, starting at 0. For example: [Device0] ■ Path specifies the partition's mount point. Since a partition can have several paths, <path_number> represents the number of the current path, starting at 0 for each device. For example: Path0=/mnt/XYZ Path1=/usr/local/ABC ■ TotalAvailableReadBandwidth represents the estimated total reading bandwidth of the device, in megabytes per second. Based on this value, and on the amount of active reservations for the current partition, the Bandwidth Manager decides whether new reservation requests are granted or rejected. For example: TotalAvailableReadBandwidth=200 ■ TotalAvailableWriteBandwidth represents the maximum estimated writing bandwidth of the device, in megabytes per second. If this parameter is not specified, its value defaults to the value of TotalAvailableReadBandwidth. For example: 46 | Chapter 1 Flame Premium Installation and Configuration TotalAvailableWriteBandwidth=150 NOTE The total bandwidth parameters are estimates of the theoretical maximum bandwidth of the partition. The actual bandwidth is affected by several factors, including multiple applications trying to concurrently read or write to it. The Bandwidth Manager continuously measures partition performance and dynamically maintains the actual total available bandwidth for each partition. ■ DefaultReservation sets the bandwidth assigned by default to applications that are denied a reservation request or that don't have individual or group reservations associated to them. The value is expressed in megabytes per second. For example: DefaultReservation=10 3 After setting up all the partition parameters described above, you can start defining reservations for the current partition. 4 Save and close the configuration file, and restart Stone and Wire by typing: /etc/init.d/stone+wire restart Reserving bandwidth for an application You may define a bandwidth reservation for each Creative Finishing application or tool that uses a certain partition. By default, a group reservation for the major Creative Finishing applications (Inferno, Flame, Flint, Smoke, and Backdraft Conform) running locally is already defined. Remote applications are identified by application-specific tokens, workstation host name, as well as the user name under which the application is executed. You can use any or all of these parameters to create detailed bandwidth reservation rules. You can also customize the way bandwidth is redistributed in low bandwidth situations. In low bandwidth situations, instead of reducing all reservations proportionally towards zero, the bandwidth manager first reduces the bandwidth of each process towards the low-bandwidth value specified for that process, and attempts to maintain that minimum for as long as possible. If the device bandwidth keeps degrading, then the bandwidth manager starts reducing bandwidth proportionally from the low-bandwidth values towards zero. In the following example, low-bandwidth values are not specified in the Bandwidth Manager configuration file. The diagram illustrates the way the Bandwidth Manger redistributes device bandwidth in such a case, as the total available bandwidth decreases from 800 MB/s to 420 MB/s and then to 320 MB/s. Note how bandwidth is proportionally reduced for all processes. Software configuration | 47 In the following example, low-bandwidth values are configured for each process (300 MB/s for Flame, 100 MB/s for Flare, 10 MB/s for Wiretap and 10 MB/s for Wire). The diagram illustrates the way the Bandwidth Manger redistributes device bandwidth as the total available bandwidth decreases from 800 MB/s to 420 MB/s and then to 320 MB/s. Note how the Bandwidth Manager keeps the bandwidth for each application at the low bandwidth watermark. When total available device bandwidth falls under the sum of the low bandwidth watermarks, the Bandwidth Manager decreases bandwidth for all processes proportionally towards zero. 48 | Chapter 1 Flame Premium Installation and Configuration Perform the steps in the procedure below to set up an optimal bandwidth reservation for the local application, as well as for remote workstations, based on your system configuration. To set up bandwidth reservation: 1 Open a terminal and log in as root. 2 Open the /usr/discreet/sw/cfg/sw_bwmgr.cfg file in a text editor. 3 Locate the [Device] section that corresponds to the standard filesystem partition (by default [Device0]), and uncomment it if it is commented out. 4 Add a Reservation line for each local or remote application, using the following syntax: Software configuration | 49 Reservation<number>=<application_name> [<user_name>] [@<workstation_hostname>] <reading_bandwidth> [(<low_reading_bandwidth>)] [<writing_bandwidth>][)<low_writing_bandwidth>)] where: ■ <n> is the ID of the reservation, starting at 1 for each device. ■ <application_name> represents the name of the application that needs the reserved bandwidth. This parameter can take one of the following predefined values: “inferno”, “flame”, “flint”, “flare”, “smoke”, “stonifiseTool”, “publishTool”, “S+W Server”, “IFFFS Wiretap Server”, or “IFFFSTool” for other Creative Finishing command-line tools. The “smoke” token also includes Backdraft Conform. NOTE Application names must use quotes if they contain spaces. ■ <user_name> is the Linux user account under which the remote application is running. This parameter is optional. ■ <workstation_hostname> is the hostname of the remote workstation that is accesing the storage. This parameter is optional. ■ <reading_bandwidth> represents the minimum reading bandwidth required by the application, expressed in megabytes per second. If more bandwidth is available on the device, the Bandwidth Manager gives the application as much bandwidth as possible. ■ <low_reading_bandwidth> represents the minimum value towards which reading bandwidth for this application is reduced in low-bandwidth situations. The Bandwidth Manager will attempt to maintain this minimum bandwidth allocation for as long as possible. If the device bandwidth keeps degrading, then the bandwidth manager starts reducing bandwidth proportionally from the low-bandwidth values towards zero for all applications. ■ <writing_bandwidth> represents the minimum writing bandwidth required by the application, expressed in megabytes per second. If more bandwidth is available on the device, the Bandwidth Manager gives the application as much bandwidth as possible. If this parameter is not specified, the Bandwidth Manager automatically calculates a default value, based on <reading_bandwidth> and on the total configured read and write bandwidth values of the device. ■ <low_writing_bandwidth> represents the minimum value towards which writing bandwidth for this application is reduced in low-bandwidth situations. The Bandwidth Manager will attempt to give the application this minimum amount of bandwidth for as long as possible. If the device bandwidth keeps degrading, then the bandwidth manager starts reducing bandwidth proportionally from the low-bandwidth values towards zero for all applications. For example: Reservation1=flame 500 (300) Reservation2=flare artist@flare1 200 (100) 5 Save and close the configuration file, and restart Stone and Wire by typing: /etc/init.d/stone+wire restart NOTE Bandwidth for an application is actually reserved only when that application is running. Processes that do not have a bandwidth reservation setting in the sw_bwmgr.cfg file fall under the default combined reservation of 10 MB/s. Defining groups of applications The Stone and Wire Bandwidth Manager allows you to set up bandwidth reservations for custom groups of applications. All the applications in a group will share the same reservation. By default, the configuration file already contains a definition for the “IFFFS” group, which includes the “inferno”, “flame”, “flint”, and “smoke” application tokens. 50 | Chapter 1 Flame Premium Installation and Configuration To set up bandwidth reservation for a group of applications: 1 Open the /usr/discreet/sw/cfg/sw_bwmgr.cfg file in a text editor. 2 In the [Groups] section, add a line for each group of applications you want to define. The syntax of the line is as follows: <group_name>=<application_name> <application_name> where: ■ <group_name> is the custom name of the group. The group name must not contain spaces and must not be the same as one of the predefined application names. ■ Each <application_name> represents the name of an application in the group. This parameter can take one of the following predefined values: “inferno”, “flame”, “flint”, “smoke”, “stonifiseTool”, “publishTool”, “S+W Server”, “IFFFS Wiretap Server”, or “IFFFSTool” for other Creative Finishing command-line tools. 3 After you have defined the group, go to the [Device]section for the appropriate partition and add a Reservation line for the new group. The syntax is the same as when adding a reservation for a single application. For example (using the “IFFFSTools” group from the previous step): Reservation1=IFFFSTools 50 50 4 Save and close the configuration file, and restart Stone and Wire by typing: /etc/init.d/stone+wire restart For additional information on all the parameters in the Bandwidth Manager configuration file, and for a list of application names you can use when defining reservations, see the comments inside the configuration file. Monitor partition fill rate As each disk in a storage array gets filled near capacity, once a certain threshold is reached, its overall read and write performance decreases. Free up space on your array by archiving and deleting projects. Or reinitialise your partition, making sure that you restore from archive only the projects you need to work on. For an XFS filesystem on direct-attached storage, keep the partition fill rate below 90% for best performance. The Stone and Wire database may experience corruption if there is too little available space on the disk where clip metadata is stored. Configure the Stone and Wire database to automatically shut off when there is too little free space: 1 As root, open the /usr/discreet/sw/cfg/sw_dbd.cfg file in a text editor. 2 In the [Disk Check] section uncomment the Enabled and Minimum keywords. 3 Set the value of the Minimum keyword to the minimum allowed amount of free space on the disk (in Megabytes). If the amount of free space on the disk falls below this threshold, the Stone and Wire database daemon automatically shuts off. 4 Optional: uncomment the Timeout keyword, and set how often the Stone and Wire daemon should check the available disk space. The default value is 30 seconds. 5 Save and close the configuration file. 6 Restart Stone and Wire: /etc/init.d/stone+wire restart. Software configuration | 51 Use multi-threaded direct input output Most filesystems perform best when the I/O is parallelised across multiple threads/processes and sent asynchronously. This allows the device to buffer I/O operations and reorganize requests for optimal performance. Some applications perform better than others on the same storage device, based on how they perform their I/O. Applications that use single-threaded buffered I/O can be slow. Your Creative Finishing applications use multi-threaded asynchronous direct I/O when capturing, playing back, and performing other I/O intensive operations. Make sure that any third-party application you use in conjunction with your Creative Finishing application or to handle your media files uses direct I/O. This prevents needless CPU-intensive in-memory data copying, thus maintaining optimum storage performance and freeing resources for your Creative Finishing application. Enable media pre-allocation By default, disk space for video files is allocated on-the-fly as the files are rendered or written. Concurrent I/O operations from multiple clients or background processes can generate frames with poor locality of reference, which leads to clip fragmentation and decreases playback performance. To prevent this problem, Stone and Wire provides media file pre-allocation mechanisms that reserve the necessary space on the disk before the actual writing of the media files takes place. Pre-allocation reserves as many available contiguous disk sectors as needed for the file sequence to be written. Depending on the filesystem you are using, you may choose between two media pre-allocation methods. FALLOCATE The disk space needed for the file is allocated and filled with zeroes. On most filesystems, the performance impact of this operation is as serious as when writing the actual file. RESERVE The disk space needed for the file is reserved, but not written to. The apparent size of the frame remains zero. This operation is much faster than FALLOCATE, but is supported only on certain filesystems, such as XFS. By default, pre-allocation is turned off in Stone and Wire (the method is set to NONE). In order to enable it, you must modify a parameter in the stone+wire.cfg configuration file. NOTE This is not a global setting. Pre-allocation must be individually enabled for each partition. To enable media pre-allocation for a partition: 1 Open the/usr/discreet/sw/cfg/stone+wire.cfg file in a text editor. 2 Uncomment thePreallocation parameter in the section that configures the respective partition (for example [Partition7]). 3 Change the parameter value from the default NONE to the pre-allocation method you want to use. For example: Preallocation=RESERVE 4 Save the configuration file and restart Stone and Wire. NOTE If you are using XFS and unwritten extent flagging was disabled when creating the filesystem, the RESERVE pre-allocation method is not available for it. For more information about unwritten extent flagging, consult the Man page for mkfs.xfs. Type man mkfs.xfs in a terminal. 52 | Chapter 1 Flame Premium Installation and Configuration Test filesystem performance Each standard filesystem comes with its own set of tools to measure performance. XFS comes with the xfs_db command line tool for troubleshooting various aspects of the filesystem, including fragmentation. For information on using the xfs_db tool, consult the man page for xfs_db. Stone and Wire comes with a command line tool to measure filesystem performance called sw_io_perf_tool. This tool simulates I/O requests (audio and/or video) that would be issued by the Creative Finishing application, and reports the throughput and maximum latency of all the requested I/O operations. Use sw_io_perf_tool to measure read and write performance of a volume declared and mounted by Stone and Wire. Several options are available to simulate many file formats and writing/reading patterns. Launching the command will display a list of available options. To list all options available for sw_io_perf_tool, open a terminal and type /usr/discreet/sw/tools/sw_io_perf_tool -h . To test a standard filesystem partition's performance for a specific resolution, Run /usr/discreet/sw/tools/sw_io_perf_tool <-p #> <options> where <-p #> specifies a partition ID (0 to 7), and<options> can be a combination of several media format attributes. ./sw_io_perf_tool -p7 -v 1600,900 The command displays the throughput (in MB/sec) and maximum IO latency detected (in ms), as shown below: Running Stone+Wire IO Performance Test (Partition 7) Video: 1 stream(s) of HDTV @ 10bit Proxy: None Audio: None This test will take approximately 11 seconds *** Read Test *** Bandwidth: 275.456 MB/s Frame Rate: 39.351 Frames/s You may also use sw_io_perf_tool with custom resolutions. For example, to test read performances for frames with a width of 1600 pixels and a height of 900 pixels: Max Latency: 335.284 ms Notes: ■ The command can be run while other operations are ongoing to simulate how the application will behave under these conditions. ■ The media used by sw_io_perf_tool is allocated and freed automatically. ■ sw_io_perf_tool will not reserve any bandwidth on the storage device. ■ Partitions/Volumes must be properly configured in the Stone and Wire configuration file. Start the software You must license Inferno, Flame Premium, Flame, Flint, Smoke Advanced, Smoke and Backdraft Conform, and where applicable, Lustre, before you can start. Start the software | 53 If you use the pen and tablet while the application is starting, the tablet will fail to initialise. Press Shift+T+Insert to initialise the tablet if it does not function during a work session. To start the software for the first time: 1 Log into your workstation and do one of the following: ■ WARNING The -v option deletes all material on the framestore. Use this option only if you have no material that you want to preserve on the framestore. If this is the first time you are starting the software on a new system, in a terminal run /usr/discreet/<product_home>/bin/startApplication -v to initialize the framestore and start the application. For information on all the command-line options available, see Command line start-up options (page 54). ■ To start the application without initializing the framestore, double-click the application icon on the Desktop. 2 The Autodesk Master Systems Software License Agreement appears. To view the License Agreement in another language, click a language tab at the bottom of the License Agreement window. 3 Read the text carefully, and click I Accept if you agree to all the terms in the License Agreement. 4 Use the Project Management menu to create a project and a user. For information on creating projects and users, see the application Help. 5 Click Start or press Enter. 6 When prompted to confirm the framestore initialisation, answer “yes”. After a few moments, the following message appears: Startup complete. You are ready to start working in the application. If you see a splash screen rather than the application interface, click anywhere on the screen. Starting Lustre for the First Time ■ To start Lustre, log into the application’s Linux user account and double-click the Lustre icon on the KDE desktop. Lustre starts. ■ When the Lustre UI appears, you can begin working. For a new project, this includes: ■ Creating the project and setting its parameters (such as logarithmic or linear colour space). For information on creating projects and users, see the “Project Management” topic in the Lustre Help. To open the Help, press Shift+F1. ■ Specifying the location of footage. Command line start-up options There are a number of options you can use with the application start-up command under special circumstances. More than one start-up option can be specified on the command line. Start-up options are case-sensitive. To start the application using a command line option, open a terminal and type: <application_name> - <option> b <file> Execute batch. B Prevent the broadcast monitor from blanking when an image viewer or Player is not displayed. The broadcast monitor then displays the screen content that is displayed in the corresponding region. This is hardware dependent and may not work on all hardware configurations. c <filename.cfg> Use a configuration file other than the default, where <filename.cfg> is the name of the file. The specified file supersedes the default configuration file. If you do not use this option, the application looks first for init.cfg, and if that is not found, it looks for flame.cfg, inferno.cfg, smoke.cfg, or conform.cfg. d Debug. 54 | Chapter 1 Flame Premium Installation and Configuration f <filename> Use a custom menu file, where <filename> is the name of the menu file. For information on custom menus, see the application help. F Force the application to install new fonts that you added to the /usr/lib/DPS/outline/base directory (and the /usr/lib/DPS/AFM directory, if you have also installed the corresponding font metric file). See the application help. h To list all start-up options, use the h option. Running the application start-up command with the -h option does not launch the application. H Specify the remote host name. i Remove all clips from the project. J <project> Define the project that appears in the Project Management menu when you start the application, where <project> is the name of the project you want to use. If you start the application with both the J and U options, the application bypasses the Project Management menu. L Disable writing to the .log file. The application keeps a log of your actions in a text file in your application home directory. This file is usually cleared and recreated every time the application starts. M Define the amount of memory assigned to frame buffering. This option overrides the default settings, or if it has been uncommented, the value set by the MemoryApplication keyword in the init.cfg file. N Use Burn. p <n> On multi-processor machines, start the application using less than the full array of processors, where <n> is the number of processors to be used. Normally, the application uses all available processors. U <user> Define the user that appears in the Project Management menu when you start the application, where <user> is the name of the user you want to use. If you start the application with both the J and U options, the application bypasses the Project Management menu. v Initialise the media storage volume (all projects). WARNING When you use the v option, all data on the storage is deleted, with no possibility of recovery. NOTE Initialising the storage also removes all audio clips from the project. V Start up with workspace. W <workspace> Specify the media storage name. Z Starts the application, and skips the integrity check. Node-locked licensing Node-locked licenses are locked to one computer. ■ All customers receive a temporary node-locked license when they purchase their software. ■ Subscription customers receive a temporary node-locked license when they receive their extension software. All customers must request permanent licenses: ■ Subscription customers have the choice of requesting permanent node-locked or network licenses. Start the software | 55 ■ Customers not on subscription are entitled to only node-locked licenses. 1 If you are installing the application for the first time: 1 Request temporary license codes. For emergencies, you can acquire an immediate temporary emergency license using the emergency license generator at http://melicensing.autodesk.com/templicensing/. A 4-day license code is e-mailed to the address you provide. 1 Start the software you want to license. The License Wizard starts automatically when you launch an unlicensed application. You can also start the Wizard manually, from the Autodesk section in the KDE system menu. 2 In the License Wizard select “No, request a License Code”, and click Next. 3 Select Node-Locked License and click Next. 4 Enter your contact information in the license code request form. The host ID and system serial number of your workstation are automatically filled in. Click Next. 5 Log in to support portal: https://edge.autodesk.com/LicenseAssignment. If you do not have an account on the support portal, email [email protected] to make a request. 6 Follow the links to get the a node-locked license. Your license codes are emailed to you. 2 Install the temporary or permanent license codes. 1 Double-click the application icon on the Linux Desktop to start the application. After a few moments, the License Wizard appears. 2 Select “Yes, install the License Code”, and click Next. 3 Select Node-Locked License and click Next. 4 Paste the license codes you received from Autodesk in the next window. Be very careful to paste the license codes exactly as you have received them. Any incorrect or missing characters will prevent your application from recognizing the license. 5 Click Install to install the license code. Your application is now licensed. License codes are unique for each workstation, and are tied to the system hardware. If you replace major system components in your system, you must request and install a new license code for your software. 6 To add additional license codes you receive from the Licensing Department (such as the DI license), run the License Wizard from the Autodesk section in the KDE system menu. 7 When you receive permanent license codes, install those codes using the same procedure. 3 Start the software (page 53) and accept the license agreement. Network licensing With a network license, you can deploy your Creative Finishing software on any supported workstation in your facility. A license server manages the number and types of licenses you have available. Network licenses are available to customers with subscription to Inferno, Flame, Flame Premium, Smoke Advanced, and Lustre Master Station. Network licenses are also available for Autodesk Flare, Autodesk Burn, and Autodesk Burn for Lustre. All other customers must use node-locked licenses. Choose one of the following network license server models: ■ Single license server. The license server daemon is installed and runs on a sole server. A single license file represents the total number of licenses available on the server. This single license server can reside on a 56 | Chapter 1 Flame Premium Installation and Configuration remote workstation or on the same workstation as your Creative Finishing application. Characteristics of the Single License Server Model : ■ Of the two license server models, this configuration requires the least maintenance. ■ ■ Because all license management takes place on a single server, you have just one point of administration and one point of failure. On the other hand, if the single license server fails, the Autodesk product cannot run until the server is back online. Redundant license server model. In the redundant license server model, you use three Linux servers to authenticate a single license file. One server acts as the master, while the other two provide backup if the master server fails. With this configuration, licenses continue to be monitored and issued as long as at least two servers are still functional. The license file on each server is the same. You install the license server daemon on each server. Characteristicsof the Redundant License Server Model: ■ If one of the three servers fails, all licenses that are managed in the server pool are still available. ■ If more than one server fails, no licenses are available. ■ All three servers must reside on the same subnet and have reliable network communications. The redundant server pool does not provide network fault tolerance. ■ If you reboot one of the license servers or restart one license server daemon you must also reboot/restart all three license servers at the same time so the license servers are synchronized. ■ If one of the three servers is replaced, you must request a new license key from Autodesk Creative Finishing Support Workflow for Configuring a License Server 1 Select a license server. You can install a license server on your Creative Finishing workstation or any other machine on your network. To see if you already have a license server running on a machine, open a Terminal, login as root, and type: chkconfig --list | grep lic. For redundant license servers, select three machines. All must be set to the same date and time. 2 Install the license server software (page 57) on all machines that will be servers. 3 Get the unique host ID of a license server (page 58) for all servers. 4 Request license codes (page 58). 5 Create the workstation license. License the workstation with a local or single remote license server (page 58). Configure the workstation to use a set of redundant license servers (page 60) if using the redundant server model. 6 If using one or more remote license servers: Create a license file for a remote license server (page 59). 7 Start the license server (page 61)(s). 8 To avoid conflicts with other applications or license servers in your facility, you may need to Change the default port used by the license server (page 60)(s). Install the license server software The license server is a Linux daemon that provides concurrent licenses. You can install the license server on a workstation or node in your network, or on any 64-bit system running Red Hat Enterprise Linux Desktop 5.3 with Workstation Option (64-bit), Red Hat Enterprise Linux WS 4, Update 3 (64- bit), CentOS 5.3, or CentOS 4.3. For a redundant network license server configuration, you must install the license server software on all three workstations selected as license servers. To install the license server, as root, run on the ./INSTALL_LICSERV from the software installation directory. Start the software | 57 Get the unique host ID of a license server To get license numbers, you need the host ID of the license server, or servers, in the case of a redundant network configuration. To get the unique host ID of the license serve, in a terminal run /usr/local/bin/dlhostid. The number should look something like 25231AEF83AD9D5E9B2FA270DF4F20B1. Request license codes Request licensing codes from the Autodesk M&E Edge support portal: https://edge.autodesk.com/LicenseAssignment. If you do not have an account on the support portal, email [email protected] to make a request. To request license codes: 1 Make sure you have the unique ID of your single license server (local or remote) or a set of three unique IDs for each server of a redundant network license server configuration ready before you request your license codes. See Get the unique host ID of a license server (page 58). 2 Log in to support portal: https://edge.autodesk.com/LicenseAssignment. 3 Follow the links to set up your license server assets and select the software that you want to access using a network license. Your license codes are emailed to you. License the workstation with a local or single remote license server Create license files ■ For a redundant network license server configuration, you must create the license files for the workstation and license server manually. See Create a license file for a remote license server (page 59) and Configure the workstation to use a set of redundant license servers (page 60). ■ To license the workstation with a local license or a single remote license server, use the license wizard: 1 Start the application. If no license file is found, the License Wizard opens. 2 Select “Yes, install the license code” and click Next. 3 In the License Installation dialog, do one of the following and click next: ■ If the license server is on the same machine as your Creative Finishing application, select Local Network License. ■ If the license server is on another machine, select Remote Network License. 4 Open the license file you received from Autodesk in a text editor or display its contents in the shell. 5 In the Local Network License Installation dialog, select the license text and copy and paste the text into the field. The text should resemble the following: SERVER servername DLHOST03=2BB094B4722BDBECFA218BD3A6BB8F83 VENDOR discreet_l USE_SERVER PACKAGE smokeadvanced_x86_64_r discreet_l \ Ensure the servername (in the first row) is replaced with the actual name of the computer your license server is on. 58 | Chapter 1 Flame Premium Installation and Configuration 6 Click Install. 7 Start the license server (page 61). The license wizard creates the following license files: ■ ■ Workstation license: /usr/local/flexlm/licenses/DL_licenseNetwork.dat For a local license server, it creates the license server license: /usr/discreet/licserv/licenses/DL_license.dat. ■ For a remote license server, you must create the license file for the license server manually. See Create a license file for a remote license server (page 59). Create a license file for a remote license server After you receive your license codes, edit the /usr/discreet/licserv/licenses/DL_license.dat license file on the license server (or all three servers, if you are configuring redundant license servers), and enter the license codes you received from Autodesk. The license information contains keywords that identify the license server, as well as the license strings for products or features. Keyword Description SERVER Specifies the hostname of the license server from which to obtain the license, followed by its dlhostid. VENDOR In Burn, specifies the daemon that is serving the license. DAEMON In Flare, specifies the daemon that is serving the license. USE_SERVER Indicates whether the system should obtain its license from a license server. FEATURE License strings for the software and feature entitlements. To create the license server file on a license server: 1 Log in as root to the license server. 2 Navigate to the licenses directory by typing: cd /usr/discreet/licserv/licenses 3 If the file DL_license.dat does not exist in the directory, create it: touch DL_license.dat 4 Open the file DL_license.dat in a text editor. 5 Enter the information provided by Autodesk in this file. If you are setting up redundant a network license, there are three SERVER strings. It should be similar to the following snippet ■ For Burn: SERVER server DLHOST01=886C2B75E8E57E4B03D784C3A2100AC0 VENDOR discreet_l USE_SERVER FEATURE flameEDU_x86_64_b_2011_1 2011.99 02-oct-2010 \ ■ For Flare: Start the software | 59 DAEMON discreet_l discreet_l USE_SERVER FEATURE flare_x86_64_2011_discreet_l 2011.999 18-nov-2009 8 \ 6D7AE3402ECB46174B70 ck=47 6 Save and close the file. This file sets up the network licenses available for distribution by the license server to the Creative Finishing workstations on your network. Configure the workstation to use a set of redundant license servers To configure the workstation to use a set of redundant license servers, edit as root /usr/local/flexlm/licenses/DL_licenseNetwork.dat. Create it if it doesn't exist. Add the SERVER, VENDOR and USE_SERVER strings provided by Autodesk. It should be similar to the following shortened example: SERVER host01 DLHOST01=886C2B75E8E57E4B03D784C3A2100AC0 27005 SERVER host02 DLHOST01=886C2B75E8E57E4B03D784C3A2100AC1 27005 SERVER host03 DLHOST01=886C2B75E8E57E4B03D784C3A2100AC2 27005 VENDOR discreet_l USE_SERVER This file sets up the floating licenses available for distribution by the license server to the Creative Finishing workstations on your network. Change the default port used by the license server To avoid conflicts with other applications or license servers in your facility, you may need to change the default port setting used by the license server, or license servers in the case of a redundant configuration. This requires a minor change to the DL_license.dat file on your license server(s), as well as on every workstation or node. To change the default port used by a license server: 1 Log in as root to the license server and open /usr/discreet/licserv/licenses/DL_license.dat for editing. 2 Find the SERVER line. By default, no port number is specified at the end of the SERVER line for a single license server and the license server uses default port number in the range of 27000-27009. By default, redundant license servers are set to port 27005. 3 Enter a different port at the end of the SERVER line. The license server can use a default port number in the range of 27000-27009. For example: SERVER server DLHOST01=886C2B75E8E57E4B03D784C3A2100AC0 62222 4 Save and close the file, then verify that the new port settings are correct: /etc/init.d/license_server stop /etc/init.d/license_server start cat /usr/discreet/licserv/log/license_server.log For redundant license servers, reboot each server in close sequence to properly restart the license system. 5 Look for messages similar to the following examples in the output, and verify that the port numbers are what you requested, e.g.: 15:08:49 15:08:49 15:08:49 15:08:49 (lmgrd) (lmgrd) (lmgrd) (lmgrd) lmgrd tcp-port 62222 Starting vendor daemons ... Using vendor daemon port 12344 specified in license file Started discreet_l (internet tcp_port 12344 pid 5013) 60 | Chapter 1 Flame Premium Installation and Configuration 6 Repeat with /usr/local/flexlm/licenses/DL_license.dat for each workstation or node, using the same port as the one you set for the license server. Start the license server NOTE For redundant license servers, reboot each server in close sequence to properly restart the license system. To start the license server: 1 Type the following in a shell: /etc/init.d/license_server start WARNING The license server cannot start unless the license is entered correctly in DL_license.dat. Check the boot.log file to make sure the license server is started and working properly. NOTE The license server starts/stops automatically when the machine is booted/shut down. You can stop and restart the server manually by running one of the following commands: /etc/init.d/license_server stop or /etc/init.d/license_server restart Killing an application If a Creative Finishing application hangs, but you can still interact with the operating system, you can terminate it using either a custom command alias for your application, or the generic Linux kill command in conjunction with the application’s process ID. WARNING These procedures should only be used if the application is hung or otherwise not responding. Killing processes can cause system problems. When you install a Creative Finishing application, a special command alias is defined that can be used to kill all Creative Finishing application processes at once: 1 Open a terminal, and type one of the following commands: ■ kf to kill Flame, Flint or Flare ■ ks to kill Smoke ■ ki to kill Inferno ■ kc to kill Backdraft Conform 2 To verify that all application-related processes have been killed, type: \ps -fu <application account name>. This displays information about all active processes, including the application with which each process is associated, and a process ID number. If all application processes have been successfully killed, this command should return no results. WARNING Never restart an application if there are still processes left over from a previous session. If some processes persist after using the kill alias, perform the following procedure to kill them individually. Use the kill Linux command to kill processes individually, using their process ID number: 1 Press Alt+F3 to send the application to the background. 2 Open a terminal and type: ps -fu <application account name>. This command displays information about all active processes, including the application with which each process is associated, and a process ID number. Start the software | 61 3 Determine the process ID number of the Creative Finishing application. 4 At the command line, type: kill <process number> where <process number> is the process number you determined in the previous step. This command terminates the Creative Finishing process that is currently executing. There may be more than one Creative Finishing process running at any time. For example, there may be one process per CPU, plus some additional processes to manage the framestore. Kill each of these processes. 5 Restart the application. 62 | Chapter 1 Flame Premium Installation and Configuration Install and configure a Flare workstation 2 Installation workflows Prerequisites ■ Check the System Requirements Web page. If upgrading, check that your Linux version is still up-to-date. To determine the Linux version of Red Hat Enterprise or CentOS, in a terminal run: cat /etc/redhat-release ■ Read the Release Notes and Fixed and Known Bugs List. ■ If not using Red Hat, Prepare the CentOS disc (page 64). ■ If you plan to work in a remote connection workflow with Autodesk Flame or Autodesk Inferno, make sure to upgrade the Flame or Inferno workstation to the same software version as you are now installing. To upgrade to a new version, service pack, or extension without reinstalling or reconfiguring the operating system: 1 Install the Autodesk software (page 67). 2 License your software (page 76). Re-licensing is not necessary if you are upgrading to a service pack of the same software version or to a service pack of the same extension. To install from scratch or do a fresh reinstall: 1 Install Linux for Flare (page 64) 2 Install the Autodesk software (page 67). 3 Configure media storage (page 69). 4 License your software (page 76). If you plan to use the software in a remote connection workflow with Flame or Inferno, ensure they have the same software version. 63 Install Linux for Flare Prerequisites ■ Mouse, keyboard and graphics monitor are connected, and the graphics monitor is powered on. ■ If you are using a KVM switch, it is switched to the system on which you want to install Linux. ■ The DVD or CDROM drive is set as the primary boot device in the workstation BIOS. For information on configuring your workstation BIOS, refer to the documentation for your hardware. ■ Get the installer. Major releases are distributed on a USB drive. Service packs or extensions are distributed as a downloadable tar file. ■ If not installing Red Hat, Prepare the CentOS disc (page 64). Procedure 1 Insert the installation disc and reboot the system. The system should boot to the Linux installation disc. If not, check your BIOS settings to make sure the DVD / CDROM drive is set as the primary boot device. 2 At the boot prompt in the installation menu, run ifffsbc linux ks=cdrom to launch the Linux installation. You must use this exact command to start the Linux installation. If you use the default options presented by the Linux installation prompt, the installation proceeds, but the Autodesk kickstart file is not read by the installer, and some important packages required by Autodesk software are not installed. The command launches the Linux installation. The system spends several minutes loading drivers. The installer guides you through the rest of the process. If you experience problems with the graphical Linux installer, reboot your computer and run the installer in low resolution VESA mode by typing linux ks=cdrom xdriver=vesa. If you still experience problems, reboot again and start the installer in text-only mode with linux ks=cdrom text. 3 If you are installing Red Hat Linux, enter your installation number when the Linux installer prompts you to. The number should be included in the package you received from Red Hat, or in your account profile on the Red Hat Web site. Do not skip entering the installation number at this point. If you do not enter the installation number, the installation proceeds, but some important packages are not installed by the Red Hat installer. 4 The installation process may ask you to initialize the system disk. Follow the prompts to initialize the disk, if necessary. Autodesk recommends the following approach when partitioning your system disk: remove all existing partitions, then manually create a /boot partition of at least 100MB, a Linux swap partition of 2048MB, and use the rest of the drive for the root partition. Set the root partition to be a primary partition. 5 The rest of the installation process is automated. The default root password for a Linux installation on a node is password. Prepare the CentOS disc Before installing CentOS distro for non-Autodesk hardware, you must add the Autodesk kickstart file to the DVD or first CD of your distribution so the Linux installer to install some packages. The custom Autodesk DVD of Red Hat Enterprise Linux for Autodesk hardware already contains the Autodesk kickstart file. To copy the kickstart file to the disc. Use the new disc as the DVD or first CD of the CentOS distribution you plan to install on the node. 1 On a computer running Linux and with a CD or DVD burner, log in as root. 64 | Chapter 2 Install and configure a Flare workstation 2 If you did not download your distro as an iso image: 1 Insert the DVD or first CD of your CentOS distribution into the drive. You do not need to mount it. 2 In a terminal, get an ISO image of the disc by typing: dd if=/dev/ <CD/DVD device> of=/<destination path for the extracted ISO image>. For example: dd if=/dev/cdrom of=/tmp/ Centos5.iso 3 Eject the disc. 3 From the installation package, run dist/kickstart/build_kickstart_cd to add the kickstart file to the ISO image of your Linux distribution DVD or first CD. For example: dist/kickstart//build_kickstart_cd RHEL5_CentOS5_kickstart.cfg /tmp/Centos5.iso /tmp/Centos5_KS.iso. 4 Do cdrecord -scanbus to get the address of your CD or DVD writer and use it to address the writer. 5 Burn the new ISO image to a blank disc. For example: cdrecord -v speed=2 dev=0,4,0 /tmp/Centos5_KS.iso. Configure Linux for Flare After booting into your new Linux installation: 1 Change the default root password to secure the system. Log into your system as root, using the default password password, and in a terminal run the passwd command. 2 Disable operating system updates (page 66). 3 Install device drivers (page 67). 4 By default the time zone is set to EST. To change it, log in as root. Right-click the clock, and select Configure Clock from the context menu. 5 Configure basic network settings (page 21) 6 Optional: NO LABEL . 7 Optional: If you plan to install Autodesk Maya on the Flare workstation, install the mesa-libGLw package, that is not installed by default with your operating system. In a terminal, as root, type: yum install mesa-libGLw Configure basic network settings Login as root to edit the files described below in a text editor, and reboot the system for the new configuration to be used. You'll need the following from your network administrator: ■ A unique static IP address and host name for your system ■ The network gateway IP address. ■ The subnet mask of your network. ■ DNS server IP address(es). /etc/sysconfig/network Sample snippet from /etc/sysconfig/network. Install Linux for Flare | 65 NETWORKING=yes HOSTNAME=workstation1 GATEWAY="10.1.0.25" The GATEWAY value is used if no GATEWAY is defined in a network port’s configuration file. /etc/resolv.conf Sample snippet from /etc/resolv.conf nameserver 192.9.201.1 /etc/hosts You may need to edit the loopback setting which may look like 127.0.0.1 vxfhost.localhost.localdomain localhost by default. Optionally add hostname / IP address pairs for other workstations on your network. Sample snippet from file: 127.0.0.1 localhost.localdomain localhost 192.168.0.100 workstation1 /etc/sysconfig/network-scripts/ifcfg-ethn Edit /etc/sysconfig/network-scripts/ifcfg-ethn, where n specifies the ethernet port number, usually 0 for the first on-board port. If your workstation has an add-on ethernet card installed, the Linux operating system may assign ports eth0 through eth3 to the add-on card. In such a case, the on-board Ethernet ports become eth4 and eth5. Optionally set the GATEWAY if not set in /etc/sysconfig/network. Sample snippet from file: DEVICE="eth0" BOOTPROTO="static" IPADDR="192.168.1.100" NETMASK="255.255.0.0" ONBOOT="yes" GATEWAY=192.168.0.1 You'll need the following from your network administrator: ■ A unique static IP address and host name for your system ■ The network gateway IP address. ■ The subnet mask of your network. ■ DNS server IP address(es). Disable operating system updates OS updates may interfere with the application so it is strongly recommended to disable automatic updates, and to decline any offered package upgrades. To disable automatic updates, in a terminal, as root: ■ On Red Hat Linux: chkconfig rhnsd off chkconfig yum-updatesd off /etc/init.d/rhnsd stop /etc/init.d/yum-updatesd stop 66 | Chapter 2 Install and configure a Flare workstation ■ On CentOS chkconfig yum-updatesd off /etc/init.d/yum-updatesd stop Install device drivers After the Linux operating system is installed, perform the following procedure to install the required device drivers for your hardware. Check the system requirements at http://www.autodesk.com/flare-systemrequirements for qualified drivers. To install hardware drivers: 1 In a terminal run init 3 to shut down the graphical environment and run in text mode. 2 Install the NVIDIA graphics driver: ■ Back up your X server configuration file with cp /etc/X11/xorg.conf /etc/X11/xorg.conf.backup. ■ From the directory where the driver installer is, run the installer with: sh <installer_file>. ■ Read and accept the license agreement and accept the default answers to ALL the other questions asked by the installation script. WARNING Answer NO (default) at the end of the install process when you are asked if you wish to update the xorg.conf file. Answering Yes results in undesirable changes to xorg.conf. These changes will prevent Flare from running properly. If you answered Yes by mistake, restore the original xorg.conf file from the backup you created before installing the driver. 3 Optional: If your Flare workstation is running Red Hat Enterprise Linux 5.2, or CentOS 5.2 and you require audio, perform the following tasks to update the ALSA sound driver. You do not need to perform these tasks if your workstation is running version 5.3 of the Linux operating system. ■ From the directory where installer is, uninstall the existing version of the driver: rpm -e --allmatches --nodeps alsa-lib-1.0.14-1.rc4.el5 ■ Install the new driver version: rpm -ivh alsa-lib-1.0.17-1.el5.x86_64.rpm. See the README file included in the ALSA driver tar file for additional details. 4 Optional: If you plan to use a Wacom pen tablet, update the Wacom tablet driver. See the documentation on the Linux Wacom project Web site for instructions on compiling and installing the pen tablet driver on Red Hat Enterprise Linux 5 or CentOS 5: http://sourceforge.net/apps/mediawiki/linuxwacom/index.php?title=Distribution_Specific_Linuxwacom_Installation. 5 Install any other third party drivers required by your hardware. Consult your third party hardware documentation for details. 6 Restart your workstation with the command: reboot Install the Autodesk software 1 Test your Linux environment (page 68). 2 Prepare the installation media (page 31) 3 Install Flare (page 69). Install the Autodesk software | 67 Test your Linux environment If any of these tests fail, contact your hardware vendor, or your Linux vendor for assistance. Autodesk Customer Support does not provide support with Linux administration and configuration. ■ Confirm that you can use Linux in graphical mode at a resolution of 1900 by 1200 pixels. ■ Confirm that the proper version of Linux is installed. In a terminal, as root, run cat /etc/redhat-release The version must match one of the OS versions listed at www.autodesk.com/flare-systemrequirements. ■ Test that the workstation has network access: ping 192.168.0.1 ■ If you are using a Wacom pen tablet, test that the tablet driver works properly, by typing: wacdump /dev/input/wacom. The command should display a number of parameters for the Wacom tablet. As you move the stylus on the tablet, various parameters, such as POS_X and POS_Y should change. ■ If you plan to use audio, test that the ALSA sound driver: 1 Connect a pair of speakers or headphones to the audio output connector of your sound card. 2 Run alsamixer , unmute all sound channels, and set their volume to maximum. 3 Press Esc to quit alsamixer . 4 List the available sound devices by running: aplay -l. 5 Test the sound on one of the sound cards listed by aplay, for example: speaker-test -D”plughw:<card>,<device>” -c2 -twav. Where <card> is the card number, and <device> is the device number, as listed in the output of aplay. If your workstation has several sound cards, make sure you test the one you have plugged your speakers into. If the sound system works properly, you hear a voice in the speakers or headphones, and the command output contains several lines similar to the following: 0 - Front Left 1 - Front Right Time per period = 2.730375 0 - Front Left 1 - Front Right Time per period = 2.986758 Prepare the installation media Check the release announcement to find out on what media the installers are available. Major releases are distributed on a USB device. To mount a USB device: ■ Attach the device. Log in to the terminal as root. On Red Hat 6, change directory to the USB mount point at /media/AUTODESK/. On Red Hat 5, continue with the following steps. ■ Use the dmesg command to output something like sdf: sdf1 to list a recent device connected. Or list the devices attached to your system with the command: fdisk -l | grep "/dev/sd". The device assigned to the USB device should look similar to /dev/sds or /dev/sde ■ On a fresh Red Hat 5 installation, automount is enabled , but execution from the device is disabled by default. So you must enable it: 1 unmount the USB drive with eject /<mountpoint> or eject /dev/<device id>. 2 Create a mount point directory for the disk with mkdir /mnt/usbdisk. 3 Mount the device mount -o shortname=winnt /dev/<device>1 /mnt/usbdisk. Or from the GUI browse to /dev, right-click the USB device, and choose Mount. 68 | Chapter 2 Install and configure a Flare workstation Software is sometimes distributed as tar files. To extract from a tar file: 1 In a terminal, as root, use the md5sum command to verifty the checksum matches the md5sum listed in the checksum file. 2 Extract from the tar archive with tar -xvf filename.tar. Install Flare 1 If you need to change your system date or time, do it before installing the application. 2 Prepare the installation media (page 31). 3 In a terminal, as root, cd to the application installation directory and run the pre-installation script: ./INSTALL_FIRST. This configures some required system settings for the application. 4 Start the application installation: ./INSTALL_FLARE. The installation script verifies the installation packages and checks your system for previously installed versions of the application. This process may take a few minutes. 5 If you are upgrading from a previous version of the application, earlier versions are detected. You are prompted to select one of those versions. Click None for a clean installation, or select one of the previous versions if you want to copy its custom resource and setup directories to the new version. 6 You are prompted to create an application user. Answer Yes to create a Linux user account for the application, or No to run the application with an existing user account. You can select multiple entries. 7 When prompted to configure init.cfg, click OK. The default keyword values in this file are appropriate in most cases. If you need to change some of the settings, scroll through the file and modify keyword values as necessary. ■ If installing for the first time init.cfg appears in a text editor. ■ If you are upgrading the application, the old (previous) and new init.cfg files are opened in xxdiff. The left panel displays the old file. The right panel displays the new one that is installed with your application. 8 If any changes are detected in the /etc/X11/xorg.conf, you are prompted to configure this file. If you modify xorg.conf, you are prompted to restart the X server. When the installation script completes, log out of the Linux desktop and then log in again to restart the X server. ■ To keep the old configuration settings, when the file appears in xxdiff, in the Global menu, choose Select Left, and then, in the File menu, choose Save as Right. If prompted to overwrite, click OK. ■ To use the new configuration file without adding the settings from the old configuration file, just close the program. 9 Select a documentation set to install. 10 The application, as well as WiretapCentral, Wiretap Gateway, Backburner Server, Backburner Manager, Backburner Media I/O Adapter) are installed. Configure media storage Media can be stored on any of the following hardware, as long as it is not the system drive: a direct attached storage (DAS) device or a storage area network (SAN). Configure a standard filesystem as media storage: 1 Ensure the disk array or SAN storage is connected to your workstation and powered up, and that a UNIX-compatible filesystem exists on the storage. For best performance, it is recommended to use a filesystem known for high-performance media playback, such as XFS or SNFS. Install the Autodesk software | 69 2 In a terminal, as root. Stop Stone and Wire with the command: /etc/init.d/stone+wire stop. 3 Create one or more Managed Media Cache directories: ■ If a mount point for your storage does not exist, create one, for example: mkdir -p /mnt/SAN1. Do not use the reserved word “stonefs” as the name for your mount point directory. Mount the filesystem to the newly-created directory. To mount it at boot, update /etc/fstab. ■ Create the Managed Media Cache directory on the mounted filesystem, in a directory named after the workstation hostname. The Managed Media Cache directory should be named after the partition name (by default, partition 7, or p7). For example, if the filesystem mount point is /mnt/SAN1, your workstation hostname is flare1, and the partition name is p7, type: mkdir -p /mnt/SAN1/flare1/p7 ■ Set the ownership for the directory to the root user. For example: chown -R root:users /mnt/SAN1/flare1/p7. Set permissions for the directory to be readable, writable, and searchable by the owner and its group, and readable and searchable by all. For example: chmod -R 775 /mnt/SAN1/flare1/p7 4 To make your application aware of the standard filesystem volumes, define the Managed Media Cache of each volume as a partition in the Stone and Wire configuration file, and set its preferences in /usr/discreet/sw/cfg/stone+wire.cfg. Update the keywords: Name, Path, Shared, and SymlinkAcrossFilesystems. 5 If this is the first filesystem you are configuring for this workstation: ■ From /usr/discreet/sw/cfg/sw_framestore_map file get the FRAMESTORE value and use it to update /usr/discreet/sw/cfg/sw_storage.cfg. 6 Restart Stone and Wire by typing: /etc/init.d/stone+wire restart. 7 Ensure the filesystem is mounted: /usr/discreet/sw/sw_df. Any project created in your application after this point has the new standard filesystem partition as its primary partition. Any pre-existing projects are unaffected by this setting and remain associated to their respective partitions. Connecting Remotely to the Storage of a Flame or Inferno Workstation The Stone Direct storage arrays of Flame and Inferno workstations are tuned for the high performance I/O needs of a local creative application. Stone Direct storage can also provide a basic level of interactivity for remote Flare workstations when performing light to medium I/O tasks, such as working with Batch setups to perform operations like tracking and retouching. Remote Flare workstations can use any unused bandwidth. Stone FS and standard filesystems connected to a Flame or Inferno workstation perform differently in shared workflows. Both will perform adequately for remote Flare activity with light I/O requirements. The Stone FS filesystem incorporates a bandwidth reservation service that protects the Flame and Inferno Player and Input/Output clip module from losing bandwidth, but is not capable of providing protection for general interactivity when the storage is stressed by high-bandwidth remote operations, such as playback, Wire transfers, or import/export. It is therefore recommended to use a standard filesystem for the Flame or Inferno workstation to which Flare remotely connects. The advanced standard filesystem Bandwidth Manager (automatically installed with Creative Finishing applications) manages I/O requests to your storage, and provides greater protection in all Flame or Inferno workflows. Even when the standard filesystem Bandwidth Manager is managing I/O requests, factors such as I/O operations from third-party applications, filesystem fragmentation, partition fill rate, concurrent reading/writing, and mixed I/O sizes can still decrease the performance of your storage. Periodic filesystem maintenance and workflow changes may be required to achieve optimal performance. 70 | Chapter 2 Install and configure a Flare workstation If you expect to use Flare for very I/O-intensive tasks, it is recommended to design a storage and networking solution accordingly. Regardless of the effectiveness of the Bandwidth Manager, the direct attached storage of Creative Finishing applications (running either Stone FS or a standard filesystem) was not designed to provide the functionality and performance of a high-end SAN storage device. Configure bandwidth reservation This section provides guidelines for configuring the standard filesystem Bandwidth Manager on the Flame or Inferno workstation to have storage bandwidth adequately distributed between the local application and the remote Flare workstations. Stone and Wire provides a mechanism to reserve storage bandwidth for Creative Finishing applications and tools that use a local mount point to a standard filesystem (DAS or SAN) as their media storage. This ensures that the local application gets the bandwidth it requires and that real-time playback on the local system is not jeopardized by requests from concurrent processes, including access from remote hosts such as Flare workstations. NOTE Bandwidth reservation policies apply only to I/O requests from Creative Finishing applications and tools. They cannot protect your storage bandwidth from I/O requests coming from third-party processes or user interactions. It is your responsibility to avoid using third-party tools with the frame storage. See Limit concurrent usage (page 45). Bandwidth requests are managed by the Stone and Wire Bandwidth Manager, based on the parameters in the /usr/discreet/sw/cfg/sw_bwmgr.cfg configuration file. When Stone and Wire starts up, the Bandwidth Manager automatically creates a [Device] section in the configuration file for each partition declared in /usr/discreet/sw/cfg/stone+wire.cfg. The Manager sets total theoretical read and write bandwidth values for each device, as well as the default reservation values. Adding a New Device to the Bandwidth Manager Use the instructions in this section if you want additional standard filesystem mount points (such as mount points to SAN volumes or to any other standard filesystem volume that is not present in the /usr/discreet/sw/cfg/stone+wire.cfg file) to be managed by the Bandwidth Manager. You may also use these instructions as guidelines for understanding and editing the settings in the predefined [Device] sections of the configuration file. Each partition managed by the Bandwidth Manager must have a [Device] section associated to it in the /usr/discreet/sw/cfg/sw_bwmgr.cfg file. To add a new device to the Bandwidth Manager: 1 Open the /usr/discreet/sw/cfg/sw_bwmgr.cfg file in a text editor. 2 Add a new [Device] section at the end of the file, using the following syntax: TIP You may also copy and paste an existing [Device] section, and change its parameters. [Device<device_number>] Path<path_number>=<device_mount_point> TotalAvailableReadBandwidth=<total_read_bandwidth> TotalAvailableWriteBandwidth=<total_write_bandwidth> DefaultReservation=<default_reservation> where: ■ <device_number> represents the number of the [Device] section, starting at 0. For example: Install the Autodesk software | 71 [Device0] ■ Path specifies the partition's mount point. Since a partition can have several paths, <path_number> represents the number of the current path, starting at 0 for each device. For example: Path0=/mnt/XYZ Path1=/usr/local/ABC ■ TotalAvailableReadBandwidth represents the estimated total reading bandwidth of the device, in megabytes per second. Based on this value, and on the amount of active reservations for the current partition, the Bandwidth Manager decides whether new reservation requests are granted or rejected. For example: TotalAvailableReadBandwidth=200 ■ TotalAvailableWriteBandwidth represents the maximum estimated writing bandwidth of the device, in megabytes per second. If this parameter is not specified, its value defaults to the value of TotalAvailableReadBandwidth. For example: TotalAvailableWriteBandwidth=150 NOTE The total bandwidth parameters are estimates of the theoretical maximum bandwidth of the partition. The actual bandwidth is affected by several factors, including multiple applications trying to concurrently read or write to it. The Bandwidth Manager continuously measures partition performance and dynamically maintains the actual total available bandwidth for each partition. ■ DefaultReservation sets the bandwidth assigned by default to applications that are denied a reservation request or that don't have individual or group reservations associated to them. The value is expressed in megabytes per second. For example: DefaultReservation=10 3 After setting up all the partition parameters described above, you can start defining reservations for the current partition. 4 Save and close the configuration file, and restart Stone and Wire by typing: /etc/init.d/stone+wire restart Reserving bandwidth for an application You may define a bandwidth reservation for each Creative Finishing application or tool that uses a certain partition. By default, a group reservation for the major Creative Finishing applications (Inferno, Flame, Flint, Smoke, and Backdraft Conform) running locally is already defined. Remote applications are identified by application-specific tokens, workstation host name, as well as the user name under which the application is executed. You can use any or all of these parameters to create detailed bandwidth reservation rules. You can also customize the way bandwidth is redistributed in low bandwidth situations. In low bandwidth situations, instead of reducing all reservations proportionally towards zero, the bandwidth manager first reduces the bandwidth of each process towards the low-bandwidth value specified for that process, and attempts to maintain that minimum for as long as possible. If the device bandwidth keeps degrading, then the bandwidth manager starts reducing bandwidth proportionally from the low-bandwidth values towards zero. In the following example, low-bandwidth values are not specified in the Bandwidth Manager configuration file. The diagram illustrates the way the Bandwidth Manger redistributes device bandwidth in such a case, as the total available bandwidth decreases from 800 MB/s to 420 MB/s and then to 320 MB/s. Note how bandwidth is proportionally reduced for all processes. 72 | Chapter 2 Install and configure a Flare workstation In the following example, low-bandwidth values are configured for each process (300 MB/s for Flame, 100 MB/s for Flare, 10 MB/s for Wiretap and 10 MB/s for Wire). The diagram illustrates the way the Bandwidth Manger redistributes device bandwidth as the total available bandwidth decreases from 800 MB/s to 420 MB/s and then to 320 MB/s. Note how the Bandwidth Manager keeps the bandwidth for each application at the low bandwidth watermark. When total available device bandwidth falls under the sum of the low bandwidth watermarks, the Bandwidth Manager decreases bandwidth for all processes proportionally towards zero. Install the Autodesk software | 73 Perform the steps in the procedure below to set up an optimal bandwidth reservation for the local application, as well as for remote workstations, based on your system configuration. To set up bandwidth reservation: 1 Open a terminal and log in as root. 2 Open the /usr/discreet/sw/cfg/sw_bwmgr.cfg file in a text editor. 3 Locate the [Device] section that corresponds to the standard filesystem partition (by default [Device0]), and uncomment it if it is commented out. 4 Add a Reservation line for each local or remote application, using the following syntax: 74 | Chapter 2 Install and configure a Flare workstation Reservation<number>=<application_name> [<user_name>] [@<workstation_hostname>] <reading_bandwidth> [(<low_reading_bandwidth>)] [<writing_bandwidth>][)<low_writing_bandwidth>)] where: ■ <n> is the ID of the reservation, starting at 1 for each device. ■ <application_name> represents the name of the application that needs the reserved bandwidth. This parameter can take one of the following predefined values: “inferno”, “flame”, “flint”, “flare”, “smoke”, “stonifiseTool”, “publishTool”, “S+W Server”, “IFFFS Wiretap Server”, or “IFFFSTool” for other Creative Finishing command-line tools. The “smoke” token also includes Backdraft Conform. NOTE Application names must use quotes if they contain spaces. ■ <user_name> is the Linux user account under which the remote application is running. This parameter is optional. ■ <workstation_hostname> is the hostname of the remote workstation that is accesing the storage. This parameter is optional. ■ <reading_bandwidth> represents the minimum reading bandwidth required by the application, expressed in megabytes per second. If more bandwidth is available on the device, the Bandwidth Manager gives the application as much bandwidth as possible. ■ <low_reading_bandwidth> represents the minimum value towards which reading bandwidth for this application is reduced in low-bandwidth situations. The Bandwidth Manager will attempt to maintain this minimum bandwidth allocation for as long as possible. If the device bandwidth keeps degrading, then the bandwidth manager starts reducing bandwidth proportionally from the low-bandwidth values towards zero for all applications. ■ <writing_bandwidth> represents the minimum writing bandwidth required by the application, expressed in megabytes per second. If more bandwidth is available on the device, the Bandwidth Manager gives the application as much bandwidth as possible. If this parameter is not specified, the Bandwidth Manager automatically calculates a default value, based on <reading_bandwidth> and on the total configured read and write bandwidth values of the device. ■ <low_writing_bandwidth> represents the minimum value towards which writing bandwidth for this application is reduced in low-bandwidth situations. The Bandwidth Manager will attempt to give the application this minimum amount of bandwidth for as long as possible. If the device bandwidth keeps degrading, then the bandwidth manager starts reducing bandwidth proportionally from the low-bandwidth values towards zero for all applications. For example: Reservation1=flame 500 (300) Reservation2=flare artist@flare1 200 (100) 5 Save and close the configuration file, and restart Stone and Wire by typing: /etc/init.d/stone+wire restart NOTE Bandwidth for an application is actually reserved only when that application is running. Processes that do not have a bandwidth reservation setting in the sw_bwmgr.cfg file fall under the default combined reservation of 10 MB/s. Defining groups of applications The Stone and Wire Bandwidth Manager allows you to set up bandwidth reservations for custom groups of applications. All the applications in a group will share the same reservation. By default, the configuration file already contains a definition for the “IFFFS” group, which includes the “inferno”, “flame”, “flint”, and “smoke” application tokens. Install the Autodesk software | 75 To set up bandwidth reservation for a group of applications: 1 Open the /usr/discreet/sw/cfg/sw_bwmgr.cfg file in a text editor. 2 In the [Groups] section, add a line for each group of applications you want to define. The syntax of the line is as follows: <group_name>=<application_name> <application_name> where: ■ <group_name> is the custom name of the group. The group name must not contain spaces and must not be the same as one of the predefined application names. ■ Each <application_name> represents the name of an application in the group. This parameter can take one of the following predefined values: “inferno”, “flame”, “flint”, “smoke”, “stonifiseTool”, “publishTool”, “S+W Server”, “IFFFS Wiretap Server”, or “IFFFSTool” for other Creative Finishing command-line tools. 3 After you have defined the group, go to the [Device]section for the appropriate partition and add a Reservation line for the new group. The syntax is the same as when adding a reservation for a single application. For example (using the “IFFFSTools” group from the previous step): Reservation1=IFFFSTools 50 50 4 Save and close the configuration file, and restart Stone and Wire by typing: /etc/init.d/stone+wire restart For additional information on all the parameters in the Bandwidth Manager configuration file, and for a list of application names you can use when defining reservations, see the comments inside the configuration file. Uninstall 1 If you are logged in as the application user in KDE, log out and log back into KDE as root. 2 From the KDE menu, choose Autodesk > Remove Software. 3 Select the packages you want to uninstall in the RPM list on the left (click Select All to select all the packages), then click the arrow to move them to the RPM uninstall list on the right then click Next. 4 In the Choose folders window choose the application directories you want to remove from the /usr/discreet directory, and click Next. 5 In the confirmation dialog click Uninstall & Remove. The uninstallation starts and displays details on the process. 6 Optionally delete the log files associated with a given application version in /usr/discreet/log, or /var/log/ for Flame. License your software You can install the software without a license, but you must license it before you can use it. A “floating” license system is used, made up of the following components. 1 License Server: A Linux daemon that provides concurrent licenses to computers on your network as needed. 2 Licensing clients: Each computer on the network that requests a license from the License Server. 76 | Chapter 2 Install and configure a Flare workstation To setup: 1 Install the license server software (page 57) if you do not already have a license server in your network. 2 Get license codes (page 77). 3 Create a license file for a remote license server (page 59). 4 Configure nodes or workstations to get a license (page 78). 5 Optionally Change the default port used by the license server (page 60). Install the license server software The license server is a Linux daemon that provides concurrent licenses. You can install the license server on a workstation or node in your network, or on any 64-bit system running Red Hat Enterprise Linux Desktop 5.3 with Workstation Option (64-bit), Red Hat Enterprise Linux WS 4, Update 3 (64- bit), CentOS 5.3, or CentOS 4.3. For a redundant network license server configuration, you must install the license server software on all three workstations selected as license servers. To install the license server, as root, run on the ./INSTALL_LICSERV from the software installation directory. Get license codes To obtain permanent license codes: 1 Log in as root on the license server system and get the unique Discreet host ID for the system by running: /usr/local/bin/dlhostid. 2 Send the Discreet host ID (including the DLHOST01= part) to the Autodesk Media and Entertainment Licensing Department either by email [email protected] or by telephone 1-800-925-6442 between 8 AM and 8 PM EST (toll-free in North America). Outside of North America, call 1-514-954-7199. Create a license file for a remote license server After you receive your license codes, edit the /usr/discreet/licserv/licenses/DL_license.dat license file on the license server (or all three servers, if you are configuring redundant license servers), and enter the license codes you received from Autodesk. The license information contains keywords that identify the license server, as well as the license strings for products or features. Keyword Description SERVER Specifies the hostname of the license server from which to obtain the license, followed by its dlhostid. VENDOR In Burn, specifies the daemon that is serving the license. DAEMON In Flare, specifies the daemon that is serving the license. USE_SERVER Indicates whether the system should obtain its license from a license server. License your software | 77 Keyword Description FEATURE License strings for the software and feature entitlements. To create the license server file on a license server: 1 Log in as root to the license server. 2 Navigate to the licenses directory by typing: cd /usr/discreet/licserv/licenses 3 If the file DL_license.dat does not exist in the directory, create it: touch DL_license.dat 4 Open the file DL_license.dat in a text editor. 5 Enter the information provided by Autodesk in this file. If you are setting up redundant a network license, there are three SERVER strings. It should be similar to the following snippet ■ For Burn: SERVER server DLHOST01=886C2B75E8E57E4B03D784C3A2100AC0 VENDOR discreet_l USE_SERVER FEATURE flameEDU_x86_64_b_2011_1 2011.99 02-oct-2010 \ ■ For Flare: DAEMON discreet_l discreet_l USE_SERVER FEATURE flare_x86_64_2011_discreet_l 2011.999 18-nov-2009 8 \ 6D7AE3402ECB46174B70 ck=47 6 Save and close the file. This file sets up the network licenses available for distribution by the license server to the Creative Finishing workstations on your network. Configure nodes or workstations to get a license Create a licence file on each computer so that it can get a license from the license server. Do this even if the server and client are on the same machine. 1 As root, Log in as root, open for editing /usr/local/flexlm/licenses/DL_license.dat. If it doesn't exist yet, create it. 2 Copy the SERVER, DAEMON, and USE_SERVER lines into the license file. The resulting file should look similar to: SERVER server DLHOST01=25231AEF83AD9D5E9B2FA270DF4F20B1 DAEMON discreet_l discreet_l USE_SERVER 3 Repeat for each computer. Change the default port used by the license server To avoid conflicts with other applications or license servers in your facility, you may need to change the default port setting used by the license server, or license servers in the case of a redundant configuration. This requires a minor change to the DL_license.dat file on your license server(s), as well as on every workstation or node. 78 | Chapter 2 Install and configure a Flare workstation To change the default port used by a license server: 1 Log in as root to the license server and open /usr/discreet/licserv/licenses/DL_license.dat for editing. 2 Find the SERVER line. By default, no port number is specified at the end of the SERVER line for a single license server and the license server uses default port number in the range of 27000-27009. By default, redundant license servers are set to port 27005. 3 Enter a different port at the end of the SERVER line. The license server can use a default port number in the range of 27000-27009. For example: SERVER server DLHOST01=886C2B75E8E57E4B03D784C3A2100AC0 62222 4 Save and close the file, then verify that the new port settings are correct: /etc/init.d/license_server stop /etc/init.d/license_server start cat /usr/discreet/licserv/log/license_server.log For redundant license servers, reboot each server in close sequence to properly restart the license system. 5 Look for messages similar to the following examples in the output, and verify that the port numbers are what you requested, e.g.: 15:08:49 15:08:49 15:08:49 15:08:49 (lmgrd) (lmgrd) (lmgrd) (lmgrd) lmgrd tcp-port 62222 Starting vendor daemons ... Using vendor daemon port 12344 specified in license file Started discreet_l (internet tcp_port 12344 pid 5013) 6 Repeat with /usr/local/flexlm/licenses/DL_license.dat for each workstation or node, using the same port as the one you set for the license server. Start Flare To start Flare for the first time: 1 Double-click the Flare icon on your Linux desktop. The Autodesk Master Systems Software License Agreement appears. 2 Read the text of the License Agreement carefully, and click I Accept if you agree to all the terms in the License Agreement. 3 Use the Project Management menu to open a remote project from the storage of a Flame or Inferno workstation, or to create a project and a user on the local storage. If you cannot see the framestores of other workstations when starting Flare, ensure self-discovery is enabled in the /usr/discreet/sw/cfg/sw_probed.cfg, and that the value of the Port keyword in that file matches the value used by other workstations in your network. 4 Click Start or press Enter. You are ready to start working in the application. If you see a splash screen rather than the application interface, click anywhere on the screen. Start Flare | 79 80 Networked processing 3 Deploying on networked hardware By default, all of the software needed in a Creative Finishing workflow is installed on a single workstation. If the workflow requires more processing than can be handled by that workstation, some or all of the following components can be moved to other machines: ■ Backburner Manager (page 107) and Backburner (page 81) which get jobs from the workstations and distribute them. ■ Backburner Monitor (page 86), which monitors progress from any computer in your network. ■ Burn (page 112) render node. ■ WiretapCentral and Wiretap Gateway (page 133) can be run on a networked machine for media processing. Lustre To set up background rendering for Lustre, create a Backburner network with render nodes consisting of Linux workstations running the Backburner Server and Burn for Lustre. To set up a render farm for background transcoding of streaming media formats, create a Backburner network with render nodes running the Backburner Server and MIO Adapter. Lustre browses storage devices via the Wiretap Gateway, and submits transcoding jobs directly from its UI to the Backburner Manager. The Backburner Manager distributes the jobs to its render nodes, where the Backburner Server invokes the MIO Adapter processing engine to carry out the transcoding. The MIO Adapter reads from storage directly and writes its results to the Wiretap Gateway. The Backburner Manager can reside on the Lustre workstation, or a dedicated workstation (recommended). Similarly, there are different installation options for the Wiretap Gateway and Backburner Monitor. You can optionally monitor job progress using the Backburner Monitor. Backburner Backburner is a queue manager for background processing and distributed network processing. It allows multiple jobs, such as I/O operations, grading, composites, and animation scenes, to be processed by many computers on the same network. 81 By default it is installed on all Creative Finishing workstations, but you can install it on networked computers if you want to offload some processing. If you do not want to use the local Backburner Manager installed on your workstation, type the following commands to disable it: chkconfig backburner_manager off /etc/init.d/backburner_manager stop If you stopped the local Manager, open /usr/discreet/backburner/cfg/manager.host and delete "localhost", and enter the hostname of the system where Backburner Manager is installed. Linux Install Backburner on a Linux workstation: 1 As root, in a terminal, if installing from the application DVD, mount the DVD, navigate to the dist subdirectory of the application directory, and install the Backburner packages with: rpm -Uvh backburner*386.rpm. If the application DVD includes an installation script for Backburner, use that instead. 2 If installing from the downloaded package, navigate to the sub-directory for the installed Linux distribution and run the installation script by typing: ./INSTALL 3 Follow the prompts to install the Backburner Manager and/or Backburner Server, per your configuration requirements. Once completed, you are returned to the command prompt. 4 If this is an upgrade, installation is complete. Otherwise, you may need to run additional installation scripts. cd 5 Run the Backburner configuration script to set up the Backburner Manager and Backburner Server: /usr/discreet/backburner/backburnerConfig 6 Check if the manager and server are configured to start automatically: chkconfig --list | grep -i backburner. Levels 3, 4, and 5 must be set to “on” for the daemons to start automatically. If no output appears, or if the output is different from the above, please contact Customer Support. OS X Install Backburner on a Mac workstation: 1 Run the Smoke for Mac installer and follow the installation wizard. 2 Once completed open Applications > Autodesk > Autodesk Systems Monitor To configure the Backburner Server: 1 In the Terminal run ps -ef | grep backburner 2 Ensure the host name of the Backburner Manager appears in /usr/discreet/backburner/cfg/manager.host. This is used by the Backburner Server to locate the manager. 3 Restart the Backburner Server so that it picks up the new settings: /usr/discreet/backburner backburner restart Windows Supported Operating Systems ■ Windows XP Professional (SP2 or higher) 32 or 64 bit 82 | Chapter 3 Networked processing ■ Windows 7 Professional 32 or 64 bit Installation 1 Download the appropriate file for your system from Autodesk. 2 Unzip the package and run the backburner.exe. 3 Follow the installation prompts in the installer. Start and configure the Backburner Server: 1 From the Start menu, choose Programs, Autodesk, Backburner, and then Server. The first time you start the application, the General Properties dialog appears. 2 Enter the host name, server name, or IP address of the Backburner Server in the Server Name or IP Address field. This is the address that is used by the manager to communicate with the server. 3 Disable Automatic Search, and enter the host name, server name, or IP address of the Backburner Manager. Automatic searching is not recommended, since it makes extensive use of network resources and can be slow. 4 Modify other configuration settings for the manager, as desired. 5 Click OK to start the application. The Backburner Server GUI appears, displaying startup messages as it loads plug-ins and connects to the Backburner Manager. Ensure a connection is established with the Backburner Manager before continuing. 6 To change the information that gets displayed in the GUI and/or written to the log file, from the Edit menu, choose Log Settings. 7 Click OK to save your changes. The configuration settings are written to for example C:\Documents and Settings\<user>\Local Settings\Application Data\backburner \backburner.xml. To restore the default settings, delete the backburner.xml file. This file contains the configuration settings for all Backburner components installed on the same machine. You must restart the Backburner Server for your changes to take effect. Backburner Server configuration ■ Server Name or IP Address: The host name or IP address the Backburner Server uses to identify itself to the Backburner Manager. It is helpful when a render node has more than one network interface card, hence more than one IP address. ■ Manager Port: The port number used by the Backburner Manager. Changing this port number from its default value is not recommended. When using a different port, be sure to change the value on each Backburner component. ■ Server Port: The port used by the render node. Changing this port number from its default value is not recommended. When using a different port, be sure to change the value on each Backburner component. Make sure to configure any firewall to allow access to the manager and server ports. Otherwise, Backburner components will not be able to communicate. ■ Automatic Search: Enable to allow the Backburner Server to search for a Backburner Manager using the TCP/IP subnet mask shown. It connects to the first manager found. Disabling this option reduces Backburner network traffic, and is the recommended option. You must then specify the Backburner Manager explicitly in the Enter Manager Name or IP Address field. ■ Enter Manager Name or IP AddressThe name of the workstation on which the Backburner Manager is running. Alternately, its IP address or Domain Name System (DNS) name can be used. This option can be used to address issues arising from running multiple Backburner Managers on the same TCP/IP subnet. For example, you can enter the Manager system's IP address to avoid any problems or conflicts caused by improper implementation of DNS. You can also use this option to segment your render farm by specifying the Backburner Manager to which each Render Node connects. Backburner | 83 To set up Backburner Server to run as a Window service: 1 Create a 'privileged' user account to give the Backburner Server access to the network mountpoints containing the needed frames, textures, scenes, storage, etc. You create a user account for use by the Backburner Server service using the the Windows Control Panel. You must create the identical account on all workstations serving as render nodes. Then, when you give that account read/write access to network mountpoints, all render nodes will have the same access. 2 Configure Backburner Server as a Windows service with serversvc.exe. Running the Backburner Server as a service changes the location of the backburner.xml and log files to /backburner subdirectories of the per-user application data directory subdirectories belonging to the Local Service user. These directories are hidden to non-administrative level users. For example, on Windows XP: C:\Documents and Settings\Local Service\Local Settings\Application Data\backburner \backburner.xml. 1 To install and register Backburner Server as a service: in the Backburner root directory run serversvc -i. The next time you start the workstation, Backburner Server is started automatically. Remove the service with serversvc -r 2 Start the service without rebooting from the Windows Services dialog. By right-clicking the entry for Backburner Server and choosing Properties, you can set a number of parameters, including the account under which the service logs on, and recovery options. 3 Assign the privileged user account to the service so it starts as that user. Grant the user account read/write access to the needed mountpoints. 1 Go to Administrative Tools > Services, right-click the Backburner Server item and choose Properties. 2 On the Log On tab, choose This Account and enter the name of the privileged user you created earlier. If a user account was created on the domain, enter [domain name]\[user name] as This Account, or browse the domain for the user. 3 In the Password and Confirm Password fields, enter the password for the user account. Click OK to exit the Properties dialog. 4 If the service is started, stop it by right-clicking the item and choosing Stop. Right-click the item and choose Start to restart the service with the newly assigned user. Backburner command-job utility Use the Backburner command-job utility, cmdjob, to submit batch, executable, or script files to Backburner as custom jobs for execution on remote servers. This tool provides flexibility in running custom jobs from scripts. For example, you could create a script that submits all jobs contained in a network folder to be rendered automatically at night. Special security consideration should be given to the cmdjob utility, as it can execute commands remotely on all the render nodes on the network. A trained systems administrator should ensure that the execution permissions are properly set and managed. Two types of adapters CmdJobAdapter Executes submitted jobs as root user account. Used by default. Available on all supported platforms. UserCmdJobAdapter Executes submitted job as the account that submitted the job. To invoke this adapter, specify the -userRights job option when submitting the job.Available on Linux and Mac OS only. Location of adapters Linux/Mac /usr/discreet/backburner/Adapters Windows Program Files\Autodesk\Backburner\Adapters 84 | Chapter 3 Networked processing Use cmdjob: 1 Open a DOS shell or Linux/Mac terminal and navigate to the Backburner folder. 2 Submit a job or jobs to the cmdjob utility using the following syntax: cmdjob <options> <executable_to_run> <parameters>. You can use options, parameters, and tokens at the command line of a DOS shell or Linux terminal, as well as in a batch file or script. Options, parameters, and tokens are not case-sensitive. If multiple occurrences of the same option or parameter are used, only the last occurrence is processed by the cmdjob utility. cmdjob options Option Description -taskList:<file> Sets the task list file. The file contains a tab-separated table. Use fill-in tokens to reference the table. -taskName:<number> Sets the task name column in the task list file. A value of 0 means this column is unnamed while a value greater than 0 specifies the column in the file for the task names. This is used for feedback in the monitor when looking at the task list. -numTasks:<number> Sets the number of tasks for the job. This option is ignored if -taskList is used. -tp_start:<number> Sets the starting offset of the default task parameter in numeric format. Ignored if -taskList is specified. -tp_jump:<number> Sets the increment of the default task parameter in numeric format. Ignored if -taskList is used. -jobParamFile:<file> Sets the job parameter file. See example below. A token is a reference to a value that can vary. It is evaluated on the server assigned to the job at the time the cmdjob utility executes. You cannot nest tokens within tokens. cmdjob tokens Option Description %dsc Job description. %srv Name of the server executing the task. %tpX Task parameter X from the task list, where X is the column index in the task list file. %*tpX Same as %tpX, where * indicates the number of 0 padded digits to use. %tn Task number of the assigned task. %*tn Same as %tn, where * indicates the number of 0 padded digits to use. %jpX Parameter X from the job parameter file, where X is the row index in the job parameter file. Backburner | 85 Option Description %*jpX Same as %jpX, where * indicates the number of 0 padded digits to use. Restart Backburner Manager and Backburner Server Backburner Manager and Backburner Server must be running before you can submit jobs to the background processing network. They start automatically so you do not need to manually start them. If you are having problems with Backburner Manager and Backburner Server, restart them. Linux To restart Backburner Manager on a Linux system: 1 Log in as root and open a terminal. Check the Backburner Manager daemon is running: ps -ef | grep -i Backburner. 2 Start the Backburner Manager daemon: /etc/init.d/backburner_manager restart. To view details on the Manager's status, check the backburner log files in /usr/discreet/backburner/Network/. OS X 1 Run the Service Monitor: Applications/Autodesk/Smoke Common Utilities. 2 If Backburner Manager is not running, click Start. Backburner Manager starts. To view details on the Manager’s status, run the Console application from Applications/Utilities, and look for entries containing com.autodesk.backburner_manager. Windows ■ From the Start Menu, select Programs > Autodesk > Backburner > Manager. Backburner Manager starts and its application window appears. The message “Starting Network Manager” as well as server connection messages are displayed in the window. To view details on the status of Backburner Manager, leave its application window open or view the log files. To restart Backburner Server: ■ Log in as root to each render node. Start Backburner Server with : /etc/init.d/backburner_server restart. Backburner Server starts and searches the network for the Backburner Manager application specified in /usr/discreet/backburner/cfg/manager.hosts. Once Backburner Manager is found, a message is logged to indicate that Backburner Server has successfully established communication with the Manager. Backburner Manager should also detect the Backburner Server running on each node on the background processing network. If error messages indicate that Backburner Manager cannot find Backburner Server or vice versa, see Connect the node to Backburner Manager (page 118). Backburner Monitor The Backburner Monitor allows pausing, restarting, and reassigning jobs and tasks to different render nodes as well as creating and managing render node groups and verification that the servers are up and running. If your using of the Windows version of the Backburner Manager, it can be helpful to install the Backburner Monitor on the same workstation so you can start the manager and monitor and work out any connection configuration. As you set up each server, you can then observe as they come online, from one central location. 86 | Chapter 3 Networked processing The Backburner network can be monitored via a Windows-based or browser-based monitor. The Windows monitor is well-suited for a setup with a single creative workstation, or the administrator workstation on a larger system. The browser-based monitor is designed for the non-administrator workstations. Feature matrix Backburner Windows Monitor Backburner Web Monitor Operating System Windows OS OS independent (browser-based Adobe Flash Player compatible) Monitoring Mechanism Automatic, via broadcasts from Backburner Manager On demand via end-user requests Queue Control Obtained by first monitor to connect to the manager. Also, by request made from a noncontrolling monitor On demand when changes are requested User Management Not applicable. All users operate with admin privileges User account required to log in to web monitor Suitability Small render farm with single creative workstation. Administrator workstation on larger render farm Non-administrator workstations on larger render farm Web Monitor The Web Monitor allows users to manage jobs and render nodes using a browser. Its advantage over the Windows Monitor is that it can run on any workstation with a web browser, and it has little impact on the Backburner Manager. Data from the Manager is served by a web server on the same machine. By default, end-users have complete control over the jobs that they submit to Backburner. To control all jobs on the Backburner network, you must log on to the server with administrator privileges. Generally, the name used to log in to the workstation is associated with all jobs submitted to Backburner from that workstation. However, some applications pass on the account name used to start the application instead. In Smoke, for example, if the artist starts the application as user smoke, smoke owns the jobs. It is therefore necessary to create accounts on the web server with the same names. By matching the log in or application user names with the web server user names, you ensure the artist has control over the jobs he or she submits. To launch the Backburner Web Monitor: 1 Point a web browser to http://<machinename>/Backburner where <machinename> is the name of the workstation running the web server. 2 Enter a user name and password and then click OK. The Backburner Web Monitor appears in the browser. No network or job details are present, since it is not yet connected to a Backburner Manager. 3 From the Manager drop-down list, select the Backburner Manager of interest. The UI and Jobs tab are populated with information automatically. You can update the display manually by clicking the Jobs tab Refresh button, or you can set a refresh rate from the Auto Refresh menu. 4 To perform an operation on a job, select the job in the Jobs tab, then select the desired operation from the Action menu. To view job details, double-click the job of interest, or select a job and choose Settings from the Action menu. Backburner Monitor | 87 Setup on Windows Before users can access the Web Monitor, you must install the following software on the workstation running the Backburner Manager: ■ Apache HTTP server (Linux/Windows/Mac) or Microsoft Internet Information Services (IIS) (Windows only) ■ Backburner Web Server Users without administrator privileges can fully manage their own jobs, but can only monitor the status of other jobs in the Web Monitor. Those with administrator privileges can manage all jobs and render nodes. To assign administrator privileges to a Web Monitor user account: 1 Edit the Wiretap server configuration file, wiretap.cfg, located in the backburner directory of the application data directory. For example: C:\Documents and Settings\<user>\Local Settings\Application Data\backburner. 2 In the [SECURITY] section use the BackburnerAdministrators keyword to add users to the admin group. It can be a comma-separated list. To configure the Web Server to connect to the Backburner Manager: 1 Open for edit C:\Program Files\Apache Group\Apache2\cgi-bin\monitorCGI.cfg. 2 Find <Manager>localhost</Manager> and replace localhost with the name of the workstation running Backburner Manager. 3 If necessary update <Port>3234</Port>. 4 Save and close the file. To test the Web Server, access http://<machinename>/backburner with a web browser. 5 Enter a user name and password when prompted. By default these are both backburner. If you cannot connect to the Web Server, try restarting the Backburner service and/or the web server. To set up access to the Web Monitor: 1 Configure IIS to disable anonymous access, and enable integrated Windows authentication. These settings allow anyone who can log in to the Windows workstation to use the Web Server. If you want to provide access to users who do not have accounts on the Windows workstation, refer to the Microsoft IIS documentation for help setting up Microsoft IIS user accounts. 2 Configure the Web Server itself to run in authenticated mode and then test this mode using the Web Monitor: open for editing C:\Inetpub\wwwrootIcgi-binmonitorCGI.cfg. Add this line to the file: <AuthorizedSite>monitorCGI.cgi</AuthorizedSite>. This requires all users connect through the Web Monitor to provide a username and password. Configure IIS and set the security for the Web Server: 1 Using Windows Explorer or My Computer, navigate to the C:\Inetpub\wwwroot\backburner folder and edit its properties and enable sharing. 2 Edit the properties of the folder C:\Inetpub\wwwroot\cgi-bin. In the Web Sharing panel, enable Share This Folder. You are prompted to set the security for the cgi-bin folder. From the dialog that appears, select Execute (including scripts). 3 Set up the security for the shared backburner and cgi-bin folders in IIS using the Computer Management Console tool. From the Computer Management Console, choose Services and Applications, Internet Information Services, then Web Sites. IIS-managed Web sites appear in the right pane. If you just installed IIS, only one site (the Default Web Site) appears. Otherwise, all IIS-administered Web sites appear in the panel. 88 | Chapter 3 Networked processing 4 Right-click Default Web Site and choose Properties. In the dialog that appears, open the Documents panel and then click Add. Enter index.html in the Add Default Document dialog. This must be added to the document list for the Web Server to work. The Web Server does not work with the default index.htm entry. 5 Click OK, and double-click Default Web Site. Icons for the shared backburner and cgi-bin folders appear in the right pane. Edit the properties of backburner and enable Anonymous Access. The backburner folder contains a file that connects the Web Monitor to the Web Server as well as the files that control the look of the Monitor. Allow anonymous access to this folder to: ■ Redirect the Web Monitor to the Web Server. ■ Permit any Web browser to load the Web Monitor page. 6 In the Computer Management Console, edit the properties of cgi-bin to enable anonymous access. Setup on OS X Setting up access to the Backburner Web Monitor requires that you create Backburner Web Monitor user accounts. The Backburner web server requires all users to provide a login name and password to access the Backburner Web Monitor. The default user account backburner is created during the installation of the Backburner Manager. The password associated with this account is backburner. Create a Backburner Web Monitor user account: 1 Check if /private/etc/apache2/auth/backburner.auth file is present. If not, copy /usr/discreet/backburner/WebMonitor/backburner.auth 2 Add the account by running the commnad: htpasswd /private/etc/apache2/auth/backburner.auth. Enter a password when prompted. The Backburner Web Monitor can now be accessed with the account information you have entered. 3 To delete an account, as root in a terminal run htpasswd -D /private/etc/apache2/auth/backburner.auth <username> Users without administrator privileges can only monitor the status of Backburner jobs in the Backburner Web Monitor. Users with administrator privileges can actively manage all jobs and render nodes. The default user account backburner created during the installation of the Backburner Manager has administrator privileges by default. If you are creating new user accounts, you may wish to remove administrator privileges from the default account, for security. Alternately, change the password. Give administrator privileges to a Backburner Web Monitor user account: 1 In the Terminal open /usr/discreet/backburner/Network/wiretap.cfg. 2 In the [SECURITY] section use the BackburnerAdministrators keyword to add users to the admin group. It can be a comma-separated list. Managing and Modifying Jobs The Jobs tab presents high-level information relating to all jobs associated with the selected Backburner Manager. Use it to view and control the jobs you submit to Backburner, as well as to view jobs submitted to Backburner by other Autodesk applications. Double-click any job in the list to view its details and settings. Privilege level required for jobs. Job Task Normal User (Own Jobs) Normal User (Other Jobs) Admin User (All Jobs) Activate • • • Backburner Monitor | 89 Job Task Normal User (Own Jobs) Normal User (Other Jobs) Admin User (All Jobs) Suspend • • • Restart • • • Archive/Restore • • Modify Settings • • Delete • • To find jobs and view their status: 1 Launch a web browser, log in to the Backburner Web Monitor, and connect to a Backburner Manager. 2 Click the Jobs tab. The Job list appears, showing all jobs on the system. Their status, progress, and other information is also displayed. 3 To filter the list, type the word you want to match in the Filter by Name field. 4 The following table summarizes the contents of the interface. Field Description Name The name of the job. Status Current state of the job. % Done The number of tasks completed, expressed as a percentage. Tasks The number of tasks completed and total number of tasks. Priority The job priority, from 0 to 100. Zero is the highest priority. Submitted The time at which the job was originally submitted. Started The time at which the job was started, in the following format: YYYY/MM/DD HH:MM:SS. If the job has not yet started, this field is blank. Elapsed The time duration consumed by the task (HH:MM:SS). Type The processing engine required to complete the job. For example: ■ Burn: The Burn renderer. ■ Command Line Tool: The Backburner cmdjob command-line plug-in allows you to submit batch, executable, or script files to Backburner as “custom” jobs. ■ mio: The MIO adapter is the processing engine responsible for carrying out transcoding jobs. ■ Wire: Installed with Stone and Wire. Can be used to import/export media, perform Wire transfers, etc. Also used by the Wiretap SDK’s background I/O tool, wiretap_bgio_tool. 90 | Chapter 3 Networked processing Field Description Owner The owner of the job, and the host from which it was submitted. 5 Double-click on a job of interest to view its details and settings. General Info tab Field Description Description Job description as entered when the job was submitted. Submitted By The owner of the job, and the host from which it was submitted. State The current state of the job: Priority The job priority, from 0 to 100. Zero is the highest priority. 100 means the job is suspended. Default is 50. Email Notification The address to which job progress, completion, or failure notifications are sent. When using this feature, be sure to set the location of the mailer daemon too. Dependencies List of jobs that must be completed before the selected job can be processed. Last Task Error The last error message for the most recent task (associated with the job) executed by the Backburner Manager. Tasks tab Column Description ID The task number for this task. Status The state of the task (active, complete, waiting, error). Server The name of the server where the task is being executed. Start Time The time stamp at which the task was started (YYYY-MM-DD HH:MM:SS). Elapsed Time The time duration consumed by the task (HH:MM:SS). Last Error The last execution error message associated with this task. Server Assignment tab Field Description Assigned Server Group Name of the server group to which the job was assigned. A server group is a collection of servers. Only servers in the specified group will work on the job. Backburner Monitor | 91 Field Description Max Server Count The maximum number of render nodes made available for the job, as specified when the job was submitted. Set to 0 (zero) to assign the job to all servers. Assigned Servers A comma-separated list of servers currently assigned to the job. Filter on Job Type Select this checkbox to list only the servers installed with the required adapter. Name Host name of the server. Assigned to Job A checkbox indicating whether or not the listed server is assigned to the job. To add a new server to the job, check a checkbox. Click the Save button to apply the changes. Description A description of the server. Status The current activity of the server: Perf. Index A value in the range [0–1] indicating the performance level of the server, relative to other servers on the same job. A score of 1 indicates this is the best-performing server. Adapters The adapters installed on the server, for example: ■ Burn: The Burn renderer. ■ Command Line Tool: The Backburner cmdjob command-line plug-in allows you to submit batch, executable, or script files to Backburner as “custom” jobs. See Submitting Jobs from a Command Line or Script (page 84). ■ mio: The MIO adapter engine is responsible for transcoding some streaming media formats (such as R3D and OpenEXR). ■ Wire: Installed with Stone and Wire. Can be used to import/export media, perform Wire transfers, etc. Used internally by Autodesk Visual Effects and Finishing applications. Suspend a rendering job: 1 Click the Jobs tab and select the job you want to suspend. 2 From the Action menu, choose Suspend. The selected job is suspended. If the selected job is completed, the Suspend command has no effect. 3 To reactivate a suspended rendering job: from the Action menu, choose Activate. The selected job is reactivated. If another job is already being processed, the selected job becomes pending. Restart a job: 1 Click the Jobs tab and select the job you want to restart. 2 From the Action menu, choose Restart. The selected job is restarted from the beginning. If another job is already being processed, the selected job becomes pending. While the most common workflow is to suspend a job, change its settings, and then re-activate the job, restarting a job is another possibility. Re-activating a suspended job picks up processing from where it left off. That is, tasks already completed are not re-done. In contrast, restarting a job halts all processing for the job, clears the server of all job-related temporary files (including completed tasks), and restarts the job from its first task. It is 92 | Chapter 3 Networked processing identical to resubmitting the job from the creative application, without the need for that application to be running. To delete a job: 1 On the Jobs tab, select the job of interest and choose Delete from the Action menu. 2 When prompted, click OK. The job is deleted from the system and removed from the Job list. Deleting a job completely removes it from the job queue and Backburner system. It does not, however, destroy source material or rendered results. Deleting cannot be undone. If you think you may need to run the job again in the future, or examine job details, consider archiving it instead. To set email notifications for a job: 1 On the Jobs tab, double-click the job of interest, or select a job and choose Settings from the Action menu. The Job Details page appears. 2 Enter the information in the Email Notification area: ■ From: Return address used by the Backburner Manager when sending notification email. ■ To: Destination address. ■ Server: Server where the smtp mailer daemon is running. Leave this field blank to use the Backburner Manager’s default setting. ■ Notification: Turns on/off notifications for the job. ■ Failure: Enable to be notified on job failure. ■ Progress Every nth Task: Enable for email notification when each nth task is completed. ■ Completion: Enable for email notification on job completion. 3 Save your changes. Managing Render Nodes (Servers) The Servers tab provides an overview of the general health of each render node, the adapters installed on it, and so on. It also provides access to server details, where you can set an availability schedule, for example. Tasks related to render nodes (servers) Server Task Admin User Shift jobs between servers/server groups • Delete absent server • Set server availability schedule • Create server groups • Manage server group settings • View render node status: 1 Launch a web browser, log in to the Backburner Web Monitor, and connect to a Backburner Manager. 2 Click the Servers tab. If a server that is already known to the Backburner Manager subsequently fails to re-connect to it, the manager marks it as absent. Servers tab Backburner Monitor | 93 Column Description Name Server name (host name). Description A short description of the server. Status Current server activity: ■ absent: Server is no longer seen by the manager, possibly down. ■ active: Currently working on a job. ■ suspended: On hold. ■ idle: Inactive. ■ error: Problem on the server. Perf. Index A value in the range [0–1] indicating the performance level of the render node, relative to the other servers on the same job. A score of 1 indicates this is the best-performing server. Adapters The adapters installed on the server, for example: ■ Burn: The Burn renderer. ■ Command Line Tool: The Backburner cmdjob command-line plug-in allows you to submit batch, executable, or script files to Backburner as “custom” jobs. See Submitting Jobs from a Command Line or Script (page 84). ■ mio: The MIO adapter engine is responsible for transcoding some streaming media formats (such as R3D and OpenEXR). ■ Wire: Installed with Stone and Wire. Can be used to import/export media, perform Wire transfers, etc. Used internally by Autodesk Visual Effects and Finishing applications. 3 Double-click on a render node of interest to view its details, as described in the following table. Item Description Host The server's IP address. This is used by the Backburner Manager to communicate with the server. State See previous table. Description See previous table. Performance Index See previous table. Current Job The current job as assigned by the Backburner Manager. Plugins Detailed information on the adapters installed on the render node. 4 Click the Close button to return to the list of all render nodes. Shift a render node: 1 On the Jobs tab, select the job of interest, and choose Settings from the Action menu, or double-click the job. 94 | Chapter 3 Networked processing 2 In the Job Details page, click on the Server Assignment tab. Server Assignment tab Field Description Assigned Server Group Name of the server group, if any, to which the job was assigned. A server group is a named collection of servers. Only servers in the specified group will work on the job. Max Server Count The maximum number of render nodes made available for the job, as specified when the job was submitted. Set to 0 (zero) to assign the job to all servers. Assigned Servers A comma-separated list of servers currently assigned to the job. If you make changes, be sure to save them, then click the Refresh button to ensure the list is up to date. Filter on Job Type Select this checkbox to list only the servers on which the required adapter is installed. Name Name of the server. Assigned to Job A checkbox indicating whether or not the listed server is assigned to the job. To add a new server to the job, check a checkbox. Notice the Assigned Servers list is updated automatically. Nevertheless, click the Save button, then the Refresh button to ensure the list is up to date. Description A description of the server. Status The current activity of the server: ■ absent: Server is no longer seen by the manager, possibly down. ■ active: Server is currently working on a job. ■ suspended: Server has been put on hold. ■ idle: Server is inactive. ■ error: Problem on the server. Perf. Index A value in the range [0–1] indicating the performance level of the server, relative to other servers on the same job. A score of 1 indicates this is the best-performing server. Adapters The adapters installed on the server, for example: ■ Burn: The Burn renderer. ■ Command Line Tool: The Backburner cmdjob command-line plug-in allows you to submit batch, executable, or script files to Backburner as “custom” jobs. ■ mio: The MIO adapter engine is responsible for transcoding some streaming media formats (such as R3D and OpenEXR). ■ Wire: Installed with Stone and Wire. Can be used to import/export media, perform Wire transfers, etc. Used internally by Autodesk Visual Effects and Finishing applications. 3 Assign and/or remove servers, as desired, using the checkboxes. 4 Apply your changes. The selected render nodes are assigned to the job. If a render node is already occupied, it completes its current task first. Backburner Monitor | 95 5 Verify your changes by clicking the Refresh button. This queries the Backburner Manager for the most up-to-date information. The Assigned Servers list is updated to reflect your changes. 6 Click Close to return to the list of all servers. Delete a render node: 1 Before deleting a node, consider archiving jobs that made use of it, to preserve job details, including the nodes to which tasks were sent. 2 On the Servers tab, select the node of interest, and click the Delete button. Only nodes marked by the system as absent can be deleted. 3 Confirm the deletion in the dialog box that appears. The node is deleted and removed from the list. Deleting a render node removes its entry from the database maintained by the Backburner Manager. It does not delete any software from the node itself. To help with network traffic, you can schedule the availability of a render node: 1 On the Servers tab, select a node of interest and click the Settings button. Alternately, double-click the node of interest. 2 In the Server Details page, click the Weekly Schedule tab. Periods of time that are green indicate the node is available to process jobs. By default, nodes are always available. 3 Toggle render node availability as desired: ■ Toggle a single hour by clicking the hour of interest. ■ Toggle the same hour for each day with one click using the hour buttons. ■ Click and drag to toggle a number of hours at once. ■ Toggle a whole day using the days-of-the-week buttons. 4 Apply your changes. Server groups A server group is a named collection of render nodes that is treated, for the most part, as if it were a single node. By default, jobs are submitted by creative applications to the Backburner network as a whole. It is the Backburner Manager that determines the specific render nodes to which they are sent, based on job type and node availability. However, certain Autodesk applications can be configured to submit jobs to a specific server group. Server groups can be used to implement a job-processing strategy. For example, consider a facility with two Visual Effects and Finishing applications, and a render farm consisting of eight Burn nodes, four of which are GPU-enabled. In such a situation, you might create two server groups, one each for the non-GPU and GPU-enabled Burn nodes. By assigning each workstation to a different server group, you can reserve the GPU-enabled Burn nodes for the workstation with higher priority or more demanding jobs. Server groups do not restrict your ability to assign render nodes to particular jobs as you see fit. When a creative application is configured to submit its jobs to a server group, additional nodes can be assigned to it, automatically, or manually, once the job is on the network. Conversely, you can always remove individual nodes from a job, regardless of their relationship to a server group. For information on configuring a creative application to submit jobs to a server group, see the User Guide for the application of choice. Set the optional BackburnerManagerGroup keyword in the application's init.cfg file. Create a server group: 1 On the Server Groups tab, click the Create button. 2 Enter a name for the new server group in the Group Name field. 3 Add render nodes to the group by selecting them in the Available Servers list and moving them to the Servers in Group list. 96 | Chapter 3 Networked processing 4 Once you are satisfied with your choices, click OK to commit the changes. Server groups you create in the Backburner Web Monitor appear as global groups in Backburner Windows Monitor. To assign a server group to a job: 1 On the Jobs tab, select the job of interest and choose Settings from the Action menu, or double-click the job. 2 In the Job Details page, click on the Server Assignment tab. 3 Choose a server group from the Assigned Server Group menu. 4 Apply your changes, then click Refresh to update the display. Compatible servers belonging to the group appear in the Assigned Servers list. If an expected server belonging to the chosen group does not appear in the list, it can indicate the server is absent, or does not have the correct adapter installed. The manager will only assign servers that are able to carry out the job. Changed settings apply to new tasks only. Completed tasks are not reprocessed. To reprocess completed tasks, restart the job from the beginning. To delete a server group: 1 On the Server Groups tab, select the server group of interest and click the Delete button. 2 When prompted to confirm your action, click OK. Manager Use the Manager tab to set options related to the Backburner network, such as logs, server assignments criteria, job retries, and the tasks performed when a job finishes, such as archiving. Manager tab Area Field Description Logging and Notification Logging Level ■ Error: Fatal errors that halt the processing of a job. ■ Warning: Operations that complete with non-fatal errors. ■ Info: Successful operations, possibly with minor faults or caveats. ■ Debug and Debug Extended: Detailed state information, including TCP/IP packet information. Helpful in tracking down bugs. ■ Debug Extended: A more verbose listing than Debug. Default Mail Server The smpt mail server through which all email notifications for this manager are sent. This can be overridden for individual jobs. Server Assignment Max Concurrent Jobs The maximum number of jobs Backburner will send out for processing on the render farm at the same time. Task Failures Retry Count The number of times the Backburner Manager attempts to restart a job on a server that has failed to complete its processing. A failed job may be returned by Backburner to the job processing queue. Set to zero (0) to Backburner Monitor | 97 Area Field Description have job processing halted on the server after its first failure. Default is 3. Job Handling Time Between Retries The time before the Backburner Manager attempts to re-start a job on a server that has failed. Works in conjunction with Retry Count. Default is 30 seconds. On Job Completion Specifies what happens to a job once it has successfully completed: ■ Leave: Job is left in the job list. ■ Archive After: Remove from the job list and place in the archive after the number of days specified. ■ Delete After: Permanently remove from the job list after the number of days specified. Archive The Archive tab presents information pertaining to all archived jobs. From here, you can delete and re-activate old jobs. Archiving removes completed jobs from the job queue. It reduces clutter. Its advantage over deleting completed jobs is in preserving all the information needed to re-submit the jobs at a later date. You can also restore an archived job to examine job details, such as the render nodes that processed it. This can assist in troubleshooting. Archiving can also be part of a facility backup strategy. The job archive contains metadata (job details) only—it does not contain source material or rendered frames. Archiving a job has no effect upon the associated media. Jobs can be archived automatically, when the manager has been configured to do so. Archive a job: 1 On the Jobs tab, begin by selecting the job of interest and choosing Suspend from the Action menu. Jobs are archived (and restored) with their original status intact. Suspending the job before archiving it minimizes the impact on the system if the job is restored later. 2 Choose Archive from the Action menu. The job is archived and removed from the Job list. By default, archived jobs are saved to the Network\Archive folder where the Backburner Manager is installed. 3 To view the list of archived jobs, click the Archive tab. 4 To restore or delete a job from the archive: Click the Archive tab. The Job Archive appears, presenting information for all archived jobs. Find the job of interest, then do one of the following ■ Delete: Removes the job from the archive. Since deletion cannot be undone, you are asked to confirm your action. ■ Activate: Restores a selected job to the job queue, removing it from the archive. You can then choose to modify its settings and restart the job. Jobs reappear in the job queue with the settings they had when archived. This includes job status. If a job was suspended or completed when it was archived, once restored, you must re-activate or restart it to start the processing again. ■ Refresh: Updates the display with the most recently archived jobs. 98 | Chapter 3 Networked processing Windows Monitor The Backburner Manager maintains a database, which it updates with every change of state of the render nodes. It then broadcasts the changes to every workstation running a Backburner Windows Monitor, whether the end-user is actively viewing it or not. The Windows Monitor can be launched from any Windows workstation on the network where it has been installed. The first Windows Monitor making the connection has full control over the job queue and Backburner network—that is, “queue control”. Subsequent connections by other Windows Monitors have more limited functionality. It is recommended to run Windows Monitor on not more than one or two workstations. Run the Backburner Windows Monitor: 1 From the Start menu, choose Programs, Autodesk, Backburner, and then Monitor. The Backburner Monitor appears. If this is your first time running the application, no network or job details are present, since it is not yet connected to a Backburner Manager. 2 Connect to a Backburner Manager. From the Manager menu, choose Connect. In the Connect to Manager dialog that appears, uncheck the Automatic Search checkbox, and enter the host name or IP address of the Backburner Manager in the Enter Manager Name or IP Address text field. Automatic searching is not recommended, since it makes extensive use of network resources and can take some time. Click OK to initiate the connection. If the title bar displays “Read Only”, this indicates that another user has already connected to the manager via a Backburner Windows Monitor. To get control: 1 From the Manager menu, choose Request Client List. A Client List dialog appears, showing the status of all users connected to the manager via the Backburner Windows Monitor. The Status column indicates the user with control of the queue. 2 Dismiss the dialog, then from the Manager menu, choose Request Queue Control. The manager transmits the request to the user currently with queue control. A message similar to the following appears on the remote machine. The user has 10 seconds to actively refuse the request; otherwise, control of the queue passes over to you. You can now perform all operations on jobs and servers on the Backburner network. 3 Verify the connection. From the Manager menu, choose Properties. Manager details appear in a dialog. If no connection was made, this option is greyed-out. 4 Optional: Set the monitor to connect to its manager automatically at start-up. From the Manager menu, choose Autoconnect. 5 When finished, end the session. From the Manager menu, choose Disconnect. The first monitor establishing a connection to the manager is automatically granted queue control, and can perform all job-related activities, including stopping, restarting, or deleting jobs. Subsequently, other monitors connect in read-only mode, allowing them to observe the activity on the Backburner network only. Managing and Modifying Jobs Suspend and reactivate a job, select it, then: ■ In the toolbar, click the Suspend button ■ Tap Ctrl+S. ■ From the Jobs menu, choose Suspend. Backburner Monitor | 99 ■ Right-click a job in the Job list and choose Suspend. ■ To reactivate, select the job, then do one of: ■ Click the Activate button ■ Tap Ctrl+A. ■ Right-click the job and choose Activate. ■ From the Jobs menu, choose Activate. Modify job settings: ■ From the Jobs menu choose Edit Settings. ■ Right-click the job and choose Edit Settings. ■ Press Ctrl+J. 1 Select the job of interest in the Job list. 2 Display the current settings for the selected job: 3 Double-click the field of interest, and modify it as desired. If the job setting can be modified, you are allowed to change it. Otherwise, the setting remains unchanged. 4 Modify the Job properties as desired. 5 The Backburner Manager can send job success, failure, and other notifications to the email addresses you specify in the Notifications area. Job properties Item Description Description The description provided when the job was submitted to Backburner. Priority The job priority, from 0 to 100. Zero is the highest priority. 100 means the job is suspended. Override Task Blocks Setting Depending on how your system administrator has configured the Backburner Manager, it either i) assigns multiple tasks to each render node—that is, blocks of tasks (the default setting), or ii) assigns each render node one task at a time. Enable to override the manager's configuration, for this particular job. Enable Task Blocks Enable to cause the manager to send render nodes blocks of tasks, for this job. Disable if you want each render node to receive only one task at a time, for this job. For example, enabling for frame-based render jobs results in each render node receiving a block of several frames to render at once. Disabling results in frames being sent one at a time. For this setting to have an effect, you must also enable Override Task Blocks Setting. Use All Available Servers Overrides any Backburner Manager settings that restrict the maximum number of servers that can work on this job at any one time. Server Limit The maximum number of servers that can work on this job at any one time. Set this to zero to run on all servers. 100 | Chapter 3 Networked processing Item Description Server Group The server group to which the job is assigned. Only servers in the specified server group will work on the given job, unless the group is set to use idle non-group servers. Restarting a job halts all processing for the job, clears the server of all job-related temporary files (including completed tasks), and restarts the job from its first task. It is identical to resubmitting the job from the creative application, without the need for that application to be running. ■ From the Jobs menu, choose Restart Job. ■ Right-click the job and then choose Restart Job. Cloning a job creates a 100% duplicate job that is independent of the original, but inherits all of its qualities, including its status and settings. Cloning is a convenient means for experimenting with changes to job settings or testing render nodes, since changes made to the clone do not affect the original. Cloning is allowed, but not generally recommended. For efficiency, the Visual Effects and Finishing applications pre-allocate space on the destination storage device for the frames resulting from all Burn and background I/O jobs. Since the clone is a duplicate of the original job, its results overwrite those of the original job. Archiving conveniently removes completed jobs from the job queue. It is a practical means for keeping the job queue organized by reducing clutter. Its advantage over deleting completed jobs is in preserving all the information needed to re-submit the jobs at a later date. You can also restore an archived job simply to examine job details, such as the render nodes that processed it. This can assist in identifying problems—if unexpected or unsatisfactory results occurred, for example. Archiving can also be part of a facility backup strategy, since the archive represents a job history, in compact form. Note, however, that the job archive contains metadata (job details) only—it does not contain source material or rendered frames. Note that archiving a job has no effect upon the associated media. The job archive contains job metadata only; that is, it contains the information needed to restart a job, but not the source media. By default, archived jobs are saved to the Network\Archive folder where the Backburner Manager is installed. Archive a selected job: ■ From the Jobs menu, choose Archive Job. ■ Right-click the job and then choose Archive Job. ■ To restore or delete a job from the archive, from the Jobs menu, choose Job Archives. Click Refresh if you do not see all the jobs expected. Select a job (or jobs) and: ■ Delete: Removes the job from the archive. Since deletion cannot be undone, you are asked to confirm your action. ■ Activate: Restores a selected job to the job queue, removing it from the archive. You can then choose to modify its settings and restart the job. Jobs reappear in the job queue with the settings they had when archived. This includes job status. If a job was suspended or completed when it was archived, once restored, you must re-activate or restart it to start the processing again. ■ Refresh: Updates the display with the most recently archived jobs. Delete a selected job: ■ From the Jobs menu, choose Delete, or in the toolbar, click Delete , use the righ-click menu, or tap the Delete key. Backburner Monitor | 101 ■ Confirm the action. Deleting a job completely removes it from the job queue and Backburner system. It does not, however, destroy source material or rendered results. Deleting cannot be undone. If you think you may need to run the job again in the future, or examine job details, consider archiving it instead. Managing Render Nodes To view render node status: 1 Start the Backburner Monitor and connect to a Backburner Manager. The Server List area occupies the lower panes in the monitor. This area shows nodes organized in a hierarchical tree view and as a list. The tree view presents a hierarchical list of all node groups, as well as the plug-ins available for the system. You can use this area to see which render nodes are available to render jobs, as well as manage groups of nodes. The list of render nodes shows all nodes assigned to the group selected in the tree view. If no group is selected, all render nodes on the system appear in this area. By default, this area shows the following information for each node: ■ The name and current status of the node. ■ The job the node is currently processing. ■ The most recent message sent by the node to the Backburner Manager. ■ The icon beside each server provides a visual indication of its state. ■ Green: OK ■ Yellow: idle ■ Grey: absent ■ Red: error 2 Customize the information shown in the list of render nodes, as desired. 3 To locate a render node, do any of the following: ■ Scroll through the entries using the scroll bars. ■ Reorder the list in ascending or descending order by clicking a column heading. ■ Filter the list by first clicking the square on the right side of each column in the Job list. Enter filtering criteria in the dialog that appears. 4 Right-click a render node and choose Properties (or tap Ctrl+N). The Server Properties dialog appears, showing hardware and software information for the node. Item Description Server Server host name. User User account name under which the Backburner Server was launched. Current Job The current job as assigned by the Backburner Manager. Status Current server activity. Handle Server ID, used internally and in log files. Platform Operating system details. Memory Installed RAM. 102 | Chapter 3 Networked processing Item Description CPUs The total number of CPUs installed on the system. IP address The server's IP address. This is used by the Backburner Manager to communicate with the server. Perf. Index A value in the range [0–1] indicating the performance level of the render node, relative to the other servers on the same job. A score of 1 indicates this is the best-performing server. Available Disk Space Disk space available for rendering. burn, mio, Command Line Tool, Wire, etc. A list of adapters installed on the render node, for example: burn: The Burn renderer mio: The Media I/O adapter used by WiretapCentral.Command Line Tool: The adapter associated with cmdjob. Server Backburner Server software version. Backburner API DSO version. Should match the Backburner software version. Plugin Backburner Adapter version and platform info. Customize the render node list: 1 To add a new column: from the Server menu choose Column Chooser, or right-click any node in the list and choose Column Chooser. The Server Columns dialog appears, presenting the columns that can be added. 2 Drag and drop the column of interest to the column title bar in the Job list. 3 To rearrange the columns, drag and drop. 4 To remove a column, right-click the column title, and choose Remove Column. You cannot remove the Server column. To shift a render node: 1 Select the node in the server list, then click the Remove Server icon on the toolbar. The node ends its current processing task and becomes available for other jobs. 2 In the job list, select the job to which you want to assign the node. 3 Assign the render node to the job: select the unassigned node and then, from the Servers menu, choose Assign To Selected Jobs, or right-click the unassigned node and choose Assign To Selected Jobs from the popup menu. The selected render node begins working on the new job. It remains assigned to the new job until the entire job is complete. Use the following procedure to delete offline render nodes from the system. Deleting a render node removes its entry from the database maintained by the Backburner Manager. It does not delete any software from the node itself. Backburner Monitor | 103 To delete a render node: 1 Deleting a node can make it more difficult to troubleshoot jobs with problems, since it will be more difficult to determine which node carried out the flawed work. Before deleting a node, consider archiving jobs that made use of it, to preserve job details, including the nodes to which tasks were sent. 2 Select the render node(s) of interest. Only nodes marked by the system as absent can be deleted. 3 Choose Delete Server from the Servers menu, or by right clicking the node. The node is deleted and is removed from the list. To help manage network traffic, schedule the availability of a render node: 1 Select the render node(s) of interest and choose Week Schedule from the Servers menu or the righ-click menu. Periods of time that are green indicate the node is available to process jobs. By default, nodes are always available. 2 Select the time of interest: ■ Select a single hour by clicking the hour of interest. ■ Select the same hour for each day with one click using the hour buttons. ■ Click and drag to select a number of hours at once. ■ Select a whole day using the days-of-the-week buttons. ■ Select the entire week by clicking the button at the top left. The selected time is shown in white. 3 Click the Allow or Disallow buttons, as desired. Green indicates node availability. Red indicates processing is prohibited during this time. 4 Click OK to update the schedule for the node and close the dialog. Server groups A server group is a named collection of render nodes that is treated, for the most part, as if it were a single node. By default, jobs are submitted by creative applications to the Backburner network as a whole. It is the Backburner Manager that determines the specific render nodes to which they are sent, based on job type and node availability. However, certain Autodesk applications can be configured to submit jobs to a specific server group. Server groups can be used to implement a job-processing strategy. For example, consider a facility with two Visual Effects and Finishing applications, and a render farm consisting of eight Burn nodes, four of which are GPU-enabled. In such a situation, you might create two server groups, one each for the non-GPU and GPU-enabled Burn nodes. By assigning each Visual Effects and Finishing workstation to a different server group, you can reserve the GPU-enabled Burn nodes for the workstation with higher priority or more demanding jobs. Server groups do not restrict your ability to assign render nodes to particular jobs as you see fit. When a creative application is configured to submit its jobs to a server group, additional nodes can be assigned to it, automatically, or manually, once the job is on the network. Conversely, you can always remove individual nodes from a job, regardless of their relationship to a server group. Two kinds of server groups can be created, local groups and global groups. In almost all cases, you will want to create global server groups only. Local groups serve a particular purpose for 3ds Max, under a specific Backburner configuration. For information on configuring a creative application to submit jobs to a server group, see the User Guide for the application of choice. Create a server group: 1 Right-click All Servers in the server list and choose Global Group from the popup menu. If the option is greyed-out, connect to a Backburner Manager, and then try again. 104 | Chapter 3 Networked processing 2 Configure the behaviour of the group: Item Description Name The name of the server group as it will appear in the UI. Weight Adjusts the priority of jobs assigned to the server group. Jobs assigned to a high-weight server group are given higher priority than jobs assigned to lower-weight groups. In fact, a job assigned to a high-weight group may be rendered ahead of non-group jobs—even if the non-group jobs have higher priorities at the job level. Can Use Idle Non-group Servers Enable to allow the Backburner Manager to temporarily assign idle non-group render nodes to the group. Enabling this option increases the rendering power of the group. Suspend Non-Current Group Jobs Enable to allow the Backburner Manager to suspend the processing of non-group jobs running on group nodes, when a new job is submitted specifically to the group. Enabling this option allows a render node group to automatically switch from non-group jobs to new group jobs. 3 Add render nodes to the group by selecting them in the Available list and clicking Add. The render nodes are added to the group. You can add render nodes directly from the Server list area by dragging and dropping them onto an already existing group. 4 Once you are satisfied with your choices, click OK to commit the changes. The render node group is added to the Global Groups list. Assign a server group to a job: 1 Select the job(s) of interest in the Job list. 2 In the Server list, right-click the server group and choose Assign Group to Selected Jobs. The server group is assigned to the job. ■ If nodes in the group are busy, they complete their currently-assigned jobs before working on the new job to which you have assigned them. Otherwise, they begin working on the new job immediately. ■ If the “Suspend current non-group jobs” option is enabled for the group, all nodes in the Server group drop their current rendering job and begin processing the assigned job immediately. Shift a server group between two jobs: 1 Select all jobs in the Job list. 2 In the Global Groups list, right-click the render node group to be reassigned and choose Remove Group From Selected Jobs. Each render node in the group ends its current assignment and becomes available for other jobs. If "Suspend current non-group jobs" is enabled for the group, the jobs are dropped immediately. Server groups are subject to the same job assignment and completion rules and restrictions as individual render nodes. 3 In the Job list, select the job to which you want to assign the group. 4 In the Server list, right-click the server group and choose Assign Group to Selected Jobs. The render node group is assigned to the new job and begins rendering. If "Can use idle non-group servers" is enabled for the group, the Backburner Manager adds nodes to the group temporarily, as they become available from other jobs. To delete a server group: 1 In the Global Groups list, right-click the render node group of interest and choose Delete Group. Backburner Monitor | 105 2 When prompted to confirm your action, click Yes. The group is deleted from the Server list. The render nodes themselves remain untouched, and can be assigned to other groups, as needed. Use the following procedures to create or delete a named collection of render nodes, called a server group, and to assign a server group to a job. NOTE Two kinds of server groups can be created, local groups and global groups. In almost all cases, you will want to create global server groups only. Local groups serve a particular purpose for 3ds Max, under a specific Backburner configuration. The configuration in question has 3ds Max, the Backburner Manager, and the Backburner Monitor all installed and running on the local machine. In this case, a local group is a shortcut to a list of render nodes individually selectable from within the 3ds Max application. In all other cases—and for all other Autodesk applications—create global groups, as described in this section. NOTE For information on configuring a creative application to submit jobs to a server group, see the User Guide for the application of choice. To configure a Visual Effects and Finishing application to submit its jobs to a server group, set the optional BackburnerManagerGroup keyword in the application's init.cfg file. See the Burn Installation and User Guide. For Smoke for Mac OS X, this can be done in the Smoke Setup UI. Server Group Customization Customizing server group behaviour is made possible by way of two key options. First, you can configure a server group to automatically make use of non-group render nodes that are sitting idle. That is, when you have configured the creative application to submit jobs to a named server group, the Backburner Manager will send the job to any available non-group render nodes too. Second, by default, the nodes in a server group are available to all jobs submitted to the Backburner network. You can configure a server group to give priority to the jobs submitted to it specifically. Once configured, when the Backburner Manager receives a job for a server group, non-group jobs are immediately suspended, freeing up the nodes for the “server group” job. To create a server group: 1 Right-click All Servers in the server list and choose Global Group from the popup menu. If the option is greyed-out, connect to a Backburner Manager, and then try again. The Server Group dialog appears. 2 Configure the behaviour of the group as desired. Item Description Name The name of the server group as it will appear in the UI. Weight Adjusts the priority of jobs assigned to the server group. Jobs assigned to a high-weight server group are given higher priority than jobs assigned to lower-weight groups. In fact, a job assigned to a high-weight group may be rendered ahead of non-group jobs—even if the non-group jobs have higher priorities at the job level. Can Use Idle Non-group Servers Enable to allow the Backburner Manager to temporarily assign idle non-group render nodes to the group. Enabling this option increases the rendering power of the group. Suspend Non-Current Group Jobs Enable to allow the Backburner Manager to suspend the processing of non-group jobs running on group nodes, when a new job is submitted specifically to the group. Enabling this option allows a render node group to automatically switch from non-group jobs to new group jobs. 3 Add render nodes to the group by selecting them in the Available list and clicking Add. You can add render nodes directly from the Server list area by dragging and dropping them onto an already existing group. 106 | Chapter 3 Networked processing 4 Once you are satisfied with your choices, click OK. To assign a server group to a job: 1 Select the job(s) of interest in the Job list. 2 In the Server list, right-click the server group and choose Assign Group to Selected Jobs. ■ If nodes in the group are busy, they complete their currently-assigned jobs before working on the new job to which you have assigned them. Otherwise, they begin working on the new job immediately. ■ If the “Suspend current non-group jobs” option is enabled for the group, all nodes in the Server group drop their current rendering job and begin processing the assigned job immediately. To shift a server group between two jobs: 1 Select all jobs in the Job list. 2 In the Global Groups list, right-click the render node group to be reassigned and choose Remove Group From Selected Jobs. Each render node in the group ends its current assignment and becomes available for other jobs. If "Suspend current non-group jobs" is enabled for the group, the jobs are dropped immediately. Server groups are subject to the same job assignment and completion rules and restrictions as individual render nodes. 3 In the Job list, select the job to which you want to assign the group. 4 In the Server list, right-click the server group and choose Assign Group to Selected Jobs. If "Can use idle non-group servers" is enabled for the group, the Backburner Manager adds nodes to the group temporarily, as they become available from other jobs. To delete a server group: 1 In the Global Groups list, right-click the render node group of interest and choose Delete Group. 2 When prompted to confirm your action, click Yes. The group is deleted from the Server list. The render nodes themselves remain untouched, and can be assigned to other groups, as needed. Backburner Manager Introduction Backburner Manager receives jobs from the clients, and then distributes the work as jobs to the render nodes on the network. Backburner Manager functionality ■ Receiving processing requests from client applications. ■ Receiving status reports as tasks are completed on the servers. ■ Handling requests from the Backburner Monitors. ■ Updating its database with all transactions. Ensure only one Backburner Manager is running on the background processing network at any given time. Otherwise, jobs submitted to the network may not be processed. Backburner Manager | 107 Linux setup Normally, there should be no need to configure the Backburner Manager. The most common changes—such as specifying the default mail server through which Backburner sends job-related email specifications—can also be made via the Backburner Web Monitor. To start and configure Backburner Manager: 1 In a terminal, as root: stop the Backburner Manager service: /etc/init.d/backburner stop. The Backburner Manager service on the workstation is stopped, if it was running previously. If it was not running previously, a “Failed” error message is displayed. If you are starting Backburner Manager for the first time, configure the Manager before starting it. Otherwise, start the Manager. 2 The Backburner configuration file is at /usr/discreet/backburner/Network/backburner.xml 3 Start Backburner Manager: /etc/init.d/backburner start. All Backburner Manager events are recorded in log files in the directory /usr/discreet/backburner/Network/backburner.log. You can use the tail command to view the contents of this log. OS X setup Configure Backburner Manager: 1 In the Terminal run /usr/discreet/backburner/backburner stop 2 Edit /usr/discreet/backburner/Network/backburner.xml and configure the Backburner Manager settings as desired. 3 Save and close the edited backburner.xml file. 4 Start the Backburner Manager with: /usr/discreet/backburner/backburner stop. All Backburner Manager events are recorded in log files in /usr/discreet/backburner/Log. Windows setup Backburner Manager is configured in its General Properties dialog. To install Backburner on a Windows workstation: 1 As an administrator, run backburner.exe. The Backburner installation wizard appears. 2 If there is an earlier version of Backburner on the system, you are prompted to uninstall it. 3 Follow the prompts to install Backburner on the workstation. It is recommended that you install Backburner components in the same destination folders on all machines. To start and configure the Backburner Manager: 1 From the Start menu, choose Programs, Autodesk, Backburner, and then Manager. The first time you start the application, the General Properties dialog appears. 2 Configure the manager as desired. For most purposes the default settings should suffice. 3 Click OK to start the application. The configuration settings are written to the Backburner configuration file, for example, C:\Documents and Settings\<user>\Local Settings\Application Data\backburner \backburner.xml. To restore the default settings, delete backburner.xml. Note that this file contains the configuration settings for all Backburner components installed on the same machine. The Backburner Manager GUI appears, displaying startup messages. 4 From the Edit menu, choose Log Settings to change the information that gets displayed in the GUI and/or written to the log file. 108 | Chapter 3 Networked processing 5 Click OK to save your changes. The configuration settings are written to the Backburner configuration file, backburner.xml. 6 Restart the Backburner Manager for the changes to take effect. You can set up the Backburner Manager to run as a Windows service so that it starts with the workstation's operating system and runs in the background. When running as a service, no GUI is presented—events are logged to the log file only. Depending on how Windows is configured, it may be necessary to log on to a Windows account for the service to load. Running the Backburner Manager as a service changes the location of the backburner.xml, wiretap.cfg, and log files to /backburner subdirectories of the per-user application data directory subdirectories belonging to the Local Service user. These directories are hidden to non-administrative level users. For example, on Windows XP: C:\Documents and Settings\Local Service\Local Settings\Application Data\backburner \backburner.xml To set up Backburner Manager as a Windows service: 1 Open a shell and navigate to the Backburner root directory 2 Register the Backburner Manager executable as a service with the command managersvc -i. 3 To undo this, do managersvc -r. 4 You can start the service without rebooting from the Services GUI, typically accessed at Control Panel > Administrative Tools > Services. You can also configure the service here. 5 The next time you start the workstation and/or log on to Windows, the Backburner Manager is started automatically. General configuration The Backburner Manager should be stopped before configuring. While the default settings are appropriate for most cases, you may have to adjust these settings to enable communication between the Backburner Manager and other components. TCP/IP settings Field XML Element Description Manager Port <ManagerPort> The port number used by the Backburner Manager. The default value is 3234. Server Port <ServerPort> The port number used by the Render Node(s). The default value is 3233. N/A <NetworkMask> The default subnet mask used for the network. The default value is 255.255.255.0. This value can be overridden using the Windows-based Backburner Monitor; when you launch the Monitor, from the Manager menu, choose Connect. Enter the subnet mask in the dialog that appears. General settings Field XML Element(s) Description Max Concurrent Assignments <MaxConcurrentAssignments> Specifies the number of jobs the Manager sends out simultaneously. This number depends on the processor speed of the Manager workstation, general job size, and overall network speed. Generally, the default value of 4 is adequate. Too high a value may cause an increased number of node timeouts because the jobs are sent faster than the nodes can handle them. In such cases, decrease the value. Backburner Manager | 109 Field XML Element(s) Description Use Server Limit <UseServerLimit> and <ServerLimit> The maximum number of Render Nodes that will be allocated for a specific job. This feature can override the server limit settings in some applications. For information, see the application's Advanced Settings Dialog. Use Task Error Limit <UseTaskErrorLimit> and <TaskErrorLimit> The number of times a Render Node retries a task before suspending it. Default Mail Server <DefaultMailServer> The default mail server used for email notification. This mail server is used only for jobs that do not already have a mail server associated with them. Failed node behaviour Field XML Element(s) Description Restart Failed Servers <RetryFailedServers> Activate to enable automatic Render Node restarting. If this option is disabled, the Render Node does not attempt to render the job again after the first failure. This option is enabled by default. Number of Retries <RetryCount> The number of times the Manager attempts to restart a failed Render Node. The number of retries is set to 3 by default. The range is between 1 and 1024. Seconds Between Retries <TimeBetweenRetries> The time between each retry in milliseconds. This value is set to 30000 milliseconds by default. In Windows, this value is adjusted to be displayed as 30 seconds. The state of a Render Node is recorded on a per-job basis. The Backburner Manager regularly goes through the list of Render Nodes for a job, checking for failures. If Restarts Failed Servers is enabled (set as 1 in the backburner.xml file), the Manager keeps track of the following: ■ The time a Render Node fails on a particular job. ■ The time elapsed since the node failed on a particular job. If the time elapsed is greater than the specified Seconds Between Retries, the Backburner Manager decreases the Number of Retries by one and resets the Failed flag for the Render Node. Once the failure count reaches the specified Number of Retries, the Manager stops trying to restart the Render Node for that particular job. Once a restarted Render Node completes a frame, it is flagged as active and resumes processing until the job is complete. Configure the Backburner Manager to access jobs on specified system or network drives by modifying either fields in the Direct Access to Job Path group of the Backburner Manager General Properties dialog, or elements of the ManagerSettings sub-element of the AppDetails element of the backburner.xml file. You use these fields/elements when you do not want to have jobs kept on the drive or workstation where the Backburner Manager is installed. Examples of such situations are: ■ You have very little drive space on the system drive where the Backburner Manager is installed. Because another system drive has plenty of space, you share a folder on this drive called MyJobs, where jobs are placed when submitted. In this case, you would direct jobs to \\computername\MyJobs. ■ You are using your workstation simultaneously as a Backburner Manager and creative workstation. To reduce the overhead on the workstation from the Backburner Manager, you set up a shared job folder 110 | Chapter 3 Networked processing on a network file server, called backburnerJobs. The Win32 job path would be set to \\fileserver\backburnerJobs and jobs you submit placed on the file server. Job path settings Field XML Element(s) Description Use Jobs Path <EnableJobPath> When enabled, defines job location using the Win32 or UNIX paths. This tells the Render Nodes to get the job files from this location, minimizing the file I/O traffic on the Manager workstation. Win32 Path <Win32Path> The Windows file path where jobs are located. You can click the Browse button in the General Properties dialog to search your system for the job location. Unix Path <UnixPath> The Unix file path where jobs are located. You can click the Browse button in the General Properties dialog to search your system for the job location. These settings can be overridden from the Advanced Settings dialog accessed from the Network Job Assignment dialog. Default job handling behaviour (can be overridden from the Advanced Settings dialog accessed from the Network Job Assignment dialog) <DefJobHandling> Setting State XML Element(s) 0 Do Nothing When enabled: a completed job is left in the queue. 1 Delete it When enabled: the job is deleted from the queue upon completion. 2 Delete After 3 Archive it 4 Archive After <DeleteDays> Description When enabled: the job is kept in the queue for the specified number of days upon completion. Once the number of days has been exceeded, the job is deleted from the queue. When enabled: the job is archived upon completion. Archive it is enabled by default for Windows Managers. <ArchiveDays> When enabled: the job is kept in the queue for the specified number of days upon completion. Once the number of days has been exceeded, the job is deleted from the queue. Backburner Manager | 111 Burn Architectural overview Architectural overview Burn is a Linux-based network processing solution. Components ■ Render node: a computer running Burn. ■ Does imaging processing which frees a workstation for more creative tasks. ■ Render nodes without GPU-accelerated graphics cards cannot process jobs that require a GPU (such as floating point jobs). They can only process jobs in software mode, using the OSMesa API. Render nodes equipped with GPU-accelerated graphics cards can process both jobs that require a GPU and OSMesa jobs. The Burn installation script installs the appropriate software including the plugin, the link to Backburner (page 81). ■ Multiple Burn processing engines on a render node, enabling the render node to process jobs from different clients. ■ Render nodes can be networked with a fast network connection such as InfiniBand technology. Wire enables the high-speed transfer of uncompressed video, film, and audio between Autodesk systems, over TCP/IP and InfiniBand networks. Render nodes use Wire to transfer source frames from the render client, and to return the processed frames back again. ■ Render client: an application, like Inferno, Flame, Flare, Flint, Smoke, or Backdraft Conform, that sends jobs to the background processing network. ■ Backburner (page 81), Backburner Manager (page 107), and Backburner Monitor (page 86) Installation or upgrade workflow You can either set up a new system from nothing, or upgrade an existing one. Nodes purchased from Autodesk ship with the correct distribution Linux installed and configured. You must (re)install Linux if: your Linux version is too old. You had to replace the system disk. If you must replace the hard disk of your license server system, you need to obtain a new license. Contact Customer Support for assistance. Installation workflow 1 Check the NO LABEL . If doing a fresh install or your Linux is outdated, Install Linux for Burn (page 113). 2 Install and configure Burn (page 116). 3 License your software (page 76). 4 Run the software (page 125). Upgrade workflow 1 Check the NO LABEL .. 2 Install the DKU (page 116). 3 Install and configure Burn (page 116). 112 | Chapter 3 Networked processing 4 Upgrade the Creative Finishing workstations to the same version as the version of Burn you are about to install. Each version of Burn is compatible with only one version of Autodesk Creative Finishing applications. 5 Install the Burn software on each node. 6 Run the software (page 125). Install the Smoke for Mac distribution of Burn Two distributions of Burn cannot be installed on the same node. However, either distribution can process jobs sent from a Mac or Linux product, as long as it is licensed. The licensing requirements for the Smoke for Mac OS X distribution of Burn are different from the Linux Creative Finishing distribution. 1 Install and license Smoke for Mac and the Network License Manager. See the Smoke Installation and Licensing Guide. Note the Smoke for Mac license server name and host ID. 2 If necessary, set up Burn hardware and install the operating system. 3 Install and configure Burn. During installation, enter the license server name and host ID in /var/flexlm/autodesk.lic. Install Linux for Burn Prerequisites: ■ Mouse, keyboard and graphics monitor are connected, and the graphics monitor is powered on. ■ If you are using a KVM switch, it is switched to the system on which you want to install Linux. ■ Get the installer. Major releases are distributed on a USB drive. Service packs or extensions are distributed as a downloadable tar file. ■ If not installing Red Hat, Prepare the CentOS disc (page 64). To do a fresh install of Linux: 1 Insert the installation disc and reboot the system. The system should boot to the Linux installation disc. If not, check your BIOS settings to make sure the DVD / CDROM drive is set as the primary boot device. 2 At the boot prompt in the Red Hat Linux or CentOS installation menu, run one of the following commands: ■ burn: A Burn node using the Autodesk custom DVD of Red Hat Enterprise Linux ■ linux ks=cdrom: A Burn node using CentOS with the Autodesk kickstart file The command launches the Linux installation. The system loads drivers. The installer guides you through the rest of the process. If you experience problems with the graphical Linux installer, reboot your computer and run the installer in low resolution VESA mode by running the command linux ks=cdrom xdriver=vesa. If you still experience problems, reboot again and start the installer in text-only mode by typing linux ks=cdrom text. 3 If prompted, follow the prompts to initialize the system disk. 4 Insert the remaining Linux distribution discs if prompted. The remainder of the installation process is automated. If the installation drops into text mode or to a blank screen just before completing, press CTRL+ALT+F6 to return to graphical mode. At this point, the installation should be finished, and you should see the “Congratulations...” message and the Reboot button. Burn | 113 The default root password for a Linux installation on a node is password. Prepare the CentOS disc Before installing CentOS distro for non-Autodesk hardware, you must add the Autodesk kickstart file to the DVD or first CD of your distribution so the Linux installer to install some packages. The custom Autodesk DVD of Red Hat Enterprise Linux for Autodesk hardware already contains the Autodesk kickstart file. To copy the kickstart file to the disc. Use the new disc as the DVD or first CD of the CentOS distribution you plan to install on the node. 1 On a computer running Linux and with a CD or DVD burner, log in as root. 2 If you did not download your distro as an iso image: 1 Insert the DVD or first CD of your CentOS distribution into the drive. You do not need to mount it. 2 In a terminal, get an ISO image of the disc by typing: dd if=/dev/ <CD/DVD device> of=/<destination path for the extracted ISO image>. For example: dd if=/dev/cdrom of=/tmp/ Centos5.iso 3 Eject the disc. 3 From the installation package, run dist/kickstart/build_kickstart_cd to add the kickstart file to the ISO image of your Linux distribution DVD or first CD. For example: dist/kickstart//build_kickstart_cd RHEL5_CentOS5_kickstart.cfg /tmp/Centos5.iso /tmp/Centos5_KS.iso. 4 Do cdrecord -scanbus to get the address of your CD or DVD writer and use it to address the writer. 5 Burn the new ISO image to a blank disc. For example: cdrecord -v speed=2 dev=0,4,0 /tmp/Centos5_KS.iso. Configure Linux for Burn 1 Change the default root password by logging in as root (default password is password), and running the passwd command. 2 If you did not receive your render node from Autodesk, check for firmware or driver updates for your hardware after CentOS is installed. Refer to the CentOS and/or hardware manufacturer web sites to ensure you have the correct firmware and drivers. 3 The automated Autodesk installation sets the time zone to North American Eastern Standard Time (EST) by default. If necessary, set the time zone for your location. 4 Configure basic network settings (page 21). 5 Optional: Configure an InfiniBand card (page 116). Configure basic network settings Login as root to edit the files described below in a text editor, and reboot the system for the new configuration to be used. You'll need the following from your network administrator: ■ A unique static IP address and host name for your system 114 | Chapter 3 Networked processing ■ The network gateway IP address. ■ The subnet mask of your network. ■ DNS server IP address(es). /etc/sysconfig/network Sample snippet from /etc/sysconfig/network. NETWORKING=yes HOSTNAME=workstation1 GATEWAY="10.1.0.25" The GATEWAY value is used if no GATEWAY is defined in a network port’s configuration file. /etc/resolv.conf Sample snippet from /etc/resolv.conf nameserver 192.9.201.1 /etc/hosts You may need to edit the loopback setting which may look like 127.0.0.1 vxfhost.localhost.localdomain localhost by default. Optionally add hostname / IP address pairs for other workstations on your network. Sample snippet from file: 127.0.0.1 localhost.localdomain localhost 192.168.0.100 workstation1 /etc/sysconfig/network-scripts/ifcfg-ethn Edit /etc/sysconfig/network-scripts/ifcfg-ethn, where n specifies the ethernet port number, usually 0 for the first on-board port. If your workstation has an add-on ethernet card installed, the Linux operating system may assign ports eth0 through eth3 to the add-on card. In such a case, the on-board Ethernet ports become eth4 and eth5. Optionally set the GATEWAY if not set in /etc/sysconfig/network. Sample snippet from file: DEVICE="eth0" BOOTPROTO="static" IPADDR="192.168.1.100" NETMASK="255.255.0.0" ONBOOT="yes" GATEWAY=192.168.0.1 You'll need the following from your network administrator: ■ A unique static IP address and host name for your system ■ The network gateway IP address. ■ The subnet mask of your network. ■ DNS server IP address(es). Burn | 115 Configure an InfiniBand card To use the render node in an InfiniBand-connected background processing network, it must be equipped with an InfiniBand network adapter. The precompiled QuickSilver (QLogic) InfiniServ 9000 HCA adapter drivers for the Red Hat Enterprise Linux kernel are included in the dist/ib subdirectory of the installation package. If you are using CentOS, you need to manually compile the InfiniBand driver for your version of the Linux kernel. The source files for the driver are located in the src/infiniband subdirectory of the latest DKU installation package. Refer to your CentOS documentation for information on compiling software. Refer to the README file located inside the driver tar file for instructions on how to install the driver and configure your InfiniBand interface. Install and configure Burn To install or upgrade Burn and Backburner: 1 Install the DKU (page 116) if necessary. 2 Install or upgrade Backburner on the system that will act as the Backburner Manager for submitted Burn jobs. See Installing Backburner Manager (page 117). 3 Install or upgrade Burn on each render node to be used in the background processing network. See Install Burn on render nodes (page 117). 4 Activate each render node so it can receive and process jobs from Backburner Manager. See Connect the node to Backburner Manager (page 118). 5 Your Autodesk Creative Finishing application can use Burn by default. No additional software is required. Configure workstations for Burn (page 118) where applicable. 6 If this is the first time you installed Burn on this node, Configure multicasting (page 119). 7 Optional: Install additional fonts (page 120). 8 Optional: to improve performance Disable local Stone and Wire IO on a node (page 120). 9 Optional: Group Burn nodes into groups to manage them more efficiently. 10 Optional: If you are also running versions of Burn earlier than 2.0 on the same render node, synchronize the version of the Burn client and Burn server with the version of the Autodesk Creative Finishing application you are running. See Run multiple versions of Burn on the same node (page 120). Install the DKU Before installing your software, you must install the required version of the DKU on all nodes, whether Red Hat or CentOS. See the Release Notes for the required DKU version, and check whether you have the required version by running as root in a terminal: head -n1 /etc/DKUversion. For major releases, the DKU is available on the application DVD or as a download from Autodesk. For extensions and service packs, the DKU is only available for download. The download link is provided in the release announcement you received from Autodesk. 1 Mount the USB key or extract the tar file to access the DKU installation directory. 2 In the DKU installation directory run the DKU installation script: INSTALL_DKU. 3 If you installed from a disc, eject the disc. 116 | Chapter 3 Networked processing 4 Reboot the system. Prepare the installation media Check the release announcement to find out on what media the installers are available. Major releases are distributed on a USB device. To mount a USB device: ■ Attach the device. Log in to the terminal as root. On Red Hat 6, change directory to the USB mount point at /media/AUTODESK/. On Red Hat 5, continue with the following steps. ■ Use the dmesg command to output something like sdf: sdf1 to list a recent device connected. Or list the devices attached to your system with the command: fdisk -l | grep "/dev/sd". The device assigned to the USB device should look similar to /dev/sds or /dev/sde ■ On a fresh Red Hat 5 installation, automount is enabled , but execution from the device is disabled by default. So you must enable it: 1 unmount the USB drive with eject /<mountpoint> or eject /dev/<device id>. 2 Create a mount point directory for the disk with mkdir /mnt/usbdisk. 3 Mount the device mount -o shortname=winnt /dev/<device>1 /mnt/usbdisk. Or from the GUI browse to /dev, right-click the USB device, and choose Mount. Software is sometimes distributed as tar files. To extract from a tar file: 1 In a terminal, as root, use the md5sum command to verifty the checksum matches the md5sum listed in the checksum file. 2 Extract from the tar archive with tar -xvf filename.tar. Installing Backburner Manager Backburner Manager acts as the communications hub for the background processing network. If you create a background processing network that serves a single Creative Finishing workstation, you can run Backburner Manager on the workstation itself. Backburner components are installed automatically with Creative Finishing applications. If the background processing network serves multiple workstations, it is recommended to run Backburner Manager on a dedicated machine on your network. Backburner Manager works on Windows, Linux, and Mac OS X systems. Refer to the Autodesk Backburner Installation Guide for detailed system requirements and instructions on installing and configuring Backburner Manager. You can find this document at www.autodesk.com/backburnerdocumentation. Install Burn on render nodes Install Burn on each dedicated render node. You can install it alongside earlier versions. Installing on Creative Finishing workstations is not supported. 1 As root, in a terminal, Log in to the render node as root, and open a terminal. Prepare the installation media (page 31) to access the installer. Burn | 117 2 From the installation directory. Run the installation script: ./INSTALL_BURN to install Burn and Backburner Server. 3 If you are installing the Smoke for Mac OS X edition of Burn, you are prompted to enter the license server name or address and the license server MAC address. For more information on licensing Smoke for Mac applications, see the Smoke Installation and Licensing Guide. 4 If graphics are enabled, the following prompts appear: ■ Do you want to automatically run the Backburner Manager on this machine? Click No. ■ Do you want to automatically run the Backburner Server on this machine? Click Yes ■ Do you want to enter the manager for this server? Click Yes. 5 In the the manager.host file enter the host name or IP address of your Backburner Manager. Otherwise, close it without saving. You may edit this file later. See Connect the node to Backburner Manager (page 118). Connect the node to Backburner Manager Validate the connection to Backburner Manager for each render node on the network. You do not need to perform this procedure if you already specified the correct manager host name when installing Burn on each node. 1 On the render node, log in as root on the render node and open for editing /usr/discreet/backburner/cfg/manager.host. 2 Replace the text in the file with the host name or IP address of the system running Backburner Manager. It must be the same as the one specified in the configuration of the Creative Finishing application. manager.host cannot contain comments. 3 Save the file and restart Backburner Server on the render node with /etc/init.d/backburner_server restart Configure workstations for Burn Creative Finishing workstations can use Burn if they are on the same version. When changing parameters, restart the software for them to be used. Location of parameters ■ Linux: edit /usr/discreet/<product_home>/cfg/init.cfg. ■ Mac: run the Smoke Setup utility which is usually in Applications/Autodesk/Smoke/Smoke Utilities. Backburner settings are in the Backburner tab, under Application Settings. Parameters for Mac and [Linux] Manager Hostname [BackburnerManagerHostname] The hostname or IP address of the Backburner Manager system that will handle background jobs submitted by the workstation. Job Priority [BackburnerManagerPriority] The priority for jobs submitted by the workstation to Backburner Manager, from 1 (most important) to 100. With the default setting, all jobs are given the same priority, and Backburner Manager manages jobs and network resources automatically. WARNING Changing this setting is not recommended and may compromise access to the background processing network for other users in your facility. 118 | Chapter 3 Networked processing Server Group [BackburnerManagerGroup] Specifies a server group (a preset group of render nodes) used to process jobs submitted by the application. By default, Backburner Manager assigns a job to all available render nodes capable of processing it. If you have a dedicated group of render nodes for processing jobs, set the value to the name of the render node group. See the the Backburner User Guide for information on creating groups. Group Capability [BackburnerManagerGroupCapability] Enables or disables the submission of jobs that require a GPU (such as floating point jobs) to the background processing network. Configure this according to the GPU capabilities of the nodes in your background processing network: ■ Software: none of the nodes in your background processing network is equipped with a GPU. The application will not send jobs that require a GPU to the background processing network, but only jobs that can be processed in software mode (using OSMesa) by the render nodes. ■ GPU: all the nodes in your background processing network are GPU-enabled. The application will send all jobs to the GPU-equipped nodes in the background processing network, even if some jobs do not specifically require a GPU node. The GPU-equipped render nodes will render jobs that require a GPU, as well as OSMesa jobs. If your background processing network also contains nodes without a GPU, and this setting is used, , all jobs are sent only to GPU-equipped render nodes, and the nodes without a GPU are never used. ■ Hybrid: your background processing network contains a mix of nodes with GPUs and without GPUs. The application will send all jobs to the background processing network, and Backburner Manager will distribute each job to the appropriate type of render node. Jobs that require a GPU are sent only to GPU-equipped nodes, while jobs that do not require a GPU are sent to any available render node (GPU or non-GPU), to be processed in software mode. Use this setting only if you are sure that at least one node in your background processing network is equipped with a GPU. Attempting to submit a job that requires a GPU to a background processing network with no GPU-enabled nodes results in the job being stuck in the queue indefinitely. Configure multicasting Enable multicasting in Stone and Wire. Unnecessary if upgrading an existing installation of Burn. 1 Open the /usr/discreet/sw/cfg/sw_probed.cfg configuration file on the render node in a text editor. 2 Set SelfDiscovery to Yes. Now sw_probed runs in self-discovery mode and it will automatically probe the network for other systems. This is set to Yes by default when Stone and Wire is installed on the render node. 3 The Scope parameter defines the scope for the multicast. This parameter setting must be the same for all machines on your network. ■ For networks with one subnet, set to LinkLocal. ■ For networks with subnets, use a value that is appropriate for your requirements and router configuration, either OrganizationLocal, or GlobalWorld. 4 If the workstations and nodes in your facility are on separate networks connected through routers, use the ttl parameter in the file to specify the number of router hops for a multicast. Transfers across multiple routers may cause bottlenecks at network bridges, especially with jobs involving film frames. Using the ttlparameter may reduce multicast-related traffic and improve general network performance in your facility. Consult your network administrator for guidance on setting the appropriate values for your network. 5 Save and close sw_probed.cfg then restart the sw_probed daemon: /etc/init.d/stone+wire restart. Burn | 119 Install additional fonts During the install, the same fonts that are installed by default with your Creative Finishing application are installed. However, if you installed additional fonts on the workstation that are not provided with your application, you must also install those fonts on each render node. Contact your third-party font supplier(s) for information about Linux support for those fonts. Ensure any 3D Text fonts used with Action nodes in the Batch setups you submit to Burn are installed. Disable local Stone and Wire IO on a node If the Burn render node has a slower connection to a shared storage device (such as a SAN) than the Creative Finishing workstation, it is preferable for Stone and Wire I/O operations to be performed on the Creative Finishing workstation, rather than on the render node. To disable local Stone and Wire I/O operations: 1 In a terminal on the Burn render node, as root, stop Stone and Wire by typing /etc/init.d/stone+wire stop. 2 Open for editing /usr/discreet/sw/cfg/stone+wire.cfg. 3 Set DisableLocalIO=True to true. 4 Save and close the configuration file, then restart Stone and Wire: /etc/init.d/stone+wire start. Run multiple versions of Burn on the same node Each version of a Creative Finishing application includes its own version of Burn, and each version of Burn is compatible with only one version of Creative Finishing applications. Because your facility may have different versions of Creative Finishing applications running with their corresponding version of Burn, you can run different versions of Burn on the same machine. Assessing Compatibility Between Client and Server Versions For Burn versions 2.0 and later, your Creative Finishing application sends jobs directly to the background processing network, removing the need to synchronize the client with the server. For Burn versions earlier than 2.0, you must synchronize the version of the Burn client and Burn server with the version of the Creative Finishing application you are running. Burn Client Version Burn Server Version Creative Finishing Version 1.0.x 1.0.x Inferno 5.3.2, Flame/Flint 8.3.2 1.5 1.5 Inferno 5.5, Flame/Flint 8.5 1.6 1.6 Inferno 6.0, Flame/Flint 9.0, Fire 6.5, Smoke 6.5 1.7 1.7 Inferno 6.2, Flame/Flint 9.2, Fire 6.7, Smoke 6.7 120 | Chapter 3 Networked processing Managing Multiple Burn Servers on a Render Node You can have multiple versions of the server installed on a render node to handle jobs from different Burn clients. For example, you can run the Burn 1.6 and current version servers to allow the same render node to handle jobs from the Burn 1.6 client used by Flame 9.0 and Smoke 6.5, as well as jobs from other Autodesk applications that use the latest version. Use /usr/discreet/burn_2011/bin/select_burn script to help you manage the Burn servers running on a render node. select_burn -h gives usage. List installed Burn server versions: 1 On the render node, log in as root and open a terminal. 2 Run for exampe select_burn -l to list the server versions that are installed on the render node and their current status. Servers listed as Enabled process jobs of their type. Select the version of the server used for processing jobs on a node with select_burn -c <job type, server version>: 1 On the render node, log in as root and open a terminal. 2 Run for example ./select_burn -c 2010,2010.SP1. 3 Test that it's status is Enabled with select_burn -l. Synchronize a Burn 1.x Client with the Autodesk Application Creative Finishing applications that used Burn 1.x included a daemon called the Burn client which linked the application with the Backburner Manager. Because a Burn 1.x client can only submit processing jobs to its version of Burn, you must manually change the Burn client if you run different versions of Inferno, Flame, Flint, or Smoke on the same workstation. If a workstation in your facility is running one of the these applications, perform the following procedure to synchronize the Burn client version with the application. Otherwise, you will be unable to submit jobs from these applications. ■ Inferno 5.3.2 to Inferno 6.2 ■ Flame/Flint 8.3.2 to Flame/Flint 9.2 ■ Fire/Smoke 6.5 to Fire/Smoke 6.7 To synchronize the client version with its application so that you can use a previous version of Burn with the Autodesk application: 1 Exit the Autodesk application and log in as root on the workstation. 2 Stop the Burn client with /etc/init.d/burnclient stop 3 Get a directory listing of /usr/discreet. It contains: ■ A sub-directory for the current version of the Burn client. ■ Sub-directories for earlier versions of the Burn client, named burnclient.previous.<number>. For example, /usr/discreet/burnclient.previous.1 ■ A symbolic link called burnclient that points to the directory of the current version of the Burn client. 4 Remove the symbolic link to the current version of the Burn with rm burnclient. 5 Create a new link to the Burn client version that you want to run with ls -s <target directory> burnclient where <target directory> is the name of the sub-directory containing the version of the Burn client you want to run. Burn | 121 6 Start the previous version of Burn with /etc/init.d/burnclient start License your software You can install the software without a license, but you must license it before you can use it. A “floating” license system is used, made up of the following components. 1 License Server: A Linux daemon that provides concurrent licenses to computers on your network as needed. 2 Licensing clients: Each computer on the network that requests a license from the License Server. To setup: 1 Install the license server software (page 57) if you do not already have a license server in your network. 2 Get license codes (page 77). 3 Create a license file for a remote license server (page 59). 4 Configure nodes or workstations to get a license (page 78). 5 Optionally Change the default port used by the license server (page 60). Two licensing scenarios The licensing requirements for the Smoke for Mac OS X distribution of Burn are different from the Creative Finishing distribution. ■ To license Burn for Creative Finishing Linux workstations, see License your software (page 76). ■ For information on licensing the Smoke OS X distribution of Burn, see Install the Smoke for Mac distribution of Burn (page 113). Two distributions of the same version Burn cannot be installed on the same node. However, either distribution can process jobs sent from a Mac or Linux product, as long as it is licensed. Get license codes To obtain permanent license codes: 1 Log in as root on the license server system and get the unique Discreet host ID for the system by running: /usr/local/bin/dlhostid. 2 Send the Discreet host ID (including the DLHOST01= part) to the Autodesk Media and Entertainment Licensing Department either by email [email protected] or by telephone 1-800-925-6442 between 8 AM and 8 PM EST (toll-free in North America). Outside of North America, call 1-514-954-7199. Install the license server software The license server is a Linux daemon that provides concurrent licenses. You can install the license server on a workstation or node in your network, or on any 64-bit system running Red Hat Enterprise Linux Desktop 5.3 with Workstation Option (64-bit), Red Hat Enterprise Linux WS 4, Update 3 (64- bit), CentOS 5.3, or CentOS 4.3. 122 | Chapter 3 Networked processing For a redundant network license server configuration, you must install the license server software on all three workstations selected as license servers. To install the license server, as root, run on the ./INSTALL_LICSERV from the software installation directory. Create a license file for a remote license server After you receive your license codes, edit the /usr/discreet/licserv/licenses/DL_license.dat license file on the license server (or all three servers, if you are configuring redundant license servers), and enter the license codes you received from Autodesk. The license information contains keywords that identify the license server, as well as the license strings for products or features. Keyword Description SERVER Specifies the hostname of the license server from which to obtain the license, followed by its dlhostid. VENDOR In Burn, specifies the daemon that is serving the license. DAEMON In Flare, specifies the daemon that is serving the license. USE_SERVER Indicates whether the system should obtain its license from a license server. FEATURE License strings for the software and feature entitlements. To create the license server file on a license server: 1 Log in as root to the license server. 2 Navigate to the licenses directory by typing: cd /usr/discreet/licserv/licenses 3 If the file DL_license.dat does not exist in the directory, create it: touch DL_license.dat 4 Open the file DL_license.dat in a text editor. 5 Enter the information provided by Autodesk in this file. If you are setting up redundant a network license, there are three SERVER strings. It should be similar to the following snippet ■ For Burn: SERVER server DLHOST01=886C2B75E8E57E4B03D784C3A2100AC0 VENDOR discreet_l USE_SERVER FEATURE flameEDU_x86_64_b_2011_1 2011.99 02-oct-2010 \ ■ For Flare: DAEMON discreet_l discreet_l USE_SERVER FEATURE flare_x86_64_2011_discreet_l 2011.999 18-nov-2009 8 \ 6D7AE3402ECB46174B70 ck=47 6 Save and close the file. This file sets up the network licenses available for distribution by the license server to the Creative Finishing workstations on your network. Burn | 123 Configure nodes or workstations to get a license Create a licence file on each computer so that it can get a license from the license server. Do this even if the server and client are on the same machine. 1 As root, Log in as root, open for editing /usr/local/flexlm/licenses/DL_license.dat. If it doesn't exist yet, create it. 2 Copy the SERVER, DAEMON, and USE_SERVER lines into the license file. The resulting file should look similar to: SERVER server DLHOST01=25231AEF83AD9D5E9B2FA270DF4F20B1 DAEMON discreet_l discreet_l USE_SERVER 3 Repeat for each computer. Change the default port used by the license server To avoid conflicts with other applications or license servers in your facility, you may need to change the default port setting used by the license server, or license servers in the case of a redundant configuration. This requires a minor change to the DL_license.dat file on your license server(s), as well as on every workstation or node. To change the default port used by a license server: 1 Log in as root to the license server and open /usr/discreet/licserv/licenses/DL_license.dat for editing. 2 Find the SERVER line. By default, no port number is specified at the end of the SERVER line for a single license server and the license server uses default port number in the range of 27000-27009. By default, redundant license servers are set to port 27005. 3 Enter a different port at the end of the SERVER line. The license server can use a default port number in the range of 27000-27009. For example: SERVER server DLHOST01=886C2B75E8E57E4B03D784C3A2100AC0 62222 4 Save and close the file, then verify that the new port settings are correct: /etc/init.d/license_server stop /etc/init.d/license_server start cat /usr/discreet/licserv/log/license_server.log For redundant license servers, reboot each server in close sequence to properly restart the license system. 5 Look for messages similar to the following examples in the output, and verify that the port numbers are what you requested, e.g.: 15:08:49 15:08:49 15:08:49 15:08:49 (lmgrd) (lmgrd) (lmgrd) (lmgrd) lmgrd tcp-port 62222 Starting vendor daemons ... Using vendor daemon port 12344 specified in license file Started discreet_l (internet tcp_port 12344 pid 5013) 6 Repeat with /usr/local/flexlm/licenses/DL_license.dat for each workstation or node, using the same port as the one you set for the license server. 124 | Chapter 3 Networked processing Run the software Overview Once GUID-25446F29-3FA9-4AB4-878F-972996FDC947 is installed and licensed, send jobs from your Creative Finishing applications to the background processing network. The background processing network refers to all the nodes on the physical network that are used for background processing. The following procedures provide a general overview for doing background processing and assumes that the network is configured properly, including the TCP/IP settings. Submitting Jobs to the Background Processing Network When the Creative Finishing application is properly configured, a Burn button appears in the clip library or in various application modules. Click this button to submit a setup, timeline, or clip as a background processing job. Refer to the application help for details. The Burn button appears when Burn-related settings are configured in the init.cfg file of Linux applications, or in the Smoke Setup utility of Smoke for Mac OS X. However, this button's appearance does not mean that the background processing network is operational. Always check the status of the network using the Backburner Monitor before submitting jobs to Burn. Monitoring and Managing Burn Jobs You can preview results for jobs by viewing the _Burn_ library in the clip library of an Creative Finishing application. As you are previewing your result, the clip may appear semi-rendered. Frames are not processed sequentially, so it is important to wait until the processing tasks are finished and the clip is completely processed. ■ The Background I/O window in your Creative Finishing application. See your application help. ■ The browser-based Backburner Monitor. See the latest Backburner User Guide for details. ■ The Windows-based Backburner Monitor application. See the latest Backburner User Guide for details. ■ The browser-based Backburner Monitor included in Autodesk WiretapCentral. See the WiretapCentral chapter in your application help for details. Previewing Results To preview a result: 1 Open the clip library. See your application help. 2 Open the _Burn_ library. Submitted jobs appear with a name that identifies the machine, the date and time of the job, as well as the job type. Jobs that require a render node equipped with a GPU contain the string “gpu” in their name. The _input reel contains jobs and source clips that are sent as input to Burn for processing over the network. The _output reel indicates the rendered result that is copied back to the Linux workstation. A clip labelled PENDING RENDER indicates that the clip is being rendered by Burn. 3 To refresh the view of the rendered result, press the F hot key. Troubleshooting 1 Restart Backburner Manager and Backburner Server (page 86) and shut down and restart all Burn and Backburner components, including all Creative Finishing applications that submit jobs to Burn, Backburner Manager. This may be enough to fix the problem. Burn | 125 2 Troubleshoot the background processing network (page 126). 3 Review the Burn and Backburner logs from render nodes on the network. 1 Create a list of render nodes from which Burn and Backburner logs should be collected. On your Creative Finishing workstation, log in to the account for your Autodesk application and open a terminal. Run /usr/discreet/<product_home>/bin/GATHER_BURN_LOGS Run it with -h for usage. This directory contains scripts and binary files for the application, including those used for submitting jobs to the background processing network. 2 The script collects Burn and Backburner logs from each render node listed in the script and collates these logs to a single text file. It uses the rsh protocol to access render nodes. 3 To avoid being prompted for login information while running this script, create a user account on the workstation and populate the .rhosts file on each render node with the hostname of the workstation followed by the username of this account. You can then use the -l option to run the script as this user. 4 If these logs indicate that the problems may be due to background processing network components such as Wire networking, then Test network components (page 130). 5 Assess compatibility between jobs and render nodes (page 131) if these logs indicate that the problems may be due to memory issues on the render nodes, or if you suspect that the render nodes do not meet the graphics card requirements for a certain job type. 4 If neither the logs nor the included scripts help you troubleshoot the problem with the background processing network, contact Autodesk Media and Entertainment Customer Support. Troubleshoot the background processing network Problems with processing jobs may not be directly related to Burn but to background processing network. Check connectivity The following information and procedure applies to all components of a background processing network. Burn works only when components on an Autodesk background processing network are communicating with each other. For example, if Backburner Manager cannot contact the render nodes over the network, jobs cannot be rendered remotely. Use ping to test connectivity between components on the background processing network: ■ From the workstation, test connectivity between the Backburner Manager and each render node on the network. ■ From the Backburner Manager workstation, test connectivity between the workstation and each render node on the network. ■ From the render nodes on the network, test connectivity between the Backburner Manager and the workstations that submit jobs to the background processing network. Check network connectivity for jumbo frames Jumbo frames increase the efficiency of a background processing network, but must be supported throughout the network. Problems can be caused by jumbo frames being sent to a switch or network adapter that is misconfigured or cannot handle these frames. 126 | Chapter 3 Networked processing If your network supports jumbo frame switching, test if jumbo frames can be sent between the workstations and render nodes: 1 On a workstation or render node, open a terminal and run ping using the -s option to set the packet size used for network communications. Type: ping -s 50000 <hostname> where <hostname> is the hostname or IP address of the workstation or render node you are trying to reach. 2 If ping fails, ensure basic network connectivity between the same two network components: ping <hostname> where <hostname> is the hostname or IP address of the workstation or render node you are trying to reach. If step 3 works while step 2 failed, recheck the configuration for your network adapter and/or switch to ensure: ■ Jumbo frames are supported by both network components. ■ Both the network adapter and switch are properly configured for jumbo frame support. The network infrastructure in your facility may not support jumbo frame switching. Consult your network administrator if you are unsure if your network supports jumbo frames. Check mount points on the background processing network Certain directories on Creative Finishing workstations, such as /usr/discreet/clip and /usr/discreet/project, must be accessible as NFS mount points to render nodes, so that material for processing jobs can be retrieved by render nodes. The directories shared by each Creative Finishing workstation must be mounted on the /hosts/<workstation_hostname> directory on render nodes, where <workstation_hostname> is the host name of the workstation submitting jobs to Burn. Normallly, these directories are mounted automatically when you install the Creative Finishing application on the workstations, and the Burn software on the render nodes. Perform the following procedure to check these mount points and ensure that render nodes can access material. To check that mount points are accessible to the background processing network: 1 Log in as root to a render node, and open a terminal, if necessary. Type: cd /hosts/<hostname>/usr/discreet/clip where <hostname> is the name of the workstation submitting jobs to Burn. 2 If the previous step fails, configure the amd automounter service on each render node, and make sure the amd and NFS services are set to run automatically on each render node and workstation. See below. 3 Try again to connect to the usr/discreet/clip directory of the workstation that is submitting jobs to the background processing network, and create an empty file by typing: <workstation_hostname>/usr/discreet/clip/export_test where <workstation_hostname> is the hostname or IP address of the workstation. If the file cannot be created, permission to write to the required directories may not be assigned to the render nodes. 4 Check the permissions assigned to the file you created in the previous step. Type: ls -al /hosts/<workstation_hostname>/usr/discreet/clip where <workstation_hostname> is the hostname or IP address of the workstation. File system details for the export_test file you created appear. 5 Ensure that the owner of the file is root and the group ID is sys.. Configure the amd automounter on render nodes The amd automounter is automatically installed on each render node by the custom Linux kickstart file. Perform the following tasks to modify the amd configuration file to redirect the mount point to /hosts instead of /net. : 1 Log in as root to the render node. Stop the amd automounter daemon: /etc/init.d/amd stop Burn | 127 2 Open the /etc/amd.conf configuration file in a text editor and change /net to /hosts. So the file contains the following: #DEFINE AN AMD MOUNT POINT [ /hosts ] 3 Save and close the file then restart the amd daemon: /etc/init.d/amd start Configure the NFS and amd services to start automatically By default, the NFS and amd services are set to start automatically on workstations and render nodes. Perform the following procedure to check these services, and reconfigure their startup mode if necessary. 1 Log in as root to the workstation or render node. Open a terminal, and check that the amd and NFS services are running by typing: chkconfig --list | egrep ‘nfs|amd’ The output of the command should contain the following lines: nfs 0:off 1:off 2:on 3:on 4:on 5:on 6:off amd 0:off 1:off 2:on 3:on 4:on 5:on 6:off 2 If the services are not set to on for run levels 2 through 5, configure them to be started automatically with: chkconfig nfs on chkconfig amd on 3 Reboot the workstation or render node for the changes to take effect. Enabling Export Permissions Edit the /etc/exports file on the Creative Finishing workstation so that render nodes on the background processing network can access the media storage for the jobs submitted to Burn. Directory Description /usr/discreet/clip Enables remote access to clip libraries for Wire. /usr/discreet/project Enables remote access to projects by Burn at start-up. To edit the /etc/exports file: 1 As root, open for editing /etc/exports. 2 Enable access to the /usr/discreet directory on your workstation by appending to the file: /usr/discreet *(rw,sync,no_root_squash) This allows any remote system access to /usr/discreet. You can restrict access by adding the host names for each render node to the line, separated by a colon (:). For example, to restrict access to the /usr/discreet directory to nodes burn01 to burn03: /usr/discreet burn01:burn02:burn03(rw,sync,no_root_squash) 3 Save and close the file then apply the changes with: /usr/sbin/exportfs -va 128 | Chapter 3 Networked processing Verify Stone and Wire connectivity from the background processing network Render nodes on a background processing network access frames on storage devices attached to the workstation using the Wire network. To ensure these storage devices are available to the render node: 1 Log in as root to a render node on the background processing network. In a terminal, view all storage devices available to the render node: /usr/discreet/sw/tools/sw_framestore_dump. All storage devices attached to the Wire network appear. 2 If a storage device does not appear in the list of devices available to the render node, check: ■ The workstation is on the same network as the render node. ■ The workstation to which the device is attached is available on the network and can be pinged. ■ The probed daemon running on the workstation is using the same port as the rest of the network. See the entries for sw_probed and sw_probed.cfg in the Creative Finishing Installation and Configuration Guide. ■ Verify that the sw_framestore_map file on the workstation contains only the local media storage: as root, open for editing /usr/discreet/sw/cfg/sw_framestore_map. Verify that only the local media storage appears in this file. If other media storage devices appear, delete them, unless server self-discovery is not enabled for Stone and Wire. Media storage devices must be explicitly listed in the sw_framestore_map file if server self-discovery is not enabled for Stone and Wire, such as when you are using legacy disk arrays. Use sw_framestore_dump to see if storage devices for other workstations on the network can be viewed. Save and close the file. Checking Burn Licensing for Render Nodes The following applies to all render nodes as well as the workstation or render node being used as the License Server for the background processing network. Render nodes must get Burn licenses from the License Server to process jobs. If the License Server is not working, or if licenses cannot be checked out, jobs are not rendered. To ensure that licensing for Burn is working on the render nodes: 1 Log in as root to the render node or workstation running the License Server for the background processing network and check if the License Server is set to start automatically: chkconfig --list | grep license_server 2 If the License Server is not set to start running automatically, configure it to do so: chkconfig license_server on. If the License Server was not started, start it: /etc/init.d/license_server start 3 View the usr/discreet/licserv/log/boot.log file for the License Server to ensure that the Burn license is being read by the server and check: ■ The versions of Burn that are licensed for the network ■ The start and expiry dates for Burn licenses ■ The workstation or render node running as the License server for the background processing network ■ The availability of each Burn license for render nodes 4 View the /usr/discreet/licserv/licenses/DL_license.dat file to see the number of Burn licenses purchased. To check Burn licensing on a render node: 1 Log in as root to a render node that is not running the License Server. 2 Contact the render node or workstation running the License Server: ping <hostname> where <hostname> is the hostname or IP address of the render node or workstation running the License Server. If this step fails, check the network connection between the render node and the render node or workstation running the License Server, then retry ping. Otherwise, continue to the next step. Burn | 129 3 View the DL/usr/local/flexlm/licenses/DL_license.dat file to check that the render node is licensed for Burn. It should like something like the below. If it doesn't, contact customer support. SERVER exuma-001 DLHOST01=886C2B75E8E57E4B03D784C3A2100AC0 DAEMON discreet_l discreet_l USE_SERVER 4 Repeat the above for the remaining render nodes on the background processing network. If the License Server for your network is running on a render node, make sure you perform this procedure on this node as well. Otherwise, this node is able to distribute Burn licenses to other render nodes, but is unable to retrieve a license for itself. Test network components Reviewing log files can help to indicate the source of a problem on the background processing network. For example, log messages showing network timeouts for jobs may indicate a problem with the TCP/IP protocol or the Stone and Wire network. Use the following scripts to test background processing network components and identify the source of the problem ■ The verifySWConn script is used to test Wire network connectivity in the background processing network. Refer to Testing Stone and Wire Connectivity for Burn in this topic. ■ The verifyBurnServer script is used to test whether a render node meets minimum hardware requirements for processing jobs on a network. Refer to Testing Render Node Hardware for Burn in this topic. Testing Stone and Wire Connectivity for Burn The following information and procedure applies to workstations and render nodes on a background processing network. Use the verifySWConn script to see if problems are due to Stone and Wire. This script can be run from a workstation or from a render node on the background processing network using the following procedure. To test, log in to the workstation using the account for the application, or into a render node as root, and run /usr/discreet/<product_directory>/bin/verifySWConn <options> <Workstation1 Workstation2 ...> where: <Workstation1 Workstation2 ...> are the workstations or Burn render nodes on which Stone and Wire are to be tested. You must specify at least two workstations or render nodes to be tested. <options> include the following options for this script. Option Function -v Verbose. -l <username> Uses the specified user name to log in to the render node. If this option is omitted, you may be prompted to provide a username and password. The username must be valid on the test host. Testing Render Node Hardware for Burn Use the verifyBurnServer script to see if a Linux system has the hardware requirements to be used as a render node. The script also checks if a render node has a supported GPU-accelerated graphics card and graphics driver version, necessary for processing jobs that require a GPU. 130 | Chapter 3 Networked processing To test render node hardware for Burn, log in to the render node as root and open a terminal. Run: /usr/discreet/<burn_version>/bin/verifyBurnServer The verifyBurnServer script checks the hardware of the system to ensure it meets the requirements for render nodes, and displays the results. Assess compatibility between jobs and render nodes Read the following sections if you suspect problems are caused by memory problems on the render nodes, or that render nodes do not meet the graphics card requirements for a certain job type. Processing jobs that require a GPU Some of the jobs created in your Creative Finishing application (for example, floating point jobs, such as unclamped colors in Action, directional RGB blur, radial RGB blur) require a GPU-accelerated graphics card in order to be rendered. While your workstation is equipped with a GPU-accelerated graphics card, and can render such jobs locally, your background processing network is unable to render these types of jobs if no node is equipped with a GPU. To see if a render node has the hardware capabilities to process jobs that require a GPU, use the verifyBurnServer script, Backburner Monitor, or Backburner Web Monitor. If you attempt to submit a job that requires a GPU to a background processing network where no render node is equipped with a GPU, one of the following situations occurs: ■ If the BackburnerManagerGroupCapability keyword in the application’s init.cfg file is set up correctly, the application does not attempt to submit the job to the background processing network, and an error message is displayed. You must render the respective job locally on the Creative Finishing workstation. ■ If the BackburnerManagerGroupCapability keyword is not set up properly, no error message is displayed and the application attempts to send the job to the background processing network. Since no render node can process the job, the job will be stuck in the queue indefinitely. Use Backburner Monitor or the application’s Background I/O window to remove the job from the queue, and then set the BackburnerManagerGroupCapability keyword properly to reflect the hardware capabilities of your background processing network. To avoid further problems, before attempting to submit a job that requires a GPU to your background processing network, make sure at least one of the render nodes is equipped with a GPU, and that the BackburnerManagerGroupCapability keyword in the application’s init.cfg file is set up correctly. Troubleshoot memory problems This section explains how to diagnose and address problems that are caused by jobs submitted from workstations with more memory than the render node. Inferno , Flame , Flint , Smoke , and Backdraft Conform are all 64-bit applications, and can thus make full use of up to 16 GB of memory. As a general rule, render nodes should have the same amount of RAM as the Creative Finishing workstation you are sending jobs from. A Burn server running on a render node equipped with less memory than what is installed on your Creative Finishing workstation, may fail when processing these jobs due to their higher memory demands. However, do not assume that every problem on render nodes with less memory than your workstation is exclusively caused by memory issues. Burn | 131 If you suspect that a render node has failed due to a job exceeding the node's memory capacity, check the logs: 1 If you are running graphics on the render node, log in as root and open a terminal. Otherwise, just log in as root. 2 Navigate to /usr/discreet/log. This directory contains logs of events for the Burn servers installed on the render node. You need to view the log created at the time the server failed. Identify the Burn log file from the time of the Burn server failure using one of the following methods: ■ If the render node has just failed, look for the following file: burn<version>_<render_node_name>_app.log. ■ If the render node failed previously and was brought back online, look for burn<version>_<render_node_name>_app.log.## created around the time of the render node's failure. 3 Review the messages in the log file for entries similar to the following which may indicate that the render node was experiencing memory problems at the time of failure. 1 [error] 8192 PPLogger.C:145 01/24/06:17:06:16.998 Cannot load video media in node "clip17" for frame 2 2 [error] 8192 PPLogger.C:145 01/24/06:17:06:17.210 Out of memory for image buffers in node "clip6" (76480512 bytes). 3 Increase your memory token. 4 Next, check the Backburner Server log file /usr/discreet/backburner/log/backburnerServer.log from the time of the server failure, using the methods listed above. 5 Review the messages in the Backburner Server log file in a text editor, looking for entries similar to the following: 1 [notice] 16387 common_services.cpp:45 01/24/06:17:06:10.069 Launching 'burn' 2 [error] 16387 common_services.cpp:37 01/24/06:17:06:48.182 Task error: burn application terminated (Hangup) 3 [error] 16387 common_services.cpp:37 01/24/06:17:06:48.182 burn application terminated (Hangup) These log entries confirm that a server failure occurred on the render node. Since you know the server failed around this time, you can deduce that the memory problem caused the server to fail. 6 Optional: Identify the workstation running the application that submitted the job, and then look at the Batch setup, timeline segment, or clip to try and determine why the server failed. Knowing what factors caused the render node to fail may help you to gauge what jobs your render nodes can handle. It can also give you ideas about how to deal with this problem. Problems that cause the server to fail due to lack of memory on a render node, usually arise due to: ■ The size of images used in a project. For example, projects using higher resolution HD, 2K, and 4K images require more memory to store and render than SD projects. ■ The complexity of the effect sent for processing. For example, a complex Batch setup with many layers and effects requires more memory to render than a simple Batch setup. Addressing Memory Issues If servers on your render nodes are failing while processing jobs, increase the amount of RAM set aside for processing jobs. You must repeat this procedure on each render node on your network running the server. To configure Burn to reserve a set amount of RAM for jobs: 1 In a terminal, as root: /etc/init.d/backburner_server stop. 132 | Chapter 3 Networked processing 2 In /usr/discreet/burn_<version>/cfg/init.cfg uncomment the MemoryApplication keyword. This keyword sets the amount of RAM in megabytes (MB) to be reserved for jobs. This keyword is disabled by default so Burn can dynamically adjust the amount of RAM used for each job based on the resolution of the project. When you enable this keyword, Burn reserves the same amount of memory for each job regardless of the project's resolution. 3 If necessary, change the value for the MemoryApplication keyword to set the amount of RAM (in MB) to be reserved for each job up to 1400 (about 1.4 GB). For example: MemoryApplication 1024. Setting the MemoryApplication keyword so that the (total render node memory) - (value of MemoryApplication) is less than 2600 MB may adversely affect the stability of the render node. 4 Save and close init.cfg and restart the Backburner Server on the render node by typing: /etc/init.d/backburner_server start. 5 Optionally implement the following guidelines for processing Burn jobs. Although these guidelines are not mandatory, following them may help increase the success rate while processing jobs on render nodes with limited memory resources. ■ If you know that the size of images in your projects may cause render node failure, enforce guidelines about what can and cannot be sent to the render nodes. For example, if you know that 2K and 4K images with Batch setups exceeding six layers may cause the render nodes to fail, ensure these setups are not sent to Burn. ■ If you know that the complexity of the effects sent for processing may cause render node failure, simplify effects by creating multiple Batch setups or by processing memory-intensive effects locally. For example, if you know that complex Batch setups with multiple logic ops and colour correction may cause render nodes to fail, render these locally instead. If, after following these guidelines, your render nodes still fail because of low memory, consider adding memory to the render nodes. Matching the amount of memory on the render nodes with the amount of memory found on your Creative Finishing workstation is the most effective solution to memory issues. WiretapCentral and Wiretap Gateway Installation WiretapCentral and Wiretap Gateway Wiretap is a is a protocol that allows a client system to remotely browse, read, and write media and metadata from Autodesk Creative Finishing applications. The Creative Finishing Wiretap server (ifffsWiretapServer) is installed with Creative Finishing applications, and requires no modification for WiretapCentral. The server runs independently of the Creative Finishing application. Wiretap Central is a web-browser-based application that allows you access to the Smoke and Flame projects through any web browser on any workstation that has the ability to see your system through the network. Wiretap Central can perform 3 types of functions 1 Browse through projects of your machine or machines within your infrastructure. This means you can go into clip libraries, view reels and even create reels for future incoming media. 2 Import R3D media as well as all the multi-channel passes embedded in an OpenEXR file for 3D compositing into the database. 3 The exporting facility allows you to encode different types of media from within wiretap central without having to disturb the Smoke and Flame system if they are being used in a creative session. This gives you different format support compared to the export options within Creative Finishing applications. For example you can export H264, Mpeg1, Mpeg2, Mpeg4, FLV, IPOD compatible files and a few other formats. WiretapCentral and Wiretap Gateway Installation | 133 Wiretap Gateway is a Wiretap server that exposes any mounted standard filesystem as a Wiretap hierarchy of directories, files, and clip nodes, and streams them as raw RGB to local or remote Wiretap clients, such as WiretapCentral. If Wiretap Gateway is installed on a Mac equipped with a RED ROCKET card, it can use the card to improve the speed of decoding and debayering R3D files. Wiretap Gateway machines in your network are labeled as such in the WiretapCentral network tree, or in the Lustre file browser. They act as gateways to the storage devices where the media to import resides. When you select a Wiretap Gateway machine, and initiate a media import operation, the media is read from the source storage by the Wiretap Gateway, processed by the Media I/O Adapter encoding engines on the processing nodes, and then written to the destination storage through the Wiretap server. Installation Set up your Creative Finishing workstation. WiretapCentral, Wiretap Gateway, Backburner (page 81), Backburner Manager (page 107), and Backburner Monitor (page 86) are automatically installed on the workstation. A stand-alone installation is the simplest deployment model, as all components are installed and configured with your application on the same workstation. All media processing is performed locally, which can have a significant impact on system performance if you are using several components at the same time. If you need more performance, consider using distributed, deployment. Performance is improved by distributing processing tasks via Backburner (page 81) Server and Media I/O nodes on your network. This is the only supported deployment model for Lustre Windows workstations. To install this software you must be able to administer a Linux system with root access. If you plan to reconfigure your workstation or your storage, knowledge of computer hardware, storage and networking in a professional video/film production environment is recommended. The default root account password on an Autodesk workstation is password. Some or all of these components can also be installed on other networked hardware: ■ Install and license Wiretap Gateway on a dedicated system (page 135), then Configure Wiretap Gateway (page 136) ■ Install WiretapCentral on a dedicated system (page 137) ■ Test the installation (page 140) Optionally Configure Wiretap Gateway (page 136)Configure WiretapCentral (page 138), and Test the installation (page 140). Set up your Creative Finishing workstation. WiretapCentral, Wiretap Gateway, Backburner (page 81), Backburner Manager (page 107), and Backburner Monitor (page 86) are automatically installed on the workstation. Some or all of these components can also be installed on other networked hardware: ■ Install and license Wiretap Gateway on a dedicated system (page 135), then Configure Wiretap Gateway (page 136) ■ Install WiretapCentral on a dedicated system (page 137) ■ Test the installation (page 140) Optionally Configure Wiretap Gateway (page 136)Configure WiretapCentral (page 138), and Test the installation (page 140). Components Wiretap WiretapCentral communicates with media and metadata databases through their Wiretap server, typically a Creative Finishing workstation. Each workstation is listed in the WiretapCentral network tree as a member of the Wiretap network. WiretapCentral Wiretap Gateway 134 | Chapter 3 Networked processing Autodesk Wire This service enables high-speed transfer of uncompressed timelines, clips, and libraries between workstations, on industry-standard TCP/IP and InfiniBand networks, preserving all metadata. Media I/O Adapter The Media I/O Adapter is a Backburner processing engine that reads media from a storage device or Wiretap server, processes it, and then writes it to a storage device or Wiretap server. Install and license Wiretap Gateway on a dedicated system See Prepare the installation media (page 31). ■ If you have only Linux machines serving your Linux products, install Wiretap Gateway on a Linux workstation. ■ If you want Apple ProRes support for your Linux products, you must install the Wiretap Gateway software for Linux on a Mac workstation. Installing Wiretap Gateway Software for Linux Products Install on Linux: 1 Log in to the system as root. On the USB key, the installer is in the directory StandaloneInstallers/. A link to the installer is in the release announcement. 2 Run WiretapGateway_[product version]_Linux/INSTALL. Install on OS X by double clicking WiretapGateway_2012_Mac_Use_With_Linux_Products.dmg. This is on the USB drive at StandaloneInstallers/WiretapGateway_[product version]_Mac or you can download it from the link in the Release Announcement. License Dedicated Wiretap Gateway Software for Linux Products You cannot use a Wiretap Gateway on a dedicted system until it is licensed. Although they still appear in the network tree in applications, unlicensed Wiretap Gateways block all media I/O. When you attempt to play or import media through an unlicensed Wiretap Gateway, the operation fails and an “Unlicensed” error message is returned. To license Wiretap Gateway through a remote (network) license server (Linux or OS X): 1 On the machine running Wiretap Gateway create /usr/local/flexlm/licenses/DL_licenseNetwork.dat. 2 Add the lines: SERVER <license_server_machine_name> 0 VENDOR discreet_l USE_SERVER To license (node locked) Wiretap Gateway (Linux or Mac machine): 1 On the Wiretap Gateway system in a terminal, get the Discreet host ID of the system with /usr/local/bin/dlhostid This should return something like: The Discreet host ID of this machine is “DLHOST01=25231AEF83AD9D5E9B2FA270DF4F20B1”. 2 Send the Discreet host ID line (e.g. everything in quotations marks, above) to Autodesk M&E Licensing:[email protected]. You can immediately acquire a 4-day license code via the emergency license generator at http://melicensing.autodesk.com/templicensing/. To speak to a licensing representative call the Licensing Department in North America at 1-800-925-6442, 08:00-20:00 EST. Outside of North America, call 1-514-954-7199. WiretapCentral and Wiretap Gateway Installation | 135 3 Carefully add the code to the license file /usr/local/flexlm/licenses/DL_license.dat. 4 Save the license file and restart Wiretap Gateway with /etc/init.d/wiretapgateway restart. Installing and and Licensing the Wiretap Gateway Software Included with Smoke for Mac OS X Install and license the Wiretap Gateway included with Smoke for Mac OS X. This version is for Smoke for Mac only. Install, configure and license Smoke for Mac OS X before you install and license the Wiretap Gateway. 1 You should register and set up the network license server for Smoke for Mac OS X before you install Wiretap Gateway. 2 On the Smoke installation media run Install Wiretap Gateway Server from the Standalone Installers folder. 3 Click through to the Network License Configuration dialog and enter the license server hostname in the Server hostname field. 4 Depending on your OS configuration, the Select a Destination window may appear. Click “Install for all users of this computer”, then click Continue. 5 Click Install to begin the installation process. To change the license server after you install the Smoke for Mac edition of Wiretap Gateway: 1 Open the License Server Selector: ■ If Smoke is installed on the same workstation: /Applications/ Smoke [product version]/Utilities ■ If Smoke is not installed on the workstation: /Applications/Autodesk/Adlm 2 Enter the name of the license server in the Hostname field and click OK. Configure Wiretap Gateway After changing the configuration file /usr/discreet/wiretapgateway/cfg/wiretapgateway.cfg you must restart Wiretap Gateway: ■ On OS X, use Applications/Autodesk/Smoke Common Utilties/Service Monitor ■ On Linux, do sudo /etc/init.d/wiretapgateway restart Define an additional IP address By default, the primary network interface of Wiretap Gateway is the GigE network adapter. If you are using an additional network, such as an InfiniBand network, uncomment the IP0 parameter, and set its value to the InfiniBand IP address of the host. For example: IP0=10.10.11.10 To define more network interfaces, use the IP1, IP2, parameters and so on. Filtering the file system You can hide directories and file types from Wiretap Gateway with the ExcludeDirs, ExcludeExts, and LimitDirs parameters. The first two exclude a comma-delimited list of objects. LimitDirs excludes everything on the filesystem except a comma-delimited list of objects. LimitDirs overrides ExcludeDirs in the event of a conflict. Examples: ■ ExcludeDirs=/dev,/lib,/usr/lib,/bin,/usr/bin,/sbin ■ ExcludeExts=jpg,tiff,mov 136 | Chapter 3 Networked processing ■ LimitDirs=/mnt. Proxy Quality for RED Footage The LowresDebayerMode parameter sets the proxy quality level for viewing RED (R3D) media. Legal values: Full, Half Premium, Half Good, Quarter (default), Eighth. Slave processes To improve real-time playback of RED media, Wiretap Gateway can spawn multiple slave processes that increase performance without requiring additional licenses. This is set with NumLocalSlaves. The default setting is 4. NOTE Do not use slaves in conjunction with a RED ROCKET. Set NumLocalSlaves=0. On a dedicated system, enable as many slave processes as the number of CPU cores on the system. If you are running Creative Finishing workstation, make sure you set aside at least four CPU cores for a Creative Finishing application, or two cores for Lustre. For example, on a 16-core HP Z800 running Lustre, enable 12 slave processes, so that two CPU cores remain available for Lustre, and two other CPU cores are available for background processes like Backburner. Read-ahead threads If using a RED ROCKET you can't make slaves available. The Wiretap server can handle concurrent reading from multiple clients and the number of threads to create is set with NumReadAheadThreads. The default value, 7, is tuned for two clients each reading (in parallel) two streams, each with three read-ahead requests. If you cannot find this parameter in the configuration file, see /usr/discreet/wiretapgateway/cfg/wiretapgateway.cfg.sample. Set NumReadAheadThreads=12 and NumReadThreads=6. NumReadThreads=6 is the number of read-ahead requests sent by clients when no slaves are available. This number should not be set higher than NumReadAheadThreads above. When slaves are available, this number is ignored and the number of read-aheads will equal the number of slaves available. Install WiretapCentral on a dedicated system Linux: 1 Prepare the installation media (page 31) in a terminal as root. 2 In the directory to which the files were unpacked, run the installer with the command INSTALL. OS X: 1 Whether on the Smoke DVD or the DMG file, the WiretapCentral is found in the Standalone Installers folder. 2 Run the app and follow the on-screen instructions to complete the installation. WiretapCentral and Wiretap Gateway Installation | 137 Configure WiretapCentral Setting Up User Access Control Access control options ■ By default, no user name or password is needed to use WiretapCentral, and all jobs submitted from it to Backburner are owned by the user apache. As a result, all users can perform operations on any WiretapCentral job on the Backburner network, including suspending, activating, and deleting jobs submitted by other users. ■ You can assign the generic user “apache” administrator privileges for Backburner. This allows all users to manage and control all jobs on the Backburner network, including Burn jobs, for example. ■ For greater control, you use using the Apache server’s authentication mechanism on the root directory of WiretapCentral, which requires users to submit a user name and password to access WiretapCentral. Then WiretapCentral jobs on the Backburner network have specific user names associated with them. Only the owner of a job can perform operations upon it. Optionally, you can give administrator privileges to specific users so they can control Backburner jobs other than their own. The first step in setting up user authentication is to password-protect the directory (and subdirectories) from which the WiretapCentral Web page is served. Do this by adding standard server directives to the main Apache configuration file. 1 Open for editing the main Apache configuration file, /etc/httpd/conf/httpd.conf (Linux) or /etc/apache2/httpd.conf (OS X) and append this: # WiretapCentral User Authentication Section <Directory /var/www/html/wiretapcentral> AuthType Basic AuthName WireTapCentral AuthUserFile /etc/httpd/auth/wiretapcentral.auth <Limit GET POST> require valid-user </Limit> </Directory> 2 Restart the Apache server for the changes to take effect. ■ Linux: in a terminal, as root: /etc/init.d/httpd restart ■ OS X: in a terminal type: sudo /usr/sbin/apachectl restart 3 Verify that password protected was successful by opening a browser and attempting to use WiretapCentral: http://<hostname>/WiretapCentral. A pop-up should request credentials. Step 2: create a password file containing user names and passwords. 1 Verify /etc/httpd/auth/wiretapcentral.auth (Linux) or /etc/apache2/auth/wiretapcentral.auth (OS X) exists. 2 Use the Apache htpasswd command to add users to the wiretapcentral.auth file: ■ Linux: htpasswd -c /etc/httpd/auth/wiretapcentral.auth <username> <password> ■ OS X: htpasswd -c /etc/apache2/auth/wiretapcentral.auth <username> <password> WARNING The -c option replaces any existing password file. Use this option for the first password only, if wiretapcentral.auth is not already in place. 3 Optional: To delete an account type one of the following commands: ■ Linux: htpasswd -D /etc/httpd/auth/backburner.auth <username> 138 | Chapter 3 Networked processing ■ OS X: htpasswd -D /etc/apache2/auth/backburner.auth <username> Step 3 (Optional): Giving Specific Users Administrator Privileges Users without administrators privileges can perform operations on the jobs they themselves submit, but can only monitor other jobs on the Backburner network. Users with administrator privileges can actively manage all jobs and render nodes. Administrator privileges are assigned in the Backburner configuration file. 1 On the workstation where the Backburner Manager is installed, open for editing /usr/discreet/backburner/cfg/wiretap.cfg. 2 Update the BackburnerAdministrators keyword, You can a comma-separate list of users, for example: BackburnerAdministrators=backburner, apache, wiretapcentral, admin 3 Save and exit the file. To verify that administrator privileges have been successfully applied to the user account, first, on the workstation where the Backburner Manager is installed, restart the Backburner Manager so it picks up the new settings: ■ Linux: /etc/init.d/backburner restart ■ OS X: /usr/discreet/backburner/backburner_manager restart 4 Next, log in to WiretapCentral as the administrator account, and attempt to suspend a job that belongs to a different user. If the suspension operation is successful, the administrator privileges have been applied. If you receive a “permission denied” error message, the account does not have administrator privileges. Web browser configuration The WiretapCentral graphical user interface runs in any Web browser that supports the Adobe Flash Player plug-in, version 9 or later. If you already have the Adobe Flash Player plug-in installed for your browser, you do not have to perform any additional configuration to use WiretapCentral. Open a Web browser, and point it to http://<hostname>/WiretapCentral. On Creative Finishing workstations, the Autodesk DKU (Discreet Kernel Utilities) automatically installs the Adobe Flash Player. This does not apply to Flare workstations, as the DKU is not installed for Flare. You can get Adobe Flash Player from the Adobe Web site.. Configuring Creative Finishing Applications to Access WiretapCentral Linux: 1 If the Creative Finishing application is running, exit it. 2 In a terminal, as root, open for editing init.cfg, in a text editor. 3 Change the value of the WiretapCentralUrl keyword to refer to the system where you installed WiretapCentral, for example: WiretapCentralUrl http://server1/WiretapCentral/ 4 Save and close the file. Smoke for Mac: 1 If Smoke is running, exit it. 2 Run the Smoke Setup application from Applications / Autodesk / Smoke <version> / Smoke Utilities. 3 Enter the URL of WiretapCentral in the WiretapCentral Url field, in the General tab. For example: http://server1/WiretapCentral/ 4 Click Apply to save the settings, and then close the Smoke Setup application. WiretapCentral and Wiretap Gateway Installation | 139 Test the installation Wiretap Gateway: 1 Access the file browser in Lustre, the Network panel in a Creative Finishing application, or open WiretapCentral in a Web browser: http://<hostname>/WiretapCentral 2 Locate the Wiretap Gateway system in the list, and make sure the label “Gateway” or “Autodesk Wiretap Gateway Server” appears next to the system name. 3 In WiretapCentral, locate the Wiretap Gateway system you want to verify in the Servers panel on the left-hand side, and make sure the label “Gateway” appears next to the system name. 4 Click the Wiretap Gateway system name, and verify that Wiretap Gateway was successfully licensed: ■ In WiretapCentral, the Description row in the Server Details panel should no longer contain the mention “Unlicensed”. ■ In Creative Finishing applications, Wiretap Gateway should no longer contain the mention “Unlicensed”. 5 Ensure you can browse the storage device connected to the Wiretap Gateway system. Verify your Render Farm from WiretapCentral: 1 Open WiretapCentral in a Web browser: http://<hostname>/WiretapCentral 2 Select Backburner Monitor from the Tools menu or from http://<hostname>/WiretapCentral/bbmon.html. 3 En sure the machine where you set up Backburner Manager appears in the Backburner Manager drop-down list. 4 Select the manager for your render farm and then click the Servers tab. A list of all the Backburner Servers assigned to the selected manager appears. 5 Make sure the servers you set up are in the list, and that “mio” is listed in the Adapters column for each of them. 6 Click the Server Groups tab, and make sure the node groups you set up are listed. To verify your Render Farm from the Windows Backburner Monitor: 1 In Backburner Monitor, from the Manager menu, select Connect. 2 Enter the IP or hostname of the machine where you installed Backburner Manager, and verify that you can connect to the Manager. 3 Once you are connected to the Manager, expand the “Plugins” branch in the lower-left panel of the Monitor window, and select “MIO File Import”. The Servers panel should list all the Backburner Servers where you installed the Media I/O Adapter. 4 Expand the “Global Groups” branch in the lower-left panel of the Monitor window, and verify that the server groups you defined are listed there, and that the correct servers are listed under each group. Wiretap path translation About Wiretap Path Translation The Wiretap path translation service converts the syntax of a file path referred by a Wiretap server running on a Linux workstation to a format that the client can understand. This service allows Wiretap clients, who might be running Windows or Mac OS X, to understand file paths that are referenced by an Autodesk Creative Finishing product to clips that have been soft-imported from a NAS, SAN, or any remote mounted storage. 140 | Chapter 3 Networked processing For example, Lustre running on a Windows workstation can work with an Autodesk Creative Finishing product's soft-imported clip on a SAN or NAS. For the Windows workstation, the syntax of the path to the media files may resemble: N:\myclips\clip1\frame1.dpx On a Linux workstation, the path to the same media files may resemble: /CXFS1/myclips/clip1/frame1.dpx When the Wiretap client tries to locate this clip, the path translation service converts the syntax of the path so that the client can access the soft-imported clip from a remote storage device it has mounted locally. Configuring the Path Translation Database The path translation service uses a translation database. The path translation database contains a set of rules that specify how to convert (or “translate”) a file path referred to by a source workstation (the host running the Wiretap server) into a path that the client can understand. These rules are contained in the /usr/discreet/wiretap/cfg/sw_wiretap_path_translation_db.xml file on each Autodesk Creative Finshing workstation. This configuration file is read by the Wiretap server. The translation database is an XML file that must be updated by hand as the network configurations change. The file should be created and maintained by a system administrator who is aware of the configuration of the network. To configure the path translation database: 1 Consider your network environment and how you can organize hosts to simplify the path translation process. Do you have many hosts accessing the same storage device? Do they mount the central storage using the same syntax and drive names? Are these hosts running the same application? Are they running the same operating system? 2 Open /usr/discreet/wiretap/cfg/sw_wiretap_path_translation_db.xml in a text editor. 3 Create the rules for translating the file path. The rules are applied in the order that they appear in the file. The first rule is applied. If that rule matches, then the translation is complete. If the rule doesn't match, the next rule is examined. If your network includes groups of hosts that mount their storage using the same syntax, you may be able to use a group or platform rule to translate the syntax for all similar hosts. If, however, all of your hosts use different syntax and mount points for their storage, you will have to create a host/path rule for each source and destination host. See the sections that follow for a description of the possible path translation rules you can create. 4 Save the file. 5 You do not have to restart Stone and Wire to apply changes in the path translation database. The Wiretap server periodically checks the timestamp of the file and, if there are changes, it updates itself accordingly. However, if you want to test the results of your changes, you can restart Stone and Wire manually. To restart Stone and Wire manually, type: /etc/init.d/stone+wire restart Stone and Wire restarts. About XML Syntax You must respect XML syntax standards when editing the path translation file. For example, the values assigned to attributes must not include ampersands (&) or left angle brackets (<) in their literal form. All instances of these characters, except left and right angle brackets used to delimit XML tags, should be replaced with & and < respectively. Do not concern yourself with the white-space between attributes; it is ignored when the file is parsed. WiretapCentral and Wiretap Gateway Installation | 141 Creating a Host/Path Rule for Host-to-Host Translation Create a host/path rule to translate the path syntax used by the source workstation (the workstation running the Wiretap server) to the path syntax used by the destination workstation. The syntax of the host/path rule is as follows: <map src_host=”<src_host>” src_path=”<src_path>” dst_host=”<dst_host>” dst_path=”<dst_path> ”> Enter a value for each attribute. See the following table for a description of the valid values for each attribute. Attribute Description src_host The host name or IP address of the workstation to which a client connects. If you create a group rule for source workstations, the value of this attribute can be the group name. src_path The path to the remote storage as referred to by the source host (or hosts, when mapping a group). dst_host The host name or IP address of the client that mounts the same storage referred to by the source, using a different syntax. If you create a group rule for destination workstations, the value of this attribute can be the group name. dst_path The path to the remote storage as referred to by the destination host (or hosts, when mapping a group). Example: <map src_host=“flame1” src_path=“/CXFS1” dst_host=“windows1” dst_path=“N:\”> Setting up a host-to-host translation for every machine in your network is inefficient. If you have many hosts that will use the same path translation rule, you can set up a group or platform rule. See the sections that follow. Creating a Rule for Groups of Hosts Use the group rule when you have several workstations that will use the same rule to convert the path syntax of a single source or group of source workstations. This rule is effective in larger installations where numerous workstations mount storage using identical syntax. All hosts in a group rule must mount directories using exactly the same syntax. NOTE Group names must be unique and must not conflict with host names or platform names. The syntax of the group rule is as follows: <group name=”<group_name>” os=”<os_name>”> [<host name=”<host_name>”>] </group> 142 | Chapter 3 Networked processing You must enter a value for each attribute. See the following table for a description of the valid values for each attribute. Attribute Description group name Identifies the name of the group. Create a group name of your choosing. Each group name must be unique. Use the value of this attribute in a host-to-host rule to map all members of the group to the same storage mount point. host name Identifies the name of a host that is in the group. os This attribute is optional. It allows you to link all of the hosts in the group to a single operating system. You can then use a platform rule to map all the hosts in a group to the same mount point. The os attribute is restricted to the following values: Linux, Windows NT, and MacOSX. Example: <group name=“Autodesk_Stations” os=”Linux”> <host_name=“flame1”> <host_name=“inferno1”> <host_name=“smoke1”> </group> <group name=“Lustre_Windows_Stations” os=”WindowsNT”> <host_name=“lustre1”> <host_name=“lustre2”> <host_name=“lustre3”> </group> After you have defined a group, you can use the host/path rule to map all the hosts in the group to the same path by using the group name for either the src_host or dst_host attribute value. In the following example, all hosts in the Lustre_Windows_Stations group map the Autodesk_Stations storage path to N:\myclips, a mount point they all share: <map src_host=“Autodesk_Stations” src_path=“/CXFS1/myclips” dst_host=“Lustre_Windows_Stations” dst_path=“N:\myclips”> You can also use a platform rule to map all the hosts in a group to the same destination path based on the operating system they all run. In the following example, the platform rule is used to map all Windows users to N:\ when translating /usr/ from a Linux system: <map src_os=“Linux” dst_os=“WindowsNT” src_path=“/usr/” dst_path=“N:\”> Creating a Rule for a Group of Hosts Running on the Same Operating System The platform rule is similar to the group rule in that the rule is applied to all hosts running the same operating system. WiretapCentral and Wiretap Gateway Installation | 143 All hosts running the same operating system must mount directories using exactly the same syntax. For example, all Windows workstations must mount the NAS on the N:\ mount point to use the same path translation rule for the NAS. NOTE Platform names must be unique and must not conflict with host names or group names. The syntax of the platform rule is as follows: <map src_os=“<src_os>” src_path=“<src_path> ” dst_os=“<dst_os>” dst_path=“<dst_path>”> You must enter a value for each attribute. See the following table for a description of the valid values for each attribute. NOTE The src_os and dst_os attributes are restricted to the following values: Linux, WindowsNT, and MacOSX. Attribute Description src_os The operating system of the workstation to which a client connects src_path The path to the remote storage as referred to by all hosts using the same operating system dst_os The operating system of the client that mounts the same storage referred to by the source dst_path The path to the remote storage as referred to by the hosts running the destination operating system Example: <map src_os=“Linux” src_path=“/usr/” dst_os=“WindowsNT” dst_path=“N:\”> Sharing the Database Among Multiple Wiretap Servers When you have many Wiretap servers, you must update the path translation database on each server every time there is a change to the network configuration. To simplify the management of the database, you can create a symbolic link from the path translation file on all hosts running the Wiretap server to one machine that contains the actual file. Testing the Path Translation Database After the path translation database is updated by the system administrator, it must be tested. The sw_wiretap_translate_path command verifies that a path requested from the Wiretap server on the local machine can be translated into a path that can be understood by the client machine. The syntax of the command is the following: sw_wiretap_translate_path[-h <host name>] [-p <path>] [-f <file containing paths>] [-H <destination host name>] [-O <destination OS>] The command options are described in the following table. Option Description -h Specifies the host name or IP address of the Wiretap server. The default is localhost. 144 | Chapter 3 Networked processing Option Description -p Specifies the path on the Wiretap server host to translate. -f Specifies the file containing the paths on the remote host to translate to the path on the local host, delimited by new lines. -H Specifies the destination host name. The default is localhost. -O Specifies the destination operating system (Linux, Windows NT, Mac OSX). NOTE Either -p or -f must be specified, but not both. To test the path translation database: 1 Change to the Stone and Wire tools directory: cd /usr/discreet/sw/tools 2 Type the sw_wiretap_translate_path command with the appropriate options. For example, suppose you have a SAN mounted as “/CXFS1” on your Flame workstation (flame1). A Windows PC (windows1) will mount the SAN as “N:\”. The path translation file contains the following entries: <map src_host=“flame1” src_path=“/CXFS1” dst_host=“windows1” dst_path=“N:\”> From the workstation, open a new terminal and type: ./sw_wiretap_translate_path -h flame1 -p /CXFS1/myclips -H windows1 The result should return the value of the destination path, which represents how “windows1” will mount“/CXFS1” on “flame1”. N:\myclips NOTE If the result returns the value of the source path, the translation database entry was not successfully applied. Troubleshoot the Wire network This section describes some common Wire problems and steps you can take to solve them. Testing Wire Using sw_framestore_dump Use sw_framestore_dump to identify the Wire hosts that are reachable from one workstation. You should do this if you are having any problems with Wire or after you configure Wire for the first time. You must have at least two Wire hosts set up to test Wire connectivity: 1 Run: /usr/discreet/sw/tools/sw_framestore_dump. A list of all the available framestores appears in the terminal. Review the output and verify that all the framestores on your Wire network appear in the list. You can also verify that each framestore on your network is using a unique framestore ID. ■ If You are unable to see other Wire hosts on your network, check: ■ The filesystem and networking configurations in sw_framestore_map. ■ The sw_probed.cfg port number. ■ You may also have problems with your Wire network. Use sw_ping to test that you can connect to other Wire hosts. WiretapCentral and Wiretap Gateway Installation | 145 ■ If you see only some of the Wire hosts (as opposed to all or none), check that each framestore has a unique Framestore ID. 2 Repeat this procedure on each Wire host. Using ping to Test Network Communication Try to ping your local host from a client machine. If this works, ping all other machines that should be accessible through Wire. : 1 Type the following command: ping <host_name>. 2 If ping fails, try using the machine's IP address (for example, 172.16.100.23) instead of its hostname. If this is successful, verify how the machine resolves host names on the network. You should set the order of host name resolution to first look at the local setup file, then validate on the network. The /etc/nsswitch.conf file should include a “hosts” line that has the name validation process in the following order: hosts: files nis dns Using sw_ping to Test Wire Communication If you are unable to connect to a Wire host, use sw_ping to determine if you can connect to the other Wire host over the Wire network: 1 Run sw_ping: /usr/discreet/sw/sw_ping -framestore <framestore_name> -r -w -size <packetsize> -loop <n> where <host_name> is the name of the host to ping, <count> is the number of times to execute this test, <packetsize> is the size of the read/write buffer (in bytes). Results similar to the following are reported to the terminal: Using Stone+Wire API 2009 [ProductSW_1166] (64 bits). Stone+Wire TCP port set to 7000. Ping successful to host tunisia (186) Buffer size = 9043968 Sending data to tunisia, filesystem id 186 MB/sec: 111.460127 Ping successful. Buffer size = 9043968 Sending data to tunisia, filesystem id 186 MB/sec: 111.509057 Ping successful. Buffer size = 9043968 Sending data to tunisia, filesystem id 186 MB/sec: 111.500577 Ping successful. Buffer size = 9043968 Sending data to tunisia, filesystem id 186 MB/sec: 111.516597 Ping successful. Minimum MB/sec: 111.460127 Maximum MB/sec: 111.516597 Average MB/sec: 111.496590 ■ If an sw_ping from machine 1 to machine 2 is successful and you still cannot access the remote framestore through your Creative Finishing application, check that the remote system has exported its directories so that the local system has read/write access. ■ If an sw_ping from machine 1 to machine 2 is unsuccessful, validate the sw_framestore_map file on both machines and check that sw_probed and sw_serverd are running on both machines. 146 | Chapter 3 Networked processing Using sw_ping to Test Network Performance Use the sw_ping command to test network performance. For more significant results, run the test 100 times.: 1 Start sw_ping: /usr/discreet/sw/sw_ping -framestore <framestore_name> -r -w -size <packetsize> -loop <n> Option: Description: -framestore <framestore_name> Is the name of the framestore to ping. -r Reads a buffer from the remote framestore. -w Writes a buffer to the remote framestore (non-destructive). -size <packetsize> Reads/writes a buffer of packetsize bytes. -loop <n> Executes this test n times. The following is an example for an NTSC (720 x 486 x 3) frame format, sent 100 times in read and write mode to framestore my_framestore: /usr/discreet/sw/sw_ping -framestore my_framestore -read -write -size 1049760 -l 100 Verifying Remote Clip Library Access and Permissions Verify that the local host has write permissions to the clip library directory of the remote host: 1 Try to access the clip library directory of the remote host. Type: cd /hosts/ <remote_machine>/usr/discreet/clip 2 If an error message appears on the client machine, check to see that the required network daemons are on. If you have access to /hosts/<remote_machine >/usr/discreet/clip, check you have root privileges to read and write to this directory: touch /hosts/ <remote_machine> /usr/discreet/clip/deleteme . 3 If error messages appear, verify the permissions in /etc/exports on the server machine. Read and write permission must be given to the hosts. The appropriate line should look similar to the following: /usr/discreet/clip *(rw,sync,no_root_squash Verifying that NFS and Automounting Daemons are Running These daemons are installed and running by default. Use the following procedures to verify that these daemons are running. Network File System (NFS) and automounting daemons (AMD on Linux) must be running for Wire transfers to work. To start NFS and AMD: 1 Run: chkconfig --list | grep nfs and then chkconfig --list | grep amd 2 Verify that NFS and AMD are set to “on” for run levels 3,4, and 5. 3 If NFS or AMD is off on any of those run levels, run: chkconfig nfs on and chkconfig amd on 4 Restart your network: /etc/init.d/network restart. You might also consider rebooting your workstation. WiretapCentral and Wiretap Gateway Installation | 147 Checking the Status of Network Interfaces If you continue to have problems with your network, you should verify that your network interfaces are up and running: 1 Run: ifconfig ■ If your network interface is up and running, an “up” appears in the broadcast report for the interface. The report includes a line similar to the following: UP BROADCAST RUNNING MULTICASTMTU:1500Metric:1 ■ If your network interface is not up and running, check the connections on your network card. A green light appears when there is a good connection between your network card and its destination. If you must reconnect cables on Linux, you must restart the network interface. To restart a network interface, run: ifconfig <interface_name> up Viewing InfiniBand Statistics This section describes how to view port statistics for the workstation and InfiniBand switch, and how to obtain InfiniBand log files. For more information about configuring, monitoring, and managing the InfiniBand switch and network, see the documentation provided by the manufacturer of your InfiniBand switch. Viewing InfiniBand Information for a Workstation The InfiniBand driver installed on your workstation provides two commands that output statistics and information about InfiniBand ports. Log in as root, and type the following commands in a terminal: cat /proc/iba/ <driver_id> /1/port <x> /stats cat /proc/iba/ <driver_id>/1/port <x> / info where <x> is the port number on the device, and <driver_id> is the HCA driver ID for your device, for example: mt25218. A report appears in the terminal for each command. To find out the HCA (Host Channel Adapter) driver ID, type ls /proc/iba/ | grep mt . The driver number, beginning with mt, will be returned. Generating InfiniBand Log Files for Support The script /sbin/iba_capture gathers information about your system and InfiniBand configurations that can be useful for troubleshooting InfiniBand issues. This script outputs a GZIP file. As root, open a terminal on your workstation and run /sbin/iba_capture <path and name of output gzip file>. A GZIP file is generated that includes a number of log files from your system. The help for this command incorrectly indicates that the output is a TAR file, when it is in fact a GZIP file. Viewing Port Statistics for a Mellanox IS5030 Switch The Mellanox IS5030 switch is the recommended switch model for QDR InfiniBand networks. It comes with a Web-based management console that you can use to configure the switch and monitor the InfiniBand network. When you suspect that performance is not optimal on your QDR switch, it is a good idea to view statistics for each connected port, to determine if they are running normally. The nominal speed for DDR InfiniBand connections is 5 Gbps, and the nominal speed for QDR connections is 10 Gbps. To access the management console, your browser must be on the same subnet as the InfiniBand switch, which has a default IP address of 10.10.10.252. To view switch port statistics: 1 Open a Web browser and enter the IP address of the InfiniBand switch. The default IP for switches shipped from Autodesk is 10.10.10.252. The login page appears. 148 | Chapter 3 Networked processing 2 Enter your user name and password. The defaults are admin / admin. The Summary page appears. 3 Click Ports in the menu at the top. The Ports page appears, displaying an overview of the switch. Connected ports are displayed in green. 4 Click a port to view information and statistics on it. If you have ports with DDR connections that appear to be running at SDR speed (2.5 Gbps instead of 5 Gbps), unplug the cable and then plug it back in. The connection should run at normal DDR speed afterwards. This issue occurs because of a bug in the switch firmware. Viewing Port Statistics for an InfiniCon InfinIO 9024 Switch The InfinIO 9024 InfiniBand switch is the recommended switch model for DDR InfiniBand networks. The InfinIO switch comes with a Web-based application, the InfiniView Device Manager, that you can use to configure, monitor, and manage the InfiniBand network. When you suspect that performance is not optimal on your QDR switch, it is a good idea to view statistics for each connected port, to determine if they are running normally. The nominal speed for DDR InfiniBand connections is 5 Gbps. To access the Device Manager, your browser must be on the same subnet as the InfiniBand switch, which has a default IP address of 10.10.10.252. To view switch port statistics: 1 Open a Web browser and enter the IP address of the InfiniBand switch, usually 10.10.10.252. The main page of the Device Manager appears. 2 Click Port Stats in the menu on the left. The IB Port Statistics page appears. The page displays the status of each port on the switch. 3 Optional: Click Refresh to update the data on the page. Supported ingest file formats An image sequence is a series of sequentially numbered files, traditionally the result of scanning film stock at high resolution to produce a digital intermediate. Each file contains the digital scan of an individual frame. Common formats include Cineon, DPX and Tiff. The file type is usually indicated by its extension. In contrast, container formats, also called “wrapper” formats, can contain image sequences (commonly called streams or essences) and audio, compressed using a variety of compression algorithms (codecs) into a single file. Container formats do not impose specific video or audio codecs upon the media they contain. Rather, a container format defines only how the video, audio and other data is stored within the container itself. Unlike image sequences, it is not possible to tell by looking at the extension what kind of video or audio is inside a container format. See the documentation of your application for a list of supported formats. Installing and Configuring Lustre ShotReactor Lustre ShotReactor renders modified frames when the artist moves to the next shot on the timeline on the Creative workstation. With ShotReactor, playback is enabled without interrupting your work during creative sessions. ShotReactor is installed on your workstation by default when you install Lustre. You must, however, have a valid ShotReactor license on the creative workstation or on the license server, for the ShotReactor service to be available. Installing and Configuring Lustre ShotReactor | 149 You can also run ShotReactor on a remote server. 1 Install Linux on the server you plan to use as the ShotReactor and connect it to your local network. After installing the Linux RedHat version that matches your hardware (version 4, 5 or 6) on the ShotReactor server, configure the IP of the ethernet port that connects ShotReactor to your network. The address you choose must not conflict with any of the other IP addresses on the network. 2 Start the server onto which you will install ShotReactor and log in as root. Assign an IP address to the ethernet port that connects the ShotReactor server to the network switch. The IP address must be in the same IP class as your network. See /etc/sysconfig/network-scripts/ifcfg-ethn. The ShotReactor server must share the same storage as the Creative workstation. Hence, the project and ShotReactor files paths must point to the same location. The paths on each workstation may be different. You may have to configure the file paths manually. 3 If not Using BrowseD with ShotReactor, configure read and write access on the storage filesystem, and mount it on the ShotReactor server. The storage filesystem is mounted as /mnt/StorageMedia HP Z800, or /mnt/md0 for older systems: 1 Log in to the Creative workstation as root. Open /etc/exports and add a new line for the mount point, e.g.: /mnt/StorageMedia *(rw,no_subtree_check,async) or /mnt/md0 *(rw,no_subtree_check,async). This creates a network share for the mount point for the storage filesystem. Other users on the network will access the storage devices by mounting its network share. 2 Activate the new network share for the storage device with exportfs -a. The list of network shares is refreshed from the exports file. 3 Confirm the storage devices are available to be mounted with exportfs. 4 Launch a terminal window and log in as root on the ShotReactor server to create a mount point on the ShotReactor server and set permissions: mkdir /mnt/StorageMedia chmod 666 /mnt/StorageMedia mount <Master Station>:/mnt/StorageMedia/ /mnt/StorageMedia 5 To configure ShotReactor to automatically mount the storage filesystem edit vi /etc/fstab and add a line for the mount point you just created, e.g.: <IP address>:/<exported filesystem> /<mount point> nfs rw,bg,hard,intr 0 0. 6 Restart the Shot Reactor server. The storage filesystem should mount automatically. 4 To install the ShotReactor license, you will need the dlhostid of the ShotReactor. Log in to the ShotReactor server as root and create the directory for the license file, e.g: mkdir -p /usr/local/flexlm/licenses/. Create a file called DL_license.dat in the new directory and copy the license code into it. 5 Once the license is installed, navigate to the Lustre install directory whether or a USB device or from an unpacked tar file and run ./INSTALL_LUSTRE_SHOTREACTOR. 6 After you have configured the Creative workstation and the ShotReactor server to communicate, configure the “HostName string=” keyword with the Shot Reactor server IP address in the ShotReactor section of the init.config file. 7 Make sure your project file paths and the ShotReactor file paths point to the same location (the paths on each workstation may be different) and enable ShotReactor for the project. 8 Render shots as you work. See Rendering Shots as You Work. 150 | Chapter 3 Networked processing Lustre Background Rendering During background rendering, a shot on the timeline is rendered by a background rendering network. This is different from Shot Reactor, which renders shots on a shot-by-shot basis as they are colour graded to enable improved playback performance. Background rendering in Lustre is done with Burn for Lustre, also known as the Lustre Background Renderer. This application is specific to Lustre and provides asynchronous background processing of Lustre render jobs. By off-loading rendering activities to remote Linux servers, Lustre stations are freed up for interactive colour grading, while background rendering is sped up by splitting the task amongst multiple hosts. General workflow for installing and configuring background rendering: 1 If you are not using BrowseD, Share the storage for rw access from background render nodes (page 154). 2 Install Backburner Manager (page 107) and Backburner Monitor (page 86) 3 Configue Lustre to detect Backburner Manager (page 157). 4 Set up render nodes (page 154). 5 Specify the Background Rendering path in Lustre (page 157). Configure Lustre BrowseD About BrowseD BrowseD is a Lustre file server with its own high level protocols that optimize network transfers. BrowseD provides Lustre workstations, Slave Renderers, and background render nodes with high-speed access to centralized storage, especially if your network uses InfiniBand, without mounting the storage on the render nodes. Consider using BrowseD if your facility uses a storage area network (SAN), network attached storage (NAS), or a network file server. In these configurations, you install and configure BrowseD on the computer that is connected to the centralized storage and configure all workstations to use the BrowseD server to access Lustre project files. The recommended Lustre configuration in a digital film or high-resolution workflow is to store the full-resolution images on a SAN, NAS, or file server, and the proxies locally. You can run BrowseD on the Lustre Master Station to provide render nodes or Slave Renderers high-speed access to local storage for background rendering. However, this is not recommended. The BrowseD process requires extra bandwidth from the storage and adds extra load on the host system's CPU. Real-time functionality cannot be guaranteed with this setup—2K playback speed and video input and output will not function correctly when BrowseD is running on the Lustre workstation, and is serving client requests. If you are working with StandardFS DPX or Cineon footage coming from the local Wiretap Server, you must mount your storage on the render nodes. BrowseD startup and configuration: 1 The BrowseD service starts automatically after you install it. You can manually start the service using the command line interface. The service starts automatically whenever the computer running BrowseD restarts. /etc/init.d/browsed_ <version> stop Stops BrowseD. /etc/init.d/browsed_ <version> start Starts BrowseD. /etc/init.d/browsed_ <version> restart Restarts BrowseD if it is not currently running. Lustre Background Rendering | 151 /etc/init.d/browsed_ <version> condrestart Restarts BrowseD if it is already running. 2 Configure the init.config file for all machines that will use the BrowseD server to access centralized storage. Username The administrative user on the BrowseD server. Password The password for Username. Port All computers on the BrowseD network must use the same port to communicate. Set to 1055, the default. If configuring a render node or a workstation running on a GigE network, set this as 1044. If configuring a render node or a workstation running on a high-speed InfiniBand network, set this as 1055. BrowsedServer Defines the IP address or DNS host name for a specific BrowseD Server. UseInfi Enable this option if the networking procotol to use with BrowseD is InfiniBand. 3 Making BrowseD Directories Accessible from the Lustre Browser: When using centralized storage, make the directories on the BrowseD server accessible to all Lustre workstations through the browser. You do this by configuring the BrowsedServerGroup keyword in the init.config file. The mapped directory will appear in the Lustre browser. 4 You must configure the Lustre Render Backburner paths with the IP address of the BrowseD server to use BrowseD to render with Burn for Lustre. To use BrowseD for rendering with Burn for Lustre: 5 In Lustre, open the Setup menu, and select Settings. 1 Select your project from the Project list, and click Edit. 2 Click Project, and set the local project paths. For information on configuring your projects, see the Autodesk Lustre User Guide. 3 Click Network Rendering, and then click the Backburner tab. 4 Enter the IP address of the BrowseD server to each path, or click the ellipsis button to browse to the BrowseD path you want to use. For example, if your Project_Home is set to the bernice directory on the mount point /mnt/StorageMedia of a station that has an IP address of 172.17.20.146, the Project_Home path in the Render > Backburner menu should read 172.17.20.146: /mnt/StorageMedia/project/bernice. 6 To use BrowseD with the Slave Renderer: 1 In Lustre, open the Setup menu, and select Settings. 2 Select your project from the Project list, and click Edit. 3 Click Project, and set the local project paths. For information on configuring your projects, see the Autodesk Lustre User Guide. 4 Click Network Rendering, and then click the Slave Render tab. Enter the IP address of the BrowseD server to each path, or click the ellipsis button to browse to the BrowseD path you want to use. For example, if your Project_Home is set to the bernicedirectory on the mount point /mnt/StorageMedia of a station that has an IP address of 172.17.20.146, the Project_Home path in the Render > Backburner menu should read 172.17.20.146:/mnt/StorageMedia/project/bernice. Background rendering components The components of the basic background rendering package include Lustre, a background management and monitoring application (such as Backburner Web Monitor, or the Backburner Monitor in Autodesk WiretapCentral), and several render nodes running on Linux servers. The Lustre system and all background 152 | Chapter 3 Networked processing rendering nodes are connected over a dedicated background TCP/IP network. Render nodes can access media through NFS mount points, or by using the faster and recommended BrowseD service. See Configure Lustre BrowseD (page 151). You can have up to eight render nodes on the background rendering network. Background rendering components Lustre The client. Lustre rendering jobs are submitted for background rendering through the Render > Backburner menu. Backburner Manager The hub of the background rendering workgroup. It can reside on a master station or Lustre station, or can be installed on a dedicated machine in your network. When jobs are submitted from Lustre to Backburner Manager, Backburner Manager breaks each submitted job into tasks and distributes the tasks to the rendering servers on the network. To view the progress of the tasks, use Backburner Monitor. Backburner Web Monitor The user interface for the Backburner rendering network. It is installed with Backburner Manager. It allows you to view and control jobs currently being processed. Backburner Server A server that runs on render nodes. It is installed with Burn for Lustre. Backburner Server accepts commands from Backburner Manager to start and stop rendering tasks. Backburner Server communicates through a plug-in to execute rendering tasks. See the Backburner documentation webpage. Burn for Lustre The Linux rendering engine that renders one or more frames from Lustre render jobs. Burn for Lustre is a different software than Burn for Creative Finishing software. While they can co-exist on the same node, the installation and configuration procedures are different. For information about how to set up Burn for Creative Finishing software, consult the Autodesk Burn Installation and User Guide. Shared storage mount point This is the mount point on each Linux server that allows Burn for Lustre to transfer rendered frames/files to the Lustre storage system. The storage does not have to be mounted on the Lustre Background Rendering | 153 render nodes if you are using BrowseD for background rendering. See Remote Rendering with Burn and Wiretap in the Flame User Guide. Share the storage for rw access from background render nodes To allow read and write access, the storage must be exported from the system to which it is connected. This makes it possible for the background rendering components on the network to remotely mount the storage system. NOTE Skip this section if you are using BrowseD. To make the storage system visible over the network: 1 Log in to the Lustre system (or the central storage system) as root. The storage filesystem is mounted as /mnt/StorageMedia (on HP Z800 workstations) or /mnt/md0 (on older workstations). 2 Open for editing /etc/exports. The file appears, lists the available network shares (filesystems mountable over the network). 3 Append in the file a line for the mount point of the storage filesystem: /mnt/StorageMedia *(rw,no_subtree_check,async) or /mnt/md0 *(rw,no_subtree_check,async). Other users on the network will access the storage devices by mounting its network share. 4 Save and close the file. 5 Activate the new network share for the storage device. Type: exportfs -a The list of network shares is refreshed from the exports file. 6 Verify the storage filesystem mount points are listed in the output of exportfs. Set up render nodes You can set up as many as eight render nodes for background rendering with Lustre. On each system intended for background rendering, you must verify and perform the procedures below, in order. Render node hardware and software requirements Render nodes purchased from Autodesk come with all the necessary hardware and software components preinstalled. Minimum hardware and OS to use Burn for Lustre on nodes that were not purchased from Autodesk Processor: 1 or 2 Xeon Intel Processor DP Memory: 2 GB Hard drive: 20 GB Ethernet: 100/1000 Mbps OS: Red Hat Enterprise Linux 5.3 with Workstation option, customized with the Autodesk kickstart file 154 | Chapter 3 Networked processing Install Linux on nodes Render nodes purchased from Autodesk ship with the correct Linux distribution. If you did not purchase your node from Autodesk, get your own 64-bit distribution of Red Hat Enterprise Linux Desktop 5.3 with Workstation option, customize it using the Autodesk kickstart file, and install it. The kickstart is used to install the packages required for Burn, some of which are not installed as part of a general Linux installation. The kickstart file can be used to automate the Linux installation process for multiple render nodes. To copy the Autodesk kickstart file to the DVD of your Linux distribution: 1 On a computer running Linux and with a DVD burner, log in as root. 2 Insert the first installation disc of your Linux distribution into the drive. You do not need to mount it at this time. 3 Extract an ISO image of the disc: dd if=/dev/ <optical_disc_device> of=/ <destination path for the extracted ISO image> 4 Eject the disc. 5 In the Lustre installation package run dist/build_kickstart_cd the kickstart file is at dist/ks_centos5_rh5.cfg. This script adds the kickstart file dist/ks_centos5_rh5.cfg to the ISO image of your Linux distribution DVD: ./build_kickstart_cd ks_centos5_rh5.cfg <original ISO image name> <new ISO image name>. 6 Once the new ISO image of the Linux distribution DVD is created, burn it to a blank disc. The new disc will contain the Autodesk kickstart file and replaces the disc in the Linux distribution. Mount storage on the render nodes You can use BrowseD to allow background render nodes to access the workstation's storage. See Configure Lustre BrowseD (page 151). Otherwise, mount the media storage on each render node using an NFS mount point. If the system that stores the render files is different from the system that stores the Project Home directories, you need two (or more) mount points. For example, if, in the Project Setup menu, the Project Home path is /mnt/md0/SCENES and the Renders Full Home path is /sanserver:/RENDERS, located on a central storage system, you must define a mount point for each path. Mount the storage on a render node: 1 Determine the IP address of the computer that manages the storage. If you are using direct attached storage only, this is the IP address of the Lustre workstation. You must also determine the IP address of your centralized file server if you are also using a server area network (SAN) or network attached storage (NAS). 2 Create a directory for the mount point. For example, type: mkdir /mnt/md0. The directory name must be the same for the mount point on each node. It should not be in /root, but in /mnt. 3 Change the permissions on this directory to allow read/write access. 4 Set up the mount point to access the Lustre system storage or the central system storage. You must use the mount point as defined in the Lustre Project Setup menu. For example, if the Project Home is /mnt/md0/SCENES, and the Linux mount point directory is named /mnt/md0, the mount command will be: mount <hostname> :/mnt/md0/SCENES /mnt/md0 To add an entry in fstab: 1 Open /etc/fstab in a text editor and then add a line for your new mount point: <IP address>:/<exported filesystem> /<mount point> nfs rw,bg,hard,intr,nfsvers=3 0 0 2 Save and close the file and restart the render node. Lustre Background Rendering | 155 Install and Configure Burn for Lustre on render nodes ■ Install Burn for Lustre. ■ Add the IP address of the machine where Backburner Manager is installed to the manager.host file on each render node. ■ Start the Backburner Server on each render node. ■ License Burn for Lustre. Install Burn for Lustre on render nodes When you install Burn for Lustre, the necessary Backburner components are also installed on the render node. Perform the following procedure to install the Burn for Lustre software on each node. 1 Open a terminal to the render node, and log in as root. 2 If you are installing from a USB key, insert the key navigate to the Lustre install directory. 3 If you are installing from a downloaded tar file, unpack the tar file by typing: tar zxvf <file_name> .tar.gz. The installation package is unpacked into a new directory. Navigate to the new directory. 4 Start the Burn installation script: ./INSTALL_LUSTRE_BURN. The Burn for Lustre package is installed. Licensing Burn for Lustre Burn uses a floating license scheme where licenses are centralized on a server. The license server provides a license to all registered machines. The license server machine can be any of the render nodes on the rendering network. 1 Open a terminal on the license server and log in as root. Run: dlhostid. A message appears that includes a line indicating the dlhostid of the machine. For example: The Discreet host ID of this machine is “DLHOST01=25231AEF83AD9D5E9B2FA270DF4F20B1” 2 Write down the dlhostid (including the “DLHOST01=” part). 3 Request license codes (page 58). 4 If you are installing from a USB key, insert the key navigate to the Lustre install directory. Or if you are installing from a tar file, unpack the tar file. 5 Run the license server installation script: ./INSTALL_LICSERV. The license server is installed. 6 Once you have received the license codes, go to the /usr/discreet/licserv/licenses/ directory, and open the DL_license.dat file in a text editor. If the file does not exist, create it by typing: touch /usr/discreet/licserv/licenses/DL_license.dat 7 In this file, enter all the information submitted to you by the Licensing Department upon your registration. Save and close the file. 8 Start the license server: /etc/init.d/license_server start. The license server starts/stops automatically when the machine is booted/shut down. You can stop and restart the server manually by running one of the following commands: /etc/init.d/license_server stop and then /etc/init.d/license_server start Enable render nodes to contact the license server. 1 Log in to each render node as root, open for editing /usr/local/flexlm/licenses/DL_license.dat. 2 Copy the first three lines of the information submitted to you by the Autodesk Licensing Department upon your registration. For example: 156 | Chapter 3 Networked processing SERVER burn-01 DLHOST01=25231AEF83AD9D5E9B2FA270DF4F20B1 VENDOR lustre USE_SERVER 3 Save and close the file. Configure backburner server to detect Backburner Manager Backburner Server needs to be able to detect the location of Backburner Manager to provide status information concerning the render jobs: 1 On the Backburner Manager system, open a terminal and log in as root. 2 Determine which IP address the Backburner Manager workstation uses to connect to the network. You can also use the hostname of the machine, if it has been properly defined in the /etc/hosts file. 3 On each render node, open a terminal and log in as root and open for editing: cd /usr/discreet/backburner/cfg/manager.host. Enter the IP address or hostname of the Backburner Manager machine. 4 Save and close the file. Starting Backburner Server You must start the Backburner Server daemon on each Linux system for the first time. Once it is started the first time, the daemon will start automatically. 1 Log in to your Linux system as root. In a terminal, type: service backburner_server start. You can verify that Backburner Server is properly configured: tail -f /usr/discreet/backburner/Network/backburnerServer.log. The file should contain lines similar to the following: <INF>: Loading plugin: Lustre renderer plugin 2 Repeat these steps to start Backburner Server on each node in the background rendering network. If you cannot start the Backburner Server, contact Autodesk Customer Support. 3 If you need to stop or restart Backburner Server, use /etc/init.d/backburner_server stop or /etc/init.d/backburner_server restart. Configue Lustre to detect Backburner Manager For Backburner Manager to receive render jobs, you must set up the Lustre application to connect to the system on which Backburner Manager is running: 1 To configure new projects to use background rendering, you must set the IP address of the Backburner Manager workstation in the init.config file. Locate the Backburner keyword. In the HostName line, set the string parameter to the hostname or IP address of the system where Backburner Manager is installed. For example: <HostName string=”172.19.23.161” /> NOTE Do not forget the quotation marks. 2 Save and close the configuration file. Specify the Background Rendering path in Lustre Specify the correct mount points in the settings of each project that uses background rendering: 1 In the Lustre Setup menu, go to Settings. Lustre Background Rendering | 157 2 Select your project in the Project drop-down list, and click Edit. 3 In the Project Settings menu click Network Rendering, then click Backburner. 4 Enter the location of the Project Home, Scans Full Home, Scans Half Home, Renders Full Home and Renders Half Home, as seen from the Linux render nodes. You only need to enter those locations that are defined for the project in the local project setup, located in the Setup > Project menu. The path required in these fields is comprised of the directory defined for the mount point and the actual storage folder. For example, if the Project Home on the Lustre workstation is E:\SCENES/mnt/md0/SCENES in the Project Setup menu, and the mount point for the Lustre workstation storage on the Linux render nodes is /mnt/Lustre_storage, the Project Home path to enter in this menu is: /mnt/Lustre_storage/SCENES 5 Press Enter. 6 Verify that you have entered the proper path for each project, look at the project configuration file in /usr/autodesk/lustre<application_version>/project/<project name>/project.config. The value in the burn_project_home line is sent to the render node. This value must match a mount point on the background render nodes. For help setting up and managing projects, refer to the Lustre Help. 158 | Chapter 3 Networked processing Index A AMD starting daemon 147 amd (Linux automounter) 127 application entering license codes 55 installing 69 licensing 55 starting 54 uninstalling 32, 76 audio Discreet Native Audio 7 hardware components 7 wiring workflow 7 audio converter 7 AutoFS starting daemon 147 B Backburner 112 Backburner Manager 112 detecting in Lustre 157 detecting with Backburner Server 157 installing 117 overview 153 Backburner Monitor managing jobs on the Distributed Queueing System 125 overview 153 Backburner Server 112 detecting Backburner Manager 157 overview 153 starting 157 BackburnerManagerGroup keyword 37 BackburnerManagerHostname keyword 36 BackburnerManagerPriority keyword 36 background rendering components 152 configuring in Lustre 157 overview 151 setting up render nodes 154 setup, workflow 151 storage, mounting 155 with BrowseD 151 broadcast monitor, wiring 7 BrowseD accessing directories from Lustre 151 configuring, workflow 151 overview 151 remote rendering 151 starting and stopping 151 using 151 browsed.config configuring 151 Burn architecture 112 compatibility 120 compatibility between client and server versions 120 configuring keywords 118 fonts 120 managing multiple servers on a Render Node running multiple versions 120 testing Render Node hardware 130 testing Stone and Wire connectivity 130 troubleshooting 126 using 125 Burn for Lustre hardware and software requirements 154 installing and configuring 156 license 156 overview 153 Burn Monitor 112 120 C commands, start-up options 54 compatibility 120 configuring browsed.config 151 Burn for Lustre 156 kewords 118 connecting audio 7 video I/O components 7 video I/O devices 7 Creative Finishing application typical configuration (illustration) 2 D Discreet Kernel Utility version 22, 116 Discreet Native Audio 7 disk failure operating system access 42 disk usage 43 clearing undo buffer 43 159 | Index Distributed Queueing System activating Render Nodes 118 background rendering 125 checking mount points 127 components 112 defined 112 managing and monitoring jobs 125 submitting jobs to 125 testing components 130 troubleshooting 126 verifying Stone and Wire connectivity DKU version 22, 116 E error logs 40 error reporting errors logs 40 verbose 41 exports file 128 filesystem disk usage 43 problems 40 floating licenses background rendering 156 fonts 120 installing 55 framestore ID mismatch, resolving 43 G 142 H hardware requirements, Burn for Lustre 154 hardware configuration guidelines 2 host/path rule Wiretap path translation 142 I InfiniBand log files 148 management 148 port statistics 148, 149 init.cfg, configuring 69 installing Backburner Manager 117 Burn for Lustre 156 Burn on Render Nodes 117 Lustre (Linux) 31 160 | Index 69 J jobs 125 managing on Distributed Queueing System previewing 125 jumbo packets 126 129 125 K keywords BackburnerManagerGroup 37 BackburnerManagerHostname 36 BackburnerManagerPriority 36 Kill process command 61 L F group rule Wiretap path translation installing the application license background rendering, floating 156 Burn for Lustre 156 license codes editing the license file 55 entering application 55 requesting 55 license server background rendering 156 creating the license file 59, 77, 123 License Server 76, 122 licensing 76, 122 checking for Burn 129 creating the license server license file 59, 77, 123 Licensing Client 76, 122 log files InfiniBand 148 logs See error logs Lucid ADA 88192.See audio converter Lustre accessing BrowseD directories 151 detecting Backburner Manager 157 installing (Linux) 31 M manager.host file 118 mount points checking on Distributed Queueing System overview 153 multi-OS networks Wiretap path translation 140 multicasting Linux 21, 22, 65, 66, 114, 115 127 N S NAS SAN using BrowseD 151 network interfaces status 148 network performance sw_ping 147 network tests ping 146 networking multicasting, Linux 21, 22, 65, 66, 114, 115 NFS starting daemon 147 using BrowseD 151 scanning storage hardware 42 server groups creating 106 global server groups 106 local server groups (3ds Max) 106 setting export permissions 128 ShotReactor configuring, workflow 149 software requirements for Burn for Lustre 154 Sparks, background rendering with 112 standard filesystem testing performance 53 start-up options 54 starting the application 54 starting, Burn client 120 status network interfaces 148 Stone and Wire verifying connectivity on Distributed Queueing System 129 viewing sw_framestore_map file 129 Stone and Wire processes displaying 40 starting 40 Stone and Wire utilities swr_set_debug 41 stopping, Burn client 120 storage scanning hardware 42 sw_framestore_dump testing Wire 145 sw_framestore_map file 129 sw_ping network performance 147 testing Wire 146 sw_probed.cfg file 119 swr_set_debug 41 system freezes, what to do 61 O operating system rule Wiretap path translation 143 P path translation database XML syntax 141 ping 146 ping utility 126 port statistics, InfiniBand 148, 149 previewing rendered jobs 125 problems filesystem 40 Wire 145 processes displaying, Stone and Wire 40 starting, Stone and Wire 40 processes, stopping 61 R Render Client 112 Render Node 112 activating on Distributed Queueing System checking Burn licensing 129 compatibility between jobs 131 fonts 120 installing Burn 117 managing multiple Burn Servers 120 testing hardware 130 render nodes creating server groups 106 setting up 154 rendering with BrowseD 151 Rendering Engine 112 requirements DKU 22, 116 118 T tablet initialising 54 testing Wiretap path translation 144 testing Wire sw_framestore_dump 145 sw_ping 146 troubleshooting 126 common filesystem problems 40 common Wire problems 145 troubleshooting Stone filesystem operating system access 42 Index | 161 U undo buffer clearing 43 uninstalling the application 32, 76 V verbose error reporting 41 video I/O, wiring 7 video wiring 7 Visual Effects and Finishing applications submitting jobs to server groups 106 VTR connecting 7 W Wire 112 clip library access, verifying 147 problems 145 Wire troubleshooting network interface status 148 Wiretap configuring path translation 141 162 | Index path translation 140 Wiretap path translation configuring 141 group rule 142 host/path rule 142 operating system rule 143 sharing the database 144 testing 144 wiring video I/O and broadcast monitor 7 workflow configuring BrowseD 151 configuring ShotReactor 149 licensing 55 setting up background rendering 151 workflows audio wiring workflow 7 X X server configuring 69 restarting 69 XML syntax path translation database xxdiff, using 69 141