1
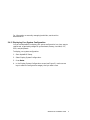
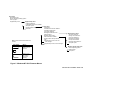
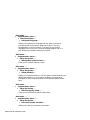
Alpha Microprocessors
Motherboard
Windows NT 3.51 and 4.0
Installation Guide
Order Number: EC–QLUAH–TE
Revision/Update Information: This is a revised document. It
supersedes the Alpha Microprocessors
Motherboard Windows NT 3.51 and
4.0 Installation Guide,
EC–QLUAG–TE.
Software:
Microsoft Windows NT Workstation
and Windows NT Server
Digital Equipment Corporation
Maynard, Massachusetts
http://www.digital.com/semiconductor
October 1997
While DIGITAL believes the information included in this publication is correct as of the date
of publication, it is subject to change without notice.
© Digital Equipment Corporation 1997. All rights reserved.
Printed in U.S.A.
AlphaPC, DIGITAL, DIGITAL Semiconductor, DIGITAL UNIX, and the DIGITAL logo are
trademarks of Digital Equipment Corporation.
DIGITAL Semiconductor is a Digital Equipment Corporation business.
CompuServe is a registered trademark of CompuServe, Inc.
Linux is a registered trademark of Croce, William R. Della, Jr.
Microsoft, MS-DOS, and Windows are registered trademarks and Windows NT is a
trademark of Microsoft Corporation.
PS/2 is a registered trademark of International Business Machines Corporation.
QLogic is a registered trademark and ISP is a trademark of QLogic Corporation.
All other trademarks and registered trademarks are the property of their respective owners.
Contents
Preface .................................................................................................................................v
1. Requirements ................................................................................................................1
1.1
Hardware............................................................................................................1
1.2
Software..............................................................................................................2
2. AlphaBIOS.....................................................................................................................3
2.1
AlphaBIOS Conventions ....................................................................................3
2.2
Starting the AlphaBIOS Setup Program ...........................................................4
2.3
Upgrading AlphaBIOS .......................................................................................5
2.4
Performing CMOS Setup Tasks .........................................................................5
2.4.1 Setting Up Your Hard Disk.....................................................................6
2.4.2 Displaying Your System Configuration ..................................................7
2.4.3 Running a Maintenance Program...........................................................9
2.5
Installing the Windows NT Operating System................................................11
2.5.1 Before Installing Windows NT ..............................................................11
2.5.2 Starting Windows NT Setup .................................................................11
3. Windows NT ARC Firmware.......................................................................................12
3.1
Firmware Conventions.....................................................................................13
3.2
Firmware Menus Access ..................................................................................13
3.3
Firmware Menus Structure .............................................................................14
3.4
Firmware Menus Descriptions.........................................................................16
3.4.1 Boot Menu .............................................................................................16
3.4.2 Supplementary Menu............................................................................17
3.4.3 Setup Menu ...........................................................................................18
3.4.4 Boot Selections Menu ............................................................................21
3.4.5 Machine Specific Setup Menu ...............................................................23
3.5
Firmware Update Utility..................................................................................24
3.5.1 Updating Firmware in a Flash ROM ....................................................24
3.5.2 Updating Firmware in a UVPROM ......................................................25
3.6
Disk Partition Utility .......................................................................................25
3.6.1 Using the Disk Partition Utility............................................................26
3.6.2 Creating the System Partition ..............................................................26
3.7
Installing the Windows NT Operating System................................................27
3.7.1 Before Installing Windows NT ..............................................................27
iii
3.7.2 Starting Windows NT Setup................................................................. 28
4. Troubleshooting .......................................................................................................... 29
4.1
Beep Codes....................................................................................................... 31
4.2
Post Codes........................................................................................................ 33
4.3
Fail-Safe Booter ............................................................................................... 44
4.3.1 Starting the Fail-Safe Booter ............................................................... 44
5. Support, Products, and Documentation ..................................................................... 46
5.1
DIGITAL Semiconductor Products.................................................................. 47
5.2
DIGITAL Semiconductor Documentation ....................................................... 48
5.3
Ordering Third-Party Software and Documentation...................................... 50
5.4
Obtaining the Hardware Compatibility List for Windows NT........................ 50
Figure 1
Figure 2
Figure 3
Figure 4
Figure 5
AlphaBIOS Boot Screen................................................................................ 4
Display System Configuration...................................................................... 8
Run Maintenance Program Submenu .......................................................... 9
Entering the Program Name ...................................................................... 10
Windows NT ARC Firmware Menus .......................................................... 15
Table 1 Computer Types and Installation Diskette Requirements for
Windows NT 3.51.......................................................................................... 28
Table 2 Computer Types and Installation Diskette Requirements for
Windows NT 4.0 ........................................................................................... 28
Table 3 Beep Codes for AlphaPC 164SX ................................................................... 31
Table 4 Beep Codes for AlphaPC 164LX ................................................................... 31
Table 5 Beep Codes for AlphaPC 164 ........................................................................ 32
Table 6 Beep Codes for EB164................................................................................... 32
Table 7 Post Codes for AlphaPC 164SX .................................................................... 33
Table 8 Post Codes for AlphaPC 164LX .................................................................... 35
Table 9 Post Codes for AlphaPC 164 ......................................................................... 37
Table 10 Post Codes for EB164.................................................................................. 39
Table 11 Post Codes for AlphaPC 64 ......................................................................... 41
Table 12 Post Codes for EB66+ ................................................................................. 42
Table 13 Post Codes for EB66.................................................................................... 43
iv
Preface
This document describes how to install the Microsoft Windows NT Workstation
and Microsoft Windows NT Server operating systems on the following Alpha
microprocessor motherboards:
•
AlphaPC 164SX Motherboard (AlphaPC 164SX)
•
AlphaPC 164LX Motherboard (AlphaPC 164LX)
•
AlphaPC 164 Motherboard (AlphaPC 164)
•
Alpha 21164 Evaluation Board (EB164)
•
AlphaPC 64 Evaluation Board (AlphaPC 64)
•
Alpha 21066A Evaluation Board (EB66+)
•
Alpha 21064 and Alpha 21064A PCI Evaluation Board (EB64+)
•
Alpha 21066 and Alpha 21068 Evaluation Board (EB66)
The DIGITAL Semiconductor AlphaPC 164SX and AlphaPC 164LX
motherboards run new firmware called AlphaBIOS. The DIGITAL
Semiconductor AlphaPC 164, EB164, AlphaPC 64, EB66+, EB64+, and EB66
motherboards run the Windows NT ARC firmware.
DIGITAL recommends that you read this entire document before installing the
Windows NT Workstation or Windows NT Server operating system.
Windows NT Installation Guide v
Document Conventions and Terms
In this document, the term motherboard refers to the AlphaPC 164SX
Motherboard, the AlphaPC 164LX Motherboard, the AlphaPC 164 Motherboard,
the EB164 Evaluation Board, the AlphaPC 64 Evaluation Board, the EB66+
Evaluation Board, the EB64+ Evaluation Board, and the EB66 Evaluation
Board, unless otherwise noted.
The following conventions are used in this document:
Convention
Description
boldface type
Boldface type in text indicates a command or menu selection.
Caution
Cautions contain information to prevent damage to software or
hardware.
Italic type
Italic type emphasizes important information and indicates complete
titles of manuals.
Note:
Notes provide additional information about a topic.
The following terms are used in this document:
Term
Description
AlphaBIOS
A new enhanced Basic Input Output System (BIOS) for certain Alpha
system families based on the Alpha processor
Alpha SDK and firmware
update compact disc
The compact disc labeled Alpha Motherboards Software Developer’s
Kit and Firmware Update
ARC firmware
Advanced RISC Computing (ARC) firmware
Microsoft Windows NT
installation guide
The Windows NT Workstation Installation Guide and the
Windows NT Server Installation Guide
Motherboard
An Alpha microprocessor motherboard
System
All of the hardware and software components associated with an
Alpha microprocessor motherboard
Windows NT
The Microsoft Windows NT Workstation and Windows NT Server
operating systems
vi Windows NT Installation Guide
Related Documentation
Documentation referenced in this document, such as the Alpha Motherboards
Software Developer’s Kit and Firmware Update Read Me First and platformspecific README files can be found on the Alpha SDK and firmware update
compact disc.
See Section 5 for information about ordering related documentation.
Windows NT Installation Guide vii
1. Requirements
This section describes the hardware, software, and firmware requirements to
install and boot Windows NT on Alpha microprocessor motherboard systems.
1.1 Hardware
You need the following hardware to run Windows NT on Alpha motherboard
systems:
•
A supported video adapter and monitor
•
A 166MB (or larger) hard drive
Note: For information about IDE/ATA hard drives, ATAPI CD–ROM
drives, and support for QLogic ISP 1020 SCSI host adapters, see the
platform-specific READNT.TXT file on the Alpha SDK and firmware
update compact disc or the platform-specific README.TXT file on the
Windows NT firmware installation diskette.
•
A SCSI or ATAPI CD–ROM drive
•
A 3.5-in, 1.44MB diskette drive
•
A PS/2 keyboard
•
Memory:
•
−
16MB of memory (RAM) is required for the Windows NT Workstation
operating system; 32MB is recommended
−
32MB of memory (RAM) is required for the Windows NT Server
operating system
Optional components:
−
A PS/2 mouse or other supported pointing device
−
One or more supported network adapters if you want to use Windows NT
on a network
To obtain the hardware compatibility list for Windows NT, see Section 5.4.
Windows NT Installation Guide
1
1.2 Software
You need different software to install Windows NT on an Alpha motherboard
system running AlphaBIOS firmware than on an Alpha motherboard system
running Windows NT ARC firmware.
AlphaPC 164SX and AlphaPC 164LX
You need the following software to install Windows NT on the AlphaPC 164SX
and the AlphaPC 164LX.
Software
Vendor
Microsoft Windows NT compact disc
Microsoft Corporation
AlphaBIOS Firmware diskette
Digital Equipment Corporation
Windows NT 4.0 Installation diskette
Digital Equipment Corporation
AlphaPC 164, EB164, AlphaPC 64, EB66+, EB64+, and EB66
You need the following software to install Windows NT on the AlphaPC 164,
EB164, AlphaPC 64, EB66+, EB64+, and EB66.
Software
Vendor
Microsoft Windows NT compact disc
Microsoft Corporation
Manufacturer-supplied hardware support files
Digital Equipment Corporation
1
Update and Windows NT ARC firmware diskette
1
Digital Equipment Corporation
Depending on your computer type, this diskette may or may not be required for Windows NT. See
Table 1 and Table 2 to determine if your computer type requires an installation diskette. Future
versions of Windows NT may not require this diskette. Contact your OEM or system vendor for
details.
2 Windows NT Installation Guide
2. AlphaBIOS
The AlphaPC 164SX and the AlphaPC 164LX motherboards ship with
AlphaBIOS firmware and online documentation that describes how to configure
the firmware for Windows NT. This firmware initializes the system and enables
you to install and boot the Windows NT operating system. The AlphaBIOS
firmware resides in the flash ROM on the motherboard.
2.1 AlphaBIOS Conventions
AlphaBIOS uses the following keys and key combinations for navigating the
interface and selecting items. If you are familiar with MS-DOS or Microsoft
Windows keyboard conventions, navigating AlphaBIOS is simple.
Key or Key Combination
Description
Tab
Move highlight forward between fields of a dialog.
Shift + Tab
Move highlight backwards between fields of a dialog.
↓ or ↑
Move highlight within a menu, or cycle through available field values
in a dialog window.
Alt + ↓
Drop down a menu of choices from a drop-down listbox. A dropdown listbox can be recognized by the symbol ⇓.
Home
Move to the beginning of a text entry field.
End
Move to the end of a text entry field.
← or →
Move to the left or right in a text entry field.
Esc
Discard changes and back up to previous screen.
Windows NT Installation Guide
3
Two levels of keyboard help are available:
•
Press F1 once to display explanations of the keystrokes available for the
currently displayed part of AlphaBIOS.
•
Press F1 twice to display explanations of the keystrokes available for
navigating throughout AlphaBIOS.
2.2 Starting the AlphaBIOS Setup Program
When you power up or reset your system, the boot screen with the system logo is
displayed. Figure 1 shows an example of an AlphaBIOS Boot Screen with the
“Press <F2> to enter SETUP” message at the bottom. Press F2 to start the
AlphaBIOS setup program.
Figure 1 AlphaBIOS Boot Screen
4 Windows NT Installation Guide
2.3 Upgrading AlphaBIOS
As new versions of Windows NT are released, it might be necessary to upgrade
AlphaBIOS to the latest version. Additionally, as improvements are made to
AlphaBIOS, it might be desirable to upgrade to take advantage of new features.
To upgrade from an earlier version of AlphaBIOS:
1. Insert the diskette or CD–ROM containing the AlphaBIOS upgrade.
2. Run the AlphaBIOS Setup program by restarting your system and pressing
F2 when the boot screen is displayed.
3. In the main AlphaBIOS Setup screen, select Upgrade AlphaBIOS and press
Enter.
This menu option is used to upgrade to later versions of AlphaBIOS. When
you choose this option, the existing AlphaBIOS searches for an executable
AlphaBIOS update file, first on CD–ROM, then on diskette. Once the update
file has been found, AlphaBIOS executes it, and the firmware is upgraded.
4. After the upgrade is complete, the system either resets automatically or
prompts you to reset it.
2.4 Performing CMOS Setup Tasks
CMOS Setup is divided into two modes, standard and advanced. The following
table lists the tasks that you can perform in standard and advanced setup mode.
Standard CMOS Setup
Advanced CMOS Setup
Autostart
Memory test
Date and time
PCI parity
Floppy
Password protection
Keyboard
SCSI termination
SCSI BIOS emulation
Windows NT Installation Guide
5
To enter standard CMOS Setup:
1. Start AlphaBIOS Setup.
2. Select CMOS Setup.
3. Press Enter.
To enter advanced CMOS Setup:
1. Start AlphaBIOS Setup.
2. Select CMOS Setup.
3. Press Enter.
4. In the CMOS Setup screen, press F6.
2.4.1 Setting Up Your Hard Disk
Express hard-disk setup is an easy way to create the recommended partition
arrangement on your first hard disk, disk 0. Note, however, that express harddisk setup does not format the large partition with NTFS. You will have the
opportunity to do this during the Windows NT installation.
Note: AlphaBIOS assigns “disk 0” to the hard disk with the lowest SCSI ID
number on the first bus in your system. If no SCSI devices are present,
AlphaBIOS assigns disk 0 to the first IDE hard drive.
Caution: If you have any information on your disk that you want to save, be
sure to back it up before using express hard-disk setup.
To perform express hard-disk setup:
1. Start AlphaBIOS Setup.
2. Select Hard Disk Setup.
3. Press Enter.
4. Press F7 to enter express hard-disk setup.
5. Press F10 to continue with the setup.
6 Windows NT Installation Guide
For information on manually managing hard disks, see the online
documentation.
2.4.2 Displaying Your System Configuration
You can use AlphaBIOS to display your system configuration in a clear, easy-toread format, organized by categories: system board, memory, hard disk, PCI,
SCSI, and peripherals.
To display your system configuration:
1. Start AlphaBIOS Setup.
2. Select Display System Configuration.
3. Press Enter.
4. In the Display System Configuration screen (see Figure 2), use the arrow
keys to select the configuration category that you want to see.
Windows NT Installation Guide
7
Figure 2 Display System Configuration
8 Windows NT Installation Guide
2.4.3 Running a Maintenance Program
You can run maintenance programs such as RAID and other configuration
utilities directly from the AlphaBIOS utility menu.
To run a maintenance program:
1. Start AlphaBIOS Setup.
2. Select Utilities.
3. Select Run Maintenance Program from the submenu shown in Figure 3.
4. Press Enter.
Figure 3 Run Maintenance Program Submenu
Windows NT Installation Guide
9
5. In the Run Maintenance Program dialog box, type the name of the program
to be run at the Program Name prompt, as shown in Figure 4. Then tab to
the Location listbox and select the hard-disk partition, floppy diskette, or
CD–ROM drive from which to run the program.
6. Press Enter to execute the program.
Figure 4 Entering the Program Name
If you are running a utility from a floppy diskette, you can simply type the
utility’s name into the Program Name field, and press Enter. This is because
the floppy drive is the default selection in the Current Partition field.
Use Alt + ↓ when a listbox is selected to open the list.
10 Windows NT Installation Guide
2.5 Installing the Windows NT Operating System
This section supplements the Microsoft Windows NT installation guide for
installing the Windows NT operating system on an AlphaPC 164SX and the
AlphaPC 164LX systems.
If you have a previous version of Windows NT installed, see the Microsoft
Windows NT installation guide for information about how to upgrade to a new
version of the operating system.
2.5.1 Before Installing Windows NT
Before installing Windows NT, ensure that you have completed the following
tasks:
•
Use the CMOS Setup program to:
−
Set the system date and time.
−
Verify that all other standard CMOS settings match your system.
Refer to Section 2.4 for more information about the CMOS Setup
program.
•
Perform an express hard-disk setup. This configures the first hard disk that
AlphaBIOS detects in your system with the recommended default partition
arrangement. See Section 2.4.1 for more information on setting up your hard
disk. If you do not want to use the express hard-disk setup, refer to the
online AlphaBIOS documentation for other hard-disk setup options.
2.5.2 Starting Windows NT Setup
Windows NT Setup, located on the Microsoft Windows NT compact disc, installs
the Windows NT operating system. Windows NT Setup provides a brief
description of available key functions at the bottom of the screen.
During the Windows NT installation procedure, you may be prompted for the
type of computer that you have. For the AlphaPC 164SX system, choose
DIGITAL AlphaPC 164SX. For the AlphaPC 164LX system, choose DIGITAL
AlphaPC 164LX. If the appropriate system is not shown, choose “other” after you
have inserted the system-specific Windows NT 4.0 Installation diskette. The
Windows NT Installation Guide 11
following procedure supersedes the Starting Setup on a RISC-Based Computer
section of the Microsoft Windows NT installation guide.
To start the Windows NT Setup program:
1. Insert the Windows NT compact disc in the CD–ROM drive.
2. Restart your computer.
3. Start AlphaBIOS Setup.
4. Select Install Windows NT.
5. Press Enter.
6. Follow the instructions on the screen.
3. Windows NT ARC Firmware
This section describes how to use and update the Windows NT ARC firmware.
This firmware is provided on your Alpha SDK and firmware update compact disc
and is required to install and boot Windows NT on the following Alpha
motherboard systems: AlphaPC 164, EB164, AlphaPC 64, EB66+, EB64+, and
EB66.
The Windows NT ARC firmware initializes the system and enables you to install
and boot Windows NT. Depending on the type of motherboard you have, the
firmware resides in either a flash ROM or a UVPROM. Updating to the newest
firmware allows you to take advantage of new functionality.
The following table lists the minimum ARC firmware version required for
running Windows NT. To determine if your firmware requires updating,
compare the minimum firmware version for your system with the version
displayed in the firmware menus.
12 Windows NT Installation Guide
System
Minimum Firmware Version
AlphaPC 164
4.49-4
EB164
4.35
AlphaPC 64
3.5-10
EB66+
3.5-10
EB64+
3.5-4 (H1.6)
EB66
3.5-4 (H1.7)
Note: Firmware versions that are earlier than the minimum firmware
versions shown in the previous table must be updated before the installation.
3.1 Firmware Conventions
To select and choose different options in the Windows NT ARC firmware menus,
use the following keys:
Key
Description
Arrow
The arrow keys are used to select different options.
Enter
The Enter key is used to choose the highlighted option.
Esc
The Esc key is used to close a menu or cancel an operation.
3.2 Firmware Menus Access
When you power up your system, the firmware displays a blue screen on the
monitor, initializes the firmware drivers, and displays the Boot menu, the first
menu of the Windows NT ARC firmware menus. The currently selected option in
the menu is highlighted.
Note: If autoboot is enabled, you must cancel autoboot to interact with the
firmware. To cancel autoboot, press the Esc key before the timeout period
expires.
Windows NT Installation Guide 13
3.3 Firmware Menus Structure
Figure 5, which appears on the following page, shows the structure of the
Windows NT ARC firmware menus.
Note: The text of some of the options may differ, and some options may not
always be available.
14 Windows NT Installation Guide
Boot menu:
Boot Windows NT
Boot an alternate operating system...
Run a program...
Supplementary menu...
Supplementary menu:
Install new firmware...
Install Windows NT from CD-ROM
Setup the system...
Display hardware configuration
Boot menu...
Note: Arrows indicate flow between menu
screens.
This symbol...
Setup menu:
Set the time...
Set default environment variables...
Set default configuration...
Set system language...
Manage boot selection menu...
Setup autoboot...
Machine specific setup...
Edit environment variables...
Reset system to factory defaults...
Help
Supplementary menu, and do not
save changes...
Supplementary menu, and save changes...
Boot selections menu:
Add a boot selection...
Change a boot selection...
Verify boot selections...
Delete a boot selection...
Dumps boot selections
Rearrange boot selections...
Setup the system
Means...
Takes you to a
submenu
Machine specific setup menu:
Switch Operating System...
Partition Disks...
Setup menu...
Returns you to
the previous
menu in the
hierarchy
Figure 5 Windows NT ARC Firmware Menus
Windows NT Installation Guide 15
3.4 Firmware Menus Descriptions
This section describes the Windows NT ARC firmware menus and the options on
the menus. (See Figure 5.)
3.4.1 Boot Menu
This section describes the Boot menu options.
Boot menu . . .
Boot Windows NT
È
Boots the default boot selection. The name of your default boot
selection appears in place of the string “Windows NT.”
Boot menu . . .
Boot an alternate operating system . . .
È
Provides a menu of all boot selections; choose one to boot the system.
Boot menu . . .
Run a program . . .
È
Runs an ARC application. This option prompts you for the path to
the application and runs it.
Boot menu . . .
Supplementary menu. . .
È
Takes you to the Supplementary menu.
16 Windows NT Installation Guide
3.4.2 Supplementary Menu
This section describes the Supplementary menu options.
Boot menu . . .
Supplementary menu . . .
Install new firmware . . .
È
È
Runs the firmware update program.
Note: If you want to update firmware on an EB64+ or EB66
motherboard, see Section 3.5.2. Otherwise, you can update firmware
using a CD–ROM or diskette. The firmware update utility is
provided only on a compact disc; a diskette is not provided. For
information about how to create a firmware update diskette, see the
Alpha Motherboards Software Developer’s Kit and Firmware Update
Read Me First.
Load either the compact disc or the diskette in the appropriate drive.
Choose Install new firmware to start the firmware update utility.
Your system will appear to restart as the firmware update utility
reinitializes the system. See Section 3.5 for directions on how to
update your firmware once the firmware update utility has started.
Boot menu . . .
Supplementary menu . . .
Install Windows NT from CD-ROM
È
È
Starts an installation of Windows NT from a CD–ROM. See Section
3.7 for more information about installing Windows NT.
Windows NT Installation Guide 17
Boot menu . . .
Supplementary menu . . .
Setup the system . . .
È
È
Takes you to the Setup menu.
Boot menu . . .
Supplementary menu . . .
Display hardware configuration
È
È
Displays your hardware configuration in three screens. The first
screen displays information about your processor and memory, as
well as the firmware version. The second screen displays the name of
the firmware-supported devices that were detected. The third screen
displays information about PCI devices found in your system.
Boot menu . . .
Supplementary menu . . .
Boot menu . . .
È
È
Returns you to the Boot menu.
3.4.3 Setup Menu
This section describes the Setup menu options.
Boot menu . . .
Supplementary menu . . .
Setup the system . . .
Set the time . . .
È
È
È
Allows you to set the system date and time.
18 Windows NT Installation Guide
Boot menu . . .
Supplementary menu . . .
Setup the system . . .
Set default environment variables . . .
È
È
È
Allows you to set the default system partition. The system partition
is the disk partition where the Windows NT osloader, PALcode, and
HAL reside. Choosing this option removes all current boot selections.
If you are unsure of the values for your system, use the following
typical values:
Media:
SCSI bus number:
SCSI ID:
Partition:
SCSI Hard Disk
0
0
1
Boot menu . . .
Supplementary menu . . .
Setup the system . . .
Set default configuration . . .
È
È
È
Allows you to describe your system’s monitor resolution, diskette
capacity, keyboard type, and SCSI host ID to the firmware.
If you are unsure of the values for your system, use the following
typical values:
Monitor resolution:
First diskette drive capacity:
Second diskette drive capacity:
Keyboard:
SCSI host ID:
1024 x 768
3.5” 1.44MB
None
U.S. 101-key keyboard
7
Note: SCSI host ID refers to the SCSI ID of the SCSI host adapter
on a given SCSI bus.
Windows NT Installation Guide 19
Boot menu . . .
Supplementary menu . . .
Setup the system . . .
Set system language . . .
È
È
È
Allows you to specify the language that you want to use while
interacting with the firmware. American English is the only
language built into the firmware. If you want to use another
language, ensure that your firmware language support disk is in
your diskette drive before choosing this option.
Boot menu . . .
Supplementary menu . . .
Setup the system . . .
Manage boot selection menu . . .
È
È
È
Takes you to the Boot selections menu.
Boot menu . . .
Supplementary menu . . .
Setup the system . . .
Setup autoboot . . .
È
È
È
Allows you to specify whether or not the system should autoboot your
default boot selection. If you choose to autoboot, you will also be
prompted for the number of seconds to wait before autoboot should
occur.
Boot menu . . .
Supplementary menu . . .
Setup the system . . .
Machine specific setup . . .
È
È
È
Takes you to the Machine specific setup menu.
Boot menu . . .
Supplementary menu . . .
Setup the system . . .
Edit environment variables . . .
È
È
È
Allows you to edit the firmware environment.
20 Windows NT Installation Guide
Boot menu . . .
Supplementary menu . . .
Setup the system . . .
Reset system to factory defaults . . .
È
È
È
Resets all options to the factory defaults.
Boot menu . . .
Supplementary menu . . .
Setup the system . . .
Help
È
È
È
Provides rudimentary help for the Setup menu.
Boot menu . . .
Supplementary menu . . .
Setup the system . . .
Supplementary menu, and do not save changes . . .
È
È
È
Returns you to the Supplementary menu, discarding any changes
made from the Setup menu.
Boot menu . . .
Supplementary menu . . .
Setup the system . . .
Supplementary menu, and save changes . . .
È
È
È
Returns you to the Supplementary menu, saving any changes made
from the Setup menu. Note that if you have not made any changes,
this option might not appear.
3.4.4 Boot Selections Menu
This section describes the Boot selections menu options.
Windows NT Installation Guide 21
Boot menu . . .
Supplementary menu . . .
Setup the system . . .
Manage boot selection menu . . .
Add a boot selection . . .
È
È
È
È
Allows you to manually add a new boot selection (usually you do not
need to do this because installing Windows NT will automatically
add a boot selection for the newly installed operating system).
Boot menu . . .
Supplementary menu . . .
Setup the system . . .
Manage boot selection menu . . .
Change a boot selection . . .
È
È
È
È
Allows you to modify a boot selection.
Boot menu . . .
Supplementary menu . . .
Setup the system . . .
Manage boot selection menu . . .
Verify boot selections . . .
È
È
È
È
Checks your boot selections and reports any problems found.
Boot menu . . .
Supplementary menu . . .
Setup the system . . .
Manage boot selection menu . . .
Delete a boot selection . . .
È
È
È
È
Allows you to delete a boot selection from a list of all boot selection
names.
22 Windows NT Installation Guide
Boot menu . . .
Supplementary menu . . .
Setup the system . . .
Manage boot selection menu . . .
Dumps boot selections
È
È
È
È
Displays all your boot selections.
Boot menu . . .
Supplementary menu . . .
Setup the system . . .
Manage boot selection menu . . .
Rearrange boot selections . . .
È
È
È
È
Allows you to rearrange your boot selections, changing which is the
default boot selection.
Boot menu . . .
Supplementary menu . . .
Setup the system . . .
Manage boot selection menu . . .
Setup the system
È
È
È
È
Returns you to the Setup menu.
3.4.5 Machine Specific Setup Menu
This section describes the Machine specific setup menu options.
Boot menu . . .
Supplementary menu . . .
Setup the system . . .
Machine specific setup . . .
Switch Operating System . . .
È
È
È
È
Switch which firmware is active on reset or power-up.
Windows NT Installation Guide 23
Boot menu . . .
Supplementary menu . . .
Setup the system . . .
Machine specific setup . . .
Partition Disks . . .
È
È
È
È
Starts the disk partition utility. See Section 3.6 for information about
this utility.
Boot menu . . .
Supplementary menu . . .
Setup the system . . .
Machine specific setup . . .
Setup menu . . .
È
È
È
È
Returns you to the Setup menu.
3.5 Firmware Update Utility
If you have an EB64+ or EB66 motherboard, see Section 3.5.2 for directions on
how to update your firmware.
3.5.1 Updating Firmware in a Flash ROM
The following procedure updates the flash ROM using the firmware update
utility. (To start the firmware update procedure, see Section 3.4.2.)
1. From the Firmware Update menu, choose whichever selection appears:
•
Update Windows NT ARC firmware.
•
Update Firmware.
2. When prompted to continue the update, choose Yes. If the console selection
does not match the firmware that you flashed, you will be prompted to
update the console selection.
3. If you are prompted to update the console selection, choose Yes.
4. When the update has completed, restart your computer.
24 Windows NT Installation Guide
3.5.2 Updating Firmware in a UVPROM
If you do not have an EB64+ or EB66 motherboard, see Section 3.5.1 for
directions on how to update your computer type’s firmware.
The Windows NT ARC firmware is provided only on the compact disc; a
UVPROM is not provided. To program your own UVPROM, see the Alpha
Motherboards Software Developer’s Kit and Firmware Update Read Me First.
Replacing the UVPROM
To update the firmware on a motherboard after you have programmed your
UVPROM, follow this procedure:
1. Power off the system.
2. Locate and, noting the correct orientation of the ROM, remove one of the
UVPROMs from the motherboard.
3. Using the correct orientation, insert the new Windows NT ARC firmware
UVPROM.
4. Select the new Windows NT ARC firmware UVPROM device with the
UVPROM select jumper, as described in the motherboard’s user’s guide.
5. Power on the system.
3.6 Disk Partition Utility
The disk partition utility, which first appears in Windows NT ARC firmware
Version 4.48, is used to partition your hard drive and to format a partition with
a FAT file system. The disk partition utility also displays information about the
drive, such as the manufacturer and model ID strings and the ARC path. See
Section 3.4.5 for instructions on how to start the disk partition utility.
Windows NT Installation Guide 25
Function Keys
The following table lists the disk partition utility function keys and their
functions:
Key
Description
↑ or ↓
Change selections in the active cell.
← or →
Change the active cell.
Esc
Exits the disk partition utility.
Keyboard commands
Listed in the Keyboard Commands box. To perform a
specific action on the current selection, type the key
associated with the action.
Help
The disk partition utility provides context-sensitive on-screen help. The
keyboard commands available for the current selection in the active cell are
shown in the Keyboard Commands box.
3.6.1 Using the Disk Partition Utility
When you start the disk partition utility, the default selection is the first
partition on the first disk on your system. If no partitions exist on that disk, the
default selection is the unpartitioned space on the first disk.
Note: Although the disk partition utility displays changes immediately,
partition changes are not actually committed until you either exit the utility
or perform an action that requires the changes to be committed, such as
formatting. You will always be prompted for confirmation before changes are
committed.
3.6.2 Creating the System Partition
To make a partition the system partition, select the partition and
type S.
26 Windows NT Installation Guide
3.7 Installing the Windows NT Operating System
This section supplements the Microsoft Windows NT installation guide for
installing the Windows NT operating system on the AlphaPC 164, EB164,
AlphaPC 64, EB66+, EB64+, and EB66.
If you have a previous version of Windows NT installed, see the Microsoft
Windows NT installation guide for information about how to upgrade to a new
version of the operating system.
3.7.1 Before Installing Windows NT
Before you install Windows NT, ensure that you have completed the following
tasks:
•
Defined the environment variables for the default system partition. For more
information about describing your system configuration, see the description
for Set default environment variables . . . in Section 3.4.3.
•
Described your system configuration to the firmware. For more information
about describing your system configuration, see the description for Set
default configuration . . . in Section 3.4.3.
•
Provided the required system partition on your hard disk. For more
information on creating the system partition, see Section 3.4.5.
The following table specifies the free space and file-system requirements for
installing Windows NT:
1
Item
Free Space Required
File-System Requirement
System partition
5MB
FAT
Windows NT
161MB
FAT or NTFS
1
System partition must be FAT.
The system partition is the disk partition that contains the hidden files
OSLOADER.EXE and HAL.DLL in the subdirectory \OS\WINNT351. If the system
partition is large enough, it can also contain Windows NT, or you may choose to
use a separate partition. The system partition and Windows NT may be on
different hard disks.
Windows NT Installation Guide 27
3.7.2 Starting Windows NT Setup
Windows NT Setup, located on the Microsoft Windows NT compact disc, installs
Windows NT. Windows NT Setup provides a brief description of the available
key functions at the bottom of the screen.
During the Windows NT installation procedure, you may be prompted for your
computer type. Use Table 1 or Table 2 to determine your computer type and to
determine whether an installation diskette is required, based on the version of
Windows NT.
Table 1 Computer Types and Installation Diskette Requirements for
Windows NT 3.51
System
Choose this system…
Installation diskette required?
AlphaPC 164
EB164
EB66+
EB66
Digital AlphaPC164
Alpha EB164
Alpha EB66+
Alpha EB66
Yes; create an installation diskette.
AlphaPC 64
EB64+
Digital AlphaPC64
Digital AlphaPC64
No.
Table 2 Computer Types and Installation Diskette Requirements for
Windows NT 4.0
System
Choose this system…
Installation diskette required?
AlphaPC 164
EB164
AlphaPC 64
EB64+
Alpha EB164
Alpha EB164
Digital AlphaPC64
Digital AlphaPC64
No.
EB66+
EB66
Alpha EB66+
Alpha EB66
Yes; create an installation diskette.
If your motherboard does not appear as one of the choices, then insert the
update and Windows NT firmware diskette. The following procedure supersedes
the Starting Setup on a RISC-Based Computer section of the Microsoft
Windows NT installation guide.
28 Windows NT Installation Guide
To start the Windows NT Setup program, follow this procedure:
1. Insert the Microsoft Windows NT compact disc in the CD-ROM drive.
2. Restart your computer.
3. From the Boot menu, choose Supplementary menu . . . .
4. From the Supplementary menu, choose Install Windows NT from
CD–ROM.
5. Follow the instructions on the screen.
Note: If you have an Alpha Windows NT driver diskette for your video card, you
can use the driver to install Windows NT. Follow this procedure:
1. Choose Custom Setup.
2. Choose display type Other, and insert the graphics disk driver when asked
for the manufacturer-supplied hardware support disk.
4. Troubleshooting
This section provides solutions to some of the common problems that you may
encounter while using the Windows NT firmware and installing Windows NT.
Problem
When you turn on your computer, nothing displays.
Solutions
Ensure that the video card is correctly connected to the monitor.
Ensure that the flash ROM update procedure was performed correctly. If you
have a terminal attached to COM1, check the output for error messages after
verifying that the flash ROM update procedure was performed correctly.
Windows NT Installation Guide 29
Problem
While booting Windows NT, you receive one of the following error messages:
•
The required system file DISPLAY_DRIVER.DLL is bad or missing.
•
The required system file DISPLAY_DRIVER.SYS is bad or missing.
Solutions
These error messages indicate video driver problems. Use the following table to
solve common video driver problems.
If the...
Then...
Driver becomes disabled
Boot the Windows NT operating system with
the last known good configuration.
Incorrect video driver is chosen
while installing the Windows NT
operating system
Reinstall the Windows NT operating system
with the correct driver.
New video card was installed before
the driver was installed
Reinstall the old video card, boot the Windows
NT operating system, and install the driver for
the new video card. Then install the new video
card and reboot the Windows NT operating
system.
The rest of this section provides descriptions of available beep and post codes,
and instructions on how to use the fail-safe booter.
30 Windows NT Installation Guide
4.1 Beep Codes
Beep codes provide error information about the motherboard.
The following table lists and describes the beep codes for the AlphaPC 164SX.
Table 3 Beep Codes for AlphaPC 164SX
Beep Code
1
1
Description
1–2–3
This sequence represents the fail-safe booter startup
4
No valid header found in ROM; loading entire ROM
5
No memory found
6
Checksum error detected when image was read back
from memory
One beep and a pause, followed by two beeps and a pause, followed by three beeps.
The following table lists and describes the beep codes for the AlphaPC 164LX.
Table 4 Beep Codes for AlphaPC 164LX
Beep Code
1
1
Description
1–2–3
This sequence represents the fail-safe booter startup
4
No valid header found in ROM; loading entire ROM
5
No memory found
6
Checksum error detected when image was read back
from memory
One beep and a pause, followed by two beeps and a pause, followed by three beeps.
Windows NT Installation Guide 31
The following table lists and describes the beep codes for the AlphaPC 164.
Table 5 Beep Codes for AlphaPC 164
Beep Code
1
1
Description
1–2–3
This sequence represents the fail-safe booter startup
4
No valid header found in ROM; loading entire ROM
5,6,7
Same meaning as AlphaPC 164 post code 3F fatal error
subcodes
One beep and a pause, followed by two beeps and a pause, followed by three beeps.
The following table lists and describes the beep codes for the EB164.
Table 6 Beep Codes for EB164
Beep Code
Description
2
Jumping to system code
4
No valid header found in ROM; loading entire ROM
5,6,7
Same meaning as fatal error subcodes
32 Windows NT Installation Guide
4.2 Post Codes
Post codes indicate the progress of the SROM and Windows NT firmware.
The following table lists and describes the post codes for the AlphaPC 164SX.
Table 7 Post Codes for AlphaPC 164SX
Source
Post
Code
(hex)
Description
SROM
00
Firmware initialization is complete
01
CPU speed detected
02
CPU speed converted
03
Configuration jumpers read
04
Bcache configuration value computed
05
Bcache control value computed
0C
Memory sized and memory bank 0 written
0D
Enable Dcache
13
All of memory rewritten (good data parity written)
14
Memory errors cleared; start reading system ROM
15
Loading ROM without SROM decompression
16
Loading ROM using SROM decompression
17
System ROM loaded to memory
18
Icache flush code written to memory
19
CPU errors cleared; jump to system code
20
ISA bus reset
3A
Jump to Mini-Debugger
Windows NT Installation Guide 33
Source
AlphaBIOS
Fail-safe
booter
Post
Code
(hex)
Description
3F
Fatal error. Second code identifies source of error:
05 = No memory found
06 = Checksum error detected when image was read
back from memory
98
Firmware has control
97
Buses initialized
95
Video console opened
51
FATAL–returned from boot menu selection
50
FATAL–firmware fatal error
42
Firmware drivers have been started
00
Firmware has been initialized
FD
I/O bus initialization
FC
I/O initialization complete
FB
UART initialization
BF
Fail-safe booter is scanning diskette
1
Fail-safe booter is loading the Windows NT AlphaBIOS
2
Fail-safe booter is loading the Debug Monitor
3
Fail-safe booter is loading the SRM console
4
Fail-safe booter is loading the Linux miniloader
34 Windows NT Installation Guide
The following table lists and describes the post codes for the AlphaPC 164LX.
Table 8 Post Codes for AlphaPC 164LX
Source
Post
Code
(hex)
Description
SROM
00
Firmware initialization is complete
01
CPU speed detected
02
CPU speed converted
03
Configuration jumpers read
04
Bcache configuration value computed
05
Bcache control value computed
06
Bcache turned off
0C
Memory sized and memory bank 0 written
0F
Bcache turned on
13
All of memory rewritten (good data parity written)
14
Memory errors cleared; start reading system ROM
15
Loading ROM without SROM decompression
16
Loading ROM using SROM decompression
17
System ROM loaded to memory
18
Icache flush code written to memory
19
CPU errors cleared; jump to system code
20
ISA bus reset
Windows NT Installation Guide 35
Source
AlphaBIOS
Fail-safe
booter
Post
Code
(hex)
Description
3F
Fatal error. Second code identifies source of error:
05 = No memory found
06 = Checksum error detected when image was read
back from memory
98
Firmware has control
97
Buses initialized
95
Video console opened
51
FATAL–returned from boot menu selection
50
FATAL–firmware fatal error
42
Firmware drivers have been started
00
Firmware has been initialized
FD
I/O bus initialization
FC
I/O initialization complete
FB
UART initialization
BF
Fail-safe booter is scanning diskette
1
Fail-safe booter is loading the Windows NT AlphaBIOS
2
Fail-safe booter is loading the Debug Monitor
3
Fail-safe booter is loading the SRM console
4
Fail-safe booter is loading the Linux miniloader
36 Windows NT Installation Guide
The following table lists and describes the post codes for the AlphaPC 164.
Table 9 Post Codes for AlphaPC 164
Post Code (hex)
Description
00
Firmware initialization is complete
01
CPU speed detected
02
CPU speed converted
03
Configuration jumpers read
04
Bcache configuration value computed
05
Bcache control value computed
06
Bcache turned off
07
Memory timing registers written
08
Memory control register written
09
Memory bank 0 register written
0B
DRAMs awakened
0C
Memory sized and memory bank 0 written
0F
Bcache turned on
13
All of memory rewritten (good data parity written)
14
Memory errors cleared; start reading system ROM
15
Loading ROM without SROM decompression
16
Loading ROM using SROM decompression
17
System ROM loaded to memory
18
Icache flush code written to memory
19
CPU errors cleared; jump to system code
20
ISA bus reset
Windows NT Installation Guide 37
Post Code (hex)
Description
3A
Jumping to SROM Mini-Debugger
3F
Fatal error. Second code identifies source of error:
05 = No memory found
06 = Checksum error detected when image was read back from
memory
07 = Could not determine the SIMM type
41
Firmware environment has been loaded
42
Firmware services have been initialized
50
A fatal error has occurred (FATAL)
51
The Boot menu illegally returned (FATAL)
75
System initialization is complete—start firmware setup
76
Checking system information for sanity
77
About to initialize the video subsystem
78
PCI configuration is complete; about to initialize the keyboard
79
About to configure PCI devices
80
About to initialize the PCI bus (hard restart)
81
About to initialize the PCI bus (soft restart)
85
About to validate the SCB
86
Early initialization of firmware API
87
About to initialize the system chipset
88
Initialize vendor API
89
The firmware kernel debugger module is starting
95
Video subsystem and keyboard are okay; using graphic console
38 Windows NT Installation Guide
Post Code (hex)
Description
96
Video or keyboard is missing or broken; using COM1 as console
97
Trying to initialize video subsystem and keyboard as graphic console
98
Serial ports have been initialized; firmware initialization is starting
99
The firmware is about to initialize the serial ports
FD
I/O bus initialization
FC
I/O initialization complete
FB
UART initialization
BF
Fail-safe booter is scanning diskette
0
Fail-safe booter is loading the firmware update utility
The following table lists and describes the post codes for the EB164.
Table 10 Post Codes for EB164
Post Code (hex)
Description
00
ISA bus reset
01
CPU speed detected
02
CPU speed converted
03
Configuration jumpers read
04
Bcache configuration value computed
05
Bcache control value computed
06
Bcache turned off
07
Memory timing registers written
Windows NT Installation Guide 39
Post Code (hex)
Description
08
Memory control register written
09
Memory bank 0 register written
0B
DRAMs awakened
0C
Memory sized and memory bank 0 written
0F
Bcache turned on
13
All of memory rewritten (good data parity written)
14
Memory errors cleared; start reading system ROM
15
Loading ROM without SROM decompression
16
Loading ROM using SROM decompression
17
System ROM loaded to memory
18
Icache flush code written to memory
19
CPU errors cleared; jump to system code
3A
Jumping to SROM Mini-Debugger
3F
Fatal error. Second code identifies source of error:
05 = No SIMMs found when sizing memory
06 = Checksum error detected when image was read back from
memory
07 = Could not detect SIMM type during memory sizing
40 Windows NT Installation Guide
The following table lists and describes the post codes for the AlphaPC 64.
Table 11 Post Codes for AlphaPC 64
Post Code (hex)
Description
00
ISA bus reset
01
CPU speed detected
02
CPU speed converted
05
Bcache timing parameters computed
06
BIU_CTL register written
07
Memory global timing register written
08
Memory refresh timing register written
09
Bank 0 timing register written
0A
Bank 1 timing register written
0B
DRAMs awakened
0C
Bank 0 configuration register written
0D
Bank 1 configuration register written
0E
Memory general control register written
0F
Bcache flushed (good tag parity written)
10
Tag enable register written
11
Final memory general control register written
12
ABOX_CTL register written
13
All of memory rewritten (good data parity written)
14
Memory errors cleared; start reading system ROM
15
Loading ROM without SROM decompression
16
Loading ROM using SROM decompression
17
System ROM loaded to memory
Windows NT Installation Guide 41
Post Code (hex)
Description
18
Icache flush code written to memory
19
CPU errors cleared
The following table lists and describes the post codes for the EB66+.
Table 12 Post Codes for EB66+
Post Code (hex)
Description
00
ISA bus reset
01
CPU speed detected
03
CPU speed converted; Bcache disabled
06
Preconfigure memory banks
07
DRAMs awakened
08
Bcache timing established
09
Bcache flushed (good tag parity written)
0A
Bank timing registers written
0D
Bank configuration registers written
0E
Bank base addresses established
10
ABOX_CTL register written
11
All of memory rewritten (good data parity written)
12
Memory errors cleared; start reading system ROM
15
Loading ROM without SROM decompression
16
Loading ROM using SROM decompression
17
System ROM loaded to memory
18
Icache flush code written to memory
19
CPU errors cleared
42 Windows NT Installation Guide
The following table lists and describes the post codes for the EB66.
Table 13 Post Codes for EB66
Post Code (hex)
Description
00
ISA bus reset
01
CPU speed detected
02
CPU speed converted
04
Memory global timing register written
05
Read system configuration data
06
Preconfigure memory banks
07
DRAMs awakened
08
Bcache timing established
09
Bcache flushed (good tag parity written)
0A
Bank 0 timing register written
0B
Bank 1 timing register written
0C
Bank configuration registers written
0D
Bank base addresses established
0F
ABOX_CTL register written
10
All of memory rewritten (good data parity written)
14
Memory errors cleared; start reading system ROM
15
Loading ROM (header located)
16
Loading ROM (image located)
17
System ROM loaded to memory
18
Icache flush code written to memory
19
CPU errors cleared
Windows NT Installation Guide 43
4.3 Fail-Safe Booter
The fail-safe booter, currently available for use on the AlphaPC 164SX, the
AlphaPC 164LX, and the AlphaPC 164 only, provides an emergency recovery
mechanism when the primary firmware image contained in flash memory has
been corrupted. When flash memory has been corrupted, such that no image is
safely loaded from the flash, the fail-safe booter can be run to facilitate booting
another image from a diskette that is capable of reprogramming the flash.
4.3.1 Starting the Fail-Safe Booter
The fail-safe booter can be started in one of two ways for each system listed
below.
AlphaPC 164SX and AlphaPC 164LX
•
If the primary firmware image is unavailable when the system is powered on
or reset, the fail-safe booter runs automatically. When the fail-safe booter
runs, the system emits a series of beeps through the speaker as beep code
1–2–3; this is, one beep and a pause, followed by two beeps and a pause,
followed by three beeps. After the diskette activity light flashes:
1. Insert the system-specific AlphaBIOS Firmware diskette. The fail-safe
booter will load and run AlphaBIOS from this diskette.
2. Go to Section 2.3 and follow the procedure for upgrading AlphaBIOS.
•
You can also start the fail-safe booter manually as follows:
1. Power off your system.
2. Add jumper CF7 as described in the system-specific motherboard
Windows NT user’s manual.
3. Power on your system.
44 Windows NT Installation Guide
4. Insert the system-specific AlphaBIOS Firmware diskette into the
diskette drive
5. Go to Section 2.3 and follow the procedure for upgrading AlphaBIOS.
AlphaPC 164
•
If the primary firmware image is unavailable when the system is powered on
or reset, the fail-safe booter runs automatically. When the fail-safe booter
runs, the system emits a series of beeps through the speaker as beep code
1–2–3; this is, one beep and a pause, followed by two beeps and a pause,
followed by three beeps. After the diskette activity light flashes, insert the
update and Windows NT firmware diskette containing the file
FWUPDATE.EXE.
•
You can also start the fail-safe booter manually as follows:
1. Add jumper CF7 as described in the AlphaPC 164 Motherboard User’s
Manual.
2. Insert the update and Windows NT firmware diskette into the diskette
drive.
3. Go to Section 3.5 for information on how to update the flash ROM using
the firmware update utility.
Windows NT Installation Guide 45
5. Support, Products, and Documentation
If you need technical support, a DIGITAL Semiconductor Product Catalog, or
help deciding which documentation best meets your needs, visit the DIGITAL
Semiconductor World Wide Web Internet site:
http://www.digital.com/semiconductor
You can also call the DIGITAL Semiconductor Information Line or the DIGITAL
Semiconductor Customer Technology Center. Please use the following
information lines for support.
For documentation and general information:
DIGITAL Semiconductor Information Line
United States and Canada:
Outside North America:
Electronic mail address:
1–800–332–2717
1–510–490–4753
[email protected]
For technical support:
DIGITAL Semiconductor Customer Technology Center
Phone (U.S. and international):
Fax:
Electronic mail address:
46 Windows NT Installation Guide
1–978–568–7474
1–978–568–6698
[email protected]
5.1 DIGITAL Semiconductor Products
To order Alpha microprocessors and motherboards, contact your local
distributor.
Note:
The following products and order numbers might have been revised.
For the latest versions, contact your local distributor.
Product
Order Number
DIGITAL Semiconductor Alpha 21164 600 MHz Microprocessor
21164–MB
DIGITAL Semiconductor Alpha 21164 533 MHz Microprocessor
21164–P8
DIGITAL Semiconductor Alpha 21164 466 MHz Microprocessor
21164–IB
Motherboard Kits
Motherboard kits include the motherboard, the motherboard’s user’s manual,
and firmware.
Product
Order Number
DIGITAL Semiconductor AlphaPC 164SX Motherboard for Windows NT
21A05–A0
DIGITAL Semiconductor AlphaPC 164SX Motherboard for DIGITAL UNIX
21A05–A1
DIGITAL Semiconductor AlphaPC 164LX Motherboard for Windows NT
21A04–C0
DIGITAL Semiconductor AlphaPC 164LX Motherboard for DIGITAL UNIX
21A04–C1
DIGITAL Semiconductor AlphaPC 164 Motherboard for Windows NT
21A04–B0
DIGITAL Semiconductor AlphaPC 164 Motherboard for DIGITAL UNIX
21A04–B2
Design Kits
Design kits include full documentation and schematics. They do not include
motherboards or related hardware.
Product
Order Number
DIGITAL Semiconductor AlphaPC 164 Motherboard Design Kit
QR–21A04–12
Windows NT Installation Guide 47
5.2 DIGITAL Semiconductor Documentation
The following table lists some of the available DIGITAL Semiconductor
documentation.
Title
Order Number
1
Alpha AXP Architecture Reference Manual
Alpha Architecture Handbook
1
2
EY–T132E–DP
EC–QD2KB–TE
DIGITAL Semiconductor Alpha 21164PC Microprocessor Hardware
Reference Manual
EC–R2W0A–TE
DIGITAL Semiconductor Alpha 21164 Microprocessor Hardware
Reference Manual
EC–QP99B–TE
DIGITAL Semiconductor AlphaPC 164SX Motherboard Product Brief
EC–R57CA–TE
DIGITAL Semiconductor AlphaPC 164LX Motherboard Product Brief
EC–R2RZA–TE
AlphaPC 164SX Motherboard Windows NT User’s Manual
EC–R57DA–TE
AlphaPC 164LX Motherboard Windows NT User’s Manual
EC–R2ZQD–TE
DIGITAL Semiconductor AlphaPC 164LX Motherboard Technical
Reference Manual
EC–R46WA–TE
DIGITAL Semiconductor AlphaPC 164 Motherboard Product Brief
EC–QUQKC–TE
AlphaPC 164 Motherboard User’s Manual
EC–QPG0B–TE
DIGITAL Semiconductor AlphaPC 164 Motherboard Technical
Reference Manual
EC–QPFYB–TE
To purchase the Alpha AXP Architecture Reference Manual, contact your local distributor or call
Butterworth-Heinemann (Digital Press) at 1–800–366–2665.
2
This handbook provides information subsequent to the Alpha AXP Architecture Reference Manual.
48 Windows NT Installation Guide
Title
Order Number
DIGITAL Semiconductor AlphaPC 164 Motherboard Design Kit Read Me
First
EC–QPFZA–TE
DIGITAL Semiconductor AlphaPC 164 Motherboard DIGITAL UNIX
Product Brief
EC–QZT6B–TE
AlphaPC 164 Motherboard DIGITAL UNIX User’s Manual
EC–QZT5B–TE
DIGITAL Semiconductor Alpha Motherboards Software Developer’s Kit
and Firmware Update V3.1 Product Brief
EC–QXQKC–TE
Alpha Motherboards Software Developer’s Kit and Firmware Update
Read Me First
EC–QERSH–TE
Alpha Microprocessors Motherboard Debug Monitor User’s Guide
EC–QHUVF–TE
Alpha Microprocessors Motherboard Software Design Tools User’s
Guide
EC–QHUWD–TE
Alpha SRM Console for Alpha Microprocessor Motherboards User’s
Guide
EC–QK8DF–TE
Alpha Microprocessors SROM Mini-Debugger User’s Guide
EC–QHUXC–TE
PALcode for Alpha Microprocessors System Design Guide
EC–QFGLC–TE
Windows NT Installation Guide 49
5.3 Ordering Third-Party Software and Documentation
To order Microsoft software and documentation, contact your local Microsoft
sales office. The following products and documentation are available from
Microsoft.
Title
Vendor Address
Microsoft Windows NT Workstation
Microsoft Corporation
One Microsoft Way
Redmond, WA 98052-6399
Microsoft Windows NT Server
Windows NT Workstation Installation Guide
Windows NT Server Installation Guide
5.4 Obtaining the Hardware Compatibility List for Windows NT
The Hardware Compatibility List is available through the following sources:
•
Microsoft’s customer service representatives at 1–800–426–9400
•
CompuServe Information Systems in Library 1 of the WINNT forum
(GO WINNT) or Library 17 of the MSWIN32 forum (GO MSWIN32)
•
Microsoft’s World Wide Web Internet site: http://www.microsoft.com
50 Windows NT Installation Guide