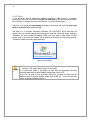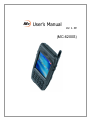
1
User’s Manual
Ver 1. 4E
(MC-6200S)
2
Note
This manual is subject to copyright protection along with all relevant rights. No part of this
document can be copied, reproduced, changed or translated in whole or in part by any
means without prior written consent of M3 MOBILE Co., Ltd.
The content of the manual is provided “as-is” and be subject to change at any time
without notice.
M3 MOBILE Co., Ltd. makes no warranty of any kind with regard to this manual, including,
but not limited to, the implied warranties of merchantability and fitness for a particular
purpose,
Programs in this product are subject to copyright protection. No part of these programs is
permitted to be reproduced, revised or translated in whole or in part by any means
without prior written consent of M3 MOBILE Co., Ltd.
Microsoft, ActiveSync, Windows, Windows logos, Windows CE 4.2(CE.NET) logos are
trademarks, or registered trademarks of Microsoft Corporation in the United States and/or
other countries. Microsoft OEM products are licensed by Microsoft Licensing Inc., a
wholely owned subsidiary of Microsoft Corporation.
All other product names in this document or product are company names, trademarks or
registered trademarks of the respective owners.
M3 MOBILE Co., LTD.
* Prepared by: Marketing Dept. Inspected by: Tech. Research Center
137-130 2nd floor, Yongjean building, 401-1, Yangjae-dong, Seocho-gu, Seoul, South
Korea
3
Danger
1. Never attempt to alter or modify the construction of the device or its components in
any way. It may cause fire, injury, electric shock, or serious damage to user or the
device itself.
2. Do not use this product in a potentially explosive environment or near inflammable
gases. It may cause an explosion.
3. Do not use or operate the device with wet hands. Doing so may result in electric
shock to users or device itself.
4. Do not leave the production in a place exposed to high temperature, direct sunlight,
or extreme temperature changes. Being exposed to high temperature can have harmful
effects on internal components and a risk of fire.
5. For safety reason, keep the device out of reach of children or animals. Failure to do
so can cause the following accidents.
a. Damage due to falling of device;
b. Swallowing of stylus pen
c. Injury on the body caused by stylus pen.
If an accident or injury occurs, immediately contact a medical professional for treatment.
6. Use only the designated battery charger. Otherwise, it may lead to the risk of fire or
injuries.
Warning
1. Do not use the product in humid and high temperature environment. It may cause a
fatal damage to the device.
2. Do not allow an excessive shock such as a dropping from height. It may cause
damage to the device. To avoid such damage, use a leather case when using it outside.
3. Before using this device for the first time, charge battery to maximum.
4. Use only the accessories and batteries that are provided or approved by M3
MOBILE. If the product becomes defective due to installation of other accessories or
batteries, the Company may not provide any after-services, either free repair or replace.
4
Content
1. Greetings ................................................................ 7
Components .............................................................................................................. 7
How to use the manual .............................................................................................. 7
2. Introduction of M3 ................................................... 8
Overview of M3 .......................................................................................................... 9
How to charge .................................................................................................. 11
Input button function ................................................................................................ 12
Reset button function ............................................................................................... 13
Soft Reset ......................................................................................................... 13
Hard Reset ....................................................................................................... 14
USB Cradle.............................................................................................................. 15
3. Getting started ...................................................... 16
4. How to connect to a desktop PC ........................... 18
Microsoft ActiveSync ................................................................................................ 19
Understanding of ActiveSync program .............................................................. 19
How to connect M3 to ActiveSync ............................................................................ 20
How to set up a Partnership ..................................................................................... 21
How to connect M3 .................................................................................................. 23
How to search M3 contents in a desktop PC..................................................... 24
5. Overview of Microsoft Windows CE 4.2 ................ 25
Main Windows ......................................................................................................... 25
Taskbar .................................................................................................................... 27
Taskbar ............................................................................................................. 28
6. How to Use Bluetooth ........................................... 35
Bluetooth Power On/Off .................................................................................... 35
Options Menu ................................................................................................... 35
Paring Wizard ................................................................................................... 36
BT Manager ...................................................................................................... 38
7. How to set up M3 .................................................. 44
Regional Settings..................................................................................................... 45
Data/Time Features ................................................................................................. 46
Date/time .......................................................................................................... 46
5
Watch ............................................................................................................... 46
Alarm ................................................................................................................ 47
Network and Dial-up Connections ............................................................................ 47
How to make new connection in M3......................................................................... 48
How to set up high-speed internet with M3 Modem .................................... 48
Display ..................................................................................................................... 54
Desktop ............................................................................................................ 54
Setting .............................................................................................................. 54
Volume and Sound .................................................................................................. 55
Volume ............................................................................................................. 55
Sound ............................................................................................................... 55
User ......................................................................................................................... 55
User information ............................................................................................... 56
Stylus ....................................................................................................................... 56
Correction ......................................................................................................... 56
System .................................................................................................................... 57
Password ................................................................................................................. 58
Certificates............................................................................................................... 58
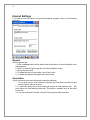
Internet Settings....................................................................................................... 59
General............................................................................................................. 59
Connection ....................................................................................................... 59
Security ............................................................................................................ 60
Premium ........................................................................................................... 60
Input panel ............................................................................................................... 60
Storage Manager ..................................................................................................... 61
Power ...................................................................................................................... 62
Battery ..................................................................................................................... 62
Power Turn off ......................................................................................................... 62
How to optimize battery longevity ..................................................................... 63
Removal of Programs .............................................................................................. 64
PC Connection ........................................................................................................ 64
8. How to use personal organizer ............................. 65
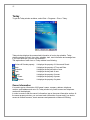
Today ....................................................................................................................... 66
Owner Information ............................................................................................ 66
InfoBox .................................................................................................................... 67
SmartMemo ............................................................................................................. 83
SWRecoder ............................................................................................................. 87
6
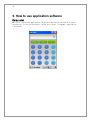
9. How to use application software ........................... 89
Calculator ................................................................................................................ 89
Image Viewer ........................................................................................................... 90
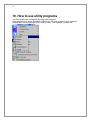
10. How to use utility programs................................. 91
Menu Setting (Menus).............................................................................................. 92
Backlight .................................................................................................................. 92
Button setting (Buttons) ........................................................................................... 92
MS-Backup .............................................................................................................. 93
Quick start (Qstart)................................................................................................... 94
Task Manager .......................................................................................................... 94
Contrast ................................................................................................................... 94
Touch Protector........................................................................................................ 94
11. How to use Microsoft application ........................ 95
Command Prompt.................................................................................................... 95
Microsoft Media Player 9 Series............................................................................... 96
View.................................................................................................................. 99
Playback ........................................................................................................... 99
Internet Explorer .................................................................................................... 100
Menu bar ........................................................................................................ 101
Microsoft WordPad ................................................................................................ 104
Menu Bar ........................................................................................................ 104
How to convert the document type.................................................................. 106
Windows Explorer .................................................................................................. 107
File Menu ........................................................................................................ 107
Icon Menu ....................................................................................................... 108
Appendix A ............................................................. 109
Product Specification ............................................................................................. 109
Troubleshooting ..................................................................................................... 110
Battery power ........................................................................................................ 111
Reset ..................................................................................................................... 111
Common problems ................................................................................................ 112
Data/File Backup ................................................................................................... 115
Synchronization with PC ........................................................................................ 116
Infrared (IrDA) Communication .............................................................................. 117
Glossary ........................................................................................................... 118
7
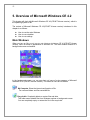
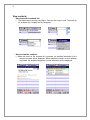
1. Greetings
Congratulate your purchase of M3 MOBILE Co., Ltd.‟s M3. M3 is a palm-size PC using
the Windows CE 4.2(CE.NET). M3 helps you to keep abreast of important business
and/or personal information and is easy to handle.
M3 adopts Microsoft Windows CE 4.2(CE.NET), which is one of the latest operation
systems. Microsoft Windows CE 4.2(CE.NET) enables user to experience the skins and
functions of Windows XP and deal with important tasks of the users.
By using M3‟s versatile functions such as phone and barcode scanner, etc, you can
enhance convenience of the daily tasks, arrange daily schedule with various application
programs, or check out emails or stay connected to the Internet in any place and at any
time.
Microsoft ActiveSync reinforces the functions of M3 by synchronizing information stored
in your desktop or notebook.
Topics discussed in this chapter are as follows:
List of components in M3 package;
Overview of the manual.
Components
M3‟s components are as follows:
M3 PDA + basic battery
Manual
USB cable
Battery charge cradle
M3 bundle CD-ROM (including Active Sync 3.x)
Stylus pen
How to use the manual
This manual provides detailed information to make using M3 PDA easier and faster.
The content of this manual is subject to change without prior notice due to product
improvement or modification of its functions, etc.
8
2. Introduction of M3
M3 is a palm-size PC based on the Windows CE 4.2(CE.NET) operating system and
powered by XScale PXA255 processor and 16 bits color TFT-LCD screen.
“Microsoft Windows Powered Logo” is a Windows OS of Microsoft Corporation and
offered by the corporation for built-in system device in operation.
It is compulsory to comply with the logo specifications of Microsoft Corporation
This chapter describes ways to start M3 for the first time, characteristics of M3 hardware
and its input functions. In addition, it also shows you how to connect M3 to a battery
charger and how to use input buttons.
It will make it easy and simple for you to use M3.
The content of this chapter is as follows:
Overview of M3
Input button functions
Reset button functions
Function buttons
9
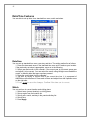
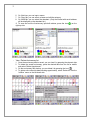
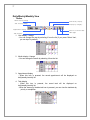
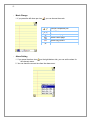
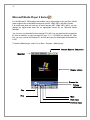
Overview of M3
The pictures below provide information on M3‟s various buttons, ports and other functions.
Laser scanner window
CF/SD extension
slot
Camera window
ESC
Antenna
Function Key
Stylus pen
Camera
button
LCD
Touch
screen
Scanner
button
Reset switch
Navigation
button
Infrared
communication
Port (IrDA)
Charge & USB/serial port
Upper (portable),
Lower (Cradle) use
LCD power
button
Battery lock
Battery
Infrared communication port: Infrared communication (IrDA) port enables file and data
exchanges with other devices such as mobile printers without wire or cable.
USB/Serial Port: USB port enables sending and receiving files and data with desktop PC.
To be able to transmit file and data, ActiveSync has to be installed in PC. In addition, it is
possible to connect M3 with other devices such as GPS, CCD camera, Image scanner by
using the serial port.
Scanner button: It is used for activating a built-in barcode scanner.
Camera button: It is used for activating a built-in camera.
Navigation button: It is used for the same purpose as direction keys.
Reset Switch: It provides the same functions as the reset button in the PC and used for
OS rebooting when a program error occurs.
]
Warning
Always use a cover when the memory card is not inserted in CF Slot and SD Slot. If it
is not kept closed, it may result in serious malfunction due to dust or foreign objects.
10
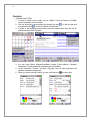
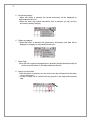
LED status: LEDs show the current status of M3. LED signals present as follows:
Classification
LED status
Charge LED
Red
Green
GSM/GPRS
status LED
Flashing Blue
Kept blue
Blue OFF
Scanner LED
green
Description
On charge
Charge completed
GSM/GPRS standby mode(Within a phone/internet accessible area)
GSM/GPRS communication mode (Voice, or internet in use).
GSM/GPRS turned off or out of coverage area
When the scanner reads barcodes.
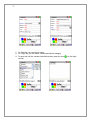
How to charge
Cradle: Insert the plug of the provided charger into the charge jack and place the terminal
onto the cradle.
Terminal: As the terminal‟s body has a built-in charge circuit, you can plug into the lower
part of the main body to charge while you are on a trip.
Charge LED
You can see the charge status from the upper left LED in the terminal or from the lower
right battery LED in the cradle.
Classification
Terminal charge LED
Cradle charge LED
(additional battery charge)
LED Status
Description
Red
Green
Red
Green
On charge
Charge completed
On charge
Charge completed
11
Body charge LED
Additional
battery
Additional
battery
charge LED
Warning:
Plug in as DC 5V
sticker
directs
upwards
as
the
picture shows.
[Charge in the cradle]
[Charge through the additional charger]
To confirm the completion of the battery charge, check out the color of the upper left LED
in the terminal in case of the built-in battery or the lower right LED in the cradle for the
additional battery.
Warning
Do not use any other adapters other than the power supply device (5V/3A)
enclosed in the original purchase. Connect the power supply device in a way
the DC 5V sticker faces upwards.
On the other hand, if you plug in using excessive force, it may result in
problems that need customer-service. In that case, the Company cannot
provide any customer-service, either free repair or replacement as it is
caused by users‟ inadvertence.
When you charge the device in the cradle, insert the plug into the charge jack
with two fingers until „click‟ sound is heard as shown in the backside picture
of [charge in the cradle] above. When the device is completely discharged,
plug in the adapter and reset it to check if the LCD is on. Then, charge it for
at least 10 minutes before use.
12
Input button function
The following is the description of M3 hardware function buttons and other interfaces.
Hardware Input function
Input
Action
Function
Power button
Press
Power On/Off
Press and hold
Back light On/Off
ESC button
Press
Escape function
Function button
Press
Function mode change
Scanner button
Press
Laser scanner beam activation
Camera button
Press
Camera program activation
Navigation button
Press
Up/down & left/right movement
Enter key
Press
Run application programs
Reset button
Click
Software reset
Click again after
Hardware reset
pressing and
(Click again after pressing the button for
holding
4 seconds)
Note: a. Press (Click): Press (Click) for 1 second or so,
b. Press & hold: Press for 2 to 4 seconds.
Power button: lf you want to save battery power while you do not work on M3, press the
power button for a short time. Doing so will enter M3 to a sleep mode and turn off its back
light. If you press the button again, M3 will return to a normal operating mode. (If you
have set the password before, the password input window will pop up and main screen
will be displayed only when you input the right password)
If you press and hold the power button, the LCD backlight will be turned off. If you press
and hold it once again, the LCD backlight will be turned on.
Record button: If you press the record button for a short while, the memo program will
be activated or recorded.
If you press the record button once, the memo program will start. To record, press the
button once again while the note function is in operation. To close the recording, just
press the button again.
ESC button: Pressing ESC button has same effect as pressing ESC key on the keyboard.
It can be used to close the program.
13
Function button: It is used to change the Function Mode. Every time your press you can
confirm the change of mode by looking at the Function Icon on the tray bar.
Navigation button: It consists of up, down, left, and right movement. Press the
Movement button to select an icon or item on the display or make a movement in
documents.
Reset button function
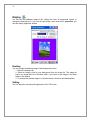
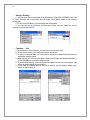
Soft Reset
If an unexpected problem occurs concerning the installed software while using M3, click
the Reset button on the lower part of the device.
After while, M3‟s initial screen will appear followed by Microsoft Corporation’s
Windows CE4.2 (CE.NET) logo and [Start Up…] sentence then it will show the main
screen. If the process reaches 100%, it will display the main screen. If you have set the
password, the password input window will appear before that and the main screen will
appear only when you key in the right password.
In a soft reset mode, the currently operating programs will be closed and current data or
files can be deleted. However, data and files that have been already stored do not
affected by the mode.
[Soft Reset screen]
14
Hard Reset
If you encounter serious application program problems in M3 Device or a problem
unsolved by soft reset, you must restart M3 with hard reset. If you press the reset button
for more than 4 seconds, the screen will fade out. It will turn off all powers.
After that if you press the reset button once again, the system will enter the hard reset
mode and re-load OS in the flash ROM.
And after 4 or 5 seconds, Microsoft‟s Windows CE 4.2(CE.NET) and a seek bar will
appear. You can see the loading status through the seek bar. When the image loading is
completed, the main screen will appear. When you have done a hard reset, all data
except ones in the flash disk folders will be deleted and turned into the factory default.
Therefore it needs to be done with extra care.
[Hard reset screen]
Cautio
n
1. If you carry out a soft reset and press the reset button for more than 1
second, it can trigger a hard reset. So be careful.
2. In hard reset mode, it will delete all data files and programs, personal
schedule data either created in M3 or transmitted from the PC.
If you do not want to lose important data, back up data and files such as
address book in external storage media such as SD, CF, or built-in flash disk
using “personal schedule back-up”.
15
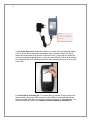
USB Cradle
M3‟s USB Cradle supports charging function and USB port connection.
The following procedure describes how to connect M3‟s USB cradle:
1. Connect the battery charger to USB cradle.
2. Connect the battery charger to the power outlet.
3. Connect the USB cable of USB cradle to the USB port of a desktop PC.
4. Insert M3 into the USB cradle and carry out the synchronization with the desktop PC.
For details of the synchronization with a desktop computer, refer to the CD manual
chapter 4, How to connect to a desktop PC.
The pictures below show how to connect M3 with the USB cradle. The location of USB
input terminal can be the back, front, or side of the computer. The shape of USB input
terminal is same for both desktop PC and notebook.
[Connecting to USB cradle]
[Connection between PDA and Computer‟s USB]
16
3. Getting started
This chapter explains the way to use M3 for the first time.
Take the following procedure.
1. Click the Reset button: Unpack the M3 package. When using it for the first time,
the battery power is not connected to M3. If you lightly click the Reset button, the
battery power is automatically connected to M3. After 4 or 5 second, M3 enters into
hardware reset mode and load images in the flash ROM to SDRAM. The screen will
show Microsoft Windows CE 4.2 (CE.NET) logo and the seek bar. You can check out
the loading status through the seek bar. When images are fully loaded, the main
screen will appear. Now you are ready to use M3.
[Click the reset button]
2. Connect the battery charger: If you connect the charger to DC terminal of the
M3, the charge LED will become red. To use M3 safely, you have to charge M3 until
the charge LED turns into green. When battery is completely discharged, it will take
about 3 hours for M3 to be fully charged. You can also use M3 while it is on charge
status.
Warning
If the device is completely discharged, there is a risk of losing all data and
files. To prevent the loss of data, use its power save mode to prevent
power running out completely. If LED is flashing in red or a battery
discharge warning message continues to pop up, stop use the device and
use the charger to fill the battery.
17
Warning:
Plug in as the DC 5V
sticker to be upward as
the picture!
3. Set up the stylus pen: When M3 is started, on-screen Set-up Wizard will appear.
(The on-screen set-up wizard will also appear after a hardware reset) The Set-up
Wizard will arrange the tough screen. Press and hold a (+) mark with the stylus pen
and keep chasing and pressing the (+) mark as it moves around. When all processes
are completed, M3 will automatically show the main screen and now you can do your
work in M3.
4. Connect M3 to a desktop PC: To connect M3 to a desktop PC and synchronize
files and data, connect the USB connector to the USB port of the desktop and link
M3 to the cradle. After that, carry out the ActiveSync program in the desktop PC. For
detailed information, refer to the Chapter 4. How to connect to a desktop PC.
18
4. How to connect to a desktop PC
To be able to properly manage abundant data and files, you need to link M3 to either
desktop PC or notebook. This chapter describes the ways to connect M3 and desktop PC,
to conduct synchronization and to transmit data and files. The following is the main points
of this chapter.
How to install Microsoft ActiveSync 3.X on a desktop PC
How to connect M3 to a PC using USB cable
How to install USB driver
How to set up a partnership between M3 and a PC
How to synchronize data between M3 and a PC
How to search M3 files in a PC
How to transmit data between M3 and a PC
19
Microsoft ActiveSync
Understanding of ActiveSync program
Sync is an abbreviation of “Synchronization” and refers to the process of making data in
PDA and desktop computer to be same by linking both data.
By linking M3 and computer, you can make data in both devices in the same status
(synchronization) or install, copy, move, delete programs for business purpose and others.
It is compulsory to install this program in order to install business programs, synchronize
data, back up and synchronize contact numbers in an address book, etc.
If you would like to get the upper version of ActiveSync other than the one in the provided
CD, download the program at the mobile device page of Microsoft Corporation at
http://www.microsoft.com/windowsmobile/default.mspx or visit www.mobilecompia.co.kr
The basic PC specification for the installation of ActiveSync is as follows:
OS: Microsoft Windows XP/2000/ME/98, or higher version program than SP6
Windows NT Workstation 4.2
Application: To be able to synchronize data such as email, calendar, tasks and
notes between M3 and a desktop or notebook, you need to have a higher version
than Microsoft Outlook 2000.
Browser: Microsoft Internet Explorer 4.21 SP1 or higher.
Hard disk: Free hard disk space more than 65 MB (The actual size of the
required space can be different according to the selected functions and the user‟s
current system configuration)
Communication port: 9 pin or 25 pin communication port (for adapter, 25-pin port
is necessary)
Infrared port or USB port (available only for Windows 98/Me/2000/XP)
Graphic card: VGA graphic card or compatible video graphic adapter supporting
the resolution of 256 colors or higher
Keyboard
Microsoft mouse or compatible input devices
CD-ROM drive
20
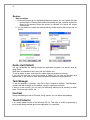
How to connect M3 to ActiveSync
Connect M3 to a desktop PC using a USB cable.
Make the partnership between desktop PC and M3 through ActiveSync, then proceed
with the synchronization of desktop PC and M3.
Use a USB cable to link M3 to the desktop PC.
The table below shows available communication devices (USB, serial, infrared) according
to operation system.
Connection
methods
USB
Serial
Infrared
Supporting operation system
Desktop PC OS
Windows 95
Windows 98 Windows2000/XP
Not available
Available
Available
Not available
Available
Available
Available
Available
Available
Windows NT
Not available
Available
Not available
The procedure to connect desktop PC and M3 through cable is as follows.
1. Connect a USB cable to the USB port of a desktop PC.
2. Insert the cable into M3‟s cable terminal. It will automatically run M3‟s PC
connection program and Microsoft ActiveSync in the desktop to link them together.
3. To set up a connection, “New Connection” set-up wizard appears in desktop
computer. Set-up methods will be discussed in the following section.
21
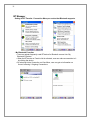
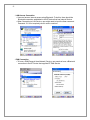
How to set up a Partnership
When you first connect M3 to the desktop computer, Microsoft ActiveSync will ask you if
you are going to set up a partnership. Once the partnership set-up is finished, you can
synchronize data with M3. While M3 can set up the partnership with two desktop
computers, the email message can be received only through one computer.
To set-up a partnership:
1. Insert M3 into the USB cradle connected to desktop PC. It will automatically start
New Partnership wizard on the desktop PC screen. When it ask you if you would
like to set up the partnership, select Yes and click “next”
2. Key in the name of the device (for instance, Windows CE1, MyPDA, etc.) then
click next.
3. If M3 has already set up a partnership with other desktop computer but no longer
use it, select “Yes, I want to synchronize with only this computer” in the dialog
box named “Select Number of Partnerships”. Then it will remove the other
partnership set-up so that M3 will no longer recognize the previous desktop computer.
Click next.
22
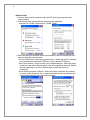
4. Window for setting up synchronization appears. To synchronize specific kind of
data, select the item then click next. Most popular items include Calendar (schedule),
Contacts (contact numbers), Tasks (works), and Xinbox (email, mail box). We
recommend you to select and use these items. In the item list, two types of email
items are available: Inbox and Xinbox. While the inbox is an email program provided
by Microsoft Corporation, Xinbox is offered by a software provider. In M3, Xinbox
offers special functions such as connecting to “Today,” set-up function button, etc.
5. Complete the set-up process by clicking End.
When the partnership set-up is completed between desktop PC and M3, ActiveSync
will automatically synchronize the selected data.
23
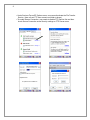
How to connect M3
How to synchronize data
If you see the Microsoft ActiveSync window in the desktop PC, you can find an option
icon. If you click this option icon, taps such as “Sync Options”, “Sync Mode”, “Rules”
will appear. “Sync Options” is a menu that you can select an item to synchronize. “Sync
Mode” enables you to choose synchronization methods. According to the selected
synchronization mode, there are 3 following methods:
In the default setting, the synchronization mode is set to” Continuously while the device is
connected” mode.
a. Continuously while the device is connected: In this mode, if you want to carry
out synchronization, connect M3 to the desktop computer. ActiveSync will
immediately start synchronization and synchronize according to the user‟s input of
changes in a computer or M3.
b. Only upon connection: To carry out synchronization, connect M3 to the desktop
computer. ActiveSync will immediately start the synchronization. If you want to carry
out the synchronization after the first synchronization on a manual basis, click Sync.
c. Manually: In this mode, ActiveSync will not run automatically. In order to carry out
synchronization, click Sync.
Synchronization is the process of updating M3 and desktop PC after comparing their
data. Any files including personal organizer management data, email message, etc in
M3 can synchronize with those in the desktop PC.
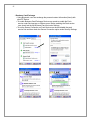
How to solve a problem during synchronization
When a problem occurs during the synchronization process, it will be marked as” Not
completed” in both ActiveSync and M3. You can solve the problem at any time at your
convenience.
There are various reasons for failure of ActiveSync to carry out synchronization. For
instance, if the computer cannot access to Microsoft Outlook information due to the
server failure, ActiveSync cannot synchronize items such as Calendar, Contacts, Tasks,
and XinBox. Or else, the problem stems from the changes in items in M3 and desktop PC.
By modifying the problem-solving setting, you can have ActiveSync not to register the
problem as “not completed item” Instead, if you select M3 or desktop PC as default
version, ActiveSync will automatically update the information contained in other computer.
If you do not want to solve the problem manually, you can modify the problem-solving
setting to have ActiveSync to always use the version of M3 or desktop PC.
1. Click Options then click Rules tap.
2. Select the item of choice from Conflict Resolution item.
24
For those items that cannot complete synchronization without user intervention,
ActiveSync and portable device display them as “not completed”
1. Connect M3 to the desktop computer and carry out synchronization.
2. When there are not completed items, click Resolve items in Tools menu.
3. Follow the instruction on the screen. The dialog box will differ depending on the
cause of the problem.
How to search M3 contents in a desktop PC
If M3 is connected to a desktop PC, you can use ActiveSync in the desktop PC to see the
content of M3. Click Explorer from the file menu of ActiveSync. Then the content of M3
will be displayed on the window of Mobile Device.
Using ActiveSync, you can see the files in M3 according to the following procedure:
1. Connect M3 to the desktop PC
2. Click Explore in ActiveSync. It will open the Mobile Devices folder in Windows
explorer
3. Applying the same method, check the files in the device in other Windows
explorers
If you double click folders in the Mobile Devices, it may take several seconds to open the
folder.
While browsing the folders, you can carry out cut, paste, copy by dragging file icons
In the desktop PC, you can get access to the content of M3 using Windows explorer. If
you choose Files during the partnership set-up, Windows CE My Documents will be
created in My Documents folder. If you use Windows CE My Documents in the desktop
PC, you can easily access to My Documents folder in M3.
25
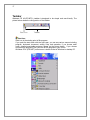
5. Overview of Microsoft Windows CE 4.2
This chapter will deal with Microsoft Windows CE 4.2(CE.NET Korean version), which is
the operating system of M3.
The content of Microsoft Windows CE 4.2(CE.NET Korean version) introduced in this
chapter is as follows:
How to use the main Windows
How to use a taskbar
How to use settings
Main Windows
When you turn on M3, you will see the main Windows of Windows CE 4.2(CE.NET Korean
version), which is similar in appearance to Windows XP. The main window consists of a
background screen and taskbar.
In the background screen, you can see short cut icons of main programs of Microsoft
Windows CE 4.2(CE.NET Korean version). The details of icons are as follows:
My Computer: Show the internal configuration of M3.
You can see folders and files contained M3.
Recycle bin: Completely delete or restore files and data.
This folder saves deleted files from Windows explorer or background screen.
You can completely empty or restore the file in the recycle bin.
26
After emptying the recycle bin, you cannot restore files and data previously in
the recycle bin. So be careful when you delete files, data in the bin.
Warning
Internet explorer: Search the web or intranet.
Microsoft Internet Explorer can search the web or intranet of companies. M3 uses
Microsoft Pocket Internet Explorer 6.0.
Media player: it plays digital audio or video files.
If you use Microsoft Windows Media player, you can enjoy a range of digital audio/video
files. Media player supports files with ASF, WMA, MP3, WAV formats. For detailed
information on the media player, refer to the chapter 10.How to use Microsoft
applications
Microsoft WordPad: It is used for creating and managing documents. As Microsoft
WordPad is compatible with Microsoft Word in the desktop PC, it is easy to access to the
user‟s document. For detailed information on Microsoft WordPad refer to the chapter
10.How to use Microsoft applications
My Document: It saves and shows various programs, files, and data. You can
create your own files using various applications and save them in My Documents folder.
In addition, you can read and edit these files and data in My Documents folder
In M3 you can use the same function like clicking right button of the mouse in a desktop
PC. If you press and hold the LCD touch panel with the stylus pen, the right button menu
will appear.
Using the right button menu, you can carry out various tasks such as icon arrangement,
the renewal of the background screen, copy/cut/paste of files and data, creating new
folders, set-up features.
27
Taskbar
Windows CE 4.2(CE.NET)‟s taskbar is designed to be simple and user-friendly. The
picture below shows the configuration of the taskbar.
Start icon
Taskbar
Start Icon
Start icon is the starting point of M3 program.
If you point the start menu with the stylus pen, you can see various menus including
program, bookmark, document, setting, help, and operation. If you choose each
menu, detailed executable programs appear as the picture below. If you choose
and press the program of M3, you can run the program of your choice.
Windows CE 4.2(CE.NET)‟s start menu is similar to that of Windows in desktop PC.
28
Taskbar
Taskbar shows a variety of information including how to key in character, battery, network
connection, status of running programs, etc.
If you press and hold the taskbar with the stylus pen, the right button function menu will
appear.
The right button function menu is composed of task manager and features. For more
information on the task manager, refer to the cheaper 9. How to use utility programs. If
you select the taskbar and start menu feature, general option menus such as “always
place above, “automatic hiding,” “Watch display”, etc. You can choose the check box of
desired options and use them.
The following explains the function of icons appeared on the taskbar.
Quick link:
If you press the quick link icon, the program link menu will appear. Using this function
you can operate frequently used programs more promptly. This menu consists of
screen rotation, infrared communication, contrast (gradation) adjustment, backlight
adjustment, task manager, etc.
29
Screen rotation: It changes the direction of screen. Screen rotation feature let you
use your M3 display in either portrait or landscape mode.
To rotate the screen:
1. Press the short-cut icon and select the screen rotation.
2. Run application programs. You can use this function in various programs such
as My Computer, Media player, My Documents, Internet Explorer, Microsoft
WordPad, Image Viewer, Personal organizer Management, etc.
Warning
1. In screen rotation mode, you can only use software keyboard to key in
characters.
2. Sometimes, when you rotate the screen, it would not fit to the size of the
screen.
3. When you see an application program in landscape mode, rotate the
screen first then run the application program in order to get a normal view.
Infrared Communication: It carries out infrared communication using OBEX (Object
Exchange Protocol). OBEX features for Microsoft Windows CE 4.2(CE.NET)
provides an effective and simple binary protocol to exchange data in an efficient and
convenient manner. This function is handled by the IrDA protocol. Therefore, M3 can
communicate with desktop, notebook, pocket PC as well as other PDA that has
OBEX protocol for the IrDA communication.
30
To use infrared communication:
1. Locate M3‟s Infrared communication port to be in series with an infrared (IrDA)
port with other device.
2. Press a short cut icon > Infrared communication menu.
3. Infrared communication program is started and the connection status message
will appear as the picture above. When the device to be used for communication is
found, it will show the name of the device with “send” and “close the connection”
icons.
4. To send a file or data, press the icon of “send”.
5.”Open file” screen appears. Select a file and press OK.
6. File/data transmission message will appear at the center of the infrared
communication window. When the transmission is completed, a message saying
“100% file sending completed” and communication is completed.
7. When you transmit files or data from other devices to M3, the receiving status
message appears. The received files are stored in My Computer > Received Files
Folder. When you see the “File receiving completed” message, it indicates that file
transmission has been completed.
8. After finishing the infrared communication, press “Close the connection” icon
and end the infrared communication program.
※ If you have installed Bluetooth as one of options of M3, you cannot use infrared
communication.
Contrast: Please refer to the contrast section in the How to use utility programs.
Backlight : Please refer to the backlight section in the How to use utility programs.
Task Manager: Please refer to the task manager section in the How to use utility
programs
31
Wireless LAN: You can use internet with Wireless LAN. Wireless LAN supports IEEE
802.11b.
How to make a connection with Wireless LAN:
1. Turn on the AP (Access Point) which supports IEEE 802.11b.
2. TAP on „WLAN ON‟under QUICK MENU icon on the tray bar.
3. Please select the desired access point on WLAN connection manager and TAP
on „Connect‟.
4. TAP on „WLAN OFF‟under QUICK MENU icon on the tray bar to finish WLAN
connection.
Function Key Mode: If you press the down button on the left side, you can change
the Function Mode.
How to use the Function Key:
1. Press 1~8 number keys on Function Enable or Hold Mode.
2. Under Start < Programs < Utility < Buttons you can set the „User programs'.
32
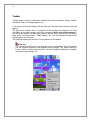
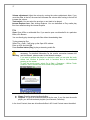
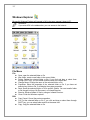
Transcriber:
When you want to key in characters in making document or setting, start Transcriber.
Using the stylus pen to draw characters you want on the input panel, this program
will recognize the characters by itself and transform them into typeface characters.
To start the Transcriber, run the program as the following order: start → program →
Transcriber.
The picture below shows how the Transcriber works in keying in characters on
Microsoft Word Pad. When Microsoft Transcriber is running, you will see the „hand
with a pen‟ icon located in the taskbar. When Microsoft Transcriber is active, the‟
hand with a pen‟ icon will have a dark background.
33
Keyboard: Press this icon to activate the keyboard input.
Upper/lower case Selection:
Press this icon to change upper and lower case letter. If you select upper case,
capital letter and its character will appear on the number key pad. It serves the same
function with Shift key.
Hot key Selection:
If you use hot key such as“z”, “x”, “c” and “v”, you can carry out Cancel, Cut, Copy,
and Paste, respectively.
If you want to change the features of soft keyboard, select keyboard in Go to Start>
Setting> Control Panel> Input Panel and click the option you like to set up.
Input Method:
To carry out character key-in using [keyboard] input, press keyboard icon on the
taskbar.In case of {Script Reorganization}, you can key in by activating Transcriber in
the following order. Start → program → Transcriber. When you press the keyboard
once, it will appear on the screen and one more press will make it disappear.
34
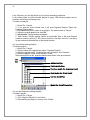
Status Indicator Icon:
The following is a list of icon that can appear on the taskbar‟s status area of M3.
Status indication icon on the taskbar
Icons
Details
Low battery.
Battery in charging.
Connected to Desktop PC by USB
Quick connection icon
Phone program icon
Function Status icon
Bluetooth Status / Menu icon
Keypad Alpha Numeric Status icon
Caps Lock ON icon
Network connection status.
Status of Internet connection through CDMA
Status of Internet connection through WLAN
35
6. How to Use Bluetooth
Bluetooth Power On/Off
- The user can on/off the power of Bluetooth by selecting the Bluetooth Tray
Icon.
<Bluetooth ON>
▪ Switch to ON(
)/OFF(
<Bluetooth OFF>
) by clicking BT ON/OFF on the popped up menu.
Options Menu
- Accessibility Tab
: Change of BT Device Name, Setting for Discoverable/Connectable Mode and Auto ON.
Device Name :
It is a Name to be shown when other BT Device
discovers the user‟s BT.
Discoverable Mode :
When Discoverable Mode enabled, other BT can
discover the user‟s BT Device.
Connectable Mode :
When Connectable Mode enabled, other BT can
connect to the user‟s BT Device.
Auto On
By Device Reset or Power On, BT Device will be
turned on automatically.
36
- Service Tab
: Services in BT device
File Transfer Service :
Enable File transfer service
- When enabled, the File transfer between the
user‟s BT and other BT is possible.
Authentication
- When enabled, only authenticated users can use
File Transfer service.
Push Service :
When enabled, the personal contact information file
(Vcard) can be exchanged.
Generic Serial :
When enabled, other BT can get a Serial
connection with the user‟s BT.
Paring Wizard
- User can run Pairing wizard by clicking Pairing on the BT menu.
▪ When the next button is clicked on the welcome page, the list of paired device will
be displayed. To
delete the paired device, user needs to select the device and then click „Unpair‟.
37
▪ When the user can not find the required device on the list, user can click next
button to move to device search page. Before searching for devices user can
specify the type of a device so that only that type of device can be detected.
▪ When user clicks next button after selecting the device to pair, authentication
page comes up. By inserting a correct passkey user can pair with the selected
BT device.
! Once pairing is established using Pairing Wizard, user does not need to go
through authentication procedure for BT Connect.
38
BT Manager
Setting for BT Favorite / Connection Menu per service that Bluetooth supports.
- My Bluetooth Favorites
▪ User can register frequently used BT device for Bluetooth connect into „My
Bluetooth Favorites‟.
▪ When the BT device on Favorite List is activated, user can make a connection to it
by clicking the device.
▪ By selecting Active Connection on View Menu, user can get an information on
current Incoming / Outgoing Connections.
39
- Generic Serial
▪ User can make a serial connection with other BT device that supports serial
communication.
▪ On Bluetooth Serial communication, three ports are supported.
- Inbound Port: COM4, Outbound Port: COM4, COM9
▪ When connecting for Bluetooth Serial communication, user can allocate the com
ports for outbound communication.
- Set this COM port for the following favorite device : When this option is selected,
user can allocate the selected COM Port to one of favorite BT devices.
- Don‟t use a favorite. Prompt me with a list of suitable devices : When this option
is selected, user will be directed either to Favorite page(when there are favorite
devices registered) or to Device Search page to select the device for
connecting.
- Set as Generic purpose COM port : When this option is selected, the selected
com port is only for generic use. It means that next time the user should make
a connection manually using connection manager.
40
- ActiveSync Connection
▪ User can establish an ActiveSync connection to Bluetooth PC Device.
▪ User selects ActiveSync Connection on BT Manager. After detecting device and
searching service procedure user can make an ActiveSync connection to the
selected device.
▪ On PC Device ActiveSync setting should be set to the COM Port which is used for
Bluetooth Connection.
▪ When ActiveSync Connection is established, it is possible to have a File Transfer,
Sync service and Internet Service when the connected device has an internet
connection.
- File Transfer
▪ Using Bluetooth, user can exchange files with other BT Device which has FTP(File
Transfer Profile) enabled.
▪ To use this service, user needs to select File Transfer on BT Manager. After
searching and selecting the device, user can start FTP Service to the selected
device.
41
▪ Under Services Tap on BT Options menu, user can authenticate the File Transfer
Service. (User can set FTP user account and folder to share)
▪ To enable Secure Connection, user needs to disable FTP Service first and then
check Secure Connection under Security settings on FTP Server menu.
42
- Business Card Exchange
▪ Using Bluetooth, user can exchange the personal contact information(Vcard) with
other BT Device.
▪ To enable Business Card Exchange Service user needs to enable the Push
service under Services tap on Options menu. Before enabling the Push service
user should set the My Business Card first under Settings.
▪ To set the Secure Connection on Push Service user should disable the push
service first and then check the Secure Connection option under Security Settings.
43
- LAN Access Connection
▪ User can have an internet access using Bluetooth. To do this, there should be
Bluetooth connection established to the BT device that has Internet Service.
▪ When Connecting to LAN Service, user might need to input the User name and
Password. If it is not required just click next to continue.
- PAN Connection
▪ To have a PAN(Personal Area Network) Service, user needs to have a Bluetooth
connection to the BT Device that supports BT PAN Service.
44
7. How to set up M3
You can set up various configurations of M3 such as date/time. Network, Display,Volume,
Power, System, etc. at the control panel.
If you press start > setting > control panel, control panel window will appear.
On View option in the menu, you can change the view mode into large icons, small icons,
or detailed, etc, or to arrange icons.
The control panel is as such:
45
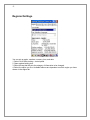
Regional Settings
You can set up region, numbers, currency, time, and date.
1. Select Go to Start> setting > control panel.
2. Open regional setting icon.
3. Select the tap that falls into the category of information to be changed.
4. Select the option you like. Available features are dependent on which region you have
chosen in the region tab.
46
Data/Time Features
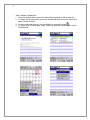
You are able to set up date, time, standard time zone, watch and alarm.
Date/time
You can set up standard time zone, year, day and time. The setting method is as follows:
1. Press the downward arrow in the standard time zone until it reaches your location.
If the previously set value is appropriate, move on to the following.
2. Select year and month in the calendar. If the current year is not correct, press year
and adjust it to be correct. You can select the month using left/right arrow beside the
month, or Monthly label that pops up when pressed.
3. Press the correct date from the calendar.
3. Set time by keying in correct time in the current time box. It is composed of
AM/PM:hour:minute:second. Press each of them and adjust time with Up/down arrow
on the right side.
5. Press Apply to save the changes. Confirm if the time set is correct.
Watch
You can set time in current location and visiting place.
1. Select home (current location) or visiting place.
2. Set up region from the location list.
3. Set up year, month, and day in the year/month/day list.
4. Set up time.
5. Press Apply.
47
Alarm
You can set the alarm to be informed at a certain time on a certain date. There are 4
alarm events that you can set. On each event, you can assign the time and the date.
Following steps explain how to set up the alarm.
1. Please check the check box of one of alarm events.
2. Tap on the desired day of the week (Sunday to Saturday). The first letter of date
will be marked with blue color. If you want to select the entire week, check the check
box on the right side.
3. Tap on the time to set the desired time.
4. Tap on the alarm looking icon to move to setup window.
In the setup window, you can select the sound and repeat option.
5. Tap on „OK‟ to save and exit the Alarm program.
Network and Dial-up Connections
You can directly be linked to the network via network (Ethernet, LAN) or phone (modem)
connection. Throughout network connection, you can send or receive emails or access to
available files on the network server or search Internet or Intranet.
48
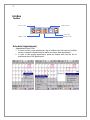
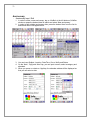
How to make new connection in M3
How to set up high-speed internet with M3 Modem
※ Internet setting is set to the corresponding country as default. User can change the
settings using GPRS Setting option on the GSM Phone Program. For detailed manual
setting you can refer to the following explanation.
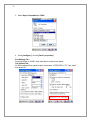
1. Start / Settings / Network and Dial-up Connections or Control Panel / Network
and Dial-up Connections.
49
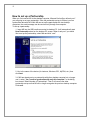
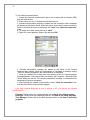
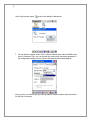
2. Select make new Connection. Enter the name of connection. check dial-up
connection, and press next..
50
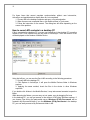
3. Select Hayes Compatible on COM1
4. Press [configure..], and set [Device properties] .
Port Settings Tab :
Set a Baud Rate to 115200. other data remain as the picture below.
Call Options Tab :
On Extra settings Enter special modem commands “+CGDCONT=1”,”IP”,”apn_name”
then press OK.
51
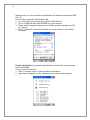
5. After done with configuration, input “*99***1#” in the „Phone number‟ edit box and
leave all the rest untouched. As last press „Finish‟ button.
6. Now the connection icon would have been generated on the „Network and DialUP Connections‟ Window as the picture below. On the window which pops up by
double-clicking on this icon, user needs to input the username and the password,
provided by the SIM card or Network provider.
Check mark “ save password”, then press “connect” to finish Internet setting
52
After using Internet, press
button from taskbar to disconnect
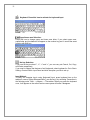
7. On the internet explorer, select View >Internet Options and under Autodial name
on the Connection Tab, you can choose the name which has been generated. If
the configuration setting was not correct, the name would not be diaplayed.
Now you can use internet just by running Internet Explorer without extra procedure
for Dial-Up Connecting.
53
Internet connecting through desktop PC
This connection method is used in “ PC connection” in control panel, and with
partnership setting, Internet is available through USB Active Sync. This method is a
economical way when user downloads upgrade program or files to PDA while CDMA
connection is used.
The Setting step is as next.
Explore > View> Internet option > connection> Autodial name choose the name
[USB@PocketPDA], this option is only available when Desktop PC is online with
Internet.
54
Display
You can set the wallpaper image of M3, change the color of background screen, or
change the backlight set. If you call the right button menu and select “properties” you
can see display properties window.
Desktop
You can change the desktop image of the background screen.
1. Select the desktop tap.
2. Select an image to use for your background from the image list. The image list
shows you image files for in Windows folder. If you want to use images in the other
folders, click Search
3. To arrange the desktop image in a checked format, choose a checkered pattern.
Setting
You can adjust the contrast and brightness of the LCD screen.
55
Volume and Sound
You can make a volume adjustment and select the sound to be used.
Volume
To adjust the volume of the system and set the sound:
1. Select Go to Start>Setting>Control Panel.
2. Open volume and sound icons and select volume tap.
3. Press the left/right arrow icon or move the slide bar to adjust a volume.
4. Click all items to activate the sound such as event (warning, system events),
application program, reminder (Alarm, notice).
Sound
To change the event sound:
1. Select Go to Start>Setting>Control Panel.
2. Open volume and sound icons and select volume tap.
3. Select an event from the event list.
4. Select a sound from the event sound list. You can check it out through Prelistening, and others
5. To remove the sound from the selected event, choose (None).
6. To save the changes in the other scheme, select save in other name then give
name to the sound scheme.
7. To remove the sound scheme, select the scheme to be deleted then select Delete.
User
This function enable user to set the M3 to display the user information when it starts, add
information on the user, and set up a network ID.
56
User information
Enter information such as name, company, address, company phone number, home
phone number in the user information tab. To display the owner information on the start
screen for system start, click „Show User Information‟ check box.
Memo
Enter additional user information or other information in the memo box.
To show the memo on the initial screen when the system starts, click‟ Show User
Information‟ check box.
Network ID
Windows CE 4.2(CE.NET) gains access to Network resources using the owner
information.
Enter the information provided by Network manager such as user name, password, and
domain.
Stylus
The double touch of the LCD screen sets the sensitivity and Correction.
Double touch
Set and check out the sensitivity of double touch.
To set up the sensitivity of double-touch:
1. Select Go to Start> Setting> Control Panel.
2. Activate the stylus and select Double Touch Tab.
3. Tap the grid. The color of the grid will change.
4. It will automatically record the speed and field of the Double Touch.
To test the sensitivity of double touch:
1. Select Go to Start> Setting> Control Panel.
2. Activate the stylus and select Double touch tab.
3. Touch the icon below twice. The icon will be changed.
4. If the icon does not change, adjust the setting using the grid above.
Correction
If Press does not properly respond to M3, re-adjust the screen again using the Correction
function.
To start Correction again:
1. Select Go to Start> Setting> Control Panel.
2. Activate the stylus and select correction tap.
3. Press the correction again then re-adjustment process will begin.
Sometimes, when you touch the screen with the stylus pen once or twice, it will
trigger the right mouse function. In that case, you can solve the problem by reWarning adjusting the double touch-sensibility
57
System
The system feature window will display information of M3.
Here you can see the information on M3 including system, memory, the names of devices,
and copyright details.
General information contained in the window includes operating system data such as
software version, processor, memory, user information, etc.
The memory of M3 is used for data storage and programs. Its basic memory capacity is
64MB.You can set the size of the memory cache used for running programs or storing
data.
To set the memory:
1. Select Go to Start>Setting>Control Panel.
2. Run the system and select the memory tap.
3. The blue part of the slider indicates the available memory capacity.
4. Move the slider around. The left part of the slider is the storage memory while the
right part is the program memory.
5. If the memory storage capacity increases, you can save more data and files. On
the other hand, if you have more program memory, you will have fewer problems
with running programs. If you find a program is running too slowly, move the slider to
the left to secure more program memory capacity.
The device name indicates the name of the device used for M3‟s partnership relation
when M3 is linked to the desktop through ActiveSync
.
To set up Device ID:
1. Select Go to Start>Setting>Control Panel.
2. Run the system and select the name of the device.
3. Enter the name of the device and its details.
58
Password
You can set up password to keep unauthorized users away from M3.
To set up password:
1. Select the password setting tab.
2. Enter the password in the password box.
3. Re-enter the password in the password confirmation box.
4. To enable the password protection when the system starts, click the” Use
Password for While System starts” check box.
If you touch the screen with a stylus pen so as to input the password in the initial screen,
a keyboard will appear. After keying in the password and press enter on the keyboard,
then you will move onto the main screen. However, you may encounter a request to enter
the password again on the initial screen in cases that if you have turned off or on the M3‟s
power after activating password or have done a software reset. If you forget about the
password, you cannot boot the system. Therefore you have to do the hardware reset.
If you carry out hardware reset, it will erase all files, data as well as programs installed
before. So it would be better to have an easy password to remember and leaves the
record in the desktop PC and others. When you have forgotten the password, use M3
after completing a hardware reset.
To decode a password, delete the password in the password feature window.
Certificates
Certificates are used in some application programs in order to ensure their reliability and
safe communication.
Certificates are issued by authorized certificate providers and valid for a certain period.
Windows CE.NET manager manages several certificate storages.
1. Select Go to Start>Setting>Control Panel.
2. Double click a certificate to run.
Select certificate storage for browsing or correcting through the storage tap list.
My certificate: it saves the user‟s personal certificate to identify the user.
Other certificate providers: middle certificate providers that help establish the chains of
reliability
Reliable certificate providers: includes the top quality certificates.
3. To add certificates or secrete key on the selected storage, press Bring button then
select the way to bring certificates or keys. You can select them from files or smart
card.
4. To see the details of the selected certificate such as extension, expiration date, etc.
press View button.
5. To delete the selected certificate from the storage, press Delete button.
59
Internet Settings
If you want to use the Internet using Internet Explorer program, carry out the following
procedure.
General
Click the general tap.
1. Enter a webpage which will be started with the activation of Internet Explorer in the
start page box.
2. Enter it to Search Engine page box for Internet Explorer search
3. Set up the cache size.
4. To delete the cache in the system, click Clear Cache.
5. To delete the opened web pages click Clear History.
Connection
Click the connection tap and set Internet connection methods.
1. To use proxy server, click [Internet Connection by Proxy Server] check box and
enter the proxy address and port.
2. To ignore the proxy server when making an access to local address, click
[No
proxy server for local address] check box. This option is available only for the proxy
server use.
3. If you use a wireless LAN card, click [LAN Use (manual dial)] check box.
60
Security
Click the security tap to set up security option.
1. To allow cookies, click Cookie check box.
2. Click an appropriate security option among TLS 1.0, SSL 2.0, SSL 3.0, etc.
3. Click “Warn When Switching to Secure and Non-Secure Area”. If you select
this option, Internet Explorer will issue a warning when you access to non-secure
websites.
Premium
Click the Premium tab to set up the premium option.
1. To show images in a website, click Picture Display check box.
2. To play sound in a website, click Play Sound. If you deactivate these two
options, you can have faster access to the Internet.
3. To use the script automatically, click Enable Script.
4. To show all messages for all script errors, click Show Script Error check box.
5. As a method to give underline for links, select among None, Always, and Among
Pointed Items.
Input panel
You can set up the input modes and options.
1. Select an input mode to be set from the current input mode list. The current input
mode will show you available input modes.
2. Select a keyboard and press Option. Then you will see Soft Keyboard Option
window.
3. Select the size of keyboard. You can select either large key or small key.
4. To make Space, Backspace, Shift and Enter to use gesture, click Use gestures
check box.
5. Click OK to save the changes.
6. Select the handwriting reorganization as the current input mode and click Option.
Handwriting reorganization feature window appear.
7. You can set the time needed for the program to recognize handwritings.
8. Click OK to save the setting.
61
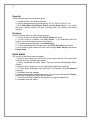
Storage Manager
The storage manager enables you to manage flash ROM(Disk1). In general, Disk1 is
used for a space to back up personal organizer management. You can create/eliminate
disk partitions or format a disk. Disk1 is installed as one of the basic options.
1. Select the built-in Disk1 from the storage information dropdown list.
2. To format the partitions of the selected disk, click Separate icon and choose
Format icon. If you execute the format, the partition names in the partition list will
disappear.
3. After clicking Create New icon, key in the new partition names. Then the system
will automatically create new partitions to set up.
4. To dismount a partition, select the partition to delete then click Separate icon and
press Delete button,
5. To see the features of the selected partition, click Properties icon.
6. You can back up personal organizer data in the partition. For more details on the
personal organizer management back-up, refer to the chapter 7. How to use
personal organizer.
If you format a disk, it will eliminate all data, files, and programs. So be careful.
If you insert external extension memory CF,SD*MMC memory card, CF
Warning memory will be indicated as“Storage Card”, while the SD*MMC memory is
shown as “SDMMC Storage Card”.
62
Power
You can set up to show M3‟s battery status and to be turned off while it is not used for a
while.
Battery
Check out M3 „s battery status.
1. Select Go to Start>Setting>Control Panel.
2. Open the power icon and select the battery tap. The battery tap contains general
information on the battery status.
3. There are 3 different battery states as follows:
High: Battery power is sufficient.
Mid: Battery power is low. It is advisable to charge the battery.
Low: Battery power is very low. In order to protect important data, turn off M3
and charge again.
Power Turn off
If the user idle state has been set, the LCD system will be shut down when there is no
input activities from the user. If the system idle state has been set, the system‟s
peripheral devices will enter into the power saving mode. (LAN card, Camera, External
extension memory, etc)
You can turn off the power of M3 so as to save the battery power and prevent
unauthorized use of other people. To set up automatic shut down while M3 is not used:
1. Select Go to Start>Setting>Control Panel.
2. Open the power icon and select the power shut-down tap.
3. If you use the battery, click “Power shut down after idle time while using
battery”check box and set up the idle time applied to shut down of M3
4. If you use the external power, click “after idle time while using external
power”check box and set up the idle time applied to shut down of M3
63
How to optimize battery longevity
When you work outside office or home, you will especially want your battery to last as
long as possible. There are several tips for longer battery life.
A. If possible, use external power supplies.
If possible, always connect your device to external power supplies using battery charger.
In particular, it is strongly recommended to use external power in the following cases:
When you set up Dial-up connection (The more communication with local base
station, the more power consumed.)
When you use backlight function
When connected to a desktop computer
When you use other peripheral devices
When you have to run LED lamp to flash for a long time
B. When you are not using the device, turn it off.
When you use the battery power, if you do not touch the keyboard or use a stylus pen or
mouse for more than 3 minutes, the device will automatically be shut down. Shorten this
time to have longer battery life
C. Turn off unnecessary sounds.
In the default mode, M3 is set to make a sound in response to various events such as
warning, appointment, pressing hardware buttons, etc. To optimize the battery life, turn
off unnecessary sounds. Select Go to Start>Setting>Control Panel then choose
appropriate volume and sound.
If battery power is too low, “Too Low Battery” message will appear on the
taskbar and start window. In that case, you have to recharge M3 using the
Warning charger. Otherwise, it may cause problems in the system.
64
Removal of Programs
Remove the installed programs.
1. Select Go to Start>Setting>Control Panel.
2. Open the Program removal icon.
3. Select the program to be deleted from the program list.
4. Click Delete.
Note
You can only remove those programs installed in RAM.
If you cannot delete a program, see detailed information in Windows CE Help in
M3 or the program documents.
PC Connection
You can set up PC connection to synchronize the device with desktop PC or other
devices.
You can set up desktop과 USB, Infrared Port, Serial port connection. The following is the
procedure required for changes in PC connection.
Begin with WindowsCE.NET 4.2, M3 basically supports the Internet functions via
USB.
Basically, if you set up a partnership with PC during the ActiveSync, it will provide
“USB@PocketPDA”link items that enable the Internet connection through cradle.
1. Create new connection in Go to Start>Setting> Network. Choose the direct
connection as a connection format. For detailed information, refer to “Network and
Dial-up Connections” section.
2. Select Go to Start>Setting>Control Panel> PC connection.
3. Select Connection Change icon.
4. Select the connection mode.
5. Connect to a desktop PC.
To connect M3 to a desktop PC, you must have Microsoft ActiveSync 3.6 or higher in your
desktop PC.
65
8. How to use personal organizer
The Pims and Utility in M3 contains SmartMemo, SWRecorder, Today, InfoBox and MSBackup.
These programs can be run either individually or simultaneously. Using ActiveSync, you
can synchronize information from Microsoft Outlook on PC to InfoBox on M3. At each
synchronization ActiveSync compares M3 with PC and updates both M3 and PC to the
latest information.
(Using ActiveSync Option, you can choose which data, either M3 or PC, should be
changed)
The Pims and Utility contains following applications.
Today: It displays a summarized view of today‟s information
InfoBox: It is used as a personal agenda. You can organize appointment,
anniversary, task and contacts in a convenient way for a later use.
SmartMemo: Using stylus pen, you can take a memo and save it.
SWRecorder: Using SWRecorder, you can record your own voice or an
important conversation.
There are three ways to run Pims program.
1. Go to Start > Programs > Pims or Utility and run the program.
2. Using function key makes it to run faster.
3. Run „Today‟ program, using either first or second way and Tap on the desired
section to run the corresponding program.
66
Today
To get the Today window as below, select Start > Programs > Pims > Today.
Today window displays the summarized information of user‟s day schedule. Today
window consists of sound, time, date, schedule, task, user information and manage item.
If you click each item, you can view and edit it.
The explanation of each icon on Today window is as following:
Volume & Sounds property
Date
Schedule
Task
Owner
: It displays the property of Volume and Sound.
: It displays the property of Time and Date.
: It displays the day schedule of user.
: It displays the day task of user.
: It displays the property of owner.
Power
: It displays the property of power.
System
: It displays the property of system.
Owner Information
It is used to get an information of M3 owner‟s name, company, address, telephone
number, email address and note. On Today window only owner‟s name and telephone
number will be displayed.
In order to create or edit the owner‟s information, tap on the owner information section. At
the owner property window, you can insert each information of owner and if you wish to
access to network resource, insert username and password on Network ID dialog.
67
InfoBox
Toolbar
Daily View
View contacts
View task
Weekly view
Monthly View
Schedule (Appointment)
-
Appointment Input / Edit
1. In order to make a new appointment, tap on„InfoBox‟at the left bottom of InfoBox
window or press the desired date for awhile and select „New appointment‟.
2. In order to edit existing appointment, press the desired item from the list for
awhile and select „Edit Appointment‟.
68
3. You can insert Subject, Location, Time, Period, Notify and Status.
4. On the „Note‟, „Ctgry‟and „Attnd‟ tap, you can input a memo, select a category and
attendant.
5. When you press on a date on „Appt‟ tap, the calendar window will be displayed so
that you can select a date.
6. When you press on a time, you can select from pre-generated time list or you can
also input it yourself.
7. On „Note‟ tap, you can input a memo.
8. On „Ctgry‟ tap, you can select, release and edit the category.
9. On „Attnd‟ tap, you can select the attendant. (Only the contact with email address
will be displayed on the attendant list.)
10. To save and exit the appointment input/edit window, press the icon( ) on the
right-up side.
69
-
View / Delete Appointment list
1. Once the appointment data is saved, you can view it by pressing the relevant
date.
2. To delete the saved appointment, press the desired data from the list for awhile
and select „Delete Appointment‟.
3. On the appointment edit window, you can delete it by pressing the icon( ).
4. To delete entire schedule data(including anniversary), select „Delete all‟ from the
„InfoBox‟Menu on the left-down side.
70
Anniversary
-
Anniversary Input / Edit
1. In order to make a new anniversary, tap on „InfoBox‟ at the left bottom of InfoBox
window or press the desired date for awhile and select „New anniversary‟.
2. In order to edit existing anniversary data, press the desired item from the list for
awhile and select „Edit Appointment‟.
3. You can insert Subject, Location, Date/Time, Occur, Notify and Status.
4. On the „Note‟, „Ctgry‟and „Attnd‟ tap, you can input a memo, select a category and
attendant.
5. When you press on a date on „Appt‟tap, the calendar window will be displayed so
that you can select a date.
71
6. On „Note‟ tap, you can input a memo.
7. On „Ctgry‟tap, you can select, release and edit the category.
8. On „Attnd‟tap, you can select the attendant. (Only the contact with email address
will be displayed on the attendant list.)
9. To save and exit the Anniversary input/edit window, press the icon(
right-up side.
-
) on the
View / Delete Anniversary list
1. Once the anniversary data is saved, you can view it by pressing the relevant date.
2. To delete the saved anniversary, press the desired data from the list for awhile
and select „Delete Appointment‟.
3. On the anniversary edit window, you can delete it by pressing the icon( ).
4. To delete entire schedule data(including appointment), select „Delete all‟ from the
„InfoBox‟ menu on the left-down side.
72
Task
-
Task Input / Edit
1. In order to make a new task, tap on „InfoBox‟ at the left bottom of InfoBox window
or press the desired date for awhile and select „New Task‟.
2. You can also input a new task by pressing the Icon( ) on the tool bar and then
press the icon( ) on the left-up side of task list.
3. In order to edit existing task data, press the desired item from the list for awhile
and select „Edit Task‟.
4. You can insert Subject, Start Date/Due Date, Completed Date, Priority, Occur and
Reminder (The Completed date will be set, when you check the check-box
beside the Subject.
5. When you press on a date on „Task‟tap, the calendar window will be displayed so
that you can select a date.
73
6. On „Note‟ tap, you can input a memo.
7. On „Ctgry‟ tap, you can select, release and edit the category.
8. To save and exit the Task input/edit window, press the icon(
side.
-
) on the right-up
View / Delete Task list
1. Once the Task data is saved, all the date within the task period will be marked
with dot () on the view screen.
2. To delete the saved Task, press the desired data from the list for awhile and
select „Delete Task‟.
3. On the Task edit window, you can delete it by pressing the icon( ).
4. To delete entire task data, select „Delete all‟ from the „InfoBox‟ menu on the leftdown side.
74
Contacts
-
Contacts Input / Edit
1. In order to make a new contact, tap on „InfoBox‟ at the left bottom of InfoBox
window and select „New Contacts‟.
2. You can also input a new contacts by pressing the icon( ) on the tool bar and
then press the icon( ) on the left-up side of contact list.
3. In order to edit existing contacts data, press the desired item from the list for
awhile and select „Edit Contacts‟.
4. You can insert Name, Mobile/Home/Work number, Email address, Company
Information, Private information and other extra information.
5. On the „Business‟, „Private‟, „etc‟,‟Note‟,‟Ctgry‟tap, you can input and select the
detailed information respectively.
6. When you insert a phone number, you can click the icon ( ) for easy input.
75
7. On „Note‟tap, you can input a memo.
8. On „Ctgry‟ tap, you can select, release and edit the category.
9. To save and exit the contacts input/edit window, press the icon(
up side.
) on the right-
76
-
View / Delete Contacts list
1. Once the contacts data is saved, the data will be displayed on the contacts list.
2. To delete the saved contacts, press the desired data from the list for awhile and
select „Delete Contacts‟.
3. On the contacts edit window, you can delete it by pressing the icon( ).
4. To delete entire contacts data, select „Delete all‟ from the „InfoBox‟ menu on the
left-down side.
77
Daily/Weekly/Monthly View
-
Toolbar
Month display/change
Year display/change
Anniversary display
Display by category
Appointment display
Return to current date
Task display
Move page
1. Year display / change
- You can change the year by selecting it from the list (if you press „Select Year‟,
you can input it yourself.)
2. Month display / change
- You can change the month by selecting it from the list.
3. Appointment display
- When this icon is pressed, the saved appointment will be displayed on
daily/weekly/monthly list.
4. Task display
- When this icon is pressed, the saved task will be displayed on
daily/weekly/monthly list.
- When the „down sign‟ beside task icon is pressed, you can view the task data by
priority or completion.
78
5. Anniversary display
- When this button is pressed, the saved anniversary will be displayed on
daily/weekly/monthly list.
- When the „down sign‟ beside anniversary icon is pressed, you can view the
anniversary data by category.
6. Display by category
- When this button is pressed, the appointment, anniversary, task data will be
displayer by category on daily/weekly/monthly list.
7. Move Page
- When the left or right move page button is pressed, the daily/weekly/monthly list
will be moved to before or next daily/weekly/monthly list.
8. Return to current date
- When this button is pressed, you can return to the day of today which has been
set on the system.
- The day of today will be marked with red ground on the daily/weekly/monthly
view.
79
-
Daily view
1. When daily view is selected, the relevant appointment, anniversary and task on
that day will be displayed.
2. Appointment, Anniversary and Task will be displayed on the list with white, gray
and blue ground respectively.
-
Weekly view
1. When weekly view is selected, the relevant appointment, anniversary and task on
that week will be displayed.
2. If you press the relevant date, Appointment, Anniversary and Task will be
displayed on the list with white, gray and blue ground respectively.
3. Appointment, Task and Anniversary will be indicated with icon( ), icon( ) and
black ground respectively on the relevant date.
80
-
Monthly view
1. When monthly view is selected, the relevant appointment, anniversary and task
on that month will be displayed.
2. If you press the relevant date, Appointment, Anniversary and Task will be
displayed on the list with white, gray and blue ground respectively.
3. Appointment, Task and Anniversary will be indicated with number of
appointments in red color, icon( ) and black ground respectively on the relevant
date.
81
View contacts
-
How to sort the contacts list
1. The default way of sorting is by Name. There are four ways in total. These are by
All, by Name, by Company and by Categories.
-
How to view the contacts
1. When the name on the contacts list is pressed, the detailed information of the
relevant contacts will be displayed. When telephone number or email address
is pressed, the simplified telephone or email information will be displayed.
82
View task
-
How to sort the task list
1. The default way of sorting is by category. There are four ways in total. These are
by Category, by Status, by Priority and by Dates.
-
View task
1. When the view task button is pressed, you can see the detailed information of task.
The icon( , ) indicates the completion and the icon( , , ) indicates the
priority (low,high,normal respectively).
83
SmartMemo
Settings
-
Category
1. Using menus above the window, you can create, edit and delete the category.
2. Using the left-up menu, you can either create new main category or delete existing
main category (by long press of the category name).
3. On each main category (except „No category‟), you can create a sub category
using „create‟ menu.
-
Program Configuration
1. When you press the Option menu (
) on the buttom of window, you can
set the location to save data and the default category which the program opens at.
2. When the menu animation is active, the movement of menu box on new memo
window will somewhat softer.
84
Memo Menu
-
Color Change
1. If you press the palette icon( ) on the left-bottom of window, you can change the
pen color.
2. You can choose the pen color from the selection on the left and using the right
scroll bar, you can adjust the brightness of color.
-
Change of pen thickness
1. You can adjust the pen thickness using the thickness icon( ).
85
-
Mode Change
1. If you press the left-down pen icon(
), you can choose the mode.
,
Opaque/Transparent pen
,
Partial/Total erase
Erase current page
Delete current page
Delete entire memo
Save and Exit
-
Alarm Setting
1. If you press the alarm icon( ) on the right-bottom side, you can set the alarm for
the relevant memo.
2. You can check the current time from the alarm menu.
86
-
Page Move / Exit
1. If you press the icon(
) on the right-above side, you can move from page to
page.(Maximum 10 pages)
2. The current page you can check with page number on the right-above of page.
3. To save and exit, you can press the icon( ) on the right-above.
Writing a Memo / Memo List
-
How to write a memo
1. On the new memo page, you can write a memo using stylus pen.
-
Memo List
1. On the memo list, you can check the saved date and the number of pages.
87
2. You can delete, copy and move the memo by pressing the relevant memo for
awhile.
SWRecoder
Settings
-
Toolbar
Stop
Play
Record
Pause
Status
Time
Option Menu
Progress bar
Forward, Backward
1. On the toolbar, you can play, stop, record, forward, backward and move. If you
press the option menu, you can set the channel and sample rate.
2. High sample rate raises the quality of recording, but it requires bigger file capacity.
88
-
Saving / Sorting
1. You can save the recorded data to My Documents, Flash Disk, SD MMC Card, and
CF Card. The data will be saved as „ave‟ file under Voice_Memo folder on the relevant
saving path.
2. On the menu left-above, you can select the saving path.
3. You can sort the list by Name, by Date and by size. You can select this on the
right-above drop down menu.
-
Function / List
1. By pressing the record button, you can start the voice recording.
2. To stop the recording, you need to press the stop button.
3. To play the recorded data, you first need to choose the relevant data from the list
and press the play button.
4. While playing you can move the place to play with forward and backward button. It
is also possible by moving the progress bar.
5. To pause while playing, you need to press the pause button and to play again, just
press the pause button one more time.
6. If you press a recorded data on the list for awhile, you can delete, create copy,
select all and rename it.
89
9. How to use application software
Calculator
M3 offers a calculator application. Using this application you can do a simple
calculation. To run the calculator, select Go to start > Programs > Application
> Calculator.
90
Image Viewer
You can see the image file using the image viewer. To run the image viewer, select Go to
Start> Programs> Application Programs> Image Viewer. The viewer supports various
image files such as jpg, gif, bmp, tif, png, etc.
Viewer icons and functions
Icon
Name
Open
Description
Open an image file.
Enlarge
Enlarge the current image.
Reduce
Shrink the current image.
Full view mode
Change into the full view mode.
Slide show
Shows all image files in my computer
Adjust
to
the Adjust an image to the screen size
screen size
Previous image
Show the previous image
Next image
Show the next image.
91
10. How to use utility programs
You can use M3 more conveniently by using utility programs.
After selecting Go to Start> Programs> Utilities, you can use a range of utility programs
such as Menu setting, backlight, button setting, Qstart, Task manager, Contrast, etc.
92
Menu Setting (Menus)
In the Menu, you can select the programs to be included in the bookmark
The installed programs will automatically appear on the program list. Click it to the
programme to be added
You can see the added item in Start> Programs>Bookmark
Backlight
If you click the backlight menu in the utility programs, you can select the level of
brightness of the screen. Click the radio button to set up the level of brightness. In
addition, you can turn on/off the light by selecting the backlight turn off/ turn off.
There are four levels in the brightness including maximum, high, normal, low brightness.
Button setting (Buttons)
To assign your application programs to the function keys, select Start> Programs>
Utilities /Buttons. It will bring up the button window.
To change the allocation of buttons:
1. Please select the button to change (Button1).
2. Please select the application to assign to the button from the „Button assignment‟
drop down list.
3. You can set the application for when button is pressed briefly and when button is
pressed awhile.
4. To return to default settings, please press the„Restore Default‟ button.
5. The application will be added to the list, if you insert the shortcut of the application
into My Computer > Windows > Programs folder.
6. You can also use Function key to run the application by assigning it to Function
key 1, 2 or 3.
93
MS-Backup
Backup
-
How to set the saving location and name.
1. Under the Backup tap On the Backup Manager window, you can assign the saving
location to Flash Disk, SD MMC Card and CF Card.
2. In the Name box, you can input the backup name to save with.
3. You can check the latest backup date under the „Last Backup Date‟ box.
-
How to backup
1. All Data : All the file, registry and Pims data will be backed up except Flash Disk.
2. PIMS Data : Only Pims data will be backed up.
3. Once you have completed with type, name and location setting, you can start the
backup by pressing the „Backup Start‟ button.
94
Restore
-
How to restore
1. Under the Restore tap on the Backup Manager window, you can restore the data
by pressing the „Restore Start‟ button after setting the type, Location and the file
name to be restored. When the restore is complete, the device will restart
automatically.
2. You can delete or restore the backup data by double clicking the relevant file on
the list.
Quick start (Qstart)
You can accelerate the starting process an application program in a specific area by
using Qstart.
Quick start is composed of tool, area, and Go to Menu icon.
To add or delete an area, click the tool to add or delete a program in the area.
If you click the area list on the main screen of Qstart, you can click on the basic and
added areas. If you select an area, added program will appear on the program list.
Task Manager
To see the program in operation, click Go to Start> Programs> Utilities> Task Manager,
or select the task manager on the taskbar, using the right mouse function.
If there is a task running, you can carry out necessary tasks such as switching to other
tasks, Finish the task, cancel, etc.
Contrast
Set up the shadings of the LCD screen. Using a slider, you can adjust the shadings.
Touch Protector
It is a newly added function of the Windows CE 4.2. This utility is useful for protecting a
touch screen being pressed while other application is in operation.
95
11. How to use Microsoft application
Command Prompt
M3 has a window console for pocket CMD. You can use DOS commands using the
pocket CMD.
96
Microsoft Media Player 9 Series
It is the Microsoft의 Media player that enable user to enjoy digital music and films. Media
player supports four multimedia formats such as ASF, WMA, MP3, and WAV formats.
If an audio data does not have any of these formats (ASF, WMA, MP3, WAV), you can
change the digital audio data into an appropriate format file via “Microsoft Media
Manager”
You can copy a multimedia file from desktop PC to M3. You can download the multimedia
file from an website, or copy the audio file from 하거나 CD-ROM to a desktop PC. After
that, you may connect the desktop PC and M3 and copy the downloaded multimedia file
to M3.
To start the Media player, select, Go to Start > Program > Media player.
Internet Explorer Connection
Menu bar
Display window
Process bar
Volume
adjustment
Play
Stop
Mute
Next track
Previous track
97
Volume adjustment: Adjust the volume by moving the volume adjustment slider. If you
move the slider to the left, the sound will decrease the volume while moving to the left will
increase the volume.
Track switch: You can select the previous or next track to be played.
Internet Explorer Icon: Start Internet Explorer. You can download or Play media play
files from websites using the Internet Explorer
File
Open: Open URLs or multimedia files. If you want to open a multimedia file in a particular
folder, click Browse.
You can directly play streaming media files without downloading them.
To play streaming files:
Select File > Open. If will bring up the Open URL window.
Enter an URL and click OK.
Press Confirm button (Play) to play a streaming media file.
In order to be able to Play streaming media files, the network connection is
necessary. For detailed information on the remote connection between M3
Warning and the Network, please contact to the Network manager.
If you want to operate the player in a pocket or case, you can start the touch
screen lock function to prevent error in functions due to the accidental
pressing on the screen.
To lock the touch screen, select Go to Start→ Programs→ Utilities Touch
Protector. And to release the touch screen lock press Enter.
Close: Close the opened multimedia files.
Playlists: It is a list of multimedia defined by the user. If you first start the media
player, you will find two basic playlists (local contents, Favorites)
In the Local Content, there are all multimedia files in M3. Local Content cannot be edited.
98
In the Favorites, you can find the list of your favorite streaming media files.
In the default mode, the Web Favorite playlist is empty. Web Favorite playlist can be
created or edited by the following ways:
To create new playlist:
1. Select File > Playlist.
2. If you click the Local Content icon, it will open Organize Playlists. Select this
Organize Playlists Menu.
3. Click New and enter the name of new playlist. The default name is “Playlist”.
4. Select the created playlist then click OK.
5. Add Content: Playlist window will appear.
6. Add Content: Playlist window shows all multimedia files in M3 and External
extension memory cards (CF, SD). Select the files to add then click OK. It will bring
up the selected multimedia files on the playlist window.
You can edit the existing playlists.
To edit the playlists:
1. Select File > Playlist.
2. Click the name of the playlist then select “Organize Playlists.”
3. Select the playlist to edit. To change the name of playlist, click “Rename.”
4. Select the playlist to add, delete, transfer, or edit.
After selecting files to edit, press the same button shown in the picture below.
List
box
Add media files
Delete media files
Previous media file (previous track)
Next media file (Next track)
Current track Play
Media file (track) Properties
You can also delete the existing playlists.
To delete a playlist:
1. Select File > Playlist.
2. Click “Organize Playlists” in the Listbox
3. After selecting the playlist to remove, click “Delete”.
99
Favorites: You can quickly play the multimedia files by using the Favorites. Favorites are
in the designated playlist. To add a multimedia file or streaming media file in the
Favorites:
1. Play multimedia file to add to the Favorites.
2. Select File > Favorites > Add Favorites while the multimedia file is loading.
3. The added file will appear in the Favorites.
You can arrange the Favorites.
To arrange the Favorites:
1. Select File > Favorites > Organize Favorites. It will bring up the Favorites window.
2. For detailed information on the Favorites edit, refer to the Playlist edit.
To play multimedia files in the Favorites:
1. Select File > Favorites
2. Multimedia files added in to the list box will appear.
3. Select the file to Play, and then click the Play icon.
To delete files in the Favorites:
1. Select File > Favorites
2. Select “Organize Playlists” in the Listbox.
3. After clicking the file to delete, click the Delete icon.
Exit: It finishes the Media player.
View
Zoom/Focus: Enlarge or reduce a file. You can select from various sizes of files
such as 50%, 100%, 200% or the original size.
Full Screen: Play video file in the full screen mode. It only applies to a video file.
Statistics: Show statistics of the Media player(name of opened files, source
protocols, memory use)
Properties: Show the property of opened files (file name, length, audio frequency,
whether or not stereo sound available, copyright)
Options: Set up the options of the Media player
a. Select View > Options. Options window appears.
b. Set the buffering time by moving slide. In default mode, the buffering time is
set to 3 seconds.
c. Click the check box to set up the Play mode. You can choose between Play
once or Repeat forever.
d. Set up the level of Zoom/Focus through the dropdown box.
Playback
Play: Plays opened files.
Pause: Stop playing a file for a while.
Stop: Stop playing a file.
Mute: Remove the sound. To activate the sound, click the Mute once again.
Repeat: Repeat playing a file.
Shuffle: Play files in random order.
100
Web Icon
Move on to the Media player‟s website.
Internet Explorer
Explorer Menu
Icon
File Menu
Address bar
Content window
Status Line
[Vertical Screen]
[Horizontal screen]
101
You can search the Internet or Intranet using M3‟s pocket Internet Explorer 6.0(Pocket
Internet Explorer). To access to ISP or the network, the device has in-built wireless
modem.
To set up the pocket Internet Explorer, refer to the chapter 6. How to set up M3.
You can use the Pocket Internet Explorer in the same way as the one in the desktop PC.
Pocket Internet Explorer consists of four parts including Menu bar, address bar, content
window, status line.
Menu bar
There are two different menus in the Menu: File Menu and Explorer Menu. It the default
mode, the menu is set to File Menu. To switch to other Menu, click the Explorer Menu
icon.
A. File Menu Bar
File
Open: Open files. Using the Pocket Internet Explorer, you can open files in a range of
formats including HTML, TXT, GIF, JPEG, AIFF, XBM, etc.
1. Select File > Open.
2. Select the file to open. You can select the file format in the Type dropdown list.
3. Click “OK”.
Save As: You can save the current web page to see later without using the cache
memory even though the connection with the Internet or Intranet has been closed.
To save the copy of current webpage:
1. Select File > Save As.
2. Designate a folder location and enter the name of the file.
3. You can save the webpage either in HTML or text only. Using the Type dropdown
list, select the file format to save. If you save the file in text, you can see the HTML
source code of the file.
4. Click OK
If you save the copy of a webpage, it will not display image and link will be
deactivated.
In case of a webpage with frames, it will not display the entire frames but
the structure of frames. To save individual frames, press ALT and frame.
Warning
Then select the Save As or Save Picture As in the hot key menu. Some
frames are designed to prevent saving. These frames cannot be
displayed even if you open the saved files in Windows explorer.
Find: You can search words or character strings.
1. Select Edit > Find. Find window appears
2. Enter the word or character string in the Find what box.
3. To find a perfect match sentence, click Match whole word.
4. To distinguish uppercase and lowercase, click the Uppercase/Lowercase
Classification (Match case).
5. Select the Direction. You can search upward or downword.
102
6. Click the Find Next to initiate search.
7. To cancel the search process, click the Cancel.
Work Offline: When you search webpage in the Internet, it will store web pages in the
cache in the Temporary Internet Files located at the My Computer. It is faster to browse
web pages left in the cache than to go back to the Internet sites.
To use cache pages:
1. Before closing the connection, select File > Work Offline.
2. Search the list on the address window to select a webpage you want to see.
In the Work offline mode, all links to the website will be closed. If you see the
webpage with frames using cache, you can only see the first one of all frames.
Note
Close: Finishes the Pocket Internet Explorer
Edit
Cut: Cut off the selected area.
Copy: Copy the selected area.
Paste: Paste the selected area.
View
Text Size: Changes the size of a text. To change the text size, select View > Text Size
then choose the Pont size. You can select the size among the largest, large, medium,
small, the smallest
Encoding: Select the language to encode. In the default setting, it is set to [Korean] or
random.
To select a particular language, select it from the More lists.
Stop: Stops the process of page loading.
Refresh: Arrange the current page again.
Internet Options: Set up the Internet Options.
For detailed information, refer to the cheaper 6. Hot to set up M3.
Go
Home: Move on to the start page of the default setting.
Search: Move on to the search page of the default setting.
Back: Move back to the next webpage. You cannot use this function in the start page.
Forward: Go back to the previous page. You can use this function only when you have
moved on to the next page.
Favorite
103
Add Favorite: In order to access more easily, add web pages to the Favorite
To add the current page to the Favorite:
1. Move on to the page to add.
2. Select Favorite > Add to Favorite. It will bring up the Add Favorite window.
3. Change or leave the page name.
4. To designate the folder you want, click the Create in then select the folder.
5. Click OK,
Organize Favorite: Arrange the added pages.
To arrange the Favorite:
a. Select Favorite > Organize Favorite. It will bring up the Organize Window.
b. After selecting the Favorite page to edit, click an appropriate button.
c. You can change, transfer, or delete a page. To create a new folder, click the
Create folder.
B. Explorer Menu
There are six icons in Explorer Menu including Back, forward, stop, refresh, home,
and search. For detailed information, refer to the file Menu in question.
Address bar: If you enter the URL in the address bar, you can move to other
pages. Also, if you press the arrow behind the address bar, you can see the list of
URLs that you have opened.
Content window: display the page
Status line: Display the status of access process.
104
Microsoft WordPad
You can create or edit a document using Microsoft WordPad. The buttons and Menu are
similar to Microsoft Word in desktop PC.
Normally, WordPad is saved as pwd file format; you can also save it as an rtf or doc
format document.
See other menu
There are two different menus in Microsoft WordPad: File Menu and Icon Menu.
Menu Bar
File
Create New: Create a new document. You can also make a new document in
Template.
Open: Open an existing file, you can open files in the format of TXT, DOC and
DOT.
Save: Save the current document. You can save the document in the form of
WordPad document (*.pwd), Word 97/95/6.0 Compatible document (*.doc) or
Word 97/95/6.0 Compatible Template (*.dot).
Password: You can set up a password for a document for security reason.
To set up password:
1. Select Files > Passwords.
2. Enter a password and confirm it.
3. Select Files > Save to preserve the password.
View other Menu
105
Print: Print the current document. To use the print function, connect M3 to a desktop
PC and set up printer.
Recent
document: Show documents that you have opened recently.
Close:
Finish the WordPad and close the program.
Edit
Undo: Cancel the last operation
Redo: Carry out the last operation again. You can use if after using Undo
command.
Cut: Cut the selected text or object.
Copy: Copy the selected text or object.
Paste: Paste the cut or copied text or object.
Erase: Delete the selected text or object.
Select all: Select all text or object in the document.
Find: Search a text. Enter keywords and click the Find Next. You can use the
options of Match whole words or Match case.
Find Next: Find out the next corresponding text.
Modify: Find the text to change to another text.
View
You can select Original view or View overview.
Original: View original. Show a document as it is.
Overview: View overview. You can the overview of the document.
Change the line according to window: Make WordPad to fit into the size of the
window.
Full screen: Set up as the full screen mode.
Zoom/Focus: Enlarge or reduce a document. You can apply the user defined
magnification.
Form
Tool
Pont: Set up a Pont type. You can set up the font of the selected text. You can
select Pont, point size, color, and type of point. To restore the default value, click
the Apply Default. To use this default value, click, the Set as Default
Paragraph: Set up the paragraph for your chosen text. You can select
adjustment (left, right, middle), type and indentation. If you lick the Tabs, this will
bring up the Tabs window.
Tab: Set up the tab. After entering the tab location, click the setting.
Symbol insert: Insert symbols. Select the symbols to insert. If you use the
subset of the Pont, you can find the symbol faster.
To change the Icon Menu, click the View other Menu icon. You can change the type and
size of ponts and find uppercase and lowercase in a simple and fast way.
After clicking the Menu, you can drag it to move.
106
Font size change
Font type change
How to convert the document type
If the device received email with the attachment of Word document or templates created
in Word 6.0 or higher when there is an email program such as InBox installed in M3,
WordPad will convert the file in order to open it in M3. To convert the document, open the
attachment in the email program or open the file in WordPad. Then it will automatically
execute the conversion process.
During the conversion process, the part of file properties can be changed or lost. To
secure the file property, save the document under other file name and close the
document. The following is the changes occurring due to Word document conversion.
a. Frame and shadow
While frame and shadow are not displayed in WordPad, they will be restored when
converted again.In case of the table, while the shade will not be restored but simple
frame will be restored.
b. Pont type
The Pont type features such as bold, lopsided, cancel line, superscript, subscript,
hidden text will be maintained and displayed. Other effects will be modified or
removed.
c. Color
Color will be kept intact and be subject to mapping for available colors in the device.
d. Font and font size
Fonts that are not supported by M3 will be subject to mapping for the closest font
available in the WordPad.
e. Page Format
Page formats such as header, footer, footnote, each page setting information will be
eliminated. WordPad supports built-in titles.
f. Paragraph format
Paragraph formats such as tab, adjustment, bulleted, Indentation, simple number list,
paragraph interval, etc will stay intact and be displayed in WordPad.
g. Picture
Picture will be removed during the conversion process.
h. Content
Content and some format will be preserved. However, the text arranged on the right
tap can be transferred to the next line.
Index text and some format will stay intact.
The table will be displayed as distinguished text by tab. The text whose lines have been
rearranged or cells with tap and paragraph marks. The simple table will be displayed
more correctly and be restored when the file is converted again to Word document.
OLE objects can be eliminated during the conversion process.
107
Windows Explorer
Microsoft‟s Windows Explorer will operate in M3 in the same manner it does in PC.
Reference:
If you enter URL in the address bar, you can access to the Internet.
File Menu
File
Edit
Open: open the selected folder or file.
New folder: create a new folder in the current folder.
Delete: Delete the selected folder or file. If you click and drag or select them
through SHIFT key, you can delete multifold items at the same time.
Change Name: Change the name of the selected folder or file.
Properties: Show the properties of the selected folder or file. If you have not
selected any folder or file, it will display the system properties.
Send: Send the selected folder or file to specific folders. You can transfer folder
or file through hot keys, My Document, or Infrared Receiver.
Receive: Receive folders or files by using an Infrared Receiver.
Close: Finish the Windows explorer.
Copy Cancel: Cancel the previous operation.
Cut: Cut the selected folder or file. If you click and drag or select them through
SHIFT key, you can select folder and file at the same time.
Copy: Copy the selected folder or file.
108
View
Paste: Paste the cut or copied folder/file in the current folder.
Shortcut Paste: Create a hot key for cut or copied folder/file.
Select All: Select all files and folders in the current file.
Address bar: Display an address bar in Windows explorer.
Large icon: Display folders or files in large icons.
Small icon: Display folders or files in small icons.
Details: Show the details of folders and files such as name, size, format, last
modification date, etc.
Icon arrangement: Arrange icons in the current folder. This function is applicable
for large and small icons.
Refresh: Correct the current folder.
Option: Set up the options of the Window Explorer. You can display or hide a
hidden file and file extension.
Move
Back: Move on to the previous folder.
Forward: Move on to the next folder.
My Documents: show my documents.
List of opened pages: show items that you have opened. The search history will
be erased when Windows explorer is finished.
Favorites
Add Favorites: Add a hotkey of the current folder to the Favorites.
Organize Favorites: Arrange the Favorites.
To move on to the Icon Menu, Click the View other menu.
Icon Menu
Back: Move on to the previous folder.
Forward: Move on to the next folder.
Parent: Move on to the parent folder.
Delete: Delete the selected folder or file.
Properties: Display the properties of selected folder or file.
View type: Select a view type.
109
Appendix A
Product Specification
The following is the specification of hardware and devices.
Specification
OS
Windows CE.NET 4.2(CE.NET)
(Operating System)
Processor
Intel XScale PXA255
Memory
RAM 64MB SDRAM
Memory
FLASH 64MB Flash (expendable up to 256MB)
Audio / Voice
Stereo audio output terminal, Speaker, microphone
Infrared
IrDA standard
communication port
Reminder
Charging LED, sensitivity LED, scanner LED
USB communication
1 port (USB Communication)
port
Display
65,000 color 16-bit semi-reflective TFT-LCD, 3.5 inch
DC 4.2V max, 2,000mA/h
Device Power
rechargeable Lithium Polymer Battery
Size (H×W×D)
78.6x160x24mm
Weight
300g (including Battery)
Battery Specification
Type
Capacity
Voltage
Battery Charging time
Li-Polymer charger
2,000 mAh
DC 4.2 V max
Within 3 hrs
Battery longevity
500 cycle
Battery charger Specification
AC Input power
100 ~ 240 V
DC output power
DC 4.2V max
110
Troubleshooting
This chapter provides tips to efficiently use M3 and ways to solve malfunction problems.
In particular, it will deal with the following problems.
Battery power
Reset
Common problem
Data/file backup
Synchronization with a PC
Infrared(IrDA) communication
Maintenance
111
Battery power
The following are steps to prevent an unexpected system failure in M3 due to power.
When you use M3 for the When you purchase M3, there are occasions that the
first time
battery is discharged. Thus use M3 after charging up
the battery with the charger.
When you charge Battery
When you charge a battery, be sure to check out the
connection between the charger and M3 and between
the charger and outlet.
When an Exhausted Battery Charge the battery with charger. You can still use M3
icon appears on the taskbar while it is on charge.
or battery warning pops up in
the dialog box
When the device power is As the battery power is very low, charge the battery for a
turned off while it is on.
certain period of time. If you leave M3 in a low power
state without charging it, M3 might result in a hardware
reset due to the power cut off of M3‟s CPU and it will
eventually lead to the loss of all data and files stored in
M3.
When M3 is not used for a Turn off M3‟s power with the power button.
long time
Click in the order of GO to Start > Settings > Control
Panel > Power > Power Off then set M3 to be turned off
when it is not used for a certain period of time. It will help
you to manage the power in a more efficient way.
Use of device to save power After clicking GO to Start > Settings > Control Panel
>Display > Light, you set up the LCD backlight to be
turned off for non performance of M3. Then you can
save the battery power. In addition, if you click GO to
Start > Settings > Control Panel >Display > Backlight,
you can adjust the brightness of the LCD backlight.
When automatic turn-off When M3 is connected to PC, power will not go off
does not operate
automatically.
When inadvertent turn-off It indicates that M3 has automatically turns off power
occurs while using M3
due to insufficient battery power. Rather than attempting
to continue on with M3, use it later when the battery is
charged.
Reset
Software reset
Hardware reset
(Battery power
If you cannot remove a program in operation that stops
functioning with the Task Manager or you keep on failing to start
synchronization while in connection with desktop, briefly click the
reset button on the bottom of M3 to conduct a soft reset. To do a
software reset, you have to click the reset button in one second.
Otherwise it may lead to a hardware rest. If it does happen, all
files and data in M3 will disappear.
If you cannot get M3 to respond by pressing any keys and a
is software reset does not solve the problem, you have to resort to
112
blocked)
a hardware reset.
To do a hardware rest, you have to press and hold the reset
button on the button of M3 for more than 4 seconds. Then M3‟s
battery power will be blocked, thereby cutting off the power of
M3. If you briefly click the reset button, it will connect battery
power and proceed with the hardware reset. Hardware reset
results in the lost of all files and data. So it is advisable to do
regular backup of data and files in M3 in a desktop PC and flash
ROM.
Reset due to a When M3 cannot function due to a complete battery discharge,
problem in battery
use charger to fill up. When M3 is in the state of complete
discharge, do not attempt to run M3. When the battery is
charged, M3 will automatically be under a hardware reset.
Common problems
Dim screen
If you press the power button for a long time, it will turn off
the LCD backlight. In that case, press the power button
again then the backlight will be turned on again.
If the LCD backlight is set to too low a brightness, it may
cause a dim screen. Click Go to Start> Programs> Utilities>
Backlight to adjust the level of backlight.
Backlight can be turned off when it is on automatic turn-off
mode. To make backlight to stay, click Go to Start>
Settings> Control Penal> Display. Then cancel the light turnoff setting in the light tab.
Error in stylus pen input
When the screen is not in proper position, click Go to Start>
Settings> Control Penal> Stylus. Then adjust the screen on
the correction tab.
If the screen does not respond to double click, click Go to
Start> Settings> Control Penal> Stylus. Then adjust double
click grid in the double click tab.
Slow down of program If you run too many program at once, it can slow down the
running speed
speed. Reduce the number of running programs.
113
If M3‟s program memory is not sufficient, it can slow down
the speed. Click Go to Start> Settings> Control Penal>
System, then expand the program memory area with the
slider in the memory tab. If storage memory area occupies
too much space, backup programs in the storage area to PC
so as to empty the space. Then expand the program
memory area.
When M3 is not turned When the battery is completely discharged, the power of M3
on even if it is connected can be turned off automatically. In that case, charge the
to the charger.
battery for about 30 minutes and turn it on. Then keep on
charging the battery.
When the battery cannot be charged, check out the
connection state between the charger and M3. When the
battery is properly on charge, the lamp on the charger turns
out red. When the battery is fully charged, it turns to green.
If you overuse M3 when it is discharged, it may cause
damage to the device, Before trying to use M3, be sure to
charge the battery again.
Automatic turn-off
Automatic idle mode
or LCD backlight turnoff
When you lost the
password
Display
information
owner
Too small volume or
no sound
When battery capacity is too low, the power of M3 will
automatically go off. For detailed information, refer to the
problem solving regarding battery power.
When M3 is not in use for a certain period of time, it will
automatically enter into an idle mode or the LCD backlight turnoff mode. To check the setting, click the power turn-off tab in
GO to Start > Settings > Control Panel> Power Or else, click
the light tab in GO to Start > Settings > Control Panel >Display.
If you set up a password in GO to Start > Settings > Control
Panel> Passwords and click the “Use Password when
System Start”check box, it will bring up the password input
window when M3 is turned on. If you enter the correct
password, it will be switched to the Start window. If you cannot
remember the password, you cannot start M3. In that case,
you have to execute a hardware reset. So it is important to
remember a password. (In particular, if you have forgotten the
password in the dial-up program, you cannot use the phone
function even if you carry out a hardware reset. So never forget
a password)
It is possible to display the owner information when M3 is
turned on and off. To switch to the Start window, click the
screen with a stylus pen. To modify the user information, click
GO to Start > Settings > Control Panel> User.
After clicking GO to Start > Settings > Control Panel> Volume
& Sound, click the volume to check out the sounds assigned to
the device movements. Also adjust the volume adjustment bar
114
Too small text size
Date/Time Settings
in left and right directions.
Sometimes it is hard to read a text when running MS WordPad
or Internet Explorer. In WordPad, click View Menu bar>
Zoom/Focus then select the size that you want. In Internet
Explorer, you can select the size after clicking View Menu bar>
Text Size.
If you click GO to Start > Settings > Control Panel>
Date/Time program, you can efficiently manage time. If you
press Date/Time, it will bring up calendar, time setting
window, and time zone window. First, select the location that
you desire. Then set the year, month, and date in the
calendar. At last, select the hour: minute: second and
AM/PM in the time setting. If you click the Apply, the setting
will be completed.
Click the watch. You can set up the current location and the
time of visiting place. While Home will display value set for
Date/Time, Visiting place will show time in the place visited
due to business or travel. The way to set the time is identical
with the one with Date/Time setting. If you click Home or
Visiting place radio boxes, M3 will operate according to the
time of the selected location.
The current time can be displayed in the Start window‟s
taskbar.
If you press and hold the taskbar with a stylus pen, it will
bring up the right button function menu. Click appropriate
properties and press the View Watch, it will display the
current time on the taskbar. The current time is the time of
location selected in Home/Visiting Place radio box.
115
Data/File Backup
Data/File Backup
Sometimes you have to conduct a hardware reset due to
unexpected problems. Thus you should backup data/files to
desktop PC and flash ROM.
To backup data/files in a desktop PC, connect M3 to PC. For
detailed information on the connection methods, refer to the
chapter 4. How to connect to Desktop PC. Using ActiveSync
explorer or the Copy/Paste Menu in a desktop PC‟s
Windows explorer, you can copy M3 data/files to the backup
folder (created by the user) in a desktop PC.
It is recommended to carry out the file restoration process by
the backup program only when the personal schedule data is
lost due to a hardware reset and unexpected problem.
116
Synchronization with PC
When the connection USB cable is not in connection with a desktop PC or is not
with desktop PC does connected properly. Check out if the USB cable and the USB
not happen.
port of desktop PC is properly connected. Check out if the
USB cable is properly inserted to the USB port of M3.
ActiveSync option is not properly set up. Check out the
setting. For detailed information, refer to the Help of the
desktop ActiveSync.
Check out the communication mode setting of the desktop
ActiveSync.
Check out if Microsoft Outlook is properly operating in the
desktop PC.
Due to the characteristics of Windows CE 4.2(CE.NET), it
may take some time to complete synchronization process.
Thus connect M3 with PC then wait for the synchronization
to be completed.
When
synchronization If you continue to fail to make a connection, remove M3 from
does not occur or the the USB cable and wait for a while. Then re-insert it and wait
connection
is
not for synchronization to start.
maintained
after If you still fail to run synchronization, carry out a software
synchronization.
rest and repeat the above steps. Reboot the desktop PC, do
software or hardware reset of M3 then repeat the above
procedure.
If the problem persists, visit the Microsoft Website to inquire
about ActiveSync or refer to the Q&A.
When the“Attention
Remove M3 from a USB cradle then close the ActiveSync
Required”
message program window. Then try the synchronization between M3
pops
up
in
the and desktop PC.
ActiveSync
window
during synchronization.
117
Infrared (IrDA) Communication
When
Infrared(IrDA) Arrange M3 and the IrDA ports of other devices. The
communication does not distance should be no more than 1m.
operate
Remove obstacles that can possibly block the
communication between M3 and other devices.
Check out if M3 has IrDA OBEX communication protocol
installed. Without it, M3 cannot make a communication.
When a disconnection takes Communication can be interrupted while transmitting a
place while transmitting files large size file. In that case, disconnect the
communication first and try the file transfer again.
It is not possible to connect 3 or 4 devices
simultaneously. Connection is only made between two
different devices.
Infrared(IrDA)
After locating M3 in the right position, click Quick
Communication
Connection Icon> Infrared Sending/receiving Menu. Then
a program will find M3 to make a communication by itself
제어
and display relevant data. Click the Connection Menu
then carry out necessary tasks.
Maintenance
M3 power management
M3 management
Data/file management
.
Set up M3 to enter an automatic idle mode or to be
turned off when it is not in use.
Adjust the brightness of backlight to save power.
Avoid using M3 in a hot and humid environment.
To protect M3 from external impact, use leather
protection case.
Try not o expose M3 in direct sunlight.
While on long-term trip, backup data/files
Do regularly backup data/files.
118
Glossary
Backup. A copy or copies of data stored in M3 file, desktop PC, CompactFlash
card or other safe storage files.
Battery charger. Supply external power suitable for operating M3 by switching the
AC power of standard household outlet to low power DC power.
DHCP (Dynamic Host Configuration Protocol). Protocol that assigns a floating IP
address to M3 whenever it is connected to the Network.
Dial-up connection. Connection made between M3 and other computer‟s modem.
Able to make a dial-up connection with ISP, Network, and PC installed modem.
Direct connection. Connection made between M3 and USB or Infrared port of
other computers.
DNS (Domain Name System). An Internet service that converts domain names to
IP addresses.
Driver. A control program that makes a computer to operate with its peripheral
devices.
Flash ROM. Refer to ROM.
IMAP4 (Internet Messaging Access Protocol v4). Protocol that allows a computer
to extract messages from a mail server.
Infrared port. A communication port that applies optical (infrared) signals, rather
than wire or cable, to transmit data.
Internet. The worldwide computer network that provides various services such as
email, WWW, FTP, Usenet news, etc.
Intranet. An exclusive network system that offers similar services with the Internet
but is only available for the members of a single company or organization.
IP (Internet Protocol). Internet transmission standard for data packet.
IrDA (Infrared Data Association protocol). A standard established for infrared
communication between computers, other peripheral devices or equipment.
ISP (Internet service provider). Business that provides individual or businesses
with Internet access for certain fee.
LAN (local area network). A computer group that is interconnected in a local area
(same or nearby buildings) so as to share and exchange files and data.
Modem. Communication device that enables computer to transmit data through
telephone lines.
NIC (network interface card). A card installed in a computer to enable network
connection. NIC provides all-time exclusive connection to the Network.
Partnership. A relation established for the purpose of synchronization and data
transfer between M3 and a desktop PC.
PIM: personal information manager. A single or group of applications that
manages user‟s personal information such as address, appointment, note, etc.
POP3 (Post Office Protocol v3). A protocol that makes a computer to extract
messages from a mail server.
PPP (Point-to-Point Protocol). A basic method that M3 is using in order to
communicate with ISP or Network servers.
Proxy server. A server that exists between client computer or web browser and
Internet. Proxy server provides security by filtering requests while it improves the
performance by storing local copies of the requested information.
RAM (random access memory). A transient memory that is available for read and
119
write. Data stored in RAM will be kept while the power is on.
Remote connection. Connection between M3 and remote computer or server.
Reset. The process of restarting M3 and initialize the OS again. When the user
carries out Reset, the data in opened files will be lost. However, data that has
already been saved will be restored.
Restore. The step of recovering the user‟s device to the state of its last backup. It
includes a copying of backup data in M3.
ROM (read-only memory). A resident flash memory Pocket that includes
Microsoft Windows for PC operating system and built-in programs.
Serial connection. Connect M3 and cables between serial (COM) ports of a
desktop PC.
SLIP (Serial Line Internet Protocol). One of the internet connection methods.
While it is similar to PPP, it is more simple and old.
SMTP (Simplified Mail Transport Protocol). An email message transfer protocol
between computers through the Internet.
Stylus Pen (Stylus). A pen-shape tool designed to apply for a touch screen.
Synchronization. The process of comparing if files or data in two computers are
exactly the same.
Touch screen. A contact-sensitive screen that is used for opening files, running
programs by touching or clicking activities of stylus pen to select text.
USB (Universal Serial Bus). New standard to make the connection with
peripheral devices. USB supports a relatively faster transmission and can be
used for connecting the multifold number of devices to one computer.