1
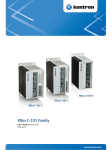
HP Kayak XU800 Technical Notes Notice The information contained in this document is subject to change without notice. Hewlett-Packard makes no warranty of any kind with regard to this material, including, but not limited to, the implied warranties of merchantability and fitness for a particular purpose. Hewlett-Packard shall not be liable for errors contained herein or for incidental or consequential damages in connection with the furnishing, performance, or use of this material. This document contains proprietary information that is protected by copyright. All rights are reserved. No part of this document may be photocopied, reproduced, or translated to another language without the prior written consent of Hewlett-Packard Company. ELSA®and GLoria Synergy® are registered trademarks of ELSA AG, Aachen and/or ELSA Inc., Santa Clara. Matrox® is a registered trademark of Matrox Electronic Systems Ltd. Microsoft®, Windows® and MS-DOS® are registered trademarks of the Microsoft Corporation. Windows NT® is a registered trademark of Microsoft Corporation. Pentium® , and AGPsetTM are trademarks of Intel Corporation. Rambus and RDRAM are registered trademarks of Rambus Inc. Direct Rambus, Direct RDRAM and RIMM are trademarks of Rambus Inc. Hewlett-Packard France Business Desktop Division (BDD) Outbound Marketing Communications 38053 Grenoble Cedex 9 France 1999 Hewlett-Packard Company HP Kayak XU800 PC Workstation Technical Information This section provides technical information about your PC Workstation. Features Feature: Description: System Board Extended-ATX with a dimension of 12.8-inch x 11.4-inch. Microprocessor All models have support for up to two Intel Pentium® III processor with either a i256 KB. For Processor 1, a VRM (Voltage Regulator Module) is integrated on the system board, while there is a VRM socket for a second processor, if one is installed. Cache Memory (integrated in processor package) • • Internal CPU Clock Rate External Processor Bus 533 MHz, 600 MHz, 667 MHz, 733 MHz, 800 MHz and higher. 133 MHz Front Side Bus. Chipset Intel® Chipset (I840) including, Input/Output Controller Hub (ICH), PCI 64-bit Hub (P64H), FirmWare Hub (FWH) and Memory Repeater Hub (MRH-S) for SDRAM support. Super I/O Chip NS 87364. BIOS (Basic Input/Output System) Based on the core of AMIBIOS, including: Firmware - BIOS Flash EEprom: Intel’s Firmware hub concept. HP MaxiLife Utility (available on all models) Hardware monitoring utility that monitors system components via the I2C bus and a LCD status panel. • • • Level-One: 16 KB code, 16 KB data. Level-Two: i256 KB. 4 M/bits of flash memory. Support for PCI 2.2 Specification. Support for RDRAM or SDRAM memory modules. Features Feature: Description: Operating System All models are preloaded with Windows NT® 4.0 SP5. Main Memory Models include either: Maximum amount of memory that can be installed is: 2 GB (4 x 512 MB). • • Mass Storage Four RIMM sockets supporting RDRAM ECC memory modules installed in pairs. Any unused RIMM sockets must contain a continuity module. Models are supplied with either 128 MB or 256 MB RDRAM ECC main memory installed in pairs. Memory upgrades are available in pairs of: 128 MB, 256 MB or 512 MB RDRAM ECC modules. Four DIMM sockets supporting SDRAM 100 MHz ECC memory modules installed in pairs. Models are supplied with 128 MB of SDRAM unbuffered ECC main memory. Memory upgrades are available in 32 MB, 64 MB, 128 MB, 256 MB or 512 MB unbuffered 100 MHz ECC SDRAM modules. Seven shelves supporting: • • • Two front-access, third-height 3½-inch (one for the floppy disk drive and one free) (height 1”); Three front-access, half height, 5¼-inch drives (height 1.0”); Possibility to install a 3½-inch hard disk drive in one of the 5¼-inch shelves. Two internal 3½-inch hard disk drives (height 1.0”). SCSI Controller SCSI Ultra 160m controller: Adaptec® AIC-7892 Ultra-Wide 16-bit integrated SCSI controller (160 MB/s). The internal SCSI connectors allows for up to five internal devices to be connected. Additional devices can be added outside the PC Workstation by connecting directly to the rear panel SCSI connector. The external connector allows up to ten external devices to be connected. This gives a maximum of 15 (internal + external) devices that can be connected. IDE Controller All models include an integrated Ultra ATA-66 controller that supports up to four IDE devices. 2 English Features Feature: Video Controllers Description: Models include either: • • • • Accessory Card Slots ELSA GLoria Synergy® II AGP video controller with 32 MB of installed SGRAM video memory (maximum configuration). Matrox® Millennium G250 AGP video controller with 8 MB SGRAM video memory which can be upgraded to 16 MB. Matrox Millennium G400-Dual monitor AGP video controller with 16 MB SGRAM video memory (maximum configuration). 3Dlabs Oxygen® GVX1, 32 MB SGRAM video memory (maximum configuration). All models haves: • One Universal AGP PRO 4X 50 W 32-bit slot. The AGP bus provides a high performance graphics interface. • Three 32-bit 33 MHz PCI slots1 1, 2 and 5 (5 V). ❒ PCI slot 5 is Alert-On LAN (AOL) ready. • Two 64-bit 66 MHz PCI slots 3 and 4 (3.3 V). A majority of the configurations are delivered with PCI slots 1 to 4 vacant. LAN Card All models are supplied with an HP 10/100BT PCI Ethernet Adapter LAN card installed in PCI slot 5, supporting Wake-On LAN (WOL) and PCI 2.2 Specification. CD-ROM Drive Models include either an IDE 48X CD-ROM, CD-RW drive or DVD drive. Audio Integrated on the system board CSA4280 audio PCI chip and AC97 Codec (CS4297) audio. HP UltraFlow Cooling System Cooling system with multiple temperature-regulated fans to optimize cooling. Alert reporting to MaxiLife and TopTools. 1. All five PCI slots comply with the PCI Specification 2.2. English 3 Features Feature: Description: System Board Connectors • • • Rear Panel Connectors (color coded) • One flexible disk drive connector Two ATA-66 IDE connectors (for up to four IDE devices) One 16-bit U-160SCSI connector and one SCSI terminator. The SCSI cable is routed from the SCSI connector on the system board (located near the system switches) to the SCSI devices inside the chassis, onto an onboard SCSI terminator (behind the processor), and finally onto the external SCSI connector on the rear panel. The onboard SCSI terminator is automatically deactivated when an external device is attached. • One CD-IN audio connector • AUX connector • Internal speaker connector • One WOL connector • One status panel connector • Two power supply connectors that must be connected • Two fan connectors (one for the PCI fan, and one for the rear fan) • One battery socket The system board layout with all connectors can be found on page 11. 9-pin serial (two, buffered) ❒ Standard: Two UART 16550 buffered serial ports (both RS-232-C). ❒ Serial Ports A and B: 2F8h (IRQ 3), 2E8h (IRQ 3), 3F8h (IRQ 4), 3E8h (IRQ 4), or Off— (if one port uses 2xxh, the other port must use 3xxh). • • • • • 4 English Dual USB connectors External 16-bit U160m SCSI connector Audio ❒ Joystick/Dual MIDI connector ❒ LINE IN jack (3.5 mm) ❒ LINE OUT jack (3.5 mm) ❒ MIC IN jack (3.5 mm) Keyboard/Mouse ❒ HP enhanced keyboard with mini-DIN connector ❒ HP enhanced scrolling mouse with mini-DIN connector 25-pin parallel connector ❒ Mode: Centronics or bidirectional modes (ECP/EPP) ❒ Parallel port: 1 (378h, IRQ 7), 2 (278h, IRQ 5), or Off. Features Physical Characteristics (standard configuration) Characteristics: Description: Weight (excl. keyboard and display) 14.4 kilograms (31.68 pounds). Dimensions 47.0 cm max. (D) by 21,0 cm (W) by 49.0 cm (H) (18.50 inches by 8.26 inches by 19.29 inches). Footprint 0.09 m2 (1.06 sq ft). Storage temperature -40 °C to 70°C (-40 °F to 158 °F). Storage humidity 8% to 85% (relative). Operating temperature 10 °C to 35 °C (50 °F to 95 °F). Operating humidity 15% to 85% (relative). Power supply Input voltage: 100 - 127, 200 - 250 V (switch select) Input frequency: 50/60 Hz Maximum output power: 300 W continuous English 5 System Specifications System Specifications Power Consumption Information The power consumption and acoustics given in the below table is valid for a standard configuration as shipped (one processor, 256 MB of memory, 300 W power supply, one hard disk drive, video card, LAN card). All infomation in this section is based on primary power consumptions. Acoustic noise emission (as defined ISO 7779): • • • Operating Operating with hard disk access Operating with floppy disk access Power consumption - Windows NT: • • • 1. Operating with input/output (disk access) Operating without input/output (idle) Off with LAN card Sound Power Sound Pressure LwA <= 43.9 dB LwA <= 44.9 dB LwA <= 46.7 dB LpA <= 30.8 dB LpA <= 31.8 dB LpA <= 33.6 dB 115 V / 60 Hz 230 V / 50 Hz 1 85.5 W - 291.7 Btu/h 75.8 W - 258.6 Btu/h 4.2 W - 14.3 Btu/h 84.5 W - 288.3 Btu/h 77.2 W - 263.4 Btu/h 4 W - 13.6 Btu/h 1 W = 3.4121 Btu/h Component: • • • • NOTE Processor: SCSI HDD with access: SCSI HDD with no access: PCI card: 50 W 23 W 16 W 10 W - 36 W - 170.6 Btu/h 78.4 Btu/h 54.5 Btu/h 34.1 Btu/h - 122.8 Btu/h When the computer is turned off with the power button on the front panel, the power consumption falls below 5 Watts, but is not zero. The special on/off method used by these computers considerably extends the lifetime of the power supply. To reach zero power consumption in “off” mode, either unplug the power outlet or use a power block with a switch. 6 English System Specifications Maximum Loads Available for Accessory Slots PCI Accessory Slots The maximum supported power consumption per slot is 25W, either from the 5V or the 3.3V supply and must respect the electrical specifications of the PCI 2.2 specification. Total power consumption for the PCI slots must not exceed 75W. If the total power consumption used in the PCI/AGP slots exceeds 75W, the BIOS will display a warning during the boot sequence. There are five PCI slots on the system board: • Three 32-bit 33 MHz PCI slots 1, 2 and 5, accepting 5 V PCI cards and Universal PCI cards (support for 3.3 V or 5 V). • Two 64-bit 66 MHz PCI slots 3 and 4, supports 3.3 V PCI cards and Universal PCI cards (support for 3.3 V or 5 V). The following table shows the various PCI board installations for the different PCI slots: PCI Card 5 V PCI Slot 1. 2. 3. 4. 3.3 V Universal (3.3 V or 5 V compatible) 32-bit/ 33 MHz 64-bit/ 33 MHz 32-bit/ 33 MHz or 66 MHz 64-bit/ 33 MHz or 66 MHz Slots 1, 2 & 5 5 V, 32-bit/33 MHz yes yes1 not supported not supported Slots 3 and 4 3.3 V, 64-bit/66 MHz not supported not supported 32-bit/ 33 MHz or 66 MHz 64-bit/ 33 MHz or 66 MHz yes yes2 yes1 yes1,2 33 MHz 66MHz 33 MHz 66 MHz 33 MHz 66 MHz 33 MHz 66 MHz yes3,4 yes4 yes3 yes yes3,4 yes4 yes3 yes A 64-bit card can be installed in a 32-bit slot. However, this card will only operate in 32-bit mode. A 66 Mhz card can be installed in a 33 MHz slot. However, this card will only operate in 33 MHz mode. A 33 MHz card can be installed in a 66 MHz slot, However, the card will operate in 33 MHz mode and will force all other PCI devices to operate at 33 MHz as well. A 32-bit card can be installed in a 64-bit slot without preventing other 64-bit PCI devices to operate in 64-bit mode. English 7 System Specifications If a standard AGP (Accelerated Graphic Port) card is installed in the AGP PRO slot, the maximum power consumption for the PCI accessory and AGP slot must not exceed 75 W. If an AGP PRO card (>25 W and ≤50 W) is installed, then the PCI slot 1 is made inaccessible as defined in the AGP PRO specification (PCI slot must be left unoccupied to provide its sources in terms of cooling and electrical power to the AGP PRO card. AGP PRO Slot The AGP PRO slot is a Universal-type connector which provides power through 3.3 V, 12 V or 5 V power rails with a maximum allocated power consumption of 50 W. If this power consumption is exceeded, MaxiLife reports an error and prevents the PC Workstation from powering on. It provides an AGP 4x interface which is fully compliant with the AGP specification revision 2.0. The universal AGP PRO slot supports AGP 1x and 2x modes (uses 3.3 V or 1.5 V signals), and AGP 4x mode (1.5 V signalling). AGP Video Card1 1.5 V Universal 3.3 V Supported operation in the Universal AGP PRO Slot ≤ 25 W ≤ 50 W ≤ 25 W ≤ 50 W ≤ 25 W ≤ 50 W AGP1x2 yes yes yes yes yes yes AGP2x2 yes yes yes yes yes yes 2 AGP4x yes yes yes yes no no PCI-type yes yes yes yes yes yes 1. AGP PRO video cards are supported up to 50 W. 2. With or without sideband addressing. 8 English System Specifications IRQs, DMAs, and I/O Addresses Used by Your PC Workstation The IRQ, DMA, and I/O address mappings shown here are for a basic configuration. The resources used by your PC Workstation may vary, depending on which accessory boards are bundled with the PC Workstation. Resources are allocated by the system BIOS or the Plug and Play operating system. IRQs used by PC Workstation IRQ0 IRQ1 IRQ2 IRQ3 IRQ4 IRQ5 IRQ6 IRQ7 IRQ8 IRQ9 IRQ10 IRQ11 IRQ12 IRQ13 IRQ14 IRQ15 System timer Keyboard controller Free COM2, COM4 COM1, COM3 Free Flexible disk drive controller LPT1 Real-time clock Free Free Free Mouse Not connected Integrated IDE controller (primary) Integrated IDE controller (secondary) DMAs used by PC Workstation DMA 0 DMA 1 DMA 2 DMA 3 DMA 4 DMA 5 DMA 6 DMA 7 Capture Playback Flexible disk drive controller LPT ECP Cascade free free free English 9 System Specifications I/O Addresses used by PC Workstation 10 English 0000 - 000F 0020 - 0021 002E - 002F 0040 - 0043 0060, 0064 0061 0070 0070 - 0071 0080 0081 - 0083, 008F 0092 00A0 - 00A1 00C0 - 00DF 00F0 - 00FF 0130 - 013F 0170 - 0177 01F0 - 01F7 0200 0220 - 0232 0278 - 027F 02E8 - 02EF 02F8 - 02FF 0330 - 0331 0372 - 0377 0378 - 037A 0388 - 038B 03B0 - 03DF 03E8 - 03EF 03F0 - 03F5 03F6 03F7 03F8 - 03FF 04D0 - 04D1 0678 - 067B 0778 - 077B 0CF8 - 0CFF 8000 8400 8800 DMA controller 1 Master interrupt controller Configuration registers Timer 1 Keyboard controller Port B (speaker, NMI status and control) Bit 7: NMI mask register RTC and CMOS Manufacturing port (POST card) DMA low page register PS/2 reset and Fast A20 Slave interrupt controller DMA controller 2 Coprocessor error Free (IDE secondary channel) IDE primary channel LPT 2 Serial port 4 (COM4) Serial port 2 (COM2) Free (Secondary flexible disk drive) LPT1 VGA COM3 Flexible disk drive controller IDE primary channel Flexible disk drive controller COM1 Interrupt edge/level control LPT2 ECP LPT1 ECP PCI configuration space Power Management I/O space ACPI Registers MBus I/O space System Board Connectors System Board Connectors The following diagram shows where the different chips and connectors are located on the E-ATX system board. Fan CPU 1c SCSI Termination Connector Battery Backup Unitc AUX Power Power Supply Mouse (upper) & Keyboard (lower) FDD Two USB Processor 1 Connector Serial Port A Serial Port B (Both ports are stacked with the Parallel Port) Midi & Audio Memory Expansion Card Card Connectors- J22 Connectors Processor 2 Connector Rear Fan Line Out Line In MIC Fan CPU2c Anti-Intrusionb Memory Controller Hub (MCH) 8284O-QP Input/Output Controller Hub (ICH) 82801AA One AGP 4x Slot PCI Slot 1 (32-bit 33 MHz, 5V) PCI Slot 2 (32-bit 33 MHz, 5V) Super I/O NS 87364 Chip MaxiLife - Status Panel Primary IDE VRM for socket CPU 2 HDD Temperature Sensor Battery PCI Fan CD-ROM Audio In AUX Audio In Internal Speaker Internal SCSI U160 Connector to Internal Devices CSA4280 Audio PCI chip PCI Slot 5 (32-bit 33 MHz, 5V) Secondary IDE Adaptec 7892 SCSI U160 Controller PCI Slot 4 Wake-On Lan PCI 64-bit Hub FirmWare Hub (64-bit 66 MHz, 3.3V) (WOL)c (P64H) Controller (FWH) PCI Slot 3 (64-bit 66 Additional SCSI 82802AB MHz, 3.3V) LED Connectord Configuration Switchesa a. Refer to “System Board Switches” on page 12 or the Switch Block Label located on the chassis of the system box for the different system board switch settings. b. Connector for the Anti-Intrusion switch. c. Optional. d. Connector for additional control of HDD LED on the status panel through the SCSI controller on a PCI add-on card. English 11 System Board Switches System Board Switches There are ten system board switches used for configuration, numbered from 1 to 10. Of these a certain number are reserved and should not be modified, otherwise it could lead to a system failure. Switch Default Position 1 UP Enables normal mode. DOWN enables the BIOS recovery mode at next boot. 2 UP Reserved. Do Not change Default Setting 3 UP Enables User and System Administrator passwords. DOWN clears the passwords at next boot. 4 UP Retains CMOS memory. DOWN clears CMOS memory at next boot. 5 UP 6 DOWN To Configure: Reserved 5-6. Do Not change Default Settings 7 Enables keyboard power-on. UP disables this option. DOWN Switch Boxes 8 DOWN 9 DOWN 10 UP Reserved 8-10. Do Not change Default Settings There are two types of system board switch boxes that may be used on the HP Kayak XU800 PC Workstation. or OFF = OPEN ON = CLOSED OPEN = UP CLOSED = DOWN Default Configuration OPEN = UP CLOSED = DOWN 12 English 10 9 X 8 7 6 X X X X 5 4 3 X X X 2 1 X X Configuring Your Network Connection Configuring Your Network Connection You need to use the PC Workstation’s Setup program to change the integrated Ethernet interface settings. To access the Setup program, Press while the initial “Kayak” logo is displayed immediately after restarting the PC Workstation. The following table summarizes which network options you can set using the Setup program. To Network Setup Items1 Where to find in Setup Enable your PC Workstation to be started (booted and logged on) from the network. In the Security menu, go to the Boot Devices Security submenu (described below). Enable remote power-on of your PC Workstation. In the Power menu, enable the Integrated Network item. From “Suspend Wakeup” mode, enable your PC Workstation to return to full power when a command is received by the integrated network interface. In the Power menu, enable the Network Interface item. Determine boot device priority. In the Boot menu, select the Boot Device Priority list item. 1. For full information on setting up your network, refer to the online Network Administrator’s Guide preloaded onto your PC Workstation. Controlling the Network Security Features The Security Features allow you to enable starting from the network if you want the PC Workstation to start from a LAN server. To enable starting from the network: 1 Press while the initial “Kayak” logo is displayed immediately after restarting the PC Workstation to access the Setup program. Use the or key to select the Boot menu. 2 Check that Option ROM is enabled on the PCI 5 (Advance PCI5). English 13 Configuring Your Network Connection 3 Highlight the line 1st Device and press option to Lan. or to change the To disable boot options: 1 Press while the initial “Kayak” logo is displayed immediately after restarting the PC Workstation to access the Setup program. Use the or key to select the Security menu. 2 Press to go to the Start From Floppy line. Press to change the option to Disabled. or 3 Press to go to the Start From CD-ROM line. Press to change the option to Disabled. or 4 Press to go to the Start From HDD line. Press change the option to Disabled. or to 5 Save your changes and exit. To obtain further information and assistance, refer to the online help in the Setup program. 14 English