1
Menus, Configuration, and Adjustments
Scaler configuration and adjustments can be performed by using the Windowsbased control program (see chapter 3 for details) or by using the front panel
controls and the menus that are displayed on the DVS 406’s LCD screen. These
menus are used primarily when the scaler is first set up.
Moving through menus by using front panel controls
Menu button — Press the Menu button to activate menus and to scroll to the six
main menus.
Next button — Press the Next button to move between the submenus of a
selected main menu. Pressing the Next button during input configuration
causes the current input’s number and format type to be displayed on the
LCD.
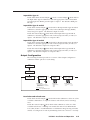
Adjust ( , ) knobs — When configuring the DVS 406, rotate the horizontal
Adjust ( ) knob and vertical Adjust ( ) knob to scroll through submenu
options and to make adjustment selections. Refer to the flowcharts in this
chapter and to specific sections for explanations on knob adjustments.
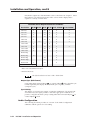
Image adjustment buttons: Col/Tnt, (color/tint) Brt/Cont (brightness/contrast),
Detail, Size, and Center — When one of these buttons is pressed, the
corresponding image adjustment menu appears on the LCD screen.
Adjustments can then be made by rotating the horizontal Adjust ( ) knob
or the vertical Adjust ( ) knob. Settings and adjustments are stored in
nonvolatile memory.
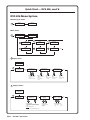
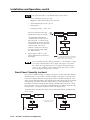
Menu overview
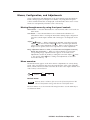
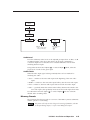
The default menus appear on the LCD when no adjustments are actively being
made. They cycle between the screen showing the name of the scaler (DVS 406/
406 A/ 406 D/ 406 AD) and the screen that shows the active input’s number and
video format, as shown below.
Power
on
Extron
DVS 406 AD
2 sec.
2 sec.
Input #2
RGB
Default menus
From any menu or submenu, after ten seconds of inactivity the DVS 406
will save all adjustment settings and time-out to the default menus.
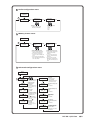
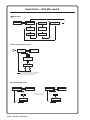
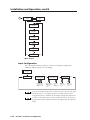
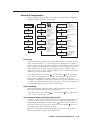
The main menus are as shown in the following flowchart. Use the Menu key to
scroll between them.
DVS 406 • Installation and Operation
2-9