1
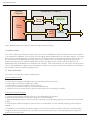
TM
Technical Services Group
Advanced Remote Control of MediaMatrix
A white paper by Joe Kurta, Systems Integration Specialist
Advanced Remote Control of MediaMatrix®
Advanced Remote Control of MediaMatrix
How to compile a viewfile using a control system
By Joe Kurta, Systems Integration Specialist. Edited by Will Roland, Operations Manager.
A. Introduction to Remote Control
When implementing a large-scale MediaMatrix system that may encompass multiple Mainframes, the designer may find the need to
implement tools that support remote control of MediaMatrix. Using a third party, integrated control system such as those offered
by AMX® (www.amx.com) or Crestron® (www.crestron.com) can be greatly beneficial by adding facility-wide control functionality.
In addition, these systems provide familiar hardware interfaces to common system functions that end-users are most familiar with.
Finally, establishing a centralized control source for all of the site’s MediaMatrix hardware will generally save time, ease troubleshooting and better support maintenance processes.
The interface between MediaMatrix and these types of control systems can be accomplished in many ways. Usually, a serial communications connection (RS-232, RS-422, RS-485, etc.) is used because it is a simple and cost effective solution. However, a serial
interface has serious limits in terms of data flow, stability and speed. A much more robust method of interfacing these, and other
control systems, can be found by making use of MediaMatrix’ built-in Ethernet (TCP/IP) port. Thus, this is the focus of this paper1.
MediaMatrix supports multiple, simultaneous toolsets for remote control. One of the most powerful tools when implementing
advanced remote control is “RATC™.” RATC, or Remote Access Terminal Control, is a powerful command-line protocol for use in
remote client control systems. RATC includes functionality that gives a remote client application access to controls and their values within a compiled view file in MediaMatrix. The remote client application or control system communicates with MediaMatrix
via a TCP/IP network connection, so RATC is compatible with both local area networks, VPN’s and the Internet. In addition, any
reasonable number of RATC clients can be connected simultaneously to the MediaMatrix frame. RATC runs as a “Remote Service”
in the MWare™ application, and the service is configured and enabled through the MediaMatrix user interface2.
B. Why use Telnet?
Within the MediaMatrix software (MWare), there are actually two separate Windows® applications that work together in a clientserver relationship. There is the client GUI, “PAVCON™” (Peavey Audio Virtual CONsole), and the server, “PADPU™” (Peavey Audio
Digital Processing Unit), which contains the kernel that manages the DSP hardware. The user, however, only sees PAVCON, and
when a control on the MWare screen is gestured, PAVCON sends a message to PADPU to change the setting of the control parameter in the DSP. After the change has occurred in the DSP hardware, PAVCON updates its controls to reflect the new hardware settings. This process occurs transparently to the user, and the controls are updated virtually in real-time.
When the RATC service is enabled, a Windows socket is granted access to PADPU directly, and thus, can send commands to the
hardware much in the same way that PAVCON does (See Fig. 1). It is important to remember that a remote computer using RATC
does not send commands to PAVCON, only to PADPU. In this context, RATC is an independent client to PADPU, just as
PAVCON is. While this is generally acceptable for most control issues, there may arise an occasion when the user wishes to perform a function that is only available from PAVCON, such as a “Compile” command. When the user is at the MediaMatrix frame,
operating PAVCON directly, such a command is a simple matter of using functionality from the GUI, or from a command line
switch using the MediaMatrix CLAMM™ protocol (Ex: "pavcon.exe /compile c:\viewfile.pav")3. But in our case, the user is located at
a remote location. Our goal is therefore to allow this remote user to utilize these CLAMM functions on the MediaMatrix in much
the same way as he/she would locally. This can be done using Telnet.
Hardware Setup
Remote
Computer
MediaMatrix Computer
TCP/IP
Telnet
Server
CLAMM
PAVCON
Telnet
Client
TCP/IP via RATC
RATC
Server
PADPU
HARDWARE CONTROL
Figure 1, MediaMatrix application components and their relationship to Telnet based computers.
C. Hardware Setup
Let's create a simple system for future examples. First, we must have a MediaMatrix4 frame-based audio system. This would have
to be a Miniframe or Mainframe, as the X-Frame™ does not support TCP/IP communications. For our remote computer, let’s assume
that we will use a standard Windows® notebook. Because we're keeping it simple, we're going make a direct connection between
the notebook and the MediaMatrix frame using a single CAT-5 crossover cable. One end of the cable plugs directly into the
Ethernet network port on the notebook, and the other end of the cable plugs into the network interface card (NIC) on the
MediaMatrix frame (all MediaMatrix "nt" models have NIC’s built-in). That's all the hardware you will need to start using remote
services. Since MediaMatrix computers ship with Windows NT/2000, we're going to assume that the notebook also has Windows
NT or Windows 2000 as its primary operating system.
D. Verify the Network
Let's make sure our network is ready for communications.
At the MediaMatrix frame:
1. Verify/assign the computer an IP address (10.10.1.1)5 and subnet mask (255.255.255.0).
2. Create or open a view file that compiles successfully.
3. Enable a RATC™ port (Tools | Options - Remote Services).
4. Create a new account (User | Edit User List) called“mediamatrixuser.”
5. Enable the "Access the system remotely" option for this account in the “User Privileges” checklist.
At the remote notebook computer:
1. Verify/Assign the computer an IP address (10.10.1.2)5 and subnet mask (255.255.255.0).
2. Open the Command Prompt window (Start | Programs | Command Prompt).
3. "Ping" the MediaMatrix frame to verify the network is operating correctly by typing “ping 10.10.1.1” (no quotes) at the command
prompt.
4. Launch Telnet by double-clicking the Telnet icon in the Accessories folder, or at the command prompt, type telnet and press
ENTER.
You should now see the Windows Telnet Client appear. The Telnet Client interface resembles an MS-DOS™ command window
except for the menu selections at the top. If you don't see such a window, please refer to your operating system for solutions or
install your own Telnet Client6.
Advanced Remote Control of MediaMatrix®
E. Connecting using RATC™
Let's begin our remote control exercise by controlling the MediaMatrix frame using
the RATC protocol. As we mentioned earlier, it is not possible to compile directly via
RATC; however, this exercise will confirm that our Telnet Client is set up properly
and will allow you to get more comfortable using Telnet and the RATC protocol.
At the remote notebook computer:
1. On the Telnet Client, select Remote System (Connect | Remote System).
2. (Refer to Fig. 2.) In the Host Name box, type the IP address (10.10.1.1) of the
MediaMatrix frame.
Figure 2, TelNet Connect Dialog
3. In the Port box, specify port 1634.
4. Click on the “Connect” button. This will open a Telnet session and bring you to the log-in prompt (see Fig. 3.).
5. At the "Name:" prompt, type "mediamatrixuser." This matches the active account name at the MediaMatrix frame that you set up
earlier.
6. At the "Password" prompt, press Enter. No password is required in this case.
At this point, you should see a message welcoming you to
RATC (similar to Fig. 3). Type "help" to see all of the available RATC commands. This would be a good time to try
some of them out. Each command is described in the
MediaMatrix Help for reference2.
Before moving to the next step, make sure you are completely familiar with the concepts presented so far. You
should understand how RATC is operated as a service
within MediaMatrix, and how a generic Telnet client
accesses MediaMatrix controls. If you are not sure, go
back, review, and if necessary, read the MediaMatrix Help
on RATC and Remote Services.
Figure 3, Telnet Logon Screen
F. WinTD® Overview
In any communications setup, two applications have to exist. One to act as a server and one to act as a client which connects to the
server. If you remember from Fig. 1, PADPU™ has a RATC client built-in, which in itself, acts as a server. This is why we can enable
direct communications between a remote RATC client and PADPU. However, PAVCON™ does not have this built-in server, so in
order to send a command to PAVCON, an additional Telnet Server must be installed on the MediaMatrix frame.
WinTD (Windows® Telnet Daemon) is a simple shareware Telnet server that is available for minimal cost from the Internet
(http://serverwatch.internet.com/telserver-wintd.html). Many other Telnet server applications are available, so use the one you’re
most comfortable with. Follow the manufacturer's instructions when installing the application on the MediaMatrix frame.
NOTE: This process is considered an advanced procedure, as we do not provide support for third-party software on factoryconfigured MediaMatrix frames. It is assumed that you are an advanced user, and are capable of troubleshooting Windowsbased computers. Defects to the MediaMatrix software, the operating system or any other factory configuration is not covered by the MediaMatrix Technical Support Group, or the warranty.
Telnet Setup
G. WinTD® Setup
Start WinTD. It will ALWAYS start as a minimized window, but it can be configured
for “hidden” operation. To restore the hidden WinTD window, start it again (the new
instance will "unhide" the already running copy).
First, we need to set up the server interface so the client can connect. From the pulldown menu, select Options | Configuration and open the WinTD Configuration dialog (Fig. 4). For this exercise, let's change the port to 1634. If you would like, you may
also change the display message by typing a new message in the “Message” text box.
This message is what the user will see after a successful logon. You will most likely
NOT need to modify any other settings at this point. Select OK to save the settings
and exit the dialog.
Figure 4, WinTD Configuration Dialog
Now that the server is set up, we need
to establish a user account for the client
log-on. From the pull-down menu, select Options | Users (CTRL-U) to open the
“WinTD Users” dialog. When a connection is requested from the server, WinTD will
prompt the client for a user name. When the user types in his/her name, the server
scans this list for the user's settings and prompts for a password. If the log-in name
does not exist, WinTD will not prompt for a password. In this sense, WinTD will
deny access to everyone7 unless they exist in the User List. When creating a user, fill
in ALL of the requested information (see Fig. 5) and check the “Enabled” option so
that WinTD will permit this user access. Before clicking on the “Add User” button,
we must configure the executable path in DOS syntax. In the “Home Dir:” field, type
Figure 5, WinTD Users Dialog
in the root directory of the MediaMatrix installation. This is where the Pavcon executable is located. It should look something like, “d:\progra~1\peavey\mediam~1.2a\."
This must be in DOS syntax, that means the lowercase characters, the tilde symbol and numeric variables for extended Windows
file names. If you are not familiar with DOS vs. Windows file name syntax, please refer this section to someone who is. If the path
is not correct, you will be unable to implement command line controls.
To enable specific command privileges for a user, highlight the user name (in the User
List) and click the “Command Privileges” button. This will open the “Command
Privileges” dialog (see Fig. 6). From here, select the desired functions from the
"System Commands" list and place them into the "User Commands" list by using the
mouse (drag and drop) or the INSERT and DELETE keys. For our example, we only
need to enable the “root” checkbox which will enable full access to all Telnet commands. This command includes the execution of a Windows® program (.exe). Since
this is such a powerful and potentially dangerous feature, we should limit the command set for this user. This process however, is beyond the scope of this document.
After you have enabled the “root” checkbox in the “Command Privileges” dialog box,
click on the “OK” button to exit. This will return you to the “WinTD Users” dialog
(Fig. 5). Click on “Add User” to add this user to the access list. NOTE: IF YOU DO
NOT "ADD" THE USER, THE SETTINGS WILL BE LOST. Click “Done” to continue.
Figure 6, WinTD Command Privileges Dialog
Advanced Remote Control of MediaMatrix®
You are now ready to test WinTD.
At the notebook computer:
1. Run Telnet (if it isn't running already).
2. Connect to the MediaMatrix frame (IP=10.10.1.1)
using port 1634.
3. When prompted, type in the user name and password you set up in WinTD.
4. Type "man," which stands for 'manual'. You should
now see some basic help and other information about
the Telnet application (see Fig. 7.).
Fig. 7, Telnet screen showing WinTD “man” command
NOTES: Depending on the Telnet client options, the
backspace key may not work properly. If you type a line using the backspace key and it doesn't seem to work properly, try typing it
again without using the backspace key.
Once the user is logged on, he/she can change his/her assigned password with the "passwd" command.
H. Compiling a view file
Now that we've tested the Telnet client and server communications, we can use CLAMM™ to compile a view file. In the Telnet
client, type "pavcon /compile <filename>." Replace <filename> with the absolute path of your view file, for example
"C:\viewfiles\mytestfile.pav." There are many other CLAMM commands available; try experimenting with some more. Also, see the
Help within MWare for a summary of CLAMM commands and their syntax3.
I. Using a control system
We are now able to invoke PAVCON™ commands via our notebook computer. However, this does not provide any real benefit if a
stand-alone control system (AMX®, Crestron®, etc.) is the desired user interface. So, now we must replace the functions of the notebook computer with a control system.
Since control system configurations vary from manufacturer to manufacturer, we can only generalize here. The primary steps
required include the following:
1. Verify/Assign the control system an IP address and subnet mask.
2. Open a socket connection to the MediaMatrix Telnet Server (port 1634).
3. Send the desired CLAMM commands.
4. Close the socket connection.
It should go without saying, but a control system that is not capable of communicating via Ethernet (TCP/IP) cannot be used with
MediaMatrix in this context. For interfacing other control systems via RS-232, RS-485 or other serial formats, please refer to the
following sources for more information:
The MWare™ Help, see PASHA™1.
The MediaMatrix website, see http://mediamatrix.peavey.com1.
Footnotes
1. For information regarding serial control of MediaMatrix® please refer to the online help file: http://mediamatrix.peavey.com.
Click on the “MWare™ Online Help” link to open the help file. Navigate to; Advanced Topics-Remote Control-PASHA™.
2. For a detailed description of controlling MediaMatrix via RATC™ please refer to the online help file:
http://mediamatrix.peavey.com. Click on the “MWare Online Help” link to open the help file. Navigate to; Advanced TopicsRemote Control-RATC.
3. For a detailed description of controlling MediaMatrix via CLAMM™ please refer to the online help file:
http://mediamatrix.peavey.com. Click on the “MWare Online Help” link to open the help file. Navigate to; Advanced TopicsRemote Control-CLAMM.
4. If a MediaMatrix is not available, it is possible to emulate one using a suitable computer running MWare.
5. If you're not sure how to assign or verify the IP address of a computer, please refer to the Operating System's help file, manual or
the manufacturer’s technical support department.
6. Telnet Client applications are available at many shareware/freeware web sites. A few of our favorites include www.tucows.com
and www.hotfiles.com.
7. WinTD® can be more appropriately enabled/disabled individually for users (using the Enabled option in the User screen) or overall using Options | Enable (Disable) WinTD.
The information contained herein is subject to change without notice. Peavey Electronics is not liable for improper installation or configuration of software components. This information is intended only as an aid to qualified persons in the design, installation and maintenance of MediaMatrix audio systems. The designer, installer or end user is ultimately responsible for the successful implementation of the systems.
WinTD®, Telnet®, Windows®, NT®, Windows 2000® are registered trademarks of their respective companies.
Illustrations are not drawn to scale.
All creative content, including but not limited to, specifications, layout design, artwork, photography, drawings, illustrations and logos are Copyright © 2001 Peavey Electronics Corporation, all rights reserved, except where
noted. MediaMatrix®; MM™; the stylized Delta logo; the MediaMatrix computer logo; the "fast forward," the stylized Peavey logo and the MediaMatrix brand name are registered trademarks of Peavey Electronics. Unauthorized duplication or distribution is prohibited by law. This document was designed, written, formatted, pre-press and printed in Meridian, Mississippi, USA. 2001.
Design by WR.
TM
MediaMatrix
A Division of Peavey Electronics Corp.
711 A St., Meridian, Mississippi 39301
601-483-9548
http://mediamatrix.peavey.com
Features & specifications subject to change without notice.
Copyright 2001, All Rights Reserved
Printed in the USA 8/2001


![SOLO [Nr.19] USER'S MANUAL](http://vs1.manualzilla.com/store/data/006880922_1-a650282ebddd9b1db13372fd9b60b3ef-150x150.png)