1
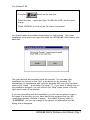
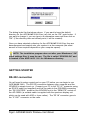
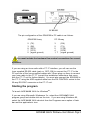
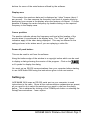
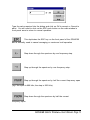
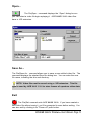
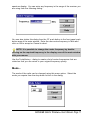
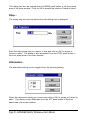
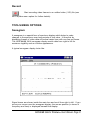
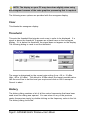
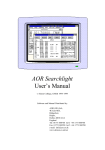
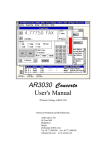
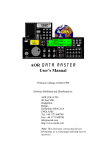
TM
AOR Hawk 5000 User’s Manual
© Simon Collings, G4SGI 1995
Software Published and Distributed by:
AOR (UK) LTD.,
4E East Mill,
Bridgefoot,
Belper,
Derbyshire DE56 2UA
ENGLAND
Tel: +44 1773 880788
Fax: +44 1773 880780
e-mail: [email protected]
AOR HAWK 5000 for WindowsTM User’s Manual - Page 1
CONTENTS
INTRODUCTION .....................................................................
MINIMUM SYSTEM REQUIREMENTS ....................................
INSTALLING THE PROGRAM ................................................
COPY PROTECTION ..............................................................
TO INSTALL... .........................................................................
GETTING STARTED ...............................................................
RS-232 CONNECTION ............................................................
STARTING THE PROGRAM ....................................................
SETTING UP ...........................................................................
FRONT PANEL PUSH BUTTONS ............................................
OBTAINING HELP ...................................................................
FILE MENU OPTIONS .............................................................
NEW .......................................................................................
OPEN... ...................................................................................
SAVE AS .................................................................................
EXIT ........................................................................................
SETUP MENU OPTIONS .........................................................
COMMUNICATIONS... .............................................................
CONFIGURATION... ................................................................
CENTRE FREQUENCY... .........................................................
MODE... ..................................................................................
STEP... ....................................................................................
ATTENUATOR... ......................................................................
SPAN... ....................................................................................
RBW... .....................................................................................
VIDEO MENU OPTIONS .........................................................
REWIND ..................................................................................
FORWARD ..............................................................................
PLAY .......................................................................................
STOP ......................................................................................
PAUSE ....................................................................................
RECORD .................................................................................
TOOLS MENU OPTIONS ........................................................
SONOGRAM ...........................................................................
CLEAR ....................................................................................
THRESHOLD ..........................................................................
HISTORY ................................................................................
NEA .........................................................................................
MOVING COPY PROTECTION ...............................................
Page 2 - AOR HAWK 5000 for WindowsTM User’s Manual
3
4
4
4
6
8
8
9
11
12
14
14
14
15
15
15
16
16
16
16
17
18
18
19
19
20
20
20
20
20
20
21
21
21
22
22
22
23
25
INTRODUCTION
Welcome to AOR Hawk 5000 for WindowsTM. This is a powerful control and
analysis software package for the AOR SDU5000 spectrum display unit and
your AOR AR-3000A communications receiver (or compatible). The software
has the following features and many more:
l Remote control of the SDU5000 and radio using RS-232 commands for
control of centre frequency, span, resolution bandwidth, attenuator
(AR-3000A only), mode, step size, averaging, maximum hold, up, down,
page up and page down.
l Spectrum display with frequency and level readout using your mouse.
l Centre frequency history listing
l Digital spectrum video recording and playback with pause and forward/
reverse controls.
l Wideband sonogram display with frequency and time readout using your
mouse.
l New energy analysis in which RF energy is channelised and may be
exported in PC-MANAGER format for interoperability with PC-MANAGER
for DOS, PC-MANAGER for WindowsTM and AOR Searchlight (may require
upgrade).
l On-line context sensitive help. You may obtain help from the main menu
and in all dialogs. Help is also available simply by pressing the F1 key.
You have purchased a “licence” to install and operate a maximum
of two copies of AOR Hawk 5000 for WindowsTM. There are two copy
protection tokens on the master disk. See the section on copy protection
for more details.
AOR HAWK 5000 for WindowsTM User’s Manual - Page 3
MINIMUM SYSTEM REQUIREMENTS
l 80486 PC DX2/66 MHz (or higher) with fast colour graphics display
l Microsoft® WindowsTM 3.x or Windows® 95 (WindowsTM NT is not currently
supported)
l 8M byte of system memory (640k bytes of base DOS memory)
l Microsoft® mouse or equivalent (strongly recommended)
l At least 1M bytes of free hard disk space
l At least two RS-232 serial ports (one for mouse if used, highly recommended)
l AOR AR-3000A with IF and AGC modifications or ICOM R7100, R7000,
R9000 (with the Icom CT-17 RS-232 interface). It is planned to support the
new AR5000 too.
l Option: AOR PC-MANAGER for DOS (version 2.2.1 or higher)
l Option: AOR PC-MANAGER for WindowsTM (version 1.7 or higher)
l Option: AOR Searchlight (version 2.2.2 or higher)
INSTALLING THE PROGRAM
In this manual, it is assumed that you are familiar with Microsoft® WindowsTM
3.x or Windows® 95 and the hardware you are using with your computer. If
you need further information on using specific WindowsTM features, consult
your Microsoft® manuals.
Copy Protection
AOR Hawk 5000 for WindowsTM is copy protected. The protection
does not use a dongle or other cumbersome devices, however, there are
a few simple points that you may need to refer to. Please read this
section carefully.
Page 4 - AOR HAWK 5000 for WindowsTM User’s Manual
AOR Hawk 5000 for WindowsTM is copy protected using a system which
places a “token” on your hard disk when you install the program. The program
will only work on the hard disk you installed it to. There is no dongle or keydisk, so once installed the program runs completely normally and you will not
be inconvenienced (unlike other schemes).
Specific points to remember:
1. The distribution disk contains two tokens. This means that you can install
up to two complete copies of the software on separate machines at once. You
cannot transfer the program to another machine without first moving one of the
tokens back onto the original distribution disk then re-installing. The tokens
can easily be moved with the program that is provided. Contact your AOR
distributor if you need additional copies of the software.
2. You should keep your original disk in a safe place away from strong
magnetic fields, high humidity or other environmental conditions that could
damage it. You will not be able to re-install the software or move it to another
machine without the distribution disk.
3. Two hidden files are copied to a hidden subdirectory of the AOR Hawk
5000 directory (SDU5000.CCC and CCONTROL.SYS) when you install the
software. These contain configuration information for the copy protection
scheme and are normal DOS format files. DO NOT DELETE THESE FILES
UNDER ANY CIRCUMSTANCES. If these files are deleted, AOR Hawk 5000
will not run.
4. If you are using a backup utility, make sure that the two hidden files are not
backed up. When restored, the copy protection scheme may not be able to
validate the installation and AOR Hawk 5000 will not run. Most backup
utilities do not touch these files because they have the hidden, system and
read-only attributes set. The two copy protection files also do not have the
archive bit set, so you should be able to exclude them from backups by setting
up your backup software to ignore files without an archive bit. Remember, it is
not the backup but the restore that can cause problems.
5. The /d+ option of the PC-Kwik disk cache software from Multisoft
Corporation is not compatible with the copy protection scheme and should be
temporarily disabled when installing AOR Hawk 5000 or moving the token.
HyperCache also affects the copy protection scheme in the same way because
of non-standard methods of accessing the floppy disk drive. Again, it should
be temporarily disabled, but both caches may be used at other times.
6. The copy protection scheme is compatible with disk drives compressed
with SuperStor, Stacker and DoubleSpace. However, you should temporarily
remove the token from the hard disk when installing one of these compression
utilities because the protection will appear invalid when the drives are
compressed. The disk compression utilities warn you of this in their manuals.
AOR HAWK 5000 for WindowsTM User’s Manual - Page 5
7. The copy protection scheme is known to be compatible with the following
disk defragmenters: Central Point’s Compress, Digital Research’s Diskopt,
Stac’s Sdefrag and Microsoft’s Defrag.
8. The copy protection scheme is not currently compatible with WindowsTM NT.
9. The copy protection scheme is not compatible with non-standard floppy
disk systems. At present (7/95) this includes the following PCs:
Evesham Vale Voyager laptop
Zeos Pentiums
It is possible to install onto a PC with a non-standard floppy disk (or no floppy
disk) using a networked standard drive. The easiest way to do this if you do
not already have a network is to use the INTERLNK or INTERSVR utilities
supplied with MS-DOS.
10. The copy protection scheme is compatible with Windows 95. However,
you can completely erase your tokens using Explorer to drag and drop the
AOR Hawk 5000 directory onto the Recycle bin. Although the token files are
not deleted, they cannot be restored to their original positions on disk.
EXPLORER DOES NOT GIVE WARNINGS LIKE FILE MANAGER UNDER
WINDOWS 3.X!.
See the section of this manual entitled MOVING COPY PROTECTION for
instructions on using the utility for moving the copy protection token.
To Install...
You will need to follow slightly different instructions depending on the operating
system you are using.
For Microsoft® WindowsTM 3.x
Either...
Click on the File menu of program manger and select the Run... option.
Type “A:\INSTALL.EXE<ENTER>” into the dialog.
Or...
Use file manager to list the files on drive A and double-click on the line
with “INSTALL.EXE” on it.
Page 6 - AOR HAWK 5000 for WindowsTM User’s Manual
For Windows® 95
From the
button on the task bar...
Select the Run... option and type “A:\INSTALL.EXE” into the open
dialog.
Press <ENTER> or click on the OK button to proceed.
You should obtain the window shown below on your screen. This is the
installation utility which will copy and install the AOR Hawk 5000 files to your
hard disk:
Two push buttons are provided inside the window. You can abort the
installation by clicking on the “Quit” push button (or by pressing “Q”).
Alternatively, to decompress and copy the program files onto your hard disk,
click on the “Install...” push button (or press “I”). If you want to obtain help on
the installation program, you can click on the “Help” menu option in the top
right hand corner of the window.
If you are proceeding with the installation, you will now be asked to type in
the name of a directory on your hard disk for the program files (you will
need approximately 1M byte of space). The default directory name is
“C:\SDU5000”, but you can change it by typing in an alternative into the
dialog that is displayed.
AOR HAWK 5000 for WindowsTM User’s Manual - Page 7
The dialog looks like that shown above. If you want to keep the default
directory for the AOR Hawk 5000 files, just click on the “OK” push button. If
you want to change it, you can type in an alternative name and then click on
“OK” (if the directory does not already exist, it will be created).
Once you have selected a directory for the AOR Hawk 5000 files, they are
decompressed and copied onto your system in a few moments (the exact
amount of time required depends on your computer speed).
NOTE: The installation program does not alter your WindowsTM “.INI”
initial settings files; it uses its own. The file is called “SDU5000.INI” and
is located in the AOR Hawk 5000 for WindowsTM directory.
GETTING STARTED
RS-232 connection
You will need to setup a serial port on your PC before you can begin to use
AOR Hawk 5000. The RS-232 connection between your computer and the
SDU5000 is simple to set up. Connect your PC to the “PC I/F” connector using
an RS-232 cable (not supplied) and link the radio to the SDU5000 connecting
the “RX CONTROL” socket on the SDU5000 unit to the “REMOTE” socket on
the AR-3000A (a suitable cable is supplied with the spectrum display unit
which can be used with AOR or Icom radios). The “RF IN” connector goes to
the “IF OUT” connector on the radio.
Page 8 - AOR HAWK 5000 for WindowsTM User’s Manual
The pin configuration of the SDU5000 to PC cable is as follows:
SDU5000 9-way
PC 25-way
2
3
8
7
5
3
2
5
4
1, 7
(TX)
(RX)
(RTS)
(CTS)
(signal ground)
(RX)
(TX)
(CTS)
(RTS)
(signal ground)
You must include the hardware flow control connections for correct
operation.
If you are using an Icom radio with a CT-17 interface, you will can use the
Icom supplied RS-232 cable (part no. OPC-159) to connect the CT-17 to the
PC and one of the Icom supplied cables with 3.5mm plugs on them to connect
your Icom radio to the CT-17 (consult the installation instructions that come
with the CT-17 unit for further details). You must also connect the SDU5000 to
the CT-17 using the AOR supplied cable from the RX CONTROL socket to the
25-way RS-232C connector on the CT-17 unit.
Starting the program
To launch AOR Hawk 5000 for WindowsTM:
If you are using Microsoft® WindowsTM 3.x, select the AOR Hawk 5000
program group and double-click on the icon. If you are using Windows® 95,
select the AOR Hawk 5000 shortcut from the Programs menu option of task
bar and the application’s icon.
AOR HAWK 5000 for WindowsTM User’s Manual - Page 9
AOR Hawk 5000 should then appear on your screen. The main window has a
number of components in it as follows (screen shots are for Windows® 95):
Menu options:
The main menu provides access to all the features of the program and is
located just below the top edge of the window.
Video controls:
Underneath the main menu is a tool bar with video controls on the left. This
includes a set of push buttons which provide rapid access to the options on the
Video menu.
Status:
Next to the tool bar push buttons is a status display showing the current centre
frequency, mode, step size, attenuator setting, span, resolution bandwidth and
gain.
Front panel push buttons:
These emulate many of the SDU5000 front panel controls and include push
Page 10 - AOR HAWK 5000 for WindowsTM User’s Manual
buttons for some of the extra features offered by the software.
Display area:
This contains the spectrum data and is displayed as “video” frames (about 1
per second). You can measure the frequency and level of signals simply by
positioning your mouse in the display area over features of interest. It is also
possible to change the centre frequency by double-clicking on the required
frequency in the display area.
Cursor position:
The position indicator shows the frequency and level at the location of the
mouse when it is positioned in the display area. The “Cent:” and “Span:”
indicators apply to the video being displayed. This may be different to the
settings shown in the status area if you are replaying a video file.
Power off push button:
This can be used to exit from the software.
Along the bottom edge of the window is a copyright notice which can be used
to display a dialog showing the version of the program. Click on the
or © symbol to display the dialog.
You must set up RS-232 communications from your computer before starting
to use AOR Hawk 5000 using the instructions given in the next section.
Setting up
AOR Hawk 5000 uses an RS-232 serial port on your computer to send
instructions to the radio. Since all the communications parameters are preset,
all you need to do is select the serial port you want to use from the dialog
below. This is obtained by clicking on the COMM push button or selecting the
Setup|Communications... menu option:
AOR HAWK 5000 for WindowsTM User’s Manual - Page 11
Choose the serial port to use on your PC from those available (COM1 to
COM4) by clicking on the required one then click on OK to accept or Cancel to
abort. Once you have selected the PC serial port, you can begin to use AOR
Hawk 5000.
Front Panel Push Buttons
A variety of push buttons are provided on the front panel area of the main
window. Most of these are short cuts to the equivalent functions on the front
panel of the SDU5000 unit; some are equivalent to menu options on the AOR
Hawk 5000 package.
The push buttons with equivalent software menu options are described in the
relevant section of this manual. The other push buttons are as follows:
This push button selects maximum hold operation. When
maximum hold is in operation, the SDU5000 only displays the maximum signal
level detected for each part of the spectrum. Press the ESC push button in the
main window’s front panel area to restore normal operation.
This push button sets the level of averaging that is used to
display the data. You can enter the number of video frames that will be
included in “the average” using the following dialog:
Page 12 - AOR HAWK 5000 for WindowsTM User’s Manual
Type the value required into the dialog and click on OK to accept or Cancel to
abort. You will need to click on the ESC push button on the main window’s
front panel area to return to normal operation.
This duplicates the ESC key on the front panel of the SDU5000
and is normally used to cancel averaging or maximum hold operation
Step down through the spectrum by one frequency step.
Step up through the spectrum by one frequency step.
Step up through the spectrum by half the current frequency span
(eg if the span is 600 kHz, the step is 300 kHz).
Step down through the spectrum by half the current
frequency span.
AOR HAWK 5000 for WindowsTM User’s Manual - Page 13
Obtaining Help
AOR Hawk 5000 has an extensive context sensitive help available at all times.
You can obtain help from the desktop simply by pressing [F1] or by selecting
the “Help” option from the main menu. Help is also provided from a push
button in each dialog.
The help information that is provided is hypertext based and fully
inter-referenced for your convenience.
FILE MENU OPTIONS
New
The File|New command creates a new, untitled video file and
begins recording immediately. It has the same affect as pushing the record
push button control or selecting the Video|Record menu option. While
recording, a “Recording” indicator appears in the display window with the
time shown beneath it.
Page 14 - AOR HAWK 5000 for WindowsTM User’s Manual
Open...
The File|Open... command displays the “Open” dialog box so
you can select a video file begin replaying it. AOR Hawk 5000 video files
have a .VID extension.
Save As...
The File|Save As... command allows you to save a new untitled video file. The
command displays the standard Save As dialog box. You can enter the new
file name, including the drive and directory.
NOTE: Video files must be saved using a .VID extension. This file
type is used by AOR Hawk 5000 to store frames of spectrum video data.
Exit
The File|Exit command exits AOR Hawk 5000. If you have created a
new video file without saving it, you’ll be prompted to save before exiting. You
can also exit by clicking in the “Power off” push button.
AOR HAWK 5000 for WindowsTM User’s Manual - Page 15
SETUP MENU OPTIONS
Communications...
This menu option opens the Communications dialog which allows you to select
the PC serial port to use for RS-232 communications with the SDU5000.
Further details are given in the “Setting Up” subsection of the “GETTING
STARTED” section.
Configuration...
You can select the “configuration” options of the SDU5000 using this option. It
is also available from the CONF push button on the front panel area of the
software. The following dialog is displayed:
Select the communications receiver you are connected to from the “Receiver”
panel. You can select the gain setting and plot mode from the “Gain” and “Plot
mode” panels. Click on OK to accept or Cancel to abort.
NOTE: The software will follow the SDU5000 plot mode using this
dialog, but since the software cannot request the plot mode from the
unit, it may differ on power up. This is a hardware limitation.
Centre Frequency...
The centre frequency is the frequency that appears in the centre of the
Page 16 - AOR HAWK 5000 for WindowsTM User’s Manual
spectrum display. You can enter any frequency in the range of the receiver you
are using from the following dialog:
You can also obtain this dialog from the CF push button in the front panel push
button area of the main window. Enter the new centre frequency in MHz and
click on OK to accept or Cancel to abort.
NOTE: It is possible to change the centre frequency by doubleclicking on the required frequency in the display area of the main window
with your mouse.
Use the Tools|History... dialog to create a list of centre frequencies that are
visited so that you can return to your original frequency quickly.
Mode...
The mode of the radio can be changed using this menu option. Select the
mode you require from the drop down list box in the dialog:
AOR HAWK 5000 for WindowsTM User’s Manual - Page 17
This dialog can also be opened from the MODE push button in the front panel
area of the main window. Click on OK to accept the mode or Cancel to abort.
Step...
The tuning step size can be altered from the dialog that is displayed.
Enter the tuning step size you require in kHz and click on OK to accept or
Cancel to abort. The dialog is also accessible from the STEP push button in
the front panel area of the main window.
Attenuator...
The attenuator setting can be toggled from the following dialog:
Select the attenuator setting you require and click on OK to accept or Cancel to
abort. This dialog is also obtainable from the ATT push button of the front
panel area of the main window.
Page 18 - AOR HAWK 5000 for WindowsTM User’s Manual
Attenuator operation is only supported with the AR-3000A.
Span...
The display span can be changed from this dialog:
Enter the span you require in kHz and click on OK to accept or Cancel to abort.
This dialog can also be opened from the SPAN push button in the front panel
area of the main window.
RBW...
You can alter the resolution bandwidth from the following dialog:
Select the resolution bandwidth you require (either 5 kHz or 30 kHz) and click
on OK to accept or Cancel to abort. This dialog can also be obtained by
clicking on the RBW push button in the front panel area of the main window.
AOR HAWK 5000 for WindowsTM User’s Manual - Page 19
VIDEO MENU OPTIONS
The Video menu contains the options needed to control video recording and
playback. The video push buttons on the tool bar also provide the same
functions.
Rewind
While paused, step backwards one video frame.
Forward
While paused, step forwards one video frame.
Play
Open and start playing a video (.VID) file (see the File|Open
menu option for further details).
Stop
Stop playing the current video file. If you have been recording,
you will be prompted to save the video (.VID) file to disk.
Pause
Pause playing the current video file. You can rewind or forward
through the video file while paused and resume playing by selecting pause
again.
Page 20 - AOR HAWK 5000 for WindowsTM User’s Manual
Record
Start recording video frames in an untitled video (.VID) file (see
the File|New menu option for further details).
TOOLS MENU OPTIONS
Sonogram
A sonogram is a special form of spectrum display which helps to make
changes in the spectrum over long periods of time clear. It does this by
displaying frames of video data as vertical raster lines with one line per frame.
The AOR Hawk 5000 sonogram display scrolls data from right to left for
maximum legibility and an intuitive appearance.
A typical sonogram display looks like:
Signal traces are shown inside the main box and scroll from right to left. If you
move your mouse over the sonogram display, the mouse position (in terms of
frequency and time) is displayed beneath the display.
AOR HAWK 5000 for WindowsTM User’s Manual - Page 21
NOTE: The display on your PC may slow down slightly when using
the sonogram because of the extra graphics processing that is required.
The following menu options are provided with the sonogram display:
Clear
This blanks the sonogram display.
Threshold
This sets the threshold that signals must cross in order to be displayed. If a
signal is above the threshold, it appears as a black trace on the sonogram
display. If it is below the threshold, the signal does not appear on the display.
The following dialog is used to set the threshold:
The range is determined by the current gain setting (Low: -60 to -10 dBm,
High: -90 to -40 dBm). The default is 6 dBm above the lowest possible value.
Use the scroll bar to set the level you require and click on OK to accept or
Cancel to abort.
History
The history dialog contains a list of all the centre frequencies that have been
used since the dialog was opened. You can return to any of the previous
centre frequencies simply by double-clicking on the frequency value in the list.
The history dialog looks like:
Page 22 - AOR HAWK 5000 for WindowsTM User’s Manual
Click on the close push button to remove the History dialog.
NEA
The New Energy Analysis (NEA) is a powerful feature of the AOR Hawk 5000
software which allows you to extract active frequencies, correct for
channelisation of the spectrum and export a PC-MANAGER format memory
file (which can be read by PC-MANAGER for DOS, PC-MANAGER for
WindowsTM and AOR Searchlight (may require an upgrade)). The NEA works
with live and pre-recorded video data.
The NEA dialog may be launched from the Tools menu or from the NEA push
button in the front panel area of the main window. The dialog looks like:
AOR HAWK 5000 for WindowsTM User’s Manual - Page 23
An array of push buttons are provided along the right hand side of the dialog
for controlling operation.
Click on the Start push button to begin analysing video for active channels. As
new energy is found (ie it is at least 6 dBm above the noise floor), the frequency of the nearest channel is calculated. This is done on the basis of the
tuning step size that is currently being used and the position of new energy
appearing in the video data. This feature helps to pin-point active channels
precisely.
A list of active channels slowly builds up in the panel on the right hand side of
the dialog.
Click on the Stop push button to stop the analysis. Once stopped, you will be
able to export the data to a PC-MANAGER format file. This file format is
readable by PC-MANAGER for DOS, PC-MANAGER for WindowsTM and AOR
Searchlight (although an upgrade may be required).
AORSC does not currently support PC-MANAGER format.
Page 24 - AOR HAWK 5000 for WindowsTM User’s Manual
Note: The standard “Save As” dialog is used to save the exported file as
follows:
The exported file will be written in PC-MANAGER .MEM format to the directory
you specify. Enter the name you require in the “File Name:” box, select the
target directory required and click on OK to export the list of active channels or
Cancel to abort.
MOVING COPY PROTECTION
A simple utility has been provided so you can move the copy protection “token”
that is installed by the software back onto the distribution floppy disk or
between hard disks.
You may need to move the copy protection token back onto you original
distribution disk in the following circumstances:
F
F
When installing disk compression software.
When upgrading AOR Hawk 5000
F
F
When moving the program to a new computer.
When returning the original disk to your AOR distributor
(for updates etc.)
AOR HAWK 5000 for WindowsTM User’s Manual - Page 25
To transfer the token onto the distribution floppy disk, run the Copy Protection
Move utility:
When you have done this, the following window is displayed:
To transfer the token onto the distribution floppy disk, click on the Move to
master floppy... push button. If the token is already on the floppy disk, you can
transfer it to hard disk using the Move from master floppy... push button. You
can use this utility to have copies of the program on several computers at
once, however the program will only work on the machine that has the copy
protection token on it.
This AOR software product comes with a single license
and two tokens. Contact your AOR dealer to obtain
additional copies of the software.
Page 26 - AOR HAWK 5000 for WindowsTM User’s Manual
AOR HAWK 5000 for WindowsTM User’s Manual - Page 27
AOR LTD, 2-6-4 Misuji, Taito-Ku,
Tokyo 111, Japan
Tel: +81 3 3865 1681
AOR Manufacturing LTD, AOR (UK) LTD
4E East Mill, Bridgefoot, Belper,
Derbyshire DE56 2UA, England
Tel: +44 1773 880788 Fax: +44 1773 880780
Serial No:
Page 28 - AOR HAWK 5000 for WindowsTM User’s Manual