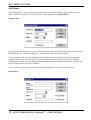
1
AOR PC-MANAGER for Windows
User’s Manual
© Simon Collings, G4SGI 1995 - 1998
Software Published and Distributed by:
AOR (UK) LTD.,
4E East Mill,
Bridgefoot,
Belper,
Derbyshire DE56 2UA
ENGLAND
Tel: +44 1773 880788
Fax: +44 1773 880780
e-mail: [email protected] www.demon.co.uk/aor
CONTENTS
CONTENTS
INTRODUCTION ...............................................................................................
MINIMUM SYSTEM REQUIREMENTS ............................................................
INSTALLING THE PROGRAM .........................................................................
Copy Protection ....................................................................................................................................
To Install... .............................................................................................................................................
GETTING STARTED ........................................................................................
RS-232 connection ................................................................................................................................
Starting the Program ...........................................................................................................................
Setting up ...............................................................................................................................................
Obtaining Help ......................................................................................................................................
FILE MENU OPTIONS ......................................................................................
New .........................................................................................................................................................
Open... ....................................................................................................................................................
Close .......................................................................................................................................................
Save ........................................................................................................................................................
Save As ...................................................................................................................................................
Send to RX... ..........................................................................................................................................
Get from RX... .......................................................................................................................................
Print... ....................................................................................................................................................
Print Setup... ..........................................................................................................................................
Exit .........................................................................................................................................................
EDIT MENU OPTIONS .....................................................................................
Cut ..........................................................................................................................................................
Copy .......................................................................................................................................................
Paste .......................................................................................................................................................
AOR PC-MANAGER for WindowsTM - USER MANUAL - 2
CONTENTS
Clear .......................................................................................................................................................
Delete .....................................................................................................................................................
Add Item... .............................................................................................................................................
Modify Item... ........................................................................................................................................
Check .....................................................................................................................................................
Renumber ..............................................................................................................................................
SETUP MENU OPTIONS..................................................................................
Tune... ....................................................................................................................................................
Step Up ..................................................................................................................................................
Step Down ..............................................................................................................................................
Attenuator .............................................................................................................................................
Monitor ..................................................................................................................................................
Auto Mode .............................................................................................................................................
Audio Log... ...........................................................................................................................................
Communications... ................................................................................................................................
Password... .............................................................................................................................................
Play .........................................................................................................................................................
Stop ........................................................................................................................................................
Record ....................................................................................................................................................
Power Save Options... ...........................................................................................................................
Priority Scan Interval... ........................................................................................................................
SEARCH MENU OPTIONS ..............................................................................
Search Operation... ...............................................................................................................................
Audio Recording ...................................................................................................................................
Spectrum Display ..................................................................................................................................
Expert Options... ...................................................................................................................................
For the AR8000 .................................................................................................................................
For the AR2700 .................................................................................................................................
SCAN MENU OPTIONS ...................................................................................
3 - AOR PC-MANAGER for WindowsTM - USER MANUAL
CONTENTS
Scan Operation... ..................................................................................................................................
Audio Recording ...................................................................................................................................
Select Scan Operation... .......................................................................................................................
Delete Bank ...........................................................................................................................................
WINDOW MENU OPTIONS ..............................................................................
Cascade ..................................................................................................................................................
Tile .........................................................................................................................................................
Arrange Icons ........................................................................................................................................
Close All .................................................................................................................................................
Position Toolbar ....................................................................................................................................
Save Desktop .........................................................................................................................................
Save Desktop As... .................................................................................................................................
Load Desktop ........................................................................................................................................
AUDIO LOG ......................................................................................................
SETTING UP ........................................................................................................................................
FILE MENU OPTIONS .......................................................................................................................
New .....................................................................................................................................................
Open... ................................................................................................................................................
Close ...................................................................................................................................................
Save ....................................................................................................................................................
Delete .................................................................................................................................................
Print... ................................................................................................................................................
Print Setup.........................................................................................................................................
Exit .....................................................................................................................................................
SELECT MENU OPTIONS ................................................................................................................
By Frequency ....................................................................................................................................
Select All ............................................................................................................................................
Clear All ............................................................................................................................................
CONTROLS MENU OPTIONS ..........................................................................................................
Rewind ...............................................................................................................................................
Forward .............................................................................................................................................
Play.....................................................................................................................................................
Stop ....................................................................................................................................................
Pause ..................................................................................................................................................
Record ................................................................................................................................................
MOVING COPY PROTECTION ........................................................................
AOR PC-MANAGER for WindowsTM - USER MANUAL - 4
INTRODUCTION
INTRODUCTION
Welcome to AOR PC-MANAGER for WindowsTM. This is a powerful data management and
control package using the latest WindowsTM programming techniques for AOR handheld radios. This
simple to use program lets you configure memory, search, auto mode and pass frequency data in your
AOR AR8000 or AR2700 radio. PC-MANAGER allows you to define and execute high-speed
searches and scans while intelligently collecting audio from your radio onto your PC hard disk (requires a PC sound card, not included). Managing frequencies and your radio’s configurations could
not be simpler with PC-MANAGER for WindowsTM. The program uses an RS-232 serial port to communicate with your radio and has these exciting features and more:
• Easy to use intuitive windowing system with tile and cascade in a variety of formats. You may
have any number of data files as you wish (disk space permitting).
• Comprehensive and powerful editing features for memory, search, auto mode and pass frequency
data including intelligent cut/paste, line renumbering and syntax checking (for auto mode data)
• On-line context sensitive help. You may obtain help from the main menu and in all dialogs. Help
is also available from the desktop simply by pressing the F1 key.
• Set the password (not supported with AR2700 ), search, scan and many other parameters of the
radio with simple dialogs.
• Send memory, search, auto mode or pass frequency data to your radio or print it out.
• Edit auto mode data to define your own bandplan setup and send it to the radio.
• Execute searches and scans within the radio for maximum tuning speed (approx. 30 channels/s
maximum)
• Record audio from the radio automatically during searches and scans in an audio log (PC sound
card required, not included)
• Display the spectrum when searching, measure frequency and signal strength with your mouse.
You have purchased a “licence” to install and operate a maximum of two copies of AOR PCMANAGER for WindowsTM. There are two copy protection tokens on the master disk. See the
section on copy protection for more details.
5 - AOR PC-MANAGER for WindowsTM - USER MANUAL
MINIMUM SYSTEM REQUIREMENTS
MINIMUM SYSTEM REQUIREMENTS
• 80486 PC compatible (or higher) with colour graphics display
• Microsoft® WindowsTM 3.x or Windows® 95 (WindowsTM NT is not currently supported)
• 8M byte of system memory (640k bytes of base DOS memory)
• Microsoft® mouse or equivalent (strongly recommended)
• at least 2M bytes of free hard disk space
• At least two RS-232 serial ports (one for mouse if used, highly recommended)
• WindowsTM compatible printer (optional)
• WindowsTM compatible sound card (eg Sound BlasterTM )
• AOR AR8000 or AR2700 hand portable radio receiver with AOR CU8232 remote control interface and connecting cable (available separately)
NOTE: We plan to add software support for new AOR radios as they become available.
AOR PC-MANAGER for WindowsTM - USER MANUAL - 6
INSTALLING THE PROGRAM
INSTALLING THE PROGRAM
In this manual, it is assumed that you are familiar with Microsoft® WindowsTM 3.x or Windows®
95 and the hardware you are using with your computer. If you need further information on using
specific WindowsTM features, consult your Microsoft® manuals.
Copy Protection
AOR PC-MANAGER for WindowsTM is copy protected. The protection does not use a dongle
or other cumbersome devices, however, there are a few simple points that you may need to refer
to. Please read this section carefully.
PC-MANAGER for WindowsTM is copy protected using a system which places a “token” on your
hard disk when you install the program. The program will only work on the hard disk you installed it
to. There is no dongle or key-disk, so once installed the program runs completely normally and you
will not be inconvenienced (unlike other schemes).
Specific points to remember:
1. The distribution disk contains two tokens. This means that you can install up to two complete
copies of the software on separate machines at once. You cannot transfer the program to another
machine without first moving one of the tokens back onto the original distribution disk then re-installing. The tokens can easily be moved with the program that is provided. Contact your AOR distributor
if you need additional copies of the software.
2. You should keep your original disk in a safe place away from strong magnetic fields, high humidity
or other environmental conditions that could damage it. You will not be able to re-install the software
or move it to another machine without the distribution disk.
3. Two hidden files are copied to a hidden subdirectory of the PC-MANAGER directory
(PC-MANAG.CCC and CCONTROL.SYS) when you install the software. These contain configuration
information for the copy protection scheme and are normal DOS format files. DO NOT DELETE
THESE FILES UNDER ANY CIRCUMSTANCES. If these files are deleted, PC-MANAGER will
not run.
4. If you are using a backup utility, make sure that the two hidden files are not backed up. When
restored, the copy protection scheme may not be able to validate the installation and PC-MANAGER
will not run. Most backup utilities do not touch these files because they have the hidden, system and
read-only attributes set. The two copy protection files also do not have the archive bit set, so you
should be able to exclude them from backups by setting up your backup software to ignore files without an archive bit. Remember, it is not the backup but the restore that can cause problems.
7 - AOR PC-MANAGER for WindowsTM - USER MANUAL
INSTALLING THE PROGRAM
5. The /d+ option of the PC-Kwik disk cache software from Multisoft Corporation is not compatible
with the copy protection scheme and should be temporarily disabled when installing PC-MANAGER or
moving the token. HyperCache also affects the copy protection scheme in the same way because of
non-standard methods of accessing the floppy disk drive. Again, it should be temporarily disabled, but
both caches may be used at other times.
6. The copy protection scheme is compatible with disk drives compressed with SuperStor, Stacker and
DoubleSpace. However, you should temporarily remove the token from the hard disk when installing
one of these compression utilities because the protection will appear invalid when the drives are compressed. The disk compression utilities warn you of this in their manuals.
7. The copy protection scheme is known to be compatible with the following disk defragmenters:
Central Point’s Compress, Digital Research’s Diskopt, Stac’s Sdefrag and Microsoft’s Defrag.
8. The copy protection scheme is not currently compatible with WindowsTM NT.
9. The copy protection scheme is not compatible with non-standard floppy disk systems. At present
(7/95) this includes the following PCs:
Evesham Vale Voyager laptop
Zeos Pentiums
It is possible to install onto a PC with a non-standard floppy disk (or no floppy disk) using a networked
standard drive. The easiest way to do this if you do not already have a network is to use the
INTERLNK or INTERSVR utilities supplied with MS-DOS.
10. The copy protection scheme is compatible with Windows 95. However, you can completely erase
your tokens using Explorer to drag and drop the PC-MANAGER directory onto the Recycle bin. Although the token files are not deleted, they cannot be restored to their original positions on disk. EXPLORER DOES NOT GIVE WARNINGS LIKE FILE MANAGER UNDER WINDOWS 3.X!.
See the section of this manual entitled MOVING COPY PROTECTION for instructions on
using the utility for moving the copy protection token.
To Install...
You will need to follow slightly different instructions depending on the operating system you are
using.
AOR PC-MANAGER for WindowsTM - USER MANUAL - 8
INSTALLING THE PROGRAM
For Microsoft® WindowsTM 3.x
Either...
Click on the File menu of program manger and select the Run... option.
Type “A:\INSTALL.EXE <ENTER>” into the dialog.
Or...
Use file manager to list the files on drive A and double-click on the line with
“INSTALL.EXE” on it.
For Windows® 95
button on the task bar...
From the
Select Run... option and type “A:\INSTALL.EXE” into the open dialog.
Press <ENTER> or click the OK button to proceed.
You should obtain the window shown below on your screen. This is the installation utility which will
copy and install the PC-MANAGER files to your hard disk:
Two push buttons are provided inside the window. You can abort the installation by clicking on
the “Quit” push button (or by pressing “Q”). Alternatively, to decompress and copy the program files
onto your hard disk, click on the “Install...” push button (or press “I”). If you want to obtain help on
the installation program, you can click on the “Help” menu option in the top right hand corner of the
window.
If you are proceeding with the installation, you will now be asked to type in the name of a directory on your hard disk for the program files (you will need approximately 2 MByte of space). The
default directory name is “C:\PC-MANAG”, but you can change it by typing in an alternative into the
dialog that is displayed.
9 - AOR PC-MANAGER for WindowsTM - USER MANUAL
INSTALLING THE PROGRAM
The dialog looks like that shown above. If you want to keep the default directory for the
PC-MANAGER files, just click on the “OK” push button. If you want to change it, you can type in an
alternative name and then click on “OK” (if the directory does not already exist, it will be created).
Once you have selected a directory for the PC-MANAGER files, they are decompressed and
copied onto your system in a few moments (the exact amount of time required depends on your
computer speed).
NOTE: The installation program does not alter your WindowsTM “.INI” initial settings
files; it uses its own. The file is called “PC-MANAG.INI” and is located in the PC-MANAGER for
WindowsTM directory.
AOR PC-MANAGER for WindowsTM - USER MANUAL - 10
GETTING STARTED
GETTING STARTED
RS-232 connection
You will need to setup a serial port on your PC before you can begin to use PC-MANAGER.
The RS-232 connection between your computer and the AR8000 or AR2700 is simple to set up.
Connect your AOR CU8232 remote control interface unit following the instructions given in the
CU8232 manual (and supplement if you have an AR2700). You will need to prepare and fit an
RS-232 interface lead, again instructions are given in the CU8232 manual.
Starting the program
To launch PC-MANAGER for WindowsTM:
If you are using Microsoft® WindowsTM 3.x, select the AOR PC-MANAGER program group
and double-click on the correct icon for the radio you are using (there is one icon for each radio type
supported).
If you are using Windows® 95, select the AOR PC-MANAGER shortcut from the Programs menu
option of task bar and the correct icon for the radio you are using.
PC-MANAGER should then appear on your screen. The main window has a number of components as follows (screen shots are for Windows® 95):
11 - AOR PC-MANAGER for WindowsTM - USER MANUAL
GETTING STARTED
Menu options:
The main menu provides access to all the features of the program and is located just below the
top edge of the window.
Tool bar:
Underneath the main menu is the tool bar. This contains a number of push buttons which
provide rapid access to the most frequently used menu options. If you move your mouse over any of
the tool bar buttons, a line of text is displayed on the status bar in place of the copyright notice on the
bottom edge of the main window telling you what the button does.
Frequency and status display:
Next to the tool bar push buttons is a status display showing the current frequency the radio is
tuned to. It is also used to display memory comments and search/scan status.
Status bar:
Along the bottom edge of the window is a copyright notice which can be used to display a dialog
showing the version of the program. Click on the AOR or © symbol to display the dialog.
Desktop:
The main part of the window (the application’s desktop) is used to display files of data in
individual windows. A specially developed style of list box is used for display and provides a flexible
and fast way to handle data. Data windows can be reduced to icons and appear along the bottom edge
of the desktop.
You must set up RS-232 communication from your computer before starting to use
PC-MANAGER using the instructions given in the next section.
Setting up
PC-MANAGER uses an RS-232 serial port on your computer to send instructions to the radio.
You must have a suitable interface unit to make the physical connection between the D-type connector
on your computer to the remote control port on your radio. The AOR CU8232 unit and associated
cables should be used to do this. Detailed instructions are given in the CU8232 manual.
Once you have made the physical connection and launched PC-MANAGER, you will need to use
the Setup|Communications... dialog to configure the serial port used by PC-MANAGER for your radio.
AOR PC-MANAGER for WindowsTM - USER MANUAL - 12
GETTING STARTED
There is one dialog for each supported radio.
For the AR8000:
You can select the baud rate, serial port on your PC, type of delimiter and handshake.
For the AR2700:
You can select the baud rate, serial port on your PC and type of delimiter.
Use the dialog controls to select the PC serial port configuration you need and click on the “OK”
push button to continue. The parameters you select are stored in the “PC-MANAG.INI” initial values
file so that they can be reused next time you run PC-MANAGER.
You can setup more than one radio type (if you have several AOR radios) by running
PC-MANAGER again for the other radio and setting the serial port parameters for that radio. All
supported radios have separate serial port parameters stored in “PC-MANAG.INI” so that you only
need to setup the program once.
Once you have setup your PC serial port for the radio you are using, you can begin to use
PC-MANAGER.
13 - AOR PC-MANAGER for WindowsTM - USER MANUAL
GETTING STARTED
The RS-232 parameters you select from the dialog must EXACTLY match those setup in
the radio. If they are different, you will get unstable behaviour when using the program or no
apparent operation at all.
Obtaining Help
PC-MANAGER has a extensive context sensitive help available at all times. You can obtain help
from the desktop simply by pressing F1 or by selecting the “Help” option from the main menu. Help
is also provided from a push button in each dialog.
The help information that is provided is hypertext based and fully inter-referenced for your
convenience.
AOR PC-MANAGER for WindowsTM - USER MANUAL - 14
FILE MENU OPTIONS
FILE MENU OPTIONS
The file menu contains all the menus you need to work with files and manage data held on
disk. The content of each file is shown inside a data window on the desktop and may be memory,
search, auto mode or pass frequency data.
New
The File|New command opens a new, untitled data window, and makes it the active window.
You will need to select the type of data you want from the panel that appears on the PC-MANAGER
desktop.
PC-MANAGER prompts you to name untitled documents when they are closed.
Open...
The File|Open... command displays the “Open” dialog box so you can select a file and create a
new window to display it.
You can select the type of data you want using the “List Files of Type:” list box that is displayed in the
standard Windows file open dialog. Memory data is displayed by default.
15 - AOR PC-MANAGER for WindowsTM - USER MANUAL
FILE MENU OPTIONS
NOTE:The radios that are supported by PC-MANAGER require slightly different formats
because of different memory or search bank sizes. Wherever possible, data is converted automatically and can be read for every radio. However, data may be truncated in some circumstances (eg when AR8000 memory is being read for an AR2700).
Close
File|Close closes the currently active window. If you have modified the file without saving, you will
be prompted to save before exiting.
Save
The File|Save command saves the file in the active window to disk. If the file is unnamed, the
File|Save As... dialog box is displayed so you can name the file, and choose where it is to be saved.
Save As...
The File|Save As... command allows you to save a file under a new name, or in a new location on disk.
The command displays the standard Save As dialog box. You can enter the new file name, including
the drive and directory.
Send to RX...
The File|Send to RX... command transfer the contents of the current window to your radio using
RS-232 commands.
If you are sending memory data, all channels in the radio will be cleared before the data is sent. This
ensures that the data stored in the radio is exactly the same as that displayed in the memory data window.
You can use the following dialog to abort sending data by simply clicking on the abort push button:
Data in your radio will be overwritten.
AOR PC-MANAGER for WindowsTM - USER MANUAL - 16
FILE MENU OPTIONS
Get from RX...
The File|Get from RX... command gets a file of data from the radio and places it in the currently
active window. You should open a new window before getting new data if you do not want to
overwrite the current window.
You will need to select the type of data you want from those available using the panel that appears on
the desktop:
You can abort this operation in the same way as you can for sending data: simply click on the Abort
push button in the dialog that is displayed.
Data in the current window will be overwritten.
Print...
The File|Print... command prints the contents of the active window. Use File|Print Setup... to
select a printer, and to set printer options.
Print Setup...
The File|Printer Setup... command displays the Printer Setup dialog box which allows you to select and
configure the WindowsTM compatible printer to be used to print documents in the application.
Exit
The File|Exit command exits PC-MANAGER. If you have modified files without saving, you’ll be
prompted to save before exiting.
17 - AOR PC-MANAGER for WindowsTM - USER MANUAL
EDIT MENU OPTIONS
EDIT MENU OPTIONS
The edit menu provides you with all the facilities you need to edit the data displayed inside
the windows. Most of the edit menu options work by copying, cutting and pasting using WindowsTM
Clipboard.
You often need to highlight areas of text before using edit menu options. It is possible to
select an individual line simply by clicking on it. If you want to select several lines at once, you can
select a block by clicking on the first line and shift clicking on the last (click with the mouse while
holding the SHIFT key down). You can select several lines scattered throughout the file by controlclicking on each (clicking with the mouse while holding the CTRL key down).
Cut
The Edit|Cut command removes the selected items from the active window and places the text in the
Clipboard. Choose Edit|Paste to paste the cut text into another window or into another part of the same
window. The text remains selected in the clipboard, and can be pasted several times.
Copy
The Edit|Copy command leaves the selected items intact and places an exact copy of them in the
Clipboard. To paste the copied text into another document, choose Edit|Paste.
Paste
The Edit|Paste command inserts the text currently in the Clipboard into the current window at the
cursor position.
Clear
The Edit|Clear command removes the selected items and leaves blank lines in their place. The text is
not placed in the Clipboard.
Data cannot be recovered once it has been cleared.
Delete
The Edit|Delete command deletes the currently selected items from the current window removing it
completely. The text is not placed in the Clipboard.
Data cannot be recovered once it has been deleted.
AOR PC-MANAGER for WindowsTM - USER MANUAL - 18
EDIT MENU OPTIONS
Add Item...
The Edit|Add Item... option allows you to add a new item of data just below the currently selected
item. A different dialog is used for each type of data supported by PC-MANAGER.
Memory data:
You can define the frequency, step size, mode, attenuator and comment for the memory channel using
the dialog (above). The current frequency, mode and step size are used by default.
You can speed up entry of large amounts of data using the Next push button which increments the
frequency by the step size and copies over the mode and comment into the next memory channel.
When editing a list of data, the Next push button updates the current channel and moves you on to the
next in a single step for speed of operation.
Click on OK to accept the data and return to normal operation, or click on Cancel to abort.
Search data:
19 - AOR PC-MANAGER for WindowsTM - USER MANUAL
EDIT MENU OPTIONS
This dialog allows you to define the frequency limits (upper and lower frequency) of a search, the step
size, mode, attenuator and comment. If you select Auto Mode, the mode and step size is ignored in
favour of the settings stored in the radios internal band plan.
Click on OK to accept the data and return to normal operation, or click on Cancel to abort.
Auto Mode data:
This dialog is used to add or modify lines of auto mode data. You type in a line of text into the dialog.
See the section on auto mode data format for information about the format of data required.
This option is unavailable with pass frequency data.
Modify Item...
The Edit|Modify Item... opens a dialog which lets you alter the current item of data in the active
window. You get a different dialog for each type of data that PC-MANAGER supports. See the section
on adding items for descriptions of the dialogs.
Check
NOTE: This option is available with auto mode data.
This menu option allows you to check the syntax of each line of auto mode data and report any errors
that will prevent PC-MANAGER from creating RS-232 commands for sending to the radio.
The following syntax checks are made:
•
•
•
•
•
•
•
Invalid channel number (AR8000: 0 - 127, AR2700: 0 - 112)
Channel number not in ascending order
Invalid frequency
Invalid step size
Invalid mode type
Frequency is not divisible by current or previous step (auto mode data only)
Invalid step offset (AR8000 only)
AOR PC-MANAGER for WindowsTM - USER MANUAL - 20
EDIT MENU OPTIONS
NOTE: The AR8000 supports WFM, NFM, AM, USB, LSB and CW modes, frequency
range 0.1 to 1950.0 MHz and step sizes 50 Hz - 999.995 kHz. The AR2700 supports WFM, NFM
and AM modes, frequency range 0.1 - 1300.0 MHz and step sizes 5 kHz - 100.0 kHz.
If an error is detected, you will be told what the error was and on what line it was found. Go to the
relevant line, correct and try again.
When editing auto mode data, a simple set of rules must be followed so that the radio works correctly
when the data is transferred to it. The rules are as follows:
1. The frequencies must be listed in ascending order.
2. Each step frequency must be a multiple of 0.05 kHz (50 Hz) (AR8000 only)
3. The current frequency must have a whole number of steps in it. For example:
54, 29.200, NFM, 10, N
ü
because 29.200 is divisible by 10 kHz, but
1, 0.150, AM, 9, N
û
because there are not a whole number of 9 kHz steps in 0.150 MHz
4. The current frequency must be divisible by a whole number of steps used in the previous band
definition. For example, for line 65:
64, 70.000, CW, 0.05, N
65, 70.030, USB, 1.0, N
ü
because 70.030 is divisible by a step size of 0.05, but
64, 70.000, CW, 9.0, N
65, 70.030, USB, 0.05, N
û
because 70.030 is not divisible by a whole number of 9.0 kHz steps
YOU SHOULD CHECK AUTO MODE DATA CAREFULLY BEFORE SENDING THE
DATA TO YOUR RADIO, IMPROPER OPERATION OF THE RADIO MAY OTHERWISE
RESULT.
NOTE: The frequency range supported by PC-MANAGER is the maximum possible that can
be obtained over the RS-232 interface. The guaranteed frequency range may be less in some
cases.
21 - AOR PC-MANAGER for WindowsTM - USER MANUAL
EDIT MENU OPTIONS
Renumber
The Edit|Renumber menu option allows you to renumber the lines of data items so that they are in
ascending order (by channel number).
You will need to use this option after editing using Clipboard or whenever the channels are not in the
right order before sending the data to the radio.
NOTE: This option is unavailable with pass frequency data which is automatically renumbered.
AOR PC-MANAGER for WindowsTM - USER MANUAL - 22
SETUP MENU OPTIONS
SETUP MENU OPTIONS
This set of menu options will allow you to alter the setup of PC-MANAGER to match the
RS-232 settings of your radio and also to adjust the values of parameters which are used for general
operation (eg: the AR8000 password).
Tune...
The Setup|Tune... command opens a dialog box which allows you to set the frequency, mode,
step size and attenuator by tuning the radio directly.
Use the Tune dialog to select the parameters you want and click on OK to accept or CANCEL to abort.
The
auto mode push button on the tool bar can also be used to toggle the auto mode status. If auto
mode is selected, the mode and step size in the Tune dialog are ignored in favour of the settings in the
internal band plan of the radio. A letter “A” appears in the frequency and status display when auto
mode is active just after the mode.
The RS-232 command needed to change the radio is sent and the status display on the tool bar updated
when you press OK.
Step Up
This command tunes the radio up in frequency by one step.
Step Down
This command tunes the radio down in frequency by one step.
23 - AOR PC-MANAGER for WindowsTM - USER MANUAL
SETUP MENU OPTIONS
Attenuator
This command toggles the attenuator ON/OFF. The attenuator is ON when the tool bar push
button is depressed.
Monitor
This command toggles the squelch between open/normal operation. The squelch is forced open
when the tool bar push button is depressed, normal squelch operation is obtained when the tool bar
push button is up.
Auto Mode
This command toggles auto mode operation. Auto mode is ON when the push button is depressed and OFF when it is up. It is also possible to alter auto mode operation from the Tune dialog.
Audio Log...
This command launches Audio Log. This companion application to PC-MANAGER is used with
your sound card (not supplied) to record audio from your radio onto your hard disk. This feature is
particularly useful with searches and scans where recordings of active frequencies found are created
automatically.
You must have a suitable sound card installed in your PC for Audio Log to operate. All
audio Log options in PC-MANAGER are disabled if no sound card could be found.
Communications...
The Setup|Communications... command opens the Communications dialog box which allows
you to select the parameters of the serial port you want to use for bi-directional RS-232 communications with your radio. See the section on setting up the software for descriptions of the dialogs.
You can select the serial port you want to use (COM1 to COM4), the baud rate, type of handshake and
delimiter sequence (CR or CR,LF)
You must make sure that the RS-232 parameters set in the radio EXACTLY match those
selected in the software.
AOR PC-MANAGER for WindowsTM - USER MANUAL - 24
SETUP MENU OPTIONS
Password...
AR8000 only
The Setup|Password command in the setup menu is an easy way to select the four-digit password used
to protect sensitive data stored in the radio. This command opens a dialog and lets you enter a new
password; the old one is automatically loaded into the dialog.
NOTE: You can disable the password feature by entering “0000”.
Play
AR2700 only
This option is available only with radios supporting voice recording. Use this option to replay
audio from your radio that has been stored on the voice recording board.
NOTE: You must have the voice recording hardware option fitted to your radio to use these
facilities.
Stop
AR2700 only
This option is available only with radios supporting voice recording. Use this option to stop
replaying or recording audio using the voice recording board.
Record
AR2700 only
This option is available only with radios supporting voice recording. Use this option to record
audio from your radio onto the voice recording board.
25 - AOR PC-MANAGER for WindowsTM - USER MANUAL
SETUP MENU OPTIONS
Power Save Options...
AR8000 only
The power save options dialog is opened from the setup menu, it is for altering the power save delay
period and cycle time.
Delay
This is the length in time in seconds the radio remains active after the squelch last closed or the radio’s
keypad was used. The radio then enters a “dormant” mode where the power to the receive circuitry is
cycled so that your batteries are conserved.
The present power save delay value is shown on the scroll bar at the top of the dialog. Adjust the
delay to the value you require (1-99 seconds) or click on the ‘Delay off” check box to disable power
save delay.
Cycle
This is the length in time in seconds the radio takes to go dormant then return to active operation
before going dormant again.
The present value of the cycle time is shown on the lower scroll bar. You can adjust the cycle time in
the range 1-9 seconds.
Refer to section 16 of your AR8000 Operating Manual for more details of the power save
feature.
Priority Scan Interval...
The priority scan interval is the period of time between checks for activity on the priority memory
channel when scanning, searching or monitoring.
AOR PC-MANAGER for WindowsTM - USER MANUAL - 26
SETUP MENU OPTIONS
The factory default is 5 seconds, but you can change the value from 1-19 sec using the scroll bar in this
dialog.
Refer to section 12 of your AR8000 or section 8 of your AR2700 Operating Manual for
more details of priority operation.
Priority scan is not currently supported by PC-MANAGER because of hardware limitations.
27 - AOR PC-MANAGER for WindowsTM - USER MANUAL
SEARCH MENU OPTIONS
SEARCH MENU OPTIONS
This menu option allows you to setup and select searches. It is possible to control bank
searches and bank link searches running within the radio at high speed (up to 30 channel/s maximum.
In both cases audio from the radio can be stored on disk using the Audio Log application.
Search automatically tunes the receiver through all frequencies between two specific limits
looking for active frequencies. Scan automatically recalls specific spot frequencies which have
been stored into memory.
Search Operation...
This dialog is used to select and start a search. You can select one or more search banks to use
from the range A - J and a- j (for the AR8000) or 0 - 9 (for the AR2700) displayed in the ‘Available’
list. The search banks shown are read from the radio when the dialog is created.
NOTE: it may take a few seconds for the search banks in the radio to be loaded into the
‘Available’ list box.
To select a bank from the ‘Available’ list, single-click on it and click on the ‘->‘ push button to
transfer it into the ‘Selected’ list box. You can put more than one search bank in the ‘Selected’ list if
you want to link several together (linking is done automatically). To remove a ‘Selected’ channel,
select it by single-clicking on its entry in the ‘Selected’ list then click on the ‘Del’ push button.
You may change expert search options from a separate dialog which is displayed when you click
on the ‘Expert...’ push button. You may edit search data by opening a new search window and
uploading the data from the radio.
AOR PC-MANAGER for WindowsTM - USER MANUAL - 28
SEARCH MENU OPTIONS
Audio Recording
You can also record audio from your radio onto the hard disk of your PC using Audio Log if you
have a sound card fitted. This is a very powerful feature of PC-MANAGER which allows you to store
audio during a scan or search for review later. Recordings are made whenever active frequencies are
found and are the free time period in length (see Search|Expert Options...). You do not need to operate
Audio Log manually since PC-MANAGER controls it remotely for totally “hands-off” operation.
The audio recording time is set to 99 seconds (same as max. free time) if no free time period
is specified in the expert options.
Audio Log can be launched from the “Audio Log...” push button or from the main window’s tool
bar. You may also launch Audio Log from its icon, but if launched from within PC-MANAGER it will
be configured to be the top most window at all times. This prevents Audio Log from being covered by
other windows used by PC-MANAGER.
Spectrum Display
To active the spectrum display, first begin a search using the Search|Search Operation... menu
option to open the Search Operation dialog, select a bank from those available (so that it is listed in the
“Selected” list box), then click on the “Spectrum...” push button. The spectrum display indicates the
signal level of each active frequency found during the search.
The spectrum display has its own menu. You can clear the display or print it out using the
“Options” menu option. As you move your mouse over the display, guide bars on the edge of the
display follow the mouse and help to position it on signal traces. The mouse position is shown in the
bottom left hand corner of the display (in terms of frequency and signal level).
29 - AOR PC-MANAGER for WindowsTM - USER MANUAL
SEARCH MENU OPTIONS
The spectrum display will not operate with the AR8000 when operating in WFM mode.
When you have setup the search, simply click on ‘Start’ to begin searching.
While searching, frequencies can be added to the pass list by clicking on the ‘Pass’ push button;
pass frequencies are effective until uploaded and edited using a Pass Frequency Window. Alternatively, you can force the search to skip an active frequency and resume searching using the ‘Skip’ push
button; this does not block the frequency from the search.
Click on the ‘Close’ push button to stop searching and close the dialog.
Expert Options...
For the AR8000
This dialog is used to set expert options to be used with searches and scans (including select
scans) for the AR8000. You get two independent sets of options: one for searches and the other for
scans. The dialog contains three scroll bars and a number of check boxes for altering the various
expert options.
Squelch Level:
Select the RF level required to open the squelch (1 - 7). Click on the “Level Off” check box to
disable the squelch level option and allow the squelch to open on any signal.
Audio Squelch:
The “Audio Squelch” check box toggles audio squelch operation ON/OFF. This options is
useful for preventing the squelch from opening on some unmodulated carriers.
AOR PC-MANAGER for WindowsTM - USER MANUAL - 30
SEARCH MENU OPTIONS
Delay Time:
The delay time is the period that the radio remains on a frequency after a signal has disappeared
before it resumes the search or scan. Use the scroll bar to select a period of time in the range (0.1 9.9s). Click on the “Delay Hold” to force the radio to remain on active frequencies indefinitely or
“Delay Off” to disable the delay timer.
Free Time:
The free time is the period that the radio remains on an active frequency before resuming the
search or scan. Use the scroll bar to select a period of time in the range (1 - 99s) or click on the “Free
Time Off” check box to disable the free timer.
If no free time period is specified and Audio Log is to be used for making recordings on
disk, the recording time is set to 99 seconds (same as max. free time).
For the AR2700
This dialog is used to set expert options to be used with searches and scans for the AR2700.
You get one set of options which is used for searches and scans. The dialog contains two scroll bars
for altering the various expert options.
Delay Time:
The delay time is the period that the radio remains on a frequency after a signal has disappeared
before it resumes the search or scan. Use the scroll bar to select a period of time in the range (0.1 9.9s).
Pause Time:
The pause time is the period that the radio remains on an active frequency before resuming the
search or scan. Use the scroll bar to select a period of time in the range (1 - 99s) or click on the “Pause
Off” check box to disable the pause timer.
If no pause time period is specified and Audio Log is to be used for making recordings on
disk, the recording time is set to 99 seconds (same as max. pause time).
31 - AOR PC-MANAGER for WindowsTM - USER MANUAL
SCAN MENU OPTIONS
SCAN MENU OPTIONS
This menu option allows you to setup and select scans. It is possible to control scans running within the radio at high speed (up to 30 channel/s maximum). Audio from the radio can be stored
on disk using the Audio Log application.
Search automatically tunes the receiver through all frequencies between two specific limits
looking for active frequencies. Scan automatically recalls specific spot frequencies which have
been stored into memory.
Scan Operation...
This dialog is used to start a memory scan. You can select one or more memory banks to use
from the range A - J and a- j (for the AR8000) or 0 - 9 ( for the AR2700) displayed in the ‘Available’
list.
To start a scan, select a bank from the ‘Available’ list by single-clicking on it and click on the ‘>‘ push button to transfer it into the ‘Selected’ list box. You can put more than one memory bank in
the ‘Selected’ list if you want to link several together. To remove a ‘Selected’ channel, select it by
single-clicking on its entry in the ‘Selected’ list then click on the ‘Del’ push button.
You may change expert scan options from a separate dialog which is displayed when you click
on the ‘Expert...’ push button.
Audio Recording
You can record audio from your radio onto the hard disk of your PC using Audio Log if you
have a sound card fitted. This is a very powerful feature of PC-MANAGER which allows you to store
audio during a scan or search for review later. Recordings are made whenever active frequencies are
AOR PC-MANAGER for WindowsTM - USER MANUAL - 32
SCAN MENU OPTIONS
found and are the free time period in length (see Scan|Expert Options...). You do not need to operate
Audio Log manually since PC-MANAGER controls it remotely for totally “hands-off” operation.
The audio recording time is set to 99 seconds (same as max. free time) if no free time period
is specified in the expert options.
Audio Log can be launched from the “Audio Log...” push button or from the main window’s tool
bar. You may also launch Audio Log from its icon, but if launched from within PC-MANAGER it will
be configured to be the top most window at all times. This prevents Audio Log from being covered by
other windows used by PC-MANAGER.
Once you have setup the scan, simply click on ‘Start’ to begin scanning.
While scanning, frequencies can be added to the pass list by clicking on the ‘Pass’ push button.
You can force the scan to skip an active frequency and resume scanning using the ‘Skip’ push button.
Click on the ‘Close’ push button to stop scanning and close the dialog.
Select Scan Operation...
AR8000 only
This dialog is used to start a select scan. This is different from a normal memory scan in that
only selected channels in the radio’s memory are included in the scan.
You must make sure that you have sent memory data to the radio before starting a select
scan.
33 - AOR PC-MANAGER for WindowsTM - USER MANUAL
SCAN MENU OPTIONS
A select scan is setup in three stages: send a complete set of memory banks to the radio; select a
range of memory channels from the bank in PC-MANAGER; start select scan.
Step 1:
Open a memory file (extension .MEM) and send it to the radio using the File|Send to RX... menu
option.
Step 2:
Select channels from the memory bank.
You select memory channels from the memory window using the mouse. To select a block of channels, click on the first and then shift-click (hold the SHIFT key down and click) on the last. To select
individual channels, ctrl-click (hold down the CTRL key and click) on each channel. You can also
deselect channels from within a block using ctrl-click.
NOTE: You can only select channels from one set of banks at a time.
Step 3:
Start the select scan by selecting Scan|Select Scan Operation... from the main menu.
Once you have opened the select scan dialog, you can change expert scan options from a separate
dialog which is displayed when you click on the ‘Expert...’ push button (see Scan|Expert Options...).
These options are the same as those used with a conventional memory scan.
When you have setup the scan, simply click on ‘Start’ to begin scanning.
While scanning, frequencies can be added to the pass list by clicking on the ‘Pass’ push button.
You can force the scan to skip an active frequency and resume scanning using the ‘Skip’ push button.
Click on the ‘Close’ push button to stop scanning and close the dialog.
AUDIO LOG IS NOT AVAILABLE WITH SELECT SCAN.
Delete Bank
This menu option expands to a number of sub-menu options which allows you to delete individual memory banks from the radio or all the banks in one go. There is a separate sub-menu option
for bank A - J and a - j (for the AR8000) or 0 - 9 (for the AR2700).
AOR PC-MANAGER for WindowsTM - USER MANUAL - 34
SCAN MENU OPTIONS
Once memory data has been deleted in the radio it cannot be recovered (unless you have a
copy in a PC-MANAGER memory file).
35 - AOR PC-MANAGER for WindowsTM - USER MANUAL
WINDOW MENU OPTIONS
WINDOW MENU OPTIONS
This menu allows you to change the way that windows are displayed on the PC-MANAGER
desktop and to save the desktop configuration. A list of the files that are currently open is appended
automatically to the bottom of the menu.
Cascade
The Window|Cascade command arranges all document windows from the top-left position of the
application’s main window so that the title bar of each is visible.
Tile
The Window|Tile command arranges all document windows side-by-side in a non-overlapping pattern.
Arrange Icons
The Window|Arrange Icons command arranges all iconised windows into rows along the bottom of the
application’s main window.
Close All
The Window|Close All command closes all document windows open in the application.
Position Toolbar
This command on the Windows menu allows you to position the toolbar on the left, right or top of the
main desktop of the application.
Select this menu option repeatedly until the toolbar is located in the position you prefer. The position
is saved along with the configuration of the desktop when you choose the Save Desktop menu option.
Save Desktop
The Window|Save Desktop command allows you to save the current layout of windows so that you can
load it back in later. This is useful if you like a particular configuration of files.
Save Desktop As...
The Window|Save As... Desktop command allows you to save the current layout of windows to a
different name to the default. You can save several layouts in this way.
AOR PC-MANAGER for WindowsTM - USER MANUAL - 36
WINDOW MENU OPTIONS
Load Desktop
The Window|Load Desktop... command allows you to recall the layout of windows in the application
that were saved by the Window|Save Desktop or Window|Save As... Desktop commands.
37 - AOR PC-MANAGER for WindowsTM - USER MANUAL
AUDIO LOG
AUDIO LOG
Audio log is a simple to use utility that provides wave audio recording and playback on your
PC using a sound card (not included). You can operate the audio log manually using the push buttons
on the tool bar or automatically from PC-MANAGER during searches and scans.
SETTING UP
The Audio Log application needs no setting up, but you will need to install a WindowsTM compatible sound card, such as one of the Sound BlasterTM cards (not supplied). Follow the installation
instructions that come with your sound card before attempting to use Audio Log. If you have test
software, use that after installation to ensure that your sound card is working properly.
Some adjustment of the audio levels may be necessary for best results. There is usually an audio
mixer utility supplied with your sound card which can be used to adjust the levels correctly. If you are
using Windows® 95, you can use the Volume Control utility to make alterations to sound levels by
double-clicking on the
symbol in the bottom right hand corner of the Windows® 95 desktop.
To connect your radio to the sound card, you need a screened coaxial audio cable with a 3.5mm
mono jack on one end and a suitable connector for the “Line In” socket on your sound card. It may be
necessary to adjust the volume level on the radio to prevent clipping or an excessively low audio level
before proceeding.
Audio Log has the following appearance:
AOR PC-MANAGER for WindowsTM - USER MANUAL - 38
AUDIO LOG
The utility can either be launched from the
push button of PC-MANAGER’s tool bar or from
the “Audio Log” push button in search and scan dialogs. If launched from PC-MANAGER, Audio Log
remains on top of all other windows so that it is not obscured during operation.
You can use Audio Log standalone by launching it from its WindowsTM desktop icon, but no
frequency data will be displayed if the radio control software is absent. When used with PC-MANAGER, entries are compiled automatically while searches or scans are in progress. Dynamic Data
Exchange (DDE) is used to transfer the frequency and mode from the control software to Audio Log so
that each entry contains a time/date stamp, the frequency and mode, and the duration of the audio
recording.
You can replay an entry simply by double-clicking on it in the list. Alternatively, the array of
push button controls can be used from the utility’s tool bar. These are enabled or disabled in a logical
way during operation for clarity and ease of use.
FILE MENU OPTIONS (AUDIO LOG)
New
The File|New command opens a new, untitled audio log file. The utility prompts you to name an
untitled audio log when it is closed.
Open...
The File|Open command displays the “Open” dialog box so you can select an audio log file to load.
You can also create a new log by naming a file that doesn’t currently exist.
Audio Log files have the extension “.LOG” and contain all the entries
Close
File|Close closes the current audio log.
Save
The File|Save command saves the audio log to disk. If the audio log is unnamed, the “Save As” dialog
box is displayed so you can name the log.
Delete
The File|Delete command removes the current audio log and all the wave audio files that it contains
from your hard disk.
39 - AOR PC-MANAGER for WindowsTM - USER MANUAL
AUDIO LOG
YOU CANNOT RECOVER ANY OF THE AUDIO FILES IN THE LOG ONCE YOU
HAVE DELETED IT.
Print...
The File|Print command prints the current audio log. Use File|Print Setup... to select a printer, and to
set printer options.
Print Setup...
The File|Printer Setup command displays the “Printer Setup” dialog box which allows you to select
and configure the printer to be used to print audio logs in the application.
Exit
The File|Exit command exits audio log. If you have modified a log without saving, you will be
prompted to save before exiting.
SELECT MENU OPTIONS (AUDIO LOG)
By Frequency
This option allows you to select all the entries in the log that have the same frequency. This is useful
for replaying activity from a single frequency that was found during a search or scan.
To select all entries having the same frequency, first select an entry then select the Select|By Frequency menu option.
You can now play all the entries that are highlighted one after another automatically simply by using
the play push button on the toolbar.
Select All
This option selects all the entries in the current log. This is useful if you want to eliminate a few
entries by control-clicking them.
Clear All
This option allows you clear the selection on every entry in the log. It does not delete any data, use the
File|Delete menu option to erase a log.
AOR PC-MANAGER for WindowsTM - USER MANUAL - 40
AUDIO LOG
CONTROLS MENU OPTIONS (AUDIO LOG)
Rewind
Step backwards one entry, play it then stop.
Forward
Step forwards one entry, play it then stop.
Play
Play audio log entries.
You can select and replay one or more log entries by single-clicking on the listing shown in the main
window. Either single-click on an entry then click on the play button, or just double-click on the entry.
You can select a block of entries to replay by clicking on the first and shift-clicking on the last
(clicking with the mouse while holding down the SHIFT key). When you press the play button all the
log entries in the block will be played in sequence.
You can control-click (single-click on an entry while holding down the CTRL key) to select individual
entries one-by-one. You can also control-click to toggle the select status of an individual entry.
Stop
Stop playing the current log entry.
Pause
Pause playing the current audio log entry. You can resume playing by selecting pause
again.
Record
Start recording audio and append a new log entry to the end of the current audio log.
41 - AOR PC-MANAGER for WindowsTM - USER MANUAL
MOVING COPY PROTECTION
MOVING COPY PROTECTION
A simple utility has been provided so you can move the copy protection “token” that is installed
by the software back onto the distribution floppy disk or between hard disks.
You may need to move the copy protection token back onto you original distribution disk in the
following circumstances:
F
F
F
F
When installing disk compression software.
When upgrading PC-MANAGER
When moving the program to a new computer.
When returning the original disk to your AOR distributor (for updates etc.)
To transfer the token onto the distribution floppy disk, run the Copy Protection Move utility:
When you have done this, the following window is displayed:
To transfer the token onto the distribution floppy disk, click on the Move to master
floppy... push button. If the token is already on the floppy disk, you can transfer it to hard disk
using the Move from master floppy... push button. You can use this utility to have copies
of the program on several computers at once, however the program will only work on the machine that
has the copy protection token on it.
This AOR software product comes with a single license and two tokens. Contact your
AOR dealer to obtain additional copies of the software.
AOR PC-MANAGER for WindowsTM - USER MANUAL - 42
®
AOR Ltd
2-6-4 Misuji, Taito-ku, Tokyo 111-0055, Japan.
Tel: +81 3 3865 1695 Fax: +81 3 3865 1697
[email protected] www.aorja.com
AOR (UK) Ltd - AOR Manufacturing Ltd
4E East Mill, Bridgefoot, Belper, Derbys DE56 2UA, England
Tel: +44 1773 880788 Fax: +44 1773 880780
[email protected] www.demon.co.uk/aor
AOR USA, INC.
20665 S. Western Avenue, Suite # 112
Torrance, CA. 90501, USA
Tel: (310) 787 8615 Fax: (310) 787 8619
[email protected] www.aorusa.com