1
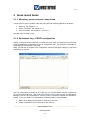
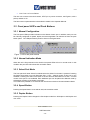
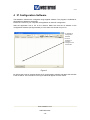
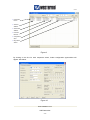
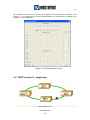
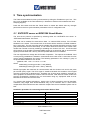
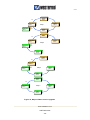
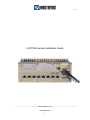
V4.2
U/R/T200 series Installation Guide
www.westermo.com
U/R/T200 series
-1-
V4.2
1
INTRODUCTION ..................................................................................................................... - 4 1.1
1.2
1.3
2
QUICK INSTALL GUIDE ....................................................................................................... - 5 2.1.1
2.1.2
3
T200......................................................................................................................................- 4 R200 .....................................................................................................................................- 4 U200 .....................................................................................................................................- 4 -
Mounting, power and port connections ....................................................................... - 5 Redundant ring – FRNT0 configuration ...................................................................... - 5 -
SWITCH INSTALLATION AND CONFIGURATION ........................................................ - 8 3.1
MOUNTING ............................................................................................................................- 8 3.1.1
DIN rail mounting........................................................................................................ - 8 3.1.2
19” dual units mounting .............................................................................................. - 8 3.1.3
19” single unit mounting ............................................................................................. - 9 3.1.4
Wall mounting............................................................................................................ - 10 3.1.5
Power connection ...................................................................................................... - 11 3.1.6
Copper drop link connection ..................................................................................... - 11 3.1.7
Fiber drop link connection ........................................................................................ - 11 3.2
POWER SUPPLY CONNECTOR ...............................................................................................- 12 3.2.1
Redundant power inputs ............................................................................................ - 12 3.2.2
Fault Contact............................................................................................................. - 12 3.3
FRONT PANEL LED’S AND PUSH BUTTONS..........................................................................- 13 3.3.1
Manual Configuration ............................................................................................... - 13 3.3.2
Normal Indication Mode............................................................................................ - 13 3.3.3
Select Port Mode ....................................................................................................... - 13 3.3.4
Speed Button .............................................................................................................. - 13 3.3.5
Duplex Button ............................................................................................................ - 13 3.3.6
Auto-negotiation ........................................................................................................ - 14 3.3.7
Save Button ................................................................................................................ - 14 3.3.8
LED Fault indication................................................................................................. - 14 3.4
FIBER OPTIC CARE ...............................................................................................................- 14 -
4
IP CONFIGURATION SOFTWARE.................................................................................... - 16 4.1
4.2
4.3
4.4
4.5
4.6
4.7
4.8
4.9
4.10
4.11
4.12
4.13
5
FRNT VERSION 0 – SINGLE RING .........................................................................................- 20 FRNT TROUBLE SHOOTING .................................................................................................- 21 FRNT VERSION 1 – MULTIPLE RINGS ...................................................................................- 22 RSTP/STP...........................................................................................................................- 22 SNMP .................................................................................................................................- 23 DHCP .................................................................................................................................- 24 STATIC IP ADDRESS .............................................................................................................- 24 IP GATEWAY ADDRESS ........................................................................................................- 24 PORT LINK ALARMS ............................................................................................................- 24 ENABLING PUSH BUTTONS ..................................................................................................- 25 PORT CONFIGURATION AND PORT MIRRORING ...................................................................- 25 IGMP SNOOPING .................................................................................................................- 25 VLAN .................................................................................................................................- 26 -
TIME SYNCHRONIZATION ............................................................................................... - 28 5.1
5.2
5.3
5.4
5.5
5.6
5.7
SNTP/NTP SERVER OR IEEE1588 GRAND MASTER ...........................................................- 28 IEEE1588 TRANSPARENT CLOCK .......................................................................................- 30 SNTP TIME CLIENT ..............................................................................................................- 30 PTP SLAVE ..........................................................................................................................- 31 SERIAL TIME SERVER ...........................................................................................................- 31 IRIG-B................................................................................................................................- 32 OUTPUT SIGNALS ON GPS INTERFACE .................................................................................- 32 www.westermo.com
U/R/T200 series
-2-
V4.2
6
RETURN PROCEDURE ........................................................................................................ - 33 -
7
UPGRADING OF THE R/T200 SWITCH............................................................................ - 34 7.1
INTRODUCTION ....................................................................................................................- 34 7.1.1
Typical problems ....................................................................................................... - 34 -
8
SOFTWARE VERSIONS OF THE R/T200 SWITCH. ....................................................... - 35 8.1
8.2
8.3
INTRODUCTION ....................................................................................................................- 35 HOW TO UPGRADE FROM OLD TO NEW MAJOR SOFTWARE VERSION .....................................- 35 IP CONFIGURATION TOOL – SOFTWARE VERSIONS ...............................................................- 37 -
www.westermo.com
U/R/T200 series
-3-
V4.2
1 Introduction
This document describes how to install and configure switches in the T200, R200 or U200
series.
This Operator Manual describes the properties of the T200, R200 and U200 series.
1.1 T200
The T200 is the time synchronization switch series of Westermo. The T200 series has also
full management support including QoS, network redundancy (FRNT protocol), SNMP, IGMP
snooping, VLAN and MAC security. The switches are approved for industrial use.
All chapters in this document are relevant for the T200 series.
Note: Using the time synchronization, SNMP, IGMP snooping, VLAN and MAC security
management features of the T200 series require minimum network knowledge by the user.
1.2 R200
The R200 series contains the same features as the T200 series except for time
synchronization.
All chapters in this document except chapter 5 are relevant for the R200 series.
Note: Using the SNMP, IGMP snooping, VLAN and MAC security management features of
the R200 series require minimum network knowledge by the user.
1.3 U200
The U200 series is an unmanaged switch implementation with QoS support (layer 2 and 3).
The U200 switch series has the same approvals for industrial use as the R200 and T200
series.
All chapters in this document except chapters 3.3.8, 4, 5, and 7 are relevant for the U200
series.
www.westermo.com
U/R/T200 series
-4-
V4.2
2 Quick Install Guide
2.1.1 Mounting, power and port connections
A quick guide for how to install a U/R/T/200 using DIN rail mounting (default) is as follows:
1. Mounting, see chapter 3.1.1
2. Power connection, see chapter 3.1.5
3. Port connections, see chapter 3.1.6 and 3.1.7
Now the switch is ready for use.
2.1.2 Redundant ring – FRNT0 configuration
Setting up several R/T200 switches in a redundant ring using the FRNT0 protocol requires
switch management configuration via the IP configuration tool. The program is available for
download from the Westermo web page.
Make sure that the IP Address of the configuration software (see figure below) is in the same
sub domain as your PC.
In a ring configuration as FRNT v0, one, and only one, R/T200 switch must be configured to
be the network Focal Point. The Focal Point switch will then have the role as Redundancy
Manager, and thus be responsible for recovery when a connection between the switches is
broken. To set up a FRNT v0 configuration the following steps must be followed:
1. Define which Switch that shall be the network Focal Point.
2. Power up the switch and connect this to the network.
www.westermo.com
U/R/T200 series
-5-
V4.2
3. Assign an IP address for the configuration software. Ensure the address range is
within the same Subnet as your assigned IP address for your PC.
4. Press the ‘Scan for devices’ button. The Switches on the network will be listed, see
below.
5. Run the cursor over the listed Switch and left click the mouse.
6. A new configuration Window will open:
www.westermo.com
U/R/T200 series
-6-
V4.2
7. If required; assign a new IP address and Subnet address for this Switch.
8. Press the ‘Set’ button to assign this IP address and Subnet settings to the Switch.
9. Tick the ‘Enable FRNT Ring’ and ‘Network focal point’ to set the Switch to be the
Focal Point and Bus Member to ensure the Switch configured to run within a
Redundant Ring.
10. Press the ‘Set’ button (all your changes performed will be set).
11. Press the ‘Restart’ button to re-configure the Switch. The Switch will run through the
start sequence. During this period communication to the Switch will be lost.
12. Connect the next Switch into the ring. (This must be connected from Port 8 to Port 7
in a clockwise manner on version 2.30 or older).
13. Press the ‘Scan for devices’ button. The second Switch will appear on the list.
14. Run the cursor over the second Switch and left click the mouse.
15. If required; assign a new IP address and Subnet address for this Switch.
16. Tick ‘Enable FRNT ring’ to ensure the Switch is configured to run within a Redundant
Ring.
17. Press the ‘Set’ button.
18. Press the ‘Restart’ button to re-configure the Switch. The Switch will run through the
start sequence. During this period communication to the Switch will be lost.
19. Continue connecting Switches in this manner until the ring has been completed
www.westermo.com
U/R/T200 series
-7-
V4.2
3 Switch Installation and Configuration
3.1 Mounting
3.1.1 DIN rail mounting
The U/R/T200 DIN rail kit is the default mounting kit, and this kit is enclosed in the switch
shipment unless another mounting kit is specified. Both vertical and horizontal mounting is
possible. The DIN rail kit contains the following parts:
-
1 x DIN clips
4 x screws
Figure 1 shows vertical and horizontal DIN rail mounting.
Figure 1, DIN rail mounting
Heavy duty DIN clips are also available (improved vibration properties) for horizontal DIN rail
mounting, MOUN0003. This mounting kit must be ordered separately.
3.1.2 19” dual units mounting
The U/R/T200 wall mounting kit, MOUN0009, contains the following parts:
-
2 x short angle brackets
4 x nut brackets
2 x H – lists
4 x curved nuts
4 x rack screws
4 x rack brackets
8 x brackets
8 x screws
www.westermo.com
U/R/T200 series
-8-
V4.2
Figure 2 shows how to mount two URT200 by using the 19” dual units mounting kit.
This mounting kit must be ordered separately.
Figure 2, 19” dual units mounting kit
3.1.3 19” single unit mounting
The U/R/T200 wall mounting kit, MOUN0008, contains the following parts:
-
1 x long angle bracket
1 x short angle bracket
4 x nut brackets
4 x curved nuts
4 x rack screws
4 x rack brackets
8 x brackets
8 x screws
Figure 3 shows how to mount on U/R/T200 by using the 19” single unit mounting kit.
This mounting kit must be ordered separately.
www.westermo.com
U/R/T200 series
-9-
V4.2
Figure 3, 19” single unit mounting kit
3.1.4 Wall mounting
The U/R/T200 wall mounting kit, MOUN0006, contains the following parts:
-
2 x short angle brackets
4 x nut brackets
8 x brackets
8 x screws
Figure 4 shows how to mount the wall mounting kit.
This mounting kit must be ordered separately.
www.westermo.com
U/R/T200 series
- 10 -
V4.2
Figure 4, Wall mounting kit
3.1.5 Power connection
Connect your primary voltage (e.g. +24VDC) to the VinA pin and ground to one of the –COM
pins on the power input on the U/R/T200 switch by using the enclosed power connector.
Figure 5, Power input
3.1.6 Copper drop link connection
Both straight and crossed RJ45 cables can be used for copper connection, see Operator
Manual for details related to the Auto-MDIO operations.
3.1.7 Fiber drop link connection
www.westermo.com
U/R/T200 series
- 11 -
V4.2
Auto-MDIO is not supported on the fiber ports. Thus, the user must make sure that the fiber
drop link used is crossed. This is easily verified by checking if the fiber port LED is on or not,
when the fiber drop link is connected between two switches or the switch and a fiber enabled
end node. Manual swooping of the TX/RX drop link on one of the fiber devices is required in
case the LED is off on both devices. This can be done either directly on the switch fiber port
or on a fiber patch panel if this is available (preferably).
3.2 Power Supply Connector
3.2.1 Redundant power inputs
The switch is designed to operate permanently over a very wide range of power input (19 V
DC to 60 VDC). Two redundant inputs are provided to provide enhanced redundancy if either
supply fails.
The power supply draws power from the input that has the highest potential difference when
compared to the alternate supply.
This enables use of e.g. a 48V source as primary supply with a 24VDC battery as back up.
Power supply inputs have reverse polarity protection.
The switch is delivered with a power connector (Wieland 25.621.3553.0) that is suitable for
wires between AWG 20 and AWG 22 (0,34-0,5 mm2).
Figure 6, Power contact
3.2.2 Fault Contact
The switch is incorporated with a user configurable fault contact (STAT pin on the power
contact) that enables network and switch faults to be highlighted.
The user configurable fault contact is a solid state component and therefore requires power to
control the device.
As standard the fault contact will always highlight the following:
•
•
•
•
•
•
Internal switch watchdog failure.
Link / Port 7 Failure (if redundant ring mode is activated)
Link / Port 8 Failure (if redundant ring mode is activated)
Power Supply Failure
Focal Point / Redundancy Mode activated.
Time sync error; NMEA reports or PPS missing on RS232/422 interface
Using the Switch configuration software, the fault contact can highlight the following addition
failures:
www.westermo.com
U/R/T200 series
- 12 -
V4.2
•
Link / Port 1 to Port 8 Failure
The user can connect to the fault contact, STAT pin on power connector, see Figure 6, with a
pull-up resistor to Vin.
The fault contact implementation is described in details in the Operator Manual.
3.3 Front panel LED’s and Push Buttons
3.3.1 Manual Configuration
The front panel LEDs provides indication on the Status of each port. In addition, each port can
be manually configured for speed, duplex and auto-negotiation can also be set from the push
button panel. The LED/push button panel is shown in the figure below.
Figure 7, LED’s and push buttons
3.3.2 Normal Indication Mode
When the unit is first powered on the Switch front panel LEDs will run in normal mode. In this
condition the port LED will indicate link and traffic status.
3.3.3 Select Port Mode
The front panel will enter Select Port Mode when the Select Port button is pressed. Pressing
the Select Port button once will illuminate Port 1 LED – manual control of this port is now
available. Pressing the Select Port button a second time will illuminate Port 2 LED – manual
control of this port is now available. Each additional port can be placed into Manual mode by
subsequent pressing of the Select Port button.
If no buttons are pressed for 30 seconds the unit will return back to Normal Indication Mode.
3.3.4 Speed Button
Pressing the Speed button once selects 10M, twice enables 100M.
3.3.5 Duplex Button
Pressing the Duplex button changes the Port duplex mode from full duplex to half duplex and
vice-versa.
www.westermo.com
U/R/T200 series
- 13 -
V4.2
3.3.6 Auto-negotiation
Pressing both the Speed and the Duplex button will enable or disable auto-negotiation for the
selected port.
3.3.7 Save Button
Newly configured settings are stored in non-volatile memory when the Save button is
pressed.
Note: Manual configuration of fiber ports is not possible. These ports are configured for full
duplex connectivity and 100 Mbps.
3.3.8 LED Fault indication
In addition to display port and traffic status, the LED front panel will display fault information if
the switch is managed (U/R200 series). The LED fault indications are as follows:
•
•
•
•
HDX LED will blink in case of a FRNT v0 error. I.e. the FRNT v0 ring is not intact.
The focal point or a member switch will indicate that one or both of its FRNT0 ring
ports is not working (link is OFF, or no FRNT v0 packets are received. The HDX LED
will also blink on the FRNT v0 focal point even if its FRNT v0 ports is working if the
FRNT v0 ring is not intact. Relevant in case FRNT v0 (FRNT ring) is enabled in the IP
configuration tool.
FDX LED will blink in case of a port alarm. Relevant in case port alarm is enabled in
the IP configuration tool.
100 LED will blink in case of no PPS signal or no NMEA reports from the GPS
receiver is received on the GPS interface. Relevant when time synchronization and
external time base are enabled in the IP configuration tool. The 100 LED will also
blink in case the SNTP client is out of synchronization, relevant in case SNTP client is
selected in the IP configuration tool.
10 LED will blink in case of an FRNT v1 error. I.e. no communication to remote
FRNT v0 ring via the FRNT v1 enabled port (either primary or secondary FRNT v1
port). Relevant in case FRNT v1 is enabled in the IP configuration tool.
When the fault contact is energised the front panel display will also mimic this status by
strobing one or more the above LEDs. When the fault(s) is cleared the LEDs will automatically
be extinguished.
3.4 Fiber optic care
Fiber optic transmission medium is usually made of Glass. In addition, the diameter of the
fiber can be as low as 9um. In comparison, the diameter of an average piece of Human hair is
40 um.
Therefore, a small piece of dust or contaminate located on the end of a patch cable
could easily disrupt communications. Permanent damage to both fiber patch cords and
fiber optic transceiver components may be the result of just a small invisible piece of
dust!
www.westermo.com
U/R/T200 series
- 14 -
V4.2
The fiber optic transceivers and associated patch cables must be treated with great care.
Therefore, the following rules should be adhered to during any commissioning work and fiber
optic installation.
•
•
•
•
Dust caps must be replaced immediately after removal of patch cable from
transceiver or patch box. Failure to comply could result in damage to transceivers or
patch cables.
Keep hands clean when touching fiber optic cable.
Patch cables should be cleaned with IPA and dried with a lint-free cloth before
installation.
Once patch cables have been installed dust will not ingress the transceiver
www.westermo.com
U/R/T200 series
- 15 -
V4.2
4 IP Configuration Software
The Westermo switches are configured using supplied software. The program is available for
download from Westermo web page.
Extract the .ZIP file to your computer, the application is called IP configuration.
Start the application from a PC on the network. Make sure that the IP Address of the
configuration software (see figure below) is in the same sub domain as your PC.
• IP Address Of
Configuration
Software
• Scan For
Switches To
Find And
Configure Focal
Point Switch
Figure 8
By clicking the Scan for switches button the IP Configuration Software will detect the switches
in the IP subnet. The information in the figure below will appear for each switch.
www.westermo.com
U/R/T200 series
- 16 -
V4.2
• First Switch
Found
• Switch IP
Address
• Switch MAC
Address
• Firmware
Revision
• Configuration
Style
• Ring Status
Alarms
Figure 9
By clicking on the line for each respective switch, further configuration opportunities will
appear. See below.
Figure 10
www.westermo.com
U/R/T200 series
- 17 -
V4.2
After choosing one of the switches to be the FRNT Primary switch it will appear like the first
one in the list below. For further information about FRNT v0 see section 3.1
• Scanning For
Devices Highlights
All Switches On
Ring
• Highlights FP
Running Network
As A ‘Ring’
• Highlights Network
Focal Point
• Switch software
version
Figure 11
If the ring should be broken the Status of the Focal Point switch will change from RING to
BUS. An exclamation mark will be shown on the ports that have lost connection.
• Scanning For
Devices Highlights
All Switches On
Ring
• Ring Failure
Occurred
• FP Now Running
As Bus
• Highlights Link /
Port That Have
Failed
www.westermo.com
U/R/T200 series
- 18 -
V4.2
Figure 12
By clicking the Multiple rings button in the FRNT section the FRNT Advanced setup dialog
box will appear, see Figure 13. Redundant connection between two FRNT v0 rings, FRNT v1,
can be configured here. See chapter 4.3 for further information of FRNT v1.
Figure 13, FRNT v1 Multiple ring configuration
By clicking the “port config” button in the “Port configuration” setup dialog box will appear, see
Figure 14. See chapter 4.11 for more details.
Figure 14, Port configuration setup
www.westermo.com
U/R/T200 series
- 19 -
V4.2
By clicking the “VLAN” button in the “VLAN configuration” setup dialog box will appear, see
Figure 15. The VLAN tick box must be enabled before the VLAN button is enabled. See
chapter 4.13 for more details.
Figure 15, VLAN configuration setup
4.1 FRNT version 0 – single ring
www.westermo.com
U/R/T200 series
- 20 -
V4.2
Figure 16, FRNT v0 ring
In a ring configuration as FRNT v0, one, and only one, R/T200 switch must be configured to
be the network Focal Point. The Focal Point switch will then have the role as Redundancy
Manager, and thus be responsible for recovery when a connection between the switches is
broken. To set up a FRNT v0 configuration the following steps must be followed:
20. Define which Switch that shall be the network Focal Point.
21. Power up the switch and connect this to the network.
22. Assign an IP address for the configuration software. Ensure the address range is
within the same Subnet as your assigned IP address for your PC.
23. Press the ‘Scan for devices’ button. The Switches on the network will be listed.
24. Run the cursor over the listed Switch and left click the mouse.
25. A new configuration Window will open
26. If required; assign a new IP address and Subnet address for this Switch.
27. Press the ‘Set’ button to assign this IP address and Subnet settings to the Switch.
28. Tick the ‘Enable FRNT Ring’ and ‘Network focal point’ to set the Switch to be the
Focal Point and Bus Member to ensure the Switch configured to run within a
Redundant Ring.
29. Press the ‘Set’ button (all your changes performed will be set).
30. Press the ‘Restart’ button to re-configure the Switch. The Switch will run through the
start sequence. During this period communication to the Switch will be lost.
31. Connect the next Switch into the ring. (This must be connected from Port 8 to Port 7
in a clockwise manner on version 2.30 or older).
32. Press the ‘Scan for devices’ button. The second Switch will appear on the list.
33. Run the cursor over the second Switch and left click the mouse.
34. If required; assign a new IP address and Subnet address for this Switch.
35. Tick ‘Enable FRNT ring’ to ensure the Switch is configured to run within a Redundant
Ring.
36. Press the ‘Set’ button.
37. Press the ‘Restart’ button to re-configure the Switch. The Switch will run through the
start sequence. During this period communication to the Switch will be lost.
38. Continue connecting Switches in this manner until the ring has been completed
4.2 FRNT trouble shooting
Check cabling, port 8 must be connected to port 7 on the next switch.
Only one FRNT v0 focal point switch is allowed in a ring.
Setting FRNT parameters require restart of the switch.
www.westermo.com
U/R/T200 series
- 21 -
V4.2
4.3 FRNT version 1 – multiple rings
Figure 17, FRNT v1
Connecting two FRNT v0 rings together via redundant bridges creates a configuration called
FRNT v1. One switch acts as the FRNT primary switch and the other as a FRNT secondary
switch. To establish a FRNT v1 configuration follow the steps bellow.
1. Choose one of the switches to be the FRNT primary switch in IP configuration tool.
2. The switch is configured as a FRNT primary switch through the ‘advanced’ dialog box
in the IP configuration tool by ticking the ‘Enable redundant bridge function’ and
‘FRNT primary switch’, see .
3. Define which port that will act as the ‘FRNT enabled port’ in the ‘advanced’ dialog
box. Connect this to the other FRNT v0 ring.
4. Choose one of the switches in the same FRNT v0 ring to be the FRNT secondary
switch in IP configuration tool
5. The switch is configured as a FRNT secondary switch through the advance dialog in
the IP configuration tool by ticking the ‘Enable redundant bridge function’..
6. Define which port that will act as the ‘FRNT enabled port’ in the ‘advanced’ dialog
box. Connect this to the other FRNT v0 ring.
4.4 RSTP/STP
The R/T200 can also be enabled for the Rapid Spanning Tree Protocol (RSTP) with Spanning
Tree Protocol (STP) fallback, where fallback means that the switch will act as a STP enabled
switch if other switches in the network only support STP. This RTSP protocol is based on
IEEE802.1w and the STP protocol is based on IEEE802.1D. RTSP/STP is an alternative to
the FRNT.
www.westermo.com
U/R/T200 series
- 22 -
V4.2
Both RSTP and STP are open standards that can handle any network topology (i.e. all kinds
of network loops) and provide interoperability versus other Ethernet switches from other
vendors enabled for STP.
RSTP/STP is enabled by ticking the “Enable RSTP/STP” tick box, and the RSTP/STP focal
point of the network can be set by ticking the focal point option on one of the switches in the
network.
The network re-configuration time in case of RSTP is used is 2-5 seconds (depending on the
topology change), while the corresponding re-configuration time for STP is approx. 40
seconds.
The user can enable RTSP/STP on a per port basis. However, care must be shown if the
switch is used in a topology with network loops, and where some of the ports are disabled for
RSTP/STP.
Note: RTSP/STP and FRNT can not be combined.
4.5 SNMP
The R/T200 switch supports Simple Network Management Protocol (SNMP). To
enable/disable SNMP tick the SNMP box and press the ‘Set’ button. Press the ‘Reset’ button
to restart the Switch with SNMP enabled/disabled.
The R/T200 MIBs, MIB2-Interface, IF MIB and Bridge MIB can be inspected by the SNMP
manager (SNMP tool) running on e.g. a windows or Unix platform (e.g. HP OpenView,
IntraVue, iSNMP). How the R/T200 MIB information is presented depends on the SNMP
manager GUI implementation.
The IP address of the SNMP Host (NMS - Network Monitoring Stations) must be defined
before SNMP traps can be generated by the R/T200 switch and sent to the NMS. This is
done by setting the address in the Westermo private MIB part general/trapHostAddr. The
SNMP TRAP is sending TCP/UDP packets on port 162.
After the host address is set the user can configure what type of TRAP he wants to configure.
The Westermo switch has today support for several traps, see below:
•
Link down/up trap
Link up/down trap - use the ifMib. ifMib/ifXEntry/ifLinkUpDownTrapEnable.
•
Status trap
To monitoring the status of the switch - use private MIB,
Westermo/switch/fs200/stat/statTrapEnable.
The switch sends a SNMP TRAP :
* when the ring functions is not working
* when it starts to work again,
* when the GPS is out of sync
* when the GPS is in sync state.
* when a monitored link is down (see the IP Configuration tool).
•
Frntv1 trap
To enable the frntv1 warning system - use
Westermo/switch/fs200/frntv1/frntEnTrapPrim trap or the
Westermo/switch/fs200/frntv1/frntEnTrapSec. The switch sends a SNMP
www.westermo.com
U/R/T200 series
- 23 -
V4.2
TRAP when the frntv1 has lost the connection to the backbone ring.
•
Temperature Alarm Trap
To enabled the monitoring of the temperature in the switch - use the
tempAlarm trap. Westermo/switch/fs200/tempAlarm/tempTrapEn. The switch
sends a SNMP TRAP when the temperature has raised the predefined limit.
The Trap host address is set by the Westermo private Management Information Base (MIB)
general part.
Parameter changes performed in SNMP must be followed by a SNMP set command to the:
- writeParametersToFlash, OID: 1.3.6.1.4.1.16177.1.1.2.7
See the Operational Manual for further information about SNMP and SNMP traps.
4.6 DHCP
The R/T200 switch supports Dynamic Host Configuration Protocol (DHCP). The R/T200
switch can get an IP address dynamically from a DHCP server. To enable/disable DHCP tick
the DHCP box and press the ‘Set’ button. Press the ‘Reset’ button to restart the Switch with
DHCP enabled/disabled. The “IP address” found in the IP field of the “Selected device” dialog
has no meaning if the DHCP box is enabled.
4.7 Static IP address
A static IP address can be set on the R/T200 switch by entering an available IP address in the
“IP address” field and the corresponding IP subnet mask of your IP domain in the “Subnet
mask” in the “Selected device” dialog. Your new IP address and mask will take immediate
effect after you have pressed the ‘Set’ button. No switch restart is required for this operation.
A correct IP address and IP mask must be set in order for correct operation of ping, SNMP
and other IP based applications on the R/T200.
4.8 IP gateway address
An IP gateway address can be set on the R/T200 switch by entering the IP address of your
gateway in the “IP gateway address” field in the “Selected device” dialog. Your new IP
gateway address will take effect when you have pressed the ‘Set’ button and then restarted
the switch by pressing the ‘Reset’ button.
A correct gateway address will ensure that the R/T200 switch CPU can be accessed from
another IP subnet via the specified gateway. This means ping, SNMP and other IP based
applications on the R/T200 will work through the gateway.
Note: the gateway settings have no impact on the packet forwarding from one switch port to
another switch port.
4.9 Port Link Alarms
www.westermo.com
U/R/T200 series
- 24 -
V4.2
Using the Configuration software, any or all, of the ports can be configured to highlight a link
failure.
Simply tick the Port that link failure is required on. When the port has been highlighted press
the ‘Set’ button and then the ‘Reset’ button to restart the Switch with port link alarms
enabled/disabled.
Note: Port numbers 7 & 8 are always configured to highlight link failure in case FRNT0
is enabled.
4.10 Enabling Push buttons
The front panel push buttons on the switch can be enabled/disabled in the IP configuration
tool. The push buttons are by default enabled (an operator at the switch installation can
change the speed, duplex connectivity and auto-negotiation settings per port).
To enable/disable push buttons tick the “Enable front panel push buttons” and press the ‘Set’
button. Press the ‘Reset’ button to restart the Switch with push buttons enabled/disabled.
4.11 Port Configuration and Port Mirroring
Port configuration is available in the “Port configuration” dialog window; see Figure 14, which
is found by clicking the “port config” button.
The port types, i.e. fiber (Fx) or copper (Tx) and whether link is found on the ports are shown
on the Link row, while the auto-negotiation [enable/disable]], duplex connectivity [HDX, FDX]
and speed [10, 100] Mbps are shown on the next rows. The duplex connectivity and speed
settings for a given port are editable if the user un-tick the auto-neg tick box for the port. The
auto-negotiation, duplex connectivity and speed settings for an Fx port are not editable.
The user can also enable port mirroring. This means that all packets sent and received on a
given port, the sniff port, is mirrored to another port, the mirror port. Only one sniff port and
one mirror port can be defined. Wireshark or similar network capture programs can be used
for detailed inspections of the packets sent and received on the sniff port.
See
http://www.wireshark.org/download.html for Wireshark download.
Press the ‘Set’ button after any changes performed on the port configuration parameters in
the Port configuration dialog.
4.12 IGMP snooping
The R/T200 switch supports Internet Group Management Protocol (IGMP) snooping (based
on IGMP v1 and IGMPv2). To enable IGMP snooping, tick the “Enable IGMP” box. The
“Multicast stop filter” option can also be ticked if you want the switch to set multicast stop
filters for multicast packets not being based on IP multicasting (IGMP). The switch can also
act as an IGMP Querier. The IGMP Querier operation of the switch is controlled by the “Auto
mode” and “Querier” parameters. The following combinations of these two parameters are
possible:
- “Auto mode” enabled + Querier enabled: the switch is able to act as an IGMP Querier
(IGMP server) and the IGMP Querier in the network is selected automatically. The
switch (with Querier support) in the network with the lowest IP address will be chosen as
the network Querier (i.e. IGMP focal point). Only one Querier will exist in the network if
www.westermo.com
U/R/T200 series
- 25 -
V4.2
all IGMP enabled switches and routers in the network have this configuration. This is
the default IGMP settings.
- “Auto mode” enabled + Querier disabled: same operation as above, but the switch
cannot act as an IGMP Querier.
- “Auto mode” disabled + Querier enabled: the switch will always act as an IGMP Querier.
Each switch/router will act as IGMP Querier if this configuration is used on each
switch/router in the network.
The interval between two IGMP query packets can also be set in the IP configuration tool.
Four intervals are possible: [12, 30, 70, 150] seconds.
The user can also specify the switch trunk ports in the IGMP snooping parameter section.
IGMP information is forwarded on the port towards the IGMP Querier and on the switch trunk
ports. It might be required that the user defines the trunk ports in a network where no
protocol for network redundancy is running (e.g. FRNT or STP), see the Operator Manual for
details about this.
Press the ‘Set’ button and then the ‘Reset’ button to restart the Switch after any changes
performed on the IGMP parameters.
4.13 VLAN
The R/T200 can be enabled for VLAN by ticking the “VLAN” tick box, while the “VLAN
configuration” dialog shows the VLAN parameters, see Figure 15. The following VLAN
parameters can be set:
- Default VLAN per port, “Standard VLANs: [White, Red, Blue, Green, Yellow, Brown,
Pink]; the default VLAN for a given port is the only VLAN available for the port if the end
node connected to the port is unable to send and receive tagged packets.
- The Standard VLAN id’s is by default as follows:
o White VLAN id
=1
o Red VLAN id
=2
o Blue VLAN id
=3
o Green VLAN id
=4
o Yellow VLAN id
=5
o Brown VLAN id
=6
o Pink VLAN id
=7
These VLAN id’s can be changed. Legal range is: [1..4096].
- Four Additional VLANs per port can be set, “Additional VLANs : [Purple, Violet, Cyan,
Magenta]. A non-trunk port cannot use any of the “Additional VLAN’s as the default
VLAN for the given port.
- The “Additional VLAN id’s is by default as follows:
o Purple VLAN id
=8
o Violet VLAN id
=9
o Cyan VLAN id
= 10
o Magenta VLAN id = 11
- Layer 2 priority [0..7] for each VLAN can be set; where priority = [0..3] means low priority
and priority = [4..7] means high priority.
- Remove tag; tag removal on egress port (i.e. on port output) can be set per port. Tag
removal is enabled per default on non-trunk ports.
The trunk ports are member of all seven “Standard VLANs” and the four “Additional VLANs”,
and the packet tag is kept on the packets sent on such ports. The VLAN parameters for a
trunk port cannot be changed.
The VLAN that is selected as the default VLAN for a given port will appear as a VLAN that
cannot be changed. Other VLANs selected for the same port have only relevance in case the
www.westermo.com
U/R/T200 series
- 26 -
V4.2
end node connected to the same port is able to send and receive packets with these VLAN
ids.
All ports on a switch are by default members of the white VLAN, i.e. the switch management
VLAN. The administrator can remove non-trunk ports from the white VLAN. That means that
such ports cannot be used for switch management. All trunk ports are part of the white VLAN.
This is automatically configured on run-time.
Port 1 has the white VLAN id as the default VLAN is. This is cannot be changed. An end
node that is used for network management (SNMP or IP configuration) must always use the
white VLAN in order to communicate with the switch CPUs. Thus, the switch CPUs can
always be accessed via port 1 with untagged packets, since port 1 has the white VLAN as the
default VLAN.
Press the ‘Set’ button after any changes performed on the VLAN parameters in the VLAN
configuration dialog, while a switch restart is required in case the VLAN tick box is changed
(enable/disable VLAN). I.e. press the ‘Set’ button and then the ‘Reset’ button to restart the
Switch after a change performed on the VLAN tick box
Note 1: all switches in the network should either be enabled or disabled for VLAN. A mix of
switches with and without VLAN support will not provide the user with the capability of tag
removal on all parts of the network.
Note 2: CPU based MAC learning is used instead of switch core MAC learning when VLAN is
enabled. This means that MAC security is also implemented on the switch. E.g. MAC attack
prevention, see the Operator Manual for details. CPU based MAC learning with MAC security
means that packets with new source MAC addresses will not get through the switch before
the new MAC address is authorized by the switch. Thus, N packets with the new MAC
address must be sent before packets with this new MAC address will get through N VLAN
enabled switches. This property has the following practical impact on the IP configuration
tool: the user must type “Scan for switches” a few times before the complete switch list will
appear.
www.westermo.com
U/R/T200 series
- 27 -
V4.2
5 Time synchronization
The T200 can be enabled for time synchronization by ticking the “Enable time sync” box. This
box is only available on the T200 switches (i.e. Westermo switches with hardware level time
stamping support).
Press the ‘Set’ button and then the ‘Reset’ button to restart the Switch after any changes
performed on the time synchronization parameters in the IP configuration tool.
5.1 SNTP/NTP server or IEEE1588 Grand Master
The time server protocol is specified by selecting either the “SNTP/NTP time server” or
“IEEE1588 Grandmaster” tick boxes.
The T200 can be enabled for external time base, i.e. external GPS receiver, if the “Enable
timebase” box is ticked. The internal clock of the switch will be used if the “Enable timebase”
box is not ticked. The user must also specify whether the Acutime Gold GPS receiver is used
(the preferred GPS receiver alternative), or if an off-the-shelf GPS receiver from another GPS
vendor than Trimble is used by enabling or disabling the “Acutime” tick box. An off-the-shelf
GPS receiver must be able to generate NMEA reports on a serial line and an accurate PPS
signal (rise time better than 100 ns), see the Operator Manual for more details.
The user might want to change the GPS mode of operation. Two options are available: Land
or sea (moving) installations. Westermo recommends that “Land mode” is used also for slow
moving marine installations (few knots). The following parameter in the “timesync” group of
the private MIB of Westermo can be set:
- gpsMode, OID: 1.3.6.1.4.1.16177.1.1.5.28.
where:
modeLand(1) means gps mode = Land (default)
modeSea(2) means gps mode = Sea (< 50knots)
RS422 signal pairs are used both for communication with the Acutime unit and for the pulse
per second (PPS) signal. The PPS signal is sensitive because the transition of this signal
must be synchronous to absolute time. Therefore use of short range modems, extenders or
other equipment in-between the Acutime Gold unit and the T200 will most certain reduce the
accuracy dramatically. Westermo do not recommend using any equipment what so ever
between the Acutime unit and the T200.
In a system that requires redundancy, single point of failure scenarios must be identified.
Therefore using single GPS antenna/receiver may not be sufficient. But in cases where
multiple GPS antennas/receivers are used with multiple T200 a true redundant system can be
built.
Installation procedure for connecting the Acutime Gold to T200:
Color and # of Acutime RS422 cable
Violet 2
Orange 3
Brown 4
Yellow 5
Orange/White 11
Black/White 12
Pin # on RS 422 connector
Pin 11
Pin 1
Pin 12
Pin 2
Pin 4
Pin 14
www.westermo.com
U/R/T200 series
- 28 -
V4.2
Black *
Red *
- Minus supply voltage (Ground) *
+ Plus supply voltage *
* Supply voltage is not present on RS422 connector on switch. Supply voltage must be from external
power supply. (Reason is that the FS200 series of switches can operate on up to 60VDC, while the
Acutime 2000 requires 24VDC power supply). The Acutime can also be powered from the same power
source as the switch via the power plug if the switch is powered from external 24VDC.
See tables below for more details about signal routing.
Table 1 shows the pin-out of the T200 GPS interface connector, and table 2 shows the pinout of the Acutime 2000.
Pin nr
Function
Description
1
2
3
4
5
6
7
8
9
10
11
12
13
14
15
RS422 TX +
RS422 RX +
PPX OUT2 TTL
PPS RS422 RX+
PPS TTL INPUT
PPX OUT1 TXPPX/TTL 0V
PPX OUT2 TXPPX OUT1 TTL
RS232/TTL 0V
RS422 TXRS422 RXPPX OUT2 TX+
PPS RS422 RXPPX OUT1 TX+
RS422 positive transmitter output to GPS
RS422 positive receiver input from GPS
OUT2, PPX output TTL signal
Pulse per second input from GPS RS422 I/F
Pulse per second input from GPS TTL level
OUT1, PPX RS422 negative transmitter output
Return path for RS232 and TTL signals
OUT2, PPX RS422 negative transmitter output
OUT1, PPX output TTL signal
Return path for RS232 and TTL signals
RS422 negative transmitter output to GPS
RS422 negative receiver input from GPS
OUT2, PPX RS422 positive transmitter output
Pulse per second input from GPS RS422 I/F
OUT1, PPX RS422 positive transmitter output
Table 1, pin-out GPS interface connector
Pin nr/ Wire color
Function
Description
1/Red
2/Violet
3/Orange
4/Brown
5/Yellow
6/White
7/Gray
8/Green
9/Black
10/Blue
11/Orange w/ white
stripe
12/Black w/ White
stripe
+8-36V
Port B RS422 RXPort B RS422 RX+
Port B RS422 TXPort B RS422 TX+
Port A RS422 RXPort A RS422 RX+
Port A RS422 TXGround
Port A RS422 TX+
PPS RS422 TX+
Positive DC power
Port B RS422 Negative receive
Port B RS422 Positive receive
Port B RS422 Negative transmit
Port B RS422 Positive transmit
Port A RS422 Negative receive
Port A RS422 Positive receive
Port A RS422 Negative transmit
Negative DC power / ground
Port A RS422 positive transmit
RS422 Pulse per second positive
transmit
RS422 Pulse per second negative
transmit
PPS RS422 TX-
Table 2, pin-out Acutime Gold interface connector
Connector type T200:
15-pol high density D-sub type connector, female part on the switch and male part on cable
assembly.
www.westermo.com
U/R/T200 series
- 29 -
V4.2
Connection to the Acutime Gold:
Westermo provide cables that are pre-assembled, the Acutime end is sealed for outdoor
installations. The following standard cable lengths are available: 15 m and 30 m. But cables
up to 120 m can be provided.
Cable length specification:
RS422 Serial communication port <1200m
RS422 Pulse Per Second signal <1200m
The T200 end of the cable shall be terminated for the receiver pairs (120 Ohm).
The Acutime receiver end is terminated inside the GPS receiver. The pre-assembled cables
are normally terminated.
5.2 IEEE1588 Transparent Clock
A T200 switch can be enabled for IEEE1588 Transparent Clock support. An IEEE1588
Transparency switch traps IEEE1588 packets that are sent and received between the
IEEE1588 Grand Masters and Slaves. The variable switch latency of the IEEE1588 SYNC
and DEL_REQ through the Transparency switch is measured and the corresponding
FOLLOW_UP and DEL_RESP are adjusted accordingly. See the Operator Manual for
details.
IEEE1588 Transparent Clock is enabled by selecting the IEEE1588 Transparency or
IEEE1588 Slave tick box.
Peer-To-Peer (P2P) support on the switch can be enabled or disabled if the T200 is enabled
for Transparent Clock support. Enable means that PTP version 1-, PTP version 2 E2E and
PTP version 2 P2P Slaves and masters can be combined in the same network and that all
PTP end nodes can take advantage of the switch TC peer-to-peer property. Disable means
that the switch does not support peer-to-peer. Only PTP v1- and PTP v2 end-to-end Slaves
and masters can be combined in the same network if this parameter is disabled
Configuration of this parameter is done via SNMP. The following parameter in the “config”
group of the private MIB of Westermo Westermo can be set:
- ptpHybrid, [enable, disable], OID: 1.3.6.1.4.1.16177.1.1.2.17.
5.3 SNTP time client
The switch can operate as an SNTP time client. The switch will then perform time updates
versus a SNTP/NTP server in the network in order to update the local clock of the T200
switch.
The “SNTP time client” tick box must be ticked in the “time synchronization” dialog in the IP
configuration tool in order to enable SNTP client operation on the T200 switch.
The T200-SNTP/NTP server IP address must be defined on the T200-SNTP client. This can
be done via SNMP. The following parameter in the “timesync” group of the private MIB of
Westermo can be set:
- sntpSrvAddr, OID: 1.3.6.1.4.1.16177.1.1.5.26.
www.westermo.com
U/R/T200 series
- 30 -
V4.2
SNTP client operation is meant to be used in combination with serial time server operation on
the 15 pin connector (E.g. GPS emulation), see 5.5 and 5.7, or for IRIG-B output generation,
see 5.6.
5.4 PTP Slave
The switch can operate as a PTP version 1 Slave. The switch will then perform time updates
based on incoming PTP SYNC packets from a PTP version 1 Grand Master in the network in
order to update the local clock of the T200 switch.
The “IEEE1588 Slave” tick box must be ticked in the “time synchronization” dialog in the IP
configuration tool in order to enable PTP Slave operation on the T200 switch.
The T200 - IEEE1588 Slave will join the PTP multicast group automatically if IGMP is enabled
on the switch. A T200 – IEEE1588 Slave does also support IEEE1588 Transparent Clock.
The user can define a minimum stratum level at the PTP Slave that shall be used in order to
qualify incoming PTP time sync packets from a PTP Grand Master. This can be done via
SNMP. The following parameter in the “timesync” group of the private MIB of Westermo can
be set:
- SlaveStratum, OID: 1.3.6.1.4.1.16177.1.1.5.26.
Legal stratum levels = [1 .. 255], default is 255 (all stratum levels are acceptable).
A T200-PTP Grand Master that is based on GPS as external time base will have a stratum of:
- 1 if the GPS receiver has sufficient GPS coverage., while the stratum will be
- 2 if the GPS receiver does not have valid sync, but the GPS receiver previously have
had valid synchronization.
- 255 if the GPS receiver does not have valid sync and has not have had valid
synchronization
PTP Slave operation is meant to be used in combination with serial time server operation on
the 15 pin connector (E.g. GPS emulation), see 5.5 and 5.7, or for IRIG-B output generation,
see 5.6.
5.5 Serial time server
The switch can act as a serial time server on the RS422 serial output interface (available in
the 15 pin connector), if the T200 switch is enabled for SNTP client or PTP Slave support.
The “Serial output” tick box must be ticked in the “time synchronization” dialog in the IP
configuration tool in order to enable Serial time server operation on the T200 switch.
Serial enabled devices can be connected to the T200 serial interface and receive UTC strings
or NMEA reports on this interface when the T200 switch is enabled as a serial time server.
The serial output protocols (NMEA or UTC) used for serial time synchronization is described
in the Operator Manual.
The serial output protocol can be set in SNMP:
• serialOutput (OID: 1.3.6.1.4.1.16177.1.1.5.23)
www.westermo.com
U/R/T200 series
- 31 -
V4.2
Table 1 in chapter 5.1 shows the pin-out of the T200 serial interface connector. Only the
RS422 transmit pairs shall be used if the switch is enabled for SNTP client/PTP Slave/serial
time server support. This means pin 1 (RS422 TX+) and pin 11 (RS422 TX-).
These pins shall be connected to the corresponding receive pairs (RX+ and RX-) on the serial
devices enabled for time client support. Several serial devices (up to 32) can be connected
on the same serial interface according to the RS422 standard.
The RS422 serial interface has the following configuration:
• Baudrate:
9600
• Data bit:
8
• Stop bit
1
• Parity
No
Or:
•
•
•
•
Baudrate:
Data bit:
Stop bit
Parity
4800
8
1
No
The serial RS422 baud rate (9600 or 4800) can be set in SNMP:
• serialConfig (OID: 1.3.6.1.4.1.16177.1.1.5.24)
The connector type for the T200 switch is the same as for the GPS receiver:
15-pol high density D-sub type connector, female part on the switch and male part on cable
assembly. Connector and shell are delivered together with the switch.
When using long cables (longer than 50 to 100m) a termination resistor (120 Ohm) shall be
mounted in the connector between the positive and negative conductor of each RS422 pair
on the last serial device (time client).
5.6 IRIG-B
An optical IRIG-B output signal is generated on the ST 850nm fiber transmitter on the T200
front panel if the switch is enabled for time synchronization. See the Operator Manual for
details about the IRIG-B protocol.
5.7 Output signals on GPS interface
Two copper output signals can be generated on the GPS interface (15 pin connector) on the
front panel of the T200 if the switch is enabled for SNTP server, SNTP client or IEEE1588
Grand master.
Configuration of these two signals, OUT 1 and OUT 2, is done via SNMP. The following
parameters in the timesync group of the private MIB of Westermo can be set:
- tsOut1Config[low, IRIG-B, PPX, high, xKHz], OID: 1.3.6.1.4.1.16177.1.1.5.16.
- tsOut2Config [low, IRIG-B, PPX, high, xKHz], OID: 1.3.6.1.4.1.16177.1.1.5.17.
- ppxDuration
[10us, 20us, 30us, 40us, 50us, 60us, 70us, 80us, 90us, 100us, 1ms, 10ms, 100ms],
OID: 1.3.6.1.4.1.16177.1.1.5.18.
- ppxOut1Interval [1, 5, 10, 60, 3600] seconds, OID: 1.3.6.1.4.1.16177.1.1.5.19.
- ppxOut2Interval [1, 5, 10, 60, 3600] seconds, OID: 1.3.6.1.4.1.16177.1.1.5.20
- outFrequency [1000 .. 50.000] Hz, OID: 1.3.6.1.4.1.16177.1.1.5.25
www.westermo.com
U/R/T200 series
- 32 -
V4.2
OUT 1 is available on the 15 pin time sync connector (GPS interface) on the T200 front panel.
OUT 1 is pin 9 and 7 (ground) in case of TTL and pin 15(+) and 6(-) in case of RS422.
OUT 2 is available on the 15 pin time sync connector (GPS interface) on the T200 front panel.
OUT 2 is pin 3 and 7 (ground) in case of TTL and pin 13(+) and 8(-) in case of RS422.
6 Return procedure
Contact your equipment supplier before returning any equipment.
Equipment will not be accepted without an allocated returns number.
www.westermo.com
U/R/T200 series
- 33 -
V4.2
7 Upgrading of the R/T200 switch.
7.1 Introduction
Upgrading of the FS 200 switch is done by transferring a file called Vx(software version
number).BIN via FTP. Firmware upgrade is possible from software version 2.16 or newer
firmware.
This is done in two steps; first configure and start of the FTP server, second Transferring of
the
BIN
file
via
the
IP
configuration
tool.
DO NOT REMOVE THE POWER SUPPLY DURING THE UPGRADE PROCESS !!
7.1.1 Typical problems
•
FTP server not running
•
Anonymous logins not allowed
•
Image file does not exist in the home directory or root directory.
•
Root directory access not allowed.
With the deployment of Windows XP Service pack 2 and various anti virus programs, the FTP
access might be stopped in the firewall on your PC. If this is the case, you either need to
configure your firewall to allow FTP access, or simply disable the firewall while you are
upgrading your Westermo switch.
www.westermo.com
U/R/T200 series
- 34 -
V4.2
8 Software versions of the R/T200 switch.
8.1 Introduction
The following major software versions have been launched for the R/T200 switch series:
- version 1.xx; This version is now obsolete.
- version 2.xx; This version is now obsolete.
- version 3.xx; This version contains support for all features in the R/T200 Operator
Manual including the VLAN and Security features. This version must be ordered
separately.
- version 4.xx; This version contains support for all features in the R/T200 Operator
Manual except the VLAN and Security features. This is the default R/T200 software
version.
- version 9.xx; Switches with version 9.xx are beta releases, and will only be made
available for beta customers prior to a launch of new switch features.
Switches with software version 3.xx and 4.xx are newer than version 1.xx and 2.xx, and
switches with equal minor number of version 3.xx and 4.xx are equal from functionality point
of view except for the VLAN and Security features (e.g. version 3.06 and 4.06 correspond).
Switches with different major software versions can not be combined in the same network.
Backward compatibility cannot be guaranteed if switches with different major software
version.
8.2 How to upgrade from old to new major software version
A switch software upgrade shall preferably be performed on a switch that is removed from the
network. However, software upgrade on a switch in a running network is possible. The
principles are based on FTP download of the new image via FTP, then the switch will isolate
itself from the network, write the new software image to flash and then re-boot.
Combining switches with different major software versions are not recommendable. This can
be a challenge if the user wants to upgrade multiple switches from an old major software
version to a new major software version since backward compatibility between different major
software versions cannot be guaranteed. The lack of backward compatibility is first of all
related to fiber ports. I.e. the layer 2 protocol implemented on fiber ports will not work in case
new and old major software are used and the switches with different major software versions
are connected via fiber ports.
Figure 18 shows how to upgrade switches in a FRNT 0 ring with fiber trunk ports from version
2.24 to version 4.06. This upgrade principle is based on keeping the old FRNT 0 ring running
the old software (switches in orange) and build a new FRNT 0 ring with switches running the
new software (switches in green). The two rings are connected via the two focal points
through a copper drop link (TX). One extra R/T200 switch is required in order to perform this
upgrade procedure.
www.westermo.com
U/R/T200 series
- 35 -
V4.2
MEMBER
SWITCH
FX
FOCAL POINT
SWITCH
MEMBER
SWITCH
Step 1
FOCAL POINT
SWITCH
TX
MEMBER
SWITCH
MEMBER
SWITCH
FX
MEMBER
SWITCH
FOCAL POINT
SWITCH
Step 2
FOCAL POINT
SWITCH
TX
MEMBER
SWITCH
MEMBER
SWITCH
FX
FOCAL POINT
SWITCH
FOCAL POINT
SWITCH
TX
Step 3
MEMBER
SWITCH
MEMBER
SWITCH
MEMBER
SWITCH
FX
FOCAL POINT
SWITCH
Step 4
MEMBER
SWITCH
MEMBER
SWITCH
Figure 18, Major software version upgrade
www.westermo.com
U/R/T200 series
- 36 -
V4.2
8.3 IP configuration tool – software versions
The IP configuration tool version 9.9.x or newer can be used versus any managed switch
from Westermo. Switch control options for a given switch will be enabled based on the type
of switch and software version running on the switch. This means that no separate release
note exist for a new version of the IP configuration tool. How to use the IP configuration tool
is described in this document.
Old software versions of the IP configuration tool can be used versus R/T200 switches with
new features not supported in the IP configuration tool. However, the user will then not be
able to configure the new switch features. The release note of the R/T200 switch for a given
switch software version specifies the latest and recommended version of the IP configuration
tool.
www.westermo.com
U/R/T200 series
- 37 -