1
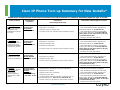
Cisco IP Phone Provisioning Guide Sylantro-hosted Service Release 3.2.1 October 2007 Covad Confidential Cisco IP Phone Turn-up Summary for New Installs* Covad offers several stream-lined ways to provision Cisco IP phones on our network, depending upon the type of circuit. Phone Location 1. Managed - New Site For installing new phones into new sites using DHCP with broadband connection to Covad Configuration Document Cisco IP Phone Configuration using DHCP - see slides 3-8 Overview of Description of what happens to phone Local Configuration Steps 9 If phone is used, erase configuration ¾ Gets IP address via DHCP from CPE router 9 Plug phone in to network ¾ Gets intermediate firmware upgrade from provisional TFTP server 72.245.184.79 9 Configure router for primary TFTP 9 At “0000” invoke *51 procedure to bind number to phone ¾ Gets VoIP settings, latest/current firmware from primary TFTP server at 68.165.105.181 (SV2), 64.2.21.251 (SV1), 64.2.21.45 (SJ) or 72.245.184.75 (DC) ¾ Extension bound to MAC address 2. Managed Existing Site For adding new phones to existing sites using DHCP with broadband connection to Covad Cisco IP Phone Configuration using DHCP - see slides 9-12 9 If phone is used, erase configuration ¾Gets IP address via DHCP from CPE router 9 Plug phone in to network ¾ Gets intermediate firmware upgrade from provisional TFTP server 72.245.184.79 9 Configure Alternate TFTP 9 Erase phone configuration 9 At “0000” invoke *51 procedure to bind number to phone ¾ Gets VoIP settings, latest/current firmware from primary TFTP server at 68.165.105.181 (SV2), 64.2.21.251 (SV1), 64.2.21.45 (SJ) or 72.245.184.75 (DC) ¾ Extension bound to MAC address 3. Manual Method. For adds to existing Managed sites where DHCP not implemented Cisco IP Phone Configuration – Manual Method - see slides 13-18 9 Configure phone IP settings via manual configuration ¾ Gets IP address as manually configured 9 Plug phone into network ¾ Gets intermediate firmware upgrade from provisional TFTP server 72.245.184.79 9 Configure primary TFTP 9 At 0000, invoke *51 procedure to bind number to phone ¾ Gets VoIP settings, latest/current firmware from primary TFTP server at 68.165.105.181 (SV2), 64.2.21.251 (SV1), 64.2.21.45 (SJ) or 72.245.184.75 (DC) ¾ Extension bound to MAC address 4. Remote Teleworker Remote sites using public Internet with wandering WAN IP address and 1 VOIP device Cisco IP Phone Configuration for Remote Teleworker without Static IP - see slides 19-33 9 Configure phone IP settings via manual configuration ¾ Gets TFTP server manually configured 9 Plug phone into network ¾ Gets IP address via DHCP from CPE router 9 Configure CPE router (if required) ¾ Gets intermediate firmware upgrade from provisional TFTP server 72.245.184.79 9 Configure primary TFTP 9 Configure MGCP Gateway Controller to address given by Covad Provisioning (i.e., 64.2.21.54 or 66.151.0.41) 9 At 0000, invoke *51 procedure to bind number to phone ¾ Gets VoIP settings, latest/current firmware from primary TFTP server at 68.165.105.182 (SV2), 64.2.21.250 (SV1), 64.2.21.243 (SJ) or 74.245.184.76 (DC) ¾ Extension bound to MAC address 2 Covad Confidential Managed – New Site Cisco IP Phone Configuration using DHCP For installations using: • Managed circuits • Public or Private WAN IP addresses • DHCP addressing on LAN • Cisco 7940G or 7960G phone Upgrading Cisco Phones - DHCP Attention: There is a updated process for installing new phones at a new customer site Covad is currently utilizing Cisco MGCP 7.7 firmware for 7940 and 7960 customer phones. Brand new Cisco phones will need a two step upgrade from factory default firmware P0030301MFG2 (3.1) to MGCP 7.7 firmware. Phones will first need to connect to a provisional TFTP for an intermediate upgrade, then connect to the primary TFTP that is assigned by the Voice Serving Office (VSO). Here is an overview of the steps for performing firmware upgrades on all new Cisco phones at a new site: Initially configure ‘Option 66’ on the router to be 72.245.184.79.This is the provisional TFTP server. When phones connect to this server they will upgrade to firmware 6.4. You do not need to bind phones at this time. After phones have rebooted, change ‘Option 66’ on the router to one of the following: VSO DC (McLean) Sunnyvale 2 Sunnyvale 1 San Jose TFTP IP 72.245.184.75 68.165.105.181 64.2.21.251 64.2.21.45 Reboot phones. They will upgrade to firmware 7.7. The upgrade process may take up to 15 minutes per phone. After this upgrade the phones are ready to bind extensions. Note: To add new phones to existing sites please use the Managed - Existing Site section of this guide 4 Covad Confidential Configuring the Router and Switch for DHCP The appropriate CPE router and switch configurations must be applied to support DHCP. These steps must be completed by Covad prior to configuring the phones. As part of router turn-up, add in configuration for DHCP support 5 service dhcp no ip dhcp conflict logging ip dhcp excluded-address x.x.x.a Å x.x.x.a is the phone default gateway or Ethernet interface address ip dhcp pool VOICE network x.x.x.x 255.255.255.y Å x.x.x.x 255.255.255.y is the phone network default-router x.x.x.a option 66 ascii “TFTP server” lease 7 Å x.x.x.a is the phone default gateway or Ethernet interface address Å 72.245.184.79 On Layer 3 switches, such as the Cisco Catalyst 3560, DHCP must be disabled In addition to the standard configuration applied to the CPE router, the following items must be configured to support DHCP for the phones. No other DHCP options should be added. no service dhcp Note: If this is an SDSL circuit installation, please contact your Provisioning Engineer or Support to change the TFTP setting. Alternatively, you may use the ‘Managed-Existing Site’ section (beginning on page 9) to install phones without changing router settings. Covad Confidential Cisco IP Phone Configuration using DHCP 1. 6 Prepare to configure the phone by following these steps. Upon completion of this step, the phone will begin to perform a software upgrade and reboot itself, which should take about 5 minutes to complete. *** Used Phone Configuration *** If phone is previously used, Covad recommends erasing any pre-existing configuration settings Plug the Ethernet cable into the phone’s 10/100 SW port. Plug the other end into an Ethernet switch port on the VLAN associated with the router’s FastEthernet port. Phone should be powered on Select Network Configuration. Press **# to unlock phone and enter “edit mode.” Upon completion, the safety lock icon at the top of the display will change to an opened lock. Scroll down to “Erase Configuration” and select “Yes” Select “Save” Reboot phone - Unplug the Ethernet cable from the phone If you Cisco phone is powered by a separate power cord, unplug power cable from the phone If inline ethernet power (PoE) is being used, unplug the ’10/100 Switch’ cable from back of phone *** New Phone Configuration *** Plug the Ethernet cable into the phone’s 10/100 SW port. Plug the other end into an Ethernet switch port on the VLAN associated with the router’s FastEthernet port. Covad Confidential Cisco IP Phone Configuration using DHCP 2. 3. 7 When the phone displays the Configuring IP message, validate firmware upgrade: (5 min) Press the Settings button. Enter the Status menu Select Firmware Version Application Load ID should be P0M3-06-4-00 Change the following setting on your router: option 66 ascii “TFTP server” to the primary TFTP server where the client is provisioned: VSO DC SV2 SV1 SJ TFTP IP 72.245.184.75 68.165.105.181 64.2.21.251 64.2.21.45 4. You will now need to power cycle the phone. Upon completion of this step, the phone will begin to perform a software upgrade, reboot itself, and register with the Covad switch, all of which could take up to 15 minutes to complete. DO NOT REBOOT OR ATTEMPT TO USE THE PHONE DURING THIS TIME. Disrupting the software download process may permanently damage the phone. Either press *, 6, and Settings buttons simultaneously to reboot the phone, or Unplug the power cable or 10/100 SW cable (if PoE) from the back of the phone 5. When the phone displays the Configuring IP message, validate firmware upgrade: Press the Settings button. Enter the Status menu. Select Firmware Version Application Load ID should be P0M3-07-7-00 Covad Confidential Cisco IP Phone Configuration using DHCP 6. If configured properly, you’ll see 4 zeros next to the top right function button when the phone completes booting. 7. To assign an extension to the phone, go off-hook and enter the following digit string: * 51 <Tenant Registration Code> * <Admin Registration Code> * <Admin Registration Password> * <4-digit extension> # Note: to unbind a number, enter 0000 as the 4-digit extension Partners can find the Registration Codes and Password in the on-line Order Processing System. Registration codes and password may be 4 or 5 digits in length. Contact [email protected] to get the Registration Code and Password. 8. The Cisco phone LCD will now display the extension assigned to the phone. You can now go into the ADMIN portal and station dashboard to program the function keys. For instructions on how to use the phone, download the ‘Using Covad with your Cisco IP Phone Guide’, found in the HELP tab of any Dashboard. Note: if there is a need to later edit a phone’s setting, i.e., change its IP address, to enter “edit mode”: Press the Settings button on the right side of the phone Scroll down to Unlock Config Press the Number soft key Enter the password #46# Press the Accept soft key 9. 8 Customize the phone for the local user To set the Time Zone and display formats for time and date Press the Settings button; scroll to Localization and press the Select soft key Scroll down to whatever values you would like to modify and press the Change soft key to toggle through the options To select a ring type Press the Settings button; scroll to Ring Type and press the Select soft key Scroll down to desired ring type, press the Select soft key and then press the OK soft key Covad Confidential Managed – Existing Site Adding a Cisco phone to an Existing Site For installations using: • Managed circuits • DHCP addressing on LAN • Cisco 7940G or 7960G phone Covad Confidential Adding a Cisco Phone To An Existing Site Attention: There is a updated process for installing new phones at an existing customer site Covad is currently utilizing Cisco MGCP 7.7 firmware for 7940 and 7960 customer phones. Brand new Cisco phones will need a two step upgrade from factory default firmware P0030301MFG2 (3.1) to MGCP 7.7 firmware. Phones will first need to connect to a provisional TFTP for an intermediate upgrade, then connect to the primary TFTP that is assigned by the Voice Serving Office (VSO). *** Used Phone Configuration *** If phone is previously used, Covad recommends erasing any pre-existing configuration settings Plug the Ethernet cable into the phone’s 10/100 SW port. Plug the other end into an Ethernet switch port on the VLAN associated with the router’s Fast Ethernet port. Phone should be powered on Select Network Configuration Press **# to unlock phone and enter “edit mode.” Upon completion, the safety lock icon at the top of the display will change to an opened lock. Scroll down to Erase Configuration and select Yes Select Save Reboot phone - Unplug the Ethernet cable from the phone If you Cisco phone is powered by a separate power cord, unplug power cable from the phone If inline ethernet power (PoE) is being used, unplug the 10/100 SW cable from back of phone *** New Phone Configuration *** 10 Plug the Ethernet cable into the phone’s 10/100 SW port. Plug the other end into an Ethernet switch port on the VLAN associated with the router’s FastEthernet port. Covad Confidential Adding a Cisco Phone To An Existing Site 1. 2. 3. 4. 5. 6. 7. 8. 9. Plug the Ethernet Cable to the phone’s 10/100 SW Port and allow it to obtain an IP address Press the Settings button Select Network Configuration Press **# to unlock phone and enter “edit mode.” Upon completion, the safety lock icon at the top of the display will change to an opened lock. select Alternate TFTP - Change to Yes select TFTP Server 1 – Press the Edit soft key and change to 72.245.184.79 Press Validate soft key Press the Save soft key Reboot phone – The upgrade will take approximately 5 minutes to complete. DO NOT interrupt phone while upgrade is in process Either simultaneously press *, 6, and Settings button to reboot the phone, or Unplug the power cable or 10/100 SW cable (if PoE) from the back of the phone the phone displays the Configuring IP message, validate firmware upgrade: Press the Settings button Enter the Status menu Select Firmware Version Application Load ID should be P0M3-06-4-00 10. When 11. Press the Settings button on the right side of the phone 11 Scroll down and select Unlock Config Select the Number softkey Type in #46# with your key pad and select the Accept softkey Select Network Configuration Scroll down to Erase Configuration and select Yes Select Save Reboot Phone – The upgrade could take up to 15 minutes to complete. DO NOT REBOOT OR ATTEMPT TO USE THE PHONE DURING THIS TIME. Disrupting the software download process may permanently damage the phone. Either simultaneously press *, 6, and Settings button to reboot the phone, or Unplug the power cable or 10/100 SW cable (if PoE) from the back of the phone Covad Confidential Adding a Cisco Phone To An Existing Site 12. If configured properly, you’ll see 4 zeros next to the top right function button when the phone completes booting. 13. To assign an extension to the phone, go off-hook and enter the following digit string. * 51 <Tenant Registration Code> * <Admin Registration Code> * <Admin Registration Password> * <4-digit extension> # • • 14. Note: to unbind a number, enter 0000 as the 4-digit extension Partners can find the Registration Codes and Password in the on-line Order Processing System. Registration codes and password may be 4 or 5 digits in length. Contact [email protected] to get the Registration Code and Password. The Cisco phone LCD will now display the extension assigned to the phone. You can now go into the ADMIN portal and station dashboard to program the function keys. For instructions on how to use the phone, download the ‘Using Covad with your Cisco IP Phone Guide’, found in the HELP tab of any Dashboard. Note: if there is a need to later edit a phone’s setting, i.e., change its IP address, to enter “edit mode”: 12 – Press the Settings button on the right side of the phone – Scroll down to Unlock Config – Press the Number soft key – Enter the password #46# – Press the Accept soft key Covad Confidential Cisco IP Phone Configuration using Static IPs For adds/changes to existing sites (or new installations) where DHCP is not used: • Managed circuits • Public or Private WAN IP addresses • Statically-assigned addressing on LAN • Cisco 7940G or 7960G phone Upgrading Cisco Phones – Static IP Attention: There is a updated process for installing new phones at a new customer site Covad is currently utilizing Cisco MGCP 7.7 firmware for 7940 and 7960 customer phones. Brand new Cisco phones will need a two step upgrade from factory default firmware P0030301MFG2 (3.1) to MGCP 7.7 firmware. Phones will first need to connect to a provisional TFTP for an intermediate upgrade, then connect to the primary TFTP that is assigned by the Voice Serving Office (VSO). Here is an overview of the steps for performing firmware upgrades on all new Cisco phones at a new site: Initially configure the TFTP Server option on each phone to be 72.245.184.79.This is the provisional TFTP server. When phones connect to this server they will upgrade to firmware 6.4. You do not need to bind phones at this time. After phones have rebooted, change the TFTP Server option on each phone to one of the following: 14 VSO DC SV2 SV1 SJ TFTP IP 72.245.184.75 68.165.105.181 64.2.21.251 64.2.21.45 Reboot phones. They will upgrade to firmware 7.7. The upgrade process may take up to 15 minutes per phone. After this upgrade the phones are ready to bind extensions. Covad Confidential Cisco IP Phone Configuration using Static IPs 1. Prepare to configure the phone by following these steps. Upon completion of this step, the phone will begin to perform a software upgrade and reboot itself, which should take about 5 minutes to complete. *** Used Phone Configuration *** If phone is previously used, Covad recommends erasing any pre-existing configuration settings Plug the Ethernet cable into the phone’s 10/100 SW port. Plug the other end into an Ethernet switch port on the VLAN associated with the router’s FastEthernet port. Phone should be powered on Press the Settings button Select Network Configuration Press **# to unlock phone and enter “edit mode.” Upon completion, the safety lock icon at the top of the display will change to an opened lock. Scroll down to Erase Configuration and select Yes Select Save Reboot phone - Unplug the Ethernet cable from the phone If you Cisco phone is powered by a separate power cord, unplug power cable from the phone If inline ethernet power (PoE) is being used, unplug the 10/100 SW cable from back of phone *** New Phone Configuration *** Plug the Ethernet cable into the phone’s 10/100 SW port. Plug the other end into an Ethernet switch port on the VLAN associated with the router’s FastEthernet port. 15 Covad Confidential Cisco IP Phone Configuration – Manual Method 2. Configure the phone using following command sequence. These should be done in a single series of steps (i.e., do not save each option; wait until you have completed the series). Scroll down to DHCP Enabled, (near the end of the options); select No. Scroll down to DHCP Address Released, and select No. Scroll up to IP Address; enter the local IP address assigned to the phone. Scroll down to TFTP Server, and enter 72.245.184.79 Scroll down to Subnet Mask, and enter the Network Mask assigned to the Cisco IP phone. Scroll to Default Router, and enter Default Gateway assigned to the IP network. All other settings should remain at their default: While the Ethernet port defaults to auto negotiate, it can be configured for other values (i.e., Full100 and Full10) which would be necessary if the corresponding Ethernet switch port has been hard-coded for whatever reasons. If a PC is placed behind the phone, Network Port 2 Device Type must be set to PC 3. Press the Save softkey. 4. Power cycle the unit If you Cisco phone is powered by a separate power cord, unplug power cable from the phone If inline ethernet power (PoE) is being used, unplug the 10/100 SW cable from back of phone 5. The telephone should now begin to download new software from the TFTP server; this process may take up to 5 minutes.When done, the phone will display a Configuring IP message. 6. To validate firmware upgrade: Press the Settings button. Select Status menu. Select Firmware Version Application Load ID should be P0M3-03-1-00 or later Note: all previously entered IP address information will be erased 16 Covad Confidential Cisco IP Phone Configuration – Manual Method On the day of activation, the phone must be configured at the site: 7. Power up the telephone. Make sure the phone’s Default Gateway is not reachable by the phone The configuration information you entered prior to the site visit has now been erased and must be re-entered. (see step 9) 8. Configure the primary TFTP server Press the Settings button on the right side of the phone Scroll down and select Unlock Config Select the Number softkey Type in #46# with your key pad and select the Accept softkey Select Network Configuration Scroll down to TFTP Server, and enter one of the following TFTP server IPs: VSO DC SV2 SV1 SJ TFTP IP 72.245.184.75 68.165.105.181 64.2.21.251 64.2.21.45 If you don’t know which TFTP server you need, please check with Covad Provisioning or Support before configuring your phone Configure MGCP settings When the phone displays the Configuring IP message, press the Settings button and select the MGCP Configuration option Next to Media Gateway Controller, enter 68.165.105.160 (SV2) or 68.165.105.130 (SV1), 64.2.21.61 (SJ) or 72.245.184.75 (DC) if you don’t know which Media Gateway Controller to use, please check with Covad Provisioning or Support. The MGCP Input & Output ports must retain their defaults of 2427 & 2727 Press the Save softkey; escape back to the main menu You will now need to power cycle the phone. This process may take up to 15 minutes. DO NOT REBOOT OR ATTEMPT TO USE THE PHONE DURING THIS TIME. Disrupting the software download process may permanently damage the phone. If you Cisco phone is powered by a separate power cord, unplug power cable from the phone If inline ethernet power (PoE) is being used, unplug the 10/100 SW cable from back of phone 9. 10. 17 Covad Confidential Cisco IP Phone Configuration – Manual Method 11. Configured properly, you’ll see 4 zeros next to the top right function button. 12. To assign an extension to the phone, go off-hook and enter the following digit string. * 51 <Tenant Registration Code> * <Admin Registration Code> * <Admin Registration Password> * <4-digit extension> # Note: to unbind a number, enter 0000 as the 4-digit extension Partners can find the Registration Codes and Password in the on-line Order Processing System. Registration codes and password may be 4 or 5 digits in length. Contact [email protected] to get the Registration Code and Password. 13. The Cisco phone LCD will now display the extension assigned to the phone. You can now go into the ADMIN portal and station dashboard to program the function keys. For instructions on how to use the phone, download the ‘Using Covad with your Cisco IP Phone Guide’, 14. • 18 found in the HELP tab of any Dashboard. To set the Time Zone and display formats for time and date Press the Settings key; scroll to Localization and press the Select soft key Scroll down to whatever values you would like to modify and press the Change soft key to toggle through the options To select a ring type Press the Settings button; scroll to Ring Type and press the Select soft key Scroll down to desired ring type, press the Select soft key and then press the OK soft key Note: if there is a need to later edit a phone’s setting, i.e., change its IP address, to enter “edit mode”: Press the Settings button on the right side of the phone Scroll down to Unlock Config Press the Number soft key Enter the password #46# Press the Accept soft key Covad Confidential Cisco IP Phone Config for Remote Teleworker For installations using: • Unmanaged circuit with single or multiple user • Static or Dynamic WAN IP Addresses • DHCP addressing on LAN (Dynamic WAN IP, Single Phone) • Static addressing on LAN (Static Public IPs, Multiple Phones) • NEW Cisco 7940G or 7960G phone Remote Teleworker *** Notes for Remote Teleworker Installations *** - Only 1 VoIP device is supported for remote teleworkers utilizing NAT. - Multiple phones at a single unmanaged (non-Covad circuit) site can be configured when each phone is assigned a public static IP address. - Remote Station with Dashboard can only be configured with new Cisco 7940 or 7960 phones that have not been previously configured on any VoIP-based service, including customer premise equipment or service provider solutions. Covad does not support phones obtained from unauthorized resellers, including online auction sites. The Covad support organization will not be able to assist you with your service configuration unless you are using a new telephone. Please contact your authorized Cisco Reseller in order to obtain a new telephone. Covad does not support any NAT device Although Covad provides configuration guidance for NAT devices such as Linksys and Netgear routers, Covad Support will not be able to troubleshoot these units. You can determine a Cisco 7940G or 7960G phone is new with the following steps: - Press the Settings button - Using the arrow key, scroll down to Status - Press the Select soft key - Scroll down to Firmware Versions - Press the Select soft key - On a new phone, the Application load ID will begin with the value “P00305002” 20 Covad Confidential Remote Teleworker 1. 2. 3. 21 In the ADMIN portal, create the employee and assign a phone template Ensure the phone is not connected to the network Unplug the Ethernet Cable from the phone. The power cable will need to remain connected. Prepare to configure the phone by following these steps. Select Network Configuration. Press **# to unlock phone and enter “edit mode.” Upon completion, the safety lock icon at the top of the display will change to an opened lock. If phone is used, Covad recommends erasing any pre-existing configuration settings Unplug the Ethernet cable from the phone Select Network Configuration Press **# unlock phone and to enter “edit mode.” Upon completion, the safety lock icon at the top of the display will change to an opened lock. Scroll down to Erase Configuration and select Yes Select Save DHCP-configured phones use steps 4-8 Static-configured phones use steps 9-12 Covad Confidential Remote Teleworker – NAT Configuration *** NAT Router (i.e., Linksys, Netgear) Configuration *** 4. Scroll down to DHCP Enabled, (near the end of the options); select Yes. Scroll down to DHCP Address Released, and select No. Scroll down to Alternate TFTP; select Yes Scroll up to TFTP Server and enter 72.245.184.79 (Provisional TFTP Server) Press the Validate softkey (if displayed) Press the Save softkey 5. Plug the Ethernet cable into the phone port labeled 10/100SW. 6. Connect cable to CPE router or LAN switch. Phone will obtain IP address from CPE router. 7. Verify the IP address that has been assigned. Note this address. 8. 22 Configure the phone’s network configuration settings including the TFTP server address using following command sequence. These should be done in a single series of steps (i.e., do not save each option; wait until you complete this series). Press the Settings button Select: 3 - Network Configuration Scroll down to 5 - IP address Covad recommends placing the IP address of the telephone in the DMZ of the router. With most routers, this should allow for successful implementation and service delivery. Add the IP address for your phone into your home router’s DMZ port. Refer to the router’s user manual for instructions on how to configure the phone in the DMZ port. Covad Confidential Remote Teleworker – Static IP Configuration *** Static IP Configuration *** 9. 23 Configure the phone’s network configuration settings including the TFTP server address using following command sequence. These should be done in a single series of steps (i.e., do not save each option; wait until you complete this series). Scroll down to DHCP Enabled, (near the end of the options); select No. Scroll down to DHCP Address Released, and select Yes. Scroll up to IP Address; Enter the IP address assigned to the phone Scroll up to TFTP Server and enter 72.245.184.79 Scroll down to Subnet Mask, and enter the Network Mask assigned to the Cisco IP phone. Scroll to Default Router, and enter Default Gateway assigned to the IP network. Press the Validate softkey (if displayed) Press the Save softkey 10. Plug the Ethernet cable into the phone port labeled 10/100SW. 11. Connect cable to CPE router or LAN switch. 12. Covad recommends placing the IP address of the telephone in the DMZ of the router. With most routers, this should allow for successful implementation and service delivery. Add the IP address for your phone into your home router’s DMZ port. Refer to the router’s user manual for instructions on how to configure the phone in the DMZ port. Covad Confidential Remote Teleworker 13. 14. 24 Power cycle the unit (Unplug power, or, simultaneously press *, 6, and Settings button”) After the phone configures its VLAN and IP address, the phone should begin to download new software from the TFTP server; the message “Upgrading Software” will be displayed on the phone. This process may take up to 2 minutes. When done, the phone will reboot and ultimately display a Configuring IP message. Note: if this does not occur and the phone continues to display the message, “Configuring CM List,” the following items should be checked and corrected if an error is found before proceeding to the next step. Verify the phone has obtained an IP address from the router and has retained the TFTP Server 1 address 72.245.184.79 Press the Settings button Select Network Configuration (or Network Setup) and scroll down Validate that the phone has obtained an IP address, Subnet Mask and Default Router 1 from the local router Validate that the phone has retained the TFTP Server 1 address 72.245.184.79 Correct local connection issues and repeat steps 2 through 8 Verify that the local router is not blocking TFTP traffic. See Appendix starting on slide 34 for recommendations on how to configure the router to allow for this upgrade to occur. To validate firmware upgrade: Press the Settings button. Select Status menu. Select Firmware Version Application Load ID should be P0M3-03-1-00 or higher Note: all previously entered IP address information will be erased and will need to be re-entered Covad Confidential Remote Teleworker 15. Reconfigure the phone’s network configuration settings including the TFTP server address using following command sequence. These should be done in a single series of steps (i.e., do not save each option; wait until you complete the entire series). Unplug the Ethernet Cable from the phone Press the Settings button on the right side of the phone Select 8 – Unlock Config Select the Number softkey Type in #46# with your key pad and select the Accept softkey Select 3 – Network Configuration Scroll down to 28 - Erase Configuration and select Yes Select Save Scroll down to DHCP Enabled, (near the end of the options); select Yes. Scroll down to DHCP Address Released, and select No. Scroll up to IP Address; enter the local IP address assigned to the phone. Scroll down to Alternate TFTP; select Yes Scroll up to TFTP Server 1 and enter 72.245.184.79 Press the Accept softkey Press the Save softkey Press the Back softkey Scroll down to MGCP Configuration 25 If you don’t know which Softswitch you are provisioned out of, please check with Covad Provisioning or Support before setting up your phone so you have the correct TFTP server. Next to Media Gateway Controller, enter value specified by Covad Provisioning. This will be one of the following values: 66.151.0.41 (East) or 64.2.21.54 (West) The MGCP Input & Output ports must retain their settings of: 2427 & 2727 (SJ), 2427 & 2728 (SV), 2427 & 2729 (SV2) or 2427 & 2730 (DC) Press the Accept softkey Covad Confidential Remote Teleworker 16. 17. 26 Plug the Ethernet cable into the phone port labeled 10/100SW. The phone will receive another software upgrade, displaying the message, “Upgrading Software.” The phone will then reboot itself. Note: If this does not occur, see the note in Step 9 to identify and correct the problem. Step 11 may need to be repeated or changes to the firewall may need to be made based on the IP address assigned to the phone. When the phone displays the Configuring IP message, validate firmware upgrade: (5 min) Press the Settings button. Enter the Status menu. Select Firmware Version Application Load ID should be P0M3-06-4-00 Covad Confidential Remote Teleworker 18. Configure the primary TFTP and MGCP settings Press the Settings button on the right side of the phone Select 8 – Unlock Config Select the Number softkey Type in #46# with your key pad and select the Accept softkey Select 3 – Network Configuration Scroll up to TFTP Server 1 and enter one of the following TFTP Servers: VSO DC SV2 SV1 SJ TFTP IP 74.245.184.76 68.165.105.182 64.2.21.250 64.2.21.243 Press the Accept softkey Press the Back softkey Scroll down to MGCP Configuration 27 If you don’t know which Softswitch you are provisioned out of, please check with Covad Provisioning or Support before setting up your phone so you have the correct TFTP server. Next to Media Gateway Controller, enter value specified by Covad Provisioning. This will be one of the following values: 66.151.0.41 (East) or 64.2.21.54 (West) The MGCP Input & Output ports must retain their settings of: 2427 & 2727 (SJ), 2427 & 2728 (SV1), 2427 & 2729 (SV2) or 2427 & 2730 (DC) Press the Accept softkey Press the Save softkey Covad Confidential Remote Teleworker 28 19. Power cycle the unit (Unplug power, or, simultaneously press *, 6, and Settings button) After the phone configures its VLAN and IP address, the phone should begin to download new software from the TFTP server; the message “Upgrading Software” will be displayed on the phone. This process may take up to 15 minutes. When done, the phone will reboot and ultimately display a Configuring IP message. DO NOT REBOOT OR ATTEMPT TO USE THE PHONE DURING THIS TIME. Disrupting the software download process may permanently damage the phone. 20. When 21. If the phone is configured properly, you will see 0000 as the first extension. 22. Customize the phone for the local user. To set the Time Zone and display formats for time and date Press the Settings key; scroll to Localization and press the Select soft key Scroll down to whatever values you would like to modify and press the Change soft key to toggle through the options To select a ring type Press the Settings button; scroll to Ring Type and press the Select soft key Scroll down to desired ring type, press the Select soft key and then press the OK soft key the phone displays the Configuring IP message, validate firmware upgrade: (~8 min) Press the Settings button. Enter the "Status" menu. Select "Firmware Version“ Application Load ID should be P0M3-07-7-00 Covad Confidential Cisco IP Phone Config for Remote Teleworker 23. Activate the extension Go off-hook, and enter the following digit string. * 51 <Tenant Registration Code> * <Admin Registration Code> * <Admin Registration Password> * <4-digit extension> # Note: to unbind a number, enter 0000 as the 4-digit extension Partners can find the Registration Codes and Password in the on-line Order Processing System. Registration codes and password may be 4 or 5 digits in length. Contact [email protected] to get the Registration Code and Password. The Cisco phone LCD will now display the extension assigned to the phone. The phone ID must be validated. Go into the ADMIN portal and validate that the extension has been bound to the MAC address of the phone. If the extension has been bound to an IP address (for example 192.168.2.2), the cpe must be deleted and you must re-start at step 11. 24. 25. When the extension is successfully bound to the MAC address, you can go into the ADMIN portal and station dashboard to program the function keys. For instructions on how to use the phone, download the ‘Using Covad with your Cisco IP Phone Guide’, found in the HELP tab of any dashboard. • 29 Note: if there is a need to later edit a phone’s setting, i.e., change its IP address, to enter “edit mode”: Press the Settings button on the right side of the phone Scroll down to Unlock Config Press the Select soft key Enter the password #46# Covad Confidential Appendix: Configuring the Local Router’s Firewall 30 • Covad • • • service should be expected to work popular routers including following: Linksys WRT54GC Linksys BEFW11S4 version 4 Netgear WGT624 • Cisco phones use the TFTP protocol for upgrades. In many cases, no changes to routers are required. • Some routers, however, may have a built-in firewall or support other software functions provided by the vendor that prevent traffic to trusted interfaces that originate from the Internet. This may prevent setup or service from working. • If you experience issues during the setup, Covad recommends placing the IP address of the telephone in the DMZ of the router. With most routers, this should allow for successful implementation and service delivery. • Contact your CPE router vendor or refer to the user manual for instructions on how to configure your local router’s DMZ/firewall, if necessary. • The following slides provide examples on how to configure certain routers for this. • Contact your Covad dealer if you face phone upgrade problems or problems in setting up Covad service with your home router. Covad Confidential Example 1: Netgear MGT624 • • • • 31 Open Internet Explorer Refer to the instruction manual for the address to access the router controls From the Main Menu - Select WAN Setup under the Advanced menu - Check the box next to ‘Default DMZ Server’ - Enter the last octet of the IP address of your phone into the open field (e.g. where your phone is .X on the LAN subnet enter X into the open field. This is usually .100, .101, .102, .103 -- depending on the number of devices already connected to the router. For example: 192.168.2.104) Select ‘Apply' on the screen to save the settings Covad Confidential Example 2: Linksys WRT54GC 32 1. Using a browser, access the router main setup menu – click on the ‘Applications & Gaming’ tab 2. Select the DMZ submenu 3. From the dropdown menu, select ‘Enable’ 4. Next to Host IP address, enter the last octet of the IP address for your Cisco IP phone 5. Click on ‘Save Settings’ Covad Confidential Example 3: Port Forwarding 33 Some home routers may not have DMZ capability, or the DMZ configuration isn’t passing traffic through to the phone. In this case, implement port forwarding on the router. This forwards specific traffic from Covad’s network to the phone’s IP address connected to the router. In this example we are using a Linksys BEFSX41 router with phone 192.168.1.200. Enter the ports below and your phone’s IP address. The following ports need to be open for Cisco IP Phones: 50200 thru 50800 TFTP 12574 TCP/UDP 2427 RTP 2727-2730 RTP Covad Confidential