1
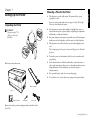
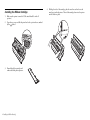
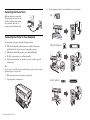
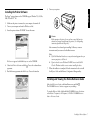
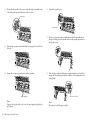
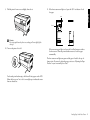
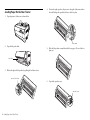
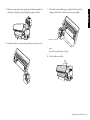
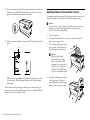
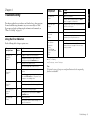
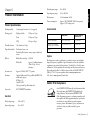
9-pin Dot Matrix Printer
User’s Guide
This manual explains how to set up your printer and provides
basic product information.
For detailed information, see the on-screen Reference Guide
(which is installed when you install the printer software). It
describes all the printer’s functions, optional products, printer
software, troubleshooting, and detailed technical specifications.
English
®
Contents
Chapter 1 - Setting Up the Printer
Unpacking the Printer . . . . . . . . . . . . . . . . . . . . . . . . . . . . . . . . . . . . . . . . . . . . . . 3
Choosing a Place for the Printer . . . . . . . . . . . . . . . . . . . . . . . . . . . . . . . . . . . . . . 3
Installing the Ribbon Cartridge . . . . . . . . . . . . . . . . . . . . . . . . . . . . . . . . . . . . . . . 4
Connecting the Power Cord . . . . . . . . . . . . . . . . . . . . . . . . . . . . . . . . . . . . . . . . . 6
Connecting the Printer to Your Computer . . . . . . . . . . . . . . . . . . . . . . . . . . . . . . 6
Installing the Printer Software . . . . . . . . . . . . . . . . . . . . . . . . . . . . . . . . . . . . . . . . 7
Installing and Viewing the Online Reference Guide . . . . . . . . . . . . . . . . . . . . . . . 7
Installing and Using the Remote Configuration Manager . . . . . . . . . . . . . . . . . . . 8
Chapter 2 - Loading Paper
Using the Two-Tractor System . . . . . . . . . . . . . . . . . . . . . . . . . . . . . . . . . . . . . . . 9
Supported Paper Types and Sizes . . . . . . . . . . . . . . . . . . . . . . . . . . . . . . . . . 9
Loading Paper On the Front Tractor . . . . . . . . . . . . . . . . . . . . . . . . . . . . . . . . . . . 9
Loading Paper On the Rear Tractor. . . . . . . . . . . . . . . . . . . . . . . . . . . . . . . . . . . 12
Switching Between Front and Rear Tractors . . . . . . . . . . . . . . . . . . . . . . . . . . . . 14
Changing Paper . . . . . . . . . . . . . . . . . . . . . . . . . . . . . . . . . . . . . . . . . . . . . . . . . . 15
Chapter 3 - Using the Control Panel
Buttons and Lights . . . . . . . . . . . . . . . . . . . . . . . . . . . . . . . . . . . . . . . . . . . . . . . 17
Selecting a Font and Pitch . . . . . . . . . . . . . . . . . . . . . . . . . . . . . . . . . . . . . . . . . . 18
Changing the Printer’s Default Settings . . . . . . . . . . . . . . . . . . . . . . . . . . . . . . . . 18
Using SelecType Mode . . . . . . . . . . . . . . . . . . . . . . . . . . . . . . . . . . . . . . . . 18
Default-setting Mode . . . . . . . . . . . . . . . . . . . . . . . . . . . . . . . . . . . . . . . . . 20
Locking the Control Panel Buttons . . . . . . . . . . . . . . . . . . . . . . . . . . . . . . . . . . . 21
Chapter 4 - Troubleshooting
Using the Error Indicators . . . . . . . . . . . . . . . . . . . . . . . . . . . . . . . . . . . . . . . . . . 23
Clearing Paper Jams. . . . . . . . . . . . . . . . . . . . . . . . . . . . . . . . . . . . . . . . . . . . . . . 24
Where To Get Help . . . . . . . . . . . . . . . . . . . . . . . . . . . . . . . . . . . . . . . . . . . . . . 24
2 Contents
Chapter 5 - Product Information
Printer Specifications . . . . . . . . . . . . . . . . . . . . . . . . . . . . . . . . . . . . . . . . . . . . .
Electrical . . . . . . . . . . . . . . . . . . . . . . . . . . . . . . . . . . . . . . . . . . . . . . . . . .
Environmental . . . . . . . . . . . . . . . . . . . . . . . . . . . . . . . . . . . . . . . . . . . . . .
Options . . . . . . . . . . . . . . . . . . . . . . . . . . . . . . . . . . . . . . . . . . . . . . . . . . .
ENERGY STAR Compliance . . . . . . . . . . . . . . . . . . . . . . . . . . . . . . . . . . . . . . .
Safety Instructions . . . . . . . . . . . . . . . . . . . . . . . . . . . . . . . . . . . . . . . . . . . . . . .
Hot Parts Caution Symbol. . . . . . . . . . . . . . . . . . . . . . . . . . . . . . . . . . . . .
Important Safety Instructions. . . . . . . . . . . . . . . . . . . . . . . . . . . . . . . . . . .
FCC Compliance Statement for United States Users . . . . . . . . . . . . . . . . . . . . .
WARNING. . . . . . . . . . . . . . . . . . . . . . . . . . . . . . . . . . . . . . . . . . . . . . . .
For Canadian users. . . . . . . . . . . . . . . . . . . . . . . . . . . . . . . . . . . . . . . . . . .
Declaration of Conformity . . . . . . . . . . . . . . . . . . . . . . . . . . . . . . . . . . . . . . . . .
EPSON AMERICA, INC., LIMITED WARRANTY . . . . . . . . . . . . . . . . . . . .
SUPPLEMENT TO THE LIMITED WARRANTY. . . . . . . . . . . . . . . . . . . . .
25
25
25
25
25
26
26
26
26
26
26
27
27
28
Chapter 1
Choosing a Place for the Printer
❏
If you use a printer stand, make sure it can support at least 75 lb (34 kg).
Never use a stand that tilts the printer.
Unpacking the Printer
w
Place the printer on a flat, stable surface. The printer will not operate
properly if it is tilted.
WARNING
The printer weighs 75 lb
(34 kg), so do not try to
lift it alone.
2
❏
Keep the printer away from direct sunlight, strong light, heat sources, or
excessive moisture or dust; or places subject to rapid changes in temperature
and humidity, or shocks and vibrations.
❏
Keep your computer system away from potential sources of electromagnetic
interference, such as loudspeakers or the base units of cordless telephones.
❏
Place the printer near a wall outlet where you can easily unplug the power
cord.
Placez l’imprimante près d’une prise de courant où la fiche peut être débranchée
facilement.
34kg
Make sure you have these items:
❏
Position the power cord and interface cable so they do not interfere with
paper feeding.
❏
Avoid electrical outlets controlled by wall switches or automatic timers, or
outlets on the same circuit as large motors or other appliances that can cause
voltage fluctuations. Power interruptions can erase your printer or
computer memory.
❏
Use a grounded power outlet; do not use an adapter plug.
❏
Do not block, cover, or insert objects into openings in the printer cabinet.
ribbon cartridge
printer
printer software
screwdriver
power cord
Remove and save the protective packing materials as described on the
Notice Sheet.
Setting Up the Printer 3
English
Setting Up the Printer
Installing the Ribbon Cartridge
1.
Make sure the printer is turned off. (The switch should be in the O
position.)
2.
Open the top cover and slide the print head to the position shown, marked
by the
symbol.
3.
Unpack the ribbon cartridge and
remove the black plastic separator.
4 Installing the Ribbon Cartridge
4.
Holding the sides of the cartridge, place the notch on each end onto the
metal posts inside the printer. Then tilt the cartridge down into the printer
until it clicks into place.
5.
Lift up the black plastic ribbon guide and slide it down behind the print
head until it clicks into place. Do not twist or crease the ribbon.
6.
Slide the print head back and forth to make sure it moves freely. If not, lift
up the ribbon guide and try again.
English
ribbon tightening knob
7.
Turn the ribbon-tightening knob to remove any slack.
8.
Close the top cover.
Note:
For safety reasons, the printer will not work if the top cover is not closed completely.
Installing the Ribbon Cartridge 5
Connecting the Power Cord
Make sure the printer is turned off.
Then plug the power cord into the
AC inlet on the back of the printer
and connect the other end to a
properly grounded electrical outlet.
3.
Use the appropriate cable to connect the printer to your computer.
USB
Connecting the Printer to Your Computer
You can connect your printer using the following interfaces:
❏
IEEE-1284-compatible parallel interface (use a shielded, twisted-pair
parallel cable with a 36-pin Centronics® compatible connector)
❏
USB (Universal Serial Bus) interface (use a shielded USB cable)
❏
RS-232C serial interface (use a null modem cable)
❏
Type-B optional interface (see the Reference Guide to install an optional
interface card)
IEEE1284 (PARALLEL)
Note:
You can connect to multiple interfaces simultaneously; the printer switches interfaces
automatically when it receives data.
1.
Make sure your printer and computer are turned off.
2.
Open the printer’s interface cover.
6 Connecting the Power Cord
RS-232C (SERIAL)
6.
Installing the Printer Software
Turn on your printer.
English
The Epson® printer software on the CD-ROM supports Windows® 95, 98, Me,
2000, XP, and NT® 4.0.
1.
Make sure the printer is connected to your computer, but turned off.
2.
Turn on your computer and wait for Windows to load.
3.
Insert the printer software CD-ROM. You see this screen:
c
Caution:
Before turning on the printer, be sure you have removed all protective
materials or you may seriously damage the printer. (See the unpacking
instructions provided with the printer.)
After a moment, the software begins installing. Follow any on-screen
instructions until you return to the Installation screen.
Note:
If the New Hardware Found screen or any other wizard appears when you
turn on your printer, click Cancel.
❏
If it does not appear, double-click Setup.exe on the CD-ROM.
4.
5.
Select Install Printer Software and click
agreement.
❏
. You see the software license
Read the license agreement and click Accept. You see this window:
7.
If you’re asked to insert a Windows CD-ROM, insert it and click OK.
Close the Windows installer screen to continue installing the driver.
When the installation is complete, follow the instructions below to install
the Reference Guide and the Remote Configuration Manager utility.
Installing and Viewing the Online Reference Guide
Select Install Reference Guide on the Installation screen and click
The DFX-9000 Reference Guide icon appears on your desktop.
.
To view the Reference Guide, double-click the DFX-9000 Reference Guide icon
or click Start > Programs (or All Programs) > EPSON > DFX-9000 Reference
Guide > Reference Guide.
Installing the Printer Software 7
Installing and Using the Remote Configuration
Manager
The Epson Remote Configuration Manager provides an easy way to change your
printer’s default settings in Windows. Follow these steps to install it:
1.
Select Install EPSON Remote Configuration Manager on the Installation
screen and click .
2.
When you see the InstallShield window, click Yes. You see this screen:
3.
Click Next and follow the on-screen instructions.
4.
When the installation is complete, click Finish. (You may need to close a
window on your screen to see the final installation screen.)
To start the program, select Programs (or All Programs) > Epson Remote
Configuration Mgr > Epson Remote Configuration Manager.
To open the program’s on-screen User’s Guide, select Programs (or All
Programs) > Epson Remote Configuration Mgr > Epson Remote Configuration
Manager User’s Guide.
Note:
If you are using the serial port, you need to switch the printer driver to COM2 before
you run the Remote Configuration Manager. Switch it back to COM1 when you’re
done.
8 Installing and Using the Remote Configuration Manager
Chapter 2
You can print on continuous paper from 3 inches (76.2 mm) to 16.5 inches
(419.1 mm) wide. Your printer senses the paper width automatically.
The printer automatically adjusts to the thickness of the paper loaded when the
platen gap setting is set to Auto in SelecType mode. See “Using SelecType
Mode” on page 18 for details.
Using the Two-Tractor System
Your printer can load paper from a front tractor and a rear tractor. Be sure to
leave enough room around the printer for the two stacks of fresh paper and for
the printed stack. Align your paper supply so the paper feeds smoothly into the
printer.
front tractor
rear tractor
Note:
❏ Make sure your paper matches the specifications described in the on-screen
Reference Guide.
❏
When the optional perforation cutter (part number C81507X) is installed, the
printable width is from 4 inches (101.6 mm) to 16 inches (406.4 mm).
both tractors
Loading Paper On the Front Tractor
Place the paper supply lower than the printer to avoid a paper jam. Make sure
that your stack of printed pages does not interfere with the rear tractor’s paper
supply.
Supported Paper Types and Sizes
1.
Lift up the front cover until it locks in place.
2.
Release the right and left sprockets by pulling the lock levers down.
sprocket lock lever
You can use the following types of continuous paper with either tractor:
❏
Single-sheet
❏
Multi-part
❏
Labels
❏
Continuous forms with labels
❏
Overlapping multi-part forms
Loading Paper 9
English
Loading Paper
3.
Position the left sprocket so the pins are to the left of the arrow mark on the
scale. Push up the sprocket lock lever to lock it in place.
6.
Open both sprocket covers.
arrow mark
sprocket cover
4.
Slide the right sprocket to match the width of your paper. (Do not lock it in
place yet.)
5.
Center the two paper supports between the two sprockets.
7.
Be sure your paper has a clean, straight edge and that the printable side of
the paper is facing up. Fit the first few holes over the sprocket pins and close
the sprocket covers.
8.
Slide the right sprocket until the paper is straight and there is no slack. Lock
the sprocket by pushing up the sprocket lock lever. (The right sprocket may
move slightly.)
sprocket lock lever
paper supports
Note:
For paper less than four inches wide, remove the paper supports by pulling them
off the tractor.
10 Loading Paper On the Front Tractor
Note:
Be careful not to pull the paper too tightly.
9.
Pull the printer’s front cover out slightly, then close it.
11. If the front tractor arrow light is red, press the LF/FF Load button to load
the paper.
English
rear
front
c
Caution:
Do not just push down the front cover; always pull it out slightly before
closing it.
10. Turn on the printer if it is off.
If the rear tractor arrow light is red, press the Front/Rear button to switch to
the front tractor. When the printer switches tractors, it loads the paper
automatically.
The front tractor arrow light turns green and the paper is loaded to the top-ofform position. If you need to adjust the paper position, see “Adjusting the Paper
Position” in your on-screen Reference Guide.
You hear the print head moving to the left and Ready appears on the LCD.
Either the front or rear Tractor Select arrow lights up to indicate the tractor
that was selected last.
Loading Paper On the Front Tractor 11
Loading Paper On the Rear Tractor
1.
Open the printer’s back cover as shown below.
2.
Open the flap at the back.
4.
Position the right sprocket so the pins are to the right of the arrow mark on
the scale. Push up the sprocket lock lever to lock it in place.
arrow mark
5.
Slide the left sprocket to match the width of your paper. (Do not lock it in
place yet.)
6.
Open both sprocket covers.
back flap
3.
Release the right and left sprockets by pulling the lock levers down.
sprocket lock lever
sprocket cover
12 Loading Paper On the Rear Tractor
7.
Make sure your paper has a clean, straight edge and that the printable side
of the paper is facing down. Feed it through the opening at the back.
9.
Slide the left sprocket until the paper is straight. Lock the sprocket by
pushing up the lock lever. (The left sprocket may move slightly.)
English
sprocket lock lever
8.
Fit the first few holes over the sprocket pins and close the sprocket covers.
Note:
Be careful not to pull the paper too tightly.
10. Close the back cover and flap.
Loading Paper On the Rear Tractor 13
11. Turn on the printer if it is off. You hear the print head move to the left and
Ready appears on the LCD. Either the front or rear Tractor Select arrow
lights up to indicate the tractor that was selected last.
12. If the rear tractor arrow light is red, press the LF/FF Load button to load the
paper.
Switching Between Front and Rear Tractors
You can easily switch between paper loaded on the front and rear tractors, and
vice-versa. Just wait for any print jobs to finish before switching tractors.
c
Caution:
Never switch between tractors if labels are loaded in the printer. First remove
the labels by tearing off the fresh supply below the tractor and pressing
LF/FF Load to eject the remaining labels.
1.
Turn on the printer.
2.
If no paper is loaded in the front or rear tractor, load it as described on
page 9 (front) or page 12 (rear).
3.
To tear off any printed pages or excess
paper, press the Tear Off button and
tear off the pages at the perforation.
rear
c
front
If the front tractor arrow light is red, press the Front/Rear button to switch
to the rear tractor. When the printer switches tractors, it loads the paper
automatically.
The rear tractor arrow light turns green and the paper is loaded to the top-ofform position. If you need to adjust the paper position, see “Adjusting the Paper
Position” in your on-screen Reference Guide.
14 Switching Between Front and Rear Tractors
4.
Caution:
Always tear off the printed
document and any excess paper
before switching tractors. If the
perforation does not align with the
tear-off edge, you can adjust it. See
“Adjusting the Tear-Off Position”
in your on-screen Reference Guide.
Press the Front/Rear button to switch
to the other tractor. The selected
tractor light turns green and the paper
advances to the top-of-form position.
Changing Paper
Open the front cover or the back cover and the back flap.
4.
Open the sprocket covers and remove the paper from the tractor.
English
3.
Follow the steps here when you need to change the paper loaded on the front or
rear tractor.
1.
To tear off any printed pages or excess paper, press the Tear Off button and
tear off the pages at the perforation.
c
Caution:
❏ Always tear off the printed document and any excess paper before
changing paper. If the perforation does not align with the tear-off edge,
you can adjust it. See “Adjusting the Tear-Off Position” in your
on-screen Reference Guide.
sprocket cover
❏ To safely remove labels, continuous forms with labels, or overlapping
multi-part forms before changing paper, tear off the fresh supply below
the tractor and press LF/FF Load to eject the remaining labels or forms.
2.
Press the Front/Rear button to switch to the other tractor. The selected
paper advances to the top-of-form position.
5.
Load the new paper. See “Loading Paper On the Front Tractor” on page 9
or “Loading Paper On the Rear Tractor” on page 12 for instructions.
Changing Paper 15
16 Changing Paper
Chapter 3
This chapter describes the buttons and lights on the control panel, plus:
❏
Selecting a font and pitch
❏
Changing the printer’s default settings
❏
Locking the control panel buttons
Buttons and Lights
a
d
Font (ItemU)
button
Selects one of the fonts. See “Selecting a Font and Pitch” on
page 18.
In SelecType mode and Default-setting mode, you can press
the ItemU button to select the previous menu or option.
See page 19 or page 21 for details.
e
Reset
(Font and Pitch)
buttons
When you press both the Font and Pitch buttons
simultaneously, the printer clears its buffer and restores its
default settings.
f
Pitch (ItemD)
button
Selects one of the pitch settings. See page 18 for more
information.
In SelecType mode and Default-setting mode, you can press
the ItemD button to select the next menu or option.
See page 19 or page 21 for details.
g
Tear Off (SetU)
button
Feeds continuous paper forward to the tear-off position.
In SelecType mode and Default setting mode, you can press
the SetU button to select the previous option for a menu item.
See page 19 or page 21 for details.
Tear Off light
On when paper is in the tear-off position.
h
Menu
(Tear Off and
Top of Form)
buttons
When you press the Tear Off and Top of Form buttons at the
same time, the printer enters or exits the SelecType mode and
you can set the various printer settings. See page 19 or page 21
for details.
i
Top of Form
(SetD) button
Enters the top-of-form position mode and sets the new
top-of-form position after it has been adjusted with the
Micro Feed buttons.
In SelecType mode and Default-setting mode, you can press
the SetD button to select the next option for a menu item.
See page 19 or page 21 for details.
Top of Form light
On when the printer is in top-of-form and tear-off modes.
j
LF/FF Load
button
Loads continuous paper when the printer is out of paper.
Feeds paper line by line when pressed briefly.
Advances continuous paper to the next top-of-form position
when held down for a few seconds.
k
Micro Feed
buttons
Adjust the paper position, such as the top-of-form position and
tear-off position.
m
b
c
Function
d
e
f
g
h
i
j
k
l
Button/Light
Function
a
Front Tractor
Select light
On when the front tractor is selected. The light is green when
paper is loaded, or red when the tractor is out of paper.
b
Rear Tractor
Select light
On when the rear tractor is selected. The light is green when
paper is loaded, or red when the tractor is out of paper.
c
Front/Rear
tractor button
Selects the front or rear tractor. If you have been using paper
loaded on one tractor, first remove the printed output before
pressing this button to switch the tractor.
Using the Control Panel 17
English
Using the Control Panel
Button/Light
Button/Light
Function
l
Pause button
Stops printing temporarily, and resumes printing when pressed
again.
Pause light
On when the printer is paused.
Flashes when the print head overheats.
Paper Out light
On when the printer is out of paper.
Flashes when paper jams or the printer fails to eject paper.
m
Selecting a Font and Pitch
Usually, you use your application program to select the font and pitch you want
to use in a document. If necessary, however, you can select one of the printer’s
fonts (in different pitches) with the buttons on the printer’s control panel, as
described below. (The settings you make in application programs usually
override settings you make from the printer’s control panel.) The pitches
available depend on the font you select:
Font
Pitch
High Speed Draft
10, 12, 15, 17, 20
Draft
10, 12, 15, 17, 20, Proportional
Roman
10, 12, 15, 17, 20, Proportional
Sans Serif
10, 12, 15, 17, 20, Proportional
Changing the Printer’s Default Settings
While you can change many printer settings through your application software
or the printer driver, there are other printer functions you can control as follows:
❏
Using the Epson Remote Configuration Manager on the printer software
CD-ROM. (See page 8.)
❏
Using the printer’s control panel to access SelecType mode and Defaultsetting mode
For instructions on using the Remote Configuration Manager, see the on-screen
Remote Configuration Manager User’s Guide, installed when you installed your
printer software. (See page 8.) To use SelecType, follow the instructions below.
For Default-setting mode, see page 20.
Using SelecType Mode
The table below lists the settings available in SelecType mode.
Setting
Options (default in bold)
Language
English, French, German, Italian, Spanish,
Portuguese
Print settings
Press the SetD (Top of Form) button to print all
current settings.
Page length for rear tractor
3 inches, 3.5 inches, 4 inches, 5.5 inches, 6 inches,
7 inches, 8 inches, 8.5 inches, 11 inches,
70/6 inches, 12 inches, 14 inches, 17 inches
1.
Make sure that the printer is not printing. If it is, press the Pause button to
stop printing.
Page length for front tractor
2.
Press the Font button. The first available font is displayed on the LCD.
Press the Font button until you see the font you want to use. The LCD
returns to its original state in a few seconds and the font you selected is set.
3 inches, 3.5 inches, 4 inches, 5.5 inches, 6 inches,
7 inches, 8 inches, 8.5 inches, 11 inches,
70/6 inches, 12 inches, 14 inches, 17 inches
Skip over perforation
Off, On
Line spacing
1/6 inch, 1/8 inch
Left margin
0 column to 80 columns
Right margin
1 column to 136 columns
Platen gap
Auto, 0 to 15
Auto tear off
Off, On
Auto line feed
Off, On
Print direction
Bi-D, Uni-D
3.
Press the Pitch button. The first available pitch is displayed on the LCD.
Press the Pitch button until you see the pitch you want to use. The LCD
returns to its original state in a few seconds and the pitch you selected is set.
18 Selecting a Font and Pitch
Setting
Options (default in bold)
®
Software
ESC/P, IBM PPDS
Off, On
Options (default in bold)
*3
Subnet mask
000.000.000.000 to 255.255.255.255
*3
Default gateway
Save settings?
*5
000.000.000.000 to 255.255.255.255
Yes, No
I/F (Interface) mode
Auto, Parallel, Serial, USB, Optional
Auto I/F (Interface) wait time
10 seconds, 30 seconds
Parallel I/F bi-directional mode
Off, On
*2 This setting is available only when the optional perforation cutter (#C81570X) is installed.
Packet mode
Auto, Off
*3 These settings are available only when the optional Print Server is installed.
Serial baud rate
19200 BPS, 9600 BPS, 4800 BPS, 2400 BPS,
1200 BPS, 600 BPS, 300 BPS
*4 This setting is available only when the optional Print Server is installed and the Get IP address setting is
set to Panel or PING.
Serial parity
None, Odd, Even, Ignore
Serial data length
8-bit, 7-bit
Character table
Standard version: PC437, PC850, PC860, PC863,
PC865, PC861, BRASCII, Abicomp, Roman8, ISO
Latin 1, PC858, ISO 8859-15, Italic U.S.A., Italic
France, Italic Germany, Italic U.K., Italic Denmark 1,
Italic Sweden, Italic Italy, Italic Spain 1
*1 This setting is available only in IBM PPDS emulation mode.
*5 This menu appears when you press the Menu buttons (Tear Off and Top of Form) in SelecType mode.
NLSP version: PC437, PC850, PC860, PC863, PC865,
PC861, BRASCII, Abicomp, Roman8, ISO Latin 1,
PC858, ISO 8859-15, PC437 Greek, PC853, PC855,
PC852, PC857, PC866, PC869, MAZOWIA, Code
MJK, ISO 8859-7, ISO Latin 1T, Bulgaria, PC774,
Estonia, ISO 8859-2, PC866 LAT., PC866 UKR, PC
APTEC, PC708, PC720, PCAR864, PC771, PC437
Slovenia, PC MC, PC1250, PC1251, Italic U.S.A.,
Italic France, Italic Germany, Italic U.K., Italic
Denmark 1, Italic Sweden, Italic Italy, Italic Spain 1
Auto CR (IBM PPDS)*1
Off, On
IBM character table (IBM
PPDS)*1
Table 2, Table 1
Buzzer
Off, On
Low-noise mode
Auto cut mode
Off, On
*2
Auto cut/back mode
Continuous forms with labels
Off, On
Skip over binding
Off, On
IP address
*4
Make sure paper is loaded and the printer is on.
2.
Press the Menu buttons (Tear Off and Top of Form) to enter the SelecType
mode. The LCD displays the currently selected language.
3.
If you want a different language, press the SetU (Tear Off) or SetD
(Top of Form) button until you see the language you want.
4.
Press the ItemD (Pitch) button to set the desired language.
5.
You see Print Settings on the LCD. Press the SetD (Top of Form) button to
print the current settings.
6.
Press the ItemU (Font) or ItemD (Pitch) button to select the setting you
want to change.
Note:
You can scroll the menu settings by holding down the ItemU (Font) or ItemD
(Pitch) button for a few seconds.
7.
Off, On
Off, On
Get IP address
1.
Off, On
*2
Overlapping multipart forms
*3
Follow these steps to enter SelecType mode and change the settings:
Panel, Auto, PING
Press the SetU (Tear Off) or SetD (Top of Form) button to scroll through
the options available for the current setting until you see the one you want.
Note:
You can scroll the options by holding down the SetU (Tear Off) or SetD
(Top of Form) button for a few seconds.
8.
When you finish making settings, press and hold down the Menu buttons
(Tear Off and Top of Form). The LCD displays Save Setting.
000.000.000.000 to 255.255.255.255
Using SelecType Mode 19
English
0 slash
Setting
9.
If you want to save the settings, select Yes by pressing the SetU (Tear Off)
button. If you don’t want to save the settings, select No by pressing the
SetD (Top of Form) button. The printer exits SelecType mode.
Note:
You do not need to change these settings for printing label sheets of uniform thickness.
Note:
If you turn off the printer prior to exiting the SelecType mode, any changes you have
made are canceled and not saved.
Default-setting Mode
Use the Default-setting mode if you need to adjust the print head position for
printing on uneven forms or to choose which control panel buttons to lock
when Lock-out mode is turned on. (See page 21 for more information about
Lock-out mode.)
Continuous forms with labels
If you are printing on forms of varying thicknesses—for example, a form that
includes a label in addition to standard printing—you may need to adjust the
Forms w/labels setting. By defining the position of the label, you tell the printer
where it needs to raise the print head to accommodate the greater thickness as it
prints over the label.
Before you can change the settings for continuous forms with labels, use
SelecType as described on page 19 to make sure the Forms w/labels setting is set
to On.
20 Default-setting Mode
*
Setting
Options (default in bold)
Label base position
Paper left edge, First dot
Label top position
0 to 4752/216 (0 to 22” in 1/216-inch increments)
Label length
0 to 4752/216 (0 to 22” in 1/216-inch increments)
Label left position
0 to 1440/120 (0 to 12” in 1/120-inch increments)
Label width
0 to 1440/120 (0 to 12” in 1/120-inch increments)
Base sheet PG (platen gap)
position number
0 to 14*
Label paper PG (platen gap) position
number
0 to 14**
Adjusts the platen gap for printing on label carrier (base sheet).
** Adjusts the platen gap for printing on labels affixed to label carrier.
Lock-out mode settings
Button function
Settings (default in bold)
Pause
Unlock, Lock
Micro Feed
Unlock, Lock
Load
Unlock, Lock
LF
Unlock, Lock
FF
Unlock, Lock
Top of Form
Unlock, Lock
Tear Off
Unlock, Lock
Font
Unlock, Lock
Pitch
Unlock, Lock
Front/Rear
Unlock, Lock
Menu
Unlock, Lock
Reset
Unlock, Lock
Follow these steps to enter Default-setting mode and change the settings:
Make sure paper is loaded and turn off the printer.
c
2.
Caution:
Whenever you turn off the printer, wait at least five seconds before turning
it back on; otherwise, you may damage the printer.
Turn on the printer while holding down the Font button to enter Defaultsetting mode. (Turning on the printer this way, you can access three menus:
the Setting [SelecType] menu, Forms w/labels, and Panel lock out.)
Note:
The instructions and current settings are printed in the language that you
selected in SelecType mode.
3.
Press the SetU (Tear Off) or SetD (Top of Form) button to select the
Forms w/labels or Panel lock out menu.
Note:
To change the printer’s other settings, select the Print Settings menu and change
the settings as described for SelecType on page 18.
4.
Locking the Control Panel Buttons
You can restrict the use of buttons on the control panel by turning on Lock-out
mode. When Lock-out mode is on, only the Pause, Load, and Tear Off buttons
work.
If you want to lock other buttons, you can use Default-setting mode to select
which buttons to lock. (See page 20 for details.)
Follow these steps to turn on Lock-out mode:
1.
Turn off the printer.
2.
Hold down both the Font and Pitch buttons and turn on the printer.
It beeps twice, indicating that Lock-out mode has been turned on.
To turn off Lock-out mode, repeat the steps above. The printer beeps once,
indicating that Lock-out mode has been turned off.
Press the ItemU (Font) or ItemD (Pitch) button to select the item you want
to change and go to the next step.
Note:
You can scroll the menu settings by holding down the ItemU (Font) or ItemD
(Pitch) button for a few seconds.
5.
Press the SetU (Tear Off) or SetD (Top of Form) button to select the
options within the selected option until you find the desired setting.
Note:
You can scroll through options by holding down the SetU (Tear Off) or SetD
(Top of Form) button for a few seconds.
6.
After choosing the desired option, you can either continue to make changes
to other settings by pressing the ItemD or ItemU button, or exit Defaultsetting mode.
7.
When you finish selecting your settings, turn off the printer to exit Defaultsetting mode and save the settings.
Locking the Control Panel Buttons 21
English
1.
22 Locking the Control Panel Buttons
Chapter 4
This chapter explains the error indicators and describes how to clear paper jams.
For more troubleshooting information, see your on-screen Reference Guide.
If you cannot resolve the problem using the information in the manuals, see
“Where To Get Help” on page 24.
Using the Error Indicators
Use the following table to diagnose printer errors.
LCD message and
panel light status
Beep
pattern
Problem
Error: Paper out
O Paper Out
O Pause
•••
No paper is loaded on the selected tractor.
Solution
Load paper in the printer or select a different
tractor by pressing the Front/Rear button.
•••
The paper is not loaded correctly.
Remove your paper and reload it correctly.
Error: No paper loaded
O Paper Out
O Pause
•••
Error: Paper jam
F Paper Out
O Pause
•••
Error: Switching not
completed
O Pause
•••
Error: Ribbon jam
O Pause
•••
Continuous paper is not fed to the standby
position.
Beep
pattern
Problem
Error: Ribbon out
O Pause
•••
Ribbon is not installed.
Error: Cover open
O Pause
•••
Solution
Install the ribbon cartridge and press the Pause
button. See page 4 for instructions.
The printer’s top cover is open. The printer will not
print if the cover is open.
Close the cover.
Print head hot
Please wait
F Pause
—
Error: xx
Turn off printer
F Paper Out
F Pause
F Tear Off/SetU
F Top of Form/SetD
F Front
F Rear
•••••
The print head is overheated.
Wait a few minutes; the printer resumes printing
automatically once the print head cools.
An unknown printer error has occurred.
Turn off the printer and leave it off for several
minutes; then turn it on again. If the error recurs,
contact your dealer.
O = On, F = Flashing
••• = Three beeps, ••••• = Five beeps
Note:
The printer beeps once if you press a control panel button when the corresponding
function is not available.
Tear off the printed page at the perforation; then
press the LF/FF Load button. The printer feeds
the paper to the standby position.
Paper is jammed in the printer.
Clear the paper jam as described on page 24.
The printer fails to change the paper.
Cut the paper at the top and press the Pause or
Front/Rear button.
Ribbon has jammed.
Remove and re-install the ribbon cartridge. See
page 4 for instructions.
Troubleshooting 23
English
Troubleshooting
LCD message and
panel light status
Clearing Paper Jams
1.
Turn off the printer and open the front or back printer cover (depending on
the tractor currently being used).
2.
Tear off the fresh supply of paper at the perforation nearest the paper entry
slot.
3.
Gently pull the paper out of the printer. Remove any remaining pieces of
paper.
4.
Close the printer cover and turn on the printer. Make sure the Paper Out
light is not flashing and the Pause light is off.
Where To Get Help
If your Epson printer is not operating properly and you cannot solve the
problem using the troubleshooting information, see the support information
below.
Internet support
Visit Epson’s support website at http://support.epson.com and select your
printer for solutions to common problems. You can download drivers and
documentation, get FAQs and troubleshooting advice, or e-mail Epson with
your questions.
Speak to a support representative
Before you call for support, please have the following information ready:
❏
Product name (Epson DFX-9000)
❏
Product serial number (located on the back of the printer)
❏
Proof of purchase (such as a store receipt) and date of purchase
❏
Computer configuration
❏
Description of the problem
24 Clearing Paper Jams
Then call:
❏
U.S.: (562) 276-4322, 6 AM to 6 PM, Pacific Time, Monday through
Friday.
❏
Canada: (905) 709-2170, 6 AM to 6 PM, Pacific Time, Monday through
Friday.
Toll or long distance charges may apply.
Purchase supplies and accessories
You can purchase ribbon cartridges and other accessories from an
Epson authorized reseller. To find the nearest reseller, call 800-GO-EPSON
(800-463-7766). Or you can purchase online at www.epsonstore.com
(U.S. sales) or www.epson.ca (Canada sales).
Chapter 5
50 to 60 Hz
Input frequency range:
49.5 to 60.5 Hz
Rated current:
4.8 A (maximum 14.5 A)
Power consumption:
Approx. 185 W (ISO/IEC 10561 letter pattern)
Approx. 9.5 W in sleep mode
Printer Specifications
Printing method:
36-pin impact dot matrix (9 × 4, staggered)
Printing speed:
High speed draft
1550 cps at 10 cpi
Draft
1320 cps at 10 cpi
NLQ
330 cps at 10 cpi
Printable columns:
136 columns (at 10 cpi)
Paper feed methods:
Push tractor (front, rear)
Push and pull (front/rear) tractor; requires additional
tractor
Ribbon:
Black ribbon cartridge
S015384
Ribbon life
approx. 15 million characters
(Draft, 10 cpi, 14 dots/
character)
Acoustic noise:
Approx. 58 dB (A) (ISO 7779 pattern)
Interfaces:
Standard bidirectional, 8-bit, parallel with IEEE 1284
nibble mode support
USB (ver 1.1)
Serial RS-232C
Slot for optional Type B interface card
Control code
ESC/P, IBM PPDS emulation
Electrical
Rated voltage range:
100 to 240 V
Input voltage range:
90 to 264 V
Environmental
Temperature
Humidity (without
condensation)
Operation (plain paper)
5 to 35°C (41 to 95°F)
10 to 80% RH
Operation (recycled paper,
envelope, label, or roll paper)
15 to 25°C (59 to 77°F)
30 to 60% RH
Storage
–30 to 60°C (–22 to 140°F)
0 to 85% RH
Options
By adding options such as a pull tractor or perforation cutter, you can further
expand your printer’s capabilities. Optional interface cards are also available to
supplement your printer’s built-in interfaces. (See the Reference Guide for more
information.) You can purchase ribbon cartridges and other accessories from an
Epson authorized reseller. To find the nearest reseller, call 800-GO-EPSON
(800-463-7766). Or you can purchase online at www.epsonstore.com
(U.S. sales) or www.epson.ca (Canada sales).
ENERGY STAR Compliance
As an ENERGY STAR Partner, Epson has determined that
this product meets the ENERGY STAR guidelines for
energy efficiency. The International ENERGY STAR
Office Equipment program is a voluntary partnership with
the computer and office equipment industry to promote the
introduction of energy-efficient personal computers,
monitors, printers, fax machines, copiers, and scanners in
an effort to reduce air pollution caused by power
generation.
Product Information 25
English
Product Information
Rated frequency range:
Safety Instructions
❏
Hot Parts Caution Symbol
K
This symbol is placed on the print head and other parts to indicate that
they may be hot. Never touch those parts just after the printer has been
used. Let them cool for a few minutes before touching them.
Important Safety Instructions
Read all of these safety instructions before using the printer. In addition, follow all
warnings and instructions marked on the printer itself.
❏
❏
❏
❏
❏
❏
❏
❏
❏
❏
❏
❏
❏
Do not place the printer on an unstable surface or near a radiator or heat
source.
Place the printer on a flat surface. It will not operate properly if it is tilted or
placed at an angle.
Do not block or cover the slots and openings in the printer’s cabinet, and do
not insert objects through the slots.
Use only the type of power source indicated on the printer’s label.
Connect all equipment to properly grounded electrical outlets. Avoid using
outlets on the same circuit as photocopiers or air control systems that regularly
switch on and off.
Do not use a damaged or frayed power cord.
If you use an extension cord with the printer, make sure the total ampere rating
of all devices plugged into the extension cord does not exceed the cord’s ampere
rating. Also, make sure the total ampere of all devices plugged into the electrical
outlet does not exceed the electrical outlet’s ampere rating.
Unplug the printer before cleaning it, and clean it with a damp cloth only.
Do not spill liquid onto the printer.
Except as specifically explained in the user documentation, do not attempt to
service the printer yourself.
Never replace the print head yourself; you may damage the printer. Also, other
parts of the printer must be checked when the print head is replaced.
You need to move the print head by hand to replace the ribbon cartridge. If
you have just used the printer, the print head may be hot; let it cool for a few
minutes before touching it.
Adjust only those controls that are covered by the operating instructions.
26 Safety Instructions
Unplug the printer and refer servicing to qualified service personnel under
the following conditions: if the power cord or plug is damaged, if liquid has
entered the printer, if the printer has been dropped or damaged, if it does not
operate normally or exhibits a distinct change in performance.
FCC Compliance Statement for United States Users
This equipment has been tested and found to comply with the limits for a Class B
digital device, pursuant to Part 15 of the FCC Rules. These limits are designed to
provide reasonable protection against harmful interference in a residential
installation. This equipment generates, uses, and can radiate radio frequency energy
and, if not installed and used in accordance with the instructions, may cause
harmful interference to radio or television reception. However, there is no guarantee
that interference will not occur in a particular installation. If this equipment does
cause interference to radio and television reception, which can be determined by
turning the equipment off and on, the user is encouraged to try to correct the
interference by one or more of the following measures.
❏
❏
❏
❏
Reorient or relocate the receiving antenna.
Increase the separation between the equipment and receiver.
Connect the equipment into an outlet on a circuit different from that to which
the receiver is connected.
Consult the dealer or an experienced radio/TV technician for help.
WARNING
The connection of a non-shielded equipment interface cable to this equipment will
invalidate the FCC Certification of this device and may cause interference levels
which exceed the limits established by the FCC for this equipment. It is the
responsibility of the user to obtain and use a shielded equipment interface cable with
this device. If this equipment has more than one interface connector, do not leave
cables connected to unused interfaces.
Changes or modifications not expressly approved by the manufacturer could void
the user’s authority to operate the equipment.
For Canadian users
This Class B digital apparatus meets all requirements of the Canadian Interface
Causing Equipment Regulations.
Cet appareil numérique de la classe B respecte toutes les exigences du Règlement sur le
matériel brouileur du Canada.
Declaration of Conformity
We:
Located at:
Epson America, Inc.
MS 3-13
3840 Kilroy Airport Way
Long Beach, CA 90806
Telephone: (562) 290-5254
Declare under sole responsibility that the product identified herein, complies with
47CFR Part 2 and 15 of the FCC rules as a Class B digital device. Each product
marketed is identical to the representative unit tested and found to be compliant
with the standards. Records maintained continue to reflect the equipment being
produced can be expected to be within the variation accepted, due to quantity
production and testing on a statistical basis as required by 47CFR §2.909.
Operation is subject to the following two conditions: (1) this device may not cause
harmful interference, and (2) this device must accept any interference received,
including interference that may cause undesired operation.
Trade Name:
Type of Product:
Model:
EPSON
Dot Matrix Printer
P371A
EPSON AMERICA, INC., LIMITED WARRANTY
What Is Covered: Epson America, Inc. (“Epson”) warrants to the first end user customer of the Epson
product enclosed with this limited warranty statement that the product, if purchased and used in the
United States or Canada, will be free from defects in workmanship and materials for a period of one (1)
year from the date of original purchase. Epson also warrants that the consumable ribbon enclosed with
the product will perform to the manufacturer’s specified usage, which usage may expire before the
expiration of the limited warranty for the Epson product. For warranty service, you must provide proof
of the date of original purchase.
What Epson Will Do To Correct Problems: Should your Epson product prove defective during the
warranty period, please call the Epson ConnectionSM at (562) 276-4322 (U.S.) or (905) 709-2170
(Canada) for warranty repair instructions and return authorization, if required. Epson will, at its
option, repair or replace on an exchange basis the defective unit, without charge for parts or labor.
When warranty service involves the exchange of the product or of a part, the item replaced becomes
Epson property. The exchanged product or part may be new or previously repaired to the Epson
standard of quality. Exchange or replacement products or parts assume the remaining warranty period
of the product covered by this limited warranty. At Epson’s option where available, Epson will provide
What This Warranty Does Not Cover: This warranty covers only normal consumer use in the United
States and Canada. This warranty is not transferable and will not apply to products purchased from an
end user. This warranty does not cover damage to the Epson printer caused by parts and supplies not
manufactured, distributed, or certified by Epson. This warranty does not cover ribbon or third party
parts, components, or peripheral devices added to the Epson product after its shipment from Epson,
e.g., dealer-added boards or chips. This warranty also excludes maintenance coverage. Epson is not
responsible for warranty service should the Epson label or logo or the rating label or serial number be
removed or should the product fail to be properly maintained or fail to function properly as a result of
misuse, abuse, improper installation, neglect, improper shipping, damage caused by disasters such as
fire, flood, and lightning, improper electrical current, software problems, interaction with non-Epson
products, or service other than by an Epson Authorized Servicer. Packaging, postage, insurance and
shipping costs incurred in presenting your Epson product for warranty service are your responsibility.
If a claimed defect cannot be identified or reproduced in service, you will be held responsible for costs
incurred for such service.
THE WARRANTY AND REMEDY PROVIDED ABOVE ARE EXCLUSIVE AND IN LIEU OF
ALL OTHER EXPRESS OR IMPLIED WARRANTIES INCLUDING, BUT NOT LIMITED TO,
THE IMPLIED WARRANTIES OF NONINFRINGEMENT, MERCHANTABILITY OR
FITNESS FOR A PARTICULAR PURPOSE. SOME LAWS DO NOT ALLOW THE
EXCLUSION OF IMPLIED WARRANTIES. IF THESE LAWS APPLY, THEN ALL EXPRESS
AND IMPLIED WARRANTIES ARE LIMITED TO THE WARRANTY PERIOD IDENTIFIED
ABOVE. UNLESS STATED HEREIN, ANY STATEMENTS OR REPRESENTATIONS MADE
BY ANY OTHER PERSON OR FIRM ARE VOID. EXCEPT AS PROVIDED IN THIS
WRITTEN WARRANTY, NEITHER EPSON AMERICA, INC., NOR ITS AFFILIATES SHALL
BE LIABLE FOR ANY LOSS, INCONVENIENCE, OR DAMAGE, INCLUDING DIRECT,
SPECIAL, INCIDENTAL OR CONSEQUENTIAL DAMAGES, RESULTING FROM THE USE
OR INABILITY TO USE THE EPSON PRODUCT, WHETHER RESULTING FROM
BREACH OF WARRANTY OR ANY OTHER LEGAL THEORY. IF THE REMEDY ABOVE
FAILS, EPSON’S ENTIRE LIABILITY SHALL BE LIMITED TO A REFUND OF THE PRICE
PAID FOR THE EPSON PRODUCT COVERED BY THIS LIMITED WARRANTY.
In Canada, warranties include both warranties and conditions.
Some jurisdictions do not allow limitations on how long an implied warranty lasts and some
jurisdictions do not allow the exclusion or limitation of incidental or consequential damages, so the
above limitations and exclusions may not apply to you. This warranty gives you specific legal rights,
and you may also have other rights which vary from jurisdiction to jurisdiction.
To find the Epson Authorized Reseller nearest you, visit our website at: http://www.epson.com.
To find the Epson Customer Care Center nearest you, visit http://support.epson.com.
You can also write to: Epson America, Inc., P.O. Box 93012, Long Beach, CA 90809-3012.
Declaration of Conformity 27
English
According to 47CFR, Part 2 and 15 for Class B Personal Computers and
Peripherals; and/or CPU Boards and Power Supplies used with Class B Personal
Computers:
on-site warranty support for this product. On-site service will be generally available within a 50-mile
radius of the Epson authorized service provider, only during normal business hours, Monday through
Friday, holidays excluded. If on-site is not available, or the Epson product is not located within 50
miles of an Epson authorized service provider, warranty service is provided in accordance with the
above, or you may choose to pay a travel charge for on-site warranty service to be provided. Service
hours may vary by provider and on-site service may not be available in all areas or all instances. In order
to provide on-site service, the technician must have full access to your Epson printer, as well as to
working space, electricity and a local telephone line.
SUPPLEMENT TO THE LIMITED WARRANTY
How to Receive On-site Warranty Service on Your Epson DFX Series Printer
Where available and at Epson’s option, Epson America, Inc. (“Epson”) will make available on-site
limited warranty service on this Epson printer to supplement the limited warranty service already
available to you through Epson authorized service providers. This supplement provides you with
additional information about Epson’s on-site service.
What is Covered Under the On-site Program: The terms of the Epson Limited Warranty apply.
On-site limited warranty coverage, where available, applies for a period of one year from the date of
original purchase when authorized by Epson. On-site limited warranty service will be generally
available within a 50-mile radius of the Epson authorized on-site Epson Customer Care Center or
other Epson authorized service provider closest to you.
How to Receive On-site Repair Service: If the reseller who supplied your Epson printer has not
arranged to provide you with on-site warranty service, you may find another Epson Authorized Service
Center nearest you by visiting http://support.epson.com. Please be ready to provide the on-site service
provider with your name, unit serial number and the exact location of your Epson printer, specifying
whether that location is a business or residence. NOTE: If the location where on-site is to be performed
is a residence, an adult MUST be home and present at all times for the service technician to enter and
perform service.
When on-site is authorized, a service technician will normally be dispatched to your location by the
next business day following your request for on-site warranty service. If your location is more than 50
miles from an authorized on-site service provider, you may be asked to pay a travel charge directly to
the on-site warranty service provider. Service hours may vary by provider, but generally fall within
normal business hours, Monday through Friday, holidays excluded. Please sign the service form
provided by the service technician upon completion of the service.
In order to provide on-site service, the technician must have full access to your Epson printer, as well as
to working space, electricity and a local telephone line. If the service technician cannot verify or
reproduce a warranty problem or encounters a problem which is not covered by the terms of Epson’s
Limited Warranty, you may be responsible for the service provider’s trip charges as well as for any nonwarranty service provided.
Limitations to On-site Service Coverage: Preventive maintenance, installation, de-installation,
relocation, and operating supplies are not included. Epson is not liable for any failure or delay in service
performance due to any cause beyond its control. This on-site service program extends only to the
Epson printer and does not extend to any other products, peripherals, devices or add-ons, whether or
not manufactured or sold by Epson. On-site service is subject to the same limitations and exclusions
under the terms of the Epson Limited Warranty.
To find the Epson Authorized Reseller nearest you, visit our website at: http://www.epson.com.
To find the Epson Customer Care Center nearest you, visit http://support.epson.com.
Copyright Information
All rights reserved. No part of this publication may be reproduced, stored in a retrieval system, or
transmitted in any form or by any means, electronic, mechanical, photocopying, recording, or otherwise,
without the prior written permission of Seiko Epson Corporation. The information contained herein is
designed only for use with this Epson printer. Epson is not responsible for any use of this information
as applied to other printers.
Neither Seiko Epson Corporation nor its affiliates shall be liable to the purchaser of this product or third
parties for damages, losses, costs, or expenses incurred by the purchaser or third parties as a result of:
accident, misuse, or abuse of this product or unauthorized modifications, repairs, or alterations to this
product, or (excluding the U.S.) failure to strictly comply with Seiko Epson Corporation’s operating and
maintenance instructions.
Seiko Epson Corporation shall not be liable for any damages or problems arising from the use of any
options or any consumable products other than those designated as Original Epson Products or Epson
Approved Products by Seiko Epson Corporation.
Epson and Epson ESC/P are registered trademarks of Seiko Epson Corporation.
You can also write to:
Epson Store, Epson Connection, and SoundAdvice are service marks of Epson America, Inc.
Epson America, Inc., P.O. Box 93012, Long Beach, CA 90809-3012
General Notice: Other product names used herein are for identification purposes only and may be
trademarks of their respective owners. Epson disclaims any and all rights in those marks.
© 2006 Epson America, Inc. 8/06
28 SUPPLEMENT TO THE LIMITED WARRANTY
CPD-19384R1