1
Meru System Director
Configuration Guide
Release 5.1
Copyright © Meru Networks, Inc., 2003– 2012. All rights reserved.
Other names and brands may be claimed as the property of others.
January 2012
Document Number: 882-20050 Rev A Rel 5.1-47 Ver 6 Configuration Guide
END USER SOFTWARE LICENSE AGREEMENT
IMPORTANT:
This end user software license Agreement (this “Agreement”) is a legal agreement between the end user
(“Customer”) of the software accompanying this Agreement (the “Software”) and Meru Networks, Inc. (“Meru”).
This Agreement governs Customer’s use of, and the term “Software includes, any and all computer software, any
printed or electronic documentation, or other code, whether on a disk, in any memory device, embedded in a
semiconductor, downloaded or on any other media provided to Customer by Meru Networks, Inc. (“Meru”) or its
authorized reseller (“Reseller”) as part of a Meru product (“Meru Product”) or as a stand-alone product. Customer
must read this Agreement carefully before installing or otherwise using the Software. By Installing, downloading,
embedding or otherwise using the Software, Customer agrees to be bound by the terms of this Agreement. This
Agreement provides a license to use the Software and contains warranty disclaimers and liability limitations. By
using the software in any way, INCLUDING BUT NOT LIMITED TO, requesting a license key from Meru, Customer
confirms its acceptance of, and agreement to be bound by, the terms of this Agreement. If Customer does not
agree to be bound by the terms of this Agreement, then Customer must: (i) erase all aspects of the Software
from its computers; (ii) not request from Meru or anyone else a license key that would allow operation of the
Software; and (iii) not operate the Software in any manner.
Article 1.
License
(a).Grant. Subject to Customer’s compliance with the terms and conditions in this Agreement, Meru grants
Customer a non-exclusive, non-transferable royalty-free license to use the Software exclusively in connection with the Meru
Product on which it has been embedded or for which it has been offered, and to use all written materials accompanying the
Software (the “Documentation”).
1.1.
Ownership of Software and Confidentiality.
(a).The Software is licensed, not sold, to Customer by Meru. CUSTOMER MAY OWN THE MEDIA ON WHICH THE
SOFTWARE IS PROVIDED, BUT MERU AND/OR MERU'S LICENSOR(S) RETAIN TITLE TO THE SOFTWARE. Customer
acknowledges that the Software and Documentation are protected, among other ways, by federal copyright law and
international treaties and that they constitute confidential information of Meru, protected also by this Agreement. The
organization, structure, sequence, logic and source code of the Software are valuable trade secrets of Meru and its
licensors. Except for those rights expressly granted by this Agreement to Customer, Meru or its licensors retain and shall
own all rights, title and interests in and to the Software, and Customer shall have no right, title or interest in or to any of,
the Software or Documentation, including without limitation, the intellectual property rights comprising or related to the
Software and Documentation.
(a).Customer shall keep the Software and Documentation confidential and shall take all reasonable precautions to
preserve its confidentiality, including where applicable, having all of its employees and subcontractors execute
confidentiality agreements that cover the Software and Documentation. Customer shall take all steps reasonably necessary
to ensure that no person or entity has unauthorized access to the Software or Documentation.
1.1.
Permitted Uses. This Agreement allows Customer to use the Software solely as embedded in the Meru Product on which the
Software has been installed, for execution on, or (where the applicable documentation permits installation on non-Meru equipment)
for communication with Meru Product owned or leased by the Customer and in accordance with Meru's documentation.
Notwithstanding the restrictions set out above in Section 1.2, Customer may make one copy of any Software that is offered separate
from, not embedded in, a Meru Product, in a machine-readable form for back-up purposes only, subject to Customer including on the
copy all copyright, trademark and other proprietary rights notices, as contained on the original version. Customer may copy the
Documentation in a reasonable number for employees using the Software, subject to Customer including on each copy all copyright,
trademark and other proprietary rights notices, as contained in the original version of the Documentation.
1.1.
Restrictions on Use. Customer may not, nor may Customer permit any third party to: (a) decompile, reverse engineer,
disassemble, or otherwise attempt to derive, reconstruct or discover any humanly readable form of the Software source code; (b)
modify, translate, copy, reproduce, disclose, or create derivative works of the Software or Documentation; (c) allow access to the
iii
Software or Documentation by any third party other than agents and representatives working on Customer’s behalf; or (d) rent,
lease, loan, distribute, assign or transfer the Software unless expressly permitted in writing by Meru or by this Agreement. Customer
may not disclose, provide, or otherwise make available any trade secret and/or copyrighted material, including without limitation,
the specific design and structure of individual programs or trade secrets, contained within or related to the Software to any third
party without Meru's prior written consent. Additionally, Customer shall keep any result of any benchmark or other evaluation of the
Software confidential and shall not publish any result of any such result without Meru’s prior written consent. Customer will
implement reasonable security measures to protect such trade secrets and copyrighted materials. Customer shall not under any
circumstance, and shall not permit any third party to, prepare any error correction, modification or derivative work of the Software
or Documentation or remove deface or obscure any product identification, copyright, trademark, suppliers' proprietary rights
notices, or other notice on or in the Software or on output generated by the Software or the Documentation.
Article 1.
Termination. This Agreement is effective until terminated. Customer’s rights under this Agreement will terminate
automatically without notice from Meru if Customer violates any of the restrictions in Article 1 or breaches any term(s) of this
Agreement. Upon termination, Customer must destroy all copies of the Software in Customer’s possession or control. Customer
acknowledges and agrees that any unauthorized use, transfer, sublicensing or disclosure of the Software may cause irreparable
injury to Meru, and under such circumstances, Meru shall be entitled to equitable relief, without posting bond or other security,
including but not limited to, preliminary and permanent injunctive relief.
Article 1.
Disclaimer of Warranty.
1.1.
TO THE MAXIMUM EXTENT PERMITTED BY LAW, MERU AND MERU 'S LICENSOR(S) (FOR THE PURPOSES OF ARTICLES 3 AND 4,
MERU AND MERU 'S LICENSOR(S) SHALL BE COLLECTIVELY REFERRED TO AS “MERU “) PROVIDES THE SOFTWARE AND DOCUMENTATION “AS
IS” AND “WITHOUT WARRANTY”, AND WITH RESPECT TO THE SOFTWARE AND ANY DOCUMENTATION, MERU HEREBY SPECIFICALLY
EXCLUDES AND DISCLAIMS THE IMPLIED WARRANTIES OF MERCHANTABILITY, AND FITNESS FOR A PARTICULAR USE AND ALL OTHER
WARRANTIES, WHETHER EXPRESS OR IMPLIED BY LAW, STATUTE OR COURSE OF DEALING, AND MERU SPECIFICALLY EXCLUDES ALL
REPRESENTATIONS AND WARRANTIES, WHETHER STATUTORY OR OTHERWISE, WITH RESPECT TO NON-INFRINGEMENT OF ANY NATURE OF THE
RIGHTS OF ANY THIRD PARTY.
1.1.
SPECIFICALLY, MERU DOES NOT WARRANT THAT THE FUNCTIONS CONTAINED IN THE SOFTWARE WILL MEET CUSTOMER’S
REQUIREMENTS, OR THAT THE OPERATION OF THE SOFTWARE WILL BE UNINTERRUPTED OR ERROR-FREE, OR THAT DEFECTS IN
THE SOFTWARE WILL BE CORRECTED. FURTHERMORE, MERU DOES NOT WARRANT OR MAKE ANY REPRESENTATION REGARDING
THE USE OR THE RESULTS OF THE USE OF THE SOFTWARE OR RELATED DOCUMENTATION IN TERMS OF THEIR CORRECTNESS,
ACCURACY, RELIABILITY, OR OTHERWISE. NO ORAL OR WRITTEN INFORMATION OR ADVICE GIVEN BY MERU OR MERU
AUTHORIZED REPRESENTATIVE SHALL CREATE A WARRANTY OR IN ANY WAY INCREASE THE SCOPE OF THIS WARRANTY.
1.1.
Meru does not warrant that the Software or any Appliance will be free of vulnerability to intrusion, virus attack or hacker
attacks. The Software is not fault-tolerant nor designed or intended for use in hazardous environments requiring fail-safe
performance, including without limitation, in the operation of nuclear facilities, aircraft navigation or communication systems, air
traffic control, weapons systems, direct life-support machines or any other application in which the failure of the Software could lead
directly to death, personal injury, or severe physical or property damage (collectively, “High Risk Activities”). Meru expressly
disclaims any express or implied warranty of fitness for High Risk Activities.
Article 1.
1.1.
Limitation of Liability.
CUSTOMER
ASSUMES THE ENTIRE RISK AS TO RESULTS AND PERFORMANCE OF THE
PERMITTED UNDER LAW, UNDER NO CIRCUMSTANCE SHALL
MERU
SOFTWARE. TO
THE MAXIMUM EXTENT
BE LIABLE FOR ANY SPECIAL, INDIRECT, INCIDENTAL, EXEMPLARY OR
CONSEQUENTIAL DAMAGES OF ANY KIND OR NATURE WHATSOEVER ARISING OUT OF OR IN ANY WAY RELATED TO THIS AGREEMENT OR THE
SOFTWARE. Such limitation of damages includes, but is not limited to, lost good will, lost profits, loss of data or software, work
stoppage or impairment of other goods, regardless of the legal theory on which the claim is brought, even if Meru has been advised
of the possibility of such damage or if such damage could have been reasonably foreseen, and notwithstanding any failure of
essential purpose of any exclusive remedy provided in this Agreement.
1.1.
IN
NO EVENT SHALL
MERU’S
TOTAL LIABILITY IN CONNECTION WITH THIS
AGREEMENT OR THE SOFTWARE, WHETHER BASED ON CONTRACT,
(i) THE AMOUNT TO MERU FOR THE SOFTWARE LICENSE, OR (ii) IF
THE MERU PRODUCT IN WHICH THE SOFTWARE IS EMBEDDED. IN NO
PRODUCT, SOFTWARE OR SERVICE.
WARRANTY, TORT, INCLUDING NEGLIGENCE, STRICT LIABILITY OR OTHERWISE, EXCEED
NO SEPARATE FEE WAS PAID FOR THE SOFTWARE LICENSE, THE AMOUNTS PAID FOR
CASE SHALL
MERU
BE LIABLE FOR THE COST OF PROCUREMENT OF ANY SUBSTITUTE
1.1.
Customer acknowledges that its agreement to the limitations of liability set out in this article is a crucial part of its
consideration for the rights under the license grant.
Article 1.
U.S. Government Rights. If Customer is the U.S. Government, Customer acknowledges that it obtains only
those rights customarily provided to commercial end use customers. For U.S. governmental entities, this commercial license is
provided in accordance with FAR 12.211 (Technical Data) and 12.212 (Computer Software) and, for Department of Defense
purchasers, DFAR 252.227-7015 (Technical Data – Commercial Items) and DFAR 227.7202-3 (Rights in Commercial Computer
Software or Computer Software Documentation). Use, duplication or disclosure by the U.S. Government is subject to the restrictions
iv
set forth in FAR 52.227-14(g), Rights in Data—General (June 1987) and FAR 52.227-19, Commercial Computer Software—Restricted
Rights (June 1987), or if under Department of Defense, DFAR 252.227-7015(b), Technical Data—Commercial Items (June 2004) and
DFAR 227.7202-3(a) June 2005) in accordance with this Agreement. If Customer is a governmental entity that has a need for rights
not addressed above in this Article 5, it must negotiate a separate agreement with Meru. Customer acknowledges that the Software
source code is unpublished and that all rights are reserved under the copyright laws of the United States. Any use, modification,
reproduction, display or disclosure of the Software or any documentation by the United States Government shall be governed by the
terms of this Agreement.
Article 1.
Export. The Software may be subject to the United States laws and regulations related to the export of technical
data and products produced from such data. Customer shall not, without fully complying with all applicable laws and regulations,
including all United States laws and regulations with respect to export, export any Software or any Appliance, allow any Software to
be exported or transfer any Software to any person or entity that engages in the research or production of military devices,
armaments or any instruments of warfare, including biological, chemical and nuclear warfare.
Article 1.
Governing Law. This Agreement will be governed by and construed in accordance with the laws of the State of
California, U.S.A., without reference to its conflict of law principles, and the United Nations Convention on Contracts for the
International Sale of Goods does not apply. Except for actions for injunctive relief for a violation of intellectual property rights or
confidentiality obligations, any action by either party with respect to this Agreement or the Software must be brought in the state or
federal courts sitting in Santa Clara County, California, and each party submits to the personal jurisdiction of such courts.
Article 1.
Injunctive Relief. Customer acknowledges that its violation of any restriction set out in Article 1 or of any
obligation set out under Article 2 may cause irreparable harm to Meru and upon any such violation, Meru shall be entitled to seek
equitable relief without posting any bond or other security.
Article 1.
Entire Agreement; Waiver; Modifications; Severability. This Agreement constitutes the entire agreement
between the parties with respect to the subject matter of this Agreement and supersedes and replaces all prior or contemporaneous
understandings or agreements, written or oral, with respect to such subject matter. No modification or amendment of this Agreement
or any waiver of any right under this Agreement shall be effective unless in writing and signed by an authorized representative of the
party to be charged. Any waiver of any breach of any provision of this Agreement shall not be construed as a waiver of any
continuing or succeeding breach of such provision or a waiver or modification of the provision. If a court of competent jurisdiction
finds any provision of this Agreement invalid or unenforceable, that provision will be amended to achieve as nearly as possible the
same economic effect as the original provision and the remainder of this Agreement will remain in full force. Failure of a party to
enforce any provision of this Agreement shall not constitute and shall not be construed as a waiver of such provision or of the right
to enforce such provision. CUSTOMER ACKNOWLEDGES THAT IT IS NOT RELYING UPON ANY ORAL REPRESENTATION BY Meru OF ANY NATURE,
INCLUDING WITH RESPECT TO ANY WARRANTY.
Article 1.
v
vi
Contents
About This Guide . . . . . . . . . . . . . . . . . . . . . . xvii
What’s New in this 5.1 Edition. . . . . . . . . . . . . . . . .
xvii
Audience . . . . . . . . . . . . . . . . . . . . . . . . xviii
Other Sources of Information . . . . . . . . . . . . . . . . . . xix
Web Resources . . . . . . . . . . . . . . . . . . . . . . xix
Meru Publications . . . . . . . . . . . . . . . . . . . . . xix
Guide to Typographic Conventions . . . . . . . . . . . . . . . . xix
Syntax Notation . . . . . . . . . . . . . . . . . . . . . . . xx
Contacting Meru . . . . . . . . . . . . . . . . . . . . . . xxi
Customer Services and Support . . . . . . . . . . . . . . . . xxi
Chapter 1
CLI Concepts . . . . . . . . . . . . . . . . . . . . . . . . . 1
Getting Started . . . . . . . . . . . . . . . . . . . . . . .
1
CLI Command Modes . . . .
User EXEC Mode . . . .
Privileged EXEC Mode . .
Global Configuration Mode .
.
.
.
.
2
2
2
3
Command Line-Only Commands . . . . . . . . . . . . . . . . .
3
Abbreviating Commands . . . . . . . . . . . . . . . . . . . .
5
Using No and Default Forms of Commands
. . . . . . . . . . . . .
6
Getting Help . . . . . . . . . . . . . . . . . . . . . . . .
6
Using Command History . . . . . . . .
Setting the Command History Buffer Size .
Recalling Commands . . . . . . . .
Disabling the Command History Feature .
.
.
.
.
7
8
8
9
Finding Words in show Command Output . . . . . . . . . . . . . .
9
.
.
.
.
.
.
.
.
.
.
.
.
.
.
.
.
.
.
.
.
.
.
.
.
.
.
.
.
.
.
.
.
.
.
.
.
.
.
.
.
.
.
.
.
.
.
.
.
.
.
.
.
.
.
.
.
.
.
.
.
.
.
.
.
.
.
.
.
.
.
.
.
.
.
.
.
.
.
.
.
.
.
.
.
.
.
.
.
.
.
.
.
.
.
.
.
.
.
.
.
.
.
.
.
.
.
.
.
Customizing the CLI Prompt . . . . . . . . . . . . . . . . . . 9
Default CLI Prompt . . . . . . . . . . . . . . . . . . . . 9
Commands to Customize CLI Prompt . . . . . . . . . . . . . . 10
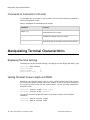
Manipulating Terminal Characteristics . . . . . . . . . . . . . . . 10
Displaying Terminal Settings . . . . . . . . . . . . . . . . . 10
Setting Terminal Screen Length and Width . . . . . . . . . . . . 10
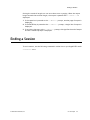
Ending a Session
Chapter 2
. . . . . . . . . . . . . . . . . . . . . . 11
System Director Web UI Concepts . . . . . . . . . . . . . . 13
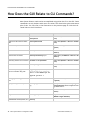
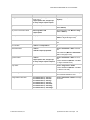
How Does the GUI Relate to CLI Commands? . . . . . . . . . . . . . 14
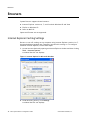
Browsers . . . . . . . . . . . . . . . . . . . . . . . . . 16
Internet Explorer Caching Settings . . . . . . . . . . . . . . . 16
© 2012 Meru Networks, Inc.
Contents vii
What is E(z)RF Network Manager? . . . . . . . . . . . . . . . .
Chapter 3
Managing System Files . . . . . . . . . . . . . . . . . . . . 19
About the CFS . . . . . . . . . . . .
Working with Local Directories . . . . .
Viewing Directory and File Information.
Changing to Another Directory. . . .
Chapter 4
17
.
.
.
.
.
.
.
.
.
.
.
.
.
.
.
.
.
.
.
.
19
20
20
21
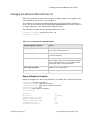
Working with Configuration Files . . . . . . . . . . . . . . . .
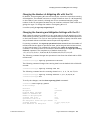
Changing the Running Configuration . . . . . . . . . . . . . .
Changing the Startup Configuration . . . . . . . . . . . . . .
22
22
23
Manipulating System Files. . . . . . . . . . .
Manipulating Files on a Network Server . . . . .
Remote File Transfer Tasks . . . . . . . . .
Copying Files to a Remote Server . . . . . .
Displaying a Remote Server’s Directory Contents
Setting a Remote Username and Password . . . .
.
.
.
.
.
.
23
23
24
24
24
25
Upgrading System Images . . . . . . . . . . . . . . . . . . .
25
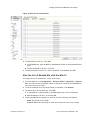
Summary of File System Commands . . . . . . . . . . . . . . .
26
.
.
.
.
.
.
.
.
.
.
.
.
.
.
.
.
.
.
.
.
.
.
.
.
.
.
.
.
.
.
.
.
.
.
.
.
.
.
.
.
.
.
.
.
.
.
.
.
.
.
.
.
.
.
.
.
.
.
.
.
.
.
.
.
.
.
Managing the System. . . . . . . . . . . . . . . . . . . . . 29
Configure Basic Controller Parameters During Setup
. . . . . . . . .
29
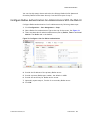
Configure Controller Parameters From the Web UI . . . . . . . . . .
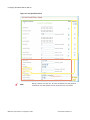
Configure UDP Broadcast with Web UI . . . . . . . . . . . . .
30
31
Configure Controller Parameters From the CLI . . . . . .
Reset System and System Passwords from the CLI . . . .
Limit Wireless Client Access to the Controller From the CLI .
Limit Wired Client Access to the Controller With QoS Rules .
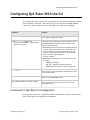
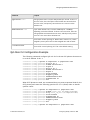
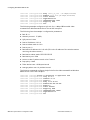
Configuring UDP Broadcast From the CLI . . . . . . .
Configure Time Services From the CLI . . . . . . . .
Configure a Controller Index with the CLI . . . . . . .
.
.
.
.
.
.
.
.
.
.
.
.
.
.
.
.
.
.
.
.
.
.
.
.
.
.
.
.
.
.
.
.
.
.
.
31
31
32
33
34
35
35
System Licensing . . . . . . . . . . .
Configure a License with the Web UI . . .
Configure a License with the Web UI . . .
AP300 Licensing Changed in Release 4.0 and
.
.
.
.
.
.
.
.
.
.
.
.
.
.
.
.
.
.
.
.
35
36
36
37
Configuring E(z)RF Location Manager . . . . . . . . . . . . . . .
Configure E(z)RF Location Manager with the CLI . . . . . . . .
37
37
802.11n Video Service Module (ViSM) . . . . . . . . . . . . . . .
Implementing ViSM. . . . . . . . . . . . . . . . . . .
38
38
Using AeroScout . . . . . . . .
Configuring AeroScout . . .
Location Accuracy . . . . .
Tag Protocol Implementation .
AeroScout and Rogue Detection
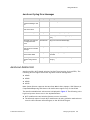
AeroScout Syslog Error Messages
AeroScout Mobile Unit . . . . .
Configuring AeroScout . . .
Configure AeroScout Mobile Unit
39
40
40
41
42
43
43
45
45
viii Meru System Director Configuration Guide
. .
. .
. .
. .
. .
. .
. .
. .
from
. .
. .
. .
Later
.
.
.
.
. . . .
. . . .
. . . .
. . . .
. . . .
. . . .
. . . .
. . . .
AeroScout
.
.
.
.
.
.
.
.
.
.
.
.
. . .
. . .
. . .
. . .
. . .
. . .
. . .
. . .
Engine.
.
.
.
.
.
.
.
.
.
.
.
.
.
.
.
.
.
.
.
.
.
.
.
.
.
.
.
.
.
.
.
.
.
.
.
.
.
.
.
.
.
.
.
.
.
© 2012 Meru Networks, Inc.
AeroScout Compounded Report . .
Dilution Timeout . . . . . . .
Generic AP Notification . . . . . .
Configure AeroScout Integration tool
. . . . .
. . . . .
. . . . .
for Receiving
. . . . . . . . 45
. . . . . . . . 45
. . . . . . . . 46
the Generic AP Notification46
Configure Controller Security . . . . . . . . . . . . . . . . . . 47
Configure Controller Redundancy. . . . . . . . . . . . . . . . . 47
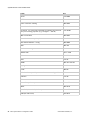
System Director Communication Ports . . . . . . . . . . . . . . . 47
Chapter 5
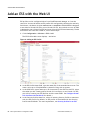
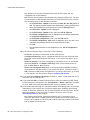
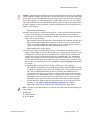
Configuring an ESS . . . . . . . . . . . . . . . . . . . . . 49
Add an ESS with the Web UI
. . . . . . . . . . . . . . . . . . 50
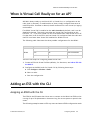
When is Virtual Cell Really on for an AP? . . . . . . . . . . . . . . 57
Adding an ESS with the CLI . . . . . . . . . . . . .
Assigning an ESSID with the CLI . . . . . . . . . .
Enable and Disable . . . . . . . . . . . . . .
CLI Configuration . . . . . . . . . . . . . .
Security Profiles for an ESS. . . . . . . . . . . .
Configuring CAC for an ESSID AP with the CLI . . . . .
Configuring Beacon Parameters with the CLI . . . . .
Configuring ESSID Broadcasting with the CLI . . . . . .
Configuring ESSID Joining of Access Points with the CLI . .
Configuring Virtual Cell Support . . . . . . . . . .
Configuring Virtual Cell Support for AP300 or AP400 with
Configuring Virtual Cell Support for AP300 or AP400 with
Configuring Virtual Cell Support for AP150 . . . . .
Virtual Port is Now Part of Virtual Cell. . . . . . . .
Configuring Probe Response Threshold. . . . . . . .
Change in CLI . . . . . . . . . . . . . . .
Configuring Probe Response Threshold: . . . . . .
SNRRange . . . . . . . . . . . . . . . .
GUI Page: . . . . . . . . . . . . . . . .
Configuring Silent Client Polling with the CLI . . . . .
Configuring Data Transmit Rates with the CLI . . . . .
Assigning a VLAN with the CLI . . . . . . . . . . .
WMM Features Supported by System Director . . . . .
Configure U-APSD . . . . . . . . . . . . . .
Virtual Cell Overflow Feature . . . . . . . . . . .
When Would I Use Virtual Cell Overflow?. . . . . .
Configure Virtual Cell Overflow with the Web UI . . .
Configure Virtual Cell Overflow with the CLI . . . .
. . .
. . .
. . .
. . .
. . .
. . .
. . .
. . .
. . .
. . .
Web UI
the CLI
. . .
. . .
. . .
. . .
. . .
. . .
. . .
. . .
. . .
. . .
. . .
. . .
. . .
. . .
. . .
. . .
.
.
.
.
.
.
.
.
.
.
.
.
.
.
.
.
.
.
.
.
.
.
.
.
.
.
.
.
.
.
.
.
.
.
.
.
.
.
.
.
.
.
.
.
.
.
.
.
.
.
.
.
.
.
.
.
.
.
.
.
.
.
.
.
.
.
.
.
.
.
.
.
.
.
.
.
.
.
.
.
.
.
.
.
57
57
58
58
60
60
60
61
62
62
62
63
64
64
65
65
66
66
66
66
67
68
69
70
70
70
71
71
Bridging Versus Tunneling . . . . . . . .
Supported Features for Bridged ESS Profiles .
Example of Bridged AP Deployment. . . .
Configure a Bridged AP . . . . . . . .
When a Bridged AP Loses Controller Contact
.
.
.
.
.
.
.
.
.
.
.
.
.
.
.
.
.
.
.
.
72
72
73
74
74
.
.
.
.
.
.
.
.
.
.
.
.
.
.
.
.
.
.
.
.
.
.
.
.
.
.
.
.
.
.
.
.
.
.
.
Multicasting Feature . . . . . . . . . . . . . . . . . . . . . 74
Configuring IGMP Snooping on Controllers and APs . . . . . . . . . 75
Commands to Configure IGMP Snooping . . . . . . . . . . . . 75
Multicast MAC Transparency Feature
© 2012 Meru Networks, Inc.
. . . . . . . . . . . . . . . 76
Contents
ix
Chapter 6
Enable Multicast From the Web UI . . . . . . . . . . . . . .
Enable Multicast with the CLI . . . . . . . . . . . . . . . .
View Mapping Between VLANs and ESS Profiles . . . . . . . . . .
76
76
76
Bridging with AirFortress and AppleTalk . . . . . . . . . . . . . .
FortressTech Layer 2 Bridging . . . . . . . . . . . . . . . .
AppleTalk Layer 2 Bridging . . . . . . . . . . . . . . . . .
77
77
77
GRE ESSID Feature . . . . . . . . . . . . . . . . . . . . .
77
Band Steering Feature . . . . . . . . . . . .
Configure Band Steering with the Web UI . . . .
Configure Band Steering with the CLI . . . . .
Expedited Forward Override . . . . . . . .
Steps to configure Expedited Forward Override .
SSID Broadcast for Vport . . . . . . . . . .
Configuration of SSID Broadcast for Vport . . .
.
.
.
.
.
.
.
77
78
78
80
80
83
83
Multiple ESSID Mapping. . . . . . . . . . . . . . . . . . . .
84
Bridged AP300 in a Remote Location . . . . . . . . . . . . . . .
Configure Bridged Mode with the Web UI . . . . . . . . . . . .
Configure Bridged Mode with the CLI. . . . . . . . . . . . . .
86
86
86
Utilizing Multiple IPs on a Single MAC . . . . . . . . . . . . . . .
87
.
.
.
.
.
.
.
.
.
.
.
.
.
.
.
.
.
.
.
.
.
.
.
.
.
.
.
.
.
.
.
.
.
.
.
.
.
.
.
.
.
.
.
.
.
.
.
.
.
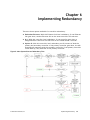
Implementing Redundancy . . . . . . . . . . . . . . . . . . 89
Redundant Ethernet. . . . . . . . . . . . . . . . . . . . .
Configure Redundant Ethernet Failover With the CLI . . . . . . . .
Recovering From Redundant Ethernet Failover . . . . . . . . . .
N+1 Redundancy . . . . . . . . . . . . .
N+1 with Non-Revertive Mode . . . . . . .
Preparing the Network . . . . . . . . .
Configuring the N+1 Clusters . . . . . . .
Starting N+1 on Master Controllers . . . .
Configuring N+1 on the Slave Controller . .
Monitoring the N+1 Installation. . . . . . .
Managing the N+1 Installation . . . . . . .
Enabling Non-Revertive mode . . . . . .
Scheduling revert on Active slave. . . . .
Cancel the Schedule Revert. . . . . . .
Reverting the Active Slave to Standby . . .
Changing the WTR Interval . . . . . . .
Disabling and Deleting N+1 Master Controllers
Stopping N+1 Installations . . . . . . .
Replacing a Master Controller . . . . . .
Working with N+1 Syslog . . . . . . . .
Recovering From N+1 Failover . . . . . . .
Recovering From N+1 with Dual Ethernet Failover
.
.
.
.
.
.
.
.
.
.
.
.
.
.
.
.
.
.
.
.
.
.
.
.
.
.
.
.
.
.
.
.
.
.
.
.
.
.
.
.
.
.
.
.
.
.
.
.
.
.
.
.
.
.
.
.
.
.
.
.
.
.
.
.
.
.
.
.
.
.
.
.
.
.
.
.
.
.
.
.
.
.
.
.
.
.
.
.
.
.
.
.
.
.
.
.
.
.
.
.
.
.
.
.
.
.
.
.
.
.
.
.
.
.
.
.
.
.
.
.
.
.
.
.
.
.
.
.
.
.
.
.
.
.
.
.
.
.
.
.
.
.
.
.
.
.
.
.
.
.
.
.
.
.
.
.
.
.
.
.
.
.
.
.
.
.
.
.
.
.
.
90
91
91
91
93
93
94
95
95
97
100
100
101
101
101
102
102
102
103
103
105
105
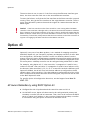
Option 43 . . . . . . . . . . . . . . . . . . . . . . . . 106
AP Aware Redundancy using DHCP Option 43 . . . . . . . . . . . 106
AP Aware Redundancy using DNS . . . . . . . . . . . . . . . 107
x
Meru System Director Configuration Guide
© 2012 Meru Networks, Inc.
Chapter 7
Chapter 8
Configuring Network Interfaces . . . . . . . . . . . . . . . 109
Configuring Basic Networking for the Interface . . . . . . . . . . .
802.11d Support . . . . . . . . . . . . . . . . . . . .
109
110
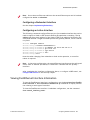
Dual-Ethernet Operation. . . . . . . . .
Configuring Dual Ethernet . . . . . . .
Configuring a Redundant Interface . . .
Configuring an Active Interface . . . .
Viewing FastEthernet Interface Information .
Interface and Networking Commands . . .
110
110
111
111
111
112
.
.
.
.
.
.
.
.
.
.
.
.
.
.
.
.
.
.
.
.
.
.
.
.
.
.
.
.
.
.
.
.
.
.
.
.
.
.
.
.
.
.
.
.
.
.
.
.
.
.
.
.
.
.
.
.
.
.
.
.
Configuring Security . . . . . . . . . . . . . . . . . . . . 113
Configuring Wireless LAN Security
. . . . . . . . . . . . . . .
113
Configure a Security Profile With the Web UI . . . . . . . . . . .
Wi-Fi Protected Access (WPA and WPA2) . . . . . . . . . . . .
114
117
Encryption Support . . . . . . .
CCMP-AES. . . . . . . . . .
TKIP . . . . . . . . . . .
WEP Security Features . . . . .
Operation of the WEP Protocol .
Limitations of the WEP Protocol.
.
.
.
.
.
.
119
119
119
119
120
121
Configure GRE Tunnels . . . . . . . . . . . . . . . . . . .
121
Configure a Security Profile With the CLI . . . .
Configure 802.1X Radius Security With the CLI .
Example Security Profile with 802.1X Radius
802.1X PTK Rekey. . . . . . . . . .
802.1X GTK Rekey . . . . . . . . .
Configure WPA2 With the CLI . . . . . . .
Example WPA2 Configuration . . . . . .
Example WPA2-PSK Configuration . . . .
Configure WPA With the CLI . . . . . . .
Example CLI WPA Configuration . . . . .
Opportunistic PMK Caching for WPA . . .
WPA PTK Rekey . . . . . . . . . .
WPA GTK Rekey . . . . . . . . . .
Example WPA-PSK Configuration . . . .
WPA/WPA-PSK Command Summary. . . .
Configure 802.11 WEP Encryption . . . . .
Checking a CLI Configuration . . . . . . .
.
.
.
.
.
.
.
.
.
.
.
.
.
.
.
.
.
124
125
125
126
126
128
128
129
129
129
130
130
131
131
131
132
133
Policy Enforcement Module . . . . . . . . . . . . . . . . . .
Configure Firewall Policies with the CLI . . . . . . . . . . . .
Troubleshooting Per-User Firewall . . . . . . . . . . . . . .
135
135
136
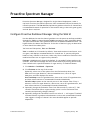
Proactive Spectrum Manager . . . . . . . . . . . . . . . . .
Configure Proactive Dashboard Manager Using the Web UI . . . . . .
Configure Proactive Dashboard Manager Using the CLI . . . . . . .
137
137
138
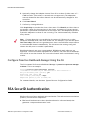
RSA SecurID Authentication. . . . .
RSA SecurID Authenticator Token and
RSA SecurID Server . . . . . .
RSA SecurID Agent. . . . . . .
138
139
139
139
© 2012 Meru Networks, Inc.
.
.
.
.
.
.
.
.
.
.
.
.
. .
Code
. .
. .
.
.
.
.
.
.
.
.
.
.
.
.
.
.
.
.
.
.
.
.
.
.
.
.
.
.
.
.
.
.
.
.
.
.
.
.
.
.
.
.
.
.
.
.
.
.
.
.
.
.
.
.
.
.
.
.
.
.
.
.
.
.
.
.
.
.
.
.
.
.
.
.
.
.
.
.
.
.
.
.
.
.
.
.
.
.
.
.
.
.
.
.
.
.
.
.
.
.
.
.
.
.
.
.
.
.
.
.
.
.
.
.
.
.
.
.
.
.
.
.
.
.
.
.
.
.
.
.
.
.
.
.
.
.
.
.
.
.
.
.
.
.
.
.
.
.
.
.
.
.
.
.
.
.
.
.
.
.
.
.
.
.
.
.
.
.
.
.
.
.
.
.
.
.
.
.
.
.
.
.
.
.
.
.
.
.
.
.
.
.
.
.
.
.
.
.
.
.
.
.
.
.
.
.
.
.
.
.
.
.
.
.
.
.
.
.
.
.
.
.
.
.
.
.
.
.
.
.
.
.
.
.
.
.
.
.
.
.
.
.
Contents
xi
Configure RSA SecurID . . . . . . . . . . . . . . . . . . . 139
Chapter 9
Chapter 10
Configure MAC Filtering . . . . . . . . . . .
Configure MAC Filtering . . . . . . . . . .
Configure a Deny MAC Filtering List . . . . .
Configure a Remote Radius Server for MAC Filtering
Configure an ESS Profile for MAC Filtering . . . .
.
.
.
.
.
.
.
.
.
.
.
.
.
.
.
.
.
.
.
.
.
.
.
.
.
.
.
.
.
.
.
.
.
.
.
.
.
.
.
.
140
141
142
143
144
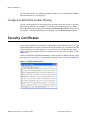
Security Certificates . . . . .
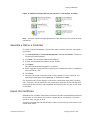
Generate a CSR on a Controller
Import the Certificate . . . .
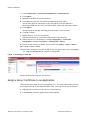
Assign a Server Certificate to an
Troubleshooting Certificates .
.
.
.
.
.
.
.
.
.
.
.
.
.
.
.
.
.
.
.
.
.
.
.
.
.
.
.
.
.
.
.
.
.
.
.
.
.
.
.
.
144
145
145
146
147
. . . .
. . . .
. . . .
Application
. . . .
.
.
.
.
.
.
.
.
.
.
.
.
.
.
.
Authentication . . . . . . . . . . . . . . . . . . . . . . 149
Radius Authentication . . . . . . . . . . . . . . . . . .
Conceptual 802.1X Model for Radius Authentication . . . . . .
Configure Radius Authentication for Users With the Web UI . . . .
Configure Radius Authentication for Administrators With the Web UI
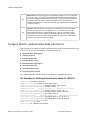
Configure Radius Authentication for Administrators With the CLI . .
CLI Example for Setting Authentication Mode to Radius . . . .
Radius Authentication Attributes . . . . . . . . . . . . .
Attributes for 802.1X . . . . . . . . . . . . . . . .
Radius Accounting for Clients . . . . . . . . . . . . . .
Configure Radius Accounting for Captive Portal . . . . . . . .
Radius-Based ESS Profile Restriction . . . . . . . . . . . .
.
.
.
.
.
.
.
.
.
.
.
.
.
.
.
.
.
.
.
.
.
.
149
149
150
151
152
152
153
153
154
158
158
TACACS+ Authentication . . . . . . . . . . . . . .
Configure TACACS+ Authentication Mode with the CLI . . .
CLI Example for Setting Authentication Mode to TACACS+
Configure TACACS+ Authentication Mode with the Web UI .
.
.
.
.
.
.
.
.
.
.
.
.
.
.
.
.
159
160
160
161
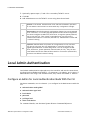
Local Admin Authentication . . . . . . . . . . . . . .
Configure an Admin for Local Authentication Mode With the CLI
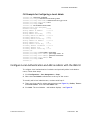
CLI Example for Configuring a Local Admin . . . . . .
Configure Local Authentication and Add an Admin with the Web
.
.
.
UI
.
.
.
.
.
.
.
.
.
.
.
.
162
162
163
163
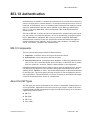
802.1X Authentication . . . . . . . . . . . . . .
802.1X Components . . . . . . . . . . . . .
About the EAP Types . . . . . . . . . . . . .
EAP-TLS . . . . . . . . . . . . . . . .
EAP-TTLS (Tunneled Transport Layer Security) . . .
LEAP (Lightweight Extensible Authentication Protocol)
PEAP (Protected Extensible Authentication Protocol) .
.
.
.
.
.
.
.
.
.
.
.
.
.
.
.
.
.
.
.
.
.
.
.
.
.
.
.
.
165
165
165
166
166
166
166
.
.
.
.
.
.
.
Captive Portals for Temporary Users . . . . . . . . . . . . 169
Configuring Meru Captive Portal . . . . . . . .
Optionally Customize and Use Your Own HTML Pages
Create Custom Pages . . . . . . . . . .
Implement New Custom HTML Files Using the CLI
Implement New Custom HTML Files Using the GUI
Configure Meru Captive Portal with the CLI . . .
Create Meru Captive Portal Guest User IDs Locally .
xii
.
.
.
.
.
.
.
.
.
.
.
Meru System Director Configuration Guide
.
.
.
.
.
.
.
.
.
.
.
.
.
.
.
.
.
.
.
.
.
.
.
.
.
.
.
.
.
.
.
.
.
.
.
.
.
.
.
.
.
.
.
.
.
.
.
.
.
.
.
.
.
.
.
.
169
170
171
172
173
175
176
© 2012 Meru Networks, Inc.
CLI Example - Create Guest User ID
Optionally Configure Pre-Authentication
Captive Portal With N+1. . . . . .
Troubleshooting Captive Portal . . .
Chapter 11
. . .
Captive
. . .
. . .
.
.
.
.
177
178
179
179
Third-Party Captive Portal Solutions. . . . . . . . . . . . . . .
Configure Third-Party Captive Portal With the Web UI . . . . . . .
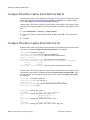
Configure Third-Party Captive Portal With the CLI . . . . . . . .
179
180
180
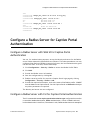
Configure a Radius Server for Captive Portal Authentication . . . . . .
Configure a Radius Server with Web UI for Captive Portal Authentication
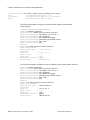
Configure a Radius Server with CLI for Captive Portal Authentication . .
181
181
181
.
.
.
.
.
.
.
.
.
.
.
.
185
186
186
187
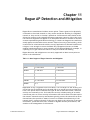
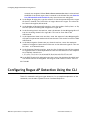
Configuring Rogue AP Detection Using the CLI . . . . . . . . . . .
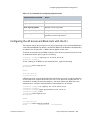
Configuring the AP Access and Block Lists with the CLI . . . . . . .
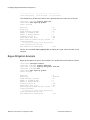
Rogue Mitigation Example . . . . . . . . . . . . . . . . .
188
189
190
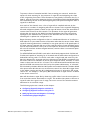
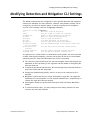
Modifying Detection and Mitigation CLI Settings. . . . . . .
Changing the Number of Mitigating APs with the CLI . . . .
Changing the Scanning and Mitigation Settings with the CLI .
Changing the Minimum RSSI with the CLI . . . . . . . .
Rogue Mitigation Example . . . . . . . . . . . .
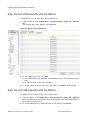
Modify Rogue Detection and Mitigation Settings with the CLI .
Changing the Number of Mitigating APs with the CLI. . .
Changing the Scanning and Mitigation Settings with the CLI
Changing the Minimum RSSI with the CLI . . . . . . .
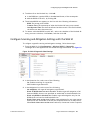
Configure Rogue AP Mitigation with the Web UI . . . . .
Alter the List of Allowed APs with the Web UI . . . . .
Alter the List of Blocked APs with the Web UI . . . . .
Configure Scanning and Mitigation Settings with the Web UI
.
.
.
.
.
.
.
.
.
.
.
.
.
191
192
192
193
193
194
195
195
196
196
196
197
198
. . . . . . . . . . . . . . .
199
Troubleshooting Rogue Mitigation
Chapter 13
.
.
.
.
Rogue AP Detection and Mitigation . . . . . . . . . . . . . 183
Configuring Rogue AP Mitigation with Web UI . .
Alter the List of Allowed APs with the Web UI .
Alter the List of Blocked APs with the Web UI .
Configure Scanning and Mitigation Settings with
Chapter 12
. . . . .
Portal Bypass
. . . . .
. . . . .
.
.
.
the
. .
. .
. .
Web
.
.
.
UI
.
.
.
.
.
.
.
.
.
.
.
.
.
.
.
.
.
.
.
.
.
.
.
.
.
.
.
.
.
.
.
.
.
.
.
.
.
.
.
.
.
.
.
.
.
.
.
.
.
.
.
.
.
.
.
Configuring VLANs . . . . . . . . . . . . . . . . . . . . . 201
Configure and Deploy a VLAN . . . . . . . . . . . . . . . . .
201
Bridged APs in a VLAN
. . . . . . . . . . . . . . . . . . .
202
Delete a VLAN . . . . . . . . . . . . . . . . . . . . . .
203
More About VLANs . . . . . . . . . . . . . . . . . . . . .
203
Configuring Access Points . . . . . . . . . . . . . . . . . . 205
How AP Discovery Works . . . . . . . . . . . . . . . . . . .
205
Add and Configure an AP with the Web UI. . . . . . . . . . . . .
206
Configure an AP’s Radios with the Web UI. . . . . . . . . . . . .
209
Add and Configure an AP with the CLI . . . . . . . . . . . . . .
Configure a Layer 3 AP with the CLI . . . . . . . . . . . . .
211
213
© 2012 Meru Networks, Inc.
Contents xiii
Configure AP Power Supply, Channel Width, and MIMO Mode with CLI . . 214
Configure an AP’s Radios with the CLI . . . . . . . .
Summary of Radio Interface Configuration Commands
Set Radio Transmit Power with the CLI . . . . . . .
Enable and Disable Short Preambles with the CLI . . .
Set a Radio to Scan for Rogue APs with the CLI . . . .
Enable or Disable a Radio Interface with the CLI. . . .
Set a Radio to Support 802.11n Only with the CLI . . .
.
.
.
.
.
.
.
.
.
.
.
.
.
.
.
.
.
.
.
.
.
.
.
.
.
.
.
.
.
.
.
.
.
.
.
.
.
.
.
.
.
.
215
215
216
218
218
218
219
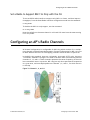
Configuring an AP’s Radio Channels . . . . . . . . . . . . . . . 219
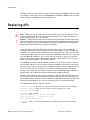
Replacing APs . . . . . . . . . . . . . . . . . . . . . . . 220
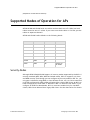
Supported Modes of Operation for APs . . . . . . . . . . . . . . 221
Security Modes . . . . . . . . . . . . . . . . . . . . . 221
When APs are in a Virtual Cell . . . . . . . . . . . . . . . . . 222
Configure Gain for External Antennas
. . . . . . . . . . . . . . 222
Automatic AP Upgrade . . . . . . . . . . . . . . . . . . . . 223
Viewing AP Status
Chapter 14
. . . . . . . . . . . . . . . . . . . . . 224
Intercontroller Roaming . . . . . . . . . . . . . . . . . . 227
How Inter-Controller Roaming Works . . . . . .
Configuring Intercontroller Roaming with the Web
Configuring Intercontroller Roaming with the CLI
Intercontroller Roaming Configuration Example .
ICR Limitations
Chapter 15
.
UI
.
.
.
.
.
.
.
.
.
.
.
.
.
.
.
.
.
.
.
.
.
.
.
.
.
.
.
.
.
.
.
.
.
.
227
228
228
228
. . . . . . . . . . . . . . . . . . . . . . 229
Configuring Quality of Service . . . . . . . . . . . . . . . 231
Configuring QoS Rules With the Web UI . . . . . . . . . . . . . . 231
More About the Match Checkbox and Flow Class Checkbox . . . . . . 235
Configuring QoS Rules With the CLI . . . . . . . . . . . . . . . 237
Commands for QoS Rule CLI Configuration . . . . . . . . . . . . 237
QoS Rule CLI Configuration Example . . . . . . . . . . . . . . 239
Optimizing Voice Over IP . . . . . . . . . . . . . . . . . . . 241
Using Meru Wireless LAN System QoS Rules for VoIP . . . . . . . . 242
Modifying QoS Rules for Nonstandard Ports . . . . . . . . . . . 242
Global QoS Settings . . . . . . . . . . . . . . . . . . . . . 243
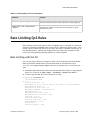
Rate Limiting QoS Rules . . . . . . . . . . . .
Rate Limiting with the CLI . . . . . . . . . .
Rate Limiting QoS Rules with the GUI . . . . . .
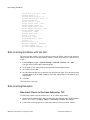
Rate Limiting Examples . . . . . . . . . . .
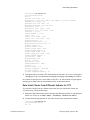
Rate-Limit Clients in the Same Subnet for TCP . .
Rate-Limit Clients From Different Subnets for TCP.
.
.
.
.
.
.
.
.
.
.
.
.
.
.
.
.
.
.
.
.
.
.
.
.
.
.
.
.
.
.
.
.
.
.
.
.
.
.
.
.
.
.
245
245
246
246
246
247
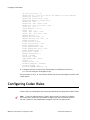
Configuring Codec Rules . . . . . . . . . . . . . . . . . . . 248
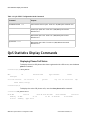
QoS Statistics Display Commands . . . . . . . . . . . . . . . . 252
Displaying Phone/Call Status . . . . . . . . . . . . . . . 252
Displaying Call Admission Details . . . . . . . . . . . . . . 253
More QoS Rule Examples . . . . . . . . . . . . . . . . . . . 253
Rate-Limit a Certain Client . . . . . . . . . . . . . . . . . 253
xiv Meru System Director Configuration Guide
© 2012 Meru Networks, Inc.
Wireless Peer-to-Peer Qos Rules . . . . . . . .
Prioritize Peer-to-Peer . . . . . . . . . .
Peer-to-Peer Blocking . . . . . . . . . .
802.11n Video Service Module (ViSM) . . . . . .
Implementing ViSM . . . . . . . . . . .
Configuring Call Admission Control and Load Balancing
Chapter 16
. .
. .
. .
. .
. .
with
.
.
.
.
.
.
.
.
.
.
.
.
.
.
.
.
.
.
.
.
.
.
.
.
.
.
.
.
.
.
.
.
.
.
.
.
.
.
.
.
.
.
.
.
.
.
.
.
.
.
Installing and Configuring an Enterprise Mesh System . . .
Determine Antenna Placement . . . . . . . . .
Installing the Meru Networks Enterprise Mesh . . . .
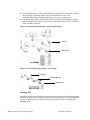
Phase 1: Connect Controller and APs with an Ethernet
Phase 2: Configure the APs for Enterprise Mesh . .
Phase 3: Remove the Cables and Deploy the APs . .
Enterprise Mesh Troubleshooting . . . . . . . .
Problem-Solution Chart . . . . . . . . . .
Troubleshooting via Console-over-Wireless . . .
Accessing Wireless AP via Console-over-Wireless
.
.
.
.
.
.
254
254
255
257
257
258
.
.
.
.
.
.
.
.
.
.
.
.
.
.
.
.
.
.
.
.
.
.
.
.
.
.
.
.
.
.
259
260
261
261
261
. . .
. . .
. . .
Switch
. . .
. . .
.
.
.
.
.
.
.
.
.
.
.
.
.
.
.
.
.
.
262
262
262
263
263
267
.
.
.
.
.
.
.
.
.
.
.
.
268
268
269
270
. . . .
. . . .
. . . .
Example .
.
.
.
.
Configuring SNMP . . . . . . . . . . . . . . . . . . . . . . 273
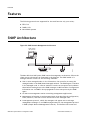
Features . . . . . . . . . . . . . . . . . . . . . . . .
274
SNMP Architecture . . . . . . . . . . . . . . . . . . . . .
MIB Tables . . . . . . . . . . . . . . . . . . . . . .
Download the MIB Tables for Management Applications . . . . .
274
275
276
SNMP Configuration . . . . . . . . . . . . . . .
SNMP Community Strings . . . . . . . . . . . .
Trap Managers . . . . . . . . . . . . . . . .
SNMP Traps . . . . . . . . . . . . . . . . .
Objects That Monitor System Status Through SNMP/OID. .
Agent Contact and Location Commands . . . . . . .
Configure SNMP Service on a Meru Controller With the CLI .
Configure SNMP Service on a Meru Controller With the Web
Set up 3rd Party Vendors . . . . . . . . . . . .
Enabling, Disabling, and Reloading SNMP .
SNMP Version 3 Support . . . . . .
Security Levels. . . . . . . .
Security Models . . . . . . .
Combinations of Security Levels and
SNMP Version 3 Commands . . .
SNMP Version 3 Support Limitations
Chapter 18
.
.
.
.
.
.
Wireless Backbones With Enterprise Mesh . . . . . . . . . . 259
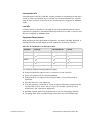
Enterprise Mesh Design . .
Gateway APs . . . .
Intermediate APs . . .
Leaf APs . . . . . .
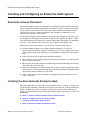
Equipment Requirements
Chapter 17
. . .
. . .
. . .
. . .
. . .
the CLI
. . .
. . .
. . .
. . .
Security
. . .
. . .
. . .
. . .
. . .
. . .
Models
. . .
. . .
.
.
.
.
.
.
.
.
.
.
.
.
.
.
UI
.
.
.
.
.
.
.
.
.
.
.
.
.
.
.
.
.
.
.
.
.
.
.
.
.
.
.
.
.
.
.
.
.
.
.
.
.
276
276
277
279
281
281
282
282
283
.
.
.
.
.
.
.
.
.
.
.
.
.
.
.
.
.
.
.
.
.
.
.
.
.
.
.
.
.
.
.
.
.
.
.
283
283
284
284
284
285
285
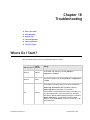
Troubleshooting . . . . . . . . . . . . . . . . . . . . . . 287
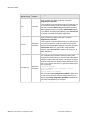
Where Do I Start? . . . . . . . . . . . . . . . . . . . . .
© 2012 Meru Networks, Inc.
287
Contents xv
Error Messages
. . . . . . . . . . . . . . . . . . . . . . 289
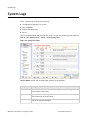
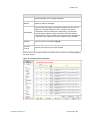
System Logs . . . . . . . . . . .
Station Log Events . . . . . . . .
MAC Filtering Station Log Events . .
Key Exchange Station Log Events . .
Authentication Station Log Events .
1X/WPA/WPA2 Authentication Station
DHCP Station Log Events . . . . .
Captive Portal Station Log Event . .
. . . .
. . . .
. . . .
. . . .
. . . .
Log Events
. . . .
. . . .
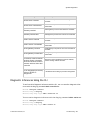
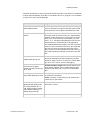
System Diagnostics . . . . . . . . . . .
Radio diagnostics . . . . . . . . . .
Station diagnostics . . . . . . . . . .
Inferences . . . . . . . . . . . . .
Station Inference Messages . . . . . .
Diagnostic Inferences Using the CLI . . . .
What Else Can I learn From A Diagnostic Event?
.
.
.
.
.
.
.
.
.
.
.
.
.
.
.
.
.
.
.
.
.
.
.
.
.
.
.
.
.
.
.
.
.
.
.
.
.
.
.
.
.
.
.
.
.
.
.
.
.
.
.
.
.
.
.
.
.
.
.
.
.
.
.
.
290
293
296
297
299
301
302
304
.
.
.
.
.
.
.
.
.
.
.
.
.
.
.
.
.
.
.
.
.
.
.
.
.
.
.
.
.
.
.
.
.
.
.
.
.
.
.
.
.
.
.
.
.
.
.
.
.
.
.
.
.
.
.
.
.
.
.
.
.
.
.
.
.
.
.
.
.
.
304
304
306
307
309
311
312
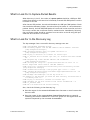
Capturing Packets . . . . . . . . . . . .
Packet Capture Profile Example - WireShark .
What to Look For In Capture-Packet Results . .
What to Look For In the Discovery Log . . . .
.
.
.
.
.
.
.
.
.
.
.
.
.
.
.
.
.
.
.
.
.
.
.
.
.
.
.
.
.
.
.
.
.
.
.
.
312
314
315
315
FTP Error Codes . . . . . . . . . . . . . . . . . . . . . . 316
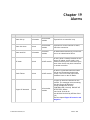
Chapter 19
Alarms . . . . . . . . . . . . . . . . . . . . . . . . . . 319
Glossary . . . . . . . . . . . . . . . . . . . . . . . . . . 325
xvi Meru System Director Configuration Guide
© 2012 Meru Networks, Inc.
About This Guide
This guide describes the various options for configuring the Meru Wireless LAN
System. The architecture and fundamental operations of system are described.
What’s New in this 5.1 Edition
The previous edition of this guide covered System Director 5.0. The new or changed
topics for this System Director 5.1 version of the Configuration Guide include:
Batch adding AP-Interfaces to ESS Profile: The user is now allowed to add multiple
AP interfaces on the ESS Profile screen, rather than having to do it on a
one-by-one basis. Refer to “Add an ESS with the Web UI” on page 50 for further
information.
A Description field is now added on the MAC Filtering (ACL) Configuration screen.
Refer to the MAC Filtering (ACL) Configuration topic of the System Director 5.1
Online Help.
The maximum allowed link-probe duration value has been increased to 32000
minutes. This is implemented in order to help users who have a WAN connectivity
issue come up over a weekend, as the previous maximum (7200) would result in
system reboots upon returning to the office on Monday. Refer to “Add and
Configure an AP with the Web UI” on page 206 for further configuration details.
A new field KeepAlive Timeout(seconds) is included in the AP Table - Update
screen. This field has been included to assist with remote AP issues in which an
AP in a relatively inaccessibly location would lose connectivity with the main
controller and start looking for a new Master too quickly. Users may now specify
how long the AP waits before beginning the scanning process. Refer to “Add and
Configure an AP with the Web UI” on page 206 for further information.
An alarm named Radio Failure is generated when the Radio fails to turn
operational during Initial bootup. Refer to “Alarms” on page 319 for further
information.
A new feature N+1 with Non-Revertive mode is now introduced to control the
fail back operation. Refer to “N+1 with Non-Revertive Mode” on page 93 for
further information.
A new feature 802.1x Termination is introduced to perform the configuration on
per-security profile basis. This is intended to help users with a deployment that
implements the Starnet Radius Server. Refer to “Configure a Security Profile
With the Web UI” on page 114 for further information.
© 2012 Meru Networks, Inc.
About This Guide xvii
Audience
U-APSD support has been added for the AP1000 series. Refer to “Configure
U-APSD” on page 70 for more details.
DFS support has been added for the AP1000 series. This feature requires no
configuration, is always on, and cannot be disabled.
SIP over TCP communication has been implemented. Refer to “Optimizing Voice
Over IP” on page 241 for additional details on configuring a Voice over IP
deployment.
Several new AP models have been implemented: AP400i, AP400is, OAP433, and
AP1000e. See each AP’s individual Access Point Installation Guide for details.
This version of System Director supports the new MC6000 chassis controller. Refer
to the Meru Controller Installation Guide for controller specifications.
Audience
This guide is intended for network administrators configuring and maintaining the
Meru Wireless LAN System. Familiarity with the following concepts is helpful when
configuring the Meru Wireless LAN System:
Network administration, including:
— Internet Protocol (IP) addressing and routing
— Dynamic Host Configuration Protocol (DHCP)
— Configuring Layer 2 and Layer 3 switches (if required by your switch)
IEEE 802.11 (Wi-Fi) concepts, including:
— ESSIDs
— WEP
Network Security (optional)
— WPA
— 802.1X
— Radius
— X.509 certificates
xviii Meru System Director Configuration Guide
© 2012 Meru Networks, Inc.
Other Sources of Information
Other Sources of Information
Additional information is available in the following Web site, Meru publications, and
external references.
Web Resources
For the first 90 days after you buy a Meru controller, you have access to online
support. If you have a support contract, you have access for the length of the
contract. See this web site for information such as:
Knowledge Base (Q&A)
Downloads
Open a ticket or check an existing one
Customer Discussion Forum
The URL is: http://support.merunetworks.com
Meru Publications
Meru System Director Release Notes
Meru Access Point and Radio Switch Installation Guide
Meru Controller Installation Guide
Meru System Director Command Reference
Meru System Director Getting Started Guide
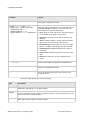
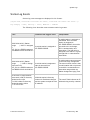
Guide to Typographic Conventions
This guide uses the following typographic conventions in paragraph text to help you
identify information:
Bold text
Identifies commands and keywords in syntax descriptions that are
entered literally.
Italic text
Used for new terms, emphasis, and book titles; also identifies
arguments for which you supply values in syntax descriptions.
© 2012 Meru Networks, Inc.
About This Guide
xix
Syntax Notation
Courier font
Identifies file names, folder names, computer screen output, and text
in syntax descriptions that you are required to type.
Ctrl-
Denotes that the Ctrl key should be used in conjunction with another
key, for example, Ctrl-D means hold down the Ctrl and press the D key.
Keys are shown in capitals, but are not case sensitive.
Note:
Provides extra information, tips, and hints regarding the topic
Caution!
Identifies important information about actions that could result in
damage to or loss of data, or could cause the application to behave in
unexpected ways
Warning!
Identifies critical information about actions that could result in
equipment failure or bodily harm
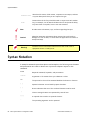
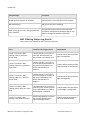
Syntax Notation
In example command syntax descriptions and examples, the following text elements
and punctuation are used to denote user input and computer output for the
command.
bold
Required command, keywords, and punctuation.
italic
Arguments or file names where you substitute a value.
no
The optional no form of the command disables the feature or function.
[ ]
Optional elements are enclosed by square brackets.
{ }
Braces indicates that one of the enclosed elements must be used.
|
xx
Choices among elements are separated by vertical bars.
[{}]
A required choice within an optional element.
…
The preceding argument can be repeated.
Meru System Director Configuration Guide
© 2012 Meru Networks, Inc.
Contacting Meru
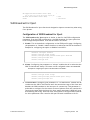
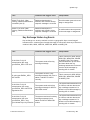
The following figure shows a sample of syntax notation.
[no] action target {keyword|keyword} [argument ...]
One or more repeated values
Choose between the enclosed elements
Keyword or command within a submode.
Command or action. In some cases, action takes you to another command mode.
The optional no form disables the command; without the no, enables or re-enables.
Note:
Many commands have a default setting or value, listed in the Default section of
the command page.
Contacting Meru
You can visit Meru Networks on the Internet at this URL:
http://www.merunetworks.com
Click the Support menu button to view Meru Customer Services and Support information.
Customer Services and Support
For assistance, contact Meru Customer Services and Support 24 hours a day at
+1-888-637-8952 (+1-888-Meru-WLA(N)) or +1-408-215-5305. Email can be sent to
[email protected].
Meru Customer Services and Support provide end users and channel partners with the
following:
Telephone technical support
Software update support
Spare parts and repair service
© 2012 Meru Networks, Inc.
About This Guide
xxi
Contacting Meru
xxii Meru System Director Configuration Guide
© 2012 Meru Networks, Inc.
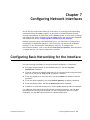
Chapter 1
CLI Concepts
This chapter presents tips for working with the System Director command line interface (CLI). It describes the various command modes, provides some tips for getting
help, using the history functions, and customizing the prompt and terminal characteristics. The following sections are included in this guide:
Getting Started
CLI Command Modes
Command Line-Only Commands
Command Line-Only Commands
Abbreviating Commands
Using No and Default Forms of Commands
Getting Help
Using Command History
Finding Words in show Command Output
Customizing the CLI Prompt
Manipulating Terminal Characteristics
Ending a Session
Getting Started
To start using the Command Line Interface:
1. Connect to the controller using the serial console or Ethernet port, or remotely
with a telnet or SSH2 connection once the controller has been assigned an IP
address.
To assign the controller an IP address, refer to the “Initial Setup” chapter of the
Meru System Director Getting Started Guide.
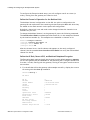
2. At the login prompt, enter a user ID and password. By default, the guest and
admin user IDs are configured.
— If you log in as the user admin, with the admin password, you are
automatically placed in privileged EXEC mode.
© 2012 Meru Networks, Inc.
CLI Concepts
1
CLI Command Modes
— If you log in as the user guest , you are placed in user EXEC mode. From there,
you must type the enable command and the password for user admin before
you can enter privileged EXEC mode.
3. Start executing commands.
CLI Command Modes
The CLI is divided into different command modes, each with its own set of commands
and in some modes, one or more submodes. Entering a question mark (?) at the
system prompt provides a list of commands available at the current mode.
User EXEC Mode
When you start a session on the controller, you begin in user mode, also called user
EXEC mode. Only a subset of the commands are available in user EXEC mode. For
example, most of the user EXEC commands are one-time and display-only commands,
such as the show commands, which list the current configuration information, and
the clear commands, which clear counters or interfaces. The user EXEC commands
are not saved when the controller reboots.
Access method: Begin a session with the controller as the user guest.
Prompt: default>
Exit method: Enter either exit or quit.
Summary: Use this mode to change console settings, obtain system information
such as showing system settings and verifying network connectivity.
Privileged EXEC Mode
To access all the commands in the CLI, you need to be in privileged EXEC mode. You
can either log in as admin, or enter the enable command at the user EXEC mode and
provide the admin password to enter privileged EXEC mode. From this mode, you can
enter any privileged EXEC command or enter Global Configuration mode.
Access method: Enter enable while in user EXEC mode, or log in as the user admin.
Prompt: default#
Exit method: Enter disable.
Summary: Use this mode to manage system files and perform some
troubleshooting. Change the default password (from Global Configuration mode)
to protect access to this mode.
2
Meru System Director Configuration Guide
© 2012 Meru Networks, Inc.
Command Line-Only Commands
Global Configuration Mode
You make changes to the running configuration by using the Global Configuration
mode and its many submodes. Once you save the configuration, the settings are
stored and restarted when the controller reboots.
From the Global Configuration mode, you can navigate to various submodes (or
branches), to perform more specific configuration functions. Some configuration
submodes are security, qosrules, vlan, and so forth.
Description: configures parameters that apply to the controller as a whole.
Access method: Enter configure terminal while in privileged EXEC mode.
Prompt: controller(config)#
Exit method: enter exit or press Ctrl-Z to return to privileged EXEC mode (one
level back).
Summary: Use this mode to configure some system settings and to enter additional
configuration submodes (security, qosrules, vlan).
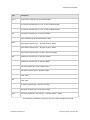
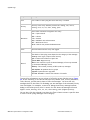
Command Line-Only Commands
Many CLI commands have an equivalent functionality in the Web Interface, so you can
accomplish a task using either interface. The following lists commands that have no
Web Interface functionality.
EXEC Mode Commands
configure terminal
no history
no prompt
no terminal length |width
help
cd
copy (including copy running-config startup-config, copy startup-config
running-config and all local/remote copy)
delete flash: image
delete filename
dir [dirname]
debug
disable
enable
© 2012 Meru Networks, Inc.
CLI Concepts
3
Command Line-Only Commands
exit
quit
more (including more running-config, more log-file, more running-script)
prompt
rename
terminal history|size|length|width
traceroute
show history
show running-config
show terminal
Config Mode Commands
do
ip username ftp|scp|sftp
ip password ftp|scp|sftp
show context
Commands that Invoke Applications or Scripts
calendar set
timezone set|menu
date
capture-packets
analyze-capture
debug
diagnostics[-controller]
ping
pwd
shutdown controller force
reload controller default
run
setup
upgrade
downgrade
poweroff
show calendar
show timezones
show file systems
4
Meru System Director Configuration Guide
© 2012 Meru Networks, Inc.
Abbreviating Commands
show memory
show cpu-utilization
show processes
show flash
show qosflows
show scripts
show station details
show syslog-host
show log
autochannel
rogue-ap log clear
telnet
syslog-host
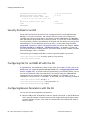
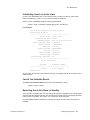
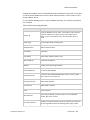
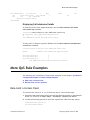
Abbreviating Commands
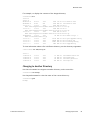
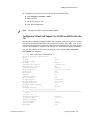
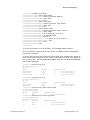
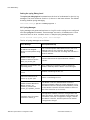
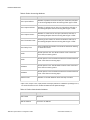
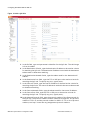
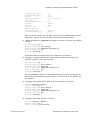
You only have to enter enough characters for the CLI to recognize the command as
unique. This example shows how to enter the show security command, with the
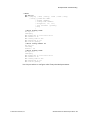
command show abbreviated to sh:
Lab-MC1000# sh security-profile default
Security Profile Table
Security Profile Name : default
L2 Modes Allowed : clear
Data Encrypt : none
Primary RADIUS Profile Name :
Secondary RADIUS Profile Name :
WEP Key (Alphanumeric/Hexadecimal) : *****
Static WEP Key Index : 1
Re-Key Period (seconds) : 0
Captive Portal : disabled
802.1X Network Initiation : off
Tunnel Termination: PEAP, TTLS
Shared Key Authentication : off
Pre-shared Key (Alphanumeric/Hexadecimal) : *****
Group Keying Interval (seconds) : 0
Key Rotation : disabled
Reauthentication : off
MAC Filtering : off
Firewall Capability : none
Firewall Filter ID :
Security Logging : off
Allow mentioned IP/Subnet to pass through Captive portal : 0.0.0.0
© 2012 Meru Networks, Inc.
CLI Concepts
5
Using No and Default Forms of Commands
Subnet Mask for allowed IP/Subnet to pass through Captive portal : 0.0.0.0
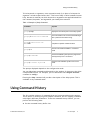
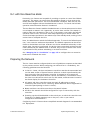
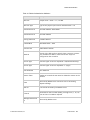
Using No and Default Forms of Commands
Almost every configuration command has a no form. In general, use the no form to:
1. Disable a feature or function.
2. Reset a command to its default values.
3. Reverse the action of a command.
4. Use the command without the no form to reenable a disabled feature or to reverse
the action of a no command.
Configuration commands can also have a default form. The default form of a
command returns the command setting to its default. Most commands are disabled
by default, so the default form is the same as the no form. However, some commands
are enabled by default and have variables set to certain default values. In these
cases, the default command enables the command and sets variables to their default
values. The reference page for the command describes these conditions.
Getting Help
Entering a question mark (?) at the system prompt displays a list of commands for
each command mode. When using context-sensitive help, the space (or lack of a
space) before the question mark (?) is significant. To obtain a list of commands that
begin with a particular character sequence, enter those characters followed immediately by the question mark (?). Do not include a space. This form of help is called
word help, because it completes a word for you.
6
Meru System Director Configuration Guide
© 2012 Meru Networks, Inc.
Using Command History
To list keywords or arguments, enter a question mark (?) in place of a keyword or
argument. Include a space before the ?. This form of help is called command syntax
help, because it reminds you which keywords or arguments are applicable based on
the command, keywords, and arguments you already have entered.
Table 1: Examples of Help Commands
Command
Purpose
(prompt)# help
Displays a brief description of the help system.
(prompt) # abbreviated-command?
Lists commands in the current mode that begin
with a particular character string.
(prompt)# abbreviated-command<Tab>
Completes a partial command name
(prompt)# ?
Lists all commands available in command
mode
(prompt)# command?
Lists the available syntax options (arguments
and keywords) for the command.
(prompt)# command keyword ?
Lists the next available syntax for this command.
The prompt displayed depends on the configuration mode.
You can abbreviate commands and keywords to the number of characters that allow
a unique abbreviation. For example, you can abbreviate the configure terminal
command to config t.
Entering the help command will provide a description of the help system. This is
available in any command mode.
Using Command History
The CLI provides a history of commands that you have entered during the session.
This is useful in recalling long and complex commands, and for retyping commands
with slightly different parameters. To use the command history feature, you can
perform the following tasks:
Set the command history buffer size
© 2012 Meru Networks, Inc.
CLI Concepts
7
Using Command History
Recall commands
Disable the command history feature
Setting the Command History Buffer Size
By default, the CLI records ten command lines in its history buffer. To set the number
of command lines that the system will record during the current terminal session, and
enable the command history feature, use the terminal history command:
controller# terminal history [size n]
The terminal no history size command resets the number of lines saved in the
history buffer to the default of ten lines or number specified by size.
To display the contents of the history buffer, type default history:
controller# default history
To display the contents of the history buffer, type terminal history
controller# terminal history
7 interface Dot11Radio 1
8 end
9 interface Fast Ethernet controller 1 2
10 show interface Dot11Radio 1
11 end
12 show interfaces FastEthernet controller 1 2
13 sh alarm
14 sh sec
15 sh security
Recalling Commands
To recall commands from the history buffer, use one of the following commands or
key combinations:
Ctrl-P or Up Arrow key. This recalls commands in the history buffer, beginning
with the most recent command. Repeat the key sequence to recall successively
older commands.
Ctrl-N or Down Arrow key. Returns to more recent commands in the history buffer
after recalling commands with Ctrl-P or the Up Arrow key.
!number. Execute the command at the history list number. Use the terminal
history or show history commands to list the history buffer, then use this
command to re-execute the command listed by its sequence number.
To list the contents of the history buffer, use the show history command:
controller# show history
8
Meru System Director Configuration Guide
© 2012 Meru Networks, Inc.
Finding Words in show Command Output
Disabling the Command History Feature
The terminal history feature is automatically enabled. To disable it during the
current terminal session, type no terminal history in either privileged or non-privileged EXEC mode:
controller# no terminal history
Finding Words in show Command Output
To quickly locate a word in the output of any show command, use the following
command:
show argument | grep "string"
For this feature to work, only one show command can be the input to the grep and
the show command cannot have arguments (for example, the form of the command
such as show ap 54. The "string" is a literal, case-sensitive word to search for (such
as AP-54), and must be enclosed in double quotation marks. Only one string search
can be performed per command line.
As an example, to search for and display the entry for AP-54 in the output of the show
ap command, use the command:
controller# show ap | grep "AP-54"
AP ID AP Name
Serial Number
Connectivity AP Model AP Type
Op State
Availability
Runtime
54
AP-54
00:0c:e6:00:3e:a8
AP320 Local
AP Table(1 entry)
Disabled
Offline
3.1.4-25 None
Customizing the CLI Prompt
Default CLI Prompt
By default, the CLI prompt consists of the system name followed by an angle bracket
(>) for user EXEC mode or a pound sign (#) for privileged EXEC mode.
© 2012 Meru Networks, Inc.
CLI Concepts
9
Manipulating Terminal Characteristics
Commands to Customize CLI Prompt
To customize the CLI prompt for your system, use one of the following commands in
Global Configuration mode:
Table 2: Commands to Customize the CLI Prompt
Command
prompt string
no prompt
default prompt
Purpose
Customizes the CLI prompt.
Disables the display of the CLI prompt.
Sets the prompt to the default, which is the hostname.
Manipulating Terminal Characteristics
Displaying Terminal Settings
To display the current terminal settings, including the screen length and width, type:
controller> show terminal
Terminal Length:
0
Terminal Width:
80
History Buffer Size:
10
Setting Terminal Screen Length and Width
By default, the terminal length is set to 0 rows, and the width is set to 80 columns.
To override this default setting, and set the number of lines or character columns on
the current terminal screen for the current session, use the following commands in
user EXEC mode:
controller> terminal length screen-length
controller> terminal width characters
To reset the terminal length and width to the default values, use the default
command:
controller> default terminal length
controller> default terminal width
10
Meru System Director Configuration Guide
© 2012 Meru Networks, Inc.
Ending a Session
Setting the terminal length to a non-zero value turns on paging. When the output
length exceeds the terminal length, the output is paused and a ---More--- is
displayed:
1. If the space bar is pressed at the ---More--- prompt, another page of output is
displayed.
2. If the ENTER key is pressed at the ---More--- prompt, a single line of output is
displayed.
3. If any other character at the ---More--- prompt, this signifies the end of output
and the command prompt is displayed.
Ending a Session
To end a session, use the following command in either User or privileged EXEC mode:
controller> exit
© 2012 Meru Networks, Inc.
CLI Concepts
11
Ending a Session
12
Meru System Director Configuration Guide
© 2012 Meru Networks, Inc.
Chapter 2
System Director Web UI Concepts
Access System Director by entering the IP address of the controller in a browser (see
Browsers below). The Web UI interface that displays operates from three menus.
Configuration
© 2012 Meru Networks, Inc.
Monitor
Maintenance
System Director Web UI Concepts
13
How Does the GUI Relate to CLI Commands?
How Does the GUI Relate to CLI Commands?
Most System Director tasks can be accomplished using either the CLI or the GUI. Some
commands can only be done with one or the other. The chart below gives some examples of this. You can refer to the illustration on the previous page or click the indicated links on the UI Interface.
I need to know...
With the CLI
With the GUI
Stations that are associated
show station
show phones
Station table (Monitor > Devices > All Stations)
Stations and APs that are detectable
show ap-discovered
Station table (Monitor > Devices > All Stations)
Controller setup
show controller
System Summary (Monitor > Dashboard >
System)
APs that are connected
show ap
Station table (click Monitor > Devices > All
Stations)
How are APs connected
show ap-connectivity ap-id
Station table (click Monitor > Devices > All
Stations)
How many stations are connected sh station or sh topostation
Station table (Monitor > Devices > All Stations)
Stations connections to certain AP show ap-assigned mac-address
Station table (Monitor > Devices > All Stations)
Add a new operating system version to a controller using FTP
NA
copy ftp://ftpuser:ftppasswd@offbox-ip-address/
meru-5.1-xxx-MODEL-rpm.tar.
upgrade system 5.1
See aggregate throughput for all
APs
NA
System Dashboard (Monitor > Dashboard
> System)
Syslog message summary
show syslog-table shows the entire
log
SysLog Files Table (Monitor > Syslog >
View Syslog Files) shows a segment of the
log based on time
Alarms
show alarms
Alarm Dashboard (Monitor > Dashboard >
Alarms)
Rogues detected
show rogue-ap-list
Rogue AP Table (Monitor > Wireless
IDS/IPS > Rogue AP Table)
AP300/AP400 model (AP320, etc.) show ap
14
Meru System Director Configuration Guide
© 2012 Meru Networks, Inc.
How Does the GUI Relate to CLI Commands?
I need to know...
With the CLI
With the GUI
Throughput bottlenecks
sh statistics top10 -ap -problem
(shows loss %)
analyze-capture start, analyze-capture stop, analyze-capture capture
System Dashboard (Monitor > Dashboard
> System)
High-volume users
sh statistics top10-station-talker
Stations Dashboard (click Monitor > Dashboard > Station)
Why a user’s connection failed
station-log/station add
Station Diagnostics (click Monitor > Diagnostics > Station)
analyze-capture
Dead spots
sh topoap
Station Diagnostics (Monitor > Diagnostics
> Station > Signal Strength Chart)
Station retries
sh station
Monitor > Dashboard > Station > Retries
chart
User’s location
sh station or sh topostation
NA
Overloaded radios
sh station
Monitor > Dashboard > Radio > Retries
chart
sh statistics top10-ap-problem
Radio Dashboard (Monitor > Dashboard >
Radio > Throughput Chart)
High-loss radios
sh station
Noisy radios
NA
Monitor > Dashboard > Radio > Loss %
chart
analyze-capture start, analyze-capController Dashboard (Monitor > Controlture stop, analyze-capture snapshot
ler > High-Loss Radio chart)
Monitor > Diagnostics > Radio
Controller Dashboard (Monitor > Controller > Noise Level chart)
Radio Management Overhead
sh interfaces Dot11Radio statistics
Monitor > Dashboard > Radio > Management Overhead Distribution chart
Average Station data rates
show station 802.11 | “802.11a”
show station 802.11 | “802.11b”
show station 802.11 | “802.11g”
show station 802.11 | “802.11g”
show station 802.11 | “802.11ab”
show station 802.11 | “802.11bg”
show station 802.11 | “802.11bgn”
Monitor > Dashboard > Station > Average
Rate charts
© 2012 Meru Networks, Inc.
System Director Web UI Concepts
15
Browsers
Browsers
System Director supports these browsers:
Internet Explorer versions 6, 7, and 8 on both Windows XP and Vista
Firefox on Windows XP
Safari on MAC OS
Opera and Chrome are not supported.
Internet Explorer Caching Settings
Be sure to turn off caching on any computer using Internet Explorer version 6 or 7,
because dashboard updates are frequently ignored with caching on. To configure
Windows Internet Explorer, follow these steps:
1. Access Internet Options by opening an Internet Explorer window and then clicking
Tools > Internet Options.
A window like this one displays:
Figure 1: Internet Options for Microsoft Windows
2. Under Browsing history, click Settings.
A window like this one displays:
16
Meru System Director Configuration Guide
© 2012 Meru Networks, Inc.
What is E(z)RF Network Manager?
Figure 2: Internet Browsing Settings
3. Select the option Every time I visit the web page.
4. Click OK.
The dashboard will now be updated every time the statistics change.
Note that no configuration is needed for Mozilla Firefox.
What is E(z)RF Network Manager?
E(z)RF Network Manager is a Meru product that manages multiple controllers. ESS,
Security, VLAN, GRE and Radius profiles can all be configured either from E(z)RF
Network Manager or from the controller. You can tell where a profile was configured
by checking the read-only field Owner; the Owner is either E(z)RF NMS or controller.
If a profile belongs to E(z)RF Network Manager, you cannot alter or delete it from a
controller.
If a profile belongs to E(z)RF Network Manager, the recommendation is to
alter/delete it from the Network Manager interface. If for some reason Network
Manager is not reachable from the controller, then the recommendation is to unregister the Network Manager server from the controller using the nms-server unregister CLI command.
© 2012 Meru Networks, Inc.
System Director Web UI Concepts
17
What is E(z)RF Network Manager?
18
Meru System Director Configuration Guide
© 2012 Meru Networks, Inc.
Chapter 3
Managing System Files
This chapter describes how to work with the Controller File System (CFS), which
provides a single interface for managing all files available for use with Meru controllers. This chapter contains the following sections:
About the CFS
Working with Configuration Files
Manipulating System Files
Upgrading System Images
Summary of File System Commands
About the CFS
The CFS allows you to manage the controller operating system (System Director) and
its configuration files.
Files used to operate the controller are located in directories on the controller flash
card. Initially, the flash contains the shipped operating system, referred to as the
image, which of course is set with default settings. During the course of normal operation, you probably will want to perform some or all of the following tasks:
Configure custom settings and save the settings to a configuration file.
Save the configuration file to a backup directory on the controller.
Save the configuration file to a remote location to provide a more secure backup
or as input for configuring other controllers.
Restore the settings from a known, reliable backup file.
Restore the system to its default settings.
Upgrade the system to a new version of the operating system.
Downgrade the system to a previous operating system version.
Execute scripts to automate configuration.
© 2012 Meru Networks, Inc.
Managing System Files
19
About the CFS
To accomplish these tasks you need to use the CFS to manipulate files. The CFS allows
you to perform the following tasks:
Display information about files within a directory
The display information includes the file name, size, and date of modification.
Navigate to different directories
You can navigate to different directories and list the files in a directory.
Copy files
The CFS allows you to copy files on the controller via a pathname or to manipulate
remote files. Use Uniform Resource Locators (URLs) to specify the location of a
remote file. URLs are commonly used to specify files or locations on the World
Wide Web. You can use the URL format to copy file to or retrieve files from a
location on a remote file server.
Delete files
Working with Local Directories
The controller flash card uses the following directories to organize its system files.
You can access the following local directories:
Directory Name
Directory Contents
images
Directory where the current image resides and where
you can place upgrade images that you have obtained
remotely.
backup
Directory containing backup configuration files and
databases.
ATS/scripts
Directory containing AP bootup scripts.
capture
Directory containing the packet capture files.
Viewing Directory and File Information
Use the pwd command to view the current directory. By default, the current working
directory is images, as shown with the pwd command:
controller# pwd
images
To view a detailed listing about the contents of a directory, use the dir command,
which accepts an optional directory or filename argument:
dir [[directory/]filename]
20
Meru System Director Configuration Guide
© 2012 Meru Networks, Inc.
About the CFS
For example, to display the contents of the images directory:
controller# dir
total 10
total 70
drwxr-xr-x
8 root
root
1024 Jan 30 11:00 meru-3.6-45
drwxrwxr-x
8 522
522
1024 Feb 21 2008 meru-3.6-46
-rw-r--r-1 root
root
2233 Feb 19 02:07
meru.user-diagnostics.Dickens.2008-02-19.02-07-17.tar.gz
-rw-r--r-1 root
root
3195 Feb 19 02:17
meru.user-diagnostics.Dickens.2008-02-19.02-17-17.tar.gz
-rw-r--r-1 root
root
3064 Feb 21 00:50
meru.user-diagnostics.Dickens.2008-02-21.00-50-50.tar.gz
lrwxrwxrwx
1 root
root
28 Feb 21 00:50 mibs.tar.gz ->
meru-3.6-46/mibs/mibs.tar.gz
-rw-r--r-1 root
root
16778 Feb 21 00:50 pre-upgrade-config
-rw-r--r-1 root
root
18549 Feb 21 00:53 script.log
-rw-r--r-1 root
root
16427 Feb 21 00:53 startup-config
-rw------1 root
root
1915 Feb 21 00:50 upgrade.log
To view information about a file in different directory, use the directory arguments:
controller# dir ATS/scripts
total 4
-rwxr-xr-x
-rwxr-xr-x
-rwxr-xr-x
-rwxr-xr-x
1
1
1
1
root
root
root
root
root
root
root
root
67
25
82
126
Feb
Feb
Feb
Feb
21
21
21
21
2008
2008
2008
2008
dense-voice.scr
guard.scr
non-guard.scr
svp.scr
Changing to Another Directory
Use the cd command to navigate to another directory on the controller:
controller# cd backup
Use the pwd command to view the name of the current directory:
controller# pwd
backup
© 2012 Meru Networks, Inc.
Managing System Files
21
Working with Configuration Files
Working with Configuration Files
Configuration files direct the functions of the controller. Commands in the configuration file are parsed by the CLI and executed when the system is booted from the
database, or when you enter commands at the CLI in a configuration mode. There are
two types of configuration files used by the CLI:
The startup database file (startup-config) is executed at system startup.
The running configuration file (running-config) contains the current (running)
configuration of the software.
The startup configuration file may be different from the running configuration file.
For example, you might want to change the configuration, and then for a time period
evaluate your changes before saving them to the startup configuration.
In this case, you would make the configuration changes using the configure terminal
commands, but not save the configuration. When you were sure you wanted to
permanently incorporate the changes, you would use the copy running-config
startup-config EXEC command.
Changing the Running Configuration
The configure terminal EXEC command allows you to make changes to the running
configuration. Commands are executed immediately, but are not saved. To save the
changes, see “Changing the Startup Configuration.”
Table 3: Steps to Modify the Running Configuration
Command
Purpose
controller# configure
terminal
Enters global configuration mode.
controller(config)# .....
Enter the commands you want to put in your running configuration.
The CLI executes these commands immediately and also inserts
them to the running configuration file.
controller# copy
running-config
startup-config
Saves the running configuration file as the startup configuration
file. You must save the running configuration to the startup
configuration file for your configuration changes to persist during a
reboot.
22
Meru System Director Configuration Guide
© 2012 Meru Networks, Inc.
Manipulating System Files
Table 3: Steps to Modify the Running Configuration
Command
Purpose
controller(config)# end
Ends the configuration session and exits EXEC mode. NOTE: You
need to press the Ctrl and Z keys simultaneously.
or
controller(config)# Ctrl-Z
controller(config)# Ctrl-C
Cancels any changes and reverts to the previous mode.
Changing the Startup Configuration
To make your configuration changes persistent across reboots, use the copy
running-config startup-config EXEC command to copy the running configuration to a
startup configuration.
Manipulating System Files
To manage the system files, you might want to transfer a configuration file to a
remote system to back up the file, or obtain from a remote system an update or
backup file. To access the remote system, you probably need a username and password. This section provides some example commands for performing these tasks.
Manipulating Files on a Network Server
To specify a file on a network server, use one of the following forms:
ftp://<username>:<password>@server/filename
scp://<username>:<password>@server/filename
sftp://<username>:<password>@server/filename
tftp://server/filename
The server can either be an IP address or host name. The username, if specified,
overrides a username specified by the global configuration command ip ftp username. A password also overrides a password specified by the global configuration
command ip ftp password.
The specified directory and filename are relative to the directory used for file transfers, or in absolute format.
© 2012 Meru Networks, Inc.
Managing System Files
23
Manipulating System Files
The following example uses secure FTP to access the file named meru-3.7-config
on a server named ftp.merunetworks.com. This example uses the username admin
and the password secret to access this server:
controller# copy sftp://admin:[email protected]/meru-3.7-config<space>.
For SCP (secure copy), replace the prefix sftp with scp.
Remote File Transfer Tasks
On a remote file system located on an FTP, SFTP, TFTP or SSH server, you can perform
the following tasks:
Copy files to or from the controller using the copy command.
List the files in a given directory using the dir command.
Copying Files to a Remote Server
For example, to copy a backup image jun01.backup.mbu from the local directory
images to a remote directory /home/backup on server server1, with user user1 using
FTP, with the same remote filename, type:
controller# cd images
controller# dir
total 48
-rw-r--r-- 1 root root
15317 Jan
9 15:46 jun01.backup.mbu
controller# copy jun01.backup.mbu ftp://user1@server1/home/backup/.
FTP Password:
controller#
Type the password for user user1 at the FTP Password prompt. To use SCP instead of
FTP:
controller# copy jun01.backup.mbu scp://user1@server1/home/backup/.
SCP Password:
Displaying a Remote Server’s Directory Contents
To display the contents of the remote directory /home/backup on the server server1,
for the username user1 and password userpass, you can type:
controller# dir ftp://user1:userpass@server1/home/backup
If you only specify the user name but not the password, the CLI prompts you to enter
the password:
controller# dir ftp://user1@server1/home/backup
FTP Password:
24
Meru System Director Configuration Guide
© 2012 Meru Networks, Inc.
Upgrading System Images
Setting a Remote Username and Password
The secure remote file transfer commands require a remote username and password
on each request to a server. The CLI uses the user name and password specified in
the dir or copy command to authenticate with the remote file servers.
If you do not want to type the user name and password for each secure remote file
transfer command, you can set these values for the duration of your session using the
ip ftp, ip sftp, or ip scp commands.
For example, to set the FTP user name to user1 and the FTP password to userpass,
type:
controller# configure terminal
controller(config)# ip ftp username user1
controller(config)# ip ftp password userpass
controller(config)# ^Z
controller#
Likewise, to set the SCP user name to user1 and the SCP password to userpass, type:
controller# configure terminal
controller(config)# ip scp username user1
controller(config)# ip scp password userpass
controller(config)# ^Z
controller#
If you have set the FTP username and password as in the previous example, you can
now type the following:
controller# dir ftp://server1/home/backup
Upgrading System Images
The controller is shipped with a pre-installed system image, containing the complete
System Director software. This image is loaded when the controller boots. As new
software releases become available, you may decide to upgrade the system image.
Each release is accompanied by a Release Notes file on the documentation CD, which
include procedures for upgrading different types of system configurations to the
current release. Be sure to use the procedure included in the Release Notes when you
choose to upgrade your system, as they provide the most up-to-date procedures.
© 2012 Meru Networks, Inc.
Managing System Files
25
Summary of File System Commands
Summary of File System Commands
The following lists the available file system commands in privileged EXEC mode.
Command
controller> cd [filesystem]
Purpose
Sets the default directory on the Flash memory
device. If no directory name is specified, this sets the
default directory to images. Permitted directories
are:
images: The directory containing upgrade images
ATS/scripts: The directory containing AP boot scripts
backup: The directory containing database backup
images.
controller> pwd
Displays the current working directory.
controller> dir [filesystem:][filename]
Displays a list of files on a file system. This can be one
of the permitted directories given in the cd command
or a remote directory referenced by an FTP URL.
controller# delete filename
Deletes a file from the file system or deletes an
upgrade image file from flash memory. The directory
parameter can be used to delete a file from a different
folder.
controller# delete directory:filename
controller# delete flash: image
controller# show flash
Display the versions of the image files contained in the
controller’s flash memory.
controller# rename old new
Renames a file from old to new.
controller# show running-config
Display the contents of the running configuration file.
controller# more running-config
Display the contents of the running configuration file.
Alias for show running-config, but in contrast to that
command, this one prompts the user to press a key to
scroll the screen once it is filled. This allows the
configuration to be shown a screen at a time, instead
of scrolling all the way through instantly.
26
Meru System Director Configuration Guide
© 2012 Meru Networks, Inc.
Summary of File System Commands
Command
controller# copy running-config
ftp|sftp|scp:[[[//username:password]@
location/directory]/filename]
Purpose
Copies the running configuration file to an FTP, SFTP,
or SCP server, for example:
controller# copy running-config
ftp://user1:userpass@server1/jan01-config
controller# copy running-config
scp://user1:userpass@server1/jan01-config
controller# copy running-config
startup-config
Saves the running-configuration to the startup
configuration to make it persistent. You should always
do this after a set of configuration commands if you
want your changes to persist across reboots.
controller# reload ap [id] | all |
controller | default
Reboots the controller and/or the specified AP:
If the ap keyword is specified, all APs are rebooted, or
if id is included, the AP with the identifier id is
rebooted.
If the keyword all is specified, the Meru controller and
all the APs are rebooted, using the current startup
configuration.
If the keyword controller is specified, the controller
is rebooted, using the current startup configuration.
If the keyword default is specified, the controller and
all the APs are rebooted at the factory default startup
configuration.
controller# upgrade feature version
Upgrades the system with the specified feature.
controller# upgrade system version
Upgrades the system image on the controller and all
APs to the specified version.
© 2012 Meru Networks, Inc.
Managing System Files
27
Summary of File System Commands
Command
controller# upgrade ap version | same
[id | range | all]
Purpose
Upgrades the access point image to the same version
of system software that the controller is running.
id—Upgrades the access point with the specified ID to
the same version of system software that the
controller is running.
range—Upgrades a range of APs, specified as a list
using commas and dashes, without spaces or
wildcards. AP IDs must be listed in ascending order.
all—Upgrades all access point image to the same
version of system software that the controller is
running.
controller# downgrade system version
Downgrades the system image on the controller and all
APs to the specified version. Note that when this
command is executed, the user will be prompted to
remove all local users and groups from the system.
controller# run script
Executes the named script. If the script is in the
current directory, the relative path name is specified.
Otherwise, the full path name must be specified. The
script must be either in images, ATS/scripts, or
backup.
28
Meru System Director Configuration Guide
© 2012 Meru Networks, Inc.
Chapter 4
Managing the System
This chapter describes procedures for configuring controllers and managing the
system. This chapter contains the following sections:
Configure Basic Controller Parameters During Setup
Configure Controller Parameters From the Web UI
Configure Controller Parameters From the CLI
System Licensing
Configuring E(z)RF Location Manager
802.11n Video Service Module (ViSM)
Using AeroScout
Configure Controller Security
Configure Controller Redundancy
System Director Communication Ports
Configure Basic Controller Parameters During
Setup
These basic controller parameters are configured by someone with Level 15 permission, using the interactive setup script that sets up every new controller:
Country setting
Controller location
Hostname
Passwords for admins and guests
Dynamic IP address or a static IP address and netmask
Time zone
DNS server names
Gateway server name
Network Time Protocol server
© 2012 Meru Networks, Inc.
Managing the System
29
Configure Controller Parameters From the Web UI
To start the setup script, at the Privileged EXEC prompt, type setup. Refer to the
“Initial Setup” chapter of the Meru System Director Getting Started Guide for an
example session using the setup command.
Configure Controller Parameters From the Web
UI
To add a new controller, click Configuration > Devices > Controller > Add. To reconfigure an existing controller, click Configuration > Devices > Controller > select a
controller > Settings. The following parameters can be configured from the Web UI
with Level 10 permission:
Information for recognizing and tracking controllers such as the Description,
Location, and Contact person
Whether or not APs should be Automatically Upgraded by a controller
DHCP Server address and DHCP Relay Passthrough (whether or not packets are
actually passed to the DHCP server)
Statistics Polling Period and Audit Polling Period, which affect how often a
controller refreshes data
Default AP Initialization Script (bootscript) that run on APs with no other script
specified
Controller Index number used for identification (Note that changing this initiates
a controller reboot.)
Whether or not the controller will interact with the AeroScout Location Engine
and associated APs will interact with AeroScout Tags to provide real-time asset
tracking
Whether or not Fastpath Mode is used. Fastpath Mode accelerates the rate that
packets move through the Ethernet interface based on identification of an IP
packet stream. When FastPath is enabled, the beginning of the IP packet stream
is processed by the controller, and all subsequent packets of the same stream are
forwarded according to the disposition of the initial packets, without being
processed by the controller. This offloads a significant amount of processing from
the controller.
Bonding Mode affects only MC4100. Single Bonding combines all MC4100 Ethernet
ports into one port for accelerated throughput. Dual Bonding configures two ports
for this controller.
Virtual Cell for AP300, AP400, or AP1000 is not determined by any controller
setting. However, AP150 Virtual Cell is enabled or disabled at the controller.
30
Meru System Director Configuration Guide
© 2012 Meru Networks, Inc.
Configure Controller Parameters From the CLI
Whether or not Dynamic Frequency Selection (DFS) is enforced. For installations
within the United States, enforcing DFS means that channels 52-64 (5.25-5.35
GHz), 100-116 (5.47-5.725 GHz), and 136-140 (5.68-5.70 GHz) conform to DFS
regulations, protecting radar from interference on these channels.
The number of minutes of station inactivity that causes a client to time out is set
by the Station Aging Out Period.
Whether or not inter-controller roaming will be used. Enabling the Roaming
Domain sets IP-IP tunnel-based routing between a named group of controllers that
is configured elsewhere. For more information, see the chapter on Intercontroller
Roaming.
Configure UDP Broadcast with Web UI
You can enable all UDP ports at once with the CLI commands for upstream and downstream
traffic. Meru does not recommend that you enable this feature on a production network
because it could lead to broadcast storms leading to network outages. This feature is
provided for testing purposes only.
You need to assign each ESS (see the chapter Configuring an ESS) to a specific VLAN (see
the chapter Configuring VLANs) before enabling all UDP broadcast ports. Having multiple
ESS’s in the default VLAN and enabling all UDP broadcast ports does not work.
To configure UDP broadcast upstream/downstream for all ports, follow these steps:
1. Click Configuration > Devices > System Settings.
2. Click the tab UDP Broadcast Up.
3. Click Add, provide a UDP Port Number in the range 1-65355, and then click OK.
The port number now appears in the Upstream UDP Broadcast Port list.
4. Click the tab UDP Broadcast Down.
Click Add, provide a UDP Port Number in the range 1-65355, and then click OK.
The port number now appears in the Downstream UDP Broadcast Port list.
Configure Controller Parameters From the CLI
Reset System and System Passwords from the CLI
The passwords for the system users “admin' and “guest” can be reset to their default
values during a system boot. When the controller prompts “accepting reset request”
displays, type pass to reset the passwords.
To reset the settings for the entire system to their default values, type reset at the
reset system values prompt.
© 2012 Meru Networks, Inc.
Managing the System
31
Configure Controller Parameters From the CLI
Limit Wireless Client Access to the Controller From the CLI
Administrators wishing to block access to the controller management utilities for
wireless clients can do so with the no management access command. When wireless
management access is blocked, all packets sent to the controller by wireless clients
are dropped except for those used for Captive Portal.
To remove wireless access to the controller, enter the command:
controller(config)# no management wireless
To check the management status, use the show controller command. The line near
the bottom of the output, Management by wireless stations: will show either an on
or off value.
MC3000# show controller
Global Controller Parameters
Controller ID : 1
Description : InteropLab-MC1000
Host Name : InteropLab-MC1000
Uptime : 02d:13h:36m:19s
Location : DC Cabinet 6
Contact : Network Group
Operational State : Enabled
Availability Status : Online
Alarm State : No Alarm
Automatic AP Upgrade : off
Virtual IP Address : 172.26.96.11
Virtual Netmask : 255.255.255.0
Default Gateway : 172.26.96.1
DHCP Server : 10.0.0.10
Statistics Polling Period (seconds)/0 disable Polling : 60
Audit Polling Period (seconds)/0 disable Polling : 60
Software Version : 4.1-49
Network Device Id : 00:90:0b:0e:a8:61
System Id : 1FC4B274070D
Default AP Init Script :
DHCP Relay Passthrough : on
Controller Model : MC1000
Country Setting : United States Of America
Manufacturing Serial # : 2008MC10001039
Management by wireless stations : on
Controller Index : 0
Topology Information Update : off
AeroScout Enable/Disable : disable
FastPath Mode : on
Bonding Mode : single
AP150 Vcell : enable
Station Aging Out Period (minutes) : 2000To re-enable access to wireless clients, use
the management wireless command:
controller(config)# management wireless
32
Meru System Director Configuration Guide
© 2012 Meru Networks, Inc.
Configure Controller Parameters From the CLI
Limit Wired Client Access to the Controller With QoS Rules
To control access to the controller from wired network devices, you can configure
rule-based IP ACL lists using the qosrules command. This section provides qosrule
examples for several types of configurations.
The following is an example that blocks management access (on TCP and UDP) to the
controller (at 192.168.1.2) for all devices except the host at 192.168.1.7. Notice that
match tags are enabled when srcip, dstip, srcport, dstport, netprotocol, or packet
min-length is configured for a rule.
Allow the host 192.168.1.7 to access the controller with TCP/UDP:
controller(config)# qosrule 20 netprotocol 6 qosprotocol none
controller(config-qosrule)# netprotocol-match
controller(config-qosrule)# srcip 192.168.1.7
controller(config-qosrule)# srcip-match
controller(config-qosrule)# srcmask 255.255.255.255
controller(config-qosrule)# dstip 192.168.1.2
controller(config-qosrule)# dstip-match
controller(config-qosrule)# dstmask 255.255.255.255
controller(config-qosrule)# action forward
controller(config-qosrule)# end
controller(config)# qosrule 21 netprotocol 17 qosprotocol none
controller(config-qosrule)# netprotocol-match
controller(config-qosrule)# srcip 192.168.1.7
controller(config-qosrule)# srcip-match
controller(config-qosrule)# srcmask 255.255.255.255
controller(config-qosrule)# dstip 192.168.1.2
controller(config-qosrule)# dstip-match
controller(config-qosrule)# dstmask 255.255.255.255
controller(config-qosrule)# action forward
controller(config-qosrule)# end
The following qosrules allow wireless clients to access the controller on TCP ports
8080/8081 if using the Captive Portal feature.
controller(config)# qosrule
controller(config-qosrule)#
controller(config-qosrule)#
controller(config-qosrule)#
controller(config-qosrule)#
controller(config-qosrule)#
controller(config-qosrule)#
controller(config-qosrule)#
controller(config-qosrule)#
controller(config-qosrule)#
controller(config-qosrule)#
controller(config-qosrule)#
22 netprotocol 6 qosprotocol none
netprotocol-match
srcip <subnet of wireless clients>
srcip-match
srcmask <netmask of wireless clients>
dstport-match on
dstip 192.168.1.2
dstip-match
dstmask 255.255.255.255
dstport 8080
action forward
end
controller(config)# qosrule
controller(config-qosrule)#
controller(config-qosrule)#
controller(config-qosrule)#
controller(config-qosrule)#
23 netprotocol 6 qosprotocol none
netprotocol-match
srcip <subnet of wireless clients>
srcmask <netmask of wireless clients>
dstport-match on
© 2012 Meru Networks, Inc.
Managing the System
33
Configure Controller Parameters From the CLI
controller(config-qosrule)#
controller(config-qosrule)#
controller(config-qosrule)#
controller(config-qosrule)#
controller(config-qosrule)#
controller(config-qosrule)#
dstip 192.168.1.2
dstip-match
dstmask 255.255.255.255
dstport 8081
action forward
end
The following qosrules block all hosts from accessing the Controller using TCP/UDP.
controller(config)# qosrule
controller(config-qosrule)#
controller(config-qosrule)#
controller(config-qosrule)#
controller(config-qosrule)#
controller(config-qosrule)#
controller(config-qosrule)#
24 netprotocol 6 qosprotocol none
netprotocol-match
dstip 192.168.1.2
dstip-match
dstmask 255.255.255.255
action drop
end
controller(config)# qosrule
controller(config-qosrule)#
controller(config-qosrule)#
controller(config-qosrule)#
controller(config-qosrule)#
controller(config-qosrule)#
25 netprotocol 17 qosprotocol none
dstip 192.168.1.2
dstip-match
dstmask 255.255.255.255
action drop
end
Configuring UDP Broadcast From the CLI
You can enable all UDP ports at once with the CLI commands for upstream and downstream
traffic. Meru does not recommend that you enable this feature on a production network
because it could lead to broadcast storms leading to network outages. This feature is
provided for testing purposes only.
You need to assign each ESS (see the chapter Configuring an ESS) to a specific VLAN (see
the chapter Configuring VLANs) before enabling all UDP broadcast ports. Having multiple
ESS’s in the default VLAN and enabling all UDP broadcast ports does not work.
To configure UDP broadcast upstream/downstream for all ports, use these two CLI
commands:
default# configure terminal
default(config)# ip udp-broadcast upstream all-ports selected
default(config)# ip udp-broadcast downstream all-ports on
default(config)# end
To display configured UDP broadcast upstream/downstream for all ports, use these two CLI
commands:
default# show ip udp-broadcast upstream all-ports
Upstream UDP Broadcast All Ports
UDP All Ports : on
default#
default# show ip udp-broadcast downstream all-ports
Downstream UDP Broadcast All Ports
UDP All Ports : selected
default#
34
Meru System Director Configuration Guide
© 2012 Meru Networks, Inc.
System Licensing
Configure Time Services From the CLI
We recommend that you configure controllers to synchronize their system clock with
a Network Time Protocol (NTP) server. This ensures the system time is accurate and
standardized with other systems. Accurate and standardized system time is important for alarms, traces, syslog, and applications such as cryptography that use timestamps as a parameter for key management and lifetime control. An accurate clock
is also necessary for intrusion detection, isolation and logging, as well as network
monitoring, measurement, and control.
During the initial system configuration, the setup script prompts for an IP address of
an NTP server. If you do not supply an IP address of an NTP server at that time, or if
you wish to change an assigned server at a later time, you can use the ntp server
followed by the ntp sync commands.
To set up automatic periodic synchronizing with the configured NTP server, use
the command start-ntp.
There are several NTP servers that can be designated as the time server. The site
www.ntp.org provides a list of servers that can be used.
To set a server as an NTP server, use the command:
ntp server ip-address
where ip-address is the IP address of the NTP server providing clock synchronization.
Note: If you choose not to use a NTP server to synchronize the system clock, the
system time can be set manually with the calendar set command.
Configure a Controller Index with the CLI
To configure a controller index from CLI, using the following commands
ramecntrl(0)# configure terminal
ramecntrl(0)(config)# controller-index 22
ramecntrl(0)(config)# exit
Note that changing the index causes a controller to reboot.
System Licensing
Licensing is embedded in controller firmware and is enabled with a Meru-generated
license file tied to that specific controller. Obtain these licensing files from
www.merunetworks.com/license.
© 2012 Meru Networks, Inc.
Managing the System
35
System Licensing
Configure a License with the Web UI
To see your license from the CLI, use the following commands:
controller# show controller
controller# show license
controller# show license-file active
You need a license for any of the following optional features if you plan to enable
them with release 5.1:
—
—
—
—
—
—
—
More than five A/B/G APs
N-capable AP300s
N+1 (for more than two controllers)
Per-User Firewall
GRE Tunnel
Dual ABG
Mesh/Wireless
Configure a License with the Web UI
To see your license from the GUI, click Maintenance > Licensing > View License. To
import a license using the GUI, click Maintenance > Licensing > Import License and
follow the directions. To see existing licenses, click Maintenance > Licensing > View
License.
The following CLI command imports the license file license17331.lic from the FTP
server at 192.168.1.10 to an active MC3000 controller:
controller# configure terminal
controller(config)# license
ftp://admin:[email protected]/license17331.lic active
controller(config)# end
Use the show license command to see the status of the system licenses:
Feature Name
InUse
CtlrStatus
controller
active
ap
active
DUAL_A_B_G
active
N_PLUS_1
active
PER_USER_FW
active
GRE_TUNNELS
active
11n_upgrade
active
License Table(7)
36
Meru System Director Configuration Guide
LicenseType Expiry Date
permanent
permanent
permanent
permanent
permanent
permanent
trial
05/02/2010
1
30
30
5
1
1
1
TotalCount
1
2
1
0
1
1
1
© 2012 Meru Networks, Inc.
Configuring E(z)RF Location Manager
AP300 Licensing Changed in Release 4.0 and Later
Before release 4.0, all AP300 units were recognized as AP320, N-capable APs. Because
AP300 licensing has been applied in System Director release 4.0, now AP320, AP310,
AP302, AP301, AP311, and AP320i are individually recognized and require the appropriate
licenses to be N-capable. This could affect upgraded AP300 units because licenses are
required for specific radios. You will have to either reconfigure units such as AP302, AP311
or AP301 in such a way that total number of interfaces configured as 11n in all APs
connected to the controller exactly match the number of 11n license on the controller or
alternately obtain more licenses that will allow you to configure more interfaces to 11n.
To obtain additional licenses, www.merunetworks.com/license. To reconfigure an AP300,
see the directions in any version of release notes later than 4.0.
Configuring E(z)RF Location Manager
Location Manager is supported by release 3.7 and later.
Configure E(z)RF Location Manager with the CLI
This example creates a packet-capture-profile named Location on a controller and
then forwards the captured packets directly from AP 16 to Location Manager on port
#9177. Port 9177 is the port where Location Manager is listening for incoming packets
in L3 mode.
MC3K-1#
MC3K-1# configure terminal
MC3K-1(config)# packet-capture-profile Location
MC3K-1(config-pcap)# mode l3 destination-ip 1.1.1.1 port 9177
MC3K-1(config-pcap)# ap-list 16
MC3K-1(config-pcap)# exit
MC3K-1(config)# exit
MC3K-1# show packet-capture-profile Location
AP Packet Capture profiles
Packet Capture Profile Name
: Location
Packet Capture profile Enable/Disable
: off
Modes Allowed L2/L3
: l3
Destination IP Address
: 1.1.1.1
UDP Destination Port
: 9177
Destination MAC for L2 mode
: 00:00:00:00:00:00
Rx only/Tx only/Both
: rx
Rate Limiting per station or cumulative : station
Token Bucket Rate
: 10
Token Bucket Size
: 10
AP Selection
: 16
Extended Filter String
:
Interface List
:
Packet Truncation Length
: 82
© 2012 Meru Networks, Inc.
Managing the System
37
802.11n Video Service Module (ViSM)
Rate Limiting
: off
Capture frames sent by other APs in the network : on
MC3K-1#
For a detailed explanation of the packet capture profile commands, see the Troubleshooting chapter of the Meru System Director Configuration Guide.
802.11n Video Service Module (ViSM)
Video streaming has the low latency and loss requirements of voice with the
high-throughput requirements of data. The Meru Networks Video Service Module™ (ViSM)
is an optional licensed software module that delivers predictable 802.11 video performance with minimal delay, latency and jitter. Sustainable high data rates, even in mixed
traffic, are supported along with synchronization of video and audio transmissions.
ViSM also introduces additional mechanisms for optimizing unicast and multicast video
such as application aware scheduling, voice/video synchronization, and client-specific
multicast group management. Features include the following:
High throughput with low burstiness offers predictable performance and
consistent user experience
Application-aware prioritization synchronizes the voice and video components of
a video stream, adapting the delivery of each frame based on its importance to
the application.
Multicast group management optimizes delivery to only those Virtual Ports whose
clients are members of the multicast group.
Seamless video-optimized handoff proactively reroutes the multicast delivery
tree to prevent lost video frames during a transition between access points and
ensures zero loss for mobile video.
User and role based policy enforcement provides granular control over application
behavior.
Visualization reveals which clients are running which applications.
Implementing ViSM
Virtual Port already changes multicast to unicast transmissions. ViSM adds per-client IGMP
Snooping to the transmission. Therefore, to implement ViSM, turn on IGMP Snooping. CLI
commands control IGMP snooping (see Meru System Director Command Reference). At this
time, ViSM licensing is not enforced.
38
Meru System Director Configuration Guide
© 2012 Meru Networks, Inc.
Using AeroScout
Using AeroScout
The AeroScout System version 3 (but not version 2) product works with Meru controllers and AP300 (in Virtual Cell or non-Virtual Cell mode) and AP150 (in non-Virtual
Cell mode only) to locate and track tagged assets to deliver direct benefits such as
process automation and theft prevention. Tags are small, battery-powered devices
attached to equipment or personnel. See AeroScout’s web site for more detailed
information about the various tags available from AeroScout.
AeroScout tags do not associate to an access point; instead they send out beacon
signals in pre-configurable intervals or when an event is triggered (the tag is in
motion, a button is pressed, etc.). Messages transmitted by AeroScout tags are
received by access points and are forwarded with additional information, such as RSSI
values or signal strength measurements, to the AeroScout Engine. The Engine calculates the accurate location of the tag.
Reporting Tags do not affect the normal operation of access points; they keep
performing in all of the supported modes (802.11a/b/g communication). AeroScout
Tags also do not have an IP address and are unidirectional in the sense that they
transmit and do not receive standard Wi-Fi messages.
For APs to process the tag signals and communicate with the AeroScout Engine, the
AeroScout Engine-AP Interface protocol must be implemented on access points. In
Figure 3, the AeroScout solution architecture is shown. The following is the
high-level process that occurs in the implementation:
AeroScout tags send short wireless messages at a regular interval.
The signal is received by access points that are connected to a Meru controller
running AeroScout software, and the signal is sent to the AeroScout engine along
with its measured signal strength.
The AeroScout engine uses signal strength to determine the coordinates of the
reported location, and sends this data to AeroScout MobileView.
AeroScout MobileView uses location data to display maps, enable searches, create
alerts, manage assets, interface to third parties through an API.
© 2012 Meru Networks, Inc.
Managing the System
39
Using AeroScout
Figure 3: Figure 1 – AeroScout Network Diagram
In addition to Meru standard Wi-Fi infrastructure, AeroScout Location Receivers and
Exciters can be deployed for time-different of arrival (TDOA) locationing and choke
points respectively.
Configuring AeroScout
Tracking tags is done from the AeroScout product using a Meru controller and APs. To
configure a Meru controller to work with AeroScout, use the command aeroscout
enable as shown here:
controller(config)# aeroscout ?
<option>
Enable/Disable AeroScout Feature.
disable
Disable
enable
Enable
controller(config)#
Location Accuracy
Since RSSI values are the basis of the location calculation, the access point must
match its channel with the tag’s transmission channel, and drop tag messages that
were transmitted on a channel other than that of the access point. The matching is
implemented because tag reports contain the transmission channel in each message.
40
Meru System Director Configuration Guide
© 2012 Meru Networks, Inc.
Using AeroScout
For this reason, the combination of AeroScout’s solution architecture with Meru’s
Virtual Cell deployments and Air Traffic Control TM technology provide a more accurate location for tags. In other words, Meru’s APs can all be deployed in a single
channel with a virtualized BSSID, thereby providing more reference points for the tag
messages and a more accurate location.
For the location of a tag to be calculated accurately, at least three access points
need to report the Wi-Fi message transmitted by the tag. A message received and
reported by less than three APs provides only a very general location which, in most
cases, is the location of the AP closest to the tag. To see the tag locations, use AeroScout. Tags do not show up when you use the Meru CLI command show discovered-station or anywhere else from the Meru CLI.
It is important to place APs closer to the perimeter of the space that will tag and
track assets, filling in coverage holes in the center of the coverage area. It is better
to surround the tracking area. Aside from this, use standard Meru Networks deployment guidelines in placing the APs and distancing them from one another. In other
words, plan for coverage and optimal data rates. When AeroScout Exciters are used
for choke-point location, one AP receiving the Tag message is enough to deliver an
accurate location report.
Tag Protocol Implementation
The Tag protocol operates between access points and the AeroScout engine. The Meru
AeroScout implementation supports tag (but not laptop) messages transmitted in
either in IBSS (default) or WDS frame format, although Meru APs receive and process
tag frames only in IBSS format.
Once the Meru controller and access points are upgraded to the current version, the
tag protocol is enabled automatically. No additional configuration steps are necessary. Management of the AeroScout Tags, Engine, and MobileView application are
managed through the AeroScout platform. Figure 4 shows the operation and
messages used in the Tag protocol:
© 2012 Meru Networks, Inc.
Managing the System
41
Using AeroScout
Figure 4: AeroScout Tag Protocol Messages
AeroScout Tag
AP
Controller
AeroScout Engine
Tag Message
Tag Message
1 Request Version
2 Version Report
Tag Message
3a Get Status
3 Get Status
Tag Message
4 Status Response
4a Status Response
5a Set Configuration
5 Set Configuration
Tag Message
Tag Message
Tag Message
6 ACK
6a ACK
7a Set Tags Mode(Start) 7 Set Tags Mode(Start)
8 ACK
8a ACK
Tag Message
Tag Report
Tag Report
Tag Message
Tag Report
Tag Report
Tag Message
Tag Report
Tag Report
Tag Message
Tag Report
Tag Report
AeroScout and Rogue Detection
If an AP interface is in dedicated scanning mode with Rogue AP enabled, tags are not
forwarded for any channels. If an AP interface is in normal mode with Rogue AP
enabled, tags are forwarded on the home channel only. Tags on foreign channels are
not forwarded.
42
Meru System Director Configuration Guide
© 2012 Meru Networks, Inc.
Using AeroScout
AeroScout Syslog Error Messages
Error Condition
Severity
Message
Cannot create a ATS
critical
AeroScout Manager mailbox
AeroScoutMgr mailbox creation failed
Cannot set AeroScout
mode in the driver
critical
Cannot set AeroScout mode to enable/disable
Invalid AE messages
warning
Unknown Message Code[0xXX]
Data length error. rcvdLength[%d], expect at least
[%d]
Messages from unknown miscellaneous
or unsupported mailboxes
Msg from Unknown MailboxId[xx]
Cannot allocate a mailbox warning
buffer to send a controller
message
AllocBuf failed reqID[0xXXXX]
IOCTL to the AeroScout
kernel module failed
warning
reqID[0xXXXX] IOCTL[xx] to AeroScout kernel module failed
Cannot get wireless
channel config information
warning
Could not get wireless interface config for interface[xx]
AeroScout Mobile Unit
AeroScout offers Wi-Fi-based solutions for Real Time Location Service (RTLS). The
following devices support AeroScout tag based location management:
AP400
AP300
AP200
AP150
Meru System Director supports the AeroScout Mobile Unit (Laptops, VOIP Phones) or
Compounded Reporting and Generic AP Notification support only on the AP300.
The AeroScout Mobile Unit architecture is displayed in Figure 5. The following is the
high-level process that occurs in the implementation:
Wi-Fi mobile units send wireless frames to one or more APs.
The AP sends reports for each Wi-Fi mobile unit (by using a dilution mechanism to
control traffic between AP and Engine) to the AeroScout Engine.
© 2012 Meru Networks, Inc.
Managing the System
43
Using AeroScout
The AeroScout Engine determines the coordinates and sends it to AeroScout
MobileView.
The AeroScout Mobile View uses location data to display maps, enable searches,
create alerts, manage assets, work with third-parties, and much more.
Figure 5: Aeroscout Mobile Unit
Wi-Fi Mobile Units (MUs) can be located, if associated to some access point, or while
transmitting broadcast messages. The messages transmitted by Wi-Fi Mobile Units
are received by Access Points and are passed along with additional information (e.g.,
signal strength measurements) to the AeroScout Engine, which is a core component
of the AeroScout visibility system. The AeroScout Engine also calculates an accurate
location of the Wi-Fi device. In order to locate the Mobile Units, Access Points that
receive their messages must pass the RSSI values of each message to the AeroScout
Engine. The access points must also be able to collect data messages from MUs that
are not associated with them and pass the RSSI values to the AeroScout Engine.
Reporting Tags and/or Wi-Fi mobile units must not affect the normal operation of the
AP—that is, the AP must be performing in all its supported modes, such as normal
802.11a/b/g communication, monitoring, bridge modes, etc. Due to the high MU
traffic, it is possible to dilute the MU messages that are sent to AeroScout Engine.
44
Meru System Director Configuration Guide
© 2012 Meru Networks, Inc.
Using AeroScout
Configuring AeroScout
Tracking tags is preformed from the AeroScout product using a Meru controller and
APs. To configure a Meru controller to work with AeroScout, use the command aeroscout enable, as shown below:
default# sh aeroscout
Aeroscout Parameters
Enable/Disable
: enable
Aeroscout Engine IP Address : 0.0.0.0
Aeroscout Engine Port
: 12092
default#
Configure AeroScout Mobile Unit from AeroScout Engine
Follow the steps below to configure an AeroScout Mobile Unit from the AeroScout
Engine:
1. Enable Aeroscout on the controller.
2. Open the Aeroscout Engine.
3. Load the Floor Map on the Engine.
4. Add the APs on the Aeroscout Engine.
5. In the Configuration->system parameters->Access Points, check the “Enable
mobile-unit location with access Points” checkbox.
6. To start the Mobile Unit Positioning option on the AeroScout engine, select ‘Start
MU positioning’ from the Actions menu.
AeroScout Compounded Report
For better performance, several MU reports can be combined within a fixed
pre-defined period in Compounded Reports. Meru’s system combines a maximum of
18 MU reports in one Compounded Report. The number of Mobile Unit reports inside
the Compounded Report varies as per the Compounded Message Timeout configured
on the Aeroscout Integration Tool. The ‘Compounded Message timeout’ is configured
on the Aeroscout Integration tool under ‘Set Configuration’.
Dilution Timeout
In certain scenarios, the Mobile Unit traffic may be high, and the time resolution
needed for location is much lower than the data rate of most Mobile Units. If every
AP starts reporting every Wi-Fi frame to the Aeroscout Engine, it will create unnecessary data overhead on the network, and provide a real-time location in a level
much higher than required.
To help the AP dilute messages from each Mobile Unit, the Aeroscout protocol
provides the following two parameters:
© 2012 Meru Networks, Inc.
Managing the System
45
Using AeroScout
1. Dilution Factor
2. Dilution Timeout
Meru Mobile Unit reporting supports and implements only Dilution Timeout. The Dilution Timeout allows to set a limitation for the amount of time with no Mobile Unit
messages from a specific Mobile Unit.
For Example: If the Dilution Timeout value is set to 60 seconds and, if the AP receives
a message from an MU for which it has not reported a message to the AE for more
than 60 seconds, the new message will be reported to the AE immediately regardless
of the dilution factor and the dilution counter will be initialized. Commands broadcast by an MU (e.g. Probe Requests) are required to be forwarded to the AE regardless
of the dilution parameters.
The Dilution Timeout can be configured on the Aeroscout Engine as follows
Configuration->system parameters->Access Points->Dilution Time out.
Generic AP Notification
Generic AP notifications are autonomous messages sent to the Aeroscout Integration
tool on port 12092 to report the AP connectivity state (AP comes online, offline,
Aersocout parameter configuration changes).The Aeroscout Integration tool
acknowledges all Generic AP notification messages sent by the controller. For
Generic AP Notifications, the IP address of the Aeroscout engine must be configured
on the controller.
•
When AeroScout mode is changed from "enabled" to "disabled”, No
Generic AP notification is sent.
•
Ensure to use the AP Integration tool with version as 1.0.1.
Note:
In the Meru solution, Generic AP notifications are sent out from the controller to the
Aeroscout Engine during the AP connectivity state change or when aeroscout configurations on the controller undergoes a change. In general a Generic AP notification
is used to communicate an IP address change, a "wake up" from reboot, and or any
error conditions that need to be communicated to the Aeroscout engine.
Configure AeroScout Integration tool for Receiving the
Generic AP Notification
To Configure AeroScout Integration tool for receiving the Generic AP Notification,
perform the following steps:
Enable AeroScout on the controller and configure the ip-address of the AeroScout
Integration tool on controller.
Open the AeroScout Integration Tool and configure the port from the default value
1122' to '12092'.
46
Meru System Director Configuration Guide
© 2012 Meru Networks, Inc.
Configure Controller Security
In the scenario where the AP's come online and go offline, change the AeroScout
Configuration parameter on the controller. The Controller sends a generic AP
Notification for all the AP's on the Controller and the AeroScout Integration Tool
acknowledges to the controller's notification for each generic AP Notification.
Configure Controller Security
See the chapter Configuring Security in this guide.
Configure Controller Redundancy
See the chapter Implementing Redundancy in this guide.
System Director Communication Ports
The tunnel between an AP and a controller uses the following ports for communication.
Traffic
Port
AeroScout
UDP/6091
Captive Portal (http redirection)
TCP/8080
Captive Portal (https redirection)
TCP/8081
E(z)RF Location Manager - Web UI
TCP/443
E(z)RF Location Manager - Administrative Web UI (SSL)
TCP/8003
E(z)RF Location Manager - AP Communication (Capture Packets
subsystem)
UDP/9177and
UDP/37008
FTP
TCP/20 and TCP/21
H.323v1 flow detection.
TCP/1720
© 2012 Meru Networks, Inc.
Managing the System
47
System Director Communication Ports
Traffic
48
Port
HTTP
TCP/8080
HTTPS
TCP/443
Inter-controller roaming
UDP/9394
Meru L3 AP COMM
UDP/5000
Licensing - for connections initiated from within the controller
only for licensing purposes (e.g. wncagent -> merud)
TCP/32780
Meru L3 AP Data
UDP/9393
Meru L3 AP Discovery/Keepalive
UDP/9292
NP1 advertisements / config
UDP/9980
NTP
UDP/123
Radius accounting
1813 / 1646
Radius auth
1812 / 1645
SIP
UDP/TCP 5060
SSH
TCP/22
SNMP
UDP/161 and 162
Syslog
UDP/514
TFTP
UDP/69
UDP broadcast up to 5 upstream/downstream configurable
UPD/xxx
TACACS+
TCP/49
Telnet
TCP/23
Controller packet capture
UDP/9177
WIPS
UDP/9178
WireShark, OmniPeek, Newbury
UDP/9177
SAM (AP and server)
EtherIP 97
Meru System Director Configuration Guide
© 2012 Meru Networks, Inc.
Chapter 5
Configuring an ESS
A basic service set (BSS) is the basic building block of an IEEE 802.11 wireless LAN;
one access point together with all associated clients is called a BSS. An AP acquires
its clients by broadcasting its name (SSID) which is picked up by clients within range.
Clients can then respond, establishing a connection. It is legitimate for multiple
access points to share the same SSID if they provide access to the same network as
part of an Extended Service Set (ESS). You can establish different kinds of ESS for
different situations such as:
a VLAN that supports multiple access points per ESS.
several different ESSs on one physical access point.
a VLAN for each ESS to separate network traffic. You can also specify that a VLAN
be shared between multiple ESSs.
an ESS that supports just one person.
an ESS for a remote AP, such as in a branch office. That AP can additionally
support ESSs for local traffic.
an ESS divided to support different security requirements. For example, you can
set up an ESS such that clients who use WPA are placed into a VLAN named vlan10,
and clients who enter the network in Open mode are placed into a VLAN named
vlan20. (For information about configuring security, see Chapter 8, “Configuring
Security” on page 113).
The Meru Wireless LAN System also allows you to customize a beacon per ESS to
support different access point settings, such as base or supported transmit rates,
different BSSs, different beacon intervals, and different DTIM periods. This beacon
customization allows service customization for each ESS, as well as more flexibility
in supporting different clients and services.
ESS profiles for a controller can also be configured from E(z)RF Network Manager. You
can tell where an ESS was configured by checking the read-only field Owner. The
Owner is either nms-server or controller. AP1000 can simultaneously support an ESS
with Virtual cell and another ESS without Virtual Cell; AP300 cannot do this.
© 2012 Meru Networks, Inc.
Configuring an ESS
49
Add an ESS with the Web UI
Add an ESS with the Web UI
ESS profiles can be configured either from E(z)RF Network Manager or from the
controller. You can tell where an ESS profile was configured by checking the read-only
field Owner; the Owner is either nms-server or controller. AP300/AP400 is designed
to use either a Virtual Cell ESS or a non-Virtual Cell ESS, but not both at once. AP1000
is designed to use a Virtual Cell ESS and a non-Virtual Cell ESS simultaneously. To add
an ESS from the controller’s Web UI, follow these steps:
1. Click Configuration > Wireless > ESS > Add.
The ESS Profile Add screen displays - see below.
Figure 6: Adding an ESS Profile
2. In the ESS Profile Name field, type the name (ID) of the extended service set. The
name can be up to 32 alphanumeric characters long with no spaces.
3. In the SSID field, type a name up to 32 characters for the SSID for this ESS. (Note
that when you are creating either Virtual Cell overflow or a non-Virtual Cell ESS,
you will be creating two ESS Profiles with the same ESSID. See Configure Virtual
Cell Overflow with the Web UI for details.)
4. In the Security Profile Name list, select an existing Security Profile to associate
with the ESS profile. By default, an ESS profile is associated with the Security
Profile named default. For more explanation, see Security Profiles for an ESS.
50
Meru System Director Configuration Guide
© 2012 Meru Networks, Inc.
Add an ESS with the Web UI
5. In the Primary Radius Accounting Server list, select either the name of a
previously configured Radius accounting server profile or the No RADIUS option.
Selecting the No RADIUS option means that no Radius accounting messages will
be sent for clients connecting to this ESSID profile. For more information, see the
authentication chapter Radius Accounting for Clients.
6. In the Secondary Radius Accounting Server list, select the name of a previously
configured Radius accounting server profile or the No RADIUS option. If No Radius
is selected, then no Radius accounting messages will be sent for clients
connecting to this ESSID profile. For more information, see the security chapter
Radius Accounting for Clients.
7. In the Accounting Interim Interval field, type the time (in seconds) that elapses
between accounting information updates for Radius authentication. If a Radius
accounting server is enabled, the controller sends an interim accounting record
to the Radius server at the interval specified. Accounting records are only sent to
the Radius server for clients that authenticate using 802.1x. The interval can be
from 600 through 36,000 seconds (10 minutes through 10 hours). The default
value is 3,600 seconds (1 hour). For more information, see the security chapter
Radius Accounting for Clients.
8. Beacon Interval sets the rate at which beacons are transmitted. Setting the
beacon interval to a higher value decreases the frequency of unicasts and
broadcasts sent by the access point. If the power-save feature is enabled on
clients that are connected to access points, clients “wake up” less if fewer
unicasts and broadcasts are sent, which conserves the battery life for the clients.
In the Beacon Interval field, type the interval (in ms) at which beacons are
transmitted. The beacon interval must be between 20 through 1000 milliseconds.
For AP300/AP400 and AP1000, beacon interval is a multiple of 20, from 20 to
1000ms. For AP150 and OAP180, the beacon interval is a multiple of 100, from 100
to 500ms. If your WLAN consists mostly of Wi-Fi phones, and you have a low
number of ESSIDs configured (for example, one or two), Meru Networks
recommends setting the beacon interval to 100.
9. In the SSID Broadcast list, select one of the following:
— On: SSID is included in the beacons transmitted.
— Off: SSID is not included in the beacons transmitted. Also Probe Responses will
are not sent in response to Probe Requests that do not specify an SSID.
10. In the Bridging area, check any of these bridging options:
— AirFortress: FortressTech Layer 2 bridging and encryption with Fortress
Technology AirFortress gateway.
— IPv6: Configures bridging Internet version 6 addresses. IPv6 via tunneling mode
has these limitations:
No
dynamic VLAN
No
multiple ESSID mapping to same VLAN
No
support for IPv6 filtering
No
IPv6 IGMP snooping
— AppleTalk: configures bridging to AppleTalk networks on this ESS.
11. By default, access points that join the ESS profile and have the same channel form
a Virtual Cell. In the New APs Join ESS profile list, select one of the following:
© 2012 Meru Networks, Inc.
Configuring an ESS
51
Add an ESS with the Web UI
— On: (default) Access points automatically join an ESS profile and are
configured with its parameters.
— Off: Prevents access points from automatically joining an ESS profile. The user
is now allowed to add multiple interfaces on the ESS Profile screen. Perform
the following steps to add multiple interfaces:
On
the ESS Profile - Update screen select the New APs Join ESS profile as
Off. This option prevents the APs from automatically joining an ESS profile.
Select
The
On
the checkbox for an ESS profile and click the Settings button.
ESS Profile - Update screen is displayed.
the ESS Profile - Update screen, select the ESS-AP Table tab.
The
ESS-AP Configuration screen is displayed. No information is displayed
on the ESS-AP Configuration screen.
On
the ESS-AP Configuration screen, click the Add button.
The
ESS-AP Configuration - Add screen is displayed. Here, the user is now
allowed to add multiple interfaces on the ESS Profile screen.
Click
OK.
The
selected interfaces are now displayed on the ESS-AP Configuration
screen.
12. In the Tunnel Interface Type, select one of the following:
— No Tunnel: No tunnel is associated with this ESS profile.
— Configured VLAN Only: Only a configured VLAN listed in the following VLAN
Name list is associated with this ESS profile. If you select this option, go to
Step 13.
— Radius VLAN Only: The VLAN is assigned by the Radius server via the Radius
attribute Tunnel Id. Use Radius VLAN Only when clients authenticate via
802.1x/WPA/WPA2 or MAC Filtering.
— Radius and Configured VLAN: Both a configured VLAN and Radius VLAN are
associated with this ESS profile. If you select this option, proceed to Step 15.
— GRE: Specifies a GRE Tunnel configuration If you select this option, go to Step
14. For details, see the security chapter Configure GRE Tunnels.
13. If you selected Configured VLAN Only in Step 12, select a VLAN from the list to
associate with this ESS profile.
14. If you selected GRE for Tunnel Interface Type, select the name of a GRE Tunnel
profile previously configured in the Configuration > Wired > GRE area. For GRE
to work, DHCP relay must be enabled either locally or globally. Also see
15. In the Allow Multicast Flag list, optionally enable multicasting (on). Only enable
multicasting if you need to use a multicast application. Enabling multicasting
causes all multicast packets on the air side to appear on the wired side, and all
multicast packets on the wired side to appear on the air side. Also see
Multicasting Feature in this chapter.
— On: Enables multicasting. Enable multicasting only if you need to use a
multicast application. Enabling multicasting causes all multicast packets on
the air side to appear on the wired side, and all multicast packets on the wired
side to appear on the air side.
52
Meru System Director Configuration Guide
© 2012 Meru Networks, Inc.
Add an ESS with the Web UI
Caution! Multicasting is allowed only when an ESS profile has a one-to-one mapping
with the default VLAN for this ESS profile. No other ESS profile can use the same VLAN
and security rules associated with this ESS profile must not redirect traffic to another
VLAN. Multicasting is an advanced feature. Enable multicasting only if you need to
use a multicast application. Enabling multicasting causes all multicast packets on the
air side to appear on the wired side, and all multicast packets on the wired side to
appear on the air side.
— Off: Disables multicasting.
16. Silent Client Polling is used with Virtual Cell to track wireless clients that roam
without transmitting (for example, phones and other devices that conserve
battery life). This feature is enabled by default. In the Silent Client Polling list,
select one of the following:
— On: (default) Tracking information is sent between the controller and APs, and
also sent between the APs and a phone that is not in a call or in powersave
mode. This feature keeps the system appraised of a client phone location if
the client moves between APs while the phone is inactive.
— Off: Disables silent client polling.
17. Virtual Cell (which includes Virtual Port) is on by default; this affects AP300,
AP400, and AP1000. On the AP1000, Virtual Cell is controlled exclusively by the
settings here. You can create any combination of Virtual Cell ESS profiles and
non-Virtual Cell ESS profile and use them on an AP1000 radio. For AP300s and
AP400s, this setting is not the only factor that affects Virtual Cell - the Dot11
radio interface setting for each radio also controls Virtual Cell on each AP. They
both must on for Virtual Cell to work. See When is Virtual Cell Really on for an AP?
for details.
To enable/disable Virtual Cell on this ESS, select one of the following:
— On: (default) Access points on the same channel share the same BSSID, forming
a Virtual Cell (default). Note that if an ESSID profile is configured for Virtual
Cell, but an AP300/AP400 radio interface providing that EESID service is
non-Virtual Cell, the service will be non-Virtual Cell on that radio interface.
Conversely, if an AP300/AP400 radio is configured for Virtual Cell, but either
the ESSID Virtual Cell setting is off or Virtual Port is off, no service will be
provided by that radio. The radio must have Virtual Cell on and the ESSID
profile must have both Virtual Cell and Virtual Port on for the service to be
Virtual Cell. See When is Virtual Cell Really on for an AP? for details.
— Off: Prevents APs on the same channel from sharing the same BSSID.
Note: All APs on the same channel in a Virtual Cell must have the same setting for
these values:
RF-Mode
Channel Width
N-only Mode
© 2012 Meru Networks, Inc.
Configuring an ESS
53
Add an ESS with the Web UI
Note: If you set Virtual Cell on for an ESS used with AP300s or AP400s and then turn
it off, Virtual Cell capability is removed from the interface and must be added to the
interface again if Virtual Cell is turned on again in the ESS. To add the SSID back to
AP300 or AP400, the best option is to delete the ESS profile and then re-add it.
Alternately, you can add a BSSID to each and every interface manually. Note with this
last option, if there are multiple APs in network then this option does not help.
18. In Release 5.1, the Virtual Port setting has no effect. Virtual Port is on if Virtual
Cell is on and off if Virtual Cell is off.
19. If Virtual Cell is off and the APs are any AP300 or AP400 model, you can make this
ESS an “overflow” ESS by selecting a Virtual Cell ESS for the Overflow for:
setting. This means that when the named Virtual Cell ESS (that was created
earlier) maxes out, it will overflow into this non-Virtual Cell ESS. This works by
having the two ESS Profiles share an SSID so they can seamlessly move clients back
and forth as needed. For more explanation, see Virtual Cell Overflow Feature.
20. In release 5.1, WMM configuration in the ESSID has no effect. However, in order
to enable or disable APSD features across APs, the WMM parameter must be set
to on. WMM Classification for different traffic patterns is not supported by AP150
models. For more information, see WMM Features Supported by System Director.
21. For APSD support, select on or off. APSD stands for Advanced WMM Power Save
and is supported AP300/AP400/AP1000. For more explanation, see WMM Features
Supported by System Director.
On: Data packets for powersave mode clients are buffered and delivered based
on the trigger provided by the client. This feature saves more power and provides
longer lifetime for batteries than the legacy power save mode (TIM method). Note
that you must have WMM set to on for this to work - see previous step.
Off: No APSD support.
22. DTIM affects clients in power save mode. In the DTIM Period field, type the
number of beacon intervals that elapse before broadcast and multicast frames
stored in buffers are sent. This value is transmitted in the DTIM period field of
beacon frames.
The DTIM period can be a value from 1 through 255. The default DTIM period is 1.
Setting the DTIM period to a higher value decreases the frequency of broadcasts
sent by the access point. If power save is enabled on clients that are connected
to access points, clients “wake up” less if fewer broadcasts are sent, which
conserves battery life for the clients.
Only the behavior of clients currently in power-save mode is affected by the DTIM
period value. Because broadcasts are generally wasteful of air resources, the
Meru WLAN has devised mechanisms that mitigate broadcasts either with proxy
services or with more efficient, limited unicasts. As an example, ARP Layer 2
broadcasts received by the wired side are not relayed to all wireless clients.
Instead, the Meru controller maintains a list of IP-MAC address mappings for all
wireless clients and replies with proxy-ARP on behalf of the client.
23. In the Dataplane Mode list, select the type of AP/Controller configuration:
— Tunneled: (default) In tunneled mode, a controller and an AP300/AP1000 are
connected with a data tunnel so that data and control packets from a mobile
station are tunneled to the controller from the AP and vice versa.
54
Meru System Director Configuration Guide
© 2012 Meru Networks, Inc.
Add an ESS with the Web UI
— Bridged: (Bridged mode was formerly Remote AP mode.) In bridged mode, data
packets are not passed between AP300/AP1000 and the controller; only control
plane packets are passed. When bridged mode is configured in 5.1, an AP300
or AP1000 can be installed and managed at a location separated from the
controller by a WAN or ISP, for example at a satellite office. The controller
monitors the remote APs through a keep-alive signal. Remote APs can exchange
control information with the controller, including authentication and
accounting information, but they are unable to exchange data. Remote APs
can, however, exchange data with other APs within their subnet. ESSIDs in
bridged mode cannot exchange dataplane traffic (including DHCP) with the
controller and the following System Director features are not available in a
bridged configuration: Rate Limiting, and QoS (and all QoS-related features).
For more explanation, see Bridging Versus Tunneling in this chapter.
A VLAN tag can be configured for a Bridged mode profile (see Step 28 below)
and then multiple profiles can be associated to that VLAN tag. The AP VLAN
priority can be set in Step 26 below.
24. Provide an AP VLAN tag between zero and 4094. This VLAN tag value is configured
in the controller VLAN profile and is used for tagging client traffic for ESSIDs with
dataplane mode bridged, using 802.1q VLAN. This field indicates whether an AP
needs to map incoming VLAN 802.1p data packets into WMM ACs or not. By default
in a bridged ESS, this field is disabled and an AP always honors DSCP field in IPV4
packet to map an incoming packet to one of WMM ACs. When turned on, an AP
honors VLAN 802.1p priority over DSCP priority when the packet is mapped into
one of WMM ACs.
25. To Enable VLAN Priority, set this field to On.
— On: AP disregards the DSCP value in the IP header of a packet.
— Off: AP honors the DSCP values in the IP header of a packet. AP converts the
DSCP value in the IP header to appropriate WMM queues. This feature works
only for downstream packets and only for an ESSID with dataplane mode set to
bridged.
26. For Countermeasure, select when to enable or disable MIC Countermeasures:
— On: (default) Countermeasures are helpful if an AP encounters two
consecutive MIC errors from the same client within a 60 second period. The AP
will disassociate all clients from the ESSID where the errors originated and not
allow any clients to connect for 60 seconds. This prevents an MIC attack.
— Off: Countermeasures should only be turned off temporarily while the network
administrator identifies and then resolves the source of a MIC error.
27. In the Enable Multicast MAC Transparency field, indicate on or off. For more
explanation, see Multicast MAC Transparency Feature in this chapter.
— On: All downstream multicast packets will have the MAC address of the
streaming station.
— Off: (default) All downstream multicast packets will have the MAC address of
the controller.
28. Band steering balances multi-band capable clients on AP300/AP1000 by assigning
bands to clients based on their capabilities. To use band steering for ABGN traffic,
you could use A-steering to direct dual mode clients with A capability to the 5GHz
band and use N-steering to direct all dual mode clients with AN capability to the
© 2012 Meru Networks, Inc.
Configuring an ESS
55
Add an ESS with the Web UI
5GHz band. Band steering is also useful for directing multicast traffic. For this
command to work as clients are added, also set the field New APs Join ESS to on.
For more explanation, see Band Steering Feature in this chapter.Band Steering
Mode options are:
— Band Steering Disabled
— Band Steering to A band: Infrastructure attempts to steer all A-Capable
wireless clients to the 5GHz band when they connect to this ESS.
— Band Steering to N band: Infrastructure attempts to steer all N-Capable
wireless client that are also A-Capable to the 5GHz band when they connect to
this ESS. Infrastructure also attempts to steer non N-Capable wireless clients
to the 2.4GHz band.
29. Band Steering Timeout sets the number of seconds that assignment for a steered
client is blocked on the forbidden band while it is unassociated. For this command
to work, also set the field Band Steering to A-band or N-band (see above). Band
Steering Timeout can be any integer from 1-65535.
30. Expedited Forward Override option is implemented to override the system’s default
DSCP-to-WMM priority mapping. IP datagrams marked with DSCP Expedited Forwarding
(46) will be sent from the WMM Voice queue (AC_VO) of the AP rather than the Video
queue (AC_VI) in downstream (to stations). This feature is specific to AP300 and is
disabled by Default. It is configured on a per-ESS Profile basis and works in both
bridged and tunneled ESS profiles. For configuration, see Expedited Forward
Override in this chapter.
31. SSID Broadcast for Vport is specific to address the CISCO phone connectivity
issues. It consists of three options as follows:
— Disable: This is the default configuration on the ESSID profile page.
Configuring the parameter to “Disable” makes the AP not to advertise the SSID
string in the beacon.
— Always: Configuring the parameter to “Always” enables the AP to advertise
the SSID on the beacons always. This must not be configured unless
recommended.
— Till-Association: Configuring the parameter to “Till-Association” enables the
AP to advertise the SSID in the beacons till association stage of the client and
disable the SSID broadcast in the later part of connectivity. This parameter is
preferable to configure for the certain version of phones which will resolves
the connectivity issues with the Vport ON. Once station associated, AP320 will
stop broadcasting SSID string. Here the users are allowed to configure SSID
broadcast for VPort parameter from controller GUI per ESS basis in addition to
AP CLI. For configuration, see SSID Broadcast for Vport in this chapter.
32. For the remaining Supported and Base Transmit Rates for B, A, G, and BG modes,
enable or disable rates as needed.
33. Click OK.
Note:
56
If Ascom i75 phones are used to connect to WPA2PSK profile with VCell
enabled, then create an ESSID with all BGN Supported HT Transmit rates
unchecked (set to none).
Meru System Director Configuration Guide
© 2012 Meru Networks, Inc.
When is Virtual Cell Really on for an AP?
When is Virtual Cell Really on for an AP?
AP1000 is always ready to use Virtual Cell or Virtual Port; no configuration at the
radio level is necessary. To enable either of them, simply configure them as on in
each ESS profile. If neither is desired, the AP can be used in a non-virtual (or legacy)
environment.
For AP300, Virtual Cell is enabled on the radio interface by default, and it can be
disabled as desired. This setting overrides any Virtual Cell configuration at the
ESS-level, i.e., if you turn Virtual Cell off at an AP300 radio, then Virtual Cell is off
for that radio, even if the ESS in use has Virtual Cell configured. Both the radio and
the ESS in use must have Virtual Cell enabled for AP300 to work.
The following table illustrates the three possible configurations for the AP300:
Radio Virtual Cell
AP300
ESS Profile VCell and VPort
ESSIDs are...
on
on
Virtualized
off
off
Not Virtualized
off
on
Not Virtualized
There are two steps for configuring AP300 Virtual Cell:
1. Create an ESS with Virtual Cell On (default); for directions, see Add an ESS with
the Web UI.
2. Configure each AP300 radio for Virtual Cell by following these steps:
a. Click Configure > Wireless > Radio.
b. Select a radio.
c. Save the configuration.
Adding an ESS with the CLI
Assigning an ESSID with the CLI
The ESSID is the ESS name that clients use to connect to the WLAN. An ESSID can be
a string of up to 32 alphanumeric characters long. Do not use spaces or special characters.
The following example names an ESS corp-users and enters ESSID configuration mode:
© 2012 Meru Networks, Inc.
Configuring an ESS
57
Adding an ESS with the CLI
controller# configure terminal
controller(config)# essid corp-users
controller(config-essid)#
Enable and Disable
The Enable and Disable field represents all the Enabled and Disabled services of a
profile. If a specific ESS profile is Disabled, the NMS deletes all the Services that
belong to the ESS profile. If a specific ESS profile is Enabled, the NMS creates all the
Services that belong to the ESS profile. A client will not associate to the ESSID profile
when its state is disabled.
Note:
The "Service" refers to client connectivity. When the ESSID state is
disabled, the BSSID is removed from the AP and the client will not be
able to view the Disabled SSID on air.
CLI Configuration
MERUCNTRL# sh essid
ESS
Profile
Name
Interface
Type
Enable/Disable
SSID
Security
Profile
Broadcast
Tunnel
meru
enable
meru
default
on
none
meruwpa
enable
meruwpa
meruwpa
on
none
meruwpa2ps
k
enable
meruwpa2psk
meruwpa2psk
on
none
ESS Profile(3)
MERUCNTRL# configure terminal
MERUCNTRL(config)# essid meru
MERUCNTRL(config-essid)# disable
MERUCNTRL(config-essid)# end
MERUCNTRL# sh essid
58
ESS Profile
Name
Interface
Type
Enable/Disable
SSID
Security
Profile
Broadcast
Tunne
l
meru
disable
meru
default
on
none
Meru System Director Configuration Guide
© 2012 Meru Networks, Inc.
Adding an ESS with the CLI
meruwpa
enable
meruwpa
meruwpa
on
none
meruwpa2psk
enable
meruwpa2psk
meruwpa2psk
on
none
ESS Profile(3)
MERUCNTRL# sh essid meru
ESS Profile
ESS Profile Name
Enable/Disable
SSID
Security Profile Name
Primary RADIUS Accounting Server
Secondary RADIUS Accounting Server
Accounting Interim Interval (seconds)
Beacon Interval (msec)
SSID Broadcast
Bridging
New AP's Join ESS
Tunnel Interface Type
VLAN Name
GRE Tunnel Profile Name
Allow Multicast Flag
Silent Client Polling
Virtual Cell
Virtual Port
WMM Support
APSD Support
DTIM Period (number of beacons)
Dataplane Mode
AP VLAN Tag
AP VLAN Priority
Countermeasure
Multicast MAC Transparency
Band Steering Mode
Band Steering Timeout(seconds)
Expedited Forward Override
SSID Broadcast for Vport
B Supported Transmit Rates (Mbps)
B Base Transmit Rates (Mbps)
A Supported Transmit Rates (Mbps)
A Base Transmit Rates (Mbps)
G Supported Transmit Rates (Mbps)
G Base Transmit Rates (Mbps)
BG Supported Transmit Rates (Mbps)
1,2,5.5,11,6,9,12,18,24,36,48,54
BG Base Transmit Rates (Mbps)
BGN Supported Transmit Rates (Mbps)
1,2,5.5,11,6,9,12,18,24,36,48,54
BGN Base Transmit Rates (Mbps)
BGN Supported HT Transmit Rates (MCS)
0,1,2,3,4,5,6,7,8,9,10,11,12,13,14,1
5
BGN Base HT Transmit Rates (MCS)
© 2012 Meru Networks, Inc.
:
:
:
:
:
:
:
:
:
:
:
:
:
:
:
:
:
:
:
:
:
:
:
:
:
:
:
:
:
:
:
:
:
:
:
:
:
meru
disable
meru
default
3600
100
on
none
on
none
off
off
on
on
off
off
1
tunneled
0
off
on
off
disable
5
off
disabled
1,2,5.5,11
11
6,9,12,18,24,36,48,54
6,12,24
6,9,12,18,24,36,48,54
6,9,12,18,24,36,48,54
: 11
:
: 11
:
: none
Configuring an ESS
59
Adding an ESS with the CLI
AN Supported Transmit Rates (Mbps)
AN Base Transmit Rates (Mbps)
AN Supported HT Transmit Rates (MCS)
0,1,2,3,4,5,6,7,8,9,10,11,12,13,14,1
5
AN Base HT Transmit Rates (MCS)
Owner
MERUCNTRL#
: 6,9,12,18,24,36,48,54
: 6,12,24
:
: none
: controller
Security Profiles for an ESS
ESS profiles and Security profiles can be configured either from E(z)RF Network
Manager or from the controller. You can tell where a profile was configured by
checking the read-only field Owner; the Owner is either nms-server or controller.
Each ESS must be associated with a security profile. If you do not create additional
security profiles, an ESS is automatically associated with the default security profile
named default. To use additional security profiles, create them using the security-profile command in global configuration mode (see either this chapter, Add an
ESS with the Web UI or Chapter 8, “Configuring Security,” for details). Create the
security profile before creating the ESS. You cannot alter profiles created in E(z)RF
Network Manager from a controller.
The following CLI example associates a security profile named corp-access:
controller(config-essid)# security-profile corp-access
controller(config-essid)#
Configuring CAC for an ESSID AP with the CLI
If implemented, Call Admission Control (CAC) limits the number of VoIP calls for all
BSSIDs with the command qosvars calls-per-bssid (see “Configuring QoS Rules With
the CLI” on page 237). If you have special requirements for an ESSID’s AP300, you can
set the CAC maximum calls limit specifically for the ESS using the calls-per-bss
command from the essid/ess-ap configuration sublevel. For example, to set a
maximum of 10 calls for AP 1, interface 1 in the ESSID, use the following command:
controller(config-essid)# ess-ap 1 1
controller(config-essid-essap)# calls-per-bss 10
controller(config-essid-essap)# exit
Configuring Beacon Parameters with the CLI
You can set the following beacon parameters:
Beacon DTIM period—DTIM affects clients in power save mode. In the DTIM Period
field, type the number of beacon intervals that elapse before broadcast frames
stored in buffers are sent. This value is transmitted in the DTIM period field of
beacon frames.
60
Meru System Director Configuration Guide
© 2012 Meru Networks, Inc.
Adding an ESS with the CLI
The DTIM period can be a value from 1 through 255. The default DTIM period is 1.
Setting the DTIM period to a higher value decreases the frequency of broadcasts
sent by the access point. If power save is enabled on clients that are connected
to access points, clients “wake up” less if fewer broadcasts are sent, which
conserves battery life for the clients.
Only the behavior of clients currently in power-save mode is affected by the DTIM
period value. Because broadcasts are generally wasteful of air resources, the
Meru WLAN has devised mechanisms that mitigate broadcasts either with proxy
services or with more efficient, limited unicasts. As an example, ARP Layer 2
broadcasts received by the wired side are not relayed to all wireless clients.
Instead, the Meru controller maintains a list of IP-MAC address mappings for all
wireless clients and replies with proxy-ARP on behalf of the client.
Beacon interval—Sets the rate at which beacons are transmitted.
The beacon period setting affects unicasts and broadcasts. The beacon interval
must be between 20 through 1000 milliseconds. For AP300 and AP1000, beacon
interval is a multiple of 20, from 20 to 1000ms. For AP150 and OAP180, the beacon
interval is a multiple of 100, from 100 to 500ms. Setting the beacon interval to a
higher value decreases the frequency of unicasts and broadcasts sent by the
access point. If the power-save feature is enabled on clients that are connected
to access points, clients “wake up” less if fewer unicasts and broadcasts are sent,
which conserves the battery life for the clients. The beacon period setting affects
unicasts and broadcasts.
If your WLAN consists mostly of Wi-Fi phones, and you have a low number of ESSIDs
configured (for example, one or two), Meru Networks recommends setting the
beacon interval to 100.
The following example sets the beacon DTIM period to 10 and beacon interval to
240 TUs:
controller(config-essid)# beacon dtim-period 10
controller(config-essid)# beacon period 240
Configuring ESSID Broadcasting with the CLI
By default, an ESSID is broadcast. When an ESSID is broadcast, it is included in the
advertised beacon. Clients using passive scanning listen for beacons transmitted by
access points. If ESSID broadcasting an is disabled, those clients listening for beacons
cannot receive ESSID information.
Clients using active scanning send probe requests and wait for probe responses from
access points. If broadcasting an ESSID is disabled, access points do not respond to
probe requests, unless the probe request includes the ESSID.
To prevent the ESSID from being broadcast, use the no publish-essid command.
The following example prevents the ESSID from being broadcast:
controller(config-essid)# no publish-essid
© 2012 Meru Networks, Inc.
Configuring an ESS
61
Adding an ESS with the CLI
Configuring ESSID Joining of Access Points with the CLI
By default, when a new access point is plugged into the WLAN, it joins all ESSIDs that
are configured to have new access points automatically join upon discovery and a
BSSID is created.
After you are satisfied with your WLAN configuration, you can disable the automatic
joining so that new access points do not change your configuration. If you are adding
a new ESS that you want to advertise on only a small subset of access points, it is
easier to disable joining and add the ESS-AP mappings manually.
The following example prevents access points from automatically joining an ESSID:
controller(config-essid)# no ap-discovery join-ess
After preventing automatic joining, a BSSID must be assigned manually.
Caution! The status of this command is only evaluated when new ESS-AP mappings
are created. ESS-AP mappings are either created manually with the ess-ap
command, or automatically when a new ESS is created, or a new access point is
discovered.
Configuring Virtual Cell Support
Virtual Cell is on by default for Meru access points. The major benefit of Virtual Cell
is infrastructure-controlled handoffs with seamless roaming between access points.
AP300 Virtual Cell differs from other Virtual Cell configuration in these ways:
Virtual Cell has to be enabled per AP300 radio interface, in addition to the ESS
Profile configuration. Both the radio and the ESS in use have to have Virtual Cell
enabled for it to work. Virtual Cell is enabled by default on Meru AP300.
If you configure some AP300s in a Virtual Cell-enabled ESS Profile for Virtual Cell
and others for non-Virtual Cell, only the Virtual Cell-configured AP300s are
recognized by the Virtual Cell enabled ESS.
In the Wireless Interface Configuration, the setting Virtual Cell Mode enables
Virtual Cell on AP300 radios only.
AP300 only supports per-station Virtual Cell.
AP300 and AP200 cannot share a Virtual Cell.
Configuring Virtual Cell Support for AP300 or AP400 with Web UI
Virtual Cell is enabled by default on Meru AP300/AP400. However, if you turn Virtual
Cell off at an AP300/AP400 radio then Virtual Cell is off for that radio, even if the
ESS in use has Virtual Cell configured. Both the radio and the ESS in use have to have
Virtual Cell enabled for it to work.There are two steps (instead of just the first one
below for AP150) for configuring Virtual Cell:
1. Create an ESS with Enable Virtual Cell On and Virtual Port On. (These two settings
default to On.)
62
Meru System Director Configuration Guide
© 2012 Meru Networks, Inc.
Adding an ESS with the CLI
2. Configure each radio for Virtual Cell by following these steps:
a. Click Configure > Wireless > Radio
b. Select a radio.
c. Set Virtual Cell as “On”
d. Save the configuration.
Note:
Configure multiple radios with Bulk Update.
Configuring Virtual Cell Support for AP300 or AP400 with the
CLI
Virtual Cell is enabled by default on Meru APs. However, note that if you turn Virtual
Cell off at an AP300/AP400 radio then Virtual Cell is off for that radio, even if the
ESS in use has Virtual Cell configured. Both the radio and the ESS in use have to have
Virtual Cell enabled for the AP to use Virtual Cell. (This does not apply to AP1000.)
You can see the Virtual Cell setting by using the CLI command show interfaces
Dot11Radio. For example:
vcell22# show interfaces Dot11Radio 2 1
Wireless Interface Configuration
AP ID
: 2
AP Name
: AP-2
Interface Index
: 1
AP Model
: AP320
Interface Description
: ieee80211-2-1
Administrative Status
: Up
Operational Status
: Enabled
Last Change Time
: 09/27/2008 02:44:52
Radio Type
: RF6
MTU (bytes)
: 2346
Channel
: 11
Operating Channel
: 11
Short Preamble
: on
RF Band Support
: 802.11abgn
RF Band Selection
: 802.11bgn
Antenna Selection
: Left
Transmit Power High(dBm)
: 18
AP Mode
: Normal
Scanning Channels
:
1,2,3,4,5,6,7,8,9,10,11,12,13,14,34,36,
38,40,42,44,46,48,52,56,60,64,100,104,108,112,116,120,124,128,132,136,140,
149,15
3,157,161,165
Protection Mechanism
: wmm-txop
Protection Mode
: auto
Number of Antennas
: 3
Dual abg Support
: off
Channel Width
: 20-mhz
MIMO Mode
: 2x2
© 2012 Meru Networks, Inc.
Configuring an ESS
63
Adding an ESS with the CLI
802.11n only mode
Virtual Cell mode
: off
: on
<-
To turn Virtual Cell off, use this version of the command:
vcell22(config-if-802)# no virtual-cell
Note: All APs on the same channel in a Virtual Cell must have the same setting for
these values:
RF-Mode
Channel Width
N-only Mode
Configuring Virtual Cell Support for AP150
AP150 Virtual Cell is enabled by default. The following command disables Virtual Cell
for AP150s (note that the command is issued from Global Configuration mode, and
not the ESSID submode):
controller(config)# vcellap150 disable
The following command enables Virtual Cell for AP150s (note that the command is
issued from Global Configuration mode, and not the ESSID submode):
controller(config)# vcellap150 enable
The virtual-port setting determines how the BSSID is populated. To add or edit
this, click Configuration > Wireless > ESS.
Note:
Note that Shared BSSID configuration is enabled in the ESSID profile example
above. This is required because AP150 does not forward data packets to
power save clients when using Virtual Cell.
Virtual Port is Now Part of Virtual Cell
In release 5.1, Virtual Cell includes Virtual Port. If Virtual Cell is on, so is Virtual Port. They
cannot be configured separately; it is all one feature that is turned on and off by the
Virtual Cell setting when you Add an ESS with the Web UI.
AP300, AP400, and AP1000 support Virtual Port. AP150 and OAP180 do not support
Virtual Port
Virtual Port enhances Virtual Cell by giving each client its own virtual access point. With
Virtual Port, each client has its own access instead of sharing access with other clients.
Because each client has its own Virtual Port, you can tailor it to match the client’s needs.
For example, different employees can be given different amounts of bandwidth,
depending on the applications used in their jobs. A voice client can be given limited bandwidth but high quality of service. A guest is given lower priority and restricted access.
There are three types of limits on the number of Virtual Ports per controller:
64
Meru System Director Configuration Guide
© 2012 Meru Networks, Inc.
Adding an ESS with the CLI
Restricted by the number of clients supported by the controller
Restricted by the number of AP radios On AP300/AP400, the theoretical
maximum number of Virtual Ports is 128 per radio. Meru’s best practices
recommendation is to have no more than 64 per radio.
Restricted by Virtual Cell There is a hard limit of 2007 Virtual Ports per Virtual
Cell. This number is set by the standard of having no more than 2007 associations
per single BSSID. In Meru's environment, each BSSID represents a Virtual Cell.
Configuring Probe Response Threshold
The Probe Response Threshold configures the way in which an AP responds to
requests based on its distance from the transmitting device. It is designed to ensure
that the AP responds more swiftly to requests sent from stations located nearby. It
is configurable through GUI support in addition to the AP CLI. This feature is also
configured via bulk update on a per-AP interface level. The default probe response
threshold on AP is 15.
This value can be viewed by connecting to <AP ID>
Radio show radio0/1
ic_meru.icm_rssiThreshold
= 15
Change in CLI
To change SNR value to 20
ap 7>
ap 7> radio prt radio0 threshold 20
Verify using radio show radio0
© 2012 Meru Networks, Inc.
ap 7> radio show radio0
=============================
===
radio0
===
=============================
Device Name
If index
If Mode
= radio0
= 0
= 11NG
ic_meru.icm_rssiThreshold
ic_meru.nodeallocated
ic_meru.nodefreed
ic_meru.icm_ibss_prot
=
=
=
=
20
7
3
off
Configuring an ESS
65
Adding an ESS with the CLI
Configuring Probe Response Threshold:
ap 7> radio help prt
radio {probe-resp | prt} <radio-name> assigned <snr>|all
<snr>|threshold <snr>|maxresp
<maxcount>
set probe response assigned/rssi threshold/max response count.
radio probe-resp <radio-name> assigned <SNR>|all <SNR>|threshold
<SNR>|maxresp <maxcount>
SNR threshold value or Max broadcast probe response count
(0 <= SNR <= 100) 0 disables
(0 <= maxcount <= 128) 0 disables broacast probe response
SNRRange
The GUI must have the SNR value ranging from 0 to 100, zero means probe response
threshold disable.
GUI Page:
Figure 7: Wireless Interface Configuration - Update
Configuring Silent Client Polling with the CLI
Use silent client polling to allow tracking information to be sent between the
controller and the APs and between the AP and a phone that is not in a call or using
powersave. This feature keep the system appraised of a client phone location if the
client moves between APs while the phone is inactive.
66
Meru System Director Configuration Guide
© 2012 Meru Networks, Inc.
Adding an ESS with the CLI
default(config-essid)# silent-client-enable
default(config-essid)# no silent-client-enable
default(config-essid)# end
Configuring Data Transmit Rates with the CLI
Note: The AP150 does not support configuration of the Base/Supported data
rates. The default settings in use for these products are:
802.11b: Base (1,2,5.5,11), Supported (1,2,5.5,11)
802.11bg: Base (1,2,5.5,11), Supported (all)
802.11a: Base (all), Supported (all)
Any data transmit rate settings made in the ESSID are ignored by AP150.
The data transmit rate is the data rate that the access points use to transmit data.
There are two types of data rates:
Base data transmit rates
Mandatory rates that all connecting clients must support when connecting to
access points. For 802.11AN/BGN, the data rate is selected using MCS Index. The
actual data rate is computed based on MCS Index, Channel Width, and Guard
Interval. When channel width selected is 40MHz Extension above, then the data
rate for the client depends on associated clients channel width and guard interval
capabilities. Valid rates are as follows:
— 802.11b valid rates are 1, 2, 5.5, 11 Mbps, or all
— 802.11g valid rates are 6, 9, 12, 18, 24, 36, 48, 54 Mbps, or all
— 802.11bg valid rates are 1, 2, 5.5, 11, 6, 9, 12, 18, 24, 36, 48, 54 Mbps, or all
— 802.11bgn valid rates are 1, 2, 5.5, 11, 6, 9, 12, 18, 24, 36, 48, 54 Mbps, or all
— 802.11a valid rates are 6, 9, 12, 18, 24, 36, 48, 54 Mbps, or all
— 802.11an valid rates are 6, 9, 12, 18, 24, 36, 48, 54, or all
— 802.11an-mcs valid rates are MCS 0, MCS 1, MCS 2, MCS 3, MCS 4, MCS 5, MCS
6, MCS 7, MCS 8, MCS 9, MCS 10, MCS 11, MCS 12, MCS 13, MCS 14, MCS 15, or all
— 802.11bgn-mcs valid rates are MCS 0, MCS 1, MCS 2, MCS 3, MCS 4, MCS 5, MCS
6, MCS 7, MCS 8, MCS 9, MCS 10, MCS 11, MCS 12, MCS 13, MCS 14, MCS 15, or all
Supported data transmit rates
Rates at which clients can optionally connect, provided the clients and access
points support the rates. Valid rates are as follows:
— 802.11b valid rates are 1, 2, 5.5, 11 Mbps, or all
— 802.11g valid rates are 6, 9, 12, 18, 24, 36, 48 and 54 Mbps, or all
— 802.11bg valid rates are 1, 2, 5.5, 11, 6, 9, 12, 18, 24, 36, 48 and 54 Mbps, or
all
— 802.11bgn valid rates are 1, 2, 5.5, 11, 6, 9, 12, 18, 24, 36, 48 and 54 Mbps,
or all
— 802.11a valid rates are 6, 9, 12, 18, 24, 36, 48, and 54 Mbps, or all
© 2012 Meru Networks, Inc.
Configuring an ESS
67
Adding an ESS with the CLI
— 802.11an valid rates are 6, 9, 12, 18, 24, 36, 48, and 54 Mbps, or all
— 802.11an-mcs valid rates are MCS 0, MCS 1, MCS 2, MCS 3, MCS 4, MCS 5, MCS
6, MCS 7, MCS 8, MCS 9, MCS 10, MCS 11, MCS 12, MCS 13, MCS 14, MCS 15, or all
— 802.11bgn-mcs valid rates are MCS 0, MCS 1, MCS 2, MCS 3, MCS 4, MCS 5, MCS
6, MCS 7, MCS 8, MCS 9, MCS 10, MCS 11, MCS 12, MCS 13, MCS 14, MCS 15, or all
All base rates must be entered as supported rates.
Note: Changing the base rate in an ESS profile will cause all clients on all
ESSIDs to reassociate.
The supported data rates are the rates supported by the access points. The basic data
rates are a subset of the supported rates. The access point first tries to transmit at
the highest data rate set to Basic. If there are problems encountered in the transmission, the access points steps down to the highest rate that allows data transmission.
Use the base-tx-rates command in ESSID configuration mode to configure the basic
data rates, for example, for 802.11bg:
controller(config-essid)# base-tx-rates 802.11bg
1|2|5.5|11|9|12|18|24|36|48|54|all
Use the supported-tx-rates command in ESSID configuration mode to configure the
supported transmit rates, for example, for 802.11bg:
controller(config-essid)# supported-tx-rates 802.11bg
1|2|5.5|11|9|12|18|24|36|48|54|all
To remove a base transmit rate, use the no base-tx-rates command with the mode
and speed value, for example, for 802.11bg:
controller(config-essid)# no base-tx-rates 802.11bg
1|2|5.5|11|9|12|18|24|36|48|54|all
To remove a supported transmit rate, use the no supported-tx-rates command with
the mode and speed value, for example, for 802.11bg:
controller(config-essid)# no supported-tx-rates 802.11bg
1|2|5.5|11|9|12|18|24|36|48|54|all
To display the radio data rates, use the show essid command.
Assigning a VLAN with the CLI
When creating an ESSID, you can assign a VLAN to the ESSID. This allows you isolate
an ESSID to a specific part of your network. By default, ESSIDs do not have VLANs
assigned to them. You must create a VLAN using the vlan command in global configuration mode before assigning the VLAN to an ESSID.
The following example assigns a vlan named corp:
controller(config-essid)# vlan corp
68
Meru System Director Configuration Guide
© 2012 Meru Networks, Inc.
Adding an ESS with the CLI
controller(config-essid)#
To remove a VLAN assignment from an ESSID, use the no vlan name command. The
following example removes the VLAN assignment from the ESSID:
controller(config-essid)# no vlan corp
controller(config-essid)#
WMM Features Supported by System Director
In general, WMM contains these features:
WMM (for QoS)
WMM PS (U-APSD) - helps with battery life
WMM AC (TSPEC) - admission control
System Director supports WMM packet tagging for QoS on AP300, AP400, and AP1000
automatically (if the client is WMM); this feature cannot be turned off. System
Director supports U-APSD on AP300/AP400/AP1000; this can be turned on and off.
System Director does not support WMM AC (TSPEC).
U-APSD is ideally suited to mobile devices that require advanced power-save mechanisms for extended battery life, and for applications like VoIP where the user experience rapidly degrades as latency increases. WMM Power Save was designed for
mobile and cordless phones that support VoIP. See the chart below for defaults and
possible configurations of both the WMM QoS and WMM APSD features.
WMM-PS is an enhancement over the legacy power-save mechanisms supported by
Wi-Fi networks. It allows devices to spend more time in a “dozing” state, which
consumes less power, while improving performance by minimizing transmission
latency. Furthermore, U-APSD promotes more efficient and flexible over-the-air
transmission and power management by enabling individual applications to control
capacity and latency requirements.
Note:
If a deployment utilizing AP1000 models has WMM or WMM-APSD VoIP
phones in use with DSCP set to Expedited Forwarding, a special QoS rule
must be configured to support the deployment. This rule must have a
DSCP parameter value of CS6 or CS7 in order to ensure that the AP1000
queues packets properly, ensuring optimal call quality.
U-APSD capable stations download frames buffered from AP300/AP400/AP1000s
during unscheduled Service Periods (SP); the result is that there is no wait for
beacons as there is in the legacy method. For U-APSD capable stations, APs negotiate
U-APSD and use it to transmit data for the WMM Access Categories (priority levels)
negotiated for U-APSD when a station is in power save mode. When a device is in
power-save mode, the uplink data frame triggers AP300/AP400/AP1000 to send
frames buffered in U-APSD enabled WMM_AC-queues. Pending legacy mode frames
are not transmitted. You can configure AP300/AP400/AP1000 U-APSD support from
© 2012 Meru Networks, Inc.
Configuring an ESS
69
Adding an ESS with the CLI
the CLI using the ESSID command apsdsupport or you can configure APSD support for
an ESSID from the Web UI (Configuration > Wireless > ESSID and then turn on
U-APSD).
Configure U-APSD
APSD settings are configured per ESS and APSD support is on by default; this setting
only affects AP300/AP400/AP1000. To configure APSD from the Web UI, click Configuration > Wireless > ESS > select an ESS from the list > set APSD Support to on.
To turn on/off APSD support with the CLI, use the command apsd-support for the
ESSID as shown in this example:
default# configure terminal
default(config)# essid apsd
default(config-essid)# no apsd-support
default(config-essid)# end
Virtual Cell Overflow Feature
If you are using AP300/AP400 models, you can now temporarily expand the capacity
of a Virtual Cell for peak usage times or areas. This feature, called Vcell Overflow,
works by pairing a Virtual Cell ESS with a non-Virtual Cell ESS. The overflow ESS automatically inherits the parameters of the Virtual Cell ESS (except the setting for
Virtual Cell). The non-Virtual Cell ESS is not used unless the Virtual Cell ESS is
maxed-out; when this happens, the Virtual Cell ESS overflows into the other ESS as
needed. The two ESS Profiles share an SSID so that clients seamlessly move back and
forth. The overflow decision is based on the percentage of airtime spent on beacons
crossing a threshold; when the percentage reaches 50%, clients start to overflow.
When Would I Use Virtual Cell Overflow?
This feature is designed for a high density deployment and provides a solution for
bottlenecks caused by transmitting beacons. Virtual Cell Overflow is useful in these
situations:
Beacon overhead has become very high due to the legacy b devices.
A very dense network is consuming a lot of airtime with beacons.
For whatever reason, you Virtual Cell and non-Virtual Cell must co-exist on
AP300/AP400. For example, some phones’ best practices recommend non-Virtual
Cell, and it’s OK to have low bandwidth on these phones.
Be aware that Virtual Cell Overflow has these tradeoffs:
Trade-off between mobility and performance
Trade-off between density and performance
Not a solution to get good performance for overflow clients
70
Meru System Director Configuration Guide
© 2012 Meru Networks, Inc.
Adding an ESS with the CLI
Configure Virtual Cell Overflow with the Web UI
To set up Virtual Cell Overflow from the Web UI, follow these steps:
1. Create a Virtual Cell ESS by following the directions Add an ESS with the Web UI.
Be sure that the setting for Virtual Cell is set to On.
2. Create a non-Virtual Cell ESS by following the directions Add an ESS with the Web
UI. Be sure that the setting for Virtual Cell is set to Off. Make this an Overflow
ESS with the setting Overflow for; select the ESS you created in Step 1. This
overflow ESS automatically inherits the remaining parameters of the Virtual Cell
ESS.
Configure Virtual Cell Overflow with the CLI
In the CLI, a new command, overflowfrom-essprofile, has been added for this
purpose. See the example below.
default(0)# show essid
ESS Profile Name
SSID
Security Profile
Broadcast Tunnel Interface Type
vcelloverflow
vcelloverflow
default
on
none
ESS Profile(1 entry)
default(0)# configure terminal
default(0)(config)# essid vcelloverflowoss
default(0)(config-essid)# overflowfrom-essprofile vcelloverflow
default(0)(config-essid)# end
default(0)# show essid
ESS Profile Name
SSID
Security Profile
Broadcast Tunnel Interface Type
vcelloverflow
vcelloverflow
default
on
none
vcelloverflowoss
vcelloverflow
default
on
none
ESS Profile(2)
default(0)# show essid vcelloverflowoss
ESS Profile
ESS Profile Name
SSID
Security Profile Name
Primary RADIUS Accounting Server
Secondary RADIUS Accounting Server
Accounting Interim Interval (seconds)
Beacon Interval (msec)
SSID Broadcast
Bridging
New AP's Join ESS
Tunnel Interface Type
VLAN Name
GRE Tunnel Profile Name
Allow Multicast Flag
Silent Client Polling
Virtual Cell
© 2012 Meru Networks, Inc.
:
:
:
:
:
:
:
:
:
:
:
:
:
:
:
:
vcelloverflowoss
vcelloverflow
default
3600
100
on
none
on
none
off
off
off (because this is the overflow ESS)
Configuring an ESS
71
Bridging Versus Tunneling
Virtual Port
Overflow for
WMM Support
APSD Support
DTIM Period (number of beacons)
Dataplane Mode
AP VLAN Tag
AP VLAN Priority
Countermeasure
Multicast MAC Transparency
Band Steering Mode
Band Steering Timeout(seconds)
:
:
:
:
:
:
:
:
:
:
:
:
off
vcell_ESS
off
off
1
tunneled
0
off
on
off
disable
5
Bridging Versus Tunneling
The bridged AP feature allows APs to be installed and managed at locations separated
from the controller by a WAN or ISP, for example, in a satellite office. Encryption can
be enabled on the bridged connection to provide security over ISP-based connections.
The controller, through a keep-alive signal, monitors the remote AP. Remote APs can
exchange control information, including authentication and accounting information
with the controller, but are unable to exchange data. (Remote bridged APs can,
however, exchange data with other APs within their subnet.)
Supported Features for Bridged ESS Profiles
The features supported by bridged ESS profiles are:
WMM QoS AP300/AP400
AP300/AP400 and AP1000 support bridged ESS profiles with a static VLAN. AP150
supports bridged ESS profiles without VLAN tagging.
Virtual Cell/Virtual Port (AP300/AP400, AP1000)
802.1X authentication (dynamic WEP, WPA, WPA2 or MIXED)
Multiple ESSIDs
All security modes/options except Captive Portal (both static and dynamic keying)
RADIUS authentication and accounting ACL-based and RADIUS-based MAC filtering
ACL-based and Radius-based MAC filtering
Mapping IP DSCP or 802.1p to WMM Access Categories (AP300/AP400)
Because remote APs cannot exchange data-plane traffic (including DHCP) with the
controller, certain Meru Wireless LAN features are not available for remote AP configurations. These include:
72
Meru System Director Configuration Guide
© 2012 Meru Networks, Inc.
Bridging Versus Tunneling
QoS rules and firewall rules
Dynamic Flow detection (for SIP/H.323)
Captive Portal
L3 mobility
Radius-based VLAN assignment
DHCP relay
Example of Bridged AP Deployment
The following figure is an example of remote bridged AP deployment. Notice that AP1
is configured for L2/local mode, AP2 is configured L2/Remote mode, AP3 is configured L3/local mode, and AP4 is configured for L3/Remote AP mode. The controller,
AP1 and AP2 are located in the same 10.0.10.x/24 subnet, and AP3 and AP4 are in a
different subnet, 192.0.10.x/24. The blue and red lines correspond to L2 and L3 data
tunnel, respectively. Also, MS A through D are associated to AP 1 to 4, respectively.
Note that the MS C and MS D have different IP addresses, even though they are associated to APs within the same IP subnet. The reason for this is because AP3 is configured in local mode and is tunneled back to the controller at Layer 3. This example
demonstrates how a mobile client’s IP domain is changed by the dataplane bridged
or tunneled setting.
Figure 8: Example Remote AP Topology
M ERU L2 tunnel
M ERU L3 tunnel
10.0.10..x/24 Netw ork
AP 1
Router
AP 2
MS A
10.0.10.100
MS B
10.0.10.101
192.0.10..x/24 Netw ork
AP 3
AP 4
MS C
10.0.10.102
© 2012 Meru Networks, Inc.
MS D
192.0.10.100
Configuring an ESS
73
Multicasting Feature
Configure a Bridged AP
For complete UI directions, see Add an ESS with the Web UI or click Configuration >
Wireless > ESS and select an ESS to edit.
To configure a bridged AP for an existing ESSID with the CLI, follow these steps:
1. Enter the ESSID configuration mode and set the dataplane mode to bridged:
controller# configure terminal
controller(config)# essid profile_name
controller(config-ap)# dataplane bridged
controller(config-ap)# exit
After you make the config changes, force the APs to do a hard reboot.
2. If the connection between the controller and the Remote AP should be secured,
use the following command to encrypt only an AP150 connection:
controller# configure terminal
controller(config)# ap ap#
controller(config-ap)# dataplane-encryption on
controller(config-ap)# exit
The Remote AP feature may require that corporate firewall configuration be updated
to permit wireless access over certain Ethernet ports. The affected ports are:
L2 (Ethernet) L3 (UDP)
Data 0x4000 9393
Comm 0x4001 5000
Discovery 0x4003 9292
When a Bridged AP Loses Controller Contact
When a bridged AP loses contact with its host controller, it continues to function for
up to two days, depending on controller’s the setting for Link Probing (1 minute 32000 minutes). During this time, clients that were connected when the controller
went down function normally, but they cannot switch APs. Also, new clients cannot
join a bridged AP during this time.
Multicasting Feature
Multicasting is a technique frequently used for the delivery of streaming media, such
as video, to a group of destinations simultaneously. Instead of sending a copy of the
stream to each client, clients share one copy of the information, reducing the load
74
Meru System Director Configuration Guide
© 2012 Meru Networks, Inc.
Multicasting Feature
on the network. Multicasting is an advanced feature and can cause subtle changes in your
network. By default, multicasting is disabled and should be enabled only for specific
circumstances. Possible multicasting applications include:
Broadcast via cable or satellite to IPTV (for example, Vbrick or Video Furnace)
Any broadcast application (for example, CEO address to company)
Distance learning (live lectures)
Video surveillance
Video conferencing
For multicast to work, you need to complete these four tasks:
Enable Virtual Cell and Virtual Port on AP300/AP400s - see Configuring Virtual Cell
Support for AP300 or AP400 with the CLI and Virtual Port is Now Part of Virtual Cell
for directions.
Enable IGMP snooping on the controller - see Configuring IGMP Snooping on
Controllers and APs
Enable IGMP snooping on the network infrastructure including intermediary
switches. You must do this because Meru controllers do not source multicast group
membership queries. We rely (as do most controllers) on the switches to perform
that task.
Map a Virtual Cell enabled ESS with the default VLAN - see Assigning a VLAN with
the CLI.
Configuring IGMP Snooping on Controllers and APs
Multicasting is implemented using IGMP snooping. In System Director release 3.6, IGMP
snooping was only done at the controller; the controller knew which clients were
subscribed to specific multicast streams and sent the data for the subscribed multicast
stream only to the APs with clients currently being serviced. Since the AP didn't know
which clients subscribed to the specific stream, it would send multicast streams to all
clients currently being serviced by the AP. (With Virtual Port, there would be N copies, one
for each client). This wasted airtime and created unnecessary traffic and contention.
In release 4.0 and later, IGMP snooping is done not only by the controller but also done by
AP300/AP400s (excluding AP1000) when using Virtual Cell. The controller passes the client
subscription list for multicast streams to AP300/AP400, which limits the multicast streams
to only subscribed clients, reducing wireless traffic and saving time. (There are no changes
in sending multicasts for stations connected to non-Virtual Cell ESS profiles.)
Commands to Configure IGMP Snooping
The following command is used to enable/disable IGMP snooping on the controller and APs:
igmp-snoop state [enable, disable]
Command to show igmp-snoop status:
show igmp-snoop
© 2012 Meru Networks, Inc.
Configuring an ESS
75
Multicast MAC Transparency Feature
Command to see which multicast groups are currently active:
show igmp-snoop forwarding-table
Command to see which stations have joined multicast groups:
show igmp-snoop subscription-table
Multicast MAC Transparency Feature
This feature enables MAC transparency for tunneled multicast, which is needed for
some clients to receive multicast packets. Multicasting is an advanced feature and can
cause subtle changes in your network. By default, multicasting is disabled. To enable it,
use either the multicast-enable command (see example below) or Configuration > Wireless > ESS > Add in the Web UI (see example below).
Caution! Multicasting is an advanced feature. Enabling multicasting in the WLAN
can cause subtle changes in your network. Contact Meru Networks Customer Service
Technical Assistance Center before enabling multicasting.
Enable Multicast From the Web UI
To enable multicasting from the Web UI, add or modify an ESS. For directions, see
Add an ESS with the Web UI.
Enable Multicast with the CLI
The following example enables multicasting with the CLI:
controller(config-essid)# multicast-enable
For command details, see the Meru System Director Command Reference.
View Mapping Between VLANs and ESS Profiles
Use the following command to see the VLANs and ESS profiles currently mapped:
controller(config-essid)# show vlan ess-profile
For command details, see the Meru System Director Command Reference.
76
Meru System Director Configuration Guide
© 2012 Meru Networks, Inc.
Bridging with AirFortress and AppleTalk
Bridging with AirFortress and AppleTalk
Wireless bridging with Fortress Technology AirFortress gateway and AppleTalk
networks can be configured to extend ESSID functionality.
FortressTech Layer 2 Bridging
FortressTech Layer 2 bridging and encryption with Fortress Technology AirFortress
gateway allows an administrator to configure FortressTech encryption on one or more
ESSIDs.
From the essid configuration submode, use the commands l2bridge airf and no
l2bridge airf to enable and disable this feature, respectively.
AppleTalk Layer 2 Bridging
This feature allows an administrator to configure bridging to AppleTalk networks on
one or more ESSIDs. From the essid configuration sub mode, use the commands
l2bridge appletalk and no l2bridge appletalk to enable and disable AppleTalk
bridging, respectively.
Note: If more than one ESSID profile is active on the controller, AppleTalk clients
are not able to find an enabled AppleTalk printer. This does not occur when only one
ESSID is active.
GRE ESSID Feature
The ESSID configuration for GRE tunneling is described in chapter Chapter 12,
“Configuring VLANs.”
Band Steering Feature
Band steering works with multi-band capable clients by letting you assign bands to
clients based on their capabilities. Without band steering, an ABG client could
formerly associate on either the A or the B/G channels, leading to overcrowding on
one band or the other. With band steering, you can direct some of this traffic to the
A band. Another example of using band steering is to separate voice and data traffic.
© 2012 Meru Networks, Inc.
Configuring an ESS
77
Band Steering Feature
You can leave all voice-capable clients the B/G channels (where bandwidth is not a
concern) and move data-only clients to the A bands to achieve higher data rates. To
use band steering for ABGN traffic, you could use A-Steering to direct dual mode
clients with A capability to the 5GHz band and use N-Steering to direct all dual mode
clients with AN capability to the 5GHz band. Band steering is also useful for directing
multicast traffic.
Configure Band Steering with the Web UI
Band Steering is enabled on a per-ESS basis. When you create or modify an ESS, you
can enable band steering. To do this with the Web UI, follow the directions Add an
ESS with the Web UI setting the field Enable Band Steering to On. The field Band
Steering Timeout defaults to 5 seconds; this is the number of seconds that assignment
for a steered client is blocked on the forbidden band while it is unassociated. For this
command to work as clients are added, also set the field New APs Join ESS to on in
the ESS.
Configure Band Steering with the CLI
Two new CLI commands have been added for band steering. band-steering-mode
enables band steering on an ESS and band-steering-timeout sets the number of
seconds that assignment for a steered client is blocked on the forbidden band while
it is unassociated. The command band-steering-mode disable turns off band
steering. To use band steering, create an ESS with the following configuration:
New AP's Join ESS
Tunnel Interface Type
VLAN Name
GRE Tunnel Profile Name
Allow Multicast Flag
Silent Client Polling
Enable Virtual Cell
WMM Support
DTIM Period (number of beacons)
Virtual Cell Type
Dataplane Mode
B Supported Transmit Rates (Mbps)
B Base Transmit Rates (Mbps)
A Supported Transmit Rates (Mbps)
A Base Transmit Rates (Mbps)
G Supported Transmit Rates (Mbps)
G Base Transmit Rates (Mbps)
BG Supported Transmit Rates (Mbps)
1,2,5.5,11,6,9,12,18,24,36,48,54
BG Base Transmit Rates (Mbps)
Enable Countermeasure
Packet Error Control
Packet Error Limit
Rx Packet control
Rx Packet Limit
Band Steering Mode
78
Meru System Director Configuration Guide
:
:
:
:
:
:
:
:
:
:
:
:
:
:
:
:
:
:
on
none
:
:
:
:
:
:
:
1,2,5.5,11
on
off
0
off
0
a-steering
off
off
on
off
1
shared-bssid
bridged
1,2,5.5,11
1,2,5.5,11
6,9,12,18,24,36,48,54
6,12,24
6,9,12,18,24,36,48,54
6,9,12,18,24,36,48,54
© 2012 Meru Networks, Inc.
Band Steering Feature
Band Steering Timeout(seconds)
: 5
This example sets band steering to the A channel on the existing ESS named Bandsteeress:
default# configure terminal
default(config)# essid Bandsteeress
default(config-essid)# dataplane
default(config-essid)# dataplane bridged
default(config-essid)# band-steering-mode a-steering
default(config-essid)# end
default# sh essid Bandsteeress
ESS Profile Name
SSID
Security Profile Name
Primary Radius Accounting Server
Secondary Radius Accounting Server
Accounting Interim Interval (seconds)
Beacon Interval (msec)
SSID Broadcast
Bridging
New AP's Join ESS
Tunnel Interface Type
VLAN Name
GRE Tunnel Profile Name
Allow Multicast Flag
Silent Client Polling
Enable Virtual Cell
WMM Support
DTIM Period (number of beacons)
Virtual Cell Type
Dataplane Mode
B Supported Transmit Rates (Mbps)
B Base Transmit Rates (Mbps)
A Supported Transmit Rates (Mbps)
A Base Transmit Rates (Mbps)
G Supported Transmit Rates (Mbps)
G Base Transmit Rates (Mbps)
BG Supported Transmit Rates (Mbps)
1,2,5.5,11,6,9,12,18,24,36,48,54
BG Base Transmit Rates (Mbps)
Enable Countermeasure
Packet Error Control
Packet Error Limit
Rx Packet control
Rx Packet Limit
Band Steering Mode
Band Steering Timeout(seconds)
:
:
:
:
:
:
:
:
:
:
:
:
:
:
:
:
:
:
:
:
:
:
:
:
:
:
:
Bandsteeress
Bandsteeress
default
:
:
:
:
:
:
:
:
1,2,5.5,11
on
off
0
off
0
a-steering
5
3600
100
on
none
on
none
off
off
on
off
1
shared-bssid
bridged
1,2,5.5,11
1,2,5.5,11
6,9,12,18,24,36,48,54
6,12,24
6,9,12,18,24,36,48,54
6,9,12,18,24,36,48,54
This example disables band steering:
default# configure terminal
default(config)# essid Bandsteeress
default(config-essid)# band-steering-mode disable
default(config-essid)# end
default# sh essid Bandsteeress
© 2012 Meru Networks, Inc.
Configuring an ESS
79
Band Steering Feature
ESS Profile
ESS Profile Name
SSID
Security Profile Name
Primary Radius Accounting Server
Secondary Radius Accounting Server
Accounting Interim Interval (seconds)
Beacon Interval (msec)
SSID Broadcast
Bridging
New AP's Join ESS
Tunnel Interface Type
VLAN Name
GRE Tunnel Profile Name
Allow Multicast Flag
Silent Client Polling
Enable Virtual Cell
WMM Support
DTIM Period (number of beacons)
Virtual Cell Type
Dataplane Mode
B Supported Transmit Rates (Mbps)
A Supported Transmit Rates (Mbps)
A Base Transmit Rates (Mbps)
G Supported Transmit Rates (Mbps)
G Base Transmit Rates (Mbps)
BG Supported Transmit Rates (Mbps)
1,2,5.5,11,6,9,12,18,24,36,48,54
BG Base Transmit Rates (Mbps)
Enable Countermeasure
Packet Error Control
Packet Error Limit
Rx Packet control
Rx Packet Limit
Band Steering Mode
Band Steering Timeout(seconds)
:
:
:
:
:
:
:
:
:
:
:
:
:
:
:
:
:
:
:
:
:
:
:
:
:
:
Bandsteeress
Bandsteeress
default
:
:
:
:
:
:
:
:
1,2,5.5,11
on
off
0
off
0
disable
5
3600
100
on
none
on
none
off
off
on
off
1
shared-bssid
bridged
1,2,5.5,11
6,9,12,18,24,36,48,54
6,12,24
6,9,12,18,24,36,48,54
6,9,12,18,24,36,48,54
Expedited Forward Override
The Expedited Forward Override option is implemented to override the system’s
default DSCP-to-WMM priority mapping. IP datagrams marked with DSCP Expedited
Forwarding (46) will be sent from the WMM Voice queue (AC_VO) of the AP rather than the
Video queue (AC_VI) in downstream (to stations). This feature is specific to AP300/AP400
and is disabled by Default. It is configured on a per-ESS Profile basis and works in both
bridged and tunneled ESS profiles.
Steps to configure Expedited Forward Override
1. Steps to Enable Expedited Forward Override Feature in ESSID:
Meru # config terminal
Meru(config)# essid meru
Meru(config-essid)# expedited-forward-override
80
Meru System Director Configuration Guide
© 2012 Meru Networks, Inc.
Band Steering Feature
Meru(config-essid)# end
Meru# show essid meru
ESS Profile
ESS Profile Name
Enable/Disable
SSID
Security Profile Name
Primary RADIUS Accounting Server
Secondary RADIUS Accounting Server
Accounting Interim Interval (seconds)
Beacon Interval (msec)
SSID Broadcast
Bridging
New AP's Join ESS
Tunnel Interface Type
VLAN Name
GRE Tunnel Profile Name
Allow Multicast Flag
Silent Client Polling
Virtual Cell
Virtual Port
WMM Support
APSD Support
DTIM Period (number of beacons)
Dataplane Mode
AP VLAN Tag
AP VLAN Priority
Countermeasure
Multicast MAC Transparency
Band Steering Mode
Band Steering Timeout(seconds)
Expedited Forward Override
SSID Broadcast for Vport
B Supported Transmit Rates (Mbps)
B Base Transmit Rates (Mbps)
A Supported Transmit Rates (Mbps)
A Base Transmit Rates (Mbps)
G Supported Transmit Rates (Mbps)
G Base Transmit Rates (Mbps)
BG Base Transmit Rates (Mbps)
BGN Supported Transmit Rates (Mbps)
1,2,5.5,11,6,9,12,18,24,36,48,54
BGN Base Transmit Rates (Mbps)
BGN Supported HT Transmit Rates (MCS)
0,1,2,3,4,5,6,7,8,9,10,11,12,13,14,15
BGN Base HT Transmit Rates (MCS)
AN Supported Transmit Rates (Mbps)
AN Base Transmit Rates (Mbps)
AN Supported HT Transmit Rates (MCS)
0,1,2,3,4,5,6,7,8,9,10,11,12,13,14,15
AN Base HT Transmit Rates (MCS)
Owner
© 2012 Meru Networks, Inc.
:
:
:
:
:
:
:
:
:
:
:
:
:
:
:
:
:
:
:
:
:
:
:
:
:
:
:
:
:
:
:
:
:
:
:
:
:
:
meru
enable
meru
default
3600
100
on
none
on
none
off
off
on
on
off
on
1
tunneled
0
off
on
off
disable
5
on
disabled
1,2,5.5,11
11
6,9,12,18,24,36,48,54
6,12,24
6,9,12,18,24,36,48,54
6,9,12,18,24,36,48,54
11
: 11
:
: none
: 6,9,12,18,24,36,48,54
: 6,12,24
:
: none
: controller
Configuring an ESS
81
Band Steering Feature
2. Steps to Disable Expedited Forward Override Feature in ESSID:
Meru# config terminal
Meru(config)# essid meru
Meru (config-essid)# no expedited-forward-override
Meru(config-essid)# end
Meru # show essid meru
ESS Profile
ESS Profile Name
Enable/Disable
SSID
Security Profile Name
Primary RADIUS Accounting Server
Secondary RADIUS Accounting Server
Accounting Interim Interval (seconds)
Beacon Interval (msec)
SSID Broadcast
Bridging
New AP's Join ESS
Tunnel Interface Type
VLAN Name
GRE Tunnel Profile Name
Allow Multicast Flag
Silent Client Polling
Virtual Cell
Virtual Port
WMM Support
APSD Support
DTIM Period (number of beacons)
Dataplane Mode
AP VLAN Tag
AP VLAN Priority
Countermeasure
Multicast MAC Transparency
Band Steering Mode
Band Steering Timeout(seconds)
Expedited Forward Override
SSID Broadcast for Vport
B Supported Transmit Rates (Mbps)
B Base Transmit Rates (Mbps)
A Supported Transmit Rates (Mbps)
A Base Transmit Rates (Mbps)
G Supported Transmit Rates (Mbps)
G Base Transmit Rates (Mbps)
BG Supported Transmit Rates (Mbps)
1,2,5.5,11,6,9,12,18,24,36,48,54
BG Base Transmit Rates (Mbps)
BGN Supported Transmit Rates (Mbps)
1,2,5.5,11,6,9,12,18,24,36,48,54
BGN Base Transmit Rates (Mbps)
BGN Supported HT Transmit Rates (MCS)
0,1,2,3,4,5,6,7,8,9,10,11,12,13,14,15
BGN Base HT Transmit Rates (MCS)
AN Supported Transmit Rates (Mbps)
AN Base Transmit Rates (Mbps)
82
Meru System Director Configuration Guide
:
:
:
:
:
:
:
:
:
:
:
:
:
:
:
:
:
:
:
:
:
:
:
:
:
:
:
:
:
:
:
:
:
:
:
:
:
meru
enable
meru
default
3600
100
on
none
on
none
off
off
on
on
off
on
1
tunneled
0
off
on
off
disable
5
off
disabled
1,2,5.5,11
11
6,9,12,18,24,36,48,54
6,12,24
6,9,12,18,24,36,48,54
6,9,12,18,24,36,48,54
: 11
:
: 11
:
: none
: 6,9,12,18,24,36,48,54
: 6,12,24
© 2012 Meru Networks, Inc.
Band Steering Feature
AN Supported HT Transmit Rates (MCS)
0,1,2,3,4,5,6,7,8,9,10,11,12,13,14,15
AN Base HT Transmit Rates (MCS)
Owner
:
: none
: controller
SSID Broadcast for Vport
The SSID Broadcast for Vport function is designed to improve connectivity when using
Cisco phones.
Configuration of SSID Broadcast for Vport
The SSID Broadcast for Vport option is similar to that for the ESSID configuration
parameter. From the ESSID configuration, the SSID Broadcast for Vport option has
three configurable parameters from GUI and IOSCLI as follows:
1. Disable: This is the default configuration on the ESSID profile page. Configuring
the parameter to “Disable” makes the AP not to advertise the SSID in the beacon.
Example for configuring the option to Disable from IOSCLI:
default# configure terminal
default(config)# essid assign
default(config-essid)# publish-essid-vport disabled
default(config-essid)# exit
default(config)# exit
2. Always: Configuring the parameter to “Always” enables the AP to advertise the
SSID on the beacons always. This must not be configured unless recommended.
Example for configuring the option to till association from IOSCLI:
default# conf terminal
default(config)# essid assign
default(config-essid)# publish-essid-vport always
default(config-essid)# end
3. Till-Association: Configuring the parameter to “Till-Association” enables the AP
to advertise the SSID in the beacons until the association stage of the client and
disables the SSID broadcast in the later part of connectivity. This parameter is
preferable to configure for the certain version of phones which will resolves the
connectivity issues with the Vport ON. Once station associated, AP320 will stop
broadcasting SSID string. Here the users are allowed to configure SSID broadcast
for VPort parameter from controller GUI per ESS basis in addition to AP CLI.
© 2012 Meru Networks, Inc.
Configuring an ESS
83
Multiple ESSID Mapping
Example for configuring the option to till association from IOSCLI:
default# conf terminal
default(config)# essid assign
default(config-essid)# publish-essid-vport till-association
default(config-essid)# end
Multiple ESSID Mapping
The following configuration example shows how to create three ESSIDs and map them
to three different VLANs to separate guest users, corporate users, and retail traffic.
The first ESSID, guest-users, is mapped to a VLAN named guest. This ESSID is configured to use the default security profile, which requires no authentication method or
encryption method. The VLAN IP address is 10.1.1.2/24 with a default gateway of
10.1.1.1. The DHCP server IP address is 10.1.1.254. This ESSID is configured so that
it is added to each access point automatically and is also part of a Virtual Cell. (All
access points on the same channel with this ESSID share the same BSSID.)
The second ESSID, corp-users, is mapped to a VLAN named corp. This ESSID is configured to use a security profile called corp-access, which requires 64-bit WEP for an
authentication/encryption method. The static WEP key is set to corp1. The VLAN IP
address is 10.1.2.2/24 with a default gateway of 10.1.2.1. The DHCP server IP
address is 10.1.2.254. This ESSID is configured so that it is added to each AP automatically and is also part of a Virtual Cell.
The third ESSID, retail-users, is mapped to a VLAN named retail. This ESSID is configured to use a security profile called retail-access, which requires 802.1X as an
authentication method. The 802.1X rekey period is set to 1000 seconds. The primary
Radius server IP address is set to 10.1.3.200, the primary Radius port is set to 1812,
and the primary Radius secret is set to secure-retail. The VLAN IP address is set to
10.1.3.2/24 with a default gateway of 10.1.3.1. The DHCP server IP address is
10.1.3.254. This ESSID is configured so that it is added to the access point with node
id 1 only. Also, the broadcasting of this ESSID value in the beacons from the access
point is disabled, and the ESS is given a BSSID of 00:0c:e6:02:7c:84.
Use the show vlan command to verify the VLAN configuration:
controller# show vlan
VLAN Configuration
VLAN Name
Tag IP Address
guest
1
10.1.1.2
corp
2
10.1.2.2
retail
3
10.1.3.2
NetMask
255.255.255.0
255.255.255.0
255.255.255.0
Default Gateway
10.1.1.1
10.1.2.1
10.1.3.1
Now that the VLANs and security profiles have been created, the new ESSIDs can be
created and configured.
84
Meru System Director Configuration Guide
© 2012 Meru Networks, Inc.
Multiple ESSID Mapping
controller# configure terminal
controller(config)# essid guest-users
controller(config-essid)# security-profile default
controller(config-essid)# vlan guest
controller(config-essid)# exit
controller(config)# essid corp-users
controller(config-essid)# security-profile corp-access
controller(config-essid)# vlan corp
controller(config-essid)# exit
controller(config)# essid retail-users
controller(config-essid)# security-profile retail-access
controller(config-essid)# vlan retail
controller(config-essid)# no ap-discovery join-ess
controller(config-essid)# no publish-essid
controller(config-essid)# ess-ap 1 1
controller(config-essid-ess-ap)# bssid 00:0c:e6:03:f9:a4
controller(config-essid-ess-ap)# exit
controller(config-essid)# exit
controller(config)# exit
controller#
To verify the creation of the new ESSIDs, use the show essid command.
To view detailed configuration for each of the new ESSIDs, use the show essid
essid-name command.
To verify that the guest-users and corp-users ESSIDs were automatically joined to
both access points connected to the controller and that the retail-users ESSID was
only joined to AP 1, use the show ess-ap ap ap-node-id or the show ess-ap essid
essid-name commands.
controller# show ess-ap
ESS-AP Configuration
AP ID: 1
ESSID
guest-users
corp-users
retail-users
controller# show ess-ap
ESS-AP Configuration
AP ID: 2
ESSID
guest-users
corp-users
controller# show ess-ap
ESS-AP Configuration
ESSID: retail-users
AP ID
AP Name
1
AP-1
controller# show ess-ap
ESS-AP Configuration
ESSID: corp-users
AP ID
AP Name
1
AP-1
2
AP-2
© 2012 Meru Networks, Inc.
ap 1
AP Name
AP-1
AP-1
AP-1
Channel
6
6
6
BSSID
00:0c:e6:01:d5:c1
00:0c:e6:02:eb:b5
00:0c:e6:03:f9:a4
AP Name
Channel
AP-2
6
AP-2
6
essid retail-users
BSSID
00:0c:e6:01:d5:c1
00:0c:e6:02:eb:b5
ap 2
Channel BSSID
6
00:0c:e6:03:f9:a4
essid corp-users
Channel
6
6
BSSID
00:0c:e6:02:eb:b5
00:0c:e6:02:eb:b5
Configuring an ESS
85
Bridged AP300 in a Remote Location
Bridged AP300 in a Remote Location
When bridged mode is configured in an ESSID, an AP using that ESSID can be installed
and managed at a location separated from the controller by a WAN or ISP, for example
at a satellite office. The controller monitors remote APs with a keep-alive signal.
Remote APs exchange control information, including authentication and accounting
information, with the controller but cannot exchange data. Remote APs exchange
data with other APs within their subnet.
Because Remote APs cannot exchange data-plane traffic (including DHCP) with the
controller, certain Meru Wireless LAN features are not available for remote AP configurations. These include:
QoS
Captive Portal
L3 mobility
The features that are available are:
VLAN
Virtual Cell
802.1X authentication
High user density
Multiple ESSIDs
Dataplane encryption for backhoe on L3 tunnel with AP150s
Configure Bridged Mode with the Web UI
Configure bridged mode when you add or modify an ESS with the Web UI; for directions, see Add an ESS with the Web UI.
Configure Bridged Mode with the CLI
This example creates the ESSID abcjk, sets its mode to bridged, assigns a tag, and
then gives top priority to abcjk.
test (config-essid)#
test# configure terminal
test (config)# essid abcjk
test (config-essid)# dataplane bridged
test (config-essid)# ap-vlan-tag 11
test (config-essid)# ap-vlan-priority
test (config-essid)# end
For details of the commands used here, see the Command Reference Guide.
86
Meru System Director Configuration Guide
© 2012 Meru Networks, Inc.
Utilizing Multiple IPs on a Single MAC
Utilizing Multiple IPs on a Single MAC
In current Meru implementations, a typical client machine (or station) is granted a
single IP Address per wireless adapter in use. However, with the growing use of
Virtual Machine models (provided by VMware, Parallels, etc.), a single station can run
multiple Operating Systems from a single client. With this release of Meru System
Director, each Virtual Machine can now be provided with an individual IP Address,
making it much easier to troubleshoot packet transmissions.
To support this function, the System Director ESS Profile screen has a new function
labeled MIPS, which is disabled by default. With this function enabled, packets are
bridged across from the “host”, or main, Operating System to the “guest”, or virtual,
system(s) as needed. The following notes apply:
All data packets sent from the client will have the host OS MAC address as their
source address.
All data packets sent to the client will have the host OS MAC address as their
destination address.
Each OS has a different client hardware address that is transmitted as part of the
DHCP payload.
“Guest” OS hardware devices have MAC addresses that start “00:0c:29”; this is
the global standard OUI for VMware. This hardware address is used by the DHCP
server to identify guest OSes, allowing them to be provided separate IP addresses.
Grat ARP packets transmitted by any IP will have their corresponding unique client
hardware addresses.
All broadcast packets received by the host OS will also be delivered to the guest
OS(es).
All unicast packets received by the host OS will be delivered to the guest OS(es)
based on the packets’ destination IP address.
In order to support this capability, a command has been added to the CLI:
show station multiple-ip—Displays all IP addresses provided by each individual
station along with MAC addresses (labeled ‘vmac’ for virtual devices). Note that
for the host device, the Client MAC and Virtual MAC will be identical.
Note:
© 2012 Meru Networks, Inc.
Only IPv4 address types are supported.
All IP addresses belonging to a single station are assumed to be part of the
same VLAN.
IP addresses provided to Virtual OSes are always dynamic; static addresses are
not supported.
ICR is not supported when this feature is enabled.
Configuring an ESS
87
Utilizing Multiple IPs on a Single MAC
88
Meru System Director Configuration Guide
© 2012 Meru Networks, Inc.
Chapter 6
Implementing Redundancy
There are three options available for controller redundancy:
Redundant Ethernet: With this Ethernet link level redundancy, if one Ethernet
link goes down, another Ethernet link on the same controller will take over.
N+1: With this controller level redundancy, if one controller goes down, a
designated slave controller will take over for the failed master controller.
Option 43: With this controller level redundancy, an AP is aware of both the
primary and secondary controller. If the primary controller goes down, the APs
automatically associate with the secondary controller. If the primary controller
comes back up, they associate to the primary controller.
Figure 9: Meru System Director Redundancy Flow
© 2012 Meru Networks, Inc.
Implementing Redundancy
89
Redundant Ethernet
For any redundancy option to work without issues, make sure that the VLANs are the
same across all the ports on the external manageable switch.
With N+1, the backup controller must be in the same subnet as the primary controllers. With DHCP Option 43, you can specify a primary and backup controllers for the
APs and with this configuration, the backup controller can be in a different subnet
from the primary controller.
This chapter contains the following sections:
Configure Redundant Ethernet Failover With the CLI
N+1 Redundancy
Option 43
Redundant Ethernet
When operating an MC1500 or MC3000, Ethernet redundancy can be enabled at any
time by simply following the steps outlined in the following sections. However, some
controller models require dual port bonding to be enabled before Ethernet redundancy can be activated. These controllers include the following models:
MC3200
MC4100
MC4200
MC5000 (with accelerator card)
To enable dual bonding on these models, access the controller’s CLI and enter the
following commands:
default# configure terminal
default(config)# bonding dual
default(config)# exit
default(config)# copy running-config startup-config
Note: MC6000 deployments require that bonding be set to none for Dual Ethernet
redundant and Active configuration functionality.
The system requires a reboot for the change to become effective. Reboot the system
now and then proceed with the following sections to enable redundancy.
90
Meru System Director Configuration Guide
© 2012 Meru Networks, Inc.
N+1 Redundancy
Configure Redundant Ethernet Failover With the CLI
The following commands configure Ethernet interface 2 on a controller as a backup
to Ethernet interface 1. Do this by issuing the option redundant for the type
command as shown below.
default# configure terminal
default(config)# interface FastEthernet 2
default(config-if-FastEth)# type redundant
default(config-if-FastEth)# exit
default(config)# exit
default(config)# copy running-config startup-config
Note: In the redundant configuration, the IP address for the second Ethernet
interface cannot be configured. It will receive the IP address of the primary Ethernet
interface when the failover occurs.
The system requires a reboot for the change to become effective. Reboot the system
now, and then check the redundant second interface configuration with the show
second_interface_status command:
default# show second_interface_status
Recovering From Redundant Ethernet Failover
Once Dual Ethernet Redundant mode configuration is complete, the controller needs
to be rebooted - see directions above. After the reboot, if the first Ethernet interface
link goes down, then the second Ethernet interface takes over the controller connectivity. Redundant Ethernet failover is based on LinkID and does not require any spanning-tree configuration. When a LinkID is missing, the failover will occur in under one
second. This failover will be transparent to the access points. The second interface
remains active and serving all APs, even if the first interface comes up again. Verify
this with the CLI command show second-interface-status. Only when the second
interface goes down will the first interface (if it is up) take over the controller
connectivity.
When N+1 or L3 redundancy is also configured and controller 1 fails, the APs move to
controller 2. When controller 1 comes back online, the APs immediately begin to
move back to controller 2. Also see Recovering From N+1 with Dual Ethernet Failover.
N+1 Redundancy
The optional N+1 redundancy software feature, when implemented, allows a standby
N+1 slave controller in the same subnet to monitor and failover more than one master
controller.
© 2012 Meru Networks, Inc.
Implementing Redundancy
91
N+1 Redundancy
A set of master controllers and a standby slave controller are configured via static IP
addressing to reside in the same subnet, and are considered to be an N+1 cluster. The
standby slave monitors the availability of the master controllers in the cluster by
receiving advertisement messages sent by the masters over a well known UDP port at
expected intervals. If five successive advertisements are not received, the standby
slave changes state to an active slave, assumes the IP address of the failed master,
and takes over operations for the failed master. Because the standby slave already
has a copy of the master’s latest saved configuration, all configured services
continue with a short pause while the slave switches from standby to active state.
While in the active slave role, the slave controller’s cluster monitoring activities are
put on hold until the failed master rejoins the cluster. An active Slave detects the
restart of a master through ARP. When the active slave is aware of the master’s return
(via the advertisement message) it relinquishes the master’s IP address and then
returns to the standby state. The now-passive slave will not fail over for the same
master until a WTR is completed.
If it is necessary for the failed master to be off-line for a lengthy interval, the administrator can manually set the active slave back to the standby slave, thereby ensuring
the standby slave is able to failover for another master.
In most cases with a cluster of N+1 Masters, the APs all have to be in L3 Connectivity
mode, but if you only have one Master and one Slave unit (N=1) the APs can be in L2
connectivity mode. In this case, while the Master unit is active the Slave unit will not
take AP registration so the AP will always go to the correct controller.
92
Meru System Director Configuration Guide
© 2012 Meru Networks, Inc.
N+1 Redundancy
N+1 with Non-Revertive Mode
Previously, N+1 feature was incapable of providing an option to control the failback
operation. This means, an active slave relinquishes a master's role as soon as the
master becomes operational. The service downtime is doubled, when the fail over
and fall back happens without the administrator's control. To control the fail back
operation a Non-Revertive feature is introduced.
The Non-Revertive feature enables the administrator to choose when an active slave
can relinquish a master's role. Apparently, an active slave verifies if the master is
ready to take over the master's role or not. If the master is not ready, the failback
operation fails to start, and active slave keeps operating as a master. While the
active slave keeps operational, the master stays in the standby mode, waiting for the
active slave to relinquish the role.
Here, the Administrator minds the failback operation. To control the failback operation, a non-revertive mode must be enabled. The failback operation can be scheduled at a desired date and time. A Revert can also be scheduled exclusively on the
Active slave. Once this is performed, the Active slave reverts back to Passive at the
time scheduled by the administrator. In another way, Active to Passive slave revert
is performed forcibly without scheduling it on the Active Slave.
See “Managing the N+1 Installation” on page 100 to configure the non-revertive
mode and to schedule the revert.
Preparing the Network
The N+1 cluster must be configured within a set of guidelines to operate as described
in the previous section. While configuring your network for N+1 redundancy, the
following guidelines must be followed:
In the N+1 cluster, the slave and master controllers must be the same model and
run the same version of System Director software. A check is performed by the
slave controller after each master controller is assigned to it to ensure the
hardware model and System Director version are identical; if a mismatch occurs,
the slave is not allowed to switch over for this master, and that status is noted in
the Status display for the Master Controller.
All master and slave controllers must use static IP addressing to ensure
consistency and control of N+1 clustering. (DHCP addresses are not supported for
controllers participating in the N+1 cluster).
Master and slave controllers must be on the same IP subnet.
All APs in the network should be configured for Layer 3 connectivity with the
controller.
Spanning tree should be disabled on the switch port to which the controllers are
connected. To disable spanning tree on the port, refer to your switch
configuration documentation.
Configuring the N+1 Clusters shows a simplified network diagram of a recommended
N+1 deployment.
© 2012 Meru Networks, Inc.
Implementing Redundancy
93
N+1 Redundancy
Figure 10: Example N+1 Redundancy Network Deployment
Configuring the N+1 Clusters
This can only be configured using the CLI and up to five masters and one slave. You
will need passwords for all controllers involved in the N+1 configuration. A summary
of the steps to configure and start N+1 follows:
Step
1.
94
Command
Description
nplus1 start master
On each master, start N+1 redundancy.
Meru System Director Configuration Guide
© 2012 Meru Networks, Inc.
N+1 Redundancy
Step
2.
3.
Command
Description
nplus1 start slave
Start N+1on the slave controller.
nplus1 add
master_hostname
master_IP_address
Add the master controller’s hostname and IP address to
the slave’s cluster list.
Starting N+1 on Master Controllers
N+1 must first be started on the Master Controllers.
To configure a master controller:
1. On each master controller, enter configuration mode and start the N+1 software:
master# configure terminal
master(config)# nplus1 start master
2. Exit configuration mode and check that the N+1 software has been started on that
controller:
master(config)# exit
master# sh nplus1
----------------------------------------------------Master controller
Master IP : 10.1.1.10
Master Hostname : master
-----------------------------------------------------
Configuring N+1 on the Slave Controller
After starting N+1 on each of the Master Controllers, start N+1 on the Slave
Controller, and then add each Master Controller to the Slave Controller.
Note:
The Slave Controller must be the last controller in the cluster to start
N+1. All Master Controllers must be added to the cluster before starting
N+1 on the Slave Controller.
To configure N+1 on the slave controller, follow these steps:
1. Enter configuration mode and start the N+1 software:
slave# configure terminal
slave(config)# nplus1 start slave
Setting up this controller as a Passive Slave controller
3000-slave(config)#
© 2012 Meru Networks, Inc.
Implementing Redundancy
95
N+1 Redundancy
2. Check that the software has started on the slave with the show nplus1 command
(note that no masters display in the Master Controllers list):
Slave(config)# do show nplus1
The system is not fully operational
-------------------------------------------------------------------------slave(config)# do show nplus1
Current State : Passive
Non-Revertive mode : Disable
Wait to Restore (WTR) : 8 minutes
Master Timeout : 5 keepalives
Slave IP : 192.168.10.204
Slave Hostname : slave
License Type : Licensed
License Usage (Used/Tot) : 0/5
-------------------------------------------------------------------------Master Controllers
Missed
Hostname
IP Address
SW Version
Admin
Switch
Reason
Adverts
-------------------------------------------------------------------------Slave#
3. Supply the hostname and IP address of each master controller in the cluster. You
will be prompted for the controller’s password to complete the addition:
Slave# configure terminal
Slave(config)# nplus add ScaleMasterThree 10.1.1.10
[email protected] Password:
4. Exit configuration mode and check that the master controller has been enabled
(the Admin status is now Enable):
slave(config)# exit
slave# show nplus1
-----------------------------------------------------------------------------------------Current State : Passive
Non-Revertive mode : Disable
Wait to Restore (WTR) : 8 minutes
Master Timeout : 5 keepalives
Slave IP : 10.1.1.21
Slave Hostname : Slave
License Type : Licensed
License Usage (Used/Tot) : 1/5
-----------------------------------------------------------------------------------------Master Controllers
Missed
SW
Hostname
IP Address Admin
Switch Reason
Adverts Version
------------------------------------------------------------------------------------------
96
Meru System Director Configuration Guide
© 2012 Meru Networks, Inc.
N+1 Redundancy
ScaleMasterThree
10.1.1.10
Enable
Yes
-
0
5.0-xx
Monitoring the N+1 Installation
The show nplus1 command allows you to check the current controller configuration
and show the status of the controller. Some sample output displays are included to
show the information displayed in the various controller states.
N+1 on master—displays basic master controller identification information
ScaleMasterThree# sh nplus1
----------------------------------------------------Master controller
Master IP : 10.1.1.10
Master Hostname : ScaleMasterThree
----------------------------------------------------
N+1 on a standby slave—basic slave controller identification information plus the
status for the master controllers in the cluster (accompanying table describes
status fields)
Slave# sh nplus1
-------------------------------------------------------------------------Current State : Passive
Non-Revertive mode : Disable
Wait to Restore (WTR) : 8 minutes
Master Timeout : 5 keepalives
Slave IP : 10.1.1.21
Slave Hostname : Slave
License Type : Licensed
License Usage (Used/Tot) : 1/5
-------------------------------------------------------------------------Master Controllers
Missed
Hostname
IP Address Admin
Switch Reason
Adverts SW
Version
-------------------------------------------------------------------------ScaleMasterThree
10.1.1.10
Enable
Yes
0
5.0-xx
Slave#
© 2012 Meru Networks, Inc.
Implementing Redundancy
97
N+1 Redundancy
The descriptions of the display fields are provided in the following table:
Field
Description
Hostname
Hostname of the master controller
IP Address
Static IP address assigned to the master controller
Status of N+1 redundancy on the master:
Admin
Enable—N+1 redundancy has been enabled on the master
Disable—N+1 redundancy has been disabled
Ability of the slave to assume active slave for the master:
Yes—Slave and master model/system director version
Switch
number are compatible
No—Slave and master model/system director version
number are incompatible or the administrator has
disabled N+1 on the master
98
Meru System Director Configuration Guide
© 2012 Meru Networks, Inc.
N+1 Redundancy
Field
Description
If Switch is No, describes why switch cannot be made:
Down: Master has been disabled by the user
SW Mismatch: The system director software is out of sync
(update the Master Controller).
No Access: The Passive Slave was not able to access the
Master because it did not receive a copy of the
configuration. This is a rare message that occurs if show
nplus1 is executed almost immediately after adding a
controller.
No Access: The Passive Slave was not able to access the
Reason
Master Controller. This occurs most frequently if a
replacement controller has not had access cleared using
the nplus1 access command.
WTR Set: As an Active Slave transitions back to Passive
Slave this state is the first step in the WTR timer
countdown.
WTR—Xs: After the WTR Set is reached, the timer counts
down, showing the number of seconds (s) remaining.
Suspected Up: If N+1 service is stopped on the Master
when the controller is reachable via its IP, the Passive
Slave transitions to Active Slave (due to missing N+1
keepalives from its master), becomes the Active Slave
(with Master’s IP address), now detects that the Master
IP is reachable, and then transitions back to Passive
Slave with the reason as Suspected up.
Adverts
Number of consecutively missed (not received) advertisements
(a maximum of 5 triggers a failover if the Switch field is Yes).
SW Version
The software version of System Director on the controller.
N+1 on an active slave—the master IP address and hostname are added to the
display
3000-1# show nplus1
---------------------------------------------Current State : Active
Non-Revertive mode : Disable
Wait to Restore : 8 minutes
Master IP : 10.1.1.10
Master Hostname : 3000-1
Slave IP : 10.1.1.21
Slave Hostname : 3000-slave
----------------------------------------------
© 2012 Meru Networks, Inc.
Implementing Redundancy
99
N+1 Redundancy
Master Controllers
Hostname
IP Address Admin
---------------------------------------------3000-1
10.1.1.10
Disabled
3000-1#
Note:
Slave configuration commands are not operable when the Slave is Active.
3000-1# configure terminal
3000-1(config)# nplus1 add 3000-3 10.1.1.13
ERROR: Cannot add Master controller while being ACTIVE Slave
3000-1(config)#
Managing the N+1 Installation
The tasks to manage an N+1 installation include:
Enabling Non-Revertive mode
Scheduling revert on Active slave
Cancel the Schedule Revert
Reverting the Active Slave to Standby
Changing the WTR Interval
Disabling and Deleting N+1 Master Controllers
Stopping N+1 Installations
Replacing a Master Controller
Working with N+1 Syslog
Enabling Non-Revertive mode
To control the N+1 failback operation, a non-revertive mode is used on the passive
slave controller. When the non-revertive mode is enabled, post the N+1 failover
state, the active slave remains active though master is the back up. Here, the master
remains in standby mode till the active slave reverts back to passive either forcibly
or at the scheduled time.
On passive slave, use the following commands to,
enable the non-revertive mode - nplus1 non-revertive enable
disable the non-revertive mode - nplus1 non-revertive disable
100 Meru System Director Configuration Guide
© 2012 Meru Networks, Inc.
N+1 Redundancy
Scheduling revert on Active slave
A revert can scheduled only on the active slave or passive to active slave state.
Before scheduling a revert, a non-revertive must be enabled.
Revert can be scheduled using the following command,
nplus1 revert schedule <month/day/year> <hh:mm:ss>
For Example:
nplus1 revert schedule 12/01/2012 01:02:03
Master1(15)# sh nplus1
------------------------------------------------Current State : Active Slave
Non-Revertive Mode : Enable
Scheduled Revert : Thu Jan 12 01:02:03 2012
Wait to Restore (WTR) : 8 minutes
Master Timeout : 5 keepalives
Master IP : 10.1.1.10
Master Hostname : MasterNplus1
Slave IP : 10.1.1.21
Slave Hostname : slave4200
License Type : Licensed
License Usage (Used/Tot) : 1/1
------------------------------------------------Master Controllers
Hostname
IP Address Admin
------------------------------------------------Master1
10.1.1.10 Enable
Master1(15)#
At this time, the active slave switches the role to standby master and reverts to the
passive state.
Cancel the Schedule Revert
To Cancel the Schedule Revert the following command is used:
nplus1 revert cancel
Reverting the Active Slave to Standby
You may want to change the role the active slave back to standby slave if it becomes
obvious that the failed controller will be offline for some time. By reverting the slave
from active to standby, the cluster can continue to be monitored.
Use the nplus1 revert command to change the status of the slave from active to
standby.
© 2012 Meru Networks, Inc.
Implementing Redundancy 101
N+1 Redundancy
Changing the WTR Interval
To provide stability and reduce unintended failback flip-flopping, a Wait to Restore
(WTR) count-down timer is used to count down before the Standby slave can again
take over the role of a Master unit it recently relinquished. By default, this interval
is set for 8 minutes, but can be changed to a number of minutes from 1 to 20 minutes.
To change the interval, use the nplus1 wtr set command:
3000-slave# configure terminal
3000-slave(config)# nplus1 wtr set minutes
3000-slave(config)# end
To clear the counter on a Master Controller that is in the process of counting down
and start an immediate failover, use the nplus1 wtr clear command:
3000-slave# configure terminal
3000-slave(config)# nplus1 wtr clear Master_IP_addr
3000-slave(config)# end
Disabling and Deleting N+1 Master Controllers
To disable N+1 operation on a master controller, but still maintain its configuration
in the cluster, from the slave controller, use the nplus1 disable command, with the
IP address of the controller you are deleting:
3000-slave# configure terminal
3000-slave(config)# nplus1 disable 10.1.1.10
3000-slave(config)# end
To remove an N+1 master controller from the cluster, from the slave controller, use
the nplus1 delete command, with the IP address of the controller you are deleting:
3000-slave# configure terminal
3000-slave(config)# nplus1 delete 10.1.1.10
3000-slave(config)# end
Stopping N+1 Installations
N+1 Slave and N+1 Master Controllers must be stopped separately.
Stopping N+1 Slave Controllers
To stop N+1 on a Slave Controller:
3000-slave# configure terminal
3000-slave(config)# nplus1 stop
Making this a normal controller.
3000-slave(config)# exit
3000-slave#
Stopping N+1 Master Controllers
To stop N+1 on a Master Controller:
102 Meru System Director Configuration Guide
© 2012 Meru Networks, Inc.
N+1 Redundancy
3000-1# configure terminal
3000-1(config)# nplus1 stop
3000-1(config)# exit
Replacing a Master Controller
Should a Master Controller in the cluster need to be replaced, the following summarizes the steps needed to replace a Master Controller.
1. On the Slave Controller, disable the failed Master Controller:
3000-slave# configure terminal
3000-slave(config)# nplus1 disable <master IP-addr>
3000-slave(config)# exit
2. Stop the failed Master Controller N+1 services (skip if Master Controller is not
functioning):
3000-master# configure terminal
3000-master(config)# nplus1 stop
3000-master(config)# exit
3. Power down the failed Master Controller (skip if Master Controller is not
functioning):
3000-master(config)# poweroff
4. Physically remove the failed controller and replace it with the new controller.
(New controller must be running the same version of System Director as the Slave
Controller and have the same static IP address that the replaced controller had.)
5. On the Slave Controller, execute the nplus1 access command to allow access to
the newly added Master Controller:
3000-slave# configure terminal
3000-slave(config)# nplus1 access master_IP_addr
6. On the Slave Controller, enable the new Master Controller:
3000-slave(config)# nplus1 enable master_IP_addr
3000-slave(config)# exit
On the Slave Controller, give access permission for the new Master Controller:
3000-slave(config)# nplus1 access master_IP_addr
Working with N+1 Syslog
Checking the Syslog Debug Level
The show nplus1 debugloglevel command shows the level of verboseness set for the
N+1 log messages.
3000-slave# sh nplus1 debugloglevel
nplus1 Debug Logging Level: 0
3000-slave#
© 2012 Meru Networks, Inc.
Implementing Redundancy 103
N+1 Redundancy
Setting the syslog Debug Level
The nplus1set debugloglevel command sets the level of verboseness for the N+1 log
messages. The level can be set from 0 to 3, where 1 is the least verbose. The default
0 setting disables syslog messaging.
3000-slave(config)# nplus1 setdebugloglevel 1
N+1 Syslog Messages
Syslog messages are generated and sent to a log file on the syslog server configured
with the syslog-host command. These message are sent by a standalone N+1 slave
controller when an error condition occurs. A sample syslog message follows:
Oct 26 14:02:45 slave nplus1_Slave: <error message>
The list of syslog messages are as follows:
Error Message
Description/Remedy
IP address not assigned.
Please run setup before using
nplus1
The command nplus1 start slave executed, but no IP
address exists for the controller. Run the setup
command on that controller and assign the controller a
static IP address.
ERROR: Could not get
software version from file:
meru_sw_version_file
Couldn’t determine the System Director software
version.
Rejecting record number due
to parsing issues
Error reading the persistent record of configured
masters. Manually add the Master Controllers again.
Could not open socket for CLI
server
Problem initializing the N+1 CLI.
CLI server: Bind error for
server ip: ip port: port
Issues in initializing N+1 CLI.
ALERT: Software Mismatch:
Master (master_ip):
software_version Slave
(slave_ip): software_version
The Master Controller advertisement revealed a
software mismatch. While the version mismatch occurs,
the Master Controller cannot provide redundancy. Install
on the Master Controller the same software version as
the Slave Controller (or vice versa).
Copyback failed for master
controller: master_ip
Configuration of Master Controller changed while the
Slave was active, and the copyback failed. Remove the
new Master Controller configuration changes, failback
the Master Controller, and then perform the needed
configuration changes.
104 Meru System Director Configuration Guide
© 2012 Meru Networks, Inc.
N+1 Redundancy
For MC: master_ip State: SW
Mismatch -> No Access Saved Config does not exist
Software mismatch was resolved, but the Master
Controller is not accessible from the Slave Controller
and cannot provide redundancy. Ensure that the Master
Controller is accessible using the command nplus1
access master_ip.
For MC: master_ip State:
WTR Set-> WTR - Copyback
Done
Failback process has begun, WTR timer initiated and is
in the process of counting down, and the Master
Controller is accessible. The failback process cannot
complete and the Master Controller cannot provide
redundancy until WTR expires.
For MC: master_ip State:
WTR Set-> WTR - No Access
Failback process has begun, WTR timer initiated and is
in the process of counting down, but the Master
Controller is not accessible. Ensure that the Master
Controller is accessible, and verify by using the
command nplus1 access master_ip.
Could not access host:
master_ip. Setting No Access
Count to: count
Could not access the Master Controller. The Master
Controller cannot provide redundancy until it is
accessible. Access will be rechecked after count
(default is 60 seconds). The problem may be caused by
a gateway failure. Ensure that the Master Controller is
accessible, and verify by using the command nplus1
access master_ip.
Recovering From N+1 Failover
When an N+1 master controller goes down, the slave controller transitions from
passive slave to active slave (failover) and starts acting as the master controller.
When the original master comes back up, the active slave becomes the passive slave
again (fallback). The APs then reboot and discover the master controller again.
Note:
If non-revertive mode is enabled, the Active to Passive Slave transition
does not take place until revert is executed at its scheduled time/date
or it should be executed forcibly. During this scenario, the standby
master takes over the master role. The APs drop the Active slave and
discovers the original master controller again.
Recovering From N+1 with Dual Ethernet Failover
On the Master controller, when the first Ethernet interface goes down, the controller
fails over to second interface of the same controller. If the second interface goes
down, Nplus1 failover takes place and the N+1 passive slave becomes an active slave
with Dual Ethernet redundant configuration.
© 2012 Meru Networks, Inc.
Implementing Redundancy 105
Option 43
The active slave is now in control. If the first active slave Ethernet interface goes
down, the slave controller fails over to the second Ethernet interface.
To revert the failover, verify that the first interface on the Slave controller is up and
running. Then, bring up the first interface of the original Master controller. The N+1
active slave becomes a passive slave and the original N+1 master becomes the N+1
Master again.
Caution! If the first interface on the Slave controller is not running when the Master
controller’s first interface is brought online, the Active Slave would transition to a Passive
Slave. However, since the first interface is not online, the N+1 module will assume that the
Master controlelr is down and try to resume the Master role itself. This can cause a loop in
functionality. To avoid this, always ensure that the first interface on the Slave controller is
up prior to bringing up the same interface on the Master controller.
Option 43
Option 43 is not part of any Meru product; it is a method for mapping controllers.
With DHCP Option 43, you can specify a primary and backup controller for APs. With
this configuration, the backup controller can be in a different subnet from the
primary controller. Option 43 implements redundancy by specifying which controllers
(primary and secondary) an AP should associate to. This feature is supported across
all access points. A backup controller can be configured using either DHCP or DNS.
For example, using Option 43, if “wlan-controller” is mapped to P1 (and P1 has a
redirect to P2) and “wlan-controller-2” is mapped to S1 (and S1 has a redirect to S2),
the discovery order would be P1, P2, S1, S2. If a controller has both a DNS entry and
Option 43 enabled, the AP will first use the host address as configured on the AP
(default value = wlan-controller). If the host address is configured as 0.0.0.0 or if the
host is a name and the name cannot be resolved using DNS, only then will the AP look
at the DHCP Option 43 value.
For specific Option 43 configuration directions, see the Support Portal How-To
4062-125.
AP Aware Redundancy using DHCP Option 43
Configure APs with L3 preferred and the controller name as 0.0.0.0
On the DHCP server, Option 43 values need to be configured with primary and
secondary controller IPs and/or hostnames. Then, when an AP contacts the DHCP
server to obtain an IP address, it also receives primary and secondary controller
IP information using the Option 43 value from the DHCP server.
106 Meru System Director Configuration Guide
© 2012 Meru Networks, Inc.
Option 43
AP Aware Redundancy using DNS
Configure APs with L3 preferred and the controller name as the hostname of the
controller.
Configure a DNS entry to resolve the primary hostname on the DNS server.
Configure a DNS entry to resolve the secondary hostname on the DNS server.
Configure the hostname of the primary controller on the AP with L3 preferred
mode.
© 2012 Meru Networks, Inc.
Implementing Redundancy 107
Option 43
108 Meru System Director Configuration Guide
© 2012 Meru Networks, Inc.
Chapter 7
Configuring Network Interfaces
One of the first steps when setting up a controller is to configure the networking
parameters using the setup program, as described in the Meru System Director
Getting Started Guide. If you did not run the setup program, or if you want to change
the settings that were configured with the setup script, you can use the commands
described in the section Configuring Basic Networking for the Interface.
Because controllers have two FastEthernet ports, you may want to configure the
second port for additional operation. The second port can be used as redundant
interface or as a second active FastEthernet interface. To configure the
Dual-Ethernet feature, refer to the section Dual-Ethernet Operation. Note that after
a change like this, you need to reboot the controller.
Configuring Basic Networking for the Interface
Use the following commands to configure network parameters, if necessary:
To change the parameters of the FastEthernet port, use the interface
FastEthernet command.
To set up a dynamic IP address assignment for the wireless clients using the DHCP
relay server, use the ip dhcp-server ip-address command.
To set the IP address of the controller, use the ip address ip-address netmask
command.
To set the default gateway, use the ip default-gateway ip-address command.
To set the domain name, use the ip domainname name command.
To add one or more DNS name servers, use the ip dns-server ip-address command.
For additional information about configuring network information, see the Meru
System Director Getting Started Guide. For more information about the listed
commands, see the Meru System Director Command Reference.
© 2012 Meru Networks, Inc.
Configuring Network Interfaces 109
Dual-Ethernet Operation
802.11d Support
The original 802.11 standard defined operation in only a few regulatory domains
(countries). 802.11d added the ability for 802.11 WLAN equipment to operate in additional countries by advertising the country code in the beacon. Devices pick up the
country code and adjust communication accordingly. You do not have to configure or
enable this feature; the Meru implementation currently works automatically for all
countries listed in setup. There is no show command that displays this feature. Validate 802.11d in the 802.11 Beacons and Probe Response, Country code IE field.
Dual-Ethernet Operation
Dual-Ethernet support enables the controller’s second Ethernet port and provides the
ability for it to work either as a redundant interface or a second active interface.
If the second interface is configured as redundant, it will serve as a backup interface
to the first interface. This means that it will be idle as long as the first interface is
functional and will perform all functions of the first interface if the first interface
fails. In a redundant configuration, the first interface must have a static IP address.
If the second interface is configured as active, it can be configured as a separate
interface that can support an additional configuration, for example to support GRE
tunneling while the first interface is configured for VLANs.
Note: The first Ethernet interface is treated as the default interface. The
responsibility of the default interface is to pass wireless tunnel traffic between the
APs and the controller. In addition to the general support of GRE and VLAN, the
default interface is also the designated management interface for the controller,
providing support for management access traffic via SSH and HTTPS.
It is implicit in the configuration of redundant mode that the second Ethernet interface should be connected to a switch port in which it can perform the same functions
as the default Ethernet interface.
Note that when changing from redundant to dual active operation, a controller
reboot is required.
Configuring Dual Ethernet
The second Ethernet interface can be configured as either redundant or active. An
active interface can be used to support a VLAN or GRE (Generic Routing Encapsulation) tunneling. A redundant interface is a backup interface in case the primary
interface fails.
110 Meru System Director Configuration Guide
© 2012 Meru Networks, Inc.
Dual-Ethernet Operation
Note: Do not insert an Ethernet cable into the second Ethernet port until it has been
configured as active or redundant.
Configuring a Redundant Interface
See the chapter Implementing Redundancy.
Configuring an Active Interface
The following commands configure Ethernet port 2 as an active interface that can be
used to support a VLAN or GRE (Generic Routing Encapsulation) tunneling. The ip
address specifies the IP address of the VLAN or GRE local endpoint followed by the
associated netmask. The gw command specifies the gateway address, and is a mandatory field.
default# configure terminal
default(config)# interface FastEthernet 2
default(config-if-FastEth)# ip address 172.26.16.200 255.0.0.0
default(config-if-FastEth)# gw 172.26.16.1
default(config-if-FastEth)# type active
default(config-if-FastEth)# exit
default(config)# exit
Note that when changing from redundant to dual active operation, a controller
reboot is required.
Note: In the active configuration, the second Ethernet interface must be configured
with a static IP address (not DHCP) to a different L2 domain than the primary
interface.
After completing the interface configuration above, to configure a GRE tunnel, see
Configure GRE Tunnels in the Security chapter.
Viewing FastEthernet Interface Information
To view the FastEthernet interface 1 configuration, use the show interfaces FastEthernet controller or show interfaces FastEthernet ap commands to display information relating to each type of interface.
To view the FastEthernet interface 2 redundant configuration, use the command
show second_interface_status.
© 2012 Meru Networks, Inc.
Configuring Network Interfaces 111
Dual-Ethernet Operation
Interface and Networking Commands
The following interface and networking configuration commands are available.
Table 4: Interface and Networking Commands
Command
Purpose
controller(config)# interface FastEthernet
controller interface-index
Specify the controller interface index (0-31) and enter
FastEthernet interface configuration submode.
controller(config)# ip address ip-address
mask
Specifies the IP address and subnet mask for the
controller. This is used to specify the static IP address
if you are not enabling DHCP.
controller(config)# gw ip-address
Specifies the IP address of the default gateway. Used
to specify the gateway if you are not using DHCP.
controller# setup
Interactive script that helps set up hostname and
other system and networking parameters.
controller# show interfaces FastEthernet
statistics
Displays the summary table of Ethernet statistics for
the controller and APs.
controller# show interfaces FastEthernet
statistics controller
Displays the Ethernet statistics for the controller.
controller# show interfaces FastEthernet
statistics ap id
Displays the Ethernet statistics for the AP with the
given node ID.
controller# show second_interface_status
Displays the status of the second FastEthernet
interface when configured for redundant mode.
112 Meru System Director Configuration Guide
© 2012 Meru Networks, Inc.
Chapter 8
Configuring Security
System Director provides industry-standard security options that can be implemented
according to the requirements of the ESSID (and VLAN, if so configured) to protect
the site’s wireless and, as a result, wired LAN infrastructure.
Configuring Wireless LAN Security
Configure a Security Profile With the Web UI
Encryption Support
Configure GRE Tunnels
Configure a Security Profile With the CLI
Policy Enforcement Module
Proactive Spectrum Manager
RSA SecurID Authentication
Configure MAC Filtering
Security Certificates
Also see the security-related chapters Authentication, Captive Portals for Temporary
Users, and Rogue AP Detection and Mitigation.
Configuring Wireless LAN Security
In Meru Wireless LAN System, Layer 2 and Layer 3 security options are enforced by
creating Security Profiles that are assigned to an ESSID. As such, they can be tailored
to the services and the structure (virtual LAN, Virtual Cell, etc.) offered by the ESSID
and propagated to the associated APs. Security profiles for a controller can also be
configured from E(z)RF Network Manager. You can tell where a profile was configured
by checking the read-only field Owner. The Owner is either E(z)RF or controller. The
general security configuration tasks are as follows:
1. Create VLANs to keep the client traffic in each SSID secure and separate from
clients in other SSIDs. See the chapter Configuring VLANs for directions.
© 2012 Meru Networks, Inc.
Configuring Security 113
Configure a Security Profile With the Web UI
2. Set up the Certificate Server or Radius server configuration (see the Radius server
documentation for instructions).
3. Configure Security Profiles based on the type of security required (continue with
the following sections).
4. Configure one or more ESSIDs (see the chapter Configuring an ESS for directions)
and assign the VLAN and Security Profile to them.
Configure a Security Profile With the Web UI
To configure Security Profile parameters, follow these steps:
1. Click Configuration > Security > Profile.
2. In the Security Profile Name box, type the name of the security profile. The name
can be up to 32 alphanumeric characters long and cannot contain spaces.
3. In the L2 Modes Allowed area, select one of the following Layer 2 security modes:
— Clear: The WLAN does not require authentication or encryption, and the WLAN
does not secure client traffic. This is the default setting.
— 802.1X: Can provide 802.1X authentication and WEP64 or WEP128 encryption.
— Static WEP keys: Requires that stations use a WEP key (see step 6).
— WPA: Requires 802.1X Radius server authentication with one of the EAP types;
see step 4 to select a pre-configured Radius server profile. For more
information, see Wi-Fi Protected Access (WPA and WPA2).
— WPA PSK: Uses the TKIP encryption protocol and requires a shared key (see
step 11 to enter the shared Key).
— WPA2: Requires 802.1x Radius server authentication with one of the EAP types
(see step 4 to select a pre-configured Radius server profile). For more
information, see Wi-Fi Protected Access (WPA and WPA2).
— WPA2 PSK: Uses the CCMP-AES encryption protocol and requires a pre-shared
key (see step 12 to enter the pre-shared key).
— MIXED: Allows both WPA and WPA2 clients using a single security profile.
— MIXED PSK: Allows pre-shared key clients to use a single security profile.
4. In the Data Encrypt area, select one of the following (available choices are
determined by the L2 Mode selected):
— WEP64: A 64-bit WEP key is used to encrypt packets. For more information,
see WEP Security Features.
— WEP128: A 128-bit WEP key is used to encrypt packets. For more information,
see WEP Security Features.
— TKIP: Encryption algorithm used with WPA; uses a 128-bit key and 64-bit
Initialization Vector (IV).
— CCMP-AES: A 128-bit block key is used to encrypt packets with WPA2. For more
information, see CCMP-AES.
114 Meru System Director Configuration Guide
© 2012 Meru Networks, Inc.
Configure a Security Profile With the Web UI
— CCMP/TKIP: Use the Counter Mode with Cipher Block Chaining (CCMP)
encryption protocol that replaces TKIP, the mandatory protocol in WPA, and
WEP. For more information, see TKIP.
If you select WEP64 or WEP128, you need to specify a WEP key, as described in
step 6. If you specify TKIP for WPA-PSK or CCMP-AES for WPA2-PSK, a pre-shared
key must be set, as described in step 12.
5. From the Primary Radius Profile Name list, select one of the configured Radius
Server Profiles for use as the primary server or select the No Radius option. If no
Radius Server Profiles have been configured, the selectable list is unavailable and
the text “No Data for Primary Radius Profile Name” displays. To configure a Radius
Server Profile, click Configuration > Security > Radius.
6. From the Secondary Radius Profile Name list, select one of the configured Radius
Server Profiles for use as the secondary server or select the No Radius option. If
no Radius Server Profiles have been configured, the selectable list is unavailable
and the text “No Data for Primary Radius Profile Name” displays. To configure a
Radius server profile, click Configuration > Security > Radius.
7. In the WEP Key box, specify a WEP key. If you selected Static WEP Keys in step 2,
you need to specify a WEP key in hexadecimal or text string format.
A WEP64 key must be 5 octets long, which you can specify as 10 hexadecimal digits
(the hexadecimal string must be preceded with 0x) or 5 printable alphanumeric
characters (the ! character cannot be used). For example, 0x619B947A3D is a valid
hexadecimal value, and wpass is a valid alphanumeric string.
A WEP128 key must be 13 octets long, which you can specify as 26 hexadecimal
digits (the hexadecimal string must be preceded with 0x) or 13 printable
alphanumeric characters (the ! character cannot be used). For example,
0xB58CE2C2C75D73B298A36CDA6A is a valid hexadecimal value, and
mypass8Word71 is a valid alphanumeric string.
8. In the Static WEP Key Index box, type the index number to be used with the WEP
key for encryption and decryption. A station can have up to four static WEP keys
configured. The static WEP key index must be an integer between 1 through 4
(although internal mapping is performed to handle wireless clients that use 0
through 3 assignments).
9. In the Re-Key Period box, type the duration that the key is valid. Specify a value
from 0 to 65,535 seconds. The default re-key value is zero (0). Specifying 0
indicates that re-keying is disabled, which means that the key is valid for the
entire session, regardless of the duration.
10. In the Captive Portal list, select one of the following:
— Disabled: Disables Captive Portal.
— WebAuth: Enables a WebAuth Captive Portal. This feature can be set for all L2
Mode selections.
11. If you want to use a third-party Captive Portal solution from a company such as
Bradford, Avenda, or CloudPath change the value for Captive Portal
Authentication Method to external. For more information, see Third-Party
Captive Portal Solutions.
12. To use 802.1X, select one of the following in the 802.1X Network Initiation list:
© 2012 Meru Networks, Inc.
Configuring Security 115
Configure a Security Profile With the Web UI
— On: The controller initiates 802.1X authentication by sending an EAP-REQUEST
packet to the client. By default, this feature is enabled.
— Off: The client sends an EAP-START packet to the controller to initiate 802.1X
authentication. If you select this option, the controller cannot initiate 802.1X
authentication.
13. 802.1x Termination: 802.1x-Termination is provided by IOSCLI and Controller GUI,
to perform configuration on per-security profile basis. Select one of the following
in the 802.1x Termination list:
— PEAP: PEAP (Protected Extensible Authentication Protocol) is a version of EAP,
the authentication protocol used in wireless networks and Point-to-Point
connections. It is designed to provide more secure authentication for 802.11
WLANs (wireless local area networks) that support 802.1X port access control.
It authenticates the server with a public key certificate and carries the
authentication in a secure Transport Layer Security (TLS)
— TTLS: TTLS (Tunneled Transport Layer Security) is a proposed wireless security
protocol.
Note: Note that when 802.1x Termination is enabled, Meru’s default
certificate is used. In this case, the certificate must be “trusted” on the
wireless client end in order for authentication to be successful. Refer to
Security Certificates for details on how to import a certificate.
Note: When PEAP/TTLS is configured on the Radius server, PEAP/TTLS
termination should be disabled.
14. If the Static WEP Key mode is used, in the Shared Key Authentication list, select
one of the following:
— On: Allows 802.1X shared key authentication.
— Off: Uses Open authentication. By default, this feature is off.
15. In the Pre-shared Key text box, enter the key if either WPA-PSK or WPA2-PSK was
selected in step 2 above. The key can be from 8 to 63 ASCII characters or 64 hex
characters (hex keys must use the prefix "0x" or the key will not work).
16. In the Group Keying Interval text box, enter the time in seconds for the interval
before a new group key is distributed.
17. In the Key Rotation drop-down list, select whether to enable or disable this
feature.
18. The timeout value for Backend Authentication Server Timeout can be 1-65535
seconds.
19. For Re-authentication, select one of the following:
— On: Causes the controller to honor and enforce the "Session-timeout" Radius
attribute that may be present in a Radius Access-Accept packet. A customer
would use this option if the Session-timeout attribute is used to require
stations to re-authenticate to the network (802.1X) at a specified period. If
"Session-timeout" is not used, there is no reason to enable re-authentication.
— Off: Disables re-authentication for this security profile.
116 Meru System Director Configuration Guide
© 2012 Meru Networks, Inc.
Configure a Security Profile With the Web UI
20. In the MAC Filtering list, select one of the following:
— On: Enables MAC Filtering for this security profile.
— Off: Disables MAC Filtering for this security profile.
21. In the Firewall Capability drop-down list, select one of the following:
— Configured: The controller defines the policy through configuration of the
Firewall filter-id.
— Radius-configured: The Radius server provides the policy after successful
802.1X authentication of the user. This option requires the Radius server have
the filter-id configured. If this is not configured, the firewall capability is not
guaranteed.
— None: Disables the Firewall Capability for this security profile.
22. In the Firewall Filter ID text box, enter the firewall filter-id that is used for this
security profile. The filter-id is an alphanumeric value that defines the firewall
policy to be used on the controller, when the firewall capability is set to
configured. For example, 1.
23. In the Security Logging drop-down list, select one of the following:
— On: Enables logging of security-related messages for this security profile.
— Off: Disables logging of security-related messages for this security profile
24. In the Passthrough Firewall Filter ID text box, enter a firewall filter ID that was
created using Configuration > QoS > System Settings > QoS and Firewall Rules
> Add. The filter ID is an alphanumeric value that defines the firewall policy to
be used on the controller for a Captive Portal-enabled client that has no
authentication.
25. Click OK.
Wi-Fi Protected Access (WPA and WPA2)
Meru Meru Wireless LAN System supports both WPA2 and WPA protocols that have
been presented by the Wi-Fi Alliance as interim security standards that improve upon
the known vulnerabilities of WEP until the release of the 802.11i standard.
In WPA2, the WPA Message Integrity Code (MIC) algorithm is replaced by a message
authentication code, CCMP, that is considered fully secure and the RC4 cipher is
replaced by the Advanced Encryption Standard (AES), as described in CCMP-AES.
WPA includes the encryption protocol TKIP (see TKIP) and leverages existing 802.1X
authentication (see 802.1X Authentication), including the dynamic key management
facility.
If 802.1X authentication is not available (in a SOHO, for example), WPA2-Personal or
WPA-Personal can be implemented as alternatives and provide for manual key distribution between APs and clients.
To achieve a truly secure WPA/WPA2 implementation, the installation must be
“pure,” that is, all APs and client devices are running either WPA-Enterprise or
WPA2-Enterprise. Implement this for Meru Wireless LAN System with an ESS that uses
© 2012 Meru Networks, Inc.
Configuring Security 117
Configure a Security Profile With the Web UI
a Security Profile that configures WPA/WPA2, leverages the site’s 802.1X user authentication and includes TKIP or CCMP encryption. Once associated with this profile,
users and enterprises can be assured of a high level of data protection.
You can mix WPA and WPA2 security in System Director release 3.6 and later.
To configure these security options see the sections Configure a Security Profile With
the Web UI and Configure WPA2 With the CLI.
118 Meru System Director Configuration Guide
© 2012 Meru Networks, Inc.
Encryption Support
Encryption Support
Meru Wireless LAN System offers CCMP-AES for WPA2 and TKIP for WPA. A key difference between WPA and WPA2 is the underlying encryption method. For WPA2 it is
CCMP/AES and for WPA it is TKIP/RC4. Descriptions of these technologies are
provided in this section. Meru also supports the original 802.11encryption protocols
provided by WEP64 and WEP128.
We recommend using the more secure CCMP, or the TKIP encryption solution if your
site’s client hardware cannot support CCMP.
CCMP-AES
AES is the Advanced Encryption Standard and is used by the US Department of
Defence as a replacement for older encryption standards. As such, it is very secure.
AES can be used in several modes, and CCMP is the mode used by WPA2. Both terms
are commonly used interchangeably.
TKIP
As part of the WPA solution to address the weaknesses in WEP, WPA uses Temporal Key
Integrity Protocol (TKIP) to improve upon WEP security by expanding the size of the
encryption key and Initialization Vector (IV), increasing the number of keys in use,
and creating a message integrity check.
TKIP is a Layer 2 encryption algorithm that uses a 128-bit key and a 64-bit IV. TKIP
uses the RC4 algorithm along with a symmetrical key to produce encrypted text. The
symmetrical key is used for encrypting and decrypting packets, and can be automatically distributed to an AP and from there to the user station when 802.1X EAP is
implemented. TKIP key management system uses one of a possible 500 trillion keys
to uniquely encrypt each data packet. TKIP uses the Message Integrity Check (MIC),
a function that computes and compares a per-packet integrity check to ensure the
content of the packets have not been modified by an outside source during packet
transmission. If the sent/received checksums do not match, the packet is assumed to
be tampered with and dropped.
To configure TKIP, see the section Configure WPA With the CLI.
WEP Security Features
Wired Equivalent Privacy (WEP64 and WEP128) is a Layer 2 security protocol specified
in the IEEE Wireless Fidelity (Wi-Fi) standard, 802.11. WEP is designed to provide a
wireless LAN with comparable level of security and privacy to what is usually
expected of a wired LAN. A wired LAN is generally protected by physical security
mechanisms, such as controlled access to a building, that are effective for a
controlled physical environment. However, such security mechanisms do not apply to
© 2012 Meru Networks, Inc.
Configuring Security 119
Encryption Support
WLANs because the walls containing the network do not necessarily bind radio waves.
WEP seeks to establish protection similar to that offered by the wired network's physical security measures by encrypting data transmitted over the WLAN. Data encryption protects the vulnerable wireless link between clients and access points. Once
this measure has been taken, other typical LAN security mechanisms such as authentication, password protection, and end-to-end encryption, can be put in place to
protect privacy.
With the WEP protocol, all access points and client radio NICs on a particular wireless
LAN must use the same encryption key. Each sending station encrypts the body of
each frame with a WEP key before transmission, and the receiving station decrypts
it using an identical key. This process reduces the risk of someone passively monitoring the transmission and gaining access to the information contained within the
frames.
The WEP implementation allows the Security Profile configuration to specify one of
four possible WEP keys that can be configured by a user station key management
program.
To configure WEP, see the section Configure 802.11 WEP Encryption.
Operation of the WEP Protocol
If a user activates WEP, the NIC encrypts the payload, which consists of the frame
body and cyclic redundancy check (CRC), of each 802.11 frame before transmission
using an RC4 stream cipher provided by RSA Security. The receiving station, such as
an access point or another radio NIC, performs decryption when it receives the
frame. As a result, 802.11 WEP only encrypts data between 802.11 stations. Once the
frame enters the wired side of the network, such as between access points, WEP no
longer applies.
As part of the encryption process, WEP prepares a key schedule (“seed”) by concatenating the shared secret key supplied by the user of the sending station with a
randomly-generated 24-bit initialization vector (IV). The IV lengthens the life of the
secret key because the station can change the IV for each frame transmission. WEP
inputs the resulting “seed” into a pseudo-random number generator that produces a
key stream equal to the length of the frame's payload plus a 32-bit integrity check
value (ICV).
The ICV is a checksum that the receiving station later recalculates and compares to
the one sent by the sending station to determine whether the transmitted data
underwent any form of tampering while in transit. In the case of a mismatch, the
receiving station can reject the frame or flag the user for potential security violations.
With WEP, the sending and receiving stations use the same key for encryption and
decryption. WEP specifies a shared 40- or 104-bit key to encrypt and decrypt data
(once the 24-bit IV is added in, this matches System Director’s 64- or 128-bit WEP
specification, respectively). Each radio NIC and access point, therefore, must be
manually configured with the same key.
120 Meru System Director Configuration Guide
© 2012 Meru Networks, Inc.
Configure GRE Tunnels
Before transmission takes place, WEP combines the key stream with the payload and
ICV through a bit-wise XOR process, which produces cipher text (encrypted data).
WEP includes the IV in the clear (unencrypted) within the first few bytes of the frame
body. The receiving station uses this IV along with the shared secret key supplied by
the user of the receiving station to decrypt the payload portion of the frame body.
Limitations of the WEP Protocol
WEP is vulnerable because the relatively short IVs and keys remain static. Within a
short amount of time, WEP eventually uses the same IV for different data packets.
For a large busy network, the same IVs can be used within an hour or so. This results
in the transmitted frames having key streams that are similar. If a hacker collects
enough frames based on the same IV, the hacker can determine the shared values
among them (the key stream or the shared secret key). This can allow to the hacker
to decrypt any of the 802.11 frames.
A major underlying problem with the existing 802.11 standard is that the keys are
cumbersome to change. The 802.11 standard does not provide any functions that
support the exchange of keys between stations. To use different keys, an administrator must manually configure each access point and radio NIC with a new common
key. If the WEP keys are not updated continuously, an unauthorized person with a
sniffing tool can monitor your network and decode encrypted frames.
Despite the flaws, you should enable WEP as a minimum level of security. Many
hackers are capable of detecting wireless LANs where WEP is not in use and then use
a laptop to gain access to resources located on the associated network. By activating
WEP, however, you can at least minimize this from happening. WEP does a good job
of keeping most honest people out.
Configure GRE Tunnels
The GRE tunneling provides packet isolation from one endpoint to another, encapsulated within an IP tunnel to separate user traffic.
GRE Tunneling facilitates configurations as shown in Figure 11, where guest users who
are logged into a guest ESS are given “guest” Internet access at Level 1 and have their
traffic separated from corporate users who are on a common shared link to the corporate campus. Contract users have similar connection as corporate users but are
restricted in access to certain sites by user firewall policies.
GRE tunneling provides an option to segregate users’ traffic by allowing an ESS
profile to be tied to a GRE profile. This provides an alternative to VLANs for segregating traffic.
© 2012 Meru Networks, Inc.
Configuring Security 121
Configure GRE Tunnels
Figure 11: Example GRE Tunneling Configuration
To configure GRE tunneling, create the GRE tunnel profile as well as an ESSID that
specifies the GRE tunnel and also references a Security Profile. GRE can also be
configured from E(z)RF Network Manager.
All IP addresses configured for the tunnel must be unique; these IP addresses define
the endpoints of the tunnel, with the controller FastEthernet IP address defining
the local endpoint and the ip remote-external-address specifying the remote
endpoint.The ip tunnel-ip-address defines the tunnel network.
Note: If the GRE Tunnel is to be configured on the second interface of a
Dual-Ethernet configuration, be sure to configure the second Ethernet
interface, as described in the section “Configuring an Active Interface” in the
chapter “Configuring Network Interfaces.”
The following example shows the commands for configuring a GRE tunnel profile on
the second FastEthernet interface, where the IP address of the tunnel’s local
endpoint is 13.13.13.13 and the remote endpoint is 172.27.0.206, and the DHCP
server is at 10.0.0.12:
default(config)# gre
default(config-gre)#
default(config-gre)#
default(config-gre)#
default(config-gre)#
default(config-gre)#
default(config-gre)#
guest
interface FastEthernet controller 2
ip tunnel-ip-address 13.13.13.13 255.255.255.0
ip remote-external-address 172.27.0.206
ip dhcp-override
ip dhcp-server 10.0.0.12
end
To check the configuration of the GRE tunnel, use the show gre command:
122 Meru System Director Configuration Guide
© 2012 Meru Networks, Inc.
Configure GRE Tunnels
default# show gre
GRE Name
vlan1
gre1
Remote External Address
Tunnel IP address
172.27.0.162
12.12.12.12
172.27.0.206
13.13.13.13
GRE Configuration(2 entries)
Tunnel IP Netmask
255.255.0.0
255.255.0.0
LocalExternal
1
2
To configure the GRE ESSID, specify the GRE profile name, a tunnel-type and Security
Profile, as shown in the following example:
default(config)# essid
default(config-essid)#
default(config-essid)#
default(config-essid)#
default(config)# exit
guest
gre name guest
tunnel-type gre
security-profile default
The GRE ESSID name must be the same as the GRE Tunnel Profile name specified
in the preceding GRE Configuration procedure (for example, guest). The GRE
Tunnel Profile name is specified in the gre name.
For the tunnel-type, the gre parameter must be specified for GRE Tunnel
configuration.
Specify the Security Profile name with the security-profile command—typically
the default profile is used.
To check the status of the a GRE tunnel, use the command:
default# test gre gre_name ip_address
where gre_name is the GRE Profile name and ip_address is the IP address of the
machine that is connected behind the tunnel (optional).
Note:
By default, the command will ping the remote endpoint.
The following points should be noted when configuring a GRE tunnel:
The DHCP relay pass-through flag always should be off for a GRE tunnel. This
ensures the DHCP relay is always on and hence the DHCP request packets are
forwarded to the DHCP Server specified by DHCP Server IP Address.
DHCP traffic associated with users connecting to a GRE tunnel are relayed to the
configured DHCP Server located at the remote location through the associated
GRE tunnel.
Only IPv4 support is provided for GRE tunneling.
© 2012 Meru Networks, Inc.
Configuring Security 123
Configure a Security Profile With the CLI
Configure a Security Profile With the CLI
The controller supports the ability to define multiple Security Profiles that can be
assigned to different wireless LAN extended service sets (ESS) according to the level
and type of security required. A Security Profile is a list of parameters that define
how security is handled within an ESS. With Security Profiles, you can define the
Layer 2 security method, including the cipher suite, primary and secondary Radius
server, static WEP key entries and key index position, and other parameters. The
various Security Profiles you create allow you to support multiple authentication and
encryption methods within the same WLAN infrastructure.
Note:
Only one Layer 2 method can be defined in each Security Profile.
The controller is shipped with OPEN authentication, meaning that there is no
authentication, and that any wireless client can connect to the controller. These
setting are defined in the default Security Profile named default.
You can view the default Security Profile using the show security-profile default
command.
default# show security-profile default
Security Profile Table
Security Profile Name
L2 Modes Allowed
Data Encrypt
Primary Radius Profile Name
Secondary Radius Profile Name
WEP Key (Alphanumeric/Hexadecimal)
Static WEP Key Index
Re-Key Period (seconds)
Captive Portal
802.1X Network Initiation
802.1x Termination
Shared Key Authentication
Pre-shared Key (Alphanumeric/Hexadecimal)
Group Keying Interval (seconds)
PMK Caching
Key Rotation
Reauthentication
MAC Filtering
Firewall Capability
Firewall Filter ID
Security Logging
:
:
:
:
:
:
:
:
:
:
:
:
:
:
:
:
:
:
:
:
:
default
clear
none
*****
1
0
disabled
off
PEAP, TTLS
off
*****
0
disabled
disabled
off
off
none
off
The default Security Profile is configured to allow “clear” Layer 2 access with no
authentication method, encryption, or cipher suite specified.
124 Meru System Director Configuration Guide
© 2012 Meru Networks, Inc.
Configure a Security Profile With the CLI
The 802.1x Termination is configured separately for PEAP and TTLS.
Configure 802.1X Radius Security With the CLI
To allow WLAN access to your site’s 802.1X authorized and authenticated users, set
up 802.1X Radius authentication. To do this:
Create a global Radius Server Profile that specifies how to communicate with the
primary Radius server in your network. If an optional secondary Radius server is
to be used, a separate profile is also created for it.
Create a Security Profile for the ESS that configures 802.1X Layer 2 security and
assigns a primary Radius profile and optional secondary Radius profile
Refer to your Radius server documentation regarding how to configure the type of
EAP protocol for your site and the procedure for installing any necessary certificates.
The actual Radius server configuration is not covered here, only the configuration for
enabling the communication between the Radius server and the controller is
described.
The following commands set up a profile for the primary Radius server, main-auth,
that specify the server’s IP address and secret key. All other default parameters (such
as the port number (1812)) are acceptable, and not changed:
default# configure terminal
default(config)# radius-profile main-auth
default(config-radius)# ip-address 10.1.100.10
default(config-radius)# key secure-secret
default(config-radius)# exit
For additional reliability, configure a secondary Radius Server Profile to serve as a
backup should the primary server become unavailable.
default# configure terminal
default(config)# radius-profile backup-auth
default(config-radius)# ip-address 10.1.100.2
default(config-radius)# key secure-secret2
default(config-radius)# exit
Next, create the Security Profile that enables 802.1X and points to the profiles that
describe the Radius primary and secondary servers.
Example Security Profile with 802.1X Radius
In the following example, the Security Profile 8021x-data is created. It supports
802.1X authentication and uses the Radius profile main-auth to enable the primary
Radius authentication server and the backup-auth profile for the secondary Radius
server.
default(config)# security-profile 8021x-data
default(config-security)# allowed-l2-modes 802.1x
default(config-security)# radius-server primary main-auth
default(config-security)# radius-server secondary backup-auth
default(config-security)# exit
© 2012 Meru Networks, Inc.
Configuring Security 125
Configure a Security Profile With the CLI
default(config)# exit
802.1X PTK Rekey
With the 802.1X PTK rekey feature, whenever the rekey interval expires, the Access
Point sends a unicast key and a broadcast key to the client. These two key packets
are NOT encrypted.
To enable 802.1X PTK rekey, enter the following command from the Security Profile
configuration: (n can be from 0 to 65535 (60 minutes), and is specified in seconds)
default(config-security)# rekey period n
To disable 802.1X PTK rekey, enter the following command from the Security Profile
configuration:
default(config-security)# rekey period 0
802.1X GTK Rekey
To configure the 802.1X GTK rekey period, from the Security Profile configuration,
add the following command (the rekey period is specified in seconds):
default(config-security)# group-rekey interval n
To disable 802.1X GTK rekey, enter the following command from the Security Profile
configuration:
default(config-security)# no group-rekey interval
802.1X Radius Server Command Summary
The following commands are used to configure the Radius servers:
Table 5: Commands to Configure the 802.1X Radius Servers
Command
Purpose
radius-profile name
Creates a Radius server profile with the specified name and
enters Radius profile configuration submode (maximum 16
characters).
description text
Configures a description of the profile (maximum 128
characters).
ip-address ip-address
Configures the IP address of the Radius profile (required
parameter).
126 Meru System Director Configuration Guide
© 2012 Meru Networks, Inc.
Configure a Security Profile With the CLI
Table 5: Commands to Configure the 802.1X Radius Servers
Command
Purpose
key key
Specifies the shared secret text string used by the controller for
the Radius profile (required parameter if password-type is
shared-secret). Maximum 64 characters.
password-type shared-secret |
mac-address
Specifies whether the password type is the Radius key
(shared-secret) or is the MAC address of the client, as
determined by the client setup in Radius for MAC Filtering
configuration.
mac-delimiter colon | hyphen |
singlehyphen | none
Optional. Sets the Radius profile delimiter character.
port port
Optional. Configures the Radius profile port (the default port
1812, is configured by default).
vlan vlan
Optional. Configures a VLAN for the RADIUS server. Use the
command if the Radius server is located on a VLAN so that
RADIUS requests are sent to the VLAN interface instead of
default/untagged interface.
pmkcaching pmkcaching |
disable
Enables or disables PMK caching.
rekey period n
Sets the PTK rekey period. The default is set to 60 seconds and
the allowable range is 60 seconds to 60 minutes.
[no] group-rekey interval n
Sets the GTK group rekey period. The default is set to 60
seconds and the allowable range is 60 seconds to 60 minutes
Table 6: Commands Used to Create Security Profiles
Command
Purpose
allowed-l2-modes 802.1x
In Security Profile configuration, enables 802.1X
authentication.
radius-server primary profile
In Security Profile configuration, specifies the Radius profile
containing the configuration parameters for the primary Radius
server.
© 2012 Meru Networks, Inc.
Configuring Security 127
Configure a Security Profile With the CLI
Table 6: Commands Used to Create Security Profiles
radius-server secondary
profile
Optional. In Security Profile configuration, specifies the Radius
profile containing the configuration parameters for the
secondary Radius server.
rekey multicast-enable
Optional. In Security Profile configuration, enable the multicast
key broadcast.
[no] 8021x-network-initiation
In Security Profile configuration, determines 802.1X initiation
method. When enabled (default), the AP sends the first EAP
packet (an EAP ID request) to the wireless station to start
802.1X after the wireless station completes 802.11
authentication and association to an 802.1X-enabled ESSID.
With the command no 8021x-network-initiation, the wireless
station sends an EAPOL Start packet to the AP to start the
802.1X exchange.
Configure WPA2 With the CLI
The controller supports the WPA2 standard that includes CCMP encryption which is
considered extremely secure. Implementing WPA2 provides the highest level of security that the Meru Meru Wireless LAN System offers.
Additionally, if 802.1X is implemented at the site, automatic key exchange is
provided by the Radius server. Existing primary and secondary Radius Server Profiles
can be assigned from within the Security Profile to leverage the existing 802.1X
authentication. Otherwise, the WPA2-PSK configuration can be implemented.
Example WPA2 Configuration
To configure WPA security with the Web UI, click Configuration > Security > Profile.
Click Help for option details. Note that you can configure MIXED WPA and WPA2 in
release 3.6 and later.
The following CLI example creates the profile named wpa2-ccmp that enables WPA2
for Layer 2, sets the encryption mode to CCMP-AES, and names the Radius server in
the main-auth profile as the primary Radius authentication server.
default(config)# security-profile wpa2-ccmp
default(config-security)# allowed-l2-modes wpa2
default(config-security)# encryption-modes ccmp
default(config-security)# radius-server primary main-auth
default(config-security)# exit
default(config)# exit
128 Meru System Director Configuration Guide
© 2012 Meru Networks, Inc.
Configure a Security Profile With the CLI
Example WPA2-PSK Configuration
To configure security with the Web UI, click Configuration > Security > Profile. Click
Help for option details.
When setting the PSK key with the CLI, use a key from 8 to 63 ASCII characters (the
characters ! \ " ? must be escaped with the backslash (\) character; for example \!
\?) or 64 hex characters (hex keys must be prefixed with “0x” or the key will not
work).
The following example creates the profile named wpa2-psk that enables WPA2-PSK
for Layer 2, sets the encryption mode to CCMP, and sets the preshared key to
theSecretKeyForNov28.
default(config)# security-profile wpa2-psk
default(config-security)# allowed-l2-modes wpa2-psk
default(config-security)# encryption-modes ccmp
default(config-security)# psk key theSecretKeyForNov28
default(config-security)# exit
default(config)# exit
Configure WPA With the CLI
The controller supports the WPA standard that includes TKIP which improves upon
WEP security by expanding the size of the encryption key (128 bits) and Initialization
Vector (IV) (64 bits), increasing the number of keys in use, and supplying a message
integrity check.
Additionally, with 802.1X implementations, the Radius server profiles can be assigned
from within the Security Profile to leverage the existing 802.1X authentication.
To configure WPA security with the Web UI, click Configuration > Security > Profile.
Click Help for option details. Note that you can configure MIXED WPA and WPA2 in
release 3.6 and later.
Example CLI WPA Configuration
The following example creates the profile named wpa-tkip that enables WPA for
Layer 2, sets the encryption mode to TKIP, and names the Radius server in the
main-auth profile as the primary Radius authentication server.
default(config)# security-profile wpa-tkip
default(config-security)# allowed-l2-modes wpa
default(config-security)# encryption-modes tkip
default(config-security)# radius-server primary main-auth
default(config-security)# exit
default(config)# exit
default#
© 2012 Meru Networks, Inc.
Configuring Security 129
Configure a Security Profile With the CLI
Opportunistic PMK Caching for WPA
Opportunistic PMK caching allows the controller, acting as the 802.1X authenticator,
to cache the results of a full 802.1X authentication so that if a client roams to any
AP associated with that controller, the wireless client needs to perform only the
4-way handshake and determine new pair-wise transient keys. PMK caching is
supported only for KDDI phones when using WPA with TKIP and 802.1X authentication.
The system automatically detects the KDDI phone using the KDDI Vendor ID and
applies PMK caching if available.
From with the Security Profile configuration, enable or disable PMK caching for KDDI
phones. This option is only available when WPA is chosen for L2 encryption.
To enable PMK caching, add the following line to the WPA Security Profile configuration:
default(config-security)# pmkcaching enabled
To disable PMK caching, execute the following command at the WPA Security Profile
configuration:
default(config-security)# pmkcaching disabled
WPA PTK Rekey
The WPA PTK rekey exchange mechanism includes a configurable PTK rekey period.
The default is set to 60 seconds and the allowable range is 0 to 65535 (60 minutes).
Upon expiration of the PTK re-key period, the access point initiates a 4-way PTK
exchange followed by a GTK exchange. After the Radius Session time-out, an 801.X
exchange occurs followed by a PTK rekey exchange.
To configure the WPA PTK rekey period, from the Security Profile configuration, add
the following commands (the rekey period is in seconds):
default(config-security)#
default(config-security)#
default(config-security)#
default(config-security)#
default(config-security)#
allowed-l2-modes wpa
radius-server primary server_name
encryption-modes tkip
rekey period 120
no group-rekey interval
If the rekey period is configured for a WPA profile (and not for WPA-PSK), then during
every rekey period the infrastructure initiates a WPA 4-way handshake and a 2-way
group key handshake to the client.
With the WPA PTK rekey feature, whenever a rekey interval expires, the Access Point
performs a 4-way key exchange. This exchange is NOT encrypted. Following this, the
Access Point sends a broadcast key to the client. This key packet is encrypted.
To disable WPA PTK rekey, enter the following command from the Security Profile
configuration:
default(config-security)# rekey period 0
130 Meru System Director Configuration Guide
© 2012 Meru Networks, Inc.
Configure a Security Profile With the CLI
WPA GTK Rekey
With the WPA GTK rekey feature, whenever the group-rekey interval expires, the
Access Point sends a broadcast key to the client. This key packet is encrypted.
To configure the WPA GTK rekey period, from the Security Profile configuration, add
the following command (the rekey period can be between 0 and 65535 seconds):
default(config-security)# group-rekey interval n
To disable WPA GTK rekey, enter the following command from the Security Profile
configuration:
default(config-security)# no group-rekey interval
Example WPA-PSK Configuration
When setting the PSK key, use a key from 8 to 63 ASCII characters (the characters ! \
" ? must be escaped with the backslash (\) character; for example \! \?) or 64 hex
characters (hex keys must be prefixed with “0x” or the key will not work).
The following example creates the profile named wpa-psk that enables WPA-PSK for
Layer 2, sets the encryption mode to TKIP, and sets the preshared key to
theSecretKeyForMay22.
default(config)# security-profile wpa-psk
default(config-security)# allowed-l2-modes wpa-psk
default(config-security)# encryption-modes tkip
default(config-security)# psk key theSecretKeyForMay22
default(config-security)# exit
default(config)# exit
default#
WPA/WPA-PSK Command Summary
The following commands are used to configure WPA2, WPA, WPA2-PSK, and WPA-PSK:
Table 7: Commands to Configure WPA/WPA2
Command
Purpose
allowed-l2-modes wpa2 |
wpa2-psk | wpa | wpa-psk
|clear
With 802.1X authentication, enables WPA2 or WPA; or for manual
key exchange WPA2-PSK or WPA-PSK; or with the clear option sets
the mode to open (disables WPA).
encryption-modes ccmp |
tkip
Configures WPA2/CCMP or WPA/TKIP as the Security Profile cipher
suite.
© 2012 Meru Networks, Inc.
Configuring Security 131
Configure a Security Profile With the CLI
Table 7: Commands to Configure WPA/WPA2
Command
Purpose
psk key key
Sets the key for a WPA2/PSK/WPA-PSK configuration. Assign one
PSK per ESSID that uses this Security Profile. The key can be:
hexadecimal characters (that is, 0-9,a-f, A-F). Example:
0xa0a1a2a3a4a5a6a7a8a9aaabac or
0x12345678901234567890abcdef...
8 to 63 ASCII characters (the characters ! \ " ? must be
escaped with the backslash (\) character; for example \!
\?). Example: m6o0secret79ckey
radius-server primary
profile
Specifies the Radius profile information that is used for the
primary Radius server.
radius-server secondary
profile
Specifies the Radius profile information that is used for the
secondary Radius server.
8021x-network-initiation
Determines 802.1X initiation method. When enabled (default), the
AP sends the first EAP packet (an EAP ID request) to the wireless
station to start 802.1X after the wireless station completes 802.11
authentication and association to an 802.1X-enabled ESSID. With
the command no 8021x-network-initiation, the wireless station
sends an EAPOL Start packet to the AP to start the 802.1X
exchange.
pmkcaching pmkcaching |
disable
Enables or disables PMK caching.(WPA2/Mixed profiles only)
rekey period n
Sets the PTK rekey period. The default is set to 60 seconds and the
allowable range is 60 seconds to 60 minutes. (WPA only)
[no] group-rekey interval
n
Sets the GTK group rekey period. The default is set to 60 seconds
and the allowable range is 0 - 65535 (WPA only)
Configure 802.11 WEP Encryption
The controller supports two WEP cypher suites: WEP128 and WEP64.
The key configuration parameters allow the setting of the mutually shared key and
the choice of key slot positions from 1 to 4, as allowed by most user key configuration
programs.
132 Meru System Director Configuration Guide
© 2012 Meru Networks, Inc.
Configure a Security Profile With the CLI
Example 802.11 WEP Configuration
The following example creates the profile named wep-voice that supports a static
128-bit WEP encryption for voice users. The static WEP key is defined as voice and
uses the third key index position on a user station’s WEP key definition.
default(config)# security-profile wep-voice
default(config-security)# allowed-l2-modes wep
default(config-security)# encryption-modes wep128
default(config-security)# static-wep key voice
default(config-security)# static-wep key-index 3
default(config-security)# exit
default(config)# exit
default#
802.11 WEP Command Summary
The following summarizes the commands that can be used to configure 802.11 WEP
security.
Table 8: Commands to Configure 802.11 WEP Security
Command
Purpose
encryption-modes
wep128|wep64
Sets the cipher suite to WEP128, or WEP64 respectively.
static-wep key key
Sets the WEP key:
For WEP64, also known as WEP or WEP40, the key is a 5-character
ASCII (for example, 123de) or 10-character hex key (for example,
0x0123456789) (the 0x prefix must be entered).
For WEP128, the key must be 13 ASCII characters or 26 hex digits
(the 0x prefix must be entered).
static-wep key-index
position
Sets which WEP key is in use. position can be set from 1 to 4.
allowed-l2-modes wep
| clear
Enables or disables 802.11 WEP security. The clear option sets the mode
to open.
Checking a CLI Configuration
To view all Security Profiles currently configured, use the show security-profile
command.
# sh security-profile
© 2012 Meru Networks, Inc.
Configuring Security 133
Configure a Security Profile With the CLI
Profile Name
Filter
L2 Mode
default
clear
captive-portal
clear
wep
wep
802.1x
802.1x
wpa
wpa
wpapsk
wpa-psk
wpa2
wpa2
wpa2psk
wpa2-psk
Security Profile Table(8)
Data Encrypt Firewall
none
none
wep64
wep128
tkip
tkip
ccmp
ccmp
To view the details of an individual Security Profile, use the show security-profile
profile-name command.
default# show security-profile wpa-leap
Security Profile Table
Security Profile Name
L2 Modes Allowed
Data Encrypt
Primary Radius Profile Name
Secondary Radius Profile Name
WEP Key ASCII:(default) 13 chars / 0x:26 chars
Static WEP Key Index
Re-Key Period (seconds)
Enable Multicast Re-Key
Captive Portal
802.1X Network Initiation
802.1x Termination
Shared Key Authentication
Pre-shared Key (Alphanumeric/Hexadecimal)
Group Keying Interval (seconds)
PMK Caching
Key Rotation
Reauthentication
MAC Filtering
Firewall Capability
Firewall Filter ID
Security Logging
:
:
:
:
:
:
:
:
:
:
:
:
:
:
:
:
:
:
:
:
:
:
wpa-leap
802.1x
none
ACS-87-8#
*****
1
0
off
disabled
on
PEAP, TTLS
off
*****
0
disabled
disabled
off
off
none
off
Use the commands show web login-page and show web custom-area to find out
what set of web pages are used for Captive Portal and WebAuth.
134 Meru System Director Configuration Guide
© 2012 Meru Networks, Inc.
Policy Enforcement Module
Policy Enforcement Module
The optional Policy Enforcement Module feature makes it possible to control network
content by dropping/allowing traffic based on configured policies applied on a firewall tag associated with a user group. This includes Captive Portal users in release
3.7 and later.
Meru’s firewall is generic, and can be used to prevent any subnet to subnet communication, for specific ports or all ports. With the Filter ID, we can also prevent any
user from any SSID from accessing specific subnets.
The per-user firewall filtering is implemented either by:
A Radius-returned filter-id attribute, that is created on the Radius server and
assigned to users
A configured firewall filter-id parameter that is part of the ESS profile
configuration and is applied to clients associated with an ESS
For the Radius-based per-user firewall, the returned filter-id attribute is part of
Access-Accept message returned for a user, and is used as the firewall tag. The
filtering action is determined by the configured firewall polices for this firewall tag.
In the absence of a Radius configuration, a configured firewall tag in the ESS profile
can be used for defining the filtering based on the configured firewall polices. In this
case, all users connecting to a given ESS profile are allocated the same firewall tag
as configured for the profile.
Note: For successful operation using a Radius configuration, the Filter-id attribute
that is configured on the Radius Server must match that used on the controller. In
some Radius Servers, a Filter ID must be created.
The policies that filter the traffic are created using the standard QoS qosrule configuration, and the inherent priorities and configuration parameters are described in
detail in the Chapter 15, “Configuring Quality of Service,” as well as in the qosrule
entry in the Meru System Director Command Reference.
Configure Firewall Policies with the CLI
Begin the Policy Enforcement Module configuration by configuring a set of qosrule
policies to manage the traffic.
The following example shows the creation of qosrule 200 as a policy for Firewall
filter-id 1:
default# configure terminal
default(config)# qosrule 200 netprotocol 6 qosprotocol none
default(config)# netprotocol-match
default(config-qosrule)# dstport 80
default(config-qosrule)# dstport-match on
© 2012 Meru Networks, Inc.
Configuring Security 135
Policy Enforcement Module
default(config-qosrule)#
default(config-qosrule)#
default(config-qosrule)#
default(config-qosrule)#
default(config-qosrule)#
default(config-qosrule)#
default(config)# exit
action drop
firewall-filter-id 1
firewall-filter-id-match on
qosrule-logging on
qosrule-logging-frequency 30
exit
To check the configuration of the policy, use the show qosrule command:
default# show qosrule
ID
Dst IP
Action
Drop
Dst Mask
Firewall Filter
0.0.0.0
0.0.0.0
h323 capture head
2
0.0.0.0
0.0.0.0
h323 capture head
3
0.0.0.0
0.0.0.0
capture head
4
0.0.0.0
0.0.0.0
capture head
7
0.0.0.0
0.0.0.0
none forward head
8
0.0.0.0
0.0.0.0
none forward head
200
0.0.0.0
0.0.0.0
none drop
tail 1
QoS Rules(7 entries)
default#
DPort Src IP
1
Src Mask
SPort Prot QoS
1720
0.0.0.0
0.0.0.0
0
6
0
0.0.0.0
0.0.0.0
1720
6
5060
0.0.0.0
0.0.0.0
0
17
sip
0
0.0.0.0
0.0.0.0
5060
17
sip
5200
0.0.0.0
0.0.0.0
0
17
0
0.0.0.0
0.0.0.0
5200
17
80
0.0.0.0
0.0.0.0
0
6
The following commands are required to apply the example filter ID 1 to the Security
Profile.
default(config-security)# firewall-capability configured
default(config-security)# firewall-filter-id 1
default(config-security)# security-logging off
Note: Once you create a firewall rule, you cannot modify the rule to enable or
disable firewall logging. As a workaround, either create the firewall rule with the
required option or delete the rule and re-apply it with the required option.
Troubleshooting Per-User Firewall
Policy Enforcement Module license must already be installed.
Turn on the QoS rule logging feature available in QoS rule page. If the client traffic
hits the rule, the same will be displayed in the syslog server or via the CLI
command show syslog-file firewall.
136 Meru System Director Configuration Guide
© 2012 Meru Networks, Inc.
Proactive Spectrum Manager
Proactive Spectrum Manager
Proactive Spectrum Manager, designed for single channel deployment, takes a
top-level view into the channel spectrum, then recommends the best channels) for
network operation. The PSM dashboard presents a goodness value for all channels and
recommended channels of operation for the network using a chart with green (good)
and red (don’t use) bars.
Configure Proactive Dashboard Manager Using the Web UI
Use the dashboard to see the channel goodness over the spectrum and best available
channels for 20MHz or channel-bonded (40MHz) operation on the 2.4 and 5GHz bands.
The spectrum shows bar chart goodness values for all 20MHz and 40MHz channels. The
higher the bar, the better the channel is. If the color of the bar is grey, no observation
on that channel has taken place.
You have two PSM options, View and Evaluate.
View is enabled on all channels by default. View mode monitors interference, such
as rogues, and displays recommendations for channel use. If you see solid green
bands on every channel in the charts, either only View is enabled or Evaluate is also
enabled and there are no rogues on any channels.
Evaluate is disabled on all channels by default. If you enable Evaluate mode on the
channels, then PSM will manage the use of those channels by moving devices away
from channels with a specified amount of rogue activity. To enable Evaluate:
1. Click Monitor > Dashboard > Spectrum.
2. Click Evaluate at the top of the screen.
Optionally, select one of the options from the Evaluate drop-down list:
View turns on rogue detection, does an immediate scan, turns off rogue
detection, and then displays the results.
One Time Adapt turns on rogue detection, does a scan, turns off rogue detection,
and then moves stations to recommended channels immediately
Periodic Adapt repeats at the interval you set in the minutes value. Every x
minutes, it turns on rogue detection, does a scan, turns off rogue detection, and
then moves stations to recommended channels immediately.
3. Optionally change the Evaluation Time from 120 seconds to a value of 5 - 300
seconds. Evaluation affects rogue scanning (turns it on for Evaluation Time
seconds) and optionally changes channels.
4. Optionally change the Threshold from 25 to a value of 1 - 100 rogues. Threshold
indicates a delta in goodness value between current and recommended channel
that triggers a change of channel. Non-zero threshold applies to periodic
adaptation.
© 2012 Meru Networks, Inc.
Configuring Security 137
RSA SecurID Authentication
5. Optionally change the Adaption Interval from 30 to a value of either zero or 5 10080 seconds. (The values 1-4 seconds are not supported.) The adaptation
interval determines how often channels can be automatically changed for this
controller.
6. Click Start Wizard.
7. Confirm by clicking OK twice.
Click Graph Help to see what the chart colors mean. Click Details on either chart to
see numeric values for the green bars in the charts. A summary of rogue scanning
parameters is presented at the bottom of the screen. Also, the adaptation period of
a periodic adaptation is shown if one is running. The view automatically refreshes
every minute.
Note: If rogue detection is not enabled on the network, PSM turns it on when
needed for evaluate mode, then turns it back off. For example, if you use the option
One Time Adapt, PSM turns on rogue detection, does a scan and then moves stations
to recommended channels immediately. This overwrites the running config and
reboots the APs (save it to make it permanent).
Blacklisted channels are never recommended. RS4000 and mesh radios are not
supported. The more non-Meru equipment on a channel, the lower the recommendation will be to use that channel. Do not use this feature with a multichannel configuration.
Configure Proactive Dashboard Manager Using the CLI
The CLI command for Proactive Dashboard Manager is proactive-spectrum-manager
evaluate. This is an example:
mg-mc2# proactive-spectrum-manager evaluate
** Attention: Stations may be disconnected in this evaluation **
Are you absolutely sure [yes/No]? yes
Evaluation time [120s]? 10
View or Adapt [View/adapt]? adapt
Adaptation period [0] min (5-10080)? 0
For command details, see the Meru System Director Configuration Guide.
RSA SecurID Authentication
RSA SecurID is two-factor authentication mechanism. This authentication mechanism
primarily involves three components:
RSA SecurID Authenticator token (hardware based or software based) that
generates a unique authentication code
138 Meru System Director Configuration Guide
© 2012 Meru Networks, Inc.
RSA SecurID Authentication
RSA SecurID Server (Authentication Manager)
RSA Authentication Agent
RSA SecurID Authenticator Token and Code
Each RSA SecurID token includes a factory-encoded, unique ‘seed.’ The token uses
this unique seed to generate an authentication code at fixed intervals (for example
60 seconds). By utilizing the built-in-clock time and the unique seed, the authentication code keeps changing at fixed intervals. Since the token's clock and the server's
clock are synchronized. the server generates authentication codes at the same fixed
intervals as the token. Possession of the resulting code is then combined with knowledge of a PIN number to produce secure authentication.
RSA SecurID Server
Users are authenticated against the RSA SecurID Server with the username and the
passcode, which is the combination of the authentication code generated/displayed
by the token and the PIN (see above).
The first time a user uses the token, they are asked to choose a new PIN. The server
also requests a new time-synchronous PIN regularly or whenever the timing between
a token and a server ‘drifts.’ If the drift is more than 3 minutes, then the Server
requests the user to enter the next authentication code generated by the token in
the next interval to verify the possession of the token. If the next authentication
mode has the same clock drift, then token is assumed valid by the Server.
RSA SecurID Agent
This authentication is similar to the standard username-passcode authentication, but
the passcode is not a single word. It is a numeric combination of the authentication
code in the token and the PIN known to the user.
The RSA SecurID can be achieved two ways:
EAP-RSA based authentication - implemented currently
Native SecurID Authentication - not in use at this time
Configure RSA SecurID
Communication between an RSA server and a controller is the same as communication
between a controller and any other radius server (IAS or Free radius). The only difference is in the way the client authenticates to the RSA Server, by means of two factor
authentication in which Meru does not interfere. Configure an RSA server on a
controller using the CLI command radius-profile. For example:
default# configure terminal
default(config)# radius-profile <RSA>
© 2012 Meru Networks, Inc.
Configuring Security 139
Configure MAC Filtering
default(config-radius)# ip-address <IP of the RSA server>
default(config-radius)# key secure-secret
default(config-radius)# exit
Configure MAC Filtering
MAC filtering controls a user station’s access to the WLAN by permitting or denying
access based on specific MAC addresses. A MAC address is unique to each IEEE
802-compliant networking device. In 802.11 wireless networks, network access can
be controlled by permitting or denying a specific station MAC address, assigned to its
wireless NIC card, from attempting to access the WLAN.
The Meru Wireless LAN System provides MAC filtering using the following methods:
Locally on the Controller, through the administration of an Access Control List
(ACL) that permits or denies access for specific stations based on their unique MAC
addresses. Two ACLs are available for MAC filtering:
— Permit ACL, which limits access to only those MAC addresses on the permit list
— Deny ACL, which specifically disallows access to those addresses (clients) on
the deny list
Changes made to the local access/deny ACL are implemented in real time. For
example, if a user currently on the WLAN is removed from the permit list, they
are immediately dropped from the WLAN.
Remotely, in conjunction with the Radius Server, which is configured to authorize
access to a set of MAC addresses. The user authentication follows the procedure
shown in Radius Authentication, but a MAC address is used for user validation.
If the Controller Deny ACL is enabled, those addresses on the Deny list overrule
MAC addresses on the Radius Server. Changes made to the MAC addresses on the
Radius Server are not implemented in real time.
Per ESS, which allows MAC filtering to be enabled or disabled in the associated
Security Profile, overriding the MAC filtering setting on the controller, or on the
Radius server.
The state that is set for the MAC filtering option determines the type of access
control in use, with the precedence in the order of ESS Security Profile setting, local
MAC filtering list, and then the Radius Server state:
For Controller ACL administration, the valid states are:
— disabled: (default) both the permit and deny ACLs are inactive, even if they
contain MAC addresses
— permit: permit ACL is enabled and deny ACL (if it exists) is disabled
— deny: deny ACL is enabled and permit ACL (if it exists) is disabled
For remote Radius Server administration, the valid states are:
— enabled
— disabled
140 Meru System Director Configuration Guide
© 2012 Meru Networks, Inc.
Configure MAC Filtering
The following table summarizes the controller/Radius Server settings.
RADIUS Server Setting
disabled
MAC
Filtering
enabled
no MAC filtering
RADIUS MAC filtering
only
enabled
allow client in Permit
list only
check Permit list first; if
not in Permit list, check
RADIUS server
Deny ACL
Deny list used only
if not in Deny list, check
RADIUS server
disabled
Permit ACL
enabled
Configure MAC Filtering
MAC filtering can be set up for both the controller and the Radius Server. By default,
MAC filtering is disabled. Enable MAC filtering before adding MAC addresses.To
change the state of MAC filtering so that the permit list is enabled, use the command
access-list state permit as follows:
controller(config)# access-list state permit
controller# show access-list state
MAC Filtering (ACL) Configuration
ACL Environment State : permit
Radius Profile name
:
Secondary Radius Profile Name
controller#
:
Add addresses to a permit ACL list by specifying them as command arguments, or by
importing them from a prepared list. To add one or more MAC addresses to the permit
access control list along with a brief description, type the following:
controller(config)# access-list permit 00:40:96:51:eb:2b 00:40:96:51:eb:22
controller(config-acl-permit)# descr MyClient
controller(config-acl-permit)# end
To import a list of MAC addresses to permit, create a text file listing all the MAC
addresses, and import the text file. When creating the text file to be imported, only
include one MAC address, in hexadecimal format (xx:xx:xx:xx:xx:xx), per line. For
example, the contents of a text file to be imported might look like the following:
00:04:23:87:89:71
00:06:25:a7:e9:11
00:07:e9:15:69:40
00:0c:30:be:f8:19
00:0c:e6:09:46:64
© 2012 Meru Networks, Inc.
Configuring Security 141
Configure MAC Filtering
00:0c:e6:12:07:41
After creating the text file, transfer the file to the controller’s /images directory.
Use the CLI copy command to transfer the file to the controller. Check that the file
has been copied using the dir command. The following example shows the command
to import a text file named acl that adds the MAC addresses to the permit ACL list:
controller(config)# access-list permit import acl
00:04:23:87:89:71
00:06:25:a7:e9:11
00:07:e9:15:69:40
00:0c:30:be:f8:19
00:0c:e6:09:46:64
00:0c:e6:12:07:41
00:0c:e6:bd:01:05
Successfully Added
Duplicate Entries
Invalid Format
Entries Processed
:
:
:
:
7
0
0
7
Configure a Deny MAC Filtering List
To set up a Deny MAC Filtering List, enable the ACL deny state and then either
configure a Deny ACL or import a Deny ACL.
A Deny ACL takes precedence over Radius Server access, so you can use it to immediately deny access to a station or black-list certain clients (for example, if they have
a virus or are attacking other devices).
By default, MAC filtering is disabled. To change the state of MAC filtering so that the
deny list is enabled, use the command access-list state deny as follows:
controller(config)# access-list state deny
controller# show access-list state
MAC Filtering (ACL) Configuration
ACL Environment State : deny
Radius Profile Name
:
Secondary Radius Profile Name
controller#
:
Add client addresses to a deny ACL list by either specifying them as command arguments, or by importing them from a prepared list. This command specifies them as
command arguments and enters a brief description:
controller(config)# access-list deny 00:40:96:51:eb:2b 00:40:96:51:eb:10
controller(config-acl-deny)# descr DenyStation
controller(config-acl-deny)# end
controller(config)#
142 Meru System Director Configuration Guide
© 2012 Meru Networks, Inc.
Configure MAC Filtering
To import a list of MAC addresses to deny, create a text file listing all the MAC
addresses, and import the text file. When creating the text file to be imported, only
include one MAC address, in hexadecimal format (xx:xx:xx:xx:xx:xx), per line. For
example, the contents of a text file to be imported might look like the following:
00:04:23:87:89:71
00:06:25:a7:e9:11
00:07:e9:15:69:40
00:0c:30:be:f8:19
00:0c:e6:09:46:64
00:0c:e6:12:07:41
After creating a text file for import, transfer the file to the controller’s /images
directory using the CLI copy command. Ensure that the file has been copied using the
dir command. Then, import the file.
The following example imports a text file named denyacl that adds the MAC
addresses to the deny ACL list:
controller(config)# access-list deny import denyacl
00:04:23:87:89:71
00:06:25:a7:e9:11
00:07:e9:15:69:40
00:0c:30:be:f8:19
00:0c:e6:09:46:64
00:0c:e6:12:07:41
Successfully Added
Duplicate Entries
Invalid Format
Entries Processed
:
:
:
:
6
0
0
6
Configure a Remote Radius Server for MAC Filtering
When Radius Server MAC filtering is enabled, station MAC addresses are set up and
managed by a remote Radius Server. When a new station attempts to join the WLAN,
the Controller queries the Radius server with the MAC address to determine whether
the client is permitted. If the Radius server does not respond, or responds that the
client is not authorized, the client is blocked from entering the WLAN.
Radius Server configuration with the CLI is performed using the radius-profile
command and submode where you specify the configuration profile for the primary
(and optional secondary) Radius Server (includes IP address, secret key, port, and the
delimiter used between MAC addresses in its authorization table).
The following command configures and enables the primary Radius server named in
the profile main-auth:
controller(config)# access-list radius-profile primary main-auth
controller(config)#
© 2012 Meru Networks, Inc.
Configuring Security 143
Security Certificates
For more information on configuring a Radius profile, see “Configure 802.1X Radius
Security With the CLI” on page 125.
Configure an ESS Profile for MAC Filtering
Control is provided per ESS via settings in its Security Profile to turn off or on global
MAC Filtering settings. For example, if controller-based MAC filtering or if Radius
Server MAC Filtering is enabled, the command no macfiltering disables those settings
for the ESS. To enable global MAC filtering again, use the macfiltering command.
Security Certificates
Certificates provide security assurance validated by a Certificate Authority (CA). This
chapter describes the process to obtain and use certificates. For a Custom Certificate
to work properly, you must import not only the Server Certificate, but the entire
chain of trust starting with the issuer certificate all the way up to the Root CA (see
Figure 16).
Server certificates are generated based on a specific CSR (see Figure 15) and, along
with the server certificate, you should get the entire chain of trust (see Figure 16).
Figure 15: Sample CSR Sent to CA
144 Meru System Director Configuration Guide
© 2012 Meru Networks, Inc.
Security Certificates
Figure 16: Sample Certificates Returned by CA (Server, Intermediate, and Root)
Note: Generate Certificate Signing Requests (CSR) directly on the controller using
the Web UI.
Generate a CSR on a Controller
To create a Certificate Request, follow these steps from the controller that needs a
certificate:
1. Click Configuration > Certificate Management > Server Certificates. The Server
Certificate window displays.
2. Click Add. The Certificate Add window displays.
3. Provide the requested information in this window.
4. Click Apply.
The CSR is generated and appears in a window.
5. Either copy this Certificate PEM for pasting into a submittal form or click Save to
save the CSR as a file.
6. Click Close.
7. Send the CSR to the Certificate issuer to be processed. If the CA asks for the
operating system type, select Open SSL (if available) or Other.
The Certificate entry now displays in the Server Certificates page under “Pending
CSR.” This entry will be matched to the certificates when they arrive and imported,
ensuring that the controller that requested certificates is the only one to use those
certificates.
Import the Certificate
Remember that you MUST add the Root Certificate and ALL Intermediate Certificates
in the chain of trust before you install the signed Server Certificate; if you don’t
install in order, you get an error.
To import a Trusted Root CA and the entire chain of trust that you receive from a CA,
follow these steps:
© 2012 Meru Networks, Inc.
Configuring Security 145
Security Certificates
1. Click Configuration > Certificate Management > Trusted Root CA
2. Click Import.
3. Browse to the Root CA file and select it.
4. Click Open and give the Certificate an appropriate alias name.
You can also open the certificate in any text editor and copy/paste the
Certificate's PEM text into the “Certificate PEM” blank text area shown below.
5. Click Import.
You should see a message indicating that the import was successful.
6. Click OK > Close.
7. Repeat steps 2 - 6 for all certificates.
You should now see all certificates imported into the controller
8. Import the Server Certificate by clicking Configuration > Certificate
Management > Server Certificates > Pending CSR > Import.
9. Browse to the server certificate, select it and click Import > Open > Import.
10. Click OK > Close > Close.
11. Restart the web server by clicking CLI at the top right of the screen (see Figure
17), selecting Restart Server. and then clicking Run.
Figure 17: Accessing CLI from GUI
You are finished importing the certificates.
Assign a Server Certificate to an Application
Certificates can be used for security purposes (i.e., for radius termination) as well
as by Captive Portal or Web Administration tools. To assign the Server Certificate:
1. Highlight the Certificate in the Server Certificates list.
2. Click Used By. The User Applications dialog displays.
146 Meru System Director Configuration Guide
© 2012 Meru Networks, Inc.
Security Certificates
Figure 18: Applications to Use Certificate
a
3. Click to select the Captive Portal or Web Administration & Management
Application entry or shift-click to select both.
4. Click Apply.
5. Click Close.
6. To ensure that the certificate is applied and activated correctly, use the
reload-security command from the system’s CLI.
The Apache Web Server needs to be restarted after successfully assigning a certificate to be used by Captive Portal and/or Management Applications. Restart the Web
Server with the Web CLI (top right corner of the Web Interface) and choosing “Restart
Web Server” command.
Troubleshooting Certificates
.The following errors can occur during the certificate process.
Error Message
Certificate file is not a valid x.509
certificate
Why It Appeared
Certificate file is corrupt or not a
X.509 certificate (PEM/DER) file.
Certificate has expired or not yet
valid
Certificates are valid for a
specified number of days with
Start Date (Valid From) and End
Date (Valid To). This certificate is
not valid at this time.
Certificate alias name already
exists
Another certificate with same
alias name has already been
imported.
© 2012 Meru Networks, Inc.
How to Correct Problem
Navigate to a valid X.509
certificate file.
Make sure that the Certificates
Start Date (Valid From) and End
Date (Valid To) range is current.
If the certificate Start Date is in
future, then wait till that time to
import the certificate. If the
certificate has expired, then get
another certificate issued by the
CA.
Use a different alias name.
Configuring Security 147
Security Certificates
Error Message
Why It Appeared
How to Correct Problem
Certificate already exists (with
either same alias name or
different alias name)
Certificate has already been
imported.
Do nothing.
Certificate Public key verification
failed
You selected an alias name that is
different from the certificate’s
CSR alias name.
Select the alias name that you
used when creating the CSR for
this certificate.
Certificate’s Issuers verification
failed
The Issuers certificates (complete
chain-of-trust) is not available in
Trusted Root CA’s list. The most
common cause is that you tried to
import an intermediate or server
certificate first.
148 Meru System Director Configuration Guide
Import the Trusted Root CA
certificates chain of trust first.
Then import the Server
Certificate.
© 2012 Meru Networks, Inc.
Chapter 9
Authentication
There are three authentication methods available for administrators and two
methods available for users. Administrators can be authenticated with Radius,
TACACS+ or Local authentication. Users can be authenticated with Radius or Local
authentication.
Radius Authentication
Conceptual 802.1X Model for Radius Authentication
The conceptual model for 802.1X authentication looks like this:
Figure 19: Conceptual Model for 802.1X Radius Server Authentication
Wirelessstation
Step 1: Obtain certificate
Certificate server
Step 2: Contact AP
controller
Step 3: Forward request
PMC1
POWER
PMC2
HDD WDT
PW
COM1
LAN3
USB1 USB0
HS
RST
PWR LED
RESET
AccessPoint
Step 4: Send RADIUS request
Step 6: User sends password / certificate
R A DIUS server
00145
Step 5: Password challenge / certificate request
802.1X Radius authentication works like this:
© 2012 Meru Networks, Inc.
Authentication 149
Radius Authentication
1. Depending on the EAP type, you may first need to obtain a digital certificate from
the Certificate Server.
2. Using EAP as end user, contact the AP in order to be authenticated.
3. The AP forwards the request to the controller.
4. The controller acts as a Radius client and sends the request to the Radius server.
5. Depending on the EAP type, the Radius server may challenge the end user for a
password, or the user may present a digital certificate that they have previously
obtained from a Certificate Server.
6. The Radius server authenticates the end user and the access point, and opens a
port to accept the data from the end user.
Configure Radius Authentication for Users With the Web UI
Note: Radius Authentication requires Level 10 permission.
To use Radius authentication for guests and employees on the network, you first need
to create a Radius Profile, then include that Radius Profile in a Security Profile, then
include the Security Profile in an ESS Profile. Configuring Radius authentication for
administrators is a different, simpler process. Follow these steps to add a Radius
profile to System Director:
1. Click Configuration > Security > Radius.
2. Provide a name, IP address, secret key, and port number (1812 is default).
3. Select a MAC address delimiter (Hyphen, Single Hyphen or Colon) from the list.
4. Select a password type (Shared Key or MAC Address) from the list.
5. Click OK.
Indicate when the Radius server should be used. There are two ways to do this. One
way is a two-step process that creates a Security Profile to call the Radius Profile,
and then creates an ESS Profile to call the Security Profile. This process is described
in steps 6 and 7.
6. Click Configuration > Security > Profile. Here you see all security profiles that
have been created on this controller. You can either modify an existing security
profile to use the Radius server or you can add a new security profile. Either way,
the security profile includes a drop-down list for Primary Radius Profile Name and
Secondary Radius Profile Name; all configured Radius servers are listed and you
can select one from the list.
Indicate which ESS Profile should use the Security Profile.
7. Click Configuration > Wireless > ESS. Here you see all ESS profiles that have been
created on this controller. You can either modify an existing ESS profile to use the
Security Profile or you can add a new ESS Profile. Either way, there is a drop-down
list for Security Profile Name; all configured Security Profiles are listed and you
can select one from the list.
150 Meru System Director Configuration Guide
© 2012 Meru Networks, Inc.
Radius Authentication
You can also skip step 6 above and select the Primary Radius Profile Name and
Secondary Radius Profile Name directly from the ESS as part of step 7.
Configure Radius Authentication for Administrators With the Web UI
Configure Radius authentication for all administrators by following these steps:
1. Click Configuration > User Management > Setup.
2. Select Radius for Authentication Type at the top of the screen. See Figure 21.
3. There are three tabs for admin authentication (see m), Radius, Tacacs+ and Local
Admins. The Radius tab is the default.
Figure 20: Configure a User for Radius Authentication
4. Provide the IP address of the primary Radius server.
5. Provide a primary Radius port number; the default is 1812.
6. Provide the secret key for Radius server access.
7. Optionally repeat steps 4, 5 and 6 for a secondary Radius server.
8. Click OK.
© 2012 Meru Networks, Inc.
Authentication 151
Radius Authentication
9. Add administrators on the Radius server using these three levels.
1
Operator is the lowest authentication level and also the default. Operators
can see statistics and results but cannot make any configuration changes.
10
Administrators can also do general configuration changes, but cannot upgrade
APs or controllers, nor can they upgrade System Director versions using Telnet.
The cannot configure an NMS server, NTP server, change the system password,
date or time (all CLI). They cannot create admins nor can they set the
authentication mode for a controller (GUI and CLI). Administrators cannot add
or remove licensing.
15
SuperUser administrators can perform all configurations on the controller.
They are the only ones who can upgrade APs or controllers and they can
upgrade System Director versions using Telnet. The can configure an NMS
server, NTP server, system password, date and time (all CLI). They can also
create admins and set the authentication mode for a controller (GUI and CLI).
Superusers can add and remove licensing.
Configure Radius Authentication for Administrators With the CLI
New commands to configure all controller administrators for Radius authentication
mode were introduced in System Director 4.1:
authentication mode global
primary-radius-ip
primary-radius-port
primary-radius-secret
authentication type radius
secondary-radius-ip
secondary-radius-port
secondary-radius-secret
For command details, see the Meru System Director Command Reference.
CLI Example for Setting Authentication Mode to Radius
ramcntrl(0)# configure terminal
ramcntrl(0)(config)# authentication-mode global
ramcntrl(0)(config-auth-mode)# authentication-type radius
ramcntrl(0)(config-auth-mode)# primary-radiusprimary-radius-ip
primary-radius-port
primary-radius-secret
ramcntrl(0)(config-auth-mode)# primary-radius-ip 172.18.1.3
ramcntrl(0)(config-auth-mode)# primary-radius-secret RadiusP
ramcntrl(0)(config-auth-mode)# secondary-radiussecondary-radius-ip
secondary-radius-port
secondary-radius-secret
152 Meru System Director Configuration Guide
© 2012 Meru Networks, Inc.
Radius Authentication
ramcntrl(0)(config-auth-mode)# secondary-radius-ip 172.18.1.7
ramcntrl(0)(config-auth-mode)# secondary-radius-secret RadiusS
ramcntrl(0)(config-auth-mode)# exit
ramcntrl(0)(config)# exit
ramcntrl(0)# sh authentication-mode
Administrative User Management
AuthenticationType
: radius
Primary RADIUS IP Address
: 172.18.1.3
Primary RADIUS Port
: 1812
Primary RADIUS Secret Key
: *****
Secondary RADIUS IP Address : 172.18.1.7
Secondary RADIUS Port
: 1812
Secondary RADIUS Secret Key : *****
Primary TACACS+ IP Address
: 0.0.0.0
Primary TACACS+ Port
: 49
Primary TACACS+ Secret Key
: *****
Secondary TACACS+ IP Address : 0.0.0.0
Secondary TACACS+ Port
: 49
Secondary TACACS+ Secret Key : *****
ramcntrl(0)#
Radius Authentication Attributes
Attributes for 802.1X
The Radius 802.1X message attributes are:
MESSAGE: Access-Request
ATTRIBUTES:
User-Name(1)
NAS-IP-Adress(4)
NAS-Port(5)
Called-Station-Id(30) = <mac of Controller>:<ssid string>
Calling-Station-Id(31)
Framed-MTU(12)
NAS-Port-Type(61) = Wireless-802.11(19)
Connect-Info(77)
Message-Authenticator(80)
OPTIONAL ATTRIBUTES (depends on EAP type):
EAP-Message(79)
State(24)
OPTIONAL ATTRIBUTES (depends on Radius based User Management)
© 2012 Meru Networks, Inc.
Authentication 153
Radius Authentication
Service-Type(6) = Value:Login(1)
User-Password(2) = Value:<password string>
MESSAGE: Access-Accept
ATTRIBUTES:
Framed-Protocol(7) = PPP(1)
Service-Type(6) = Framed-User(2)
Class(25)
Message-Authenticator(80)
OPTIONAL ATTRIBUTES (depends on EAP type):
EAP-Message(79)
OPTIONAL ATTRIBUTES (required for Radius-assigned VLAN):
Tunnel-Medium-Type(65) = 802(6)
Tunnel-Type(64) = VLAN(13)
Tunnel-Private-Group-Id (81) = <the VLAN ID>
OPTIONAL ATTRIBUTES (depends on Radius based User Management)
Filter-Id(11) = Value:<Privilege Level>:<1-15>
Radius Accounting for Clients
If you have a Radius accounting server in your network, you can configure the
controller to act as a Radius client, allowing the controller to send accounting
records to the Radius accounting server. The controller sends accounting records
either for clients who enter the wireless network as 802.1X authorized users or for
the clients that are Captive Portal authenticated.
When using Radius accounting, set up a separate Radius profile for the Radius
accounting server and point the ESS profile to that Radius profile. So, for example,
you could have a Radius profile called radiusprofile1 that uses UDP port 1645 or 1812
(the two standard ports for Radius authentication) and your security profiles would
point to radiusprofile1. To support Radius accounting, configure a new radius profile
(like radiusprofile1_acct) even if the Radius accounting server is the same as the
Radius authentication server. Set its IP and key appropriately and set its port to the
correct Radius accounting port (1646, 1813 for example). Then point ESS profiles) to
this new Radius profile radiusprofile1_acct.
Accounting records are sent for the duration of a client session, which is identified
by a unique session ID. You can configure a Radius profile for the primary Radius
accounting server and another profile for a secondary Radius accounting server,
which serves as a backup should the primary server be offline. The switch to the
backup Radius server works as follows. After 30 seconds of unsuccessful Primary
Radius server access, the secondary Radius server becomes the default. The actual
154 Meru System Director Configuration Guide
© 2012 Meru Networks, Inc.
Radius Authentication
attempt that made it switch is discarded and the next Radius access that occurs goes
to the Secondary Radius server. After about fifteen minutes, access reverts to the
Primary Radius Server.
In every Radius message (Start, Interim Update and Stop), the following attributes
are included:
Table 9: Radius Accounting Attributes
Radius Attribute
Description
Session-ID
Client IP Address-Current Time - The session time returned
from the radius server has priority. If the radius server
doesn’t return the session time, the configured value is
used.
Status Type
Accounting Start/Accounting Stop
Authentication
Radius authentication
User-Name
Username
User-Name
Station Mac Address (station info)
NAS-IP Address
Controller IP Address
NASPort
Unique value (system generated)
Called Station-ID
Controller MAC Address
Called Station-ID
Controller MAC Address:ESSID Name (Used to enforce what
ESS a station can connect to)
Calling Station-ID
Station MAC address
Connect Info
Radio Band of Station
Class
Class Attribute
NAS-Identifier
Any string to identify controller (self) in Access Request
Packet. Min value 3 chars.
Acct-Input-Octets*
Number of octets received on this port (interface) and sent in
Accounting-Request when Accounting status type is STOP
© 2012 Meru Networks, Inc.
Authentication 155
Radius Authentication
Table 9: Radius Accounting Attributes
Radius Attribute
Description
Acct-Input-Packets*
Number of packets received on this port (interface) and sent
in Accounting-Request when Accounting status type is STOP
Acct-Output-Packets*
Number of packets sent on this port (interface) and sent in
Accounting-Request when Accounting status type is STOP
Acct-Output-Octets*
Number of octets sent on this port (interface) and sent in
Accounting-Request when Accounting status type is STOP
Acct-Terminate-Cause
Used to get the reason for session termination and sent in
Accounting-Request when Accounting status type is STOP
Acct-Delay-Time
Sent to indicate the number of seconds we have been waiting
to send this record.
AP ID
Vendor specific info: the AP ID to which client connected.
Sent when accounting starts
AP ID
Vendor specific info: the AP ID from which client disconnected
from. Sent when accounting stops
AP Name
Vendor specific info: The AP Name to which client connected.
Sent when accounting starts
AP Name
Vendor specific info: the AP ID from which client disconnected
from. Sent when accounting stops
Session-Time
Number of seconds between start and stop of session
* Input-octets, output-octets, input-packets and output-packets are in Radius stop messages in 3.6,
but those attributes are not included in Radius Interim Update messages.
Table 10: Radius Authentication Attributes
Radius Attribute
Description
User-Name
Username
NAS-IP-Address
Controller IP Address
156 Meru System Director Configuration Guide
© 2012 Meru Networks, Inc.
Radius Authentication
Table 10: Radius Authentication Attributes
Radius Attribute
Description
NAS-Port
Unique value = essid << 11 | Sta AID
NAS-Port-Type
Type of the physical port used for authentication = 19
Called-Station-Id
Own MAC Address: ESSID Name
Called-Station-Id
Own MAC Address
Calling-Station-Id
STA MAC Address
Framed-MTU
Max Radius MTU = 1250
Connect-Info
Radio Band of Station
VLAN ID
Vlan Id of the ESS profile to which client is trying to connect.
Only available for 802.1x clients and is sent only if its
configured on the controller
Service-Type
Send the types of service requested = 8 (Authenticate Only)
Service-Type
Send the types of service requested = 1 (Login)
User-Password
User Password
Session-Timer
Number of seconds the user must be allowed to remain in the
network
Class
Returned by Radius Server and to be sent in Accounting
Request message
Vlan-Id
The Vlan ID returned by the Radius server
Filter-Id
Used with Per User Firewall (PEM); privilege level (1, 10, 15)
sent as filter id in Radius response
Message-Authenticat
or
Returned by Radius server
© 2012 Meru Networks, Inc.
Authentication 157
Radius Authentication
Table 10: Radius Authentication Attributes
Radius Attribute
Description
EAP Message
Returned by Radius server
Tunnel-Medium-Type
Indicates the transport medium like ipv4, ipv6. In CP, valid only
if VPN is set. Also sent in Access-Request in case of CP.
Tunnel-Type
The type of tunnel, in our case should be VLAN i.e. 13. If
anything else is received, treat as ACCESS-REJECT. In CP, valid
only if VPN is set. Also sent in Access-Request in case of CP.
Tunnel-Private-Group
Receives the Vlan ID from this attribute (Does not apply for
Captive Portal)
Framed-Compression
Indicates the compression protocol that is being used. In our
case, NONE
Idle-Timeout
Use this to calculate client idle time and knock the client off.
Configure Radius Accounting for Captive Portal
See Configure Radius Accounting for Captive Portal.
Radius-Based ESS Profile Restriction
This feature gives a controller the capability to restrict wireless clients attempting
connection through Radius based ESS profiles; the clients can connect only to certain
SSIDs as returned in a Radius Accept message.
With this system, there is one Radius server and multiple ESS profiles with 802.1X
security using this Radius Server. In absence of the RSSID feature, all wireless clients
provisioned in the Radius Server have access to all ESS profiles and hence all associated VLANS. With SSID restriction, the Radius server can be further configured for
each of these wireless clients specifying the SSIDs they can connect with.
You can use a Radius server to restrict SSID connection using VSA in the Radius Accept
message. There are three possible conditions for an SSID:
Radius Server is sending:
Results in:
No list of acceptable SSIDs
Connection is accepted
A list of acceptable SSIDs that
includes the ID
Connection is accepted
158 Meru System Director Configuration Guide
© 2012 Meru Networks, Inc.
TACACS+ Authentication
A list of acceptable SSIDs that
does not include the ID
Connection is not
accepted
The Radius server should return the allowed SSID(s) in a Vendor-specific attribute
(VSA) with Vendor code 9 and attribute number 1 in the Access-Accept message. The
attribute value should be string format.
The string should say ssid=<ssid-string> where <ssid-string> is replaced by the actual
SSID (also known as the ESSID).
If a list of multiple allowed SSIDs is used, put each SSID in a separate instance of the
attribute. The order of the attributes does not matter. If the SSID to which the station
is trying to connect is not among the SSIDs returned by the Radius server, the station
will be denied access.This feature has no CLI or Web UI commands associated with
it. If the Radius responds with a list of allowed SSIDs, the list is used to process and
limit the user.
TACACS+ Authentication
Terminal Access Controller Access-Control System Plus (TACACS+) is a remote authentication protocol that runs on a TACACS+ server on the network and is similar to
Radius authentication. There are some differences between the two, however.
Radius combines authentication and authorization in one user profile, while TACACS+
separates the two operations. Another difference is that TACACS+ uses TCP port 49
while RADIUS uses UDP port 1812. System Director 5.1 supports TACACS+ authentication but not accounting; System Director supports both Radius authentication and
accounting. Only the Cisco ACS server is supported for Tacacs+ authentication.
The TACACS+ level required, 15 (superuser), 10 (admin), and 1 (user), for the activity
on the current GUI window is listed in the Help. Click Help on any GUI window of
System Director. In the CLI, all command lists also include the required authentication level, which is also now used for both Radius and local admin authentication in
Release 5.1. TACACS+ actually provides eight levels, but Meru only uses the three
authentication levels described here. The three levels used are described below:
1
© 2012 Meru Networks, Inc.
Operator is the lowest authentication level and also the default. Operators
can see statistics and results but cannot make any configuration changes.
Authentication 159
TACACS+ Authentication
10
Administrators can also do general configuration changes, but cannot upgrade
APs or controllers, nor can they upgrade System Director versions using Telnet.
The cannot configure an NMS server, NTP server, change the system password,
date or time (all CLI). They cannot create admins nor can they set the
authentication mode for a controller (GUI and CLI). Administrators cannot add
or remove licensing.
15
SuperUser administrators can perform all configurations on the controller.
They are the only ones who can upgrade APs or controllers and they can
upgrade System Director versions using Telnet. The can configure an NMS
server, NTP server, system password, date and time (all CLI). They can also
create admins and set the authentication mode for a controller (GUI and CLI).
Superusers can add and remove licensing.
Configure TACACS+ Authentication Mode with the CLI
New commands to configure TACACS+ authentication mode for all administrators on
a Cisco ACS server were introduced in System Director 4.1:
authentication mode global
primary-tacacs-ip
primary-tacacs-port
primary-tacacs-secret
authentication type tacacs+
secondary-tacacs-ip
secondary-tacacs-port
secondary-tacacs-secret
For command details, see the Meru System Director Command Reference.
CLI Example for Setting Authentication Mode to TACACS+
ramcntrl(0)# configure terminal
ramcntrl(0)(config)# authentication-mode global
ramcntrl(0)(config-auth-mode)# authentication-type tacacs+
ramcntrl(0)(config-auth-mode)# primary-tacacsprimary-tacacs-ip
primary-tacacs-port
primary-tacacs-secret
ramcntrl(0)(config-auth-mode)# primary-tacacs-ip 172.18.1.5
ramcntrl(0)(config-auth-mode)# primary-tacacs-secret TacacsP
ramcntrl(0)(config-auth-mode)# secondary-tacacssecondary-tacacs-ip
secondary-tacacs-port
secondary-tacacs-secret
ramcntrl(0)(config-auth-mode)# secondary-tacacs-ip 172.18.1.10
ramcntrl(0)(config-auth-mode)# secondary-tacacs-secret TacacsS
ramcntrl(0)(config-auth-mode)# exit
ramcntrl(0)(config)# exit
ramcntrl(0)# sh authentication-mode
160 Meru System Director Configuration Guide
© 2012 Meru Networks, Inc.
TACACS+ Authentication
Administrative User Management
AuthenticationType
:
Primary RADIUS IP Address
:
Primary RADIUS Port
:
Primary RADIUS Secret Key
:
Secondary RADIUS IP Address :
Secondary RADIUS Port
:
Secondary RADIUS Secret Key :
Primary TACACS+ IP Address
:
Primary TACACS+ Port
:
Primary TACACS+ Secret Key
:
Secondary TACACS+ IP Address :
Secondary TACACS+ Port
:
Secondary TACACS+ Secret Key :
ramcntrl(0)#
tacacs+
172.18.1.3
1812
*****
172.18.1.7
1812
*****
172.18.1.5
49
*****
172.18.1.10
49
*****
For command details, see the Meru System Director Command Reference.
Configure TACACS+ Authentication Mode with the Web UI
To configure TACACS+ authentication on a Cisco ACS server for all admins, follow
these steps:
1. Click Configuration > User Management > Setup.
2. Select the Authentication Type Tacacs at the top of the screen.
3. There are three tabs for admin authentication (see Figure 21), Radius, Tacacs+
and Local Admins. Click the Tacacs+ tab.
Figure 21: Setting Authentication for Admins
4. Provide the IP address of the primary TACACS+ server.
5. Provide a primary TACACS+ port number; the default is 49.
6. Provide the secret key for TACACS+ server access.
© 2012 Meru Networks, Inc.
Authentication 161
Local Admin Authentication
7. Optionally repeat steps 4, 5 and 6 for a secondary TACACS+ server.
8. Click OK.
9. Add administrators on the TACACS+ server using these three levels.
1
Operator is the lowest authentication level and also the default. Operators
can see statistics and results but cannot make any configuration changes.
10
Administrators can also do general configuration changes, but cannot upgrade
APs or controllers, nor can they upgrade System Director versions using Telnet.
The cannot configure an NMS server, NTP server, change the system password,
date or time (all CLI). They cannot create admins nor can they set the
authentication mode for a controller (GUI and CLI). Administrators cannot add
or remove licensing.
15
SuperUser administrators can perform all configurations on the controller.
They are the only ones who can upgrade APs or controllers and they can
upgrade System Director versions using Telnet. The can configure an NMS
server, NTP server, system password, date and time (all CLI). They can also
create admins and set the authentication mode for a controller (GUI and CLI).
Superusers can add and remove licensing.
Local Admin Authentication
Local admin authentication takes place on the controller and uses the same three
privilege levels as Radius and TACACS+, 15 (superuser), 10 (admin), and 1 (user). If
administrators are using Local authentication, they cannot use Radius or TACACS+.
Configure an Admin for Local Authentication Mode With the CLI
Use these commands, new in release 4.1, to configure local administrators with the
CLI:
authentication-mode global
authentication-type local
local-admin
password
privilege-level
show local admins
For command details, see the Meru System Director Command Reference.
162 Meru System Director Configuration Guide
© 2012 Meru Networks, Inc.
Local Admin Authentication
CLI Example for Configuring a Local Admin
ramcntrl(0)# configure terminal
ramcntrl(0)(config)# authentication-mode global
ramcntrl(0)(config-auth-mode)# authentication-type local
ramcntrl(0)(config-auth-mode)# exit
ramcntrl(0)(config)# exit
ramcntrl(0)# sh authentication-mode
Administrative User Management
AuthenticationType
: local
Primary RADIUS IP Address
: 0.0.0.0
Primary RADIUS Port
: 1812
Primary RADIUS Secret Key
: *****
Secondary RADIUS IP Address : 0.0.0.0
Secondary RADIUS Port
: 1812
Secondary RADIUS Secret Key : *****
Primary TACACS+ IP Address
: 0.0.0.0
Primary TACACS+ Port
: 49
Primary TACACS+ Secret Key
: *****
Secondary TACACS+ IP Address : 0.0.0.0
Secondary TACACS+ Port
: 49
Secondary TACACS+ Secret Key : *****
ramcntrl(0)#
ramcntrl(0)(config)# local-admin LocalUser
ramcntrl(0)(config-local-admin)# privilege-level 15
ramcntrl(0)(config-local-admin)# password LocalUser
ramcntrl(0)(config-local-admin)# exit
ramcntrl(0)(config)# exit
ramcntrl(0)
Configure Local Authentication and Add an Admin with the Web UI
To configure Local authentication for admins and optionally add a local administrator, follow these steps:
1. Click Configuration > User Management > Setup.
2. Select the Local Admin radio button at the top of the screen.
To actually add a local administrator, continue with Step 3.
3. There are three tabs for admin authentication (see Figure 21), Radius, Tacacs+
and Local Admins. Click the Local Admin tab.
4. Click Add. The Local Admins - Add window displays - see Figure 22.
© 2012 Meru Networks, Inc.
Authentication 163
Local Admin Authentication
Figure 22: Setting Local Authentication for Admins
5. Provide the user name for a local administrator.
6. Provide a password for that local administrator.
7. Enter a privilege level, 15 (Superuser), 10 (Admin), or 1 (Operator); see the
descriptions for each level below.
8. Click OK.
164 Meru System Director Configuration Guide
© 2012 Meru Networks, Inc.
802.1X Authentication
802.1X Authentication
Authentication in the 802.11 standard is focused more on wireless LAN connectivity
than on verifying user or station identity. For enterprise wireless security to scale to
hundreds or thousands of users, an authentication framework that supports centralized user authentication must be used in addition to the WEP type specified by
802.11, or by using WPA/WPA2, which incorporates TKIP/CCMP-AES and 802.1X
authentication.
The use of IEEE 802.1X offers an effective framework for authenticating and controlling user traffic to a protected network, as well as dynamically varying encryption
keys if WPA/WPA2 is configured. 802.1X ties a protocol called EAP (Extensible
Authentication Protocol) to both the wired and wireless LAN media and supports
multiple authentication methods, such as token cards, Kerberos, one-time passwords, certificates, and public key authentication.
802.1X Components
There are three basic pieces to 802.1X authentication:
1. Supplicant—a software client running on the wireless station
2. Authenticator—the access point and the controller
3. Authentication Server—an authentication database, traditionally a Radius server
such as Cisco ACS, Steel Belt Radius server (Juniper), or Microsoft IAS. In System
Director release 4.1 and later, TACACS+ authentication is also supported.
Extensible Authentication Protocol (EAP) is used to pass the authentication information between the supplicant (the wireless station) and the authentication server
(Radius, MS IAS, TACACS+ or other). The actual authentication is defined and handled
by the EAP type. The access point (and the controller in the configuration) acts as
the authenticator. The authenticator is a client of the server that allows the supplicant and the authentication server to communicate.
About the EAP Types
The EAP type you choose, and whether you choose to implement authentication in
your organization, depends on the level of security you require. Some of the most
commonly deployed EAP authentication types include the following, all of which are
supported by the controller:
EAP-TLS
EAP-PEAP
EAP-TTLS
Cisco LEAP
© 2012 Meru Networks, Inc.
Authentication 165
802.1X Authentication
EAP-TLS
EAP-TLS (Transport Layer Security) provides certificate-based mutual authentication
between the client and the network. It relies on client and server certificates to
provide authentication and can be used to dynamically generate user-based and
session-based encryption keys to secure subsequent communications between the
WLAN client and the access point. This type of authentication mechanism requires
the administrator install a Certificate Server to store and distribute user and
computer certificates. Each client will need the certificate to be downloaded and
installed on the wireless client before attempting to use the WLAN. For a large WLAN
installation, this can be a cumbersome task.
EAP-TTLS (Tunneled Transport Layer Security)
EAP-TTLS (Tunneled Transport Layer Security) was developed by Funk Software and
Certicom, as an extension of EAP-TLS. This security method provides for certificate-based, mutual authentication of the client and network through an encrypted
channel (or tunnel), as well as a means to derive dynamic, per-user, per-session
encryption keys. Unlike EAP-TLS, EAP-TTLS requires only server-side certificates.
LEAP (Lightweight Extensible Authentication Protocol)
LEAP (Lightweight Extensible Authentication Protocol), is an EAP authentication type
used primarily in Cisco Aironet WLANs. It encrypts data transmissions using dynamically generated WEP keys, and supports mutual authentication. Cisco has recently
licensed LEAP to a variety of other manufacturers enabling the usage of other than
Cisco adapters with LEAP.
PEAP (Protected Extensible Authentication Protocol)
PEAP (Protected Extensible Authentication Protocol) provides a method to securely
transport authentication data, including legacy password-based protocols, via 802.11
wireless networks. PEAP accomplishes this by using tunneling between PEAP clients
and an authentication server. Like the competing standard Tunneled Transport Layer
Security (TTLS), PEAP authenticates wireless LAN clients using only server-side
certificates, thus simplifying the implementation and administration of a secure
wireless LAN. Microsoft, Cisco and RSA Security developed PEAP. Note that Cisco's
LEAP authentication server, ACS, recently added support for PEAP.
802.1X EAP Types
Feature/Benefit
MD5
TLS
TTLS
PEAP
LEAP
Client certificate required
no
yes
no
no
no
Server certificate required
no
yes
yes
yes
no
WEP key management
no
yes
yes
yes
yes
166 Meru System Director Configuration Guide
© 2012 Meru Networks, Inc.
802.1X Authentication
Provider
Microso
ft
Microso
ft
Funk
MS
Cisco
Authentication Attributes
One
way
Mutual
Mutual
Mutual
Mutual
Deployment Difficulty
Easy
Difficul
t
Modera
te
Modera
te
Modera
te
Wireless Security
Poorest
Highest
High
High
High
The following notes apply to the authentication mechanisms above:
1. MD5 is not typically used as it only provides one-way authentication. MD5 does
not support automatic distribution and rotation of WEP keys and therefore does
nothing to relieve the administrative burden of manual WEP key maintenance.
2. TLS, although very secure, requires the administrator to install client certificates
on each wireless station. Maintaining a PKI infrastructure adds additional time
and effort for the network administrator.
3. TTLS addresses the certificate issue by tunneling TLS, and thus eliminates the
need for a certificate on the client side. This often makes TTLS the preferred
option. Funk Software primarily promotes TTLS and there is a charge for
supplicant and authentication server software.
4. LEAP has the longest history. Although previously proprietary to Cisco, Cisco now
licenses the software. Other vendors are now beginning to support LEAP in their
wireless LAN adapters.
5. The more recent PEAP works similar to EAP-TTLS in that it does not require a
certificate on the client side. PEAP is backed by Cisco and Microsoft and is
available at no additional cost from Microsoft. If you want to transition from LEAP
to PEAP, Cisco's ACS authentication server runs both.
© 2012 Meru Networks, Inc.
Authentication 167
802.1X Authentication
168 Meru System Director Configuration Guide
© 2012 Meru Networks, Inc.
Chapter 10
Captive Portals for Temporary Users
If you want to give limited wireless access to a group of users, use Captive Portal.
Captive Portal is a feature designed to isolate temporary users on a network, for
example guests in a company or students using a library. If Captive Portal is enabled,
the HTTP protocol over Secure Socket Layer (SSL, also known as HTTPS) provides an
encrypted login interchange with the Radius server until the user is authenticated
and authorized. During this interchange, all traffic with the CLIent station except
DHCP, ARP, and DNS packets is dropped until access is granted. If access is not
granted, the user is unable to leave the Captive Portal login page. If access is
granted, the user is released from the Captive Portal page and is allowed to enter
the WLAN. This section provides instructions to both implement Captive Portal and
customize the GUI pages for Meru Captive Portal. Guest Login is disabled by default
and requires privilege level 1 (lowest level). You can either Configuring Meru Captive
Portal or use Third-Party Captive Portal Solutions.
Note: The Radius attributes for Dynamic VLAN assignment (Tunnel-Type,
Tunnel-Medium-Type, and Tunnel-Private-Group-ID, see the command vlan
support) are not supported and are ignored if returned as part of the Radius
exchange.
Captive Portal does not support bridged profiles.
Security logging must be set to on before passthrough will work. Also, security
logging has to be toggled of/on for any new settings to take effect.
Configuring Meru Captive Portal
To implement the built-in Captive Portal feature, complete these tasks (only two
tasks are required). The Captive Portal configuration tasks are:
Optionally Customize and Use Your Own HTML Pages
Configure Meru Captive Portal with the CLI or Configure Meru Captive Portal with
the CLI
For authentication, either Configure a Radius Server for Captive Portal
Authentication or Create Meru Captive Portal Guest User IDs Locally
Optionally Configure Pre-Authentication Captive Portal Bypass
© 2012 Meru Networks, Inc.
Captive Portals for Temporary Users 169
Configuring Meru Captive Portal
Optionally Customize and Use Your Own HTML Pages
If you want to create custom Captive Portal login and success pages with your own
logos and credentials, complete the directions in this section. You do not need to do
this if you plan to use all of the default Captive Portal pages provided by Meru
Networks (see login example in Figure 23). If you do want to create custom HTML
pages, you can create up to four sets of Captive Portal custom login pages; these are
referred to as Captive Portal 1 through 4. Each set has 6 files, but you can only create
customized pages for the main login page and the authentication successful page.
The remaining four HTML pages are always the default pages. If you create multiple
custom files, they must both use the same authentication (Radius or Local) with up
to 32 local users (the users can be different for each custom portal).
Figure 23: Default Captive Portal Login Page
Figure 24: Customized Captive Portal Login Page
bookstore
username
password
Note: All Custom Portal pages (HTML, CSS, JS, and graphics) for the default pages
and up to four sets of Custom Portal 2 pages that you create are all located in the
same folder. This makes it imperative that you use unique names for all custom files.
It also means that you can share a file such as a CSS file used for both CP1 and CP2
custom pages. This is also how and why any pages that you do not customize will use
default HTML files. Here are the locations for the custom web portal files:
— /opt/meru/etc/ws/html.vpn.custom
— /opt/meru/etc/ws/Styles.vpn.custom
— /opt/meru/etc/ws/Images.vpn.custom
170 Meru System Director Configuration Guide
© 2012 Meru Networks, Inc.
Configuring Meru Captive Portal
Create Custom Pages
The easiest way to create your own set of custom pages is to download Meru default
files and use the two customizable ones (Login page and Success page) as templates,
giving the two altered HTML pages new names. To do this, follow these steps:
1. Get the template files. Click Maintenance > Captive Portal > Customization >
Get Files.
A zip file called zip.tar.gz is downloaded to your computer. When the zip.tar.gz
file is unzipped, you see the folder html.vpn that contains these six default files:
— Login page can be customized (default filename is loginformWebAuth.html)
— Successful login page can be customized (default filename is
auth_web_ok.html)
— Your login failed - try again page (default filename is
loginformWebAuthRetry.html)
— Web authentication succeeded; do you want to log off? (default filename is
logoff User.html)
— You are now logged off page (default filename is loggedoff.html)
— Your logoff failed - try again page (default filename is logoffUserFailed.html)
2. You can only create two custom files per Captive Portal interface: a replacement
for the Login page loginformWebAuth.html and a replacement for the Successful
Login page auth_web_ok.html. Locate the two customizable HTML files on your
computer and use them as templates to create your own custom HTML files. Use
a program such as Notepad, make your changes, and then save the files with
unique names.
— CSS, JavaScript, and HTML are supported.
— You can upload graphics up to 50K each in the formats .html .gif, .jpg, .png,
.bmp .css, .js.
To replace the first Meru logo graphic, look for the line that reads:
src="Images.vpn/img_merulogo.gif" width=133 border=0></A></TD>
Change the text "Images.vpn/img_merulogo.gif" to
"Images.vpn.custom/your_image.gif" (Note that you are specifying a new
directory for the .gif file, which is Images.vpn.custom).
To replace the second graphic (the mountain), look for the line that reads:
src="Images.vpn/img_aboutmeru.jpg" width=326 border=0></TD></TR>
Change the text "Images.vpn/img_aboutmeru.jpg" to
"Images.vpn.custom/your_image2.gif" (Note that you are specifying a new
directory for the .gif file, which is Images.vpn.custom).
Possible edits include changing logos, text, and formatting. The only lines that
cannot be altered are the login communication process between the controller
and the Radius server in the file loginformWebAuth.html.
3. Import all new Captive Portal files (HTML, CSS, JS, and graphics) to the controller
one by one. Click Maintenance > Captive Portal > Import File > enter the
location/file in the text box > Import File. Be sure that the files have unique
names; they will all be placed in the same directory.
Tell the controller to use custom pages. Click Configuration > Captive Portal and
select the radio button Customization.
The custom HTML, CSS, JS, and graphic files are now on the controller.
© 2012 Meru Networks, Inc.
Captive Portals for Temporary Users 171
Configuring Meru Captive Portal
4. If you want to remove the word Meru or make any other changes in the four
remaining files loginformWebAuthRetry.html, logoff User.html, loggedoff.html,
or logoffUserFailed.html, alter the default files that you downloaded in Step 1
and import them as you did in Step 3. All five sets of Portal pages (default, CP1,
CP2, CP3, and CP4) will then use the default files that you altered. These four
files have only one version. See Figure 25.
Figure 25: Captive Portal HTML Pages (maximum)
Default
Files
Custom
CP1 Files
Custom
CP2 Files
Custom
CP3 Files
Custom
CP4 Files
Login
CP1
Login
CP2
Login
CP3
Login
CP4
Login
Success
CP1
Success
CP2
Success
CP3
Success
CP4
Success
Logoff
Logged
off
Retry
User
Next, tell System Director which custom files to use under what circumstances.
Either Implement New Custom HTML Files Using the CLI or Implement New Custom
HTML Files Using the GUI.
Implement New Custom HTML Files Using the CLI
Implement custom Captive Portal pages with the CLI in System Director 3.7 and later
by indicating which subset of users should see the new login and success pages; when
a user logs in from this subnet, they will see the corresponding custom pages. You
can implement up to two sets of Captive Portal pages at a time. For example,
students in a library might see the Custom Captive Portal 1 login and success pages
while visitors to the football stadium see the Custom Captive Portal 2 login and
success pages. See Figure 25.
172 Meru System Director Configuration Guide
© 2012 Meru Networks, Inc.
Configuring Meru Captive Portal
Determine who will see which pages. Point to two custom Captive Portal pages with
the CLI command web custom CaptivePortal[1|2] landing-file-name
<landing.html> success-file-name <success.html>. Then, point to the network or
subnet for the custom captive portal pages with web custom CaptivePortal[1|2]
subnet <x.x.x.x> mask <x.x.x.x>. For example:
MC3K-1# configure terminal
MC3K-1(config)# web custom ?
CaptivePortal1
Custom configuration for captive portal 1
CaptivePortal2
Custom configuration for captive portal 2
MC3K-1(config)# web custom captiveportal2 ?
landing-file-name subnet
MC3K-1(config)# web custom CaptivePortal1 landing-file-name landing.html
success-file-name success.html
MC3K-1 (config) web custom CaptivePortal1 subnet 1.1.1.0 mask
255.255.255.0
MC3K-1(config)# exit
MC3K-1# show web ?
custom
Displays IP range for captive portal custom mode.
custom-area
Lists the files in the custom area for web-auth and
captive portal.
login-page
Displays the type of login page used for web-auth
and captive portal.
MC3K-1# show web custom-area
Html Files
total 16
-rw-rw-rw1 root
root
2607 Jul 13 16:26 page2OK.html
-rw-rw-rw1 root
root
4412 Jul 13 16:26 page2LOGIN.html
-rwx-----1 root
root
2607 Jul 13 16:04 auth_web_ok.html
-rw-rw-rw1 root
root
4412 Jul 13 16:04
loginformWebAuth.html
-rwx-----1 root
root
0 Jun 30 00:31 empty.html
Image Files
total 9
-rwx-----1 root
root
0 Jun 30 00:31 empty.gif
-rw-rw-rw1 root
root
8574 Oct 29 2008 Sample.jpg
MC3K-1# show web login-page
custom
Implement New Custom HTML Files Using the GUI
Implement custom Captive Portal pages with Web UI of System Director 3.7 and later
by first directing Captive Portal to use custom HTML files; those HTML files will then
reference the CSS, JS and graphic files you imported. Second, indicate which subset
of users should see the new login and success pages by providing a subnet and a mask;
when a user logs in from this subnet, they will see the corresponding custom pages.
For example, students in a library might see the Custom Captive Portal 1 login page
while visitors to the football stadium see the Custom Captive Portal 2 login page.
Direct Captive Portal to use custom HTML files by following these steps:
1. Click Maintenance > Customization > select a controller > Change Mode
2. Scroll down and select Customized.
© 2012 Meru Networks, Inc.
Captive Portals for Temporary Users 173
Configuring Meru Captive Portal
indicate which subset of users should see the custom pages by following these steps:
1. Make sure that security logging is set to on by clicking Configuration > Security
> Profile and then selecting a security profile from the list. The security logging
setting is near the bottom of the Security Profile Table. This setting must be set
to on for Captive Portal configuration to work.
2. Click Maintenance > Captive Portal > Custom CP.
The Custom Captive Portal page is displayed.
Figure 26: Custom Captive Portal Page
3. Provide the names of the new HTML Login Page and Success Page for CP1. Since
they are on the controller now, you do not have to indicate a location. Click Save
Page Info.
4. Provide at least one subnet location by clicking Add, providing a Subnet IP and a
Network Mask, then clicking OK. Users logging in from this subnet will see these
custom pages.
5. Create a corresponding Security Profile for this portal by clicking Configuration
> Security > Profile > Add. Be sure that the setting for Captive Portal is set to
webauth in this profile, then save it.
6. Click Configuration > Security > Captive Portal. In this window, identify the
Radius server, whether or not to adjust the session, and idle timeouts. Session
timeout and idle timeout are indicated in minutes.
174 Meru System Director Configuration Guide
© 2012 Meru Networks, Inc.
Configuring Meru Captive Portal
Note: The L3 User Session Timeout field is used for specific clients that have issues
in which they get de-authenticated upon entering sleep mode. This field specifies
that the controller will retain these clients in memory for the specified number of
minutes before the client is dropped from the captive portal authentication state.
7. Click OK.
The custom HTML files are now configured. You can configure up to four sets of
custom files, Captive Portal 1, Captive Portal 2, Captive Portal 3, and Captive Portal
4; or, you can use the default files. See Figure 25.
Configure Meru Captive Portal with the CLI
radius-profile defines the primary and secondary Captive Portal authentication
servers.
accounting-radius-profile defines the primary and secondary Captive Portal
accounting servers.
captive-portal > activity-timeout determines one timeout value. If a client is
idle for this many seconds, the client is asked to reauthenticate.
captive-portal > session-timeout determines one timeout value. If a client
session lasts this long (seconds), the client is asked to reauthenticate.
change_mac_state
ssl-server captive-portal-external-URL directs Captive Portal to use a
third-party solution located at the named URL.
captive-portal-auth-method sets authentication to internal (default for Meru) or
external for third-party solutions.
Captive Portal CLI Examples
This example configures Captive Portal with the CLI by completing these tasks:
Create a guest user ID (Guest) and password.
Enter the service start time ( 01/01/2010 00:00:00).
Enter the service end time ( 01/01/2011 00:00:00).
Show the Captive Portal.
MC3K-1(config)# guest-user ?
<guestname> Enter the name of the guest user.
MC3K-1(config)# guest-user Guest ?
<password> Enter the password of the guest user.
MC3K-1(config)# guest-user Guest XXXXX ?
<start-time> Enter the service start-time (mm/dd/yyyy hh:mm:ss) in double quotes.
MC3K-1(config)# guest-user Guest XXXXX "01/01/2010 00:00:00" ?
<end-time> Enter service end-time (mm/dd/yyyy hh:mm:ss) in double quotes.
MC3K-1(config)# guest-user Guest XXXXX "01/01/2010 00:00:00" "01/01/2011 00:00:00" ?
<CR>
MC3K-1(config)# guest-user Guest XXXXX "01/01/2010 00:00:00" "01/01/2011 00:00:00"
© 2012 Meru Networks, Inc.
Captive Portals for Temporary Users 175
Configuring Meru Captive Portal
MC3K-1(config)# exit
MC3K-1#
MC3K-1# show guest-user
Guest User Name
Service Start Time
Guest
01/01/2010 00:00:00
Guest User Table(1 entry)
Service End Time
01/01/2011 00:00:00
The commands in this section show how to configure Captive Portal. The Radius
server user configuration is performed separately, and is vendor-specific. (Check the
Customer Service website for applicable Application Notes.) The Microsoft Internet
Explorer and Netscape 7 browsers are both supported for the client application.
1. Create the Security Profile for the WebAuth Captive Portal:
default# configure terminal
default(config)# security-profile web_auth
default(config-security)# captive-portal webauth
default(config-security)# exit
default(config)# exit
2. Bind the web_auth Security Profile to an ESSID:
default# configure terminal
default(config)# essid WebAuth-meru-WIFI
default(config-essid)# security-profile web_auth
default(config-essid)# exit
3. Set the SSL server to use the primary Radius authentication server profile:
default(config)# ssl-server radius-profile primary main-auth
default(config)# end
4. Save the configuration:
default(config)# copy running-config startup-config
When users are authenticated, they can be moved into a corporate VLAN, and can
have QosRules applied to their session. Each user will have a supplied default session
timeout, which if nothing is supplied, will be the default of 33 minutes. If a user
disconnects and connects back to same SSID on the same controller within 60
seconds, no re-authentication will be required.The session time returned from the
radius server takes priority. If the radius server doesn’t return the session time,
configured values are used.
Create Meru Captive Portal Guest User IDs Locally
For authentication purposes, you can set up guest user IDs instead of using Radius
authentication. (This is also a backup for Radius authentication; if Radius fails, this
list is then used.) Releases 3.6 and later support user IDs. Be sure that the field Override Radius Configuration is set to On when using Guest IDs (click Configuration >
Security > Captive Portal).
176 Meru System Director Configuration Guide
© 2012 Meru Networks, Inc.
Configuring Meru Captive Portal
The guest user features of both releases are as follows.
Guest User Feature
Supported
Number of users
32
Add/delete users
yes
Change user’s password
yes
Time of day login
yes
Day of month login
yes
Assigned to local
administrators
yes
CLI Example - Create Guest User ID
This CLI example creates the guest user named Guest:
MC3K-1 configure terminal
MC3K-1(config)# guest-user ?
<guestname>
Enter the name of the guest user.
MC3K-1(config)# guest-user Guest ?
<password>
Enter the password of the guest user.
MC3K-1(config)# guest-user Guest XXXXX ?
<start-time>
Enter the service start-time (mm/dd/yyyy hh:mm:ss) in double
quotes.
MC3K-1(config)# guest-user Guest XXXXX "01/01/2010 00:00:00" ?
<end-time>
Enter service end-time (mm/dd/yyyy hh:mm:ss) in double quotes.
MC3K-1(config)# guest-user Guest XXXXX "01/01/2010 00:00:00" "01/01/2011 00:00:00" ?
<CR>
MC3K-1(config)# guest-user Guest XXXXX "01/01/2010 00:00:00" "01/01/2011 00:00:00"
MC3K-1(config)# exit
MC3K-1#
MC3K-1# show guest-user
Guest User Name
Service Start Time
Guest
01/01/2010 00:00:00
Guest User Table(1 entry)
MC3K-1#
© 2012 Meru Networks, Inc.
Service End Time
01/01/2011 00:00:00
Captive Portals for Temporary Users 177
Configuring Meru Captive Portal
There is an additional option for Local Authentication so that when local authentication
for a Captive Portal user fails, Radius authentication is automatically checked; this option
is called Local and Radius. From the Web UI, configure this by clicking Configuration >
Security > Captive Portal > select an SSL Server > Captive Portal Authentication Type
drop-down box (see below).
Figure 27: Local Captive Portal Authentication Has Two Options
The corresponding CLI command ssl-server captive-portal authentication-type configures the controller to use both local and radius authentication.
Controller(config)# ssl-server captive-portal authentication-type ?
local
Set Authentication Type to local.
local-radius
Set Authentication Type to Local and Radius.
radius
Set Authentication Type to radius.
Optionally Configure Pre-Authentication Captive Portal Bypass
Not all users or traffic types need to be authorized and authenticated by Captive
Portal; users of VPN software can pass through the portal without authentication. To
enable this passthrough firewall filter ID, follow these steps:
1. Click Configuration > Security > Profile.
2. Enter the name of the Passthrough Firewall Filter ID.
3. Click Configuration > QoS > System Settings to see the QosRule section of the
Configuration menu (a license for PPF is required to enter the passthrough rules).
4. Add a rule. Remember that rules are stored in the order they are entered and can
not be modified once they are entered.
5. At the bottom of the screen enter the QoS Filter ID.
178 Meru System Director Configuration Guide
© 2012 Meru Networks, Inc.
Third-Party Captive Portal Solutions
The last entry in the filter should be a rule that drops all other traffic, so that
traffic other than the passthrough will not be allowed to transverse the Captive
Portal without authentication.
Captive Portal With N+1
Captive Portal changes are propagated in an Nplus1 environment as follows. When a
slave takes over a master, it uses the master's Captive Portal pages. If changes are
made on that active slave, that change is not automatically propagated to the
master.
Troubleshooting Captive Portal
The same subnet should not be entered for both CaptivePortal1 and
CaptivePortal2. If you do this, only the CaptivePortal1 configured splash page will
be displayed.
Custom pages have to imported properly before making use of this feature. See
Optionally Customize and Use Your Own HTML Pages.
To check if the pages and images have been properly imported into the controller
use the command show web custom-area
To check if the imported page is coming up properly use the CLI
https://<controller ip>/vpn/<page Name>
To ensure that Captive Portal authentication is taking place, look at the
access-accept message from the Radius server during Captive Portal
authentication.
Even when using custom CP pages, four default HTML files are used; only two are
actually customized. The only way to change this is to alter the four default files
which are used for both CP1 and CP2.
The AP List is limited by space. If you exceed the space limit, the CLI command
fails and the list of APs that you entered are lost.
Third-Party Captive Portal Solutions
Instead of using the Meru Captive Portal solution, you can use a third-party solution;
you cannot use both. Companies such as Bradford, Avenda, and CloudPath all provide
Captive Portal solutions that work with System Director 4.1 and later. There are two
places that you need to indicate a third-party captive portal solution, in the corresponding Security Profile and in the Captive Portal configuration.
© 2012 Meru Networks, Inc.
Captive Portals for Temporary Users 179
Third-Party Captive Portal Solutions
Configure Third-Party Captive Portal With the Web UI
Indicate that a third-party Captive Portal solution will be used in the Security Profile
by setting Captive Portal Authentication Method to external. For complete directions, see Configure a Security Profile With the Web UI.
Indicate that a third-party Captive Portal solution will be used in the Captive Portal
configuration by setting Captive Portal External URL to the URL of the Captive Portal
box:
1. Click Configuration > Security > Captive Portal.
2. Change the value for CaptivePortal External URL to the URL of the third-party
box.
3. Click OK.
Configure Third-Party Captive Portal With the CLI
Indicate that a third-party Captive Portal solution will be used in the Security Profile
with the CLI command captive-portal-auth-method. For example:
controller1# configure terminal
controller1(config)# security-profile CPExternal
controller1(config-security)# captive-portal-auth-method
external internal
controller1(config-security)# captive-portal-auth-method ?
<captivePortAuthMethod> Configure captive portal authentication method.
external
external
internal
internal
controller1(config-security)# captive-portal-auth-method external
Indicate that a third-party Captive Portal solution will be used in the Captive Portal
configuration with the CLI command ssl-server captive-portal-external-URL. Then,
provide the URL for the Captive Portal box with the command change_mac_state.
For example:
controller1# configure terminal
controller1(config)# ssl-server ca
captive-portal
captive-portal-external-URL
controller1(config)# ssl-server captive-portal-external-URL
controller1(config)# exit
controller1#
<ip-address>
controller1#
off
on
controller1#
<CR>
<filter-id>
controller1#
change_mac_state ?
Enter the Client IP Address.
change_mac_state 172.18.19.14 ?
Web Auth mode off.
Web Auth mode on.
change_mac_state 172.18.19.14 on ?
Enter the Filter Id.
change_mac_state 172.18.19.14 on ftp_only
180 Meru System Director Configuration Guide
© 2012 Meru Networks, Inc.
Configure a Radius Server for Captive Portal Authentication
<CR>
controller1# change_mac_state 172.18.19.14 on ftp_only
controller1#
controller1x# change_mac_state 172.18.19.14 ?
off
Web Auth mode off.
on
Web Auth mode on.
controller1# change_mac_state 172.18.19.14 off ?
<CR>
<filter-id>
Enter the Filter Id.
controller1# change_mac_state 172.18.19.14 off
controller1
Configure a Radius Server for Captive Portal
Authentication
Configure a Radius Server with Web UI for Captive Portal
Authentication
You can, for authentication purposes, set up the identity and secret for the Radius
server in Meru Networks's System Director software. This takes precedence over any
configured User IDs but if Radius accounting fails over, the local authentication guest
user IDs are used. To do this, follow these steps:
1. Click Configuration > Security > Radius to access the Radius Profile Table.
2. Click Add.
3. Provide the Radius server information.
4. Save the configuration by clicking OK.
5. Enable a security profile for use with a Captive Portal login page by clicking
Configuration > Security > Radius > Add.
6. Provide the required information, such as the name of the Radius profile. L2MODE
must be clear to use Captive Portal. Set the Captive Portal to WebAuth and adjust
any other parameters as required.
The identity and secret are now configured.
Configure a Radius Server with CLI for Captive Portal Authentication
The CLI command ssl-server captive-portal authentication-type configures the controller
to use either local authentication, Radius authentication, or both. If both is selected,
local authentication is tried first; if that doesn’t work, Radius authentication is attempted.
© 2012 Meru Networks, Inc.
Captive Portals for Temporary Users 181
Configure a Radius Server for Captive Portal Authentication
Controller(config)# ssl-server captive-portal authentication-type ?
local
Set Authentication Type to local.
local-radius
Set Authentication Type to Local and Radius.
radius
Set Authentication Type to radius.
The following example configures an authentication Radius profile named
radius-auth-pri.
/* RADIUS PROFILE FOR AUTHENTICATION */
default# configure terminal
default(config)# radius-profile radius-auth-pri
default(config-radius)# ip-address 172.27.172.3
default(config-radius)# key sept20002
default(config-radius)# mac-delimiter hyphen
default(config-radius)# password-type shared-secret
default(config-radius)# port 1812
default(config-radius)# end
default#
default# sh radius-profile radius-auth-pri
Radius Profile Table
Radius Profile Name
: radius-auth-pri
Description
:
Radius IP
: 172.27.172.3
Radius Secret
: *****
Radius Port
: 1812
MAC Address Delimiter : hyphen
Password Type
: shared-secret
The following example configures a security Radius profile named radius-auth-sec.
default# configure terminal
default(config)# radius-profile radius-auth-sec
default(config-radius)# ip-address 172.27.172.4
default(config-radius)# key sept20002
default(config-radius)# mac-delimiter hyphen
default(config-radius)# password-type shared-secret
default(config-radius)# port 1812
default(config-radius)# end
default#
default# sh radius-profile radius-auth-sec
Radius Profile Table
Radius Profile Name
: radius-auth-pri
Description
:
Radius IP
: 172.27.172.4
Radius Secret
: *****
Radius Port
: 1812
MAC Address Delimiter : hyphen
Password Type
: shared-secret
182 Meru System Director Configuration Guide
© 2012 Meru Networks, Inc.
Chapter 11
Rogue AP Detection and Mitigation
Rogue APs are unauthorized wireless access points. These rogues can be physically
connected to the wired network or they can be outside the building in a neighbor's
network or they can be in a hacker’s parked car. Valid network users should not be
allowed to connect to the rogue APs because rogues pose a security risk to the corporate network. Rogue APs can appear in an enterprise network for reasons as innocent
as users experimenting with WLAN technology, or reasons as dangerous as a malicious
attack against an otherwise secure network. Physical security of the building, which
is sufficient for wired networks with the correct application of VPN and firewall technologies, is not enough to secure the WLAN. RF propagation inherent in WLANs
enables unauthorized users in near proximity of the targeted WLAN (for example, in
a parking lot) to gain network access as if they were inside the building.
Rogue detection and mitigation are currently supported on Meru access points as
shown in the table below.
Table 11: Meru Support of Rogue Detection and Mitigation
Rogue Detection
Rogue Mitigation
AP300
3.4.2 and later
3.7 and later
AP1000
4.1 and later
4.1 and later
AP400
4.2 and later
4.2 and later
AP150
3.6.1 and later
3.6.1 and later
OAP180
3.6.1 and later
3.6.1 and later
RS4000
3.6.1
3.6.1
Regardless of why a rogue AP exists on a WLAN, it is not subject to the security policies of the rest of the WLAN and is the weak link in an overall security architecture.
Even if the person who introduced the rogue AP had no malicious intent, malicious
activity can eventually occur. Such malicious activity includes posing as an authorized access point to collect security information that can be used to further exploit
the network. Network security mechanisms typically protect the network from unauthorized users but provide no means for users to validate the authenticity of the
network itself. A security breach of this type can lead to the collection of personal
information, protected file access, attacks to degrade network performance, and
attacks to the management of the network.
© 2012 Meru Networks, Inc.
Rogue AP Detection and Mitigation 183
To prevent clients of unauthorized APs from accessing your network, enable the
options for both scanning for the presence of rogue APs and mitigating the client
traffic originating from them. These features are set globally from either the CLI or
Web UI, with the controller managing the lists of allowable and blocked WLAN BSSIDs
and coordinating the set of APs (the mitigating APs) that perform mitigation when a
rogue AP is detected.
As a result of the channel scan, a list of rogue APs is compiled and sent by the
controller to a number of mitigating APs that are closest to the rogue AP. Mitigating
APs send mitigation (deauth) frames to the rogue AP where clients are associated to
remove those clients from the network. This presence of the rogue AP generates
alarms that are noted on the Web UI monitoring dashboard and via syslog alarm
messages so the administrator is aware of the situation and can then remove the
offending AP or update the configuration list.
Rogue Scanning can be configured so that it is a dedicated function of a radio on a
dual radio AP or a part time function of the same radio that also serves clients. When
rogue AP scanning (detection) is enabled, for any given period, an AP spends part of
the time scanning channels and part of the time performing normal AP WLAN operations on the home channel. This cycle of scan/operate, which occurs on a designated
AP or an AP interface without assigned stations, ensures there is no network operation degradation.
For AP300/AP400 and AP1000, each radio is dual band (supports both 2.4GHz and
5.0GHz) and capable of scanning for all channels and all bands when configured as a
dedicated scanning radio. For AP150, each radio is single band and scans only the
band it's designed for. As access points are discovered, their BSSID is compared to an
AP access control list of BSSIDs. An access point might be known, blocked, or nonexistent on the access control list. A “known” AP is considered authorized because that
particular BSSID was entered into the list by the system administrator. A “selected”
AP is blocked by the Meru Wireless LAN System as an unauthorized AP. The Meru WLAN
also reports other APs that are not on the access control list; these APs trigger alerts
to the admin console until the AP is designated as known or selected in the access
control list. For example, a third party BSS is detected as a rogue unless it is added
to the access control list.
Meru APs also detect rogue APs by observing traffic either from the access point or
from a wireless station associated to a rogue. This enables the system to discover a
rogue AP when the rogue is out of range, but one or more of the wireless stations
associated to it are within range.
The following topics are covered in this chapter:
Configuring Rogue AP Mitigation with Web UI
Configuring Rogue AP Detection Using the CLI
Modifying Detection and Mitigation CLI Settings
Troubleshooting Rogue Mitigation
184 Meru System Director Configuration Guide
© 2012 Meru Networks, Inc.
Configuring Rogue AP Mitigation with Web UI
Configuring Rogue AP Mitigation with Web UI
To prevent clients of unauthorized APs from accessing your network, enable the
options for both scanning for the presence of rogue APs and mitigating the client
traffic originating from them. These features are set globally, with the controller
managing the lists of allowable and blocked WLAN BSSIDs and coordinating the set of
APs (the Mitigating APs) that perform mitigation when a rogue AP is detected.
When rogue AP scanning (detection) is enabled, for any given period, the AP spends
part of the time scanning channels (determined by the setting Scanning time in ms),
and part of the time performing normal AP WLAN operations on the home channel
(determined by the setting Operational time in ms). This cycle of scan/operate
repeats so quickly that both tasks are performed without noticeable network operation degradation.
The channels that are scanned by a particular AP are determined by the model of the
AP. As a result of the channel scan, a list of rogue APs is compiled and sent by the
controller to a number of Mitigating APs that are closest to the rogue AP. Mitigating
APs send mitigation (deauth) frames to the rogue AP where clients are associated to
remove those clients from the network. This presence of the rogue AP generates
alarms that are noted on the Web UI monitoring dashboard and via syslog alarm
messages so the administrator is aware of the situation and can then remove the
offending AP or update the configuration list.
As well, if a rogue device seen on the wired interface of the AP and if the device is
in the AP’s discovered list of stations a wired rogue notification will be sent via the
Web UI monitoring dashboard and syslog alarm message. If the rogue client is associated with the AP, that client is also classified as a rogue.
© 2012 Meru Networks, Inc.
Rogue AP Detection and Mitigation 185
Configuring Rogue AP Mitigation with Web UI
Alter the List of Allowed APs with the Web UI
To change the list of allowed APs, follow these steps:
1. From the Web UI, click Configuration > Wireless IDS/IPS > Rogue APs > Allowed
APs.
The Allowed APs screen appears. See Figure 28.
Figure 28: Web UI List of Allowed APs
2. To add a BSSID to the list, click Add.
a. In the BSSID boxes, type the BSSID, in hexadecimal format, of the permitted access
point.
b. To add the BSSID to the ACL, click OK.
3. To delete a BSSID from the list, select the BSSID, click Delete, and then OK.
Alter the List of Blocked APs with the Web UI
To change the list of allowed APs, follow these steps:
1. From the Web UI click Configuration > Wireless IDS/IPS > Rogue APs > Blocked
APs. The table shows information about access points listed as blocked BSSIDs in
the access control list (ACL).
2. To see an updated list of the APs blocked in the WLAN, click Refresh.
186 Meru System Director Configuration Guide
© 2012 Meru Networks, Inc.
Configuring Rogue AP Mitigation with Web UI
3. To add an AP to the blocked list, click Add.
a. In the BSSID box, type the BSSID, in hexadecimal format, of the access point.
b. Add the BSSID to the ACL, by clicking OK.
4. The blocked BSSID now appears on the list with the following information:
— BSSID The access point's BSSID.
— Creation Time The timestamp of when the blocked AP entry was created.
— Last Reported Time The time the AP was last discovered. If this field is blank,
the AP has not been discovered yet.
5. To remove a blocked BSSID from the ACL, select the checkbox of the blocked AP
entry you want to delete, click Delete, and then click OK.
Configure Scanning and Mitigation Settings with the Web UI
To configure rogue AP scanning and mitigation settings, follow these steps:
1. From the Web UI click Configuration > Wireless IDS/IPS > Rogue APs.
The Rogue AP screen appears with the Global Settings tab selected. See Figure 29.
Figure 29: Web UI Rogue AP Global Settings
2. In the Detection list, select one of the following:
— On: Enables scanning for rogue APs.
— Off: Disables rogue detection.
3. In the Mitigation list, select one of the following:
— No mitigation: No rogue AP mitigation is performed.
— Block all BSSIDs that are not in the ACL: Enables rogue AP mitigation of all
detected BSSIDs that are not specified as authorized in the Allowed APs list.
— Block only BSSIDs in blocked list: Enables rogue AP mitigation only for the
BSSIDs that are listed in the Blocked APs list.
— Block Clients seen on the wire: Enables rogue mitigation for any rogue station
detected on the wired side of the AP (the corporate network, in many cases).
When Block clients seen on the wire is selected, clients seen on the corporate
© 2012 Meru Networks, Inc.
Rogue AP Detection and Mitigation 187
Configuring Rogue AP Detection Using the CLI
network are mitigated. When Block clients seen on the wire is selected and
the BSSID of the wired rogue client is entered in the blocked list (see Alter the
List of Blocked APs with the Web UI) only listed clients are mitigated.
4. In the Rogue AP Aging box, type the amount of time that passes before the rogue
AP alarm is cleared if the controller no longer detects the rogue. The value can
be from 60 through 86,400 seconds.
5. In the Number of Mitigating APs text box, enter the number of APs (from 1 to 20)
that will perform scanning and mitigation of rogue APs.
6. In the Scanning time in ms text box, enter the amount of time Mitigating APs will
scan the scanning channels for rogue APs. This can be from 100 to 500
milliseconds.
7. In the Operational time in ms text box, enter the amount of time Mitigating APs
will spend in operational mode on the home channel. This can be from 100 to 5000
milliseconds.
8. In the Max mitigation frames sent per channel text box, enter the maximum
number of mitigation frames that will be sent to the detected rogue AP. This can
be from 1 to 50 deauth frames.
9. In the Scanning Channels text box, enter the list of channels that will be scanned
for rogue APs. Use a comma separated list from 0 to 256 characters. The complete
set of default channels are
1,2,3,4,5,6,7,8,9,10,11,36,40,44,48,52,56,60,64,149,153,157,161,165.
10. In the RSSI Threshold for Mitigation text box, enter the minimum threshold level
over which stations are mitigated. The range of valid values is from to -100 to 0.
11. Click OK.
Configuring Rogue AP Detection Using the CLI
These CLI commands configure rogue detection; for a complete explanation of the
commands, see the Meru System Director Command Reference.
188 Meru System Director Configuration Guide
© 2012 Meru Networks, Inc.
Configuring Rogue AP Detection Using the CLI
Table 12: CLI Commands for Configuring Rogue Detection
Rogue Detection Command
Action
rogue-ap acl
Adds to list of allowed BSSIDs
rogue-ap blocked
Adds to list of blocked BSSIDs
show rogue-ap globals
Displays current rogue data.
rogue-ap scanning-time
Configures time spent scanning channels
rogue-ap operational-time
Configures time spent performing normal AP WLAN
operations on the home channel
Configuring the AP Access and Block Lists with the CLI
The feature uses an Access Control List (ACL) containing a list of allowed BSSIDs and
a list of Blocked BSSIDs. By default, all Meru ESS BSSIDs in the WLAN are automatically
included in the allowed ACL. A BSSID cannot appear in both lists.
To add an access point with a BSSID of 00:0e:cd:cb:cb:cb to the access control list as
an authorized access point, type the following:
controller (config)# rogue-ap acl 00:0e:cd:cb:cb:cb
controller (config)#
To see a listing of all BSSIDs on the authorized list, type the following:
controller# show rogue-ap acl
Allowed APs
BSSID
00:0c:e6:cd:cd:cd
00:0e:cd:cb:cb:cb
A BSSID cannot be on both the blocked list and the access list for rogue AP detection
at the same time. Suppose 00:0c:e6:cd:cd:cd is to be placed on the blocked list. If
this BSSID is already on the authorized list, you must remove the BSSID from the
authorized list, and then add the BSSID to the blocked list, as follows:
controller (config)# no rogue-ap acl 00:0c:e6:cd:cd:cd
controller (config)#
controller (config)# rogue-ap blocked 00:0c:e6:cd:cd:cd
controller (config)# exit
controller# show rogue-ap acl
Allowed APs
BSSID
00:0e:cd:cb:cb:cb
controller# show rogue-ap blocked
BssId
Creation Date
© 2012 Meru Networks, Inc.
Last Reported
Rogue AP Detection and Mitigation 189
Configuring Rogue AP Detection Using the CLI
----------------00:0c:e6:cd:cd:cd
-------------11/02 01:05:54
-------------11/02 01:06:20
The commands to enable and confirm the rogue AP detection state are as follows:
controller (config)# rogue-ap detection
controller# show rogue-ap globals
Global Settings
Detection
: on
Mitigation
: none
Rogue AP Aging (seconds)
: 60
Number of Candidate APs
: 3
Number of Mitigating APs
: 5
Scanning time in ms
: 100
Operational time in ms
: 400
Max mitigation frames sent per channel : 10
Scanning Channels
:
1,2,3,4,5,6,7,8,9,10,11,36,40,44,48,52,
56,60,64,149,153,157,161,165
RSSI Threshold for Mitigation
: -100
Use the CLI command show rogue-ap-list to display all rogue clients and APs in the
network.
Rogue Mitigation Example
Rogue AP mitigation for APs in the blocked list is enabled and confirmed as follows:
controller# configure terminal
controller (config)# rogue-ap detection
controller (config)# rogue-ap mitigation selected
controller (config)# exit
controller# show rogue-ap globals
Global Settings
Detection
: on
Mitigation
: selected
Rogue AP Aging (seconds)
: 60
Number of Candidate APs
: 3
Number of Mitigating APs
: 5
Scanning time in ms
: 100
Operational time in ms
: 400
Max mitigation frames sent per channel : 10
Scanning Channels
:
1,2,3,4,5,6,7,8,9,10,11,36,40,44,48,52,
56,60,64,149,153,157,161,165
RSSI Threshold for Mitigation
: -100
190 Meru System Director Configuration Guide
© 2012 Meru Networks, Inc.
Modifying Detection and Mitigation CLI Settings
Modifying Detection and Mitigation CLI Settings
The default settings that are configured for the rogue AP detection and mitigation
features are adequate for most situations. However, many default settings can be
changed if your network requires lighter or heavier scanning and/or mitigation
services. The following is the list of rogue-ap commands:
controller (config)# rogue-ap ?
acl
Add a new rogue AP ACL entry.
aging
Sets the aging of alarms for rogue APs.
assigned-aps
Number of APs assigned for mitigation.
blocked
Add a new rogue AP blocked entry.
detection
Turn on rogue AP detection.
min-rssi
Sets RSSI Threshold for Mitigation.
mitigation
Set the rogue AP mitigation parameters.
mitigation-frames
Sets the maximum number of mitigation frames sent
out per channel.
operational-time
Sets the APs time on the home channel during
scanning.
scanning-channels
Sets the global Rogue AP scanning channels.
scanning-time
Sets the APs per channel scanning time
As a general rule, unless the AP is in dedicated scanning mode, the more time that
is spent scanning and mitigating, the less time is spent by the AP in normal WLAN
operating services. Some rules determine how service is provided:
The controller picks the APs that will scan and mitigate; those that mitigate are
dependant on their proximity to the rogue AP and the number of mitigating APs
that have been set.
To preserve operational performance, APs will mitigate only the home channel if
they have clients that are associated.
Settings are administered globally; there is no way to set a particular AP to
mitigate.
Mitigation is performed only on clients associated to rogue APs; the rogue APs
themselves are not mitigated. It is the network administrator’s responsibility to
remove the rogue APs from the network.
AP mitigation frames are prioritized below QoS frames, but above Best Effort
frames.
To reduce network traffic, you may configure the scanning channels list that
contains only the home channels
© 2012 Meru Networks, Inc.
Rogue AP Detection and Mitigation 191
Modifying Detection and Mitigation CLI Settings
Changing the Number of Mitigating APs with the CLI
By default, three Mitigating APs are selected by the controller to perform scanning
and mitigation. This number can be set to a high of 20 APs or down to 1 AP, depending
on the needs of your network. To change the number of mitigating APs to 5:
controller (config)# rogue-ap assigned-aps 5
Changing the Scanning and Mitigation Settings with the CLI
When rogue AP scanning is enabled, for any given period, the AP spends part of the
time scanning channels, and part of the time performing normal AP WLAN operations
on the home channel. This cycle of scan/operate repeats so quickly that both tasks
are performed without noticeable network operation degradation.
If scanning is enabled, the rogue-ap operational-time command sets the number of
milliseconds that are spent in operational time, performing normal wireless services,
on the home channel. This command is related to the rogue-ap scanning-time
command. The channels that are scanned are determined by the rogue-ap scanning
channels command. The complete set of default channels are
1,2,3,4,5,6,7,8,9,10,11,36,40,44,48,52,56,60,64,149,153,157,161,165.
The following command changes the operational time from the default 400 to 2500
milliseconds:
controller (config)# rogue-ap operational-time 2500
The following command changes the scanning time from the default 100 to 200 milliseconds:
controller (config)# rogue-ap scanning-time 200
The following command sets the scanning channels to 1, 6, 11, 36, 44, 52, 60:
controller (config)# rogue-ap scanning-channels 1,6,11,36,44,52,60
controller (config)# exit
To verify the changes, use the show rogue-ap globals command:
controller# show rogue-ap globals
Global Settings
Detection
: on
Mitigation
: selected
Rogue AP Aging (seconds)
: 60
Number of Candidate APs
: 5
Number of Mitigating APs
:5
Scanning time in ms
: 200
Operational time in ms
: 2500
Max mitigation frames sent per channel : 10
Scanning Channels
: 1,6,11,36,44,52,60
RSSI Threshold for Mitigation
: -100
192 Meru System Director Configuration Guide
© 2012 Meru Networks, Inc.
Modifying Detection and Mitigation CLI Settings
Changing the Minimum RSSI with the CLI
RSSI is the threshold for which APs attempt to mitigate rogues; if the signal is very
week (distant AP), APs won’t try to mitigate it.
The command to change the minimum RSSI (Received Signal Strength Indication)
level, over which a station will be mitigated is rogue-ap min-rssi. A level range of 0
of -100 is supported, with -100 being the default setting.
The following command sets the minimum RSSI level to -80:
controller (config)# rogue-ap min-rssi -80
controller (config)#
Table 13: CLI Commands for Rogue Mitigation
Rogue Mitigation Command
Action
rogue-ap mitigation all
Sets rogue mitigation for all rogue APs that are
not on the access control list.
rogue-ap mitigation selected
Sets rogue mitigation for all rogue APs that are
on the blocked list.
rogue-ap mitigation wiredrogue
Sets rogue mitigation for all wired-side rogue
APs. If rogue clients on the wired side are added
to the blocked ACL list, then only those listed
wired-side rogue clients are blocked.
show rogue-ap globals
Displays current rogue data.
rogue-ap mitigation none
Turns off rogue mitigation.
Rogue Mitigation Example
Rogue AP mitigation for APs in the blocked list is enabled and confirmed as follows:
controller# configure terminal
controller(config)# rogue-ap detection
controller(config)# rogue-ap mitigation selected
controller(config)# exit
controller# show rogue-ap globals
Global Settings
Detection
Mitigation
Rogue AP Aging (seconds)
Number of Candidate APs
Number of Mitigating APs
Scanning time in ms
Operational time in ms
© 2012 Meru Networks, Inc.
:
:
:
:
:
:
:
on
selected
60
3
5
100
400
Rogue AP Detection and Mitigation 193
Modifying Detection and Mitigation CLI Settings
Max mitigation frames sent per channel : 10
Scanning Channels
:
1,2,3,4,5,6,7,8,9,10,11,36,40,44,48,52,
56,60,64,149,153,157,161,165
RSSI Threshold for Mitigation
: -100
Modify Rogue Detection and Mitigation Settings with the CLI
The default settings that are configured for the rogue AP detection and mitigation
features are adequate for most situations. However, many default settings can be
changed if your network requires lighter or heavier scanning and/or mitigation
services. The following is the list of rogue-ap commands:
controller(config)# rogue-ap ?
acl
Add a new rogue AP ACL entry.
aging
Sets the aging of alarms for rogue APs.
assigned-aps
Number of APs assigned for mitigation.
blocked
Add a new rogue AP blocked entry.
detection
Turn on rogue AP detection.
min-rssi
Sets RSSI Threshold for Mitigation.
mitigation
Set the rogue AP mitigation parameters.
mitigation-frames
Sets the maximum number of mitigation frames sent
out per channel.
operational-time
Sets the APs time on the home channel during
scanning.
scanning-channels
Sets the global Rogue AP scanning channels.
scanning-time
Sets the APs per channel scanning time
As a general rule, unless the AP is in dedicated scanning mode, the more time that
is spent scanning and mitigating, the less time is spent by the AP in normal WLAN
operating services. Some rules determine how service is provided:
The controller picks the APs that will scan and mitigate; those that mitigate are
dependant on their proximity to the rogue AP and the number of mitigating APs
that have been set.
To preserve operational performance, APs will mitigate only the home channel if
they have clients that are associated.
Settings are administered globally; there is no way to set a particular AP to
mitigate.
Mitigation is performed only on clients associated to rogue APs; the rogue APs
themselves are not mitigated. It is the network administrator’s responsibility to
remove the rogue APs from the network.
AP mitigation frames are prioritized below QoS frames, but above Best Effort
frames.
To reduce network traffic, you can configure the scanning channels list that
contains only the home channels.
194 Meru System Director Configuration Guide
© 2012 Meru Networks, Inc.
Modifying Detection and Mitigation CLI Settings
Changing the Number of Mitigating APs with the CLI
By default, three mitigating APs are selected by the controller to perform scanning
and mitigation. This number can be set to a high of 20 APs or down to 1 AP, depending
on the needs of your network, although we do not recommend assigning a high
number of APs for mitigation because they can interfere with each other while mitigating the rogue. To change the number of mitigating APs to 5:
controller(config)# rogue-ap assigned-aps 5
Changing the Scanning and Mitigation Settings with the CLI
When rogue AP scanning is enabled, for any given period, the AP spends part of the
time scanning channels, and part of the time performing normal AP WLAN operations
on the home channel. This cycle of scan/operate repeats so quickly that both tasks
are performed without noticeable network operation degradation.
If scanning is enabled, the rogue-ap operational-time command sets the number of
milliseconds that are spent in operational time, performing normal wireless services,
on the home channel. This command is related to the rogue-ap scanning-time
command. The channels that are scanned are determined by the rogue-ap scanning
channels command. The complete set of default channels are
1,2,3,4,5,6,7,8,9,10,11,36,40,44,48,52,56,60,64,149,153,157,161,165.
The following command changes the operational time from the default 400 to 2500
milliseconds:
controller(config)# rogue-ap operational-time 2500
The following command changes the scanning time from the default 100 to 200 milliseconds:
controller(config)# rogue-ap scanning-time 200
The following command sets the scanning channels to 1, 6, 11, 36, 44, 52, 60:
controller(config)# rogue-ap scanning-channels 1,6,11,36,44,52,60
controller(config)# exit
To verify the changes, use the show rogue-ap globals command:
controller# show rogue-ap globals
Global Settings
Detection
: on
Mitigation
: selected
Rogue AP Aging (seconds)
: 60
Number of Candidate APs
: 5
Number of Mitigating APs
: 5
Scanning time in ms
: 200
Operational time in ms
: 2500
Max mitigation frames sent per channel : 10
Scanning Channels
: 1,6,11,36,44,52,60
RSSI Threshold for Mitigation
: -100
© 2012 Meru Networks, Inc.
Rogue AP Detection and Mitigation 195
Modifying Detection and Mitigation CLI Settings
Changing the Minimum RSSI with the CLI
RSSI is the threshold for which APs attempt to mitigate rogues; if the signal is very
week (distant AP), APs won’t try to mitigate it.
The command to change the minimum RSSI (Received Signal Strength Indication)
level, over which a station will be mitigated is rogue-ap min-rssi. A level range of 0
of -100 is supported, with -100 being the default setting.
The following command sets the minimum RSSI level to -80:
controller(config)# rogue-ap min-rssi -80
controller(config)#
Configure Rogue AP Mitigation with the Web UI
To prevent clients of unauthorized APs from accessing your network, enable the
options for both scanning for the presence of rogue APs and mitigating the client
traffic originating from them. These features are set globally, with the controller
managing the lists of allowable and blocked WLAN BSSIDs and coordinating the set of
APs (the Mitigating APs) that perform mitigation when a rogue AP is detected.
When rogue AP scanning (detection) is enabled, for any given period, the AP spends
part of the time scanning channels (determined by the Scanning time in ms setting),
and part of the time performing normal AP WLAN operations on the home channel
(determined by the Operational time in ms setting). This cycle of scan/operate
repeats so quickly that both tasks are performed without noticeable network operation degradation.
The channels that are scanned by a particular AP are determined by the model of AP.
As a result of the channel scan, a list of rogue APs is compiled and sent by the
controller to a number of Mitigating APs that are closest to the rogue AP. Mitigating
APs send mitigation (deauth) frames to the rogue AP where clients are associated to
remove those clients from the network. This presence of the rogue AP generates
alarms that are noted on the Web UI monitoring dashboard and via syslog alarm
messages so the administrator is aware of the situation and can then remove the
offending AP or update the configuration list.
As well, if a rogue device seen on the wired interface of the AP and if the device is
in the AP’s discovered list of stations a wired rogue notification will be sent via the
Web UI monitoring dashboard and syslog alarm message. If the rogue client is associated with the AP, that client is also classified as a rogue.
Alter the List of Allowed APs with the Web UI
To change the list of allowed APs, follow these steps:
1. From the Web UI, click Configuration > Wireless IDS/IPS > Rogue APs > Allowed
APs.
The Allowed APs screen appears. See Figure 28.
196 Meru System Director Configuration Guide
© 2012 Meru Networks, Inc.
Modifying Detection and Mitigation CLI Settings
Figure 30: Web UI List of Allowed APs
2. To add a BSSID to the list, click Add.
a. In the BSSID boxes, type the BSSID, in hexadecimal format, of the permitted access
point.
b. To add the BSSID to the ACL, click OK.
3. To delete a BSSID from the list, select the BSSID, click Delete, then OK.
Alter the List of Blocked APs with the Web UI
To change the list of allowed APs, follow these steps:
1. From the Web UI click Configuration > Wireless IDS/IPS > Rogue APs > Blocked
APs. The table shows information about access points listed as blocked BSSIDs in
the access control list (ACL).
2. To see an updated list of the APs blocked in the WLAN, click Refresh.
3. To add an AP to the blocked list, click Add.
a. In the BSSID box, type the BSSID, in hexadecimal format, of the access point.
b. Add the BSSID to the ACL, by clicking OK.
4. The blocked BSSID now appears on the list with the following information:
— BSSID The access point's BSSID.
— Creation Time The timestamp of when the blocked AP entry was created.
© 2012 Meru Networks, Inc.
Rogue AP Detection and Mitigation 197
Modifying Detection and Mitigation CLI Settings
— Last Reported Time The time the AP was last discovered. If this field is blank,
the AP has not been discovered yet.
5. To remove a blocked BSSID from the ACL, select the checkbox of the blocked AP
entry you want to delete, click Delete, and then click OK.
Configure Scanning and Mitigation Settings with the Web UI
To configure rogue AP scanning and mitigation settings, follow these steps:
1. From the Web UI click Configuration > Wireless IDS/IPS > Rogue APs.
The Rogue AP screen appears with the Global Settings tab selected. See Figure 29.
Figure 31: Web UI Rogue AP Global Settings
2. In the Detection list, select one of the following:
— On: Enables scanning for rogue APs.
— Off: Disables rogue detection.
3. In the Mitigation list, select one of the following:
— No mitigation: No rogue AP mitigation is performed.
— Block all BSSIDs that are not in the ACL: Enables rogue AP mitigation of all
detected BSSIDs that are not specified as authorized in the Allowed APs list.
— Block only BSSIDs in blocked list: Enables rogue AP mitigation only for the
BSSIDs that are listed in the Blocked APs list.
— Block Clients seen on the wire: Enables rogue mitigation for any rogue station
detected on the wired side of the AP (the corporate network, in many cases).
When Block clients seen on the wire is selected, clients seen on the corporate
network are mitigated. When Block clients seen on the wire is selected and
the BSSID of the wired rogue client is entered in the blocked list (see Alter the
List of Blocked APs with the Web UI) only listed clients are mitigated.
4. In the Rogue AP Aging box, type the amount of time that passes before the rogue
AP alarm is cleared if the controller no longer detects the rogue. The value can
be from 60 through 86,400 seconds.
5. In the Number of Mitigating APs text box, enter the number of APs (from 1 to 20)
that will perform scanning and mitigation of rogue APs.
198 Meru System Director Configuration Guide
© 2012 Meru Networks, Inc.
Troubleshooting Rogue Mitigation
6. In the Scanning time in ms text box, enter the amount of time Mitigating APs will
scan the scanning channels for rogue APs. This can be from 100 to 500
milliseconds.
7. In the Operational time in ms text box, enter the amount of time Mitigating APs
will spend in operational mode on the home channel. This can be from 100 to 5000
milliseconds.
8. In the Max mitigation frames sent per channel text box, enter the maximum
number of mitigation frames that will be sent to the detected rogue AP. This can
be from 1 to 50 deauth frames.
9. In the Scanning Channels text box, enter the list of channels that will be scanned
for rogue APs. Use a comma separated list from 0 to 256 characters. The complete
set of default channels are
1,2,3,4,5,6,7,8,9,10,11,36,40,44,48,52,56,60,64,149,153,157,161,165.
10. In the RSSI Threshold for Mitigation text box, enter the minimum threshold level
over which stations are mitigated. The range of valid values is from to -100 to 0.
11. Click OK.
Note: If a station that is already present in the discovered station database (learned
wirelessly by the AP) is also discovered via DHCP broadcast on the APs wired
interface, it implies that the station is connected to the same physical wired network
as the AP. Such a station could potentially be a rogue device and is flagged by the
controller as a wired rogue, indicating the rogue was identified as being present on
the same wired network as the AP. If mitigation is enabled for wired rogue, mitigation
action is performed accordingly on the rogue device.
Troubleshooting Rogue Mitigation
Check if the rogue AP is being displayed in the discovered list of stations on the AP
or the rogue list on the controller.
If the system is taking too long to find a rogue, reduce the number of channels that
need to be scanned.
© 2012 Meru Networks, Inc.
Rogue AP Detection and Mitigation 199
Troubleshooting Rogue Mitigation
200 Meru System Director Configuration Guide
© 2012 Meru Networks, Inc.
Chapter 12
Configuring VLANs
A virtual local area network (VLAN) is a broadcast domain that can span across wired
or wireless LAN segments. Each VLAN is a separate logical network. Several VLANs
can coexist within any given network, logically segmenting traffic by organization or
function. In this way, all systems used by a given organization can be interconnected
independent of physical location. This has the benefit of limiting the broadcast
domain and increasing security. VLANs can be configured in software, which enhances
their flexibility. VLANs operate at the data link layer (OSI Layer 2), however, they are
often configured to map directly to an IP network, or subnet, at the network layer
(OSI Layer 3). You can create up to 512 VLANs.
IEEE 802.1Q is the predominant protocol used to tag traffic with VLAN identifiers.
VLAN1 is called the default or native VLAN. It cannot be deleted, and all traffic on
it is untagged. A trunk port is a network connection that aggregates multiple VLANs
or tags, and is typically used between two switches or between a switch and a router.
VLAN membership can be port-based, MAC-based, protocol-based, or authentication-based when used in conjunction with the 802.1x protocol. Used in conjunction
with multiple ESSIDs, VLANs support multiple wireless networks on a single Access
Point using either a one-to-one mapping of ESSID to VLAN, or mapping multiple ESSIDs
to one VLAN. By assigning a security profile to a VLAN, the security requirements can
be fine-tuned based on the use of the VLAN, providing wire-like security or better on
a wireless network.
VLAN assignment is done for Radius-based MAC filtering and authentication. VLAN
assignment is not done in Captive Portal Authentication by any of the returned attributes. Because VLANs rely on a remote switch that must be configured to support
trunking, also refer to the Meru Wi-Fi Technology Note WF107, “VLAN Configuration
and Deployment.” This document contains the recommended configuration for
switches as well as a comprehensive description of VLAN configuration and deployment.
Configure and Deploy a VLAN
VLANs can be configured/owned either by E(z)RF Network Manager or by a controller.
You can tell where a profile was configured by checking the read-only field Owner;
the Owner is either nms-server or controller.
© 2012 Meru Networks, Inc.
Configuring VLANs 201
Bridged APs in a VLAN
In order to map an ESSID to a VLAN, the VLAN must first be configured. To create a
VLAN from the CLI, use the command vlan name tag id. The name can be up to 16
alphanumeric characters long and the tag id between 1 and 4,094.
For example, to create a VLAN named guest with a tag number of 1, enter the
following in global configuration mode:
controller (config)# vlan guest tag 1
controller (config-vlan)#
As shown by the change in the prompt above, you have entered VLAN configuration
mode, where you can assign the VLAN interface IP address, default gateway, DHCP
Pass-through or optional DHCP server (if specified, this DHCP server overrides the
controller DHCP server configuration).
In the following example, the following parameters are set:
VLAN interface IP address: 10.1.1.2 with a subnet mask of 255.255.255.0
Default gateway: 10.1.1.1
DHCP server: 10.1.1.254
controller
controller
controller
controller
controller
(config-vlan)#
(config-vlan)#
(config-vlan)#
(config-vlan)#
(config)#
ip address 10.1.1.2 255.255.255.0
ip default-gateway 10.1.1.1
ip dhcp-server 10.1.1.254
exit
To create a VLAN from the GUI, click Config > Wired > VLAN > Add.
Bridged APs in a VLAN
When creating an ESS, AP300/AP400 and AP1000 can be configured to bridge the traffic to
the Ethernet interface. This is called bridged VLAN dataplane mode (per ESSID); it is also
sometimes known as Remote AP mode. These two AP models also have the capability to
tag the Ethernet frames when egressing the port, using 802.1Q VLAN tags, and setting the
802.1p priority bit. Bridging is configured setting the Dataplane Mode parameter in the ESS
profile to Bridged (default is Tunneled).
In Tunneled mode, all traffic in an ESS is sent from the AP to the controller, and then
forwarded from there. This is configured on a per ESS profile basis. In Bridged mode, client
traffic is sent out to the local switch. Meru control and coordination traffic is still sent
between the AP and the controller.
Remote AP300/AP400s can use VLANs with System Director 4.0 and later. When
configuring an ESS, the Dataplane Mode setting selects the type of AP/Controller
configuration:
Bridged VLANs support:
Non-Virtual Cell
202 Meru System Director Configuration Guide
© 2012 Meru Networks, Inc.
Delete a VLAN
Virtual Port
Radius profile for Mac Filtering/1x/WPA/WPA2
Standard DSCP/802.1q to AC mapping defined in WMM
Radius profile for Mac Filtering/1x/WPA/WPA2
Bridged VLANs do not support:
Meru rule-based QoS rules. Instead, bridged VLANs support a standard
DSCP/802.1q to AC mapping defined in WMM.
Display of mobiles’ DHCP addresses
Printing IP address changes or discoveries in a station log
Captive Portal related Radius profiles
RADIUS assigned VLANs (even with 802.1x)
Reactive/proactive diagnostics
It doesn't display mobile's DHCP addresses, and the station log, IP address change,
and IP address discovery is not printed out.
See the ESSID chapters in this guide for more information on configuring an ESSID.
Delete a VLAN
You cannot delete a VLAN if it is currently assigned to an ESSID (see Chapter 5,
“Configuring an ESS” on page 49). You cannot delete a VLAN created by E(z)RF
Network Server; that must be done from Network Server. To delete a VLAN created
on a controller, use the following command in global configuration mode:
no vlan name
For example, to delete the VLAN name vlan1, enter the following:
controller (config)# no vlan vlan1
controller (config)#
More About VLANs
System Director provides commands for configuring both virtual LAN (VLANs) and
Generic Routing Encapsulation (GRE) tunnels to facilitate the separation of traffic
using logical rather than physical constraints. As an alternative to VLANs, if the
optional Generic Routing Encapsulation (GRE) feature is licensed, GRE Tunneling can
be configured on the either Ethernet interface, as described in Configure GRE Tunnels
© 2012 Meru Networks, Inc.
Configuring VLANs 203
More About VLANs
in the Security chapter. VLANs and GRE tunnels can coexist within any given network,
logically segmenting traffic by organization or function. In this way, all systems used
by a given organization can be interconnected, independent of physical location.
This has the benefit of limiting the broadcast domain and increasing security.
VLANs, when used in conjunction with multiple ESSIDs, as discussed in Chapter 5,
“Configuring an ESS,” allow you to support multiple wireless networks on a single
access point. You can create a one-to-one mapping of ESSID to VLAN or map multiple
ESSIDs to one VLAN.
Customized security configuration by VLAN is also supported. By assigning a VLAN a
Security Profile, you can fine-tune the security requirements based on the use of the
VLAN (see Chapter 8, “Configuring Security,” for details).
204 Meru System Director Configuration Guide
© 2012 Meru Networks, Inc.
Chapter 13
Configuring Access Points
This chapter includes instructions for the following:
How AP Discovery Works
Add and Configure an AP with the Web UI
Configure an AP’s Radios with the Web UI
Add and Configure an AP with the CLI
Configure an AP’s Radios with the CLI
Configuring an AP’s Radio Channels
Supported Modes of Operation for APs
Configure Gain for External Antennas
Automatic AP Upgrade
Viewing AP Status
How AP Discovery Works
There are three types of access point discovery:
Layer 2 only—Access point is in same subnet as controller.
Layer 2 preferred—Access point sends broadcasts to find the controller by trying
Layer 2 discovery first. If the access point gets no response, it tries Layer 3
discovery.
Layer 3 preferred—Access point send broadcasts to find the controller by trying
Layer 3 discovery first. If the access point gets no response, it tries Layer 2
discovery.
For Layer 2 and Layer 3 discovery, the access point cycles between Layer 2 and Layer
3 until it finds the controller. The access point waits 16 seconds before cycling
between Layer 2 and Layer 3.
An access point obtains its own IP address from DHCP (the default method), or you
can assign a static IP address. After the access point has an IP address, it must find
a controller’s IP address. By default, when using Layer 3 discovery, the access point
obtains the controller’s IP address by using DNS and querying for hostname
© 2012 Meru Networks, Inc.
Configuring Access Points 205
Add and Configure an AP with the Web UI
“wlan-controller.” This presumes the DNS server knows the domain name where the
controller is located. The domain name can be entered via the AP configuration or it
can be obtained from the DHCP server, but without it, an Layer 3-configured AP will
fail to find a controller. Alternately, you can configure the AP to point to the
controller's IP directly (if the controller has a static IP configuration).
After the access point obtains the controller IP address, it sends broadcast messages
using UDP port 9393. After the controller acknowledges the messages, a link is
formed between the AP and the controller.
Add and Configure an AP with the Web UI
When you add an AP to a controller, you configure these features:
AP ID
AP Name
Serial Number
Location, Building, Floor
Contact
LED Mode
Boot script (AP Init Script)
Dataplane Encryption
AP Role
Parent AP ID
Link Probing Duration
Power Supply Type
AP Indoor/Outdoor Type
Meru Access Points can be connected to the controller through a Layer 2 network or
a Layer 3 network. To both add and configure an AP, follow these steps:
1. Click Configuration > Devices > APs > Add.
The AP Table Add window displays.
206 Meru System Director Configuration Guide
© 2012 Meru Networks, Inc.
Figure 32: Add an AP to the Network
2. Provide the following values and then click OK.
Field
Description
AP ID
(required)
Unique AP numeric identifier up to 9999 characters long
AP Name
(required)
Alphanumeric string up to 64 characters long assigned as identifier for
the access point. Note that it can be helpful to name the AP something
descriptive, such as a means of indicating its location in the building.
Serial Number
(optional)
These boxes are designed to hold the MAC address which is part of the
longer part number on the bottom of an AP. The MAC address is the last
12 numbers.
Location
(optional)
Alphanumeric string up to 64 characters long
Building
(optional)
Alphanumeric string up to 64 characters long
© 2012 Meru Networks, Inc.
Configuring Access Points 207
Add and Configure an AP with the Web UI
Field
Description
Floor
(optional)
Alphanumeric string up to 64 characters long
Contact
(optional)
Alphanumeric string up to 64 characters long
LED Mode
(optional)
Sets LED appearance on AP300/AP400 and AP1000.
Normal: LEDs are as described in the Access Point Installation Guide
Node ID: Not supported in release 5.1
Blink: Sets all LEDs flashing; this is useful to locate one AP. The blink
sequence is unique for different AP models.
Dark: Turns off all LEDs except power
AP Init Script
(optional)
Name of an initialization script that the access point runs when
booted. If nothing is configured here, the AP uses the default
bootscript.
Dataplane
Encryption
(optional)
In a Mesh configuration, selects how the AP and Controller pass data
packets:
On: the AP-Controller link is encrypted
Off: the AP-Controller link is unencrypted (default)
AP Role
(optional)
In a Mesh configuration, determines the role that the AP plays in the
mesh:
access: Access point is operating as a standard, wired AP.
wireless: Access Point is part of the Enterprise Mesh configuration,
providing wireless access services to 802.11/bg clients and backhaul
services on the 802.11/a link.
gateway: Access point is part of the Enterprise Mesh configuration,
providing the link between the wired and wireless service.
Parent AP ID
(optional)
In a Mesh configuration, a wireless AP is directed to look for a signal
from a Parent AP, which provides the wireless AP with its backhaul
connectivity. Several APs can be assigned the same Parent AP ID.
Link Probing
Duration
(optional)
Length of time (from 1 to 32000 minutes) that bridged APs wait before
rebooting when the controller link is broken. This setting is used in
Remote AP configurations to prevent AP reboots when the connectivity
to the remote controller is lost. The default is 120.
KeepAlive
Timeout
(seconds)
In the KeepAlive Timeout (seconds), specify the duration of time
(from 1 to 1800 seconds), for the remote APs to remain in the online
state with respect to the controller, even when the link to the AP is
down. The discovery message from the controller to the AP is modified
depending on the time lapse provided in the Link Probing Duration box
and the KeepAlive Timeout (seconds) box. The default is 20.
208 Meru System Director Configuration Guide
© 2012 Meru Networks, Inc.
Configure an AP’s Radios with the Web UI
Field
Description
Power Supply
Type
(AP300
only—not
configurable
with AP400)
802.3-af: Default AP300 power supply. Select this when using a
traditional PoE. This power supply type supports 2x2 MIMO mode on
both radios; both radios cannot run 3x3 MIMO with this PoE.
802.3-at: Select when using a higher-powered, next generation PoE.
This power supply type supports 3x3 MIMO mode on AP320 and AP400.
5V-DC: Select when AP300 is plugged into a wall outlet. This power
supply type supports 3x3 MIMO mode on AP320. It can also support 2x2
MIMO on AP1000. This option is not available for AP400 models.
dual-802.3: Not supported in release 5.1.
AP Indoor/
Outdoor AP
(optional)
An Indoor and outdoor AP have different regulatory settings for
channels and power levels. This setting adjusts those values. AP180
defaults to outdoor and the other APs default to indoor.
Configure an AP’s Radios with the Web UI
After you Add and Configure an AP with the Web UI, the AP’s radios will be listed in
System Director. Follow these steps to configure the radios:
1. Click Configuration > Wireless > Radio.
2. Select one of the radios by clicking the red arrow in the first column; remember
that most APs have two radios. In that case, you will want to configure both of
them.
3. There are three tabs of settings for a radio, Wireless Interface, Wireless
Statistics, and Antenna Property. Wireless Interface is the default tab. Here you
see the existing interface settings for the radio. Any setting that is greyed out
cannot be changed. Make any of the changes listed in the following chart, and
then click OK.
Field
Description
Interface
Description
Description can be up to 256 alphanumeric characters long and contain
spaces (for example, Lobby AP interface 1). By default, the
description is ieee80211-ap_id-index_ID.
Administrative
Status
© 2012 Meru Networks, Inc.
Indicate whether the interface is to be used:
— Up: Enable the interface
— Down: Disable the interface
Configuring Access Points 209
Configure an AP’s Radios with the Web UI
Field
Description
Channel
In the drop-down list, select the channel number for the wireless
interface to use. The channel numbers displayed depend on the RF
Band Selection and the regulatory domain for each country; for
example, in the United States 802.11b shows channels 1 through 11 and
802.11a shows channels 36, 40, 44, etc. Two access points can belong
to the same virtual AP only if they are on the same channel. Thus, two
neighboring access points on different channels cannot perform
seamless handoff (0 ms).
Short Preamble
Short preambles are more efficient on the air, but not all clients
support them.
— On
— Off
RF Band
Selection
Select the RF Band this interface uses. Available selections are based
on both the AP model and radio cards installed (for example, 802.11an)
and the licensing in effect.
Transmit Power
High
Meru AP radios operate at their maximum power level by default. High
power level increases the signal strength of the frames received by the
client stations, allowing a client station to decode frames at a higher
rate and increasing the coverage area. This causes minimal
interference because Meru uses Virtual Cell technology, moving clients
to a better AP without re-association. For a very few cases, we
recommend that you reduce the power level on APs due to
co-channel-interference. Check with Support first to make sure your
issue really is due to co-channel-interference. To change transmit
power, change the value in the Transmit Power High (dBm) field. The
maximum level depends on the country code and the RF band in use.
AP Mode
Select whether the radio for the interface is in Normal Mode (servicing
clients first and scanning in the background) or Scanning Mode
(dedicated monitoring for Rogue APs).
Protection
Mode
Configures 802.11b/g interoperability mode. This setting defaults to
auto and should not be changed without consulting Meru Support.
Channel Width
Channel Width can be:
— 20 MHz
— 40MHz Extension Channel Above
— 40MHz Extension Channel Below
Note that all APs in a Virtual Cell must have the same channel width.
MIMO Mode
Select:
2x2 for either AP1000 or AP300 with an 802.3af PoE
3x3 for AP300 or AP400 depending on radio and power source
configuration
210 Meru System Director Configuration Guide
© 2012 Meru Networks, Inc.
Add and Configure an AP with the CLI
Field
Description
802.11n Only
Mode
802.11n only mode is for AP300/AP400/AP1000s with N capability.
Select:
On: to support only 802.11n
Off: (default) to support 802.11an or 802.1bgn
Virtual Cell
Virtual Cell Mode enables Virtual Cell for AP300/AP400 only.
On: enable per-station Virtual Cell on AP300/AP400
Off: (default) disable per-station Virtual Cell on AP300/AP400
Note: AP1000 radios always have Virtual Cell enabled, but there is a way to use AP1000
in non-Virtual Cell mode. See Adding an ESS with the CLI.
Add and Configure an AP with the CLI
To configure an AP with the CLI, first enter AP configuration mode (first command
shown below) and then use the rest of the AP configuration commands:
Command
Purpose
configure terminal
Enter global configuration mode.
ap ap-id
Enter AP configuration for the specified AP. Use the command
show ap to get a list of APs.
... commands ...
Enter the AP configuration commands listed in the next chart
here.
boot-script string
Name of an initialization script that the access point runs when
booted. If nothing is configured here, the AP uses the default
bootscript.
building string
Command to describe building identification.
contact string
Enters AP contact information
© 2012 Meru Networks, Inc.
Configuring Access Points 211
Add and Configure an AP with the CLI
Command
Purpose
connectivity l2-only |
l2-preferred |
l3-preferred
For AP300/AP400, AP100, and AP150, this setting configures
Layer 2 or Layer 3 connectivity to the controller. Using either L3
or L2 preferred also invokes AP connectivity mode where
additional connectivity configuration can be done.
dataplane-encryption {on |
off}
In a Mesh configuration, selects how the AP and Controller pass
data packets:
On: the AP-Controller link is encrypted
Off: the AP-Controller link is unencrypted (default)
description string
Enters AP description. Note that this corresponds to the AP Name
in the GUI.
floor string
Enters AP floor location
led {normal | blink | NodeId
| Normal}
Sets LED appearance on AP300/AP400 and AP1000.
Normal: AP300/AP400 and AP1000 LEDs appear as described in
the Meru Access Point Installation Guide
Blink: Sets all LEDs flashing; this is useful to locate an AP
Dark: Turns off all LEDs
link-probing duration
minutes
For Remote AP, set the number of minutes between keep-alive
signals. Minutes can be between 1 and 3200.
location string
Enters AP location information
mac-address
ff:ff:ff:ff:ff:ff
Sets the MAC address if you are pre-configuring an AP
model string
Command to enter the model type of the AP if you are
pre-configuring the AP
no boot-script
Disables the boot script
end
Return to privileged EXEC mode.
212 Meru System Director Configuration Guide
© 2012 Meru Networks, Inc.
Add and Configure an AP with the CLI
Configure a Layer 3 AP with the CLI
The following commands can be used to set up a Layer 3 configuration for an AP not
in the same subnet as the controller. It specifies the AP will obtain its IP address from
DHCP, which allows it to use a DNS server for obtaining its IP address. If the network
administrator has added to the DNS server the IP address for the controller hostname
“wlan-controller,” DNS can return the IP address of the controller with the hostname
“wlan-controller:”
default# configure terminal
default(config)# ap 1
default(config-ap)# connectivity
default(config-ap-connectivity)#
default(config-ap-connectivity)#
default(config-ap-connectivity)#
default#
l3-preferred
ip address dhcp
controller hostname wlan-controller
end
The following table presents the commands available within the ap-connectivity
mode.
Table 14: Summary of Connectivity Mode Commands
Command
controller {domainname
name|hostname name|ip
ip-address}
Purpose
Configure the controller IP information.
The domainname name must be from 1 to 63 characters.
The hostname name must be from 1 to 63 characters.
The IP address must be in the format nnn.nnn.nnn.nnn or dhcp
to obtain the AP IP address dynamically.
hostname name
Sets the AP hostname. name must be from 1 to 63 characters.
ip address {ip-address|dhcp}
Configures the IP addressing for the AP.
Use ip-address to assign a static IP address to the AP.
Use dhcp to obtain the AP IP address dynamically.
ip default-gateway gateway
Adds an IP address of the default gateway in the format
nnn.nnn.nnn.nnn
ip dns-server {primary
ip-address|secondary
ip-address}
Adds a DNS server entry for static IP.
© 2012 Meru Networks, Inc.
primary ip-address sets a primary DNS server for static IP.
secondary ip-address sets the secondary DNS server for
the static IP.
Configuring Access Points 213
Add and Configure an AP with the CLI
Configure AP Power Supply, Channel Width, and MIMO Mode with CLI
Set the power supply type, channel width, and MIMO mode by following these steps:
1. Open a terminal session on the controller.
2. Enter configuration mode by with the command terminal configuration at the CLI
prompt.
3. Select the AP with the command ap #, for example, AP1:
default(config)# ap 1
4. Set the power supply value to 5V-DC for AP Power, 802.3af Power Over Ethernet,
802.3-at Power Over Ethernet, or dual-802.3-af Power Over Ethernet with the
CLI command power-supply.
default(config-ap)# power-supply 5V-DC
5. Exit ap configuration mode.
default(config-ap) # exit
6. Enter radio configuration submode with the command interface Dot11Radio
node-id interface_ID. For example, for AP1, interface 1:
default(config)# interface Dot11Radio 1 1
7. Change channel width from 20 MHz (default) to 40 MHz (either
40-mhz-extension-channel-above or 0-mhz-extension-channel-below 40) with the
command channel-width. This command also sets channel bonding.
default(config-if-802)# channel-width above 40 MHz Extension channel
8. Change MIMO Mode from 2x2 (default) to 3x3 with the mimo-mode 3x3 command
and exit.
default(config-if-802)# mimo-mode 3x3
default(config-if-802)# end
The AP is now configured.
214 Meru System Director Configuration Guide
© 2012 Meru Networks, Inc.
Configure an AP’s Radios with the CLI
Configure an AP’s Radios with the CLI
Before you can configure any radio settings, you need to enter radio interface configuration mode. To do this, follow these steps:
Table 15: Entering Radio Interface Configuration Mode
Command
Purpose
configure terminal
Enter global configuration mode.
interface Dot11Radio <ap-id>
<Interface ID>
Enter interface configuration for the specified AP and radio
interface. Use show interfaces Dot11Radio to obtain a list
of radio interfaces.
... commands ...
Enter the 802.11configuration commands here.
end
Return to privileged EXEC mode.
copy running-config
startup-config
This is an optional step to save your entries in the configuration
file.
Summary of Radio Interface Configuration Commands
The following is a summary of the commands available in radio interface configuration mode:
Table 16: Commands available in Radio Interface Configuration Mode
Command
Purpose
admin-mode
Enables or disables a radio interface.
antenna-property
Manages external wireless interface antennas.
channel
Configures the channel ID.
localpower (new in 3.5)
Configures the AP transmit power level for all APs
mode
AP mode configuration.
© 2012 Meru Networks, Inc.
Configuring Access Points 215
Configure an AP’s Radios with the CLI
Table 16: Commands available in Radio Interface Configuration Mode
Command
Purpose
n-only-mode (new in 3.6)
Supports only 802.11n clients on the radio to improve
performance.
power
Note: Obsolete. Use localpower command instead
preamble-short
Enables or disables short preambles.
protection-mode
Configures 802.11b/g interoperability mode. This setting
defaults to auto and should not be changed without
consulting Meru Support.
rf-mode
Configures the Radio Frequency mode (802.11a, b, g, or bg,
bgn, or an). Note that All APs on the same channel in a
Virtual Cell must have the same setting for rf-mode.
scanning channels
Configures the channels for scanning
tuning
Tunes the wireless interface
Set Radio Transmit Power with the CLI
The radio transmit power changes the AP’s coverage area; this setting helps manage
contention between neighboring access points. Transmit power for Meru APs is
defined as the EIRP1 (Effective Isotropic Radiated Power) at the antenna and includes
the antenna gain. (This is important to remember; transmit power is not the power
at the connector.) Power level settings are dependent on the country code and the
radio band (and for 802.11a, the channel) in use.
For example, if the transmit power, configured with the command localpower, is set
to 20 dBm2, and the antenna gain is set 3 to 2 dBm, then the actual transmitted
power at the connector is 18 dBm.
If an external antenna with an 8dBi (isotropic) gain is used, then adjust the gain value
to the same value, 8. If the desired EIRP after the antenna is the same, then keep
the transmit power set to the same value, 20. For higher or lower EIRP values, adjust
the transmit power to the desired value.
The maximum power setting is an integer between 4-30dBm for 802.11/bg radios.
The Maximum Transmit Power for the 802.11a band is based on the channel in use,
as detailed in the following table, which shows the levels for the United States:
216 Meru System Director Configuration Guide
© 2012 Meru Networks, Inc.
Configure an AP’s Radios with the CLI
802.11a Channel
Maximum Transmit Power (dBm) for United States
36
17
40
23
44
23
48
23
52
30
56
30
60
30
64
30
100
30
104
30
108
30
112
30
116
30
120
30
124
30
128
30
132
30
136
30
140
30
149
36
153
36
157
36
161
36
165
36
© 2012 Meru Networks, Inc.
Configuring Access Points 217
Configure an AP’s Radios with the CLI
Use the localpower command in the Dot11Radio interface configuration mode to
configure the maximum power level.
localpower max-level
For example, to set the 802.11a radio maximum power to 15, type
localpower 15
Enable and Disable Short Preambles with the CLI
The radio preamble, also called the header, is a section of data at the head of a
packet that contains information that the access point and client devices need when
sending and receiving packets. By default, a short preamble is configured, but you
can set the radio preamble to long or short:
A short preamble improves throughput performance.
A long preamble ensures compatibility between the access point and some older
wireless LAN cards. If you do not have any older wireless LAN cards, you should
use short preambles.
To disable short preambles and use long preambles, type:
no preamble-short
To enable short preambles, type:
preamble-short
Set a Radio to Scan for Rogue APs with the CLI
To configure radios to constantly scan for rogue APs, use this command from the
Dot11Radio interface configuration mode:
mode scanning
To set the radio back to servicing clients, use the command:
mode normal
Enable or Disable a Radio Interface with the CLI
To temporarily disable a radio interface, use this command from Dot11Radio interface configuration mode:
admin-mode Down
To later enable the off-line interface, use the command:
admin-mode Up
218 Meru System Director Configuration Guide
© 2012 Meru Networks, Inc.
Configuring an AP’s Radio Channels
Set a Radio to Support 802.11n Only with the CLI
To set an AP320 radio interface to support only 802.11n clients, and thus improve
throughput, from the Dot11Radio interface configuration mode use the command:
n-only-mode
To disable the 802.11n-only support, use the command:
no n-only-mode
Note that All APs on the same channel in a Virtual Cell must have the same setting
for n-only mode.
Configuring an AP’s Radio Channels
AP channel configuration is configurable for 802.11bg which consists of 11 overlapping channels in United States deployments. Channel configuration for 802.11a is not
an issue because there are no overlapping channels within the 802.11a spectrum.
In the 802.11b/g standard, there are 14 channels. As a result of FCC rules, there are
11 channels: channels 1 through 11 are used in the USA. Other countries may also use
channels 12, 13, and 14. These channels represent the center frequency of the wireless transmission wave. In practice, 802.11bg has only three operational frequencies
in a given area, and most deployments use channels 1, 6, and 11, for which there is
no overlap.
Figure 33: Channel 1, 6, and 11
© 2012 Meru Networks, Inc.
Configuring Access Points 219
Replacing APs
To assign a channel, use the Dot11Radio interface command channel. With the Web
UI, configure a channel by clicking Configuration > Wireless > Radio, select a radio
and then select a Channel from the drop-down list.
Replacing APs
Note: Replacing one AP model with another usually preserves the settings of the
original configuration. A newer AP may have settings that the older one does not;
those settings will be set to the default.
Caution! Despite the fact that some AP settings and configurations can be carried over
when replacing an AP, users cannot simply replace an AP300/AP400 with a different model
(such as an AP1000). The two models have very different capabilities and configuration
specifications and should not be considered synonymous.
If you are replacing existing APs with a newer model of APs, use the swap ap
command to ease the task of updating your site’s AP settings. To use the swap ap
command, you need the MAC addresses of the new and old APs. There are two ways
to determine a MAC address. You can check MAC addresses of the APs to be replaced
with the show ap command. You can also look on the back of any AP for the MAC
address. The serial number is displayed on the label, below the bar code. The last 12
digits of the serial number is the AP MAC address.
The swap ap command equates the MAC address of an AP that you want to replace
with the MAC address of the new AP. By linking the numbers to an AP ID in the replacement table, the system can assign the configured settings from the old AP to the new
AP. The settings that are tracked are the channel number, preamble, and power
settings. After inputting the swap information, use the show ap-swap command to
double check the AP MAC settings before physically swapping the APs.
Once you have double-checked the MAC addresses, take the old APs offline by disconnecting them from the system. Replace the APs. When the APs are discovered, the
replacement table is checked, and the changes are applied to the new APs. Once the
new AP has been updated, the entry is removed from the replacement table.
To summarize the steps to replace the APs:
meru-wifi (config)# do show ap (gets the serial numbers of the APs you are replacing)
meru-wifi (config)# swap ap 00:oc:e6:00:00:66 00:CE:60:00:17:BD
meru-wifi (config)# exit
meru-wifi# show ap-swap
AP Serial Number
New AP Serial Number
00:0c:e6:00:00:66
00:ce:60:00:17:bd
AP Replacement Table(1 entry)
meru-wifi# show ap (Disconnect the old APs and make sure they show Disconnect/offline
status)
220 Meru System Director Configuration Guide
© 2012 Meru Networks, Inc.
Supported Modes of Operation for APs
(Replace the old APs with the new APs)
Supported Modes of Operation for APs
AP300/AP400 and AP1000 with two radios can have both set to 5.0 GHz, but both
radios cannot be set to 2.4 GHz. If you want to use both radios on 2.4 GHz, put the
radios on separate channels.
AP300 and AP1000 radios default to the following bands:
AP Model
Radio 1
Radio 2
Radio 3
AP302
BG
A
-
AP310
BGN
AP311
BGN
A
-
AP320
BGN
AN
-
AP1010
BGN
AP1020
BGN
AN
-
AP400
BGN
AN
Scanning on
both bands
-
-
Security Modes
Although AP300/AP400/AP1000 support all security modes supported by the 802.11i
security standard (WEP, WPA, WPA2 and mixed mode), 802.11n supports only clear
and WPA2 security. Even though you can configure any security mode for 802.11n, you
only gain 11n benefits using WPA2 or clear. Because of this, any 11n client connected
to an SSID configured for WEP or WPA will behave like a legacy ABG client. An 802.11n
ESSID configured for either WEP or WPA has no 802.11n rates for that ESSID. If you
configure an ESSID for Mixed Mode, 802.11n rates are enabled only for the WPA2
clients; WPA clients behave like a legacy ABG client. See the chart below for details.
© 2012 Meru Networks, Inc.
Configuring Access Points 221
When APs are in a Virtual Cell
ESSID Security AP300/AP400/AP1000 Realize These 11n Benefits
Clear and
WPA2
All 11n benefits are realized.
WEP and WPA
No 11n benefits are realized. Clients behave like legacy ABG clients.
Mixed Mode
11n performance in ESS configured for mixed mode depends on
kind of application used in the network. Only WPA2 clients
connected to mixed mode have 11n benefits. WPA clients behave like
legacy ABG clients.
When APs are in a Virtual Cell
All APs on the same channel in a Virtual Cell must have the same setting for these
values:
RF-Mode
Channel Width
N-only Mode
Configure Gain for External Antennas
The total power that an AP produces must not exceed 30dbi; this number includes
any antenna gain. Therefore, if an antenna produces 2dbi, the radio can produce
28dbi. System Director automatically sets antenna gain; in the case of an
AP300/AP400, it assumes an antenna with 5dbi and therefore sets the AP300/AP400
to 25dbi. This may or may not be correct for your antenna.
To check and change antenna gain, follow these steps from System Director:
1. Click Configuration > APs (under Devices).
2. Select an AP ID.
3. Click the Antenna Property tab.
4. Select an Interface (1/2).
5. Change the gain if needed.
6. Click OK.
222 Meru System Director Configuration Guide
© 2012 Meru Networks, Inc.
Automatic AP Upgrade
Note: The antenna gain value can never exceed the local power of the radios as set
in the Dot 11 physical configuration.
Automatic AP Upgrade
The automatic AP upgrade features is enabled by default. It allows an AP’s firmware
to be automatically upgraded by the controller when the AP joins the WLAN. An AP
cannot provide service (and consequently be part of the WLAN) if its firmware is at
a different level than that of the controller.
When an AP initiates its discovery phase, the controller checks the firmware version
and initiates an upgrade if the version is not at the same level as that of the
controller. This feature simplifies the process of adding and maintaining a group of
APs on an existing WLAN.
When the automatic AP upgrade feature is enabled, you can check the upgrade status
of affected APs through syslog messages and SNMP traps that warn of an
AP/controller software version mismatch. An alarm is dispatched to an SNMP
manager if a mismatch exists. After the firmware is downloaded to the AP, the AP
boots, attempts discovery, is checked, and after upgrading, runs the new software
version. Once the match is confirmed, another set of syslog messages and SNMP traps
are sent notifying that the AP/controller software versions match. Alarms are then
cleared.
To disable this feature:
default# auto-ap-upgrade disable
default# show controller
Global Controller Parameters
Controller ID
Description
Controller
Host Name
Uptime
Location
near IT
room
Contact
Operational State
Availability Status
Alarm State
Automatic AP Upgrade
Virtual IP Address
Virtual Netmask
Default Gateway
DHCP Server
Statistics Polling Period (seconds)/0 disable Polling
© 2012 Meru Networks, Inc.
: 1
: 3dot4dot1
: DC9
: 03d:01h:17m:33s
: Qa scale testbed
:
:
:
:
:
:
:
:
:
:
Raju
Enabled
Online
No Alarm
off
192.168.9.3
255.255.255.0
192.168.9.1
10.0.0.10
60
Configuring Access Points 223
Viewing AP Status
Audit Polling Period (seconds)/0 disable Polling
Software Version
Network Device Id
System Id
Default AP Init Script
DHCP Relay Passthrough
Controller Model
Country Setting
America
:
:
:
:
:
:
:
:
60
3.7-49
00:90:0b:07:9f:6a
245AA7436A21
Manufacturing Serial #
Management by wireless stations
Controller Index
Topology Information Update
AP150 Vcell
:
:
:
:
:
N/A
on
0
off
enable
on
MC3000
United States Of
Viewing AP Status
From the Web UI, view AP radio status by clicking Monitor > Dashboard > Radio or
Monitor > Diagnostics > Radio. Click Help for descriptions of the charts. The icons
at the bottom of all screens include a green AP (enabled) and a red AP (disabled);
you can also see the same information at Monitor > Dashboard > System.
There are several CLI commands you can use to view AP status:
Table 17: Commands to View System Status
Command
Purpose
show ap [index]
Displays the status of the AP, such as serial number,
uptime, operational status, availability, alarm state,
security mode, privacy bit, boot script, AP model, and
FPGA version. If the AP index is not specified, a
summary of the AP status is displayed.
show antenna-property
Displays the antenna properties.
show ap-connectivity
Displays the access point connections.
show ap-discovered
Displays the list of discovered access points and
stations.
show ap-limit
Displays how many APs are licensed for this controller.
224 Meru System Director Configuration Guide
© 2012 Meru Networks, Inc.
Viewing AP Status
Table 17: Commands to View System Status
Command
Purpose
show ap-siblings
Displays the AP Siblings table. APs operating in the same
channel that can hear each other are AP-siblings. APs
can hear beacons with RSSI as low as -80 to -85dbm, but
RSSI values lower than this are not heard.
show ap-swap
Displays the access point replacement table.
show ess-ap
Displays the ESS-AP table for the access point.
show interfaces Dot11radio
Displays the configuration of the wireless interface.
show interfaces Dot11Radio
statistics
Displays the statistics related to the wireless interface.
show regulatory-domain
Displays the regulatory information for the country.
show statistics top10-ap-problem
Displays a list of the top 10 problem access points.
show statistics top10-ap-talker
Displays a list of the top 10 most active access points.
show topoap
Displays the topology of all access points as seen by the
coordinator.
show topoapap
Displays the Received Signal Strength Indicator (RSSI)
between all pairs of APs.
© 2012 Meru Networks, Inc.
Configuring Access Points 225
Viewing AP Status
226 Meru System Director Configuration Guide
© 2012 Meru Networks, Inc.
Chapter 14
Intercontroller Roaming
When a wireless client can maintain connection from one AP to another, this is
roaming. When a client can roam between APs on different controllers on different
IP subnets without losing its IP address, roaming becomes inter-controller roaming.
Meru Networks’ Intercontroller Roaming feature (ICR) provides IP-IP tunnel-based
routing between a group of controllers (a roaming domain) to support IP address
mobility for stations. The feature works only if member controllers in a roaming
group spans at least two distinct IP subnets. This feature is hence targeted for
deployments with a routed network between controllers.
With ICR, a static or DHCP-provisioned IP address of a station remains routable into
an Anchor (home) controller while the station roams between other (serving) controllers in the roaming group.
With this feature, the upstream traffic for a client is tunneled to the Anchor
Controller, and the downstream traffic is handled by the Guest Controller.
Intercontroller Roaming supports controllers configured in a group of up to 30 Meru
controllers (a roaming domain) that is configured with CLI commands to support ICR.
At least one controller must be in an IP subnet distinct from the rest; this feature
does not work when all controllers of a roaming domain are on the same link.
Controllers must have the same SSID and identical security profiles for those SSIDs
spanning the roaming domain. (There can be additional SSIDs local to individual
controllers.) ICR can be established between two or more controllers so that the
feature activates as long as they have at least one shared ESSID where the subnet
bound to the ESSID differs between at least the two controllers.
How Inter-Controller Roaming Works
Intercontroller roaming retains stations’ IP addresses by forwarding packets via a
dedicated point-to-point tunnel between controllers, using UDP port 9394. Then, a
user can roam between supported Meru controllers in the same domain without
disconnection or a change of IP address. Any mix of up to 30 supported controller
models is supported by ICR. Captive Portal context transfer and multicasting are not
supported by ICR.
© 2012 Meru Networks, Inc.
Intercontroller Roaming 227
How Inter-Controller Roaming Works
After 802.11 re-authentication takes place on a subsequent AP and controller, the
station’s original IP address and connectivity are preserved. (Note that the QoS flows
are not handed off across the roaming domain.)
Note that intercontroller roaming does not support the dynamic addition or deletion
of peers or anchored ESSIDs to/from the roaming domain. Before adding/deleting any
peers to/from the existing list, stop the roaming-domain using the command stop.
And after adding the peers start the roaming domain again using the command start.
GRE is not supported in a roaming domain. Captive Portal reauthenticates when it
roams to a new ICR controller.
Configuring Intercontroller Roaming with the Web UI
Intercontroller roaming is one of the Global Controller Parameters that you set when
you configure a controller at Configuration > Devices > Controller. The value for
Roaming Domain Sate can be either Enable or Disable.
Configuring Intercontroller Roaming with the CLI
ICR can only be configured with the CLI. There is no Web UI interface at this time.
The following commands are used to configure ICR:
roaming-domain essid
roaming-domain peer-controller
roaming-domain start
show roaming-domain
roaming-domain stop
show roaming-domain
These commands are described in detail in the System Director Command Reference
Guide.
Intercontroller Roaming Configuration Example
This example lists the three roaming domain commands. The controller 172.19.2.20
is added to the ICR, and then roaming is started.
default# configure terminal
default (config)# roaming-domain ?
peer-controller
Add the peer controller into roaming domain.
start
start roaming domain.
stop
stop roaming domain.
default (config)# peer-controller 172.19.2.20
default (config)# roaming-domain start
default (config)# exit
default#
228 Meru System Director Configuration Guide
© 2012 Meru Networks, Inc.
ICR Limitations
ICR Limitations
Each controller is identified by one IP address and this must be the virtual IP
address in the Meru interface. No controller IP interface address that participates
in a roaming domain can reside in VLAN interface. This address is used as the
end-point of inter-controller tunnels. Stations can use VLAN-connected ESSIDs.
Each controller maintains a list of roaming group members as IP addresses. All
member controller configurations must have the same list of IP addresses and
they must be in the same order.
If a member is added after the group has been created, all controllers must add
the member and restart the service. The restart will cause stations to be dropped
in all member controllers until the feature is back online.
Caution! The above operation is service-disrupting, and should only be performed when
absolutely necessary.
Each member controller should have the exact same shared ESSID configuration
to ensure predictable/desired roaming.
To activate fixed mode, one of the controllers needs to be acknowledged as the
DHCP home (a question asked after entering each peer IP address).
A roaming group can contain up to five controllers.
Clients using inter-controller roaming can be identified using the command show
roaming-domain all (my interface addresses, peer controllers, my roaming
stations, stations at home here, stations onlink now).
Tunnels are per-controller.
For N+1, failover is not seamless but IP layer mobility is retained.
Ongoing IP sessions such as TCP/IP or UDP/IP continue across inter-controller
roaming. Ongoing voice calls also continue but the QoS is not preserved on the
subsequent controller; Captive Portal users have to re-authenticate as well.
Only one roaming domain is supported and the assumption is that all members
support the same ESSID among the controllers. An ESSID can be bound to untagged
(Meru Networks) or tagged (VLAN) interface.
No fast roaming is supported, with the switchover time in the order of seconds.
For this release, dual Ethernet operation, active-active or active-redundant, is
not supported.
After changing VLAN configuration, inter-controller roaming must be restarted.
© 2012 Meru Networks, Inc.
Intercontroller Roaming 229
ICR Limitations
230 Meru System Director Configuration Guide
© 2012 Meru Networks, Inc.
Chapter 15
Configuring Quality of Service
Quality of Service rules evaluate and prioritize network traffic types. For example,
you can prioritize phone calls (VoIP) or prioritize a certain department in a company.
This chapter describes QoS settings for Meru Wireless LAN System.
Configuring QoS Rules With the Web UI
Configuring QoS Rules With the CLI
Optimizing Voice Over IP
Global QoS Settings
Rate Limiting QoS Rules
Configuring Codec Rules
QoS Statistics Display Commands
More QoS Rule Examples
Configuring QoS Rules With the Web UI
To configure QoS rules from the GUI, follow these steps:
1. Click Configuration > QoS > System Settings > QoS and Firewall Rules (tab).
2. Click Add. The screen below appears.
© 2012 Meru Networks, Inc.
Configuring Quality of Service 231
Configuring QoS Rules With the Web UI
Figure 34: Add a QoS Rule
3. In the ID field, type a unique numeric identifier for the QoS rule. The valid range
is from 0 to 6000.
4. In the Destination IP fields, type the destination IP address to be used as criteria
for matching the QoS rule. The destination IP address is used with the destination
subnet mask to determine matching.
5. In the Destination Netmask fields, type the subnet mask for the destination IP
address.
6. In the Destination Port field, type the TCP or UDP port to be used as criteria for
matching the QoS rule. To specify any port, type 0 (zero).
7. In the Source IP fields, type the source IP address to be used as the criteria for
matching the QoS rule. The source IP address is used with the source subnet mask
to determine matching.
8. In the Source Netmask fields, type the subnet mask for the source IP address.
9. In the Source Port field, type the TCP or UDP port to be used as criteria for
matching the QoS rule. To specify any port, type 0 (zero).
10. In the Network Protocol field, type the protocol number of the flow protocol for
the QoS rule. The protocol number can be a number 0 through 255. The protocol
number of TCP is 6, and the protocol number for UDP is 17. For a list of protocol
numbers, see http://www.iana.org/assignments/protocol-numbers.
232 Meru System Director Configuration Guide
© 2012 Meru Networks, Inc.
Configuring QoS Rules With the Web UI
If you are also using a QoS protocol detector, you must match the network
protocol with the type of QoS protocol. Use the following network protocol and
QoS protocol matches:
— UDP: SIP
— TCP: H.323v1 or SIP
11. In the Firewall Filter ID field, enter the filter-ID to be used (per-user or per-ESS),
if Policy Enforcement Module configuration is enabled (optional feature). This ID
must be between 1 and 16 alphanumeric characters.
12. In the Packet minimum length field, specify the size of the minimum packet
length needed to match the rule. (Valid range: 0-1500.)
13. In the Packet maximum length field, specify the size of the maximum packet
length needed to match the rule. (Valid range: 0-1500.)
14. In the QoS Protocol list, select one of the following:
— SIP
— H.323v1
— Other
— None
For capture rules, the QoS protocol determines which QoS protocol detector
automatically derives the resources needed for the flow (implicitly). Select Other
if you want to specify the resource requirements for matched flows explicitly. The
QoS protocol value is ignored for non-capture rules.
15. In the Average Packet rate box, type the average flow packet rate. The rate can
be from 0 through 200 packets/second.
16. In the Action list, select the action the rule specifies:
— Forward: A flow is given an explicit resource request, bypassing the QoS
protocol detector and regardless of whether a QoS protocol was specified.
— Capture: The system, using a QoS protocol detector, analyzes the flow for its
resource requirements.
— Drop: The flow is dropped.
17. In the Drop Policy list, select one of the following:
— Head: New packets that arrive after the queue has reached its maximum length
are allowed in the queue, and old information in the queue is replaced with
the new information.
— Tail: New packets that arrive after the queue has reached its maximum length
are dropped.
18. In the Token Bucket Rate box, type the rate (in Kbps or Mbps, depending on the
option checked) at which tokens are placed into an imaginary token bucket. Each
flow has its own bucket, to which tokens are added at a fixed rate. To send a
packet, the system must remove the number of tokens equal to the size of the
packet from the bucket. If there are not enough tokens, the system waits until
enough tokens are in the bucket.
© 2012 Meru Networks, Inc.
Configuring Quality of Service 233
Configuring QoS Rules With the Web UI
19. In the Priority box, type the priority at which the flow is placed in a best-effort
queue. Packets in a higher priority best-effort queue are transmitted by access
points before packets in lower-priority queues, but after packets for reserved
flows.
Priority can be a value from 0 through 8, with 0 specifying no priority and 8
specifying the highest priority. The default value is 0. If you enable priority
(specify a non-zero value), you cannot specify an average packet rate or token
bucket rate.
20. In the Traffic Control list, select one of the following:
— On
— Off
For all types of flows (explicit, detected, and best-effort), selecting On for traffic
control restricts the flow to the rate you specified. Packets above that rate are
dropped.
21. In the DiffServ Codepoint list, select the appropriate DiffServ setting, if
applicable.
22. In the QoS Rule Logging list, select whether to enable or disable logging activity
for this QoS rule:
— On
— Off
23. In the QoS Rule Logging Frequency field, change the default collection interval in
which packets related to this rule are logged, if QoS Logging is enabled. The
interval must be a number between 30 and 60 (seconds).
24. Match Checkbox: For any field with the corresponding Match checkbox selected,
packets must match the information in the field or they are dropped. If no match
box is checked, the opposite happens and all criteria are matched. Also see More
About the Match Checkbox and Flow Class Checkbox.
25. Flow Class Checkbox: Flow Class options are relevant only for Flow Control rules
(rules with Traffic Control enabled and Token Bucket Rate specified) and Firewall
rules. This is typically rate limiting. When Flow Class is checked for a field, if a
packet has matched a rule (either Flow Control or Firewall types), these fields
are stored in the Flow Class entry. A Flow Class entry is used by the system for
aggregating a set of flows so that they can be subjected to similar behavior, be it
dropping the packets, or rate limiting them.
For example, if a rule has a Src IP address of 0.0.0.0 and the Flow Class box
checked, and Token Bucket Rate set to 10 kbytes/sec, all packets passing through
the system must match this rule, and each flow will be allowed a maximum
throughput of 10000 bytes/sec. If the rule were to have Src IP address of 10.0.0.10
and the Flow Class box checked, with a Token Bucket Rate of 10 kbytes/sec, all
packets coming from a machine with IP address 10.0.0.10, must match this rule,
and the cumulative throughput allowed for this machine shall be no more than
10000bytes/sec. Also see More About the Match Checkbox and Flow Class
Checkbox.
26. To add the QoS rule, click OK.
234 Meru System Director Configuration Guide
© 2012 Meru Networks, Inc.
Configuring QoS Rules With the Web UI
More About the Match Checkbox and Flow Class Checkbox
The two checkboxes Match and Flow Class operate independently from each other;
they perform two different functions. Match will almost always be used because
checking this box indicates that the setting on the left must match - this sets the
matching criteria for the QoS rule. You can check more than one matching criteria.
Matching is the first phase of QoS rule execution - see the green box in Figure 35.
After criteria are matched, the action phase of the QoS rule is executed. This phase
is enclosed in the orange box in Figure 35. Here are the directions that describe what
to do with the matched packet from phase 1, Matching. For example, the rule can
capture the packet from a named source and drop it. Action is phase 2 of QoS rule
execution.
The Flow Class column is all about rate limiting. If a rule involves rate limiting, the
actions Traffic Control and Token Bucket Rate must have been turned on. When the
QoS rule executes traffic control, it looks at the check marks in the flow class
column. If there are no check marks at all, the rate limiting is applied to everything.
If Destination, Source, or Network Protocol have Flow Class checked, the following
happens:
Destination Flow Class - Each destination flow is limited to the rate.
Source Flow Class - All source flows combined must be less than or equal to the
rate.
Network Protocol Flow Class - Any data transported using this protocol is limited
to the rate.
© 2012 Meru Networks, Inc.
Configuring Quality of Service 235
Configuring QoS Rules With the Web UI
Figure 35: How QoS Rules Work
1. MATCH CRITERIA
2. Take Action
Note:
3. Rate
Limit
During creation of a QoS rule, at least one Match Flow flag must be
selected or else the system will not allow the user to proceed.
236 Meru System Director Configuration Guide
© 2012 Meru Networks, Inc.
Configuring QoS Rules With the CLI
Configuring QoS Rules With the CLI
To configure QoS rules with the CLI, you need to be in QoS Rule configuration mode.
Enter configure terminal, then specify a QoS rule with the command qosrule
< rule-id>. See the chart below for the options for these two commands.
Command
Purpose
configure terminal
Enter global configuration mode.
qosrule rule-id netprotocol
{6|17|protocolnumber} qosprotocol
{H323v1|sip|none}
Enter QoS Rule configuration for the specified rule ID.
Use show qosrules to obtain a list of rule IDs. The
required parameters are:
netprotocol: The network protocol is a standard network
protocol number such as 6 for TCP or 17 for UDP. It can
be any valid protocol number such as 119 for the SVP
protocol, used with Spectralink phones. [Full listing at:
http://www.iana.org/assignments/
protocol-numbers]
qosprotocol: The QoS protocol. This can be one of the
following:
— H323v1 (H.323v1)
— sip (SIP - Session Initiation Protocol)
— none (Used to denote all other protocols)
... commands ...
Enter the QoS rule configuration commands here (see
the following table).
end
Return to privileged EXEC mode.
copy running-config startup-config
This is an optional step to save your entries in the
configuration file.
Commands for QoS Rule CLI Configuration
Once you are in QoS rule configuration mode (see directions above), you can issue
any of these QoS rule configuration commands:
© 2012 Meru Networks, Inc.
Configuring Quality of Service 237
Configuring QoS Rules With the CLI
Command
Purpose
dstip ip
Destination IP in the format 255.255.255.255.
dstmask ipmask
Destination netmask in the format 255.255.255.255
dstport port
Destination port number from 0 to 65535.
srcip ip
Source IP in the format 255.255.255.255.
srcmask ipmask
Source netmask in the format 255.255.255.255.
srcport port
Source port number from 0 to 65535.
action {forward | capture
| drop}
Action to take for packets matching the rule. This can be one of
the following:
droppolicy {head | tail}
forward—A flow is given an explicit resource request, bypassing the
QoS protocol detector and regardless of whether a QoS protocol was
specified.
capture—The flow is passed through the QoS protocol detector, using
the specified QoS protocol. This is the recommended action for static
QoS rules that are H.323v1/SIP based.
drop—The flow is dropped.
The drop policy. This can be one of the following:
head—Drop the entry at the head of the list.
tail—Drop the entry at the tail of the list. This is the default setting.
dscp class
The DiffServ codepoint class. This lets you choose a per-hop
forwarding behavior for the packets in the flow. It is recommended
that you be familiar with RFCs 2475 and 2597 before changing
these values.
priority rate
The number (0-8) that specifies best effort priority queue, where
0 is default (best-effort) and 8 is highest priority. Priority may be
turned on (non-zero) or the average packet rate and TSpec token
bucket rate may be specified, but not both. Defaults to 0.
238 Meru System Director Configuration Guide
© 2012 Meru Networks, Inc.
Configuring QoS Rules With the CLI
Command
Purpose
avgpacketrate rate
Average packet rate: from 0 to 200 packets per second. If this is a
non-zero value, then the TSpec token bucket rate must also be a
non-zero value, and priority cannot be set to a non-zero value.
Defaults to 0.
tokenbucketrate rate
TSpec token bucket rate, from 0 to 1000 Kbps or 1-64 Mbps,
depending on the box checked. If this is a non-zero value, then the
average packet rate must also be non-zero, and the priority cannot
be set to a non-zero value. Defaults to 0.
trafficcontrol-enable
Turns traffic control policing on. When traffic control is on, traffic
assigned a priority will travel at the assigned rate and no faster.
no trafficcontrol
Turns traffic control policing off. This is the default setting.
QoS Rule CLI Configuration Example
The following commands configure QoS rule 10 for the set of IP phones whose server
is at the IP address 10.8.1.1:
controller
controller
controller
controller
controller
controller
controller
controller
controller
controller
controller
controller
(config)# qosrule
(config-qosrule)#
(config-qosrule)#
(config-qosrule)#
(config-qosrule)#
(config-qosrule)#
(config-qosrule)#
(config-qosrule)#
(config-qosrule)#
(config-qosrule)#
(config-qosrule)#
(config-qosrule)#
10 netprotocol 17 qosprotocol none
srcip 10.8.1.1
srcmask 255.255.255.0
srcport 0
dstip 10.8.1.1
dstmask 255.255.255.0
dstport 0
action forward
droppolicy head
tokenbucketrate 9400
avgpacketrate 35
end
When SCCP phones are used, we recommend that you create a separate VLAN for the
SCCP phones and create the following qosrules for G.711 (20ms) codec to handle
qosflow traffic:
controller
controller
controller
controller
controller
controller
controller
controller
(config)# qosrule
(config-qosrule)#
(config-qosrule)#
(config-qosrule)#
(config-qosrule)#
(config-qosrule)#
(config-qosrule)#
(config-qosrule)#
123 netprotocol 17 qosprotocol none
srcmask subnet_mask (for example, 255.255.192.0)
srcip subnet_IP_addr (for example,172.27.128.0)
action forward
avgpacketrate 50
tokenbucketrate 10000
droppolicy head
exit
controller (config)# qosrule 124 netprotocol 17 qosprotocol none
© 2012 Meru Networks, Inc.
Configuring Quality of Service 239
Configuring QoS Rules With the CLI
controller
controller
controller
controller
controller
controller
controller
(config-qosrule)#
(config-qosrule)#
(config-qosrule)#
(config-qosrule)#
(config-qosrule)#
(config-qosrule)#
(config-qosrule)#
dstip subnet_IP_addr (for example,172.27.128.0)
dstmask subnet_mask (for example, 255.255.192.0)
action forward
avgpacketrate 50
tokenbucketrate 10000
droppolicy head
exit
The following example configures a QoS rule for a 1 Mbps CBR-encoded video
streamed from Windows Media Server 9 over UDP transport.
The following lists the example’s configuration parameters:
Rule ID: 11
Network protocol: 17 (UDP)
QoS protocol: None
Source IP address: 0.0.0.0
Source subnet mask: 0.0.0.0
Source port: 0
Destination IP address:10.10.43.100 (This is the IP address of the wireless station
receiving the video stream.)
Destination subnet mask: 255.255.255.255
Destination port: 5004
Action to take if packets match rule: Forward
Drop policy: Head
Token bucket rate: 128 kbytes/second
Average packet rate: 10 packets/second
The following commands configure the QoS rule for the video streamed from Windows
Media Server 9 over UDP transport:
controller
controller
controller
controller
controller
controller
controller
controller
controller
controller
controller
controller
(config)# qosrule
(config-qosrule)#
(config-qosrule)#
(config-qosrule)#
(config-qosrule)#
(config-qosrule)#
(config-qosrule)#
(config-qosrule)#
(config-qosrule)#
(config-qosrule)#
(config-qosrule)#
(config-qosrule)#
240 Meru System Director Configuration Guide
11 netprotocol 17 qosprotocol none
srcip 0.0.0.0
srcmask 0.0.0.0
srcport 0
dstip 10.10.43.100
dstmask 255.255.255.255
dstport 0
action forward
droppolicy head
tokenbucketrate 128000
avgpacketrate 10
end
© 2012 Meru Networks, Inc.
Optimizing Voice Over IP
Optimizing Voice Over IP
Transmitting voice over IP (VoIP) connections is, in most senses, like any other
network application. Packets are transmitted and received from one IP address to
another. The voice is encoded into binary data at one end and decoded at the other
end. In some sense, voice is just another form of data. However, there are a few
special problems.
The requirements for quality voice traffic are not exactly the same as the requirements for most data traffic:
If a data packet arrives a second late, it is usually of no consequence. The data
can be buffered until the late packet is received. If a voice packet arrives a
second late, it is useless and might as well be thrown away.
If a data packet takes a third of second to arrive at the destination, that is usually
fast enough. If voice packets routinely take a third of a second to arrive, the users
will begin to take long pauses between sentences to make sure that they don’t
interfere with the other person’s speech.
Quality VoIP calls need voice data to be delivered consistently and quickly. Meeting
the requirements of VoIP data requires either a connection with plenty of bandwidth
all along the data route or a means of ensuring a certain quality of service (QoS) for
the length of the call.
Even if the bandwidth is available, setting up the phone call can be a nontrivial task.
When a phone call is initiated, the destination of the call might be a standard telephone on the public switched network, an IP-to-voice device at a particular IP
number, or one of several computers (for example, systems at home or the office and
a laptop used by an individual). If the destination device is a phone on the public
network, the initiation protocol must locate a gateway between the Internet and the
telephone network. If the destination is a person, the initiation protocol must determine which computer or device to call.
After the destination device has been found, the initiating and the destination
devices must negotiate the means of coding and decoding the voice data. This
process of finding a destination device and establishing the means of communication
is called session initiation.
The two main standards for initiating voice sessions:
Session Initiation Protocol, or SIP, used for most VoIP telephone calls.
H.323v1, used for multimedia communication, for example by Microsoft
NetMeeting.
In both cases, the initiating device queries a server, which then finds the destination
device and establishes the communications method.
After the two devices have been matched and the communication standards chosen,
the call proceeds. The server may remain in the communication loop (H.323v1) or it
may step out of the loop (SIP).
© 2012 Meru Networks, Inc.
Configuring Quality of Service 241
Optimizing Voice Over IP
In practice, this means that if your VoIP devices are configured correctly, that is, if
they know how to find their SIP or H.323v1 server and the servers understand how to
find them, then the VoIP devices should work when communicating over the Meru
Meru Wireless LAN System without any special configuration.
Using Meru Wireless LAN System QoS Rules for VoIP
As discussed in the previous section, quality voice traffic has different network
requirements than does typical network traffic. The Meru Wireless LAN System is
designed to automatically provision voice traffic with a level of QoS appropriate for
voice calls. The result is that VoIP traffic works much better over a Meru Meru Wireless LAN System than it does over most WLANs.
The controller watches the traffic passing through it and when it sees packets from
stations to servers on ports reserved for SIP or H.323v1 service, it tracks subsequent
communication in that sequence and provisions the VoIP call with a level of service
appropriate for a VoIP call.
The port numbers watched are:
5060 for SIP service (UDP or TCP)
1720 for H.323v1 service (TCP)
5200 for Vocera (UDP)
These are the standard port numbers for these services. If your VoIP devices use
these ports to communicate with their servers, you do not need to configure VoIP QoS
rules on your system.
If your VoIP devices and servers are configured to use different ports, you will need
to modify the QoS rules on the controller to match the ports your system uses.
Change QoS rules with either the Web UI or the CLI.
Modifying QoS Rules for Nonstandard Ports
The controller is pre-configured to detect the bandwidth requirements for a SIP or
H.323v1 call and make a bandwidth reservation. Change QoS rules with either the
Web UI or the CLI. The following default QoS rules are configured at the factory:
default(15)# show qosrule
ID
1
Dst IP
Dst Mask
Firewall Filter Qos
Action
0.0.0.0
h323 capture
2
0.0.0.0
h323 capture
3
0.0.0.0
sip
capture
5
0.0.0.0
sip
capture
0.0.0.0
head
0.0.0.0
head
0.0.0.0
head
0.0.0.0
head
242 Meru System Director Configuration Guide
DPort Src IP
Src Mask
SPort Prot
Drop
1720 0.0.0.0
0
0.0.0.0
0
6
0.0.0.0
0.0.0.0
1720 6
5060 0.0.0.0
0.0.0.0
0
17
5060 0.0.0.0
0.0.0.0
0
6
© 2012 Meru Networks, Inc.
Global QoS Settings
7
8
0.0.0.0
other forward
0.0.0.0
other forward
0.0.0.0
head
0.0.0.0
head
5200 0.0.0.0
0
0.0.0.0
0.0.0.0
0.0.0.0
0
17
5200 17
QoS and Firewall Rules(6 entries)
The first two pre-configured QoS rules give priority to H.323v1 traffic sent to and
from TCP port 1720 respectively. The next two QoS rules give priority to SIP traffic
sent to and from UDP/TCP port 5060 respectively. Rules 7 and 8 are for Vocera
badges and use port 5200 with UDP.
You normally do not need to configure QoS rules in the controller, unless you have
special requirements in your configuration. For example:
You want to drop packets coming from certain ports or IP addresses.
You want to configure the controller to give priority to traffic other than H.323v1
and SIP traffic.
You can configure rules to provide priority-based or reserved QoS. QoS is applied with
reserved traffic being allocated the first portion of total bandwidth, followed by
fixed priority levels, and finally by the best-effort (default) traffic class. You can
configure reserved QoS for new applications using the average packet rate and token
bucket rate parameters together as the traffic specification (also called TSpec in
IETF IntServ RFCs).
Global QoS Settings
Global QoS parameters configure settings that determine call quality on a global
level. These settings allow you to fine tune Call Admission Control (CAC), client load
balancing, bandwidth scaling, and time-to-live settings.
You can configure the following global quality-of-service parameters:
Table 18: Global Quality-of-Service Parameters
Command
Purpose
qosvars admission { admitall |
pending | reject }
Admission control. Valid values are admitall, pending, and
reject.
qosvars ttl ttl-value
Default time-to-live in seconds for all other protocols besides
TCP and UDP.
© 2012 Meru Networks, Inc.
Configuring Quality of Service 243
Global QoS Settings
Table 18: Global Quality-of-Service Parameters
Command
Purpose
qosvars tcpttl ttl-value
Time-to-live for TCP protocol, in seconds.
qosvars udpttl ttl-value
Time-to-live for UDP protocol, in seconds.
qosvars bwscaling value
Scale factor for Tspec bandwidth, in percent. May range from
1% to as high as 100% ; 100% is typical
qosvars cac-deauth {on | off}
Configures the optional 802.11 de-authentication behavior.
qosvars calls-per-ap max
Configures the maximum number of calls per AP.
qosvars calls-per-bssid max
Configures the maximum number of calls per BSSID.
qosvars drop-policy {head|tail}
Configures the drop policy. Valid values are head or tail
respectively.
qosvars load-balance overflow {on |
off}
Enables and disables load balancing across BSSIDs.
qosvars max-stations-per-ap max
Configures the maximum stations (0-128) allowed to associate
with an AP. 128 is the default. We recommend planning for
about 50 clients per AP300/AP400 radio (or per interference
region) if you plan to use Virtual Port and plan to have phones
as clients. For a data-only installation, plan up to 128 clients
per radio, meaning 256 for AP320/AP400 and 128 for other
AP300 models. The maximum clients per radio on AP150/AP180
for a data-only installation is 62. AP1000 supports up to 20 data
clients per radio. Refer to the Meru Deployment Guides on the
support site for more information.
qosvars max-stations-per-bssid max
Configures the maximum stations (0-1023) allowed to associate
with an BSSID.
qosvars no enable
Turns off QoS.
SIP Idle Timeout
Sets the time period after which an idle SIP connection will time
out.
244 Meru System Director Configuration Guide
© 2012 Meru Networks, Inc.
Rate Limiting QoS Rules
Table 18: Global Quality-of-Service Parameters
Command
Purpose
Station Assignment Aging Time (s)
Sets the time period after which stations will begin aging out.
Maximum Calls Per Interference
Region
Specifies the number of calls that are permitted in a given
interference area.
Rate Limiting QoS Rules
Rate limiting controls the overall traffic throughput sent or received on a network
interface. A specific bandwidth limit can be set for a network or device; then, if the
actual traffic violates that policy at any time, the traffic is shaped in some way. In
this implementation, packets are dropped until the traffic flow conforms to the
policy with some queuing (delaying packets in transit) applied.
Rate Limiting with the CLI
You can rate limit traffic by turning on Traffic Control and using the Token Bucket
Rate as the token bucket limiter. Follow these steps to rate limit the client
10.11.31.115 to approximately 3Mbps and then run a quick test to verify functionality.
1. Determine the token bucket rate to achieve the desired rate limit. In the example
below, we’ll limit it to 3Mbps (3Mbps = 3000000bps. 3000000/8/8=46875).
2. Create a qosrule that does rate limiting for a client.
Controller1# sh qosrule 23
QoS and Firewall Rules
ID : 23
Id Class flow class : on
Destination IP : 10.11.31.115 (this is the client to be rate limited)
Destination IP match : on
Destination IP flow class : on
Destination Netmask : 255.255.255.255
Destination Port : 0
Destination Port match : none
Destination Port flow class : none
Source IP : 0.0.0.0
Source IP match : none
Source IP flow class : none
Source Netmask : 0.0.0.0
Source Port : 0
Source Port match : none
© 2012 Meru Networks, Inc.
Configuring Quality of Service 245
Rate Limiting QoS Rules
Source Port flow class : none
Network Protocol : 6
Network Protocol match : on
Network Protocol flow class : on
Firewall Filter ID :
Filter Id match : none
Filter Id Flow Class : none
Packet minimum length : 0
Packet Length match : none
Packet Length flow class : none
Packet maximum length : 0
QoS Protocol : other
Average Packet Rate : 0
Action : forward
Drop Policy : head
Token Bucket Rate : 46875
Priority : 0
Traffic Control : on
DiffServ Codepoint : disabled
Qos Rule Logging : on
Qos Rule Logging Frequency : 31
Rate Limiting QoS Rules with the GUI
You can rate limit traffic for a single user by turning on Traffic Control and using the
Token Bucket Rate as the token bucket limiter. Follow these steps to rate limit the
traffic:
1. Click Configure > QoS > System Settings > QoS and Firerules tab > Add.
The QoS and Firerules Add window displays.
2. Scroll down to the lower half of the QoS and Firerules Add window.
3. Set Traffic Control On.
4. Set the token bucket rate to achieve the desired rate limit. This can be entered
in either Kbps (from 0-1000) or Mbps (from 0-64), depending on the needs of your
deployment.
5. Click OK.
The rate limit is now set.
Rate Limiting Examples
Rate-Limit Clients in the Same Subnet for TCP
To rate-limit clients from the subnet 10.11.31.0, follow these steps:
1. Determine the token bucket rate to achieve the desired rate limit. In the example
below, we’ll limit it to 3Mbps (3Mbps = 3000000bps. 3000000/8/8=46875).
2. Create the following qosrule to rate-limit clients from a particular subnet:
246 Meru System Director Configuration Guide
© 2012 Meru Networks, Inc.
Rate Limiting QoS Rules
Controller1# sh qosrule 23
QoS and Firewall Rules
ID: 23
ID Class flow class : on
Destination : 10.11.31.0 (this is the subnet to be rate limited)
Destination IP match : on
Destination IP flow class : on
Destination Netmask : 255.255.255.0
Destination Port : 0
Destination Port match : none
Destination Port flow class : none
Source IP : 0.0.0.0
Source Netmask : 0.0.0.0
Source Port : 0
Source Port match : none
Source Port flow class : none
Network Protocol : 6
Network Protocol match : on
Network Protocol flow class : on
Firewall Filter ID :
Filter Id match : none
Filter Id Flow Class : none
Packet minimum length : 0
Packet Length match : none
Packet Length flow class : none
Packet maximum length : 0
QoS Protocol : other
Average Packet Rate : 0
Action : forward
Drop Policy : head
Token Bucket Rate : 46875
Priority : 0
Traffic Control : on
DiffServ Codepoint : disabled
Qos Rule Logging : on
Qos Rule Logging Frequency : 60
3. Configure Chariot to send a TCP downstream to the client 10.11.31.115 using the
throughput script. You should see throughput averaging around3Mbps on Chariot.
As a result of this QoS rule, each client in the 10.11.31.xxx network will get approximately get 3 mbps from each individual source in the same subnet.
Rate-Limit Clients From Different Subnets for TCP
To rate-limit clients from any subnet other than the one that those clients are
currently using, follow these steps:
1. Determine the token bucket rate to achieve the desired rate limit. In the example
below, we’ll limit it to 3Mbps (3Mbps = 3000000bps. 3000000/8/8=46875).
2. Create the following qosrule to rate-limit clients from a particular subnet:
Controller1# sh qosrule 23
QoS and Firewall Rules
ID : 23
© 2012 Meru Networks, Inc.
Configuring Quality of Service 247
Configuring Codec Rules
Id Class flow class : on
Destination IP : 10.11.31.0 (this is the subnet to be rate limited)
Destination IP match : on
Destination IP flow class : none
Destination Netmask : 255.255.255.0
Destination Port : 0
Destination Port match : none
Destination Port flow class : none
Source IP : 0.0.0.0
Source Netmask : 0.0.0.0
Source Port : 0
Source Port match : none
Source Port flow class : none
Network Protocol : 6
Network Protocol match : on
Network Protocol flow class : on
Firewall Filter ID :
Filter Id match : none
Filter Id Flow Class : none
Packet minimum length : 0
Packet Length match : none
Packet Length flow class : none
Packet maximum length : 0
QoS Protocol : other
Average Packet Rate : 0
Action : forward
Drop Policy : head
Token Bucket Rate : 46875
Priority : 0
Traffic Control : on
DiffServ Codepoint : disabled
Qos Rule Logging : on
Qos Rule Logging Frequency : 60
3. Configure Chariot to send a TCP downstream to the different clients in
10.11.31.xxx using the throughput script.
All the clients in 10.11.31.xxx network should now share the 3 Mbps from each individual source.
Configuring Codec Rules
Codec rules are configurable and can be specified with the commands in this section.
Note: If your SIP phones support "ptime" then you will not need to configure
any codec rules. Otherwise, you should configure QoS rules and ensure the rule
you set is based on the packetization/sample rate that the phone uses.
248 Meru System Director Configuration Guide
© 2012 Meru Networks, Inc.
Configuring Codec Rules
The SIP ptime attribute is an optional part of the SIP Specification. It allows a SIP
media device to advertise, in milliseconds, the packetization rate of the RTP media
stream. For example, if ptime is set to the value “20” the SIP device sends 1 RTP
packet to the other party every 20 milliseconds. With this specification, the Meru
Meru Wireless LAN System can accurately reserve QoS bandwidth based on the Codec
and Packetization rate.
The following is a sample of the "ptime" attribute included as part of an SDP media
attribute:
m=audio 62986 RTP/AVP 0
a=rtpmap:0 PCMU/8000
a=ptime:20
If the ptime attribute is not present when the media is negotiated in SDP between
the SIP devices, the Meru Meru Wireless LAN System uses the default value of the
codec type specified with the qoscodec command.
Note: The proper packetization rate must be configured to match the actual
media traffic or the QoS reservation will be inaccurate. A spreadsheet,
qoscodec_parameters.xls, is available from the Customer Support FTP site
that can help you to determine the correct values for the relevant parameters.
Please contact Customer Support for details and access.
To configure QoS Codec rules, you need to enter Codec configuration mode. To do
this, follow these steps:
© 2012 Meru Networks, Inc.
Configuring Quality of Service 249
Configuring Codec Rules
Command
Purpose
configure terminal
Enter global configuration mode.
qoscodec rule-id codec type
qosprotocol {H323v1|sip|none}
tokenbucketrate tbr
maxdatagramsize maxdg
minpolicedunit minpol samplerate
sr
Enter QoS Codec configuration for the specified rule ID.
Use show qoscodec to obtain a list of rule IDs. The
following are the required parameters:
codec. Enter the Codec type after at the Codec keyword.
The acceptable Codec types are given below.
qosprotocol. The QoS protocol. This can be one of the
following:
H323v1 (H.323v1); sip (SIP - Session Initiation Protocol);
none. This is used to denote all other protocols.
tokenbucketrate. Token bucket rate, from 0 to 1000
Kbps or 1-64 Mbps, depending on the box checked.
maxdatagramsize. Maximum datagram size. From 0 to
1,500 bytes.
minpolicedunit. Minimum policed unit. From 0 to 1,500
bytes.
samplerate. Sample rate. From 0 to 200 packets per
second.
... commands ...
Enter the QoS CODEC configuration commands here.
end
Return to privileged EXEC mode.
copy running-config startup-config
This is an optional step to save your entries in the
configuration file.
The Codec type can be one of the following
Type
Description
1016
1016 Audio: Payload Type 1, Bit Rate 16 Kbps
default
Contains the default TSpec/ RSpec for unknown codecs or codecs for which there is no
entry in the codec translation table
dv14
DV14 Audio: Payload Type 5, Bit Rate 32 Kbps
250 Meru System Director Configuration Guide
© 2012 Meru Networks, Inc.
Configuring Codec Rules
Type
Description
dv14.2
DV14.2 Audio: Payload Type 6, Bit Rate 64Kbps
g711a
G711 Audio: Payload Type 8, G.711, A-law, Bit Rate 64 Kbps
g711u
G711 Audio: Payload Type 0, G.711, U-law, Bit Rate 64 Kbps
g721
G721 Audio: Payload Type 2, Bit Rate 32 Kbps
g722
Audio: Payload Type 9, Bit Rate 64 Kbps, 7KHz
g7221
G7221 Audio: Payload Type *, Bit-Rate 24 Kbps, 16KHz
g7221-32
G7221 Audio: Payload Type *, Bit-Rate 32 Kbps, 16KHz
g723.1
G7231 Audio: Payload Type 4, G.723.1, Bit Rate 6.3Kbps
g728
G728 Audio: Payload Type 15, Bit Rate 16Kbps
g729
G729 Audio: Payload Type 16, Bit Rate 8Kbps
g7red
Proprietary MSN Codec Audio: Payload Type *
gsm
GSM Audio: Payload Type 3, Bit Rate 13Kbps
h261
H.261 Video
h263
H.263 Video
lpc
IPC Audio: Payload Type 7, Bit Rate 2.4 Kbps
mpa
MPA Audio: Payload Type 14, Bit Rate 32 Kbps
siren
Proprietary MSN Audio: Payload Type *, Bit Rate 16Kbps, 16KHz
The following commands are used in the QoS Codec configuration mode:
© 2012 Meru Networks, Inc.
Configuring Quality of Service 251
QoS Statistics Display Commands
Table 19: QoS CODEC Configuration Mode Commands
Command
Purpose
tokenbucketsize size
Token bucket size in bytes. From 0 to 16,000 bytes. Defaults to 8.
peakrate rate
Traffic spec peak rate. From 0 to 1,000,000 bytes/second.
Defaults to 0.
rspecrate rate
Reservation spec rate. From 0 to 1,000,000 bytes/second.
Defaults to 0.
rspecslack slack
Reservation spec slack. From 0 to 1,000,000 microseconds.
Defaults to 0.
QoS Statistics Display Commands
Displaying Phone/Call Status
To display the active SIP phones that have registered with a SIP server, use the show
phones command.
Controller(15)# show phones
MAC
Transport
IP
00:01:3e:12:24:b5
AP ID AP Name
172.18.122.21
3
QoS-Lab
Type Username
sip
Server
100 172.18.122.122
udp
Phone Table(1 entry)
Controller(15)#
To display the active SIP phone calls, use the show phone-calls command.
controller# sh phone-calls
From MAC
Pending
To Flow
From IP
To MAC
Pending
To IP
Type State
252 Meru System Director Configuration Guide
From AP From AP Name
From Username
From Flow
To AP
To AP Name
To Username
© 2012 Meru Networks, Inc.
More QoS Rule Examples
00:0f:86:12:1d:7c
10.0.220.119
1
AP-1
off
00:00:00:00:00:00
10.0.220.241
0
101
off
sip connected
Phone Call Table(1 entry)
controller#
5381
100
69
Displaying Call Admission Details
To view the current calls supported by APs, use the show statistics call-admission-control ap command.
controller# show statistics call-admission-control ap
AP ID Current Calls Cumulative Rejected Calls
6
0
0
Call Admission Control AP Statistics(1 entry)
To show calls in relation to specific BSSIDs, use the show statistics call-admission
control bss command.
controller# show statistics call-admission-control bss
BSSID
Current Calls Cumulative Rejected Calls
00:0c:e6:13:00:da 0
0
00:0c:e6:52:b3:4b 0
0
00:0c:e6:f7:42:60 0
0
Call Admission Control BSS Statistics(3 entries)
More QoS Rule Examples
The following are in addition to the previous examples in this chapter, QoS Rule CLI
Configuration Example and Rate Limiting Examples:
Rate-Limit a Certain Client
Wireless Peer-to-Peer Qos Rules
Rate-Limit a Certain Client
To rate-limit the client 10.11.31.115 from any source, follow these steps:
1. Determine the token bucket rate to achieve the desired rate limit. In the example
below, we’ll limit it to 3Mbps (3Mbps = 3000000bps. 3000000/8/8=46875).
2. Create the following qosrule to rate-limit a particular client from any source:
Controller1# sh qosrule 23
QoS and Firewall Rules
© 2012 Meru Networks, Inc.
Configuring Quality of Service 253
More QoS Rule Examples
ID : 23
ID Class flow class : on
Destination IP : 10.11.31.115 (this is the client to be rate limited)
Destination IP match : on
Destination IP flow class : on
Destination Netmask : 255.255.255.255
Destination Port : 0
Destination Port match : none
Destination Port flow class : none
Source IP : 0.0.0.0
Source Netmask : 0.0.0.0
Source Port : 0
Source Port match : none
Source Port flow class : none
Network Protocol : 6
Network Protocol match : on
Network Protocol flow class : on
Firewall Filter ID :
Filter Id match : none
Filter Id Flow Class : none
Packet minimum length : 0
Packet Length match : none
Packet Length flow class : none
Packet maximum length : 0
QoS Protocol : other
Average Packet Rate : 0
Action : forward
Drop Policy : head
Token Bucket Rate : 46875
Priority : 0
Traffic Control : on
DiffServ Codepoint : disabled
Qos Rule Logging : on
Qos Rule Logging Frequency : 60
3. Configure Chariot to send a TCP downstream to the client (10.11.31.115) using
the throughput script.
You should see throughput averaging around 3Mbps on Chariot. As a result of this QoS
rule, when the client 10.11.31.115 receives traffic, it will be rate-limited to approximately 3mbps.
Wireless Peer-to-Peer Qos Rules
In general, to create a priority QoS rule for a particular protocol between two IP
addresses, specify the network protocol and then select the match flow for the
protocol. This creates QoS priority for a particular protocol between the IP's.
Prioritize Peer-to-Peer
This particular IP-Based QoS rule prioritizes peer-to-peer traffic generated from
172.18.85.11 and destined to 172.18.85.12.
Testing# show qosrule 11
254 Meru System Director Configuration Guide
© 2012 Meru Networks, Inc.
More QoS Rule Examples
QoS and Firewall Rules
ID : 11
Id Class flow class : on
Destination IP : 172.18.85.12
Destination IP match : on
Destination IP flow class : none
Destination Netmask : 255.255.255.255
Destination Port : 0
Destination Port match : none
Destination Port flow class : none
Source IP : 172.18.85.11
Source Netmask : 255.255.255.255
Source IP match
: on
Source IP flow class : none
Source Port : 0
Source Port match : none
Source Port flow class : none
Network Protocol : 0
Network Protocol match : none
Network Protocol flow class : none
Firewall Filter ID :
Filter Id match : none
Filter Id Flow Class : none
Packet minimum length : 0
Packet Length match : none
Packet Length flow class : none
Packet maximum length : 0
QoS Protocol : none
Average Packet Rate : 100
Action : forward
Drop Policy : head
Token Bucket Rate : 1000000
Priority : 0
Traffic Control : off
DiffServ Codepoint : disabled
Qos Rule Logging : on
Qos Rule Logging Frequency : 31
Peer-to-Peer Blocking
In this peer-to-peer blocking example, rules 60 and 61 apply to an isolated WLAN for
guest internet access where the DNS server is actually on that network. Rules 60 and
61 are only needed if the DNS server for the wireless clients is on the same subnet as
the clients themselves.
ID
Dst IP
Dst Mask
DPort Src IP
Firewall Filter Qos
Action
Drop
60
0.0.0.0
0.0.0.0
53
0.0.0.0
none forward tail
61
0.0.0.0
0.0.0.0
0
0.0.0.0
none forward tail
100 192.168.2.0
255.255.255.0 0
192.168.2.0
none drop
tail
© 2012 Meru Networks, Inc.
Src Mask
SPort Prot
0.0.0.0
0
0
0.0.0.0
53
0
255.255.255.0
0
0
Configuring Quality of Service 255
More QoS Rule Examples
qosrule 60 netprotocol 0 qosprotocol none
firewall-filter-id ""
id-flow on
dstip 0.0.0.0
dstmask 0.0.0.0
dstport 53
dstport-match on
dstport-flow on
srcip 0.0.0.0
srcmask 0.0.0.0
srcport 0
action forward
droppolicy tail
priority 0
avgpacketrate 0
tokenbucketrate 0
dscp disabled
qosrulelogging off
qosrule-logging-frequency 60
packet-min-length 0
packet-max-length 0
no trafficcontrol
exit
qosrule 61 netprotocol 0 qosprotocol none
firewall-filter-id ""
id-flow on
dstip 0.0.0.0
dstmask 0.0.0.0
dstport 0
srcip 0.0.0.0
srcmask 0.0.0.0
srcport 53
srcport-match on
srcport-flow on
action forward
droppolicy tail
priority 0
avgpacketrate 0
tokenbucketrate 0
dscp disabled
qosrulelogging off
qosrule-logging-frequency 60
packet-min-length 0
packet-max-length 0
no trafficcontrol
exit
qosrule 100 netprotocol 0 qosprotocol none
firewall-filter-id ""
id-flow on
dstip 192.168.2.0
dstip-match on
dstip-flow on
dstmask 255.255.255.0
dstport 0
srcip 192.168.2.0
256 Meru System Director Configuration Guide
© 2012 Meru Networks, Inc.
More QoS Rule Examples
srcip-match on
srcip-flow on
srcmask 255.255.255.0
srcport 0
action drop
droppolicy tail
priority 0
avgpacketrate 0
tokenbucketrate 0
dscp disabled
qosrulelogging off
qosrule-logging-frequency
packet-min-length 0
packet-max-length 0
no trafficcontrol
60
802.11n Video Service Module (ViSM)
Video streaming has the low latency and loss requirements of voice with the
high-throughput requirements of data. The Meru Networks Video Service Module™ (ViSM)
is an optional licensed software module that delivers predictable 802.11 video performance with minimal delay, latency and jitter. Sustainable high data rates, even in mixed
traffic, are supported along with synchronization of video and audio transmissions.
ViSM also introduces additional mechanisms for optimizing unicast and multicast video
such as application aware scheduling, voice/video synchronization, and client-specific
multicast group management. Features include the following:
High throughput with low burstiness offers predictable performance and
consistent user experience
Application-aware prioritization synchronizes the voice and video components of
a video stream, adapting the delivery of each frame based on its importance to
the application.
Multicast group management optimizes delivery to only those Virtual Ports whose
clients are members of the multicast group.
Seamless video-optimized handoff proactively reroutes the multicast delivery
tree to prevent lost video frames during a transition between access points and
ensures zero loss for mobile video.
User and role based policy enforcement provides granular control over application
behavior.
Visualization reveals which clients are running which applications.
Implementing ViSM
Virtual Port already changes multicast to unicast transmissions (for non-U-APSD clients).
ViSM adds per-client IGMP Snooping to the transmission. Therefore, to implement ViSM,
turn on IGMP Snooping. CLI commands control IGMP snooping (see Meru System Director
Command Reference). At this time, ViSM licensing is not enforced. ViSM is not recommended for AP1000 access points.
© 2012 Meru Networks, Inc.
Configuring Quality of Service 257
More QoS Rule Examples
Configuring Call Admission Control and Load Balancing with the CLI
To help shape a global Quality of Service for calls and traffic, Call Admission Control
(CAC) and client load balancing can be set per AP or BSSID.
CAC commands can set threshold levels for the number of new SIP connections (calls)
that can exist per AP or BSSID to ensure a global amount of bandwidth is available.
The result is that existing calls maintain a consistent level of service, even if new
calls have to be temporarily denied. When CAC is enabled, as the set call level
threshold is neared for the AP or BSSID, the admin can configure actions to occur such
as having the system send a 486_BusyHere response, a modified INVITE message to
the ipPathfinder, or alternatively, sending a 802.11 De-authentication message the
originator of the call. If an existing call moves to another AP without sufficient bandwidth, the call is classified as Pending/Best-effort until the needed resources are
available.
Note: A unique CAC value can be configured for an ESSID, that affects only
only that ESSID. Setting CAC at the ESSID level takes precedence over the
global settings described in this section. To configure CAC for an ESSID, see
“Configuring CAC for an ESSID AP with the CLI” on page 60.
Enabling client load balancing implements round-robin load balancing of client associations for an AP or BSSID. When the maximum number of stations are associated,
new stations are allowed to join in a round-robin fashion.
The following commands enable CAC and limits the number of calls per AP to 12:
controller (config)# qosvars cac-deauth on
controller (config)# qosvars calls-per-ap 12
The following commands enable client load balancing overflow protection and sets
the maximum number of stations per AP to 15:
controller (config)# qosvars load-balance-overflow on
controller (config)# qosvars max-stations-per-ap 15
The following commands limits the number of calls per BSSID to 14 and sets the
maximum number of stations per BSSID to 30:
controller (config)# qosvars calls-per-bssid 14
controller (config)# qosvars max-stations-per-bssid 30
258 Meru System Director Configuration Guide
© 2012 Meru Networks, Inc.
Chapter 16
Wireless Backbones With Enterprise Mesh
Enterprise Mesh is an optional (separately licensed) wireless replacement for the
Ethernet links connecting APs to controllers. Deploy the Enterprise Mesh system to
replace a switched wired backbone with a completely wireless 802.11 backbone,
while providing similar levels of throughput, QoS, and service fidelity. At this time,
AP300/AP400 and AP100 do not support mesh.
The following are Enterprise Mesh features:
Hierarchical bandwidth architecture
Dynamic allocation and balancing of the RF spectrum
Full duplex capability
Extend virtual cell, QoS, and RF coordination over backbone
Wireless DS-to-DS (WDS) encapsulation of the Enterprise Mesh traffic
Backhaul 3DES encryption (end-to-end), configurable per-AP
Static hop setup in the connectivity tree
Static backhaul channel setup
Dataplane Encryption (affects performance because encryption/decryption is in
software)
An Enterprise Mesh instance operates on a preset, static channel (by default, channel
40). The permissible channel range and maximum transmission power per channel is
determined by the country code.
Wireless backhaul security supports automatic keying using Meru Networks Certificates as well as backhaul encryption. Security is supported via end-to-end 3DES data
tunnel encryption between each AP and controller, as implemented with the dataplane-encryption command.
Enterprise Mesh Design
Enterprise Mesh is typically composed of hub-and-spoke configurations (as shown in
Figure 36), chain configurations (as shown in Figure 37) or a variation of these.
Within the Enterprise Mesh, on all APs, the 802.11b/g interfaces provide connectivity
for client traffic while the 802.11a radios provide wireless backhaul.
In a dense network, hub-and-spoke (all APs point to the gateway) is the best topology
although collisions can occur.
© 2012 Meru Networks, Inc.
Wireless Backbones With Enterprise Mesh 259
For best performance, avoid collisions between adjacent small clouds by creating
each cloud on a separate channel. A cloud is defined as a set of APs
communicating along a backhaul topology path to/from a gateway AP.
In a typical deployment, limit siblings without going to great lengths to modify
power settings. Since traffic is sent unicast, some collisions will occur within the
cloud, caused by siblings.
Figure 36: Enterprise Mesh Network - Hub and Spoke Design
Leaf APs
Gateway AP
Figure 37: Three Hop Enterprise Mesh - Chain Design
Leaf APs
Intermediate APs
Gateway AP
Gateway APs
A gateway AP (AP150 or OAP180) is located at the wired edge of the Enterprise Mesh
network, and provides the link between wired and wireless service. The gateway AP
is the only AP that has a wired connection to the network and is configured for
gateway mode.
260 Meru System Director Configuration Guide
© 2012 Meru Networks, Inc.
Intermediate APs
Intermediate APs (AP150 or OAP180) connect upstream to the gateway AP and downstream to other intermediate APs or leaf APs via a wireless backhaul link. Intermediate AP have no wired connection to the network and are configured for wireless
mode.
Leaf APs
Leaf APs (AP150 or OAP180), at the edge of the Enterprise Mesh network connect
upstream to a gateway or intermediate AP and provide service to 802.11 clients. Leaf
APs are configured for wireless mode.
Equipment Requirements
When designing an Enterprise Mesh configuration, use either a MC3000, MC41000, or
MC5000 controller and APs based on their capabilities, as shown in Table 20.
Table 20: AP Capabilities in an Enterprise Mesh
AP Model
Gateway
Intermediate AP
Leaf AP
AP300/AP400
Not supported
Not supported
Not supported
Not supported
Not supported
AP150
RS4000
OAP180
AP1000
Not supported
The following additional design guidelines apply:
Enterprise Mesh APs support only L2 connectivity to the controller.
QoS is not supported on the wireless backhaul.
Bridged mode is not supported for Enterprise Mesh—only tunneled mode is
supported.
Dynamic discovery is not supported.
From the gateway, a maximum of 3 hops is supported between the gateway and
leaf APs with no more than 7 APs per cloud, (for example,1 gateway with 2
wireless APs, and 4 leaf APs is supported).
Minimum channel separation guidelines are to use non-overlapping channels.
The design must have uncompromising LoS between any two backhaul hops.
© 2012 Meru Networks, Inc.
Wireless Backbones With Enterprise Mesh 261
Installing and Configuring an Enterprise Mesh System
Installing and Configuring an Enterprise Mesh System
Determine Antenna Placement
An Enterprise Mesh uses APs (as repeaters) to extend the range of wireless coverage.
An AP in a Enterprise Mesh configuration is directed to look for a signal from a Parent
AP. (A Parent-AP ID is the AP ID of the of the intermediate AP providing backhaul
connectivity). As such, antenna placement and reception is important for the
optimum performance of the system.
If there are obstacles in the radio path, the quality and strength of the radio signal
are degraded. Calculating the maximum clearance from objects on a path is important and should affect the decision on antenna placement and height. It is especially
critical for long-distance links, where the radio signal could easily be lost.
When planning the radio path for a wireless hop, consider these factors:
Enterprise Mesh requires line-of-sight antenna placement. If you use a
point-to-point directional antenna, a maximum of 1/2 mile is supported. For our
standard omni-directional antennas, we recommend a maximum of 150 feet per
hop.
Avoid any partial line-of-sight paths between antennas.
Be cautious of trees or other foliage that may be near the path, or ones that may
grow to obstruct the path.
Be sure there is enough clearance from buildings and that no building construction
may eventually block the path.
Check the topology of the land between the antennas using topographical maps,
aerial photos, or even satellite image data (software packages are available that
may include this information for your area).
Avoid a path that may incur temporary blockage due to the movement of cars,
trains, or aircraft.
Installing the Meru Networks Enterprise Mesh
Enterprise Mesh APs are configured in three phases. Phase 1 consists of setting up a
wired physical installation with APs connected to the controller through an Ethernet
switch. In Phase 2 the AP are configured with their wireless mesh parameters. In
Phase 3 the APs are disconnected from the Ethernet switch and placed in their final
destination.
Phase 1: Connect Controller and APs with an Ethernet Switch
Phase 2: Configure the APs for Enterprise Mesh
Check the Configuration Before Phase 3
Phase 3: Remove the Cables and Deploy the APs
262 Meru System Director Configuration Guide
© 2012 Meru Networks, Inc.
Installing and Configuring an Enterprise Mesh System
Phase 1: Connect Controller and APs with an Ethernet Switch
1. Connect all APs directly to a controller through a switch or hub.
2. Power on the controller.
3. Connect the APs to a power source using either separate power supplies or Power
over Ethernet (PoE) connections.
4. If the controller does not have an assigned IP address, configure with the
following, otherwise, skip to step 5:
a. Connect a computer to the controller using a serial cable.
b. Using a PC terminal program with the settings 115200 baud, 8 bit, no parity,
access the controller and log in with the default admin/admin
username/password.
c. Use the setup command to assign the controller an IP address.
d. Reboot the controller and log in again as admin.
5. For the APs that will be in the Enterprise mesh, verify they are connected to the
controller (enabled and online) and ensure that APs’ runtime version is the same
version of System Director as the controller:
— Check the System Director version with the command show controller
— Verify the APs and with the command show ap
6. Check that you have installed an Enterprise Mesh license for all APs using the
command show license.
The output should show the WIRELESS entry:
Feature Name
CtlrStatus LicenseType Expiry Date
controller
active
ap
active
WIRELESS_AP
active
License Table(3)
permanent
permanent
permanent
-
TotalCount InUse
1
1
200
10
5
0
Phase 2: Configure the APs for Enterprise Mesh
Phase 2 consists of configuring the mesh parameters of the APs while they are wired.
Be sure that the APs are connected as described in Phase 1 and are online.
It is recommended that you attach a paper tag to each AP with its AP ID. Leave space
to add the parent AP ID.
This example uses a chain configuration, as shown in Figure 37. The chain
configuration uses multiple hops within the wireless mode (which a hub and spoke
configuration does not). In this example, the Enterprise Mesh consists of one
gateway AP150, two wireless AP150s, and one wireless leaf AP150. The first
wireless AP connects to the gateway AP, the second wireless AP connects to the
first wireless AP, and the third wireless AP connects to the second wireless AP.
If you are configuring a hub and spoke configuration, you will have a gateway
(AP1) and leaf nodes configured as wireless that point to the gateway.
© 2012 Meru Networks, Inc.
Wireless Backbones With Enterprise Mesh 263
Installing and Configuring an Enterprise Mesh System
To configure the Enterprise Mesh setup, you will configure one AP at a time (in
order), moving from the gateway out toward to leaf.
Define the Channel of Operation for the Backhaul Link
The backhaul channel configuration on the 802.11a radio is configured on the
gateway AP and replicated to the remaining wireless Enterprise Mesh APs when they
are added to the mesh network via the parent AP configuration.
By default, channel 40 is set and need not be changed unless this channels is not
available for your site.
To change the backhaul channel, on the gateway AP, enter the following commands.
The interface Dot11Radio command specifies the AP ID (1 in this example) followed
by the interface number (2). This example sets a backhaul to channel to 44.
Default# configure terminal
(config)# interface Dot11Radio 1 2
(config-if-802)# channel 44
(config-if-802)# end
After the channel is set, the AP reboots and appears on the newly configured
channel. Use the command show interfaces Dot11Radio 2 to verify the new backhaul
channel for the AP.
Define the AP Role, Parent AP ID, and Backhaul Dataplane-Encryption
The Enterprise Mesh requires the AP roles change from the default access to gateway
(for the one gateway AP) and wireless for the remaining APs. Configure the APs one
at a time, in order, starting with the gateway. Turning on encryption results a secure
environment.
1. For the AP that will be the gateway (this example uses AP 1), display the current
AP setting with the show ap command:
Default# show ap 1
AP Table
AP ID
AP Name
Serial Number
Uptime
Location
Building
Floor
Contact
Operational State
Availability Status
Alarm State
LED Mode
AP Init Script
Boot Image Version
FPGA Version
Runtime Image Version
264 Meru System Director Configuration Guide
:
:
:
:
:
:
:
:
:
:
:
:
:
:
:
:
1
EMesh-GW
00:12:F2:04:02:b9
00d:00h:00m:00s
Enabled
Online
Normal
3.6-40
© 2012 Meru Networks, Inc.
Installing and Configuring an Enterprise Mesh System
Connectivity Layer
Dataplane Encryption
AP Role
Parent MAC Address
Parent AP ID
Link Probing Duration
AP Model
AP Label
Sensor AP ID
Hardware Revision
Power Supply Type
AP Indoor/Outdoor type
:
:
:
:
:
:
:
:
:
:
:
:
L2
off
access
00:00:00:00:00:00
0
120
OAP180
ATS5
0
802.3-af
Indoor
Note the output values for the AP Role, Parent AP ID, and Dataplane Encryption
parameters. Initially all new APs have the default values shown above.
2. Change the AP Role to a gateway and enable encryption for security, then reboot
the AP:
Default(config)# ap
Default(config-ap)#
Default(config-ap)#
Default(config-ap)#
Default)# reload ap
1
role gateway
dataplane-encryption on
end
1
(Note that Parent AP configuration is not required for a gateway.)
3. Configure the wireless AP that will become AP 2 and that will consider the
gateway its parent, then reboot the AP:
Default(config)# ap
Default(config-ap)#
Default(config-ap)#
Default(config-ap)#
Default(config-ap)#
Default)# reload ap
2
role wireless
parent-ap 1
dataplane-encryption on
end
2
The role wireless is used for all Enterprise Mesh APs that are not a gateway AP.
The parent-ap ID identifies the parent AP for connection, AP 1 (the gateway) in
this example.
4. Configure the third AP, which refers to AP 2 as its parent, as follows:
Default# configure terminal
Default(config)# ap 3
Default(config-ap)# role wireless
Default(config-ap)# parent-ap 2
Default(config-ap)# dataplane-encryption on
Default(config-ap)# end
Default)# reload ap 3
5. Configure the last AP, the leaf, as follows:
Default# configure terminal
Default(config)# ap 4
Default (config)# role wireless
© 2012 Meru Networks, Inc.
Wireless Backbones With Enterprise Mesh 265
Installing and Configuring an Enterprise Mesh System
Default(config-ap)#
Default(config-ap)#
Default(config-ap)#
Default)# reload ap
parent-ap 3
dataplane-encryption on
end
4
You can also configure these Enterprise Mesh parameters from the Web UI interface.
Check the Configuration Before Phase 3
Provisioning the wrong AP parameters can make the mesh backbone unable to reconnect. Also, it is difficult to debug a setup once the APs are in unreachable places.
Therefore, boot up the system multiple times in the staging configuration (all
connected to the wire in an installation room), until you are satisfied that the mesh
consistently comes up correctly. Before removing the AP wires, confirm that the APs
and the network are correctly configured by completing these tasks:
Make Sure the APs are on the Network
You see a list of configured APs online when you issue the command show ap. Note
that each AP has two interface (IFIndex) entries, one for Ethernet and one for
wireless.
Make Sure the Wireless APs Have Power
If an AP is getting power from a PoE and you disconnect the cable, you must
provide another power source.
Check the AP Channels
Check the channels with the show interfaces Dot11Radio command. The results
look something like this example:
1
1
2
2
3
3
4
4
AP-1
AP-1
AP-2
AP-2
AP-3
AP-3
AP-4
AP-4
1
2
1
2
1
2
1
2
AP180
AP180
AP150
AP150
AP150
AP150
AP150
AP150
Up
Up
Up
Up
Up
Up
Up
Up
Enabled
Enabled
Enabled
Enabled
Enabled
Enabled
Enabled
Enabled
11
44
11
44
11
44
11
44
on802.11 Normal
off 802.11 Normal
on802.11 Normal
off802.11 Normal
on 802.11 Normal
off802.11 Normal
on 802.11 Normal
off802.11 Normal
Ensure that enabled APs (here AP-1, AP-2, AP-3 and AP-4) show the right channel
(44) for their IfIndex 2. If only two of APs are showing and you configured more,
you need to check your Enterprise Mesh licensing.
Check the Topology and Dataplane-Encryption for Each AP
Check the Enterprise Mesh-tree after the APs are configured with the command
show ap-topology, which shows how the APs are connected to the controller:
Default#
show ap-topology
|_AP-1(wds 00:12:F2:00:ce:29 ch 44)
|_|_AP-2 (wds 00:12:F2:00:cd:66 ch 44)
|_|_|_AP-3 (wds 00:12:F2:00:ce:35 ch 44)
|_|_|_|_AP-4 (wds 00:12:F2:00:cd:54 ch 44)
An Enterprise Mesh interface (wds) shows the radio addresses of the next-hop
forwarding and backhaul radio channel assignments.
266 Meru System Director Configuration Guide
© 2012 Meru Networks, Inc.
Installing and Configuring an Enterprise Mesh System
Each Enterprise Mesh node has a forwarding address that contains the destination
for the next hop, which provides the basic forwarding mechanism. As a packet
moves towards the root of the Enterprise Mesh tree, the wds-table records the
route that will be used when the packet is returned.
To ensure that the topology and dataplane-encryption in each AP is correct, issue
the following command for each AP:
show ap 1
...
AP Role
Parent AP ID
Dataplane-Encryption
...
show ap 2
...
AP Role
Parent AP ID
Dataplane-Encryption
...
show ap 3
...
AP Role
Parent AP ID
Dataplane-Encryption
...
show ap 4
AP Role
Parent AP ID
Dataplane-Encryption
: gateway
: 0
: off
: wireless
: 1
: off
: wireless
: 2
: off
: wireless
: 3
: off
Determine from this output that:
— Each AP displays the correct role. In our example, AP1 has the gateway role,
and the remaining three APs are wireless.
— Each wireless AP has two interface identifiers, the first is Ethernet and second
is wireless.
— Each AP has its parent AP ID pointing to the correct AP. In our example, the
gateway AP (AP-1) has no parent. The first wireless AP (AP-2) has the parent
AP ID for the gateway (AP-1), and the second wireless AP (AP-3) has a parent
AP ID of the first wireless AP (AP-2). The final AP has AP3 for a parent AP ID.
Phase 3: Remove the Cables and Deploy the APs
Phase 3 consists of removing the cables, deploying the APs in their final location, and
turning them on. They will then be picked up by the controller as wireless APs.
To deploy the APs, follow these steps:
1. Determine that the first level of wireless APs are provisioned and connected, with
parent APs showing the correct entries.
2. Ensure that each AP has a power source; if you are using PoE, you need to provide
a power supply for wireless nodes or leaf nodes before Step 7.
© 2012 Meru Networks, Inc.
Wireless Backbones With Enterprise Mesh 267
Enterprise Mesh Troubleshooting
3. Unplug APs with power supplies.
4. Remove the Ethernet wires from the first level of wireless APs (in this example,
AP-2).
5. Repeat steps 2 -3 for the second level (in this example, AP-3) of a connectivity
tree and check that they connect to the intermediaries.
6. Repeat steps 2 -3 for the third level (in this example, AP-4) of a connectivity tree
and check that they connect to the intermediaries.
7. Issue the CLI command copy running-config startup-config to save your setup.
8. Power up the APs in order starting with AP-1. Make sure an AP is online (light is
green) before powering up the next one.
9. Check the status of the APs (show ap #). One should be operating as a gateway
and the rest as wireless.
10. Create ESSIDs for clients and connect clients. Try pinging, browsing, etc. with the
CLIents.
11. Power off and disconnect all APs with the role wireless. (Do not power off or
disconnect the gateway AP.)
12. Relocate the APs to their operational location, and power them on in order
starting with AP-1. Make sure an AP is online (light is green) before powering up
the next one.
Provided the APs are in range with each other as per your topology design, they
should appear online automatically with no further settings. Try them out as you did
with the staging phase. Your installation is complete.
Enterprise Mesh Troubleshooting
Problem-Solution Chart
Problem
Possible Cause & Solution
During installation, I upgraded the
wireless APs in the order as directed,
but when I upgraded the controller
(last), that wiped out all of the
previous configurations.
Install the Enterprise Mesh license first, then
perform the AP and controller upgrade.
Wireless APs are not connecting to
their designated parent AP.
Ensure that AP150 Virtual Cell is not enabled.
Ensure that bg-radio mode is not configured to
virtual (AP150 virtual cell).
Ensure that per-essid bridge is not enabled on
wireless or gateway APs.
268 Meru System Director Configuration Guide
© 2012 Meru Networks, Inc.
Enterprise Mesh Troubleshooting
Problem
Possible Cause & Solution
Wireless APs were correct but are no
longer pointing to their designated
parent AP.
If, for any reason, an AP stops functioning, the
rest of the downstream chain of wireless APs will
lose connection. If this happens, restore the
configured setup by first restoring the gateway
AP to operation, then turning off the wireless
APs. Turn the APs back on in order and operation.
Only two APs are showing up on the
network but I configured more than
two
Check your Enterprise Mesh licensing. Two APs
are license-free, after the third, a license is
needed.
APs are picking up a configuration
that I did not create
Your APs may have inherited an old configuration
from a previously-used AP. Try resetting all APs to
factory defaults with the CLI command reload ap
id default (for one AP) or reload all default.
Then, follow the setup directions Installing and
Configuring an Enterprise Mesh System.
APs are rebooting
A possibility could be bad channel conditions.
Check the backhaul channel condition using a
wireless sniffer.
No APs are online
Did you upgrade from 3.1.5? When upgrading
from 3.1.5, you could lose your license key.
Workaround: Reapply your license.
Troubleshooting via Console-over-Wireless
Console-over-Wireless (CoW) is a way of accessing a wireless AP for troubleshooting
purposes. Considering that an AP may be deployed on rooftops, poles, or other inaccessible places, it can not be connected to a serial cable (RS-232). CoW enables
access to the AP wirelessly with the help of a special client utility and the procedures
described below.
There can be times when a AP is not able to connect to the controller and hence the
Enterprise Mesh parameters need to be checked or configured on the AP itself. The
Enterprise Mesh parameters are channel, role, and parent-MAC.
The following procedures may be used as a last resort to rescue an offline, physically
unreachable all-wireless AP.
1. Ensure that you have the following:
— Wireless adapters supported in the following
http://www.winpcap.org/misc/faq.htm#Q-16
— WinPcap 4.02 installed
— wcoe.exe on the computer (downloaded from Meru Networks FTP with 3.5
release or later)
— default windows wireless turned on the interface
© 2012 Meru Networks, Inc.
Wireless Backbones With Enterprise Mesh 269
Enterprise Mesh Troubleshooting
2. Associate with the ESSID. The ESSID is beaconing, but hidden (the hidden-bit is
set in beacons) so do this:
a. Open Network Connections (Network Places -> View Network Connections)
b. Open View the available networks from the Intel(R) PRo/Wireless
Connection.
c. Change the order of preferred Networks from the left panel under Related
tasks
d. Click Add a preferred network and supply the parameters SSID mcow-aabbcc
where aabbcc are the last 3 bytes of the AP’s MAC address (which is the Serial
Number in the show ap output).
Accessing Wireless AP via Console-over-Wireless Example
Your Enterprise Mesh interface (wds1-31) is 00:12:F2:aa:bb:cc
Your CoW ESSID is “mcow-aabbcc”
— Network Authentication is Open
— Data Encryption is WEP
— Uncheck The key is provided for me automatically
— Network key is mC0w!
— Key Index is 3
— Click OK twice
Disable and enable your interface and based on order you connect to the ESS. Note
that it shows “limited or no connectivity” because you don't get (or need) any IP
address.
:
Note:
This works only if the AP is in discovery loop or has not yet loaded any
ESS profiles after booting up.
3. Connect to the AP with wcoe.exe as follows:
— wcoe -p -d 00:12:F2:c0:ec:0e (you must use this command, as shown)
— Select your Centrino interface
— Pressing Enter gives you login prompt from the AP
— To Escape out of the terminal program use Ctrl-Break
— You can login as user admin with the default password admin
— Use the command wbsclient display flash, which is the command to do the
same as wbs display flash from serial console.
:
Note:
wcoe is L2-based connectivity only, which does not use any IP addresses.
If the node reboots in its discovery loop, as it occasionally does, you may
be disconnected. Wait and reconnect after a short period of time.
4. Use the Enterprise Mesh CLI commands to display and configure Enterprise Mesh
parameters:
270 Meru System Director Configuration Guide
© 2012 Meru Networks, Inc.
Enterprise Mesh Troubleshooting
# wbscli
wbs mgr cli
wbs { {display | show} {config | flash | table | help}
| config { parent-mac <MAC>
| channel <number>
| country-code <number>
| encryption { on | off }
| role {wireless | gateway}
| help
}
# wbscli display flash
wbs mgr cli
CliDisplay
WBS parent-mac is ff:ff:ff:ff:ff:ff
WBS channel is 40
WBS country-code is 840
WBS encryption is off
WBS role is gateway.
# wbscli config channel 44
wbs mgr cli
CliConfig
channel : 44.
# wbscli display flash
wbs mgr cli
CliDisplay
WBS parent-mac is ff:ff:ff:ff:ff:ff
WBS channel is 44
WBS country-code is 840
WBS encryption is off
WBS role is gateway.
Use this procedure to configure other Enterprise Mesh parameters.
© 2012 Meru Networks, Inc.
Wireless Backbones With Enterprise Mesh 271
Enterprise Mesh Troubleshooting
272 Meru System Director Configuration Guide
© 2012 Meru Networks, Inc.
Chapter 17
Configuring SNMP
The SNMP Agent offers the network administrator performance management and
fault management features, with the collection of statistics as well as notification of
unusual events via traps.
This information applies to all controller models and the following APs:
AP400
AP300 / AP300i
AP1000
AP150 / OAP180
The Meru Wireless LAN System SNMP Agent can interoperate with 3 rd party Network
Management Systems (NMS) such as HP OpenView, and present alarm and trap information to configured management stations.
MERU Software Director supports versions of SNMP protocols. On MERU software, all
versions (SNMPv1, SNMPv2c, and SNMPv3) of the Internet-Standard Management
Framework share the same basic structure and components. Furthermore, all
versions of the specifications of the Internet-Standard Management Framework
follow the same architecture.
No
Feature
RFCs
1
SNMPv1
RFC-1155, RFC-1157
2
SNMPv2c
RFC-1901, RFC-1905, RFC-1906
3
SNMPv3
RFC-1905, RFC-1906, RFC-2571, RFC-2574, RFC-2575
4
MIB-II
RFC-1213
5
MERU Private MIB
MERU Wireless LAN Proprietary MIB
Note that Meru System Director doesn’t support write operation through SNMP. You
need to provision any required configuration through the CLI or Web UI.
© 2012 Meru Networks, Inc.
Configuring SNMP 273
Features
Features
The following protocols are supported for the read function only (not write):
RFC-1214
SNMPv1/v2c
Meru WLAN systems
SNMP Architecture
Figure 38: SNMP Network Management Architecture
SNMP manager
(HP OpenView)
AP
AP
Ethernet
POWER
PMC2
HDD WDT
PW
COM1
LAN3
USB1 USB0
HS
RST
PWR LED
RESET
Controller
(with SNMP agent)
AP
00146
PMC1
The Meru Wireless LAN System SNMP network management architecture follows the
client-server architecture as illustrated in the diagram. The SNMP model of a
managed network consists of the following elements:
One or more managed nodes. In the illustration, the controller is among the
managed nodes in the SNMP-based managed network. The SNMP agent is resident
in the managed node. It collects statistics from the access points and combines
them before sending them to the SNMP manager via MIB variables. Configuration
information set via SNMP is also propagated to the access points by the SNMP
agent.
At least one management station containing management applications.
Management information in each managed node, that describes the configuration,
state, statistics, and that controls the actions of the managed node.
A management protocol, which the managers and agents use to exchange
management messages. In an SNMP managed network, the management protocol
is SNMP (Simple Network Management Protocol). This defines the format and
274 Meru System Director Configuration Guide
© 2012 Meru Networks, Inc.
SNMP Architecture
meaning of the messages communicated between the managers and agents. Meru
Meru Wireless LAN System provides support for traps, gets, and MIB walk functions
only.
Neither read nor write privilege gives the SNMP manager access to the community
strings. The controller can have an unlimited number of read and read/write community strings.
MIB Tables
The MIB tables supported by the Meru Meru Wireless LAN System SNMP implementation can be downloaded from the controller and then copied to an off-box location.
The MIB Tables are also available on the Meru web site. A summary of the Meru Wireless LAN System MIB Enterprise tables are:
mwstatistics.1
mwTop10ApStationProblemTable.1
mwGlobalStatistics.1 *
mwTop10ApStationProblemEntry.1
mwIf80211StatsTable.1
mwTop10Statistics.2
mwGlobalStatistics.2 *
mwTop10ApStationRxtxTable.1
mwIfStatsTable.1
mwTop10ApStationRxtxEntry.1
mwIfStatsEntry.1
mwTop10Statistics.3
mwGlobalStatistics.6 *
mwTop10ApProblemTable.1
mwStationStatsTable.1
mwTop10ApProblemEntry.1
mwStationStatsEntry.1
mwGlobalStatistics.4
mwGlobalStatistics.7 *
mwTop10ApRxtxTable.1
mwApStationStatsTable.1
mwTop10ApRxtxEntry.1
mwApStationStatsEntry.1
mwVoiceStatistics.1
mwGlobalStatistics.8 *
mwPhoneTable.1
mwCacApStatsTable.1
mwPhoneEntry.1
mwCacApStatsEntry.1
mwVoiceStatistics.2
mwGlobalStatistics.9 *
mwPhoneCallTable.1
mwCacBssStatsTable.1
mwPhoneCallEntry.1
mwCacBssStatsEntry.1
mwVoiceStatistics.3
mwStatistics.2 *
mwVoiceStatusTable.1
mwTop10Statistics.1
mwVoiceStatusEntry.1
Global statistics use 64 bit counters in System Director 4.0 and later
© 2012 Meru Networks, Inc.
Configuring SNMP 275
SNMP Configuration
Download the MIB Tables for Management Applications
If you are using a third-party SNMP-based Network Manager program, you will need
to integrate the Meru Meru Wireless LAN System proprietary MIB tables that allow the
manager program to manage controllers and APs. The MIB tables are available in a
compressed (zipped) file that can be copied from the controller to an off-box location.
To download the enterprise MIB Tables, contained in the file mibs.tar.gz, located in
the images directory, use the following CLI commands:
controller# cd image
controller# copy mibs.tar.gz off-box_location
To download the enterprise MIB Tables using the Web UI, follow these steps:
1. Open a Web Browser(IE or Firefox), enter the system IP address (example:
https://172.29.0.133) and then enter a user name and password (factory default
user name/password is admin/admin).
2. Click Configuration > SNMP > Setup > Download MIB Files > Download MIBs.
When the download is done, you will see the file listed in the Downloads list.
3. Save the file mibs(x).tar.gz.
SNMP Configuration
The SNMP agent in the controller must be properly configured for the following:
1. The read and write community strings must be configured before the Web UI can
be used to view and update any of the components of the controller.
2. The trap manager must be configured so that traps are sent to the correct SNMP
manager.
3. The contact and location information should also be correctly configured so that
the SNMP manager can access this information and know who to contact in case
of problems.
SNMP Community Strings
SNMP community strings authenticate access to MIB objects. They determine whether
the SNMP manager has read and/or write access to particular MIB objects, if at all.
Before the SNMP manager can access a controller, it must supply a community string
that matches at least one of the community string definitions of the controller, with
the same access privileges.
A community string can have one of these attributes:
276 Meru System Director Configuration Guide
© 2012 Meru Networks, Inc.
SNMP Configuration
Read-only. Management stations with the community string can view all objects
in the MIB, but cannot modify them.
Read-write. This gives read and write access to authorized management stations
to all objects in the MIB.
To configure community strings, enter privileged EXEC mode, and follow these steps:
Table 21: Configuring SNMP Community Strings
Command
Purpose
configure terminal
Enter global configuration mode.
snmp-server community string host
{ro|rw}
Creates a new SNMP community string with the
specified host and privileges. The host can either be a
host name or an IP address in the format
255.255.255.255. The access privileges can be either
read-only (ro) or read-write (rw).
end
Return to privileged EXEC mode
show running-config
Verify your entries.
copy running-config startup-config
(Optional) Save your entries in the configuration file.
Trap Managers
A trap manager is a management station that receives and processes traps. The
controller can have an unlimited number of trap managers. Trap managers are
grouped into communities. A single community may have one or more hosts, which
are specified as IP addresses.
© 2012 Meru Networks, Inc.
Configuring SNMP 277
SNMP Configuration
Table 22: Configure SNMP Trap Managers
Command
Purpose
configure terminal
Enter global configuration mode.
snmp-server trap community-string hostIP
Specify the recipient of the trap message:
For community-string, specify the
string to send with the notification
operation.
For hostIP, specify the name or address of
the host (the targeted recipient).
end
Return to privileged EXEC mode.
show running-config
Verify your entries.
copy running-config startup-config
(Optional) Save your entries in the configuration
file.
278 Meru System Director Configuration Guide
© 2012 Meru Networks, Inc.
SNMP Configuration
SNMP Traps
These are important traps for the Meru Meru Wireless LAN System:
No
Case
Trap ID
Scenario
1
Controller Down
SNMP Poll
When a controller goes down or loses IP connectivity,
SNMP Manager detects that the controller is down with an
SNMP polling mechanism.
2
Controller Up
Cold Start trap
When a controller comes up, the SNMP Agent generates a
<Cold Start> trap on the SNMP server.
3
NPlus1 Master Down mwlMasterDown in
meru-wlanmib.
When a master controller with NPlus1 goes down, SNMP
generates a MasterDown trap.
my
4
NPlus1 Master Up
mwlMasterUp in meru-wlanmib.
When a master controller with NPlus1 comes up, SNMP
generates a MasterUp trap.
my
5
AP Down
mwlAtsDown in meru-wlanmib.
When an AP goes down, SNMP generates an AP_DOWN
trap.
my
6
AP Up
mwlAtsUp in meru-wlanmib.
When an AP comes up, SNMP generates an AP_UP trap.
my
7
Rogue AP detected
mwlRogueApDetected in
meru-wlanmib.my
When the system detects a rogue device, SNMP generates
a <RogueAPDetected> trap.
8
Rogue AP Removed mwlRogueApRemoved in
meru-wlanmib.my
When the system detects a rogue device has disappeared
from the network, SNMP generates a <RogueAPRemoved> trap.
The following chart lists all traps that exist for the Meru Meru Wireless LAN System:
© 2012 Meru Networks, Inc.
Configuring SNMP 279
SNMP Configuration
mwlRogueApDetected
New in version 3.6:
mwlRogueApRemoved
mwlCacLimitReached
mwlAtsDown
mwlRadarDetected
mwlAtsUp
mwlMasterDown
mwlWatchdogFailure
mwlMasterUp
mwlWatchdogUp
mwlSoftwareLicenseExpired
mwlCertificateError
mwlSoftwareLicenseInstalled
mwlCertificateInstalled
mwlTopoStaAtsAdd
mwlApSoftwareVersionMismatch
mwlAtsNeighborLoss
mwlApSoftwareVersionMatch
mwlAtsNeighborLossCleared
mwlApInitFailure
mwlHandoffFail
mwlApInitFailureCleared
mwlHandoffFailCleared
mwlApRadioCardFailure
mwlResourceThresholdExceed
mwlApRadioCardFailureCleared
mwlResourceThresholdExceedClear
mwlAuthFailure
mwlRadiusServerSwitchover
ed
mwlSystemFailure
mwlRadiusServerSwitchoverFailure mwlSystemFailureCleared
mwlRadiusServerRestored
mwlApBootimageVersionMismatch
mwlAcctRadiusServerSwitchover
mwlApBootimageVersionMatch
mwlAcctRadiusServerSwitchoverFa mwlMacFilterDeny
ilure
mwlMicFailure
mwlMacFilterDenyCleared
mwlApTemperature
mwlMicCounterMeasureActivated mwlApTemperatureCleared
mwlHardwareDiagnostic
mwlHardwareDiagnosticCleared
mwlCacLimitReached
mwlRadarDetected
mwlOperationalChannelChange
280 Meru System Director Configuration Guide
© 2012 Meru Networks, Inc.
SNMP Configuration
Objects That Monitor System Status Through SNMP/OID
Use the SNMP get operation to monitor these objects:
No
Case
OID
Shows
1
System Uptime
mwWncVarsUpTime in
mwConfigController.my
system uptime
2
System Operational
mwWncVarsOperationalS
tate in mwConfigController.my
system’s current operational status
Status
3
System
Availability Status
mwWncVarsAvailabilityStasystem’s current available status.
tus in mwConfigController.my
4
AP Uptime
mwApUpTime in mwConfigAp.my
AP’s uptime
5
AP Operational
mwApOperationalState in
mwConfigAp.my
AP’s current operational status
mwApAvailabilityStatus in
mwConfigAp.my
AP’s current available status
Status
6
AP Availability
Status
Agent Contact and Location Commands
The following are the commands to set the system description, contact and location
of the SNMP agent:
Table 23: Configure SNMP Description, Contact and Location
Command
Purpose
configure terminal
Enter global configuration mode.
snmp-server contact text
Sets the system contact string. For example:
snmp-server contact [email protected]
snmp-server location text
Sets the system location string. For example:
snmp-server location Tower Building, IT Department
© 2012 Meru Networks, Inc.
Configuring SNMP 281
SNMP Configuration
Table 23: Configure SNMP Description, Contact and Location
Command
Purpose
snmp-server description text
Sets the system description string. For example:
snmp-server description main controller
end
Return to privileged EXEC mode
show running-config
Verify your entries.
copy running-config
startup-config
(Optional) Save your entries in the configuration file.
Configure SNMP Service on a Meru Controller With the CLI
Set up the SNMP server community with a specific IP address with these commands:
default# configure terminal
default(config)#
default(config)# snmp-server community public 0.0.0.0 rw
default(config)# end
default# show snmp-community
SNMP Community Client IP Privilege
public 0.0.0.0 read-write
SNMP Community Management(1 entry)
default#
Set up the trap community with a specific IP address with these commands:
default# configure terminal
default(config)# snmp-server trap public 10.0.220.30
default(config)# end
default# show snmp-trap
Trap Community Destination IP
public 10.0.220.30
SNMP Trap Management(1 entry)
Configure SNMP Service on a Meru Controller With the Web UI
Set up the SNMP server community with a specific IP address by following these steps:
1. Open a Web Browser(IE or Firefox), enter the system IP address (example:
https://172.29.0.133) and then enter a user name and password (factory default
user name/password is admin/admin).
2. Click Configuration > SNMP > Setup > SNMP Community Management > Add.
282 Meru System Director Configuration Guide
© 2012 Meru Networks, Inc.
Enabling, Disabling, and Reloading SNMP
3. Provide an SNMP Community Name, Client IP Address, and select a privilege level
such as read-write.
4. Click OK.
Set up the trap community with a specific IP address with these commands:
5. Click Configuration > SNMP > Setup > SNMP Trap Management > Add.
6. Provide a Trap Community and Trap Destination IP Address.
7. Click OK.
Set up 3rd Party Vendors
Meru MIB files should be compiled and loaded on SNMP manager to be used with Meru
controller. SNMP Manager has to have Meru MIB file and compile to access Meru OIDs
through SNMP. To download the Meru MIB file from the controller, follow these steps:
1. Open an MIB Compiler. Load and compile all MIBs.
2. Access the Meru controller from the Web UI.
3. From the MIB tree browser expand ios -> org -> dod -> internet -> private ->
enterprise -> meru -> meru-wlan -> mwConfiguration -> mwWncVars>.
4. Activate a walk operation. This will query all OIDs under mwWncVars tree.
Enabling, Disabling, and Reloading SNMP
Once an SNMP configuration is complete, enable it with the command snmp start:
controller# snmp start
To turn off SNMP messaging, use the command snmp stop:
controller# snmp stop
To reload the SNMP module, use the command reload-snmp:
controller# reload-snmp
SNMP Version 3 Support
The SNMPv3 architecture, supported by System Director 4.0 and later, incorporates new
descriptions for SNMP Entities (Managers, Agents, Proxy Forwarders), updated message
formats, and standard MIBs used to configure access to entities. The SNMP Agent on Meru
Network Controllers is multi-lingual with simultaneous support for SNMPv1/v2c/v3 if
configurations such as snmp-community for SNMPv1/v2c or SNMPv3-user for SNMPv3 are
correct. New features include:
© 2012 Meru Networks, Inc.
Configuring SNMP 283
Enabling, Disabling, and Reloading SNMP
Security levels for user authentication using entity shared secret keys
Message time stamps
Data secrecy using encryption
Control of user access to MIB information based on the need to know
Security Levels
SNMPv3 provides both security levels and security models. A security level is the permitted
level of security within a security model. A combination of a security level and a security
model determine which security mechanism is employed when handling an SNMP packet.
(See Combinations of Security Levels and Security Models in this document.) SNMPv3
messages can be sent at any of the following three security levels:
No Authentication and No Encryption This is also called noAuth/noPriv. Priv
refers to privacy. With this security, only a valid user name is required to access
data or to send a trap.
Authentication and No Encryption This is also called Auth/noPriv. With this
security, you must be authenticated as a valid user for a message to be accepted.
Authentication is accomplished by sharing a secret key and using that key to
produce a message-hashed authentication code sent with each message.
Authentication and Encryption This is also called Auth/Priv. With this security,
you are authenticated and the data payload is encrypted using a second shared
secret key.
Security Models
SNMPv3 provides for both security levels and security models. A security model is an
authentication strategy that is set up the group in which a user resides. Three security
models are now available:
SNMPv1
SNMPv2c
SNMPv3
A combination of a security model and a security level will determine which security mechanism is employed when handling an SNMP packet. See Combinations of Security Levels
and Security Models in this document.
Combinations of Security Levels and Security Models
The table below identifies the combinations of security models and levels and describes
how security is handled with each combination.
284 Meru System Director Configuration Guide
© 2012 Meru Networks, Inc.
Enabling, Disabling, and Reloading SNMP
Model
Level
Authentication
Encryption
What Happens
v1
noAuthNoPriv
Community String
No
Uses a community string
match for authentication
v2c
noAuthNoPriv
Community String
No
Uses a community string
match for authentication
v3
noAuthNoPriv
Username
No
Uses a username match
for authentication
v3
authNoPriv
MD5 or SHA
No
Provides authentication
based on the HMAC-MD5 or
HMAC-SHA algorithms
DES
Provides authentication
based on the HMAC-MD5 or
HMAC-SHA algorithms.
Provides DES 56-bit
encryption in addition to
authentication based on
the CBC-DES (DES-56)
standard
v3
authPriv
MD5 or SHA
SNMP Version 3 Commands
The Meru System Director Command Reference has detailed descriptions of these
commands.
snmpv3-user
snmpv3-user auth-key
snmpv3-user auth-protocol
snmpv3-user priv-key
snmpv3-user priv-protocol
snmpv3-user target ip-address
SNMP Version 3 Support Limitations
Currently, Meru does not support the following SNMPv3 features.
Since Meru Network Controllers do not support write access for SNMP MIBS, all
users belong to the Read View Access Control table and they are handled as Read
View with a group internally. View the Access Control Model (VACM) to determine
if a user belonging to a specific group has access (Read, Write, Notify) to the
management entity. Access Policy is defined by associating the respective read,
write or notify view with a group.
© 2012 Meru Networks, Inc.
Configuring SNMP 285
Enabling, Disabling, and Reloading SNMP
SNMPv3 Notifications: Meru does not support SNMPv3 trap/inform. Along with the
supported SNMPv3 feature (read only), Meru Network controllers still provide both
SNMPv1/v2c accessibility using the existing snmp-community table and SNMPv1
trap using snmp-trap community table.
286 Meru System Director Configuration Guide
© 2012 Meru Networks, Inc.
Chapter 18
Troubleshooting
Where Do I Start?
Error Messages
System Logs
System Diagnostics
Capturing Packets
FTP Error Codes
Where Do I Start?
We recommend that you start troubleshooting as follows:
Problem
Web UI or CLI? Involves?
Strategy
Web UI
stations
View station log history by clicking Monitor >
Diagnostics > Station
Web UI
radios
View radio log history by clicking Monitor > Diagnostics
> Radio
View station-log history with one of these commands:
station-log show-mac=<affected MAC address>
station-log show (if the MAC is not known)
CLI
© 2012 Meru Networks, Inc.
stations
If the problem is reproducible/occurring continually, log
your terminal session, enter the station-log interface
and add the affected MAC address using the command
station add <MAC>. If you DON'T know the MAC
address, enter event all all to capture all events for all
MAC addresses.
Troubleshooting 287
Where Do I Start?
Problem
Web UI or CLI? Involves?
Strategy
View controller-log history with the command
diagnostics-controller
CLI
controller
If the problem is reproducible/occurring continually, log
your terminal session, enter the station-log interface
with the command station-log, and add the affected
MAC address using the command station add <MAC>.
If you DON'T know the MAC address, type event all all
to capture all events for all MAC addresses.
View controller-log history with the command
diagnostics-controller
3.6 CLI
stations or
controller
If the problem is reproducible/occurring continually, log
your terminal session, enter the station-log interface
and add the affected MAC address using the command
station add <MAC>. If you DON'T know the MAC
address, type event all all to capture all events for all
MAC addresses.
The command snort enables wireless sniffing from
multiple APs simultaneously. You will need a WireShark
client to retrieve captured output. It is best to configure
snort from the GUI as it allows multiple AP selection per
sniff. If you want to use the CLI, type the following from
the CLI prompt:
3.6 Web UI
stations or
controller
configure terminal
snort ip-address <IP of WireShark laptop>
snort port 9177
snort integration enabled
The command snort integration enabled is what turns
on the sniff at each AP selected. Make sure that you
always type snort integration disabled to disable the
sniff after data gathering is complete.
288 Meru System Director Configuration Guide
© 2012 Meru Networks, Inc.
Error Messages
Error Messages
The following are common error messages that may occur either at the controller or
at an AP.
Message Text
Explanation
May be observed on the AP command line or in trace log output from an
AP after a full diagnostics gather.
[07/20 13:02:11.122]
1m[35m**Warning**[0m
WMAC: Wif(0):SetTsf()
TSF[00000000:000006e3]
->
[00000033:77491cfd]thr[000
00000:03938700]
[07/31 14:01:33.506]
*****ERROR***** QOS:
FlowMgr failed while
processing flow request,
reason= 5,
srcMac[00:23:33:41:ed:27],
dstMac[00:00:00:00:00:00].
Received non-local pkt on
AP!
© 2012 Meru Networks, Inc.
The SetTsf() messages indicate that the AP has adjusted its TSF (TSF
stands for Time Synchronization Function and is really the AP's clock)
forward by more than a certain threshold (the threshold is 5 seconds).
The specific case above indicates that the AP has just booted up and
adjusted its TSF value to its neighboring AP's TSF value.
You can tell that the AP just booted because its current TSF is a low
value (i.e. 6e3 microseconds). During initialization, the AP will
synchronize its TSF to the TSF of its neighbors whenever the neighbors
support a BSSID in common with this AP. That is a requirement to
support Virtual Cell.
May be observed in the controller's CLI interface.
This error occurs when there is an attempt to either set up or remove an
AP flow on a station that has started a phone call. "reason=5" means the
cited station is not assigned to the AP where the attempt to set up/
remove the flow was made.
The presumed impact is that the stations (presumably phones) get lower
than normal call quality since there are no QoS flows established on
behalf of the MAC address.
This message may be observed on the serial console of a controller or
in the dmesg.txt output included with a controller's diagnostics. This
message indicates that a Ethernet type 0x4001 or UDP port 5000 packet
(L2 and L3 COMM respectively) was received by the controller's
Ethernet, but was not actually destined for the controller's MAC or IP
address.
Troubleshooting 289
System Logs
System Logs
The 5.1 system log records the following:
Configuration changes (CLI or GUI)
Key commands
Events and operations
Errors
The CLI command show log lists the entire log. To view the system log files from the
Web UI, click Maintenance > Syslog > View Syslog Files.
Figure 39: Syslog Files Table
Facility Name can be one of these eight sources of information:
Facility
Security
Messages contain...
Creation and violation of security configuration, including User logins and Captive Portal activity
QoS
System WNC
Quality of Service messages for both creation and violation of QoS
rules created on this controller
Rogue AP syslog messages
290 Meru System Director Configuration Guide
© 2012 Meru Networks, Inc.
System Logs
Facility
NMS
Messages contain...
Network Manager Server syslog messages
Mobility
Handoff or redirect messages
Bulk Update
Any use of the bulk update commands available from the GUI are
noted here. The Bulk Update function, accessed from the AP
Configuration, Wireless Interfaces Configuration, and Antenna
Property pages, updates a group of selected APs. Bulk Update
works the same in each of these areas, but the items to be updated
are specific to the page where the bulk update is being initiated.
Upgrade
Any use of the CLI command upgrade
Per-user
Firewall
Creation and violation of per-user firewalls
Select one of the Facilities listed in the above chart and then click View Syslog to
see these details:
Figure 40: Security System Log Details
© 2012 Meru Networks, Inc.
Troubleshooting 291
System Logs
Entry
Meaning
Line
Line number of the syslog file where the entry is located
Priority
Severity of the entry. Possible priorities are: debug, info, notice,
warning, error, err, crit, alert, emerg, panic.
Three-letter mnemonic assigned to the entry:
CAP = Captive Portal
RED = redirect
Mnemonic
FOR = forward
WAU = WebAuth user authentication
WST = Web Server Event
WPW = Web UI user password administration
Time
Date and time when the entry was logged.
The details of the syslog event depend on the category of the message:
Security: User logins, Captive Portal activity
QoS: Creation and violation of QoS rules
System WNC: Rogue activity
Record
NMS: If this controller is part of Network Manager, all activity initiated
by the Network Manager Server
Mobility: This consists primarily of RED (redirect) messages
Bulk Update: AP updates done in groups
Upgrade: System Director upgrades
Per-User Firewall: Creation and violation of firewalls
To search for information on any column of a Facility screen like the one in Figure
40, do the following. In the box at the top of any column (Line, Priority, Mnemonic,
Time, Record), provide search data to filter the messages. You then see only
messages that fit that filter. For Priority, you see messages of the selected priority
level and higher; for example, a search for debug shows every message because
debug is the lowest priority level. A search for info shows the messages info and
higher: notice, warning, error, err, crit, alert emerg, panic (highest priority).
You can also click the calendar icon above the Time column to enter a specific date
or time to filter syslog messages in this category.
292 Meru System Director Configuration Guide
© 2012 Meru Networks, Inc.
System Logs
Station Log Events
Station log event messages are displayed in this format:
[object name, field name <old value: new value>, field name <old value: new value> …]”
Log Category : “nms”, Priority : ‘info”, Mnemonic : “CONFIG”
The following chart describes some common station log events.
Event
Condition That Triggers Event
Interpretation
A mobile station is assigned to
AP::ESSID::BSSID.
A mobile station is assigned to
the BSSID. Once a mobile
station is assigned to
AP::ESSID::BSSID, the mobile
proceeds to the next stage,
802.11 authentication and
association. The AID value is
assigned to the station if it goes
through 802.11 authentication/
association.
| 00:0f:8f:9d:d3:23 | Station
Assign
| <AID=1> Assign
Removed From
<AP_ID=31><ESSID=swhan-es
sid><BSSID=00:0c:e6:9d:4f:be>
A mobile station's assignment
state is removed from
AP::ESSID::BSSID.
A mobile station cannot proceed
to the next stage, assignment.
The most common cause is that
a mobile station did not proceed
to the 802.11 authentication or
association stage within the
Station Assignment Aging Time.
00:16:6f:3b:17:a9|IP Address
Discovered| <Old IP discovery
Method=none><Old
IP=0.0.0.0<New IP discovery
Method=dynamic><New
IP=10.101.66.25>
A Mobile station's discovery
method or IP address changes
and the system accepts the new
IP address.
The new IP field indicates an IP
address being used by a station.
| 00:0f:8f:9d:d3:23 | Station
Assign
| <AID=1> assigned
to
<AP_ID=31><ESSID=swhan-es
sid><BSSID=00:0c:e6:9d:4f:be>
© 2012 Meru Networks, Inc.
Troubleshooting 293
System Logs
Event
Condition That Triggers Event
Interpretation
00:16:6f:3b:17:a9|IP Address
Discovered| <IP =
10.101.64.100> fails due to one
of local IPs
A Mobile station is detected
trying to use the controller’s IP
address.
The system blocks IP traffic from
the station using the IP address.
00:16:6f:3b:17:a9|IP Address
Discovered| ip update not
performed. <Client
IP=10.101.64.1> is used by a
wired station
<00:0e:84:85:33:00>
A Mobile station is detected
trying to use the IP used by a
wired station whose MAC
address is shown.
The system blocks IP traffic from
the station using the IP address.
Syslog Message
Description
AP DOWN CLEAR Access Point <ap-id> is up
Access Point ap-id was added to the WLAN. The
coverage is extended.
Action: None
AP DOWN CRITICAL Access Point <ap-id> is
down
AP rebooted by admin
AP Software Version Mismatch
Access Point ap-id was removed from WLAN.
Expect loss of service in some areas.
Action: If this event is unexpected, check the
network connectivity between the access point
and the controller.
Access Point has been manually rebooted.
Action: None
The software version on the AP does not match
that on the Controller. This message can be
generated because the auto-AP upgrade feature
is disabled.
Action: To resolve this condition, the AP must be
upgraded manually with the upgrade ap
command to ensure continued functionality.
CAP <user>@<a.b.c.d> logged in
<OK|FAILED>
294 Meru System Director Configuration Guide
The specified Captive Portal user has logged in
successfully (OK) or has been refused login
(FAILED).
© 2012 Meru Networks, Inc.
System Logs
Syslog Message
Description
Controller rebooted by admin
Controller has been manually rebooted.
The boot image version on the AP does not match
that required for the version of the AP software.
AP Boot Image Version Mismatch
Action: The boot image must be upgraded using
the upgrade ap command with the boot image
option before attempting to upgrade the AP
software version.
The AP failed to initialize properly.
AP Initialization Failure
AP Temperature
Hardware Diagnostic
ROGUE AP DETECTED CLEAR STATION
mac=<mac-address> bss=<bssid>
ch=<channel-id> reported by AP <ap-id>
ROGUE AP DETECTED CRITICAL STATION
mac=<mac-address> bss=<bssid>
ch=<channel-id> reported by AP <ap-id>
Radio Card Failure
WLAN services started on controller
© 2012 Meru Networks, Inc.
Action: Check that the AP network cables are
properly connected. Check that the version of the
AP boot image matches the version of the AP
software, and that the AP software version
matches the software version of the controller. If
the AP still fails to initialize after these checks,
contact Meru Customer Support.
The AP temperature has exceeded the maximum
threshold.
The AP failed the hardware diagnostic checks.
Action: Contact Meru Customer Support.
A station previously reported as rogue is not
detected any longer by any of the access points.
A station using an unknown BSSID as been
detected.
Action: Check if the bssid belongs to another valid
WLAN. If not, you may decide to turn on the rogue
AP mitigation feature.
The AP radio card has failed.
Contact Meru Customer Support.
System Director processes have been started on
the controller.
Troubleshooting 295
System Logs
Syslog Message
Description
WLAN services stopped on controller
System Director processes have been stopped.
WST:WS Serving...
Web server new event message.
WPW :<user>@<a.b.c.d> changed password
<OK | FAILED>
The specified System Director user has either
successfully changed their password (OK) or was
unable to change the password (FAILED).
MAC Filtering Station Log Events
Seven events are defined for MAC Filtering log events.
Event
Condition That Triggers Event
Interpretation
| 00:66:77:c2:03:01 | Mac
Filtering | Mac in permit list accept client
A station, 00:66:77:c2:03:01, is
in the ACL Allow Access List,
and a Permit List Enabled is on.
A mobile station goes to the next
stage or assignment.
| 00:66:77:c2:04:01 | Mac
Filtering | Mac not in permit list reject client
A station, 00:66:77:c2:04:01, is
not in the ACL Allow Access List,
and Permit List Enabled is on.
Radius authentication is
disabled.
A mobile station cannot proceed
to the next stage or assignment.
| 00:66:77:c2:03:01 | Mac
Filtering | Mac not in deny list accept client
A station, 00:66:77:c2:03:01, is
not in the ACL Deny Access List
and Deny List Enabled is on.
Radius authentication is
disabled.
A mobile station goes to the next
stage or assignment.
| 00:66:77:c2:04:01 | Mac
Filtering | Mac in deny list - reject
client
The station 00:66:77:c2:04:01 is
in the ACL Deny Access List and
Deny List Enabled is on. Radius
authentication is disabled.
A mobile station can't proceed to
the next stage or assignment.
| 00:66:77:c2:03:01 | Mac
Filtering | Sent Radius request
Radius authentication is enabled
and a Radius authentication
request message is sent.
A Radius request message is
sent for an authentication.
296 Meru System Director Configuration Guide
© 2012 Meru Networks, Inc.
System Logs
Event
Condition That Triggers Event
Interpretation
| 00:66:77:c2:02:01 | Mac
Filtering | Radius authentication
succeeded (vlan 0)
Radius authentication is
enabled, and a Radius accept
response message is received.
A mobile station goes to the next
stage or assignment.
| 00:66:77:c2:02:06 | Mac
Filtering | Radius authentication
failed
Radius authentication is
enabled, and a Radius reject
response message is received.
A mobile station cannot proceed
to the next stage or assignment.
Key Exchange Station Log Events
Key exchange is a security method in which cryptographic keys are exchanged
between users. A station goes through this stage of connection when any of these are
enabled: WPA, WPA2, WPA PSK, WPA2 PSK, MIXED or MIXED_PSK.
Event
Condition That Triggers Event
Interpretation
00:16:6f:3b:17:a9 |1X
Authentication |M1 <msg
type=EAPOL_KEY> PTK sent
The system sends a first key
exchange message.
This is common for WPA, WPA2,
WPA PSK, WPA2 PSK, MIXED
or MIXED_PSK. The system
tries transmission up to 4 times
and then aborts the key
exchange transaction if it doesn't
receive an M2 message by
sending 802.11 deauth.
M2 <pkt type=EAPOL_KEY>
MIC Verified
The system receives a key
exchange message, M2, from a
station, and MIC is verified
correctly.
This is common for WPA, WPA2,
WPA PSK, WPA2 PSK, MIXED
or MIXED_PSK.
00:16:6f:3b:17:a9 |1X
Authentication | M3 <msg
type=EAPOL_KEY> WPA PTK
Negotiation sent
The system sends a third key
exchange message for WPA or
WPA-PSK modes.
The system tries transmission up
to 4 times, and then aborts the
key exchange transaction if it
doesn't receive M2 message by
sending 802.11 deauth.
00:16:6f:3b:17:a9 |1X
Authentication | M4 <pkt
type=EAPOL_KEY> <key
type=Unicast Key> Key Pairwise
The system receives a fourth key
exchange message from a
station for WPA or WPA-PSK
modes.
The system tries transmission up
to 4 times, and then aborts the
key exchange transaction if it
doesn't receive M2 message by
sending 802.11 deauth.
© 2012 Meru Networks, Inc.
Troubleshooting 297
System Logs
Event
Condition That Triggers Event
00:16:6f:3b:17:a9 |1X
Authentication | M5 <msg
type=EAPOL_KEY> WPA GTK
Rekey Negotiation sent
The system sends a fifth key
exchange message for WPA or
WPA-PSK modes.
00:16:6f:3b:17:a9 |1X
Authentication | M6 <pkt
type=EAPOL_KEY> <key
type=Group Key>
The system receives a sixth key
exchange message from a
station for WPA or WPA-PSK
modes.
This is the last message of a key
exchange for WPA or WPA-PSK.
It indicates a successful key
exchange. A station can proceed
to the next stage.
00:16:6f:3b:17:a9 |1X
Authentication | M3 <msg
type=EAPOL_KEY> WPA2 PTK
Negotiation sent
The system sends a third key
exchange message for WPA2 or
WPA2-PSK modes.
The system tries transmission up
to 4 times and then aborts the
key exchange transaction if it
doesn't receive M2 message by
sending 802.11 deauth.
00:16:6f:3b:17:a9 |1X Authentica- The system receives a fourth key
tion | M4 <pkt type=EAPOL_KEY> exchange message from a station
<key type=Unicast Key> Key Pair- for WPA2 or WPA2-PSK modes.
wise
00:16:6f:3b:17:a9 |1X
Authentication |Sending Station
Disconnect, Reason : MIC
Failure, Auth Type 802.1X
00:16:6f:3b:17:a9 |1X
Authentication |Sending Station
Disconnect, Reason : 4-way
Handshake Timeout, Auth Type
802.1X
Interpretation
This is a last message of a key
exchange for WPA2 or
WPA2-PSK. It indicates a
successful key exchange. A
station can proceed to a next
stage.
The message sent by a station
results in a MIC failure.
For WPA-PSK, or WPA2-PSK,
the wrong passphrase or
password leads to this failure.
When the MIC failure occurs, a
the system sends a 802.11
deauth to the station.
The key exchange aborts due to
no response from a client.
The system tries to transmit a
key exchange message up to 6
times with one second intervals.
If the station does not respond, it
aborts the key exchange.
298 Meru System Director Configuration Guide
© 2012 Meru Networks, Inc.
System Logs
Authentication Station Log Events
Event
Condition That Triggers Event
00:16:6f:3b:17:a9 |802.11 State
|state change
<old=Unauthenticated><new=A
uthenticated><AP=00:0c:e6:04:f
c:ad><BSSID=00:0c:e6:0a:ca:6
e>
A station successfully completes
the 802.11 authentication phase
on AP::BSSID.
00:16:6f:3b:17:a9 |802.11 State
|state change
<old=Unauthenticated><new=A
uthenticated><AP=00:0c:e6:04:f
c:ad><BSSID=00:0c:e6:0a:ca:6
e>
A station successfully completes
the 802.11 association phase on
AP::BSSID.
© 2012 Meru Networks, Inc.
Interpretation
Troubleshooting 299
System Logs
Event
Condition That Triggers Event
Interpretation
A state change from associated
to unauthenticated can happen
because:
00:16:6f:3b:17:a9 |802.11 State
|state change
<old=Associated><new=Unauth
enticated><AP=00:0c:e6:04:fc:c
0><BSSID=00:0c:e6:d8:84:14>
Station ages out. The default
aging out period is 30 minutes.
The aging out period of 802.11
associated stations is different
from the aging out period of an
assigned stations.
Station voluntarily leaves a
currently associated BSSID by
sending a 802.11
deauthentication frame.
Station moves from BSSIDOLD
to BSSIDNEW. The associated
state of BSSIDOLD is
automatically cleared up.
In the multi-controller
environment, a station moves
from ControllerOLD to
ControllerNEW and the two
controllers are in the same
subnet; the associated state of
the station in ControllerOLD is
automatically cleared up.
1x/WPA/WPA2 authentication
fails due to either Radius
reject, a message timeout, or
an unknown reason.
A key exchange fails due to
timeout or MIC failure.
A station's 802.11 state changes
from Associated to
Unauthenticated.
300 Meru System Director Configuration Guide
© 2012 Meru Networks, Inc.
System Logs
Event
Condition That Triggers Event
00:16:6f:3b:17:a9 |802.11 State
|<AID=1> handoff
<OLD_AP_ID=3><NEW_AP_ID
=4><BSSID=00:0c:e6:30:47:17
>
Interpretation
This event is generated only if a
mobile station is associated to
the ESS of a Virtual Cell or a
Virtual Port. The abbreviations
mean the following:
Station is handed off from an AP
to another AP.
AID: Association ID
OLD_AP_ID: AP servicing the
station before the handoff
NEW_AP_ID: AP servicing the
station after the handoff
BSSID: Parent BSSID in the
Virtual Cell or Virtual Port.
00:16:6f:3b:17:a9 |802.11 State
|Received Deauth frame from
station <Deauth reason:
authentication leave><deauth
packet RSSI =
62><AID=3><BSSID=00:0c:e6:f
9:01:01>
Station sends 802.11
de-authentication frame.
Station decided to leave the
ESS/BSS. This is only supported
by AP300/AP400.
00:16:6f:3b:17:a9 |802.11 State
| Received Disassoc frame from
station <Disassoc reason:
association leave><deauth
packet RSSI =
57><AID=3><BSSID=00:0c:e6:f
9:01:01>
Station sends 802.11
dis-association frame.
Station decided to disassociate.
This is only supported by
AP300/AP400.
1X/WPA/WPA2 Authentication Station Log Events
© 2012 Meru Networks, Inc.
Troubleshooting 301
System Logs
DHCP Station Log Events
Event
Condition That Triggers Event
Interpretation
The system receives
EAPOL_START message from a
station associated to an
ESSID::BSSID pair.
There are two auth methods;
WAP2_EAP or WPA_EAP. The
standard states that this
message is optional.
The system sends an EAP
Identity Request to the station.
The system tries this message
up to four times with one second
intervals. As authentication
proceeds, the EAP ID increases
by one.
|00:16:6f:3b:17:a9 | 1X
Authentication |<pkt
type=EAP_PACKET> <EAP
code=response><EAP ID=1>
The system receives an EAP
Response message from a
station.
The EAP ID of the response
must match the EAP ID of
request.
00:16:6f:3b:17:a9|1X
Authentication| Radius <msg
code=access_request><msg
ID=178> sent
<ip=192.168.101.17>:<port=181
2>
The system forwards a station's
request to the Radius Server
IP::Port
As authentication proceeds, the
message ID increases by one.
00:16:6f:3b:17:a9|1X
Authentication| <pkt
type=EAP_PACKET> <EAP
code=request><EAP ID=2>
<info=relay eap-request from
Radius> sent
The system forward a Radius
Server's request to a station.
00:16:6f:3b:17:a9|1X
Authentication| <pkt
type=EAP_PACKET> <EAP
code=success><EAP ID=13>
<info=relay eap-request from
Radius> sent
The system receives Radius
Accept message, and send EAP
SUCCESS message to a mobile.
00:16:6f:3b:17:a9|1X
Authentication| Backend
Authentication Timeout
A message forwarded to a
Radius server is timed out.
|00:16:6f:3b:17:a9 | 1X
Authentication |<auth
method=WPA2_EAP>:<pkt
type=EAPOL_START> recvd
<ESSID=vcellwpa2>
<BSSID=22:01:0f:3b:17:a9>
|00:16:6f:3b:17:a9 | 1X
Authentication | <EAP
code=request> <EAP ID=1>
<EAP type=Identity> sent
302 Meru System Director Configuration Guide
This is the last message of an
authentication. A key exchange
stage immediately follows if
WAP or WAP2 is used.
© 2012 Meru Networks, Inc.
System Logs
Event
Condition That Triggers Event
Interpretation
Three cases trigger this event:
00:16:6f:3b:17:a9|1X
Authentication| Sending EAP
Failure to station, (identifier 1)
An EAP failure message is sent
to a station.
00:16:6f:3b:17:a9|1X
Authentication| Radius
Access-Reject received
The system receives a Radius
Reject message from a Radius
server.
00:16:6f:3b:17:a9|1X
Authentication| Backend
Authentication Failure
The system receives a Radius
Reject message from a Radius
server.
Event
Condition That Triggers Event
00:16:6f:3b:17:a9|DHCP |
<msg_type=DISCOVER><serve
r_ip=255.255.255.255><server_
mac=ff:ff:ff:ff:ff:ff><client_ip=0.0.
0.0
00:16:6f:3b:17:a9|DHCP
|<msg_type=OFFER><server_ip
=10.101.64.1><server_mac=00:
0e:84:85:33:00><offered_ip=10.
101.66.25>
© 2012 Meru Networks, Inc.
The system receives a DHCP
message from a station.
The system receives a DHCP
message from a DHCP server.
A Radius message times out
An EAP message to a station
times out
A Radius Server sends a reject
message
Interpretation
The message displays a server's
IP and MAC, and a client's IP.
DHCP message types displayed
are DISCOVER, REQUEST, or
RELEASE.
The message displays a server's
IP and MAC, and a client's
offered IP.
DHCP message types displayed
are OFFER, ACK, NACK or
INFORM.
Troubleshooting 303
System Diagnostics
Captive Portal Station Log Event
Event
Condition That Triggers Event
Interpretation
00:16:6f:3b:17:a9|CP User
Authentication| <User=vijay>
authenticated
<ipaddr=10.101.66.25>
The system gets a Radius
Accept message.
A user is authenticated
successfully.
System Diagnostics
There are three sets of diagnostics for a controller:
Radio diagnostics
Station diagnostics
Inferences
Radio diagnostics
Each AP has either one or two radios that can be configured individually (Configuration > Wireless > Radio). You can check on the wireless activity trends for these
radios by looking at the diagnostic information:
1. Click Monitor > Diagnostics > Radio.
2. Provide an AP number and an interface ID (Radio 1 or 2).
3. Click Start Diagnostics in the upper right corner of the screen.
304 Meru System Director Configuration Guide
© 2012 Meru Networks, Inc.
System Diagnostics
Figure 41: Radio Diagnostics
4. Check the four charts for these radio trends:
Chart
What it tells you
Why you might want to know this
Throughput
Sum of upstream
and downstream
traffic for the radio
Users are experiencing slow response in the
area covered by this AP
Noise Level
How much unwanted
energy is present in
the received radio
signals
Users are experiencing connection problems
or low transmission speeds in the region
covered by this AP
© 2012 Meru Networks, Inc.
Troubleshooting 305
System Diagnostics
Chart
What it tells you
Why you might want to know this
Associated
Stations
How many clients
are using this AP
Find out if you need to add another AP
(consult your reseller for specific AP
deployment recommendations)
Current
Value
Packet retries, loss
%, channel
utilization, and
management
overhead for the
radio
Users are experiencing slow response in the
area covered by this AP
Station diagnostics
Each client on an AP can be studied individually by looking at the station diagnostic
information:
1. Click Monitor > Diagnostics > Station.
2. Provide a MAC address for the client. One way to determine the client MAC
address on Windows XP is to open the Command Prompt by clicking Programs >
Accessories > Command Prompt and then entering the command ipconfig /all this gives you physical addresses for the wireless connections.
3. Click Start Diagnostics in the upper right corner of the screen.
306 Meru System Director Configuration Guide
© 2012 Meru Networks, Inc.
System Diagnostics
Figure 42: Station Diagnostics
4. Check the four charts for these station trends:
— Throughput
— Loss %
— Signal Strength
— Airtime Utilization
5. Click Help for explanations for the charts.
Inferences
Inferences are best guesses as to what could be wrong with your wireless network.
Check a controller, AP, and station by looking at the diagnostic inferences:
1. Click Monitor > Diagnostics > Inferences.
2. Optionally narrow down the list by providing a MAC address for a controller, AP,
or station.
A list of recent events is listed along with corresponding details.
© 2012 Meru Networks, Inc.
Troubleshooting 307
System Diagnostics
Figure 43: Diagnostic Inferences
The first part of the message is the issue and level of severity. In the example above,
there is an IP conflict which is a critical issue. The information in a Station Entry is
listed below. You can read it or alternately cut and paste the MAC address into the
Station Diagnostics window.
Figure 44: Decoding a Station Entry
Sample Station Entry
Inference Rule #8 matched : IP Address Update 32 times within
360 seconds.
[IP 172.27.0.198] [dhcp] [data] [AP-3 AP-3] [BSSID
00:0c:e6:3d:0b:45] [ESSID rcomm_diag]
[Vlan Tag 0] [L2 State clear] [L3 State clear] [First Seen @ UTC
Jun 9 13:50:22]
Inference Rule #12 matched : Soft Handoff 21 times within 360
seconds.
[IP 172.27.0.198] [dhcp] [data] [AP-2 AP-2] [BSSID
00:0c:e6:3d:0b:45] [ESSID rcomm_diag]
[Vlan Tag 0] [L2 State clear] [L3 State clear] [First Seen @ UTC
Jun 9 13:50:22]
308 Meru System Director Configuration Guide
Information Provided
- Rule that triggered entry
- Latest IP address of station
- DHCP used
- Type of traffic (data or SIP)
- AP updated
- BSSID of Station
- ESSID of Station
- VLAN tag number
- Authentication used on L2
- Authentication used on L3
- Date problem was first seen
© 2012 Meru Networks, Inc.
System Diagnostics
Station Inference Messages
Some possible station rules and messages are:
#
Station Message
Remarks
1
MAC Filter ACL Success
Station executed MAC filtering ACL authentication
2
MAC Filter ACL Failure
Station exceeded threshold of MAC filtering ACL authentication
attempts
3
MAC Filter Radius
Success
Station executed MAC filtering Radius authentication
4
MAC Filter Radius Failure
Station exceeded threshold of MAC filtering Radius authentication
attempts
Station exceeded threshold of 802.11 assignment attempts. This could
be caused by any of the following:
5
Assignment Failure
Associated AP is not found in AP table
Maximum number of stations, which varies with AP models, is
exceeded
Maximum number of licensed stations is exceeded
Controller has not received configuration of the AP yet
BSSID for a client to be assigned is not found in the BSS table
AP does not have a free slot for the station
RSSI is not appropriate for the station
Monitor WEP-key index mismatched count
6
WEP-key Index Mismatch
7
Association Success
Station executed 802.11 association
8
Key Exchange Success
Station executed 802.1x key exchange
© 2012 Meru Networks, Inc.
(Not implemented yet)
Troubleshooting 309
System Diagnostics
#
Station Message
Remarks
Station exceeded threshold of 802.1x key exchange attempts. An AP
detected either of the following conditions of 1X authentication
failure between the AP and the client;
EAPoL handshaking failed
EAPoL handshaking timed out
Another possible cause is that Hostapd detected one of the following
conditions of 1X authentication and 802.1x key exchange failure:
9
Key Exchange Failure
Invalid Radius VLAN tag detected
EAP packet failed to reach the station
MIC failure occurred and both the counts of MIC failure and 802.1x
key exchange failure are increased
4-way handshake timed out
Group key update timed out
EAP key replay counter is mismatched
10
MIC Failure
Station exceeded threshold of 802.1x MIC attempts
11
802.1x Radius Success
Station executed 802.1x Radius authentication
12
802.1x Radius Failure
Station exceeded threshold of 802.1x Radius authentication attempts
13
IP Address Update
IP address changed from valid to 0, 0 to valid, or valid to valid
14
Data Decryption Failure
Data decryption failure of RX packet occurred; attempt threshold was
exceeded. Hostapd detected that
Ess.MicCountermeasureData.MicCounter exceeded 1 within the
MIC_COUNTERMEASURE_PERIOD (60 seconds). When this occurs,
Hostapd notifies the AP to stop accepting communication from that
station and disassociate the station.
15
CP Guest User Success
Station authenticated a Captive-Portal guest
16
CP Guest User Failure
Station exceeded threshold of Captive-Portal guest authentication
attempts
17
CP Radius User Success
Station authenticated Captive-Portal user using Radius
18
CP Radius User Failure
Station exceeded threshold of Captive-Portal Radius user
authentication attempts
19
Soft-Handoff
Station executed soft-handoff
Some possible controller inference messages are:
310 Meru System Director Configuration Guide
© 2012 Meru Networks, Inc.
System Diagnostics
Controller Message
What it tells you
DHCP server reached
DHCP Server required for IP address assignment is
reachable
DHCP server unreachable
DHCP Server required for IP address assignment is
unreachable
Gateway reached
Gateway unreachable
Default gateway for client sub-network is reachable
Default gateway for client sub-network is unreachable
Radius server reached
Radius server required for client authentication is
reachable
Radius server unreachable
Radius server required for client authentication is
unreachable
VLAN gateway reached
VLAN gateway in the path for client communication is
reachable
VLAN gateway unreachable
VLAN gateway in the path for client communication is
unreachable
IP Address conflict between
wireless clients or between
wired and wireless clients or
between wireless client and
controller
IP un-assignment of client by
failure of DHCP IP
assignment
At least two wireless clients or controllers have been
assigned (or have specified) the same IP address,
which is causing network confusion.
An IP address has been removed from the client due
to the DHCP server failing to provide an assignment.
Diagnostic Inferences Using the CLI
To see Controller Diagnostic Inferences with the CLI, turn on controller diagnostic inferences with the diag-log command admin controller on.
Meru01# configure terminal
Meru01(config)# diag-log
Meru01(config-diag-log)# admin controller on
Turn on station diagnostic inferences with the diag-log command admin station on.
Meru01# configure terminal
Meru01(config)# diag-log
Meru01(config-diag-log)# admin station on
© 2012 Meru Networks, Inc.
Troubleshooting 311
Capturing Packets
What Else Can I learn From A Diagnostic Event?
Examine the details of a particular event by copying a MAC address from a Web UI
screen such as Figure 43, pasting it into the Station Diagnostics window (Monitor >
Diagnostics > Station) and then clicking Start Diagnostics.
Figure 45: Results of pasting a MAC address into the Station Diagnostics window
Scroll down to the bottom of the screen and click Show Buffered Diagnostics.
Capturing Packets
With the packet-capture-profile commands, you can capture packets from either a
controller’s local interface or capture over the air from access points. The
packet-capture-profile commands work on AP300/AP400 and AP1000. (For packet
capture on AP150, use the legacy command capture-packets.)
Once packets are captured, you have three options for using them. You can see
packet captures in real time, save them to a file for future offline analysis, or send
them to an IDS program or device.
The CLI command packet-capture-profile supports a capture of a file up to 10Mg.
Make sure that the directory captive is empty before using the command
packet-capture-profile. With the packet-capture-profile commands, you can
forward packet captures from APs directly to external devices without storing
packets locally on the controller. This eliminates the restriction on the file size of
the packet capture (you are not limited by controller memory) and also allows the
312 Meru System Director Configuration Guide
© 2012 Meru Networks, Inc.
Capturing Packets
captured information to be stored and archived externally. Use these CLI commands
to send captured packets from APs to a hardware device or program. This command
is required to use Location Manager.
To Do this:
Using this command:
Enter pcap mode and create a packet-capture-profile either updates an existing
packet capture profile.
profile or creates a new profile and then enters pcap
mode where the rest of these commands are used.
Determine which APs will send ap-list determines which APs will send packets. You
packets.
must type each AP name one by one, separated by
commas. At this time there is no all option or range
ability. This list is limited by buffer space; you can
enter 1, 2, 3,...90 without exceeding the limit. We recommend that you create the list in an application
such as Notepad and then paste it into the command
because if you exceed the buffer size, the command
fails and you have to retype the entire list of APs
again. If your list of APs exceeds the buffer size, you
can create another profile that covers the rest of the
APs.
Indicate packet destination.
Indicate which port to use.
Determine the biggest
packet size that you want an
AP to send.
mode sets the transmit mode to layer2 or layer3,
names the destination IP and names the port that
should be used. Port 9177 is used for Location Manager and 17777 can be used for debugging.
packet-truncation-length sets packet capture truncation length. Default is 0 for troubleshooting and
operation with WIPS. 82 is used for Location Manager.
Decide if you want to limit the rate-limiting sets the packet capture rate limit to
rate at which packets are sent. per-station or cumulative.
! Note: Currently, if rate limiting is on, packets are
limited only for per-station.
Determine whether you want to rxtx sets traffic intrusion detection to received traffic,
sent traffic, or both. .
capture packets going to the
AP, coming from the AP, or
both. Only one option is available in System Director 5.1:
packets going to the AP.
Limit bandwidth used.
© 2012 Meru Networks, Inc.
token-bucket-rate sets the token bucket rate.
Troubleshooting 313
Capturing Packets
To Do this:
Using this command:
Limit bandwidth used.
token-bucket-size sets the token bucket size.
Download the configuration to
the APs and start capturing
packets.
enable-profile turns on a packet capture profile.
For a detailed explanation of all packet capture commands, see the Troubleshooting
chapter of the Meru System Director Command Reference.
Packet Capture Profile Example - WireShark
To do this, you need an external system running WireShark. This example creates the
packet-capture-profile named Sniffer on a controller and then forwards the captured
packets in layer 3 mode from AP-16 to WireShark on port #17777. Port 17777 is the
port where WireShark is listening for incoming packets in L3 mode on a remote
machine with IP address 1.1.1.1.
MC3K-1#
MC3K-1# configure terminal
MC3K-1(config)# packet-capture-profile Sniffer
MC3K-1(config-pcap)# mode l3 destination-ip 1.1.1.1 port 17777
MC3K-1(config-pcap)# ap-list 16
MC3K-1 (config-pcap)# enable-profile
MC3K-1(config-pcap)# exit
MC3K-1(config)# exit
MC3K-1# show packet-capture-profile Sniffer
AP Packet Capture profiles
Packet Capture Profile Name
: Sniffer
Packet Capture profile Enable/Disable
: off
Modes Allowed L2/L3
: l3
Destination IP Address
: 1.1.1.1
UDP Destination Port
: 17777
Destination MAC for L2 mode
: 00:00:00:00:00:00
Rx only/Tx only/Both
: rx
Rate Limiting per station or cumulative : station
Token Bucket Rate
: 10
Token Bucket Size
: 10
AP Selection
: 16
Extended Filter String
:
Interface List
:
Packet Truncation Length
: 0
Rate Limiting
: off
Capture frames sent by other APs in the network : on
MC3K-1#
For a detailed explanation of the packet capture profile commands, see the Troubleshooting chapter of the Meru System Director Command Reference. (This cannot be
done from the Web UI.)
314 Meru System Director Configuration Guide
© 2012 Meru Networks, Inc.
Capturing Packets
What to Look For In Capture-Packet Results
When discovery is via L3, the results of capture-packet should be a UDP port 9292
packet from the AP to the controller followed by a second UDP 9292 packet from the
controller to the AP.
After the two UDP packets, there should be about nine UDP port 5000 packets. Check
the time deltas between packets; there should only be tenths of a second between
packets. Usually, the fifth UDP 5000 packet is from the AP to the controller and is the
first one to contain the certificate used for authentication. Immediately following
the certificate packet should be a packet from controller to the AP using UDP port
5000 that also contains a certificate.
What to Look For In the Discovery Log
The key messages from a successful discovery message trace are:
COMM: CSDS_REQUEST_DISCOVERY message
COMM: Discovery request from <AP MAC address>/<AP IP Address> received
[skip unimportant messages]
COMM: Searching redirect entry for ipAddr 192.168.10.53
[skip unimportant messages]
COMM: Trying to check-out <n> licenses for feature "ap".
COMM: lc_checkout OK for feature "ap". Now, <n> licenses have been checked
out
COMM: Response msg to ATS <AP MAC address>/<AP IP Address>
[skip unimportant messages]
COMM: Starting ATS script as: /opt/meru/bin/meru-wnc-ats start 3 8 1 1
Result: Registered virtual device '<AP MAC address>'
COMM: State file /opt/meru/var/run/discovery.state successfully written.
[skip unimportant messages]
COMM: authentication message 0 with payload type 0 from --- 3:8:37
COMM: /CN=meru AP/ST=California/C=US/[email protected] - OK
[skip unimportant messages]
COMM: AuthMgr::ProcessAccept: 3:8 new key 8f 8e eb ...
One example of the messages you would see when discovery failed because of
a licensing issue is:
COMM: Trying to check-out 1 licenses for feature "ap".
COMM: Checking out one more license for AP failed. FlexRetCode = -9
COMM: lc_checkout FAIL
COMM: AP-1 00:0C:E6:00:2C:96 failed licensing
Also, check the following in the discovery log:
Does the output of the command sh license show the same or more licenses than
there are APs?
Does the output of the command show license-file active show a system ID
something like HOSTID=COMPOSITE=<controller system id> that agrees with the
system ID outputted by the command sh controller?
© 2012 Meru Networks, Inc.
Troubleshooting 315
FTP Error Codes
FTP Error Codes
This section lists the possible error codes for FTP downloads. The codes are industry
standard reporting codes.
100 Codes—The requested action is being taken. Expect a reply before
proceeding with a new command.
110 Restart marker reply.In this case, the text is exact and not left to the
particular implementation; it must read: MARK yyyy = mmmm Where yyyy is
User-process data stream marker, and mmmm server's equivalent marker (note
the spaces between markers and "=").
120 Service ready in (n) minutes.
125 Data connection already open, transfer starting.
150 File status okay, about to open data connection.
150 File status okay; about to open data connection.
200 Codes—The requested action has been successfully completed.
200 Command okay.
202 Command not implemented, superfluous at this site.
211 System status, or system help reply.
212 Directory status.
213 File status.
214 Help message. On how to use the server or the meaning of a particular
non-standard command. This reply is useful only to the human user.
215 NAME system type. Where NAME is an official system name from the list in the
Assigned Numbers document.
220 Service ready for new user.
221 Service closing control connection. Logged out if appropriate.
225 Data connection open; no transfer in progress.
226 Closing data connection. Requested file action successful (for example, file
transfer or file abort).
227 Entering Passive Mode (h1,h2,h3,h4,p1,p2).
230 User logged in, proceed.
250 Requested file action okay, completed.
257 "PATHNAME" created.
300 Codes—The command has been accepted, but the requested action is being
held pending receipt of further information.
331 User name okay, need password.
332 Need account for login.
350 Requested file action pending further information.
400 Codes—The command was not accepted and the requested action did not take
place. The error condition is temporary, however, and the action may be
requested again.
316 Meru System Director Configuration Guide
© 2012 Meru Networks, Inc.
FTP Error Codes
421 Service not available, closing control connection. (May be a reply to any
command if the service knows it must shut down.)`
425 Can't open data connection.
426 Connection closed; transfer aborted.
450 Requested file action not taken. File unavailable (e.g., file busy).
451 Requested action aborted: local error in processing.
452 Requested action not taken. Insufficient storage space in system.
500 Codes—The command was not accepted and the requested action did not take
place.
500 Syntax error, command unrecognized. This may include errors such as
command line too long.
501 Syntax error in parameters or arguments.
502 Command not implemented.
503 Bad sequence of commands.
504 Command not implemented for that parameter.
530 User not logged in.
532 Need account for storing files.
550 Requested action not taken. File unavailable (e.g., file not found, no access).
551 Requested action aborted: page type unknown.
552 Requested file action aborted. Exceeded storage allocation (for current
directory or dataset).
553 Requested action not taken. Illegal file name.
© 2012 Meru Networks, Inc.
Troubleshooting 317
FTP Error Codes
318 Meru System Director Configuration Guide
© 2012 Meru Networks, Inc.
Chapter 19
Alarms
No.
Alarm
Severity
1.
Source
Explanation
Alarm link up
information
all controller
models
Physical link on controller is up.
Alarm link down
critical
all controller
models
Physical link on the controller is down;
check the connection.
Alarm auth fail
information
controller
models
An administrator failed to log in to the GUI
due to an authentication failure.
all AP models
An AP is down. Possible reasons for this
are an AP reboot, an AP crash, or an
Ethernet cable from the controller may be
down. Also the AP may have connected
to another controller.
all AP models
An alarm is generated when the Radio
fails to turn operational during Initial
bootup. This is occurred due to some
Hardware issue on the AP Radio.
2.
3.
4.
AP down
critical
5.
Radio Failure
critical
6.
Rogue AP detected
critical
all controller
models
A rogue AP has been detected on the
network. The message looks something
like this: Rogue AP Detected
Critical 06/04/2010 10:04:51
CONTROLLER (1:24194) ROGUE AP
DETECTED. Station
mac=0c:60:76:2d:fe:d9
bss=00:02:6f:3a:fd:89 by AP Ben-Cubei
(18)
See the chapter Rogue AP Detection and
Mitigation.
© 2012 Meru Networks, Inc.
Alarms 319
No.
Alarm
Severity
Source
Explanation
7.
8.
AP software version
mismatch
critical
all AP models
The software version on the AP does not
match the version on the controller.
Automatic AP upgrade must have been
turned off. Update the AP from the
controller with either the CLI command
upgrade ap same <ap id> force or
upgrade ap same all force. You can also
turn automatic upgrade back on by with
the CLI command auto-ap-upgrade
enable.
AP init failure
major
all AP models
AP initialization failed.
Software license
expired
major
all controller
models
Controller software license has expired.
To obtain additional licenses, see
www.merunetworks.com/license.
all controller
models
Radius server authentication failed. To
find out why, look at the Radius server log
for the error message and also check the
station log. If this happens only
occasionally, you can ignore it. However,
if this message appears repeatedly, the
authentication failures could prevent a
station from entering the network. In this
case, check the Radius server to make
sure the client and server have the same
credentials.
9.
10.
802.1X auth failure
major, minor,
information
11.
12.
MIC failure AP
major
all controller
models
The Michael MIC Authenticator Tx/Rx
Keys provided in the Group Key
Handshake are only used if the network is
using TKIP to encrypt the data. A failure
of the Michael MIC in a packet usually
indicates that the WPA WPSK password
is wrong.
MIC
countermeasure
activation
major
all controller
models
Two consecutive MIC failures have
occurred (see above).
320 Meru System Director Configuration Guide
© 2012 Meru Networks, Inc.
No.
Alarm
Severity
Source
13.
Explanation
A switchover from the Primary
Authentication Radius Server to the
Secondary Authentication Radius Server
occurred. When this message occurs, the
Primary Radius server is configured but
not reachable and the Secondary Radius
server is both configured and reachable.
Radius Server
Switchover
major
all controller
models
This message is generated only for
802.1x switchover, not for Captive Portal
switchover.
An example looks like this:
Radius Server Switchover
Major
06/07/2010 14:09:57 Radius Server
switches over from Primary <172.18.1.7>
to Secondary <172.18.1.3> for Profile
<wpa>
14.
A switchover from the Primary
Authentication Radius Server to the
Secondary Authentication Radius Server
failed because the secondary server is
not configured. When this message
occurs, the Primary Radius server is
configured but not reachable and the
Secondary Radius server is not
configured.
Radius Server
Switchover Failed
major
all controller
models
This message is generated only for
802.1x switchover failure, not for Captive
Portal switchover failure.
An example looks like this:
Radius Server Switchover Failed Major
06/07/2010 14:02:47 Primary Radius
Server <172.18.1.7> failed. No valid
Secondary Radius Server present.
Switchover FAILED for Profile <wpa>
Alarms Table(1 entry)
© 2012 Meru Networks, Inc.
Alarms 321
No.
Alarm
Severity
Source
15.
Explanation
A switchover from the Secondary
Authentication Radius Server to the
Primary Authentication Radius Server
occurred. This alarm was generated while
doing Radius fall back to the primary
server after 15 minutes.
Restore Primary
Radius Server
major
all controller
models
This message is generated only for
802.1x primary Radius restore, not for
Captive Portal restore.
An example looks like this:
Restore Primary Radius Server Major
06/07/2010 15:54:10 Security Profile
<wpa> restored back to the Primary
Radius server <172.18.1.7>
16.
A switchover from either Accounting
Radius Server (primary or secondary) to
the other one occurred. This message is
generated only for 802.1x switchover, not
for Captive Portal switchover.
Acct Radius server
switchover
major
all controller
models
An example when the primary to
secondary switch occurred looks like this:
Accounting Radius Server Switch Major
06/07/2010 14:39:00 Accounting Radius
Server switches over from Primary
<172.18.1.7> to Secondary <172.18.1.3>
for Profile <wpa>
322 Meru System Director Configuration Guide
© 2012 Meru Networks, Inc.
No.
Alarm
Severity
Source
17.
Explanation
An attempted switchover from one
Accounting Radius Server to the other
server failed.When this message occurs,
the Primary Accounting Radius server is
configured but not reachable and the
Secondary Accounting Radius server is
not configured.
Acct Radius server
switchover failed
major
all controller
models
This message is generated only for
802.1x switchover failure, not for Captive
Portal switchover fail lure.
An example looks like this:
Accounting Radius Server Switch Major
06/07/2010 14:22:26 Primary Accounting
Radius Server <172.18.1.7> failed. No
valid Secondary Accounting Radius
Server present. Switchover FAILED for
Profile <wpa>
18.
Master down
critical
all controller
models
N+1 Master controller is down and no
longer in control; the slave controller will
now take over.
Master up
critical
all controller
models
N+1 Master controller is up and running;
this controller will now take control away
from the slave controller.
all controller
models
Admission control in ATM networks is
known as Connection Admission Control
(CAC) - this process determines which
traffic is admitted into a network. If this
message occurs, the maximum amount of
traffic is now occurring on the network
and no more can be added.
AP301,
AP302, AP311
An 11N license is not available to support
11n mode for the specified AP300. You
can either obtain an N license or
reconfigure the AP to ABG mode. See the
System Director Release Notes for
directions.
19.
20.
CAC limit reached
major
21.
N-Upgrade License
checkout failed
© 2012 Meru Networks, Inc.
major
Alarms 323
324 Meru System Director Configuration Guide
© 2012 Meru Networks, Inc.
Glossary
This glossary contains a collection of terms and abbreviations used in this document.
ABCDEFGHIJKLMNOPQRSTUVWXY
Numerals
10BaseT
An IEEE standard (802.3) for operating 10 megabits per second (Mbps) Ethernet networks
(LANs) over twisted pair cabling and using baseband transmission methods.
100baseT
A Fast Ethernet standard (802.3u) that allows up to 100 Mbps and uses the CSMA/CD LAN
access method.
3DES
Triple Des. A Data Encryption Standard (DES) that uses three 64-bit encryption key, and
therefore is three times longer than that used by DES.
802.11
802.11, or IEEE 802.11, is a radio technology specification used for Wireless Local Area
Networks (WLANs). 802.11 defines the mobile (wireless) network access link layer,
including 802.11 media access control (MAC) and different Physical (PHY) interfaces. This
standard defines the protocol for communications between a wireless client and a base
station as well as between two wireless clients.
The 802.11 specification, often called Wi-Fi, is composed of several standards operating
in different radio frequencies, including the 2.4 GHz (802.11 b and g) and 5 GHz (802.11a)
unlicensed spectrums. New standards are emerging within the 802.11 specification to
define additional aspects of wireless networking.
802.11a
A supplement to 802.11 that operates in the 5 GHz frequency range with a maximum 54
Mbps data transfer rate. The 802.11a specification offers more radio channels than the
802.11b and uses OFDM. The additional channels ease radio and microwave interference.
802.11b
International standard for wireless networking that operates in the 2.4 GHz frequency
range (2.4 GHz to 2.4835 GHz) and provides a throughput of up to 11 Mbps. This common
frequency is also used by microwave ovens, cordless phones, medical and scientific equipment, as well as Bluetooth devices.
802.11e
An IEEE specification for providing Quality of Service (QoS) in 802.11 WLANs. 802.11e is a
supplement to the IEEE 802.11 and provides enhancements to the 802.11 MAC layer
supplying a Time Division Multiple Access (TDMA) construct and error-correcting mechanisms that aid delay-sensitive applications such as voice and video.
802.11g
Similar to 802.11b, this standard operates in the 2.4 GHz frequency. It uses OFDM to
provide a throughput of up to 54 Mbps.
© 2012 Meru Networks, Inc.
Glossary 325
802.11i
Supports the 128-bit Advanced Encryption Standard (AES) and Temporal Key Integrity
Protocol (TKIP) along with 802.1X authentication and key management features for
increased WLAN security capabilities.
802.11j
Provides enhancements to the current 802.11 standard to support the 4.9GHz - 5GHz band
for operations in Japan.
802.11k
Due for ratification in 2005, the 802.11k Radio Resource Management standard will provide
measurement information for access points and switches to make Wireless LANs run more
efficiently.
802.11n
An emerging standard aimed at providing greater than 100 Mbps of throughput in a wireless
environment.
802.11r
A specification under development to improve a wireless client's ability to roam across
wireless networks.
802.16
A specification for fixed broadband wireless metropolitan access networks (MANs) that
uses a point-to-multipoint architecture. The standard defines the use of bandwidth
between the licensed 10GHz and 66GHz bands and between the 2GHZ and 11GHz (licensed
and unlicensed) frequency ranges. 802.16 supports very high bit rates for a distance of
approximately 30 miles.
802.1X
Wireless LAN security implementation that uses port-based authentication between an
operating system and the network access device, meant to increase security in user
authentication by using Radius, Extensible Authentication Protocol (EAP), and LDAP.
A
AAA
authentication, authorization, and accounting (triple A). An IP-based system for
providing services to ensure secure network connections for users. The system requires a
server such as a Radius server to enforce these services.
access point
A device that is managed by a controller and that allows stations such as cellular phones
or laptops to communicate wirelessly with the Meru Wireless LAN System.
accounting
Services that track the resources a user session uses such as amount of time logged on,
data transferred, resources, etc. Accounting services are typically used for billing,
auditing, analysis, etc.
ACL
Access Control List. A list kept by the controller to limit access of station to the WLAN. The
ACL can be a permit, deny, or Radius Server list of MAC addresses of the NIC device within
the station. An ACL is controller by the configured state, either enabled or disabled.
AES
Advanced Encryption Standard. An encryption standard that uses a symmetric encryption
algorithm (Rijndael). AES was chosen by the National Information and Standards Institute
(NIST) as the Federal Information Processing Standard (FIPS).
Air Traffic
Control
Meru technology that exercises a high degree of control over all transmissions within a
wireless network. Unlike superficially similar technologies from other vendors, Air Traffic
Control technology coordinates uplink and downlink transmissions on a single 802.11
channel in such a manner that the effects of co-channel and adjacent channel interference
326 Meru System Director Configuration Guide
© 2012 Meru Networks, Inc.
are eliminated and all access points on a network can share a single radio channel. It also
load balances traffic across channels when using Channel Layering, ensuring that each
channel
ATS
Access Transaction Station. Alternative term for access point.
attenuation
The reduction of RF signal strength due to the presence of an obstacle, such as a wall or
person. The amount of attenuation caused by a particular object will vary depending upon
its composition.
authentication
The process of identifying a user, usually based on a username and password, but can also
be a MAC address.
authorization
The process of granting or denying a user access to network resources once the user has
been authenticated through the username and password.
B
backbone
The central part of a large network that links two or more subnetworks and is the primary
path for data transmission for a large business or corporation. A network can have a wired
backbone or a wireless backbone.
bandwidth
The amount of transmission capacity that is available on a network at any point in time.
Available bandwidth depends on several variables such as the rate of data transmission
speed between networked devices, network overhead, number of users, and the type of
device used to connect PCs to a network. It is similar to a pipeline in that capacity is determined by size: the wider the pipe, the more water can flow through it; the more bandwidth
a network provides, the more data can flow through it. Standard 802.11b provides a bandwidth of 11 Mbps; 802.11a and 802.11g provide a bandwidth of 54 Mbps. These are the raw
capabilities of the network. Many things conspire to reduce these values, including
protocol overhead, collisions, and implementation inefficiencies.
base station
A term in cellular networking that refers to a radio transmitter/receiver that maintains
communications with mobile radiotelephone sets within a given range (typically a cell
site).
bps
bits per second. A measure of data transmission speed over communication lines based on
the number of bits that can be sent or received per second. Bits per second-bps-is often
confused with bytes per second-Bps. 8 bits make a byte, so if a wireless network is operating at a bandwidth of 11 megabits per second (11 Mbps or 11 Mbits/sec), it is sending
data at 1.375 megabytes per second (1.375 MBps).
bridge
A product that connects a local area network (LAN) to another local area network that uses
the same protocol (for example, wireless, Ethernet or token ring). Wireless bridges are
commonly used to link buildings in campuses.
BSC
Base Station Controller. Manages radio resources and controls handoff between cells. May
also contain the transcoder for compressing/uncompressing voice between cellular
network and the Public Switched Telephone Network (PSTN).
BSSID
Basic Service Set Identifier is a means of uniquely identifying an access point, usually
intended for machine use rather than human use. A 48-bit Ethernet MAC address is used to
identify an 802.11 wireless service. In a Virtual Cell, all same-channel APs may appear to
© 2012 Meru Networks, Inc.
Glossary 327
have the same BSSID, thus virtualizing the network from the client's perspective. When
Virtual Ports are used, each client sees a different BSSID, appearing to get its own private
AP. See also ESSID.
C
Co-channel
Interference
Radio interference that occurs when two transmitters use the same frequency without
being closely synchronized. Legacy wireless systems cannot achieve this kind of synchronization, so access points or cell towers that transmit on one channel must be spaced far
apart. The result is coverage gaps that must be filled in with radios tuned to another
channel, resulting in an inefficient and complex microcell architecture. Air Traffic Control
technology avoids co-channel interference by tightly synchronizing access point transmissions, enabling that adjacent APs to use the same channel.
Channel
Bonding
The combination of two non-overlapping 20 MHz. channels into a single 40 MHz. channel,
doubling the amount of data that can be transmitted in a given time but halving the
number of available channels. Along with MIMO, it is a key innovation in the 802.11n standard.
Channel
Layering
Wireless LAN architecture in which several Virtual Cells are located in the same physical
space but on non-overlapping channels, multiplying the available capacity. This additional
capacity can be used for redundancy or to support higher data rates or user density. It can
be enabled through multiple radios on one AP or by using multiple AP close together, so
the total capacity is limited only be the number of non-overlapping channels available.
Channel Reuse
A pattern in which different APs can use the same channel. In microcell networks, such
APs need to be placed far apart to avoid co-channel interference, meaning that contiguous
coverage requires multiple channels. In networks using Air Traffic Control technology, the
same channel can be reused throughout the network, meaning that only one channel is
required and others are left free for other purposes.
CHAP
Challenge Handshake Authentication Protocol. An authentication protocol that defines a
three-way handshake to authenticate a user. CHAP uses the MD5 hash algorithm to
generate a response to a challenge that can be checked by the authenticator.
CLI
Command-line interpreter. On a controller and other units, this is similar to a command
shell for giving instructions.
client
Any computer connected to a network that requests services (files, print capability) from
another member of the network.
client devices
Clients are end users. Wi-Fi client devices include PC Cards that slide into laptop
computers, mini-PCI modules embedded in laptop computers and mobile computing
devices, as well as USB radios and PCI/ISA bus Wi-Fi radios. Client devices usually communicate with hub devices like access points and gateways.
collision avoidance
A network node characteristic for proactively detecting that it can transmit a signal
without risking a collision.
controller
A device that is responsible for configuring and integrating the access points in a WLAN.
328 Meru System Director Configuration Guide
© 2012 Meru Networks, Inc.
CSMA-CA
CSMA/CA is the principle medium access method employed by IEEE 802.11 WLANs. It is a
"listen before talk" method of minimizing (but not eliminating) collisions caused by simultaneous transmission by multiple radios. IEEE 802.11 states collision avoidance method
rather than collision detection must be used, because the standard employs half duplex
radios-radios capable of transmission or reception-but not both simultaneously.
CSMA/CD
A method of managing traffic and reducing noise on an Ethernet network. A network device
transmits data after detecting that a channel is available. However, if two devices transmit
data simultaneously, the sending devices detect a collision and retransmit after a random
time delay.
D
dBm
A measurement of relative power (decibel) related to 1 milliwatt (mW).
Denial of Service
(DoS) A condition in which users are deliberately prevented from using network resources.
DES
Data Encryption Standard. A symmetric encryption algorithm that always uses 56 bit keys.
It is rapidly being replaced by its more secure successor, 3DES.
DHCP
A utility that enables a server to dynamically assign IP addresses from a predefined list for
a predefined time period, limiting their use time so that they can be reassigned. Without
DHCP, IP addresses would have to be manually assigned to all computers on the network.
When DHCP is used, whenever a computer logs onto the network, it automatically is
assigned an IP address.
DNS
A program that translates URLs to IP addresses by accessing a database maintained on a
collection of Internet servers. The program works behind the scenes to facilitate surfing
the Web with alpha versus numeric addresses. A DNS server converts a name like mywebsite.com to a series of numbers like 107.22.55.26. Every website has its own specific IP
address on the Internet.
DSL
Various technology protocols for high-speed data, voice and video transmission over ordinary twisted-pair copper POTS (Plain Old Telephone Service) telephone wires.
E
EAP
Extensible Authentication Protocol. An extension to PPP. EAP is a general protocol for
authentication that also supports multiple authentication methods, such as token cards,
Kerberos, one-time passwords, certificates, public key authentication and smart cards.
IEEE 802.1x specifies how EAP should be encapsulated in LAN frames.
EAP-TLS
Extensible Authentication Protocol with Transport Layer Security. EAP-TLS supports mutual
authentication using digital certificates. When a client requests access, the authentication
server responds with a server certificate. The client replies with its own certificate and
also validates the server certificate. The certificate values are used to derive session
encryption keys.
© 2012 Meru Networks, Inc.
Glossary 329
EAP - TTLS
Extensible Authentication Protocol with Tunneled Transport Layer Security. EAP-TTLS uses
a combination of certificates and password challenge and response for authentication
within an 802.1X environment. TTLS supports authentication methods defined by EAP, as
well as the older Challenge Handshake Authentication Protocol (CHAP), Password Authentication Protocol (PAP), Microsoft CHAP (MS-CHAP), and MS-CHAPV2.
encryption key
An alphanumeric (letters and/or numbers) series that enables data to be encrypted and
then decrypted so it can be safely shared among members of a network. WEP uses an
encryption key that automatically encrypts outgoing wireless data. On the receiving side,
the same encryption key enables the computer to automatically decrypt the information
so it can be read.
enterprise
A term that is often applied to large corporations and businesses. The enterprise market
can incorporate office buildings, manufacturing plants, warehouses and R&D facilities, as
well as large colleges and universities.
ESSID
Extended Service Set Identifier (ID). The identifying name of an 802.11 wireless network,
which is a string of up to 32 characters that is intended to be viewed by humans. When you
specify an ESSID in your client setup, you ensure that you connect to your wireless network
rather than another network in range.
A set of access points can share an ESSID. In this case, a station can roam among the access
points.
Ethernet
International standard networking technology for wired implementations. Basic 10BaseT
networks offer a bandwidth of about 10 Mbps. Fast Ethernet (100 Mbps) and Gigabit
Ethernet (1000 Mbps) are becoming popular.
F
FCC
Federal Communications Commission. The United States' governing body for telecommunications law.
firewall
A system that secures a network and prevents access by unauthorized users. Firewalls can
be software, hardware or a combination of both. Firewalls can prevent unrestricted access
into a network, as well as restrict data from flowing out of a network.
Fourth Generation
Term coined by analyst firm Gartner to describe a wireless LAN system in which the
controller governs handoffs, such as one utilizing Virtual Cells. This is contrasted with third
generation (micro-cell architecture) systems, in which the controller is only responsible
for managing access points and clients must decide for themselves when to initiate a
handoff. Second generation systems lacked a controller altogether and were designed for
standalone operation, whereas the first generation used proprietary, non-802.11 systems.
G
gain
The ratio of the power output to the power input of an amplifier in dB. The gain is specified
in the linear operating range of the amplifier where a 1 dB increase in input power gives
rise to a 1 dB increase in output power.
330 Meru System Director Configuration Guide
© 2012 Meru Networks, Inc.
gateway
In the wireless world, a gateway is an access point with additional software capabilities
such as providing NAT and DHCP. Gateways may also provide VPN support, roaming, firewalls, various levels of security, etc.
H
Handoff
The transfer of a link from one access point to another as a client moves through a
network. In legacy microcell networks, Wi-Fi clients are responsible for handoff, meaning
that the quality of the link and the overall network performance is dependent on each
client's implementation of 802.11 roaming algorithms. In Virtual Cell and Virtual Port
networks, the network itself governs handoffs as clients remain connected to a single
virtual AP.
hotspot
A place where you can access Wi-Fi service. This can be for free or for a fee. HotSpots can
be inside a coffeeshop, airport lounge, train station, convention center, hotel or any other
public meeting area. Corporations and campuses are also implementing HotSpots to
provide wireless Internet access to their visitors and guests. In some parts of the world,
HotSpots are known as CoolSpots.
hub
A multiport device used to connect PCs to a network via Ethernet cabling or via Wi-Fi.
Wired hubs can have numerous ports and can transmit data at speeds ranging from 10 Mbps
to multigigabyte speeds per second. A hub transmits packets it receives to all the
connected ports. A small wired hub may only connect 4 computers; a large hub can
connect 48 or more. Wireless hubs can connect hundreds.
Hz
The international unit for measuring frequency, equivalent to the older unit of cycles per
second. One megahertz (MHz) is one million hertz. One gigahertz (GHz) is one billion hertz.
The standard US electrical power frequency is 60 Hz, the AM broadcast radio frequency
band is 535-1605 kHz, the FM broadcast radio frequency band is 88-108 MHz, and Wireless
802.11b LANs operate at 2.4 GHz.
I
IP number
Also called an IP address. A 32-bit binary number that identifies senders and receivers of
traffic across the Internet. It is usually expressed in the form nnn.nnn.nnn.nnn where nnn
is a number from 0 to 256.
identity-based
networking
A concept whereby WLAN policies are assigned and enforced based upon a wireless client's
identity, as opposed to its physical location. With identity networking, wireless devices
need only authenticate once with a WLAN system. Context information will follow the
devices as they roam, ensuring seamless mobility.
IEEE
Institute of Electrical and Electronics Engineers. (www.ieee.org) A membership organization that includes engineers, scientists and students in electronics and allied fields. It has
more than 300,000 members and is involved with setting standards for computers and
communications.
IEEE 802.11
A set of specifications for LANs from The Institute of Electrical and Electronics Engineers
(IEEE). Most wired networks conform to 802.3, the specification for CSMA/CD based
Ethernet networks or 802.5, the specification for token ring networks. 802.11 defines the
standard for Wireless LANs encompassing three incompatible (non-interoperable) technol-
© 2012 Meru Networks, Inc.
Glossary 331
ogies: Frequency Hopping Spread Spectrum (FHSS), Direct Sequence Spread Spectrum
(DSSS) and Infrared. WECA's focus is on 802.11b, an 11 Mbps high-rate DSSS standard for
wireless networks.
infrastructure
mode
A client setting providing connectivity to an AP. As compared to Ad-Hoc mode, whereby
PCs communicate directly with each other, clients set in Infrastructure Mode all pass data
through a central AP. The AP not only mediates wireless network traffic in the immediate
neighborhood, but also provides communication with the wired network. See Ad-Hoc and
AP.
IP
Internet Protocol. A set of rules used to send and receive messages at the Internet address
level.
IP telephony
Technology that supports voice, data and video transmission via IP-based LANs, WANs, and
the Internet. This includes VoIP (Voice over IP).
IP address
A 32-bit number that identifies each sender or receiver of information that is sent across
the Internet. An IP address has two parts: an identifier of a particular network on the
Internet and an identifier of the particular device (which can be a server or a workstation)
within that network.
IPSec
IPSec is a security protocol from the Internet Engineering Task Force (IETF) that provides
authentication and encryption. IPsec, which works at Layer 3, is widely used to secure
VPNs and wireless users. Some vendors, like Airespace, have implemented special WLAN
features that allow IPsec sessions to roam with clients for secure mobility.
ISDN
A type of broadband Internet connection that provides digital service from the customer's
premises to the dial-up telephone network. ISDN uses standard POTS copper wiring to
deliver voice, data or video.
ISO network
model
A network model developed by the International Standards Organization (ISO) that consists
of seven different levels, or layers. By standardizing these layers, and the interfaces in
between, different portions of a given protocol can be modified or changed as technologies
advance or systems requirements are altered. The seven layers are:
Physical
Data Link
Network
Transport
Session
Presentation
Application
The IEEE 802.11 Standard encompasses the physical layer (PHY) and the lower portion of
the data link layer. The lower portion of the data link layer is often referred to as the
Medium Access Controller (MAC) sublayer.
332 Meru System Director Configuration Guide
© 2012 Meru Networks, Inc.
J
K
L
LAN
Local Area Network. A system of connecting PCs and other devices within the same physical proximity for sharing resources such as an Internet connections, printers, files and
drives. When Wi-Fi is used to connect the devices, the system is known as a Wireless LAN
or WLAN.
LDAP
Lightweight Directory Access Protocol. A set of protocols for accessing information directories conforming to the X.500 standard.
LWAPP
Lightweight Access Point Protocol. A proposed specification to the International Engineering Task Force (IETF) created to standardize the communications protocol between
access points and WLAN system devices (switches, appliances, routers, etc.). Initial
authors include Airespace and NTT DoCoMo. See CAPWAP
M
MAC
Medium Access Control. This is the function of a network controller that determines who
gets to transmit when. Each network adapter must be uniquely identified. Every wireless
802.11 device has its own specific MAC address hard-coded into it. This unique identifier
can be used to provide security for wireless networks. When a network uses a MAC table,
only the 802.11 radios that have had their MAC addresses added to that network's MAC
table will be able to get onto the network.
Man in Middle
(MiM) An attack that results from the interception and possible modification of traffic
passing between two communicating parties, such as a wireless client and Access Point.
MIM attacks succeed if the systems can't distinguish communications with an intended
recipient from those with the intervening attacker.
Mbps
Million bits (megabits) per second.
MIC
Message Integrity Check. MIC is part of a draft standard from IEEE 802.11i working group.
It is an additional 8 byte field which is placed between the data portion of an 802.11
(Wi-Fi) frame and the 4 byte ICV (Integrity Check Value) to protect both the payload and
the header. The algorithm which implements the MIC is known as Michael.
Microcell
Wireless architecture in which adjacent APs must be tuned to different, non-overlapping
channels in an attempt to mitigate co-channel interference. This requires complex
channel planning both before the network is built and whenever a change is made, and
uses spectrum so inefficiently that some co-channel interference still occurs, especially at
2,4 GHz. Microcell architectures were common in 2G cell phone systems and legacy wireless LAN systems. They are not used in 3G cellular networks or in wireless LAN systems that
use Air Traffic Control, as these allow all access points to share a single channel.
© 2012 Meru Networks, Inc.
Glossary 333
mobile professional
A salesperson or a "road warrior" who travels frequently and requires the ability to regularly access his or her corporate networks, via the Internet, to post and retrieve files and
data and to send and receive e-mail.
multipath
The process or condition in which radiation travels between source and receiver via more
than one propagation path due to reflection, refraction, or scattering.
N
NAT
NetwOrk Address Translation. A system for converting the IP numbers used in one network
to the IP numbers used in another network. Usually one network is the internal network
and one network is the external network. Usually the internal IP numbers form a relatively
large set of IP numbers, which must be compressed into a small set of IP numbers for the
external network.
network name
Identifies the wireless network for all the shared components. During the installation
process for most wireless networks, you need to enter the network name or SSID. Different
network names are used when setting up your individual computer, wired network or workgroup.
NIC
Network Interface Card. A type of PC adapter card that either works without wires (Wi-Fi)
or attaches to a network cable to provide two-way communication between the computer
and network devices such as a hub or switch. Most office wired NICs operate at 10 Mbps
(Ethernet), 100 Mbps (Fast Ethernet) or 10/100 Mbps dual speed. High-speed Gigabit and
10 Gigabit NIC cards are also available. See PC Card.
O
OFDM
Orthogonal Frequency Division Multiplexing. A modulation technique for transmitting large
amounts of digital data over a radio wave. OFDM splits the radio signal into multiple
smaller signals that are transmitted in parallel at different frequencies to the receiver.
OFDM reduces the amount of crosstalk in signal transmissions. 802.11a uses OFDM.
Overlay Network
A dedicated network of radio sensors that are similar to access points but do not serve
clients, scanning the airwaves full time for security or management issues. Overlay
networks lack the flexibility of AP-based scanning, as radios cannot be redeployed
between scanning and client access. They also lack deep integration with the main wireless network, necessary for real-time management and intrusion prevention.
P
Partitioning
Virtualization technique in which a single resource is divided up into virtual resources that
are then dedicated to a particular application. Examples include the virtual machines in
server virtualization, virtual disk drives in SANs and Virtual Ports in Meru's Wireless LAN
Virtualization. The main advantages of partitioning are control and isolation: Each application or user can be given exactly the resources that it needs, protecting them from each
other and ensuring that none consumes more than its allocated share of resources. In a
wireless context, it makes a wireless LAN behave more like a switched Ethernet port.
334 Meru System Director Configuration Guide
© 2012 Meru Networks, Inc.
Pooling
Virtualization technique in which multiple physical resources are combined into a single
virtual resource. Examples include the multiple disk drives in a virtual storage array, the
multiple CPUs in a modern server and the multiple access points in a Meru Virtual Cell. The
main advantages of pooling are agility, simplified management and economies of scale:
Resources can be moved between applications on demand, reducing the need for
over-provisioning and freeing applications or users from dependence on a single piece of
limited infrastructure.
PC card
A removable, credit-card-sized memory or I/O device that fits into a Type 2 PCMCIA standard slot, PC Cards are used primarily in PCs, portable computers, PDAs and laptops. PC
Card peripherals include Wi-Fi cards, memory cards, modems, NICs, hard drives, etc.
PCI
A high-performance I/O computer bus used internally on most computers. Other bus types
include ISA and AGP. PCIs and other computer buses enable the addition of internal cards
that provide services and features not supported by the motherboard or other connectors.
PDA
Smaller than laptop computers but with many of the same computing and communication
capabilities, PDAs range greatly in size, complexity and functionality. PDAs can provide
wireless connectivity via embedded Wi-Fi Card radios, slide-in PC Card radios, or Compact
Flash Wi-Fi radios.
PEAP
Protected Extensible Authentication Protocol. An extension to the Extensible Authentication Protocol with Transport Layer Security (EAP-TLS), developed by Microsoft Corporation.
TLS is used in PEAP Part 1 to authenticate the server only, and thus avoids having to
distribute user certificates to every client. PEAP Part 2 performs mutual authentication
between the EAP client and the server.
peer-to-peer
network
A wireless or wired computer network that has no server or central hub or router. All the
networked PCs are equally able to act as a network server or client, and each client
computer can talk to all the other wireless computers without having to go through an
access point or hub. However, since there is no central base station to monitor traffic or
provide Internet access, the various signals can collide with each other, reducing overall
performance.
PHY
The lowest layer within the OSI Network Model. It deals primarily with transmission of the
raw bit stream over the PHYsical transport medium. In the case of Wireless LANs, the
transport medium is free space. The PHY defines parameters such as data rates, modulation method, signaling parameters, transmitter/receiver synchronization, etc. Within an
actual radio implementation, the PHY corresponds to the radio front end and baseband
signal processing sections.
plenum
The ceiling plenum is the volume defined by the area above the back of the ceiling tile,
and below the bottom of the structural slab above. Within this plenum is usually found a
combination of HVAC ducts, electrical and electronic conduits, water pipes, traditional
masking sound speakers, etc. Networking equipment needs to be plenum rated to certify
that it is suitable for deployment in this area.
PoE
Power over Ethernet. A technology defined by the IEEE 802.3af standard to deliver dc
power over twisted-pair Ethernet data cables rather than power cords. The electrical
current, which enters the data cable at the power-supply end and comes out at the device
end, is kept separate from the data signal so neither interferes with the other.
© 2012 Meru Networks, Inc.
Glossary 335
POTS
Plain Old Telephone Service. Standard analog telephone service (an acronym for Plain Old
Telephone Service).
proxy server
Used in larger companies and organizations to improve network operations and security, a
proxy server is able to prevent direct communication between two or more networks. The
proxy server forwards allowable data requests to remote servers and/or responds to data
requests directly from stored remote server data.
PSTN
Public Switched Telephone Network. The usual way of making telephone calls in the late
20th century, designed around the idea of using wires and switches. Perhaps to be
supplanted by Voice Over IP in the 21st century.
Q
QoS
Quality of Service. A set of technologies for managing and allocating Internet bandwidth.
Often used to ensure a level of service required to support the performance requirements
of a specific application, user group, traffic flow, or other parameter. Defined within the
service level are network service metrics that include network availability (uptime),
latency and packet loss.
R
Radius
Remote Authentication Dial-In User Service. A service that authorizes connecting users and
allows them access to requested systems or services. The Microsoft ISA server is a Radius
server.
range
How far will your wireless network stretch? Most Wi-Fi systems will provide a range of a
hundred feet or more. Depending on the environment and the type of antenna used, Wi-Fi
signals can have a range of up to mile.
RC4 algorithm
The RC4 algorithm uses an Initialization Vector (IV) and a secret key to generate a
pseudo-random key stream with a high periodicity. Designed by RSA Security, RC4 is used
in WEP and many other transmission protocols including SSL.
RF
Radio Frequency. The type of transmission between a Wireless LAN access point and a wireless client (e.g., laptop, PDA, or phone). Wireless LANs can use RF spectrum at either 2.4
GHz (IEEE 802.11b or IEEE 802.11g) or 5 GHz (IEEE 802.11G).
RFID
Radio Frequency ID. A device that picks up signals from and sends signals to a reader using
radio frequency. Tags come in many forms, such as smart labels that are stuck on boxes;
smart cards and key-chain wands for paying for things; and a box that you stick on your
windshield to enable you to pay tolls without stopping. Most recently, active 802.11 RFID
tags are being deployed in enterprise environments to provide more consistent tracking
across farther distances than traditional passive devices.
RF fingerprinting
In an enterprise WLAN scenario, RF fingerprinting refers to creating a blueprint of a
building's RF characteristics, taking into account specific wall and design characteristics
such as attenuation and multipath. This information is compared to real-time information
collected by APs for 802.11 location tracking. By taking RF characteristics into account, RF
fingerprint is the most accurate method of wireless device tracking available today.
336 Meru System Director Configuration Guide
© 2012 Meru Networks, Inc.
RF prediction
The process of predicting WLAN characteristics, such as throughput and coverage area,
based upon imported building characteristics and sample WLAN design configurations.
RF triangulation
A common method used for 802.11 device tracking whereby 3 or more Access Points
compare RSSI information to triangulate in on a device's location. While easy to implement, RF triangulation does not account for multipath, attenuation, and other RF characteristics that may affect receive sensitivity, making it less accurate than RF fingerprinting.
roaming
The process that takes places as a client moves between the coverage areas of different
APs, necessitating a handoff. In microcell Wi-Fi networks, roaming can be a complex
procedure that risks dropped connections and drags down network performance, as the
client is forced to decide when to disconnect from one AP and search for another. In
networks using Virtual Cell and Virtual Port technology, the infrastructure controls
roaming, automatically connecting each client to the optimum AP.
rogue Access
Point
An AP that is not authorized to operate within a wireless network. Rogue APs subvert the
security of an enterprise network by allowing potentially unchallenged access to the enterprise network by any wireless user (client) in the physical vicinity.
RJ-45
Standard connectors used in Ethernet networks. Even though they look very similar to standard RJ-11 telephone connectors, RJ-45 connectors can have up to eight wires, whereas
telephone connectors have only four.
roaming
Moving seamlessly from one AP coverage area to another with no loss in connectivity.
router
A device that forwards data packets from one local area network (LAN) or wide area
network (WAN) to another. Based on routing tables and routing protocols, routers can read
the network address in each transmitted frame and make a decision on how to send it via
the most efficient route based on traffic load, line costs, speed, bad connections, etc.
RSA
A public-key algorithm developed in 1977 and named after its inventors, Rivest, Shamir,
and Adleman. RSA, currently owned by RSA Data Security, Inc., is used for encryption,
digital signatures, and key exchange.
RSN
Robust Security Network. A new standard within IEEE 802.11i to provide security and
privacy mechanisms in an 802.11 wireless network. RSN leverages 802.1x authentication
with Extensible Authentication Protocol (EAP) and AES for encryption.
RSSI
Received Signal Strength Indication. The measured power of a received signal.
S
scanning
The process of checking the airwaves for rogue access points or attackers. Scanning APs
are typically implemented as an Overlay Network, as most APs can not scan and serve
traffic at the same time. Meru's APs are able to scan the airwaves and serve clients simultaneously, eliminating the need for an overlay. Meru's single-channel architecture
improves accuracy when scanning for intruders, as all APs are able to detect signals from
all clients.
server
A computer that provides its resources to other computers and devices on a network.
These include print servers, Internet servers and data servers. A server can also be
combined with a hub or router.
© 2012 Meru Networks, Inc.
Glossary 337
Single Channel
Term sometimes used to describe a network in which all access points operate on the same
channel, such as one using Virtual Cell technology. Single channel operation is more spectrally efficient than a microcell architecture and necessary for the use of Virtual Cells and
network-controlled handoff. Single Channel improves security by making intrusion detection easier and location tracking more accurate, as every AP automatically receives transmissions from every client within range. It also enables the RF Barrier to function with as
little as one radio, because only one channel needs to be blocked from outside access.
SIP
Session Initiation Protocol. SIP is a protocol for finding users, usually human, and setting
up multimedia communication among them, typically a VoIP phone call.
site survey
The process whereby a wireless network installer inspects a location prior to putting in a
wireless network. Site surveys are used to identify the radio- and client-use properties of
a facility so that access points can be optimally placed. Meru Wireless LAN System WLANs
are optimized to not require a site survey.
spectral
efficiency
The ratio of data rate to radio spectrum usage. A Virtual Cell is much more spectrally efficient than a microcell architecture, as the microcells consume at least three non-overlapping channels to provide the coverage that a Virtual Cell offers with just one.
SSID
A 32-character unique identifier attached to the header of packets sent over a WLAN that
acts as a name when a mobile device tries to connect to the BSS. (Also called ESSID.) The
SSID differentiates one WLAN from another, so all access points and all devices attempting
to connect to a specific WLAN must use the same SSID. A device will not be permitted to
join the BSS unless it can provide the unique SSID. Because an SSID can be sniffed in plain
text from a packet, it does not supply any security to the network. An SSID is also referred
to as a Network Name because essentially it is a name that identifies a wireless network.
ssh
Secure SHell. A terminal-emulation program that allows users to log onto a remote device
and execute commands. It encrypts the traffic between the client and the host.
SSL
Secure Socket Layer. Commonly used encryption scheme used by many online retail and
banking sites to protect the financial integrity of transactions. When an SSL session begins,
the server sends its public key to the browser. The browser then sends a randomly generated secret key back to the server in order to have a secret key exchange for that session.
station
Devices such as cellular phones or laptops that need to communicate wirelessly with the
Meru Wireless LAN System and do so through access points.
subnetwork or
subnet
Found in larger networks, these smaller networks are used to simplify addressing between
numerous computers. Subnets connect to the central network through a router, hub or
gateway. Each individual Wireless LAN will probably use the same subnet for all the local
computers it talks to.
subnet mobility
The ability of a wireless user to roam across Access Points deployed on different subnets
using a single IP address.
supplicant
A wireless client that is requesting access to a network.
338 Meru System Director Configuration Guide
© 2012 Meru Networks, Inc.
switch
A type of hub that efficiently controls the way multiple devices use the same network so
that each can operate at optimal performance. A switch acts as a networks traffic cop:
rather than transmitting all the packets it receives to all ports as a hub does, a switch
transmits packets to only the receiving port.
T
TCP
Transmission Control Protocol. A protocol used along with the Internet Protocol (IP) to send
data in the form of individual units (called packets) between computers over the Internet.
While IP takes care of handling the actual delivery of the data, TCP takes care of keeping
track of the packets that a message is divided into for efficient routing through the
Internet. For example, when a web page is downloaded from a web server, the TCP
program layer in that server divides the file into packets, numbers the packets, and then
forwards them individually to the IP program layer. Although each packet has the same
destination IP address, it may get routed differently through the network. At the other
end, TCP reassembles the individual packets and waits until they have all arrived to
forward them as a single file.
TCP/IP
The underlying technology behind the Internet and communications between computers in
a network. The first part, TCP, is the transport part, which matches the size of the
messages on either end and guarantees that the correct message has been received. The
IP part is the user's computer address on a network. Every computer in a TCP/IP network
has its own IP address that is either dynamically assigned at startup or permanently
assigned. All TCP/IP messages contain the address of the destination network as well as
the address of the destination station. This enables TCP/IP messages to be transmitted to
multiple networks (subnets) within an organization or worldwide.
TKIP
Temporal Key Integrity Protocol. An enhancement to the WEP encryption technique that
uses a set of algorithms to rotate session keys for better protection. TKIP uses RC4
ciphering, but adds functions such as a 128-bit encryption key, a 48-bit initialization
vector, a new message integrity code (MIC), and initialization vector (IV) sequencing rules.
U
USB
A high-speed bidirectional serial connection between a PC and a peripheral that transmits
data at the rate of 12 megabits per second. The new USB 2.0 specification provides a data
rate of up to 480 Mbps, compared to standard USB at only 12 Mbps. 1394, FireWire and
iLink all provide a bandwidth of up to 400 Mbps.
UTC
Universal Time Coordinated. Also known as Greenwich Mean Time. The time is not adjusted
for time zones or for daylight savings time.
V
Virtual Cell
Proprietary wireless LAN architecture in which multiple access points are pooled into a
single, virtual resource. To the client, APs are indistinguishable because they all use the
same BSSID and radio channel . Because clients remain connected to the same virtual AP
as they move through a network, no client-initiated handoffs are necessary. Instead, the
© 2012 Meru Networks, Inc.
Glossary 339
network itself automatically routes all radio connections through the most appropriate AP.
This maximizes bandwidth, simplifies network management and conserves radio spectrum
for scalability and redundancy.
Virtual Port
An enhancement to the Virtual Cell architecture which partitions the network so that each
client device has its own private network with a unique BSSID. From the client's perspective, it gets its own dedicated AP to which it remains connected no matter where it travels
in the network. Like a switched Ethernet port, the Virtual Port eliminates latency, jitter
and contention for bandwidth as there is only ever one client on each port. Unlike an
Ethernet port, it can be personalized to fit each user or device, giving the network control
over client behavior with no proprietary client-side software or extensions necessary.
VoFI (Voice over
Wi-Fi) or
VoWLAN (Voice
over Wireless
LAN)
Voice over IP links that run over a wireless network. VoIP does not usually require high data
rates, but it stresses wireless networks in other ways by demanding low latencies and
smooth handoffs. In addition, no 802.11n phones yet exist, as most handsets are too small
to accommodate MIMO's multiple antennas spaced a wavelength apart. This means that
802.11n networks running VoFI must have a way to deal with 802.11b/g clients.
VLAN
Virtual LAN. A logical grouping of devices that enables users on separate networks to
communicate with one another as if they were on a single network.
VPN
Virtual Private Network. A type of technology designed to increase the security of information transferred over the Internet. VPN can work with either wired or wireless
networks, as well as with dial-up connections over POTS. VPN creates a private encrypted
tunnel from the end user's computer, through the local wireless network, through the
Internet, all the way to the corporate servers and database.
W
WAN
Wide Area Network. A communication system of connecting PCs and other computing
devices across a large local, regional, national or international geographic area. Also used
to distinguish between phone-based data networks and Wi-Fi. Phone networks are considered WANs and Wi-Fi networks are considered Wireless Local Area Networks (WLANs).
WEP
Wired Equivalent Privacy. Basic wireless security provided by Wi-Fi. In some instances, WEP
may be all a home or small-business user needs to protect wireless data. WEP is available
in 40-bit (also called 64-bit), or in 104-bit (also called 128-bit) encryption modes. As
104-bit encryption provides a longer key that takes longer to decode, it can provide better
security than basic 40-bit (64-bit) encryption.
Wi-Fi
Brand name for wireless LANs based on various 802.11 specifications. All products bearing
the Wi-Fi logo have been tested for interoperability by the Wi-Fi Alliance, an industry
group composing every major 802.11 client and infrastructure vendor.
WLAN
Wireless LAN. Also referred to as LAN. A type of local-area network that uses
high-frequency radio waves rather than wires to communicate between nodes.
WME
Wireless Multimedia Extension. The Wi-Fi Alliance's standard for QoS based upon the
Enhanced Distribution Coordination Function (EDCF), which is a subset of the IEEE 802.11e
specification.
WNC
Wireless Network Controller. Alternative term for controller.
340 Meru System Director Configuration Guide
© 2012 Meru Networks, Inc.
WSM
Wi-Fi Scheduled Media. The Wi-Fi Alliance's emerging standard for QoS that is based upon
the HCF portion of the 802.11e standard, which dedicates bandwidth segments to specific
data types. WSM is going to have less of a focus in the enterprise space than its WME counterpart.
WPA
Wi-Fi Protected Access. The Wi-Fi Alliance put together WPA as a data encryption method
for 802.11 Wireless LANs. WPA is an industry-supported, pre-standard version of 802.11i
utilizing the Temporal Key Integrity Protocol (TKIP). WPA will serve until the 802.11i standard is ratified in the third quarter of 2003.
X
X.509
Created by the International Telecommunications Union Telecommunication Standardization Sector (ITU-T), X.509 is the most widely used standard for defining digital certificates.
© 2012 Meru Networks, Inc.
Glossary 341
342 Meru System Director Configuration Guide
© 2012 Meru Networks, Inc.
MERU NETWORKS, INC.
Limited Product Warranty
This Limited Product Warranty applies to the original end-user customer of the Meru product which you
purchased for your own use, and not for resale (“Product”), from Meru Networks, Inc. (“Meru”) or its
authorized reseller (“Reseller”).
Limited Warranties
— One-year limited hardware warranty: Meru warrants to you that Meru hardware (other than Third
Party Products as described below) will be free from defects in materials and workmanship for a
one-year period after the date of delivery of the applicable product to you from Meru or its
Reseller (the “Hardware Warranty Period”). If Meru receives written notice from you of such
defects during the Hardware Warranty Period, Meru will, at its option, either repair or replace
Meru hardware that Meru determines to be defective. Replacement products may be remanufactured units, and will be warranted for the remainder of the original Hardware Warranty Period, or
if greater, for thirty days from delivery of such replacement. Should Meru be unable to repair or
replace the Meru hardware, Meru (or its Reseller, as applicable) will refund to you the purchase
price of the Product.
— 90-Day Limited Software Warranty: Meru warrants to you that, for a 90-day period after the date
of delivery of the applicable product to you from Meru or its Reseller (the “Software Warranty
Period”), when properly installed and used, (a) the media on which the Meru software is provided
will be free from defects in materials or workmanship; and (b) the Meru software will substantially
conform to the functional specifications in the applicable documentation. If Meru receives written
notice from you of a breach of this warranty during the Software Warranty Period and is able to
reproduce the defect, Meru will, at its option, either repair or replace the defective Meru software.
Should Meru be unable to repair or replace the Meru software, Meru (or its Reseller, as applicable)
will refund to you the purchase price of the Product.
Exclusions
The warranty on the Product shall not apply to defects resulting from the following:
— Alteration or modification of the Product in any way, including without limitation configuration
with software or components other than those supplied by Meru or integration with parts other
than those supplied by Meru.
— Abuse, damage or otherwise being subjected to problems caused by negligence or misapplication
(including without limitation improper or inadequate maintenance or calibration), relocation of
the products (including without limitation damage caused by use of other than Meru shipping
containers), or use of the products other than as specified in the applicable Meru product documentation (including without limitation incompatible operating environments and systems), or
improper site preparation or maintenance.
— Damage as a result of accidents, extreme power surge, extreme electromagnetic field, acts of
nature or other causes beyond the control of Meru.
343
— Use of the Product with software, interfacing, parts or supplies not supplied by Meru.
The warranty on the Product does not apply if the Product is sold, or in the case of software,
licensed, for free for evaluation or demonstration purposes.
Meru expressly disclaims any warranty or obligation to support the Product for all operating
environments – for example, as illustration and not limitation, Meru does not warrant or ensure
interoperability of the Product with future telecommunication systems or other future software or
hardware.
You understand and acknowledge that the Products may generate, use or radiate radio frequency
energy and may interfere with radio communications and/or radio and television receptions if is not
used and/or installed in accordance with the documentation for such products. WHILE MERU USES
COMMERCIALLY REASONABLE EFFORTS TO ENSURE COMPLIANCE OF THE
PRODUCTS WITH APPLICABLE UNITED STATES FEDERAL COMMUNICATIONS
COMMISSION AND PROTECT AGAINST HARMFUL INTERFERENCES, YOU
ACKNOWLEDGE AND AGREE THAT INTERFERENCES WITH RADIO COMMUNICATIONS
AND/OR RADIO AND TELEVISION RECEPTIONS MAY OCCUR AND THAT MERU WILL
NOT BE LIABLE FOR ANY DAMAGES OR INCONVENIENCE BASED ON SUCH
INTERFERENCES.
Third Party Products - The above Limited Warranties are exclusive of products manufactured
by third parties (“Third Party Products”). If such third party manufacturer provides a separate
warranty with respect to the Third Party Product, Meru will include such warranty in the packaging
of the Meru Product.
Return procedures
To obtain warranty service you must: (a) obtain a return materials authorization number (“RMA#”)
from Meru by contacting [email protected], and (b) deliver the Product, in accordance
with the instructions provided by Meru, along with proof of purchase in the form of a copy of the bill
of sale including the Product’s serial number, contact information, RMA# and detailed description of
344 Meru System Director Configuration Guide
the defect, in either its original package or packaging providing the Product with a degree of
protection equivalent to that of the original packaging, to Meru at the address below. You agree to
obtain adequate insurance to cover loss or damage to the Product during shipment.
If you obtain an RMA# and return the defective Product as described above, you agree to bear the cos
of returning, and prior to receipt by Meru, you assume risk of any loss or damage to the Product. Meru
is responsible for the cost of return shipment to you if the Meru Product is defective.
Returned products which are found by Meru to be not defective, returned out-of-warranty or otherwise
ineligible for warranty service will be repaired or replaced at Meru’s standard charges and shipped
back to you at your expense.
At Meru’s sole option, Meru may perform repair service on the Product at your facility, and you agree
to provide Meru with all reasonable access to such facility and the Product, as required by Meru.
On-site repair service may be available and is governed by the specific terms of your purchase.
All replaced parts, whether under warranty or not, are the property of Meru.
Warranty limitations
THE WARRANTIES SET FORTH ABOVE ARE EXCLUSIVE AND NO OTHER WARRANTY,
WHETHER WRITTEN OR ORAL, IS EXPRESSED OR IMPLIED BY MERU, TO THE
MAXIMUM EXTENT PERMITTED BY LAW. THERE ARE NO OTHER WARRANTIES
RESPECTING THE PRODUCT AND DOCUMENTATION AND SERVICES PROVIDED
UNDER THIS AGREEMENT, INCLUDING WITHOUT LIMITATION ANY WARRANTY OF
DESIGN, MERCHANTABILITY, FITNESS FOR A PARTICULAR PURPOSE (EVEN IF MERU
HAS BEEN INFORMED OF SUCH PURPOSE), TITLE OR AGAINST INFRINGEMENT OF
THIRD PARTY RIGHTS. IF ANY IMPLIED WARRANTY CANNOT BE DISCLAIMED UNDER
APPLICABLE LAW, THEN SUCH IMPLIED WARRANTY SHALL BE LIMITED IN DURATION
TO THE HARDWARE AND SOFTWARE WARRANTY PERIODS DESCRIBED ABOVE.
NO AGENT OF MERU IS AUTHORIZED TO ALTER OR EXCEED THE WARRANTY OBLIGATIONS OF MERU.
MERU SPECIFICALLY DOES NOT WARRANT THAT THE MERU SOFTWARE WILL BE
ERROR FREE OR OPERATE WITHOUT INTERRUPTION.
THE REMEDIES IN THIS LIMITED PRODUCT WARRANTY ARE YOUR SOLE AND EXCLUSIVE REMEDIES, AND MERU’S SOLE AND EXCLUSIVE LIABILITY, FOR BREACH OF THE
HARDWARE OR SOFTWARE WARRANTY SET FORTH ABOVE.
Limitations of Liability
You acknowledge and agree that the consideration which you paid to Meru does not include any
consideration by Meru of the risk of consequential, indirect or incidental damages which may arise in
connection with your use of, or inability to use, the Product. THUS, MERU AND ITS RESELLER
WILL NOT BE LIABLE FOR ANY INDIRECT, INCIDENTAL, SPECIAL, PUNITIVE OR
CONSEQUENTIAL DAMAGES, INCLUDING WITHOUT LIMITATION LOST PROFITS, LOST
BUSINESS, LOST DATA, LOSS OF USE, OR COST OF COVER INCURRED BY YOU ARISING
OUT OF OR RELATED TO YOUR PURCHASE OR USE OF, OR INABILITY TO USE, THIS
PRODUCT OR THE SERVICES, UNDER ANY THEORY OF LIABILITY, WHETHER IN AN
ACTION IN CONTRACT, STRICT LIABILITY, TORT (INCLUDING NEGLIGENCE) OR
OTHER LEGAL OR EQUITABLE THEORY, EVEN IF MERU OR ITS RESELLER KNEW OR
345
SHOULD HAVE KNOWN OF THE POSSIBILITY OF SUCH DAMAGES. IN ANY EVENT, THE
CUMULATIVE LIABILITY OF MERU OR ITS RESELLER FOR ALL CLAIMS WHATSOEVER
RELATED TO THE PRODUCT OR THE SERVICE WILL NOT EXCEED THE PRICE YOU PAID
FOR THE PRODUCT OR SERVICES GIVING RISE TO SUCH CLAIMS.
THE LIMITATIONS SET FORTH HEREIN ARE INTENDED TO LIMIT THE LIABILITY OF
MERU AND ITS RESELLERS AND SHALL APPLY NOTWITHSTANDING ANY FAILURE OF
ESSENTIAL PURPOSE OF ANY LIMITED REMEDY.
The jurisdiction applicable to you may not allow the limitations of liability or damages set forth above,
in which case such limitation shall only apply to you to the extent permitted in such jurisdiction.
Additional Information
This Limited Product Warranty shall be governed by and construed in accordance with the laws of the
State of California, U.S.A., exclusive of its conflict of laws principles. The U.N. Convention on
Contracts for the International Sale of Goods shall not apply.
This Limited Product Warranty is the entire and exclusive agreement between you and Meru with
respect to its subject matter, and any modification or waiver of any provision of this statement is not
effective unless expressly set forth in writing by an authorized representative of Meru.
All inquiries or claims made under this Limited Product Warranty must be sent to Meru at the
following address:
Meru Networks Inc.,
1309 South Mary Avenue, Sunnyvale, CA 94087, USA
Tel: 408-215-5300
Fax: 408-215-5301
Email: [email protected]
346 Meru System Director Configuration Guide
Meru Networks, Inc.
894 Ross Drive
Sunnyvale, CA 94087
408-215-5300
www.merunetworks.com