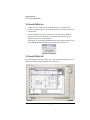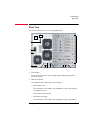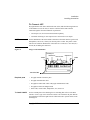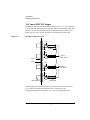
1
Keysight Technologies B1500A Semiconductor Device Analyzer User’s Guide Notices © Keysight Technologies 2005-2014 Warranty No part of this manual may be reproduced in any form or by any means (including electronic storage and retrieval or translation into a foreign language) without prior agreement and written consent from Keysight Technologies as governed by United States and international copyright laws. The material contained in this document is provided “as is,” and is subject to being changed, without notice, in future ed itions. Further, to the maximum extent permitted by applicable law, Keysight d isclaims all warranties, either express or implied, with regard to this manual and any information contained herein, includ ing but not limited to the implied warranties of merchantability and fitness for a particular purpose. Keysight shall not be liable for errors or for incidental or consequential damages in connection with the furnishing, use, or performance of this document or of any information contained herein. Should Keysight and the user have a separate written agreement with warranty terms covering the material in this document that conflict with these terms, the warranty terms in the separate agreement shall control. Manual Part Number B1500-90000 Ed ition Edition 1, July 2005 Edition 2, December 2005 Edition 3, April 2006 Edition 4, January 2007 Edition 5, June 2007 Edition 6, November 2007 Edition 7, October 2008 Edition 8, February 2009 Edition 9, June 2009 Edition 10, June 2010 Edition 11, June 2011 Edition 12, June 2013 Edition 13, October 2013 Edition 14, August 2014 Keysight Technologies 1400 Fountaingrove Parkway Santa Rosa, CA 95403 Technology Licenses The hardware and/or software described in this document are furnished under a license and may be used or copied only in accordance with the terms of such license. Restricted Rights Legend If software is for use in the performance of a U.S. Government prime contract or subcontract, Software is delivered and licensed as “Commercial computer software” as defined in DFAR 252.227-7014 (June 1995), or as a “commercial item” as defined in FAR 2.101(a) or as “Restricted computer software” as defined in FAR 52.227-19 (June 1987) or any equivalent agency regulation or contract clause. Use, duplication or disclosure of Software is subject to Keysight Technologies’ standard commercial license terms, and non-DOD Departments and Agencies of the U.S. Government will receive no greater than Restricted Rights as defined in FAR 52.227-19(c)(1-2) (June 1987). U.S. Government users will receive no greater than Limited Rights as defined in FAR 52.227-14 (June 1987) or DFAR 252.227-7015 (b)(2) (November 1995), as applicable in any technical data. Declaration of Conformity To get the latest version of the declaration of conformity, go to http://regulations.products.keysight.com/DoC/search.htm and type in the product number in the Search field. Latest Information To get the latest firmware/software/electronic manuals/support information, go to www.keysight.com and type in the product number in the Search field at the top of the page. COMPLIANCE WITH GERMAN NOISE REQUIREMENTS This is to declare that this product is in conformance with the German Regulation on Noise Declaration for Machines (Lärmangabe nach der Maschinenlärminformation-Verordnung -3.GSGV Deutschland). • Herstellerbescheinigung GERÄUSCHEMISSION Lpa < 70 dB am Arbeitsplatz normaler Betrieb nach DIN 45635 T. 19 • Manufacturer’s Declaration ACOUSTIC NOISE EMISSION Lpa < 70dB operator position normal operation per ISO 7779 South Korean Class A EMC declaration This equipment is Class A suitable for professional use and is for use in electromagnetic environments outside of the home. Safety Summary The following general safety precautions must be observed during all phases of operation, service, and repair of this instrument. Failure to comply with these precautions or with specific warnings elsewhere in this manual may impair the protections provided by the instrument. In addition, it violates safety standards of design, manufacture, and intended use of the instrument. Keysight Technologies assumes no liability for customer’s failure to comply with these requirements. Product manuals may be provided on CD-ROM or in printed form. Printed manuals are an option for many products. Manuals may also be available on the Web. Go to www.keysight.com and type the product model number in the Search field at the top of the page. NOTE Do not use this instrument in any manner not specified by the manufacturer. The protective features of this instrument may be impaired if it is used in a manner not specified in the operation instructions. This instrument is an INDOOR USE product. This instrument complies with INSTALLATION CATEGORY II for mains input and INSTALLATION CATEGORY I for measurement input terminals, and POLLUTION DEGREE 2 defined in IEC 61010-1. If an instrument is marked CAT I (IEC Measurement Category I), or it is not marked with a measurement category, its measurement terminals must not be connected to line-voltage mains. • DANGEROUS PROCEDURE WARNINGS Warnings, such as example below, shall be complied. Procedures throughout in this manual prevent you from potentially hazard. Their instructions contained in the warnings must be followed. WARNING Hazardous vol tage, instrument maximum output vol tage may appear at the measurement terminals (Force, Guard, and Sense) if Interlock terminal is closed. Open the Interlock terminal when the measurement terminals are accessible. Vol tage applied to the terminals will be limited up to ±42 V. Do not work the interlock function intentionally in order to bring the output vol tage to the safe level. While the high vol tage ind icator is lit, the dangerous vol tage by the output vol tage or the resid ual charge appears on the measurement terminal. • BEFORE APPLYING POWER Verify that all safety precautions are taken. Make all connections to the instrument before applying power. Note the instrument's external markings described under “Safety Symbols”. • GROUND THE INSTRUMENT This is Safety Class I instrument. To minimize shock hazard, the instrument chassis and cabinet must be connected to an electrical ground. The power terminal and the power cable must meet International Electrotechnical Commission (IEC) safety standards. • DO NOT OPERATE IN AN EXPLOSIVE ATMOSPHERE Do not operate the instrument in the presence of flammable gases or fumes. Operation of any electrical instrument in such an environment constitutes a definite safety hazard. • DO NOT REMOVE COVERS No operator serviceable parts inside. Refer servicing to qualified personnel. To prevent electrical shock do not remove covers. • IN CASE OF DAMAGE Instruments that appear damaged or defective should be made inoperative and secured against unintended operation until they can be repaired by qualified service personnel. Return the instrument to a Keysight Technologies sales or service office for services and repair to ensure that safety features are maintained. • USE ONLY THE SPECIFIC ACCESSORIES Specific accessories satisfy the requirements for specific characteristics for using the instrument. Use the specific accessories, cables, adapters, and so on for safety reasons. Safety Symbols The general definitions of safety symbols used on equipment or in manuals are listed below. Direct current. ` Alternating current. Earth (ground) terminal. Protective conductor terminal. For protection against electrical shock in case of a fault. Used with field wiring terminals to indicate the terminal which must be connected to ground before operating equipment. Frame or chassis terminal. A connection to the frame (chassis) of the equipment which normally includes all exposed metal structures. > ^ Grounded terminal which indicates the earth potential. On supply. Off supply. Standby supply. The equipment will be marked with this symbol is not completely disconnected from AC mains when power switch is in the standby position. In position of a bi-stable push switch. Out position of a bi-stable push switch. Hazardous voltage and potential for electrical shock. Do not touch terminals that have this symbol when the equipment is on. Hot surface. Avoid contact. Surfaces are hot and may cause personal injury if touched. Instruction manual symbol. The equipment will be marked with this symbol when it is necessary for the user to refer to the instruction manual. WARNING The warning sign denotes a hazard. It calls attention to a procedure, practice, cond ition or the like, which, if not correctly performed or adhered to, could resul t in injury or death to personal. CAUTION The caution sign denotes a hazard. It calls attention to an operating procedure, practice, condition or the like, which, if not correctly performed or adhered to, could result in damage to or destruction of part or all of the equipment. CAT I IEC Measurement Category I The CE mark shows that the product complies with all applicable European Directives. The CSA mark is a registered trademark of the Canadian Standards Association. The RCM mark is a registered trademark of the Australian Communications Authority. This signifies compliance with the Australian EMC Framework Regulations under the terms of the Radio communications Act. This ISM device complies with Canadian ICES-001. Cet appareil ISM est conforme à la norme NMB-001 du Canada. This is the symbol for an Industrial, Scientific and Medical, Group 1 Class A product. (CISPR 11) Korea’s safety and EMC mark China RoHS - Environmentally Green Product Label China RoHS - Product with Toxic Substance 40 yr EPUP The Chinese mark for paper-based packaging materials; Paperboard and Corrugated Fiberboard Plastic Material Coding Identification Power Supply and Measurement Safety • Power Supply Safety This instrument can output high currents and voltages. Make sure that the load or device under test can safely handle the output current and voltage. Also, make sure that the connection leads can safely withstand the expected currents and are insulated for the expected voltages. The instrument outputs may be connected so as to float relative to earth ground. Isolation or floating voltage ratings are indicated on the instrument, near the output terminal or the Circuit Common terminal. There is the danger of electric shock by touching the floated measurement terminals. Keep in mind it to protect yourself. And it is a reason of using the recommended accessories. • Voltage/Current Measurement Safety Multimeters and other instruments capable of measuring high voltages and currents are subject to specific safety concerns because of the circuits to which they may be connected. To safely use these instruments, you need to understand the markings on the instrument near the input terminals, which include the Protection Limits and the IEC Measurement Category. • Protection Limits Keysight multimeters and other voltage measurement instruments provide protection circuitry to prevent damage to the instrument and to protect against the danger of electric shock, provided the Protection Limits are not exceeded. To ensure safe operation of the instrument, do not exceed the Protection Limits shown on the input terminals. • Source/Monitor Terminals Source/monitor unit, SMU, can simultaneously perform DC voltage or current output and measurement. Typical SMU has the Force, Guard, Sense, and Circuit Common terminals as shown below. Normally the Force, Guard, and Sense terminals are the same potential. Voltage marked around the terminals indicates the Protection Limits. Force and Sense must be connected to a terminal of a device under test for the Kelvin connection which is effective for high current measurement and low resistance measurement. For the non-Kelvin connection to ease the connections, connect Force only. Do not connect Sense. It must be opened. Guard should be extended to around the device terminal for reducing leakage current caused by a coaxial cable used. Guard must be never connected to anything at the device side. Circuit Common should be connected to shielding of the coaxial cable used. The following image is the Kelvin triaxial connector of High Power SMU. Guard Force Circuit Common Sense Guard High Voltage Shock Hazard Keysight B1500A can force dangerous voltages (±200 V for HPSMU and ±100 V for MPSMU/HRSMU) at the Force, Guard, and Sense terminals. To prevent electric shock hazard, the following safety precautions must be observed during the use of Keysight B1500A. • Use a three-conductor AC power cable to appliance coupler (inlet) and the instrument to an electric ground (safety ground). • Prepare shielding box which covers interface to a device under test and equipped with interlock circuit that opens when the door is opened. • Before performing measurement, connect the interlock circuit to the Interlock terminal of this instrument. • Confirm periodically that the interlock function works normally. • Before touching the connections of the Force, Guard, and Sense terminals, turn the instrument off and discharge any capacitors of the measurement path. If you do not turn the instrument off, complete “all” of the following items, regardless of any instrument’s settings. • • Terminate measurement by pressing the Stop key, confirm that the Measurement status indicator is not lit. • Confirm that the High Voltage indicator is not lit. • Open the shielding box access door (open the Interlock terminal). • Discharge any capacitors if the capacitance is connected to an SMU. Warn workers in the vicinity of the instrument about hazardous conditions. Gefahr durch Hochspannung Von den Geräten Keysight B1500A können Spannungen an den Anschlüssen “Force”, “Guard” und “Sense” von bis zu 200 V ausgehen. Um elektrischem Schlag vorzubeugen, ist bei der Benützung der Geräte Keysight B1500A folgendes zu beachten. • Verwenden Sie ein dreiphasiges AC-Stromkabel für die Gerätsteckvorrichtung (Eingang) und schließen Sie das Instrument an eine Erdung an (Sicherheitserdung). • Bereiten Sie das Abschirmungsgehäuse vor, dass die Oberfläche eines zu testenden Geräts abdeckt und mit einem Verriegelungsstromkreis ausgestattet ist, der bei geöffneter Tür unterbrochen wird. • Vor der Messung verbinden Sie den Verriegelungsstromkreis mit dem Interlock-Anschluss dieses Instruments. • Prüfen Sie in regelmäßigen Abständen, dass die Verriegelungsfunktion ordnungsgemäß funktioniert. • Bevor Sie die Verbindungen zu den Anschlüssen “Force”, “Guard” und “Sense” berühren, schalten Sie das Instrument aus und entladen alle Kondensatoren des Messwegs. Wenn Sie das Instrument nicht ausschalten, führen Sie, unabhängig von den Instrumenteinstellungen, alle folgenden Schritte durch. • • Beenden Sie die Messung, indem Sie auf die Taste “Stop” drücken. Stellen Sie sicher, dass die Statusanzeige “Measurement” nicht leuchtet. • Stellen Sie sicher, dass die Anzeige “High Voltage” nicht leuchtet. • Öffnen Sie die Tür des Abschirmungsgehäuses (öffnen des Interlock-Anschlusses). • Entladen Sie alle Kondensatoren, wenn die Kapazität mit einer SMU verbunden ist. Warnen Sie Mitarbeiter in der Umgebung des Instruments vor den Gefahren. Danger de choc dû à une haute tension Une tension dangereuse (max. ± pour HPSMU; 200 Vdc, max. ± pour MPSMU/ HRSMU; 100 Vdc) émanant du dispositif Keysight B1500A peut être sortie aux bornes Force, Guard et Sense. Les précautions suivantes doivent être obserées contre commotion électrique accidentelle. • Utilisez un câble d’alimentation CA à trois conducteurs vers le coupleur secteur (entrée) et branchez l’instrument sur une mise électrique à la terre (prise de terre de sécurité). • Préparez le boîtier de protection qui couvre l’interface avec le dispositif à tester et équipez-le d’un circuit de sécurité qui s’ouvre lors de l’ouverture d’une porte. • Avant de procéder aux mesures, connectez le circuit de sécurité à la borne Interlock de l’instrument. • Vérifiez régulièrement le bon fonctionnement de la fonction de sécurité. • Avant de toucher les connexions des bornes Force, Guard et Sense, mettez l’instrument hors tension et déchargez tout condensateur du chemin de mesure. Si vous ne mettez pas l’instrument hors tension, effectuez « toutes » les opérations ci-dessous, quels que soient les paramètres de l’instrument. • • Terminez les mesures en appuyant sur la touche Stop ; vérifiez que l’indicateur d’état Measurement est éteint. • Vérifiez que le témoin High Voltage est éteint. • Ouvrez la trappe d’accès au boîtier de protection (ouvrez la borne Interlock). • Déchargez les éventuels condensateurs si la capacité est connectée à une unité SMU. Informez les personnes travaillant à proximité de l’instrument des conditions. 高電圧感電注意 Keysight B1500A の Force、Guard、Sense 端子には、危険電圧が出力されることがあ ります(HPSMU の場合は最大 ±200 Vdc、MPSMU/HRSMU の場合は最大 ±100 Vdc) 。感電事故防止のため、必ず以下の事柄を守ってください。 • 3 極電源ケーブルを使用して本器を接地してください。 • ドアを開くことによって開放されるインターロック回路を装備し、被測定デバ イスとのインタフェースを覆うことのできるシールド・ボックスを用意してく ださい。 • 測定を開始する前にはインターロック回路を本器の Interlock 端子に接続してく ださい。 • インターロック機能が正常であることを定期的に確認してください。 • Force、Guard、Sense 端子に繋がる接続部に触れる前には、本器の電源を切断し てください。また、測定系のキャパシタを放電してください。電源を切らない 場合は、以下の事項を全て実施してください。 • • Stop キーを押して Measurement インジケータが消灯したことを確認してくだ さい。 • 高電圧警告(High Voltage)インジケータが消灯していることを確認してく ださい。 • シールド・ボックスのドアを開けてください(Interlock 端子を開放してくだ さい) 。 • キャパシタが SMU に接続されているならば、キャパシタを放電してくださ い。 周囲のほかの作業者に対しても、高電圧危険に対する注意を徹底してください。 Product Stewardship • Waste Electrical and Electronic Equipment (WEEE) Directive 2002/96/EC This product complies with the WEEE Directive (2002/96/EC) marking requirements. The affixed label indicates that you must not discard this electrical/ electronic product in domestic household waste. Product Category: With reference to the equipment types in the WEEE directive Annex 1, this product is classified as a “Monitoring and Control instrumentation” product. Do not dispose in domestic household waste. To return unwanted products, contact your local Keysight office or visit the following website for more information. www.keysight.com/environment/product/ • LCD Fluorescent Lamp Certain products sold by Keysight contain a liquid crystal display (LCD); backlighting for the LCD is provided by a fluorescent lamp which contains mercury, and must be managed, recycled, and/or disposed in accordance with all applicable laws, ordinances and regulations. For information on how to recycle or dispose of the fluorescent lamp contained in your own product, visit the following website. http://www.keysight.com/environment/mercury.shtml If you live in the U.S., also visit the following websites. http://www.lamprecycle.org http://www.eiae.org If you have additional questions, please visit the following website. http://www.keysight.com/go/contactus • Perchlorate Information Perchlorate Material - special handling may apply. Visit the following website. http://www.dtsc.ca.gov/hazardouswaste/perchlorate/ Equipment's real-time clock battery or coin cell battery may contain perchlorate and may require special handling when recycled or disposed of in California. Precautionary Statement Keysight B1500A Semiconductor Device Analyzer operates in the Microsoft Windows environment. Keysight B1500A requires Keysight EasyEXPERT software, a specially-designed Windows application program. • About guarantee and support for Keysight B1500A Keysight Technologies guarantees and supports the performance of Keysight B1500A for the same condition as the preload condition when shipped from the factory. • About updating Keysight EasyEXPERT and the Windows Update Keysight Technologies confirms the operation of Keysight EasyEXPERT patch programs and important Windows security patches, and provides recommended update information. Visit Keysight B1500A support site, download the patches, and perform the software update. • About Windows application programs and peripherals (including driver) Using commercial products on Keysight B1500A is your responsibility. Keysight Technologies cannot provide compatibility information for commercial products. If problems arise, perform Keysight B1500A system recovery. • About servicing Bench repair service is available at your nearest Keysight Technologies service center. Be aware that the B1500A configuration might be updated to the latest one without notice because of support issues. The internal hard disk drive (HDD) might be initialized during servicing. If peripherals are connected, they will be removed. When Keysight B1500A is returned, the internal HDD might be initialized. Peripherals will be returned separately. • Other notes • Back up the internal HDD to prevent loss of data by accident or failure. • Protect Keysight B1500A from computer viruses. • If you connect Keysight B1500A to the network, take care to protect it from computer virus. Working in Comfort To optimize your comfort and productivity, it is important that you set up your work area correctly and use your instrument properly. With that in mind, we have developed some set-up and use recommendations for you to follow based on established ergonomic principles. Improper and prolonged use of keyboards and input devices are among those tasks that have been associated with repetitive strain injury (RSI) to soft tissues in the hands and arms. If you experience discomfort or pain while using the instrument, discontinue use immediately and consult your physician as soon as possible. For more information on RSI you may wish to consult the About Repetitive Strain Injury section. Please study the recommendations described below. Included there are references to relevant parts of international standards, regulations and guidelines, such as ISO 9241 and the European Community Display Screen Equipment directive. You may also wish to consult your employer’s human resources department or other relevant departments for guidance specific to your company. About Repetitive Strain Injury Because your comfort and safety are our primary concern, we strongly recommend that you use the instrument in accordance with established ergonomic principles and recommendations. Scientific literature suggests that there may be a relationship between injury to soft tissues -especially in the hands and arms- and prolonged improper use of keyboards or other equipment requiring repeated motions of the hands and forearms. This literature also suggests that there are many other risk factors that may increase the chance of such injury, commonly called Repetitive Strain Injury. What is RSI? Repetitive Strain Injury (RSI -also known as cumulative trauma disorder or repetitive motion injury) is a type of injury where soft tissues in the body, such as muscles, nerves, or tendons, become irritated or inflamed. RSI has been a reported problem for those who perform repetitive tasks such as assembly line work, meatpacking, sewing, playing musical instruments, and computer work. RSI also has been observed in those who frequently engage in activities such as carpentry, knitting, housework, gardening, tennis, windsurfing and lifting children. What causes RSI? The specific causes of RSI have not been established. Nevertheless, the incidence of RSI has been associated with a variety of risk factors, including: • Too many uninterrupted repetitions of an activity or motion. • Performing an activity in an awkward or unnatural posture. • Maintaining static posture for prolonged periods. • Failing to take frequent short breaks. • Other environmental and psychosocial factors. In addition, there have been reports associating the occurrence of RSI with the use of keyboards, mice, and other input devices. Also, certain medical conditions, such as rheumatoid arthritis, obesity and diabetes, may predispose some people to this type of injury. What if I experience discomfort? If you are experiencing any discomfort, seek professional medical advice immediately. Typically, the earlier a problem is diagnosed and treated, the easier it is to resolve. Mice and Other Input Devices Various aspects of using mice and other input devices may increase your risk of discomfort or injury. Observing the following recommendations may reduce that risk. • Try to keep your hand, wrist, and forearm in a neutral position while using your mouse or other input device. • If you use your thumb to rotate the ball on a trackball or spaceball, keep it in a relaxed, natural shape, and maintain a neutral posture in your hand, wrist, and forearm. • Hold the mouse gently by draping your fingers over it. Keep your hand relaxed and fingers loose. Do not grip the mouse tightly. • It takes very little pressure or force from your fingers to activate the buttons or scroll wheel on your mouse, scrolling mouse, trackball, or other input device. Using too much force can place unnecessary stress on the tendons and muscles in your hands, wrists, and forearms. • If you are using a scrolling mouse, be sure to keep your fingers and hand in a relaxed, neutral position when activating the scroll wheel. Also, this type of mouse features software that can minimize the number of mouse movements or button clicks. • When using a mouse, trackball, or other input device, position it as close to the keyboard as possible, and keep it at the same level as you do not have to stretch while using it. • Be sure to keep your mouse and trackball clean. Regular removal of accumulated dust and dirt helps ensure proper tracking and reduces unnecessary hand and wrist motions. In This Manual This manual describes the product overview and installation information of Keysight Technologies B1500A. This manual consists of the following chapters: • Chapter 1, Getting Started This chapter describes basic operations of Keysight B1500A. • Chapter 2, Introduction This chapter describes basic features of Keysight B1500A. • Chapter 3, Installation This chapter describes installation, device connection, and maintenance. • Chapter 4, Specifications This chapter describes specifications of Keysight B1500A. • Chapter 5, Accessories and Options This chapter describes accessories and options of Keysight B1500A. Contents 1. Getting Started To Turn On/Off B1500A . . . . . . . . . . . . . . . . . . . . . . . . . . . . . . . . . . . . . . . . . . . . . . . . . . . . 1-3 To Turn B1500A On. . . . . . . . . . . . . . . . . . . . . . . . . . . . . . . . . . . . . . . . . . . . . . . . . . . . . . 1-4 To Turn B1500A Off . . . . . . . . . . . . . . . . . . . . . . . . . . . . . . . . . . . . . . . . . . . . . . . . . . . . . 1-4 To Launch EasyEXPERT . . . . . . . . . . . . . . . . . . . . . . . . . . . . . . . . . . . . . . . . . . . . . . . . . . . . 1-6 If Only One Workspace Exists . . . . . . . . . . . . . . . . . . . . . . . . . . . . . . . . . . . . . . . . . . . . . 1-7 To Create Workspace . . . . . . . . . . . . . . . . . . . . . . . . . . . . . . . . . . . . . . . . . . . . . . . . . . . . 1-8 To Select Workspace . . . . . . . . . . . . . . . . . . . . . . . . . . . . . . . . . . . . . . . . . . . . . . . . . . . . 1-9 To Use Tracer Test Mode . . . . . . . . . . . . . . . . . . . . . . . . . . . . . . . . . . . . . . . . . . . . . . . . . . 1-10 To Use Application Test Mode . . . . . . . . . . . . . . . . . . . . . . . . . . . . . . . . . . . . . . . . . . . . . . 1-12 To Use Classic Test Mode . . . . . . . . . . . . . . . . . . . . . . . . . . . . . . . . . . . . . . . . . . . . . . . . . 1-14 To Perform Measurement. . . . . . . . . . . . . . . . . . . . . . . . . . . . . . . . . . . . . . . . . . . . . . . . . . 1-16 To Use Test Result Editor . . . . . . . . . . . . . . . . . . . . . . . . . . . . . . . . . . . . . . . . . . . . . . . 1-17 To Use Analysis Tools . . . . . . . . . . . . . . . . . . . . . . . . . . . . . . . . . . . . . . . . . . . . . . . . . . . . . 1-18 2. Introduction Overview . . . . . . . . . . . . . . . . . . . . . . . . . . . . . . . . . . . . . . . . . . . . . . . . . . . . . . . . . . . . . . . . 2-3 Keysight EasyEXPERT Software . . . . . . . . . . . . . . . . . . . . . . . . . . . . . . . . . . . . . . . . . . . . 2-6 Front View . . . . . . . . . . . . . . . . . . . . . . . . . . . . . . . . . . . . . . . . . . . . . . . . . . . . . . . . . . . . . . . 2-8 Rear View. . . . . . . . . . . . . . . . . . . . . . . . . . . . . . . . . . . . . . . . . . . . . . . . . . . . . . . . . . . . . . . 2-11 . . . . . . . . . . . . . . . . . . . . . . . . . . . . . . . . . . . . . . . . . . . . . . . . . . . . . . . . . . . . . . . . . 2-12 . . . . . . . . . . . . . . . . . . . . . . . . . . . . . . . . . . . . . . . . . . . . . . . . . . . . . . . . . . . . . . . . . 2-13 . . . . . . . . . . . . . . . . . . . . . . . . . . . . . . . . . . . . . . . . . . . . . . . . . . . . . . . . . . . . . . . . . 2-14 . . . . . . . . . . . . . . . . . . . . . . . . . . . . . . . . . . . . . . . . . . . . . . . . . . . . . . . . . . . . . . . . . 2-15 . . . . . . . . . . . . . . . . . . . . . . . . . . . . . . . . . . . . . . . . . . . . . . . . . . . . . . . . . . . . . . . . . 2-16 Measurement Modules. . . . . . . . . . . . . . . . . . . . . . . . . . . . . . . . . . . . . . . . . . . . . . . . . . . . 2-17 GNDU - Ground Unit. . . . . . . . . . . . . . . . . . . . . . . . . . . . . . . . . . . . . . . . . . . . . . . . . . . . 2-17 About SMU . . . . . . . . . . . . . . . . . . . . . . . . . . . . . . . . . . . . . . . . . . . . . . . . . . . . . . . . . . . 2-18 Keysight B1500A User’s Guide, Ed ition 14 Contents HPSMU - High Power SMU. . . . . . . . . . . . . . . . . . . . . . . . . . . . . . . . . . . . . . . . . . . . . . MPSMU - Medium Power SMU . . . . . . . . . . . . . . . . . . . . . . . . . . . . . . . . . . . . . . . . . . MCSMU - Medium Current SMU . . . . . . . . . . . . . . . . . . . . . . . . . . . . . . . . . . . . . . . . . HRSMU - High Resolution SMU. . . . . . . . . . . . . . . . . . . . . . . . . . . . . . . . . . . . . . . . . . MFCMU - Multi Frequency CMU . . . . . . . . . . . . . . . . . . . . . . . . . . . . . . . . . . . . . . . . . HVSPGU - High Voltage SPGU. . . . . . . . . . . . . . . . . . . . . . . . . . . . . . . . . . . . . . . . . . . WGFMU - Waveform Generator/Fast Measurement Unit . . . . . . . . . . . . . . . . . . . . . 2-19 2-22 2-26 2-28 2-32 2-35 2-36 3. Installation . . . . . . . . . . . . . . . . . . . . . . . . . . . . . . . . . . . . . . . . . . . . . . . . . . . . . . . . . . . . . . . . . . . . .3-3 Requirements . . . . . . . . . . . . . . . . . . . . . . . . . . . . . . . . . . . . . . . . . . . . . . . . . . . . . . . . . . . .3-4 Power Requirements . . . . . . . . . . . . . . . . . . . . . . . . . . . . . . . . . . . . . . . . . . . . . . . . . . . .3-4 Operating Environment . . . . . . . . . . . . . . . . . . . . . . . . . . . . . . . . . . . . . . . . . . . . . . . . . .3-4 Storaging/Shipping Environment . . . . . . . . . . . . . . . . . . . . . . . . . . . . . . . . . . . . . . . . . .3-4 Installation Requirements . . . . . . . . . . . . . . . . . . . . . . . . . . . . . . . . . . . . . . . . . . . . . . . .3-5 Power Cable . . . . . . . . . . . . . . . . . . . . . . . . . . . . . . . . . . . . . . . . . . . . . . . . . . . . . . . . . . .3-5 Inspection and Installation . . . . . . . . . . . . . . . . . . . . . . . . . . . . . . . . . . . . . . . . . . . . . . . . . .3-7 To Inspect B1500 and Accessories . . . . . . . . . . . . . . . . . . . . . . . . . . . . . . . . . . . . . . . . .3-7 To Perform Initial Setup . . . . . . . . . . . . . . . . . . . . . . . . . . . . . . . . . . . . . . . . . . . . . . . . . .3-8 To Change Windows Logon Setting . . . . . . . . . . . . . . . . . . . . . . . . . . . . . . . . . . . . . . . . .3-9 To Change GPIB Address . . . . . . . . . . . . . . . . . . . . . . . . . . . . . . . . . . . . . . . . . . . . . . . 3-10 To Enable System Controller . . . . . . . . . . . . . . . . . . . . . . . . . . . . . . . . . . . . . . . . . . . . 3-11 Installing Accessories . . . . . . . . . . . . . . . . . . . . . . . . . . . . . . . . . . . . . . . . . . . . . . . . . . . To Connect 16442B Test Fixture (B1500A-A5F). . . . . . . . . . . . . . . . . . . . . . . . . . . . . To Connect Connector Plate . . . . . . . . . . . . . . . . . . . . . . . . . . . . . . . . . . . . . . . . . . . . To Connect ASU. . . . . . . . . . . . . . . . . . . . . . . . . . . . . . . . . . . . . . . . . . . . . . . . . . . . . . . To Connect SCUU/GSWU . . . . . . . . . . . . . . . . . . . . . . . . . . . . . . . . . . . . . . . . . . . . . . . To Connect GNDU Adapter . . . . . . . . . . . . . . . . . . . . . . . . . . . . . . . . . . . . . . . . . . . . . . To Connect MCSMU Connection Box . . . . . . . . . . . . . . . . . . . . . . . . . . . . . . . . . . . . . ................................................................ 3-12 3-13 3-15 3-17 3-21 3-25 3-26 3-26 Keysight B1500A User’s Guide, Ed ition 14 Contents . . . . . . . . . . . . . . . . . . . . . . . . . . . . . . . . . . . . . . . . . . . . . . . . . . . . . . . . . . . . . . . . . 3-27 Mounting Connectors . . . . . . . . . . . . . . . . . . . . . . . . . . . . . . . . . . . . . . . . . . . . . . . . . . . . 3-29 To Make an Interlock Circuit . . . . . . . . . . . . . . . . . . . . . . . . . . . . . . . . . . . . . . . . . . . . . 3-31 . . . . . . . . . . . . . . . . . . . . . . . . . . . . . . . . . . . . . . . . . . . . . . . . . . . . . . . . . . . . . . . . . 3-31 To Connect GNDU Output . . . . . . . . . . . . . . . . . . . . . . . . . . . . . . . . . . . . . . . . . . . . . . . 3-34 To Connect SMU Output . . . . . . . . . . . . . . . . . . . . . . . . . . . . . . . . . . . . . . . . . . . . . . . . 3-35 To Connect MCSMU Output. . . . . . . . . . . . . . . . . . . . . . . . . . . . . . . . . . . . . . . . . . . . . . 3-41 To Connect MFCMU Output . . . . . . . . . . . . . . . . . . . . . . . . . . . . . . . . . . . . . . . . . . . . . . 3-42 Connecting Measurement Devices . . . . . . . . . . . . . . . . . . . . . . . . . . . . . . . . . . . . . . . . . . 3-43 Using Test Fixture . . . . . . . . . . . . . . . . . . . . . . . . . . . . . . . . . . . . . . . . . . . . . . . . . . . . . . 3-44 Using Connector Plate . . . . . . . . . . . . . . . . . . . . . . . . . . . . . . . . . . . . . . . . . . . . . . . . . . 3-46 Capacitance Compensation When Using Switching Matrix . . . . . . . . . . . . . . . . . . . . . . 3-50 Required Conditions. . . . . . . . . . . . . . . . . . . . . . . . . . . . . . . . . . . . . . . . . . . . . . . . . . . . 3-51 To Create Compensation Data File . . . . . . . . . . . . . . . . . . . . . . . . . . . . . . . . . . . . . . . . 3-53 Maintenance . . . . . . . . . . . . . . . . . . . . . . . . . . . . . . . . . . . . . . . . . . . . . . . . . . . . . . . . . . . . 3-58 Cleaning . . . . . . . . . . . . . . . . . . . . . . . . . . . . . . . . . . . . . . . . . . . . . . . . . . . . . . . . . . . . . 3-58 Self-test and Diagnostics . . . . . . . . . . . . . . . . . . . . . . . . . . . . . . . . . . . . . . . . . . . . . . . 3-58 . . . . . . . . . . . . . . . . . . . . . . . . . . . . . . . . . . . . . . . . . . . . . . . . . . . . . . . . . . . . . . . . . 3-58 Calibration . . . . . . . . . . . . . . . . . . . . . . . . . . . . . . . . . . . . . . . . . . . . . . . . . . . . . . . . . . . . 3-58 About Plug-in Modules . . . . . . . . . . . . . . . . . . . . . . . . . . . . . . . . . . . . . . . . . . . . . . . . . . . 3-59 Module Type and Locations . . . . . . . . . . . . . . . . . . . . . . . . . . . . . . . . . . . . . . . . . . . . . . 3-59 To Interconnect SPGUs . . . . . . . . . . . . . . . . . . . . . . . . . . . . . . . . . . . . . . . . . . . . . . . . . 3-60 To Interconnect WGFMUs . . . . . . . . . . . . . . . . . . . . . . . . . . . . . . . . . . . . . . . . . . . . . . . 3-61 About Module Installation . . . . . . . . . . . . . . . . . . . . . . . . . . . . . . . . . . . . . . . . . . . . . . . 3-62 4. Specifications Hard ware. . . . . . . . . . . . . . . . . . . . . . . . . . . . . . . . . . . . . . . . . . . . . . . . . . . . . . . . . . . . . . 4-3 EasyEXPERT Software. . . . . . . . . . . . . . . . . . . . . . . . . . . . . . . . . . . . . . . . . . . . . . . . . . . 4-42 Program and interface capabilities . . . . . . . . . . . . . . . . . . . . . . . . . . . . . . . . . . . . . . . . 4-49 Furnished Software. . . . . . . . . . . . . . . . . . . . . . . . . . . . . . . . . . . . . . . . . . . . . . . . . . . . . 4-49 Keysight B1500A User’s Guide, Ed ition 14 Contents Desktop EasyEXPERT Software . . . . . . . . . . . . . . . . . . . . . . . . . . . . . . . . . . . . . . . . . . 4-50 General Specifications . . . . . . . . . . . . . . . . . . . . . . . . . . . . . . . . . . . . . . . . . . . . . . . . . 4-51 5. Accessories and Options Keysight B1500A User’s Guide, Ed ition 14 1 Getting Started Getting Started This chapter describes the basic operations of Keysight B1500A. Before learning the product details, let’s try to use the B1500A briefly. The operations need the B1500A, power cable, and USB keyboard only (USB mouse and stylus pen are optional). Keysight B1500A also requires Keysight EasyEXPERT software as its graphical user interface. During the operations, you will not connect device under test. Open all measurement terminal. This chapter consists of the following sections. NOTE • “To Turn On/Off B1500A” • “To Launch EasyEXPERT” • “To Use Tracer Test Mode” • “To Use Application Test Mode” • “To Use Classic Test Mode” • “To Perform Measurement” • “To Use Analysis Tools” If you use the B1500A at the first time If this is the first time to turn Keysight B1500 on after the delivery, you need to perform the initial setup of the B1500. See “Inspection and Installation” on page 3-7. After the initial setup and if no users are added, you can automatically logon as “Keysight B1500 User” account without password. 1- 2 Keysight B1500A User’s Guide, Ed ition 14 Getting Started To Turn On/Off B1500A To Turn On/Off B1500A NOTE When turning the B1500A on Open the measurement terminals at the device side when turning the B1500A on. Also disconnect the device from the measurement terminals and open the measurement terminals after the test. If you leave the connection with the device, the device may be damaged by unexpected operations or charge-up of measurement cables. NOTE If Start EasyEXPERT button is not displayed Select All Programs > Start EasyEXPERT from the Start menu. The Start EasyEXPERT button will be displayed. NOTE Automatic start function If the automatic start function is on, EasyEXPERT is launched within the B1500A boot up process. If the function is off, EasyEXPERT is not launched and the Start EasyEXPERT button is displayed. To turn the automatic start function off, use the Start EasyEXPERT window displayed by the File > Exit menu on the EasyEXPERT main screen. And remove the check from the Option > Auto Start of EasyEXPERT menu. NOTE If EasyEXPERT does not run Launch “Keysight Connection Expert” by using the icon on Windows taskbar. And check the USB0 connection status displayed in “Instrument I/O on this PC” area. USB0 connection status display example: USB0 + B1500A(USB0::2391::1::0001::0::INSTR) + agb1500a + UsbDevice1 If “agb1500A” and “UsbDevice1” are not listed, add them by using “Add VISA Alias” in the right-button-menu on “B1500A (USB0:: . . ::INSTR)”. If the problem still remains, perform Keysight B1500 system recovery. To perform recovery, see Keysight EasyEXPERT User’s Guide. Keysight B1500A User’s Guide, Ed ition 14 1- 3 Getting Started To Turn On/Off B1500A To Turn B1500A On 1. Connect the power cable from Keysight B1500A to an AC power outlet. 2. Connect the USB keyboard to the B1500A. Optionally, connect the USB mouse to the B1500A. 3. Press the Standby switch (lower right corner of the front panel). Windows, measurement module initialization, and self-calibration will start. For the Windows logon screen, log on Windows. After logging on, the Start EasyEXPERT button will be displayed on the screen, or EasyEXPERT will be launched if the automatic start function is on. To Turn B1500A Off Press the Standby switch (lower right corner of the front panel). Windows will be shutdown and the B1500A will become the standby state. 1- 4 Keysight B1500A User’s Guide, Ed ition 14 Getting Started To Turn On/Off B1500A NOTE Keysight B1500A has the following front panel user interface. • Stop Stops the present measurement or source output immediately. • Rotary knob Rotating the knob moves the marker on the graph window, or increases/decreases/changes the value in the active entry field. Pressing the knob sets or enters the value. • Softkeys Seven softkeys are available. Used to select one for the entry field specified or the dialog box. They are also used to recall the test definitions (pre-defined test setups). • Touch Panel Off Enables or disables the touch screen operation. • Standby switch Turns the B1500A on. Pressing the button in the ON state makes the B1500A in the standby state. • LCD Off Enables or disables the LCD panel. LED lights when the LCD is disabled. • +, -, Set, Cancel Four keys are available for adjusting brightness. Use + and - to adjust it and then press Set to fix it. Pressing Cancel instead of Set cancels the adjustment. Keysight B1500A also requires Keysight EasyEXPERT software as its graphical user interface. You can operate Keysight EasyEXPERT by using the touch panel. Use your fingers, stylus pen, and so on for the touch panel operation. The USB keyboard and the USB mouse are also available for operating the EasyEXPERT. To remove USB devices from the B1500A, use “Safely Remove Hardware” on Windows taskbar. If it is not used, the B1500A may cause the internal USB communication error. If the error occurs, turn the B1500A off and disconnect the power cable from the B1500A. Leave it about 30 seconds before rebooting the B1500A, and connect the power cable again, and then turn the B1500A on. Keysight B1500A User’s Guide, Ed ition 14 1- 5 Getting Started To Launch EasyEXPERT To Launch EasyEXPERT 1. If the automatic start function is off, the Start EasyEXPERT button is displayed. Click the button and wait until the EasyEXPERT main screen or workspace selection screen is displayed. NOTE Workspace is the space created in Keysight B1500A’s internal hard disk drive, and is used to store the test setup, test result data, and so on. The workspace can be created and allocated for each user. 2. If this is the first time to start the EasyEXPERT, or if no workspace exists, a workspace will be created automatically. Skip to “To Use Tracer Test Mode” on page 1-10, “To Use Application Test Mode” on page 1-12, or “To Use Classic Test Mode” on page 1-14. 3. If only one workspace exists, the B1500A displays the screen as shown in Figure 1-1. Skip to “If Only One Workspace Exists” on page 1-7. 4. If two or more workspaces exist, the B1500A displays the screen as shown in Figure 1-3. Skip to “To Select Workspace” on page 1-9. 1- 6 Keysight B1500A User’s Guide, Ed ition 14 Getting Started To Launch EasyEXPERT If Only One Workspace Exists For the screen as shown in Figure 1-1, perform the following steps. • If you do not want to create a workspace, select the Yes radio button and click OK. Skip to “To Use Tracer Test Mode” on page 1-10, “To Use Application Test Mode” on page 1-12, or “To Use Classic Test Mode” on page 1-14. • If you want to create a workspace, select the No, I want to start a new session. radio button and click Next. The B1500A displays the screen as shown in Figure 1-2. Skip to “To Create Workspace” on page 1-8. • If you want to manage workspaces, select the No, I want to manage Workspaces. radio button and click Next. The B1500A displays the screen as shown in Figure 1-3. Skip to “To Select Workspace” on page 1-9. Figure 1-1 If Only One Workspace Exists NOTE Work on the same setups and data in the next time If this check box is checked, the workspace selection screen will be skipped at the next startup and EasyEXPERT will be launched with the workspace used at the last operation. To perform this setup again, click the File > Close Workspace menu on the EasyEXPERT main screen. Keysight B1500A User’s Guide, Ed ition 14 1- 7 Getting Started To Launch EasyEXPERT To Create Workspace For the screen as shown in Figure 1-2, perform the following steps. To cancel creating workspace, click Prev. 1. Enter the name of the new workspace into the above-entry field. Check Allow other users to access this workspace box if you want to create a public workspace that is opened for all users. 2. If you are the owner of the existing workspace, you can change the name of the existing workspace. If you want to rename the existing workspace, enter the name into the below-entry field. Check Allow other users to access this workspace box if you want to set it to a public workspace that is opened for all users. 3. Click OK. Skip to “To Use Tracer Test Mode” on page 1-10, “To Use Application Test Mode” on page 1-12, or “To Use Classic Test Mode” on page 1-14. Figure 1-2 To Create Workspace 1- 8 Keysight B1500A User’s Guide, Ed ition 14 Getting Started To Launch EasyEXPERT To Select Workspace For the screen as shown in Figure 1-3, perform the following steps. This example selects the workspace named as test that is a private workspace. 1. Select Your Workspaces radio button. 2. Select test and click Continue. Skip to “To Use Tracer Test Mode” on page 1-10, “To Use Application Test Mode” on page 1-12, or “To Use Classic Test Mode” on page 1-14. If you want to manage workspaces, click the Manage Workspaces button. See Keysight EasyEXPERT User’s Guide. Figure 1-3 To Select Workspace NOTE Choose the same Workspace in the next time If this check box is checked, the workspace selection screen will be skipped at the next startup and EasyEXPERT will be launched with the workspace used at the last operation. To perform this setup again, click the File > Close Workspace menu on the EasyEXPERT main screen. Keysight B1500A User’s Guide, Ed ition 14 1- 9 Getting Started To Use Tracer Test Mode To Use Tracer Test Mode The following procedure performs the tracer test setup. 1. Click the Tracer Test tab on the main screen. The tab is in the leftmost column on the screen. The I/V Trace screen is displayed. See Figure 1-4. 2. Set the channels at the field below the graph as shown in Table 1-1. 3. Set the measurement condition at the right field of the graph as shown in Table 1-3. 4. Set the graph display condition at the field below the graph as shown in Table 1-2. To enter the value, use the USB keyboard or the screen/numeric keyboard opened by clicking the right button of the entry field. To start measurement, click for the repeat measurement. for the single measurement or If the Stop field is highlighted, the range of measurement and graph display can be changed by using the rotary knob during the repeat measurement. Table 1-1 I/V Trace Channel Setup Unit V Name Mode a I Name Function SMU1 V1 I1 V VAR1 SMU2 V2 I2 V CONST a. Channel output mode. Set I or IPULSE for the current output and voltage measurement. Set V or VPULSE for the voltage output and current measurement. Table 1-2 I/V Trace Graph Setup Name Y 1- 10 I1 Scale LIN Name X V1 Scale LIN Keysight B1500A User’s Guide, Ed ition 14 Getting Started To Use Tracer Test Mode Table 1-3 I/V Trace Measurement Setup VAR1 Figure 1-4 CONST Mode LIN-SGL Unit SMU2 Start 0 V Source 0 V Stop 1 V Compliance 5 mA Step 10 mV NOS 101 Interlacing 1 Compliance 5 mA Pwr Comp. OFF Meas. Time 2 us Dual Polarity ON Step Time 500 us Display Example of I/V Trace Screen Keysight B1500A User’s Guide, Ed ition 14 1- 11 Getting Started To Use Application Test Mode To Use Application Test Mode For the screen as shown in Figure 1-5, perform the following procedure. Figure 1-5 Display Example of EasyEXPERT Main Screen 1. Click the Application Test tab on the main screen. The tab is in the leftmost column on the screen. 2. Set the Category field. For example, check the CMOS only. The Library field lists the test definitions. 3. Select a test definition at the Library field. For example, click the Id-Vg and Select button sequentially. The screen changes the display as shown in Figure 1-6. 4. Change the measurement conditions at the Test Parameters field. The following example changes the voltage sweep output. a. Set VgStart to 0 V and VgStep to 0.2 V. b. Set VsubsStep to -1.0 V. 1- 12 Keysight B1500A User’s Guide, Ed ition 14 Getting Started To Use Application Test Mode To enter the value, use the USB keyboard or the screen/numeric keyboard opened by clicking the right button of the entry field. See “To Perform Measurement” on page 1-16 to start measurement. NOTE Test Definitions Test definitions are the built-in test setups that have been defined and stored in the EasyEXPERT as the application library. The EasyEXPERT contains more than two hundred test definitions. You can execute the test without modifications. Also you can create your own test setup/definition by making any changes. All furnished test definitions are just sample. Keysight Technologies is NOT LIABLE for any damages caused by the samples. Figure 1-6 Display Example of Application Test Setup Screen Keysight B1500A User’s Guide, Ed ition 14 1- 13 Getting Started To Use Classic Test Mode To Use Classic Test Mode The following procedure performs the I/V Sweep classic test setup. 1. Click the Classic Test tab on the main screen. The tab is in the leftmost column on the screen. 2. Click I/V Sweep and Select button sequentially. The I/V Sweep Channel Setup screen is displayed. See Figure 1-7. 3. Set the Channel Setup parameters as shown in Table 1-4. 4. Click the Measurement Setup tab and set the parameters as shown in Table 1-5. 5. Click the Display Setup tab and set the parameters as shown in Table 1-6. To enter the value, use the USB keyboard or the screen/numeric keyboard opened by clicking the right button of the entry field. Figure 1-7 Display Example of I/V Sweep Channel Setup Screen 1- 14 Keysight B1500A User’s Guide, Ed ition 14 Getting Started To Use Classic Test Mode See “To Perform Measurement” on page 1-16 to start measurement. Table 1-4 I/V Sweep Channel Setup Unit V Name Mode a I Name Function SMU1 V1 I1 V VAR1 SMU2 V2 I2 V CONST a. Channel output mode. Set I or IPULSE for the current output and voltage measurement. Set V, VPULSE, or COMMON for the voltage output and current measurement. Table 1-5 I/V Sweep Measurement Setup VAR1 Table 1-6 Timing Constants Unit SMU1 Hold 0 s Unit SMU2 Name V1 Delay 0 s V Name V2 Direction Single I Name I2 Linear/Log LINEAR Mode V Start 0 V Source 0 V Stop 1 V Compliance 100 mA Step 10 mV No of Step 101 Compliance 100 mA Pwr Comp OFF Sweep CONTINUE AT ANY status I/V Sweep Display Setup Name Sharing Scale Min Max X V1 (None) Linear 0 V 1 V Y1 I1 (None) Linear -1 pA 1 pA Keysight B1500A User’s Guide, Ed ition 14 1- 15 Getting Started To Perform Measurement To Perform Measurement 1. Click the Single button (upper right on the main screen) to start measurement. This opens the Data Display window and starts a single sweep measurement. After the measurement, the measurement data is displayed on the Data Display window. For the measurement after performing “To Use Classic Test Mode” on page 1-14, you will have the test result as shown in Figure 1-8. This is the leakage current measurement result because all measurement terminal is opened for performing the procedures described in this chapter. 2. If the automatic data record function has been set to ON (Auto Record ON), Test Result Editor appears on the lower area of the screen when the measurement is completed. See “To Use Test Result Editor” on page 1-17. Figure 1-8 Display Example of Data Display Window 1- 16 Keysight B1500A User’s Guide, Ed ition 14 Getting Started To Perform Measurement To Use Test Result Editor The Test Result Editor provides the following GUI to set a flag and remarks to the test result record. • Save button and Delete button Divides test records into groups, Save and Delete. Test records in Save-group are always listed in the lower area of the EasyEXPERT main screen. Test records in Delete-group can be listed when Results > Filter > Show Deleted Data is checked. • Flags buttons The following buttons are available. You can set one of the following flags. • Important ! button Sets the important flag (!) to the test result record. • Valid # button Sets the valid flag (#) to the test result record. • Questionable ? button Sets the questionable flag (?) to the test result record. • Remarks field You can enter characters into this field. The characters will be recorded as the Remarks value of the test result record. • OK button Applies the setup on the Test Result Editor, and closes this dialog box. Keysight B1500A User’s Guide, Ed ition 14 1- 17 Getting Started To Use Analysis Tools To Use Analysis Tools The Data Display window provides several analysis functions. • View menu: used to adjust the graph scale. • Marker menu: used to display and control the marker. • Cursor menu: used to display and control the cursor. • Line menu: used to display and control the lines. When the marker, cursor, and lines are effective, their parameters are also displayed on the X-Y Graph Plot area. Figure 1-9 is an example displaying marker, tangent line, and regression line on the test result graph shown in Figure 1-8. You can read position of the marker and the active cursor, and interrupt and gradient of the active line. Figure 1-9 Display Example of Analysis Tools 1- 18 Keysight B1500A User’s Guide, Ed ition 14 2 Introduction Introduction This chapter describes the basic functions and features of Keysight B1500A Semiconductor Device Analyzer, and consists of the following sections: NOTE • “Overview” • “Front View” • “Rear View” • “Measurement Modules” Application Library Keysight B1500A has installed Keysight EasyEXPERT software as the user interface. The EasyEXPERT contains an application library that is a set of test definitions. The application test can be performed by selecting a test definition and setting the test condition for the actual DUT (device under test). All test definitions are just sample. If the samples damage your devices, Keysight Technologies is NOT LIABLE for the damage. NOTE Furnished Sample Programs (Utility) The following sample programs are stored in the following folder. • <program folder>\Agilent\B1500\EasyEXPERT\Utilities\ Prober control programs sleep.exe program • <program folder>\Agilent\B1500\EasyEXPERT\415xC\Conversion\ 4155/4156 setup file converter • <program folder>\Agilent\B1500\EasyEXPERT\IC-CAP Support\MDM\ MDM file converter for IC-CAP users Where, <program folder> is as follows. Then, <system drive> is the drive the EasyEXPERT has been installed. For Windows 7 64 bit version, <system drive>:\Program Files (x86) For Windows 7 32 bit version, Vista, or XP, <system drive>:\Program Files For more details of programs, see Keysight EasyEXPERT User’s Guide. 2- 2 Keysight B1500A User’s Guide, Ed ition 14 Introduction Overview Overview Keysight B1500A Semiconductor Device Analyzer is the new generation one box solution for the semiconductor device DC/AC parametric measurement and analysis application. Keysight B1500A provides the DC voltage/current output capability, DC voltage/current measurement capability, and AC signal output and impedance measurement capability. So you can perform a current-voltage sweep measurement and a capacitance-voltage sweep measurement for example by one instrument. Keysight B1500A also provides an intuitive graphical user interface, touch screen LCD panel, keyboard, and mouse for easy and effective measurement and analysis on the Windows environment. You can analyze a measurement result characteristics graph for example by using several tools such as markers, cursors, and lines. Also, in the GPIB remote control mode, you can control the B1500A from an external computer by using Keysight FLEX command set that is the common language for Keysight semiconductor DC measurement instruments. So you can reuse the measurement program created for Keysight 4155/4156/E5260/E5270. Keysight B1500A User’s Guide, Ed ition 14 2- 3 Introduction Overview • Keysight B1500A Semiconductor Device Analyzer Mainframe that provides the ground unit (GNDU) and ten empty slots for the measurement facilities, and Keysight EasyEXPERT software for the operating environment. The EasyEXPERT is the GUI based measurement control and analysis software runs on the Windows. This instrument is equipped with the 15 inch LCD with touch panel, hard disk drive, DVD drive, and USB/LAN/GP-IB interfaces. This instrument is also furnished the USB keyboard, the USB mouse, and the stylus pen. • HRSMU module High resolution source/monitor unit module. Occupies one slot. Needs Keysight E5288A ASU to perform atto level current measurement or automatic switching of the measurement resource connected to the device under test (DUT). • HPSMU module High power source/monitor unit module. Occupies two slots. • MPSMU module Medium power source/monitor unit module. Occupies one slot. Needs Keysight E5288A ASU to perform atto level current measurement or automatic switching of the measurement resource connected to the device under test (DUT). ASU is effective for the B1511B MPSMU. ASU cannot be connected to the B1511A MPSMU. • MCSMU module Medium current source/monitor unit module. Occupies one slot. • MFCMU module Multi frequency capacitance measurement unit module. Occupies one slot. Needs Keysight N1301A-100 SCUU to perform automatic switching of the measurement resource connected to the DUT. • SPGU module High voltage semiconductor pulse generator unit module. Occupies one slot. Up to five modules can be installed in one mainframe. One module provides two output channels. Needs Keysight 16440A (B1500A-A04) and 16445A to perform automatic switching of the measurement resource connected to the DUT. 2- 4 Keysight B1500A User’s Guide, Ed ition 14 Introduction Overview • WGFMU module and RSU Waveform generator/fast measurement unit module and the remote-sense and switch unit. Occupies one slot. Up to five modules can be installed in one mainframe. One module provides two channels. See Keysight B1530A User’s Guide for using the WGFMU. • Keysight 16440A SMU/PGU pulse generator selector (B1500A-A04) Used to switch the measurement resource connected to the DUT. The measurement resource can be SPGU or SMU. Needs the 16445A adapter to use the selector. One selector provides two switching channels. • Keysight 16442B test fixture (B1500A-A5F) Test fixture for semiconductor parameter analyzers and device analyzers. Provides three Kelvin triaxial connectors (six non-Kelvin triaxial connectors) for connecting SMU, six BNC connectors for connecting SPGU, MFCMU, or other instruments, a GNDU connector, and an Intlk connector. Furnished with the dual-in-line package socket module, universal socket modules (two types), blank PTFE board, and connection wires for device connection. • Keysight 16445A selector adapter Used to connect the 16440A selector (B1500A-A04) to the B1500A. Two selectors can be connected. • Keysight E5288A ASU Atto sense and switch unit (ASU). Used to enable the 1 pA range for the atto level current measurement, also switch the measurement resource connected to the DUT. The measurement resource can be HRSMU/MPSMU (B1511B) or the instrument connected to the AUX terminal. • Keysight N1255A 2 channel connection box for MCSMU Connection box to make the MCSMU connection easy. Supports two MCSMU. • Keysight N1301A-100 SCUU SMU CMU unify unit (SCUU). Used to switch the measurement resource connected to the DUT. The measurement resource can be CMU or one of two HRSMU/MPSMU connected to the SCUU. • Keysight N1301A-200 GSWU Guard switch unit (GSWU). Needs the SCUU to use the GSWU. Effective for the accurate impedance measurements by connecting the guard lines between CMU high and low near the DUT. Keysight B1500A User’s Guide, Ed ition 14 2- 5 Introduction Overview Keysight EasyEXPERT Software Keysight EasyEXPERT software is a specially-designed Windows application program for controlling Keysight B1500A. The EasyEXPERT provides the easy and effective measurement and analysis environment with intuitive graphical user interface (GUI), touch screen LCD panel, keyboard, and mouse. Some of the functions are listed below. • Single measurement, repeat measurement, and append measurement • Switching matrix control Supported models: • Keysight B2200A/B2201A switching matrix • Keysight E5250A switching matrix with E5252A • Measurement/setup data management by workspace • Graph display and analysis with markers, cursors, and lines; and auto analysis • Data import/export capability, data output by CSV/XML format, and graph output by EMF/BMP/GIF/PNG format • Maintenance; self-test and self-calibration • Remote control function from an external computer The EasyEXPERT has the following measurement execution environments. Application Test • Application test • Classic test • Tracer test • Quick test The EasyEXPERT contains an application library that supports typical measurements for CMOS devices, TFT, BJT, memory, nanotechnology devices such as CNT FET, and so on. The application library includes more than two hundred test definitions. You can perform measurements by choosing the best one for your device under test (DUT) from the application libraries, and modifying and executing it. Modification is really simple. For example, it will be completed by changing the output voltage only to DUT terminals. And the setup with your modifications can be saved and recalled as your setup (My Favorite Setup). 2- 6 Keysight B1500A User’s Guide, Ed ition 14 Introduction Overview Classic Test You can perform measurements by using the user interface similar to the semiconductor parameter analyzers such as Keysight 4156C. The setup can be made by entering values into the setup tables used for the measurement module control. And it can be saved and recalled as your setup (My Favorite Setup). This measurement environment provides the following functions. • I/V Sweep • Multi Channel I/V Sweep • I/V List Sweep • I/V-t Sampling • C-V Sweep • SPGU Control • Switching Matrix Control • Direct Control The Direct Control test mode is used to control the measurement modules directly by using the B1500A GPIB control commands and perform measurement. For the control commands, see “Programming Guide”. Tracer Test Curve tracer test mode. This test allows you to perform the high speed I-V measurement on one screen. The Tracer Test screen provides GUI for selecting the used channels, setting the sweep output, and displaying the measurement result (tracing the I-V curve). Range of the sweep output and measurement can be changed by the rotary knob on the front panel. Tracer test also provides the oscilloscope view to display the pulse current or voltage output waveform of the MCSMU. You can verify output waveform over the I-V curve. Quick Test You can execute the test setups saved in a preset group (My Favorite Setup) sequentially. Keysight B1500A User’s Guide, Ed ition 14 2- 7 Introduction Front View Front View This section describes the front view of Keysight B1500A. 6 7 8 9 5 10 11 12 1 4 3 2 1. Standby switch Turns the instrument on. Pressing the button in the ON state makes it in the standby state. The green LED lights when it is in the ON state. NOTE When turning the B1500A on Open the measurement terminals at the device side when turning the B1500A on. Also disconnect the device from the measurement terminals and open the measurement terminals after the measurement. If you leave the connection with the device, the device may be damaged by unexpected operations or charge-up of measurement cables. 2- 8 Keysight B1500A User’s Guide, Ed ition 14 Introduction Front View 2. HDD access indicator This green LED lights in the access status of HDD or DVD drive. Do not turn the instrument off during this LED lights. 3. LCD adjustment keys LCD Off enables or disables the LCD panel. The green LED lights when the LCD is disabled. Four keys are available for adjusting brightness. Use + and - to adjust it and then press Set to fix it. Pressing Cancel instead of Set cancels the adjustment. 4. USB interfaces USB, 2 ports. For keyboard, mouse, and so on. To remove USB devices from the instrument, use “Safely Remove Hardware” on Windows taskbar. If it is not used, the instrument may cause the internal USB communication error. If the error occurs, turn the instrument off and disconnect the power cable from it. Leave it about 30 seconds before rebooting it, and connect the power cable again, and then turn the instrument on. 5. LCD panel 15 inch TFT XGA display, 1024 768 resolution. Displays the Windows screen, Keysight EasyEXPERT software window, and so on. Touch screen operation is available when the Touch Panel Off indicator does not light. To adjust the touch panel, use Microchip TSHARC Control Panel which is opened by selecting Microchip TSHARC Control Panel from the Start menu. 6. Stop key Stops the present measurement or source output immediately. 7. High voltage status indicator This red LED lights when a source channel applies more than ± 42 V. 8. Measurement status indicator This green LED lights when a measurement channel performs measurement. 9. Rotary knob Works on Keysight EasyEXPERT environment. Rotating the knob moves the marker on the graph window, or increases/decreases/changes the value in the active entry field. Pressing the knob sets or enters the value. Keysight B1500A User’s Guide, Ed ition 14 2- 9 Introduction Front View 10. Softkeys Seven softkeys are available for Keysight EasyEXPERT environment. Used to select an alternative for the entry field specified or the dialog box. 11. DVD-R drive For data backup, software update, and so on. With the option DR1, the drive is changed to the DVD-ROM drive. 12. Touch Panel Off key Works on the execution environment of EasyEXPERT software. Enables or disables the touch screen operation. The green LED lights when the touch screen is disabled. 6 7 8 9 5 10 11 12 1 4 3 2- 10 2 Keysight B1500A User’s Guide, Ed ition 14 Introduction Rear View Rear View This section describes the rear view of Keysight B1500A. 14a 14 E D 4 D D D 3 5 D 2 D C B A 1 13 12 11 10 9 8 7 6 1. Serial number You need this serial number when using Keysight Technologies telephone assistance program. 2. LED status indicator For troubleshooting. Followings are some examples. • Both LEDs turn off: The instrument is in the standby state and Standby switch is OFF position. • One LED turns green: Power supply works normally. • Both LEDs turn orange: The instrument is in the standby state and Standby switch is ON position. Keysight B1500A User’s Guide, Ed ition 14 2- 11 Introduction Rear View 3. LINE input receptacle AC power cable is connected to this receptacle. 4. GPIB interface Use a Keysight 82357A USB/GPIB interface or Keysight 10833A/B/C/D GPIB cable to connect to an external computer or equipment. 5. Module slot Ten slots are available for installing the modules. Several kinds of module can be installed in the B1500A. However, the allowable number to install is different by the module type. See “Measurement Modules” on page 2-17. Also, there is a rule for the installation order by the module type. See Chapter 3, “Installation.” 6. Circuit Common ( ) and Frame ground ( ) terminals Normally, connect the terminals together by using the shorting bar (Keysight part number 5000-4206). For floating measurement, remove the shorting bar. WARNING If the Circuit Common terminal is not connected to the frame ground terminal (for floating measurement), a potential shock hazard may present. Do not touch any of measurement circuit at any time while a floating measurement is in progress. CAUTION For floating measurement, do not apply dangerous voltage to the Circuit Common terminal. Failure to heed this caution may result in damage to the instrument. 7. Zero Check terminal Ground reference point of the instrument. CAUTION The Zero Check terminal can be used for the service purpose only. For the normal operation, leave this terminal open and do not connect anything to this terminal. Connecting anything can damage the instrument. 8. GNDU terminal 0 V constant voltage source. Used for the reference of measurement ground. Triaxial connector. 9. LAN interface RJ45 connector. 2- 12 Keysight B1500A User’s Guide, Ed ition 14 Introduction Rear View 10. USB interfaces USB, 2 ports. For keyboard, mouse, or peripherals. To remove USB devices from the instrument, use “Safely Remove Hardware” on Windows taskbar. If it is not used, the instrument may cause the internal USB communication error. If the error occurs, turn the instrument off and disconnect the power cable from it. Leave it about 30 seconds before rebooting it, and connect the power cable again, and then turn the instrument on. 11. Ext Trig terminals Two BNC connectors, one for trigger input, and one for trigger output. For details about the trigger function, see Programming Guide. 12. Digital I/O terminal DSUB 25 pin connector. Can be used for the trigger input/output terminals or an interface to control an external relay circuit and so on. For details, see Programming Guide. This connector is also used to connect Keysight 16445A selector adapter. 13. Interlock terminal Used in conjunction with the interlock function of the instrument. If the Interlock terminal is open, maximum SMU output is limited to ±42 V. Be sure to connect this terminal to the interlock circuit of the 16442B test fixture (B1500A-A5F) or the prober station before performing measurement. For the interlock circuit, see “To Make an Interlock Circuit” on page 3-31. To verify the interlock function, perform the Interlock Open/Close test on the Main Frame tab screen of the EasyEXPERT Configuration window. WARNING Dangerous voltage, instrument maximum output voltage may appear at Force, Guard, and Sense terminals if the Interlock terminal is closed. 14. Video output terminal VGA connector. For an external display. Signal to the built-in LCD is also applied to this terminal. For the B1500A manufactured before the video output terminal is supported, it is mounted on the position “14a” by upgrading the mainframe. Keysight B1500A User’s Guide, Ed ition 14 2- 13 Introduction Rear View A. GNDU/ADC Ground unit and A/D converter module. Always installed in the B1500A. B. SPGU module The semiconductor pulse generator unit (SPGU) has the Output 1 and Output 2 terminals and the following terminals to synchronize the operation between SPGUs or with an external equipment. Ref Out/Sync Out: Connect to the Ref In/Sync In of the slave SPGU. Ref In/Sync In: Connect to the Ref Out/Sync Out of the master SPGU. Trig Out: Connect to the trigger input terminal of the equipment synchronized with the SPGU output. CAUTION Connect the Ref Out/In, Sync Out/In, and Trig Out terminals to the specified terminal properly. Connecting to the other terminal may result in damage to the SPGU. In the EasyEXPERT operation mode, the SPGU outputs can be specified by the PG number. PG1 and PG2 are assigned to the Output 1 and Output 2 terminals of the SPGU at the lowest position. And the following PG numbers are assigned to the outputs of the upper SPGUs in sequence. Use the PG number label furnished with the B1500A or equivalent to identify the SPGU channel number. 14a 14 E D 4 D D D 3 5 D 2 D C B A 1 13 2- 14 12 11 10 9 8 7 6 Keysight B1500A User’s Guide, Ed ition 14 Introduction Rear View C. WGFMU module The waveform generator/fast measurement unit (WGFMU) has the Ch 1 and Ch 2 terminals and the following terminals to synchronize the operation between WGFMUs or with an external equipment. Sync Out: Connect to the Sync In of the slave WGFMU. Sync In: Connect to the Sync Out of the master WGFMU. Trig Out: Connect to the trigger input terminal of the equipment synchronized with the WGFMU output. CAUTION Connect the Sync Out/In, and Trig Out terminals to the specified terminal properly. Connecting to the other terminal may result in damage to the WGFMU. Connect the connection cable between the WGFMU and the RSU (remote-sense and switch unit) before turning the instrument on. Changing the cable connection in the power on state may damage them. See Keysight B1530A User’s Guide for cable connection and usage. D. SMU module The source/monitor unit (SMU) has two triaxial connectors, force and sense, for the Kelvin connections. The HRSMU (high resolution SMU) and MPSMU (B1511B medium power SMU) also have a D-sub connector (To ASU terminal) which is used to connect the ASU (atto sense and switch unit). In the EasyEXPERT operation mode, the SMUs can be specified by the SMU number. SMU1 is assigned to the SMU at the lowest position. And the following SMU numbers are assigned to the upper SMUs in sequence. Use the SMU number label furnished with the B1500A or equivalent to identify the SMU number. NOTE Connect the connection cables between the SMU and the ASU before turning the instrument on. Changing the cable connection in the power on state may damage them. To connect the ASU, see “To Connect ASU” on page 3-17. E. CMU module The multi frequency capacitance measurement unit (MFCMU) has four coaxial connectors, Lcur, Lpot, Hpot, and Hcur, for the four-terminal pair connection. The Hcur and Hpot have to be connected together at a terminal of the device Keysight B1500A User’s Guide, Ed ition 14 2- 15 Introduction Rear View under test (DUT). Also the Lcur and Lpot have to be connected together at the other terminal of the DUT. Then, the guard lines of four-terminal pair must be connected together. CAUTION Do not apply voltage more than ±25 V to the MFCMU input terminals. Failure to heed this caution may result in damage to the module. WARNING To avoid electrical shock and instrument damage, turn the all instruments off before connecting or disconnecting measurement cable. WARNING There are potentially hazardous voltages (± 200 V for HPSMU, and ± 100 V for MPSMU/HRSMU) present at the Force, Sense, and Guard terminals of this instrument. To prevent electrical shock, the following safety precautions must be observed during the use of the instrument. • Use a three-conductor AC power cable to connect the instrument to an electrical ground (safety ground). • If you do not use the B1500A-A5F/16442A/B test fixture, you must install and connect an interlock circuit that opens the Interlock terminal when the shielding box access door is opened. • If you change the DUT interface, test fixture, prober, and such, connect an interlock cable to the one actually used. • Confirm periodically that the interlock function works normally. • Before touching the connections on the Force, Guard, and Sense terminals in the test fixture or the shielding box, turn the instrument off and discharge any capacitors. If you do not turn the instrument off, complete all of the following items, regardless of the instrument settings. • • Press the front panel Stop key to set the module output off. • Confirm that the front panel High Voltage indicator is not lit. • Open the Interlock terminal (open the fixture cover or the shielding box access door). • Discharge any capacitors connected to a measurement resource. Warn persons working around the instrument about dangerous conditions. 2- 16 Keysight B1500A User’s Guide, Ed ition 14 Introduction Measurement Modules Measurement Modules Keysight B1500A can be equipped with the following measurement modules. • “GNDU - Ground Unit” • “HPSMU - High Power SMU” • “MPSMU - Medium Power SMU” • “MCSMU - Medium Current SMU” • “HRSMU - High Resolution SMU” • “MFCMU - Multi Frequency CMU” • “HVSPGU - High Voltage SPGU” • “WGFMU - Waveform Generator/Fast Measurement Unit” See Keysight EasyEXPERT User’s Guide for the functions available for Keysight EasyEXPERT software. See Programming Guide for the functions available for the GPIB remote mode. See Keysight B1530A User’s Guide for using the WGFMU. GNDU - Ground Unit Keysight B1500A is equipped with the ground unit (GNDU). The GNDU is a 0 V constant voltage source, and used for the reference of measurement ground. Also the GNDU can sink up to ± 4.2 A, so it is effective for using the HPSMU (high power SMU). Figure 2-1 is a simplified circuit diagram of GNDU. Figure 2-1 Simplified GNDU Circuit Diagram 0V GNDU Force Common Keysight B1500A User’s Guide, Ed ition 14 2- 17 Introduction Measurement Modules About SMU Source/monitor unit (SMU) can apply DC voltage or current, and can measure DC current or voltage. Figure 2-2 is a simplified SMU circuit diagram. The SMU can perform the following operations: The HPSMU, MPSMU, and HRSMU can perform the following operations: • Apply voltage and measures current or voltage • Apply current and measures current or voltage The MCSMU can perform the following operations: • Apply voltage and measures current and/or voltage • Apply current and measures current and/or voltage NOTE To select the SMU operation mode in the GPIB remote condition, enter the CMM command. Figure 2-2 Simplified SMU Circuit Diagram +A SMU Force + VCommon Compliance The SMU has a compliance feature that limits output voltage or current to prevent damage to the device under test. When the SMU applies voltage, you can specify current compliance. When the SMU applies current, you can specify voltage compliance. For details about the compliance, see Keysight EasyEXPERT User’s Guide. 2- 18 Keysight B1500A User’s Guide, Ed ition 14 Introduction Measurement Modules HPSMU - High Power SMU This section describes typical specification of the high power source/monitor unit (HPSMU). Maximum four modules can be installed in one mainframe. Figure 2-3 • Maximum voltage, current, output power: ± 200 V, ± 1 A, 20 W • Minimum range: 2 V, 1 nA • Output/measurement value and resolution: see Table 2-1 to Table 2-4. HPSMU Output and Measurement Ranges Current (mA) 1000 500 125 50 -200 -100 Voltage (V) -40 -20 20 40 -125 200 100 -500 -1000 Keysight B1500A User’s Guide, Ed ition 14 2- 19 Introduction Measurement Modules Table 2-1 Table 2-2 HPSMU Output Voltage Ranges and Resolutions Range Output Value Setting Resolution Maximum Current 2V 0 |V| 2 V 100 V ± 1000 mA 20 V 0 |V| 20 V 1 mV ± 1000 mA 40 V 0 |V| 40 V 2 mV ± 500 mA 100 V 0 |V| 100 V 5 mV ± 125 mA 200 V 0 |V| 200 V 10 mV ± 50 mA HPSMU Output Current Ranges and Resolutions Range Output Value Setting Resolution Maximum Voltage 1 nA 0 |I| 1.15 nA 50 fA ± 200 V 10 nA 0 |I| 11.5 nA 500 fA ± 200 V 100 nA 0 |I| 115 nA 5 pA ± 200 V 1 A 0 |I| 1.15 A 50 pA ± 200 V 10 A 0 |I| 11.5 A 500 pA ± 200 V 100 A 0 |I| 115 A 5 nA ± 200 V 1 mA 0 |I| 1.15 mA 50 nA ± 200 V 10 mA 0 |I| 11.5 mA 500 nA ± 200 V 100 mA 0 |I| 50 mA 5 A ± 200 V 50 mA < |I| 115 mA 5 A ± 100 V 0 |I| 50 mA 50 A ± 200 V 50 mA < |I| 125 mA 50 A ± 100 V 125 mA < |I| 500 mA 50 A ± 40 V 500 mA < |I| 1 A 50 A ± 20 V 1A 2- 20 Keysight B1500A User’s Guide, Ed ition 14 Introduction Measurement Modules Table 2-3 HPSMU Measurement Voltage Values and Resolutions Table 2-4 Measurement Resolutions Measurement Value a High Speed ADC High Resolution ADC 2V 0 |V| 2.2 V 100 V 2 V 20 V 0 |V| 22 V 1 mV 20 V 40 V 0 |V| 44 V 2 mV 40 V 100 V 0 |V| 110 V 5 mV 100 V 200 V 0 |V| 200 V 10 mV 200 V Range HPSMU Measurement Current Values and Resolutions Measurement Resolutions Range Measurement Value a High Speed ADC High Resolution ADC 1 nA 0 |I| 1.15 nA 50 fA 10 fA 10 nA 0 |I| 11.5 nA 500 fA 10 fA 100 nA 0 |I| 115 nA 5 pA 100 fA 1 A 0 |I| 1.15 A 50 pA 1 pA 10 A 0 |I| 11.5 A 500 pA 10 pA 100 A 0 |I| 115 A 5 nA 100 pA 1 mA 0 |I| 1.15 mA 50 nA 1 nA 10 mA 0 |I| 11.5 mA 500 nA 10 nA 100 mA 0 |I| 115 mA 5 A 100 nA 1A 0 |I| 1 A 50 A 1 A a. This column is applied to the auto ranging or the limited auto ranging. For fixed ranging, maximum measurement value is Range column value. Keysight B1500A User’s Guide, Ed ition 14 2- 21 Introduction Measurement Modules MPSMU - Medium Power SMU This section describes typical specification of the medium power source/monitor unit (MPSMU). There is no restriction for the number of modules installed in one mainframe. Figure 2-4 • Maximum voltage, current, output power: ± 100 V, ± 100 mA, 2 W • Minimum range: 0.5 V, 1 nA (1 pA when the E5288A ASU is used) • Output/measurement value and resolution: see Table 2-5 to Table 2-8. MPSMU Output and Measurement Ranges Current (mA) 100 50 20 Voltage (V) -40 -100 -20 20 40 -20 100 -50 -100 NOTE The E5288A Atto Sense and Switch Unit (ASU) can be connected to the B1511B MPSMU, but it cannot be connected to the B1511A MPSMU. 2- 22 Keysight B1500A User’s Guide, Ed ition 14 Introduction Measurement Modules Table 2-5 MPSMU Output Voltage Ranges and Resolutions Range 0.5 V Maximum Current 0 |V| 0.5 V 25 V ± 100 mA 2V 0 |V| 2V 100 V ± 100 mA 5V 0 |V| 5V 250 V ± 100 mA 20 V 0 |V| 20 V 1 mV ± 100 mA 0 |V| 20 V 2 mV ± 100 mA 20 V < |V| 40 V 2 mV ± 50 mA 5 mV ± 100 mA 20 V < |V| 40 V 5 mV ± 50 mA 40 V < |V| 100 V 5 mV ± 20 mA 40 V 100 V Table 2-6 Setting Resolution Output Value 0 |V| 20 V MPSMU Output Current Ranges and Resolutions Range Output Value Setting Resolution Maximum Voltage 1 pA a 0 |I| 1.15 pA 1 fA ± 100 V 10 pA a 0 |I| 11.5 pA 5 fA ± 100 V 100 pA a 0 |I| 115 pA 5 fA ± 100 V 1 nA 0 |I| 1.15 nA 50 fA ± 100 V 10 nA 0 |I| 11.5 nA 500 fA ± 100 V 100 nA 0 |I| 115 nA 5 pA ± 100 V 1 A 0 |I| 1.15 A 50 pA ± 100 V 10 A 0 |I| 11.5 A 500 pA ± 100 V 100 A 0 |I| 115 A 5 nA ± 100 V 1 mA 0 |I| 1.15 mA 50 nA ± 100 V 10 mA 0 |I| 11.5 mA 500 nA ± 100 V 100 mA 0 |I| 20 mA 5 A ± 100 V 20 mA < |I| 50 mA 5 A ± 40 V 50 mA < |I| 100 mA 5 A ± 20 V a. For B1511B MPSMU. Available when the ASU is used. Keysight B1500A User’s Guide, Ed ition 14 2- 23 Introduction Measurement Modules Table 2-7 MPSMU Measurement Voltage Values and Resolutions Table 2-8 Measurement Resolutions Measurement Value a High Speed ADC High Resolution ADC 0.5 V 0 |V| 0.55 V 25 V 0.5 V 2V 0 |V| 2.2 V 100 V 2 V 5V 0 |V| 5.5 V 250 V 5 V 20 V 0 |V| 22 V 1 mV 20 V 40 V 0 |V| 44 V 2 mV 40 V 100 V 0 |V| 100 V 5 mV 100 V Range MPSMU Measurement Current Values and Resolutions Measurement Resolutions Measurement Value a High Speed ADC High Resolution ADC 1 pA b 0 |I| 1.15 pA 100 aA 100 aA 10 pA b 0 |I| 11.5 pA 1 fA 400 aA 100 pA b 0 |I| 115 pA 5 fA 500 aA 1 nA 0 |I| 1.15 nA 50 fA 10 fA 10 nA 0 |I| 11.5 nA 500 fA 10 fA 100 nA 0 |I| 115 nA 5 pA 100 fA 1 A 0 |I| 1.15 A 50 pA 1 pA 10 A 0 |I| 11.5 A 500 pA 10 pA 100 A 0 |I| 115 A 5 nA 100 pA 1 mA 0 |I| 1.15 mA 50 nA 1 nA 10 mA 0 |I| 11.5 mA 500 nA 10 nA 100 mA 0 |I| 100 mA 5 A 100 nA Range a. This column is applied to the auto ranging or the limited auto ranging. For fixed ranging, maximum measurement value is Range column value. b. For B1511B MPSMU. Available when the ASU is used. 2- 24 Keysight B1500A User’s Guide, Ed ition 14 Introduction Measurement Modules NOTE To connect ASU To use the ASU, it must be connected to the SMU which is connected together when the calibration is performed. The specifications are satisfied and guaranteed in this condition only. So confirm the serial number of the ASU and connect it to the dedicated SMU properly. To connect the ASU, see “To Connect ASU” on page 3-17. To confirm the serial number, see Keysight EasyEXPERT User’s Guide. NOTE Before using 1 pA range The measurement channel connected to the ASU supports the 1 pA range. To use the 1 pA range, set the 1 pA fixed range or the 1 pA limited auto ranging. The B1500A automatically performs the compensation of the data measured by the 1 pA range and returns the compensated data. You can use either the pre-stored offset data or the pre-measured offset data. To measure the offset data, perform the self-calibration before starting the measurement for a DUT. This offset data is temporarily memorized until the B1500A is turned off. Keysight B1500A User’s Guide, Ed ition 14 2- 25 Introduction Measurement Modules MCSMU - Medium Current SMU This section describes typical specification of the medium current source/monitor unit (MCSMU). Maximum four modules can be installed in one mainframe. Figure 2-5 • Maximum current: ± 1 A (pulse), ± 0.1 A (DC) • Maximum voltage: ± 30 V • Maximum output power: 30 W (pulse), 3 W (DC) • Minimum range: 0.2 V, 10 A • Minimum pulse width: 10 s • Output/measurement value and resolution: see Table 2-9 and Table 2-10. MCSMU Output and Measurement Ranges Current (A) 1 Pulse mode only 0.1 30 Voltage (V) - 30 - 0.1 Pulse mode only -1 2- 26 Keysight B1500A User’s Guide, Ed ition 14 Introduction Measurement Modules Table 2-9 MCSMU Voltage Ranges and Resolutions Range Output Value and Measurement Value Setting/ Measurement Resolution Maximum Current Maximum Pulse Base Value 0.2 V 0 |V| 0.2 V 200 nV 100 mA, 1 A a ± 0.2 V 2V 0 |V| 2 V 2 V ±2V 20 V 0 |V| 20 V 20 V ± 20 V 40 V 0 |V| 30 V 40 V ± 30 V a. For pulse. Table 2-10 MCSMU Current Ranges and Resolutions Range Output Value and Measurement Value Setting/ Measurement Resolution Maximum Voltage Maximum Pulse Base Value 10 A 0 |I| 11.5 A 10 pA ± 30 V ± 10 A 100 A 0 |I| 115 A 100 pA ± 100 A 1 mA 0 |I| 1.15 mA 1 nA ± 1 mA 10 mA 0 |I| 11.5 mA 10 nA ± 10 mA 100 mA 0 |I| 100 mA, 0 |I| 115 mA a 100 nA ± 100 mA 1Ab 0 |I| 1 A 1 A ± 50 mA a. For pulse. b. For pulse. Maximum pulse width and duty cycle are 100 ms and 5 % respectively. Keysight B1500A User’s Guide, Ed ition 14 2- 27 Introduction Measurement Modules HRSMU - High Resolution SMU This section describes typical specification of the high resolution source/monitor unit (HRSMU). There is no restriction for the number of modules installed in one mainframe. Figure 2-6 • Maximum voltage, current, output power: ± 100 V, ± 100 mA, 2 W • Minimum range: 0.5 V, 10 pA (1 pA when the E5288A ASU is used) • Output/measurement value and resolution: see Table 2-11 to Table 2-14. HRSMU Output and Measurement Ranges Current (mA) 100 50 20 Voltage (V) -40 -100 -20 20 40 -20 100 -50 -100 2- 28 Keysight B1500A User’s Guide, Ed ition 14 Introduction Measurement Modules Table 2-11 HRSMU Output Voltage Ranges and Resolutions Range Output Value Setting Resolution Maximum Current 0.5 V 0 |V| 0.5 V 25 V ± 100 mA 2V 0 |V| 2 V 100 V ± 100 mA 5V 0 |V| 5 V 250 V ± 100 mA 20 V 0 |V| 20 V 1 mV ± 100 mA 40 V 0 |V| 20 V 2 mV ± 100 mA 20 V < |V| 40 V 2 mV ± 50 mA 0 |V| 20 V 5 mV ± 100 mA 20 V < |V| 40 V 5 mV ± 50 mA 40 V < |V| 100 V 5 mV ± 20 mA 100 V Table 2-12 HRSMU Output Current Ranges and Resolutions Range Output Value Setting Resolution Maximum Voltage 1 pA a 0 |I| 1.15 pA 1 fA ± 100 V 10 pA 0 |I| 11.5 pA 5 fA ± 100 V 100 pA 0 |I| 115 pA 5 fA ± 100 V 1 nA 0 |I| 1.15 nA 50 fA ± 100 V 10 nA 0 |I| 11.5 nA 500 fA ± 100 V 100 nA 0 |I| 115 nA 5 pA ± 100 V 1 A 0 |I| 1.15 A 50 pA ± 100 V 10 A 0 |I| 11.5 A 500 pA ± 100 V 100 A 0 |I| 115 A 5 nA ± 100 V 1 mA 0 |I| 1.15 mA 50 nA ± 100 V 10 mA 0 |I| 11.5 mA 500 nA ± 100 V 100 mA 0 |I| 20 mA 5 A ± 100 V 20 mA < |I| 50 mA 5 A ± 40 V 50 mA < |I| 100 mA 5 A ± 20 V a. Available when the ASU is used. Keysight B1500A User’s Guide, Ed ition 14 2- 29 Introduction Measurement Modules Table 2-13 HRSMU Measurement Voltage Values and Resolutions Table 2-14 Measurement Resolutions Measurement Value a High Speed ADC High Resolution ADC 0.5 V 0 |V| 0.55 V 25 V 0.5 V 2V 0 |V| 2.2 V 100 V 2 V 5V 0 |V| 5.5 V 250 V 5 V 20 V 0 |V| 22 V 1 mV 20 V 40 V 0 |V| 44 V 2 mV 40 V 100 V 0 |V| 100 V 5 mV 100 V Range HRSMU Measurement Current Values and Resolutions Measurement Resolutions Measurement Value a High Speed ADC High Resolution ADC 1 pA b 0 |I| 1.15 pA 100 aA 100 aA 10 pA 0 |I| 11.5 pA 1 fA 1 fA / 400 aA b 100 pA 0 |I| 115 pA 5 fA 2 fA / 500 aA b 1 nA 0 |I| 1.15 nA 50 fA 10 fA 10 nA 0 |I| 11.5 nA 500 fA 10 fA 100 nA 0 |I| 115 nA 5 pA 100 fA 1 A 0 |I| 1.15 A 50 pA 1 pA 10 A 0 |I| 11.5 A 500 pA 10 pA 100 A 0 |I| 115 A 5 nA 100 pA 1 mA 0 |I| 1.15 mA 50 nA 1 nA 10 mA 0 |I| 11.5 mA 500 nA 10 nA 100 mA 0 |I| 100 mA 5 A 100 nA Range a. This column is applied to the auto ranging or the limited auto ranging. For fixed ranging, maximum measurement value is Range column value. b. Available when the ASU is used. 2- 30 Keysight B1500A User’s Guide, Ed ition 14 Introduction Measurement Modules NOTE To connect ASU To use the ASU, it must be connected to the SMU which is connected together when the calibration is performed. The specifications are satisfied and guaranteed in this condition only. So confirm the serial number of the ASU and connect it to the dedicated SMU properly. To connect the ASU, see “To Connect ASU” on page 3-17. To confirm the serial number, see Keysight EasyEXPERT User’s Guide. NOTE Before using 1 pA range The measurement channel connected to the ASU supports the 1 pA range. To use the 1 pA range, set the 1 pA fixed range or the 1 pA limited auto ranging. The B1500A automatically performs the compensation of the data measured by the 1 pA range and returns the compensated data. You can use either the pre-stored offset data or the pre-measured offset data. To measure the offset data, perform the self-calibration before starting the measurement for a DUT. This offset data is temporarily memorized until the B1500A is turned off. Keysight B1500A User’s Guide, Ed ition 14 2- 31 Introduction Measurement Modules MFCMU - Multi Frequency CMU This section describes typical specification of the multi frequency capacitance measurement unit (CMU). The CMU performs the impedance measurement and returns the specified measurement data such as Cp-G. Only one module can be installed in one mainframe. • Measurement parameters: See Table 2-15. • AC signal, output frequency: 1 kHz to 5 MHz Setting resolution: 1 mHz (1 kHz to), 10 mHz (10 kHz to), 0.1 Hz (100 kHz to), or 1 Hz (1 MHz to 5 MHz) • AC signal, output level: 10 mVrms to 250 mVrms, 1 mV resolution • DC bias: 0 to ± 25 V, using MFCMU internal DC bias 0 to ± 100 V, using SMU and SCUU (SMU CMU unify unit) • Measurement range: For the fixed ranging mode, measurement range (impedance range) must be specified to perform measurement. Table 2-16 shows the available measurement ranges and the corresponding impedance value. And Figure 2-7 shows the calculation example of the impedance vs frequency characteristics of a capacitive load. Use these information to decide the measurement range. Impedance Z is calculated by the following formula. Z = 1 / (2 f C) where f is frequency (Hz) and C is capacitance (F). 2- 32 Keysight B1500A User’s Guide, Ed ition 14 Introduction Measurement Modules Table 2-15 Measurement Parameters Primary Parameter Secondary Parameter R (resistance, ) X (reactance, ) G (conductance, S) B (susceptance, S) Z (impedance, ) (phase, radian) Z (impedance, ) (phase, degree) Y (admittance, S) (phase, radian) Y (admittance, S) (phase, degree) Cp (parallel capacitance, F) G (conductance, S) Cp (parallel capacitance, F) D (dissipation factor) Cp (parallel capacitance, F) Q (quality factor) Cp (parallel capacitance, F) Rp (parallel resistance, ) Cs (series capacitance, F) Rs (series resistance, ) Cs (series capacitance, F) D (dissipation factor) Cs (series capacitance, F) Q (quality factor) Lp (parallel inductance, H) G (conductance, S) Lp (parallel inductance, H) D (dissipation factor) Lp (parallel inductance, H) Q (quality factor) Lp (parallel inductance, H) Rp (parallel resistance, ) Ls (series inductance, H) Rs (series resistance, ) Ls (series inductance, H) D (dissipation factor) Ls (series inductance, H) Q (quality factor) Keysight B1500A User’s Guide, Ed ition 14 2- 33 Introduction Measurement Modules Table 2-16 Measurement Range for Fixed Ranging Mode Measurement range (impedance range) Impedance Z 1 kHz f 200 kHz 200 kHz < f 2 MHz 2 MHz < f 5 MHz 0 Z < 100 50 50 50 100 Z < 300 100 100 100 300 Z < 1 k 300 300 300 1 k Z < 3 k 1 k 1 k 1 k 3 k Z < 10 k 3 k 3 k 3 k 10 k Z < 30 k 10 k 10 k 30 k Z < 100 k 30 k 30 k 100 k Z < 300 k 100 k 300 k Z 300 k Impedance vs Frequency Characteristics of Capacitive Load, Calculation Example Impedance Z Figure 2-7 10 T7 1 T7 100 G7 10 G7 1 G7 100 M7 10 M7 1 M7 100 k7 10 k7 1 k7 100 7 10 7 17 100 m7 10 m7 1 m7 100 M7 10 M7 1 M7 100 n7 10 n7 1 kHz 300 k7 range 3 k7 range 100 aF 1 fF 10 fF 100 fF 1 pF 10 pF 100 pF 1 nF 10 nF 100 nF 1 MF 10 MF 100 MF 1 mF 10 mF 100 mF 1F 50 7 range 10 kHz 100 kHz 1 MHz 5 MHz Frequency f 2- 34 Keysight B1500A User’s Guide, Ed ition 14 Introduction Measurement Modules HVSPGU - High Voltage SPGU This section describes key specification of the high voltage semiconductor pulse generator unit (SPGU). Maximum five modules can be installed in one mainframe. • Number of output channels: 2 channels per module • Output impedance: 50 • Output level: 0 to ± 40 V (open load), ± 20 V (50 load), 1 mV resolution • SPGU operation mode: PG (pulse generator) or ALWG (arbitrary linear waveform generator) • Channel output operation mode: Free run, duration, or pulse count (PG mode)/sequence count (ALWG mode) • PG output mode: 2-level pulse or 3-level pulse, for each channel • Pulse timing parameters: (programmable range) Period: 20 ns to 10 s, 10 ns resolution Width: 10 ns to period-10 ns, resolution 2.5 ns or 10 ns (transition time > 8 s) Delay: 0 to period-20 ns, resolution 2.5 ns or 10 ns (transition time > 8 s) Transition time (leading time or trailing time): 8 ns to 400 ms, resolution 2 ns or 8 ns (transition time > 8 ms) Figure 2-8 • Pulse switch, which is more durable than mechanical relays, and better suited for frequent switching applications. • Automatic voltage level adjustment by specifying load impedance of DUT SPGU Simplified Circuit Diagram 50 7 Pulse switch 50 7 Pulse switch Output 1 PG 2-level or 3-level or ALWG Keysight B1500A User’s Guide, Ed ition 14 Output 2 PG 2-level or 3-level or ALWG 2- 35 Introduction Measurement Modules WGFMU - Waveform Generator/Fast Measurement Unit This section describes typical specification of the waveform generator/fast measurement unit (WGFMU) and the remote-sense and switch unit (RSU). Maximum five modules can be installed in one mainframe. • Number of channels: 2 channels per module • Function: Voltage output and current or voltage sampling measurement with minimum sampling interval of 5 ns • Current measurement range: 1 A, 10 A, 100 A, 1 mA, or 10 mA • Operation mode: PG mode, Fast IV mode, or DC mode • PG mode: ALWG (arbitrary linear waveform generator) voltage output and voltage measurement (VFVM). Output level: -5 V to 5 V for open load or -2.5 V to 2.5 V for 50 load Minimum pulse width: 50 ns • Fast IV mode: ALWG voltage output and current or voltage measurement (VFIM or VFVM). Output level: 0 to -10 V, 0 to 10 V, or -5 V to 5 V Minimum pulse width (VFVM): 130 ns for 10 V output, 105 ns for 5 V output • DC mode: DC voltage output and current or voltage measurement (VFIM or VFVM). Output level: 0 to -10 V, 0 to 10 V, or -5 V to 5 V Figure 2-9 WGFMU Simplified Circuit Diagram PG mode PG mode 50 7 V Ch1 RSU output ALWG A Fast IV mode 2- 36 50 7 V V Ch2 RSU output ALWG A Fast IV mode V Keysight B1500A User’s Guide, Ed ition 14 3 Installation Installation This chapter describes how to install Keysight B1500A and accessories. • “Requirements” • “Inspection and Installation” • “Installing Accessories” • “Mounting Connectors” • “Connecting Measurement Devices” • “Capacitance Compensation When Using Switching Matrix” • “Maintenance” • “About Plug-in Modules” To change the GPIB address of the B1500A, see “To Change GPIB Address” on page 3-10. To control external GPIB devices from the B1500A/EasyEXPERT, see “To Enable System Controller” on page 3-11. WARNING To avoid electrical shock and instrument damage, turn the instrument off before connecting or disconnecting measurement cable. WARNING This instrument is heavy and requires a two person lift. CAUTION Do not grab the fixture cover when lifting the test fixture. 3- 2 Keysight B1500A User’s Guide, Ed ition 14 Installation WARNING There are potentially hazardous voltages (± 200 V for HPSMU, and ± 100 V for MPSMU/HRSMU) present at the Force, Sense, and Guard terminals of this instrument. To prevent electrical shock, the following safety precautions must be observed during the use of the instrument. • Use a three-conductor AC power cable to connect the instrument to an electrical ground (safety ground). • If you do not use the B1500A-A5F/16442A/B test fixture, you must install and connect an interlock circuit that opens the Interlock terminal when the shielding box access door is opened. • If you change the DUT interface, test fixture, prober, and such, connect an interlock cable to the one actually used. • Confirm periodically that the interlock function works normally. • Before touching the connections on the Force, Guard, and Sense terminals in the test fixture or the shielding box, turn the instrument off and discharge any capacitors. If you do not turn the instrument off, complete all of the following items, regardless of the instrument settings. • • Press the front panel Stop key to set the module output off. • Confirm that the front panel High Voltage indicator is not lit. • Open the Interlock terminal (open the fixture cover or the shielding box access door). • Discharge any capacitors connected to a measurement resource. Warn persons working around this instrument about dangerous conditions. Keysight B1500A User’s Guide, Ed ition 14 3- 3 Installation Requirements Requirements This section contains information on: • “Power Requirements” • “Operating Environment” • “Storaging/Shipping Environment” • “Installation Requirements” • “Power Cable” Power Requirements This instrument can operate from any single-phase AC power source supplying 100-240 V (±10 %) at 50/60 Hz. The maximum power consumption is 900 VA. Operating Environment This instrument is specified to operate within the following environmental conditions: Temperature: 5 C to 40 C Humidity: 20 % to 70 % RH, non-condensing Altitude: 0 to 2,000 m (6,561 ft.) Storaging/Shipping Environment This instrument is specified to store/ship within the following environmental conditions: Temperature: -20 C to 60 C Humidity: 10 % to 90 % RH, non-condensing Altitude: 0 to 4,600 m (15,092 ft.) 3- 4 Keysight B1500A User’s Guide, Ed ition 14 Installation Requirements Installation Requirements WARNING Do not operate the instrument in dusty environment, or in the presence of flammable gasses, corrosive gasses, or fumes. • Environmental conditions for this instrument are documented in “General Specifications” on page 4-51. In principle, this instrument should only be operated indoors in a controlled environment. • Install the instrument horizontal place then face the roof up. • The dimensions of this instrument are also given in “General Specifications”. Fan cools the instrument by drawing air through the sides and exhausting it out the back. The instrument must be installed in a location that allows sufficient space at the sides and back of the instrument for adequate air circulation. If the airflow is restricted, the internal operating temperature will be higher. This may reduce the instrument’s reliability, or cause the thermal-protection circuits to turn the instrument off. • Make sure that there is enough space for connecting/disconnecting the power cable easily. Power Cable WARNING FIRE HAZARD: Use only the power cable supplied with your instrument. Using other types of power cable may cause overheating of the power cable, resulting in fire. SHOCK HAZARD: The power cable provides the chassis ground through a third conductor. Be sure to connect to a three-conductor type power outlet with the correct pin grounded. NOTE The detachable power cable may be used as an emergency disconnecting device. Removing the power cable will disconnect AC input power to the instrument. Connect the power cable to the IEC 320 connector on the rear of the instrument. If the wrong power cable was shipped with your instrument, contact your nearest Keysight Sales and Support Office. The AC input on the back of your instrument is a universal AC input. It accepts nominal line voltages in the range of 100 to 240 VAC. Keysight B1500A User’s Guide, Ed ition 14 3- 5 Installation Requirements Option 900 Option 901 Option 902 Option 903 • • • • • Plug: BS 1363/A, 250 V, 10 A PN: 8120-4420 • Plug: AS/NZS 3112, 250 V, 10 A PN: 8120-4419 • Plug: IEC 60277-1, 250 V, 10 A PN: 8121-1226 • Plug: NEMA 5-15P, 125 V, 10 A PN: 8120-6825 Option 904 Option 906 Option 912 Option 917 • • • • • Plug: NEMA 6-15P, 250 V, 10 A PN: 8120-3996 • Plug: SEV 1011, 250 V, 10 A PN: 8120-4416 • Plug: SB 107-2-D1, 250 V, 10 A PN: 8121-1655 • Plug: IS 1293 and IS 6538, 250 V, 10 A PN: 8121-1690 Option 918 Option 919 Option 920 Option 921 • • • • • Plug: JIS C 8303, 125 V, 12 A PN: 8121-0743 • Plug: Israel SI 32, 250 V, 10 A PN: 8121-0724 • Plug: IRAM 2073, 250 V, 10 A PN: 8121-0725 • Plug: CEI 23-16, 250 V, 10 A PN: 8121-0722 Option 922 Option 923 Option 927 Option 930 • • • • • Plug: GB 1002 figure 3, 250 V, 10 A PN: 8120-8376 • Plug: SANS 164-1, 250 V, 10 A PN: 8121-0564 Option 931 Option 932 • • • Plug: CNS 10917-2, 125 V, 10 A PN: 8121-1635 • 3- 6 • Plug: NEMA WD-6, 250 V, 10 A PN: 8120-0674 • Plug: NBR 14136, 250 V, 10 A PN: 8121-1809 Plug: CS 0017, 250 V, 10 A PN: 8121-1638 Keysight B1500A User’s Guide, Ed ition 14 Installation Inspection and Installation Inspection and Installation This section describes what to do when you receive the instrument and accessories. 1. Inspect the shipment. See “To Inspect B1500 and Accessories”. 2. Verify the instrument operation and perform initial setup. See “To Perform Initial Setup”. 3. Install the instrument in the appropriate place. See “Requirements” on page 3-4. To use the instrument briefly, see “Getting Started” on page 1-1. To change the Windows logon setting, see “To Change Windows Logon Setting” on page 3-9. To change the GPIB address of the instrument, see “To Change GPIB Address” on page 3-10. To allow the B1500A/EasyEXPERT to control external GPIB devices, see “To Enable System Controller” on page 3-11. To Inspect B1500 and Accessories Perform the following inspections when the instrument and accessories arrive at your site. 1. Before unpacking any components, inspect all boxes for any signs of damage that might have occurred during shipment, such as: • dents • scratches • cuts • water marks If you suspect any damage, notify your local Keysight Technologies sales or service office. 2. When you open the boxes that contain the instrument and accessories, check the components against the contents lists attached to the boxes. If anything is missing, notify your local Keysight Technologies sales or service office. Keysight B1500A User’s Guide, Ed ition 14 3- 7 Installation Inspection and Installation To Perform Initial Setup After you receive the instrument, perform the following setup. For the users available just after the initial setup, see Table 3-1. 1. Make sure that the Standby switch is set to off. 2. On the instrument rear panel, connect the Circuit Common terminal to the frame ground terminal by using a shorting-bar. 3. If you use Keysight 16444A-001 USB keyboard and/or the 16444A-002 USB mouse, connect it to an USB port of the instrument. 4. Connect the power cable from the instrument to an AC power outlet. 5. Open the measurement terminals and press the Standby switch to turn on the instrument. If the instrument is operating correctly, the power-on self-test is automatically performed. If problems arise, see Keysight EasyEXPERT User’s Guide. 6. Follow the Windows setup wizard and complete the initial setup. a. Set the system display language to English. The language must be English. If you set another language, you must perform the system recovery of the B1500A. See Keysight EasyEXPERT User’s Guide for the system recovery. b. Set Country or region, Time and currency, and Keyboard layout. If you use the 16444A-001 USB keyboard, the Keyboard layout must be US. c. Accept the End User License Agreement. d. Set Time zone, date and time. If the instrument has been already connected to your site LAN, you can proceed the network connection setup. NOTE Other Windows setup You can set other setup of Windows after the initial setup. It is your responsibility. If you connect the instrument to the network, take care to protect it from computer virus. 3- 8 Keysight B1500A User’s Guide, Ed ition 14 Installation Inspection and Installation Table 3-1 Users Available Just After the Initial Setup User Account Description Keysight B1500 User Account for automatic logon. Password is not set to this account. keysightOnly Account for Keysight service personnel. Do not delete this account. This account is password protected. Administrator Administrator. Password is not set to this account. You can add users after the initial setup. Add users as you need. NOTE Keysight Technologies cannot guarantee the performance and provide compatibility information for all B1500As under several conditions. If problems arise, perform Keysight B1500A system recovery. To perform recovery, see Keysight EasyEXPERT User’s Guide. To Change Windows Logon Setting Keysight B1500A initially enables Windows automatic logon. If you want to change this setting, select All Programs > Control Auto Logon from the Start menu. Control Auto Logon is displayed on the browser. Then click one of the following buttons on the browser and follow the setup script. NOTE • Enable Auto Logon • Disable Auto Logon If you set a password for the user account Keysight B1500 User, disable the automatic logon. Keysight B1500A User’s Guide, Ed ition 14 3- 9 Installation Inspection and Installation To Change GPIB Address When this instrument is shipped from the factory, the GPIB address is set to 17. To change the GPIB address, perform the following procedure. 1. If the EasyEXPERT software is running, terminate it as shown below: a. Select the menu function File > Exit on the EasyEXPERT main screen. b. Click [x] at the upper right corner of the Start EasyEXPERT button. 2. Select All Programs > Keysight IO Libraries Suite > Keysight Connection Expert from the Start menu. Keysight Connection Expert window appears. 3. At the Instrument I/O on this PC area, select GPIB0, and click the Change Properties... button. Keysight 82350 PCI GPIB Interface - GPIB0 window appears. 4. Change the GPIB Address value. 5. Remove the check from the Auto-discover instruments connected to this interface box. 6. Click the OK button on Keysight 82350 PCI GPIB Interface - GPIB0 window. 7. If the Reboot Required dialog box is displayed, click the Reboot Now button, and reboot the instrument. 3- 10 Keysight B1500A User’s Guide, Ed ition 14 Installation Inspection and Installation To Enable System Controller To allow Keysight B1500A/EasyEXPERT to control external GPIB devices, perform the following procedure. 1. If the EasyEXPERT software is running, terminate it as shown below: a. Select the menu function File > Exit on the EasyEXPERT main screen. b. Click [x] at the upper right corner of the Start EasyEXPERT button. 2. Select All Programs > Keysight IO Libraries Suite > Keysight Connection Expert from the Start menu. Keysight Connection Expert window appears. 3. At the Instrument I/O on this PC area, select GPIB0, and click the Change Properties... button. Keysight 82350 PCI GPIB Interface - GPIB0 window appears. 4. Set the GPIB Address value to 21 that is the typical address number for the system controller. 5. Check the System Controller box. 6. Remove the check from the Auto-discover instruments connected to this interface box. This disables the automatic device detection. So the Connection Expert cannot detect the instruments connected to the GPIB interface by itself. 7. Click the OK button on Keysight 82350 PCI GPIB Interface - GPIB0 window. 8. If the Reboot Required dialog box is displayed, click the Reboot Now button, and reboot the instrument. NOTE To Disable System Controller If the B1500A is the system controller, you cannot control the B1500A by using an external computer. To disable the system controller, change the steps 4 and 5 for setting the GPIB Address value to not 21 and removing the check from the System Controller box, and perform the procedure to the step 8. Keysight B1500A User’s Guide, Ed ition 14 3- 11 Installation Installing Accessories Installing Accessories This section describes how to install the accessories. • “To Connect 16442B Test Fixture (B1500A-A5F)” • “To Connect Connector Plate” • “To Connect ASU” • “To Connect SCUU/GSWU” • “To Connect GNDU Adapter” • “To Connect MCSMU Connection Box” WARNING To avoid electrical shock and instrument damage, turn the instrument off before connecting or disconnecting measurement cable. WARNING There are potentially hazardous voltages (± 200 V for HPSMU, and ± 100 V for MPSMU/HRSMU) present at the Force, Sense, and Guard terminals. To prevent electrical shock, do not expose these lines. WARNING This instrument supports the Interlock function to prevent you from receiving an electrical shock from high voltage (more than ± 42 V). If the Interlock terminal is open, this instrument cannot apply high voltage more than ± 42 V. If you do not use the 16442A/B test fixture, install an interlock circuit (see page 31) and connect it to the Interlock terminal. CAUTION The GNDU can sink current of up to 4.2 A. Use Keysight 16493L GNDU cable to connect the GNDU to a test fixture or a connector plate. Do not use normal triaxial cable (Keysight 16494A) because the maximum current rating of the cable is 1 A. CAUTION Never connect the Guard terminal to any output, including circuit common, chassis ground, or any other guard terminal. Doing so will damage the SMU. 3- 12 Keysight B1500A User’s Guide, Ed ition 14 Installation Installing Accessories To Connect 16442B Test Fixture (B1500A-A5F) See this section if you use Keysight 16442B test fixture (B1500A-A5F). This section describes how to set up the 16442B and how to connect the B1500A to the 16442B. To Set up 16442B (B1500A-A5F) You can stabilize the 16442B (B1500A-A5F) as shown in the figure below. 1. Put a stabilizer on both sides of the test fixture. 2. Attach each stabilizer to the test fixture with a flathead screw. To Connect 16442B (B1500A-A5F) Use the cables shown in Table 3-2 to connect from the B1500A connectors to the 16442B’s relative connectors. NOTE Making non-Kelvin connection The Force terminals can be used to force and measure DC voltage or current. If you want to simplify the cable connections, open the Sense terminals and connect the Force terminals only to the test fixture by using the triaxial cables. If you make the Kelvin connection (remote sensing), use both Force and Sense terminals. Connecting the Force and Sense lines together at the terminal of the device under test minimizes the measurement error caused by the residual resistance of the connection cables. The Kelvin connection is effective for the low resistance measurement and the high current measurement. Keysight B1500A User’s Guide, Ed ition 14 3- 13 Installation Installing Accessories Table 3-2 To Connect 16442B (B1500A-A5F) Cables 16442B Terminals B1500A Terminals Keysight 16493J Interlock Cable, 3 m or 1.5 m Intlk Interlock Keysight 16493L GNDU Cable, 3 m or 1.5 m GNDU GNDU Keysight 16493K Kelvin Triaxial Cable, 3 m or 1.5 m, for the Kelvin connection SMU1 Up to 3 SMUs can be connected to the 16442B by the Kelvin connection. SMU SMU2 SMU3 Sense SMU SMU4 SMU5 Keysight 16493P SPGU Cable, 3 m or 1.5 m SMU Force Sense SMU1 SMU Force SMU2 SMU Force SMU3 SMU Force SMU4 SMU Force SMU5 SMU Force SMU6 SMU Force PGU1 SPGU Output 1 PGU2 Keysight N1300A CMU Cablea, 3 m or 1.5 m Force Sense SMU6 Keysight 16494A Triaxial Cable, 3 m or 1.5 m, for the non-Kelvin connection Force PGU1 PGU2 Output 2 CMU Hcur/Hpot Lcur/Lpot a. To extend the four-terminal pair (4TP) connection to the 16442B inputs, connect the Hcur and Hpot cables together and the Lcur and Lpot cables together by using the BNC T-type adapter (female-female-male, Keysight part number 1250-2405), then connect them to the 16442B inputs. To extend the 4TP connection to the socket module inputs, connect the cables to the PGU1, PGU2, VSU1, VSU2, VMU1, or VMU2 connector individually, and connect the Hcur and Hpot terminals together and the Lcur and Lpot terminals together at the socket module inputs. It is ok to leave open the ground wire extended from the CMU cable. 3- 14 Keysight B1500A User’s Guide, Ed ition 14 Installation Installing Accessories To Connect Connector Plate The available connector plates are listed in Table 3-3. Option 001 provides the through connectors except for the Interlock connector that provides the soldering patterns at the back side. For the option 002, the back of each connector is designed for soldering. For connector plate installation information, see Keysight 16495 Installation Guide. For the 16495H/J, the insulator is inserted between the panel and the outer conductor of Triax connectors/BNC connectors. Use the cables shown in Table 3-4 to connect from the B1500A connectors to the connector plate’s relative connectors. For the cable connections from the connector plate to the DUT interface such as manipulator and probe card, see “Mounting Connectors” on page 3-29 as reference. NOTE Making non-Kelvin connection The Force terminals can be used to force and measure DC voltage or current. If you want to simplify the cable connections, open the Sense terminals and connect the Force terminals only to the connector plate by using the triaxial cables. If you make the Kelvin connection (remote sensing), use both Force and Sense terminals. Connecting the Force and Sense lines together at the terminal of the device under test minimizes the measurement error caused by the residual resistance of the connection cables. The Kelvin connection is effective for the low resistance measurement and the high current measurement. Table 3-3 Connector Plates Model Option Item 16495F 16495F-001 Triax. (f-f) 12, GNDU (f-f) 1, Interlock (f) 1 16495F-002 Triax. (f) 12, GNDU (f) 1, Interlock (f) 1 16495G-001 Triax. (f-f) 24, GNDU (f-f) 1, Interlock (f) 1 16495G-002 Triax. (f) 24, GNDU (f) 1, Interlock (f) 1 16495H-001 Triax. (f-f) 6, Coax. (f-f) 6, GNDU (f-f) 1, Interlock (f) 1 16495H-002 Triax. (f) 6, Coax. (f) 6, GNDU (f) 1, Interlock (f) 1 16495J-001 Triax. (f-f) 8, Coax. (f-f) 4, GNDU (f-f) 1, Interlock (f) 1 16495J-002 Triax. (f) 8, Coax. (f) 4, GNDU (f) 1, Interlock (f) 1 16495K-001 Connector plate, rubber holder 16495G 16495H 16495J 16495K Connectors Keysight B1500A User’s Guide, Ed ition 14 3- 15 Installation Installing Accessories Table 3-4 To Connect Connector Plate Cables Connector Plate B1500A Terminals Keysight 16493J Interlock Cable, 3 m or 1.5 m Intlk Interlock Keysight 16493L GNDU Cable, 3 m or 1.5 m GNDU GNDU Keysight 16493Ka Kelvin Triaxial Cable, 3 m or 1.5 m, for the Kelvin connection odd number 16495F provides the inputs 1 to 12 (6 Kelvin). 16495H provides the inputs 1 to 6 (3 Kelvin). Force SMU even number Sense 16495J provides the inputs 1 to 8 (4 Kelvin). Keysight 16494A Triaxial Cable, 3 m or 1.5 m, for non-Kelvin connection 16495H provides the inputs 1 to 6. odd number or even number SMU Force SPGU Output 1 16495J provides the inputs 1 to 8. Keysight 16493P SPGU Cable, 3 m or 1.5 m 16495H provides the inputs 7 to 12. odd number or even number Output 2 16495J provides the inputs 9 to 12. Keysight N1300A CMU Cableb, 3 m or 1.5 m 16495H provides the inputs 7 to 12. odd number or even number Hcur/Hpot CMU Lcur/Lpot 16495J provides the inputs 9 to 12. a. Use Keysight 16494B Kelvin Triaxial Cable to connect to Keysight E5250A Low Leakage Switch Mainframe or the connector plate for Keysight 4142B Modular DC Source/Monitor by the Kelvin connection. b. To extend the four-terminal pair (4TP) connection to the connector plate inputs, connect the Hcur and Hpot cables together and the Lcur and Lpot cables together by using the BNC T-type adapter (female-female-male, Keysight part number 1250-2405), then connect them to the connector plate inputs. To extend the 4TP connection to the DUT interface, connect the cables to the connector plates input connectors individually, and connect the Hcur and Hpot terminals together and the Lcur and Lpot terminals together on the DUT interface. See Figure 3-21. It is ok to leave open the ground wire extended from the CMU cable. 3- 16 Keysight B1500A User’s Guide, Ed ition 14 Installation Installing Accessories To Connect ASU Keysight E5288A Atto Sense and Switch Unit (ASU) adds the following functions to the B1500A. To use the ASU, it must be connected to the SMU which is connected together when the calibration is performed. • Atto ampere (aA) level current measurement capability • Automatic switching of ASU input resource connected to ASU output NOTE For the installation of the ASU and the connection to the DUT interface (probe card, manipulators, and so on), contact your favorite prober vender. The prober vender will have the solutions. Dimensions of the ASU are 132 mm (W) 88.5 mm (H) 50 mm (D) excluding the connectors. Figure 3-1 Image of ASU Installation Shielding box CMU Return 16495K CMU Return DUT interface ASU 16495K ASU Prober To B1500A/CMU Required parts To install 16495K • Keysight 16495K Connector plate • Keysight 16493M ASU cable • Keysight N1300A CMU cable or Keysight 16048D/E test leads • Keysight N1254A-108 Magnet stand • BNC cable, coaxial cable, manipulator, wire, and so on Fix the 16495K plate to the shielding box or something that will cover the DUT interface. See Keysight 16495 Installation Guide. The 16495K is the plate that has the mechanism to block the light from the cable hole used to pass the cables in the shielding box. Keysight B1500A User’s Guide, Ed ition 14 3- 17 Installation Installing Accessories To install ASU 1. Fix the ASU in the shielding box. The ASU must be fixed to the best position for accessing its connectors. Keysight N1254A-108 Magnetic Stand will be useful for fixing the ASU. 2. Pass the 16493M (D-sub cable, triaxial cable), N1300A CMU cable, 16048D/E test leads, BNC cable and so on through the cable hole of the 16495K. They will be connected between the ASU and the instruments 3. Connect the D-sub cable to the ASU D-sub connector. Connect the triaxial cable to the ASU Force terminal. Connect the cable to the ASU CMU-cur/AUX In terminal. See Figure 3-2. • For the MFCMU, connect the N1300A CMU cable. • For Keysight 4284A/E4980A LCR meter, connect Keysight 16048D/E test leads. • For the instrument other than the MFCMU or the 4284A/E4980A, connect the BNC cable to the CMU-cur/AUX In terminal. And open the CMU-pot terminal or cover it by using the BNC open cap. 4. Adjust the cable length in the shielding box, and catch in the cables by using the cover of the 16495K. 5. Connect the cable from the DUT interface to the ASU output terminal. For the non Kelvin connection, open the Sense terminal or cover it by using the triaxial open cap. To connect B1500A 1. Turn the B1500A off. 2. Connect the D-sub cable from the ASU to the SMU D-sub connector. 3. Connect the triaxial cable from the ASU to the SMU Force terminal. NOTE To use the ASU, it must be connected to the SMU which is connected together when the calibration is performed. The specifications are satisfied and guaranteed in this condition only. So confirm the serial number of the ASU and connect it to the dedicated SMU properly. See Keysight EasyEXPERT User’s Guide to confirm the serial number. 3- 18 Keysight B1500A User’s Guide, Ed ition 14 Installation Installing Accessories To connect MFCMU/4284A/ E4980A to AUX Perform the following procedure to connect the MFCMU or the 4284A/E4980A. See Figure 3-2 and Figure 3-3. Prepare a shorting bar furnished with the ASU. The shorting bar is effective for reducing the offset capacitance caused by connecting a measurement terminal to the chuck of a wafer prober. 1. Turn the instrument off. 2. Prepare two ASUs (#1 and #2) and two shorting bar. And perform the following procedure for each ASU. a. Disconnect the triaxial cable from the ASU if it is connected to the ASU Force terminal. b. Face the concave side of the shorting bar to front. c. Slide the shorting bar from the right side of the connectors. 3. Connect the cable to the instrument. For the MFCMU, use the N1300A CMU cable. For the 4284A/E4980A, use the 16048D/E test leads. It is ok to leave open the ground wire extended from the cable. 4. Connect the high potential (Hp) cable of the test leads to the ASU #1 CMU-pot terminal. 5. Connect the high current (Hc) cable to the ASU #1 CMU-cur/AUX In terminal. The shorting bar is fixed to the ASU #1 by the step 5 and 6. 6. Connect the triaxial cable from the SMU #1 Force terminal to the ASU #1 Force terminal. 7. Connect the low potential (Lp) cable to the ASU #2 CMU-pot terminal. 8. Connect the low current (Lc) cable to the ASU #2 CMU-cur/AUX In terminal. The shorting bar is fixed to the ASU #2 by the step 8 and 9. 9. Connect the triaxial cable from the SMU #2 Force terminal to the ASU #2 Force terminal. 10. Prepare the connection wire (both pin terminals) furnished with the ASU and connect it between the CMU Return terminals of the ASU #1 and ASU #2 together. NOTE About ASU output cables To perform capacitance measurements accurately, the cable length between DUT and the ASU output must be as short as possible. Keysight B1500A User’s Guide, Ed ition 14 3- 19 Installation Installing Accessories Figure 3-2 To Connect ASU ASU #1 To CMU To SMU Hc CMU-cur/AUX In Hp CMU-pot Force Force D-sub From SMU Force/CMU/AUX Sense To DUT CMU Return/AUX Common ASU #2 To CMU To SMU Figure 3-3 Lc CMU-cur/AUX In Lp CMU-pot Force Force D-sub From SMU CMU Return/AUX Common Force/CMU/AUX Sense To DUT To Set Shorting Bar 5/8 AUX CMU-cur/AUX In b/c SMU Force 6/9 SMU Force Shorting bar To connect other To connect the instrument other than the MFCMU or the 4284A/E4980A: instrument to AUX 1. Turn the instrument off. 2. Connect the BNC cable from the ASU CMU-cur/AUX In terminal to the instrument. Prepare an adapter if the instrument’s input/output connector is not BNC. 3- 20 Keysight B1500A User’s Guide, Ed ition 14 Installation Installing Accessories To Connect SCUU/GSWU Keysight N1301A-100 SMU CMU Unify Unit (SCUU) is used to switch the measurement resource (CMU or SMU) to be connected to the DUT. Keysight N1301A-200 Guard Switch Unit (GSWU) is used to connect the CMU high and low guard lines together near the DUT. The connection is broken when the SCUU is in the SMU connection state. The GSWU is effective for the accurate impedance measurement. NOTE For the installation of the SCUU/GSWU and the connection to the DUT interface (probe card, manipulators, and so on), contact your favorite prober vender. The prober vender will have the solutions. Dimensions of the SCUU are 148 mm (W) 75 mm (H) 70 mm (D). Dimensions of the GSWU are 33.2 mm (W) 41.5 mm (H) 32.8 mm (D). Figure 3-4 Image of GSWU Installation Shielding box Wire from CMU Guard GSWU 16495K DUT interface To B1500A/ SCUU Required parts Prober • Keysight 16495K Connector plate • Keysight N1301A-201/202 GSWU cable (if GSWU is used) • Keysight N1301A-102 SCUU cable (if SCUU is not attached to the MFCMU) • Keysight N1301A-110 Magnet stand (if GSWU is used) • BNC cable, coaxial cable, manipulator, wire, and so on Keysight B1500A User’s Guide, Ed ition 14 3- 21 Installation Installing Accessories To install 16495K Fix your necessary 16495 connector plates to the shielding box or something that will cover the DUT interface. See Keysight 16495 Installation Guide. For the GSWU installation, the 16495K is required. It is the plate that has the mechanism to block the light from the cable hole used to pass the cables in the shielding box. Before starting 1. GSWU is furnished with wires (2 ea.) for the connection between the GSWU and the DUT interface Guard terminal. If it is too short to connect them, prepare additional wire. 2. Turn the B1500A off. Figure 3-5 To Connect SCUU/GSWU SCUU To CMU (slot N) Hc Hp Force1/CMUH Lc Lp Sense1 To SMU Force1 (slot N-1) Sense1 To SMU Force2 (slot N-2) Sense2 3- 22 Guard DUT Sense2 GSWU Guard Force2/CMUL Keysight B1500A User’s Guide, Ed ition 14 Installation Installing Accessories To connect SCUU/GSWU 1 To attach the SCUU to the B1500A: 1. Attach the SCUU to the B1500A rear panel connectors for the MFCMU in the slot N and two SMUs in the slots N-1 and N-2 (N: integer, 3 to 10). Connection will be easy by bringing the control connectors together before bringing the BNC connectors. 2. Fix the GSWU in the shielding box. The GSWU must be fixed to the best position for accessing its connectors. 3. Pass the GSWU cable (Keysight N1301A-201/202) through the cable hole of the 16495K. And connect it between the SCUU and the GSWU. 4. Adjust the cable length in the shielding box, and catch in the cables by using the cover of the 16495K. 5. Connect the proper cables from Force1/CMUH and Force2/CMUL to the 16495 connector plates or the DUT interface. See Figure 3-5. For the Kelvin connections, also connect the proper cables from Sense1 and Sense2 to the 16495 connector plates or the DUT interface. 6. Connect the wires (furnished, 2 ea.) to the GSWU. 7. Connect one of the wires to the Guard terminal extended from CMUH of SCUU. Then the wire should contact the Guard terminal as close to the device as possible. 8. Connect another one to the Guard terminal extended from CMUL of SCUU. Then the wire should contact the Guard terminal as close to the device as possible. NOTE About SCUU output cables To perform capacitance measurements accurately, the cable length between DUT and the SCUU output must be as short as possible. To connect SCUU/GSWU 2 1. Attach an end of the SCUU cable (Keysight N1301A-102) to the SCUU. Connection will be easy by putting the SCUU and the cable connection box on the flat table, and bringing the control connectors together before bringing the BNC connectors. If the SCUU is fixed inside the shielding box, pass the SCUU cable through the cable hole of the 16495K. Keysight B1500A User’s Guide, Ed ition 14 3- 23 Installation Installing Accessories 2. Fix the SCUU inside or outside the shielding box. The SCUU must be fixed to the best position for accessing its connectors. Keysight N1301A-110 Magnetic Stand will be useful for fixing the SCUU. 3. Attach the other end of the SCUU cable to the B1500A rear panel connectors for the MFCMU in the slot N and two SMUs in the slots N-1 and N-2 (N: integer, 3 to 10). Connection will be easy by bringing the control connectors together before bringing the BNC connectors. 4. Fix the GSWU in the shielding box. The GSWU must be fixed to the best position for accessing its connectors. 5. Connect the GSWU cable (Keysight N1301A-201/202) between the SCUU and the GSWU. If the SCUU is fixed outside the shielding box, pass the GSWU cable through the cable hole of the 16495K. 6. Adjust the cable length in the shielding box, and catch in the cables by using the cover of the 16495K. 7. Connect the proper cables from Force1/CMUH and Force2/CMUL to the 16495 connector plates or the DUT interface. See Figure 3-5. For the Kelvin connections, also connect the proper cables from Sense1 and Sense2 to the 16495 connector plates or the DUT interface. 8. Connect the wires (furnished, 2 ea.) to the GSWU. 9. Connect one of the wires to the Guard terminal extended from CMUH of SCUU. Then the wire should contact the Guard terminal as close to the device as possible. 10. Connect another one to the Guard terminal extended from CMUL of SCUU. Then the wire should contact the Guard terminal as close to the device as possible. NOTE About SCUU output cables To perform capacitance measurements accurately, the cable length between DUT and the SCUU output must be as short as possible. 3- 24 Keysight B1500A User’s Guide, Ed ition 14 Installation Installing Accessories To Connect GNDU Adapter The ground unit (GNDU) output is the single triaxial connector. To change it to the dual triaxial connector, use Keysight N1254A-100 GNDU to Kelvin Adapter. The adapter and cables are furnished with the B1500A. Attach the adapter directly to the rear panel as shown below. 1. Face the adapter’s GNDU connector and banana jack to the B1500A’s GNDU connector and Circuit Common terminal respectively. 2. Push the adapter toward the B1500A. 3. Rotate the GNDU connector handle of the adapter to fix it to the B1500A. Use the following cables to extend the GNDU Force and Sense terminals. Figure 3-6 Figure 3-7 • 16493L GNDU cable, for Force • 16494A Triaxial cable, for Sense GNDU to Kelvin Adapter Connector handle GNDU Banana jack Force Sense GNDU to Kelvin Adapter Internal Connections GNDU Common Sense Force Force Sense Keysight B1500A User’s Guide, Ed ition 14 3- 25 Installation Installing Accessories To Connect MCSMU Connection Box Keysight N1255A connection box is used to make the connection of MCSMU easy. Input panel provides six triaxial connectors for connecting two MCSMU and one GNDU or SMU. Output panel provides six triaxial connectors for the High1, High2, and Low terminals. See Figure 3-10 for image of the Input panel and the Output panel. Also see Figure 3-8 for the connection image. And see Figure 3-9 for the internal connection. Use the following cables to connect the N1255A to the MCSMU. • 16494A Triaxial cable, 2 ea. per one MCSMU Use the following cables and adapter to connect the N1255A to the GNDU. Figure 3-8 • N1254A-100 GNDU to Kelvin adapter, 1 ea. • 16493L GNDU cable, 1 ea. • 16494A Triaxial cable, 1 ea. N1255A Connection Example B1500A MCSMU N1255A Connection Box 16494A Force Sense 16494A MCSMU Force Sense 16493L N1254A-100 NOTE Force High1 Sense Force MCSMU2 Sense Force High2 Sense Force GNDU/SMU Sense Low 16494A 16494A GNDU Force MCSMU1 Sense Force Sense DUT Force Sense 16494A N1255A Input and Output terminals If a MP/HP/HRSMU is connected instead of the GNDU, use the following cable. Also, do not use the SMU current range less than 100 mA. • 16494A Triaxial cable, 2 ea. Voltage rating of terminal is indicated near connector on the Input or Output panel. The N1255A cannot be used for measurement of the IEC Measurement Category II, III, or IV. 3- 26 Keysight B1500A User’s Guide, Ed ition 14 Installation Installing Accessories Figure 3-9 N1255A Internal Connections N1255A Connection Box High Low Force MCSMU1 Force SW1 High1 High Sense Low High Low Force MCSMU2 Sense Sense 100 Ω SW4 SW2 High2 High Low Sense 50 Ω SW5 Force Force SW3 GNDU/SMU Sense NOTE Force Low Sense • SW1: Kelvin/Non-Kelvin selection switch for High1 • SW2: Kelvin/Non-Kelvin selection switch for High2 • SW3: Kelvin/Non-Kelvin selection switch for Low • SW4: 0 /100 series resistor selection switch for High2 Force • SW5: Open/50 shunt resistor selection switch between High2 and Low, Force Selection switch SW2 and SW4 The SW4 switches the series resistance 0 /100 on the High2 Force line. The resistor is not mounted on the High2 Sense line. Set the SW4 to “0 ” if the SW2 is set to “Kelvin”. Set the SW2 to “Non-Kelvin” if the SW4 is set to “100 ”. NOTE Selection switch SW1/SW2/SW3 and Sense connector on Output panel The switch is used to make or break the connection between Force and Sense in the N1255A. Setting it to “Non-Kelvin” makes this internal connection to enable the non-Kelvin connection. And setting it to “Kelvin” breaks this internal connection to enable the Kelvin connection. If the switch is set to “Non-Kelvin”, do not extend the Sense output corresponding to it. Voltage on the Force line also appears on the Sense line. So, open the Sense connector on the Output panel. Keysight B1500A User’s Guide, Ed ition 14 3- 27 Installation Installing Accessories NOTE Series Resistor and Shunt Resistor The series resistor and the shunt resistor can be used for preventing MCSMU from oscillation. If the MCSMU oscillates, insert either 100 series resistor or 50 shunt resistor. If it does not stop the oscillation, prepare the resistor of the other value and insert it between the Output High and the device under test (DUT). Figure 3-10 N1255A Input Panel and Output Panel Input Panel Input MCSMU 1 MCSMU 2 GNDU/SMU ±40 V&Max Force Sense ±40 V &Max Force Sense ±200 V &Max Force Sense High Force/ Sense Low Force/ Sense Circuit Common High Force/ Sense Low Force/ Sense Circuit Common Force/ Sense Circuit Common Guard Use N1254A-100 GNDU Adapter to connect GNDU. Circuit Common Circuit Common High Sense High Force Low Force Force Sense Guard Low Sense Guard Output Panel Output Low High 2 High 1 ±200 V&Max Sense Force ±240 V &Max Sense Force ±240 V &Max Sense Force Force/ Sense Circuit Common Force/ Sense Circuit Common Force/ Sense Circuit Common Open the Sense terminal if the switch is set to Non-Kelvin. Circuit Common Low Sense Low Force Circuit Common 3- 28 Circuit Common High Sense High Force Circuit Common Keysight B1500A User’s Guide, Ed ition 14 Installation Mounting Connectors Mounting Connectors Previous sections described how to install the available accessories, and Keysight 16495 Installation Guide provides the information on how to install connector plates on the shielding box. However, you may choose to mount connectors directly on your own connector plate or test fixture. To do this, you will need to make connector holes and mount the connectors yourself. This section contains information on connector hole dimensions. To mount connectors: 1. Select and prepare the appropriate parts for your application. See Table 3-5. 2. Make the holes and mount the connectors. See Table 3-6. For Kelvin connections (remote sensing), use Keysight 16493K Kelvin triaxial cable. The Kelvin triaxial cable requires a Kelvin triaxial connector, which has two connector holes and three screw holes. 3. Build the interlock circuit shown in “To Make an Interlock Circuit” on page 3-31. 4. Attach cables from the connectors to the DUT (device under test). See “To Connect GNDU Output” on page 3-34, “To Connect SMU Output” on page 3-35, and “To Connect MFCMU Output” on page 3-42. WARNING For safety, prepare and attach a shield cover to avoid touching the joints on the wiring side of connectors. And ground the cover. Wrap an insulator around the naked conductors of coaxial cable to avoid touching it. Keysight B1500A User’s Guide, Ed ition 14 3- 29 Installation Mounting Connectors Table 3-5 Recommended Parts Usage Keysight Part No. Making an interlock circuit Description 1252-1419 Interlock Connector (6 pin, female) N1254A-402 or 3101-3241 Switch 1450-0641 LED (VF 2.1 V @ IF = 10 mA) 8150-5680 Wire (24 AWG, 600 V, 150 C) Connecting GNDU to DUT 1250-2457 Triaxial Connector (female) 8121-1189 or 8150-2639 Coaxial Cable or Wire Connecting SMU to DUT 1250-2457 Triaxial Connector (female) 8121-1191 Low Noise Coaxial Cable Connecting MFCMU to DUT 1250-0118 BNC Connector (female) 8120-0367 Coaxial Cable (50 ) 8150-0447 Wire Table 3-6 Dimensions of Connector Holes Kelvin Triaxial Connector (in mm) 14 11 11 Triaxial Connector (in mm) 14 11.3 10.3 2.8 10.3 2− 11.3 3.2 2 − M3 x 0.5 BNC Connector (in mm) Interlock Connector (in mm) 1.8 12.8 8.2 5.1 12.1 3- 30 Keysight B1500A User’s Guide, Ed ition 14 Installation Mounting Connectors To Make an Interlock Circuit The interlock circuit is designed to prevent electrical shock when a user touches the measurement terminals. CAUTION You must install an interlock circuit on a shielding box to prevent hazardous voltages when the door of the shielding box is open. Figure 3-11 shows the pin assignments of the interlock connector that should be mounted on a connector plate or test fixture. Figure 3-11 Interlock Connector Pin Assignments Interlock switch 6 1 1 5 6 2 5 2 4 3 3 Connector side WARNING 4 LED Wiring side Potentially hazardous voltages may be present at the Force, Guard, and Sense terminals when the interlock terminals are shorted. Keysight B1500A User’s Guide, Ed ition 14 3- 31 Installation Mounting Connectors Installing the interlock circuit Install the interlock circuit as follows: 1. Mount two mechanical switches on your shielding box, so that the switches close when the door of the shielding box is closed, and open when the door is opened. For the dimensions of the switch, see Figure 3-13 and Figure 3-14 below. 2. Mount an LED on your shielding box. For the dimensions of the LED, see Figure 3-12. 3. Use wire to connect the two switches in series between pin number 1 and 2 (or 3) of the interlock connector. See Figure 3-11. 4. Use wire to connect the LED between pin number 4 and 5 (or 6) of the interlock connector. See Figure 3-11. If Keysight B1500A Interlock connector is connected to the interlock circuit, Keysight B1500A SMU cannot force more than ± 42 V when the door is open. When the door is closed, it can force more than ± 42 V. When more than ± 42 V is forced from an SMU, the LED lights to indicate high voltage output. Figure 3-12 Dimensions of the LED (1450-0641) 6 11 10 5 5 5.6 Anode (+) Cathode (-) 3- 32 Units : mm Keysight B1500A User’s Guide, Ed ition 14 Installation Mounting Connectors Figure 3-13 Dimensions of the Interlock Switch (N1254A-402) 2.8 10.3 4.3 4.75 2.8 6.4 35.6 Switch off 2.8 8.1 3.2 3.1 2.8 15.3 NC 10.3 6.3 NO 15.9 18.8 C OM 3.1 22.2 14 27.8 Figure 3-14 Units: mm Dimensions of the Interlock Switch (3101-3241) 10.2 4.3 27.5 10.9 3.1 3.2 Switch off Switch on 2.0 15.9 3.4 Units: mm 27.8 Keysight B1500A User’s Guide, Ed ition 14 6.8 3- 33 Installation Mounting Connectors To Connect GNDU Output The GNDU output connection examples are shown in Table 3-7 Table 3-7 GNDU Output Connections Kelvin connections (remote sensing) non-Kelvin connections Use a low-noise coaxial cable (Keysight part number 8121-1189) from the connector to the prober, socket, or DUT as shown. Short the Sense and Force on the connector as shown below. Measurement data will include the residual resistance of the connection wire. To cancel the effects of cable resistance, connect the Sense line and Force line as close as possible to the terminal of the DUT. Use AWG 22 single-strand insulated wire (Keysight part number 8150-2639) from the connector plate to the prober, socket, or DUT. For a quick connection where measurement accuracy is not critical, connect only Force to the DUT, without shorting the Sense and Force. With this connection, the measurement data will include residual resistance from the connection cable between the GNDU and the connector plate. Common Force Sense Common Force Sense to DUT to DUT Insulator Plate Coaxial cable Triaxial connector CAUTION Insulator Plate Wire Triaxial connector Use Keysight 16493L GNDU cable to connect the GNDU to your connector plate or test fixture. Do not use the triaxial cable. The GNDU is rated for up to 4.2 A, while the maximum current rating of the triaxial cable is 1 A. 3- 34 Keysight B1500A User’s Guide, Ed ition 14 Installation Mounting Connectors To Connect SMU Output The SMU output connection examples are shown in Table 3-8. WARNING There are potentially hazardous voltages (± 200 V for HPSMU, and ± 100 V for MPSMU/HRSMU) present at the Force, Sense, and Guard terminals. To prevent electrical shock, do not expose these lines. Before turning the instrument on, connect the Interlock terminal to an interlock circuit. Before you touch any connections to these terminals, turn the instrument off, disconnect the power cable, and discharge any capacitors. CAUTION Never connect the Guard terminal to any output, including circuit common, chassis ground, or any other guard terminal. Doing so will damage the SMU. NOTE Low-Noise Coaxial Cable For the extended measurement paths over the connector plate, use low-noise coaxial cable (Keysight part number 8121-1191). This cable can maximize the guard effects and minimize the impression of the external noise. Figure 3-15 shows the cutting example of this cable. Key point is the isolation between the conductive layer and the center conductor. So, cut and trim the end of the cable as shown in this figure by using a cutter and so on. Figure 3-15 Coaxial Cable Cutting Example Cover here using sleeve Insulator (black) min 2 mm Center conductor (for Force/Sense signal) approx. 10 to 15 mm Outer conductor (for Guard signal) Insulator (clear) Conductive layer (black) WARNING Wrap an insulator around the naked conductors of coaxial cable to avoid touching it. Keysight B1500A User’s Guide, Ed ition 14 3- 35 Installation Mounting Connectors Table 3-8 SMU Output Connections Kelvin connections (remote sensing) non-Kelvin connections Use low-noise coaxial cable (Keysight part number 8121-1191) from the connector to the prober, socket, or DUT as shown. Use low-noise coaxial cable (Keysight part number 8121-1191). The following figure is for the connection using Kelvin triaxial cable. See Figure 3-16 and Figure 3-18 for the ASU and SCUU connections respectively. For the connection using triaxial cable, connect the cable to the Force terminal only. To cancel the effects of cable resistance, connect the Sense line and Force line as close as possible to the DUT terminal. In this connection, measurement data will include residual resistance from the connection cable. To prevent oscillations, do not use cables longer than 1.5 m. See Figure 3-17 and Figure 3-19 for the ASU and SCUU connections respectively. Common Guard Force Common Guard Force to DUT Triaxial connector Common Guard Sense Coaxial cable to DUT Triaxial connector Common Guard Sense Coaxial cable Wire Insulator Plate NOTE Insulator Plate To Minimize Leakage Current For the highly accurate current forcing and measurements, surround all force and sense lines by a guard as far as possible, and physically stable the cables with tape. 3- 36 Keysight B1500A User’s Guide, Ed ition 14 Installation Mounting Connectors Figure 3-16 ASU Output Kelvin Connection (Remote Sensing) Guard Wire CMH or Force ASU #1 Coaxial cable Common to DUT 1 or DUT 1 high terminal Sense CMU Return Guard CMU Return CML or Force ASU #2 Common to DUT 2 or DUT 1 low terminal Sense Guard The ASU inputs can be connected to the instruments by using a control cable, a triaxial cable, and two coaxial cables. The cables can be connected to the ASU inside the shielding box through the 16495K plate. The ASU outputs should be connected to the DUT by using coaxial cables and wires as shown above. When a SMU is used for the measurements, the Kelvin paths will work as same as Table 3-8. When a four-terminal pair (4TP) instrument is used, the sense lines can be ignored. And a Kelvin path is used for the high signal, and the other one is used for the low signal. For the accurate impedance measurements, a wire must be connected between the ASU#1 CMU Return and the ASU#2 CMU Return. If the 4TP instrument is not used, you can ignore the CMH, CML, CMU Return, and the DUT1 high and low terminals. Keysight B1500A User’s Guide, Ed ition 14 3- 37 Installation Mounting Connectors Figure 3-17 ASU Output non-Kelvin Connection Guard Wire CMH or Force ASU #1 Coaxial cable Common Wire to DUT 1 or DUT 1 high terminal Sense CMU Return Guard to DUT 2 or DUT 1 low terminal CMU Return CML or Force Common ASU #2 Sense Guard The ASU inputs can be connected to the instruments by using a control cable, a triaxial cable, and two coaxial cables. The cables can be connected to the ASU inside the shielding box through the 16495K plate. The ASU outputs should be connected to the DUT by using coaxial cables and wires as shown above. When a SMU is used for the measurements, the Kelvin paths/force lines will work as same as Table 3-8. Then the sense line is not extended to the DUT. When a four-terminal pair (4TP) instrument is used, the sense lines can be ignored. And a force line is used for the high signal, and the other one is used for the low signal. For the accurate impedance measurements, a wire must be connected between the ASU#1 CMU Return and the ASU#2 CMU Return. If the 4TP instrument is not used, you can ignore the CMH, CML, CMU Return, and the DUT1 high and low terminals shown above. 3- 38 Keysight B1500A User’s Guide, Ed ition 14 Installation Mounting Connectors Figure 3-18 SCUU Output Kelvin Connection (Remote Sensing) Guard Force 1 or CMH Common to GSWU to DUT 1 or DUT 1 high terminal Guard Sense 1 Insulator Plate Guard Force 2 or CML Common to GSWU to DUT 2 or DUT 1 low terminal Guard Sense 2 Coaxial cable Triaxial connector Wire The SCUU should be connected to the DUT by using coaxial cables and wires as shown above. Also the SCUU should be connected to the GSWU inside the shielding box by using a control cable through the 16495K plate. When a SMU is used for the measurements, the Kelvin paths will work as same as Table 3-8. When the MFCMU is used, the sense lines can be ignored. And a Kelvin path is used for the CMU high, and the other one is used for the CMU low. For the accurate impedance measurements, wires must be connected to the GSWU from the CMH guard and the CML guard as near as possible to the DUT. Keysight B1500A User’s Guide, Ed ition 14 3- 39 Installation Mounting Connectors Figure 3-19 SCUU Output non-Kelvin Connection Guard Force 1 or CMH to GSWU Common to DUT 1 or DUT 1 high terminal Guard to GSWU Insulator Sense 1 Plate to DUT 2 or DUT 1 low terminal Guard Force 2 or CML Coaxial cable Wire Common Guard Sense 2 Triaxial connector The SCUU should be connected to the DUT by using coaxial cables and wires as shown above. Also the SCUU should be connected to the GSWU inside the shielding box by using a control cable through the 16495K plate. When a SMU is used for the measurements, the Kelvin paths/force lines will work as same as Table 3-8. Then the sense line is not extended to the DUT. When the MFCMU is used, the sense lines can be ignored. And a force line is used for the CMU high signal, and the other one is used for the CMU low signal. For the accurate impedance measurements, wires must be connected to the GSWU from the CMH guard and the CML guard as near as possible to the DUT. 3- 40 Keysight B1500A User’s Guide, Ed ition 14 Installation Mounting Connectors To Connect MCSMU Output The MCSMU output connection example is shown in Figure 3-20. For the connection of the MCSMU, the N1255A connection box is required. See “To Connect MCSMU Connection Box” on page 3-26 to connect the MCSMU to the N1255A Input terminals. To connect the N1255A Output terminals to the connectors as shown in Figure 3-20, use the 16494A triaxial cable. Figure 3-20 MCSMU Output Connection High Force High Force From N1255A Output Common To DUT High terminal High Sense High Sense Insulator Plate Low Force Low Force From N1255A Output Common To DUT Low terminal Low Sense Coaxial cable Low Sense Triaxial connector Wire The High Force/High Sense/Low Force/Low Sense lines should be connected to the DUT as shown above. Wiring shown in “To Connect SMU Output” on page 3-35 can be used. To simplify the connections, omit the wiring of the Common. For the non-Kelvin connection, use the High Force and the Low Force only. Omit the wiring of the High Sense and the Low Sense. Keysight B1500A User’s Guide, Ed ition 14 3- 41 Installation Mounting Connectors To Connect MFCMU Output The MFCMU output connection example is shown in Figure 3-21. This connection is for the MFCMU without the SCUU. Then Keysight N1300A-001/002 CMU cable should be used for the connection between the MFCMU and the connectors you mount. It is ok to leave open the ground wire extended from the CMU cable. Figure 3-21 MFCMU Output Connection Hcur Wire Guard Hpot to DUT 1 high terminal Insulator Plate Lpot to DUT 1 low terminal Guard Lcur BNC connector Coaxial cable The Hcur/Hpot/Lcur/Lpot lines should be connected to the DUT as shown above. Use a 50 coaxial cable (Keysight part number: 8120-0367) for the Hcur/Hpot/Lcur/Lpot lines connection. Use a wire for the guard connection. 3- 42 Keysight B1500A User’s Guide, Ed ition 14 Installation Connecting Measurement Devices Connecting Measurement Devices This section describes how to connect device under test (DUT) to the 16442B test fixture (B1500A-A5F), and how to connect cables to the connector plate. If you use a wafer prober, see wafer prober manuals. Note that you must set the module output off when connecting or disconnecting DUTs. If not, the DUTs may be damaged. To set the module output off, press the Stop key. This section has the following descriptions: NOTE • “Using Test Fixture” • “Using Connector Plate” Kelvin connection and non-Kelvin connection To make the Kelvin connection (remote sensing), use both Force and Sense terminals. Connecting the Force and Sense lines together at the terminal of the DUT (device under test) minimizes the measurement error caused by the residual resistance of the connection cables. The Kelvin connection is effective for the low resistance measurement and the high current measurement. If you want to simplify the cable connections, open the Sense terminals and use the Force terminals only. This is the non-Kelvin connection. The Force terminals can be used to force and measure dc voltage or current. Keysight B1500A User’s Guide, Ed ition 14 3- 43 Installation Connecting Measurement Devices Using Test Fixture 1. Press the Stop key to set the output off. 2. Select a proper socket module for your DUT, then set the socket module on the test fixture. 3. Mount your DUT on the socket module. 4. Connect between the socket module and the test fixture by using the proper test leads. 5. Close the fixture cover. To force more than ± 42 V, close the fixture cover. Otherwise, the interlock function will stop Keysight B1500A output. To connect between the socket module and the test fixture, you can use test leads that have the following terminals: WARNING • Miniature banana-to-miniature banana • Miniature banana-to-pin plug • Miniature banana-to-miniature clip Set the instrument output off before connecting or disconnecting test leads. Press the front panel Stop key to set the output off. And confirm that the front panel High Voltage indicator is not lit. WARNING Make sure that the fixture cover is closed properly before starting measurement. Do not perform the measurement when a test lead is protruding from the test fixture and the cover. CAUTION Do not touch the terminals of the test leads. Oil, perspiration, and dirt prevent good electrical contact, deteriorate insulation, and degrade measurement accuracy. WARNING To prevent electrical shock and DUT damage, do not connect or disconnect the DUT while the instrument is applying voltage or current. When you touch the DUT after measurement, devise a countermeasure of residual charge and heat to prevent electrical shock and burn. Use glove and any tool. Also have enough time for discharge and radiation. 3- 44 Keysight B1500A User’s Guide, Ed ition 14 Installation Connecting Measurement Devices Connections for High Current Measurements When you force or measure a large current, you may want to use a Kelvin connection (4-wire, remote sensing) to eliminate the residual resistance effects of test leads and contacts. For example, you can use the following connections as Kelvin connections on the test fixture. Examples: Kelvin Connection SMU(±200V= 1A Max) 1 2 3 (Selected) Force Sense Force Sense Force Sense Guard Guard Guard Guard Guard Guard Drain Gate Substrate Source To cancel the effects of the residual resistance, test leads must be connected as close as possible to the DUT. Keysight B1500A User’s Guide, Ed ition 14 3- 45 Installation Connecting Measurement Devices Using Connector Plate This section provides the information useful for connecting cables and probing needles to a connector plate. • “To Reduce Leakage Current” • “To Measure Low Resistance” To Reduce Leakage Current To reduce the leakage current caused by connection cables, the guard technique is effective. Connect the probing needles to the terminals of the connector plate by using coaxial cables as shown below: 1. At end of cable, connect coaxial center conductor to force terminal of connector plate, and connect coaxial outer conductor to guard terminal of connector plate. 2. At another end, connect coaxial center conductor to tail of the probing needle. Never connect the outer conductor at this cable end. Extend the outer conductor as close as possible to the probing needle. Example The following example connection can be used to reduce the leakage current. Extend the outer conductor as close as possible to the probing needle. This also reduces the induced noise. Center conductor Outer conductor Coaxial cable Connector plate WARNING Probing needle Contact pad For safety, prepare and attach a shield cover to the connector plate to avoid touching the joints on the wiring side of connectors. And ground the cover. Wrap an insulator around the naked conductors of coaxial cable to avoid touching it. 3- 46 Keysight B1500A User’s Guide, Ed ition 14 Installation Connecting Measurement Devices WARNING To prevent electrical shock and DUT damage, do not connect or disconnect the DUT while the instrument is applying voltage or current. When you touch the DUT after measurement, devise a countermeasure of residual charge and heat to prevent electrical shock and burn. Use glove and any tool. Also have enough time for discharge and radiation. WARNING Do not touch the guard terminal with bare hands because you may be shocked by high voltage. The potential of the guard terminal is equal to the output voltage. CAUTION Never connect the guard terminal to any other output, including circuit common, frame ground, or the terminals of any other measurement resource. Doing so may damage it. Guarding Guarding reduces the leakage current between the measurement points and instrument. This is important when you measure low current. The following figure shows the theory of guarding. The buffer amplifier (1) keeps the potential of the guard conductor at the same potential as the force conductor, so current does not flow between the force and guard conductors. Therefore, the current measured by SMU is same as current at measurement point because no current is leaked. A Guard Force DUT Buffer Keysight B1500A User’s Guide, Ed ition 14 3- 47 Installation Connecting Measurement Devices To Measure Low Resistance When you measure a low resistance, high current flows through the DUT. This high current increases the measurement error caused by the residual resistance of cables. To cancel the effect of this resistance, you can use Kelvin connections (4-wire, remote sensing), which means the force and sense lines are extended separately to the DUT. Connect the probing needles to the terminals of the connector plate by using test leads or coaxial cables. Following instruction uses the coaxial cables: 1. At end of cable, connect coaxial center conductor to force terminal of connector plate, and connect coaxial outer conductor to guard terminal of connector plate. 2. At another end, connect coaxial center conductor to tail of the probing needle. Never connect the outer conductor at this cable end. Extend the outer conductor as close as possible to the probing needle. 3. Repeat 1 and 2 for the sense terminal of connector plate. 4. Contact the probing needles from force and sense terminals as close as possible to the DUT. Example The following example connection can be used to measure low resistance. The sense line is extended to the probing pad, and contacts the force line through the pad, so the voltage drop due to the residual resistance caused by cables and test leads is canceled. To reduce the leakage current, use coaxial cables. Force Center conductor Outer conductor Probing needle Sense Contact pad Coaxial cable Connector plate Contact pad WARNING For safety, prepare and attach a shield cover to the connector plate to avoid touching the joints on the wiring side of connectors. And ground the cover. Wrap an insulator around the naked conductors of coaxial cable to avoid touching it. 3- 48 Keysight B1500A User’s Guide, Ed ition 14 Installation Connecting Measurement Devices WARNING To prevent electrical shock and DUT damage, do not connect or disconnect the DUT while the instrument is applying voltage or current. When you touch the DUT after measurement, devise a countermeasure of residual charge and heat to prevent electrical shock and burn. Use glove and any tool. Also have enough time for discharge and radiation. Kelvin Connection (Remote Sensing) Kelvin connections give good measurement results when you force high-current. The following figure shows the equivalent circuits for Kelvin and non-Kelvin connections. • For the non-Kelvin connection, the voltmeter measures the voltage drop of resistances rF1, RDUT, and rF2. • For the Kelvin connection, the voltmeter measures the voltage drop of resistance RDUT only. The impedance of the voltmeter is very high, so the voltage drop of resistances rS1 and rS2 can be ignored. R DUT rF1 R DUT rF2 V (a) non-Kelvin connection rF1 rF2 rS1 rS2 V V (b) Kelvin connection The Kelvin connection is effective even when forcing voltage. The voltage drop due to the residual resistance of the force line wiring is fed back to the voltage source via a comparator in the sense line. The input impedance of comparator is high, and current flow into the sense line is very low. So output error is not significant if the sense line wiring has a residual resistance of 10 or less. Therefore, the specified voltage appears at the sense point (point where sense line contacts force line) Keysight B1500A User’s Guide, Ed ition 14 3- 49 Installation Capacitance Compensation When Using Switching Matrix Capacitance Compensation When Using Switching Matrix When the capacitance/conductance measurement is performed through Keysight B2200A/B2201A/E5250A switching matrix, Keysight B1500A measures the capacitance/ conductance of the path including a DUT (device under test), matrix switches, extension cables and so on. So, the data measured by the B1500A is far from the DUT’s capacitance/conductance. Keysight EasyEXPERT provides the functions used to compensate the data measured in the environments described in “Required Conditions” on page 3-51. This section explains how to perform compensation. NOTE • “Required Conditions” • “To Create Compensation Data File” Corrected data by the function is not guaranteed. But typical data (supplemental data) is as follows. Capacitance measurement accuracy (typical): ±1 % ±0.5 pF This typical data is for the following measurement conditions: Measurement frequency: 1 kHz to 5 MHz Measurement range: Maximum 1000 pF Measurement terminal: At the end of Keysight 16494A/B/C cable connected to the switch module output terminals. The typical data does not apply to anything extended from the 16494A/B/C cable. The conditions described in “Required Conditions” on page 3-51 must be satisfied. 3- 50 Keysight B1500A User’s Guide, Ed ition 14 Installation Capacitance Compensation When Using Switching Matrix Required Conditions The following conditions must be satisfied to use the capacitance compensation function. For the instrument connections, see Figure 3-22. • Setting of the MFCMU • Range of the measurement frequency: 1 kHz to 5 MHz • Measurement function: Cp-G, Cp-D, Cs-Rs, or Z-Th. There is no limitation. • Calibration Perform the MFCMU open calibration at the end of the measurement paths in front of the switching matrix inputs. If you also perform the short calibration (optional), prepare the BNC thru adapter (Keysight part number 1250-0080, 1 ea.). • • Total cable length of both Hc-Hp side and Lc-Lp side must be the same. Switching matrix input ports Use Keysight N1300A CMU cable to connect the MFCMU. The BNC-T adapters (2 ea., Keysight part number 1250-2405 for each) are required to connect between the Hc and Hp terminals and between the Lc and Lp terminals. Connect the Hc-Hp cable and the Lc-Lp cable as follows. It is ok to leave open the ground wire extended from the CMU cable. Hc-Hp: Input 13 (B2200A/B2201A) or AUX INPUT CV1 (E5250A) Lc-Lp: Input 14 (B2200A/B2201A) or AUX INPUT CV2 (E5250A) • Switching matrix output terminals Use the Keysight 16494A triaxial cable to extend the outputs to the connector plate or the Keysight B2220A probe card interface (only for B2200A/B2201A). For the Kelvin connection, use the Keysight 16494B/C Kelvin triaxial cable. • Ahead of the connector plate Recommended cable: Keysight part number 8121-1191 Triaxial cable You can also use another type of triaxial cable, coaxial cable, or combination of these. To approximate the capacitance/conductance of the DUT, you need to obtain the appropriate compensation coefficients for your measurement environment, and create your compensation data file. See Figure 3-22. Keysight B1500A User’s Guide, Ed ition 14 3- 51 Installation Capacitance Compensation When Using Switching Matrix In Figure 3-22, C1 (DATA04), C2H (DATA05), C2L (DATA06), C3H (DATA07), C3L (DATA08) are the compensation coefficients defined in the compensation data file. where, CxH is for the path connected to the MFCMU Hc-Hp terminal, and CxL is for the path connected to the MFCMU Lc-Lp terminal. When Keysight B2220A probe card interface is used, obtain the coefficients for C3x, and create your compensation data file. In this case, probe card will be used for the C3x path. When the connector plate is used, obtain the coefficients for C2x and C3x, and create your compensation data file. In this case, triaxial cable with connector plate will be used for the C2x path. And coaxial cable with positioner will be used for the C3x path. For obtaining the compensation coefficients and creating the compensation data file, see “To Create Compensation Data File” on page 3-53. Figure 3-22 Extension Cables and Compensation Coefficients B1500A/MFCMU Perform open calibration at this plane. Short calibration is optional. N1300A + BNC-T adapters Low to CML C2H, C3H, DATA05, DATA07: for CMH path C2L, C3L, DATA06, DATA08: for CML path High to CMH Case 1. Probe card interface B2220A (C2H, DATA05, need update) (C2L, DATA06, need update) Case 1 is not available for E5250A. 16494A/C (C1, DATA04, fixed) Probe card etc. (C3H, DATA07, need update) (C3L, DATA08, need update) Case 2. Connector plate 16494A/B (C1, DATA04, fixed) B2200A with B2210A or B2201A with B2211A or E5250A with E5252A B2210A outputs or B2211A outputs or E5252A outputs 3- 52 16495F/G Extended coaxial cables and positioners Extended triaxial (C3H, DATA07, need update) cables with connector plate (C3L, DATA08, need update) (C2H, DATA05, need update) (C2L, DATA06, need update) Keysight B1500A User’s Guide, Ed ition 14 Installation Capacitance Compensation When Using Switching Matrix To Create Compensation Data File This section explains how to create the compensation data file. To perform the capacitance compensation, enter the file name of the compensation data file to the User Compensation Data File field of the Extended Configuration dialog box opened from the Switching Matrix tab screen of the Configuration window. 1. Create a text file (e.g. C:\temp\c_data.txt) that contains the information as shown below. • For B2200A/B2201A: # # Compensation data file for B2210A/Cable connection/3m triax cable # # # MB Mother Board # MH Matrix Path High # ML Matrix Path Low # C1 Triax Cable # C2H Probe card I/F or User Triax cable High # C2L Probe card I/F or User Triax cable Low # C3H Probe card or User Coax cable High # C3L Probe card or User Coax cable Low # format version 1.0 B2210A CABLE # # R[Ohm] L[H] C[F] #--------------------------------------------------MB 0.000000e+00 5.250000e-08 2.940000e-11 MH 2.430000e+00 6.310000e-07 1.930000e-10 ML 2.490000e+00 5.970000e-07 1.920000e-10 C1 6.300000e-01 1.250000e-06 1.600000e-10 C2H 1.007000e-01 4.000000e-07 8.000000e-11 C2L 1.007000e-01 4.000000e-07 8.000000e-11 C3H 1.140000e-01 5.440000e-07 1.300000e-10 C3L 1.140000e-01 5.440000e-07 1.300000e-10 The 15th line specifies the used switch module, B2210A or B2211A. The 16th line specifies the DUT interface, PCIF or CABLE. PCIF indicates that Keysight B2220A probe card interface is used. CABLE indicates that the connector plate is used. The lines C2H to C3L should be modified for each measurement environment. See Table 3-9. Do not modify the other lines. NOTE EasyEXPERT provides the template of the compensation data file for the B2200A/B2201A. See Table 3-11. Select and use the template suitable for your measurement environment. Keysight B1500A User’s Guide, Ed ition 14 3- 53 Installation Capacitance Compensation When Using Switching Matrix • For E5250A: # E5250A C Compensation coefficient data table # # CAUTION : Do not add or delete "REVISION" line and "DATAxx" line. # Change the value for R,L,C of DATA05,06,07 or 08. # REVISION A.03.00 # R [ohm] L [H] C [F] DATA00 74.65E-3 140.00E-9 58.44E-12 # Frame Path 1 DATA01 75.41E-3 90.00E-9 67.13E-12 # Frame Path 2 DATA02 231.41E-3 450.00E-9 178.85E-12 # Card Path High DATA03 177.56E-3 390.00E-9 135.45E-12 # Card Path Low DATA04 100.70E-3 400.00E-9 80.00E-12 # Triax Cable [/m] DATA05 100.70E-3 400.00E-9 80.00E-12 # User Triax Cbl H [/m] DATA06 100.70E-3 400.00E-9 80.00E-12 # User Triax Cbl L [/m] DATA07 114.00E-3 544.00E-9 130.00E-12 # User Coax Cbl H [/m] DATA08 114.00E-3 544.00E-9 130.00E-12 # User Coax Cbl L [/m] DATA09 0.00E-3 0.00E-9 1.20E-12 # Stray Capacitance # END of Data The lines DATA05 to DATA08 should be modified for each measurement environment. See Table 3-9. Do not modify the other lines. Table 3-9 Compensation Coefficients and Modifications Compensation coefficients C2H (DATA05) C2L (DATA06) Modifications of data file For the connector plate, change the R, L, C values in the lines. The value must be changed to the R, L, C values of the C2H (DATA05) path and the C2L (DATA06) path (triaxial cable with connector plate) shown in Figure 3-22. For Keysight B2220A probe card interface, do not modify the lines. C3H (DATA07) C3L (DATA08) Change the R, L, C values in the lines. The value must be changed to the R, L, C values of the C3H (DATA07) path and the C3L (DATA08) path shown in Figure 3-22. For the connector plate, the coaxial cable with positioner will be the appropriate path. For Keysight B2220A probe card interface, the probe card will be the appropriate path. 3- 54 Keysight B1500A User’s Guide, Ed ition 14 Installation Capacitance Compensation When Using Switching Matrix 2. Measure the R, L, C values of the for C2H (DATA05), C2L (DATA06), C3H (DATA07), and C3L (DATA08) by using the MFCMU. See “To obtain compensation coefficients” on page 3-56. After the measurements, calculate the per meter value of the R, L, C, and record them into the following table. Compensation coefficients Explanation R () L (H) C (F) C2H (DATA05) C2L (DATA06) C3H (DATA07) C3L (DATA08) 3. Launch a text editor and open the compensation data file created at step 1. Change the R, L, C values of the C2H (DATA05), C2L (DATA06), C3H (DATA07), and C3L (DATA08) lines to the values recorded at step 2. Do not change any other lines. 4. Save the file as your compensation data file (e.g. C:\temp\my_env_1.txt). To perform the capacitance compensation, enter the file name of the compensation data file to the User Compensation Data File field of the Extended Configuration dialog box, and execute the measurement. Before starting measurement, perform the CMU calibration. For details, see Keysight EasyEXPERT User’s Guide. Keysight B1500A User’s Guide, Ed ition 14 3- 55 Installation Capacitance Compensation When Using Switching Matrix To obtain compensation coefficients Obtain the compensation coefficients as shown below. 1. Select the measurement frequency (Fmeas) used for the capacitance measurement of a device under test (DUT), and set it to the MFCMU. The coefficients must be measured at the same frequency. 2. Perform the MFCMU open calibration at the measurement terminal. Optionally, perform short calibration if you want. 3. See Table 3-10 and Figure 3-23, and set the MFCMU. 4. Connect the path/cable corresponding to C3H (DATA07) shown in Figure 3-22 to the MFCMU. Then measure and record the R, L, and C values. 5. Connect the path/cable corresponding to C3L (DATA08) to the MFCMU. Then measure and record the R, L, and C values. 6. If you use the connector plate, perform the following procedure. a. Connect the path/cable corresponding to C2H (DATA05) to the MFCMU. Then measure and record the R, L, and C values. b. Connect the path/cable corresponding to C2L (DATA06) to the MFCMU. Then measure and record the R, L, and C values. Table 3-10 R, L, C Measurement Conditions Parameter Frequency Function Terminals R 1 kHz to 5 MHz a A and B L SERIES see note b C PARALLEL A and C a. R, L, C of all coefficients must be measured with the same frequency setting. b. For triaxial cable, connect B to F directly, and measure L between A and E. For coaxial cable, ignore E and F, and connect B to D directly, and measure L between A and C. Figure 3-23 Compensation Coefficient Measurement Terminals of Extended Cables GUARD (C) GROUND (E) GROUND (F) GUARD (D) Insulator FORCE or SENSE (A) 3- 56 Triaxial Cable FORCE or SENSE (B) Keysight B1500A User’s Guide, Ed ition 14 Installation Capacitance Compensation When Using Switching Matrix Table 3-11 Template Compensation Data Files for B2200A/B2201A Measurement environment that template targets File namea <path>\b2210a\pcif\triax\3m.data Switch module Cableb DUT interfacec Coefficients to be modified B2210A 16494A-002 B2220A C3H and C3L 16495F/G C2H, C2L, C3H, and C3L B2220A C3H and C3L 16495F/G C2H, C2L, C3H, and C3L <path>\b2210a\pcif\triax\4m.data 16494A-005 <path>\b2210a\pcif\kelvin\3m.data 16494C-002 <path>\b2210a\pcif\kelvin\4m.data 16494C-005 <path>\b2210a\cable\triax\1_5m.data 16494A-001 <path>\b2210a\cable\triax\3m.data 16494A-002 <path>\b2210a\cable\triax\4m.data 16494A-005 <path>\b2210a\cable\kelvin\1_5m.data 16494B-001 <path>\b2210a\cable\kelvin\3m.data 16494B-002 <path>\b2210a\cable\kelvin\4m.data 16494C-005 <path>\b2211a\pcif\triax\3m.data B2211A 16494A-002 <path>\b2211a\pcif\triax\4m.data 16494A-005 <path>\b2211a\pcif\kelvin\3m.data 16494C-002 <path>\b2211a\pcif\kelvin\4m.data 16494C-005 <path>\b2211a\cable\triax\1_5m.data 16494A-001 <path>\b2211a\cable\triax\3m.data 16494A-002 <path>\b2211a\cable\triax\4m.data 16494A-005 <path>\b2211a\cable\kelvin\1_5m.data 16494B-001 <path>\b2211a\cable\kelvin\3m.data 16494B-002 <path>\b2211a\cable\kelvin\4m.data 16494C-005 a. <path>: \Program Files\Agilent\B1500\EasyEXPERT\B220xA\ccdata b. Model number of the cable connected between the switch module and the DUT interface. c. Keysight B2220A probe card interface or Keysight 16495F/G connector plate. Keysight B1500A User’s Guide, Ed ition 14 3- 57 Installation Maintenance Maintenance Maintenance should be performed periodically to keep the instrument in good condition. Cleaning Before performing cleaning, turn off the instrument, and disconnect power cable from the rear panel. Use a dry cloth to clean the external case parts. To prevent electrical shock, do not perform cleaning when the instrument is turned on, and do not use a wet cloth. Self-test and Diagnostics This instrument provides the following functions to check the operation. Perform the following functions as necessary. Open the measurement terminals to perform self-test, self-calibration, or diagnostics. • Self-test • Self-calibration • Diagnostics If problems arise, contact Keysight Technologies. For details, see Keysight EasyEXPERT User’s Guide. NOTE Interlock Open/Close test and High Voltage LED test Interlock function limits the maximum output voltage to ± 42 V when the measurement terminal is touchable. For safety, this function must be checked before using the B1500A after power on at least once a day by performing the diagnostics. Calibration Calibration and adjustments must be performed periodically so that the instruments satisfy the specifications, and keep a good condition. It is recommended to perform the calibration once a year at least. For the calibration and adjustments, contact Keysight Technologies. Trained service personnel will perform the calibration and adjustments. Also see Keysight EasyEXPERT User’s Guide. 3- 58 Keysight B1500A User’s Guide, Ed ition 14 Installation About Plug-in Modules About Plug-in Modules This section describes the following notices about plug-in modules. • “Module Type and Locations” • “To Interconnect SPGUs” • “To Interconnect WGFMUs” • “About Module Installation” Module Type and Locations Module locations when the B1500A is shipped from the factory are shown in Table 3-12. This table shows the relative locations by the module types. If the SPGUs are installed, the SPGUs must be installed in the slots from the slot number 1. And if the SPGU and the WGFMU are not installed and the HPSMUs are installed, the HPSMUs must be installed in the slots from the slot number 1. Then the same type of modules must be installed in the contiguous slots. For example, if the module configuration is two HPSMU, two MPSMU, and one CMU, the B1500A will be shipped with the HPSMUs of the slots 1 to 4, the MPSMUs of the slots 5 to 6, the CMU of the slot 7, and the blank panels of the slots 8 to 10. Table 3-12 Module Installation Rule Slot Number and Location 10 : : : : : : : : : 1 0 top : : : : : : : : : : : bottom Module Type B1514A Medium Current SMU (MCSMU) B1520A Multi Frequency CMU B1511A Medium Power SMU (MPSMU) B1511B Medium Power SMU (MPSMU) B1517A High Resolution SMU (HRSMU) B1510A High Power SMU (HPSMU) B1530A WGFMU B1525A High Voltage SPGU GNDU/ADC (always installed) Keysight B1500A User’s Guide, Ed ition 14 3- 59 Installation About Plug-in Modules To Interconnect SPGUs If multiple SPGUs have been installed, connect the SPGUs by using the following parts furnished with the SPGU. See Figure 3-24. Figure 3-24 • SPGU Sync cable, 16493Q-001, (number of SPGUs -1)2 ea. • RF connector cap, 1253-7431, 4 ea. SPGU Module Connection Example, Four Modules RF connector cap SPGU Sync cable Slave SPGU Master SPGU Ref In Trig Out Ref Out Output 2 Sync In Sync Out Output 1 If multiple SPGUs have been installed, connect the SPGUs as shown in Figure 3-24. This connection makes it possible to perform the synchronous output by the multiple SPGU channels. In this figure, the master SPGU is the module which outputs the reference signal and the slave SPGUs are the modules which follow to the reference signal. Connect the RF connector cap to the Ref In and Sync In connectors on the master SPGU and the Ref Out and Sync Out connectors on the last slave SPGU. The Trig Out terminal must be connected to the trigger input terminal of the external equipment to make the synchronized operation of it. CAUTION Connect the Ref Out/In, Sync Out/In, and Trig Out terminals to the specified terminal properly. Connecting to the other terminal may result in damage to the SPGU. NOTE The B1500A does not support the synchronized operation between SPGU and WGFMU. 3- 60 Keysight B1500A User’s Guide, Ed ition 14 Installation About Plug-in Modules To Interconnect WGFMUs If multiple WGFMUs have been installed, connect the WGFMUs by using the following cable furnished with the WGFMU. See Figure 3-25. • Figure 3-25 WGFMU Sync cable, 16493R-803, number of WGFMUs -1 ea. WGFMU Module Connection Example, Four Modules WGFMU Sync cable open Slave WGFMU open Master WGFMU Trig Out Ch 1 Sync Out Sync In Ch 2 If multiple WGFMUs have been installed, connect the WGFMUs as shown in Figure 3-25. This connection makes it possible to perform the synchronous output by the multiple WGFMU channels. In this figure, the master WGFMU is the module which outputs the reference signal and the slave WGFMUs are the modules which follow to the reference signal. Open the Sync In connector on the master WGFMU and the Sync Out connector on the last slave WGFMU. The Trig Out terminal must be connected to the trigger input terminal of the external equipment to make the synchronized operation of it. CAUTION Connect the Sync Out/In, and Trig Out terminals to the specified terminal properly. Connecting to the other terminal may result in damage to the WGFMU. NOTE The B1500A does not support the synchronized operation between SPGU and WGFMU. Keysight B1500A User’s Guide, Ed ition 14 3- 61 Installation About Plug-in Modules About Module Installation Module installation must be carried out at a Keysight Technologies service center. Contact Keysight Technologies for the module installation. Then send the following equipment and accessories to Keysight Technologies. • B1500A • Plug-in modules to be installed • ASU, for installing the exclusive SMU or retrofitting ASU only • Connection cable between ASU and SMU, for installing the exclusive SMU or retrofitting ASU only • RSU, for installing WGFMU • Connection cable between RSU and WGFMU, for installing WGFMU For returning ASU or RSU, do not forget to notify the combination of the unit, connection cable, and module channel. WARNING To prevent electrical shock, turn the instrument off and remove the power cable before removing the connection cables. NOTE About B1500A which supports SPGU and WGFMU SPGU and WGFMU are supported by the B1500A serial numbered JP40Nxxxxx and later. The other B1500A needs the mainframe upgrade to support the module. Contact Keysight Technologies to upgrade the B1500A. NOTE Module locations after servicing After the module installation, upgrade, and so on, the B1500A will be returned with the module configuration decided by the rule shown in Table 3-12. If you want to change the module locations, consult the service personnel before servicing. 3- 62 Keysight B1500A User’s Guide, Ed ition 14 4 Specifications Specifications This chapter describes the specifications and supplemental characteristics for Keysight B1500A Semiconductor Device Analyzer and its associated modules. The specifications are the standards against which the B1500A and its associated modules are tested. When the B1500A and any of its associated modules are shipped from the factory, they meet the specifications. The “supplemental” information and “typical” entries in the following specifications are not warranted, but provide useful information about the functions and performance of the instrument. This chapter contains the following sections. • “Hardware” • “Specification Conditions” • “Ground Unit (GNDU)” • “MPSMU/HRSMU” • “ASU” • “HPSMU” • “MCSMU” • “SMU Common Specifications” • “SMU Supplemental Characteristics” • “MFCMU” • “SCUU/GSWU” • “HV-SPGU” • “WGFMU/RSU” • “EasyEXPERT Software” • “Furnished Software” • “General Specifications” 4- 2 Keysight B1500A User’s Guide, Ed ition 14 Specifications Hardware Hardware Specification Conditions The measurement and output accuracy are specified at the rear panel connector terminals when referenced to the Zero Check terminal. The B1530A WGFMU measurement and output accuracy are specified at the output terminal of the RSU. Accuracy is specified under the following conditions: 1. Temperature: 23 C ± 5 C 2. Humidity: 20 % to 60 % 3. After 40 minutes warm-up followed by self-calibration 4. Ambient temperature change less than ± 1 C after self-calibration execution, not applicable for MFCMU and WGFMU 5. Measurement made within one hour after self-calibration execution, not applicable for MFCMU and WGFMU 6. Calibration period: 1 year 7. SMU integration time setting: 1 PLC (1 nA to 1 A range, voltage range) 20 PLC (100 pA range) 50 PLC (1 pA to 10 pA range) Averaging of high speed ADC: 128 samples per 1 PLC 8. SMU filter: ON for HPSMU, MPSMU, and HRSMU 9. SMU measurement terminal connection: Kelvin connection 10. WGFMU load capacitance: 25 pF or less NOTE Keysight Technologies is responsible for removing, installing, and replacing the B1500A modules. Contact your nearest Keysight Technologies to install and calibrate the B1500A modules. Keysight B1500A User’s Guide, Ed ition 14 4- 3 Specifications Hardware Supported Plug-in Modules The B1500A supports ten slots for the following plug-in modules. B1510A High power source/monitor unit (HPSMU). • Slots occupied: 2 • Range up to 200 V/1 A with 4-quadrant operation • Minimum measurement resolution 10 fA/2 V • Spot, sweep, and more measurement capabilities • Sampling (time domain) measurement from 100 s • Pulse measurement from 500 s pulse width • Accurate Quasi-Static Capacitance Voltage (QSCV) measurement with leakage current compensation B1511B Medium power source/monitor unit (MPSMU). • Slots occupied: 1 • Range up to 100 V/0.1 A with 4-quadrant operation • Minimum measurement resolution 10 fA/0.5 V • Optional ASU (atto-sense and switch unit) for 100 aA resolution and IV/CV switching capability • Spot, sweep, and more measurement capabilities • Sampling (time domain) measurement from 100 s • Pulse measurement from 500 s pulse width • Accurate Quasi-Static Capacitance Voltage (QSCV) measurement with leakage current compensation B1517A High resolution source/monitor unit (HRSMU). • Slots occupied: 1 • Range up to 100 V/0.1 A with 4-quadrant operation • Minimum measurement resolution 1 fA/0.5 V • Optional ASU (atto-sense and switch unit) for 100 aA resolution and IV/CV switching capability 4- 4 Keysight B1500A User’s Guide, Ed ition 14 Specifications Hardware • Spot, sweep, and more measurement capabilities • Sampling (time domain) measurement from 100 s • Pulse measurement from 500 s pulse width • Accurate Quasi-Static Capacitance Voltage (QSCV) measurement with leakage current compensation B1514A Medium current source/monitor unit (MCSMU). • Slots occupied: 1 • Range up to 30 V/1 A pulsed (0.1 A DC) with 4-quadrant operation • Pulse measurement from 50 s pulse width with 2 s resolution • Oscilloscope view for voltage/current waveform monitoring • Minimum measurement resolution 10 pA/0.2 V B1520A Multi-frequency capacitance measurement unit (MFCMU). • Slots occupied: 1 • AC impedance measurement (C-V, C-f, C-t) • 1 kHz to 5 MHz frequency range with minimum 1 mHz frequency resolution • 25 V built-in DC bias and 100 V DC bias with SMU and SCUU (SMU CMU Unify Unit) • Easy and fast yet accurate IV and CV automated connection change by SCUU B1525A High voltage semiconductor pulse generator unit (HV-SPGU). • Slots occupied: 1 • High voltage output up to ± 40 V applicable for non-volatile memory testing • Two-level and three-level pulse capability by single channel • Flexible arbitrary waveform generation with 10 ns resolution (arbitrary linear waveform generation function) • Two channels per module B1530A Waveform generator / fast measurement unit (WGFMU). • Slots occupied: 1 Keysight B1500A User’s Guide, Ed ition 14 4- 5 Specifications Hardware • Ultra-fast IV measurement capability for the pulsed IV and transient IV such as NBTI/PBTI, RTN, etc. • Waveform generation with 10 ns programmable resolution • Simultaneous high-speed IV measurement capability (200 MSa/s, 5 ns sampling rate) • 10 V peak-to-peak output • No load line effect accurate pulsed IV measurement by dynamic SMU technology Maximum Module Configuration The B1500A can contain any combination of the following module. Then the total power consumption of all SMU modules cannot exceed 84 W. • Up to 10 MPSMU • Up to 10 HRSMU • Up to 4 HPSMU • Up to 4 MCSMU • One MFCMU • Up to 5 HV-SPGU • Up to 5 WGFMU When one or more WGFMU modules are installed in the B1500A mainframe, the following table applies. Multiply the values given below by the number of installed modules of that type and add the products together. The sum of the products must be less than or equal to 59 for the configuration to be permissible. MPSMU 2 HRSMU 2 HPSMU 14 MCSMU 5 MFCMU 7 HV-SPGU 12 WGFMU 10 Maximum Voltage between Common and Ground ± 42 V 4- 6 Keysight B1500A User’s Guide, Ed ition 14 Specifications Hardware Ground Unit (GNDU) The GNDU is furnished standard with the mainframe. • Output voltage: 0 V ± 100 V • Maximum sink current: ± 4.2 A • Output terminal/connection: Triaxial connector, Kelvin (remote sensing) • Load capacitance: 1 F, supplemental characteristics • Cable resistance: supplemental characteristics Terminal Cable resistance Sense 10 Force < 1 (Is 1.6 A) < 0.7 (1.6 A < Is 2.0 A) < 0.35 (2.0 A < Is 4.2 A) where Is is the current being sunk by the GNDU. Keysight B1500A User’s Guide, Ed ition 14 4- 7 Specifications Hardware MPSMU/HRSMU MPSMU: Medium Power Source/Monitor Unit HRSMU: High Resolution Source/Monitor Unit • Voltage range, resolution, and accuracy See Table 4-1 for high resolution ADC and Table 4-3 for high speed ADC. • Current range, resolution, and accuracy See Table 4-2 for high resolution ADC and Table 4-4 for high speed ADC. Specified measurement resolution is limited by fundamental noise limits. Minimum displayed resolution is 1 aA at 1 pA range by 6 digits. Measurements made in the lower ranges can be greatly impacted by vibrations and shocks. These specifications assume an environment free of these factors. • Power consumption Voltage source mode: Voltage range (V) Power consumptiona (W) 0.5 Ic 20 2 Ic 20 5 Ic 20 20 Ic 20 40 Ic 40 100 Ic 100 a. Ic is the current compliance setting. Current source mode: Voltage compliancea (V) Power consumptionb (W) Vc 20 Io 20 20 < Vc 40 Io 40 40 < Vc 100 Io 100 a. Vc is the voltage compliance setting. b. Io is the output current. 4- 8 Keysight B1500A User’s Guide, Ed ition 14 Specifications Hardware Table 4-1 Voltage range, resolution, and accuracy (high resolution ADC) Range Force resolution Measurement resolution Force accuracy ±(%+mV)a Measurement accuracy ±(%+mV)a Maximum current ±0.5 V 25 V 0.5 V ±(0.018 + 0.15) ±(0.01 + 0.12) 100 mA ±2 V 100 V 2 V ±(0.018 + 0.4) ±(0.01 + 0.14) 100 mA ±5 V 250 V 5 V ±(0.018 + 0.75) ±(0.009 + 0.25) 100 mA ±20 V 1 mV 20 V ±(0.018 + 3) ±(0.009 + 0.9) 100 mA ±40 V 2 mV 40 V ±(0.018 + 6) ±(0.01 + 1) b ±100 V 5 mV 100 V ±(0.018 + 15) ±(0.012 + 2.5) a. ±(% of output/measured value + offset value in mV) b. 100 mA (Vo 20 V), 50 mA (20 V < Vo 40 V), 20 mA (40 V < Vo), Vo is the output voltage. Table 4-2 Current range, resolution, and accuracy (high resolution ADC) Range Force resolution Measurement resolution Force accuracy ±(%+A+A)a Measurement accuracy ±(%+A+A)a Maximum voltage ±1 pAb 1 fA 0.1 fA ±(0.9+15E-15) ±(0.9+12E-15) 100 V ±10 pAc 5 fA 0.4 fAb / 1 fA ±(0.46+3E-14+VoE-17) ±(0.46+15E-15+Vo1E-17) 100 V ±100 pAc 5 fA 0.5 fAb / 2 fA ±(0.3+1E-13+VoE-16) ±(0.3+3E-14+Vo1E-16) 100 V ±1 nA 50 fA 10 fA ±(0.1+3E-13+Vo1E-15) ±(0.1+2E-13+Vo1E-15) 100 V ±10 nA 500 fA 10 fA ±(0.1+3E-12+Vo1E-14) ±(0.1+1E-12+Vo1E-14) 100 V ±100 nA 5 pA 100 fA ±(0.05+3E-11+Vo1E-13) ±(0.05+2E-11+Vo1E-13) 100 V ±1 A 50 pA 1 pA ±(0.05+3E-10+Vo1E-12) ±(0.05+1E-10+Vo1E-12) 100 V ±10 A 500 pA 10 pA ±(0.05+3E-9+Vo1E-11) ±(0.04+2E-9+Vo1E-11) 100 V ±100 A 5 nA 100 pA ±(0.035+15E-9+Vo1E-10) ±(0.03+3E-9+Vo1E-10) 100 V ±1 mA 50 nA 1 nA ±(0.04+15E-8+Vo1E-9) ±(0.03+6E-8+Vo1E-9) 100 V ±10 mA 500 nA 10 nA ±(0.04+15E-7+Vo1E-8) ±(0.03+2E-7+Vo1E-8) 100 V ±100 mA 5 A 100 nA ±(0.045+15E-6+Vo1E-7) ±(0.04+6E-6+Vo1E-7) d a. b. c. d. ±(% of output/measured value + fixed offset in A + proportional offset in A), Vo is the output voltage in V. Applicable if Keysight E5288A Atto Sense and Switch Unit (ASU) is used. Not applicable for the MPSMU without ASU. 100 V (Io 20 mA), 40 V (20 mA < Io 50 mA), 20 V (50 mA < Io), Io is the output current. Keysight B1500A User’s Guide, Ed ition 14 4- 9 Specifications Hardware Table 4-3 Voltage range, resolution, and accuracy (high speed ADC) Range Force resolution Measurement resolution Force accuracy ±(%+mV)a Measurement accuracy ±(%+mV)a Maximum current ±0.5 V 25 V 25 V ±(0.018 + 0.15) ±(0.01 + 0.25) 100 mA ±2 V 100 V 100 V ±(0.018 + 0.4) ±(0.01 + 0.7) 100 mA ±5 V 250 V 250 V ±(0.018 + 0.75) ±(0.01 + 2) 100 mA ±20 V 1 mV 1 mV ±(0.018 + 3) ±(0.01 + 4) 100 mA ±40 V 2 mV 2 mV ±(0.018 + 6) ±(0.015 + 8) b ±100 V 5 mV 5 mV ±(0.018 + 15) ±(0.02 + 20) a. ±(% of output/measured value + offset value in mV) b. 100 mA (Vo 20 V), 50 mA (20 V < Vo 40 V), 20 mA (40 V < Vo), Vo is the output voltage. Table 4-4 Current range, resolution, and accuracy (high speed ADC) Range Force resolution Measurement resolution Force accuracy ±(%+A+A)a Measurement accuracy ±(%+A+A)a Maximum voltage ±1 pAb 1 fA 0.1 fA ±(0.9+15E-15) ±(1.8+12E-15) 100 V ±10 pAc 5 fA 1 fA ±(0.46+3E-14+VoE-17) ±(0.5+15E-15+Vo1E-17) 100 V ±100 pAc 5 fA 5 fA ±(0.3+1E-13+VoE-16) ±(0.5+4E-14+Vo1E-16) 100 V ±1 nA 50 fA 50 fA ±(0.1+3E-13+Vo1E-15) ±(0.25+3E-13+Vo1E-15) 100 V ±10 nA 500 fA 500 fA ±(0.1+3E-12+Vo1E-14) ±(0.25+2E-12+Vo1E-14) 100 V ±100 nA 5 pA 5 pA ±(0.05+3E-11+Vo1E-13) ±(0.1+2E-11+Vo1E-13) 100 V ±1 A 50 pA 50 pA ±(0.05+3E-10+Vo1E-12) ±(0.1+2E-10+Vo1E-12) 100 V ±10 A 500 pA 500 pA ±(0.05+3E-9+Vo1E-11) ±(0.05+2E-9+Vo1E-11) 100 V ±100 A 5 nA 5 nA ±(0.035+15E-9+Vo1E-10) ±(0.05+2E-8+Vo1E-10) 100 V ±1 mA 50 nA 50 nA ±(0.04+15E-8+Vo1E-9) ±(0.04+2E-7+Vo1E-9) 100 V ±10 mA 500 nA 500 nA ±(0.04+15E-7+Vo1E-8) ±(0.04+2E-6+Vo1E-8) 100 V ±100 mA 5 A 5 A ±(0.045+15E-6+Vo1E-7) ±(0.1+2E-5+Vo1E-7) d a. b. c. d. ±(% of output/measured value + fixed offset in A + proportional offset in A), Vo is the output voltage in V. Applicable if Keysight E5288A Atto Sense and Switch Unit (ASU) is used. Not applicable for the MPSMU without ASU. 100 V (Io 20 mA), 40 V (20 mA < Io 50 mA), 20 V (50 mA < Io), Io is the output current. 4- 10 Keysight B1500A User’s Guide, Ed ition 14 Specifications Hardware ASU ASU: Atto Sense and Switch Unit • Maximum voltage, AUX path 100 V (AUX input to AUX common) 100 V (AUX input to circuit common) 42 V (AUX common to circuit common) • Maximum current, AUX path 0.5 A (AUX input to Force output) • Band width (at -3 dB), AUX port 30 MHz, supplemental characteristics NOTE Connect ASU to dedicated SMU The specifications of the ASU are guaranteed while it is connected to the exclusive SMU which is connected together when the calibration is performed. Confirm the serial number of the ASU, and connect it properly. NOTE Connection path control Disable source output of the instruments connected to the ASU inputs before controlling the ASU connection path. Keysight B1500A User’s Guide, Ed ition 14 4- 11 Specifications Hardware HPSMU HPSMU: High Power Source/Monitor Unit • Voltage range, resolution, and accuracy See Table 4-5 for high resolution ADC and Table 4-7 for high speed ADC. • Current range, resolution, and accuracy See Table 4-6 for high resolution ADC and Table 4-8 for high speed ADC. Specified measurement resolution is limited by fundamental noise limits. • Power consumption Voltage source mode: Voltage range (V) Power consumptiona (W) 2 Ic 20 20 Ic 20 40 Ic 40 100 Ic 100 200 Ic 200 a. Ic is the current compliance setting. Current source mode: Voltage compliancea (V) Power consumptionb (W) Vc 20 Io 20 20 < Vc 40 Io 40 40 < Vc 100 Io 100 100 < Vc 200 Io 200 a. Vc is the voltage compliance setting. b. Io is the output current. 4- 12 Keysight B1500A User’s Guide, Ed ition 14 Specifications Hardware Table 4-5 Voltage range, resolution, and accuracy (high resolution ADC) Range Force resolution Measurement resolution Force accuracy ±(%+mV)a Measurement accuracy ±(%+mV)a Maximum current ±2 V 100 V 2 V ±(0.018 + 0.4) ±(0.01 + 0.14) 1A ±20 V 1 mV 20 V ±(0.018 + 3) ±(0.009 + 0.9) 1A ±40 V 2 mV 40 V ±(0.018 + 6) ±(0.01 + 1) 500 mA ±100 V 5 mV 100 V ±(0.018 + 15) ±(0.012 + 2.5) 125 mA ±200 V 10 mV 200 V ±(0.018 + 30) ±(0.014 + 2.8) 50 mA a. ±(% of output/measured value + offset value in mV) Table 4-6 Current range, resolution, and accuracy (high resolution ADC) Measurement accuracy ±(%+A+A)a Maximum voltage ±(0.1+3E-13+Vo1E-15) ±(0.1+2E-13+Vo1E-15) 200 V 10 fA ±(0.1+3E-12+Vo1E-14) ±(0.1+1E-12+Vo1E-14) 200 V 5 pA 100 fA ±(0.05+3E-11+VoE-13) ±(0.05+2E-11+Vo1E-13) 200 V ±1 A 50 pA 1 pA ±(0.05+3E-10+VoE-12) ±(0.05+1E-10+Vo1E-12) 200 V ±10 A 500 pA 10 pA ±(0.05+3E-9+Vo1E-11) ±(0.04+2E-9+Vo1E-11) 200 V ±100 A 5 nA 100 pA ±(0.035+15E-9+VoE-10) ±(0.03+3E-9+Vo1E-10) 200 V ±1 mA 50 nA 1 nA ±(0.04+15E-8+Vo1E-9) ±(0.03+6E-8+Vo1E-9) 200 V ±10 mA 500 nA 10 nA ±(0.04+15E-7+VoE-8) ±(0.03+2E-7+Vo1E-8) 200 V ±100 mA 5 A 100 nA ±(0.045+15E-6+VoE-7) ±(0.04+6E-6+Vo1E-7) b ±1 A 50 A 1 A ±(0.4+3E-4+VoE-6) ±(0.4+15E-5+Vo1E-6) Range Force resolution Measurement a resolution Force accuracy ±(%+A+A) ±1 nA 50 fA 10 fA ±10 nA 500 fA ±100 nA a. ±(% of output/measured value + fixed offset in A + proportional offset in A), Vo is the output voltage in V. b. 200 V (Io 50 mA), 100 V (50 mA < Io 125 mA), 40 V (125 mA < Io 500 mA), 20 V (500 mA < Io 1 A), Io is the output current. Keysight B1500A User’s Guide, Ed ition 14 4- 13 Specifications Hardware Table 4-7 Voltage range, resolution, and accuracy (high speed ADC) Range Force resolution Measurement resolution Force accuracy ±(%+mV)a Measurement accuracy ±(%+mV)a Maximum current ±2 V 100 V 100 V ±(0.018 + 0.4) ±(0.01 + 0.7) 1A ±20 V 1 mV 1 mV ±(0.018 + 3) ±(0.01 + 4) 1A ±40 V 2 mV 2 mV ±(0.018 + 6) ±(0.015 + 8) 500 mA ±100 V 5 mV 5 mV ±(0.018 + 15) ±(0.02 + 20) 125 mA ±200 V 10 mV 10 mV ±(0.018 + 30) ±(0.035 + 40) 50 mA a. ±(% of output/measured value + offset value in mV) Table 4-8 Current range, resolution, and accuracy (high speed ADC) Measurement accuracy ±(%+A+A)a Maximum voltage ±(0.1+3E-13+Vo1E-15) ±(0.25+3E-13+Vo1E-15) 200 V 500 fA ±(0.1+3E-12+Vo1E-14) ±(0.25+2E-12+Vo1E-14) 200 V 5 pA 5 pA ±(0.05+3E-11+VoE-13) ±(0.1+2E-11+Vo1E-13) 200 V ±1 A 50 pA 50 pA ±(0.05+3E-10+VoE-12) ±(0.1+2E-10+Vo1E-12) 200 V ±10 A 500 pA 500 pA ±(0.05+3E-9+Vo1E-11) ±(0.05+2E-9+Vo1E-11) 200 V ±100 A 5 nA 5 nA ±(0.035+15E-9+VoE-10) ±(0.05+2E-8+Vo1E-10) 200 V ±1 mA 50 nA 50 nA ±(0.04+15E-8+Vo1E-9) ±(0.04+2E-7+Vo1E-9) 200 V ±10 mA 500 nA 500 nA ±(0.04+15E-7+VoE-8) ±(0.04+2E-6+Vo1E-8) 200 V ±100 mA 5 A 5 A ±(0.045+15E-6+VoE-7) ±(0.1+2E-5+Vo1E-7) b ±1 A 50 A 50 A ±(0.4+3E-4+VoE-6) ±(0.5+3E-4+Vo1E-6) Range Force resolution Measurement a resolution Force accuracy ±(%+A+A) ±1 nA 50 fA 50 fA ±10 nA 500 fA ±100 nA a. ±(% of output/measured value + fixed offset in A + proportional offset in A), Vo is the output voltage in V. b. 200 V (Io 50 mA), 100 V (50 mA < Io 125 mA), 40 V (125 mA < Io 500 mA), 20 V (500 mA < Io 1 A), Io is the output current. 4- 14 Keysight B1500A User’s Guide, Ed ition 14 Specifications Hardware MCSMU Medium Current Source/Monitor Unit • Voltage range, resolution, and accuracy See Table 4-9. • Current range, resolution, and accuracy See Table 4-10. • Power consumption Voltage source mode: Voltage range (V) Power consumptiona (W) 0.2 Ic 40 2 Ic 40 40 Ic 40 a. Ic is the current compliance setting. Current source mode: Voltage compliancea (V) Power consumptionb (W) Vc 0.2 Io 40 0.2 < Vc 2 Io 40 2 < Vc 40 Io 40 a. Vc is the voltage compliance setting. b. Io is the output current. Keysight B1500A User’s Guide, Ed ition 14 4- 15 Specifications Hardware Table 4-9 MCSMU voltage range, resolution, and accuracy Range Force resolution Measurement resolution Force accuracy ±(%+mV)a Measurement accuracy ±(%+mV+mV)a Maximum current ±0.2 V 200 nV 200 nV ±(0.06+0.14) ±(0.06+0.14+Io0.05) 1A ±2 V 2 V 2 V ±(0.06+0.6) ±(0.06+0.6+Io0.5) 1A ±20 V 20 V 20 V ±(0.06+3) ±(0.06+3+Io5) 1A ±40 Vb 40 V 40 V ±(0.06+3) ±(0.06+3+Io10) 1A a. ±(% of output/measured value + fixed offset + proportional offset), Io is the output current in A. b. Maximum output voltage is 30 V. Table 4-10 MCSMU current range, resolution, and accuracy Measurement accuracy ±(%+A+A)a Maximum voltage ±(0.06+2E-9+Vo1E-10) ±(0.06+2E-9+Vo1E-10) 30 V 100 pA ±(0.06+2E-8+VoE-9) ±(0.06+2E-8+VoE-9) 30 V 1 nA 1 nA ±(0.06+2E-7+Vo1E-8) ±(0.06+2E-7+Vo1E-8) 30 V ±10 mA 10 nA 10 nA ±(0.06+2E-6+VoE-7) ±(0.06+2E-6+VoE-7) 30 V ±100 mA 100 nA 100 nA ±(0.06+2E-5+VoE-6) ±(0.06+2E-5+VoE-6) 30 V ±1 A b 1 A 1 A ±(0.4+2E-4+VoE-5) ±(0.4+2E-4+VoE-5) 30 V Range Force resolution Measurement a resolution Force accuracy ±(%+A+A) ±10 A 10 pA 10 pA ±100 A 100 pA ±1 mA a. ±(% of output/measured value + fixed offset + proportional offset), Vo is the output voltage in V. b. Pulse mode only. The maximum value of the base current during pulsing is ±50 mA. 4- 16 Keysight B1500A User’s Guide, Ed ition 14 Specifications Hardware SMU Common Specifications • Output terminal/connection Dual triaxial connector, Kelvin (remote sensing) • Voltage/current compliance (limiting) The SMU can limit output voltage or current to prevent damaging the device under test. • Voltage compliance: 0 V to ± 100 V (MPSMU, HRSMU) 0 V to ± 200 V (HPSMU) 0 V to ± 30 V (MCSMU) • Current compliance: ± 10 fA to ± 100 mA (HRSMU/MPSMU with ASU) ± 100 fA to ± 100 mA (HRSMU) ± 1 pA to ± 100 mA (MPSMU) ± 1 pA to ± 1 A (HPSMU) ± 10 nA to ± 1 A (MCSMU) • Compliance accuracy: Same as the current or voltage set accuracy. • Pulsed measurement Programmable pulse width, period, and delay: For HPSMU, MPSMU, HRSMU • Width: 500 s to 2 s, 100 s resolution • Period: 5 ms to 5 s, 100 s resolution Period Width+2 ms (when Width 100 ms) Period Width+10 ms (when Width > 100 ms) • Delay: 0 s Keysight B1500A User’s Guide, Ed ition 14 4- 17 Specifications Hardware For MCSMU • Width: 10 s to 100 ms (1 A range), 10 s to 2 s (10 A to 100 mA ranges), 2 s resolution Recommended pulse width: 50 s (time to reach within 1 % of the final value at resistive load 50 , 10 V step voltage, and 1 A compliance, supplemental characteristics) • Period: 5 ms to 5 s, 100 s resolution • Pulse duty: For 1 A range: 5 % For 10 A to 100 mA ranges: Period Width+Delay+2 ms (when Width+Delay 100 ms) Period Width+Delay+10 ms (when Width+Delay > 100 ms) • • Delay: 0 to (Period-Width) s, 2 s resolution About measurement accuracy • RF electromagnetic field and SMU measurement accuracy Voltage and current measurement accuracy may be affected by RF electromagnetic field of strength over 3 V/m at frequencies 80 MHz to 1 GHz and 1.4 GHz to 2.0 GHz, and 1 V/m at frequencies 2.0 GHz to 2.7 GHz. The extent of this effect depends upon how the instrument is positioned and shielded. • Induced RF field noise and SMU measurement accuracy Voltage and current measurement accuracy can be affected by induced RF field noise strengths greater than 3Vrms in the frequency range of 150 kHz to 80 MHz. The extent of this effect depends upon how the instrument is positioned and shielded. 4- 18 Keysight B1500A User’s Guide, Ed ition 14 Specifications Hardware SMU Supplemental Characteristics • Current compliance setting accuracy (for opposite polarity) For HPSMU, MPSMU, HRSMU ± (setting accuracy + 12 % of range), for 1 pA to 10 nA ranges ± (setting accuracy + 2.5 % of range), for 100 nA to 1 A ranges For MCSMU ± (setting accuracy + 2.5 % of range) • SMU pulse setting accuracy (fixed measurement range) For HPSMU, MPSMU, HRSMU Width: ± (0.5 % + 50 s) Period: ± (0.5 % + 100 s) For MCSMU Width: ± (0.1 % + 2 s) Period: ± (0.1 % + 100 s) • Minimum pulse measurement time For HPSMU, MPSMU, HRSMU: 16 s For MCSMU: 2 s • Voltage source output resistance (Force line, Non-Kelvin connection) 0.2 (HPSMU) 0.3 (MPSMU, HRSMU) • Voltage measurement input resistance For HPSMU, MPSMU, HRSMU: 1013 For MCSMU: 109 • Current source output resistance For HPSMU, MPSMU, HRSMU: 1013 For MCSMU: 109 Keysight B1500A User’s Guide, Ed ition 14 4- 19 Specifications Hardware • Maximum allowable cable resistance (Kelvin connection) For HPSMU, MPSMU, HRSMU: 10 (Sense), 10 (Force, 100 mA), 1.5 (Force, > 100 mA) For MCSMU: 10 (Sense), 1 (Force, between high and low) • Maximum allowable inductance For MCSMU: 3 H (Force, with low force as shield) • Maximum load capacitance For HPSMU, MPSMU, HRSMU 1000 pF, for 1 pA to 10 nA ranges 10 nF, for 100 nA to 10 mA ranges 100 F, for 100 mA and 1 A ranges For MCSMU 12 nF, for 10 A to 10 mA ranges 100 F, for 100 mA and 1 A ranges • Maximum guard capacitance 900 pF (HPSMU, MPSMU, HRSMU) 660 pF (HRSMU/MPSMU with ASU) • Maximum shield capacitance 5000 pF (HPSMU, MPSMU, HRSMU) 3500 pF (HRSMU/MPSMU with ASU) • Noise characteristics For HPSMU, MPSMU, HRSMU Voltage source: 0.01 % of V range (rms.) Current source: 0.1 % of I range (rms.) For MCSMU Voltage/Current source: 200 mV (0 to peak) max Condition: filter ON for HPSMU, MPSMU, and HRSMU 4- 20 Keysight B1500A User’s Guide, Ed ition 14 Specifications Hardware • Overshoot (filter ON) For HPSMU, MPSMU, HRSMU Voltage source: 0.03 % of V range Current source: 1 % of I range For MCSMU Voltage/Current source: 10 % of range • Range switching transient noise Voltage ranging: 250 mV Current ranging: 70 mV Condition: filter ON for HPSMU, MPSMU, and HRSMU • Maximum guard offset voltage ± 1 mV (HPSMU) ± 3 mV (MPSMU, HRSMU) ± 4.2 mV (HRSMU/MPSMU with ASU, Iout 100 A) • Maximum slew rate 0.2 V/s (HPSMU, MPSMU, HRSMU) 1 V/s (MCSMU) • Maximum DC floating voltage ± 200 V DC between low force and common (MCSMU) Keysight B1500A User’s Guide, Ed ition 14 4- 21 Specifications Hardware MFCMU MFCMU: Multi Frequency Capacitance Measurement Unit • • Measurement functions • Measurement parameters: Cp-G, Cp-D, Cp-Q, Cp-Rp, Cs-Rs, Cs-D, Cs-Q, Lp-G, Lp-D, Lp-Q, Lp-Rp, Ls-Rs, Ls-D, Ls-Q, R-X, G-B, Z-, Y- • Ranging: Auto or fixed • Measurement terminal: Four-terminal pair configuration, four BNC (female) connectors • Cable length: 1.5 m or 3 m, automatic identification of accessories Test signal • Frequency Range: 1 kHz to 5 MHz Resolution: 1 mHz (minimum) Accuracy: ± 0.008 % • Output signal level Range: 10 mVrms to 250 mVrms Resolution: 1 mVrms Accuracy: ± (10.0 % + 1 mVrms) at the measurement port of the MFCMU ± (15.0 % + 1 mVrms) at the measurement port of the MFCMU cable (1.5 m or 3.0 m) • Output impedance: 50 , typical • Signal level monitor Range: 10 mVrms to 250 mVrms Accuracy (open load): ± (10.0 % of reading + 1 mVrms) at the measurement port of the MFCMU ± (15.0 % of reading + 1 mVrms) at the measurement port of the MFCMU cable (1.5 m or 3.0 m) 4- 22 Keysight B1500A User’s Guide, Ed ition 14 Specifications Hardware • DC bias function • DC bias Range: 0 to ± 25 V Resolution: 1 mV Accuracy: ± (0.5 % + 5.0 mV) at the measurement port of the MFCMU or the MFCMU cable (1.5 m or 3.0 m) • Maximum DC bias current, supplemental characteristics: Impedance range () Maximum DC bias current (A) 50 1010-3 100 1010-3 300 1010-3 1103 110-3 3103 110-3 10103 10010-6 30103 10010-6 100103 1010-6 300103 1010-6 • Output impedance: 50 , typical • DC bias monitor Range: 0 to ± 25 V Accuracy (open load): ± (0.2 % of reading + 10 mV) at the measurement port of the MFCMU or the MFCMU cable (1.5 m or 3.0 m) • Sweep characteristics • Available sweep parameters: DC bias voltage, oscillator level, frequency • Sweep type: linear, log • Sweep mode: single, double • Sweep direction: up, down • Number of measurement points: maximum 1001 Keysight B1500A User’s Guide, Ed ition 14 4- 23 Specifications Hardware • Measurement accuracy Measurement accuracy at the measurement port of the MFCMU or the MFCMU cable (1.5 m or 3.0 m) • |Z| accuracy: ± E (%) • accuracy: ± E/100 (radian) • C accuracy: ± E (%) at Dx 0.1 ± E(1+Dx2)1/2 (%) at Dx > 0.1 • D accuracy: ± E/100 at Dx 0.1 ± E(1+Dx)/100 at Dx > 0.1 • G accuracy: ± E/Dx (%) at Dx 0.1 ± E(1+Dx2)1/2/Dx (%) at Dx > 0.1 where, Zx: Impedance measurement value () Dx: Measurement value of D E = EP’ + (ZS’ / |Zx| + YO’ |Zx| ) 100 (%) EP’ = EPL + EPOSC + EP (%) YO’ = YOL + YOSC + YO (S) ZS’ = ZSL + ZOSC + ZS () For the parameter value, see Table 4-11 to Table 4-13. Calculation example of the measurement accuracy is also shown in Table 4-14. Specification conditions: • Temperature: 23 C ± 5 C • Integration time: 1 PLC or 16 PLC 4- 24 Keysight B1500A User’s Guide, Ed ition 14 Specifications Hardware Table 4-11 Parameters EPOSC, ZOSC Oscillator level Vosc mV EPOSC % ZOSC m 125 < Vosc 250 0.03(250/Vosc-1) 5(250/Vosc-1) 64 < Vosc 125 0.03(125/Vosc-1) 5(125/Vosc-1) 32 < Vosc 64 0.03(64/Vosc-1) 5(64/Vosc-1) Vosc 32 0.03(32/Vosc-1) 5(64/Vosc-1) Vosc is oscillator level in mV. Table 4-12 Parameters EPL, YOL, ZSL Cable length EPL % YOL nS ZSL m 1.5 m 0.02+3f/100 750f/100 5.0 3m 0.02+5f/100 1500f/100 5.0 f is frequency in MHz. If measurement cable is extended, open compensation, short compensation, and load compensation must be performed. Table 4-13 Parameters YOSC, YO, EP, ZS YOSC nS YO nS EP % ZS m 200k 1(125/Vosc-0.5) 1.5 0.095 5.0 200k < f 1M 2(125/Vosc-0.5) 3.0 0.095 5.0 1M < f 2M 2(125/Vosc-0.5) 3.0 0.28 5.0 2M < f 20(125/Vosc-0.5) 30.0 0.28 5.0 Frequency f Hz 1k f Vosc is oscillator level in mV. Keysight B1500A User’s Guide, Ed ition 14 4- 25 Specifications Hardware Table 4-14 Example of calculated C/G measurement accuracy Frequency Measured Capacitance C Accuracy a Measured Conductance G Accuracy a 5 MHz 1 pF ± 0.61 % 3 S ± 192 nS 10 pF ± 0.32 % 31 S ± 990 nS 100 pF ± 0.29 % 314 S ± 9 S 1 nF ± 0.32 % 3 mS ± 99 S 1 pF ± 0.26 % 628 nS ± 16 nS 10 pF ± 0.11 % 6 S ± 71 nS 100 pF ± 0.10 % 63 S ± 624 nS 1 nF ± 0.10 % 628 S ± 7 S 10 pF ± 0.18 % 628 nS ± 11 nS 100 pF ± 0.11 % 6 S ± 66 nS 1 nF ± 0.10 % 63 S ± 619 nS 10 nF ± 0.10 % 628 S ± 7 S 100 pF ± 0.18 % 628 nS ± 11 nS 1 nF ± 0.11 % 6 S ± 66 nS 10 nF ± 0.10 % 63 S ± 619 nS 100 nF ± 0.10 % 628 S ± 7 S 100 pF ± 0.92 % 63 nS ± 6 nS 1 nF ± 0.18 % 628 nS ± 11 nS 10 nF ± 0.11 % 6 S ± 66 nS 100 nF ± 0.10 % 63 S ± 619 nS 1 MHz 100 kHz 10 kHz 1 kHz a. The calculation examples are specified under the conditions Dx = 0.1, 1 PLC integration time, 30 mVrms test signal level, and at four-terminal pair port of MFCMU. 4- 26 Keysight B1500A User’s Guide, Ed ition 14 Specifications Hardware SCUU/GSWU SCUU: SMU CMU Unify Unit GSWU: Guard Switch Unit The SCUU multiplexes the outputs from two SMUs (MPSMUs and/or HRSMUs) and the CMU. The SCUU outputs are two sets of Kelvin triaxial ports (Force and Sense). The SCUU also allows the SMUs to act as DC bias sources in conjunction with the CMU. Special cables are available to connect the SMUs and CMU with the SCUU, and an auto-detect feature automatically compensates for the cable length going to the SCUU. The GSWU contains a relay that automatically opens for IV measurements and closes for CV measurements, forming a guard return path to improve CV measurement accuracy. • Supported SMU: MPSMU and HRSMU • SCUU • Inputs Triaxial port: Force1, Sense1, Force2, and Sense2 BNC port: for MFCMU Control port: for MFCMU • Outputs Triaxial port: Force1/CMUH, Sense1, Force2/CMUL, and Sense2 Control port: for GSWU LED: SMU/CMU output status indicator • Docking mode Direct and indirect mode • GSWU • Input Control port: for SCUU Mini pin plug port: Guard1 and Guard2 • Output LED: Connection status indicator Keysight B1500A User’s Guide, Ed ition 14 4- 27 Specifications Hardware • SCUU supplemental characteristics • SMU path Offset current: < 20 fA Offset voltage: < 100 V at 300 sec Closed channel residual resistance: < 200 m Channel isolation resistance: > 1015 • CMU path • Test signal • Signal output level additional errors (CMU bias, open load): ± 2 % (direct docking) ± 7 % (indirect docking) • Signal output level additional errors (SMU bias, open load): ± 5 % (direct docking, 10 kHz) ± 10 % (indirect docking, 10 kHz) • Output impedance: 50 , typical • Signal level monitor additional errors (open load): ± 2 % (CMU bias), direct docking ± 5 % (SMU bias), direct docking ± 7 % (CMU bias), indirect docking ± 10 % (SMU bias), indirect docking • DC bias function • DC voltage bias (CMU bias) Range: 0 to ± 25 V Resolution: 1 mV Additional errors (for CMU bias): ± 100 V (open load) • DC voltage bias (SMU bias) Range: 0 to ± 100 V Resolution: 5 mV 4- 28 Keysight B1500A User’s Guide, Ed ition 14 Specifications Hardware Additional errors (for SMU voltage output accuracy): ± 100 V (open load) • DC bias monitor additional errors (open load): ± 20 mV, direct docking ± 30 mV, indirect docking • • Output impedance: 50 , typical • DC output resistance: 50 (CMU bias), 130 (SMU bias) Measurement accuracy Impedance measurement error is given by adding the following additional error Ee to the MFCMU measurement error. Ee = ± (A + Zs / |Zx| + Yo |Zx| ) 100 (%) Zx: Impedance measurement value () A: 0.05 % (direct docking) or 0.1 % (indirect docking) Zs: 500 (1 + f ) m (f: frequency in MHz) Yo: 1 + f 10 nS (direct docking, 2 for indirect docking) When the measurement terminals are extended by using the measurement cable, the measurement accuracy is applied to the data measured after performing the open/short/load correction at the DUT side cable end. Specification conditions: • Temperature: 23 C ± 5 C • Integration time: 1 PLC or 16 PLC Keysight B1500A User’s Guide, Ed ition 14 4- 29 Specifications Hardware HV-SPGU HV-SPGU: High Voltage Semiconductor Pulse Generator Unit • Number of output channels: 2 channels per module • Modes: pulse, constant, and free run • Standard pulse mode • Two level pulse • Three level pulse per one channel • Pulse period: 30 ns to 10 s • Delay range: 0 s to 9.99 s • Delay resolution: minimum 2.5 ns • Output count: 1 to 1,000,000 • Voltage monitor minimum sampling period: 5 s • Trigger output Level: TTL Timing: Synchronized with pulse period Trigger width: Pulse period 1/2 (pulse period 10 s), maximum 5 s (pulse period > 10 s) Figure 4-1 • Pulse range and pulse parameter: See Table 4-15. • Pulse/DC output voltage and accuracy: See Table 4-16. SPGU pulse setup parameters Tperiod Tdelay Twidth Vpeak 90% 90% Vamp Vbase 10% Tr 4- 30 10% Tf Keysight B1500A User’s Guide, Ed ition 14 Specifications Hardware Table 4-15 Pulse range and pulse parameter Value a Item Frequency range 0.1 Hz to 33 MHz Pulse period Pulse width Programmable range 30 ns to 10 s Resolution 10 ns Minimum 100 ns (Vamp 10 V) Accuracy ± 1 % (± 0.01 % b ) Programmable range 10 ns to (period -10 ns) Resolution 2.5 ns (Tr and Tf 8 s) 10 ns (Tr or Tf > 8 s) Transition time (leading time Tr and trailing time Tf) c Minimum 50 ns (25 ns, typical) at Vamp 10 V Accuracy ± (3 % + 2 ns) Programmable range 8 ns to 400 ms (see below for the minimum transition time) Resolution 2 ns (Tr and Tf 8 s) 8 ns (Tr or Tf > 8 s) Minimum (typical) < 15 ns (Vamp 10 V) Minimum 20 ns (Vamp 10 V) 30 ns (Vamp 20 V) 60 ns (Vamp > 20 V) Accuracy -5 % to 5 % + 10 ns (Vamp 10 V) -5 % to 5 % + 20 ns (Vamp 20 V) Output relay switching time d a. b. c. d. Open/close < 100 s Unless otherwise stated, all specifications assume a 50 termination. Typical minimum. This is the supplemental characteristics. The time from 10 % to 90 % of Vamp which is the amplitude of output pulse. The time it takes the open state relay to open or close. Keysight B1500A User’s Guide, Ed ition 14 4- 31 Specifications Hardware Table 4-16 Pulse/DC output voltage and accuracy Item Value Condition -20 V to +20 V 50 load -40 V to +40 V open load Accuracy a ± (0.5 % + 50 mV) open load Amplitude resolution 0.2 mV (± 10 V range) 50 load Output voltage (Vout) 0.8 mV (± 40 V range) 0.4 mV (± 10 V range) open load 1.6 mV (± 40 V range) Output connectors SMA Source impedance 50 b Short circuit current 800 mA peak (400 mA average c ) Overshoot/pre-shoot/ringing d ± (5 % + 20 mV) Output limit Monitoring over current limit 50 load a. At 1 s after completing transition. b. Typical (± 1 %) c. Specification condition: N 0.2 + Itotal < 3.0 A where, N is the number of installed HV-SPGUs, and Itotal is DC current output by all modules (including HV-SPGUs) d. Following the specified condition with transition time. • ALWG (arbitrary linear waveform generator) function Arbitrary linear waveform generator (ALWG) mode • Output complex waveform per one channel of HV-SPGU • Define multi-level pulse and multi-pulse waveform including open state pulse with ALWG GUI editor • Sequential pulse waveform from user-defined pulse waveform • 1024 points per one channel 4- 32 Keysight B1500A User’s Guide, Ed ition 14 Specifications Hardware • • Programmable timing range: 10 ns to 671.088630 ms, 10 ns resolution SPGU supplemental characteristics • Pulse width jitter: 0.001 % + 150 ps • Pulse period jitter: 0.001 % + 150 ps • Maximum slew rate: 1000 V/s (50 load) • Noise: 10 mVrms (at DC output) • Advanced feature: Voltage monitor: The HV-SPGU has a voltage monitor function to measure the voltage at the DUT terminal. Measurement accuracy (open load): ± (0.1 % of reading + 25 mV) Measurement resolution: 50 V Note: Specified at 1 PLC (20 ms = (5 s sample + 5 s interval) 2000 samples) Voltage compensation: The HV-SPGU can measure the impedance of DUT and adjust the output voltage according to the DUT impedance. Figure 4-2 ALWG setup table and pattern example Pattern P3 15 P4 10 0 P1 P2 P5 P7 P8 P6 P9 500 ns 0 Figure 4-3 P10 Point Time Voltage 1 2 3 4 5 6 7 8 9 10 0 50 ns 70 ns 100 ns 200 ns 300 ns 320 ns 400 ns 450 ns 500 ns 0.0 V 0.0 V 15.0 V 15.0 V 0.0 V 0.0 V 10.0 V 10.0 V 0.0 V 0.0 V ALWG complex waveform example Pattern1 x 1 Pattern2 x 5 Keysight B1500A User’s Guide, Ed ition 14 Pattern3 x 1 4- 33 Specifications Hardware Selector Keysight 16440A (B1500A-A04) SMU/pulse generator selector switches either a SMU or PGU to the associated output port. You can expand to four channels by adding an additional selector. The PGU port on channel 1 provides a “PGU OPEN” function, which can disconnect the PGU by opening a semiconductor relay. Keysight B1500A and 16445A are required to use the selector. The following specifications data is specified at 23 C ± 5 C (73 F ± 9 F) and 50 % relative humidity. • Channel configuration: 2 channels (CH 1 and CH 2). Can add the additional 2 channels (CH 3 and CH 4) by adding another selector (selector expander). Input Output Channel 1 (CH 1) 2 (SMU and PGU a) 1 Channel 2 (CH 2) 2 (SMU and PGU) 1 Channel 3 (CH 3) b 2 (SMU and PGU a) 1 Channel 4 (CH 4) b 2 (SMU and PGU) 1 a. PGU channels 1 and 3 have a built-in series semiconductor relay. b. Available when a selector expander is installed. • Voltage and current range Input port Maximum voltage (V) Maximum current (A) SMU 200 1.0 PGU 40 0.4 a a. This is peak-to-peak ac current. For 50 load. If DUT impedance is lower than 50 , SPGU output voltage should be decreased for preventing the selector from over current. Selector Adapter Keysight 16445A selector adapter is required to control and to supply DC power to the selector. • Power requirement: 100 to 240 V, 50/60 Hz • Maximum volt-amps (VA): 20 VA 4- 34 Keysight B1500A User’s Guide, Ed ition 14 Specifications Hardware WGFMU/RSU WGFMU: Waveform Generator/Fast Measurement Unit RSU: Remote-sense and Switch Unit The WGFMU is a self-contained module offering the combination of arbitrary linear waveform generation (ALWG) with synchronized fast current or voltage (IV) measurement. The ALWG function allows you to generate not only DC, but also various types of AC waveforms. In addition to this versatile sourcing capability, the WGFMU can also perform measurement in synchronization with the applied waveform, which enables accurate high-speed IV characterization. • Number of output channels: 2 channels per module • Modes: Fast IV, PG (pulse generator), DC, and SMU pass-through • Measurement functions: See Table 4-17. • Voltage force accuracy, resolution, and timing: See Table 4-18. • Voltage measurement accuracy, resolution and noise: See Table 4-19. • Current measurement accuracy and resolution: See Table 4-20. • RF electromagnetic field and WGFMU measurement accuracy The voltage and current measurement accuracy and the timing accuracy between modules may be affected by RF electromagnetic field of strength over 3 V/m at frequencies 80 MHz to 1 GHz and 1.4 GHz to 2.0 GHz, and 1 V/m at frequencies 2.0 GHz to 2.7 GHz. The extent of this effect depends upon the installation condition how the instrument is positioned and shielded. • RSU • • • Output terminal • Connector: SMA • Source impedance: 50 (nominal), at DC output in PG mode SMU path • Maximum voltage: ± 25 V • Maximum current: ± 100 mA V Monitor terminal • Connector: BNC • Source impedance: 50 (nominal), at DC output Keysight B1500A User’s Guide, Ed ition 14 4- 35 Specifications Hardware The V Monitor terminal outputs a buffered signal equal to 1/10 of the Output terminal voltage (into a 50 load). • WGFMU to RSU cable length The WGFMU and RSU are connected by a special composite cable. The following configurations are available. • 3m • 5m • 1.5 m • 2.4 m + connector adapter + 0.6 m • 4.4 m + connector adapter + 0.6 m Note: The connector adapter is used when routing the cable through the prober’s connector panel. • ALWG function: See Table 4-21. • Trigger output Level: TTL Trigger width: 10 ns Generated synchronously with ALWG waveform. • • Software • Instrument library for WGFMU control • NBTI and general-purpose EasyEXPERT Application Tests • Sample programs (NBTI and general-purpose measurement using WGFMU and RTS data analysis) WGFMU supported prober vendors Cascade Microtech Suss MicroTec Vector Semicon Note: The maximum number of installable RSUs for a given prober depends upon the available space. Please contact your local sales representative for details on connecting and mounting the WGFMU and RSU. 4- 36 Keysight B1500A User’s Guide, Ed ition 14 Specifications Hardware • WGFMU supplemental data • RSU SMU path Leakage current: < 100 pA Residual resistance: < 300 m • Jitter: < 1 ns • Skew between channels: < 3 ns, under no electrostatic discharge condition • Trigger output skew: < 3 ns • Current range change time: < 150 s This is the time until the measured current settles within ± 0.3 % of the final result value after the range change. Table 4-17 • Minimum timing parameters for current measurement: See Table 4-22. • Minimum timing parameters for voltage measurement: See Table 4-23. Measurement functions, voltage forcing, voltage measurement, and current measurement Mode Function V force ranges V measure ranges I measure ranges Fast IV V force/ I measure, V force/ V measure -3 V to +3 V, -5 V to +5 V, -10 V to 0 V, 0 V to +10 V -5 V to +5 V, -10 V to +10 V 1 A, 10 A, 100 A, 1 mA, 10 mA PG V force/ V measure -3 V to +3 V, -5 V to +5 V -5 V to +5 V - DC V force/ I measure, V force/ V measure -3 V to +3 V, -5 V to +5 V, -10 V to 0 V, 0 V to +10 V -5 V to +5 V, -10 V to +10 V 1 A, 10 A, 100 A, 1 mA, 10 mA SMU pass through Measurement using SMU Maximum ± 25 V Keysight B1500A User’s Guide, Ed ition 14 - Maximum ± 100 mA 4- 37 Specifications Hardware Table 4-18 Voltage force accuracy, resolution, and timing V force (Fast IV mode) -5 V to +5 V, -10 V to 0 V, 0 V to +10 V V force (PG mode) -5 V to +5 V, open load -2.5 V to +2.5 V, 50 load Accuracy ± 0.1 % of setting ± 0.1 % of range a Resolution b 96 V (-3 V to +3 V) 160 V (all ranges except for -3 V to +3 V) Overshoot/undershoot ± (5 % + 20 mV) c Noise Maximum 0.1 mVrms d Rise time Trise (10 to 90 %)/ Fall time Tfall (90 to 10 %) Accuracy: -5 % to +(5 % + 10 ns) of setting e Pulse period Minimum: 24 ns, PG mode and 50 load Timing accuracy: ± 1 % of setting f Minimum: 100 ns, PG mode and 50 load Pulse width Accuracy: ± (3 % + 2 ns) g Minimum: 50 ns, PG mode and 50 load a. Independent of the range or the mode. DC constant voltage output. Load impedance must be 1 M (1 A range) or 200 k (all other current ranges) for Fast IV mode, or 1 M for PG mode. b. Can vary at most 5 % based on the result of calibration c. PG mode, 50 load, Trise and Tfall >16 ns with the 1.5 m cable, >32 ns with 3 m cable, or >56 ns with 5 m cable d. Theoretical value for the observed time 100 ns to 1 ms, supplemental characteristics e. PG mode, 50 load, Trise and Tfall 24 ns f. PG mode, 50 load, pulse period 100 ns g. PG mode, 50 load, pulse width 50 ns 4- 38 Keysight B1500A User’s Guide, Ed ition 14 Specifications Hardware Table 4-19 Voltage measurement accuracy, resolution, and noise Accuracy ± (0.1 % of reading + 0.1 % of range) a Resolution b 680 V, -5 V to +5 V range 1.4 mV, -10 V to +10 V range Noise c Maximum 4 mVrms (-5 V to +5 V range) a. Independent of the range or the mode. DC constant voltage output. Applicable condition: 10,000 averaging samples for 10 A range and above; 100,000 averaging samples for the 1 A range b. Display resolution. Can vary at most 5 % based on the result of calibration c. 0 V output, open load, no averaging. Maximum 1.5 mVrms as supplemental characteristics Table 4-20 Current measurement accuracy, resolution, and noise Accuracy ± (0.1 % of reading + 0.2 % of range) a Resolution b 0.014 % of range Noise (Effective resolution) Maximum 0.2 % of range c a. Independent of the range or the mode. DC constant voltage output. Applicable condition: 10,000 averaging samples for 10 A range and above; 100,000 averaging samples for the 1 A range b. Display resolution. Can vary at most 5 % based on the result of calibration c. Effective value at 0 V output, open load, and no averaging. Supplemental characteristics Table 4-21 ALWG and sampling measurement capability Maximum number of vectors 2048 Maximum number of sequences 512 Maximum number of loop counts 1 to 1012 Length of a vector 10 ns to 10,000 s with 10 ns resolution Sampling rate 5 ns, or 10 ns to 1 s with 10 ns resolution Averaging time 10 ns to 20 ms with 10 ns resolution Hardware memory About 4 M data points/channel (typical) Keysight B1500A User’s Guide, Ed ition 14 4- 39 Specifications Hardware Table 4-22 Minimum timing parameters for current measurement1 Voltage applied to DUT Current applied to DUT 10 V 100 nA 1 A 10 A 100 A 1 mA 10 mA Applied voltage condition Recommended minimum pulse widtha 47 s 38.7 s 6.8 s 950 ns 240 ns 145 ns Current measurement condition Measurement Range 1 A 1 A 10 A 100 A 1 mA 10 mA Recommended minimum measurement window 10 s 1.64 s 1 s 130 ns 40 ns 20 ns Settling timeb 37 s 37 s 5.8 s 820 ns 200 ns 125 ns Noise (rms)c 160 pA 425 pA 2.5 nA 47 nA 280 nA 1.9 A a. Recommended minimum pulse width = settling time + recommended minimum measurement window. b. The time until the measured value settles to within ± 0.6 % of the final result value after the output voltage is changed from the initial value (0 V). Minimum rise/fall time of 70 ns is recommended for minimizing overshoot. c. RMS noise measured over the recommended minimum measurement window. 1. Measurement conditions: The DUT is a resistive load chosen to adjust the flowing current to the specified current in the table above. The capacitance of the cable between the RSU and the DUT is 20 pF. Voltage is applied to the DUT by a channel of WGFMU/RSU in Fast IV mode and in the 10 mA range, and current measurement is performed by another channel at 0 V in Fast IV mode. 4- 40 Keysight B1500A User’s Guide, Ed ition 14 Specifications Hardware Table 4-23 Minimum timing parameters for voltage measurement1 Voltage applied to DUT 5V 10 V 105 ns 130 ns 5V 10 V Recommended minimum measurement window 20 ns 20 ns Settling timeb 85 ns 110 ns Noise (rms)c 1.4 mV 1.4 mV Applied voltage condition Recommended minimum pulse widtha Voltage measurement condition Measurement Range a. Recommended minimum pulse width = settling time + recommended minimum measurement window. b. The time until the measured value settles to within ± 0.6 % of the final result value after the output voltage is changed from the initial value (0 V). Minimum rise/fall time of 70 ns for 10 V, or 30 ns for 5 V is recommended for minimizing overshoot. c. RMS noise measured over the recommended minimum measurement window. 1. Measurement conditions: The DUT is a resistive load between 1 k and 10 M. The capacitance of the cable between the RSU and the DUT is 20 pF. Voltage is applied to the DUT by a channel of WGFMU/RSU, and voltage measurement is performed by the same channel. (PG mode for 5 V, Fast IV mode for 10 V) Keysight B1500A User’s Guide, Ed ition 14 4- 41 Specifications EasyEXPERT Software EasyEXPERT Software Operation mode • Application test mode Realizes application oriented point-and-click test setup and execution. You can select a test definition from library by device type and measurement item, and execute the test after changing setup parameter values as needed. Also see “Application library”. • Classic test mode Realizes function oriented test setup and execution with the same look, feel, and terminology of Keysight 4155/4156 user interface. In addition, it improves the user interface by taking full advantage of EasyEXPERT’s GUI features. • Tracer test mode (Curve tracer mode) Realizes intuitive and interactive sweep control by using a rotary knob, similar to a curve tracer. Just like an analog curve tracer, you can sweep in only one direction (useful for R&D device analysis) or in both positive and negative directions (useful in failure analysis applications). Test setups can be saved, and used in the classic test mode for further detailed measurement and analysis. Also see “Oscilloscope view”. • Quick test mode A GUI-based quick test mode enables you to perform test sequencing without programming. You can select, copy, rearrange, and cut-and-paste any test setups with a few simple mouse clicks. Once you have selected and arranged your tests, simply click on the measurement button to begin running an automated test sequence. Application library Contains over 300 application test definitions conveniently organized by device type, application, and technology. You can easily edit and customize the furnished application tests to fit your specific needs. The following table shows a part of tests included in the library. They are subject to change without notice. 4- 42 Keysight B1500A User’s Guide, Ed ition 14 Specifications EasyEXPERT Software Category CMOS BJT Test items Id-Vg, Id-Vd, Vth, breakdown, capacitance, QSCV, etc. Ic-Vc, diode, Gummel plot, breakdown, hfe, capacitance, etc. Discrete Id-Vg, Id-Vd, Ic-Vc, diode, etc. Memory Vth, capacitance, endurance test, etc. PwrDevice Pulsed Id-Vg, pulsed Id-Vd, breakdown, etc. NanoTech Resistance, Id-Vg, Id-Vd, Ic-Vc, etc. Reliability NBTI/PBTI, charge pumping, electromigration, hot carrier injection, J-Ramp, TDDB, etc. Oscilloscope view Available for the tracer test using MCSMU modules. The oscilloscope view displays MCSMU current or voltage measurement data versus time. The pulsed measurement waveforms appear in a separate window for easy verification of the measurement timings. This function is useful for verifying waveform timings and debugging pulsed measurements. It is available when a tracer test has one or more MCSMU channels being used in pulsed mode. The oscilloscope view can display the pulse waveform at any (user specified) sweep step of the sweep output. • Sampling interval: 2 s • Sampling points: 2000 Sa • Sampling duration: 22 s to 24 ms • Marker function Data read-out for each channel Resolution: 2 s • Data saving Numeric: TXT/CSV/XMLSS Image: EMF/BMP/JPG/PNG Keysight B1500A User’s Guide, Ed ition 14 4- 43 Specifications EasyEXPERT Software Measurement modes Supports the following measurement modes. • IV measurement Spot Staircase sweep Pulsed spot Pulsed sweep Staircase sweep with pulsed bias Sampling Multi-channel sweep Multi-channel pulsed sweep List sweep Linear search (*1) Binary search (*1) • C measurement Spot C CV (DC bias) sweep Pulsed spot C (*1) Pulsed sweep CV (*1) C-t sampling (*1) C-f sweep (*1) CV (AC level) sweep (*1) Quasi-static CV (QSCV) (*1) (*1) Direct Control classic test is used. Sweep measurement Number of steps: 1 to 10001 (SMU), 1 to 1001 (CMU) Sweep mode: linear or logarithmic (log) Sweep direction: single or double Hold time: 0 to 655.35 s, 10 ms resolution Delay time: 0 to 65.535 s or 655.35 s for CV (AC level) sweep and C-f sweep, 100 s resolution 4- 44 Keysight B1500A User’s Guide, Ed ition 14 Specifications EasyEXPERT Software Step delay time: 0 to 1 s, 100 s resolution Step output trigger delay time: 0 to (delay time) s, 100 s resolution Step measurement trigger delay time: 0 to 65.535 s, 100 s resolution Sampling (time domain) measurement Performs the voltage/current measurement in the specified time interval and plots the measured data versus time. Sampling channels: up to 10 Sampling mode: linear or logarithmic (log) Sampling points: 1 to 100001/(number of channels) for linear sampling, 1 to 1 + (number of data for 11 decades) for log sampling Sampling interval range: 100 s + 20 s (number of channels -1) to 2 ms in 10 s resolution for linear sampling, or 2 ms to 65.535 s in 1 ms resolution for both linear and log sampling Hold time, bias hold time: -90 ms to -100 s in 100 s resolution, 0 to 655.35 s in 10 ms resolution Measurement time resolution: 100 s Other measurement characteristics • Measurement control: Single, repeat, append, and stop • SMU setting capabilities: Limited auto ranging, voltage/current compliance, power compliance, automatic sweep abort functions, self-test, and self-calibration • Standby mode If the standby mode is ON, only the standby channels remain programmed to their specified output value in the non-measurement status. • Bias hold function This function allows you to keep a source active between measurements. The source module will apply the specified bias between measurements when running classic tests inside an application test, in quick test mode, or during a repeated measurement. The function ceases as soon as these conditions end or when a measurement that does not use this function is started. Keysight B1500A User’s Guide, Ed ition 14 4- 45 Specifications EasyEXPERT Software • Current offset cancel This function subtracts the offset current from the current measurement raw data, and returns the result as the measurement data. This function is used to compensate the error factor (offset current) caused by the measurement path such as the measurement cables, manipulators, or probe card. • Time stamp Time stamp function utilizing an internal quartz clock. Resolution: 100 s Data display • X-Y graph plot X-axis and up to eight Y-axes. Linear and log scale. Real time graph plotting. X-Y graph plot can be printed or stored as image data to clip board or mass storage device. The formats BMP, GIF, PNG, and EMF are supported. • Scale Auto scale and zoom • Marker Marker to min/max, interpolation, direct marker, and marker skip • Cursor Direct cursor • Line Two lines, normal mode, grad mode, tangent mode, and regression mode • Overlay graph comparison Graphical plots can be overlaid for comparison. • List display Measurement data and calculated user function data are listed in conjunction with sweep step number or time domain sampling step number. Up to 20 data sets can be displayed. • Data variable display Up to 20 user-defined parameters can be displayed. 4- 46 Keysight B1500A User’s Guide, Ed ition 14 Specifications EasyEXPERT Software Automatic analysis function On a graphics plot, the markers and lines can be automatically located using the auto analysis setup. Parameters can be automatically determined using automatic analysis, user function, and read out functions. • Analysis functions Up to 20 user-defined analysis functions can be defined using arithmetic expressions. Measured data, pre-defined variables, and read out functions can be used in the computation. The results can be displayed on the LCD. • Read out functions Built-in functions for reading various values related to the marker, cursor, or line Arithmetic functions • User functions Up to 20 user-defined functions can be defined using arithmetic expressions. Measured data and pre-defined variables can be used in the computation. The results can be displayed on the LCD. • Arithmetic operators +, -, *, /, ^, abs (absolute value), at (arc tangent), avg (averaging), cond (conditional evaluation), delta, diff (differential), exp (exponent), integ (integration), lgt (logarithm, base 10), log (logarithm, base e), mavg (moving average), max, min, sqrt, trigonometric function, inverse trigonometric function, and so on • • Physical constants assigned to the keys • q: Electron charge, 1.602177E-19 C • k: Boltzmann constant, 1.380658E-23 J/K • (e): Dielectric constant of vacuum, 8.854188E-12 F/m Numeric constants assigned to the keys a (10-18), f (10-15), p (10-12), n (10-9), u or (10-6), m (10-3), k (103), M (106), G (109), T (1012), P (1015) Keysight B1500A User’s Guide, Ed ition 14 4- 47 Specifications EasyEXPERT Software Workspace and data management • Workspace Separate work environment for EasyEXPERT. Every workspace supports the following features. • • Measurement setup and execution • Save/Recall My Favorite (preset group) setup • Save/Recall measurement data and settings • Import/Export device definition, measurement settings, My Favorite setup, measurement data, and application library • Test result data management • Access authority (private/public) setting Data auto record / auto export EasyEXPERT has the ability to automatically store the measurement setup and data within a workspace. It can also export measurement data in real time. You can save data to any storage device connected to the PC. • Import/export files File type: EasyEXPERT format, XML-SS format, CSV format • Workspace management EasyEXPERT has the ability to import/export a workspace for back-up and portability. External instrument control • Switching matrix operation panel (GUI) Keysight B2200A, B2201A, and E5250A with E5252A cards • External instruments supported by application tests Keysight 4284A/E4980A, 81110A, and 3458A • Wafer prober control Scripts to perform chuck move/up/down and subsite move for major semiautomatic probers are furnished. The wafer prober control can be performed in the repeat measurement process. 4- 48 Keysight B1500A User’s Guide, Ed ition 14 Specifications Program and interface capabilities Program and interface capabilities • Data storage Hard disk drive, DVD-R drive • Interfaces GPIB, interlock, USB (USB 2.0, 2 ea. on front, 2 ea. on rear), LAN (1000BASE-T/100BASE-TX/10BASE-T), trigger in/out, digital I/O, VGA video output • Remote control capabilities FLEX commands (GPIB) EasyEXPERT remote control function (LAN) • Trigger I/O Only available using GPIB FLEX commands. Trigger in/out synchronization pulses before and after setting and measuring DC voltage and current. Arbitrary trigger events can be masked or activated independently. Furnished Software • Prober control scripts • Desktop EasyEXPERT software • VXIplug&play driver for Keysight B1500A • 4155/56 setup file converter Converts the measurement setup file (extension MES or DAT) for Keysight 4155 and 4156 into the equivalent setup file for EasyEXPERT classic test mode. • MDM file converter Converts the EasyEXPERT test result data file (extension XTR or ZTR) to Keysight IC-CAP MDM file. Supports the data of the following classic tests. • I/V Sweep • Multi Channel I/V Sweep • C-V Sweep Keysight B1500A User’s Guide, Ed ition 14 4- 49 Specifications Desktop EasyEXPERT Software NOTE For the latest system requirements, go to www.keysight.com and type in B1500A in the Search field at the top of the page. Desktop EasyEXPERT Software Provides almost the same capability, look and feel of EasyEXPERT on a PC. • Execution mode Online and offline • Supported instruments • B1500A • B1505A • 4155B, 4156B, 4155C, and 4156C Firmware: • • HOSTC: 03.08 or later • SMUC: 04.08 or later Supported 4155/4156 functionality • I/V sweep • I/V-t sampling (except thinned out mode) • VSU/VMU (except differential voltage measurement using VMU) • PGU (41501B) • Switching matrix control 4- 50 Keysight B1500A User’s Guide, Ed ition 14 Specifications General Specifications General Specifications • Temperature range Operating: +5 C to +40 C Storage: -20 C to +60 C • Humidity Operating: 20 % to 70 %RH, non-condensing Storage: 10 % to 90 %RH, non-condensing • Altitude Operating: 0 to 2,000 m (6,561 ft.) Storage: 0 to 4,600 m (15,092 ft.) • Power requirement: 100-240 V (±10 %), 50/60 Hz • Maximum volt-amps (VA): 900 VA • Regulatory compliance • EMC IEC 61326-1 / EN 61326-1 ICES/NMB-001 AS/NZS CISPR 11 KC: RRA Notification amending Radio Waves Act Article 58-2 • Safety IEC 61010-1 / EN 61010-1 CAN/CSA-C22.2 No. 61010-1 • Dimensions B1500A: 420 mm (W) 330 mm (H) 575 mm (D) B1531A RSU: 45.2 mm (W) 70 mm (H) 82 mm (D) E5288A ASU: 132 mm (W) 88.5 mm (H) 50 mm (D) N1255A Connection box: 184.4 mm (W) 61.6 mm (H) 169.6 mm (D) N1301A-100 SCUU: 148 mm (W) 75 mm (H) 70 mm (D) N1301A-200 GSWU: 33.2 mm (W) 41.5 mm (H) 32.8 mm (D) Keysight B1500A User’s Guide, Ed ition 14 4- 51 Specifications General Specifications 16440A Selector: 250 mm (W) 50 mm (H) 275 mm (D) 16445A Selector adapter: 250 mm (W) 50 mm (H) 260 mm (D) • Weight B1500A (empty): 20 kg B1510A: 2.0 kg B1511B: 1.0 kg B1514A: 1.3 kg B1517A: 1.2 kg B1520A: 1.5 kg B1525A: 1.3 kg B1530A: 1.3 kg B1531A: 0.13 kg E5288A: 0.5 kg N1255A: 0.7 kg N1301A-100: 0.8 kg N1301A-200: 0.1 kg 16440A: 1.1 kg 16445A: 1.0 kg 4- 52 Keysight B1500A User’s Guide, Ed ition 14 5 Accessories and Options Accessories and Options Furnished accessories, available accessories, and available options of Keysight B1500A Semiconductor Device Analyzer are described in this chapter. Table 5-1 Furnished Accessories Description Quantity USB keyboard 1 USB mouse 1 Stylus pen 1 Interlock cable, 1.5 m or 3.0 m 1 GNDU cable, 1.5 m or 3.0 m 1 GNDU Kelvin adaptera 1 Triaxial cablea, 1.5 m or 3.0 m 1 SMU number label, only for the B1500A installed with SMU 1 PG number label, only for the B1500A installed with SPGU 1 Power cable 1 Disk set for Keysight 4155B/4155C/4156B/4156C firmware update 1 Software CD (including VXIplug&play driver and utility tools) 1 WGFMU instrument library and sample program CD 1 Desktop EasyEXPERT CD 1 License-to-use for EasyEXPERT and Desktop EasyEXPERT a. GNDU Kelvin adapter must be directly connected to the B1500A GNDU connector for taking out the GNDU Force and Sense to the individual connectors. Then the GNDU cable must be used for extending the GNDU Force. And the triaxial cable must be used for the Sense. Cable length 1.5 m or 3.0 m is specified by the option B1500A-015 or B1500A-030. 5- 2 Keysight B1500A User’s Guide, Ed ition 14 Accessories and Options Table 5-2 Options Option Item Description B1500A-015 1.5 m length of bundled cables B1500A-030 3.0 m length of bundled cables B1500A-050 50 Hz power line frequency B1500A-060 60 Hz power line frequency B1500A-A00 Empty package for custom solution, contains no measurement module B1500A-A01 Standard package, contains four MPSMU and eight triaxial cables B1500A-A02 High resolution package, contains four HRSMU and eight triaxial cables B1500A-A03 High power package, contains two HPSMU, two MPSMU, and eight triaxial cables B1500A-A04 Flash memory cell measurement basic package, see Table 5-3 B1500A-A10 HPSMU add-on package, adds one HPSMU and two triaxial cables B1500A-A11 MPSMU add-on package, adds one MPSMU and two triaxial cables B1500A-A17 HRSMU add-on package, adds one HRSMU and two triaxial cables B1500A-A1A Add-on package, adds one MCSMU, two triaxial cables, and one N1255A B1500A-A1B Add-on package, adds two MCSMU, four triaxial cables, and one N1255A B1500A-A20 Capacitance measurement add-on package, adds the MFCMU and one CMU cable B1500A-A25 HVSPGU add-on package, adds one HVSPGU and two SPGU cables B1500A-A28 Add-on package for HRSMU, adds one ASU, one D-sub cable, and one triaxial cable B1500A-A29 Add-on package for MPSMU, adds one ASU, one D-sub cable, and one triaxial cable B1500A-A30 WGFMU add-on package, adds one WGFMU, two RSU, and two RSU cables B1500A-A31 WGFMU add-on package with connector adapters, see Table 5-4 B1500A-A3P WGFMU probe cable kit, see Table 5-5 B1500A-A5F Test fixture for package device measurement, adds one 16442B, see Table 5-6 B1500A-A6J ANSI Z540 compliant calibration B1500A-ABA Paper manual set, English B1500A-ABJ Paper manual set, Japanese B1500A-DR1 Changing DVD-R drive to DVD-ROM drive B1500A-UK6 Commercial calibration certificate with test data Keysight B1500A User’s Guide, Ed ition 14 5- 3 Accessories and Options Table 5-3 B1500A-A04 Basic Flash Memory Cell Package Description Table 5-4 Quantity Medium power source/monitor unit (MPSMU) 2 High resolution source/monitor unit (HRSMU) 2 High voltage semiconductor pulse generator unit (HVSPGU) 1 SPGU cable, 1.5 m or 3.0 m 2 16440A SMU/PGU pulse generator selector 1 16445A selector adapter for 16440A 1 Control cable, 1.5 m, between B1500A and 16445A 1 Control cable, 40 cm, between 16445A and 16440A 1 Triaxial cable, 1.5 m, between B1500A and 16440A 2 Triaxial cable, 1.5 m or 3.0 m 8 B1500A-A311 WGFMU Add-on Package with Connector Adapter Description Quantity Waveform generator/fast measurement unit (WGFMU) 1 Remote-sense and switch unit (RSU) 2 RSU cable, 2.4 m, between WGFMU and connector adapter 2 RSU cable, 0.6 m, between RSU and connector adapter 2 16493R-801 connector adapter (female-female) 2 1. The option B1500A-A31 cannot be selected with the option B1500A-015. 5- 4 Keysight B1500A User’s Guide, Ed ition 14 Accessories and Options Table 5-5 B1500A-A3P WGFMU Probe Cable Kit Description Table 5-6 Quantity 16493R-101 SSMC short-open cable for current return path, 50 mm 2 16493R-102 SSMC short-open cable for current return path, 75 mm 2 16493R-202 SMA-SSMC cable between RSU and DC probe, 200 mm 2 16493R-302 SMA-SMA cable between RSU and RF probe, 200 mm 2 B1500A-A5F1 Test Fixture for Package Device Measurement Description Quantity 16442B test fixture 1 Accessory case 1 Blank PTFE board for DUT stage 1 28-pin DIP (dual-in-line) package socket module 1 Universal socket module, 0.075 inch pitch 1 Universal socket module, 0.05 inch pitch 1 Connection pin set for universal socket module 10 Connection wire, mini banana to pin plug 4/color Connection wire, pin plug to pin plug 3/color Connection wire, mini banana to mini clip 3/color Connection wire, mini banana to mini banana 3/color 1. Contains four types of the connection wire. There is three colors for each connection wire, black, red, and blue. Keysight B1500A User’s Guide, Ed ition 14 5- 5 Accessories and Options Table 5-7 Model Number Available Accessories Option Item 16440A Description SMU/PGU pulse generator selector 16440A-001 Control cable, 1.5 m 16440A-002 Control cable, 3.0 m 16440A-003 Control cable, 40 cm for second selector 16442B Test fixture 16442B-010 Add triaxial cables, 1.5 m, 4 ea. 16442B-011 Add triaxial cables, 3 m, 4 ea. 16442B-800 Extra blank PTFE board 16442B-801 Universal socket module, 0.1 inch pitch, with 10 pins 16442B-802 Universal socket module, 0.075 inch pitch, with 10 pins 16442B-803 Universal socket module, 0.05 inch pitch, with 10 pins 16442B-810 Extra pin set (for universal socket module, 10 pins.) 16442B-811 Extra wire set (mini banana to pin plug, 6 ea.) 16442B-812 Extra wire set (pin plug to pin plug, 6 ea.) 16442B-813 Extra wire set (mini banana to mini clip, 6 ea.) 16442B-814 Extra wire set (mini banana to mini banana, 6 ea.) 16442B-821 Socket module, 4-pin TO package 16442B-822 Socket module, 18-pin DIP package 16442B-823 Extra socket module, 28-pin DIP package 16442B-890 Extra accessory case 16444A Accessories for B1500A 16444A-001 USB keyboard 16444A-002 USB mouse 16444A-003 Stylus pen 5- 6 Keysight B1500A User’s Guide, Ed ition 14 Accessories and Options Model Number Option Item 16445A Description Selector adapter for 16440A 16445A-001 Control cable (B1500 to 16445A), 1.5 m 16445A-002 Control cable (B1500 to 16445A), 3.0 m 16493G Digital I/O connection cable 16493G-001 1.5 m length 16493G-002 3 m length 16493J Interlock cable 16493J-001 1.5 m length 16493J-002 3 m length 16493J-003 5 m length 16493K Kelvin triaxial cable (B1500 to B1500) 16493K-001 1.5 m length 16493K-002 3 m length 16493L GNDU cable 16493L-001 1.5 m length 16493L-002 3 m length 16493L-003 5 m length 16493M Triaxial and D-sub cables for ASU 16493M-001 1.5 m length 16493M-002 3 m length 16493N GNDU cable for B2200 Kelvin input 16493N-001 16493P 2 m length SPGU output connection cable (SMA to BNC) 16493P-001 1.5 m length 16493P-002 3 m length Keysight B1500A User’s Guide, Ed ition 14 5- 7 Accessories and Options Model Number Option Item 16493Q Description SPGU-SPGU connection cable (SMA to SMA) 16493Q-001 16493R 8 cm length WGFMU Cables and Accessories 16493R-001 WGFMU-to-RSU cable, 0.6 m 16493R-002 WGFMU-to-RSU cable, 2.4 m 16493R-003 WGFMU-to-RSU cable, 3 m 16493R-004 WGFMU-to-RSU cable, 5 m 16493R-005 WGFMU-to-RSU cable, 4.4 m 16493R-006 WGFMU-to-RSU cable, 1.5 m 16493R-101 SSMC short-open cable for current return path, 50 mm 16493R-102 SSMC short-open cable for current return path, 75 mm 16493R-202 SMA-SSMC cable between RSU and DC probe, 200 mm 16493R-302 SMA-SMA cable between RSU and RF probe, 200 mm 16493R-801 WGFMU connector adapter (female-female) 16493R-802 Magnet stand for RSU 16493R-803 Sync terminal connection cable 16494A Triaxial cable 16494A-001 1.5 m length 16494A-002 3 m length 16494A-003 80 cm length 16494A-004 40 cm length 16494A-005 4 m length 16494B Kelvin triaxial cable (B1500 to E5250) 16494B-001 1.5 m length 16494B-002 3 m length 16494B-003 80 cm length 5- 8 Keysight B1500A User’s Guide, Ed ition 14 Accessories and Options Model Number Option Item 16495F Description Connector plate w/ 12triax., Interlock, GNDU 16495F-001 Bulkhead feedthrough connectors (female to female) 16495F-002 Connectors to contacts for soldering 16495G Connector plate w/ 24triax., Interlock, GNDU 16495G-001 Bulkhead feedthrough connectors (female to female) 16495G-002 Connectors to contacts for soldering 16495H Connector plate w/ 6triax., 6coax., Interlock, GNDU 16495H-001 Bulkhead feedthrough connectors (female to female) 16495H-002 Connectors to contacts for soldering 16495J Connector plate w/ 8triax., 4coax., Interlock, GNDU 16495J-001 Bulkhead feedthrough connectors (female to female) 16495J-002 Connectors to contacts for soldering 16495K Connector plate with universal cable holder 16495K-001 Connector plate with rubber holder B1510A High Power Source/Monitor Unit module (HPSMU) B1511B Medium Power Source/Monitor Unit module (MPSMU) B1514A Medium Current Source/Monitor Unit module (MCSMU) B1517A High Resolution Source/Monitor Unit module (HRSMU) B1520A Multi Frequency Capacitance Measurement Unit module (MFCMU) B1525A Semiconductor Pulse Generator Unit module (SPGU) B1530A Waveform Generator/Fast Measurement Unit (WGFMU) B1530A-0KN Self-paced sample program learning kit B1531A Remote-sense and Switch Unit (RSU) B1542A Pulsed IV package for B1500A/EasyEXPERT Keysight B1500A User’s Guide, Ed ition 14 5- 9 Accessories and Options Model Number Option Item E5288A Description Atto Sense and Switch Unit (ASU) E5288A-001 Add triaxial and D-sub cables, 1.5 m E5288A-002 Add triaxial and D-sub cables, 3 m N1253A Accessories for Digital I/O N1253A-100 Digital I/O T-cable N1253A-200 Digital I/O BNC Box N1254A Accessories N1254A-100 GNDU Kelvin Adapter N1254A-108 ASU Magnetic Stand N1255A 2 Channels Connection Box for MCSMU N1300A CMU cable N1300A-001 1.5 m length N1300A-002 3 m length N1301A Accessories for CMU N1301A-100 SMU CMU Unify Unit (SCUU) N1301A-102 SCUU cable, 3 m N1301A-110 SCUU magnetic stand N1301A-200 Guard Switch Unit (GSWU) N1301A-201 GSWU cable, 1.5 m N1301A-202 GSWU cable, 3 m 5- 10 Keysight B1500A User’s Guide, Ed ition 14 This information is subject to change without notice. © Keysight Technologies 2005-2014 Edition 14, August 2014 *B1500-90000* B1500-90000 www.keysight.com