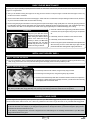
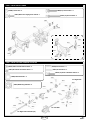
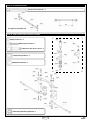
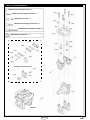
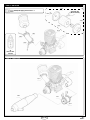
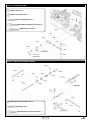
1
*Due to production changes, the
photos in these Operating
Instructions may differ from the
actual production model.
OPERATING INSTRUCTIONS AND ASSEMBLY MANUAL
XST 4WD Truggy RTR FEATURES
Includes Cirrus 3 Channel FM Radio and XTM Racing 24.7 Engine!
Before operating your new XTM Racing XST 4WD Truggy RTR,
please read and understand the warnings listed on the next page.
Failure to do so could lead to injury and/or property damage.
The XTM Racing XST 4WD Truggy RTR is not intended for persons
under 14 years of age, unless closely supervised by an adult.
specifications
l
Factory-Built
l
Powerful XTM Racing 24.7 Engine with Pull-Starter
l
Aluminium Header and Tuned Pipe
l
Full Set of Sealed Ball Bearings for Drive Line
l
Factory-Printed Body Shell
l
High-Torque, Metal-Geared Steering Servo
l
Lay-Down Steering Servo for Lower Centre of Gravity
l
Aluminium Threaded Shocks w/3.5mm Shock Shafts
l
Bevel Differentials - Front, Rear and Centre
l
Heavy-Duty Aluminium Front and Rear Chassis Bracing
l
Dust-Resistant Receiver and Battery Boxes
l
Adjustable Toe-in, Front and Rear
l
Adjustable Camber
l
3mm Aluminium Chassis w/Kicked Up Front End
Length......................................................................533mm/21"
l
4mm Aluminium Shock Towers
Width (Front/Rear).............................419~425mm/16.5~16.75"
l
Chrome-Plated CVDs and Drive Shafts for Greater Strength
Height.....................................................................165mm/6.5"
l
Gearboxes Allow Easy Differential Removal
Wheelbase (Adjustable)........................349~355mm/13.75~14"
l
Bi-Level Wing for Added Rear Downforce
l
Off-Road 'Trackers' Tyres for Maximum Traction
l
Dish-Style Racing Wheels (Will Accept a Wide Range of
l l l l Weight...................................................................4.13kg/9.1lbs
l All contents copyright © 2008, XTM Racing - All Rights Reserved
Version 1 July 2008
Made in Taiwan
After-Market Tyres)
Page Kit Product # 145635 (US) / C-XTM-XST (Europe)
TABLE OF CONTENTS
Safety Warnings.........................................................................................2
Basic Engine Maintenance.......................................................................17
Customer Service Information....................................................................3
Installing the Body Shell...........................................................................17
Introduction.................................................................................................3
Chassis Tuning Guide....................................................................... 17~22
Popular Option Parts..................................................................................3
Maintaining Your XST 4WD Truggy RTR..................................................23
Recommended Tools and Supplies....................................................... 4~5
Troubleshooting Guide...................................................................... 24~25
Becoming Familiar with Your XST 4WD Truggy RTR . ......................... 5~6
Assembly Manual ............................................................................. 25~52
Tips From the Pros.....................................................................................7
Replacement Parts List..................................................................... 53~58
Preparing to Run Your XST 4WD Truggy RTR . ..................................7~11
Option Parts List ............................................................................... 59~63
Becoming Familiar with the XTM Racing 24.7 Nitro Engine...............11~13
Important Warranty Service Information....................................Back Cover
Fueling and Starting the XTM Racing 24.7 Nitro Engine..........................13
Warranty Information.................................................................Back Cover
Breaking in and Fine-Tuning the XTM Racing 24.7 Nitro Engine...... 14~16
Distributed IN NORTH AMERICA by:
Global Hobby Distributors
18480 Bandilier Circle
Fountain Valley, CA 92708
Visit us on the web at
WWW.TEAMXTM.COM
Distributed IN europe by:
Ripmax Ltd.
241 Green Street
Enfield, EN3 7SJ, U.K.
SAFETY WARNINGS
ENGINE WARNINGS
glow fuel WARNINGS
Never use any fuel in your engine other than glow fuels
specifically designed for use in model car engines. Use of any
other types of fuel can cause severe damage to your engine
and/or personal injury.
NEVER use gasoline/PETROL or diesel fuel!
l
l
l
l
l
l
l
Never operate your model on any public streets. This could
cause traffic accidents, personal injury and/or property damage.
Glow fuel engines emit exhaust vapors that are poisonous
and can be dangerous to your health. It is important that you
operate your engine in a very well-ventilated area, preferably
outdoors.
Before starting your engine, make sure that the throttle trim
is set to the idle position. Starting your engine at any setting
above idle can cause the model to lurch out of your hands.
When your engine is running, there are certain parts that rotate
at high speeds. Be careful not to touch the drive shafts, gears,
clutch assembly or any other moving parts. Otherwise, serious
injury could result.
l
l
l
Keep glow fuel out of the reach of children.
Glow fuel is extremely flammable. Keep away from high heat,
sparks and flame.
general WARNINGS
l
l
l
l
l
It is normal for your engine and tuned pipe to get very hot during
operation. Never touch these parts while they are hot or you
could be burned.
Model engines produce vibration when they are running. It is
important to periodically check the engine mounting screws
and other assemblies to ensure they are tight. Running your
engine with the engine mounting screws loose can lead to
severe engine and/or chassis damage.
Glow fuels like those used in your model engine are extremely
poisonous. Follow all the precautions that are printed on the
fuel manufacturer's container.
l
l
Page Under no circumstances should you operate your model in
crowds of people. Serious injury could result.
Never operate your model on busy streets or if there are cars
around.
Do not use your model to chase pets or other animals.
The receiver and battery boxes are not waterproof; therefore,
do not drive through water, wet grass, mud or snow.
Because your model is operated by radio control, it is important
to make sure you are always using fresh and/or fully charged
batteries (if using NiCDs or NiMHs). Never allow the batteries
to run low or you could lose control of the model.
If your model becomes stuck, allow the engine to idle, then
retrieve your model by hand.
To prevent excessive r.p.m.s from damaging your engine and/or
drivetrain components, we suggest reducing throttle while in
the air during jumps.
CUSTOMER SERVICE INFORMATION
If you should have trouble with any of the steps listed in these Operating Instructions, or if you find a missing or damaged part
in your kit or require additional information, please contact your local distributor at the address below:
In North America:
In Europe:
Global Services
18480 Bandilier Circle
Fountain Valley, CA 92708
Ripmax Ltd.
241 Green Street
Enfield, EN3 7SJ, U.K.
Phone: (714) 963-0329
Fax: (714) 964-6236
Email: [email protected]
Phone: (0) 20 8282 7500
Fax: (0) 20 8282 7501
Email: [email protected]
XTM Racing guarantees this kit to be free from defects in both material and workmanship, at the date of purchase. This does not cover any component
parts damaged by use, misuse or modification. In no case shall XTM Racing's liability exceed the original cost of the purchased kit.
In that XTM Racing has no control over the final assembly or material used for final assembly, no liability shall be assumed for any damage resulting from
the use by the user of the final user-assembled product. By the act of using the final user-assembled product, the user accepts all resulting liability.
INTRODUCTION
The XST 4WD Truggy RTR is a purpose-built truck meant to handle the different
terrain it encounters. With 4mm thick aluminium shock towers, threaded aluminium
oil-filled shocks with 3.5mm diameter shock shafts, chrome-plated front universals
and 3mm thick aluminium chassis, you'll be sure the XST 4WD Truggy RTR is
ready for back yard bashing or the next trip to the local track. The XTM Racing
24.7 engine with aluminium tuned pipe is the heart of the XST 4WD Truggy RTR
and this power plant has been a reliable source of fun in numerous XTM Racing
cars and trucks for many years!
For those who do choose to race the XST 4WD Truggy RTR, they can be assured that it will perform with beefy 5mm aluminium braces
that support the front and rear gearboxes, a mega high-torque metal-geared steering servo, and steel drive train to keep the enjoyment
flowing. A race-legal 150cc fuel tank is also fitted for fewer pit stops. Additionally, with its stock wheelbase and steering geometry, the XST
4WD Truggy RTR will make it through the tightest turns on the track. Take the inside line! From the adjustable camber and toe-in on the
front to the adjustable caster on the rear, the XST 4WD Truggy RTR can be adapted to any condition and driving style that it meets.
This Operating Instructions and Assembly Manual is designed to help you get your new XST 4WD Truggy RTR running
as quickly as possible. Included is information on taking your XST 4WD Truggy RTR from the box through its first run. Also
included are Pro Tips, a Chassis Tuning Guide and a complete Parts/Option Parts List with detailed Exploded View Assembly
Drawings. You will find good tips and recommendations throughout this booklet, so keep it handy for future reference.
POPULAR option parts
XTM Racing produces a number of popular option parts for your XST 4WD Truggy RTR. Please see page 59 for a complete list of
current option parts. New option parts are always in the works, so check our website often at www.teamxtm.com.
Sure Start Electric Starter
7075 Steering Knuckles and Hub Carriers
2-Speed Conversion Kit
7075 Front and Rear Lower Suspension Arms
7075 Front Upper Suspension Arms
7075 Suspension Plate and Holders
Page RECOMMENDED TOOLS AND SUPPLIES
This section lists the recommended tools and supplies that you need to purchase and have onhand to finish assembling and to run and
maintain your new XST 4WD Truggy RTR.
WHAT FUEL DO I USE?
Fuel can make a big difference in the way your engine performs. For the break-in period you should use a fuel specifically designed
for R/C car engines that contains no more than 20% nitromethane and 10% ~ 14% oil content. Once the engine has been adequately
broken in (about 45 minutes of run-time) you can switch to an R/C car fuel containing up to, but no more than, 30% nitromethane
and 10% ~ 14% oil content.
WARNING: We do not recommend using fuels designed for R/C airplane engine use. These fuels do not contain the proper amount
of lubricants; therefore, they will cause the engine to overheat and severe damage to the engine will result.
20% Nitro Car Fuel
(use this fuel for break-in and normal use)
20% Nitro Car Fuel
Use For Break-In and For
Normal Use
30% Nitro Car Fuel
(use this fuel after break-in for more power)
do i need to use a fuel bottle?
Fuel Bottle
Use This to Fill the Fuel Tank
Yes. Because fuel is packaged in quarts, gallons or litres, you will need to use a smaller
bottle with an extension tube to fill the fuel tank. Fueling using this method is much
easier, faster and a lot less messy.
how do i remove the glow plug?
1/8th Scale 4-Way
Wrench
Use This to Remove
and Reinstall the
Engine’s Glow Plug
A long reach glow plug wrench is necessary to easily and quickly remove and replace
glow plugs.
What do i use to ignite the glow plug?
Glow Starter
Use This to Ignite the
Engine’s Glow Plug
A glow starter is a battery-operated device that, when attached to the glow plug, heats
the glow plug so that the engine can start. The glow starter is then removed once the
engine is running.
do i need to purchase extra glow plugs?
Yes. Even though your XTM Racing 24.7 engine comes with a glow plug already installed, glow plugs
wear out, especially during the break-in period; therefore, it's a good idea to have a couple of spares
handy. We recommend using a 'medium' or 'hot' heat-range glow plug intended specifically for
performance engines like the XTM Racing # 4 or the XTM Racing # 3 during the break-in process.
After the break-in process you may want to use a different heat-range glow plug. Do not use glow plugs
intended for four stroke airplane engines or glow plugs with an 'idle bar'. Using the wrong type of glow
plug will cause the engine to run erratically and make it difficult to tune properly. The wrong type of glow plug could also damage the
engine. An XTM Racing # 4 glow plug is included in the engine.
Page RECOMMENDED TOOLS AND SUPPLIES, continued....
In addition to the items listed previously, the following tools and supplies will also be required to run and maintain your XST 4WD Truggy RTR:
l
8-Pack 'AA' Alkaline Batteries for Transmitter
l
4-Pack 'AA' Alkaline Batteries for Receiver
l
High-Quality After-Run Oil
l
XTM Racing Air Filter Oil
l
Nitro Car Cleaner
l
Metric Ruler
l
Small, Flat Blade Screwdriver and #1 and # 2 Phillips Head Screwdrivers
l
1.5mm, 2mm, 2.5mm and 3mm Hex Wrenches
l
5.5mm and 7mm Nut Drivers
l
Adjustable Wrench and Needle Nose Pliers
l
Assorted Weights of Silicone Oil to Tune the Shocks and Differentials (Optional)
BECOMING FAMILIAR WITH YOUR xst 4WD TRUGGY RTR
Each radio control system comes with a sticker on the transmitter and on the receiver showing which frequency the radio control system
operates on (either in the 27MHz, 40MHz or 75MHz band). No two radio systems can operate nearby each other if they are on
the same frequency. You can purchase transmitter and receiver crystals separately and change them if you plan on running your XST
4WD Truggy RTR with other people.
Antenna
LCD
Display
Crystal
Digital Function
Buttons
27MHz and 75MHz
These frequencies are legal for use in North America
Steering Wheel
Auxiliary
Charge Jack
ON/OFF
Switch
Channel 3
Button
27MHz and 40MHz
These frequencies are legal for use in Europe,
but can vary from country to country
Throttle/Brake
Trigger
For more information on the features and use
of your Cirrus 3CFM transmitter, please refer
to the separate User's Guide provided.
Digital Function
Buttons
Battery Cover
Note: The Cirrus 3CFM radio is not available on 75MHz.
Antenna: Transmits the signal from the transmitter to the receiver. The antenna should be completely extended during use.
Auxiliary Charge Jack: For onboard charging when using rechargeable batteries (not supplied).
Battery Cover: This cover houses the 8 'AA' Alkaline batteries (not supplied) that power the transmitter.
Channel 3 Button: Used to operate a third function, like switching to reverse function on a model that features reverse. The channel
3 button is not utilised with the XST 4WD Truggy RTR.
Crystal: This is the frequency crystal of the transmitter. You can change crystals in both the transmitter and the receiver so that you
and your friends can drive at the same time. No two radio control systems nearby can be operated on the same frequency.
Digital Function Buttons: Used to adjust steering and throttle trim, function changes, EPA, dual rates and servo reversing.
LCD Display: Displays all menu screens for function updates, power level indicator, etc.
ON/OFF Switch: Turns the transmitter on and off. A red L.E.D. indicates that the transmitter is turned on. Voltage is displayed on the
LCD display.
Steering Wheel: Controls your XST 4WD Truggy RTR’s steering. Turn the wheel to the right and the XST 4WD Truggy RTR turns
right. Turn the wheel to the left and the XST 4WD Truggy RTR turns left.
Throttle/Brake Trigger: Controls the speed and braking ability of your XST 4WD Truggy RTR. Pull the trigger to accelerate, release
the trigger to decelerate, and push the trigger to brake.
Page BECOMING FAMILIAR WITH YOUR XST 4WD TRUGGY RTR, CONTINUED....
Antenna
Engine
Battery Box
Throttle/Brake Servo
Wing
Receiver Box
Steering Servo
ON/OFF
Switch
Body Mount
Shock Tower
Pull-Start
Bumper
Air Filter
Tuned Pipe
Wheel/Tyre
Assembly
Fuel Tank
Shock Absorber
Steering
Tie-Rod
Suspension Arm
PHOTO SHOWN MAY DIFFER
FROM ACTUAL PRODUCTION MODEL
Air Filter: The air filter is made of foam and prevents dirt and debris from entering the engine through the carburettor. The air filter should
be 'wet' with air filter oil for maximum efficiency.
Antenna: Receives the signal from the transmitter. The antenna should be completely extended. Do not cut the antenna shorter.
Battery Box: The battery box protects the receiver batteries from dust, dirt and oil. The battery box is not waterproof.
Body Mount: Made of high-impact nylon plastic for strength, the body mount supports the body.
Engine: The XST 4WD Truggy RTR includes the powerful XTM Racing 24.7 engine with pull-starter for ease of use and great performance.
Bumper: Made out of high-impact nylon plastic, the bumper protects the chassis from most head-on impacts.
Fuel Tank: The fuel tank holds the fuel that your engine uses. The fuel tank includes a fuel pressure nipple that connects to the tuned pipe
to pressurise the fuel system and also features a quick-flip type lid for fast refueling. A splash guard and overflow drain are also featured.
ON/OFF Switch: Turns the receiver on and off.
Pull-Start: Spring recoil system used to start the engine.
Receiver Box: The receiver box protects the receiver from dust, dirt and oil. The receiver box is not waterproof.
Shock Absorber: Each shock is oil-filled and uses a spring that is well suited for most off-road conditions. The shocks feature threaded
shock bodies that allow the shocks to be easily tuned for different driving conditions. The shocks come standard with # 400 (40 weight)
oil and 1.6mm yellow springs.
Shock Tower: Secures the shock absorber while allowing many different geometry settings to suit different track conditions.
Steering Servo: Controls the XST 4WD Truggy RTR's steering. A 'servo saver' is used to help prevent the servo gears from being
stripped out. The XST 4WD Truggy RTR features a high-torque metal-geared servo for maximum steering power.
Steering Tie-Rod: The tie-rod connects the steering linkage and the steering knuckles. The tie-rods are adjustable so you can
make toe-angle adjustments to the front wheels.
Suspension Arm: Helps improve the XST 4WD Truggy RTR's handling (when coupled to shock absorbers) and braking while ensuring
maximum traction (keeps the wheels in contact with the ground) and protects the chassis components from undue stress and strain.
Throttle/Brake Servo: Controls both the XST 4WD Truggy RTR’s acceleration and braking functions.
Tuned Pipe: The tuned pipe is an expansion muffler that greatly increases the power output of the engine.
Wheel/Tyre Assembly: The XST 4WD Truggy RTR features moulded rubber tyres with a tread pattern that is good for most off-road
applications. The wheels are moulded in one piece from lightweight, high-impact plastic for strength.
Wing: Provides downforce to ensure maximum traction when racing. Wing angle can be adjusted to suit different track conditions.
Page TIPS FROM THE PROS
Make sure to read these Operating Instructions and Assembly Manual in its entirety before starting. This will allow you to become
familiar with the XTM Racing XST 4WD Truggy RTR, XTM Racing 24.7 Nitro Engine and Cirrus 3CFM radio control system.
l Double-check all of the fasteners to ensure that they're tight.
l l
l
l
Any screws that are threaded directly into metal should be secured into place with threadlock. This will prevent the screws from loosening
during use. Screws threaded into nylon or composite material do not require threadlock.
Do not overtighten any screws that thread into nylon or composite material, or the material may strip out. Screws threaded into nylon
or composite material need only be tightened snugly.
After installing the receiver batteries into the battery holder, fit a rubber band or a nylon cable tie around the battery holder. This will
prevent the batteries from coming loose when doing jumps, etc.
If you have difficulty sliding the receiver antenna wire through the antenna support tube, first pull the antenna wire through your fingers
several times to straighten it, then lightly wet the antenna wire with glass cleaner. The glass cleaner will make the antenna wire slide
through the support tube much easier.
l When testing the steering, lift the front of the XST 4WD Truggy RTR off the ground. This will allow the steering system to operate
smoothly, without any binding.
l If the carburettor barrel does not open completely when you pull the throttle trigger, adjust the throttle trim on the transmitter until the
carburettor barrel opens completely when you pull back fully on the throttle trigger.
l When oiling the air filter element, place the cleaned air filter element in a plastic bag and then apply the air filter oil on it. Close the bag
and work the oil into the air filter element. This allows you to work the oil into the element without getting excess oil on your hands.
l When you pinch the fuel line to stop the engine, you must pinch it hard and hold it. The engine will rev up quickly, then stop. We
suggest holding the XST 4WD Truggy RTR while doing this, so that it doesn't lurch out of your hands.
l Other than during the break-in period, always make sure that you install the body when driving your XST 4WD Truggy RTR. When
your XST 4WD Truggy RTR flips over, the body will help protect the chassis and its components.
l Place the chassis on a dedicated car stand or similar so that all four wheels are suspended off the ground. This ensures that your
XST 4WD Truggy RTR does not accidentally drive away when starting the engine if the idle setting is too high.
l PREPARING TO RUN YOUR XST 4wd tRUGGY RTR
Now that you are familiar with the major component parts of your XST 4WD Truggy RTR, and with the functions of the Cirrus 3CFM
transmitter, it's time to prepare your XST 4WD Truggy RTR for its first run.
IMPORTANT: Before continuing, please double-check that you've read and understood the warnings on page 2. It's important that
you understand this information before preparing to run your XST 4WD Truggy RTR. Also, remember, if you have any questions or
encounter any problems, you can contact your local distributor using the Customer Service Information on page 3.
Your XST 4WD TRUGGY RTR should include the following items separately in the box:
XST 4WD Truggy RTR Chassis
Cirrus 3CFM 3 Channel FM Transmitter
l Transmitter Antenna
l Lexan Body Shell (Printed) and Nylon Wing
Tyres and Wheels (Glued)
Body Clips
l Decal Set
l Plastic Parts Set
Receiver Antenna Support Tube
Suspension Plate Holders
l Air filter Assembly
l Allen Keys and Wrenches
l
l
l
l
l
l
step 1: final assembly
q Install the wheels onto the chassis, making sure to tighten the wheel retaining nuts
firmly, using a 17mm wrench.
+Notice that the back of the wheels are moulded to key over the hex-shaped wheel
hubs. All four wheels and tyres are the same size.
IMPORTANT: Double-check that the tyres are glued onto the wheels. If they're not,
glue the tyres onto the wheels, using C/A tyre glue. See page 51 for information on
how to glue the tyres onto the wheels.
Page q Push the transmitter antenna down into the moulded hole in the top of the transmitter.
q Thread the antenna (clockwise) into place and tighten it gently until it stops.
IMPORTANT: Do not force the antenna into place or tighten it too strongly. Doing
so could cause damage to the antenna and/or transmitter.
q Check to make sure that the transmitter ON/OFF switch is in the 'OFF' position.
q Remove the plastic battery cover from the bottom of the transmitter.
q Install 8 'AA' Alkaline batteries into the battery tray, double-checking to make sure
that the polarity (+/-) is correct.
q Reinstall the battery cover and set the transmitter aside for now.
qCheck to make sure that the receiver ON/OFF switch is in the 'OFF' position. 'ON'
and 'OFF' are moulded into the switch cover plate.
qOpen the battery box cover by removing the retaining clip and pulling up on the front
of the battery box cover. The battery box cover is hinged at the back.
q Remove the battery holder from the battery box.
PRO TIP: After installing the batteries into the battery holder in the next procedure, we recommend fitting a rubber band or a nylon
cable tie around the battery holder. This will prevent the batteries from coming loose when doing jumps, etc.
qInstall 4 'AA' Alkaline batteries into the battery holder, double-checking to make sure
that the polarity (+/-) is correct.
q Reinstall the battery holder into the battery box and secure the battery box cover
back into place, using the retaining clip.
IMPORTANT: Make sure that the batteries are pushed firmly into place. They should not be loose. If for any reason the plug from
the battery holder (male plug) is not plugged into the switch (female plug), plug them together now, making sure that the polarity
is correct. For safety, the plugs can fit together only one way.
upgrade tip
Upgrading your transmitter and receiver to use rechargeable NiCD or NiMH batteries is
easy and recommended. You will need to purchase 8 'AA' rechargeable NiCD or NiMH
batteries for the transmitter, a 5 cell 1200mAH (or higher capacity) NiMH battery pack
for the receiver, and a compatible transmitter/receiver (Tx/Rx) charger.
For UK/Europe:
Charger for
North America
Charger for UK/Europe
We recommend the Ripmax P-FBC10D/4 (UK) / P-FBC10D/4EUR (Europe), Tx/Rx
NiCad/NiMH AC Charger 70/70mA.
Transmitter
NiCDs/NiMHs
For North America:
We recommend the Airtronics 95033Z 110V AC 75mA Dual Charger.
Page 5-Cell NiMH Receiver Pack
qRemove the four screws from the receiver mounting box cover, then remove the
receiver mounting box cover itself.
qUncoil the receiver antenna wire and feed it out through the hole in the aluminium
antenna mount, then reinstall the receiver mounting box cover, making sure not to
pinch any of the servo wires.
IMPORTANT: Verify that the steering and throttle servo leads are plugged into
channel 1 and channel 2, respectively.
PRO TIP: If you have difficulty sliding the antenna wire through the antenna support tube in the next procedure, first pull the antenna
wire through your fingers several times to straighten it, then lightly wet the antenna wire with glass cleaner. The glass cleaner will
make the antenna wire slide through the support tube much easier.
qSlide the receiver antenna wire into one end of the antenna support tube and out
the other end.
qPush the end of the antenna support tube firmly into the antenna mount (you may
have to loosen the nut), then gently tighten the nut to lock the antenna support tube
in place.
IMPORTANT: Leave the excess antenna wire hanging from the top of the antenna
support tube. Under no circumstances should you cut the antenna wire shorter.
qSlide the transmitter's ON/OFF switch forward to turn the transmitter on. The red
LED should glow brightly and the LCD screen display transmitter information.
IMPORTANT: If the red LED does not glow or if it blinks, check the batteries in the
transmitter and replace them or recharge them (if using rechargeable NiCD or NiMH
batteries). It's important that the batteries you are using (Alkaline or rechargeable)
have sufficient power to operate the transmitter. Never attempt to recharge Alkaline
batteries. Doing so could cause them to explode!
Safety tip
Before driving your XST 4WD Truggy RTR, always turn on the transmitter first, followed by the receiver. After you're done driving your
XST 4WD Truggy RTR, turn off the receiver first, then turn off the transmitter. This will prevent the possibility of a runaway model.
qSlide the receiver's ON/OFF switch to the 'ON' position to turn the receiver on. You
should hear the servos move to their neutral positions.
step 2: Range checking the radio control system
To ensure that the radio control system is operating properly and to prevent any chance of a runaway model, the radio control system should
be range checked before the first run of the day and/or after a crash. To range check the radio control system, do the following:
q With the transmitter and receiver turned on, extend the transmitter antenna completely. With the XST 4WD Truggy RTR on the ground
(without the engine running), walk away from it about 25 metres (75 feet). Move the steering wheel while looking at the XST 4WD
Truggy RTR's front wheels. The wheels should pivot back and forth smoothly without any 'glitching' or interference.
IMPORTANT: If the radio system does not operate properly, please refer to the troubleshooting guide on page 24 before continuing
further. Never attempt to operate your XST 4WD Truggy RTR if the radio control system is not functioning properly.
Page step 3: CHECKing THE STEERING AND THROTTLE/BRAKE CONTROLS
PRO TIP: We suggest doing the steering tests with the XST 4WD Truggy RTR's front wheels lifted off the ground. This will allow the
steering system to operate smoothly, without any binding.
q With both the transmitter and the receiver turned on, rotate the
transmitter's wheel forward (to the right). The XST 4WD Truggy RTR's
front wheels should turn right.
IMPORTANT: If the wheels don't turn right, use the transmitter's
servo reversing function to change the direction that the front wheels
turn. Refer to the transmitter's User Guide for more information.
qRotate the transmitter's wheel backward (to the left). The XST 4WD
Truggy RTR's front wheels should turn left.
qNow, let go of the transmitter wheel. The XST 4WD Truggy RTR's
wheels should return to centre.
IMPORTANT: If the wheels do not point straight ahead (centre) after
you return the transmitter wheel to centre, use the transmitter's trim
function to adjust the wheels so that they point straight ahead. Refer
to the transmitter's User Guide for more information.
qPull back on the throttle trigger. The carburettor barrel should open
completely and the brakes should be disengaged (i.e., the XST 4WD
Truggy RTR should roll forward smoothly when pushed).
qLet go of the throttle trigger and the carburettor barrel should return to
its idle position - open about 1mm / 1/16". The brakes should still be
disengaged, too. If the brakes are not disengaged when the throttle is
at the idle position, see page 19 "Adjusting the Brake Linkage".
IMPORTANT: If the carburettor barrel does not open when you
pull back on the throttle trigger, use the transmitter's servo reversing
function to change the direction. Refer to the transmitter's User Guide
for more information.
PRO TIP: If the carburettor barrel does not open completely, use the transmitter's trim function to adjust the throttle until the carburettor
barrel opens completely when you pull back fully on the throttle trigger. Refer to the transmitter's User Guide for more information.
qPush the throttle trigger forward. The carburettor barrel should stay
in the idle position (open about 1mm / 1/16") and the brake linkage
should move forward and engage the brakes (i.e., the XST 4WD Truggy
RTR will not be able to roll at all when pushed).
q Let go of the throttle trigger and the brakes should disengage.
IMPORTANT: If you need to adjust the brake linkage, see page 19
"Adjusting the Brake Linkage".
Page 10
upgrade tip
To prevent your XST 4WD Truggy RTR from going out of control should the radio control system
encounter signal loss, we strongly suggest using an electronic failsafe. The electronic failsafe is
connected between the throttle/brake servo and the receiver. The failsafe is designed to electronically bring the throttle to idle and apply a preset amount of braking force should the radio
control system lose its signal. This will prevent the XST 4WD Truggy RTR from driving out of control and causing damage/injury.
A failsafe will not will not work if the radio control system loses its signal due to battery failure (i.e., loss of battery capacity
or the battery coming unplugged) or throttle servo failure.
step 4: installing the air filter
qRemove the foam air filter element from the plastic bag and push it onto the air filter
base. Secure the top of the air filter in place, using the screw provided.
IMPORTANT: The foam air filter element comes pre-oiled with air filter oil. See the
information below on how to clean and reoil the foam air filter element when it
gets dirty.
qSlip the short end of the silicone elbow onto the base of the air filter and secure it
in place, using one nylon cable tie; then, slip the long end of the air filter assembly
over the base of the carburettor and secure it in place, using a second nylon cable
tie.
IMPORTANT: The short end of the silicone elbow is attached to the air filter and the
long end is attached to the carburettor, otherwise it could foul the spur gear.
l
To clean the air filter, remove the air filter
upgrade tip
element and wash it thoroughly in warm water
and a small amount of liquid detergent. After If you'll be running your XST 4WD Truggy RTR in dusty
it's clean, allow it to dry, then reoil it and install or wet conditions, we suggest using a prefilter sleeve
it back onto the air filter housing. To wet the over the air filter. Wet the main air filter element, then
air filter element, simply squeeze an ample simply slide the prefilter sleeve over the air filter. It's
amount of air filter oil onto the air filter element not necessary, nor desirable, to oil the prefilter sleeve.
and work it through the air filter element, using We suggest using XTM Racing 1/8th Scale Prefilter
your fingers. Use enough oil to completely Sleeves (P/N 149412).
saturate the air filter element. The entire air filter element should be oiled, but not so much that excess oil is dripping from it.
PRO TIP: Place the cleaned air filter element in a plastic bag and then apply the air filter oil on it. Close the plastic bag and work the
oil into the air filter element. This allows you to work the oil into the element without getting excess oil on your hands.
Under no circumstances should you operate the engine without the air filter installed on the carburettor. The air filter prevents
dust and debris from entering the engine and damaging it. If you operate your engine at any time without the air filter installed,
the engine will be quickly damaged and require replacement of the piston and sleeve (liner).
BECOMING FAMILIAR WITH THE XTM RACING 24.7 NITRO ENGINE
warning!! please read this information before proceeding!!
Your XST 4WD Truggy RTR comes equipped with the user-friendly and powerful XTM Racing 24.7 nitro engine. Before starting the
engine for the first time, you MUST read this section and the next two sections very carefully. This section details the different parts
of the engine's carburettor and how to adjust the carburettor's needle valves to tune the engine. The remaining two sections detail
fueling and starting the engine, then breaking in the engine. Failure to read this information may result in your not knowing how
to properly operate your new engine, which can result in poor engine performance and even damage to the engine itself.
Page 11
Low Speed
Needle Valve
High Speed
Needle Valve
Idle Stop
Screw
carburettor familiarisation
Refer to the photo at left to familiarise yourself with your engine's carburettor. All of the
carburettor settings come preset from the factory for initial starting and break-in, but you
should have a small flat blade screwdriver handy to make adjustments to the carburettor
during the break-in process, which will be detailed later.
idle stop screw
1mm
The idle stop screw adjusts the closure of the carburettor barrel. The idle stop screw should
be adjusted so that the carburettor barrel stays open about 1mm / 1/16". Turning the idle
stop screw clockwise will cause the carburettor barrel to stay open more. Turning the idle
stop screw counterclockwise will allow the carburettor barrel to close more. If the carburettor
barrel stays open too far, the engine will idle very high and the clutch will never disengage.
This will wear out the clutch very quickly. If the idle stop screw is closed too far, the engine
may die during idle or when you engage the brakes. Ideally, the engine should idle smoothly,
yet slow enough so that the clutch stays disengaged.
Turn Clockwise
to Lean
Turn
Counterclockwise
to Richen
high speed needle valve
The high speed needle valve is preset from the factory for the initial starting procedure.
Do not make adjustments to it at this time. The high speed needle valve is used to
meter the air/fuel mixture at full throttle. Turn the needle valve clockwise to lean the
mixture or turn the needle valve counterclockwise to richen the mixture.
Check to ensure that the high speed needle valve is set at 3 full turns out from
the fully closed position for the break-in process.
low speed needle valve
The low speed needle valve is preset from the factory for the initial starting procedure.
Do not make adjustments to it at this time. The low speed needle valve meters the
air/fuel mixture at idle and during transition from idle to full throttle. Turn the needle valve
clockwise to lean the mixture. Turn the needle valve counterclockwise to richen the
mixture. The low speed needle valve is preset from the factory, but minor adjustments
may need to be made to suit your application: fuel used, glow plug and environment all
contribute to the setting. Do not adjust the low speed needle valve until
AFTER the engine has been broken in.
Turn Clockwise
to Lean
Turn
Counterclockwise
to Richen
resetting the high and low speed needle valves to the factory settings
There may come a time when you get the needle valve settings out of spec, resulting in poor engine performance or not even being able
to start the engine at all. If this occurs, reset both the high and low speed needle valves to their factory settings as described below:
RESETTING THE HIGH SPEED NEEDLE VALVE
Gently turn the high speed needle valve clockwise until it bottoms out (fully closed).
Do not force it or you may damage the carburettor.
l
l
Turn the high speed needle valve counterclockwise (open) 3 full turns.
RESETTING THE LOW SPEED NEEDLE VALVE
l
l
l
Open the carburettor barrel completely.
While holding the carburettor barrel open with your fingers, use a flat blade screwdriver to gently turn the low speed needle valve
clockwise until it bottoms out (fully closed). Do not force it or you may damage the carburettor.
From this point, turn the low speed needle valve counterclockwise (open) 3 full turns.
IMPORTANT: The factory settings listed above are for break-in. Once the engine is broken in, the needle valve settings will be
different, although these settings are good for getting your engine running again. Please be aware that you will need to retune
your engine for proper performance.
Page 12
fueling and starting the xtm racing 24.7 nitro engine
warning!! please read this information before starting your engine for the first time!!
If at any time the pull-starter becomes very tight or difficult to pull - STOP! The engine has become flooded and the excess fuel must
be removed from the engine or damage to the pull-starter and/or engine could occur. To remove the excess fuel from the engine
follow the procedures listed below:
l
Completely close the high speed needle valve (turn clockwise) until it bottoms out. Do this gently. Don't force it!
l
Remove the glow plug and its washer from the cylinder head.
l
With a rag over the top of the engine, pull the pull-starter cord several times to expel the excess fuel from the engine.
l
Check to make sure that the glow plug has not been fouled, then reinstall it and its washer.
l
Reset the high speed needle valve 3 full turns out from bottom (fully closed).
WARNING: Under no circumstances should you operate the engine without the air filter installed on the carburettor. The air filter
prevents dust and debris from entering the engine and damaging it. If you operate your engine at any time without the air filter
installed, the engine will be quickly damaged and require replacement of the piston and sleeve (liner).
q Lift the fuel tank lid and carefully fill the fuel tank until the fuel level is just below the
top of the fuel tank.
WARNING: Use fuel that is appropriate for nitro car engines. Do not use gasoline/petrol
or diesel fuel! For the break-in period you should use fuel specifically designed
for R/C nitro car engines that contains no more than 20% nitromethane.
q Using your glow plug wrench, verify that the glow plug and its washer are installed
in the cylinder head and tight. If they're not already preinstalled, install them now.
important tips about glow plugs
An XTM Racing # 4 'medium' heat-range glow plug is included with your engine. We suggest having a couple of extra glow plugs handy,
because it can be expected that glow plugs will wear out quickly during the engine's break-in process. This glow plug will suit most users during
the break-in process, although you may or may not need to change to a different type of glow plug after the break-in process is complete.
There are a variety of different heat range glow plugs to suit your engine. Typically, use a hotter
XTM Racing # 3 Glow Plug - Hot
glow plug if you're using 15% ~ 20% nitro fuel or are running in cooler ambient temperatures.
SH Engines # 5 Glow Plug - Cold
Hotter glow plugs typically improve idle and transition, too. Use a cooler glow plug if you're running
25% ~ 30% nitro fuel or are running in higher ambient temperatures. See tip on page 16 about using 30% nitro fuel.
qPrime the engine by first opening the throttle completely and covering the exhaust
opening in the tuned pipe with your finger, then, pull the pull-starter cord several
times until you see fuel just start to enter the carburettor through the fuel line.
IMPORTANT: Do not pull the pull-starter cord all the way out or damage to the pull‑starter
will occur. Use a couple of short pulls - about 18~20cm / 7~8" long.
qRemove your finger from the exhaust opening and close the throttle down to the
idle position.
IMPORTANT: We recommend that you place the chassis on a dedicated car stand or similar so that all four wheels are suspended off the
ground. This ensures that your XST 4WD Truggy RTR does not accidentally drive away when starting the engine if the idle setting is too high.
qWhile holding the XST 4WD Truggy RTR firmly with one hand (keeping your hand
clear of any moving parts), carefully pull on the pull-starter cord 3 times, using short,
quick pulls to check for a flooded condition.
IMPORTANT: If you can't turn the engine over using the pull-starter, don't force it.
The engine is flooded. See the warning and resolution at the top of this page.
Page 13
qConnect a fully charged glow starter to the top of the glow plug, making sure that the
glow starter is locked firmly onto the top of the glow plug. You don't want it to fall off
while you're trying to start the engine.
new engine starting tip
When the engine is new, it can sometimes be difficult to turn over using the pull-starter. You may find you need to pull the pull-starter
harder than you expect. A trick to help this is to loosen the glow plug slightly, start the engine, then remove the glow starter and
retighten the glow plug. This effectively lessens the engine's compression, making it easier to turn over with the pull-starter.
qWith the throttle still in the idle position, hold the XST 4WD Truggy RTR firmly with
one hand and carefully pull on the pull-starter cord, using short, quick pulls, until the
engine starts.
qOnce the engine starts, release the pull‑starter cord, allow the engine to run for about
10 seconds more, then remove the glow starter from the glow plug.
IMPORTANT: If the engine does not start after a dozen pulls, refer to the troubleshooting guide on page 24.
warning about running your engine for the first time
Until you're actually ready to break in the engine, do not run the engine for more than a few minutes. If you run the engine longer
without breaking in the engine properly, damage to the engine can occur. Break-in will be done in the next section.
qOnce the engine is running, to stop the engine, carefully pinch the fuel line with your
fingers until the engine stops. Make sure to pinch the fuel pick-up line and not the
fuel pressure line. The fuel pick-up line is the one connected to the carburettor.
WARNING: Be careful not to touch any parts of the engine or the tuned pipe because
they will be hot. Also be careful to avoid any moving parts.
PRO TIP: When you pinch the fuel line to stop the engine, you must pinch it hard and hold it. The engine will rev up quickly, then
stop. We suggest holding the XST 4WD Truggy RTR firmly whilst doing this, so that it doesn't lurch out of your hands.
breaking in and fine-tuning the xtm racing 24.7 nitro engine
The XTM Racing 24.7 nitro engine is an ABN engine. The cylinder sleeve (liner) is tapered at the top, causing severe resistance
when the piston moves through the top of the stroke. This is normal. When the engine heats up to operating temperature, this
resistance will decrease and the proper clearance will be achieved. The break-in procedure will guide you through the steps
necessary to properly break in your new engine. Please follow the steps closely.
Fuel recommendation
For the break-in period you should use a fuel specifically designed for R/C car engines that contains no more than 20% nitromethane
and 10~14% oil content. Once the engine has been adequately broken in (about 45 minutes of run-time) you can switch to an R/C car
fuel containing up to, but no more than, 30% nitromethane and 10~14% oil content.
WARNING: We do not recommend using fuels designed for R/C airplane engine use. These fuels do not contain the proper amount
of lubricants; therefore, they will cause the engine to overheat or run erratically and severe damage to the engine can result.
Page 14
glow plug recommendation
The glow plug can make a big difference in how your engine performs. We recommend using a 'medium' or 'hot' heat-range glow plug
intended specifically for performance engines like the XTM Racing # 4 or the
engine break-in tip
XTM Racing # 3 during the break-in process. After the break-in process you
may want to use a different heat-range glow plug. Do not use glow plugs
To make sure that you're not leaning out the
intended for four stroke airplane engines or glow plugs with an 'idle bar'.
engine too much and overheating it during
Using the wrong type of glow plug will cause the engine to run erratically
the break-in process, we suggest using a
and make it difficult to tune properly. The wrong type of glow plug could
temperature gun to monitor the engine's
also damage the engine.
operating temperature.
air filter
The air filter is a very important part of your engine. Failure to use the air filter
will damage the engine in a very short period of time. Make sure that you
wet the air filter element with air filter oil and use a prefilter sleeve if you are
driving in dusty or wet conditions. See page 11 for more information.
During break-in, engine temperature
should not exceed 132ºC (270ºF). The
optimum engine operating temperature is
99~110ºC (210~230ºF). The minimum engine operating
temperature is 82ºC (180ºF).
Under no circumstances should you operate the engine without the air filter installed on the carburettor. The air filter prevents
dust and debris from entering the engine and damaging it. If you operate your engine at any time without the air filter installed,
the engine will be quickly damaged and require replacement of the piston and sleeve (liner).
step 1: breaking in the engine using the Heat cycling method
WARNING: Do not adjust the low speed needle valve until after the engine has been broken in. You can begin to adjust the low
speed needle valve after you have broken in the engine and after you have read and understood Step 2: Fine Tuning the Engine
on the next page. The high speed needle valve is preset from the factory for easy starting in most conditions for the break-in period.
engine break-in tip
Break in the engine by running the XST 4WD Truggy RTR on a flat surface (car park/parking lot, etc.) without the body shell fitted. It's
important that the engine receive adequate airflow during the break-in process, so as not to overheat.
q Follow the previous procedures to fill the fuel tank and start the engine.
qOnce the engine starts, keep the glow starter attached to the glow plug and let the engine run for about 10 seconds without giving
it throttle. This will allow the engine to warm up.
engine break-in tip
qAfter the engine has been running for about 10 seconds, remove the
glow starter from the glow plug. Advance the throttle in short, quick During the break-in process, it's normal for excess fuel oil
bursts and drive the XST 4WD Truggy RTR for about 2~3 minutes. If and exhaust residue to drip from the tuned pipe.
the engine is running rich enough, you should notice smoke coming from the tuned pipe and the engine should sound like it’s running
very rough. Also, the XST 4WD Truggy RTR will barely be moving because the engine is running so rich that it won't produce much
power. This is what you want for now. If smoke isn't coming from the tuned pipe, richen the high speed needle valve 1/4 of a turn
(turn counterclockwise). After 2~3 minutes stop the engine by pinching the fuel line to the carburettor.
qLet the engine cool for approximately 10 minutes, then restart it. Set the high speed needle valve mixture to a slightly leaner setting,
about 1/8 of a turn more in (turn clockwise). Repeat the procedure above, advancing the throttle in short, quick bursts and driving
the XST 4WD Truggy RTR for about 2~3 minutes, then stop the engine again and let it cool for approximately 10 minutes.
qRepeat the procedure above, leaning the high speed needle valve about 1/8 of a turn more each time (turn clockwise). In all, you should
run the engine a total of about 45 minutes. After 45 minutes of run-time the engine will be broken in. Run the engine with the high
speed needle valve set slightly rich, but lean enough to power the XST 4WD Truggy RTR adequately. At this point the engine should
hold a good setting on the high speed needle valve and you can begin to fine tune the needle valve settings to increase performance.
engine tuning tip
No two engines will have the exact same needle valve settings once broken in. Different fuels used, different types and heat-ranges of
glow plugs, the outside air temperature and air pressure all affect the engine. The factory needle valve settings on page 12 are break-in
settings. If you reset the needle valves to the factory settings, the engine will run very rich and you will need to retune the engine.
IMPORTANT: It is of the utmost importance that the engine never be leaned out too much. When running the engine, you should
always be able to see a slight trail of smoke coming from the tuned pipe. If you can’t, stop the engine immediately and richen the
high speed needle valve (turn counterclockwise). You should also make sure there is plenty of air flowing over the cylinder head to
keep the engine from overheating.
Page 15
engine break-in tip - why is my pull-starter slipping?
If, during the break-in process, the pull-starter slips when you try to start
the engine, the one-way bearing and pull-starter shaft may be coated with
Pull-Starter Handle and
Cover Assembly
excess fuel oil. This can occur because the excess oil in the engine during the
One-Way
break-in process gets into the one-way bearing. To fix this, carefully remove the
Bearing
Pull-Starter
Backplate
Recoil
Cord
Bolts
Spring
O-Ring
one-way bearing and the pull-starter shaft, clean them with rubbing alcohol and
Spool
Cushion
Spring
reassemble the parts. Use the exploded parts view to see how the parts are
assembled. Also, be careful when removing the pull-starter assembly to ensure
that the recoil spring does not uncoil and fly out. After removing the screws
Backplate
securing the pull-starter, carefully insert a flat blade screwdriver between the
Pull-Starter
engine backplate and the pull-starter. Apply slight pressure against the
Shaft
Retaining Bolts
pull-starter to help prevent the recoil spring from uncoiling. Temporarily secure
the pull-starter with a rubber band or tape while cleaning the one-way parts and be very careful when reassembling the unit.
The use of eye protection during this procedure is strongly recommended.
step 2: fine tuning the engine
After your engine has been broken in, you can set the high and low speed needle valves for optimum engine performance.
warning about tuning your engine
Be careful to never lean out the engine too much. Remember that the lubricants for your engine are suspended in the fuel. If you
lean out the fuel mixture too much you will also be lowering the amount of lubricant entering your engine. Less lubricant means more
chance of your engine overheating and possible engine failure.
setting the high speed needle valve
q Start the engine and remove the glow starter from the glow plug, then allow the engine to warm up for about 10 seconds.
q After the engine has warmed up, drive the XST 4WD Truggy RTR as you normally would. If the engine seems to be running rich (i.e., not
reaching maximum power), lean the high speed needle valve about 1/16 of a turn (turn clockwise) at a time until the desired setting is
achieved. Use a temperature gun to ensure that the engine is within the suggested temperature range 99~110ºC (210~230ºF) and
always make sure that you run the engine slightly rich - you want to be able to see a faint exhaust trail at all times.
setting the low speed needle valve
q Start the engine and lean out the high speed needle valve as per the procedures above. Close the throttle until the engine slows
down enough so that the clutch is disengaged and the wheels don’t turn when the XST 4WD Truggy RTR is lifted from the ground.
Allow the engine to idle for about 10~15 seconds.
q While holding the XST 4WD Truggy RTR off the ground (making sure to keep your fingers away from any moving parts), quickly open the
throttle in a short burst. If the engine just stops running as soon as the throttle is advanced, the low speed needle valve is too lean and
the engine is not getting enough fuel. With the engine stopped, richen the low speed needle valve about 1/16 of a turn (turn counterclockwise).
q Restart the engine and repeat the procedure above until the engine will transition smoothly and quickly. Very slight hesitation in the
transition is normal.
q If you quickly advance the throttle and the engine seems to be very rich during transition (i.e., lots of smoke coming from the tuned
pipe and very rough sounding), the low speed needle valve is too rich and the engine is getting too much fuel. With the engine
stopped, lean the low speed needle valve about 1/16 of a turn (turn clockwise).
q Restart the engine and repeat the procedure above until the engine will transition smoothly and quickly. Very slight hesitation in the
transition is normal.
q Now drive the XST 4WD Truggy RTR as you normally would for a while to get a feel for how the engine reacts to throttle. Now that you
please read if using 30% nitro fuel
To get more power from your engine you can use fuel containing up to 30% nitromethane. We must caution you, though,
that once you run the engine with increased nitro you may not get satisfactory results if you decide to go back to a lower
nitro content. Also, if you use fuel containing 30% nitro, we suggest adding a .10mm head gasket to lower the compression
ratio. If you don’t lower the compression ratio, overheating and erratic running will likely occur. You may also find it
necessary to run a 'cold' heat-range glow plug to ensure satisfactory results.
Page 16
P/N 148418
.10mm
basic engine maintenance
To keep your engine operating at peak performance there are some basic maintenance procedures that need to be performed on your
engine on a regular basis:
l
l
l
After you are finished running the engine for the day, pinch the fuel line to stop the engine. This will allow the engine to burn any
excess fuel out of the crankcase.
Remove the air filter element and wash it thoroughly in warm water and a small amount of liquid detergent. After it's clean, allow it to
dry, then reoil it and install it back into the air filter housing.
Remove the glow plug and its washer from the engine and squirt several drops of high-quality after-run oil into the glow plug hole and
the carburettor opening. Pull the pull-starter cord several times to distribute the oil throughout the engine, then reinstall the glow plug
and its washer. The after-run oil will prevent the inside of the engine (especially the crankshaft bearings) from rusting.
ENGINE TIP
l
Loop four nylon cable ties around
the corners of the engine's cylinder
head, making sure that the ratchet
portion of the cable ties are up
toward you. When your XST 4WD
Truggy RTR flips over, the cable
ties will help prevent the cylinder
head from being scratched.
Clean the outside of the engine using a stiff brush and nitro
car cleaner, then dry the engine, using a rag or compressed
air.
l
Periodically check the condition of the clutch for wear.
l
Periodically oil the clutch bell bearings.
l
Check the engine's cylinder head bolts and backplate bolts
after each day of use to ensure that they're tight. This will
prevent air leaks from causing erratic engine performance.
installing the body SHELL
step 1: applying the decals
q For your convenience, some of the decals have already been applied to the body shell. To apply the remaining decals to the body
shell, simply remove them from the protective backing sheet and apply them to the body shell as you like.
step 2: installing the body
q Fit the body shell onto the chassis, using the body clips provided.
q Fit the wing to the wing mount, using the long body clip provided.
q Double-check that the body shell does not interfere with the wheels, the suspension,
the engine's cylinder head or the tuned pipe. If it does, you will need to trim the body
shell slightly to fit around those areas.
PRO TIP: Other than during the break-in period, always make sure that you fit the body shell when driving your XST 4WD Truggy
RTR. When your XST 4WD Truggy RTR flips over, the body shell will help protect the chassis and its components.
chassis tuning guide
Chassis alignment and geometry are important if you want your XST 4WD Truggy RTR to perform well. A good performing truck
means a truck that is easier to drive, too. Follow our guidelines in this section to get the most out of your XST 4WD Truggy RTR.
IMPORTANT: It's very important when making changes to the settings of your XST 4WD Truggy RTR that you make the settings
the same for each side. For example, if you change the spring tension on the right front shock, you should change the spring tension
on the left front shock the same amount, etc.
Do not make any changes that are more than 3 degrees from the initial settings or the handling characteristics of your XST 4WD
Truggy RTR will become very poor.
Page 17
adjusting the toe angle
The toe angle is the angle of both front tyres (or rear tyres) to each other, when viewed from above. Toe-in is when the front of both
tyres point toward each other and toe-out is when the front of both tyres point away from each other.
l
l
For the front tyres, toe-in will make the XST 4WD Truggy RTR track (run) straighter, but the steering will be more sensitive. Toe-out
will desensitise the steering, making the XST 4WD Truggy RTR a little more driver-friendly.
For the rear tyres, if you're running on a smooth surface, we suggest no toe-in. If you are running on a rough surface, we suggest
about 1~2 degrees of toe-in. This will give the rear end a little more 'bite' (traction).
recommended initial settings
Straight - No Toe
Toe-In
Toe-Out
l
0 degrees toe-in on the front and 2 degrees on the rear for overall best 4WD driveability
on most surfaces. 2 degrees toe-in on the rear is stock.
+Adding more than 3 degrees of toe-in or toe-out on the front will result in excessive
loss of speed and erratic handling. Toe adjustments should be measured with the
XST 4WD Truggy RTR at its normal ride height.
PRO TIP: For more precise toe angle adjustments, use a dedicated toe angle
adjustment gauge, available at most hobby retailers.
qTo adjust the toe-angle of the front tyres, turn the tie-rods (steel rods connecting each wheel to the steering arm) in or out with the
adjustable wrench provided.
qTo adjust the toe-in on the rear tyres, use one of the different suspension holders provided to set the desired toe angle, as described in the
procedures below. For convenience, the degree of toe angle is moulded into the back of each suspension holder.
qRemove the two 4x16mm F/H TP screws from the bottom of the chassis that hold the
suspension holder support in place, then remove the suspension holder support from
the chassis.
qRemove the two 4x12mm TP screws that hold the suspension holder in place, then
carefully pull out the suspension holder, being careful not to pull out the hinge pins.
qInstall the desired suspension holder. Installation is the reverse of the disassembly
procedure.
adjusting the camber angle
Camber is referred to as the amount of the tyre's surface that contacts the ground. Tyres that are exactly perpendicular to the ground
have 0 degrees of camber. If the top of the tyre leans in toward the chassis, the tyre has negative camber. If the top of the tyre leans
out away from the chassis, the tyre has positive camber.
recommended initial settings
l
For driving on smooth surfaces set both the front and back tyres at 0 degrees.
l
For driving on rough surfaces set the front tyres at -1 degree and the back tyres at -2 degrees.
+Camber settings should be measured
with the XST 4WD Truggy RTR at its
normal ride height.
Negative
Camber
Positive
Camber
PRO TIP: For more precise camber
adjustments, use a dedicated camber
gauge, available at most hobby retailers.
q Adjust the camber angle of the tyres by turning the upper turnbuckles in or out using the adjustable wrench provided.
Page 18
adjusting the brake linkage
With both the transmitter and the receiver turned on, and the throttle trim and the servo arm centred, the XST 4WD Truggy RTR should
roll forward smoothly when pushed (i.e., the brakes should be disengaged). If the brakes are dragging when the throttle trigger is at
neutral, the brake discs will wear out very quickly. To ensure that the brakes are disengaged, always make sure that there is a 1mm /
1/16" wide gap between the two rear collars and the two brake levers. Both collars should be adjusted so that they are equal distance
behind each of the two brake levers. This will ensure that both brake levers engage equally during braking.
recommended initial settings
l
We suggest initially leaving the brake linkage collars in the factory positions, then
readjust them after driving your XST 4WD Truggy RTR a couple of times.
qTo make adjustments to the brake linkage, simply loosen the grub screw in the collars
behind the brake levers and reposition them, then retighten the grub screws.
Moving the collars forward, toward the brake levers, will result in the brakes
coming on sooner and more forcefully.
adjusting the brake bias
Since the front and rear brakes can be adjusted independently of each other, you may not want both front and rear brakes to engage at
the same time. If you want the rear brakes to engage just before the front brakes, move the collar at the front brake lever just a fraction
further back from neutral. This will result in the rear brakes engaging just before the front brakes. If you want the front brakes to engage
just before the rear brakes, move the collar at the rear brake lever just a fraction further back from neutral. This will result in the front
brakes engaging just before the rear brakes. Experimentation will be necessary to achieve the desired braking response, dependant
on your track conditions and driving style.
adjusting the shock spring tension
By adjusting the spring tension of the shocks, you can increase steering sensitivity, adjust the ride-height of the XST 4WD Truggy RTR and
fine-tune the damping quality of the suspension system. How you drive your XST 4WD Truggy RTR will dictate what settings you should
be using. As an example, if you're driving your XST 4WD Truggy RTR off-road and going over lots of jumps, you may want to increase the
spring tension of the front shocks to help prevent the front of the XST 4WD Truggy RTR from bottoming out. If you're racing your XST 4WD
Truggy RTR, local track conditions will dictate the settings to use.
recommended initial settings
l
We recommend initially leaving all of the adjustment rings at their factory settings.
qIncrease or decrease spring tension by threading the adjustment ring up or down the
shock body. Threading the ring down increases spring tension and the chassis's ride
height, and will stiffen the overall damping characteristics of the suspension. Threading
the ring up decreases spring tension and makes the damping characteristics of the
suspension softer.
+When adjusting the spring tension, make sure to adjust the right and left shocks equally.
changing the shock springs
Shock springs are easy to change and can make a difference in the way your XST 4WD Truggy RTR handles relative to the type of
terrain you're driving on. If you drive your XST 4WD Truggy RTR off-road, in a smooth, high-traction area, use stiffer springs to reduce
body roll and weight shift. If the area where you drive your XST 4WD Truggy RTR is very bumpy, you might consider using softer springs
to help absorb the bumps. If the area is bumpy and you use harder springs, the XST 4WD Truggy RTR will have a tendency to jump and
hop around. The shock springs included with the XST 4WD Truggy RTR are suitable for most general off-road applications.
FRONT and REAR
SOFT
STIFF
P/N 149370
P/N 149366
P/N 149363
P/N 149364
Page 19
80.5mm
80.5mm
80.5mm
80.5mm
1.4mm Shock Spring (BLUE)
1.5mm Shock Spring (WHITE)
1.6mm Shock Spring (YELLOW) - STOCK
1.7mm Shock Spring (BLACK)
adjusting the shock damping
Changing the shock oil (the oil inside the shocks) will change the damping characteristics of the shocks. Typically, if you are running on
smooth surfaces, use a heavier weight oil. If you are running on rough surfaces, use a lighter weight oil.
# 400 (40 weight) shock oil is stock. This is good for all-around use. For racing, you may want to consider using # 250~# 500
(25~50 weight) shock oil.
IMPORTANT: Use only 100% silicone oil in the shocks. Do not use motor oil.
recommended initial settings
l
We recommend using the # 400 shock oil that the shocks are already filled with.
q Remove the shock, then carefully unscrew the shock cap. Pull the shock piston down
completely, then empty the shock oil from the shock. Fill the shock body with shock oil
until the oil level is just below the top of the shock body, then, gently pump the shock
piston up and down to dissipate any air bubbles from the shock oil. Top off the shock
oil level if necessary, before reinstalling the shock cap and diaphragm.
adjusting the bump steer
The front upper hinge pins can be moved up or down to adjust bump steer. Generally, if you move the hinge pins into a lower position,
this will increase bump steer, which can be helpful on tight tracks. For a larger track, you may want to move the hinge pins to a higher
position to decrease bump steer.
recommended initial settings
l
We recommend initially leaving the front upper hinge pins in the factory locations.
qAdjust bump steer by removing the upper hinge pins and reinstalling them, along with
the upper suspension arms, in a hole either further up or lower down in the upper
suspension plate.
IMPORTANT: When tightening the hex nuts on the back of the hinge pins, be careful not to overtighten them or the suspension
arms may not pivot freely. When adjusting the hinge pin positions, make sure to adjust the right and left sides equally.
adjusting the shock mounting positions
The XST 4WD Truggy RTR shock towers feature a number of different mounting positions for the shocks. By changing the location of
the upper shock mounts you can make the shock feel stiffer or softer as the XST 4WD Truggy RTR rolls from side-to-side. In general,
moving the shocks toward the outside will make the shock stiffer and moving the shock toward the inside will make the shock softer.
You will need to experiment with these settings to find something that suits both your track and driving style. A good starting point is
to adjust the rear shocks. Moving the rear shocks toward the outside will give more 'bite' (traction) in the turns; however, depending on
how you drive, you might want to move the shocks toward the middle. This will give a more 'plush' suspension.
recommended initial settings
l
We recommend initially leaving the shock mounting positions in their factory locations.
qChange the shock mounting positions by first removing the top of the shock from the
shock mount, then by removing the shock mount from the shock tower. Reinstall the
shock mount, then the top of the shock into the desired position on the shock tower.
Make sure to adjust the right and left sides equally.
Page 20
adjusting the differentials
The XST 4WD Truggy RTR features front, centre and rear bevel gear differentials that each feature O-Ring seals and cup-style housings.
All three differentials are packed with differential grease that is good for most driving conditions. You can make fine-tuned adjustments
to each differential by removing them from the chassis, opening them up and replacing the grease with different weights of silicone oil.
l
l
Front andRear Differentials: Adding heavier silicone oil will tighten the differentials and adding lighter silicone oil will loosen the differentials.
If your XST 4WD Truggy RTR feels loose (uncontrollable) during turns, you can tighten the front differential or loosen the rear differential. If
your XST 4WD Truggy RTR is pushing (understeers) during turns, you can loosen the front differential or tighten the rear differential.
Centre Differential: For the centre differential, using a lighter weight oil will cause the differential to unload easier. Generally, this is
good for loose tracks with little traction. Using a heavier weight oil will provide a more even amount of power to the front and rear. On
loose tracks, this can cause the XST 4WD Truggy RTR to be too 'squirrely' (uncontrollable) or cause the rear end to slide out. For this
reason, we only suggest using heavier oil if you're driving on a high-traction surface.
For racing and general use, we recommend using XTM Racing # 3000 oil (P/N 146712) in the front, # 5000 oil (P/N 146714) in
the centre and # 1000 oil (P/N 146710) in the rear. This is a good starting point for most driving conditions.
For your convenience, we show you how to remove and disassemble the front differential. Removing and disassembling the centre
and rear differential is similar. Please refer to the differential assembly drawing on page 26 for a detailed break-down of the
differential assembly.
qRemove the four 4x18mm F/H TP screws from the bottom of the chassis that hold the
front bumper and the gearbox in place.
qRemove the upper hinge pins, then remove the two 3x38mm TP screws that hold the
upper suspension plate in place. Remove the upper and lower suspension plates.
qPull the front half of the differential case straight out, then remove the hinge pins, drop
the lower suspension arms and pull the differential assembly straight out.
qRemove the four 2x10mm TP screws that hold the differential housing together. Pull
the differential housing apart, then pull the differential assembly out of the differential
housing.
qYou can now disassemble the differential, clean away all of the grease, then reassemble
and refill the differential with the silicone oil of your choice.
Refer to the steps below to assemble the differential.
q Push one ball bearing onto the differential cup.
q Push the output joint into the differential cup, then push one small pin into the hole in the output joint, making sure that the pin is centred. Install the pin through the hole
in the side of the differential cup (A).
q Install one large bevel gear into the differential cup, making sure that the slot in the back of the bevel gear fits over the pin in the output joint.
q Install two small bevel gears onto each pin, then install the small bevel gear assemblies into the differential cup, making sure that the flat spots in the pins cross over
each other and that the ends of the pins fit in the slots in the side of the differential cup (B).
q Install one grub screw into the side of the differential cup, then fill the differential cup full with differential oil. Let the differential 'rest' until the air bubbles are gone.
q Press a second large bevel gear into the differential cup, making sure that the gears mesh with each other, then carefully place a gasket onto the differential cup (C).
q Reinstall the ring gear (or centre spur gear) onto the differential cup, making sure to tighten the screws firmly (D).
A
C
B
Page 21
D
Adjusting the GEARING AND TYRES
The XST 4WD Truggy RTR features a 13T stock clutch bell and tyres that will both work well on a decent size track. If you're racing your
XST 4WD Truggy RTR, you will probably want to experiment with different tyres and clutch bells. In general, using a smaller clutch bell
will result in quicker acceleration, but slower top speed and using a larger clutch bell will result in faster top speed, but slower acceleration.
In addition, if you use smaller diameter tyres, there will be less rotating mass and the engine will spool up faster. This means that you'll
have better off-the-line power, but at a price - you'll lose top-end speed because of the smaller diameter tyres. To compensate for this,
you might want to use a 14T clutch bell.
On smaller, tight tracks, you might want to use smaller diameter tyres for quicker acceleration and keep the 13T clutch bell if top-end
speed will not be an issue. It's all a matter of experimenting with different combinations to find the one that best suits your track and
driving style.
Adjusting the rear squat
Rear squat can be adjusted using the rear suspension holder. Installing the rear suspension holder upside down causes the rear end to
develop some anti-squat. This, essentially, gives a little more forward 'bite' and better control in large sweeping turns or straightaways. In
some instances, however, it will give you less control while in tighter turns. Deciding to run anti-squat will depend on your track. If you’re
running on a large track with large, sweeping turns or straightaways, install the rear suspension holder upside down to add anti-squat. If
you’re running on a tight track with little or no straightaways install the rear suspension holder right-side up to remove any anti-squat.
The rear suspension holder is installed upside down from the factory to add anti-squat.
Adjusting the steering sensitivity
You can adjust your XST 4WD Truggy RTR's steering sensitivity by tightening or loosening the servo saver spring. Tightening the
servo saver spring will cause the steering to be more responsive, and loosening the servo saver spring will cause the steering to be
less responsive.
recommended initial settings
We recommend initially leaving the servo saver adjustment ring in the factory location.
l
qAdjust the servo saver spring by adjusting the servo saver adjustment ring up or down.
Threading the adjustment ring up will tighten the servo saver spring and threading the
adjustment ring down will loosen the servo saver spring.
WARNING: Tightening the servo saver spring increases the chance of damaging the steering servo during a crash.
Adjust only as necessary.
THIS SPACE INTENTIONALLY LEFT BLANK
Page 22
maintaining your xst 4WD TRUGGY RTR
Following a simple maintenance schedule will ensure that your XST 4WD Truggy RTR operates in top condition every time you use it.
It is strongly recommended.
l
l
l
l
l
l
l
l
l
l
Check the foam air filter element for dirt blockage. If the foam air filter element is dirty, remove it from the air filter housing and wash
it in liquid soap and warm water. Dry the foam air filter element with a paper towel, reinstall it and 'wet' it with air filter oil.
Check the chassis for any loose screws, especially the engine and the outdrive cup mounting screws. Tighten them if necessary.
Any screws that are threaded directly into metal should be secured in place with threadlock. This will prevent the screws from loosening
during use. Screws threaded into nylon or composite material do not require threadlock.
Do not overtighten any screws that thread into nylon or composite material or the material may strip out. Screws
threaded into nylon or composite material need only be tightened snugly.
Check the steering linkage and the throttle/brake linkage for any signs of wear or misalignment. Tighten and/or
readjust them as necessary. Double-check that the grub screws in the collars are tight and threadlocked.
Once in a while, remove the wheels and clean the wheel bearings, using a bearing cleaner. This will remove any dust
and grit that may, over time, damage the bearings. After cleaning the bearings, reoil them using a good quality bearing oil. Never run
the bearings dry or damage to the bearings will result.
When you clean the wheel bearings as described above, also remove, clean and reoil the clutch bell bearings.
Check the fuel system, including the fuel tank and fuel tubing, for any signs of cracking, splitting or looseness. Replace any fuel tubing
you suspect may be damaged.
Check the condition of your transmitter and receiver batteries each time you drive your XST 4WD Truggy RTR. If you think they might
need replacement or recharging, do so before driving your XST 4WD Truggy RTR again.
After a period of time the chassis will accumulate a lot of dirt and debris, especially around the engine area. This buildup should be
cleaned off using a high-powered spray cleaner like Emerald Nitro Car Cleaner. Some nitro car cleaners will damage
anodised and/or plated parts. Test on an inconspicuous area first.
After cleaning the chassis and engine with Nitro Car Cleaner, you should oil the moving parts of the chassis. Do not
oil the clutch bell, spur gear, drive shafts (dog bones) or the brake discs.
l
Always use new fuel and keep the cap on the fuel tightly closed. As fuel ages it absorbs water, which
degrades the fuel's performance and will cause erratic engine operation.
l
After you have finished using your engine for the day, remove the glow plug and its washer from the
engine and squirt several drops of high-quality after-run oil into the glow plug hole. Pull the pull-start
cord several times to distribute the oil throughout the engine, then reinstall the glow plug and its washer.
This will prevent corrosion inside your engine.
l
l
l
Never leave unused fuel in the fuel tank for more than a couple of days. The nitromethane and methanol in the fuel
will evaporate, leaving the oil behind. This will eventually turn into a thick sludge that will require replacement of the fuel tank to fix.
If you need to remove the engine to clean it or change the clutch bell, etc., it's important that you set the gear mesh between the clutch
bell and the spur gear properly when reinstalling the engine; otherwise, the spur gear may be damaged or the gears may bind. To set
the gear mesh, first start by setting the engine mount assembly temporarily in place, then slide the engine back within the mounts
until the teeth on the clutch bell are even with the spur gear. When satisfied with the alignment, tighten the four socket-cap screws to
secure the engine to the engine mounts. Next, place a piece of notebook paper between the clutch bell
and the spur gear, and push the engine toward the spur gear firmly, so that the notebook paper crinkles.
When set properly, there should be very slight play between the gears. If the gears are too tight they
will bind and if they are too loose they will strip out. When satisfied with the alignment, tighten the four
hex screws on the bottom of the chassis. With the wheels off the ground, you should be able to spin the
clutch bell with your finger. The clutch bell should rotate the spur gear and other drivetrain components
rather easily. If it's difficult to rotate the clutch bell, your gear mesh is likely too tight. Readjust the gear
mesh, making sure to use a piece of notebook paper between the gears. When set properly, the paper
should be tightly crinkled, but not ripped or punctured.
Page 23
troubleshooting guide
This troubleshooting guide has been provided to help you diagnose and solve most problems that you may encounter with your XTM
Racing XST 4WD Truggy RTR, XTM Racing 24.7 Nitro Engine or Cirrus 3CFM radio control system.
If you cannot solve a problem using this troubleshooting guide,
please contact your local distributor, using the Customer Service Information on page 3.
if you're having a problem with the radio control system
PROBLEM
CAUSE
SOLUTION
1) Radio system does not operate A) Transmitter and/or receiver batteries are low A)
B) Batteries are installed incorrectly
B)
C) Receiver battery connector is loose
C)
Replace/recharge transmitter and/or receiver batteries
Check that the polarity of the batteries is correct
Check that receiver battery connector is plugged in and tight
2) Operating range is short
Extend transmitter antenna completely
Extend receiver antenna completely
Contact your local distributor for repair information
Replace/recharge transmitter and/or receiver batteries
A)
B)
C)
D)
Transmitter antenna is retracted
Receiver antenna is not extended
Receiver antenna is cut
Transmitter and/or receiver batteries are low
A)
B)
C)
D)
3) Servos do not operate normally A) Transmitter and/or receiver batteries are low
B) Servo gear stripped or otherwise damaged
A) Replace/recharge transmitter and/or receiver batteries
B) Replace with new gear set
4) When engine is running, radio A) Receiver crystal is loose
system operates erratically
B) Receiver battery connector is loose
C) Damage to receiver after a crash
A) Remove and reinstall the receiver crystal
B) Check that receiver battery connector is tight
C) Contact your local distributor for repair information
if you're having a problem with the xtm racing 24.7 nitro engine
PROBLEM
CAUSE
SOLUTION
1) Engine does not start
A)
B)
C)
D)
E)
F)
Failed glow plug
Glow Starter not charged and/or faulty
Idle mixture screw set too lean
Old or contaminated fuel
Engine flooded with too much fuel
Air leak in fuel system and/or engine
A) Replace glow plug with new one
B) Fully charge glow starter and/or replace
C) Reset idle mixture to factory setting (Pg12)
D) Replace with new fuel
E) Remove glow plug and expel fuel from cylinder (Pg13)
F) Replace fuel lines and/or tighten all engine bolts
2) Engine does not draw fuel
A)
B)
C)
D)
E)
Air leak in fuel system and/or engine
High speed needle valve fully closed
Idle mixture screw set too lean
Fuel lines kinked
Defective fuel tank
A) Replace fuel lines and/or tighten all engine bolts
B) Reset high speed needle valve to factory setting (Pg12)
C) Reset idle mixture to factory setting (Pg12)
D) Check and straighten fuel lines
E) Replace fuel tank
3) Engine does not transition
A)
B)
C)
D)
E)
F)
Failed and/or wrong type of glow plug
Old and/or wrong type fuel
High speed needle valve set too rich
Idle mixture set too lean
Idle mixture set too rich
Air leak in fuel system and/or engine
A) Replace with new recommended glow plug (Pg4)
B) Replace with new recommended fuel (Pg4)
C) Reset high speed needle valve to leaner setting (Pg16)
D) Set idle mixture richer (Pg16)
E) Set idle mixture leaner (Pg16)
F) Replace fuel lines and/or tighten all engine bolts
4) Engine overheats
A)
B)
C)
D)
Engine running too lean
Body too restrictive
Wrong type of fuel used
Engine not fully broken in
A) Richen high speed needle valve (Pg16)
B) Open larger vents in body to allow air to enter and exit
C) Use fuel recommended only for R/C cars (Pg4)
D) Allow engine further break-in time (Pg15)
5) Engine vibrates excessively
A) Engine and/or engine mounts loose
A) Tighten all engine and engine mounting bolts
6) Engine does not idle down
A) Idle stop screw out of adjustment
B) Engine has developed an air leak
C) One or more carburettor O-rings damaged
D) High speed needle valve set too lean
A) Adjust idle stop screw to factory setting (Pg12)
B) Check and tighten all engine screws
C) Replace carburettor O-rings
D) Richen high speed needle valve (Pg16)
7) Pull-Start Assembly Slips
A) One-way bearing coated with oil
B) Fuel used has too much oil content
C) One-way bearing shaft is worn
A) Clean one-way bearing using rubbing alcohol (Pg16)
B) Change to fuel that with 10~14% oil content (Pg4)
C) Replace one-way bearing shaft
Page 24
if you're having a problem with the chassis
PROBLEM
CAUSE
SOLUTION
1) XST 4WD Truggy RTR pulls
to one side
A) Steering trim out of adjustment
B) Toe angle out of adjustment
C) One wheel is hanging or has damaged bearing
A) Readjust trim to centre both wheels (Pg10)
B) Readjust toe angle (Pg18)
C) Remove wheel and clean or replace bearing
2) Brakes seem ineffective
A) Brake linkage out of adjustment
B) Brake disc(s) worn
A) Readjust brake linkage (Pg19)
B) Replace affected brake disc(s)
3) Clutch does not engage
A) Clutch shoes damaged or worn
B) Clutch bell damaged or worn
C) Clutch shoes glazed
A) Replace clutch shoes
B) Replace clutch bell
C) Remove glaze using fine sandpaper and reinstall
4) Clutch does not disengage
A) Clutch spring(s) worn or damaged
A) Replace clutch springs
5) XST 4WD Truggy RTR does not 'go'
A)
B)
C)
D)
E)
G)
Stripped or damaged spur gear
Stripped differential gear(s)
Swing shaft(s) slipping and/or broken
Outdrive cup(s) slipping
Clutch not engaging
Carburettor set too rich
A) Replace spur gear
B) Replace differential gear(s)
C) Tighten grub screw(s) and/or replace swing shaft(s)
D) Tighten grub screw(s) in outdrive cup(s)
E) Check clutch assembly and repair or replace
G) Lean high speed needle valve (Pg16)
6) Suspension not smooth or free
A)
B)
C)
D)
One or more shocks sticking
Bent shock shaft(s)
Bent or otherwise damaged hinge pin(s)
Hinge pin bolts/nuts too tight
A) Clean and/or rebuild the affected shock(s)
B) Rebuild affected shock(s)/replace affected shock shafts(s)
C) Replace hinge pin(s)
D) Loosen hinge pin bolts/nuts to ensure free movement
7) Shocks leaking oil
A) Shock seals worn
B) Bent shock shaft(s)
C) Bottom cap not tight
A) Replace shock seals
B) Replace affected shock shaft(s)
C) Tighten bottom cap securely
8) Spur gear strips out
A) Gear mesh too loose
A) Replace spur gear and readjust gear mesh (Pg23)
9) XST 4WD Truggy RTR rolls A) Engine idle is set too high
A) Lower your engine's idle speed (Pg12)
while engine is idling
B) Clutch spring(s) worn out
B) Replace clutch springs
10) Screws loosen and/or fall
A) Vibration under normal use
A) Clean screw(s) and/or replace and use threadlock
out during use to secure them in place
11) Steering sensitivity is 'sluggish'
A) Servo saver spring is set too loose
A) Tighten servo saver spring (Pg22)
assembly manual
The Assembly Manual contains several sections. The first section details the assembly of the XST 4WD Truggy RTR. Detailed drawings in
a step-by-step format make it easy to disassemble and reassemble the XST 4WD Truggy RTR. This is useful when it’s necessary to
replace damaged or worn parts or when it’s time for a complete tear down for cleaning. The second section lists all of the replacement parts that are available for purchase. For your convenience, a drawing of each replacement parts pack is shown, along with a
description and the XTM Racing order number. The third section is a list of option parts that are available, in the same format as the
replacement parts.
When it comes time to order replacement parts and option parts, we recommend ordering directly from your local hobby
retailer. If your hobby retailer does not stock XTM Racing products, contact your closest distributor for a local dealer, using
the Customer Service Information on page 3.
ASSEMBLY MANUAL (PAGES 26~52)
REPLACEMENT PARTS (PAGES 53~58)
OPTION PARTS (PAGES 59~63)
Page 25
STEP 1: FRONT, REAR AND CENTRE DIFFERENTIALS
(149899) O-Ring 3x1mm -- 12
(149895) Pin 2.5x12.8mm -- 6
149893
149891
(149895) Pin 4x26.6mm -- 6
149899
149899
149563
149563
149895
149895
148623
148623
148602
148602
148602
148602
149895
149895
149895
149897
148764
149905
149905
149895
Differential Oil
Differential Oil
149895
149895
149895
149895
149895
For Front and Rear (x2)
For Centre
148570
149563
149899
(146712, 146714, 146710) Differential Oil -- 1
149891
149893
(148570) Grub Screw w/Threadlock 4x4mm -- 3
For Front and Rear (x2)
For Centre
(148602) F/H Tapping Screw 3x16mm -- 12
(149563) Ball Bearing 8x16x5mm -- 6
(148623) Shim 8x12x0.4mm -- 3
Page 26
STEP 2: FRONT AND REAR DIFFERENTIAL HOUSINGS
(148593) Round Head Tapping Screw 2x10mm -- 8
(148624) Shim 8x12x0.2mm -- 2
(148572) Grub Screw w/Threadlock 5x4mm -- 2
148593
(149563) Ball Bearing 8x16x5mm -- 4
149778
Step 1
148593
148572
For Front and Rear (x2)
148624
149918
149563
149563
149317
149898
STEP 3: FRONT GEARBOX
(148615) Button Head Tapping Screw 4x8mm -- 2
149911
(148583) Button Head Tapping Screw 3x38mm -- 2
149275
Step 2
148583
149911
149916
148615
Page 27
STEP 4: FRONT SHOCK TOWER
(148558) Lock Nut 3mm -- 4
(148506) Cap Screw 3x16mm -- 4
(148576) Button Head Tapping Screw 3x10mm -- 1
(148511) Cap Screw 3x25mm -- 2
148558
Step 3
148558
149762
148511
149762
149307
148506
148761
148576
STEP 5: FRONT CVD AND STEERING KNUCKLES
(149506) Pin 2.5x13.8mm -- 2
(149506) Grub Screw w/Threadlock 4x3mm -- 4
(149261) Pin 2.5x16.8mm -- 2
(148574) Grub Screw w/Threadlock 5x5mm -- 2
(149499) Cap Screw w/Threadlock 4x12mm -- 4
(148624) Shim 8x12x0.2mm -- 2
149261
For Right Side
148574
149261
(149563) Ball Bearing 8x16x5mm -- 6
149499
149499
149563
148624
149506
149563
149343
149506
149506
149963
149489
149499
149963
149506
For Left Side
For Right and Left Sides (x2)
Page 28
149499
STEP 6: FRONT UPPER SUSPENSION ARMS
(149491) Turnbuckle 5x25mm -- 2
149788
149788
149491
11.4mm
For Right and Left Sides (x2)
STEP 7: FRONT LOWER SUSPENSION ARMS AND CVD
(149377) Hub Stub 3x37.5mm -- 4
(148558) Lock Nut 3mm -- 4
Step 6
For Right Side
148558
149377
Step 5
For Right and Left Sides (x2)
149781
148558
For Left Side
149377
Page 29
STEP 8: FRONT SUSPENSION
(148558) Lock Nut 3mm -- 1
(149901) Hinge Pin 4x67.2mm -- 2
(148650) Cap Screw 3x42mm -- 2
(148584) Button Head Tapping Screw 4x12mm -- 2
148584
Step 4
149915
Step 7R
148558
148650
Step 7L
149901
STEP 9: REAR GEARBOX
(148559) Lock Nut 4mm -- 1
(148583) Button Head Tapping Screw 3x38mm -- 2
(148507) Cap Screw 4x50mm -- 1
(148615) Button Head Tapping Screw 4x8mm -- 2
149911
148583
149907
149911
148559
Step 2
148507
149274
148615
149916
Page 30
STEP 10: WING MOUNT
(148612) Button Head Tapping Screw 3x18mm -- 4
148612
(149271) Post 6x32mm -- 2
149271
149271
149271
149271
149271
148612
STEP 11: REAR SHOCK TOWER
(148511) Cap Screw 3x25mm -- 4
(148558) Lock Nut 3mm -- 4
(148559) Lock Nut 4mm -- 1
(148649) Cap Screw 4x45mm -- 1
(148576) Button Head Tapping Screw 3x10mm -- 4
Step 10
148511
148559
148649
148558
149762
148511
148558
149762
149307
Step 9
148762
148576
Page 31
STEP 12: REAR HUBS
149301
(148574) Grub Screw w/Threadlock 5x5mm -- 2
149483
149563
(149261) Pin 2.5x16.8mm -- 2
For Left Side
149563
149261
149483
(148624) Shim 8x12x0.2mm -- 2
148624
148574
149261
For Right Side
(149563) Ball Bearing 8x16x5mm -- 4
For Right and Left Sides (x2)
STEP 13: REAR UPPER SUSPENSION ARMS
(148771) Turnbuckle 5x84.5mm -- 2
149543
149497
148771
For Right and Left Sides (x2)
64.6mm
149543
149497
STEP 14: REAR LOWER SUSPENSION ARMS AND HUBS
(149381) Hub Stud 3x43.5mm -- 2
(148558) Lock Nut 3mm -- 4
(148636) Button Head Screw 3x25mm -- 2
For Left Side
Step 13
For Right and Left Sides (x2)
148636
148558
Step 12
149783
149381
148558
For Right Side
Page 32
STEP 15: REAR SUSPENSION
(148560) Flanged Lock Nut 3mm -- 2
(149901) Hinge Pin 4x67.2mm -- 2
(148584) Button Head Tapping Screw 4x12mm -- 2
(148508) Cap Screw 3x18mm -- 2
Step 11
148584
149915
148560
Step 14R
149901
Step 14L
148508
149791
STEP 16: REAR SWAY BAR
(148566) Grub Screw w/Threadlock 3x3mm -- 2
(148596) F/H Tapping Screw 3x12mm -- 4
(148570) Grub Screw w/Threadlock 4x4mm -- 2
(148542) F/H Screw 3x20mm -- 2
(148780) Threaded Stud 3x12mm -- 2
148570
148596
148566
148596
148780
148780
148542
148780
148780
148780
Step 15
148780
148780
Page 33
STEP 17: FRONT CHASSIS BRACE
(148651) Cap Screw 4x55mm -- 1
(148559) Lock Nut 4mm -- 1
(148634) Button Head Machine Screw 3x12mm -- 1
149286
148559
148651
149273
148634
Step 8
STEP 18: CHASSIS PLATE
(148560) Flanged Lock Nut 3mm -- 1
(148548) F/H Machine Screw w/Threadlock 4x10mm -- 6
(148600) F/H Tapping Screw 3x10mm -- 2
(148598) F/H Tapping Screw 4x16mm -- 4
(148547) F/H Machine Screw 3x12mm -- 1
149926
149926
149894
148766
149455
149455
149894
148560
148598
148760
149471
148547
148548
148598
148548
148600
Page 34
STEP 19: STEERING TIE-RODS
(149334) Turnbuckle 5x90.5mm -- 2
149731
149549
149334
149543
76mm
For Right and Left Sides (x2)
149549
STEP 20: SERVO SAVER AND STEERING LINKAGES
(148558) Lock Nut 3mm -- 4
149567
149455
(148509) Cap Screw 3x20mm -- 2
149567
(149457) Servo Saver Screw L=19.7mm -- 2
149453
149453
(149567) Bushing 6x10x3mm -- 4
149453
(148625) Shim 8x12x0.8mm -- 2
149455
149455
149457
149567
148558
149559
149457
149923
149559
148558
148625
148625
Step 19L
148509
148558
Step 19R
148558
148509
(149559) Flanged Ball Bearing 5x8x2.5mm -- 2
Page 35
149567
STEP 21: FRONT SUSPENSION MOUNTING AND STEERING LINKAGE
148506
148624
148624
148554
Step 20
148558
148506
148554
Step 17
Step 18
148540
149906
(148558) Lock Nut 3mm -- 2
(148554) Washer Head Machine Screw w/Threadlock 4x10mm -- 2
(148540) F/H Machine Screw 3x15mm -- 2
148609
(148506) Cap Screw 3x16mm -- 2
(148624) Shim 8x12x0.2mm -- 2
(148609) F/H Tapping Screw 4x18mm -- 4
Page 36
STEP 22: REAR SUSPENSION MOUNTING
(148598) F/H Tapping Screw 4x16mm -- 4
(148558) Lock Nut 3mm -- 1
(148540) F/H Machine Screw 3x15mm -- 1
Step 16
148558
Step 21
148598
148540
Page 37
STEP 23: RECEIVER BOX
(148576) Button Head Tapping Screw 3x10mm -- 12
(149860) Flanged Lock Nut 4mm -- 1
148576
148576
148576
148576
149860
148767
149860
149871
149884
149288
Receiver
149871
148576
149860
CH 1
Steering Servo
148576
STEP 24: BATTERY BOX
148576
148576
CH 2
Throttle/Brake Servo
148576
148576
149870
Included
w/Switch
Battery Holder
148525
148768
148525
149870
149467
149319
149870
Switch
149471
149471
149467
149467
(Included w/Switch) Round Head Machine Screw 2x10mm -- 2
(149870) Round Head Machine Screw 2x15mm -- 1
(148525) Button Head Machine Screw w/Threadlock 3x8mm -- 3
(148576) Button Head Tapping Screw 3x10mm -- 6
(149467) Post 6x32mm -- 3
Page 38
STEP 25: RADIO TRAY MOUNTING
(148600) F/H Tapping Screw 3x10mm -- 4
(148546) F/H Machine Screw w/Threadlock 3x8mm -- 3
(148576) Button Head Tapping Screw 3x10mm -- 1
148576
Step 24
Step 23
Step 22
148546
148600
148600
Page 39
STEP 26: CENTRE DIFFERENTIAL
(148566) Grub Screw w/Threadlock 3x3mm -- 2
148616
(148593) Round Head Tapping Screw 2x10mm -- 4
148616
(149284) Brake Pin 3x10mm -- 4
148593
148593
(148576) Button Head Tapping Screw 3x10mm -- 2
148566
148566
(148616) Button Head Tapping Screw 3x25mm -- 4
148770
(148889) Ball Bearing 3x6x2.5mm -- 2
149328
149281
149328
149284
148889
149284
148889
149284
149284
149469
149284
For Right and Left Sides (x2)
148576
149283
149281
Step 1
Finished
Page 40
STEP 27: CENTRE DIFFERENTIAL AND DRIVE SHAFTS
(148607) F/H Tapping Screw 4x12mm -- 4
149501
Step 26
148772
Step 25
148607
Page 41
STEP 28: FUEL TANK
(148546) F/H Machine Screw w/Threadlock 3x8mm -- 2
(149287) Post 6x27.5mm -- 2
(148620) Washer 3x8x1mm -- 2
(148550) Washer Head Machine Screw w/Threadlock 3x10mm -- 2
148550
148550
Silicone Tubing
Silicone Tubing
6mm
148769
148620
148620
149287
149287
Step 27
148546
148546
Page 42
STEP 29: ENGINE AND CLUTCH
(148558) Lock Nut 3mm -- 4
148506
(148502) Button Head Machine Screw 3x6mm -- 1
(148506) Cap Screw 3x16mm -- 4
(149414) Shim 5x8x0.2mm -- 2
(149414) Shim 5x8x0.4mm -- 1
148334
148506
149528
149408
148558
149925
149414
149414
149525
149408
149559
149414
149925
149408
148502
148558
149559
149414
(149559) Flanged Ball Bearing 5x8x2.5mm -- 2
(148334) Collet for SG Shaft
(149414) Engine Nut for SG Shaft
STEP 30: EXHAUST HEADER
149415
148346
149577
149577
Step 29
Page 43
STEP 31: AIR FILTER
149409
(148600) F/H Tapping Screw 3x10mm -- 1
Air Filter Oil
(Not Included)
148600
149409
149411
Step 30
149410
149409
149409
(149571)
Air
Filter Oil - Not
Included
STEP 32: TUNED PIPE
Step 31
145823
149717
149717
Page 44
STEP 33: ENGINE MOUNTING
(148570) Grub Screw w/Threadlock 4x4mm -- 1
(148514) Button Head Machine Screw w/Threadlock 5x10mm -- 4
Step 32
Insert a Sheet of
Notebook Paper to
Set Gear Mesh
148570
Step 28
148514
148514
Page 45
STEP 34: FUEL PICK-UP AND PRESSURE TUBING
Fuel Pressure Tubing
Fuel Pick-Up Tubing
STEP 35: SHOCK BODIES AND SHOCK SHAFTS
(149842) Lock Nut 2.6mm -- 4
(149842) Washer 2.5x5.9x0.5mm -- 4
(149847) Shock Body 14x53mm -- 4
(149850) O-Ring 3mm -- 4
(149842) Shock Shaft 3.5x61mm -- 4
(149850) O-Ring 3.5mm -- 8
149842
149842
One 3mm O-Ring is installed
between the two 3.5mm
O-Rings to improve the seal.
149842
3mm
149847
3.5mm 3.5mm
149850
149847
149842
149850
149909
For Front and Rear (x4)
149847
Page 46
149842
STEP 36: SHOCK OIL
Silicone Shock Oil
(Not Included)
149850
After filling with
shock oil, GENTLY
pump shaft up and
down to eliminate
air bubbles.
149847
For Front and Rear (x4)
STEP 37: SHOCK SPRINGS
(149363) Shock Spring 80.5x1.6mm Yellow -- 4
Step 36
149850
149312
For Front and Rear (x4)
149363
Page 47
STEP 38: FRONT SHOCK MOUNTING
(148542) F/H Machine Screw 3x20mm -- 2
(148560) Flanged Lock Nut 3mm -- 2
149347
148560
Step 37
Step 37
148542
STEP 39: REAR SHOCK MOUNTING
(148542) F/H Machine Screw 3x20mm -- 2
(148560) Flanged Lock Nut 3mm -- 2
149347
148560
Step 37
Step 37
148542
Page 48
STEP 40: STEERING LINKAGE
(148558) Lock Nut 3mm -- 1
(148560) Flanged Lock Nut 3mm -- 1
(149333) Threaded Stud 3x16mm -- 1
148508
(148634) Button Head Machine Screw 3x12mm -- 1
(148508) Cap Screw 3x18mm -- 1
Step 39
148634
149333
149312
149333
149731
148558
149333
Servo Arm
Included with Servo
148560
Retaining Screw
Included with Servo
STEP 41: THROTTLE AND BRAKE LINKAGE
148566
148760
149555
148566
148760
149553
50mm
149555
5mm
22mm
149553
Finished
148578
148760
(148566) Grub Screw w/Threadlock 3x3mm -- 2
100mm
(148760) Spring 18mm -- 1
Servo Arm
Included with Servo
(148578) Button Head Tapping Screw 3x12mm -- 1
Page 49
STEP 42: THROTTLE AND BRAKE LINKAGE MOUNTING
Retaining Screw
Included with Servo
Step 41
32mm
148566
148760
37mm
149553
Step 40
(148566) Grub Screw w/Threadlock 3x3mm -- 4
STEP 43: THROTTLE AND BRAKE LINKAGE ADJUSTMENT
High Throttle
Full Brake
Neutral Throttle
Page 50
STEP 44: ANTENNA SUPPORT TUBE
Antenna Support
Tube
Slide the antenna through the antenna support
tube, then push the antenna support tube into the
antenna mount.
Important: DO NOT cut the excess
antenna shorter. Allow the excess
antenna wire to hang out beyond the
end of the antenna support tube.
Receiver Box
STEP 45: WHEELS AND TYRES
Outside
Inside
C/A Tyre Glue
(Not Included)
148773
148773
For Front and Rear (x4)
148774
Page 51
STEP 46: WHEELS, BODY AND WING MOUNTING
(149259) Wheel Nut 17mm -- 4
149321
149319
149522
149319
148776
149319
149319
149259
Step 45
Step 45
Step 44
149259
Page 52
REPLACEMENT PARTS LIST
We stock a complete set of replacement parts for your XST 4WD Truggy RTR. Listed below are the replacement parts that are available
along with their respective part numbers for easy ordering convenience.
When it comes time to order replacement parts, we recommend ordering directly from your local hobby retailer.
If your hobby retailer does not stock XTM Racing products, contact your closest distributor for a local dealer,
using the Customer Service Information on page 3.
Also for option 2-Speed Transmission
145823
Dual-Chamber Tuned Pipe - Black
148623
148624
148625
Differential Shim 8x12x0.4mm (Pk10) Differential Shim 8x12x0.2mm (Pk10) Differential Shim 8x12x0.8mm (Pk10)
Aluminium
148760
Linkage and Tuned Pipe Mount Set
148761
148762
Front Shock Tower - 4mm/6061/Black Rear Shock Tower - 4mm/6061/Black
148764
Spur Gear - 53T
148766
Chassis - 3mm/6061/Black
148767
148768
Radio Plate (Front) - 2mm/6061/Black Radio Plate (Rear) - 2mm/6061/Black
148769
Fuel Tank - 150cc
L=117mm
L=84.5mm
148770
Brake Plate - 3mm/6061/Black
148771
Turnbuckles - 5mm/Upper Rear (Pk2)
148772
Swing Shaft - Centre Front (Pk2)
148773
'Trackers' Tyres with Inserts (Pk2)
Sorry. No Photo Available
Fr/Rr
148774
Dish Wheel - Black (Pk2)
148776
Body - Preprinted Blue & Yellow w/Decals
Page 53
148777
Decal Set
L=133mm
148779
Shock Set w/Yellow Springs
2.5mm / 2.8mm / 3.5mm
148780
Sway Bar Set
148889
Ball Bearing 3x6x2.5mm (Pk2)
149259
Wheel Nuts - 17mm/Black (Pk4)
149261
Hex Hubs - 17mm/Black (Pk2)
149271
Wing Mount
149273
Chassis Brace - Front
149274
Chassis Brace - Rear
149275
Upper Suspension Plate - Front
149281
Centre Differential Mount
149283
Brake Disc Guard (Pk2)
149284
Brake Pad Set
149286
Servo Saver Plate - 3mm/6061/Black
L=14.2mm
L=27.5mm
149287
149288
149301
Fuel Tank Post
Transponder Mount
Rear Wheel Shafts (Pk2)
L=27mm
149312
Balls 6.9x4.9mm - Steel (Pk4)
149317
Pinion Output Joints (Pk2)
149319
Body Clips - Type 'R' (Pk10)
149307
Shock Mounting Studs (Pk4)
L=80mm
149321
Body Clips - Type 'R' (Pk5)
L=90.5mm
149328
Brake Cam
149333
Steering Servo Rod Set
149334
Steering Rod Set - 5mm (Tie-Rods)
Page 54
149343
Steering Knuckles (Pk2)
L=37.5mm
L=80.5mm
Fr/Rr
149347
149363
Shock Spring Spacer & Bushing Set Shock Springs - 1.6mm/Yellow (Pk2)
L=43.5mm
149377
Hub Studs - Front (Pk4)
149381
Hub Studs - Rear (Pk4)
149408
Clutch Shoes & Springs - 1mm (Pk3)
149409
Air Filter Assembly
149410
Air Filter Elbow
149411
Air Filter Elements (Pk2)
149414
3-Shoe Clutch Nut - SG Shaft
149415
Exhaust Header w/Spring
149453
Servo Saver Plastic Parts
149455
Servo Saver Metal Parts
149457
Servo Saver Screw Set
149467
Radio Tray Post
149469
Brake Disc
149471
Servo Mount - Throttle/Brake
L=25mm
149483
Rear Hubs - Left and Right
149489
149491
149497
Front Hub Carriers - Left and Right Turnbuckles - 5mm/Upper Front (Pk2) Suspension Arms - Upper Rear (Pk4)
L=97.8mm
149499
Rocker Bolts and Bushings (Pk4)
149501
Swing Shaft - Centre Rear (Pk2)
149506
CVD Universal Joint Rebuild Kit
Page 55
149522
Bi-Level Wing - Black
L=22.5mm
149525
Clutch Bell - 13T
149528
Flywheel (for 3-Shoe Clutch)
149543
Balls 7x3mm - Steel (Pk4)
149549
Ball End - 4mm for 7mm Ball (Pk4)
149553
Rod Stopper Set
149555
Plastic Parts Accessories
149559
Flanged Ball Bearing 5x8x2.5mm (Pk2)
149563
Ball Bearing 8x16x5mm
149567
Bushing 6x10x3mm (Pk4)
149577
Exhaust Header Spring w/Gasket
149717
Exhaust Coupler - Yellow
149731
4mm Ball with Flange (Pk4)
149762
Body Mount Set (3 Hole)
149778
149781
149783
Differential Housing Cover - Aluminium Suspension Arms - Lower Front (Pk2) Suspension Arms - Lower Rear (Pk2)
149788
Suspension Arms - Upper Front (Pk2)
L=53mm
L=61mm
L=138.6mm
149791
Swing Shaft - Rear (Pk2)
149842
Shock Shaft Set - 3.5mm
149847
Shock Body Set - 3.5mm/Black
149860
Antenna Mount
149870
Battery Box
149871
Receiver Box
includes 2x 3mm O-Ring
149850
Shock Rebuild Kit - 3.5mm
Page 56
149884
Servo Mount Set - Steering
149891
Brake Output Joints (Pk2)
149893
Differential Output Joints (Pk2)
Steel
149895
Differential Set - Bevel Type
149894
Suspension Holder Supports (Pk2)
Steel
149897
Ring Gear - 43T Straight Cut
149898
Pinion Gear - 13T Straight Cut
149899
O-Rings for Diff Output Shafts (Pk10)
149905
Gaskets for Bevel Differentials (Pk5)
149906
Bumper - Front
149907
Wing Mount Stabiliser Rod
149909
Ball Ends - 3.5mm for 7mm Ball (Pk4)
149911
Gearbox Halves - Front or Rear
149915
Suspension Plate Holders
149916
Suspension Plate - Front or Rear
149918
Differential Housing - Front or Rear
149923
Steering Plate - 3mm/6061/Black
149925
Engine Mounts
149926
Engine Mount Spacers - 4mm/6061/Black
L=67.2mm
149901
Lower Hinge Pins (Pk4)
L=25.5mm
L=168.7mm
149963
CVD Universal Joint - Front (Pk2)
Page 57
XTM PART # DESCRIPTION
REPLACEMENT QUANTITY
148566
Grub Screws with Threadlock 3x3mm
QTY. 5
148570
Grub Screws with Threadlock 4x4mm
QTY. 10
148572
Grub Screws with Threadlock 5x4mm
QTY. 5
148574
Grub Screws with Threadlock 5x5mm
QTY. 5
148558
Lock Nuts - 3mm
QTY. 10
148559
Lock Nuts - 4mm
QTY. 10
148560
Flanged Lock Nuts - 3mm
QTY. 5
148593
Round Head Tapping Screws 2x10mm
QTY. 10
148576
Button Head Tapping Screws 3x10mm
QTY. 10
148578
Button Head Tapping Screws 3x12mm
QTY. 10
148612
Button Head Tapping Screws 3x18mm
QTY. 10
148616
Button Head Tapping Screws 3x25mm
QTY. 10
148583
Button Head Tapping Screws 3x38mm
QTY. 10
148615
Button Head Tapping Screws 4x8mm
QTY. 10
148584
Button Head Tapping Screws 4x12mm
QTY. 10
148600
F/H Tapping Screws 3x10mm
QTY. 10
148596
F/H Tapping Screws 3x12mm
QTY. 10
148602
F/H Tapping Screws 3x16mm
QTY. 10
148607
F/H Tapping Screws 4x12mm
QTY. 10
148598
F/H Tapping Screws 4x16mm
QTY. 10
148609
F/H Tapping Screws 4x18mm
QTY. 10
148550
Washer Head Machine Screws with Threadlock 3x10mm
QTY. 5
148554
Washer Head Machine Screws with Threadlock 4x10mm
QTY. 5
148502 Button Head Machine Screws 3x6mm (Also for option 2-Speed Transmission) QTY. 10
148525 Button Head Machine Screws with Threadlock 3x8mm QTY. 5
148634 Button Head Machine Screws 3x12mm QTY. 10
148636
Button Head Machine Screws 3x25mm
QTY. 10
148514 Button Head Machine Screws with Threadlock 5x10mm QTY. 5
148546
F/H Machine Screws with Threadlock 3x8mm (Also for option 2-Speed Transmission)
QTY. 5
148547
F/H Machine Screws 3x12mm
QTY. 10
148540
F/H Machine Screws 3x15mm
QTY. 10
148542
F/H Machine Screws 3x20mm
QTY. 10
148548
F/H Machine Screws with Threadlock 4x10mm
QTY. 5
148504 Cap Screws 3x14mm QTY. 10
148506 Cap Screws 3x16mm QTY. 10
148508
Cap Screws 3x18mm
QTY. 10
148509 Cap Screws 3x20mm QTY. 10
148511 Cap Screws 3x25mm QTY. 10
148650
Cap Screws 3x42mm
QTY. 5
148649
Cap Screws 4x45mm
QTY. 5
148507 Cap Screws 4x50mm QTY. 5
148651 Cap Screws 4x55mm QTY. 5
148620
Washer - 3x8x1mm
QTY. 10
Page 58
OPTION PARTS LIST
We stock many option parts for your XT2 Racer - Track Edition RTR. Listed below are the option parts that are available along with
their respective part numbers for easy ordering convenience.
When it comes time to order option parts, we recommend ordering directly from your local hobby retailer.
If your hobby retailer does not stock XTM Racing products, contact your closest distributor for a local dealer,
using the Customer Service Information on page 3.
Shock Absorber Springs
1.4, 1.5, 1.6 & 1.7mm
L=80.5mm Fr/Rr
149320
Shock Spring Set - Front or Rear
L=80.5mm
149370
Shock Springs - 1.4mm/Blue/Pk2
Fr/Rr
L=80.5mm
149366
Shock Springs - 1.5mm/White/Pk2
Fr/Rr
L=80.5mm
149364
Shock Springs - 1.7mm/Black/Pk2
Hardened (7075) Aluminium Parts
Replaces 149343
Replaces 149916
Replaces 149489
149268
149269
149400
Steering Knuckles (7075) - Left & Right Front Hub Carriers (7075) - Left & Right Suspension Plate (7075) - Front or Rear
Replaces 149923
149458
Steering Plate (7075)
Replaces 149915
149991
Front Suspension Holder (7075)
Replaces 149483
149484
Rear Hubs (7075) - Left and Right
Replaces 149788
149496
Outer Arms (7075) - Upper Front
Replaces 149915
Replaces 149915
Replaces 149453
149454
Servo Saver (7075) with Bearings
Replaces 149788
149857
Inner Arms (7075) - Upper Front
Replaces 149894
149992
149993
149994
Rear Suspension Holder - 2º (7075) Rear Suspension Holder - 3º (7075) Suspension Holder Support (7075)
Page 59
Clutch Bells (Single Speed)
149580
Clutch Bell - 14T (Single Speed)
149581
Clutch Bell - 15T (Single Speed)
149582
Clutch Bell - 16T (Single Speed)
149583
Clutch Bell - 17T (Single Speed)
149541
Switch Covers - Red and Yellow
149544
Switch Covers - Blue (Pk2)
149584
Clutch Bell - 18T (Single Speed)
Silicone Parts (Protects against Moisture, Dust and Dirt)
149538
CVD Dust Boots - Black (Pk4)
149539
CVD Dust Boots - Blue (Pk4)
149545
Switch Covers - Yellow (Pk2)
149718
Exhaust Coupler - Blue
Use in Place of 149717
For Shock Absorbers
Tuned Pipe Parts (Power Boosting)
Use with 150016
150015
Exhaust Header w/Springs - Polished
Use with 150015
150016
Tuned Pipe - Polished
For Shock Absorbers
149746
149747
Shock Bump Stops - 60lbs/Yellow (Pk4) Shock Bump Stops - 40lbs/Blue (Pk4)
Spare Springs for 150015/150016
150017
Retainer Spring (Pk3) - Tuned Pipe
Page 60
2 Speed Transmission
Use with 149313
149825
2-Speed Conversion Kit
Replacement Part for 149825
149563
Ball Bearing 8x16x5mm
Replacement Part for 149825
149663
2-Speed One-Way Mount w/Bearing
Option Part for 149825. Use with 149798
Use With 149825
149560
Ball Bearing 5x10x4mm
Replacement Part for 149825
Replacement Part for 149825
149300
2-Speed Main Gear Shaft
150009
Ball Bearing 5x8x2.5mm
Replacement Part for 149825
149666
2-Speed Clutch
Option Part for 149825
149797
2-Speed Clutch Bell - 12T/17T
Replacement Part for 149825
149799
Pinion Gear 12T/17T - for 2-Speed
149810
2-Speed Clutch Bell w/o Pinion Gears
Replacement Part for 149825
Use with 149810/149814
Option Part for 149825
Use with 149810/149816
149819
Pinion Gear - 19T (2-Speed)
Replacement Part for 149825
149313
Output Joint (Pk2)
149821
Pinion Gear - 21T (2-Speed)
Replacement Part for 149825
Use with 149810/149819
149814
Pinion Gear - 14T (2-Speed)
Replacement Part for 149825
149826
2-Speed Gear - 45T
Page 61
Replacement Part for 149825
149562
Ball Bearing 8x12x3.5mm
Replacement Part for 149825
149661
2-Speed Clutch Housing
Option Part for 149825. Use with 149799
149798
Clutch Bell for 12T/17T Pinion Gears
Option part for 149825
Use with 149810/149821
149816
Pinion Gear - 16T (2-Speed)
Replacement Part for 149825
149827
2-Speed Gear - 50T
General Options
Replaces Engine Pull-start (Requires 7.2V battery)
For O.S Engines
145890
Sure Start Electric Starting System
146077
Electronic Failsafe
149546
Fuel Filter
149520
Bi-Level Wing - White
149521
Bi-Level Wing - Yellow
149277
Spur Gear - 48T
149407
Clutch Nut Assembly - O.S.
Use in Place of 148764
Fits wheel with 14mm hex
148778
Dish Wheels - White (Pk2)
Fits wheel with 14mm hex
146110
Axle Adapters (14mm) - Rear
L=22.5mm
L=25.5mm
148891
Differential - Front or Rear
4mm Thread
150019
Foam Dust Pads (Pk10)
Titanium
Replaces 149491
150021
150022
149492
Aluminium Ball End (Pk2) w/Mounts Aluminium Ball End (Pk2) w/Mounts Turnbuckle - 5mm/Upper Front (Pk2)
149726
149547
Ball Ends - 3mm for 7mm Ball (Pk4) Ball Ends - 3mm for 7mm Ball (Pk4)
Assembled
149552
3-Shoe Clutch Kit w/1mm Springs
4mm Reverse Thread
For 3.5mm Shock Shafts
150020
Aluminium Ball End (Pk2)
Use with Aluminium Ball Ends
146112
Axle Adapters (14mm) - Front CVD
L=50mm
Replaces 149381
L=42mm
Replaces 149377
149873
Upper Arm Studs - Front (Pk4)
149875
Upper Arm Studs - Rear (Pk4)
148775
Body Shell - Clear w/Decals
148763
Body Mount Set (4 Hole)
Assembled
148765
Differential (53T) - Centre
Page 62
100% Silicone Oil (for Differentials and Shock Absorbers)
146700
Silicone Oil # 250 - 2.5oz 146701
Silicone Oil # 300 - 2.5oz
146702
Silicone Oil # 350 - 2.5oz
146703
Silicone Oil # 400 - 2.5oz (standard for shock absorbers)
146704
Silicone Oil # 450 - 2.5oz
146705
Silicone Oil # 500 - 2.5oz
146706
Silicone Oil # 550 - 2.5oz
146707
Silicone Oil # 600 - 2.5oz
146708
Silicone Oil # 650 - 2.5oz
146709
Silicone Oil # 700 - 2.5oz
146710
Silicone Oil # 1000 - 2.5oz (standard for rear differential)
146711
Silicone Oil # 2000 - 2.5oz
146712
Silicone Oil # 3000 - 2.5oz (standard for front differential)
146713
Silicone Oil # 4000 - 2.5oz
146714
Silicone Oil # 5000 - 2.5oz (standard for centre differential)
146715
Silicone Oil # 7000 - 2.5oz
146716
Silicone Oil # 10000 - 2.5oz
149571
Air Filter Oil
Tools
1.5, 2, 2.5 & 3mm
149187
Hex Wrench Set - Metric (4pcs)
149500
Tool Set
For wet/dusty conditions
149412
Prefilter Sleeves
149959
Clutch Tool for Leading Clutch Shoes
Page 63
IMPORTANT WARRANTY SERVICE iNFORMATION
Before returning your XST 4WD Truggy RTR for warranty consideration, the status of the unit must be within the terms of the Warranty
Information as stated below. Do not return your XST 4WD Truggy RTR to the place of purchase. They are not authorised nor equipped
to perform warranty work on XTM Racing products. When requesting warranty service, please observe the following:
l
l
l
l
Crash damage will not be covered under warranty. Do not request warranty service for a crash-damaged product.
Always send your XST 4WD Truggy RTR complete with the transmitter. Please unplug and/or remove the batteries both from the
transmitter and the XST 4WD Truggy RTR (battery box) before returning it. Please also remove all fuel as applicable. We like to
have the XST 4WD Truggy RTR complete so it can be thoroughly tested before returning it to you.
Include a note detailing the problem or service you are requesting. Service cannot be provided without this information. Include
your daytime phone number, shipping address and/or email address in the event we need more details pertaining to the service
requested.
If your XST 4WD Truggy RTR is out of the warranty period you may request an estimate of services at the time you return it for service. An
omission of this request implies permission for Global Services/Ripmax Ltd. to service your XST 4WD Truggy RTR at our discretion.
l
Include a method of payment for any service charges.
l
Send the unit to us by United Parcel Service, Federal Express or by Insured Mail. Postage is nonrefundable. Send your package to:
In North America:
In Europe:
Global Services
18480 Bandilier Circle
Fountain Valley, CA 92708
Ripmax Ltd.
241 Green Street
Enfield, EN3 7SJ, U.K.
Phone: (714) 963-0329
Fax: (714) 964-6236
Email: [email protected]
Phone: (0) 20 8282 7500
Fax: (0) 20 8282 7501
Email: [email protected]
WARRANTY iNFORMATION
In North America
Your XTM Racing XST 4WD Truggy RTR is warranted against manufacturer defects in materials and workmanship for a period of 90
days from the date of purchase. Warranty service will be provided within 90 days of the date of purchase only if you are able to provide
the original or a copy of the original dated sales receipt.
In the United Kingdom/Europe
Your XTM Racing XST 4WD Truggy RTR is warranted against manufacturer defects in materials and workmanship for a period of 1
(one) year from the date of purchase. Warranty service will be provided within 1 (one) year of the date of purchase only if you are able
to provide the original or a copy of the original dated sales receipt. This does not affect your statutory rights.
Page 64