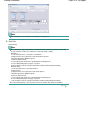
1
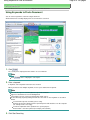
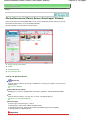
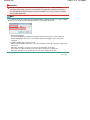
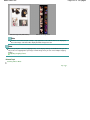
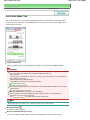
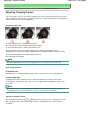
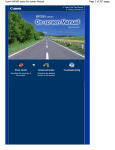
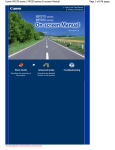
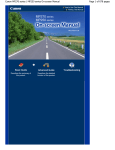
Canon CanoScan 9000F On-screen Manual
MC-4665-V1.00
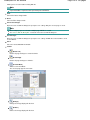
How to Use This Manual
Printing This Manual
Obtaining the Latest ScanGear
(Scanner Driver)
Using Your Scanner Functions
Scanning photos and documents
Scanning film
Scanning multiple documents at one time
Scanning images larger than the platen
Making fine adjustments to image brightness and
color when scanning images
Sharpening out-of-focus photographs, removing
spots/scratches and correcting faded colors when
scanning images
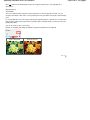
Correcting/enhancing scanned photographs
Printing scanned photographs in various ways
Sending scanned images via e-mail
Searching for lost images
Page 1 of 334 pages
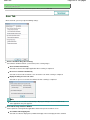
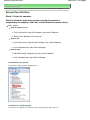
How to Use This Manual
Page 2 of 334 pages
On-screen Manual > How to Use This Manual
How to Use This Manual
Operating the Contents Pane
Operating the Explanation Window
Printing This Manual
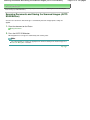
Using Keywords to Find a Document
Registering Documents to My Manual
Symbols Used in This Document
Trademarks
Page top
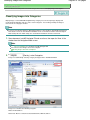
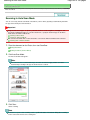
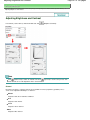
Operating the Contents Pane
Page 3 of 334 pages
On-screen Manual > How to Use This Manual > Operating the Contents Pane
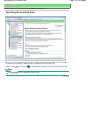
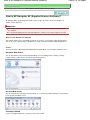
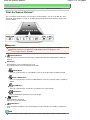
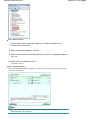
Operating the Contents Pane
When you click a document title displayed in the contents pane found to the left of the on-screen manual,
the documents of that title are displayed in the explanation window on the right side.
When you click
found to the left of
, the document titles found in the lower hierarchies are displayed.
Note
Click
to close or display the contents pane.
Page top
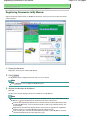
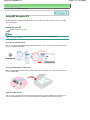
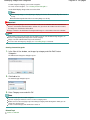
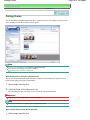
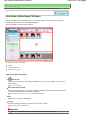
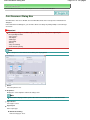
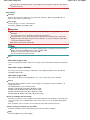
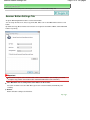
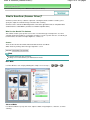
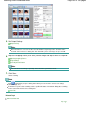
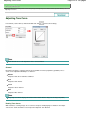
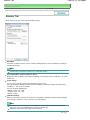
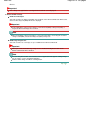
Operating the Explanation Window
Page 4 of 334 pages
On-screen Manual > How to Use This Manual > Operating the Explanation Window
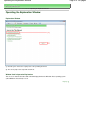
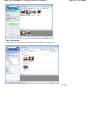
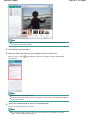
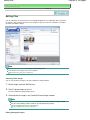
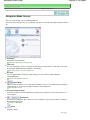
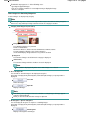
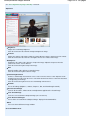
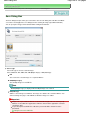
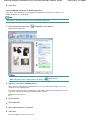
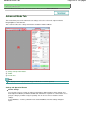
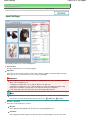
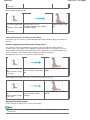
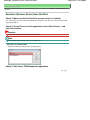
Operating the Explanation Window
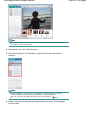
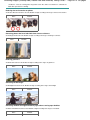
Explanation Window
(1) Click the green characters to jump to the corresponding document.
(2) The cursor jumps to the top of this document.
Window Used in Operation Explanation
This on-screen manual describes with a window displayed when the Windows Vista operating system
(called Windows Vista below) is used.
Page top
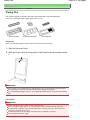
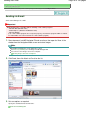
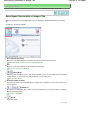
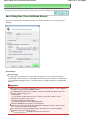
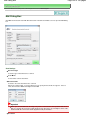
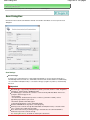
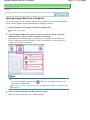
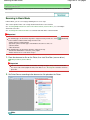
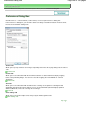
Printing This Manual
On-screen Manual > How to Use This Manual > Printing This Manual
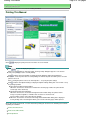
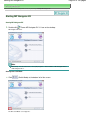
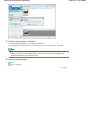
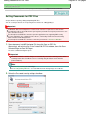
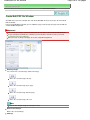
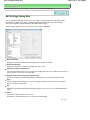
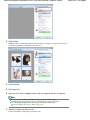
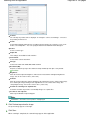
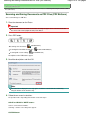
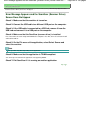
Printing This Manual
Click
to display the print pane to the left of the on-screen manual.
Note
Click
to close or display the print pane.
When you click and then click Page Setup, the Page Setup dialog box appears. You can then
easily set up the paper to be used for printing.
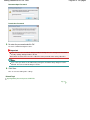
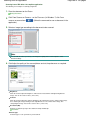
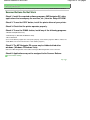
Click , and then click Print Settings to display the Print dialog box. When the dialog box is
displayed, select the printer to be used for printing. The Print Setup tab also allows you to select the
printer to be used.
After selecting the printer to be used, click Properties... to specify the print settings.
Click , and then click Option Settings to display the Option Settings dialog box. You can then set up
the printing operation.
Print document title and page number
When this check box is checked, the manual name and the page number are printed in the
header (top of the document).
Print background color and images
When this check box is checked, the background color and the image are printed. Some
images are printed regardless of whether this check box is checked or not.
Check number of pages to be printed before printing
When this check box is checked, the Print Page Count Confirmation dialog box is displayed
before printing starts. This dialog box allows you to check how many pages will be printed.
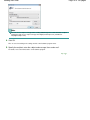
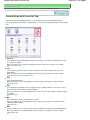
On the Document Selection tab, select the method for printing the document. The following four methods
of printing are available:
Print Current Document
Print Selected Documents
Print My Manual
Page 5 of 334 pages
Printing This Manual
Print All Documents
Note
You can select the type to be printed, and then easily specify print settings on the Print Setup tab.
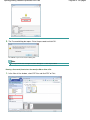
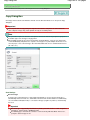
Print Current Document
You can print the currently displayed document.
1. From Select Target, select Current Document
The title of the currently displayed document is displayed in the Documents to Be Printed list.
Note
By selecting Print linked documents, you can also print documents that are linked to the current
document. The linked documents are added to the Documents to Be Printed list.
Click Print Preview to display and check what the print results will look like before you actually
print the document.
2. Click Print Setup tab
On the Page Setup tab, select the printer to be used and specify simple print settings, as necessary.
3. Click Start Printing
A message confirming the number of print pages is displayed.
4. Execute print
Confirm the number of pages to be printed, and then click Yes.
The documents that are currently displayed are printed.
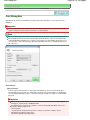
Print Selected Documents
You can select and print the documents that you want printed.
1. From Select Target, select Selected Documents
The titles of all documents are displayed in the Documents to Be Printed list.
2. Select the documents to be printed
From the Documents to Be Printed list, select the title check boxes of the documents to be printed.
Note
When you select the Automatically select documents in lower hierarchies check box, the check
boxes of all document titles found in the lower hierarchies are selected.
Click Select All to select the check boxes of all document titles.
Click Clear All to clear the check boxes of all document titles.
Click Print Preview to display and check what the print results will look like before you actually
print the document.
3. Click Print Setup tab
On the Page Setup tab, select the printer to be used and specify simple print settings, as necessary.
4. Click Start Printing
A message confirming the number of print pages is displayed.
5. Execute print
Page 6 of 334 pages
Printing This Manual
Confirm the number of pages to be printed, and then click Yes.
All documents with selected check boxes are printed.
Print My Manual
You can select and print documents registered in My Manual.
For details about My Manual, see " Registering Documents to My Manual ."
1. From Select Target, select My Manual
The titles of the documents that have been registered to My Manual are displayed in the Documents
to Be Printed list.
2. Select the documents to be printed
From the Documents to Be Printed list, select the title check boxes of the documents to be printed.
Note
Click Select All to select the check boxes of all document titles.
Click Clear All to clear the check boxes of all document titles.
Click Print Preview to display and check what the print results will look like before you actually
print the document.
3. Click Print Setup tab
On the Page Setup tab, select the printer to be used and specify simple print settings, as necessary.
4. Click Start Printing
A message confirming the number of print pages is displayed.
5. Execute print
Confirm the number of pages to be printed, and then click Yes.
All documents with selected check boxes are printed.
Print All Documents
You can print all documents of the on-screen manual.
1. From Select Target, select All Documents
The titles of all documents are displayed in the Documents to Be Printed list, and the check boxes
are automatically selected.
Note
When you uncheck the check box of a document title, that document is not printed.
Click Select All to select the check boxes of all document titles.
Click Clear All to clear the check boxes of all document titles.
Click Print Preview to display and check what the print results will look like before you actually
print the document.
2. Click Print Setup tab
On the Page Setup tab, select the printer to be used and specify simple print settings, as necessary.
3. Click Start Printing
A message confirming the number of print pages is displayed.
4. Execute print
Page 7 of 334 pages
Printing This Manual
Page 8 of 334 pages
Confirm the number of pages to be printed, and then click Yes.
All documents are printed.
Important
A large amount of paper is necessary to print all documents. Before printing, be sure to check
the number of print pages displayed in the Print Page Count Confirmation dialog box.
The Print Preview dialog box allows you to scale the printing to the paper width or to set the
zoom rate. However, if the print data extends outside the paper because of the new zoom rate,
that portion of the document will not be printed on the paper.
Page top
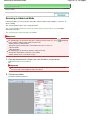
Using Keywords to Find a Document
On-screen Manual > How to Use This Manual > Using Keywords to Find a Document
Using Keywords to Find a Document
You can enter a keyword to search for a target document.
All documents in the currently displayed on-screen manual are searched.
1. Click
The search pane is displayed to the left of the on-screen manual.
Note
Click
to close or display the search pane.
2. Enter a keyword
In Keyword, enter a keyword for the item to be checked.
When you want to enter multiple keywords, insert a space between the keywords.
Note
You can enter up to 10 search keywords or up to 255 characters.
Uppercase and lowercase are not distinguished.
The program can also search for keywords that contain spaces.
A convenient way of quickly finding a document to be read is to enter keywords as described
below.
To learn how to operate a function you are using:
Enter the menu name displayed on the operation panel of this machine or on the computer
(for example, frame erase copy).
To find an explanation of the operation for a specific purpose:
Enter function + item to be printed (for example, print calendar).
3. Click Start Searching
Page 9 of 334 pages
Using Keywords to Find a Document
Page 10 of 334 pages
The search is started, and the titles of documents containing the keyword are displayed in the
search results list.
When you execute a search by entering multiple keywords, the search results are displayed as
shown below.
[Documents Containing Perfect Match]
Documents containing the entire search character string (including spaces) exactly as entered
(perfect match)
[Documents Containing All Keywords]
Documents containing all keywords that were entered
[Documents Containing Any Keyword]
Documents containing at least one of the keywords that were entered
4. Display the document that you want to read
From the search results list, double-click (or select and press Enter key) the title of the document
you want to read.
When the documents of that title are displayed, the keywords found on those documents are
highlighted.
Note
If you modify the keyword entry and perform multiple searches, a search history remains. To delete
the search history, click
located to the right of Keyword, and select Clear History, which is
displayed.
Page top
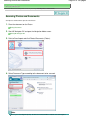
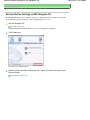
Registering Documents to My Manual
On-screen Manual > How to Use This Manual > Registering Documents to My Manual
Registering Documents to My Manual
Register frequently read documents as My Manual documents so that you can refer to those documents
easily at any time.
1. Display the document
Display the document to be added to My Manual.
2. Click
The My Manual pane is displayed to the left of the on-screen manual.
Note
Click
to close or display the My Manual pane.
3. Register the document to My Manual
Click Add.
The title of the currently displayed document is added to List of My Manual.
Note
You can also add documents to My Manual by the following methods. If you add a document to
My Manual, a
mark is displayed in the document icons in the contents pane.
From the Recently Displayed Documents list, double-click the document title that you want
to add to My Manual (or select the document and press Enter key) to display the title, and
then click Add.
Right-click the document title displayed in the contents pane or right-click the explanation
window, and then select Add to My Manual from the right-click menu.
In the contents pane, select the document title that you want to add to My Manual, and then
click Add to My Manual at the bottom right of the pane.
Page 11 of 334 pages
Registering Documents to My Manual
Page 12 of 334 pages
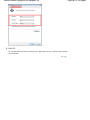
4. Display My Manual
When you double-click (or select and press Enter key) a document title displayed in List of My
Manual, that document is displayed in the explanation window.
Note
To delete a document from List of My Manual, select that document title from the list, and then
click Delete (or press Delete key).
Page top
Symbols Used in This Document
Page 13 of 334 pages
On-screen Manual > How to Use This Manual > Symbols Used in This Document
Symbols Used in This Document
Warning
Instructions that, if ignored, could result in death or serious personal injury caused by incorrect operation
of the equipment. These must be observed for safe operation.
Caution
Instructions that, if ignored, could result in personal injury or material damage caused by incorrect
operation of the equipment. These must be observed for safe operation.
Important
Instructions including important information.
Be sure to read these indications.
Note
Instructions as notes for operation or additional explanations.
Page top
Trademarks
Page 14 of 334 pages
On-screen Manual > How to Use This Manual > Trademarks
Trademarks
Microsoft is a registered trademark of Microsoft Corporation.
Windows is a trademark or registered trademark of Microsoft Corporation in the U.S. and/or other
countries.
Windows Vista is a trademark or registered trademark of Microsoft Corporation in the U.S. and/or
other countries.
Internet Explorer is a trademark or registered trademark of Microsoft Corporation in the U.S. and/or
other countries.
Macintosh and Mac are trademarks of Apple Inc., registered in the U.S. and other countries.
Bonjour is a trademark of Apple Inc., registered in the U.S. and other countries.
Adobe, Adobe Photoshop, Adobe RGB and Adobe RGB (1998) are either registered trademarks or
trademarks of Adobe Systems Incorporated in the United States and/or other countries.
Exif Print
This machine supports Exif Print.
Exif Print is a standard for enhancing the communication between digital cameras and printers. By
connecting to an Exif Print-compliant digital camera, the camera's image data at the time of shooting is
used and optimized, yielding extremely high quality prints.
Page top
CanoScan 9000F Scanning Guide
Page 15 of 334 pages
MA-6206-V1.00
General Notes (Scanner Driver)
What Is MP Navigator EX (Supplied Scanner
Software)?
Placing Documents
Placing Film
What Is ScanGear (Scanner Driver)?
Let's Try Scanning
Starting MP Navigator EX
Scanning Photos and Documents
Scanning Film
Scanning Multiple Documents at One Time
Scanning Images Larger than the Platen
(Stitch Assist)
Easy Scanning with One-click
Useful MP Navigator EX Functions
Correcting/Enhancing Images Automatically
Correcting/Enhancing Images Manually
Adjusting Images
Searching Images
Classifying Images into Categories
Utilizing Images in MP Navigator EX
Scanning with Advanced Settings Using
ScanGear (Scanner Driver)
Starting ScanGear (Scanner Driver)
Scanning in Basic Mode
Scanning in Advanced Mode
Scanning in Auto Scan Mode
Scanning Film in Advanced Mode
Scanning Multiple Documents at One Time
with ScanGear (Scanner Driver)
Correcting Images and Adjusting Colors with
ScanGear (Scanner Driver)
Correcting Images (Unsharp Mask, Reduce
Dust and Scratches, Fading Correction, etc.)
Adjusting Colors Using a Color Pattern
Adjusting Saturation and Color Balance
Adjusting Brightness and Contrast
Saving
Saving as PDF Files
Creating/Editing PDF Files
Adjusting Histogram
Adjusting Tone Curve
Setting Threshold
Printing Documents
Printing Photos
ScanGear (Scanner Driver) Screens
Sending via E-mail
Basic Mode Tab
Editing Files
Advanced Mode Tab
Setting Passwords for PDF Files
Auto Scan Mode Tab
Opening/Editing Password-protected PDF
Files
Preferences Dialog Box
Useful Information on Scanning
MP Navigator EX Screens
Navigation Mode Screen
Scan/Import Documents or Images Tab
View & Use Images on your Computer Tab
Adjusting Cropping Frames
Resolution
File Formats
Color Matching
Custom Scan with One-click Tab
Photos/Documents (Platen) Screen (Scan/
Import Window)
Film Screen (Scan/Import Window)
Other Scanning Methods
Scanning from an Application
CanoScan 9000F Scanning Guide
Page 16 of 334 pages
Scanning Using the Control Panel (Windows
Save Dialog Box
XP Only)
Save as PDF file Dialog Box
View & Use Window
Create/Edit PDF file Window
Print Document Dialog Box
Print Photo Dialog Box
Send via E-mail Dialog Box
Correct/Enhance Images Window
One-click Mode Screen
Auto Scan Dialog Box
Save Dialog Box (One-click Mode Screen)
Copy Dialog Box
Print Dialog Box
Mail Dialog Box
OCR Dialog Box
Scan Dialog Box
PDF Dialog Box
Preferences Dialog Box
Scanning Using the Scanner Buttons
What Are Scanner Buttons?
Scanning Documents and Saving the Scanned
Images (AUTO SCAN Button)
Scanning and Saving Documents as PDF
Files (PDF Buttons)
Scanning and Printing/Copying Documents
(COPY Button)
Scanning and Attaching Documents to E-mail
(E-MAIL Button)
Scanner Button Settings
Scanner Button Settings via MP Navigator EX
Troubleshooting
Installation Problems
Problems with Scanning
Problems with Scanning Film
Software Problems
Opening Files Other than Scanned Images
MP Navigator EX Problems
Opening Images Saved on a Computer
Updating the ScanGear (Scanner Driver)
Obtaining the Latest ScanGear (Scanner
Driver)
Uninstalling the ScanGear (Scanner Driver)
Before Installing the ScanGear (Scanner
Driver)
Installing the ScanGear (Scanner Driver)
Bundled Applications
ArcSoft PhotoStudio
About Inkjet Printer/Scanner/Fax Extended
Survey Program
Using MP Navigator EX
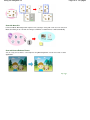
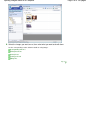
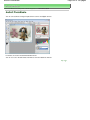
On-screen Manual > Using MP Navigator EX
Using MP Navigator EX
MP Navigator EX is an application that enables you to easily scan photos and documents. It is suitable
even for beginners.
Start MP Navigator EX
Click Here: MP Navigator EX
Note
See "Let's Try Scanning" for details on how to scan images using MP Navigator EX.
Scan Photos and Documents
You can scan easily by navigating through MP Navigator EX screens. You can also save/print scanned
images using MP Navigator EX.
Scan Small Documents at One Time
You can scan multiple small documents (photos, cards, etc.) at one time. It is useful as you do not need
to scan multiple times.
Scan Large Documents
You can easily scan documents that are larger than the Platen using MP Navigator EX. It allows you to
scan the left and right halves of a document separately and combine them back into one image.
Page 17 of 334 pages
Using MP Navigator EX
Page 18 of 334 pages
Scan with One-click
In One-click Mode, MP Navigator EX completes from scanning to saving, with a click of an icon. One-click
Mode also allows you to scan and save images as PDF files or attach them to e-mail automatically.
Scan and Correct/Enhance Photos
You can easily correct/enhance scanned photos using MP Navigator EX. You do not need to use other
applications.
Page top
General Notes (Scanner Driver)
On-screen Manual > Scanning Guide > General Notes (Scanner Driver)
General Notes (Scanner Driver)
ScanGear (scanner driver) is subject to the following restrictions. Keep these points in mind when using
it.
Scanner Driver Restrictions
When using the NTFS file system, the TWAIN data source may not be invoked. This is because the
TWAIN module cannot be written to the winnt folder for security reasons. Contact the computer's
administrator for help.
Some computers (including laptops) connected to the machine may not resume correctly from
standby mode. In that case, restart the computer.
Do not connect two or more machines or multifunction printers with scanner function to the same
computer simultaneously. If multiple scanning devices are connected, you cannot scan from a
button on the machine (Scanner Button) and also may experience errors while accessing the
devices.
Use the default display font size of the OS. Otherwise, software screens may not appear correctly.
Scanning may fail if the computer has resumed from sleep or standby mode. In that case, follow
these steps and scan again.
1. Turn off the machine.
2. Exit ScanGear, then disconnect the USB cable from the computer and reconnect it.
3. Turn on the machine.
ScanGear cannot be opened in multiple applications at the same time. Within an application,
ScanGear cannot be opened for the second time when it is already open.
Be sure to close the ScanGear window before closing the application.
Make sure that you have adequate disk space available when scanning large images at high
resolutions. For example, at least 300 MB of free space is required to scan an A4 document at 600
dpi in full-color.
Thick documents may not be cropped correctly when scanned. In that case, crop each item
individually or crop manually.
ScanGear and WIA driver cannot be used at the same time.
Do not enter the computer into sleep or hibernate state during scanning.
Calibration may take time if the machine is connected via USB 1.1.
Applications with Restrictions on Use
If you start Media Center included in Windows XP Media Center Edition 2005, you may not be able to
scan using a button on the machine (Scanner Button). In that case, restart the computer.
You cannot scan images with Media Center included in Windows Vista and Windows XP Media
Center Edition 2005. Scan with other applications such as MP Navigator EX.
In some applications, if you select the View scanned images checkbox in the Auto Scan Mode tab of
ScanGear, the window displaying the thumbnails of the scanned images may close automatically.
Some applications may not display the TWAIN user interface. In that case, refer to the application's
manual and change the settings accordingly.
Some applications do not support continuous scanning of multiple documents. In some cases, only
the first scanned image is accepted, or multiple images are scanned as one image.
When scanning platen size images into Microsoft Office 2000/2003 (Word, Excel or PowerPoint) etc.,
click Custom Insert in the Insert Picture from Scanner or Camera screen. Otherwise, images may
Page 19 of 334 pages
General Notes (Scanner Driver)
Page 20 of 334 pages
not be scanned correctly.
When scanning images into Microsoft Office 2007 (such as Word, Excel or PowerPoint), use
Microsoft Clip Organizer.
Images may not be scanned correctly in some applications. In that case, increase the operating
system's virtual memory and retry.
When image size is too large (such as when scanning large images at high resolution), your
computer may not respond or the progress bar may remain at 0% depending on the application. In
that case, cancel the action (for example by clicking Cancel on the progress bar), then increase the
operating system's virtual memory or reduce the image size/resolution and retry. Alternatively, scan
the image via MP Navigator EX first, then save and import it into the application.
Page top
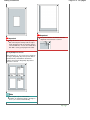
Placing Documents
Page 21 of 334 pages
On-screen Manual > Scanning Guide > Placing Documents
Placing Documents
Learn how to place documents on the machine's Platen. Place documents correctly according to the type
of document to be scanned. Otherwise, documents may not be scanned correctly.
Important
Do not place items that weigh 4.4 lbs (2.0 kg) or more on the Platen. Also, do not press on the
document with a force exceeding 4.4lbs (2.0 kg). If you press heavily, the scanner may not work
correctly or you might break the glass.
Close the Document Cover when scanning.
When scanning documents other than film, make sure that the FAU (Film Adapter Unit) Protective
Sheet is attached to the Document Cover. Without the FAU Protective Sheet, the document type may
not be detected correctly.
Note
See "Placing Film " to scan film.
Placing Documents
Place documents as described below to allow the machine to detect the document type or size
automatically.
Important
When scanning by specifying the document type or size in MP Navigator EX or ScanGear (scanner
driver), align an upper corner of the document with the corner at the arrow (alignment mark) of the
Platen.
Photos that have been cut to various shapes and documents smaller than 1.18 inches (3 cm)
square cannot be cropped accurately when scanning.
Reflective CD/DVD labels may not be scanned properly.
When Scanning Photos, Postcards, Business
Cards or CD/DVD
When Scanning Magazines, Newspapers or Text
Documents
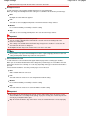
Placing a Single Document
Place the document face-down on the Platen and
align an upper corner of the document with the
corner at the arrow (alignment mark) of the Platen.
Portions placed on the diagonally striped area
cannot be scanned.
Place the document face-down on the Platen, with
0.39 inches (1 cm) or more space between the
edges (diagonally striped area) of the Platen and
the document. Portions placed on the diagonally
striped area cannot be scanned.
Placing Documents
Page 22 of 334 pages
Important
Important
Large documents (such as A4 size photos)
that cannot be placed away from the edges/
arrow (alignment mark) of the Platen may be
saved as PDF files. To save in a format other
than PDF, scan by specifying the file format.
The portion within 2 mm inwards from the
alignment mark cannot be scanned.
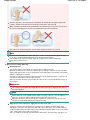
Placing Multiple Documents
Allow 0.39 inches (1 cm) or more space between
the edges (diagonally striped area) of the Platen
and documents, and between documents.
Portions placed on the diagonally striped area
cannot be scanned.
Note
You can place up to 12 documents.
Positions of slanted documents (10 degrees
or less) are corrected automatically.
Page top
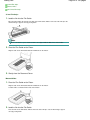
Placing Film
Page 23 of 334 pages
On-screen Manual > Scanning Guide > Placing Film
Placing Film
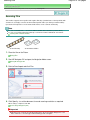
This machine supports 35 mm films (film strips and mounted slides) and 120 Format Films.
Prepare the supplied Film Guide and the film you want to scan.
35 mm Film Strip
35 mm Mounted Slides
120 Format Film
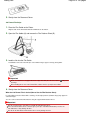
Preparation
Remove the FAU (Film Adapter Unit) Protective Sheet from the Document Cover.
1. Open the Document Cover.
2. While pressing the lever at the top, pull the FAU Protective Sheet forward to remove
it.
Important
Film scanning is not available when the FAU Protective Sheet is attached to the Document Cover.
Be careful not to lose the removed FAU Protective Sheet. Keep it in a safe place.
To avoid damaging the light source, be sure to attach the FAU Protective Sheet when not scanning
film.
Placing Film
Important
Hold the film by the edge to avoid smudges and fingerprints.
Dust on the film or Platen appears in scanned images. Remove dust from the film and Platen.
Do not block the calibration slot on the Film Guide when scanning. If the slot is blocked, the film
cannot be scanned in correct colors.
A sticker label attached to the margin of the film may be recognized as an image.
Close the Document Cover gently.
Placing Film
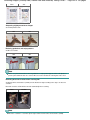
35 mm Film Strips
Mounted Slides
120 Format Film Strips
35 mm Film Strips
1. Load the film into the Film Guide.
Open the Film Holder (A) and place the film on the Film Guide, with the front side of the film (the side
on which images appear correctly) facing down.
Note
Make sure that the spaces between frames are aligned with the white lines on the holder.
2. Place the Film Guide on the Platen.
Align the tabs on the Film Guide with the FILM marks on the Platen.
3. Gently close the Document Cover.
Mounted Slides
1. Place the Film Guide on the Platen.
Align the tabs on the Film Guide with the FILM marks on the Platen.
Load the slides so that the film lies flat on the Platen.
2. Load the film into the Film Guide.
Place the film on the Film Guide, with the front side of the film (the side on which images appear
correctly) facing down.
Page 24 of 334 pages
Placing Film
3. Gently close the Document Cover.
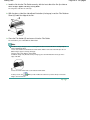
120 Format Film Strips
1. Place the Film Guide on the Platen.
Align the tabs on the Film Guide with the FILM marks on the Platen.
2. Open the Film Holder (A) and remove the Film Retainer Sheet (B).
3. Load the film into the Film Guide.
Load with the front side of the film (the side on which images appear correctly) facing down.
Important
Make sure that there is no gap between the edge of the film (the side closer to the
mark) and
the hinge.
When loading two or more 120 Format Films, allow 0.2 inches (5 mm) between films.
4. Gently close the Document Cover.
When the 120 Format Film is Curled (How to Use the Film Retainer Sheet)
If a curled film touches the Platen while scanning, circular stripe patterns (Newton's rings) may appear in
scanned images.
To scan a curled 120 Format Film, flatten it using the supplied Film Retainer Sheet.
Important
Do not cover the frames you want to scan with the Film Retainer Sheet.
Place the Film Retainer Sheet so that the glossy side (the side without illustrations) touches the
film. Otherwise, it may damage the film.
Do not rub the film with the Film Retainer Sheet. It may damage the film.
Page 25 of 334 pages
Placing Film
Page 26 of 334 pages
1. Load the film into the Film Guide correctly, with the front side of the film (the side on
which images appear correctly) facing down.
The long sides of the film are curled up.
2. With the glossy side (the side without illustrations) facing up, insert the Film Retainer
Sheet (A) under the edge of the film.
3. Close the Film Holder (B) and secure it into the Film Guide.
The entire film is pressed flat with the Film Holder.
Note
If Newton's rings still appear after scanning with the above method, the film is heavily warped.
Try the following method.
1. Turn over the film and load it into the Film Guide, with the front side of the film (the side on
which images appear correctly) facing up.
The long sides of the film are curled down.
2. With the rough side (illustrated side) facing up, place the Film Retainer Sheet (A) on the
edge of the film.
3. Close the Film Holder and secure it into the Film Guide.
4. After preview, click
images, then click Scan.
(Mirror) on the Toolbar of ScanGear (scanner driver) to invert the
Page top
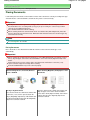
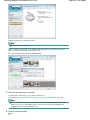
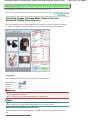
What Is MP Navigator EX (Supplied Scanner Software)?
On-screen Manual > Scanning Guide > What Is MP Navigator EX (Supplied Scanner Software)?
What Is MP Navigator EX (Supplied Scanner Software)?
MP Navigator EX is an application that enables you to easily scan photos, documents and film. It is
suitable even for beginners.
Important
MP Navigator EX may not start from a button on the machine (Scanner Button). In that case, restart
the computer.
Use the default display font size of the OS. Otherwise, software screens may not appear correctly.
What You Can Do with This Software
This software allows you to scan multiple documents at one time, or scan images larger than the Platen.
You can also save scanned images, attach them to e-mail or print them using the supplied applications.
Screens
There are two types of MP Navigator EX Main Menu: Navigation Mode screen and One-click Mode screen.
Navigation Mode Screen
You can start various tasks from the Navigation Mode screen, including simple scanning, scanning
using ScanGear (scanner driver), and enhancing/correcting images.
One-click Mode Screen
You can complete from scanning to saving, printing, etc. at one time by simply clicking the corresponding
icon in the One-click Mode screen.
Scan/Import Window
Use the Scan/Import window to scan photos, documents and film.
Page 27 of 334 pages
What Is MP Navigator EX (Supplied Scanner Software)?
Page 28 of 334 pages
View & Use Window
Use the View & Use window to select what you want to do with the scanned images.
Page top
Let's Try Scanning
Page 29 of 334 pages
On-screen Manual > Scanning Guide > Let's Try Scanning
Let's Try Scanning
Try scanning using MP Navigator EX.
Starting MP Navigator EX
Starting MP Navigator EX
Scanning documents, photos, magazines, etc. from the Platen
Scanning Photos and Documents
Scanning Film
Scanning Film
Scanning two or more photos (small documents) at one time
Scanning Multiple Documents at One Time
Scanning images larger than the Platen
Scanning Images Larger than the Platen (Stitch Assist)
Scanning easily according to purpose (scan and save, attach to e-mail, etc.)
Easy Scanning with One-click
Page top
Starting MP Navigator EX
On-screen Manual > Scanning Guide > Let's Try Scanning > Starting MP Navigator EX
Starting MP Navigator EX
Starting MP Navigator EX
1. Double-click
Canon MP Navigator EX 3.1 icon on the desktop.
MP Navigator EX starts.
Note
Alternatively, from the Start menu, select (All) Programs > Canon Utilities > MP Navigator EX 3.1
> MP Navigator EX 3.1.
Starting One-click Mode
1. Click
(Switch Mode) at the bottom left of the screen.
The One-click Mode screen appears.
Page 30 of 334 pages
Starting MP Navigator EX
Page 31 of 334 pages
Note
Select the Show this window at startup checkbox in the Navigation Mode screen to always open
the Navigation Mode screen at startup. If this checkbox is not selected, the last used screen
appears at startup.
Page top
Scanning Photos and Documents
On-screen Manual > Scanning Guide > Let's Try Scanning > Scanning Photos and Documents
Scanning Photos and Documents
Scan photos and documents placed on the Platen.
1. Place the document on the Platen.
Placing Documents
2. Start MP Navigator EX and open the Navigation Mode screen.
Starting MP Navigator EX
3. Point to Scan/Import and click Photos/Documents (Platen).
4. Select Document Type according to the document to be scanned.
Note
When you select Magazine(Color), the Descreen function will be enabled and scanning takes
Page 32 of 334 pages
Scanning Photos and Documents
longer than usual. To disable the Descreen function, deselect the Descreen checkbox in the
Scan Settings dialog box.
Select Text(OCR) to extract the text in the image and convert to editable text data using MP
Navigator EX.
Color scanning is not available for Text(OCR). To scan in color, open the OCR dialog box from
the One-click Mode screen and scan with Color Mode set to Color.
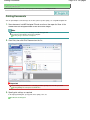
5. Click Specify... to set the document size and scanning resolution as required.
When setting is completed, click OK.
Scan Settings Dialog Box (Photos/Documents)
Important
When scanning a large document (such as an A4 size photo), align its corner with the corner at
the arrow (alignment mark) of the Platen and specify the document size in the Scan Settings
dialog box.
6. Click Scan.
Starts scanning.
Note
Click Cancel to cancel the scan.
When scanning is completed, the Scan Complete dialog box opens. Select Scan or Exit. Select
Scan to scan the next document, or select Exit to end.
The scanned images appear in the Thumbnail window.
Page 33 of 334 pages
Scanning Photos and Documents
Page 34 of 334 pages
7. Edit the scanned images as required.
Use Edit Tools to rotate images, select a part of an image, etc.
See the Edit Tools in "Photos/Documents (Platen) Screen (Scan/Import Window) " for details.
Note
First select images to edit. (Selected images are outlined in orange.) Drag the mouse or use
Shift + arrow keys to select multiple images. You can also select images by dragging and
dropping them into the Selected Images area.
8. Save the scanned images.
Saving
Saving as PDF Files
Page top
Scanning Film
Page 35 of 334 pages
On-screen Manual > Scanning Guide > Let's Try Scanning > Scanning Film
Scanning Film
This machine supports 35 mm positive and negative film strips (standard state of developed film, with
six frames in each strip) as well as 35 mm mounted positive slides (one frame per mounted slide).
Up to twelve film strip frames or four mounted slide frames can be scanned continuously.
Note
To scan 120 Format Films, scan from the Advanced Mode tab of ScanGear (scanner driver).
To scan at a resolution higher than 4800 dpi, scan from the Advanced Mode tab of ScanGear.
Scanning Film in Advanced Mode
35 mm Film Strip
35 mm Mounted Slides
1. Place the film on the Platen.
Placing Film
2. Start MP Navigator EX and open the Navigation Mode screen.
Starting MP Navigator EX
3. Point to Scan/Import and click Film.
4. Click Specify... to set the document size and scanning resolution as required.
When setting is completed, click OK.
Scan Settings Dialog Box (Film)
Important
Film may not be scanned correctly when Film Type in the Scan Settings dialog box is set to
Auto. In that case, select the type of film in Film Type and scan again.
Scanning Film
Note
To scan black and white film, it is recommended that you select Black and White Negative Film
or Black and White Positive Film for Film Type in the Scan Settings dialog box.
5. Click Scan.
Preview scan starts.
Note
Click Cancel to cancel the scan.
When preview scan of the film is completed, the preview images appear.
Note
Preview images do not appear when the Preview before scanning checkbox is not selected in
the Scan Settings dialog box. The scanned images appear directly in the Thumbnail window.
If film cannot be scanned correctly, see " Problems with Scanning Film " in "Troubleshooting."
6. Select the checkboxes of the frames you want to scan, then click Scan.
When scanning is completed, the Scan Complete dialog box opens. Select Scan or Exit. Select
Page 36 of 334 pages
Scanning Film
Page 37 of 334 pages
Scan to scan the next film, or select Exit to end.
The scanned images appear in the Thumbnail window.
7. Edit the scanned images as required.
Use Edit Tools to rotate images, select a part of an image, etc.
See the Edit Tools in "Film Screen (Scan/Import Window) " for details.
Note
First select images to edit. (Selected images are outlined in orange.) Drag the mouse or use
Shift + arrow keys to select multiple images. You can also select images by dragging and
dropping them into the Selected Images area.
8. Save the scanned images.
Saving
Saving as PDF Files
Page top
Scanning Multiple Documents at One Time
On-screen Manual > Scanning Guide > Let's Try Scanning > Scanning Multiple Documents at One Time
Scanning Multiple Documents at One Time
You can scan two or more photos (small documents) at one time by setting Document Size to Auto
Detect (Multiple Documents) in the Scan Settings dialog box of MP Navigator EX.
Important
The following types of documents may not be cropped correctly. In that case, start ScanGear
(scanner driver), then adjust the cropping frames (scan areas) in whole image view and scan
again.
- Photos that have a whitish border
- Documents printed on white paper, hand-written text, business cards, etc.
- Thin documents
- Thick documents
Scanning Multiple Documents in Whole Image View
1. Place the documents on the Platen.
Placing Documents
2. Start MP Navigator EX and open the Navigation Mode screen.
Starting MP Navigator EX
3. Point to Scan/Import and click Photos/Documents (Platen).
4. Select Document Type according to the documents to be scanned.
Page 38 of 334 pages
Scanning Multiple Documents at One Time
5. Click Specify....
Select Auto Detect (Multiple Documents) for Document Size.
When setting is completed, click OK.
Scan Settings Dialog Box (Photos/Documents)
6. Click Scan.
Page 39 of 334 pages
Scanning Multiple Documents at One Time
Multiple documents are scanned at one time.
Note
Click Cancel to cancel the scan.
When scanning is completed, the Scan Complete dialog box opens. Select Scan or Exit. Select
Scan to scan the next document, or select Exit to end.
The scanned images appear in the Thumbnail window.
7. Edit the scanned images as required.
Use Edit Tools to rotate images, select a part of an image, etc.
See the Edit Tools in "Photos/Documents (Platen) Screen (Scan/Import Window) " for details.
Note
First select images to edit. (Selected images are outlined in orange.) Drag the mouse or use
Shift + arrow keys to select multiple images. You can also select images by dragging and
dropping them into the Selected Images area.
8. Save the scanned images.
Saving
Page 40 of 334 pages
Scanning Multiple Documents at One Time
Page 41 of 334 pages
Saving as PDF Files
Note
If you want to preview the images before scanning, use ScanGear.
Scanning Multiple Documents at One Time with ScanGear (Scanner Driver)
Page top
Scanning Images Larger than the Platen (Stitch Assist)
On-screen Manual > Scanning Guide > Let's Try Scanning > Scanning Images Larger than the Platen (Stitch Assist)
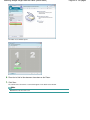
Scanning Images Larger than the Platen (Stitch Assist)
Stitch Assist allows you to scan the left and right halves of a large document separately and combine the
scanned images back into one image. You can scan documents that are up to twice as large as the
Platen.
1. Start MP Navigator EX and open the Navigation Mode screen.
Starting MP Navigator EX
Note
You can complete from scanning to saving, printing, etc. at one time by simply clicking the
corresponding icon in the One-click Mode screen. Stitch Assist is available from the One-click
Mode screen as well, by changing the document size. Click the corresponding icon and select
Stitch Assist for Document Size. Then skip ahead to Step 5.
2. Point to Scan/Import and click Photos/Documents (Platen).
3. Select Document Type according to the document to be scanned.
Page 42 of 334 pages
Scanning Images Larger than the Platen (Stitch Assist)
4. Click Specify....
Select Stitch Assist for Document Size, then specify the scanning resolution as required.
When setting is completed, click OK.
Scan Settings Dialog Box (Photos/Documents)
5. Click Scan.
Page 43 of 334 pages
Scanning Images Larger than the Platen (Stitch Assist)
The Stitch-assist window opens.
6. Place the left half of the document face-down on the Platen.
7. Click Scan.
The left half of the document is scanned and appears in the Stitch-assist window.
Note
Click Cancel to cancel the scan.
Page 44 of 334 pages
Scanning Images Larger than the Platen (Stitch Assist)
8. Place the right half of the document face-down on the Platen.
9. Click Scan.
The right half of the document is scanned.
Note
Click Cancel to cancel the scan.
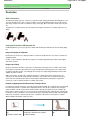
10. Adjust the scanned image as required.
Use the icons to swap the left and right halves, rotate the image 180 degrees or enlarge/reduce the
image.
(Swap Left & Right)
Swaps the left and right halves.
Important
This function is not available while the image is enlarged/reduced.
Rotate 180°
Rotates right half of the image 180 degrees.
Page 45 of 334 pages
Scanning Images Larger than the Platen (Stitch Assist)
Important
This function is not available while the image is enlarged/reduced.
(Enlarge)
Enlarges the displayed image.
(Reduce)
Reduces the displayed image.
(Full-screen)
Enlarges/reduces the image to display it full-screen.
Note
Enlarge/Reduce does not affect the actual size of the scanned image.
When the document is scanned upside down, the image displayed in the Stitch-assist window
will also be upside down. Click Rotate 180° to rotate the image to the correct orientation.
You can drag the right half of the image from right to left or up and down to adjust the position.
If the left and right halves do not match due to a slanted document, place the document
correctly and click Back, then scan again.
11. Click Next.
12. Drag the mouse to specify the area to be saved, then click OK.
The combined image is created.
When scanning is completed, the Scan Complete dialog box opens. Select Scan or Exit. Select
Scan to scan the next document, or select Exit to end.
The scanned images appear in the Thumbnail window.
Page 46 of 334 pages
Scanning Images Larger than the Platen (Stitch Assist)
Page 47 of 334 pages
13. Save the scanned images.
Saving
Saving as PDF Files
Page top
Easy Scanning with One-click
On-screen Manual > Scanning Guide > Let's Try Scanning > Easy Scanning with One-click
Easy Scanning with One-click
You can complete from scanning to saving, printing, etc. at one time by simply clicking the corresponding
icon.
1. Place the document on the Platen.
Placing Documents
2. Start MP Navigator EX.
Starting MP Navigator EX
The MP Navigator EX Navigation Mode screen or One-click Mode screen appears.
Navigation Mode Screen
One-click Mode Screen
Note
Skip ahead to Step 4 if One-click Mode screen is open.
3. Point to One-click.
Page 48 of 334 pages
Easy Scanning with One-click
Page 49 of 334 pages
4. Click the corresponding icon.
Custom Scan with One-click Tab
One-click Mode Screen
5. Select Document Type according to the document to be scanned.
6. Set the document size and scanning resolution as required.
7. Start scanning.
Starts scanning.
Note
Click Cancel to cancel the scan.
Page top
Useful MP Navigator EX Functions
Page 50 of 334 pages
On-screen Manual > Scanning Guide > Useful MP Navigator EX Functions
Useful MP Navigator EX Functions
With MP Navigator EX, you can correct/enhance scanned images beautifully, and search saved images
quickly.
Correcting/enhancing images automatically
Correcting/Enhancing Images Automatically
Correcting/enhancing images manually
Correcting/Enhancing Images Manually
Adjusting color characteristics such as brightness and contrast
Adjusting Images
Searching for lost images
Searching Images
Classifying and sorting images
Classifying Images into Categories
Page top
Correcting/Enhancing Images Automatically
On-screen Manual > Scanning Guide > Useful MP Navigator EX Functions > Correcting/Enhancing Images Automatically
Correcting/Enhancing Images Automatically
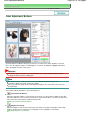
MP Navigator EX will analyze and correct/enhance scanned images automatically.
1. Scan documents into MP Navigator EX and save them, then open the View & Use
window from the Navigation Mode screen and select the photos you want to correct/
enhance.
Note
See " Let's Try Scanning" to scan images into MP Navigator EX.
You can also select images saved on a computer.
Opening Images Saved on a Computer
2. Click Edit/Convert, then click Fix photo images on the list.
The Correct/Enhance Images window opens.
Note
The Correct/Enhance Images window can also be opened by clicking
(Image Correction/
Enhancement) on the Toolbar or in the Zoom in dialog box. In that case, only the target image
(outlined in orange) can be corrected/enhanced.
See " Correct/Enhance Images Window " for details on the Correct/Enhance Images window.
3. Select the image you want to correct/enhance from the thumbnail list.
The selected image appears in Preview.
Page 51 of 334 pages
Correcting/Enhancing Images Automatically
Note
If you selected only one image in the View & Use window, the thumbnail list does not appear
and only the preview image appears.
4. Make sure that Auto is selected.
5. Click Auto Photo Fix, Face Sharpener or Digital Face Smoothing.
Important
Once image is corrected with Auto Photo Fix and saved, it cannot be corrected again with Auto
Photo Fix. Auto Photo Fix may not be available for images edited using an application, digital
camera, etc. manufactured by other companies.
Note
The Face Sharpener and Digital Face Smoothing effect levels can be changed using the slider
that appears by clicking the corresponding buttons.
When you apply Auto Photo Fix, dark backlit photos will be corrected automatically. If the image
is not corrected enough using Auto Photo Fix, it is recommended that you apply Face
Brightener on the Manual tab.
Correcting/Enhancing Images Manually
Page 52 of 334 pages
Correcting/Enhancing Images Automatically
Page 53 of 334 pages
6. Click OK.
The entire image is corrected/enhanced automatically and
upper left of the thumbnail and preview image.
(Correct/Enhance) appears on the
Note
Click Reset Selected Image to undo the correction/enhancement.
Select the Apply to all images checkbox to correct/enhance all selected images.
7. Click Save Selected Image or Save All Corrected Images.
You can save corrected/enhanced images as new files.
Note
To save only the images you like, select them and click Save Selected Image. To save all
images, click Save All Corrected Images.
The file format of corrected/enhanced images is JPEG/Exif.
Adobe RGB images are saved as sRGB images.
8. Click Exit.
Important
The corrections/enhancements will be lost if you exit before saving corrected/enhanced
images.
Page top
Correcting/Enhancing Images Manually
On-screen Manual > Scanning Guide > Useful MP Navigator EX Functions > Correcting/Enhancing Images Manually
Correcting/Enhancing Images Manually
You can correct/enhance scanned images manually.
1. Scan documents into MP Navigator EX and save them, then open the View & Use
window from the Navigation Mode screen and select the photos you want to correct/
enhance.
Note
See " Let's Try Scanning" to scan images into MP Navigator EX.
You can also select images saved on a computer.
Opening Images Saved on a Computer
2. Click Edit/Convert, then click Fix photo images on the list.
The Correct/Enhance Images window opens.
Note
The Correct/Enhance Images window can also be opened by clicking
(Image Correction/
Enhancement) on the Toolbar or in the Zoom in dialog box. In that case, only the target image
(outlined in orange) can be corrected/enhanced.
See " Correct/Enhance Images Window " for details on the Correct/Enhance Images window.
3. Select the image you want to correct/enhance from the thumbnail list.
The selected image appears in Preview.
Page 54 of 334 pages
Correcting/Enhancing Images Manually
Note
If you selected only one image in the View & Use window, the thumbnail list does not appear
and only the preview image appears.
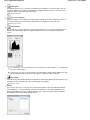
4. Click Manual, then click Correct/Enhance.
5. Click Face Brightener, Face Sharpener, Digital Face Smoothing or Blemish
Remover.
Note
The Face Brightener, Face Sharpener and Digital Face Smoothing effect levels can be
changed using the slider that appears by clicking the corresponding buttons.
Move the cursor over the image. The shape of the cursor changes to
(Cross).
6. Drag to select the area you want to correct/enhance, then click OK that appears
over the image.
Page 55 of 334 pages
Correcting/Enhancing Images Manually
The portion in and around the selected area is corrected/enhanced and
appears on the upper left of the thumbnail and preview image.
Page 56 of 334 pages
(Correct/Enhance)
Note
You can also drag to rotate the rectangle.
Click Undo to undo the latest correction/enhancement.
Click Reset Selected Image to cancel all corrections, enhancements and adjustments applied
to the selected image.
7. Click Save Selected Image or Save All Corrected Images.
You can save corrected/enhanced images as new files.
Note
To save only the images you like, select them and click Save Selected Image. To save all
images, click Save All Corrected Images.
The file format of corrected/enhanced images is JPEG/Exif.
8. Click Exit.
Important
The corrections/enhancements will be lost if you exit before saving corrected/enhanced
images.
Page top
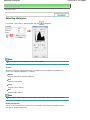
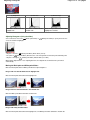
Adjusting Images
On-screen Manual > Scanning Guide > Useful MP Navigator EX Functions > Adjusting Images
Adjusting Images
You can make fine adjustments to the overall brightness, contrast, etc. of images.
1. Scan documents into MP Navigator EX and save them, then open the View & Use
window from the Navigation Mode screen and select the photos you want to adjust.
Note
See " Let's Try Scanning" to scan images into MP Navigator EX.
You can also select images saved on a computer.
Opening Images Saved on a Computer
2. Click Edit/Convert, then click Fix photo images on the list.
The Correct/Enhance Images window opens.
Note
The Correct/Enhance Images window can also be opened by clicking
(Image Correction/
Enhancement) on the Toolbar or in the Zoom in dialog box. In that case, only the target image
(outlined in orange) can be corrected/enhanced.
See " Correct/Enhance Images Window " for details on the Correct/Enhance Images window.
3. Select the image you want to adjust from the thumbnail list.
The selected image appears in Preview.
Page 57 of 334 pages
Adjusting Images
Page 58 of 334 pages
Note
If you selected only one image in the View & Use window, the thumbnail list does not appear
and only the preview image appears.
4. Click Manual, then click Adjust.
5. Move the slider of the item you want to adjust and set the effect level.
When you move a slider,
preview image.
(Correct/Enhance) appears on the upper left of the thumbnail and
Note
Click Defaults to reset all adjustments.
Click Reset Selected Image to cancel all corrections, enhancements and adjustments applied
to the selected image.
6. Click Save Selected Image or Save All Corrected Images.
You can save adjusted images as new files.
Note
To save only the images you like, select them and click Save Selected Image. To save all
images, click Save All Corrected Images.
Adjusting Images
Page 59 of 334 pages
The file format of adjusted images is JPEG/Exif.
7. Click Exit.
Important
The adjustments will be lost if you exit before saving adjusted images.
Page top
Searching Images
Page 60 of 334 pages
On-screen Manual > Scanning Guide > Useful MP Navigator EX Functions > Searching Images
Searching Images
In the View & Use window of the Navigation Mode screen, you can search images saved on your
computer and open them in MP Navigator EX. Opened images can be printed, edited, etc.
Note
Search images in My Box (Scanned/Imported Images), Recently Saved Images or a selected folder
and its subfolders.
See "Starting MP Navigator EX" to start MP Navigator EX.
Quick Search
In
(Text box) on the Toolbar, enter a word or phrase included in the file
name, Exif information or PDF text of the image you want to search for, then click
information, text in Maker, Model, Description and User Comment is searched.
(Search). For Exif
Advanced Search
Click Search on the left of the screen to open search options. Enter information of the image you want to
search for, then click Start Search.
Searching Images
Search in
If you know where to look for, select the drive, folder or network from Specify Folder.
File Name
If you know the file name, enter it.
A word or phrase in the file
Enter a word or phrase included in the items selected in More Advanced Options.
Important
For PDF files, you can only search for those created with MP Navigator EX. You cannot search
PDF files created or edited in other applications. Also, searching PDF files is available only
when keyword search is set.
For details of creating PDF files that enables keyword search, see " PDF Settings Dialog Box ."
Password-protected PDF files cannot be searched.
Category
You can search for images by category.
Modified Date
To search for images that have been updated in a specific time period, enter the first and last dates
of the period.
Shooting Date
To search for images captured in a specific time period, enter the first and last dates of the period.
Note
Captured date is the date and time of data creation, which are included in the document's Exif
information.
More Advanced Options
A word or phrase in the file
In A word or phrase in the file, select the items to search. If you select the Exif information
Page 61 of 334 pages
Searching Images
Page 62 of 334 pages
checkbox, text in Maker, Model, Description and User Comment is searched. If you select the
PDF text checkbox, text in PDF files is searched.
Important
Text in password-protected PDF files cannot be searched.
Search subfolders
Select this checkbox to search subfolders.
Case sensitive
Select this checkbox to match case.
Match all criteria
Searches for files that meet all the specified criteria.
Match any criteria
Searches for files that meet any of the specified criteria.
Start Search
Starts search.
Related Topic
View & Use Window
Page top
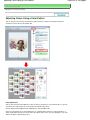
Classifying Images into Categories
On-screen Manual > Scanning Guide > Useful MP Navigator EX Functions > Classifying Images into Categories
Classifying Images into Categories
Display images scanned with MP Navigator EX by category. You can classify images displayed in
Unclassified automatically, and also create custom categories. You can drag and drop an image to
move it from one category to another.
Note
If you have classified the images in MP Navigator EX 2.0 or later and then upgrade MP Navigator EX
to the latest version, the classification information on the second latest version is transferred upon
initial startup. After the initial startup, the classification information cannot be transferred.
1. Scan documents into MP Navigator EX and save them, then open the View & Use
window from the Navigation Mode screen.
Note
See " Let's Try Scanning" to scan images into MP Navigator EX.
You can also select images saved on a computer.
Opening Images Saved on a Computer
2.
In
(Sort by), select Categories.
Images are automatically sorted by category and appear in the Thumbnail window.
Images are sorted into the following categories.
Photos: Portrait, Others
Documents: Business Card, Postcard, Standard Size, PDF File, Others
Page 63 of 334 pages
Classifying Images into Categories
Custom categories: Displays your custom categories.
To create custom categories, see " Creating Custom Categories ."
Unclassified: Displays images that are not classified.
Note
Click Classify Images to classify images displayed in Unclassified automatically. Click Cancel
to stop.
Classification may take time if there are many images to classify.
Important
Even if you classify images saved in removable media such as USB flash drive and external hard
disk, the classification information will be deleted once you remove the media. From the next time,
the images are classified to Unclassified.
Images cannot be classified when Recently Saved Images is selected in the View & Use window.
Note
Some images may not be detected correctly and thus may be classified into wrong categories. In
that case, drag and drop the image to the correct category.
Images saved in network folders may not be classified.
You can search for images by category. See " Searching Images " for details.
Creating Custom Categories
1. In the View & Use window, sort images by category and click Edit Custom
Categories.
The Edit Custom Categories dialog box opens.
2. Click Add to List.
The Add Category dialog box opens.
3. Enter Category name and click OK.
Note
You can create up to 20 custom categories.
Up to 50 single-byte characters can be used for a category name.
Double-click a created category to open the Change Category Name dialog box in which you can
change the category name.
Select a custom category and click Delete to delete it.
Related Topic
View & Use Window
Page 64 of 334 pages
Classifying Images into Categories
Page 65 of 334 pages
Page top
Utilizing Images in MP Navigator EX
Page 66 of 334 pages
On-screen Manual > Scanning Guide > Utilizing Images in MP Navigator EX
Utilizing Images in MP Navigator EX
You can scan images using MP Navigator EX and edit or print the saved images.
See the corresponding sections below for details on saving scanned images.
Saving scanned images to computer
Saving
Saving scanned image as PDF Files
Saving as PDF Files
See the corresponding sections below for details on using images/files.
Creating/editing PDF files from scanned images
Creating/Editing PDF Files
Printing multiple scanned images at one time or printing at specific size, quality, etc.
Printing Documents
Printing scanned photos
Printing Photos
Sending scanned images via e-mail
Sending via E-mail
Correcting/enhancing scanned images or converting them to text
Editing Files
Setting passwords for created PDF files
Setting Passwords for PDF Files
Opening/Editing Password-protected PDF Files
Page top
Saving
Page 67 of 334 pages
On-screen Manual > Scanning Guide > Utilizing Images in MP Navigator EX > Saving
Saving
Save images scanned with MP Navigator EX to a computer.
1. Select the checkboxes of the images you want to save, then click Save.
2. In the Save dialog box, specify the save settings.
Specify the destination folder, file name and file type.
Save Dialog Box
Important
When saving 48 bit color or 16 bit grayscale images scanned with ScanGear (scanner driver),
select TIFF. If you select a format other than TIFF, they will be saved as 24 bit color or 8 bit
grayscale images.
You cannot select JPEG/Exif when Document Type is Text(OCR).
You cannot select JPEG/Exif when Black and White is selected for Color Mode on the Advanced
Mode tab of ScanGear.
Note
By default, the following folders are specified as the destination folders.
Windows 7: MP Navigator EX folder in My Pictures folder
Saving
Page 68 of 334 pages
Windows Vista: MP Navigator EX folder in Pictures folder
Windows XP: MP Navigator EX folder in My Pictures folder
Windows 2000: MP Navigator EX folder in My Pictures folder
3. Click Save.
Scanned images are saved according to the settings.
To further use/edit the scanned images on MP Navigator EX, click Open saved location in the Save
Complete dialog box.
Creating/Editing PDF Files
Printing Documents
Printing Photos
Sending via E-mail
Editing Files
Page top
Saving as PDF Files
On-screen Manual > Scanning Guide > Utilizing Images in MP Navigator EX > Saving as PDF Files
Saving as PDF Files
Save images scanned with MP Navigator EX as PDF files.
1. Select the checkboxes of the images you want to save, then click Save as PDF file.
2. In the Save as PDF file dialog box, specify the save settings.
Specify the file type, file name and destination folder.
Save as PDF file Dialog Box
Select from the following PDF file types:
PDF
Page 69 of 334 pages
Saving as PDF Files
Page 70 of 334 pages
Save each of the selected images as a separate PDF file.
PDF(Multiple Pages)
Save multiple images in one PDF file.
Note
PDF(Multiple Pages) is displayed when multiple images are selected.
PDF(Add Page)
Add the scanned images to a PDF file. The images are added to the end of the PDF file. You
cannot rearrange the pages of the PDF file to which the images are added.
Important
Images can only be added to PDF files created with MP Navigator EX. You cannot specify
PDF files created with other applications. PDF files edited in other applications cannot be
specified as well.
If a password-protected PDF file is edited, the passwords will be deleted. Reset the
passwords.
Note
By default, the following folders are specified as the destination folders.
Windows 7: MP Navigator EX folder in My Pictures folder
Windows Vista: MP Navigator EX folder in Pictures folder
Windows XP: MP Navigator EX folder in My Pictures folder
Windows 2000: MP Navigator EX folder in My Pictures folder
You can set passwords for PDF files.
Setting Passwords for PDF Files
3. Click Save.
Scanned images are saved according to the settings.
To further use/edit the scanned images on MP Navigator EX, click Open saved location in the Save
Complete dialog box.
Creating/Editing PDF Files
Printing Documents
Printing Photos
Sending via E-mail
Editing Files
Page top
Creating/Editing PDF Files
On-screen Manual > Scanning Guide > Utilizing Images in MP Navigator EX > Creating/Editing PDF Files
Creating/Editing PDF Files
Create/edit PDF files using MP Navigator EX. After scanning documents and saving them, open the View
& Use window to create PDF files and add/delete pages, rearrange the page order, etc.
Important
You can create or edit up to 99 pages at one time using MP Navigator EX.
Note
See "Let's Try Scanning" to scan images into MP Navigator EX.
You can also select images saved on a computer.
Opening Images Saved on a Computer
Creating/Editing PDF Files with MP Navigator EX
1. Select images and click PDF.
Note
You can select PDF, JPEG, TIFF and BMP files.
2. Click Create/Edit PDF file on the list.
Important
For PDF files, you can only edit those created with MP Navigator EX. You cannot edit PDF files
created with other applications. PDF files edited in other applications cannot be edited as well.
Note
If a password-protected PDF file is selected, you will be prompted to enter the password.
Opening/Editing Password-protected PDF Files
Page 71 of 334 pages
Creating/Editing PDF Files
3. Add/delete pages as required.
To add an existing file, click Add Page and select the file. To delete a page, select it and click Delete
Selected Pages.
Note
You can add PDF, JPEG, TIFF and BMP files.
When adding a password-protected PDF file, you will be prompted to enter the password.
4. Rearrange the page order as required.
Use the icons to rearrange the order. Alternatively, drag the thumbnail to the target location.
Note
See " Create/Edit PDF file Window " for details on the Create/Edit PDF file window.
5. Click Save Selected Pages or Save All Pages.
The Save as PDF file dialog box opens.
Save as PDF file Dialog Box
Important
You cannot save images scanned at 10501 pixels or more in the vertical and horizontal
directions.
If a password-protected PDF file is edited, the passwords will be deleted. Reset the
passwords in the Save as PDF file dialog box.
Setting Passwords for PDF Files
6. Specify the save settings in the Save as PDF file dialog box, then click Save.
Images are saved according to the settings.
Opening PDF Files in an Application
You can open PDF files created with MP Navigator EX in an associated application and edit or print them.
1. Select PDF files and click PDF.
Important
For PDF files, you can only select those created with MP Navigator EX. You cannot select PDF
files created with other applications. PDF files edited in other applications cannot be selected
as well.
Page 72 of 334 pages
Creating/Editing PDF Files
Page 73 of 334 pages
2. Click Open PDF file on the list.
The application associated with the .pdf file extension by the operating system starts.
Important
Password-protected PDF files cannot be opened in applications not supporting PDF security.
Files may not open if an application that can be associated with PDF files is not installed.
3. Use the application to edit/print the file.
For details, refer to the application's manual.
Important
In some applications, the commands (print, edit, etc.) restricted by Permissions Password
may differ from those in MP Navigator EX.
Page top
Printing Documents
On-screen Manual > Scanning Guide > Utilizing Images in MP Navigator EX > Printing Documents
Printing Documents
You can print multiple scanned images at one time, print at specific quality, etc. using MP Navigator EX.
1. Scan documents into MP Navigator EX and save them, then open the View & Use
window from the Navigation Mode screen and select images.
Note
See " Let's Try Scanning" to scan images into MP Navigator EX.
You can also select images saved on a computer.
Opening Images Saved on a Computer
2. Click Print, then click Print Document on the list.
Important
If a password-protected PDF file is selected, you will be prompted to enter the password.
Opening/Editing Password-protected PDF Files
3. Specify print settings as required.
In the displayed dialog box, specify print count, quality, scale, etc.
Print Document Dialog Box
Page 74 of 334 pages
Printing Documents
Page 75 of 334 pages
Note
The setting items in the Print Document dialog box vary by printer.
4. Click Print.
Starts printing.
Note
When printing a multiple-page PDF file via Print Document, printing may take time depending
on your computer. In that case, follow these steps and change settings.
Windows 7:
1. From the Start menu, select Devices and Printers.
2. Right-click the icon of your printer and click Printer Properties.
The printer properties dialog box opens.
3. Click the Advanced tab.
4. Select Spool print documents so program finishes printing faster.
5. Select Start printing after last page is spooled.
6. After printing, return the setting on the Advanced tab to Start printing immediately.
Windows Vista:
1. From the Start menu, select Control Panel.
2. Click Printers.
3. Right-click the icon of your printer and click Properties.
The printer properties dialog box opens.
4. Click the Advanced tab.
5. Select Spool print documents so program finishes printing faster.
6. Select Start printing after last page is spooled.
7. After printing, return the setting on the Advanced tab to Start printing immediately.
To cancel while printing, select the printer icon on the taskbar and click Cancel Printing.
Page top
Printing Photos
On-screen Manual > Scanning Guide > Utilizing Images in MP Navigator EX > Printing Photos
Printing Photos
You can print photos using MP Navigator EX. After scanning documents and saving them, open the View
& Use window to select how you want to print the photos.
Note
See "Let's Try Scanning" to scan images into MP Navigator EX.
You can also select images saved on a computer.
Opening Images Saved on a Computer
When Printing Photos Using Easy-PhotoPrint EX
You can use Easy-PhotoPrint EX (application that accompanies Canon inkjet printer) to print scanned
photos at high quality or to layout and print images.
1. Select images and click Print.
2. Click Print Photo or Print Album on the list.
Easy-PhotoPrint EX starts. For details, refer to the help file of Easy-PhotoPrint EX.
Important
Supported as of 2010. Application is subject to change.
Note
If Easy-PhotoPrint EX is not installed, print with MP Navigator EX.
When Printing Photos Using MP Navigator EX
1. Select images and click Print.
Page 76 of 334 pages
Printing Photos
Page 77 of 334 pages
2. Click Print Photo on the list.
3. Specify print settings as required.
In the displayed dialog box, specify paper size, print count, etc.
Print Photo Dialog Box
4. Click Print.
Starts printing.
Note
To cancel while printing, select the printer icon on the taskbar and click Cancel Printing.
Page top
Sending via E-mail
On-screen Manual > Scanning Guide > Utilizing Images in MP Navigator EX > Sending via E-mail
Sending via E-mail
Send scanned images via e-mail.
Important
MP Navigator EX is compatible with the following e-mail software programs:
- Windows Mail (Windows Vista)
- Outlook Express (Windows XP/Windows 2000)
- Microsoft Outlook
(If an e-mail software program does not operate properly, check that the program's MAPI is enabled.
To enable MAPI, refer to the manual of the e-mail software program.)
1. Scan documents into MP Navigator EX and save them, then open the View & Use
window from the Navigation Mode screen and select images.
Note
Only PDF and JPEG files can be attached to e-mail.
See " Let's Try Scanning" to scan images into MP Navigator EX.
You can also select images saved on a computer.
Opening Images Saved on a Computer
2. Click Send, then click Attach to E-mail on the list.
3. Set save options as required.
Specify the destination folder and file name.
Send via E-mail Dialog Box
Page 78 of 334 pages
Sending via E-mail
Page 79 of 334 pages
Note
You can select a compression type when sending JPEG images via e-mail. Click Set... to open
a dialog box and select a compression type from High(Low Compression), Standard or
Low(High Compression).
4. Click OK.
Files are saved according to the settings, and the e-mail software program starts.
5. Specify the recipient, enter the subject and message, then send e-mail.
For details, refer to the manual of the e-mail software program.
Page top
Editing Files
On-screen Manual > Scanning Guide > Utilizing Images in MP Navigator EX > Editing Files
Editing Files
You can edit images or convert them to text using MP Navigator EX or an application that accompanies
the machine. After scanning documents and saving them, open the View & Use window to select what
you want to do with the images.
Note
See "Let's Try Scanning" to scan images into MP Navigator EX.
You can also select images saved on a computer.
Opening Images Saved on a Computer
Correcting Photo Images
You can correct/enhance images in the Correct/Enhance Images window.
1. Select images and click Edit/Convert.
2. Click Fix photo images on the list.
The Correct/Enhance Images window opens.
3. Correct/enhance images in the Correct/Enhance Images window.
Note
See " Correct/Enhance Images Window " for details on the Correct/Enhance Images window.
See the corresponding sections below for correcting/enhancing images.
Correcting/Enhancing Images Automatically
Correcting/Enhancing Images Manually
Editing Photograph Images
Page 80 of 334 pages
Editing Files
Page 81 of 334 pages
You can enhance images or correct colors using ArcSoft PhotoStudio.
© ArcSoft, Inc. All rights reserved for PhotoStudio.
1. Select images and click Edit/Convert.
2. Click Edit photo images on the list.
ArcSoft PhotoStudio starts.
3. Edit the images in ArcSoft PhotoStudio.
For details, refer to the ArcSoft PhotoStudio manual.
Converting Documents to Text
Scan text in scanned magazines and newspapers and display it in Notepad (included with Windows).
Important
PDF files cannot be converted to text.
1. Select images and click Edit/Convert.
2. Click Convert to text file on the list.
Notepad (included with Windows) starts and editable text appears.
Note
Only text written in languages that can be selected on the General tab can be extracted to
Notepad (included with Windows). Click Set... on the General tab and specify the language
according to the language of the document to be scanned.
When scanning multiple documents, you can collect the extracted text into one file.
General Tab
Text displayed in Notepad (included with Windows) is for guidance only. Text in the image of
the following types of documents may not be detected correctly.
- Documents containing text with font size outside the range of 8 points to 40 points (at 300 dpi)
- Slanted documents
- Documents placed upside down or documents with text in the wrong orientation (rotated
characters)
- Documents containing special fonts, effects, italics, or hand-written text
- Documents with narrow line spacing
- Documents with colors in the background of text
- Documents containing multiple languages
Page top
Setting Passwords for PDF Files
On-screen Manual > Scanning Guide > Utilizing Images in MP Navigator EX > Setting Passwords for PDF Files
Setting Passwords for PDF Files
Set passwords for opening, editing and printing PDF files.
You can set two passwords: one for opening the file and one for editing/printing it.
Important
In Windows 2000, Internet Explorer 5.5 Service Pack 2 or later is required to use this function.
You will not be able to open/edit the file if you forget the password. Record your passwords in a safe
place for future reference.
Password-protected PDF files cannot be opened in applications not supporting PDF security.
In some applications, the commands (print, edit, etc.) restricted by Permissions Password may
differ from those in MP Navigator EX.
Password-protected PDF files cannot be searched by text from the " View & Use Window ."
1. Scan documents into MP Navigator EX, then click Save as PDF file.
Alternatively, edit existing files in the Create/Edit PDF file window, then click Save
Selected Pages or Save All Pages.
The Save as PDF file dialog box opens.
Important
Passwords cannot be set when images are automatically saved after scanning, such as when
scanning from the One-click Mode screen or scanning using the buttons on the machine
(Scanner Buttons).
Note
See " Let's Try Scanning" to scan images.
See " Creating/Editing PDF Files " to create PDF files from existing images or to edit files.
2. Select the Password security settings checkbox.
Page 82 of 334 pages
Setting Passwords for PDF Files
The Password Security -Settings dialog box opens.
Note
You can also open the Password Security -Settings dialog box by clicking Set..., then selecting
Password Security for Security in the PDF Settings dialog box.
3. Select the Require a password to open the document or Use a password to restrict
printing and editing of the document and its security settings checkbox, then enter a
password.
Important
Up to 32 single-byte alphanumeric characters can be used for the password. Passwords are
case sensitive.
Select both checkboxes to set both Document Open Password and Permissions Password.
You cannot use the same password for both.
4. Click OK.
The Confirm Document Open Password or Confirm Permissions Password dialog box opens.
Page 83 of 334 pages
Setting Passwords for PDF Files
Page 84 of 334 pages
Document Open Password
Permissions Password
5. Re-enter the password and click OK.
The Save as PDF file dialog box returns.
Important
If you close the Save as PDF file dialog box without clicking Save, the settings in the Password
Security -Settings dialog box will be deleted.
Passwords are deleted once the file is edited. Reset the passwords when saving edited files.
Note
If you set the passwords via the PDF Settings dialog box, the PDF Settings dialog box returns.
Click OK. The Save as PDF file dialog box returns.
6. Click Save.
Files are saved according to the settings.
Related Topic
Opening/Editing Password-protected PDF Files
Page top
Opening/Editing Password-protected PDF Files
Page 85 of 334 pages
On-screen Manual > Scanning Guide > Utilizing Images in MP Navigator EX > Opening/Editing Password-protected PDF
Files
Opening/Editing Password-protected PDF Files
Enter a password to open or edit/print password-protected PDF files.
Password entry method varies by operation. The following procedures are examples only.
Important
You can open, edit or print only PDF files whose passwords were set with MP Navigator EX. You
cannot edit PDF files edited in other applications or whose passwords were set with other
applications. Only MP Navigator EX version 1.1 and 2.0 or later supports opening, editing and
printing password-protected PDF files.
In Windows 2000, Internet Explorer 5.5 Service Pack 2 or later is required to open, edit or print
password-protected PDF files.
Passwords are case sensitive.
You can create or edit up to 99 pages at one time using MP Navigator EX.
Entering a Password to Open a File
1. In the View & Use window, select the PDF file you want to open and click
Zoom
in.
Alternatively, double-click the PDF file.
Note
Only the Document Open Password will be required. The Permissions Password will not be
required.
If the Zoom in dialog box with a lock icon opens, click Enter Password.
Opening/Editing Password-protected PDF Files
2. The Password dialog box opens. Enter the password and click OK.
The PDF file opens in the Zoom in dialog box.
Note
To reopen the file after closing the Zoom in dialog box, re-enter the password.
Entering a Password (Permissions Password) to Edit or Print a File
1. In the View & Use window, select PDF files and click PDF or Print.
Page 86 of 334 pages
Opening/Editing Password-protected PDF Files
Page 87 of 334 pages
2. To create a PDF file or edit the file, select Create/Edit PDF file on the list. To print
the file, click Print Document.
In the Password dialog box, you will be prompted to enter a password.
Note
If the Document Open Password is set as well, the Document Open Password will be
required, then the Permissions Password will be required.
3. Enter the password and click OK.
The corresponding dialog box opens.
Important
If a password-protected PDF file is edited, the passwords will be deleted. Reset the
passwords.
Setting Passwords for PDF Files
Related Topic
Setting Passwords for PDF Files
Page top
MP Navigator EX Screens
Page 88 of 334 pages
On-screen Manual > Scanning Guide > MP Navigator EX Screens
MP Navigator EX Screens
Learn about the screens and functions of MP Navigator EX.
Scan/Import Documents or Images Tab
Photos/Documents (Platen) Screen (Scan/Import Window)
Scan Settings Dialog Box (Photos/Documents)
Save Dialog Box
Save as PDF file Dialog Box
Film Screen (Scan/Import Window)
Scan Settings Dialog Box (Film)
View & Use Images on your Computer Tab
View & Use Window
Create/Edit PDF file Window
Print Document Dialog Box
Print Photo Dialog Box
Send via E-mail Dialog Box
Correct/Enhance Images Window
Custom Scan with One-click Tab / One-click Mode Screen
Auto Scan Dialog Box
Save Dialog Box (One-click Mode Screen)
Scan Settings Dialog Box
Copy Dialog Box
Print Dialog Box
Mail Dialog Box
OCR Dialog Box
Scan Dialog Box
PDF Dialog Box
Preferences Dialog Box
General Tab
Scanner Button Settings Tab
Page top
Navigation Mode Screen
Page 89 of 334 pages
On-screen Manual > Scanning Guide > MP Navigator EX Screens > Navigation Mode Screen
Navigation Mode Screen
This is one of the startup screens of MP Navigator EX.
Point to the icon at the top of the screen to display each tab. Use each tab depending on what you want to
do.
Scan/Import
Scan photos and documents.
Scan/Import Documents or Images Tab
View & Use
You can open images saved on a computer and print them or attach them to e-mail. You can also edit
them using an application that accompanies the machine.
View & Use Images on your Computer Tab
One-click
You can complete from scanning to saving, printing, etc. at one time by simply clicking the
corresponding icon.
Custom Scan with One-click Tab
(Switch Mode)
Switches to One-click Mode screen. In the One-click Mode screen, you can complete from scanning to
saving, printing, etc. at one time by simply clicking the corresponding icon.
One-click Mode Screen
Show this window at startup
Select this checkbox to open the Main Menu at startup. If this checkbox is not selected, the last used
screen appears.
Preferences
The Preferences dialog box opens. In the Preferences dialog box, you can make advanced settings to
MP Navigator EX functions.
Preferences Dialog Box
(Guide)
Opens this guide.
Page top
Scan/Import Documents or Images Tab
Page 90 of 334 pages
On-screen Manual > Scanning Guide > MP Navigator EX Screens > Scan/Import Documents or Images Tab
Scan/Import Documents or Images Tab
Point to Scan/Import in the Navigation Mode screen to display the Scan/Import Documents or Images
tab.
Scan photos, documents and film.
Photos/Documents (Platen)
Opens the Scan/Import window. Scan photos and documents placed on the Platen.
Photos/Documents (Platen) Screen (Scan/Import Window)
Film
Opens the Scan/Import window. Scan film placed on the Platen.
Film Screen (Scan/Import Window)
(Switch Mode)
Switches to One-click Mode screen. In the One-click Mode screen, you can complete from scanning to
saving, printing, etc. at one time by simply clicking the corresponding icon.
One-click Mode Screen
Show this window at startup
Select this checkbox to open the Main Menu at startup. If this checkbox is not selected, the last used
screen appears.
Preferences
The Preferences dialog box opens. In the Preferences dialog box, you can make advanced settings to
MP Navigator EX functions.
Preferences Dialog Box
(Guide)
Opens this guide.
Page top
View Use Images on your Computer Tab
On-screen Manual > Scanning Guide > MP Navigator EX Screens > View & Use Images on your Computer Tab
View & Use Images on your Computer Tab
Point to View & Use in the Navigation Mode screen to display the View & Use Images on your Computer
tab.
You can open images saved on a computer and print them or attach them to e-mail. You can also edit
them using an application that accompanies the machine.
My Box (Scanned/Imported Images)
Opens the View & Use window with My Box (Scanned/Imported Images) selected.
You can open and use images saved in My Box.
My Box is a specific folder for saving images scanned with MP Navigator EX.
Note
The following folders are specified by default.
Windows 7: MP Navigator EX folder in My Pictures folder
Windows Vista: MP Navigator EX folder in Pictures folder
Windows XP: MP Navigator EX folder in My Pictures folder
Windows 2000: MP Navigator EX folder in My Pictures folder
Specify Folder
Opens the View & Use window with Specify Folder selected.
You can open and use images saved in specific folders.
Recently Saved Images
Opens the View & Use window with Recently Saved Images selected.
You can open and use "Scanned/Imported Images" and images that have been "Attached to E-mail" or
"Sent to Application" recently.
View & Use Window
(Switch Mode)
Switches to One-click Mode screen. In the One-click Mode screen, you can complete from scanning to
saving, printing, etc. at one time by simply clicking the corresponding icon.
One-click Mode Screen
Show this window at startup
Select this checkbox to open the Main Menu at startup. If this checkbox is not selected, the last used
screen appears.
Preferences
Page 91 of 334 pages
View Use Images on your Computer Tab
Page 92 of 334 pages
The Preferences dialog box opens. In the Preferences dialog box, you can make advanced settings to
MP Navigator EX functions.
Preferences Dialog Box
(Guide)
Opens this guide.
Related Topic
Opening Images Saved on a Computer
Page top
Custom Scan with One-click Tab
On-screen Manual > Scanning Guide > MP Navigator EX Screens > Custom Scan with One-click Tab
Custom Scan with One-click Tab
Point to One-click in the Navigation Mode screen to display the Custom Scan with One-click tab.
You can complete from scanning to saving, printing, etc. at one time by simply clicking the corresponding
icon.
Auto Scan
Scan documents by automatically detecting the document type. File format is automatically set. Files
are saved to a computer.
When you click this icon, the Auto Scan dialog box opens and you can specify the save settings.
Auto Scan Dialog Box
Save
Scan documents or photos and save them to a computer. The document type can be detected
automatically.
When you click this icon, the Save dialog box opens and you can specify the scan/save settings.
Save Dialog Box (One-click Mode Screen)
Copy
Scan and print documents.
When you click this icon, the Copy dialog box opens and you can specify the scan/print settings.
Copy Dialog Box
Print
Scan documents and print them after specifying the paper, printing method, size, etc. This is useful
when you want to copy/enlarge printed photographs.
When you click this icon, the Print dialog box opens. You can specify the scan/print settings and print
on a printer.
Print Dialog Box
Mail
Scan documents or photos and attach them to e-mail.
When you click this icon, the Mail dialog box opens and you can specify the scan/save and e-mail
software program settings.
Mail Dialog Box
OCR
Scan text documents then extract text in the image and display it in Notepad (included with Windows).
When you click this icon, the OCR dialog box opens and you can specify the scan/save settings.
OCR Dialog Box
Page 93 of 334 pages
Custom Scan with One-click Tab
Page 94 of 334 pages
Scan
Scan documents/photos and open them in a specified application. The document type can be
automatically detected.
When you click this icon, the Scan dialog box opens and you can specify the scan/save and application
settings.
Scan Dialog Box
PDF
Scan documents and save them as PDF files.
When you click this icon, the PDF dialog box opens and you can specify the scan/save and application
settings.
PDF Dialog Box
AUTO SCAN button
This icon indicates which MP Navigator EX function is assigned to the AUTO SCAN button on the
machine (Scanner Button). The AUTO SCAN button icon appears above the assigned function.
COPY button
This icon indicates which MP Navigator EX function is assigned to the COPY button on the machine
(Scanner Button). The COPY button icon appears above the assigned function.
E-MAIL button
This icon indicates which MP Navigator EX function is assigned to the E-MAIL button on the machine
(Scanner Button). The E-MAIL button icon appears above the assigned function.
Start scanning by clicking the button
Select this checkbox and click an icon to start scanning immediately.
(Switch Mode)
Switches to One-click Mode. The One-click Mode screen appears.
One-click Mode Screen
Show this window at startup
Select this checkbox to open the Main Menu at startup. If this checkbox is not selected, the last used
screen appears.
Preferences
The Preferences dialog box opens. In the Preferences dialog box, you can make advanced settings to
MP Navigator EX functions.
Preferences Dialog Box
(Guide)
Opens this guide.
Important
The following restrictions apply when you scan with Document Type set to Auto Mode in the Save,
Print or Scan dialog box.
When you want to convert text in the scanned image to text data, specify Document Type (do not
select Auto Mode).
Related Topic
Easy Scanning with One-click
Page top
Photos/Documents (Platen) Screen (Scan/Import Window)
On-screen Manual > Scanning Guide > MP Navigator EX Screens > Photos/Documents (Platen) Screen (Scan/Import
Window)
Photos/Documents (Platen) Screen (Scan/Import Window)
Point to Scan/Import in the Navigation Mode screen and click Photos/Documents (Platen) to open the
Photos/Documents (Platen) screen (Scan/Import window).
Open this window to scan documents from the Platen.
(1) Settings and Operation Buttons
(2) Toolbar
(3) Thumbnail Window
(4) Selected Images Area
Settings and Operation Buttons
(View & Use)
Click this when you want to open images and PDF files saved on your computer. The View & Use
window opens.
View & Use Window
Photos/Documents (Platen)
Displays the screen for scanning photos, documents, magazines and other printed materials.
Film
Click this when you want to scan film. The screen for scanning film appears.
Film Screen (Scan/Import Window)
Document Type
Select the type of document to be scanned.
Scanning photos: Color Photo or Black and White Photo
Scanning text documents: Color Document, Black and White Document or Text(OCR)
Scanning magazines: Magazine(Color)
Important
Page 95 of 334 pages
Photos/Documents (Platen) Screen (Scan/Import Window)
You cannot select Document Type if the Use the scanner driver checkbox is selected.
Specify...
Specify the document size, resolution, and other advanced scan settings.
Scan Settings Dialog Box (Photos/Documents)
Important
Specify... is not available if the Use the scanner driver checkbox is selected.
Use the scanner driver
Select this checkbox when you want to scan with ScanGear (scanner driver). Use ScanGear to
correct images and adjust colors when scanning.
Scan
Scanning starts.
Note
This button changes to Open Scanner Driver when you select the Use the scanner driver
checkbox.
Open Scanner Driver
ScanGear starts.
See "ScanGear (Scanner Driver) Screens " for details on ScanGear screens.
Note
This button changes to Scan when you deselect the Use the scanner driver checkbox.
Clear
Delete all images in the Thumbnail window.
Note
Images not saved on a computer will be deleted. To keep important images, use Save or other
methods to save them to a computer before clicking Clear.
Save
Save the selected images. Click to open the Save dialog box and specify the save settings.
Save Dialog Box
Save as PDF file
Save the selected images as PDF files. Click to open the Save as PDF file dialog box and specify the
save settings.
Save as PDF file Dialog Box
Jump to Main Menu
Jumps to the Main Menu.
Toolbar
Preferences
The Preferences dialog box opens. In the Preferences dialog box, you can make advanced settings
to MP Navigator EX functions.
Preferences Dialog Box
(Guide)
Opens this guide.
Edit Tools
(Select All)
Page 96 of 334 pages
Photos/Documents (Platen) Screen (Scan/Import Window)
Selects all images in the Thumbnail window.
(Cancel All)
Cancels all image selections in the Thumbnail window.
(Rotate Left)
Rotates the target image (outlined in orange) 90 degrees counter-clockwise.
(Rotate Right)
Rotates the target image (outlined in orange) 90 degrees clockwise.
(Invert)
Inverts the target image (outlined in orange) horizontally.
(Trimming)
Trims the target image (outlined in orange). Trimming is the act of selecting the area you want
to keep in a photo and discarding the rest. Click this button to open the Crop window and
specify the trimming frame.
Zoom in
Enlarges the target image (outlined in orange). You can also enlarge the image by doubleclicking it.
(Display Size)
Changes the size of images in the Thumbnail window.
(Sort by)
Sorts the images in the Thumbnail window by category or by date (ascending or descending).
Thumbnail Window
Thumbnail Window
Scanned images are displayed.
When you select the checkbox of an image, the image appears in the Selected Images area.
Note
Thumbnails may appear as "?" when there is not enough memory to display the images.
When Images are Sorted by Categories
Close All / Open All
You can hide or show all images in the displayed categories.
Close All
Hides all images.
Open All
Displays all images.
Note
When you click Close All, the button changes to Open All.
Selected Images Area
(Cancel All)
Cancels the selection of all images in the Selected Images area.
Page 97 of 334 pages
Photos/Documents (Platen) Screen (Scan/Import Window)
Page 98 of 334 pages
(Cancel Selection)
Cancels the selection of the target image (outlined in orange) in the Selected Images area.
Selected Images Area
Images selected in the Thumbnail window are displayed.
Related Topic
Scanning Photos and Documents
Page top
Scan Settings Dialog Box (Photos/Documents)
On-screen Manual > Scanning Guide > MP Navigator EX Screens > Scan Settings Dialog Box (Photos/Documents)
Scan Settings Dialog Box (Photos/Documents)
The Scan Settings dialog box opens when you click Specify... in the Scan/Import window.
In the Scan Settings dialog box, you can make advanced scan settings.
Document Type
Select the type of document to be scanned.
Scanning photos: Color Photo or Black and White Photo
Scanning text documents: Color Document, Black and White Document or Text(OCR)
Scanning magazines: Magazine(Color)
Important
To scan correctly, select a document type that matches the document to be scanned.
Document Size
Select the size of the document to be scanned.
When you select Custom, a screen in which you can specify the document size appears. Select a
Units, then enter the Width and Height and click OK.
Important
When you select Auto Detect, the image may not be scanned at the correct position and size. In
that case, change the size to the actual document size (A4, Letter, etc.) and align a corner of the
document with the corner at the arrow (alignment mark) of the Platen.
You cannot select Auto Detect (Multiple Documents) or Auto Detect when Document Type is
Text(OCR).
Scanning Resolution
Select the resolution at which to scan documents.
Resolution
Note
Page 99 of 334 pages
Scan Settings Dialog Box (Photos/Documents)
The following scanning resolutions can be specified when Document Type is Text(OCR).
300 dpi / 400 dpi
Auto Photo Fix / Auto Document Fix
The displayed item varies by Document Type.
Auto Photo Fix
This is displayed when Document Type is Color Photo. Select this checkbox to automatically
analyze the captured scene (landscape, night scene, etc.) and apply suitable corrections.
Auto Document Fix
This is displayed when Document Type is Color Document, Black and White Document or
Magazine(Color). Select this checkbox to sharpen text in a document or magazine for better
readability.
Important
When this checkbox is selected, the files can be saved in JPEG/Exif or PDF format only.
Scanning may take longer than usual when this checkbox is selected.
You cannot select this checkbox when Document Type is Black and White Photo or Text(OCR).
The color tone may change from the source image due to corrections. In that case, deselect the
checkbox and scan.
Descreen
Select this checkbox to reduce moire patterns.
Printed photos and pictures are displayed as a collection of fine dots. "Moire" is a phenomenon where
uneven gradation or a stripe pattern appears when such photos or pictures printed with fine dots are
scanned. Descreen is the function for reducing this moire effect.
Important
You cannot select this checkbox when Document Type is Color Photo, Black and White Photo or
Text(OCR).
Note
Scanning takes longer than usual when you enable Descreen.
Unsharp Mask
Select this checkbox to emphasize the outline of the subjects and sharpen the image.
Important
You cannot select this checkbox when Document Type is Text(OCR).
Remove gutter shadow
Select this checkbox to correct shadows that appear between pages when scanning open booklets.
Important
You cannot select this checkbox when Auto Detect, Auto Detect (Multiple Documents) or Stitch
Assist is selected for Document Size.
Align the document correctly with the alignment mark on the Platen.
Note
Use ScanGear (scanner driver)'s Advanced Mode tab to correct gutter shadows when scanning
non-standard size documents or when custom cropping frames are set.
For details, see Gutter Shadow Correction in " Image Settings " (ScanGear's Advanced Mode tab).
Reduce Show-through
Select this checkbox to sharpen text in a document or reduce show-through in newspapers.
Important
You cannot select this checkbox when Document Type is Color Photo, Black and White Photo or
Page 100 of 334 pages
Scan Settings Dialog Box (Photos/Documents)
Page 101 of 334 pages
Text(OCR).
Note
Select this checkbox when Document Type is text document and show-through is apparent in the
scanned image.
Correct slanted document
Select this checkbox to detect the scanned text and correct the angle (within -0.1 to -10 degrees or +0.1
to +10 degrees) of the document.
Important
You cannot select this checkbox when Document Type is Color Photo or Black and White Photo.
You cannot select this checkbox when Document Size is Stitch Assist.
The inclination of the following types of documents may not be corrected, as the text cannot be
detected correctly.
- Documents in which the text lines are inclined more than 10 degrees or the angles vary by line
- Documents containing both vertical and horizontal text
- Documents with extremely large or small fonts
- Documents with small amount of text
- Documents containing figures/images or hand-written text
- Documents containing both vertical and horizontal lines (tables)
Note
Scanning takes longer than usual when you enable Correct slanted document.
Detect the orientation of text documents and rotate images
Select this checkbox to detect the orientation of the document from the scanned text and rotate the
scanned image to the correct orientation. Select the language of the document to be scanned in
Document Language.
Important
You cannot select this checkbox when Document Type is Color Photo or Black and White Photo.
You cannot select this checkbox when Document Size is Stitch Assist.
This function may not work properly depending on the document language. Only text documents
written in languages that can be selected from Document Language are supported.
The orientation of the following types of documents may not be corrected, as the text cannot be
detected correctly. In that case, select the scanned image in the Thumbnail window of the "
Photos/Documents (Platen) Screen (Scan/Import Window) " and rotate it with Edit Tools.
- Resolution is outside the range of 300 dpi to 600 dpi
- Font size is outside the range of 8 points to 48 points
- Documents containing special fonts, effects, italics, or hand-written text
- Documents with patterned backgrounds
Note
Scanning takes longer than usual when you enable Detect the orientation of text documents and
rotate images.
Document Language
Select the language of the document to be scanned.
Important
You cannot select this checkbox when Document Type is Color Photo or Black and White Photo.
You cannot select this checkbox when Document Size is Stitch Assist.
Defaults
Restores the default settings.
Page top
Film Screen (Scan/Import Window)
On-screen Manual > Scanning Guide > MP Navigator EX Screens > Film Screen (Scan/Import Window)
Film Screen (Scan/Import Window)
Point to Scan/Import in the Navigation Mode screen and click Film, or click Film in the Scan/Import
window to open the Film screen (Scan/Import window).
Open this window to scan film from the Platen.
(1) Settings and Operation Buttons
(2) Toolbar
(3) Thumbnail Window
(4) Selected Images Area
Settings and Operation Buttons
(View & Use)
Click this when you want to open images and PDF files saved on your computer. The View & Use
window opens.
View & Use Window
Photos/Documents (Platen)
Click this when you want to scan photos, documents, magazines and other printed materials. The
screen for scanning photos and documents appears.
Photos/Documents (Platen) Screen (Scan/Import Window)
Film
Displays the screen for scanning film.
Specify...
Specify the film type, resolution, and other advanced scan settings.
Scan Settings Dialog Box (Film)
Important
Specify... is not available if the Use the scanner driver checkbox is selected.
Page 102 of 334 pages
Film Screen (Scan/Import Window)
Page 103 of 334 pages
Use the scanner driver
Select this checkbox when you want to scan with ScanGear (scanner driver). Use ScanGear to
correct images and adjust colors when scanning.
Scan
Scanning starts.
Note
This button changes to Open Scanner Driver when you select the Use the scanner driver
checkbox.
Open Scanner Driver
ScanGear starts.
See "ScanGear (Scanner Driver) Screens " for details on ScanGear screens.
Note
This button changes to Scan when you deselect the Use the scanner driver checkbox.
Clear
Delete all images in the Thumbnail window.
Note
Images not saved on a computer will be deleted. To keep important images, use Save or other
methods to save them to a computer before clicking Clear.
Save
Save the selected images. Click to open the Save dialog box and specify the save settings.
Save Dialog Box
Save as PDF file
Save the selected images as PDF files. Click to open the Save as PDF file dialog box and specify the
save settings.
Save as PDF file Dialog Box
Jump to Main Menu
Jumps to the Main Menu.
Toolbar
Preferences
The Preferences dialog box opens. In the Preferences dialog box, you can make advanced settings
to MP Navigator EX functions.
Preferences Dialog Box
(Guide)
Opens this guide.
Edit Tools
(Select All)
Selects all images in the Thumbnail window.
(Cancel All)
Cancels all image selections in the Thumbnail window.
(Rotate Left)
Rotates the target image (outlined in orange) 90 degrees counter-clockwise.
Film Screen (Scan/Import Window)
(Rotate Right)
Rotates the target image (outlined in orange) 90 degrees clockwise.
(Invert)
Inverts the target image (outlined in orange) horizontally.
(Trimming)
Trims the target image (outlined in orange). Trimming is the act of selecting the area you want
to keep in a photo and discarding the rest. Click this button to open the Crop window and
specify the trimming frame.
Zoom in
Enlarges the target image (outlined in orange). You can also enlarge the image by doubleclicking it.
(Display Size)
Changes the size of images in the Thumbnail window.
(Sort by)
Sorts the images in the Thumbnail window by category or by date (ascending or descending).
Thumbnail Window
Thumbnail Window
Scanned images are displayed.
When you select the checkbox of an image, the image appears in the Selected Images area.
Note
Thumbnails may appear as "?" when there is not enough memory to display the images.
When Images are Sorted by Categories
Close All / Open All
You can hide or show all images in the displayed categories.
Close All
Hides all images.
Open All
Displays all images.
Note
When you click Close All, the button changes to Open All.
Selected Images Area
(Cancel All)
Cancels the selection of all images in the Selected Images area.
(Cancel Selection)
Cancels the selection of the target image (outlined in orange) in the Selected Images area.
Selected Images Area
Images selected in the Thumbnail window are displayed.
Page 104 of 334 pages
Film Screen (Scan/Import Window)
Page 105 of 334 pages
Related Topic
Scanning Film
Page top
Scan Settings Dialog Box (Film)
On-screen Manual > Scanning Guide > MP Navigator EX Screens > Scan Settings Dialog Box (Film)
Scan Settings Dialog Box (Film)
The Scan Settings dialog box opens when you click Specify... in the Scan/Import window.
In the Scan Settings dialog box, you can make advanced scan settings.
Film Type
Select the type of film to be scanned.
Important
Film may not be scanned correctly when Auto is selected. In that case, select the type of film and
scan again.
Note
To scan black and white film, it is recommended that you select Black and White Negative Film or
Black and White Positive Film.
Document Size
35mm Film is displayed.
Note
To scan 120 Format Films, scan from the Advanced Mode tab of ScanGear (scanner driver).
Scanning Film in Advanced Mode
Scanning Resolution
Select the resolution at which to scan film.
Resolution
Auto Photo Fix
Select this checkbox to automatically analyze the captured scene (landscape, night scene, etc.) and
apply suitable corrections.
Important
When this checkbox is selected, the files can be saved in JPEG/Exif or PDF format only.
Scanning may take longer than usual when this checkbox is selected.
You cannot select this checkbox when Film Type is Black and White Negative Film or Black and
White Positive Film.
The color tone may change from the source image due to corrections. In that case, deselect the
checkbox and scan.
Unsharp Mask
Select this checkbox to emphasize the outline of the subjects and sharpen the image.
Page 106 of 334 pages
Scan Settings Dialog Box (Film)
Page 107 of 334 pages
Preview before scanning
Select this checkbox, then start a scan to display preview images before the actual scan. In the preview
screen, click Cancel to return to the MP Navigator EX screen, or click Scan to start scanning the
selected frames.
Defaults
Restores the default settings.
Page top
Save Dialog Box
Page 108 of 334 pages
On-screen Manual > Scanning Guide > MP Navigator EX Screens > Save Dialog Box
Save Dialog Box
The Save dialog box opens when you click Save in the Scan/Import window.
In the Save dialog box, you can make settings for saving images to a computer.
Save in
Displays the folder in which to save the scanned images. To change the folder, click Browse... to
specify another one.
The following folders are specified by default.
Windows 7: MP Navigator EX folder in My Pictures folder
Windows Vista: MP Navigator EX folder in Pictures folder
Windows XP: MP Navigator EX folder in My Pictures folder
Windows 2000: MP Navigator EX folder in My Pictures folder
File name
Enter the file name of the image to be saved (up to 64 characters). When saving multiple files, 4 digits
are appended to each file name.
Save as type
Select a file type to save the scanned images.
Select JPEG/Exif, TIFF or BMP.
Important
You cannot select JPEG/Exif when Document Type is Text(OCR).
When saving 48 bit color or 16 bit grayscale images scanned with ScanGear (scanner driver),
select TIFF. If you select a format other than TIFF, they will be saved as 24 bit color or 8 bit
grayscale images.
You cannot select JPEG/Exif when Black and White is selected for Color Mode on the Advanced
Mode tab of ScanGear.
Set...
When Save as type is JPEG/Exif
You can specify a compression type for JPEG files. Select High(Low Compression), Standard or
Low(High Compression).
Save to a Subfolder with Current Date
Select this checkbox to create a subfolder in the folder specified in Save in with the current date and
save scanned files in it. A subfolder with a name such as "2010_01_01" (Year_Month_Date) will be
created.
If this checkbox is not selected, files are saved directly in the folder specified in Save in.
Page top
Save as PDF file Dialog Box
On-screen Manual > Scanning Guide > MP Navigator EX Screens > Save as PDF file Dialog Box
Save as PDF file Dialog Box
In the Save as PDF file dialog box, you can make advanced settings for saving scanned images as PDF
files. You can save multiple documents as one PDF file or add pages to a PDF file created with MP
Navigator EX.
Important
You cannot save images scanned at 10501 pixels or more in the vertical and horizontal directions.
Dialog box that opens when Save as PDF file in the Scan/Import window is clicked
Dialog box that opens when Save Selected Pages or Save All Pages is clicked in the
Create/Edit PDF file window
Save as type
Select a PDF file type to save the scanned images.
PDF
Page 109 of 334 pages
Save as PDF file Dialog Box
Page 110 of 334 pages
Save each of the selected images as a separate PDF file.
PDF(Multiple Pages)
Save multiple images in one PDF file.
Note
PDF(Multiple Pages) is displayed when multiple images are selected.
PDF(Add Page)
Add the scanned images to a PDF file. The images are added to the end of the PDF file. You
cannot rearrange the pages of the PDF file to which the images are added.
Important
Images can only be added to PDF files created with MP Navigator EX. You cannot specify
PDF files created with other applications. PDF files edited in other applications cannot be
specified as well.
If a password-protected PDF file is edited, the passwords will be deleted. Reset the
passwords.
Setting Passwords for PDF Files
Set...
Make advanced settings for creating PDF files. See " PDF Settings Dialog Box " for details.
Password security settings
Select this checkbox to open the Password Security -Settings dialog box in which you can set
passwords for opening, editing and printing created PDF files.
Setting Passwords for PDF Files
Add to
This is displayed when you select PDF(Add Page) for Save as type and specify the PDF file to which
images are added. To change the file, click Browse... to specify another one.
Important
Images can only be added to PDF files created with MP Navigator EX. You cannot specify PDF
files created with other applications. PDF files edited in other applications cannot be specified
as well.
File name
Enter the file name of the image to be saved (up to 64 characters). When saving multiple files, 4
digits are appended to each file name.
Save in
Displays the folder in which to save the PDF files. To change the folder, click Browse... to specify
another one.
The following folders are specified by default.
Windows 7: MP Navigator EX folder in My Pictures folder
Windows Vista: MP Navigator EX folder in Pictures folder
Windows XP: MP Navigator EX folder in My Pictures folder
Windows 2000: MP Navigator EX folder in My Pictures folder
Save to a Subfolder with Current Date
Select this checkbox to create a subfolder in the folder specified in Save in with the current date and
save scanned files in it. A subfolder with a name such as "2010_01_01" (Year_Month_Date) will be
created.
If this checkbox is not selected, files are saved directly in the folder specified in Save in.
Page top
PDF Settings Dialog Box
Page 111 of 334 pages
On-screen Manual > Scanning Guide > MP Navigator EX Screens > PDF Settings Dialog Box
PDF Settings Dialog Box
In the PDF Settings dialog box, you can specify the PDF compression type and other advanced settings
for creating PDF files.
Enable keyword search
Select this checkbox to convert characters in a document to text data. This will enable an easy search
by keyword.
Document Language
Select the language of the document to be scanned.
Detect the orientation of text documents and rotate images
Select this checkbox to detect the orientation of the document from the scanned text and rotate the
scanned image to the correct orientation.
Important
This function may not work properly depending on the document language. Only text documents
written in languages that can be selected from Document Language are supported.
The orientation of the following types of documents may not be corrected, as the text cannot be
detected correctly.
- Resolution is outside the range of 300 dpi to 600 dpi
- Font size is outside the range of 8 points to 48 points
- Documents containing special fonts, effects, italics, or hand-written text
- Documents with patterned backgrounds
Correct slanted document
Select this checkbox to detect the scanned text and correct the angle (within -0.1 to -10 degrees or +0.1
to +10 degrees) of the document.
Important
The inclination of the following types of documents may not be corrected, as the text cannot be
detected correctly.
- Documents in which the text lines are inclined more than 10 degrees or the angles vary by line
- Documents containing both vertical and horizontal text
- Documents with extremely large or small fonts
- Documents with small amount of text
- Documents containing figures/images or hand-written text
- Documents containing both vertical and horizontal lines (tables)
PDF Compression
Select a compression type for saving.
Standard
PDF Settings Dialog Box
Page 112 of 334 pages
It is recommended that you normally select this setting.
High
Compresses the file size when saving, allowing you to reduce the load on your network/server.
Important
Highly compressed PDF images may degrade if you repeatedly save them with high
compression.
Important
Compression type cannot be set when Color Mode is Black and White.
Note
The following images can be compressed with high efficiency.
- Images with resolutions within the range of 75 dpi to 600 dpi
Security
Set passwords for opening, editing and printing the created PDF files.
Important
In Windows 2000, Internet Explorer 5.5 Service Pack 2 or later is required to use this function.
This function is not available when images are automatically saved after scanning, such as when
scanning from the One-click Mode screen or scanning using the button on the machine (Scanner
Button).
Note
Select Password Security and set passwords in the Password Security -Settings dialog box.
Setting Passwords for PDF Files
Page top
View Use Window
On-screen Manual > Scanning Guide > MP Navigator EX Screens > View & Use Window
View & Use Window
Point to View & Use in the Navigation Mode screen and click My Box (Scanned/Imported Images), Specify
Folder or Recently Saved Images to open the View & Use window.
Open this window to display or use scanned images or images saved on a computer.
Important
For PDF files, only those created with MP Navigator EX are displayed. You cannot display PDF files
created with other applications. PDF files edited in other applications cannot be displayed as well.
(1) Display Setting Items
(2) Image Handling Buttons
(3) Toolbar
(4) Thumbnail Window
(5) Selected Images Area
Display Setting Items
(Scan/Import)
Click this when you want to scan photos, documents, magazines and other printed materials. The
Scan/Import window opens.
Photos/Documents (Platen) Screen (Scan/Import Window)
My Box (Scanned/Imported Images)
Displays folders of images (grouped by year, year/month and year/month/date) in My Box in tree
Page 113 of 334 pages
View Use Window
Page 114 of 334 pages
view. Select a folder to display its contents in the Thumbnail window to the right.
Image date is the scanned, captured or updated date.
Specify Folder
Displays all hard disks and folders in tree view. Select a folder to display images in the Thumbnail
window to the right.
Selecting a folder and clicking it highlights the folder name, allowing you to rename it.
Recently Saved Images
"Scanned/Imported Images" and images that have been "Attached to E-mail" or "Sent to Application"
recently are displayed in tree view by date. Select a Month/Date/Year folder to display images by date
in the Thumbnail window to the right.
Image date is the scanned or sent date.
Click Clear History to clear all data (date folders and images) displayed in Recently Saved Images.
Note
The actual image files are not deleted.
Search
The advanced search options opens.
Searching Images
Jump to Main Menu
Jumps to the Main Menu.
Image Handling Buttons
Image Handling Buttons
Specify what to do with the selected images. See the corresponding sections below for details on
each button.
Creating/Editing PDF Files
Printing Documents
Printing Photos
Sending via E-mail
Editing Files
Note
The buttons in Image Handling Buttons are displayed when the corresponding applications are
installed.
Toolbar
Preferences
The Preferences dialog box opens. In the Preferences dialog box, you can make advanced settings
to MP Navigator EX functions.
Preferences Dialog Box
(Guide)
Opens this guide.
Edit Tools
(Select All)
Selects all images in the Thumbnail window.
(Cancel All)
Cancels all image selections in the Thumbnail window.
(Image Correction/Enhancement)
View Use Window
Page 115 of 334 pages
Allows you to correct the target image (outlined in orange). Click this button to open the Correct/
Enhance Images window in which you can correct/enhance images and also adjust the
brightness, contrast, etc.
Correct/Enhance Images Window
Important
Image correction/enhancement cannot be applied to PDF files or black and white binary
files.
Zoom in
Enlarges the target image (outlined in orange). You can also enlarge the image by doubleclicking it. You can check all pages when you select a PDF file.
You can also check file information such as file name, date, size and security setting. A lock icon
appears for PDF files with Document Open Password set.
Opening/Editing Password-protected PDF Files
(Search)
Enter a word or phrase included in the file name, Exif information or PDF text of the image you
(Search). For Exif information, text in Maker, Model,
want to search for, then click
Description and User Comment is searched.
Note
Search images in My Box (Scanned/Imported Images), Recently Saved Images or a
selected folder and its subfolders.
(Refresh)
Refreshes the Thumbnail window contents.
(Display Size)
Changes the size of images in the Thumbnail window.
(Sort by)
Sorts the images in the Thumbnail window by category, date (ascending or descending) or
name (ascending or descending).
Images can be sorted by category only when My Box (Scanned/Imported Images) or Specify
Folder is displayed.
Thumbnail Window
Thumbnail Window
Scanned images are displayed.
When you select the checkbox of an image, the image appears in the Selected Images area.
Selecting an image and clicking the file name highlights the file name, allowing you to rename it.
Drag and drop an image to do the following things.
- Move from one category to another within the Thumbnail window
- Move to a category folder displayed in My Box (Scanned/Imported Images)
- Copy to a folder displayed in Specify Folder
Important
In Windows 2000, Internet Explorer 5.5 Service Pack 2 or later is required to open passwordprotected PDF files.
You cannot change the extension (.jpg, .pdf, etc.) when renaming a file.
You cannot move or copy images to the date folders displayed in tree view in My Box (Scanned/
Imported Images) or Recently Saved Images.
Note
A lock icon appears for PDF files with Document Open Password set.
View Use Window
Page 116 of 334 pages
Thumbnails may appear as "?" in the following cases.
- Opening unsupported images
- File size is too large and there is not enough memory to display the image
- The file is corrupted
When Images are Sorted by Categories
Scanned images are displayed by category.
Note
Some images may not be detected correctly and thus may be classified into wrong categories.
In that case, drag and drop an image and move it from one category to another.
Category name Images: N (Selected: n)
Category name
The following categories are provided.
Photos: Portrait, Others
Documents: Business Card, Postcard, Standard Size, PDF File, Others
Custom categories: Displays your custom categories.
Unclassified: Displays images that have not yet been classified.
Images: N
The number of images classified into the category is displayed.
(Selected: n)
The number of images with the checkbox selected is displayed.
Note
This portion is displayed only when one or more images are selected.
Close All / Open All
You can hide or show all images in the displayed categories.
This button is displayed only when My Box (Scanned/Imported Images) or Specify Folder is
displayed.
Close All
Hides all images.
Open All
Displays all images.
Note
Immediately after opening the View & Use window or sorting images, all images appear
and Close All is displayed.
When you click Close All, the button changes to Open All.
All Categories / Specific Categories
You can display all categories or only those containing images.
This button is displayed only when My Box (Scanned/Imported Images) or Specify Folder is
displayed.
All Categories
Displays all categories and images.
View Use Window
Page 117 of 334 pages
Specific Categories
Displays categories containing images, along with the contained images. More images will
be displayed in the Thumbnail window, allowing you to find or move images easily.
Note
Immediately after opening the View & Use window, categories containing images appear
along with the contained images, and All Categories is displayed.
Click All Categories, to changes to Specific Categories.
Edit Custom Categories
When My Box (Scanned/Imported Images) or Specify Folder is displayed, the Edit Custom
Categories dialog box opens.
In the Edit Custom Categories dialog box, you can add/delete categories displayed in Custom
Categories.
See "Classifying Images into Categories " for details.
Classify Images
Images imported from hard disks appear in Unclassified. Click Classify Images to classify
them automatically.
This button is displayed only when My Box (Scanned/Imported Images) or Specify Folder is
displayed.
Note
Classification may take time if there are many images to classify.
Selected Images Area
(Cancel All)
Cancels the selection of all images in the Selected Images area.
(Cancel Selection)
Cancels the selection of the target image (outlined in orange) in the Selected Images area.
Selected Images Area
Images selected in the Thumbnail window are displayed.
Related Topic
Opening Images Saved on a Computer
Page top
Create/Edit PDF file Window
On-screen Manual > Scanning Guide > MP Navigator EX Screens > Create/Edit PDF file Window
Create/Edit PDF file Window
Click PDF in the View & Use window, then click Create/Edit PDF file on the list to open the Create/Edit
PDF file window.
In the Create/Edit PDF file window, you can add/delete pages and rearrange the page order of PDF files
created with MP Navigator EX.
Important
You cannot save images scanned at 10501 pixels or more in the vertical and horizontal directions.
If a password-protected PDF file is edited, the passwords will be deleted. Reset the passwords.
Setting Passwords for PDF Files
You can create or edit up to 99 pages at one time using MP Navigator EX.
Rearrange Pages
You can move the selected image (outlined in orange).
Moves the selected image to the top.
Moves the selected image up one page.
Moves the selected image down one page.
Moves the selected image to the end.
Note
You can also drag the image to rearrange the order.
Delete Selected Pages
Deletes the selected image.
Add Page
Page 118 of 334 pages
Create/Edit PDF file Window
Allows you to select and add an existing PDF file.
Note
A password will be required to add a password-protected PDF file.
Undo
Cancels the latest change made.
Reset
Cancels all the changes made.
Save Selected Pages
Opens the Save as PDF file dialog box. Specify the save settings. Only the selected page is saved.
Note
When multiple pages are selected, a multiple-page PDF file is created.
See "Save as PDF file Dialog Box " for details on the Save as PDF file dialog box.
Save All Pages
Opens the Save as PDF file dialog box. Specify the save settings. All PDF files in the list will be saved
as one PDF file.
Finish
Closes the Create/Edit PDF file window.
Toolbar
(Rotate Left)
Rotates the page 90 degrees counter-clockwise.
(Rotate Right)
Rotates the page 90 degrees clockwise.
(Preview Mode)
Switches to Preview Mode.
The selected page appears in Preview.
(Enlarge)
Enlarges the image displayed in Preview.
(Reduce)
Reduces the image displayed in Preview.
Page 119 of 334 pages
Create/Edit PDF file Window
Page 120 of 334 pages
(Full-screen)
Enlarges/reduces the image to display it fully in Preview.
(Thumbnail Mode)
Switches to Thumbnail Mode. The pages are displayed in thumbnail view.
Page top
Print Document Dialog Box
On-screen Manual > Scanning Guide > MP Navigator EX Screens > Print Document Dialog Box
Print Document Dialog Box
Click Print in the View & Use window, then click Print Document on the list to open the Print Document
dialog box.
In the Print Document dialog box, you can make advanced settings for printing multiple scanned images
at one time.
Important
The following settings are available only when using a Canon inkjet printer supporting the
corresponding functions.
- Paper Source
- Auto Duplex
- Media Type
- Print Quality
- Density
- Grayscale Printing
- Preview before printing
Note
The setting items in the Print Document dialog box vary by printer.
Printer
Select the printer to use.
Properties...
Displays the selected printer's advanced setting screen.
Note
This button is displayed when a printer other than a Canon inkjet printer is selected for Printer.
Paper Source
Select paper source.
Page Layout
Select a print type.
Normal-size Printing
Print one image per sheet.
Page 121 of 334 pages
Print Document Dialog Box
Page 122 of 334 pages
Scaled Printing
Print images at the selected scale (enlarged or reduced).
Fit-to-Page Printing
Print an image at the paper size (enlarged or reduced).
Borderless Printing
Print the image on an entire sheet of paper without margins.
Page Layout Printing (2 on 1)
Layout and print two images on a sheet of paper.
Page Layout Printing (4 on 1)
Layout and print four images on a sheet of paper.
Important
The following settings are available only when using a Canon inkjet printer supporting the
corresponding functions.
- Borderless Printing
- Page Layout Printing (2 on 1)
- Page Layout Printing (4 on 1)
Auto Duplex
Print on both sides of a sheet of paper automatically.
Note
Auto Duplex is displayed when Page Layout is Normal-size Printing or Scaled Printing, and
available when Media Type is Plain Paper.
Staple Side
Select a stapling side from the list.
Note
Staple Side is available when Auto Duplex On is set.
Specify Margin...
Specify the width of the margin (0 mm to 30 mm).
Note
Specify Margin... is available when Auto Duplex On is set.
A page may not fit in one page due to the Specify Margin... setting. In that case, the document will
be reduced for printing.
Enlarge/Reduce
Enlarge or reduce images to print.
(Enlarge/Reduce)
Print a reduced or enlarged image by specifying a scale in increments of 1%.
Auto
Scale is adjusted automatically according to the detected paper width and the selected paper size.
Image may be printed rotated 90 degrees depending on its size.
Scale
Select a scale from the list.
Important
At normal-size (100%), some images may be printed small or with some portions cropped. In
that case, select Auto to resize the print in proportion to the paper size.
Print Document Dialog Box
Page 123 of 334 pages
Paper Size
Select the size of paper for printing. Match the size to the size of the paper set in the printer.
Note
Selectable paper sizes depend on the selected printer.
Media Type
Select the type of paper for printing. Print quality may be fixed depending on the paper type.
Note
Selectable paper types depend on the selected printer.
Print Quality
Select the print quality.
Density
Click
(Density adjustment) to select the print density.
Copies
Click
(Copy setting) to select the number of copies to be printed.
Grayscale Printing
Select this checkbox to print the document in black and white.
Preview before printing
Select this checkbox to display the print result before printing.
Defaults
Restores the default settings.
Print
Start printing with the specified settings.
Note
To cancel while printing, select the printer icon on the taskbar and click Cancel Printing.
Page top
Print Photo Dialog Box
On-screen Manual > Scanning Guide > MP Navigator EX Screens > Print Photo Dialog Box
Print Photo Dialog Box
Click Print in the View & Use window, then click Print Photo on the list to open the Print Photo dialog box.
Important
PDF files cannot be printed.
The following settings are available only when using a Canon inkjet printer supporting the
corresponding functions.
- Media Type
- Borderless Printing
- Vivid Photo
- Preview before printing
Note
Double-click an image to display it in a different window.
Printer
Select the printer to use.
Properties...
Displays the selected printer's advanced setting screen.
Paper Size
Select the size of paper for printing. Match the size to the size of the paper set in the printer.
Media Type
Select the type of paper for printing. Print quality may be fixed depending on the paper type.
Page Layout
Select a print type.
Normal-size Printing
Print one image per sheet.
Fit-to-Page Printing
Page 124 of 334 pages
Print Photo Dialog Box
Page 125 of 334 pages
Print an image at the paper size (enlarged or reduced).
Borderless Printing
Select this checkbox to print the image on an entire sheet of paper without margins.
Important
Page Layout setting will be disabled when you select Borderless Printing.
Orientation
Specify the print orientation.
Important
This setting is available only when Page Layout is Normal-size Printing. For others, the image is
automatically rotated according to the aspect ratio of the paper.
Copies
Specify the number of copies to print.
Vivid Photo
Select this checkbox to print the image in vivid colors.
Preview before printing
Select this checkbox to display the print result before printing.
Print
Starts printing.
Note
Only the images in the Thumbnail window with the checkbox selected are printed.
Close
Closes the dialog box without printing the photo.
Page top
Send via E-mail Dialog Box
On-screen Manual > Scanning Guide > MP Navigator EX Screens > Send via E-mail Dialog Box
Send via E-mail Dialog Box
Click Send in the View & Use window, then click Attach to E-mail on the list to open the Send via E-mail
dialog box.
In the Send via E-mail dialog box, you can make advanced settings for attaching images to e-mail.
Important
MP Navigator EX is compatible with the following e-mail software programs:
- Windows Mail (Windows Vista)
- Outlook Express (Windows XP/Windows 2000)
- Microsoft Outlook
(If an e-mail software program does not operate properly, check that the program's MAPI is enabled.
To enable MAPI, refer to the manual of the e-mail software program.)
Note
Only PDF and JPEG files can be attached to e-mail.
Mail Program
The e-mail software program set up on the General tab of the Preferences dialog box is displayed.
Select the e-mail software program you want to use.
Adjust attachment file size
When save as type is JPEG, selecting this checkbox allows you to resize the images. Select a size
from Size.
Save in
Displays the folder in which to save the images. To change the folder, click Browse... to specify another
one. If resized, the resized images are saved.
The following folders are specified by default.
Windows 7: MP Navigator EX folder in My Pictures folder
Windows Vista: MP Navigator EX folder in Pictures folder
Windows XP: MP Navigator EX folder in My Pictures folder
Windows 2000: MP Navigator EX folder in My Pictures folder
File name
Enter the file name of the image to be attached (up to 64 characters). When saving multiple files, 4
digits are appended to each file name.
Set...
You can specify a compression type for JPEG files.
Select High(Low Compression), Standard or Low(High Compression).
Page 126 of 334 pages
Send via E-mail Dialog Box
Page 127 of 334 pages
Page top
Correct/Enhance Images Window
Page 128 of 334 pages
On-screen Manual > Scanning Guide > MP Navigator EX Screens > Correct/Enhance Images Window
Correct/Enhance Images Window
Click
(Image Correction/Enhancement) in the View & Use window or click Fix photo images in
Image Handling Buttons to open the Correct/Enhance Images window.
In the Correct/Enhance Images window, you can make advanced settings including image correction/
enhancement and brightness/contrast adjustment.
You can also display the source image and corrected image side by side for comparison.
Important
Image correction/enhancement cannot be applied to PDF files or black and white binary files.
Note
The Correct/Enhance Images window can also be opened by clicking
Enhancement) in the Zoom in dialog box.
It may take a while to correct large images.
See "View & Use Window" for details on the View & Use window.
(Image Correction/
(1) Task Area
(2) Toolbar
Task Area
Available tasks and settings vary between the Auto and Manual tabs.
Click Auto or Manual to open the corresponding tab.
Auto Tab
Use the functions in the Auto tab to apply corrections and enhancements to the entire image.
See "Correcting/Enhancing Images Automatically " for details.
Correct/Enhance Images Window
Auto Photo Fix
Applies automatic corrections suitable for photos.
Prioritize Exif Info
Select this checkbox to apply corrections primarily based on the settings made at the time of
shooting.
Deselect this checkbox to apply corrections based on the image analysis results. It is
recommended that you normally select this setting.
Note
Exif is a standard format for embedding various shooting data in digital camera images
(JPEG).
Face Sharpener
Sharpens out-of-focus faces.
You can adjust the effect level using the slider.
Digital Face Smoothing
Enhances skin beautifully by removing blemishes and wrinkles.
You can adjust the effect level using the slider.
Apply to all images
Automatically corrects/enhances all images displayed in the thumbnail list.
OK
Applies the selected effect to the selected image or all images.
Reset Selected Image
Cancels all corrections and enhancements applied to the selected image.
Save Selected Image
Saves the corrected/enhanced image (the selected one).
Save All Corrected Images
Saves all the corrected/enhanced images displayed in the thumbnail list.
Exit
Closes the Correct/Enhance Images window.
Manual Tab
There are two menus on the Manual tab: Adjust and Correct/Enhance.
Use Adjust to adjust brightness and contrast, or to sharpen the entire image.
Use Correct/Enhance to correct/enhance specific areas.
Page 129 of 334 pages
Correct/Enhance Images Window
See "Correcting/Enhancing Images Manually " for details.
Adjustment
Brightness
Adjusts the overall image brightness.
Move the slider to the left to darken and right to brighten the image.
Contrast
Adjusts the contrast of the image. Adjust the contrast when the image is flat due to lack of contrast.
Move the slider to the left to decrease and right to increase the contrast of the image.
Sharpness
Emphasizes the outline of the subjects to sharpen the image. Adjust the sharpness when the
photo is out of focus or text is blurred.
Move the slider to the right to sharpen the image.
Blur
Blurs the outline of the subjects to soften the image.
Move the slider to the right to soften the image.
Show-through Removal
Removes show-through of text from the reverse side or removes the base color. Adjust the showthrough level to prevent text on the reverse side of thin document or the base color of the document
from appearing on the image.
Move the slider to the right to increase the show-through removal effect.
Defaults
Resets all settings (brightness, contrast, sharpness, blur, and show-through removal).
Reset Selected Image
Cancels all corrections, enhancements and adjustments applied to the selected image.
Save Selected Image
Saves the corrected/enhanced/adjusted image (the selected one).
Save All Corrected Images
Saves all the corrected/enhanced/adjusted images displayed in the thumbnail list.
Exit
Closes the Correct/Enhance Images window.
Correction/Enhancement
Page 130 of 334 pages
Correct/Enhance Images Window
Face Brightener
Corrects the entire image to brighten the facial area in and around the selected area.
You can adjust the effect level using the slider.
Face Sharpener
Corrects the entire image to sharpen the facial area in and around the selected area.
You can adjust the effect level using the slider.
Digital Face Smoothing
Enhances skin beautifully by removing blemishes and wrinkles in the selected area.
You can adjust the effect level using the slider.
Blemish Remover
Removes moles in the selected area.
OK
Applies the selected effect to the specified area.
Undo
Cancels the latest correction/enhancement.
Reset Selected Image
Cancels all corrections and enhancements applied to the selected image.
Save Selected Image
Saves the corrected/enhanced image (the selected one).
Save All Corrected Images
Saves all the corrected/enhanced images displayed in the thumbnail list.
Exit
Closes the Correct/Enhance Images window.
Toolbar
Toolbar
(Rotate Left)
Rotates the image 90 degrees counter-clockwise.
(Rotate Right)
Rotates the image 90 degrees clockwise.
(Invert)
Page 131 of 334 pages
Correct/Enhance Images Window
Page 132 of 334 pages
Inverts the image horizontally.
(Trimming)
Trimming is the act of selecting the area you want to keep in a photo and discarding the rest. In
the displayed window, drag the white frame to specify the trimming area. Move the cursor inside
the white frame and drag to move the trimming area.
Note
Place the main subjects along the broken white lines or at the intersections to create a
balanced image.
(Enlarge)
Enlarges the displayed image.
(Reduce)
Reduces the displayed image.
(Full-screen)
Displays the entire image in Preview.
(Compare)
Opens a window in which you can compare the images before and after the correction/
enhancement side by side.
The source image appears on the left and the corrected image appears on the right.
Page top
One-click Mode Screen
Page 133 of 334 pages
On-screen Manual > Scanning Guide > MP Navigator EX Screens > One-click Mode Screen
One-click Mode Screen
Click
(Switch Mode) at the bottom left of the Navigation Mode screen to display the One-click
Mode screen.
You can complete from scanning to saving, printing, etc. at one time by simply clicking the corresponding
icon.
Auto
Scan documents by automatically detecting the document type. File format is automatically set. Files
are saved to a computer.
When you click this icon, the Auto Scan dialog box opens and you can specify the save settings.
Auto Scan Dialog Box
Save
Scan documents or photos and save them to a computer. The document type can be detected
automatically.
When you click this icon, the Save dialog box opens and you can specify the scan/save settings.
Save Dialog Box (One-click Mode Screen)
Copy
Scan and print documents.
When you click this icon, the Copy dialog box opens and you can specify the scan/print settings.
Copy Dialog Box
Print
Scan documents and print them after specifying the paper, printing method, size, etc. This is useful
when you want to copy/enlarge printed photographs.
When you click this icon, the Print dialog box opens. You can specify the scan/print settings and print
on a printer.
Print Dialog Box
Mail
Scan documents or photos and attach them to e-mail.
When you click this icon, the Mail dialog box opens and you can specify the scan/save and e-mail
software program settings.
Mail Dialog Box
OCR
Scan text documents then extract text in the image and display it in Notepad (included with Windows).
When you click this icon, the OCR dialog box opens and you can specify the scan/save settings.
OCR Dialog Box
Scan
Scan documents/photos and open them in a specified application. The document type can be
automatically detected.
When you click this icon, the Scan dialog box opens and you can specify the scan/save and application
settings.
Scan Dialog Box
PDF
Scan documents and save them as PDF files.
One-click Mode Screen
Page 134 of 334 pages
When you click this icon, the PDF dialog box opens and you can specify the scan/save and application
settings.
PDF Dialog Box
AUTO SCAN button
This icon indicates which MP Navigator EX function is assigned to the AUTO SCAN button on the
machine (Scanner Button). The AUTO SCAN button icon appears above the assigned function.
COPY button
This icon indicates which MP Navigator EX function is assigned to the COPY button on the machine
(Scanner Button). The COPY button icon appears above the assigned function.
E-MAIL button
This icon indicates which MP Navigator EX function is assigned to the E-MAIL button on the machine
(Scanner Button). The E-MAIL button icon appears above the assigned function.
(Switch Mode)
Switches to Navigation Mode. The Navigation Mode screen appears.
Custom Scan with One-click Tab
Preferences
The Preferences dialog box opens. In the Preferences dialog box, you can make advanced settings to
MP Navigator EX functions.
Preferences Dialog Box
(Guide)
Opens this guide.
Important
The following restrictions apply when you scan with Document Type set to Auto Mode in the Save,
Print or Scan dialog box.
When you want to convert text in the scanned image to text data, specify Document Type (do not
select Auto Mode).
Related Topic
Easy Scanning with One-click
Page top
Auto Scan Dialog Box
On-screen Manual > Scanning Guide > MP Navigator EX Screens > Auto Scan Dialog Box
Auto Scan Dialog Box
Click Auto Scan on the Custom Scan with One-click tab or click Auto in the One-click Mode screen to
open the Auto Scan dialog box.
Supported Documents
Photos, postcards, business cards, magazines, newspapers, text documents, CD/DVD and film.
Important
The following types of documents cannot be scanned correctly. In that case, click another icon in
One-click Mode or on the Custom Scan with One-click tab and specify the document type or size.
- A4 size photos
- Text documents smaller than 2L (5 inches x 7 inches) (127 mm x 178 mm), such as paperback
pages with the spine cut off
- Documents printed on thin white paper
- Long narrow documents such as panoramic photos
To scan black and white film or 120 Format Film, scan from the Advanced Mode tab of ScanGear
(scanner driver).
Scanning Film in Advanced Mode
Reflective CD/DVD labels may not be scanned properly.
Place documents correctly according to the type of document to be scanned. Otherwise,
documents may not be scanned correctly.
See "Placing Documents " for details on how to place documents.
Note
To reduce moire, click another icon in One-click Mode or on the Custom Scan with One-click tab
and set Document Type to Magazine.
Scan Settings
Recommended Image Correction
Select this checkbox to apply suitable corrections automatically based on the document type.
Important
When this checkbox is selected, the files can be saved in JPEG/Exif or PDF format only.
Scanning may take longer than usual when this checkbox is selected.
Page 135 of 334 pages
Auto Scan Dialog Box
The color tone may change from the source image due to corrections. In that case, deselect the
checkbox and scan.
Save Settings
File name
Enter the file name of the image to be saved (up to 64 characters). When saving multiple files, 4
digits are appended to each file name.
Save as type
Select a file type to save the scanned images.
Select Auto, JPEG/Exif, TIFF, BMP or PDF.
Important
When Save as type is Auto, the file format may differ depending on how you place the
document.
See "Placing Documents " for details on how to place documents.
Large documents (such as A4 size photos) that cannot be placed away from the edges/arrow
(alignment mark) of the Platen may be saved as PDF files. To save in a format other than PDF,
scan by specifying the file format.
You cannot set passwords for PDF files.
Note
When Auto is selected, files are saved in the following formats according to the document type.
Photos, postcards, CD/DVD, business cards and film: JPEG
Magazines, newspapers and text documents: PDF
You can change the file format from Set....
Set...
When Save as type is Auto
You can specify the file format in which to save images. Select a file format for Document and Photo
each.
When Save as type is JPEG/Exif
You can specify a compression type for JPEG files. Select High(Low Compression), Standard or
Low(High Compression).
When Save as type is PDF
Make advanced settings for creating PDF files. See " PDF Settings Dialog Box " for details.
Save in
Displays the folder in which to save the scanned images. To change the folder, click Browse... to
specify another one.
The following folders are specified by default.
Windows 7: MP Navigator EX folder in My Pictures folder
Windows Vista: MP Navigator EX folder in Pictures folder
Windows XP: MP Navigator EX folder in My Pictures folder
Windows 2000: MP Navigator EX folder in My Pictures folder
Save to a Subfolder with Current Date
Select this checkbox to create a subfolder in the folder specified in Save in with the current date and
save scanned files in it. A subfolder with a name such as "2010_01_01" (Year_Month_Date) will be
created.
If this checkbox is not selected, files are saved directly in the folder specified in Save in.
Start scanning by clicking the one-click button
Select this checkbox to start scanning when you click an icon in One-click Mode.
Apply
Saves and applies the specified settings.
Page 136 of 334 pages
Auto Scan Dialog Box
Page 137 of 334 pages
Click Cancel instead of Apply to cancel the specified settings.
Cancel
Cancels the specified settings. The current screen closes.
Defaults
Returns all settings in the screen to their defaults.
Scan
Scans and saves documents with the specified settings.
When Save as type is Auto, a confirmation appears. Click Open Manual to open this guide (if it is
installed).
Page top
Save Dialog Box (One-click Mode Screen)
On-screen Manual > Scanning Guide > MP Navigator EX Screens > Save Dialog Box (One-click Mode Screen)
Save Dialog Box (One-click Mode Screen)
Click Save on the Custom Scan with One-click tab or in the One-click Mode screen to open the Save
dialog box.
Scan Settings
Document Type
Select the type of document to be scanned. When Auto Mode is selected, the document type is
automatically detected. In that case, Color Mode, Document Size and Resolution are automatically
set as well. When Film(Auto mode) is selected, the film type (negative or positive) is automatically
detected.
Important
Document types supported by Auto Mode are photos, postcards, business cards, magazines,
newspapers, text documents, CD/DVD and film.
The following types of documents cannot be scanned correctly with Auto Mode. In that case,
specify the document type or size.
- A4 size photos
- Text documents smaller than 2L (5 inches x 7 inches) (127 mm x 178 mm), such as
paperback pages with the spine cut off
- Documents printed on thin white paper
- Long narrow documents such as panoramic photos
Reflective CD/DVD labels may not be scanned properly.
Film may not be scanned correctly when Auto Mode or Film(Auto mode) is selected. In that
case, select the type of film and scan again.
Place documents correctly according to the type of document to be scanned. Otherwise,
documents may not be scanned correctly.
See "Placing Documents " for details on how to place documents.
Page 138 of 334 pages
Save Dialog Box (One-click Mode Screen)
Note
To reduce moire, set Document Type to Magazine.
Color Mode
Select how to scan the document.
Document Size
Select the size of the document to be scanned.
When you select Custom, a screen in which you can specify the document size appears. Select a
Units, then enter the Width and Height and click OK.
Important
When you select Auto Detect, the image may not be scanned at the correct position and size. In
that case, change the size to the actual document size (A4, Letter, etc.) and align a corner of the
document with the corner at the arrow (alignment mark) of the Platen.
Resolution
Select the resolution at which to scan documents. The following scanning resolutions can be
specified:
When Document Type is other than film: 75 dpi / 100 dpi / 150 dpi / 200 dpi / 300 dpi / 400 dpi / 600
dpi
When Document Type is film: 300 dpi / 400 dpi / 600 dpi / 1200 dpi / 2400 dpi / 4800 dpi
Resolution
Use the scanner driver
Select this checkbox to display the ScanGear (scanner driver) screen and make advanced scan
settings.
Color Mode, Document Size, Resolution and other settings in the Save dialog box will be disabled.
Specify these settings in the ScanGear screen.
Specify...
Opens the Scan Settings dialog box in which you can make advanced scan settings.
Scan Settings Dialog Box
Save Settings
Automatically save the image to your computer after scanning it
Select this to save the images to your computer as specified after scanning them.
The File name, Save as type and Save in settings will be displayed.
Important
If you select this function, you will not be able to set passwords for PDF files.
File name
Enter the file name of the image to be saved (up to 64 characters). When saving multiple files, 4
digits are appended to each file name.
Save as type
Select a file type to save the scanned images.
Select Auto, JPEG/Exif, TIFF or BMP. Auto is displayed when Document Type is Auto Mode. When
saving as PDF files, select PDF, PDF(Multiple Pages) or PDF(Add Page).
Important
Page 139 of 334 pages
Save Dialog Box (One-click Mode Screen)
When Document Type is Auto Mode and Save as type is Auto, the file format may differ
depending on how you place the document.
See "Placing Documents " for details on how to place documents.
Large documents (such as A4 size photos) that cannot be placed away from the edges/arrow
(alignment mark) of the Platen may be saved as PDF files. To save in a format other than PDF,
scan by specifying the file format.
Images cannot be added to password-protected PDF files.
You cannot select JPEG/Exif when Color Mode is Black and White.
Note
When Auto is selected, files are saved in the following formats according to the document type.
Photos, postcards, CD/DVD, business cards and film: JPEG
Magazines, newspapers and text documents: PDF
You can change the file format from Set....
Images saved as PDF files may not open depending on the application. In that case, select an
option other than Auto in Save as type.
If you select JPEG/Exif when Document Type is not Auto Mode , the Save the JPEG/Exif file in
AdobeRGB checkbox will be selectable.
Set...
When Save as type is Auto
You can specify the file format in which to save images. Select a file format for Document and Photo
each.
When Save as type is JPEG/Exif
You can specify a compression type for JPEG files. Select High(Low Compression), Standard or
Low(High Compression).
When Save as type is PDF, PDF(Multiple Pages) or PDF(Add Page)
Make advanced settings for creating PDF files. See " PDF Settings Dialog Box " for details.
Save in
Displays the folder in which to save the scanned images. To change the folder, click Browse... to
specify another one.
The following folders are specified by default.
Windows 7: MP Navigator EX folder in My Pictures folder
Windows Vista: MP Navigator EX folder in Pictures folder
Windows XP: MP Navigator EX folder in My Pictures folder
Windows 2000: MP Navigator EX folder in My Pictures folder
Save to a Subfolder with Current Date
Select this checkbox to create a subfolder in the folder specified in Save in with the current date and
save scanned files in it. A subfolder with a name such as "2010_01_01" (Year_Month_Date) will be
created.
If this checkbox is not selected, files are saved directly in the folder specified in Save in.
Save the JPEG/Exif file in AdobeRGB
Select this checkbox to save the images in colors that correspond to Adobe RGB.
Important
This function is available only when Save as type is JPEG/Exif and Document Type is not Auto
Mode.
This function is not available if the Adobe RGB profile is not installed.
Note
You cannot select this setting if the Use the scanner driver checkbox is selected.
When you save an image with the Save the JPEG/Exif file in AdobeRGB checkbox selected, an
underscore is added to the beginning of the file name. (Example: _Image0001.jpg)
Open the save dialog box after scanning the image (Input Exif information)
Page 140 of 334 pages
Save Dialog Box (One-click Mode Screen)
Page 141 of 334 pages
Select this to open the Save dialog box after scanning the images and specify the save settings
such as destination folder, file name and Exif information.
Save Dialog Box
Note
To set passwords for PDF files, select Open the save dialog box after scanning the image
(Input Exif information). After scanning, you can set the passwords in the Save dialog box.
Setting Passwords for PDF Files
Application Settings
Open with
You can select whether to open the View & Use window or Explorer after saving the images.
Start scanning by clicking the one-click button
Select this checkbox to start scanning when you click an icon in One-click Mode.
Apply
Saves and applies the specified settings.
Click Cancel instead of Apply to cancel the specified settings.
Cancel
Cancels the specified settings. The current screen closes.
Defaults
Returns all settings in the screen to their defaults.
Scan / Preview
Scans and saves documents with the specified settings. When film is selected for Document Type,
this button changes to Preview, and clicking it displays the thumbnails of the photos on the film. In
the displayed dialog box, select the checkboxes of the images you want to scan, then click Scan.
Starts scanning.
When Save as type is Auto, a confirmation appears. Click Open Manual to open this guide (if it is
installed).
Page top
Scan Settings Dialog Box
On-screen Manual > Scanning Guide > MP Navigator EX Screens > Scan Settings Dialog Box
Scan Settings Dialog Box
The Scan Settings dialog box opens when you click Specify... in a dialog box of the One-click Mode
screen.
In the Scan Settings dialog box, you can make advanced settings for scanning with one-click or scanning
using the buttons on the machine (Scanner Buttons).
Note
The displayed items vary by document type and how the screen was opened.
Document Type
Select the type of document to be scanned. When Auto Mode is selected, the document type is
automatically detected.
In that case, Color Mode, Document Size, etc. are automatically set as well. When Film(Auto mode) is
selected, the film type (negative or positive) is automatically detected.
Important
Film may not be scanned correctly when Auto Mode or Film(Auto mode) is selected. In that case,
select the type of film and scan again.
To scan correctly, select a document type that matches the document to be scanned.
Place documents correctly according to the type of document to be scanned. Otherwise,
documents may not be scanned correctly.
See "Placing Documents " for details on how to place documents.
Color Mode
Select how to scan the document.
Color
This mode renders the image in 256 levels (8 bit) of R(ed), G(reen), and B(lue).
Grayscale
This mode renders the image in 256 levels (8 bit) of black and white.
Important
Grayscale cannot be selected when Film(Auto mode) is selected for Document Type.
Black and White
Page 142 of 334 pages
Scan Settings Dialog Box
Page 143 of 334 pages
This mode renders the image in black and white. The contrast in the image is divided at certain
levels (threshold level) into black and white and is rendered in two colors.
Important
You cannot select Black and White if Document Type is film.
Document Size
Select the size of the document to be scanned.
When you select Custom, a screen in which you can specify the document size appears. Select a
Units, then enter the Width and Height and click OK.
Important
When you select Auto Detect, the image may not be scanned at the correct position and size. In
that case, change the size to the actual document size (A4, Letter, etc.) and align a corner of the
document with the corner at the arrow (alignment mark) of the Platen.
Scanning Resolution
Select the resolution at which to scan documents. The following scanning resolutions can be
specified:
When Document Type is other than film: 75 dpi / 100 dpi / 150 dpi / 200 dpi / 300 dpi / 400 dpi / 600 dpi
When Document Type is film: 300 dpi / 400 dpi / 600 dpi / 1200 dpi / 2400 dpi / 4800 dpi
Resolution
Recommended Image Correction / Auto Photo Fix / Auto Document Fix
The displayed item varies by Document Type.
Recommended Image Correction
This is displayed when Document Type is Auto Mode. Select this checkbox to apply Auto Photo Fix
or Auto Document Fix based on the document type.
Auto Photo Fix
This is displayed when Document Type is Photo or film. Select this checkbox to automatically
analyze the captured scene (landscape, night scene, etc.) and apply suitable corrections.
Auto Document Fix
This is displayed when Document Type is Document or Magazine. Select this checkbox to
sharpen text in a document or magazine for better readability.
Important
When this checkbox is selected, the files can be saved in JPEG/Exif or PDF format only.
Scanning may take longer than usual when this checkbox is selected.
When this checkbox is selected, Easy Color Matching in the Print dialog box will be unavailable.
These functions are not available when the Scan Settings dialog box is opened from the OCR
dialog box.
Auto Photo Fix is not available when Color Mode is Grayscale or Black and White.
Auto Document Fix is not available when Color Mode is Black and White.
The color tone may change from the source image due to corrections. In that case, deselect the
checkbox and scan.
Descreen
Select this checkbox to reduce moire patterns.
Printed photos and pictures are displayed as a collection of fine dots. "Moire" is a phenomenon where
uneven gradation or a stripe pattern appears when such photos or pictures printed with fine dots are
scanned. Descreen is the function for reducing this moire effect.
Scan Settings Dialog Box
Page 144 of 334 pages
Note
Scanning takes longer than usual when you enable Descreen.
Unsharp Mask
Select this checkbox to emphasize the outline of the subjects and sharpen the image.
Remove gutter shadow
Select this checkbox to correct shadows that appear between pages when scanning open booklets.
Important
You cannot select this checkbox when Auto Detect, Auto Detect (Multiple Documents) or Stitch
Assist is selected for Document Size.
Align the document correctly with the alignment mark on the Platen.
Note
Use ScanGear (scanner driver)'s Advanced Mode tab to correct gutter shadows when scanning
non-standard size documents or when custom cropping frames are set.
For details, see Gutter Shadow Correction in " Image Settings " (ScanGear's Advanced Mode tab).
Reduce Show-through
Select this checkbox to sharpen text in a document or reduce show-through in newspapers.
Note
Select this checkbox when Document Type is text document and show-through is apparent in the
scanned image.
Correct slanted document
Select this checkbox to detect the scanned text and correct the angle (within -0.1 to -10 degrees or +0.1
to +10 degrees) of the document.
Important
You cannot select this checkbox when Document Size is Stitch Assist.
The inclination of the following types of documents may not be corrected, as the text cannot be
detected correctly.
- Documents in which the text lines are inclined more than 10 degrees or the angles vary by line
- Documents containing both vertical and horizontal text
- Documents with extremely large or small fonts
- Documents with small amount of text
- Documents containing figures/images or hand-written text
- Documents containing both vertical and horizontal lines (tables)
Note
Scanning takes longer than usual when you enable Correct slanted document.
Detect the orientation of text documents and rotate images
Select this checkbox to detect the orientation of the document from the scanned text and rotate the
scanned image to the correct orientation. Select the language of the document to be scanned in
Document Language.
Important
You cannot select this checkbox when Document Size is Stitch Assist.
This function may not work properly depending on the document language. Only text documents
written in languages that can be selected from Document Language are supported.
The orientation of the following types of documents may not be corrected, as the text cannot be
detected correctly.
- Resolution is outside the range of 300 dpi to 600 dpi
- Font size is outside the range of 8 points to 48 points
- Documents containing special fonts, effects, italics, or hand-written text
- Documents with patterned backgrounds
Scan Settings Dialog Box
Page 145 of 334 pages
Note
Scanning takes longer than usual when you enable Detect the orientation of text documents and
rotate images.
Document Language
Select the language of the document to be scanned.
Important
You cannot select this checkbox when Document Size is Stitch Assist.
Preview before scanning
Select this checkbox to display images after scanning film.
Defaults
Restores the default settings.
Page top
Save Dialog Box
On-screen Manual > Scanning Guide > MP Navigator EX Screens > Save Dialog Box
Save Dialog Box
The Save dialog box opens when you scan from the Save or Scan dialog box of the One-click Mode
screen after selecting Open the save dialog box after scanning the image (Input Exif information).
You can specify the file type and destination while viewing the thumbnails.
Save as type
Select a file type to save the scanned images.
Select JPEG/Exif, TIFF, BMP, PDF, PDF(Multiple Pages) or PDF(Add Page).
PDF
Save each of the selected images as a separate PDF file.
PDF(Multiple Pages)
Save multiple images in one PDF file.
Note
PDF(Multiple Pages) is displayed when multiple images are scanned.
PDF(Add Page)
Add the scanned images to a PDF file. The images are added to the end of the PDF file. You
cannot rearrange the pages of the PDF file to which the images are added.
Important
Images can only be added to PDF files created with MP Navigator EX. You cannot specify
PDF files created with other applications. PDF files edited in other applications cannot be
specified as well.
If a password-protected PDF file is edited, the passwords will be deleted. Reset the
passwords.
Setting Passwords for PDF Files
Page 146 of 334 pages
Save Dialog Box
Page 147 of 334 pages
Important
PDF, PDF(Multiple Pages) and PDF(Add Page) cannot be selected for images scanned from the
Scan dialog box.
You cannot select JPEG/Exif when Color Mode is Black and White.
Set...
When Save as type is JPEG/Exif
You can specify a compression type for JPEG files. Select High(Low Compression), Standard or
Low(High Compression).
When Save as type is PDF, PDF(Multiple Pages) or PDF(Add Page)
Make advanced settings for creating PDF files. See " PDF Settings Dialog Box " for details.
Exif Settings...
When Save as type is JPEG/Exif, you can input Exif information into the file to be saved.
Exif Settings Dialog Box
Password security settings
Select this checkbox to open the Password Security -Settings dialog box in which you can set
passwords for opening, editing and printing created PDF files.
Setting Passwords for PDF Files
Note
This function is available only when Save as type is PDF, PDF(Multiple Pages) or PDF(Add Page).
Add to
This is displayed when you select PDF(Add Page) for Save as type and specify the PDF file to which
images are added. To change the file, click Browse... to specify another one.
Important
Images can only be added to PDF files created with MP Navigator EX. You cannot specify PDF
files created with other applications. PDF files edited in other applications cannot be specified as
well.
Rotate Left 90° / Rotate Right 90°
Rotates scanned images 90 degrees counter-clockwise or clockwise.
Select the image you want to rotate and click Rotate Left 90° or Rotate Right 90°.
File name
Enter the file name of the image to be saved (up to 64 characters). When saving multiple files, 4 digits
are appended to each file name.
Save in
Displays the folder in which to save the scanned images. To change the folder, click Browse... to
specify another one.
The following folders are specified by default.
Windows 7: MP Navigator EX folder in My Pictures folder
Windows Vista: MP Navigator EX folder in Pictures folder
Windows XP: MP Navigator EX folder in My Pictures folder
Windows 2000: MP Navigator EX folder in My Pictures folder
Save to a Subfolder with Current Date
Select this checkbox to create a subfolder in the folder specified in Save in with the current date and
save scanned files in it. A subfolder with a name such as "2010_01_01" (Year_Month_Date) will be
created.
If this checkbox is not selected, files are saved directly in the folder specified in Save in.
Page top
Exif Settings Dialog Box
Page 148 of 334 pages
On-screen Manual > Scanning Guide > MP Navigator EX Screens > Exif Settings Dialog Box
Exif Settings Dialog Box
You can input Exif information into a file to be saved. Exif is a standard format for embedding various
shooting data in digital camera images (JPEG). Embedding Exif information into scanned images
allows you to organize and print them along with digital camera images.
The Exif Settings dialog box can be opened when Save as type is JPEG/Exif.
Basic Information
Displays the information obtained automatically from the machine or software.
Advanced Information
Displays the information specified on the right side of the screen.
Advanced Information Settings Area
You can input Exif information such as the title and shooting data. Select the checkbox of the items you
want to specify, and select or enter information.
Apply the Same Setting of Input Items Automatically
Select this checkbox to automatically display the information you specified for the previous image.
Apply
After specifying all the information you need, click Apply to embed it into the image. The information
appears in Advanced Information.
OK
Embeds the specified information into the image and closes the screen. The specified information is
saved.
Cancel
Cancels the settings and closes the screen.
Information is embedded when Cancel is clicked after clicking Apply.
Page top
PDF Dialog Box
On-screen Manual > Scanning Guide > MP Navigator EX Screens > PDF Dialog Box
PDF Dialog Box
Click PDF on the Custom Scan with One-click tab or in the One-click Mode screen to open the PDF
dialog box. In the PDF dialog box, you can make advanced settings on the COLOR, BLACK & WHITE and
CUSTOM tabs before scanning.
Scan Settings
Document Type
Select the type of document to be scanned.
Color Mode
Select how to scan the document.
Document Size
Select the size of the document to be scanned.
When you select Custom, a screen in which you can specify the document size appears. Select a
Units, then enter the Width and Height and click OK.
Page 149 of 334 pages
PDF Dialog Box
Important
When you select Auto Detect, the image may not be scanned at the correct position and size. In
that case, change the size to the actual document size (A4, Letter, etc.) and align a corner of the
document with the corner at the arrow (alignment mark) of the Platen.
Resolution
Select the resolution at which to scan documents.
Resolution
Display the Settings Dialog Box when Scanning with Scanner Buttons on the Scanner
Select this checkbox to display the ScanGear (scanner driver) screen and make advanced scan
settings.
Specify...
Opens the Scan Settings dialog box in which you can make advanced scan settings.
Scan Settings Dialog Box
Save Settings
Automatically save the image to your computer after scanning it
Select this to save the images to your computer as specified after scanning them.
The File name, Save as type and Save in settings will be displayed.
Important
If you select this function, you will not be able to set passwords for PDF files.
File name
Enter the file name of the image to be saved (up to 64 characters). When saving multiple files, 4
digits are appended to each file name.
Save as type
Select a file type to save the scanned images.
Select PDF, PDF(Multiple Pages) or PDF(Add Page).
PDF
Save each of the selected images as a separate PDF file.
PDF(Multiple Pages)
Save multiple images in one PDF file.
PDF(Add Page)
Add the scanned images to a PDF file. The images are added to the end of the PDF file. You
cannot rearrange the pages of the PDF file to which the images are added.
Important
Images cannot be added to password-protected PDF files.
Note
See "Creating/Editing PDF Files " to delete or rearrange the pages of saved PDF files.
Set...
You can specify the PDF compression type and other advanced settings for creating PDF files.
PDF Settings Dialog Box
Save in
Displays the folder in which to save the scanned images. To change the folder, click Browse... to
specify another one.
The following folders are specified by default.
Windows 7: MP Navigator EX folder in My Pictures folder
Windows Vista: MP Navigator EX folder in Pictures folder
Windows XP: MP Navigator EX folder in My Pictures folder
Page 150 of 334 pages
PDF Dialog Box
Page 151 of 334 pages
Windows 2000: MP Navigator EX folder in My Pictures folder
Save to a Subfolder with Current Date
Select this checkbox to create a subfolder in the folder specified in Save in with the current date and
save scanned files in it. A subfolder with a name such as "2010_01_01" (Year_Month_Date) will be
created.
If this checkbox is not selected, files are saved directly in the folder specified in Save in.
Open the save dialog box after scanning the image
Select this to open the Save as PDF file dialog box after scanning the images and specify the save
settings such as destination folder and file name.
Save as PDF file Dialog Box
Note
To set passwords for PDF files, select Open the save dialog box after scanning the image. After
scanning, you can set the passwords in the Save as PDF file dialog box.
Setting Passwords for PDF Files
Defaults
Returns all settings in Scan Settings and Save Settings to their defaults.
Application Settings
Open with
Specify an application with which to open scanned images. Drag and drop the icon of an application
that supports the file format displayed in Save as type. The specified application starts after images
are scanned.
Important
Depending on the specified application, the images may not appear correctly or the application
may not start.
Note
For further procedures, refer to the application's manual.
Reset
Cancels the application setting.
Set...
Allows you to select an application to start.
Start scanning by clicking the one-click button
Select this checkbox to start scanning when you click an icon in One-click Mode.
Apply
Saves and applies the specified settings.
Click Cancel instead of Apply to cancel the specified settings.
Cancel
Cancels the specified settings. The current screen closes.
Scan
Scans and saves documents as PDF files with the specified settings.
Page top
Save as PDF file Dialog Box
On-screen Manual > Scanning Guide > MP Navigator EX Screens > Save as PDF file Dialog Box
Save as PDF file Dialog Box
The Save as PDF file dialog box opens when you scan from the PDF dialog box of the One-click Mode
screen after selecting Open the save dialog box after scanning the image.
In the Save as PDF file dialog box, you can make settings for saving images to a computer.
Important
You cannot save images scanned at 10501 pixels or more in the vertical and horizontal directions.
Save as type
Select a PDF file type to save the scanned images.
PDF
Save each of the selected images as a separate PDF file.
PDF(Multiple Pages)
Save multiple images in one PDF file.
Note
PDF(Multiple Pages) is displayed when multiple images are scanned.
PDF(Add Page)
Add the scanned images to a PDF file. The images are added to the end of the PDF file. You
cannot rearrange the pages of the PDF file to which the images are added.
Important
Images can only be added to PDF files created with MP Navigator EX. You cannot specify
PDF files created with other applications. PDF files edited in other applications cannot be
specified as well.
If a password-protected PDF file is edited, the passwords will be deleted. Reset the
passwords.
Page 152 of 334 pages
Save as PDF file Dialog Box
Page 153 of 334 pages
Setting Passwords for PDF Files
Set...
Make advanced settings for creating PDF files. See " PDF Settings Dialog Box " for details.
Password security settings
Select this checkbox to open the Password Security -Settings dialog box in which you can set
passwords for opening, editing and printing created PDF files.
Setting Passwords for PDF Files
Rotate Left 90° / Rotate Right 90°
Rotates scanned images 90 degrees counter-clockwise or clockwise.
Select the image you want to rotate and click Rotate Left 90° or Rotate Right 90°.
File name
Enter the file name of the image to be saved (up to 64 characters). When saving multiple files, 4 digits
are appended to each file name.
Save in
Displays the folder in which to save the PDF files. To change the folder, click Browse... to specify
another one.
The following folders are specified by default.
Windows 7: MP Navigator EX folder in My Pictures folder
Windows Vista: MP Navigator EX folder in Pictures folder
Windows XP: MP Navigator EX folder in My Pictures folder
Windows 2000: MP Navigator EX folder in My Pictures folder
Save to a Subfolder with Current Date
Select this checkbox to create a subfolder in the folder specified in Save in with the current date and
save scanned files in it. A subfolder with a name such as "2010_01_01" (Year_Month_Date) will be
created.
If this checkbox is not selected, files are saved directly in the folder specified in Save in.
Page top
Mail Dialog Box
On-screen Manual > Scanning Guide > MP Navigator EX Screens > Mail Dialog Box
Mail Dialog Box
Click Mail on the Custom Scan with One-click tab or in the One-click Mode screen to open the Mail dialog
box.
Scan Settings
Document Type
Select the type of document to be scanned.
Color Mode
Select how to scan the document.
Document Size
Select the size of the document to be scanned.
When you select Custom, a screen in which you can specify the document size appears. Select a
Units, then enter the Width and Height and click OK.
Important
When you select Auto Detect, the image may not be scanned at the correct position and size. In
that case, change the size to the actual document size (A4, Letter, etc.) and align a corner of the
document with the corner at the arrow (alignment mark) of the Platen.
Resolution
Page 154 of 334 pages
Mail Dialog Box
Select the resolution at which to scan documents.
Resolution
Use the scanner driver
Select this checkbox to display the ScanGear (scanner driver) screen and make advanced scan
settings.
Color Mode, Document Size, Resolution and other settings in the Mail dialog box will be disabled.
Specify these settings in the ScanGear screen.
Specify...
Opens the Scan Settings dialog box in which you can make advanced scan settings.
Scan Settings Dialog Box
Save Settings
File Size
Select a size from Small (fits in a 640 by 480 window), Medium (fits in a 800 by 600 window), Large
(fits in a 1024 by 768 window) and Original.
File name
Enter the file name of the image to be saved (up to 64 characters). When saving multiple files, 4
digits are appended to each file name.
Save as type
Select a file type to save the scanned images.
Select JPEG/Exif, PDF or PDF(Multiple Pages).
Important
You cannot set passwords for PDF files.
You cannot select JPEG/Exif when Color Mode is Black and White.
Set...
When Save as type is JPEG/Exif
You can specify a compression type for JPEG files. Select High(Low Compression), Standard or
Low(High Compression).
When Save as type is PDF or PDF(Multiple Pages)
Make advanced settings for creating PDF files. See " PDF Settings Dialog Box " for details.
Save in
Displays the folder in which to save the scanned images. To change the folder, click Browse... to
specify another one.
The following folders are specified by default.
Windows 7: MP Navigator EX folder in My Pictures folder
Windows Vista: MP Navigator EX folder in Pictures folder
Windows XP: MP Navigator EX folder in My Pictures folder
Windows 2000: MP Navigator EX folder in My Pictures folder
Save to a Subfolder with Current Date
Select this checkbox to create a subfolder in the folder specified in Save in with the current date and
save scanned files in it. A subfolder with a name such as "2010_01_01" (Year_Month_Date) will be
created.
If this checkbox is not selected, files are saved directly in the folder specified in Save in.
Attachment Settings
Mail Program
Specify an e-mail software program.
Note
Page 155 of 334 pages
Mail Dialog Box
Page 156 of 334 pages
Select Add... to open the Select Mail Program dialog box in which you can select an e-mail
software program. If the e-mail software program you want to use is not listed, click Add to List
and select it.
Start scanning by clicking the one-click button
Select this checkbox to start scanning when you click an icon in One-click Mode.
Apply
Saves and applies the specified settings.
Click Cancel instead of Apply to cancel the specified settings.
Cancel
Cancels the specified settings. The current screen closes.
Defaults
Returns all settings in the screen to their defaults.
Scan
Scans documents with the specified settings.
When scanning is completed, the e-mail software program starts automatically and a new message
screen appears with the image attached.
Page top
OCR Dialog Box
On-screen Manual > Scanning Guide > MP Navigator EX Screens > OCR Dialog Box
OCR Dialog Box
Click OCR on the Custom Scan with One-click tab or in the One-click Mode screen to open the OCR
dialog box.
Scan Settings
Document Type
Select the type of document to be scanned.
Color Mode
Select how to scan the document.
Document Size
Select the size of the document to be scanned.
When you select Custom, a screen in which you can specify the document size appears. Select a
Units, then enter the Width and Height and click OK.
Resolution
Select the resolution at which to scan documents.
Resolution
Use the scanner driver
Select this checkbox to display the ScanGear (scanner driver) screen and make advanced scan
settings.
Page 157 of 334 pages
OCR Dialog Box
Color Mode, Document Size, Resolution and other settings in the OCR dialog box will be disabled.
Specify these settings in the ScanGear screen.
Specify...
Opens the Scan Settings dialog box in which you can make advanced scan settings.
Scan Settings Dialog Box
Note
When scanning slanted documents, select the Correct slanted document checkbox to improve
the text recognition accuracy.
Save Settings
File name
Enter the file name of the image to be saved (up to 64 characters). When saving multiple files, 4
digits are appended to each file name.
Save as type
Select a file type to save the scanned images.
Select JPEG/Exif, TIFF or BMP.
Important
You cannot select JPEG/Exif when Color Mode is Black and White.
Set...
When Save as type is JPEG/Exif
You can specify a compression type for JPEG files. Select High(Low Compression), Standard or
Low(High Compression).
Save in
Displays the folder in which to save the scanned images. To change the folder, click Browse... to
specify another one.
The following folders are specified by default.
Windows 7: MP Navigator EX folder in My Pictures folder
Windows Vista: MP Navigator EX folder in Pictures folder
Windows XP: MP Navigator EX folder in My Pictures folder
Windows 2000: MP Navigator EX folder in My Pictures folder
Save to a Subfolder with Current Date
Select this checkbox to create a subfolder in the folder specified in Save in with the current date and
save scanned files in it. A subfolder with a name such as "2010_01_01" (Year_Month_Date) will be
created.
If this checkbox is not selected, files are saved directly in the folder specified in Save in.
Application Settings
OCR with
Specify an OCR application.
When MP Navigator EX is specified, after the image is scanned, the text in the image is extracted
and appears in Notepad (included with Windows).
Note
Only text written in languages that can be selected on the General tab can be extracted to
Notepad (included with Windows). Click Set... on the General tab and specify the language
according to the language of the document to be scanned.
When scanning multiple documents, you can collect the extracted text into one file.
General Tab
Text displayed in Notepad (included with Windows) is for guidance only. Text in the image of
the following types of documents may not be detected correctly.
- Documents containing text with font size outside the range of 8 points to 40 points (at 300 dpi)
Page 158 of 334 pages
OCR Dialog Box
Page 159 of 334 pages
- Slanted documents
- Documents placed upside down or documents with text in the wrong orientation (rotated
characters)
- Documents containing special fonts, effects, italics, or hand-written text
- Documents with narrow line spacing
- Documents with colors in the background of text
- Documents containing multiple languages
For further procedures, refer to the application's manual.
Reset
Cancels the application setting.
Set...
Allows you to select an application.
Important
Depending on the specified application, the text may not be extracted correctly or the application
may not start.
Start scanning by clicking the one-click button
Select this checkbox to start scanning when you click an icon in One-click Mode.
Apply
Saves and applies the specified settings.
Click Cancel instead of Apply to cancel the specified settings.
Cancel
Cancels the specified settings. The current screen closes.
Defaults
Returns all settings in the screen to their defaults.
Scan
Scans documents with the specified settings.
Page top
Scan Dialog Box
On-screen Manual > Scanning Guide > MP Navigator EX Screens > Scan Dialog Box
Scan Dialog Box
Click Scan on the Custom Scan with One-click tab or in the One-click Mode screen to open the Scan
dialog box.
Scan Settings
Document Type
Select the type of document to be scanned. When Auto Mode is selected, the document type is
automatically detected. In that case, Color Mode, Document Size and Resolution are automatically
set as well. When Film(Auto mode) is selected, the film type (negative or positive) is automatically
detected.
Important
Document types supported by Auto Mode are photos, postcards, business cards, magazines,
newspapers, text documents, CD/DVD and film.
The following types of documents cannot be scanned correctly with Auto Mode. In that case,
specify the document type or size.
- A4 size photos
- Text documents smaller than 2L (5 inches x 7 inches) (127 mm x 178 mm), such as
paperback pages with the spine cut off
- Documents printed on thin white paper
- Long narrow documents such as panoramic photos
Reflective CD/DVD labels may not be scanned properly.
Film may not be scanned correctly when Auto Mode or Film(Auto mode) is selected. In that
case, select the type of film and scan again.
Place documents correctly according to the type of document to be scanned. Otherwise,
documents may not be scanned correctly.
See "Placing Documents " for details on how to place documents.
Page 160 of 334 pages
Scan Dialog Box
Note
To reduce moire, set Document Type to Magazine.
Color Mode
Select how to scan the document.
Document Size
Select the size of the document to be scanned.
When you select Custom, a screen in which you can specify the document size appears. Select a
Units, then enter the Width and Height and click OK.
Important
When you select Auto Detect, the image may not be scanned at the correct position and size. In
that case, change the size to the actual document size (A4, Letter, etc.) and align a corner of the
document with the corner at the arrow (alignment mark) of the Platen.
Resolution
Select the resolution at which to scan documents. The following scanning resolutions can be
specified:
When Document Type is other than film: 75 dpi / 100 dpi / 150 dpi / 200 dpi / 300 dpi / 400 dpi / 600
dpi
When Document Type is film: 300 dpi / 400 dpi / 600 dpi / 1200 dpi / 2400 dpi / 4800 dpi
Resolution
Use the scanner driver
Select this checkbox to display the ScanGear (scanner driver) screen and make advanced scan
settings.
Color Mode, Document Size, Resolution and other settings in the Scan dialog box will be disabled.
Specify these settings in the ScanGear screen.
Specify...
Opens the Scan Settings dialog box in which you can make advanced scan settings.
Scan Settings Dialog Box
Save Settings
Automatically save the image to your computer after scanning it
Select this to save the images to your computer as specified after scanning them.
The File name, Save as type and Save in settings will be displayed.
File name
Enter the file name of the image to be saved (up to 64 characters). When saving multiple files, 4
digits are appended to each file name.
Save as type
Select a file type to save the scanned images.
Select Auto, JPEG/Exif, TIFF or BMP. Auto is displayed when Document Type is Auto Mode.
Important
When Document Type is Auto Mode and Save as type is Auto, the file format may differ
depending on how you place the document.
See "Placing Documents " for details on how to place documents.
Large documents (such as A4 size photos) that cannot be placed away from the edges/arrow
(alignment mark) of the Platen may be saved as PDF files. To save in a format other than PDF,
Page 161 of 334 pages
Scan Dialog Box
scan by specifying the file format.
You cannot select JPEG/Exif when Color Mode is Black and White.
Note
When Auto is selected, files are saved in the following formats according to the document type.
Photos, postcards, CD/DVD, business cards and film: JPEG
Magazines, newspapers and text documents: PDF
You can change the file format from Set....
Images saved as PDF files may not open depending on the application. In that case, select an
option other than Auto in Save as type.
If you select JPEG/Exif when Document Type is not Auto Mode, the Save the JPEG/Exif file in
AdobeRGB checkbox will be selectable.
Set...
When Save as type is Auto
You can specify the file format in which to save images. Select a file format for Document and Photo
each.
When Save as type is JPEG/Exif
You can specify a compression type for JPEG files. Select High(Low Compression), Standard or
Low(High Compression).
Save in
Displays the folder in which to save the scanned images. To change the folder, click Browse... to
specify another one.
The following folders are specified by default.
Windows 7: MP Navigator EX folder in My Pictures folder
Windows Vista: MP Navigator EX folder in Pictures folder
Windows XP: MP Navigator EX folder in My Pictures folder
Windows 2000: MP Navigator EX folder in My Pictures folder
Save to a Subfolder with Current Date
Select this checkbox to create a subfolder in the folder specified in Save in with the current date and
save scanned files in it. A subfolder with a name such as "2010_01_01" (Year_Month_Date) will be
created.
If this checkbox is not selected, files are saved directly in the folder specified in Save in.
Save the JPEG/Exif file in AdobeRGB
Select this checkbox to save the images in colors that correspond to Adobe RGB.
Important
This function is available only when Save as type is JPEG/Exif and Document Type is not Auto
Mode.
This function is not available if the Adobe RGB profile is not installed.
Note
You cannot select this setting if the Use the scanner driver checkbox is selected.
When you save an image with the Save the JPEG/Exif file in AdobeRGB checkbox selected, an
underscore is added to the beginning of the file name. (Example: _Image0001.jpg)
Open the save dialog box after scanning the image (Input Exif information)
Select this to open the Save dialog box after scanning the images and specify the save settings
such as destination folder, file name and Exif information.
Save Dialog Box
Application Settings
Open with
Specify an application with which to open scanned images. Drag and drop the icon of an application
that supports the file format displayed in Save as type. The specified application starts after images
Page 162 of 334 pages
Scan Dialog Box
Page 163 of 334 pages
are scanned.
Important
Depending on the specified application, the images may not appear correctly or the application
may not start.
Note
For further procedures, refer to the application's manual.
Reset
Cancels the application setting.
Set...
Allows you to select an application to start.
Start scanning by clicking the one-click button
Select this checkbox to start scanning when you click an icon in One-click Mode.
Apply
Saves and applies the specified settings.
Click Cancel instead of Apply to cancel the specified settings.
Cancel
Cancels the specified settings. The current screen closes.
Defaults
Returns all settings in the screen to their defaults.
Scan / Preview
Scans and saves documents with the specified settings. When film is selected for Document Type,
this button changes to Preview, and clicking it displays the thumbnails of the photos on the film. In
the displayed dialog box, select the checkboxes of the images you want to scan, then click Scan.
Starts scanning.
When Save as type is Auto, a confirmation appears. Click Open Manual to open this guide (if it is
installed).
Page top
Copy Dialog Box
On-screen Manual > Scanning Guide > MP Navigator EX Screens > Copy Dialog Box
Copy Dialog Box
Click Copy on the Custom Scan with One-click tab or in the One-click Mode screen to open the Copy
dialog box.
Important
You can print from the Copy dialog box only when the machine and printer are connected to the
same computer. Images may not be printed correctly on a network printer.
Note
This procedure requires the machine and a printer. Refer to the manual of your printer to prepare it.
Selectable paper sizes and types vary by printer.
When multiple documents are placed on the Platen and Auto Mode is selected, each document is
scanned individually and printed on a separate sheet of paper. To print multiple documents on one
sheet of paper, select a document type other than Auto Mode and select a standard document size
(A4, Letter, etc.).
Scan Settings
Document Type
Select the type of document to be scanned. When Auto Mode is selected, the document type is
automatically detected. In that case, Color Mode, Document Size and Resolution are automatically
set as well. When Film(Auto mode) is selected, the film type (negative or positive) is automatically
detected.
Important
Document types supported by Auto Mode are photos, postcards, business cards, magazines,
newspapers, text documents, CD/DVD and film.
The following types of documents cannot be scanned correctly with Auto Mode. In that case,
specify the document type or size.
Page 164 of 334 pages
Copy Dialog Box
- A4 size photos
- Text documents smaller than 2L (5 inches x 7 inches) (127 mm x 178 mm), such as
paperback pages with the spine cut off
- Documents printed on thin white paper
- Long narrow documents such as panoramic photos
Reflective CD/DVD labels may not be scanned properly.
Film may not be scanned correctly when Auto Mode or Film(Auto mode) is selected. In that
case, select the type of film and scan again.
Note
To reduce moire, set Document Type to Magazine.
Color Mode
Select how to scan the document.
Document Size
Select the size of the document to be scanned.
When you select Custom, a screen in which you can specify the document size appears. Select a
Units, then enter the Width and Height and click OK.
Important
When you select Auto Detect, the image may not be scanned at the correct position and size. In
that case, change the size to the actual document size (A4, Letter, etc.) and align a corner of the
document with the corner at the arrow (alignment mark) of the Platen.
Resolution
Select the resolution at which to scan documents. The following scanning resolutions can be
specified:
When Document Type is other than film: 150 dpi / 300 dpi / 600 dpi
When Document Type is film: 300 dpi / 400 dpi / 600 dpi / 1200 dpi / 2400 dpi / 4800 dpi
Resolution
Scale
Select a scale according to the paper to print on or as required.
Select Fit to paper to resize the scanned image automatically to fit to the paper for printing. Since the
image's aspect ratio is maintained, margins may appear at the top and bottom or left and right
edges of the paper depending on the document and paper sizes.
Select Custom to enter a value in Scale. Enter a percentage (25% to 400%) and click OK.
Note
Scanned images are printed onto paper of a size that is specified on your printer.
For details, refer to the manual of your printer.
Brightness
Adjust the image brightness.
Move the slider to the left to darken and right to brighten the image.
Important
This function is available only when Document Type is Magazine or Document.
This function is not available when Document Size is set to be detected automatically.
Use the scanner driver
Select this checkbox to display the ScanGear (scanner driver) screen and make advanced scan
settings.
Page 165 of 334 pages
Copy Dialog Box
Page 166 of 334 pages
Color Mode, Document Size, Resolution and other settings in the Copy dialog box will be disabled.
Specify these settings in the ScanGear screen.
Specify...
Opens the Scan Settings dialog box in which you can make advanced scan settings.
Scan Settings Dialog Box
Printer Settings
Paper Size
Select the size of paper for printing.
Note
Selectable paper sizes depend on the selected printer.
Number of Copies
Specify the number of copies to print.
Click
(up and down buttons) to the right of the value or enter a value.
Specify up to 99 copies.
Printer
Select a printer to use when multiple printers are connected.
Click Properties... to open a dialog box to configure the printer settings.
Media Type
Select the type of paper to use.
Note
Selectable paper types depend on the selected printer.
Borderless Printing
Select this checkbox to print borderless images.
Important
This option is available only for Canon inkjet printers supporting Borderless Printing.
Since Borderless Printing enlarges the image to a size slightly larger than the paper size, the
portion of the image that extends beyond the edges of the paper will not be printed.
Start scanning by clicking the one-click button
Select this checkbox to start scanning when you click an icon in One-click Mode.
Apply
Saves and applies the specified settings.
Click Cancel instead of Apply to cancel the specified settings.
Cancel
Cancels the specified settings. The current screen closes.
Defaults
Returns all settings in the screen to their defaults.
Copy / Preview
Scans and prints documents with the specified settings. When film is selected for Document Type,
this button changes to Preview, and clicking it displays the thumbnails of the photos on the film. In
the displayed dialog box, select the checkboxes of the images you want to scan, then click Scan.
Starts scanning.
Select the Use the scanner driver checkbox to display the ScanGear screen.
Page top
Print Dialog Box
On-screen Manual > Scanning Guide > MP Navigator EX Screens > Print Dialog Box
Print Dialog Box
Click Print on the Custom Scan with One-click tab or in the One-click Mode screen to open the Print
dialog box.
Important
You can print with the Print function only when the machine and printer are connected to the same
computer. Images may not be printed correctly on a network printer.
Note
This procedure requires the machine and a printer. Refer to the manual of your printer to prepare it.
When multiple documents are placed on the Platen and Auto Mode is selected, each document is
scanned individually and printed on a separate sheet of paper. To print multiple documents on one
sheet of paper, select a document type other than Auto Mode and select a standard document size
(A4, Letter, etc.).
Scan Settings
Document Type
Select the type of document to be scanned. When Auto Mode is selected, the document type is
automatically detected. In that case, Color Mode, Document Size and Resolution are automatically
set as well. When Film(Auto mode) is selected, the film type (negative or positive) is automatically
detected.
Important
Document types supported by Auto Mode are photos, postcards, business cards, magazines,
newspapers, text documents, CD/DVD and film.
The following types of documents cannot be scanned correctly with Auto Mode. In that case,
specify the document type or size.
- A4 size photos
- Text documents smaller than 2L (5 inches x 7 inches) (127 mm x 178 mm), such as
paperback pages with the spine cut off
- Documents printed on thin white paper
Page 167 of 334 pages
Print Dialog Box
- Long narrow documents such as panoramic photos
Reflective CD/DVD labels may not be scanned properly.
Film may not be scanned correctly when Auto Mode or Film(Auto mode) is selected. In that
case, select the type of film and scan again.
Note
To reduce moire, set Document Type to Magazine.
Color Mode
Select how to scan the document.
Document Size
Select the size of the document to be scanned.
When you select Custom, a screen in which you can specify the document size appears. Select a
Units, then enter the Width and Height and click OK.
Important
When you select Auto Detect, the image may not be scanned at the correct position and size. In
that case, change the size to the actual document size (A4, Letter, etc.) and align a corner of the
document with the corner at the arrow (alignment mark) of the Platen.
Resolution
Select the resolution at which to scan documents. The following scanning resolutions can be
specified:
When Document Type is other than film: 150 dpi / 300 dpi / 600 dpi
When Document Type is film: 300 dpi / 400 dpi / 600 dpi / 1200 dpi / 2400 dpi / 4800 dpi
Resolution
Brightness
Adjust the image brightness.
Move the slider to the left to darken and right to brighten the image.
Important
This function is available only when Document Type is Magazine or Document.
This function is not available when Document Size is set to be detected automatically.
This function is not available when the Easy Color Matching checkbox is selected.
Use the scanner driver
Select this checkbox to display the ScanGear (scanner driver) screen and make advanced scan
settings.
Color Mode, Document Size, Resolution and other settings in the Print dialog box will be disabled.
Specify these settings in the ScanGear screen.
Important
This function is not available when the Easy Color Matching checkbox is selected.
Specify...
Opens the Scan Settings dialog box in which you can make advanced scan settings.
Scan Settings Dialog Box
Printer Settings
Printer
Page 168 of 334 pages
Print Dialog Box
Page 169 of 334 pages
Select a printer to use when multiple printers are connected.
Easy Color Matching
Perform color matching between the machine and printer.
Color matching is performed only when using a Canon inkjet printer supporting Easy Color
Matching.
Important
This option is not available when Color Mode is Black and White or Grayscale.
Note
It is recommended that you use Photo Paper Plus Glossy II when using Easy Color Matching.
Easy Color Matching may not be available depending on the type of paper to use. In that case,
install the Add-On Module for your printer driver.
Access our website to obtain the Add-On Module for your printer driver.
Recommended Image Correction, Auto Photo Fix and Auto Document Fix in the Scan Settings
dialog box will be disabled when using Easy Color Matching.
Open a File and Perform Color Matching
This option is available if the Easy Color Matching checkbox is selected.
Open a JPEG file saved in the Adobe RGB color tone, perform Easy Color Matching and display the
image in the Print Layout dialog box.
When this checkbox is selected, Scan changes to Open.
Click Open and select a JPEG file saved in the Adobe RGB color tone.
Important
This function does not scan images.
Note
Use the Save or Scan dialog box to create and save images in the Adobe RGB color tone.
You can only specify one image at a time.
Start scanning by clicking the one-click button
Select this checkbox to start scanning when you click an icon in One-click Mode.
Apply
Saves and applies the specified settings.
Click Cancel instead of Apply to cancel the specified settings.
Cancel
Cancels the specified settings. The current screen closes.
Defaults
Returns all settings in the screen to their defaults.
Scan / Preview
Scans documents with the specified settings and opens the Print Layout dialog box.
Print Layout Dialog Box
When film is selected for Document Type, this button changes to Preview, and clicking it displays the
thumbnails of the photos on the film. In the displayed dialog box, select the checkboxes of the
images you want to scan, then click Scan. Starts scanning.
Select the Use the scanner driver checkbox to display the ScanGear screen. The Print Layout dialog
box opens after you press Scan.
Page top
Print Layout Dialog Box
On-screen Manual > Scanning Guide > MP Navigator EX Screens > Print Layout Dialog Box
Print Layout Dialog Box
The Print Layout dialog box opens after scanning from Print on the Custom Scan with One-click tab or in
the One-click Mode screen.
Note
Double-click an image to display it in a different window.
Printer
Select the printer to use.
Properties...
Displays the selected printer's advanced setting screen.
Paper Size
Select the size of paper for printing. Match the size to the size of the paper set in the printer.
Media Type
Select the type of paper for printing. Print quality may be fixed depending on the paper type.
Page Layout
Select a print type.
Normal-size Printing
Print one image per sheet.
Fit-to-Page Printing
Print an image at the paper size (enlarged or reduced).
Borderless Printing
Select this checkbox to print the image on an entire sheet of paper without margins.
Important
Page Layout cannot be specified when you select Borderless Printing.
This setting is only available with Canon inkjet printers that support borderless printing.
Page 170 of 334 pages
Print Layout Dialog Box
Page 171 of 334 pages
Orientation
Specify the print orientation.
Important
This setting is available only when Page Layout is Normal-size Printing. For others, the image is
automatically rotated according to the aspect ratio of the paper.
Copies
Specify the number of copies to print.
Vivid Photo
Select this checkbox to print the image in vivid colors.
Important
This function is not available when a printer other than a Canon inkjet printer is selected for
Printer.
Preview before printing
Select this checkbox to display the print result before printing.
Save...
Save the scanned images.
Print
Starts printing.
Note
Only the images in the Thumbnail window with the checkbox selected are printed.
Close
Closes the dialog box without printing.
Page top
Preferences Dialog Box
Page 172 of 334 pages
On-screen Manual > Scanning Guide > MP Navigator EX Screens > Preferences Dialog Box
Preferences Dialog Box
Click Preferences to open the Preferences dialog box.
In the Preferences dialog box, you can make advanced settings to MP Navigator EX functions via the
General and Scanner Button Settings tabs.
Note
See the corresponding sections below for details on each tab.
General Tab
Scanner Button Settings Tab
Page top
General Tab
On-screen Manual > Scanning Guide > MP Navigator EX Screens > General Tab
General Tab
On the General tab, you can specify general MP Navigator EX settings.
Product Name
Displays the product name of the machine that MP Navigator EX is currently configured to use.
If the displayed product is not the one you want to use, select the desired product from the list.
Save in (My Box)
Displays the folder in which to save scanned documents. To change the folder, click Browse... to
specify another one.
The following folders are specified by default.
Windows 7: MP Navigator EX folder in My Pictures folder
Windows Vista: MP Navigator EX folder in Pictures folder
Windows XP: MP Navigator EX folder in My Pictures folder
Windows 2000: MP Navigator EX folder in My Pictures folder
Location of Temporary Files
Displays the folder in which to save images temporarily. To change the folder, click Browse... to specify
another one.
Important
An error may occur if you set the destination to the root directory of the drive on which the
operating system is installed. Be sure to specify a folder.
An error may occur if you set the destination to a network folder. Be sure to specify a local folder.
Application to run
Displays the applications that can be started via MP Navigator EX. Install the applications from the
Setup CD-ROM that accompanies the machine.
For Attach to E-mail, you can select an e-mail software program to start.
For Open PDF file, the application associated with the .pdf file extension by the operating system is
displayed.
Page 173 of 334 pages
General Tab
Page 174 of 334 pages
Important
You can change which items are installed during installation from the Setup CD-ROM by
selecting Custom Install. If you choose not to install some applications with Custom Install, the
corresponding MP Navigator EX functions will be unavailable. To use those functions, install the
corresponding applications.
Note
For Convert to text file, Notepad (included with Windows) is displayed. Click Set... to open a dialog
box, then specify Document Language and how to scan multiple documents.
Document Language
Specify the language according to the language of the document to be scanned. Only text
written in languages that can be selected in the Document Language can be extracted to
Notepad.
Combine multiple text conversion results
When scanning multiple documents, select the checkbox to collect the conversion results (text)
into one file.
When the checkbox is selected, you can scan up to 99 pages at one time.
Deselect the checkbox to display each conversion result (text) in a separate file.
When the checkbox is not selected, you can scan up to 10 pages at one time.
Page top
Scanner Button Settings Tab
Page 175 of 334 pages
On-screen Manual > Scanning Guide > MP Navigator EX Screens > Scanner Button Settings Tab
Scanner Button Settings Tab
Assign an MP Navigator EX function to each Scanner Button.
You can assign the Auto Scan, Save, Copy, Print, Mail, OCR, Scan or Show Main Menu function to each
button.
By default, the Copy, Mail, and Auto Scan functions are assigned to the COPY, E-MAIL, and AUTO SCAN
buttons respectively.
Important
You cannot assign the same function to two or more Scanner Buttons. (For example, you cannot
assign the Copy function to the COPY button and AUTO SCAN button at the same time.)
Close Main Menu after Scanning with Scanner Buttons on the Scanner
Select this checkbox to close the Main Menu (opened via a Scanner Button) automatically after
scanning.
Defaults
Returns all button settings to their defaults.
Page top
Opening Files Other than Scanned Images
Page 176 of 334 pages
On-screen Manual > Scanning Guide > Opening Files Other than Scanned Images
Opening Files Other than Scanned Images
You can save or print data other than scanned images using MP Navigator EX.
Using images saved on a computer
Opening Images Saved on a Computer
Page top
Opening Images Saved on a Computer
On-screen Manual > Scanning Guide > Opening Files Other than Scanned Images > Opening Images Saved on a
Computer
Opening Images Saved on a Computer
You can open images saved on a computer and print them or attach them to e-mail using MP Navigator
EX. You can also edit them using an application that accompanies the machine.
1. Start MP Navigator EX and open the Navigation Mode screen.
Starting MP Navigator EX
2. In the Navigation Mode screen, point to View & Use and click My Box (Scanned/
Imported Images), Specify Folder or Recently Saved Images.
Click My Box (Scanned/Imported Images) to open images saved in My Box (Scanned/Imported
Images), click Specify Folder to open images saved in a specific folder, or click Recently Saved
Images to open recently saved images.
Note
If the Show this window at startup checkbox is not selected, the last used screen appears. If
the Scan/Import window is displayed, click
(View & Use) on the upper left of the screen.
The View & Use window opens.
See " View & Use Images on your Computer Tab " for details on the View & Use Images on your
Computer tab.
3. Click the folder containing the images you want to open.
Images saved in the folder appear in the Thumbnail window.
Page 177 of 334 pages
Opening Images Saved on a Computer
Page 178 of 334 pages
4. Select the images you want to use, then select what you want to do with them.
See the corresponding sections below for details on using images.
Creating/Editing PDF Files
Printing Documents
Printing Photos
Sending via E-mail
Editing Files
Page top
What Is ScanGear (Scanner Driver)?
Page 179 of 334 pages
On-screen Manual > Scanning Guide > What Is ScanGear (Scanner Driver)?
What Is ScanGear (Scanner Driver)?
ScanGear (scanner driver) is software required for scanning documents and film. It enables you to
specify the output size and make image corrections when scanning.
ScanGear can be started from MP Navigator EX or from other applications that are compatible with a
standard interface called TWAIN. (ScanGear is a TWAIN-compatible driver.)
What You Can Do with This Software
This software enables you to preview scan results or set document type and output size, etc. when
scanning documents and film. It is useful when you want to scan in a specific color tone, as it allows you
to make various corrections and adjust brightness, contrast, etc.
Screens
There are three modes: Basic Mode, Advanced Mode and Auto Scan Mode.
Switch modes by clicking a tab on the upper right of the screen.
Note
ScanGear starts in the last used mode.
Settings are not retained when you switch between modes.
Basic Mode
Use Basic Mode to scan easily by following three simple on-screen steps (
,
and
).
Advanced Mode
Use Advanced Mode to specify color mode, output resolution, image brightness, color tone, etc. when
scanning.
What Is ScanGear (Scanner Driver)?
Page 180 of 334 pages
Auto Scan Mode
Use Auto Scan Mode to scan easily by simply placing documents on the Platen and clicking Scan.
Page top
Scanning with Advanced Settings Using ScanGear (Scanner Driver)
Page 181 of 334 pages
On-screen Manual > Scanning Guide > Scanning with Advanced Settings Using ScanGear (Scanner Driver)
Scanning with Advanced Settings Using ScanGear (Scanner
Driver)
Starting ScanGear (scanner driver)
Starting ScanGear (Scanner Driver)
Scanning documents after making simple image corrections
Scanning in Basic Mode
Scanning documents after making advanced image corrections and brightness/color adjustments
Scanning in Advanced Mode
Scanning Film in Advanced Mode
Scanning with a simple operation
Scanning in Auto Scan Mode
Scanning multiple documents at one time after making image corrections and color adjustments
Scanning Multiple Documents at One Time with ScanGear (Scanner Driver)
Page top
Starting ScanGear (Scanner Driver)
On-screen Manual > Scanning Guide > Scanning with Advanced Settings Using ScanGear (Scanner Driver)
ScanGear (Scanner Driver)
Page 182 of 334 pages
> Starting
Starting ScanGear (Scanner Driver)
Use ScanGear (scanner driver) to make image corrections and color adjustments when scanning.
ScanGear can be started from MP Navigator EX or an application.
Starting from MP Navigator EX
Navigation Mode Screen
Follow these steps to start ScanGear from the Navigation Mode screen of MP Navigator EX.
1. Start MP Navigator EX and open the Navigation Mode screen.
Starting MP Navigator EX
2. Point to Scan/Import and click Photos/Documents (Platen).
The Scan/Import window opens.
3. Select the Use the scanner driver checkbox, then click Open Scanner Driver.
The ScanGear screen appears.
One-click Mode Screen
Follow these steps to start ScanGear from the One-click Mode screen of MP Navigator EX.
1. Start MP Navigator EX and open the One-click Mode screen.
Starting MP Navigator EX
2. Click the corresponding icon.
The corresponding dialog box opens.
3. Select the Use the scanner driver checkbox in Scan Settings, then click Scan.
Starting ScanGear (Scanner Driver)
Page 183 of 334 pages
The ScanGear screen appears.
Important
Use the scanner driver is not displayed in the PDF dialog box or Auto Scan dialog box.
Starting from an Application
Follow these steps (example) to start ScanGear from an application.
The procedure varies depending on the application. For details, refer to the application's manual.
1. Start the application.
2. On the File menu of the application, select Select Source and select the machine.
3. Select the command to scan a document (Scan/Import, Acquire image, etc.).
The ScanGear screen appears.
Page top
Scanning in Basic Mode
Page 184 of 334 pages
On-screen Manual > Scanning Guide > Scanning with Advanced Settings Using ScanGear (Scanner Driver)
in Basic Mode
> Scanning
Scanning in Basic Mode
In Basic Mode, you can scan easily by following the on-screen steps.
This section explains how to scan a single document and how to scan color film.
See "Scanning Multiple Documents at One Time with ScanGear (Scanner Driver) " to scan multiple
documents at one time.
See "Scanning Film in Advanced Mode " to scan black and white film or 120 Format Film.
Important
The following types of documents may not be cropped correctly. In that case, click
on the Toolbar to switch to whole image view and scan.
- Photos that have a whitish border
- Documents printed on white paper, hand-written text, business cards, etc.
- Thin documents
- Thick documents
The following types of documents cannot be cropped correctly.
- Documents smaller than 1.18 inches (3 cm) square
- Photos that have been cut to various shapes
(Thumbnail)
1. Place the document or film on the Platen, then start ScanGear (scanner driver).
Starting ScanGear (Scanner Driver)
Important
Place the document face-down on the Platen and align an upper corner of the document with
the corner at the arrow (alignment mark) of the Platen. See " Placing Film " for details on how to
place film.
2. Set Select Source according to the document or film placed on the Platen.
Note
Scanning in Basic Mode
To scan magazines containing many color photos, select Magazine(Color).
3. Click Preview.
When Photo or Document is Previewed
Preview image appears in the Preview area.
Note
Colors are adjusted based on the document type selected in Select Source.
When Film is Previewed
Preview images appear in the Preview area. Images are cropped (scan areas are specified)
automatically according to the film size.
Select the frames to scan.
Important
Film cannot be scanned without previewing.
Page 185 of 334 pages
Scanning in Basic Mode
Page 186 of 334 pages
4. Set Destination.
5. Set Output Size.
Output size options vary by the item selected in Destination.
6. Adjust the scan area (cropping frame) as required.
Adjust the size and position of the cropping frame (scan area) on the preview image.
Adjusting Cropping Frames
7. Set Image corrections as required.
8. Click Scan.
Starts scanning.
Note
Click
(Information) to open a dialog box in which you can check the current scan settings
(document type, etc.).
ScanGear's response after scanning can be specified in Status of ScanGear dialog after scanning
on the Scan tab of the Preferences dialog box.
Scan Tab
Related Topic
Basic Mode Tab
Page top
Scanning in Advanced Mode
Page 187 of 334 pages
On-screen Manual > Scanning Guide > Scanning with Advanced Settings Using ScanGear (Scanner Driver)
in Advanced Mode
> Scanning
Scanning in Advanced Mode
In Advanced Mode, you can specify the color mode, output resolution, image brightness, color tone, etc.
when scanning.
This section explains how to scan a single document.
See "Scanning Multiple Documents at One Time with ScanGear (Scanner Driver) " to scan multiple
documents at one time.
See "Scanning Film in Advanced Mode " to scan film.
Important
The following types of documents may not be cropped correctly. In that case, click
on the Toolbar to switch to whole image view and scan.
- Photos that have a whitish border
- Documents printed on white paper, hand-written text, business cards, etc.
- Thin documents
- Thick documents
The following types of documents cannot be cropped correctly.
- Documents smaller than 1.18 inches (3 cm) square
- Photos that have been cut to various shapes
(Thumbnail)
1. Place the document on the Platen, then start ScanGear (scanner driver).
Starting ScanGear (Scanner Driver)
Important
Place the document face-down on the Platen and align an upper corner of the document with
the corner at the arrow (alignment mark) of the Platen.
2. Click Advanced Mode.
The Advanced Mode tab appears.
Scanning in Advanced Mode
Note
Settings are not retained when you switch between modes.
3. Set Input Settings according to the document or purpose.
Input Settings
4. Click Preview.
Preview image appears in the Preview area.
Note
If you scan without preview, the show-through reduction function will be active. This function is
useful when scanning magazines. However, when scanning photos, the color tone of the
scanned image may differ from the source due to the show-through reduction function. In that
case, use preview first.
5. Set Output Settings.
Output Settings
6. Adjust the cropping frame (scan area), correct image and adjust colors as required.
Adjusting Cropping Frames
Image Settings
Color Adjustment Buttons
7. Click Scan.
Starts scanning.
Note
Click
(Information) to open a dialog box in which you can check the current scan settings
(document type, etc.).
ScanGear's response after scanning can be specified in Status of ScanGear dialog after scanning
on the Scan tab of the Preferences dialog box.
Scan Tab
Related Topic
Page 188 of 334 pages
Scanning in Advanced Mode
Page 189 of 334 pages
Advanced Mode Tab
Page top
Scanning in Auto Scan Mode
On-screen Manual > Scanning Guide > Scanning with Advanced Settings Using ScanGear (Scanner Driver)
in Auto Scan Mode
Page 190 of 334 pages
> Scanning
Scanning in Auto Scan Mode
You can scan easily in Auto Scan Mode of ScanGear (scanner driver) by letting it automatically determine
the type of document placed on the Platen.
Important
Supported document types are photos, postcards, business cards, magazines, newspapers, text
documents, CD/DVD and film. To scan other documents, specify the document type on the Basic
Mode tab or the Advanced Mode tab.
Scanning in Basic Mode
Scanning in Advanced Mode
To scan black and white film or 120 Format Film, scan from the Advanced Mode tab of ScanGear.
Scanning Film in Advanced Mode
1. Place the document on the Platen, then start ScanGear.
Placing Documents
Starting ScanGear (Scanner Driver)
2. Click Auto Scan Mode.
The Auto Scan Mode tab appears.
Note
Select the Execute recommended image correction checkbox to apply suitable corrections
automatically according to the type of document to be scanned.
3. Click Scan.
Starts scanning.
Note
ScanGear's response after scanning can be specified in Status of ScanGear dialog after scanning
on the Scan tab of the Preferences dialog box.
Scanning in Auto Scan Mode
Page 191 of 334 pages
Scan Tab
Related Topic
Auto Scan Mode Tab
Page top
Scanning Film in Advanced Mode
On-screen Manual > Scanning Guide > Scanning with Advanced Settings Using ScanGear (Scanner Driver)
Film in Advanced Mode
Page 192 of 334 pages
> Scanning
Scanning Film in Advanced Mode
In Advanced Mode, you can specify the color mode, output resolution, image brightness, color tone, etc.
when scanning.
This section explains how to scan film.
1. Place the film on the Platen, then start ScanGear (scanner driver).
Placing Film
Starting ScanGear (Scanner Driver)
Important
Some applications cannot receive images scanned in Color(48bit) or Grayscale(16bit), or may
close when such images are received.
2. Click Advanced Mode and select film for Select Source.
Note
Settings are not retained when you switch between modes.
3. Set Input Settings according to the film or purpose.
Input Settings
4. Click Preview.
Preview images appear in the Preview area. Images are cropped (scan areas are specified)
automatically according to the film size.
Select the frames to scan.
Scanning Film in Advanced Mode
Page 193 of 334 pages
5. Set Output Settings.
Output Settings
Note
When the data size exceeds 1.8 GB, select the Enable Large Image Scans checkbox on the
Scan tab of the Preferences dialog box. This will enable you to scan images of up to 4.0 GB.
6. Adjust the cropping frame (scan area), correct image and adjust colors as required.
Adjusting Cropping Frames
Image Settings
Color Adjustment Buttons
Note
You can correct each image separately. Select the frame you want to correct.
7. Click Scan.
Starts scanning.
Note
Click
(Information) to open a dialog box in which you can check the current scan settings
(document type, etc.).
ScanGear's response after scanning can be specified in Status of ScanGear dialog after scanning
on the Scan tab of the Preferences dialog box.
Scan Tab
Related Topic
Advanced Mode Tab
Page top
Scanning Multiple Documents at One Time with ScanGear (Scanner Driver)
On-screen Manual > Scanning Guide > Scanning with Advanced Settings Using ScanGear (Scanner Driver)
Multiple Documents at One Time with ScanGear (Scanner Driver)
Page 194 of 334 pages
> Scanning
Scanning Multiple Documents at One Time with ScanGear
(Scanner Driver)
You can scan two or more photos (small documents) on the Platen at one time in Basic Mode and
Advanced Mode of ScanGear (scanner driver).
This section explains how to scan multiple documents from the Basic Mode tab.
Important
To scan multiple documents as a single image, scan in whole image view.
The following types of documents may not be cropped correctly. In that case, adjust the cropping
frames (scan areas) in whole image view and scan.
- Photos that have a whitish border
- Documents printed on white paper, hand-written text, business cards, etc.
- Thin documents
- Thick documents
Scanning Multiple Documents in Whole Image View
The following types of documents cannot be cropped correctly.
- Documents smaller than 1.18 inches (3 cm) square
- Photos that have been cut to various shapes
Note
See "Scanning in Auto Scan Mode " to scan easily by automatically detecting the document type.
You can also scan multiple documents at one time from the Advanced Mode tab. Use the Advanced
Mode tab to make advanced scan settings such as the color mode, output resolution, image
brightness and color tone.
See the corresponding sections below for details on the Basic Mode tab and Advanced Mode tab.
Basic Mode Tab
Advanced Mode Tab
1. Place the document on the Platen, then start ScanGear.
Placing Documents
Starting ScanGear (Scanner Driver)
2. Set Select Source according to the document placed on the Platen.
Scanning Multiple Documents at One Time with ScanGear (Scanner Driver)
3. Click Preview.
Thumbnails of the preview images appear in the Preview area. Images are cropped (scan areas are
specified) automatically according to the document size.
4. Set Destination.
5. Set Output Size.
6. Adjust the scan areas (cropping frames) and set Image corrections as required.
Note
You can correct each image separately. Select the frame you want to correct.
In thumbnail view, you can only create one cropping frame (scan area) per image.
To create multiple cropping frames in an image, scan in whole image view.
Scanning Multiple Documents in Whole Image View
7. Select the images you want to scan.
Select the checkboxes of the images you want to scan.
Page 195 of 334 pages
Scanning Multiple Documents at One Time with ScanGear (Scanner Driver)
Page 196 of 334 pages
8. Click Scan.
Scanning Multiple Documents in Whole Image View
Follow these steps if thumbnails are not displayed correctly when previewed or if you want to scan
multiple documents as a single image.
Note
Positions of slanted documents are not corrected in whole image view.
1. After previewing images, click
(Thumbnail) on the Toolbar.
Switch to whole image view.
Note
When the whole image is displayed, the icon changes to
(Whole Image).
2. Adjust the scan areas (cropping frames).
Adjust the size and position of the cropping frame (scan area) on the preview image. You can also
create two or more cropping frames.
If an area is not specified, the document will be scanned at the document size (Auto Crop). If an area
is specified, only the portion in the specified area will be scanned.
Adjusting Cropping Frames
3. Set Destination.
4. Set Output Size.
5. Set Image corrections as required.
6. Click Scan.
Areas framed by broken lines are scanned.
Scanning Multiple Documents at One Time with ScanGear (Scanner Driver)
Note
ScanGear's response after scanning can be specified in Status of ScanGear dialog after scanning
on the Scan tab of the Preferences dialog box.
Scan Tab
Page top
Page 197 of 334 pages
Correcting Images and Adjusting Colors with ScanGear (Scanner Driver)
Page 198 of 334 pages
On-screen Manual > Scanning Guide > Correcting Images and Adjusting Colors with ScanGear (Scanner Driver)
Correcting Images and Adjusting Colors with ScanGear
(Scanner Driver)
The following sections provide you with tips and know-how on advanced scanning techniques involving
color/brightness adjustment, etc.
Sharpening out-of-focus photos, reducing dust and scratches, and correcting faded colors
Correcting Images (Unsharp Mask, Reduce Dust and Scratches, Fading Correction, etc.)
Previewing and changing the color tone of the entire image to scan
Adjusting Colors Using a Color Pattern
Brightening colors that have faded with time or due to colorcast
Adjusting Saturation and Color Balance
Adjusting images that are too dark or bright, or too flat due to lack of contrast
Adjusting Brightness and Contrast
Adjusting the color tone using histogram (a graph showing brightness distribution)
Adjusting Histogram
Adjusting the image brightness using tone curve (a graph of brightness balance)
Adjusting Tone Curve
Sharpening characters in text documents or reducing show-through effects
Setting Threshold
Page top
Correcting Images (Unsharp Mask, Reduce Dust and Scratches, Fading Correc... Page 199 of 334 pages
On-screen Manual > Scanning Guide > Correcting Images and Adjusting Colors with ScanGear (Scanner Driver)
Correcting Images (Unsharp Mask, Reduce Dust and Scratches, Fading Correction, etc.)
>
Correcting Images (Unsharp Mask, Reduce Dust and
Scratches, Fading Correction, etc.)
The Image Settings functions in Advanced Mode tab of ScanGear (scanner driver) allow you to enhance
the outline of the subjects, reduce dust/scratches and correct faded colors when scanning images.
Setting Items
Click
(Arrow) of a function and select an item from the pull-down menu.
Important
Do not apply these functions to images without moire, dust/scratches or faded colors. The color
tone may be adversely affected.
See "Image Settings " for details and precautions on each function.
Note
See "Scanning in Advanced Mode " to start ScanGear in Advanced Mode tab and scan.
The setting items vary depending on whether Select Source is Platen or film.
Adjusting the image brightness and color tone
Set Image Adjustment to Auto, Photo, Magazine, Newspaper or Document according to the document
type.
Correcting Images (Unsharp Mask, Reduce Dust and Scratches, Fading Correc... Page 200 of 334 pages
None
Auto
Sharpening slightly out-of-focus images
Set Unsharp Mask to ON.
ON
OFF
Reducing gradations and stripe patterns
Set Descreen to ON.
ON
OFF
Note
"Moire" is a phenomenon where uneven gradation or a stripe pattern appears when such photos or
pictures printed with fine dots are scanned. Descreen is the function for reducing this moire effect.
Removing dust and scratches when scanning film
Set Remove Dust and Scratches (FARE) to Low, Medium or High according to the degree of dust and
scratches.
Dust and scratches on film will be removed automatically when scanning.
None
Medium
Note
When the resolution is set to 4801 dpi or higher and the Remove Dust and Scratches (FARE)
Correcting Images (Unsharp Mask, Reduce Dust and Scratches, Fading Correc... Page 201 of 334 pages
checkbox is selected, scanning takes longer than usual. Also, make sure that there is sufficient free
hard disk space before scanning.
Reducing dust and scratches on photos
Set Reduce Dust and Scratches to Low, Medium or High according to the degree of dust and scratches.
Medium
None
Correcting photos that have faded with time or due to colorcast
Set Fading Correction to Low, Medium or High according to the degree of fading or colorcast.
None
Medium
Reducing graininess
Set Grain Correction to Low, Medium or High according to the degree of graininess.
None
Medium
Correcting backlit images
Set Backlight Correction to Low, Medium or High according to the degree of backlight.
None
Medium
Correcting shadows that appear between pages when scanning open booklets
Set Gutter Shadow Correction to Low, Medium or High according to the degree of shadows.
None
Medium
Correcting Images (Unsharp Mask, Reduce Dust and Scratches, Fading Correc... Page 202 of 334 pages
Adjusting the film exposure manually
Click
(Down arrow) of Exposure/Tone Settings.
Select the Manual Exposure checkbox and adjust the exposure within the range of 50% to 200%.
Before
After
Scanning film at high quality
Click
(Down arrow) of Exposure/Tone Settings and set High Quality to ON.
OFF
ON
Page top
Adjusting Colors Using a Color Pattern
On-screen Manual > Scanning Guide > Correcting Images and Adjusting Colors with ScanGear (Scanner Driver)
Adjusting Colors Using a Color Pattern
Page 203 of 334 pages
>
Adjusting Colors Using a Color Pattern
You can preview color changes and reproduce natural colors by using the Color Pattern function in
ScanGear (scanner driver)'s Basic Mode tab.
Color Adjustment
Correct colors that have faded with time or due to colorcast. Colorcast is a phenomenon where a specific
color affects the entire picture due to the weather or ambient strong colors.
Click an arrow in Color Adjustment to emphasize the corresponding color.
Cyan & red, magenta & green and yellow & blue are complementary color pairs (each pair produces a
shade of gray when mixed). You can reproduce the natural colors of the scene by reducing the cast color
and increasing the complementary color.
Adjusting Colors Using a Color Pattern
Page 204 of 334 pages
It is recommended that you find a portion in the image where it should be white, and adjust the colors so
that the portion turns white.
Preview image appears in the center. Preview image colors change as you adjust them.
Below is an example of correcting a bluish image.
Since Blue and Green are too strong, click the Yellow and Magenta arrows to correct.
Before
After
Note
Color adjustments are applied only to the scan area (cropping frame) or the frame selected in
thumbnail view.
You can select multiple frames or cropping frames by clicking them while pressing the Ctrl key.
You can also select a color tone from the color pattern displayed on the left of the Color Pattern
screen.
You can also use this function to add a specific tint to an image. Increase the magenta to add a
warm tint, and increase the blue to add a cool tint.
Page top
Adjusting Saturation and Color Balance
Page 205 of 334 pages
On-screen Manual > Scanning Guide > Correcting Images and Adjusting Colors with ScanGear (Scanner Driver)
Adjusting Saturation and Color Balance
>
Adjusting Saturation and Color Balance
In ScanGear (scanner driver)'s Advanced Mode tab, click
(Saturation/Color Balance).
Note
Click Defaults to reset all adjustments in the current window.
Saturation
Adjust the image's saturation (vividness). You can brighten colors that have faded with time, etc.
Move
(Slider) under Saturation to the left to decrease the saturation (darken the image), and to the
right to increase the saturation (brighten the image). You can also enter a value (-127 to 127).
Saturation decreased
Original image
Saturation increased
Note
The natural color tone of the original image may be lost if you increase saturation too much.
Color Balance
Adjust images that have a colorcast. Colorcast is a phenomenon where a specific color affects the entire
picture due to the weather or ambient strong colors.
Adjusting Saturation and Color Balance
Move
Page 206 of 334 pages
(Slider) under Color Balance to the left or right to emphasize the corresponding color.
Cyan & Red
Magenta & Green
Yellow & Blue
These are complementary color pairs (each pair produces a shade of gray when mixed). You can
reproduce the natural colors of the scene by reducing the cast color and increasing the complementary
color.
It is usually difficult to correct the image completely by adjusting only one color pair. It is recommended
that you find a portion in the image where it should be white, and adjust all three color pairs so that the
portion turns white.
You can also enter a value (-127 to 127).
Below is an example of an image in which the "Cyan & Red" pair has been adjusted.
Cyan is increased
Red is increased
Page top
Adjusting Brightness and Contrast
Page 207 of 334 pages
On-screen Manual > Scanning Guide > Correcting Images and Adjusting Colors with ScanGear (Scanner Driver)
Adjusting Brightness and Contrast
>
Adjusting Brightness and Contrast
In ScanGear (scanner driver)'s Advanced Mode tab, click
(Brightness/Contrast).
Note
Click
(Down arrow) to switch to detailed view. Click
(Up arrow) to return to the previous view.
Click Defaults to reset all adjustments in the current window.
Channel
Each dot of an image is a mixture of Red, Green and Blue in various proportions (gradation). These
colors can be adjusted individually as a "channel."
Master
Adjust the Red, Green and Blue combined.
Red
Adjust the Red channel.
Green
Adjust the Green channel.
Blue
Adjust the Blue channel.
Adjusting Brightness and Contrast
Page 208 of 334 pages
Note
Only Grayscale will be displayed in Channel when Color Mode is Grayscale or Grayscale(16bit).
Brightness
Adjust the image brightness. Move
(Slider) under Brightness to the left to darken and right to brighten
the image. You can also enter a value (-127 to 127).
Darkened
Original image
Brightened
Note
Highlights may be lost if you brighten the image too much, and shadows may be lost if you darken
the image too much.
Contrast
"Contrast" is the degree of difference between the brighter and darker parts of an image. Increasing
contrast will increase the difference, thus sharpening the image. Decreasing contrast will decrease the
difference, thus softening the image.
Move
(Slider) under Contrast to the left to decrease and right to increase the contrast of the image.
You can also enter a value (-127 to 127).
Decreased contrast
Original image
Increased contrast
Note
Increasing the contrast is effective in adding a three-dimensional feel to soft images. However,
shadows and highlights may be lost if you increase the contrast too much.
Page top
Adjusting Histogram
Page 209 of 334 pages
On-screen Manual > Scanning Guide > Correcting Images and Adjusting Colors with ScanGear (Scanner Driver)
Adjusting Histogram
Adjusting Histogram
In ScanGear (scanner driver)'s Advanced Mode tab, click
(Histogram).
Note
Click Defaults to reset all adjustments in the current window.
Channel
Each dot of an image is a mixture of Red, Green and Blue in various proportions (gradation). These
colors can be adjusted individually as a "channel."
Master
Adjust the Red, Green and Blue combined.
Red
Adjust the Red channel.
Green
Adjust the Green channel.
Blue
Adjust the Blue channel.
Note
Only Grayscale will be displayed in Channel when Color Mode is Grayscale or Grayscale(16bit).
Reading Histograms
You can see the histogram of a specified area for each Channel. The higher the histogram peak, the
more data is distributed to that level.
>
Adjusting Histogram
Page 210 of 334 pages
(1) Bright area
(2) Dark area
(3) Whole image
More data is distributed to the
highlight side.
More data is distributed to the
Data is widely distributed between the
highlight and shadow.
shadow side.
Adjusting Histograms (Using the Slider)
Select a Channel, then move
set as the shadow or highlight.
- All parts to the left of
- The parts at
(Black-point Slider) or
(White-point Slider) to specify the level to be
(Black-point Slider) will be black (level 0).
(Mid-point Slider) will turn to the color exactly between the black-point and white-point.
- All parts to the right of
(White-point Slider) will turn white (level 255).
When Image Adjustment is set to anything but None, the adjustments shown below are performed
automatically.
Moving the Black-point and White-point Sliders
Move the Black-point Slider or White-point Slider to adjust brightness.
Images with more data distributed to the highlight side
Move the Black-point Slider toward the highlight side.
Images with more data distributed to the shadow side
Move the White-point Slider toward the shadow side.
Images with widely distributed data
Move the Black-point Slider toward the highlight side, and White-point Slider toward the shadow side.
Adjusting Histogram
Page 211 of 334 pages
Moving the Mid-point Slider
Move the Mid-point Slider to specify the level to be set as the middle of the tonal range.
Images with more data distributed to the highlight side
Move the Mid-point Slider toward the highlight side.
Images with more data distributed to the shadow side
Move the Mid-point Slider toward the shadow side.
Adjusting Histograms (Using the Droppers)
When you select a Channel and click the Black-point, Mid-point or White-point Dropper, the mouse
pointer on the preview image changes to a dropper. Click a Dropper displayed below the histogram to
change the setting.
- The point clicked with
to 245).
(Black-point Dropper) will be the darkest point. You can also enter a value (0
- The point clicked with
a value (5 to 250).
(Mid-point Dropper) will be the middle of the tonal range. You can also enter
- The point clicked with
(10 to 255).
(White-point Dropper) will be the brightest point. You can also enter a value
- Click
(Dropper) for Gray Balance and click the area you want to adjust the color in the preview
image.
The clicked point will be set as the achromatic color reference, and the rest of the image is adjusted
accordingly. For instance, if snow in a photo appears bluish, click the bluish part to adjust the whole
image and reproduce natural colors.
Page top
Adjusting Tone Curve
Page 212 of 334 pages
On-screen Manual > Scanning Guide > Correcting Images and Adjusting Colors with ScanGear (Scanner Driver)
Adjusting Tone Curve
>
Adjusting Tone Curve
In ScanGear (scanner driver)'s Advanced Mode tab, click
(Tone Curve Settings).
Note
Click Defaults to reset all adjustments in the current window.
Channel
Each dot of an image is a mixture of Red, Green and Blue in various proportions (gradation). These
colors can be adjusted individually as a "channel."
Master
Adjust the Red, Green and Blue combined.
Red
Adjust the Red channel.
Green
Adjust the Green channel.
Blue
Adjust the Blue channel.
Note
Only Grayscale will be displayed in Channel when Color Mode is Grayscale or Grayscale(16bit).
Reading Tone Curves
With ScanGear, scanning images via a scanner is the input, and displaying to a monitor is the output.
"Tone Curve" shows the balance of tone input and output for each Channel.
Adjusting Tone Curve
Adjusting Tone Curve
In Select Tone Curve, select a tone curve from No correction, Overexposure, Underexposure, High
contrast, Reverse the negative/positive image and Edit custom curve.
No correction (No adjustment)
Overexposure (Convex curve)
The midtone data of the input side is stretched toward the highlight of the output side, resulting in a
bright-toned image when viewed on a monitor.
Underexposure (Concave curve)
The midtone data of the input side is stretched toward the shadow of the output side, resulting in a darktoned image when viewed on a monitor.
High contrast (S curve)
The highlight and shadow of the input side are enhanced, resulting in a high-contrast image.
Reverse the negative/positive image (Downward-sloping line)
The input and output sides are reversed, resulting in a negative-positive inverted image.
Page 213 of 334 pages
Adjusting Tone Curve
Page 214 of 334 pages
Edit custom curve
You can drag specific points on the Tone Curve to freely adjust the brightness of the corresponding
areas.
Page top
Setting Threshold
Page 215 of 334 pages
On-screen Manual > Scanning Guide > Correcting Images and Adjusting Colors with ScanGear (Scanner Driver)
Setting Threshold
>
Setting Threshold
The brightness of color and grayscale images is expressed in a value between 0 and 255. However, in
creating black and white images, all colors are mapped to either black (0) or white (255). "Threshold" is
the borderline value that determines a color as black or white. By adjusting the threshold level, you can
sharpen text in a document or reduce show-through in newspapers.
This function is available when Color Mode is Black and White.
In ScanGear (scanner driver)'s Advanced Mode tab, click
(Threshold).
Note
Click Defaults to reset all adjustments in the current window.
Adjusting Threshold
Move
(Slider) to the right to increase the threshold value and thus increase the black areas. Move the
slider to the left to decrease the value and thus increase the white areas. You can also enter a value (0 to
255).
Page top
ScanGear (Scanner Driver) Screens
Page 216 of 334 pages
On-screen Manual > Scanning Guide > ScanGear (Scanner Driver) Screens
ScanGear (Scanner Driver) Screens
The following sections describe ScanGear (scanner driver)'s screens and functions, and how to use
ScanGear.
Basic Mode Tab
Advanced Mode Tab
Input Settings
Output Settings
Image Settings
Color Adjustment Buttons
Auto Scan Mode Tab
Preferences Dialog Box
Scanner Tab
Preview Tab
Scan Tab
Color Settings Tab
Page top
Basic Mode Tab
On-screen Manual > Scanning Guide > ScanGear (Scanner Driver) Screens > Basic Mode Tab
Basic Mode Tab
This mode allows you to scan easily by following the on-screen steps.
This section describes the settings and functions available in Basic Mode.
(1) Settings and Operation Buttons
(2) Toolbar
(3) Preview Area
Note
The displayed items vary by document type and how the screen was opened.
Settings and Operation Buttons
Select Source
Photo(Color)
Scan color photos.
Magazine(Color)
Scan color magazines.
Newspaper(Grayscale)
Scan text and line drawings in black and white.
Document(Grayscale)
Scan documents and photos in black and white.
Select this mode to create high-resolution black and white images.
Negative Film(Color)
Scan 35 mm color negative film in color.
Positive Film(Color)
Scan 35 mm color positive film in color.
Note
Page 217 of 334 pages
Basic Mode Tab
To scan black and white film or 120 Format Film, scan from the Advanced Mode tab.
Scanning Film in Advanced Mode
When you select a document type, colors are adjusted based on the Unsharp Mask function or
document type.
If you select Magazine(Color), the Descreen function will be active.
Display Preview Image
Preview
Performs a trial scan.
Note
When using the machine for the first time, scanner calibration starts automatically. Wait a while
until the preview image appears.
Destination
Select what you want to do with the scanned image.
Print
Select this to print the scanned image on a printer.
Image display
Select this to view the scanned image on a monitor.
OCR
Select this to use the scanned image with OCR software.
OCR software is software that converts text scanned as an image into text data that can be
edited in word processors and other programs.
Important
This option is not displayed when film is scanned.
Output Size
Select an output size.
Output size options vary by the item selected in Destination.
Flexible
Allows you to freely adjust the cropping frames.
In thumbnail view
Drag the mouse over a thumbnail to display a cropping frame. When a cropping frame is
displayed, the portion within the cropping frame will be scanned. When no cropping frame is
displayed, each frame is scanned individually.
Page 218 of 334 pages
Basic Mode Tab
In whole image view
When no cropping frame is displayed, the entire Preview area will be scanned. When a
cropping frame is displayed, the portion within the cropping frame will be scanned.
Paper Size (L, A4, etc.)
Select an output paper size. The portion within the cropping frame will be scanned at the size of
the selected paper size. You can drag the cropping frame to enlarge/reduce it while maintaining
the aspect ratio.
Monitor Size (1024 x 768 pixels, etc.)
Select an output size in pixels.
A cropping frame of the selected monitor size will be displayed and the portion within the
cropping frame will be scanned. You can drag the cropping frame to enlarge/reduce it while
maintaining the aspect ratio.
Add/Delete...
Opens the Add/Delete the Output Size dialog box, in which you can specify custom output sizes.
You can select this option when Destination is Print or Image display.
In the Add/Delete the Output Size dialog box, you can specify multiple output sizes and save
them at one time. Saved items will be registered to the Output Size list and can be selected,
along with the predefined items.
Add
To add a size, enter Output Size Name, Width and Height, then click Add. For Unit, you can
select mm or inches when Destination is Print but you can only select pixels when Destination
is Image display. The name of the added size appears in Output Size List. Click Save to save
the items listed in Output Size List.
Delete
To delete an item, select it in Output Size List and click Delete. Click Save to save the items
listed in Output Size List.
Important
You cannot delete predefined output sizes such as A4 and 1024 x 768 pixels.
Note
Save up to 10 items.
An error message appears when you enter a value outside the setting range. Enter a value
within the setting range.
Note
For details on whether or how the cropping frame is initially displayed on a preview image, see
Cropping Frame on Previewed Images in " Preview Tab " (Preferences dialog box).
Invert aspect ratio
This button is available when Output Size is set to anything but Flexible.
Click this button to rotate the cropping frame. Click again to return it to the original orientation.
Adjust cropping frames
You can adjust the scan area within the Preview area.
If an area is not specified, the document will be scanned at the document size (Auto Crop) or film
size. If an area is specified, only the portion in the cropping frame will be scanned.
Page 219 of 334 pages
Basic Mode Tab
Adjusting Cropping Frames
Image corrections
Remove dust and scratches (FARE)
Removes dust and scratches automatically when scanning film.
Important
This function is available only when film is scanned.
Fading correction
Use this function to correct photos and film that have faded with time or have a colorcast.
Backlight correction
Corrects photos and film that have been shot against light.
Gutter shadow correction
Corrects shadows that appear between pages when scanning open booklets.
Important
For precautions on using this function, see " Gutter Shadow Correction ."
This function is not available when film is scanned.
Color Pattern...
Allows you to adjust the image's overall color. You can correct colors that have faded due to
colorcast, etc. and reproduce natural colors while previewing color changes.
Adjusting Colors Using a Color Pattern
Perform Scan
Scan
Scanning starts.
Note
When scanning starts, the progress will be displayed. Click Cancel to cancel the scan.
Preferences...
The Preferences dialog box opens and you can make scan/preview settings.
Preferences Dialog Box
Close
Closes ScanGear (scanner driver).
Toolbar
Toolbar
You can adjust or rotate preview images. The buttons displayed on the Toolbar vary by view.
When Select Source is other than film and in thumbnail view
When Select Source is other than film and in whole image view
When Select Source is film and in thumbnail view
Page 220 of 334 pages
Basic Mode Tab
Page 221 of 334 pages
When Select Source is film and in whole image view
(Thumbnail)/
(Whole Image)
Switches the view in the Preview area when document type is other than film.
Preview Area
(Film Thumbnail)/
(Whole Film Image)
Switches the view in the Preview area when document type is film.
Preview Area
(Mirror)
Inverts the preview image horizontally.
- The result will be reflected in the scanned image.
- The image returns to its original state when you preview again.
(Rotate Left)
Rotates the preview image 90 degrees counter-clockwise.
- The result will be reflected in the scanned image.
- The image returns to its original state when you preview again.
(Rotate Right)
Rotates the preview image 90 degrees clockwise.
- The result will be reflected in the scanned image.
- The image returns to its original state when you preview again.
(Auto Crop)
Displays and adjusts the cropping frame automatically to the size of the document displayed in
the Preview area. The scan area is reduced every time you click this button if there are
croppable areas within the cropping frame.
(Check All Frames)
This button is available when two or more frames are displayed.
Selects the checkbox of the image in thumbnail view.
(Uncheck All Frames)
This button is available when two or more frames are displayed.
Deselects the checkbox of the image in thumbnail view.
(Select All Frames)
This button is available when two or more frames are displayed.
Selects the image in thumbnail view and the image will be outlined in blue.
(Select All Cropping Frames)
This button is available when there are two or more cropping frames.
All cropping frames will be displayed in thick broken lines. The settings will be applied to all the
cropping frames.
(Remove Cropping Frame)
Removes the selected cropping frame.
(Information)
Displays the version of ScanGear and the current scan settings (document type, etc.).
Basic Mode Tab
Page 222 of 334 pages
(Open Guide)
This page appears.
Preview Area
Preview Area
This is where a trial image is displayed after you click Preview. You can also check the results of the
settings (image corrections, color adjustments, etc.) made in " Settings and Operation Buttons ."
When
(Thumbnail) or
(Film Thumbnail) is displayed on the Toolbar
Thumbnails of images cropped to the document size are displayed. Only the images with the
checkbox selected will be scanned.
Note
When multiple images are previewed, different outlines indicate different selection status.
- Focus Frame (thick blue outline): The displayed settings will be applied.
- Selected Frame (thin blue outline): The settings will be applied to the Focus Frame and
Selected Frames simultaneously. You can select multiple images by clicking them while
pressing the Ctrl key.
- Unselected (no outline): The settings will not be applied.
(Frame Advance) at the bottom of
Double-click a frame to zoom in on the image. Click
the screen to display the previous or next frame. Double-click the frame again to return the
display to its non-magnified state.
When
(Whole Image) or
(Whole Film Image) is displayed on the Toolbar
When document type is other than film, items on the Platen are scanned and displayed as a single
image. When document type is film, the whole film image is displayed. All portions in the cropping
frames will be scanned.
Basic Mode Tab
Whole image view (Full Platen)
Page 223 of 334 pages
Whole film image view
Note
If frames are not detected (for example, only eight frames out of twelve frames are displayed)
due to the image color of the film, display the whole image and scan.
Note
You can specify the scan area (cropping frame) on the displayed image. In thumbnail view, you can
only create one cropping frame per image. In whole image view, you can create multiple cropping
frames.
Adjusting Cropping Frames
Related Topic
Scanning in Basic Mode
Page top
Advanced Mode Tab
On-screen Manual > Scanning Guide > ScanGear (Scanner Driver) Screens > Advanced Mode Tab
Advanced Mode Tab
This mode allows you to make advanced scan settings such as the color mode, output resolution,
image brightness and color tone.
This section describes the settings and functions available in Advanced Mode.
(1) Settings and Operation Buttons
(2) Toolbar
(3) Preview Area
Note
The displayed items vary by document type and how the screen was opened.
Settings and Operation Buttons
Favorite Settings
You can name and save a group of settings (Input Settings, Output Settings, Image Settings and
Color Adjustment Buttons) on Advanced Mode tab, and load it as required. It is convenient to save a
group of settings if you will be using it repeatedly. You can also use this to reload the default
settings.
Select Add/Delete... from the pull-down menu and the Add/Delete Favorite Settings dialog box
opens.
Page 224 of 334 pages
Advanced Mode Tab
Page 225 of 334 pages
Enter Setting Name and click Add. The name appears in Favorite Settings List.
When you click Save, the item appears in the Favorite Settings list and can be selected, along with
the predefined items.
To delete an item, select it in Favorite Settings List and click Delete. Click Save to save settings
displayed in Favorite Settings List.
Note
You can set Add/Delete... in Favorite Settings after preview.
Save up to 10 items.
Input Settings
Specify the input settings such as the document type and size.
Input Settings
Output Settings
Specify the output settings such as the output resolution and size.
Output Settings
Image Settings
Enable/disable various image correction functions.
Image Settings
Color Adjustment Buttons
These buttons can be used to make fine corrections to the image brightness and color tones. You
can adjust the image's overall brightness or contrast, and adjust its highlight and shadow values
(histogram) or balance (tone curve).
Color Adjustment Buttons
Zoom
Zooms in on an image or the portion within the cropping frame. When the image is zoomed in,
Zoom changes to Undo. Click Undo to return the display to its non-magnified state.
In thumbnail view
When multiple images are displayed in thumbnail view, clicking this button zooms in on the selected
frame. Click
frame.
(Frame Advance) at the bottom of the screen to display the previous or next
Note
You can also zoom in on an image by double-clicking the frame. Double-click the frame again
to return the display to its non-magnified state.
In whole image view
Rescans the portion within the cropping frame at higher magnification.
Note
Zoom rescans the image and displays high-resolution image in Preview.
(Enlarge/Reduce) on the Toolbar zooms in on the preview image quickly. However, the
resolution of the displayed image will be low.
Advanced Mode Tab
Preview
Performs a trial scan.
Scan
Scanning starts.
Note
When scanning starts, the progress will be displayed. Click Cancel to cancel the scan.
When scanning is completed, a dialog box prompting you to select the next action may open.
Follow the prompt to complete. For details, see Status of ScanGear dialog after scanning in "
Scan Tab" (Preferences dialog box).
It will take time to process the images if the total size of the scanned images exceeds a certain
size. In that case, a warning message appears. It is recommended that you reduce the total
size. To continue, scan in whole image view.
Preferences...
The Preferences dialog box opens and you can make scan/preview settings.
Preferences Dialog Box
Close
Closes ScanGear (scanner driver).
Toolbar
Toolbar
You can adjust or rotate preview images. The buttons displayed on the Toolbar vary by view.
When Select Source is Platen and in thumbnail view
When Select Source is Platen and in whole image view
When Select Source is film and in thumbnail view
Page 226 of 334 pages
Advanced Mode Tab
Page 227 of 334 pages
When Select Source is film and in whole image view
(Thumbnail)/
(Whole Image)
Switches the view in the Preview area when document type is Platen.
Preview Area
(Film Thumbnail)/
(Whole Film Image)
Switches the view in the Preview area when document type is film.
Preview Area
(Clear)
Click this button to delete the preview image.
It also resets the Toolbar and color adjustment settings.
(Crop)
Allows you to specify the scan area by dragging the mouse.
(Move Image)
If an enlarged image is too large to fit in the Preview area, you can click this button and drag the
image across the screen until the part you want to see is displayed. You can also move the
image using the scroll bars.
(Enlarge/Reduce)
Click this button then click on the image to enlarge it (zoom in). Right-click on the image to
reduce it (zoom out).
(Mirror)
Inverts the preview image horizontally.
- The result will be reflected in the scanned image.
- The image returns to its original state when you preview again.
(Rotate Left)
Rotates the preview image 90 degrees counter-clockwise.
- The result will be reflected in the scanned image.
- The image returns to its original state when you preview again.
(Rotate Right)
Rotates the preview image 90 degrees clockwise.
- The result will be reflected in the scanned image.
- The image returns to its original state when you preview again.
(Auto Crop)
Displays and adjusts the cropping frame automatically to the size of the document displayed in
the Preview area. The scan area is reduced every time you click this button if there are
croppable areas within the cropping frame.
(Check All Frames)
This button is available when two or more frames are displayed.
Selects the checkbox of the image in thumbnail view.
Advanced Mode Tab
Page 228 of 334 pages
(Uncheck All Frames)
This button is available when two or more frames are displayed.
Deselects the checkbox of the image in thumbnail view.
(Select All Frames)
This button is available when two or more frames are displayed.
Selects the image in thumbnail view and the image will be outlined in blue.
(Display Film Cropping Frame)
Displays the cropping frame according to the film size selected in Film Size.
(Select All Cropping Frames)
This button is available when there are two or more cropping frames.
All cropping frames will be displayed in thick broken lines. The settings will be applied to all the
cropping frames.
(Remove Cropping Frame)
Removes the selected cropping frame.
(Information)
Displays the version of ScanGear and the current scan settings (document type, etc.).
(Open Guide)
This page appears.
Preview Area
Preview Area
This is where a trial image is displayed after you click Preview. You can also check the results of the
settings (image corrections, color adjustments, etc.) made in " Settings and Operation Buttons ."
When
(Thumbnail) or
(Film Thumbnail) is displayed on the Toolbar
Thumbnails of images cropped to the document size are displayed. Only the images with the
checkbox selected will be scanned.
Note
When multiple images are previewed, different outlines indicate different selection status.
- Focus Frame (thick blue outline): The displayed settings will be applied.
Advanced Mode Tab
Page 229 of 334 pages
- Selected Frame (thin blue outline): The settings will be applied to the Focus Frame and
Selected Frames simultaneously. You can select multiple images by clicking them while
pressing the Ctrl key.
- Unselected (no outline): The settings will not be applied.
When
(Whole Image) or
(Whole Film Image) is displayed on the Toolbar
When document type is Platen, items on the Platen are scanned and displayed as a single image.
When document type is film, the whole film image is displayed. All portions in the cropping frames
will be scanned.
Whole image view (Full Platen)
Whole film image view
Note
If frames are not detected (for example, only eight frames out of twelve frames are displayed)
due to the image color of the film, display the whole image and scan.
Note
You can specify the scan area (cropping frame) on the displayed image. In thumbnail view, you can
only create one cropping frame per image. In whole image view, you can create multiple cropping
frames.
Adjusting Cropping Frames
Related Topic
Scanning in Advanced Mode
Scanning Film in Advanced Mode
Page top
Input Settings
Page 230 of 334 pages
On-screen Manual > Scanning Guide > ScanGear (Scanner Driver) Screens > Input Settings
Input Settings
Input Settings allows you to set the following items:
Select Source
The type of document to be scanned is displayed.
Paper Size
Select the size of the document to be scanned. This setting is available in whole film image view only.
When you select a size, the Preview area size changes accordingly.
Important
Some applications have a limit to the amount of scan data they can receive. ScanGear (scanner
driver) can scan data that is of:
- 21000 pixels x 30000 pixels or less (and 1.8 GB or less in data size)
- 50000 pixels x 50000 pixels or less (and 4.0 GB or less in data size) (When the Enable Large
Image Scans checkbox is selected on the Scan tab of the Preferences dialog box.)
If you change Paper Size after previewing, the preview image will be deleted.
Note
If you are not sure which size you should select for Paper Size, set Paper Size to Full Platen, then
measure the size of the document and enter the values into
(Width) and
(Height).
Film Size / Scan Area
Select the size of the film to be scanned.
Film Size
This is displayed in thumbnail view. The film size is automatically detected.
Scan Area
This is displayed in whole image view. Detect the film size automatically or select the size of the
Input Settings
Page 231 of 334 pages
film to be scanned.
Note
Click
(Film Thumbnail) or
(Whole Film Image) on the Toolbar to switch views.
Color Mode
Select how to scan the document.
Color
Select this mode to scan color documents or film, or to create color images. This mode renders
the image in 256 levels (8 bit) of R(ed), G(reen), and B(lue).
Color(48bit)
Select this mode to scan color photos or film. This mode renders the image in 65536 levels (16
bit) of R(ed), G(reen), and B(lue).
Grayscale
Select this mode to scan black and white photos or film, or to create black and white images. This
mode renders the image in 256 levels (8 bit) of black and white.
Grayscale(16bit)
Select this mode to scan film in black and white. This mode renders the image in 65536 levels
(16 bit) of black and white.
Black and White
Select this mode to scan photos and documents in black and white. This mode renders the
image in black and white. The contrast in the image is divided at certain levels (threshold level)
into black and white and is rendered in two colors. The threshold level can be set with
(Threshold).
Important
Some applications cannot display images scanned in Color(48bit) or Grayscale(16bit).
Color(48bit) and Grayscale(16bit) are displayed only when the Enable 48/16 bit Output checkbox
is selected on the Scan tab of the Preferences dialog box.
Scan Tab
Input Size
In thumbnail view, the cropped document size or film size is displayed after preview.
In whole image view, the Paper Size is displayed before preview, and the cropping frame (scan area)
size or film size is displayed after preview.
You can adjust the cropping frame size by entering the values into
Click
(Keep Aspect Ratio) and change it to
specify the cropping frame size.
(Width) and
(Height).
(Locked) to maintain the aspect ratio when you
Important
Input size settings are available only when Output Size in Output Settings is Flexible. If you select
a size other than Flexible, a cropping frame calculated from Output Size and Output Resolution is
displayed, and its aspect ratio is fixed.
Note
The values you can enter will be within the range of the selected document size. The minimum
size is 96 pixels x 96 pixels when Output Resolution is 600 dpi, scaled at 100%.
When Auto Crop is performed in whole image view, the aspect ratio will not be maintained since
the size will be prioritized.
See "Adjusting Cropping Frames" for details on cropping frames.
Page top
Output Settings
On-screen Manual > Scanning Guide > ScanGear (Scanner Driver) Screens > Output Settings
Output Settings
Output Settings allows you to set the following items:
Output Resolution
Select the resolution to scan at.
The higher the resolution (value), the more detail in your image.
Select a resolution from the options displayed by clicking the button, or enter a value within the range
of 25 dpi to 19200 dpi (in 1 dpi increments).
Resolution
Output Size
Select an output size.
Select Flexible to set custom sizes or select a size for printing or displaying. Select Add/Delete... to set
custom size and save it as a new output size option.
Flexible
You can specify the output resolution and scale, and adjust the cropping frame.
In thumbnail view
Drag the mouse over a thumbnail to display a cropping frame. When a cropping frame is
displayed, the portion within the cropping frame will be scanned. When no cropping frame is
displayed, each frame is scanned individually.
In whole image view
When no cropping frame is displayed, the entire Preview area will be scanned. When a cropping
frame is displayed, the portion within the cropping frame will be scanned.
Note
(Width) and
To enlarge/reduce the scanned image, enter values into
(Height) in
Output Settings or specify a value (by 1%) for %. The maximum value available for %
Page 232 of 334 pages
Output Settings
depends on the Output Resolution. % can be specified for up to 19200 dpi (the maximum
available output resolution).
Paper Size (L, etc.) & Monitor Size (1024 x 768 pixels, etc.)
(Width),
(Height) and scale cannot be specified. The preview image will be cropped
according to the selected output size and resolution. The portion within the cropping frame will be
scanned at the size of the selected paper/monitor size. You can drag the cropping frame to
enlarge, reduce or move it while maintaining the aspect ratio.
Add/Delete...
Opens the Add/Delete the Output Size dialog box, in which you can specify custom output sizes.
In the Add/Delete the Output Size dialog box, you can specify multiple output sizes and save them
at one time. Saved items will be registered to the Output Size list and can be selected, along with
the predefined items.
Add
To add a size, select Print or Image display for Destination, then enter Output Size Name, Width,
and Height then click Add. The name of the added size appears in Output Size List.
Click Save to save the items listed in Output Size List.
Delete
To delete an item, select it in Output Size List and click Delete. Click Save to save the items listed
in Output Size List.
Important
You cannot delete predefined output sizes such as A4 and 1024 x 768 pixels.
Note
Save up to 10 items for each destination.
An error message appears when you enter a value outside the setting range. Enter a value
within the range displayed in the message.
Unit varies by Destination. For Print, select mm or inches. For Image display, the unit is
pixels.
Note
See "Adjusting Cropping Frames" for details on cropping frames.
For details on whether or how the cropping frame is initially displayed on a preview image, see
Cropping Frame on Previewed Images in " Preview Tab " (Preferences dialog box).
(Switch Aspect Ratio)
This button is available when Output Size is set to anything but Flexible.
Click this button to rotate the cropping frame. Click again to return it to the original orientation.
Data Size
An image file is created when the preview image is scanned. Its size when saved in BMP format is
displayed.
Note
When the file size exceeds a certain size, the value appears in red. In that case, a warning
Page 233 of 334 pages
Output Settings
Page 234 of 334 pages
message appears when you click Scan. It is recommended that you adjust the settings to reduce
Data Size. To continue, scan in whole image view.
Page top
Image Settings
On-screen Manual > Scanning Guide > ScanGear (Scanner Driver) Screens > Image Settings
Image Settings
Important
Do not apply these functions to images without moire, dust/scratches or faded colors. The color
tone may be adversely affected.
Image correction results may not be reflected in the preview image.
Note
Selectable settings depend on color mode settings.
Scanning may take longer when you use Image Settings.
Image Settings allows you to set the following items:
Note
The setting items vary depending on whether Select Source is Platen or film.
Image Adjustment
When Image Adjustment is set, the brightness of the specified portion of the image is optimized.
Images can be adjusted according to the automatically detected document type or the specified
document type. The result of the adjustment will be reflected in the entire image.
None
Image Adjustment will not be applied.
Auto
Applies Image Adjustment by automatically detecting the document type. It is recommended that
you normally select this setting.
Photo
Applies Image Adjustment suitable for photos and film.
Page 235 of 334 pages
Image Settings
Magazine
Applies Image Adjustment suitable for magazines.
Newspaper
Applies Image Adjustment suitable for newspapers.
Document
Applies Image Adjustment suitable for text documents.
Important
You can set Image Adjustment after preview.
You can set this setting when Recommended is selected on the Color Settings tab of the
Preferences dialog box.
Note
Only Photo and None are available when Select Source is film.
If the image is not adjusted properly with Auto, specify the document type.
The color tone may change from the source image due to the Image Adjustment. In that case, set
Image Adjustment to None.
Unsharp Mask
When this is set to ON, the outline of the subjects is emphasized to sharpen the image.
Descreen
Printed photos and pictures are displayed as a collection of fine dots. "Moire" is a phenomenon where
uneven gradation or a stripe pattern appears when such photos or pictures printed with fine dots are
scanned. Descreen is the function for reducing this moire effect.
Note
Even if Descreen is set to ON, some moire effects may remain if Unsharp Mask is set to ON. In
that case, set Unsharp Mask to OFF.
Selecting Magazine(Color) in Select Source in Basic Mode tab has the same effect as setting
Descreen to ON in Advanced Mode tab.
Reduce Dust and Scratches
Scanned photos may contain white dots caused by dust or scratches. Use this function to reduce such
noise.
None
Dust and scratches will not be reduced.
Low
Select this to reduce small dust particles and scratches. Large ones may remain.
Medium
It is recommended that you normally select this setting.
High
Select this to reduce small/large dust particles and scratches. Evidence of the reduction process
may remain and may also remove delicate parts of the image.
Important
This function may not be effective for some types of photos.
Note
It is recommended that you select None when scanning printed materials.
Remove Dust and Scratches (FARE) (Film only)
Removes dust and scratches automatically when scanning film.
None
Page 236 of 334 pages
Image Settings
Page 237 of 334 pages
Dust and scratches will not be removed.
Low
Select this to remove major dust and scratches. Large ones may remain.
Standard
It is recommended that you normally select this setting.
High
Select this to remove minor dust and scratches as well. Evidence of the removal process may
remain when large dust and scratches are removed.
Important
This setting is not available when scanning black and white film.
Dust and scratches may not be removed if the scan area is too small or if they are in the top/
bottom edges of the image.
Note
When the resolution is set to 4801 dpi or higher and the Remove Dust and Scratches (FARE)
checkbox is selected, scanning takes longer than usual. Also, make sure that there is sufficient
free hard disk space before scanning.
Fading Correction
Use this function to correct photos and film that have faded with time or have a colorcast. Colorcast is
a phenomenon where a specific color affects the entire picture due to the weather or ambient strong
colors.
None
Fading correction will not be applied.
Low
Select this to correct a small amount of fading and colorcast.
Medium
It is recommended that you normally select this setting.
High
Select this to correct a large amount of fading and colorcast. This can affect the tone of the image.
Important
You can set Fading Correction after preview.
You can set this setting when Recommended is selected on the Color Settings tab of the
Preferences dialog box.
Fading Correction may not be effective if the scan area is too small.
Grain Correction
Use this function to reduce graininess (roughness) in photos taken with high-speed or sensitized film.
None
Graininess will not be reduced.
Low
Select this when the photo is slightly grainy.
Medium
It is recommended that you normally select this setting.
High
Select this when the photo is very grainy. This can affect the gradation and sharpness of the
image.
Important
Image Settings
Grain Correction may not be effective if the scan area is too small.
Backlight Correction
Use this function to correct photos and film that have been shot against light.
When you change the Backlight Correction setting, the result will be reflected in the preview image.
None
Backlight correction will not be applied.
Low
Select this to correct slightly backlit photos. This will not affect the image contrast.
Medium
It is recommended that you normally select this setting.
High
Select this to correct strongly backlit photos. This can affect the image contrast.
Important
You can set Backlight Correction after preview.
You can set this setting when Recommended is selected on the Color Settings tab of the
Preferences dialog box.
This setting is not available when the Enable Large Image Scans checkbox is selected on the
Scan tab of the Preferences dialog box.
Backlight Correction may not be effective if the scan area is too small.
Note
Noise patterns may appear when Backlight Correction is applied. Applying Grain Correction and
setting Unsharp Mask to OFF may reduce the noise patterns.
Gutter Shadow Correction
Use this function to correct shadows that appear between pages when scanning open booklets.
When you set the Gutter Shadow Correction setting in the preview image, the result will be reflected.
Preview the effects before scanning, as results vary depending on the type of document and how it is
pressed.
Unclear or blurred text/lines caused by curved pages are not corrected.
None
Gutter shadow will not be corrected.
Low
Select this when the effect level is too strong with the medium setting.
Medium
It is recommended that you normally select this setting.
High
Select this when the effect level is too weak with the medium setting.
Important
Do not place items that weigh 4.4 lbs (2.0 kg) or more on the Platen. Also, do not press on the
document with a force exceeding 4.4 lbs (2.0 kg). If you press heavily, the scanner may not work
correctly or you might break the glass.
Align the document with the edge of the Platen. If not, the shadow will not be corrected properly.
Page 238 of 334 pages
Image Settings
Page 239 of 334 pages
Shadows may not be corrected properly depending on the document. If the page background is
not white, shadows may not be detected correctly or may not be detected at all.
While scanning, press down on the spine with the same amount of pressure you used to preview
the scan. If the binding part is not even, the shadow will not be corrected properly.
How to place the document depends on your model and the document to be scanned.
Note
Cover the document with black cloth if white spots, streaks, or colored patterns appear in scan
results due to ambient light entering between the document and the Platen.
If the shadow is not corrected properly, adjust the cropping frame on the preview image.
Adjusting Cropping Frames
Exposure/Tone Settings (Film only)
Manual Exposure
This function enables you to adjust the exposure data according to the film.
When this checkbox is not selected, the optimal exposure data (the exposure level for each RGB
channel and compensation levels) is automatically set according to the color density of the portion
within the cropping area of the film.
Select this checkbox if you intend to adjust the image using an application after it is scanned or to
scan with an under-exposed or over-exposed effect.
After you select this checkbox, you can adjust the exposure in 1% increments within the range of
50% to 200%.
Important
This setting is not available when Apply the tone value to all frames / Apply the tone value to
all crops is applied.
Note
Manual Exposure is not available in Basic Mode. To change exposure, select the Manual
Exposure checkbox in Advanced Mode tab, then adjust the value and scan.
When this checkbox is not selected, the time required for scanning varies by film since the
exposure is automatically optimized according to the film.
Apply the tone value to all frames / Apply the tone value to all crops
"All frames" is displayed in thumbnail view, and "All crops" is displayed in whole image view.
Click Apply to reflect the color adjustment data of the selected film frame or the portion within the
selected cropping frame into other frames. This color adjustment data will be used in subsequent
scans. It will remain in effect until you click Reset.
This is useful when you want to scan film of photos taken on the same day in the same place, in a
Image Settings
Page 240 of 334 pages
consistent color tone.
High Quality
Set to ON to improve the image quality and reduce noise when scanning film.
Important
Image quality may not change depending on the film type.
This setting is not available when Apply the tone value to all frames / Apply the tone value to
all crops is applied.
Page top
Color Adjustment Buttons
On-screen Manual > Scanning Guide > ScanGear (Scanner Driver) Screens > Color Adjustment Buttons
Color Adjustment Buttons
The Color Adjustment Buttons allow you to make fine corrections to the image brightness and color
tones. You can adjust the image's overall brightness or contrast, and adjust its highlight and shadow
values (histogram) or balance (tone curve).
Important
The Color Adjustment Buttons are not available when you select Color Matching on the Color
Settings tab of the Preferences dialog box.
Note
When Select Source is film, you can use the Color Adjustment Buttons after preview.
Selectable settings depend on color mode settings.
When you adjust the image via the Color Adjustment Buttons, the results will be reflected in the
preview image.
Click a Color Adjustment Button to set the following items:
(Saturation/Color Balance)
Adjust the saturation (vividness) and color tone of the image. Use this function to brighten colors that
have faded with time or due to colorcast. Colorcast is a phenomenon where a specific color affects the
entire picture due to the weather or ambient strong colors.
Adjusting Saturation and Color Balance
(Brightness/Contrast)
Adjust the brightness and contrast of the image. If the image is too dark or too bright, or if the image
quality is flat due to lack of contrast, you can adjust the levels of brightness and contrast.
Adjusting Brightness and Contrast
Page 241 of 334 pages
Color Adjustment Buttons
Page 242 of 334 pages
(Histogram)
A histogram allows you to see the data concentration at each brightness level of an image. You can
specify the darkest level (shadow) and brightest level (highlight) within an image, cut the levels and
expand the middle of the tonal range of the image.
Adjusting Histogram
(Tone Curve Settings)
Adjust the brightness of an image by selecting the type of graph (tone curve) showing the balance of
tone input and output. You can make fine adjustments to the brightness of a specific area.
Adjusting Tone Curve
(Final Review)
Make a final check of color adjustments. The final synthesized tone curve and the histogram derived
from the subsequent image processing will be displayed. There are no settings to make in this
screen.
For a color image, select a color in Channel to check either Red, Green or Blue, or select Master to
check three colors together.
If you place the cursor on the preview image, the portion will be enlarged and its RGB values (only
L when Color Mode is Grayscale) before and after the adjustments will be displayed.
(Threshold)
Set the boundary (threshold) at which black and white are divided. By adjusting the threshold level, you
can sharpen text in a document or reduce show-through in newspapers.
Setting Threshold
Custom
You can name and save a set of tone curve and threshold settings of the Color Adjustment Buttons.
Select Add/Delete... from the pull-down menu. When Color Mode is set to anything but Black and
White, the Add/Delete Tone Curve Settings dialog box opens. When Color Mode is Black and White,
the Add/Delete Threshold Settings dialog box opens.
Color Adjustment Buttons
Page 243 of 334 pages
Enter Setting Name and click Add. The name appears in Tone Curve Settings List or Threshold
Settings List.
Click Save to save.
You can load and apply the saved tone curve/threshold settings to a preview image. To load the
settings, select the saved item from the pull-down menu.
To delete an item, select it in Tone Curve Settings List or Threshold Settings List and click Delete.
Click Save to save settings displayed in Tone Curve Settings List or Threshold Settings List.
Note
Save up to 20 items.
Defaults
Reset all adjustments (saturation/color balance, brightness/contrast, histogram and tone curve).
Page top
Auto Scan Mode Tab
On-screen Manual > Scanning Guide > ScanGear (Scanner Driver) Screens > Auto Scan Mode Tab
Auto Scan Mode Tab
This mode allows you to scan easily by simply placing documents on the Platen and clicking a button.
In Auto Scan Mode, documents are automatically detected. You do not need to specify cropping frames
or make image corrections.
Supported Documents
Photos, postcards, business cards, magazines, newspapers, text documents, CD/DVD and film.
Important
The following types of documents cannot be scanned correctly. In that case, specify the document
type or size on the Basic Mode tab or the Advanced Mode tab and scan.
- A4 size photos
- Text documents smaller than 2L (5 inches x 7 inches) (127 mm x 178 mm), such as paperback
pages with the spine cut off
- Documents printed on thin white paper
- Long narrow documents such as panoramic photos
Scanning in Basic Mode
Scanning in Advanced Mode
To scan black and white film or 120 Format Film, scan from the Advanced Mode tab of ScanGear
(scanner driver).
Scanning Film in Advanced Mode
Reflective CD/DVD labels may not be scanned properly.
Place documents correctly according to the type of document to be scanned. Otherwise,
documents may not be scanned correctly.
See "Placing Documents " for details on how to place documents.
Note
Scan from the " Basic Mode Tab " or "Advanced Mode Tab " to reduce moire.
Placing Documents
"Placing Documents " appears.
Execute recommended image correction
Select this checkbox to apply suitable corrections automatically based on the document type.
Page 244 of 334 pages
Auto Scan Mode Tab
Page 245 of 334 pages
Important
When this checkbox is selected in ScanGear started from MP Navigator EX, the files can be saved
in JPEG/Exif or PDF format only.
Scanning may take longer than usual when this checkbox is selected.
You can set this setting when Recommended is selected on the Color Settings tab of the
Preferences dialog box.
The color tone may change from the source image due to corrections. In that case, deselect the
checkbox and scan.
View scanned images
Select this checkbox to display the thumbnails of scanned images in a different window.
Scan
Scanning starts.
Note
When scanning starts, the progress will be displayed. Click Cancel to cancel the scan.
When scanning is completed, a dialog box prompting you to select the next action may open.
Follow the prompt to complete. For details, see Status of ScanGear dialog after scanning in "
Scan Tab" (Preferences dialog box).
Instructions
This page appears.
Preferences...
The Preferences dialog box opens and you can make scan/preview settings.
Preferences Dialog Box
Close
Closes ScanGear.
Related Topic
Scanning in Auto Scan Mode
Page top
Preferences Dialog Box
Page 246 of 334 pages
On-screen Manual > Scanning Guide > ScanGear (Scanner Driver) Screens > Preferences Dialog Box
Preferences Dialog Box
Click Preferences... in the ScanGear (scanner driver) screen to open Preferences dialog box.
In the Preferences dialog box, you can make advanced settings to ScanGear functions via the Scanner,
Preview, Scan and Color Settings tabs.
Scanner Tab
Allows you to specify a folder to save images temporarily and a music file to play during or at the end of a
scan.
Scanner Tab
Preview Tab
Allows you to select what to do with Preview when ScanGear is started and how to display cropping
frames after previewing images. You can also select the cropping size for thumbnails of scanned
documents.
Preview Tab
Scan Tab
Allows you to select what to do with ScanGear after scanning, set the option for scanning film into
applications that do not open the ScanGear screen, set the Color Mode (48/16 bit output) option for
Advanced Mode tab, and set to scan large file size images.
Scan Tab
Color Settings Tab
Allows you to select how to adjust color, and specify the monitor gamma value.
Color Settings Tab
Page top
Scanner Tab
Page 247 of 334 pages
On-screen Manual > Scanning Guide > ScanGear (Scanner Driver) Screens > Scanner Tab
Scanner Tab
On the Scanner tab, you can specify the following settings.
Quiet Mode
Select this checkbox to reduce scanner sound by slowing down the scanner head when previewing or
scanning documents.
Note
Scanning takes longer than usual when you enable this function.
Select Folder Where Temporary Files are Saved
Displays the folder in which to save images temporarily. To change the folder, click Browse... to specify
another one.
Sound Settings
You can set the machine to play music during/at the end of a scan.
Select the Play Music During Scanning or Play Sound When Scanning is Completed checkbox, then
click Browse... and specify a sound file.
You can specify the following files.
- MIDI file (*.mid, *.rmi, *.midi)
- Audio file (*.wav, *.aif, *.aiff)
- MP3 file (*.mp3)
Calibration Settings
When you set Execute at Every Scan to ON, the scanner will be calibrated every time before previewing
and scanning, to reproduce correct color tones in scanned images.
Note
Even when Execute at Every Scan is set to OFF, the scanner may be calibrated automatically in
some cases (such as immediately after you turn the machine on).
Calibration may take time depending on your computer.
Page top
Preview Tab
On-screen Manual > Scanning Guide > ScanGear (Scanner Driver) Screens > Preview Tab
Preview Tab
On the Preview tab, you can specify the following settings.
Preview at Start of ScanGear
Select what to do with Preview when ScanGear (scanner driver) is started.
Automatically Execute Preview
ScanGear will automatically start previewing at startup.
Display Saved Preview Image
The previously previewed image will be displayed.
The Color Adjustment Button settings, the Toolbar settings, and the Advanced Mode tab settings
are also saved.
None
No preview image will be displayed at startup.
Note
Select None if you do not want to save the preview image.
Cropping Frame on Previewed Images
Select how to display cropping frames after previewing images.
Execute Auto Cropping on Previewed Images
The cropping frame will automatically be displayed in the document size after previewing.
Display the Last Frame on Previewed Images
A cropping frame of the same size as the last used cropping frame will be displayed after
previewing.
None
No cropping frame will be displayed after previewing.
Cropping Size for Thumbnail View
Page 248 of 334 pages
Preview Tab
Page 249 of 334 pages
Select the cropping size for thumbnails of scanned documents.
Larger
Displays 105% (in width and height) of the area displayed for the standard size.
Standard
The standard size.
Smaller
Displays 95% (in width and height) of the area displayed for the standard size.
Note
When you change the Cropping Size for Thumbnail View setting, the preview images will be
refreshed and cropped to the new size. As the preview images are refreshed, the color
adjustments and other settings applied to them are reset.
Page top
Scan Tab
On-screen Manual > Scanning Guide > ScanGear (Scanner Driver) Screens > Scan Tab
Scan Tab
On the Scan tab, you can specify the following settings.
Status of ScanGear dialog after scanning
Select what to do with ScanGear (scanner driver) after scanning images.
Close ScanGear automatically
Select this to return to the original application when scanning is completed.
Do not close ScanGear automatically
Select this to return to the ScanGear screen for another scan when scanning is completed.
Display the dialog to select next action
Select this to open a screen and select what to do when scanning is completed.
Note
Even if Do not close ScanGear automatically or Display the dialog to select next action is set,
some applications may not support it.
Scan without using ScanGear's Window
Set the option for scanning film into applications that do not open the ScanGear screen.
Set a Smaller Film Cropping Size
Select this checkbox to display 95% (in width and height) of the area displayed for the standard
Page 250 of 334 pages
Scan Tab
Page 251 of 334 pages
film size.
Important
This setting is not applied when scanning with the ScanGear screen displayed.
Advanced Mode Settings
Enable 48/16 bit Output
Select this checkbox to display Color(48bit) in Color Mode on the Advanced Mode tab. When Select
Source is film, Grayscale(16bit) will also be displayed.
Important
Some applications cannot receive images scanned in Color(48bit) or Grayscale(16bit), or
may close when such images are received.
Note
When Color(48bit) or Grayscale(16bit) is selected for Color Mode, deselecting this checkbox
changes Color(48bit) to Color and Grayscale(16bit) to Grayscale.
Enable Large Image Scans
Select this checkbox to scan images of up to 4.0 GB from the Advanced Mode tab.
Important
When you select the Enable Large Image Scans checkbox, Backlight Correction on the
Advanced Mode tab will be disabled.
Note
To scan using this function, start ScanGear from an application that supports editing of large
file size images, such as ArcSoft PhotoStudio.
Switch to whole image view when scanning Platen.
Page top
Color Settings Tab
On-screen Manual > Scanning Guide > ScanGear (Scanner Driver) Screens > Color Settings Tab
Color Settings Tab
On the Color Settings tab, you can specify the following settings.
Color Adjustment
Select either of the following.
You can select one when Color Mode is Color, Color(48bit), Grayscale or Grayscale(16bit).
Recommended
Select this to vividly reproduce the tone of a document on the screen. It is recommended that you
normally select this setting.
Color Matching
Select this to automatically match the scanner, monitor and color printer colors, thus reducing
time and trouble to manually match the monitor and printer colors.
Color Adjustment Buttons will be disabled.
This function is available when Color Mode is Color or Color(48bit).
- Source(Scanner): Select scanner profile.
- Target: Select target profile.
- Monitor: Select this to display preview image with optimum correction for monitor.
- Defaults: Returns to the default Color Matching settings.
None
Select this to disable color correction provided by ScanGear (scanner driver).
Note
Color Matching is available when ScanGear, monitor, color management-compliant application
(such as Adobe Photoshop) and printer are set up correctly.
Refer to the corresponding manual for the monitor, printer and application settings.
Monitor Gamma
By setting the gamma value of a monitor, you can adjust the input data to the brightness
characteristics of the monitor. Adjust the value if your monitor's gamma value does not match the
default value set in ScanGear, and the colors of the original image are not accurately reflected in the
monitor.
Page 252 of 334 pages
Color Settings Tab
Page 253 of 334 pages
Click Defaults to return to the default Monitor Gamma value (2.20).
Note
Refer to the manual of your monitor to check its gamma value. If it is not written in the manual,
contact the manufacturer.
Page top
Useful Information on Scanning
Page 254 of 334 pages
On-screen Manual > Scanning Guide > Useful Information on Scanning
Useful Information on Scanning
Adjusting the cropping frame (scan area)
Adjusting Cropping Frames
Selecting the best resolution
Resolution
Learning about file formats
File Formats
Learning about Color Matching
Color Matching
Matching the colors between the document and monitor
See Monitor Gamma in the following section.
Color Settings Tab
Page top
Adjusting Cropping Frames
On-screen Manual > Scanning Guide > Useful Information on Scanning > Adjusting Cropping Frames
Adjusting Cropping Frames
You can specify the scan area by creating a cropping frame on the image displayed in the Preview area
of the ScanGear (scanner driver) screen. When you click Scan, only the portion within the cropping frame
will be scanned and passed to the application.
Cropping Frame Types
(1) Active Cropping Frame (rotating thick broken lines)
The settings in Basic Mode or Advanced Mode will be applied.
(2) Selected Cropping Frame (stationary thick broken lines)
The settings will be applied to the Active Cropping Frame and Selected Cropping Frames
simultaneously. You can select multiple cropping frames by clicking them while pressing the Ctrl key.
(3) Unselected Cropping Frame (stationary thin broken lines)
The settings will not be applied.
Note
Active Cropping Frame and Selected Cropping Frames are displayed in whole image view.
Initial Cropping Frame
In thumbnail view
Cropping frame is not displayed initially. Drag the mouse over a frame to create a cropping frame.
In whole image view
A cropping frame (Active Cropping Frame) is displayed automatically around the preview image
according to the document size. You can also create a cropping frame by dragging the mouse in the
Preview area.
Note
Cropping frames are set according to the document size (Auto Crop) by default. For details, see
Cropping Frame on Previewed Images in " Preview Tab " (Preferences dialog box).
Adjusting a Cropping Frame
(Arrow) when it is positioned over a cropping frame. If you
The cursor will change into
click and drag the mouse in the direction of the arrow, the cropping frame will expand or contract
accordingly.
Page 255 of 334 pages
Adjusting Cropping Frames
Page 256 of 334 pages
(Crosshair arrow) when it is positioned within a cropping frame. Click
The cursor will change into
and drag the mouse to move the entire cropping frame.
Note
In Advanced Mode, you can specify the cropping frame size by entering the values into
(Width)
(Height) in Input Settings.
and
Input Settings
(Switch Aspect Ratio). However,
You can rotate a cropping frame 90 degrees by clicking
(Switch Aspect Ratio) is not available when Output Size is Flexible.
Creating Multiple Cropping Frames
In thumbnail view
You can only create one cropping frame per image.
In whole image view
Click and drag the mouse in a space outside the existing cropping frame to create a new cropping frame
in the Preview area. The new cropping frame will be the Active Cropping Frame, and the old cropping
frame will be the Unselected Cropping Frame.
Adjusting Cropping Frames
Page 257 of 334 pages
You can create multiple cropping frames and apply different scan settings to each cropping frame.
You can also select multiple cropping frames by clicking them while pressing the Ctrl key.
If you select multiple cropping frames and change the settings on a tab at the right of ScanGear, the
settings will be applied to all the selected cropping frames.
When you create a new cropping frame, it retains the settings of the latest cropping frame.
Note
The maximum numbers of cropping frames are as follows:
- When document type is paper or photo: 12 frames
- When document type is film: 30 frames
Scanning takes longer than usual when multiple cropping frames are selected.
Deleting Cropping Frames
In thumbnail view
To delete a cropping frame, click an area outside the cropping frame on an image.
In whole image view
To delete a cropping frame, select it and click
Alternatively, press the Delete key.
(Remove Cropping Frame) on the Toolbar.
When there are multiple cropping frames, all the selected cropping frames (Active Cropping Frame and
Selected Cropping Frames) are deleted simultaneously.
Page top
Resolution
Page 258 of 334 pages
On-screen Manual > Scanning Guide > Useful Information on Scanning > Resolution
Resolution
What is Resolution?
The data in the image you have scanned is a collection of dots carrying information about brightness and
color. The density of these dots is called "resolution", and resolution will determine the amount of detail
your image contains. The unit of resolution is dots per inch (dpi). Dpi is the number of dots per inch (2.54
cm).
The higher the resolution (value), the more detail in your image; the lower the resolution (value), the less
detail.
Setting the Resolution in MP Navigator EX
In MP Navigator EX, you can specify the resolution with Scanning Resolution in the Scan Settings dialog
box.
Images for Display on a Monitor
Documents to be viewed on a display should be scanned at 150 dpi, which is close to the resolution of a
standard monitor.
For film, set the resolution to 600 dpi since images are enlarged approximately four times their original
size when scanned.
Images for Printing
Images to be printed should be scanned at a resolution that corresponds to the resolution of the printer.
For example, if you want to print documents using a 600 dpi black and white printer, you should set the
resolution to 600 dpi. For film, set to 2400 dpi since images are enlarged approximately four times their
original size when scanned.
With a color printer, specifying the resolution at half the resolution of the printer should be fine. For
example, if you want to print using a 600 dpi color printer, you should set the resolution to 300 dpi for
documents and 1200 dpi for film. However, with a high-resolution printer, printing takes longer than
usual if you set the resolution to half the resolution of the printer.
Example of Appropriate Resolution when Printing to Scale
If you print a document at twice the size both vertically and horizontally, the resolution of the document will
be reduced by half. If the resolution of the original document is 300 dpi, the resolution of the enlarged
document will be 150 dpi. If you print the document with a 600 dpi color printer, the lack of detail in the
image may be obvious. In that case, if you scan at the Scanning Resolution of 600 dpi, the resolution will
be 300 dpi even if you double the size of document and you can print the document with sufficient quality.
Conversely, if you print a document at half scale, it should be sufficient to scan at half the resolution.
When Printing Color Photos at Twice the Size
Document resolution: 300
dpi
Scanning resolution: 600
Print at twice the size
Scanning resolution/actual scanning
resolution: 600 dpi
Printing resolution: 300
dpi
Resolution
Page 259 of 334 pages
dpi
Scale: 200%
When Printing Color Film at L Size
Document resolution: 300
dpi
Scanning resolution: 1200
dpi
Scale: 400%
Print at four times the size
Scanning resolution/actual scanning
resolution: 1200 dpi
Printing resolution: 300
dpi
Setting the Resolution in ScanGear (Scanner Driver)
In ScanGear, you can specify the resolution with Output Resolution in Output Settings on the Advanced
Mode tab.
Example of Appropriate Resolution when Printing to Scale
The scanning resolution is automatically set so that the value set in Output Resolution will be the
resolution of the scanned image. If you set Output Resolution to 300 dpi and scan at twice the size, the
document will be automatically scanned at 600 dpi, and the resolution of the scanned image will be 300
dpi. You can print the document with sufficient quality using a 600 dpi color printer.
When Printing L Size (8.9 cm x 12.7 cm) Photos at Twice the Size
Document resolution: 300
dpi
Output resolution: 300 dpi
Scale: 200%
Scan at twice the size
Actual scanning resolution: 600
Image resolution/printing resolution:
300 dpi
dpi
When Printing 35 mm Color Film (2.4 cm x 3.6 cm) at L Size (8.9 cm x 12.7 cm)
Document resolution: 300
dpi
Output resolution: 300 dpi
Scale: 400%
Scan at four times the size
Actual scanning resolution:
1200 dpi
Image resolution/printing resolution:
300 dpi
Appropriate Resolution Settings
Set the resolution according to the use of the scanned image.
Note
Although you can change Output Resolution in ScanGear, it is recommended that you scan at the
default value.
Resolution
Page 260 of 334 pages
For displaying on a monitor: 150 dpi
For printing: 300 dpi
When Output Size is set to Flexible in ScanGear's Advanced Mode tab (scale is 100%)
Document
Use
Color Mode
Output
Resolution
Film
Copying
(Printing)
Color
1200 dpi
Color photo
Copying
(Printing)
Color
300 dpi
Creating a postcard
Color
300 dpi
Saving to a computer
Color
75 dpi - 300 dpi
Using on a website or attaching
to e-mail
Color
75 dpi - 150 dpi
Black and white
photo
Saving to a computer
Grayscale
75 dpi - 300 dpi
Using on a website or attaching
to e-mail
Grayscale
75 dpi - 150 dpi
Text document
Copying
Color, Grayscale or Black
and White
300 dpi
Attaching to e-mail
Color, Grayscale or Black
and White
150 dpi
Scanning text using OCR
Color or Grayscale
300 dpi - 400
dpi
Important
If you double the resolution, the file size quadruples. If the file is too large, the processing speed will
slow down significantly, and you will experience inconvenience such as lack of memory. Set the
minimum required resolution according to the use of the image.
Page top
File Formats
Page 261 of 334 pages
On-screen Manual > Scanning Guide > Useful Information on Scanning > File Formats
File Formats
You can select a file format when saving scanned images. You should specify the most suitable format
according to how you want to use the image on which application.
Available file formats vary by application and computer (Windows or Macintosh).
See below for the characteristics of each image file format.
BMP (Standard File Extension: .bmp)
A standard file format for Windows.
BMP is often selected for images that are used only on Windows.
JPEG (Standard File Extension: .jpg)
A file format often used on websites and for digital camera images.
JPEG features high compression rates. JPEG images slightly degrade every time they are saved, and
cannot be returned to their original state.
JPEG is not available for black and white images.
Exif (Standard File Extension: .jpg)
A file format supported by many digital cameras.
It adds information such as the date of image capture, camera model, shutter speed, shooting mode
and comments to JPEG files.
The file format version must be Exif 2.2 or later in order to print on a Direct Print compatible printer.
TIFF (Standard File Extension: .tif)
A file format featuring a relatively high compatibility between various computers and applications. (Some
TIFF files are incompatible.) TIFF is suitable for editing saved images.
Note
MP Navigator EX supports the following TIFF file formats.
- Uncompressed, black and white binary
- Uncompressed, RGB (8 bits per channel)
- Uncompressed, YCC (8 bits per component)
- Uncompressed, RGB (16 bits per channel)
- Uncompressed, YCC (16 bits per component)
- Uncompressed, Grayscale
PDF (Standard File Extension: .pdf)
A file format developed by Adobe Systems. It can be used on various computers and operating systems.
Therefore, PDF files can be exchanged between people who use different operating systems, fonts, etc.
regardless of the differences.
Important
Only PDF files created with MP Navigator EX are supported. PDF files created or edited in other
applications are not supported.
Page top
Color Matching
Page 262 of 334 pages
On-screen Manual > Scanning Guide > Useful Information on Scanning > Color Matching
Color Matching
Color Matching adjusts devices as shown below to match the colors of an image displayed on a monitor
or a printed image with the colors of the original document.
Example: When sRGB is selected as the output profile (target)
Input Profile (Source)
Scanner
ScanGear (Scanner Driver)
Output Profile (Target)
sRGB
OS
Application
Application
Printer Driver
Monitor
Printer
ScanGear converts the image's color space from the scanner's color space to sRGB.
When displaying on a monitor, the image's color space is converted from sRGB to the monitor's color
space based on the operating system's monitor settings and the application's working space settings.
When printing, the image's color space is converted from sRGB to the printer's color space based on the
application's print settings and the printer driver's settings.
Page top
Other Scanning Methods
Page 263 of 334 pages
On-screen Manual > Scanning Guide > Other Scanning Methods
Other Scanning Methods
Scanning with applications other than MP Navigator EX
Scanning from an Application
Scanning images via the Control Panel
Scanning Using the Control Panel (Windows XP Only)
Page top
Scanning from an Application
Page 264 of 334 pages
On-screen Manual > Scanning Guide > Other Scanning Methods > Scanning from an Application
Scanning from an Application
You can scan an image from a TWAIN- or WIA-compliant application and use the image in that
application.
Windows Image Acquisition (WIA) is a driver model implemented in Windows XP or later. It allows you to
scan documents without using an application. Scan documents from a TWAIN-compliant application to
specify advanced settings for scanning.
The procedure varies depending on the application. The following procedures are examples only.
For details, refer to the application's manual.
Important
In Windows 2000, you cannot scan using the WIA driver.
You cannot scan film using the WIA driver.
Scanning from a TWAIN-compliant application
The following is an example of scanning using ArcSoft PhotoStudio.
1. Place the document on the Platen.
Placing Documents
2. From the Start menu, select (All) Programs > ArcSoft PhotoStudio 6 > PhotoStudio
6.
3. From the File menu, select Select Source....
In the Select Source screen, select the machine and click OK.
4. From the File menu, select Acquire....
ScanGear (scanner driver) starts.
For details on how to scan using ScanGear, see " Scanning in Basic Mode ."
Scanning from a WIA driver 2.0-compliant application
The following is an example of scanning using Windows Fax and Scan or Windows Photo Gallery.
In Windows 7, scan using Windows Fax and Scan.
1. Place the document on the Platen.
Placing Documents
2. In Windows Fax and Scan, click Scan... from New on the File menu.
In Windows Photo Gallery, click Import from Camera or Scanner... on the File menu,
then double-click WIA CanoScan (model name).
The scan setting screen appears.
3. Specify the settings.
Scanning from an Application
Scanner
The currently set product name is displayed. To change the scanner, click Change... and select
the product you want to use.
Profile
Select Photo (Default) or Documents according to the document to be scanned. To save a new
Profile, select Add profile.... You can specify the details in the Add New Profile dialog box.
Source
Select a scanner type.
Paper size
This setting is not available for this machine.
Color format
Select how to scan the document.
File type
Select a file format from JPEG, BMP, PNG and TIFF.
Resolution (DPI)
Enter the resolution. Specify a value between 50 dpi and 600 dpi. 300 dpi is set by default.
Resolution
Brightness
Move the slider to adjust the brightness. Move it to the left to darken and right to brighten the
image. You can also enter a value (-100 to 100).
Contrast
Move the slider to adjust the contrast. Moving it to the left will decrease the contrast of the image,
thus softening the image. Moving it to the right will increase the contrast of the image, thus
sharpening the image. You can also enter a value (-100 to 100).
Preview or scan images as separate files
Select this checkbox to preview or scan multiple images as separate files.
See how to scan a picture
Click to open Windows Help and Support.
Note
In Windows 7, See how to scan a picture is not displayed.
4. Click Preview to preview the image.
The preview image appears on the right.
5. Click Scan.
When scanning is completed, the scanned image appears in the application.
Page 265 of 334 pages
Scanning from an Application
Page 266 of 334 pages
Scanning from a WIA driver 1.0-compliant application
The following is an example of scanning using Paint.
1. Place the document on the Platen.
Placing Documents
2. Click From Scanner or Camera... on the File menu. (In Windows 7, click From
scanner or camera from
application.)
.) (Select the command to scan a document in the
3. Select an image type according to the document to be scanned.
Note
To scan with the values previously set in Adjust the quality of the scanned picture, select
Custom Settings.
4. Click Adjust the quality of the scanned picture and set the preferences as required.
Brightness
Move the slider to adjust the brightness. Move it to the left to darken and right to brighten the
image. You can also enter a value (-127 to 127).
Contrast
Move the slider to adjust the contrast. Moving it to the left will decrease the contrast of the image,
thus softening the image. Moving it to the right will increase the contrast of the image, thus
sharpening the image. You can also enter a value (-127 to 127).
Resolution (DPI)
Enter the resolution. Specify a value between 50 dpi and 600 dpi.
Resolution
Picture type
Select the type of scan you want for your document.
Scanning from an Application
Page 267 of 334 pages
Reset
Click to restore the original settings.
5. Click Preview to preview the image.
The preview image appears on the right. Drag
to specify the scan area.
6. Click Scan.
When scanning is completed, the scanned image appears in the application.
Page top
Scanning Using the Control Panel (Windows XP Only)
Page 268 of 334 pages
On-screen Manual > Scanning Guide > Other Scanning Methods > Scanning Using the Control Panel (Windows XP Only)
Scanning Using the Control Panel (Windows XP Only)
You can scan images via the Control Panel of Windows XP using the WIA driver.
Important
You cannot scan film using the Control Panel.
1. From the Start menu, select Control Panel.
2. Click Printers and Other Hardware > Scanners and Cameras, then double-click WIA
CanoScan (model name).
The Scanner and Camera Wizard dialog box opens.
3. Click Next.
4. Select Picture type according to the document to be scanned.
Note
To scan with the values previously set in Custom settings, select Custom.
5. Click Custom settings to set the preferences as required.
Brightness
Move the slider to adjust the brightness. Move it to the left to darken and right to brighten the
Scanning Using the Control Panel (Windows XP Only)
Page 269 of 334 pages
image. You can also enter a value (-127 to 127).
Contrast
Move the slider to adjust the contrast. Moving it to the left will decrease the contrast of the image,
thus softening the image. Moving it to the right will increase the contrast of the image, thus
sharpening the image. You can also enter a value (-127 to 127).
Resolution (DPI)
Enter the resolution. Specify a value between 50 dpi and 600 dpi.
Resolution
Picture type
Select the type of scan you want for your document.
Reset
Click to restore the original settings.
6. Click Preview to preview the image.
The preview image appears on the right. Drag
to specify the scan area.
7. Click Next and follow the instructions.
Page top
Scanning Using the Scanner Buttons
Page 270 of 334 pages
On-screen Manual > Scanning Guide > Scanning Using the Scanner Buttons
Scanning Using the Scanner Buttons
Using the Scanner Buttons to create PDF files, print documents or attach images to e-mail
What Are Scanner Buttons?
Scanning Documents and Saving the Scanned Images (AUTO SCAN Button)
Scanning and Saving Documents as PDF Files (PDF Buttons)
Scanning and Printing/Copying Documents (COPY Button)
Scanning and Attaching Documents to E-mail (E-MAIL Button)
Setting to start MP Navigator EX when a Scanner Button is pressed
Scanner Button Settings
Specifying how to respond when a Scanner Button is pressed
Scanner Button Settings via MP Navigator EX
Page top
What Are Scanner Buttons?
On-screen Manual > Scanning Guide > Scanning Using the Scanner Buttons > What Are Scanner Buttons?
What Are Scanner Buttons?
The seven buttons on the machine are referred to as Scanner Buttons. You can create PDF files, print
documents, attach images to e-mail, etc. by simply placing the document on the machine and pressing
a Scanner Button.
Important
When you press a Scanner Button, a program selection screen may appear instead of MP
Navigator EX. In that case, you will need to set MP Navigator EX as the program to start.
See "Scanner Button Settings " for details.
AUTO SCAN Button
Scans and saves documents. Document type is automatically detected and appropriate settings are
applied.
PDF Buttons
Create PDF files easily according to your needs.
These button names are not inscribed on the machine.
COLOR Button
Saves the scanned images as color PDF files in A4 size at 300 dpi output resolution by default.
BLACK & WHITE Button
Saves the scanned images as black and white PDF files in A4 size at 300 dpi output resolution by
default.
CUSTOM Button
Saves the scanned images as PDF files according to your custom settings.
FINISH Button
Ends the PDF button operation and saves the images.
COPY Button
Scans and prints documents.
Paper size is set to A4 by default.
E-MAIL Button
Scans documents and attaches the scanned images to new e-mail. File size suitable for attachments
is set.
Note
You can change how MP Navigator EX responds when the AUTO SCAN, COPY or E-MAIL button is
Page 271 of 334 pages
What Are Scanner Buttons?
Page 272 of 334 pages
pressed.
Scanner Button Settings via MP Navigator EX
When a Scanner Button is pressed and scanning starts, an MP Navigator EX dialog box displaying
the scan details opens. Click Cancel while Scanning... appears to change the settings in the MP
Navigator EX setting screen.
The Power Lamp flashes when a Scanner Button is pressed.
By default, the scanned images are saved in the following folders.
Windows 7: MP Navigator EX folder in My Pictures folder
Windows Vista: MP Navigator EX folder in Pictures folder
Windows XP: MP Navigator EX folder in My Pictures folder
Windows 2000: MP Navigator EX folder in My Pictures folder
Page top
Scanning Documents and Saving the Scanned Images (AUTO SCAN Button)
On-screen Manual > Scanning Guide > Scanning Using the Scanner Buttons > Scanning Documents and Saving the
Scanned Images (AUTO SCAN Button)
Scanning Documents and Saving the Scanned Images (AUTO
SCAN Button)
Scan and save documents. Document type is automatically detected and appropriate settings are
applied.
1. Place the document on the Platen.
Placing Documents
2. Press the AUTO SCAN button.
MP Navigator EX screen appears automatically and scanning starts.
Note
The scanned image is saved in an appropriate file format according to the document type. See
"Auto Scan Dialog Box " for details.
Page top
Page 273 of 334 pages
Scanning and Saving Documents as PDF Files (PDF Buttons)
Page 274 of 334 pages
On-screen Manual > Scanning Guide > Scanning Using the Scanner Buttons > Scanning and Saving Documents as PDF
Files (PDF Buttons)
Scanning and Saving Documents as PDF Files (PDF Buttons)
Save scanned images as PDF files.
1. Place the document on the Platen.
Important
Place the document face-down on the Platen and align an upper corner of the document with
the corner at the arrow (alignment mark) of the Platen.
2. Press PDF button.
Scanning color documents :
(COLOR Button)
Scanning black and white documents :
Scanning with custom settings :
(BLACK & WHITE Button)
(CUSTOM Button)
Descriptions on the PDF buttons appear.
3. Read the descriptions and click OK.
Note
Select the Do not display this message again. checkbox to scan documents continuously
using the buttons on the machine only.
4. Follow the on-screen instructions.
The operation varies depending on the button selected in Step 2.
COLOR and BLACK & WHITE buttons:
Scans in color or black and white.
Scanning... and the scan setting values appear.
CUSTOM button:
Scanning and Saving Documents as PDF Files (PDF Buttons)
Page 275 of 334 pages
A message about the setting screen appears.
Click OK. The Custom tab in the " PDF Dialog Box " of MP Navigator EX opens.
Specify the scan settings and click Scan.
Note
Adobe Acrobat Reader or Adobe Acrobat may start (to create thumbnails). If Microsoft Office
documents or other documents are saved in the same folder, the corresponding application
may start.
5. Select to add a page or end according to the number of pages.
When scanning is completed, a message prompting you to add a page or exit appears.
Adding a page
Place the next document on the Platen and press the button selected in Step 2 or click Next in the
message screen. After the additional page is scanned, a message prompting you to add a page or
end appears again.
Ending
Press
(FINISH button) on the machine or click Finish in the message screen.
The scanned images are saved in PDF format.
Page top
Scanning and Printing/Copying Documents (COPY Button)
Page 276 of 334 pages
On-screen Manual > Scanning Guide > Scanning Using the Scanner Buttons > Scanning and Printing/Copying
Documents (COPY Button)
Scanning and Printing/Copying Documents (COPY Button)
Print documents on a printer.
Note
Prepare the printer when printing with the COPY button. Refer to the manual of your printer to
prepare it.
1. Place the document on the Platen.
Placing Documents
2. Press the COPY button.
MP Navigator EX screen appears automatically and scanning starts. The scanned image is printed
on a printer.
Page top
Scanning and Attaching Documents to E-mail (E-MAIL Button)
Page 277 of 334 pages
On-screen Manual > Scanning Guide > Scanning Using the Scanner Buttons > Scanning and Attaching Documents to Email (E-MAIL Button)
Scanning and Attaching Documents to E-mail (E-MAIL Button)
Attach image files to new e-mail.
Important
MP Navigator EX is compatible with the following e-mail software programs:
- Windows Mail (Windows Vista)
- Outlook Express (Windows XP/Windows 2000)
- Microsoft Outlook
(If an e-mail software program does not operate properly, check that the program's MAPI is enabled.
To enable MAPI, refer to the manual of the e-mail software program.)
Note
If an e-mail software program is not selected, manually attach the scanned and saved image to e-
mail.
Refer to the corresponding manual for the printer, application and e-mail program settings.
1. Place the document on the Platen.
Important
Place the document face-down on the Platen and align an upper corner of the document with
the corner at the arrow (alignment mark) of the Platen.
2. Press the E-MAIL button.
MP Navigator EX screen appears automatically and scanning starts. The scanned image is
attached to new e-mail.
3. Specify the recipient, enter the subject and message, then send e-mail.
For details, refer to the manual of the e-mail software program.
Page top
Scanner Button Settings
On-screen Manual > Scanning Guide > Scanning Using the Scanner Buttons > Scanner Button Settings
Scanner Button Settings
Set to start MP Navigator EX when a Scanner Button is pressed.
Specifying the Scanner Button settings using MP Navigator EX allows you to scan documents easily.
Scanner Button Settings via MP Navigator EX
Important
Log on to an administrator account before making the settings.
Windows 7
1. From the Start menu, select Devices and Printers.
2. Right-click the icon of your scanner, then select Scan properties.
3. In the User Account Control dialog box, click Yes.
4. In Actions on the Event tab, set MP Navigator EX as the application to start.
Set MP Navigator EX 3.1 for all events in Select an event.
If MP Navigator EX is already set, click Cancel to end.
5. Click OK.
Windows Vista
1. From the Start menu, select Control Panel > Hardware and Sound > Scanners and
Cameras.
2. Select WIA CanoScan (model name), then click Properties.
3. In the User Account Control dialog box, click Continue.
4. In the WIA CanoScan (model name) Properties dialog box, select the Event tab.
5. In Actions on the Event tab, set MP Navigator EX as the application to start.
Set MP Navigator EX 3.1 for all events in Select an event.
If MP Navigator EX is already set, click Cancel to end.
6. Click OK.
Windows XP
1. From the Start menu, select Control Panel > Printers and Other Hardware.
2. In the resulting screen, click Scanners and Cameras.
Page 278 of 334 pages
Scanner Button Settings
Page 279 of 334 pages
3. Right-click WIA CanoScan (model name), then click Properties.
4. In Actions on the Event tab, set MP Navigator EX as the application to start.
Set MP Navigator EX 3.1 for all events in Select an event.
If MP Navigator EX is already set, click Cancel to end.
5. Click OK.
Windows 2000
1. From the Start menu, select Settings > Control Panel.
2. In the resulting screen, click (or double-click) Scanners and Cameras.
3. The Scanners and Cameras Properties dialog box opens. Select CanoScan (model
name), then click Properties.
4. Select an event in Scanner events, then set MP Navigator EX 3.1 for Send to this
application.
If MP Navigator EX is already set, click Cancel to end.
5. Click OK.
Restart the computer.
Important
The settings are not effective until you restart the computer.
Page top
Scanner Button Settings via MP Navigator EX
Page 280 of 334 pages
On-screen Manual > Scanning Guide > Scanning Using the Scanner Buttons > Scanner Button Settings via MP Navigator
EX
Scanner Button Settings via MP Navigator EX
MP Navigator EX enables you to specify the response resulting from pressing a button on the machine
(Scanner Button). You can specify the response individually for each event.
1. Start MP Navigator EX.
Starting MP Navigator EX
The MP Navigator EX Navigation Mode screen or One-click Mode screen appears.
2. Click Preferences.
The Preferences dialog box opens.
3. Select the Scanner Button Settings tab, then specify a function to assign to each
Scanner Button.
Scanner Button Settings Tab
Scanner Button Settings via MP Navigator EX
Page 281 of 334 pages
4. Click OK.
The operation will be performed according to the settings when you press a button on the machine
(Scanner Button).
Page top
Troubleshooting
Page 282 of 334 pages
On-screen Manual > Scanning Guide > Troubleshooting
Troubleshooting
This section provides solutions to problems you may encounter.
Installation Problems
Problems with Scanning
Problems with Scanning Film
Software Problems
MP Navigator EX Problems
Page top
Installation Problems
Page 283 of 334 pages
On-screen Manual > Scanning Guide > Troubleshooting > Installation Problems
Installation Problems
The Found New Hardware screen appears when the scanner is connected to a computer
Menu Screen Does Not Appear When the Setup CD-ROM Is Inserted
Installation Is Unsuccessful (Insufficient Free Hard Disk Space)
Installation Is Unsuccessful (Insufficient Memory)
Page top
The Found New Hardware screen appears when the scanner is connected to ...
Page 284 of 334 pages
On-screen Manual > Scanning Guide > Troubleshooting > Installation Problems > The Found New Hardware screen
appears when the scanner is connected to a computer
The Found New Hardware screen appears when the scanner is
connected to a computer
Check: The machine may have been connected before installing the
software programs from the Setup CD-ROM .
Disconnect the USB cable from the computer, then click Cancel in the Found New Hardware (Windows
XP and Windows 2000: Found New Hardware Wizard) screen to close it. Then install the software
programs from the Setup CD-ROM .
Page top
Menu Screen Does Not Appear When the Setup CD-ROM Is Inserted
Page 285 of 334 pages
On-screen Manual > Scanning Guide > Troubleshooting > Installation Problems > Menu Screen Does Not Appear When
the Setup CD-ROM Is Inserted
Menu Screen Does Not Appear When the Setup CD-ROM Is
Inserted
Check 1: Make sure that the CD-ROM is inserted properly.
Reinsert the Setup CD-ROM .
Check 2: The auto start function for CD-ROMs may be disabled.
The CD-ROM may not start automatically for some reason. Double-click the CD-ROM drive icon and start
the setup directly.
1. From the Start menu, select Computer.
(In Windows XP, select My Computer from the Start menu. In Windows 2000, double-click the My
Computer icon on the desktop.)
2. Double-click the CD-ROM drive icon, or right-click the CD-ROM drive icon and click
Open, then double-click MSETUP4.EXE.
Important
The CD-ROM drive may not be operating correctly if the CD-ROM drive icon does not appear.
Contact the manufacturer of the computer. Or, the Setup CD-ROM may be damaged. Contact Canon
Customer Support Help Desk (refer to the printed manual: Quick Start Guide ) or the service center.
Check 3: The Setup CD-ROM may be dusty or dirty. There may be
fingerprints on the CD-ROM.
Gently dust or wipe off the dirt on the CD-ROM with a soft cloth.
Gently wipe fingerprints and other smears from the CD-ROM with a soft cloth or an eyeglass
cleaner, being careful not to scratch the CD-ROM.
Remove dust and dirt from the CD-ROM drive with a blower brush for a camera lens.
Important
Do not wipe the CD-ROM drive's sensor directly with a cloth or other materials. It could cause the
drive to malfunction and cease to read CD-ROMs.
Page top
Installation Is Unsuccessful (Insufficient Free Hard Disk Space)
Page 286 of 334 pages
On-screen Manual > Scanning Guide > Troubleshooting > Installation Problems > Installation Is Unsuccessful (Insufficient
Free Hard Disk Space)
Installation Is Unsuccessful (Insufficient Free Hard Disk Space)
Check: Delete unnecessary files to obtain sufficient free hard disk space,
then try again.
From the Start menu, select (All) Programs > Accessories > System Tools > Disk Cleanup to delete
unnecessary files in the hard disk drive (C:).
Select unnecessary files, then right-click a selected file and click Delete. Right-click Recycle Bin,
then click Empty Recycle Bin.
From the Start menu, select Control Panel (Windows 2000: Settings > Control Panel) > Uninstall a
program (Windows XP and Windows 2000: Add or Delete Programs), then delete unnecessary files.
Page top
Installation Is Unsuccessful (Insufficient Memory)
Page 287 of 334 pages
On-screen Manual > Scanning Guide > Troubleshooting > Installation Problems > Installation Is Unsuccessful (Insufficient
Memory)
Installation Is Unsuccessful (Insufficient Memory)
Check: Close other applications or restart the computer and try again.
Page top
Problems with Scanning
Page 288 of 334 pages
On-screen Manual > Scanning Guide > Troubleshooting > Problems with Scanning
Problems with Scanning
Error Message "Release the lock switch..." Is Displayed
Scanner Does Not Work
ScanGear (Scanner Driver) Does Not Start
Error Message Appears and the ScanGear (Scanner Driver) Screen Does Not Appear
Scanner Buttons Do Not Work
"Select the program to launch for this action" Is Displayed When a Scanner Button Is Pressed
When a Scanner Button or MP Navigator EX Button Is Pressed, a Wrong Application Starts
Scan Quality (Image Displayed on the Monitor) Is Poor
Scanned Image Is Surrounded by Extra White Areas
Cannot Scan Multiple Documents at One Time
Cannot Scan Properly in Auto Scan Mode
Slow Scanning Speed
"There is not enough memory." Message Is Displayed
Computer Stops Operating during Scanning
Scanner Does Not Work After Upgrading Windows
Page top
Error Message "Release the lock switch..." Is Displayed
Page 289 of 334 pages
On-screen Manual > Scanning Guide > Troubleshooting > Problems with Scanning > Error Message "Release the lock
switch..." Is Displayed
Error Message "Release the lock switch..." Is Displayed
Check: The machine may be locked.
Close the software program and unlock the machine, then turn on the machine again. For information on
how to unlock the machine, see the printed manual: Quick Start Guide .
Page top
Scanner Does Not Work
Page 290 of 334 pages
On-screen Manual > Scanning Guide > Troubleshooting > Problems with Scanning > Scanner Does Not Work
Scanner Does Not Work
Check 1: Restart the computer.
Check 2: Follow the steps below to make sure that the machine is
recognized by the computer, and if not, reinstall ScanGear (scanner driver).
Step 1: Confirm.
Windows 7/Windows Vista:
1. On the Start menu, right-click Computer, then select Properties.
2. Select Device Manager in the task area.
Windows XP:
1. On the Start menu, right-click My Computer, then select Properties.
2. On the Hardware tab, select Device Manager.
Windows 2000:
1. Right-click the My Computer icon, then select Properties.
2. On the Hardware tab, select Device Manager.
If the Machine is Recognized
The machine is displayed under "Imaging devices."
If the Machine is Not Recognized
The machine is not displayed. ("CanoScan" may be displayed under "Other devices.")
Scanner Does Not Work
Page 291 of 334 pages
Step 2: Delete ScanGear.
1. From the Start menu, select (All) Programs > CanoScan (model name) >
Scanner Driver Uninstaller.
2. When a confirmation appears, click OK.
3. When a confirmation for removing ScanGear and all of its components appears,
click Yes.
4. When all files are deleted, click Exit.
ScanGear is deleted.
Step 3: Reinstall ScanGear.
Insert the Setup CD-ROM into the computer's disc drive, click Custom Install, select the ScanGear
checkbox and reinstall it.
Note
Deselect the checkboxes to the left of applications that are already installed. These
applications will not be reinstalled.
Scanner Does Not Work
Page 292 of 334 pages
Page top
ScanGear (Scanner Driver) Does Not Start
Page 293 of 334 pages
On-screen Manual > Scanning Guide > Troubleshooting > Problems with Scanning > ScanGear (Scanner Driver) Does
Not Start
ScanGear (Scanner Driver) Does Not Start
Check 1: Make sure that the ScanGear (scanner driver) is installed.
If it is not installed, insert the Setup CD-ROM into the computer's disc drive, then select Custom Install
and install ScanGear.
Check 2: On the File menu of the application, select Select Source... and
select the machine.
Important
Do not select the model name that includes WIA in it.
Note
The operation may differ depending on the application.
Example: ArcSoft PhotoStudio
Display may differ depending on your operating system.
Check 3: Start from a TWAIN-compliant application.
Page top
Error Message Appears and the ScanGear (Scanner Driver) Screen Does Not ...
On-screen Manual > Scanning Guide > Troubleshooting > Problems with Scanning > Error Message Appears and the
ScanGear (Scanner Driver) Screen Does Not Appear
Error Message Appears and the ScanGear (Scanner Driver)
Screen Does Not Appear
Check 1: Make sure that the machine is turned on.
Check 2: Connect the USB cable to a different USB port on the computer.
Check 3: If the USB cable is connected to a USB hub, remove it from the
USB hub and connect it to a USB port on the computer.
Check 4: Make sure that the ScanGear (scanner driver) is installed.
If it is not installed, insert the Setup CD-ROM into the computer's disc drive, then select Custom Install
and install ScanGear.
Check 5: On the File menu of the application, select Select Source and
select the machine.
Note
The operation may differ depending on the application.
Check 6: Make sure that the application is TWAIN-compliant.
You cannot open ScanGear from applications not supporting TWAIN.
Check 7: Exit ScanGear if it is running on another application.
Page top
Page 294 of 334 pages
Scanner Buttons Do Not Work
Page 295 of 334 pages
On-screen Manual > Scanning Guide > Troubleshooting > Problems with Scanning > Scanner Buttons Do Not Work
Scanner Buttons Do Not Work
Check 1: Install the required software programs (MP Navigator EX, other
applications that accompany the machine, etc.) from the Setup CD-ROM .
Check 2: To use the COPY button, install the printer driver of your printer.
Check 3: Check that the printer operates properly.
Check 4: To use the E-MAIL button, install any of the following programs.
- Windows Mail (Windows Vista)
- Outlook Express (Windows XP/Windows 2000)
- Microsoft Outlook
(If an e-mail software program does not operate properly, check that the program's MAPI is enabled. To
enable MAPI, refer to the manual of the e-mail software program.)
Check 5: The MP Navigator EX screen may be hidden behind other
windows. (Windows 7/Windows Vista)
Click Canon MP Navigator EX on the taskbar to bring the MP Navigator EX screen to the front.
Check 6: Applications may not be assigned to the Scanner Buttons.
Scanner Button Settings
Page top
"Select the program to launch for this action" Is Displayed When a Scanner B...
On-screen Manual > Scanning Guide > Troubleshooting > Problems with Scanning > "Select the program to launch for
this action" Is Displayed When a Scanner Button Is Pressed
"Select the program to launch for this action" Is Displayed
When a Scanner Button Is Pressed
Check 1: If MP Navigator EX is not installed, install it from the Setup CDROM.
Insert the Setup CD-ROM into the computer's disc drive, click Custom Install, select the MP Navigator EX
checkbox and install it.
Check 2: Set to start MP Navigator EX when a Scanner Button is pressed.
Scanner Button Settings
Page top
Page 296 of 334 pages
When a Scanner Button or MP Navigator EX Button Is Pressed, a Wrong Appli...
Page 297 of 334 pages
On-screen Manual > Scanning Guide > Troubleshooting > Problems with Scanning > When a Scanner Button or MP
Navigator EX Button Is Pressed, a Wrong Application Starts
When a Scanner Button or MP Navigator EX Button Is Pressed,
a Wrong Application Starts
Check: Change the MP Navigator EX settings.
Applications that correspond with the Scanner Buttons are managed by MP Navigator EX. After installing
all the applications from the Setup CD-ROM , the print function is assigned to Copy and Print, mail-related
function to Mail, Notepad (included with Windows) to OCR, and ArcSoft PhotoStudio to Scan by default.
You can replace the assigned application with another application by changing the settings in MP
Navigator EX.
Assign an application to PDF.
Application Settings
Specify an application to open scanned images. The name of the specified application is displayed
in Application Settings.
To change the application:
Method 1
Click Set, select the application to assign, then click Open.
Make sure that the application is an executable file.
Normally a folder named after the application or its manufacturer is created in the Program Files
folder, and a file with a ".exe" extension is saved in it. Double-click the file to make sure that the
corresponding application starts.
Note
If extensions are hidden, from the Start menu, click Control Panel > Folder Options > View, then
deselect the Hide extensions for known file types checkbox.
Method 2
Drag and drop the executable file on the desktop or the Start menu, or its shortcut to Application
Settings.
Important
Some applications may not start.
Some applications may not start if the shortcut is assigned.
To cancel the application setting:
Click Reset.
Important
If you press a Scanner Button to which an application is not set in Application Settings, a
message requesting you to specify an application appears. Click OK, then select an
application in the Select Application screen.
Page top
Scan Quality (Image Displayed on the Monitor) Is Poor
Page 298 of 334 pages
On-screen Manual > Scanning Guide > Troubleshooting > Problems with Scanning > Scan Quality (Image Displayed on
the Monitor) Is Poor
Scan Quality (Image Displayed on the Monitor) Is Poor
Check 1: Increase the scanning resolution.
Resolution
Check 2: Set the scale to 100%.
Some applications do not display images clearly if the image is too small.
Check 3: Update the calibration data.
Recalibrate the scanner from the Scanner tab in the Preferences dialog box of ScanGear (scanner
driver). Calibration may take time depending on your computer.
Scanner Tab
Check 4: If moire (stripe pattern) appears, take the following measures and
scan again.
On the Basic Mode tab of ScanGear, select Magazine(Color) in Select Source.
Basic Mode Tab
On the Advanced Mode tab of ScanGear, set Descreen in Image Settings to ON.
Image Settings
Note
If moire appears when you scan a digital print photo, take the above measures and scan again.
If you use MP Navigator EX, set Document Type to Magazine(Color) or enable Descreen in the Scan
Settings dialog box and scan again.
Scan Settings Dialog Box (Photos/Documents)
Check 5: Check the monitor's color depth.
Windows 7:
From the Start menu, select Control Panel > Appearance and Personalization > Adjust screen
resolution > Preferences.
On the Monitor tab of the displayed dialog box, set Colors to High Color (16 bit), True Color (24 bit) or
True Color (32 bit).
Windows Vista:
From the Start menu, select Control Panel > Appearance and Personalization > Adjust screen
resolution to open the Display Settings dialog box. Set the color depth to Medium (16 bit) or Highest
(32 bit).
Windows XP:
From the Start menu, select Control Panel > Display to open the Display Properties dialog box. On
the Settings tab, set Colors to Medium (16 bit) or Highest (32 bit).
Windows 2000:
From the Start menu, select Settings > Control Panel > Display to open the Display Properties dialog
box. On the Settings tab, set Colors to High Color (16 bit) or True Color (32 bit).
Check 6: Clean the Platen and Document Cover.
Clean the Platen of the scanner or the light source of the Film Adapter Unit, taking special care not to
press strongly on the Platen.
Check 7: If the document is in poor condition (dirty, faded, etc.), use
Scan Quality (Image Displayed on the Monitor) Is Poor
Page 299 of 334 pages
Reduce Dust and Scratches, Fading Correction, Grain Correction, etc. in
Image Settings on the Advanced Mode tab of ScanGear.
Image Settings
Check 8: If the color tone of images is different from the original document,
take the following measures and scan again.
On the Advanced Mode tab of ScanGear, set Image Adjustment in Image Settings to None.
Image Settings
On the Color Settings tab in the Preferences dialog box of ScanGear, set Color Matching.
Color Settings Tab
Check 9: Cover the machine with black cloth if white spots, streaks, or
colored patterns appear in scan results due to interference from ambient
light.
Page top
Scanned Image Is Surrounded by Extra White Areas
Page 300 of 334 pages
On-screen Manual > Scanning Guide > Troubleshooting > Problems with Scanning > Scanned Image Is Surrounded by
Extra White Areas
Scanned Image Is Surrounded by Extra White Areas
Check: Specify the scan area.
(Auto Crop) in whole image view of ScanGear (scanner driver) to automatically display the
Click
cropping frame (scan area) according to the document size.
You can also manually specify the scan area in thumbnail view or when there are white margins along
the document (for example, in photos), or when you want to create custom cropping frames.
Adjusting Cropping Frames
Page top
Cannot Scan Multiple Documents at One Time
Page 301 of 334 pages
On-screen Manual > Scanning Guide > Troubleshooting > Problems with Scanning > Cannot Scan Multiple Documents at
One Time
Cannot Scan Multiple Documents at One Time
Check 1: Make sure that the documents are placed correctly on the Platen.
Placing Documents
Check 2: Scan each item individually.
Some applications do not support multiple image scanning.
Page top
Cannot Scan Properly in Auto Scan Mode
Page 302 of 334 pages
On-screen Manual > Scanning Guide > Troubleshooting > Problems with Scanning > Cannot Scan Properly in Auto Scan
Mode
Cannot Scan Properly in Auto Scan Mode
Check 1: Make sure that the documents are placed correctly on the Platen.
Placing Documents
Check 2: Multiple image scanning may not be supported.
Some applications do not support multiple image scanning. In that case, scan each item individually.
Page top
Slow Scanning Speed
Page 303 of 334 pages
On-screen Manual > Scanning Guide > Troubleshooting > Problems with Scanning > Slow Scanning Speed
Slow Scanning Speed
Check 1: To view the image on a monitor, set the output resolution to
around 150 dpi. To print, set it to around 300 dpi.
Resolution
Check 2: Set Fading Correction, Grain Correction, etc. to None.
Image Settings
Check 3: In MP Navigator EX, deselect the Correct slanted document /
Detect the orientation of text documents and rotate images checkbox and
scan again.
Scan Settings Dialog Box (Photos/Documents)
Scan Settings Dialog Box
Page top
"There is not enough memory." Message Is Displayed
Page 304 of 334 pages
On-screen Manual > Scanning Guide > Troubleshooting > Problems with Scanning > "There is not enough memory."
Message Is Displayed
"There is not enough memory." Message Is Displayed
Check 1: Exit other applications and try again.
Check 2: Reduce the resolution or output size and scan again.
Resolution
Page top
Computer Stops Operating during Scanning
Page 305 of 334 pages
On-screen Manual > Scanning Guide > Troubleshooting > Problems with Scanning > Computer Stops Operating during
Scanning
Computer Stops Operating during Scanning
Check 1: Restart the computer, reduce the output resolution in ScanGear
(scanner driver) and scan again.
Check 2: Delete unnecessary files to obtain sufficient free hard disk space,
then scan again.
Error message may appear if there is not enough hard disk space to scan and save, when the image
size is too large (such as when scanning a large document at high resolution.)
Check 3: For Location of Temporary Files in MP Navigator EX, specify a
folder on a drive with sufficient free space.
General Tab
Check 4: Multiple devices may be connected to USB ports.
Disconnect other devices.
Page top
Scanner Does Not Work After Upgrading Windows
Page 306 of 334 pages
On-screen Manual > Scanning Guide > Troubleshooting > Problems with Scanning > Scanner Does Not Work After
Upgrading Windows
Scanner Does Not Work After Upgrading Windows
Check: Disconnect the USB cable, then uninstall and reinstall the
ScanGear(scanner driver) and MP Navigator EX.
Step 1: Delete ScanGear.
See "Uninstalling the ScanGear (Scanner Driver) " for details.
Step 2: Uninstall MP Navigator EX.
1.
From the Start menu, select (All) Programs > Canon Utilities > MP Navigator EX 3.1 > MP
Navigator EX Uninstall.
2.
When a confirmation appears, click Yes.
3.
When uninstallation is complete, click OK.
MP Navigator EX is uninstalled.
Step 3: Reinstall the ScanGear and MP Navigator EX.
Insert the Setup CD-ROM into the computer's disc drive, then select Custom Install and reinstall the
ScanGear and MP Navigator EX.
Page top
Problems with Scanning Film
Page 307 of 334 pages
On-screen Manual > Scanning Guide > Troubleshooting > Problems with Scanning Film
Problems with Scanning Film
Cannot Scan Film
Scan Quality Is Poor or Colors Are Scanned Incorrectly
Image Becomes Too Dark or Too Bright When a Cropping Frame Is Moved, Enlarged or Reduced
Frames Are Not Detected Correctly
Scanner Stops Operating during Scanning, or "There is not enough memory." Message Is Displayed
Page top
Cannot Scan Film
Page 308 of 334 pages
On-screen Manual > Scanning Guide > Troubleshooting > Problems with Scanning Film > Cannot Scan Film
Cannot Scan Film
Check 1: Make sure that the FAU (Film Adapter Unit) Protective Sheet is
removed from the Document Cover.
Check 2: Make sure that the Film Guide is placed correctly on the Platen.
Check 3: Make sure that the calibration slot is not blocked.
Do not block the calibration slot on the Film Guide with film or other items.
Check 4: Make sure that the Document Cover is closed properly.
Check 5: Make sure that ScanGear (scanner driver) is set for scanning film.
In ScanGear, set Select Source in Basic Mode to Negative Film(Color) or Positive Film(Color), or set
Select Source in Advanced Mode to Color Negative Film, Color Positive Film, Monochrome Negative Film
or Monochrome Positive Film.
Check 6: In MP Navigator EX, select the machine on the General tab of the
Preferences dialog box and click OK.
Check 7: In the dialog box that opens by clicking an icon in the One-click
Mode screen of MP Navigator EX, set Document Type to film or Film(Auto
mode), then click Apply.
Also follow Check 6 and Check 7 when you cannot scan using the Scanner Buttons.
Check 8: Set the appropriate output resolution and scan again.
If the computer has stopped operating, restart it and scan again.
Page top
Scan Quality Is Poor or Colors Are Scanned Incorrectly
Page 309 of 334 pages
On-screen Manual > Scanning Guide > Troubleshooting > Problems with Scanning Film > Scan Quality Is Poor or Colors
Are Scanned Incorrectly
Scan Quality Is Poor or Colors Are Scanned Incorrectly
Check 1: The Platen or the light source on the Document Cover may be
dusty or dirty.
Remove dust and dirt from the Platen and the light source on the Document Cover. Clean the Platen of
the scanner or the light source of the Film Adapter Unit, taking special care not to press strongly on the
Platen.
Check 2: Recalibrate the scanner from the Scanner tab in the Preferences
dialog box of ScanGear (scanner driver).
Scanner Tab
Check 3: If the film is in poor condition (dirty, faded, etc.), use Remove Dust
and Scratches (FARE), Fading Correction, Grain Correction, etc. in Image
Settings in Advanced Mode of ScanGear.
Image Settings
Note
If a print out of an image does not appear satisfactory or the same as what you see on the monitor,
you may need to change the printer's settings. Or, there may be a problem with the printer.
For details, refer to the manual of your printer.
Check 4: If circular stripe patterns (Newton's rings) appear, load the film
face-up and click Preview, then click
(Mirror) on the Toolbar of
ScanGear to invert the image, then click Scan.
Check 5: The film may be extremely dark or bright, or the spaces between
frames are extremely narrow (2 mm is standard).
Scan again using ScanGear if the Scanner Buttons or MP Navigator EX yielded less than satisfactory
colors.
Check 6: Adjust the brightness, contrast, tone curve, etc. on the Advanced
Mode tab if the colors of the ScanGear's preview scan was unsatisfactory.
Correcting Images and Adjusting Colors with ScanGear (Scanner Driver)
Check 7: Adjust the saturation and color balance on the Advanced Mode
tab of ScanGear if the scanned image appears reddish or bluish.
Adjusting Saturation and Color Balance
Check 8: Light may reflect off white slide mounts into images. In that case,
use black slide mounts or cover the white slide mounts with black frames.
Page top
Image Becomes Too Dark or Too Bright When a Cropping Frame Is Moved, E...
On-screen Manual > Scanning Guide > Troubleshooting > Problems with Scanning Film > Image Becomes Too Dark or
Too Bright When a Cropping Frame Is Moved, Enlarged or Reduced
Image Becomes Too Dark or Too Bright When a Cropping
Frame Is Moved, Enlarged or Reduced
Check: Follow these steps from the Advanced Mode tab of ScanGear
(scanner driver).
1. Click Preview.
The preview images are refreshed.
When the whole film image is displayed, click
the thumbnails.
(Whole Film Image) on the Toolbar to display
2. Select the frame you want to correct the colors of.
3. Click Apply in the Apply the tone value to all frames section.
If the Apply the tone value to all frames section is not displayed, click
Tone Settings.
(Down arrow) of Exposure/
4. Specify a cropping frame and click Scan.
Scanning starts.
Page top
Page 310 of 334 pages
Frames Are Not Detected Correctly
Page 311 of 334 pages
On-screen Manual > Scanning Guide > Troubleshooting > Problems with Scanning Film > Frames Are Not Detected
Correctly
Frames Are Not Detected Correctly
Check 1: Film may be out of position.
Placing Film
Check 2: The film may be extremely dark or bright, or the spaces between
frames are extremely narrow (2 mm is standard).
Follow these steps if thumbnails are not displayed correctly when previewed in ScanGear (scanner
driver).
The following is an example using the Advanced Mode tab.
1. Click
(Film Thumbnail) on the Toolbar.
The whole film image is displayed.
2. Select unnecessary cropping frames and click
(Remove Cropping Frame).
The cropping frames are deleted. You can also delete the cropping frames by pressing the Delete
key.
3. Specify the scan area of the frame that was not displayed correctly.
4. Select
(Enlarge/Reduce) and click on the image.
The Preview area is enlarged.
Frames Are Not Detected Correctly
5. Click
Page 312 of 334 pages
(Crop) and adjust the cropping frame to the desired size.
6. Click Scan.
Starts scanning.
Check 3: Check if there are frames that are not cropped even when the
whole film image is displayed.
On the Advanced Mode tab of ScanGear, click
(Film Thumbnail) on the Toolbar to display the whole
film image. Cropping frames appear on automatically detected frames. If the frame you want to scan is
not cropped correctly, select the size of the film to be scanned from Scan Area and click
(Film
Cropping Frame). If the frame is still not cropped correctly, adjust the cropping frame. See the procedure
in Check 2 to 6 to adjust the cropping frame.
Page top
Scanner Stops Operating during Scanning, or "There is not enough memory."...
On-screen Manual > Scanning Guide > Troubleshooting > Problems with Scanning Film > Scanner Stops Operating
during Scanning, or "There is not enough memory." Message Is Displayed
Scanner Stops Operating during Scanning, or "There is not
enough memory." Message Is Displayed
Check 1: Reduce the resolution or output size and scan again.
Resolution
Check 2: Reduce the number of frames to scan or apply Image Settings
(such as Backlight Correction) only to frames that require corrections.
Page top
Page 313 of 334 pages
Software Problems
Page 314 of 334 pages
On-screen Manual > Scanning Guide > Troubleshooting > Software Problems
Software Problems
E-mail Software Program You Want to Use Does Not Appear in the Screen for Selecting an E-mail
Software Program
Scanned Image Is Printed Enlarged (Reduced)
Scanned Image Is Enlarged (Reduced) on the Computer Monitor
Scanned Image Does Not Open
Page top
E-mail Software Program You Want to Use Does Not Appear in the Screen for...
Page 315 of 334 pages
On-screen Manual > Scanning Guide > Troubleshooting > Software Problems > E-mail Software Program You Want to
Use Does Not Appear in the Screen for Selecting an E-mail Software Program
E-mail Software Program You Want to Use Does Not Appear in
the Screen for Selecting an E-mail Software Program
Check 1: MP Navigator EX may not support the e-mail software program.
The following e-mail software programs are supported. (Image are attached to the mail message
automatically.)
- Windows Mail (Windows Vista)
- Outlook Express (Windows XP/Windows 2000)
- Microsoft Outlook
Check 2: If an e-mail software program does not operate properly, check
that the program's MAPI is enabled.
To enable MAPI, refer to the manual of the e-mail software program.
Check 3: If using an e-mail software program other than the ones listed
above, select None (Attach Manually) when prompted to select a program
and attach the scanned image manually.
Page top
Scanned Image Is Printed Enlarged (Reduced)
Page 316 of 334 pages
On-screen Manual > Scanning Guide > Troubleshooting > Software Problems > Scanned Image Is Printed Enlarged
(Reduced)
Scanned Image Is Printed Enlarged (Reduced)
Check: Set the printing size in the application.
Page top
Scanned Image Is Enlarged (Reduced) on the Computer Monitor
Page 317 of 334 pages
On-screen Manual > Scanning Guide > Troubleshooting > Software Problems > Scanned Image Is Enlarged (Reduced)
on the Computer Monitor
Scanned Image Is Enlarged (Reduced) on the Computer
Monitor
Check 1: Change the display setting in the application.
For details, refer to the application's manual. If you have any questions, contact the manufacturer of the
application.
Note
You cannot reduce the image size in Paint. To reduce the display size, open the images in an
application.
Check 2: Change the resolution setting in ScanGear (scanner driver) and
scan again.
The higher the resolution, the larger the resulting image will be.
Resolution
Page top
Scanned Image Does Not Open
Page 318 of 334 pages
On-screen Manual > Scanning Guide > Troubleshooting > Software Problems > Scanned Image Does Not Open
Scanned Image Does Not Open
Check: If the file format is not supported by the application, scan the image
again and save it in a popular file format such as JPEG.
For details, refer to the application's manual. If you have any questions, contact the manufacturer of the
application.
Page top
MP Navigator EX Problems
Page 319 of 334 pages
On-screen Manual > Scanning Guide > Troubleshooting > MP Navigator EX Problems
MP Navigator EX Problems
Cannot Scan at the Correct Size
Position or Size of the Image Cannot be Detected Correctly When Scanning Using the Scanner
Buttons
Document Is Placed Correctly, but the Scanned Image Is Slanted
Document Is Placed Correctly, but the Orientation Changes in the Scanned Image
Page top
Cannot Scan at the Correct Size
Page 320 of 334 pages
On-screen Manual > Scanning Guide > Troubleshooting > MP Navigator EX Problems > Cannot Scan at the Correct Size
Cannot Scan at the Correct Size
Check 1: Make sure that the documents are placed correctly on the Platen.
Placing Documents
Check 2: Set Document Size to the actual document size and scan again.
If the matching size is not found, scan at a larger size and trim the image.
See the Toolbar (
(Trimming)) in " Correct/Enhance Images Window " for details.
Page top
Position or Size of the Image Cannot be Detected Correctly When Scanning U...
On-screen Manual > Scanning Guide > Troubleshooting > MP Navigator EX Problems > Position or Size of the Image
Cannot be Detected Correctly When Scanning Using the Scanner Buttons
Position or Size of the Image Cannot be Detected Correctly
When Scanning Using the Scanner Buttons
Check 1: Make sure that the documents are placed correctly on the Platen.
Placing Documents
Check 2: Check that the settings are correctly set according to the
document.
If you cannot scan properly using the AUTO SCAN button, specify the document type in MP Navigator EX.
Scanning Photos and Documents
Page top
Page 321 of 334 pages
Document Is Placed Correctly, but the Scanned Image Is Slanted
Page 322 of 334 pages
On-screen Manual > Scanning Guide > Troubleshooting > MP Navigator EX Problems > Document Is Placed Correctly, but
the Scanned Image Is Slanted
Document Is Placed Correctly, but the Scanned Image Is
Slanted
Check: In MP Navigator EX, deselect the Correct slanted document
checkbox and scan again.
Scan Settings Dialog Box (Photos/Documents)
Scan Settings Dialog Box
Page top
Document Is Placed Correctly, but the Orientation Changes in the Scanned I...
Page 323 of 334 pages
On-screen Manual > Scanning Guide > Troubleshooting > MP Navigator EX Problems > Document Is Placed Correctly, but
the Orientation Changes in the Scanned Image
Document Is Placed Correctly, but the Orientation Changes in
the Scanned Image
Check: In MP Navigator EX, deselect the Detect the orientation of text
documents and rotate images checkbox and scan again.
Scan Settings Dialog Box (Photos/Documents)
Scan Settings Dialog Box
Page top
Updating the ScanGear (Scanner Driver)
Page 324 of 334 pages
On-screen Manual > Scanning Guide > Updating the ScanGear (Scanner Driver)
Updating the ScanGear (Scanner Driver)
Obtaining the Latest ScanGear (Scanner Driver)
Uninstalling the ScanGear (Scanner Driver)
Before Installing the ScanGear (Scanner Driver)
Installing the ScanGear (Scanner Driver)
Page top
Obtaining the Latest ScanGear (Scanner Driver)
Page 325 of 334 pages
On-screen Manual > Scanning Guide > Updating the ScanGear (Scanner Driver) > Obtaining the Latest ScanGear
(Scanner Driver)
Obtaining the Latest ScanGear (Scanner Driver)
Upgrading your current ScanGear (scanner driver) to the latest ScanGear may solve some problems you
have experienced.
Checking the Version of ScanGear
Start ScanGear and click
(Information) to display the version of ScanGear.
Obtaining ScanGear
To obtain ScanGear, access our website and download the ScanGear for your model.
Important
ScanGear can be downloaded for free. However, Internet connection fees apply.
When the ScanGear is upgraded, use the latest versions of the MP Navigator EX as well.
Install the latest ScanGear after deleting the old one. See " Uninstalling the ScanGear (Scanner
Driver)" for details.
Related Topic
Before Installing the ScanGear (Scanner Driver)
Installing the ScanGear (Scanner Driver)
Page top
Uninstalling the ScanGear (Scanner Driver)
Page 326 of 334 pages
On-screen Manual > Scanning Guide > Updating the ScanGear (Scanner Driver) > Uninstalling the ScanGear (Scanner
Driver)
Uninstalling the ScanGear (Scanner Driver)
You can delete the ScanGear (scanner driver) you no longer use.
When deleting ScanGear, close all running applications and remove the USB cable connecting the
machine and computer.
1. Start Scanner Driver Uninstaller.
From the Start menu, select (All) Programs > CanoScan (model name) > Scanner Driver Uninstaller.
Note
In Windows 7 and Windows Vista, a confirmation or warning dialog box may appear while
installing, uninstalling or starting software.
Such dialog box appears when administrative rights are required to perform a task.
If you are logged on to an administrator account, click Continue or Allow (Yes in Windows 7) to
continue.
Some applications require administrator account to continue. If you are logged on to a
standard account, switch to an administrator account and start over.
2. Delete ScanGear.
When the Scanner Driver Uninstaller dialog box opens, click Execute.
When a confirmation appears, click Yes.
3. Complete uninstallation.
When all files are deleted, click Complete.
ScanGear is deleted.
Page top
Before Installing the ScanGear (Scanner Driver)
Page 327 of 334 pages
On-screen Manual > Scanning Guide > Updating the ScanGear (Scanner Driver) > Before Installing the ScanGear
(Scanner Driver)
Before Installing the ScanGear (Scanner Driver)
Check the following points before installing ScanGear (scanner driver). Check these also when you
cannot install ScanGear.
Machine Status
If the machine and computer are connected with a USB cable, disconnect the USB cable from the
computer.
Turn off the machine.
Computer Settings
Close all running applications.
In Windows 7 and Windows Vista, log on to an administrator account.
In Windows XP, log on as the administrator of the computer.
In Windows 2000, log on as a member of the Administrators group.
Note
If an older version of ScanGear is already installed, delete (uninstall) it beforehand.
See "Uninstalling the ScanGear (Scanner Driver) " for details.
Related Topic
Obtaining the Latest ScanGear (Scanner Driver)
Installing the ScanGear (Scanner Driver)
Page top
Installing the ScanGear (Scanner Driver)
Page 328 of 334 pages
On-screen Manual > Scanning Guide > Updating the ScanGear (Scanner Driver) > Installing the ScanGear (Scanner
Driver)
Installing the ScanGear (Scanner Driver)
Access our website via the Internet to download the latest ScanGear (scanner driver).
Follow these steps to install the downloaded ScanGear.
1. Turn off the machine.
Important
If you turn on the computer with the machine turned on, the Windows Plug and Play runs
automatically and the Found New Hardware (Windows XP and Windows 2000: Found New
Hardware Wizard) screen appears. In that case, click Cancel.
2. Double-click the icon of the downloaded file.
The installation program starts.
Note
In Windows 7 and Windows Vista, a confirmation or warning dialog box may appear while
installing, uninstalling or starting software.
Such dialog box appears when administrative rights are required to perform a task.
If you are logged on to an administrator account, click Continue or Allow (Yes in Windows 7) to
continue.
Some applications require administrator account to continue. If you are logged on to a
standard account, switch to an administrator account and start over.
3. In the Welcome screen, click Next.
4. Read and understand the License Agreement, then click Yes.
ScanGear installation starts.
5. When the Installation complete screen appears, click Complete.
A message prompting you to restart the computer may appear depending on your environment.
Restart the computer to complete the installation properly.
6. Connect the machine and computer with the supplied USB cable, then turn on the
machine.
The computer recognizes the machine.
ScanGear is installed.
Important
ScanGear can be downloaded for free. However, Internet connection fees apply.
Related Topic
Obtaining the Latest ScanGear (Scanner Driver)
Uninstalling the ScanGear (Scanner Driver)
Before Installing the ScanGear (Scanner Driver)
Page top
Bundled Applications
Page 329 of 334 pages
On-screen Manual > Scanning Guide > Bundled Applications
Bundled Applications
ArcSoft PhotoStudio
Page top
ArcSoft PhotoStudio
Page 330 of 334 pages
On-screen Manual > Scanning Guide > Bundled Applications > ArcSoft PhotoStudio
ArcSoft PhotoStudio
You can correct/enhance images imported from scanners and digital cameras.
For details, refer to the ArcSoft PhotoStudio manual.
You can access the ArcSoft website from Extras menu and obtain the manual.
Page top
About Inkjet Printer/Scanner/Fax Extended Survey Program
Page 331 of 334 pages
On-screen Manual > Scanning Guide > About Inkjet Printer/Scanner/Fax Extended Survey Program
About Inkjet Printer/Scanner/Fax Extended Survey Program
If you installed the Inkjet Printer/Scanner/Fax Extended Survey Program when installing software from the
Setup CD-ROM , a confirmation screen for sending the machine usage status opens after three months,
after six months, and then semiannually for four years.
Read the descriptions in the displayed screen and select one of the options below.
If you agree
Click Agree and follow the on-screen instructions. Information will be sent via the Internet. Once the
operation is completed, from the next time, information will be sent automatically without displaying the
confirmation screen.
Note
An Internet security warning screen may appear when sending information.
In that case, make sure that the program name is "IJPLMUI.exe" and allow to continue.
Deselect the Send automatically from the next time checkbox to open a confirmation screen
before sending the usage status from the next time too. See " Changing the confirmation screen
display setting " to set to send information automatically.
If you do not agree
Click Do not agree. The confirmation screen closes. The usage status will not be sent this time.
After three months, the confirmation screen for sending the usage status opens again.
To uninstall the Inkjet Printer/Scanner/Fax Extended Survey Program
To uninstall the Inkjet Printer/Scanner/Fax Extended Survey Program, click Uninstall and follow the onscreen instructions.
Changing the confirmation screen display setting
1. From the Start menu, navigate as follows:
Windows 7/Windows Vista:
From the Start menu, select Control Panel > Uninstall a program.
Windows XP:
From the Start menu, select Control Panel > Add or Remove Programs.
Windows 2000:
From the Start menu, select Settings > Control Panel > Add/Remove Programs.
Note
About Inkjet Printer/Scanner/Fax Extended Survey Program
Page 332 of 334 pages
In Windows 7 and Windows Vista, a confirmation or warning dialog box may appear while
installing, uninstalling or starting software.
Such dialog box appears when administrative rights are required to perform a task.
If you are logged on to an administrator account, click Continue or Allow (Yes in Windows 7)
to continue.
2. Select Canon Inkjet Printer/Scanner/Fax Extended Survey Program.
3. Select Change.
Follow the on-screen instructions and select Yes to open a confirmation screen before sending
the usage status from the next time.
Select No to send the usage status automatically.
Note
Select Uninstall (Windows XP and Windows 2000: Delete) to delete the Inkjet Printer/
Scanner/Fax Extended Survey Program. Follow the on-screen instructions to complete.
Page top
About Solution Menu
Page 333 of 334 pages
On-screen Manual > About Solution Menu
About Solution Menu
Quick Shortcut!! Solution Menu
Solution Menu is a menu window that provides quick access from your desktop to Canon applications,
manuals, and online product information.
Important
The number and types of buttons displayed in the window may vary depending on your product and
region.
Starting Solution Menu
Click Here: Solution Menu
To start from desktop, see below.
Double-click the Canon Solution Menu icon on the desktop. Alternatively, from the Start menu, select (All)
Programs > Canon Utilities > Solution Menu > Solution Menu.
From the next time, Solution Menu starts when Windows starts.
If the Start Solution Menu when Windows starts checkbox at the bottom left of the window is not selected,
Solution Menu does not start when Windows starts.
Note
Solution Menu will start automatically when you install it using the Setup CD-ROM that
accompanies the machine.
Changing the Window Size
Click
(window size: large) or
(large or small).
(window size: small) on the title bar to change the window size
Solution Menu opens with the last used window size next time it is started.
When window size is small
About Solution Menu
Page 334 of 334 pages
Starting an Application
1. Point to a button on the window to display the description of each application.
2. By clicking each button, the introduced application starts.
Follow the same steps to view the manuals or online product information.
Important
Internet connection is required to access the online information. Internet connection fees apply.
Exiting Solution Menu
Click
(Close) on the title bar.
Restriction on Use of Solution Menu
This software is subject to the following restriction. Keep this point in mind when using it.
All icons of the installed applications that support Solution Menu are displayed in the window. After
the installation, you cannot rearrange the icons or delete only the icons.
Page top