1
Installation and Quick Configuration Guide
Installation
DVR Installation
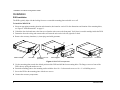
The DVR typically ships with the locking front cover on and the mounting plate and cable cover off.
To install the MX4 DVR:
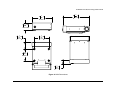
1 Select an appropriate mounting location and orientation, horizontal or vertical. For the dimensions and location of the mounting holes,
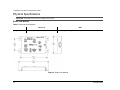
see Figure 6 “MX4 Dimensions” on page 11.
2 Unlock the door lock and remove the front cover from the unit to access the front panel. Verify there is a media cartridge inside the DVR.
3 Determine where the wiring and camera cables will enter the unit: on the left side, right side or back.
4 Remove the necessary knockout (s), insert plugs and cable grommets.
Media cartridge
Door lock
Locking front cover
(reversible)
Mounting plate
Cable cover
Cable grommets
Knockouts
Figure 3 MX4 DVR components
5 Use the mounting plate to mark the desired position of the DVR and drill the four mounting holes. The flange secures to front of the
DVR, the tray spring tab attaches to rear.
6 Fasten the mounting plate to the mounting surface with the four #10 × ¾ sheet metal screws or #10 × 1" self-drilling screws.
7 Secure the DVR to the mounting plate with the two screws.
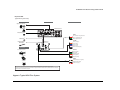
8 Connect the necessary components.
6
700-0077 R002