1
. English
. Deutsch
. Frangais
. Svenska
. Espafrol
.ltaliano
.+t
. Pyccrnfr
www.orphancameras.com
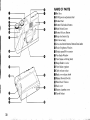
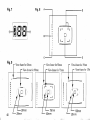
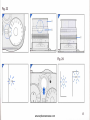
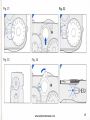
NAME OF PARTS
OHot Shoe
@ ISO/Exposure adjustmentdial
@ shutter Dial
@ Shutter Dial unlock button
@ vain Switch Lever
@ Shutter ReleaseButton
Strap attachment clip
Self-timer lamp
Lens attachment/removal button/Lens index
Finder BrightnessWindow
Display panel/Film counter
Vier-finder Window
View frame switching lever
Rangefinder window
@ View finder eyepiece
@ CaUtereleasesocket
@ Back cover releaseknob
@Manual Rewind Switch
@fim Check Window
@ Back cover
@ Battery chamber cover
@ Tripod Socket
@
@
@
@
@
@
@
@
30
i:;; r;:.r
i;.1; ., ili.]!j!r,f;:
Bezeichnungder
D6signation
Delarnasnamn
Gerdteteile
Q Blitzschuh
@ tSO-leetlchtungseinstellring
@ VerschluBzeiten-Einstellring
@ Veniegelungsknopffiir
lfl crlre d'allumage
@ Bague de r6glage ISO/exposition
@ Bague de vitessed'obturation
@ Bouton de d6blocagede la bague
des vitesses
@Levier d'interrupteur principal
Q Blixtutlosare
@ ISO/exponeringsratt
@ Slutaratt
@ Upplisningsknapp fcir slutarratten
@ Huvudomkopplare
@Avtryckare
@ Klamma fcir remfdste
@
@
@
@
@
Verschlu8zeiten-Einstellring
Hauptschalter-Hebel
Ausl<iser
Befestigung fiir Tragriemen
Anzeige fiir Selbstausliiser
Knopf zum Anbringen/Abnehmen des
Objektivs/Objektiv-Index
@ Sucher-Helligkeit
@ Fli.issigkristall-Display/Bildziihlwerk
@ Sucherfenster
@ Sucherrahmen-Umschalthebel
@Entfernungsmesserfenster
@ Sucherokular
@ Drahtausloser-AnschluB
@ Ruckwandverriegelung
@ Taste fiir manuell gesteuerte
Rtickspulung
@ Filmfenster
@ Ruckwand
@ Batteriefachdeckel
@ Stativgewinde
D6clencheur
Oeittet d'attache de courroie
Voyant du retardateur
Bouton de fixation/d6pose
d'objectif/Repbre d'objectif
(E Illuminateur du viseur
@ Panneau d'affichage/Compteur de
vues
@ FenOtrede viseur
@ Levier de s6lection de cadre du
viseur
@Fen0tre de t6l6mdtre
@ Oculaire du viseur
@ Prise de d6clencheursouple
(D Bouton de lib6ration du dos
@ Bouton de r6embobinage manuel
@ Fen€tre d'indentification de la
pellicule
@ Porte du boitier pellicule
@
@
@
@
@ Couvercle de pile
@ Embase de tr6pied
www.orphancameras.com
G) Sjalvutldsarlampa
@ OU.lettivfaste/frigcirningsknapp/
objektivindex
@ I-jusstyrka scikare
@ eitAsmrdFilmriikneverk
@ Scikare
@ Ramens omkopplingsspak
@ Avstindsmdtarruta
Scikarensokular
Avtryckarens vajerfattning
Bakstycketsfrigcirningsknapp
Knapp fcir manuell returspolning
Filmkontrollruta
@ Bakstycke
@ Batterilock
@ Stativfriste
@
@
@
@
(D
31
..,'w
\)5
Simplified steps in taking pictures
* For more detailed information, see the Figure numbers given
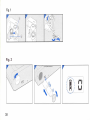
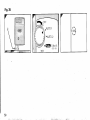
Insertins the batteries(Fis. 2)
A t t i l c h i r i et h e l e n st F i e . 3 )
Open th6 back cover"@ and insert the film roll, then close the
back cover.(Fig. l3)
Turn main switch lever @ and set the index to "S". (Fig. 5)
Turn shutterdi4l @ to set the exposuremode to'AE". (Fig. 23)
Pull out hood @) and set the fbcus viilue (b). After determining the
picture structure,turn fbcus ring Q to place the camerain shalp
focus. (Fis. 17 and 23)
Z Pressthe ihutter releasebutton @ partially down. Shutter speecl
will now be displayed inside the finder. Now press the shutter
releasebutton all the way down to take the picture. (Fig 23)
34
www.orphancameras.com
Vereinfachte Vorgehensweise beim Aufnehmen
;t Fijr weitere Informationen sich auf die angegebenen
Abbildungsnummernbeziehen.
Einlegender Batterien(Fig. 2)
Einsetzen
d e sO b j e k t i v et F i g . . l )
Die Rtickwandoffnen @. Oanndie Filmspuleeinlegenund die
Rtickwandwieder schlieBen(Fis. l3).
V Den Hebel des Hauptschalters@ drehen, dann <lenIndex auf
"S" stellen(Fie. 5).
V D e n V e r s c h l l B z e i t e n - E i n s t e l l r i n g@ d r e h e n , u m d e n
Belichtungsmodusauf "AE" ginzustellen(Fig. 23).
Y Die Gegenlichtblende G) herausziehen,dann den
Schdrfeneinstellwert (b) fixieren. Nach dem Festlegen des
Bildausschnittsden SchdrfeneinstellringQl drehen,um das Bild
(Fis. l7 und 23).
scharfzustellen
V D e n A u s l d s e r k n o p f @ z u r H i i l f t e n i e d e r d r t i c k e n .D i e
V e r s c h l u B z e iw
t i r d n u n i m S u c h e r a n g e z e i g t .U m d a s B i l d
aufzunehmen,den Ausldserknopf nun vollkommen
niederdriicken(Fi e. 23)
a^\
a^l
\Y,
Etapes simplifi6es de la prise de vues
* Pour des informationsd6taill6es,consultezles num6rosde figure
indiqu6s.
T Metiez les piles en place. (Fig. 2)
V F i x e t l ' o b i e c r i lr' F
. ig.3.1
V (hvrez le dos @, initallez un rouleaude film et refermezle dos.
(Fig. l3)
Tournezle levier d'interrupteurprincipal @ et r6glez son repdre
sur "S". (Fig. -5)
Tournezla baguede vitessed'obturation @ pour r6gler le mode
d'expositione'AE" (expositionautomatique).(Fig. 23)
D6posez le paresoleil l.f et r6glez la valeur de diaphragme ($.
Apris lvoir composdl'image.lournezla baguede miseuu poinr
c p ( ) u ro b t e n i ru n e i m a g en e t t e .( F i g . l 7 e r 2 3 t
Acfionnez le d6clencheui@ i mi-couise.La vitessed'obturation
s'afllche alors dans le viseur.Appuyez ensuite i fond sur le
d6clencheurpour prendrela photo. (Fig 23)
F<irenklade steg att ta bilder.
t Fcir mera detaljeradinfbrmation, se bilden vars nummer ges.
[/ Iszittningav batterier (Fig. 2)
V Att sdra fast objektivet (Fig. 3)
V 6ppna bakstycket@ och lidda en frlm, srdngsedanbakstycket
ordentligt.(Fig. l3)
Vrid pi huvudomkopplaren
@ och strillin indexpi "S". (Fig. 5)
Vrid pi slutarratten€) for att stdltain exponeringsfunktionpi
'AE"
tFis.2-1).
V Dra ut klpan 4 och stiill in bliindarviirdet @. Efter att ha
komponerat bilden, vrid pir skiirpeinstiillningen(c-)for att sHlla
i n s k r i r p a nt F i g . l 7 o c h 2 . 3 1 .
Z Tryck'in avtryckaren@ halvvrigs.Slutatticlenkommer nu att
visas i scjkarcn.Tryck nu ner avtryckarenhelt for att kniippa
b i l d e n( F i g . 2 3 ) .
www.orphancameras.com
35
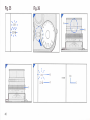
Fi g .2
www.orphancameras.com
38
Fi g.4
Fig.3
H il
I
(1)
I
(2)
Fis.6
Fig.5
\.:h(t' \\\ o
www.orphancameras.com
39
Fig.7
F i g .8
"+H+=
r---l
] ;1
Fis.9
1-1
1:
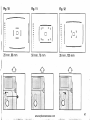
View-frame for 28mm
View-frame for 90mm
90mm
28mm
View-frame for 50mm
View-frame for 75mm
75mm
50mm
View-frame for 35mm
View-frame for l35mr
F i g .1 0
4000
2000
1000
500
25C
1?5t
00
t0
F i g .1 1
{000
2000
I 000
500
250
t25,
60
30
I!
!
i-l
lrrl
8
Fig.12
-I
r:
E
-n
t-
t/
50mm, 75 mm
G
;.'
^
,,
l"r"r
rooo
ll
oEn
;illl
i:ll
;ll
[,J
,;
I
t/
28 mm, 90 mm
ilil ll
3 5 m m , 1 3 5m m
^
www.orphancameras.com
.
F i g .1 3
F i g .1 4
E]
F i g .1 5
F i g .1 7
F i g .1 6
F i g .1 8
www.orphancameras.com
Fi g.20
F i g .1 9
Fi g.22
F i g .2 1
P ' )
-tzl
-)
N
Fig.23
Fi g.24
1
www.orphancameras.com
45
Fig.25
Fig.26
_250 _
(tlz'
- r25,-
I
-_ 250__ _(B)
Izs, -(a)
Fig.27
Fis.29
Fis.28
2
2 8
3 3,s
0.E I t2
4
5 b l0
t5 2 3
16 ll
t6 ll
8{
2 {8ll
5.6
8{
E
l.,Il"'
2 {8ll
l0
www.orphancameras.com
l0
o
Fis.30
1.2
- : . + t_ tl
o
J.]-
(r0 E V)
(r0 E V )
trr
+Exp o su r e
Compensation
48
-Ex p o s ure
Compensation
Fis.32
Fig.31
"nt
I
\\
og'
00
''/,
c,/f
Fig.33
Fig.34
www.orphancameras.com
49
Fig.35
e)
. (GUID G No18
0 s o 10 0 )
50
-.
-il
.11;i*.'r.;i,l
,,*l*;*.rii#f;r,,i:
..r.ri,L.,, .,r.,.d&#*
(2)Low power (Battery power symbol is 2/3 blank, 1/3 black)' Time
to replacethe battery.
;o* p;*ei tr/'3 black portion.ofBattery qoy"t tllb:l
t:fi{"
' 'blinks,
then turns completely blank)' No more prctures can De
taken.
power
Wnen the Battery power symbol is 213blank' enough
remains to finish a ioll of fiim before replacing the battery'
*
How to use the straP (Fig.1)
'
Damase protection cover G) fits onio strap attachment clip @
clasp to
lnr.ti?itting @ between the metal clasp and squeezethe
.*ounO it, tfien passthrough the opening in the strap atlachment
and
.iiile,,^.tt uv dtt*ing the"strapthioughlhe ring in the fitting
the hole on the damagepreventlon cover'
p;;trusiofi on the plastic piece of the strap for easeof
;*U;;ih"
p u s h i n gi h e M a n u a lR e w i n dS w i t c h@ '
Note on replacing batterY
tfr" uutt".l,is, make sure to tum the power switch
;-wh;;-t;p[.ing
OFF first.
* Wf"t"n replacing the batteries with a film loaded in the camera'
d o i t q u i i k l y ( w i t h i n3 0 s e c o n d s ) .
2. Attaching and removing lenses
lensesthat can be used with this camera
Th"
"t.h"tg""bte
M-liexanon Lenses of the KM mount type that cre
ui. ttt"
made bv Konica. Konica will not guarantee correct
are
iun.tioning and performance if lenses other than these
for
ur"O. foni"u wiil accept no responsibility wiatsoever
and malfunctions thatbccur from the use of any
;;;g;
other lenses.
1.Loadingthe BatterY(Fig'2)
This cameraw-ill not operatewithout a battery loaded'
the main switch first before installing new batteries or
* i*"
"tt old ones.
replacing
Z i?il.; t;"in or similar object into the groove on the battery
to
compartment cover @ and-turn in the direction of the arow
ooen the batterycompaflmentcover.
Z i'Gn ift" Uun.ii.t so that they are correctly placed with positive
O terminali in the directions indicated by the
O;;,i
";gative
ifrside the battery compartment'.thenclose the battery
Oiagram
compartmentcover into its originalposition- .
*" If tlie batteries are incorreitly inserted into the battery
not only will the camera fail to function correctly'
;;;p;ft.";t,
such incorrect placement muy damage the caqera'
V i;;, main swiich lever@ to turn po*eron (Fig 5) and check
display panel @. If the black battery mark is on then the battenes
are fullv charged'
V t J s et * o . r V l i t h i u mb a t t e r i e tsC R 2 ) .
(l)Adequate power supply (Battery power symbol is black)'
52
Cautionsin removing and attaching lenses
or
First turn off the camera's nllin switch betorc removtng
attaching lenses.
the
* When rJmoving or attaching a lens, make sure that you hold
not
-"in body of linses, otherwise remove and attachmentmay
be correct.
to ensure that no dust or dirt gets into the body of the
* S" .*"i"i
iftat you do not touch the suiface of the lens or the
G".
"tO inside. Do not touch the lens or get finger prints on it in
"tttuitt
ih" tafest way is to keep the lens cap on when removing
;;t1;;.
or attachinglenses.
when
* Avoid any.-.ou.."s of strong ligh^t,such.as sunlight
not
i"-ouing or attaching lenses with film in the camera' Do
removed'
lens
the
with
sunlight
leave thJcamera in stiong
*
www.orphancameras.com
Attaching
the lens (Fig. 3)
^
l/ Hold the main body section of the lens (€), match the indices on
the lens (red dot) with the lens indices on the camera @. press
the lens on gently and then turn clockwise until you hear a click.
Then turn until the lens stops.
* Before attaching a lens, remove the lens's rear cap and the
g l m e r a ' sb o d y c a p .
* If the lens will not go on the camera,or if the index is out of line
and the lens is on, the lens cannot lock in place.
a rens(Fig.4)
lemovins
the lens by the main body section,pressthe removal
f
button
{old
@ on rhe camera. and turn the lens counterclockwise until it
stgpq.Then remove it by pulling it forward.
* The lens will come off when the lens and camerabody indices
are matched.
* After removing.the lens,-don't forget to protect ,!:
the lens by attaching the lens cap and the rear cap ro :-"-q::
the lens ll9
and
the body cap to the camera.
3.Operatingthe main switch lever
operating the main switch lever @ turns the .o..t1
o.l
1lq
o{31d allows switching-to consecutive photography!9y,"_t
(Fig 6) and
selfLimer photography (Fig. 34).
* Operate_
the camera after turning the lever stopping at the position
where the click sound is heard.
(Fig.5)
Powgr,gnan! off
.L:_..d,,
Jurning
, v Turn rnuin switch Iever@ set the index to position
"S'^(oneframe photography) and camera power will be on. Normat
operation of the camera is in this position.
* After taking pictures, or when the camera is not going to be
used for a long time after taking pictures,turn power off so that
the shutter will not be releasedaccidentally.
* When power is turned ofTonly the battery mark will be lit in the
display panel. Red mark can no longer be seen.
Operations
photography
during
consecutive
(Fiq. 6)
7 itrnthe main switch lever so that the index is on ,,C". press and
consecutiverv'
l:il:,i",T:.,fi!"ff"tTt:,xPo;;ffiiJrtJ.'res
* Maximum piciure-frahe speeil is three frames per second.
However, frime speedwill .hung" depending on shutter speed,
sensitivity of the film being used and batterylevel.
4. Display
Panel (Fig. 7)
The-Suti"r'
diagram shows all crystil displays in the ..on,,stare.
power
Symboi
@,
6 Fii; counrer
Liquid Grystal Display
rrtt.'.u-".u
uses rhe liquid crysral in the Display panel.
* iri" r-co display daikens uihigh t"-p..atures, and the responss
is slower at lbw'temperatures.
* ine I_Cp returns totorrect operating characteristics at normal
temperatures.
5. Using the viewfinder (Fig.8)
ir'rJ,ii.u,o, insiclerhc rinderlights up when power goesoN and
;h;;'i;.
shu*er retease.,utton ffii fi#;';#;;'rf;""1"'oy
oo*n
* rheredmark
inp6wer
gN.Iut".,..,
@canbeseen
inthe
,h- ::JHff:n?ljfll[;1x..tiTlil"g,:'.#t]j,3ffij:i,:?:1,,1:
* when power is on' the film counter and the battery morL
mark in
i;;i;rr
inside
panel
@ will be lighted
_ display
'
ro the positionshown
i z iid;;iff;;;#;;;;'"r
the.power
witl
be off. Stopthe lever *n"r irt?r'i; ff3tlTl
!
Posttton'
I
I
the finder will go off. when the shutter button is
..r;.rr., n--..^,r
;r.,,:,
r:^r^+
partiallv
pressed'
it
will -re-light'
* Thecliagram
showsall da?ain lightedstate'
53
i
ff
rf
A. LED indicators (displays shutter speed or exposure warning).
-+ SeeFig. 23 and24.
B. Battery charged indicator (When the batteries used in the
dedicaied flash are fully charged, "125 +" lights up. -+ See Fig.
35.
C. Exposure control mark (The +/- sign lights up while the exposure
is being adjusted).-+ See Fig. 30.
D. View frame -> See Fig. 9.
E. Focus frame (range for setting focus). --> See Fig. 17.
Fieldof view frame and lightmeter range
* This camera is equipped with a view-frame for 28mm, 35mm,
50mm,75mm,90mm, and 135mm lenses.
* The view frame changes depending on what lens is used (Fig.
9). Make sure the subject is within the view frame and then take
the picture.
* The view frame for each lens automatically adjusts parallax
(differences in viewing angle) during photography according to
the range at which the image is brought into focus.
* The lightmeter range for each lens is almost the same as the
diagram in Fig. 9 (blue dotted line).
Manually switching the view frame
* Operating the view-frame switching lever @ allows checks to
be made of the different photography ranges for each focal
distanceof each lens even without havine the lens attached.
* Pressing the view frame switching levei@ inward makes the
view frame (Fig. l0) used for 28mm and 90mm focal distances
appear.The lever in vertical position displays view frames for
50mm and 75mm (Fig. I l). Move the lever position toward the
outside to show view frames for 35mm and l35mm (Fig. 12).
Cautionsin regard to the shutter diaphragm
S The shutter diaphragm is a prccision-made product. Do not touch
it with your fingers and do not allow the tip of the film to touch
it or to strike againstit. Never operatethe shutter when the t'ilm
tip is on the shutter diaphragm.
$Wtren using a blower tb cle-anthe camera, do not apply the air
too strongly. This presentsthe possibility of bending or otherwise
damaging the shutter diaphragm. Do not use blowers fitted with
compressedair tanks.
T.Setting film sensitivity (Fig.15)
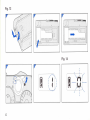
6. L o a d i ngt he F ilm ( F ig.1 3 )
Use 35mm (size 135) film in this camera.The camera will
automatically set film sensitivity (ISO25-5000) if DX code film is
loaded. If film without DX code is loaded, set the sensitivity
54
manually.(seeFie. 15)
Z Raisethe backlover releaseknob @and turn in the direction of
the arrow to open back cover @.
* After the covei is opened, return the back cover release knob @
t o i t s o r i g i n a lp o s i t i o n .
* Make sure that you do not touch the inside of the camera.
* When loading film for the first time, remove the "protective
sheet" that is in the camera.
7 Place a new roll of film in the film chamber. Draw out the tip of
the fllm. holdine the masazine in place.
mark inside the camera.
7 Draw ttre film tio as far it.repILV^tp
Close the Back cover firmlv.
F7 Turning on the main switch causesa motor sound to be heard
and at the same time the film to be wound automatically.
't When the main switch is on. Dressthe shutter releasebutton.
* When usine film that is not DX coded. tum on the main switch
then oressihe shutter releasebutton once.
7 rc tn6 film is wound correctly, a "1" will appear in the display
panel.
* If the film is not wound correctly, a "0" will be blinking in the
display panel (Fig. l4). Open the rear cover and reload the frlm.
Use when setting the sensitivity of film that does not have a DX
code or when you want to change to a sensitivity film that is different
from the DX code indicated.
www.orphancameras.com
Z Raise and turn the ISO/Exposure control dial @. set to the
sensitivity ofthe film being used and align the film sensitivity
indicator with the index.
Film
sensirivitycan be set in one-third stepsfrom 150-6 to 6400.
t
l9l W-hen-you want to return to automatic se-ttingfor the loading of
DX film set the index on the letters "DX".
* If the film that is loaded does not have a DX code and the ISO/
exposurecontrol dial is setto DX, all sensitivitiesfor film loaded
will be set to ISO100.
* That wilt be held until the film sensitivity is reser.
* If the film is set to the sensitivity that you want. the values will
be manually set even if DX coded film is used.
S.Switchingthe shutter dial (Fig.16)
The exposuremode oan be selectedin line with the photography
plrpose.
l/ Trsm shutter dial @ to switch exposure mode or to select manual
shutter speed.
* When turning the dial, stop at the position where a click sound
is heard.
* Shutter dial is locked when set to 'AE" or'AEL" and the dial
will not tum to a position other than AE and AEL. To unlock the
dial, press and hold the "shutter dial unlock button @' and turn
the shutter dial.
* The modes shown below can be selected. For more detailed
information, check the description of the particular mode.
(l)Focus priority AE photography -+ See FrE. n.
(!)Manual exposurephotography -+ See Fig-.26
(3)AE lock photography -+ See Fig. 31
(4)Bulb photography -+ See Fig. 32
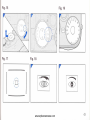
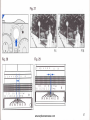
9 . S h a rpFo c us( F ig.17)
Sharp focusing is performed in the l-_l section at the center of the
finder (Fig. l7). There are two methods of focusing. Use the method
that is easiestfor the subjecrbeing phorographed.
To put picture in focus, place eye aicentei of view finder eyepiece
@ and look into finder.
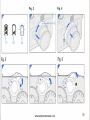
@Dual image merging method (Fig.1B)
This is the method most commonly used.When taking pictures of
people and focusing on the subjects'eyes,look into the finder and
move the lens focus rlng until the dual images in l--l (Fig. lg-l)
become one (Fig. l8-2).
@Verticalmerging method (Fig.19)
When taki.ng pictures of the edges of a subject or vertical objects
such as buildingsor towers, and the subject is jutting out vertically
from the l__.1as shown in Fig. l9- 1, turn the lCnsfoius ring so thit
they are togetherin the I
las shown in Fig. l9-2.
1 0 .U n l o a d i n gt h e F i l m ( F i s . 2 0 )
Z When the loaded lilrn reaches the end, it is automatically
rewound.
7 The rewind will automatically stop when it is complete and the
film counter will show "0" blinking. Open the baik cover and
remove the film.
* Do not remove film in any location that is exposed to direct
sunlight.
* We recommend that film be developed as soon as possible after
it has been exoosed.
* Film can be rewound with the tip out. Immediately before the
film has completed rewind and after the "1" liehti in the film
c o u n t e r .t h e f i l m w i l l s t o p f o r a b o u r o n e s e c o n d w i t h . . - - "
displayed (Fig. 2l). Ifyou open the back cover now, the film tip
will remain out. Make sure that you don't make a mistake and
reuse that film asain.
* Film rewinds can be paused temporarily. If the main switch lever
is turned while the rewind is in operation,the power will go off
and the rewind will stop. Turn the power on again. This is an
excellent function to use when taking pictures at places like
wedding ceremonies where you don't want the rewind noise
heard (you want to pause the rewind).
55
Manual Rewind Gig.22l
To rewind the film manually (forced rewind) before the roll is
finished.Use the Strap Ring tip to pressthe Manual Rewind Switch
@ . f n e f i l m w i l l b e g i nt o r e w i n d .
*Bff3icffiottrffiryfi'b
1 2 .Ma n ual exposurephotography(Fi g.26)
11 .Fo cu spr ior it y A E photo g ra p h y(F i g .2 3 )
This is the mode for automatically setting a designatedF stop and
changing shutter speed.This is an excellent features for use in
photography where you are taking depth of field into consideration
becauseol the F stop held at a fixed point.
V Tumpower on tFig. 5 r, turn shutter dial @ and set the exposure
mode to AE.
7 pultout the lens hood @, turn the focus ring @ and set to the Fstoo value.
* Shutter soeed is set automaticallv to a correct speed in line with
the focus that hasbeenset.
Z Look throughthe finder @. turn focus ring @ and adjustfocus.
7 Pressthe shutter releasebutton @ down halfway to light the
indictor inside the flnder. The indicator showing automatically
set shutter speed(correct value) will now light.
* The light meter will stay on for about 15 secondsand the power
will then go off automatically and the indicators will go off. To
light them again pressthe shutterbutton down halfway.
* The AE lock can also be operated. See Fig. 31.
Z Pressthe Shutter ReleaseButton all the way down to take the
oicture. The film will advanceone frame.
* If the shutter speedshould go beyond the linked range (correct
value) the LED indicator "4" or "4000" will rapidly blink (Fig.
24). Change the focus value at this time.
l) lf "4" is blinking rapidly, this is a warning that the camerais
outside the low luminosity linked range. Turn the focus to a
lower value. If the shutter speedis slower than l/2 seconds
within the linked range. "4" witl slowly blink.
56
2) When "4000" is blinking rapidly, it is a warning that the
camera is outside the highly luminosity linked range. Turn
the fbcus rins to a hisher number.
* When two link-edshutier speedsare lighted steady on, that
indicates that the shutter speed is between the two indications
(Fie.25).
This is the mode that allows the combination of shutter speedand
focus to be set at any level desired. This also makes it easier to
intentionallvraiseor louer lhe exposuresetting.
V T u r n p o * e , o n a n d t u r n t h e s h u t t e rd i a l @ t o s e t t h e s h u t t e r
speedfor picture-taking to the index value.
* When the shutter dial is locked, press and hold the shutter dial
unlock button @ and turn the shutter dial.
V putl out the lenihood @, turn the fbcus ring @ and set to the Fstoo value.
V Lo;k through the finder @, turn focus ring @ and adjust focus.
Y Pressthe shutterhutton down halfl'ay to light the display inside
the finder.^The set shutter speed ($) will light.
* Indicator (9) will not be on steady but will be blinking, indicating
the correct shutter speed for the focus and film sensitivity.
However, pictures can be taken in manual photography at the
focus value and shutter speed(1) set.
* rlyou want to take pictures with the settings on the correct value
€), turn the focus ring or shutter dial.to make both indications
the same.When the light stateis at (9, you can take pictures at
the correct exposure.
V Pressthe Shuiter Release Button all the way down to take the
oicture. The film will advanceon frame.
* if the set shutter soeed and correct value are slower than onehalf second.the LilD indicator inside the finder will be on "4"
and blinking slowly.
* If the "4" or "4000" is blinking rapidly, this is a warning that the
shutter speedis outside the linked range. If you want to set it to
the correct value, change the focus value.
www.orphancameras.com
* In.manual exposure,you can shift consciously the indicator
blinking on and off or steady on to make the exposure either
under or over to take the kind of picture desired.
ffi u"ahcedInstrudti6fit*
13.Depth of Field
When focusing on a certain subject, there is an area both in front
and behind the subjectthat can be held in focus.This rangeis called
the.depth of field. When the range is wide it is a deep defth of field
andwhen the^rangeis narrow it is a shallow depth of field. Depth of
field has the followins characteristics
( l)The higher the F v:aluethe deeper the depth of field, the lower
the F value the shallower the depth of field.
(2)At the same F value, the shorter the focirl length of the lens. the
deeper.thedepthof field. and likewise. the lonfer
- the fbcal length
of the lens. the shallower the depth of field.
(3)The farther the distance from the subject. the deeperthe depth
of field and the shorter the distance from the^subiect.ihe
shallower the depth of field.
(4)From.the p-ositionat which the subject is in focus, the depth of
fleld is shallower to the rear and deeper to the front.
* Fig.27 is a test photograph showing-how
depth offield works.
Depth of Field Checking
Therange. for depth of field can be read by the graduations for
d.epthof field that are on every lens. The figureslowed on both
sides.of the lens range/F index are the depthbf field graduations.
The depth of field graduationsare written in relation-io the ranse
graduationsso that the depth range can generally be read from t[e
distancegraduations.
How to read depth of field graduations
tFis.28)
Say, lbr example, we are taking pictures with a 50mm/F2 lens and
range set to 5 meters and F stop set to F8. When we read the ranse
graduationslwirhin rhe"8" rangelhat is on both sidesof the indei.y
that coffespondsto F8 at this time, the range is about 3.4 meters to
about^9.7metersand subjectswithin that range will generally be in
clear focus.
1 4 .In fra re dphotography(Fi g.29)
An offset in lbcus in infiared photography must be compensated
for becausethe positions at which the subie'ctwill be in fbcus under
in.frrrred
light and under visible light are different.
N/ Moye the distance at which the subiect is in focus to the red line
(inl'raredline) nexr to lhe index.
If the focus results are 5 meters,for example, move the number
"5" on the lens distancescaleto the infrared line index oosition.
* Infrared photography requires the use of infrared film and filters.
For more detailed information, see the instructions that
accompany infrared film.
* The 90mm/F2.8 KM rnount type M-Hexanon lens has no infiared
index becauseof the subject depth of field eraduations. For
more detailed information, see the instructiois that come with
the 90mm/F2.8 lens.
15. Exposurecompensationphotography
lncorrect exposuremay result when you snap the shutter in taking
pictures against backlight or extreme difl'erencesin brightnesi
between the main subject and the background.At those times,
compensatefor exposure.There are two methods of exposure
compensation(seeFigs. 30 and 3l).
1) Using the exposurecompensationdial (Fig.30)
In both focus priority AE photography and manual exposure
photography, the standard values set for exposure compensation
are shown in the finder.
V Tum exposurecompensationdial @to set the index to the desired
exposurevalue. The exposurevalues can be set in stcps of onethird each from -2EV to +2EV.
57
* However, settings for'ISO6 film sensitivity are only from 0 to
+2EV and for ISO12 sensitivity settingsfrom -1 to +2EV.
V If the exposure compensation dial is set to another value than
"0", the +/- indicator inside the finder will light to show that
exposureis being compensated.
;t Ordinarily, the exposure composition dial is set to "0". After
taking pictures, don't forget to return the exposure compensation
dial to "0".
* Compensation in focus priority AE photography controls shutter
speeo.
* When a bright background occupies most of the picture such as
when a picture is taken against backlight, under a bright sky or
near a window, the people who are subjectswill be underexposed
and may appearas dark silhouettes.For pictures such as these,
increase the amount of exposure by placing compensation
between +1/3 to +2EV. You can also use this feature in taking
pictureswhere you want to intentionally increaseexposuresuch
as in giving a bright finish to the entire picture or the dark sections
of a building with strong contrastsbetween dark and light.
J< When you have a dark background such as people posed against
a black backdrop or when they are illuminated by a spotlight,
the people will be overexposedand appear whitish. For these
pictures, set the exposurecompensationto -ll3 to -2EV to reduce
exposure.You can use this feature in taking pictures where you
want to intentionally decreaseexposuresuch as in giving a dark
finish to the entire picture or creating a sccneof the background
with sky emphasized.
* When it is difficult to determine what the exposure should be,
we recommend taking a number of pictures with the exposure
quantity changed in one-third steps negative and positive for
each one.
2) Using the AE lock (Fig.31)
This is the method of exposure compensation used during focus
priority AE photography (Fig. 23). Use this when you want to fix
exposuresuch as when taking consecutivepictures at fixed exposure
of moving subjectsor subjectsagainstbacklight.
58
Z First turn the shutter dial @ to set the exposure mode on'AEL".
Then look through the finder, get the main subject inside the
focus frame and adiust the focus.
Z Pressing the shutter button down halfway makes the camera
record the exposure and places it in AE lock state.Now, with the
shutter button still pressed halfway down, decide the desired
picture composition, then take the picture by gently pushing the
shutterbutbn all the way down.
* The shutter will now remain at the recorded exposure no matter
how the background changes.
* The camera stays in AE lock state as long as the shutter button is
pressedhalfway down. Releasingthe finger holding the button
halfway down clears the AE lock.
;t When consecutivepictures are taken, and the AE lock is preset
to a certain subject brightness, pictures can be taken with the
same exposurewith no effect from changesin background.
* If the alarm for being outside the exposurelinked range is given
when an attempt is made to AE-lock the camera, it cannot be
AE-locked.
* This camera records shutter speed for AE lock mode. When the
focus is changed after AE-locking, the exposure quantity will
cnange.
1 6 .B u l b p hotography(Fi s.32)
Use this mode when taking pictures at shutter speedslonger than 1
second,such as of nighttime scenesor of the nighttime sky.
* To prevent the camera from shaking, mount it on a tripod or on
some other stable stand and use a commercially availablecable
release.
V Turn shutter dial @ and set the exposure mode to "B". Set the F
value, focus and take the picture. The shutter will be open and
the film exoosedas lons as the shutter button is held down.
* When the shutter dial iJ locked, press and hold the shutter dial
unlock button @ and turn the shutter dial.
www.orphancameras.com
- . * - , " ' . * . i . ..:,
,
G a b l er e l e a s e( F i g . 3 3 )
Use a commercially availablecable releaseby plugging it into cable
releasesocket@.
* When using a cable release,the AE lighrmeter cannot be used
in tle halfway-pressedshutterstate. pie-press
-then the shutterbutton
halfway down, check the exposure and
operate the cable
retease.
17.Self-timerMode (Fig.341
For best resultl. gle a tripod. Be sure to use a tripod to prevent the
cameralrom shakingthat causesblurred picture.
V Tum the main switch lever @ and set the index on the
\) mark.
7 Adiust the focus and pressihe shutter releasebutton. The self
ttmer startsand in about ten secondsthe shutter will release.
* The Self-timer lamp blinks for 7 seconds,then lights for 3
seconos.
* The lighrmeter will operate when the shutter releasebutton is
pressed,so stand behind the camera and press the shutter.
* If the exposuremode is set to .'B" tbutbt, the self_timercannot
operate.
* To cancel self-timer operation, turn the main switch lever to
s w i l c ht o a n o r h e p
r osition.
* When using the self-timer and taking pictures with the flash,
check to make sure the flash is completely charged before
pressingthe shutter button.
* After you've finished taking pictures with the self_timer, turn
the main swirch lever to return to either the .,OFF,,',,S," oi..C',
positions. If the main switch lever is left as is, then the next
picture-taking will be done by self-timer.
18.Flashphotography
We recommend
\sing the flash when taking pictures indoors or
outside at night.. FJashphotography is very efiective when taking
plc(uresof peoplein the shadeor when rhey are backlighted.
\ ) D o n o t d i s c h a r g et h e f l a s h c l o s e u p p e o p l e ' se y e si e s p e c i a l l y
young children). There is a danger otinldry to tle eye.
$Don't point a flash toward the driver of any vehicle and then
^ take a picture.That could causean accident.
\) Do not take.flash.pictures if the surfaceof the flash is dirty or if
it iscovered by th_ehand or some object. The high tempeiature
produced during flash photography iould causelJegrad'ationof
the flash or distortion oTcoloi. Eefore taking picturEs,clean off
the flash surfacesand make sure the flash is"not covered.
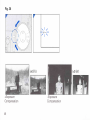
Taking pictures with the dedicated HX18W flash.
Selectioncan be made with the HX- I 8W of either automatic lightcontr()lphotographyor lull-fl ush photographv.
Flash attachmentsother than those in thi packaee,such as the HX_
18W dedicatedflash, may be purchasedjepar,riely.
1) Auto.malic li g ht-co ntrol photo g ra phy/focus
priority AE photography (Fig.3S)_
Z Loosen the shoe-lock-screw@ on thJ flash and push the HX_
18W onto the camera's hot shoe $ all the way until it stops.
Tighten the shoe-lock-screwto hold the flash in place.
* Don't use anything but the shoe-lock-screwto trota the flash in
Dlace.
7 Turn camera power on, turn the flash's rotary switch to set the
index to AUTO- | or AUTO-2 and adiust lens focus. Ser rhe
c a m e r a ' ss h u t t e rd i u l t o " A E " o r ' A E L j '
* Decide whether to use AUTO- I or AUTO-2 accordins to the
sensitivity ofthe film being used and the fbcused distanie. For
more detailed information, see the instructions that come with
the flash.
* Focuspriority AE photography automatically sets shutter speed
to 1/125 second.
V rc the bauery is fully cha{ged, " 125+" will be lit up in the finder.
Focus the camera and take pictures.
Jr If the picture taking^modeis set ro consecutive picture-taking
check the f1a,shperformance on such points as'flash interva'i
before operating.
59
i
2 )A u t o m a t i c l i g h t a d i u s t p h o t o g r a p h y / m a n u a l
exposurephotography
( I )Select either AUTO- l or AUTO-2 the same as with focus priority
AE photography(Fig. 3-5).
(2)Look at the indications inside the finder and select the correct
shuttersDeed.
* The camera cannot be synchronized to a speed higher than 1/
125second.
(3)Check the flash indicator to make sure the battery is fully charged,
focus the cameraand take pictures.
* To select a focus other than AUTO-1 or AUTO-2, set the rotary
switch on the flash to "FULL". Decide what the correct focus
value is by using the formula below.
Others
Dedicatedaccessories(purchased
separately)
We have prepared a wide array of conversion lenses, flash
attachments and camera casesespecially for this camera' For more
detailed information, inquire at the store where you purchased this
camera.
Lenseswith adiustable view angle
* We also have prepared a variety of lenses with adjustable view
angle (+2, +1,0, -2 and -3 deopter)(purchasableseparately).
For more detailed information, inquire at the store where you
purchasedthis cumera.
value(F)=ffi""**#NI
correctaperture
* For guide numbers according to llhn sensitivity, see the flash
instructions.
Usingthe Konica HX-14(purchased
separatelyl
The HX-14 is operatedin basically the same way as the HX-18W.
* Automatic light adjustment can be used in the position A and
full-light emission flash can be used in the P. FULL positionHowever, the focus in automatic light adjustment photography
(positionA on the flash) is F4 with ISO 100.
* fhe full-charge indicator (I25 r) does not light inside the finder
when in position A.
Using a commerciallyavailableflash
(1)Set the shutter speedto 11125secondsor less.
(2)Setthe F value.
* Decide what the F value is bv consulting the instructions for the
flash.
60
www.orphancameras.com
Specifications
Camera Type
Formal
Lens mount
Shutter
Shutter speeds
Displav in viewfinder
: Direct metering, Auto exposure type,
Range finder 35 mm camera with
interchangeablelenses
24 x 36 mm (standard35 mm film)
: Bayonet Konica KM mount
: Digital-control vertical action electronic
metal blade focal plane shutter
: Auto; 16-l/4000 sec (continuous)
1 3 5 m m , w i t h i l l u m i n a r e db r i l - l hlr' r a m e
( p o s s i b l et o s w i r c h m a n u a l l y ) a n d
automaticpar.lll@ensation
=
Dishnce measuringmeter : Sp@
M a n u a l ;1 - l 1 4 0 0 0s e c( l T V s t e p )B
,
(Bulb)
Synchro
Exposure adjustment
Exposure metering
method
Exposurecoupling
range
Film sensitivity range
: Shutter speed,LED dot display indicator,
Flash ready signal (for dedicared
electronic flash), Exposure
compensation
signal.AE mode:'LEDdot
display indicates correct shutter speed,
Manual mode:LED dot displayindicates
correct shutter speed and expected
Hot shoe and Direct X contact.
Automatically set to 1/125 sec with
dedicated electronic flash at AE, mode.
Manually set to 1/125 sec and slower
shutter speedsnon-dedicatedelectronic
flash.
: Aperture priority AE, Manual exposure
and AE lock
: Center weighted TTL metering (SpD
used)
: (ISOl00, F2) EVI-EVl8
,.
nto"
Film transport
:Automatic film advance to first frame
(Motor-drive autoloading stafts when the
Back cover is closed an-dturn the Main
switch ON), auto wind after each frame,
auto rewind at end of roll with autorewind stop. Manual rewind feature
Self-timer
: Digital-controlled self-timer with a
duration of l0 sec, operation indicated
by LED. Once started.possiblero cancel
Filmcounter
:LCDpa@
Rewind: subtractivetype)
LCD panel
: Film counter,Battery check
Operation temperature : -10'C to +50'C
range
Battery life
: About 100 rolls (36-exposurefilm)
Power source
: Two lithium batteries(CR2.3V)
Size, weight
139.5x80x35mm
(5.4x3.
1x1.4"),-5609
Automatic settings (DX) from ISO 25
to ISO 5000
Galileo type finder. Field of vision; 85
% (at 3 m), Magnification; 0.6X.
Interactive distance;0.7 m--.
(19.8oz) withoutbatteries
Note: Specificationsand design subject to change without notice.
Above data basedon manufacturer'stests.
61
;r*!.1:
.
ll
I
:*r.{