1
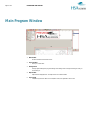
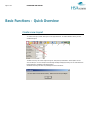
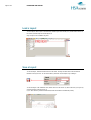
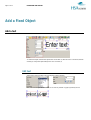
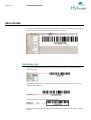
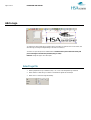
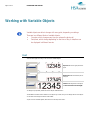
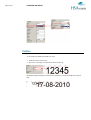
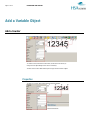
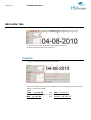
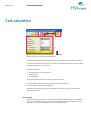
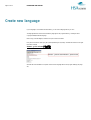
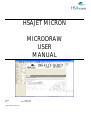
HSAJET MICRON MICRODRAW USER MANUAL Version: By: For MicroDraw version 1.07 25 Mar 2012 Torben Dam Jensen CONTENT Introduction............................................................................................................ 3 Main Program Window........................................................................................... 4 Basic Functions – Quick Overview........................................................................... 5 Working with Fixed Objects .................................................................................... 8 Add a Fixed Object ............................................................................................... 11 Add a text ........................................................................................................................................... 11 Add a barcode .................................................................................................................................... 12 Add a Logo ......................................................................................................................................... 14 Working with Variable Objects ............................................................................. 15 Add a Variable Object ........................................................................................... 17 Add a Counter .................................................................................................................................... 17 Add a date / time................................................................................................................................ 19 Edit Variable Fonts ............................................................................................... 22 Program Settings .................................................................................................. 24 Layout settings ..................................................................................................... 28 Cost calculation .................................................................................................... 31 Create new language ........................................................................................... 32 Support ................................................................................................................ 33 Page 3 of 33 MICRODRAW USER MANUAL Introduction Welcome to MicroDraw MicroDraw is the design software for the Micron printer. Important features: Multiple Language support Fully Unicode compatible and support for non-Western characters Variable Resolution Setting from 50 dpi to 600 dpi Cost calculation feature included Both linear and 2D barcodes supported Please also refer to the following documents Manual Content Micron Quick Guide Micron User manual Technician's guide to setting up this product Printer user manual. Page 4 of 33 MICRODRAW USER MANUAL Main Program Window 1. Main toolbar Access commands and submenu's here. 2. Layout window Place your content here. 3. Settings menu Change object settings and program settings here. Settings menu changes according to what you are working on. 4. Help window Help texts are displayed here. The help window is context sensitive. 5. Layout panel Load/Save layouts here. When not in load/save mode, the object list is shown here. Page 5 of 33 MICRODRAW USER MANUAL Basic Functions – Quick Overview Create a new Layout To create a new layout, select "new layout" in the upper left corner. You will be asked to save if you have modified the layout. The Micron memory can contain a layout of approx. 2500 pixel in print direction. This is equal to around 20cm in 300 dpi or 10 cm in 600 dpi. If the following message is displayed, the layout is too wide. Maximum length depends on variable font size and resolution. At all times a memory bar shows in percentage the load on the Micron. Page 6 of 33 MICRODRAW USER MANUAL Load a Layout To load a layout, select "open" in the tool bar(1). Select a layout from the list (2). A preview will be shown on the canvas (3).Press accept to load the layout (4) Only one layout can be edited at any time. Save a Layout To save the layout, select the red disc button in the toolbar. The layout will be saved under the default filename in the layout menu. For more information, please refer to the chapter "Layout settings". To save the layout under a different name, select "save as" in the tool bar (1). Enter a name for your layout (2) and press accept to save the layout (3) If your “Files” directory contains subdirectories, these will be listed in brackets like [subdir]. Page 7 of 33 MICRODRAW USER MANUAL Transfer to USB for Micron use Select the USB button to transfer the layout to a USB key. It is only possible to store ONE layout on the USB key, which is used for temporary data transport to the Micron. Before you can save, you must have selected the drive letter for the USB key. Insert the USB key and use Windows File Explorer to learn drive letter. This is done in settings menu. To save date and time to a USB, select the USB clock icon. The date/time is written as an absolute timestamp (+ 5 minutes by default to give you time to update) Insert the USB in the Micron printer to update date and time on the unit. Please refer to Micron user manual. Exit the program Select the exit button to terminate program. Page 8 of 33 MICRODRAW USER MANUAL Working with Fixed Objects Fixed objects are used to create the "static" part of your message Not changing with every print Placeable anywhere Can be stretched and rotated freely Resize / Rotate / Position You can resize the object in two ways. 1. Change the width and height in the menu. 2. Select a snap point, hold down the left mouse button and drag. You can rotate the object in two ways. 1. Enter an angle in the rotation box. 2. Place the cursor over the center snap point, hold down left mouse button and turn. TEXT objects rotate freely. Other fixed objects rotate in 90 degrees steps. You can position the text object in two ways. 1. Change the values in the boxes "Left" and "Top" 2. Place the cursor on the object, hold down left mouse button and drag Page 9 of 33 MICRODRAW USER MANUAL "Left" is the distance from the left border of the canvas to the object. "Top" is the distance from the top border of canvas to the object. Delete Object To delete an object, highlight the object and select the delete button, or press DEL on the keyboard. Page 10 of 33 MICRODRAW USER MANUAL Transparency By default the text is transparent. Uncheck the box "Transparent" in the object panel to make the background white in the text field. Transparent off Transparent on Page 11 of 33 MICRODRAW USER MANUAL Add a Fixed Object Add a text To create a text object, select the text object button in the toolbar (1). Place the cursor on the canvas, left click and drag (2). Change text object settings in the menu on the left (3). Edit text Select a font from the drop down menu and adjust font style if necessary. Next, enter a text string in the content box. You can enter any character or glyph supported by the font. Page 12 of 33 MICRODRAW USER MANUAL Add a barcode To create a barcode object, select the barcode object button in the toolbar (1). Place the cursor on the canvas, left click and drag (2). Change text object settings in the menu on the left (3). Symbology type Select a barcode symbology from the drop down menu. MicroDraw allows you to use almost every type of barcode symbology. Select human readable to show numbers below the barcode. Select a font from the drop down menu and adjust font style if necessary. Adjust width of side frame and top/bottom frame if necessary. With some barcode types, composite mode is possible which allows a 2D barcode to be printed on a linear barcode. Page 13 of 33 MICRODRAW USER MANUAL Select a composite mode and enter content of the 2D barcode in the box "composite text" Composite mode must be set to A for EAN8, EAN13, UPCA, UPCE, or GS1 DataBar barcodes,. Composite mode must be set to C for EAN/UCC-128 barcodes. Notice that in some cases, you can use special codes in the barcode content. Known as ESCAPE CODES, these typically are \x where “x” is a character. Example for GS1 structured DataMatrix code To create a GS1 structured DataMatrix code, enter identifiers and data directly after each other, and put the special escape code \F first, and after each variable length data – except the last last. Thus, the string \F011234567890123717110507 Will encode (01)12345678901237(17)110517 Finally also make sure that you have selected “GS1” under “Structure”, as GS1 isn’t the only way to encode DataMatrix. Page 14 of 33 MICRODRAW USER MANUAL Add a Logo To create a logo object, select the logo object button in the toolbar (1). Place the cursor on the canvas, left click and drag (2). Change text object settings in the menu on the left (3). The micron can print 300 dpi in the vertical direction. This means that a picture should be exactly 150 pixel in the height to fit within the printhead (using no resize). Maximum image size approx 150 x 2400 pixel. Select logo file 1. Select a graphic file from your harddrive.(*.bmp, *.ico, *.emf, *vmf) HSA systems logo is default. 2. Select "stretch" to resize the logo. If Stretch is unchecked the original size will be kept. 3. Select "mirror" to mirror the image horizontally. Page 15 of 33 MICRODRAW USER MANUAL Working with Variable Objects Variable objects are able to change with every print, depending on settings. There are two different kinds of variable objects: Counters, which change every time you release the photo cell Date/time, which change depending on the time of day. A date/time can be displayed in different formats. Font There are three types of fonts you can use for the variable objects: T o c h a n g e T o c h Top font exists in the upper part of the layout Bottom font exists in the lower part of the layout Full font exists anywhere in the layout, and does not have to be full height. To change font properties, please refer to the chapter "edit fixed fonts". The variable font sizes are set to default on new layouts you create, but you can change them for each layout. You can also save change font sizes as new default. To pick a font for variable objects, select a font from the drop down menu. Page 16 of 33 MICRODRAW USER MANUAL Position You can position the variable horizontally in two ways. 1. Change the values in the box "Left". 2. Place cursor on the object, hold down left mouse button and drag By default the object is transparent. Uncheck the box "Transparent" to remove the background in the text field. Page 17 of 33 MICRODRAW USER MANUAL Add a Variable Object Add a Counter To create a counter, select the counter button (1) and click on the canvas (2). Change counter object settings in the menu on the left (3). The size of the counter is determined by the font type and the number of digits. Properties To setup your counter, select it and adjust the following settings. Page 18 of 33 MICRODRAW USER MANUAL Setting What it does Current Current counter value Minimum Maximum Digits Minimum counter value Maximum counter value. Number of digits Number of times the same value is repeated. How much counter increments after each sensor signal. Count min..max (UP) or max..min (DOWN) This option will reset counter when print mode is activated. If off, the controller will continue until max/min/ reset is performed. Lead in will be displayed as zeros. Otherwise spaces. Repeat Step Direction Reset on start Lead-in zeros Restaints Must be in range Minimum<= current <= maximum Must be less than or equal to max Must be more than or equal to min Maximum 9 0..255 0..65535 Page 19 of 33 MICRODRAW USER MANUAL Add a date / time To create a date stamp, select the date button (1) and click on the canvas (2). Change text object settings in the menu on the left (3). Properties To setup your date stamp, please adjust the following settings Select a format. Please refer to below table for available format codes. Anything apart from these codes and anything in quotes is output literally. Example: “MHD:” yy-mm-dd prints MHD: 13-02-15 Without quotes, MHD is interpreted (hour equal to 13): MHD: yy-mm-dd prints 21315: 13-02-15 Page 20 of 33 MICRODRAW USER MANUAL Format string yyyy yyy yy y mm m dd d hh h nn n Meaning Year (4 digits) Year (3 digits) Year (2 digits) Year (1 digit) Month (2 digits) Month (1 digit) Day (2 digits) Day (1 digit) Hour (2 digits) Hour (1 digit) Minute (2 digits) Minute (1 digit) Example 2009 009 09 9 05 5 09 9 03 3 02 2 Format string W w J j Meaning Week (0 lead in) Week (space lead in) Day No (0 lead in) Day No (space lead in) Example 02 for week 02 _2 for week 02 001 for first day __1 for first day The format codes shown below will display month and weekday. However, unlike the format codes shown above, weekdays and month names will only update when the layout is loaded in MicroDraw and will not update on Micron controller automatically. To update weekdays and months on the unit, upload the layout again Special cases ddd dddd ddddd mmm mmmm mmmmm Day name Month name Sa Sat Saturday Ma May May Page 21 of 33 MICRODRAW USER MANUAL Offsets on dates Enter a number in the appropriate box to offset each element in your time date stamp The following values are allowed: Element Year Month Day Hour Minute Offset allowed +/- 125 +/- 12 +/- 30000 +/- 24 +/- 60 Invalid dates will not be shown. If month offset results in invalid dates (such as 31 Feb), the next valid date will be shown. Page 22 of 33 MICRODRAW USER MANUAL Edit Variable Fonts To change font properties, click the font button in the toolbar (1), select a font in the window to the right(2) and change the settings in the font menu(3) The illustrations below show the use of a different script for digits. Other scripts as illustrated are only available if you have fonts with Unicode support. Typically Arial Unicode MS will have the characters required. If you don't have the proper font, selecting other languages will display squares instead of digits. You can get license free Unicode fonts at gnu.org/software/freefont/ Select a font from the drop down menu (1). Next select a language (2). Characters will be shown if the language is supported by the selected font (3). Adjust font style if needed. Select Upside/down (1) to display the font upside down (2). Page 23 of 33 MICRODRAW USER MANUAL Enter a distance (mm) in the offset box to adjust the vertical position of the font. ...or simply place the cursor on the font, hold down the left mouse button and drag. Crop the fonts by adjusting the two blue dotted lines. There is one line at the bottom and one at the top of the character field. Place the cursor on the line, hold down the left mouse button and drag. ... or adjust the distance in the boxes “Cutting (top)” and “Cutting (bottom)”. The cutting is adjusted proportionally when the font size is changed, to reveal same portion of the font. You can now go back to edit the layout. If you wish to have the variable font changes be used with next layout you create, click the “Save font” button lower right in screen (bottom of list panel). Otherwise, the font changes are for this file only. Page 24 of 33 MICRODRAW USER MANUAL Program Settings Select the tool button (1) to change program settings (2). In this menu, the following settings can be changed: Language Change the settings menu language. If your language is not included with MicroDraw you can make a translation of your own. Please refer to the chapter "Make new language file". Help language Translate the messages displayed in the help window. Unit Select the unit of measure to be displayed on the canvas and in the object settings menus. Page 25 of 33 MICRODRAW USER MANUAL Resizable panels When "Resizable panels" is enabled, panel width can be adjusted. Place the cursor on the panel border, hold down the left mouse button and drag. Fast drag With fast drag enabled, you can relocate an object on the canvas without highlighting it first. Just left click on the object and drag. Auto help Check "Autohelp" to display help messages in the bottom window. If unchecked, the last help message will be displayed. Page 26 of 33 MICRODRAW USER MANUAL Log level Select a log level to save program events to a log file. Currency Please select the currency sign to be displayed in the cost menu. Custom character set Please enter the characters to be used, when you select custom language in the font menu. The first 10 characters are used to replace 0,1,2,…9 in that order. (ABC.. will replace 0=>A, 1=>B etc). Only first 10 positions will be used. Page 27 of 33 MICRODRAW USER MANUAL USB drive Select USB key drive letter. MicroDraw will save the layout at this location when "save to usb" is selected in the main toolbar. USB time offset Enter a number of minutes to offset time information saved to USB. This is intended to get a more accurate time on the Micron when the unit and the pc are not in close proximity. Confirmations Turn confirmation messages on or off. Page 28 of 33 MICRODRAW USER MANUAL Layout settings Layout settings determine HOW your print will look, and must be corresponding to the physical installation of the controller. It is not always necessary to change all settings. Page 29 of 33 MICRODRAW USER MANUAL Unit Print direction Print direction is the travel direction of your media. Upside Down Select this if your printer is mounted in a 180 degree rotation, or to print all layout rotated 180 degrees. Sensor distance An important part of setting up your system is to measure the distance between the start sensor and the head. This is to ensure the product is printed at the right spot. Remember the value must correspond to the physical setup. Sensor edge Set the sensor settings to positive or negative edge, depending on the type of sensor you are using. Refer to installation manual and wiring diagram. Ink A dropdown with selection of ink types. These are taken from the text file settings/inks.dat, and help to preselect drop size, voltage and supply size Pen Voltage and Fire pulse width These settings can greatly influence the quality of your printout. Please refer to the documentation for your ink. Print mode Select encoder if an encoder is installed on your system or velocity if you want to enter the printing speed manually. Velocity Please enter your printing speed if "print mode" is set to "velocity" Encoder resolution Encoder resolution must be set if "encoder" has been selected under "print mode". Resolution is calculated by dividing the circumference of the measuring wheel by the number of pulses per revolution generated from the encoder. Spit Interval Automatically shoot a row on all nozzles every nn miliseconds. If this value is set to 0 then function is disabled Burst size The number of rows to fire at every spit interval Sensor spit active Automatically shoot a row on all nozzles when the sensor is activated Sensor spit distance If sensor spit is ON, how long time after sensor is spit actually activated. In distance - by either fixed speed or encoder. Page 30 of 33 MICRODRAW USER MANUAL Spit delay How long distance to keep the spit active. Start block distance The distance from start sensor in which no further start signals can be received. This will prevent unwanted sensor signals. End block distance Distance after print in which no further start signals can be received Layout Filename Enter a layout name. This is the default layout name that will be used when you select the "save button". Length The length of your layout. Maximum length depends on the size of variable fonts and resolution. As a rule-ofthumb, you have in 300 dpi approx 20 cm print length in 600 dpi approx 10 cm print length You can see the memory meter display how much you use of the resources available. Smaller fonts means more print length. The maximum avialable length is 2400 pixel or around 8 inches. Resolution (Horizontal) Select a horizontal resolution from the drop down menu. 75x300 dpi 150x300 dpi 300x300 dpi 600x300 dpi The possible resolution is not limited to the 3 options above. To enter a different resolution, enter a number between 50 and 600. The maximum speed is affected by selection of horizontal resolution, since the frequency of the printhead remains the same. 75 dpi Max 302 m/min to 600 dpi Max 38 m/min Resolution (Vertical) The vertical resolution is created by removing lines from the printed image, in order to save ink costs. Available options are 300, 225, 200, and 150 DPI (0%, 25%, 33%, 50% ink reduction). Notice that because of print height being just ½", the number of active dots are 150 to 75. Page 31 of 33 MICRODRAW USER MANUAL Cost calculation Select the cost button to enter the cost calculation menu. The default supply size and drop size are already filled in, these are taken from the ink type in unit settings You should enter the cost for each supply in your currency. The result will be in the same currency. By default cost is set to arbitrary value of "100" per unit. MicroDraw will calculate 1. Coverage, based on 300 x 300 dpi canvas 2. Cost/1000 prints 3. Ink supply lifetime Although the calculations are often close to the actual costs, notice that: Even the slightest change in font size can greatly influence the consumption of ink. It is rarely possible to empty an ink cartridge 100%. Please also notice that the coverage is the same regardless of resolution. The cost of printing is what is changing with resolution. Ink warning level Notice setting for "Ink Warning Level". This is the level on which Micron will give an alarm on the hardware output. You can set this level freely, and you can continue production after the alarm. Adjust to your needs, depending on how soon you can change ink versus your production intensity. Page 32 of 33 MICRODRAW USER MANUAL Create new language If your language is not included with MicroDraw, you can make a language file of your own. The language files are stored in the subdirectory language of the program directory, normally found at c:\program files\MicroDraw\Language Make a copy of the file English, rename it and open it with a text editor. Every line in a section is made up by two parts separated by an equal sign. Translate the content on the right hand side, example: Start position=开始位置 Save the file when translation is complete. Load the new language file from the program settings (see page 24). Page 33 of 33 MICRODRAW USER MANUAL Support For product support, please contact HSA SYSTEMS Customer Service department HSA SYSTEMS CUSTOMER SERVICE Phone: +45 66103401 Email: [email protected]